


DID ALLOCATOR
USER AND INSTALLATION GUIDE
NEC America, Inc.
NDA-30047-005
Revision 5.0
March, 1998
Stock # 241714

LIABILITY DISCLAIMER
NEC America reserves the right to change the specifications, functions,
or features in this document at any time without notice. NEC America
has prepared this document for use by its employees and customers. The
information contained herein is the property of NEC America and shall
not be reproduced without prior written approval from NEC America.
Copyright 1996
NEC America, Inc.

DID Allocator User and Installation Guide CONTENTS
TABLE OF CONTENTS
Page
Chapter 1 - Introduction . . . . . . . . . . . . . . . . . . . . . . . . . . . . . . . . . . . . . . . . . . . . . . . . . . 1
Here’s How it Works . . . . . . . . . . . . . . . . . . . . . . . . . . . . . . . . . . . . . . . . . . . . . . . . . . . . . . . . . . . . 1
Installation. . . . . . . . . . . . . . . . . . . . . . . . . . . . . . . . . . . . . . . . . . . . . . . . . . . . . . . . . . . . . . . . . . . . 1
Chapter 2 - Application Configuration. . . . . . . . . . . . . . . . . . . . . . . . . . . . . . . . . . . . . . . 5
Step 1: Application Characteristics . . . . . . . . . . . . . . . . . . . . . . . . . . . . . . . . . . . . . . . . . . . . . . . . 5
Step 2: Primary C o n fig u r ation Parameters . . . . . . . . . . . . . . . . . . . . . . . . . . . . . . . . . . . . . . . . . . 6
Step 3: OAI Facilities . . . . . . . . . . . . . . . . . . . . . . . . . . . . . . . . . . . . . . . . . . . . . . . . . . . . . . . . . . . 6
Step 4: Secondary OAI Configuration Parameters . . . . . . . . . . . . . . . . . . . . . . . . . . . . . . . . . . . . 7
Chapter 3 - Mat Assignments. . . . . . . . . . . . . . . . . . . . . . . . . . . . . . . . . . . . . . . . . . . . . . 9
Function Key Assignment. . . . . . . . . . . . . . . . . . . . . . . . . . . . . . . . . . . . . . . . . . . . . . . . . . . . . . . . 9
NDA-30047 Revision 5.0 Page i

CONTENTS DID Allocator User and Installation Guide
Page ii NDA-30047 Revision 5.0

DID Allocator User and Installation Guide FIGURES
LIST OF FIGURES
Figure Title Page
3-1 OAI Function Key Assignment . . . . . . . . . . . . . . . . . . . . . . . . . . . . . . . . . . . . . . . . . . . 9
3-2 OAI Function Key Assignment Example . . . . . . . . . . . . . . . . . . . . . . . . . . . . . . . . . . . 10
NDA-30047 Revision 5.0 Page iii

FIGURES DID Allocator User and Installation Guide
Page iv NDA-30047 Revision 5.0

DID Allocator User and Installation Guide Introduction
Chapter 1 Introduction
DID Allocator is a sup plement to the Med ical Ce nter Sy stem (M CS) that makes i t
possible for hospit al admitt ing personn el to re trie ve DID tele phone numbe rs fro m
Here’s How it Works
the MCS database. Wit h DID Allocator , obtaining a DID numbe r for a new pat ient
is a simple matter of pressing a function key on the D
Allocator accesses the MCS database of DID numbe rs, retrieves th e next available
one on the list, and d is plays i t on th e D
term
LCD panel. Admitting personnel have
only to accept the number and enter it into the patient’s record or to reject the
number.
Once a DID number has been accepted, it is placed into “Offered and Accepted”
status in the MCS da tabas e. Onl y aft er the DID numbe r has be en impl emented by
the PBX is it considered to be in “Active” status.
term
. In response, DID
Your Action D
Press the D
term
function ke y that is assigned t o DID
Allocator.
• To accept the displayed DID number:
Press 1#. (Then enter th e accepted DID number
to the patient record.)
• To cancel the DID request:
Press 0#, the function key assigned to DID
Allocator , or nothing. If you do not press a key,
DID Allocator will time-out and reject the
number.
Installation
This guide provides specific field entries that need to be made during the
installation and configuration of DID Allocator. In addition to this guide, use
instructions in the following manuals for this installation:
• Applications Manager (APM) I nstallatio n Manual — Contains step-by step
instructions for installing the software from the release media.
term
Response
An ava ilable DID number is displa yed on the D
term
LCD panel, followed by the notation “ACCEPT?”
If the number is accepted, DID Allocator marks it
as offered and accepted. If the number is not
accepted, the number remains available. After the
term
transaction, DID Allocat or clears the D
Note:
If any entry other th an 1# or 0# is ma de , DID
Allocator displays the message “1=YES
0=NO” and awaits a correct entry.
display .
• Applications Manager (APM) Operations Manual — Explains how
applications like DID Allocator are configured in the APM environment using
the entries and values provided in this chapter.
• NEAX2400 System Manuals — Give very detailed explanations about the
assignments that need to be made through the Maintenance Administration
Terminal (MAT) commands on the NEAX2400.
NDA-30047 Revision 5.0 Page 1

Introduction DID Allocator User and Installation Guide
The installation and set up of DID Allocator involves the following sequence of
steps:
• Software Inst allation — DID Allocator softwa re must first be load ed from the
release media. Log into the APM Platform Management Menu, select the
Installation of Applications/Packages option, and follow the instructions
provided in the APM Installation Manual to complete this part o f the
installation.
• Application Configuration — DID Allocator is internally supported by the
APM and must be configured in the APM environment. Application
Configuration provides the information that must be entered into this APM
configuration file. Use the instructions provided in the APM Operations
Manual to make the entries contained in this section.
Note:
DID Allocator version 1.2 uses the autocfg (autoconfiguration) APM utility program to automatically configure DID Allocator under the APM platform. This
progr am runs upon installation. If you have pr e viously installed DID Allocator,
the autoconfiguration utility enables you to overwrite the previous configur ation
information.
• MA T Assignments — Se veral data se ttings must be assigned at the NEAX2400
Maintenance Administra tion Terminal (MAT) before DID Allocator will
function. Mat Assignments specifies the necessary commands and the values
at which they are to be set. Use the instructions provided in the NEAX2400
IMS System Manuals to make the entries contained in this section.
Page 2 NDA-30047 Revision 5.0

DID Allocator User and Installation Guide Introduction
DID ALLOCATOR
INSTALLATION REQUIREMENTS
Discussed in chapter:
Introduction
Application Configuration
Mat Assignments
Software
Application Characteristics
Primary Parameter Configuration
OAI Facilities (Optional)
OAI Configuration Parameters (Optional)
User-Defined Parameters
NEAX2400 IMS
Maintena nc e Ad m i nistration
Terminal (MAT) Assignments
ASYD (Assignment of System Data)
AOKC (Assignment of OAI Key Codes)
term
AKYD (Assignment of D
Function Key)
Instructions in:
APM Installation
Manual
APM Installatio n
Manual
NEAX2400 IMS
System Manuals
NDA-30047 Revision 5.0 Page 3

Introduction DID Allocator User and Installation Guide
This Page Left Blank.
Page 4 NDA-30047 Revision 5.0

DID Allocator User and Installation Guide Application Configuration
Chapter 2 Application Configuration
DID Allocator is configured into the APM system using the Add function of the
Application Configuration on the APM System Administration Menu.
• Enter the APM option from the APM Platform Management Menu.
• Enter the System Administrator p assword at the APM password screen.
• Enter the Application Configuration option from the System Administration
menu.
This section contains the information that should be entered to the configuration
file for DID Allocator. For specific instructions on what these parameters mean
and how to make these entries, use the APM Operations Manual.
Note 1:
Note 2:
DID Allocator version 1.2 uses the autocfg (autoconfiguration) APM utility program to automatically configure DID Allocator under the APM platform. This
progr am runs upon installation. If you have pr e viously installed DID Allocator,
the autoconfiguration utility enables you to overwrite the previous configur ation
information.
Entries for parameters that are marked with an asterisk (*) should be made exactly as they are shown; all other entries in this section serve as examples only.
Step 1: Application Characteristics
In adding DID Allocator to the APM Application Configuration file, define
it as follows:
Parameter Entry Description
OAI Application* Y(es) Indicates whether or not (Yes or No) DID
CRT Application* N(o) Indicates whether or not (Yes or No) DID
Allocator communicates with the
NEAX2400 using OAI processes.
Allocator requires a terminal screen that is
of the same type as the one used by the
APM.
Communication Queue* N(o) Indicates whether or not (Yes or No) this
non-OAI a pplication ne eds an IPC queue to
communicate with other process.
NDA-30047 Revision 5.0 Page 5

Application Configuration DID Allocator User and Installation Guide
Step 2: Primary Configuration Parameters
On the APM Configurati on Entry screen, ma ke the entries i ndicated below fo r each
DID Allocator parameter.
Parameter Entry Description
Application Name DID_Allocator Specifies the name to be displayed in the
APM menus. This name is displayed
however it is entered h ere; i.e., capital
letters, lower case, etc.
Executable Filename* /oai/app/mcs/bin/
Group* (make no entry) Indicates that DID Allocator does not
Response Mode* I(gnore) Indicates the ac tion that the APM i s to tak e
Initialization Batch Y(es) Indicates whether or not (Yes or NO) DID
Termination Mode* M(essage) Indicates how th e APM is to notify DIID
Standard Output /dev/null Indicates where any output is sent.
Number of Restarts 10 Indicates how many times th e APM may
Step 3: OAI Facilities
didalloc
Indicates the path name of the executable
file.
belong to a group.
with DID Allocator should a member of the
group terminate.
Allocator is to be initia lized automatically
when the OAI syst em is initialized.
Allocator to terminate.
restart DID Allocator after it terminates
erroneously.
According to instructions in the APM Operations Manual, designate the
following NEAX2400 facilities for DID Allocator using the Facilities command
on the Configuration Entry screen.
MRFI Mode Release (I) MRFR Mode Release (R)
MSF OAI Mode Set NTF Number Transfer
TCFD Terminal Control (D) TCFI Terminal Control (I)
Note:
Page 6 NDA-30047 Revision 5.0
The same MSF Op-Code that is specified here in the APM must be assigned to
DID Allocator the NEAX MAT. For more information, see Mat Assignments.
This code defaults to 130 with the autoconfiguration utility.

DID Allocator User and Installation Guide Application Configuration
Step 4: Secondary O A I Config uration Parameters
Using the OAI-Conf command on the APM Configurati on Entry screen , make the
entry shown for each of the following parameters. Use the instructions provided
for this opt ion in the APM Operations Manual:
Parameter Entry Description
Database Name #1 (make no entry)
Database Name #2 (make no entry)
Timeout V alue #1 30 Indicates the l ength of time, in seconds, th at
Timeout Value #2 1
T enant Number 1 Specifies the numbe r of the tenant that DID
Source Link Name OAI1TCP Identifies the port on the source side of the
Destination Link Name PBX1TCP Ident ifie s the port on t he destinat ion side of
DID Allocator waits for a response to a
displayed message.
Allocator serves.
communication link.
the communication link.
Association Recovery 30 Designates the number of seconds DID
Allocator will wait before trying to reestablish an asso ciation with the NEAX that
has been released.
This completes the confi guration of DI D Allocator in the APM. Now go to
Mat Assignments to make the necessary MAT assignments.
NDA-30047 Revision 5.0 Page 7

Application Configuration DID Allocator User and Installation Guide
This Page Left Blank.
Page 8 NDA-30047 Revision 5.0

DID Allocator User and Installation Guide Mat Assignments
Chapter 3 Mat Assignments
This guide assumes that data settings that affect the operation of all OAI software
on a system-wide basis have already been assigned on the NEAX Maintenance
Administration Termi nal (MAT). Such settings include, fo r instance, system index
values and assignment of Interface I/O Port Data in the Interface Processor (IP).
For more information about these system data settings and the MAT commands
described below for DID Allocator, refer to the OAI Module Installation Manual
for the NEAX2400 IMS, the NEAX2400 IMS Command Manual, the
NEAX2400 IMS Job Specification Manual, and the NEAX2400 IMS
Programming Manual.
Function Key Assignment
A function key on every D
assigned to the Mod e Set Facili ty nu mber (Op-Code ) that was c onfigu red fo r DID
Allocator in the APM (Application Configuration).
1. ASYD SYS1 Index 4 bit 4=1
term
that is to be used to access DID Allocator must be
APM
Application
Configuration
Designatio n of
and its Op-
(Type)
for Use by
Code
Application
(Find this Number
from Application
Providers)
Facility
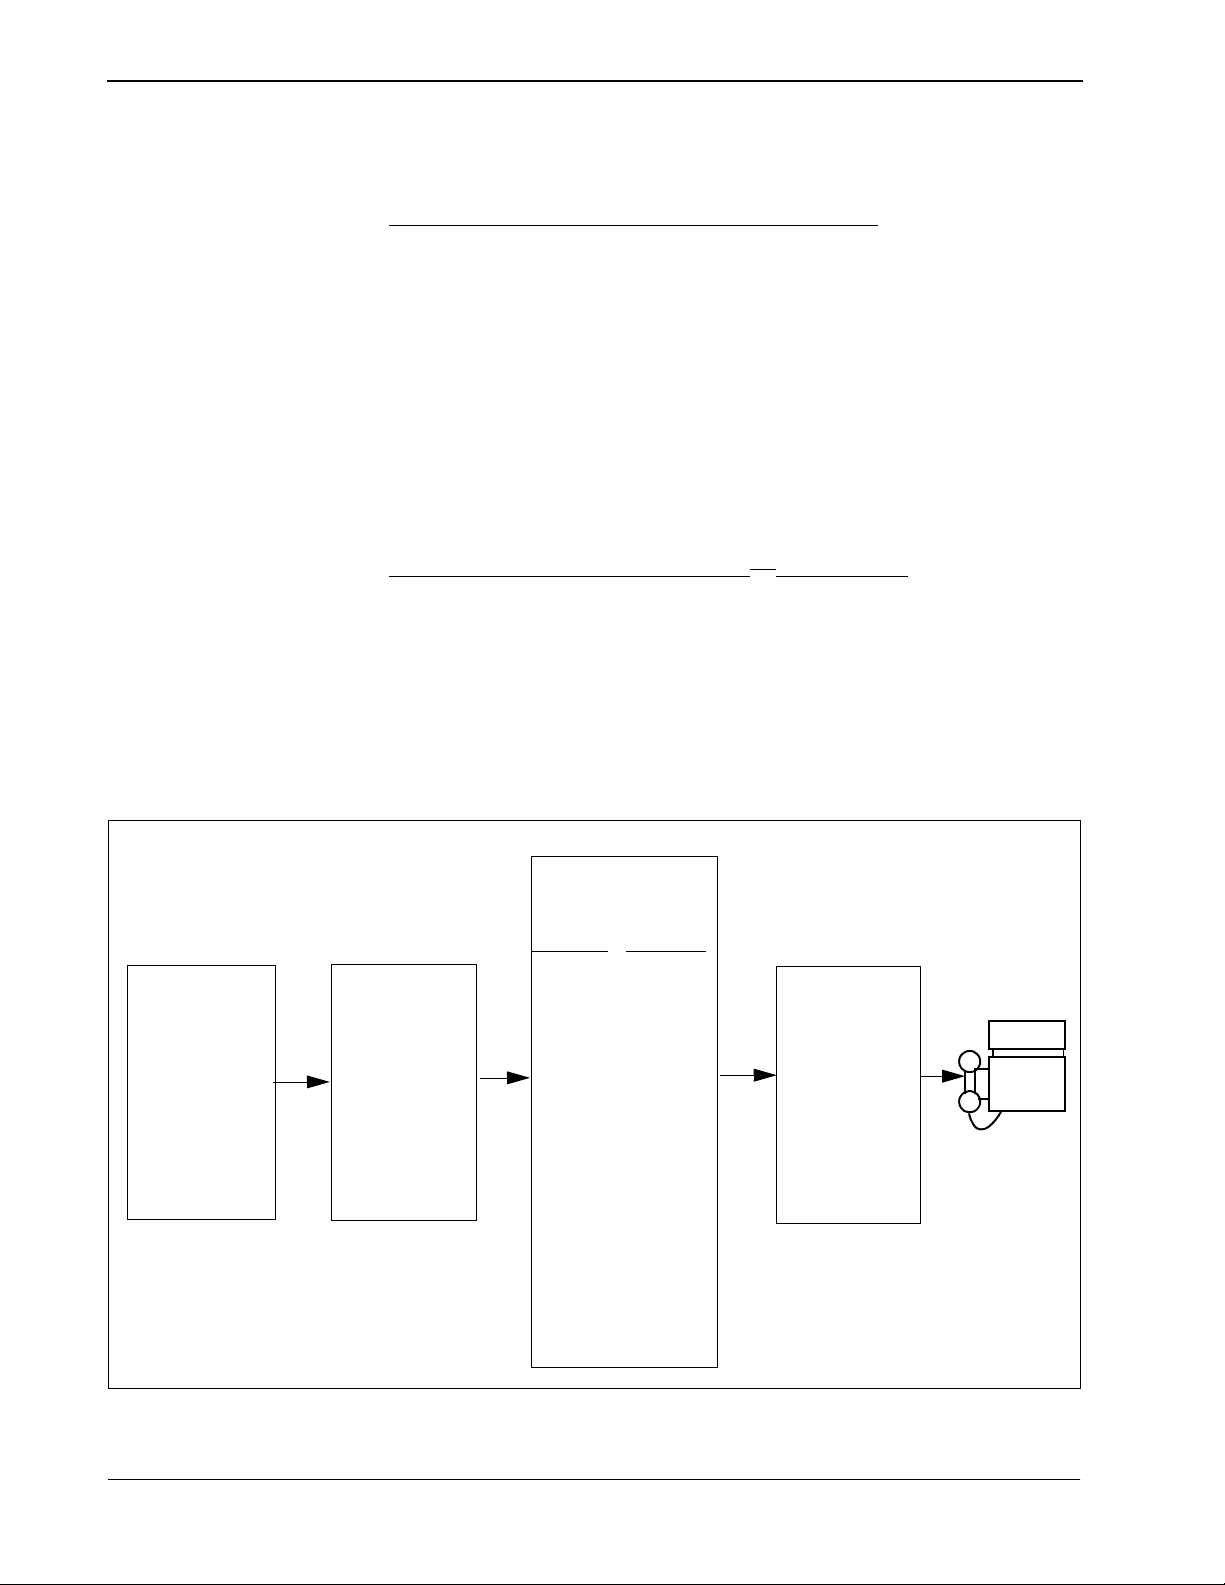
2. The MSF facility and its Op-Code a re assigned to one of the 14 O AI K e y Codes
in the MAT using the A OKC command. Second, ea ch of the se O AI K e y Codes
corresponds to an AKYD Function Key Index (FKI) value which is then as-
term
signed to the specific D
PBX Correspondence of
AOKC AKYD
OAI Function
Key Codes
MAT
AOKC
Command
Assignment of
Key Code
and 14)
Facility Type and Op-
an OAI
(between 1
to the Same
Code
1 < . . . .> 34
2 < . . . .> 35
3 < . . . .> 36
4 < . . . .> 37
5 < . . . .> 38
6 < . . . .> 39
7 < . . . .> 40
8 < . . . .> 41
9 < . . . .> 42
10 < . . . .> 43
11 < . . . .> 44
12 < . . . .> 45
13 < . . . .> 46
14 < . . . .> 47
function key. This process is illustrated below.
Key Indices
MAT
AKYD
Command
. . . . .
Assignment of Corresponding MAT Func-
tion Key Index to a
specific D
term
tion Key
Func-
. . . . .
. . .
. . .
Figure 3-1 OAI Function Key Assignment
NDA-30047 Revision 5.0 Page 9
Mat Assignments DID Allocator User and Installation Guide
A knowledge of the D
term
stations in the NEAX sys tem and which ones wi ll be set
up to access DID Allocator is necessary for using these two commands:
AOKC COMMAND: (Assignment of OAI Key Codes)
This command is first used to associate the MSF facility and its Op Code that
was confi gur ed in the APM for DID Allocato r t o one of the O AI Key Codes i n
the MAT.
(a) Select an unused OAI Key Code, from 1 to 14. To determine what Key
Codes are available for assignment, use the LOKC command to list the
AOKC Key Codes that are already assigned.
(b)Enter the type of facility using the value that designates the MSF.
(c) Enter the same MSF Op-Code that was configured for DID Allocator in the
APM. Retriev e it u sing the Pro vide rs comman d on the APM Co nf igur ation
Entry screen.
term
AKYD COMMAND: (Assignment of D
Function Key)
(a) Enter the same tenant number that is configured for the application in the
APM Application Configuration option (Tenant #1, page 7).
term
(b)Enter th e sta ti on number of the D
on which the function key is being as-
signed.
term
(c) Enter a D
function key to the MAT Function Key Index that in turn cor-
responds to the previously assigned OAI Key Code.
APM
Application
Configuration
DID Allocator
confi gured for
MSF #129
PBX Correspondence of
AOKC AKYD
OAI Function
MAT
AOKC
Command
OAI Key
Code #10 given
MSF facility type
and
Op-Code #129
Key Codes
1 < . . . .> 34
2 < . . . .> 35
3 < . . . .> 36
4 < . . . .> 37
5 < . . . .> 38
6 < . . . .> 39
7 < . . . .> 40
8 < . . . .> 41
9 < . . . .> 42
10 < . . . .> 43
11 < . . . .> 44
12 < . . . .> 45
13 < . . . .> 46
14 < . . . .> 47
Key Indices
At KYN 8, KYZ1
Assign Function Key
OAI Key Code #10
Figure 3-2 OAI Function Key Assignment Example
MAT
AKYD
Command
Index #43
to
Function
Key #8
. . . . .
. . . . .
. . .
. . .
Page 10 NDA-30047 Revision 5.0

DID Allocator User and Installation Guide Mat Assignments
In the OAI Function Key Assignment example (Figure 3-2 on page 10), the MSF
was selected in the APM Application Configuration and its Op-Code was
determined to be #130. MSF #130 is a ssign ed thr ough t he AOKC c ommand to an
OAI Key Code. The Key Code to which it i s assigned in this exampl e is #10. The
term
D
function key that is to be used to access DID Allocator is configured as
function key #8. Since OAI Key Code #10 corresponds in the PBX to MAT
Function Key Index #43, D
term
function key #8 is assigned to Function Key Inde x
#43 using the AKYD command. Thus, wh enever a phone user presses f unction key
#8 on any assigned D
term
, MSF 130 initiates communication with DID Allocator
for display of the next available number.
DID Allocat or is now inst alled and ready to be initialized. Enter the APM
Operations Menu and initialize DID Allocator through the Non-CRT Application
option, according to instructions provided in the
APM Operations Manual
.
NDA-30047 Revision 5.0 Page 11

Mat Assignments DID Allocator User and Installation Guide
This Page Left Blank.
Page 12 NDA-30047 Revision 5.0
 Loading...