


General safety
l
Observe ‘Turn off 2-way radio’ signs, such as those near stores of fuel, chemicals or explosives.
l
Do not allow children to play with the phone, charger or batteries.
l
A small rubber bung (for antenna socket protection) is included in the carton. Keep this out of reach of small children, for whom it could be hazard.
l
The operation of some medical electronic devices, such as hearing aids and pacemakers, may be affected if a cellphone is used next to them. Observe any warning signs and
manufacturer’s recommendations.
Road safety
l
You MUST exercise proper control of your vehicle at all times.
l
The handset or hand-held microphone should not be used while driving. Find a safe place to stop first or use the hands-free kit available.
l
Do not speak into a hands-free microphone if it will take your mind off the road.
l
You MUST NOT stop on the hard shoulder of a motorway to answer or make a call, except in an emergency.
l
Switch off your cellphone at a refuelling point, such as a petrol station, even if you are not refuelling your own car.
l
Do not store or carry flammable or explosive materials in the same compartment as a radio transmitter, such as a cellphone.
l
You must not use the phone’s car kit alert device to operate the lights or horn of your vehicle while on a public road.
l
Electronic vehicle systems, such as anti-lock brakes, speed control and fuel injection systems are not normally affected by radio transmissions. The manufacturer of such equipment can
advise if it is adequately shielded from radio transmissions. If you suspect vehicle problems caused by radio transmissions consult your dealer and do not switch on your phone until it has
been checked by qualified approved installers.
Third party equipment
The use of third party equipment, cables or accessories, not made or authorised by NEC, may invalidate the warranty of your cellphone and also adversely affect the phone’s operation. For
example use only the NEC mains cable supplied with the AC charger.
Service
The cellphone, batteries and charger contain no user-serviceable parts. We recommend that your NEC cellphone is serviced or repaired by an NEC authorised service centre. Please contact
your Service Provider or NEC for advice.
Non-Ionising Radiations
The radio equipment shall be connected to the antenna via a non-radiating cable (e.g. coax).
The antenna shall be mounted in a position such that no part of the human body will normally rest close to any part of the antenna unless there is an intervening metallic screen, for example,
the metallic roof.
Before you start
Cellphone system structure
It is worth remembering that every time you use your phone, three different organisations are involved:
Service
Network
Provider
Thepeoplethat
make your phone
All the features described in this user guide are supported by your phone . However, for all these features to work, you must have a SIM card (supplied by your Service Provider) that also
supports these features. Even if you have a fully featured SIM card, any feature not supported by the Network transmitting your call will not work. This last point is especially important when you
are roaming networks (see page 10).
User guide conventions
The following markers are used throughout the user guide to attract your attention:
$
This type of paragraph will contain details of where to find related information to the topic being explained.
O
This type of paragraph will contain information worth noting.
The people that supply
your SIM card and bills
Thepeoplethat
transmit your calls
I
This type of paragraph will contain important information often regarding SIM cards, Service Providers and or Network facilities.

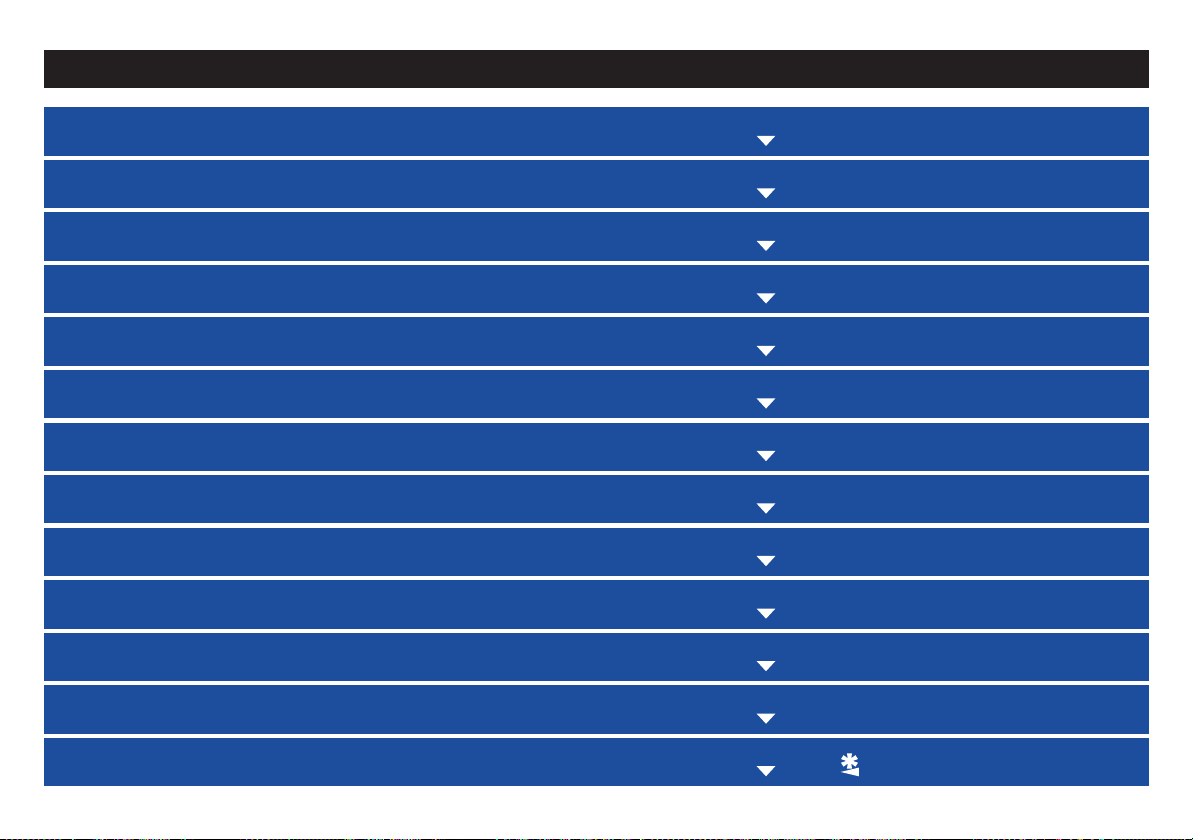
GETTING STARTED 1
BASIC CALLS & PHONE USE 4
CARING FOR BATTERIES 12
SELECTING FEATURES 14
SETTING UP YOUR PHONE 16
STORING & RETRIEVING NUMBERS 26
TEXT ENTRY & NUMBER EDITING 36
SECURITY 40
DIVERTING & CONTROLLING INCOMING CALLS 46
MESSAGES & VOICE MAIL 50
Getting Started
This cellphone is a dual band digital type designed for use on a Global System for Mobile Communications (GSM) network. GSM networks
are installed and planned for many countries throughout Europe and operate on two frequencies: 900MHz (known as GSM900 or just GSM)
and 1800MHz (known as GSM1800 or PCN - Personal Communications Network). Your cellphone is capable of working on both of these
systems.
This world standard allows you to roam and use your own phone in other countries. You can, if you wish, make and receive all calls as if you
were in your home country, with all billing being made via your normal Service Provider.
Preparing the phone
Before you try to use your phone check the following has been carried out.
l Valid SIM card inserted (see below)
Battery charged (see page 13)
l
l PIN 1 code entered (if necessary - see page 2)
SIM card
Before using your cellphone you must sign-up with one of the digital network Service Providers. In addition to your subscription details you
will receive a personal SIM (Subscriber Identity Module) which is inserted into your phone.
If the SIM card is removed then the phone becomes unusable until a valid SIM is fitted. It is possible to transfer your SIM to another
compatible phone and resume your network subscription.
There are two types of SIM, plug-in and full-size, and this phone uses the plug-in type. The screen on your phone will display appropriate
messages if no SIM is fitted.
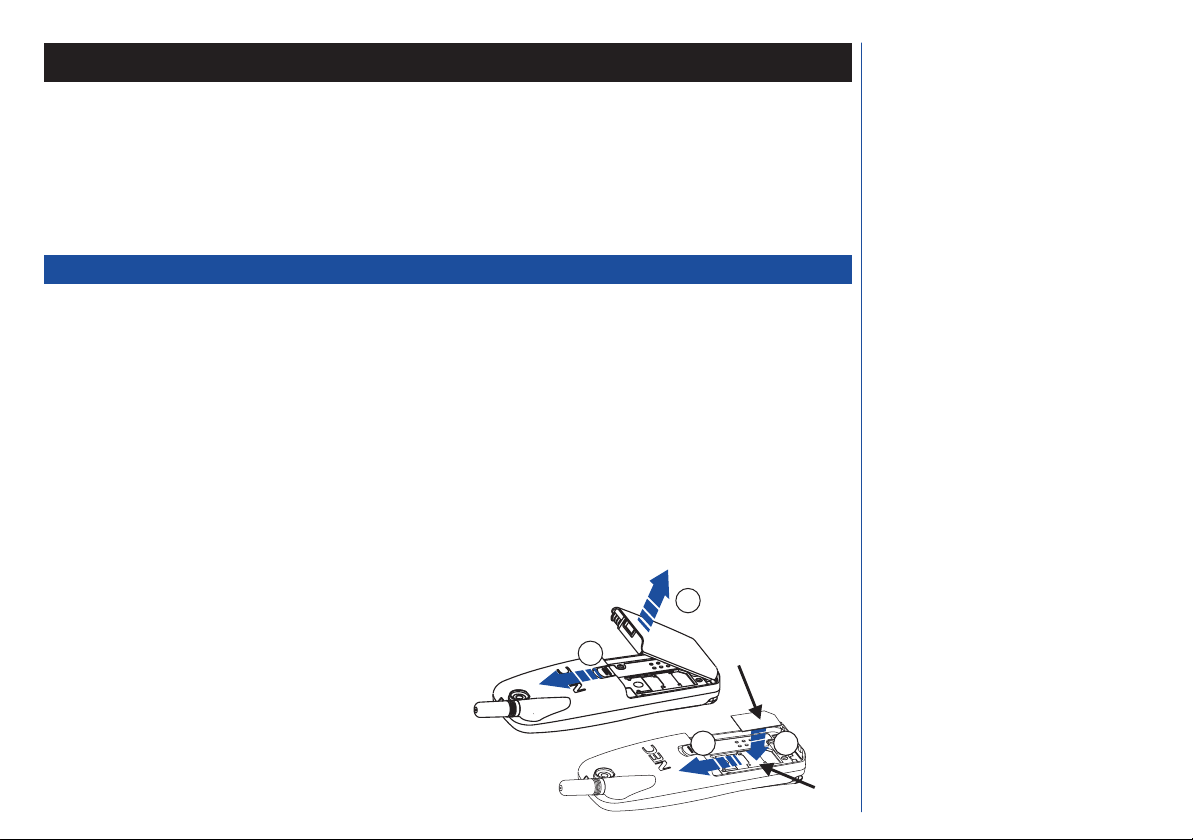
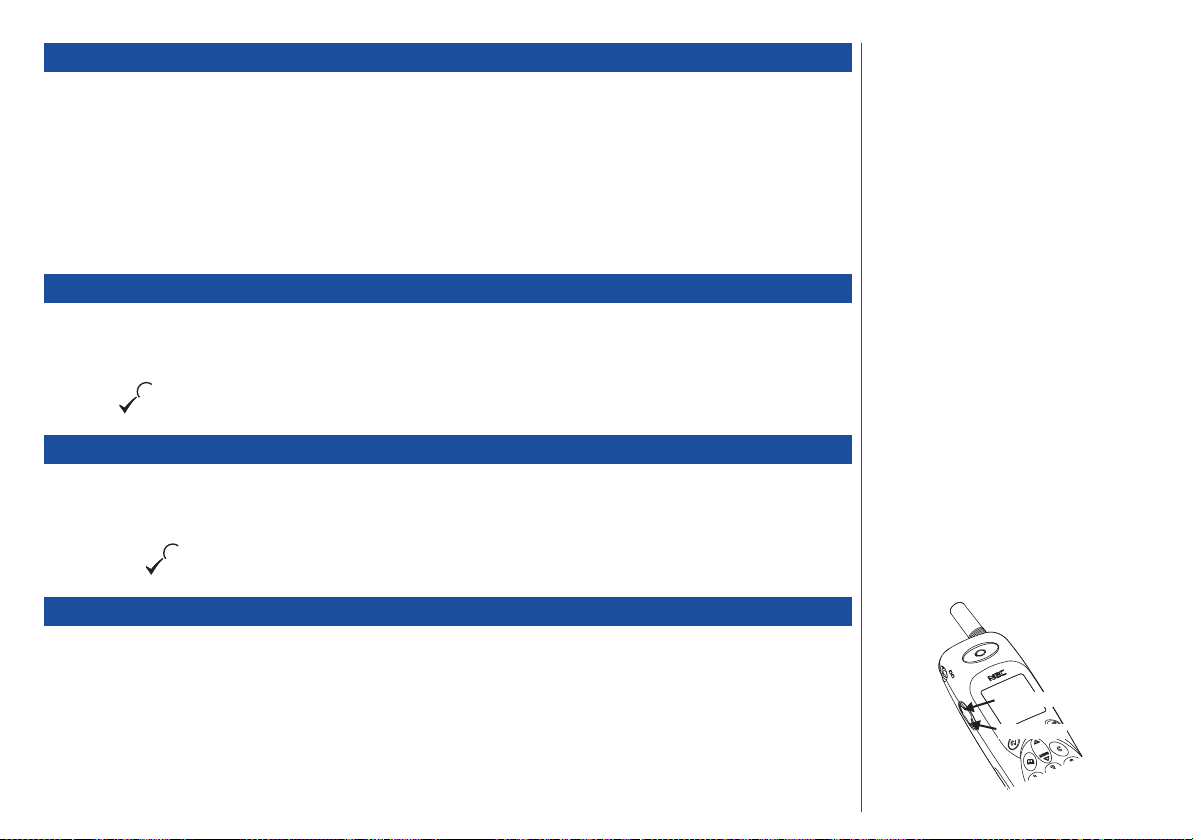
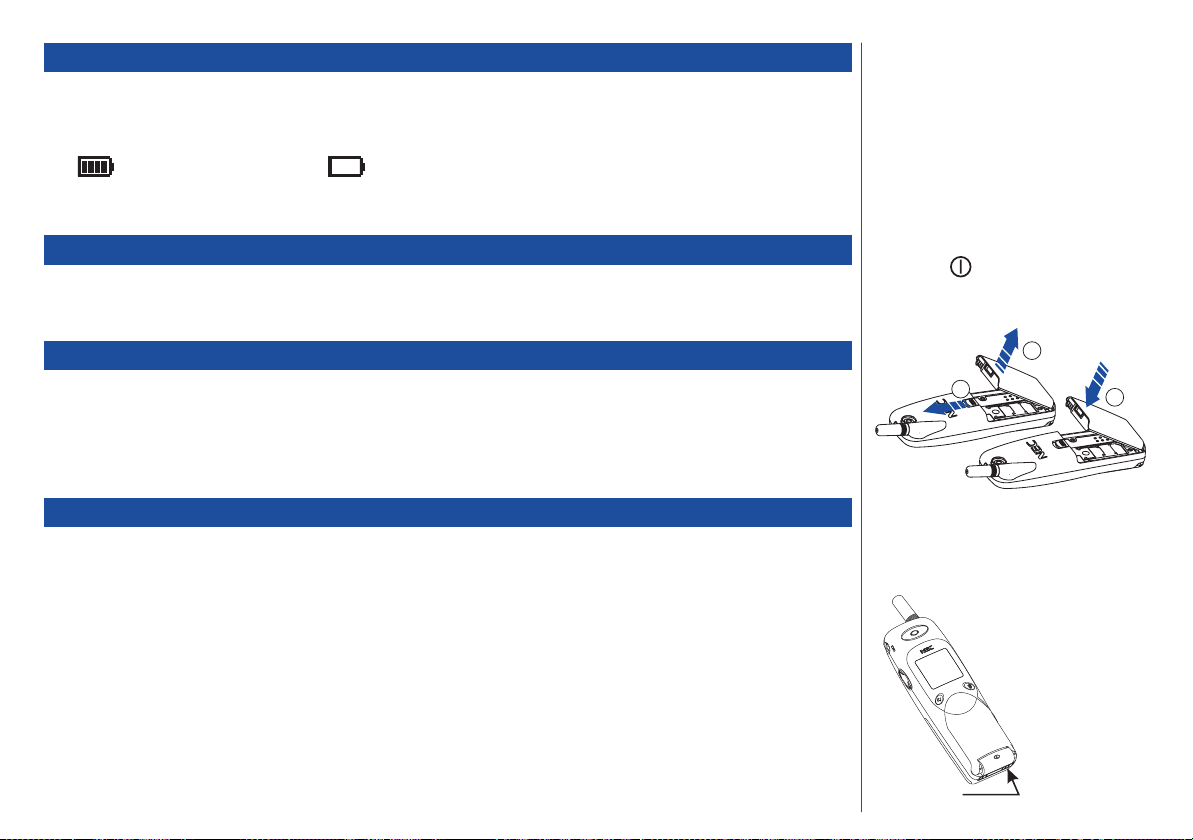
Inserting a SIM
l
Make sure that the power is off and then remove the battery À &
Á to reveal the SIM location.
l
Slide the catch  in the direction of the open arrow.
l
Insert the SIM Ã, ensuring the gold contacts are face down and
the notch on the card lines up with the SIM location recess.
l
Slide the catch in the direction of the lock arrow and replace the
battery.
1
2
SIM Card
3
4
The phone supports a number of
O
languages and the keyboard symbols have
been chosen for world-wide operation.
The digital technology of your NEC GSM
O
phone helps to ensure that your
conversations are kept secure.
If the phone, or the SIM, is lost or stolen
O
then you should contact your Service
Provider immediately in order to bar it
from use.
O The SIM card contains personal data such
as your electronic phonebook, messages
(see page 50) and also details of the
network services you have subscribed to.
The phone will not work (except for
emergency calls on some networks)
unless a valid SIM is fitted.
O
If the SIM is already fitted, see Start-up on
page 2.
O
If you insert a SIM card other than your
own, information such as call logs may be
lost.
1
Catch
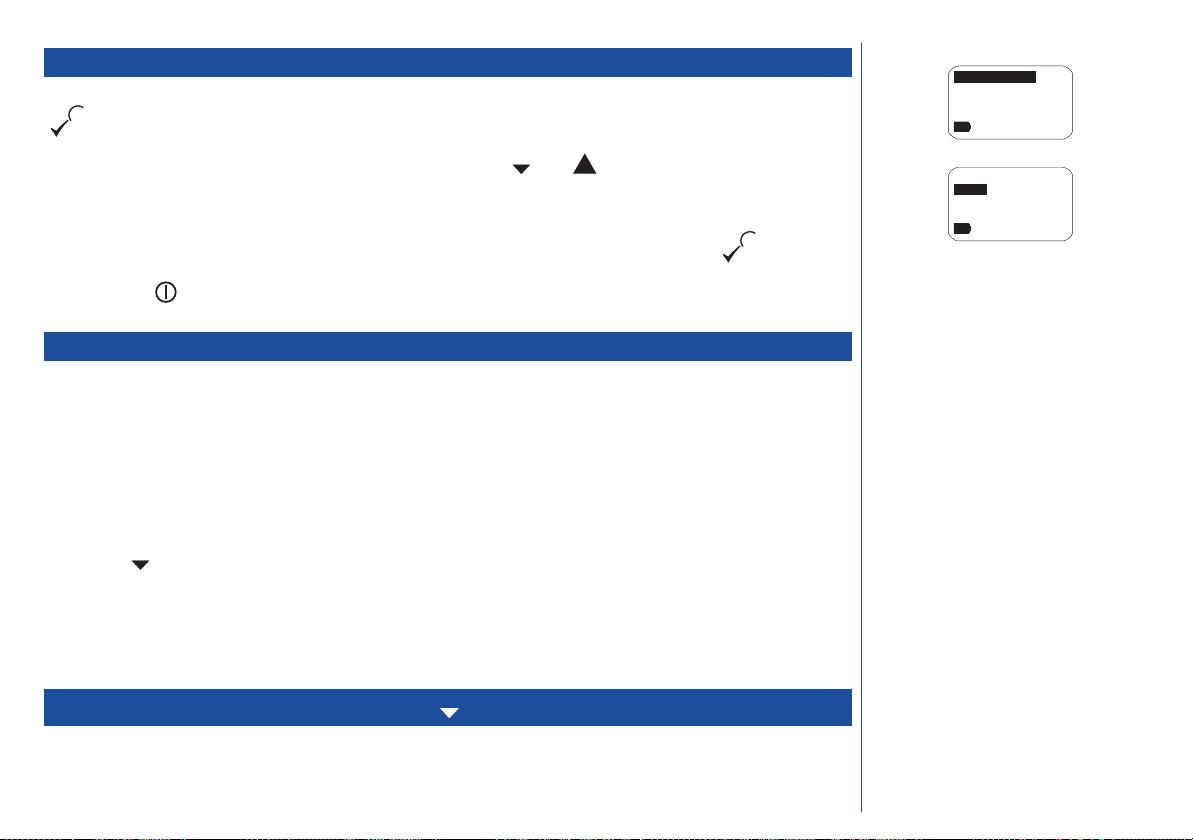
Start-up
Switching the phone on
Hold down the power key for about a second, to switch on. The screen usually displays the greeting
*
message (see page 24 to change this) and the phone is then in standby, see the Standby screen on page 5.
Switching the phone off
Hold down the power key until the display shows power down message.
*
PIN 1 code
The SIM card issued by your service provider has a security feature called PIN 1 code protection. The PIN 1(Personal Identification Number)
is a number put onto the card by your Service Provider, and is 4 to 8 digits long. Some service providers supply SIM cards which will cause
your phone to prompt for a PIN 1 code when it is turned on. If this is the case, use the phone’s keypad to enter your code. You can disable
this prompt (see page 41).
Greeting message
Powering
down
Please wait
Power down message
Display information
LCD alphanumeric display
This display shows the current network, signal strength, status messages (e.g. Calling...), the current time, and whatever you
have keyed in on the phone’s keypad. In addition to this, it also displays the phone’s menu options. Many of the phone’s features are activated
using its powerful menu structure (see page 14 on selecting the phone’s features).
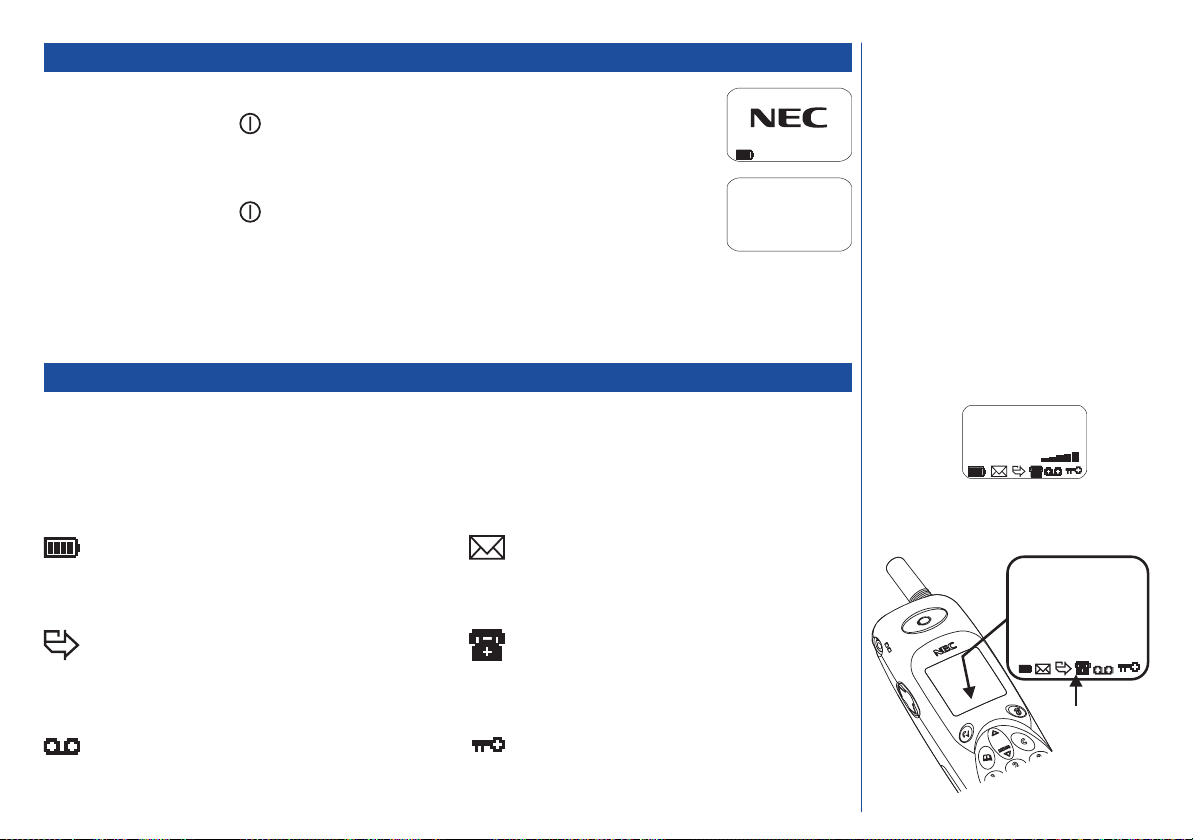
LCD Icons
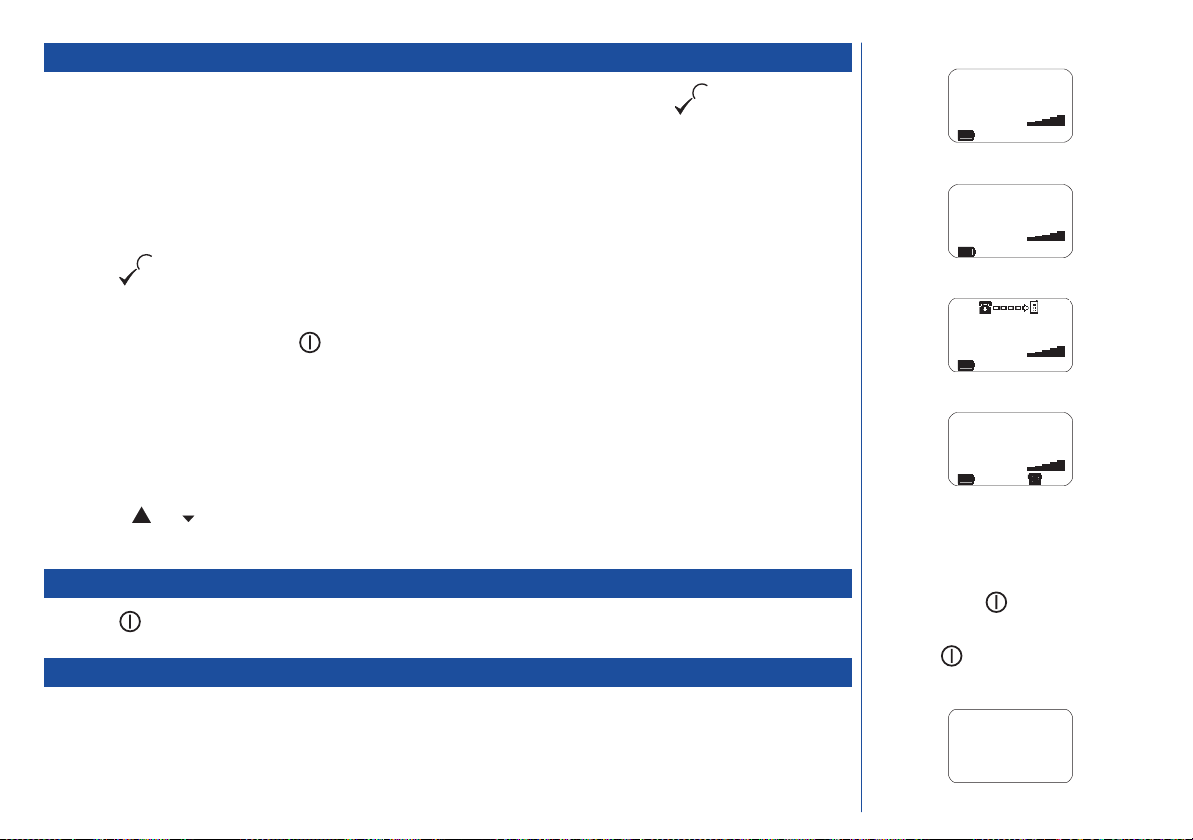
Battery charge level
This icon indicates the amount of charge left in your battery; the more black
squares shown the higher the battery charge level (see page 12 for battery
care details). This icon will pulse when the battery is being charged.
Call forwarding set to on
This icon indicates your phone is set up to divert incoming calls under
the conditions in menu 3 (divert). See page 47 for a full description of
call forwarding.
Voice mail waiting
This icon indicates a voice mail message is awaiting your attention (see
page 59 for details).
Short message waiting
This icon indicates a short message is awaiting your attention (see
page 51 for details).
Call connected
This icon is displayed continuously during a call and will flash if
you have a call waiting or if you have a call on hold.
Key lock
This indicates the keypad is locked (see page 41 for details).
You may need to charge the battery before
O
using your cellphone. If the phone gives no
response when switched on, read the
information about batteries on page 12.
The greeting message may not be as
O
indicated if any locks have been set or the
wrong SIM has been inserted. Please
follow any instructions given, e.g. ‘Return
to Service Centre’.
Do not remove the battery to switch your
O
phone off as this may cause loss of stored
information.
UK NETWORK
06:21
Display position of LCD
icons
LCD
Alphanumeric
display
LCD icons
2
Flip options
When the phone’s Flip is active (set to On) it will perform the following functions:
Answer a call when flipped open
l
Disable Auto key lock when flipped open (if option set - see below)
l
Cancel or reject a call when flipped shut
l
Set Auto key lock on when flipped shut (if option set - see below)
l
Activating the Flip for call control
The active Flip will answer an incoming call or end an active call. To activate the Flip, proceed as follows:
MENU
Press 801. The Flip function menu will be displayed.
*
Press 1 to activate the Flip function or 2 to turn it off.
*
Activating the Auto key lock function
The Auto key lock function will disable all your phone’s keys when the Flip is closed. To activate or deactivate the Auto key lock function,
proceed as follows:
* Press 802. The Auto key lock function menu will be displayed.
*
MENU
Press 1 to activate the Auto key lock function or 2 to turn it off.
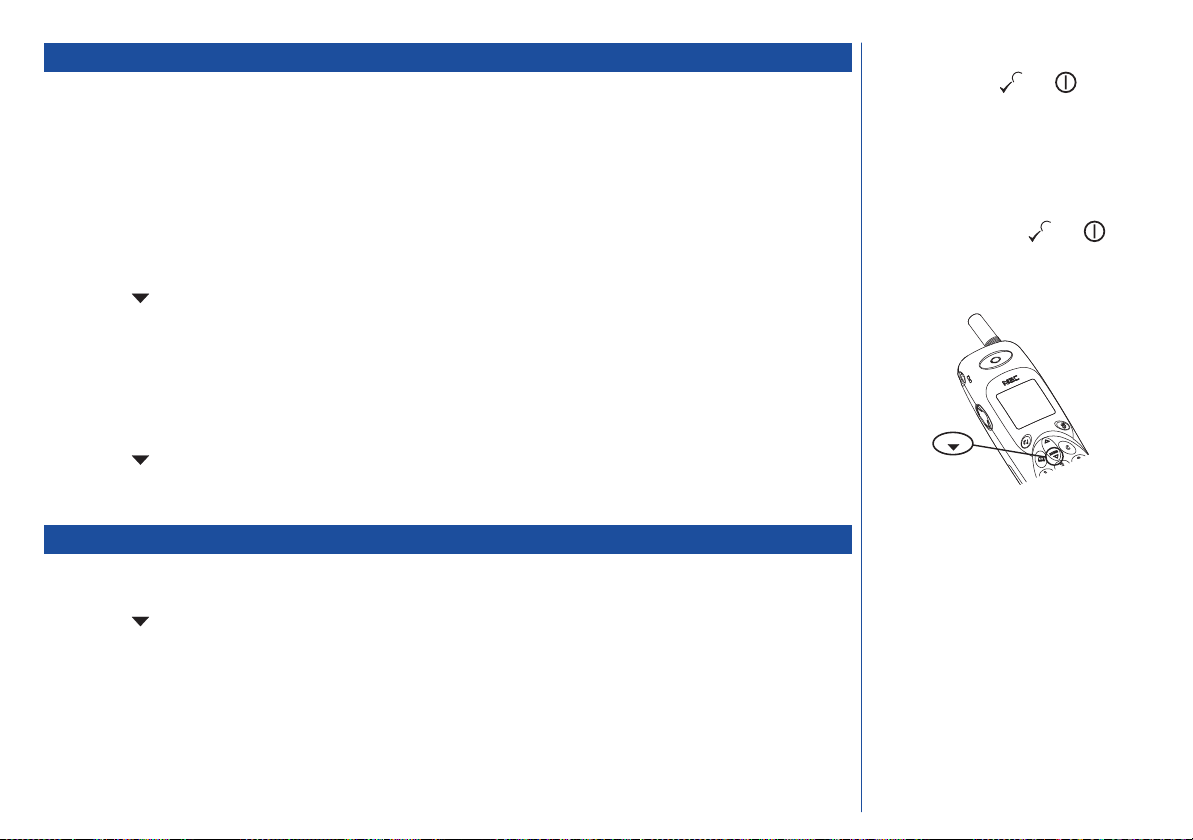
Setting the display to English
If the display is showing any other language than English, proceed as follows:
Even when the Flip function is active, you
O
can still use the and keys to start
or end a call when the Flip is closed
(unless the Auto key lock function is ‘on’
see below left).
The Flip function is disabled when a simple
O
hands free earpiece is plugged into your
phone. An incoming call can be answered
or diverted using the and keys
respectively. Alternatively, calls are
automatically answered after three rings if
the Autoanswer facility is activated (see
page 20).
MENU
O
The Flip function has no effect on the key
lock function (see page 41).
*
Press 871.
3
MENU

Basic calls & phone use
Connecting to the network 5
Receiving/Making/Ending/Unsuccessful calls 5 to 6
Stored numbers 7
Emergency calls 7
Last number redial 7
Earpiece & ringer volume 7
Muting the microphone during a call 8
Own phone number displaying/sending 8
Phone modes 8
International dialling codes 9
Roaming 10
Using your phone with a laptop computer 11
4

Connecting to the network
Hold down the power key for about a second, to switch on.
*
After start-up, and correct PIN 1 code entry if necessary, the phone searches for a network. When found, the network name and country are
displayed. You also see the time, signal strength, battery strength and any area messages if this facility is enabled (see page 57).
The phone’s LCD display shows the strength of the radio signal that links your phone to the network. A maximum signal is shown by 5 shaded
blocks and a minimum signal by 1 block.
Receiving calls
When someone calls your number, the phone’s ringer will sound, if set (see page 19), and the incoming call screen is displayed (see right).
The phone number of the person calling may be displayed in the middle of the screen if the calling line identification (CLI) facility is available
and the caller has activated the feature. If the caller’s phone number has been stored in your phonebook along with a name (see page 30), that
name will be displayed. If the caller has withheld their identity then the screen will give a message that the incoming number is being
withheld.
Searching
Please wait
Linking to network
UK NETWORK
Tue 19 Jan 1999
06:21
Standby screen
If the screen indicates Searching or
O
No Service you will not be able to
make or receive any normal calls. You may
be able to make emergency calls.
Accepting a call
* Press the key or open the Flip (if the Flip option is active - see page 3).
Rejecting a call
*
Press briefly or close the Flip (if the Flip was already open and the Flip option is active - see page 3).
You also have options for holding calls and diverting calls. These options depend upon your network and your subscription arrangements.
If your cellphone receives a call and you do not answer it, the screen will display the telephone number (or the name if a stored number) of
the caller (if available). This information is stored in the unanswered calls list. Up to 10 unanswered calls are stored in this list. The last 10
answered calls are stored in the answered calls list.
5
01987654321
Answer ?
Incoming call
O
You can set your phone to answer a call
when any key except the key is
pressed - see 'Answer key' on page 20. If
you are making a call, the phone gives
priority to receiving a call unless you have
already pressed the key.
$
See Also: Call waiting & holding
(page 48) and Call diverting (page 47).
$
See Also: Viewing Answered and
Unanswered Calls on page 29.
Making basic calls
You make a simple call in the same way as you would with a normal phone, except that you need to press the key after entering the
phone number and area STD code. To make international calls you must first enter the international dialling code (see page 9).
Starting a call
Open the Flip (if necessary) and key in the phone number. Check the number on the display.
*
Use the full STD area code even if you are in the same town. Long numbers will continue on a second line.
O
Press to send the call.
*
If you do not wish your number to be displayed on the phone you are calling, turn the send own number feature off (see page 8).
O
* To abort the call at any time, press briefly or close the Flip (if the Flip option is active - see page 3). The Standby screen
will be displayed.
The display will show you that the system is trying to connect your call and changes as you hear the call established.
When the call is connected the screen displays the number called or your name for the number (if a name has been stored in memory along
with the number - see page 30), the duration of this call so far (if the in-call timer feature is enabled - see page 21), and the signal strength.
Correcting mistakes
*
Use the or key to to scroll through the number then press C to clear individual digits or hold down the C key to
completely clear a phone number.
MENU
UK NETWORK
Tue 19 Jan 1999
11:42
In standby ready for
use
UK NETWORK
0123456789
11:42
Phone number on
screen
0123456789
11:42
Trying to connect
Connected
0123456789
11:42
Connected
$
See also: Phone Number Editing on page
39.
Ending calls
Press (Short press) or close the Flip (if the Flip option is active - see page 3). The phone returns to standby.
*
Unsuccessful calls
If the call cannot be connected, you will hear a tone. The display will give an appropriate message, and the phone will return to standby. If
your phone is set to Autoredial the number will be automatically called again after a short delay (see page 21).
If a connection is broken, such as by a poor radio signal, then the phone returns to standby. You may also get a warning tone.
O
Always press or close the Flip even if
the other person has ended the call first.
O
If the key is held down, the unit will
turn off.
The other
user is
busy
Unsuccessful call
6
Stored numbers
You can store numbers and names on your phone, and recall these numbers to make calls. The numbers and names are stored on your SIM
card.
The following numbers are considered to be stored numbers:
Numbers you have stored yourself
l
The last 10 outgoing call numbers (redial numbers)
l
The last 10 incoming answered calls (unless a number was withheld)
l
The last 10 unanswered calls (unless a number was withheld)
l
Emergency calls
The standard emergency number of 112 can be used.
Key 112
*
* Press to connect the call to the local emergency services.
Last number redial
To redial the last number you called:
*
Ensure the standby screen is displayed and no phone number is shown.
*
Press the key twice. The last number you dialled will be called (unless the Auto key lock is on - see page 3).
Earpiece and ringer volume
To change the earpiece volume
See Also: Storing and retrieving numbers
$
on page 26.
O On some networks emergency calls can be
made using the 112 number without a SIM
card inserted. In the UK, the number 999
can also be used for emergency services
but the phone must contain a valid SIM
card.
$See also: Redial facilities on page 28.
*
Use volume keys during a call. The settings remain at the level last set.
Whilst the phone is ringing, the volume keys on the side of your phone control the ringer volume. At other times the volume keys on the side
of your phone control the volume of keypad tones.
7
Volu me u p
Volume down
Muting the microphone during a call
MENU
Press 7 during a call to turn the mute on or off.
*
Displaying your own phone number
MENU
Press with the phone switched on and in standby or in a call. This will display the first number stored on the
*
SIM.
Press the or key to select from the list of your own numbers, if applicable.
*
MENU
Sending your own phone number
You can send your own phone number when you make a call so it will be displayed on the phone you are calling (CLI).
Mute
01234567890
17:10
Mute during call
You can enter a number of ‘own phone
O
numbers’ to allow for voice, data and FAX
calls etc. To enter and/or edit your own
phone numbers, see page 37.
* Press 813. Then 1 to turn CLI on or 2 to turn it off.
MENU
Phone modes
Your phone can be set to operate in one of four modes.
l
Normal
l
Meeting
l
In-car
l
Pocket
These modes are selected from a menu displayed when the key is pressed from an empty standby screen, i.e. with no number
displayed (see the table on page 9 for selection details). When a mode is selected, some of your phone’s settings will be altered
automatically to suit the situation suggested by the respective mode name. The phone functions altered are as follows:
l
Ringer volume level
l
Key volume
l
Silent mode setting
l
Vibrator setting
l
Keypad lock setting
l
Backlight setting
l
Autoanswer
8
Mode selection & settings
The following table shows the selection keys and default settings for each mode.
Normal
(press p 1)
Ringer Volume Medium Medium Medium High
Key volume Medium Medium Medium Medium
Silent mode As set in menu On Off Off
Vibrator As set in menu On Off On
Auto key lock Off Off Off On
Backlight Normal Normal On Normal
Autoanswer As set in menu Off On Off
Meeting
(press p 2)
In-car
(press p 3)
Pocket
(press p 4)
International dialling codes
When you make an international call from any country, you must start by dialling a special international access code.
Your cellphone has the facility to prefix numbers with a '+' symbol, which saves you entering the access code for the country that you are
calling from.
To select any other mode when in the
O
pocket mode the keypad lock will have to
be turned off ( 0 ).
Any changes made to these settings
I
whilst in a mode will be stored and
used when that mode is selected
again.
Whichever mode is selected when you turn
O
your phone off will still be selected when
you turn your phone on again.
MENU
O The Autoanswer function will only work if
your phone is connected to a headset or
car kit.
Your phone will automatically dial the correct numbers for each country if you enter the '+' digit as follows:
Entering international dialling codes
With the phone in standby
*
Hold down 0. The '0' character displayed changes to a '+' character.
You can then enter the country code, area code, and phone number that you wish to call.
The UK country code is always 44, no matter what country you are dialling from. For example, a typical UK number of 01189 123456 is entered as:
+ 44 1189 123456
International country area phone
9
access code code number
UK NETWORK
+44118912345
6
11:42
International number
entry
Roaming
Roaming is a standard feature of the GSM network technology. Roaming allows you to use your phone in many parts of the world and pay all
charges through your normal Service Provider.
Your network operator usually has agreements with named networks in other countries. The SIM fitted in your phone can be supplied so that
automatic roaming can take place with these named networks. The phone also allows you to set network preferences of your own.
Before leaving your home country you should select any preferences such as call barring or call diverting. Note that you will be charged for
calls forwarded to you whilst roaming.
When dialling you will need to add the international access codes when required, so storing all numbers with the codes (such as +44 for the
UK) is helpful (see page 9).
Set automatic or manual network selection
* With the standby screen displayed, press 86. The automatic/manual menu will be displayed.
MENU
* Press 1 to select automatic network selection or 2 to set manual selection. A confirmation screen will be displayed
momentarily and then the standby screen will be displayed.
View/edit network list
O Before editing your network list, please consult with your service provider.
*
With the standby screen displayed, press 863.
*
Use the or key as appropriate until the required network is displayed.
*
Press the key.
*
Press the appropriate key to select the required action (see table right).
MENU
MENU
When your phone is set to manual mode,
O
you will have to wait while the phone is
searching for networks. If several network
options are found, use the or
key to scroll through the list.
Before you manually select a
I
network, ensure it is covered under
the agreement you have with your
service provider.
Action No.
Select 1
Delete 2
Edit code 3
O
If you select a network to be added to your
network list (option 1) but the list is full,
you will have to use the or key
to select the network to be replaced and
then press the key.
MENU
MENU
10

Using your phone with a laptop computer
You can use your phone with a laptop computer and a suitable modem to make both FAX and data transmissions. Connect the laptop, modem
and your phone as shown below. Consult your IT department or the relevant software documentation to set-up and carry out the following:
Your computer has the correct driver for your modem
l
The laptop has the relevant fax and data applications loaded
l
The fax transmission print screen points to the fax driver and not a printer
l
Make a fax and a data transmission using a standard land line
l
When both types of transmission have been successful, connect your phone to the output of the modem, turn the phone on and with
l
the standby screen displayed, use your computer to send either a fax or data
When a fax is sent, the number being called will be displayed on the 2nd line of the phone’s LCD display. The top line will display
l
Fax then Calling...then Connected alternating with Fax call. When the transmission is complete, the
phone’s screen will return to standby.
When data is sent, the number being called will be displayed on the 2nd line of the phone’s LCD display. The top line will display
l
Data then Calling...then Connected alternating with Data call. When the transmission is complete, the
phone’s screen will return to standby.
Land Line
PCMCIA
Direct to cellphone or
optionally via
You can set your phone’s ringer style so
O
you can distinguish between incoming
speech, FAX and data calls (see page 19).
car kit
11
Software Modem

Caring for batteries
Checking the battery 13
Low battery alarm 13
Changing the battery 13
Charging a battery 13
STANDBY AND TALK TIMES
Your cellphone works closely with the network you are using to provide the services you need, and the standby and talk times achieved will depend on how you use
the phone and choices made by the network operator.
In particular, your location within the network, the frequency at which this location is updated, the type of SIM you have, your reception of area or ‘cell broadcast’
messages and the use of Full Rate or Enhanced Full Rate speech, as well as other factors, will affect both standby and talk times.
If you need to maximise the standby time of your cellphone, you may choose to switch on ‘Area Messages Power Save Option’ (see page 57).
IMPORTANT BATTERY CHARGING INFORMATION
Charging a very low battery
The battery’s charge continues to drop after the
considerable time after this warning is displayed a trickle charge is used to slowly top-up the battery to the safe level at which ‘fast charging’ can begin. During this
time the battery icon will pulse but you will not be able to make or receive a call, or fully power up the phone. Normal operation is resumed once fast charging
begins. The phone can be in trickle charge for a few hours before fast charging starts if the battery is left uncharged for some days after the
Battery
warning is displayed.
Recharge Battery warning is displayed. In extreme cases where the battery is left uncharged for some
Recharge
12
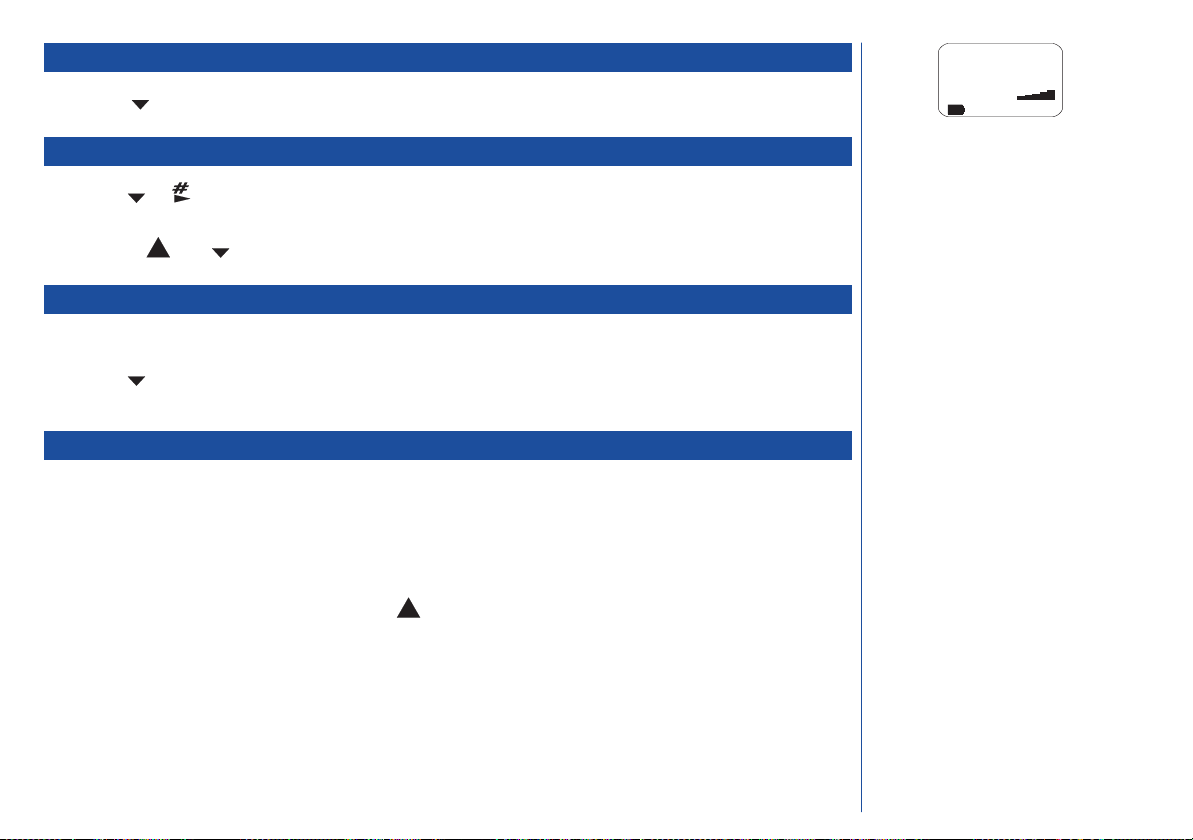
Checking the battery
Check icon at the bottom of the screen
*
The blocks on the display show the charge of your battery pack.
Full battery power Low battery power
Low battery alarm
When the battery voltage falls below the working level, Recharge Battery is displayed on screen along with a flashing empty battery
icon and a warning tone. The phone will automatically power down shortly afterwards.
DO NOT connect a charger or any
I
other external DC source if the
phone's battery is not inserted.
To cancel the battery alarm, press any key
O
except . The low battery alarm will
repeat until the phone automatically
switches off.
Changing the battery
Make sure the phone is switched off. Some settings may be lost if the battery is removed while the power is on.
* Slide the battery catch towards the top of the phone À and lift the battery out Á.
*
Put the new battery pack in base first then lower it into place  .
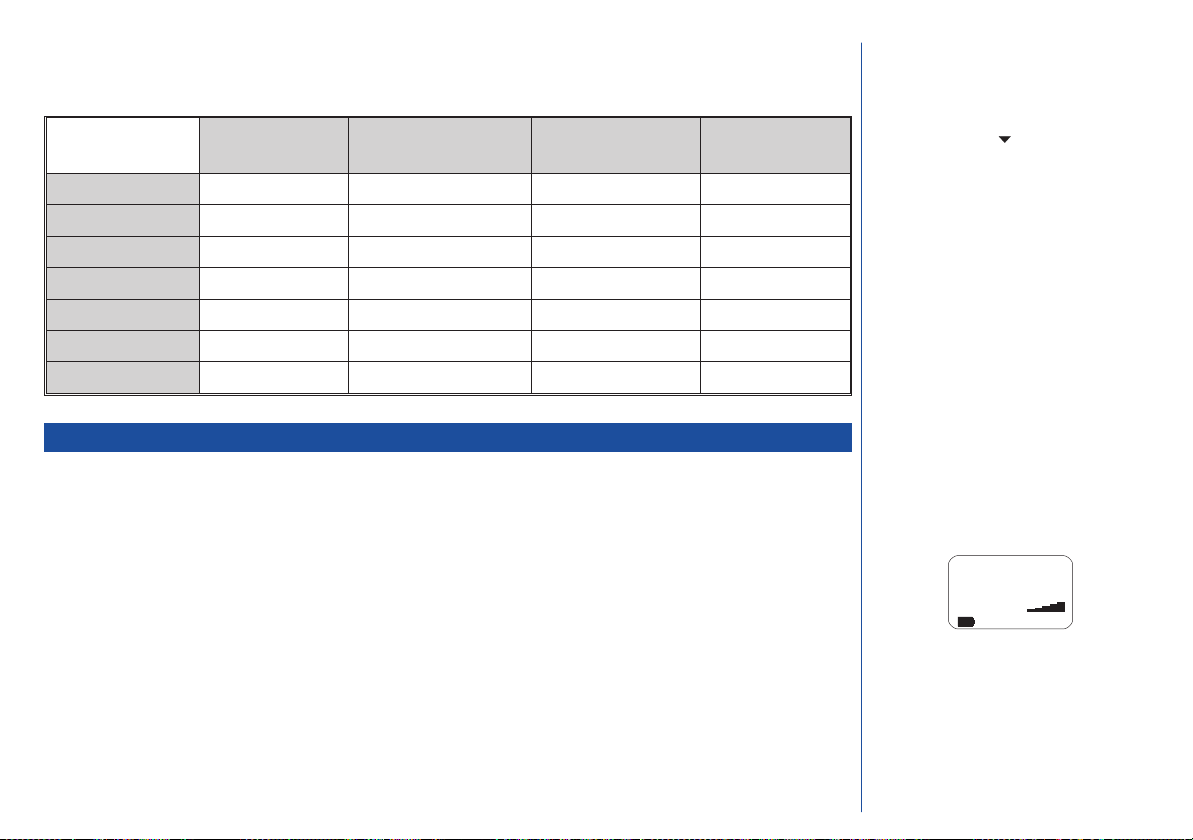
Charging a battery
The charger unit begins to restore the battery power when it is connected to the phone.
*
Connect the charger plug into the connector at the base of the phone. Check the battery icon is pulsing.
When charging is complete, the battery icon will stop pulsing and trickle charging continues. During charging the battery icon pulses and
shows as a solid block when charging is complete. This is also shown when the phone is switched off.
If you need to receive calls, the cellphone can be switched on and left in standby while it is charging, although the total time taken to charge
is then increased.
The cellphone is designed to be charged with the NEC equipment listed with the specifications of your phone.
13
2
1
O
It may take a few seconds for the indication
to start.
I
Using the wrong type of charger
Charger
connector
can be dangerous and
may invalidate any
warranty and approval
given to the cellphone.
Do not connect more
than one charger at
any time. Do not
leave the charger
connected to the
mains supply when
it is not in use.
3

Selecting features
This section describes how you select and alter the features provided by your phone and the network it is connected to.
Selection overview 15
Menu selection 15
Fastkey selection 15
14
Menu selection
When using the menu method to select a feature, you just need to scroll through the options on screen and confirm your choice with the
key which is also the ‘send’ key.
A
Õ at the base of the options indicates there are more to choose from. Use the or keys to scroll through the menu options.
The choice of options available depends on whether the phone is on a call or in standby.
O
The currently selected option is normally marked by a
Pressing the key will return you to the standby screen.
O
> whilst the highlighted option will be selected if you press the key.
MENU
Fastkey selection
The alternative ‘fastkey’ method of selection lets you jump straight to a menu or function without scrolling through the intermediate menu
options. The selections are made by pressing numbers on the keypad which relate to the displayed menus options. This means the required
option does not have to be on the screen to be selected.
If you lose track or make a mistake, just press C to return to the previous menu. If you keep pressing C you will return to the standby display.
Fastkey selection example
Using the fastkey selection method, setting the Autoanswer facility on or off can be carried out as follows:
*
*
At the start of the section which contains the Autoanswer facility procedure (page 16) an abbreviated form of the fastkey method will be shown
as follows:
MENU
Press 82. The Autoanswer on/off menu will be displayed. The currently selected option will have a >next to it.
Press 1 to set Autoanswer to on or 2 to set Autoanswer to off. The appropriate Autoanswer confirmation screen will be
displayed momentarily and then the standby screen will be displayed.
1 Messages
2 View calls
3 Divert
Õ select
Menu with extra options
Redial
1On
2>Off
select
Redial Off current
option
The instructions in this user guide usually
O
make use of the fastkey method and,
where applicable, the fastkey selection for
a function is shown at the beginning of
each section.
Autoanswer 8 2 20
MENU
15
Setting up your phone
Clock/alarm set 6 17
Ringer volume 7 3 19
Ringer style 7 4 19
Silent mode 7 1 19
Vibration alert (option) 7 6 19
Send tones 7 5 20
Answer key 8 3 20
Autoanswer 8 2 20
Autoredial 8 4 21
Call timer/Advice of Charge (AoC) 5 21/23
Greeting message 8 8 24
Language setting 8 7 24
MENU
MENU
MENU
MENU
MENU
MENU
MENU
MENU
MENU
MENU
MENU
MENU
Backlight functions 8 25
MENU
16
Clock/alarm set
Clock set
Your phone has the ability to store the time and date. This information is displayed, in 12 or 24 hour format (see below), on the standby
screen and can be used to trigger an alarm (see page 18 for alarm set-up). To set the time and date, proceed as follows:
MENU
Press 61. The clock set screen will be displayed.
*
When the clock set screen is entered, the first hour digit can be altered by pressing either the or key. Alternatively,
*
the required digit on the keypad can be pressed. If the digit does not need to be altered, press the key so the second hour
digit can be altered.
MENU
* Alter the digit if necessary, and then use the or key as appropriate to move to the next value to be altered.
The following values can ONLY be altered by pressing either the or key.
O
l am/pm indicator (where applicable)
l Month name
l Year
MENU
12:34
Mar 10 1999
ÑmoveÒ
Õset Done
Clock set screen
* When you have set the clock to the required time and date, press the key. The clock set message will be displayed
momentarily and then the standby screen will be displayed.
12/24 hour set
To set the phone’s clock display to either 12 or 24 hour format, proceed as follows:
*
*
17
MENU
Press 63. The 12/24 hour menu screen will be displayed. The currently selected option will have a >next to it.
Press 1 for 12 hour or 2 for 24 hour. The appropriate confirmation screen will then be displayed momentarily before the
standby screen is displayed.
Clock set message
12/24 hour
1>12 hour
2 24 hour
select
12/24 hour selection
screen

Alarm function
Your phone can be used as an alarm so it can alert you at a preset time. If the alarm is set, it will be triggered in all the following
circumstances:
When the phone is on and in standby
l
During a call
l
When the phone is ringing
l
When the phone is powered off
l
When the phone is charging
l
When the alarm is triggered, a tone will sound, the backlight will flash and the alarm screen will be displayed.
If the phone is ringing or the ringer is set to off (see page 19), the alarm tone will not sound but the alarm screen will be displayed.
O
Setting the alarm on
MENU
Press 62. The alarm set/off menu will be displayed. The currently selected option will have a >next to it.
*
* Press 1. The alarm set menu will be displayed.
*
If you wish to set the alarm to go off at the time currently displayed, press the key. The alarm set message will be
displayed momentarily and then the standby screen will be displayed.
*
If you wish to alter the time, the first hour digit can be altered by pressing either the or key. Alternatively, the
required digit on the keypad can be pressed. If the digit does not need to be altered, press the key so the second hour digit
can be altered.
Alter the digit if necessary, and then use the or key as appropriate to move to the next value to be altered.
When you have set the clock to the required time and date, press the key. The alarm set message will be displayed
momentarily and then the standby screen will be displayed.
MENU
Push any key
Alarm triggered screen
Set alarm
16:38
ÑmoveÒ
Õset Done
Alarm set screen
O
When the alarm has been set, the time on
the standby screen will be displayed with a
bell icon as follows:
13Ê45.
Setting the alarm off
*
MENU
Press 622. The alarm off message will be displayed momentarily and then the standby screen will be displayed.
18

Ringer volume
* Press 73. The ringer volume display will be shown on the screen.
*
*
O
MENU
Press the volume keys on the side of the phone to adjust the setting as required. A sample of the setting will be heard whenever
a setting is changed.
Press the key to select the current setting.
The ringer volume can be changed with the volume keys when your phone is alerting you to an incoming call.
Ringer style
*
MENU
Press 74.
* Then press the appropriate key for the calls to be viewed (see table right).
* Use the or key to scroll through the styles . As each style is indicated on the display, a sample ring will be given.
MENU
* When the required ringer style is heard, press the key. The ring style alert confirmation screen will be momentarily
displayed and then the standby screen will be displayed.
Silent mode
* Press 71. Press 1 to turn the ringer off or 2 to turn it on. The silent on/off confirmation screen will be displayed
MENU
momentarily and then the standby screen will be displayed containing the word
Silent.
Vibration alert (option)
* Press 76. Press 1 to turn the vibration alert on or 2 to turn it off. The vibrator on/off confirmation screen will be
MENU
displayed momentarily and then the standby screen will be displayed.
Volu me up
Volume down
If you set the ringer volume to zero,
O
Ringer off will be displayed.
Ringer style No.
Speech 1
Data 2
FAX 3
O
You can also associate a ringer style with
incoming calls from a number stored in
your personal directory (see page 34).
19

Silent mode & vibration alert
To turn the silent mode and vibration alert on or off together, proceed as follows:
MENU
Press 72. Press 1 to turn the silent mode and vibration alert on or 2 to turn them off. The silent and vibrator on/off
*
confirmation screen will be displayed momentarily and then the standby screen will be displayed.
Send tones
If you need to send DTMF tones during a call (e.g. to select options on an automated phone answering service), proceed as follows:
MENU
Press 75. Press 1 to turn the tones on or 2 to turn them off. The tones on/off confirmation screen will be displayed
*
momentarily and then the standby screen will be displayed.
Answer key
Your phone will connect to an incoming call by pressing any key (except the key) or by pressing the key only. To set up how you
want to answer incoming calls, proceed as follows:
*
MENU
Press 83. Press 1 for any key to answer or 2 for only the key to answer. The answer key confirmation menu will
be displayed momentarily and then the standby screen will be displayed.
Autoanswer
The Autoanswer facility will cause an incoming call to be connected automatically only if you are using your phone as a car phone or with the
simple hands free kit.
*
MENU
Press 82. Press 1 to set Autoanswer to on or 2 to set it to off. The Autoanswer on/off confirmation screen will be
displayed momentarily and then the standby screen will be displayed.
O
Autoanswer will only work if your phone is
connected to a car kit or headset.
O
It is recommended that you do not use the
Autoanswer facility if you have the ringer
volume set to off or your phone is set to
the silent mode (see page 19).
O
With Autoanswer set to ‘on’, you have 5
seconds to reject an incoming call before it
is answered automatically.
20

Autoredial
With this facility on, your phone will try up to 10 times to redial a number if the first attempt fails. The intervals between each redial will get
longer after each attempt. A tone will be heard at each redial attempt. The failure to connect a call can be due to network problems or if the
other phone is busy. Pressing any key during a redial attempt will abort it. To set redial on or off, proceed as follows:
MENU
Press 84. Press 1 to turn Auto redial on or 2 to turn it off.
*
Call timer
The Auto redial attempt tone will still be
O
heard even if the phone is set to the silent
mode (see page 19).
View calls
MENU
Press 51. Then press the appropriate key for the calls to be viewed (see table right).
*
Use the and keys to scroll through the information.
*
MENU
* Press the C key to return to the view calls menu or press and hold it down to return to standby.
Last call
The last call screen will display the duration of the last call made on your phone.
All calls
The all calls screen will display the duration of all calls made from your phone since the last time the call timer was reset and also the split
between calls made on your ‘home’ network and those made whilst roaming.
Outgoing
The outgoing calls screen will show the total time duration of all outgoing calls and also the split between calls made on your ‘home’ network
and those made whilst roaming.
Incoming
The incoming calls screen will show the total time duration of all incoming calls and also the split between calls received via your ‘home’
network and those received whilst roaming.
21
The Call Timer function will only be
I
displayed if your network or SIM
card does not support AoC.
View type No.
Last call 1
All calls 2
Outgoing 3
Incoming 4

Show timer
This facility enables you to view the total time duration for all calls or for outgoing calls. This information can be viewed from a menu or on
the phone’s display during a call. To set-up the show timer to your requirements, proceed as follows:
MENU
Press 52. The show timer menu will be displayed.
*
Press 1 to select the display menu (to select where information will be displayed) or 2 to select the timer format menu (to
*
select which information will be displayed).
Display menu
With the display menu selected, press 1 to display the timer during a call and in the menu or 2 to select menu only display .
*
Press the C key to return to the show timer menu or press and hold down the C key to return to standby.
*
Format menu
With the format menu selected, press the appropriate key to select the required call types (see table right).
*
* Press the C key to return to the show timer menu or press and hold down the C key to return to standby.
Reset
This facility allows you to reset the accumulated call times and restart the timer from zero. To reset the timer, proceed as follows:
*
*
*
MENU
Press 53. A screen will be displayed to allow you to confirm or abort the reset.
Press the key to reset the timer or C to return to the call timer menu.
If you confirmed the reset, a confirmation screen will be displayed momentarily and then the standby screen will be displayed.
Call types No.
Current 1
Outgoing 2
Total 3
22

Advice of Charge (AoC)
The AoC feature enables you to view the time and cost of calls; the cost can be displayed in either units or currency. You can also set a limit
(in either units or currency) so your phone cannot be used once the limit is reached .
View calls
MENU
Press 51. The view calls menu will be displayed.
*
Press the appropriate key to select the view type required (see table right) and use the key if necessary to view the
*
contents of the screen.
Press C when you have viewed the screen. Either make another selection from the view calls menu or press and hold down the
*
C key to return to the standby screen.
Show timer
The following table shows the key strokes necessary for the AoC show timer facility:
AoC display
location
AoC format
information
Resetting
the meter
View calls menu only
In-call display screen & view calls menu 11
Time display = current call time
Time display = total call time 13
Time display = outgoing call time 12
Cost display = total cost since last reset (no limit set) 3
Cost display = total cost since last reset (limit set) 31
Cost display = balance until limit reached 32
Unit display = total units since last reset (no limit set) 2
Unit display = total units since last reset (limit set) 21
Unit display = balance until limit reached 22
Reset call timer
Reset call meter 2
Reset both call timer & meter 3
MENU
MENU
MENU
MENU
12
52
11
522
1
531
The AoC facility is SIM card and
I
network dependant.
View type No.
Last call 1
All calls 2
Outgoing 3
Incoming 4
Limits 5
O
When resetting the meter you may be
requested to enter your PIN 2 code (see
page 41).
23

Set the call limit
MENU
Press 532. Key in your PIN 2 code and press if required. The call limit screen will be displayed.
*
Key in the call limit value and press the key.
*
Set no limit
MENU
Press 533. Key in your PIN 2 code and press if required.
*
Set currency
MENU
Press 54. Key in your PIN 2 code and press if required.
*
Use the text entry procedures (see page 37) to enter the currency type, using a maximum of three characters.
*
Press the key. The charge rate screen will be displayed.
*
* Enter the charge rate and press the key. If you enter a value which cannot be stored, you will be offered an alternative.
Press to confirm the alternative.
Greeting message
* Press 88.
*
MENU
Enter the text you require for your message (see page 37 for the text entry procedure). Press the key to store the text and
return to standby.
Language setting
Your phone can display all its menus and other information in a number of languages. To set the required language, proceed as follows:
*
*
MENU
Press 87. The language menu will be displayed. The currently selected option will have a > next to it.
Use the or key until the required language is displayed and then press the key.
MENU
O
The Automatic option (if available) sets
your phone’s display language to that
dictated by the SIM card present.
24

Backlight functions
You can control the backlight functions as follows:
MENU
Press 8 . The backlight function menu will be displayed.
*
Press 1 to set the backlight to stay on for a preset time, 2 to set it permanently on or 3 to set it off.
*
Restore factory settings
This function will revert your phone to its factory settings.
By restoring the factory settings, any changes you have made to your phone’s set-up will be lost. An example of some of
I
theses settings are as follows:
Clock
Ringer volume
Ringer type
Ring style allocation
Dial lock code
Mode settings
Backlight
SMS management options
O
Your phonebooks will be unaffected.
*
*
MENU
Press 8 .
Press to confirm.
25

Storing & retrieving numbers
Telephone directories (phonebooks) 27
Scratchpad number 27
Redial numbers - viewing/calling 28
Answered & Unanswered calls - viewing/calling 29
Clearing call lists 30
Storing numbers and names (ADN & FDN) 30
Calling stored numbers 31
Managing stored numbers 32
Fastdial setting 8 1 2 34
One touch dial setting 8 1 4 35
FDN setting 8 1 5 35
MENU
MENU
MENU
26

Telephone directories (phonebooks)
Your phone can have up to 3 phonebooks stored on your SIM card:
Personal directory (ADN)
l
Fixed dialling numbers (FDN)
l
Service dialling numbers (SDN)
l
When viewing any of the directories
O
described, you can scroll to the other
directories (if your SIM card supports
them) by using the or key.
Personal directory (ADN)
These numbers are known as abbreviated dialling numbers (hence ADN) and up to 255 (depending on your SIM card capacity) can be stored
along with a name. All numbers can be stored with their own ring style (see page 34). These numbers form your personal phonebook and can
be viewed, altered and called whenever you wish.
Fixed dialling numbers (FDN)
Fixed dialling numbers are a means of limiting which numbers can be called from your phone. With the FDN feature switched on (see page
35), only numbers you have stored in this phonebook and the emergency number can be called from your phone.
Service dialling numbers (SDN)
The numbers stored in the SDN phonebook are supplied ready installed by your service provider. They will call numbers and services as
agreed with your supplier (e.g. customer enquiries, billing information, sportslines, weatherlines, etc.) and cannot be edited by you. You will
not be able to see the number which will be dialled, only the associated text title.
Scratchpad number
Your phone has a scratchpad facility that enables you to take down a telephone number during a call and then make a call to it when you have
finished. This scratchpad number can be stored in memory for future use.
Noting & calling a scratchpad number
*
During a call, key in the number to be placed in the scratchpad. It will be shown on your phone’s screen.
*
Press the key when the call is finished. The number will still be displayed.
*
Press the key. The number displayed will be called.
The procedures for storing, calling, altering
O
and deleting these numbers are detailed
from page 30 onwards.
Although FDN is supported by your
I
phone, it must be present on your
SIM - check with your service
provider.
I Although SDN is supported by your
phone, it must be present on your
SIM - check with your service
provider.
27

Storing a scratchpad number
With the scratchpad still displayed, press the key. Enter number will be displayed.
*
Press the key. The text entry screen will then be displayed.
*
Key in a name associated with the number (see page 37 for the text entry procedure).
*
Press the key to confirm you have completed the text entry.
*
To store the number in the next available location, press the key. To store the number in a specific location, key in the
*
location number required and then press the key.
Redial numbers - viewing/calling
The last 10 phone numbers of calls made on your phone are stored as redial numbers. These numbers can be viewed and called as follows:
Viewing redial numbers
The following information can be viewed:
l The call’s position in the list (1-10)
l The name associated with the number if it is stored in memory or, if it is not stored, the number itself
l
The date and time of the last call attempt to this number
l
The number of times this number has been called
l Total cost of calls to this number (AoC only - see page 23)
l
Total time duration of calls to this number
To view information on redial numbers, proceed as follows:
*
*
MENU
Press 23.
Use the or keys as appropriate to scroll through the information. Use the or key to go to the next or
previous number as appropriate.
MENU
The information which can be viewed
I
is dependant on the services
provided by your network and your
phone’s settings.
O
If you insert a SIM card other than your
own, information such as call logs may be
lost.
28

Fast redial
To access the redial list quickly, proceed as follows:
Press the key.
*
Use the or key to scroll through the list until the required number is displayed.
*
Press the key. The number will be called.
*
MENU
Redial from the viewing list
To call a redial number from the viewing list, proceed as follows:
* Press 23.
MENU
* Use the or key as appropriate to scroll through the redial numbers.
* When the number (or name) you wish to call is displayed, press the key so the number or name is highlighted.
MENU
* Press the key. The call will be made.
To redial the last number you called, press
O
the key twice.
The or key can be used to
O
change between the redial, answered and
unanswered calls lists.
To clear the redial list, see page 30.
O
O When the redial number is flashing,
pressing the key will allow you to
store the number, see page 30.
Answered & Unanswered calls - viewing/calling
To view information on answered and unanswered calls, proceed as follows:
*
*
*
*
29
MENU
Press 2. Press 1 to select unanswered calls or 2 to select answered calls.
Use the or keys as appropriate to scroll through the information. Use the or key to go to the next
or previous number as appropriate.
To call the number displayed, press the key so the number or name is highlighted.
Press the key. The call will be made.
MENU
MENU
O If you insert a SIM card other than your
own, information such as call logs may be
lost.
O
If you missed calls while you were away
from your phone but it was switched on,
the screen will display the number of
missed calls (unless it was just once and
then it will display the word
and allow you to view the unanswered call
list by pressing the key.
O
When the answered or unanswered
number is flashing, pressing the
key will allow you to store the number, see
page 30.
O
To clear the answered and unanswered call
list, see page 30.
CALLED)

Clearing call lists
This facility clears the Redial, Answered and Unanswered call lists simultaneously.
IF YOU WANT TO: Clear the call lists now
*
IF YOU WANT TO: Automatically clear the call lists when you switch off your phone
*
IF YOU WANT TO: Turn the automatic clear call list function off
*
MENU
Press 242.
MENU
Press 2411.
MENU
Press 2412.
Storing numbers & names (ADN & FDN)
You can store a telephone number in a directory when it is displayed in any of the following screens:
Standby screen
l
l Redial, Answered & Unanswered viewing logs
l Flash or text messages (see page 51 for details of these messages)
* If the standby screen has no number in it, key in the number to be stored.
* With a telephone number displayed in one of the above screens, press the keys. You will be prompted to enter a
name.
*
Key in the name you wish to associate with the phone number (see page 37 for text entry details) and press the key. The
memory location screen will now be displayed.
*
Press the or key ONLY if you wish to enter the number and name in the selected directory. If you select the FDN
directory you will have to enter your PIN 2 code to continue (for security code details, see page 41).
*
To store the number in the next available location, press the key.
To store the number in a specific location, either key in the location number required or use the or key to select it and
then press the key. If the location is already in use, you will be prompted to press the key to confirm the
replacement.
*
Either enter another number to be stored, or press the C key to return to standby.
MENU
If you turn your phone off by removing its
O
battery, the call lists will not be cleared
automatically, even if Auto clear is set to on.
It is best to store numbers using the
O
international number format (see page 9).
O When the personal directory (ADN) is
displayed, the word
at the top of the screen. When the
directory is displayed, the word
will be shown. When the SDN directory is
displayed, the word
shown.
O
ADN and FDN numbers can be stored with
?’s instead of some digits. They are treated
as wildcards and allow several similar
numbers to be stored in the same location.
O
If one touch dialling is set to on (see page
35), the first 9 locations in your personal
directory will be your one touch numbers
(see page 31).
Personal will be
Fixed
Service will be
30

Calling stored numbers
The phone numbers in your personal phonebook can be located and then called using one of the following methods:
Scrolling or specific location
To scroll through you personal directory in alphabetical order or select a location, proceed as follows:
Press and hold down the key until the first directory entry (sorted alphabetically) will be displayed.
*
Either use the and down keys as appropriate to scroll through your directory or key in the location number.
*
When the required name and number is displayed, press the key. The number will be called.
*
MENU
Fastdialling
If the fastdial facility has been turned on (see page 34) up to the first 99 personal phonebook locations can be called as follows:
* Key in the required location number and press the key. The number at that location will be called.
One touch dialling
If the one touch facility has been turned on (see page 35), the first nine locations in your personal directory can be called as follows:
* Press and hold down the number of the required location (1 to 9). The number at that location in your directory will be called.
Searching
To search for a phone number in your personal directory alphabetically, proceed as follows:
*
Press the key. The search screen is displayed.
*
Enter up to the first 4 letters (using small or capital letters as appropriate) of the name associated with the phone number you
wish to call then press the key. The first location with a name starting with the letter entered will be displayed.
*
Use the or key to scroll up or down the list alphabetically if necessary.
*
When the required name and number is displayed, press the key. The call will be made.
MENU
If the FDN function has been set to on (see
O
page 35), only numbers in the FDN
directory can be called.
To call numbers in the SDN directory,
O
press the or key until the SDN
directory is displayed and then use either
the scrolling or searching method to locate
and call the number.
O
If the entered letter is in lower case, hold
down the key until it becomes upper case
or vice versa as appropriate.
31

Managing stored numbers
Altering numbers and names
To alter the number and/or name of a directory location, proceed as follows:
Press and hold the key once to select your personal directory (then, if required, press the or key to select the
*
fixed directory).
Either scroll or search (see page 31) to display the location to be altered.
*
Press the key so the directory alteration menu is displayed.
*
Press 1 to select the edit mode. You will be prompted to make alterations to the number. Use the and keys to
*
move the cursor to the required position in the number, press the C key to delete the required digits and then key in the new
digits.
MENU
* Press the key when the changes (if any) are complete. The name alteration screen will be displayed.
* Use the text entry procedures on page 37 to change the name, if required, and then press the key. The location selection
screen will be displayed. Either press to overwrite the original location or key in a location number to store the altered
information to a new location.
Delete entry
To delete the entry at a specific location, proceed as follows:
*
Press and hold the key once to select your personal directory (then, if required, press the or key to select
another directory).
*
Either scroll or search (see page 31) to display the location to be altered.
*
Press the key so the directory alteration menu is displayed.
*
Press 2 to select the delete mode.
*
Press the key to delete the contents of the memory location or the C key to return to the directory alteration menu. If you
choose to delete the number, a confirmation screen will be displayed momentarily and then the display will return to viewing the
directory.
If you just wish to edit a number, see page
O
39.
If you were in the fixed directory, you will
O
be prompted to enter your PIN 2 code (for
security code details, see page 41).
O To delete the number completely, press
and hold down the C key. For more
information on editing phone numbers,
see page 39.
O
If you were in the fixed directory, you will
be prompted to enter your PIN 2 code (for
security code details, see page 41).
32

Add a new number
To add a new number to a directory, proceed as follows:
Press and hold the key once to select your personal directory (then, if required, press the or key to select
*
other directories).
Press the key so the directory alteration menu is displayed.
*
Press 3.
*
Key in the number to be added and press the key. You will be prompted to enter a name.
*
Key in the name you wish to associate with the phone number (see page 37 for text entry details) and press the key. The
*
memory location screen will now be displayed, showing the maximum number of locations available.
To store the number in the next available location, press the key. Either enter another number to be stored, or press the C
*
key to return to viewing the directory.
To store the number in a specific location, key in the location number required and then press the key. If the location is
already in use, you will be prompted to press the key to confirm the replacement. Either enter another number to be
stored, or press the C key to return to viewing the directory.
Swap/move memory positions
To swap the memory locations of two stored numbers or move one stored number to an empty location, proceed as follows:
*
Press and hold the key once to select your personal directory (then, if required, press the or key to select
other directories).
*
Either scroll or search (see page 31) to display the first location to be swapped or moved.
*
Press the key so the directory alteration menu is displayed.
*
Press 4. The swap location screen is displayed.
*
Use the or key to select the required directory, if necessary, and then select the location to be swapped, or a free
location (either by keying in the location number or using the or key).
*
Press the key to swap or move.
MENU
It is best to store numbers using the
O
international number format (see page 9).
When the personal directory (ADN) is
O
displayed, the word
at the top of the screen. When the FDN
directory is displayed, the word
will be shown.
ADN and FDN numbers can be stored with
O
?’s instead of some digits. They are treated
as wildcards and allow several similar
numbers to be stored in the same location.
Personal will be
Fixed
O If one touch dialling is set to on (see page
35), the first 9 locations in your personal
directory will be your one touch numbers
(see page 31).
O
If the first location is swapped or moved to
a directory that has a lower limit on the
length of name tags, the name tag will be
truncated.
33

Allocate a Ring Style (personal directory only)
You can allocate specific ringer styles to all memory locations. This means whenever you are called by one of these numbers your phone will
use the selected ringer style. To allocate a ringer style to a memory location, proceed as follows:
Press and hold the key once to select your personal directory.
*
Either scroll or search (see page 31) to display the required location.
*
Press the key so the directory alteration menu is displayed.
*
Press 5. The ringer style option screen will be displayed.
*
Use the or key as appropriate to scroll through the ringer styles. Each time a style number is displayed, an
*
example of the style will be heard.
Press the key to select the required style. You are then returned to viewing the directory.
*
MENU
Directory status
To find out how many locations have been used and how many are free in any directory, proceed as follows:
* Press and hold the key once to select your personal directory (then, if required, press the or key to select
other directories).
*
Press the key so the directory alteration menu is displayed.
*
Press 6. The display will show which directory you are in, how many locations have been used and how many are free.
*
Press the C key to return to standby.
Fastdial setting
* Press 812. The fastdial menu will be displayed.
*
I
MENU
Press the appropriate key (from the table right) to set the function off or select the number of fastdial numbers available (1 to 9
or 1 to 99).
Although your phone allows you to Fastdial up to 99 numbers, your SIM card may limit this to a smaller number.
If the caller has set his/her phone not to
O
send their phone number when they make
a call, this facility will not work.
If you remove your SIM card from the
I
phone, the ring styles allocated will
be lost.
Setting No.
Off 1
1to9 2
1to99 3
34

One touch dial setting
For a description of how to use one touch dialling, see page 31.
MENU
Press 814. The one touch dialling on/off menu will be displayed.
*
Press 1 to turn one touch dialling on or 2 to turn it off.
*
FDN setting
* Press 815. The FDN on/off menu will be displayed.
*
35
MENU
Press 1 to turn FDN on or 2 to turn it off.
The FDN facility is network
I
dependant.
You may be requested to enter your PIN 2
O
code to change the FDN setting.

Text entry & number editing
This section describes how you enter text (letters, numbers and symbols), your own phone numbers and modify phone numbers when required.
Text entry 37
Own phone number entry 37
Phone number editing 39
36

Text entry
Whenever you need to enter text (for short messages, storing names with numbers, etc.), successive presses of a number key will display
different characters as shown in the table below. Holding the key down changes from upper case mode to lower case mode. For phone
number editing facilities, see page 39.
Digit Upper case mode Lower case mode Digit Upper case mode Lower case mode
&-#.1,?!_@()
1
ABC2ÄÅAEÇ abc2äåàaeç
2
DEF3∆ÉΦ
3
GHI4Γ
4
JKL5∧
5
:;.1,?!‘“¿ Ð §
def3èé
ghi4ì
jkl5
MNO6ÑÖØ mno6ñöòø
6
PQRS7Π Θ Σ
7
TUV8Ü tuv8üù
8
WXYZ9Ω Ξ Ψ
9
0 space+-*/=<>% £ $ 0 space+-*/=<>% ¥ ¤
0
pqrs7ß
wxyz9
Own phone number entry
Because your phone is capable of receiving not only voice but also FAX and data calls, and with the advent of advanced network facilities (e.g.
Call divert), you may wish to store and subsequently edit more than one phone number in the own number list.
Own number facilities
Add an own phone number (with none present)
*
*
*
*
MENU
Press . The first own number space in the list will be displayed.
Press the key. Key in the required number and press the key.
Key in the text associated with the number and press the key.
Use either the or key to select the required location and then press .
MENU
When the character you require is
O
displayed, press the key to move to
the next character (if you wait for more
than 1 second, the cursor will move one
character to the right automatically). You
can also use this key to create a space.
If you make a mistake, use the or
O
key to highlight the character to the
right of the incorrect character (if there is
no character to the right of the incorrect
character, a block will be displayed) then
press the C key.
I The amount of own number storage
locations is SIM dependant.
I
Whether associated text is allowable
is SIM dependant.
37

View own phone numbers
MENU MENU
Press . Use the and keys to scroll through your numbers.
*
Edit an own phone number
To edit a phone number in the own number list, proceed as follows:
With the standby screen displayed or in a call, press . The first own number in the list will be displayed.
*
Press the or key until the number to be edited is displayed and press 1.
*
Use the C key to delete individual numbers, key in the numbers required and then press the key.
*
Key in the text associated with the number and press the key. A suitable confirmation message will be shown and the
*
display will show the name and number entered.
Press the key to overwrite or use the or key to select the required location and then press .
*
Delete an own phone number
To delete a phone number in the own number list, proceed as follows:
MENU
* With the standby screen displayed or in a call, press . The first own number in the list will be displayed.
*
Press the or key until the number to be deleted is displayed and press 2 to delete.
MENU
MENU
MENU
MENU
Whether associated text is allowable
I
is SIM dependant.
38

Phone number editing
Your phone enables you to edit phone numbers in the following circumstances:
When a number is displayed whilst in standby (idle screen number)
l
When a scratchpad number is displayed whilst in a call (idle screen number)
l
During the storage of an own phone number (idle screen number)
l
During the entry of a divert-to number (divert number)
l
When short message destination number is displayed (stored number)
l
When your short message service centre number is displayed (stored number)
l
When a number is displayed whilst in any of the phonebooks (ADN or FDN) (stored number)
l
Entering the edit mode
When an idle screen or divert number is displayed (see above) the edit mode is already activated. With a stored number displayed (see
above), pressing and holding the key will cause the number to be displayed in the idle screen. Edit the number as required (see
below) and then press the key to send the new number.
Editing
In the editing mode, press the key to move the cursor to the left and the key to move it to the right. A short press of C will
delete the number to the left of the cursor, a long press will delete the entire number. When a number key is pressed, it will be inserted to the
left of the cursor.
Entering special characters
Entering a + symbol (for international numbers, see page 9)
Before you can enter a + symbol in a number, the cursor must be at the beginning of a number. To enter a + symbol, press and hold down
the 0 key for about a second.
Entering a pause (for DTMF dialling)
If you want to enter a pause in a number, make sure the conditions in Entering a + symbol above do not apply first and then press and
hold the 0 key down for about a second.
MENU
Entering wildcards in a number (for ‘wildcards’ within FDN numbers)
If you wish to enter a wildcard in a number (signified by a ?), press and hold down the 0 key for much longer than a second.
39
O
Entering wildcard numbers in this way only
works under certain conditions, e.g. whilst
in the phonebook.

Security
The facilities outlined in this section enable you to protect your phone from improper and unauthorised use.
Key lock 0 41
MENU
Security codes 41
PIN 1 code 41
Dial lock 42
Changing security codes 8 5 42
MENU
MENU
SIM lock 43
Call barring 4 1 43
MENU
40

Key lock
This simple lock is not strictly a security feature but is provided to prevent accidental pressing of keys during transit (for example in a pocket
or handbag). The key lock is independent of the Auto key lock which is activated by the Flip (see page 3).
Setting the key lock on or off
MENU
Press 0.
*
With the key lock on, the icon will be displayed.
When a call comes in, the key lock is
O
temporarily cancelled so that you can
press any key to answer the call.
It is still possible to make emergency calls
O
using ‘112’ while the key lock is on.
The key lock is not affected by the Flip.
O
Security codes
There are five security codes you may be required to enter when prompted by the phone to do so:
l PIN 1 code (provided by your Network to protect your SIM card if it is stolen)
Dial lock code (provided by your Network for call protection - normally preset to ‘0000’)
l
l PIN 2 code (provided by your Network for AoC and FDN services protection)
l SIM lock code (phone theft protection - your phone will only work with one SIM card)
l PUK code (personal unblocking key in case you forget PIN 1 code)
When the phone prompts you for any of the above codes, use the keypad to enter the appropriate number and press the key.
PIN 1 code
Your phone can be set up so it needs your PIN 1 code entered at power up before the phone can be used at all. If the PIN 1 code is not
entered, not even incoming calls can be answered. If you enter your PIN 1 code incorrectly more than three times (not necessarily in the same
session) not even the correct PIN 1 code will work and you will have to contact your service provider for a PUK code to unblock your SIM
card.
*
*
MENU
Press 851. The PIN 1 code entry on/off menu will be displayed.
Press 1 to turn PIN 1 code entry on and 2 to turn it off. You will be prompted to enter your PIN 1 number to confirm the change.
PIN 2 code
Your phone supports advanced feature (e.g. FDN) that may require a PIN 2 code to be entered before they can be accessed or modified. If the
PIN 2 code is entered incorrectly 3 times, you will need to contact your service provider for a PUK 2 code.
41
If you forget any of these codes, ALWAYS
O
contact your service provider as they are
the ONLY source for your codes.
I The PIN 2 code is SIM card related
and may only be available from your
service provider.
O
Some SIM cards are set up so that PIN 1
number entry cannot be turned off.
O
To change your PIN 1 code, see page 42.

Dial lock
With the dial lock on, your phone can receive incoming calls and make emergency calls but cannot be used to make any conventional calls.
All directories and call lists are blocked and cannot be accessed. This is a useful facility if you leave your phone with someone you need to
contact from another phone.
Set dial lock on
MENU
Press . A screen prompting you to enter your dial lock code will be displayed.
*
Key in your dial lock code. A ‘dial lock on’ confirmation screen will be displayed momentarily and then the standby screen will
*
be displayed. Whilst the dial lock is on, the ‘locked’ icon ( ) will be displayed.
Set dial lock off
Press the key and enter your dial lock code.
*
Changing security codes
The following security codes can be changed:
l PIN 1 code
l
PIN 2 code (this option may not be included on your SIM)
l
Dial lock code
To change any of the above codes, proceed as follows:
*
Press the key.
*
Press 8.
*
Press 5. The security code menu will be displayed.
*
Press the appropriate key for the required code (see table right).
*
Key in the current code. You will be prompted to enter the new code and then to enter it again as confirmation. A confirmation
screen will be displayed momentarily and then the standby screen will be displayed.
MENU
To change the dial lock code, see below.
O
If you forget your dial lock code while your
O
phone is not dial locked, you can set it to
‘0000’ by restoring your phone’s factory
settings (see page 25).
If you forget your dial lock code while your
O
phone is dial locked, you will need to
contact your service provider for an 8 digit
Dial Lock defeat code.
O The SIM lock code is not network
provided (see page 43).
Code No.
PIN 1 2
PIN 2 3
Dial lock 4
O
Menu option 2 (PIN 1) will not be
displayed if the PIN 1 code request is set
to off (see page 41).
I
Menu option 3 (PIN 2) is SIM and
network dependant.
42

SIM lock
The SIM lock prevents your phone from being used with another SIM card. This makes it less useful if stolen.
Set the SIM lock on
Devise your own 8 digit SIM lock code (nothing too obvious but easy to remember - MAKE A NOTE OF THE CODE: ONLY YOU
*
KNOW WHAT IT IS).
Press 4960 and key in your 8 digit code.
*
Press , key your code in again to confirm and then press
*
Set the SIM lock off
Press 4960 , key in your 8 digit code and then press
*
Call barring
This facility allows you to restrict the type of calls made or received on your phone as shown in the following table:
All outgoing calls
All outgoing international calls 12
Barring calls
Cancelling barred
call settings
Checking barred
call status
All outgoing international calls except those to home network 13
All incoming calls 21
Incoming calls whilst roaming 22
Outgoing barred call settings
Incoming barred call settings 2
All barred call settings 3
Outgoing barred calls
Incoming barred calls 2
All barred calls 3
MENU
MENU
MENU
41
42
43
The SIM lock does not prevent your SIM
O
card being used with your phone or any
other phone.
The SIM lock code is not provided by your
O
network and can be changed each time
you apply the SIM lock.
If you forget your SIM lock code while your
O
phone is SIM locked, you will need to
contact your service provider for an 8 digit
SIM Lock defeat code.
I Call barring facilities (barring,
11
1
1
cancelling barring and checking
barring) are network services and
may require a password.
43

Changing the call barring password
MENU
Press 44and enter your current password.
*
Key in the new password.
*
Key it in again to confirm it. A confirmation screen will be displayed momentarily and then the standby screen will be displayed.
*
Call barring facilities (barring,
I
cancelling barring and checking
barring) are network services and
may require a password.
44

INTENTIONALLY BLANK
45

Diverting & handling incoming calls
The facilities outlined in this section enable you to divert your incoming calls to other numbers under various conditions.
Diverting calls 47
Call waiting & holding 48
46

Diverting calls
The call divert facility enables you to divert incoming calls by type (e.g. Speech, FAX, data) to a number of your choosing as follows:
If you want to: Press the keys in the sequence shown below
Divert speech calls
Divert FAX calls 2
Divert DATA calls 3
Cancel divert - speech
Cancel divert - DATA 3
Check call divert status
Automatic status check - on
Automatic status check - off 2
MENU
MENU
MENU
MENU
1
Select Divert condition
31
32
33
34
(see Divert Condition
table right)
1
Select Cancel condition (see Cancel Condition table right)Cancel divert - FAX 2
Select Divert condition (see Divert Condition table right)
1
Enter telephone number
to divert to
You will pay for the diverted part of the call.
O
When any of the diversion conditions are
O
set, the icon will be displayed at the
base of the phone’s screen.
Divert Condition No.
All calls 1
No reply 2
Busy 3
Power off 4
I If the automatic status check is set to on, allow for a short delay whilst the network responds. There may be an
additional charge for this service depending on your network.
47
O
If you decline an incoming call with ‘divert
when busy’ set, the caller will be diverted
to the number selected.
Cancel Condition No.
All calls 1
No reply 2
Busy 3
Power off 4
All 5

Call waiting & holding
The following table shows the key strokes necessary to set up and use the call waiting and holding facility:
Setting up call
waiting
Using call
waiting &
call holding
Check current status
Set call waiting on 1
Set call waiting off 2
Put a single call on hold
Make call on hold active
Swap the active call for a call on hold
Answer a new call and place the active call on hold
Answer a new call with a call on hold
Reject a new call during an active call or with a call on hold
Speak to the call on hold before answering a new call
Terminate an active call and make a call on hold active
MENU
MENU
MENU
MENU
MENU
MENU
811
1
1
2
3
4
48

INTENTIONALLY BLANK
49

Messages & voice mail
The facilities outlined in this section enable you to send and receive Short Messages (SMS) if your network supports this.
Short messages overview 51
Viewing messages 1 1 52
MENU
Edit/send menu 52
Creating a short message 1 2 53
Message dictionary 1 3 54
MENU
MENU
Sending/saving short messages 53
Message options 1 4 55
Area messages (cell broadcast) 1 1 5 57
Voice mail 9 59
MENU
MENU
MENU
50

Short messages overview
Your phone is capable of sending and receiving short text messages. The short message service (SMS) facilities provided by your phone are as follows:
Flash messages
Flash messages, or ‘on screen’ messages, can contain up to 160 text characters and are displayed on your phone’s screen immediately they
are received. If a flash message contains a phone number, the number can be called or stored as if you had keyed it in yourself. Your phone
will store up to 3 of these flash messages in temporary memory and these can be viewed via the menu system (see below). If a flash message
is received whilst you are viewing another flash message from the menu, the flash message will not be stored in your phone’s memory until
your phone is in the standby or in-call state.
Standard messages
Your phone can send and receive standard messages, each containing 160 text characters. The phone can store up to 255 received messages
on your SIM card. You can choose to overwrite messages that have been read when the SIM is full or set your phone to automatically send a
message to the service centre that your SIM memory is full. When the service centre has been informed that your SIM is full, it will not send
your phone any further messages until your SIM has some free message space. Your phone will automatically notify the service centre there
is more space and message reception will resume.
When you send a message you can attach a receipt request. This will cause the service centre to send you a message indicating whether your
original message was delivered successfully or not.
Area messages (cell broadcast messages)
These messages are sent by the network to all phones in a certain area and can be viewed in the normal way (see page 57).
Quick view
When your phone receives a standard message, you will be notified by the SMS icon ( ) being displayed. Press to view the message
immediately or press C to return to the standby screen. See Viewing messages on page 52 for more viewing options.
Message dictionary
This facility allows you to create and store phrases (e.g. ‘meet me at’) which can be placed in your outgoing messages. Up to 999 characters
can be stored in the message dictionary. These messages can be entered using the or key during message entry. See Message
dictionary on page 54 for more details.
MENU
The Short Message Service is
I
network dependant.
Only networks can send Flash
I
messages.
Because flash messages are stored in your
O
phone’s temporary memory, they will be
lost when you turn your phone off.
I Although your phone can store up to
255 messages, your SIM card may
limit this to a smaller number.
Options
Your phone’s SMS facilities can be customised to work the way you wish (e.g. Autosave, Autosend, Autodelete, etc.). Details of these options
and how to set them up can be found in Message options on page 55.
51

Viewing messages
* Press 11. Then press the appropriate key to view the required message type (see table right).
*
*
*
MENU
Use the and keys, if necessary, to select the required message.
Use the or key as necessary to scroll through the message.
If the message contains a highlighted phone number, you may press the key to call the number.
If you are viewing a receipted message, the relevant status information will be displayed.
If there is no highlighted phone number in the message, press the key to enter the edit/send menu (see below).
MENU
* When you have finished viewing the messages and you do not wish to proceed to the edit/send message menu, keep pressing
the C key to retrace your steps through preceding menus until you return to the standby screen.
Edit/send menu
To access the functions available in this menu, you must
first select the message type and then the specific message
as follows:
New/read messages
*
To access the Edit/send menu for new/read/area
messages, press 111/2, use the or
key to select the required message then
press .
*
Press the relevant key(s) in the table right.
MENU
Sent/unsent messages
*
To access the Edit/send menu for sent/unsent
messages, press 113/4, use the or
key to select the required message then
press .
*
Press the relevant key(s) in the table right.
MENU
Message types Function Key(s)
Delete the message 1
Call the message originator 2
All message types
Sent/unsent only
Reply to the message 3‡
Edit the message 4‡
Forward the message 6
Resend the message 5
Cancel the message 7 1
Get message receipt status 7 2
Cancel the message’s receipt 7 3 1
Add a receipt to the message 7 3 2
See also: Quick delete on page 56.
$
See also: Quick view on page 51.
$
Type No.
New 1
Read 2
Sent 3
Unsent 4
Area 5
Receipts 6
Status 7
O
If you do not save messages when you
send them, you cannot use the edit/send
menu options.
O
If you wish the network to provide you with
a status report regarding the delivery of the
message, ensure the receipt option is set
to ‘on’ before you send the message (see
page 56).
O
The reply facility uses the phone number of
the person who sent the message.
‡ Key in or edit the message as appropriate
then follow the send or save procedure
(see page 53).
52

Creating a short message
To create a short message, proceed as follows:
MENU
Press 12. The message entry screen will be displayed.
*
Enter your message (up to 160 characters) either using the procedure detailed on page 37 or use the dictionary by entering the
*
first letter of a previously created word or phrase and then pressing the or key to select it from the message
dictionary (see page 54 for details of how to use the dictionary).
When you have created your message, press the key. The send or save procedure should now be followed (see below).
*
MENU
Sending/saving short messages
This process is entered from the create option (see above) or the edit/send menu (see page 52). To send a short message, proceed as
follows:
* With the send message menu displayed, press 1 (Yes) to just send or send and save your message. Press 2 (No) to save your
message. Press C to discard your message without saving it.
Send or send and save a message
If you have not set up the SMS centre phone number when you try to send a message, SMS centre will be displayed:
*
Enter the SMS centre number or press the key to select it from your phonebook. Press the key. If you are sending a
created or edited message, you will be prompted to enter the phone number of the person you are sending the message to.
*
Enter the relevant number or press the key to select it from your phonebook. Press the key. Your phone will
attempt to send the message and inform you if it was successful. You will be prompted to save the message (only if the
Autosave option is set to ‘prompt’ - see Message options on page 55).
*
Press 1 to save the message or 2 to discard it. If you are replying to a message, your phone will attempt to send the reply and
inform you if it was successful. You will be prompted to save the message.
*
Press 1 to save the message or 2 to discard it.
Save or discard a message
If you do not wish to send the message or reply at the present time the message will be saved automatically (providing space is available)
when selecting No to the send prompt. Press C to discard the message.
53
Whilst creating a short message, a counter
O
is displayed at the base of the display
showing the number of characters
remaining out of the 160 allowed per
message.
You can store frequently used words and
O
phrases in your dictionary to save time
when writing messages (see page 54).
If you receive a call while you are creating
O
a message, the message will saved
automatically for you to complete later.
O If there is no space left in your phone’s
memory to store the message, you will
either be prompted to overwrite an existing
message or the edited message will be
lost (see page 56 for details).
O
If a receipt has been requested, the
message will be saved automatically.
O
If the message is not sent, it will be stored
automatically (unless the C key is
pressed).
O
Messages will only be saved if the
Autosave option (see page 56) is set to
‘yes’ or ‘prompt’ and you subsequently
select ‘yes’.

Message dictionary
The dictionary facility allows you to create and store words or phrases that you regularly use in short messages. This will drastically cut down
the time it takes to enter message text. The dictionary allows you to store up to 100 words and phrases with a total of 999 characters.
To enter words or phrases from the dictionary into a short message, see Creating a short message on page 53. To add, delete, edit words and
phrases in the dictionary, or perform a status check to see how much free space there is left in the dictionary, proceed as follows:
Adding words and phrases
MENU
Press 13then .
*
Press 1 to add a new message. The enter text screen will be displayed.
*
Key in the required text and press to confirm.
*
Either key in another new dictionary entry or press C to return to the dictionary menu.
*
Deleting words and phrases
* Press 13, use the or key to select the entry you wish to delete then press 2. The entry will be deleted
Editing words and phrases
* Press 13, use the or key to select the entry you wish to edit then press 3. The enter text screen will
*
Status
MENU MENU
and you will be returned to the dictionary menu.
MENU MENU
be displayed.
Edit the text as required and press . The edited entry will be saved and you will be returned to viewing the directory.
*
*
MENU
Press 13then press 4. The dictionary status screen will be displayed informing you of how many entries there
are, how many entries you can still make and used and free memory.
Press to return to the dictionary menu.
54

Message options
The following facilities can be accessed from the message options menu:
Set up the SMS centre number
l
Define the default message type
l
Define the period a message is held by your network
l
Define whether read messages are kept or automatically overwritten when your phone’s memory is full
l
Define whether or not a receipt status report is requested for all messages sent
l
Quick delete on/off
l
Autosend on/off
l
Autosave on/off/prompt
l
Autodelete on/off/prompt
l
Reply requested on/off/prompt
l
SMS centre number
To set up your SMS centre’s number, proceed as follows:
* Press 141. The SMS centre number screen will be displayed.
MENU
* Enter the relevant number and press the key.
Message type
To set up the default message type, proceed as follows:
*
*
Valid for
To set the time your messages will be held by your network, proceed as follows:
*
*
MENU
Press 142. The message type selection screen will be displayed.
Select the required type by pressing the appropriate number (see table right).
MENU
Press 143. The valid for menu will be displayed.
Select the required time scale by pressing the appropriate number (see table right). After any selection you will be prompted to
enter a figure between the range displayed.
When you have completed any of the
O
option menu functions, you will be
returned to the option menu. Press C once
to return to the message menu or twice to
return to the standby screen.
Type No.
Text 1
Fax 2
E-mail 3
X400 4
Voice 5
ERMES 6
Nat paging 7
Other 8
Time No.
Mins 1
Hours 2
Days 3
Weeks 4
*
Key in the required figure and press the key.
55

Read messages
To select whether to keep or automatically overwrite read messages when your phone’s memory is full, proceed as follows:
MENU
Press 144. The keep/overwrite menu will be displayed.
*
Press 1 to keep read messages or 2 to overwrite them automatically.
*
Receipt
To select whether or not a receipt status report request is attached to all messages sent, proceed as follows:
MENU
Press 145. The receipt on/off menu will be displayed.
*
* Press 1 to turn status report requests on or 2 to turn them off.
Quick Delete
Quick delete allows you to delete a message whilst viewing it by pressing and holding down the C key for about a second. To turn this facility
on or off, proceed as follows:
* Press 146. The quick delete on/off menu will be displayed.
MENU
* Press 1 to turn quick delete on or 2 to turn it off.
Autosend
Autosend allows you to send a message as soon as you have entered the destination. To turn this facility on or off, proceed as follows:
*
*
MENU
Press 147. The Autosend on/off menu will be displayed.
Press 1 to turn Autosend on or 2 to turn it off.
When read messages are overwritten, it is
O
done with the following priority:
The oldest read message
l
The oldest sent message with no
l
receipt status report requested or
received
The oldest sent message with a read
l
status report
The oldest sent message with an
l
unacknowledged report pending
The oldest unsent message
l
Quick delete will delete the message from
O
memory.
Autosave
Autosave allows you to automatically save a message when you send it. This function can be set to on, off or to prompt you to save the
message or not as you require. To set Autosave to on, off or prompt, proceed as follows:
*
*
MENU
Press 148. The Autosave on/off/prompt menu will be displayed.
Press 1 to turn Autosave on, 2 to turn it off or 3 to set it to prompt.
O
Autosave will save all messages.
56

Autodelete
This function allows you to automatically delete a previously unsent message when it is finally sent. To turn the Autodelete function on, off or
to set it to prompt you to delete the message, proceed as follows:
MENU
Press 149. The Autodelete on/off/prompt menu will be displayed.
*
Press 1 to turn Autodelete on, 2 to turn it off or 3 to set it to prompt.
*
Reply requested
This function allows you to send a message which when replied to will be at your cost.. To turn the Reply requested function on, off or to set it
to prompt you to pay for the reply, proceed as follows:
MENU
Press 140. The Reply requested on/off/prompt menu will be displayed.
*
Press 1 to turn Reply requested on, 2 to turn it off or 3 to set it to prompt.
*
Area messages
The following options are available for area messages:
l Viewing area messages (see page 52)
l
Set power save option on or off
l
Display (set your phone to receive area messages or not)
l
Edit area message type list
Set power save option
The power save option will limit the amount of times your phone will look for area messages, this will reduce the power drain on your
batteries. To set the power save option on or off, proceed as follows:
*
Press 1 to turn power save on or 2 to turn it off. A suitable confirmation screen will be shown and the view messages menu will be displayed.
Either make another selection from this menu or press C twice to return to the idle screen.
MENU
Press 153. The power save on/off menu will be displayed.
If you set Reply Requested to On you
I
maybe charged for messages sent to
you.
This function is network dependant
I
and you should consult your network
provider if you have any problems.
57

Displaying area messages
If you do not wish your phone to receive area messages, proceed as follows:
MENU
Press 151. The display on/off menus will be displayed.
*
Press 1 to turn display on or 2 to turn it off. A suitable confirmation screen will be shown and the view messages menu will be
*
displayed. Either make another selection from this menu or press C twice to return to the idle screen.
Edit area message type list
The edit area message type list facility has the following options:
Add a message type
l
Delete a message type
l
Add a message type
To add a message type to the list, proceed as follows:
* Press 152. The first message type and its code in the list will be displayed.
MENU
* Press 1. The message type entry screen will be displayed.
* Enter the message type number and press the key. A suitable confirmation screen will be shown and the area messages
option menu will be displayed. Either make another selection from this menu or press and hold C to return to the idle screen.
Deleting an area message type
To delete an area message type, proceed as follows:
*
*
MENU
Press 152. The first message type and its code in the list will be displayed.
Press the or key to display the code to be deleted and press 2. A suitable confirmation message will be
shown and the area messages option menu will be displayed. Either make another selection from this menu or press and hold
C to return to the idle screen.
MENU
When display is set to off, the edit list and
O
power save options will not be available.
For more information regarding the
I
area message types and their codes,
contact your service provider.
58

Voice mail
Your phone supports voice mail, allowing incoming calls to be diverted to the voice mail service provided by your network.
When you are called, your current divert settings will dictate if the call is diverted to your voice mailbox. When you next turn on your phone,
the network will send you a signal informing you that you have voice mail waiting. This will cause the voice mail icon ( ) to be displayed
on your phone. You can then call your voice mail centre and listen to your message(s).
Diverting your incoming calls to voice mail
Divert your call in the normal way (see page 47) but enter your voice mail service centre number as the number to divert to.
Storing/changing your voice mail number(s)
Before you can use the voice mail retrieval menu option you must store your voice mail retrieval number(s). Up to 2 voice mail retrieval
numbers (plus 1 data and 1 fax number) can be stored as follows:
* Press 9. The voice mail number 1 screen will be displayed.
*
*
*
Retrieving your voice mail
To retrieve your voice mail, proceed as follows:
*
*
MENU
If you wish to store voice mail number 2, press the or key.
Press the key, enter the voice mail number and press the key. You will be prompted to allocate a name to this
voice mail number.
Key in the required name and press . A confirmation screen will be displayed and you will be returned to the voice mail
number screen.
Press C to return to the main menu and once more to return to the standby screen.
MENU
Press 9.
If necessary, press the or key to select the required number and then press . You will be connected to your
voice mail centre.
MENU
MENU
The Voice Mail facility is network
I
dependant.
Contact your Service Provider for
I
details of your voice mail number,
and any other options associated with
this facility.
Some networks send a voice mail signal
O
which turns on your message
icon ( ).
You are provided with 2 voice mail
O
numbers in case you use this facility on
more than one network.
O You can also store your voice mail
numbers in your phonebook with names .
This means when you retrieve your voice
mail the stored name will be displayed on
your phone.
O
If your phone is displaying the message
icon ( ) but you have no new
messages, it could mean your network
uses the same icon for messages and
voice mail.
Fast dial access to your voice mail
*
Press and hold the 1 key to access your voice mail (in a GSM network, this will only work if you have a number stored in voice
mail 1 or ADN 1).
59

Voice mail icon control
Not all networks clear the voice mail icon automatically when all mail messages have been retrieved. To avoid the problem of your icon being
left on when you have retrieved your voice mail, you can set your phone to clear the icon when you connect with your voice mail service. If
you regularly collect voice mail and therefore do not need the voice mail icon to be turned on, you can set it to off. To set the icon options,
proceed as follows:
IF YOU WANT TO: Have the network clear the voice mail icon
*
IF YOU WANT TO: Have the voice mail icon cleared on connection to the voice mail service
*
IF YOU WANT TO: Turn the voice mail icon off permanently
*
IF YOU WANT TO: Allow the voice mail icon to be turned on when there is voice mail to retrieve
* Press 8911.
MENU
Press 8921.
MENU
Press 8922.
MENU
Press 8912.
MENU
If you turn the voice mail icon off
O
permanently it will not be turned on when
you have voice mail waiting.
60

12/24 hour set 17
A
Accepting a call 5
ADN 27
Advice of Charge (AoC) 23
Alarm function 18
Alarm off 18
Alarm on 18
Answer key 20
Answered & Unanswered calls - viewing/calling 29
AoC call limit 24
AoC no limit 24
AoC set currency 24
Area message display 58
Area message type list editing 58
Area messages 57
Area messages (cell broadcast messages) 51
Autoanswer 20
Autodelete 57
Auto key lock function 3
Autoredial 21
Autosave 56
Autosend 56
B
Barring calls 43
Barring password change 44
Basic calls & phone use 4
Battery care 12
Battery changing 13
Battery charging 13
Battery check 13
Battery low alarm 13
C
Call barring 43
Call barring password change 44
Call list clearing 30
Call timer 21
Call waiting & holding 48
Cell broadcast messages 51,57
Cellphone system structure ii
Clock set 17
Clock/alarm set 17
Correcting mistakes 6
Currency setting 24
D
Dial lock 42
Directory status 34
Display information 2
Diverting calls 47
DTMF tones 20
E
Earpiece volume 7
Edit/send menu 52
Emergency calls 7
Ending calls 6
English language set-up 3
F
Fast dial access to your voice mail 59
Fastdial setting 34
Fastdialling 31
Fastkey selection 15
FDN 27
FDN setting 35
Feature selection 14
Flash messages 51
Flip activation 3
Flip options 3
G
Getting Started 1
Greeting message 24
I
International dialling codes 9
K
Key lock 41
L
Language setting 24
Laptop 11
Last number redial 7
LCD alphanumeric display 2
LCD Icons 2
M
Making basic calls 6
Menu selection 15
Message dictionary 54
Message options 55
Message viewing 52
Mode selection & settings 9
Mode setting 8
Muting the microphone 8
N
Network connection 5
Network selection 10
INDEX
One touch dial setting 35
One touch dialling 31
Own phone number deletion 38
Own phone number display 8
Own phone number editing 38
Own phone number entry 37
Own phone number sending 8
Own phone number viewing 38
P
Phone number editing 39
PIN 1 code (details) 41
PIN 1 code (overview) 2
PIN 2 code 41
Power save option 57
Preparing the phone 1
Q
Quick Delete 56
Quick view 51
R
Receiving calls 5
Redial from the viewing list 29
Redial last number 7
Redial numbers - viewing/calling 28
Rejecting a call 5
Reply requested 57
Ring style allocation 34
Ringer style 19
Ringer volume 7,19
Roaming 10
S
Scratchpad number 27
SDN 27
Security 40
Security codes 41
Security codes changing 42
Short message creation 53
Short message sending/saving 53
Short messages overview 51
Show timer (AoC) 23
Show timer (call timer) 22
Silent mode 19
Silent mode & vibration alert 20
SIM card 1
SIM insertion 1
SIM lock 43
SMS centre number 55
Standard messages 51
Standby time 12
Start-up 2
Stored number altering 32
Stored number calling 31
Stored number deletion 32
Stored numbers 7
Storing & retrieving numbers 26
Storing numbers & names (ADN & FDN) 30
Swap/move phone numbers 33
Switching the phone off 2
Switching the phone on 2
T
Talk time 12
Telephone directories (phonebooks) 27
Text entry 37
Tone sending 20
U
Unsuccessful calls 6
User guide conventions ii
V
Vibration alert 19
View calls (AoC) 23
View calls (call timer) 21
Voice mail 59
Voice mail icon control 60

DB4000 UK
 Loading...