


Read Me First: Unpacking
Express5800/320Fd System Cabinets
NEC Corporation of America
456-01741-000

Notice
The information contained in this document is subject to change without notice.
UNLESS EXPRESSLY SET FORTH IN A WRITTEN AGREEMENT SIGNED BY
AN AUTHORIZED REPRESENTATIVE OF NEC, NEC MAKES NO WARRANTY
OR REPRESENTATION OF ANY KIND WITH RESPECT TO THE INFORMATION
CONTAINED HEREIN, INCLUDING WARRANTY OF MERCHANTABILITY AND
FITNESS FOR A PURPOSE. NEC assumes no responsibility or obligation of any
kind for any errors contained herein or in connection with the furnishing,
performance, or use of this document.
Software described in NEC (a) is the property of NEC and/or its licensees, (b) is
furnished only under license, and (c) may be copied or used only as expressly
permitted under the terms of the license.
NEC documentation describes all supported features of the user interfaces and the
application programming interfaces (API) developed by NEC and/or its licensees.
Any undocumented features of these interfaces are intended solely for use by NEC
personnel and are subject to change without warning.
This document is protected by copyright. All rights are reserved. No part of this
document may be copied, reproduced, or translated, either mechanically or
electronically, without the prior written consent of NEC Corporation of America.
The NEC Corporation of America logo, Express5800/320F
Express5800/320Fd logo, are trademar
ActiveServ
other trademarks and trade names are the pr
ice Network is a trademark of Stratus Technologies Bermuda, Ltd. All
ks of NEC Corporation of America.
operty of their respective owners.
d, and the
Manual Name: Read Me First: Unpacking Express5800/320Fd System Cabinets
Part Number: 465-01741-000
Revision Number: 0
Publication Date: July 2008
NEC Corpor
10850 Gold Center Drive, Suite 200
Rancho Cordova, CA 95670
© 2007NEC Corporation of America. All rights reserved.
ation of America

Contents
Introduction 1
Packaged Cabinet 1
Before Unpacking the Cabinet 3
Moving the Cabinet to the Installation Site 6
Unpacking and Checking the Cabinet 7
Tools Needed to Unpack the Cabinet 8
Removing the Packing Materials 8
Removing the Cabinet from the Pallet 15
Checking the Cabinet and Systems 17
Verifying the Express5800/320F
Stabilizing the Systems 19
Disposing of Shippin
What Happens Next? 20
System Documentation 20
g Materials 20
d Serial Number 18
-iii-

-iv-

Introduction
Read Me First: Unpacking Express5800/320Fd Cabinets
describes how to move cabinets that contain these systems to an
installation site and how to unpack them.
Warnings, cautions, and notes in this document convey the
following special information:
WARNING
!
A warning indicates a situation where failure
to take or avoid a specified action could cause
bodily harm or loss of life.
CAUTION
!
A caution indicates a situation where failure to
take or avoid a specified action could damage a
hardware device, program, system, or data.
NOTE
A note provides important information concerning
the operation of your system.
Packaged Cabinet
Figure 1 shows a shipping container for a 38U cabinet that
contains one or more systems and optional components. (“U,” for
unit, equals 1.75 inches (in.), or 4.45 centimeters (cm).)
-1-
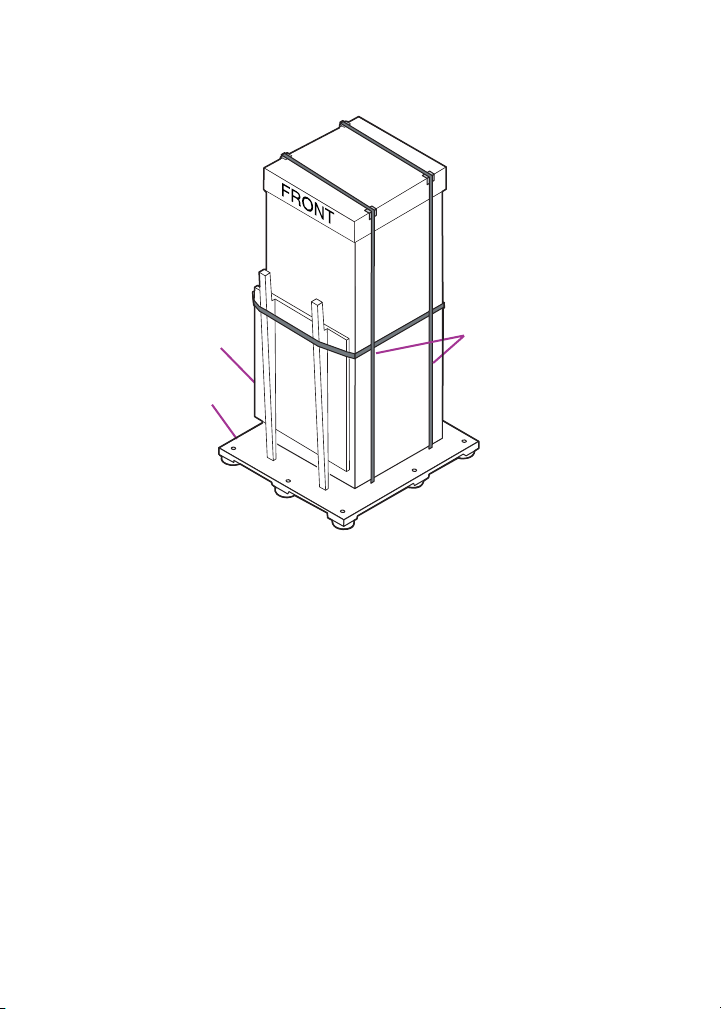
Figure 1. Cabinet Packaged for Shipping
Tie-down
Ramp
Pallet
straps
hsys032
The cardboard shipping container is secured to a shipping pallet
by exterior shipping straps. (Inside the shipping container, interior
shipping straps secure the cabinet to the pallet.) A ramp for rolling
the cabinet off the pallet is attached to one side of the shipping
container, at the rear of the cabinet. Labels on the cardboard cap
indicate the front and rear of the cabinet.
-2-

Before Unpacking the Cabinet
1. Check the packing list to verify that you have received the
correct shipment.
2. Verify that the Tip-N-Tell and Shockwatch handling indicators
on the outside of the shipping container have not been
activated.
CAUTION
!
If you received the wrong shipment or a handling
indicator has been activated, do not proceed
with the unpacking. Contact the vendor from
which you purchased your system and the
shipping carrier immediately.
3. Verify that the area through which you must move the cabinet
has adequate clearance, as the following figures indicate:
• Figure 2 shows the dimensions of a packaged 38U
cabinet.
• Figure 3 shows the dimensions of a packaged 24U
cabinet.
• Figure 4 shows the clearances required at the installation
site.
Include the height of the pallet jack when you calculate the
overall cabinet height.
-3-
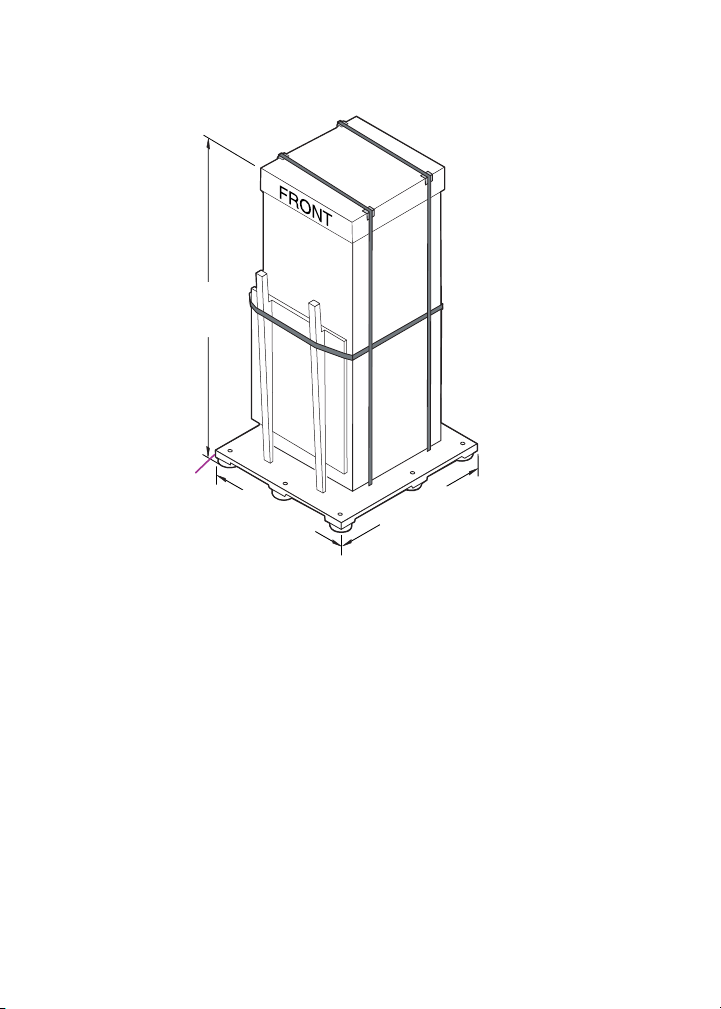
Figure 2. Dimensions of a Packaged 38U Cabinet
80 in.
(2m)
5 in.
(12.7 cm)
41 in.
(104.14 cm)
38U Cabinet
53 in.
(134.62 cm)
hsys033
-4-

Figure 3. Dimensions of a Packaged 24U Cabinet
56.5 in.
(1.435m)
24U Cabinet
5 in.
(12.7 cm)
41 in.
(104.14 cm)
53 in.
(134.62 cm)
Figure 4. Clearances Required at the Installation Site
Pallet Ramp
42 in.
(107 cm)
Unload From
This End
150 in.
(381 cm)
Cabinet
on Pallet
hsys034
42 in.
(107 cm)
42 in.
(107 cm)
-5-

If the corridor and door dimensions are large enough to
accommodate the unpacked cabinet still tied to its pallet, use a
pallet jack to move it from the delivery site to the installation site,
as described in “Moving the Cabinet to the Installation Site” on
page 6.
If the corridor and door dimensions are too small to accommodate
the unpacked cabinet still tied to its pallet, unpack the cabinet and
unload it from the pallet before you move it to the installation site.
In this case, use the pallet jack to move the unpacked cabinet as
close to the installation site as possible. Then, unpack the cabinet,
remove it from its pallet, and roll it carefully on its casters to the
installation site.
Moving the Cabinet to the Installation Site
WARNING
!
To avoid personal injury or damage to the
systems or cabinet, two persons are required
to move, unpack, and install a cabinet that
contains Express5800/320
ause o
Bec
in cabinets, consider using professional
movers to deliver and move the packaged
units to the installation site.
f the size and weight of the systems
Fd systems.
CAUTION
!
To prevent or minimize condensation on the
systems’ internal and external surfaces, avoid
exposing the systems to extreme temperature or
humidity changes when moving them to the
installation site. If the systems have been
exposed to extreme temperature or humidity
conditions during transit, or if condensation is
-6-

present, see the section “Stabilizing the Systems”
on page 19 for stabilization guidelines.
When shipped, the system cabinet is tied to the pallet beneath it.
The pallet has a clearance for a pallet jack to move the unit. When
moving a system cabinet, follow these guidelines:
1. Verify that the unpacked cabinet is still secured to the pallet.
2. Use a pallet jack to move the cabinet on its pallet to the
installation site.
CAUTION
!
Use a pallet jack to move the packaged cabinet,
not a forklift. Using a forklift could damage the
cabinet or a system. Use the pallet jack at the
front or rear of the cabinet.
3. Position the cabinet pallet so that it has the clearances shown
in Figure 4.
Unpacking and Checking the Cabinet
Unless you have a service agreement that includes installation of
the system, you need to unpack the cabinet.
To unpack the cabinet
• Make sure you have the correct tools.
• Remove the packing materials.
• Check the cabinet and system.
• Verify the system serial numbers.
• Remove the cabinet from its pallet.
-7-

Tools Needed to Unpack the Cabinet
Use the following tools to unpack the cabinet:
• Metal shears to cut pallet straps
• Pair of scissors or utility knife
• One 3/8-inch drive ratchet with a 9/16-inch socket
Removing the Packing Materials
WARNING
!
To avoid personal injury or damage to the
systems or cabinet, two persons are required
to perform the following procedures.
1. Orient the cabinet package so that the package and the ramp
have, as a minimum, the clearance shown in Figure 4. Also,
verify that you have enough clearance above the cabinet to
remove the top cardboard cap.
2. With one person holding the ramp in place, use the metal
shears to cut the exterior shipping straps. To avoid injury while
cutting each strap, hold the strap firmly with one hand as you
stand away from it. See Figure 5.
WARNING
!
The shipping straps can snap with
considerable force when they are cut. To avoid
eye or skin injuries, use caution when cutting
the shipping straps.
-8-

Figure 5. Cutting the Exterior Shipping Straps
hsys035
3. Remove the ramp. The ramp is in two pieces that are held
together by a bolt. Unbolt the two pieces. Behind the ramp is
an accessory box, which contains various components and
documentation. Remove the box and set it aside for later use.
4. Construct the ramp by inserting the bevel in the smaller ramp
piece into the larger ramp piece. Set the ramp aside to use
when you remove the cabinet from the pallet.
5. Remove the cardboard pieces of packing material
surrounding the cabinet (see Figure 6). These pieces include
two C-fold sleeves around the sides of the cabinet and a cap
at the top.
-9-
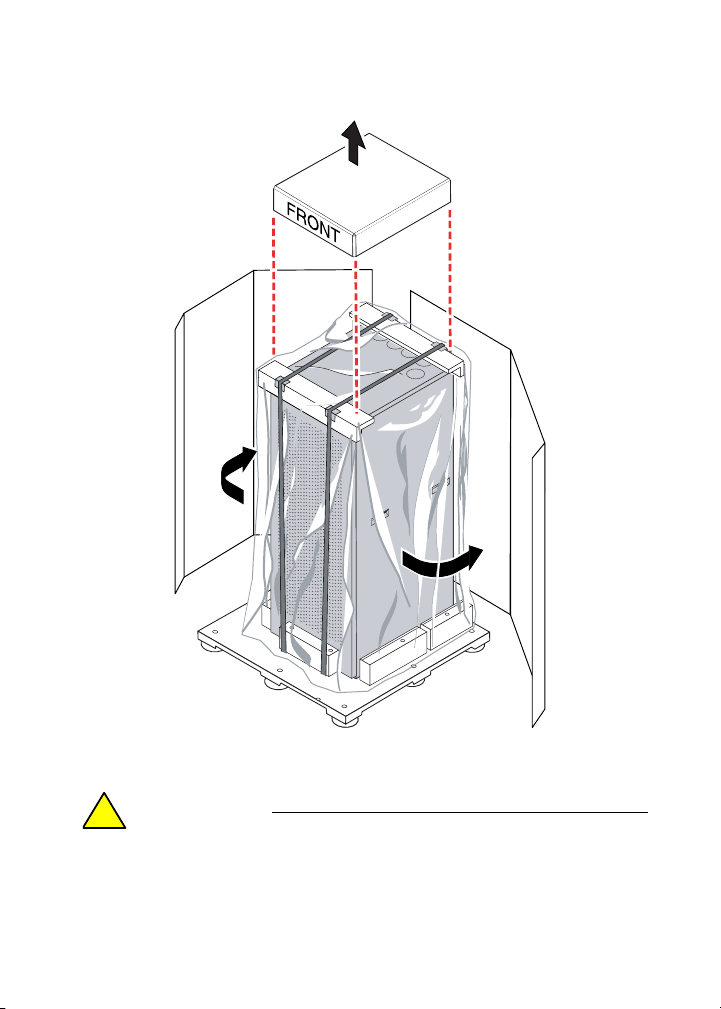
Figure 6. Removing the Packing Material
hsys036
6. Remove the plastic wrap encasing the cabinet.
CAUTION
!
If condensation exists inside the plastic wrap, you
must provide a stabilization period for the
systems. “Stabilizing the Systems” on page 19
-10-

provides complete information about the
stabilization process.
7. Use the strap buckles to loosen the interior shipping straps
that secure the cabinet to the pallet. See Figure 7.
Figure 7. Removing the Interior Shipping Straps
hsys037
8. Remove the two fiber protective sleeves at the top-front and
top-rear of the cabinet.
9. Loosen, but do not remove, the bolts that secure the
wooden-restraint blocks to the pallet at the bottom sides of the
cabinet. See Figure 8. (You do not need to loosen the bolts of
the wooden-restraint blocks at the bottom rear of the cabinet.)
To loosen the bolts, use the 9/16-inch socket wrench. You may
need to hold the nut underneath the pallet that secures the
bolt.
-11-

Figure 8. Wooden-Restraint Blocks
hsys038
10. Loosen and remove the bolts that secure the wooden-restraint
block at the front door of the cabinet. Then, remove the block.
11. Locate the lever bar. Insert it in the center slot of one of the
sides. See Figure 9.
-12-

Figure 9. Inserting the Lever Bar
hsys039
12. With the assistance of another person, tilt the cabinet from
one side. As one person stands to brace the cabinet near the
top, a second person kneels on the floor and uses both arms
to push down on the lever bar, forcing the cabinet to tilt. See
Figure 10.
-13-

Figure 10. Tilting the Cabinet
msys101
13. After the cabinet is tilted, the person who has been standing
must kneel on the floor to slide the wooden restraint blocks
away from the cabinet. See Figure 11.
-14-

Figure 11. Sliding Back the Wooden Restraint Blocks
msys102
14. Move the lever bar to the opposite side of the cabinet. Repeat
the process of tilting the cabinet and sliding back the two
wooden restraint blocks on the opposite side of the cabinet.
Removing the Cabinet from the Pallet
1. Position the pallet ramp under the pallet, at the rear of the
cabinet (see Figure 12). Verify that it is secure.
-15-

Figure 12. Position the Pallet Ramp
msys105
2. With the help of another person, slowly and carefully roll the
cabinet down the ramp, with one person on each side of the
cabinet, not in the front or back. See Figure 13. Each person
must hold the upper portion of the cabinet with both hands.
WARNING
!
The cabinet is top heavy. Use extreme caution
when rolling it down the ramp.
-16-

Figure 13. Moving the Cabinet Down the Pallet Ramp
msys104
3. Check the cabinet and systems for damage, as the next
section describes.
Checking the Cabinet and Systems
Check the cabinet, systems, and optional components for
damage:
1. Open the rear door of the cabinet. From the bottom of the
cabinet, remove and discard the desiccant bags.
2. Check the cabinet and systems for damage. Verify that the
cabinets and panels have no dents, scratches, or scrapes.
If you notice damage, contact the vendor from which you
purchased your systems. If you purchased your systems from
NEC Corporation of America, contact the NEC Technical
Support.
-17-

Verifying the Express5800/320Fd Serial Number
Find the equipment label to check the Express5800/320Fd serial
number. To find the equipment label, open the rear door of the
cabinet. The equipment label is attached to the rear of each
system.
Check that the Express5800/320Fd serial number (not the
Sol
ect
®
ron
serial number) on the equipment label matches the
Express5800/320Fd serial number on the packing list. If the
numbers are not identical, contact NEC Technical Support before
continuing to unpack the cabinet.
-18-

Stabilizing the Systems
If temperature and humidity changes have been extreme during
transit, the cabinet and systems might develop condensation.
Therefore, before you install and power on the systems, you must
inspect them and the cabinet for condensation and, if necessary,
stabilize the systems. To stabilize the systems, let the cabinet
stand, unpacked and without its plastic wrap, in the open air of an
office environment.
1. Inspect each cabinet and system for condensation. Use the
guidelines in Ta b le 1 to determine if a system requires a
stabilization period before you install it and power it on.
Table 1. Stabilization Guidelines
Condition Stabilization Period
Desiccant is present.
No condensation is on the plastic bag or system
surfaces.
Desiccant is present.
Condensation is on the plastic bag or on the
cabinet or system surfaces.
Desiccant and plastic bag are missing.
Condensation is on the cabinet or system
surfaces.
None
4 hours
8 hours
2. After the stabilization period, if you still notice signs of
condensation inside or outside the cabinet, allow an additional
stabilization period of two hours. Repeat the two-hour period,
if necessary, until there are no signs of condensation. Then,
continue to the next step.
3. Remove the desiccant bags and the cardboard tray in which
they were shipped, if these items are still present.
-19-

4. Continue the installation, and continue to inspect for signs of
condensation. If condensation appears, allow additional
stabilization periods until there are no signs of condensation.
CAUTION
!
Before you power on the systems, verify that the
installation site environment meets the
requirements specified in the
Express5800/320Fd: Site Planning Guide.
Disposing of Shipping Materials
The shipping materials contain no hazardous materials. Dispose
of the shipping materials according to applicable procedures or
local regulations. Stratus recommends, however, that you retain
one or two undamaged containers and their shipping materials in
case you need to repack the cabinet for later shipment.
What Happens Next?
To install a system, see the Express5800/320Fd: Installation
Guide.
System Documentation
The Express5800/320Fd Help and Manuals are found on the
ExpressBuilder CD shipped with your system. You can
view the documents in the Help system or open them in PDF
format for viewing or printing.
-20-

To gain access to the documents on the World Wide Web, point
your browser to:
http://support.necam.com/servers/
Getting Help
If you have a technical question about
Express5800/320Fd hardware or software, try these
online resources first:
• Online support from NEC Technical Support. Yo u
can find the latest technical information about an
Express5800/320Fd through online product support
at the NEC Technical Support Web site:
http://support.necam.com/servers/ft
• Online product support for Microsoft
®
products.
Your primary source for support is the computer
manufacturer who provided your software, or an
authorized Microsoft Support Provider. You can also
find the latest technical information about Microsoft
®
Windows
and other Microsoft products through
online product support at the Microsoft Help and
Support Web site:
http://support.microsoft.com/
If you are unable to resolve your questions with the help
available at these online sites, and the
Express5800/320
Fd system is covered by a service
agreement, please contact NEC Technical Support
(866-269-1239).
-21-

-22-
 Loading...