


Copyright 2003 by NEC America, Inc. All rights reserved.
NEC is a registered trademark of NEC Corporation.
All other applications, services, or product names are the property of their respective owners.
Manual Part Number: 621-0341
Version 1.1**
**This may include features not available in all NEC 515 phones, or may not include features available in updated phones. Contact NEC Service Support with any questions.
NEC America, Inc. reserves the right to make changes or improvements to any of the products described in this document without prior notice.
All features, specifications, conditions, and actual colors are subject to change without notice.
The availability of particular products may vary by region.
1, 2, 3, 4
This product contains the Internet browser, NetFront version 3.0. Furthermore, this product carries the browser modules developed by ACCESS Co., LTD. and NTT DoCoMo, Inc.
Printed in U.S.A.
THE CONTENTS OF THIS DOCUMENT ARE PROVIDED “AS IS.” EXCEPT AS REQUIRED BY APPLICABLE LAW, NO WARRANTIES OF ANY KIND, EITHER EXPRESSED OR IMPLIED,
INCLUDING, BUT NOT LIMITED TO THE IMPLIED WARRANTY OF MERCHANTABILITY AND FITNESS FOR A PARTICULAR PURPOSE, ARE MADE IN RELATION TO THE ACCURACY
AND RELIABILITY OR CONTENTS OF THIS DOCUMENT. NEC RESERVES THE RIGHT TO REVISE THIS DOCUMENT OR WITHDRAW IT AT ANY TIME WITHOUT PRIOR NOTICE.
WARNING! The power cords of this product contain lead, a chemical known to the State of California to cause birth defects or other reproductive harm. Wash hands after
handling.
_________________
1 Some operations and features are network and subscription dependent and are not available in all areas. Check with your wireless service provider for availability and description
of features.
2 Some of the mobile Internet services have been pre-configured by the service provider.
3 Languages may vary by region.
4 SyncML capability requires purchase of an additional NEC or carrier approved USB cable.

515 1
SAFETY AND PERFORMANCE 9
GETTING STARTED 15
BASIC CALLS AND PHONE USE 20
PERSONALIZING SETTINGS 28
TEXT ENTRY 50
MESSAGING AND VOICE MAIL 56
CLOCK 76
WEB BROWSER 80
PHONEBOOK 92
MY DOWNLOADS 114
CALL RECORDS 122
APPLICATIONS 125
ACCESSORIES 151
FDA INFORMATION 154
WARRANTY 159

Contents
515 1
Wireless System Structure ..........................1
User Guide Conventions ...........................1
Phone Controls ................................2
Display Information ..............................3
Graphic Display Area ...........................3
Status Icons ................................3
Softkey Area ................................3
7 Color LED ................................3
Main Menu ..................................4
Sub-Menu Options ............................5
Menu Shortcut Selection .........................5
Keypad Shortcuts...............................5
Main Phone Features .............................6
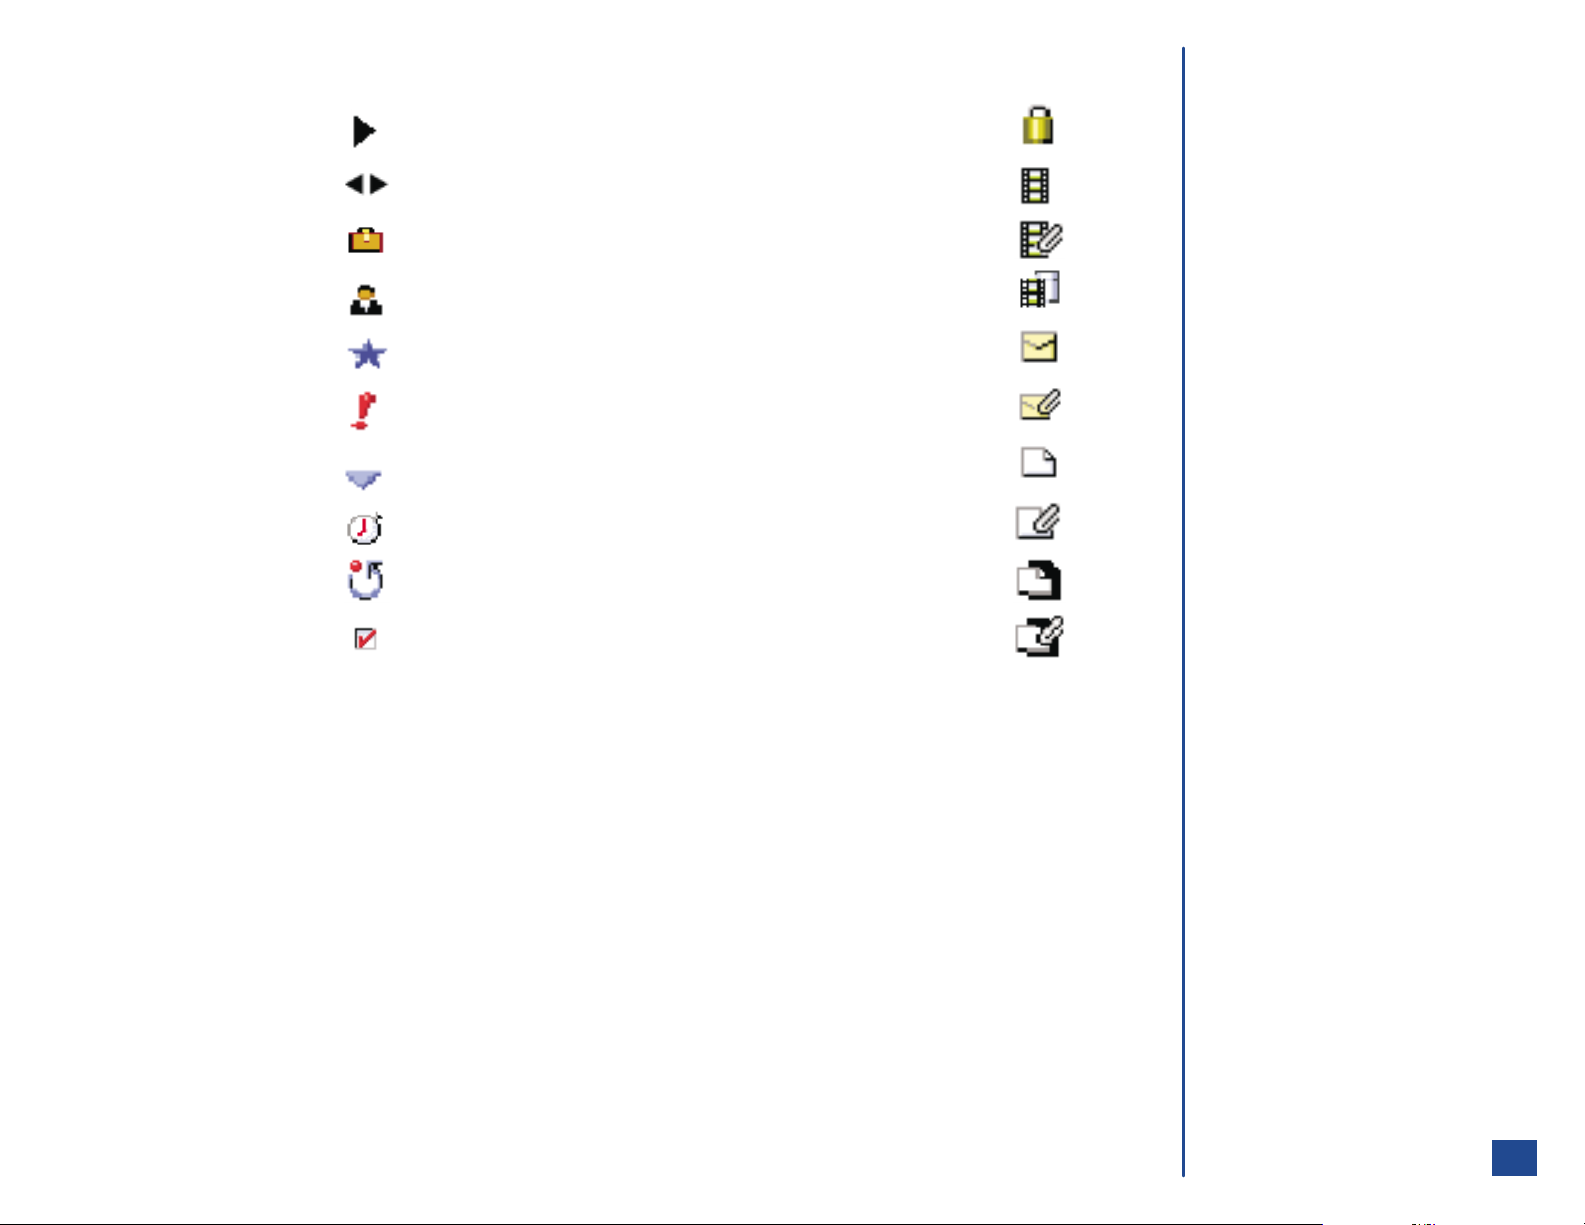
Display Icons .................................7
Status Bar Indicators ...........................7
Dial Screen Icons .............................7
Idle screen Icons .............................7
Line Item Icons ..............................8
Full-size Pop-up Screen Icons ......................8
Alert Pop up Icons.............................8
Safety and Performance 9
User Caution .................................9
Emergency Services .............................9
Safety ....................................10
General Care ...............................10
General Safety ..............................10
Radio Frequency (RF) Signals......................11
Aircraft Safety
Road Safety ...............................11
Electromagnetic Interference ......................12
Blasting Areas ..............................13
Potentially Explosive Atmospheres ...................13
Vehicles Equipped with an Air Bag ...................13
Battery Care and Disposal ........................13
Performance.................................14
Third Party Equipment ..........................14
Service ..................................14
Efficient Use ...............................14
Battery ..................................14
.................................11
Idle and Talk Times ...........................14
Antenna .................................14
Getting Started 15
Service Activation ..............................15
Voice Mail and Text Messaging .......................15
PIN and Security Codes...........................15
SIM Card ..................................16
Inserting a SIM Card ...........................16
Removing a SIM Card ..........................16
Preparing the Battery ............................17
Charging the Battery the First Time ...................17
Checking the Battery...........................17
Low Battery Indication ..........................17
Charging the Battery ...........................18
Changing the Battery ..........................18
Powering-On the Phone...........................19
Turning the Phone On ..........................19
Turning the Phone Off ..........................19
Language Display ..............................19
Frequency Bands ..............................19
Basic Calls and Phone Use 20
Dialing Calls .................................20
Correcting Mistakes ...........................20
Ending Calls .................................20
Receiving Calls ...............................20
Accepting a Call .............................21
Rejecting a Call .............................21
Receiving a Call While in an Application ..................21
Using Features/Application During a Call .................21
Unsuccessful Calls/Auto Redial.......................21
Call Features ................................22
Caller ID .................................22
Returning an Unanswered Phone Call..................22
Last Number Redial ...........................22
Plus (+) Dialing .............................22
Emergency Calls .............................23
Entering a Pause (for DTMF Dialing) ..................23
Speed Dialing ..............................23
Dialing a Number in Message Text ...................24
Volume Controls .............................24
Voice Mail ................................24
Forwarding Calls ..............................24

Call Timer and Call Charger ........................25
Using Call Features During a Call......................25
Placing a Call On Hold..........................25
Call Waiting ...............................25
Mute A Call ................................25
DTMF Tones ...............................26
New Call .................................26
Conference Calls.............................26
Private Conversation ...........................27
Disconnecting a Party ..........................27
Recording a Call .............................27
IR Send/Receive...............................27
Personalizing Settings 28
Phone Settings ...............................28
Volume ...................................28
Set Tones ..................................29
Ring Tune and New Message Tone ...................29
Ring Volume ...............................29
Setting Options..............................29
Answer Options ...............................30
Activate Any Key Answer Option ....................30
Deactivate Any Key Answer Option ...................30
Phone Modes ................................30
Mode Selection .............................30
Default Mode Settings ..........................31
Changing Mode Settings ........................32
Mode Ring Tune .............................32
Mode New Message Tone ........................32
Mode Ring Volume............................32
Mode Backlight .............................33
Mode Settings Options .........................33
ALS .....................................33
Own Number ................................34
Phonebook .................................34
Screen Settings ...............................34
Wallpaper ..................................34
Color Theme ................................35
Contrast ...................................35
Backlight...................................35
Language ..................................36
Auto-hyphenation ..............................36
Display Call Timer ..............................36
Display Call Charge .............................36
Call Settings .................................37
Call Forwarding ...............................37
Creating OFF Profile ...........................37
Adding and Editing Profiles .......................38
Deleting a Profile .............................39
Setting Call Forwarding On .......................39
Setting Call Forwarding Off .......................39
Manual Call Forwarding .........................39
Manually Set Call Forwarding Off ....................40
Check Call Forwarding Status ......................40
Call Waiting .................................40
Setting Call Waiting On/Off .......................40
Checking Status of Call Waiting .....................40
Auto Redial .................................41
Send Own Number (Caller ID) .......................41
Security Settings ..............................41
Changing PINS ...............................41
Changing PIN 1 Code ..........................41
Changing PIN 2 Code ..........................42
Changing Security Code.........................42
Forgot Your Security Code .......................42
Locks ....................................42
Phone Lock ON .............................43
Phone Lock OFF .............................43
Fixed Dialing.................................43
Network Settings ..............................44
Network Search Type ............................44
New Network Search ............................44
SIM List ...................................44
Adding Network to Empty SIM List ...................44
Editing the SIM List ...........................44
Moving a Network ............................45
Adding a Network ............................45
Removing a Network...........................45
Frequency Band...............................45
Other Settings ................................45
Synchronization Settings ..........................46
Remote Server ..............................46
Local Server ...............................46
TTY Settings .................................47

Internet Settings ...............................47
Factory Settings Connection.......................47
User Settings Connection ........................47
Time Out .................................48
Certificates ................................48
Show Versions ...............................48
Reset Settings ................................49
Reset Factory Settings ..........................49
Erase Data ................................49
Text Entry 50
Normal Text (ABC) .............................50
Numbers...................................50
T9 Text Entry ................................51
Symbol Mode ................................51
Text Entry Options Menu ..........................52
Text Color ................................52
Text Format ...............................52
Text Alignment ..............................52
Text Paste ................................53
Text Highlight ..............................53
Text Object ................................54
T9 Text Language ............................55
Text Edit Settings ............................55
Messaging and Voice Mail 56
Accessing Messages ............................56
Message Center Overview .........................56
Message Center Folders ..........................57
Message Center Icons ..........................57
Message Center Options Menu.......................58
Message Settings ..............................59
Email Settings ..............................59
SMS/EMS Settings ............................60
MMS Settings ..............................61
Voice Mail Setting ............................62
Broadcast Settings ............................62
Checking New Messages ..........................63
Receiving and Reading Messages .....................63
Displaying Next/Previous Message ...................64
Phone Number or Email in Message Text .................64
Making a Call to a Phone Number....................64
Adding Email to Blacklist ........................64
Creating SMS or Email Message ....................64
Launch Browser .............................65
Message Folder List Options Menu.....................65
Message View Options Menu ........................66
Creating and Sending Messages ......................67
SMSandEMS..............................67
MMS...................................67
Email Message ..............................69
Attachments .................................70
Adding an Attachment ..........................70
Previewing Attachments .........................70
Deleting Attachments ..........................70
Saving Attachments ...........................70
New Message Options Menu ........................71
Editing Messages ..............................71
Message Memory Maintenance.......................72
Moving Messages to Another Folder ..................72
Moving Messages to SIM ........................72
Deleting a Message ...........................73
Deleting All Messages ..........................74
Deleting Messages Permanently ....................74
Restoring Messages ...........................74
Adding Email to Blacklist ..........................74
Adding to Blacklist ............................74
Editing a Blacklist Email .........................75
Deleting a Blacklist Email ........................75
Clock 76
Show Clock .................................76
Setting Time .................................76
Setting the Time .............................76
Network Time ..............................77
Local Time ................................77
Remote Time ..............................77
Setting the Date ...............................77
Setting the Alarm ..............................78
Setting the Alarm Off ...........................78
Setting Auto On/Off .............................78
Formatting the Date and Time .......................79
Setting Time Zone..............................79
Setting Daylight Savings ..........................79
Web Browser 80
Accessing the Internet ...........................80

Connect to Bookmark ..........................80
Connect to Specific URL .........................81
Connect to Address History URL ....................81
Connect to URL in Saved Page .....................81
Connect to Last Webpage ........................81
Connect to URL in a Message ......................81
mMode Options Menu ...........................82
What Can I Download? ...........................83
Downloading Apps and Games .....................83
Downloading Sounds ..........................83
Downloading Pictures ..........................84
NEC Site...................................85
Bookmarks .................................85
Adding a Bookmark ...........................85
Go to Bookmark .............................85
Bookmark Folder Options Menu.....................86
Bookmark List Options Menu ......................86
Deleting Bookmarks ...........................87
Saved Pages ................................88
Saving a Page ..............................88
Viewing a Saved Page ..........................88
Save Pages Options Menu........................88
Protecting a Saved Page.........................89
Deleting Saved Pages ..........................89
Settings ...................................90
Setting Scroll ...............................90
Setting Load Files ............................90
Setting Tables and Wrap Text ......................90
Setting Cookies .............................91
Check Settings ..............................91
Setting Memory .............................91
Phonebook 92
Phonebook Types..............................92
Number Entry Screens ...........................93
Blank Entry Screen............................93
Number Pre-loaded Entry Screen ....................93
Storing Numbers and Names in Phonebook ................94
Adding a New Name/Number ......................94
Choose Location .............................94
Location Number in Use .........................95
Full Phonebook .............................95
Phone Number Type ............................95
Editing or Personalizing Numbers .....................96
Phonebook Entry Edit ..........................96
Phonebook Field Icons .........................96
Adding/Editing Information .......................96
Allocate a Group .............................97
Allocate a Voice Tag ...........................97
Allocate LED Color ............................98
Allocate a Phonebook Picture ......................99
Allocate a Ring Tune ...........................99
Saving the Changes ...........................99
SIM Edit ..................................100
Accessing the Edit Function ........................100
From “Input more fields?” Decision Screen ..............100
From Phonebook Options Menu ....................100
From Entry Detail Screen ........................100
From Entry Detail Options Menu ....................100
Phonebook Options Menu.........................101
Entry Details Option Menu.........................101
Copying Entries Between Phonebooks ..................102
Memory Availability ...........................103
Copying/Moving a Phonebook Entry ...................103
Within Same Phonebook ........................103
To Another Phonebook .........................104
Overwrite Location ...........................104
Delete a Single Entry ...........................105
From Phonebook ............................105
From Entry Details ...........................105
From Group Entries List ........................105
Delete All Phone Entries ..........................106
Groups ...................................106
Displaying All Groups and Group Entries ...............106
Naming a Group ............................106
Adding/Moving to a Group .......................107
Remove Entry from Group .......................108
Sorting and Recall Stored Numbers....................109
Alphanumeric ..............................109
Location.................................109
Go To Location .............................110
Voice Tag ................................110
Calling Stored Numbers ........................110
Sending an Email ............................111
Sending a Message ..........................111
Phonebook Availability Summary .....................111
Voice Tags .................................112
Displaying Voice Tag List........................112
Playing a Voice Tag...........................112
Deleting Voice Tags ..........................112
Sending IR from Phonebook .......................113

My Downloads 114
Apps and Games .............................114
Run an Application or Game ......................114
Application Settings ..........................115
Software Settings ............................116
Auto Start ................................117
Music ....................................118
Display the Music List Screen .....................118
Selecting and Playing Music ......................118
Using Music Options Menu.......................118
Play Mode................................118
Delete Current .............................119
Delete All ................................119
Edit Name................................119
View Details ...............................119
Pictures ..................................120
Selecting and Displaying an Image ..................120
Using Pictures Options Menu .....................120
Slide Show ...............................120
Delete Current .............................121
Delete All ................................121
Edit Name................................121
View Details ...............................121
Call Records 122
Last Call ..................................122
Total Calls .................................122
Call Logs ..................................122
Calling from a Call Record .......................123
Calling From Call Record Details....................123
Copying Call Record to Phonebook ..................123
Deleting Call Records .........................124
Viewing Call Record Details ......................124
Applications 125
Calculator .................................126
Scheduler .................................127
Viewing Calendars and Daily Events ..................127
Accessing Add New and Edit Screens .................128
Adding/Editing an Event ........................129
Copying an Event............................130
Deleting Events .............................131
Go To Date ...............................132
GoToURL...............................132
Viewing Events .............................132
Viewing Summary ...........................133
IR Sending ...............................133
Scheduler Alert .............................133
To Do List .................................134
Viewing To Do Tasks and Task Details.................134
Accessing To Do Add New and Edit Screens .............135
Adding/Editing a Task .........................136
Deleting Tasks .............................137
Filtering .................................138
Sorting .................................138
Viewing To Do Summary ........................139
IR Sending ...............................139
Changing Task Detail Status ......................139
Notepad ..................................140
Viewing Notes..............................140
Adding and Editing Notes .......................140
Deleting Notes .............................141
Sending as Email ............................142
Sending as SMS/EMS .........................142
Currency Converter ............................143
Setting the Currency Converter Fields .................143
Resetting Currency Converter Fields..................143
Voice Memo ................................144
Accessing Voice Memo.........................144
Adding a Memo.............................144
Labeling a Memo ............................145
Playing Memos .............................145
Deleting Memos ............................145
Synchronization ..............................146
Setup for Synchronization .......................146
Synchronizing..............................146
Synchronization Process ........................147
Full Synchronization ..........................147
Conflicts from Last Synchronization ..................147
Synchronization Errors .........................147
Synchronizing Phonebook Entries ...................149
Synchronizing Scheduler........................149
Synchronizing To Do Task Entries ...................150
IR Receive .................................150
Accessories 151
Authorized Accessories ..........................151
Battery .................................152
AC Adapter and Charger Unit .....................152
Hands-free Headset ..........................152
Vehicle Power Adapter .........................152
USB Connector Cable .........................153
U.S. FDA’s Consumer Update 154

Warranty and Service 159
515 Wireless Phone ............................159
Limited Warranty ............................159
NEC Authorized Accessories .......................161
Limited Warranty ............................161
NEC Customer Service Support......................162
Index 163
CTIA 165
Cellular Telecommunications Industry Association Driver Safety Tips . . 165
515
s
Welcome to the next generation of wireless. Now you can talk anywhere and compute everywhere. Your NEC 515 phone brings together
the best of global GSM mobile connectivity with the best of PC accessibility. From browsing the web, to sharing files during
synchronization with your desktop, everything you need to maximize your time and simplify your life is in the palm of your hand.
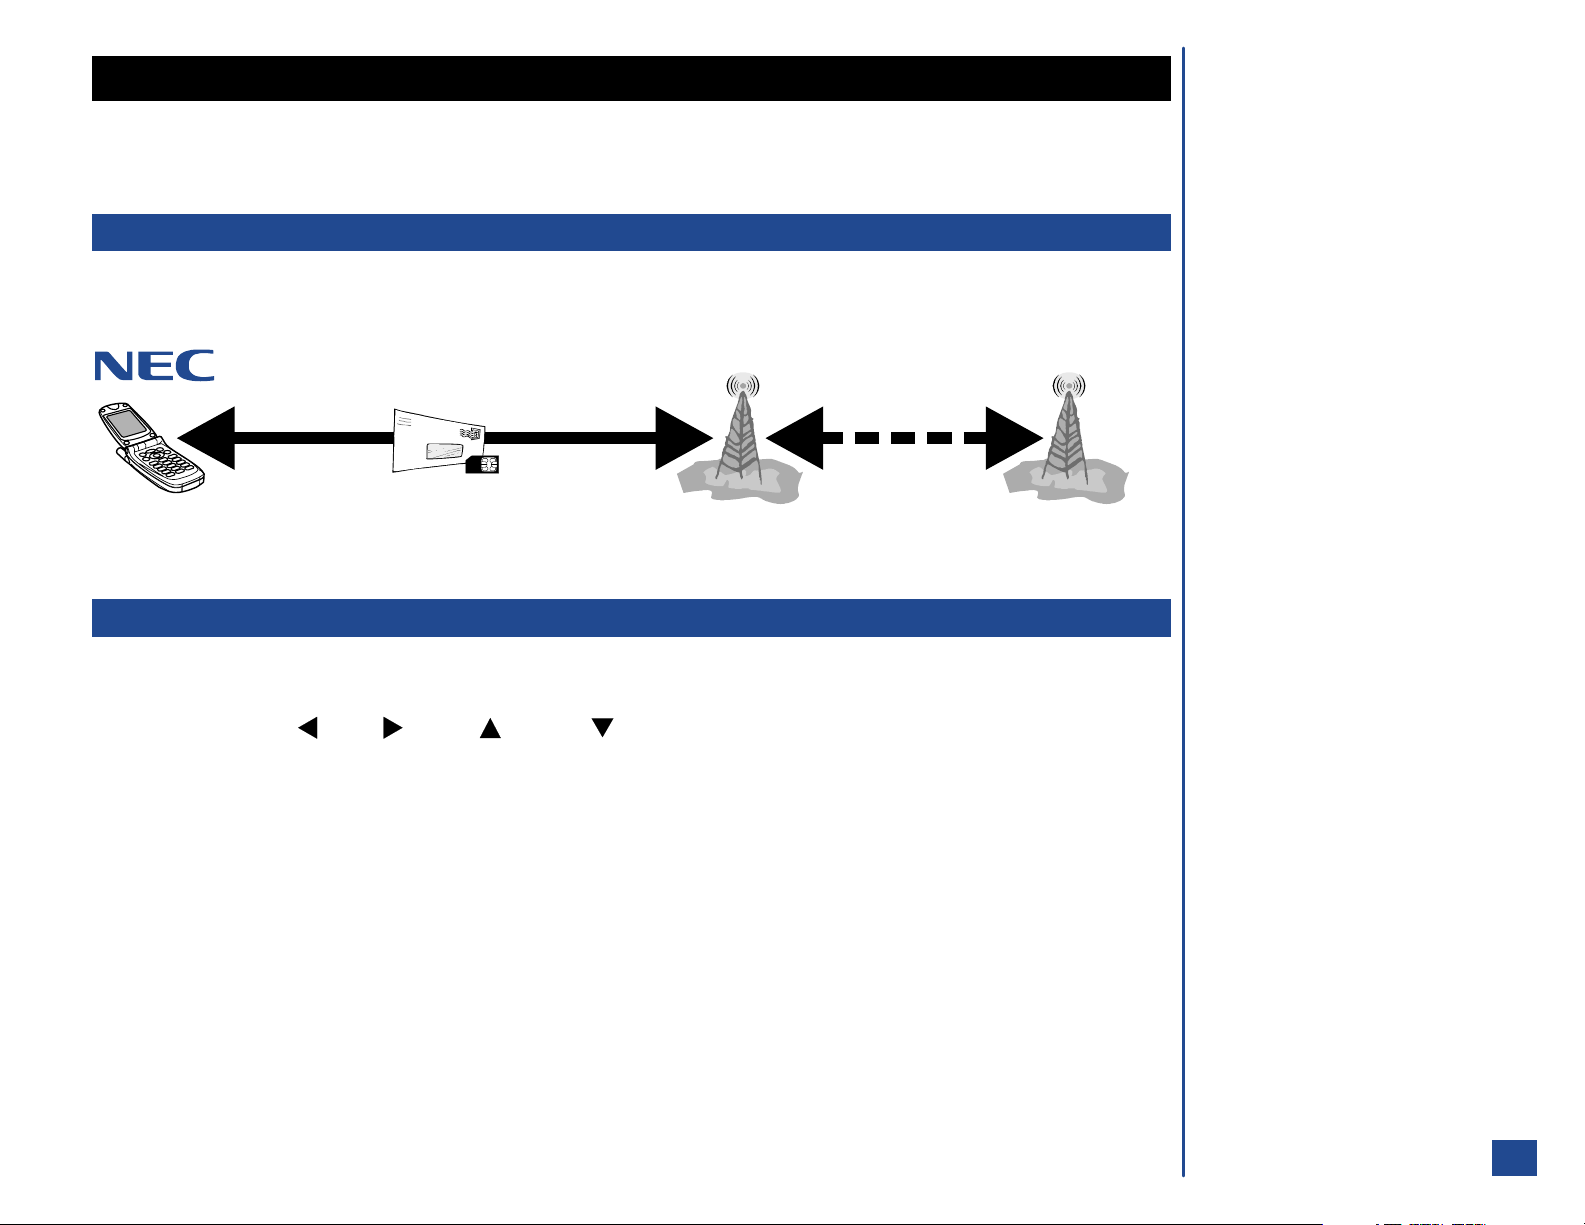
Wireless System Structure
Every time you use your wireless phone, three or four different organizations are involved:
Content Provider
The people that
provide your mMode service
The people that
make your phone
Service
Provider
The people that supply
your SIM card and bills
Network Provider
The people that
transmit your calls
User Guide Conventions
The user guide legends direct your attention to specific information and are identified in the right column.
The instructions for all tasks and phone functions start at the Idle screen (see page 3) unless instructed otherwise.
When one or more of the (Left), (Right), (Up), and (Down) symbols are shown in the user guide, press the
corresponding part of the 4 way navigation key to move the cursor, scroll, cycle, or highlight.
The instruction “press” is pressing a key or button for one second or less.
The instruction “press and HOLD” is pressing and holding a key for two to three seconds.
User Guide Legends:
*
This is a set of paragraphs
containing instructions. Follow the
directions in the sequential order
provided in the user guide.
This type of paragraph contains
L
details of where to find related
information to the topic being
explained.
O
This type of paragraph contains
information worth noting and is
provided in the right column.
I
This type of paragraph contains
important information.
1
Phone Controls
Softkey 1 and Softkey 2 functions change according to the phone’s current use. Softkey 1 function displays on the bottom, left corner of
the graphic display screen. Softkey 2 function displays on the bottom, right corner of the graphic display screen. Softkey 1 is located on
the upper left of the oval navigation keys on the keypad. Softkey 2 is located on the upper right of the oval navigation keys on the
keypad.
When an Options menu is available for the displayed screen, the Options Menu icon displays between the two softkey buttons on
bottom of the graphic display screen. Options Menu key is located on the bottom left of the oval navigation keys.
The Phonebook key is located on the bottom right of the oval navigation keys and is used to display a phonebook or access the web
browser.
The Select key is located in the center of the oval-shaped, navigation button and is used to select highlighted items or applications. It is
also used to save selections and changes.
The navigation key symbols are: (Left), (Right), (Up), and (Down). The navigation keys are located on the outer edge of
the oval shape. Press the corresponding part of the 4 way navigation key to move the cursor, scroll, cycle, or highlight. Navigation keys
are also used as keypad shortcuts to access a specific menu or list. Refer to page 5 for more keypad shortcuts information.
The Send key is used to dial and send calls. The Send key is located above the digit 1 key.
The Clear key is used to remove a character letter in the text entry screen and clear the present screen to return (go back) to the
previous screen. The Clear key is located above the digit 2 ABC key.
The End/On-Off key is used to turn the wireless phone On,
Keypad
turn it Off, terminate a phone call, or end current screen
activity or application to return to the Idle screen.
End/On-Off key is located on the right side of the keypad,
above the digit 3 DEF key.
The user guide icons for specific keys and actions are
identified in the table in the right column.
Softkey 1
Options Menu Key
Send Key
Select Button
Softkey 2
Phonebook &
Browser Key
End/On-Off Key
Icons for specific keys and actions.
Key Name Icon
Softkey 1 Softkey
Softkey 2 Softkey
Options Menu
MENU
Send
Phonebook/Brow
ser
End/On-Off
Select/Save
Left, Right
Up, Down
Clear/Back CLR
1
2
Clear/Back Key
Action Name Icon
Cycle
Select or Save
Select Button
Navigation Keys
2

Display Information
Graphic Display Area
The graphics display area is a 2.2 inch screen in 65,536 colors. The area contains the greeting graphic upon power-up, status icon
graphics, and information when searching for networks and making calls.
The Idle screen shows the current network, vibrate status, mode status, current time and date, and what you have keyed in on the
phone’s keypad. See the Graphic Display Area of the graphic in the right column. (See Flag.)
Press Softkey 1 (Main) to display the phone’s Main Menu with animated icons and text in the graphic display area.
Status Icons
This area contains icons that indicate the battery strength, unread short messages, not accepting call, call forwarding, voice mail, GPRS
attached, connection status, and Network signal strength. See the Status Icons of the graphic in the right column and the graphic below.
Softkey Area
Depending upon the current screen, the area displays applicable text information (e.g., letters available for a key press during text entry)
or context sensitive descriptions of the softkey indicator functions. Softkey 1 and Softkey 2 functions change according to the phone’s
current use. See Softkey Area of the graphic in right column and the graphic in the left column.
7 Color LED
The LED is located on the back of the handset’s flip
cover. The LED glows red when the phone is being
charged. The LED glows blue when receiving a
message or voice mail. The LED colors (green, light
blue, red, yellow, purple, pearl, and blue) can also be
utilized as color identification to assign colors to
different callers (refer to Phonebook contents on page
98).
1 23456 78 910
AT&T Wireless
Idle Screen
Status Bar Indicators
1 Battery Level
2 Message
3 MMS Message
4 Voice Mail
5 Call Forward
6 Lock/Security
7 GPRS Status
8 mMode
9 Line Status
10 Signal Strength
AT&T Wireless
The Idle screen automatically
O
appears after the phone is powered
On, but not in use.
Status Icons
AT&T Wireless
Graphic
Display
Area
Softkey Area
Alarm
Idle Screen Icons
Left to Right
1 TTY ON (See Flag.)
2 JAVA Auto Run Failure
3 Phone Mode
4 Vibrate/Vibrate Silent/Silent
(No Icon In Position Means Off)
Softkey Area Indicators
Left to Right
1 Softkey 1 Indicator
2 Options Menu
3 Softkey 2 Indicator
O
TTY is an abbreviation for
teletypewriter and text
telephony--equipment that employs
interactive text based
communications through the
telephone network.
3
Main Menu
The menu structure begins with the Main Menu icons for top level options. To access a menu option:
Press Softkey 1 to access the Main Menu. Press the option number 1 through 8 or
*
press (Left), (Right), (Up), or (Down) navigation key to highlight the desired menu option with a box frame and
press (Select) to confirm your choice. (See Flags for more information.)
A Main Menu Icon becomes animated
O
when it is highlighted.
1. Settings
4. Web browser
7. Call records
(Sub-menus)
1. Phone settings
2. Screen settings
3. Call settings
4. Security settings
5. Network settings
6. Other settings
7. Reset settings
(Sub-menus)
1. mMode Home
2. Bookmarks
3. Go to webpage
4. Saved pages
5. Last address
6. Settings
(Sub-menus)
1. Last call
2. Missed calls
3. Received calls
4. Dialed calls
5. Total calls
6. Charge info
2. Message center
(Sub-menus)
1. Inbox
2. Drafts
3. Outbox
4. Sent
5. Recycled
6. User 1
7. User 2
8. Voice
5. Phonebook (See Flag.)
Phonebook list
8. Applications
(Sub-menus)
1. Calculator
2. Scheduler
3. To Do list
4. Notepad
5. Currency converter
6. Voice memo
7. Synchronization
8. IR Receive
3.Clock
(Sub-menus)
1. Show clock
2. Set time
3. Set date
4. Set alarm
5. Set auto on/off
6. Set format
7. Set time zone
8. Daylight savings
6. My downloads
(Sub-menus)
1. Apps and Games
2. Music
3. Pictures
The default highlighted selection for
O
the Main Menu is Phonebook. The
phone book type that was used last
is displayed.
O
When an option list is displayed,
press (Up) or (Down)
navigation key to move the highlight
box over the desired option, and
press (Select) to select the
option.
O
The currently selected option on a
sub-menu is marked by a
checkmark if the options are not
numbered. A box frame surrounds
the option number if the options are
numbered.
O
Press CLR (Clear/Back) to return to
the previous screen.
O
Press (End/On-Off) to return to
the Idle screen.
4

Sub-Menu Options
A sub-menu list displays for the selected Main Menu option. The sub-menu options are shown in the table on the previous page.
Press the sub-menu option number or press (Up) or (Down) navigation key to highlight the desired sub-menu option and press
(Select) to confirm your choice.
Menu Shortcut Selection
An alternative ‘shortcut’ method of selection allows you to jump straight to a menu or function without highlighting an icon and scrolling
through the sub-menu options. The selections are made by pressing numbers on the keypad that relate to the displayed menu options.
Shortcut Selection Examples
Use the shortcut selection method to set Any Answer Key feature On or Off as follows:
Press Softkey 1 (Main),1,1,3,and 1. The option is set to any key answer and returns to the previous menu.
*
Use the shortcut selection method to access the calculator function as follows:
Press Softkey 1 (Main),8,and 1 to display the Calculator screen.
*
Keypad Shortcuts
The following single button shortcuts are available from the Idle screen (the screen that automatically appears when the phone is
powered On but not in use). (See Flag.)
Press (Up) navigation key to access the Phone mode menu.
Press (Down) navigation key to access the Voice memo list.
Press and HOLD (Down) navigation key to access the Voice tag list.
Press (Left) navigation key to access the Received call log.
Press (Right) navigation key to access the Missed call log.
MENU
Press (Options Menu) key to access the Options Menu for the current screen.
Press (Phonebook) key to access the Phonebook.
Press and HOLD the (Phonebook) key to access the Web browser.
Press Softkey 1, (located on the upper left hand side of handset) to access the Main Menu.
Press Softkey 2, (located on upper right hand side of handset) to access the Message center..
Press off-hook (Send) key once to access the Dialed call Log.
Press off-hook (Send) key twice to dial the last number called.
Press (End/On-Off) to end
O
current screen activity or application
and return to the Idle screen.
5

Main Phone Features
The GSM GPRS phone can be used almost anywhere in the world with the Quad band (GSM 850/1900 and GSM 900/1800 bands).
Your phone has the following features:
l
2 Games (user may delete)
l
2 Softkeys
l
7-Color LED
l
20 Voice memos (20 second recording time per memo)
l
10 Voice Recognition Tags
l
800 mAh Lithium-ion Battery
l
Alternate Line Service (ALS) compatibility*
l
Calculator
l
Color ID alert and vibrate mode
l
Currency converter
l
Date, Time & Alarm
l
Download graphics, phonebook pictures and ring tunes
l
Email
l
Internet Enabled
l
IR/business card transfer
l
JAVA
l
Large 2.2 inch, 216 by 162 pixels with 65,536 color display
screen
l
Messaging (EMS/MMS/SMS)
l
Enhanced Messaging Service (EMS)
l
Multi-media Messaging Service (MMS)
l
Short Messaging Service (SMS)
l
Multi-party call capability (conference calling)
l
One-button Internet access (mMode)
l
Organize your life with SyncML functionality (synchronizes
Phonebook, To Do’s, and Scheduler/Calendar)
l
Contacts
l
Scheduler/Calendar events
l
To Do tasks
l
Personalize your phone with down-loadable content
l
40-layer polyphonic ring tunes
l
Wallpapers
l
Picture caller-id (10)
l
Phonebook (can store up to 500 records)
l
SIM memory phonebook (store up to 250 records,
depending on SIM capacity)
l
T9™ Text Input
l
User mode settings (Normal, Meeting, Pocket and Car)
l
Voice mail
* Alternate Line Service (ALS) is having 2 phone numbers. The digit 1 displays with icons that represent ALS 1. The digit 2 displays
with icons that represent ALS 2. With only one phone number (no ALS), digits do not display with the icons to represent single number
service.
6
Display Icons
Status Bar Indicators
Signal Strength Network Connection
Battery Power Battery Charging
New Message Call Forward On
New MMS Message ALS Line 1, Line 2
Locked ALS Line 1 (Unencrypted)
New Voice Mail Message (See Flag.) Security Class 1, Class 2
GPRS PC Connected (Active) mMode (Active)
GPRS PC Connected (Inactive) mMode (Inactive)
New MMS on server mMode data transfer
Idle screen Icons
Vibrate Mode On
Vibrate Silent On
Silent On
Pocket Mode On
Meeting Mode On
Car Mode On
TTY On
Alarm On
Auto Run Failure
SIM Full Mailbox Full
Dial Screen Icons
Dialed Call Dialing Dialed Call Connected
Received call Circuit/Modem Connection
Sending Message Checking Server
Normal (See Flag.)
O
No icon shows for Normal mode.
O
Only one voice mail icon displays at
a time. The icon that displays
depends upon the service: the first
icon displays when there is voice
mail for only one phone number;
the second icon displays when there
is voice mail for ALS 1; the third
icon displays when there is voice
mail for ALS 2; and the fourth icon
displays when there is voice mail for
ALS 1 and ALS 2.
7
Line Item Icons
Cascading menu arrow Private Status
Cycling field arrows “MMS”
“Business” category “MMS” with attachment
“Personal” category “MMS” on server
“Others” category “Email”
“High” priority “Email” with attachment
“Low” priority “SMS/EMS”
Clock/Timer “SMS/EMS” with attachment
No icon shows for “Normal”
O
priority.
Alert Pop up Icons
Reminder of scheduled event
Recurring event “SMS/EMS” stored in SIM
Complete “SMS/EMS” with attachment
(task, item, etc.) stored in SIM
“Normal” priority (See Flag.)
Full-size Pop-up Screen Icons
Busy/Please Wait Decision symbol
Activity successful Message arrived
Activity failed
Low battery alert
Something needs attention
8
Safety and Performance
Fully charge the phone’s battery before you use your new wireless phone (see page 17 for the first time charging instructions).
User Caution
Phone settings should be adjusted to suit the likes and preferences of the individual user. Users sensitive to loud noises or sudden
alarms should take care not to use or set the phone in any manner that may result in the user being unduly alarmed.
For example, a user with heightened sensitivity to noise should adjust the wireless phone to a volume setting that is within his or her
range of comfort. If you believe the wireless phone causes you any adverse reaction, you should discontinue using the phone
immediately.
Emergency Services
Ensure your wireless phone is turned On, the battery is properly charged, and that the network connection has adequate signal strength
before attempting an emergency call. If your battery is empty (see page 17), you can not make or receive any calls, including
emergency calls.
To make an emergency call in the United States,
Input the emergency number for your present location (i.e., 911 or other designated emergency number).
*
Press (Send).
In the United States of America, the
O
emergency number is 911.
Ask the operator for the service you require: Police, Ambulance, Fire, Coastguard or Mountain Rescue Services. Give accurate and necessary
information. If possible, remain stationary to maintain phone contact. Do not terminate the call until given permission to do so.
(See Flags for more emergency information.)
O Emergency calls (911) are possible
without service activation or SIM
card. Your location is delivered to
the emergency operator along with
your caller ID as required by FCC
guidelines.
O
Due to the nature of the wireless
system, the success of emergency
calls cannot be guaranteed. Never
rely solely on a wireless phone for
essential communications such as
medical emergencies.
9

Safety
Prior to operating your wireless phone, please read this manual thoroughly, including the care and safety information. Observe the
following guidelines for safe and efficient operation of the phone.
General Care
A wireless phone contains delicate electronic circuitry, magnets, and battery systems. You should treat it with care and give particular
attention to the following points.
l
Do not allow the phone or its accessories to come into contact with liquid or moisture at any time.
l
Do not place anything in the folded phone.
l
Do not expose your phone to extreme high or low temperatures.
l
Do not expose your phone to direct flame, cigars or cigarettes.
l
Do not paint your phone.
l
Do not drop or subject your phone to abusive treatment.
l
Do not place the phone near or against computer diskettes, credit cards, travel cards and other magnetic media. The information
contained on disks or cards may be affected by the phone.
l
Do not remove the phone’s battery while the phone is turned On.
l
Do not allow metal objects, such as coins or key rings, to contact or short-circuit the battery terminals.
l
Do not allow children to play with the phone; it is not a toy.
l
Do not attempt to disassemble the phone or any of its accessories. For repair, contact a NEC qualified repair center.
l
Use only a damp or anti-static cloth to clean the phone. Do NOT use a dry cloth, a saturated wet-cloth, or electrostatically charged
cloth. Do not use chemical or abrasive cleaners as these may damage the case.
(See Flag for recycling information.)
General Safety
l
The earpiece and phone may become warm during normal use. The unit itself may become warm during charging and use.
l
Observe ‘Turn off 2-way radio’ signs, such as those near gas stations, chemicals or explosives. (See Flag.)
l
A small rubber plug (for hands free socket protection) is included in the carton. Keep this out of reach of small children for whom
it could be a choking hazard.
l
Do not allow children to play with the phone, battery charger, batteries or SIM card.
l
The operation of some medical electronic devices (such as hearing aids, cardiac pacemakers, and other implanted equipment)
may be affected if a wireless phone is used next or near to them. Observe any warning signs and manufacturer’s
recommendations.
l
Do not place the wireless phone on or near high heat items (e.g., candles, appliances that generate heat, etc.) or areas (e.g.,
fireplace, stoves, etc.) when the wireless phone is in vibrate mode. The vibration could cause the phone to move into the high heat
and cause a hazard.
O
Remember to recycle: the
cardboard packaging supplied with
this phone is ideal for recycling.
O
Turn Off the phone. The wireless
phone can still be a hazard in these
areas even when set in vibrate
mode.
10

Radio Frequency (RF) Signals
THIS MODEL PHONE MEETS THE GOVERNMENT’S REQUIREMENTS FOR EXPOSURE TO RADIO WAVES.
Your wireless phone contains a radio transmitter and receiver. Your NEC phone is designed and manufactured not to exceed the
emission limits for exposure to radio frequency (RF) energy set by the Federal Communications Commission of the U.S. Government.
These limits are part of comprehensive guidelines and establish permitted levels of RF energy for the general population. The guidelines
are based on standards that were developed by independent scientific organizations through periodic and thorough evaluation of
scientific studies.
The exposure standard for wireless mobile phones employs a unit of measurement known as the Specific Absorption Rate (SAR). The
SAR limit set by the FCC is 1.6W/kg.
* Tests for SAR are conducted using standard operating positions accepted by the FCC with the
phone transmitting at its highest certified power level in all tested frequency bands. Although the SAR is determined at the highest
certified power level, the actual SAR level of the phone while operating can be well below the maximum value. This is because the
phone is designed to operate at multiple power levels so as to use only the power required to reach the network. In general, the closer
you are to a wireless base station antenna, the lower the output.
Before a phone model is available for sale to the public, it must be tested and certified to the FCC that it does not exceed the limit
established by the government-adopted requirement for safe exposure. The tests are performed on position and locations (for example,
at the ear and worn on the body) as required by FCC for each model. The highest SAR value for this model phone as reported to the FCC
when tested for use at the ear is 1.2 W/kg, and when worn on the body, is .561 W/kg. (Body-worn measurements differ among phone
models, depending upon available accessories and FCC requirements). While there may be differences between the SAR levels of
various phones and at various positions, they all meet the government requirement.
Body-worn Operation
The FCC has granted an Equipment Authorization for this model phone with all reported SAR levels evaluated as in compliance with the
FCC RF exposure guidelines. SAR information on this model phone is on file with the FCC and can be found under the Display Grant
section at http://www.fcc.gov/oet/fcid after search on FCC ID A98-KMP6J1F1-1A.
For body worn operation, this phone has been tested and meets the FCC RF exposure guidelines when used with a NEC accessory
designated for this product or when used with an accessory that contains no metal and that positions the handset a minimum of 1.5 cm
from the body.
*In the United States, the SAR limit for
wireless mobile phones used by the public
is 1.6 watts/kg (W/kg) averaged over one
gram of tissue. SAR values may vary
depending upon national reporting
requirements and the network band.
Aircraft Safety
The use of wireless phones in aircraft may be dangerous to the operation of the aircraft and may be illegal. Any use of a wireless phone
on board an aircraft must be in accordance with applicable regulations. Follow all flight crew instructions. When instructed to turn Off
your wireless telephone, do so.
Road Safety
Check the laws and regulations concerning the use of wireless telephones and their accessories in the areas where you drive and always
obey them. If you find it necessary to use your cellular telephone behind the wheel of a car, please:
l
Give full attention to driving and exercise proper control of your vehicle at all times. (See Flag.)
l
Observe all the recommendations contained in your local traffic safety documentation.
l
Pull off the road and park before making or answering a call, if driving conditions so require.
l
Turn Off your wireless phone at a refueling point, such as a gas station, even if you are not refueling your own car.
l
Do not store or carry flammable or explosive materials in the same compartment as a wireless phone.
O
Use hands-free operation, if
available.
11

Electromagnetic Interference
Most modern electronic equipment is shielded from radio frequency (RF) signals; however, certain electronic equipment may not be
shielded against the RF signals from your wireless phone.
Pacemakers
The Health Industry Manufacturers Association recommends a minimum separation of six inches (or 15 cm) be maintained between a
handheld wireless phone and a pacemaker. These recommendations are consistent with the independent research and
recommendations by Wireless Technology Research. Persons with cardiac pacemakers:
l
Should ALWAYS keep the phone more than six inches from their pacemaker when the phone is turned On.
l
Should not carry the phone in a breast pocket.
l
Should place the phone to the ear opposite the pacemaker to minimize the potential for interference.
l
If you have any reason to suspect RF interference, turn Off your phone immediately and remove the battery.
Whether the phone vibrates, plays a ring tune, or the volume buttons increase/decrease the ring sound, a received call to a wireless
phone may interfere with a cardiac pacemaker.
Hearing Aids
Digital wireless phones may interfere with some hearing aids. In the event of such interference, you may want to consult your wireless
service provider.
Other Medical Devices and Medical Facilities
Operation of wireless phones could interfere with medical devices or implanted equipment which are inadequately shielded from
external RF energy. Consult a physician or the manufacturer of the medical device to determine if such devices are adequately shielded.
Turn Off your phone in health care facilities, if regulations posted in these areas instruct you to do so. Hospitals or health care facilities
may be using equipment that could be sensitive to external RF energy
.
Vehicles
Electronic vehicle systems, such as anti-lock brakes, speed control and fuel injection systems are not normally affected by radio
transmissions. RF signals may affect improperly installed or inadequately shielded electronic systems in motor vehicles. The
manufacturer of such equipment can advise if it is adequately shielded from radio transmissions. If you suspect vehicle problems
caused by radio transmissions, consult vehicle manufacturer or its representative regarding your vehicle and do not turn On your phone
until it has been checked by qualified approved installers. You should consult the manufacturer of any equipment that has been added
to your vehicle.
Posted Facilities
Turn Off your phone in any facility where posted notices require you to do so.
12

Blasting Areas
To avoid interfering with blasting operations, turn Off your phone when in a blasting area or areas posted: “Turn Off Two-Way Radio.”
Obey all signs and instructions. (See Flag.)
Potentially Explosive Atmospheres
Turn Off your phone prior to entering any area with a potentially explosive atmosphere, and obey all signs and instructions. Do not
remove, install, or change batteries in such areas. Sparks in such areas could cause an explosion or fire resulting in bodily injury or
even death. (See Flag.)
Areas with a potentially explosive atmosphere are often, but not always, clearly marked. These include fueling areas such as gasoline
stations; below deck on boats; fuel or chemical transfer or storage facilities; vehicles using liquefied petroleum gas (such a propane or
butane); areas where oxygen is used; areas where the air contains chemicals or particles such as grain, dust, or metal powders; and any
other area where you would normally be advised to turned Off your vehicle engine.
Vehicles Equipped with an Air Bag
An air bag inflates with great force. Do not place objects, including either installed or portable wireless equipment, in the area over the
air bag or in the air bag deployment area. If wireless equipment is improperly installed in the vehicle and the air bag inflates, serious
injury could result.
Battery Care and Disposal
Do not leave the phone or the battery in places where the temperature could exceed 140 °F, e.i., on a car dashboard, on a window sill,
in direct sunlight, etc.
Turn Off the phone. The wireless
O
phone can still be a hazard in these
areas even when set in vibrate
mode.
Do not put your phone’s battery in your mouth as battery electrolytes may be toxic, if swallowed.
Keep the battery away from children. It is not a toy and it could be a choking hazard.
Your phone battery is a sealed unit with no serviceable parts inside; do not attempt to open the battery covering.
Use only a battery approved by NEC for the 515 wireless phone.
Using any battery pack or AC adapter not specified by NEC for use with the 515 may be dangerous and may invalidate any warranty and
approval given to the wireless phone. Do not connect more than one charger at any time.
To ensure the maximum life from your battery, allow the battery to fully discharge at least once a week. To fully discharge the battery,
leave the phone turned on until the message “RECHARGE BATTERY” is displayed and the phone shuts itself Off. If left unused, a fully
charged battery discharges in approximately one month. Store batteries uncharged in a cool, dark, and dry place.
Batteries must be recycled or disposed of properly. Through the AT&T Wireless Reuse and Recycle program, consumers are invited to
bring unwanted phones, accessories, and batteries (regardless of the manufacture or carrier) to an AT&T Wireless retail store for
recycling. Use the website link to find an AT&T Wireless store nearest you:” http://www.attwireless.com/general/storelocator “.
Do not dispose of battery packs in a fire.
13

Performance
Third Party Equipment
Use only batteries, chargers, and authentic accessories approved by NEC. Modifications, the use of third party equipment, cables, or
accessories that are not made or AUTHORIZED by NEC may invalidate any approval or warranty of your phone, may adversely affect the
phone’s operation, and may be dangerous. For availability of approved accessories, check with your wireless phone dealer.
Service
The wireless phone, batteries and charger do not contain user-serviceable parts. We recommend that your NEC wireless phone is
serviced or repaired by an NEC AUTHORIZED service center. Please contact your Service Provider or NEC at 1-800-637-5917 if you
believe that you require service. Any unauthorized service may invalidate the warranty of your wireless phone.
Efficient Use
For optimum performance with minimum power consumption, hold your 515 wireless phone (with the flip open) as you would any other
phone and speak directly into the mouthpiece.
Battery
The 515 phone contains an 800 mAh, standard Lithium-ion battery. Battery performance depends upon signal strength, network
configuration, phone features selected, battery age and condition, battery charging habits, temperatures to which battery is exposed, and
many like factors.
Idle and Talk Times
Your wireless phone works closely with the network you are using to provide the services you need. The standby and talk times achieved
depend on how you use the phone and the choices made by the network operator; up to 205 hours standby time and up to 4.5 hours
talk time (typically 3.3 hours talk time).
Antenna
Your phone has an internal antenna located at the base of the phone below the keypad.
As with any other radio transmitting device, avoid touching the antenna area when the
phone is turned On to optimize the antenna performance and talk time of the phone.
Contact with the antenna area may affect call quality and may cause the phone to operate
at a higher power level than otherwise needed.
Antenna located
in this area.
14

Getting Started
Your 515 wireless phone is equipped with a battery, SIM card, hands-free headset, and a charger. Other accessory options can
customize your phone for maximum performance and mobility.
For all the features to work, you must have a SIM card that supports these features. (See Flag.) Even if you have a fully featured SIM
card, any feature not supported by the Network transmitting your call, will not work. This last point is especially important when you are
roaming among networks.
Before you try to use your phone, check that you have:
l
NEC Authentic AccessoriesTM(see page 151)
l
A valid SIM card inserted in the phone (see page 16)
l
The battery fully charged (see page 17)
Service Activation
Before you can use your new NEC wireless phone, the service must be activated by a wireless service provider. Please contact your
local wireless service provider for any questions regarding phone activation.
Voice Mail and Text Messaging
Voice mail and text messaging services, when available, are provided by your wireless service provider. Before you can receive either
voice or text messages with your wireless phone, you must subscribe to these wireless service provider options. Contact your wireless
service provider for information on availability and setup of these services.
PIN and Security Codes
The SIM card is included in the
O
phone box, supplied by the service
provider. The SIM card is required
for your phone to function properly.
When your service is activated, a PIN1and PIN2 (Personal Identification Number) are provided by the wireless phone retailer and
programmed into the SIM card. Check with your wireless service provider for additional information regarding your security codes and
passwords.
Use the PIN1 to lock and unlock SIM card to prevent unauthorized use of the SIM card. Use the PIN2 to access the FDN phonebook.
You may want to set up your own security code. Use the security code to lock and unlock the phone, lock access to the Internet, and
restrict access to the PIM (Personal Information Manager) application data. The default security code is ‘0000’.
A Security Code screen displays and requires entry of your PIN1 when the SIM PIN1 setting is locked and the phone is powered-on.
A Security Code screen displays and requires entry of your PIN2 when adding, editing, deleting, copying any phone entries in or to the
FDN phonebook. (See Flag.)
A Security Code screen displays and requires entry of your security code when you attempt to access features or functions that you have
locked.
O
FDN is a network service provider
dependent feature.
15

SIM Card
Before using your wireless phone you must register with a wireless network service provider to receive a SIM (Subscriber Identity
Module). The SIM card contains a computer chip that stores and tracks your phone number, the services included in your subscription,
and your SIM phonebook information. It is stored in a recess in the battery compartment.
The phone can not be used (except for 911 emergency calls) until a valid SIM is inserted.(See Flag.) It is possible to transfer your SIM
to another compatible phone and access your network services. The screen on your phone displays a message if the SIM card is not
inserted properly. (See Flag and Warnings.) If the SIM is already inserted, see Powering On the Phone, page 19.
Inserting a SIM Card
Make sure that the power is Off and remove the battery. (1) Release the latch. (2) Lift battery out (as in left picture below) to
*
reveal the SIM location.
Slide the SIM card holder (see right picture below) in the battery compartment to open the latch and lift the holder up. Insert the SIM
card into the card holder with the notch on the card lined up as shown.
Make sure the SIM is fully inserted in the holder and gently press the card holder into place. Slide the SIM card holder to close
the latch and replace the battery.
Removing a SIM Card
Remove the battery and slide the SIM card holder in the battery compartment to open the latch.
*
Lift the holder up to easily pull the SIM card out of the card holder.
Gently press the card holder into place and slide the SIM card holder to close the latch.
Replace the battery.
Ensure your wireless phone is
O
turned On, the battery is properly
charged, and that the network
connection has adequate signal
strength before attempting an
emergency call. If your battery is
empty (see page 17), you can not
make or receive any calls, including
emergency calls.
A message displays if any locks
O
have been set or the wrong SIM has
been inserted. Please follow any
instructions given, e.g., ‘Return to
Service Center’.
If the phone, or the SIM, is lost
I
or stolen then you should
contact your Service Provider
immediately in order to prevent
unauthorized use.
I
Do not bend or scratch your
SIM card.
I
If the SIM card is not fully
inserted when the battery is
replaced, damage to the SIM
card can occur.
16
Preparing the Battery
The minimum performance of the 800 mAh, standard Lithium battery is: up to 205 hours standby time and 4.5 hours talk time (typically
3.3 hours talk time). These times are estimates only and depend on your location within the network, the frequency at which your
location is updated, the type of SIM you have, your reception area or ‘cell broadcast’ messages, and the use of Full Rate or Enhanced
Full Rate speech , as well as other factors that affect both standby and talk times.
Charging the Battery the First Time
Your phone is powered by a rechargeable battery. A new phone battery must be fully charged before using your wireless phone the first
time.
Before trying to use your phone, ensure the SIM card is inserted and the battery is in place on the phone. Place the battery
*
terminal end towards the hinge of the phone. Lower the battery toward the phone to lock into place. (See Warning and graphic in
right column.).
Connect the NEC battery charger supplied with your phone to a compatible power outlet.
Connect the charger plug into the connector on the base side of the phone. (See graphic in right column.)
Check that the battery icon pulses and the LED, located on the back of the flip cover, glows red. (See Flag and graphic in right
column.) To fully charge the battery, leave the phone charging until the LED goes out and the battery icon displays as full.
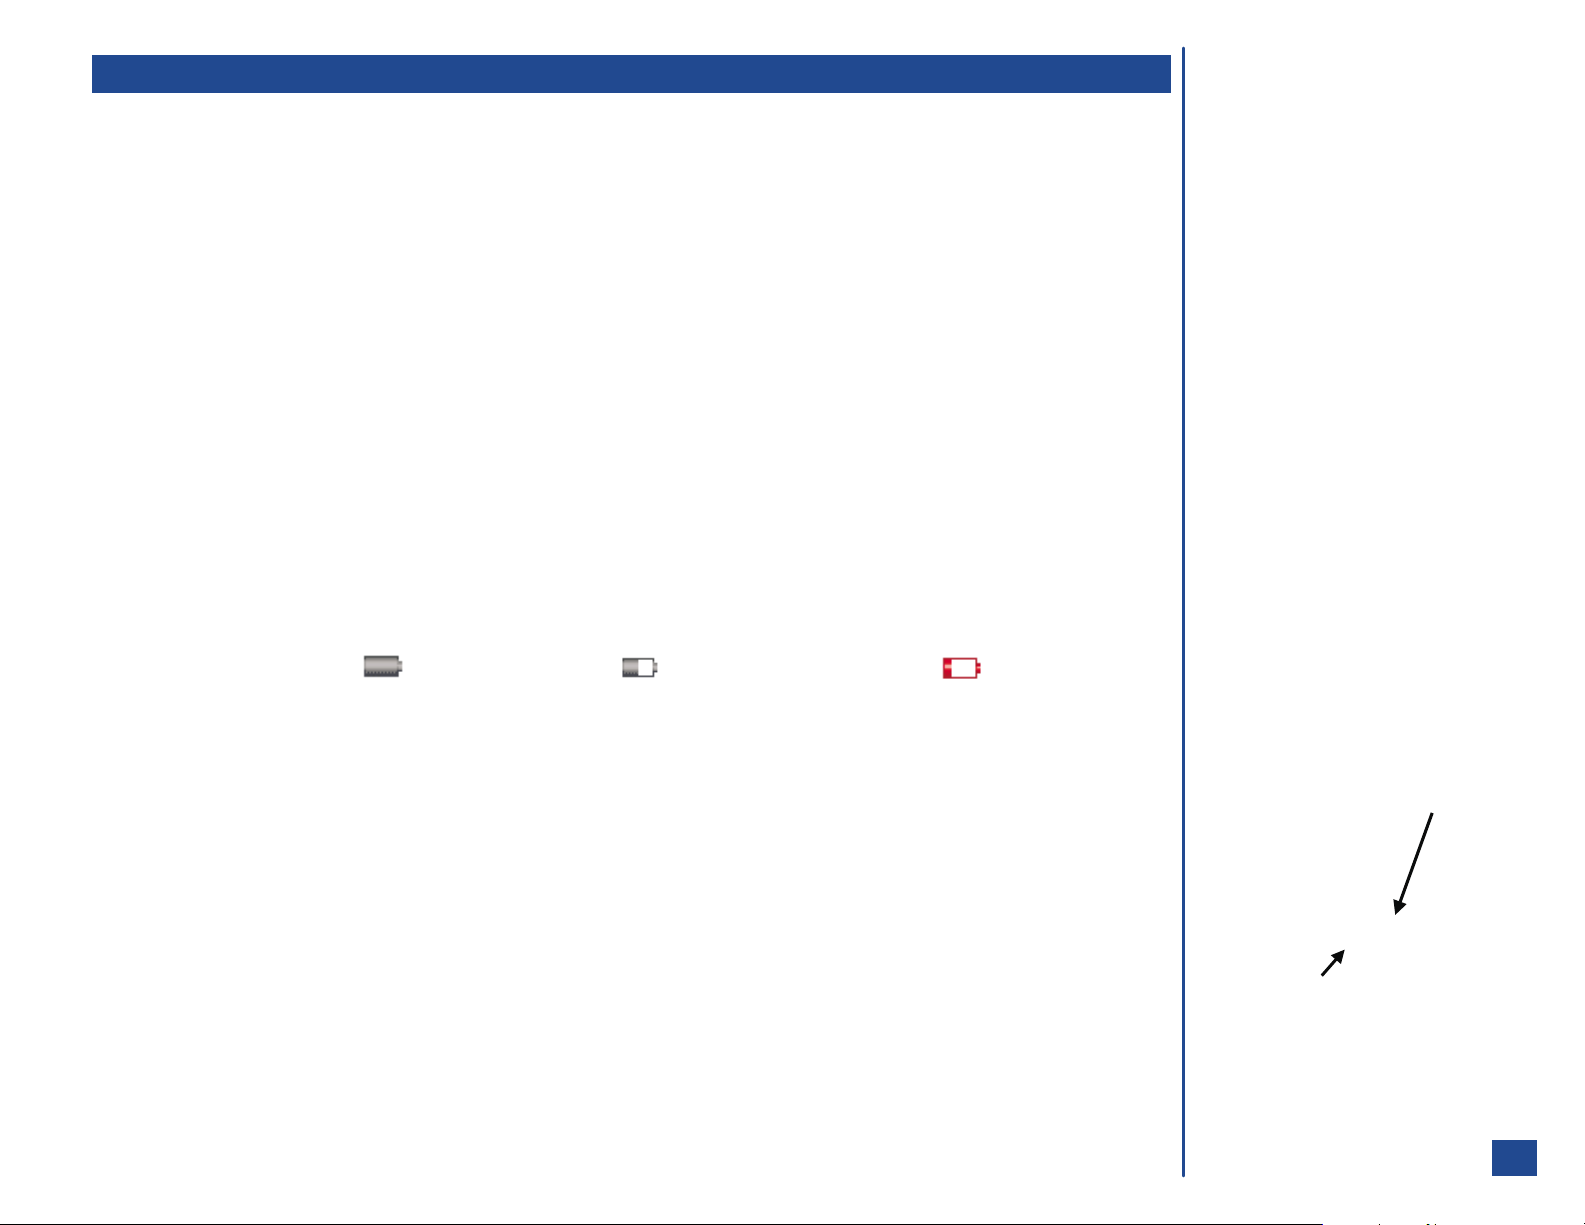
Checking the Battery
The battery charge indicator shows the approximate charge level of the battery while the phone is in use and not being charged. The
blocks on the display show the charge of your battery pack.
DO NOT connect a charger or
I
any other external DC source if
the phone's battery is not
inserted. If this happens, the
phone may not function
properly.
Battery
Terminal
End
Full battery power Low battery power Battery empty (red)
*
Check the icon at the top, left corner of the screen (the status bar, see page 3).
Low Battery Indication
When the battery voltage falls below the working level, RECHARGE BATTERY appears on the graphics display area and an empty battery
icon displays in the status bar. With the recharge notification, the phone also sounds a short tone at ten-second intervals. Once the
recharge message displays and the short tone sounds, the phone battery has approximately one minute of use remaining. The phone
automatically powers Off.
The battery charge continues to drop after the “RECHARGE BATTERY” warning displays. In extreme cases where the battery is left
uncharged for some considerable time after the warning is displayed, a trickle charge is used to slowly charge the battery back up to a
safe level at which fast charging can begin. During this time, the battery icon will show charging but you are not able to make or receive
a call, or fully power up the phone. Normal wireless phone operation resumes once fast charging begins. The phone can be in trickle
charge for a few hours before fast charging starts if the battery is left uncharged for some days after the recharge warning.
Charger Connector
O
The LED located on the back of the
flip indicates when charging is
complete by turning Off.
LED
17

Charging the Battery
The charger unit begins to restore the battery power when it is connected to the phone. (See Warnings.)
Connect the charger plug into the connector at the base side of the phone as indicated on page 17.
*
Check that the battery icon is displayed and the LED glows red (located on the back of the flip).
During charging, the battery charging icon displays and the LED continually glows red. When charging is complete, the battery
icon displays as full and the LED turns off. The battery icon and LED display as described even when the phone is turned Off
during charging.
If you need to receive calls, the wireless phone can be turned On and left in Idle while it is charging, although the total time takes longer
to charge.
The wireless phone is designed to be charged with the NEC equipment listed in the specifications of your phone.
Changing the Battery
Make sure the phone is turned Off. Some settings, stored numbers, and messages may be lost if the battery is removed while the power
is On.
Slide the battery catch towards the base of the phone (see in picture below).
*
Carefully lift the battery away from the phone (see in picture below).
Put the new battery pack in place with the battery terminal end towards the hinge of the phone (see in picture below).
Lower the battery toward the phone to lock into place.
Using any battery pack or AC
I
adapter not specified by NEC
for use with this phone may be
dangerous and may invalidate
any warranty and approval
given to the wireless phone. Do
not connect more than one
charger at any time. Do not
leave the charger connected to
the power supply when it is not
in use.
I Do not try to charge the battery
if the temperature is below 0 °C
(32 °F) or above 25 °C (77 °F).
I
Using any battery pack or AC
adapter not specified by the
manufacturer for use with this
phone creates a potential
safety hazard.
18
Powering-On the Phone
Turning the Phone On
Do not remove the battery to turn
O
your phone Off as this may cause
loss of stored information.
Press and HOLD (On-Off) to turn On the phone.
*
The screen displays mMode animation during the powering-on process.
After the powering On process, the phone displays the Idle screen.
You may need to input your PIN1 code or phone security code (refer to page 15).
Turning the Phone Off
Press and HOLD (On-Off) until it powers down. The power down screen displays the
*
NEC High Definition Mobile graphic and the phone powers Off.
After powering Off or turning the wireless phone Off, you must wait three seconds before
powering On.
Language Display
If the display is showing any language other than your own, proceed as follows:
Press Softkey 1 (Main) to display the Main Menu. Press 1, 2, and 5 to display the Language screen. (See Flag.)
*
Press the appropriate key to select the required language.
Press (End) to return to the Idle screen.
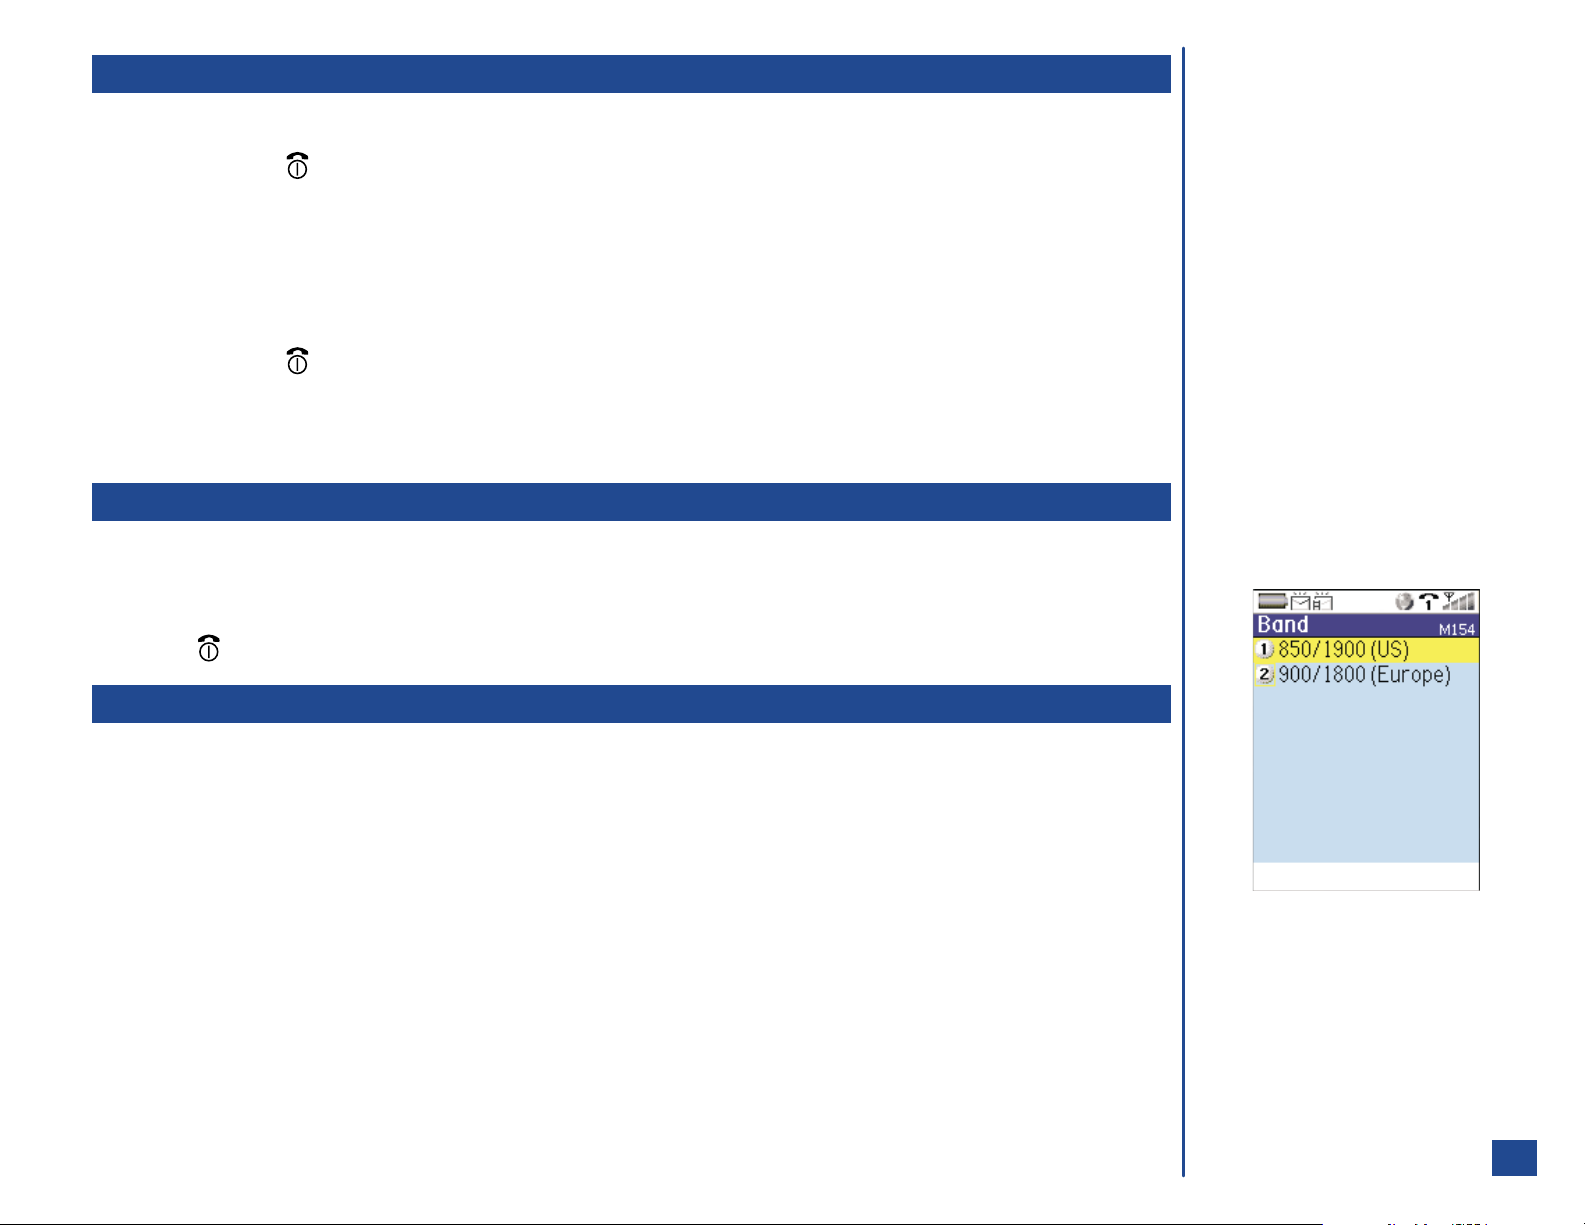
Frequency Bands
The type of frequency band that you use depends upon your location. (See Flag.)
AT&T Wireless
Language
The phone supports the above
O
languages and the keyboard
symbols have been chosen for
world-wide operation.
M125
*
Press Softkey 1 (Main),1,5,and 4 to display Band screen.
Press 1 to select the 850/1900 frequency band if you are located in the United States or
press 2 to select the 900/1800 frequency band if you are located in Europe.
O
Frequency bands need to be
changed for the wireless phone to
work properly when traveling
outside the United States.
19
Basic Calls and Phone Use
Make a call the same way as you would with a normal push-button phone, except you must press (Send) after entering the area
code and phone number to ensure the call is sent.
Dialing Calls
Key in the phone number. Check the number on the display.
*
Press (Send) to connect the call. (See Flag.)
While making the call, the screen displays the name with the phone number dialed (if a name has been stored in a phonebook along
with the number--see page 94) and a connection graphic or a phonebook picture if one has been allocated to the number called (see
page 99).
The number dialed and information related to the number dialed is stored in the dialed calls list. The last 10 calls made are stored. Each
time you make a call after the dialed call list is full, the oldest call drops off the list and the newest call is placed at the top of the list.
Press (Send) to access the dialed call list.
*
Correcting Mistakes
Press (Left) or (Right) navigation key to scroll through the number and place the cursor to the right of the incorrect number.
Press CLR (Clear/Back) key to clear individual digits to the left of the cursor or hold the CLR (Clear/Back) key at least 2 seconds to
delete the entire phone number. Press a number key and it is inserted at the cursor position.
Ending Calls
*
There are 3 ways to end a call: (1) Press (End/On-Off), (2) Press (Options Menu) and 9 to disconnect a call,or(3)
Close your phone. (See Flag.) The phone returns to Idle.
MENU
Receiving Calls
When someone calls your number,
l
The phone ringer sounds (if set On - see page 29).
l
The LED (located at the back of the flip cover) flashes.
l
The phone number of the person calling may display on the bottom, left of the screen if the caller ID feature is available and the
caller has activated the feature.
l
The calling person’s number along with a name and a picture (see page 99) may display if you have the caller’s phone number,
name, and an assigned picture stored in the phonebook.
If the caller has withheld their caller ID, the screen provides a message that the number is being withheld.
O
If you are dialing a call, the phone
gives priority to receiving a call
unless you have already pressed
(Send).
O
The digital technology of your 515
wireless phone helps to ensure that
your conversations are kept secure.
O
Always press (End/On-Off) or
close your phone even if the other
person has ended the call first.
O
If (End/On-Off) is held down, the
wireless phone turns Off.
20
Accepting a Call
Press (Send) or Softkey 1 (Accept) to connect an incoming call.
*
To use quick silent or any key to accept a call, refer to Answer Options on page 30. However, if you already have a call in progress,
pressing the any key function does not apply. With a call in progress, you must press (Send) or Softkey 1 (Accept) to answer an
incoming call. (See Flag.)
Rejecting a Call
Press (End/On-Off) or Softkey 2 (Reject) to reject or ignore the call. The call goes automatically to voicemail depending if
*
voicemail is available by your service provider. (See Flag.)
Receiving a Call While in an Application
If you receive a call while creating a new message, you can accept or reject the call. When you accept the call, the message closes so
you may answer the call. The text entry for the message is saved and the message is saved in the Message center Drafts folder.
If you receive a call while you are in a PIM application (Personal Information Manager, for example typing a phone contact, calendar
entry, or a To Do task), you can accept or reject the call. When you accept the call, the application closes so that you may answer the
call. If you accept a call during text entry or editing changes, the text entry and changes are not saved.
If you receive a call while you are using the web browser, you can accept or reject the call. When you accept and end the call, the web
browser screen returns. You are still connected to the last website accessed.
Using Features/Application During a Call
There are a number of features and applications that you may use during a call. The ones that you cannot use during a call are listed in
the following table:
Phone Settings Screen Settings Call Settings Security Settings
Network Settings Other Settings Reset Settings Language Setting
Display Call Timer Display Call Charge IR Send IR Receive
Voice Mail Send Email Clock Web Browser
My Downloads Send MMS Play Voice Memo Synchronization
Unsuccessful Calls/Auto Redial
Accept
If you already have 2 calls in
O
progress (whether active, on hold,
or mutli-party), a third incoming call
can not be accepted because the
Softkey 1 (Accept) will not be
displayed on the incoming call
screen.
O
Do not press (End/On-Off) to
reject an incoming call if you
already have 2 calls in progress.
Pressing (End/On-Off) with 2
calls in progress does not reject an
incoming call but will disconnect a
call in progress.
Reject
With Auto redial set On, your phone will try up to 10 times to redial a number if the first attempt is not successful. If the call cannot be
connected, a tone is heard, the display shows an appropriate message, and the phone returns to Idle. The number is automatically
called again after a short delay. The phone will try up to 10 times to redial the number. The failure to connect a call can be due to
network problems or if the other phone is busy.
*
Press Softkey 2 (Cancel) to end a redial attempt.
21
Call Features
Caller ID
When you dial a call, you can send your own phone number to display on the dialed phone (see page 41).
When you receive a call, the caller’s phone number displays if the caller’s function for caller ID is set On or the caller’s phone number
has been stored in your phonebook.
Returning an Unanswered Phone Call
If your wireless phone receives a call and you do not answer it, the caller information is stored in the Missed calls list. To return an
unanswered call:
Press (End) to display the Idle screen and press (Right) navigation key to display the Missed calls log or
*
press Softkey 1 (Main), 7, and 2 to display the Missed calls log.
Press (Up) or (Down) navigation key to highlight a missed call. Return the call using one of the 3 following ways.
(1) Press (Send), (2) Press Softkey 1 (Call), or (3) Press (Options Menu) and 1 to make the call from the Missed
calls Option menu.
Last Number Redial
To view and redial the last number you called:
*
Ensure the Idle screen is displayed and no phone number is shown. Press (Send) once. The last number you called displays.
Press (Send) again. The last number you dialed is automatically called. (See Flag.)
MENU
Top Dog
313455677
3135554444
Jane Doe
3135778888
Plus (+) Dialing
Before you can enter a + symbol in a number, the cursor must be at the beginning of a number. (See Flag.)
To make international calls:
*
Press and HOLD until the '0' character displayed changes to a '+' character on the display. The + replaces the
international access code used as the prefix number of the country from which you are calling and informs the network that you
are making an international call.
Input the country, area code (without the leading zero) and phone number that you wish to call.
When dialing, add the country code required. Storing all numbers with the country codes (e.g., 01 for the US, 44 for UK) is helpful. A
country code for another country is always the same, no matter what country you are dialing from. For example, to make an international call to a
typical UK number is entered as:
+ 44 1189 123456
International Country Area phone
Access Code Code Number
Call your Service Provider to activate international service options.
O
If you remember the last call made,
simply press twice.
O
The ‘+” (plus) symbol for
International access can be entered
and used within phone numbers for
speed dialing.
22

Emergency Calls
One key press can make an emergency call when the phone is powering On or when the phone is locked. SOS displays in the softkey
bar during powering-on and when the phone is locked. (See Flag.) You do not need to input the security code to make an emergency
call. (See Flag.)
Press Softkey 1 (SOS) to call emergency services.
*
From the Idle screen, the standard emergency number of 911 can be used.
Input 9, 1, and 1
*
Press (Send) to connect the call to local emergency services.
Ensure your wireless phone is turned On, battery is properly charged, and that the network connection has adequate signal strength
before attempting an emergency call. If your battery is empty (see page 17), you can not make or receive any calls, including
emergency calls.
Entering a Pause (for DTMF Dialing)
A pause (P) may be entered in a number that allows the numbers before the pause to be dialed and connected before the numbers after
the pause are dialed. An example is a phone number with an extension number. The pause is placed between the phone number and the
extension number.
Do not enter a pause in an international number. Make sure the condition in Plus Dialing does not apply.
* Input the phone number.
Press and HOLD (at least two seconds) the (Number Symbol) key to insert a pause. The letter P displays for the inserted
pause.
In the United States of America, the
O
emergency number is 911. On most
networks, 911 emergency calls can
be made without a SIM card
inserted.
Input the numbers to be dialed after the pause.
Speed Dialing
There are two speed dial methods. (See Flag.) For the first method of speed dialing:
*
The second method of speed dialing:
*
Press and HOLD a number 2-9 (the numbers 2-9 correspond to the phonebook location number) to dial a number in SIM.
Press the number keys (1-500 corresponding to the phonebook location number in Phone, refer to page 94) and (Asterisk
Symbol) key to display an entry in Phone. Press (Send) to dial the displayed number.
Press the number keys (1-250 corresponding to the phonebook location number in SIM, refer to page 94) and (Number
Symbol) key to display an entry in SIM. Press (Send) to dial the displayed number.
O
IF FDN is enabled, speed dialing is
available for FDN numbers only.
23

Dialing a Number in Message Text
To call a phone number within the message text of a message at the Message view screen:
Press (Right) navigation key to highlight the phone number in the message text.
*
MENU
Press (Options Menu) and 2 to automatically dial the phone number.
Volume Controls
To silence the ringer when receiving a call, the Quick Silent option must be selected in the
Answer options setting (See Flag.):
(With flip CLOSED) Press a volume button on the back of the flip cover. Open the flip and
*
press (Send) to accept the call, and begin your conversation.
(With flip OPEN) Press any key except the Send, End/On-Off, Softkey 1, or Softkey 2.
When receiving a call with any of the Answer option settings and the flip is OPEN, press the volume buttons on the back of the flip
cover to silence the ringer.
To change the earpiece volume during a call:
The flip cover must be open and press the buttons on the back of the flip cover. Press the top button (full oval, nearest the LED)
*
to increase volume and the bottom button (eclipsed) to decrease volume.
The volume buttons may be used to increase or decrease ringer volume when the hands-free accessory is connected.
During an incoming message, the volume buttons on the back of the flip cover adjust the ringer volume.
During the clock’s daily alarm or a Scheduler alarm, press a volume button on the back of the flip cover to silence the alarm, if the
Quick Silent option is set.
Top Dog
03 30 2003 10:30:00
It is time to go. Call
me 4445667899
The Answer options are: Any key
O
answer, SEND key answer, and
Quick silent. Refer to Answer
options on page 30.
Volume
Keys
Voice mail icons:
O
Voice Mail
The voice mail message icon displays and a tone sounds to alert you to a new voice mail. The icon remains displayed until you access
voice mail to listen to your message. (See Flag.)
*
Press and HOLD 1 at least two seconds to access your voice mail.
Refer to the Messaging and Voice Mail section on page 56 for more voice mail information.
Refer to Voice Mail settings on page 62 to set up your voice mail number.
Forwarding Calls
All call types may be forwarded to a designated number or each call type may be forwarded to different designated numbers. Call
forwarding is established in the Call settings sub-menu of Settings menu (see page 37).
When call forwarding is set on, unanswered calls are forwarded to the designated number.
Only one voice mail icon displays at
a time. The icon that displays
depends upon the service: the first
icon displays when there is voice
mail for only one phone number;
the second icon displays when there
is voice mail for ALS 1; the third
icon displays when there is voice
mail for ALS 2; and the fourth icon
displays when there is voice mail for
ALS 1 and ALS 2.
24

Call Timer and Call Charger
During calls, the call timer displays the call duration on screen, incrementing the time in minutes and seconds until the call is ended.
The call timer display must be set to On (see page 36).
During calls, the call charger displays the cost of the call on screen, incrementing the cost until the call is ended. The call charger must
be set to On (see page 36) and supported by your wireless service provider. If it is not supported by your wireless service provider, the
option is disabled (grayed out and cannot be utilized). The time presented is an estimate; not actual time.
Using Call Features During a Call
The Call in progress screen displays during a call. The instructions for the following call features begin at the Call In Progress screen.
Placing a Call On Hold
To place a received or dialed call on hold from the Call in progress screen:
Press Softkey 2 (Hold) or press (Options Menu) and 1 to place a call on hold from the Phone function Options menu.
*
Press Softkey 2 to retrieve the call.
Call Waiting
During a call, another received call is announced by a beep tone in the earpiece and an incoming message on the screen. To use call
waiting from the Call in progress screen when you hear the beep tone:
*
Press (Send) to answer the new call and automatically place the current call on hold.
MENU
The Call Charge is not supported by
O
wireless network service providers
in the United States.
Hold
Mute
New call
Transfer
Add to conference
Private conversation
DTMF tones
Record call
Disconnect party
Finish the conversation and press (End) to terminate the new call.
Press Softkey 2 to take the first call off of hold.
You may switch between the calls:
*
Press (Send) to answer the new call and automatically place the current call on hold.
Press Softkey 2 (Hold) to place the new call on hold and go back to the original call, finish the conversation, and press
(End) to terminate the call.
Press Softkey 2 to take the new call off of hold.
Mute A Call
To mute a call using the Phone function Options menu from the Call in progress screen:
*
When a call is muted and you accept a received call, mute is automatically turned Off.
MENU
Press (Options Menu) and 2 to mute the call. The Phone function Options menu has a box around the mute option number.
MENU
Press (Options Menu) and 2 to un-mute a muted call.
25

DTMF Tones
Dual tone multi-frequency (DTMF) tones are used to send digital signals to over-the-phone automated services that allow access to
information or accounts, e.g., use a specific language, access to specific information, account number and password to financial
accounts, voice mail, etc. These DTMF tones may be annoying during multi-party calls. You can turn DTMF tone Off to be considerate
so that the participants do not hear these tones when you input the number of another participant. The tones can only be sent when a
call is connected.
To turn DTMF tones Off from the Call in progress screen (during a phone call):
MENU
Press (Options Menu) ,7,and 2.
*
To turn DTMF tones On:
MENU
Press (Options Menu) ,7,and 1.
*
New Call
The associated parties will hear the DTMF tones while you dial another person. Use the instructions in the previous topic to turn Off the
DTMF tones. When the new call is connected, the original call is automatically placed on Hold.
To dial a new call while in a multi-party call,
MENU
Press (Options Menu) and 3 to display the Dialer screen.
*
Input the phone number and press (Send) to connect to the number.
Conference Calls
If your SIM card is multi-party enabled (the Network supports conference calling), you can make a conference call to more than one
caller. The 3-way and up to 6-way conference call depends on the network service provider. Extra fees may apply for conference calls.
The associated parties will hear the DTMF tones while you dial another person to add to the conference. Use the instructions in the
previous topic to turn Off the DTMF tones. When the call is being dialed, the associated parties of the multi-party call are placed on
mute and cannot hear the conversation until the new caller is added to the conference call.
You can leave the conference call while the remaining participants carry on with the call. (See Flag.)
A multi-party call is considered as one call in progress.
To use the 3-way conference call feature from the Call in progress screen with one call already in progress (first connected call):
*
Input a phone number and press (Send) to connect a second call and automatically place the first call on hold. If the call is
successful, the Call in progress screen displays showing the first call with on hold status and the highlighted second call with
connected status.
MENU
Press (Options Menu) and 5 to briefly display the busy screen and second party is added to the conference call.
To continue adding a third, fourth, and fifth party to conference calling (if Network supported), repeat the two steps of 3-way conference
calling.
If adding a call to conference calling is unsuccessful, the failure screen displays briefly and the phone returns to the previous status.
Holding
Top Dog
212-323-5363
Jane Doe
212-434-4334
John Doe
565-434-3223
O
If you already have 2 calls in
Active
Active
progress (whether active, on hold,
or mutli-party), a third incoming call
can not be accepted because the
Softkey 1 (Accept) will not be
displayed on the incoming call
screen.
Do not press (End/On-Off) to
reject an incoming call if you
already have 2 calls in progress.
Pressing (End/On-Off) with 2
calls in progress does not reject an
incoming call but will disconnect a
call in progress.
10:14
26

Private Conversation
During a multi-party call, you can select one participant for a private conversation while the other participants continue the conference
call. (See Flag.)
Press (Up) or (Down) navigation key to highlight the participant.
*
MENU
Press (Options Menu) and 6 to briefly display the busy screen for Private conversation and begin the private conversation.
Press (End) to end a private conversation and the call.
To end the private conversation and add the party back to the multi-party call:
MENU
Press (Options Menu) and 6. This combines the two calls back into a single multi-party call and all members are active.
*
Disconnecting a Party
During a multi-party call, you can disconnect one of the participants and continue the call with remaining participants from the Call in
progress screen.
Press (Up) or (Down) navigation key to highlight the participant to disconnect.
*
MENU
Press (Options Menu) and 9 to disconnect the participant from the conference call.
Recording a Call
You can record up to 20 seconds of a conversation. (See Flag.) A recorded conversation is stored in Voice memo (see page 144). To
record a received or dialed call from the Call in progress screen:
*
MENU
Press (Options Menu),8,and Softkey 1 (record) to record. Press Softkey 2 (Stop) to end recording before the 20
second time lapse.
At the end of 20 seconds, recording automatically stops and the Call in progress screen displays.
Two calls are on the phone: the
O
multi-party call and the active single
call of the private conversation. The
members of the multi-party call can
still speak to each other on the one
call while the private conversation is
the other call.
O
Recording of phone calls is subject
to varying State and Federal laws
regarding privacy and recording of
phone conversations.
IR Send/Receive
IR is short for infrared. The Infrared Data Association, a group of device manufacturers, developed a standard for transmitting data via
infrared light waves through an IR port. The infrared port enables you to transfer data from one 515 wireless phone to another 515
wireless phone without any cables. The two wireless phones must be within a few feet of each other and there must be a clear line of
sight between them. Data from the Phone phonebook, Scheduler, and To Do may be transmitted using the IR options.
For further information regarding
L
sending data via IR, refer to:
Phonebook, IR Sending, page
Scheduler, IR Sending, page 133
To Do List, IR Sending, page 139
IR Receive, page 150.
IR Port
27

Personalizing Settings
To access the Settings menu:
Press Softkey 1 (Main) and 1 to display the Settings menu or press Softkey 1 (Main) and press (Left), (Right),
*
(Up), or (Down) navigation key to highlight Settings option 1 with a box frame. The Settings menu icon becomes animated.
Press (Select) to confirm your choice. (See Flag.)
To select a Settings menu option:
Press the Settings option number (1 through 7) or press (Up) or (Down) navigation key to move the highlight over the
*
desired Settings option and press (Select).
The current selected option for a setting is marked by a checkmark if the options are not numbered. A box frame surrounds the option
number if the options are numbered. The color of the box frame is the same color as the highlight bar.
Remember to press CLR (Clear/Back) to return to the previous screen or press (End) to exit the screen and return to the Idle screen.
The Personalizing Settings instructions are for settings that affect how you want the wireless phone to operate in normal mode, except
for the settings in Phone modes topic. The settings accessed through the Phone modes menu affect how you want the wireless phone to
operate in meeting mode, pocket mode, and car mode.
Phone Settings
The Phone settings menu contains the settings for volume, ring options, answer options, phone modes, ALS, own number, and
phonebook.
Volume
Settings menu icon:
O
To change the volume during a call, proceed as follows:
*
Press the buttons on the back of the flip. Press the top button (full oval) to increase volume and the bottom button (eclipsed) to
decrease volume.
When you are not making any calls, change the volume setting from the Idle screen:
*
Press Softkey 1 (Main), 1, 1, and 1 to display the Voice volume screen with a volume slider.
Press (Up) to increase or (Down) to decrease the volume setting to the level required or
press a number key (0-Quiet to 9-Loud) for the volume level.
Press Softkey 1 (OK) or (Select/Save) to save the current setting and return to phone Settings menu.
Press Softkey 2 (Cancel) or CLR (Clear/Back) to reject any volume changes and return to phone Settings menu or (End) to
reject any volume changes and return to the Idle screen.
28

Set Tones
The Set tones menu allows you to select the ring tune, new message tone, ring volume, and setting options for your wireless phone
under normal mode operation. The set tone selections for the other operating modes (meeting, pocket, and car) are available in the
Phone modes menu (see page 30).
Ring Tune and New Message Tone
To change the ring tune or new message tone, proceed as follows:
Press Softkey 1 (Main), 1, 1, and 2 for the Set tone menu screen to display.
*
Input 1 for the Ring tune or 2 for New message tone to display the corresponding screen. A checkmark displays beside the
currently used ring tune/new message tone.
Press (Up) or (Down) navigation key to highlight the desired tune/tone.
Press Softkey 1 (Play) to play the tune/tone, Softkey 2 (Stop) to stop, and press (Select/Save) to save the highlighted
tune/tone and return to the Set tones menu.
Ring tunes, music, and melodies may be downloaded from the Web Browser, Emails, or MMS messages. These files are stored in
Music of My downloads and appear in the Ring tune list screen. The ring tunes are 40 channel; up to 40 different sounds can be played
at the same time giving an excellent sound quality.
Ring Volume
*
Press Softkey 1 (Main),1,1,2,and 3 to display the Ring volume screen with a volume slider.
Press (Up) to increase or (Down) to decrease the volume setting to the level required (the slider moves in the direction of
the corresponding key pressed) or
Oscar
Authority
Adagio
Carmen
Flower
Burning Heart
Bongo Beauty
Cartoon Trance
Wakeup
Press a number key (0-Quiet to 9-Loud) for the volume level.
Press Softkey 1 (OK) or (Select/Save) to save the current ring volume setting and return to Set tones menu.
Press Softkey 2 (Cancel) or CLR (Clear/Back) to reject any ring volume changes and return to Set tones Menu; press (End)
to reject any ring volume changes and return to the Idle screen.
Setting Options
The Setting options list allows you to establish other options of how you want your phone to ring during normal mode.
*
Press Softkey 1 (Main),1,1,2,and 4 to display the Settings options screen.
Press (Up) or (Down) navigation key to highlight the desired ring setting option.
Key tone: The DTMF tones that sound when pressing number buttons.
Vibrate: The phone vibrates when a call is received.
Service tone: A tone sounds when traveling into and out of the area where the network provides service.
Press (Select/Save) to toggle the highlighted option between On (a checkmark displays beside the option) and Off (box is
empty beside the option).
Press Softkey 1 (OK) to save the options or press Softkey 2 (Cancel) to cancel and return to the Set tones menu.
29

Answer Options
If Any key answer feature is active (On), your phone connects to a received call by pressing any key [except the (End) or Softkey
2]. When this feature is inactive (Off), the phone only connects to a received call by pressing the (Send) or Softkey 1 (Accept).
However, if you already have a call in progress, the any key function does not apply; must press (Send) or Softkey 1 (Accept) to
answer the incoming call.
To set up how you want to answer received calls, proceed as follows.
Activate Any Key Answer Option
Press Softkey 1 (Main), 1, 1, 3, and 1 to activate the any key answer feature and return to the Phone settings menu.
*
Deactivate Any Key Answer Option
Press Softkey 1 (Main), 1, 1, and 3 to display the Answer options menu. Press 2 to answer calls by pressing the Send Key or
*
press 3 to answer calls with Quick silent (See Flag.) and return to the Phone settings menu.
Phone Modes
The “Phone Modes” topic provides the instructions of: (1) Mode Selection--how to select the mode for the phone to operate/function
and (2) Changing Mode Settings--how to establish the different settings only for meeting mode, pocket mode, and car mode. The
setting instructions provided in all the other topics (except Phone Modes topic) within “Personalizing Settings” are the settings that
affect Normal phone operation.
Your phone can be set to operate in one of four modes selected from the Phone modes menu:
l
Meeting The phone’s mode of operation when in a meeting (vibrate when a call is received) so it does not disturb others.
l
Pocket The phone’s mode of operation when the phone is in your pocket (to ring or vibrate when a call is received).
l
Car The phone’s mode of operation when traveling in a car and used with hands-free accessory.
l
Normal The phone’s usual or noraml mode of operation (ringing when a call is received, etc). (See Flag.)
Quick silent allows you to silence
O
the ringer by pressing a volume
button for a received call when the
flip is closed. When the flip is open,
press any key except (Send),
(End/On-Off), Softkey 1, or
Softkey 2. If you wish to answer the
call, press (Send) to accept the
call and begin your conversation.
O
The default mode that the wireless
phone operates/functions is Normal.
Mode Selection
To select the phone mode for the wireless phone to operate:
*
At the Idle screen, press (Up/a keypad shortcut) navigation key to display the Phone modes menu.
Input the appropriate number for the mode: 1 for Meeting mode, 2 for Pocket mode, 3 for Car mode, or 4 for Normal and return
to the Idle screen. The phone now operates in the selected mode and continues so until another mode is selected.
An icon displays on the Idle screen for the selected mode (except for Normal mode, an icon does not display). (See Flag.) The
icons that display on the Idle screen for the phone modes are :
Meeting Mode Pocket Mode Car Mode
Whichever mode the wireless phone is operating when you turn your phone Off, the same mode is still effective when you turn your
phone On again.
O
Meeting and Pocket mode displays
on the Idle screen with the vibrate
icon (unless vibrate is set Off.)
30

REMEMBER that you cannot access the Main menu to select a mode of operation. You must press the (Up) navigation key to access
the menu (Phone modes) to select the mode of operation for the phone.
When you access the Main menu, you are not selecting the menu to select a phone mode. You are selecting a menu of settings (Phone
modes) to set/establish the settings for each mode of operation (except Normal).
Default Mode Settings
When a mode is selected, some of your phone’s settings are altered automatically to the respective mode name. The phone functions
altered for the operating modes are:
l
Key tone (On/Off)
l
Ring tune (See Flag.)
l
New message tune
l
Ring volume
l
Vibrate (On/Off)
l
Service tone (On/Off)
l
Backlight (On/Off) (See Warning.)
l
Auto answer (On/Off) (See Flag.)
Any changes made to the Ring
O
Setting Options, while in a mode,
are stored and used when that
mode is selected again.
The following table shows the key icon and option number to press when establishing the operating mode and the default settings for
each mode.
To Select Phone Mode:
Press:
Key tone
Ring tune
New message tune
Ring volume
Vibrate
Service tone
Backlight
Auto answer
Meeting
( p,1)
Pocket
( p,2)
Car
( p,3)
Normal
( p,4)
OffOnOnOn
OffOnOnOn
OffOnOnOn
Quiet Loud Medium Medium
On On Off On
Off Off Off Off
On (Timed) On (Timed) Always On
On (Timed)
(See warning)
Always Off Off Off Off
With the backlight always On,
I
the battery life is reduced.
With auto answer and the
O
hands-free headset in use, the
phone automatically answers a call
for you to begin a conversation.
31

Changing Mode Settings
To change the settings of a particular mode, proceed as follows:
Press Softkey 1 (Main), 1, 1, and 4 to display the Phone modes menu.
*
Press the appropriate key for the preferred mode to change the settings:
1 for Meeting, 2 for Pocket, or 3 for Car. The appropriate mode menu displays.
When you have selected the Phone mode (meeting, pocket, or car), the mode setting changes may be made. These settings are how
you want the wireless phone to operate when that mode is selected.
Normal mode settings are not made in Phone mode settings. The setting instructions provided in all the other topics (except Phone
Modes topic) within “Personalizing Settings” are the settings that affect Normal mode phone operation.
The following instructions are only for changing the settings of Meeting mode, Pocket mode, and Car mode.
Mode Ring Tune
To change the ring tune that will sound when the phone rings:
Press 1 to display the Ring tune screen. A checkmark displays beside the ring tune currently used.
*
Press (Up) or (Down) navigation key to highlight the desired ring tune. (See Flag.)
Press Softkey 1 (Play) to play the tune and Softkey 2 (Stop) to stop.
Press (Select/Save) to save the highlighted ring tune and return to the previous menu.
Mode New Message Tone
To change the new message tone that will sound when the phone receives a message or Email:
*
Press 2 for New message tune screen to display. A checkmark displays beside the ring tune currently used.
Press (Up) or (Down) navigation key to highlight the desired ring tune.
Press Softkey 1 (Play) to play the tune and Softkey 2 (Stop) to stop.
Press (Select/Save) to save the highlighted ring tune and return to the previous menu.
Mode Ring Volume
To change the ringing volume when a call is received:
*
Press 3 to display the Ring volume screen with a volume slider.
Press to (Up) increase or to (Down) decrease the volume setting to the level required (the slider moves in direction of
the corresponding key pressed) or input the number (0-Quiet to 9-Loud) for the volume level.
Press Softkey 1 (OK) or (Select/Save) to save the current ring volume setting and return to the previous menu.
Press Softkey 2 (Cancel) or CLR (Clear/Back) to reject any ring volume changes and return to the previous menu.
Press (End) to reject any ring volume changes and return to the previous menu.
O
Press (Up) or (Down)
navigation key to move the highlight
bar to the previous or next item in a
list.
O
Press CLR (Clear/Back) to return to
the previous screen.
O
Press (End) to exit the screen
and return to the Idle screen.
32

Mode Backlight
Press 4 to display the Backlight screen.
*
Press (Up) or (Down) navigation key to highlight the preferred brightness or power-save and press (Select) to select
the highlighted option.
Highlight the Minutes field and input 0 (always Off) to 99 for the length of time before the backlight turns Off. The default value is
2 minutes.
Press Softkey 1 (OK) to save the backlight settings and return to the previous menu.
Mode Settings Options
Press 5 to display the Setting options list.
*
Highlight Keytone and press (Select) to toggle key tones On or Off. (See Flag.)
Highlight Vibrator and press (Select) to toggle vibrate On or Off. (See Flag.)
Highlight Service tone and press (Select) to toggle service tone On or Off. (See Flag.)
Highlight Auto answer and press (Select) to toggle auto answer On or Off. (See Flag.)
After setting the options for key tone, vibrate, service tone, and auto answer:
*
Press Softkey 1 (OK) to save changes/selections and return to the previous menu.
ALS
If SIM and your network service provider supports ALS (Alternate Line Service), you can setup which line to use for automatic selection
as follows:
*
Press Softkey 1 (Main),1,1,and 5 to display the ALS setup screen.
Press (Up) or (Down) navigation key to highlight the line and voice mail options.
Press (Select) to select the highlighted option.
Press Softkey 1 (OK) to accept the selections and return to the Phone settings menu.
To toggle an option between On/Off:
O
On (a checkmark displays beside
option)
Off (empty box beside option)
The service tone is sounded when
O
traveling into and out of the area
where the network provides service.
O
Auto Answer option displays only for
Car Mode. The Auto answer feature
allows a received call to be
connected automatically if the
wireless phone is in car mode with
the hands-free accessory attached.
The default setting is Off.
33

Own Number
To show your own phone number:
Press Softkey 1 (Main),1,1,and 6 to display the phone number at the bottom of the screen.
*
Press (Up) or (Down) navigation key to highlight the option that displays the number on the lower bottom of the screen. If
ALS (Alternate Line Service) is available, the options Line 1, Line 2, Data, and Fax display. If ALS is not available, the options My
Mobile #, <Line 2>, and <Data> display.
If the number has not been entered for the highlighted option (no number displays on lower bottom of the screen):
Highlight the Number field and press (Select) to display the Enter number screen.
*
Input the phone number and press Softkey 1 (OK) to save the number.
Phonebook
The SIM memory allows 250 phonebook entries. The Phone memory allows 500 phonebook entries. When using the Complete
phonebook, this setting establishes the default to save new entries. Set the default (SIM or Phone) as follows:
Press Softkey 1 (Main),1,1,and 7 to display Phonebook screen.
*
Input 1 for the primary phonebook to be from the phone memory (Phone) or input 2 for the primary phonebook to be from the
SIM memory (SIM) and return to the Phone settings menu.
Screen Settings
The Screen settings menu contains the settings for wallpaper, color theme, contrast, backlight, language, auto-hyphenation, and display
call timer.
Wallpaper
<Line 1>
<Line 2>
<Data>
<Fax>
To choose a picture to be displayed as a background on the Idle screen.
*
Press Softkey 1 (Main),1,2,and 1 to display the Wallpaper screen.
Press (Up) or (Down) navigation key to highlight a wallpaper.
Press Softkey 1 (View) to preview the highlighted wallpaper and Softkey 2 (Dismiss) to dismiss the wallpaper and return to
the Wallpaper screen.
Press (Select) to select the currently highlighted item in the wallpaper list and return to the Screen settings menu.
34

Color Theme
To choose a color theme for the phone’s display, proceed as follows:
Press Softkey 1 (Main),1,2,and 2 to display the Color theme screen.
*
Press (Up) or (Down) navigation key to highlight a color theme. The screen colors change to match the highlighted color
theme.
Press (Select) when the desired color theme is highlighted or key the corresponding number of the desired color theme. The
Screen settings menu displays in the selected color theme.
Contrast
To alter the contrast of your Phone’s display screen, proceed as follows:
Press Softkey 1 (Main),1,2,and 3 to display the Contrast screen with a slider.
*
Press (Up) to increase contrast by one level or (Down) to decrease contrast by one level until screen is at desired
contrast (the slider moves in the direction corresponding to the key pressed) or
input the number corresponding to the desired contrast (0-lightest contrast to 9-darkest contrast).
The contrast changes for each press of (Up) or (Down) navigation key and for each number entered.
Press Softkey 1 (OK) or (Select/Save) to save any contrast changes and return to the Screen settings menu.
Press CLR (Clear/Back) or Softkey 2 (Cancel) to reject any contrast changes and return to the Screen settings menu.
Backlight
To select the backlight setting for normal mode operation:
*
Press Softkey 1 (Main),1,2,and 4 to display the Backlight screen.
Press (Up) or (Down) navigation key to highlight the desired brightness or power-save and press (Select) to select
the highlighted option.
Highlight the Minutes field and input 0 (always Off) to 99 for the length of time before the backlight turns Off. The default value
is 2 minutes.
Press Softkey 1 (OK) to save the backlight settings and return to the Screen settings menu.
35

Language
If you wish to change the display language:
Press Softkey 1 (Main),1,2,and 5 to display the Language screen.
*
Press the appropriate key to select the desired language (see screen right) and return to the Screen settings menu.
Press (End) to return to the Idle screen.
Auto-hyphenation
With the hyphenation set to On, the displayed Phone numbers are hyphenated automatically based on the North American Numbering
Plan. With hyphenation set to Off, the displayed Phone numbers are not hyphenated. (See Flag.)
Press Softkey 1 (Main),1,2,and 6 to display the Auto hyphenate screen.
*
Press (Up) or (Down) navigation key to highlight the desired hyphenation option and press (Select) to select the
highlighted option or enter 1 to turn On hyphenation or 2 to turn Off hyphenation. Display returns to the Screen settings menu.
Display Call Timer
To set the call timer to display the time duration of calls, incremented in minutes and seconds, proceed as follows:
Press Softkey 1 (Main),1,2,and 7 to display the Display call timer screen.
*
Input 1 to set the call timer On to display call time duration or 2 to set the call timer to Off (call time duration does not display
on the screen). The setting is saved and the display returns to the Screen settings menu.
Display Call Charge
Language
Example of hyphenation set On :
O
214-202-0202;
Example of hyphenation set Off :
2142020202.
M125
This option is disabled. It is not supported by the network service providers in the United States.
36

Call Settings
The call settings allow you to setup call forwarding, call waiting, automatic redial, and sending your own number to the phone dialed.
Call Forwarding
Call forwarding sends your phone’s received calls, fax, messages, and/or data calls to another specified phone number or forwards each
call type to different specified numbers.
You may establish profiles and profile names for different forwarding numbers to forward all calls or only certain types of calls.
The Set Forwarding screen displays ‘No Profiles’ until the first profile is set up. After adding a profile, the new profile name is added to
the Set Forwarding list screen.
Up to 10 profiles are allowed. If you try to add a profile when the Set Forwarding list contains 10 profiles, “Profile list full” displays on
the screen. You must delete a profile before adding a new one.
Manual setup of call forwarding overrides a profile. To end the manual call forwarding, reset the profile or turn call forwarding Off.
A fast and easy way to end call forwarding is to create and use a profile called ‘OFF’ before establishing other profiles. Select the Off
profile to automatically end call forwarding.
To end call forwarding without the OFF profile, you must change the settings for each call type to ‘Never’ or ‘No forward.’
The default settings for all call types is ‘Never’ or ‘No forward.’
Creating OFF Profile
Creating the OFF profile eliminates having to manually change the call forward settings to “No forward.”
*
Press Softkey 1 (Main),1,3,1,and 1 to display the Set forwarding profile screen.
Press Softkey 1 (Add New) or press (Options Menu) and 1 to display the Add profile screen.
The Add profile screen displays the types of calls allowed by the Network: voice, data, fax, line 1, and line 2. If the Network does
not allow a type of call, the call type name does not appear on the screen.
Press (Select) with the Name field highlighted to display the text editor screen.
Input the name ‘OFF’ for the profile and press (Select) to return to the Add profile screen.
For each field, highlight the field and press (Select) to display the respective Forward call screen. Press (Down)
navigation key to highlight Never, press (Select) to select the radio button, and press Softkey 1 (OK) to return to the Add
profile screen.
After selecting Never for each field, press Softkey 1 (OK) to save the OFF profile with the ‘No forward’ setting for each call type.
OFF displays in the Set forwarding list screen.
MENU
37

Adding and Editing Profiles
To Add a New Profile:
Press Softkey 1 (Main),1,3,1,and 1 to display the Set forwarding profile screen.
*
Press Softkey 1 (Add New) or press (Options Menu) and 1 to display the Add profile screen.
MENU
Vacation
To Edit a Profile:
Press Softkey 1 (Main),1,3,1,and 1 to display the Set forwarding profile screen.
*
Highlight the profile that you want to edit.
MENU
Press (Options Menu) and 2 to display the Edit profile screen through the Set forwarding Options menu.
To Add or Change the Profile Name
Press (Select) with the Name field highlighted to display the text editor screen.
*
Input a new name or change the name for the profile and press (Select) to return to the previous screen (Add profile or Edit
profile).
Press (Down) navigation key to scroll and highlight the next field.
Call Forwarding Profile Numbers
Press (Select) when each call type field is highlighted to display the Forward Calls screen (e.g., Voice calls field to Forward
*
voice calls screen, Data calls field to Forward data calls screen, Line 1 Calls field to Forward line 1 Calls, etc).
Press (Up) or (Down) navigation key to highlight Unchanged, Never, Always, or Conditional and press (Select). (See
Flag.)
Always
*
Press (Down) navigation key to highlight the number field under Always. Input or change the call forwarding number without
hyphens. This is the phone number to which received calls will always be forwarded.
Always Forward
Always Forward
Unchanged
Never
Always
Conditional
*
Press (Down) navigation key to highlight the Answer Time field. (See Flag.)
Press (Left) or (Right) navigation key to select the number of seconds for Answer time or press (Select) to display
the Answer time screen, highlight the number of seconds, and press (Select) to return to Forward call screen or (See Flag.)
Press (Down) navigation key to highlight each conditional number field and input the call forwarding number to which the
unanswered calls, busy calls, and unreachable calls will be forwarded.
Press Softkey 1 (OK) to save the call forward settings and return to the previous screen (Add profile or Edit profile).
Press Softkey 1 (OK) to save the settings for the profile.
O
The selected option becomes
enabled while the options not
selected are disabled (grayed out).
O
The Answer Time is the number of
seconds before call forwarding is
invoked for a received call.
O
There are six Answer Time options
in five second increments from 5
seconds to 30 seconds.
38

Deleting a Profile
Press Softkey 1 (Main),1,3,1,and 1 to display the Set forwarding profile screen.
*
Highlight the profile you want to delete. Press (Options Menu) and 3 to display the Delete menu.
Press 1 to delete the selected profile or 2 to delete all profiles. A decision screen displays to ensure that you want to delete the
selected profile or delete all profiles.
Press Softkey 1 (Yes) to ensure deletion. A confirmation screen displays briefly to confirm that the selected profile has been
deleted or all profiles have been deleted and display returns to the Set forwarding profile list screen. Press Softkey 2 (No) to
cancel the deletion and return to the Set forwarding profile list screen.
Setting Call Forwarding On
Press Softkey 1 (Main),1,3,1,and 1 to display the Set forwarding profile screen.
*
Highlight the profile that you prefer to set for call forwarding (do not select the OFF profile) and press (Select) to display the
profile details screen.
Press Softkey 1 (Set) to set call forwarding to the profile and the Setting Status Progress screen displays. A confirmation
screen displays briefly with the dialogue, “Setting successful” or “Setting unsuccessful” and returns to the Set forwarding profile
list screen.
Press Softkey 2 (Cancel) to cancel setting the profile for call forwarding and return to the Set forwarding profile list screen.
(See Flag.)
Setting Call Forwarding Off
MENU
Line 1 calls
Always forward
Line 2 calls
Conditionally forward
Data calls
No forward
Fax calls
No forward
When manual settings have been
O
made, follow the “Setting Call
Forwarding On” procedures to reset
the profile settings and eliminate the
manual settings.
*
Press Softkey 1 (Main),1,3,1,and 1 to display the Set forwarding profile list screen.
Highlight the Set forwarding OFF profile and press (Select). The OFF profile details screen displays.
Press Softkey 1 (Set) to set OFF profile and the Setting Status Progress screen displays. A confirmation screen displays briefly
with the dialogue, “Setting successful” or “Setting unsuccessful” and returns to the Set Forwarding list screen. If the setting is
successful, call forwarding for all call types is Off.
Manual Call Forwarding
*
Press Softkey 1 (Main),1,3,1,1,and Softkey 2 (Manual) to display the Manual forward screen. All call types available
display with the data retrieved from the network or with default values.
Press (Up) or (Down) navigation key to scroll and highlight a call type field and press (Select). The Forward calls
screen (e.g., Voice calls field goes to Forward voice calls screen, Data calls field goes to Forward data calls screen, Line 1 calls
field goes to Forward line 1 calls, etc).
Press (Up) or (Down) navigation key to highlight one of the options (Unchanged, Never, Always, or Conditional) and
press (Select). The selected option is enabled.
Input the appropriate call forwarding number(s) for Always or Conditional. Refer to page 38 for further information on Call
Forwarding numbers.
Press Softkey 1 (OK) to change the call forward settings and return to the Manual forward screen.
Press Softkey 1 (Set) to set manual call forwarding.
39

Press Softkey 1 (Yes) to make the setting changes and the Setting Status Progress screen displays with the message “Setting
manual forwarding.”
Press Softkey 2 (Cancel) to cancel the manual forwarding changes and return to the Manual forward screen.
Manually Set Call Forwarding Off
Press Softkey 1 (Main),1,3,1,1,and Softkey 2 (Manual) to display the Manual forward screen. All call types available
*
display with the data retrieved from the network or with default values.
For each call type, highlight the field and press (Select) to display the Forward calls screen.
Highlight the option Never and press Softkey 1 to change the settings and return to the Manual forward screen.
With all call types set to No Forward (Never), press Softkey 1 (OK) to apply the changes.
Press Softkey 1 (Set) to apply the setting changes and the Setting status progress screen displays with the message “Setting
manual forwarding.” When finished, call forwarding is Off.
Check Call Forwarding Status
Press Softkey 1 (Main),1,3,1,and 2 to obtain the current call forwarding status. A busy screen displays with “Retrieving call
*
forwarding status ...” When retrieving process is finished, the Current Status screen displays.
Press Softkey 1 to exit the status screen and return to Call Forwarding menu.
Call Waiting
Call waiting allows you to answer a received call during another call. The phone provides a tone during a call to announce that another
call is received. To set the call waiting option On or Off and view the call waiting status, proceed as follows:
Setting Call Waiting On/Off
*
Press Softkey 1 (Main),1,3,2,and 1 to display the Setting screen.
Input 1 to set call waiting On or 2 to set the call waiting Off. A message displays, “Setting...Please wait.” While this message
appears, press Softkey 2 (Cancel) to reject any setting changes and return to the Setting screen.
A confirmation screen displays to show whether the setting change was successful or unsuccessful.
If the setting change was successful, press Softkey 1 (OK) to return to the Setting screen.
If the setting change was unsuccessful, press Softkey 1 (OK) to return to the Setting screen.
Checking Status of Call Waiting
*
Press Softkey 1 (Main),1,3,2,and 2 to obtain the current call waiting status. One of three messages displays to show that
call waiting is activated, call waiting is not activated, or network unavailable (to provide the call waiting status).
Press Softkey 1 (OK) to exit the status screen and return to Call waiting menu.
Setting...
Please wait
40

Auto Redial
The auto redial option allows the wireless phone to dial an unsuccessful call up to 10 times. To set the auto redial On or Off, proceed as
follows:
Press Softkey 1 (Main),1,3,and 3 to display the Auto redial screen.
*
Input 1 to turn On the automatic redial or 2 to turn Off the automatic redial. The display returns to the Call settings menu.
Send Own Number (Caller ID)
When you make a call, you can send your own phone number to display on the dialed phone.
Press Softkey 1 (Main),1,3,and 4 to display Send own number screen.
*
Press 1 to turn On sending your number or 2 to turn Off sending your number and return to the Call settings menu.
Security Settings
The Security Settings enable you to protect your phone from improper and unauthorized use. The PIN codes, security codes, and
password codes are 4 to 8 digit numbers.
Changing PINS
PIN 1 and PIN 2 codes are provided by your network service provider. The security code is user defined. The default security code is
‘0000’ until you change it. Once the security code is changed, the default is no longer valid.
Changing PIN 1 Code
Your phone can be set up so it needs your PIN 1 code entered when powering On, before the phone can be used at all. If the PIN 1 code
is not entered, received calls can not be answered. If you input your PIN 1 code incorrectly more than three times (not necessarily in the
same session) not even the correct PIN 1 code works and you will have to contact your service provider for a code to unblock your SIM
card.
To change the PIN1, the SIM PIN1 lock on page 42 must be set to On for PIN 1 change to be enabled.
*
Press Softkey 1 (Main),1,4,1,and 1 to display the PIN 1 change screen.
Key in the current code. You are prompted to input the new code and then to input it again as confirmation. A confirmation
screen displays momentarily and then the Security settings menu displays.
41

Changing PIN 2 Code
Your phone supports advanced features (e.g. FDN--Fixed Dialing Numbers. See Flag.) that may require a PIN 2 code to be entered
before they can be accessed or modified. If the PIN 2 code is entered incorrectly 3 times, you will need to contact your service provider
for assistance.
Press Softkey 1 (Main),1,4,1,and 2 to display the PIN 2 change screen.
*
Key in the current code. You are prompted to input the new code and then to input it again as confirmation. A confirmation
screen displays momentarily and then the Security settings screen displays.
Changing Security Code
The security code is used to unlock the PIM features and browser.
Press Softkey 1 (Main),1,4,1,and 3 to display the Security code screen.
*
Key in the current security code. You are prompted to input the new code and then to input it a second time to confirm. A
confirmation screen displays momentarily and then the Security settings screen displays.
Forgot Your Security Code
If you forget your security code, contact your AT&T Wireless Service.
Locks
The lock settings allow you to lock access to certain phone functions. When a lock setting is enabled, that function remains locked until
the correct security code is entered. (See Flags.) The default for these settings is unlocked. To change the lock settings:
*
Press Softkey 1 (Main),1,4,and 2 to display the Locks menu.
Input the appropriate number of the function lock:
1 Auto power-up lock Phone is locked when powered On. Enter your security code to unlock the phone for use.
2 SIM PIN1 lock SIM card is locked. Enter the PIN1 to unlock the SIM card and use the phone.
3 Phone lock Locks the phone after powered On and displays locked screen. Enter your security code to unlock.
4 PIM lock Locks the PIM (Personal Information Manager) applications: Phonebook, Scheduler, and To Do.
Enter your security code to unlock PIM applications for use.
5 Browser lock Locks the Browser access. Enter your security code to unlock Browser for use.
With FDN turned On, only the FDN
O
numbers in the FDN Phonebook
may be dialed and called.
You are allowed three attempts to
O
input the correct PIN 1 and PIN 2
codes. After the third attempt, the
phone no longer allows access.
Contact your network provider for
assistance.
For auto power-up, SIM PIN1, and PIM:
*
Input 1 to enable the lock (set On) or 2 to disable the lock (set Off) and the security code screen displays.
Input your security code and press Softkey 1 (OK). A confirmation screen displays briefly stating that the setting change has
enabled or disabled the function and display returns to the Locks menu.
While auto power-up lock is enabled, each time you press and HOLD (On-Off) to power On your wireless phone, you must input
your security code to begin the powering up process.
While SIM PIN1 is enabled (set On), you must input the PIN1.
While PIM lock is enabled, any application that attempts to access PIM data requires you to input your security code before the PIM
data is accessed.
42

Phone Lock ON
Input your security code and press Softkey 1 (OK). The Phone Locked screen displays. While the phone is locked, it is capable
*
of receiving incoming calls and sending emergency calls. The phone remains locked and cannot be used until your security code
is entered. (See Flag.)
Phone Lock OFF
When the phone is locked, the Phone Locked screen displays.
Press Softkey 2 (Unlock) to display the phone lock security code screen.
*
Input your security code and press Softkey 1 (OK). The phone is unlocked and displays the Idle screen.
While the phone lock is enabled, only emergency calls can be made (if the wireless phone is turned On, battery is properly charged,
and the network connection has adequate signal strength) or the security code entered. To make an emergency call while the phone is
locked:
Press Softkey 1 (SOS) or enter the emergency 911 number and press (Send).
*
Fixed Dialing
This feature allows you to restrict the use of dialed numbers to FDN (Fixed Dialing Numbers) only. To change the settings for fixed
dialing:
* Press Softkey 1 (Main),1,4,and 4 to display the Fixed dialing screen.
Input 1 to turn FDN On or 2 to turn it Off. The Fixed dialing screen to input the PIN 2 code displays. Input the 4 to 8 digit PIN 2
code to verify user identification to the network.
There is no attempt restriction for
O
your security code. You may attempt
any number of times to enter the
security code.
If the phone lock was active when
O
the phone was powered Off, the
Phone Security Code screen
displays upon power On.
Press Softkey 1 (OK) to confirm and save changes to the network and return to the Security settings menu.
43

Network Settings
Network settings menu contains the network and frequency band settings.
Network Search Type
To set the network search to automatic or manual modes (See Flag and Warning.):
Press Softkey 1 (Main),1,5,and 1 to display the Search type screen.
*
Press 1 to select automatic mode or 2 to select manual mode (See Flag and Warning.) and return to the Network settings menu.
New Network Search
To search for a new network:
Press Softkey 1 (Main),1,5,and 2 to display the Searching screen. When the search is completed, the Network list displays.
*
Press (Up) or (Down) navigation key to highlight a network within the updated search list and press (Select). The
busy screen displays with “Connecting to the network. . .” and returns to the Network settings menu.
When your phone is set to manual mode, you will have to wait while the phone is searching for networks. If several network options are
found, press (Up) or (Down) navigation key to scroll through the list.
SIM List
To add, edit, or remove networks depends on your network service provider. Contact your network service provider to find out if they
allow this feature’s use.
Adding Network to Empty SIM List
To add the first network to the SIM List screen:
Call your Service Provider to
O
activate international service
options.
Before editing your network or
I
SIM list, please contact and
consult with your network
service provider.
I
You will be charged for calls
forwarded to you while you are
roaming.
*
Press Softkey 1 (Main),1,5,and 3 to display the SIM list screen with statement “SIM list empty.”
Press Softkey 1 (Add New) or press (Options Menu) and 2 to display the Add new screen.
Input the country location code and the network code. Press Softkey 1 (OK) to return to the SIM list screen with the network
added to the list.
Press Softkey 1 (Save) to save the network change and return to Network settings menu.
Editing the SIM List
To change the networks in the SIM List:
*
Press Softkey 1 (Main),1,5,and 3 to display the network SIM list screen.
Press (Up) or (Down) navigation key to highlight the required network and press (Options Menu) to display the SIM
list Options menu.
Use the SIM list Options menu to make changes (move network, add new network, remove network) to the SIM list. (See
Warning.)
MENU
MENU
I
Before you manually select a
network, ensure it is covered
under the agreement you have
with your service provider.
44

Moving a Network
To move the network within the SIM List as follows:
Press Softkey 1 (Main),1,5,and 3 to display the SIM list screen.
*
Highlight the desired network and press (Options Menu) to display the SIM list Options menu.
Press 1 to display the Move screen with the selected network highlighted.
Press (Up) or (Down) navigation key to move the network position in the list and press Softkey 1 (OK) to save the new
location (See Flag.) and return to the SIM list screen or press Softkey 2 to cancel the location move and display a discard
changes confirmation screen.
Press Softkey 1 (Save) to save the SIM list changes and return to the Network settings menu.
Adding a Network
To add a new network to the SIM List screen as follows:
MENU
Press (Options Menu) to display the SIM list Options menu.
*
Press 2 to display the Add new network screen.
Input the location code and network code.
Press Softkey 1 (OK) to return to the SIM list with the new name displayed at the top of the list.
With the new network added to the SIM list, press Softkey 1 (Save) to save the changes and return to the Network settings
menu. (See Flag.)
Removing a Network
MENU
If you select a network to be added
O
to your network list (option 2) but
the list is full, you will have to select
a network to be replaced and then
press Softkey 1 (OK).
With the desired network highlighted and the SIM List Options menu displayed, remove the network from the SIM List as follows:
*
Press 3 and a confirmation screen displays “Remove this network?”
Press Softkey 1 (Yes) and return to the SIM list with the network name removed from the list or press Softkey 2 (No) and
return to the SIM list with no changes made to the list.
With the network removed from the SIM list, press Softkey 1 (Save) to save the changes and return to the Network Settings
menu.
Frequency Band
The frequency band setting is necessary to start using your phone. Refer to page 19 of “Getting Started” for more information on
frequency band.
Other Settings
The Other settings menu contains the settings for synchronization, TTY, Internet, and show versions.
45

Synchronization Settings
The Other Settings Menu provides the settings to synchronize the time, date, and contact fields of PIM applications and phonebook with
a source over the air through a server on the Inter/Intranet (remote server) or locally (local server) with the use of PC applications. The
PIM applications that are synchronized are Scheduler with calendar, phonebook with contacts, and To Do list. The phone can
synchronize the PIM applications all at the same time or separately, one at a time.
The Remote feature may not be offered by your service provider. If the service is offered, the service provider may charge a fee to
synchronize a wireless phone on their server. (See Flag.)
Remote Server
To establish synchronization settings for a remote server:
Press Softkey 1 (Main),1,6,1,and 1 to display the Remote Server menu.
*
Input the appropriate number to display the corresponding setting screen: 1 for Server settings, 2 for Proxy settings, 3 for Path
setting, or 4 for HTTP Login. Input the required information in the appropriate fields for server, proxy, path, and HTTP login
settings. (See table below for field settings.) Press (Select) to select or Softkey 1 (OK) to save the setting changes and
return to the previous screen.
Setting Name Setting Entry
Server URL Enter the synchronization server’s URL.
Server Login Enter your user name and password provided by the server provider.*
IP address Enter the IP address of the server in numeric values only, e.g., “000.00.000.00”.
A separate service may be required
O
for Remote synchronization.
Proxy address** Enter the IP address of the Proxy server in numeric values only, e.g., “000.00.000.00”.
Proxy Login** Enter the user name and password provided for the proxy server address.*
Phonebook Path Enter the relative path of the phonebook in the server. Begin with “./”, e.g.,”./contact/personal”.
To Do Path Enter the relative path of the To Do/tasks in the server. Begin with “./”, e.g., “./contact/tasks”.
Scheduler Path Enter the relative path of the Scheduler in the server. Begin with “./”, e.g., “./contact/scheduler”.
HTTP Login** Enter the user name and password for HTTP authentication.*
* The user id and password are case sensitive.
** The configuration is only mandatory if the server provides the feature. Only one authentication may be used, either proxy or
HTTP. The 515 wireless phone cannot operate with both authentications turned On.
Local Server
The local server synchronization requires an NEC approved USB cable and additional software. To establish synchronization settings for
a local server:
*
Press Softkey 1 (Main),1,6,1,and 2 to display the Local Server screen.
Input your user name or login identification and password. Press Softkey 1 (OK) to save the setting changes and return to the
Synchronization menu. (See Flag.)
Refer to page 146 for the remote
L
and local Synchronization
procedures.
O
The user name and password for
the local settings are the same that
you use on your PC for
synchronization authentication.
Refer to www.nechdm.com or the
IntellisyncÒ Lite for NEC Wireless
Phones Installation Guide and User
Guide instructions.
46

TTY Settings
Press Softkey 1 (Main),1,6,and 2 to display the TTY settings screen. (See Flags.)
*
Press (Up) or (Down) navigation key to highlight the desired TTY mode On or Off and press (Select) to select the
highlighted option or input the number that corresponds to TTY mode On/Off and return to the Other settings menu.
The TTY device cable is attached to the wireless phone’s hands-free accessory port (located on the same side of the phone as the IR
port).
Internet Settings
The Other settings menu provides the settings for the factory connection settings, user connection settings, timeout, and certificates to
access the Internet.
When you receive the 515 wireless phone, some of the Internet settings may be preset by AT&T Wireless. Contact your AT&T Wireless
provider for assistance to add or change Internet settings.
The TTY default is Off mode.
O
Factory Settings Connection
Press Softkey 1 (Main),1,6,3,1,and 1 to display the Factory setting screen.
*
Press (Up) or (Down) navigation key to scroll the factory settings.
Press Softkey 1 (OK) or (Select) exit and return to the Connections menu.
User Settings Connection
*
Press Softkey 1 (Main),1,6,3,1,and 2 to display the User Setting screen.
Press (Up) or (Down) navigation key to highlight and press (Select) to display the entry screen or input the
corresponding number of the desired list item to display the entry screen.
1 APN Enter the Access Point Name that defines the network by name stored on GGSN.
2 Proxy server Enter the proxy server that is between the client application, such as a web browser, and the real server.
3 Portal URL Enter the web site/service address that offers an array of resources and services, such as Email, forums,
search engines, and on-line shopping malls.
4 User name Enter your user id to enable login to the Internet.
5 Password Enter your password to enable login to the Internet.
6 HTTP port Enter the HTTP (HyperText Transfer Protocol) proxy port number.
7 HTTPS Port Enter the secure HTTP (HyperText Transfer Protocol Security)
proxy
port number.
8 DNS Enter the Domain Name Service address. (DNS is an software
application that translates domain names into IP addresses.)
Input the data for the field and press (Select/Save) to return to the User Setting
screen.
TTY is an abbreviation for
O
teletypewriter and text
telephony--equipment that employs
interactive text based
communications through the
telephone network.
O
Factory settings are established by
the network service provider.
When all entries are completed, press CLR (Clear/Back) to return to the Connections
screen. Press (End) to return to Idle screen.
47

Time Out
Select the length of time for the phone to keep trying to make a connection to receive data before timeout is performed.
Press Softkey 1 (Main),1,6,3,and 2 to display the Timeout screen.
*
Press (Up) or (Down) navigation key to highlight and press (Select/Save) or input the corresponding number of the
timeout option. (See Flag.) The display returns to the Internet menu screen.
Certificates
A certificate is an electronic message used for security purposes and provides information to confirm your identity so you may have
access to programs, systems, and electronic commerce while surfing/browsing the Internet.
To view certification information:
Press Softkey 1 (Main),1,6,3,and 3 to display the Certificate list screen.
*
Press (Up) or (Down) navigation key to highlight a certificate and press (Select) or press (Options Menu) and 1
to display the Certificate information screen.
Press Softkey 1 (OK) to acknowledge the certificate list information and return to the Certificate list screen.
To set the certification validity:
Press Softkey 1 (Main),1,6,3,and 3 to display the Certificate List screen.
*
Press (Up) or (Down) navigation key to highlight a certificate. Press (Options Menu) to display the Certificate
Options menu.
Press 2 to display the Set Validity screen.
MENU
MENU
“Disabled” is 0 seconds and the
O
phone does not keep trying to make
a connection to receive data. If the
first attempt fails, timeout is
performed.
Input the corresponding validity option number or highlight the valid or invalid option and press (Select) to return to the
Certificate list screen.
Show Versions
The Other Settings menu provides information regarding the software version that your phone is currently using. To display the software
version information,
*
Press Softkey 1 (Main),1,6,and 4 to display the Show versions screen.
Press Softkey 1 (OK) or (Select) to acknowledge the software version and return to Other settings menu.
Certificate 4
Certificate 5
Certificate 6
Certificate 7
Certificate 8
Certificate 9
Certificate 10
Certificate 11
Certificate 12
48

Reset Settings
This function allows the phone settings to revert back to the factory settings and erase data for selected applications.
Reset Factory Settings
Press Softkey 1 (Main),1,and 7 to display the Security code entry screen.
*
Enter your security code and press Softkey 1 (OK). The reset screen displays “All user settings will be returned to factory
default. Continue?”
Press Softkey 1 (Yes) to continue or press Softkey 2 (No) to cancel with no settings reset to factory defaults and return to the
Settings menu.
If continuing, the reset screen displays, “Do you wish to erase data for any application?”
Press Softkey 1 (Yes) to erase data or press Softkey 2 (No) to cancel with no application data erased and return to the
Settings menu.
If erasing data, the next 5 application reset/erase data screens display.
Erase Data
Five screens display to allow you to erase data for the following applications:
l
Schedule Events, To Do Items, and Notepad
l
SMS, MMS, and Email Messages
l
Downloaded pictures, music, and bookmarks
l
Voice Memos
l
Downloaded Applications and Games
To erase the data for the applications that display on the screen,
*
Press Softkey 1 (Yes) to erase data for the applications stated on the screen or press Softkey 2 (No) so the data is not erased
and continue to the next reset screen
At the last reset screen, return to the Settings menu.
49

Text Entry
Text entries for messages, Emails, phonebook names, task descriptions, notepad, field entries, etc. are input at the text editor screen.
At any highlighted entry field, press (Select) to display the text editor screen.
To change the text entry mode between normal text (ABC), T9™ Text Entry (T9) or numeric entry (123), press Softkey 1 (Mode). The
text entry mode displays at the bottom of the display screen above the Softkey 1 indicator.
To toggle between lower case, shift á ( upper case for one letter and returns to lower case text entry) and caps lock á
upper case), press the (Asterisk Symbol). Shift and caps lock display on the screen above the Softkey 2 indicator.
To toggle the active symbol mode On and Off, press the (Number Symbol). There are three different symbol tables available on the
next page. The symbols are special characters, symbols, and punctuation available for text entry.
MENU
Press (Options Menu) at the text editor screen to display text Options menu that allows you to select settings for text formatting
and characteristics.
Press (Left), (Right), (Down), or (Up) navigation key to move the cursor within text. To remove unwanted characters,
press CLR (Clear/Back) key. Remove a single character or space to the left of the cursor with the Clear Mode set as “Backspace” in Edit
settings. Remove a single character or space to the right of the cursor with the Clear Mode set as “Delete” in Edit settings.
The maximum number of characters is defined as the number of single-byte characters (alphanumeric characters, etc.) allowed in a
field/description. If a double or triple byte character such as a special symbol is used, the number of characters allowed will vary
accordingly.
(permanent
Normal Text (ABC)
At the text editor screen, press Softkey 1 (Mode) until the ABC appears above the Softkey 1 indicator. ABC text entry is also known as
multi-tap entry. Each number key press contains more than one letter and successive presses are needed to obtain the desired letter.
Press a number key that contains the desired letter. The available characters for the pressed number key replace ABC above the Softkey
1 indicator until another number key is pressed.
Successive presses of the same number key displays the next available character on the text editor screen.
With the required character displayed when entering normal (ABC) text, press (Right) navigation key to move to the next character
position. If you wait for more than 1 second, the cursor moves one character to the right automatically.
Press 0 to create a space between words.
Numbers
At the text editor screen, press Softkey 1 (Mode) until the 123 appears above the Softkey 1 indicator on the display screen. Press the
number keys to enter the desired number(s).
50

T9 Text Entry
At the text editor screen, press Softkey 1 (Mode) until the T9 appears above the Softkey 1 indicator on the display screen.
T9 text entry is fast, easy and intuitive text input. Press one key per letter in a word. The phone predicts or guesses what you are writing.
For example, to enter the word “show,” spell out the word by pressing four keys: 7, 4, 6, and 9. T9
commonly used word matching that numeric entry sequence is “show.”
If more than one word shares the same numeric entry sequence, the most commonly used word displays highlighted. The number of
available words (for example, 1 of 11) displays beside the T9 above the Softkey 1 indicator. If the highlighted word is not the desired
word, press Softkey 1 (Prev) or Softkey 2 (Next) until the desired word displays.
Press 0 to insert a space after a word.
If the T9 word list does not contain the desired word:
Enter any characters till Softkey 2 (Next) indicator on the display screen changes to Softkey 2 (Spell?).
*
Press Softkey 2 (Spell?) to change the text editor into Spell mode. The text entry mode automatically becomes normal text
entry (ABC).
Press CLR (Clear/Back) to delete unnecessary letters and input the characters for the new word.
Press Softkey 1 (T9) to return to T9 text entry.
TM
text input recognizes that the most
Symbol Mode
In the symbol mode, the screen displays the available symbols (see the symbol screens below). Press the (Number Symbol) key in
text entry mode to turn On and Off the symbol mode. Press (Left), (Right), (Down), or (Up) navigation key to highlight
the desired symbol and press Softkey 1 (OK) or (Select). The required symbol displays on the text editor screen.
Make sure that the cursor is positioned where you want to input the symbol. If a word is highlighted in T9 text entry, move the cursor to
the end of the word. The symbol mode cannot be used if a word is highlighted.
The symbol screen on the left is used by 2 fields: To and Cc fields of New Email. The symbol screen in the center is used by 9 fields
and 3 text editor options: the To and Message fields of SMS; the To and Message fields of EMS; the To field of MMS; To, Subject, and
Message fields of New Email-SMS; Enter address field for Go to webpage; the Edit Text of MMS Composer Options menu; the Add
folder of Bookmark Options menu; and Edit title option of the S/W list menu. All other fields and text editor options use the symbol
screen on the right.
Used for To and cc fields Used by 9 fields and Used by all other fields
of New Email 3 text editor options and text editor options
51

Text Entry Options Menu
At any field to input information (except number fields), press (Select) to display the text editor screen. An Options menu is
available at the text editor screen that allows:
l
Color, format, and alignment changes of the text.
l
Highlight mode turned On and Off to copy, cut, delete a word, paragraph or all.
l
Paste what is copied in the highlight mode.
l
Create and insert canned text.
l
Inserting a graphic from a provided list of emoticons.
l
Inserting a sound, or picture from a provided list.
l
Identify the T9 text entry language.
l
Edit setting changes.
Not all of the menu options are available for all field or message text entry. An option is grayed out when it is not available for text entry.
All options of the text entry Options menu are available only for EMS messages.
Text Color
At the text editor screen,
MENU
Press (Options Menu) and 1 to display the Text Color screen.
*
Press (Left), (Right), (Down), or (Up) navigation key to highlight the desired text color or background color and
press (Select).
Press Softkey 1 (OK) to save the changes or press Softkey 2 (Cancel) to cancel the changes and return to the text editor
screen.
Text Format
At the text editor screen,
*
MENU
Press (Options Menu) and 2 to display the Text Format screen.
Highlight the Font field and press (Left) or (Right) navigation key to cycle the font names.
Highlight the desired Text Format field and press (Select) to check or uncheck the text
format box.
Press Softkey 1 (OK) to save the changes or press Softkey 2 (Cancel) to cancel the
changes and return to the text editor screen.
Text Alignment
At the text editor screen,
*
MENU
Press (Options Menu) and 3 to display the Text Alignment screen.
Highlight the desired Text Alignment field and press (Select). Radio button for the field
is On.
Press Softkey 1 (OK) to save the changes or press Softkey 2 (Cancel) to cancel the
changes and return to the text editor screen.
52

Text Paste
After selecting the text in the Highlight mode that was copied or cut (explained in the next topic), return to the text editor screen. At the
text editor screen:
Use the navigation keys to place the cursor where the text is to be inserted/pasted.
*
MENU
Press (Options Menu) and 4 to insert/paste the text.
Continue with text entry.
Text Highlight
Highlight mode provides an Options menu to:
l
Change the text color or text format of selected text.
l
Copy or cut selected text in highlight mode to be inserted/pasted (explained in previous topic) into the text editor screen.
l
Delete selected text.
l
Highlight a word, paragraph, or all text.
At the text editor screen,
MENU
Press (Options Menu) and 5 to display the text editor screen in Highlight mode.
*
To move the cursor without highlighting, press Softkey 1 (Off) turn Off the highlight mode. Once the cursor is positioned, press
Softkey 1 (On) to turn the highlight mode On. (See Flag.)
Press (Left) or (Right) navigation key to highlight the word(s) or paragraph(s) or position the cursor.
With the selected text highlighted (a word, paragraph, or all text), press (Options Menu) to display the Highlight mode
MENU
Options menu and input the corresponding number:
1 To change the text color of the selected text on the text editor screen.
2 To change the text format of the selected text on the text editor screen.
3 To copy the selected text.
4 To cut/remove the selected text where it is located on the text editor screen.
5 To delete the selected text from the text editor screen.
With the cursor positioned and highlight mode turned Off (the Softkey 1 indicator displays On), press (Options Menu) to
MENU
display the Highlight mode Options menu and input the corresponding number:
6 To highlight the word that the cursor is positioned within
7 To highlight the paragraph that the cursor is positioned within on the text editor screen.
8 To highlight all text on the text editor screen.
Press CLR (Clear/Back) to end highlight mode and return to the text editor screen.
O
When the highlight mode is turned
On, the Softkey 1 indicator displays
Off. When the highlight mode is
turned Off, the Softkey 1 indicator
displays On. Use Softkey 1 to
toggle highlight mode On/Off.
Selected text (a word, paragraph, or all text) that has been copied or cut may be pasted within the same text editor screen, a new
message, a new Email, or application description field (Scheduler, To Do, or Notepad). Follow the instructions provided in the previous
topic Text Paste.
53

Text Object
The Insert object menu provides a list of canned text items, sounds, animations, pictures , and emoticons that may be added to the text
editor screen. Canned text may be created and saved to add to the text editor screen.
At the text editor screen:
Position the cursor at the location to add an object.
*
MENU
Press (Options Menu) and 6 to display the Insert object menu. Input the corresponding number:
1 To display the Add Quick text screen with a list of canned text.
2 To display the Sound list screen.
3 To display the Picture Files screen.
4 To display the Animations screen.
5 To display the Emoticons screen.
6 To display the Pictograph screen.
Use the navigation keys to highlight the desired object in the list.
Press Softkey 1 (Preview) to view the object. Press CLR (Clear/Back) or Softkey 2 (Stop/Cancel) end viewing and return to
the previous list screen. (See Flag.)
With the object highlighted in the list screen, press (Select) to return to the text editor screen and the object is inserted.
In the Preview screen for sounds, pictures, animations, and pictographs, press (Select) or Softkey 1 (Insert) to return to the
text editor screen and the object is inserted.
At the Emoticon screen, use the navigation keys to highlight the desired object and press (Select) or Softkey 1 (OK) to
return to the text editor screen and the emoticon is inserted.
Canned text provides a list of items to be added to the Add Quick Text list. The Quick Text menu provides options to add new canned
text items, edit and delete existing canned text items, and restore the list to the original default canned text list.
Cannot preview Emoticons.
O
To add, edit, delete or restore canned text, begin at the text editor screen and:
*
MENU
Press (Options Menu), 6, and 1 to display the Add Quick Text list screen.
Highlight the canned text item to edit or delete.
MENU
Press (Options Menu) to display the Quick Text menu.
Input 1 to display the Create Quick Text screen or 2 to display the Edit Quick Text screen. Press Softkey 1 (Mode) to select the
text entry mode (ABC, 123, or T9) and input the text. Press (Select/Save) to save the entry and return to the Add Quick Text
screen. Press Softkey 2 (Cancel) to cancel the add or edit and return to the Quick Text menu.
Input 3 to delete and a decision screen displays, “Delete selected text message?” Press Softkey 1 (Delete) to confirm the
deletion or press Softkey 2 (Cancel) to cancel the deletion.
Input 4 to restore and a screen displays, “Restore defaults: This will destroy your personal text messages!” Press Softkey 1
(OK) to confirm restoring to the default list and a busy screen displays, “Please wait while default text messages are restored...”
A confirmation screen displays, “Default text restored.” Press Softkey 2 (Cancel) to cancel restoring the default list.
54

T9 Text Language
MENU
Press (Options Menu) and 7 to display the T9 language screen.
*
Input the number or use the navigation keys to highlight the preferred language and press (Select) to return to the text editor
screen.
Text Edit Settings
MENU
Press (Options Menu) and 8 to display the Edit Settings screen.
*
Use the navigation keys to highlight the type of write mode and clear mode of text entry and press (Select) to select the radio
button.
Press Softkey 1 (OK) to save the settings and return to the text editor screen.
55

Messaging and Voice Mail
Accessing Messages
To access the Message Center:
Press Softkey 2 (Message) or Softkey 1 (Main) and 2 to display the Message center folder screen or
*
press Softkey 1 (Main) and press (Left), (Right), (Up), or (Down) navigation key to highlight Message center
option 2 with a box frame. The Message center menu icon becomes animated. Press (Select) to confirm your choice. (See
Flag.)
To select a Message center folder option:
Press the Message center option number (1 through 8) or press (Up) or (Down) navigation key to move the highlight
*
over the desired Message center folder option and press (Select).
At message fields that require text entry, enter the first few letters in the field and the text editor screen displays or press (Select) at
a highlight field to display the text editor screen.
Message Center Overview
The 515 supports a number of message services. A message icon appears on the Idle screen for the type of new message received.
l
SMS (Short Message Service) allows you to send short text messages to a phone number. To send a SMS message, the
destination phone number must be a wireless phone with SMS service subscription. No images or graphics are sent with a SMS
message. The maximum length of the message you send depends on the number of “linked messages” established in the
SMS/EMS settings. (See Flag.)
l
EMS (Enhanced Messaging Service) is similar to SMS and allows you to send messages to another wireless phone with EMS
service subscription. In your EMS message you can include formatted text, small graphics, or musical sounds. The maximum
length of the message you send depends on the number of “linked messages” established in the SMS/EMS settings. (See Flag.)
l
MMS (Multimedia Messaging Service) is a service that allows you to send text messages with attached graphics, audio, and slide
presentations. The total data size cannot exceed 100 KB including the message text. When you receive an MMS message, you are
notified by a message from the MMS center. You can either automatically or manually receive the contents of an MMS message.
When sending MMS messages with slides, each slide may contain an image, sound, and text. You may specify the media’s timing
before the next slide displays. (See Flags.)
l
Email is an Internet message sent to an Email address. The total data size of an Email cannot exceed 10K. (See Flag.)
l
Broadcast messages are sent from the network service provider regarding the network service.
l
Voice Mail allows unanswered calls to be forwarded to the voice mail service provided by your network. When you next power on
your wireless phone, the network sends you a signal informing you that you have voice mail waiting and the voice mail message
icon is displayed on the Idle screen. Access your voice mail center and listen to your messages.
The 515 wireless phone stores a maximum of 500 messages.
SMS and EMS messages allow a phone number or an Email address entered in the To field. MMS messages allow a phone number or
an Email address entered in the To field.
Message center menu icon:
O
O
SMS and EMS messages allow a
phone number or an Email address
entered in the To field. SMS and
EMS with an Email address are not
sent as Emails; they are sent as a
message.
O
MMS messages allow a phone
number or an Email address
entered in the To field.
O
MMS supports SMIL (Synchronized
Multimedia Integration Language) to
allow presentation slides like on a
computer.
O
Emails allow only an Email address
entered in the To field.
56

Message Center Folders
The different folders of the Message center are:
(1) Inbox Displays a list of incoming/received messages.
(2) Drafts Displays a list of drafted messages stored in the folder.
(3) Outbox Displays a list of outgoing messages that have been specified to “send later.”
(4) Sent Displays a list of sent messages.
(5) Recycled Displays a list of deleted messages.
(6) User 1 Displays a list of selected messages that the user has moved to the folder (user defined storage folder).
(7) User 2 Displays a list of selected messages that the user has moved to the folder (user defined storage folder).
(8) Voice Activates the voice mail options.
(See Flags for more folder information.)
To display the messages listed in a message folder:
Press the corresponding number key or highlight the folder item and press (Select) to display the corresponding message
*
center folder list screen.
To change the folder names from User 1 and User 2:
*
Highlight the User 1 or User 2 folder name.
MENU
Press (Options Menu) and 1 to display the Rename screen.
Press CLR (Clear) to remove the existing folder name before adding text for the new name.
The number of messages in the
O
highlighted folder displays above
the softkey area.
If a message is in a folder, an icon
O
displays on the left side of the folder
name.
O
The number of unread messages
displays at the right side of the
folder name.
Input the new name for the user folder and press (Select) to save the change and return to the Message center Options
menu.
Message Center Icons
The following icons represent the number of read and unread messages in the Message center folders.
Displays to the left of the folder name indicating unread messages in the folder.
Displays to the left of the folder name indicating read messages in the folder.
Displays above the left softkey bar providing the total of unread messages in a folder when the folder name is highlighted.
Displays above the left softkey bar providing the total of read messages in a folder when the folder name is highlighted.
O
If folder does not contain any
messages, the folder name is
grayed out (disabled).
Top Dog 3/30
It is time to go.
57

Message Center Options Menu
To display the message center Options menu:
Press Softkey 2 (Message) or Softkey 1 (Main) and 2 to display the Message center folder screen.
*
MENU
Press (Options Menu) and the option number of the desired function.
The following describes the menu options that display for the message center Options menu.
(1) Rename folder Renames the User 1 and User 2 folders. (See Flag.) These folders are used to store messages.
(2) View all Displays all the messages in all folders on the same list.
(3) View msging status Displays the current number of messages stored in your phone and their total data size.
(4) Email settings Changes the settings for Email Messaging function.
(5) SMS/EMS settings Changes the settings for the SMS/EMS Messaging function.
(6) MMS settings Changes the settings for the MMS Messaging function.
(7) Voice mail number Displays and edits the mailbox number in the voice mail center for voice mail function.
(8) Broadcast Allows access to read broadcast messages and change the broadcast message settings.
User 1 and User 2 folders may be
O
renamed.
Top Dog 3/30
2143336543 3/28
Jane Doe 3/27
4697664566 3/27
O
User 1 folder renamed to Special.
58

Message Settings
When you receive the 515 wireless phone, some of the message settings (Email, SMS/EMS, MMS, and voice mail) have been
pre-configured by AT&T Wireless. Contact your AT&T Wireless provider for assistance to add or change message or voice mail settings.
Email Settings
Some of the Email settings have been pre-configured by your network service provider.
To establish or edit the Email settings :
Press Softkey 2 (Message) or Softkey 1 (Main) and 2 to display the Message center folder screen.
*
MENU
Press (Options Menu),4,and 1 for Account 1 (first Email account) or 2 for Account 2 (a second Email account) to display
the Account details screen.
Highlight each field and press (Select) to display the text editor screen. Input your Internet Account name, user Name, Email
address, and Reply to address information. Press (Select) to return to the Account details screen.
Press Softkey 1 (Next) to display the first POP3 screen. Input the POP3 server and POP3 port override information.
Press (Down) navigation key to highlight Leave on server and press (Select) to check or uncheck the box. (See Flag.)
Press Softkey 1 (Next) to display the second POP3 screen. Input the POP3 user id and password.
Press (Down) navigation key to highlight Delete blacklisted and press (Select) to check or uncheck the box. (See Flag.)
Press Softkey 1 (Next) to display the first SMTP screen. Input the SMTP server and port override information.
Press (Down) navigation key to highlight Authentication and press (Select) to check or uncheck the box. (See Flag.)
Press Softkey 1 (Next) to display the second SMTP screen.
If the SMTP user id and password are different from the POP3 user id and password, input the SMTP user id and password.
If the SMTP user id and password are the same as the POP3, leave the fields blank and press (Down) navigation key to
highlight Same as POP3. Press (Select) to check the box.
Press Softkey 1 (OK) to save the Email settings or changes and return to the Email settings menu. Press Softkey 2 (Cancel) at
any of the four Email setting screens to cancel changes and return to the Email settings screen.
With the Leave on server box
O
checked, a copy of the message is
left on the server for collection by
another mail client or server. With
the box unchecked, a copy of a
received Email is not left on the
server.
O
Blacklisted Emails are Email
addresses that are blocked and
cannot be received from the
network. With the Delete Blacklisted
box checked, blacklisted Emails are
automatically removed and deleted
off the server. With the box
unchecked, blacklisted Emails
remain on the server.
O
With the Authentication box
checked, you must enter your user
ID and password every time you
send an Email. This box must be
checked if the SMTP server is
configured to require user name
and password.
59

To establish the Email settings (send account and check account defaults):
Press Softkey 2 (Message) or Softkey 1 (Main) and 2 to display the Message center folder screen.
*
MENU
Press (Options Menu),4,and 4 to display the Default account screen.
Highlight Account 1, Account 2, or SMS and press (Select) to select the default send setting. If Account 1 or Account 2
is selected as the default account, the New Email screen displays when creating a new Email. If SMS is selected as the default,
the New Email-SMS screen displays when creating a new Email. (See Flag.)
Highlight Account 1, Account 2, or Both and press (Select) to select the default check account. The network server
checks for new messages in the selected account when Softkey 1 (Check) is pressed at the Message center screen.
Press Softkey 1 (OK) to save the default account setting.
To establish the send option for Emails:
Press Softkey 2 (Message) or Softkey 1 (Main) and 2 to display the Message center folder screen.
*
MENU
Press (Options Menu),4,and 5 to display the Send option screen.
Highlight Send now or Send later and press (Select) to select the account as the default Email account. Press Softkey 1
(OK) to save the send setting.
SMS/EMS Settings
Some of the SMS/EMS settings have been pre-configured by your network service provider.
To establish or edit the SMS/EMS settings (See Flag.)
*
Press Softkey 2 (Message) or Softkey 1 (Main) and 2 to display the Message center folder screen.
MENU
Press (Options Menu) and 5 to display the first SMS/EMS settings screen.
Input the SMS center (the short message service center number responsible for the relaying, storing and forwarding short
messages), Email MDN and user Name.
Highlight Auto display and press (Select) to check or uncheck the box. (See Flag.)
Highlight Receipt request and press (Select) to check or uncheck the box. (See Flag.)
Press Softkey 1 (Next) to display the second SMS/EMS settings screen.
Input the maximum linked message (a number
between 1 and 32; default value is 4). (See Flag.)
Highlight the time period and press (Select) to
select the radio button for the validity period.
Press Softkey 1 (OK) to save the SMS/EMS settings
or changes and return to the Message center folder
list. Press Softkey 2 (Cancel) at either SMS/EMS
settings screen to cancel changes and return to the
Message center Options menu.
The SMS/EMS settings screen
O
provides the settings for both SMS
and EMS messages.
With the Auto Display box checked,
O
SMS messages automatically
display when received. With the box
unchecked, access Message Center
Folder to view SMS messages.
O
With the Receipt request box
checked, you receive a receipt that
a sent message was delivered. It
does not indicate whether the
recipient read the message, only
that the message was delivered.
O
A message may contain up to 160
characters. Messages exceeding
160 characters are cut into two or
more messages and linked to the
original message. The Max linked
msg field allows 1 to 32 splits/links.
60

MMS Settings
Some of the MMS settings have been pre-configured by your network service provider.
To establish or edit the MMS settings:
Press Softkey 2 (Message) or Softkey 1 (Main) and 2 to display the Message center folder screen.
*
MENU
Press (Options Menu) and 6 to display the first MMS settings screen.
Input the MMS Center (MMS service center number responsible for delivering MMS messages from you to the recipient), Proxy
server, and HTTP port.
Press Softkey 1 (Next) to display the second MMS settings screen.
Highlight the option Request and/or Make and press (Select) to check the box for the Delivery Report setting. (See Flag.)
Highlight the option Manual (when a MMS notification is received, manually retrieve the complete MMS message from the
service center) or Auto (the MSS notification and complete MMS message are automatically received) and press (Select) to
mark the radio button for the message receive setting. (See Flag.)
Press Softkey 1 (Next) to display the third MMS settings screen. (See Flag.)
Highlight a message size and press (Select) to select the radio button for the maximum message size.
Press Softkey 1 (Next) to display the fourth MMS settings screen. (See Flag.)
Highlight a time period and press (Select) to select the radio button for the validity period.
Press Softkey 1 (OK) to save the MMS settings or changes and return to the Message center Options menu. Press Softkey 2
(Cancel) at any of the four MMS settings screens to cancel changes and return to the Message center Options menu.
Request Delivery Report option: A
O
delivery report is received when a
MMS message is sent.
Make Delivery Report option: A
delivery report is sent to the sender
of a MMS message if the sender
has requested a delivery report.
The MMS notification contains the
O
sender’s ID, message size, date
sent, subject, etc.
O
The Receive message size
establishes the maximum kilobytes
to receive in MMS messages.
O
The validity period is the time that
the service center continues to
attempt to deliver a message until
the validity period expires.
61

Voice Mail Setting
To establish the settings for voice mail (See Flag.):
Press Softkey 2 (Message) or Softkey 1 (Main) and 2 to display the Message center folder screen.
*
MENU
Press (Options Menu) and 7 to display the Voice mail number screen.
Input the number to access voice mail and press Softkey 1 (OK) to save the voice mail setting or changes.
The PIN/password may be input with the voice mail number. Input a “P” (pause) before the PIN/password. Press and HOLD at least two
seconds the # key to input a pause, “P.” For a voice mail number with a PIN/password, input: voicemail number, P, and PIN/password.
When adding a password ending with “#” symbol, the final character cannot be “#.” It should be a “P.” Input the voice mail number
with a PIN/password number ending with “#” symbol as: voice mail number, P, PIN/password number, #, and P.
The international dialing “+” symbol may also be input, if needed. Press and HOLD at least two seconds the 0 key to input the “+”
symbol. For international traveling, input: +, international code, voice mail number, P, PIN/password number, #, and P.
Broadcast Settings
To establish Broadcast settings from the Message center folder screen (See Flag.):
Press Softkey 2 (Message) or Softkey 1 (Main) and 2 to display the Message center folder screen.
*
MENU
Press (Options Menu),8,and 2 to display the Auto display screen.
Highlight On for broadcast messages to display automatically on the Idle screen or highlight Off so that no broadcast messages
display automatically and press (Select) to select the radio button.
Press Softkey 1 (OK) to save the broadcast setting or changes and return to the Broadcast menu.
Voice Mail is SIM and network
O
provider dependent. Contact your
Service Provider for details of your
voice mail number, and any other
associated options.
Broadcast messages are from the
O
network provider.
To establish the filters for broadcast settings from the Message center folder screen:
*
Press Softkey 2 (Message) or Softkey 1 (Main) and 2 to display the Message center folder screen.
MENU
Press (Options Menu) ,8,and 3 to display the Filter screen.
Highlight the type of filter (All to filter all broadcast messages, None for no filters, or List to filter for specific broadcast
messages) and press (Select) to select the radio button.
If List is selected, a screen displays to enter a 3-digit code for the type of broadcast message to filter. Up to 5 codes may be
filtered.
Press Softkey 1 (OK) to save the filter setting or changes and return to the Broadcast menu.
To establish the language to receive broadcast messages from the Message center folder:
*
Press Softkey 2 (Message) or Softkey 1 (Main) and 2 to display the Message center folder screen.
MENU
Press (Options Menu),8,and 4 to display the Language screen.
Highlight the preferred language, press (Select) to place a checkmark in the box, and press Softkey 1 (OK) to save the
language setting or change.
O
If Authentication is turned On in the
Email settings, the Authentication
screen displays for you to input your
user identification and password. An
“*” displays for each character
entered in the Password field.
62

Checking New Messages
To check if new messages are in the Message center (See Flag.):
Press Softkey 2 (Message) or Softkey 1 (Main) and 2 to display the Message center folder screen.
*
Press Softkey 1 (Check). The Inbox is updated with the number of new messages. (See Flag.)
When Softkey 1 (Check) is selected, the wireless phone is connected to the Email server. First, messages in the Outbox folder are
sent. These are the messages that were set to “send later” and messages that have failed to be sent. Second, a check is made for any
new messages in the Email server. Any new messages are updated in the Inbox folder.
To check and listen to voice mail messages:
Press Softkey 2 (Message) or Softkey 1 (Main) and 2 to display the Message center folder screen.
*
Press 8 and 1 to dial your wireless phone number to access the voice mail service center. A recorded guidance answers the
phone. Follow the directions provided to retrieve your voice mail. (See Flag.)
The keypad shortcut to access voice mail messages is to press and HOLD 1.
Receiving and Reading Messages
The MMS Messaging services are only supported by GPRS. When the wireless phone is in an area outside the GPRS service area, you
can still receive the notification messages in the GSM service area. However, you can only receive the contents of the MMS message
within the GPRS service area.
When you receive an MMS message, the MMS center sends you a notification message. When the notification message is received, a
pop-up message appears. When ‘Set auto receive’ setting is set as “Auto” (the default), the contents of the MMS message are
downloaded automatically from the MMS center. When ‘Set auto receive’ setting is set as “Manual,” only the notification message is
saved in the Inbox.
If the message settings have not
O
been established, the Email Account
details screen displays to establish
the settings.
Voice Mail is SIM and network
O
provider dependent. Contact your
Service Provider for details of your
voice mail number, and any other
associated options.
To manually receive MMS messages after receiving the notification message:
*
Press Softkey 2 (Message) and 1 to display the Inbox message center folder list screen.
Highlight the MMS notification message and press (Select) to display the notification message.
Press (Select) to download the message contents from the MMS center and receive the MMS message in the message view
screen.
To read new messages from the Message Center Folder when the message icon displays on the screen:
*
Press Softkey 2 (Message) and 1 to display the Inbox message center folder list screen.
Highlight a message and press (Select) to display the message in the message view screen.
To read broadcast messages from the Message Center Folder:
*
MENU
Press (Options Menu),8,and 1 to display the message view screen.
If there are no broadcast messages, the activity fail screen displays stating, “No messages.”
Top Dog 3/30
63

Displaying Next/Previous Message
When reading messages in the Message view screen, while the message text displays:
Press Softkey 1 (Prev) to display the previous message in the folder list and press Softkey 2 (Next) to display the next message in
the folder list.
Phone Number or Email in Message Text
Making a Call to a Phone Number
Highlight an item in a message in a message center folder list and press (Select) to display the message in the message
*
view screen.
Press (Right) navigation key to highlight the phone number [if there is more than one phone number, press (Right) or
(Left) navigation key to highlight the desired phone number]. (See Flags.)
MENU
Press (Options Menu) and 2 to display the number in the dial edit screen.
Press Softkey 1 (Call) to dial the phone number.
Press (Right) navigation key to
O
start and search forwards in a
message or Email for a phone
number or Email address.
Adding Email to Blacklist
To add Email address to the blacklist:
Highlight an item in a message center folder list and press to display the message in the message view screen.
*
Press (Right) navigation key to highlight the Email address [if there is more than one, press (Right) or (Left)
navigation key to highlight the desired Email address]. (See Flags.)
MENU
Press (Options Menu) and 2 to add the Email address to the blacklist.
Creating SMS or Email Message
To create a new message from a phone number or Email in the message text:
*
Highlight an item in a message center folder list and press (Select) to display the message in the message view screen.
Press (Right) navigation key to highlight the phone number or Email address [if there is more than one, press (Right) or
(Left) navigation key to highlight the desired phone number or Email address]. (See Flags.)
MENU
Press (Options Menu) and 3 to display the New SMS screen for a phone number or display the New Email screen for an
Email address.
Press (Left) navigation key to
O
search backwards in a message or
Email for a phone number or Email
address.
O
Press CLR (Clear/Back) key to end
the number search and exit the
message or Email.
O
Option menu to display depends on
whether a phone number or Email is
highlighted in message text.
64

Launch Browser
To launch the browser from an URL (Uniform Resource Locator) in the message text:
Highlight an item in a message center folder list and press (Select) to display the message in the message view screen.
*
Press (Right) navigation key to highlight the URL [if there is more than one, press (Right) or (Left) navigation key to
highlight the desired URL].
Press (Select) or press (Options Menu) and 1 to launch the browser.
MENU
Message Folder List Options Menu
While viewing your messages at the a message folder list screen, you can move a message, reply to a single message, reply to all the
messages, forward a message, view the details of a message, delete a single message, delete all messages, sort the messages as you
prefer, and change the number of messages that display on the page through the message folder list Options menu. Each message
folder list has an Options menu except voice mail.
To display the message folder list Options menu from the message list screen:
Press Softkey 2 (Message) or Softkey 1 (Main) and 2 to display the Message center folder screen.
*
Press the Message center option number (1 through 7; option 8 is not included in this procedure) or use the navigation keys to
highlight a folder name and press (Select) to display the message center folder list screen.
MENU
Press (Options Menu) and the option number to complete the desired function.
The following describes each function of the menu options that display for the message list Options menu.
(1) Move Message Moves the highlighted message to another folder or the SIM card.
(2) Reply Displays Reply with the sender of the highlighted message in the To field.
(3) Reply to all Displays Reply with all the addresses in the highlighted message (except your own) in the To field.
(4) Forward Displays Forward with the message text of the highlighted message in Message field.
(5) View details Displays detailed information of the highlighted message. The detailed information includes From, To,
CC, Date, Msg. type, Size, and Folder depending on the type of highlighted message.
(6) Delete Message Delete the highlighted message and moves it to the Recycled folder.
(7) Delete all Deletes all the messages in the current mailbox and moves them to the Recycled folder.
(8) Sort message Sorts the messages in Ascending/Descending order of selected sorting type: Date, Name, Subject,
Read/Unread, and Size.
(9) Msgs. per page Changes the number of messages to display on the Message List screen. Select 4 messages or 8
messages.
65

Message View Options Menu
While reading your messages at the message view screen, you can move a message, reply to a single message, reply to all the
messages, forward a message, view the details of a message, delete a single message, delete all messages, view the attachment list,
turn the highlight mode On, and change the number of messages that display on the page through the message view Options menu.
To display the message view Options menu from the message view screen:
Press Softkey 2 (Message) or Softkey 1 (Main) and 2 to display the Message center folder screen.
*
Press the Message center option number (1 through 7; option 8 is not included in this procedure) or use the navigation keys to
highlight a folder name and press (Select) to display the message center folder list screen.
Highlight a message in the list and press (Select) to display the message view screen.
MENU
Press (Options Menu) and the option number to complete the desired function.
The following describes each function of the menu options that display for the message view Options menu.
(1) Move Message Moves the highlighted message to another message folder (Inbox, User 1, or User 2) or copy to the
SIM card.
(2) Reply Displays Reply with the sender of the highlighted message in the To field.
(3) Reply to all Displays Reply with all the addresses in the highlighted message (except your own) in the To field.
(4) Forward Displays Forward with the message text of the highlighted message in Message field.
(5) View details Displays detailed information on the highlighted message. The detailed information includes From, To,
CC, Date, Msg. type, Size, and Folder depending on the type of highlighted message.
(6) Delete Message Delete the highlighted message and moves it to the Recycled folder.
(7) Attachments Displays a list of attachments.
(8) Highlight mode Turns the highlight mode On.
(9) Save object Save the object or attachment received in a message.
66

Creating and Sending Messages
SMS and EMS
To create and send SMS or EMS message from the Idle screen:
Press Softkey 2 (Message), Softkey 2 (New), and 1 to display the New SMS screen or 2 to display the New EMS screen.
*
Use the navigation keys to highlight the To field.
Input the recipient’s number or press (Phonebook) to access the last viewed Phonebook. Highlight the desired phonebook
entry and press (Select) to display the phone numbers and Email addresses associated with the entry in the details screen.
Highlight the desired number and press (Select) to return the new message screen with the selected number placed in the
To field.
Input the message text (refer to text entry on page 50).
Press Softkey 1 (Send) to send the message and save in the Sent folder.
MMS
MMS (Multimedia Messaging Service) allows a maximum of 5 lines of text located at the top or at the bottom of the composed
message with attached graphics, audio, and/or images. The message may be set up in a single composed screen or set up as a slide
presentations with more than one screen. It is not designed for only text messages because of the maximum 5 lines per composed
screen.
*
Press Softkey 2 (Message), Softkey 2 (New), and 3 to display the New MMS screen.
Use the navigation keys to highlight the To field and press (Select) to display the text entry screen.
Input the recipient’s number or press (Phonebook) to access the last viewed Phonebook. Highlight the desired phonebook
entry and press (Select) to display the phone numbers associated with the entry in the details screen.
Highlight the desired number or Email address and press (Select) to return to the new MMS message screen with the
selected number placed in the To field.
Highlight the Subject field and press (Select) to display the text entry screen.
Input the Subject of the message (up to maximum of 90 characters) and press
(Select) to return to the new MMS message screen. The Subject field is also
displayed as the title on the Composer screen. (See Flag.)
Highlight the Message field and press (Select) to display the Composer
screen. Continue with the Slide/Screen Composition instructions.
O
The Subject field is displayed as the
title on the MMS composer screen.
If a subject is not entered, the title of
the screen is Composer.
67

Slide/Screen Composition
One or more slides/screens may be composed for the MMS message. Each slide may contain a graphic/image, sound, and up to 5
lines of text. The graphic image becomes smaller, adjusting to the screen to make room for text when text is added.
To compose a single slide:
MENU
Press (Options Menu) to display the first page of the Edit menu (1/2).
*
Highlight Attach image or Attach audio and press (Select) or press the number key of the desired option to attach the type of
desired media. The appropriate image or audio list screen displays.
Highlight the desired image or audio and press (Select) to return to the Composer screen with the selected image or audio.
MENU
Press (Options Menu) to display the first page of the Edit menu (1/2).
Highlight the Edit text option and press (Select) or press 1 to display the text editor screen. Input the text lines. (See Flag.)
Press (Select) to return to the Composer screen with the text lines displayed.
MENU
Press (Options Menu) to display the first page of the Edit menu (1/2).
Highlight the Change layout option and press (Select) or press 4 to display the Change layout screen. Highlight the
location/line number option and press (Select) or press the number key of the location (Top or BTM--bottom) and line
number to display on the Composer screen.
To change the slide time for the current slide to display during preview, continue with the next step. (See Flag.)
MENU
Press (Options Menu) to display the first page of the Edit menu (1/2). Press (Right) navigation key to display the
second page of the Edit menu (2/2). Highlight Slide time or press 4 to display the Set Slide Time screen. Slide time may be set
from 1 to 60 seconds. Input a two-digit number, 01 to 60, in the highlighted number field and press Softkey 1 (OK) to return to
the Composer screen.
Input only the number of lines of
O
text selected on the Change layout
screen. The extra text lines do not
display.
To compose additional slides:
*
MENU
Press (Options Menu) to display the first page of the Edit menu (1/2).
Highlight the Add slide option to add a slide after the current composed slide or Insert slide option to add a slide before the
current composed slide and press (Select). Or press the appropriate option number: 5 to Add slide after the current
composed slide or 6 to Insert slide before the current composed slide. The screen returns to the current composed screen.
Press (Left) navigation key if the slide was inserted or press (Right) navigation key if the slide was added. The
inserted/added blank slide displays in the Composer screen. These same navigation keys are used to display the previous or next
slide of the presentation in the Composer screen.
Follow the instruction steps to compose a single slide.
You may add slides up to the maximum size limit.
After finished composing the slide or slide presentation:
Press Softkey 1 (Preview) to view the slides. Each slide displays the specified length of time. Press Softkey 2 (Stop) to stop
the slide display. Press CLR (Clear/Back) to end the slide display and return to the Composer screen. (See Flag.)
Press (Select) to return to the New MMS screen. The Message field contains the MMS message with attachment icon.
To send the message now, press Softkey 1 (Send) and the busy screen displays stating, “Sending message. . . Please wait.”
The MMS message is saved in the Sent folder.
O
During preview, each slide may be
set to display a specified length of
time before displaying the next
slide. The default is 3 seconds.
O
If you are not satisfied with the slide
presentation, display the slide in the
Composer screen to be changed.
MENU
Press (Options Menu) to
display the Edit menu with options
to edit the slide.
68

MMS Edit Menu
The Edit options contains two screens. To display the Edit menu from the Composer screen:
MENU
Press (Options Menu) to display the first page of the Edit menu (1/2).
*
Press (Right) navigation key to display the second page of the Edit menu (2/2) or
press (Down) navigation key with the last option item on the first page highlighted.
With the second page of the Edit menu (2/2), press (Left) navigation key to return to
the first page of the Edit menu.
Highlight and press (Select) to complete the desired Edit option or press the number
key of the desired Edit option.
When at a Edit menu screen (1/2 or 2/2), press CLR (Clear/Back) to return to the
Composer screen.
Email Message
An Email can be sent as an Email or SMS. When the Email is sent as a SMS, the Cc field and any attachments are removed. To create
an Email from the Idle screen:
Press Softkey 2 (Message), Softkey 2 (New), and 4 to display the New Email or New Email-SMS screen. If the default send
*
setting is Account 1 or Account 2, the New Email screen displays when creating a new Email. If the default send setting is SMS,
the New Email-SMS screen displays when creating a new Email.
Highlight the To field and press (Phonebook) till the Phone phonebook displays. Highlight the desired entry, press
(Right) navigation key until the desired Email address displays at the bottom of the screen, and press Softkey 1 (To) to return to
the Email screen with the selected Email address placed in the To field. If a phone number is selected, (1) the New SMS screen
displays, not the New Email-SMS screen or (2) the New Email screen displays with the To field blank. The To field allows only
one Email address.
To input the recipient’s Email address that is not in the phonebook, press (Select) to display the text entry screen. Input the
Email address and press (Select) to return to the New Email-SMS or New Email screen.
For the New Email screen, highlight the Cc field. Follow the same instructions for the To field to obtain an Email address from
the phonebook or input Email addresses not in the phonebook. More than one Email address may be input for the Cc field.
Repeat this step to add more Email addresses. Leave the Cc field blank if not required. If a phone number is selected from the
phonebook, the Cc field does not accept it.
Highlight the Subject field and press (Select) to display the text entry screen. Input the Subject of the message (up to
maximum of 90 characters) and press (Select) to return to the Email screen.
Highlight the Message field and press (Select) to display the text entry screen. Input the message text (refer to text entry on
page 50) and press (Select) to return to the Email screen.
If an attachment is to be sent, highlight the Attachments field and press (Select) to display the Attachments screen. Refer to
Attachments on page 70 for more information.
To send the Email-SMS or Email message now, press Softkey 1 (Send) and the busy screen displays stating, “Sending
message. . . Please wait.” A copy of the sent message is saved in the Message center Sent folder.
To send the New Email message later (not New Email-SMS), press (Options Menu),2,and 2. Press Softkey 1 (Send)
MENU
and the Email is placed in the Outbox folder. The Email is sent the next time that you connect to the Email server by pressing
Softkey 1 (Check) at the Message center screen.
69

Attachments
Adding an Attachment
To add an attachment to an Email:
Highlight the Attachment field and press (Select) to display the Edit attachments screen.
*
Press the option number (1 through 4) or use the navigation keys to highlight an option and press (Select) to display the
appropriate attachments list.
Use the navigation keys to highlight the desired attachment and press (Select) to add the selected attachment to the Email. A
confirmation screen displays “Attachment added”and the Attachment screen displays with the file type icon and name.
To add another attachment to the Attachment screen, press (Options Menu) to display the Edit attachments screen. Repeat
the previous two steps.
If the attachment is too large, a rejection screen displays, “Size limit for attachments exceeded.” Press Softkey 1 (OK) to return
to the Attachments screen.
After attachment(s) has been added to the Attachment screen, press (Select) to return to the new message screen.
Previewing Attachments
To preview an item from the Attachments screen:
MENU
* Highlight an item. Press Softkey 1 (Preview) to view the attachment and press Softkey 2 (Dismiss/Stop) to end the preview. If
there is no Softkey 2 indicator, press CLR (Clear/Back) to return to the Attachment screen.
Deleting Attachments
To delete an attachment from an Email:
*
Highlight the Attachment field and press (Select) to display the Attachments screen.
Highlight the attachment item to be deleted and press (Options Menu) and 5. A confirmation screen displays “Attachment
deleted” and returns to the Attachments screen with the attachment item name removed from the list.
Saving Attachments
To preview and save
*
Press (Right) navigation key to highlight an attachment in the Email or press (Options Menu) and 7 to display the
Attachments screen with the attachment name listed.
To view an attachment before saving, highlight an attachment item in the list and press Softkey 1 (Preview) to display the
Preview screen. Press CLR (Clear/Back) to return to the Attachment list screen.
Press (Options Menu) and 6 to save the highlighted attachment. Sound or audio attachments are saved to the Music folder
of My downloads. Images and graphics attachments are saved to the Pictures folder of My downloads.
To save an attachment without previewing
*
Highlight the attachment in the message view screen. Press (Options Menu) and 9 to save the highlighted attachment.
an attachment received with an Email at the message view screen:
MENU
it:
MENU
MENU
MENU
70

New Message Options Menu
While creating a new message, you may change the message type. When creating a new Email message, you may change the send
option and the Email service (Account 1, Account 2, or SMS) to use to send the message. For MMS messages, you may set the
priority, specify the delivery date, or hide/clear your address from the messages. These tasks are completed through the new message
Options menu.
To display the Options menu when creating a new message at the New SMS, New EMS, New MMS, or New Email screen:
Press Softkey 2 (Message), Softkey 2 (New), and 1 for New SMS, 2 for New EMS, 3 for New MMS, or 4 or New Email. The
*
new message screen displays.
MENU
Press (Options Menu) and the option number to complete the desired function.
The following describes each function of the menu options that display for the new message Options menu and identifies the message
type that the option is available for use. If the option is not available for a message type, the option is disabled (grayed out) or does not
appear in the menu.
(1) Change msg. type (For Emails, SMS, and EMS Only) Changes the message type of the message being created
or edited.
(2) Send option (For Emails Only) Sets sending the Email now or at a specified date and time.
(3) Send using (For Emails Only) Sets the Email account.
(4) Priority (For MMS Only) Sets the priority from High, Normal, and Low for MMS messages.
(5) Delivery Date (For MMS Only) Sets the delivery date for MMS message at a specified date and time.
(6) Hide/clear address (For MMS Only) Hides your address when sending an MMS message.
Editing Messages
SMS, EMS, MMS, and Email message types in the Drafts and Outbox folders may be edited.
To edit a message:
*
Press Softkey 2 (Message) or Softkey 1 (Main) and 2 to display the Message center screen.
Press the Message center folder number: 2 for Drafts or 3 for Outbox, or use the navigation keys to highlight the Drafts or
Outbox folder name and press (Select) to display the selected folder list screen.
Highlight the message and press Softkey 1 (Edit) to display the screen to change the message.
Follow the same instructions for the message type in the topic “Creating and Sending Messages” (SMS and EMS on page 67,
MMS on page 67, Email-SMS on page 69).
71

Message Memory Maintenance
When the memory allocated for the message function is full, your phone cannot receive new messages until you move or delete the old
messages. To prevent the message memory from becoming full, it is recommended to regularly move or delete unwanted messages.
Moving Messages to Another Folder
To move a message to a new folder from the message center folder list
Press Softkey 2 (Message) or Softkey 1 (Main) and 2 to display the Message center folder screen.
*
Press the Message center folder number (1 through 7; option 8 is not included in this procedure) or use the navigation keys to
highlight a folder name and press (Select) to display the message center folder list screen.
Highlight the message and press (Options Menu) and 1 to display the Move message screen. Press the number
corresponding to the folder: 1 for Inbox, 2 for User 1, or 3 for User 2. A confirmation screen displays “Moved 1 msg(s).”
To move a message to a new folder from the message view screen:
Press Softkey 2 (Message) or Softkey 1 (Main) and 2 to display the Message center folder screen.
Press the Message center folder number (1 through 7; option 8 is not included in this procedure) or use the navigation keys to
highlight a folder name and press (Select) to display the message center folder list screen.
Highlight a message and press (Select) to display the message view screen. Press (Options Menu) and 1 to display
the Move message screen. Press the number corresponding to the folder: 1 for Inbox, 2 for User 1, or 3 for User 2. A
confirmation screen displays “Moved 1 msg(s).”
Moving Messages to SIM
MENU
MENU
To move a message to the SIM memory from the message center folder list:
*
Press Softkey 2 (Message) or Softkey 1 (Main) and 2 to display the Message center folder screen.
Press the Message center folder number (1 through 7; option 8 is not included in this procedure) or use the navigation keys to
highlight a folder name and press (Select) to display the message center folder list screen.
Highlight the SMS or EMS message and press (Options Menu) and 1 to display the Move message screen. Press 4 to
copy to the SIM and a confirmation screen displays “Copied 1 message.” (See Flag.)
To move a message to the SIM memory from the message view screen:
*
Press Softkey 2 (Message) or Softkey 1 (Main) and 2 to display the Message center folder screen.
Press the Message center folder number (1 through 7; option 8 is not included in this procedure) or use the navigation keys to
highlight a folder name and press (Select) to display the message center folder list screen.
Highlight a message and press (Select) to display the message view screen.
MENU
Press (Options Menu) and 1 to display the Move message screen. Press 4 to copy to the SIM and a confirmation screen
displays “Copied 1 message.”
When a message is copied to the SIM memory, the message icon changes (See Flag.), the original message is stored in the Inbox
folder, and a copy of the message is placed in the Drafts folder.
When a message stored in SIM memory (displayed in Inbox or Drafts folder) is moved to any other folder, the message is moved to the
phone memory and removed from the SIM memory.
MENU
O
Only SMS and EMS messages can
be copied to SIM. Emails and MMS
messages cannot be copied to SIM.
O
SMS/EMS stored in SIM icon:
SMS/EMS with attachment stored in
SIM icon:
72

Deleting a Message
To delete a message from the message center folder list screen:
Press Softkey 2 (Message) or Softkey 1 (Main) and 2 to display the Message center folder screen.
*
Press the Message center folder number (1 through 7; option 8 is not included in this procedure) or use the navigation keys to
highlight a folder name and press (Select) to display the message center folder list screen.
Use the navigation keys to highlight the message to be deleted and press Softkey 2 (Delete) and a confirmation screen displays
“Deleted 1 msg.” The deleted message is moved to the Recycle message center folder.
To delete a message stored in SIM:
Press Softkey 2 (Message) or Softkey 1 (Main) and 2 to display the Message center folder screen.
*
Press 2 to display the Draft message center folder . Use the navigation keys to highlight the SMS or EMS message stored in SIM
to be deleted.
Press Softkey 2 (Delete) and a message displays, “1 message is stored in SIM and cannot be recycled. Delete it permanently?”
Press Softkey 1 (Yes) to delete the message stored in SIM or Softkey 2 (No) cancel the deletion. When deleting SMS or EMS
messages stored in the SIM memory, these messages are not moved to the Recycle message center folder. They are deleted
permanently.
To delete a message from the message center folder list Options menu:
Press Softkey 2 (Message) or Softkey 1 (Main) and 2 to display the Message center folder screen.
*
Press the Message center folder number (1 through 7; option 8 is not included in this procedure) or use the navigation keys to
highlight a folder name and press (Select) to display the message center folder list screen.
Highlight the message to be deleted at the message center folder list screen.
MENU
Press (Options Menu) and 6 to delete the message and a confirmation screen displays “Delete 1 msg.” The deleted
message is moved to the Recycle message center folder.
To delete a message from the message view screen:
*
Press Softkey 2 (Message) or Softkey 1 (Main) and 2 to display the Message center folder screen.
Press the Message center folder number (1 through 7; option 8 is not included in this procedure) or use the navigation keys to
highlight a folder name and press (Select) to display the message center folder list screen.
Highlight a message and press (Select) to display the message view screen.
MENU
Press (Options Menu) and 6 to delete the message and a confirmation screen displays “Delete 1 msg.” The deleted
message is moved to the Recycle message center folder.
73

Deleting All Messages
To delete all messages in message center folder:
Press Softkey 2 (Message) or Softkey 1 (Main) and 2 to display the Message center folder screen.
*
Press the Message center folder number (1 through 7; option 8 is not included in this procedure) or use the navigation keys to
highlight a folder name and press (Select) to display the message center folder list screen.
MENU
Press (Options Menu) and 7 to delete all the messages in the folder and a confirmation screen displays stating the number
of messages deleted. The deleted messages are moved to the Recycle message center folder.
Deleting Messages Permanently
To completely remove messages permanently:
Press Softkey 2 (Message) to display the Message enter folder screen.
*
Press 5 to display the Recycled message center folder list.
Highlight a message item and press (Options Menu) and 6 to permanently delete the one message or 7 to permanently
delete all the messages in the Recycled folder. A decision screen displays, “Remove msg(s) permanently?”
Press Softkey 1 (Yes) to confirm the permanent deletion or Softkey 2 (No) cancel the deletion.
Restoring Messages
To restore messages that have been sent to the Recycle folder:
*
Press Softkey 2 (Message) to display the Message enter folder screen.
Press 5 to display the Recycled message center folder list screen.
MENU
The option to add to the Blacklist
O
only displays for MMS messages
and Email messages with an Email
address in the To field.
Highlight a message item and press Softkey 1 (Restore) to restore the message to its previous message center folder.
Adding Email to Blacklist
The Blacklist blocks specific Email addresses and those Emails are not downloaded to your wireless phone.
Adding to Blacklist
To add an Email to the Blacklist from the message view screen:
*
Press Softkey 2 (Message) or Softkey 1 (Main) and 2 to display the Message center folder screen.
Press the Message center option number (1 through 7; option 8 is not included in this procedure) or use the navigation keys to
highlight a folder name and press (Select) to display the message center folder list screen.
Highlight an Email message item or a MMS message with an Email address and press (Select) to display the message view
screen. (See Flag.)
Press (Right) navigation key to highlight the Email address in the To field [if there is more than one, press (Right) or
(Left) navigation keys to highlight the desired Email address].
MENU
Press (Options Menu) and 2 to add the Email address to the Blacklist.
74

To directly enter an Email address and add it to the Blacklist:
Press Softkey 2 (Message) or Softkey 1 (Main) and 2 to display the Message center folder screen.
*
At the Message center folder screen, press (Options Menu),4,and 3 to display the Blacklist screen.
MENU
Press Softkey 1 (Add New) to display the text editor screen.
Enter the Email address to blacklist and press (Select) to save the Email address to the Blacklist.
Editing a Blacklist Email
An Email address in the Blacklist may be edited.
Press Softkey 2 (Message) or Softkey 1 (Main) and 2 to display the Message center folder screen.
*
MENU
Press (Options Menu), 4 and 3 to display the Email blacklist screen.
Press (Up) or (Down) navigation key to move the highlight to the desired blacklisted Email address and press
(Select) to display the next Email blacklist screen.
Press Softkey 1 (Edit) to display the text editor screen.
Press CLR (Clear/Back) to remove any letters and input the correct information
Press (Select) to save the changes or press Softkey 2 (Cancel) to cancel any changes and return to the first Email blacklist
screen.
Deleting a Blacklist Email
An Email address may be removed from the Blacklist.
*
Press Softkey 2 (Message) or Softkey 1 (Main) and 2 to display the Message center folder screen.
MENU
Press (Options Menu), 4 and 3 to display the Email blacklist screen.
Press (Up) or (Down) navigation key to move the highlight to the desired blacklisted Email address and press
(Select) to display the next Email blacklist screen.
Press Softkey 2 (Delete) to display the decision screen, “Delete this entry?”
Press Softkey 1 (Yes) to confirm the deletion or press Softkey 2 (No) to cancel the deletion and return to the first Email
blacklist screen.
75

Clock
To access the Clock menu:
Press Softkey 1 (Main) and 3 to display the Clock menu or
*
press Softkey 1 (Main) and press (Left), (Right), (Up), or (Down) navigation key to highlight Clock option 3
with a box frame. The Clock menu icon becomes animated. Press (Select) to confirm your choice. (See Flag.)
To select a Clock menu option:
Press the Clock option number (1 through 8)or
*
press (Up) or (Down) navigation key to move the highlight over the desired Clock option and press (Select).
Remember to press CLR (Clear/Back) key to return to the previous screen or press (End) to exit the screen and return to the Idle
screen.
Show Clock
This option allows you to select the time that you prefer to display on the Idle screen. Your phone has the ability to store the time for two
time zones: Local is your home area and Remote is any other time zone in the world.
Press Softkey 1 (Main) , 3, and 1 to display the Show clock screen. A box (same color as the highlight bar) frames the
*
currently selected option number.
Press 1 to display the local clock, 2 to display the local and remote clocks, or 3 for no clock display or use the navigation keys
to highlight the desired clock option and press (Select/Save) to return to the Clock menu.
Setting Time
This options allows time to be displayed on the Idle screen in 12 or 24 hour format.
Clock menu icon:
O
Setting the Time
The time may be set from the Idle screen.
*
The time may be set from the Main Menu.
*
MENU
Press (Options Menu), 3, and 2 to display the Set time screen.
Press Softkey 1 (Main),3,and 2 to display the Set time screen.
76

Network Time
With ‘Use network time’ highlighted, press (Select) to choose the network time for the time setting. A checkmark is placed in
*
the box. (See Flag.)
Press (Down) navigation key to move to the Offset field and input the hours and minutes for the preferred time difference.
Press (Right) navigation key to move to ‘+’ and ‘-’ radio buttons.
Press (Up) or (Down) navigation key to select the radio button for an advanced time difference (+) or a behind time
difference (-).
Press Softkey 1 (OK) to store the time setting/time difference and return to the previous menu.
Local Time
If you are not using the network time for the local time:
Press (Down) navigation key to move to the Local time field and input the local time for the time setting.
*
Press (Right) navigation key to move to the am/pm radio buttons.
Press (Up) or (Down) navigation key and press (Select) to choose am or pm.
Press Softkey 1 (OK) to store the time setting and return to the previous menu.
Remote Time
*
Press (Down) navigation key to move to the Remote time field.
Key in the remote time for the time setting.
'Network date’ and ‘Network time’ is
O
sent to your phone from the network
provider and automatically updated.
If network date/time is not used, you
must manually input the date and
time that you want for local date and
time.
Press (Right) navigation key to move to the am/pm radio buttons.
Press (Up) or (Down) navigation key and press (Select) to choose am or pm.
Press Softkey 1 (OK) to store the time setting and return to the previous menu.
Setting the Date
The date may be set from the Main Menu or from the Options menu. (See Flag.)
*
Press Softkey 1 (Main),3,and 3 or press (Options Menu), 3, and 1 to display Set date screen.
With ‘Use network date’ highlighted, press (Select) to choose the network date for the date setting. A checkmark is placed in
the box beside ‘Use network date.’
If you are not using the network date:
*
Press (Down) navigation key to move to the Day field.
Key in the 2 digits for day of the month and press (Down) navigation key to move to the Month field.
Key in the 2 digits for month and press (Down) navigation key to move to the Year field.
Key in the 4 digits for year and press Softkey 1 (OK) to store the entered date.
MENU
O
The network date and network time
are the default settings.
O
If the year is greater than
12/31/2099 or earlier than
01/01/2002, an Invalid date screen
displays.
77

Setting the Alarm
Press Softkey 1 (Main) , 3, and 4 to display the Set alarm screen.
*
With the alarm set to “Off”, press (Left) navigation key to highlight “On” and press (Select).
Press (Down) navigation key to move Set time field. Input the required alarm time. Press (Right) navigation key move to
the am field and press (Down) or (Up) navigation key to highlight am or pm and press (Select).
Press (Down) navigation key to move to the Set alarm tone field and press (Select) to display the Alarm tone Screen.
Press (Up) or (Down) navigation key to highlight an Alarm tone. Press Softkey 1 (Play) to play the highlighted tone and
press Softkey 2 (Stop) to stop the tone sounding. Press (Select) to select the highlighted alarm tone or press CLR
(Clear/Back) without selecting a new alarm tone and return to the Set alarm screen.
Press (Down) navigation key to move to the Enter alarm text field and press (Select) to display the text editor screen.
Using the text entry procedures described on page 50, input the alarm text and press (Select) to return to the Set alarm
screen with the text in the Enter alarm text field.
Press Softkey 1 (OK) to save the alarm settings and return to the Clock menu.
Setting the Alarm Off
Press Softkey 1 (Main), 3, and 4 to display the Set alarm screen.
*
Press (Right) navigation key to scroll to “Off” radio button.
Press (Select) to turn Off the alarm.
Press Softkey 1 (OK) and return to the Clock menu.
Setting Auto On/Off
To set up specific times for your wireless phone to automatically power On or power Off:
*
Press Softkey 1 (Main) ,3,and 5 to display Set auto On/Off screen.
Press (Up) or (Down) navigation key to scroll to the On time Enable or Off time Enable fields.
Press (Select) for the On time or Off time to be set On. A checkmark is placed in the box beside Enable.
Press (Down) navigation key to move to the time entry field.
Input the clock time for the phone to automatically turn itself On or turn itself Off.
Press (Right) navigation key to move to the am/pm radio buttons.
Press (Up) or (Down) to select the radio button for am or pm and press (Select).
The power On time and Off time cannot be the same time. A rejection screen displays if both On time and Off time are the same.
Press Softkey 1 (OK) to store the automatic time On or time Off setting and return to the Clock menu.
78

To turn Off the automatic power On/Off settings:
Press Softkey 1 (Main) ,3,and 5 to display Set auto On/Off screen.
*
Press (Up) or (Down) navigation key to scroll to the On time Enable or Off time Enable fields.
Press (Select) for the On time and Off time to be set Off. The checkmark is removed from the box beside Enable.
Press Softkey 1 (OK) to store changed settings and return to the Clock menu. Auto power Off only occurs from the Idle screen.
If no action is performed when the power Off message displays, the phone powers down after one minute and turns Off.
Formatting the Date and Time
The factory default for time format is 12 hours.
To change the date/time format:
Press Softkey 1 (Main), 3, and 6 to display the Set Format screen.
*
Press (Up) or (Down) navigation key to highlight the preferred date format and press (Select).
Press (Up) or (Down) navigation key to highlight the preferred time mode and press (Select).
Press Softkey 1 (OK) to accept the date and time format beside the selected radio buttons and return to the Clock menu.
Setting Time Zone
To set up the time zone:
*
Press Softkey 1 (Main), 3, and 7 to display the Set time zone screen.
Press (Up) or (Down) navigation key to highlight the preferred time zone and press (Select) to place a checkmark
beside the selected time zone and the display returns to the Clock menu.
Setting Daylight Savings
To set up the daylight savings:
*
Press Softkey 1 (Main), 3, and 8 to display the Daylight savings screen.
Press (Up) or (Down) navigation key to highlight the seasonal time and press (Select) to fill the radio button beside
the selected seasonal time and the display returns to the Clock menu.
Press Softkey 1 (OK) to accept the daylight savings beside the selected radio button and return to the Clock menu.
The daylight savings time must be set correctly or Set time zone will show the wrong time zone. In all cases, the phone’s clock will be
set to the correct local time.
When the user changes either the daylight savings or the time zone setting, these changes affect the time displayed on the phone until
updated by the network provider (based on Operator preferences).
79

Web Browser
To access mMode menu:
Press Softkey 1 (Main) and 4 to display the mMode menu or
*
press and HOLD (Phonebook) or
press Softkey 1 (Main) and press (Left), (Right), (Up), or (Down) navigation key to highlight Web browser
option 4 with a box frame. The Web browser icon becomes animated. Press (Select) to confirm your choice. (See Flag.)
To select a mMode menu option:
Press the mMode option number (1 through 6) or press (Up) or (Down) navigation key to move the highlight over the
*
desired mMode option and press (Select).
To end the session on the Internet,
Press (End) key.
*
The Clear/Back key does not function as a back key or return to previous page in the web browser mode. When accessing the Internet or URL,
press the CLR (Clear) key to end the process to connect to the Internet or URL.
The Softkey area (located at the bottom of the screen) is different on the browser screens. Only an ”M” appears as the (Options
Menu) indicator (not Menu) and the navigation indicators (arrow points) display to show the directions that you may move the cursor,
move the highlight bar, or scroll within the screen.
Accessing the Internet
Accessing the Internet may be done by two methods:
l
Press Softkey 1 (Main) and 4 to display the mMode menu. Press 1 or with mMode Home option highlighted, press (Select).
l
Press and HOLD (Phonebook) and press 1 or with mMode Home option highlighted, press (Select).
mMode menu icon:
O
The ways to access the Internet through Internet connections stored in the wireless phone are:
l
Connect to URL in Bookmarks (Bookmarks)
l
Connect to a specific URL (Go to webpage and Enter address)
l
Connect to URL in Address history (Go to webpage and Address history)
l
Connect to URL which is in a Saved page (Saved pages)
l
Connect to the last webpage connected (Last address)
l
Connect to URL in a message
Connect to Bookmark
*
From the Idle screen, press Softkey 1 (Main), 4, and 2 [or press and HOLD (Phonebook) and press 2] to display the
Bookmark folder screen.
Use the navigation keys to highlight a Bookmark folder and press (Select) or input the corresponding bookmark folder
number to display the desired Bookmark folder list screen.
Use the navigation keys to highlight a bookmark item and press (Select) or input the corresponding bookmark item number
to access to the bookmark URL.
80

Connect to Specific URL
From the Idle screen, press Softkey 1 (Main),4,3,and 1 [or press and
*
HOLD (Phonebook); press 3and 1] to display the Enter address screen.
Highlight the Address field and press (Select) to display the text editor
screen. Use the text entry procedures on page 50 to enter the URL address and
press (Select) key to return to the Enter address screen.
Press (Down) navigation key to highlight the OK box and press (Select)
to access the specified URL.
Connect to Address History URL
From the Idle screen, press Softkey 1 (Main),4,3,and 2 [or press and HOLD
*
(Phonebook); press 3 and 2] to display the Address history screen.
Press (Up) or (Down) navigation key to highlight the desired URL. Press
(Select) and the Page address screen displays the URL.
Press (Down) navigation key to highlight OK and press (Select) to access the selected URL.
The last 9 websites accessed are saved to the address history list. When a new website is accessed, the website URL is added to the top
of the list and the oldest URL is removed.
Connect to URL in Saved Page
*
From the Idle screen, press Softkey 1 (Main),4,and 4 [or press and HOLD (Phonebook) and press 4] to display the
Saved pages screen.
Press (Up) or (Down) navigation key to highlight the saved page title and press (Select) or input the corresponding
saved page number to view the saved page.
Highlight the URL (if the saved page has an URL) and press (Select) to access the highlighted URL.
Connect to Last Webpage
*
From the Idle screen, press Softkey 1 (Main), 4, and 5 [or press and HOLD (Phonebook) and press 5] to connect to the
last webpage used.
Connect to URL in a Message
*
Press Softkey 2 (Message), highlight a message center folder and press (Select) to display the message center folder list.
Highlight the desired message or Email and press (Select) to display the message view screen.
Press (Right) navigation key to highlight the URL in a message or Email [if there is more than one, press (Right) or
(Left) navigation key to highlight the desired URL]. Press (Select) or press (Options Menu) and 1 to connect to the URL.
81

mMode Options Menu
Specific tasks may be completed while accessed to the Internet.
To display the first mMode Options menu:
Press Softkey 1 (Main), 4, and 1 [or press and HOLD (Phonebook) and press 1]to access the Internet.
*
Press (Options Menu) and the option number to complete the desired function.
The following describes each function of the menu options that display for the first Bookmark folder Options menu.
(1) Add bookmark Add the website URL to Bookmark folder.
(2) Bookmarks Display the Bookmark folder and Bookmark URLs.
(3) Save page Save the website URL to Saved pages.
(4) Enter address Go to a specified URL.
(5) Reload Reload or refresh the connected website.
(6) Save image Save an image file to My download Pictures. (See Flag.)
(7) Save phonebook Save a highlighted phone number, URL link, or Email to the phonebook.
(8) Compose message Compose a new Email with the connected webpage URL in the Message field.
To display the second mMode Options menu:
*
Press (Right) navigation key to go to the second mMode Options menu or highlight option 8 on the first page and press
(Down) navigation key to go to the second menu.
Press (Left) navigation key to return to the first menu or highlight option 1 on the second page and press (Up) to return to
the first menu.
Add bookmark
Bookmarks
Save page
Enter address
Reload
Save image
Save phonebook
Compose message
Title Info
Page address
Certification info
Load images
The following describes each function of the menu options that display for the second Bookmark folder Options menu.
(1) Title info Display the title and information regarding the connected website URL
(2) Page address Displays the URL for the website.
(3) Certification info Displays the certification information for the website URL.
(4) Load images Displays an image on the screen with load image setting On. The image does not display on the
screen with the load image setting Off.
O
Only one image file at a time is
displayed in the screen and may be
saved to Pictures in My downloads.
82

What Can I Download?
Your phone supports the downloading of software applications, games, sounds, and pictures.
Downloading Apps and Games
Applications and games that are Java based may be saved to Apps and Games in My downloads.
To download an application or game:
When you have found an application or game on a website, use the navigation keys to highlight the application or game file
*
name.
Press (Select) to download the app or game.
If the application or game is network server interactive, the N/W interactive screen displays. Press (Up) or (Down)
navigation key to highlight an option and press (Select) to turn On the radio button. The options are:
Always ask Each time an application/game is run on the wireless phone, the N/W Interactive screen displays for a
decision to interact or not interact with the network server.
Enable Each time an application/game is run, the application/game interacts with the network server.
Disable Each time an application/game is run, the application/game does not interact with the network server.
The application/game is saved to My downloads and a screen displays the message “Application downloaded. Open?” Highlight
Yes and press (Select) so you can begin immediately using the application/game. Highlight No and press (Select) to
return to the Application menu.
When downloading an application or game with Java programming, the Java icon displays briefly on the screen. Highlight Cancel
and press (Select) to cancel the downloading process.
Downloading Sounds
Sounds are saved to Music in My downloads and provided to the Ring Tune list. The selected sound/melody is played as a ring tune on
your wireless phone when you receive a call. Sounds may be attached to MMS messages and Emails.
The sound/melody files that have the following file extensions are supported and may be saved to the 515 wireless phone: .mmf, .mld,
and .midi.
To download a sound/melody:
*
When you observe a sound file link on the website, use the navigation keys to highlight the sound file link.
Press (Select) to display the sound file in the Data received screen.
To play a sound/melody:
To play the sound/melody, use the navigation keys to highlight Play and press (Select). The sound/melody plays. To stop the
sound/melody, press Softkey 2 (Stop) and return to the Data Received screen.
The name of the melody can be changed in My downloads.
Refer to page 29 to set up a Ring
L
Tune.
Refer to page 70 to attach a melody
L
to an MMS message or Email.
Refer to page 99 to allocate a Ring
L
Tune to identify a caller.
Refer to page 114 for the list of
L
music files in My Downloads.
83

To save the sound/melody to Music in My downloads:
Use the navigation keys to highlight Save and press (Select) to display the text editor screen displaying the name of the
*
sound/melody file.
To accept the same name, press (Select). A confirmation screen with “File saved” displays and the screen returns to the
Data received screen. To change the file name, press CLR (Clear/Back) to remove the name, input the preferred name for the
sound/melody file, and press (Select).
Downloading Pictures
A wallpaper is an image that is displayed as the background for your Idle screen. These pictures are a maximum of 65,536 colors and
you can download them to Pictures in My downloads.
A caller id picture is a picture that you assign to a person in your phonebook. When that person calls or sends you a text message, the
allocated picture appears on the phone showing you who is trying to contact you. The caller line id pictures are a maximum of 65,536
colors and you can download them to Pictures in My downloads.
Graphic files are saved to Pictures in My downloads. These picture files in My downloads are provided to the Wallpaper list and caller
line ID list. A selected picture in Wallpaper becomes the background of the display screen during Idle. The selected picture for caller
line id displays when the person calls or sends you a text message.
Pictures may be attached to MMS messages and Emails.
The graphic files that have the following file extensions are supported by and may be saved to the 515 wireless phone: .gif, .jpeg, .jpg,
.wbmp, and .png
To download an image for viewing:
*
When you observe an image file link on the website, use the navigation keys to highlight the image link.
Press (Select) to show the image file as a picture on the display screen.
To save the picture to Pictures in My downloads:
*
Press (Options Menu) to display the mMode Options menu.
If the picture is an in-line image or embedded on the webpage, the menu option 6 Save images is disabled (grayed out) and
cannot be saved to My downloads. If the picture is not embedded on the webpage, but is a referenced link, the picture can be
saved.
Press 6 to return to the displayed picture. The picture has a highlighted frame around it.
Press (Select) to display the text editor screen with the name of the image file.
To accept the same name, press (Select). A confirmation screen with “File saved” displays and the screen returns to the
displayed picture. To change the file name, press CLR (Clear/Back) to remove the name, input the preferred name for the picture
file, and press (Select).
The name of the image file can be changed in My downloads.
Refer to page 34 to set a picture as
L
the wallpaper background.
Refer to page 70 to attach a picture
L
to an MMS message or Email.
Refer to page 99 to allocate a
L
picture to identify a caller.
Refer to page 120 for the list of
L
pictures in My downloads.
84

NEC Site
The 515 wireless phone is also supported by the website at www.nechdm.com. You can access this site from your handset to select and
download content from the variety available. You do not need a computer to take advantage of these great new services.
For more details, visit www.nechdm.com on your computer or your wireless phone.
Bookmarks
Bookmarks are a list of your favorite website URL connections contained in a bookmark folder.
The folder “Bookmark” is the default folder name. This folder cannot be deleted or the folder name changed.
A total of 9 Bookmark folders are allowed. The Add folder option becomes disabled (grayed out) with 9 Bookmark folders. A total of 100
Bookmarks are allowed in all Bookmark folders.
To access the Bookmark folders:
Press Softkey 1 (Main), 4, and 2 [or press and HOLD (Phonebook) and press 2] to display the Bookmark folder screen.
*
Use the navigation keys to highlight the desired bookmark folder and press (Select) to display the Bookmark list screen.
Adding a Bookmark
To add a bookmark while you are accessing the Internet at the desired website,
Press (Options Menu) and 1 to display the decision screen, “Add to Bookmark?”
*
Use the navigation keys to highlight Yes and press (Select) to display the Bookmark folder screen or highlight No to cancel.
Use the navigation keys to highlight a Bookmark folder name and press (Select). A confirmation screen displays, “Bookmark
is added” and returns to the website.
Go to Bookmark
While accessing the Internet and you wish to go to the URL of a Bookmark:
*
Press (Options Menu) and 2 to display Bookmark folder screen (list of Bookmark folder names).
Use the navigation keys to highlight a Bookmark folder name and press (Select) to display the Bookmark list (list of
Bookmark URL in the selected folder).
Use the navigation keys to highlight a Bookmark and press (Select) to go to the Bookmark URL.
85

Bookmark Folder Options Menu
Specific tasks may be completed through the Bookmark folder Options menu.
To display the Bookmark folder Options menu:
Press Softkey 1 (Main), 4, and 2 [or press and HOLD (Phonebook) and press 2] to display the Bookmark folder screen.
*
Use the navigation keys to highlight the desired bookmark folder, press (Options Menu) and input the option number to
complete the desired function.
The following describes each function of the menu options that display for the Bookmark folder Options Menu.
(1) Add folder Add a new folder to the Bookmark folder.
(2) Edit folder name Change the name of the bookmark folder that is highlighted in the list.
(3) Registration info Display the total number of bookmarks in the selected bookmark folder.
(4) Delete folder Delete a Bookmark folder that is highlighted in the list.
(5) Delete all Delete all bookmark folders except the default “Bookmark” folder.
Bookmark List Options Menu
Specific tasks may be completed through the Bookmark folder list Options menu.
To display the Bookmark folder list Options menu from the Bookmark folder screen:
* Press Softkey 1 (Main), 4, and 2 [or press and HOLD (Phonebook) and press 2] to display the Bookmark folder screen.
Use the navigation keys to highlight the desired bookmark folder and press (Select) to display the Bookmark folder list
screen.
Use the navigation keys to highlight the desired bookmark, press (Options Menu), and input the option number to complete
the desired function.
Move bookmark
Edit title
Compose message
Copy address
Delete one
Delete selected
Delete all
Registration info
The following describes each function of the menu options that display for the Bookmark folder list Options menu.
(1) Move bookmark Move a selected bookmark item that is highlighted to a new bookmark folder.
(2) Edit title Change the name of a bookmark item that is highlighted.
(3) Compose message Compose a new Email with the Bookmark URL in the Message field..
(4) Copy address Copy the URL address. Refer to page 53 to copy and paste text.
(5) Delete one Delete the bookmark item that is highlighted.
(6) Delete selected Delete all the selected bookmark items in a bookmark folder.
(7) Delete all Delete all the bookmark items in the selected bookmark folder.
(8) Registration info Display the total number of the total number of bookmark items in the selected bookmark folder.
86

Deleting Bookmarks
To delete a specific bookmark:
Press Softkey 1 (Main), 4, and 2 [or press and HOLD (Phonebook) and press 2] to display the Bookmark folder screen.
*
Use the navigation keys to highlight the desired bookmark folder and press (Select) to display the Bookmark folder list
screen.
Use the navigation keys to highlight the desired bookmark and press (Options Menu) and 5 to display the decision screen,
“Delete.
Use the navigation keys to highlight Yes or No and press (Select). If Yes was selected, the bookmark is deleted and a
confirmation screen displays, “Deleted.”
To delete selected bookmarks in a folder:
Press Softkey 1 (Main), 4, and 2 [or press and HOLD (Phonebook) and press 2] to display the Bookmark folder screen.
*
Use the navigation keys to highlight the desired bookmark folder and press (Select) to display the Bookmark folder list
screen.
Press (Options Menu) and 6 to display the list of bookmarks in the selected Bookmark folder. A box displays beside each
bookmark name.
Use the navigation keys to highlight a bookmark name and press (Select) to check or uncheck the box. When all bookamrks
to be deleted have a checkmark beside them, press Softkey 1 (Done). A decision screen displays, “Delete selected
bookmarks?” Use the navigation keys to highlight Yes or No and press (Select). If Yes was selected, the bookmark is
deleted and a confirmation screen displays, “Deleted.”
To delete all bookmarks in a selected folder:
Done
*
Press Softkey 1 (Main), 4, and 2 [or press and HOLD (Phonebook) and press 2] to display the Bookmark folder screen.
Use the navigation keys to highlight the desired bookmark folder and press (Select) to display the Bookmark folder list
screen.
Press (Options Menu) and 7. The Security code screen displays. Enter the correct security code and press (Select) to
display the decision screen, “Delete all bookmarks in this folder?”
Use the navigation keys to highlight Yes or No and press (Select). If Yes was selected, the bookmarks are deleted and a
confirmation screen displays, “All deleted.”
To delete a folder (See Flag.):
*
Press Softkey 1 (Main), 4, and 2 [or press and HOLD (Phonebook) and press 2] to display the Bookmark folder screen.
Use the navigation keys to highlight the desired bookmark folder and press (Options Menu) and 4. Enter the correct security
code to display the decision screen, “Delete.” Use the navigation keys to highlight Yes or No and press (Select). If Yes was
selected, the bookmark is deleted and a confirmation screen displays, “Deleted.”
To delete all folders (See Flag.):
*
Press Softkey 1 (Main), 4, and 2 [or press and HOLD (Phonebook) and press 2] to display the Bookmark folder screen.
Use the navigation keys to highlight the desired bookmark folder and press (Options Menu) and 5. Enter the correct security
code to display the decision screen, “Delete.” Use the navigation keys to highlight Yes or No and press (Select). If Yes was
selected, the bookmark is deleted and a confirmation screen displays, “Deleted.”
O
The default “Bookmark” folder
cannot be deleted. Only the folders
that you have created can be
deleted. If you have not created any
folders, the delete option is not
available (grayed out).
You may delete bookmarks that you
have added to the Bookmark folder.
Refer to page 15 for more
L
information regarding security code
entry.
87

Saved Pages
Saved pages are webpages saved to the wireless phone that may be viewed while off-line (not connected to the Internet). The maximum
number of saved pages allowed is 100. The maximum number of protected saved pages is 50.
Saving a Page
To save a page while you are accessing the Internet at the desired website,
Press (Options Menu) and 3 to display the decision screen, “Save page?”
*
Use the navigation keys to highlight the Yes or No box and press (Select). If Yes was selected, the webpage is saved and a
confirmation screen displays, “Saved.”
Viewing a Saved Page
To view a saved page offline:
Press Softkey 1 (Main), 4, and 4 [or press and HOLD (Phonebook) and press 4] to display the Saved page screen.
*
Use the navigation keys to highlight a saved page and press (Select) to display the page.
Save Pages Options Menu
Specific tasks may be completed through the Saved pages Options menu.
To display the Saved pages Options menu from the Save pages screen:
*
Press (Options Menu) and the option number to complete the desired function.
The following describes each function of the menu options that display for the Saved pages Options menu.
(1) Edit title Change the title of a saved page.
(2) Protect On/Off Protect a saved page so that it cannot be deleted.
(3) No. of memos Identifies the total number of saved pages.
(4) Delete one Delete a highlighted saved page.
(5) Delete selected Delete all the selected saved pages.
(6) Delete all Delete all saved pages.
88

Protecting a Saved Page
To protect or un-protect a saved page:
Press Softkey 1 (Main), 4, and 4 [or press and HOLD (Phonebook) and press 4] to display the Saved page screen.
*
Use the navigation keys to highlight a saved page and press (Options Menu) and 2. The page becomes protected if it was
uprotected or it becomes unprotected if it was protected. A protected saved page displays with a lock icon beside the saved page
name.
Deleting Saved Pages
To delete a specific saved page:
Press Softkey 1 (Main), 4, and 4 [or press and HOLD (Phonebook) and press 4] to display the Saved page screen.
*
Use the navigation keys to highlight a saved page and press (Options Menu) and 4 to display the decision screen, “Delete
this?”
Use the navigation keys to highlight Yes or No and press (Select). If Yes was selected, the saved page is deleted and a
confirmation screen displays, “Deleted.”
To delete selected saved pages:
Press Softkey 1 (Main), 4, and 4 [or press and HOLD (Phonebook) and press 4] to display the Saved page screen.
*
Press (Options Menu) and 5 to display the list of saved pages. A box displays beside each saved page name. If the saved
page is protected, a lock icon is shown between the saved page name and the box.
Use the navigation keys to highlight a saved page and press (Select) to check or uncheck the box. When all saved pages to
be deleted have a checkmark beside them, press Softkey 1 (Done). Protected saved pages cannot be deleted.
Done
A decision screen displays, “Delete selected pages?” Use the navigation keys to highlight Yes or No and press (Select). If
Yes was selected, the saved pages are deleted and a confirmation screen displays, “Deleted.”
To delete all saved pages:
*
Press Softkey 1 (Main), 4, and 4 [or press and HOLD (Phonebook) and press 4] to display the Saved page screen.
Press (Options Menu) and 6. The Security code screen displays.
Enter the correct security code and press (Select) to display the decision screen, “Delete all.”
Use the navigation keys to highlight Yes or No and press (Select). If Yes was selected, the saved pages are deleted and a
confirmation screen displays, “All deleted.”
89

Settings
To establish the different settings to manipulate webpages and how you prefer the web browser to perform on the wireless phone,
Press Softkey 1 (Main),4,and 6 [or press and HOLD (Phonebook) and press 6] to display the Settings menu.
*
Setting Scroll
To establish how many lines to scroll at a time on the display screen when accessing the Internet,
Press Softkey 1 (Main),4,6,1,and 1 [or press and HOLD (Phonebook); press 6, 1, and 1] to display the Scroll setting
*
screen.
Input 1 to scroll one line, 2 to scroll 3 lines, or 3 to scroll 5 lines or use the navigation keys to highlight the scroll option and
press (Select) to return to the Common settings menu.
Setting Load Files
To set up the type of files to load to the wireless phone when accessing the Internet,
Press Softkey 1 (Main),4,6,and 1 [or press and HOLD (Phonebook); press 6 and 1] to display the Common settings
*
screen.
Input 2 to load image files or 3 to load animation files. The corresponding load screen displays.
Input 1 (Yes) to load the files or 2 (No) for no files to load when accessing the Internet and return to the Common settings menu.
Setting Tables and Wrap Text
*
Press Softkey 1 (Main),4,6,and 2 [or press and HOLD (Phonebook); press 6 and 2] to display the Browser settings
screen.
Input 1 to load and show tables or 2 to wrap text on the wireless phone’s display screen when accessing the Internet. The
corresponding screen displays.
Input 1 (Yes) or 2 (No) and return to the Common settings menu.
90

Setting Cookies
Press Softkey 1 (Main),4,6,2,and 3 [or press and HOLD (Phonebook); press 6, 2, and 3] to display the Cookie setting
*
screen.
Input 1 for Disable cookies, 2 for Enable cookies, or 3 for Confirmation of cookies and return to the Browser settings menu.
Check Settings
To check the Common settings,
Press Softkey 1 (Main),4,6,1,and 4 [or press and HOLD (Phonebook); press 6, 1, and 4] to display Check settings
*
screen for the common settings. Press CLR (Clear/Back) to return to the Common settings menu.
To check the Browser settings,
Press Softkey 1 (Main),4,6,2,and 4 [or press and HOLD (Phonebook); press 6, 2, and 4] to display Check settings
*
screen for the browser settings. Press CLR (Clear/Back) to return to the Browser settings menu.
Setting Memory
Memory setting clears or removes the bookmarks, history addresses, and saved pages.
*
Press Softkey 1 (Main),4,6,3,and 1 [or press and HOLD (Phonebook); press 6, 3, and 1] to display Setting reset
security code screen.
Input your security code and press (Select) to display Setting reset screen.
Press the navigation keys to highlight No or Yes and press (Select). If Yes is selected, the memory settings are cleared, a
confirmation screen briefly display “Done” and returns to the Memory setting menu.
91

Phonebook
To access Phonebook option of the main menu:
Press Softkey 1 (Main) and 5 to display the phonebook list or
*
press (Phonebook) to display the phonebook list or
press Softkey 1 (Main). The Phonebook option 5 is highlighted with a box frame and is animated. Press (Select) to confirm
your choice. (See Flag.)
Remember to press CLR (Clear/Back)key to return to the previous screen or press (End) to exit the screen and return to the Idle
screen.
Phonebook Types
515 provides 5 phonebook types.
l
Complete List of all numbers stored in the other phonebook types (Phone, SIM, and FDN) except SDN numbers. (See Flag.)
l
Phone The personal directory stored in the phone’s memory; up to 500 number entries can be stored. Each phone
number entry allows storing a name, up to 7 phone numbers, 2 Email addresses, 2 fields of descriptive
information, a ring tune, LED ring color, a voice tag and a phonebook picture. Names can be placed into groups
to simplify searching.
l
SIM The personal directory stored in SIM memory; up to 250 number records can be stored on SIM card, depending
on your SIM card capacity. Only one name and number is allowed per entry in the SIM directory.
l
FDN Fixed dialing numbers (FDN) is a means of limiting which numbers can be called from your phone. With the FDN
feature turned On (see page 44), only the numbers in the FDN phonebook and emergency numbers can be called
from your phone. (See Flag.)
l
SDN Service Dialing Numbers are supplied, ready to use, and installed by your network service provider. The SDN
phonebook call numbers and services as agreed on by the provider (e.g., Customer enquiries, billing information,
sports lines, weather lines, etc.) cannot be edited by you. You will not be able to see the number that is dialed;
only the associated text title.
When the phone is powered On, the sorting process of the phonebook is run in the background. If you immediately access the
phonebook after powering On, you can only use Softkey 1 (Call) to call a number in the Phone phonebook during the sorting process.
If you press (Phonebook) to view another phonebook type, the busy screen displays. When the sorting process is completed, the
Softkey 2 (Add New) and (Options Menu) display on the screen showing that the phonebook types are available for viewing,
editing, adding new entries, and all other phonebook functions. (See Flag.)
MENU
Phonebook menu icon:
O
Top Dog
Entry Name
Entry Name
Entry Name
Entry Name
Entry Name
Entry Name
Entry Name
2426782468
O
FDN and SDN are network provider
dependent features.
O
For emergency calls, ensure your
wireless phone is turned On, battery
is properly charged, and the
network connection has adequate
signal strength before attempting an
emergency call. If your battery is
empty (see page 17), you can not
make or receive any calls, including
emergency calls.
124
The numbers from Phone and SIM can be viewed, altered and called unless FDN is set On. If FDN is set On, only the FDN phonebook
may be viewed, altered, and called. The Phone, SIM and SDN phonebook types cannot be viewed with FDN set On.
The factory default setting is the Complete phonebook. The first time that you press (Phonebook), the Complete phonebook
displays with “List empty.”
*
Press (Phonebook) until the preferred phonebook displays. (See Flag.) The name of the phonebook type displays at the top
of the list. After contact entries are added, the phone number type icon and phone number of the highlighted name displays at
the lower bottom of the screen.
The next time you press (Phonebook) from the Idle screen, the phonebook that displays is the last one used and exited.
O
Sorting process must be completed
before phonebook functions are
available.
O
Switch to the other directories (if the
SIM card supports them) by
pressing (Phonebook).
92
 Loading...