


vSpace Management Center 3.3.0
for N-series and vSpace 7.0
User Manual

NComputing vSpace Management Center User Manual
Important Notices
Please note that reproduction of this User Manual in whole or in part, without express written permission from NComputing, is not permitted.
NComputing reserves the right to make improvements and/or changes to this User Manual and to the products, programs and/or specifications described herein at any time without notice. Information contained in this document may have been obtained from internal testing or from a third party. NComputing shall not be liable for any direct, indirect, special, incidental or consequential damages in connection with the use of this material. The latest version of this User Manual can be downloaded from the “Documentation” page in the Support section of the NComputing website at: www.ncomputing.com
The NComputing software products described in this user manual are protected by numerous granted and pending U.S. and international patents.
Page 2 of 65
331208_v2

|
NComputing vSpace Management Center User Manual |
|
|
TABLE OF CONTENTS |
|
Important Notices........................................................................................................................................ |
2 |
|
1.0 vSpace Management Center Overview ................................................................................................. |
5 |
|
1.1 Management Zones........................................................................................................................... |
6 |
|
2.0 Installation and Registration.................................................................................................................. |
7 |
|
2.1 |
Software Installation.......................................................................................................................... |
7 |
2.2 |
Registration........................................................................................................................................ |
8 |
2.3 |
Starting vSpace Management Center ................................................................................................ |
8 |
3.0 vSpace Management Center Dashboard ............................................................................................... |
9 |
|
3.1 |
The Navigation Bar ............................................................................................................................ |
9 |
3.2 The Dashboard Summary ................................................................................................................ |
10 |
|
3.3 |
Log Activity ...................................................................................................................................... |
10 |
4.0 Device Management............................................................................................................................ |
11 |
|
4.1 Manage Devices............................................................................................................................... |
11 |
|
4.2 Advanced Search ............................................................................................................................. |
12 |
|
4.3 |
Remove, Reset, Store Profile, Apply Profile..................................................................................... |
12 |
4.4 |
View/Edit Configuration .................................................................................................................. |
13 |
4.5 |
Manage Profiles............................................................................................................................... |
13 |
4.6 Update Firmware............................................................................................................................. |
15 |
|
4.7 |
Manage Device Security Settings..................................................................................................... |
16 |
5.0 L/M-series Configuration..................................................................................................................... |
18 |
|
5.1 |
Server Connections Tab ................................................................................................................... |
18 |
5.2 |
General Tab ..................................................................................................................................... |
19 |
5.3 |
Display Tab....................................................................................................................................... |
20 |
5.4 Network Tab .................................................................................................................................... |
21 |
|
5.5 |
Security Tab ..................................................................................................................................... |
22 |
5.6 Kiosk Setup Mode ............................................................................................................................ |
23 |
|
5.7 |
Auto-Login Options Tab ................................................................................................................... |
24 |
5.8 Firmware Update Tab ...................................................................................................................... |
25 |
|
5.9 Summary Tab................................................................................................................................... |
26 |
|
6.0 N-series Configuration ......................................................................................................................... |
27 |
|
6.1 XenDesktop Tab............................................................................................................................... |
27 |
|
6.2 |
General Tab ..................................................................................................................................... |
28 |
6.3 |
Display Tab....................................................................................................................................... |
29 |
6.4 Network Tab .................................................................................................................................... |
30 |
|
6.5 Date / Time Tab ............................................................................................................................... |
31 |
|
6.6 |
Security Tab ..................................................................................................................................... |
32 |
6.7 Kiosk Setup Mode Tab ..................................................................................................................... |
35 |
|
6.8 |
Auto Login Tab................................................................................................................................. |
35 |
6.9 Firmware Update Tab ...................................................................................................................... |
36 |
|
6.10 Redirection Policy .......................................................................................................................... |
37 |
|
6.11 Keyboard Tab................................................................................................................................. |
37 |
|
6.12 Audio Tab....................................................................................................................................... |
38 |
|
6.13 Printers Tab.................................................................................................................................... |
38 |
|
6.14 Scanners Tab.................................................................................................................................. |
39 |
|
6.15 Serial Devices Tab .......................................................................................................................... |
40 |
|
Page 3 of 65 |
|
|
331208_v2

|
NComputing vSpace Management Center User Manual |
|
6.16 USB Serial Tab................................................................................................................................ |
41 |
|
6.17 Summary Tab................................................................................................................................. |
42 |
|
7.0 Group Management ............................................................................................................................ |
43 |
|
7.1 |
Browse Existing Groups ................................................................................................................... |
43 |
7.2 |
Add / Edit Group .............................................................................................................................. |
44 |
8.0 Settings ................................................................................................................................................ |
46 |
|
8.1 vSpace Servers ................................................................................................................................. |
46 |
|
8.2 |
Desktop Sessions ............................................................................................................................. |
46 |
*Requires that vSpace Client v1.6.2.2 or newer be installed on the system that is accessing vSpace |
|
|
Management Center and initiating the remote view/control session. ................................................. |
47 |
|
8.3 Manage Firmware............................................................................................................................ |
47 |
|
8.4 |
User Administration......................................................................................................................... |
48 |
8.5 |
Configure Authentication ................................................................................................................ |
49 |
8.6 |
Management Server Administration ............................................................................................... |
50 |
8.7 |
Registration and Licensing ............................................................................................................... |
52 |
8.7b N-series and vSpace Management Center Bundled Entitlement .................................................. |
53 |
|
8.8 Manage Wallpapers......................................................................................................................... |
53 |
|
9.0 Common Usage Scenarios ................................................................................................................... |
54 |
|
9.1 |
Adding an N-series device to vSpace Management Center............................................................. |
54 |
9.2 |
Configuring vSpace Management Center with Active Directory ..................................................... |
54 |
9.3 |
Configuring devices using device profiles........................................................................................ |
55 |
9.4 Adding a new vSpace Management Center server to your vSpace Management Center Zone...... |
57 |
|
9.5a Automating Sequential Firmware Updates.................................................................................... |
59 |
|
Requirements for Automatic, Sequential Updates................................................................................ |
59 |
|
9.5b Directing N-series Devices To The Firmware Archive Using the N-series GUI ............................... |
60 |
|
9.5c Directing N-series Devices To The Firmware Archive Using Device Profiles .................................. |
60 |
|
9.5d Example of FTP Folder Setup Using FileZilla .................................................................................. |
62 |
|
10.0 Troubleshooting................................................................................................................................. |
63 |
|
11.0 Support and Additional Resources .................................................................................................... |
65 |
|
11.1 Disclaimers and Legal Information ................................................................................................ |
65 |
|
Page 4 of 65
331208_v2

NComputing vSpace Management Center User Manual
1.0 vSpace Management Center Overview
For organizations deploying the NComputing N-series thin clients for Citrix HDX, or L300 and M300 access devices for vSpace 7.0, vSpace Management Center provides a highly scalable, flexible and easy to use single point of device management. With its web-based console, IT administrators can manage their NComputing devices from anywhere, anytime. vSpace Management Center helps organize a deployment whether it is a single site or multiple sites – and makes it easy to perform management tasks remotely including firmware updates, configuration changes, device resets and more. By allowing administrators to access and manage their servers and devices from a single location, regardless of the size or number of deployment sites, vSpace Management Center dramatically reduces the administrative overhead needed to maintain and control their environment.
Key Features and Attributes
•Centralized: access an entire deployment from a single console
•Scalable: manage up to a thousand devices across multiple networks and locations
•Simple: easy to install and use with a flexible web-based user interface
•Profile-based configuration: assign devices to common profiles for scalable management of device settings
•1:1 or 1:many management: use profiles for 1:many management or push settings to an individual device
•Easy firmware updates: the firmware update wizard simplifies device updates and scheduling
•Simple status: the dashboard with logging and group views enables rapid assessment of your environment’s status
•Consolidated install: install the complete vSpace Management Center via one installer in under 10 minutes
•Comprehensive logging: system events are continually logged to aid in troubleshooting and to confirm actions
•Delegated Administration: supports two levels of management for “view-only” and “editcapable” access and can be easily configured via Active Directory/LDAP
This user manual provides a comprehensive guide to the features offered by vSpace Management Center as well as a detailed explanation of their functions. From remotely updating device firmware to backing up critical information and settings, this document will walk you through each step of using vSpace Management Center’s powerful administrative toolset.
Page 5 of 65
331208_v2

NComputing vSpace Management Center User Manual
1.1 Management Zones
vSpace Management Center organizes vSpace servers and NComputing access devices into Management Zones. Each zone can be comprised of several servers and devices and exist within a single subnet or span multiple network segments. It is even possible to have a single Management Zone that spans multiple physical locations, provided the network joining those locations allows for communication between the affected segments.
When there are multiple servers within a single Management Zone, one server acts as the master while the other servers are slaved to it. You can designate a server as the master when it is created, provided there isn’t already a master server within that Management Zone. During the installation process you can manually specify which Management Zone you wish a new vSpace Management Center server to join if a Zone already exists. Likewise, you can instruct access devices to automatically join a Zone if one exists within their subnet, or specify a Zone if you wish.
More information on Management Zone configuration is available in section 6.4 of this manual.
Page 6 of 65
331208_v2

NComputing vSpace Management Center User Manual
2.0 Installation and Registration
This section of the guide will walk you through the installation and registration process for vSpace Management Center. Keep in mind that this document assumes the user has already acquired both the vSpace Management Center installation software and a number of licenses appropriate for their environment. For the latest NComputing software version please visit the NComputing software download site at http://www.ncomputing.com/downloads
2.1 Software Installation
The begin installation, run the vSpace Management Center installation (vSpace Management Center Installer.msi) and proceed as directed through the installation process.
You will be given the option to perform a “Default” or “Advanced” installation. The Default method automatically installs all components necessary to run vSpace Management Center. This includes Java and Apache Server.
The Advanced method gives you more control over which components are installed. You will also have the option to automatically join your new server to an existing vSpace Management Center management zone if this is not the first management server you have installed in your environment. For more information on Management Zone integration and Master / Slave server modes, review the following KB article: http://www.ncomputing.com/kb/HOW-TO-Configure-vSpace- Management-Center-Master-Slave-Mode_406.html
Once you have selected your installation method, proceed as directed through the installation process until you are notified that the process is complete. At this point a system restart will be required.
Note: Attempting to complete the installation process or run vSpace Management Center without the presence of Java and Apache Server will result in an error message. See the troubleshooting section for more information.
Page 7 of 65
331208_v2

NComputing vSpace Management Center User Manual
2.2 Registration
Each new install of vSpace Management Center includes a trial license for 30 days with up to 100 managed devices. For information on adding license keys to your vSpace Management Center server, review the Registration and Licensing section of this user manual.
2.3 Starting vSpace Management Center
Once you have successfully completed the installation process, you can access the vSpace Management Center user interface by opening the vSpace Management Center folder in the Windows Start menu (on the server you installed on). Click “Open vSpace
Management Center” to launch the user interface within your default web browser. You can also access the interface from other computers on your network by opening a browser and entering the IP address of your server followed by: “:8080/vmc” For example, if your vSpace Management Center server’s IP address is: 192.168.1.10, then enter: “192.168.1.10:8080/vmc” in your browser.
Opening the vSpace Management Center user interface requires a User ID and Password. When you start vSpace Management Center for the first time, enter the default User ID (“vmcadmin”) and Password (“vmcadmin”) and click “Submit.”
Note: It is recommended that you clear your browser’s cache prior to using vSpace Management Center for the first time and between updates.
Page 8 of 65
331208_v2

NComputing vSpace Management Center User Manual
3.0 vSpace Management Center Dashboard
The dashboard is the first screen you will see when connecting to your vSpace Management Center server. From here, you are presented with a brief summary of device and server status. By using the navigation bar along the top of the screen, you can access each of the management modules. This section will outline each of the functions available to you from this screen.
3.1 The Navigation Bar
The Navigation Bar is your primary means of navigating between vSpace Management Center’s various modules. As seen below, it offers access to Device Management, Group Management, vSpace Management Center Settings, as well as the Help feature.
Note the breadcrumb navigation feature to the bottom left of the Navigation Bar. As you navigate deeper within vSpace Management Center, this will track each step you have taken and give you the ability to step backwards through vSpace Management Center until you have returned to the Dashboard.
Page 9 of 65
331208_v2
NComputing vSpace Management Center User Manual
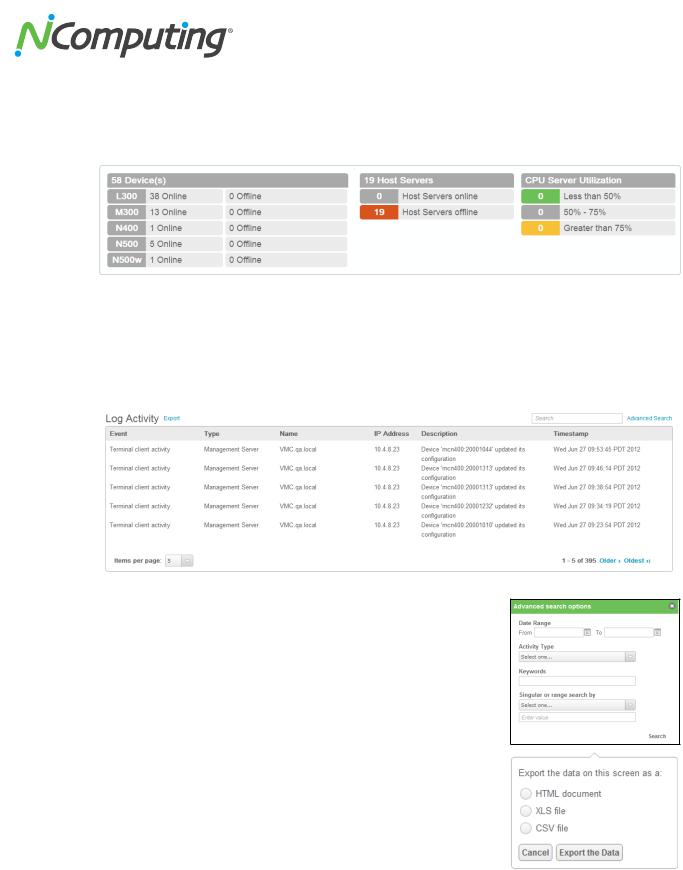
3.2 The Dashboard Summary
The Dashboard Summary provides at-a-glance information on the connection status of your access devices, hosts, and CPU utilization.
3.3 Log Activity
The Log Activity section of the dashboard presents a detailed breakdown of recent server and device activity. You can search for specific log information through the use of the Advanced Search button located at the top right of the activity list.
The Advanced Search Options menu allows you to search for activities by time and date, activity type, keyword search, and by a singular or range search. Once you have entered the criteria you wish to search by, press the “Search” button to begin your search.
You can export search results to HTML, XLS, or CSV file formats using the “Export” button located to the top left of the Log Activity section.
Page 10 of 65
331208_v2
NComputing vSpace Management Center User Manual
4.0 Device Management
The Device Management module of vSpace Management Center allows administrators to remotely configure their devices, create and manage device profiles, and push firmware updates. This section of the manual will outline each of these functions in detail.
4.1 Manage Devices
The Manage Devices screen presents the user with a list of the devices that they currently have linked with vSpace Management Center. From this screen you can perform basic administrative tasks such as applying or storing profiles, resetting devices, and verifying device information such as: Device Name, IP address, Serial Numbers, Firmware versions, and Device Model.
Page 11 of 65
331208_v2

NComputing vSpace Management Center User Manual
4.2 Advanced Search
By clicking “Advanced Search” at the top left of the Manage Devices screen, you gain access to the Advanced Search Options menu. From here, you can search for devices by specifying a number of details including Subnet and Device Group, or specific device information such as Device Model, Name, Serial Number, MAC address, or even the name of the user currently logged in to the device.
4.3 Remove, Reset, Store Profile, Apply Profile
Along the top right section of the Manage Devices screen are four buttons that will allow you to perform common management functions. Select one or more devices by clicking the checkbox to the left of the devices in question and then click on the desired function.
Remove
Remove the selected device(s) from vSpace Management Center. See section Section 7.1 Adding a Device to vSpace Management Center if you wish to link the device(s) with vSpace Management Center again in the future. Note that you will only be able to remove devices that show up as being “offline.” If no devices are currently offline, the “Remove” button will be grey and inactive.
Reset
Reset the selected device(s). NOTE: Be sure to verify whether the device is currently in use as this will immediately interrupt the user’s session and restart the device (similar to powering off the device and powering it back on).
Store Profile
Store the configuration options currently in use by this device as a profile that can later be applied to any device of the same model.
Apply Profile
Select from a list of currently stored device profiles and apply that profile to the selected device(s). NOTE: Be sure to verify whether the device is currently in use as this will immediately interrupt the user’s session.
Page 12 of 65
331208_v2

NComputing vSpace Management Center User Manual
4.4 View/Edit Configuration
To the far right of each device entry you will find a link called “View/Edit Configuration”. Clicking this button will bring up an interface that allows you to view and make changes to the device you selected. These options will vary by device model. The interface for making these changes is similar to the interface for creating and editing profiles per the following section. The only difference is that when you are in the View/Edit Configuration screens, the data in the fields for the specific device will be prepopulated. Specific configuration options are covered in detail in Section 5.0 and 6.0 of this manual.
4.5 Manage Profiles
The Manage Profiles screen allows you to create, view or edit device profiles. A profile is a common set of configurations for a particular device type in your environment. When you create a profile, you can associate one or more devices to that profile – and from that point on, the devices will continue to be associated with the profile. This means that if you later edit the profile settings, all devices associated with that profile will be updated with the new settings as well. This makes it very easy to manage common settings in a large number of devices simultaneously.
To begin, click either the “Create New” button and select a device type, or click the View/Edit Profile button next to an existing profile in the profile list.
Next, you will be taken to the profile wizard where you can name your profile and create a description for future reference. Step through each of the subsequent screens to configuration your profile. Note that a profile does not need to include all the settings of the device. For example, you may wish to have some settings configured uniquely for each device and not set by the common profile. To facilitate this, each component of the profile can be enabled or disabled by checking the box at the top of each section labeled “Edit Settings.” If a section is unchecked for a specific profile, the local data in the device will be preserved and not affected by the profile.
Page 13 of 65
331208_v2

NComputing vSpace Management Center User Manual
Proceed through the wizard to configure (or skip) each setting screen. The last screen shows a summary of the settings and has the “Apply” button. When you click the “Apply” button the settings in the profile will be pushed to all of the devices that you associated it with. Note that you can also store and apply profiles from the Manage Devices screen, by using an existing device’s settings as a template (see section 9.3 Configuring devices using device profiles).
(Below, the configuration tabs for an N-series device can be seen)
IMPORTANT: Note that if, at any time, you overwrite a profile’s setting in a particular device by either changing the setting manually via the local user interface on the device or by using the edit configuration function (see 4.1 Manage Devices) then that manually-configured setting will no longer pull from the profile and the device will always use this manually overridden setting. If you wish to revert the device to use the profile for that setting, you must first remove the device from the profile (edit profile, deselect the device, and apply the profile) and then re-attach it (edit profile, select the device, and apply the profile).
Page 14 of 65
331208_v2
NComputing vSpace Management Center User Manual
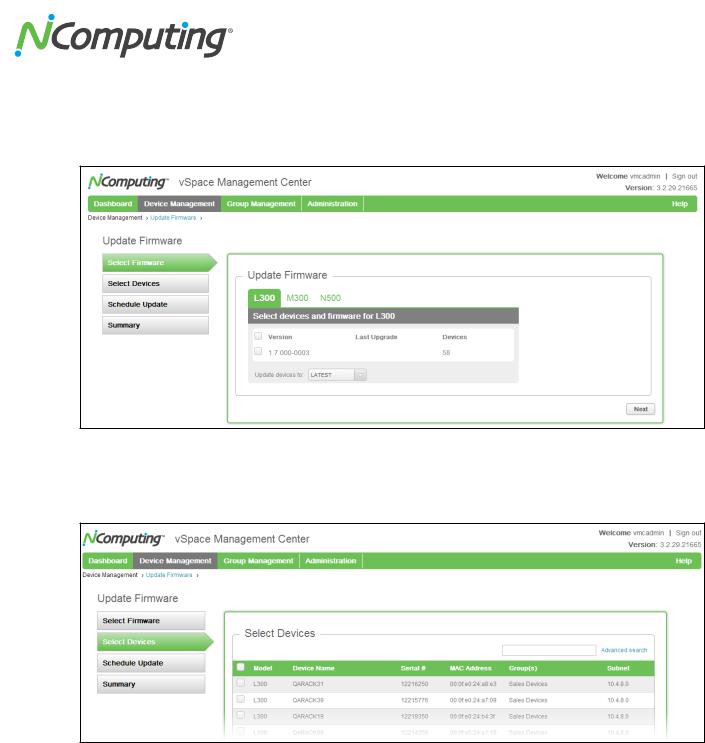
4.6 Update Firmware
The Update Firmware screen allows you to select from a list of currently available firmware versions and then push a selected version of firmware to one or more devices.
To begin a firmware update, select the firmware version from the list provided for the device model in question, and then press “Next”. To upload new firmware versions for your devices refer to 6.3 Manage Firmware.
Next, select the devices you wish to push this firmware to and press “Next”.
Page 15 of 65
331208_v2
NComputing vSpace Management Center User Manual
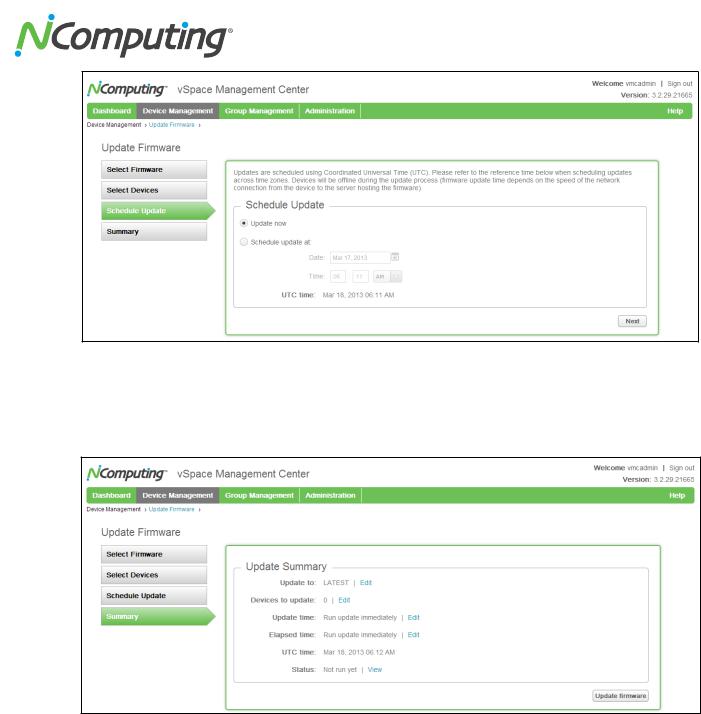
At this stage, you’ll be given the option to push the firmware immediately, or schedule the update for a future date and time. This is especially useful if you wish to perform the update later in the day when usage is at a minimum (firmware updates will cause a device reboot and will disconnect users from their session). Press “Next” when you have selected a time for the update.
Lastly, you will be presented with a summary of the choices you have made including firmware version, device to be updated, the timing of the update, and other details. Once you are satisfied with the update plan, press “Update firmware” to initiate the update.
4.7 Manage Device Security Settings
The Security Tab allows administrators to enable and configure device passwords as well as manage CA Certificates, which are used for establishing and validating SSL connections. This tab can be found by selecting View/Edit Configuration next to any device in the Manage Devices list or by editing a profile.
Page 16 of 65
331208_v2

NComputing vSpace Management Center User Manual
Change Password
To protect a device’s settings from unwanted changes, click the checkbox next to “enable password” and then enter the password you wish to associate with the device in question.
Management Zone
Within the Management Zone section, you can elect to enable Secure Mode, which will “lock” the device(s) in question to their current Management Zone. This prevents them from being altered or managed by any other Zones. To move a device configured in this way to another Zone, you must first disable Secure Mode from vSpace Management Center or at the device itself.
For N-series devices, this can be done from the Security Tab. L-series and M-series devices must be “reset” using either the CTRL-SHIFT-END method at the device password screen or the physical reset button on the back of the device.
Add Certificates (N-series only)
Click the “Choose file” button and browse to the location of your .CER and/or .CRT files to add certificates to the selected device(s).
Available Certificates (N-series only)
This portion of the security screen provides a list of all certificates currently associated with the device(s). Click the “Details” button to the right of any certificate for more information on that specific certificate.
Page 17 of 65
331208_v2

NComputing vSpace Management Center User Manual
5.0 L/M-series Configuration
The L300 and M300 product lines share a nearly identical user interface, with the exception of the M300 supporting three sessions per kit while the L300 is a single-user product. The following sections detail each of the configuration tabs found within the View / Edit Configuration menu of L300 and M300 access devices.
5.1 Server Connections Tab
The Server Connections tab allows administrators to determine how a device connects to a vSpace Server. Settings include server discovery modes and the ability to enable connection by server groups.
•Autoconnect to vSpace server group
Select to connect to an existing vSpace Server group.
•Manual connection options
Select to manually select a server.
•Auto-discovered connections
When checked, the device will populate the server list with any servers found within its subnet.
•Manual IP address or hostname
When checked, the device will allow the user to discover servers based on their IP address or hostname.
•Group list
When checked, the server list will include any available server groups.
Page 18 of 65
331208_v2

NComputing vSpace Management Center User Manual
5.2 General Tab
The General Tab allows the administrator to edit general device settings such as Management Zone and device name.
•Device Name
Use this field to alter the L300 or M300 device name. This can be used to help sort devices based on use, location, or user, for example.
•Enable automatic discovery of the vSpace Management Center server
Enabling this feature allows a device to automatically discover a vSpace Management Center server within its subnet or within the Management Zone governing it’s vSpace Server.
•Specify vSpace Management Center server(s)
Selecting this option allows administrators to specify which vSpace Management Center server the device should associate with (and by extension, which Management Zone). A primary and secondary server may be specified for failover purposes.
Page 19 of 65
331208_v2

NComputing vSpace Management Center User Manual
5.3 Display Tab
The Display Tab contains configuration options related to screen resolution and behavior.
•Resolution
This dropdown menu contains all monitor resolutions compatible with the device in question.
•Color Depth
This dropdown can be used to select display color depth.
•Enable screen saver
Check to enable the device screen saver, which will turn off the display signal and allow the connected monitor to enter its power save mode once idle for a specified period of time.
•Sleep time
This slider allows the administrator to select the amount of idle time a device will wait before entering screen saver mode.
Page 20 of 65
331208_v2
 Loading...