


PC EXPANION User s Guide
Fast Ethernet Version

Hardware specification regarding PC Expanion L100, L120, and L200
|
L100 |
L120 |
L200 |
Dimension |
8.46inch(W) x 6.30inch(D) x 1.57inch(H) |
9.57inch(W) x 5.31inch(D) x 1.57inch(H) |
9.57inch(W) x 5.31inch(D) x 1.57inch(H) |
|
|
|
|
Weight |
0.83 lb |
0.81 lb |
0.82 lb |
|
|
|
|
Protocol |
WoIP (Windows® over IP) / LoIP (Linux over IP) |
WoIP (Windows® over IP) / LoIP (Linux over IP) |
WoIP (Windows® over IP) / LoIP (Linux over IP) |
|
|
|
|
Serial Port* |
X |
X |
O |
|
|
|
|
USB port |
X |
X |
O |
|
|
|
|
Operating |
Windows® XP Home Edition |
Windows® XP Home Edition |
Windows® XP Home Edition |
System |
Windows® XP Professional |
Windows® XP Professional |
Windows® XP Professional |
|
Windows® 2000 Professional |
Windows® 2000 Professional |
Windows® XP Media Center Edition |
|
Windows® XP Media Center Edition |
Windows® XP Media Center Edition |
Windows® Server 2003 |
|
Windows® Server 2003 |
Windows® Server 2003 |
Windows® Small Business Server 2003 |
|
Windows® 2000 Server |
Windows® Small Business Server 2003 |
Linux** |
|
Windows® Small Business Server 2003 |
Linux** |
|
|
Linux** |
|
|
|
|
|
|
The specifications of the product may be altered without any advance notice being given to individual users.
*Some restrictions apply
**Some restrictions apply. See website for details.
1

Copyright
NComputing Co., Ltd. has all rights reserved in respect of this User's Guide including patent rights, trademark rights, copyright and other intellectual property rights. No part of this User's Guide may be copied or reproduced in any form or by any manner without the prior permission of NComputing Co., Ltd. The use of the contents of this User's Guide in whole or in part may result in prosecution. The contents of software, sound recordings and video images, which are registered for copyright, are protected by copyright laws and other related laws. If any part of the contents of this product, which have been registered for copyright, are reproduced or distributed without permission, the legal responsibility lies with the users. The company, organizations, products, characters and events, which are used in the examples, are fictitious. NComputing Co., Ltd. does not have any intention of using actual companies, organizations, products, characters or events anywhere in the User's Guide, and therefore no such assumption is made. It is the user's responsibility to observe the relevant copyright laws.
Trademarks
Windows , Windows 2000 Professional, Windows 2000 Server, Windows XP Home Edition, Windows XP Professional
and Windows XP Media Edition, Windows Server 2003, Windows Small Business Server 2003 are trademarks of Microsoft Corporation.
Intel , Pentinum 4, and Xeon are trademarks of Intel Corporation.
PC Expanion is a trademark of NComputing Corportaiton.
2
Disclaimers
The manufacturer, importers and agencies are not responsible for any accidental damage to the product or damage to the product which is caused by improper use and operation of this product.
The information in the User's Guide has been written based on the specifications of current products. The manufacturer of the product, NComputing Co., Ltd., continues to upgrade the product with additional new functions, and will continue to improve the product by applying new technologies.
The specifications of this product may be altered without advance notice given to individual users.
Symbols and descriptions for the correct and safe use of the product.
The following instructions are for the correct use of this product and must be observed in order to prevent any unexpected danger that may occur to users or damage the product.
A user must read and follow this User's Guide instructions carefully before use.
|
|
Warning |
|
|
Note |
|
Note |
|
|
|
|
|
|
|
|
|
|
|
This sign indicates the |
This sign indicates important |
This sign indicates helpful |
|||||
|
possibility of damage to the |
information which a user must |
information which a user can |
|||||
product when instructions are |
read carefully in order to use |
refer to in order to use the |
||||||
|
not followed. |
this device correctly. |
|
system correctly. |
||||

Classifications and descriptions of signs
The following descriptions for the correct use of the product must be referred to by the user in order to prevent any physical injury occurring from unexpected danger, or any loss of assets which may be caused by damage to the product.
A user must read this User's Guide carefully before use and follow the instructions.
Be sure that the place of installation is not too hot (temperature above 35C degrees) or too cold (temperature below 0C degrees), or too wet.
Be sure to keep the mainframe safe from any severe impact.
Be sure that the product does not come into direct contact with benzene or paint thinner.
Be sure that the product is not exposed to direct sunlight or any hot machinery.
Be sure to keep the product away from any items which have strong magnetic properties.
Do not disassemble, repair or rebuild the product.
Do not leave a LAN (Local Area Network) cable in any passageway. An electric shock, fire, damage to the product or physical injury may occur as a result of tripping over the cable.
Disconnect the LAN cable from the product when the cable is not in use for a long period of time.
Be sure to install the product in such a way that it is safe from damage caused by dropping or falling.
FCC Information to Use
This equipment has been tested and found to comply with the limit for a class B digital device, pursuant 15 of the FCC Rules.
These limits are designed to provide reasonable protection against harmful interference in a residential installation. This equipment generates, uses, and can radiate radio frequency energy, and if not installed and used in accordance with the instructions, may cause harmful interference to radio communications. However, there is no guarantee that interference will not occur in a particular installation. If this equipment does cause harmful interference to radio or television reception, which can be determined by turning the equipment off and on, the user is encouraged to try and correct the interference by one or the following measures:
Reorient or relocate the receiving antenna
Increase the separation between the equipment and receiver
Connect the equipment into an outlet on a circuit different from that to which the receiver is connected
Consult the dealer or an experienced radio TV technician for help
Change or modification not expressly approved by the party responsible for compliance could void the user’s authority to operate the equipment.
3

Notice
Thank you for purchasing our company's product.
This product has been made by using state of the art technology from NComputing and has undergone thorough testing. An understanding of reliability has been reached for this product due to extensive testing. This User's Guide is designed to help the user to achieve easy installation and use of the product. Our company makes every effort to provide our customers with information related to the product, and with answers for any questions that may be asked by our customers. The performance of the product can be continuously enhanced via the software update utility. (Please refer to the relevant section of the User's Guide for more detailed information).The customer's registration and the registration of the product serial number, which can be done via the Internet, enables customers to receive the software upgrade service and ongoing technical support via the Internet for their convenience.
Please note that reproduction of the User's Guide in whole or in part, without permission from the manufacturer, is not permitted.
Please read the notes, which are related to safety, before use.
The information in the User's Guide may vary depending on any improvements in the product and the model type of the purchased product.
The manufacturer is not responsible for any damage to the product that is caused by using any products which are not specified as standard products, or by not following instructions and procedures correctly.
This product is compatible with Windows 2000 Professional, Windows 2000 Server, Windows XP Home Edition, Windows XP Professional, Windows XP Media Center Edition, Windows Server 2003(Standard Edition/Enterprise Edition), Windows Small Business Server 2003, Linux*
4
Any other operating systems including new operating systems require special software, which can be purchased separately, or an upgrade of the software is available at extra cost.
This product is an independent terminal device which provides for the emulation of Windows, not a computer. Unlike an existing computer there is no need for the addition of auxiliary peripheral devices, or for the connection of different types of communication devices, or for the modification of hardware. The product does not support video images with a high picture quality or 3D games which have to be supported by high performance computers.
When more than one user shares one computer by using this product, the settings for related functions, which are provided by the Windows operating system, must be carried out as an adequate safety measure. The file service by using the NTFS (New Technology File System) method and environment settings in User Accounts in Control Panel must be carried out in administrator mode in order to ensure the security, easy maintenance and repair of the system. Please refer to the Windows operating system for more detailed information.
* Some restrictions apply. See website for details.

CONTENTS
Part 1 Product Features
What is the PC Expanion ? 1-1
Features 1-1
System Minimum Requirement 1-2
OS (Operating System) and Maximum Connection Limit 1-3
PC Expanion Conceptual Diagram 1-3
How to use the PC Expanion 1-4
Part 2 NCT-2000-XP Installation
Part 3 Setting up Network Configurations
Connecting to the network using a cable or DSL router 3-1
Connecting using a switch (Supports 100Mbps switching) 3-2
Part 4 Product Registration
Selecting online Internet registration 4-2
Creating a product registration document in instances where the Internet cannot be used for registration 4-3
Unregistration 4-6
Part 5 Updating the NCT-2000-XP application via the Internet
Part 6 NCT-2000-XP Remote Management Console
Part 7 Using the “Setup”
5

Part 8 Using the PC Expanion (Advanced)
1. How to add a new user account 8-1
2. How to check the IP address setting of PC Expanion 8-5
3.How to check the IP address of the host PC. 8-7
4.How to connect between the PC Expanion and the host PC using network equipment. 8-9
5. How to connect the PC Expanion to the host PC directly 8-11
6. How to connect to the specific host PC 8-13
7. How to connect to the specific host PC automatically 8-16
8. How to log in automatically when the PC Expanion connects to the host PC. 8-18
9. How to send a message to the connected PC Expanion |
8-20 |
|
|
|
10. How to start or stop running the NCT-2000-XP application 8-21 |
|
|||
11. How to terminate an active PC Expanion. 8-22 |
|
|
|
|
12. How to see the screen running PC Expanion |
8-22 |
|
|
|
13. How to control the running of the PC Expanion by an administrator 8-23 |
|
|||
14. How to log in to the host PC automatically |
8-24 |
|
|
|
15. How to set the timer for a ‘system shutdown’ message |
8-24 |
|
|
|
16. How to enable or disable the function of sending a message |
8-25 |
|
||
17. How to view and take control of the PC Expanion 8-26 |
|
|
|
|
18. How to stop the station automatically when the PC Expanion is disconnected |
8-26 |
|||
19. How to run both NCT-2000-XP program and an application using Windows RDP |
8-27 |
|||
20. How to see the background-bitmaps image of PC Expanion |
8-28 |
|
||
6

|
21. How to set the password of the NCT-2000-XP program |
8-29 |
|
|
22. How to use the USB port in case of L2XX model series |
8-29 |
|
|
23. How to change the name of the PC Expanion 8-30 |
|
|
|
24. How to run a specific program when the PC Expanion connects to the host PC 8-31 |
||
|
25. How to manage grouped PC Expanions under the NCT-2000-XP program 8-34 |
||
|
26. How to manage when a user forgets the password of the NCT-2000-XP program 8-36 |
||
|
27. How to add or remove the serial number of NCT-2000-XP program |
8-37 |
|
|
28. How to delete the PC Expanion on the list of NCT-2000-XP console |
8-39 |
|
|
29. How to set the resolution and frequency on the PC Expanion 8-40 |
||
|
30. How to set the user ID and the password before the PC Expanion logs in to the host PC 8-42 |
||
|
31. How to uninstall the NCT-2000-XP program 8-44 |
|
|
|
32. How to assign an USB storage device 8-45 |
|
|
|
Troubleshooting against an error message |
|
|
Part 9 |
|
||
|
Troubleshooting about an error message that appears on the PC Expanion 9-1 |
||
|
Troubleshooting about an error message that appears on the Host PC |
9-3 |
|
|
Glossary |
|
|
Appendix |
|
|
|
|
Regarding PC Expanion A-1 |
|
|
|
Regarding computer network A-1 |
|
|
FAQ
7

Part 1 Product Features
What is the PC Expanion ?
The PC Expanion is a unique networking device using WoIP(Windows over IP) or LoIP(Linux over IP) networking standards. Users can share the resources of the host PC system by connecting a PC Expanion terminal(s) to it, providing the benefit of having several networked PCs. Users can connect one or more PC Expanion terminals to one host PC directly using a LAN adapter and cable or via the network using a switch/router.
Features
Cost Effective
Save up to 80% of hardware cost versus buying a Pentum4 or equivalent PC; the PC Expanion gives any office or home the ability to expand any existing host PC easily and affordably.
Compatibility
The PC Expanion will run Windows or Linux based applications on a host PC; applications include Internet browsing, email, office suites, most games and much more.
No Maintenance Required
Maintenance and upgrades only apply to the host PC. The PC Expanion requires no hardware maintenance, only occasional software updates.
Small sleek design
Space saving design allows more room for your office or desk area.
1-1
Secure and Fast
Our proprietary Terminal Protocol allows for a fast and secure environment using image caching and 128 bit encryption
*No noise output and low power consumption, quiet operations while saving energy costs.
Note |
Depending on the performance of the host PC, an application’s |
|
compatibility and operating speed can vary. Refer to NComputing’s |
|
web site for more information. |

System Minimum Requirement
The minimum hardware requirements
To connect one PC EXPANION terminal to a single host PC, the following system requirements apply :
Intel Pentium 4 1.3 GHz processor with at least 512 MB RAM or higher.
To connect two to three PC EXPANION terminal(s) to a single host PC, the following system requirements apply :
Intel Pentium 4 2.4 GHz processor with Hyper - Threading technology with at least 512 MB RAM or higher.
To connect four to seven PC EXPANION terminal(s) to a single host PC, the following system requirements apply :
Intel Pentium 4 3.0 GHz processor with Hyper - Threading technology with at least 1024 MB RAM or higher.
To connect eight to ten PC EXPANION terminal(s) to a single host PC, the following system requirements apply :
Intel Pentium 4 3.2 GHz processor with Hyper - Threading technology with at least 2048 MB RAM or higher.
To connect 10-15 PC EXPANION terminal to a single host PC, the following system requirements apply :
Intel Pentium 4 or Xeon 3.0 GHz processor with at least 3 GB RAM or higher.
To connect 16-20 PC EXPANION terminal(s) to a single host PC, the following system requirements apply :
Intel Pentium 4 or Xeon 3.2 GHz processor with Hyper - Threading technology with at least 4 GB RAM or higher.
To connect 20-25 five PC EXPANION terminal(s) to a single host PC, the following system requirements apply :
Intel Pentium 4 or Xeon 3.4 GHz processor with Hyper - Threading technology with at least 5 GB RAM or higher.
To connect 26-30 PC EXPANION terminal(s) to a single host PC, the following system requirements apply :
Intel Pentium 4 or Xeon 3.6 GHz processor with Hyper - Threading technology with at least 6 GB RAM or higher.
Note |
Do not use a notebook PC as a host PC. Using notebook PCs causes |
|
power management and memory problems. Notebooks use |
|
power-saving features and different technologies than a typical |
|
desktop PC. |
|
We recommend a 60GB and 7200rpm or higher hard disk drive. |
1-2
OS (Operating System) and Maximum Connection
Limit
Windows |
2000 Professional : 10 units (L200 model does not support |
this operating system.) |
|
Windows |
2000 Server : 30 units (L200 model does not support this |
operating system.) |
|
Windows |
XP Home Edition : 10 units |
Windows |
XP Professional : 10 units |
Windows |
XP Media Center Edition : 10 units |
Windows |
Server 2003 (Standard Edition / Enterprise Edition) : 30 units |
Windows |
Small Business Server 2003 : 30 units |
Linux* : 30 units (the USB memory port of L200 model does not support a USB device under Linux.)
* Some restrictions apply. See website for details.
1-3
PC Expanion Conceptual Diagram
Host PC
2000 Professional/Server
XP Home Edition/Professional/Media Center Edition Server 2003(Standard/Enterprise Edition)
Small Business Server 2003
Maximum number of users can vary depending on host PC
configuration, type of OS and administrative settings.

How to use the PC Expanion
1 Install the PC Expanion (Refer to the Quick Installation Guide )
2 Install the NCT-2000-XP application on the host PC
3 Setup the network configuration
4 Turn on the PC Expanion, set up the PC Expanion
5 Click the “Connect” button
1-4
Part 2 |
NCT-2000-XP Installation |
||||||
1 |
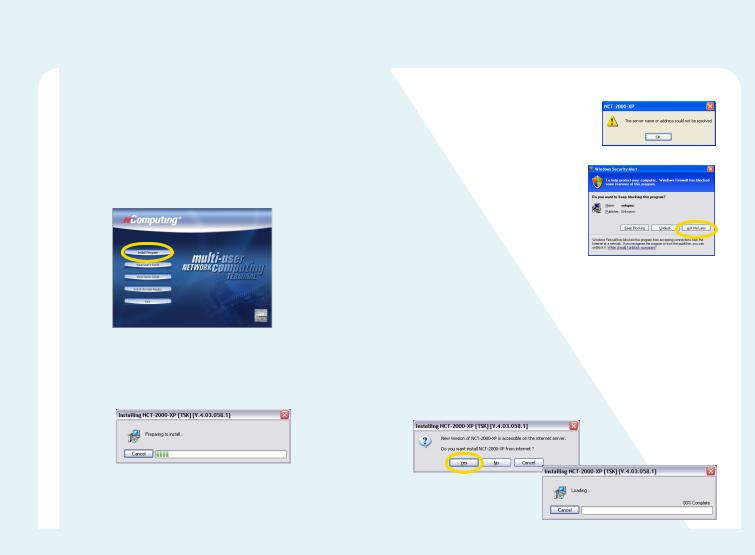
Insert the software installation CD into the CD drive. |
|
|
|
|||
Note |
Message similar to the one shown |
||||||
|
Turn on the host PC and insert the Software Installation CD into the |
||||||
|
|
|
here will appear if your Internet is not |
||||
|
CD drive after your computer boots up. |
|
|
connected. |
|||
2 Click <Install Program> button. |
|
|
If you have Internet |
||||
|
The installation program will start automatically. When the installation |
|
|
||||
|
|
|
connectivity and Windows® |
||||
|
screen appears, click “Install Main Program”. |
|
|
||||
|
|
|
XP Service pack 2 is installed, |
||||
|
|
|
|
|
|
a message similar to the one |
|
|
|
|
|
|
|
shown below will appear. |
|
|
|
|
|
|
|
Click the “Ask Me Later” |
|
|
|
|
|
|
|
button. |
|
|
|
|
|
4 The latest NCT-2000-XP program installation |
|||
|
|
|
|
|
|
If the server has the latest version, you will be asked if you want to |
|
|
|
|
|
|
|
install the latest version as shown on the left below. Click “Yes” if |
|
|
|
|
|
|
|
you want to install, or click “No” if you want to install the version on |
|
3 ‘Preparing to install’ message appears. |
|
|
the CD. The new version will be downloaded as shown on the right |
||||
|
This means that the program is checking the server to see if it has the |
|
|
below when installing. (It is recommended to select “Yes” to install |
|||
|
|
|
the latest version. The download may take some time depending |
||||
|
latest version. |
|
|
|
|
||
|
|
|
|
|
on the Internet speed) |
||
|
|
|
|
|
|
||
2-1

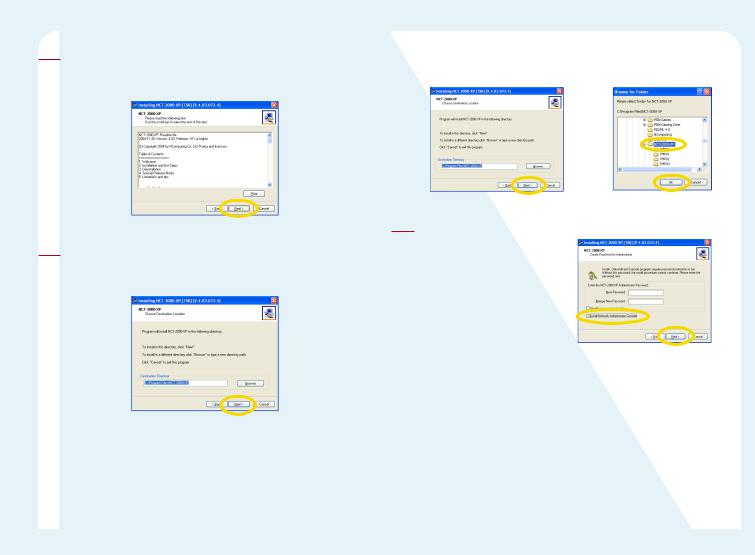
5Click <Next> button.
The installation program will start automatically. When the installation wizard screen appears, click “Next”.
6Click <Next> button.
If you click the <more> button, you will see a notice with the html type.
 Please make sure to DISABLE or UNINSTALL any Anti-Virus or Note Firewall software that may be running in the background. Security
software of this type has been tested and known to interfere with the installation and operation of this product.
7Select ‘I agree’ and then click the <Next> button.
Once the license agreement window appears, check "I agree" and click "Next". If you do not agree with the license agreement, click the "Cancel" button to finish the process. If you would like to print this out, please click “Print.”
8Select ‘I agree’ and then click the <Next> button.
When the NCT-2000-XP-Terms of Use window appears, check "I agree" and click "Next". If you do not want to agree to the license, click "Cancel" to finish the process. If you would like to print this out, please click “Print”.
2-2
9Click the <Next> button.
Read the contents of the readme file and click “Next”. If you would like to print this out, please click “Print”.
10Click the <Next> button.
Select the installation default folder and click "Next."
The “Program Files” folder is the default installation folder.
2-3
Note |
If you want to install it in another path, type the path directly or click |
|
the <find> button and select the desired folder. |
11Click <Next> button.
If the same screen as the one shown on the right appears, select the item that you want to install after confirming the following reference and click “Next.”
Note |
Administrator Password : If you set an administrator password, |
|
the Network Administrator Console will require this password to |
|
make changes within the console. You should remember the |
|
"Administrator Password" for future configuration changes. If you |
|
do not remember the password, you can't execute the program or |
|
alter management settings. |
|
( If you want to cancel the previous password, refer to “26. How |
|
to manage when a user forgets the password of the NCT-2000- |
|
XP program” in Part 8.) |
|
Network Control Console : A management application that |
14 |
|
manages local user groups and can also manage individual |
|
|
computers and the connected PC EXPANIONs |
|
12 Click the <Next> button. |
|
|
|
If you would like to review or |
|
|
change any settings, click |
|
|
“Back”. If you are satisfied with |
|
|
the settings, click “Next” to |
|
|
begin copying files. |
|
15
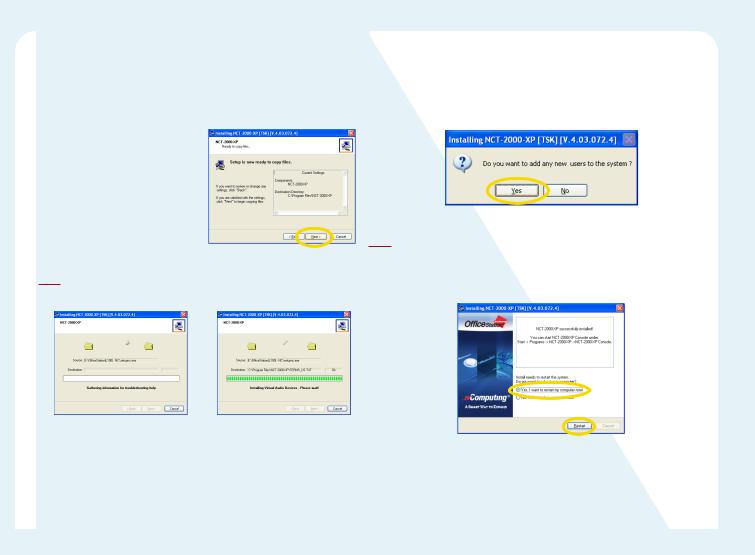
13Installing the NCT-2000-XP program
Refer to the following steps.
Gathering information for troubleshooting help Copying files Installation of service Remote management console installation
the selected items installation Virtual audio device driver installation
Add user accounts.
When the program installation is completed, the message screen for adding new users will appear.(Refer to the screen) For more details, please refer to "Create a new account" of operating system and “1. How to add new user accounts” in Part 8.
Click the <Restart> button.
When this is completed you will be asked to restart the system (Refer to the following screen). After checking "Yes, I want to restart my computer now," click "Restart" to reboot your computer.
2-4
Part 3 |
Setting up Network configuration |
|||
Connecting to the network by using a cable or DSL |
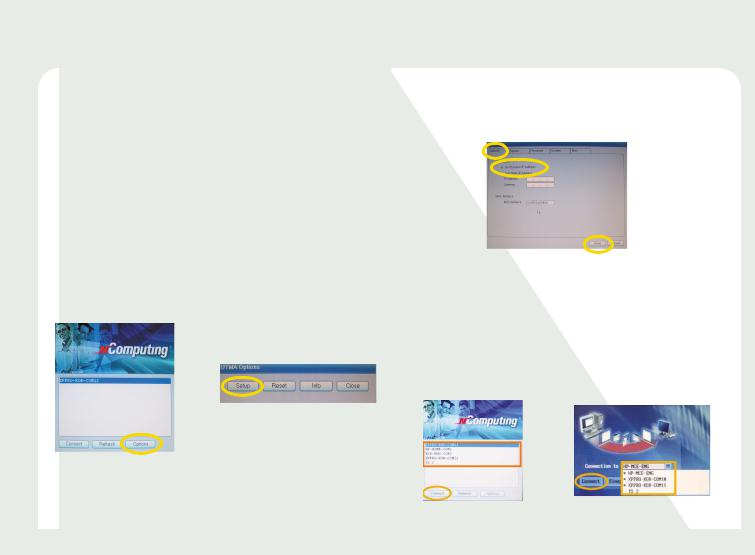
3 Select the ‘Network’ tab. Then Select ‘Get Dynamic IP address’ and |
|||
router |
|
|
click the <Save> button. (The PC Expanion uses the “Get Dynamic IP |
|
|
|
address” option as the default. No additional settings are required.) |
||
|
|
|
|
|
You need to configure the network to connect with any PC Expanion |
|
|
||
terminal(s). To configure your computer's network configurations, please |
|
|
||
refer to the following : |
|
|
||
If you use a Cable/DSL router, you can use dynamic IP addresses. (To use |
|
|
||
dynamic IP addresses, the router must support DHCP or a dynamic IP |
|
|
||
address allocation function) If you want to use static IP addresses when |
|
|
||
using a Cable/DSL router, refer to “Connecting by using a switch.” |
|
|
||
1 |
Turn on the PC Expanion. |
4 With the L120 and L200 models, the list of host computers is |
||
|
|
|
||
2 |
Click the <Setup> button on the startup screen of the PC Expanion. |
|
displayed in the startup screen of the PC Expanion. The other |
|
|
products require using the “Connection to” drop-down list. If the |
|||
|
|
|
|
|
|
|
|
|
user clicks either <TS Options> within <Setup> or <Options> |
|
|
|
|
within <Setup> after selecting “Autodetection,” the host computer |
|
|
|
|
name is displayed automatically. The name of the host computer |
|
|
|
|
will be displayed for up to 8 host computers. Click the <Connect> |
|
|
|
|
button. Start using the PC Expanion. |
3-1
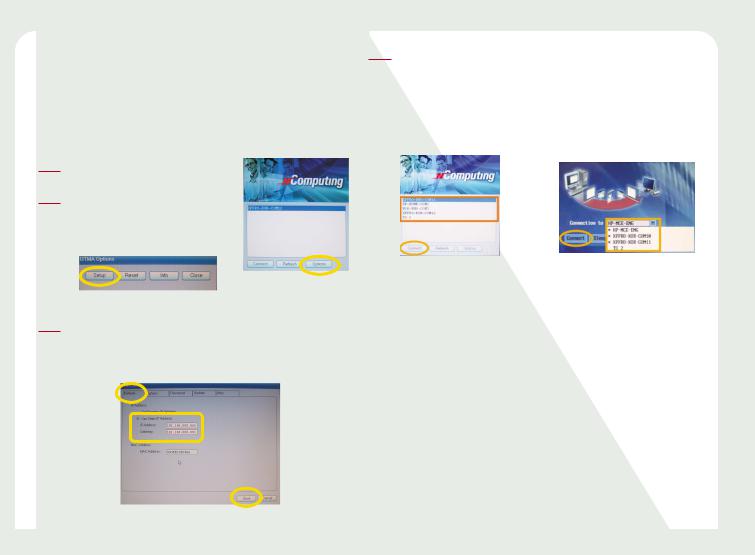
Connecting by Using a switch (Supports 100Mbps switching)
To connect by using a switch, you need to set a static IP address on both the PC Expanion terminal and the host PC.
To configure an IP address as static, follow these steps :
1 Turn on the PC Expanion.
2Click the <Setup> button on the startup screen of the PC Expanion.
3Select the ‘Network’ tab. Then select ‘Use Static IP address’ option. Type the IP address and the gateway. And then Click the <Save> button. (If you do not know them, please contact a network administrator.)
4With the L120 and L200 models, the list of host computers is displayed in the startup screen of the PC Expanion. The other models list the host computers when a user clicks the “Connection to” drop-down list. If the user clicks on either <TS Options> within <Setup> or <Options> within <Setup> after selecting “Autodetection”, the host computer name is displayed automatically. Click the <Connect> button. Start using the PC Expanion.
3-2
Part 4 Product Registration
The user must be registered in order to receive continuous support such as upgrades of the application software and after Sales service. The following method can be used for registering the user via the Internet.
 The serial number and the activation key of the product, which the Note user has purchased, must be registered via the Internet or by other means. When you are formatting or modifying the hard disk, or you are replacing the current computer with a new one after registering
the serial number, please unregister the serial number and the activation key. Please take note that the serial number and the activation key can be registered up to only 10 times if you fail to unregister the serial number.
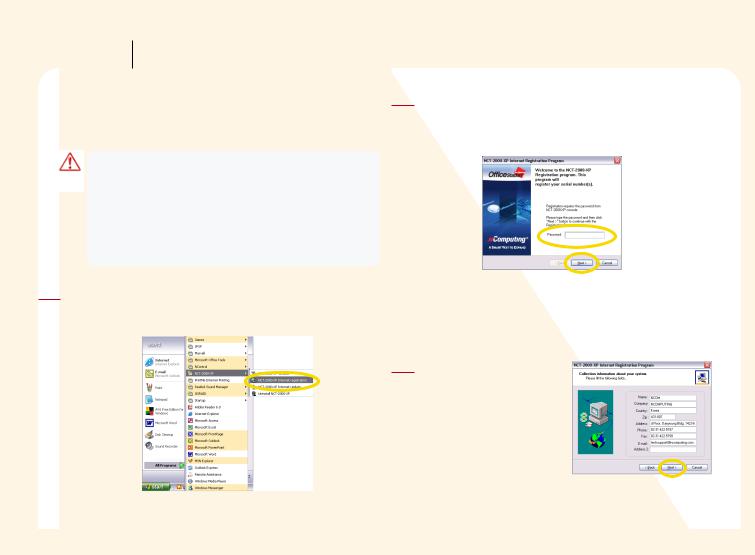
1 After clicking on the <Start> button on the Windows login screen, please select the <All Programs NCT-2000-XP NCT-2000-XP Internet Registration> in order to register.
4-1
2When the message window on the right appears, please input the ‘Administrator Password’, and then click on the <Next> button.
(If the ‘Administrator Password’ has been registered, please click on the <Next> button after inputting the ‘Administrator Password’)
Note |
If the 'Disable password protection' was selected during the |
|
installation of the application, the message window for the |
|
'Administrator Password' does not appear. |
3Please click on the <Next> button after inputting the correct information in the relevant boxes. For excellent service in the future, please make sure that all the information you provide is accurate.
Note |
Personal information protection policy |
|
The NComputing Inc. highly values any personal information which |
|
is provided by customers. NComputing Inc. observes the personal |
|
information protection provision clause of the "laws related to the |
|
use and promotion of information and communication networks" |
|
and the "guidelines for personal information protection" which |
|
were enacted by the Ministry of Information and Communication of |
|
the Korean government. NComputing Inc. informs customers of |
|
how and for what purpose personal information provided is used, |
|
in accordance with the personal information protection policy of |
|
the company. NComputing also informs the customer of what |
|
measures have been taken by the company in order to protect the |
|
customers' privacy. The personal information that customers |
|
provide for registration, is only used for the purpose of updating |
|
the software and providing technical support. |
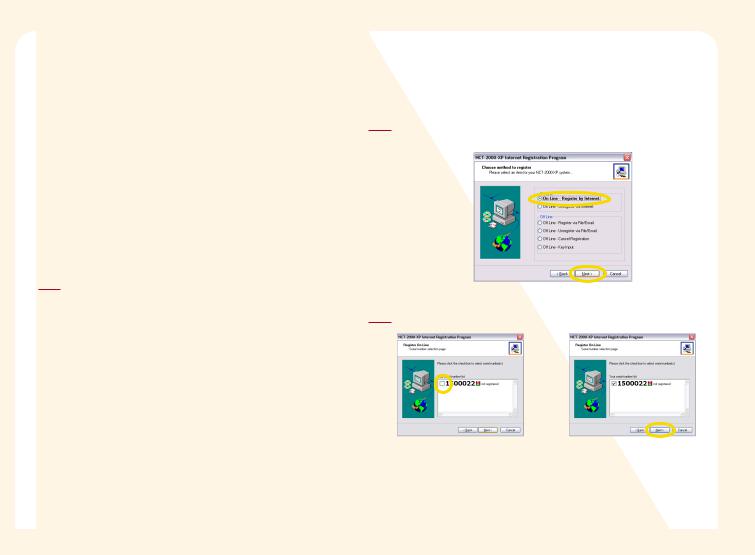
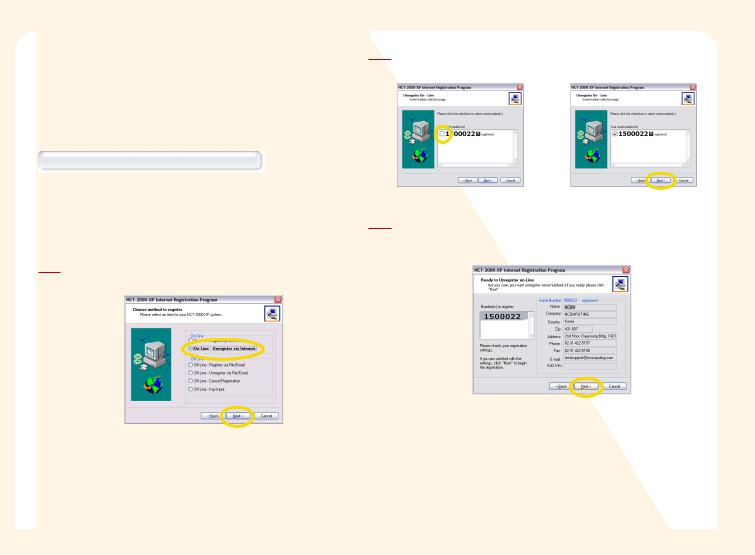
4 Select the method of registration
Online : At present the host PC is connected to the Internet
Offline : The host PC is not connected to the internet
Selecting online Internet registration
This option is only available when the computer, which has the NCT-2000-XP program, is connected to the Internet.
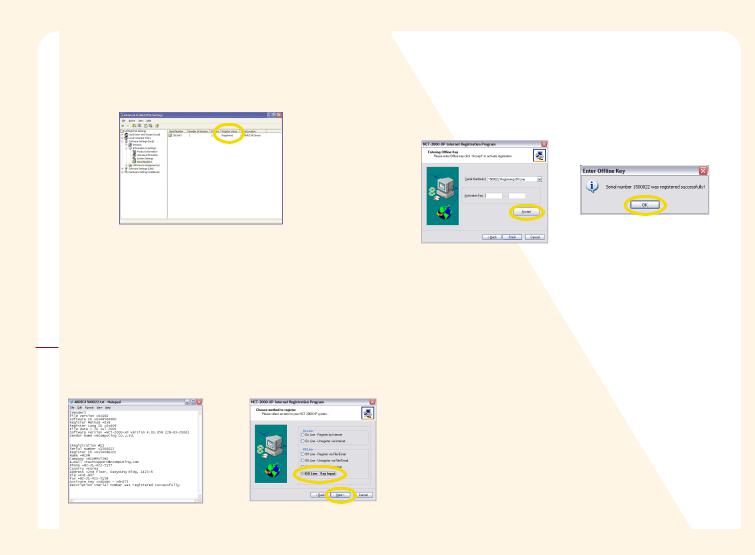
1Please click on the <Next> button after selecting 'On Line - Register by Internet'.
2 Please click on the <Next> button after selecting the serial number.
4-2
3A window for user's information registration appears. Please click on the <Back> button to correct the information, or click on the <Next> button to continue the registration.
4The registration of the serial number starts when all the information has been inputted correctly. Please take note that if the computer is logged off or the Internet is disconnected before the registration is completed, the registration cannot be completed successfully.
4-3
Creating a product registration document in instances where the Internet cannot be used for registration
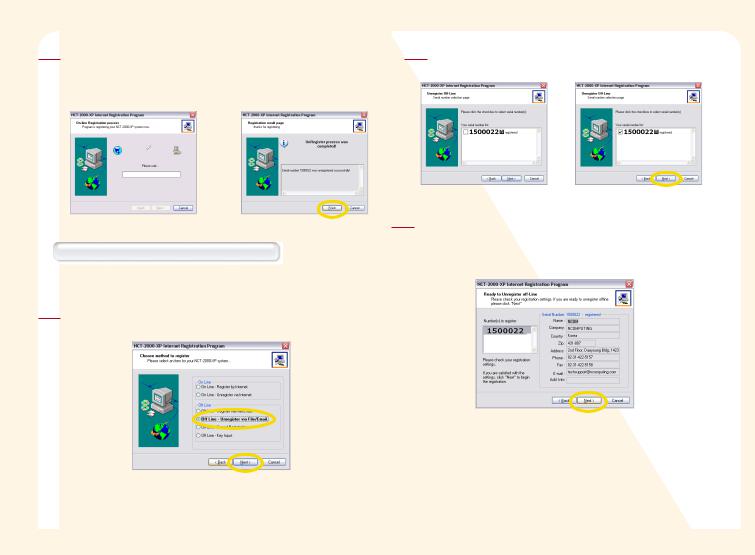
In instances where the computer with which the NCT-2000-XP software has been registered with is not connected to the Internet, please select the 'Off Line - Register via File/Email' and then create a data file for offline-registration. Please send this file in an email as an attached file to a supplier or an agent who can help you with the registration of the serial number.
1Please select the 'Off Line - Register via File/Email, ' and then click on the <Next> button.
2Please select the serial number with which you wish to register, and then click on the <Next> button.
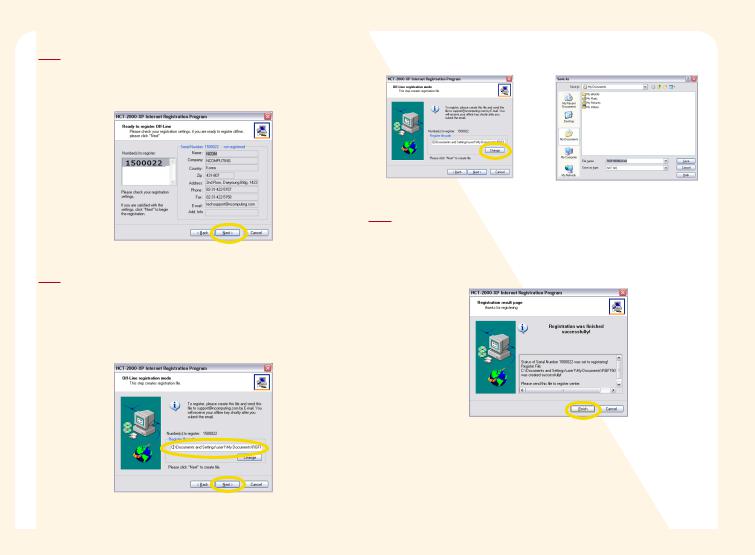
3A window with user's information registration appears. After checking the information with which the user has provided, please click on the <Back> button to correct the information, or click on the <Next> button to continue the registration.
4Please select a directory for creating the offline registration file and the name of the file, and then click on the <Next> button. The destination of the storage is <My Documents>and the name of the file is ‘RGF serial number.txt.’ To change the storage destination please click on the ‘Change’ button and select a new storage destination.
Note |
If you would like to change the path, click the <Change> button. |
5The following message window will appear to inform of the successful completion of the registration. Please send the stored file to the registration center or agent. Please click on the <Finish> button. (Please do not modify the registration file. If the registration file is modified, we cannot register it.)
4-4
6 Please send the file to the registration center or agent. The registration |
8 After selecting the corresponding serial number, input the |
||||
|
center or agent will send out a text file which can be used for registration |
|
approval number into the ' Activation Key' as seen below, and |
||
|
of the serial number. This option is used to register the serial number by |
|
then click on the <Accept> button. If the correct serial number |
||
|
using a text file. |
|
and the activation key has been submitted, the following message |
||
|
|
|
window appears. Please click on the <OK> button, and then click |
||
|
|
|
on the <Finish> button. |
||
|
|
|
|
|
|
|
|
|
|
|
|
Note |
If you would like to cancel the registration before receiving the activation |
|
key, you can select the “Offline – Cancellation of registration” option and |
|
then select the serial number that you would like to cancel. After |
|
cancelling the serial number, you cannot use the previous registration |
|
file. You must repeat the registration process. |
7There will be 2 six-digit numbers, a total of 12 digits, of the approval number in the 'Activate Key' contained in the file with which has been sent out by the registration center or agent. Please select the 'Off Line - Key Input' and then click on the <Next> button.
4-5
Unregistration
After registering the serial number, if you wish to replace the computer which is currently being used with a new computer, or to modify the hard disk, the serial number must be unregistered before cancelling the installation of the NCX-2000-XP program.
Unregistration of the product via the Internet
This option is used to unregister the corresponding serial number in the instance where the serial number was registered by using the 'On Line - Register by Internet'. If the 'On Line - Register by Internet' option is used for the registration of the serial number, please use the option to unregister the serial number.
1Please select the 'On Line – Unregister by Internet', and then click on the <Next> button.
2Please select the serial number with which you wish to unregister, and then click on the <Next> button.
3A window for the user's registration information appears. Please click on the <Back> button to correct the information, or click on the <Next> button to continue the registration.
4-6
4The registration of the serial number starts when all of the information has been inputted correctly. Please take note that the unregistration cannot be completed successfully if the computer is signed off or if the Internet is disconnected before the registration is completed.
Cancellation of registration Offline (File/Email)
Serial numbers can be unregistered offline in the same manner that they are registered offline.
1Please select the 'Off Line -unregister via File/Email' option for unregistration, and then click on the <Next> button.
4-7
2Please select the serial number with which you wish to unregister, and then click on the <Next> button.
3A window for user's information registration appears. After checking the information with which the user has provided, please click on the <Back> button to correct the information, or click on the <Next> button to continue the registration.
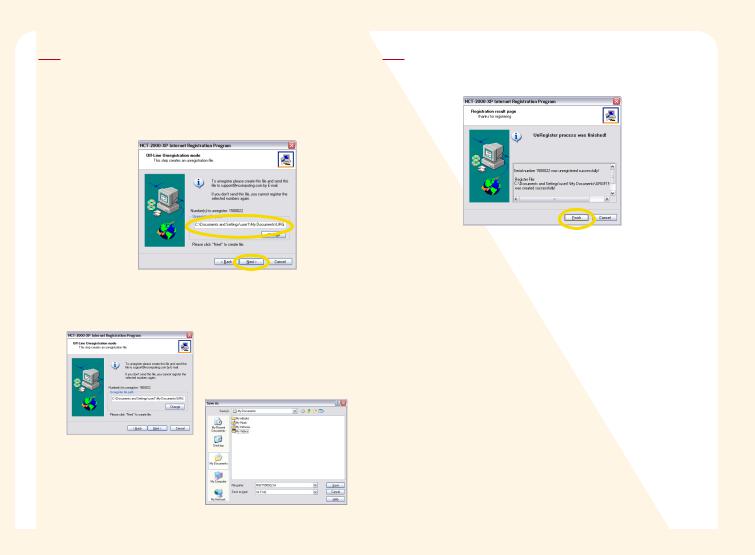
4A file creating process is required for the unregistration of the serial number. Please confirm the destination of the storage and the name of the file, and then click on the <Next> button. The storage folder is ‘My Documents’ and the file name is ‘URGF serial number.txt’. If you wish to change the storage location, please click on the ‘Change’ button to select a new destination.
Note |
If you would like to change the path of where to save the file, click |
|
the <change> button. |
5Please send the created file to the registration center or agent. The serial number cannot be used again once the unregistration is completed. Please click on the <Finish> button.
4-8
Part 5 |
Updating the NCT-2000-XP application via the Internet |
||
A user who has successfully completed the registration process can update |
2 Please input the password in the space provided in the 'Enter |
||
the NCT-2000-XP program by using the following methods. |
|
Password" message window, and then click on the <OK> button. |
|
|
|
|
(This 'Enter Password" message window appears only if the |
Updating with the application installation CD which is included |
|
administrator password is set during the installation.) |
|
In order to update the NCT-2000-XP program via the Internet, users must |
|
|
|
have completed the registration process. Without registration, updating |
|
|
|
the software will not be possible. User information must be saved |
|
|
|
temporarily before installing the new version in order to protect the |
|
|
|
private information of the user and to achieve safe and easy updates . |
|
|
|
This process is required in order to have a backup in case an unexpected |
|
|
|
problem occurs while trying to update the program with a new version, |
3 In order to continue updating, the <Internet Registration> process |
||
so that the system can always return to where it was before. |
|||
|
|
|
must have been completed. If you have already completed the |
|
|
|
registration process, please click on the <Register later> button to |
Direct Updating via the Internet |
|
continue the updating process. If you have not yet completed the |
|
This method can be used only when the user registration with the |
|
registration process, please click on the <Register Now> button to |
|
|
complete the <Internet Registration> process and then execute |
||
previous version has been completed. (Please refer to "Part 2. NCT-2000- |
|
||
|
the updating process. |
||
XP Installation") |
|
|
|
|
|
|
|
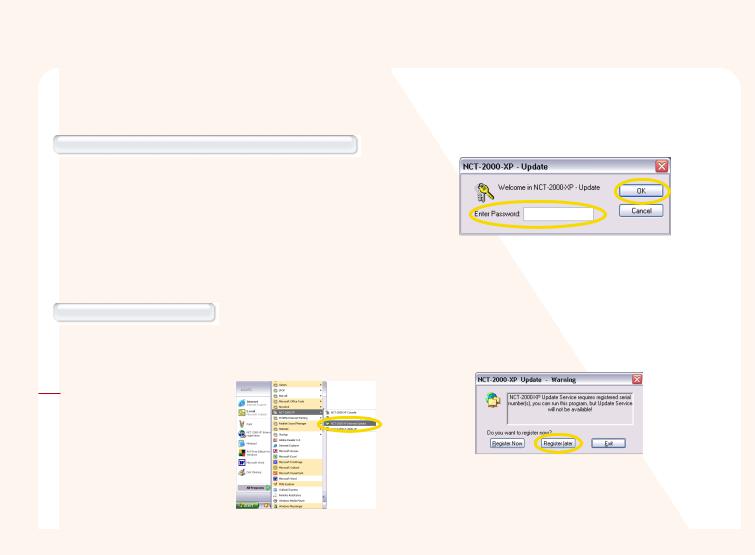
1Please click on the <Start> button on the Windows logon screen, and then
select the <All Programs NCT- 2000-XP NCT-2000-XP Internet Update> in order.
5-1
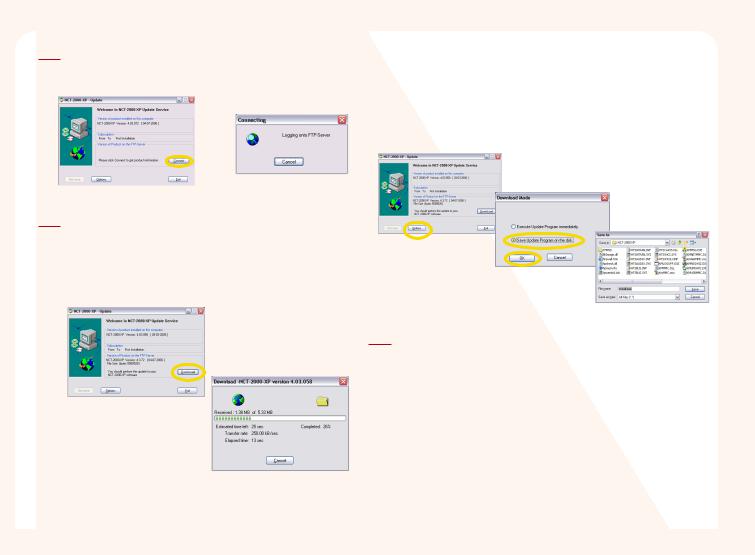
4Please click on the <Connect> button so that the user can compare the program in the NCT-2000-XP server against the program which has been currently installed.
5As shown in the picture below, the current version and the latest version on NComputing’s Internet Server can be confirmed.
If there is a new version on the Internet server, please click on the <Connect> button to start the updating process. The speed of the download varies depending on the speed of the Internet connection.)
Note |
If you do not want to install the latest NCT-2000-XP version right now, |
|
save the program the file type and click the <Product information> |
|
button. Then select the “Save the program in the disk” option. The |
|
default folder is the installed NCT-2000-XP folder in the hard disk drive. |
|
If you would like to save the file in another folder, please select another |
|
folder. When you save the file in another folder, you must move the file |
|
to the installed NCT-2000-XP folder in order to run the program. |
6. When the download is completed, the installation of the program starts in the same way as the 'Installation of the NCX-2000-XP application.'
5-2
Part 6 |
|
NCT-2000-XP Remote Management Console |
|||||||
Remote management of the NCT-2000-XP is automatically implemented |
|
|
|
|
|
|
|||
Note |
Functions of the NCT-2000-XP program icon in the taskbar of |
||||||||
with the installation. When the installation of the application is completed, |
|
|
Windows. |
|
|
||||
the NCT-2000-XP group is automatically created in the program group. |
|
|
|
|
|||||
|
|
There are some basic functions that can be accessed by right- |
|||||||
|
|
|
|
|
|||||
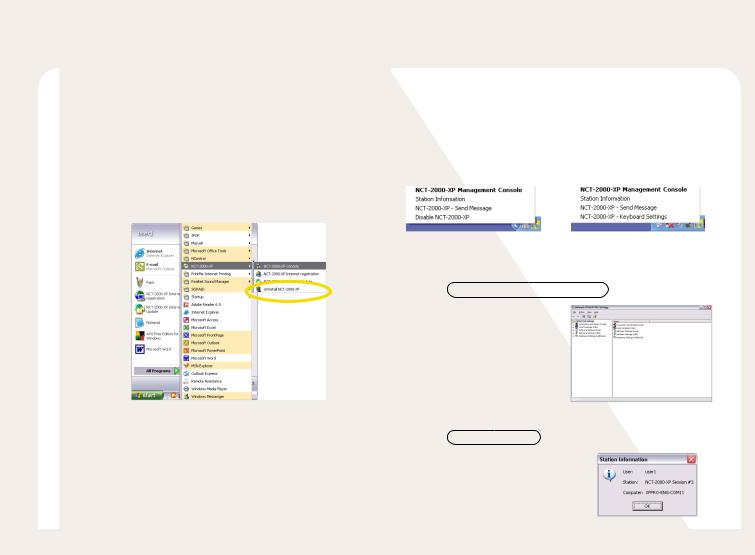
To confirm the installation of the NCT-2000-XP application, please click on |
|
|
clicking on the NCX-2000-XP icon which is in the 'Information area' |
||||||
|
|
of the taskbar. Here are the differences between options of the host |
|||||||
the <Start> button in the Windows operating system, and then select the |
|
|
|||||||
|
|
PC and PC Expanion. |
|
|
|||||
<All Programs |
NCT-2000-XP> in order.You also can run the NCT-2000- |
|
|
|
|
||||
|
|
|
|
|
|
|
|||
XP application on the NCT-2000-XP program icon on the taskbar of |
|
|
|
|
|
|
|
||
Windows. |
|
|
|
|
|
|
|
|
|
|
|
|
|
|
|
|
|
|
|
|
|
|
|
|
<Host computer> |
<PC Expanion> |
|||
|
|
|
|
|
Please refer to each option for the function. |
||||
|
|
|
|
|
NCT-2000-XP Management Console |
|
|
||
|
|
|
|
|
The option is that the |
|
|
||
|
|
|
|
|
NCT-2000-XP is running. |
|
|
||
Station Information
The user can see the user ID, the station information, and the host computer name.
6-1
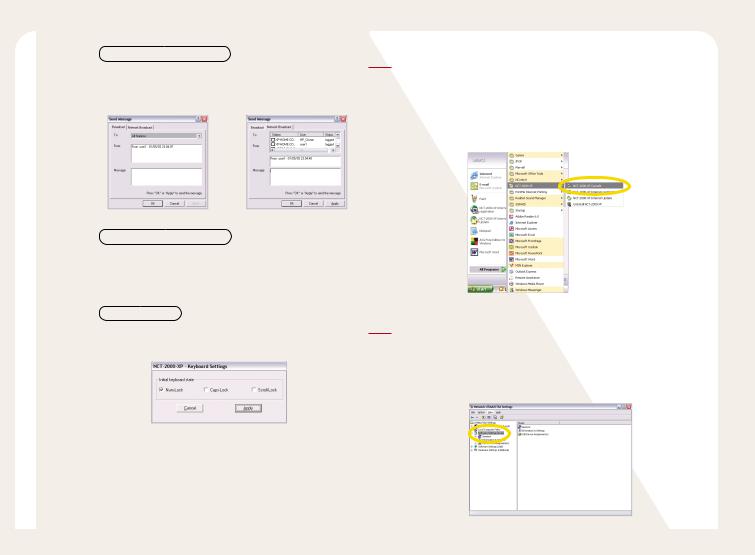
NCT-2000-XP – Send Message
The user can send a message to the connected PC Expanion or a specific PC Expanion. For more information, please see “9. How to send a message to the connected PC Expanion.” in Part 8.
NCT-2000-XP Disable(Enable)
The user can stop running or start the NCT-2000-XP application. For more information, please see “10. How to start or stop running the PC Expanion.” in Part 8.
keyboard setting
When the user uses the PC Expanion, the user can set the status of ‘Num Lock’ key or ‘Caps Lock’ key or ‘Scroll Lock’ key.
1 Run the NCT-2000-XP application
To confirm the installation of the NCT-2000-XP application, please click on the <Start> button in the Windows operating system, and then select the <All Programs NCT-2000-XP in order. You also can run the NCT-2000-XP application on the NCT-2000-XP program icon on the taskbar of Windows.
2Software Settings (Local)
There are items such as ‘Sessions’, ‘Information & Settings’ and ‘USBDevice Assignment(s) under the ‘Software Settings (local)’ These option can be used to check the status of the PC Expanion, change options, and assign the USB storage device.
6-2
 Loading...