

Page 1
PC EXPANIONUser s Guide
Fast Ethernet Version
Page 2

1
Hardware specification regarding PC Expanion L100, L120, and L200
Dimension
Weight
Protocol
Serial Port*
USB port
Operating
System
8.46inch(W) x 6.30inch(D) x 1.57inch(H)
0.83 lb
WoIP (Windows® over IP) / LoIP (Linux over IP)
X
X
Windows® XP Home Edition
Windows® XP Professional
Windows® 2000 Professional
Windows® XP Media Center Edition
Windows® Server 2003
Windows® 2000 Server
Windows® Small Business Server 2003
Linux**
L100
9.57inch(W) x 5.31inch(D) x 1.57inch(H)
0.81 lb
WoIP (Windows® over IP) / LoIP (Linux over IP)
X
X
Windows® XP Home Edition
Windows® XP Professional
Windows® 2000 Professional
Windows® XP Media Center Edition
Windows® Server 2003
Windows® Small Business Server 2003
Linux**
L120
9.57inch(W) x 5.31inch(D) x 1.57inch(H)
0.82 lb
WoIP (Windows® over IP) / LoIP (Linux over IP)
O
O
Windows® XP Home Edition
Windows® XP Professional
Windows® XP Media Center Edition
Windows® Server 2003
Windows® Small Business Server 2003
Linux**
L200
The specifications of the product may be altered without any advance notice being given to individual users.
* Some restrictions apply
** Some restrictions apply. See website for details.
Page 3
2
Trademarks
● Windows, Windows2000 Professional, Windows2000 Server,
Windows
XP Home Edition, WindowsXP Professional
and Windows
XP Media Edition, WindowsServer 2003, Windows
Small Business Server 2003 are trademarks of Microsoft Corporation.
● Intel
, Pentinum4, and Xeonare trademarks of Intel Corporation.
● PC Expanion
is a trademark of NComputing Corportaiton.
Disclaimers
● The manufacturer, importers and agencies are not responsible for any
accidental damage to the product or damage to the product which is
caused by improper use and operation of this product.
● The information in the User's Guide has been written based on the
specifications of current products. The manufacturer of the product,
NComputing Co., Ltd., continues to upgrade the product with
additional new functions, and will continue to improve the product
by applying new technologies.
● The specifications of this product may be altered without advance
notice given to individual users.
Symbols and descriptions for the correct and safe
use of the product.
The following instructions are for the correct use of this product and
must be observed in order to prevent any unexpected danger that may
occur to users or damage the product.
A user must read and follow this User's Guide instructions carefully
before use.
This sign indicates the
possibility of damage to the
product when instructions are
not followed.
This sign indicates important
information which a user must
read carefully in order to use
this device correctly.
This sign indicates helpful
information which a user can
refer to in order to use the
system correctly.
NoteWarning Note
Copyright
NComputing Co., Ltd. has all rights reserved in respect of this User's Guide
including patent rights, trademark rights, copyright and other intellectual
property rights. No part of this User's Guide may be copied or reproduced
in any form or by any manner without the prior permission of
NComputing Co., Ltd. The use of the contents of this User's Guide in whole
or in part may result in prosecution. The contents of software, sound
recordings and video images, which are registered for copyright, are
protected by copyright laws and other related laws. If any part of the
contents of this product, which have been registered for copyright, are
reproduced or distributed without permission, the legal responsibility lies
with the users. The company, organizations, products, characters and
events, which are used in the examples, are fictitious. NComputing Co.,
Ltd. does not have any intention of using actual companies, organizations,
products, characters or events anywhere in the User's Guide, and therefore
no such assumption is made. It is the user's responsibility to observe the
relevant copyright laws.
Page 4

3
● Be sure that the place of installation is not too hot (temperature
above 35C degrees) or too cold (temperature below 0C degrees), or
too wet.
● Be sure to keep the mainframe safe from any severe impact.
● Be sure that the product does not come into direct contact with
benzene or paint thinner.
● Be sure that the product is not exposed to direct sunlight or any hot
machinery.
● Be sure to keep the product away from any items which have strong
magnetic properties.
● Do not disassemble, repair or rebuild the product.
● Do not leave a LAN (Local Area Network) cable in any passageway.
An electric shock, fire, damage to the product or physical injury may
occur as a result of tripping over the cable.
● Disconnect the LAN cable from the product when the cable is not in
use for a long period of time.
● Be sure to install the product in such a way that it is safe from
damage caused by dropping or falling.
Classifications and descriptions of signs
The following descriptions for the correct use of the product must be
referred to by the user in order to prevent any physical injury occurring
from unexpected danger, or any loss of assets which may be caused by
damage to the product.
A user must read this User's Guide carefully before use and follow
the instructions.
This equipment has been tested and found to comply with the limit for a
class B digital device, pursuant 15 of the FCC Rules.
These limits are designed to provide reasonable protection against harmful
interference in a residential installation. This equipment generates, uses,
and can radiate radio frequency energy, and if not installed and used in
accordance with the instructions, may cause harmful interference to radio
communications. However, there is no guarantee that interference will not
occur in a particular installation. If this equipment does cause harmful
interference to radio or television reception, which can be determined by
turning the equipment off and on, the user is encouraged to try and correct
the interference by one or the following measures:
● Reorient or relocate the receiving antenna
● Increase the separation between the equipment and receiver
● Connect the equipment into an outlet on a circuit different from that to
which the receiver is connected
● Consult the dealer or an experienced radio TV technician for help
Change or modification not expressly approved by the party responsible for
compliance could void the user’s authority to operate the equipment.
FCC Information to Use
Page 5

4
● Any other operating systems including new operating systems require special
software, which can be purchased separately, or an upgrade of the software is
available at extra cost.
● This product is an independent terminal device which provides for the
emulation of Windows, not a computer. Unlike an existing computer there is no
need for the addition of auxiliary peripheral devices, or for the connection of
different types of communication devices, or for the modification of hardware.
The product does not support video images with a high picture quality or 3D
games which have to be supported by high performance computers.
When more than one user shares one computer by using this product, the settings
for related functions, which are provided by the Windows operating system, must
be carried out as an adequate safety measure. The file service by using the NTFS
(New Technology File System) method and environment settings in User Accounts
in Control Panel must be carried out in administrator mode in order to ensure the
security, easy maintenance and repair of the system. Please refer to the Windows
operating system for more detailed information.
* Some restrictions apply. See website for details.
Notice
Thank you for purchasing our company's product.
This product has been made by using state of the art technology from NComputing
and has undergone thorough testing. An understanding of reliability has been
reached for this product due to extensive testing. This User's Guide is designed to
help the user to achieve easy installation and use of the product. Our company
makes every effort to provide our customers with information related to the product,
and with answers for any questions that may be asked by our customers. The
performance of the product can be continuously enhanced via the software update
utility. (Please refer to the relevant section of the User's Guide for more detailed
information).The customer's registration and the registration of the product serial
number, which can be done via the Internet, enables customers to receive the
software upgrade service and ongoing technical support via the Internet for their
convenience.
● Please note that reproduction of the User's Guide in whole or in part, without
permission from the manufacturer, is not permitted.
● Please read the notes, which are related to safety, before use.
● The information in the User's Guide may vary depending on any improvements in
the product and the model type of the purchased product.
● The manufacturer is not responsible for any damage to the product that is caused
by using any products which are not specified as standard products, or by not
following instructions and procedures correctly.
● This product is compatible with Windows2000 Professional, Windows2000
Server, WindowsXP Home Edition, WindowsXP Professional, WindowsXP
Media Center Edition, WindowsServer 2003(Standard Edition/Enterprise
Edition), WindowsSmall Business Server 2003, Linux*
Page 6

5
CONTENTS
Product Features
Part 1
NCT-2000-XP Installation
Part 2
Setting up Network Configurations
Part 3
Connecting to the network using a cable or DSL router 3-1
Connecting using a switch (Supports 100Mbps switching) 3-2
What is the PC Expanion? 1-1
Features 1-1
System Minimum Requirement 1-2
OS (Operating System) and Maximum Connection Limit 1-3
PC ExpanionConceptual Diagram 1-3
How to use the PC Expanion 1-4
Product Registration
Part 4
Selecting online Internet registration 4-2
Creating a product registration document in instances where
the Internet cannot be used for registration
4-3
Unregistration 4-6
Updating the NCT-2000-XP application via
the Internet
Part 5
NCT-2000-XP Remote Management Console
Part 6
Using the “Setup”
Part 7
Page 7

6
Using the PC Expanion (Advanced)
Part 8
1. How to add a new user account 8-1
2. How to check the IP address setting of PC Expanion 8-5
3. How to check the IP address of the host PC. 8-7
4. How to connect between the PC Expanion and the host PC using network equipment. 8-9
5. How to connect the PC Expanion to the host PC directly 8-11
6. How to connect to the specific host PC 8-13
7. How to connect to the specific host PC automatically 8-16
8. How to log in automatically when the PC Expanion connects to the host PC. 8-18
9. How to send a message to the connected PC Expanion 8-20
10. How to start or stop running the NCT-2000-XP application 8-21
11. How to terminate an active PC Expanion. 8-22
12. How to see the screen running PC Expanion 8-22
13. How to control the running of the PC Expanion by an administrator 8-23
14. How to log in to the host PC automatically 8-24
15. How to set the timer for a ‘system shutdown’ message 8-24
16. How to enable or disable the function of sending a message 8-25
17. How to view and take control of the PC Expanion 8-26
18. How to stop the station automatically when the PC Expanion is disconnected 8-26
19. How to run both NCT-2000-XP program and an application using Windows RDP 8-27
20. How to see the background-bitmaps image of PC Expanion 8-28
Page 8

7
21. How to set the password of the NCT-2000-XP program 8-29
22. How to use the USB port in case of L2XX model series 8-29
23. How to change the name of the PC Expanion 8-30
24. How to run a specific program when the PC Expanion connects to the host PC 8-31
25. How to manage grouped PC Expanions under the NCT-2000-XP program 8-34
26. How to manage when a user forgets the password of the NCT-2000-XP program 8-36
27. How to add or remove the serial number of NCT-2000-XP program 8-37
28. How to delete the PC Expanion on the list of NCT-2000-XP console 8-39
29. How to set the resolution and frequency on the PC Expanion 8-40
30. How to set the user ID and the password before the PC Expanion logs in to the host PC 8-42
31. How to uninstall the NCT-2000-XP program 8-44
32. How to assign an USB storage device 8-45
Troubleshooting against an error message
Troubleshooting about an error message that appears on the PC Expanion 9-1
Troubleshooting about an error message that appears on the Host PC 9-3
Part 9
Glossary
Regarding PC Expanion A-1
Regarding computer network A-1
FAQ
Appendix
Page 9

1-1
Product Features
Part 1
What is the PC Expanion?
The PC Expanion is a unique networking device using WoIP(Windows over
IP) or LoIP(Linux over IP) networking standards. Users can share the
resources of the host PC system by connecting a PC Expanion terminal(s) to
it, providing the benefit of having several networked PCs. Users can connect
one or more PC Expanion terminals to one host PC directly using a LAN
adapter and cable or via the network using a switch/router.
Features
Cost Effective
Save up to 80% of hardware cost versus buying a Pentum4 or equivalent
PC; the PC Expanion gives any office or home the ability to expand any
existing host PC easily and affordably.
Compatibility
The PC Expanion will run Windows or Linux based applications on a host
PC; applications include Internet browsing, email, office suites, most
games and much more.
No Maintenance Required
Maintenance and upgrades only apply to the host PC. The PC Expanion
requires no hardware maintenance, only occasional software updates.
Small sleek design
Space saving design allows more room for your office or desk area.
Secure and Fast
Our proprietary Terminal Protocol allows for a fast and secure
environment using image caching and 128 bit encryption
*No noise output and low power consumption, quiet operations while saving energy costs.
Depending on the performance of the host PC, an application’s
compatibility and operating speed can vary. Refer to NComputing’s
web site for more information.
Note
Page 10
1-2
System Minimum Requirement
The minimum hardware requirements
To connect one PC EXPANION terminal to a single host PC,
the following system requirements apply :
IntelPentium4 1.3 GHz processor with at least 512 MB RAM or higher.
To connect two to three PC EXPANION terminal(s) to a single host
PC, the following system requirements apply :
IntelPentium4 2.4 GHz processor with Hyper - Threading
technology with at least 512 MB RAM or higher.
To connect four to seven PC EXPANION terminal(s) to a single host
PC, the following system requirements apply :
IntelPentium4 3.0 GHz processor with Hyper - Threading technology
with at least 1024 MB RAM or higher.
To connect eight to ten PC EXPANION terminal(s) to a single host PC,
the following system requirements apply :
IntelPentium4 3.2 GHz processor with Hyper - Threading technology
with at least 2048 MB RAM or higher.
To connect 10-15 PC EXPANION terminal to a single host PC,
the following system requirements apply :
IntelPentium4 or Xeon3.0 GHz processor with at least 3 GB RAM or higher.
To connect 16-20 PC EXPANION terminal(s) to a single host PC,
the following system requirements apply :
IntelPentium4 or Xeon3.2 GHz processor with Hyper - Threading
technology with at least 4 GB RAM or higher.
To connect 20-25 five PC EXPANION terminal(s) to a single host PC,
the following system requirements apply :
IntelPentium4 or Xeon3.4 GHz processor with Hyper - Threading
technology with at least 5 GB RAM or higher.
To connect 26-30 PC EXPANION terminal(s) to a single host PC, the
following system requirements apply :
IntelPentium4 or Xeon3.6 GHz processor with Hyper - Threading
technology with at least 6 GB RAM or higher.
Do not use a notebook PC as a host PC. Using notebook PCs causes
power management and memory problems. Notebooks use
power-saving features and different technologies than a typical
desktop PC.
We recommend a 60GB and 7200rpm or higher hard disk drive.
Note
Page 11
1-3
● Windows
2000 Professional : 10 units (L200 model does not support
this operating system.)
● Windows
2000 Server : 30 units (L200 model does not support this
operating system.)
● Windows
XP Home Edition : 10 units
● Windows
XP Professional : 10 units
● Windows
XP Media Center Edition : 10 units
● Windows
Server 2003 (Standard Edition / Enterprise Edition) : 30 units
● Windows
Small Business Server 2003 : 30 units
● Linux
*
: 30 units (the USB memory port of L200 model does not
support a USB device under Linux.)
* Some restrictions apply. See website for details.
OS (Operating System) and Maximum Connection
Limit
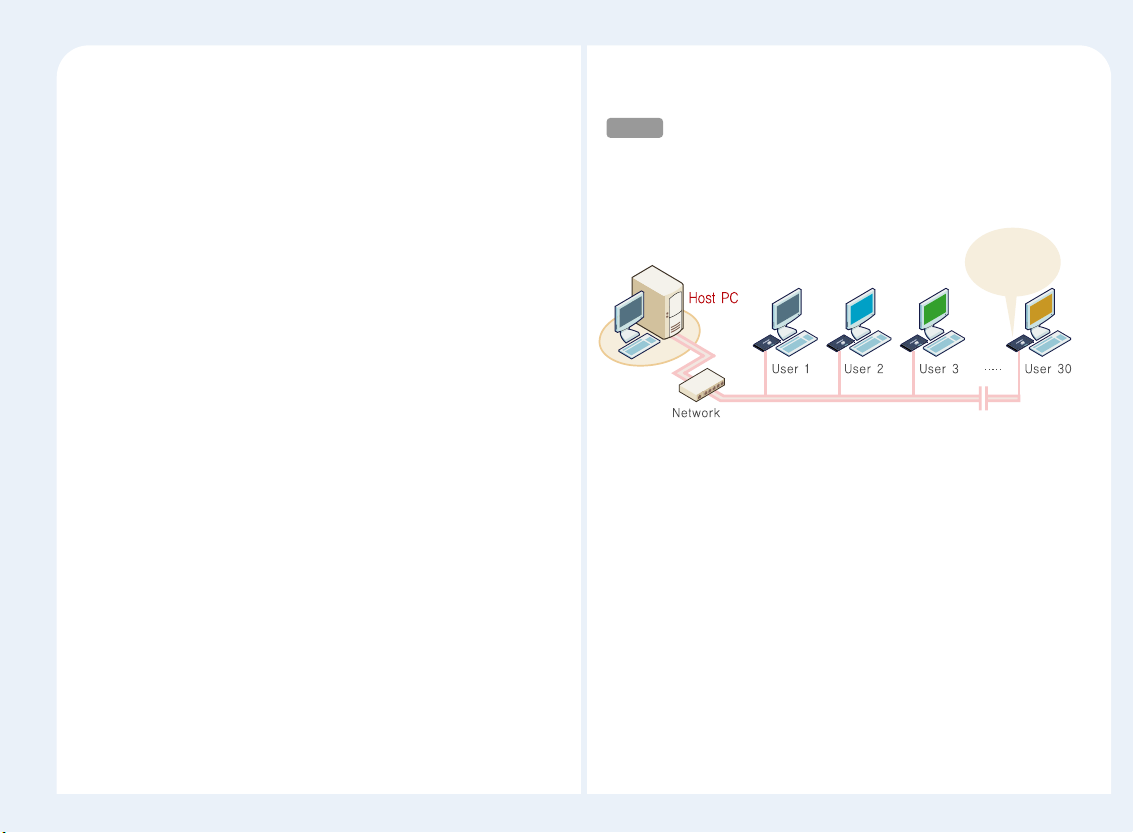
PC ExpanionConceptual Diagram
※ Maximum number of users can vary depending on host PC
configuration, type of OS and administrative settings.
PC EXPANION
Windows2000 Professional/Server
Windows
XP Home Edition/Professional/Media Center Edition
Windows
Server 2003(Standard/Enterprise Edition)
Windows
Small Business Server 2003
Linux
Host PC
Page 12

1-4
How to use the PC Expanion
Install the PC Expanion (Refer to the Quick Installation Guide )
1
Install the NCT-2000-XP application on the host PC
2
Setup the network configuration
3
Turn on the PC Expanion, set up the PC Expanion
4
Click the “Connect” button
5
Page 13
2-1
NCT-2000-XP Installation
Part 2
Insert the software installation CD into the CD drive.
Turn on the host PC and insert the Software Installation CD into the
CD drive after your computer boots up.
1
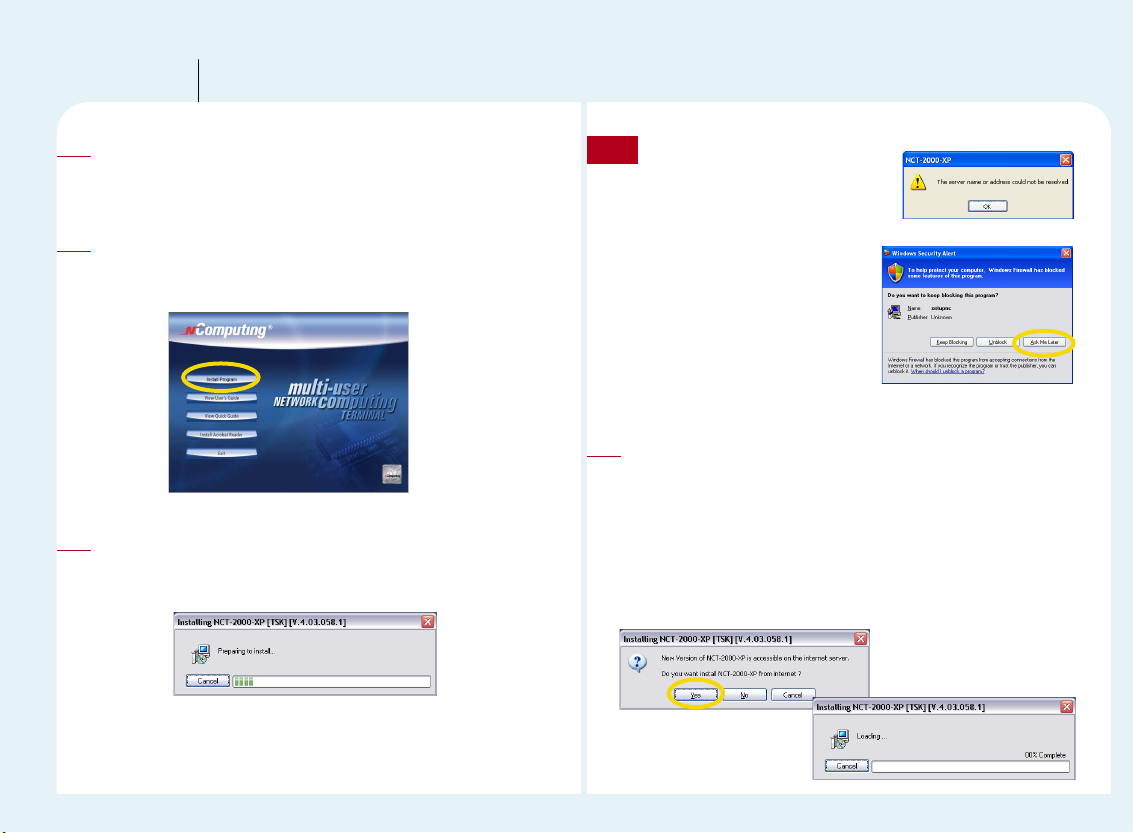
Click <Install Program> button.
The installation program will start automatically. When the installation
screen appears, click “Install Main Program”.
2
‘Preparing to install’ message appears.
This means that the program is checking the server to see if it has the
latest version.
3
Message similar to the one shown
here will appear if your Internet is not
connected.
If you have Internet
connectivity and Windows®
XP Service pack 2 is installed,
a message similar to the one
shown below will appear.
Click the “Ask Me Later”
button.
Note
The latest NCT-2000-XP program installation
If the server has the latest version, you will be asked if you want to
install the latest version as shown on the left below. Click “Yes” if
you want to install, or click “No” if you want to install the version on
the CD. The new version will be downloaded as shown on the right
below when installing. (It is recommended to select “Yes” to install
the latest version. The download may take some time depending
on the Internet speed)
4
Page 14
2-2
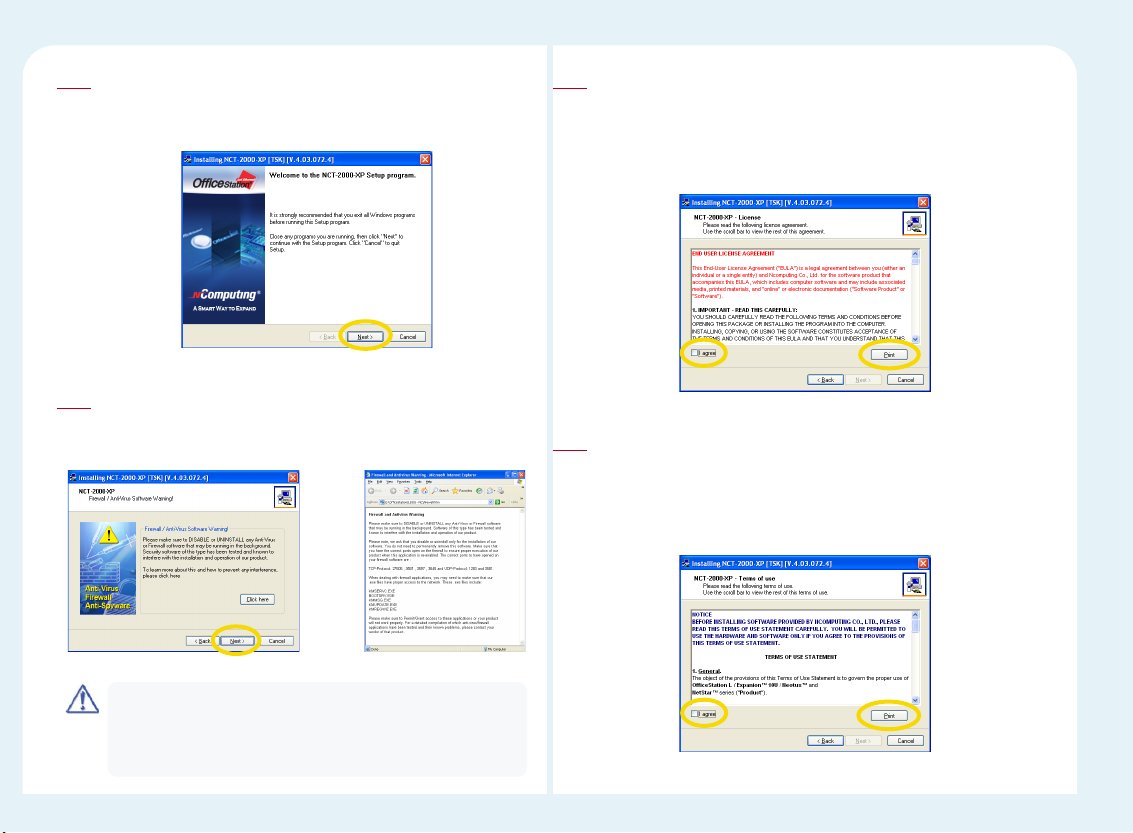
Click <Next> button.
The installation program will start automatically. When the
installation wizard screen appears, click “Next”.
5
Click <Next> button.
If you click the <more> button, you will see a notice with the html
type.
6
Please make sure to DISABLE or UNINSTALL any Anti-Virus or
Firewall software that may be running in the background. Security
software of this type has been tested and known to interfere with
the installation and operation of this product.
Note
Select ‘I agree’ and then click the <Next> button.
Once the license agreement window appears, check "I agree" and click
"Next". If you do not agree with the license agreement, click the "Cancel"
button to finish the process. If you would like to print this out, please click
“Print.”
7
Select ‘I agree’ and then click the <Next> button.
When the NCT-2000-XP-Terms of Use window appears, check "I agree"
and click "Next". If you do not want to agree to the license, click "Cancel"
to finish the process. If you would like to print this out, please click
“Print”.
8
Page 15
2-3
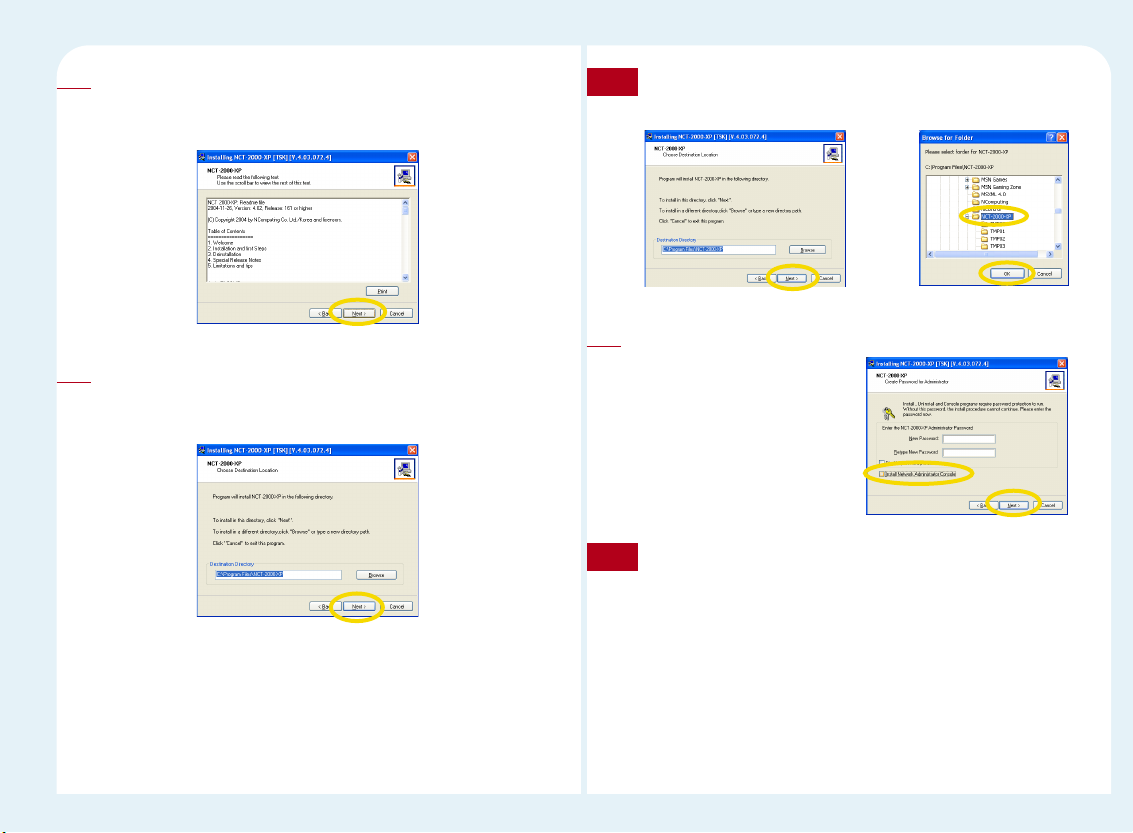
Click the <Next> button.
Read the contents of the readme file and click “Next”.
If you would like to print this out, please click “Print”.
9
Click the <Next> button.
Select the installation default folder and click "Next."
The “Program Files” folder is the default installation folder.
10
If you want to install it in another path, type the path directly or click
the <find> button and select the desired folder.
Note
Click <Next> button.
If the same screen as the one
shown on the right appears, select
the item that you want to install
after confirming the following
reference and click “Next.”
11
Administrator Password : If you set an administrator password,
the Network Administrator Console will require this password to
make changes within the console. You should remember the
"Administrator Password" for future configuration changes. If you
do not remember the password, you can't execute the program or
alter management settings.
( If you want to cancel the previous password, refer to “26. How
to manage when a user forgets the password of the NCT-2000XP program” in Part 8.)
Note
Page 16
2-4
Network Control Console : A management application that
manages local user groups and can also manage individual
computers and the connected PC EXPANIONs
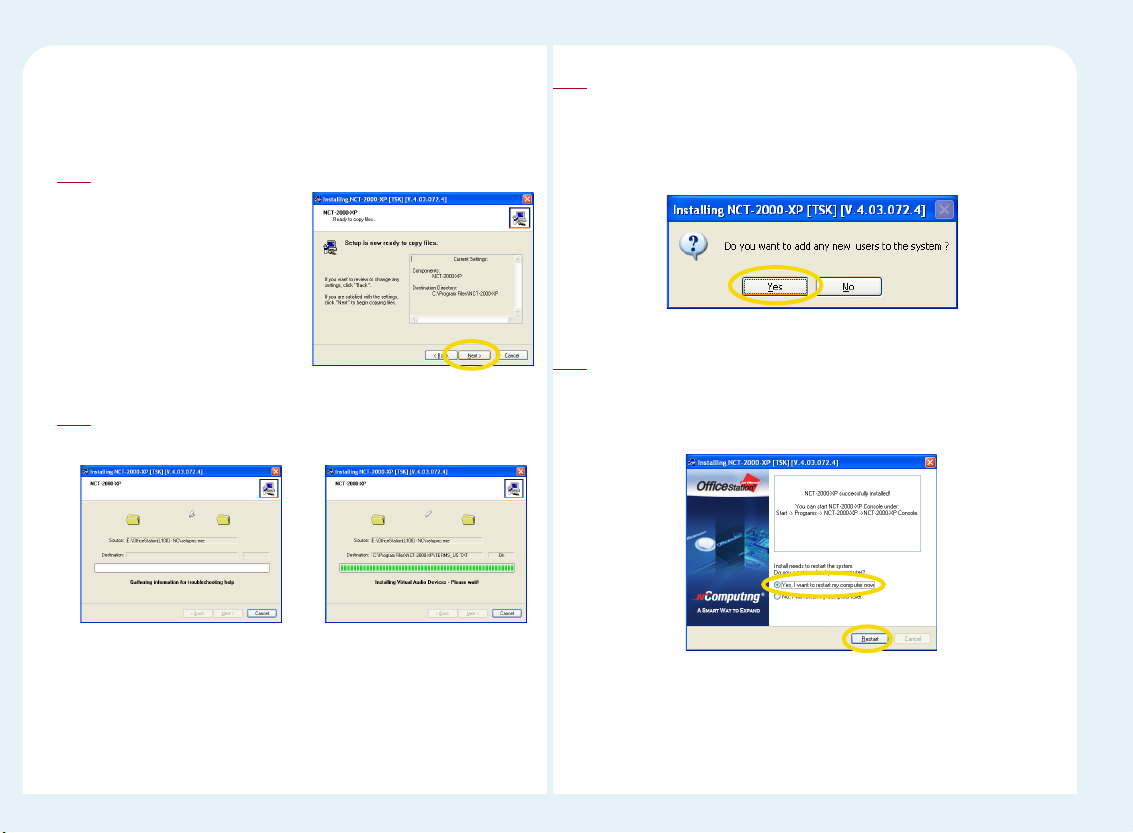
Click the <Next> button.
If you would like to review or
change any settings, click
“Back”. If you are satisfied with
the settings, click “Next” to
begin copying files.
12
Installing the NCT-2000-XP program
Refer to the following steps.
Gathering information for troubleshooting help ▶ Copying files ▶
Installation of service ▶ Remote management console installation
▶ the selected items installation ▶ Virtual audio device driver
installation
13
Add user accounts.
When the program installation is completed, the message screen for
adding new users will appear.(Refer to the screen) For more details,
please refer to "Create a new account" of operating system and “1. How
to add new user accounts” in Part 8.
14
Click the <Restart> button.
When this is completed you will be asked to restart the system (Refer
to the following screen). After checking "Yes, I want to restart my
computer now," click "Restart" to reboot your computer.
15
Page 17
3-1
Setting up Network configuration
Part 3
You need to configure the network to connect with any PC Expanion
terminal(s). To configure your computer's network configurations, please
refer to the following :
Connecting to the network by using a cable or DSL
router
If you use a Cable/DSL router, you can use dynamic IP addresses. (To use
dynamic IP addresses, the router must support DHCP or a dynamic IP
address allocation function) If you want to use static IP addresses when
using a Cable/DSL router, refer to “Connecting by using a switch.”
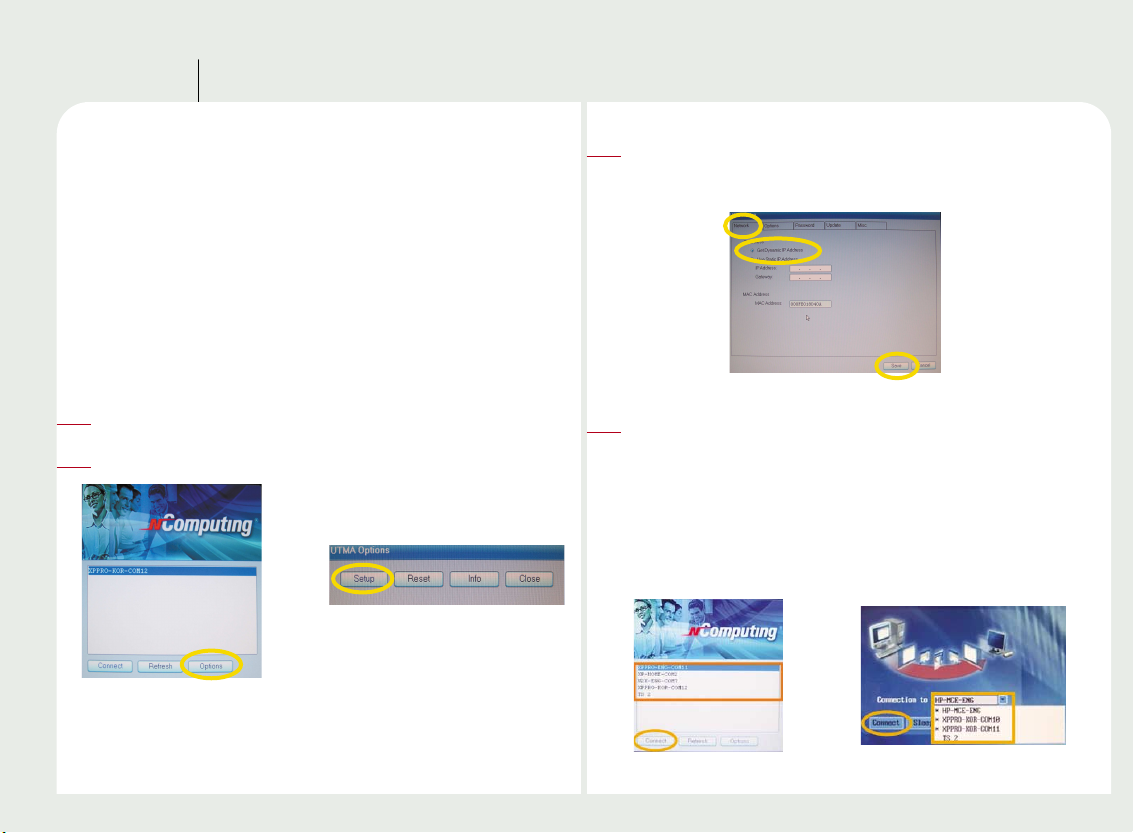
Turn on the PC Expanion.
1
Click the <Setup> button on the startup screen of the PC Expanion.
2
With the L120 and L200 models, the list of host computers is
displayed in the startup screen of the PC Expanion. The other
products require using the “Connection to” drop-down list. If the
user clicks either <TS Options> within <Setup> or <Options>
within <Setup> after selecting “Autodetection,” the host computer
name is displayed automatically. The name of the host computer
will be displayed for up to 8 host computers. Click the <Connect>
button. Start using the PC Expanion.
4
Select the ‘Network’ tab. Then Select ‘Get Dynamic IP address’ and
click the <Save> button. (The PC Expanion uses the “Get Dynamic IP
address” option as the default. No additional settings are required.)
3
Page 18
3-2
Connecting by Using a switch (Supports 100Mbps
switching)
To connect by using a switch, you need to set a static IP address on both
the PC Expanion terminal and the host PC.
To configure an IP address as static, follow these steps :
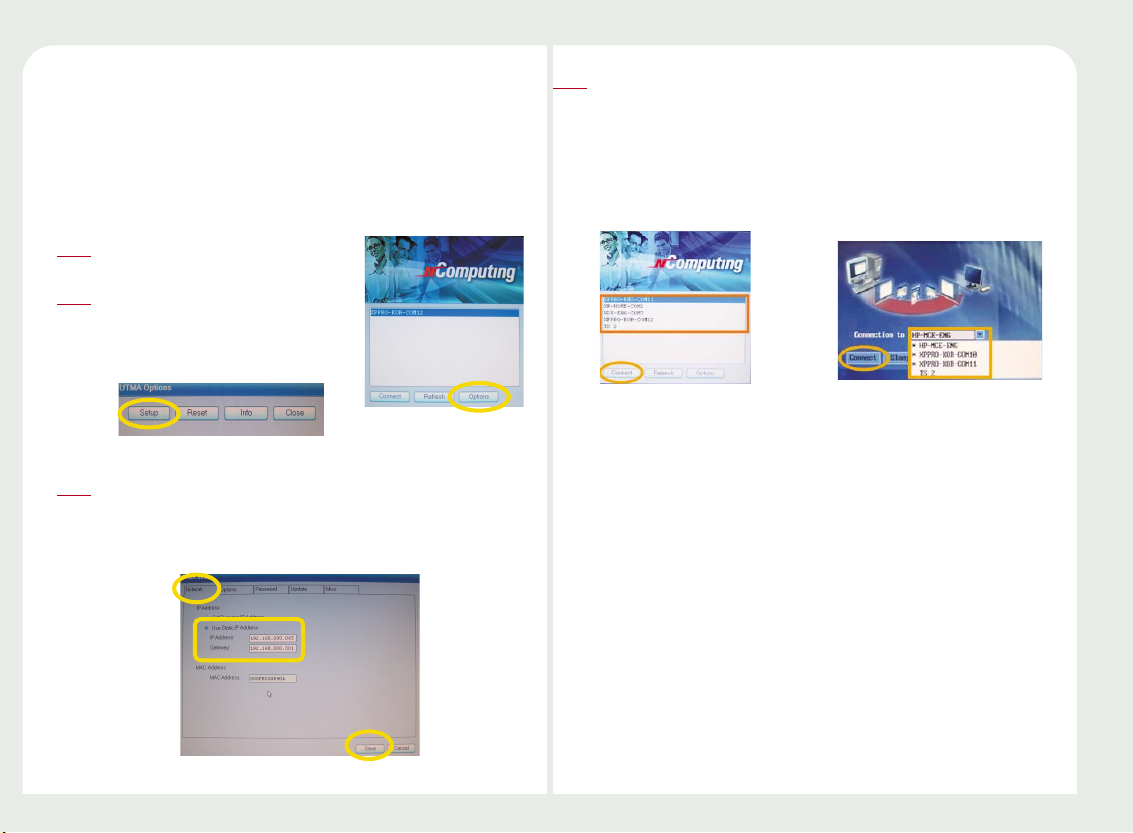
Turn on the PC Expanion.
1
Click the <Setup> button on the
startup screen of the PC Expanion.
2
Select the ‘Network’ tab. Then select ‘Use Static IP address’ option.
Type the IP address and the gateway. And then Click the <Save>
button. (If you do not know them, please contact a network
administrator.)
3
With the L120 and L200 models, the list of host computers is displayed in
the startup screen of the PC Expanion. The other models list the host
computers when a user clicks the “Connection to” drop-down list. If the
user clicks on either <TS Options> within <Setup> or <Options> within
<Setup> after selecting “Autodetection”, the host computer name is
displayed automatically. Click the <Connect> button. Start using the PC
Expanion.
4
Page 19
4-1
Product Registration
Part 4
The user must be registered in order to receive continuous support such as
upgrades of the application software and after Sales service. The following
method can be used for registering the user via the Internet.
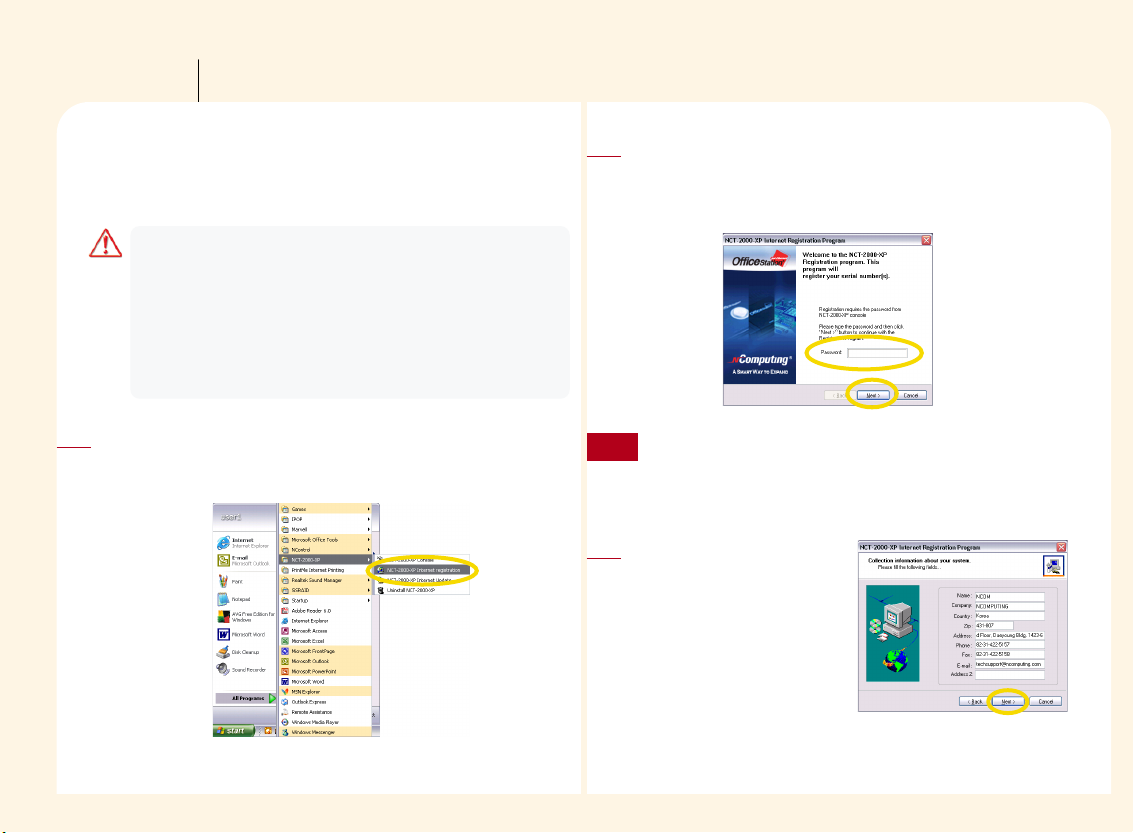
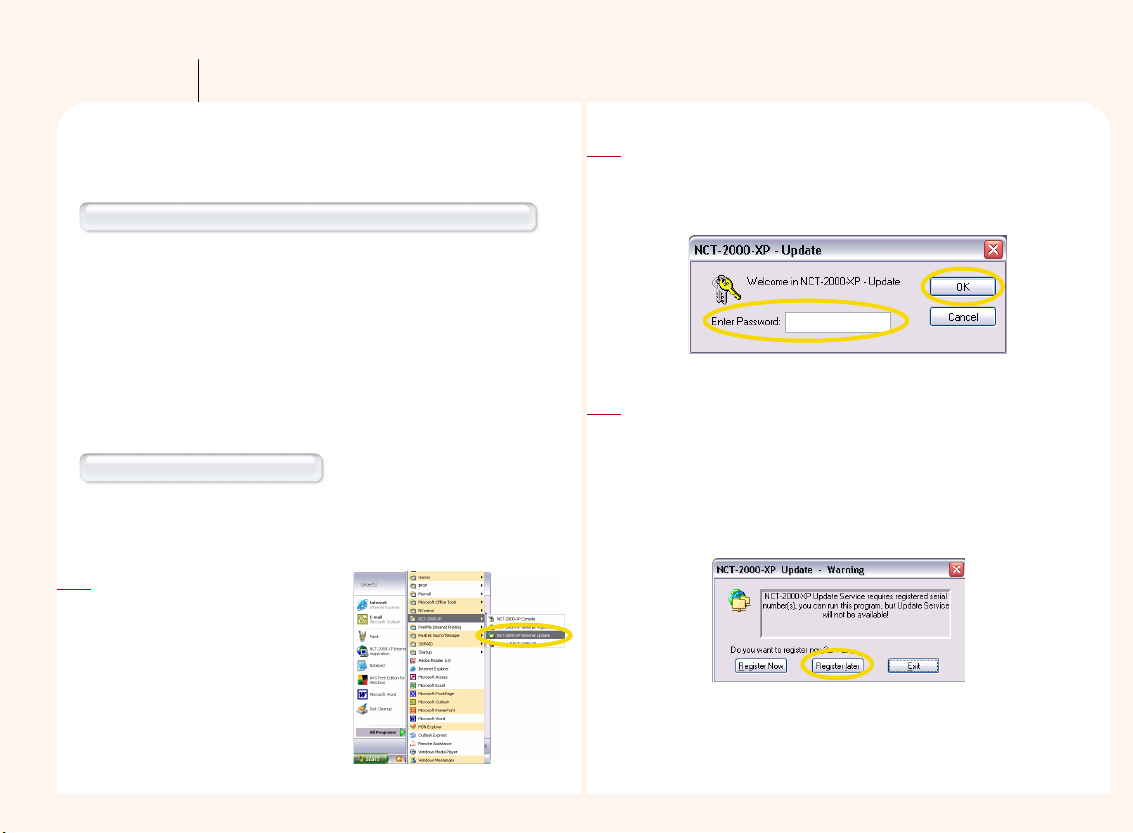
After clicking on the <Start> button on the Windows login screen,
please select the <All Programs ▶ NCT-2000-XP ▶ NCT-2000-XP
Internet Registration> in order to register.
1
The serial number and the activation key of the product, which the
user has purchased, must be registered via the Internet or by other
means. When you are formatting or modifying the hard disk, or you
are replacing the current computer with a new one after registering
the serial number, please unregister the serial number and the
activation key. Please take note that the serial number and the
activation key can be registered up to only 10 times if you fail to
unregister the serial number.
Note
When the message window on the right appears, please input the
‘Administrator Password’, and then click on the <Next> button.
(If the ‘Administrator Password’ has been registered, please click on
the <Next> button after inputting the ‘Administrator Password’)
2
If the 'Disable password protection' was selected during the
installation of the application, the message window for the
'Administrator Password' does not appear.
Note
Please click on the <Next>
button after inputting the
correct information in the
relevant boxes. For excellent
service in the future, please
make sure that all the
information you provide is
accurate.
3
Page 20
4-2
Personal information protection policy
The NComputing Inc. highly values any personal information which
is provided by customers. NComputing Inc. observes the personal
information protection provision clause of the "laws related to the
use and promotion of information and communication networks"
and the "guidelines for personal information protection" which
were enacted by the Ministry of Information and Communication of
the Korean government. NComputing Inc. informs customers of
how and for what purpose personal information provided is used,
in accordance with the personal information protection policy of
the company. NComputing also informs the customer of what
measures have been taken by the company in order to protect the
customers' privacy. The personal information that customers
provide for registration, is only used for the purpose of updating
the software and providing technical support.
Note
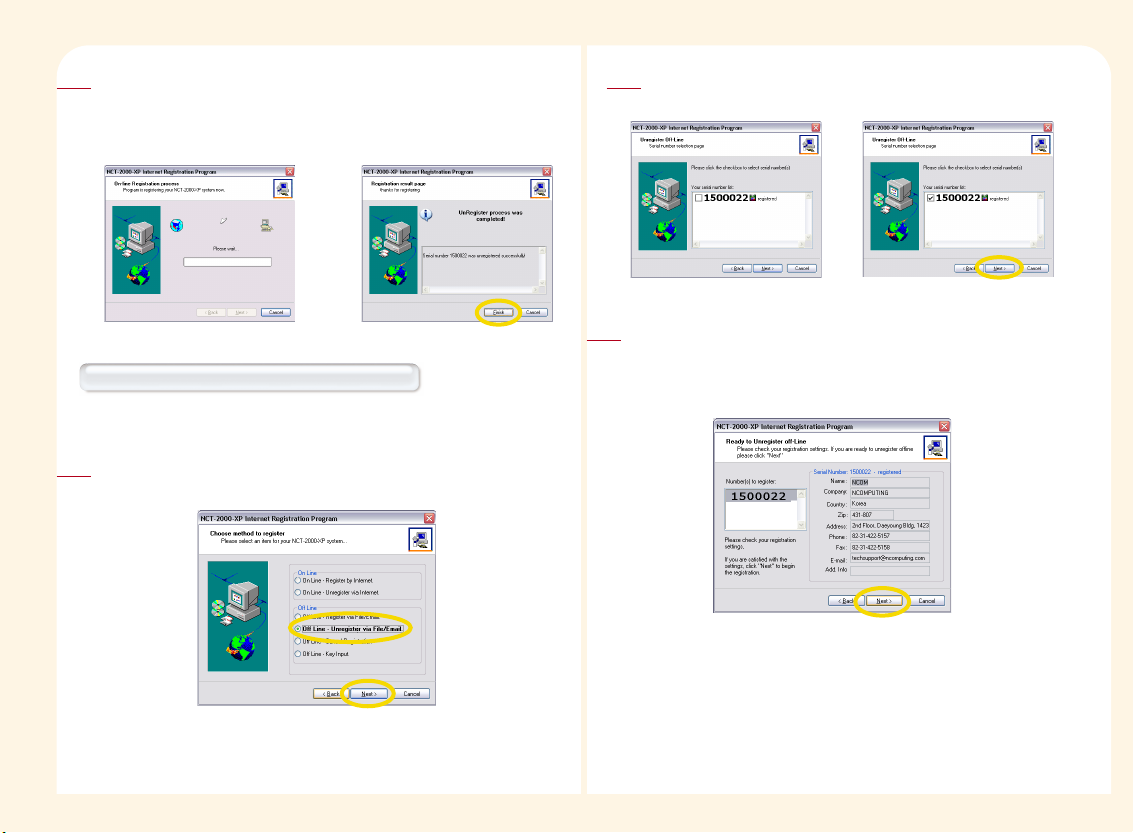
Select the method of registration
●
Online : At present the host PC is connected to the Internet
●
Offline : The host PC is not connected to the internet
4
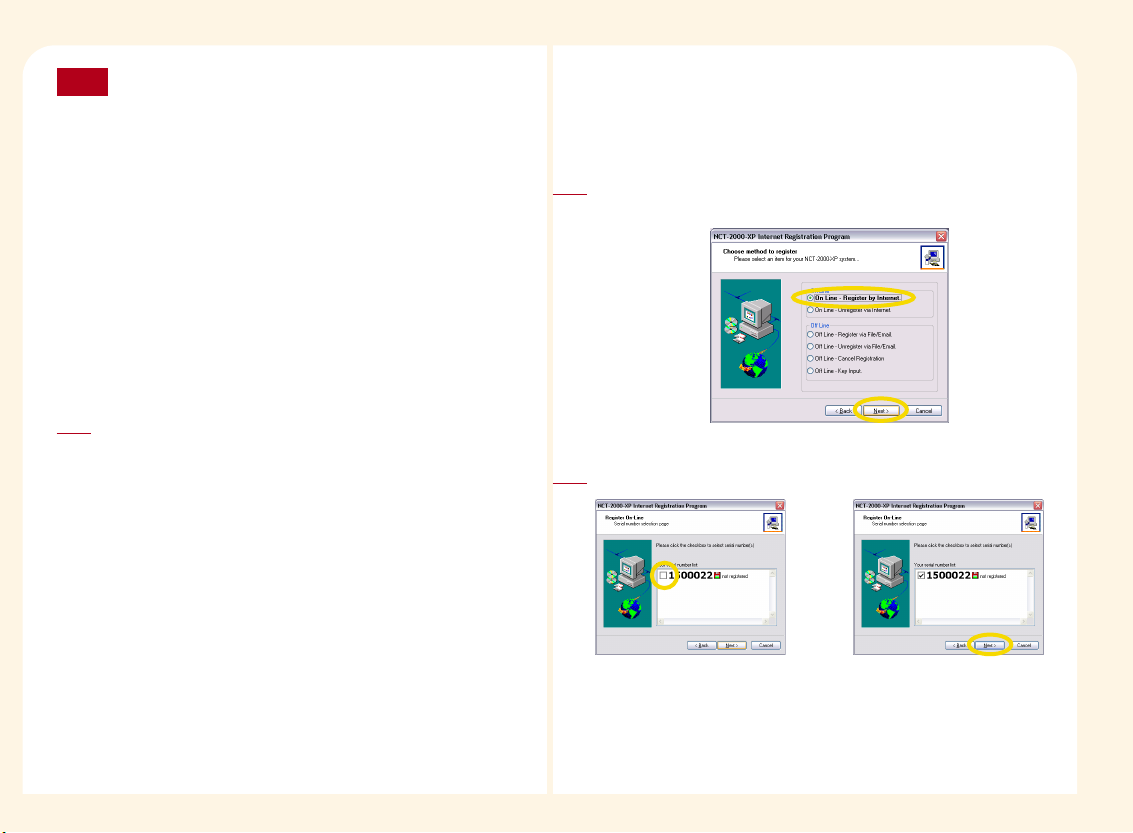
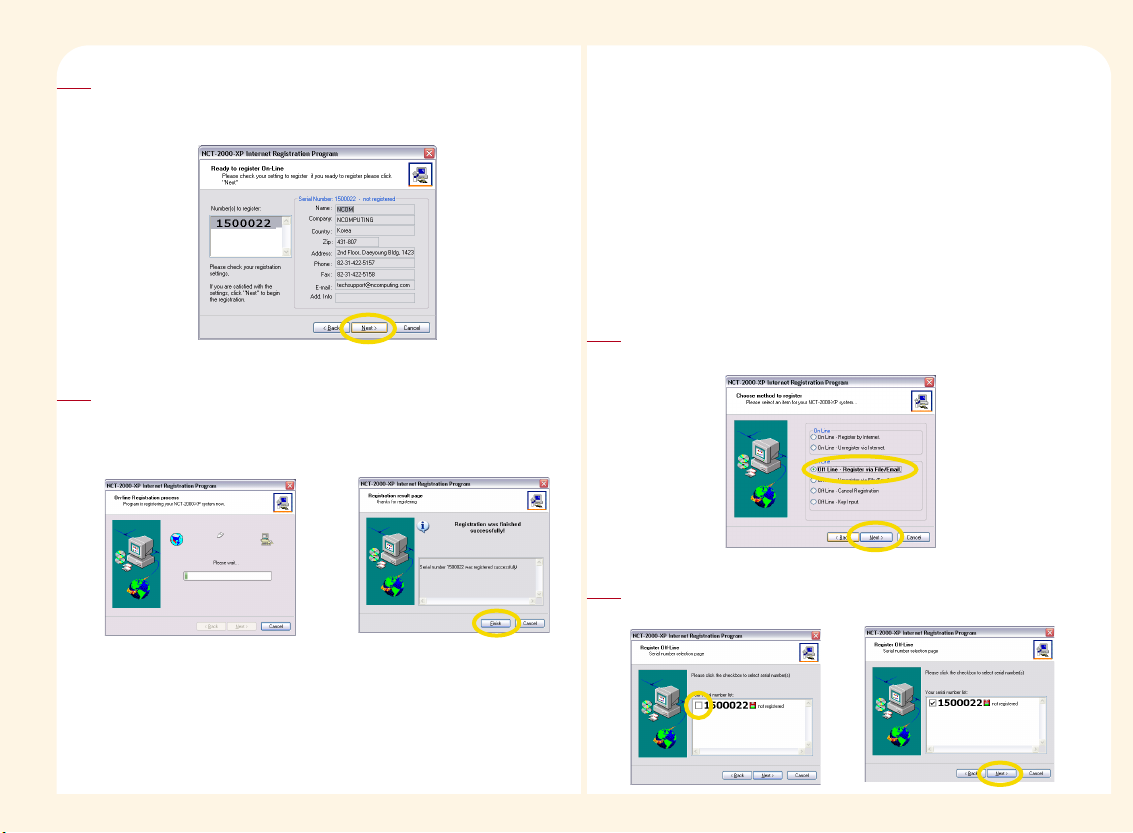
Please click on the <Next> button after selecting 'On Line - Register by
Internet'.
1
Selecting online Internet registration
This option is only available when the computer, which has the NCT-2000-XP
program, is connected to the Internet.
Please click on the <Next> button after selecting the serial number.
2
Page 21
4-3
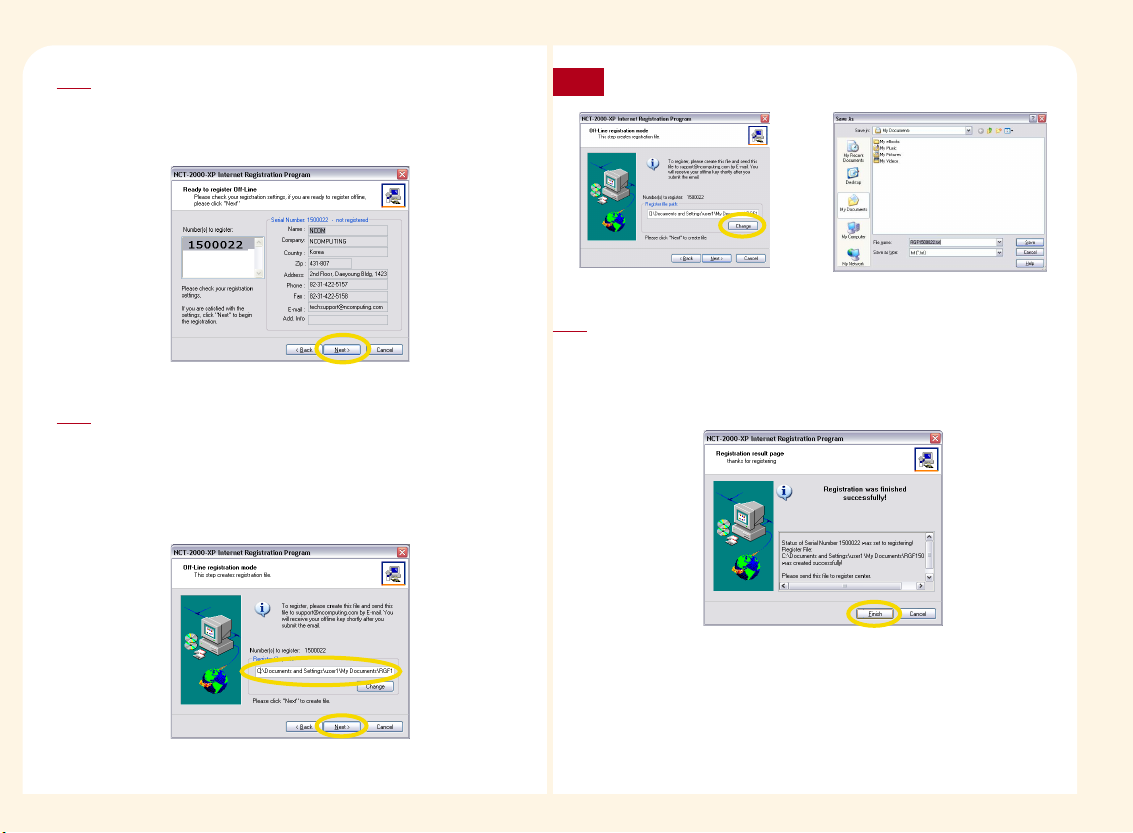
A window for user's information registration appears. Please click on
the <Back> button to correct the information, or click on the <Next>
button to continue the registration.
3
The registration of the serial number starts when all the information has
been inputted correctly. Please take note that if the computer is logged
off or the Internet is disconnected before the registration is completed,
the registration cannot be completed successfully.
4
Please select the 'Off Line - Register via File/Email, ' and then click
on the <Next> button.
1
Creating a product registration document in
instances where the Internet cannot be used for
registration
In instances where the computer with which the NCT-2000-XP
software has been registered with is not connected to the Internet,
please select the 'Off Line - Register via File/Email' and then create a
data file for offline-registration. Please send this file in an email as an
attached file to a supplier or an agent who can help you with the
registration of the serial number.
Please select the serial number with which you wish to register,
and then click on the <Next> button.
2
Page 22
4-4
A window with user's information registration appears. After
checking the information with which the user has provided,
please click on the <Back> button to correct the information, or
click on the <Next> button to continue the registration.
3
Please select a directory for creating the offline registration file
and the name of the file, and then click on the <Next> button.
The destination of the storage is <My Documents>and the name
of the file is ‘RGF serial number.txt.’ To change the storage
destination please click on the ‘Change’ button and select a new
storage destination.
4
If you would like to change the path, click the <Change> button.
Note
The following message window will appear to inform of the successful
completion of the registration. Please send the stored file to the
registration center or agent. Please click on the <Finish> button.
((PPlleeaassee ddoo nnoott mmooddiiffyy tthhee rreeggiissttrraattiioonn ffiillee.. IIff tthhee rreeggiissttrraattiioonn ffiillee iiss
mmooddiiffiieedd,, wwee ccaannnnoott rreeggiisstteerr iitt..))
5
Page 23
4-5
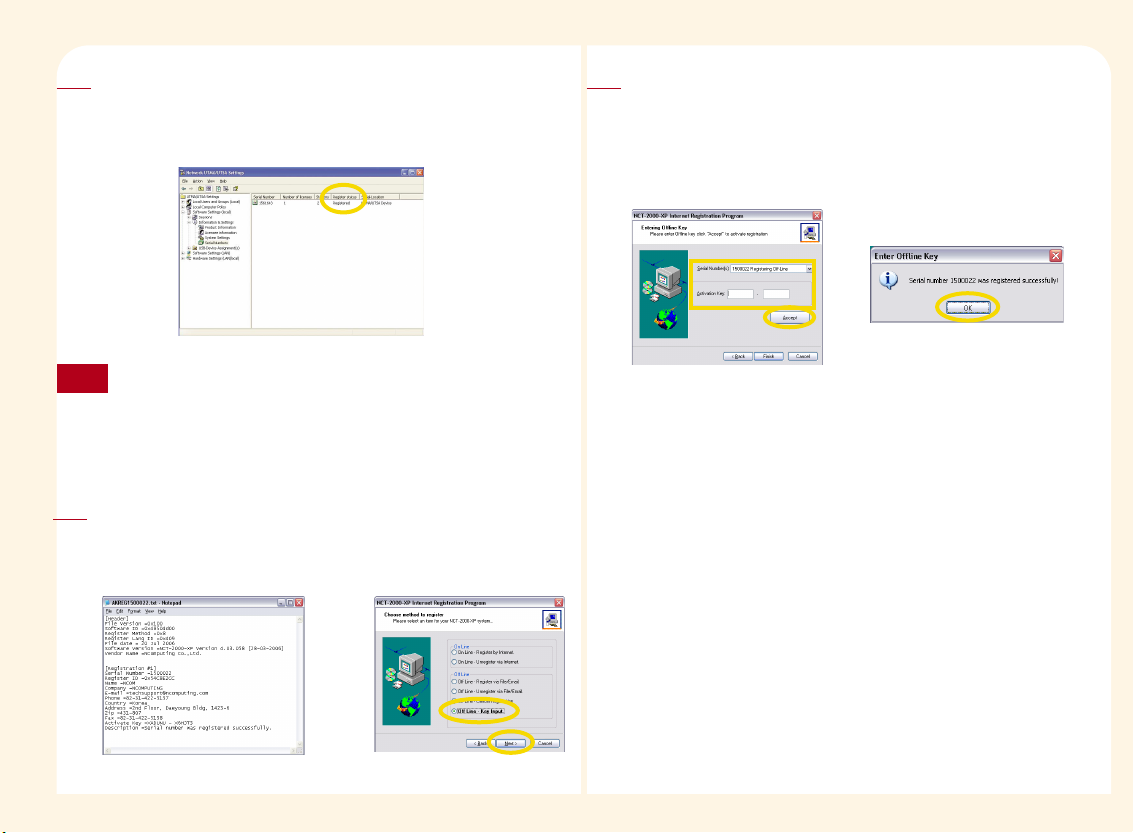
Please send the file to the registration center or agent. The registration
center or agent will send out a text file which can be used for registration
of the serial number. This option is used to register the serial number by
using a text file.
6
If you would like to cancel the registration before receiving the activation
key, you can select the “Offline – Cancellation of registration” option and
then select the serial number that you would like to cancel. After
cancelling the serial number, you cannot use the previous registration
file. You must repeat the registration process.
Note
There will be 2 six-digit numbers, a total of 12 digits, of the approval
number in the 'Activate Key' contained in the file with which has been
sent out by the registration center or agent. Please select the 'Off Line Key Input' and then click on the <Next> button.
7
After selecting the corresponding serial number, input the
approval number into the ' Activation Key' as seen below, and
then click on the <Accept> button. If the correct serial number
and the activation key has been submitted, the following message
window appears. Please click on the <OK> button, and then click
on the <Finish> button.
8
Page 24
4-6
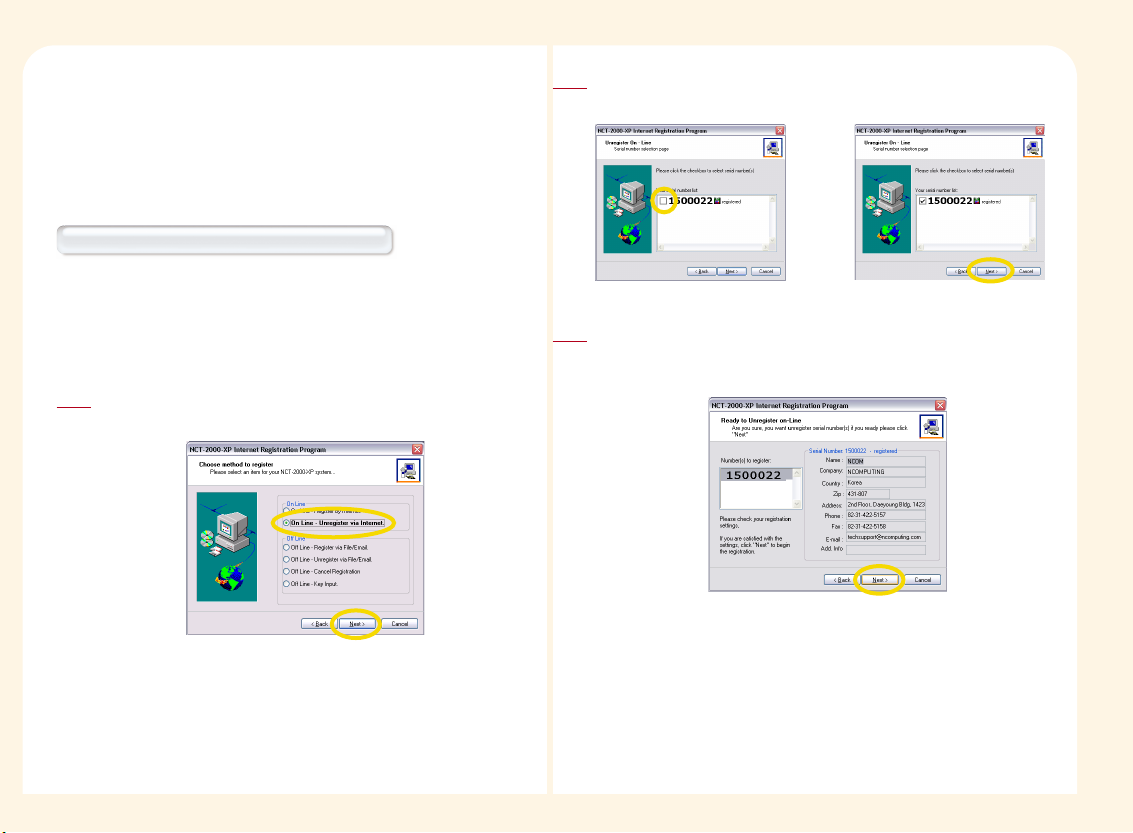
Please select the 'On Line – Unregister by Internet', and then click
on the <Next> button.
1
Unregistration
After registering the serial number, if you wish to replace the computer
which is currently being used with a new computer, or to modify the hard
disk, the serial number must be unregistered before cancelling the
installation of the NCX-2000-XP program.
Unregistration of the product via the Internet
This option is used to unregister the corresponding serial number in the
instance where the serial number was registered by using the 'On Line Register by Internet'. If the 'On Line - Register by Internet' option is used
for the registration of the serial number, please use the option to
unregister the serial number.
Please select the serial number with which you wish to unregister,
and then click on the <Next> button.
2
A window for the user's registration information appears. Please click
on the <Back> button to correct the information, or click on the <Next>
button to continue the registration.
3
Page 25
4-7
Please select the 'Off Line -unregister via File/Email' option for
unregistration, and then click on the <Next> button.
1
Cancellation of registration Offline (File/Email)
Serial numbers can be unregistered offline in the same manner that they
are registered offline.
Please select the serial number with which you wish to
unregister, and then click on the <Next> button.
2
A window for user's information registration appears. After
checking the information with which the user has provided,
please click on the <Back> button to correct the information,
or click on the <Next> button to continue the registration.
3
The registration of the serial number starts when all of the information
has been inputted correctly. Please take note that the unregistration
cannot be completed successfully if the computer is signed off or if the
Internet is disconnected before the registration is completed.
4
Page 26

4-8
A file creating process is required for the unregistration of the
serial number. Please confirm the destination of the storage and
the name of the file, and then click on the <Next> button. The
storage folder is ‘My Documents’ and the file name is ‘URGF serial
number.txt’. If you wish to change the storage location, please
click on the ‘Change’ button to select a new destination.
4
If you would like to change the path of where to save the file, click
the <change> button.
Note
Please send the created file to the registration center or agent.
The serial number cannot be used again once the unregistration is
completed. Please click on the <Finish> button.
5
Page 27
5-1
Updating the NCT-2000-XP application via the Internet
Part 5
A user who has successfully completed the registration process can update
the NCT-2000-XP program by using the following methods.
Updating with the application installation CD which is included
In order to update the NCT-2000-XP program via the Internet, users must
have completed the registration process. Without registration, updating
the software will not be possible. User information must be saved
temporarily before installing the new version in order to protect the
private information of the user and to achieve safe and easy updates .
This process is required in order to have a backup in case an unexpected
problem occurs while trying to update the program with a new version,
so that the system can always return to where it was before.
Direct Updating via the Internet
This method can be used only when the user registration with the
previous version has been completed. (Please refer to "Part 2. NCT-2000XP Installation")
Please input the password in the space provided in the 'Enter
Password" message window, and then click on the <OK> button.
(This 'Enter Password" message window appears only if the
administrator password is set during the installation.)
2
Please click on the <Start> button on
the Windows logon screen, and then
select the <All Programs ▶ NCT2000-XP ▶ NCT-2000-XP Internet
Update> in order.
1
In order to continue updating, the <Internet Registration> process
must have been completed. If you have already completed the
registration process, please click on the <Register later> button to
continue the updating process. If you have not yet completed the
registration process, please click on the <Register Now> button to
complete the <Internet Registration> process and then execute
the updating process.
3
Page 28
5-2
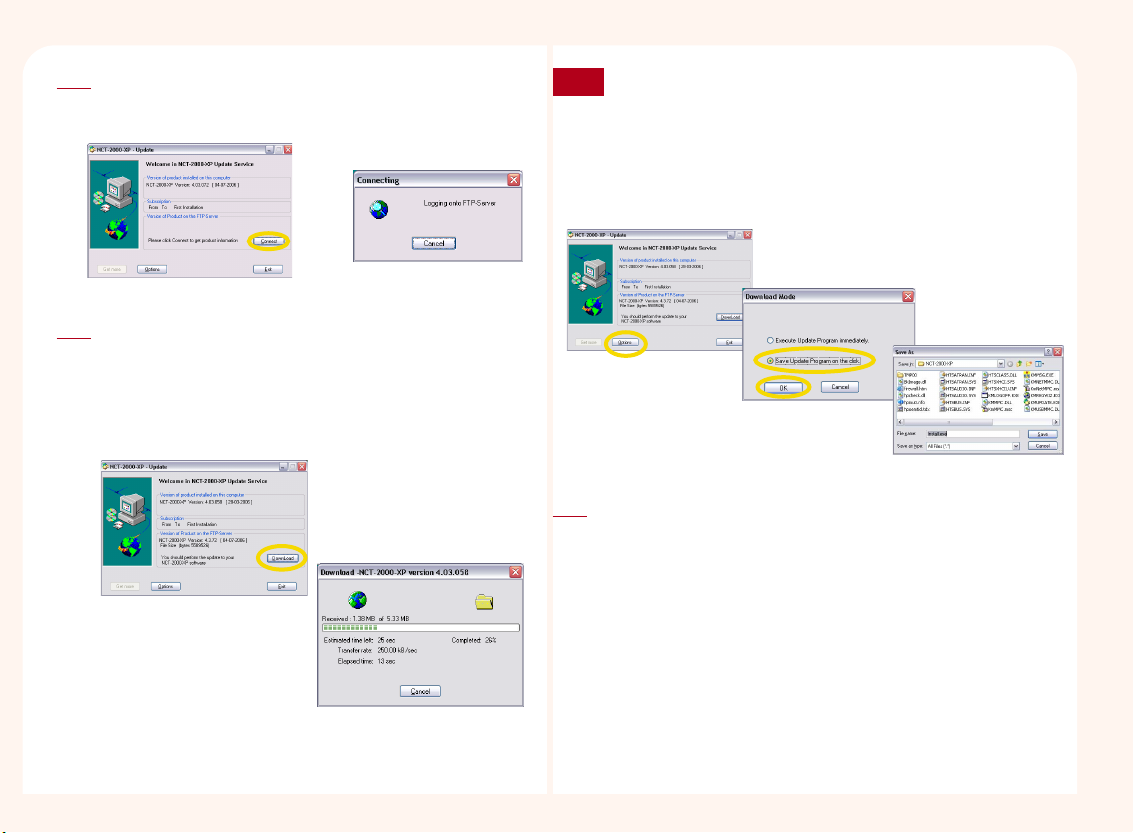
Please click on the <Connect> button so that the user can compare
the program in the NCT-2000-XP server against the program which
has been currently installed.
4
As shown in the picture below, the current version and the latest
version on NComputing’s Internet Server can be confirmed.
If there is a new version on the Internet server, please click on the
<Connect> button to start the updating process. The speed of the
download varies depending on the speed of the Internet
connection.)
5
If you do not want to install the latest NCT-2000-XP version right now,
save the program the file type and click the <Product information>
button. Then select the “Save the program in the disk” option. The
default folder is the installed NCT-2000-XP folder in the hard disk drive.
If you would like to save the file in another folder, please select another
folder. When you save the file in another folder, you must move the file
to the installed NCT-2000-XP folder in order to run the program.
Note
. When the download is completed, the installation of the program
starts in the same way as the 'Installation of the NCX-2000-XP
application.'
6
Page 29
6-1
NCT-2000-XP Remote Management Console
Part 6
Remote management of the NCT-2000-XP is automatically implemented
with the installation. When the installation of the application is completed,
the NCT-2000-XP group is automatically created in the program group.
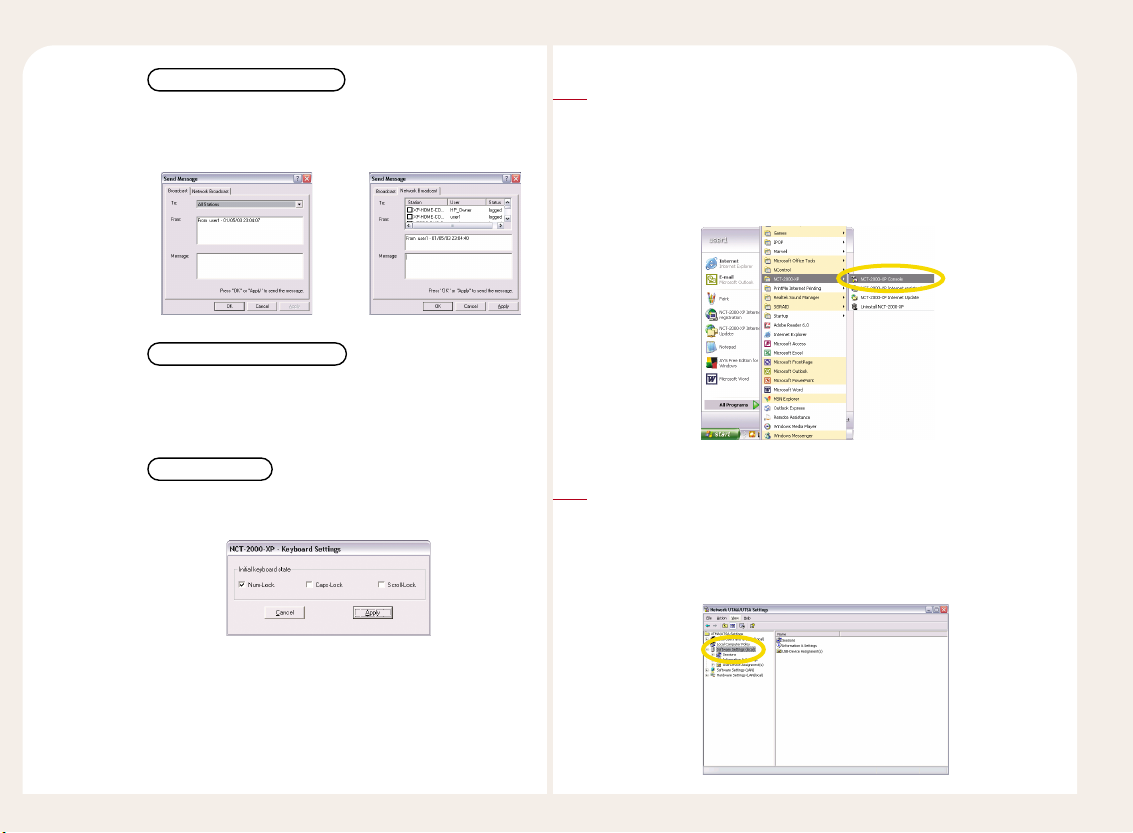
To confirm the installation of the NCT-2000-XP application, please click on
the <Start> button in the Windows operating system, and then select the
<All Programs ▶ NCT-2000-XP> in order.You also can run the NCT-2000XP application on the NCT-2000-XP program icon on the taskbar of
Windows.
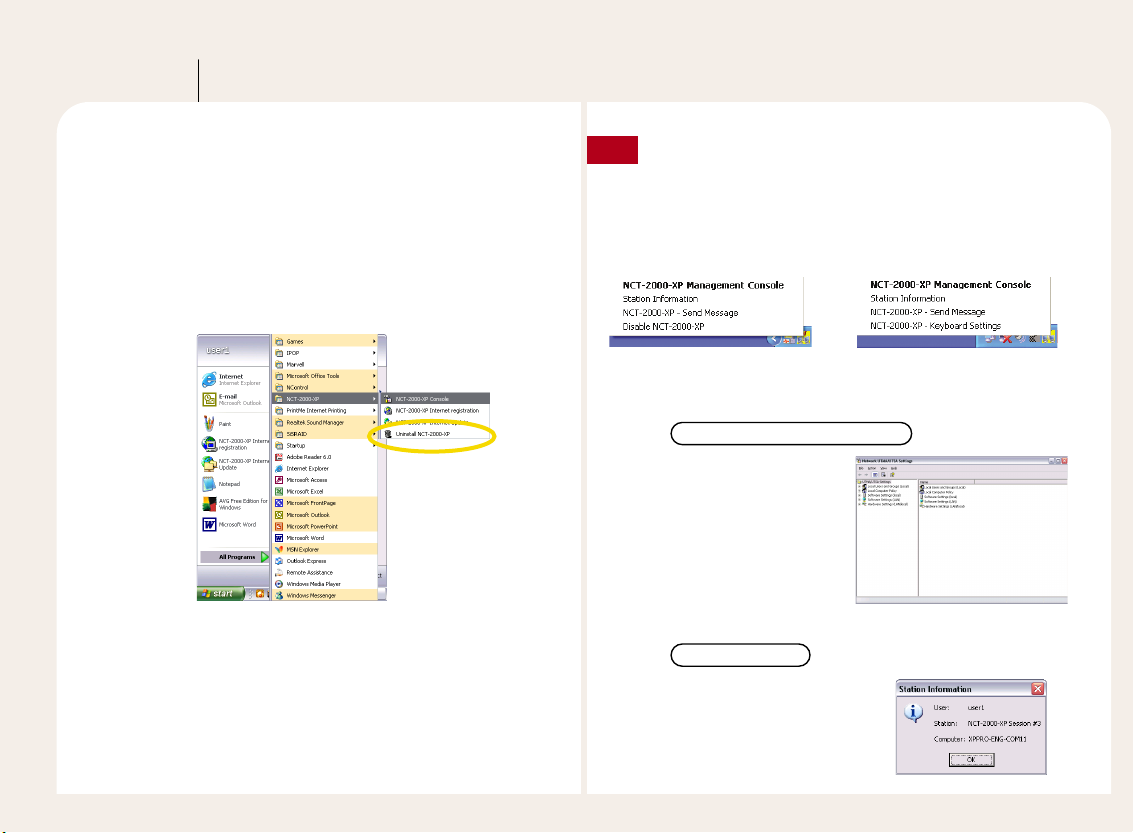
Functions of the NCT-2000-XP program icon in the taskbar of
Windows.
There are some basic functions that can be accessed by rightclicking on the NCX-2000-XP icon which is in the 'Information area'
of the taskbar. Here are the differences between options of the host
PC and PC Expanion.
Note
<Host computer> <PC Expanion>
Please refer to each option for the function.
The option is that the
NCT-2000-XP is running.
NCT-2000-XP Management Console
The user can see the user ID, the
station information, and the host
computer name.
Station Information
Page 30
6-2
When the user uses the PC Expanion, the user can set the status
of ‘Num Lock’ key or ‘Caps Lock’ key or ‘Scroll Lock’ key.
keyboard setting
The user can send a message to the connected PC Expanion or a
specific PC Expanion. For more information, please see “9. How to
send a message to the connected PC Expanion.” in Part 8.
NCT-2000-XP – Send Message
The user can stop running or start the NCT-2000-XP application.
For more information, please see “10. How to start or stop
running the PC Expanion.” in Part 8.
NCT-2000-XP Disable(Enable)
Run the NCT-2000-XP application
To confirm the installation of the NCT-2000-XP application, please click
on the <Start> button in the Windows operating system, and then
select the <All Programs ▶ NCT-2000-XP▶ in order. You also can run
the NCT-2000-XP application on the NCT-2000-XP program icon on the
taskbar of Windows.
1
Software Settings (Local)
There are items such as ‘Sessions’, ‘Information & Settings’ and ‘USB-
Device Assignment(s) under the ‘Software Settings (local)’ These option
can be used to check the status of the PC Expanion, change options,
and assign the USB storage device.
2
Page 31

6-3
The 'NCT-2000-XP Management Console' window appears when the
<Local Settings> is selected from the menu. After inputting the
password, please click on the <OK> button. (If the 'Disable password
protection' was selected during the installation of the application, the
'NCT-2000-XP Management Console' does not appear.>
Note
1
Sessions
The information on the station, which is currently connected, and
the standby status of the station for the connection can be viewed
when 'Stations' is selected.
Session #01, #02, #03 …
The programs and all the information, which are being used
by the station that is currently connected, can be checked
when the session is selected.
The following information is the information tab for each
session.
● Station names : Displays the number of the selected station.
The numbers are provided in the order of the
connection to the host computer, which
starts from Station #02.
● Logged in use : Displays the name of the user who is logged
in on the station.
● Default user : Displays the name of the user who has logged
on recently.
● Status : Displays the current connection status of the station.
● Client connection : Displays the automatic launch status of
the station which is connected.
Page 32
6-4
● Display Id : Shows the display device of the station which is
connected.
● Hardware Id : Displays the virtual hardware of the station
which is connected.
● Keyboard Id : Displays the information on the keyboard of
the station which is connected.
● Pointer Id : Displays the information on the mouse of the
station which is connected.
2
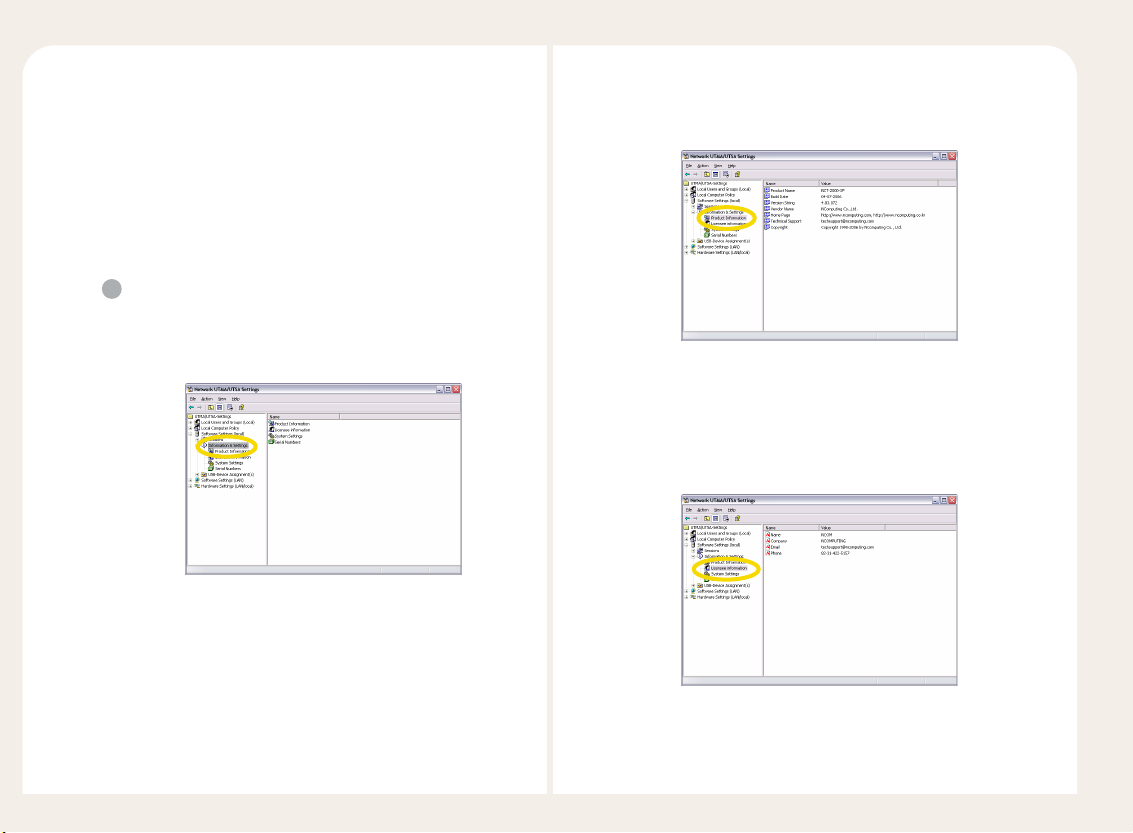
Information & Settings
There are four items including 'Product Information', 'License
Information', 'System Settings', and 'Serial Numbers' on the
Information & Settings menu.
Product Information
Displays the information on the Version String, Build Date,
Copyright, Technical Support and Home Page.
License Information
Displays information such as the name of the person who
registered the product, company name, Email address
and telephone number, which were all inputted during
the installation of the product.
Page 33

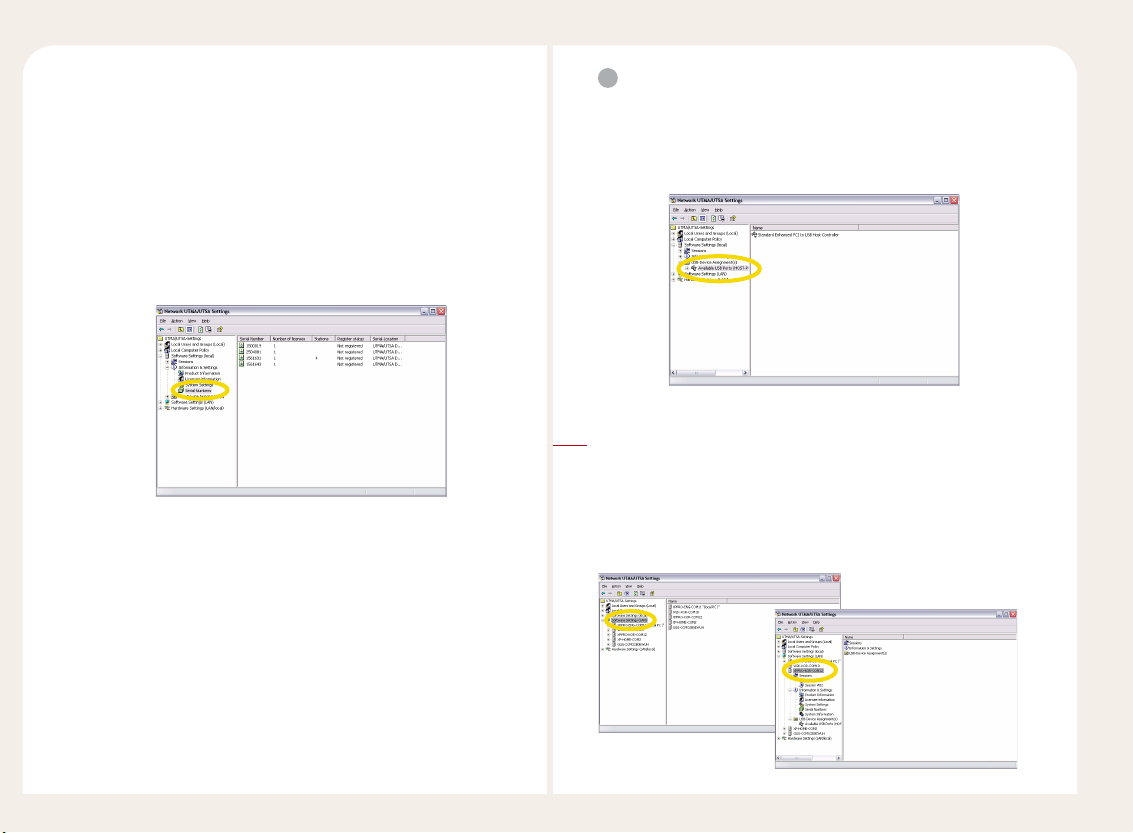
6-5
System Settings
Displays the general information on the system.
● Maximum number of stations (incl. Host) : Displays the
maximum number of stations that can be connected to the
host computer.
● Current number of additional stations : Displays the number
of users that are connected to the host computer and is
currently being used.
● This machine : Displays the name of the host computer. The
name of the computer can be changed by using the
<Computer name> option at the Windows system registration
information menu.
● This user : Displays the names of the users who have logged on
the host computer.
● System uptime : Displays the logon period of the host
computer's operating system.
● Main Station AutoLogon : Displays an option to automatically
start the stations, which are connected to the host computer, at
boot-up.
● Delay until shutdown (seconds) : The shutdown time of
each station when the host computer shuts down can be set.
The range of the input value is from 1 second to 999
seconds.
● Disable Send Broadcast Message : Displays an option that
can activate or deactivate the message sending mode for
each station.
● Prevent access of the USB-storage devices to the
attached terminal.
: Displays an option which can activate
or deactivate the USB-storage devices.
● Remote View/Control allowed : Displays an option that an
administrator can view or control the PC Expanion remotely.
● Clean up disconnected sessions not in use : Display an
option that the session can be terminated, if the user does
not log on again after disconnecting.
● Support WTSAPI32 Interface : A program, which uses the
Windows RDP function, can be selected by using this mode.
If this feature is enabled, all NComputing protocols are
automatically converted to RDP-compatible formats. Use
this for Terminal Services Compatibility issues.
● Disable background-bitmaps under Windows XP :
Displays an option which can display the background image
under the Windows XP operating system.
● Administrator Password : Entering a password to use the
NCX-2000-XP program can be activated or deactivated by
using this mode. If the user does not wish to have a
password, the 'Disable Password Protection' must be
selected.
Page 34
6-6
● Autologon on the Host Station : If the user name and
password are set, the station can start without the
Windows logon screen of the host computer when on.
Serial Numbers
Displays the serial numbers and status of the registration.
The serial numbers can be added or deleted by using
the right button on the mouse. For more information,
please see “27. How to add or remove the serial number
of NCT-2000-XP program” in Part 8.
3
USB-Storage device Assignment(s)
This menu enables the use of the USB device at each station by
setting an option for the USB Device which is connected to the host
computer. When the USB device is connected, the user can view
the USB device which is connected to the corresponding port.
Software Settings (LAN)
If the host PCs that the NCT-2000-XP program is installed on are located
on the same network, the host PCs are listed in ‘Software Settings (LAN).’
The user can see the status of a host PC and how many PC Expanions are
connected to the host PC. The host computer refers to the computer that
the NCT-2000-XP program is installed.
3
Page 35

6-7
Hardware Settings (LAN/Local)
The user can set the status of the connected PC Expanions and change
the options.
4
1
UTMA/UTSA Devices
Settings for the connected PC Expanions can be changed from the
administration console. (“UTMA/UTSA Device” shows information
about the PC Expanions connected to the network.) Select the PC
Expanion of which the settings are to be changed and click
“UTMA/UTSA Device Setup” to change the setting.
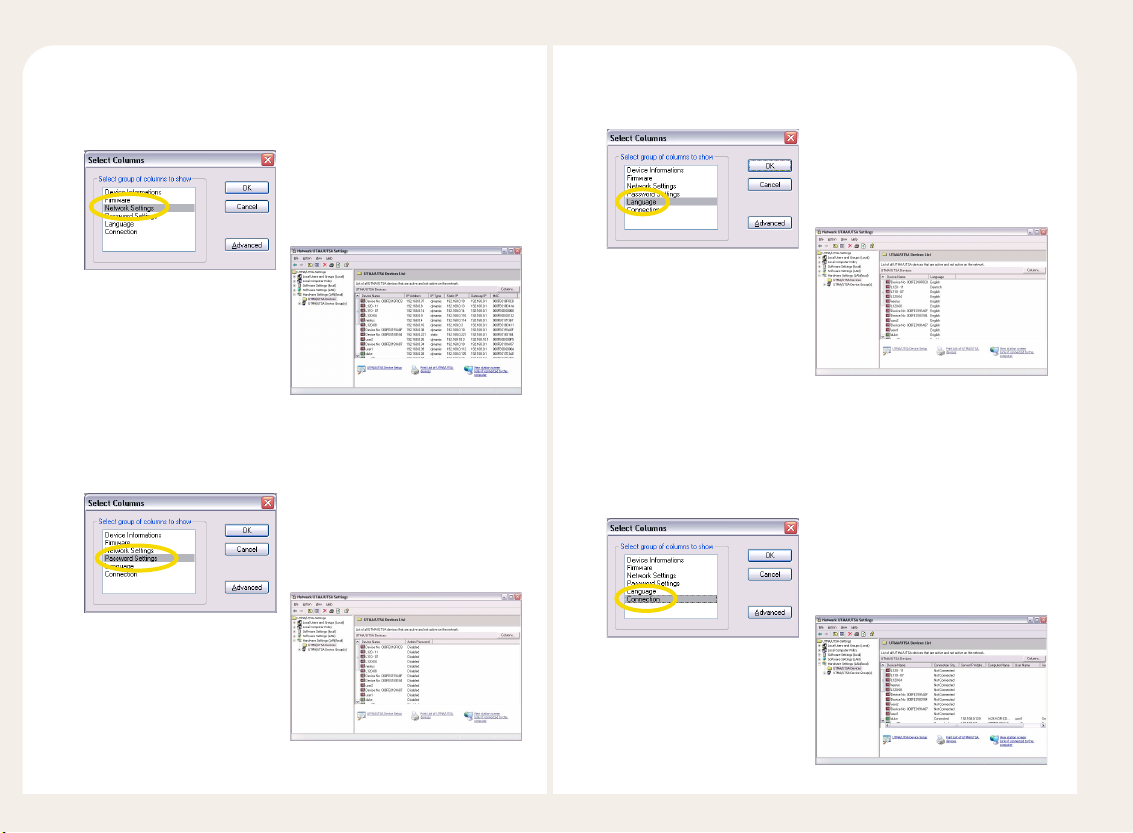
The <Column> option delete displays the various columns.
If you click the <Column> button, you can select the column list.
Device Information
The status of the connection and the serial number.
Firmware
The version, the build number, the schema ID, the device ID,
and the boot server of the PC Expanion.
Page 36
6-8
Network Settings
The IP address of the PC Expanion, the status of setting the IP
address, gateway, and a MAC address.
Password Settings
The status of the password in the setup of the PC Expanion.
Language
Language setup
Connection
Status of the connection between the PC Expanion and the host PC,
the IP address of the host PC, the name of host PC, the user name,
and the name of the station.
Page 37

6-9
Advanced
When the user clicks the <Advanced> button, the user sets the
desired columns. When the user clicks the <Move UP>, the column
moves up. When the user clicks the <Move Down> button, the
column moves down. If the user selects the column and clicks the
<Remove> button, the column will not be displayed in the list of
UTMA/UTSA Devices.
2
UTMA/UTSA Device Setup
If you would like to change the option of the PC Expanion, please
select the PC Expanion and then double-click the icon.
Also double-click the name of the PC Expanion. If the PC Expanion
is not connected to the host PC or is turned off, you cannot change
this option.
Note
Click the hardware setting (LAN/Local) in the NCT-2000-XP console
menu.
Green color icon : Connected to the host PC in the local
network.
Blue color icon : Disconnected to the host PC in the local
network.
Red color icon : Turned off state, but has been connected to
the host PC more than one time.
The color of the icon is not updated in real time. To check the status
of each PC Expanion, click the “F5” key or click the “refresh” icon.
When the user clicks the “UTMA/UTSA Device Setup” icon, the
user can see the settings of the PC Expanion. Please refer to
the above picture. If you click the <Print> button, you can see
the settings of the PC Expanion. If you would like to reset each
option, please refer to the following information.
Page 38

6-10
Connection Settings
The user can set the IP address of the host PC, the user ID,
the password, the option of “Enable Autologon Mode,”
“Auto-connection” mode, “Automatic Application”, and the
resolution and the refresh rate. For more information, please
see Part 8.
Setup Password and Language
The user can enable or disable the “Do not use password” option
or “Protect BIOS options with password.”
Network Settings.
The user can change the IP address of Station.
Member of Groups
The user can mange a group of selected PC Expanions. For more
information, please see the “25. How to manage when the PC
Expanions are grouped under NCT-2000-XP program” in Part 8.
Page 39

7-1
Using the “Setup”
Part 7
The PC Expanion allows users to set various settings such as IP settings,
host computer to connect to, resolution, etc. Users can set the settings in
PC Expanion as well as in the NCT-2000-XP console of a host computer as
described in Part 6. This section describes procedures to configure the
settings of the PC Expanion. The ‘Setup’ screen of PC Expanion supports
English only.
When the user turns on the PC Expanion, the startup screen appears.
The function is the following information.
●
Connect : Used to connect to the host PC.
●
Sleep : Used in the power save mode.
●
Setup : Used to reset the option of the PC Expanion.
●
Info : Used to see the information on the PC Expanion.
●
Connection to : Used to select the desired PC Expanion.
(When the arrow icon is clicked, you can see the host PC.)
● Refresh : The name of connected host computer is updated
●
Options : To use “Setup”, “Info”, “Reset”, or “Close.”
●
Close : Close the window.
<Setup> consists of ‘Network’, ‘TS Options’ or ‘Options’, ‘Password’, ‘Update’,
and ‘Misc’
● Network : To set the IP address of the PC Expanion.
● TS Options : To set host computer information to be connected by the
PC Expanion and the resolution and user name of the host
computer in advance.
● Password : To set a password for ‘Setup’.
● Update : To update the firmware.
● Misc : To calibrate the touch screen or touch pad device.
Each the item is described below.
Network
You can set the IP address of the PC Expanion. The default setting is
‘Obtain an IP address automatically.’ This option can be used if a DHCP
server is available on your network and an IP address is automatically
allocated to the PC Expanion. To set a static IP address manually, select
‘Use Static IP address’ option and enter an IP address for the PC
Expanion and gateway in the ‘IP address’ and ‘Gateway’ fields
respectively.
Page 40

7-2
Options or TS Options
You can set the host computer to be connected to the PC Expanion and
set the resolution and user name for the host computer. Select
‘Autodetection’, ‘TS 2’ or ‘TS 3’ in the ‘TS Options’ screen and click the
<Enable-Disable> button. It will then be displayed in the <Connection
to> list on the PC Expanion initial screen. Select ‘Autodetection’ to search
for host computers in which the NCT-2000-XP program is installed. It will
list up to 8 of the computers found and the ‘*’ symbol appears in front of
the host computer names. Select ‘TS 2’ or ‘TS 3’ to specify and connect to
a computer. If you select ‘TS 2’ or ‘TS 3’, ‘TS 2’ or ‘TS 3’ will appear without
the ‘*’ symbol. To change the settings for a host computer to be
connected, click the <Edit> button.
● Connection Name : You can enter a host computer name. This name
should be different than the name set in the host
computer you are using. If you have selected
‘Autodetection’, you cannot change this field.
‘Autodetection’ searches for host computers in the
network and shows the names set in the computers
as they are. However, if you have selected ‘TS 2’ or
‘TS 3’, you can rename a computer.
● User Name : You can set a user name that will be used to logon a host
computer. If you enter a user name, the name appears in
the user name field on the Logon screen.
● Program : If you select ‘Desktop’, you can use the operation system
without changing it. If you select ‘Start following program’,
only the specified program will be launched. If you exit the
program, you are automatically logged off. For example, if
you want to use the Notepad program only, type
‘notepad.exe’ in the ‘Program’ field and then the location of
the application file in the ‘Folder’ field such as ‘C:\
’.
● Desktop size : You can select the resolution and frequency of your PC
Expanion screen. The available resolutions may differ
depending on the model. To confirm if a resolution is
supported by the monitor before applying it, select a
resolution and click the <Mode Test> button. When you
logon, a resolution configured here is applied regardless
of the resolution you set on Windows after logon.
Page 41

7-3
Update
This is used to update the PC Expanion firmware. Once the NCT-2000-XP
application is upgraded, the PC Expanion automatically updates the
firmware during a booting sequence. Users do not need to use this
option manually.
Password
This option allows a user to set a BIOS password for protection. If the user
selects the “Protect BIOS options with password” option, the user can set
the new password.
Misc
This option is the function for end-users that want to use a touch
screen or touch pad device. The option is currently only supported by
the L2XX model series. If you want to calibrate the cursor of a touch
screen or touch pad, click the <Calibrate> button. And then click the
cross in order.
Page 42

8-1
Using the PC Expanion (Advanced)
Part 8
1. How to add a new user account
User accounts personalize Windows for each person who shares a
computer. You can choose your own account name, picture, and
password, and choose other settings that will apply only to you. A
user account gives you a personalized view of your own files, a list of
favorite Web sites, and a list of recently visited Web pages. With a user
account, documents you create or save are stored in your own My
Documents folder, separate from the documents of others who also
use the host PC. To help keep your files more secure and to help make
sure they remain private, use a password for your user account. You
can still mark certain items as shared if you want other people to be
able to access them. If you do not use a password for your user
account, other people will have access to your account and will be
able to see all of your folders and files. If you have a user account and
you change the computer settings, such as the type, size, or the
screen saver, those settings will apply only to your account. As a user
with a computer administrator account, you can create, delete, and
change all user accounts on the host PC. You can create as many
accounts on the computer as you want, and have full access to all
accounts on the computer.
● Administrator : Users with complete and unrestricted access to the
computer/domain
● Backup Operators : Backup Operators can override security
restrictions for the sole purpose of backing up or restoring files.
●Guests : Guests have the same access as members of the users
group by default, except for the guest account which is
further restricted.
● Network Configuration Operators : Members in this group can have
some administrative privileges to
manage configuration of networking
features.
● Power Users : Power Users possess most administrative powers with
some restrictions. Power Users can run legacy applications
in addition to certified applications
● Remote Desktop Users : Members in this group are granted the right to
logon remotely
● Replicator : Supports file replication in a domain
● Users : Users are prevented from making accidental or intentional
system-wide changes. Users can run certified applications,
excluding most legacy applications
● HelpServiceGroup : Help and Support Center
Page 43

8-2
Add a user account under Windows 2000 Professional
<Start> ▶ <Setup> ▶ <Control Panel> ▶ Double-click <Users &
Passwords>
1
Click the <Add> button.
2
Click the <Next> button after typing
the user ID, the full name, and the
explanation, You must type the
same name when you log on. You do
not need to type
the full name and explanation.
3
Enter your password and click the
<Next> button. If no password is
set, anyone can logon and view
and change your personal
information and settings. Be sure
to set a password.
4
You can set a password for a user account or change the password
of a password-protected account. Double-click <Control Panel> ▶
<User Accounts and Password>, select a user account and click the
<Set Password> button to set or change a password.
Note
Click the <Finish> button after setting the user group. Please select
the user group after reading each group’s detailed explanation.
5
Page 44

8-3
You can reconfigure groups for a user account. Double-click
<Control Panel> ▶ <User Accounts and Password>, select a user
account and click the <Properties> button to change the group in
the user account.
Note
Add new user accounts under Windows XP operating system.
<Start ▶ Control Panel> Double-click <User Accounts> icon.
1
Click “Create a new account”
2
Type a name for the new account.
And then click the <Next> button.
3
Select an account type and click the <Create a new account> button.
If you select an account type, you will be able to know the priority of
the account type. Windows XP provides ‘Computer administrator’ and
‘Limited’ account types.
4
Page 45
8-4
The user can only create the administrator and the limited user account
under Windows XP Home edition. However, the user can create new
user account similar to the Windows 2000 operating system under
Windows XP Professional. The following information is for the user to
create a new user account under Windows XP Professional.
Note
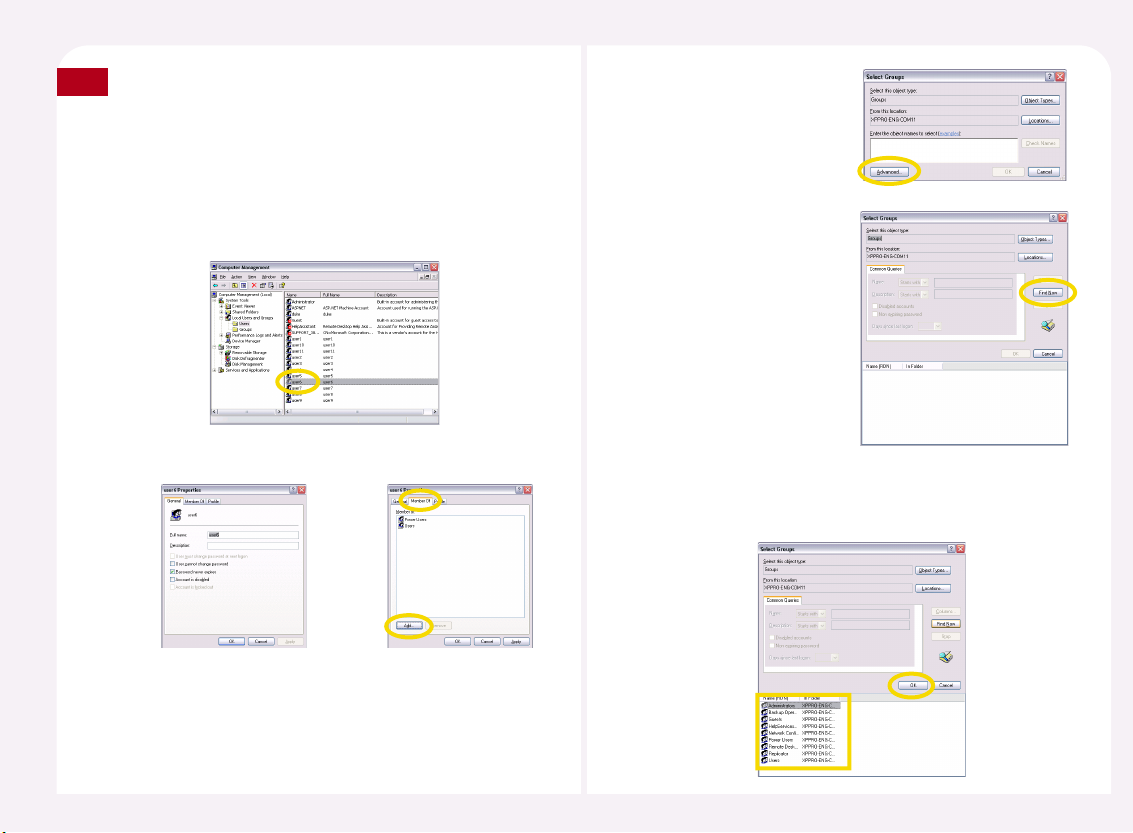
<Start ▶ Control Panel ▶ Administrative Tools ▶Computer
Management ▶ Local users and Groups ▶ Users> and then doubleclick the user account that you want to create.
Select ‘Member Of’ and then click the <Add> button.
Click the <Advanced>
button.
Click the <Find Now>
button.
Click the <OK> button after selecting the desired group.
When the screen of step 3 appears, click the <OK> button.
The user group is set.
Page 46
8-5
2. How to check the IP address setting on the PC
Expanion
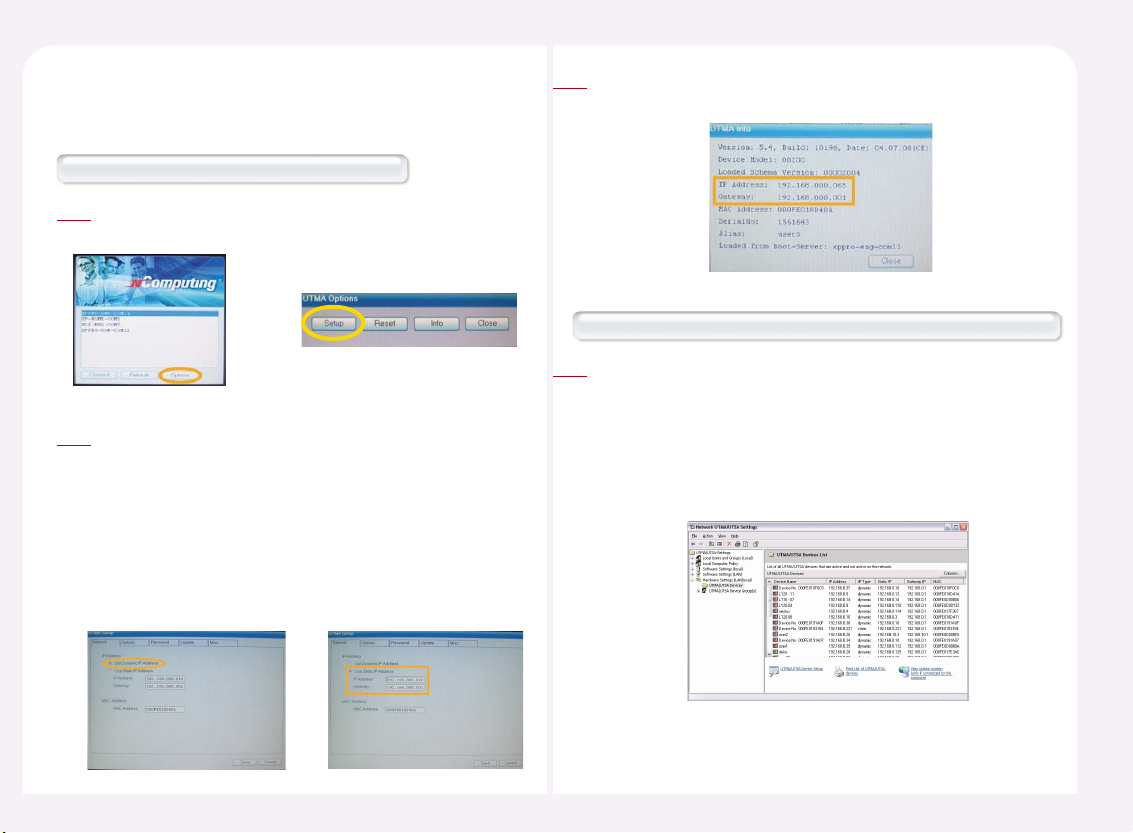
How to check the IP address on the PC Expanion.
Click the <Setup> button or <Setup> of <Options> button of
startup screen of PC Expanion.
1
Select the ‘Network’ tab.
To use an automatically allocated IP address, select ‘Obtain an IP
address automatically.’ This option is available only when your
network provides DHCP functionality. If DHCP is not supported,
you have to configure the IP address manually. To setup the IP
address manually, select ‘Use Static IP address,’ enter an IP address
in the IP address field, and enter the IP address of a gateway in the
Gateway field. For the correct IP address and the IP address of the
gateway, ask your computer administrator.
2
How to check the IP address and the gateway in the NCT-2000-XP program
Click the <Info> button or <Info> of <Options> to check the IP address
and the gateway of the PC Expanion.
3
<Start> ▶ <All Programs> ▶ <NCT-2000-XP> ▶ Select the <NCT-2000XP Console> ▶ Select <Hardware Settings (Local/LAN)> ▶ Select
<UTMA/UTSA device>. You can confirm the IP address of the
corresponding station in the device list. The view item of the device list
is set to ‘Network’ by default. If this item has been changed, click the
<Item> button, select ‘Network’ and click the <OK> button to confirm
the IP address.
1
Page 47
8-6
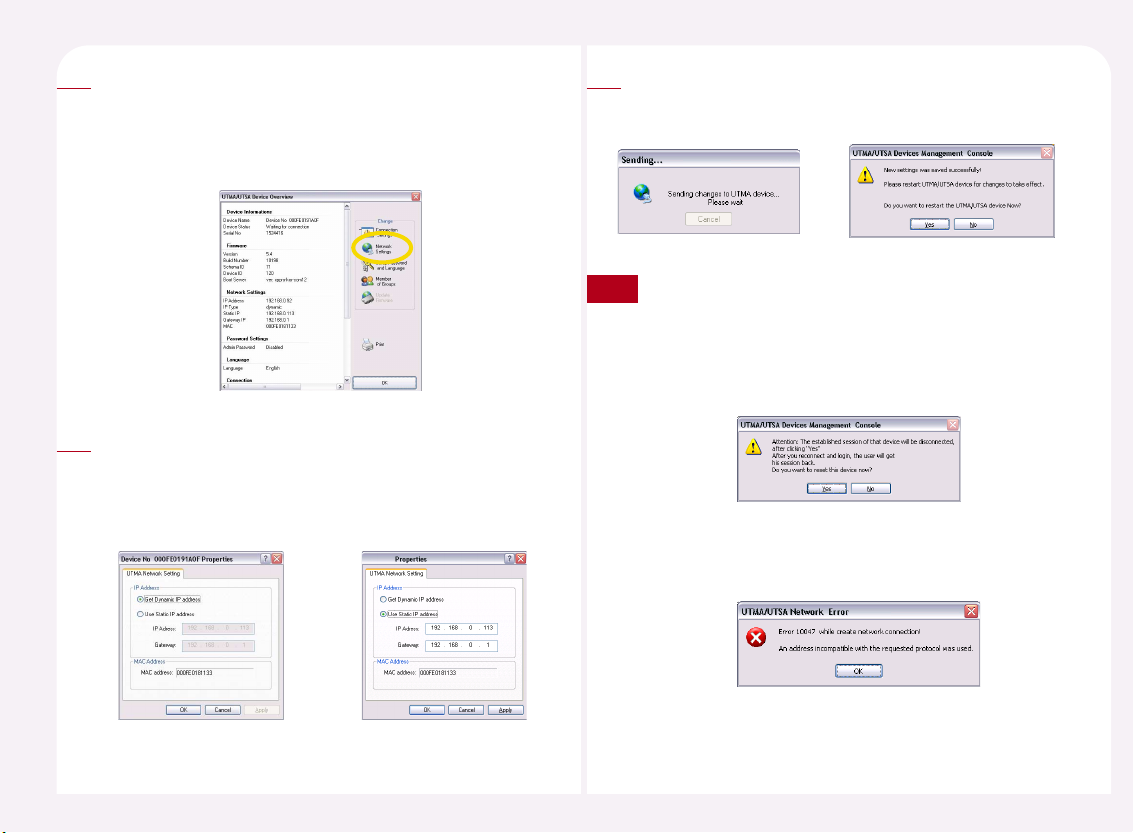
Select the corresponding PC Expanion and then double-click or click the
‘Device Settings’ icon.
You can confirm the current IP address and gateway address in the
Network Settings field. To change the IP address, click the
<Network Settings> button.
2
To use an automatically allocated IP address, select ‘Obtain an IP address
automatically.’ To use a static IP address, select ‘Use the following IP
address,’ enter an IP address and the gateway address. For the IP correct
address and the IP address of the gateway necessary for manual setting,
ask your computer administrator.
<Automatic> <Manual>
3
In order to apply the setting, click the <OK> or <Apply> button.
You must restart the PC Expanion in order to apply the setting.
Please click the <OK> button.
4
If the PC Expanion is currently being connected and used, a
warning message appears. To apply the changes, click the <Yes>
button. The PC Expanion restarts. However, since the current
environment settings are unchanged, you can use your
environment settings when you logon with the same user
account after restarting.
If the PC Expanion is turned off or does not exist in the same subnetwork, an error message appears and the settings will not be
changed. In this case, click the <OK> button to cancel the changes.
Note
Page 48

8-7
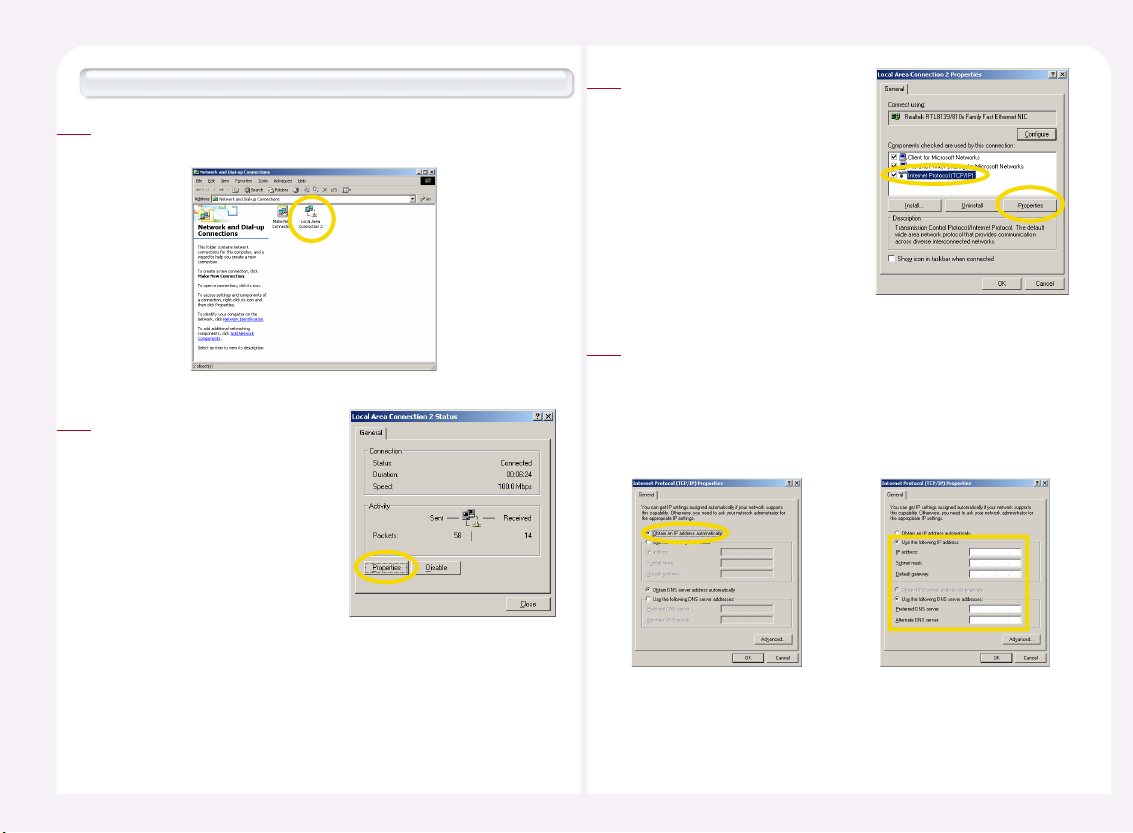
How to check the IP address with Windows 2000 operating system.
<Start> ▶ <Settings> ▶ <Network and Dial-up connection> ▶
Select ‘Local Area Connection’ and then double-click it.
1
Click the <Properties> button.
2
3. How to check the IP address of the host PC.
Select ‘Internet Protocol(TCP/IP)’ and
then click the <Properties> button.
3
To use an automatically allocated IP address, select ‘Obtain an IP address
automatically.’ To use a static IP address, select ‘Use the following IP
address.’ In this case, you must manually enter the IP address, Subnet
mask, Default gateway, and Preferred DNS server address. For the
information necessary for manual setting, ask your computer
administrator.
4
<Automatic Setting> <Manual Setting>
Page 49
8-8
How to check the IP address of the host PC under Windows XP operating system.
<Start> ▶ <Control Panel> ▶ <Network Connection> ▶ Select
‘Local Area Connection’ and then double-click.
1
Click the <Properties> button.
2
Select ‘Internet Protocol (TCP/IP)’
and then click the <Properties>
button.
3
To use an automatically allocated IP address, select ‘Obtain an IP
address automatically.’To use a static IP address, select ‘Use the
following IP address.’ In this case, you have to enter manually the IP
address, Subnet mask, Default gateway, and Preferred DNS server
address. For the information necessary for manual setting, ask your
computer administrator.
4
<In case of automatic setting> <In case of manual setting>
Page 50
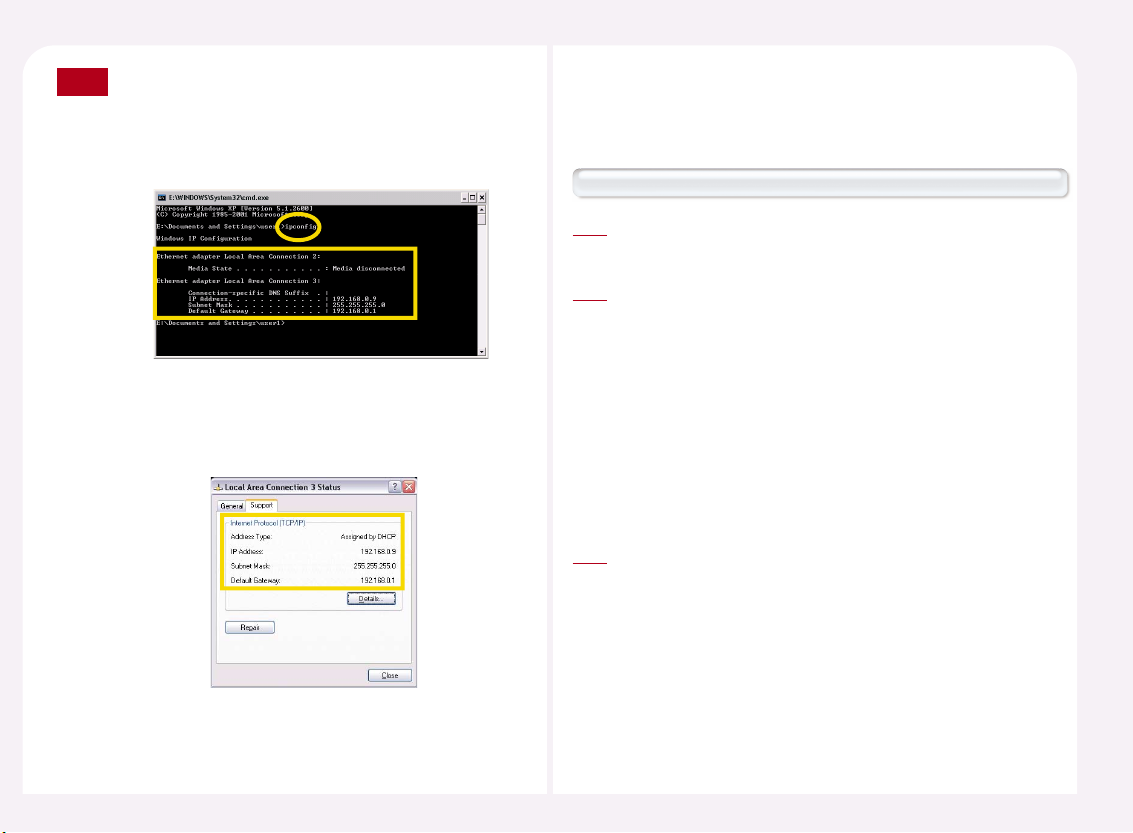
8-9
The user can check the IP address of the host PC under DOS
environment. <Start> ▶ <All Programs> ▶ <Accessory> ▶
<Command Prompt> or <Start> ▶ <Run> ▶ Type ‘cmd’ and then
click the <OK> button. Then type ‘ipconfig’ command and click the
<Enter> key. You can see the IP address of the host PC.
In Windows XP, you can easily confirm the IP address settings with
or without opening a DOS command prompt window. In Step 2 of
the Settings in Windows XP, if you select the <Support> tab, you
can view the current IP address settings.
Note
Connecting to the network using a cable or DSL router (DHCP function of more than 100Mbps with switching )
Refer to ‘2. How to check the IP address setting of PC Expanion’ in
Part 8., Then set the IP address of the PC Expanion.
1
To set the IP address of a host computer refer to ‘3. Setting and
Confirming the IP Address of a Host Computer.’ The IP address of a
host computer and the address of the PC Expanion must be in the
same sub-network. This means that the first 3 among the 4 numbers
of the IP addresses must be the same. For example, if the IP address of
a host computer is 192.168.0.1, then the PC Expanion must have an IP
address starting with 192.168.0. If one of the first 3 numbers of the IP
addresses is different, they are not in the same sub-network. To
connect to a computer outside of the same sub-network, specify a
host computer to connect to and refer to ‘6. Connecting a Specific
Host Computer.’
2
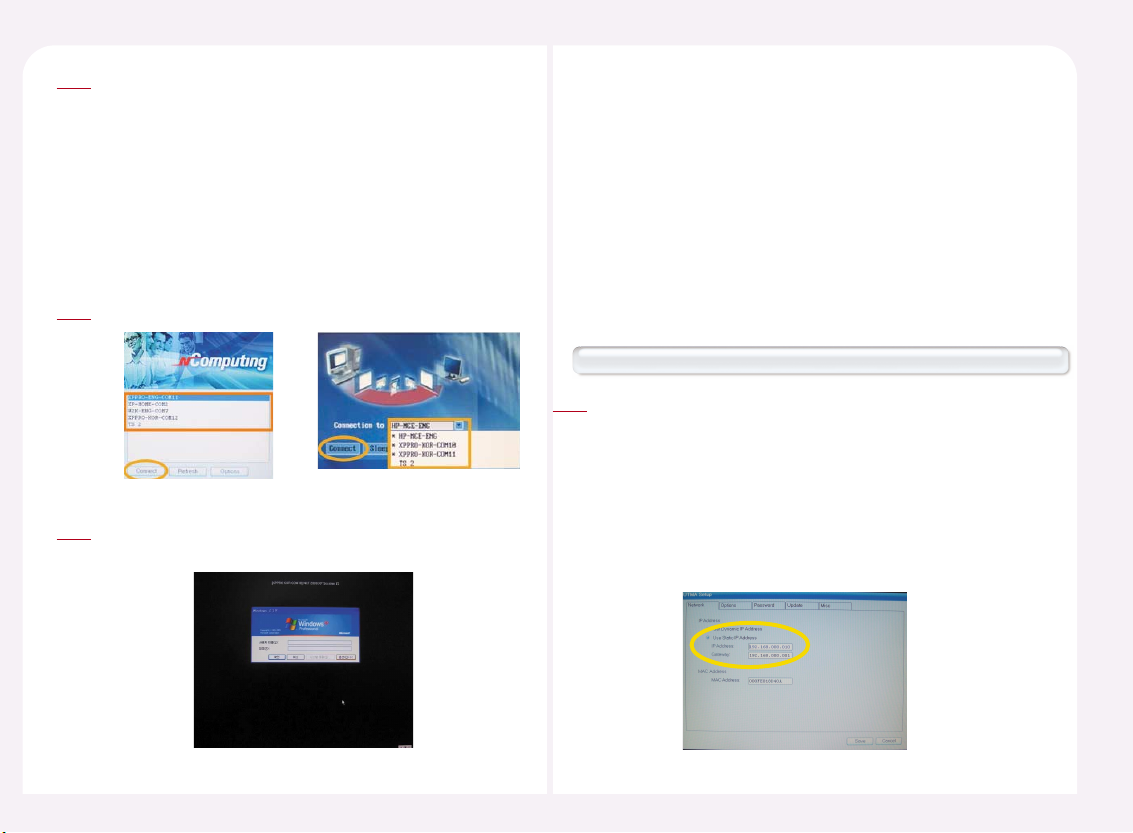
Click the ‘Connection to’ arrow in the PC Expanion initial screen and
select a host computer from the list. If ‘Autodetection’ is selected in
the <Setup> ▶ <TS Options> of the PC Expanion, up to 8 host
computers within the same sub-network of the NCT-2000-XP
application will be automatically found and listed. Automatically
found host computer names are marked by the ‘*’ symbol in front of
them. If ‘Autodetection’ is not selected in <Setup> ▶
<TS Options> and only ‘TS 2’ or ‘TS 3’ is selected, ‘TS 2’ or ‘TS 3’
appears in the list without the ‘*’ symbol.
3
4. How to connect between the PC Expanion and the
host PC using network equipment.
Page 51

8-10
Click the <Connect> button.
4
When the Windows logon window
appears, type the user name and
the password.
5
Connecting with a switch (Supports 100Mbps switching)
‘Setup the IP address of the PC Expanion by referring to ‘2. Setting and
Confirming the IP Address of PC Expanion’. If you are using a switch,
you must set up the IP address manually because you cannot use an
automatically allocated IP address. For the correct IP address and
gateway address, ask your computer administrator.
1
Set the IP address of a host computer by referring to ‘3. Setting and
Confirming the IP Address of a Host Computer.’ If you are using a
switch, you have to setup the IP address manually because you
cannot use an automatically allocated IP address. For the IP address
and gateway address, ask your computer administrator. The IP
address of a host computer and PC Expanion must be in the same
sub-network. This means the first 3 among the 4 numbers of the IP
addresses must be the same. For example, if the IP address of a host
computer is 192.168.0.1, then the PC Expanion must have an IP
address starting with 192.168.0. If one of the first 3 numbers of IP
addresses is different, they are not in the same sub-network. To
connect to a computer not in the same sub-network, specify a host
computer and refer to ‘6. Connecting to a Specified Host Computer.’
2
Page 52
8-11
Click the <Connection to> arrow in the PC Expanion initial screen
and select a host computer from the list. If ‘Autodetection’ is
selected in the <Setup> ▶ <TS Options> of the PC Expanion, up to
8 host computers within the same sub-network of the NCT-2000XP application are automatically found and listed. Automatically
found host computer names are marked by the ‘*’ symbol in front
of them. If ‘Autodetection’ is not selected in <Setup> ▶ <TS
Options> and only ‘TS 2’ or ‘TS 3’ is selected, ‘TS 2’ or ‘TS 3’ appears
on the list without the ‘*’ symbol.
3
Click the <Connect> button.
4
When the Windows logon window appears, type the user ID and
the password.
5
When only one LAN card is plugged in the host PC (more than 100Mbps support)
After referring to the ‘2. How to check the IP address setting of PC
Expanion’ in part 8, please set the IP address of PC Expanion
manually.
<For example>
Select the ‘Use Static IP address’ option in the setup menu
of the PC Expanion.
IP address column : Type “192.168.010.003”
Gateway : Type “192.168.010.001”
1
You can also use the PC Expanion by connecting it to the LAN port of a host
computer directly. In this case, you cannot use the Cable supplied with the
product. You will need a cross-over LAN cable. If a host computer has one
LAN card and the PC Expanion is connected to the LAN card, the computer
cannot be connected to the Internet or external networks. In this case, to
connect the host computer to the Internet or external networks, install an
additional LAN card in the computer and refer to ‘When there is more than
a LAN’. The LAN card must support 100Mbps or higher.
5. How to connect the PC Expanion to the host
PC directly
Page 53

8-12
After referring to “3. How to check the IP address setting of the host
computer” in part 8, set the IP address of the host PC manually.
<For example>
Select the ‘Use the following
IP address’ option.
IP address column :
Type “192.168.010.002”
Subnet Mask :
Type “255.255.255.0”
Gateway : Type “192.168.010.001”
2
Click the ‘Connection to’ arrow in the PC Expanion initial screen and
select a host computer from the list. If ‘Autodetection’ is selected in the
<Setup> ▶ <TS Options> of PC Expanion, up to 8 host computers
within the same sub-network of the NCT-2000-XP application are
automatically found and listed. However, since there is one connected
host computer, only the computer is displayed. An automatically found
host computer name is marked by the ‘*’ symbol in front of it. To
connect to a computer without a search operation, set the host
computer IP address to the IP address used in Step 2 by referring to ‘6.
How to connect to the Specific host PC.’ Click the <Connect> button.
3
When the Windows logon window
appears, type the user ID and the
password.
4
Two LAN cards are installed in the host PC(more than 100Mbps support)
If two LAN cards are installed in the host computer, you can use one
to connect to the PC Expanion and the other to connect to the
Internet or external networks. In this case, connect the host computer
and the PC Expanion by referring to ‘When there is one LAN card’ and
setup the other LAN card to connect it to the Internet or external
networks.
<Start> ▶ <Control Panel> ▶ <Network Connections> ▶ Select
‘Local Area Connection’ and then double-click it.
1
Page 54

8-13
Click the <Properties> button.
2
Select ‘Advanced’ tab. Check “Allow other network users to connect
through this computer’s Internet connection” in the Internet
Connecting Sharing window and click “OK” button.
3
Click the <Yes> button.
4
Click the <Setup> button in the startup screen of the PC Expanion.
1
6. How to connect to the specific host PC
Select the ‘TS Options’ tab, select ‘TS 2’ or ‘TS 3’ and click the <Enable-
Disable> button. Click the <Edit> button and setup host computer
information. If ‘Autodetection’ is selected, up to 8 host computers within
the same sub-network of the NCT-2000-XP application are automatically
found and listed. Automatically found host computer names are marked
by the‘*’ symbol in front of them. If ‘Autodetection’ is not selected and
‘TS 2’ or ‘TS 3’ is selected, ‘TS 2’ or ‘TS 3’ appears in the list without the ‘*’
symbol.
2
Page 55

8-14
Enter the IP address of the host computer to connect to the Terminal
Server network address field. For the IP address of a host computer, refer
to ‘3. Setting and Confirming the IP Address of a Host Computer.’ If the
IP address is incorrect, the host computer will not be connected. Click
the <OK> button to save the settings and click the <Save> button to
exit the settings.
3
Click the <Connection to> arrow in the PC Expanion’s initial screen
and select a host computer from the list. If ‘Autodetection’ is not
selected and ‘TS 2’ or ‘TS 3’ is selected, ‘TS 2’ or ‘TS 3’ appears in the list
without the ‘*’ symbol.
4
Click the <Connect> button. When the
Windows logon screen appears, type the
user ID and the password.
5
How to map the PC Expanion and connect to the host PC under the NCT-2000-XP console
<Start> ▶ <All Programs> ▶ <NCT-2000-XP> ▶ Select
<NCT-2000-XP Console> in order to run the program. Go to the
<Hardware Settings (Local/LAN)> ▶ <UTMA/UTSA Device>.
Select the specific PC Expanion and then double-click it.
1
Click the <Connection Settings> icon in
the ‘UTMA/UTSA Setup view.’
2
Select ‘TS 2’ or ‘TS 3’ in the connection list
and then click the <Apply> button. Click
the <Edit> button and view the setup
host computer information. If
‘Autodetection’ is selected, up to 8 host
computers within the same sub-network
of the NCT-2000-XP application are
automatically found and listed.
3
Page 56

8-15
Input the IP address of the host PC in
the “Terminal Server network address”
column of the “Edit Connection Profile”
window. Then click the <OK> button.
4
Click the <OK> button or the <Apply> button in order to save the
changed option. The user must restart the PC Expanion. Please click
the <OK> button in order to restart the PC Expanion.
5
If the PC Expanion is currently being connected and used, a warning
message appears. If you click the <Yes> button, the PC Expanion
restarts. However, since the current environment settings are
unchanged, you can use your environment settings when you
logon with the same user account even after restarting.
If the PC Expanion is turned off or does not exist in the same subnetwork, the following screen appears and the settings will not be
changed. In this case, click the <OK> button to cancel the changes.
Note
Click the <Connect> arrow in the PC Expanion initial screen and select a
host computer from the list. If ‘Autodetection’ is not selected and ‘TS 2’
or ‘TS 3’ is selected, ‘TS 2’ or ‘TS 3’ appears on the list.
6
When the Windows logon window appears, type the user ID and
password.
7
Page 57

8-16
How to configure the PC Expanion.
Click the <Setup> button in the startup screen on the PC Expanion.
1
7. How to connect to the specific host PC
automatically
Select the ‘TS Options’ tab, select ‘TS 2’ or ‘TS 3’, click the <Enable-
Disable> button and click the <Edit> button. To connect to a
specified host computer automatically, there must be one host
computer on the <Connection to> list of the PC Expanion initial
screen. If ‘Autodetection’ is selected in the ‘TS Options’ screen,
select ‘Autodetection’, click the <Enable-Disable> button to
unselect the option, and select either ‘TS 2’ or ‘TS 3’.
2
Type the address that you want to connect to the host PC in the
‘Terminal Server network address’ column. Then select the
‘Autoconnection Enable’ option. Refer to ‘3. How to check the IP
address setting of host Computer’ in Part 8. regarding the IP
address of specific host PC. Click the <OK> button. Then click the
<Save> button. The setup procedure is finished.
When the PC Expanion is rebooted, the PC Expanion attempts to
connect to the specific host PC after a few seconds. If the PC
Expanion is connected to the host PC, please check the IP address
of the specific host PC in the setup.
4
How to set up under the NCT-2000-XP console
<Start> ▶ <All Programs> ▶
<NCT-2000-XP> ▶ Select
<NCT-2000-XP Console> in
order to run the NCT-2000-XP
program. Go to the <Hardware
Settings (Local/LAN)> ▶ Select
<UTMA/UTSA Device> and then
select the specific PC Expanion
in the “UTMA/UTSA list” and
double-click it.
1
Page 58

8-17
Click the <Connection Settings> icon in the ‘UTMA/UTSA Setup
view.’
2
Select either ‘TS 2’ or ‘TS 3’ from the ‘Host Computer List to Connect
to,’ click the <Apply> button and then click the <Edit> button. To
connect to a specified host computer automatically, there must be
one host computer in the <Connection to> list on the PC
Expanion’s initial screen. If ‘Autodetection’ is selected in the ‘Host
Computer List to Connect to,’ select ‘Autodetection’ and click the
<Enable-Disable> button to unselect the option. Then select either
‘TS 2’ or ‘TS 3’.
3
Input the IP address of the host PC in the “Terminal Server network
address” column of “Edit Connection Profile” window. Then click the
<OK> button. Refer to ‘3. How to check the IP address setting of host
PC” in Part 8.
4
Select the host PC that the PC Expanion is connected to automatically in
the “Auto-Connect” list. Click the <OK> button or the <Apply> button.
5
Page 59

8-18
In order to save the changed option, the PC Expanion must be restarted.
Click the <Yes> button in order to restart the PC Expanion.
6
If the PC Expanion is currently being connected and used, a warning
message appears. If you click the <Yes> button, the PC Expanion
restarts. However, since the current environment settings are
unchanged, you can use your environment settings when you
logon with the same user account after restarting.
Note
If the PC Expanion is turned off or does not exist in the same subnetwork, the following screen appears and the settings will not be
changed. In this case, click the <OK> button to cancel the changes.
When the PC Expanion is rebooted, the PC Expanion attempts to
connect to the specific host PC after a few seconds. If the PC Expanion is
connected to the host PC, please check the IP address of the specific
host PC in the setup.
7
PC Expanion users can log in from the host PC. <Start> ▶ <All
Programs> ▶ <NCT-2000-XP> ▶ Select <NCT-2000-XP Console>
in order to run the NCT-2000-XP program. Go to <Hardware
Settings (Local/LAN)> ▶ Select <UTMA/UTSA Device> and then
select the specific PC Expanion. Then double-click it.
1
8. How to log in automatically when the PC
Expanion connects to the host PC.
Click the <Connection Settings> icon
in the ‘UTMA/UTSA Setup view’.
2
Page 60
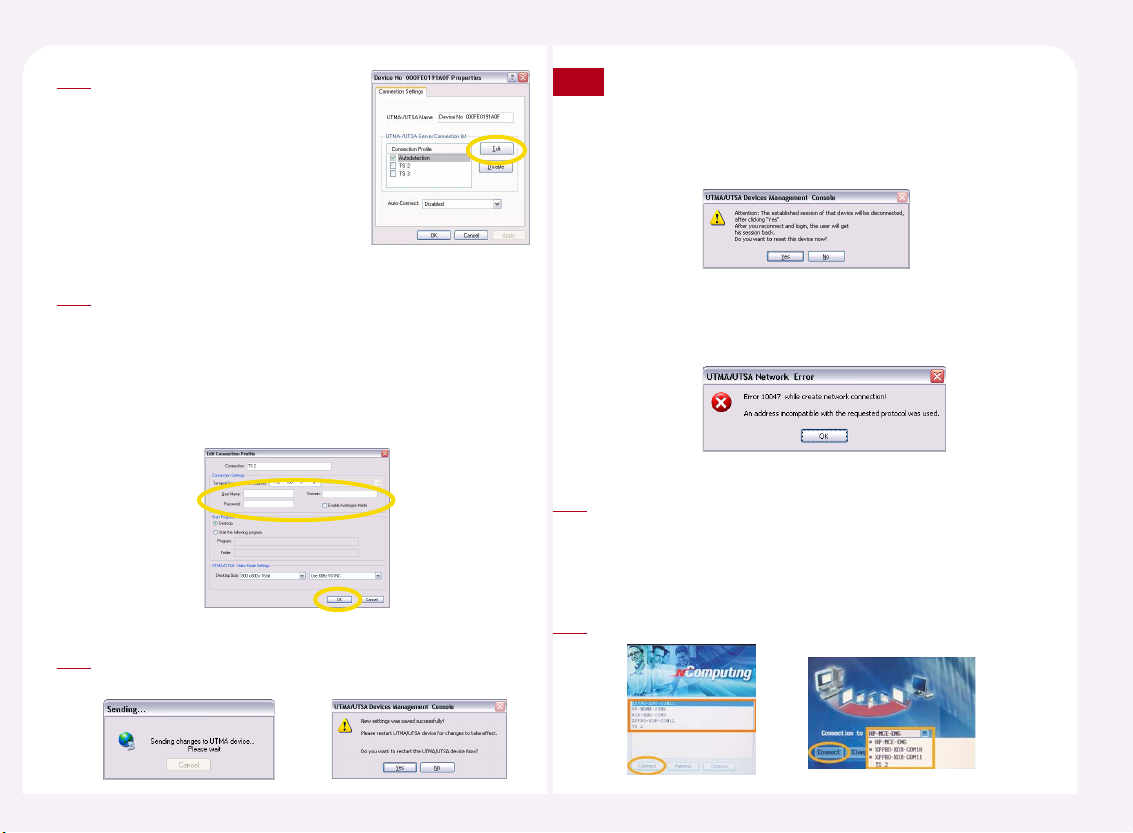
8-19
Select the host PC that is connected to
the PC Expanion in the “UTMA/UTSAServer Connection list” and then click
the <Edit> button.
3
Select ‘Use auto logon’ in the ‘Connection Information Settings’
screen. Be sure to enter your ‘User Name’ and ‘Password’ and click
the <OK> button. The Auto Logon function is only allowed on the
NCT-2000-XP console because the password is saved in the user
personal profile managed by the host computer and the PC
Expanion cannot manage this information. Therefore, this function
setting is allowed on a host computer.
4
In order to save the changed option, the PC Expanion must be
restarted. Click the <Yes> button in order to restart the PC Expanion.
5
If the user uses the specific PC Expanion, the right figure appears
like as the right window. If when the user clicks the <Yes> button,
the PC Expanion will be restarted. However the present
environment is saved. Therefore if the same user logs on again,
the environment will be loaded.
Note
If the specific PC Expanion is turned off or there is no the PC
Expanion on the network, the follwing image will appear. Click
the <OK> button.
Select the specific host PC in the connection list on the startup
screen of the PC Expanion. If the ‘Autodetection’ is disabled and
‘TS 2’ or ‘TS 3’ is enabled, ‘TS 2’ or ‘TS 3’ will be displayed in the
connection list.
6
Click the <Connect> button.
7
Page 61
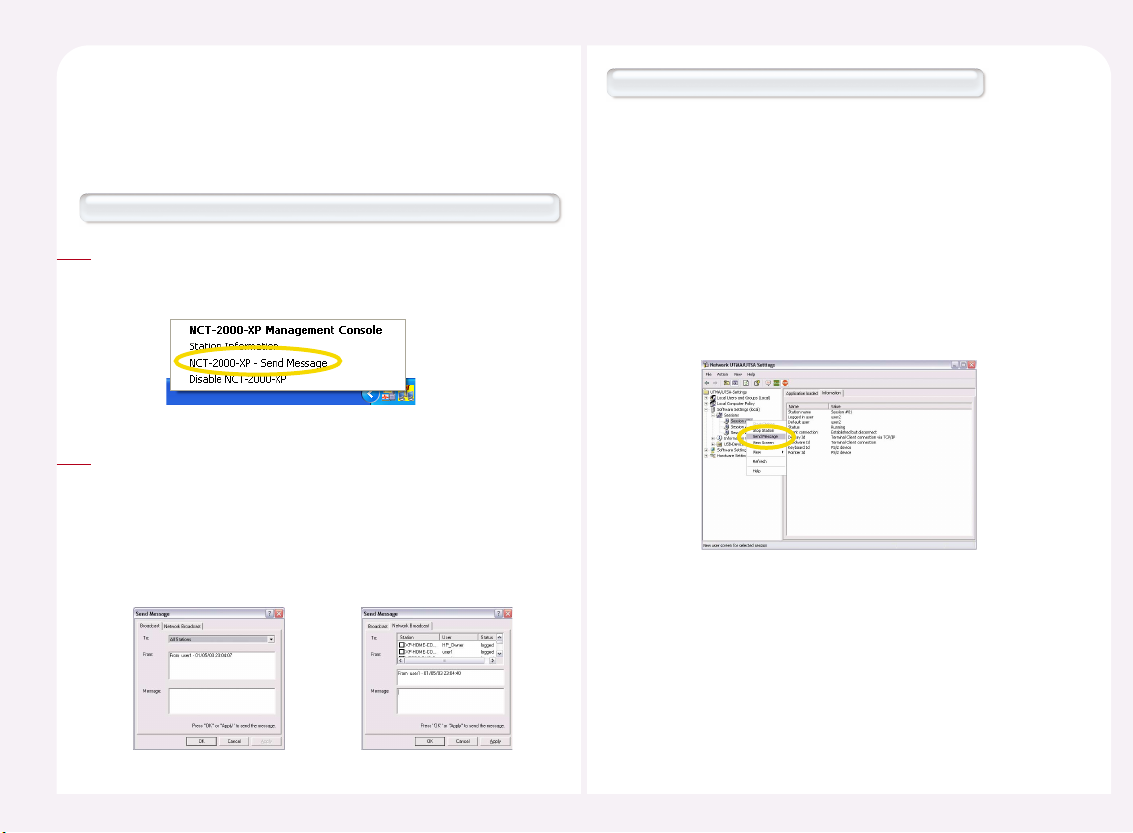
8-20
A user can send a message from the PC Expanion to other PC Expanion
or to other PC Expanion of different host PC. Select <Send Message> to
send a message to the PC Expanion connected to the same host
computer. To send a message to another host computer or the PC
Expanion connected to another host computer, select <Transmit
Message> and select a destination PC Expanion. Type your message in
the ‘Message’ field and click the <OK> or <Apply> button.
There are two methods available to send a message.
2
9. How to send a message to the connected PC
Expanion
Send a message using “NCT-2000-XP-Send Message” option in the pop-up menu of NCT-2000-XP icon on the taskbar.
Move the mouse point to the NCT-2000-XP icon on the task bar of
Windows. Then click the right mouse button. Select the ‘NCT-2000-XP
– Send Message’
1
How to send a message in the NCT-2000-XP console
The user can send a message in the NCT-2000-XP console. Go to
<Start> ▶ <All Programs> ▶ <NCT-2000-XP> ▶ <NCT-2000-XP
Console>. Go to <Software Settings (local)> ▶ <Sessions> Then
select the station that you want to send a message to.
If you select a Station and right-click, a pop-up menu appears.
Select ‘Transmit Message’ from the pop-up menu or select the
‘Transmit Message’ button at the top of the screen to transmit a
message to a selected PC Expanion. On the NCT-2000-XP console,
you can transmit a message to one selected Station only.
Transmitting a message on the NCT-2000-XP console requires
Computer Administrator user privilege.
Page 62

8-21
After installing the NCT-2000-XP application, whenever the host PC is
rebooted, the NCT-2000-XP program will run automatically. If the NCT2000-XP application is disabled, the PC Expanion cannot connect to the
host PC.
10. How to start or stop running the NCT-2000-XP
application
Move the mouse point to the NCT-2000-XP icon on the taskbar
of Windows. Then click the right mouse button. Then select the
‘NCT-2000-XP disable.’
1
The host PC rebooting message window will appear. If you want to
apply this option, the host PC must be rebooted.
2
When the host PC is rebooted, a window appears with the disabled
NCT-2000-XP application. The window asks whether you would
like to use the NCT-2000-XP program again or not. If you would like
to the NCT-2000-XP program to be enabled again, click the <Yes>
button. If you would like the NCT-2000-XP to be disabled, click the
<No> button. If the <Yes> button is clicked, the host PC reboot
message appears. In order to enable the NCT-2000-XP program,
the host PC has to be rebooted.
3
If the NCT-2000-XP is disabled after booting the host PC, please move the
mouse cursor to the NCT-2000-XP icon on the Windows taskbar. Then click
the right mouse button and select the ‘Enable NCT-2000-XP now’. The host
PC must be rebooted in order to apply the option.
Page 63

8-22
The user can terminate the PC Expanion that is presently connected to the
host PC.
11. How to terminate an active PC Expanion.
Go to <Start> ▶ <All Programs> ▶ <NCT-2000-XP> ▶ <NCT-2000-XP
Console>. Go to <Software Settings (local)> ▶ Select <Sessions> and
then select the PC Expanion that you want to terminate.
1
When the user clicks the right mouse button after selecting the
correct station, the user will see the ‘Stop Station’ option of pop-up
menu. Select ‘Stop Station’ menu or click the ‘Stop Station’ button in
the menu bar. The PC Expanion will be terminated by force.
2
A confirmation message will appear before a Station is shut down.
To exit a Station forcibly, click the <Yes> button. When this is done,
the Station is immediately terminated without further warning
messages. Note that a user cannot save data when a Station is
forcibly terminated.
3
The user can see the screen of a PC Expanion that is connected to a
host PC.
12. How to see the screen of a running PC Expanion
Go to <Start> ▶ <All Programs> ▶ <NCT-2000-XP> ▶ <NCT2000-XP Console>. Go to <Software Settings (local)> ▶ Select the
<Session> and then select the PC Expanion that you would like to
view.
1
When the user clicks the right mouse button after selecting the
station, the ‘View station’ option in the pop-up menu appear.
Select the ‘View station’ or click the ‘View Screen’ button in order
to see the screen of a PC Expanion.
2
Page 64

8-23
The station screen appears where the user can set the resolution
and color depth on the PC Expanion.
3
To view a station screen, go to in the “UTMA/UTSA Devices list”
window. Go to <Start> ▶ <All Programs> ▶ <NCT-2000-XP> ▶
<NCT-2000-XP Console>. Select <Hardware Settings (Local/LAN)>
▶ <Device>, select the corresponding PC Expanion from the
device list and then click <View User Screen view> at the bottom
of the screen.
4
The administrator can control a PC Expanion that is connected to the host
PC remotely.
13. How to control a running PC Expanion by the
administrator
After referring to ‘12. How to see the screen of running PC Expanion’ in
Part 8, run the “View station” option.
1
When the screen of the station displays, move the mouse point to the
title bar of window.
Then click the right mouse button. Two options are displayed:
● Controlled By TS Admin : If this option is selected, an administrator
can control the PC Expanion remotely.
● User Input Allowed : This option is selected by default. If this option is
selected, you can use a keyboard and mouse on
the PC Expanion. If this option is unselected, a
user cannot use a keyboard and mouse but can
only view the screen.
◀ If the user selects the option
above, it is difficult to use the
keyboard and the mouse because
both the user’s keyboard/mouse
and the administrator’s keyboard/
mouse are given equal access to
operate simultaneously.
2
Page 65

8-24
The PC Expanion provides a mechanism for automatically logging on a host
computer without entering a user name and password.
14. How to log in to the host PC automatically
Go to <Start> ▶ <All Programs> ▶ <NCT-2000-XP> ▶ <NCT-2000XP Console>. Go to <Software Settings (local)> ▶ <Information &
Settings> ▶ Select <System Settings> and then double-click the
‘Autologon on the host Station’ on the right side of the window.
1
Check the “Enable Autologon Mode on Main Station‘ option. Then
type the user ID and the password. Click the <OK> button or <Apply>
button. The PC Expanion is logged on the host PC with the user ID
and the password automatically.
2
If a user shuts down a host computer while a PC Expanion is connected
to it, a message appears informing the PC Expanion user of the
shutdown. This is to enable a PC Expanion user to save his data when
an administrator shuts down or restarts a host computer. To save the
current work, a PC Expanion user must click the <Cancel> button, save
his data and then click <Logoff>. If there is no data to be saved, click the
<Logoff> button to terminate the connection and allow the shutdown
or restart of the host computer. Click the <Cancel> button to cancel the
shutdown or restart of the host computer.
In this case, the message shown
below appears on the host computer.
To shutdown and restart the host
computer regardless of the currently
connected user, click the <Restart
Now> button. To cancel the
shutdown or restart, click the
<Cancel> button.
15. How to set the timer for a ‘system shutdown’
message
Go to <Start> ▶ <All Programs>
▶ <NCT-2000-XP> ▶ <NCT-
2000-XP Console>. Go to
<Software Settings (local)> ▶
<Information and Settings> ▶
Select the <System Settings>
and then double-click the “Delay
until shutdown (seconds)” option
on the right.
1
Page 66

8-25
Set the time. Then click <OK>
button or <Apply> button. The
range of timing is from 1 until
999 seconds.
2
When a host computer is shutdown or restarted, and if a PC
Expanion user selects the <Cancel> button, the host computer will
not be shutdown. A the message will appear saying that a station
user canceled the shutdown.
Note
Please refer to ‘9. How to send a message to the connected PC Expanion’ in
Part 8.
16. How to enable or disable the function of
sending a message
Go to <Start> ▶ <All Programs>
▶ <NCT-2000-XP> ▶ <NCT-2000
-XP Console>. Go to <Software
Settings (local)> ▶ <Information
and Settings> ▶ Select <System
Settings> and then double-click
the ‘Disable Send Broadcast
Message ’ option on the right.
1
To use the Transmit Message function, select ‘Users can transmit a
notification message.’ In order not to use the Transmit Message
function, select ‘Users cannot transmit a notification message’. Click the
<OK> or <Apply> button to apply the settings. This setting does not
control the NCT-2000-XP console function, but rather the Transmit
Message function that is available when you click the NCT-2000-XP
shortcut icon on the Desktop notification area.
2
Page 67

8-26
Please refer to ’12. How to see the screen of a running PC Expanion’ and
’13. How to control the running of a PC Expanion by an administrator’ in
Part 8 regarding the function of viewing the PC Expanion and controlling
the PC Expanion remotely.
17. How to view and control a PC Expanion
Go to <Start> ▶ <All Programs> ▶ <NCT-2000-XP> ▶ <NCT-2000-XP
Console>. Go to <Software Settings (local)> ▶ <Information and
Settings> ▶ Select <System Settings> and then double-click the
‘Remote View/Control allowed’ option on the right.
1
If you would like enable the function, select “Yes” Otherwise select
“No.” Then click <OK> button or <Apply> button in order to apply
the function.
2
A PC Expanion session continues to run if a user turns the PC Expanion
off without selecting ‘Disconnect’ or without logging off of the
connection. An NCT-2000-XP console will represent this status as
‘Disconnected’. If this status continues for a long period of time, it
wastes the host computer’s resources and it may cause some
difficulties for other users. Select the ‘Auto stop ‘Disconnected’
stations’ option, to save system resources even if the connection is
unexpectedly disconnected.
18. How to stop a station automatically when the
PC Expanion is disconnected.
Go to <Start> ▶ <All Programs> ▶ <NCT-2000-XP> ▶
<NCT-2000-XP Console>. Go to <Software Settings (local)> ▶
<Information & Settings> ▶ Select <System Settings> and then
double-click the ‘Clean up disconnection sessions not in use’
option on the right.
1
Page 68

8-27
Type a numeric character. The range is from 0 to 999 minutes. In
order to stop a ‘connected’ PC Expanion automatically, set this
value to ‘0’. When the period of time passes since PC Expanion
enters ‘Disconnected’ status, the ‘Disconnected’ PC Expanion will
be forcibly terminated.
2
Remote Desktop Protocol (RDP) is a multi-channel protocol that allows a
user to connect to a computer running Microsoft Terminal Services. If an
application using RDP does not run properly after installing the NCT-2000XP application, choose the ‘Support WTSAPI32 Interface‘ option. The
application should begin to run properly. ‘WTSAPI’ stands for Windows
Terminal Server Application Interface for NT compatible system.
19. How to run both NCT-2000-XP program and an
application using Windows RDP
Go to <Start> ▶ <All Programs> ▶ <NCT-2000-XP> ▶ <NCT-2000XP Console>. Go to <Software Settings (local)> ▶ <Information &
Settings> ▶ Select <System Settings> and then double-click the
‘Support WTSAPI32 Interface’ option on the right.
1
Select the ‘Yes, WTSAPI32 interface is
Enabled’ option. Then click the <OK>
button or <Apply> button.
2
Page 69
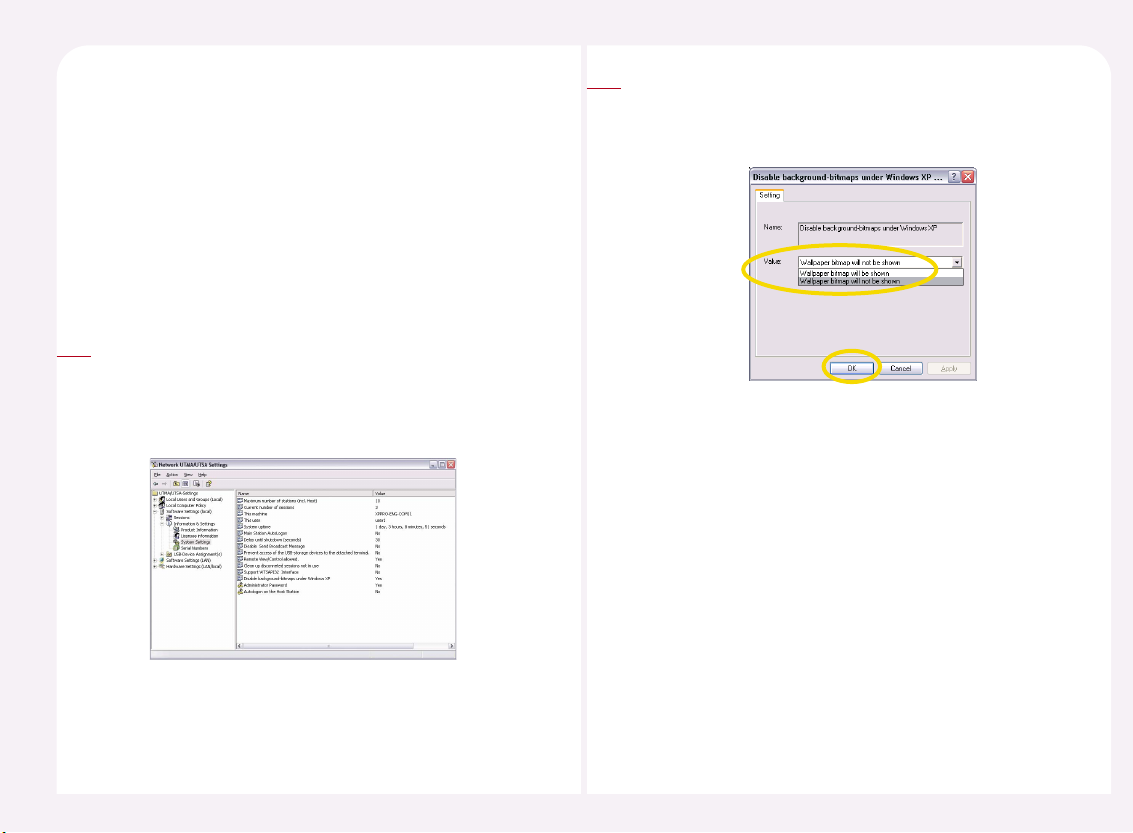
8-28
When NCT-2000-XP program is installed on a host computer and you are
using a PC Expanion to connect to the host computer, the background
image appears only once when a connection has been established for the
first time with the host computer. The background image appears only
while you are creating a personal profile. If you connect to the host
computer again after the personal profile is created, NCT-2000-XP does
not send the background image to the PC Expanion according to the
personal profile settings.
20. How to view the background-bitmaps image
of a PC Expanion
Go to <Start> ▶ <All Programs> ▶ <NCT-2000-XP> ▶ <NCT-2000-XP
Console>. Go to <Software Settings (local)> ▶ <Information & Settings>
▶ Select <System Settings> and then double-click the ‘Disable
background-bitmaps under Windows XP’ option on the right.
1
If you would like to display the background-bitmaps image, select
“Wallpaper bitmap will be shown.” If you do not want to display the
background-bitmaps image, select “Wallpaper bitmap will not be
shown.” Then click the <OK> button or <Apply> button.
2
Page 70
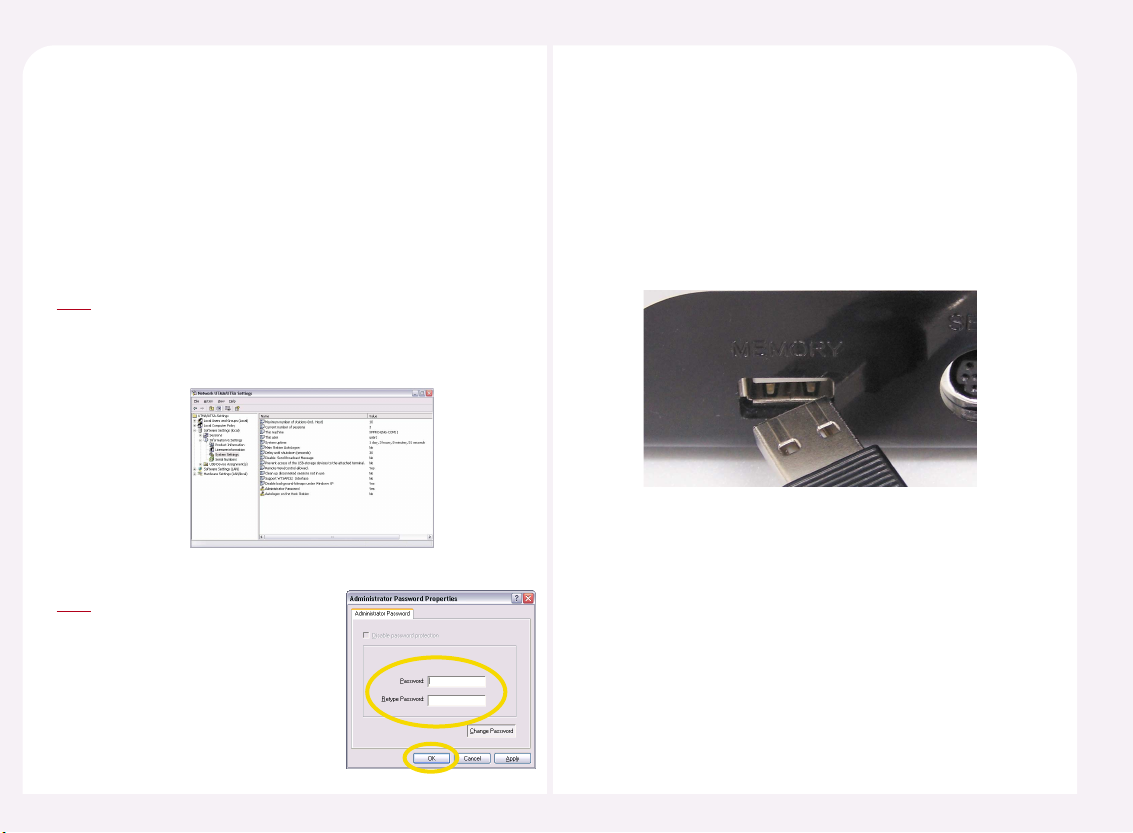
8-29
Be sure to set your password to prevent anyone other than an
administrator from changing the NCT-2000-XP console settings.
You can set a password when you install the NCT-2000-XP application.
To set a password when you install the program, enter a password in
the ‘New Password” and ‘Confirm Password’ and click the <Next>
button instead of selecting ‘Do not set administrator password.’
21. How to set the password of the NCT-2000XP program
Go to <Start> ▶ <All Programs> ▶ <NCT-2000-XP> ▶ <NCT-2000XP Console>. Go to <Software Settings (local)> ▶ <Information &
Settings> ▶ Select <System Settings> and then double-click the
‘Administrator Password’ option on the right.
1
If ‘Disable password protection’ is
checked, uncheck the option. Type
new password in the ‘Password’
and ‘Retype Password’ column.
Then click the <Change Password>
button. Click the <OK> button or
<Apply> button.
2
A user can set a USB storage device connected to a host computer so that
a specific PC Expanion can access it. The L200 model provides a USB port
so that a USB device can be connected to it directly. A USB storage device
directly connected to the L200 is not accessible by a user using another
PC Expanion. Only a user using the L200 can access a USB storage device
directly connected.
* The USB port on the L200 model does not
support the USB device or USB storage device
or USB printer under Linux.
22. How to use the USB port in case of L2XX model
series
Page 71

8-30
The name of a PC Expanion is displayed in the ‘Alias’ field of the “UTMA Info”
window when the user clicks the <Info> button.
The name of a PC Expanion can only be changed in the NCT-2000-XP
console.
23. How to change the name of a PC Expanion
Go to <Start> ▶ <All Programs> ▶ <NCT-2000-XP> ▶ <NCT-2000XP Console>. Go to <Hardware Settings (LAN/Local)> ▶ Select
<UTMA/UTSA Devices> and then double-click the PC Expanion that
you would like to change the name of.
1
Click the <Connection Settings> in the “UTMA/UTSA Device
Overview” window. ‘UTMA-/UTSA Name’ is the name of the PC
Expanion. Type new name for the PC Expanion.
2
In order to save the changed option, the PC Expanion must be
restarted. Click the <Yes> button in order to restart the PC Expanion.
3
If the user uses the specific PC Expanion, the following message will
appear. Click the <Yes> button and the PC Expanion will be restarted.
If the specific PC Expanion is turned off or if the PC Expanion is not
on the network, the following image appears.
Then the user cannot change the option. Click the <OK> button.
Note
The changed name of the PC
Expanion is applied in the NCT2000-XP console and in the “UTMA
Info” window of the PC Expanion.
4
Page 72

8-31
How to set under the PC Expanion
Click the <Setup> button in the startup screen of the PC Expanion.
You can set a PC Expanion so that it can run only one program. So, if a PC
Expanion user exits the program, the user is automatically logged off and
cannot use any other program than the one specified.
1
24. How to run the specific program when the PC
Expanion connects to the host PC
Select ‘TS Options’ tab on the terminal server of the connection list.
Then click the <Enable-Disable> button. Click the <Edit> button in
order to set the information of the host PC.
2
Select ‘Start following program’ Then type the file name in the
‘Program’ column. And type the folder name for the path to the
executable file in the ‘Folder’ column. For example, if you want to
run the notepad program automatically, type the following
information; program: Notepad.exe, Folder: C:\Windows.
Then click the <OK> button and <Save> button.
3
Click the <Connect> button.
4
Page 73

8-32
When the Windows logon window appears, type the user ID and
the password. Then click <OK> button. The application should now
run automatically. If the set application is terminated, the PC
Expanion is logged off automatically.
5
Go to <Start> ▶ <All Programs> ▶ <NCT-2000-XP> ▶ <NCT2000-XP Console>. Go to <Hardware Settings (Local/LAN)> ▶
Select <UTMA/UTSA Devices> and then double-click the desired
PC Expanion.
1
How to set the NCT-2000-XP Console
Click the <Connection Settings> in the “UTMA/UTSA Device
Overview” window.
2
Select the host PC that is connected to the PC Expanion in the
“UTMA-/UTSA-Server Connection list”. Then click <Edit>.
3
Page 74

8-33
Select ‘Start following program’ Then type the execute file name
in the ‘Program’ column. Type the folder for the execute file in the
‘Folder’ column. For example, if you would like to run ‘memo’
program automatically, type the following information; program:
Notepad.exe, Folder: C:\Windows.
Then click the <OK> button and <Save> button.
4
In order to save the changed option, the PC Expanion must be
restarted. Click the <Yes> button in order to restart the PC Expanion.
5
If the user uses the specific PC Expanion, the following figure appears.
Click the <Yes> button and the PC Expanion will be restarted.
If the specific PC Expanion is turned off or if the PC Expanion is not on
the network, the image to the right appears. Click the <OK> button.
Note
Click the <Connect> button.
6
When the Windows logon window appears, type the user ID and the
password. Then click the <OK> button. The set application runs
automatically. If the set application is terminated, the PC Expanion is
logged off automatically.
7
Page 75

8-34
The NCT-2000-XP console’s ‘Hardware Settings (LAN/Local)’ device list
shows all PC Expanions that are currently connected to the network or
were connected. A user can more efficiently manage PC Expanions by
grouping them. Group PC Expanions according to the procedures below.
25. How to manage grouped PC Expanions under
the NCT-2000-XP program
Go to <Start> ▶ <All Programs> ▶ <NCT-2000-XP> ▶ <NCT2000-XP Console>. Then <Hardware Settings (Local/LAN)> ▶ Click
to the <UTMA/UTSA Device Group(s)>. Move the mouse cursor to
the right side screen and click the right mouse button. Go to
<New> ▶ <New Logical Group>
1
Type the group name and the description. Then click the <OK>
button. You can now view the new group.
2
There are two ways to assign PC Expanions in a group. One is how
to assign the PC Expanion in the “UTMA/UTSA Device Group(s).
The other is how to assign each PC Expanion.
The following is how to assign the PC Expanion in the “UTMA/UTSA
Device Group(s).” Click on “UTMA/UTSA Device Groups” and click
the right mouse button. Go to <New> ▶ <Add an UTMA/UTSA to
Group>.
3
Select the PC Expanion that you want to group in the “Available
UTMA/UTSA devices” and then click <OK> button. If you would like
to select multiple PC Expanions, use the “Ctrl” key and the mouse.
4
Page 76
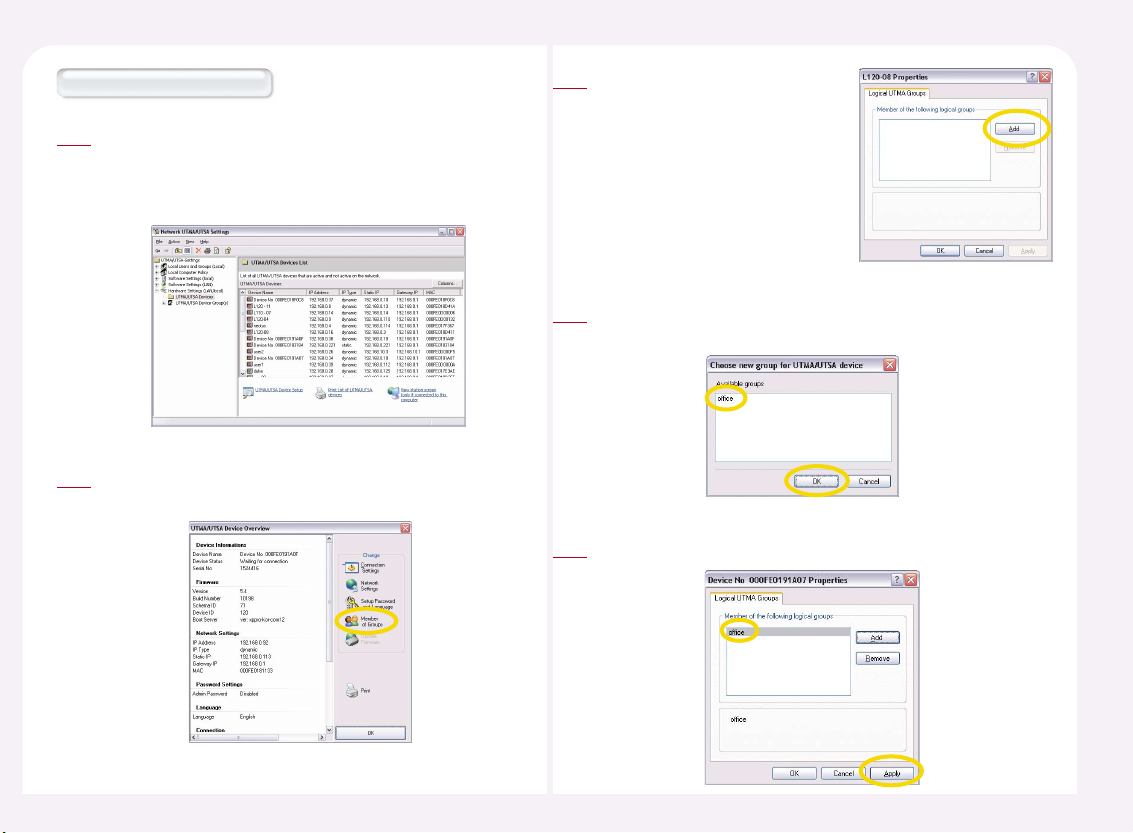
8-35
Go to <Start> ▶ <All Programs> ▶ <NCT-2000-XP> ▶ <NCT2000-XP Console>. Go to <Hardware Settings (Local/LAN)> ▶
Select <UTMA/UTSA Devices> and then double-click the PC
Expanion that you would like to change.
1
Click the <Member of Groups> in the “UTMA/UTSA Device
Overview”.
2
How to assign a PC Expanion
Click the <Add> button.
3
Select the group that you would like to group in “Available groups”
and click the <OK> button.
4
Click the <OK> button or the <Apply> button.
5
Page 77

8-36
An administrator is responsible for setting the NCT-2000-XP console
password. When you lose or forget an NCT-2000-XP console password,
you can reset the password according to the procedures below.
26. How to manage when user forgets the
password of the NCT-2000-XP program
Run the NCT-2000-XP program and input any password or character.
1
When the wrong password message
appears, click the “OK” button.
2
When “Please press “OK”, end install program now” message
appears, click the <OK> button. Then exit the program. The
previous password is reset. If you would like to set new
password, please refer to “21. How to set the password of
NCT-2000-XP program“ in Part 8.
4
When “Did you forget Your
password?” message appears,
click the <Yes> button.
3
Page 78

8-37
The serial number of the current version of a PC Expanion is embedded in
the product. To view a serial number, click the <Info> button on the PC
Expanion’s initial screen. The serial number of a product manufactured
before the year 2005 is not embedded. The serial number of a product
manufactured before the year 2005 is printed on the label at the bottom
of the product with an activation key. If your serial number is embedded
by default, you do not need to add the serial number in the NCT-2000-XP
console. Otherwise, you must add the serial number in the NCT-2000-XP
console to use the product normally.
You can add or delete serial numbers according to the procedures below.
27. How to add or remove the serial number of
NCT-2000-XP program
Go to <Start> ▶ <All Programs> ▶ <NCT-2000-XP> ▶ <NCT-2000-XP
Console>. Go to <Information & Settings> ▶ Select <Serial Numbers>.
If a PC Expanion with an added serial number connects to a host
computer, the serial number is automatically displayed as shown on the
right. The ‘Serial Number Location’ is represented as ‘Device’, when a
serial number is saved in the PC Expanion by default. If a serial number
is manually added, the ‘Serial Number Location’ is represented as ‘Hard
Disk.’
1
How to add a serial number
In order to add a serial number, select the <Serial Numbers> of
<Information & Settings> and then click the right mouse button. Or
move the mouse point to the right window of program and then click
the right mouse button. Select <Add Serial Number>.
2
Page 79

8-38
If there is no a serial number on the list, the insert window with user’s
information appears. If there is more than one serial number on the list,
the serial number and the activation key input window appears.
Type the serial number and the activation key. Then <OK> button.
3
You can add all serial numbers after making a file. Go to <Software
Settings (Local)> ▶ <Information & Settings> ▶ <Serial Numbers> and
then click the right mouse button. Select <Import Serial Numbers>.
4
Select the file where the serial number is saved.
5
Run the “Notepad” program. And then type the serial number and
the activation key as shown in the picture on the right. Save the file.
Note
If the serial number and the activation key are incorrect, when
you click the <Open> button, this error message will appear.
Note
Select the serial number that you would like to input and then
click “OK” button.
6
Page 80
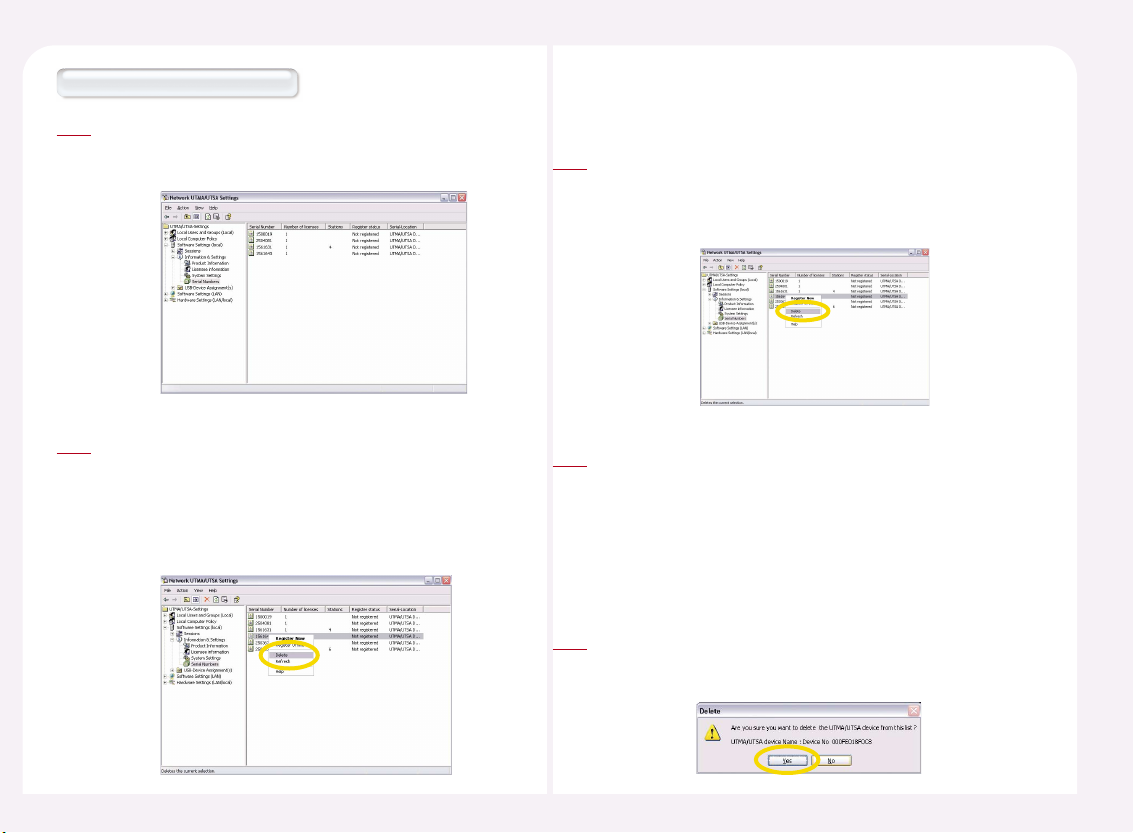
8-39
Go to <Start> ▶ <All Programs> ▶ <NCT-2000-XP> ▶ <NCT2000-XP console>. Go to <Information & Settings> ▶ Select the
<Serial Number>.
1
To delete a serial number, select the serial number to be deleted,
right-click and select <Delete> from the pop-up menu. If the serial
number is in use, you cannot delete the number. You can figure
out whether a serial number is in use or not by checking the
number in the ‘Number of Stations’ field. If there is no number in
the ‘Number of Stations’ field, you can delete the serial number.
2
How to delete the serial number
28. How to delete the PC Expanion on the list of
NCT-2000-XP console
Go to <Start> ▶ <All Programs> ▶ <NCT-2000-XP> ▶ <NCT-2000-XP
Console>. Go to <Hardware Settings (LAN/Local)> ▶ <UTMA/UTSA
Devices>. Select the PC Expanion that you would like to delete in the
UTMA/UTSA Devices List.
1
Select a PC Expanion, right-click and select <Delete Device> from the
pop-up menu. You can delete a PC Expanion only when it is not in the
same sub-network or turned off. You can only delete a PC Expanion
whose icon is red. When the icon is blue or green, the < Delete Device >
menu is disabled. NCT-2000-XP console does not refresh the list in realtime. Press the ‘F5’ key or the ‘Refresh’ button on the top of the screen to
refresh the contents of the list.
2
The message window appears. If you click the <Yes> button, the PC
Expanion will be deleted. If you click the <No> button, the PC Expanion
will be not deleted.
3
Page 81

8-40
You can set the resolution and frequency of the PC Expanion to be used
when it is connected to a host computer in advance.
The specified resolution and frequency overrules the resolution and
frequency settings made when you initially set up the
host computer.
29. How to set the resolution and frequency on the
PC Expanion
Click the <Setup> button or the <Setup> of <Options> button in the
startup screen of PC Expanion.
1
How to configure in the PC Expanion.
‘Select ‘TS Options’ tab and the
terminal server of the connection
list. Then click the <EnableDisable> button. Click the <Edit>
button in order to set the
information of the host PC.
2
Select the resolution and frequency in the ‘Desktop size’ field.
Available resolutions are displayed depending on your product
model. ‘Mode Test’ is a function to test a selected resolution
before applying it so that you can check if a selected resolution is
supported by your monitor. Since some resolutions may not be
supported by your monitor, use the ‘Mode Test’ function to check.
Click the <OK> button and then the <Save> button.
3
Go to <Start> ▶ <All Programs> ▶ <NCT-2000-XP> ▶ <NCT2000-XP Console>. Go to <Hardware Settings (Local/LAN)> ▶
Select <UTMA/UTSA Devices> and then double-click the desired
PC Expanion.
1
How to set in the NCT-2000-XP console
Page 82

8-41
Click the <Connection Settings> in the “UTMA/UTSA Device
Overview” window.
2
Select the host PC that is connected to the PC Expanion in the
“UTMA-/UTSA-Server Connection list.”
Then click <Edit> button.
3
Select the Desktop size and the
frequency. Then click the <OK>
button.
4
In order to save the changes, the PC Expanion must be restarted. Click
the <Yes> button in order to restart the PC Expanion
5
If the user is currently using the specific PC Expanion, the following
message appears. Click the <Yes> button and the PC Expanion will be
restarted.
If the specific PC Expanion is turned off or if the PC Expanion is not on
the network, the following image appears. Click the <OK> button.
Note
Page 83
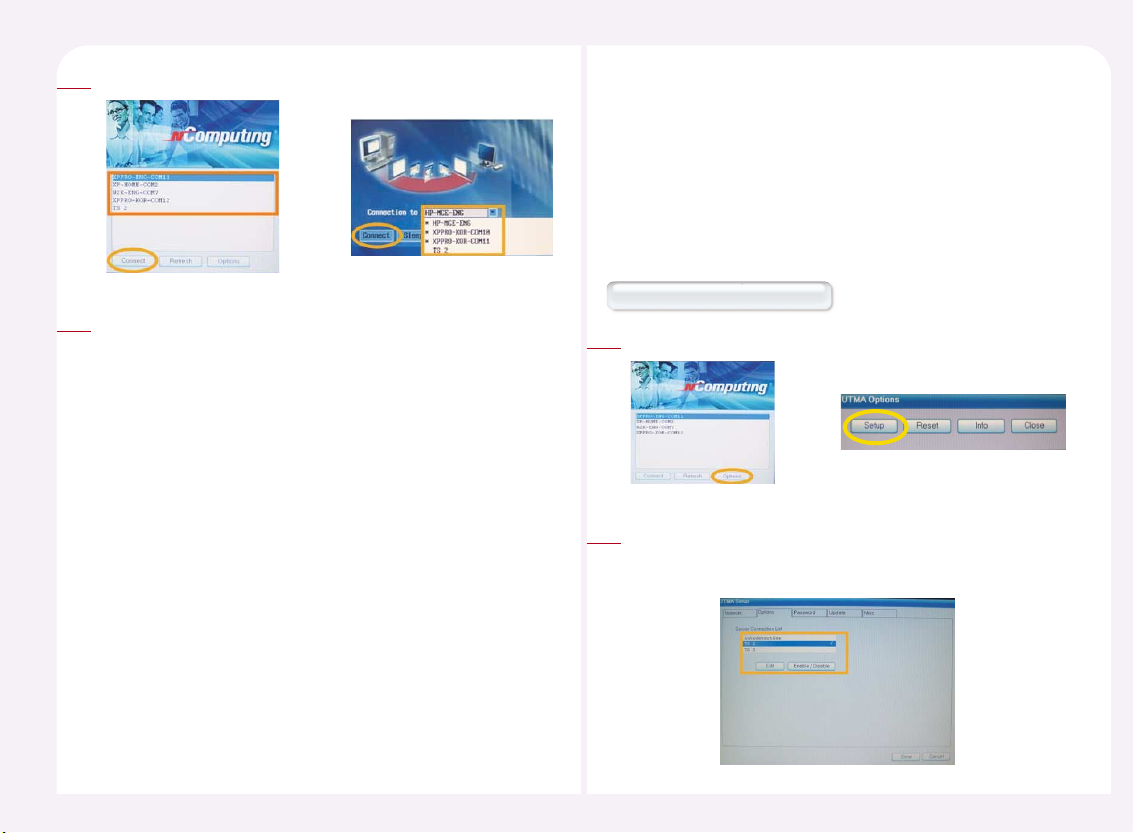
8-42
Click the <Connect> button.
6
The screen with the resolution and the color depth set is displayed.
7
30. How to set the user ID and the password before
the PC Expanion logs in to the host PC
If the PC Expanion is connected to a host computer, the Windows
logon screen appears. You can preset your user name and password
so that you can logon to Windows without entering them each time.
To logon to Windows automatically, refer to ‘8. Auto Logon when PC
Expanion is connected to a Host Computer.’
Click the <Setup> button in the startup screen of the PC Expanion.
1
How to set in the PC Expanion
‘Select ‘TS Options’ tab and the terminal server of the connection
list. Then click the <Enable-Disable> button. Click the <Edit>
button in order to set the information on the host PC.
2
Page 84

8-43
Enter a user name in the ‘User name’ field. The user name allows
alphabet letters only. You can enter a user name in a PC Expanion.
You cannot enter a password in a PC Expanion. Since a password is
private profile information, PC Expanion cannot save the
information. Click the <OK> button to save the settings and click
the <Save> button to finish the setting.
3
Click the “OK” button.
4
Go to <Start> ▶ <All Programs> ▶ <NCT-2000-XP> ▶ <NCT2000-XP Console>. Go to <Hardware Settings (Local/LAN)> ▶
Select <UTMA/UTSA Devices> and then double-click the desired
PC Expanion.
1
How to set in the NCT-2000-XP console
Click the <Connection Settings> in
the “UTMA/UTSA Device Overview”
window.
2
Select the host PC that is connected to
the PC Expanion in the “UTMA-/UTSAServer Connection list.” Then click
<Edit> button.
3
Type the user name and the
password in the “Edit Connection
Profile” window.
4
Page 85

8-44
In order to save the changes, the PC Expanion must be restarted.
Click the <Yes> button in order to restart the PC Expanion.
5
If the user is currently using the specific PC Expanion, the following
figure will appear. Click the <Yes> button and the PC Expanion will be
restarted.
l If the specific PC Expanion is turned off or if the PC Expanion is not on
the network, the following image appears. Click the <OK> button.
Note
You can see the user ID when the logon window appears after
connecting to the host PC.
6
If you uninstall the NCT-2000-XP application, you cannot use the PC
Expanion.
31. How to uninstall the NCT-2000-XP program
Please click on the <Start> button on the Windows logon screen
and select <All Programs ▶ NCT-2000-XP ▶ Uninstall NCT-2000XP> in order.
1
When the 'Uninstall NCX-2000-XP' message window appears
please click on the <Next> button. (If the 'Administrator password'
has been set, please click on the <Next> button after inputting the
'Administrator password'.)
2
Page 86
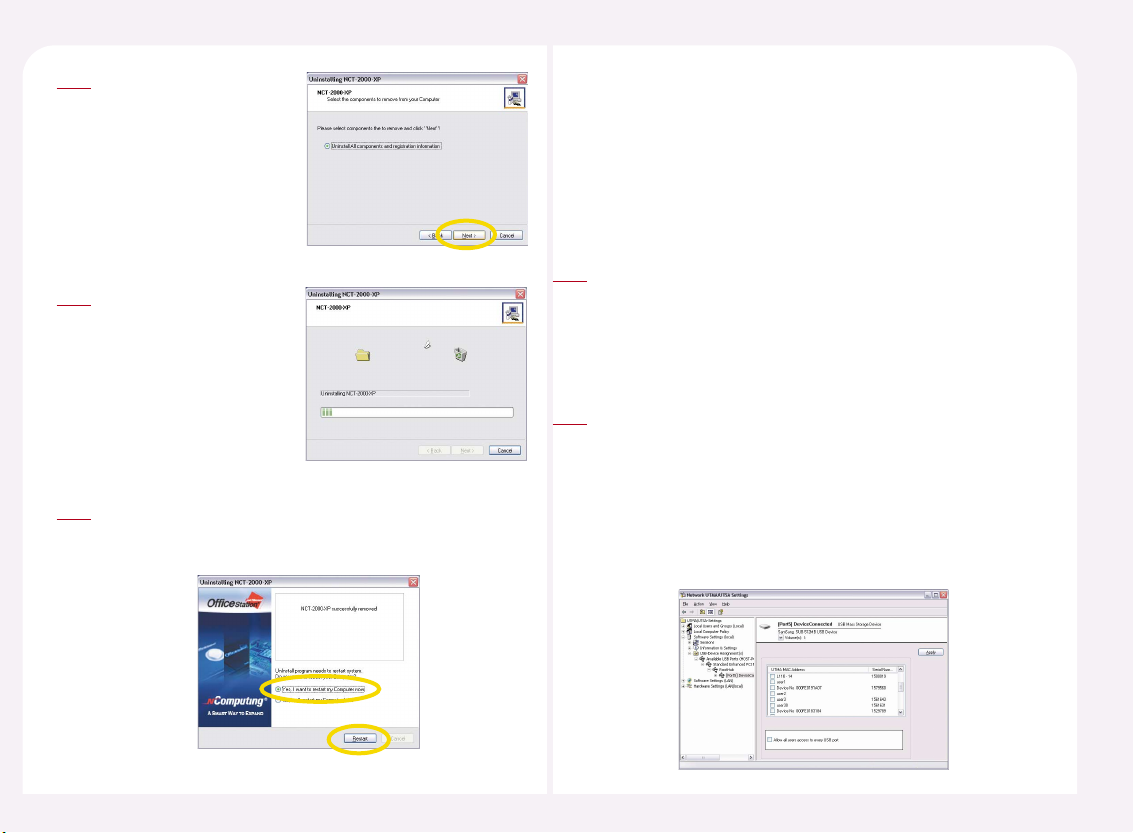
8-45
Click the <Next> button.
3
The NCX-2000-XP program
is being uninstalled.
4
When the program is uninstalled completely the following
message window appears. Please select the 'Yes, I want to restart
my computer now', and then click on the <Restart> button.
5
You can set a USB storage device connected to a host computer so that a
specific PC Expanion can access it. The L200 model provides a USB port so
that a USB device can be connected to it directly. A USB storage device
directly connected to a L200 is not accessible by a user using another PC
Expanion. Assign a USB storage device connected to a host computer to a
PC Expanion according to the procedures below.
32. How to assign a USB storage device
Go to <Start> ▶ <All Programs> ▶ <NCT-2000-XP> ▶ <NCT-2000-XP
Console>. Go to <Software Settings (local)> ▶ Select ‘USB storage
device assignment(s)’. If a USB storage device is plugged into the host
PC, the USB device is displayed in the sub-folder as shown in the figure
below.
1
Default Setting is ‘Allows all Stations to access USB port.’ To allow only a
specific PC Expanion to access a USB device, unselect ‘Allows all Stations
to access USB port’ and select the PC Expanion from the list and click the
<Apply> button. The ‘Main Console’ refers to the host computer. The list
displays device names with serial numbers. A device name is the name
that appears in the device list when you select ‘Hardware Settings
(LAN/Local)’ ▶ ‘Device’. For renaming procedures, refer to ‘23.
Renaming a PC Expanion Name.’
2
Page 87

9-1
Troubleshooting an error message
Part 9
Troubleshooting an error message that appears in
the PC Expanion
Reading flash data…
While the PC Expanion is booting,
the following message appears.
Getting dynamic IP address…
While the PC Expanion receives the IP
address automatically, the following
message appears.
DHCP server was not found…
If the PC Expanion does not receive
the IP address from DHCP, an error
message appears.
If there is no DHCP server on the current network, click the
<Setup> button, select ‘Use Static IP address’ in the ‘Network’
and manually set the IP address. For the IP address and gateway
address required for manual setting, ask your computer
administrator.
●
Check Point :
Check if there is a DHCP server on the current network.
Check if a LAN cable is connected to the PC Expanion.
Check if the LAN cable connected to the PC Expanion is a Direct
Cable.
Check if the LAN cable is properly connected and not down.
Static IP address was assigned.
When the IP address is set
manually, the following
message appears.
Try to boot latest client…
This message appears while the PC Expanion searches for the latest
version of the NCT-2000-XP program. If there is a host computer
installed within the same sub-network and the computer and PC
Expanion can communicate, PC Expanion searches for the latest
version from the host computer. If the latest version is downloaded,
the screen blinks once and PC Expanion restarts. The symbol next to
the message rotates while the latest version is being downloaded.
Page 88

9-2
No Terminal Server found or not all services initialized yet, please click on the connection list and try again
When the PC Expanion is set to find the host PC automatically,
“Autodetection” is set in <TS Options>. However the PC Expanion may
not find the host PC where the NCT-2000-XP program is installed.
Connection Terminal Server…
When the user clicks the <Connect>
button, this message appears.
Host unreachable…
When the PC Expanion is connected
to the host PC, and the PC Expanion
does not find the host PC this
message appears.
● Check Point :
Check if the NCT-2000-XP program is installed on the host
computer.
Check if the LAN cable is properly connected to the host computer.
Check if the host computer and PC Expanion are in the same sub-
network.
Check if the firewall or anti-virus programs installed on the host
computer or network equipment are compatible with NCT-2000XP.
TS ERROR - INVALID OR NO SERIAL NUMBER!
This message appears when no serial number exists on the host computer.
This message does not appear if the product includes a serial number. If a
serial number is included, ‘Serial No’ appears when you click the <Info>
button on the PC Expanion’s initial screen.
● Check Point :
If you are connected to a host computer that you selected from
the found host computer list by selecting ‘Autodetection’ in the
<Setup> ▶ <TS Options> of the PC Expanion, check if the firewall
or anti-virus programs installed on the host computer are
compatible with NCT-2000-XP.
If you have selected ‘TS 2’ or ‘TS 3’ in the <Setup> ▶ <TS Options>
of the PC Expanion, check if the IP address of the host computer is
identical with the Terminal Server Network address set in the in ‘TS
2’ or ‘TS 3’.
If you have selected ‘TS 2’ or ‘TS 3’ in the <Setup> ▶ <TS Options>
of the PC Expanion, check if the NCT-2000-XP program is installed
on the host computer to be connected.
If you have selected ‘TS 2’ or ‘TS 3’ in the <Setup> ▶ <TS Options>
of the PC Expanion, check if the host computer is in the same subnetwork.
●
Check Point :
Refer to “27. How to add or remove the serial number of the NCT-2000XP program” in Part 8. Then add the serial number on the NCT-2000-XP
console.
Page 89
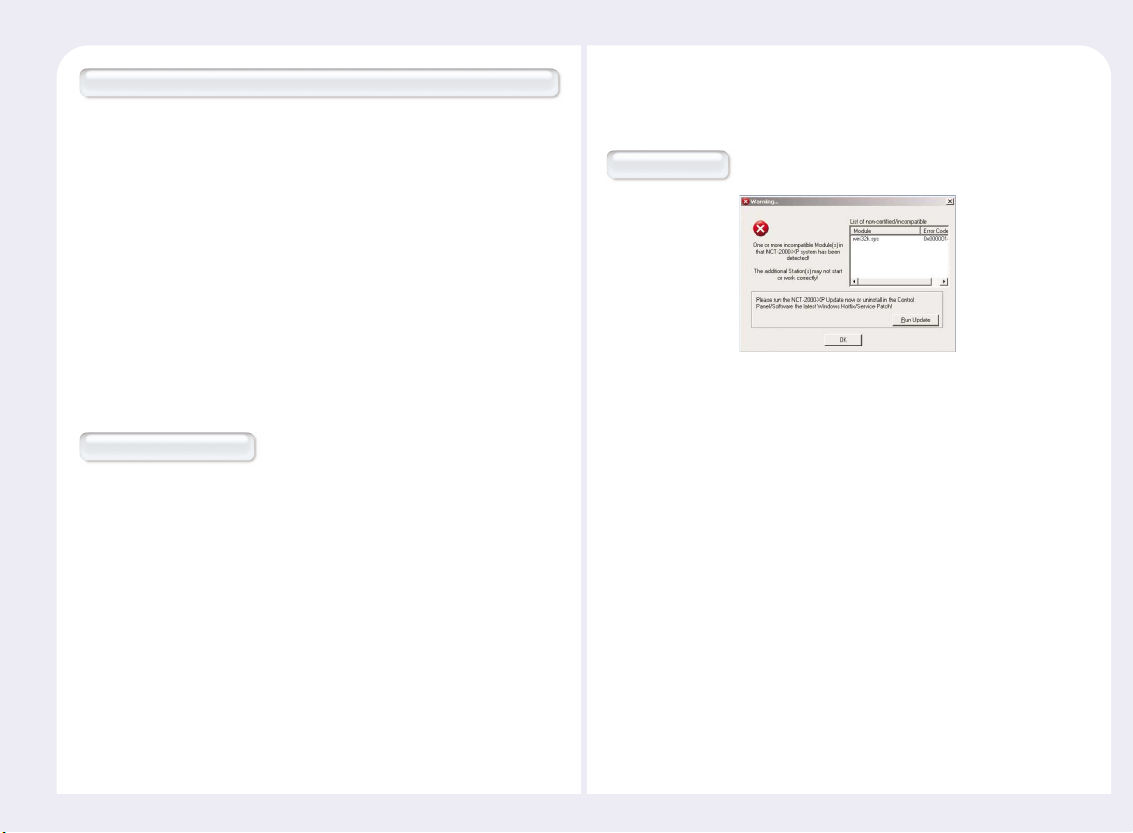
9-3
Connection was closed but data is not lost and application is still running at server side. Please connect terminal server later.
This message appears when the connection stops due to problems or
abnormality occurs in the host PC or network equipment. Check the
Host PC or the network equipment when this message appears and
restart after turning off the power the host PC and PC Expanion.
●
Check Point :
Check if the host computer is overloaded.
Check if the network traffic is overloaded.
Check if the communication is not normal due to unstable power
supply to the network equipment.
Check if it occurs when you use a specific program.
Check if it occurs when you use a specific file.
Authorization warning
When two PC Expanions use the same serial number simultaneously,
this error message appears. The serial number embedded in the
product does not reproduce this message.
●
Check Point :
Check all serial numbers in the NCT-2000-XP program console.
Troubleshooting about an error message that
appears on the Host PC
Multi user Error
Microsoft is distributing Windows updates. Some security updates
may conflict with NCT-2000-XP. A conflict may display an error
message or disable a PC Expanion. If this happens, a new version
will be distributed within a week. Therefore, please do not install
Windows updates immediately after their release. If a problem with
a Windows update is reported, detailed information will appear on
our website for your reference.
Page 90

A-1
Glossary
Appendix
Regarding PC Expanion
Host Computer
The computer which is connected to a PC Expanion, or a computer in
which the NCT-2000-XP program has been installed.
Station
A PC Expanion which is connected to a host computer, and is called a
station of the host computer.
WoIP (Windows over IP)
New network protocol that enables a PC to operate multi windows
simultaneously in virtual memory and the registered multi user can
access through TCP/IP by using a PC Expanion. This technology does
not require a high priced server and supports the multi user access via a
terminal.
UTMA(UltraThinMultiAccess) Multi-User Terminal
UTMA (Ultra Thin Multi Access) Multi User Terminal is a network
computing terminal using NComputing patent technology. It doesn't
use CPU, VGA, or main chipsets, simply a programmable SoC to connect
to the host PC. A terminal using UTMA technology can be connected to
a host PC by using a LAN cable. It can also be connected to a remote PC
via the Internet using TCP/IP.
User account
A user in a computing context is one who uses a computer system. Users
may need to identify themselves for the purposes of accounting, security,
logging and resource management. In order to identify oneself, a user
has an account (a user account) and a username, and in most cases also a
password (see below). Users employ the user interface to access systems,
and the process of identification is often referred to as log in.
Administrator
A system administrator is a person who is responsible for managing a
multi-user computing environment, such as a local area network (LAN).
The responsibilities of the system administrator typically include:
installing and configuring system hardware and software; establishing
and managing user accounts; upgrading software; and backup and
recovery tasks.
Alias
An alias is a fictitious name used by an individual as an alternative to his
or her true name.
Regarding computer network
Page 91

A-2
Bandwidth
Bandwidth is often used as a synonym for data transfer rate - the amount
of data that can be carried from one point to another in a given time
period (usually a second). This kind of bandwidth is usually expressed in
bits (of data) per second (bps). Occasionally, it's expressed as bytes per
second (Bps).
Client/Server
Client/server describes the relationship between two computer programs
in which one program, the client, makes a service request from another
program, the server, which fulfills the request.
Console
The system console, root console or simply console is the text entry and
display device for system administration messages, particularly those
from the BIOS or boot loader, the kernel, from the system and from the
system logger.
DHCP (Dynamic Host Configuration Protocol)
DHCP (Dynamic Host Configuration Protocol) is a communications
protocol that lets network administrators centrally manage and
automate the assignment of Internet Protocol (IP) addresses in an
organization's network. When using the Internet Protocol, each
machine that can connect to the Internet needs a unique IP address,
which is assigned when an Internet connection is created for a
specific computer. Without DHCP, the IP address must be entered
manually at each computer in an organization and a new IP address
must be entered each time a computer moves to a new location on
the network. DHCP lets a network administrator supervise and
distribute IP addresses from a central point and automatically sends
a new IP address when a computer is plugged into a different place
in the network.
DNS (Domain Name System)
The domain name system (DNS) is the way that Internet domain
names are located and translated into Internet Protocol addresses.
A domain name is a meaningful and easy-to-remember "handle" for
an Internet address.
Download
Downloading is the transmission of a file from one computer system
to another.
Dummy Hub
Dummy hub may include a group of gateway cards for connection
to a local area network (for example, an Ethernet or a Token Ring),
and a connection to a line.
Page 92

A-3
Ethernet
Ethernet is the most widely-installed local area network (LAN)
technology. Specified as IEEE 802.3.
Fast Ethernet
Fast Ethernet or 100BASE-T provides transmission speeds up to 100
megabits per second and is typically used for LAN backbone systems.
Firewall
firewall is a set of related programs, located on a network gateway
server, that protects the resources of a private network from users from
other networks. (The term also implies the security policy that is used
with the programs.) An enterprise with an Intranet that allows its
workers access to the wider Internet installs a firewall to prevent
outsiders from accessing its own private data resources and for
controlling what outside resources its own users have access to.
FTP (File Transfer Protocol)
File Transfer Protocol (FTP), a standard Internet protocol, is the simplest
way to exchange files between computers on the Internet.
Gateway
A gateway is a network point that acts as an entrance to another
network. On the Internet, a node or stopping point can be either a
gateway node or a host (end-point) node.
Internet
Internet, sometimes called simply "the Net," is a worldwide system of
computer networks - a network of networks in which users at any one
computer can, if they have permission, get information from any other
computer (and sometimes talk directly to users at other computers).
IP Address
The Internet is really the interconnection of many individual networks
(it's sometimes referred to as an internetwork). So the Internet Protocol
(IP) is basically the set of rules for one network communicating with any
other (or occasionally, for broadcast messages to all other networks).
Each network must know its own address on the Internet and that of
any other networks with which it communicates. To be part of the
Internet, an organization needs an Internet network number, which it
can request from the Network Information Center (NIC). This unique
network number is included in any packet sent out of the network onto
the Internet.
LAN (Local Area Network)
Local area network (LAN) is a group of computers and associated devices
that share a common communication line or wireless link and typically
shares the resources of a single processor or server within a small
geographic area (for example, within an office building). Usually, the
server has applications and data storage that is shared in common by
multiple computer users. A local area network may serve as few as two or
three users (for example, in a home network) or as many as thousands of
users (for example, in an FDDI network).
Page 93

A-4
Log on
In general computer usage, logon is the procedure used to get access to
an operating system or application, usually in a remote computer.
Almost always a logon requires that the user has (1) a user ID and (2) a
password. Often, the user ID must conform to a limited length such as
eight characters and the password must contain at least one digit and
not match a natural language word.
MAC Address
In a local area network (LAN) or other network, the MAC (Media Access
Control) address is your computer's unique hardware number. (On an
Ethernet LAN, it's the same as your Ethernet address.) When you're
connected to the Internet from your computer (or host as the Internet
protocol thinks of it), a correspondence table relates your IP address to
your computer's physical (MAC) address on the LAN. The MAC address is
used by the Media Access Control sublayer of the Data-Link Layer (DLC)
of telecommunication protocols. There is a different MAC sublayer for
each physical device type. The other sublayer level in the DLC layer is the
Logical Link Control sublayer.
NIC (Network Interface Card)
A network interface card (NIC) is a computer circuit board or card that is
installed on a computer so that it can be connected to a network.
Router
In packet-switched networks such as the Internet, a router is a device
or, in some cases, software in a computer, that determines the next
network point to which a packet should be forwarded toward its
destination. The router is connected to at least two networks and
decides which way to send each information packet based on its
current understanding of the state of the networks it is connected to.
Page 94

A-5
FAQ
A message (shown below) repeatedly appears while installing
NCT-2000-XP. What is the problem?
The following is a list of possible situations that may arise during the use
of your product. Simple answers and solutions are provided for each :
Q
When you try to install NCT-2000-XP using the Installation CD, it
compares the contents of the CD with the latest version in the
NComputing server. The message appears when the computer is
not connected to the Internet or the port is blocked by a program
such as a firewall. The reason why the message appears repeatedly
is that there are multiple NComputing servers on the network. The
redundant servers allow users to download the latest version of the
software even if some are down or unreachable.
A
Our company is using a firewall. Which ports should be opened
to use a PC Expanion?
Q
The port numbers are as follows. TCP Port: 27605, 3581, 3597, 3645,
3646, 3725, UDP Port: 1027, 1283.
The port numbers are subject to change without notice.
A
If NCT-2000-XP Installation CD is not available, can I download
the latest version of the program?
Q
Yes, you can download the latest version of the program. However,
unlike installing it with the CD, you have to select the option to search
for NComputing servers as follows when you try to install the latest
program. Click <Start> ▶ <All Programs> ▶ <Accessories> ▶
<Command Prompt> or click <Start> ▶ <Run>, type ‘cmd’ and click
OK. If the DOS command prompt window appears, change directory
to the NCT-2000-XP program folder and type ‘Setup.exe/ftpon’. Then
the NComputing servers are searched and the program is updated
with the latest version.
A
Page 95

A-6
Why does the warning message below appear when I install
NCT-2000-XP?
Q
Windows XP Service Pack 2 provides reinforced firewall that displays a
security warning message when a new port is used. The message also
appears when you install another program such as Messenger. If you
select <Continue Cut Off> in the message box, you will not be able to
find NComputing servers even if you run the setup program again
because the port is blocked. If you select <Allow>, the port will open
unless you block it manually. If you select <Check Later>, although the
port is opened for now, the security warning message will appear
again when the port is accessed next.
A
Why does a message appear asking me to stop or delete a firewall
or anti-virus program when I install NCT-2000-XP?
Q
PC Expanion communicates with a host computer using WoIP based
on TCP/IP over an Ethernet connection. Therefore a firewall or antivirus program may block the operation of the program mistaking PC
Expanion for a virus. Therefore, you have to open the ports in the
corresponding program or stop the program to use PC Expanion. For
the latest firewall and anti-virus program compatibility information,
please visit our web site.
A
Why does the Add users screen appear when I install CT-2000-XP?
Q
PC Expanion emulates the operating system. Therefore, you have
to add users in order to allow them to use their own files. For the
procedures to add users, refer to Part 8 in the manual.
A
Can I set a user account type as ‘Computer administrator’ or
‘Limited’ only in Windows XP?
Q
No. Although Windows XP basically shows ‘Computer
administrator’ and ‘Limited’, Windows XP provides the
account types supported by Windows 2000. To set an account
type different than the basic types, as can be done in Windows
2000, refer to ‘Adding a User Account’ in Part 8 in the manual.
A
Do I have to register the serial number?
Q
Yes, you have to register the serial number. Otherwise, you
cannot upgrade the program or use A/S.
A
I have formatted the hard disk drive after registering the
serial number. Can I register the serial number again?
Q
Yes, you can. You can register a serial number after formatting or
replacing the hard disk drive. However, re-registration is limited to
10 times.
A
Can I connect a PC Expanion directly to a host PC?
Q
Yes, please refer to “5. How to connect the PC Expanion to the
host PC directly” in Part 8 in the manual.
A
Page 96

A-7
How many PC Expanions can be connected to one host PC via the
network equipment ?
Q
Please refer to “Part 1. The features of the product.”
A
Will this with Windows® 98 or Windows ME?
Q
PC Expanion supports Windows® 2000 Professional, Windows® 2000
server, Windows® XP Home Edition, Windows® XP Professional,
Windows® XP Media Center Edition, Windows® 2003 Standard
Edition/Enterprise Edition, Windows® Small Business Server 2003
and Linux. For supporting other OS, please contact the technical
support team.
A
Do I have to upgrade the NCT-2000-XP program?
Q
No, you don’t need to upgrade the program if you do not have
problems using it. However, since Microsoft is releasing security
updates regularly, you may experience conflicts with new security
updates. When a conflict with a security update is reported, a new
version of the software will be distributed within a week. For more
information refer to out website. In addition, a new version provides
more functions. Therefore, using the latest version is recommended.
A
Must the version of the NCT-2000-XP programs in a sub-network
be the same?
Q
Yes, they must be the same. Keep the program updated with the
latest version. The latest version resolves problems of the previous
version and provides more advanced functions. Since different
versions in the same sub-network might cause data communication
problems, please use the same version in a sub-network.
A
Do I have to delete or stop the firewall, the security or anti-virus
programs when I install NCT-2000-XP?
Q
No, you do not have to delete or stop them. However, some firewalls,
security and/or anti-virus programs may cause problems when NCT2000-XP is installed. In this case, you have to stop the real-time
monitoring function of such a program to install NCT-2000-XP properly.
In addition, the real-time monitoring function may cause problems
when you use PC Expanion too. For detailed information, refer to our
website.
A
Do I have to setup a password for the NCT-2000-XP console
password?
Q
Yes, we recommend setting a password for the NCT-2000-XP console.
Otherwise, anyone can change the settings configuration in the console.
Since the settings determine the PC Expanion operations, please keep
the console password secure.
A
What if I forget the password of the NCT-2000-XP console ?
Q
Please refer to ’26. How to mange when the user forgets the password
of NCT-2000-XP program” in Part 8 in the manual.
A
Do I have to add a user account to use the PC Expanion?
Q
Yes, you must add a user. PC Expanion enables multiple users to have
access to one computer simultaneously. If many users logon with the
same user account, the last logged off user’s settings will be saved. In
addition, all users could see the contents created by other users causing
a security problem. You must add the necessary number of user
accounts and protect them with passwords.
A
Page 97

A-8
Can the product support 10Mbps or 1Gbps?
Q
No, PC Expanion supports 100Mbps. The product cannot run under
10Mbps or 1Gbps properly.
A
I can only move the mouse cursor but cannot do anything else
while I am using the PC Expanion. The PC Expanion status in the
NCT-2000-XP console appears to be running.
Q
This may happen when screen data is not received through the
network because a LAN cable is disconnected or network equipment
such as switching hub or IP sharer are temporarily unavailable. It may
also happen when data communication is not stable due to an
unstable power supply to network equipment or other reasons. In
this case, turn the PC Expanion off, then turn it on and connect and
logon to the host computer. Then you can resume your session
without data loss. Check if network equipment such as a switching
hub or IP sharer are operating normally and if sufficient power is
supplied to the network equipment. You can avoid this problem by
supplying stable power to the equipment using a UPS
(Uninterruptible Power Supply).
A
What games can I play?
Q
You can only run 2D games the Internet and casual games such as
a Java and flash type. Refer to the list below for what is not
supported on a PC Expanion.
- 3D games that require a GPU or hardware accelerator.
- Single user game that requires the program CD.
- Games that run on at only one registered PC and checks the IP
address of the system.
A
Can I view movie or mpeg file?
Q
Our product shares the resources of the host PC, so the memory
and host PC resource is limited and the performance speed is
dependant on the host PC’s specification. Playing the video in full
screen mode takes a lot of system resources. We recommend
playing the video in and appreciate screen size that does not
reduce the system speed. PC Expanion is designed to run office
applications at the office such as surfing the Internet, word
processing, or working with speadsheets.
A
Suddenly I cannot connect to a host computer.
Q
Microsoft enables automatic upgrades with Windows updates
that fix various bugs and correct security holes. Some of Windows
updates are closely related to the PC Expanion driver. We do not
recommend installing Windows updates immediately after their
release. We will provide a new version of the software as soon as
possible on our website. If you experience a problem, remove the
latest Windows update installed on your computer and upgrade
the NCT-2000-XP with the latest version from our website.
A
Page 98
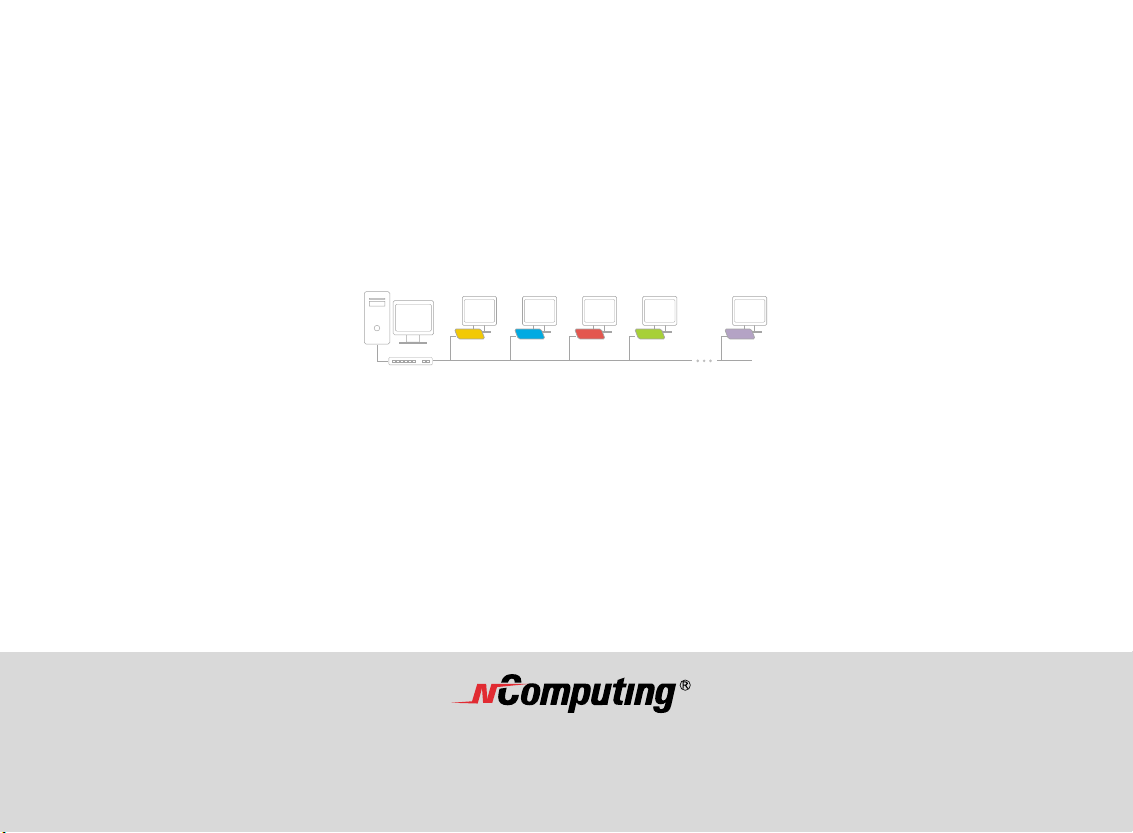
Part No. 160-0155
Rev. A
You may also contact technical support at 1-888-365-1210 Monday ~ Friday
between the hours of 9:00 AM ~ 5:00 PM PST to speak with a technical support representative.
 Loading...