

Page 1
VHF 7110
D u a l S t a t i o n R a d i o
w w w . n a v m a n . c o m
Quick Start Guide
and Installation Supplement
Page 2

FCC Statement
Note: This equipment has been tested and found to comply with the limits for a Class
B digital device, pursuant to Part 15 of the FCC Rules. These limits are designed to
provide reasonable protection against harmful interference in a normal installation.
This equipment generates, uses and can radiate radio frequency energy and, if not
installed and used in accordance with the instructions, may cause harmful interference
to radio communications. However, there is no guarantee that interference will not
occur in a par ticular installation. If this equipment does cause harmful interference to
radio or television reception, which can be determined by turning the equipment off
and on, the user is encouraged to tr y to correct the inter ference by one or more of the
following measures:
Reorient or relocate the receiving antenna.
Increase the separation between the equipment and receiver.
Connect the equipment into an output on a circuit different from that to which the
receiver is connected.
Consult the dealer or an experienced technician for help.
A shielded cable must be used when connec ting a peripheral to the serial ports.
Industry Canada
Operation is subject to the following two conditions: (1) this device may not cause
interference, and (2) this device must accept any interference, including inter ference
that may cause undesired operation of the device.
Page 3

Navman VHF 7110 Quick Star t Guide
It is the owner’s sole responsibility to install and use the instrument in such a
manner that will not cause accidents, personal injur y or property damage.
Navman New Zealand disclaims all liability for any use of this product in a way
that may cause accidents, damage or that may violate the law.
Governing Language: This statement, any instruction manuals, user guides and
other information relating to the product (Documentation) may be translated to,
or has been translated from, another language (Translation). In the event of any
conflict between any Translation of Documentation, the English language version
of the Documentation will be the official version of the Documentation.
This manual represents the Navman VHF 7110 at the time of printing. Navman New
Zealand reserves the right to make changes to specifications without notice.
Copyright © Navman New Zealand. All rights reserved. NAVMAN is a registered
trademark of Navman New Zealand.
Please check out your model. There are slight variations in the keys and some
features are not available on every model.
This manual relates to the following models:
• VHF 7110US
• VHF 7110EU
This Quick Start Guide and Installation Supplement for the VHF 7110 is to be used in
conjunction with the Navman VHF 7100 Owner’s Manual.
For further information on these and other options, including radio setup and
DSC options, troubleshooting, and channel charts, refer to the Navman VHF 7100
Owner’s Manual.
Page 4
VHF 7110 Quick Start Guide
4
NAVMAN
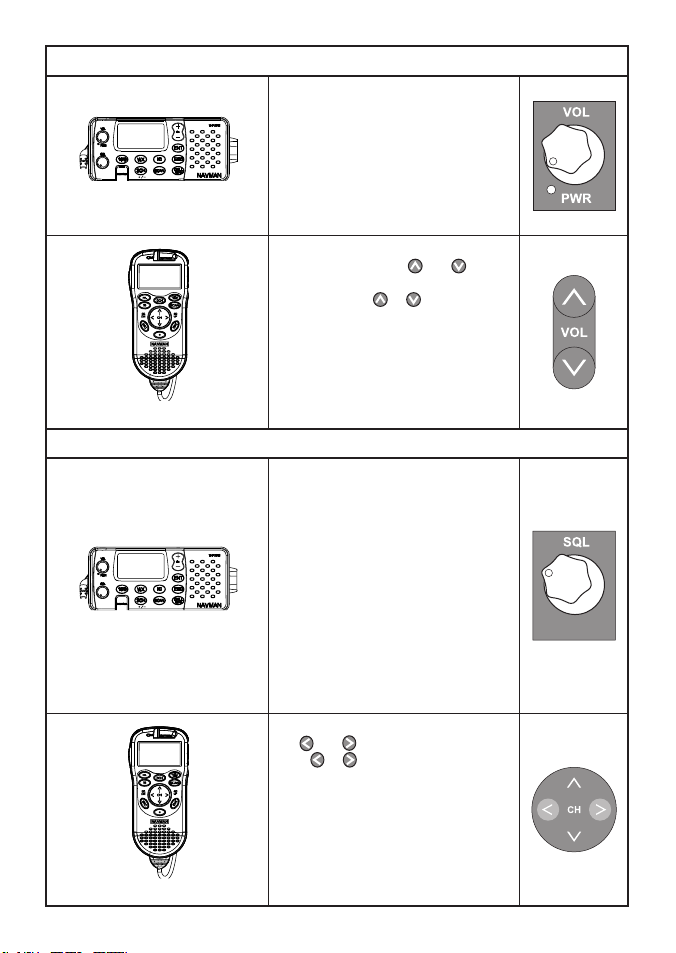
Volume and Power
Base Unit
• Turn the VOL knob clockwise to
power on.
• Continue to turn until a
comfortable volume is reached on
the base speaker.
Note: this switch controls the power to
both the base unit and second station
handset.
Handset
You can adjust the volume on your
handset with the VOL
and keys
on the righthand side of the handset.
Hold down VOL or to rapidly
increase or decrease the volume or
press quickly to step through the eight
(8) dif ferent volume levels.
This will not change the volume on the
base speaker.
Squelc h
Base Unit
• Turn the SQL knob fully
counterclockwise so that random
noise is heard.
• Turn SQL slowly clockwise until the
random noise disappears.
• Make another 1/4 turn clockwise
for best reception in normal open
sea conditions.
In areas of high noise (eg close to
large cities) reception may improve if
sensitivity is reduced. Try turning SQL
slowly clockwise or use the LOCAL
setting (see the Owner’s Manual).
Handset
You can also adjust the squelch with
the
and
keys on the handset.
Press
or
to step through the eight
(8) dif ferent squelch settings or hold
down to rapidly change the squelch.
The squelch setting on the base unit
will temporarily change to match.
When you put the handset back ON
hook, the base unit squelch setting
takes precedence again.
Page 5
VHF 7110 Quick Start Guide
5
NAVMAN
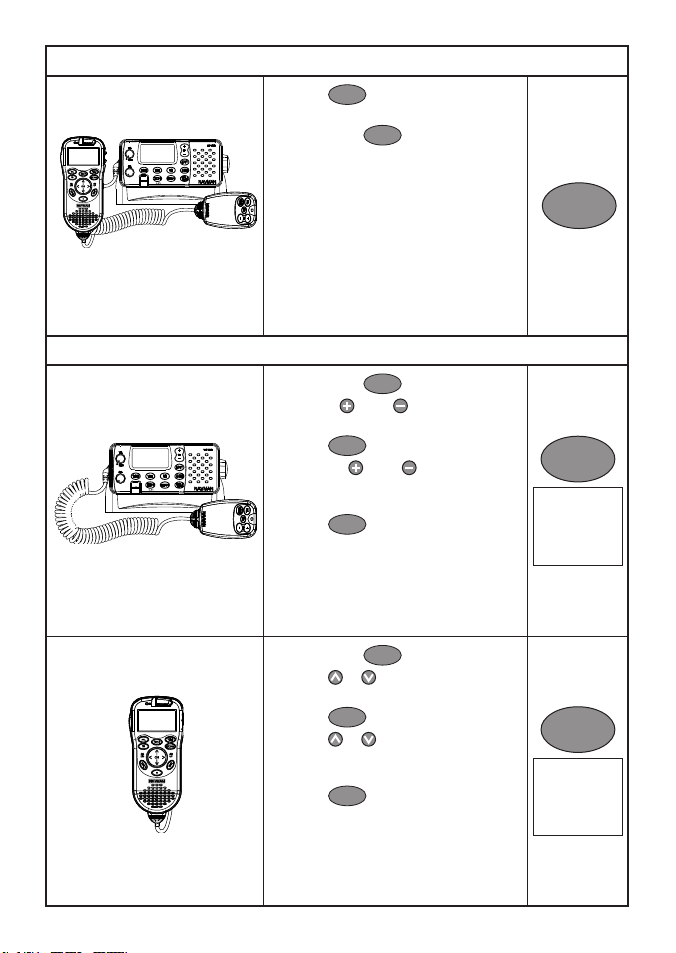
Selec t the Radio Setup OR DSC Call Menu
Base Unit, Microphone and
Handset
• Press
CALL
MENU
on the base unit or
handset to show the DSC Call Menu.
• Hold down
CALL
MENU
on the base unit
or handset to show the Radio Setup
Menu.
CALL
MENU
Set Backlighting Levels
Base Unit and Microphone
• Hold down
CALL
MENU
.
• Use CH
or CH to scroll through
the menu listing to BACKLIGHT.
• Press
ENT
.
• Press CH
or CH to select the
desired backlight level.
There are eight (8) levels.
• Press
ENT
to store the setting.
CALL
MENU
MENU SELECT
BUDDY LIST
LOCAL/DIST
> BACKLIGHT
Handset
• Hold down
CALL
MENU
.
• Press
or to scroll through the
menu listing to BACKLIGHT.
• Press
ENT
.
• Press
or to select the desired
backlight level.
There are eight (8) levels.
• Press
ENT
to store the setting.
CALL
MENU
MENU SELECT
BUDDY LIST
LOCAL/DIST
> BACKLIGHT
Page 6
VHF 7110 Quick Start Guide
6
NAVMAN
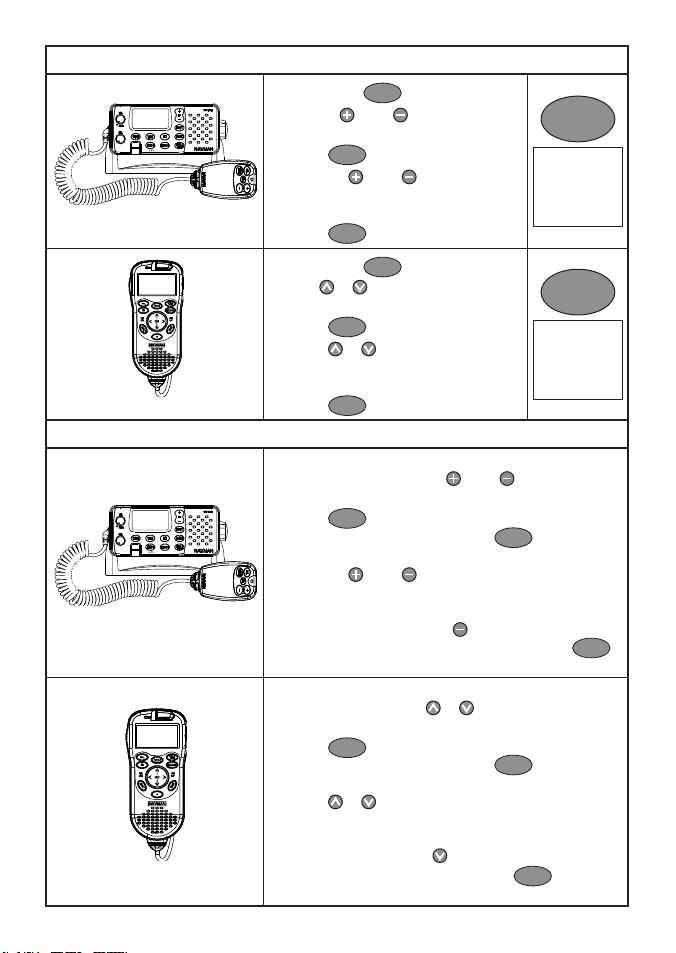
Set Contrast Levels
Base Unit and Microphone
• Hold down
CALL
MENU
.
• Use CH
or CH
to scroll through
the menu listing to CONTR AST.
• Press
ENT
.
• Press CH
or CH to select the
desired contrast level. There are eight
(8) levels.
• Press
ENT
to store the setting.
CALL
MENU
MENU SELECT
LOCAL/DIST
BACKLIGHT
> CONTRAST
Handset
• Hold down
CALL
MENU
.
• Use
or to scroll through the
menu listing to CONTRAST.
• Press
ENT
.
• Press
or
to select the desired
contrast level.
There are eight (8) levels.
• Press
ENT
to store the setting.
CALL
MENU
MENU SELECT
LOCAL/DIST
BACKLIGHT
> CONTRAST
Entering menu data correcting erro rs
Base Unit and Microphone
• Only four (4) menu items can be displayed on the LCD
at any one time. Press CH
or CH to scroll through
the menu.
• Press
ESC
to return to the previous menu screen
without saving changes OR press
ENT
to confirm
changes.
• Press CH
or CH to step through the alphabet and
numbers. Hold down to scroll rapidly to the desired
item.
• To correct errors, press CH
then select the
< backup character on the display. Then press
ENT
to backup one space at a time.
Handset
• Only four menu items can be displayed on the LCD
at any one time. Press
or to scroll through the
menu.
• Press
ESC
to return to the previous menu screen
without saving changes OR press
ENT
to confirm
changes.
• Press
or
to step through the alphabet and
numbers. Hold down to scroll rapidly to the desired
item.
• To correct errors, press then select the < backup
character on the display. Then press
ENT
to backup
one space at a time.
Page 7

VHF 7110 Quick Start Guide
7
NAVMAN
How the base unit microphone and the second station handset work together
Base Unit, Microphone
and Handset
• Neither item works when both are ON hook, but you
can hear audio from the handset speaker and adjust
the handset volume.
• To use one item when OFF hook, the other must be
ON hook.
• If both items are OFF hook, only the base unit
microphone works.
• In INTERCOM mode ONLY, both items work OFF
hook.
High and Low Power
Base Unit, Microphone
and Handset
• On the VHF 7110 US, press
H/L
IC
on the handset or
H/L
on the
microphone to toggle between HI
(High) and LO (Low) (25W or 1W)
transmission power for the entire
channel bank. A beep sounds and the
selection is shown on the LCD.
• On the VHF 7110 EU, press
H/L
.
• If HI power cannot be used with a
particular
channel, the annunciator
automatically goes to LO power. If
you press
H/L
IC
or
H/L
, a warning
beep sounds.
H/L
IC
VHF 7110
US
H/L
VHF 7110
EU
Priorit y Channel
Base Unit, Microphone
and Handset
• Channel 16 and HI power are
automatically selected at power up.
• On the VHF 7110 US, the priority
channel can be set to Channel 09.
Hold down
16/9
on the handset
or the base unit until Channel 09
appears on the LCD.
• If you are on a working channel and
want to check the priority channel for
traffic, just press
16
or
16/9
on
the handset or the base unit. Press
again to recall your working channel.
16/9
VHF 7110
US
16
VHF 7110
EU
Page 8

VHF 7110 Quick Start Guide
8
NAVMAN
Channel S elect
Base Unit and Microphone
• The channel is shown in large numbers
on the LCD.
• To step through the channels one at a
time, press CH
or CH to display
each channel.
• To change channels rapidly, hold down
CH
or CH to scroll through the
channels.
Handset
• The channel is shown in large numbers
on the LCD.
• To step through the channels one at
a time, press
or
to display each
channel.
• To change channels rapidly, hold
down
or on the handset to scroll
through the channels.
Selec t a Favourite Channel
Base Unit, Microphone
and Handset
• Press
3CH
to toggle through each of
the three favourite channels until the
desired channel is shown.
3CH
Store 3 Favourite Channels
Base Unit, Microphone
and Handset
• Select the channel.
• Hold down
3CH
to store this channel as
your first favourite channel, CH1.
• Repeat to store your second favourite
channel as CH2.
• Repeat again to store your third
favourite channel as CH3.
3CH
Page 9

VHF 7110 Quick Start Guide
9
NAVMAN
Scan/Stop Scanning a Favourite Channel
Base Unit and Handset
• Select the favourite channel.
• Press
SCAN
to scan the favourite
channel and the priority channel in
DUAL or TRI watch mode.
• Press
SCAN
again to stop.
SCAN
Scan all 3 Favourite Channels
Base Unit and Handset
• Press
3CH
.
• Hold down
SCAN
to scan all three
favourite channels and the priority
channel.
• Press
SCAN
again to stop.
3CH
SCAN
Delete a Favourite Channel
Base Unit and Handset
• Select the favourite channel.
• Hold down
3CH
until the setting
(CH1, CH2 or CH3) disappears off
the LCD.
3CH
Selec t ALL SCAN mode
Base Unit and Handset
• Hold down
SCAN
to start scanning
all channels (and the priority
channel every 1.8 seconds).
NOTE: In Europe, scanning
functions may be limited or
blocked in some countries.
When a signal is received, scanning
stops at that channel. Press
ENT
to skip over an ‘always busy ’
channel and resume scanning.
• Press
SCAN
to stop at the current
channel.
SCAN
Page 10

VHF 7110 Quick Start Guide
10
NAVMAN
Use the Intercom
Base Unit, Microphone
and Handset
• On the VHF 7110 US, hold down
H/L
IC
to enter INTERCOM mode.
This disables the radio receiver
except for incoming DSC calls. The
intercom calls the other handset.
On the VHF 7110 EU, press
IC
.
• Press PTT when invited.
• Press
ESC
to exit the INTERCOM
mode, or place the handset back
ON hook.
H/L
IC
VHF 7110 US
H/L
VHF 7110 EU
Selec t the Channel Bank (7110 US only)
Base Unit and Handset
1. Hold down
CALL
MENU
on the base unit
or handset to show the Radio Setup
Menu.
2. Press
ENT
to select UIC.
3. Scroll to the channel bank you
want (USA, International, or
Canadian), then press
ENT
to
select it.
CALL
MENU
RADIO SETUP
> UIC
RING VOLUME
INT SPEAKER
UIC
> USA
INT’L
CANADA
Page 11

VHF 7110 Quick Start Guide
11
NAVMAN
Making an Individual Call
Base Unit and Microphone
• Hold down
CALL
MENU
until the menu
appears on the LCD.
• Use CH
or CH to scroll
through the menu listing to
INDIVIDUAL then press
ENT
to
show your buddy list.
• Scroll through the buddy list to the
buddy that you want to call, then
press
ENT
.
• Select the working channel and
press
ENT
.
• Press
ENT
again to send the call.
The call will be acknowledged
when it is received and the working
channel is automatically selected.
• Press PTT to talk and release PT T to
receive a reply.
CALL
MENU
DSC CALL
> INDIVIDUAL
LAST CALL
GROUP
INDIVIDUAL
M
ANUAL NEW
BUDDY 1
> BUDDY 2
BUDDY 2
INDIVIDUAL
ROUTINE
> SET CHANNEL
Handset
• Hold down
CALL
MENU
until the menu
appears on the LCD.
• Use
or to scroll through the
menu listing to INDIVIDUAL then
press
ENT
to show your buddy list.
• Scroll through the buddy list to the
buddy that you want to call, then
press
ENT
.
• Select the working channel and
press
ENT
.
• Press
ENT
again to send the call.
The call will be acknowledged
when it is received and the working
channel is automatically selected.
• Press PTT to talk and release PT T to
receive a reply.
Page 12

VHF 7110 Quick Start Guide
12
NAVMAN
Setting Up a Buddy List
Base Unit and Microphone
Use this to alphanumerically store a
maximum of 20 favourite names and
their associated MMSIDs for DSC calls.
• Hold down
CALL
MENU
until the menu
appears on the LCD.
• Press
ENT
to show the buddy list,
then press
ENT
again.
• Enter the buddy name (maximum
of 12 characters) and the MMSID
using CH
or CH (NOTE: Hold
down the keys to scroll rapidly
through the sequences.)
• Press
ENT
when you are f inished,
then press
ENT
again to store the
new buddy name. The new buddy
name appears immediately in your
buddy list.
• Repeat the procedure to store
another buddy name.
CALL
MENU
MENU SELECT
> BUDDY LIST
LOCAL/DIST
BACKLIGHT
BUDDY LIST
> MANUAL NEW
ENTER NAME
------------------
> ENTER MMSID
------------------
NAME
123456789
> STORE?
CANCEL
Base Unit and Microphone
Use this to alphanumerically store a
maximum of 20 favourite names and
their associated MMSIDs for DSC calls.
• Hold down
CALL
MENU
until the menu
appears on the LCD.
• Press
ENT
to show the buddy list,
then press
ENT
again.
• Enter the buddy name (maximum
of 12 characters) and the MMSID
using
or (NOTE: Hold down
the keys to scroll rapidly through
the sequences.)
• Press
ENT
when you are f inished,
then press
ENT
again to store the
new buddy name. The new buddy
name appears immediately in your
buddy list.
• Repeat the procedure to store
another buddy name.
Page 13

VHF 7110 Quick Start Guide
13
NAVMAN
Making a DSC Distress Call
Base Unit and Handset
• Open the red DISTRESS cover.
If time is availa ble to specify the
nature of the d istress, press and
release the DI STRESS key to show the
categories . Scroll to your categor y.
• Hold down the DISTRESS key for
about 3 seconds. The LCD starts
to flash and beep and warns that
a distress call is about to be sent
unless it is cancelled.
To cancel, press
ESC
or CH
16
.
Otherwise, the call is sent and then
repeated automatically until an
acknowledgement is received or
the call is cancelled.
UNDEFINED
FIRE
FLOODING
CO
LLISION
GROUNDING
LISTING
SINKING
ADRIFT
ABANDONING
PIRACY
OVERBOARD
DISTRESS
AUTO TX
W
AITING ACK
> CANCEL
Receiving a Distress Call from another vessel
Base Unit, Microphone
and Handset
The Distress Alarm tone sounds and
the VHF 7110 automatically tunes to
CH16.
• Press any key to stop the alarm.
• Make voice contact on CH16 and
lend assistance if needed.
Position and time data and the vessel ’s
MMSID are shown on the LCD, and the
data is recorded in the DISTRESS CALL
LOG.
DISTRESS
ID123456789
PIRACY
12:45PM LOC
Receiving a Distress Relay from another vessel
An alarm sounds. Maintain a listening watch on CH16 and standby to lend assistance.
Receiving a Distress Acknowledgement from a coast station
An alarm sounds. Maintain a listening watch on CH16 and standby to lend assistance.
For further information on these and other options, including radio setup and
DSC options, troubleshooting, and channel charts, refer to the Navman VHF
7100 Owner’s Manual.
Page 14

VHF 7110 Installation Supplement
14
NAVMAN
Wall
Length = 10m
Fuse
Red
Black
GPS Navigation
Receiver
External
Speaker
Water Proof
Deck Outlet
Navman VHF 7110 Installation Supp lement
This Installation Supplement is designed to be read with the Navman VHF RADIO
INSTALLATION SHEET for 7000, 7100US, 7200US, 7100EU, 7200EU. It provides additional
information that is specific to your VHF 7110 radio.
Page 15

VHF 7110 Installation Supplement
15
NAVMAN
Checklist - The following extra items are
supplied in the VHF 7110 box:
1 10m connection cable
2 Rubber cushion
3 Handset wallplate
4 Two screws
5 Protective cap
6 Hexagonal nut
7 Lock ing nut
8 Handset cable
Also supplied, but not shown:
• Two self-tapping screws
• Two flat screws
• Two plain washers
• Two spring washers
• Two nuts
• Handset bulkhead mount
Installation
Before doing any cutting or drilling, check that:
• The intended location for the handset wallplate has reasonable access at the rear so that the
10m connection cable can be easily installed and accessed.
• The 10m connection cable comfortably reaches from the base unit to the intended location
for the handset wallplate.
• The intended route for the 10m connection cable allows it to be secured to a bulkhead (or
similar) along its length.
1. Install the base unit and the microphone bulkhead mount as described in the N avman VHF
RADIO INS TALLATION SHEE T for 7000, 7100US, 7200US, 7100EU, 720 0EU.
2. Drill the 25.4mm (1”)
hole through the bulk head at your chosen location.
3. Install the handset wallplate components in the order shown in the picture. Finger tighten the
locking nut on the 3m handset cable to make a waterproof connection.
4. Install the handset bulkhead mount on the bulkhead, using the screws, nuts and washers
provided.
8
5
4
3
1
2
6
7
Drill 2 x scre w
pilot hol es
Drill
1 x
25.4mm (1”)
38.0
20.0 20.0
40.0
50.0
Handset WallplateHandset and Microphone Bulkhead mount
Page 16

VHF 7110 Installation Supplement
16
NAVMAN
Wiring Details
In case a cable is cut accidentally the pinouts are shown here for information only.
Do not cut cables intentionally.
Cable Pinout Color
1 VHF Antenna
2 Power 1. 13.6V DC + Red (thick cable)
2. 13.6V DC - Black (thick cable)
3 External speaker 1. EXTERNAL SPK + White (thin cable)
2. EXTERNAL SPK - Black (thin cable)
4 Handset connection 1. MIC White
2. Shielding core for MIC Copper-colored
3. SPEAKER Black
4. POWER Red
5. Tx D+ Yellow
5 GPS connector (pins used) 4. NMEA IN + Yellow
5. NMEA IN - Green
2. NMEA OUT + Orange
6. NMEA OUT - Black
Connect the Radio Cables - Rear view of base unit
1. VHF Antenna connection. (Antenna is not supplied.)
2. Combined power and speaker cable. The end of the power cable splits in two:
BLACK. Earth. Connect to the (-) NEGATIVE battery terminal.
RED. Power. Connect to the (+) POSITIVE batter y terminal. Check that a 10A fuse is installed on
this power cable, close to the battery.
3. External speaker cable.
4. Handset connection cable.
5. GPS connector cable.
1
2
3
4
5
Page 17

How to contact us www.navman.com
NORTH AMERICA
BNT - Marine Electronics
30 Sudbury Rd, Acton, MA 01720.
Toll Free: +1 866 628 6261
Fax: +1 978 897 8264
e-mail: sales@navmanusa.com
web: www.navman.com
OCEANIA
Australia
Navman Australia Pty. Limited
Suite 2, 408 Victoria Road
Gladesville, NSW 2111, Australia.
Ph: +61 2 9879 9000
Fax: +61 2 9879 9001
e-mail: sales@navman.com.au
web: www.navman.com
New Zealand
Absolute Marine Ltd.
Unit B, 138 Harris Road,
East Tamaki, Auckland.
Ph: +64 9 273 9273
Fax: +64 9 273 9099
e-mail: navman@absolutemarine.co.nz
Papua New Guinea
Lohberger Engineering,
Lawes Road, Konedobu.
PO Box 810, Port Moresby.
Ph: +675 321 2122
Fax: +675 321 2704
e-mail: loheng@online.net.pg
web: www.lohberger.com.pg
LATIN AMERICA
Argentina
Costanera Uno S.A.
Av Pte Ramón S. Castillo y Calle 13
Zip 1425 Buenos Aires, Argentina.
Ph: +54 11 4312 4545
Fax +54 11 4312 5258
e-mail: purchase@costanerauno.com.ar
web: www.costanerauno.ar
Brazil
Equinautic Com Imp Exp de Equip
Nauticos Ltda.
Rua Ernesto Paiva, 139
Clube dos Jangadeiros
Porto Alegre - RS - Brasil
CEP: 91900-200.
Ph: +55 51 3268 6675
+55 51 3269 2975
Fax: +55 51 3268 1034
e-mail: equinautic@equinautic.com.br
web: www.equinautic.com.br
REALMARINE
Av Inf Dom Henrique s/nº - Loja 12
Marina da Glória - Rio de Janeiro - R.J.
Brasil
Cep: 2021-140
Ph: +55 21 3235-6222
Fax: +55 21 3235-6228
e-mail: vendas@realmarine.com.br
website: www.realmarine.com.br
Chile
Equimar
Manuel Rodrigurez 27
Santiago, Chile.
Ph: +56 2 698 0055
Fax +56 2 698 3765
e-mail: mmontecinos@equimar.cl
Mera Vennik
Colon 1148, Talcahuano,
4262798, Chile.
Ph: +56 41 541 752
Fax +56 41 543 489
e-mail: meravennik@entel.chile.net
Mexico
Mercury Marine de Mexico
Anastacio Bustamente #76
Interior 6 C olonia Fr ancisco Za rabia,
Zapapan, Jalisco, C.P. 45236 Mexico.
Ph: +52 33 3283 1030
Fax: +52 33 3283 1034
web: www.equinautic.com.br
Uruguay
Alvaro Burmudez , Nautica
Puerto del Buceo
11300 Montevid eo, Uruguay.
Phone & Fax +59 82 628 6562
e-mail : alvaro@ nautica.com.uy
web: www.nauti ca.com.uy
ASIA
China
Peaceful Marine Electronics Co. Ltd.
Guangzhou, Hong Kong, Dalian,
Qingdao, Shanghai
1701 Yanjiang Building
195 Yan Jiang Zhong Rd. 510115
Guangzhou, China.
Ph: +86 20 3869 8839
Fax: +86 20 3869 8780
e-mail: sales@peaceful-marine.com
web: www.peaceful-marine.com
India
Access India Overseas Pvt. Ltd.
A-98, Sector 21,
Noida - 201 301, India.
Ph: +91 120 244 2697
TeleFax: +91 120 253 7881
Mobile: +91 98115 04557
e-mail: vkapil@del3.vsnl.net.in
Esmario Export Enterprises
Block No. F-1, 3rd Floor, Surya Towers
Sardar Patel Rd, Secunderbad 500 003.
Ph: +91 40 2784 5163
Fax: +91 40 2784 0595
e-mail: gjfeee@hd1.vsnl.net.in
web: www.esmario.com
Korea
Kumhomarine Technology Co. Ltd.
#604-842, 2F, 1118-15, Janglim1-Dong,
Saha-Gu, Busan, Korea.
Ph: +82 51 293 8589
Fax: +82 51 265 8984
e-mail: info@kumhomarine.com
web: www.kumhomarine.com
Japan
PlusGain Inc.
1-A 324-3 Matunoki-Tyou
Takayama-City, Gifu-Ken, Japan
Ph: +81 577 36-1263
Fax: +81 577 36-1296
email: info@plusgain.co.jp
web: www.plusgain.co.jp
Maldives
Maizan Electronics Pte. Ltd.
Henveyru, 08 Sosunmagu.
Male', Maldives.
Mobile: +960 78 24 44
Ph: +960 32 32 11
Fax: +960 32 57 07
e-mail: ahmed@maizan.com.mv
Singapore an d Malaysia, Br unei
and Indonesi a
RIQ PTE Ltd.
Blk 3007, 81 Ubi Road 1, #02-440,
Singapore 408701.
Ph: +65 6741 3723
Fax : +65 6741 3746
e-mail: email@riq.com.sg
web: www.riq.com.sg
Taiwan
Seafirst International Corporation
No. 281, Hou-An Road, Chien-Chen
Dist. Kaohsiung, Taiwan R.O.C.
Ph: +886 7 831 2688
Fax: +886 7 831 5001
e-mail: seafirst@seed.net.tw
web: www.seafirst.com.tw
Thailand
Thong Electronics (Thailand) Co. Ltd.
923/588 Ta Prong Road, Mahachai,
Muang, Samutsakhon 74000, Thailand.
Ph: +66 34 411 919
Fax: +66 34 422 919
e-mail: sales@thongelectronics.com
admins@thongelectronics.com
web: www.thongelectronics.com
Vietnam
HaiDang Co. Ltd.
763 Le Hong Phong St. Ward 12
District 10, Hochiminh City, Vietnam
Ph: +84 8 863 2159
Fax: +84 8 863 2524
e-mail: haidang-co@hcm.vnn.vn
web: www.haidangvn.com
MIDDLE EAST
United Arab Emira tes
Kuwait, Oman , Saudi Arab ia, Bahrain
and Qatar
Abdullah Moh’d Ibrahim Trading, opp
Creak Rd. Baniyas Road, Dubai.
Ph: +971 4 229 1195
Fax: +971 4 229 1198
e-mail: sales@amitdubai.com
Egypt
18 Abou El-Ataheya St., via Abbas
Al-Akkad St.,
Nasr City, Cairo Egypt
Ph: +202 274 2911
+202 272 8493
Fax: +202 274 5219
e-mail: seet@internetegypt.com
Lebanon
Balco Stores
Balco Building, Moutran Street,
Tripoli (via Beirut). - Lebanon
P.O. Box: 622.
Ph: +961 6 624 512
Fax: +961 6 628 211
e-mail: balco@cyberia.net.lb
AFRICA
South Africa
Pertec (Pty) Ltd (Coastal Division)
16 Paarden Eiland Road.
Paarden Eiland, 7405
PO Box 527,
Paarden Eiland, 7420
Cape Town, South Africa .
Ph: +27 21 508 4707
Fax: +27 21 508 4888
e-mail: info@kfa.co .za
web: www.pertec.co.za
EUROPE
Plastimo International
15, rue Ingénieur Verrière,
BP435,
56325 Lorient Cedex.
Ph: +33 2 97 87 36 36
Fax: +33 2 97 87 36 49
e-mail: plastimo@plastimo.fr
web: www.plastimo.fr
OTHER COUNTRIE S IN EUROPE
Norway
ProNav AS
Fiskarvik Maritime Senter,
Hovlandsveien 52,
N-4370 Egersund, Norway.
Ph: +47 51 494 300
Fax: +47 51 492 100
e-mail: mail@pronav.no
web: www.pronav.no
Finland
Vator Oy
Puuskarinne 8,
00850 Helsinki, Finland.
Ph: +35 8 040 300 7212
Fax: +35 8 040 300 7200
e-mail: info@vator.com
web: www.vator.com
Croatia
Meridian Projekt d.o.o.
Savska 58,
Ph: +38 5 1 617 6364
Fax: +38 5 1 617 6365
e-mail: navman@meridianprojekt.com
web: www.meridianprojekt.com
HEADQUARTERS
Navman NZ Limited
7-21 Kawana St.
Northcote.
P.O. Box 68 155,
Newton,
Auckland,
New Zealand.
Ph: +64 9 481 0500
Fax: +64 9 481 0590
e-mail: marine.sales@navman.com
web: www.navman.com
Page 18

Lon 174° 44.535’E
Lat 36° 48.404’S
Made in China
Designed in New Zealand
MN000317A
V HF 7 110
 Loading...