

Page 1
SmartS™Professional
®
for Palm OS
5
User Manual
NAVMAN
Page 2

Navman SmartS™ Professional for Palm OS® 5
Welcome
Congratulations on the purchase of your SmartS™ Professional for Palm OS® 5 navigation solution. Whether you
travel frequently in your own country, or need to fi nd your way around overseas, SmartS Professional will direct you to
your destination without the need for map books and second-hand instructions.
The Global Positioning System is available free of charge and is accurate to within 5 m (15ft). The maps provide street
level detail allowing door to door navigation in many areas – they even include points of interest such as hotels, railway
stations and airports. With SmartS Professional, you will never be lost again!
Your SmartS Professional for Palm OS
a GPS-enabled Palm OS
effectively and safely, plus fi nd out all of the different features available to you.
Note: Further information on connecting a GPS Receiver to your handheld, and mounting the handheld into a vehicle
can be found in the User Manual provided with your handheld.and GPS receiver.
Important Notice
When using SmartST Professional in a vehicle, it is your sole responsibility to place, secure, and use the
device in a manner that will not cause accidents, personal injury or property damage, or in any manner
obstruct your view or vehicle safety equipment. The user of this product is solely responsible for observing
safe driving practices. Do not operate SmartST Professional while driving. Park the vehicle fi rst. It is your
sole responsibility that the vehicle mount installation instructions are read carefully, understood, and used
consistent with the relevant local laws.
®
®
5 handheld. Use this manual to help you install SmartS Professional, learn how to operate it
5 navigation solution consists of the SmartS Professional software running on
2
Navman disclaims all liability for any use of this product in a way that may cause accidents,
damage or that may violate the law.
Page 3

Navman SmartS™ Professional for Palm OS® 5
Safety First
It is your sole responsibility to adhere to the following safety instructions at all times.
3
Do not operate
SmartS Professional while driving.
The handheld must be placed in a position where it cannot obstruct the driver’s view of the road.
The handheld must not interfere with the normal operation of any airbags or other vehicle safety
equipment.
For security purposes and to avoid overheating, do not leave the handheld on the dash or
windshield while your vehicle is unattended, especially in strong sunlight. Do not use or handle if
the handheld is hot - leave it to cool out of the sun.
Page 4

Contents
1 What is GPS? ................................................................................................7
2 System Requirements.................................................................................. 8
2-1 Palm Powered™ Handheld Requirements ...............................................................8
2-2 Computer System Requirements..............................................................................8
2-3 Supported Screen Resolution...................................................................................8
3 The SmartST Professional CD Set..............................................................9
4 Installing the SmartST Professional Desktop.......................................... 10
4-1 Installing the SmartST Professional Desktop..........................................................10
5 Installing the Handheld Software and New Maps ................................... 11
5-1 Step 1: Connect the Handheld to Your Computer..................................................11
5-2 Step 2: Install SmartST Professional ......................................................................12
5-3 Install Maps.............................................................................................................14
5-4 Using a Memory Card after SmartST Professional.................................................16
5-5 Reading this User Manual and the Quick Start Guide ............................................16
5-6 Visit Navman for Updates .......................................................................................16
6 Confi guring the GPS Receiver ..................................................................17
6-1 Alternative GPS Receivers ......................................................................................17
6-2 Sony PEGA-CC5 Series Car Cradle .......................................................................17
7 Getting Started ...........................................................................................19
7-1 Starting SmartST Professional................................................................................19
7-2 Main Menu ..............................................................................................................19
7-3 Confi guring the GPS Receiver ................................................................................20
7-4 Switching On the GPS Receiver .............................................................................21
7-5 Obtaining a GPS Fix................................................................................................22
7-6 To Check GPS Reception .......................................................................................22
Page 5

Navman SmartS™ Professional for Palm OS® 5
5
8 Controls....................................................................................................... 23
8-1 Touch Screen ..........................................................................................................23
8-2 Keyboard Entry .......................................................................................................23
8-3 Zooming and Scrolling............................................................................................23
8-4 Address Entry Icons................................................................................................24
8-5 Changing the Volume..............................................................................................24
9 Setting Your Destination............................................................................25
9-1 Using a Quick Nav ..................................................................................................25
9-2 Navigating to an Address........................................................................................26
9-3 Navigating to an Intersection ..................................................................................28
9-4 Navigating to Points of Interest...............................................................................30
9-5 Navigating to a Favorite ..........................................................................................32
9-6 Navigating to a Recent Destination ........................................................................33
9-7 Using the Pop-Up Menu to Plan a Route ...............................................................34
9-8 Route Planning Without a GPS Fix .........................................................................35
10 Viewing Your Route..................................................................................36
10-1 Map View ..............................................................................................................37
10-2 Navigation View ....................................................................................................38
10-3 3D Navigation Screen ...........................................................................................39
10-3 Next Instruction View ............................................................................................40
10-4 Instruction List ......................................................................................................41
10-5 Back-On-Track™ Feature .....................................................................................42
11 Editing, Deleting and using Favorites and Quick Navs......................... 43
11-1 Adding a New Favorite..........................................................................................43
11-2 Editing or Deleting a Saved Favorite.....................................................................43
11-3 Quick Navs............................................................................................................46
12 Using the GPS Status Information..........................................................47
Page 6

Navman SmartS™ Professional for Palm OS® 5
6
12-1 GPS Reception .....................................................................................................47
13 Modifying the Settings.............................................................................50
13-1 About Settings ......................................................................................................50
13-2 GPS Settings.........................................................................................................51
13-3 Display Settings ....................................................................................................51
13-4 Guidance Settings.................................................................................................52
13-5 Map Settings.........................................................................................................53
13-6 POI (Points of Interest) Settings............................................................................53
13-7 Routing Settings ...................................................................................................54
14 Accessories ..............................................................................................55
14-1 Memory Cards ......................................................................................................55
14-2 Memory Card Writers............................................................................................55
15 Frequently Asked Questions ................................................................... 56
16 End User License and Warranty Agreement..........................................57
16-2 FCC Statement .....................................................................................................59
16-3 Contact Us ............................................................................................................59
16-4 Copyright ..............................................................................................................60
Page 7

Navman SmartS™ Professional for Palm OS® 5
What is GPS?
1
The Global Positioning System (GPS) is a network of satellites launched by the US military in the 1970s. The satellites
continuously transmit accurate time and position information, which is freely used by commercial and military applications
worldwide. GPS receivers are designed to pick up the high frequency radio signals from these satellites, and use the
information to determine your exact location. Today, there are many applications that use GPS, from marine to automotive,
aviation and military.
There are 24 satellites in total, orbiting approximately 12,000 miles above the earth. While a GPS receiver can detect
signals from up to 12 satellites at any one time, only three are needed to provide the two-dimensional position or “fi x”
(latitude and longitude) that is required for vehicle navigation systems. A three dimensional fi x requires four satellites and
provides improved positional accuracy.
SmartS Professional is designed specifi cally to use GPS information to fi nd your current position, and to calculate the
best route to your desired destination using the road maps stored on your memory card. SmartS Professional will then
guide you with voice and visual commands to your destination using the continuous stream of GPS data to track your
position as you make a trip.
7
Page 8

Navman SmartS™ Professional for Palm OS® 5
System Requirements
2
SmartS Professional for Palm OS® 5 is designed for a handheld running the Palm™ Operating System. A desktop
computer or laptop is also required to install the SmartS Professional software and map data onto your handheld.
Ensure your equipment meets the following requirements:
2-1 Palm Powered™ Handheld Requirements
2-2 Computer System Requirements
2-3 Supported Screen Resolution
• Sony Users: CLIÉ™ handheld - models PEG-TG50, PEG-NX73V, PEG-NZ90.
• Palm Tungsten™ T, T2 and T3 series. Please check the Navman website for a current list of compatible
models.
®
• Palm OS
• You will need a minimum of 7.5 MB (recomended 10 MB) of internal storage memory to run SmartS
Professional. Additional memory requirements will vary according to the size of the maps you are using.
• A memory card is required to store maps (sold separately). Individual map regions range in size from 1.5 MB
to 70 MB. The minimum recommended size of memory card is 128 MB.
• IBM® Compatible Pentium II 400MHz computer or higher, Dual Speed CD-ROM or higher.
• Microsoft® Windows® 98SE, ME, 2000 or XP
• Palm HotSync®.
• Internet Explorer version 5.5 or higher. An internet connection for software activation.
• Screens with 320x320 or 320x480 pixel resolution are supported. 320x480 screens are able to display a
larger map area, and frequently display device-specifi c menus that can be used with SmartS Professional.
5.0 or higher.
8
Page 9

Navman SmartS™ Professional for Palm OS® 5
The SmartST Professional CD Set
3
On purchasing the SmartS Professional for Palm OS® 5 solution, you will have received the following material:
1 SmartS Professional software.
2 Map data for your region.
3 User Manual and Quick Start Guide in Adobe® Reader® format.
4 Adobe® Reader®.
5 Application Product Key and Map Product Key
Refer to Section 14 for information about accessories.
9
Page 10
Navman SmartS™ Professional for Palm OS® 5
Installing the SmartST Professional Desktop
4
The SmartSProfessional CD set contains software and map data that allows you to:
• Install the SmartS Professional software onto your handheld.
• Install new maps to optional memory cards.
Before you can use any of these features, you need to set up the SmartS Professional Desktop software on
your computer. You will then be able to download software from your computer to your handheld via a HotSync®
connection.
10
If the installation
wizard does not start,
click Start on the
Windows taskbar, then
click Run… Type d:
\setup.exe, then click
OK. If your CD drive
is assigned to a letter
other than “d”, type this
letter instead.
4-1 Installing the SmartST Professional Desktop
1 Place the software application CD into the CD drive on your
computer. The SmartS Professional Desktop Installation
wizard will start.
2 Follow the prompts to accept the License Agreement, and
load the SmartS Professional Desktop application onto your
computer.
3 Once the wizard has fi nished the installation, the SmartS
Professional Desktop will automatically start.
Page 11

Navman SmartS™ Professional for Palm OS® 5
Installing the Handheld Software and New Maps
5
Before installing SmartS Professional onto your handheld, ensure you have completed the following steps:
1 Your handheld was supplied with an installation CD. Ensure that the Palm™ Desktop application from that CD is
Tip: The main
advantage of using
a memory card
writer is that the map
download is faster.
Note: Maps must be
stored on a memory
card. SmartS
Professional will not
operate without a
memory card plugged
into your handheld.
2 Some handheld devices require the use of a memory card writer to download maps to the memory card. Other
3 Make sure you have a memory card available with enough space to load the required map regions.
You are now ready to start installing the SmartS Professional for Palm OS
Installation is a four-step process. Make sure you complete each step correctly:
Step 1 ...... Connect the handheld to your computer.
Step 2 ...... Install the SmartSProfessional application onto your handheld.
Step 3 ...... Install the maps you require onto your handheld.
Step 4 ...... Read this User Manual and the Quick Start Guide.
installed on your computer. (Palm™ Desktop includes the HotSync® application which is used to transfer data
from your computer to your handheld).
devices (such as the Sony CLIÉ
into the handheld, or using a memory card writer if you prefer.
• If you are planning to load map data ont o your memory card via a memory card writer, connect the memory
card writer to your computer now. Follow the instructions supplied with your memory card writer to install
the appropriate drivers onto your computer.
• Alternatively, if you are a Sony CLIÉ user, you can download maps directly to a memory card plugged into
your handheld using either the MS Export or Data Export utility. You will fi nd one of these applications on the
installation CD supplied with your handheld.
™) give you the option of downloading maps directly into a memory card plugged
®
5 navigation solution onto your handheld.
11
5-1 Step 1: Connect the Handheld to Your Computer
Please refer to your handheld manual for instructions on connecting the handheld to your computer via HotSync.
Page 12
Navman SmartS™ Professional for Palm OS® 5
5-2 Step 2: Install SmartST Professional
12
Note: Before
beginning, make
sure your handheld
is connected to
the computer via a
HotSync® connection,
and that the SmartS
Professional Desktop
is installed on your
computer.
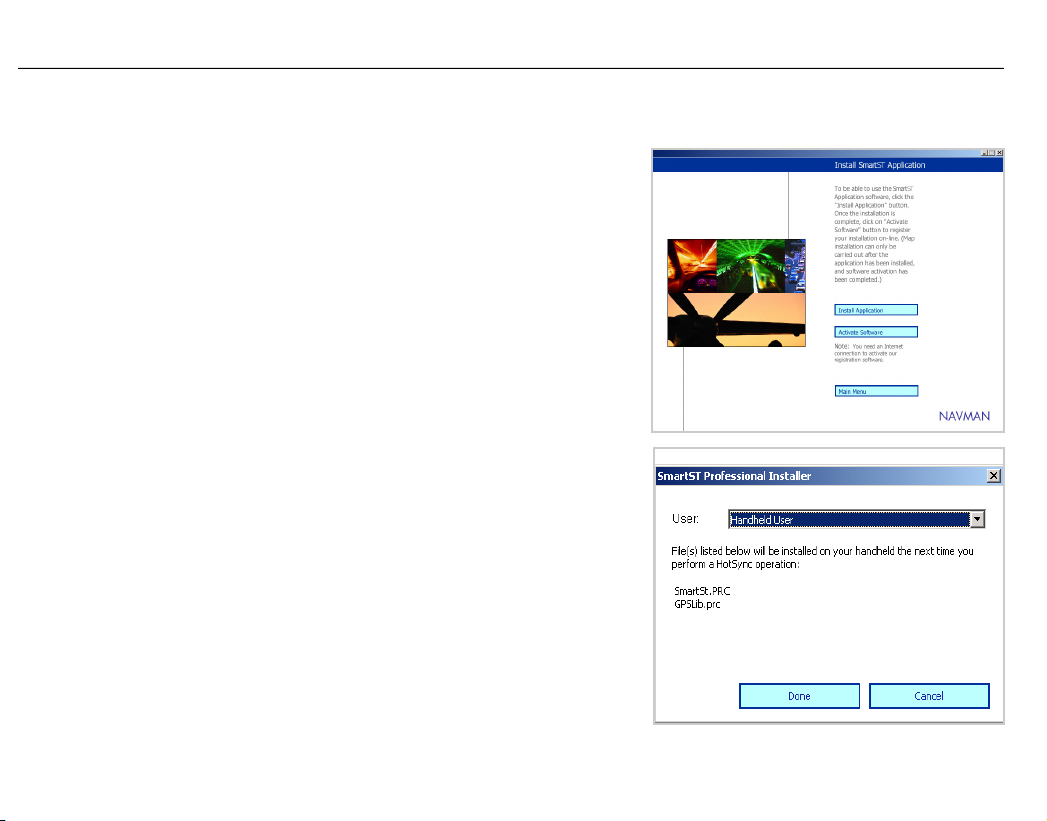
This procedure allows you to install the SmartS Professional
software onto your handheld, or to upgrade existing software to a
newer version. Once installed, follow the registration procedure to
activate the application.
1 Insert a memory card into your handheld.
2 Select SMARTS APPLICATION from the MAIN MENU.
3 Select INSTALL APPLICATION.
4 Select the HotSync® User name of your handheld device,
and click DONE. A user message will display requesting a
HotSync operation, which must be performed to complete
the installation.
5 Click OK and perform a HotSync® operation to install the
application onto your handheld. The installation may take
several minutes to complete. Please do not open other
applications during this installation.
6 If you plan to load map data onto your memory card via
a memory card writer, remove the memory card from the
handheld and insert it into the memory card writer now.
Page 13
Navman SmartS™ Professional for Palm OS® 5
7 Alternatively, if you are planning to download maps directly to a memory card plugged into your handheld:
Note: You will need to
have Microsoft Internet
Explorer version 5.5
or above to correctly
activate the software.
Warning: You will
need the Product
Keys every time
you upgrade your
software. Keep these
in a safe place.
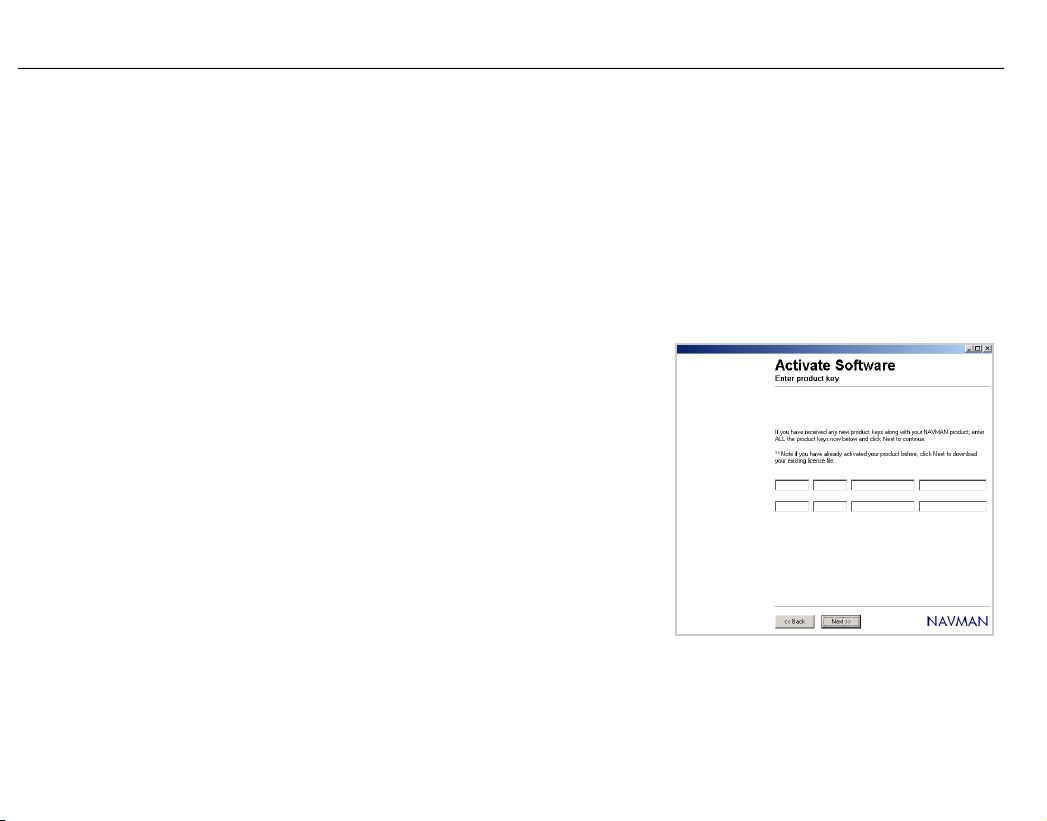
8 Now you must activate your software. From the MAIN MENU, click on ACTIVATE SOFTWARE. The registration
9 Click on MAIN MENU to return to the Main Menu.
10 To complete the installation process, click INSTALL MAPS.
13
• MS Import (or Data Import) should start automatically on your handheld once the HotSync® operation is
complete. If not, tap on MS Import (or Data Import) from the handheld launcher screen.
• If your handheld uses Data Import, select the type of memory card you are using (eg. Memory Stick or SD
card) and tap the Connect button.
program will guide you through the following steps:
• Connect to the internet. Click NEXT.
• Agree to the Navman Terms and Conditions. Click NEXT.
• Ensure your handheld is connected to the computer and Click NEXT.
• Enter the registration information. Some fi elds are
optional. Be sure to complete all of the “Required” fi elds
marked with an asterisk. Click NEXT.
• Enter both the Application Product Key and the Map
Product Key - both are clearly marked on the product
packaging. Click NEXT.
• The registration program will now contact Navman and
your handheld software will be activated.
Page 14

Navman SmartS™ Professional for Palm OS® 5
5-3 Install Maps
Maps must be downloaded to one or more memory cards. This step allows you to manage the maps that you can use
with SmartS Professional. The main options are:
Note: if you copy
maps onto a new
memory card that has
not been used with
SmartST Professional
before, you must fi rst
plug the card into your
handheld and run
SmartST Professional.
1 If you are planning to load map data onto your memory card via a memory card writer, make sure the memory
2 Alternatively, if you are planning to download maps directly to a memory card plugged into your handheld, make
3 From the SmartS Professional Desktop menu on your computer, click on INSTALL MAPS.
4 The SmartS Professional Map Downloader will display. This shows the areas covered by the maps contained on
14
• Review the maps you currently have stored in your memory card.
• Download new maps to a memory card plugged into your handheld.
• Download new maps to a memory card using a memory card writer on your computer.
• Remove maps from your memory card.
card writer is connected to your computer, and the memory card is inserted into the writer.
sure that MS Import (or Data Import) is running on your handheld, and that the memory card is plugged into your
handheld.
the CD. These areas are divided into regions. You can download selected regions onto a memory card using the
Map Downloader interface.
Page 15
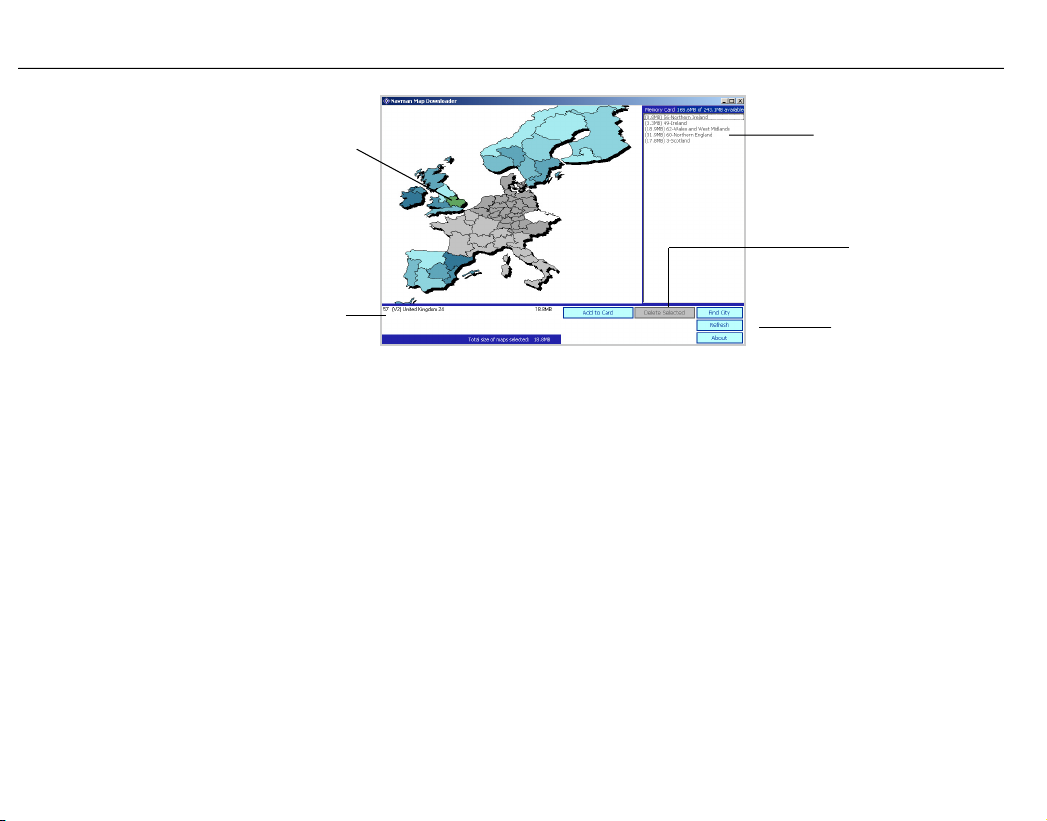
Navman SmartS™ Professional for Palm OS® 5
Maps available on the
current CD are shaded
blue. When you select a
region it appears green. The
areas shaded grey are not
available on the current CD.
Currently selected maps are
displayed here.
15
Currently installed maps are
displayed here.
The Delete button
deletes the selected
map region from your
memory card.
The Refresh button
updates the screen.
Note: Maps are of
population areas and
not political areas
(eg. county or state).
Sometimes you will
need to load multiple
maps to cover the
desired area.
Note: You may be
supplied with several
map CDs. If the map
you require is not
displayed, simply
replace the CD
currently in your CD-
ROM drive with the
correct CD.
5 To install a new map, choose one of the following:
• Click on the region that you wish to install. The region’s name will appear in the bottom left window.
• Click on “Add to Card”.
• Alternatively, drag and drop the region to the window on the right side of the screen.
6 To search for a particular city on the Map Downloader to verify it’s region:
• Click FIND CITY. Type in the name of the town or city, or select from the list provided.
• Double click on your selection to locate the city on the map.
• To install the map region, drag and drop the region to one of the windows on the right side of the screen.
7 Once you have fi nished copying maps to your memory card, choose one of the following:
• If you have used a memory card writer, remove the memory card from the writer and plug it into your
handheld. If you are using multiple memory cards, they can be used separately, or together if your handheld
device has more than one memory card slot.
• If you have copied maps using MS Import (or Data Import), tap on DISCONNECT from the MS Import (or
Data Import) screen on your handheld.
Page 16

Navman SmartS™ Professional for Palm OS® 5
5-4 Using a Memory Card after SmartST Professional
Maps can be deleted from a memory card using the Map Downloader application. However, if you wish to start using
the memory card for a different application (eg. a digital camera), you will need to reformat the card. This can be done
using the CARD INFO application which is available on all standard Palm OS
supplied with your handheld for further information.
5-5 Reading this User Manual and the Quick Start Guide
You can read this User Manual and Quick Start Guide on your computer screen by selecting these options from the
MAIN MENU.
The User Manual and Quick Start Guide are available as Adobe PDF fi les. If you do not already have Adobe® Reader®
software on your computer, you will need to install it by clicking the INSTALL ADOBE READER button. The User Manual
or Quick Start Guide can then be read.
5-6 Visit Navman for Updates
Click on this option to visit the Navman website for updates, support and general information. Note: you will need an
internet connection to use this option.
®
5 handhelds. Refer to the instructions
16
Page 17

Navman SmartS™ Professional for Palm OS® 5
Confi guring the GPS Receiver
6
Note : For security
purposes, and to
avoid overheating,
do not leave your
handheld on the dash
or attached to the
windshield while your
vehicle is unattended,
especially in strong
sunlight.
SmartS Professional can operate with many different types of GPS receivers. Please follow the instructions relevant to
your receiver, and learn how to:
1 Connect your GPS receiver to the handheld.
2 Install the GPS receiver into a vehicle.
3 Learn about features available with the GPS receiver.
6-1 Alternative GPS Receivers
1 To connect your handheld to a Bluetooth or serial GPS receiver, and for information on
2 Once installed, use the SmartS Professional software to confi gure and switch on the GPS, and obtain a GPS fi x.
6-2 Sony PEGA-CC5 Series Car Cradle
1 To connect your handheld to the Sony Car Cradle, and for information on
2 SmartST Professional requires the Sony Car Cradle software to be installed on
3 SmartS Professional will automatically recognise the Sony Car Cradle when it
17
SmartS Professional supports a number of other types of GPS receivers, including the
Navman Bluetooth GPS Receiver (shown here).
installing the GPS receiver into a vehicle, please refer to the instructions supplied with the
GPS receiver.
Instructions are provided in Section 7 - Getting Started.
installing the Sony Car Cradle into a vehicle, please refer to the instructions
supplied with your Sony Car Cradle.
your handheld. Follow the instructions supplied with your Sony Car Cradle to
install the software correctly.
is connected to the handheld. Voice instructions will be delivered through the
Car Cradle speaker using the Sony Text-to-Voice function. Note: When other
types of GPS receivers are being used, the voice instructions will sound quite
different as they are delivered directly through the speaker on your handheld.
Page 18
Navman SmartS™ Professional for Palm OS® 5
18
Sony Users:
Restricted Function.
Refer Section 6-1.
Note: Restricted
functions automatically
become available
when the handheld
is removed from the
Sony Car Cradle.
4 For your safety, a Restraint of Operation is automatically enforced when the handheld is connected to the Car
Cradle. The Restraint of Operation means that a number of menu items and functions are made unavailable to the
user to avoid driver distraction. Restricted functions are highlighted throughout this manual, as shown in the lefthand column.
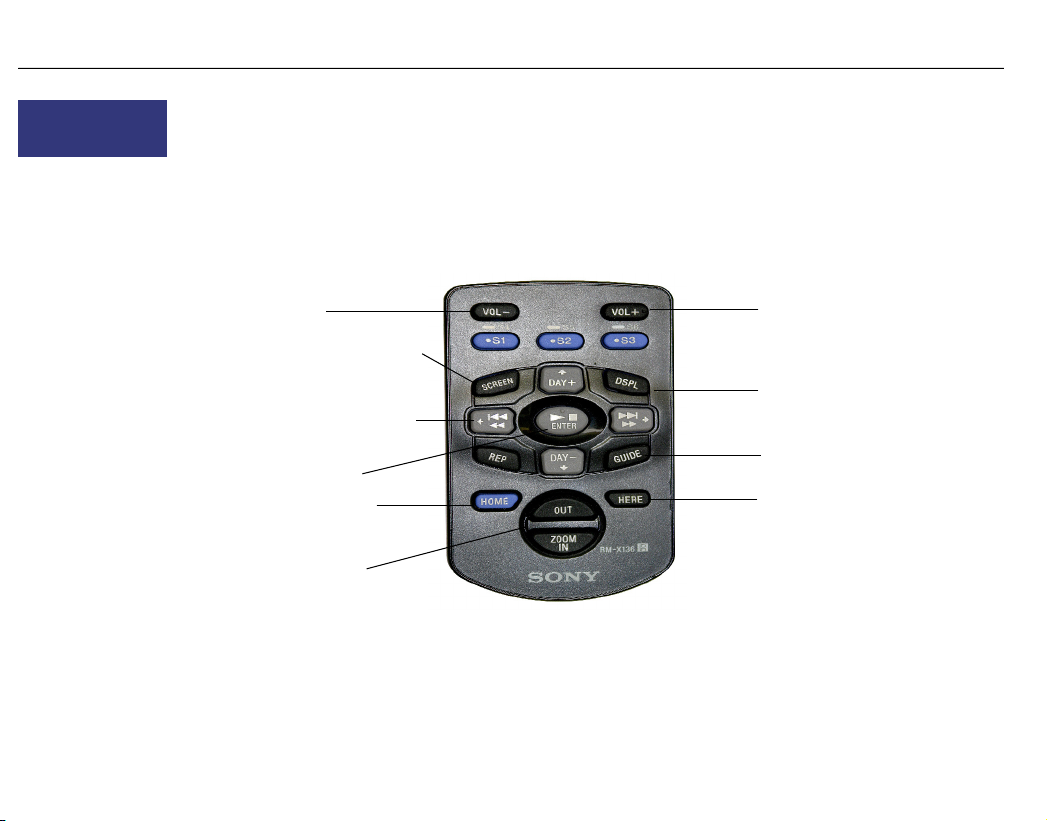
5 SmartS Professional is designed to operate with the Sony card remote commander (remote control). The
following diagram shows the functions that the Sony card remote commander buttons have when used with
SmartS Professional.
Volume down
Map screen switching (Map/Nav/
Combo)
Map Scroll (up/down/right/left)
Pop-up Menu display
Return to the Sony
CLIÉ™ Car Launcher
Zooms map in and out
Volume up
Main Menu display
Announce current instruction
Re-center vehicle position
Page 19

Navman SmartS™ Professional for Palm OS® 5
Getting Started
7
7-1 Starting SmartST Professional
1 In the Launcher screen, tap on SmartST.
2 When SmartS Professional fi rst starts, a short tutorial is available to show
3 The Main Menu will then be displayed.
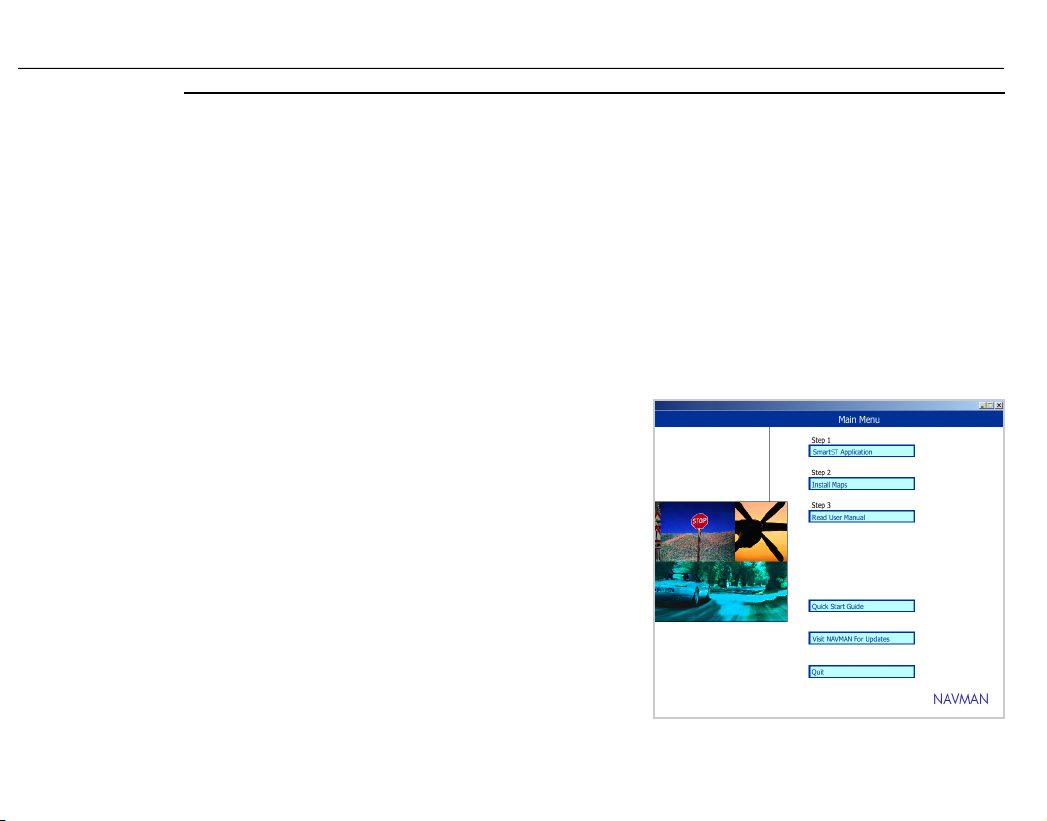
7-2 Main Menu
The MAIN MENU provides you with access to all of the routing, setup and
navigation screens.
Select an option from the MAIN MENU.
Follow the instructions in this User Manual to set your destination, choose how
you want your route displayed, and set up SmartS Professional to suit your
needs.
Remember, set up your destination BEFORE you start your trip.
19
you how to use SmartS Professional. Tap anywhere on the screen to move
to the next screen. This tutorial can be disabled by removing the tick on the
last tutorial screen.
Page 20

Navman SmartS™ Professional for Palm OS® 5
20
Sony Car Cradle
Users: Restricted
Function. Refer
Section 6-1.
Note: You only need
to confi gure your GPS
Receiver once.
7-3 Confi guring the GPS Receiver
You only need to confi gure your GPS receiver if you are using a Bluetooth or serial GPS receiver: The Sony Car Cradle
is confi gured automatically.
1 For Bluetooth GPS Receivers:
• Switch on your Bluetooth receiver. Refer to the instructions supplied with your Bluetooth GPS Receiver for
more information.
• From the MAIN MENU, select SETUP.
• From the drop down list, select GPS.
• From the Port options, select BLUETOOTH.
• Tap on DISCOVER. SmartS Professional will search for active Bluetooth devices.
• Your Bluetooth Receiver should be found, and listed on the screen. Highlight the device, and tap on
SELECT.
Page 21

Navman SmartS™ Professional for Palm OS® 5
2 For Serial GPS Receivers:
7-4 Switching On the GPS Receiver
All GPS Receivers must be switched on via the SmartS Professional
Sony Car Cradle
Users: Restricted
Function. Refer
Section 6-1.
Tip: It may take a few
minutes to obtain an
initial position fi x, but
will subsequently be
much quicker. Refer to
Section 7-5 Obtaining
a GPS Fix.
software.
1 From the MAIN MENU, tap on GPS STATUS.
2 Turn the GPS on by checking the "GPS On" box.
3 Return to the MAIN MENU.
21
• From the MAIN MENU, select SETUP.
• From the drop down list, select GPS.
• From the Port options, select SERIAL.
• Refer to the instructions supplied with your GPS Receiver to
select the Baud Rate.
Page 22

Navman SmartS™ Professional for Palm OS® 5
7-5 Obtaining a GPS Fix
Tip: In order to
attain good GPS
performance, signals
must be picked up
from three or more
satellites. To check
satellite reception,
see Section 12 Using
the GPS Status
Information.
Your handheld receives GPS signals through the GPS Receiver. In order for the receiver to receive signals:
1 Your handheld must be outside or in a vehicle parked outside – sunlight alone is not suffi cient (e.g. through the
2 Position the GPS Receiver:
When you fi rst power on your handheld or if SmartS Professional has not had a fi x for several hours, it may take
several minutes to obtain a GPS fi x. You can minimize the amount of time that this takes by remaining stationary in your
vehicle until SmartS Professional has a position fi x.
7-6 To Check GPS Reception
Note: The position
indicates your
icon
current position. A
red pointer indicates
no GPS fi x and a blue
pointer indicates a
valid GPS fi x.
You will know when SmartS Professional has a GPS fi x by the symbols
on your Map Screen. When SmartS Professional has no fi x, the position
indicator in the middle of the screen will be colored red and the words
“Waiting for GPS” will be displayed. Also, while SmartS Professional is
attempting to obtain a fi x, you will notice that there are no route instructions
displayed on the Map Screen.
To check GPS reception at any time, return to the MAIN MENU and select
GPS STATUS (see Section 12-2 GPS Settings). If the GPS receiver is only
receiving signals from a few satellites, consider moving the GPS receiver to
a more open place.
22
window of a building).
• With a good view of the sky.
• Away from buildings, trees or large metal objects.
• Away from sources of electrical interference.
Page 23

Navman SmartS™ Professional for Palm OS® 5
Controls
8
8-1 Touch Screen
Note: To "tap and
hold", press the stylus
tip against the screen
until a pop-up menu is
displayed.
SmartS Professional is easy to use. Most of the time, you can tap on menu options and other on-screen buttons. The
tap and hold function can be activated by pressing on a street map and holding to bring up a pop-up menu.
8-2 Keyboard Entry
Some handhelds feature a full QWERTY keyboard. Use this to key in street address information.
8-3 Zooming and Scrolling
Generally, you will use controls on the touch screen to move around maps and menus. Some handheld models may
have a toggle button and a scroll button which can also be used for zooming and scrolling. (eg. Sony CLIÉ™ handheld
users can use the scroll button or the JogDial™).
23
Note: Zooming IN
displays a smaller area
of the street map in
more detail. Zooming
OUT allows you to see
a larger area, but with
less detail.
1 To zoom in and out on a map screen, tap on the
or
icons on the map screen.
Zoom controls
2 To scroll up and down menus and option lists, drag
the stylus up and down the on-screen scroll bar.
Scroll bar
Page 24

Navman SmartS™ Professional for Palm OS® 5
24
Tip: The icon
is displayed on all
screens and maps
- tap this icon at any
time to return to the
previous screen.
Note: On the Sony Car
Cradle, Voice Scheme
is always English
- UK Male. You can
adjust the volume by
pressing the VOL
button on the cradle
or the card remote
commander.
+/_
8-4 Address Entry Icons
When entering a destination address, a number of icons are displayed
along the bottom of the address entry screen. The following list describes
the function of each icon.
Return to the previous screen.
Add the destination to the Favorites list.
Show the selected destination on the map.
Navigate to the selected destination.
Help - display a brief description of the functionality of each icon.
8-5 Changing the Volume
You are able to modify the volume of the voice guidance instructions to suit
the driving conditions.
To alter the volume of the voice guidance instructions:
1 From the MAIN MENU, select SETUP.
2 From the drop down list, select GUIDANCE.
3 Use the stylus to drag the volume slider bar to the left (for less volume)
or right (for more volume). A voice instruction will be spoken so that
you can check the new volume you have selected.
4 Tap the
icon to accept the changes, and return to the Main Menu.
Volume slider bar
Page 25

Navman SmartS™ Professional for Palm OS® 5
Setting Your Destination
9
Before you travel, you must fi rst select a destination and allow SmartS Professional to plan your route. There are three
main ways that you can program your destination:
9-1 Using a Quick Nav
You are able to save your three most frequently used destinations as Quick
Navs. This is the quickest and easiest way to set your route.
1 From the MAIN MENU, select QUICK NAV.
2 Select your previously programmed destination from the Quick Nav
3 SmartS Professional will calculate the route from your current
For information on programming new Quick Navs, refer to Section 11-3
Quick Navs.
25
• Use a QUICK NAV that you have previously programmed for destinations used on a regular basis.
• Set a new DESTINATION using one of the following methods:
- enter a specifi c street address;
- select the intersection of two streets;
- choose a Point of Interest such as a hotel, school or hospital;
- use a Favorite destination that you have stored already;
- pick an address you have recently travelled to.
• Take a position straight from the map and program this as your destination.
list.
position, and take you straight to the Navigation Screen.
Page 26

Navman SmartS™ Professional for Palm OS® 5
26
Sony Car Cradle
Users: Restricted
Function. Refer
Section 6-1.
Note: SmartS
Professional will
automatically display
all countries contained
in the maps currently
loaded on the memory
card. If there is only
one country map
loaded, this will be the
only option provided.
Tip: Step 3 is optional,
but can be useful if
your map area is large.
9-2 Navigating to an Address
To enter a street address as your destination:
1 From the MAIN MENU select DESTINATION, then ADDRESS. The Destination Address screen is displayed.
2 Select COUNTRY from the drop-down box.
3 Select AREA - this could be a town, city, state or county. Start by entering the fi rst few letters of the Area and then
use the drop down box to select from the appropriate options.
4 Select ROAD and start entering the road name. SmartS Professional will display the fi rst twenty matching road
names in the drop down box. Tap a road to select it and complete the address. If the maps support house
numbering, the destination can be fi nalized by entering the house/building number.
Page 27

Navman SmartS™ Professional for Palm OS® 5
27
Tip: If any of the
destination fi elds are
not presented in capital
letters, then a valid
selection has not been
made.
5 Once the address is selected, choose from one of the following:
• Tap
. SmartS Professional will calculate the route and
display the current street on the Navigation Map Screen. The
map will show the Waiting for GPS icon until a fi x is found.
• Tap
. SmartS Professional will not calculate the route, but
will simply display the address on the Map Screen. From here
you can select this address as your destination or move around
the map to fi nd a different destination. Refer to Section 9-7
Using the Pop-UP Menu to Plan a Route for more information.
• Tap
. SmartS Professional will save the destination address
as a Favorite. The address will be available in the Favorite List
(refer to Section 9-5 Navigating to a Favorite).
Page 28

Navman SmartS™ Professional for Palm OS® 5
28
Sony Car Cradle
Users: Restricted
Function. Refer
Section 6-1.
Tip: Step 3 is optional,
but can be useful if your
map area is large or the
street is not uniquely
named.
Tip: If any of the
destination fi elds
are not presented in
capital letters, then a
valid selection has not
been made.
9-3 Navigating to an Intersection
To enter the intersection of two streets as your destination:
1 From the MAIN MENU, select DESTINATION, then INTERSECTION.The Destination Intersection screen is
displayed.
2 Select COUNTRY from the drop-down box.
3 Select AREA - this could be a town, city, state or county. Start by entering the fi rst few letters of the Area and then
use the drop down box to select from the appropriate options. Selecting an Area before entering the road name is
optional but advisable for large maps.
4 Select the intersecting roads by entering the road names. SmartS Professional will display the fi rst twenty
matching roads in the drop down box. Tap a road to select it and complete the intersection address.
Page 29

Navman SmartS™ Professional for Palm OS® 5
5 Once the intersection is selected, choose from one of the following:
• Tap
. SmartS Professional will calculate the route and
display the current street on the Navigation Map Screen. The
map will show the Waiting for GPS icon until a fi x is found.
• Tap
. SmartS Professional will not calculate the route, but
will simply display the address on the Map Screen. From here
you can select this address as your destination or move around
the map to fi nd a different destination. Refer to Section 9-7
Using the Pop-Up Menu to Plan a Route for more information.
• Tap
. SmartS Professional will save the destination address
as a Favorite. The address will be available in the Favorite List
(refer to Section 9-5 Navigating to a Favorite).
29
Page 30

Navman SmartS™ Professional for Palm OS® 5
30
Sony Car Cradle
Users: Restricted
Function. Refer
Section 6-1.
Tip: Step 5 is optional,
but can be useful if
your map area is large.
9-4 Navigating to Points of Interest
The map information that you are using also has a large number of “Points of Interest”, or POIs stored for your
convenience. A Point of Interest (POI) is any named site, feature, landmark or public venue. There are thousands of
Points of Interest in larger cities, so they are sorted into categories. POI categories may be hotels, schools or parks to
name just a few.
1 From the MAIN MENU, select DESTINATION, then POINTS OF INTEREST. the Points of Interest Screen is
displayed.
2 Select COUNTRY from the drop-down box.
3 Select the CATEGORY from the drop-down box.
4 Select TYPE from the drop-down box. This will narrow down the number of options available.
5 Select AREA - this could be a town, city, state or county. Start by entering the fi rst few letters of the Area and then
use the drop down box to select from the appropriate options.
6 Once you have entered all the information in the POI Screen, tap
to display all the search results.
Page 31

Navman SmartS™ Professional for Palm OS® 5
7 Select a POI from the list. Alternatively, if you know the name of the POI you are interested in, enter the fi rst few
Example: if you wish
to locate a hotel in
a particular area,
use this function by
selecting CATEGORY
: Accommodation,
TYPE : Hotel or Motel.
Enter the area of
interest and select
from the list of hotels
provided.
31
letters of the POI to narrow down the list.
Note: To display the
POI icon on the map,
the required POI
category must be
enabled on the POI
setup screen. Refer to
Section 13.6 for more
information.
8 Choose one of the following:
• Tap
. SmartS Professional will calculate the route and display the calculated route on the Navigation
Map Screen. The map will show the Waiting for GPS icon until a fi x is found.
• Tap
. SmartS Professional will not calculate the route, but will simply display the address on the Map
Screen. From here you can select this address as your destination using the "tap-and-hold" feature, or
move around the map to fi nd a different destination. Refer to Section 9-7 Using the Pop-Up Menu to Plan a
Route for more information.
• Tap
• Tap
. This displays further information such as name, address, zip code etc.
to review or change the POI search to be performed.
Page 32

Navman SmartS™ Professional for Palm OS® 5
9-5 Navigating to a Favorite
SmartS Professional allows you to store Favorite destinations, to save you from re-entering the location again. Use
Quick Navs for your 3 most regular locations, and store other commonly used locations as Favorites.
1 From the MAIN MENU, tap DESTINATION, then FavoriteS.
2 Tap the destination from the Favorites List to select your destination.
Tip: You can also
create a Favorite by
selecting a road on
the Map Screen and
tapping and holding.
See Section 9-7 Using
the Pop-Up Menu
to Plan a Route for
further information.
3 Choose one of the following:
Sony Car Cradle
Users:
and are
restricted functions.
Refer Section 6-1.
• Tap
. SmartS Professional will calculate the route and display the current street on the Navigation
Map Screen.
• Tap
. SmartS Professional will not calculate the route, but will simply display the address using the
Map Screen. From here you can select this address as your destination or move around the map to fi nd a
different destination. Refer to Section 9-7 Using the Pop-Up Menu to Plan a Route for more information.
• Tap
• Tap
. This will delete your saved Favorite from the Favorite list.
. This is where your destination is displayed, and you are able to change details such as the name or
type of Favorite that you have assigned. Refer to Section 11-2 Editing or Deleting a Saved Favorite for more
information.
32
Page 33

Navman SmartS™ Professional for Palm OS® 5
9-6 Navigating to a Recent Destination
Destinations that you have recently used are stored inside your Handheld so that you can quickly access them.
1 From the MAIN MENU, tap DESTINATION, then RECENT. (Recent destinations can also be selected by tapping
2 Use the scroll bars to scroll through the list of recent addresses, then tap on your preferred destination.
Note: SmartS
Professional saves
the locations of
destinations you have
recently travelled to.
As the list grows,
SmartS Professional
will replace the oldest
destination with the
most recent.
3 Choose one of the following:
MAIN MENU, then QUICK NAVS then RECENT).
• Tap
. SmartS Professional will calculate the route and display the destination on the Navigation Screen.
(GPS fi x required)
• Tap
. SmartS Professional will not calculate the route, but will simply display the address using the
Map Screen. From here you can select this address as your destination or move around the map to fi nd a
different destination. Refer to Section 9-7 Using the Pop-Up Menu to Plan a Route for more information.
• Tap
to return to the previous screen.
33
Page 34

Navman SmartS™ Professional for Palm OS® 5
9-7 Using the Pop-Up Menu to Plan a Route
You may prefer to program your destination directly from the Map Screen. Generally you will use this option if you know
the area in which your destination is, or if you have selected
allow you to scroll around a map and pick a point on the map. SmartS Professional will automatically load the address
details for you and plan a route to your selected destination.
1 From the MAIN MENU, tap on MAP. You are now in the Map Screen.
2 Navigate around the map. To scroll around the map, use the stylus to drag a point on the map across the screen.
3 Zoom in and out as required. Zoom by tapping on the
4 To select a destination, tap and hold any destination (road or Point of Interest) with the stylus, then select
from a previous entry screen. SmartS Professional will
As you drag the point around, the map will scroll to reveal more map area.
or buttons on the screen, or by using relevant
hardware buttons on your handheld.
“Navigate To” from the pop-up menu. This sets your current location as your departure point and will calculate the
route and display the destination on the Navigation Screen.
This is a “North Up”
map, where the map is
orientated with North at
the top of the screen
The name of the
destination selected is
shown on the top of the
pop-up menu
Select a different view
Return to the
previous screen
Zoom controls
34
Map scale
Tap this icon to
recenter the map on
your GPS position
Page 35

Navman SmartS™ Professional for Palm OS® 5
9-8 Route Planning Without a GPS Fix
Routes can also be planned without a GPS fi x from the pop-up menu.
1 Select a departure location by tapping and holding on a street/road on the Map Screen and then selecting "Set as
2 To select a destination location, either:
3 The route will be calculated and displayed on the Navigation Screen.
Departure" from the pop-up menu.
• Tap and hold on a street/road and select "Navigate To" from the pop-up menu.
• OR select a destination as described in Section 9 Setting Your Destination.
Step 1:
Tap on "Set as Departure"
Step 2:
Tap on "Navigate To"
35
Page 36

Navman SmartS™ Professional for Palm OS® 5
36
10
Note: All map views
are accompanied
by audible
announcements of
your next turn.
Viewing Your Route
Once you have selected your destination and SmartS Professional has calculated your route, there are four different
ways that you can view instructions for your route. Cycle through the following three views by tapping on the
Each view is described below.
• The MAP view displays your route on a map which is always oriented North.
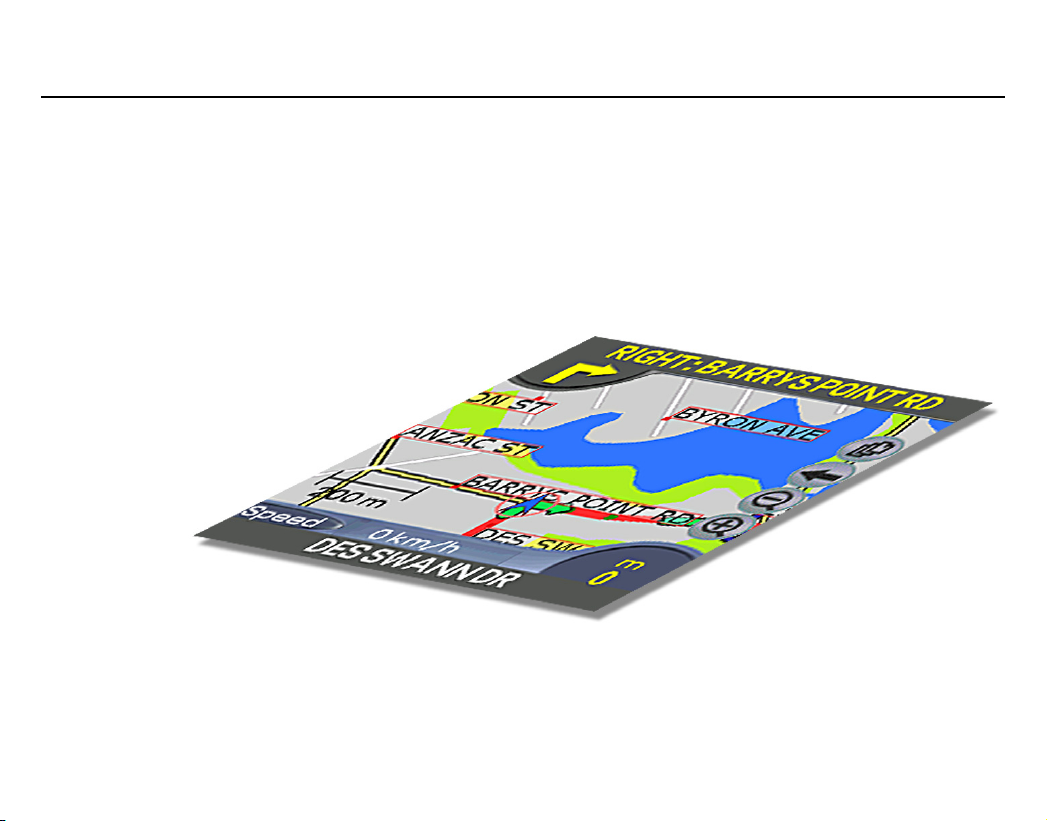
• The NAVIGATION view displays your route on map which is always oriented in the direction in which you are travelling.
• The NEXT INSTRUCTION view is a simple graphical display showing the direction and distance to your next turn.
An alternative way of viewing your route is to display an INSTRUCTION LIST. This view displays the list of remaining
turns to your destination, with the street name, direction of turn and distance to go. Refer to Section 10-2 for further
details.
icon.
Page 37

Navman SmartS™ Professional for Palm OS® 5
10-1 Map View
The Map view is always oriented to the North, and shows your current position and surrounding street names. If you
have already programmed a route, the route and all turns are highlighted. You can use the Map view to quickly set your
departure point, and navigate to any destination.
1 To view the route, tap on the
2 Zoom in and out as required.
37
symbol to cycle through the screens until the Map Screen is displayed.
Note: To cancel your
current route at any
time, tap-and-hold on
the screen, and select
Cancel Route from
the pop-up menu.
Alternatively, simply
start planning a new
route and you will be
prompted to cancel
the current route.
Note: You can use the
Map view to quickly
set your departure
point and navigate to
any destination. Refer
to section 9.7 Using
the Pop-Up Menu to
Plan a Route for more
information.
Your current position is
marked with this icon.
Blue indicates a valid
GPS fi x, red indicates no
GPS fi x
Your planned route and
turns are highlighted
Map scale
The street you
are travelling on
Select a different map screen
Return to the
Main Menu
Zoom controls
Tap this icon to
recenter the map on
your GPS position
Page 38

Navman SmartS™ Professional for Palm OS® 5
10-2 Navigation View
The Navigation view is displayed when you calculate a route, except that the map is always oriented in the direction in
which your vehicle is travelling. This is often an easier way to keep your bearings.
Note: to view this
screen, a route must
be calculated.
1 To view the route, tap on the
2 Zoom in and out as required.
38
symbol to cycle through the screens until the Navigation Screen is displayed.
Direction of next
turn. Tap this icon to
announce the current
instruction
Your current position is
marked with this icon,
blue indicates a valid
GPS fi x, red no GPS fi x
Map scale
Tap this button to cycle through the following
data display options:
• Current speed (displayed)
• Current time
• Current bearing / heading (HDG)
• Distance to go to destination (DTG)
• Expected time of arrival at destination (ETA)
• Time to go to destination (TTG)
Next instruction and
Road Name
Turns are highlighted
in green
The map automatically
zooms in or out depending
on the speed of travel.
The map may be zoomed
manually but will snap back
to the auto zoom level after a
short delay.
Distance to next turn
The street you
are travelling on
Page 39

Navman SmartS™ Professional for Palm OS® 5
10-3 3D Navigation Screen
Note: to view this
screen, a route must
be calculated.
You can cancel your
current route at any
time by starting to plan
another route (e.g. by
selecting DESTINATION
or QUICK NAV from the
MAIN MENU.
Similar to the Map Screen, the 3D (three dimensional) Navigation screen is displayed when you calculate a
route, except that the map is always oriented to the direction in which your vehicle is travelling. This is often
an easier way to keep your bearings.
Direction of next
turn. Tap this icon to
announce the current
instruction
39
Next instruction and Road
Name
Your next turn is
highlighted in green
Tip: When the angle
option is selected,
the up and down
buttons can be used
to reset the angle to
0º, which transforms
the 3D screen view
to a 2D view.
Tap this button to cycle through the
following data display options:
• Speed
• Time
• Angle
• Distance to go to destination (DTG)
• Expected time of arrival at destination (ETA)
• Time to go to destination (TTG)
• The DEFAULT 3D ANGLE of the 3D
Navigation screen can be adjusted by
tapping to select the drop down box and
then selecting the preferred default 3D angle.
Each time SmartS is opened this default
angle is applied to the 3D navigation screen.
If an angle of 0º is selected, then the 3D
Navigation screen shows the map as a two
dimensional (2D) display.
Your current position is
marked with this icon, blue
indicates a valid GPS fi x, red
no GPS fi x
Tap to view the Route
Summary information.
The street you are
travelling on
Page 40

Navman SmartS™ Professional for Palm OS® 5
10-4 Next Instruction View
Note: to use this
view, a route must be
calculated.
This view shows the information that you need for the next turn, the direction of the turn and the distance to the turn.
1 To view the route, tap on the
40
symbol to cycle through the screens until the Next Instruction Screen is
displayed.
Next instruction
Direction of next
turn. Tap this icon to
announce the current
instruction
Distance to next turn
The street you are
travelling on
Tap on these buttons to cycle through the
following data display options:
• Current speed
• Current time
• Current bearing / heading (HDG)
• Distance to go to destination (DTG)
• Expected time of arrival at destination (ETA)
• Time to go to destination (TTG)
Page 41

Navman SmartS™ Professional for Palm OS® 5
10-5 Instruction List
Note: to view this
screen, a route must
be calculated.
The Instruction List displays the list of the remaining turns to your destination with the direction of the turn, the next
street name and the distance to the turn. The very next turn is highlighted.
1 From the MAIN MENU, select INSTRUCTION LIST.
2 You can scroll up and down the instruction list by dragging the stylus up and down the scroll bar.
41
The distances shown
in the right column are
measured between the
current location and
each turn.
Scroll bar
Page 42

Navman SmartS™ Professional for Palm OS® 5
42
Tip: This function can
be disabled in the
SETUP Menu.
10-6 Back-On-Track™ Feature
SmartS Professional is designed to re-plan your route automatically if you take a wrong turn. A ? symbol will display
in place of the Direction Of Next Turn Icon. The re-routing indicator will display to show that a new route is being recalculated.
Re-routing indicator
Re-routing indicator
Page 43

Navman SmartS™ Professional for Palm OS® 5
43
11
Tip: Convert recent
destinations to
Favorites by selecting
Recent - Show then
tapping and holding to
save as a Favorite.
Tip: Favorites can be
accessed through
the DESTINATION-
FavoriteS menu.
Editing, Deleting and using Favorites and Quick Navs
SmartS Professional allows you to save destinations as Favorites, so you can access them quickly without re-entering
address information. You can also use Quick Navs to save the three most commonly used Favorites, as Quick Navs can
be accessed with less keystrokes than Favorites.
11-1 Adding a New Favorite
1 From the MAIN MENU, tap on MAP. You are now in the Map Screen.
2 Navigate around the map by dragging the stylus across the screen.
3 Zoom in and out as required.
4 Tap and hold the destination you wish to select (eg. a road, Point of
Interest or intersection), then tap “Add to Favorites”.
Page 44

Navman SmartS™ Professional for Palm OS® 5
44
Sony Car Cradle
Users: Restricted
Function. Refer
Section 6-1.
11-2 Editing or Deleting a Saved Favorite
Follow these instructions to delete Favorites, personalise them with a nickname, or change them to Quick Navs.
1 From the MAIN MENU, select DESTINATION, then FavoriteS.
2 Select the destination that you wish to edit/delete from the Favorite List.
3 To delete the destination from the Favorite List, simply tap on
4 You can customize the look of each of your Favorites by giving the destination a “nickname” (e.g. WORK) and
assigning an icon. You can also choose to save the Favorite as one of three Quick Nav destinations, which means
that you can access it more quickly through the Quick Navs menu.
. Tap on OK when prompted to confi rm.
Page 45

Navman SmartS™ Professional for Palm OS® 5
45
Example: you may
want to save your own
address as a Quick
Nav, and name it
HOME.
Tip: Quick Navs can
be deleted after they
have been ‘Saved’ as
a Favorite by using
To make any of these changes, tap .
• To change the name of your Favorite or Quick Nav, type it into the Name fi eld.
• To change the type of Favorite or Quick Nav, tap on the "Save as" drop-down box to save as a Favorite or
one of three Quick Navs.
• To change the icon of the Favorite or Quick Nav, either tap on the displayed icon and choose from the popup list provided.
• Tap
.
to save the changes you have made and return to the previous screen.
Select this to give your
Favorite a ‘nickname’
Select from the dropdown box to save
as a Quick Nav or
Favorite
Page 46

Navman SmartS™ Professional for Palm OS® 5
11-3 Quick Navs
Three of your most frequently used destinations can be stored to save time. Once saved, your Quick Navs can be
accessed quickly through the Quick Nav menu with the minimum of key presses and without having to re-enter any
information. Quick Navs also give access to the return trip function and recent destination.
1 From the MAIN MENU, select QUICK NAV.
Tip: To return to any
of these destinations
simply tap on the
desired destination in
the recent list.
2 To go straight to one of your Quick Nav destinations, simply tap on QUICK NAV. SmartST Professional will
3 To access the Recent Destinations list, tap on RECENT. Refer to Section 9-6 Navigating to a Recent Destination
4 If you tap on RETURN TRIP, SmartST Professional will calculate a route from your current position to the
46
calculate the route and display the destination on the Navigation Screen.
for more information.
departure point of your previous route. The route is displayed on the Navigation Screen.
Page 47

Navman SmartS™ Professional for Palm OS® 5
47
12
Tip: If you are having
trouble obtaining a
GPS fi x, you can use
this screen to review
the GPS satellite
reception.
Tip: The GPS receiver
must be locked
onto a minimum
of 3 satellites for
successful operation.
Using the GPS Status Information
12-1 GPS Reception
The GPS Status Screen tells you how well you are receiving the GPS satellite information. SmartST Professional relies
on the reception of signals transmitted by the Global Positioning System satellites orbiting the earth. This display shows
a visual representation of the number of satellites that your handheld is receiving information from.
1 From the MAIN MENU, select GPS STATUS.
Latitude / longitude of current
position. Units can be displayed in:
(a) degrees, mins and decimal secs;
(b) decimal degrees; OR
(c) degrees and decimal minutes.
Tap to switch between these unit
displays.
Each segment represents a satellite,
and the color represents the
satellite's status. See below for a
description of the different satellite
statuses.
Number of satellites
used in GPS fi x
Click to exit screen
Type of fi x
North pointing compass
Ground speed
A green circle means the
GPS receiver has a valid
fi x, red means no valid fi x
UTC time and date
Use this box to
connect the GPS
receiver.
Page 48

Navman SmartS™ Professional for Palm OS® 5
48
Tip: In practice less
than 12 satellites
are tracked by the
GPS receiver due to
satellite positioning.
Tip: The number of
indicated satellites
depends on your GPS
receiver.
Latitude and longitude are displayed along with a North-pointing compass, the heading in degrees and ground speed.
The 12 satellites that could be viewed from your current position are shown as segments. The satellites are represented
as follows:
• A yellow segment indicates a satellite that is being tracked but is not being used to determine your position.
• A red segment indicates a satellite that is being used to determine a two dimensional (2D) fi xed position.
• A green segment indicates a satellite that is being used to determine a valid (3D) fi xed position.
The circle underneath the segment display is green when there is a valid fi x (2D or 3D), and red when there is no fi x
available. While a 2D fi x is suffi cient to maintain a valid fi x, a 3D fi x is more accurate.
The time and date are displayed in UTC (Coordinated Universal Time), where UTC is the current term for what was
commonly referred to as Greenwich Mean Time (GMT).
Page 49

Navman SmartS™ Professional for Palm OS® 5
12-2 GPS Status Messages
The GPS status messages are displayed on the three navigation screens (Map screen, Navigation screen, and the Next
Instruction screen). The messages listed in the table below provide you with feedback on the status of the GPS receiver
connection.
Status Message Meaning Suggested Action
No GPS Data A GPS connection has been
enabled, but no GPS data is
being received.
49
Check that the handheld is correctly connected and
confi gured - see Section 3 for correct settings.
Waiting for GPS A GPS connection has been
enabled and GPS data is
being received, but a GPS
position fi x has not been
established yet.
Current street name
displayed
GPS data is being received,
and you have a valid GPS
position fi x.
Time to acquire a GPS fi x will vary according to
the satellite constellation. Please refer to your GPS
Hardware guide for more information.
None
Page 50

Navman SmartS™ Professional for Palm OS® 5
50
13
Note: SmartS
Professional is already
programmed with
default settings, which
can be adjusted to suit
your preference.
Sony Car Cradle
Users: Restricted
Function. Refer
Section 6-1.
Modifying the Settings
SmartS Professional has a number of Settings that you can alter:
• About settings: Display the version number of the SmartS Professional software you are running.
• GPS settings: Confi gure the communications settings for your GPS Receiver.
• Display settings: Change the map colors, select fast map panning or enable/disable the startup tutorial.
• Guidance settings: Choose the distance units (kilometres or miles) or change the voice guidance settings.
• Map settings: Select the map regions you need to plan your route.
• POI settings: Select the Points of Interest that are relevant to you.
• Routing settings: Select "shortest distance" or "fastest time" route planning, avoid certain road conditions or
enable/disable the Back-On-Track™ feature.
13-1 About Settings
View the software version, map data and application copyright information
relating to the SmartS Professional software.
1 From the MAIN MENU, select SETUP.
2 From the drop down list, select ABOUT.
Page 51

Navman SmartS™ Professional for Palm OS® 5
51
Sony Car Cradle
Users: Restricted
Function. Refer
Section 6-1.
Sony Car Cradle
Users: Restricted
Function. Refer
Section 6-1.
Note: Backlight
brightness can
also be modifi ed
to suit viewing
conditions. Refer
to your Handheld
documentation for
instructions.
Tip for Sony Car
Cradle Users: Map
colors can also be
switched depending
on day/night mode of
the Car Cradle
13-2 GPS Settings
For Bluetooth and serial GPS users, use this screen to confi gure the GPS
port. Refer to Section 7-3 Confi guring the GPS Receiver.
If you are experiencing diffi culty with your GPS receiver, you may be asked
by Technical Support Staff to switch on the GPS Logging option:
1 From the MAIN MENU, select SETUP.
2 From the drop down list, select GPS.
3 Enable GPS Logging by checking the "GPS Logging" box.
13-3 Display Settings
If you fi nd that the display is diffi cult to see in certain light conditions, use
this function to change the color scheme. You can also enable / disable the
tutorial that is automatically run at startup of SmartS Professional.
1 From the MAIN MENU, select SETUP.
2 From the drop down list, select DISPLAY.
3 Modify the settings as required:
• Select either Day or Night from the Map Colors menu to
improve the contrast in light and dark conditions.
• Select your preferred Map Color Scheme by selecting from the
drop-down menu.
• To enable / disable the Tutorial check or uncheck the “Show at
startup” checkbox.
• To enable / disable fast map panning, check/ uncheck the "Fast
map panning" box.
Page 52

Navman SmartS™ Professional for Palm OS® 5
This feature will speed up map panning when viewing or planning a route
across a large or high density map area. With normal panning mode, the
map is updated repeatedly as you drag the stylus across the screen. With
fast map panning, a line is drawn from when you start to drag the stylus to
the end position - only then is the map redrawn.
52
Sony Car Cradle
Users: Restricted
Function. Refer
Section 6-1.
Note: These changes
will only take effect
when the next route is
planned.
13-4 Guidance Settings
This is where the voice scheme and distance units can be set.
1 From the MAIN MENU, select SETUP.
2 From the drop down list, select GUIDANCE.
3 Modify the settings as required:
• Choose the Distance Units that you require – all measurements
(e.g. Distance to Go), map scales, navigation screens and voice
announcements can be programmed as kilometres or miles.
• Choose the type of voice you prefer from the Voice Scheme
menu by tapping the drop-down box to select the voice scheme
of choice.
• Change the volume of the voice instructions
Page 53

Navman SmartS™ Professional for Palm OS® 5
53
Sony Car Cradle
Users: Restricted
Function. Refer
Section 6-1.
Tip: Your Handheld
will run faster with
less map regions
selected. To optimise
performance, select
only the map regions
you require to plan
your route.
Sony Car Cradle
Users: Restricted
Function. Refer
Section 6-1.
Tip: For ease of
viewing, select only
the most useful POI
categories.
13-5 Map Settings
This screen shows all the map regions that have been installed in the
memory cards.
1 From the MAIN MENU, select SETUP.
2 From the drop down list, select MAPS.
3 Select the Storage Location drop-down box to display the map
regions for each storage area (only applicable for handhelds with
multiple memory cards).
4 Select and clear map regions with the check boxes as required.
13-6 POI (Points of Interest) Settings
There are usually a very large number of Points of Interest in any one
geographical region. This function allows you to select only those
categories that you might need. For example you may be interested only in
accommodation and entertainment venues, and may want to disable such
categories as amenities and institutions.
1 From the MAIN MENU, select SETUP.
2 From the drop down list, select POI.
3 Enable the “Show Icons on Map” option from the Display menu if you
want the Points of Interest to be displayed on your maps.
4 From the Categories menu, select the Points of Interest Categories
that you wish to enable.
Page 54

Navman SmartS™ Professional for Palm OS® 5
54
Sony Car Cradle
Users: Restricted
Function. Refer
Section 6-1.
Note: The AUTO
RE-ROUTING function
automatically updates
your route if you take
a wrong turn.
13-7 Routing Settings
There are a number of options that affect the way that SmartS Professional
plans your route. You may be conscious of time and therefore want to get
to your destination by the fastest route possible, or you may be conscious
of distance and wish to take the shortest route. Use this function to change
the route settings to suit your needs.
1 From the MAIN MENU, select SETUP, then ROUTING.
2 Modify the settings as required:
• Select either QUICKEST time or SHORTEST distance.
• Enable or disable AVOID TOLL ROADS and AVOID URBAN
AREAS from the Route Options menu if required.
• Enable or disable the ROUTE DEMONSTRATOR. This allows
you to demonstrate a planned route prior to driving it.
• Enable or disable the Back-On-Track™ AUTO RE-ROUTING
feature from the Rerouting menu.
Page 55

Navman SmartS™ Professional for Palm OS® 5
55
14
Accessories
14-1 Memory Cards
Maps must be stored on memory cards. Please refer to your handheld
documentation for suitable memory card options and installation
instructions.
14-2 Memory Card Writers
The memory card writer connects to your computer via a USB port, and
is used in conjunction with the SmartS Professional Desktop application
to download maps to a memory card.
Page 56

15
Frequently Asked Questions
Where will SmartST Professional for Palm OS® 5 work?
As long as the GPS receiver has a clear view of the sky, it will work accurately anywhere on earth. Note: in order for the
GPS position to be displayed on a map, the relevant map will need to be installed on the memory card.
How accurate is GPS?
Accuracy of any GPS system will vary slightly over time. It is accurate to within 5 m (16 feet) for 95% of the time in
normal usage.
How detailed are the maps supplied with SmartST Professional?
The SmartS Professional maps contain street level detail allowing door to door navigation where data is available.
Maps also have points of interest (POIs) such as hotels, railway stations and airports.
How can I make SmartST Professional run faster?
If you are fi nding that SmartS Professional is running slowly, it may be because the software is processing a large
amount of map data. Check that only the map regions you require for route planning are selected.
Refer to Section 13-5 Map Settings for more information.
For optimum performance, Navman recommend running SmartS Professional independently of other applications.
Please refer to the documentation supplied with your handheld for information on adjusting the backlighting settings or
adjusting battery and external power settings.
Page 57

Navman SmartS™ Professional for Palm OS® 5
57
16
End User License and Warranty Agreement
IMPORTANT - Please read carefully
NAVMAN (THE LICENSOR) IS WILLING TO LICENSE THE SMARTS™ PROFESSIONAL SOFTWARE (THE SOFTWARE) TO YOU (THE
CUSTOMER) ONLY IF YOU ACCEPT ALL THE TERMS OF THIS LICENCE. PLEASE READ THE TERMS CAREFULLY, BECAUSE USING
THIS SOFTWARE WILL BE DEEMED TO BE YOUR ACCEPTANCE THAT YOU ARE USING IT ON THE FOLLOWING TERMS.
IF YOU DO NOT AGREE TO THE TERMS OF THIS LICENCE DO NOT INSTALL OR USE THE SOFTWARE AND RETURN THIS PRODUCT
PROMPTLY, INCLUDING ALL PACKAGING AND WRITTEN MATERIALS, TO THE LICENSOR’S REPRESENTATIVE AND ANY AMOUNT
YOU MAY HAVE PAID WILL BE REFUNDED TO YOU (LESS ANY DELIVERY AND HANDLING CHARGES).
1. The Licensor grants to the Customer a non-exclusive licence to use: (a) one copy of the Software on one of the Customer’s handheld
devices; and (b) the accompanying materials, including any manuals contained in the Software (the Materials), in accordance with the
terms and conditions of this Licence.
2. Where the Customer uses the Software on a handheld or any other device (the Device) in a vehicle, the Customer must not place,
secure or use the handheld device in a manner that may cause accidents, personal injury or property damage or in any way obstruct
the visibility of the Customer. The Customer is solely responsible for observing safe driving practices and will not operate the Software
while operating a vehicle.
3. The copyright and all other intellectual property rights in the Software and Materials (including any enhancements or modifi cations) are
vested in the Licensor. The Customer must not rent, lease, reproduce, translate, adapt, vary, reverse-engineer or modify the Software
or Materials nor communicate the same to any person other than in accordance with the terms of this Licence.
4. The Customer may not copy the Software or Materials except that one copy of the Software may be made to the extent that such
copying is necessary for the Customer’s own backup purposes.
5. Except for the warranty provided by the Licensor for the product that includes the Software the Licensor expressly excludes to the
fullest extent permitted by law all representations or warranties, express or implied (except any which may not lawfully be excluded),
including the implied warranties of merchantability and fi tness for a particular purpose.
6. The Licensor will not in any circumstances be liable under the law of tort, contract or otherwise for any indirect or consequential loss
or damage, including any loss of profi ts, however caused, arising in connection with the use of, or inability to use, the Software.
If any limitation or exclusion or liability contained in this Licence is held to be invalid for any reason and the Licensor becomes liable
for loss or damage that would otherwise have been excluded, that liability will be limited to the total amount actually paid by the
Customer for the Software.
7. The Licensor may terminate this Licence immediately if the Customer breaches any of its obligations under this Licence. Immediately
following termination of this Licence the Customer must deliver to the Licensor’s Representative, or destroy all copies of, the Software
and Materials in whatever form possessed by the Customer.
Page 58

Navman SmartS™ Professional for Palm OS® 5
Limited Warranty:
IMPORTANT: The following terms and conditions may vary from country to country. Please check with Your Navman dealer from where
You purchased the product.
Hardware Product: Navman warrants its products to be free from defects in materials or workmanship under normal use for two years
from the date of purchase (the Warranty Period) to the original owner (You). To claim under this warranty, You must return the product to
the place of purchase, or a service centre approved by Navman (Service Centre). You must produce an original sales receipt as proof of
purchase. You will be solely responsible for all shipping charges, freight, insurance and proper packaging to prevent breakage in transit.
Navman will, at its discretion, repair or replace any defective product or its components at no cost to You for parts and labour. The
replacement product or component takes on the warranty status of the original product or component. This is Your exclusive remedy for
defective products.
Limitations: This warranty does not apply to products that have been damaged or rendered defective: (a) as a result of incorrect
installation, misuse, mishandling, misapplication, accident, abuse, breakage or other external causes; (b) by operation outside the usage
specifi cations stated in the product documentation; (c) by modifi cation or service other than by Navman or its approved Service Centres.
Software Product: Navman warrants that (a) the software will perform substantially in accordance with the accompanying written
materials for a period of 90 days from the date of purchase, and (b) any technical support provided by Navman or its approved Service
Centres shall make commercially reasonable efforts to solve any problem or issues. Some countries, states and jurisdictions do not allow
limitations on duration of an implied warranty, so the above limitation of 90 days may not apply to You.
Limitation of Liability
To the fullest extent permitted by law, Navman will not be liable in any event, whether in tort (including negligence), contract or otherwise for
any damage including loss of profi ts, any consequential, indirect or special damage, loss or injury of any kind suffered by You or any other
person. Except as expressly set out in this warranty, Navman makes no other warranties, express or implied, including any implied warranties
of merchantability and fi tness for a particular purpose. If any limitation or exclusion or liability contained in this warranty is held to be invalid for
any reason and Navman becomes liable for loss or damage that would otherwise have been excluded, such liability will be limited to the total
amount actually paid by You for the product.
58
Page 59

Navman SmartS™ Professional for Palm OS® 5
16-2 FCC Statement
Applicable to all Navman GPS Receivers.
Note: This equipment has been tested and found to comply with the limits for a Class B digital device, pursuant to
Part 15 of the FCC Rules. These limits are designed to provide reasonable protection against harmful interference
in a normal installation. This equipment generates, uses and can radiate radio frequency energy and, if not installed
and used in accordance with the instructions, may cause harmful interference to radio communications. However,
there is no guarantee that interference will not occur in a particular installation. If this equipment does cause harmful
interference to radio or television reception, which can be determined by turning the equipment off and on, the user is
encouraged to try to correct the interference by one or more of the following measures:
16-3 Contact Us
For technical support, frequently asked questions, software updates and additional information, visit our website
- www.navman.com.
59
• Re orient or relocate the receiving antenna.
• Increase the separation between the equipment and receiver.
• Connect the equipment into an output on a circuit different from that to which the receiver is connected.
• Consult the dealer or an experienced technician for help.
• A shielded cable must be used when connecting a peripheral to the serial ports.
Navman USA Ltd.
27142 Burbank
Foothill Ranch
CA 92610
USA
Phone Toll Free (1) 866-9-NAVMAN
(866 9 628626)
E-mail: support@navmanusa.com
Navman Europe Ltd.
Suite 4 G
Gatwick House
Peeks Brook Lane
Horley, Surrey
RH6 9ST
United Kingdom
Phone Toll Free (44) 1293 449 882
Navman Australia Pty. Ltd.
Unit 2, 5-13 Parsons St.,
Rozelle, NSW 2039
Australia
Phone Toll Free (612) 9818 8382
Page 60

Navman SmartS™ Professional for Palm OS® 5
16-4 Copyright
© 2004 Navman NZ Limited. Navman is a registered trademark of Navman NZ Limited. SmartSand Back-On-Track
are trademarks of Navman NZ Limited. All rights reserved.
Microsoft® Windows® 98, ME, 2000 or XP, Internet Explorer are registered trademarks of Microsoft Corporation.
Acrobat® Reader® is a registered trademark of Adobe Systems Incorporated. All rights reserved.
Palm OS, Hotsync, Palm, Palm Powered and Palm Tungsten are trademarks of PalmSource, Inc.
© 2003 Whereis™ Sensis is a trademark of Telstra Corporation Ltd., used under license.
© 2003 Tele Atlas, s-Hertogenbosch, The Netherlands.
© Crown Copyright, Ordnance Survey, License Number 43553U2.
© 1984-2004 Tele Atlas North America, Inc.
© 2004 InfoUSA. All rights reserved.
© 2004 DMTI Spatial and © 2004 Tele Atlas N.A., Inc.
© 2004.Sony Corporation, Sony, CLIÉ, JogDial and their logos are trademarks of Sony Corporation.
All other trademarks are the property of their respective owners.
60
FCC
022116
Published in New Zealand
MN000226B
For optional Navman GPS Receivers.
 Loading...