


OnlineAVL 1.8 QuickStart Guide
TABLE OF CONTENTS
1 - Introduction ............................................................................................................................ 2
2 - Requirements......................................................................................................................... 2
3 – Installation.............................................................................................................................2
4 - Getting Started....................................................................................................................... 4
4.1. Before Starting The Application....................................................................................... 4
4.2. Start The Onlineavl Application ....................................................................................... 4
4.3. Login ................................................................................................................................4
4.4. If You Are Unable To Connect......................................................................................... 5
4.5. Setting Up A Printer......................................................................................................... 5
4.6. Changing Your Password................................................................................................ 5
4.7. Disconnecting From The OnlineAVL Server.................................................................... 5
4.8. Exiting The Application .................................................................................................... 5
5 - Operating OnlineAVL............................................................................................................. 6
5.1. OnlineAVL Screen ........................................................................................................... 6
5.2. Vehicle Display Screen.................................................................................................... 6
5.3. Functions Menu (Right Click Menu)................................................................................. 6
5.4. Control Bar....................................................................................................................... 7
5.5. Vehicle Activity Log.......................................................................................................... 8
5.6. Status Bar........................................................................................................................ 8
5.7. Map Toolbar..................................................................................................................... 8
5.8. Map Display Section........................................................................................................ 9
5.9. Show Nearest .................................................................................................................. 9
5.10. Menu Bar ....................................................................................................................... 9
5.11. Fleet Selection.............................................................................................................10
4.12. Icons ............................................................................................................................ 11
5.13. Geofences.................................................................................................................... 11
5.14. Customer Sites ............................................................................................................ 12
5.15. Reports ........................................................................................................................ 13
5.16. Alerts............................................................................................................................ 15
5.17. Conex........................................................................................................................... 16
Offices ....................................................................................................................................... 17

1 - INTRODUCTION
Congratulations on your purchase of the Navman Wireless Fleet Management Solution. This
Quick Start Guide will help you install and become familiar with your OnlineAVL application.
OnlineAVL (Automatic Vehicle Location) is a PC desktop application which allows you to view
and monitor your vehicles on an interactive map display. OnlineAVL represents a key part of the
overall Navman Fleet Management Solution. In order for you to be able to fully utilize OnlineAVL
you must first ensure the following:
1. Your vehicle(s) have been setup with the Navman Halo or Halo Qube GPS (Global
Positioning System) tracking device. Contact your Navman representative to ensure that
this has been completed.
2. You have been setup with a user account for access to the Navman Fleet Management
Server. OnlineAVL requires a User Name and Password for security purposes before you
will be permitted to access the Navman Fleet Manager Server and view your vehicles.
Contact your Navman representative to ensure that this has been done.
NOTE: The OnlineAVL licensing model allows you to install as many copies of this application as
you require. OnlineAVL is User Name and Password protected allowing you to control access to
your fleet's information.
2 - REQUIREMENTS
HARDWARE:
• 133 MHz or higher Pentium-compatible CPU
• At least 64 megabytes (MB) of RAM; more memory generally improves responsiveness
• 2GB of available Hard Disk space or more
• A direct Internet connection at a minimum of 56kbs speed or higher (128kbs
recommended)
• A CD-ROM player for installation
SOFTWARE
• Microsoft Windows 95 with Winsock 2
• Microsoft Windows 98/2000/XP
NOTE: OnlineAVL is not supported on a Macintosh computer.
3 – INSTALATION
To install the OnlineAVL application onto your PC (please ensure your PC meets the minimum
hardware and software requirements for installation first):
1. Insert the OnlineAVL CD-ROM into your CD drive. The Install Wizard should start
automatically and ask you to choose your location country (allow 10-20 seconds for the
auto-run to start the Install Wizard).
a. If the Install Wizard does not start automatically when you insert your CD-ROM:
> Browse your PC with Microsoft Explorer and select your CD-ROM drive.
> Double click on 'Setup.exe' to open the install program.
2. Select the country where your fleet is located. The Main Menu will then appear. If your
country is not listed it may not be supported. Please contact your Navman representative.

3. Select 'Application'. This will take you to the Application menu. Select 'Install Application'.
4. The OnlineAVL Install screen will then open in a new window. Click 'Next' to continue.
The 'Select Destination Directory' screen will appear.
5. If you want to install the OnlineAVL application in the recommended default location, do
not modify the settings displayed. The OnlineAVL application will be installed in the
default location 'C:\Program Files\Navman\OnlineAVL'.
a. If you want to install the OnlineAVL application in a specific location, select your
destination location by browsing through the drive and folder directories. Note
that by changing the default install directory the instructions in this Quick Start
Guide may become invalid.
6. Click 'Next'. A 'Select Components' screen will appear. Ensure that 'Full Installation' is
selected in the scroll down menu. Click 'Next' to continue.
7. The 'Select Start Menu Folder' screen will appear. Click ‘Next’ to continue.
8. Choose the server location you wish to connect to and click ‘Next’ to continue.
9. The ‘Ready to Install’ screen will appear. Click ‘Next’ to continue.
10. Click ‘Install’. OnlineAVL will begin installation.
11. The installation process should only take a few minutes. At the end of the installation
process click ‘Finish’.
12. OnlineAVL is now installed and ready. If you have kept the default locations suggested
during the installation process, you will be able to access the application by selecting
from the Windows “Start” button: “Start” > “Programs” > “Navman OnlineAVL” >
“OnlineAVL”. Alternatively, you can use the OnlineAVL shortcut (
) at the bottom of
your Windows Quick Start Bar or on the Desktop.
4 - GETTING STARTED
4.1. BEFORE STARTING THE APPLICATION
Check that an Internet connection is available:
• If you are using a network connection, the Internet should be available through the
network. Check with your system administrator if you are having difficulty connecting to
the Internet.
• If you are using a dial-up Internet connection, ensure you have connected prior to
launching OnlineAVL.
4.2. START THE ONLINEAVL APPLICATION
To start the OnlineAVL application:
1. Click on the OnlineAVL icon (
desktop or access the application by following the menu items from the Windows “Start”
button: “Start” > “Programs” > “Navman OnlineAVL” > “OnlineAVL”.
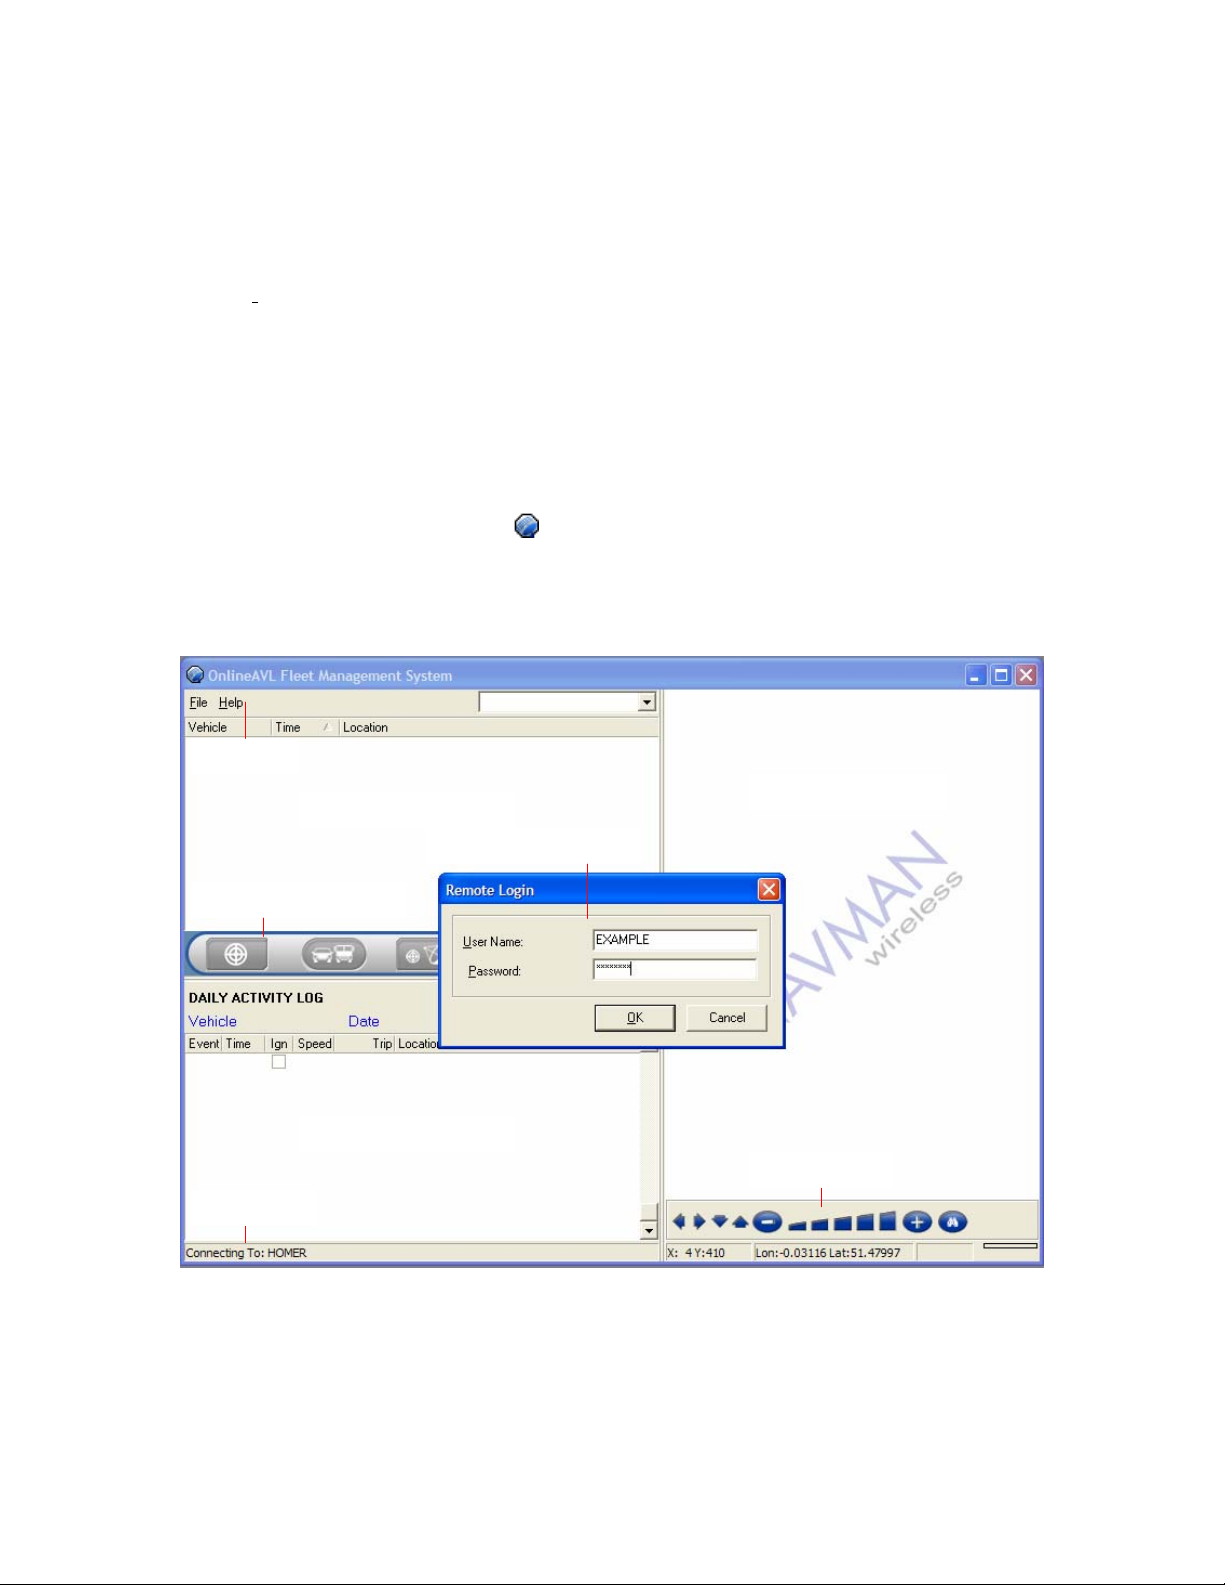
2. Once the application is started, the OnlineAVL window will appear with the “Remote
Login” screen open.
Menu Bar
) on the Windows Quick Start bar at the bottom of your
Vehicle Display Screen
Map Display Screen
Remote Login Screen
Control Bar
Vehicle Activity Screen
Map Toolbar
Status Bar
4.3. LOGIN
To login to OnlineAVL:
1. Enter your “User Name” and “Password” (case sensitive) as provided to you by your
Navman Wireless Account Manager or your OnlineAVL administrator.

2. Click “OK”.
4.4. IF YOU ARE UNABLE TO CONNECT
Are you using Microsoft Windows 95?
You may need to download Microsoft Winsock 2 from the Microsoft web site.
1. Go to www.microsoft.com.
2. Search for the Winsock 2 Update.
3. Follow the Microsoft instructions.
4. When the download is complete, try logging onto your OnlineAVL application again.
Are you connecting to the Internet through a firewall?
If you see a “No server available” message when attempting to log into OnlineAVL, you may have
an issue with permissions through your network firewall. Contact your Network Administrator for
help. You can advise your Administrator that they can refer to the “OnlineAVL Client-Server
Network Connectivity” section of the Help File.
4.5. SETTING UP A PRINTER
To set up a printer for your OnlineAVL application:
1. Select: “File” > “Printer Setup” from your OnlineAVL Menu bar
2. Select the name of the printer that you want as your default printer
3. Click “OK”.
4.6. CHANGING YOUR PASSWORD
To change your OnlineAVL Login password:
1. Select: “File” > “Password” from the OnlineAVL Menu Bar
2. Enter your existing password
3. Enter your new password
4. Confirm your new password entry again
5. Click “OK”. Your new password will replace the old one.
NOTE: both your “User Name” and “Password” are case sensitive.
4.7. DISCONNECTING FROM THE ONLINEAVL SERVER
To terminate your OnlineAVL user session, select: “File” > “Disconnect” from the OnlineAVL
Menu bar.
4.8. EXITING THE APPLICATION
To exit the OnlineAVL application, select: “File” > “Exit” from the OnlineAVL Menu bar.
You can also exit the application by clicking on the Close (
OnlineAVL window.
) icon on the top right corner of your
5 - OPERATING ONLINEAVL
r
r
r
r
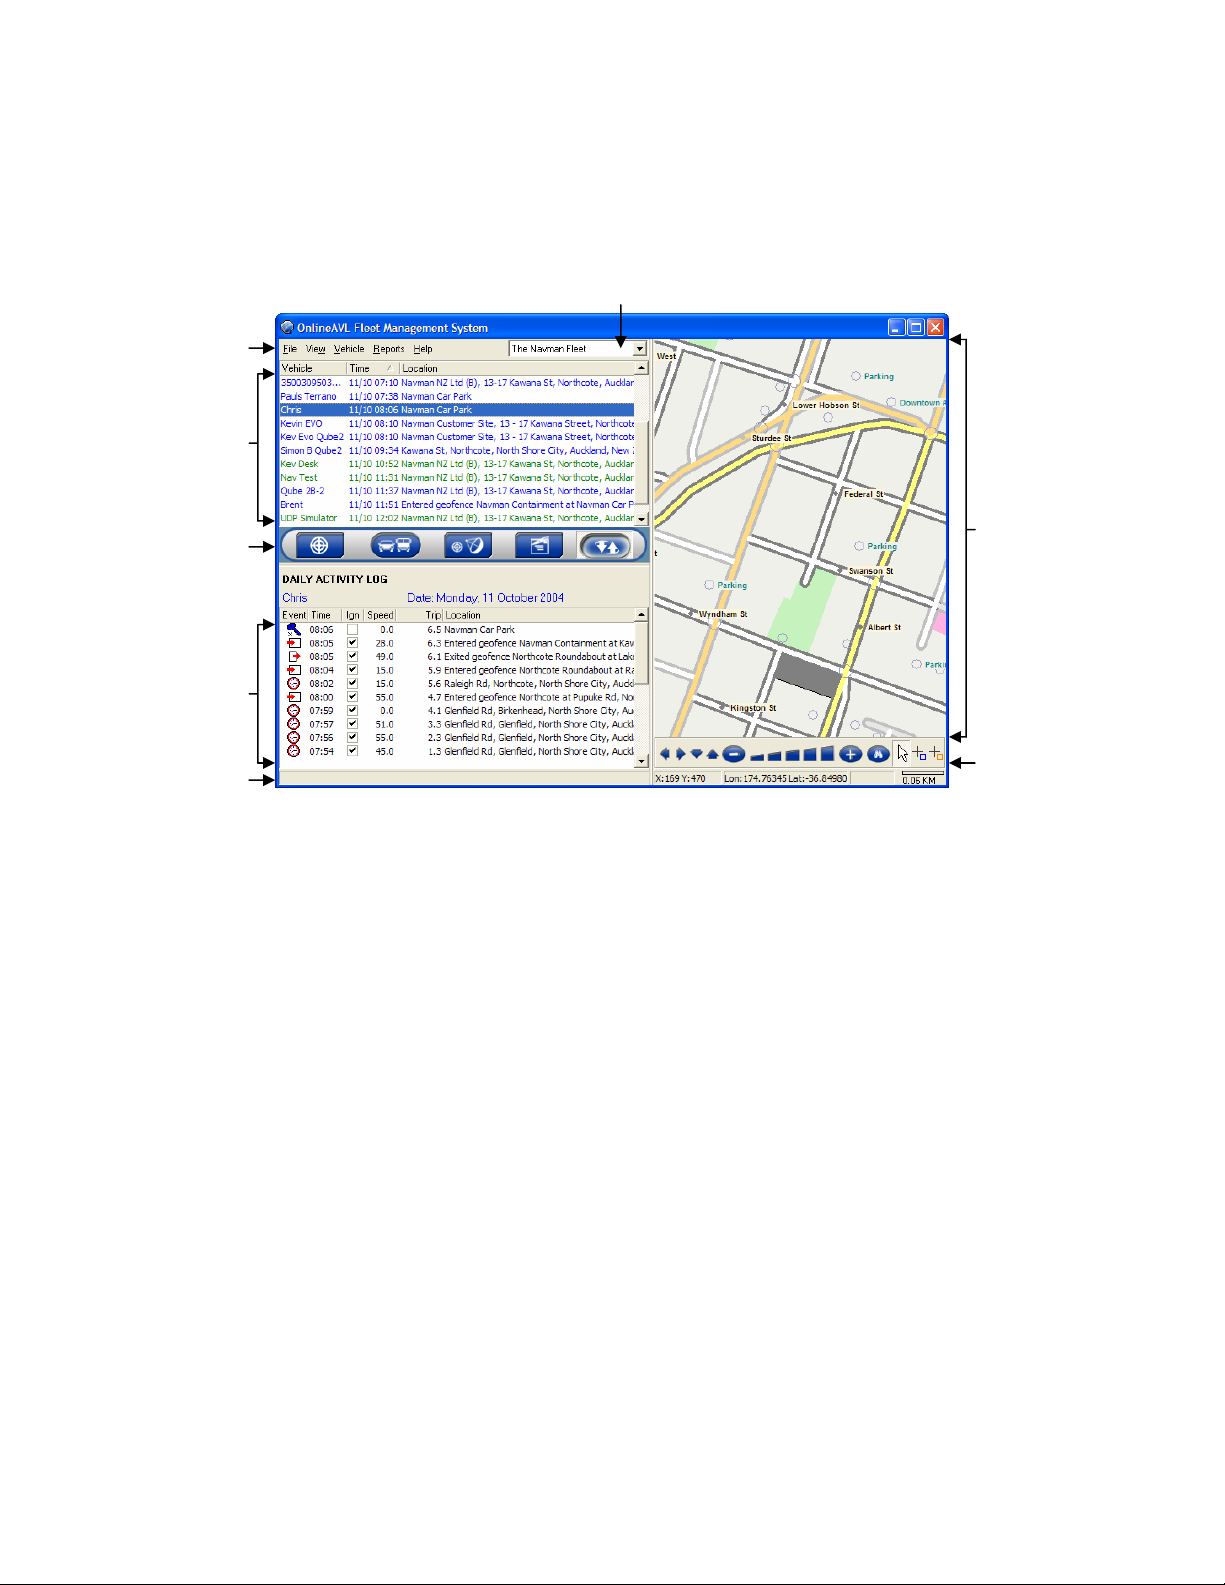
5.1. ONLINEAVL SCREEN
Fleet Selection
Menu
Ba
Vehicle
Display
Screen
Control
Ba
Vehicle
Activity
Screen
Map
Display
Screen
Status
Ba
Map
Toolba
5.2. VEHICLE DISPLAY SCREEN
The Vehicle Display Screen provides a list of the vehicles in your fleet. Vehicles are listed by
name and their last known location is also shown. Vehicles shown in green have their ignition on,
while vehicles shown in blue have their ignition off.
To select a single vehicle:
• Left click with your mouse on a vehicle name in the Vehicle Display Section
• If you double click on a vehicle its location will appear in the Map Display Screen
• If you right click on a vehicle in the Vehicle Display Screen, a Function Menu will appear
(see section 5.3 for more information)
To select multiple vehicles:
• While holding down the ‘CTRL’ key, select the vehicles of your choice in the Vehicle
Display Screen by clicking on them with your mouse.
To select a range of vehicles:
• Select the vehicle at the top of the range you want in the Vehicle Display Screen
• Hold down the ‘Shift’ key
• Select the vehicle at the bottom of the range you want in the Vehicle Display Section
• Release the ‘Shift’ key
5.3. FUNCTIONS MENU (RIGHT CLICK MENU)
To access the Functions Menu:
• Select the vehicles you want from the Vehicle Display Screen

• Right click your mouse on the vehicle(s) you have selected. The Functions Menu will
appear next to your mouse pointer
• Roll the mouse pointer over the function you want
The Functions Menu gives you access to a range of options and tools:
• Show Vehicle Groups: displays the vehicles listed in the Vehicle Display Screen by
group. These groups can be set up under any grouping you require, such as: tru cks,
vans, cars, North group, South group, etc.
• Replay a Day: shows a graphical history of vehicle activity for a given day. You can then
replay a journey or the day’s activity with event icons overlaid on the map.
• Last Known Location: refreshes selected vehicles’ activity and provides their latest
update in the Vehicle Activity Screen
• Display Vehicle on Map: displays the selected vehicles on the map at the time of the
latest update.
• Current Location: queries the position of the selected vehicles in real-time.
• Vehicle Details: lists your fleets’ vehicles and their detailed information.
• Send Message: sends text messages to vehicles equipped with a Navman Mobile Data
Terminal or equivalent device.
• ConEx Setup: not visible by all users. Allows you to configure data from the optional
ConEX telemetry module. You can then report on events such as lights on/off, doors
open, temperature, etc. See section 5.17.
• ConEx Output: not visible by all users. Allows you to configure commands to the vehicle
via the optional ConEx telemetry module. You can then instruct the vehicle to perform
certain functions such as switch on a refrigerator or disable the eng ine. See section 5.17.
• Reports: provides a list of reports available for the vehicle. See section 5.15.
5.4. CONTROL BAR
The Control Bar provides a quick access to the most commonly used functions in OnlineAVL. To
quickly access any of these functions, ensure that you have selected the vehicle(s) you want in
the Vehicles Display Screen and click any of the function buttons below:
• Refresh: (
the latest updates received.
• Show Vehicle on Map: (
are selecting several vehicles, the map will automatically be adjusted to fit all vehicles
requested. The vehicles selected will appear as a red arrow icon
vehicles will appear as blue
• Get Current Location: (
displays the results in the Vehicle Activity Screen. The
Event column of the Vehicle Activity Screen matching this update, and the Status Bar will
indicate the status of the query.
• Send Message to Vehicle(s): (
selected by directly typing your own message or sending a preset canned message.
NOTE: This function is only available to vehicles fitted with a Mobile Data Terminal.
• Activity Log / Message Log: (
the Message Log Screen.
) refreshes the Vehicle Activity Screen and Vehicle Display Screen with
) positions the selected vehicle(s) on the map. If you
, while all other
or green arrows matching their ignition status.
) queries the selected vehicle's position in real-time and
icon will be displayed in the
NOTE: Only one vehicle can be polled at a time.
) allows you to send messages to the vehicles
) toggles between the Vehicle Activity Screen and

5.5. VEHICLE ACTIVITY LOG
The Vehicle Activity Screen shows a log of the vehicle’s activity for the current day (this period is
user definable) in the form of ‘events’. This log includes:
• Ignition (on/off)
• Automatic time and distance updates
• Battery on/off
• Geofence entry/exit
• MDT on/off
• Position queries
• Movement with ignition off
• ConEX events - if your vehicle is equipped with a ConEX device.
The information displayed also includes the time, date, speed, distance travelled, and location.
To View a Vehicle’s Activity
1. Select a vehicle from the Vehicle Display Screen by clicking on it. The vehicle’s activity
details will then appear in the Vehicle Activity Screen.
2. The latest update is at the top of the list, the oldest, at the bottom.
5.6. STATUS BAR
The Status bar indicates the status of OnlineAVL activity. This includes the status of your login
progress, a vehicle’s query, the latitude/longitude of your cursor over the Map Display Screen,
your message updates, etc.
5.7. MAP TOOLBAR
Map Navigation: You can navigate around the map by clicking on the four navigation buttons
(
Map Boundaries Navigation: You can also navigate by moving your mouse pointer to the map
bounder. When the pointer is close to the borders or corners of the map it will change into a
panning arrow (
simply left click and the map will automatically scroll in that direction.
Zoom: (
• Clicking on the + or - keys on the Mapping Tool Bar
• Clicking on any of the five scale zoom settings (
• Holding down the left button of your mouse and dragging/drawing an area on the map
) to scroll up, down, left of right.
). When you see a panning arrow in the direction you desire,
) You can zoom in and out within the Map Display Screen by:
). From left to right, the
five settings approximately translate to the following levels, although, this varies by
country:
o Country View
o State View
o Regional View
o City View
o Suburb View
with your mouse pointer. The map will then automatically resize to the dimensions of the
area you have just drawn. This is an excellent way to zoom in on a group of vehicles from
a higher level view quickly.

Street Names: Most streets will automatically display a label with the name of the street. If a
street appears on the map without a name, simply hover your mouse pointer over the street for a
short time and a mouse tip label will appear with the name of that street.
NOTE: At higher level views, not all streets or map detail can be seen. Often you will need to
zoom in closer to an area to see greater detail such as surface streets or st reet names.
Search Map: (
1. Click on the Search button in the Map Toolbar that looks like a pair of binoculars.
2. Enter a street or place name, town or city, postcode (only available in the UK) and
country by separating these fields with a comma. You don’t need to specify the type of
street you are looking such as ‘road’, ‘rd’, ‘street’, ‘st.’, ‘avenue’, ‘ave’, etc. as the search
will return a list of all streets that match your search.
3. Click ‘Search’. OnlineAVL will run the search briefly and then display a list of all possible
matches.
4. Select the address you desire from the options listed.
5. Click ‘Go to’. The result of your search will appear highlighted in green on the map.
Geofence and Site Drawing: (
Geofence and Customer Site sections of this guide (sections 5.13 and 5.14).
) You can perform a search for a street name, town, country or postcode.
) For further details on these functionalities, refer to the
5.8. MAP DISPLAY SECTION
The Map Display Screen allows you to see the last known location of vehicles in your fleet. You
can also freely navigate around the map or search for addresses.
5.9. SHOW NEAREST
This function allows you to identify the vehicles closest to a location on the Map Display Screen.
To Show the Nearest Vehicles to a location:
1. Right Click within the Map on the location you are interested in.
2. A menu will appear with ‘Show Nearest’ on top. Select this.
3. The ‘Nearest Vehicles’ window will appear on top of your OnlineAVL application listing
the vehicles closest to the location by order of proximity. Note the ‘Max Distance’ box at
the top of this window. You can change this value dynamically by simply typing in a new
value. The list of vehicles will automatically grow or shorten depending on whether you
expand or reduce the search radius.
5.10. MENU BAR
The OnlineAVL Menu Bar allows you to access many of the OnlineAVL functions by simply
clicking on the menu item and scrolling down to the appropriate option.
FILE
• Connect: connects you onto the OnlineAVL application.
• Disconnect: disconnects you from the OnlineAVL application.
• Settings: allows you to access the Settings Menu
o Alerts: configuration options for OnlineAVL pop-up al erts
o General: configuration options for OnlineAVL general settings such as displaying
distance in on mile or kilometers
• Administration: allows you access to the Administration Menu
o Vehicles
o Drivers
o Geofences

o Canned Messages
o Sites
o Standard Messages
o Maintain Types
• Printer Setup: sets up the default printer for your OnlineAVL application.
• Servers: displays the OnlineAVL servers you can access.
settings unless you are prompted to do so by your Navman Wireless Customer Support
Representative.
• Password: changes your OnlineAVL access password.
• Exit: closes your OnlineAVL application.
VIEW
• Show Sites: toggles the display of the blue sites (Customer Sites) on and off on the map.
• Show Geofences: toggles the display of the orange geofence sites on and off on the
map.
• Show Vehicle Groups: if you have configured vehicles into groups using the Vehicle
Administration settings, you can toggle the Vehicle Display Screen between the list view
and group view.
• Refresh Vehicles: refreshes the Vehicle Display Screen with the latest available data
• Refresh Activities: refreshes the Vehicle Activity Screen with the latest available data
• Refresh Messages: refreshes the Message Log Screen with the latest available data
VEHICLE
• Replay a Day: shows a graphical history of vehicle activity for a given day. You can then
replay a journey or the day’s activity with event icons overlaid on the map.
• Last Known Location: refreshes selected vehicles’ activity and provides their latest
update in the Vehicle Activity Screen
• Display Vehicle on Map: displays the selected vehicles on the map at the time of the
latest update.
• Current Location: queries the position of the selected vehicles in real-time.
• Vehicle Details: lists your fleets’ vehicles and their detailed information.
• Send Message: sends text messages to vehicles equipped with a Navman Mobile Data
Terminal or equivalent device.
• ConEx Setup: not visible by all users. Allows you to configure data from the optional
ConEX telemetry module. You can then report on events such as lights on/off, doors
open, temperature, etc. See section 5.17.
• ConEx Output: not visible by all users. Allows you to configure commands to the vehicle
via the optional ConEx telemetry module. You can then instruct the vehicle to perform
certain functions such as switch on a refrigerator or disable the engine. See section 5.17.
REPORTS
Please refer to section 5.15 for a full list of available reports from this menu and a description of
their function.
HELP
• Contents: opens the OnlineAVL Help File for online help and topic searches.
• About: opens the OnlineAVL About box with information on your OnlineAVL version
number, the Navman web site address (
www.navman.com) and product credits.
NOTE: Do not modify server
5.11. FLEET SELECTION
If you have more than one fleet of vehicles, you can use the Fleet Selection box to access your
other fleet(s). OnlineAVL will dynamically change to display your selected fleet, so you do not
need to log in and out and can quickly swap between fleets.

4.12. ICONS
Ignition on
The vehicle connected to your tracking device is turned on.
Ignition off.
The vehicle connected to your tracking device is turned off.
Entering a Geofenced area.
The vehicle connected to your tracking device has entered a Geofence area (see "Geofence"
section of this Help).
Exiting a Geofenced area.
The vehicle connected to your tracking device has exited a Geofence area (see "Geofence"
section of this Help)
MDT on-line.
The Mobile Data Terminal of the vehicle connected to your tracking device is turned on.
NOTE: This is only applicable to vehicles equipped with a Mobile Data Terminal MDT-800.
MDT off-line.
The Mobile Data Terminal of the vehicle connected to your tracking device is turned off.
NOTE: This is only applicable to vehicles equipped with a Mobile Data Terminal MDT-800.
Vehicle position queried.
The position of the vehicle connected to your tracking device has been queried.
Vehicle moved with ignition off.
The vehicle connected to your tracking device has moved while its ignition is off. This can mean
that the vehicle is being stolen, towed away, loaded on a ferry, etc.
Timed update
The position of the vehicle connected to your tracking device has been updated according to the
time and distance settings determined on installation of the units.
Power removed and restored
The battery disconnection or voltage of the vehicle equipped with your tracking device has
dropped below the device's minimum operating voltage. This can happen when you are cranking
the vehicle if the battery is in poor or discharged condition and is most evident on 12-volt
systems.
5.13. GEOFENCES
A Geofence is an area you can draw on the map in the Map Display Screen. Geofences appear
as an orange rectangle or square and can basically be as large or as small as you want to draw
them.
The purpose of a “Geofence” is that it allows you to set your vehicle’s tracking device (Halo) so
that all entries and exits into or out of a preset area can trigger event logs and alert notifications.
You can have up to 30 Geofences per vehicle.
When a vehicle enters/exits a Geofence, the entry/exit will be logged into the vehicle’s activity log
with the matching entry (
driver will also receive a Geofence entry/exit message on his terminal.
VIEW/HIDE GEOFENCES
To view/hide the geofences on the map:
1. Right-click anywhere on the map
2. Click/unclick .Show Geofences.
) or exit ( ) icon. If the vehicle has a Mobile Data Terminal, the

FIND A GEOFENCE
To find a geofence:
1. Select: ‘Admin’ > ‘Geofences’
2. Select the geofence wanted
3. Click on ‘Find’ on Map.
SET UP A GEOFENCE*
1. Click on the Add Geofence icon (
location where you want to create a geofence and select ‘Add Geofence’.
2. Drag a box around the location wanted. The ‘Geofence Details’ window will appear as
soon as you release your mouse.
3. Enter a name for the geofence you have just drawn. If you want any entry or exit to this
geofence to trigger email alerts, enter the necessary emails addresses.
4. Once you are satisfied with the information provided, click ‘Ok’. If you want to cancel the
operation, click ‘Cancel’.
EDIT A GEOFENCE*
1. To edit or delete a geofence, right-click on the boundary of the geofence selected:
2. To delete the geofence, select ‘Delete’.
3. To edit the name or email address list for the alerts, select ‘Edit Properties’.
4. To move the geofence to another location, select ‘Redraw on Map’.
SENDING GEOFENCES TO VEHICLES*
To send all geofences to all vehicles:
1. Select: ‘Admin’ > ‘Geofences’.
2. Click on ‘Send All’.
To send specific geofences to a vehicle:
1. Select: ‘Admin’ > ‘Vehicles’.
2. Double-click on the vehicle of your choice
3. Click on the ‘Geofence’ tab
4. Select geofences by holding ‘Ctrl’ and clicking on the geofences needed
5. Click on ‘Send’.
NOTE: that when you send a set of geofences to a vehicle, you reset the Geofence
memory on the vehicle. If you want to send one additional Geofence to a vehicle, you
need to send the complete updated set of geofences. Adding one Geofence will
overwrite all other stored geofences.
*These functions are security-dependent, and therefore not all users have access to them.
NOTE: A key difference between a geofence and a customer site is that a geofence is
programmed into the tracking device on a vehicle and is limited to 30. A customer site is only
defined on the Navman Fleet Manager Server and you can have any number of customer sites.
Use geofences for areas of interest where you want to be 100% certain that a vehicle has passed
through regardless of whether they stop or not. A geofence can be used to define an area of
operation that a vehicle works within. You can then later determine the time and distance that a
vehicle spends inside that geofence. Use customer sites when you know that a vehicle will be
stopping and you want to record how long that vehicle is stopped there or you want to define a
location for general reporting purposes.
) at the bottom of the map screen or right-click on the
5.14. CUSTOMER SITES
A customer site is an area you can draw on the map in the Map Display Screen. Customer sites
appear as a blue rectangle or square and can basically be as large or as small as you want to
draw them.

A Customer Site allows you to set the OnlineAVL application so that the application will report on
events that occur within a set area. You can create up to 1,500 Customer Sites per fleet.
VIEW/HIDE SITES
To view/hide the sites already defined on the map:
1. Right-click anywhere on the map.
2. Click/unclick ‘Show Sites’.
FIND A SITE
To find a site:
1. Select: ‘File’ > ‘Admin’ > ‘Sites’.
2. Select the site wanted.
3. Click on ‘Find on Map’.
SET UP A SITE
1. Click on the ‘Add Site’ icon (
location where you want to create a site and select ‘Add Site’.
2. Drag a box around the location wanted. The ‘Site Details’ window will appear as soon as
you release your mouse.
3. Enter the details necessary for the site you have just drawn.
4. Once you are satisfied with the information provided, click ‘Ok’. If you want to cancel the
operation, click ‘Cancel’.
EDIT A SITE
1. To edit or delete a site, right-click on the boundary of the site selected:
2. To delete the site, select ‘Delete’.
3. To edit the name of a site, select ‘Edit Properties’.
4. To move the site to another location, select ‘Redraw on Map’.
NOTE: You cannot delete a site which has a history or previous vehicle activity associated with it.
) at the bottom of the map screen or right-click on the
5.15. REPORTS
The Report menu allows you to generate reports on your fleet’s activity.
To select a report:
Method 1:
1. Click on the vehicle(s) you want to report on in the Vehicle Detail Screen.
2. Select ‘Reports’ from the Menu Bar.
3. Scroll to the report of your choice.
Method 2:
1. Select the vehicle(s) you want to report on in the Vehicle Detail Screen
2. Right click your mouse over the selected vehicle(s) to bring up the Functions Menu.
3. Scroll to the bottom of the Functions Menu to ‘Reports” which will open a sub-function s
menu with a list of reports. Select the report you desire.
Reports Available:
• Activity Report: generates reports on the selected vehicle’s activity over a requested
period of time. The report indicates all automatic time and distance updates, as well as all

events recorded that day (ignitions on/off, location queries, Geofence entry/exit, battery,
MDT, etc.).
• Customer Site Report: generates reports on the Customer Sites selected over a
requested period of time. The report provides the date of the visits, time on-site and
identity of the vehicle and vehicle’s driver.
• Geofence Report: This report allows the user to view details on some or all of the
geofences that a vehicle has visited over a specified date range. Reports can be
generated on a per vehicle basis, per geofence basis, or a combination of both. This
report is designed to allow the user to determine the time spent and distance traveled
inside of a geofenced area.
• Idle Report: generates idling information on the selected vehicles over a period of time.
The report allows you to determine a maximum idling time above which any idling activity
will be recorded.
• Mileage Report: generates reports on the selected vehicl e’s mileage over a requested
period of time. The report provides the mileage completed per day per vehicle as well as
the total fleet mileage completed over the period selected.
• Vehicle Overspeed Report: generates reports on the selected vehicle’s peak speed
over a requested period of time. The report allows you to determine a speed limit above
which all speed will be recorded.
• Stop Report: generates reports on the selected vehicle’s stops. The report lists the
locations where the vehicles stopped, the date and time of the stops, and time on site.
• Trip Report: generates reports on the selected vehicle’s journeys. The report lists the
date, time, location of the stops, ignitions on/off, distance traveled, time traveled and time
on site per journey, as well as the overall distance traveled, time traveled, and time on
site.
• Speed Analysis Report: This report allows the user to analyze the pattern of speed for
how a vehicle is being driven over time. You may run the report based on selected
vehicles or drivers. The report also allows you to perform a graphical comparison of up to
five vehicles or drivers at a time. The report can be generated over user defined speed
bands so that you can see what proportion of time a vehicle is traveling in a particular
speed bracket. The report supports up to 10 'Speed Bands'.
To Print a Report
All Reports can be printed by clicking on the Print icon (
) on the top left corner of the Report
window. The print outs will be sent to the default printer initially set up for the OnlineAVL
application.
Export to an Excel Compatible (CSV) Format
This function allows you to save a report to an Excel compatible comma separated file (CSV) and
manipulate the data in order to obtain the information you are looking for.
To export a report’s data:
1. From any open report, click on the Print icon (
) on the top left corner of the report
window.
2. Tick the ‘Print to File’ box.
3. Click on the icon under the ‘Where’ section. A ‘Save As’ window will pop on top of your
application.
4. Select the location where you want to save your report information.
5. Enter the name under which you want to save the report data. Ensure that the name of
your document is followed by ‘.csv’.
6. Click ‘Save’ on the ‘Save As’ window. The window will automatically close and return to
the ‘Print’ window.
7. Click ‘Ok’ on the ‘Print’ window. The window will automatically close down and return to
the ‘Print Preview’ window.
8. Reduce or exit your report window.

9. Go to the location where your document has been saved.
10. Open your document by double-clicking on it. Your document will now open in Microsoft
Excel.
NOTE: We recommend that when you first open your CSV document you insert a new row on top
of the document to include the title of the columns listed (‘Vehicle’, ‘Date’, ‘Time’, ‘Time On Site’,
‘Speed’, ‘Destination’, etc.).
5.16. ALERTS
5.16.1. POPUP & AUDIBLE ALERTS
Alerts can be activated for incoming Mobile Data Terminal messages, ConEx events and
Geofence entries/exits. To activate these alerts, select ‘File’ > ‘Settings’ > ‘Alerts’. This will open
the ‘Alert Settings’ window. Simply click in the check boxes for the alert ‘Event Type Description’
you are interested in. You can specify different types of alerts for different events:
• Beep: OnlineAVL will generate an audible beep when an event is triggered. If this is the
only alert type selected, there will be no other alert other than the “beep”.
• Popup: This will generate a small alert window similar to a windows error message or
notification alert. This window will detail the nature of the alert, the vehicle affected and
the time and location of the alert event.
• Overall: This forces the popup alert to appear over the top of the OnlineAVL screen.
• Flash: This causes the OnlineAVL/Fleet Administrator tab in the lower windows taskbar
to flash when an alert is received.
5.16.2. EMAIL ALERTS
Email alerts can be generated whenever a vehicle enters or exits a geofence, or for certain
ConEx event alerts. To specify an email alert, follow these directions:
Geofence Email Alerts:
1. When you create a geofence (see section 5.13) you will see a window appear called the
‘Geofence Details’ window. At the bottom of this window are two boxes for email
addresses; one for when a vehicle enters the geofence, the other for when it exits.
2. Simply type in the email addresses you want. You can add multiple email addresses with
a semi-colon separation. E.g.
3. Note that you will need to setup email alerts for each individual geofence that you want to
receive alerts for.
ConEx Email Alerts:
NOTE: configuring ConEx data requires special security access and is recommended only for
experienced OnlineAVL users.
1. Select the vehicle that you want to receive alerts from (please ensure that the vehicle has
a properly configured ConEx first).
2. Select ‘ConEx Setup’, either by right clicking on a vehicle and using the Functions Menu,
or use the ‘Vehicle’ Menu in the Menu Bar.
3. Select the checked (active) hardware channel component that you want to receive alerts
for from the list provided and then press ‘Configure’. This will open the ‘ConEx
Configuration’ window.
4. You should now see the ‘Event Low’ and ‘Event High’ descriptions. If these are properly
configured, you should see a meaningful icon and description for that event type. Check
user1@mycompany.com; user2@mycompany.com etc.
the ‘Email Alert’ tick box and then click on the ellipses box (
the email alert bar. This will open a window where you can now add new email addresses
and select them. When done correctly, the email address should appear in the grey email
alert bar under the description box.
) on the right hand side of

There is no limit on the number of recipient email addresses listed, and these can include
standard or mobile phone email addresses.
5.17. CONEX
ConEx is an optional module that provides a means to connect external devices into your
OnlineAVL system in order to allow you to monitor or control these devices.
For further information on the ConEx, contact your Navman Wireless Representative or refer to
the ConEx Setup section of the Help menu available from your OnlineAVL application.

OFFICES
Australia
Unit 2, 5-13 Parsons St.
PO Box 1659
Rozelle, NSW 2039
Tel: + 61 (0) 2 9818 8382
Support: wirelessausupport.navman.com
Web Site: www.navmanwireless.com.au
New Zealand
7-21 Kawana Street
Northcote, Auckland
New Zealand
Tel: 0800 447 735 or + 64 9 481 0500
Support: 0800 GPS FLEET (0800 477 353) or wirelessnzsupport@navman.com
Web Site: www.navmanwireless.co.nz
United Kingdom
Innovation Centre
Keele University Science Park
Staffordshire
ST5 5NH
United Kingdom
Tel: +44 (0) 1782 557 950
Support: 0845 4561660 or support@navmanwireless.co.uk
Web Site: www.navmanwireless.co.uk
This document contains confidential and proprietary information that belongs to Navman NZ Ltd. Using any of the
information contained herein, copying or imaging all or part of this document by any means, or disclosing any of its
content to third parties is strictly forbidden without express written consent of NAVMAN.
Copyright © Navman NZ Limited 2005
NAVMAN is a registered trademark of Navman NZ Limited
All rights reserved
Web Site www.navman.com or www.navmanwireless.com
 Loading...