

Page 1
M-Nav 900/950 | User Manual
1
M-Nav 900/950
User Manual
GPS Tracking and Fleet Management Solutions
Page 2

M-Nav 900/950 | User Manual
2
Copyright
© Copyright 2015 Navman Wireless Holdings LP. Navman Wireless is a registered trademark of Navman
Wireless Holdings LP. All rights reserved.
All other trademarks and registrations are the property of their respective owners.
REVISED: MAY 4, 2015
Page 3

M-Nav 900/950 | User Manual
3
Contents
1 Introduction 4
1.1 Important Safety Information 4
1.2 Disclaimer 4
1.3 Glossary of Terms 5
2 The M-Nav 900/950 6
2.1 Box Contents 6
2.2 M-Nav 900/950 Familiarisation 7
2.3 M-Nav 900/950 Specifications 8
3 Installing the M-Nav 900/950 in a Vehicle 9
3.1 Attaching the Docking Cradle to the Windshield 9
3.2 Adding the M-Nav 900/950 to the Docking Cradle 9
4 Getting Started 10
4.1 Disclaimer and Warning screens 10
4.2 Driver Log In & Status 11
4.3 Setting Truck Attributes 11
4.4 Viewing the Current Navigation 12
4.5 Checking the GPS Status 13
4.6 Checking the Qube Tracking Device Status 13
4.7 Settings 14
4.8 Information Screen 14
4.9 Driver Log Out 15
5 Voice Command 16
5.1 Activating Voice Command 16
5.2 Starting a Route Using Voice Command 16
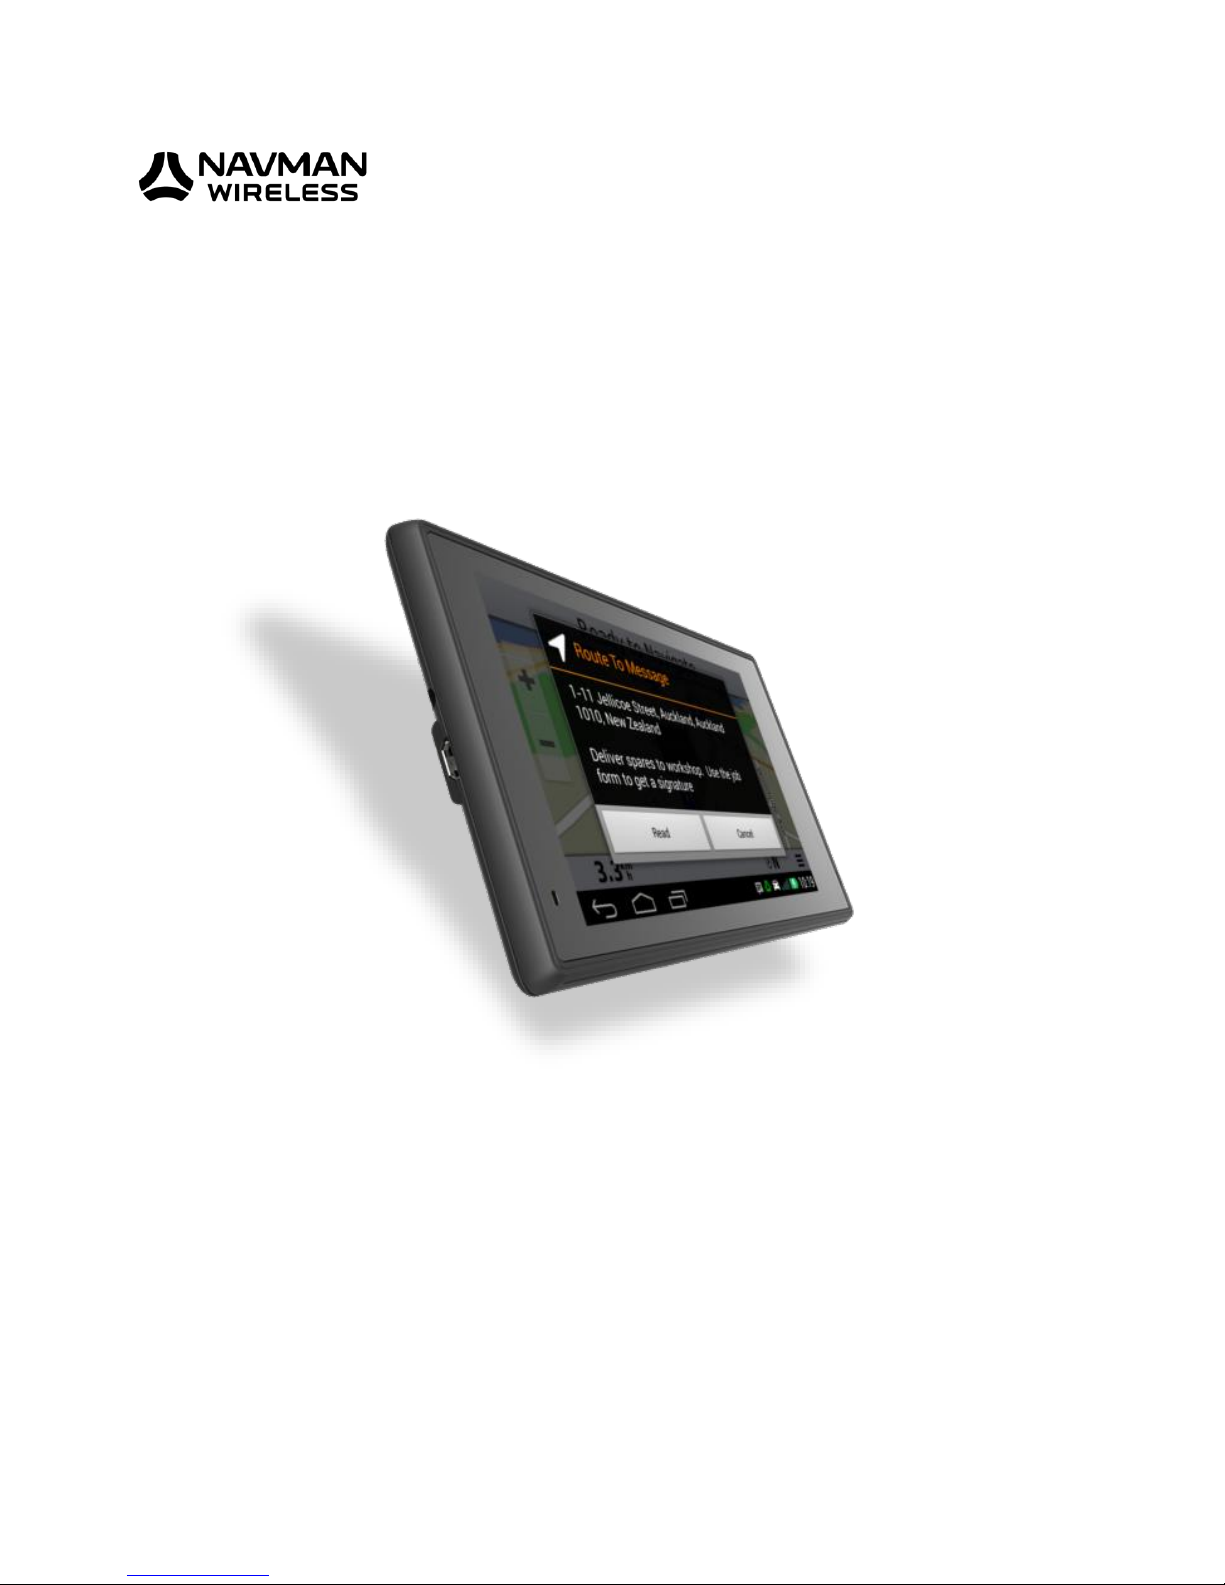
6 Messages 18
6.1 Types of Messages 18
6.2 Form Fields 19
6.3 Receiving a New Message 21
6.4 Reading a Received Message 22
6.5 Replying with a Canned Template or Reply Form 22
6.6 Sending a Form 23
6.7 Viewing a Sent Message 24
6.8 Creating a New Message or Free Text Reply 24
6.9 Navigating to a Route To Location 25
6.10 Showing a Route To Location 25
6.11 Deleting a Message 26
7 EMS (Engine Monitoring System) 27
7.1 Displaying EMS information 27
7.2 Viewing Trip Information 27
7.3 Setting up EMS Options 28
7.4 Changing the EMS Dashboard Screen 28
8 Working Time 29
8.1 Changing Driver Status 29
9 Setting Your Preferences 30
9.1 Setting the Locale 30
9.2 Setting the Language 30
9.3 Restoring Factory Default Settings 30
10 Contact Information 32
Page 4

M-Nav 900/950 | User Manual
4
1 Introduction
Thank you for purchasing the Navman Wireless M-Nav 900 or M-Nav 950 messaging and navigation device.
We hope you enjoy using it. It has been carefully designed so it is easy to install, set up, and use.
You can:
use the message option to receive messages from, and send messages to, your fleet administrator
capture a customer signature as a proof of delivery on an electronic form
navigate directly to a location specified in a message from your fleet administrator
use the navigation option to search for locations such as a street address, a postal code, or a city
center
set a location as the start point, a via point, or the destination
have the M-Nav 900/950 calculate the route then guide you along it with clear visual and verbal
instructions
check for places and points of interest such as fuel stops, nearby or along your route
add stops (via points) to your route
track the amount of time the driver spends on each task, and when a rest break is due
use the EMS option to display engine monitoring information and review engine monitoring statistics
at the end of a trip
1.1 Important Safety Information
Do NOT mount the M-Nav 900/950 where it obstructs the driver’s view or may distract the driver.
Do NOT mount the M-N 900/950 where it may interfere with the safe operation of the vehicle or the
deployment of airbags or other safety equipment. If necessary, consult the vehicle manual to ensure the
mounting location is safe.
Do NOT enter navigation data or other information into the M-Nav 900/950 while you are driving.
Comply with these safety instructions at all times. Failure to comply with these safety instructions may lead
to accidents, personal injury including death, property damage or violation of the law.
1.2 Disclaimer
Navman Wireless disclaims all liability for the installation and use of this product in a way that contributes
to injuries, death, property damage or violation of the law.
The user of this product is solely responsible for observing safe driving practices and for all use of this
device. It is the user’s responsibility to operate the M-Nav 900/950 in accordance with the law.
The M-Nav 900/950 provides route information for guidance only. Accordingly it is your sole responsibility
to consider the height, weight, length or Hazmat classification of your vehicle and to ensure that it is legally
and physically able to travel over routes that may include narrow, twisting or steep roads; weak, narrow or
low bridges; tunnels or other obstacles on the route determined by this M-Nav 900/950.
This manual represents the M-Nav 900/950 at the time of printing. Navman Wireless reserves the right to
make changes to specifications without notice.
Page 5

M-Nav 900/950 | User Manual
5
1.3 Glossary of Terms
Common terms used in this manual and on the M-Nav 900/950 include:
GPS
The Global Positioning system (GPS) is a network of satellites that orbit the Earth
at about 12,000 miles (19,300 kms) and transmit accurate time and position
information worldwide. The GPS receiver in your M-Nav 900/950 picks up signals
from any satellites in view and uses the information to determine your location,
accurate to within 15 ft (5 m). Usually, only three signals are needed to provide
a latitude and longitude position (GPS fix) for vehicle navigation systems.
POI
Point of Interest (POI) is a useful resource along or nearby the route, such as a
fuel location or a post office. You can add a POI to your route as a via point.
Via Point
A specific location that you want to visit along the route. A via point can be any
location that you specify, such as a customer site or a POI.
Destination
The next via point along your route.
Final Destination
The final via point along your route. It is always marked with a chequered flag.
Trip
The complete list of via points that you specify; including the start location, the
final destination, and any via points between.
Route
When you have defined all the via points in your trip, the M-Nav 900/950 will
calculate the best route automatically after it obtains a GPS fix. Your route shows
the path to drive. Only one route can be shown on the map at a time.
Qube
Tracking and communications device.
OnlineAVL2
Application
Desktop application used by fleet administrators to send messages and monitor
vehicle locations.
Swipe
Touch the screen and move in the indicated direction (e.g. Swipe up) without
breaking contact with the screen.
Page 6

M-Nav 900/950 | User Manual
6
2 The M-Nav 900/950
2.1 Box Contents
The M-Nav 900 and M-Nav 950 are physically identical and have the same contents in the box.
NOTE: Check that you have ALL of the items pictured below before you start the installation. Contact your
supplier if anything is missing.
Micro-USB cable
Magnetic device bracket
Suction cup
window mount
M-Nav 900/950
Page 7

M-Nav 900/950 | User Manual
7
2.2 M-Nav 900/950 Familiarisation
Component
Description
1
MicroSD card slot
Use this slot for installing updates via SD
2
Audio jack
For headphones or external speaker
3
MicroUSB
Use this connector to mount the M-Nav as a
USB device
4
Volume Up
Increases the speaker volume
5
Volume Down
Decreases the speaker volume. When pressed
simultaneously with the Power button (9), this
button will save a screen shot.
6
Magnetic mount
Attaches the device to the magnetic mount
7
NFC sensor
Near Field Communications (not currently used)
8
Speaker
9
Power On/Off
Short press to suspend or resume.
Press and hold to turn on or off.
When off and connected to external power, a
short press will show the battery charge level
Page 8

M-Nav 900/950 | User Manual
8
2.3 M-Nav 900/950 Specifications
Component
Description
Display
800x480 6.1” WVGA
Touch Panel
Capacitive Touch
Processor Type
MediaTek MT8123, 1.2 GHz quad-core
Operating System
Android 4.2 or greater (Jelly Bean)
Storage
16 GB Capacity
Memory
1 GB NAND
Battery
1500 mAh Li-ion
Micro SD Slot On Unit
Capable of 4 GB or greater SDHC
Speaker
Single, 40x30 mm
Cradle
Garmin magnetic mount with Garmin ball adapter
Temperature:
Operating range
Storage range
Battery charging
-20~60°C
-30~80°C
In order to avoid battery degradation, long term storage should be from 0°C to
25°C.
0~45°C
Humidity:
Operating range
Storage range
0~90%
0~90%
Voltage
5V (via Qube)
Page 9

M-Nav 900/950 | User Manual
9
3 Installing the M-Nav 900/950 in a Vehicle
Refer to the Garmin manual for instructions on assembling the docking cradle and windscreen mount, and
installing the unit in the vehicle.
3.1 Attaching the Docking Cradle to the Windshield
NOTE: Some windshields contain areas of tinted glass that may interfere with the GPS signal. Do not
mount the M-Nav 900/950 in these areas.
Read the Important Safety Information in Section 1.1.
1. Connect the magnetic mount to the suction cup by firmly pressing the socket on the mount of the
ball on the suction cup arm.
2. Decide where to locate the suction mount on the windshield. Use an alcohol swab to thoroughly
clean that area of the windshield, then dry the area with a soft, lint-free cloth.
3. Press the suction cup firmly against the windshield for 3 seconds.
4. Push the lever down to vacuum-seal the suction cup to the windshield.
Now you are ready to add the M-Nav 900/950 to the docking cradle (see Section 3.2).
3.2 Adding the M-Nav 900/950 to the Docking Cradle
The M-Nav 900/950 attaches magnetically to the cradle. Simply align the unit with the cradle in the center
of the back face and when the M-Nav and cradle are close enough, the magnets will snap the two together.
The magnets are positioned to prevent the M-Nav being attached in the wrong position. If you feel
resistance, check that the cradle is correctly oriented (the word “Garmin” should appear the right way up)
and the M-Nav is in landscape orientation (also with the word “Garmin” should appear the right way up).
NOTE: The M-Nav 900/950 will charge only when connected to a Qube tracking device in a standard
vehicle installation, or when using an AC adaptor supply. It will not charge effectively when connected to a
standard USB connection through a PC or similar and powered on.
IMPORTANT:
The M-Nav
900/950
must be in the docking cradle and connected to the Qube tracking
device in order for you to report your driver status, send and receive messages, and otherwise
communicate with your fleet administrator through the OnlineAVL2 application.
The start-up screen will display automatically (see Section 4).
Page 10

M-Nav 900/950 | User Manual
10
4 Getting Started
4.1 Disclaimer and Warning screens
NOTE: The following sequence of screens will appear the FIRST time you use your M-Nav 900/950, or
when the M-Nav is restarted following a factory reset.
After a factory reset, you will be asked to accept the Garmin
and associated software end user licence agreements. It is
necessary to scroll down to the bottom of the page before
pressing Accept All
The ‘Warning’ screen is displayed automatically.
If you accept the warnings, select Agree.
If your device is an M-Nav 950 (Garmin 670) you will be
warned about the navigation mode (truck vs. car) and offered
the opportunity to switch mode. If you wish to use the truckspecific routing features, press Switch Mode and then choose
Truck/Lorry. You can then set up a profile specific to your
vehicle (see Section 4.4).
If the ‘Main Menu’ is displayed, your M-Nav is ready to use. The
number of icons displayed in the ‘Main Menu’ depends on the
features that have been enabled by your fleet administrator.
NOTE: If a different screen is displayed instead of the ‘Main
Menu’, see the next section.
Page 11

M-Nav 900/950 | User Manual
11
4.2 Driver Log In & Status
NOTE: These screens will only be displayed if your fleet administrator has set up the Driver Login and
Driver Status functions in the OnlineAVL2 application. If these have been enabled, you cannot use the MNav 900/950 until you enter these details.
IMPORTANT:
The M-Nav 900/950 must be in the docking
cradle and connected to the Qube tracking device in order for
you to report your driver status to your fleet administrator
through the OnlineAVL2 application. The Navman Wireless icon
in the bottom status bar will show green when the M-Nav has a
connection to the Qube. It shows yellow when not connected.
If the login screen is displayed, use the onscreen keypad to
enter your Driver PIN (Personal Identification Number), then
select Log In.
If the ‘Driver Log In Status’ screen appears, select the
description that best describes your current status (e.g.
Driving, Other Work, Rest Break, etc.).
The check shows the current status.
4.3 Setting Truck Attributes
NOTE: The M-Nav 950 can store multiple truck profiles that define the dimensions and cargo of your truck.
The Garmin navigation software uses this information to select the best route for you based on the
information in the map data. However, this information may not be completely accurate. You are
responsible for confirming your route and avoiding any hazards.
If you wish to use Truck Routing, select Switch Mode and
select Truck/Lorry
Page 12

M-Nav 900/950 | User Manual
12
If there is no current vehicle profile, you will be prompted to
create one. Follow the prompts to enter the details of your
truck and save the profile. You can edit your settings from the
Garmin Settings menu.
In this screen you can select an existing profile or switch to a
different profile. For more details on setting the Truck Profile
please refer to the Garmin user manual.
4.4 Viewing the Current Navigation
If you leave the Navigation screen, you can easily return to it from the Main Menu.
Go to the ‘Main Menu’ and select Navigation.
The map with the current navigation will be displayed.
Page 13

M-Nav 900/950 | User Manual
13
4.5 Checking the GPS Status
Your M-Nav 900/950 has an internal GPS antenna so you can always receive a GPS signal, find your current
location and use the M-Nav 900/950 for navigation. For best operation, ensure your M-Nav is positioned
where it has a good view of the sky.
If necessary, you can check the GPS status as follows:
In the ‘Main Menu’, swipe the notification bar upwards to show
the Notifications menu.
Press and hold to show the GPS status screen.
The display shows the satellites currently being used for
positioning and a graph of the relative signal strength.
The position, elevation, speed and positional accuracy are also
shown.
Select the back button to return to the main menu.
4.6 Checking the Qube Tracking Device Status
Your M-Nav is connected to a Qube tracking device that communicates information about your vehicle to
the OnlineAVL2 application.
The Qube tracking device also enables you and your fleet administrator to send and receive messages to
each other (see Section 5).
Page 14

M-Nav 900/950 | User Manual
14
To check the status of the Qube tracking device at any time,
display the ‘Main Menu’.
Check the colour of the Qube tracking device icon shown in
the notifications bar at the bottom of the screen.
Green
Contact has been established with the OnlineAVL2 application. You can send and
receive messages.
Yellow
The Qube tracking device is trying to make contact with the OnlineAVL2 application.
4.7 Settings
You can access the Settings page from the ‘Main Menu’ by
selecting Settings. From anywhere else inside the app, select
> Settings.
You can perform the following actions:
Clear Messages Inbox – Deletes all messages in the
inbox.
Clear Sent Items – Deletes all sent messages and
items.
Clear Canned Message Profile – Clears the profile
of canned messages.
Clear AVL-Form Definitions – Clears the definition
of the AVL-forms.
Clear Map Preference – Clears the default map
preference.
4.8 Information Screen
To access the Information Screen, you can select >
Information.
The Information screen displays the following:
AVLID – This is the AVLID that will be used to
associate data from the device to a device profile in
OnlineAVL2.
Version – Displays the version of the application
running on the M-Nav 900/950.
Build – The date and time when the build was
created.
Model – Displays the model of the M-Nav 900/950.
Android – Displays the Android OS version running on
the M-Nav 900/950.
Page 15

M-Nav 900/950 | User Manual
15
4.9 Driver Log Out
If you had to enter your Driver PIN and select a work status (as described in Section 4.2) before you could
use the M-Nav 900/950, you must log out when you have finished work.
NOTE: These screens will be displayed only if your fleet administrator has set up the Driver Login and
Driver Status functions in the OnlineAVL2 application.
To log off, display the ‘Main Menu’.
Select Log Out.
You will be prompted to confirm that you wish to log out.
Select OK.
The ‘Select Driver Log Out Status’ screen is displayed.
Select the description that best describes your current status.
You will be logged out and the login screen will be displayed.
Page 16

M-Nav 900/950 | User Manual
16
5 Voice Command
Voice Command allows you to use your M-Nav 900/950 by saying words or commands. The voice
command menu provides voice prompts and a list of available commands.
5.1 Activating Voice Command
To activate the Voice Command feature on your M-Nav
900/950, say Voice Command. A list of voice commands will
be displayed.
TIPS:
Speak in a normal voice directed at the device.
Reduce background noise, such as voices, or the radio, to increase the accuracy of the voice
recognition.
Speak commands as they appear on the screen.
Respond to voice prompts from the device as needed.
Listen for two tones to confirm when the device enters and exits voice command.
5.2 Starting a Route Using Voice Command
You can use the Voice Command feature to start a route.
Say Voice Command from anywhere in the application.
Say Find Address.
Page 17

M-Nav 900/950 | User Manual
17
When prompted, speak an address. A list of addresses is
displayed.
Say the line number of the correct address (e.g. “One”). The
address is displayed on the map.
Say Navigate.
Page 18

M-Nav 900/950 | User Manual
18
6 Messages
The M-Nav 900/950 can store an unlimited number of incoming and outgoing messages and forms.
6.1 Types of Messages
The Message feature on the M-Nav 900/950 enables you and your fleet administrator to communicate with
each other. There are three types of messages: Information and Route To messages, and Forms.
Information Messages
A unique message from your fleet administrator or a unique
message that you send.
From this screen you can select:
Back to close the message without sending a
reply.
Reply (see Section 5.4).
Delete (see Section 5.10).
Route To Messages
This type of message contains a location address in the first
line of the message. The M-Nav 900/950 can navigate you to
that address automatically.
From this screen you can select:
Back to close the message without sending a
reply.
Reply (see Section 5.4).
NOTE: If you want to reply to the message, do this
BEFORE you select Go or Show.
Go to exit from the ‘Message’ screen and navigate
to the location in the message (see Section 5.8).
Show to exit from the ‘Message’ screen and display
the location on a map (see Section 5.9).
Delete (see Section 5.10).
IMPORTANT: The M-Nav 900/950 must be in the docking cradle and connected to the Qube tracking
device in order for you to send and receive messages, and otherwise communicate with your fleet
Page 19

M-Nav 900/950 | User Manual
19
Forms
Your fleet administrator can use forms to quickly enter and
send information to you in a standard format. Each Form
message contains pre-set fields. Your fleet administrator may
also set up reply Forms for you to use, and set up Form
messages so they are deleted automatically once you have
read and replied to them.
From this screen you can select:
Back to close the message without sending a
reply.
Reply (see Section 5.4).
Delete (see Section 5.10).
NOTES:
If the Form message does not require a reply, the Reply
button is not displayed.
If the Form message contains a Route To address, the
Go and Show buttons will be displayed.
6.2 Form Fields
A form may contain one or more of the following fields:
Date
Time
Numeric
Alphanumeric
Address
Drop-Down Menu
Checkbox
Signature
Date
You can enter the date by selecting Set the Date. Enter the
desired date and select Done.
Time
You can enter the time by selecting Set the Time. Enter the
desired time and select Done.
Page 20

M-Nav 900/950 | User Manual
20
Numeric
When a field is set up as numeric field by your fleet
administrator, you can only enter numbers in it. You can tap
the field to display a numeric keyboard.
Alphanumeric
The alphanumeric field allows you to enter both letters and
numbers in it. You can toggle between letters and numbers by
selecting ABC or 123 (whichever is displayed).
Address
The address field lets you enter an address of a location, such
as a job site, customer address, etc.
Drop-Down Menu
A drop-down menu is represented by a . This field allows
you to select an item from a list. You can select the field to
display the list of options. Swipe up and down to view all items
on the list. Tap the item to select it and it will be displayed on
the field.
Checkbox
The checkbox field allows you to select one or more item from
a given list or choices. You can tap the item to select it. A blue
check appears next to an item when it has been selected.
Page 21

M-Nav 900/950 | User Manual
21
Signature
When a form contains a Signature field, you can have a
customer sign on the field by selecting Open. The signature
field will open.
A customer can sign on the white signature field. You can then
select OK to go back to the form.
The signature will be displayed in the Signature field within the
form.
6.3 Receiving a New Message
When you receive a new message, the ‘New Message’ popup
box is displayed and a friendly alert sounds.
You can select:
Read to display the new message.
Cancel to store the message to read later when it is
safe or convenient.
NOTE: When a new priority message arrives, the popup box
will not have the Cancel button.
Page 22

M-Nav 900/950 | User Manual
22
6.4 Reading a Received Message
A received message can be a new message that you have not yet read, or an old message that you have
stored to read later.
NOTE: Form messages may be deleted automatically after you have read and replied to them, if this
feature has been enabled by your fleet administrator.
To read a received message at any time, display the ‘Main
Menu’.
The number of unread messages is shown on the Message
icon on the Main Menu.
Select Messages.
The ‘Inbox’ tab lists all your received messages. The most
recent is at top of the list. All unread messages are in bold.
NOTE:
High priority messages are denoted by an exclamation
mark.
Swipe down to see other messages on the list.
Select a received message to read it. It will be displayed along
with any previous replies. If you cannot see all of the message,
swipe to scroll down the screen.
The following icons show the type of received message and its status:
Unread Information or Route To message
Read Information or Route To message
Information or Route To message that has been replied to
Unread Form message
Read Form message
6.5 Replying with a Canned Template or Reply Form
NOTE: This section assumes that the message you want to
reply to is already displayed. Any previous replies to that
message are also displayed in sequence (up to a maximum of
30 replies).
Select Reply .
Page 23

M-Nav 900/950 | User Manual
23
The ‘New Message’ screen is displayed.
Canned templates are pre-set replies that can save you time.
They show common replies such as ‘OK and ‘On my way.’
(These are set up by your fleet administrator).
Canned templates may also contain one or more reply Forms.
Reply Forms are displayed with .
If you:
want to reply using a canned template, select the one you want to use then read the rest of this
section.
want to reply using a Form, select the one you want to use, then see Section 5.5.
don’t want to use a canned template or reply Form, select Free text, then see Section 5.7.
A preview of the reply is displayed on the screen.
Select to send the message. A beep sounds when the
reply is sent, and the ‘Inbox’ screen is displayed with an
updated message status icon.
NOTE: You can reply more than once to a message. Select the message to re-display it and show any
previous replies.
Some canned templates may contain editable text. These
help save time as you only have to enter the relevant details.
For example, if you select the canned template shown, the
cursor and the line show where you can enter the estimated
number of minutes before you arrive back at base (e.g. 45
minutes).
6.6 Sending a Form
You can send a Form as a new message or a reply to a
received message. The forms available in your M-Nav 900/950
are set up by your fleet administrator.
NOTE: This section assumes the reply Form is already
displayed.
Complete all the fields included in the form (see Section 5.2).
Some fields may be greyed out if the information is entered
automatically.
When you have completed all fields, select to send the form.
Page 24

M-Nav 900/950 | User Manual
24
Your reply is stored in your ‘Sent’ list (see Section 5.6).
NOTE: Your reply may be deleted automatically after you send it, if this feature has been enabled by
your fleet administrator.
6.7 Viewing a Sent Message
Display the ‘Main Menu’.
Select Messages.
The ‘Inbox’ screen lists all your stored messages and Form
messages.
Select Sent.
The ‘Sent’ screen is displayed. This lists all your replies with
the most recent one at the top of the list.
Select a reply to display the message, when it was received,
and any replies that have been sent.
NOTE: Form message replies may be deleted automatically
after you have sent them (and not stored), if this feature has
been enabled by your fleet administrator.
6.8 Creating a New Message or Free Text Reply
If you want to create a new message, display the ‘Messages’
screen (see Section 5.3), then select .
The ‘New Message’ screen is displayed.
Select Free text.
Page 25

M-Nav 900/950 | User Manual
25
The Free text onscreen keyboard is displayed.
Type your message using the onscreen keys. Select:
ABC or 123 to toggle between the numeric keyboard
and the character keyboard.
the up-arrow to change the case of the next
character.
When you have finished typing the message, select Send.
NOTE: If you have cellular coverage, the message will be
sent immediately. If you are out of coverage, the message
will be stored and sent when cellular coverage is reestablished.
The message is stored in your Sent messages list.
If you want to see it, or check the time it was sent, select
Sent on the ‘Messages’ screen (see Section 5.6). The ‘Sent’
screen will be displayed.
6.9 Navigating to a Route To Location
NOTE: This section assumes the Route To message is already displayed. (A Form message can also be set
up as a Route To message.)
Select Go to exit from Messages and navigate to the
location in the message.
The M-Nav 900/950 calculates the new route starting from
your current location and starts the navigation.
6.10 Showing a Route To Location
NOTE: This section assumes the Route To message is already displayed. (A Form message can also be set
up as a Route To message.)
Page 26

M-Nav 900/950 | User Manual
26
Select Show to exit from the Route To message and
display the map.
The location specified in the Route To message is pinpointed
on the map.
Select Go! to start navigation.
6.11 Deleting a Message
NOTE: This section assumes the message you want to delete is already displayed.
Select Delete .
A confirmation message is displayed.
Select:
OK to delete the message. The updated Message List is
displayed.
NOTE: The OnlineAVL2 application records the time the
message was deleted.
Cancel to cancel the deletion.
Page 27

M-Nav 900/950 | User Manual
27
7 EMS (Engine Monitoring System)
EMS allows you to display specific engine information. Alerts for speed, RPM, temperature, fuel and oil
pressure will be displayed if these exceed the limits pre-set by your fleet administrator. You can:
continuously display multiple engine parameters while driving (instead of viewing the navigation
screen)
view a report at the end of a trip to see engine monitoring statistics.
NOTE: EMS must be set up by your fleet administrator, and the DCU (Data Collection Unit) must be
installed.
7.1 Displaying EMS information
To display EMS information, display the ‘Main Menu’.
Select EMS.
The ‘EMS Dashboard’ screen will be displayed. Depending on
how it was set up, you will see four, six, or eight options. (The
example has four options.)
Select:
Back to return to the ‘Main Menu’.
EMS Settings to change the EMS Desktop settings or check
the diagnostic information.
Trip to view EMS statistics for the last trip.
7.2 Viewing Trip Information
Display the ‘EMS Dashboard’ screen.
Select Trip.
The ‘Trip Report’ screen is displayed. The relevant statistics for
your last trip are displayed for the EMS parameters that have
been set up.
Select Back to return to the ‘EMS Dashboard’ screen.
Page 28

M-Nav 900/950 | User Manual
28
7.3 Setting up EMS Options
NOTES:
This feature has to be enabled by your fleet administrator.
If enabled, these options may be set up by your fleet administrator and you may not be able to
change them.
Go to the ‘Main Menu’ and select EMS.
Select Settings. The ‘EMS Settings’ menu is displayed.
Select:
Update Period to change the rate that updates are
displayed (the default is one second).
Trip Report toggles between On/Off (the default is On).
EMS Diagnostics to show diagnostic information for all
options that have been set up. This may be used for
troubleshooting.
Dashboard Layout to change the information displayed on
the EMS Dashboard screen (this option will only show if it
has been set up by your fleet administrator).
7.4 Changing the EMS Dashboard Screen
NOTE: These options may be set up by your fleet administrator and you may not be able to change them.
Select Settings. The ‘EMS Settings’ menu is displayed.
Select Dashboard Layout. The ‘EMS Dashboard Layout’
screen is displayed.
The X Items button (right hand panel) shows the number of
items that will be displayed on the EMS Dashboard. Valid
options are four, six, or eight. Keep selecting this button to
toggle between the options.
Select SAVE to save changes.
The number of items selected will be displayed.
NOTE: If eight items have been selected, you will have to use
the up and down arrows to see the last two items.
When the number of items has been selected, you can select
inside any of the cells to display a menu of readings that can
be displayed in that cell.
Select any reading to select it. (The example shows that wheel
speed has been selected.)
NOTE: The units displayed for each option can be changed
(e.g. from km to miles). On the right hand panel, select None
(to set each unit separately), or choose from SI (Systeme
Internationale), US or UK.
Page 29

M-Nav 900/950 | User Manual
29
8 Working Time
The M-Nav 900/950 allows you to record when you are starting a new task, taking a break, or finishing
work. The list of tasks will be set up by your fleet administrator.
NOTE: These screens will be displayed only if your fleet administrator has set up the Working Time
functions in the OnlineAVL2 application
.
NOTE: Your driver status can also be updated by following the Driver Log Out process described in Section
4.8.
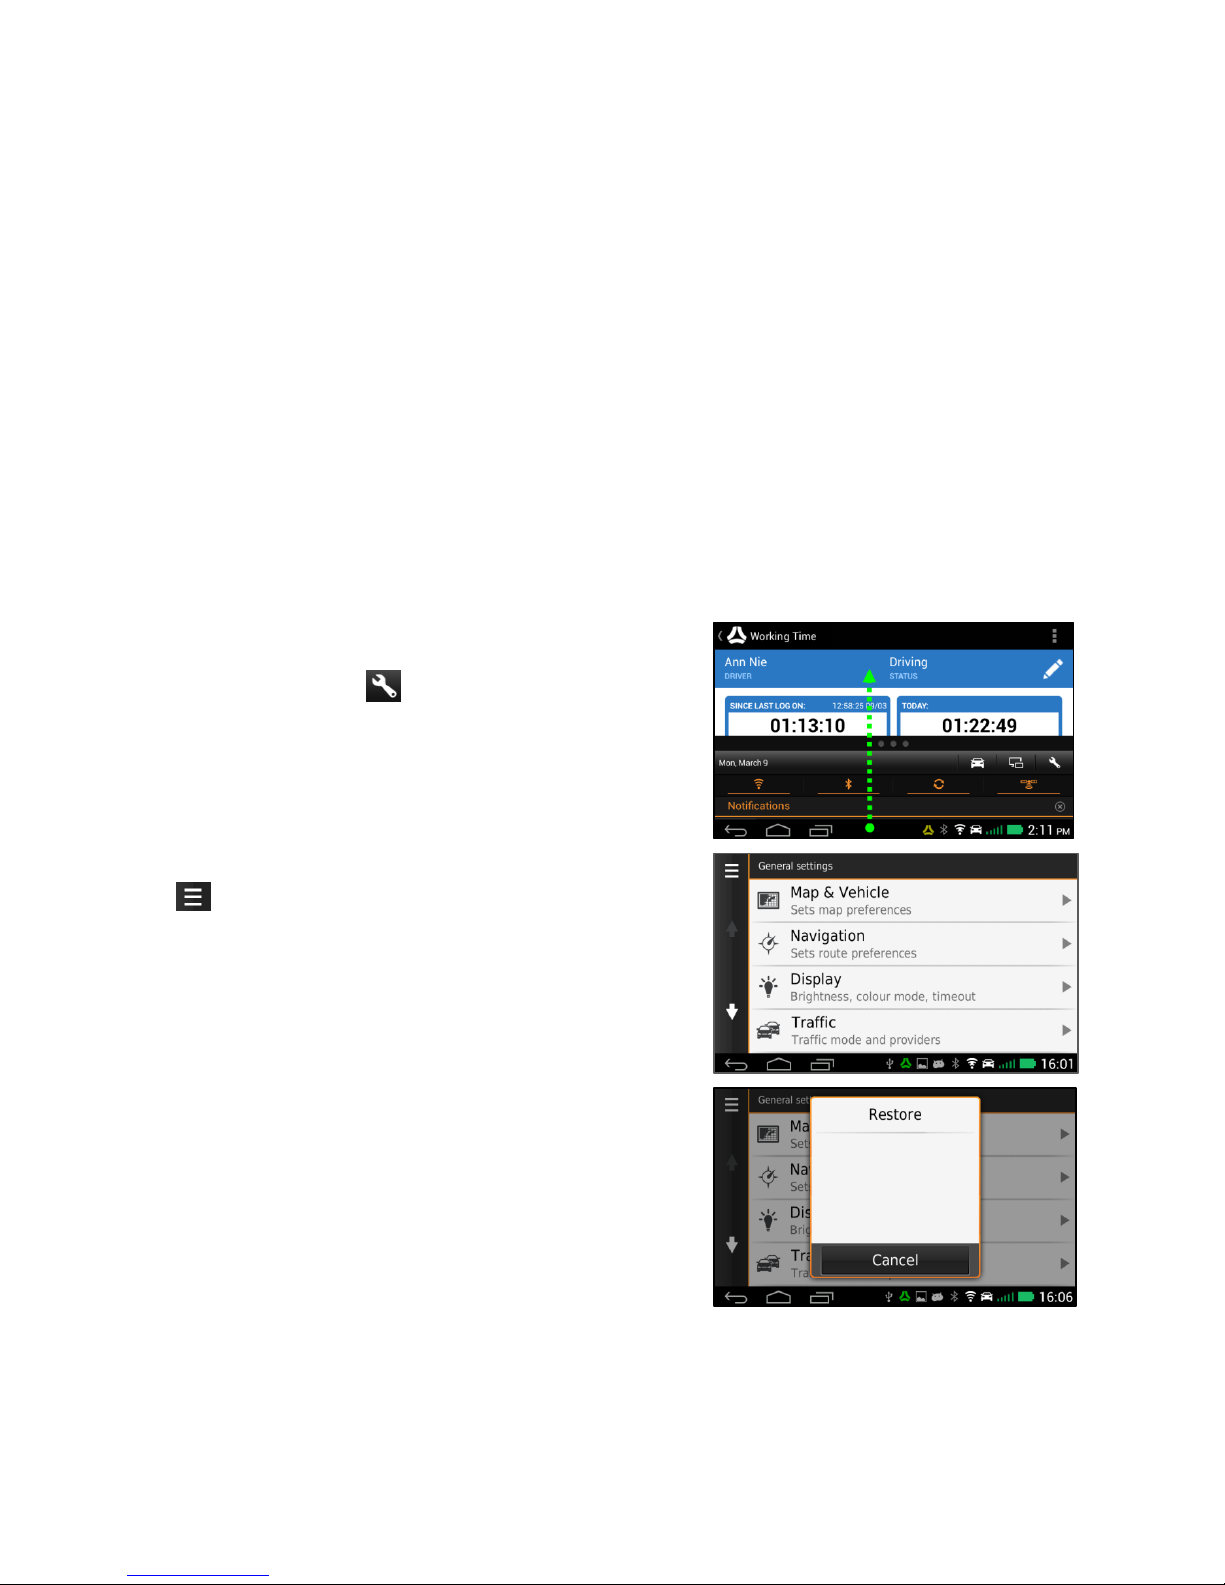
8.1 Changing Driver Status
To change your driver status, display the ‘Main Menu’.
Select Working Time.
The following information is displayed:
Time since you last logged on.
Hours worked today (this is reset at midnight).
Time when your next rest break is due.
Minimum length of time that you must rest for when you
take a break.
To change your status, select .
The ‘Change Driver Status’ screen is displayed. The highlighted
check mark shows the current status.
If necessary, scroll the screen to display more statuses.
Select the required status. The status will be updated and the
‘Working Time’ screen will be displayed.
Page 30
M-Nav 900/950 | User Manual
30
9 Setting Your Preferences
You can set many options on your M-Nav 900/950. Refer to the Garmin manual for information on the
options not described in this section.
9.1 Setting the Locale
Your locale is set via the Garmin interface when the device is started or after restoring the factory defaults.
The locale sets the default language for the user interface and the units for the navigator. The time zone is
also set and works in conjunction with the GPS signal to show the correct local time.
9.2 Setting the Language
The M-Nav 900 can operate in a variety of languages.
The M-Nav language is automatically set based on the Locale chosen for the Garmin navigator.
9.3 Restoring Factory Default Settings
In the unlikely case of any problems with your M-Nav 900/950 that you cannot otherwise resolve, you can
restore the factory default settings.
To restore your M-Nav 900/950 to the factory default settings,
display the Garmin settings menu by swiping up the
notifications bar and select .
The ‘System’ menu is displayed.
Select in the top-left corner.
The Restore dialog box is shown.
Select Restore to reset the device to the factory defaults.
Page 31

M-Nav 900/950 | User Manual
31
A further confirmation dialog box is displayed.
Select:
Yes to confirm you want to restore factory settings. All
the navigator settings (except for the map selection) are
reset to the factory default settings.
No to cancel the restore.
Page 32

M-Nav 900/950 | User Manual
32
10 Contact Information
Navman Wireless welcomes your feedback.
Navman Wireless UK
Innovation Centre 2, Keele University
Science Park
Keele, Newcastle Under Lyme
Staffordshire, ST5 5NH
UNITED KINGDOM
Tel: +44 (0) 1782 55 79 50
Fax: +44 (0) 1782 55 79 79
Email: support@navmanwireless.co.uk
Website: www.navmanwireless.co.uk
Navman Wireless USA
Navman Wireless North America
2701 Patriot Boulevard, Suite 125
Glenview, IL 60026
USA
Tel: +1 (866) 527 9896
Fax: +1 (847) 729 5988
Email: us.support@navmanwireless.com
Website: www.navmanwirelessus.com
Navman Wireless Australia Pty
Ground Floor, 16 Giffnock Ave,
Macquarie Park, NSW, 2113,
AUSTRALIA
Website: www.navmanwireless.com.au
Navman Wireless NZ
Navman New Zealand
7-11 Kawana Street, Northcote
PO Box 340-184, Birkenhead 0746
Auckland, NEW ZEALAND
Website: www.navmanwireless.co.nz
Navman Wireless Italy
Via Rudone 23rd
Rovato 25,038 · Italia
Tel: +39 030 6156468
Website: www.navmanwirelessitaly.it
Navman Wireless Scandinavia
Kometvej 10
DK-6230
Rødekro
Danmark
Tel: Danmark: +45 70 269 732
Tel: Sweden: +46 8 559 21 916
Tel: Finland: +35 89 2316 3595
Navman Wireless Mexico
Calzada San Pedro #100
Col. del Valle, San Pedro Garza Garcia
Nuevo Leon. CP 66220
Mexico
Tel: +52 (81) 8248 4600 Extn 1001
Email: soporte@navmanwireless.com
Navman Wireless Taiwan
#3, 25Fl., No.508, Sec.5 Zhongxiao E.
Rd.,
Xinyi Dist., Taipei 110,
11083
Taiwan
Tel: +886 (0)2 2728 2818
Fax: +886 (0)2 2728 2816
Page 33

33
Lat 42° 6’ 16.98” N Lon 87° 49’ 29.27” W
 Loading...