

Page 1

User Manual
M-Nav 750
GPS TRACKING AND FLEET MANAGEMENT SOLUTIONS
Page 2

Page 3

M-Nav 750 | User Manual
3
Contents
1 Introduction . . . . . . . . . . . . . . . . . . . . . . . . . . . . . . . . . . . . . . . . . . . . 5
1.1 Important Safety Information 5
1.2 Disclaimer 5
1.3 Glossary of Terms 6
2 The M-Nav 750 . . . . . . . . . . . . . . . . . . . . . . . . . . . . . . . . . . . . . . . . . . 7
2.1 Box Contents 7
2.2 Optional Items 7
2.3 M-Nav 750 Parts 8
3 Install the M-Nav 750 in a Vehicle . . . . . . . . . . . . . . . . . . . . . . . . . . . . . . . 10
3.1 Assemble the Docking Cradle 10
3.2 Windscreen Installation 10
3.3 Add the M-Nav 750 to the docking cradle 11
4 Get Started . . . . . . . . . . . . . . . . . . . . . . . . . . . . . . . . . . . . . . . . . . . . 12
4.1 Language and Warning screens 12
4.2 Driver Logon & Status 13
4.3 Vehicle Inspection 13
4.4 Check the GPS Status 14
4.5 Check the Qube Tracking Device Status 15
4.6 Driver Logoff 16
5 Messages. . . . . . . . . . . . . . . . . . . . . . . . . . . . . . . . . . . . . . . . . . . . . 17
5.1 Types of Message 17
5.2 New Messages 17
5.3 Read a Stored Message 18
5.4 Reply with a Canned Template 19
5.5 Create a New Message / Reply 20
5.6 Delete a Message 21
5.7 Show a Message Location 21
5.8 Go to a Message Location 22
6 Navigation Basics . . . . . . . . . . . . . . . . . . . . . . . . . . . . . . . . . . . . . . . . 23
6.1 Display & Move the Map 23
6.2 Map Icons 23
6.3 Navigation Icons 24
6.4 Mute or Set the Volume 25
6.5 Night-Time Navigation 26
6.6 How to Enter Data & Remove Errors 27
Page 4

M-Nav 750 | User Manual
4
7 Find and Go to a Location . . . . . . . . . . . . . . . . . . . . . . . . . . . . . . . . . . . . 28
7.1 Find a Street Address 28
7.2 Find a Postal Code 29
7.3 Find Other Types of Location 30
7.4 Navigate to Destination From Your Location 31
7.5 Set Location as Home 32
7.6 Find a POI 33
7.7 Set a Location as a Favourite Place 34
8 Plan a Route . . . . . . . . . . . . . . . . . . . . . . . . . . . . . . . . . . . . . . . . . . . 35
8.1 Plan a Route from Any Location 35
8.2 Add a Location as a Via Point 36
8.3 Show / Add Places Along the Route 37
8.4 Optimise / Change the Order of the Via Points 38
8.5 Save a Route 38
8.6 Add a Detour to Avoid an Area 39
8.7 Use a Saved Route 39
8.8 Delete a Saved Route 40
8.9 Delete a Route 40
9 Route Information . . . . . . . . . . . . . . . . . . . . . . . . . . . . . . . . . . . . . . . . 41
9.1 Show an Overview of this Route 41
9.2 Demonstrate this Route 41
9.3 Show Total Time & Distance 42
9.4 Show all Manoeuvres on the Route 42
10 Set Your Preferences . . . . . . . . . . . . . . . . . . . . . . . . . . . . . . . . . . . . . . 43
10.1 Set Route Type & Vehicle Type 43
10.2 Set Truck Attributes 44
10.3 Set Road Types to Avoid 45
10.4 Set Road Types to Exclude 46
10.5 Set Distance Units 46
10.6 Set Date / Time Formats 47
10.7 Set Geographic / Custom Time Zone 48
10.8 Set Language 49
10.9 Set the Choose Language at Startup Option 50
10.10 Restore Factory Default Settings 51
Page 5

M-Nav 750 | User Manual
5
1 Introduction
Thank you for purchasing the Navman Wireless M-Nav 750 messaging and navigation device. We
hope you enjoy using it. It has been carefully designed so it is easy to install, setup, and use.
You can:
• use the navigation option to search for locations such as a street address, a postal code, or
a city centre
• set a location as the start point, a via point, or the destination
• have the M-Nav 750 calculate the route then guide you along it with clear visual and verbal
instructions
• check for places and points of interest such as fuel stops, nearby or along your route.
• add stops (via points) to your route
• use the message option to receive messages from, and send messages to, your fl eet
administrator
• navigate directly to a location specifi ed in a message from your fl eet administrator
• use the setup option to customise the M-Nav 750 to suit your own preferences
1.1 Important Safety Information
Do NOT mount the M-Nav 750 where it obstructs the driver’s view or may distract the driver.
DO NOT mount the M-Nav 750 where it may interfere with the safe operation of the vehicle or
the deployment of airbags or other safety equipment. Consult the vehicle manual to ensure the
mounting location is safe, if necessary.
Do NOT enter navigation data or other information into the M-Nav 750 while you are driving.
Comply with these safety instructions at all times. Failure to comply with these safety instructions
may lead to accidents, personal injury including death, property damage or violation of the law.
1.2 Disclaimer
Navman Wireless disclaims all liability for installation and use of this product in a way that
contributes to injuries, death, property damage or violation of the law.
The user of this product is solely responsible for observing safe driving practices and for all use of
this device. It is the user’s responsibility to operate the M-Nav 750 in accordance with the law.
This M-Nav 750 provides route information for guidance only. Accordingly it is your sole
responsibility to consider the height, weight, length or Hazmat classifi cation of your vehicle and to
ensure that it is legally and physically able to travel over routes that may include narrow, twisting
or steep roads; weak, narrow or low bridges; tunnels or other obstacles on the route determined
by this M-Nav 750.
This manual represents the M-Nav 750 at the time of printing. Navman Wireless reserves the right
to make changes to specifi cations without notice.
Page 6

M-Nav 750 | User Manual
6
1.3 Glossary of Terms
Common terms used in this manual and on the M-Nav 750 include:
GPS The GPS is a network of satellites that orbit the Earth at about 19,300 kms
(12,000 miles) and transmit accurate time and position information worldwide.
The GPS receiver in your M-Nav 750 picks up signals from any satellites
in view and uses the information to determine your location, accurate
to within 5 m (15 ft). Usually, only three signals are needed to provide a
latitude and longitude position (GPS fi x) for vehicle navigation systems.
POI Point of Interest. This is a useful resource along or nearby the route, such
as a fuel location or a post offi ce.
You can add a POI to your route as a via point.
Via Point A specifi c location that you want to visit along the route. A via point can be
any location that you specify, such as a customer site, or a POI.
Destination The next via point along your route.
Final Destination The fi nal via point along your route. It is always marked with a chequered
fl ag.
Trip The complete list of via points that you specify; including the start
location, the fi nal destination, and any via points between.
Route When you have defi ned all the via points in your trip, the M-Nav 750 will
calculate the best route automatically after it obtains a GPS fi x. Your route
shows the path to drive. Only one route can be shown on the map at a time.
Page 7
M-Nav 750 | User Manual
7
2 The M-Nav 750
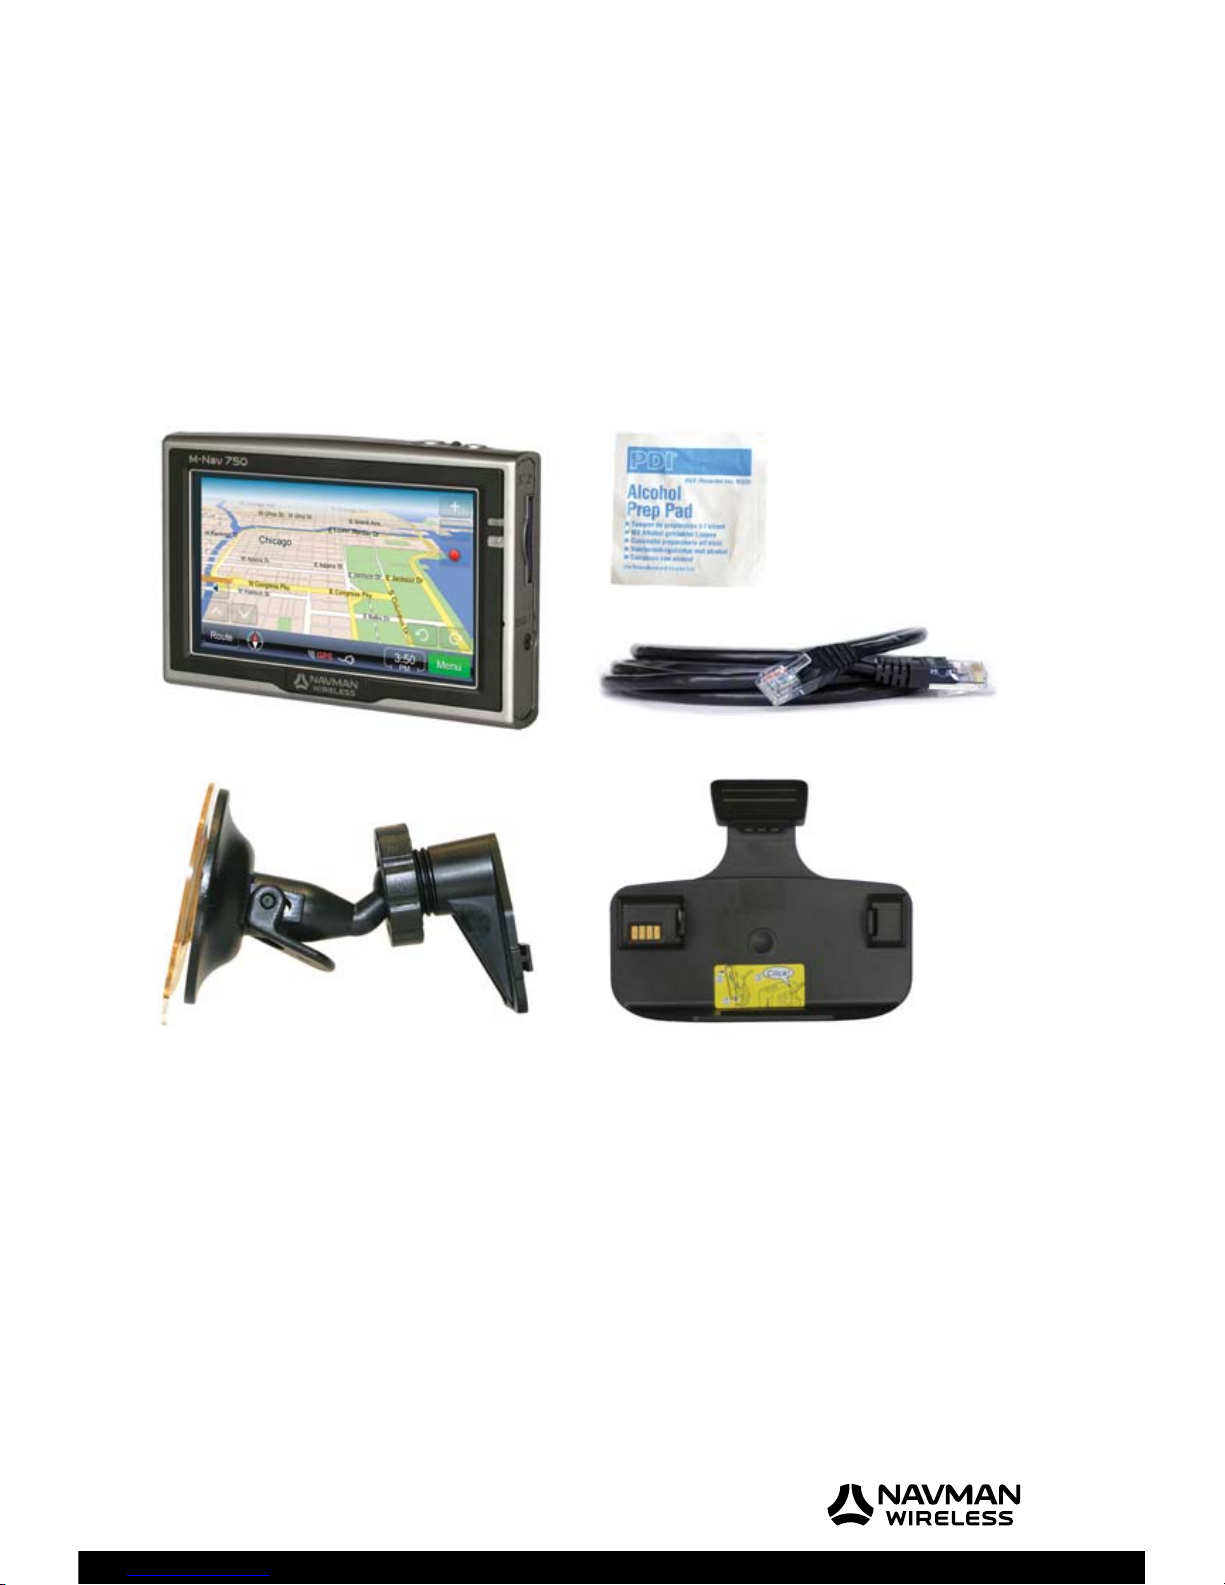
2.1 Box Contents
The M-Nav 750 is supplied with a suction mount designed for installation on a vehicle windscreen.
(If you do not want to mount the M-Nav 750 on the windscreen, use the optional Permanent
Installation Kit.) Check that you have ALL of these items before you start the installation. Contact
your supplier if anything is missing.
2.2 Optional Items
An optional Permanent Installation Kit enables you to install the M-Nav 750 onto any hard
surface, such as the top of the dashboard, which has a good view of the sky. Contact your supplier
for more information.
An optional External GPS Antenna can be connected to your M-Nav 750. This can be used to
receive the GPS signal (instead of the internal GPS antenna already built into the M-Nav 750) and
means that you can install the M-Nav 750 anywhere in the vehicle. Contact your supplier for more
information.
M-Nav 750 device RJ-45 cable
Alcohol swab
Suction mount Cradle fi xture (serial connection view)
Page 8
M-Nav 750 | User Manual
8
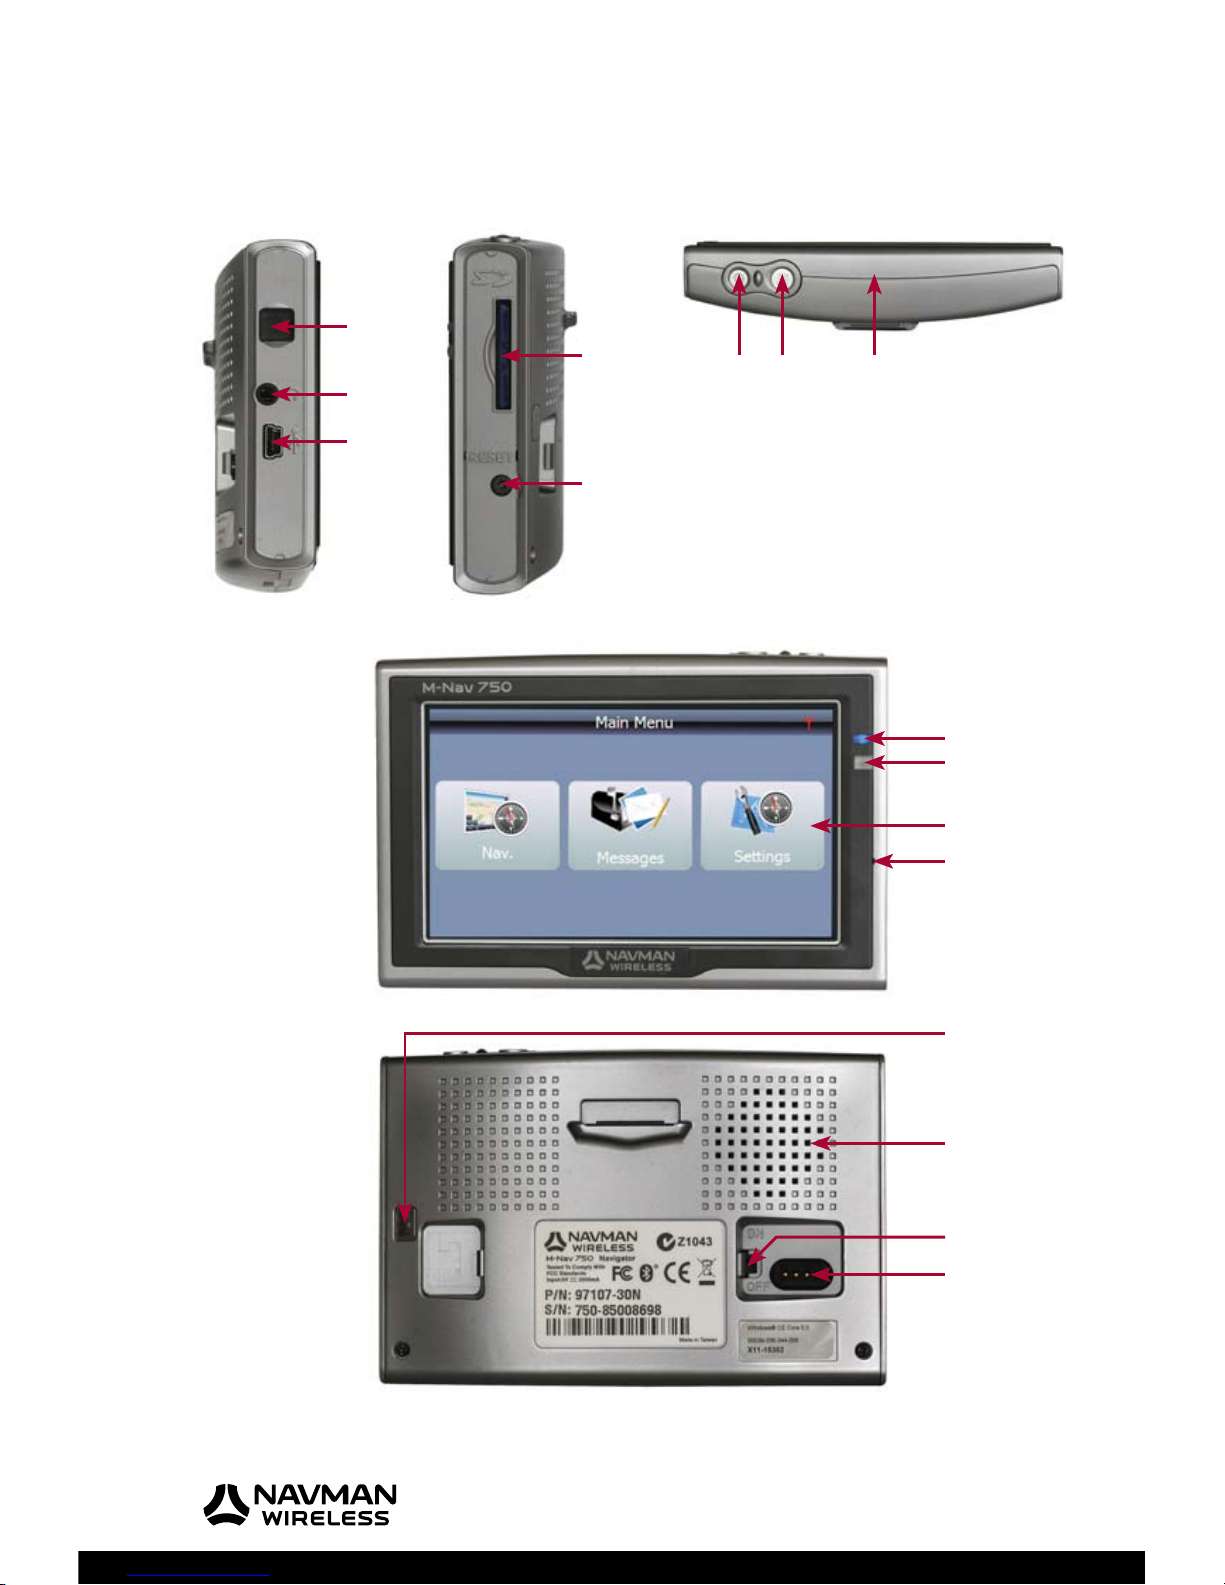
2.3 M-Nav 750 Parts
Familiarise yourself with the parts of your M-Nav 750 before starting the installation.
1
4
67 8
2
3
5
9
10
11
14
15
16
13
12
Page 9
M-Nav 750 | User Manual
9
Component Description
1
External GPS antenna
connector
Connector is located under the black dust cap. Use only if you
have purchased an optional external GPS antenna (see Section
2.2).
2
Jack point Headset connection point (optional).
3
Mini USB port External connection port (not used).
4
SD card Contains the maps for the navigation feature.
5
Reset button Restart the M-Nav 750 during the upgrade process.
6
Standby button Press to toggle the M-Nav 750 between operating and standby
state. When the M-Nav 750 is in standby state and the screen
is blank, just press the standby button to re-display the most
recent screen. (Note: if the M-Nav 750 internal battery has
discharged the splash screen will be displayed instead).
7
Hot button Press to return to the Main Menu.
8
Internal GPS antenna Approximate position of the internal GPS antenna that is built
into the M-Nav 750 and is not visible to view.
9
Not in use Not applicable.
10
LED Battery status. LED glows red when battery is charging.
LED glows green when battery is charged.
11
Screen Displays menus, maps and messages.
12
Microphone Not used in M-Nav 750.
13
Light sensor Automatically helps to adjust the screen brightness to a suitable
level for the current lighting conditions.
14
Speaker Provides system sounds and navigational voice prompts.
15
ON/OFF switch Switch the internal battery ON or OFF. Usually switched ON.
16
4-pin serial connection When the M-Nav 750 is in its cradle, this serial connection
provides external power and data from the Qube tracking device.
Page 10
M-Nav 750 | User Manual
10
3 Install the M-Nav 750 in a Vehicle
Note: These installation instructions assume that the Qube tracking device is already installed in
the vehicle and that the RJ-45 cable has been fed through the dashboard, ready for connection to
the M-Nav 750.
When you have assembled the docking cradle, you can either:
• use the suction mount to attach the M-Nav 750 to the vehicle windscreen, or
• use the optional hard installation kit to attach the M-Nav 750 to a hard surface, such as the
top of the dashboard
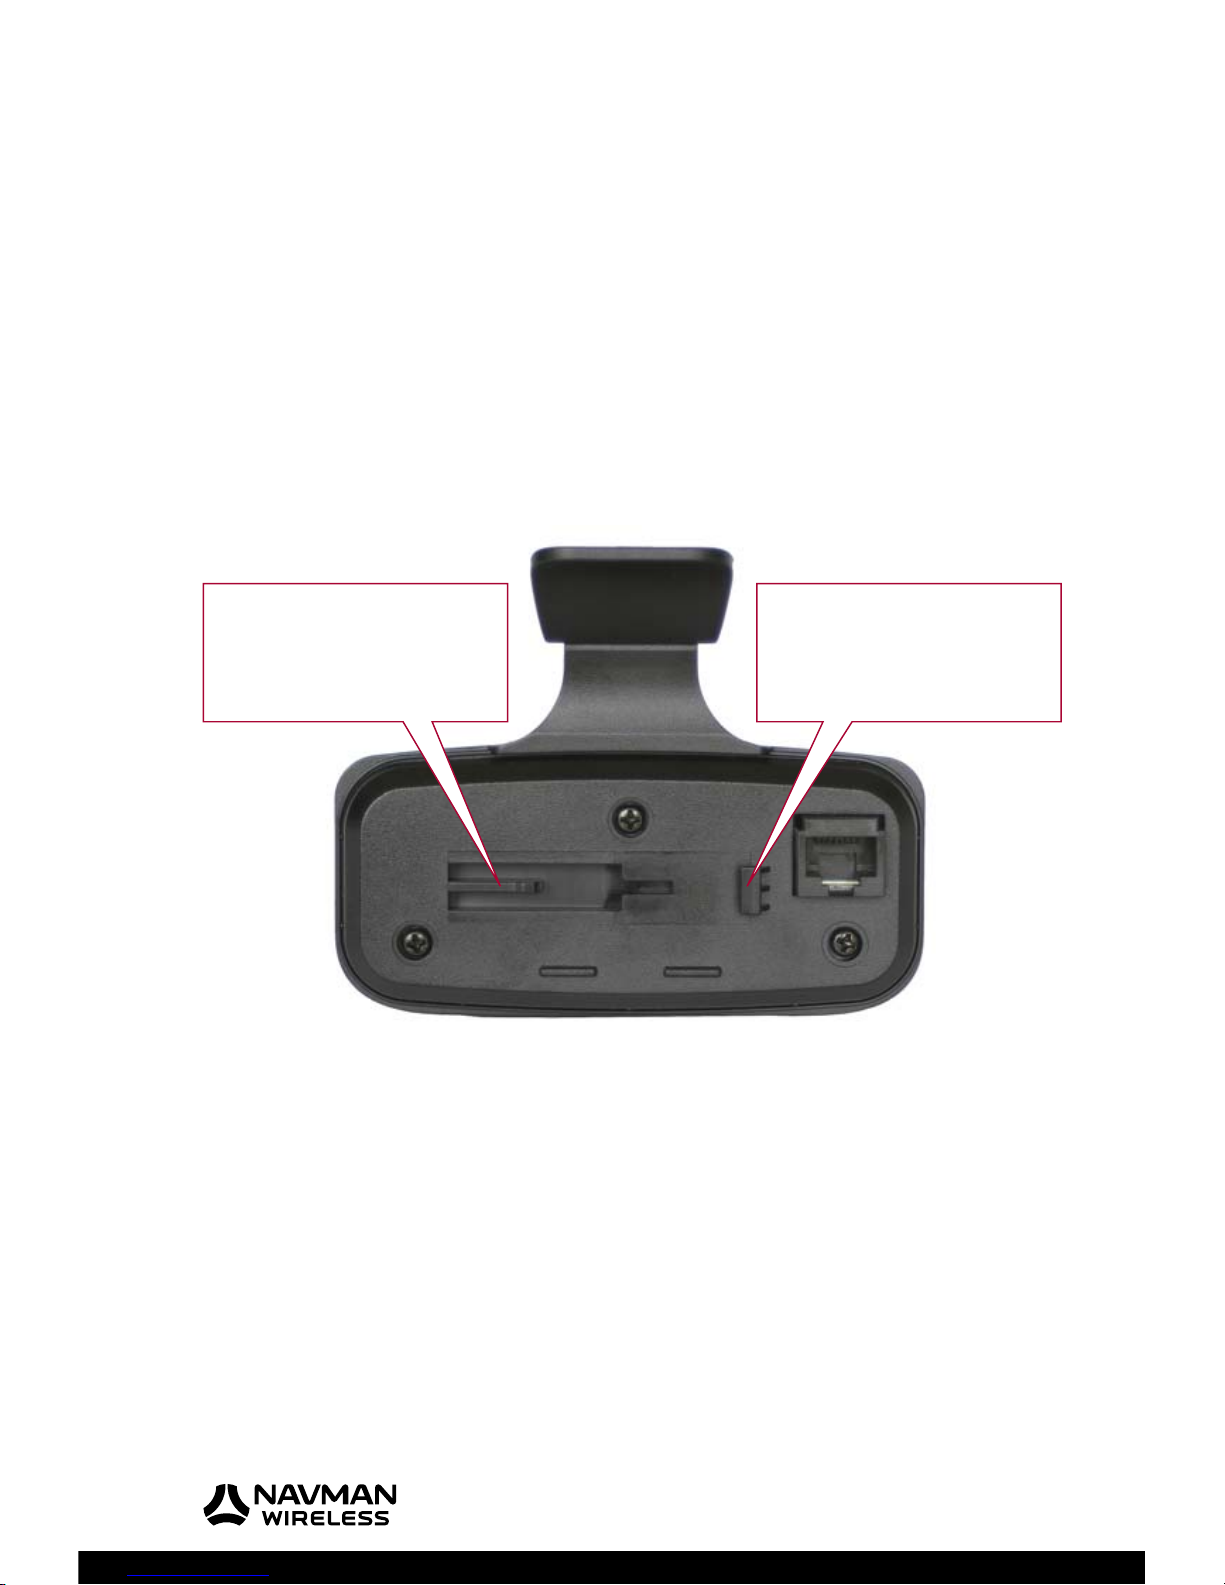
3.1 Assemble the Docking Cradle
Connect the suction mount to the cradle fi xture, as shown, to form the docking cradle.
3.2 Windscreen Installation
Note: Some windscreens contain areas of tinted glass that may interfere with the GPS signal. Do
not mount the M-Nav 750 in these areas.
Read the Important Safety Information in Section 1.1.
Decide where to locate the suction mount on the windscreen. Use the alcohol swab to thoroughly
clean that area of the windscreen, then dry the area with a soft, lint-free cloth.
Press the suction cup (part of the docking cradle) fi rmly against the windscreen for 3 seconds.
Push the lever down to vacuum-seal the suction cup to the windscreen.
Now you are ready to add the M-Nav 750 to the docking cradle. See Section 3.3.
1. Connect the suction
mount to the docking
cradle here.
2. Slide the suction
mount to the right so
that it clicks into place
under this clip.
Page 11
M-Nav 750 | User Manual
11
3.3 Add the M-Nav 750 to the docking cradle
IMPORTANT: Check the M-NAV 750 internal battery switch is ON before you add the M-Nav
750 to the docking cradle. You should not need to touch this switch again after it has been
switched ON.
Insert the RJ-45 cable (already fed through the dashboard from the Qube tracking device) into
the RJ-45 connection socket at the back of the docking cradle.
Put the bottom of the M-Nav 750 into the docking cradle, and then push the M-Nav 750 gently
back until it snaps into place with an audible click.
IMPORTANT: The M-Nav 750 must be in the docking cradle and connected to the Qube
tracking device in order for you to report your driver status, send and receive messages and
otherwise communicate with your fl eet administrator through the OnlineAVL2 application.
The start up screen will display automatically. See Section 4.
Adjust the angle of the M-Nav 750 using the pivot screw on the docking cradle to give a
comfortable viewing position.
Note: If you are leaving the vehicle for a while, we recommended that you remove the M-Nav
750 from the docking cradle and store it in a safe place.
Page 12
M-Nav 750 | User Manual
12
4 Get Started
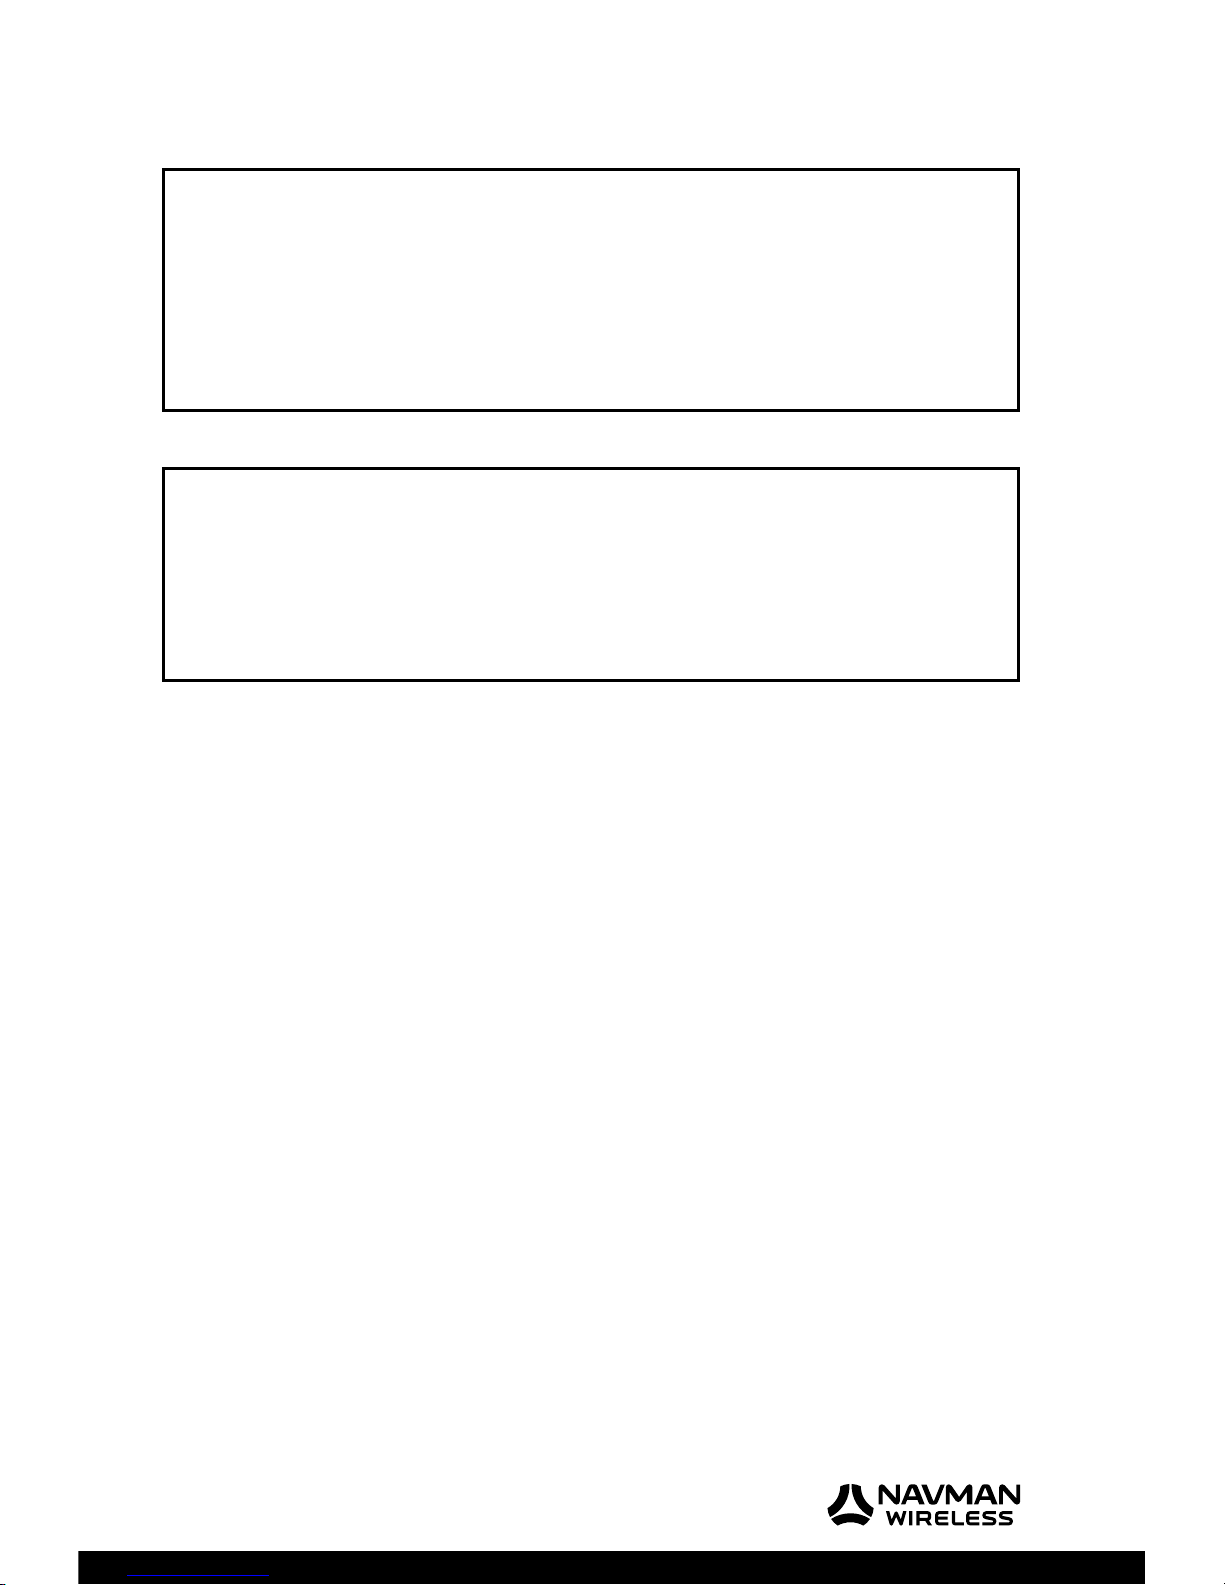
4.1 Language and Warning screens
Note: The following sequence of screens will appear the FIRST time that you use your M-Nav
750, OR whenever the internal battery in the M-Nav 750 has gone fl at (this can happen if you have
not used your M-Nav 750 for several days). Otherwise, your M-Nav 750 will re-display the last
screen that you used.
The loading bar will appear on the screen while the software
is loading into your M-Nav 750. When the loading bar
disappears, your M-Nav 750 is ready for use.
If this ‘Settings’ screen appears after the splash screen, just
touch the language you want to use, then touch Accept.
Note: You can confi gure your M-Nav to choose this
language automatically at start up (see Section 10.9).
Note: The country map is loaded automatically and is
independent of the language that you select here.
The ‘Warning’ screen is displayed automatically.
Touch the down-arrow to scroll down and read all of the
warning.
If you accept the warnings, touch Accept.
If the ‘Main Menu’ is displayed, your M-Nav 750 is ready to
use. The ‘Main Menu’ may have three icons, as shown here,
or up to fi ve icons, depending on the features that have been
enabled by your fl eet administrator.
Just touch an icon to select that option.
Note: If a different screen is displayed instead of the ‘Main
Menu’, see the next section.
Page 13
M-Nav 750 | User Manual
13
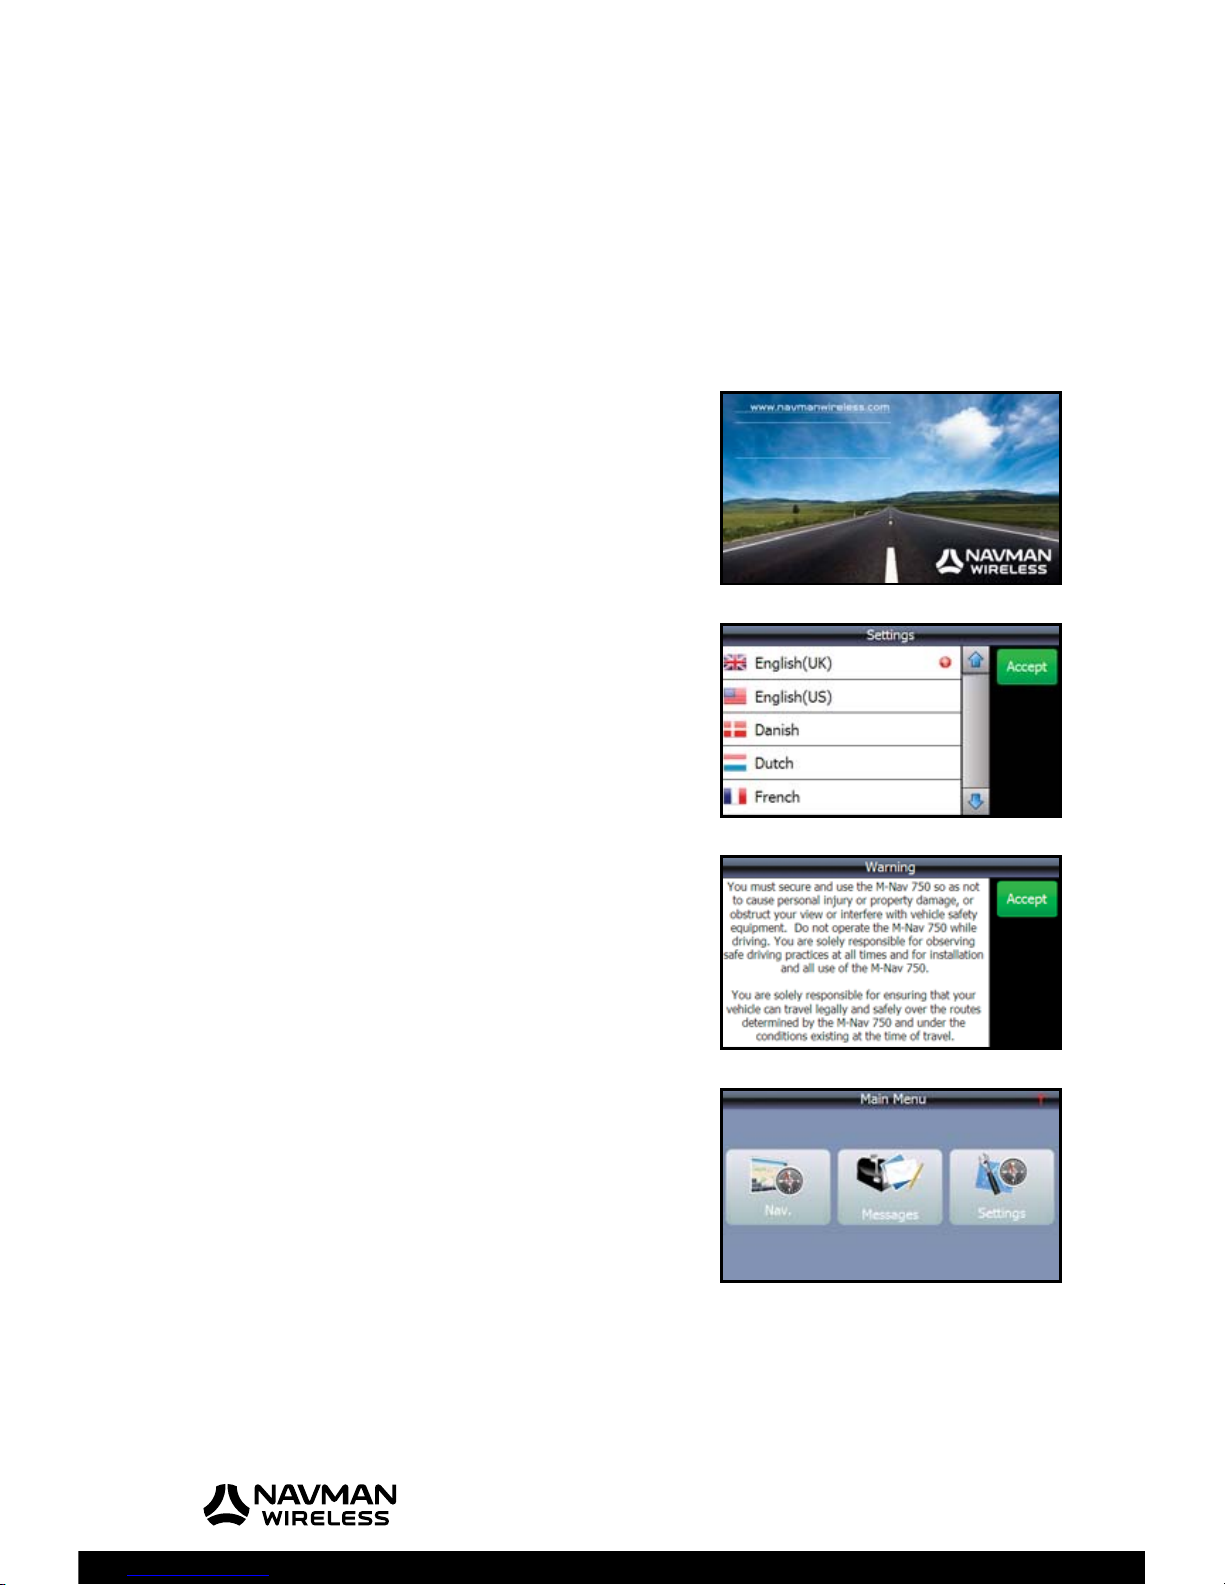
4.2 Driver Logon & Status
Note: These screens appear only if your fl eet administrator has setup the Driver Logon and
Driver Status functions in the OnlineAVL2 application. If so, you cannot use the M-Nav 750 until
you enter these details.
IMPORTANT: The M-Nav 750 must be in the docking
cradle and connected to the Qube tracking device in order
for you to report your driver status to your fl eet administrator
through the OnlineAVL2 application.
If the ‘Driver Logon’ screen is displayed, use the onscreen
keypad to enter your Driver Pin (Personal identifi cation
number) then touch Logon.
If the ‘Select Driver Logon Status’ screen appears, touch
the description that best describes your current status (e.g.
Other Work).
Note: Driving is the default Driver Logon Status. Just touch
this if it is your current status.
4.3 Vehicle Inspection
Note: The ‘’Vehicle Inspection’ option may not be available in your market. Contact your supplier
for more information. If these screens appear you cannot use the M-Nav 750 until you enter these
details.
If the ‘Vehicle Inspection’ screen appears, you must inspect
your vehicle, and then touch Accept.
The ‘Select Vehicle Inspection Result’ screen is displayed.
Touch the appropriate result. The M-Nav 750 automatically
creates and sends a text message to your fl eet administrator
to advise the result of your vehicle inspection.
Page 14

M-Nav 750 | User Manual
14
When the ‘Main Menu’ is displayed your M-Nav 750 is ready
to use. Just touch an icon to select that option.
When you have fi nished using the M-Nav 750, remember to
Logoff. See Section 4.6.
4.4 Check the GPS Status
Your M-Nav 750 has an internal GPS (Global Positioning System) antenna so that you can always
receive a GPS signal, fi nd your current location and use the M-Nav 750 for navigation. For best
operation, ensure that your M-Nav 750 is positioned where it has a good view of the sky.
Alternatively, an optional external GPS antenna is available
(see Section 2.2). This may help to improve the GPS signal in
areas that are known to have poor GPS reception.
To check the status of the GPS signal at any time, press the
Hot Button on the top of the M-Nav 750 to display the ‘Main
Menu’.
Touch Nav.
The map is displayed. This example shows a default map
view (specifi c to your region) which includes the horizon.
The GPS signal reception icons are shown in the centre of
the menu bar at the bottom of the map. These show whether
a GPS signal is being received and, if so, the strength of the
GPS signal.
If there is no GPS signal, drive to another location or wait a
few minutes for the GPS satellites to change their position.
No GPS signal
Weak GPS signal
Medium GPS signal
Strong GPS signal
Note: If the GPS signal is often weak or
absent, try re-positioning the M-Nav 750
in your vehicle so that it has a better view
of the sky. (GPS signal reception can be
affected by the mounting position as well as
urban factors such as high-rise buildings.)
Page 15

M-Nav 750 | User Manual
15
To see more information about the GPS status, just touch a
blank area anywhere in the menu bar at the bottom of the
map.
An advanced GPS status screen is displayed with detailed
information, similar to this example.
4.5 Check the Qube Tracking Device Status
Your M-Nav 750 is connected to a Qube tracking device that communicates information about
your vehicle to the OnlineAVL2 application.
The Qube tracking device also enables you and your fl eet administrator to send and receive
messages to each other (see Section 5).
To check the status of the Qube tracking device at any time,
just press the Hot Button on the top of the M-Nav 750 to
display the ‘Main Menu’.
Check the colour of the Qube tracking device icon shown
in the top right corner of the screen. The colour of the icon
shows the communication status:
Contact has been established with the OnlineAVL2
application. You can send and receive messages.
The Qube tracking device is trying to make contact
with the OnlineAVL2 application.
Contact is not established with the OnlineAVL2
application. You cannot send or receive messages.
Page 16
M-Nav 750 | User Manual
16
4.6 Driver Logoff
If you had to enter your Driver PIN and your work status details (as described in Section 4.2)
before you could use the M-Nav 750, you must use Logoff when you have fi nished work.
Note: These screens appear only if your fl eet administrator has setup the Driver Logon and Driver
Status functions in the OnlineAVL2 application.
To log off, press the Hot Button on the top of the M-Nav 750
to display the ‘Main Menu’.
Touch Logoff.
When the ‘Select Driver Logoff Status’ screen appears, touch
the description that best describes your current status (e.g.
Rest Break).
You are logged out automatically and the ‘Driver Logon’
screen is displayed.
Page 17
M-Nav 750 | User Manual
17
5 Messages
IMPORTANT: The M-Nav 750 must be in the docking cradle and connected to the Qube
tracking device in order for you to send and receive messages and otherwise communicate
with your fl eet administrator through the OnlineAVL2 application.
The M-Nav 750 can store a maximum of 500 incoming messages and 250 outgoing messages.
If you exceed the limit for incoming messages, the oldest message will be deleted automatically
when a new message is received.
5.1 Types of Message
The Message option enables you and your fl eet administrator to communicate with each other.
There are two types of message:
• Information messages; A message from your fl eet administrator e.g. “‘supplies ready
for pick up from the workshop”; or a message that you send e.g. “completed job”.
• Route-to messages; A message from your fl eet administrator with an embedded GPS
location you can use for navigation to an address e.g. “55 Keele Rd, Keele, Newcastle –
customer Anna Thompson, cold water coming out of the hot water tap in the kitchen”.
This message contained the address you will be navigated to in the fi rst line of the message.
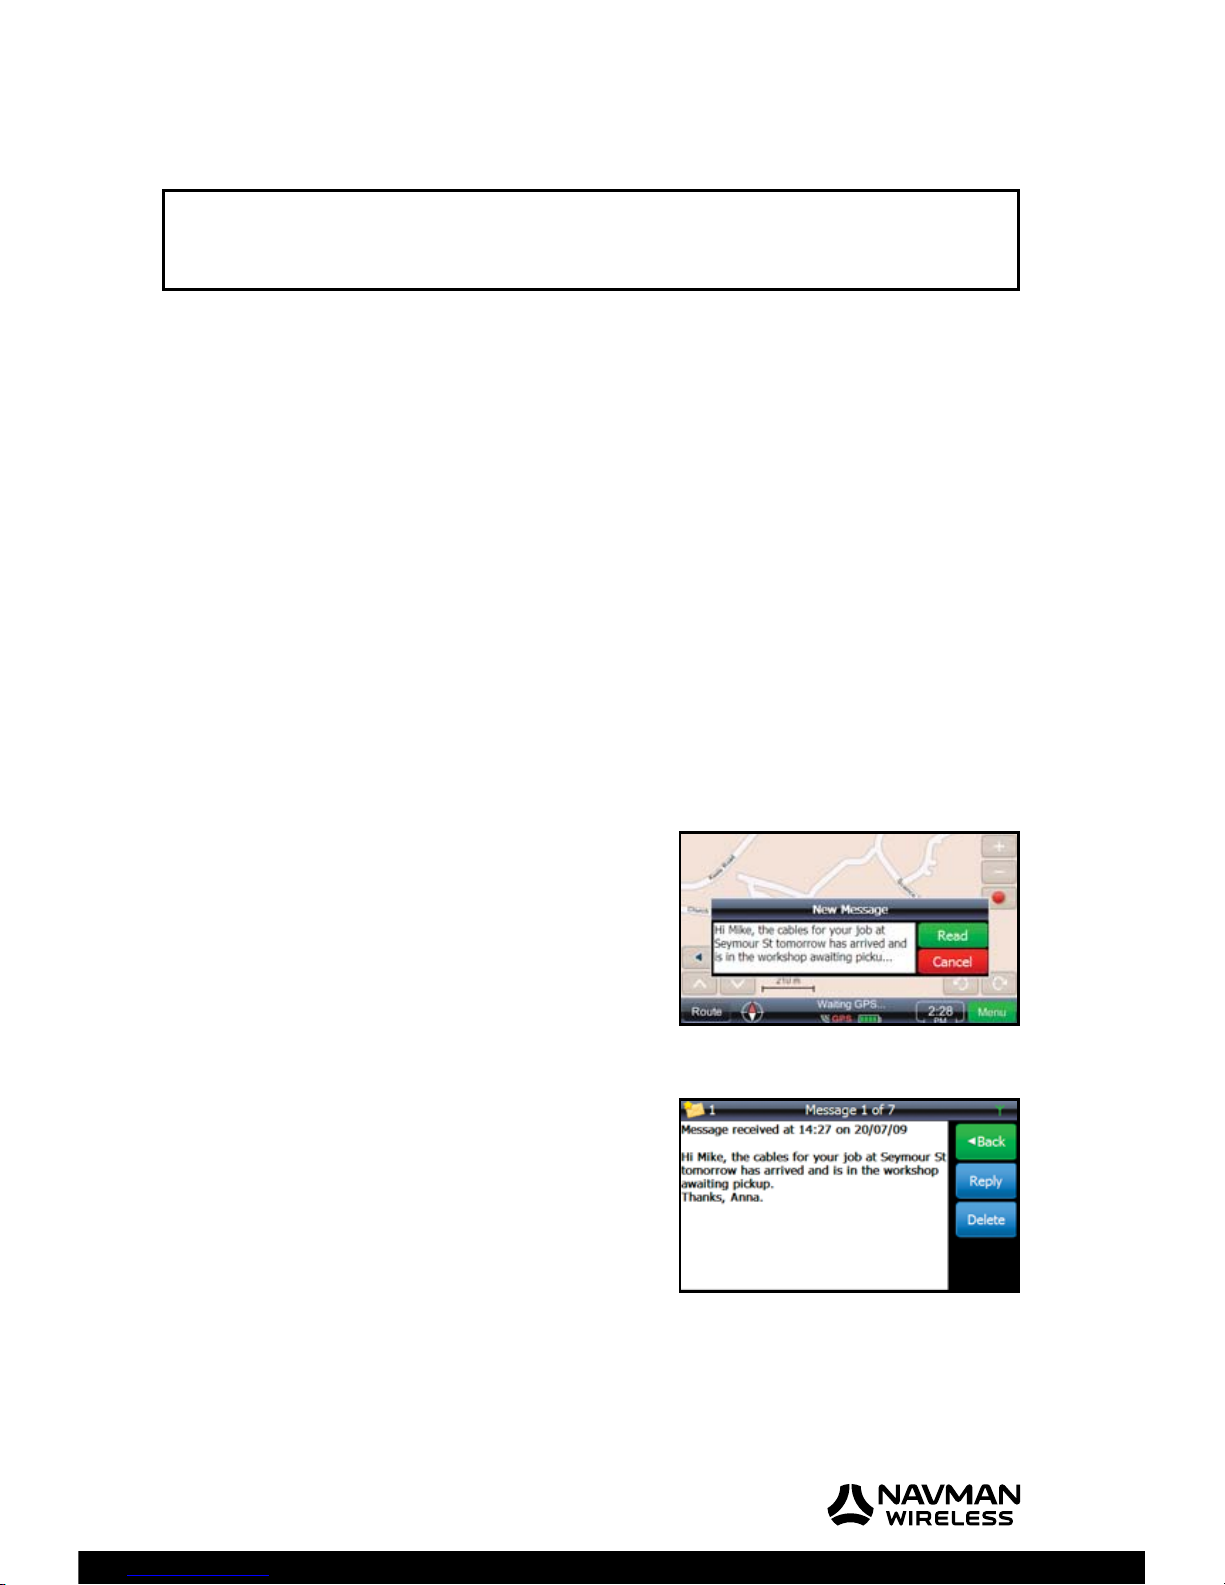
5.2 New Messages
When a new message arrives, the New Message popup box
is displayed on the current screen and a friendly alert sounds.
Touch:
• Read to display the new message immediately.
• Cancel to store the message in your Message List to read
it later, when it is safe or convenient.
Examples of the two message types are shown below.
This example shows an information message. Touch:
• Back to close the message without sending a reply.
• Reply (see Section 5.4).
• Delete (see Section 5.6).
Page 18

M-Nav 750 | User Manual
18
This example shows a Route-to message. Route-to
messages have two extra option buttons:
• Go to exit from the Message option and navigate to the
new location (see Section 5.8).
• Show to exit from the Message option and display the
new location on the map (see Section 5.8).
Note: If you want to reply to the message, do this fi rst,
before you touch Go or Show.
5.3 Read a Stored Message
A stored message can be a new message that you have not yet read, or an old message that you
have not deleted.
To read a stored message at any time, press the Hot Button
on the top of the M-Nav 750 to display the ‘Main Menu’.
The number of unread stored messages is shown in the top
left corner of the screen. In this example there are 3 unread
messages.
Touch Messages.
The ‘Received Messages’ screen lists all your stored
messages. The most recent message is at top of the list, with
the time that it was received by your M-Nav 750.
Touch the up-arrow or down-arrow to move up or down the
message list, if necessary.
Touch the stored message that you want to read. It is
displayed immediately, along with any previous replies. If you
cannot see all of the messages, move the scroll bar on the far
right hand side of the screen.
New and Unread.
Read.
Read and Replied.
Note: The M-Nav 750 will display a maximum of 30 replies to any stored message.
Page 19

M-Nav 750 | User Manual
19
5.4 Reply with a Canned Template
Note: This section assumes that the message you want to reply to is already displayed on
the M-Nav 750. Any previous replies to that message are also displayed in sequence (up to a
maximum of 30 replies).
Touch Reply.
The ‘Canned Templates’ screen is displayed.
Canned templates are pre-set replies that can save you time.
They show common replies such as ‘Yes’ and ‘No’.
If you want to reply to the message using a canned template,
touch the canned template that you want to use; e.g. Job
accepted.
Note: If you don’t want to use a canned template, see the
next section.
The reply is displayed on the screen. Touch:
• Send to send the reply immediately. A beep sounds when
the reply is sent and the message icon is updated on your
Message List.
•
to return to the ‘Canned Templates’ screen without
sending the reply.
Note: You can reply to a message more than once. Just
touch the message to re-display it and previous replies.
Some canned templates may contain editable text so that you
can save time by entering only the relevant details.
For example, if you select the Arrive in ___ mins canned
template, the blue cursor and the line show where you can
enter the estimated number of minutes before you arrive at
the destination; e.g. 45.
Note: The M-Nav 750 can hold a maximum of 100 canned
messages.
Page 20

M-Nav 750 | User Manual
20
5.5 Create a New Message / Reply
If you want to create a new message, display the ‘Received
Messages’ screen (see Section 5.3) then touch New.
If you want to create your own reply to a message that is
already displayed on the M-Nav 750, touch Reply.
Note: You can reply to a message more than once. Just
touch the message to display it again, with any previous
replies.
The ‘Canned Templates’ screen is displayed.
Touch Free Text.
The free text screen onscreen keyboard is displayed.
Type your message using the onscreen keys. Press abc
or 123 to toggle between the numeric keyboard and the
character keyboard. You can also touch the large white up
arrow to toggle between lower and uppercase characters.
To create a capital at the beginning of a sentence, press the
outline white up arrow on the far right.
To jump to the start or the end of the message, touch the
blue up-arrow or down-arrow by your message.
If you make a mistake, touch the red box to delete the last
character. Repeat if necessary. Alternatively, just touch the
incorrect word or number to move the cursor quickly to that
area. When you have fi nished, touch:
• Send to send it immediately. The message is stored in your
Sent Message list. If you want to see this, or check the time
it was sent, touch Sent on the ‘Received Messages’ screen
(see Section 5.3 ).
• Touch the green box to cancel your message.
Page 21

M-Nav 750 | User Manual
21
5.6 Delete a Message
Note: This section assumes that the message you want to
delete is already displayed on the M-Nav 750.
Touch Delete. The ‘Confi rm Message Delete’ box is
displayed on the screen immediately.
Touch Ye s to delete the message immediately. The updated
Message List is displayed.
Note: The OnlineAVL2 application records the time that the
message was deleted.
5.7 Show a Message Location
Note: This section assumes that the route-to message is
already displayed on the M-Nav device.
Touch Show to exit from Messages and display the map.
The location mentioned in the message is pinpointed on the
map.
Choose one of the navigation options shown (then see
Section 7) or touch Back or Close to return to navigation.
Page 22

M-Nav 750 | User Manual
22
5.8 Go to a Message Location
Note: This section assumes that the route-to message is
already displayed on the M-Nav 750.
Touch Go to exit from Messages and navigate to the location
mentioned in the route-to message.
The M-Nav 750 immediately calculates the new route starting
from your current location, then displays the navigation map
and starts to give verbal directions.
Page 23

M-Nav 750 | User Manual
23
6 Navigation Basics
6.1 Display & Move the Map
Press the Hot Button on the top of the M-Nav 750 to display
the ‘Main Menu’.
Touch Nav. to display the map.
Drag your fi nger across the screen to move the map in the
same direction.
6.2 Map Icons
Use the map icons to see information and change the appearance of the map to suit your own
preferences.
Note: After a time, the icons become transparent so that you can see more of the map but they
are still active. When you touch the screen, the icons are shown in solid colour again.
Map Icon Description
Navigation menu.
Route menu.
Map scale.
Volume menu.
Zoom out to see less detail.
Zoom in to see more detail.
Decrease your elevation to show a landscape view of the map.
Increase your elevation to show an aerial view of the map.
The red compass arrow points North.
Rotate the map clockwise.
Rotate the map counter-clockwise.
Page 24

M-Nav 750 | User Manual
24
Map Icon Description
Start recording your GPS position. Use the Navigation menu item GPS Logs to view
the recorded logs on the map.
Stop recording your GPS position.
Battery status.
6.3 Navigation Icons
The route map has some special icons that help you navigate along the route and manage your
schedule.
Note: After a time, the icons become transparent so that you can see more of the map, but they
are still active. When you touch the screen, the icons are shown in solid colour again.
Navigation
Icon Description
Marks the location that you touched and displays the navigation menu.
Touch the map again to remove the icon OR choose an option from the navigation menu.
A mini-map that shows an enlarged view of your next manoeuvre and the distance to it.
Touch the icon in the upper left corner to hide or show the mini-map.
DTG - Distance To Go to the next via point.
ETA - Estimated Time of Arrival at the next via point.
TTG – approximate Time To Go to the next via point.
Local time (touch to toggle to the vehicle speed).
Vehicle speed (touch to toggle to local time).
Your present position. The arrow shows the direction that you are travelling.
The name of the current road is shown in the menu bar at the bottom of the screen.
The name of the next road is shown at the top of the screen.
Your start location.
After the route has been calculated, the green fl ags show the via point along your route.
The via points are numbered in sequence along the route. This example shows the fi rst
via point.
The calculated route is shown by a thick blue line and the blue direction arrows along
the roads.
Page 25

M-Nav 750 | User Manual
25
Navigation
Icon Description
A place that has been chosen as a via point. When the route is calculated, a thick blue
line appears along the road and links all the via points to show the complete route.
Your fi nal destination.
When this icon is shown, the map display will NOT turn to follow your route because it
always shows North at the top.
Touch the icon to have the map display turn to match your road view ahead.
(To return to North at the top, just touch the map display to show the icon again).
The map is shown with your route pointing to the top of the map.
The map is shown with North at the top.
6.4 Mute or Set the Volume
To easily adjust the Volume, just touch the Volume icon on the map to temporarily increase the
volume of the spoken directions one step at a time. You can also set then save the volume at a
specifi c level or mute it.
To set and save the volume at a specifi c level, press the Hot
Button on the top of the M-Nav 750 to display the ‘Main
Menu’.
Touch Nav. to display the map.
Touch Menu.
Touch the down-arrow to scroll through the listing then
touch Settings to display the ‘Settings’ menu.
Touch Volume to display the ‘Volume’ settings.
Touch the blue slider and move it left to decrease the volume
or right to increase the volume.
You can also touch the red icons next to the ‘Mute’ and
‘Loud’ option to toggle these options ON or OFF:
Option ON
Option OFF
Note: The Loud option provides an extra boost to the volume if it is not loud enough when set to
High. This can be very useful if your vehicle is noisy.
Page 26

M-Nav 750 | User Manual
26
6.5 Night-Time Navigation
If you are driving at night, you can show the map in night vision mode.
Note: We recommend that you use the Auto day/night option to automatically switch the
map between day mode and night vision mode at dawn and dusk. Dawn and dusk are estimated
automatically by your M-Nav 750.
To show the map in night vision mode, press the Hot Button
on the top of the M-Nav 750 to display the ‘Main Menu’.
Touch Nav. to display the map.
Touch Menu.
Touch the down-arrow to scroll through the listing then
touch Settings to display the ‘Settings’ menu.
Touch Map.
The ‘Map’ screen is displayed with the current map scheme
setting.
Touch the current setting (e.g. Auto day/night).
The ‘Map scheme’ menu is displayed. Touch Night.
Touch Close to re-display the map in night vision mode.
Page 27

M-Nav 750 | User Manual
27
6.6 How to Enter Data & Remove Errors
WARNING: Do NOT enter data while you are driving.
When you need to enter data such as a street address, the
onscreen keyboard is displayed automatically.
You can toggle the onscreen keyboard between numbers
OR characters, whenever you want, by touching 123 (or
ABC) in the lower right corner. Touch the large white arrow
in the blue box if you want to toggle between lowercase and
uppercase characters.
If you make a mistake, you can touch the white arrow in the
red box to delete the most recent character.
To remove the complete entry, drag your fi nger from the end to the start of the entry to highlight it all in
blue, and then touch the white arrow in the red box to delete it so that you can start again.
Page 28

M-Nav 750 | User Manual
28
7 Find and Go to a Location
7.1 Find a Street Address
To fi nd a street address, press the Hot Button on the top of
the M-Nav 750 to display the ‘Main Menu’. Touch Nav to
display the map.
Touch Menu to display the ‘Navigation main menu’.
Touch Find location.
On the ‘Find address’ menu, touch Find Address.
Enter the street name, and the suburb or city, into the
address box using the onscreen keyboard.
Note: If the previous entry is highlighted in blue in the
address box, just touch the white arrow in the red box to
clear it.
Touch Find.
The M-Nav searches for the street address and displays the
results.
Sometimes there are multiple matches. If necessary, touch
the down-arrow or up-arrow to scroll through the listing.
When you see the street address that you want, just touch it.
The street address that you touched is shown on the map
with a list of options.
Touch Navigate to if you want the M-Nav 750 to calculate a
route to that location.
If you want to add one or more via points along the route, see
Section 8.2.
To learn more about the route before you start driving, see
Section 9.
Page 29

M-Nav 750 | User Manual
29
7.2 Find a Postal Code
To fi nd a postal code, press the Hot Button on the top of the
M-Nav 750 to display the ‘Main Menu’.
Touch Nav. to display the map.
Touch Menu to display the ‘Navigation main menu’.
Touch Find location to display the Find address menu.
On the ‘Find address’ menu, touch Find postal code.
Enter the postal code using the onscreen keyboard then
touch Find.
A list of matches is displayed. Touch the correct match.
The navigation map displays the postal code location and a
list of options.
Touch Navigate to if you want the M-Nav 750 to calculate a
route to that location.
If you want to add one or more via points along the route, see
Section 8.2.
To learn more about the route before you start driving, see
Section 9.
Page 30

M-Nav 750 | User Manual
30
7.3 Find Other Types of Location
You can use the M-Nav 750 to fi nd other types of location,
such as named junction, press the Hot Button on the top of
the M-Nav 750 to display the ‘Main Menu’.
Touch Nav. to display the map.
Touch Menu to display the ‘Navigation main menu’.
Touch Find location to display the Find address menu.
Touch the type of location that you want to fi nd (e.g.
Find Area).
Enter the location information into the location box, as
shown, using the onscreen keyboards.
Touch Find.
Note: if you are entering a Latitude and Longitude, use the
format WGS 84, decimal degrees. (e.g. 42.091172).
A list of matches is displayed.
Note: Sometimes there are multiple matches. If necessary,
touch the down-arrow or up-arrow to scroll through the rest
of the list.
When you see the location that you want, just touch it.
The location that you touched is shown on the map with a
list of options.
Touch Navigate to if you want the M-Nav 750 to calculate a
route to that location.
If you want to add one or more via points along the route, see
Section 8.2.
To learn more about the route before you start driving, see
Section 9.
Page 31

M-Nav 750 | User Manual
31
7.4 Find a POI
To fi nd a POI, press the Hot Button on the top of the M-Nav
750 to display the ‘Main Menu’.
Touch Nav. to display the map.
Touch Menu to display the ‘Navigation main menu’.
Touch Find POI to display the “Place lookup” page.
Enter the POI name followed by a space and then suburb,
town or city, into the box using the onscreen keyboard.
Note: If the previous entry is highlighted in blue in the
address box, just touch the white arrow in the red box to
clear it.
Touch Find.
A list of matches is displayed.
Note: Sometimes there are multiple matches. If necessary,
touch the down-arrow or up-arrow to scroll through the rest
of the list.
When you see the location that you want, just touch it.
The navigation map displays the POI location and a list of
options.
Choose an option from the menu if you want to add the place
to your route (e.g. touch Add a via point.)
Repeat this procedure if you want to show or add another
place along the route.
Page 32

M-Nav 750 | User Manual
32
7.5 Navigate to Destination From Your Location
WARNING: Set your destination while the vehicle is
stationary.
To navigate from your present location to your destination,
fi nd and display the destination on the map (see the previous
sections if necessary).
Touch Navigate to.
Note: Your M-Nav must be receiving a GPS signal so that
it can calculate the route from your present location. See
Section 4.4 if necessary.
The M-Nav 750 immediately calculates a route from your
present location, shows the route on the map, and starts to
give verbal instructions.
Note: If you take a wrong turn, the M-Nav 750 will
automatically re-calculate a new route to your destination.
Page 33

M-Nav 750 | User Manual
33
7.6 Set Location as Home
To set your home location, press the Hot Button on the top of
the M-Nav 750 to display the ‘Main Menu’.
Touch Nav. to display the map.
Touch Menu to display the ‘Navigation main menu’.
You can either:
• fi nd the location and display it on the map (see Sections 7.1
to 8.3 if necessary)
• or, if you have visited the location recently, touch
My recent destinations. Touch the location that you
want to set as home. It is displayed on the map.
Touch More.
Select Set as Home.
A message confi rms that the location has been saved as your
home location.
Your home location is shown in your list of favourite places,
and identifi ed as HOME.
Note: You can have only one home location. If you have
already set a home location, a message asks you to confi rm
the new location as the home location.
Page 34

M-Nav 750 | User Manual
34
7.7 Set a Location as a Favourite Place
To set a location as a favourite place, press the Hot Button on
the top of the M-Nav 750 to display the ‘Main Menu’.
Touch Nav. to display the map.
Touch Menu to display the ‘Navigation main menu’.
You can either:
• fi nd the location and display it on the map (see Section 7.1
if necessary) or
• if you have visited the location recently, touch
My recent destinations. Touch the location that you
want to make a favourite. It is displayed on the map.
Touch More.
Select Add to Favourites.
The onscreen keyboard is displayed. Enter the name of this
favourite location (e.g. Head Offi ce).
Touch OK.
A message confi rms that the location has been saved to your
list of favourite places.
To show a list of your favourite places, touch Menu then
touch My Favourite Places.
Note: You can have a maximum of 99 saved Favourites and
a maximum of 99 Recent Destinations.
Page 35

M-Nav 750 | User Manual
35
8 Plan a Route
WARNING: Plan and edit your route while your vehicle is stationary.
A route can start either:
• from your present location (see Section 7.5) OR
• from any other location that you specify.
Then, as soon as you enter the destination, the M-Nav 750 will calculate the route for you.
When the route is calculated, you can:
• add or remove via points.
• add or remove POIs.
• change the order on the route.
If it is a route that you will use regularly, you can save it (see Section 8.5).
You can also fi nd out more about the route before you start your journey (see Section 9).
8.1 Plan a Route from Any Location
You can plan a route in advance with the M-Nav 750. You can
choose any location as the start of a route.
To plan a route that does not start from your present location,
fi nd and display the starting location on the map (see
Sections 7.1 to 7.4 if necessary).
If the menu is not already displayed, touch Menu.
Touch Set as Start.
The location is immediately set as the start point and marked
with a blue fl ag.
Touch Menu.
Find and display the destination on the map (see Sections 7.1
to 7.4 if necessary).
Touch Add a destination.
Page 36

M-Nav 750 | User Manual
36
The location is set as the destination and marked with a
chequered fl ag, and the route is calculated immediately and
shown on the map.
8.2 Add a Location as a Via Point
Note: This section assumes that the M-Nav 750 is showing your current route on the map.
When the M-Nav 750 has calculated a route, you can add
one or more locations as via points to visit along the route or
to detour to.
To add a location as a via point, touch Menu to display the
‘Navigation main menu’.
Touch Find location.
Find and display the location of the fi rst via point (see
Sections 7.1 to 7.4 if necessary) that you need to visit.
Note: The blue line shows the existing route.
Touch Add a via point.
The location is immediately added as a via point and the
route is amended to include this new location.
Repeat this procedure to add another via point.
If you need to show or re-order the via points, see Section
8.4.
Page 37

M-Nav 750 | User Manual
37
8.3 Show / Add Places Along the Route
Note: This section assumes that the M-Nav 750 is showing your current route on the map.
When the M-Nav 750 has calculated a route, you can search
for useful places along the route, such as hotels or banks.
To search for places along the route, touch Route.
The ‘Trip’ menu is displayed.
Touch Places along the trip.
The ‘Select place category’ screen is displayed.
Use the down-arrow and up-arrow to scroll to the correct
category, if necessary.
Touch the category (e.g. Parking).
The M-Nav 750 immediately searches for places in that
category then displays a list of results with their distances
from the route.
The total number of results is shown at the bottom of the
screen.
Use the up-arrow and down-arrow to see the complete
listing, if necessary.
Touch a place if you want to shown it on the map.
Choose an option from the menu if you want to add the place
to your route (e.g. touch Add a via point.)
Repeat this procedure if you want to show or add another
place along the route.
Page 38

M-Nav 750 | User Manual
38
8.4 Optimise / Change the Order of the Via Points
Note: This section assumes that the M-Nav 750 is showing your current route on the map.
When the M-Nav 750 has calculated a route, you can show a
list of all the via points and optimise their order, if necessary,
to make your route more effi cient.
To show the list of via points in the route and / or optimise
their order, touch Route.
The ‘Trip’ menu is displayed. Touch Via points list.
The total number of via points is shown along the bottom of
the screen.
The via points are listed in the order that you added them
to the route, but this may not be the most effi cient order in
which to visit them.
To re-order the via points, you can either:
• touch any via point to display a list of choices, then touch
Optimise stops order OR
• touch the up-arrow or down-arrow in the red boxes by a
particular via point to move it to an earlier or later position
along the route
The via points are immediately re-ordered and the route is
re-calculated.
8.5 Save a Route
Note: This section assumes that the M-Nav 750 is showing your current route on the map.
Touch Route to show the ‘Trip’ menu.
Touch the down-arrow to scroll through the listing then
touch Save this trip.
A message confi rms that the route has been saved in
“My Saved Routes’.
Page 39

M-Nav 750 | User Manual
39
8.6 Add a Detour to Avoid an Area
WARNING: Add a detour while the vehicle is stationary.
Note: This section assumes that the M-Nav 750 is showing your current route on the map.
To calculate a detour (e.g. to avoid extensive road works),
touch Route to show the ‘Route’ menu.
Touch the down-arrow to scroll through the listing then
touch Avoid Next.
Touch the length of the detour that you want to take.
The M-Nav immediately calculates a detour for the specifi ed
distance and displays it on the map.
8.7 Use a Saved Route
To use a saved route, press the Hot Button on the top of the
M-Nav 750 to display the ‘Main Menu’.
Touch Nav. to display the map.
Touch Menu.
Touch the down-arrow to scroll through the listing then
touch ‘My saved routes’.
A list of your saved routes is displayed.
Touch the route you want to use.
A map of the saved route is displayed with a list of options.
Touch Load. The route is immediately set as the current route.
If you are in your vehicle and ready to go you can touch
Drive this trip and navigation will start from your current
location.
Page 40

M-Nav 750 | User Manual
40
8.8 Delete a Saved Route
To save or delete a route, press the Hot Button on the top of
the M-Nav 750 to display the ‘Main Menu’.
Touch Nav. to display the map.
Touch Menu to display the ‘Navigation main menu’.
Touch the down-arrow to scroll through the listing then
touch ‘My saved routes’.
A list of your saved routes is displayed.
Touch the route you want to delete.
A map of the route is displayed with a list of options.
Touch Delete this trip.
A message asks you to confi rm that you want to delete the route.
Touch Ye s to confi rm.
The route is immediately deleted and an updated list of your
saved routes is displayed.
8.9 Delete a Route
Note: This section assumes that the M-Nav 750 is showing your current route on the map and
that you have not saved the route.
Touch Route to show the ‘Route’ menu.
Touch the down-arrow to scroll through the listing then
touch Delete this route.
A message is displayed, asking you to confi rm that you want
to delete the route.
Touch Ye s to confi rm.
The map is immediately re-displayed and the route is erased
from it.
Page 41

M-Nav 750 | User Manual
41
9 Route Information
You can check some information about the route before you start driving. You can:
• show a map overview of the complete route
• watch a demonstration of the route
• show the estimated travel time and distance
• show all the manoeuvres along the route
9.1 Show an Overview of this Route
Note: This section assumes that the M-Nav 750 has calculated the route and is showing it on the map.
Touch Route. The ‘Trip’ menu is displayed.
Touch Trip Overview.
A map of the complete route, with any via points, is
displayed.
Zoom in to see more detail, if necessary.
9.2 Demonstrate this Route
Note: This section assumes that the M-Nav 750 has calculated the route and is showing it on the map.
If you want the M-Nav 750 talk you through a demonstration of
the route before you start driving, touch Route.
The ‘Trip’ menu is displayed.
Use the down-arrow to scroll through the menu then touch
Demonstrate.
The M-Nav 750 immediately starts to talk you through the
route as though you were driving along it at high speed.
Touch Route then Stop Demonstration at any time to
stop the demonstration.
Page 42

M-Nav 750 | User Manual
42
9.3 Show Total Time & Distance
Note: This section assumes that the M-Nav 750 has calculated the route and is showing it on the map.
Touch Route. The ‘Trip’ menu is displayed.
Touch Trip Summary.
The start and destination locations, the total distance, and the
estimated time are immediately displayed.
9.4 Show all Manoeuvres on the Route
Note: This section assumes that the M-Nav 750 has calculated the route and is showing it on the map.
Touch Route. The ‘Trip’ menu is displayed.
Touch Manoeuvres list.
A preview of all the manoeuvres along the route is shown
in sequence, two at a time, starting at the beginning of the
route.
The total number of manoeuvres is shown at the bottom of
the screen. Use the down-arrow and up-arrow to show more
manoeuvres.
The number in the lower right corner of each manoeuvre
shows its sequence number. This example shows the 7th and
8th manoeuvres along the route.
Page 43

M-Nav 750 | User Manual
43
10 Set Your Preferences
You can specify the type of vehicle that you are driving. If you are driving a truck, you can specify
some truck attributes such as the height of your truck.
Note: The ‘Truck Attributes’ option may not be available in your market. Contact your supplier for
more information.
You can also defi ne some route preferences, such as the types of road you want to exclude
because they are unsuitable for your type of vehicle. The M-Nav 750 will then calculate all your
routes based on these preferences. If you are driving a truck and have specifi ed your truck
attributes, the M-Nav will also use this information when calculating the routes.
You can also setup the date format, time format, and language shown on the M-Nav 750 to suit
your own preferences.
10.1 Set Route Type & Vehicle Type
The M-Nav 750 can calculate your routes in three different ways, depending on your choice:
• Fastest route The speediest route (tends to use motorways when possible)
• Shortest route The shortest distance
• Optimal route The quickest travel time
You can also set your vehicle type.
Note: This section assumes that no current route is displayed on your M-Nav 750.
To set the route type or vehicle type, press the Hot Button on
the top of the M-Nav 750 to display the ‘Main Menu’.
Touch Nav. to display the map.
Touch Route to display the ‘Trip’ menu.
Touch the down-arrow to scroll through the listing then
touch Route & vehicle types.
The ‘Route & vehicle types’ screen displays the current
settings.
To change the current route type, touch the Route type
setting (e.g. Fastest).
The ‘Route type’ menu is displayed. The red circle shows the
current setting.
Touch the route type that you want to use (e.g. Shortest).
The route type is immediately updated and the ‘Route &
vehicle types’ screen is re-displayed with the new setting.
Page 44

M-Nav 750 | User Manual
44
To change the current vehicle type, touch the Vehicle type
setting (e.g. Passenger).
The ‘Vehicle type’ menu is displayed. The red circle shows
the current setting.
Touch your vehicle type (e.g. Truck).
The vehicle type is immediately updated and the ‘Route &
vehicle types’ screen is re-displayed.
Note: You need to set your vehicle type to “Truck” in order
to use Truck Attributes in Section 10.2.
10.2 Set Truck Attributes
If you are driving a truck, you can specify some information about your truck, load and cargo. This
information will be used by the M-Nav 750 when calculating the routes.
Note: This option may not be available in your market. Contact your supplier for more information.
Press the Hot Button on the top of the M-Nav 750 to display
the ‘Main Menu’.
Touch Nav. to display the map.
Touch Route to display the ‘Route’ menu.
Touch the down-arrow to scroll through the listing then
touch Truck Attributes.
The ‘Truck Attributes’ menu displays a list of items that you
can specify.
To specify the truck dimensions, touch Dimensions.
This ‘Dimensions’ screen is displayed.
Use the blue sliders to specify any or all of the details shown.
Touch a blue slider and move it along the bar to change the
existing setting.
When you have fi nished, touch either Back to specify more
truck attributes, or Close to save the settings automatically
and re-display the map.
Page 45

M-Nav 750 | User Manual
45
To specify the load details, touch Load.
The ‘Load’ screen is displayed.
Use the blue sliders to specify any or all of the details shown.
Touch a blue slider and move it along the bar to change the
existing setting.
When you have fi nished, touch either Back to specify more
truck attributes, or Close to save the settings automatically
and re-display the map.
To specify the truck type or the type of cargo, touch
Truck & Cargo Types.
The ‘Truck & Cargo Types’ menu is displayed with the
current settings.
Touch the setting that you want to change. A list of choices
is displayed.
This example shows the list of cargo types. A red circle
identifi es the cargo type that is selected.
Touch a cargo type to change the current setting.
When you have fi nished, touch Back to specify more truck
attributes, or Close to save the settings automatically and
re-display the map.
10.3 Set Road Types to Avoid
WARNING: The M-Nav 750 can calculate a route that avoids certain types of road that you
specify (e.g. toll roads) unless there is no alternative route. In this case, the route will use these
road types but will not advise you of this.
If you must avoid certain types of road, you must exclude them (see Section 10.4).
Note: This section assumes that no current route is displayed on your M-Nav 750.
Press the Hot Button on the top of the M-Nav 750 to display
the ‘Main Menu’.
Touch Nav. to display the map.
Touch Route to display the ‘Route’ menu.
Touch the down-arrow to scroll through the listing then
touch Avoid road types.
Page 46

M-Nav 750 | User Manual
46
The ‘Avoid road types’ menu displays a list of road types. A
red circle identifi es a road type that is avoided.
You can select more than one road type to avoid (or none
at all).
Touch a road type to change the current setting.
10.4 Set Road Types to Exclude
The M-Nav 750 can calculate your routes so that they always exclude certain types of road that
you specify (e.g. unpaved roads).
Note: If there is no alternative road type, the M-Nav 750 will not be able to calculate a route.
Note: This section assumes that no current route is displayed on your M-Nav 750.
Press the Hot Button on the top of the M-Nav 750 to display
the ‘Main Menu’.
Touch Nav. to display the map.
Touch Route to display the ‘Trip’ menu.
Touch Exclude road types.
The ‘Exclude road types’ menu displays a list of road types. A
red circle identifi es a road type that is excluded.
Touch a road type to change the current setting.
10.5 Set Distance Units
To set the distance units, press the Hot Button on the top of
the M-Nav 750 to display the ‘Main Menu’.
Touch Nav. to display the map.
Touch Menu to display the ‘Navigation main menu’.
Touch the down-arrow to scroll through the listing then
touch Settings to display the ‘Settings’ menu.
Page 47

M-Nav 750 | User Manual
47
Touch the down-arrow to scroll through the listing then
touch Units.
The ‘Units’ screen is displayed with the current distance units.
Touch the current distance units (e.g. Metric – kilometres).
The ‘Distance units’ menu is displayed.
Touch the distance units that you want to use.
The ‘Units’ screen is re-displayed immediately with the new
distance units.
10.6 Set Date / Time Formats
To set the date format, press the Hot Button on the top of the
M-Nav 750 to display the ‘Main Menu’.
Touch Settings to display the ‘Settings’ menu.
Touch Units.
The ‘Units’ menu is displayed with the current date format
and time format.
To change the date format, touch Date Format.
The ‘Date Format’ menu is displayed. The red circle shows
the current setting.
Touch the new date format that you want to use
(e.g. dd/mm/yy).
The date format is immediately updated and the ‘Units’ menu
is re-displayed.
Page 48

M-Nav 750 | User Manual
48
To change the time format, touch Time Format.
The ‘Time Format’ menu is displayed. The red circle shows
the current setting.
Touch the new time format that you want to use
(e.g. 24 hr).
The time format is immediately updated and the ‘Units’ menu
is re-displayed.
10.7 Set Geographic / Custom Time Zone
You can set:
• a geographic time zone. A geographic time zone automatically shows the local time, offset
from GMT, at that location
• a custom time zone that enables you to offset your local time from GMT at 15 minute
increments
You must use either a geographic time zone OR a custom time zone. You cannot use both.
To set the geographic time zone or a custom time, press the
Hot Button on the top of the M-Nav 750 to display the ‘Main
Menu’.
Touch Nav. to display the map.
Touch Menu to display the ‘Navigation main menu’.
Touch the down-arrow to scroll through the listing then
touch Settings to display the ‘Settings’ menu.
Touch the down-arrow to scroll through the listing then
touch Time Settings.
The ‘Time settings’ screen is displayed. This example shows
the geographic time zone is set to GMT+12 based on an
Auckland / Wellington location with the custom time zone
option OFF.
Option ON
Option OFF
Page 49

M-Nav 750 | User Manual
49
To change the geographic time zone, the ‘Use custom time
zones’ option must be OFF.
Touch the current time zone setting (e.g. GMT+12).
A list of geographic time zones is displayed. Use the uparrow or down-arrow to fi nd the one you want to use, then
touch it.
The ‘Time settings’ screen is re-displayed immediately with
the new geographic time zone.
To use a custom time zone, the ‘Use custom time zones’
option must be ON.
Touch the current time zone setting (e.g. GMT+12).
A list of time offsets is displayed.
Use the up-arrow or down-arrow to fi nd the time offset you
want to use, then touch it.
The ‘Time settings’ screen is re-displayed immediately with
the new custom time zone.
10.8 Set Language
The M-Nav 750 can operate in a variety of languages.
To set the language, press the Hot Button on the top of the
M-Nav 750 to display the ‘Main Menu’.
Touch Settings to display the ‘Settings’ menu.
Touch System.
The ‘System’ menu is displayed with the current language
shown.
Touch Language.
Page 50

M-Nav 750 | User Manual
50
The ‘Language’ menu is displayed with the current language
highlighted.
Use the up-arrow and down-arrow to scroll through the
listing to fi nd the language you want to use, then touch that
language.
The language is immediately updated and the ‘System’ menu
is re-displayed with the new language selection.
10.9 Set the Choose Language at Startup Option
You can choose whether or not to show the ‘Language’ selection menu (described in the previous
section) whenever you switch on the M-Nav 750.
To change the current ‘Choose Language at Startup’ setting,
press the Hot Button on the top of the M-Nav 750 to display
the ‘Main Menu’.
Touch Settings to display the ‘Settings’ menu.
Touch System.
The ‘System’ screen is displayed.
Use the up-arrow and down-arrow to scroll through the
listing then touch Choose Language at Startup.
The ‘Choose Language at Startup’ screen is displayed with
the current setting highlighted.
Touch the new setting that you want to use (e.g. Off).
The setting is immediately updated and the ‘System’ menu is
re-displayed with the new setting.
Page 51

M-Nav 750 | User Manual
51
10.10 Restore Factory Default Settings
In the unlikely case of any problems with your M-Nav 750 device that you cannot otherwise
resolve, you can restore the factory default settings.
WARNING: This option will remove all of your customised settings and stored information
except your map selection.
To restore your M-Nav 750 to the factory default settings,
press the Hot Button on the top of the M-Nav 750 to display
the ‘Main Menu’.
Touch Settings to display the ‘Settings’ menu.
Touch System.
The ‘System’ screen is displayed.
Use the up-arrow and down-arrow to scroll through the
listing then touch Saved Info.
The ‘Saved Info’ screen is displayed.
Touch the Restore Factory Defaults.
A message asks you to confi rm that you want to restore the
factory default settings.
Touch Ye s to confi rm.
All of the M-Nav 750 settings (except for the map selection)
are immediately reset to the factory default settings.
Page 52

M-Nav 750 | User Manual
52
Navman Wireless UK
Innovation Centre 2
Keele University Science Park
Keele, Newcastle Under Lyme
Staffordshire, ST5 5NH
UNITED KINGDOM
Tel: +44 (0) 1782 55 79 50
Fax: +44 (0) 1782 55 79 79
Email: support@navmanwireless.co.uk
Website: www.navmanwireless.co.uk
Navman Wireless USA
Navman Wireless North America
2700 Patriot Blvd.
Suite 410
Glenview, IL
60026, USA
Tel: +1 (866) 527 9896
Fax: +1 (847) 729 5988
Email: us.support@navmanwireless.com
Website: www.navmanwirelessus.com
Navman Wireless Australia Pty
Unit 3, 2-6 Chaplin Drive
Lane Cove, NSW 2066
PO Box 3051, Monash Park NSW 2111
Sydney, AUSTRALIA
Tel: +61 2 9420 7500
Fax: +61 2 9420 5722
Email: support@navmanwireless.com.au
Website: www.navmanwireless.com.au
Navman Wireless NZ
Navman New Zealand
7-11 Kawana Street, Northcote
PO Box 340-184, Birkenhead 0746
Auckland, NEW ZEALAND
Tel: +64 9 481 0500
Fax: +64 9 481 0579
Email: nzsupport@navmanwireless.com
Website: www.navmanwireless.co.nz
Contact Information
Navman Wireless welcomes your feedback.
Compliance
This device complies with Part 15 of the FCC Rules. Operation is subject to the following two
conditions: (1) This device may not cause harmful interference, and (2) this device must accept
any interference received, including interference that may cause undesired operation.
Copyright
© Copyright 2009 Navman Wireless Holdings LP. Navman Wireless is a registered trademark of
Navman Wireless Holdings LP. All rights reserved.
All other trademarks and registrations are the property of their respective owners.
Page 53

M-Nav 750 | User Manual
53
Notes
Page 54

M-Nav 750 | User Manual
54
Notes
Page 55

Page 56

MAN000002 Rev A
Lat 42° 6’ 16.98” N Lon 87° 49’ 29.27” W
 Loading...