

Page 1
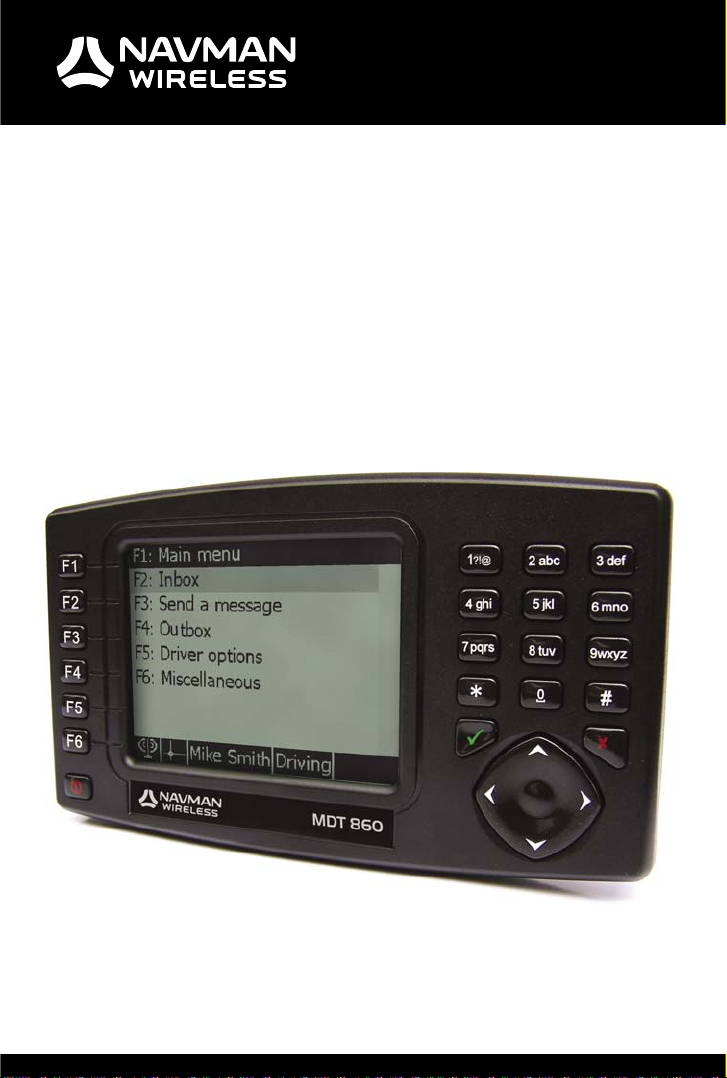
MDT 860
User Manual
GPS TRACKING AND FLEET MANAGEMENT SOLUTIONS
Page 2

Page 3

MDT 860 | User Manual
Contents
1 Introduction . . . . . . . . . . . . . . . . . . . . . . . . . . . . . . . . . . . . . . . . . . . . 5
1.1 Safety Notice 5
2 MDT 860 Hardware . . . . . . . . . . . . . . . . . . . . . . . . . . . . . . . . . . . . . . . . 6
2.1 Box Contents 6
2.2 Front Components 6
2.3 Back and Underside Components 7
3 Positioning the MDT 860 in a Vehicle . . . . . . . . . . . . . . . . . . . . . . . . . . . . . . 8
3.1 MDT 860 Suction-Mount 8
3.2 MDT 860 M3 Mounting Holes 8
4 Getting Started . . . . . . . . . . . . . . . . . . . . . . . . . . . . . . . . . . . . . . . . . . 9
4.1 Screens 9
4.2 Vehicle Inspection Functionality 12
4.3 Function Keys 13
5 Messaging . . . . . . . . . . . . . . . . . . . . . . . . . . . . . . . . . . . . . . . . . . . . 14
5.1 Receiving Messages 16
5.2 Reading Messages 16
5.3 Sending a Message 17
5.4 Deleting a Message 18
5.5 Reading and Managing Sent Messages 18
6 Driver Options . . . . . . . . . . . . . . . . . . . . . . . . . . . . . . . . . . . . . . . . . 19
6.1 Introduction 19
6.2 Driver Options 19
7 Miscellaneous . . . . . . . . . . . . . . . . . . . . . . . . . . . . . . . . . . . . . . . . . . 23
8 Confi guration . . . . . . . . . . . . . . . . . . . . . . . . . . . . . . . . . . . . . . . . . . 24
8.1 General 25
8.2 Display 25
8.3 Keypad 25
8.4 Buzzer 25
8.5 Font Size 25
8.6 Language 25
8.7 Formats and Units 26
8.8 Status Bar 26
8.9 Notifi cations 26
8.10 Main Menu 26
8.11 Inbox 27
8.12 Outbox 27
9 Diagnostics . . . . . . . . . . . . . . . . . . . . . . . . . . . . . . . . . . . . . . . . . . . 28
10 Communication Test . . . . . . . . . . . . . . . . . . . . . . . . . . . . . . . . . . . . . . 29
11 Pop Ups . . . . . . . . . . . . . . . . . . . . . . . . . . . . . . . . . . . . . . . . . . . . . 30
12 Specifi cations . . . . . . . . . . . . . . . . . . . . . . . . . . . . . . . . . . . . . . . . . . 31
Appendix . . . . . . . . . . . . . . . . . . . . . . . . . . . . . . . . . . . . . . . . . . . . . . . 32
External Keyboard 32
Memory Usage 32
Using Multi-Tap Text Entry 32
The Editor Screen 33
Conditions of Sale and Warranty. . . . . . . . . . . . . . . . . . . . . . . . . . . . . . . . . . . 34
Contacts . . . . . . . . . . . . . . . . . . . . . . . . . . . . . . . . . . . . . . . . . . . . . . . 35
3
CONTENTS
Page 4

Page 5

MDT 860 | User Manual
1 Introduction
Thank you for purchasing this Navman Wireless MDT 860. We hope you enjoy your new
OnlineAVL messaging terminal.
Whether your fl eet operates in a city, across a country or a continent, the MDT 860 will provide
effi cient, cost effective and timely two-way text messages from the dashboard to the OnlineAVL
application loaded on a PC at your offi ce. The MDT 860 can send pre-programmed replies or
outbound messages.
Navman Wireless welcomes your feedback. To contact us, please fi nd our details in the Contacts
section at the back of this user manual.
1.1 Safety Notice
WARNING: In a vehicle, it is your sole responsibility to place, secure and use the MDT 860 in
a manner that will not cause accidents, personal injury or property damage. The user of this
product is solely responsible for observing safe driving practices and for all use of this device. It
is your responsibility to read and follow the vehicle mount installation instructions and to use the
product inconsistent with your government’s laws and regulations. Consult the vehicle manual to
ensure the mounting location is safe. It is your sole responsibility to adhere to the following safety
instructions at all times:
•
Do not operate the MDT 860 while driving or place the MDT 860 in a position that
obstructs the driver’s view
•
Do not mount the MDT 860 in a way that may be distracting or interfere with the safe
operation of the vehicle, the deployment of airbags or other safety equipment
•
Do not leave the MDT 860 in view while your vehicle is unattended, especially in strong or
direct sunlight
Do not use or handle the MDT 860 when it is hot; leave it to cool, out of direct sunlight
•
Failure to adhere to these instructions may lead to serious personal injury, or property damage.
Navman Wireless disclaims all liability for use of the MDT 860 that contributes to injuries, death,
property damage or violates law.
INTRODUCTION
5
Page 6
MDT 860 | User Manual
MDT 860 HARDWARE
2 MDT 860 Hardware
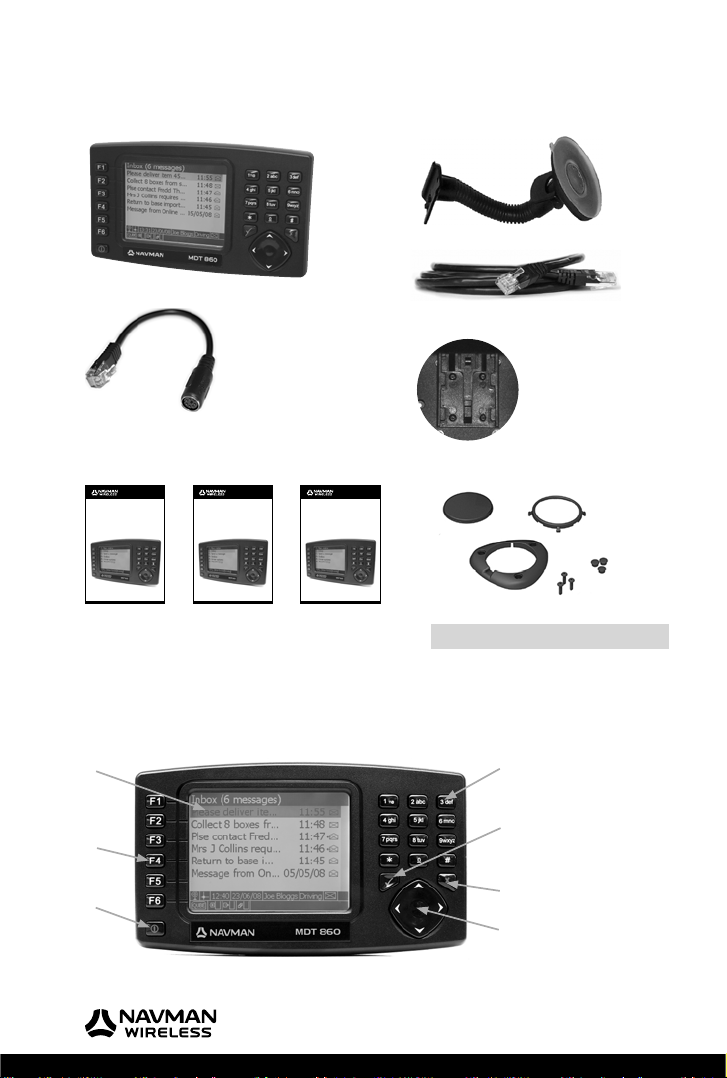
2.1 Box Contents
MDT 860
Keyboard adaptor cable (RJ25 -> PS2)
MDT 860
User Manual
GPS TRACKING AND FLEET MANAGEMENT SOLUTIONS
User manual
MDT 860
Quickstart Guide
GPS TRACKING AND FLEET MANAGEMENT SOLUTIONS
Quickstart guide Installation manual
2.2 Front Components
1
MDT 860
Installation Manual
GPS TRACKING AND FLEET MANAGEMENT SOLUTIONS
Flexible mount
RJ45 cable
Mounting Clip
(a)
(b)
(c)
(d)
Hardware mounting kit:
(a) Baseplate (d) 3 x Screws
(b) Retainer ring (e) 3 x Screw caps
(c) Screw plate
4
(e)
5
2
3
6
7
6
Page 7
MDT 860 | User Manual
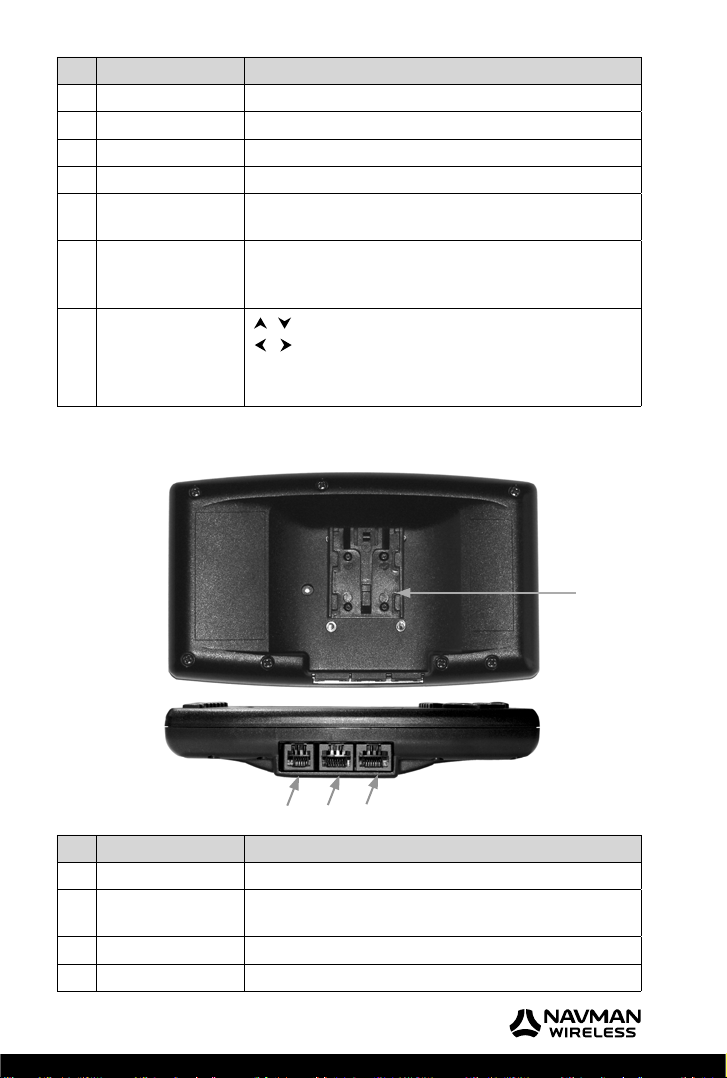
Component Description
1 LCD Screen Displays messages and menu options.
2 Function Keys One touch navigation to menu options. Refer to section 4.2.
3 Power Button Turn the MDT 860 display on and off.
4 Alpha Numeric Keys Use to input numeric or textual information using multi-tap.
5 Accept / Enter Key Use to select the highlighted item.
Confi rms a selection.
6 Cancel / Escape Key Steps back 1 screen.
Go to Main Menu – when held down.
Rejects a selection.
7 4-way Cursor Key Use to navigate through the menus.
Use to move the cursor on an edit screen.
Use to select confi guration items / values on the
confi guration screen.
2.3 Back and Underside Components
MDT 860 HARDWARE
1
2 43
Component Description
1 Slide Bracket Use to attach to the windshield suction mount.
2 RJ25 External keyboard connection. Connect to a PC keyboard using
the supplied keyboard adaptor cable.
3 RJ45 Spare (not used for the AVL system).
4 RJ45 This connects to the Qube to provide power and data
7
Page 8
MDT 860 | User Manual
POSITIONING THE MDT 860 IN A VEHICLE
3 Positioning the MDT 860 in a Vehicle
There are three options provided for mounting the MDT 860:
1.
Use the suction mounted, fl exible, snap-lock bracket provided
2.
Panel mount the MDT 860 with the hardware mounting kit provided
3.
Attach to a Panavise bracket (Navman Wireless part number BK000025-G) or an
alternative bracket using the M3 mounting holes in the backcase
3.1 MDT 860 Suction-Mount
Follow these steps:
1.
Attach the MDT 860 to the vehicle mount by matching the two slides on the stand to the
corresponding slots on the back of the MDT 860 unit and slide together until they fi rmly
latch into place
2.
Choose a position on the windshield that is clearly visible to the driver without obstructing
the view of the road or any safety equipment i.e. airbags. Clean the surface thoroughly
Press the suction cup fi rmly to the surface. Pull the lever down to seal the suction cup. The
3.
suction cup fi rmly anchors the vehicle mount
Hold the vehicle mount base fi rmly and bend the stalk to adjust to a safe and easy viewing
4.
position
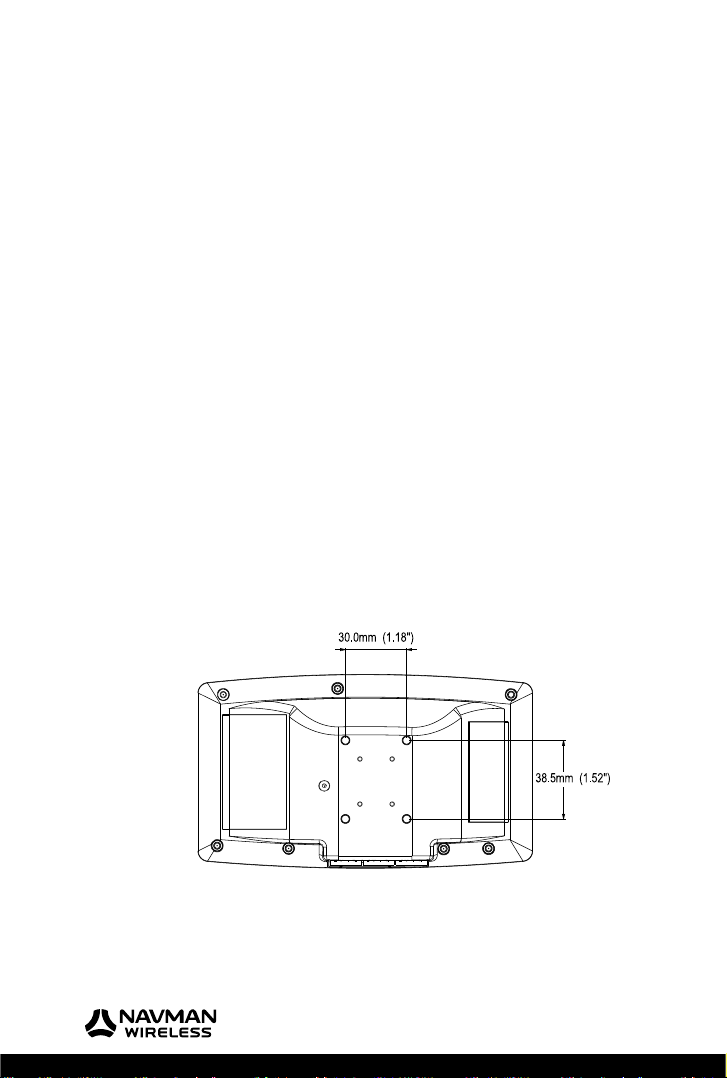
3.2 MDT 860 M3 Mounting Holes
The holes (illustrated in the diagram below) can be used to attach the MDT 860 to a Panavise
bracket or an alternative bracket.
Use the diagram below as a guide to insert M3 x 6 mm machine screws. Do not over tighten, as
driving the M3 machine screws in too far may cause damage.
8
Page 9
MDT 860 | User Manual
4 Getting Started
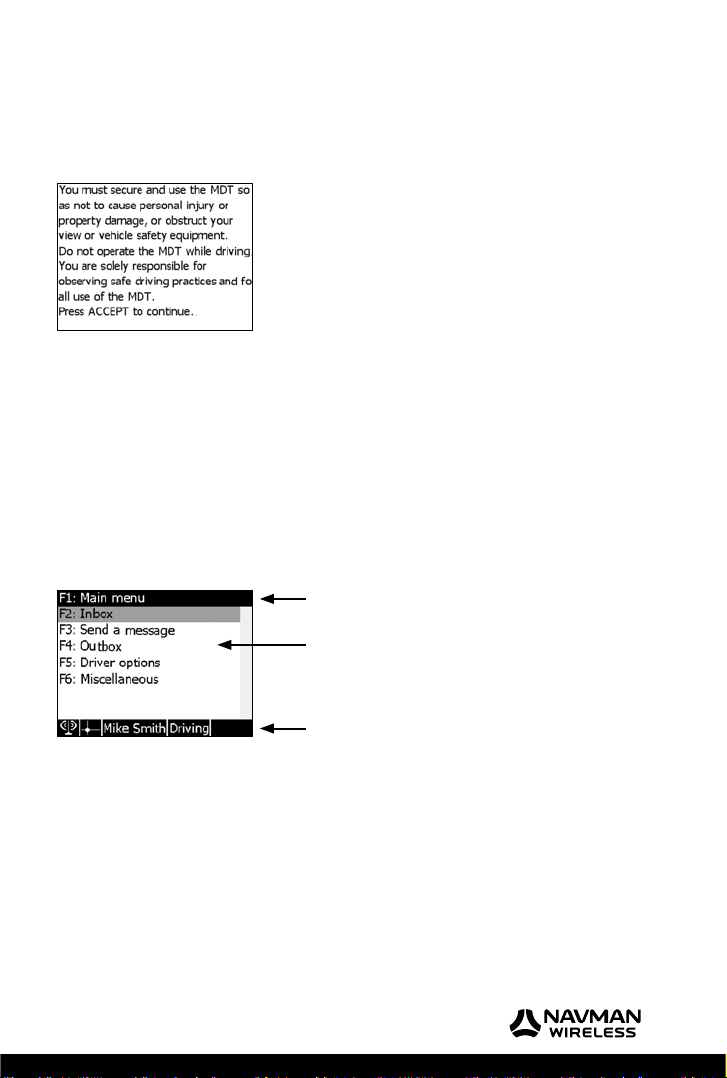
On installation or reset of the unit, the MDT 860 displays a Start screen that indicates the product
name and software version. After a few seconds a Legal Disclaimer screen is displayed.
Press P (Accept) to open the Main Menu screen.
4.1 Screens
Two types of screens are used: a normal screen and a pop up screen.
Normal screen
Normal screens are used to display and to process the MDT 860 OnlineAVL application.
A normal screen makes use of the entire display and consists of three parts:
•
Screen Title
•
Screen Body
•
Status Bar
Screen Title
Screen Body
GETTING STARTED
Status Bar
Screen title
The Screen Title identifi es the screen. Some additional information related to the contents of the
screen (body) may also be displayed on the title bar.
9
Page 10
MDT 860 | User Manual
GETTING STARTED
Screen body
The Screen Body contains a particular type of information (menu, text, confi guration or diagnostic).
If the information to be displayed is larger then what the screen can display, a vertical scroll bar will
appear on the right hand side and the screen can be scrolled.
Information that is entered or changed in an editable screen is preserved (even if a pop up screen
is displayed) until the screen is closed or the MDT 860 is turned off/reset.
The size of the font used in the screen body area is user confi gurable. Refer to section 8.5 Font Size.
Status bar
The Status bar displays continuously updated information related to the operation of the in-vehicle
system. The status bar can be customised to display one or more items. Refer to section 8.8 Status
Bar for a full list. Example of items:
Current status of GPS (fi x/no fi x)
•
Current status of the modem (online/offl ine)
•
Current time
•
Driver’s name
•
Inbox status (presence of unread text messages)
•
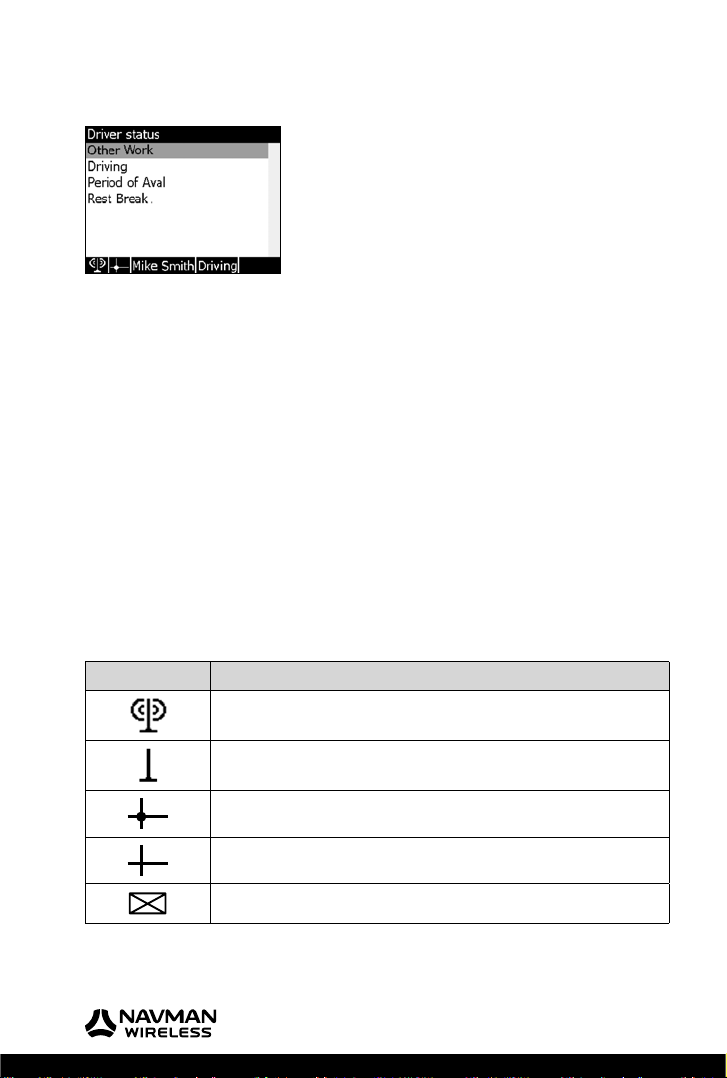
The Status bar will display information in icon format. The following icons are used:
Icons Description
The Qube modem is Online.
The Qube modem is Offl ine.
The Qube has a valid GPS fi x.
The Qube does not have a valid GPS fi x.
Indicates that there are unread messages.
10
Page 11
MDT 860 | User Manual
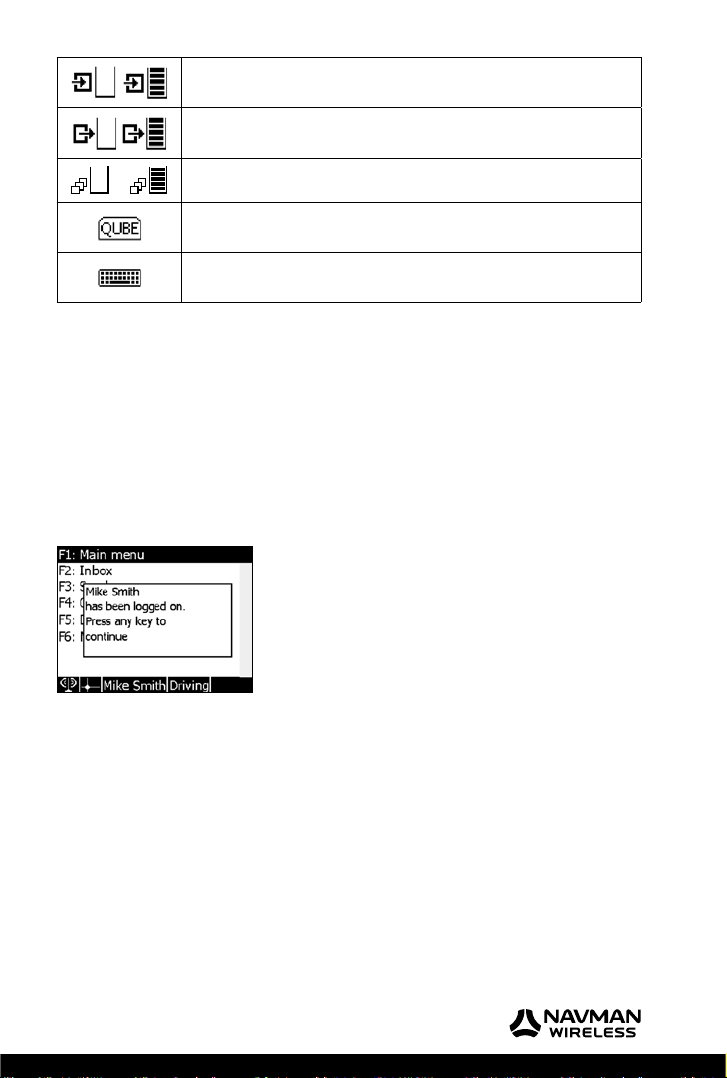
Indicates the status of the Inbox memory, from empty to full.
Indicates the status of the Outbox memory, from empty to full.
Indicates the status of the outgoing messages memory, from empty to full.
Indicates that a Qube is connected to the MDT 860.
Indicates that an external keyboard is connected to the MDT 860.
Pop up screen
Pop up screens are used to display out of order notifi cations about important events or warnings
generated as a result of actions taken. Pop up screens require immediate attention and/or action.
In most cases, a beep will sound when a pop up is displayed.
Most pop ups are blocking, i.e. pop ups must be actioned in order to be able to return to the
previously opened screens. Non-blocking pop ups, such as notifi cations regarding restoration of
cellular connection or GPS fi x are shown for a few seconds only.
•
A pop up screen is displayed over a normal screen and usually occupies only a part of the
display
GETTING STARTED
Note: Pop up screens are not stacked. However, in some cases if an event requiring generation of
a pop up arises while another pop up is shown on the screen, a beep will sound and the later pop
up will be displayed after the previous one has been processed.
11
Page 12

MDT 860 | User Manual
GETTING STARTED
Screen navigation
Initially, when the device is powered up, a Start screen showing technical information about the
hardware and fi rmware is displayed. The Start screen will remain on the screen indefi nitely until
a connection to a Navman Wireless Qube can be established. A legal disclaimer is displayed after
this Start screen. The disclaimer remains displayed until P is pressed, after which the Main Menu
screen is displayed.
An optional Vehicle Inspection screen will appear between the legal Disclaimer screen and the
Main Menu screen if your MDT is confi gured to enable the Vehicle Inspection functionality.
Note: The Disclaimer and Vehicle Inspection screens need to be processed to continue using the
MDT 860 messaging functions.
From the Main Menu screen, any single piece of information or control can be accessed via a
series of menus. All successive screens opened by selecting items in the submenus are stacked.
As a result, when travelling back up the menu structure (by closing the opened screens) all
previously opened screens can be retrieved in the same state they were left.
Alternatively, to return directly to the Main Menu screen (where all opened screens will be
automatically closed), press and hold the O key.
At all times, one item from the menu will be highlighted. To navigate through the menu, use the
‘4-way cursor key’ to highlight the required item.
A highlighted item can be selected by pressing the P key. Selecting an item will result in either
another screen opening, or one or more opened screens closing.
4.2 Vehicle Inspection Functionality (optional)
The Vehicle Inspection feature automatically prompts the driver to perform a vehicle inspection,
and then send the results of that inspection to the offi ce according to what the driver has selected.
Drivers are prompted to perform Vehicle Inspection after the MDT is plugged in, and only if has
been unplugged for more than 30 seconds.
Press P (Accept) to acknowledge that an inspection has been carried out.
Next, the Vehicle Inspection Result screen is displayed.
Select the result of the inspection using the ‘4 way cursor key’ and press P.
On each acceptance of the screens (inspection required and results) a text message is generated
from the vehicle and sent back to the software application.
12
Page 13

MDT 860 | User Manual
Note: The Vehicle Inspection screens include the status bar. The information in the status bar is
updated in real time.
Main menu
The Main Menu screen is the starting screen in the series of menus. The following items are
available:
•
Inbox
•
Send A Message
•
Outbox
•
Driver Options
•
Miscellaneous
The availability of items on the Main Menu are access controlled. It is possible to confi gure the
MDT 860 to display any of the items above. This confi guration will be possible over the air from
the OnlineAVL application or locally via the Confi guration menu. Refer to section 8.10 Main Menu.
4.3 Function Keys
The Function Keys provide a ‘one touch’ navigation to the menu options.
Function Keys Menu Option
F1 Main Menu
F2 Inbox
F3 Send a Message
F4 Outbox
F5 Driver Options
F6 Miscellaneous
GETTING STARTED
Note: Regardless of the screen (excluding pop up screens) the MDT 860 is displaying at the time,
selecting a function key will always transport the screen to the corresponding menu option as listed
above, providing that the option selected has been enabled. Refer to section 8.10 Main Menu.
13
Page 14

MDT 860 | User Manual
MESSAGING
5 Messaging
Text messages are categorised into three distinct groups:
Group Description
Received Incoming messages received by the MDT 860.
Responses Messages sent from the MDT 860 as responses to received message(s).
Originated Messages created from the MDT 860, other than responses.
There are three separate entries in the Main Menu that give access to the text messaging
functionality:
Inbox
The Inbox shows a list of all messages received from the OnlineAVL application and stored in the
MDT 860. Messages are shown in the order of their receipt, with the most recent message at the top.
The following information in the Inbox is shown for each message, on a single line:
•
First words of the message
•
Time or date of reception (time only is given if the message has been received on the
current day, otherwise date only is given)
Message’s current status
•
New (unread)
•
•
Read
•
Replied
Note: When the Inbox is initially opened the highlighted message is dependent upon the Inbox
settings. Refer to section 8.11 Inbox. The options available are:
•
Top: The newest message
•
Bottom: The oldest message
•
Current: The message accessed most recently
14
Page 15

MDT 860 | User Manual
Send a message
Displays a complete list of options for sending a message from the MDT 860. The content of the
screen is confi gurable and may contain a list of canned (pre-programmed) messages as well as a
free form text message.
Outbox
The Outbox shows a list of all messages sent from the MDT 860. Messages are shown in order of
their sending, with the most recent message sent at the top.
The following information in the Outbox is shown for each message, on a single line:
First words of the message
•
Time or date of sending (time only is given if message has been sent on the current day,
•
otherwise date only is given)
Current status of the message
•
•
•
Sent
Delivered
MESSAGING
Additional notes on messages
•
The MDT 860 can store hundreds of messages. A pop up screen is displayed to warn
when the storage for a particular type of message is about to become full
If the message memory becomes full, the MDT 860 will not be able to receive an incoming
•
message. The message will be rejected and an appropriate warning will be displayed
15
Page 16

MDT 860 | User Manual
MESSAGING
5.1 Receiving Messages
When a new message is sent to the MDT 860, a New Message pop up screen will be displayed,
accompanied by a beeping signal, regardless of what screen is being viewed.
Press P to open the Inbox screen.
Note: If the Start, Disclaimer or Vehicle Inspection screen is displayed when a new message is
received on the MDT 860, the New Message pop up screen will not be displayed. The MDT 860
will though beep to alert the user a new message has been received.
If a new message is received while there are unsaved changes on the screen (e.g. while editing a
reply) a warning will be issued.
Selecting O (Cancel) will close the New Message pop up screen and the message can be viewed
later from the Inbox screen.
5.2 Reading Messages
The Screen Title of the Read Message screen displays the time that the message was sent and the
time that the message was received at the MDT 860.
Press P to reply to the message. See section 5.3 Sending a Message.
16
Page 17

MDT 860 | User Manual
5.3 Sending a Message
A message can be sent by replying to an incoming message or sending an original (created)
message.
Notes: Canned messages and the message folders are set up by the Fleet Operator.
The following rules apply to all messages sent from the MDT 860:
•
Both free-text and canned messages (editable and non-editable) can be sent from the
MDT 860
Editable canned messages may contain a fi eld that can be edited before sending.
•
Text messaging operates on vehicle–by-vehicle (MDT by MDT) basis, i.e. there are no
•
special provisions for text messaging on driver-by-driver basis
Sending an original message
Select Send A Message from the Main Menu (or press F3). The Send A Message screen will be
displayed. Select either a canned message or the free form text message. To enter a free form text
message use either the multi-tap keypad or an external keyboard. Refer to section Appendix and
see External Keyboard.
Replying to received messages
Select Inbox from the Main Menu (or press F2) and highlight the message to reply to.
Press P to display the Process Message screen.
Select Reply To. The Send A Message screen will be displayed.
MESSAGING
Select either a canned message or the free form text message. To enter a free form text message
use either the multi-tap keypad or an external keyboard. Refer to section Appendix and see
External Keyboard.
17
Page 18

MDT 860 | User Manual
MESSAGING
5.4 Deleting a Message
Select Inbox from the Main Menu (or press F2) and highlight the message to delete.
Press P to display the Process Message screen.
Select Delete from the menu to delete the message from the Inbox. To delete all the messages in
the Inbox, refer to section 8.11 Inbox.
A notifi cation is sent to the OnlineAVL application to notify users the message has been deleted.
Note: When deleting a message, a pop up screen confi rming this action will be displayed to
ensure messages are not deleted in error.
5.5 Reading and Managing Sent Messages
To read replies that have been sent in response to received messages, select Inbox (or press F2).
Use the
and on the 4-way cursor key to select the message.
Press P to display the Previous Replies screen. Select either Delete or Resend.
To read sent messages, select Outbox (or press F4).
Use the and on the 4-way cursor key to select the message.
Press P again to display the Process Previous Message screen to either Delete or Resend the
message.
18
Page 19

MDT 860 | User Manual
6 Driver Options
6.1 Introduction
Driver Options contains the functionality to support the Driver ID and Driver Hours features.
Note: These features are enabled over the air and can be confi gured from the OnlineAVL
application.
When either the Driver ID or Driver Hours features are enabled, in order to use the MDT-860 the
driver needs to be logged on.
Driver ID
Logging on consists of entering a Personal Identifi cation Number (PIN) into the MDT-860, which
is then checked over the air by the OnlineAVL server. The PIN can be confi gured to display in
‘visible’ or ‘secure’ mode. When in ‘secure’ mode the PIN will display as asterisks.
Successful login - a correct PIN results in the drivers name being sent by the server to the MDT-860.
Unsuccessful login - if no match is found for the entered PIN, the log on fails and the MDT 860
continues to beep until a correct log on is recorded.
Driver Hours
The Driver Hours feature makes it possible to monitor drivers activities and to record their working
time as well as the duration of breaks taken. This, in turn, makes it possible to monitor and to
report driver’s compliance with relevant industry and health and safety regulations.
Additionally, the Driver Hours feature can prompt and warn the driver on:
when the next rest break is due. E.g. rest break due in 30 minutes
•
when the rest break is now due
•
if the rest break duration is too short
•
All prompts and warnings are displayed via a pop up screen.
DRIVER OPTIONS
6.2 Driver Options
Select Driver Options from the Main Menu (or press F5) to display a menu with the following
options:
Option Description
Log on or Log off Depending upon the current state, either log on or log off.
Driver Status Select to view a list of available driver statuses.
Working time Select Working time to display the total time the driver has spent in
“working” state since log on. Working time is cleared when log off occurs.
19
Page 20

MDT 860 | User Manual
DRIVER OPTIONS
How to log on
The Driver ID Log On screen will appear on the MDT 860 immediately after the ignition is turned on.
Using the numeric keypad enter the complete Driver PIN.
Press P to confi rm the Driver PIN. The MDT 860 will then send the PIN number back to the
OnlineAVL application for checking. Confi rmation may take a few minutes depending on cellular
network coverage.
If the vehicle is out of coverage
If the vehicle is out of cellular coverage when inserting the Driver PIN, the Qube tracking device
will store the information and will send it when the vehicle is back in cellular coverage.
If a CORRECT DRIVER PIN has been entered
The Driver ID Status pop up screen will appear with details of the driver’s name.
Press any key on the MDT 860 to exit the screen.
If an INCORRECT DRIVER PIN has been entered
The Driver ID Status pop up screen will appear with ‘Log on Failed’.
Press the O key to exit the screen.
The Driver ID Log On screen will reappear to request a valid log on.
20
Page 21

MDT 860 | User Manual
If a PIN number that is ALREADY IN USE by another driver has
been entered
The Driver ID Status pop up screen will appear with ‘Log on Failed! You are already logged on’.
Press any key on the MDT 860 to exit the screen.
The Driver ID Log On screen will reappear to request a valid log on. Contact your offi ce
immediately to ask the Fleet Operator to re-confi rm the Driver PIN and/or check why the Driver
PIN is in use.
How to log off
Select Driver Options from the Main Menu (or press F5).
Select Log off from the menu.
The Driver ID Log Off screen will appear.
Press P to confi rm log off OR press the O key to cancel the action.
If Driver Status* is activated, the driver must select a status before log off can occur.
*The Driver Status feature is only visible on the MDT 860 if it has been activated. This feature is
not available in all the regions.
Note: If the Driver ID is logged off, but the vehicle’s ignition has not been turned off, the Driver
ID Log On screen will reappear requesting a valid log on.
How to change driver status*
Select Driver Options from the Main Menu (or press F5).
Select Driver Status from the menu.
Use the 4-way cursor key to select the correct status.
Once highlighted press P to confi rm the Driver Status.
DRIVER OPTIONS
*The Driver Status feature is only visible on the MDT 860 if it has been activated. This feature is
not available in all regions.
21
Page 22

MDT 860 | User Manual
DRIVER OPTIONS
Working time
Select Driver Options from the Main Menu screen (or press F5).
Select Working Time from the Driver Options screen
The Working Time screen will provide the following values:
Since last logon: period of time since last logon
•
Today: working time for the current day
•
Rest break due in: period of time until the next rest break
•
Rest for: duration of the rest break
•
The Working Time screen is updated in real time.
Note: The Working Time feature is only visible on the MDT 860 if it has been activated. This
feature is not available in all regions.
If the MDT 860 is beeping
The MDT 860 will beep to remind that a log on with a Driver PIN is required. The beeping can be
stopped by entering a correct Driver PIN. If a Driver PIN has not been assigned and the MDT 860
is beeping, contact your offi ce immediately.
22
Page 23

MDT 860 | User Manual
7 Miscellaneous
Select Miscellaneous from the Main Menu screen (or press F6) to access the Miscellaneous
screen.
The Miscellaneous menu provides access to three sub-menus:
Confi guration
•
Diagnostics
•
Communication Test
•
MISCELLANEOUS
23
Page 24

MDT 860 | User Manual
CONFIGURATION
8 Confi guration
The Confi guration Menu screen provides access to menu options that allow users to confi gure
various MDT 860 settings.
The following MDT 860 setting are available:
•
General
•
Display
•
Keypad
•
Buzzer
•
Font Size
•
Language
•
Formats and units
•
Status Bar
•
Notifi cations
•
Main Menu
•
Inbox
•
Outbox
Use the 4-way cursor key to select an MDT 860 setting. Press the P key to confi rm selection.
Settings for individual MDT 860 settings can be modifi ed by using the
cursor key. As a general rule, a short press on the or key will make the value increase or
decrease by a unit. A continuous press on the or key will make the value increase or decrease
by several units. All exceptions to this rule are given in the paragraphs detailing the individual
settings (refer to section 8.1 General to 8.12 Outbox).
Note: All changes to settings take effect in real time.
To ACCEPT confi guration settings, press the P key to:
Options:
•
Save
•
Restore defaults
•
Restore defaults and save
•
Cancel
Press the O key to return the screen to the Confi guration Menu and restore the previous values.
and on the 4-way
24
Page 25

MDT 860 | User Manual
8.1 General
The MDT 860 turn-off time (time the MDT 860 turns off after ignition has been switched off).
Range: 1 – 255 minutes or infi nite.
8.2 Display
•
Contrast. Range: 0 – 100%
•
Backlight intensity. Range: 0 – 100%
•
Backlight timeout (time the backlight is turned off after ignition has been switched off)
Range: 1 – 255 minutes or infi nite
8.3 Keypad
•
Multi-tap timeout (length of time before a multi-tap character is automatically accepted.
Refer to the Appendix and see Using Multi-Tap Text Entry). Range: 0.1 – 5 seconds
Backlight intensity. Range: 0 – 100%
•
8.4 Buzzer
Three settings are available for the keypad key-press tone (beep):
•
Pitch. Range: 100 – 8000 Hz. (Note: A continuous press on the or key will result in a
large increase or decrease of the pitch)
Duration. Range: 1 – 255 milliseconds
•
Volume. Range: 0 – 100%
•
8.5 Font size
The following font sizes are available for the screen body:
Tiny (8 lines of text per screen body)
•
Small (7 lines of text per screen body)
•
Medium (6 lines of text per screen body)
•
Large (5 lines of text per screen body)
•
Font sizes can be selected by using the and cursor keys. Press the P key to accept the
selection.
CONFIGURATION
8.6 Language
The following languages are available:
•
English
•
French
•
Spanish
Use the and cursor keys to select a language. Press the P key to accept the selection.
Note: The Language settings apply to:
Fixed elements of the screens (titles, menus, pop ups, etc.)
•
Keypad multi-tap character subsets
•
Language setting does not apply to messages received at or sent from the MDT 860.
25
Page 26

MDT 860 | User Manual
CONFIGURATION
8.7 Formats and Units
The following formats and units can be confi gured:
•
Clock format (12 or 24 hour)
•
Date format (DD/MM/YY or MM/DD/YY or YY/MM/DD)
•
Temperature unit (C° or °F or K)
•
Driver ID format (visable or secure)
Note: In secure mode asterisks are displayed (rather than digits) during driver logon.
8.8 Status Bar
The status bar can be customised to display the following information:
•
Current status of the modem (online/offl ine)
•
Current status of GPS (fi x/no fi x)
•
Current time
•
Current date
•
Driver’s name
•
Driver’s status
•
Inbox status (presence of unread text messages)
•
Qube status (Qube present)
•
Keyboard status (external keyboard present)
•
Inbox memory usage
•
Outbox memory usage
•
Incoming/Outgoing messages memory usage
Use the and cursor key to select or deselect (Yes or No) the required information, respectively.
Note: The Status bar confi guration screen settings are applied in real-time, so the selection can
be viewed at the time of changing before accepting or cancelling the action.
8.9 Notifi cations
Use to set up a subset of active real-time notifi cations. The following notifi cations can be enabled
or disabled:
•
Change of GPS status
•
Modem change of state
•
Memory overfl ow warnings
Use the and cursor keys to select or deselect (Yes or No) the required information.
8.10 Main Menu
The Main menu can be customised to enable or disable the following options:
•
Inbox
•
Send A Message
•
Outbox
•
Driver Options
Use the and cursor keys to select or deselect (Yes or No) the required options.
26
Page 27

MDT 860 | User Manual
8.11 Inbox
The following settings are available:
•
Message focus (bottom, current, top). Use the
option
•
Automatic saving of responses. Use the and cursor key to enable or disable (Yes or
No) the required option
•
Threshold (percentage of the full capacity = 100%) above which warnings need to be
issued regarding the usage of Inbox memory. Range: 0 – 100%
Delete all messages. Press P to delete all the messages in the Inbox
•
Delete all stored responses. Press P to delete
•
Note: When deleting messages, a pop up screen confi rming this action will be displayed to
ensure the messages are not deleted in error.
and cursor key to select the required
8.12 Outbox
The following settings are available:
•
Automatic saving of originated messages. Use the and cursor keys to enable or disable
(Yes or No) the required option
•
Action to perform on originated messages memory overfl ow: stop storing new messages
or overwrite the oldest message. Use the and cursor keys to select the required option
Threshold (percentage of the full capacity = 100%) above which warnings need to be
•
issued regarding the usage of Outbox memory. Range: 0 – 100%
Delete all stored originated messages. Press P to delete
•
Note: When deleting messages, a pop up screen confi rming this action will be displayed to
ensure the messages are not deleted in error.
CONFIGURATION
27
Page 28

MDT 860 | User Manual
DIAGNOSTICS
9 Diagnostics
The following items are displayed:
•
Voltage of power supply
•
Temperature
•
GPS fi x status
•
Modem status
•
AVL ID
•
MDT 860 fi rmware version
•
Qube fi rmware version
•
Ignition Status
28
Page 29

MDT 860 | User Manual
10 Communication Test
Select Communication Test to perform an end-to-end communication test between the MDT 860
and the OnlineAVL server. A message will be received on the MDT 860 if the communication link
works correctly.
COMMUNICATION TEST
29
Page 30

MDT 860 | User Manual
POP UPS
11 Pop Ups
All real-time notifi cations are display as pop up screens. A tone may accompany some pop us
screens.
Example of a pop up screen.
The following pop up screens are user confi gurable and can be disabled:
•
Modem connected
•
Modem disconnected
•
GPS fi x lost
•
GPS fi x recovered
•
Inbox is nearly full. Please delete some messages
•
Outbox is nearly full. Please delete some messages
•
Rest break due in xxx. Press any key to continue
•
Rest break due now. Press any key to continue
•
Rest break too short. Press any key to continue
The following pop up screens cannot be disabled and are not user confi gurable:
•
Driver ID disabled! Press any key to continue
•
Driver status disabled. Press any key to continue
•
Xxx has been logged on. Press any key to continue
•
Logon failed! Invalid driver ID. Press any key to continue
•
Logon failed! Driver logged on xxx. Press any key to continue
•
Server logged you off! Press any key to continue
•
Log on now! Press any key to continue
•
Unsaved changes! Press P (Accept) to open the Inbox or Press O (Cancel) to continue
previous operation
•
Confi rm delete. Press P (Accept) to delete or Press O (Cancel) to cancel
•
You have ‘xxx’ new message(s). Press P (Accept) to open the Inbox or O (Cancel) to exit
•
Incoming message rejected! Please delete some messages. Press P (Accept) to open the
Inbox or O (Cancel) to exist
•
Operation cannot be completed. No contact with the server. Please try later. Press any key
to continue
•
Reply cannot be sent. Inbox is full. Please delete some messages. Press any key to continue
•
Message cannot be sent. Outbox is full. Please delete some messages. Press any key
to continue
Note: The ‘xxx’ represents ‘drivers name’, ‘vehicle’s ID’, ‘number of messages’ or ‘minutes’.
30
Page 31

MDT 860 | User Manual
12 Specifi cations
Physical:
•
Size: 165mm x 95mm x 30mm
•
Weight: 233g
Display:
•
58mm x 77mm
•
White LED backlight, user selectable level
•
320 x 240 pixels, 4 grey levels
Memory:
•
10KB RAM
•
32KB EEPROM
•
1664KB Flash as 2 banks
•
256KB battery-backed SRAM, as 2 banks
Keypad:
•
21 keys with backlighting
•
4 way cursor key with backlighting
External Interface:
•
Two RJ45 connectors (Power and RS232)
•
International PC AT keyboard interface via RJ25 connector. Keyboard adaptor cable RJ25
to PS/2 supplied
Electrical:
•
+8 to +30VDC
•
Operating: 130mA@12V, DC 70mA@24V DC (backlight on)
•
Standby: 25mA@12V DC, 15mA@24V DC (LCD and backlight off)
SPECIFICATIONS
31
Page 32

MDT 860 | User Manual
APPENDIX
Appendix
External Keyboard
The external keyboard is an optional device. When connected, it complements the in-built keypad.
Note:
Memory Usage
The following should be noted with regards to memory storage of OnlineAVL messages:
Using Multi-Tap Text Entry
How to enter multi-tap text:
•
Some of the keys are not supported (e.g. Tab, Insert)
•
There is no equivalent to the Power (•) key
•
The soft keys (1-6) are mapped onto the function keys (F1 – F6, respectively)
•
The Accept key (P) is mapped onto the Enter key, except in the editor screen
•
The Cancel key (O) is mapped onto the Esc key
•
Messages awaiting transmission are stored in a buffer which, in certain situations (vehicle
out of cellular coverage for prolonged time), may overfl ow. If this happens, an appropriate
notifi cation is issued. However, no newly generated messages will be stored for sending
(they will be lost)
•
When the storage for the Inbox becomes full, no new messages are accepted and a
warning displays every time a new message arrives
•
Multi-tap is only available for the alpha numeric keys (0 – 9)
•
Two subsets of special characters have been implemented for keys 0 and 1. These include
punctuation, currency and other symbols
•
Multi-tap characters are language-dependent, i.e. any language-specifi c (accented,
special) characters are only available for the language in question
•
In multi-tap mode, the subset of characters available for the currently used key is displayed
over the status bar with the current character highlighted
•
Multi-tap timeout (length of time before a multi-tap character is automatically accepted) is
user-confi gurable. Refer to section 8.3 Keypad
Press a key one or more times until the required character appears on the screen (e.g. to
•
select the character ‘M’, press the
To accept the selected character, use one of the following options:
•
Pause for a short while OR
•
Press the key on the 4-way cursor key OR
•
Continue to enter the next character using a different key
•
To select and accept a numeric character, press the key once with a continuous pause
•
To delete one or more characters before the cursor, press with a short pause the O button
one or more times. Note: Do not use a continuous pause on the O button, as this will
return the screen to the Main Menu
key 4 times.
32
Page 33

MDT 860 | User Manual
The Editor screen
The Editor screen is used for editing free form text messages.
•
Use the 4-way cursor key
•
Press P to send the message (or F12 if using an external keyboard)
•
To delete all the text in the message, place the cursor at the beginning of the text and
press O (≥) Backspace if using an external keyboard)
to move the cursor around the screen
APPENDIX
33
Page 34

MDT 860 | User Manual
CONDITIONS OF SALE AND WARRANTY
Conditions of Sale and Warranty
A. Conditions of Sale
Important Notice
Some of the following terms and conditions vary from country to country. Please check with
your Navman Wireless dealer from whom you purchased your product.
Except to the extent otherwise required by the laws of the country in which the accompanying
product (“the product”) is sold the manufacturer of the product Navman Wireless – has no liability
in respect of the product beyond the warranty hereunder provided. Where liability may not be
excluded but may be limited to repair or replacement or the supply of equivalent goods or for the
payment of the cost of replacing the goods or of acquiring equivalent goods, liability is so limited.
B. Manufacturers warranty
Warranty Period - 1 year from the date of purchase.
Extent of warranty - Subject to the following conditions Navman Wireless will rectify any defect
occurring in the product of which notice in writing is received by Navman Wireless or its approved
distributor within the Warranty Period.
Conditions:
Repairs may only be carried out by a Service Centre approved by Navman Wireless
1.
Repairs as above will be carried out at no cost to the owner subject to these conditions
2.
The cost of returning the goods to an approved dealer shall be met by the owner
3.
Warranty does not extend to accessories or defects or injuries caused or resulting from
4.
causes not attributable to faulty parts or the manufacturer of the product including, but not
limited to, defect or injuries caused by or resulting from misuse, abuse, neglect, accidental
damage, incorrect installation, water damage, use of consumables other than those approved
by Navman Wireless or any alterations to the product not approved by Navman Wireless
No warranty claim accepted without sales documentation
5.
Navman Wireless may, at its discretion, replace the product instead of repairing it
6.
C. Acceptance of Conditions of Sale
In consideration of this warranty the purchaser accepts the limitations of liability as set out in the
conditions of sale.
34
Page 35

MDT 860 | User Manual
Contacts
Navman Wireless Australia Pty
Unit 3, 2-6 Chaplin Drive
Lane Cove NSW 2066
PO Box 3051, Monash Park NSW 2111
Sydney, Australia
Tel: +61 (2) 9420 7500
Fax: +61 (2) 9420 5722
Email: support@navmanwireless.com.au
Website: www.navmanwireless.com.au
Navman Wireless UK
Innovation Centre 2
Keele University Science Park
Keele, Newcastle Under Lyme
Staffordshire, ST5 5NH, United Kingdom
Tel: +44 (0) 1782 557950
Fax: +44 (0) 1782 557979
Email: support@navmanwireless.co.uk
Website: www.navmanwireless.co.uk
NAVMAN WIRELESS DISCLAIM ALL LIABILITY FOR ANY USE OF THIS PRODUCT IN A WAY
THAT MAY CAUSE ACCIDENTS, DAMAGE OR VIOLATE THE LAW.
Navman Wireless New Zealand
7-11 Kawana Street, Northcote
PO Box 340-184, Birkenhead 0746
Auckland, New Zealand
Tel: +64 9 481 0500
Fax: +64 9 481 1096
Email: support@navmanwireless.co.nz
Website: www.navmanwireless.co.nz
Navman Wireless North America
2700 Patriot Blvd.
Suite 410
Glenview, IL
60026, USA
Tel: +1 (847) 832 6950
Fax: +1 (847) 729 5988
Email: support@navmanwireless.com
Website: www.navmanwireless.com
Compliance
This device complies with part 15 of the FCC Rules. Operation is subject to the following two
conditions: (1) This device may not cause harmful interference, and (2) this device must accept
any interference received, including interference that may cause undesired operation.
CONTACTS / LEGAL
Copyright
© 2007 Navman Wireless Holdings L. P. Navman Wireless is a registered trademark of Navman
Wireless Holdings L. P. All rights reserved.
Adobe Reader is a registered trademark of Adobe Systems Incorporated. All rights reserved.
All other trademarks and registrations are the property of their respective owners.
35
Page 36

MN000498B-G
Lat 36° 48’ 24.2” S Lon 174° 44’ 32.1” E
 Loading...