

Nad M12 Owner Manual

®
M12
Digital Preamp DAC
ENGLISHFRANÇAISESPAÑOLITALIANODEUTSCHNEDERLANDSSVENSKAРУССКИЙ
Owner’s Manual
IMPORTANT SAFETY INSTRUCTIONS
ENGLISH FRANÇAIS ESPAÑOL ITALIANO DEUTSCH NEDERLANDS SVENSKA РУССКИЙ
1. Read instructions - All the safety and operating instructions should
be read before the product is operated.
2. Retain instructions - The safety and operating instructions should be
retained for future reference.
3. Heed Warnings - All warnings on the product and in the operating
instructions should be adhered to.
4. Follow Instructions - All operating and use instructions should be
followed.
5. Cleaning - Unplug this product from the wall outlet before cleaning.
Do not use liquid cleaners or aerosol cleaners. Use a damp cloth for
cleaning.
6. Attachments - Do not use attachments not recommended by the
product manufacturer as they may cause hazards.
7. Water and Moisture - Do not use this product near water-for
example, near a bath tub, wash bowl, kitchen sink, or laundry tub; in a
wet basement; or near a swimming pool; and the like.
8. Accessories - Do not place this product on an unstable cart, stand,
tripod, bracket, or table. The product may fall, causing serious injury
to a child or adult and serious damage to the product. Use only with a
cart, stand, tripod, bracket, or table recommended by the manufacturer,
or sold with the product. Any mounting of the product should follow
the manufacturer’s instructions, and should use a mounting accessory
recommended by the manufacturer.
9. Cart - A product and cart combination should be moved
with care. Quick stops, excessive force, and uneven surfaces
may cause the product and cart combination to overturn.
10. Ventilation - Slots and openings in the cabinet are provided for
ventilation to ensure reliable operation of the product and to protect it
from overheating. These openings must not be blocked or covered. The
openings should never be blocked by placing the product on a bed,
sofa, rug, or other similar surface. This product should not be placed in a
built-in installation such as a bookcase or rack unless proper ventilation
is provided or the manufacturer’s instructions have been adhered to.
11. Power Sources - This product should be operated only from the type
of power source indicated on the marking label and connected to
a MAINS socket outlet with a protective earthing connection. If you
are not sure of the type of power supply to your home, consult your
product dealer or local power company.
12. Power-Cord Protection - Power-supply cords should be routed so
that they are not likely to be walked on or pinched by items placed
upon or against them, paying particular attention to cords at plugs,
convenience receptacles, and the point where they exit from the
product.
13. Mains Plug - Where the mains plug or an appliance coupler is used
as the disconnect device, the disconnect device shall remain readily
operable.
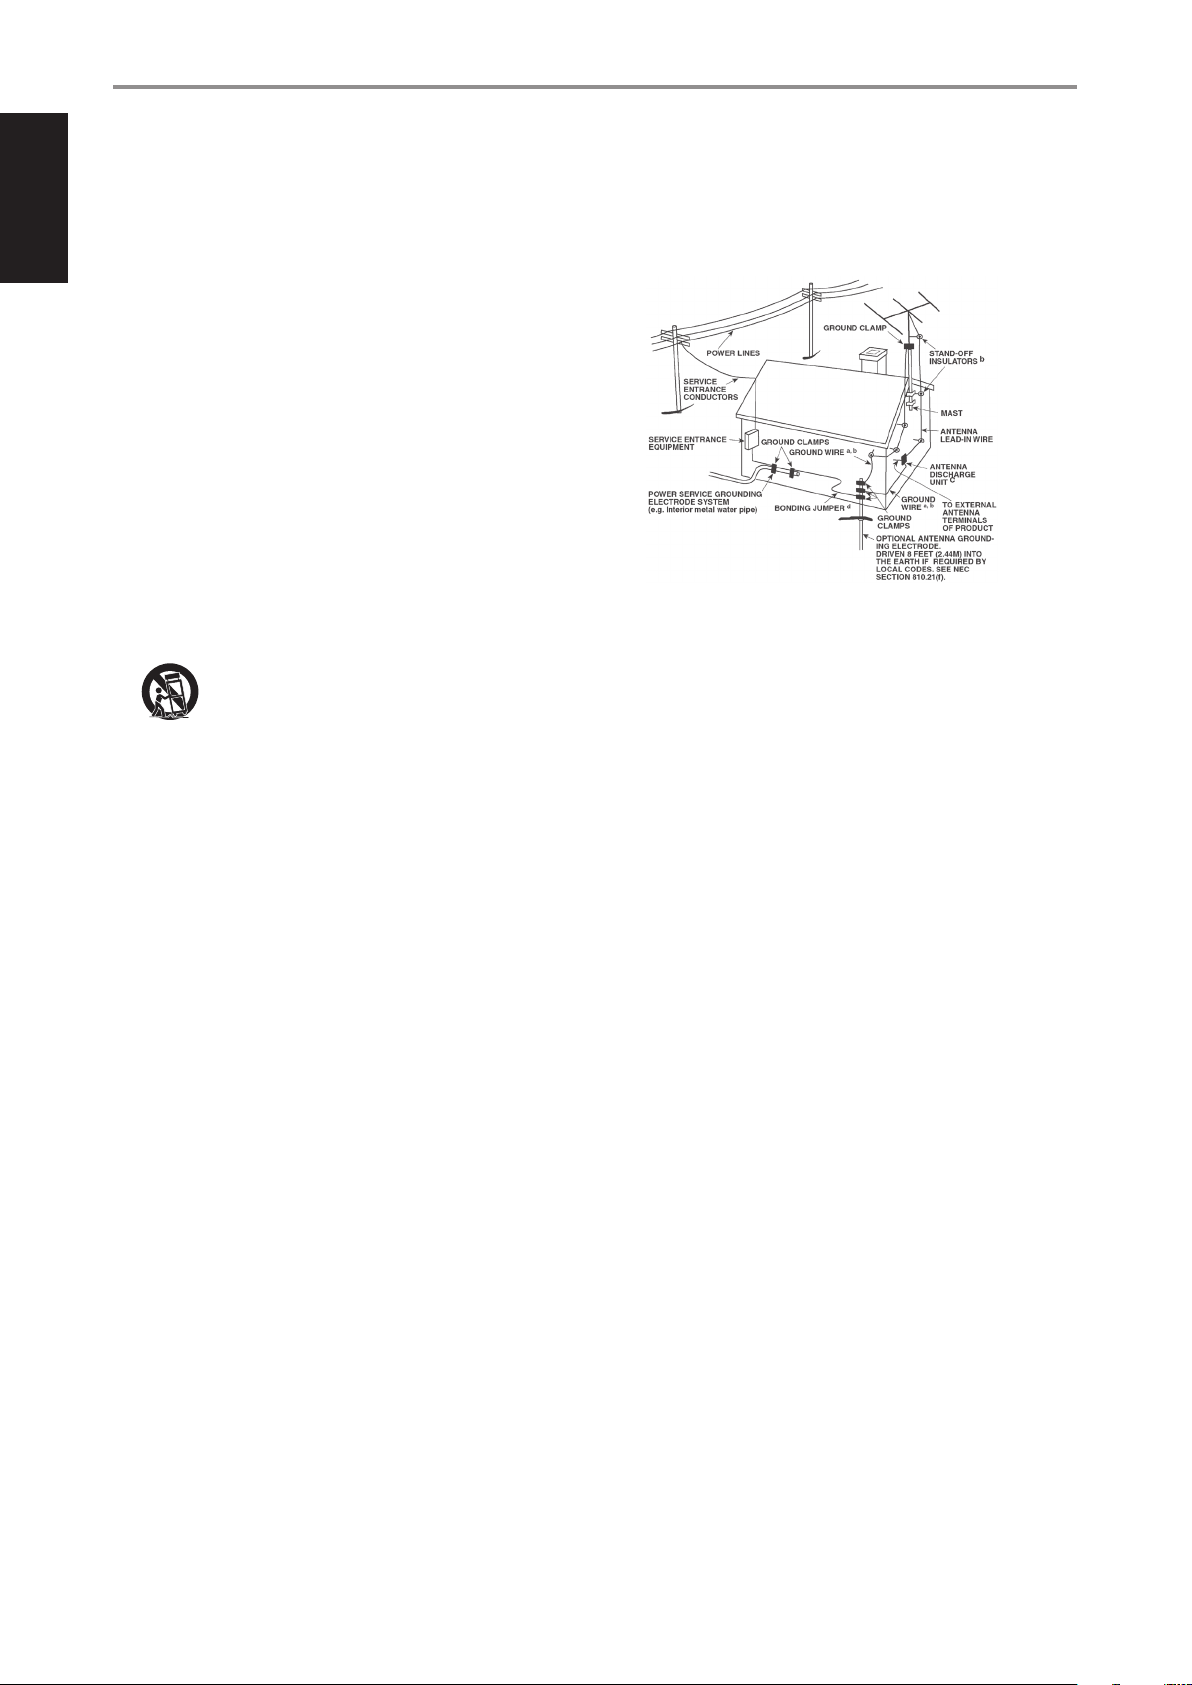
14. Outdoor Antenna Grounding - If an outside antenna or cable system
is connected to the product, be sure the antenna or cable system is
grounded so as to provide some protection against voltage surges
and built-up static charges. Article 810 of the National Electrical Code,
ANSI/NFPA 70, provides information with regard to proper grounding
of the mast and supporting structure, grounding of the lead-in wire
to an antenna discharge unit, size of grounding conductors, location
of antenna discharge unit, connection to grounding electrodes, and
requirements for the grounding electrode.
NOTE TO CATV SYSTEM INSTALLER
This reminder is provided to call the CATV system installer’s attention to Section 820-40
of the NEC which provides guidelines for proper grounding and, in particular, specifies
that the cable ground shall be connected to the grounding system of the building, as
close to the point of cable entry as practical.
15. Lightning - For added protection for this product during a lightning
storm, or when it is left unattended and unused for long periods of
time, unplug it from the wall outlet and disconnect the antenna or
cable system. This will prevent damage to the product due to lightning
and power-line surges.
16. Power Lines - An outside antenna system should not be located in the
vicinity of overhead power lines or other electric light or power circuits,
or where it can fall into such power lines or circuits. When installing an
outside antenna system, extreme care should be taken to keep from
touching such power lines or circuits as contact with them might be
fatal.
17. Overloading - Do not overload wall outlets, extension cords, or
integral convenience receptacles as this can result in a risk of re or
electric shock.
18. Flame Sources - No naked ame sources, such as lighted candles,
should be placed on the product.
19. Object and Liquid Entry - Never push objects of any kind into this
product through openings as they may touch dangerous voltage
points or short-out parts that could result in a re or electric shock.
Never spill liquid of any kind on the product.
20. Headphones - Excessive sound pressure form earphones and
headphones can cause hearing loss.
21. Damage Requiring Service - Unplug this product from the wall
outlet and refer servicing to qualied service personnel under the
following conditions:
a. When the power-supply cord or plug is damaged.
b. If liquid has been spilled, or objects have fallen into the product.
c. If the product has been exposed to rain or water.
d. If the product does not operate normally by following the
operating instructions. Adjust only those controls that are covered
by the operating instructions as an improper adjustment of other
controls may result in damage and will often require extensive
work by a qualied technician to restore the product to its normal
operation.
e. If the product has been dropped or damaged in any way.
f. When the product exhibits a distinct change in performance-this
indicates a need for service.
22. Replacement Parts - When replacement parts are required, be sure
the service technician has used replacement parts specied by the
manufacturer or have the same characteristics as the original part.
Unauthorized substitutions may result in re, electric shock, or other
hazards.
2
IMPORTANT SAFETY INSTRUCTIONS
23. Battery Disposal - When disposing of used batteries, please comply
with governmental regulations or environmental public instruction’s
rules that apply in your country or area.
24. Safety Check - Upon completion of any service or repairs to this
product, ask the service technician to perform safety checks to
determine that the product is in proper operating condition.
25. Wall or Ceiling Mounting - The product should be mounted to a wall
or ceiling only as recommended by the manufacturer.
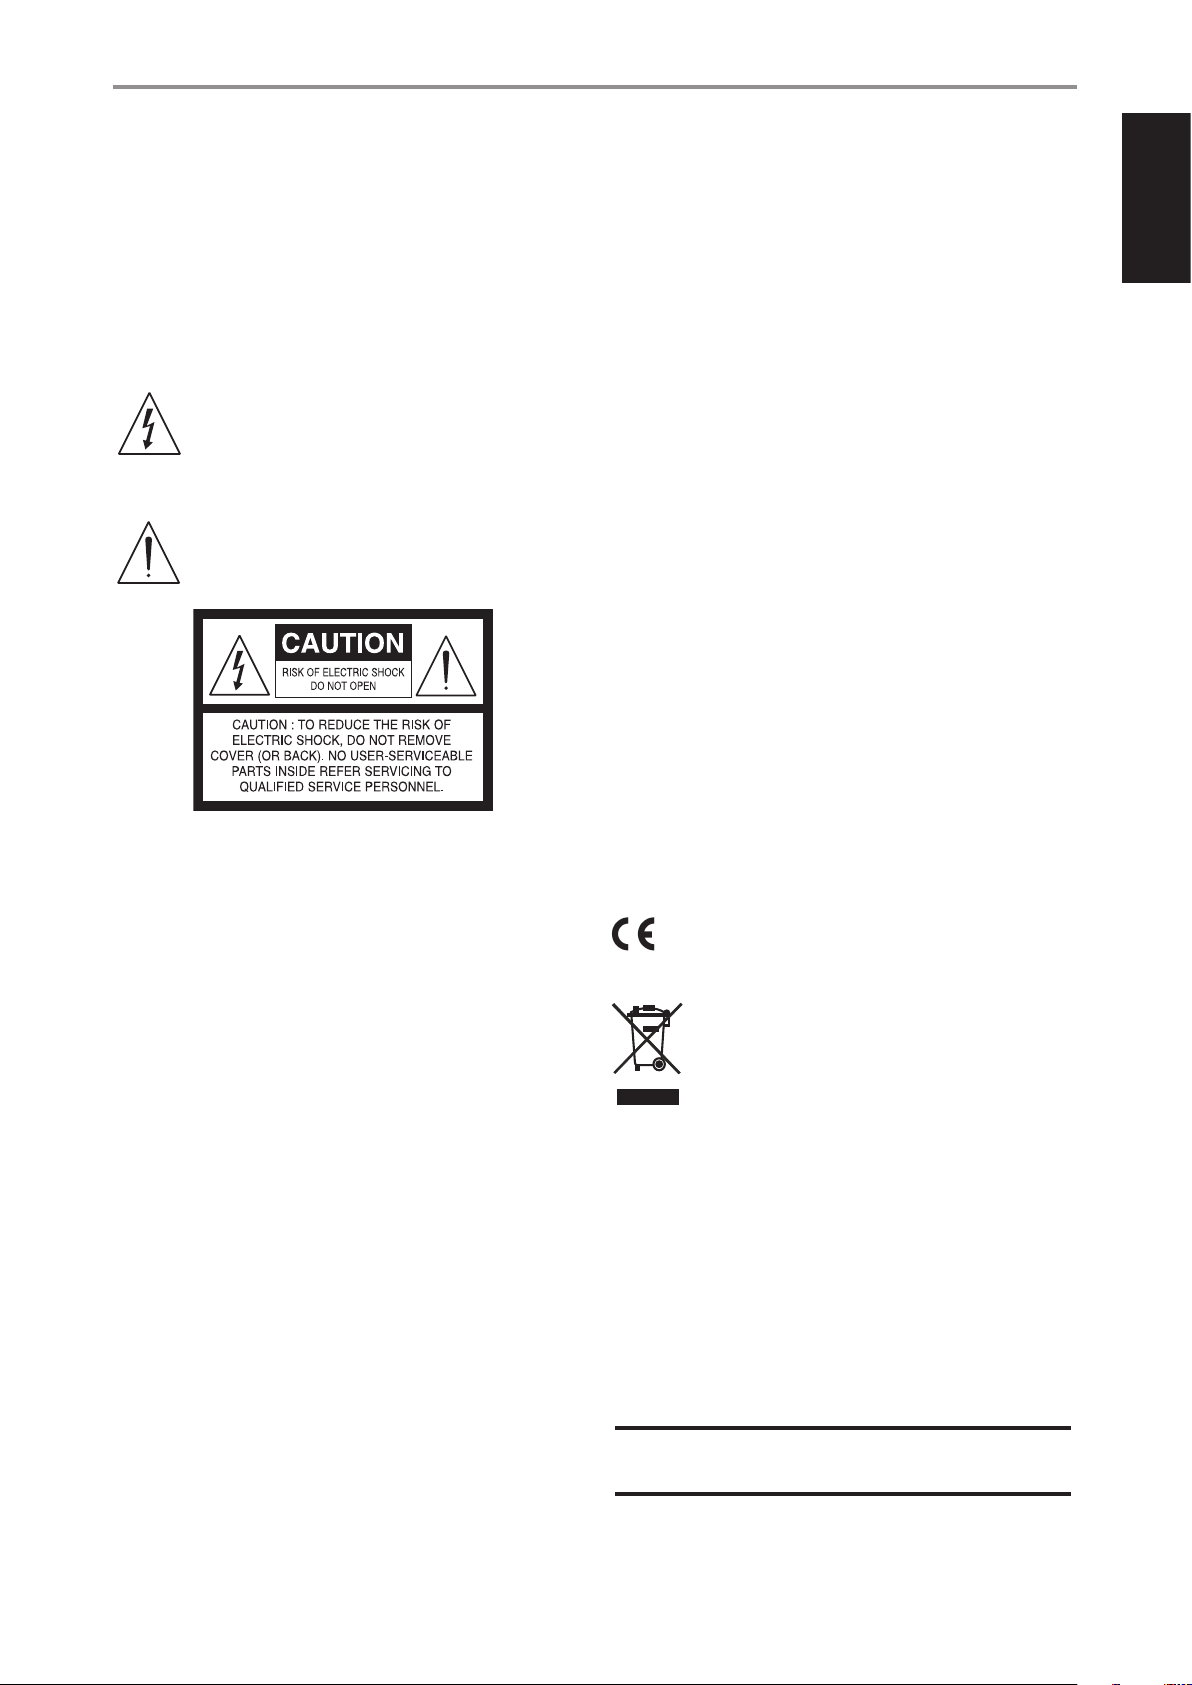
WARNING
The lightning ash with arrowhead symbol, within an
equilateral triangle, is intended to alert the user to the
presence of uninsulated “dangerous voltage” within the
product’s enclosure that may be of sucient magnitude to
constitute a risk of electric shock to persons
The exclamation point within an equilateral triangle is intended
to alert the user to the presence of important operating
and maintenance (servicing) instructions in the literature
accompanying the appliance.
CAUTION
Changes or modications to this equipment not expressly approved by
NAD Electronics for compliance could void the user’s authority to operate
this equipment.
CAUTION
To prevent electric shock, match wide blade of plug to wide slot, fully
insert.
CAUTION
Marking and rating plate can be found at the rear panel of the apparatus.
WARNING
To reduce the risk of re or electric shock, do not expose this apparatus to
rain or moisture.
The apparatus shall not be exposed to dripping or splashing and that no
objects lled with liquids, such as vases, shall be placed on apparatus.
Mains plug is used as disconnect device and it should remain readily
operable during intended use. In order to disconnect the apparatus from
the mains completely, the mains plug should be disconnected from the
mains socket outlet completely.
Battery shall not be exposed to excessive heat such as sunshine, re or the like.
CAUTION
Danger of explosion if battery is incorrectly replaced. Replace only with the
same or equivalent type.
ENGLISHFRANÇAISESPAÑOLITALIANODEUTSCHNEDERLANDSSVENSKAРУССКИЙ
THE EQUIPMENT MUST BE CONNECTED TO AN EARTHED MAINS SOCKET-OUTLET.
CAUTION REGARDING PLACEMENT
To maintain proper ventilation, be sure to leave a space around the unit
(from the largest outer dimensions including projections) than is equal to,
or greater than shown below.
Left and Right Panels: 10 cm
Rear Panel: 10 cm
Top Panel: 10 cm
FCC STATEMENT
This equipment has been tested and found to comply with the limits for Class
B digital device, pursuant to Part 15 of the FCC Rules. These limits are designed
to provide reasonable protection against harmful interference in a residential
installation. This equipment generates, uses, and can radiate radio frequency
energy and, if not installed and used in accordance with the instructions, may
cause harmful interference to radio communications. However, there is no
guarantee that interference will not occur in a particular installation. If this
equipment does cause harmful interference to radio or television reception,
which can be determined by turning the equipment o and on, the user is
encouraged to try to correct the interference by one or more of the following
measures:
• Reorient or relocate the receiving antenna.
• Increase the separation between the equipment and receiver.
• Connect the equipment into an outlet on a circuit dierent from that to
which the receiver is connected.
• Consult the dealer or an experienced radio TV technician for help.
An appliance with a protective earth terminal should be connected to a
mains outlet with a protective earth connection.
IF IN DOUBT CONSULT A COMPETENT ELECTRICIAN.
This product is manufactured to comply with the radio
interference requirements of EEC DIRECTIVE 2004/108/EC.
NOTES ON ENVIRONMENTAL PROTECTION
At the end of its useful life, this product must not be disposed
of with regular household waste but must be returned to a
collection point for the recycling of electrical and electronic
equipment. The symbol on the product, user’s manual and
packaging point this out.
The materials can be reused in accordance with their markings. Through
re-use, recycling of raw materials, or other forms of recycling of old
products, you are making an important contribution to the protection of
our environment.
Your local administrative oce can advise you of the responsible waste
disposal point.
RECORD YOUR MODEL NUMBER NOW, WHILE YOU CAN SEE IT
The model and serial number of your new M12 are located on the back of
the cabinet. For your future convenience, we suggest that you record these
numbers here:
Model number : . . . . . . . . . . . . . . . . . . . . . . . . . . . . . . . . . . . . . .
Serial number : ......................................
NAD is a trademark of NAD Electronics International, a division of Lenbrook Industries Limited
Copyright 2015, NAD Electronics International, a division of Lenbrook Industries Limited
3

INTRODUCTION
TABLE OF CONTENTS
ENGLISH FRANÇAIS ESPAÑOL ITALIANO DEUTSCH NEDERLANDS SVENSKA РУССКИЙ
IMPORTANT SAFETY INSTRUCTIONS .........................2
INTRODUCTION
GETTING STARTED ...............................................5
WHAT’S IN THE BOX ..................................................5
CHOOSING A LOCATION .............................................5
RESTORING M12 TO ITS FACTORY DEFAULT SET TINGS ................5
IDENTIFICATION OF CONTROLS
FRONT PANEL ....................................................6
REAR PANEL .....................................................7
OPERATION
USING THE M12 . . . . . . . . . . . . . . . . . . . . . . . . . . . . . . . . . . . . . . . . . . . . . . . . . . 9
NAVIGATING THE M12 FEATURES AND MAKING CHANGES ...........9
DISPLAY MENU OPTIONS ........................................... 11
MAIN ............................................................... 11
MEDIA .............................................................. 11
MODE .............................................................. 11
EQ .................................................................. 12
SETUP .............................................................. 12
SPEAKER SETUP .................................................... 12
SOURCE SETUP ..................................................... 12
DIGITAL OUTPUT ................................................... 13
CONTROL SETUP ................................................... 13
OTHER FEATURES ...............................................14
USB MODE ......................................................... 14
LISTENING TO USB DEVICE ......................................... 14
LISTENING TO COMPUTER .......................................... 14
USING THE HTRM 2 REMOTE CONTROL ..........................15
CONTROLLING THE M12 ............................................15
LEARNING CODES FROM OTHER REMOTES ......................... 16
PUNCH THROUGH .................................................. 16
COPY A COMMAND FROM ANOTHER KEY .......................... 16
MACRO COMMANDS ............................................... 16
KEY ILLUMINATION TIMEOUT ....................................... 17
CONFIGURING KEY ILLUMINATION ................................. 17
FACTORY RESET .................................................... 17
DELETE MODE ...................................................... 17
LOADING CODELIBRARIES ......................................... 18
SEARCH MODE ..................................................... 18
CHECKING CODELIBRARY NUMBER ................................ 18
SUMMARY OF THE HTRM 2 MODES ................................18
BATTERY INSTALLATION ............................................ 19
REFERENCE
TROUBLESHOOTING ............................................20
SPECIFICATIONS ................................................21
THANK YOU FOR CHOOSING NAD.
The M12 Digital Preamp DAC is a technologically advanced and highly
capable product — yet we have invested great eort in making it simple
and easy to use. The M12 is an ultra-high resolution digital audio hub that
interfaces to musical sources and renders the digital or analog source
perfectly to power ampliers and active loudspeakers.
Overall 24 bit accuracy is guaranteed by the 35 bit data path with 24 bit
coecients and 62 bit accumulation which is dithered back to 35 bits after
DSP functions. And because of the super high resolution, even 24 bit les
are processed without truncation or loss of information.
As with all our products, NAD’s “Music First” design philosophy guided the M12’s
design. The M12 delivers a range of genuinely useful options using powerful
NAD SHALL NOT BE HELD LIABLE FOR ANY TECHNICAL OR USER INTERFACE DISCREPANCIES IN THIS MANUAL. THE M12 OWNER’S
MANUAL MAY BE SUBJECT TO CHANGE WITHOUT PRIOR NOTICE. CHECK OUT THE NAD WEBSITE FOR THE LATEST VERSION OF THE M12
OWNER’S MANUAL.
digital signal processing and superbly accurate digital-audio circuitry. However,
we have also been careful to ensure that the M12 is as musically transparent,
faithful to every detail and spatially accurate as possible, incorporating much of
what we’ve learned from more than a quarter-century’s experience designing
audio, video and home-theater components.
We encourage you to take a few minutes now to read right through this
manual. Investing a little time here at the outset might save you a good
deal of time later, and is by far the best way to ensure that you make the
most of your investment in the M12.
For warranty information contact your local distributor.
4
INTRODUCTION
GETTING STARTED
WHAT’S IN THE BOX
Packed with your M12 you will nd
• A detachable mains power cord
• HTRM 2 remote control with 4 AA batteries
• Four pieces of magnetic feet
• Cleaning cloth
• USB ash drive
• Quick Setup Guide
SAVE THE PACKAGING
Please save the box and all of the packaging in which your M12 arrived.
Should you move or otherwise need to transport your M12, this is by far
the safest container in which to do so. We’ve seen too many otherwise
perfect components damaged in transit for lack of a proper shipping
carton, so please: Save that box!
CHOOSING A LOCATION
Choose a location that is well ventilated (with at least several inches to
both sides and behind), and that will provide a clear line of sight, within
25 feet / 8meters, between the M12’s front panel and your primary
listening/viewing position—this will ensure reliable infrared remote control
communications. The M12 generates a modest amount of heat, but
nothing that should trouble adjacent components.
It is perfectly possible to stack the M12 on top of other components, but
the reverse usually should be avoided.
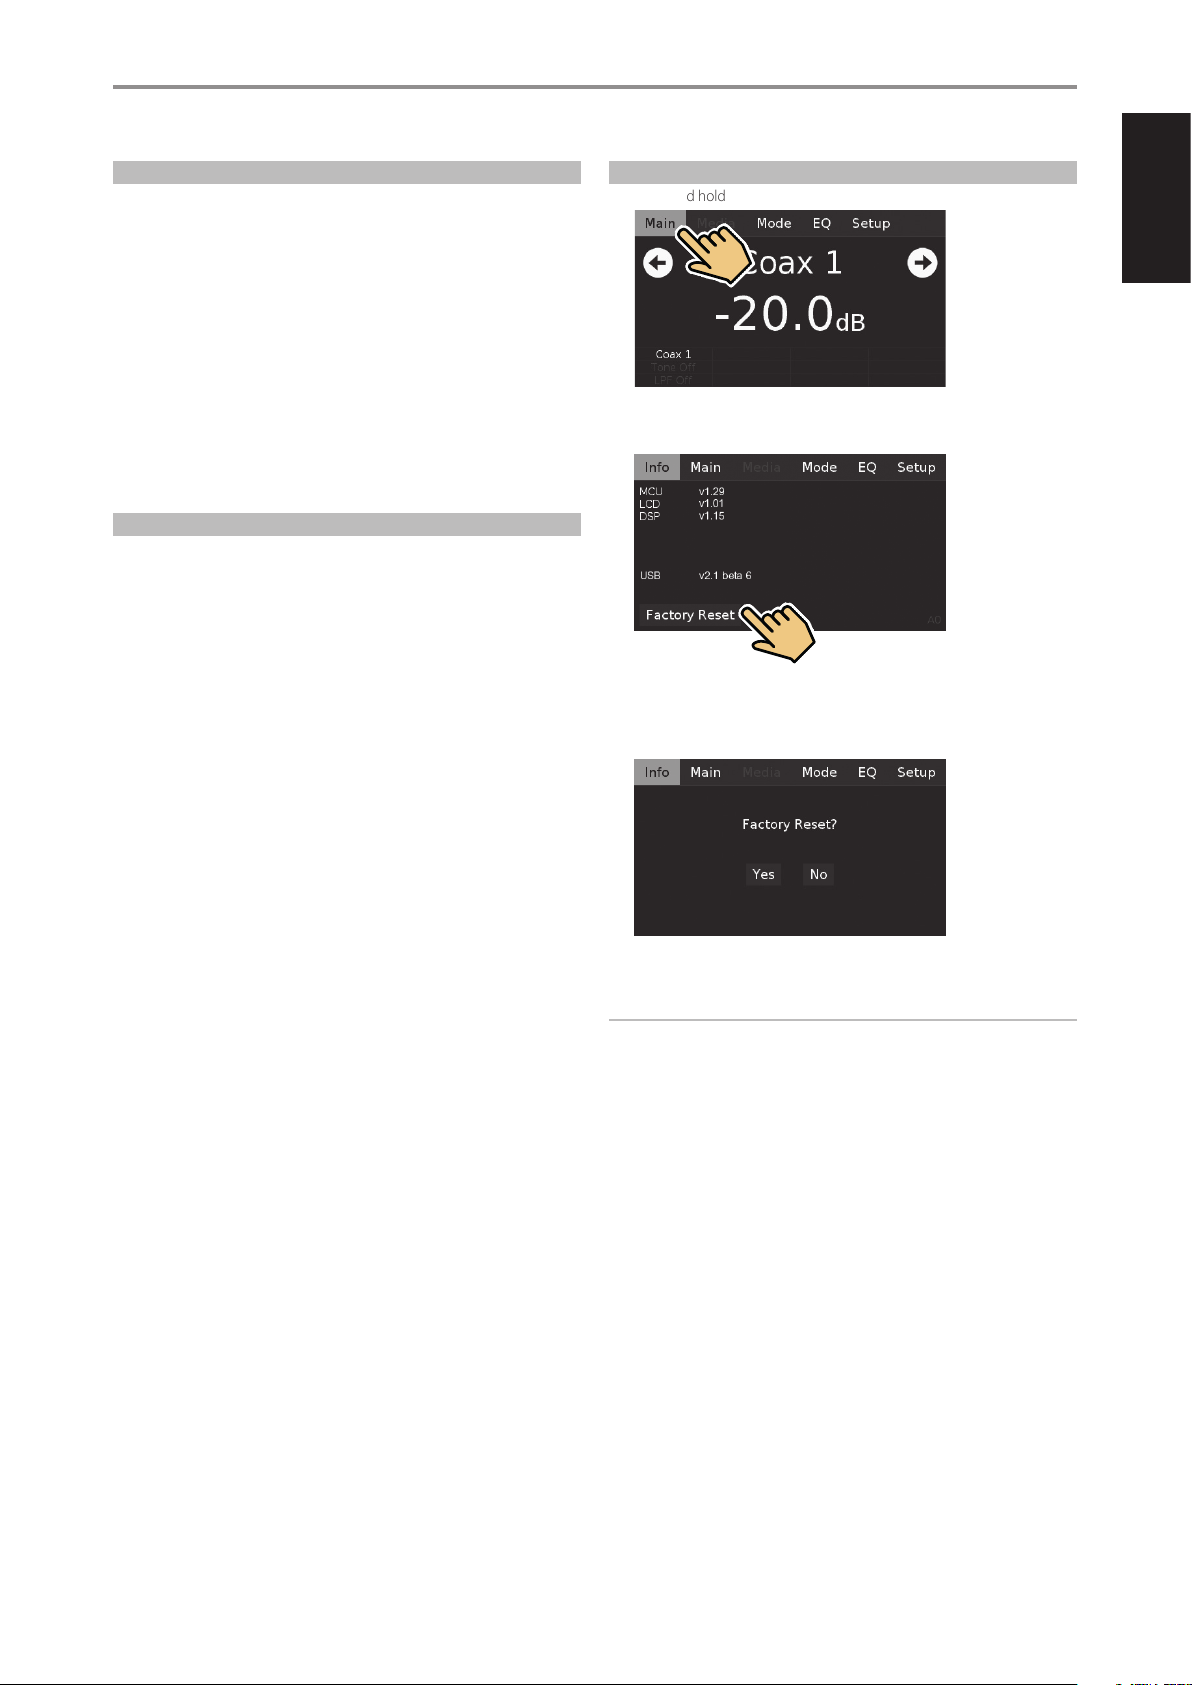
RESTORING M12 TO ITS FACTORY DEFAULT SETTINGS
1 Press and hold front panel’s “Main” display.
ENGLISHFRANÇAISESPAÑOLITALIANODEUTSCHNEDERLANDSSVENSKAРУССКИЙ
2 Select “Factory Reset” display option.
3 Select “Yes” to reset your M12 to factory default settings or “No” if you
decide not to reset your M12.
4 Factory reset is complete when the M12 goes to standby mode.
IMPORTANT NOTE
After factory reset, wait out for at least one minute to switch back the
M12 from standby mode to operating mode. This wait time can be
bypassed by turning OFF/ON the rear panel power switch and then
press Standby button.
5
ENGLISH FRANÇAIS ESPAÑOL ITALIANO DEUTSCH NEDERLANDS SVENSKA РУССКИЙ
IDENTIFICATION OF CONTROLS
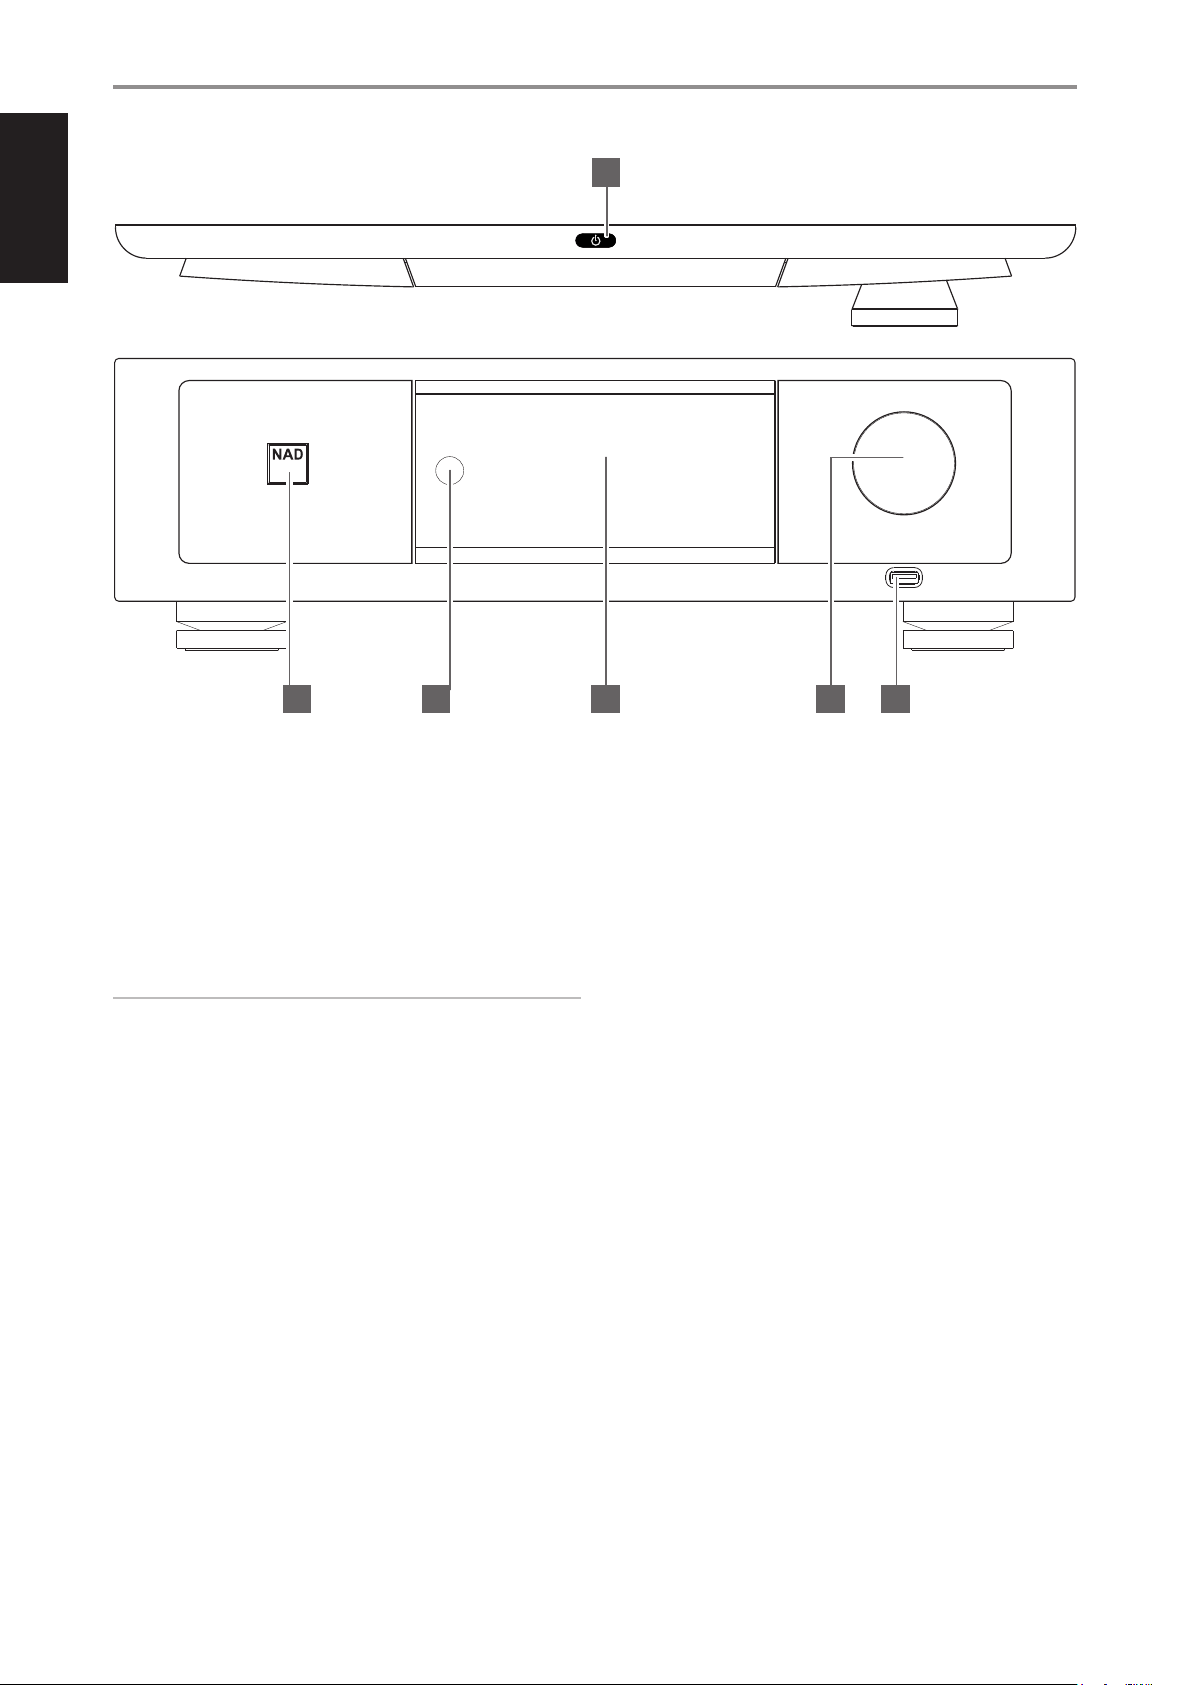
FRONT PANEL
1
DIGITAL PREAMP DAC
1 o (STANDBY)
• Press o (Standby) button for the M12 to be switched ON from
standby mode. The Power indicator will turn from amber to bright/
white color.
• Pressing o (Standby) button again switches back M12 to standby
mode. The Power indicator will illuminate to amber color at standby
mode.
• The o (Standby) button cannot activate the M12 with the rear
panel POWER switched o.
IMPORTANT NOTES
• Refer also to +12V TRIGGER (IN/OUT ) in IDENTIFICATION OF CONTROLS
– REAR PANEL.
• For the o (Standby) button to activate, two conditions must be
completed.
a. Plug-in the supplied mains power cord to a mains power source.
Connect corresponding end of the mains power cord to the AC
mains input of M12 and the plug connected to a mains power
source.
b. The rear panel POWER switch must be set to ON position.
2 POWER INDICATOR
• This indicator will light up amber when the M12 is at standby mode.
• When the M12 is powered up from standby mode, this indicator
will turn from amber to bright/white color.
M12
© NAD M12
4 652 3
4 DISPLAY (TOUCH PANEL DISPLAY)
• Show visual and menu information according to the display
settings selected.
• The following display options are accessible via the touch panel
display - Main, Media, Mode, EQ and Setup.
• Use your nger to press and select any of these display options to
show their corresponding menu options or settings.
5 VOLUME
• The VOLUME control adjusts the overall loudness of the signal being
fed to the loudspeakers. Volume control is characterized by perfect
signal tracking and channel balance. It gives a highly linear and low
noise operation.
• Turn clockwise to increase the volume level; counter clockwise to
lower it.
• The default volume level is -20dB.
6 DIGITAL USB FRONT
• Connect a USB mass storage device to this input. Typical USB
mass storage devices compatible with M12 include portable ash
memory devices and external hard drives (FAT32 formatted).
• Refer also to the item about LISTENING TO USB DEVICE at the
OTHER FEATURES section of the OPERATION page.
3 REMOTE SENSOR
• Point the HTRM 2 remote control at the remote sensor and press
the buttons.
• Do not expose the remote sensor of the M12 to a strong light
source such as direct sunlight or illumination. If you do so, you may
not be able to operate the M12 with the remote control.
Distance: About 23ft (7m) from the front of the remote sensor.
Angle: About 30° in each direction of the front of the remote sensor.
6

IDENTIFICATION OF CONTROLS
REAR PANEL
1 2 3 4 5 6 7 8 9 10 11 12
GND
R L
PHONO
SE IN
R L
L
BAL
R
13 14 15 16 17 18
ATTENTION!
Please make sure that the M12 is powered o or unplugged from the mains power source before making any connections. It is also advisable to power
down or unplug all associated components while making or breaking any signal or AC power connections.
1 SE IN (SINGLE-ENDED)
• Use single-ended analog audio input for sources (CD Player, tuner,
preamplier, processor or other applicable devices) that are not
equipped with BALANCED analog audio output.
6 DIGITAL USB BACK
• Connect a USB mass storage device to this input. Typical USB
mass storage devices compatible with M12 include portable ash
memory devices and external hard drives (FAT32 formatted).
• Refer also to the item about LISTENING TO USB DEVICE at the
2 PHONO
OTHER FEATURES section of the OPERATION page.
• Input for either a Moving Coil or Moving Magnet phono cartridge.
• Connect the twin RCA lead from your turntable to this input.
7 ANALOG PRE-OUT/SUB
• These output terminals have dual function. They are used either as
3 PHONO GROUND CONNECTOR
• Turntables normally include a single wire earth lead. Use the M12
phono ground connector to connect this lead.
• Unscrew the terminal to expose the hole that will accept the lead.
ANALOG PRE-OUT or SUBWOOFER terminals.
• Always turn OFF the M12 and associated external devices before
connecting or disconnecting anything to the ANALOG PRE-OUT/
SUB sockets.
After insertion, tighten the terminal to secure the lead.
ANALOG PRE-OUT
4 COAXIAL IN 1-2, OPTICAL IN 1-2
• Connect to the corresponding optical or coaxial digital output of
sources such as CD or BD/DVD players, digital cable box, digital
tuners and other applicable devices.
• The ANALOG PRE-OUT sockets can be used to drive an additional
amplier. Use a dual RCA cable to connect ANALOG PRE-OUT to the
corresponding analog audio input of compatible devices such as
ampliers, receivers or other applicable devices.
• ANALOG PRE-OUT will be aected by the M12’s volume control
5 COMPUTER
• Asynchronous USB 24 bit/192 kHz input assures lowest jitter for best
settings. Rotate the VOLUME control to adjust the output level of
the ANALOG PRE-OUT sockets.
musical performance.
• Using Type A to Type B cable connector (not supplied), interface
computer audio to this asynchronous Type B USB input to directly
stream 24/192 PCM content from your PC or MAC.
• Ensure that the Sound or Audio device setting of your computer is
set to “NAD USB Audio”.
SUBWOOFER
• Use a dual RCA cable to connect SUB to the low level input of a
powered subwoofer.
• Low frequency information up to 200Hz is sent to the connected
subwoofer via SUBW1 or SUBW2.
ENGLISHFRANÇAISESPAÑOLITALIANODEUTSCHNEDERLANDSSVENSKAРУССКИЙ
© NAD M12
MINIMUM PC SYSTEM REQUIREMENT
Microsoft Windows XP Service Pack 2 or higher, Microsoft Windows 7
FOR MAC USERS
Minimum Mac OS X Snow Leopard (version 10.6) and later versions
NOTE
Download and install to your PC the NAD USB Audio driver from
the Manuals/Downloads tab of the NAD web address -http://
nadelectronics.com/products/masters-series/M12-Digital-Preamp-DAC
8 DIGITAL OUT (COAXIAL, OPTICAL)
• Connect DIGITAL OUT (optical or coaxial) to the corresponding
digital audio input of compatible devices such as receivers,
computer soundcard or other digital processors.
7
 Loading...