

NAD HTRM Owners manual

®
HTRM
Learning Remote Control
ENGLISHFRANÇAISDEUTSCHNEDERLANDS
ESPAÑOLITALIANO
PORTUGUÊSSVENSKA
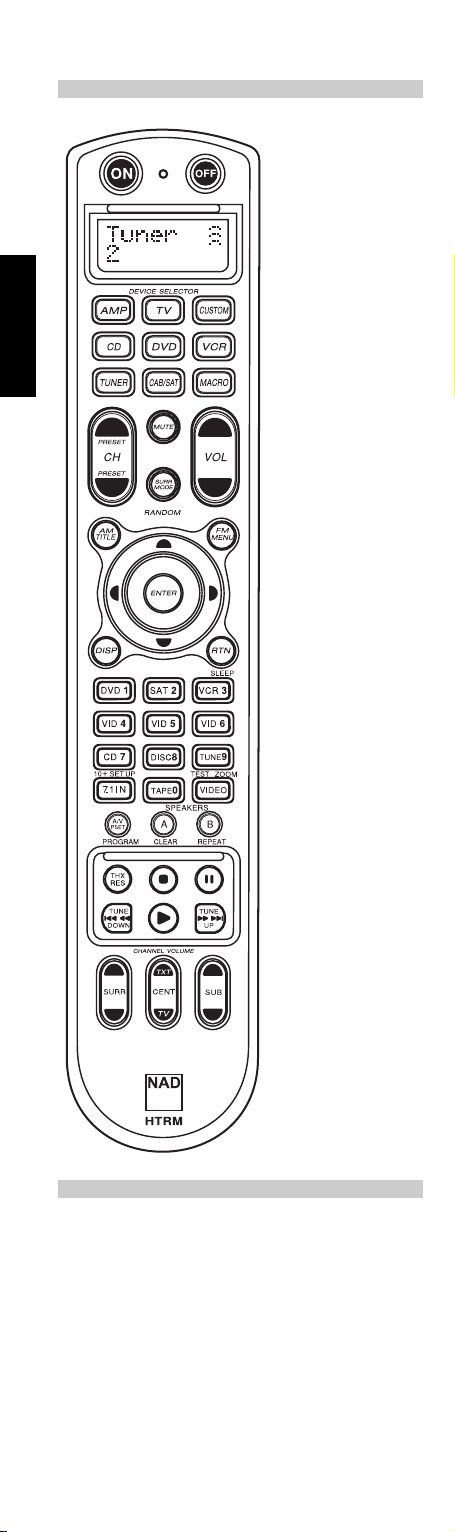
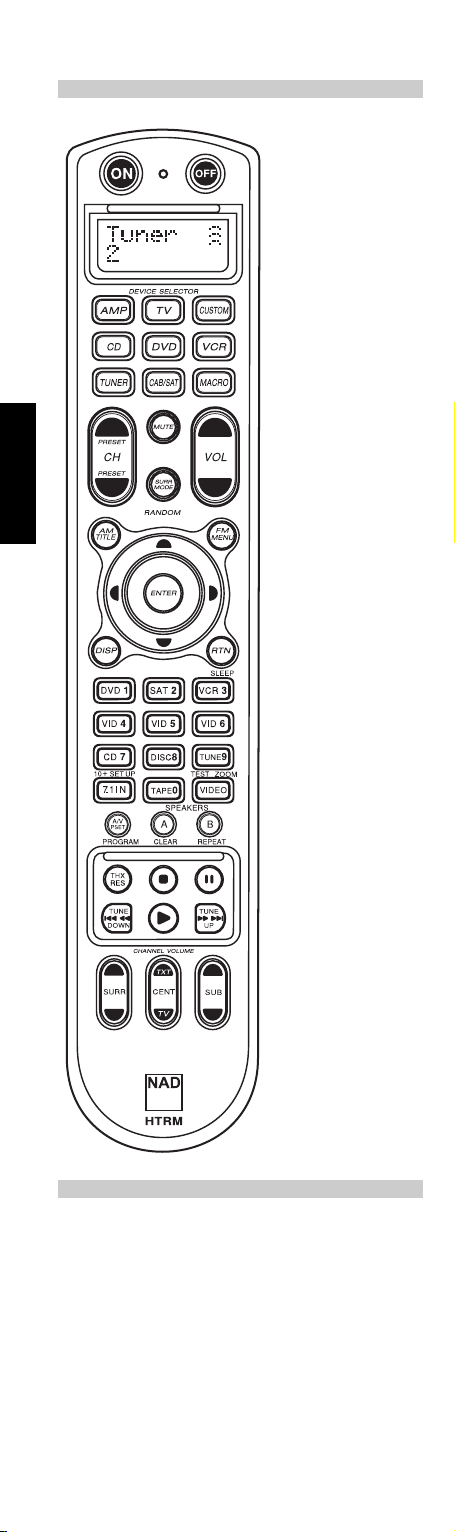
IDENTIFICATION OF CONTROLS (FIG.1)
• Top section features
ON/OFF buttons and
back-light LCD display.
ENGLISH FRANÇAIS DEUTSCH NEDERLANDS ESPAÑOL ITALIANO PORTUGUÊS
• Upper section has
eight DEVICE
SELECTOR keys
including one
programmable CUSTOM
DEVICE SELECTOR, one
MACRO buttons.
• The upper middle
section with channel,
volume, MUTE,
surround-mode buttons
• Middle section has
DVD, CD and OSD
navigation buttons
• Lower middle section
has number buttons 0 to
9, A/V PSET, SPEAKER,
function, DVD SETUP,
and receiver’s Surround
Mode TEST buttons
WHAT'S IN THE BOX
Packed with your HTRM you will find:
• The HTRM System remote control with batteries.
• USB B male 5-pin cable.
• This Owner's Manual.
SVENSKA
NAD is a trademark of NAD Electronics International,
a division of Lenbrook Industries Limited
Copyright 2006, NAD Electronics International,
a division of Lenbrook Industries Limited
• Lower section has
DVD/CD/TAPE Transport
buttons
• Bottom section with
CHANNEL VOLUME
trimming buttons
2
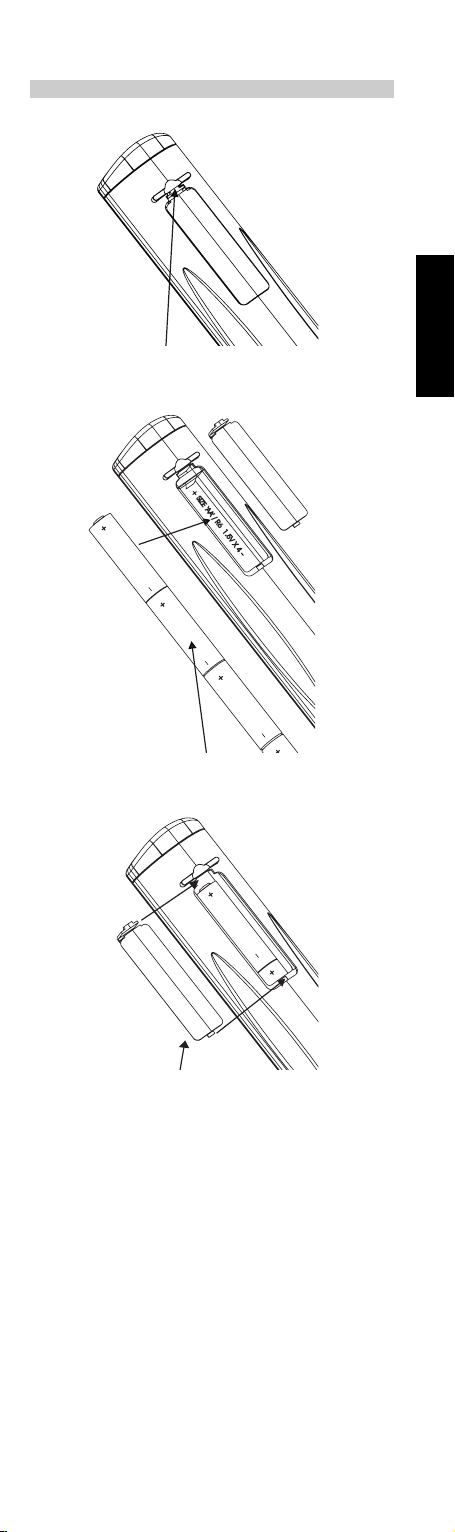
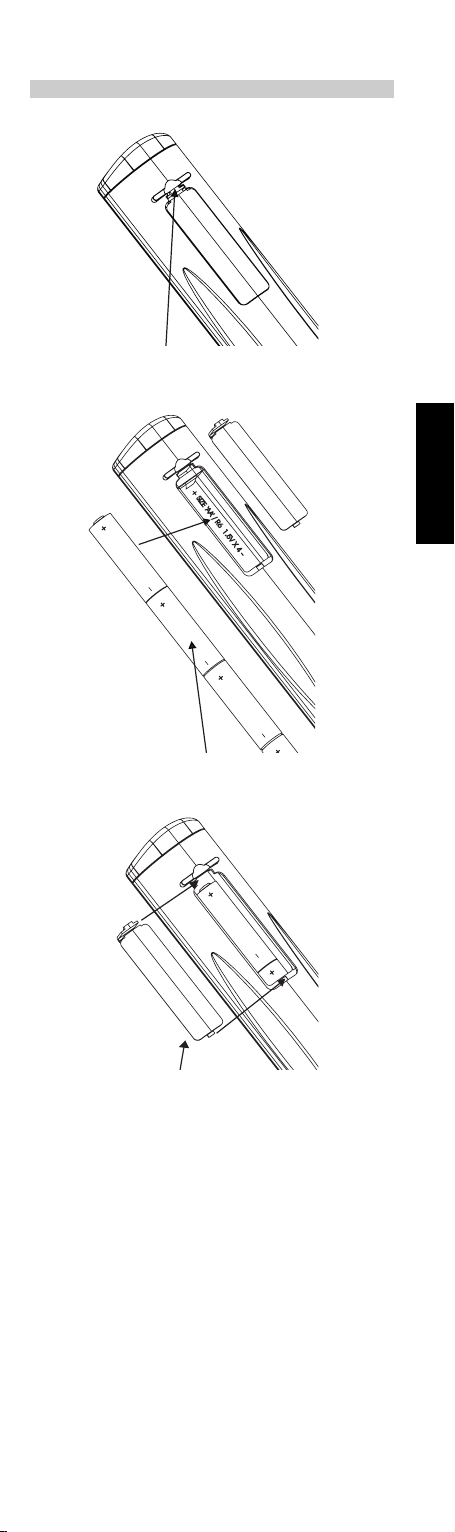
BATTERY INSTALLATION (FIG.2)
PRESS IN AND LIFT TAB TO REMOVE
BATTERY COVER OUT FROM RECESS
PLACE BATTERIES INTO OPENING. ENSURE
THE CORRECT POLARITY IS OBSERVED
ENGLISHFRANÇAISDEUTSCHNEDERLANDSESPAÑOLITALIANOPORTUGUÊSSVENSKA
PRESS BATTERY COVER INTO
PLACE UNTIL IT 'CLICKS' CLOSED
3

INTRODUCTION
The HTRM is like having eight virtual remote controls in one. The
eight DEVICE SELECTOR keys can be used to switch between the
different virtual remote controls or devices.
When the HTRM is idle, the name of the currently selected device
will be shown on the first line of the LCD display. Whenever a
function key is pressed, the name of that function will be shown
on the second line of the LCD display. The second line will be
cleared again shortly after releasing the function key.
ENGLISH FRANÇAIS DEUTSCH NEDERLANDS ESPAÑOL ITALIANO PORTUGUÊS SVENSKA
THE HTRM HAS A TOTAL OF 53 KEYS:
• Controls up to 8 Devices
• 2-line LCD display indicates selected Device (DVD) and sent
Command (PLAY) (for example)
• Preprogrammed with all NAD remote commands including
Zone 2
• Learning function - learns up to 360 commands from other
remotes
• Macro operations - program up to 52 Macros with as many as
64 commands each to automate commonly used command
sequences
• Punch Though Operations permit easy access to commonly
used functions without reselecting a device
• Full illumination with light sensor and adjustable time out for
easy operation in low light conditions
• Can generate IR signals with a carrier frequency up to 500 kHz
(B&O® compatible)
• Mini USB PC Interface allows programming from a Personal
Computer
The HTRM is already preprogrammed with a full complement of
NAD commands on its AMP DEVICE SELECTOR page, and with
library commands to operate most NAD DVD, CD, TUNER, or TAPE
components on the corresponding DEVICE SELECTOR keys. These
default commands are permanent: Even if you teach the HTRM
new commands to take their place, the underlying library
commands remain in place and can easily be recalled should you
add an NAD component to your system later.
GETTING FAMILIAR WITH THE HTRM
The HTRM is divided into three main sections. The LCD display
section at the top of the handset, the DEVICE SELECTOR , and
the remaining 44 Control keys. (see Figure 1)
Eight DEVICE SELECTOR keys at the top; AMP, TV, CUSTOM,
CD, DVD, VCR, TUNER, and CABLE/SAT determine which
component the remaining 44 control keys will operate. A DEVICE
SELECTOR key determines what component the HTRM will
command; with factory defaults, it does not perform any function
on the receiver. The DEVICE SELECTOR keys are organised into
three vertical rows of 3 buttons each; the row on the left are all
Audio devices, the row in the center are all Video devices.
Both the DEVICE SELECTOR and function keys that can “learn”
control codes from virtually any infrared remote controller, allowing
you to teach the codes of your equipment, regardless of brand, to
the HTRM. All of the function keys on the AMP DEVICE
SELECTOR are preprogrammed to control NAD amplifiers,
preamplifiers, and receivers. (The HTRM can also command many
other NAD components, from its DVD, CD, TUNERand TV pages.)
Since HTRM Control keys can perform different functions,
depending on the selected DEVICE SELECTOR key, the HTRM
uses colour coding to indicate the function of the function keys
when different device keys are chosen. Thus, the colour of the
DEVICE SELECTOR key-labelling corresponds to the labelling of
the function keys (similar to a calculator).
4
For example, the red-grey AMP DEVICE SELECTOR key label
corresponds to the grey input-select labelling adjacent to the numeric
keys: When the HTRM’s AMP DEVICE SELECTOR page is active,
these keys select the amplifier or receiver inputs. Similarly, the red
DVD DEVICE SELECTOR key label corresponds to several red labels,
the green TV DEVICE SELECTOR key to green labels, and so on.
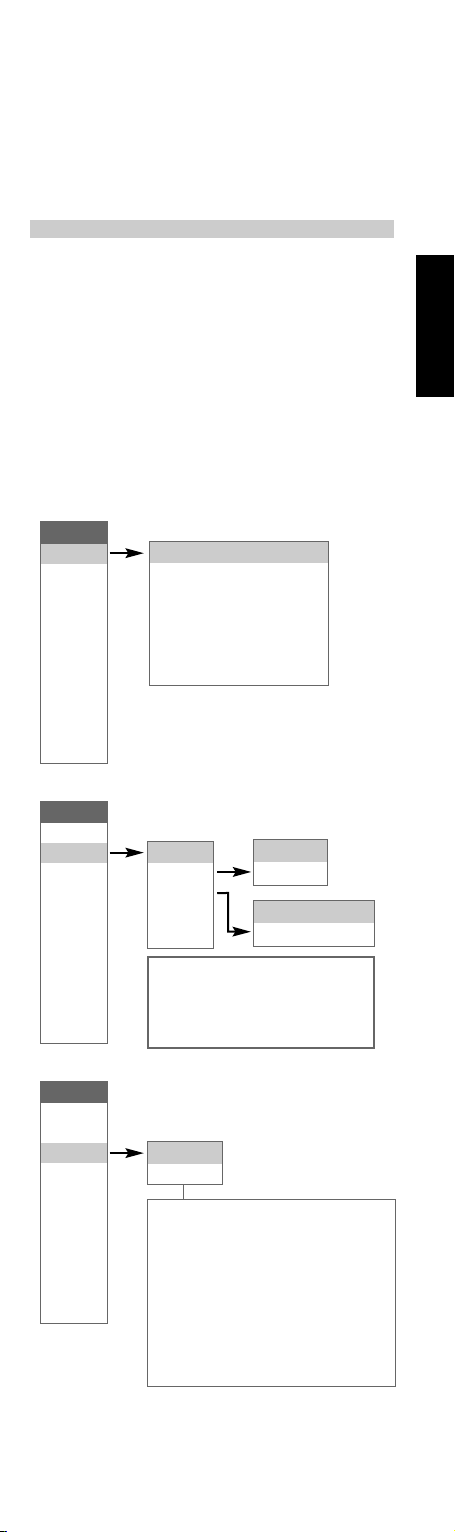
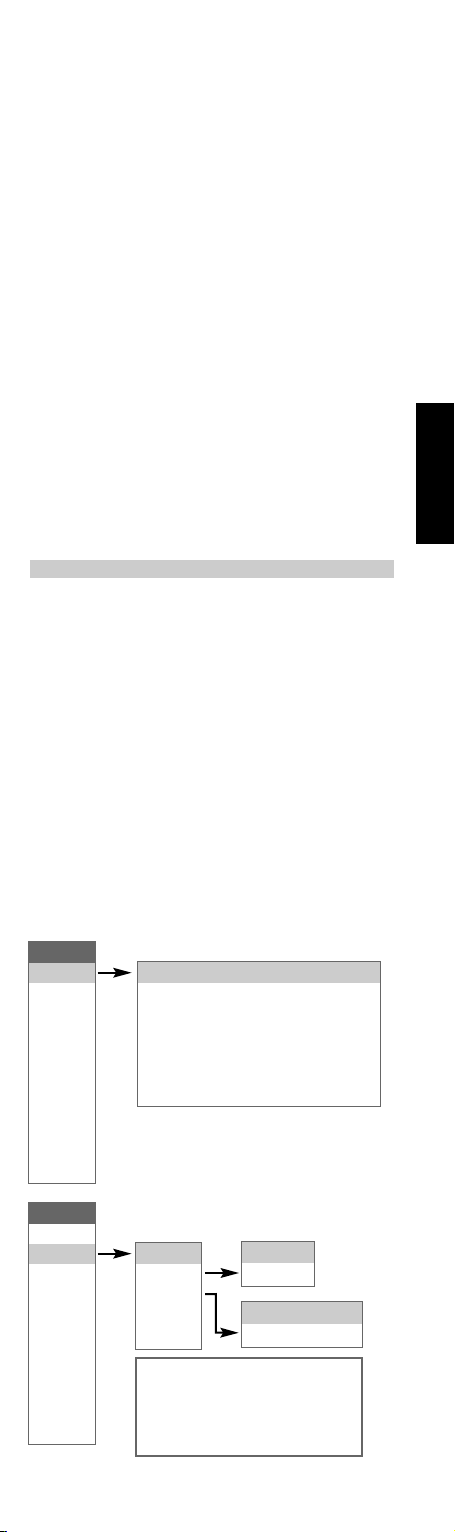
HTRM SETUP MENU
GENERAL MENU OPERATION
• Press and hold SETUP+ ENTER for 5 seconds to enter setup menu.
• TheMACRO key is a cancel function in all setup modes unless
otherwise noted.
• You can exit menus by selecting Exit or pressing the MACRO key.
• Use Up and Down cursor keys to select different menu items.
An Up/Down arrow will be shown on the display when this
action is available.
• For options which can be changed, the Right and Left keys are
used to cycle through the available options. Left and Right
arrows will be shown on the display to indicate when an
option can be changed.
• Press ENTER to select a menu option or confirm a value.
Setup
Battery
B Light
Library
Learn
Pun Thr
Copy
Delete
Battery
This option shows a bar
graph of the battery level, or
“Low Batt” if the level is too
low to register on graph.
Pressing any key returns to
the Setup menu.
Rename
Macro
Reset
Exit
ENGLISHFRANÇAISDEUTSCHNEDERLANDSESPAÑOLITALIANOPORTUGUÊSSVENSKA
Setup
Battery
B Light
Library
Learn
Pun Thr
Copy
Delete
Rename
Macro
Reset
Exit
Setup
Battery
B Light
Library
Learn
Pun Thr
Copy
Delete
Rename
Macro
Reset
Exit
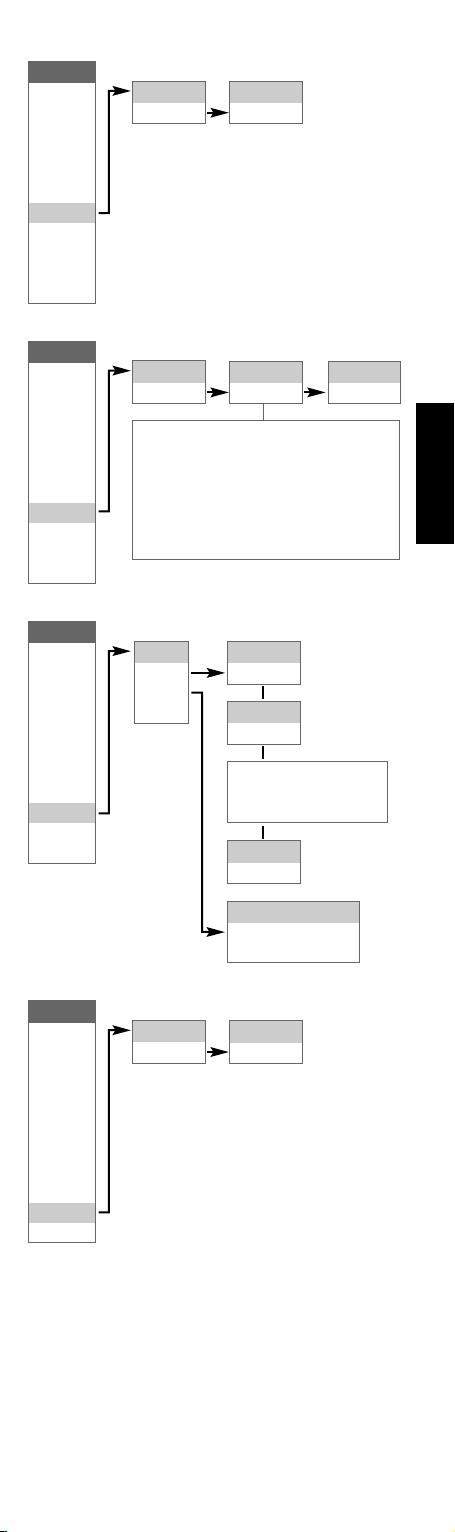
B Light
Timeout
Timeout
<0 - 20s>
Mode
Sen Lvl *
Exit
Mode
<Off / Sense / On>
* Warning! ‘Sen Lvl’ is an
adjustment that may lessen battery
life. Refer to HTRM Special
Functions for more information.
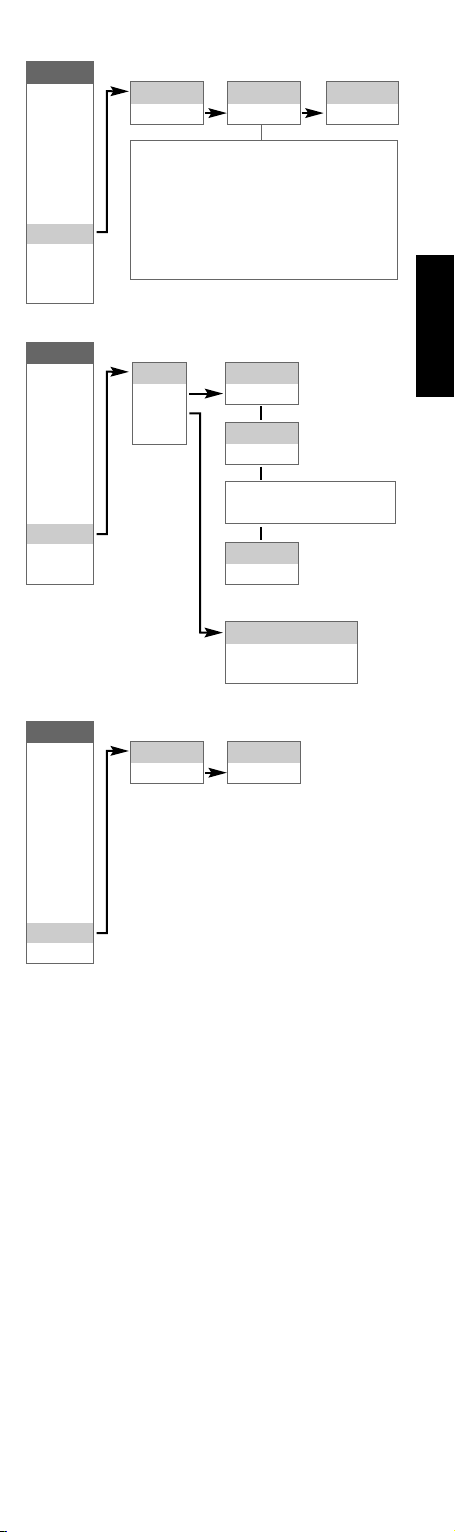
L
{Device}
<L:###>
Left / Right : Move through the available
tables within the current device type
Digit Keys : Allows you to select a table
number directly
Enter : Load the current table after
confirmation: “Load? <No / Yes>”
MACRO : Exit library mode
Device Key : Switch active device
Any other key : Transmit a test command
5

Setup
Battery
B Light
Library
Learn
Pun Thr
Copy
Delete
Rename
Macro
Reset
ENGLISH FRANÇAIS DEUTSCH NEDERLANDS ESPAÑOL ITALIANO PORTUGUÊS
Exit
Learn
Learn
Mode
Exit
Yes
No key press
L
L
for 7 seconds?
Yes
Device key
pressed?
{Device}
Key?
{Device}
Learn…
L
{Device}
Release
{Device}
{Device}
Success / Failed
L
Pass 2…
Mode
<Normal / 2 Pass / Narrow>
No
No
L
Setup
Battery
B Light
Library
Learn
Pun Thr
Copy
Delete
Rename
Macro
Reset
Exit
Setup
Battery
B Light
Library
Learn
Pun Thr
Copy
Delete
Rename
Macro
Reset
Exit
Setup
Battery
B Light
Library
Learn
Pun Thr
Copy
Delete
Rename
Macro
Reset
Exit
{Device}
Key?
{Device}
From?
{Device}
Key?
P
{Device}
To Device?
P
Macro
P
Key?
P
Save?
<No / Yes>
C
D
{Device}
To ?
Delete?
C
Copy?
C
<No / Yes>
D
<No / Yes>
SVENSKA
6
Setup
Battery
B Light
Library
Learn
Pun Thr
Copy
Delete
Rename
Macro
Reset
Exit
{Device}
Key?
R
{Device}
########
R
Save?
R
<No / Yes>
Left / Right : scroll from left to right through
all 8 character locations
Up / Down : scroll through the character
values A-Z, a-z, { | } \ | / ^ ] [ @ ? > < = ; : . - , +
* ) ( ' & % $ # " !
Setup
Battery
B Light
Library
Learn
Pun Thr
Copy
Delete
Rename
Macro
Reset
Exit
Setup
Battery
B Light
Library
Learn
Pun Thr
Copy
Delete
Rename
Macro
Reset
Exit
Macro
Record
Mode
Exit
Fac Res?
<No / Yes>
M
Macro
Key?
M
{Device}
Start…
Record macro steps…
Press Macro key when done
M
Save?
<No / Yes>
Mode
<Mode 0 / Mode 1 /
Mode 2 / Mode 3>
Sure?
<No / Yes>
ENGLISHFRANÇAISDEUTSCHNEDERLANDSESPAÑOLITALIANOPORTUGUÊSSVENSKA
7

BACKLIGHT
The HTRM is equipped with a backlight to increase visibility of the
HTRM in low light conditions. The HTRM also includes a light
sensor. By default, if you press any key on the remote and it senses
a low light condition, the back light will turn on. It will then turn
off again five seconds after no key has been pressed.
The behaviour and timeout for the backlight can be adjusted.
(Refer to the “HTRM Features” for further information.)
LOW BATTERY WARNING
ENGLISH FRANÇAIS DEUTSCH NEDERLANDS ESPAÑOL ITALIANO PORTUGUÊS SVENSKA
If the HTRM senses the batteries are low, it will show “Low Batt”
on the second line of the LCD display whenever the remote is idle.
When this occurs the batteries should be replaced with new ones
immediately.
DEVICE SELECTOR KEYS
Simply pressing a DEVICE SELECTOR key will change the active
device on the HTRM. At this time, no IR commands will be
transmitted. The name of the selected device will be shown on the
first line of the LCD display.
Note: Any IR command can be associated with a DEVICE
SELECTOR key during “Copy” and “Learn” modes. Once the
associated function is assigned to the DEVICE SELECTOR key
pressing and holding the DEVICE SELECTOR key for more than
two seconds will send the associated command in addition to
the HTRM switching its active device.
NAVIGATION OF THE HTRM CONTROLS
MACRO KEYS
A macro can be associated with every key on the HTRM except for
the MACRO button itself. A total of 52 macros can be stored.
To execute a macro:
• Press the MACRO key. The first line of the LCD display will
show "MACRO".
• Within five seconds, press the key the macro is associated with.
• While the macro is executing a small "M" will be shown in the
top right of the LCD display. (refer to the Setup Menu section
for information on how to setup macros)
FUNCTION KEYS
There are 44 dedicated function keys on the HTRM. When you
press a function key, the name of the function will be shown on
the second line of the LCD display while the command is being
transmitted.
A/V PSET KEY
In the default configuration of the HTRM, the A/V PSET key acts
as a shift function when the AMP device is selected. Pressing the
A/V PSET key once will cause "Preset" to be displayed on the first
line of the LCD display. If within five seconds you then press a digit
0 - 9, the function for the corresponding A/V Preset will be
transmitted.
Note: The HTRM is an universal-type remote control, some NAD
receivers may not have more than 5 AV presets.
SETUP MENU
Press and hold the SETUP and ENTER keys for five seconds to
enter the Setup Menu. You cannot enter the setup menu if the
remote is currently displaying "Low Batt". This feature prevents
the setup from becoming corrupted under low battery conditions.
Please refer to Setup Navigation for the overall structure and basic
operation of the Setup Menu.
8

HTRM FEATURES
BATTERY
Instead of waiting until the "Low Batt" warning is displayed, you
can check the current battery level using this option. This option
will show a bar graph representing the current battery level. When
the batteries are new, the bar graph will show 8 bars, Once the
bar graph reaches close to zero, the "Low Batt" warning will start
to show.
BACK LIGHT SENSITIVITY (B LIGHT)
The backlight timeout can be set from 0 - 20 seconds. This is the
length of time the backlight stays on after releasing the last key.
The following backlight modes are available:
• Off - The backlight will never come on.
• Sense - The backlight will only come on if the light sensor
detects low light conditions.
• On - The backlight will come on any time a key is pressed.
• Sense Level - The point where the back light comes on in a
darkened room
LIBRARY
This function allows you to set all the function keys for a device to
the functions stored in the included library tables.
LEARN
This function allows you to learn IR commands from another
remote. To learn a function into a DEVICE SELECTOR key press
the desired DEVICE SELECTOR key momentarily and then press
and hold the same key for more than two seconds.
ENGLISHFRANÇAISDEUTSCHNEDERLANDSESPAÑOLITALIANOPORTUGUÊSSVENSKA
PUNCH THROUGH
There are two types of punch through functions.
The first type allows a function key to punch through to another
device. For example, by default, the volume keys for the DVD
device punch through to AMP.
The second type allows you to punch through to a stored macro.
This provides a way to execute a macro with a single keys press.
If a macro step includes a key which has a punch through to
another macro, the punch through is not used. This is to prevent
circular macros that would never end. Instead of the punch
through, the underlying function of the key will be used when the
macro is executed. This allows you set a single key press macro for
a key without losing the original functionality of that key. For
example; you could record a macro which includes AMP power
on, TV power on and DVD power on and then have the AMP
power on button activate this macro.
COPY
This function allows you to copy functions from one key to
another. If you want to select a DEVICE SELECTOR key for either
the "From?" or "To?" you must press and hold the key for two
seconds. Just pressing the key momentarily will only change the
active device.
DELETE
Each key can have several functions types stored. However, only
the highest priority type will be active. When you delete a
function, a lower priority function type may become active. To
completely erase the functionality of a key, you may need to
execute the Delete function multiple times.
For example; if you delete a learned command, a lower priority
command may become active.
The order of priority for each function type are:
• Punch Through
• Learned
• Copied Library Command
• Default Library Command
9

To delete the function from a DEVICE SELECTOR key you must
press and hold the key for two seconds. Just pressing the key
momentarily will only change the active device.
RENAME
All keys can be renamed except the MACRO key. In the RENAME
menu, first press the DEVICE SELECTOR key then the function
key; the second line of the LCD will be blank ready to accept the
alpha-numeric characters. Use the navigation arrows to select the
alpha-numeric characters, and then press the ENTER key. Select
ENGLISH FRANÇAIS DEUTSCH NEDERLANDS ESPAÑOL ITALIANO PORTUGUÊS SVENSKA
“Save” and then “Yes” to store the new name.
Note: There are a maximum of eight segments available for the
alpha-numeric characters.
MACRO
While recording macros, the HTRM will function as normal except
there will be a small "M" in the top right of the LCD display, and
IR commands are transmitted the same as during normal
operation.
Macros will be executed with the same timing as they were
recorded. The length of time each command is sent will also
correspond to the length of time the key was held down for while
recording.
By default, when a macro is executed, the currently selected
device will be returned to what it was before the macro was
executed. However, if the very last button pressed while recording
a macro is a DEVICE SELECTOR key, the device will be changed
at the end of executing the macro.
RESET
Selecting this option and answering "Yes" to both confirmations
will reset all HTRM options to the factory default values.
Note: resetting the HTRM to the factory default settings will erase
all user configurations, macros, and custom device
programming.
HTRM SPECIAL FUNCTIONS
SOFTWARE VERSION NUMBER
• Press simultaneously the ON + TEST buttons for five seconds
to display version numbers.
LIGHT SENSOR CALIBRATION MODE
• Press simultaneously the ENTER + SETUP buttons for five
seconds to enter the setup menu. Then scroll down to "B
Light", press ENTER, then scroll down to "Sens LvL" and press
ENTER, you are now in the light sensor calibration mode:
• You will see displayed on the first line of the LCD where ####
is the reading (0 - 1023) from the light sensor. The second line
shows a bar graph representing the reading.
• Press the ENTER key to exit this mode. A confirmation will be
displayed. Select "Yes" or "No" to set the new value.
USB INTERFACE
The HTRM allows one to upload and download the configuration
through a Windows PC and NAD’s Proprietary HTRM
programming software. See Figure 3 on how to connect a USB A
male to mini USB B male 5-pin cable to the HTRM.
NOTES: Please log onto www.nadelectronics.com for the latest
HTRM interface control software.
Use a USB A male to mini USB B male 5-pin cable between
your Windows® PC and the HTRM.
Your custom installer or dealer can assist you in the proper
setup and configuration of the mini USB interface and software.
10

HTRM TABLES
Table Description
100 Receiver with Discrete On/Off
101 Receiver with Toggle On/Off
102 S170
103 L75
104 2nd Zone
200 CD Player
201 CD Player (old)
300 Tuner
301 L75 Tuner
400 Tape Deck B
401 Tape Deck A
500 TV 270
501 MR13
502 MR20
600 T562
601 T550, L55
602 T531, T571
USB CONNECTION (FIG.3)
ENGLISHFRANÇAISDEUTSCHNEDERLANDSESPAÑOLITALIANOPORTUGUÊSSVENSKA
11
IDENTIFICATION DES COMMANDES (FIG.1)
ENGLISH FRANÇAIS DEUTSCH NEDERLANDS ESPAÑOL ITALIANO PORTUGUÊS SVENSKA
• La partie tout à fait en
haut comporte les boutons
ON/OFF (Marche/Arrêt) et
l’écran LCD (à cristaux
liquides) rétroéclairé.
• La partie en dessous
comporte huit touches
DEVICE SELECTOR
(Sélection de périphériques)
comprenant une touche
programmable CUSTOM
DEVICE SELECTOR
(Sélection personnalisée
d’un périphérique) et une
touche MACRO.
• La partie du milieu
supérieure comporte les
boutons Channel (voie),
volume, MUTE (Muet) et
de modes surround
(ambiance).
• La partie du milieu
comporte les boutons de
navigation de lecteur de
DVD, CD et OSD (Affichage
sur écran des menus).
• La partie du milieu
inférieure comporte des
boutons numériques de 0 à
9, A/V PSET (Préréglage
audio/vidéo), SPEAKER
(Haut-parleurs), de fonction,
de REGLAGE DVD et de
TEST des modes surround
du récepteur.
• La partie inférieure
comporte les boutons de
transport
DVD/CD/MAGNETOSCOPE
• La partie tout en bas
comporte les boutons
d’ajustement CHANNEL
VOLUME (Volume des
voies).
CONTENU DE L’EMBALLAGE
Dans l’emballage du HTRM, on trouvera en plus :
• La télécommande HTRM du système avec des piles
• USB B mâle 5 broches
• Le présent Manuel d’installation
12
BATTERY INSTALLATION (FIG.2)
PRESS IN AND LIFT TAB TO REMOVE
BATTERY COVER OUT FROM RECESS
PLACE BATTERIES INTO OPENING. ENSURE
THE CORRECT POLARITY IS OBSERVED
ENGLISHFRANÇAISDEUTSCHNEDERLANDSESPAÑOLITALIANOPORTUGUÊSSVENSKA
PRESS BATTERY COVER INTO
PLACE UNTIL IT 'CLICKS' CLOSED
13

INTRODUCTION
La télécommande HTRM ressemble un peu à huit télécommandes
virtuelles réunies en une seule. Les huit touches DEVICE
SELECTOR (Sélecteur de périphérique) peuvent servir à choisir
entre les huit télécommandes virtuelles ou entre les périphériques.
Lorsque la télécommande HTRM est au repos, le nom du
périphérique actuellement sélectionné est affiché sur la première
ligne de l’écran LCD. Dès que l’on appuie sur une touche de
fonction, le nom de cette fonction sera affiché sur la seconde ligne
de l’écran LCD. Cette seconde ligne sera effacée rapidement après
ENGLISH FRANÇAIS DEUTSCH NEDERLANDS ESPAÑOL ITALIANO PORTUGUÊS SVENSKA
relâchement de la touche de fonction.
LA TÉLÉCOMMANDE HTRM COMPORTE UN TOTAL
DE 53 TOUCHES :
• Commande possible de 8 périphériques.
• Ecran d’affichage LCD à deux lignes indiquant le périphérique
sélectionné (DVD) et la commande envoyée (PLAY) (Lecture
par exemple).
• Préprogrammation avec toutes les télécommandes NAD
incluant la Zone 2.
• Fonction d’apprentissage - permettant d’apprendre jusqu’à
360 commandes issues d’autres télécommandes.
• Opérations macro - programmation d’un maximum de 52
macro commandes avec 64 commandes dans chacune d’elles
pour automatiser les séquences de commandes couramment
utilisées.
• Opérations de transfert forcé (Punch Though) permettant
d’accéder facilement aux fonctions couramment utilisées sans
avoir à resélectionner un périphérique.
• Eclairage complet avec capteur de lumière et temporisation
réglable permettant de simplifier l’utilisation dans des
conditions de faible éclairement.
• Emission de signaux IR avec une fréquence porteuse jusqu’à
500 kHz (compatible avec le système B&O®).
• Interface PC mini USB permettant la programmation depuis
un ordinateur personnel.
La télécommande HTRM est déjà préprogrammée avec un
ensemble complet de commandes NAD dans sa page AMP
DEVICE SELECTOR, et avec des commandes de bibliothèque pour
faire fonctionner la plupart des périphériques NAD DVD, CD,
TUNER ou TAPE affectés aux touches DEVICE SELECTOR
correspondantes. Ces commandes par défaut sont permanentes :
même si l’on apprend de nouvelles commandes à la
télécommande HTRM qui prendront leur place, les commandes de
la bibliothèque sous-jacente demeurent en place et peuvent
facilement être rappelées si on ajoute ultérieurement un
périphérique NAD au système.
SE FAMILIARISER AVEC LA TÉLÉCOMMANDE HTRM
La télécommande HTRM se divise en trois parties principales.
L’affichage LCD en haut du boîtier, les touches DEVICE
SELECTOR (Sélecteur de périphérique) et les 44 touches de
commande restantes. (Voir la figure 1.)
Les huit touches DEVICE SELECTOR en haut ; AMP, TV,
CUSTOM, CD, DVD, VCR, TUNER et CABLE/SAT déterminent
quel périphérique les 44 touches restantes feront fonctionner. Une
touche DEVICE SELECTOR détermine quel périphérique la
télécommande HTRM fera fonctionner ; avec les réglages d’usine
par défaut, elle n’effectue aucune fonction sur le récepteur. Les
touches DEVICE SELECTOR sont réparties en trois colonnes de
trois touches chacune. La colonne de gauche commande tous les
périphériques audio et la colonne du centre commande tous les
périphérique vidéo.
Toutes les touches DEVICE SELECTOR et de fonction peuvent
“apprendre” des codes de commande issus de pratiquement toutes
les télécommandes par infrarouge, permettant de faire apprendre à
14
la télécommande HTRM tous les codes de tout le matériel composant
le système, quelle qu’en soit la marque. Toutes les touches de
fonction correspondant à la touche AMP DEVICE SELECTOR sont
préprogrammées pour commander des amplificateurs,
préamplificateurs et récepteurs NAD. (La télécommande HTRM peut
également commander de nombreux autres périphériques NAD
depuis ses pages DVD, CD, TUNER et TV.)
Puisque les touches de la télécommande HTRM peuvent effectuer
différentes fonctions selon la touche sélectionnée dans la partie
DEVICE SELECTOR, la télécommande HTRM utilise un codage
par couleurs pour indiquer la fonction des touches de fonction
lorsque des touches de périphérique différentes sont choisies.
Ainsi la couleur du libellé des touches DEVICE SELECTOR
correspond à celle des touches de fonction (de la même manière
que pour une calculatrice). Par exemple, le libellé rouge-gris de la
touche AMP DEVICE SELECTOR correspond au libellé de
sélection d’entrée gris adjacent aux touches numériques : lorsque
la page AMP DEVICE SELECTOR de la télécommande HTRM est
active, ces touches sélectionnent les entrées de l’amplificateur ou
du récepteur. De même, le libellé rouge de la touche DVD DEVICE
SELECTOR correspond à plusieurs libellés rouges, le libellé vert de
la touche TV DEVICE SELECTOR correspond à plusieurs libellés
verts, et ainsi de suite.
HTRM - MENU DE RÉGLAGE
Fonctionnement général du menu :
• Appuyer et maintenir les touches SETUP+ ENTER pendant 5
secondes pour entrer dans le menu de réglage.
• Il est possible de quitter les menus en sélectionnant Exit
(Quitter) ou en appuyant sur la touche MACRO.
• La touche MACRO est une fonction d'annulation pour tous les
modes de réglage sauf mention contraire.
• Utiliser les touches de curseur Vers le haut et Vers le bas pour
sélectionner différents éléments dans le menu. Une flèche vers
le haut/vers le bas sera affichée à l'écran lorsque cette action
est possible.
• Pour les options modifiables, le touches Vers la droite et Vers
la gauche sont utilisées pour parcourir les options disponibles.
Des flèches vers la gauche et vers la droite seront affichées à
l'écran pour indiquer qu'une option est modifiable.
• Appuyer sur ENTER pour sélectionner une option de menu ou
pour confirmer une valeur.
ENGLISHFRANÇAISDEUTSCHNEDERLANDSESPAÑOLITALIANOPORTUGUÊSSVENSKA
Setup
Battery
B Light
Library
Learn
Pun Thr
Copy
Delete
Rename
Macro
Reset
Exit
Setup
Battery
B Light
Library
Learn
Pun Thr
Copy
Delete
Rename
Macro
Reset
Exit
Battery
Cette option montre un diagramme à
barres du niveau des piles, ou "Low
Batt" (Piles faibles) si le niveau est trop
bas pour s'enregistrer sur le diagramme.
La pression d'une touche quelconque
renvoie au menu de réglage.
B Light
Timeout
Mode
Sen Lvl *
Exit
* ATTENTION ! Détec niv est un
réglage qui peut raccourcir la durée
de vie des piles. Se reporter aux
fonctionnalités HTRM pour le réglage.
Timeout
<0 - 20s>
Mode
<Off / Sense / On>
15

Setup
Battery
B Light
Library
Learn
Pun Thr
Copy
Delete
Rename
Macro
Reset
ENGLISH FRANÇAIS DEUTSCH NEDERLANDS ESPAÑOL ITALIANO PORTUGUÊS SVENSKA
Exit
Setup
Battery
B Light
Library
Learn
Pun Thr
Copy
Delete
Rename
Macro
Reset
Exit
L
{Device}
<L:###>
Gauche/Droite : Permet de déplacer le type
de périphérique sélectionné dans les tableaux
disponibles.
Touches numériques : Permet de
sélectionner un numéro de tableau
directement.
Enter (Entrée) : Charge le tableau courant
après demande de confirmation :
"Load? <No/Yes>" (Charger ? <Non/Oui>)
MACRO : Permet de quitter le mode
bibliothèque.
Touches de périphériques : Sélectionne le
périphérique actif.
Toute autre touche : Transmet une
commande de test.
Oui
Pas de pression
de touche
pendant 7
secondes?
Learn
Learn
Mode
Exit
{Device}
Key?
{Device}
L
L
Oui
Pression
d'une touche
du dispositif?
Non
Learn…
{Device}
Release
{Device}
L
L
L
{Device}
Success / Failed
Pass 2…
Non
Setup
Battery
B Light
Library
Learn
Pun Thr
Copy
Delete
Rename
Macro
Reset
Exit
Setup
Battery
B Light
Library
Learn
Pun Thr
Copy
Delete
Rename
Macro
Reset
Exit
{Device}
Key?
{Device}
From?
Mode
<Normal / 2 Pass / Narrow>
P
{Device}
P
To Device?
C
{Device}
C
To ?
Macro
Key?
P
Save?
<No / Yes>
Copy?
<No / Yes>
P
C
16
Setup
Battery
B Light
Library
Learn
Pun Thr
Copy
Delete
Rename
Macro
Reset
Exit
{Device}
Key?
D
Delete?
D
<No / Yes>
Setup
Battery
B Light
Library
Learn
Pun Thr
Copy
Delete
Rename
Macro
Reset
Exit
Setup
Battery
B Light
Library
Learn
Pun Thr
Copy
Delete
Rename
Macro
Reset
Exit
{Device}
Key?
R
{Device}
########
R
Save?
R
<No / Yes>
Gauche / Droite : déroulement de la gauche
vers la droite de la position de tous les 8
caractères
Haut / Bas : Choix déroulant des caractères AZ, a-z, { | } \ | / ^ ] [ @ ? > < = ; : . - , + * ) ( ' &
% $ # " !
Macro
Record
Mode
Exit
Macro
Key?
{Device}
M
M
Start…
Enregistrement des étapes
macro… Appuyer sur Macro
lorsque c'est terminé.
M
Save?
<No / Yes>
Mode
<Mode 0 / Mode 1 /
Mode 2 / Mode 3>
ENGLISHFRANÇAISDEUTSCHNEDERLANDSESPAÑOLITALIANOPORTUGUÊSSVENSKA
Setup
Battery
B Light
Library
Learn
Pun Thr
Copy
Delete
Rename
Macro
Reset
Exit
Fac Res?
<No / Yes>
Sure?
<No / Yes>
17

RÉTROÉCLAIRAGE
La télécommande HTRM est dotée d’un rétroéclairage pour
améliorer sa visibilité dans des conditions de faible éclairement.
Elle comporte également un capteur de lumière. Par défaut, si on
appuie sur une touche quelconque et que ce capteur détecte une
lumière faible, le rétroéclairage s’allume. Il s’éteindra cinq
secondes après la pression de la dernière touche.
Le comportement et la temporisation du rétroéclairage sont
réglables. (Se reporter à la section “Fonctionnalités de la
télécommande HTRM ” pour de plus amples informations.)
ENGLISH FRANÇAIS DEUTSCH NEDERLANDS ESPAÑOL ITALIANO PORTUGUÊS SVENSKA
INDICATEUR DE PILES FAIBLES
Si la télécommande HTRM détecte que ses piles sont faibles, elle
affiche le message “Low Batt” sur la seconde ligne de son écran
LCD à chaque fois qu’elle est au repos. Lorsque cela se produit, les
piles doivent être remplacées immédiatement.
TOUCHES DEVICE SELECTOR
La simple pression sur une touche DEVICE SELECTOR changera
le périphérique actif sur la télécommande HTRM. A ce moment,
aucune commande IR ne sera transmise à ce périphérique. Le nom
du périphérique sélectionné s’affichera sur la première ligne de
l’écran LCD.
Remarque : toute commande IR peut être associée à une touche
DEVICE SELECTOR pendant les processus de “copie” et
“d’apprentissage”. Une fois que la fonction associée aura été
affectée à la touche DEVICE SELECTOR, la pression et le
maintien de cette touche pendant plus de deux secondes
enverra la commande associée en même temps que le signal
de commutation vers ce périphérique actif.
EXPLORATION DES COMMANDES HTRM
TOUCHES DE MACRO
Une macro commande peut être associée à chaque touche de la
télécommande HTRM à l’exception de la touche MACRO ellemême. Un total de 52 macro commandes peut être enregistré.
Pour exécuter une macro :
• Appuyer sur la touche MACRO. La première ligne de l’écran
LCD affichera “MACRO”.
• Dans les cinq secondes qui suivent, appuyer sur la touche à
laquelle est associée la macro commande.
• Pendant que la macro commande s’exécute, un petit “M”
s’affiche dans le coin supérieur droit de l’écran LCD. (Se
reporter à la section Menu Setup pour savoir comment
configurer des macro commandes.)
TOUCHES DE FONCTION
Il existe 44 touches de fonction dédiées sur la télécommande
HTRM. Lorsque l’on appuie sur une touche de fonction, le nom de
la fonction s’affiche sur la seconde ligne de l’écran LCD pendant
que la commande est transmise.
TOUCHE A/V PSET (PRÉRÉGLAGES A/V)
Dans la configuration par défaut de la télécommande HTRM, la
touche A/V PSET se comporte comme une fonction de préfixe
lorsque le périphérique AMP est sélectionné. Lorsque l’on appuie
une fois sur la touche A/V PSET, le mot “Preset” s’affiche sur la
première ligne de l’écran LCD. Si dans les cinq secondes qui
suivent, on appuie sur un chiffre de 0 à 9, la fonction du
préréglage A/V correspondante sera transmise.
Remarque : la télécommande HTRM est de type universel,
certains récepteurs NAD peuvent ne pas avoir plus de 5
préréglages AV.
18

MENU SETUP (RÉGLAGE)
Appuyer et maintenir les touches SETUP et ENTER pendant cinq
secondes pour entrer dans le menu de réglage. Il n’est pas possible
d’entrer dans le menu de réglage si la télécommande affiche
actuellement le message “Low Batt” (Piles faibles). Cela évite de
corrompre le réglage lorsque les piles sont faibles.
Se reporter à l’exploration du menu Setup pour la structure
globale et le fonctionnement de base du menu Setup.
FONCTIONNALITÉS DE LA TÉLÉCOMMANDE HTRM
PILES
Au lieu d’attendre que le message “Low Batt” soit affiché, il est
possible de vérifier le niveau des piles à l’aide de cette option. Elle
présente un diagramme à barres représentant le niveau effectif
des piles. Lorsque les piles sont neuves, le diagramme montre 8
barres. Lorsque le diagramme à barres est proche de zéro, le
message “Low Batt” commence à s’afficher.
SENSIBILITÉ DU RÉTROÉCLAIRAGE
(RÉTROÉCLAIRAGE)
La temporisation du rétroéclairage est réglable entre 0 et 20
secondes. Il s’agit de la durée pendant laquelle le rétroéclairage
restera allumé après avoir relâché la dernière touche.
Les modes de rétroéclairage suivants sont disponibles :
• Off (Eteint) - Le rétroéclairage ne s’allumera jamais.
• Sense (Détection) - Le rétroéclairage ne s’allumera que si le
capteur de lumière détecte des conditions de faible
éclairement.
• On (Allumé) - Le rétroéclairage s’allumera à chaque fois que
l’on appuie sur une touche.
ENGLISHFRANÇAISDEUTSCHNEDERLANDSESPAÑOLITALIANOPORTUGUÊSSVENSKA
BIBLIOTHÈQUE
Cette fonction permet d’attribuer à toutes les touches de fonction
d’un périphérique donné les fonctions enregistrées dans les
tableaux de bibliothèque inclus dans la télécommande.
APPRENTISSAGE
Cette fonction permet de faire apprendre à la télécommande
HTMR les commandes IR d’une autre télécommande.
Pour faire apprendre une commande à une touche DEVICE
SELECTOR, appuyer momentanément sur la touche DEVICE
SELECTOR désirée, puis appuyer et maintenir cette même touche
pendant au moins deux secondes.
TRANSFERT FORCÉ
Il existe deux types de fonction de transfert forcé.
Le premier type permet à la fonction d’une touche de fonction
d’un périphérique d’être transférée vers un autre périphérique. Par
exemple, par défaut, les touches de volume par défaut du
périphérique lecteur de DVD sont transférées vers AMP.
Le second type permet un transfert forcé vers une macro commande
enregistrée. Cela fournit un moyen pour exécuter une macro
commande à l’aide d’une simple pression sur quelques touches.
Si une étape de macro commande inclut une touche qui a un
transfert forcé vers une autre macro commande, le transfert forcé
n’est pas utilisé. Cela afin d’éviter des macro commandes
circulaires qui ne se termineraient jamais. Au lieu du transfert
forcé, la fonction sous-jacente de la touche sera utilisée lorsque la
macro commande sera exécutée. Cela permet de définir une
macro commande exécutable par simple pression d’une touche
sans perdre la fonctionnalité d’origine de cette touche. Par
exemple, on peut enregistrer une macro commande qui mettrait
en route l’amplificateur (AMP), le téléviseur (TV) et le lecteur de
DVD, et activer cette macro par le bouton de mise en route de
l’amplificateur.
19

COPIE
Cette fonction permet de copier des fonctions d’une touche vers
une autre. Si l’on souhaite sélectionner une touche DEVICE
SELECTOR comme “touche d’origine” ou comme “touche de
destination”, il faut appuyer et maintenir la touche pendant deux
secondes. La seule pression momentanée de la touche ne fait que
changer de périphérique actif.
SUPPRESSION
Chaque touche peut avoir plusieurs types de fonctions enregistrés
ENGLISH FRANÇAIS DEUTSCH NEDERLANDS ESPAÑOL ITALIANO PORTUGUÊS SVENSKA
en elle. Toutefois, seul le type de plus haute priorité sera actif.
Lorsque l’on supprime une fonction, une fonction de priorité
immédiatement inférieure peut devenir la fonction active. Pour
effacer complétement la fonctionnalité d’une touche, il faut
exécuter la fonction de suppression plusieurs fois.
Par exemple, si on supprime une commande apprise, une
commande de priorité inférieure peut devenir active.
L’ordre de priorité pour chaque type de fonction est le suivant :
• Commande transférée
• Commande apprise
• Commande copiée de la bibliothèque
• Commande par défaut de la bibliothèque
Pour supprimer une fonction d’une touche DEVICE SELECTOR, il
faut appuyer et maintenir la touche pendant deux secondes. La
seule pression momentanée de la touche ne fait que changer de
périphérique actif.
REDESIGNATION
Toutes les touches peuvent être renommées à l’exception de la
touche MACRO. Dans le menu RENAME , appuyer d’abord sur
la touche DEVICE SELECTOR puis sur la touche de fonction. La
seconde ligne de l’écran LCD sera effacée et prête à accepter les
caractères alphanumériques. Utiliser les flèches de navigation
pour sélectionner les caractères alphanumériques, et appuyer
ensuite sur la touche ENTER. Sélectionner “Save” (Enregistrer)
puis “Yes” (Oui) pour enregistrer le nouveau nom.
Remarque : il existe huit emplacements de caractères
alphanumériques au maximum.
MACRO
Lors de l’enregistrement de macro commandes, la télécommande
HTRM fonctionne tout à fait normalement sauf qu’il y a un petit
“M” dans le coin supérieur droit de l’écran LCD, et les
commandes IR sont transmises de la même manière que lors du
fonctionnement normal.
Les macro commandes sont exécutées avec le même timing que
celui avec lequel elles ont été enregistrées. La durée pendant
laquelle chaque commande est envoyée correspond également à
la durée pendant laquelle la touche a été maintenue appuyée lors
de l’enregistrement.
Par défaut, lorsqu’une macro commande est exécutée, le
périphérique sélectionné actuellement retournera à ce qu’il était
avant que cette macro commande ne soit exécutée. Toutefois, si la
toute dernière touche appuyée lors de l’enregistrement de la macro
commande est une touche DEVICE SELECTOR, le périphérique
actif sera changé à la fin de l’exécution de la macro commande.
RESET (RÉINITIALISATION)
Sélectionner cette option et répondre “Yes” (Oui) à toutes les
demandes de confirmation pour réinitialiser les options de la
télécommande HTRM à leurs paramètres d’usine par défaut.
Remarque : la réinitialisation de la télécommande HTRM à ses
paramètres d’usine par défaut effacera toutes les
configurations personnalisées, les macro commandes et la
programmation personnalisée des périphériques.
20

FONCTIONS SPÉCIALES DE LA TÉLÉCOMMANDE HTRM
NUMÉRO DE VERSION DU LOGICIEL
• Appuyer simutanément sur les touches ON + TEST pendant
cinq secondes pour afficher le numéro de version.
MODE D’ÉTALONNAGE DU CAPTEUR DE LUMIÈRE
• Appuyer simutanément sur les touches ENTER + SETUP
pendant cinq secondes pour entrer dans le menu de réglage.
Aller ensuite jusqu'à “B Light”, appuyer sur ENTER, puis
descendre jusqu’à “Sens LvL” et appuyer sur ENTER pour être
en mode d’étalonnage du capteur de lumière.
• La première ligne de l’écran LCD affiche la lecture ####
(comprise entre 0 et 1023) du capteur de lumière. La seconde
ligne montre un diagramme à barres représentant la lecture.
• Appuyer sur la touche ENTER pour quitter ce mode. Une
demande de confirmation sera affichée. Sélectionner “Yes”
(Oui) ou “No” (Non) pour prendre en compte la nouvelle valeur.
INTERFACE USB
La télécommande HTRM permet de télécharger vers l’amont ou
vers l’aval la configuration à l’aide d’un ordinateur sous Windows
et du logiciel de programmation HTRM exclusif de NAD. Voir la
figure 3 pour savoir comment brancher un câble muni de
connecteurs USB A mâle et mini USB B mâle 5 broches à la
télécommande HTMR.
REMARQUES : consulter le site web www.nadelectronics.com
pour obtenir la dernière version du logiciel de commande
d’interface de la télécommande HTRM.
Utiliser un câble muni d’un connecteur USB A mâle et d’un
connecteur mini USB B mâle 5 broches pour relier l’ordinateur
sous Windows® et la télécommande HTRM.
L’installateur ou le revendeur peut déterminer le montage et la
configuration corrects de l’interface mini USB et du logiciel.
ENGLISHFRANÇAISDEUTSCHNEDERLANDSESPAÑOLITALIANOPORTUGUÊSSVENSKA
21

USB CONNECTION (FIG.3)
ENGLISH FRANÇAIS DEUTSCH NEDERLANDS ESPAÑOL ITALIANO PORTUGUÊS SVENSKA
22

TABLEAUX DE LA HTRM
100 Récepteur avec Marche/Arrêt discret
101 Récepteur avec Marche/Arrêt à bascule
102 S170
103 L75
104 Zone 2
200 Lecteur de CD
201 Lecteur de CD (ancien)
300 Tuner
301 Tuner L75
400 Magnétophone B
401 Magnétophone A
500 TV 270
501 MR13
502 MR20
600 T562
601 T550, L55
602 T531, T571
Description du Tableau
ENGLISHFRANÇAISDEUTSCHNEDERLANDSESPAÑOLITALIANOPORTUGUÊSSVENSKA
23

IDENTIFIZIERUNG DER BEDIENELEMENTE (FIG.1)
• Im oberen Teil
befinden sich die Taste
ON/OFF und die LCD Anzeige mit
Hintergrundbeleuchtung.
• Im oberen Teil
befinden sich ferner acht
ENGLISH FRANÇAIS DEUTSCH NEDERLANDS ESPAÑOL ITALIANO PORTUGUÊS SVENSKA
Tasten der Gruppe
DEVICE SELECTOR
einschließlich einer
programmierbaren Taste
CUSTOM DEVICE
SELECTOR und einer
Taste MACRO.
• In der oberen Mitte
befinden sich Tasten für
die Auswahl der Kanäle,
die Lautstärkeeinstellung,
die Taste MUTE und
Tasten für die Auswahl des
Surround-Sound-Modus.
• Im mittleren Teil
befinden sich Tasten für
die Auswahl des DVDund CD-Spielers sowie
für die Navigation im
Bildschirmmenü.
• In der unteren Mitte
befinden sich
Zifferntasten von 0 bis 9,
die Tasten A/V PSET
und SPEAKER,
Funktionstasten, die
Taste DVD SETUP und
die Tasten der Gruppe
TEST zum Testen des
Surround-Sound-Modus
des Empfängers.
• Im unteren Teil
befinden sich Tasten für
die Steuerung eines
DVD- oder CD-Spielers
sowie eines
Kassettenrecorders.
• Im unteren Teil
befinden sich Tasten für
die Auswahl bzw. die
Einstellung der Kanäle
und der Lautstärke.
LIEFERUMFANG
Der HTRM wird mit folgendem Zubehör geliefert:
• HTRM-Fernbedienung mit Batterien
• 5-poliges USB-Kabel
• Dieses Benutzerhandbuch
24

BATTERIEN (FIG.2)
Drücken Sie die Lasche nach innen und
heben Sie diese an, um den Deckel des
Batteriefachs zu entfernen.
Legen Sie die Batterien in die Öffnung ein. Stellen
Sie sicher, dass die Batterien korrekt gepolt sind.
ENGLISHFRANÇAISDEUTSCHNEDERLANDSESPAÑOLITALIANOPORTUGUÊSSVENSKA
Lassen Sie den Deckel des
Batteriefachs hörbar einrasten.
25

EINFÜHRUNG
Die HTRM-Fernbedienung bietet die Funktionalität von acht
virtuellen Fernbedienungen. Die acht Tasten der Gruppe DEVICE
SELECTOR können zum Umschalten zwischen den
unterschiedlichen virtuellen Fernbedienungen oder Geräten
verwendet werden.
Im Ruhezustand der HTRM-Fernbedienung wird der Name des
momentan gewählten Geräts in der ersten Zeile der LCD-Anzeige
angezeigt. Beim Drücken einer Funktionstaste wird der Name der
entsprechenden Funktion in der zweiten Zeile der LCD-Anzeige
ENGLISH FRANÇAIS DEUTSCH NEDERLANDS ESPAÑOL ITALIANO PORTUGUÊS SVENSKA
angezeigt. Der Inhalt der zweiten Zeile wird kurz nach dem
Loslassen der Funktionstaste gelöscht.
DIE HTRM-FERNBEDIENUNG ENTHÄLT INSGESAMT
53 TASTEN:
• Steuerung von maximal 8 Geräten
• 2-zeilige LCD-Anzeige zur Anzeige des gewählten Geräts
(DVD) und des gesendeten Befehls (PLAY) (Beispiel)
• Mit allen NAD-Fernbedienungsbefehlen einschließlich
Hörzone 2 belegt
• Lernfunktion - Möglichkeit zum Lernen von bis zu 360
Befehlen von anderen Fernbedienungen
• Makrobefehlsfunktionen - Maximal 52 Makrobefehle können
programmiert werden, wobei jeder Makrobefehl aus bis zu 64
Einzelbefehlen besteht; die Makrobefehle ermöglichen die
automatisierte Abarbeitung häufig verwendeter Befehlsfolgen
• “Punch-Through”-Funktionen ermöglichen den einfachen
Zugriff auf häufig verwendete Funktionen ohne erneute
Geräteauswahl
• Volle Beleuchtung mit Lichtsensor und einstellbarer Zeitsperre
für einfache Bedienung bei schwacher Umfeldbeleuchtung
• Möglichkeit zum Generieren von Infrarot-Signalen mit einer
Trägerfrequenz von maximal 500 kHz (B&O®-kompatibel)
• Mini-USB-Schnittstelle zur Programmierung über einen
Personal Computer
Die HTRM-Fernbedienung ist bereits mit sämtlichen NAD-Befehlen
belegt, die auf der Seite AMP DEVICE SELECTOR angezeigt
werden. Diese in der Bibliothek enthaltenen Befehle ermöglichen
die Steuerung der meisten DVD- und CD-Spieler, Tuner und
Bandmaschinen von NAD mit den entsprechenden Tasten der
Gruppe DEVICE SELECTOR. Diese Standardbefehle sind
nichtflüchtig gespeichert: Auch wenn die HTRM-Fernbedienung
neue Befehle lernt, bleiben die ursprünglichen Befehle in der
Bibliothek erhalten. Diese können auf einfachste Weise reaktiviert
werden, wenn das System um eine NAD-Komponente erweitert
wird.
HANDHABUNG DER HTRM
Die HTRM-Fernbedienung ist in drei Hauptabschnitte
untergliedert: Die LCD -Anzeige an der Oberseite der
Fernbedienung, die Tasten der Gruppe DEVICE SELECTOR und
weitere 44 Funktionstasten. (Siehe Abb. 1.)
Mit den acht Tasten der Gruppe DEVICE SELECTOR an der Oberseite
(AMP, TV, CUSTOM, CD, DVD, VCR, TUNER und CABLE/SAT) wird
festgelegt, welche Funktionen die 44 restlichen Funktionstasten haben
sollen. Mit den Tasten der Gruppe DEVICE SELECTOR wird festgelegt,
welche Komponente von der HTRM-Fernbedienung gesteuert werden
soll. Wenn die Werkseinstellungen noch nicht verändert wurden,
werden Funktionen des Empfängers nicht gesteuert. Die Tasten der
Gruppe DEVICE SELECTOR sind in drei vertikale Spalten von jeweils 3
untergliedert. Die Tasten in der linken Spalte sind für die Steuerung von
Audiokomponenten und die Tasten in der mittleren Spalte für die
Steuerung von Videokomponenten vorgesehen.
Die Tasten der Gruppe DEVICE SELECTOR und die Funktionstasten
können Steuerbefehle von nahezu jeder Infrarot-Fernbedienung
“lernen”. Dies ermöglicht die Steuerung nahezu sämtlicher
26

Systemkomponenten unabhängig von Marke und Hersteller. Alle
Funktionstasten der Gruppe AMP DEVICE SELECTOR sind so
vorprogrammiert, dass Verstärker, Vorverstärker und Empfänger von
NAD gesteuert werden können. (Die HTRM-Fernbedienung ist auch
in der Lage, viele andere NAD-Komponenten über die Seiten DVD,
CD, TUNER und TV zu steuern.)
Da die Funktionstasten der HTRM-Fernbedienung je nach der
verwendeten Taste der Gruppe DEVICE SELECTOR
unterschiedliche Funktionen haben können, sind die
Funktionstasten der HTRM-Fernbedienung farbcodiert, sodass die
Funktionen nach dem Drücken der entsprechenden Taste der
Gruppe DEVICE SELECTOR ersichtlich sind. Die Farben der Tasten
der Gruppe DEVICE SELECTOR entsprechen der Beschriftung der
Funktionstasten (ähnlich wie bei einem Taschenrechner). So
entspricht beispielsweise die rotgraue Farbe der Taste AMP
DEVICE SELECTOR der grauen Beschriftung neben den
Zifferntasten für die Auswahl der Eingänge: Wenn die Seite AMP
DEVICE SELECTOR der HTRM-Fernbedienung aktiviert ist, werden
mit diesen Tasten die Eingänge des Verstärkers oder Empfängers
gewählt. Auf ähnliche Weise entspricht die rote Taste DVD DEVICE
SELECTOR mehreren roten Beschriftungen, die grüne Taste TV
DEVICE SELECTOR mehreren grünen Beschriftungen, usw.
HTRM-KONFIGURATIONSMENÜ
ALLGEMEINE MENÜSTEUERUNG:
• Halten Sie die Tasten SETUP+ ENTER 5 Sekunden lang
gedrückt, um das Konfigurationsmenü aufzurufen.
• Sie können jedes Menü durch Wählen der Menüoption Exit
oder durch Drücken der Taste MACRO verlassen.
• Durch Drücken der Taste MACRO kann jeder Konfigurationsmodus
verlassen werden, sofern nichts anderes angegeben.
• Mit den Tasten PFEIL NACH OBEN und PFEIL NACH UNTEN
können Sie die gewünschte Menüoption wählen. Wenn eine
Menüoption gewählt werden kann, werden die Tasten PFEIL
NACH OBEN und PFEIL NACH UNTEN angezeigt.
• Wenn eine Menüoption geändert werden kann, kann mit den
Tasten PFEIL NACH RECHTS und PFEIL NACH LINKS durch die
verfügbaren Optionen gerollt werden. Die Tasten PFEIL NACH
RECHTS und PFEIL NACH LINKS werden angezeigt, wenn eine
Option geändert werden kann.
• Drücken Sie die Taste ENTER, um eine Menüoption zu wählen
oder einen Wert zu bestätigen.
ENGLISHFRANÇAISDEUTSCHNEDERLANDSESPAÑOLITALIANOPORTUGUÊSSVENSKA
Setup
Battery
B Light
Library
Learn
Pun Thr
Copy
Delete
Rename
Macro
Reset
Exit
Setup
Battery
B Light
Library
Learn
Pun Thr
Copy
Delete
Rename
Macro
Reset
Exit
Battery
Wenn diese Option gewählt wird,
erscheint ein Balken in der Anzeige,
dessen Länge den Ladezustand der
Batterie anzeigt. Wenn die Batterie
tiefentladen ist, wird die Meldung
"Low Batt" angezeigt.
Durch Drücken einer beliebigen Taste
kann wieder das Konfigurationsmenü
aufgerufen werden.
B Light
Timeout
Mode
Sen Lvl *
Exit
* VORSICHT! Sen Lvl kann eine
Verringerung der Batterielebensdauer zur
Folge haben. Weitere Informationen über
die Einstellung finden Sie unter
“SPEZIELLE HTRM -FUNKTIONEN”.
Timeout
<0 - 20s>
Mode
<Off / Sense / On>
27
 Loading...