

Page 1

Multi-Functional
Digital Camera
English
User Guide
Page 2

Digital Camera User Guide
TABLE OF CONTENTS
Identifying the Parts .............................................................. 1
LCD Display Icons.................................................................. 2
Preparation ......................................................................... 2
Loading Batteries .............................................................. 2
Inserting the SD/MMC Card .................................................. 3
Attaching the Strap ........................................................... 3
Camera Settings
Record Mode .................................................................... 4
Resolution/Flash/Zoom ................................................... 4
Menu ......................................................................... 5
Macro/Normal Mode ...................................................... 6
Playback Mode .................................................................. 6
Menu ......................................................................... 6
Taking Pictures
Taking a Still Picture ........................................................... 7
Taking a Video .................................................................. 7
Playing Pictures Back
Playing the Pictures ........................................................... 8
Playing the Videos ............................................................. 8
Deleting Pictures .................................................................. 9
Installing Software ............................................................... 10
Downloading Pictures ..........................................................11
Connecting to PC .............................................................1 1
PC Camera Mode ..............................................................11
For Windows 98SE/ME/2000/XP Users ................................... 1 1
For Windows 98SE Users ..................................................... 12
Unpluging the Camera ........................................................12
For MAC Users ................................................................. 13
Specifications ..................................................................... 14
ii
Page 3
Digital Camera User Guide
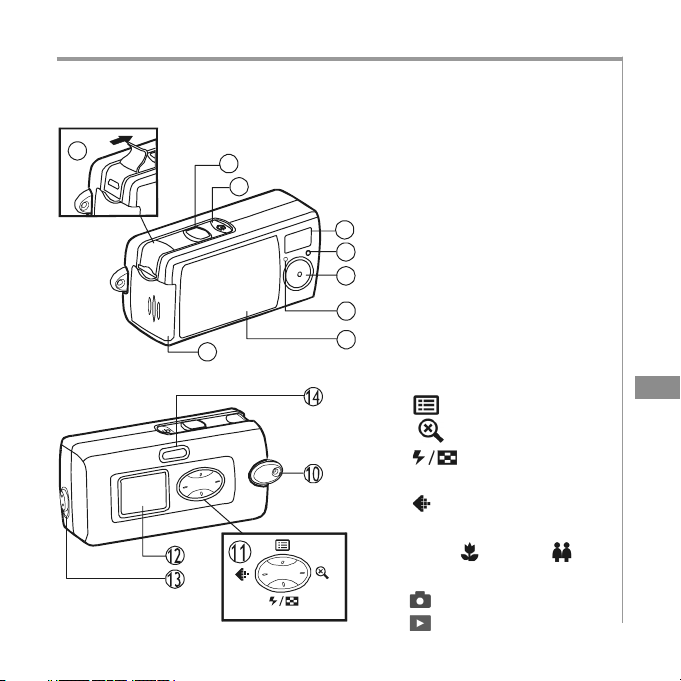
IDENTIFYING THE PARTS
9
1
2
3
4
5
6
8
<Left>
<Down>
7
<Up>
<Right>
1. Shutter button
2. Power button
3. Flash
4. Photo Sensor
5. Lens
6. Self-timer LED
7. Lens cover
8. Battery & SD/MMC card
cover
9. USB port
10. strap holder
11. Control button
: Menu/Up/Exit
: Zoom/Right
: Flash/Down/
Multi-image
: Resolution/Left
12. LCD display
13. Macro(
14. Mode button
)/Normal( ) slide
: Record Mode
: Playback Mode
EN
EN
1
Page 4
Digital Camera User Guide
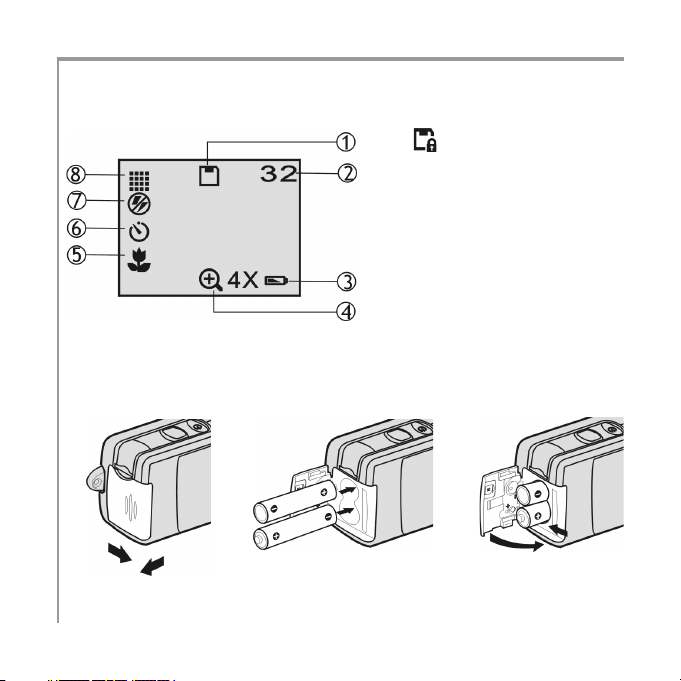
LCD DISPLAY ICONS
PREPARATION
Loading Batteries
1
a.Open the battery &
SD/MMC card cover
2
2
b.Insert batteries
1. Memory card
for writing.
2. Image counter
3. Battery Low: the power
goes off in few seconds
when it starts to blink.
4. Zoom
5. Macro/Normal mode
6. Self-timer
7. Flash
8. Resolution
as shown above
: The card is locked
2
1
c.Close the battery &
SD/MMC card cover
Page 5
Digital Camera User Guide
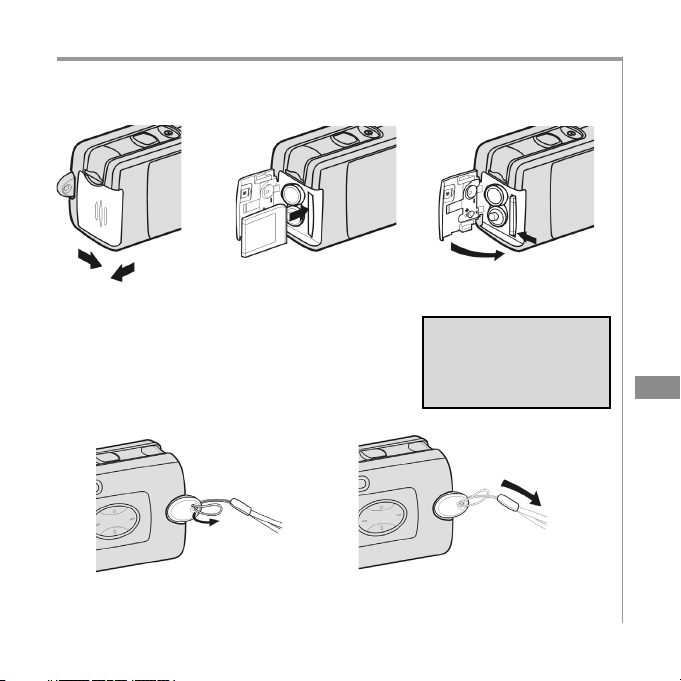
Inserting the SD/MMC Card (not supplied)
1
a.Open the battery
& SD/MMC card
cover
2
b.Insert the card as
shown above. Push
the card all the
way in until it is
securely locked.
Attaching the Strap
a. The small loop goes
through the strap holder.
b. The big loop goes through
the small loop and pull tight
c.Close the cover.
To remove the card
Open the cover, then
push in the card to
pop it out.
EN
EN
3
Page 6

Digital Camera User Guide
CAMERA SETTINGS
Record Mode
Turn on the power. Press the below
buttons to make settings before taking
pictures.
Resolution
Press the button repeatedly
to circle through the settings.
High
1600x1200
Standard
640x480
Video
320x240
Fine
2048x1536
Zoom
Press the button to view
a bigger size of the image.
4
ZOOM 1X
Fine,High
Standard
<Up>
<Left>
<Down>
Flash
Press the button repeatedly
to circle through the settings.
ZOOM 2X ZOOM 3X
Standard
Standard
<Right>
OFF
AUTO
RED-EYE
ZOOM 4X
Standard
Page 7

Digital Camera User Guide
Menu
Press the button to enter or exit the LCD menu. Press the
<Left>/<Right> buttons to select the item, and press <Down> /
<Up> to change settings.
Items
Self-timer: OFF ! ON
Photo Effect:
OFF ! BLUR
! NATURE ! INVERT
! SEPIA (sepia tone)
! B&W (black & white)
Exposure: Auto ! +1.0
! +0.5 ! -0.5 ! -1.0
White Balance:
AUTO!
!
!
!
Settings SettingsItems
(Daylight)
(cloudy)
(Fluorescent)
(Tungsten)
Auto shutdown:
OFF ! 1.5 min.
Banding:
50Hz ! 60Hz
Information: ON ! OFF
Button Beep:
ON ! OFF
Date Set: MM/DD/YY
(month/day/year)
Time Set: HH/MM/SS
(hour/minute/second)
Date Mark: OFF ! ON
Restore Default Set:
NO ! YES
EN
EN
5
Page 8

Digital Camera User Guide
Record Mode - continued
Macro/Normal mode
Push the Macro/Normal slide toward when taking close-up
pictures at a range of 25 ~ 70 cm. Push toward
from any other distance.
when taking
Playback Mode
Menu
Press the button to enter or exit the LCD menu. Press the
<Left>/<Right> buttons to select the item, and press <Down> to
change settings.
6
Items
Delete one: NO ! YES
Delete all: NO ! YES
Settings SettingsItems
Formatting the memory
card: NO ! YES
Zoom: Press <Left>/
<Right>/<Up>/<Down> to
view another area of an
image. Press Shutter to
exit.
Page 9

Digital Camera User Guide
TAKING PICTURES
Taking a Still Picture
1. Slide the lens cover.
2. Turn on the power, and make
sure it is in REC ( ) mode.
3 Position the subject in the LCD
display.
4. Press the Shutter button.
Taking a Video
Repeating step 1 and 2 above.
3-1 Press the
(VIDEO) icon.
4. Press the Shutter button to start
recording. To stop recording,
press the Shutter again.
button to select
EN
EN
7
Page 10

Digital Camera User Guide
PLAYING PICTURES BACK
Playing the Pictures
1. Turn on the power.
2. Set the camera to Playback( )mode.
3. Press the <Left>/<Right> buttons to review
your pictures.
* You can review up to 6 images at a time by
pressing button (A).
Playing the Videos
Select the picture marked with the icon
and then press the Shutter button to play (B).
8
(A)
(B)
Page 11

Digital Camera User Guide
DELETING PICTURES
1. Turn on the power.
2. Set the camera to Playback mode.
3. Press the <Left>/<Right> buttons
to select the picture/video you
want to delete.
4. Press the
5. Select to delete one or select
to delete all.
6. Select YES to delete. Select NO
not to delete and to exit.
(Menu) button.
5
6
EN
EN
9
Page 12

Digital Camera User Guide
INSTALLING SOFTWARE
* For WinXP users, please refer to ‘Notice to
Windows XP Users’ note.
1. Insert installer CD into the CD-ROM
drive.
2. Close the CD-ROM drive.
3. An installer wizard will automatically
launch.
If the installer wizard does not appear,
then;
4. You can click Start in the Windows
Taskbar. Then, select Run to continue.
5. Click Browse, and select RUN.exe in
your CD-ROM drive.
6. Click Open
7. Click OK
8. Follow the on-screen instructions to
complete driver installation and the
bundled software.
10
1
4
5
Page 13

Digital Camera User Guide
DOWNLOADING PICTURES
Connecting To PC
1. Connect your camera to a
computer via USB cable
2. Press the Power button.
Repeating step 1 and 2 above.
3. Press
4. Start NetMeeting application
* This mode is not availbe for
For Windows® 98SE/Me/
2000/XP Users:
1. Your PC will detect the camera
after connection.
EN
Tips:
PC Camera Mode
(OS: 98SE/Me/2000/XP)
EN
/ (Mode) button.
in Windows.
Mac.
11
Page 14

Digital Camera User Guide
2. A removable disk dialoge appears
3. Double click on the drive
NOTE: Please do not copy any files
into the DCIM folder of your camera.
Otherwise it may cause the camera
unstable or crash.
4. You can drag-and-drop pictures to
your PC.
For Windows® 98SE Users:
You need to install the CD driver before you can use the USB Mass
Storage Device. (Refering to “Installing Software” section)
Unpluging the Camera
1. Right-click icon in the taskbar.
2. Unplug or Eject Hardware pop-up menu will appear. Click to
enter the Unplug or Eject Hardware window (A).
(A)
12
Page 15

Digital Camera User Guide
3.Select USB Mass Storage
Device and click on Stop to
continue (B).
4.The Stop a Hardware device
window will appear. Click on OK.
5.The Safe To Remove Hardware
window will appear. Click on OK.
For MAC Users
(Mac OS: 9.x and 10.1 above)
By connecting your camera to a MAC computer (referring to
Connecting to PC), it will automatically detect Mass Storage drive.
You can easily manipulate your files the way you do in MAC user
interface.
(B)
Removing from Mac
1. Select the camera icon (shown as ‘NO_NAME’or ‘untitled’ drive)
on the desktop.
2. Drag and drop the drive to the Trash.
13
EN
(A)
EN
Page 16

Digital Camera User Guide
SPECIFICATIONS
Image Sensor 2.1M CMOS sensor
Resolution Fine: 2048 x 1536 (H/W enhancement);
Internal Memory 16MB Flash
External Memory SD/MMC card slot
Interface USB
Flashlight Auto/Red-Eye/Off
File Format JPEG/AVI
Video Frame Rate(PC cam) 20 fps (320 x240)
Self-timer 10-second delay
Shutter Speed 1/15~1/2500 sec.
Lens Fixed(5G glass lens), f=8.5mm
Focus Range 25cm~70cm(macro), 70cm~infinity(normal)
Aperture Ratio F2.8
Digital Zoom 2X/3X/4X
LCD Display 0.9" STN LCD
Power 1.5V AAA alkaline batteries X 2
Dimensions 86 x 42 x 34 mm
Weight 92g (without batteries)
Mass Storage YES (OS: Win98se/Me/2000/XP; Mac OS 9.X
PC Cam Mode YES (OS: Win98se/Me/2000/XP)
High: 1600 x 1200 ; Standard: 640 x 480
and 10.1 above)
14
 Loading...