

Page 1
Page 2
2
3
4
6
7
7
9
10
11
11
12
12
13
14
Page 3

3
Page 4
2
1
3
2
3
4
1
4
GP 135 User’s Manual
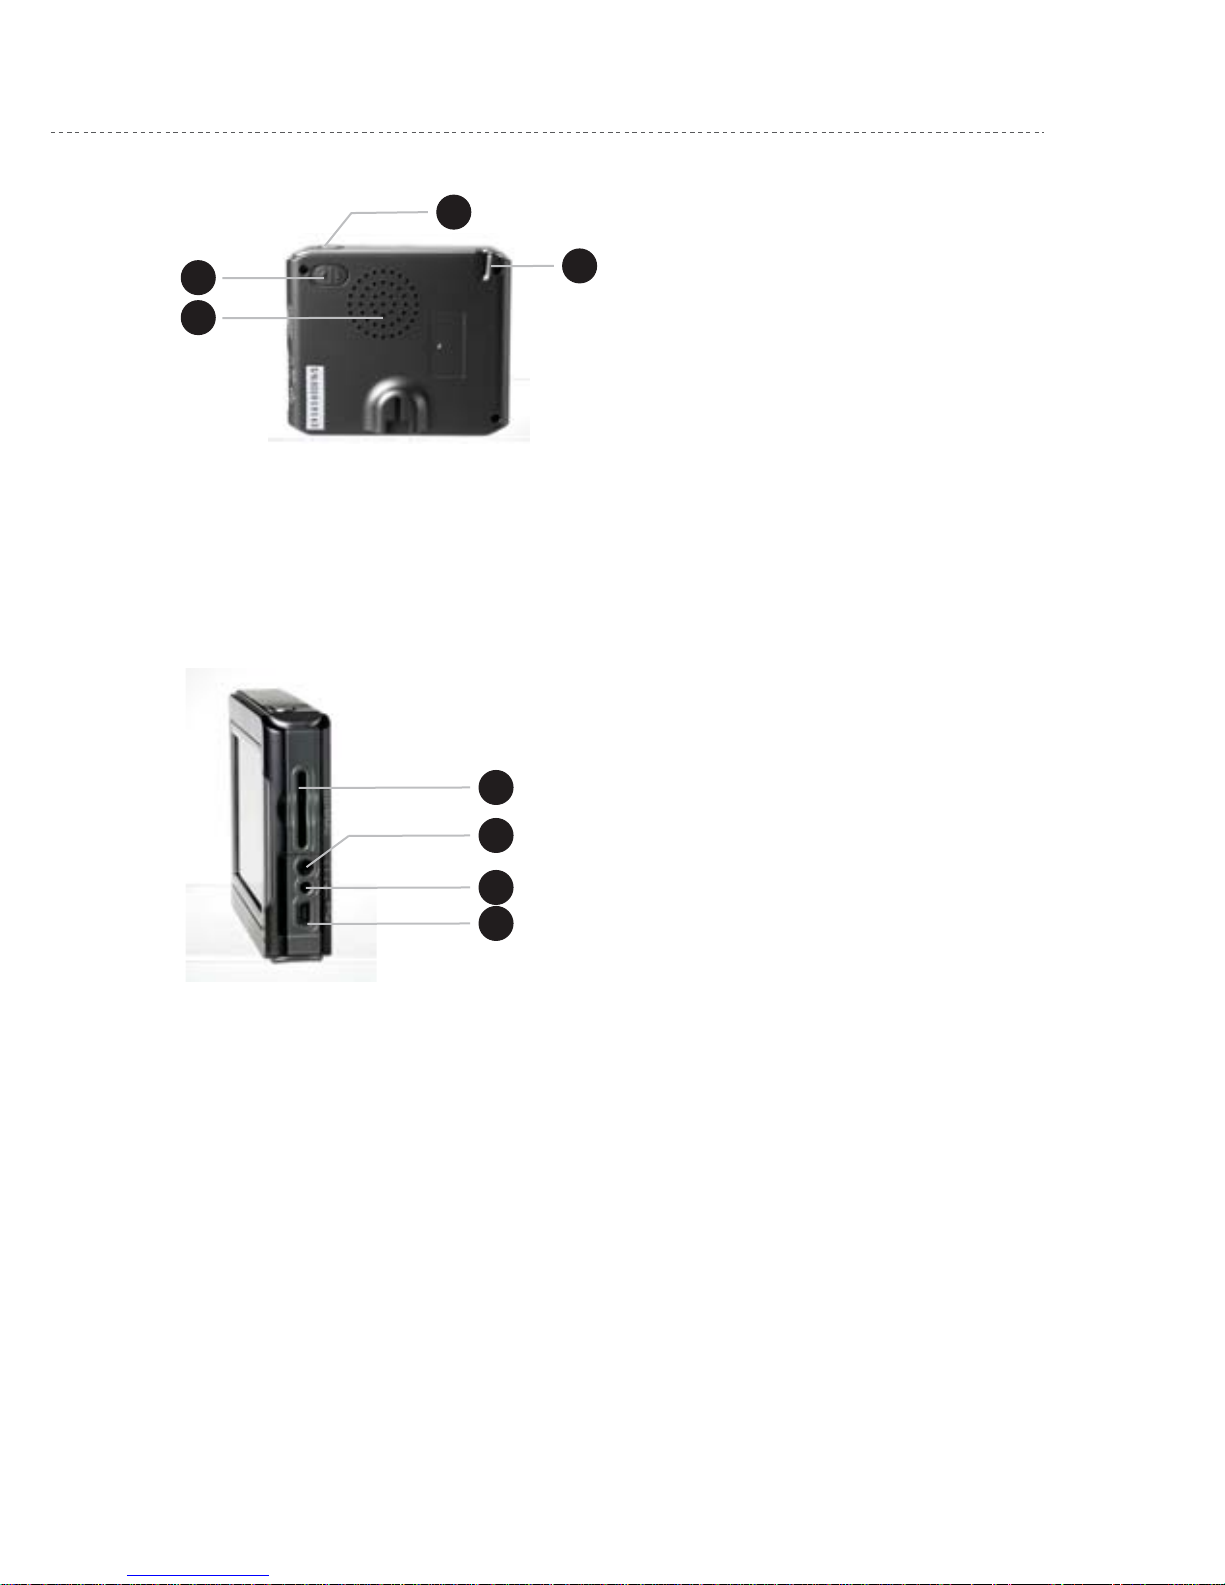
1.1.2 Back appearance and buttons˖
4
1. Power button
2. Speaker
3. Menu button
4. Touch pen
1. SD card slot
2. Earphone jack
*Earphone not included in delivery
3. Power socket
*AC adapter not included in delivery
4. USB socket
1.1.3 Left-side appearance and buttons˖
ǏDescriptionǐ
1.2 Charge
1.2.1 For initial use, please charge the battery fully; operations
are as follows:
GP 135 navigation device has 2 power mechanisms:
Charging car adapter and mini USB interface.
Page 5

GP 135 User’s Manual
5
When GPS navigation device is not connected with charging
adapter,GPS navigation device obtain power from lithium polymer
battery. The battery consumption sign [ ] on the top right corner
of the main system interface or the battery capacity bar [ ]
of the power setup interface show the current residual battery
capacity.
When GPS navigation device is connected with the external charging
adapter, GPS navigation device obtains power from external power
supply.
ǏAttentionǐ
This navigation device adopts built-in, irreplaceable lithium polymer
battery. Under normal conditions (such as lower backlight brightness),
fully charged battery can continuously works for about 10 hours.
Subject to how you use the GPS navigation device, the actual battery
supply time varies.
ǏNoticeǐ
When charge indicator lights on (red light), the navigation device is
in charging state. Charging requires a few hours, please wait patiently
and do not cut off power until red light is off.
In later use, in case of battery power deficiency or exhaustion,
please charge it timely.
1.2.2 Charging by car adapter:
1. Plug one end of car adapter into the socket on the left side of body;
2. Plug the other end of car adapter into the igniter to supply power for
GP 135 while charging.
Page 6

GP 135 User’s Manual
6
ǏNoticeǐ
Please plug the adapter only after the vehicle starts, so as to avoid
damage caused by instant current impact on equipments.
1.3 Power ON/OFF
ON/OFF is controlled by power button. OFF indicates the machine
enters into energy saving mode; next time when ON, the system will
automatically starts with the last operation interface.
1.3.1 ON˖
Please check whether:
1.The battery power is adequate, or plugged into the car adapter;
2.SD card is inserted into the SD/MMC slot correctly, and the inserted
SD card has system operating program;
Press the power button at the back of the machine to turn on.
ǏNoticeǐ
First orientation should choose open place with no upper shelter; Please
stay at the same place, for the orientation needs a few minutes to complete,
so wait patiently.
1.3.2 OFF˖
Press the power button at the back of the machine to turn off; the system
enters into energy saving mode.
Page 7

GP 135 User’s Manual
7
1.4 Use of touch pen
Touch pen is your tool to communicate with GP 135.
1. Click: Clicking on a menu on the screen with the tip of touch
pen, you can open the menu and use the menu functions.
2. Drag: First click one point on the map with the pen tip, then
move the pen tip, you can realize map move to find out the
map location you wish.
ǏNoticeǐ
Touch pen with damages on the tip, ball pen or any other edged
and rough objects may cause scratch and damage of the LCD
screen. Please use perfect touch pen. don’t use broken touch pen.
1.5 Communication with computer
Connect with computer via the MINI USB interface at the left side of
the GPS navigation device body. It allows file copy between navigation
device and computer, or back-up files from GPS navigation device into
the computer in order to restore data to the GPS navigation device
when necessary.
1. Please confirm that the GPS navigation device is in working
condition and MICROSOFT ACTIVESYENC software is installed.
2. Connect MINI USB of USB cable [ ] to the MINI USB port on the
left side of GPS body, and connect standard USB port [ ] to the
USB Host of computer;
3. After connection a computer automatically recognizes new hardware;
GPS navigation device suspends current running programs and
switches into computer communication interface;
4. After communication finishes, pull out MINI USB cable and GPS
navigation device returns to run the suspended programs.
Page 8

GP 135 User’s Manual
8
ǏNoticeǐ
Data Security: Please backup system data into external storage
devices before each upgrade of system data. Our company shall
be held reliable for system data damage or loss.
ǏAttentionǐ
In the connection between GPS navigation device and computer,
GPS navigation device will suspend other operations.
ǏNoticeǐ
The charging will start as soon as the MINI USB cable is connected
between the GPS system and the PC
ǏNoticeǐ
In the connection between GPS navigation device and computer,
execution of the following operation system will terminate
communication with computer and cause loss of un-transmitted data.:
1. Remove the MINI USB cable;
2. Press power button to turn off;
3. Use reset button or battery switch to restart system;
4. Click the close button on the upper right corner of the window.
Page 9

GP 135 User’s Manual
9
Chapter II Basic Operation
2.1 Main interface and main functions
1. Main interface of system:
2. Function description:
______________________________________________________
Navigation Provide navigation reference;
______________________________________________________
Setting Volume, power, backlight, date and time,
language, system information.
______________________________________________________
Page 10

GP 135 User’s Manual
10
Chapter III System Setting
Click the “Setting” icon to enter “Setting” menu and set up
the system
_______________________________________________________
Volume Adjust the volume of the headphone and speaker;
The volume of start/close indicating tone.
_______________________________________________________
Power Examine the current battery level.
_______________________________________________________
Backlight Adjust the backlight of the touch screen;
Adjust the interval time for LED-off
_______________________________________________________
Time Set the date/time for the system;
Choose the time-zone for the system.
_______________________________________________________
Language System language options;
System outlook options.
_______________________________________________________
System GPS test; help, touch screen calibration.
_______________________________________________________
Page 11

GP 135 User’s Manual
11
3.1 Volume setup
- Click or to adjust the volume of the headphone & speaker
- Click or to adjust the level for tap sound with options:
Soft , Loud& No sound
- Click to close the operation menu
3.2 Backlight Setup
- Click or to adjust the brightness of the backlight.
- Click or to adjust the interval time for LED-off with options:
Always on, Off after 1 / 2 / 5 / 10 / 30 min
- Click to close the operation menu
Page 12

3.3 Time setup
- Click to enter “Date/Time/Zone” interface, and then click
or to set up relevant parameters (see below pictures) :
3.4 Language selection
- Click or to make language selection.
GP 135 User’s Manual
12
Page 13

GP 135 User’s Manual
13
3.5 System
- Gps test: Once entering into GPS test screen, the GPS system will
perform self-test operation for the GPS signal and tracking.
- Help: GPS operation instruction files
- Calbration: Touch screen calibration
Carefully press and briefly hold stylus on the center of the target.
Repeat as the target moves around the screen.
ǏNoticeǐ
The GPS system will automatically jump back to system screen from
calibration screen after 10 seconds, waiting time can be eliminated by
tapping the calibration screen.
* The used pictures in the user’s manual are just for the reference
Page 14

Trouble Cause Solutions
Unable to start up
Insufficient battery
capacity
Use external power for the device
and charging the battery
Sudden cutoff of
power
Insufficient battery
capacity
Use external power for the device
and charging the battery
Unable to display/
recognize
displayed content
Too low backlight Refer to Section 3.2, adjust backlight
Auto close of
backlight
Tap LCD screen by touch pen, and
the screen becomes bright.
No proper response
for clicking a icon
Touch screen has
no calibration or
accidental failure
1, make a new calibration
2, press reset button to restart.
No sound for
playing
Too low volume
Increase volume
Poor connection
of earphone
Insert earphone properly
Fails to connect with
computer
Improper connection
by USB cable
Refer to section 1.5, properly
connect USB cable
Fails to receive
GPS signal
Subject to local GPS satellite signal
strengthen, signal receiving requires
more than 3 minutes.
Contact the agent or dealer.Loss of map data
GP 135 User’s Manual
14
Chapter IV Trouble shooting
Page 15

 Loading...