

DVD+R/RW Recorder
* Before Attempting to connect, operate or adjust this product, please save
and read the User Guide completely.
* The style of the DVD Recorder shown in the Quick Guide may be different
due to various models.
User Guide
English
English Español
Playable Disc Format:
DVD/DVD+R/DVD+RW/Audio CD/Kodak Picture CD/JPEG Picture CD
* The DVD Recorder is intended to record external sources to DVD+R or DVD+RW discs only
82-178-00430

Manufactured under license from Dolby Laboratories. “Dolby” and the double-D symbol are trademarks of Dolby Laboratories.
Contents
G
FCC and Safety In for ma tion ................ 1
Important Safety Instructions ............... 2
Precautions ........................................... 3
About This User Guide ...................... 4
I
1 Initial Settings ...................................5
1-1 Channel Setup .............................. 6
Channel Search Setting .................................. 6
Add/Del Channel Setting .................................... 6
Cable/Antenna Setting ........................................ 7
1-2 Record / Disc Setup ......................... 8
Record Quality and Auto Chapter Setting ......... 8
Disc Info. Setting .................................................... 8
Finalize and Make Compatible Setting .............. 9
Protect Disc and Erase Setting ....................... 9
1-3 Video/Audio Setup ......................... 10
TV Type, Video Output and Analog Audio Output
Setting ........................................................ 10
1-4 System Setup ................................ 12
OSD Language Setting ............................... 12
Password Setting [DVD] ............................. 12
etting Started
nitial OSD Settings
1-5 Schedule Setup .............................. 15
Da te/Tim e Settin g ..... . ...... ...... . ..... . ...... .....1 5
Prog ram List Settin g ....... ................. ......... 15
D
2-1 DVD Playback ................................... 17
Basic Playback ........................................... 17
Stopping Playback and Returning to The Menu Screen
(If a Menu Screen is Available on The Disc) ........ 17
Stopping Playback ........................................ 17
Fast Forward (Fast Backward)...................... 17
Skipping Ahead or Back to Chapters ............... 18
Still Picture (Pause) ........................................ 18
Frame Advance (Step) ...................................... 18
Slow-Motion Playback .................................... 18
Selecting Scenes by Title/Chapter Number ........ 18
Selecting Scenes by Time ............................ 19
Repea ting Viewing ....... ........... ........... ...... 19
Repeating Sections Between Two Speci c Points
(A-B Repeat) ......................................... .. 19
Displaying the Information of the Scene .......... 19
Changing Audio Soundtrack Language ............. 19
Displaying the Scene With a Larger and Closer View
Clearing/Changing Subtitles ............................ 20
VD
.... 20
Getting Started
English
Rating Setting [DVD] ............. ................... 13
Factory Reset Setting ................................... 14
Viewing From Another Angle ........................ 20
Using a DVD Menu .................................... 20
i
ii
Getting Started
Contents
Using the Menu Function ............................ 20
CM Skip Setting ....................................... 20
Muting the DVD Recorder ............................ 21
Using the Volume Function ............................. 21
VCD Menu (Only for VCD 2.0) ............................. 21
Playing Kodak Picture CDs and JPEG picture
CDs .............................................................. 22
udio CDs
A
3-1 Audio CD Playback ....................... 23
Basic Playback ......................................... 23
Stopping Playback .................................... 23
Fast Forward (Fast Backward) .................... 23
ecording Functions
R
4-1 Record Setup ............................... 26
Record Quality Setting ...............................26
Di s c Media Sett i n g ....... . . ........ . . ........ . .....26
4-2 Recording ................................... 27
To Record From External Source .....................27
To Record TV Programs (Instant Record) .............27
Schedule (Record) Setting ...............................28
4-3 Editing ........................................... 29
To Edit a Title While the Title is Playing ........ 29
To Edit a Title While the Title is Not Playing ...... 31
Skipping Ahead or Back to Tracks .................. 23
Paus e Play back ............................... ........ 24
Programming Audio CD Soundtrack ...............24
Selecting Music by Track .............................25
Selecting Music by Time ..............................25
Random Playback ...................................... 25
Repeat Playback ....... ............................. .. 25
or Your Reference
F
5-1 Troubleshooting ............................32
5-2 Disc Handling and Maintenance ...34
1
Getting Started
English
FCC and Safety Information
CAUTION:
This unit employs a laser. Due to possible eye
injury, only quali ed service personnel should remove the cover or attempt to service this de vice.
Use of controls, ad just ments, or the per for mance
of procedures other than those spec i ed herein
may result in hazardous radiation exposure.
NOTE:
This equipment has been tested and found to comply
with the limits for a Class B digital device pursuant to
part 15 of the FCC Rules. These lim its are designed
to provide rea son able protection against harmful
in ter fer ence in a residential in stal la tion. This equipment generates, uses and can radiate radio fre quen cy
energy and, if not in stalled and used in accordance
with the in struc tions, may cause harmful interference
to radio com mu ni ca tions. However, there is no guarantee that interference will not occur in a par tic u lar
in stal la tion. If this equipment does cause harmful interference to radio or television reception, which can
be determined by turn ing the equipment off and on,
the user is encouraged to try to correct the interference by one or more of the following measures:
– Reorient or relocate the receiving an ten na.
– Increase the separation between the equip ment
and receiver.
–
Connect the equipment into an outlet on a cir cuit different from that to which the re ceiv er is connected.
– Consult the dealer or an experienced ra dio/TV
technician for help.
Since it is usual for DVD movies to be released at dif fer ent
times in different regions of the world, all players have region
codes and disc can have an op tion al region code. If you load
a disc of a different region code to your player, you will see
the region code notice on the screen. The disc will not play,
and should be unloaded.
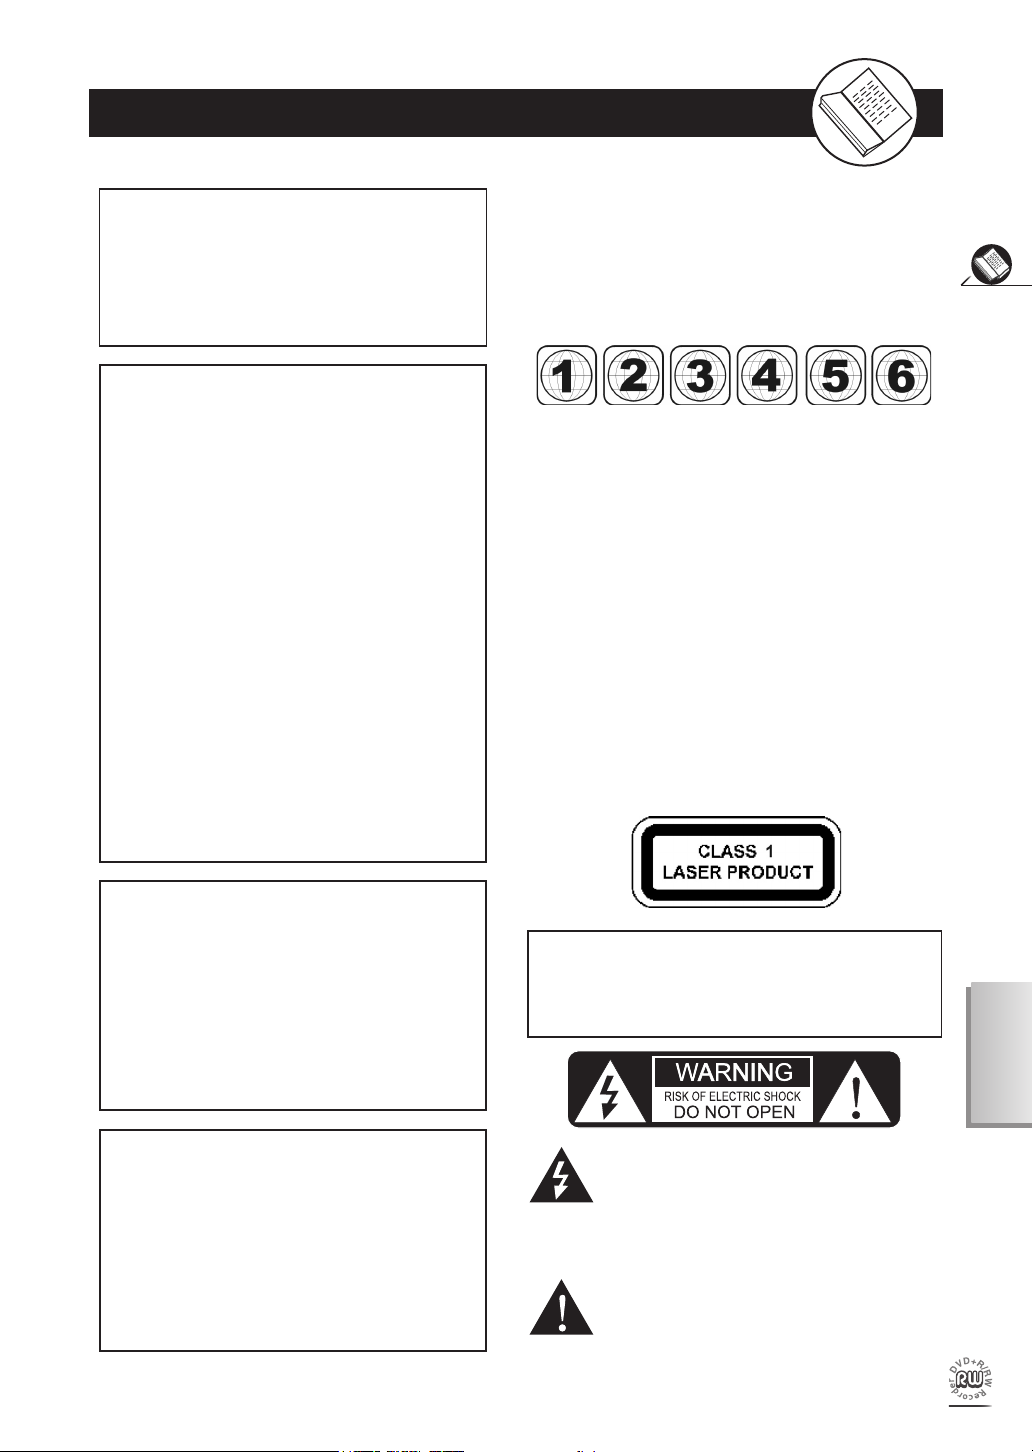
(Possible region codes:)
There are 6 regions (also called “locals”). Each DVD play er
and disc will be played in one region ONLY.
1: Canada, U.S., U.S. Territories
2: Japan, Europe, South Africa, Middle East (including
Egypt)
3: Southeast Asia, East Asia (including Hong Kong)
4: Australia, New Zealand, Paci c Islands, Central Amer-
ica, Mexico, South America, Car ib be an
5: Former Soviet Union, Indian Subcontinent, Africa (also
North Korea, Mongolia)
6: China
Never make or change connections with the
power switched on.
CAUTION
VISIBLE AND INVISIBLE LASER RADIATION WHEN
OPEN. AVOID EX PO SURE TO BEAM (WARNING
LO CATION: INSIDE ON LASER COVER SHIELD)
This product incorporates copyright pro tec tion tech nol o gy that is protected by method claims of certain
U.S. patents and other intellectual property rights
owned by Macrovision Corporation and other rights
owners. Use of this copyright protection technology
must be authorized by Macrovision Corporation, and
is intended for home and other limited viewing uses
only unless otherwise au tho rized by Macrovision
Corporation. Reverse en gi neer ing or dis as sem bly
is prohibited.
For Progressive scan output:
‘Consumers should note that not all high de nition
television sets are fully compatible with this product
and may cause artifacts to be displayed in the picture.
In case of Progressive scan picture problems, it is
recommended that the user switch the connection to
the “Standard De nition” output. If there are questions
regarding your TV set compatibility with this model
HDD+DVD Recorder, please contact our customer
service center.’
WARNING
TO REDUCE THE RISK OF FIRE OR ELECTRIC
SHOCK, DO NOT EXPOSE THIS PRODUCT TO
RAIN OR MOISTURE
The lightning ash with arrowhead symbol, within
an equilateral triangle, is intended to alert the
user to the presence of uninsulated “dangerous
voltage” within the product’s enclosure that may
be of suf cient magnitude to constitute a risk of
electric shock to persons.
The exclamation point within an equilateral triangle is
intended to alert the user to the presence of important
operating and maintenance (servicing) instructions in
the literature accompanying the appliance.

2
Getting Started
Important Safety Instructions
1. Read and keep these instructions.
2. Pay attention to all warnings.
3. Follow all instructions.
4. Do not use this apparatus near water.
5. Clean only with a damp cloth.
6. Do not block any of the ventilation openings. Install in accordance with the man u fac tur er’s instructions.
7. Do not install near any heat sources such as radiators, heat registers, stoves, or other apparatus (including
ampli ers) that produce heat.
8. Do not defeat the safety purpose of the polarized-type plug. A polarized plug has two blades with one
wider than the other. The wide blade is provided for your safety. When the provided plug does not t into
your outlet, consult an electrician for replacement of the obsolete outlet.
9. Protect the power cord from being walked on or pinched particularly at plug, con ve nience receptacles,
and the point where they exit from the apparatus.
10. Only use attachments/accessories speci ed by the manufacturer.
11. Use only with a cart, stand, tripod, bracket, or table speci ed by the manufacturer or sold with the
apparatus. When a cart is used, use caution when moving the cart/apparatus com bi na tion to avoid injury
from tip-over.
12. Unplug this apparatus during lighting storms or when unused for long periods of time.
13. Refer all servicing to quali ed service personnel. Servicing is required when the ap pa ra tus has been
damaged in any way; such as when the power-supply cord or plug is damaged, liquid has been spilled
or objects have fallen into the apparatus, the apparatus has been exposed to rain or moisture, does not
operate normally, or has been dropped.
WARNING: To reduce the risk of re or electric shock, do not expose to rain, moisture, dripping or splashing.
No objects lled with liquids, such as vases, shall be placed on top of the recorder.
Please read these precautions before op er at ing this unit.

3
Getting Started
English
Precautions
n Power cord protection
To avoid any malfunctions of the unit and to protect against electric shock, re or personal injury, please
observe the fol low ing.
l Hold the plug rmly when con nect ing or dis con nect ing the AC power cord.
l Keep the AC power cord away from heating appliances.
l Never put any heavy object on the AC power cord.
l Do not attempt to repair or reconstruct the AC power cord in any way.
n Placement
Avoid placing the unit in areas of:
l Direct sunlight or heating radiators, or closed automobiles
l High temperature (over 35
l Much dust as the internal parts may be seriously damaged.
n Non-use periods
Turn of the unit when not in use. When left unused for a long period of time, the unit should be unplugged
from the household AC outlet.
n No ngers or other objects inside
l Touching internal parts of this unit is dan ger ous, and may cause serious damage to the unit. Do not
attempt to disassemble the unit.
l Do not put any foreign object on the disc tray.
0
C) or high humidity (over 90%)
n Keep away from water/magnet
l Keep the unit away from ower vases, tubs, sinks, etc. If liquids are spilled into the unit, serious
damage could occur.
l Never bring a magnet or magnetized object near the unit.
n Stacking
l Place the unit in a horizontal position, and do not place anything heavy on it.
n Condensation
Moisture may form on the lens in the following conditions:
l Immediately after a heater has been turned on
l In a steamy or very humid room
l When the unit is suddenly moved from a cold environment to a warm one. If moisture forms inside this
unit, it may not operate properly. In this case, turn on the power and wait about one hour for the moisture
to evaporate.
n If there is noise interference on the TV while a broadcast is being received
Depending on the reception condition of the TV, interference may appear on the TV monitor while you watch
a TV broadcast and the unit is left on. This is not a malfunction of the unit or the TV. To watch a TV broadcast,
turn off the unit.

About This User Guide
De nition of Terms
Angle
Recorded onto some DVD discs are scenes which have been
si mul ta neous ly shot from a number of different angles (the
Getting Started
same scene is shot from the front, from the left side, from
the right side, etc.). With such discs, the ANGLE button can
be used to view the scene from different angles.
Chapter Number
These numbers are recorded on DVD discs. A title is divided
into many sections, each of which is numbered. Speci c
parts of video presentations can be searched quickly using
these numbers.
DVD
A high-density optical disc on which high-quality pictures
and sound have been recorded by means of digital signals.
Incorporating a new video compression technology (MPEG
II) and high-density recording technology, DVD enables
aesthetically pleas ing full-motion video to be recorded over
long periods of time (for instance, a whole movie can be
recorded). A DVD disc normally has 4.7GB capacity and is
able to record 2hrs of high quality DVD movie.
DVD+R
This means DVD+Recordable. These Discs can be recorded
and nalized only once.
DVD+RW
This means DVD+ReWritable. These Discs can be recorded
on repeatedly.
Finalize
After being nalized, the recorded disc can be played back on
a regular DVD player if the player supports DVD+R discs.
Note: Before attempting to connect, operate or
adjust this product, please save and read this User
Guide completely.
Thank you for buying this DVD Recorder.
Instructions in this User Guide describe mainly the
use of the remote control. Buttons with the same
or similar marking on your DVD Recorder have the
same function as those of the remote control. For
introduction to the panels (DVD Recorder), buttons
(Remote Control), and various connections, please
refer to the Quick Guide.
This DVD Recorder supports the following Media
Formats:
-- Playable disc format
l DVD, DVD+R, DVD+RW, DVD-R, DVD-RW, CD-
DA, MP3, Mixed CD-DA, JPEG le disc and Kodak
Picture disc.
-- Recordable disc format
l DVD+RW (Application Program)
l DVD+R
Play Time
This indicates the play time which has elapsed from the start
of a disc or a title. It can be used to nd a speci c scene
quickly. (It may not work with some discs.)
Subtitles
These are the printed lines appearing at the bottom or top of
the screen which translate or transcribe the dialogue.
Title Number
These numbers are recorded on DVD discs. When a disc
contains two or more movies, these movies are numbered
as title 1, title 2, etc.
Track Number
These numbers are assigned to the tracks which are
recorded on audio CDs.
4
Some discs may have problem of playback due to poor production or external
damage. If the discs are self-burnt, selfcopied or non-original, we cannot guarantee that they are playable.
1 Initial Settings
a
a
b
b
a
a
Date Time
Program List
b
b
c
c
a
a
b
b
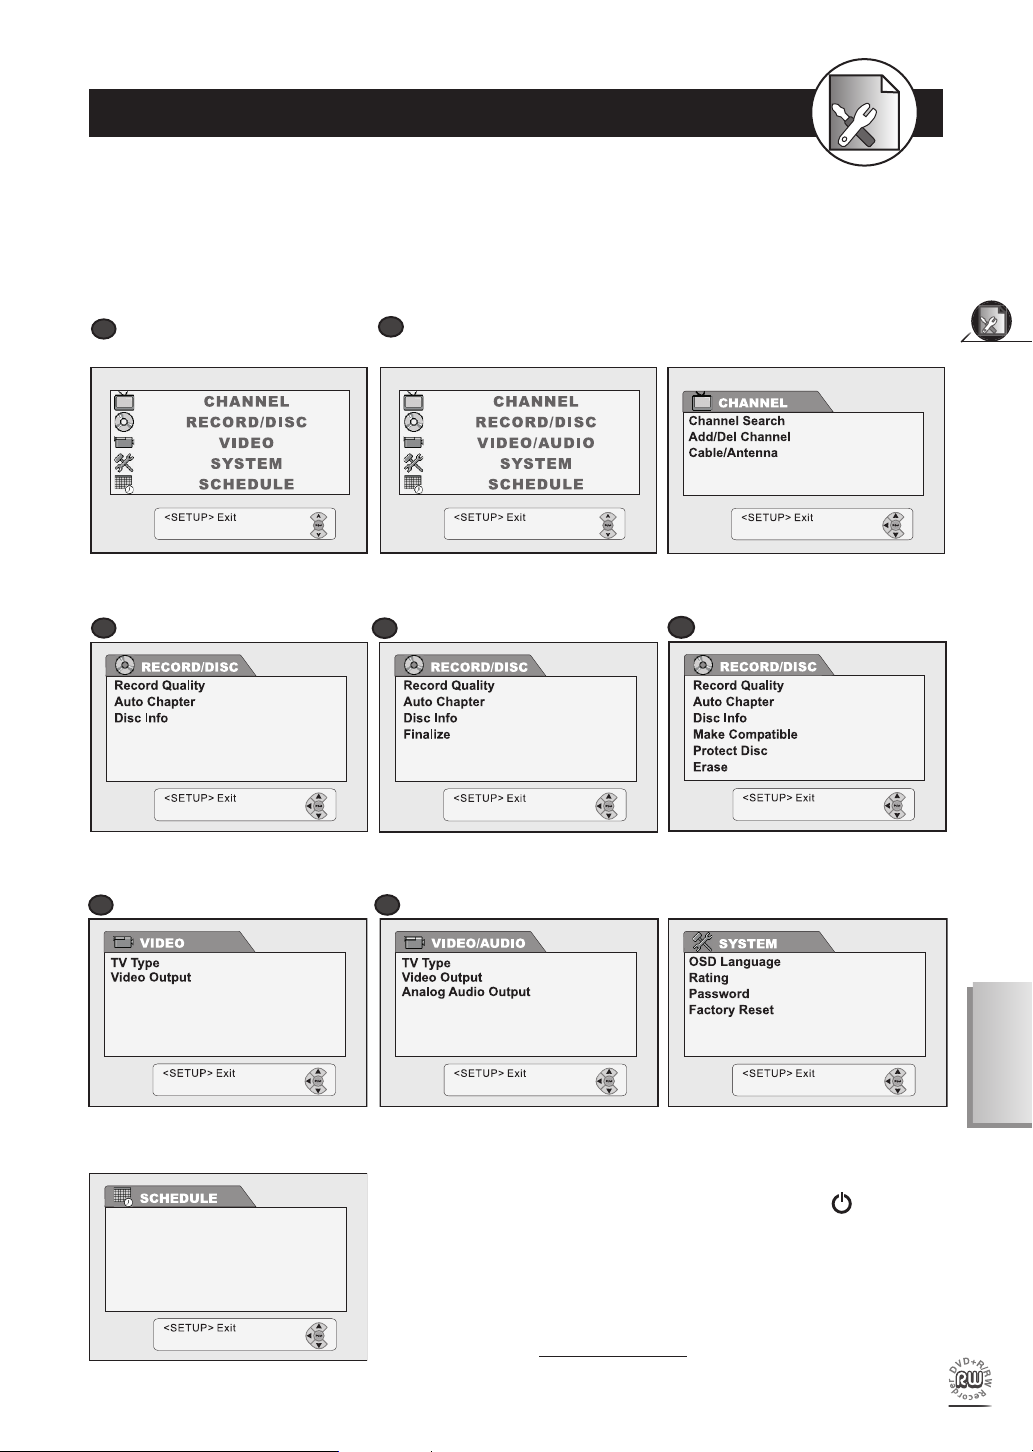
There are ve parts in the Setup menu to choose from for the setting that best suits your case,
including CHANNEL, RECORD/DISC, VIDEO, SYSTEM and SCHEDULE.
The Following is an Overview of the ve OSD Settiings:
DVD with 2 channel audio output
(B) Under RECORD/DISC Setup:
When No Disc is placed:
(C) Under VIDEO Setup:
DVD with 2 Channel audio output
DVD with 5.1 Channel audio
output (Optional)
(B) Under RECORD/DISC Setup:
When a DVD+R disc is placed:
(C) Under VIDEO/AUDIO Setup:
DVD with 5.1ch audio output (Optional)
(A) Under CHANNEL Setup:
Initial OSD Settings
(B) Under RECORD/DISC Setup:
When a DVD+RW disc is placed:
:
(D) Under SYSTEM Setup:
(E) Under SCHEDULE Setup:
In Advance:
1. Press STANDBY/ON on the DVD Recorder or
Power on
the remote control to turn on your DVD Recorder.
2. Turn on your TV, and switch it to the correct Video Input
Source (Video, etc.).
3. Press Setup in the stop mode to display the menus.
English
5
6
Initial OSD Settings
73
Channels searching done!
Toexit press LEFT key
ExitSETUP
CHANNEL
Channel Search
Add/Del Channel
Cable/Antenna
Ch 001 Delete
Ch 002 Delete
Ch 003 Delete
Ch 004 Delete
Ch 005 Add
Ch 006 Delete
Ch 007 Delete
Ch 008 Delete
ExitSETUP
CHANNEL
Channel Search
Add/Del Channel
Cable/Antenna
Ch 001 Delete
Ch 002 Delete
Ch 003 Delete
Ch 004 Delete
Ch 005 Delete
Ch 006 Delete
Ch 007 Delete
Ch 008 Delete
ExitSETUP
CHANNEL
Channel Search
Add/Del Channel
Cable/Antenna
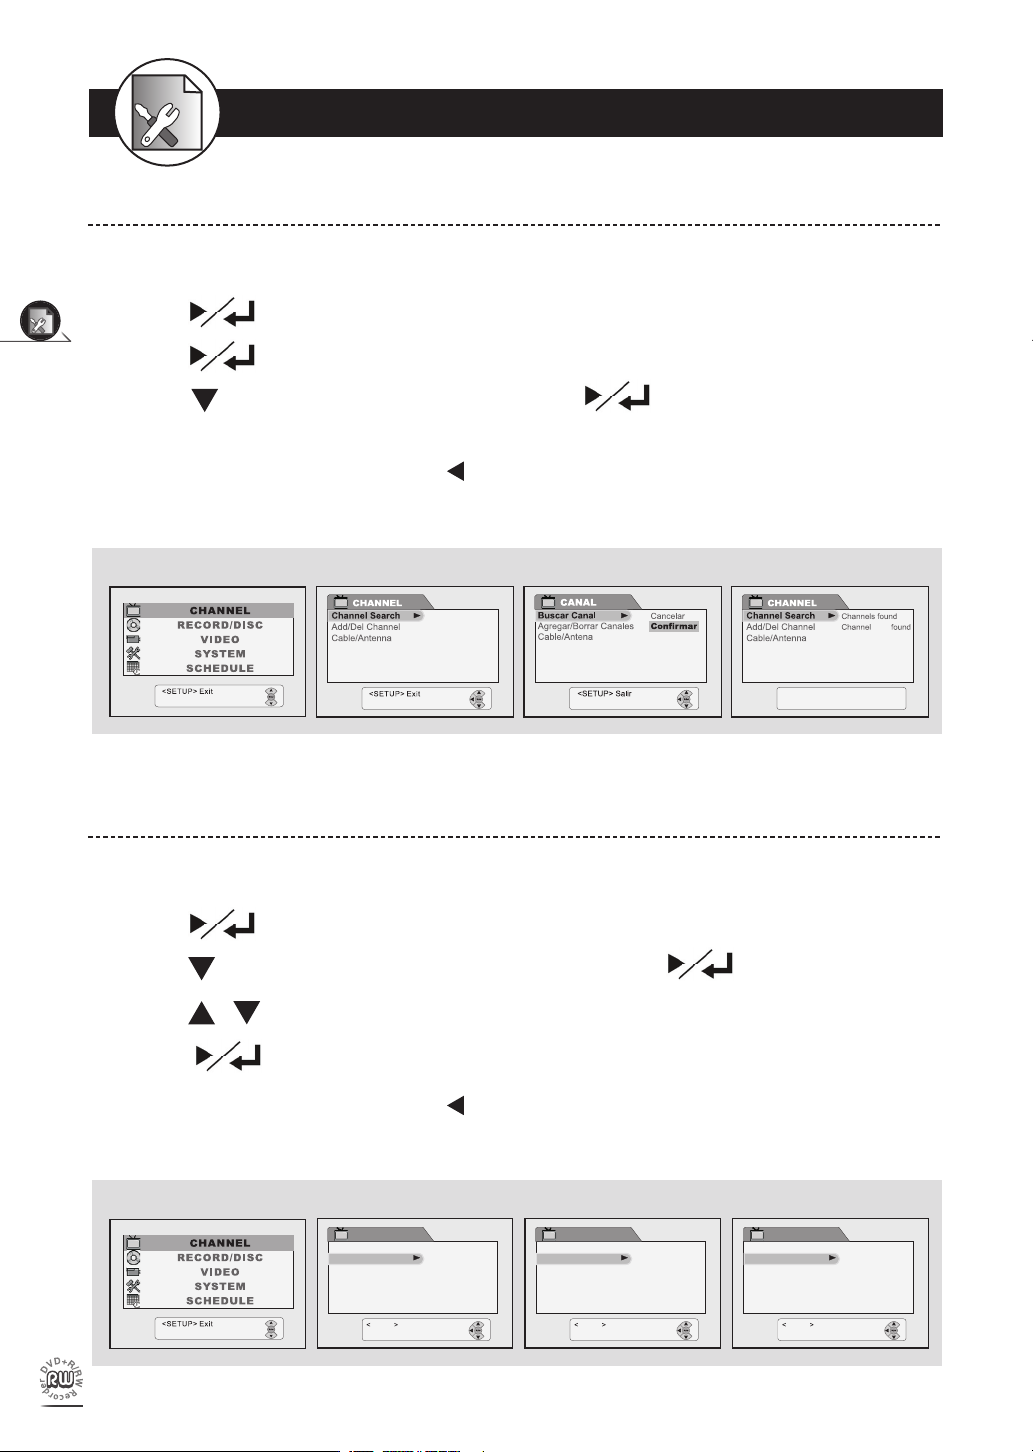
1-1 CHANNEL Setup
Channel Search
1 Press Setup in the stop mode to display the menus.
2 Press to select “CHANNEL”.
3 Press to select “Channel Search”.
4 Press to select “Con rm” and then press . The total available Channel
numbers are displayed when Channel Search is nished.
-To return to the Setup MENU screen, press .
-To complete the setup operation, press Setup to exit from Setup MENU screen.
2 3 4
Add/Del Channel Setting
1 Press Setup in the stop mode to display the menus.
2 Press to select “CHANNEL”.
3 Press to select “Add / Del Channel”, and then press .
4 Press / to choose the preferred channel number.
5 Press
-To return to the Setup MENU screen, press .
-To complete the setup operation, press Setup to exit from Setup MENU screen.
to add or delete the se lect ed channel.
2 3 4 5
7
Initial OSD Settings
English
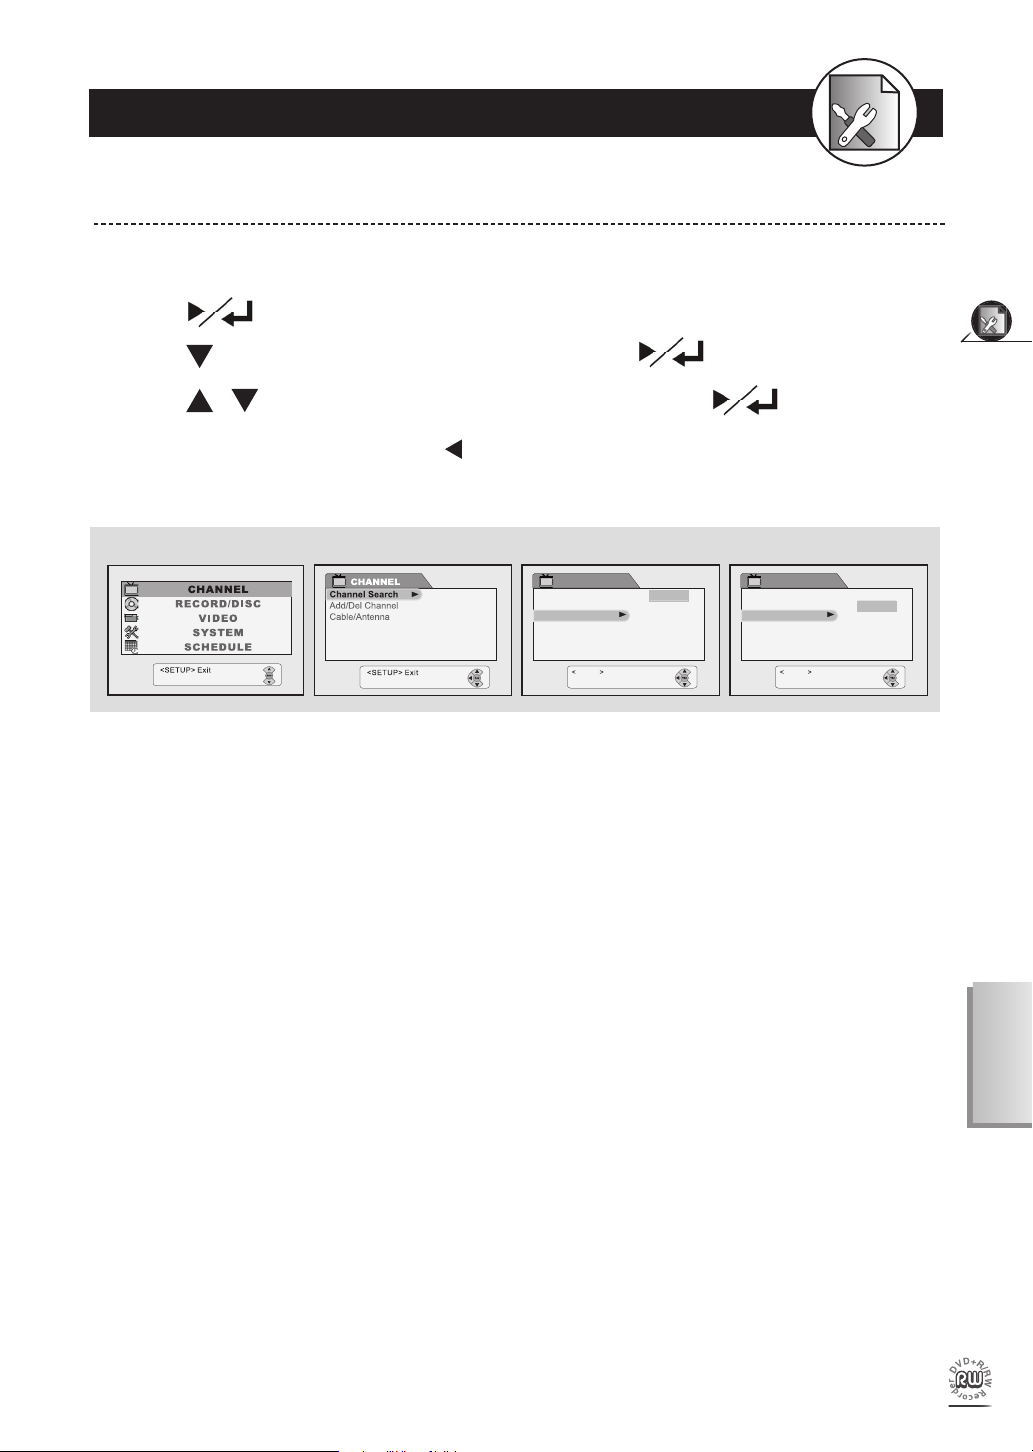
1-1 CHANNEL Setup
ExitSETUP
CHANNEL
Channel Search
Add/Del Channel
Cable/Antenna
Antenna
Cable
ExitSETUP
CHANNEL
Channel Search
Add/Del Channel
Cable/Antenna
Antenna
Cable
- continued
Cable/Antenna Setting
1 Press Setup in the stop mode to display the menus.
2 Press to select “CHANNEL”.
3 Press to select “Cable/Antenna”, and then press .
4 Press / to choose a preferred source, and then press
-To return to the Setup MENU screen, press .
-To complete the setup operation, press Setup to exit from Setup MENU screen.
2 3 4
.
8
Initial OSD Settings
No Disc
DVD+R
DVD+RW
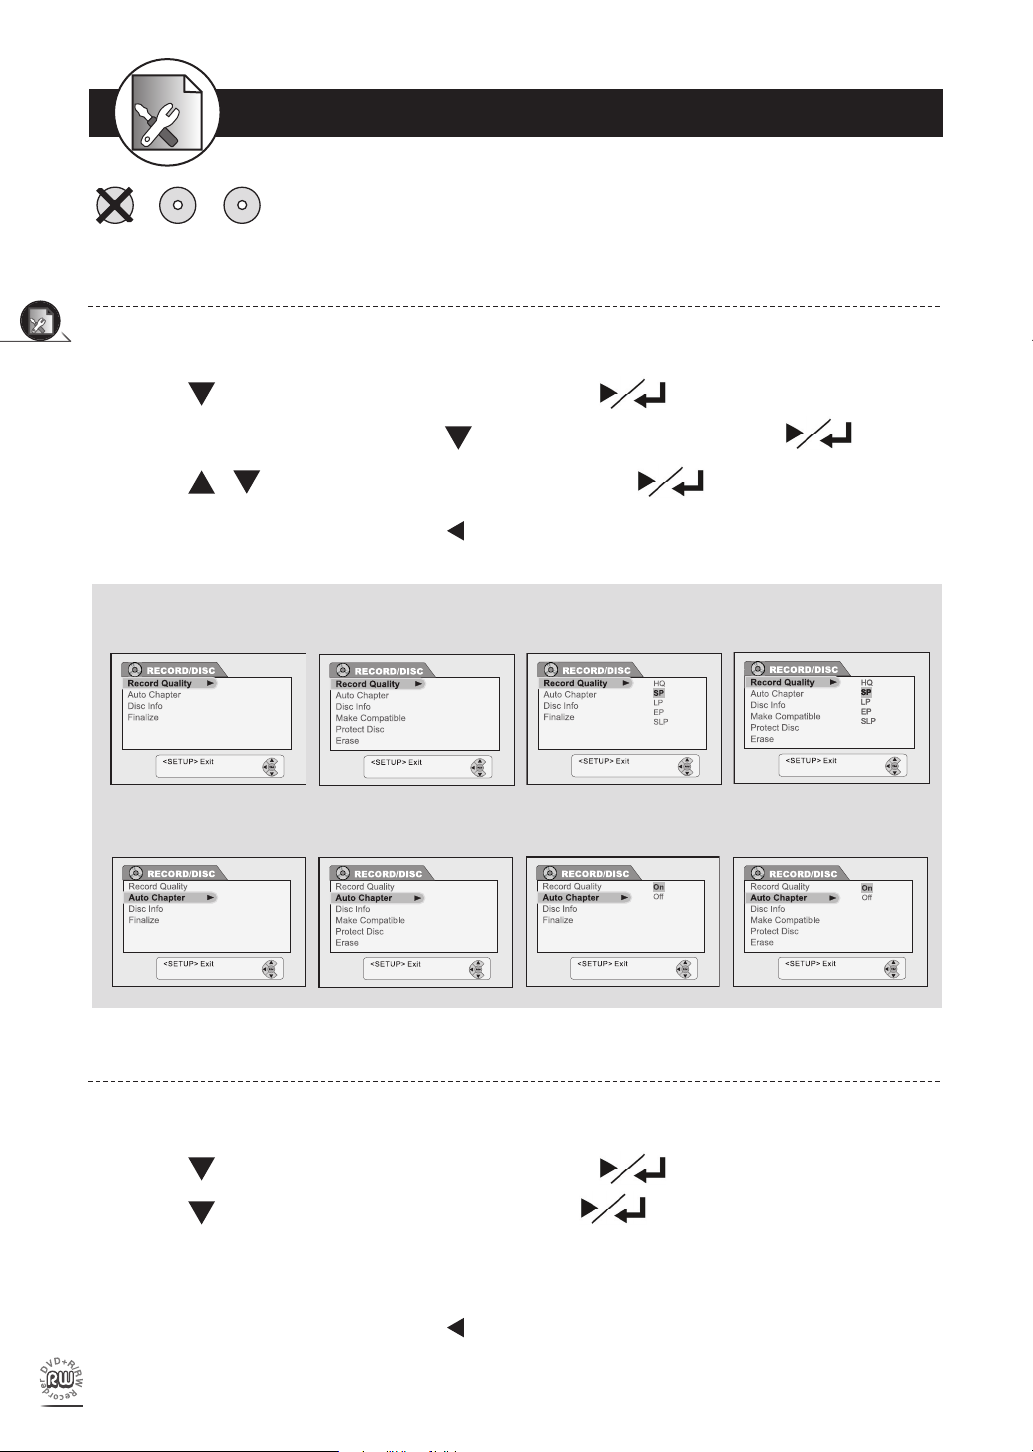
1-2
The RECORD/DISC Setting OSD will vary depending on wether a
DVD+R or DVD+RW is inserted.
RECORD / DISC Setup
Record Quality and Auto Chapter Setting
1 Press Setup in the stop mode to display the menus.
2 Press to select “RECORD / DISC” and press .
3 Select “Record Quality” or press to select “Auto Chapter”. Press .
4 Press / to select a preferred option and press .
-To return to the Setup MENU screen, press .
-To complete the setup operation, press Setup to exit from Setup MENU screen.
Record Quality
3 A DVD+R disc is placed 3 A DVD+RW disc is placed 4 A DVD+R disc is placed 4 A DVD+RW disc is placed
Auto Chapter
3 A DVD+R disc is placed 3 A DVD+RW disc is placed 4 A DVD+R disc is placed 4 A DVD+RW disc is placed
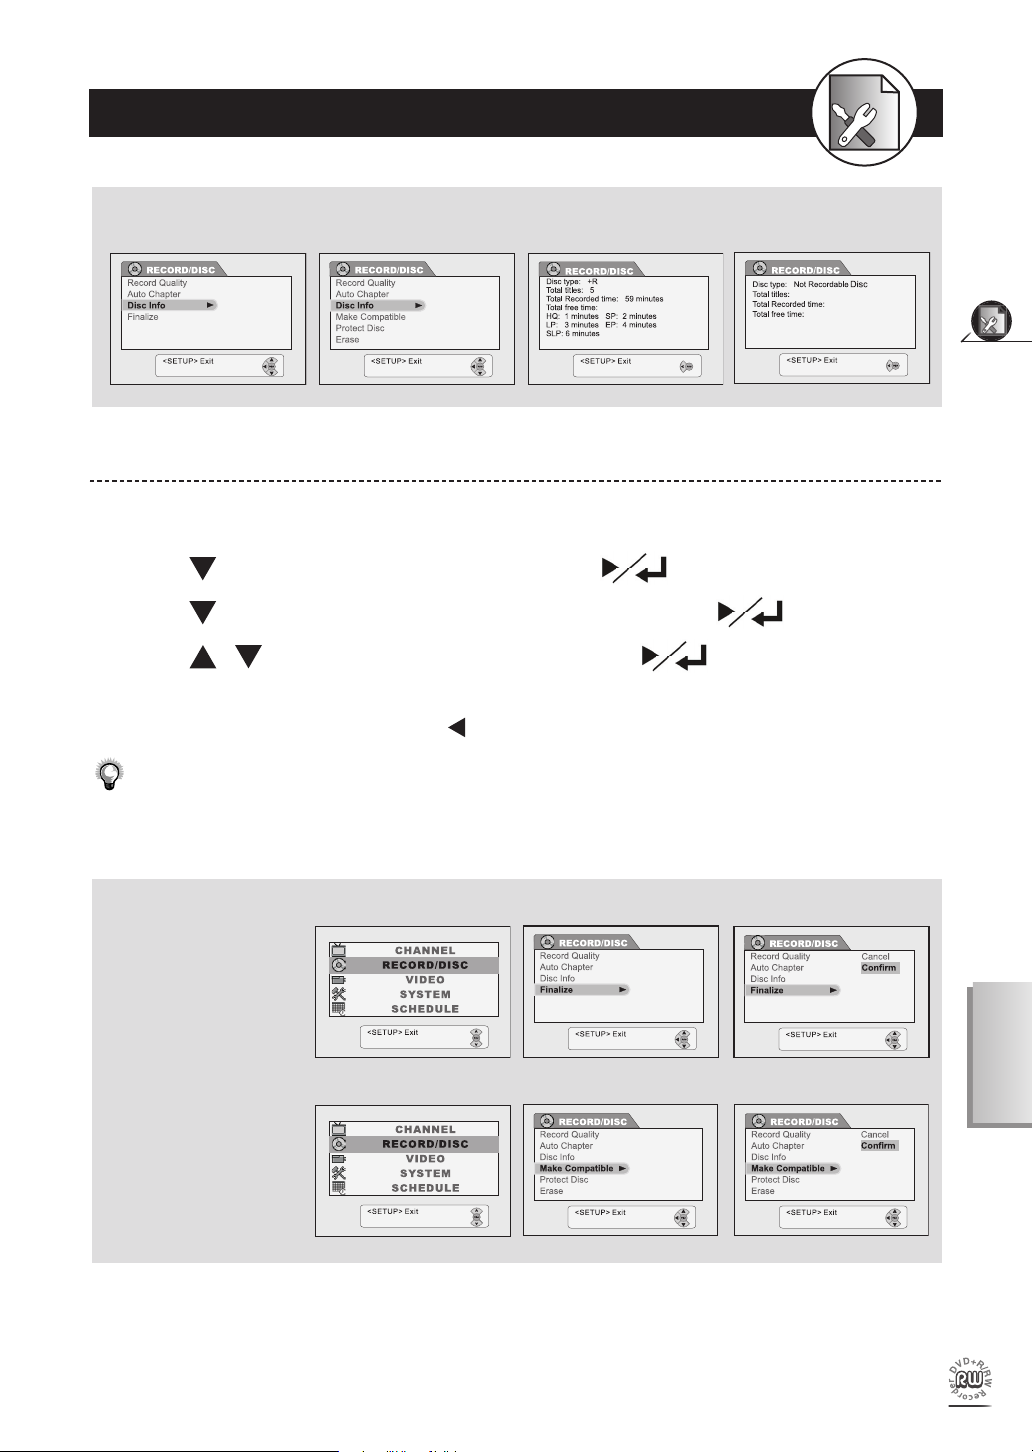
Disc Info.
1 Press Setup in the stop mode to display the menus.
2 Press to select “RECORD / DISC” and press .
3 Press to select “Disc Info.” and then press .
4 The related information about your disc will be shown on the screen, including disc
type, total title, total recorded time and total free time.
-To return to the Setup MENU screen, press .
-To complete the setup operation, press Setup to exit from Setup MENU screen.
9
Initial OSD Settings
English
1-2
RECORD / DISC Setup - continued
Disc Info.
3 A DVD+R disc is placed 3 A DVD+RW disc is placed 4
A un nalized DVD+R disc is placed
4 A DVD+RW disc is placed
Finalize and Make Compatible Setting
1 Press Setup in the stop mode to display the menus.
2 Press to select “RECORD / DISC” and press .
3 Press to select “Finalize” or “Make Compatible” and then .
4 Press / to select a preferred option and press to cancel or con rm the
procedure.
-To return to the Setup MENU screen, press .
-To complete the setup operation, press Setup to exit from Setup MENU screen.
• The nalization function only works Once in DVD+R discs.
If you do not make your DVD+RW compatible, information such as “Hide Chapter”, “New Picture” and other
•
information within the “Edit” function might not be regonizable to other DVD player.
Finalize 2 3 4
Make Compatible
2 3 4
10
Initial OSD Settings
1-2
RECORD / DISC Setup - continued
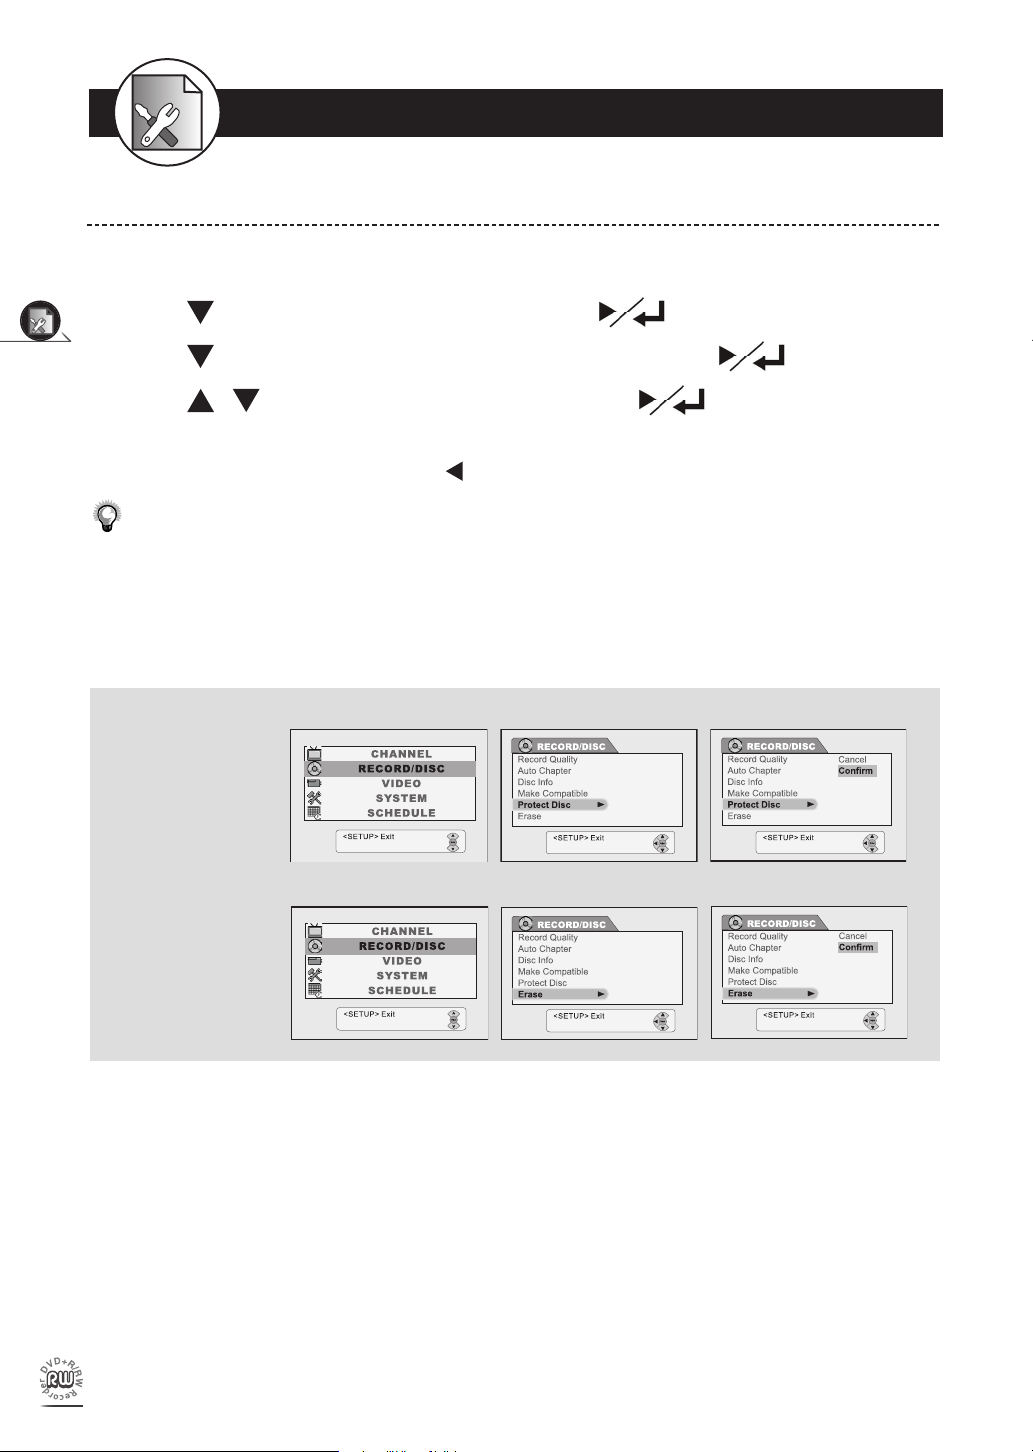
Protect Disc Setting and Erase Setting
1 Press Setup in the stop mode to display the menus.
2 Press to select “RECORD / DISC” and press .
3 Press to select “Protect Disc” or “Erase Setting” and then .
4 Press / to select a preferred option and press to cancel or con rm the
procedure.
-To return to the Setup MENU screen, press .
-To complete the setup operation, press Setup to exit from Setup MENU screen.
• These two functions are only available as a DVD+RW disc is loaded.
To remove “Protect Disc” setting, select “Unprotect Disc” on the menu and then press “Con rm”.
•
After the disc is Protected, the “Erase” and “Make Compatible” functions will become disabled.
•
When Finalization and Erasing begin, all REC functions are locked. Please do not turn off the power at this time
•
as the disc may be rendered useless.
Please note that the erase function cannot be stopped once underway.
•
Protect Disc 2 3 4
Erase 2 3 4
11
Initial OSD Settings
English
1-3
a
a
b
b
c
c
a
a
b
b
c
c
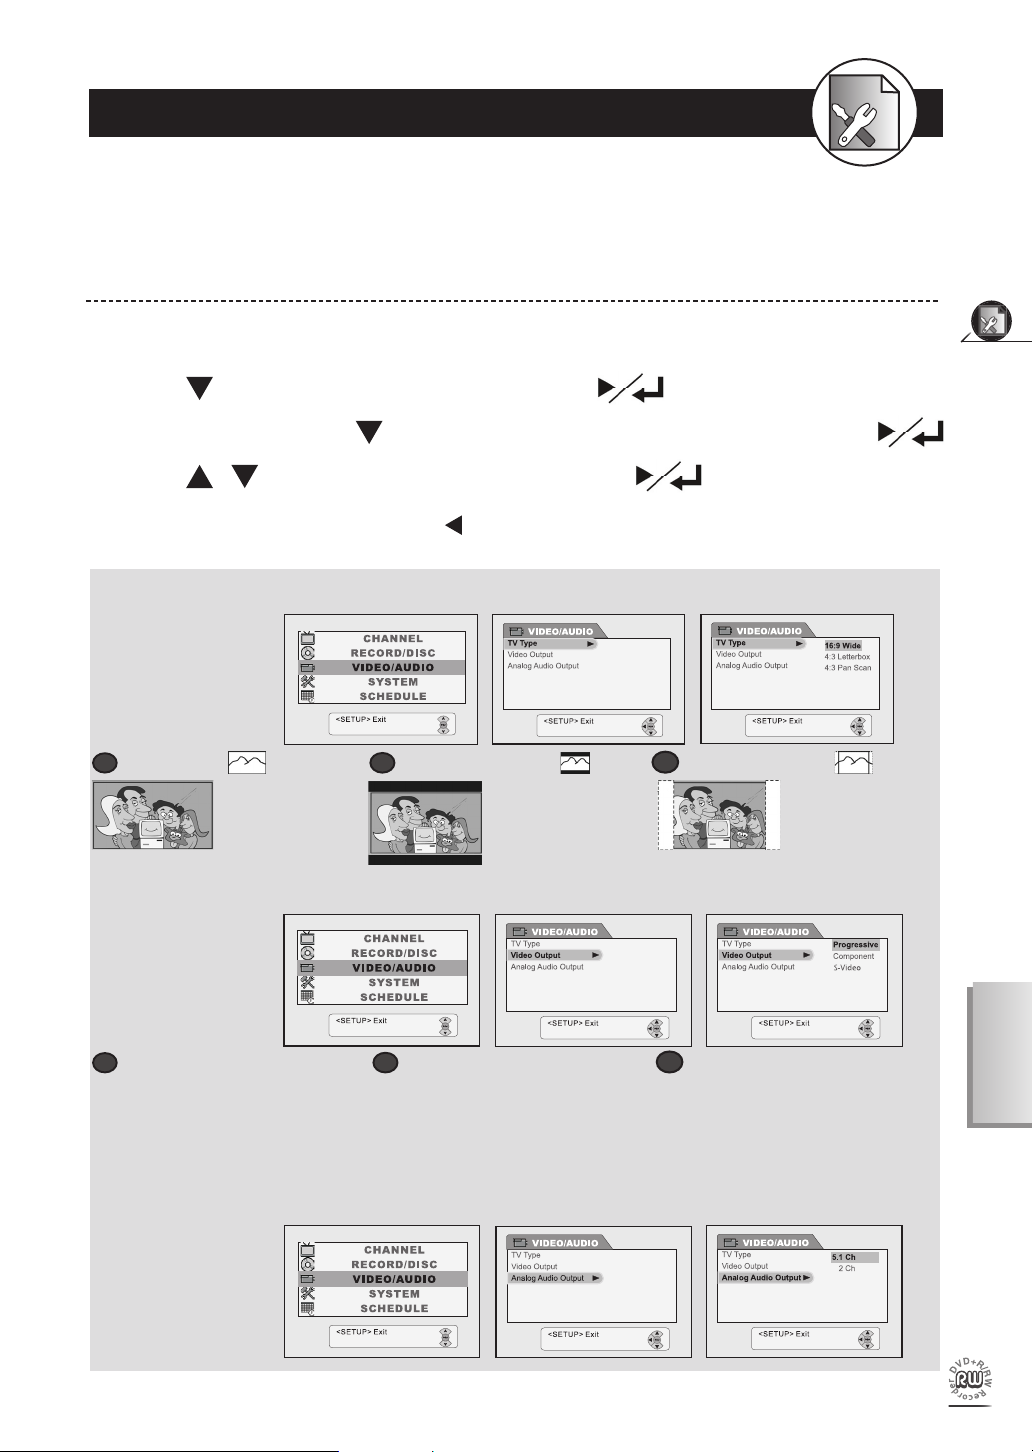
The Video OSD setting allows you to set up TV type and video output format. If your DVD Recorder provides
5.1 channel audio output, you can set up the analog audio output from Audio OSD setting. The following OSD
graphics illustrate DVD with 5.1 channel audio output.
VIDEO/AUDIO Setup
TV Type, Video Output and Analog Audio Output Setting
1 Press Setup in the stop mode to display the menus.
2 Press to select “RECORD / DISC” and press .
3
Select “TV Type”, or press to select “Video Output” or “Analog Audio Output”. Press .
4 Press / to select a preferred option and press .
-To return to the Setup MENU screen, press .
-To complete the setup operation, press Setup to exit from Setup MENU screen.
TV Type 2 3 4
16:9 Wide
Select Wide (16:9)
for a wide-screen
TV set. Played in
“FULL” size.
Video Output 2 3 4
4:3 Letter Box
Select Letter Box (4:3) for
a conventional size TV
set. Black bands appear
at top and bottom of
screen (letter-box style).
4:3 Pan Scan
Select Pan & Scan (4:
3) for a conventional
size TV set.
Progressive
Select “Progressive” when your TV
provides Progressive Scan feature
and you’ve connected the unit’s
P-Scan Pr Y Pb Out jacks to your
TV’s Progressive Scan In jacks.
Component
Select “Component” when your
TV provides Component feature
and you’ve connected the unit’s
P-Scan Pr Y Pb Out jacks to your
TV’s Component In jacks.
S-Video
Select “S-Video” when your TV
pr ovid es S-Vide o feat ure and
you ’ve connected the unit’s SVideo Out jacks to your TV’s SVideo In jacks.
Analog Audio 2 3 4
Output
12
Initial OSD Settings
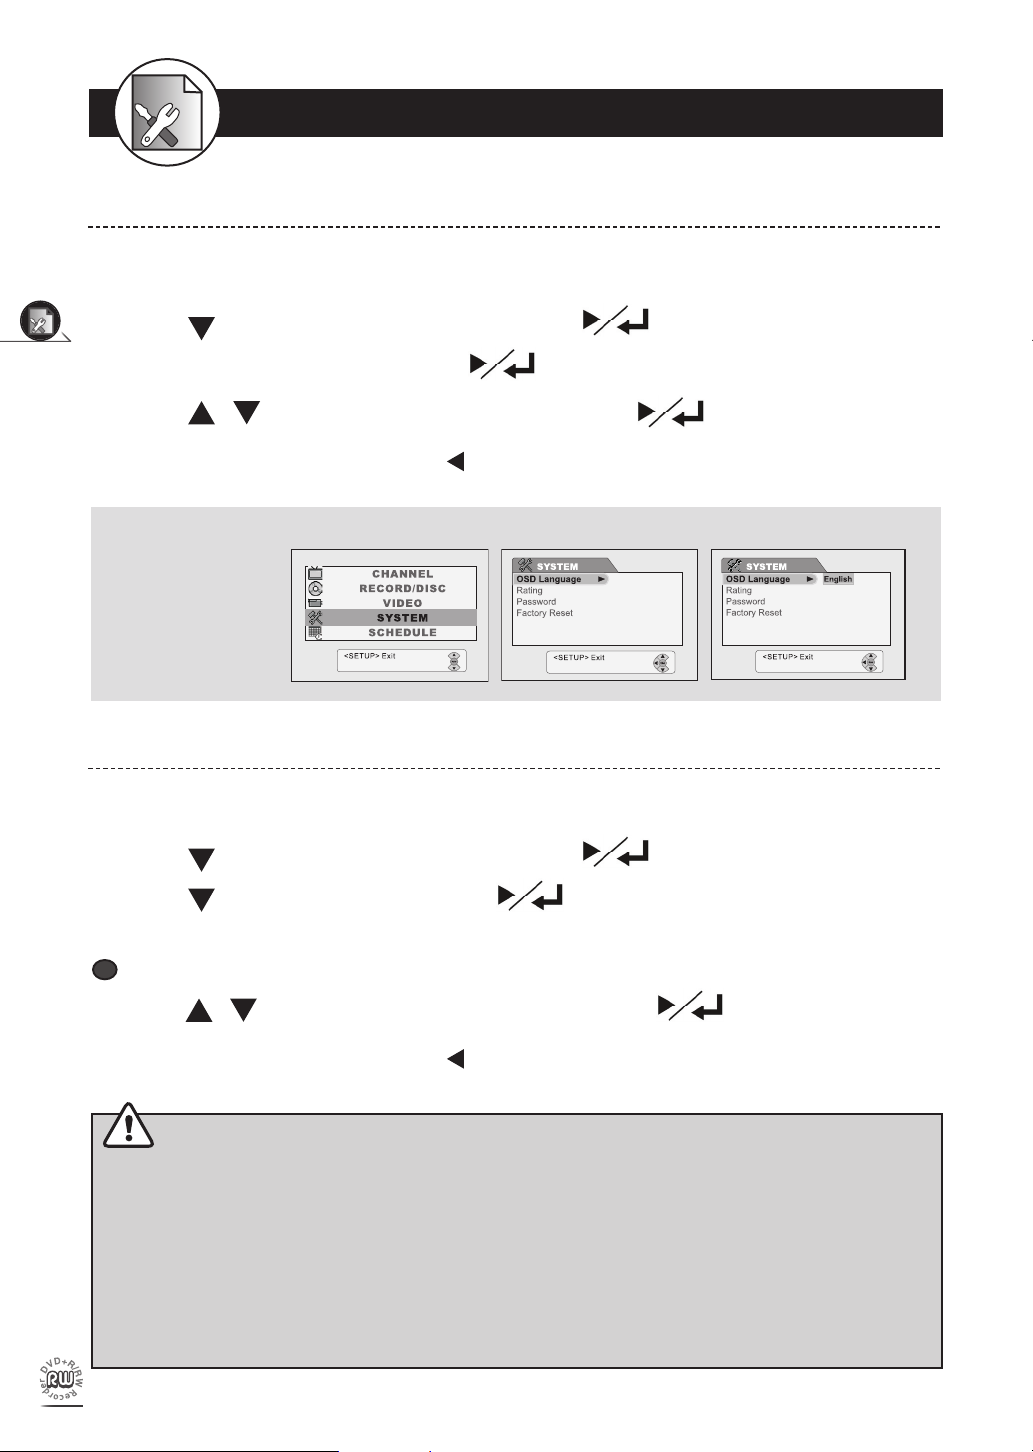
1-4 SYSTEM Setup
Espanol
Francais
a
a
OSD Language Setting
1 Press Setup in the stop mode to display the menus.
2 Press
to select “SYSTEM”, and then press .
3 Select “OSD Language” and press .
4 Press / to select a preferred option and press .
-To return to the Setup MENU screen, press .
-To complete the setup operation, press Setup to exit from Setup MENU screen.
OSD Language
2 3 4
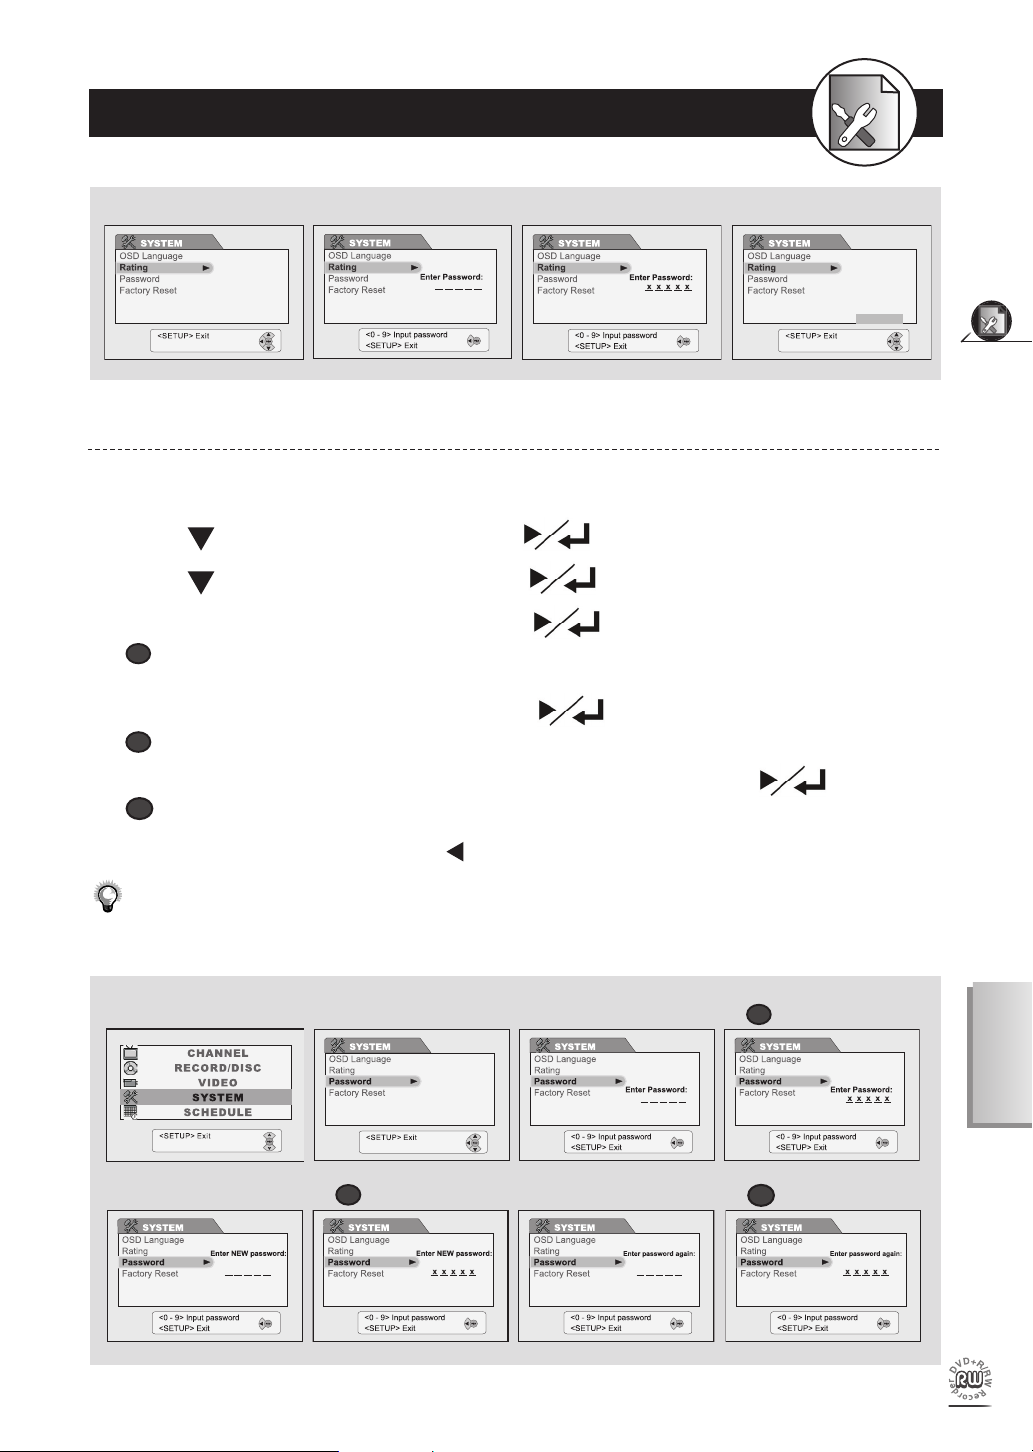
Rating Setting [DVD]
1 Press Setup in the stop mode to display the menus.
2 Press
to select “SYSTEM”, and then press .
3 Press to select “Rating” and press .
4 Input a 5-digit password with the number buttons.
Factory pre-set password : 99999
5
Press / to choose one level from 1 to 8 and press .
-To return to the Setup MENU screen, press .
-To complete the setup operation, press Setup to exit from Setup MENU screen.
Rating Explanations
1 -- KID-SAF Kid safe; it is safe even for kids.
2 -- G
3 -- PG Parental Guidance suggested.
4 -- PG-13 Material is unsuitable for children under the age of 13.
5 -- PG-R
viewing or allow children to view only when supervised by a parent or adult guardian.
6 -- R
7 -- NC-17 No children under the age of 17; not recommended viewing for children under age 17.
8 -- ADULT No restriction
General Audience; recommended as acceptable for viewers of
Parental Guidance-restricted; recommended that parents restrict
Restricted, children under 17 would not be admitted without an accompanying parent or adult guardian.
all ages.
children under age 17 from
13
Initial OSD Settings
English
1 - KID-SAF
2 - G
3 - PG
4 - PG-13
5 - PG-R
6 - R
7 - NC-17
8 - ADULT
a
a
b
b
c
c
1-4 SYSTEM Setup - continued
a
a
b
b
c
c
3 4 5
* Input 99999
Password Setting [DVD]
1 Press Setup in the stop mode to display the menus.
2 Press to select “SYSTEM” and press .
3 Press to select “Password” and press .
4 Enter your old password, and then press .
Input a 5-digit password with the number buttons.
Factory pre-set password : 99999
5 Enter your new password, and then press .
Input a NEW 5-digit password with the number buttons.
6 Enter your new password again for con rmation, and then press
Input the same 5-digit password as in Step 5 with the number buttons.
.
-To return to the Setup MENU screen, press .
-To complete the setup operation, press Setup to exit from Setup MENU screen.
• If you’ve inputted the wrong password, please re-enter your password. If you’ve forgotten your password, please
select “Factory Reset” to restore to the default setting.
2 3 4 4
5 5
6 6
* Input 5-digit numbers
* Input 99999
* Input The Same
5-digit numbers
14
Initial OSD Settings
1-4 SYSTEM Setup - continued
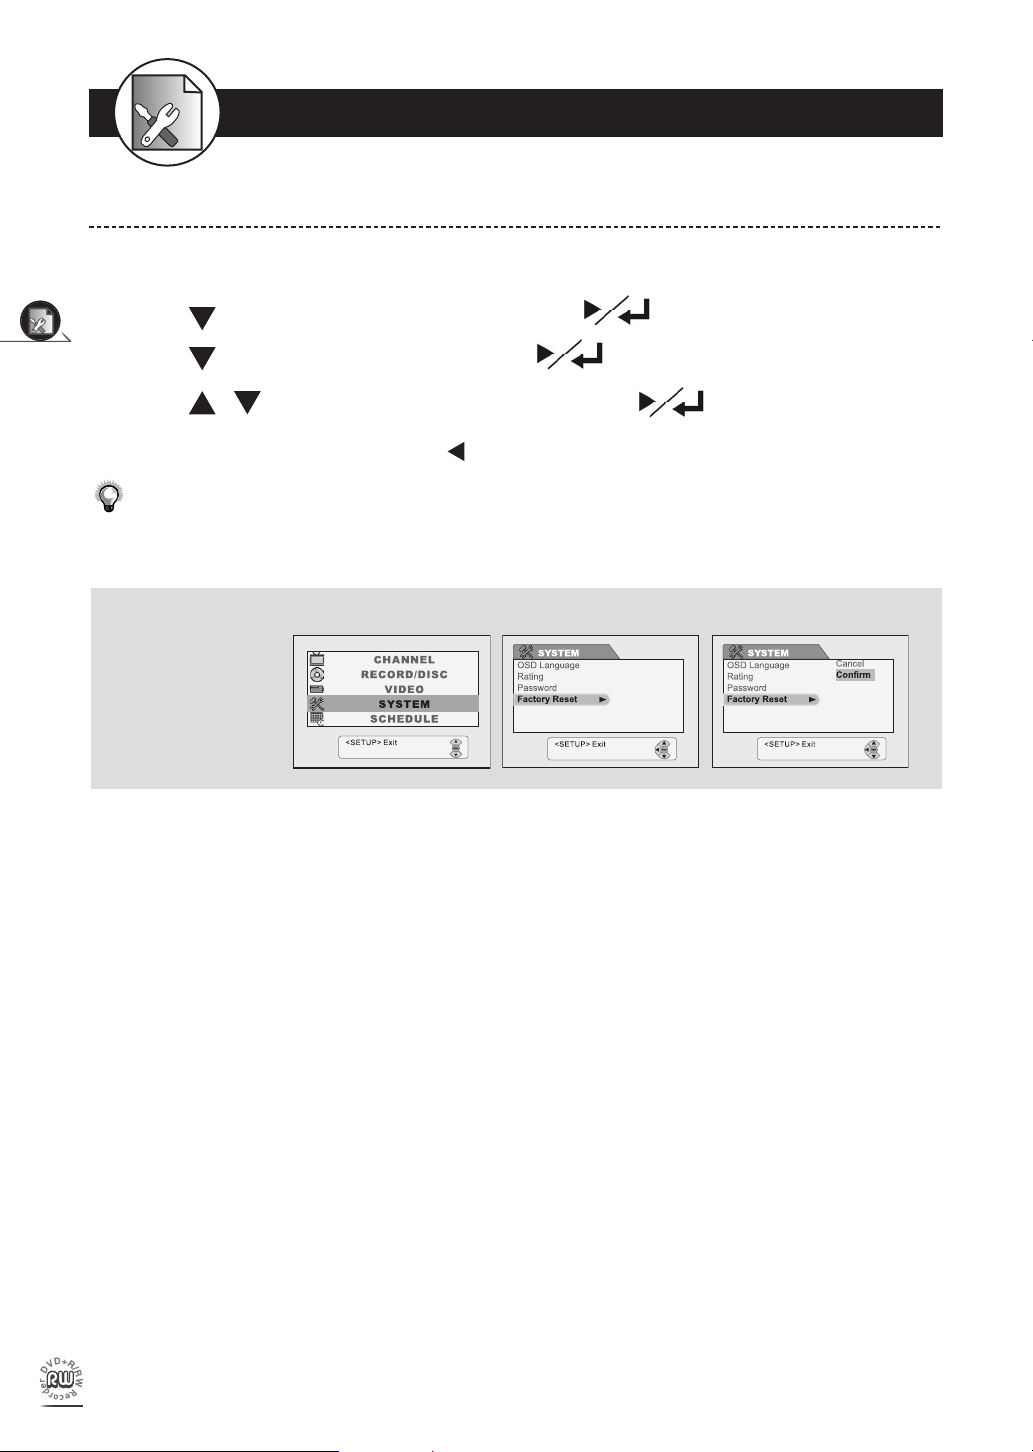
Factory Reset Setting
1 Press Setup in the stop mode to display the menus.
2 Press
3 Press to select “Factory Reset”. Press .
to select “SYSTEM”, and then press .
4 Press / to select a preferred option and press .
-To return to the Setup MENU screen, press .
-To complete the setup operation, press Setup to exit from Setup MENU screen.
• After selecting “Con rm” for “Factory Reset”, this DVD Recorder will reset every setup item in the setup menu.
When factory default is done, the machine will automatically reboot.
Facotry Reset 2 3 4
15
Initial OSD Settings
English
Hour Minute
Year Date Month
Second
1-5 SCHEDULE Setup
SCHEDULE
Exit
SETUP
DateTime
Program List
SCHEDULE
Exit Setup
SETUP
DateTime
Program List
Time 10:40:35 AM
Date 10/24/04 SUN
Return
CLEAR
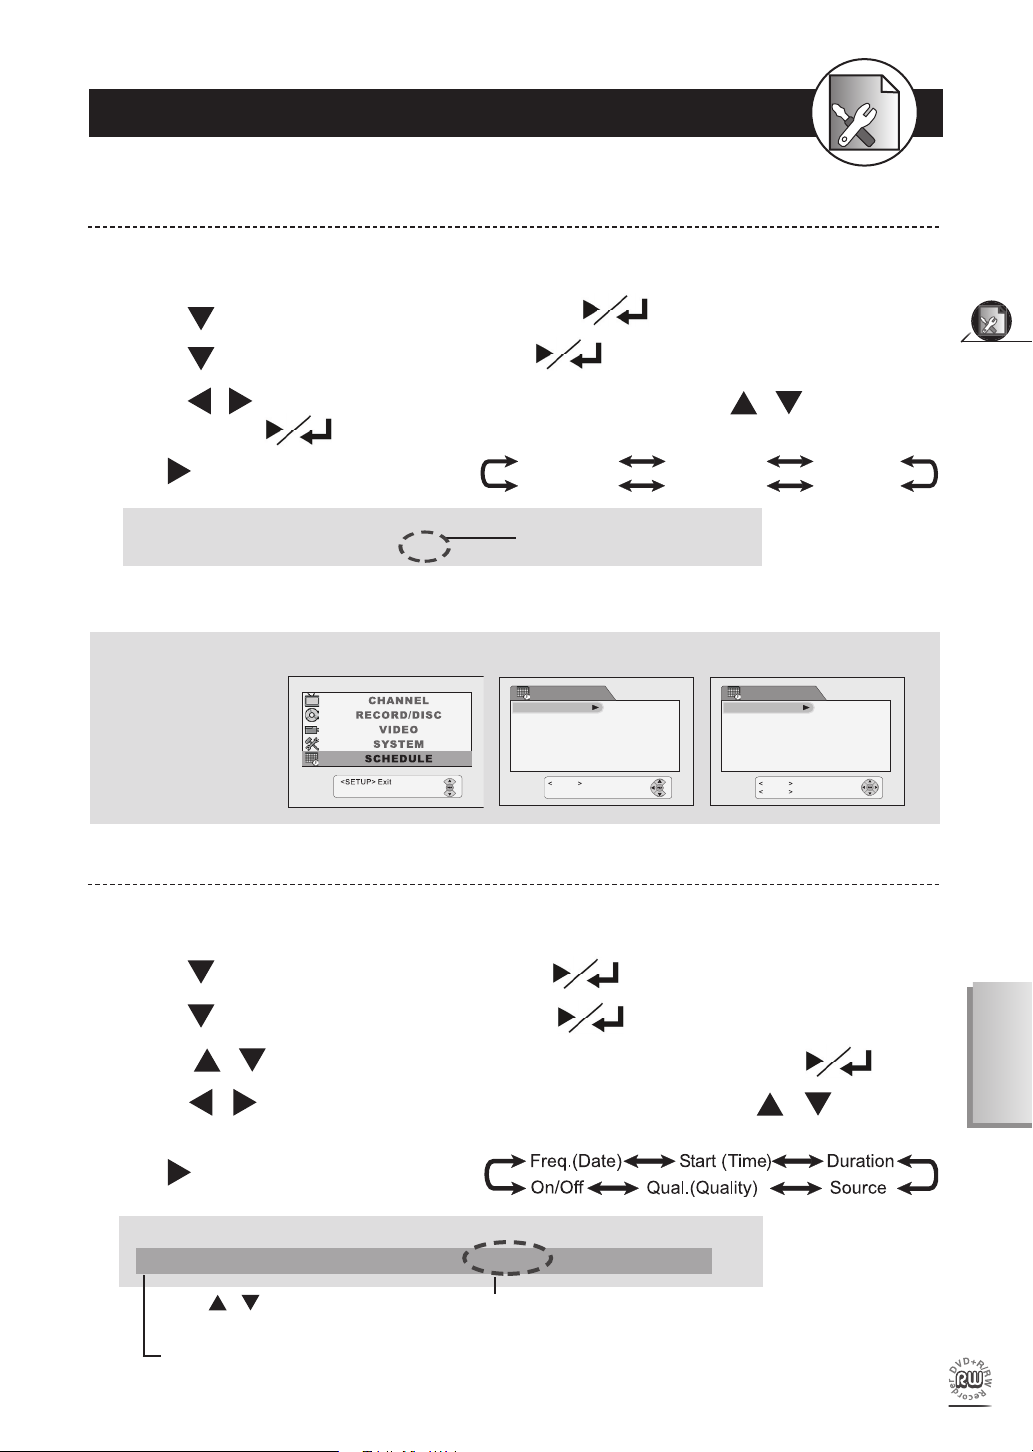
Date/Time Setting
1 Press Setup in the stop mode to display the menus.
2 Press
to select “SYSTEM”, and then press .
3 Press to select “Factory Reset”. Press .
4 Press / to select the item you want to change and press / to change the
setting. Press .
Press to scroll through the following items.
Example:
-To return to the Setup MENU screen, press Clear.
-To complete the setup operation, press Setup to exit from Setup MENU screen.
Ti m e 10 : 40 :3 5 A M
Da t e 0 2 /0 1/ 04 Su n
It will change automatically
according to your setup date.
Date/Time 2 3 4
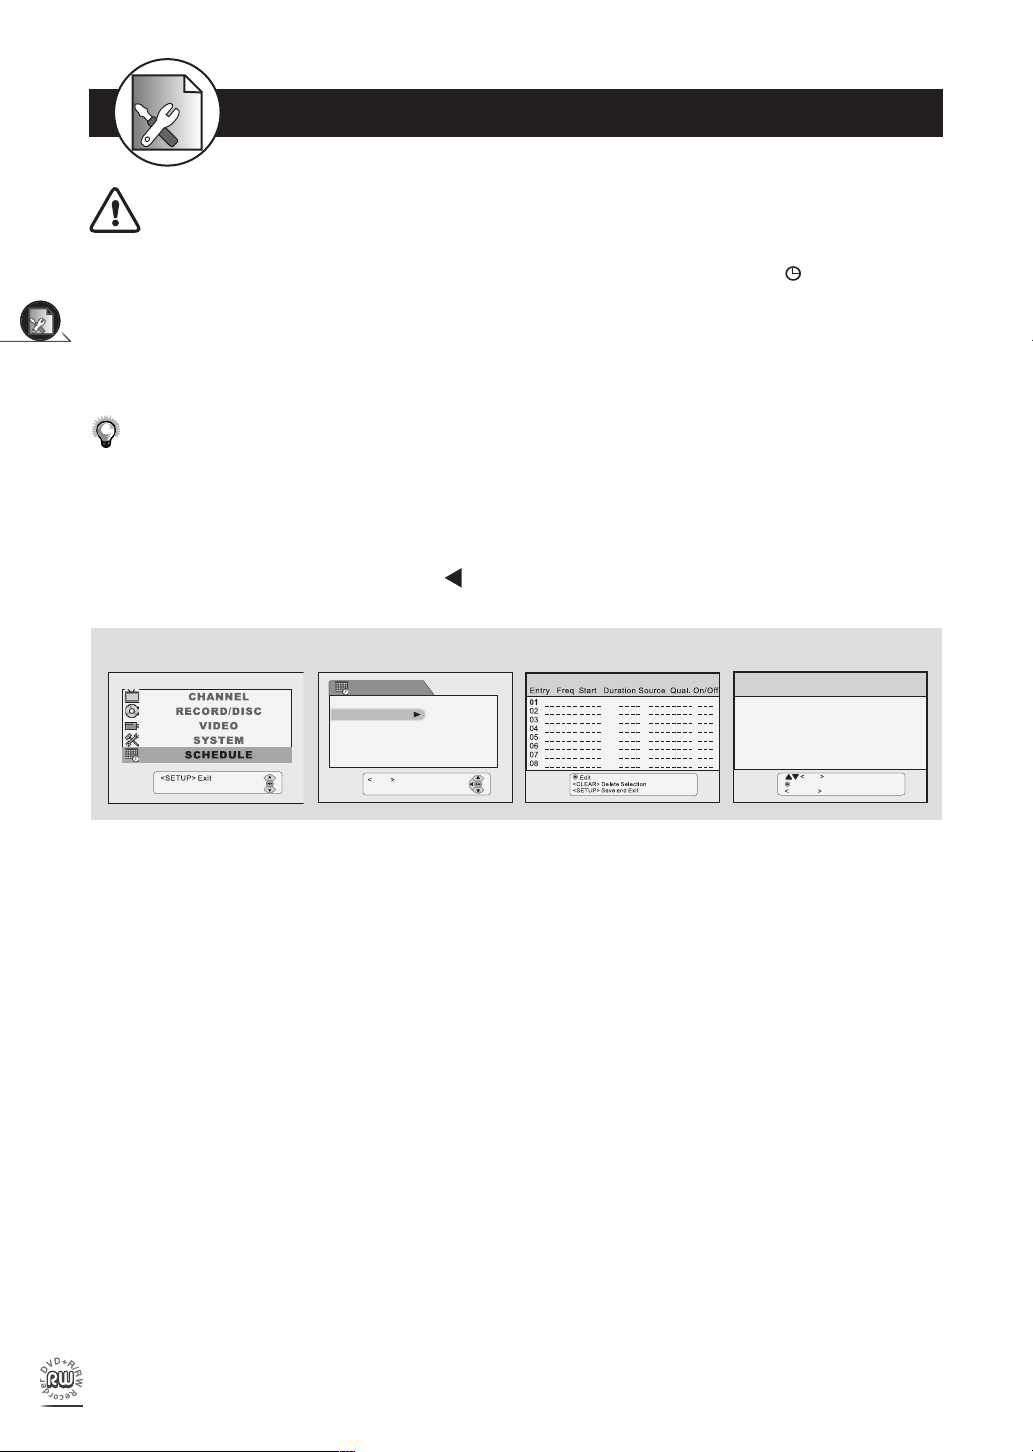
Program List Setting
1 Press Setup in the stop mode to display the menus.
2 Press to select “SCHEDULE” and press .
3 Press to select “Program List” and press .
4 Press / to select one entry to enter your information and press .
5 Press / to select the item you want to change, and press / or Number
buttons to change the setting.
Press to scroll through the following items.
En t r y F req St a r t D u r at i on So u rc e Q ua l . On / Of f
0 1 12 / 05/ 0 3 03 : 0 7A M 0 0 :0 0 Vi d eo SP Of f
Press / to select the source of your A/V signals. If you choose to record from TV programs, enter the
TV channel number by pressing number buttons.
The default setting will be shown on screen for your reference after you select and enter one entry.
SCHEDULE
Exit
SETUP
DateTime
Program List
SCHEDULE
SCHEDULE PROGRAM LIST
Entry Freq Start Duration Source Qual. On/Off
CancelRETURN
Confirm
01
Disc Space available:
092404
03:00PM
02:30 Ch072
SP
Off
01:00
02:01
03:02
04:03
06:05
Change selection
1-5
SCHEDULE Setup-continued
IMPORTANT:
After setting up the recording schedule, make sure to switch your recorder to Stand-by mode in order to activate the
schedule recording. A short message will appear reminding you the recording date and time. A “
REC” red light
will also appear on your LED screen representing schedule recording is ON.
If the time settings of two different recording schedules overlap, the schedule with a later time setting will not proceed
Initial OSD Settings
recording during the overlapped time. It will start to record the program right after the previous schedule nishes
recording.
Make sure Date and Time of this DVD Recorder is correct. If not, check Date/Time Setting to correct it.
•
Before setting up schedule recording, remember to put a recordable DVD+RW or DVD+R (with free space) disc
•
into this DVD Recorder. If not, you cannot do any recording even though schedule recording has set up.
While schedule recording, make sure POWER of this DVD Recorder is always on.
•
-To return to the Setup MENU screen, press .
-To complete the setup operation, press Setup to exit from Setup MENU screen.
2 3 4 5
16
2-1 DVD Playback
Preparations:
Press on the power button of the TV set, and select “Video” as the TV input.
•
Press on the power button of the stereo system if the player has been connected to a stereo system.
•
For Your Reference:
When “
•
prohibited by the DVD Recorder.
Basic Playback
1 Press
Power on.
2 Press Eject to open the disc tray. Place a disc onto the tray.
3 Press Eject.
The disc tray closes and this DVD Recorder starts playback if the disc does not have any menus recorded on it.
If the disc has one or more titles recorded on it, a menu screen will appear on the TV screen. Proceed with steps 4
and 5 when a menu is available on the disc.
” appears while a button is being operated, it means that the corresponding operation is
DVD
4 Press / / / to select the item you want to change and press
.
5 Press / / / to do your preferred setting and press .
Stopping Playback and Returning to the Menu Screen
(If a Menu Screen is Avail able on The Disc)
1 Press Menu. The recorder stops playback, and then displays the menu screen.
Stopping Playback
1 Press Stop.
When pressing Stop once, the disc is paused. You can press to resume playback from the point where you
•
pause the disc. To stop playing back completely, press Stop twice.
Fast Forward (Fast Backward)
1 Press F.Bwd or F.Fwd during playback.
The speed of advance ( x2, x4, x8, x16, x30 and x60) or reverse ( x2, x4, x8, x16,
x30, and x60) changes for each press of F.Fwd or F.Bwd.
English
-To return to normal playback, press .
17
18
DVD
2-1
DVD Playback - continued
Skipping Ahead or Back to Chapters
Skipping Ahead
Press Next during play back.
Skips a chapter each time you press the button.
Skipping Back
Press Prev. during play back.
When you press Prev. once midway through a chapter, this DVD Recorder returns to the previous chapter to play back.
The player skips a chapter each time you press the button.
Still Picture (Pause)
1 Press Pause once during playback.
-To return to normal playback, press .
Frame Advance (Step)
1 Press Pause twice during playback. The disc is advanced by one frame each time press the button.
-To return to normal playback, press .
Slow-Motion Playback
1 Press Slow during playback.
The playback speed changes forwardly and backwardly ( 1/2, 1/4, 1/8, and then 1/2, 1/4, 1/8) each
time you press Slow.
-To return to normal playback, press .
Selecting Scenes by Title/Chapter Number
1 Press Goto during playback.
2 Press / to move the cursor to the title or chapter box. Press to see other information boxs.
3 Press , the title box or chapter box turns yellow.
4 Press the Number button(s) or / to select a pre ferred title or chap ter.
5 Press .
-To return to normal playback, press Goto until the box disappears.
19
DVD
English
2-1
DVD Playback - continued
Selecting Scenes by Time
1 Press Goto during playback.
2 Press to move the cursor to the time box.
3 Press , the time box turns yellow.
4 Press the Number button(s) to spec i fy the starting position.
Example: To locate “01 hr. 50 min. 00 sec.”, press “0”,“1”, “5”, “0”, “0” and “0”.
5 Press
-To return to normal playback, press Goto until the box disappears.
.
Repeating Viewing
1 Press 1/ALL Repeat during playback, and a signal will be shown on the screen.
2 Press 1/ALL Repeat repeatedly to select one of the four options as below.
1/4 Off: Repeat cancelled
2/4 Chapter: Repeat chapter
3/4 Title: Repeat title
4/4 Disc: Repeat disc
Repeating Sections Between Two Speci c Points (A-B Repeat)
1 Press A-B during playback at the point where the repeating section will be started (A).
appears on the bottom right corner of the screen.
2 Press A-B again at the point where the repeating section will be ended (B).
appears on the screen. The playback will start to repeat the section from point A to point B.
3 Press A-B again during the repeat playback, and the playback will return to normal.
Displaying the Information of the Scene
1 Press Info. during playback, the title box, chapter box, time box, audio box, repeat
box, angle box and subtitle box will be shown on the top left corner of the screen.
2 Press Info. again to close the Info. box or wait for few seconds.
Changing Audio Soundtrack Language
1 Press
Audio repeatedly during playback to select a preferred language.
20
DVD
2-1
DVD Playback - continued
Displaying the Scene With a Larger and Closer View
1 Press Zoom during playback. A zoom window box will appear on the screen.
2
Press Zoom to see the scene in different size.
3 Press / / / to choose the preferred scene to see it in different sizes: Zoom
x2, x4 and x8.
-To return to normal playback, press Zoom until the box disappears.
Clearing/Changing Subtitles
1 Press
Subtitle repeatedly during playback to hide or change subtitles.
Viewing From Another Angle
1 Press Angle repeatedly during playback to select the preferred viewing angle.
Using a DVD Menu
1 Press Title. The DVD menu available on the disc now appears.
2 Press / / / to select the pre ferred item. Press
-To return to the previous menu screen, press Title.
.
Using the Menu Function
1 Press Menu. A DVD chapter menu with brief broadcast of each paragraph now appears. You may see the
introduction of each chapter and then decide with which chapter to start rst.
2 Press / / / to select the pre ferred item. Press
CM Skip Setting
.
1 Press CM Skip during playback. The interval of CM Skip is set to 30 seconds at each press.
This function only works on recorded DVD+R/RW discs.
•
If a DVD+R disc has nalized, CM Skip function will not be able to work on the disc.
•

21
DVD
English
2-1
DVD Playback - continued
Muting the DVD Recorder
1 Press
the screen.
When a MUTE icon appears on the screen, this DVD Recorder is mute.
•
To resume the sound, press Mute again.
Mute during playback. A MUTE icon appears on the bottom left corner of
Using the Volume Function
1 Press Volume +/- during playback to adjust a prefer volume.
VCD Menu (Only for VCD 2.0)
PBC is a function which provides a menu for you to choose and start from your selected chapter,
but only on VCD2.0 discs with menus recorded on.
1 Press PBC twice during playback.
2 Press the Num ber button(s) to select the preferred item.
3 Press
The default of PBC function is set to ON. By pressing PBC once, you’ll turn off this function.
•
Press Return, and you can return to the menu screen while playback. (only when the PBC function is set to ON.)
•
or wait for few seconds .

2-2
Convenient Functions
Playing Kodak Picture CDs and JPEG Picture CDs
Basic Playback
Load a Kodak picture CD on the tray.
After few seconds, the player starts to play back. Photos will show in a slide show presentation automatically.
Zoom
DVD
1 Press Zoom repeatedly to view photos in different sizes: Zoom x2, Zoom x4, Zoom
x1/2, Zoom x1/4 and normal.
2 Press / / / to view different parts of the photo in close-up mode.
Pause, Next and Prev.
1 Press Pause to pause slide show.
-To resume slide show
Press Pause again.
2 Press Next and press Prev. to view the next or previous photo.
Rotating
1 When the photo is paused, press / / / to rotate the photo by 90 degree.
The Slide Show will stop after using the above functions.
-To resume the Slide Show, press Next.
Thumbnails
1 Press Stop during playback. A page consisting of 9 thumbnails appears on the
screen.
To continue to next page, select by pressing .
2 Press / / / to select your preferred photo and press
in close-up mode.
to view it
22

3-1
Audio CD Playback
Basic Playback
The currently playing
song/track
Th e type of di s c
you’re playing
The currently playing
1 Press
Power on.
track / Total tracks
2 Press Eject to open the disc tray. Place a disc onto the tray.
3 Press Eject to close the tray. The recorder starts playback.
4 Press / or Number buttons to select a speci c music.
A List of the total
songs in your
Audio CD, including
track numbers and
playback time.
Appears when
there are more
than 10 songs in
this Audio CD.
Press to continue
to the next page.
Elapsed Time
of your currently
playing song
Audio CDs
5 Press or wait for few seconds.
Stopping Playback
Press Stop.
Fast Forward (Fast Backward)
Press F.Bwd or
Normal play is resumed when you press .
•
The speed of advance ( x2, x4, x8 and x16) or reverse ( x2, x4, x8 and x16) changes for each
•
press of F.Fwd or F.Bwd.
F.Fwd during playback.
Skipping Ahead or Back to Tracks
Skipping Ahead
Press Next during play back. A track is skipped each time you press the button.
Skipping Back
English
Press Prev. during playback. When you press the button once midway through a track, this DVD Recorder
returns to the previous track to play back. The player skips a track each time the button is pressed.
23

24
CDs de audio
a
a
3-1
Audio CD Playback - continued
Pause Playback
Press Pause during playback. The player will pause playback.
-To return to normal playback, press or press
again.
Programming Audio CD Soundtrack
A List of the total songs
Your cu rrently selected track. Press
/ to add your
desired track to the
program list.
Press to start playback
of the order from the
program list.
Press to clear all the
programmed tracks.
in Audio CD, including
tr a ck nu m bers an d
playback time.
Press to continue
to the next page.
The “Program List”
according to your
selection of tracks
1 Press Stop.
2 Press Program.
3 Press / to choose a preferred track and then to add it to program list.
The default playback order will start from the beginning to the end of the tracks. On the contrary, if you do set all
•
the playback order of the available tracks, this DVD Recorder will play back of the order you’ve speci ed.
For relevant settings, press to scroll through the following items.
•
When programming an Audio CD:
To Play back the Programmed tracks
Press to select the “Play” box, and then press to start playback of the order from the program list.
•
To Remove the Programmed tracks
Press to select the “program list” box and then press / to choose the preferred track. Press to remove
•
it from the program list.
Press to select the “Clear All” box and press to remove all the programmed tracks.
•
To Exit from the Programmed tracks
Press Program to exit. (If you press Program to exit programmed tracks, this DVD Recorder won’t playback in
•
the order you speci ed. You will need to select Play, press to exit so as this DVD Recorder will playback in
the order you speci ed.)

25
Audio CDs
English
3-1
Audio CD Playback - continued
Selecting Music by Track
1 Press Goto during playback.
2 Press / to move the cursor to the track box. Press to see other information box.
3 Press
, the track box turns yellow.
4 Press the Number button(s) or / to select the pre ferred track. Press .
Selecting Music by Time
1 Press Goto during playback.
2 Press / to move the cursor to the time box. Press to see other information box.
3 Press
, the time box turns yellow.
4 Press the Number button(s) to specify the starting position.
Example: To locate “01 hr. 30 min. 12 sec.”, press “0”,“1”, “3”, “0”, “1” and “2”.
5 Press .
Random Playback
1 Press Goto during playback.
2 Press / to move the cursor to the Normal/Random box.
3 Press , the random box turns yellow.
4 Press / to select to play in random order.
1/2: Normal
2/2: Random
5 Press .
Repeat Playback
1 Press 1/ALL Repeat during playback, and a signal will be shown on the top left corner
of the screen.
2 Press 1/ALL Repeat repeatedly to select one of the three options as below.
1/3: Off
2/3: Track
3/3: Disc

26
Recording Functions
4-1
Record Setup
Record Quality Setting
1 Press Quality on the remote control repeatedly to scroll through the following record
quality setting.
HQ (High Quality): to record about one hour
SP (Standard Play): to record about two hours
LP (Long Play): to record about three hours
EP (Extended Play): to record about four hours
SLP (Standard Long Play): to record about six hours
-To return to the Setup MENU screen, press .
-To complete the setup operation, press Setup to exit from Setup MENU screen.
Disc Media Setting
Erase (Only for DVD+RW discs)
Erasing DVD discs can only be done through the OSD Setting. Please refer to Chapter 1-2:
RECORD/DISC Setup for details.
Finalize (Only for DVD+R discs)
DVD Discs Finalization can only be done through the OSD Setting. Please refer to Chapter 1-2:
RECORD/DISC Setup or Chapter 4-4: Editing-continued for details.

27
Recording Functions
English
4-2
Recording
To Record From External Source
Preparations:
1. Connect the DVD Recorder to your TV.
2. Remember to use an un nalized and recordable DVD+RW or DVD+R disc only. This unit is not intended to record
DVD RAM, DVD-R or DVD-RW discs.
1 Turn on
Power of the DVD Recorder and outer equipment.
2 Press Eject to open the disc tray.
3 Place a recordable DVD+RW or DVD+R onto the disc tray.
4 Press Eject again to close the disc tray.
If you use an unused DVD+RW or DVD+R disc, the rst reading will take about one minute. If the DVD Recorder
reads a new DVD disc, the disc will be formatted automatically and then show one empty title with 100% free disc
space. If the DVD Recorder reads a used DVD disc, a Title menu will show the available titles for playback and
available space left for recording.
5 Press Source on the remote control to toggle between different external A/V input
sources.
- Before operating Source function, please make sure the DVD Recorder and the outer equipment are connected.
- Press Source repeatedly to go through various A/V inputs, including: TV, Video, S-Video and DV.
6 Press Record on the remote control to start to record.
7 Press Pause on the remote control to pause recording. To resume recording,
press Pause again.
8 Press Stop on the remote control to stop recording.
“WAIT” will appear on the bottom right corner of the TV screen. Wait until “LIVE” appear on the bottom right
corner of the TV screen, representing that re cord ing has completed.
9
Press DVD/REC on the remote control to switch to DVD mode.
10Press / to choose the titles just recorded.
11Press to play back the title.
To Record TV Programs (Instant Record)
1 Turn on
Power of the DVD Recorder and your TV.
2 Press Eject to open the disc tray.
3 Place a recordable DVD+RW or DVD+R onto the disc tray.
4 Press Eject again to close the disc tray.

28
Recording Functions
4-2
Recording - continued
5 Press Source on the remote control to view TV channels through the recorder.
6 Press Channel +/- or the Number buttons to select the channel to record.
7 Press Record on the remote control to start to record the selected channel.
8 Press Pause on the remote control to pause recording. Before resuming recording,
you can select a new channel to record by pressing Channel +/- or the Number
buttons. To resume recording, press Pause again.
9 Press Stop on the remote control to stop recording.
10Press DVD/REC on the remote control to switch to DVD mode.
11Press / to choose the titles just recorded.
12Press
to play back the title.
Schedule (Record) Setting
Please refer to Chapter 1-5 Schedule Setup: Program List Setting (on page 15) for
details.

29
Recording Functions
English
Ch. 20
Ch. 25
4-3 Editing
Ch. 20
Ch. 25
Ch. 20
Ch. 25
To Edit a Title While the Title is Playing
Insert Chapter, Delete Chapter and Hide Chapter
1 Press / to select one title to play, and press to start playback.
2 Press Edit and the EDIT menu will appear on the screen.
3 Press / to select
a preferred option by pressing . Once you are at the point
where you would like to do the editing, press .
You have to insert a chapter into a title rst and then hide it; if the beginning and end of the hidden chapter hasn’t
•
been set up.
Once a chapter is hidden, it will not show up during normal playback. If you want to see the hidden chapter, you
•
have to select it by chapter number. For details please refer to Chapter 2-2: “Direct Selection of Scenes”.
To show up “Hide Chapter”, refer to “Show Chapter” function. For details, please refer to next page.
•
Insert Chapter 1 2
Delete Chapter 1 2
starts playback...
EDIT
Insert Chapter
Remove Chapter
Hide Chapter
Show Chapter
New Picture
starts playback...
EDIT
Insert Chapter
Remove Chapter
Hide Chapter
Show Chapter
New Picture
Hide Chapter 1 2
starts playback...
EDIT
Insert Chapter
Remove Chapter
Hide Chapter
Show Chapter
New Picture
Show Chapter
1 Press Edit during “Play Full Title” to show hidden chapters. The EDIT menu will
appear on the screen.
2 Press to select “Show Chapter”, and then press .
You can use “Direct Selection of Scenes” to playback the hidden chapter. For details on how to select chapter
by number using Goto, please refer to Chapter 2-2: “Direct Selection of Scenes”.

30
Recording Functions
4-3 Editing
Ch. 20
Ch. 25
Ch. 20
Ch. 25
- continued
Show Chapter 1 2
starts playback...
EDIT
Insert Chapter
Remove Chapter
Hide Chapter
Show Chapter
New Picture
New Picture
1 Press / to select one title to play, and press to start the playback.
2 Press Edit, and the EDIT menu will appear on the screen.
3 Press to select “New Picture”. Once you are at the point where you prefer to be
the thumbnail, press
.
4 The Title menu will be shown on the screen.
After pressing to edit new picture, a “WAIT” box will appear on the right button corner. It might take 15~30
seconds before the new picture appears in the Title menu.
New Picture 1 2 4
EDIT
Insert Chapter
Remove Chapter
Hide Chapter
Show Chapter
New Picture
The thumbnail is changed

31
Recording Functions
English
C
h.2
0
C
5
C
0
C
h.2
5
C
h.2
0
C
h.2
5
a
a
b
b
4-3 Editing
C
0
C
h.2
5
C
0
C
h.2
5
C
0
C
h.2
5
C
0
C
h.2
5
C
h.2
0
C
h.2
5
C
h.2
0
C
h.2
5
- continued
To Edit a Title While the Title is Not Playing
You have Four options to edit a title when using a DVD+RW disc: Protect Title, Erase Title, Play Full
Title, and Edit Title.
You have three options to edit a title when using a DVD+R disc: Edit Title, Play Full Title and Finalize.
1 Press / to select one title from the title menu.
2 Press Edit, the EDIT menu will appear on the screen.
3 Press / to select a preferred option by pressing .
4 For Erase Title and Finalize: An option box appears, press to select “Con rm” and
press .
For Edit Title: An “Edit Title” box appears with a default title name shown in this box.
Press
editing, press . The updated Title will appear on the screen.
In the status of “Protect Title”, the operation of “Erase Title” will become disable. If you wish to erase this title,
•
please select “Unprotect Title” instead of “ Protect Tiltle” rst.
Titles can be edited in English letters, numbers and symbols only. After the title is edited, a “DONE” box will
•
appear. It might take few seconds before the new title is shown on the title menu.
To go back to Title Selection Menu, press Title.
•
/
/ / to change the title you wish to use. After completion of title
Protect Title Erase Title Play Full Title
2 2 4 2
DVDRW EDIT
Protect Title
Erase Title
Play Full Title
Edit Title
DVDRW EDIT
Protect Title
Erase Title
Play Full Title
Edit Title
Edit Title
2 4
DVDRW EDIT
Protect Title
Erase Title
Play Full Title
Edit Title
Finalize
DVDRW EDIT
Protect Title
Erase Title
Play Full Title
Edit Title
S-VIDEO
DVDRW EDIT
Protect Title
Erase Title
Play Full Title
Edit Title
DVDRW EDIT
Protect Title
Erase Title
Play Full Title
Edit Title
Spor
t
Era se T it le
Cancel Con rm
DVDRW EDIT
Protect Title
Erase Title
Play Full Title
Edit Title
New TItle
2 4
DVDR EDIT
Edit Title
Play Full Title
Finalize
DVDR EDIT
Edit Title
Play Full Title
Finalize
Fin al iz e
Cancel Con rm

32
For Your Reference
5-1
Troubleshooting
Before requesting service for the DVD Recorder, check the chart below for a possible cause of
the problem you are ex pe ri enc ing. Some simple checkups or a minor adjustment on your part may
eliminate the problem and restore proper op er a tion.
SYMPTOM (COMMON) REMEDY
No power. • Insert the power plug securely into the power outlet.
• Check if the ON/OFF button on the front of the player is set to on.
• Check if no power at the AC outlet by plugging in another appliance for a test.
The player does not start playback when • Condensation has formed: wait about 1 to 2 hours to allow the player to dry out.
PLAY is pressed. • This player cannot play discs other than DVDs and audio CDs.
• Check if the disc is defective by trying another disc.
• Check the region (local) code.
The player starts playback but stops • The disc may be dirty and may require cleaning.
immediately. • Ensure that the disc is installed with the label side up.
No picture. • Ensure that the equipment is connected properly.
• Ensure that the input setting for the TV is “Video”.
• Check if the TV is on.
• Select the same channel and source on the TV as on the player.
No sound. • Ensure that the equipment is connected properly.
• If using a HiFi ampli er, try another sound source.
• Check the Audio Output Setting menu to make sure that Analog Output is
selected.
Distorted sound. • Ensure that the input settings for the TV and stereo system are proper.
• No sound is heard during still picture (pause) or slow-motion playback.
No audio at Digital Output. • Check the digital connections.
• Check the settings menu to make sure that the digital output is set to on.
• Check if the audio format of the selected audio language matches your receiver
capabilities.
Distorted picture. • Check the disc for ngerprints and clean with a soft cloth, wiping from center to
edge.
• Sometimes a small amount of picture distortion may appear. This is not a mal function.
Completely distorted picture or no color • The disc format is not according to the TV-set used (PAL/NTSC).
in picture.
Picture is distorted during rapid advance • The picture will be somewhat distorted at times: this is normal.
or rapid reverse.
No rapid advance (or rapid reverse) • Some discs may have sections which prohibit rapid advance (or rapid reverse).
playback.
No 4:3 (16:9) picture. • Choose the correct setup “Aspect Ratio” item which matches the TV set used.
No operations perform with the remote • Check the batteries are installed with the correct polarities (+ and –).
control. • The batteries are depleted: replace them with new ones.
• Point the remote control unit at the remote control signal sensor and operate.
• Operate the remote control unit at a distance of not more than 7 meters from the
remote control signal sensor.
• Remove the obstacles between the remote control unit and remote control signal
sensor.

33
For Your Reference
English
5-1
SYMPTOM (COMMON) REMEDY
PLAY does not start playback even when • This may be a result of the parental lock function that has been set. Con rm the
title is selected. “PARENTAL” setup.
Audio soundtrack and/or subtitle language • If the audio soundtrack and/or subtitle language does not exist on the disc, the
is not the one selected at the initial settings. language selected at the initial settings will not be seen/heard.
No subtitles. • Subtitles appear only with discs that contain them.
•
Alternative audio soundtrack (or subtitle) • An alternative language can not be selected may result of no more than one
language available. lan guages cannot be selected.
Angle cannot change. • This function depends on software availability. Even if a disc has a number from
angles recorded, these angles may be recorded for speci c scenes only.
No sound when connecting to • Check if the disc supports 5.1 Channel.
5.1 Channel speaker • Check if the speaker is properly connected.
• Check if the audio output setting is right.
No key operation (by the DVD Recorder • Turn the unit off and then back to on. Alternatively, turn off the unit, disconnect
and/or the remote control) is effective. the AC power cord and then re-connect it. (The player may not be operating
properly due to lightning, static electricity or some other external factor.)
No picture and sound (for recorded disc) • Check if this DVD Recorder and outer equipment are properly connected.
• Check if the schedule recording setting is correct.
• Check if using the correct recordable disc. (DVD+RW/DVD+R)
• Check if power set to stand-by mode while using schedule recording.
• Check if the disc has been closed. (only for DVD+R disc)
Distorted picture or no image • Check if the TV system setting is correct.
• Check If you set output format in “Progressive Scan”, then you have to set
“Com po nent” in the video output setting. The actual output format must match
to the output format setting.
OSD setting doesn’t be executed • Some setting must be stored by pressing left button. Recheck it.
Wrong time • Reset time.
Troubleshooting
Subtitles are hidden from the TV screen. Press SUBTITLE to display the subtitles.
-continued

5-2 Disc Handling and Maintenance
Handling Precautions
Hold the disc by the edges so the surface will not be soiled with
•
ngerprints. (A)
Fingerprints, dirt and scratches can cause skipping and distortion.
Do not write on the label side with a ball-point pen or other writing
•
utensils.
Do not use record cleaning sprays, benzine, thinner, static
•
electricity prevention liquids or any other solvent.
Be careful not to drop or bend the disc.
•
Do not install more than 1 disc on the disc tray.
•
Do not try to close the disc tray when the disc is not installed
•
properly. (B)
Be sure to store the disc in its exclusive case when not in use.
•
If the surface is soiled (C)
Wipe gently with a soft, damp (water only) cloth.
When wiping discs, always move the cloth from the center hole
toward the outer edge.
(If you wipe the discs using a circular motion, circular scratches are
likely to occur and possibly cause noise or render the disc unplayable.)
For Your Reference
If the disc is brought from a cold to a warm environment, moisture
may form on the disc
Wipe this moisture off with a soft, dry, lint-free cloth before using
the disc.
(A)
(B)
Improper disc storage
You can damage discs if you store them in the following places:
Areas exposed to direct sunlight
•
Humid or dusty areas
•
Areas directly exposed to a heat outlet or heating appliance
•
Playable disc format
DVD, DVD+RW, DVD+R, DVD-RW, DVD-R, CD-DA, Mixed
•
CD-DA, JPEG le disc and Kodak Picture Disc.
Recordable disc format
DVD+RW (Application Program)
•
DVD+R
•
Maintenance
Be sure to turn the unit off and disconnect the AC power cord
•
before maintaining the unit.
Wipe this unit with a dry soft cloth.
•
If the surfaces are extremely dirty, wipe clean with a cloth which
has been dipped in a weak soap-and-water solution and wrung
out thoroughly, and then wipe again with a dry cloth.
Never use alcohol, benzine, thinner, cleaning uid or other
•
chemicals. And do not use compressed air to remove dust.
(C)
34


Grabadora DVD+R/RW
* Ant e s d e cone cta r , ut i liz ar o co nfi gur a r e s te pr odu c to, por fa vor , l e a
detenidamente este manual y guárdelo.
* El diseño de la grabadora de DVD con disco duro mostrada en este manual puede
variar debido a diferencias en los modelos.
Guía del usuario
Español
English Español
Formatos de disco reproducibles:
DVD/DVD+R/DVD+RW/Audio CD/Kodak Picture CD/JPEG Picture CD
* Con la grabadora de DVD sólo se pueden grabar fuentes externas en discos DVD+R y DVD+RW.

Fabricado bajo licencia de Dolby Laboratories. "Dolby" y el símbolo de doble D son marcas de Dolby Laboratories.

Contenido
rimeros pasos
P
Información FCC y notas de Seguridad
.................................................................1
Instrucciones importantes de seguridad
.................................................................2
Precauciones .........................................3
Acerca de este manual .........................4
1-5 Grabación programada..................15
Ajuste de Fecha/Hora............................................15
Lista de programas................................................15
VD
D
Primeros pasos
justes OSD iniciales
A
1 Ajustes iniciales .................................5
1-1 Tuning Setup ...................................6
Sistema de programación automática....................6
Ajuste fino............................................................... 6
Edición de programas ............................................7
1-2 Configuración de grabación/disco 8
Ajustes de calidad de grabación y capítulo
automático..............................................................8
Información del disco .............................................8
Funciones Cerrar y Hacer compatible................ 9
Funciones Proteger disco y Borrar ..................10
1-3 Configuración de audio y vídeo... 11
Ajustes Tipo de TV, Salida de vídeo y Salida de
audio analógica ....................................................10
1-4 Configuración de sistema ............12
Configuración del idioma para el menú OSD ..12
Protección [DVD]..................................................12
Definición de la contraseña [DVD] .......................13
Restablecer ..........................................................14
2-1 Reproducción DVD.........................17
Reproducción básica.............................................17
Detener la reproducción y volver a la pantalla del menú
(si el disco dispone de un menú en pantalla) ........17
Detener la reproducción ........................................17
Avance rápido (Retroceso rápido).........................17
Saltar capítulos (hacia adelante o hacia atrás) .....18
Imagen fija (Pausa) ...............................................18
Avance por fotogramas (Step) ..............................18
Reproducir a cámara lenta ....................................18
Seleccionar escenas por número de título/capítulo18
Seleccionar escenas en función del tiempo ..........19
Repetir la reproducción .........................................19
Repetir secciones entre 2 puntos precisos (Repetir
A-B) .......................................................................19
Visualización en pantalla de la información sobre la
escena...................................................................19
Cambiar el idioma de la pista de audio .................19
Visualizar la escena desde más cerca (zoom)......20
Borrar/cambiar subtítulos ......................................20
Visualizar diferentes ángulos ................................20
Utilización de un menú DVD .................................20
Español
i

ii
Primeros pasos
Contenido
Función de Menú................................................. 20
Saltar anuncios publicitarios ...........................20
Silenciar la salida de audio.................................. 21
Ajuste del volumen .............................................. 21
Menú VCD (sólo para VCD 2.0) .......................... 21
Reproducción de CDs de imágenes de Kodak y
CDs de imágenes JPEG ................................... 22
Ds de audio
C
3-1 Reproducción de CDs de audio.. 23
Reproducción básica........................................... 23
Detener la reproducción ...................................... 23
Avance rápido (Retroceso rápido)....................... 23
Saltar pistas (hacia adelante o hacia atrás) ........23
Pausar la reproducción ....................................... 24
Programar pistas de CDs de audio .....................24
Seleccionar música por pistas............................. 25
Seleccionar música por tiempo ...........................25
Reproducción aleatoria ....................................... 25
Repetir la reproducción .......................................25
unciones de grabación
F
4-1 Configuración de grabación.........26
Configuración de la calidad de grabación ........... 26
Ajuste del tipo de soporte.................................... 26
4-2 Grabación ......................................27
Para grabar una fuente externa .......................... 27
Para grabar programas de televisión (Grabación
instantánea)......................................................... 27
Configuración de la grabación programada ........ 28
4-3 Edición ...........................................29
Para editar un título durante su reproducción ..... 29
Para editar un título mientras no se reproduzca... 31
Para su información
5-1 Resolución de problemas ............32
5-2 Manejo y mantenimiento de los
discos ...................................................34

1
Primeros pasos
Español
Información FCC y notas de Seguridad
ATENCIÓN:
Esta unidad emplea la tecnología láser. Dado que
es posible dañar seriamente los ojos, sólo el personal técnico cuali cado debe abrir la carcasa de
este dispositivo. La ejecución de tareas, ajustes o
procedimientos diferentes a los descritos en este
manual pueden resultar peligrosos y signi car
quedar expuesto a la radiación láser.
NOTA:
Tras realizar las pruebas oportunas, se ha determinado que este equipo cumple los límites aplicables a
equipos digitales de clase B, de acuerdo con la Parte
15 de los Reglamentos de la FCC. Estos límites se
han previsto para ofrecer una protección razonable
contra interferencias peligrosas en instalaciones
residenciales. Este equipo genera, emplea y puede
radiar energía de radiofrecuencia, y si no se instala
y utiliza de acuerdo con el manual de instrucciones
puede causar interferencias en las comunicaciones de
radio. No obstante, no existe ninguna garantía de no se
produzcan interferencias en una instalación concreta.
Si el equipo inter ere la recepción de radio o televisión,
circunstancia que puede determinarse apagándolo y
volviéndolo a encender, se recomienda intentar corregir la interferencia por los siguientes medios:
– Reoriente o instale la antena de recepción en otro
lugar.
– Aumente la distancia entre el equipo y el receptor.
– Conecte el equipo a una toma de un circuito distinto
del que está utilizando el receptor.
– Consulte al distribuidor o a un técnico de radio/TV .
Puesto que las películas en DVD suelen salir al mercado en
fechas diferentes según los países, todos los reproductores
llevan códigos de región. Opcionalmente, los discos pueden
llevar también un código de región. Si carga un disco que
tiene un código de región diferente al de su reproductor,
aparecerá en pantalla un mensaje de aviso El disco no
podrá reproducirse, y deberá retirarlo del reproductor.
(Códigos de región posibles:)
Existen 6 regiones (o “zonas”). Se debe utilizar cada reproductor de DVD y disco en UNA SOLA zona:
1: Canadá, Estados Unidos, territorios americanos
2: Japón, Europa, África del Sur, Oriente Medio (Egipto
incluido)
3: Sureste asiático, Asia Oriental (Hong Kong incluido)
4: Australia, Nueva Zelanda, Islas Pací cas, América
Central, México, América del Sur, Caribe
5: Antigua Unión Soviética, subcontinente indio, África ( y
también Corea del Norte y Mongolia)
6: China
Nunca efectúe o modifique conexiones
mientras el aparato está encendido.
ATENCIÓN
RADIACIONES LÁSER VISIBLES E INVISIBLES AL
ABRIR EL APARATO - NO SE EXPONGA AL RAYO
LÁSER (ETIQUETA DE AVISO: EN LA TAPA DE
PROTECCIÓN DEL LÁSER ENEL INTERIOR)
Este producto incorpora una tecnología protegida por
derechos de autor de ciertas patentes de Estados
Unidos y otros derechos de propiedad intelectual
poseídos por Macrovision Corporation y por otros
titulares de derechos. El uso de esta tecnología protegida por derechos de autor debe ser autorizado por
Macrovision Corporation, y sólo para uso doméstico
o con nes de visualización restringida, salvo autorización explícita de Macrovision Corporation. Queda
prohibido alterar o desmontar el aparato.
Para los modelos de grabadora de DVD con disco
duro que tengan una salida de barrido progresivo:
‘Nótese que no todos los televisores de alta gama son
totalmente compatibles con este producto. Ocasionalmente pueden aparecer distorsiones en la imagen.
En caso de que se den problemas de visualización de
barrido progresivo, se recomienda que utilice el modo
de salida ‘Estándar’. Si tiene preguntas en cuanto
a la compatibilidad de su televisor con este modelo
de grabadora de DVD con disco duro, póngase en
contacto con su revendedor.
ATENCIÓN
Para reducir el riesgo de descargas eléctricas,
no exponga el equipo a la lluvia o a humedad.
El icono del rayo en un triángulo equilátero
advierte de la presencia de “tensiones peligrosas”
no aisladas en el interior del equipo y con una
magnitud su ciente para presentar un peligro
para las personas.
El sign o de exclamación en un triángulo
equilátero sirve para advertir al usuario de la
existencia de instrucciones importantes de
uso y mantenimiento en la documentación que
acompaña al producto.

2
Primeros pasos
Instrucciones importantes de seguridad
1. Lea detenidamente estas instrucciones y consérvelas.
2. Tenga en mente todas las advertencias.
3. Siga todas las instrucciones indicadas.
4. No utilice este aparato cerca de fuentes de agua.
5. Límpielo con un paño húmedo.
6. No obstruya las entradas de ventilación. Instale el aparato respetando las instrucciones del fabricante.
7. No lo instale junto a fuentes de calor, como radiadores, hornos u otros aparatos (incluso ampli cadores)
que produzcan calor.
8. Para mayor seguridad, utilice sólo el enchufe suministrado. Si el conector suministrado no corresponde
a su toma de corriente, consulte a un electricista para que la sustituya por una mejor adaptada.
9. Recoja el cable de alimentación para evitar tropezar o tirar de él (sobre todo en la base) y proteja
correctamente todas las bases de sus conexiones.
10. Utilice únicamente jaciones y accesorios indicados por el fabricante.
11. Utilice únicamente un carrito, soporte, trípode, estantería o mesa indicado por el fabricante o vendido con
el aparato. Si utiliza un carrito, tenga mucho cuidado al mover el aparato para evitar cualquier daño.
12. Desenchufe el aparato en caso de tormenta o si no ha de utilizarlo durante periodos prolongados.
13. Todas las operaciones de mantenimiento o reparación deben ser realizadas por personal cuali cado.
Es necesario reparar el aparato cuando éste ha resultado dañado de alguna manera; por ejemplo, si el
cable de alimentación o el conector están dañados, si han caído liquido u objetos dentro del aparato, si el
dispositivo ha sido expuesto a la lluvia o a la humedad, si no funciona correctamente o si se ha caído.
ATENCIÓN: Para reducir el riesgo de incendio o de sacudidas eléctricas, no exponga este aparato a la
lluvia o a la humedad.
No coloque objetos llenos de líquidos (como un jarrón) encima de la grabadora.
Lea detenidamente estas precauciones antes de utilizar el dispositivo.

3
Primeros pasos
Español
Precauciones
n Protección del cable de alimentación
Para evitar un mal funcionamiento del aparato, protegerlo de choques eléctricos, del fuego y evitar daños
personales, respete las siguientes precauciones.
l Sujete rmemente el enchufe durante la conexión y desconexión del cable de alimentación de CA.
l Mantenga el cable de alimentación de CA alejado de aparatos de calefacción.
l No coloque objetos pesados encima del cable de alimentación de CA.
l No intente reparar o modi car el cable de alimentación de CA de ninguna manera.
n Colocación
Evite colocar el aparato en zonas expuestas:
l a la luz directa del sol, cerca de radiadores o dentro de coches cerrados
l a temperaturas altas (superiores a 35ºC) o una humedad alta (superior al 90%)
l al polvo, que puede causar serios daños en las partes internas del aparato.
n Periodos de inactividad
Apague la unidad si no la emplea. Si no piensa utilizarlo durante un periodo prolongado, desenchúfelo de
la toma de corriente.
n Evite dejar huellas dactilares y no inserte ningún objeto dentro
l Tocar las partes internas de este aparato es muy peligroso. Además, podría causar serios daños a la
unidad. No intente desmontar la unidad.
l No inserte ningún cuerpo extraño en la platina.
n Mantenga el aparato alejado de cualquier fuente de humedad o fuente magnética
l No lo coloque cerca de jarrones, tuberías, fregaderos, etc. Si algún líquido penetrase en la unidad, podría
causar serios daños.
l No coloque imanes u otros objetos magnéticos cerca de la unidad.
n Superposición
l Coloque la unidad en posición horizontal y no coloque ningún objeto pesado encima.
n Condensación
Puede aparecer humedad en la pantalla de visualización en los siguientes casos:
l inmediatamente después de encender un aparato de calefacción
l en una habitación empañada o muy húmeda
l si ha trasladado la unidad directamente de un entorno frío a un entorno caliente. Si se forma humedad
dentro del aparato, puede que éste no funcione correctamente. En ese caso, enciéndala y espere
aproximadamente una hora a que desaparezca la humedad.
n Interferencias sonoras en la TV durante la recepción de un programa
Según las condiciones de recepción de su TV, pueden aparecer interferencias en la pantalla de la TV si está
viendo un programa y si la unidad está encendida. No es un mal funcionamiento de la unidad o de la TV. Si
desea ver un programa de televisión, apague la unidad.

Acerca de este manual
De nición de los términos
Ángulo
Algunos discos DVD tienen escenas grabadas simultáneamente
desde varios ángulos o puntos de vista (la misma escena ha
sido grabada por delante, por detrás, desde el lado izquierdo,
Primeros pasos
derecho, etc.) Con estos discos, puede utilizar el botón ANGLE
para ver la escena desde varios puntos de vista.
Cerrar
Después de grabar y cerrar un disco, podrá reproducirlo con un
reproductor de DVD convencional si éste admite discos DVD+R.
DVD
Un disco óptico de alta densidad en el cual se han grabado
imágenes y sonido de alta calidad mediante señales digitales. El
DVD, que incorpora una nueva tecnología de compresión vídeo
(MPEG II) y una tecnología de grabación de alta densidad, permite
grabar vídeos en movimiento y con gran calidad de imagen durante
periodos prolongados (por ejemplo, se puede grabar una película
entera). Un DVD generalmente tiene una capacidad de 4,7 GB y
es capaz de grabar 2 horas de vídeo de alta calidad.
DVD+R
Siglas de "DVD+Recordable" (DVD grabable). Este tipo de
disco se puede grabar y cerrar una sola vez.
Nota: Antes de conectar, utilizar o con gurar
este producto, por favor, lea detenidamente este
manual y guárdelo.
Gracias
por haber adquirido esta grabadora de
DVD.
Las instrucciones en este Manual se refieren
mayoritariamente a procedimientos a efectuar desde
el mando a distancia. Los botones con nombres
iguales o similares en la misma grabadora de DVD
tienen las mismas funciones que los botones del
mando a distancia. En la Guía rápida encontrará
una introducción a los paneles de la grabadora, a
los botones del mando a distancia y a las diferentes
posibilidades de conexión.
DVD+RW
Siglas de "DVD+ReWritable" (DVD regrabable). Este tipo de
disco se puede grabar varias veces.
Número de capítulo
Estos números se graban en los discos DVD. Un título está dividido
en muchas secciones enumeradas, Puede acceder fácilmente a
las diferentes partes de una película a través de esos números.
Número de pista
Estos números se asignan a las pistas que han sido grabadas
en CDs de audio.
Número de título
Estos números se graban en los discos DVD. Si un disco
contiene 2 películas o más, dichas películas se identi can
como título 1, título 2, etc.
Subtítulos
Son las líneas escritas que aparecen en la parte inferior
o superior de la pantalla y que traducen o transcriben el
diálogo.
Tiempo de reproducción
Indica el tiempo de reproducción que ha transcurrido desde
el principio de un disco o de un título. Puede ser útil para
encontrar rápidamente una escena en concreto. (Puede que
no funcione con algunos discos.)
Esta grabadora de DVD admite los soportes
siguientes:
-- Formatos de disco reproducibles
l DVD, DVD+R, DVD+RW, DVD-R, DVD-RW,
CD-DA, MP3, Mixed CD-DA, discos con archivos
JPEG y discos de imagen Kodak.
-- Formatos de disco grabables
l DVD+RW (programas aplicativos)
l DVD+R
Algunos discos no se pueden reproducir
por defectos en la producción o por daños
externos. Si se trata de grabaciones
propias, copias o reproducciones no
originales, no se puede garantizar que se
puedan reproducir.
4

GRABAR/DISCO
Salir
Calidad grabación
CAP.AUTOM.
Información del disco
CANAL
GRABAR/DISCO
VÍDEO/AUDIO
SISTEMA
PROGRAMACIÓN
Salir
CANAL
GRABAR/DISCO
VÍDEO
SISTEMA
PROGRAMACIÓN
Salir
1 Ajustes iniciales
a
a
b
b
a
a
VÍDEO
Salir
Tipo de TV
Salida Vídeo
SISTEMA
Salir
OSD Idioma
Protección
Contraseña
Restablecer
PROGRAMACIÓN
Salir
Fecha Tiempo
LISTA PROGRAMAS
VÍDEO/AUDIO
Salir
Tipo de TV
Salida Vídeo
Salida analógica audio
b
b
GRABAR/DISCO
Salir
Calidad grabación
CAP.AUTOM.
Información del disco
TERMINAR
GRABAR/DISCO
Salir
Calidad grabación
CAP.AUTOM.
Información del disco
Hacer compatible
Proteger disco
Borrar
c
c
a
a
b
b
El menú de con guración consiste en cinco secciones: CANAL, GRABARDISCO, VÍDEO,
SISTEMA y PROGRAMACIÓN.
A continuación damos un resumen de los cinco ajustes principales del OSD:
Grabadora con salida analógica
de audio de 2 canales
(B) En el menú Con guración de
Grabar/Disco:
Si no hay ningún disco insertado:
(C) En el menú Con guración de
VÍDEO.
Grabadora con salida analógica
de audio de 2 canales
Grabadora con salida analógica de
audio de 5.1 canales (opcional)
(B) En el menú Con guración de
Grabar/Disco:
Si hay un disco DVD+R insertado:
(C) En el menú Con guración de
VÍDEO/AUDIO:
Grabadora con salida analógica de
audio de 5.1 canales (opcional)
(A) En el menú Configuración de
CANAL
.
(B) En el menú Con guración de
GrabaR/Disco:
Si hay un disco DVD+RW insertado:
:
(D) En el menú SISTEMA:
Ajustes OSD iniciales
(E) En el menú Con guración de
PROGRAMACIÓN:
Previamente:
1. Pulse el botón STANDBY/ON en la grabadora de DVD o
pulse Power en el mando a distancia para encender la
unidad.
2. Encienda su televisor y seleccione la entrada de señales de
vídeo (Vídeo, etc.).
3. Pulse Setup con la reproducción detenida para abrir el menú
de con guración.
Español
5

6
Ajustes OSD iniciales
CANAL
GRABAR/DISCO
VÍDEO
SISTEMA
PROGRAMACIÓN
Salir
Ch 001 BORRAR
Ch 002 BORRAR
Ch 003 BORRAR
Ch 004 BORRAR
Ch 005
AGREGAR
Ch 006 BORRAR
Ch 007 BORRAR
Ch 008 BORRAR
Ch 001 BORRAR
Ch 002 BORRAR
Ch 003 BORRAR
Ch 004 BORRAR
Ch 005 BORRAR
Ch 006 BORRAR
Ch 007 BORRAR
Ch 008 BORRAR
1-1 Ajustes de sintonización
CANAL
GRABAR/DISCO
VÍDEO
SISTEMA
PROGRAMACIÓN
Salir
Buscar canal
1 Pulse Setup con la reproducción detenida para mostrar los menús.
2 Pulse para seleccionar “Canal”.
3 Pulse para seleccionar “Búsqueda de canales”.
4 Pulse para seleccionar “Con rmar” y luego pulse . El número total de canales
encontrados se mostrará cuando la búsqueda haya terminado.
- Para volver a la página del MENÚ DE CONFIGURACIÓN, pulse .
- Para concluir las operaciones de con guración, pulse Setup para salir del menú.
2 3 4
73
Agregar/Borrar canales
1 Pulse Setup con la reproducción detenida para mostrar los menús.
2 Pulse para seleccionar “Canal”.
3 Pulse para seleccionar “Agregar/Borrar canales” y luego pulse .
4 Pulse / para seleccionar el número de canal preferido.
5 Pulse
- Para volver a la página del MENÚ DE CONFIGURACIÓN, pulse .
- Para concluir las operaciones de con guración, pulse Setup para salir del menú.
para agregar o eliminar los canales seleccionados.
2 3 4 5

7
Ajustes OSD iniciales
Español
CANAL
GRABAR/DISCO
VÍDEO
SISTEMA
PROGRAMACIÓN
Salir
1-1 Ajustes de sintonización - Continuación
Cable/Antena
1 Pulse Setup con la reproducción detenida para mostrar los menús.
2 Pulse para seleccionar “Canal”.
3 Pulse para seleccionar “Cable/Antena” y luego pulse .
4 Pulse los botones / para seleccionar la fuente deseada y luego pulse
- Para volver a la página del MENÚ DE CONFIGURACIÓN, pulse .
- Para concluir las operaciones de con guración, pulse Setup para salir del menú.
2 3 4
.

8
Ajustes OSD iniciales
GRABAR/DISCO
Salir
Calidad grabación
CAP.AUTOM.
Información del disco
TERMINAR
GRABAR/DISCO
Salir
Calidad grabación
CAP.AUTOM.
Información del disco
Hacer compatible
Proteger disco
Borrar
GRABAR/DISCO
Salir
Calidad grabación
CAP.AUTOM.
Información del disco
Hacer compatible
Proteger disco
Borrar
GRABAR/DISCO
Salir
Calidad grabación
CAP.AUTOM.
Información del disco
TERMINAR
GRABAR/DISCO
Salir
Calidad grabación
CAP.AUTOM.
Información del disco
TERMINAR
GRABAR/DISCO
Salir
Calidad grabación
CAP.AUTOM.
Información del disco
TERMINAR
Si
No
GRABAR/DISCO
Salir
Calidad grabación
CAP.AUTOM.
Información del disco
Hacer compatible
Proteger disco
Borrar
GRABAR/DISCO
Salir
Calidad grabación
CAP.AUTOM.
Información del disco
Hacer compatible
Proteger disco
Borrar
Si
No
1-2
Con guración de GRABACIÓN/DIS
El menú OSD Con guración de grabación/disco depende de si ha
No Disc
DVD+R
DVD+RW
insertado un disco DVD+R o un disco DVD+RW.
Ajustes de calidad de grabación y capítulo automático
1 Pulse Setup con la reproducción detenida para abrir el menú de con guración.
2 Pulse para seleccionar "Grabar / Disco" y pulse .
3 Seleccione "Calidad de grabación" o pulse para seleccionar "Cap. autom.". Pulse
la tecla .
4 Pulse / para seleccionar la opción deseada y pulse .
- Para volver a la página del MENÚ DE CONFIGURACIÓN, pulse .
- Para concluir las operaciones de con guración, pulse Setup para salir del menú.
Calidad de grabación
3 Tiene insertado un disco DVD+R 3 Tiene insertado un disco DVD+RW 4 Tiene insertado un disco DVD+R 4 Tiene insertado un disco DVD+RW
Capítulo automático
3 Tiene insertado un disco DVD+R 3 Tiene insertado un disco DVD+RW 4 Tiene insertado un disco DVD+R 4Tiene insertado un disco DVD+RW
Información del disco
1 Pulse Setup con la reproducción detenida para abrir el menú de con guración.
2 Pulse para seleccionar "Grabar / Disco" y pulse .
3 Pulse para seleccionar "Información del disco" y luego pulse .
4 Se mostrará la información sobre el disco, incluyendo el tipo de disco, la duración
total del título, el tiempo total de grabación y el tiempo disponible.
- Para volver a la página del MENÚ DE CONFIGURACIÓN, pulse .
- Para concluir las operaciones de con guración, pulse Setup para salir del menú.

9
Ajustes OSD iniciales
Español
GRABAR/DISCO
Salir
Tipo de disco: +R
Total tìtulos: 3
Duración total de la grabación: 3 Min
Duración total disponible:
HQ: 57 Min� SP: 114 Min
LP: 171 Min� EP: 228 Min
SLP: 342 Min
GRABAR/DISCO
Salir
Calidad grabación
CAP.AUTOM.
Información del disco
TERMINAR
GRABAR/DISCO
Salir
Calidad grabación
CAP.AUTOM.
Información del disco
Hacer compatible
Proteger disco
Borrar
GRABAR/DISCO
Salir
Tipo de disco: +RW
Total tìtulos: 3
Duración total de la grabación: 3 Min
Duración total disponible:
HQ: 57 Min
� SP: 114 Min
LP: 171 Min
� EP: 228 Min
SLP: 342 Min
1-2 Con guración de grabación/disco - Continuación
GRABAR/DISCO
Salir
Calidad grabación
CAP.AUTOM.
Información del disco
TERMINAR
Cancelar
Confirmar
GRABAR/DISCO
Salir
Calidad grabación
CAP.AUTOM.
Información del disco
TERMINAR
GRABAR/DISCO
Salir
Calidad grabación
CAP.AUTOM.
Información del disco
Hacer compatible
Proteger disco
Borrar
GRABAR/DISCO
Salir
Calidad grabación
CAP.AUTOM.
Información del disco
Hacer compatible
Proteger disco
Borrar
Cancelar
Confirmar
Información del disco
3
Tiene insertado un disco DVD+R 3 Tiene insertado un disco DVD+RW
Funciones Terminar y Hacer compatible
1 Pulse Setup con la reproducción detenida para abrir el menú de con guración.
2 Pulse para seleccionar "Grabar / Disco" y pulse .
3 Pulse para seleccionar "Terminar" o "Hacer compatible" y luego pulse .
4 Pulse / para seleccionar la opción deseada y pulse para cancelar o
con rmar.
- Para volver a la página del MENÚ DE CONFIGURACIÓN, pulse .
- Para concluir las operaciones de con guración, pulse Setup para salir del menú.
La opción "Cerrar" sólo está disponible si tiene insertado un disco DVD+R no cerrado.
•
Es posible que las funciones de disco como "Ocultar capítulo", "Nueva imagen" y algunas opciones de edición no estén
•
disponibles en otras grabadoras si no ha hecho el disco compatible a través de la función "Hacer compatible".
4
Tiene insertado un disco DVD+R sin cerrar 4 Tiene insertado un disco DVD+RW
Terminar 2 3 4
Hacer compatible
2 3 4

10
Ajustes OSD iniciales
GRABAR/DISCO
Salir
Calidad grabación
CAP.AUTOM.
Información del disco
Hacer compatible
Proteger disco
Borrar
GRABAR/DISCO
Salir
Calidad grabación
CAP.AUTOM.
Información del disco
Hacer compatible
Proteger disco
Borrar
Cancelar
Confirmar
GRABAR/DISCO
Salir
Calidad grabación
CAP.AUTOM.
Información del disco
Hacer compatible
Proteger disco
Borrar
GRABAR/DISCO
Salir
Calidad grabación
CAP.AUTOM.
Información del disco
Hacer compatible
Proteger disco
Borrar
Cancelar
Confirmar
1-2 Con guración de grabación/disco - Continuación
Funciones Proteger disco y Borrar
1 Pulse Setup con la reproducción detenida para abrir el menú de con guración.
2 Pulse para seleccionar "Grabar / Disco" y pulse .
3 Pulse para seleccionar "Proteger disco" o "Borrar" y luego pulse .
4 Pulse / para seleccionar la opción deseada y pulse para cancelar o
con rmar el proceso.
- Para volver a la página del MENÚ DE CONFIGURACIÓN, pulse .
- Para concluir las operaciones de con guración, pulse Setup para salir del menú.
Estas dos funciones sólo están disponibles si tiene insertado un disco DVD+RW.
•
Para quitar la protección del disco, seleccione "Desproteger disco" y pulse "Con rmar".
•
Cuando tenga el disco protegido, las funciones "Borrar" y "Hacer compatible" quedarán deshabilitadas.
•
Cuando se inicie una de las funciones Cerrar o Borrar, todas las funciones de grabación quedarán deshabilitadas.
•
No apague la unidad durante este proceso, ya que de lo contrario se podría dañarse el disco.
Nótese que la función de borrado no se puede interrumpir mientras se esté ejecutando.
•
Proteger disco 2 3 4
Borrar 2 3 4

11
Ajustes OSD iniciales
Español
VÍDEO/AUDIO
Salir
Tipo de TV
Salida Vídeo
Salida analógica audio
16:9 Ancho
Carácter 4:3
Panorámica 4:3
CANAL
GRABAR/DISCO
VÍDEO/AUDIO
SISTEMA
PROGRAMACIÓN
Salir
VÍDEO/AUDIO
Salir
Tipo de TV
Salida Vídeo
Salida analógica audio
1-3 Con guración de VÍDEO/AUDIO
a
a
b
b
c
c
CANAL
GRABAR/DISCO
VÍDEO/AUDIO
SISTEMA
PROGRAMACIÓN
Salir
VÍDEO/AUDIO
Salir
Tipo de TV
Salida Vídeo
Salida analógica audio
VÍDEO/AUDIO
Salir
Tipo de TV
Salida Vídeo
Salida analógica audio
SCART RGB
Componente
S-Video
a
a
b
b
c
c
CANAL
GRABAR/DISCO
VÍDEO/AUDIO
SISTEMA
PROGRAMACIÓN
Salir
VÍDEO/AUDIO
Salir
Tipo de TV
Salida Vídeo
Salida analógica audio
VÍDEO/AUDIO
Salir
Tipo de TV
Salida Vídeo
Salida analógica audio
5.1 Ch
2 Ch
El ajuste de vídeo del OSD le permite seleccionar el tipo de televisor y la fuente de vídeo de salida. Si su
grabadora de DVD viene equipada con una salida de audio para 5.1 canales, puede con gurar la salida de
audio analógica en el menú OSD Audio. La ilustración siguiente del OSD muestra la grabadora con salida
de audio de 5.1 canales.
Ajustes Tipo de TV, Salida de vídeo y Salida de audio analógica
1 Pulse Setup con la reproducción detenida para abrir el menú de con guración.
2 Pulse para seleccionar "Vídeo/Audio" y pulse .
3 Seleccione "Tipo de TV" o pulse para seleccionar "Salida de vídeo" o "Salida
analógica de audio". Pulse la tecla .
4 Pulse / para seleccionar la opción deseada y pulse .
- Para volver a la página del MENÚ DE CONFIGURACIÓN, pulse .
- Para concluir las operaciones de con guración, pulse Setup para salir del menú.
Tipo de TV 2 3 4
16:9 Ancho
Seleccione Ancho (16:
9) para un televisor
de pantalla ancha.
Se reproducirán los
discos en "PANTALLA
COMPLETA".
Salida de vídeo 2 3 4
Carácter 4:3
Para un televisor de tamaño
convencional, seleccione
TV 4:3. Aparecerán bandas
negras en la parte inferior
y superior de la pantalla
(estilo Letterbox).
Panorámica 4:3
Para un televisor de
tamaño convencional,
seleccione Panorámica
y barrido (4:3).
SCART RGB
Selecci one "SCART RG B" s i
su
televisor tiene una entrada
Euroconector y tiene conectada la
salida Euroconector de la unidad a
esta entrada.
Componente
Seleccione "Componente" si su
televisor tiene una entrada por
componentes y tiene conectada las
salidas por componentes de la unidad
a estas entradas.
Salida de audio 2 3 4
analógica
S-Video
Seleccione "S-Video" si su
tiene una entrada
conectada la salida
unidad a esta entrada.
S-Video
S-Video
televisor
y tiene
de la

12
Ajustes OSD iniciales
1-4 Con guración de SISTEMA
SISTEMA
Salir
OSD Idioma
Protección
Contraseña
Restablecer
Español
Francais
CANAL
GRABAR/DISCO
VÍDEO
SISTEMA
PROGRAMACIÓN
Salir
SISTEMA
Salir
OSD Idioma
Protección
Contraseña
Restablecer
Con guración del idioma para el menú OSD
1
Pulse Setup con la reproducción detenida para abrir el menú de con guración.
2 Pulse
3 Seleccione "OSD idioma" y pulse .
para seleccionar "Sistema" y luego pulse .
4 Pulse / para seleccionar la opción deseada y pulse .
- Para volver a la página del MENÚ DE CONFIGURACIÓN, pulse .
- Para concluir la con guración, pulse Setup para salir del menú.
OSD idioma
2 3 4
Protección [DVD]
1 Pulse Setup con la reproducción detenida para abrir el menú de con guración.
2 Pulse
para seleccionar "Sistema" y luego pulse .
3 Pulse
para seleccionar "Protección" y pulse .
4 Escriba una contraseña de 5 dígitos con las teclas numéricas.
Contraseña predeterminada: 99999
5 Pulse los botones / para seleccionar un nivel de protección y pulse .
- Para volver a la página del MENÚ DE CONFIGURACIÓN, pulse .
- Para concluir la con guración, pulse Setup para salir del menú.
Explicación de los niveles
1 -- G apto para todas las edades.
2 -- todos los públicos, recomendado para todas las edades.
3 -- PG se recomienda el acompañamiento por parte de los padres.
4 -- PG-13 el contenido no es apto para menores de 13 años.
5 -- acompañamiento de los padres – restringido; se recomienda que los padres no dejen que los niños
6 -- R
7 -- NC-17 No apto para menores de 17 años.
8 -- ningú límite Sin restricción
menores de 17 años vean el contenido o que éstos al menos sean supervisados por los padres o
una persona adulta.
restringido, los menores de 17 años no deberían ver el contenido sin estar acompañados por un adulto.

13
Ajustes OSD iniciales
Español
SISTEMA
Salir
OSD Idioma
Protección
Contraseña
Restablecer
SISTEMA
OSD Idioma
Protección
Contraseña
Restablecer
Indique la contraseña
<0 - 9> Indicar contraseña
<SETUP> Salir
SISTEMA
OSD Idioma
Protección
Contraseña
Restablecer
Indique la contraseña
<0 - 9> Indicar contraseña
<SETUP> Salir
SISTEMA
Salir
OSD Idioma
Protección
Contraseña
Restablecer
1 - G
2 3 - PG
4 - PG-13
5 6 - R
7 - NC-17
8 - ningú limite
CANAL
GRABAR/DISCO
VÍDEO
SISTEMA
PROGRAMACIÓN
Salir
1-4
SISTEMA
Salir
OSD Idioma
Protección
Contraseña
Restablecer
SISTEMA
OSD Idioma
Protección
Contraseña
Restablecer
Indique la contraseña
<0 - 9> Indicar contraseña
<SETUP> Salir
SISTEMA
OSD Idioma
Protección
Contraseña
Restablecer
Indique la contraseña
<0 - 9> Indicar contraseña
<SETUP> Salir
SISTEMA
OSD Idioma
Protección
Contraseña
Restablecer
Indique la contraseña otra vez
<0 - 9> Indicar contraseña
<SETUP> Salir
SISTEMA
OSD Idioma
Protección
Contraseña
Restablecer
Indique la NUEVA ontraseña
<0 - 9> Indicar contraseña
<SETUP> Salir
SISTEMA
OSD Idioma
Protección
Contraseña
Restablecer
Indique la NUEVA ontraseña
<0 - 9> Indicar contraseña
<SETUP> Salir
SISTEMA
OSD Idioma
Protección
Contraseña
Restablecer
Indique la contraseña otra vez
<0 - 9> Indicar contraseña
<SETUP> Salir
a
a
b
b
c
c
Con guración de sistema
- Continuación
3 4 * Escriba 99999 5
De nición de la contraseña [DVD]
1 Pulse Setup con la reproducción detenida para abrir el menú de con guración.
2 Pulse para seleccionar "Sistema" y pulse .
3 Pulse para seleccionar "Contraseña" y pulse .
4 Escriba la contraseña antigua y pulse .
Escriba una contraseña de 5 dígitos con las teclas numéricas.
Contraseña predeterminada: 99999
5 Escriba la contraseña nueva y pulse .
Escriba la NUEVA contraseña de 5 dígitos con las teclas numéricas.
6 Escriba la contraseña nueva otra vez para con rmarla y pulse .
Escriba la misma contraseña de 5 dígitos con las teclas numéricas.
- Para volver a la página del MENÚ DE CONFIGURACIÓN, pulse .
- Para concluir la con guración, pulse Setup para salir del menú.
Si ha escrito una contraseña incorrecta, vuelva a introducirla. Si ha olvidado la contraseña, seleccione "Restablecer"
•
para restaurar los valores predeterminados.
2 3 4 4
5 5
* Escriba un número
6 6
de 5 dígitos
* Escriba 99999
* Escriba de nuevo el mismo
número de 5 dígitos

14
Ajustes OSD iniciales
SISTEMA
Salir
OSD Idioma
Protección
Contraseña
Restablecer
CANAL
GRABAR/DISCO
VÍDEO
SISTEMA
PROGRAMACIÓN
Salir
SISTEMA
Salir
OSD Idioma
Protección
Contraseña
Restablecer
Cancelar
Confirmar
1-4
Con guración de sistema
- Continuación
Restablecer
1 Pulse Setup con la reproducción detenida para abrir el menú de con guración.
2 Pulse
3 Pulse
para seleccionar "Sistema" y luego pulse .
para seleccionar "Restablecer". Pulse la tecla .
4 Pulse / para seleccionar la opción deseada y pulse .
- Para volver a la página del MENÚ DE CONFIGURACIÓN, pulse .
- Para concluir la con guración, pulse Setup para salir del menú.
Si selecciona "Con rmar" para la opción "Restablecer", la grabadora de DVD restablecerá todos los ajustes
•
con gurados a los predeterminados. Una vez restablecidos todos los ajustes de fábrica, la grabadora se reiniciará.
Restablecer 2 3 4

15
Ajustes OSD iniciales
Español
1-5 Ajustes de programació
CANAL
GRABAR/DISCO
VÍDEO
SISTEMA
PROGRAMACIÓN
Salir
PROGRAMACIÓN
Salir
Fecha Tiempo
LISTAPROGRAMAS
PROGRAMACIÓN
Salir
Fecha Tiempo
LISTA PROGRAMAS
Tiempo 01:40:35
Fecha 11/12/05DOM
Volver
CLEAR
Hour Minute
Year Month Date
Second
Ajuste de Fecha/Hora
1 Pulse Setup con la reproducción detenida para abrir el menú de con guración.
2 Pulse
para seleccionar "PROGRAMACIÓN" y luego pulse .
3 Seleccione "FechaTiempo". Pulse la tecla .
4 Pulse / para seleccionar el elemento que desee modi car y pulse / para
ajustar el valor. Pulse la tecla .
Hora Minutos
Pulse para desplazarse a los elementos siguientes.
Ejemplo:
- Para volver a la página del MENÚ DE CONFIGURACIÓN, pulse Clear.
- Para concluir las operaciones de con guración, pulse Setup para salir del menú.
Hor a 10: 40 :35
Fec ha 24/1 0/ 04 Do m
Año Mes Fecha
La fecha se ajustará
automáticamente a la nueva.
Segundos
Fecha/Hora 2 3 4
Lista de programas
1 Pulse Setup con la reproducción detenida para abrir el menú de con guración.
2 Pulse
3 Pulse
para seleccionar "Programación" y pulse .
para seleccionar "Lista programas" y pulse .
4 Pulse / para seleccionar una entrada donde insertar la información y pulse .
5 Pulse / para seleccionar el elemento que desee modi car y pulse /
teclas numéricas
Pulse para desplazarse a los elementos siguientes.
Entr a d a Fr e cuenc i a I n icio Dur a ción Fue n t e Ca l. Act i v ado/ D e sacti v ado
01 12 /05/0 3 0 3:07 00:0 0 Ví d eo SP De s activ a d o
Pulse / para seleccionar el origen de las señales de A/V. Si escoge la grabación de un programa de
televisión, escriba también el número del canal con ayuda de los botones numéricos.
Después de seleccionar y abrir una entrada aparecerá el ajuste predeterminado.
para ajustar el valor.
Frecuencia
(Fecha)
Activado
Desactivado
Inicio (Hora)
Cal. (Calidad)
Duración
Fuente
o las

PROGRAMACIÓN
Salir
Fecha Tiempo
LISTAPROGRAMAS
CONFIGURACIÓN
Entr Frec Inic Dur Fuente Cali Si/No
Editar
Borrar selección
Salir
PROGRAMACIÓN LISTA PROG.
Entr Frec Inic Dur Fuente Cali Si/No
CancelarRETURN
Confirmar
01
Espacio de disco disponible:
HQ:
SP:
LP:
EP:
SLP:
09/24/04
07:00
00:00 NoCH
LP
No
01:00
02:01
03:02
04:03
06:05
0-9 Cambie la selección
CANAL
GRABAR/DISCO
VÍDEO
SISTEMA
PROGRAMACIÓN
Salir
1-5
Ajustes de programación - Continuación
IMPORTANTE:
Después de con gurar la grabación programada, deje la grabadora en modo de espera para activar la grabación automática.
Aparecerá un mensaje recordándole la fecha y hora de la grabación. Además, en la pantalla LED aparecerá una luz roja
"
REC" signi cando que se está esperando a que llegue la hora de la grabación programada.
Si las franjas horarias de dos grabaciones programadas solapan, la grabación posterior de las dos no se ejecutará. La
Ajustes OSD iniciales
grabación del programa se iniciará justo después de nalizar la primera grabación.
Make sure Date and Time of this DVD Recorder is correct. If not, check Date/Time Setting to correct it.
•
Veri que que la fecha y hora de la grabadora de DVD coincidan con la fecha y hora actuales. Si no coinciden, vaya
•
al menú Fecha/Hora para ajustarlas.
Recuerde que antes de efectuar una grabación debe insertar un disco grabable DVD+RW o DVD+R con espacio su ciente en
•
la unidad. De lo contrario, la grabación no se podrá ejecutar, incluso si la programación ha sido efectuada correctamente.
Durante la grabación programada, la grabadora de DVD debe estar encendida.
•
- Para volver a la página del MENÚ DE CONFIGURACIÓN, pulse .
- Para concluir la con guración, pulse Setup para salir del menú.
2 3 4 5
16

2-1 Reproducción DVD
Preparación:
Encienda su televisor y seleccione "Vídeo" como entrada de señal de TV.
•
Encienda su sistema de alta delidad si la grabadora está conectada a un sistema alta delidad.
•
Para su información:
Si aparece el símbolo "
•
efectuar la operación correspondiente.
Reproducción básica
1 Pulse la tecla Power.
2 Para abrir la bandeja, pulse el botón de expulsión Eject. Coloque un disco en la
bandeja.
3 Pulse la tecla Eject.
La platina de disco se cierra y la grabadora de DVD inicia la reproducción si el disco no tiene ningún menú grabado en él.
Si el disco tiene uno o más títulos grabados en él, aparecerá un menú en la pantalla de su televisor. Continúe con
los pasos 4 y 5 si hay un menú disponible en el disco.
" cuando pulsa un botón, signi ca que la grabadora de DVD no permite
DVD
4 Pulse / /
5 Pulse / /
/
/
para seleccionar el elemento que desee modi car y pulse .
para efectuar el ajuste deseado y pulse .
Detener la reproducción y volver a la pantalla del menú
(si el disco contiene un menú)
1 Pulse el botón Menu. La grabadora detiene la reproducción y muestra el menú en
pantalla.
Detener la reproducción
1 Pulse Stop.
Pulse una vez el botón Stop para detener el disco temporalmente. Pulse para reanudar la reproducción en
•
el punto en que la había detenido. Para detener la reproducción por completo, pulse dos veces el botón Stop.
Avance rápido (Retroceso rápido)
1 Pulse el botón F.Bwd o F.Fwd durante la reproducción.
La velocidad de avance ( x2, x4, x8, x16, x30 y x60) o retroceso ( x2, x4, x8, x16,
x30 y x60) cambia con cada pulsación del botón F.Fwd o F.Bwd.
Español
- Para reanudar la reproducción normal, pulse .
17

18
DVD
2-1
Reproducción DVD - Continuación
Saltar capítulos (hacia adelante o hacia atrás)
Saltar hacia adelante
Pulse el botón Siguiente durante la reproducción.
Salta un capítulo cada vez que pulsa el botón.
Saltar hacia atrás
Pulse el botón Anterior durante la reproducción.
Si presiona una vez el botón Anterior durante la reproducción de un capítulo, la grabadora de DVD vuelve al capítulo
anterior para reproducirlo. La grabadora saltará al capítulo anterior cada vez que pulsa el botón.
Imagen ja (Pausa)
1 Pulse una vez el botón Pause durante la reproducción.
- Para reanudar la reproducción normal, pulse .
Avance por fotogramas (Step)
1 Pulse el botón Pause dos veces durante la reproducción.
Permite reproducir el disco imagen por imagen cada vez que pulsa el botón.
- Para reanudar la reproducción normal, pulse .
Reproducir a cámara lenta
1 Pulse el botón Slow durante la reproducción.
La velocidad de avance o retroceso ( x 1/2, x 1/4, x 1/8 y luego x 1/2, x 1/4, x 1/8) cambia con
cada pulsación del botón Slow.
- Para reanudar la reproducción normal, pulse .
Seleccionar escenas por número de título/capítulo
1 Pulse el botón Goto durante la reproducción.
2 Presione / para mover el cursor hasta el campo del título o capítulo deseado.
Pulse para ver otros campos de información.
3 Pulse el botón . El campo del título o capítulo queda resaltado en amarillo.
4 Pulse las teclas numéricas o / para seleccionar su título o capítulo favorito.
5 Pulse la tecla .
- Para reanudar la reproducción normal, pulse Goto hasta que el campo desaparezca.

19
DVD
Español
2-1
Reproducción DVD - Continuación
Seleccionar escenas en función del tiempo
1 Pulse el botón Goto durante la reproducción.
2 Pulse para desplazar el cursor al campo reservado a la indicación del tiempo.
3 Pulse . El campo de indicación del tiempo queda resaltado en amarillo.
4 Pulse las teclas numéricas para especi car la posición de inicio.
Ejemplo: Para ir al punto que corresponde a "01h 50 min. 00 seg.", pulse en orden "0", "1", "5", "0", "0" y "0".
5 Pulse la tecla .
- Para reanudar la reproducción normal, pulse Goto hasta que el campo desaparezca.
Repetir la reproducción
1 Pulse 1/ALL Repeat durante la reproducción. Aparecerá un mensaje.
2 Pulse varias veces el botón 1/ALL Repeat para seleccionar una de las cuatro opciones siguientes.
1/4 Desactivada: Repetición cancelada.
2/4 Capítulo: Se repite el capítulo.
3/4 Título: Se repite el título.
4/4 Disco: Se repite el disco.
Repetir secciones entre 2 puntos precisos (Repetir A-B)
1 Pulse el botón A-B durante la reproducción en el punto en el que desea que se inicie
la reproducción repetida (A).
aparece abajo a la derecha en pantalla.
2 Pulse de nuevo el botón A-B en el punto en el que desea que se acabe la reproducción
repetida (B).
aparecerá en pantalla. La sección entre los puntos A y B se reproducirá en bucle.
3 Pulse de nuevo A-B durante la reproducción para volver a la reproducción normal.
Visualización en pantalla de la información sobre la escena
1 Pulse el botón Info. durante la reproducción. Arriba a la izquierda en pantalla aparecerán los
campos de título, capítulo, indicación de tiempo, audio, repetición, perspectiva y subtítulos.
2 Para ocultar el campo de información, pulse el botón Info. nuevamente o espere unos instantes.
Cambiar el idioma de la pista de audio
1 Pulse varias veces el botón Audio durante la reproducción para seleccionar el
idioma deseado.

20
DVD
2-1
Reproducción DVD - Continuación
Visualizar la escena desde más cerca (zoom)
1 Pulse el botón Zoom durante la reproducción. Aparecerá una ventana de zoom en
pantalla.
2
Pulse varias veces el botón Zoom para ampliar el tamaño de la escena.
3 Pulse los botones / / / para seleccionar la escena a visualizar con tamaño
diferente: Zoom x2, x4 y x8.
- Para reanudar la reproducción normal, pulse Zoom hasta que el campo desaparezca.
Borrar/cambiar subtítulos
1 Pulse varias veces le botón Subtitle para ocultar o cambiar subtítulos.
Visualizar diferentes ángulos
1 Pulse varias veces el botón Angle durante la reproducción para seleccionar la
perspectiva deseada de la cámara.
Utilización de un menú DVD
1 Pulse Title. El menú DVD disponible en el disco aparecerá en pantalla.
2 Pulse / / / para seleccionar el elemento deseado. Pulse la tecla .
Para regresar al menú anterior, pulse Title.
Función de Menú
1 Pulse el botón Menu. Aparecerá un menú de capítulo con una breve introducción de cada párrafo. Puede
visualizar la introducción de cada capítulo y decidir qué capítulo desea ver primero.
2 Pulse / / / para seleccionar el elemento deseado. Pulse la tecla .
Saltar anuncios publicitarios
1 Pulse el botón CM Skip durante la reproducción. Con cada pulsación se amplía el intervalo del
salto en 30 segundos.
Esta función sólo está disponible para discos DVD+R/RW grabados.
•
Si ya ha cerrado un disco DVD+R, la función CM Skip no funcionará con él.
•

21
DVD
Español
2-1
Reproducción DVD - Continuación
Silenciar la salida de audio
1 Pulse el botón
aparecerá un icono de silencio.
Cuando en pantalla aparezca el icono "SILENCIO", la grabadora DVD no emite ningún sonido.
•
Para reactivarlo, pulse de nuevo el botón Mute.
Mute durante la reproducción. Abajo a la izquierda en pantalla
Ajuste del volumen
1 Pulse Volume +/- durante la reproducción para ajustar el volumen.
Menú VCD (sólo para VCD 2.0)
La función de control de reproducción PBC ofrece un menú en el que podrá seleccionar un capítulo
a partir del cual iniciar la reproducción. Tenga en cuenta que esto sólo funciona con discos VCD2.0
que contengan un menú correspondiente.
1 Pulse el botón PBC dos veces durante la reproducción.
2 Pulse las teclas numéricas para seleccionar el elemento deseado.
3 Pulse
o espere unos segundos.
El valor por defecto de la función PBC es ACTIVADO. Pulse el botón PBC una vez para desactivarla.
•
Pulse Return para volver al menú durante la reproducción (sólo si la función PBC está ACTIVADA).
•

2-2
Funciones útiles
Reproducción de CDs de imágenes de Kodak y CDs de
imágenes JPEG
Reproducción básica
Inserte un CD de imágenes de Kodak en la bandeja de discos.
La reproducción se iniciará al cabo de unos segundos. Las fotos se reproducirán automáticamente en forma de presentación
de diapositivas.
DVD
Zoom
1 Para ver las fotos con diferentes tamaños, pulse Zoom varias veces: Zoom x2, Zoom
x4, Zoom x1/2, Zoom x1/4 y normal.
2 Para moverse por la foto ampliada, pulse los botones / / / .
Pausa, Siguiente y Anterior
1 Para hacer una pausa en la presentación, pulse Pause.
- Para reanudar la reproducción, pulse de nuevo Pause.
2 Pulse el botón Siguiente o Anterior para visualizar la siguiente foto o
volver a la foto anterior.
Girar
1 Para girar la foto 90º, pulse los botones / / / cuando la foto esté en
pausa.
- La presentación de diapositivas se detendrá al ejecutar una de estas funciones.
- Para reanudar la presentación, pulse el botón Siguiente.
Miniaturas
1 Pulse el botón Stop durante la reproducción. Aparecerá una página con 9
miniaturas.
Para pasar a la página siguiente, seleccione pulsando .
2 Pulse los botones / / / para seleccionar una foto y luego pulse
para verla ampliada.
22

3-1 Reproducción de CDs de audio
Reproducción básica
La canción/pista
que se reproduce
actualmente
El tipo de disco que
está reproduciendo
Una lista de todas las
canciones contenidas
en el CD, con los
números y la duración
de las pistas.
Aparece cuando el CD
de audio contiene más
de 10 canciones. Pulse
para pasar a la página
siguiente.
Tiempo transcurrido
Pista que se está reproduciendo
/ Número total de pistas
de la canción actual
1 Pulse la tecla Power.
2 Para abrir la bandeja, pulse el botón de expulsión Eject. Coloque un disco en la bandeja.
3 Para cerrar la bandeja, pulse el botón de expulsión Eject.
Se inicia la reproducción.
4 Pulse los botones / o las teclas numéricas para seleccionar una música especí ca.
5 Pulse
o espere unos segundos.
Detener la reproducción
Pulse Stop.
Avance rápido (Retroceso rápido)
Pulse el botón F.Bwd o F.Fwd durante la reproducción.
La reproducción normal se reanudará cuando pulse el botón .
•
La velocidad de avance ( x2, x4, x8 y x16) o retroceso ( x2, x4, x8 y x16) cambia con cada
•
pulsación del botón F.Fwd o F.Bwd.
CDs de audio
Saltar pistas (hacia adelante o hacia atrás)
Saltar hacia adelante
Pulse el botón Siguiente durante la reproducción. Salta una pista cada vez que pulsa el botón.
Saltar hacia atrás
Pulse el botón Anterior durante la reproducción.
Si presiona una vez el botón durante la reproducción de una pista, la grabadora de DVD vuelve a la pista anterior para
reproducirla. La grabadora salta una pista cada vez que pulsa el botón.
Español
23

24
CDs de audio
a
a
3-1 Reproducción de CDs de audio - Continuació
Pausar la reproducción
Pulse el botón Pause durante la reproducción.
La grabadora detendrá la reproducción (pausa).
- Para reanudar la reproducción normal, pulse o pulse de nuevo .
Programar pistas de CDs de audio
Pista actualmente
s e le cc i on ad a .
Pulse / para
añadir la pista
deseada a la lista
de programación.
Pulse para iniciar la
reproducción en el
orden programado.
Pulse para borrar
todas las pistas
programadas.
Una lista de todas
las canc iones
contenida s en el
CD, con los números
y la duración de las
pistas.
Pulse para pasar a la
página siguiente.
La "lista de
p r o g r a m a c i ó n "
con l as p istas
seleccionadas.
1 Pulse Stop.
2 Pulse Program.
3
Pulse los botones / para seleccionar la pista deseada y pulse
a la lista de programación.
El orden de reproducción será de la primera hasta la última pista. Pero si ha establecido el orden de reproducción
•
de todas las pistas disponibles, la grabadora DVD las reproducirá en el orden indicado.
Para los ajustes, pulse para alternar entre las opciones siguientes.
•
When programming an Audio CD:
Lista de
reproducción
de CD
Lista de
programas
Reproducción de las pistas programadas
Pulse el botón para seleccionar el campo "Reproducción" y luego pulse para iniciar la reproducción en el
•
orden programado.
Borrar pistas programadas
Pulse el botón para seleccionar el campo "Lista de programas" y luego pulse / para seleccionar la
•
pista deseada. Pulse para eliminarla de la lista de programación.
Pulse el botón para seleccionar el campo "Borrar todo" y luego pulse para eliminar todas las pistas programadas.
•
Para salir de las pistas programadas
para añadirla
Reproducir
Borrar todo
Para salir, pulse Program. Si pulsa el botón Program para salir de las pistas programadas; el dispositivo ya no
•
las reproducirá en el orden que había programado. Tendrá que seleccionar Reproducir y pulsar para salir,
de manera que las pistas se reproducirán en el orden especi cado.

25
CDs de audio
Español
3-1 Reproducción de CDs de audio - Continuació
Seleccionar música por pistas
1 Pulse el botón Goto durante la reproducción.
2 Pulse / para desplazar el cursor al campo de pistas.
Pulse para ver otro campo de información.
3 Pulse . El campo de pistas queda resaltado en amarillo.
4 Pulse las teclas numéricas o / para seleccionar la pista favorita. Pulse la tecla .
Seleccionar música por tiempo
1 Pulse el botón Goto durante la reproducción.
2 Pulse / para desplazar el cursor al campo de indicación de tiempo. Pulse
para ver otro campo de información.
3 Pulse . El campo de indicación del tiempo queda resaltado en amarillo.
4 Pulse las teclas numéricas para especi car la posición de inicio.
Ejemplo: Para ir al punto que corresponde a "01h 30 min. 12 seg.", pulse en orden "0", "1", "3", "0", "1" y "2".
5 Pulse la tecla .
Reproducción aleatoria
1 Pulse el botón Goto durante la reproducción.
2 Pulse / para desplazar el cursor al campo Normal/Aleatorio.
3 Pulse . El campo de reproducción aleatoria queda resaltado en amarillo.
4 Pulse / para seleccionar la reproducción aleatoria.
1/2: Normal
2/2: Aleatorio
5 Pulse la tecla .
Repetir la reproducción
1 Pulse 1/ALL Repeat durante la reproducción. Arriba a la izquierda en pantalla
aparecerá un mensaje.
2 Pulse varias veces el botón 1/ALL Repeat para seleccionar una de las tres opciones siguientes.
1/3: Desactivado
2/3: Pista
3/3: Disco

26
Funciones de grabación
4-1
Con guración de la grabación
Con guración de la calidad de grabación
1 Pulse varias el botón Quality en el mando a distancia para alternar entre las opciones
de calidad siguientes.
HQ (High Quality – alta calidad): para grabar aproximadamente una hora
SP (Standard Play - estándar): para grabar aproximadamente dos horas
LP (Long Play – larga duración): para grabar aproximadamente tres horas
EP (Extended Play - extenso): para grabar aproximadamente cuatro horas
SLP (Standard Long Play – muy larga duración): para grabar aproximadamente seis horas
- Para volver a la página del MENÚ DE CONFIGURACIÓN, pulse .
- Para concluir las operaciones de con guración, pulse Setup para salir del menú.
Ajuste del tipo de soporte
Borrar (sólo para discos DVD+RW).
Para borrar los discos de DVD tiene que acceder al menú OSD. Véase el Capítulo 1-2: Con guración
de grabación/disco para más información.
Cerrar (sólo para discos DVD+R).
Para cerrar los discos de DVD tiene que acceder al menú OSD. Véase el Capítulo 1-2: Con guración
de grabación/disco o el Capítulo 4-4: Edición – Continuación para más información.

27
Funciones de grabación
Español
4-2
Grabación
Para grabar una fuente externa
Preparación:
1. Conecte la grabadora de DVD a su televisor.
2. Recuerde que sólo debe utilizar un disco DVD+RW o DVD+R que no haya sido cerrado. Esta unidad no puede
grabar discos DVD RAM, DVD-R o DVD-RW.
1 Encienda la grabadora de DVD ( Power) y el equipo externo.
2 Para abrir la bandeja, pulse el botón de expulsión Eject.
3 Inserte un disco grabable DVD+RW o DVD+R en la bandeja.
4 Para cerrar la bandeja, pulse nuevamente el botón Eject.
Si utiliza un disco DVD+RW o DVD+R virgen, la primera lectura tardará aproximadamente un minuto. Si inserta
un disco DVD virgen, éste se formateará automáticamente. Después se mostrará un título vacío con el 100% de
espacio disponible. En caso de insertar un disco DVD no virgen, aparecerá un menú con los títulos que ya han sido
grabados en él así como el espacio disponible.
5 Pulse el botón Source en el mando a distancia para alternar entre las diferentes fuentes
de señal A/V.
- Antes de ejecutar la función Source, encienda la grabadora DVD y todos los equipos externos que tiene conectados.
- Pulse Source varias veces para pasar de una fuente de señal de entrada a la siguiente, incluyendo: TV, Vídeo,
S-Video, Euroconector y DV.
6 Pulse el botón Record en el mando a distancia para iniciar la grabación.
7 Pulse el botón Pause en el mando a distancia para detener la grabación
temporalmente. Para reanudar la grabación, pulse nuevamente Pause.
8 Pulse el botón Stop en el mando a distancia para detener la grabación.
Abajo a la derecha en pantalla aparece la indicación "ESPERE". Espere hasta que abajo a la derecha aparezca la
indicación "EN VIVO". Ello signi ca que la grabación ha terminado.
9
Pulse el botón DVD/REC en el mando a distancia para cambiar al modo de DVD.
10Pulse / para seleccionar un título grabado.
11Pulse para reproducir el título.
Para grabar programas de televisión (Grabación instantánea)
1 Encienda la grabadora de DVD ( Power) y el televisor.
2 Para abrir la bandeja, pulse el botón de expulsión Eject.
3 Inserte un disco grabable DVD+RW o DVD+R en la bandeja.
4 Para cerrar la bandeja, pulse nuevamente el botón Eject.

28
Funciones de grabación
4-2
Grabación - continuación
5 Pulse el botón Source en el mando a distancia para ver los programas de televisión
a través de la grabadora.
6 Pulse PR +/- o las teclas numéricas para seleccionar el canal que desee grabar.
7 Pulse el botón Record en el mando a distancia para iniciar la grabación del programa
seleccionado.
8 Pulse el botón Pause en el mando a distancia para detener la grabación temporalmente.
Antes de reanudar la grabación puede seleccionar un nuevo canal pulsando PR +/- o las
teclas numéricas. Para reanudar la grabación, pulse nuevamente Pause.
9 Pulse el botón Stop en el mando a distancia para detener la grabación.
10Pulse el botón DVD/REC en el mando a distancia para cambiar al modo de DVD.
11Pulse / para seleccionar un título grabado.
12Pulse para reproducir el título.
Con guración de la grabación programada
Véase el Capítulo 1-5 Grabación programada: Lista de programas en la página 15 para
más información.

29
Funciones de grabación
Español
PRG 20
PRG 25
4-3 Edición
PRG 20
PRG 25
PRG 20
PRG 25
Para editar un título durante su reproducción
Insertar capítulo, Borrar capítulo y Ocultar capítulo
1 Pulse / para seleccionar el título deseado y pulse para iniciar la reproducción.
2 Pulse Edit para abrir el menú de edición.
3 Pulse / para seleccionar la opción deseada y luego pulse . Cuando haya
llegado a la posición donde quiera editar, pulse .
Para que las funciones de edición se puedan utilizar, un título debe contener por lo menos un capítulo. Con la
•
función "Insertar capítulo" puede insertar capítulos a los títulos que no contengan ninguna.
Una vez ocultado un capítulo, éste no se mostrará durante la reproducción normal. Si quiere ver el capítulo oculto, tendrá que
•
seleccionarlo por su número de capítulo. Para más información, véase el Capítulo 2-1: "Reproducción DVD – Continuación"
Para volver a mostrar un capítulo oculto, véase la función de "Mostrar capítulo". Para más información, véase la sección.
•
Insertar capítulo
Eliminar capítulo
Ocultar capítulo
Mostrar capítulo
1 2
1 2
1 2
inicia la reproducción...
EDITAR
Insertar Capítulo
Eliminar Capítulo
Ocultar Capítulo
Mostrar Capítulo
Nuevo Imágen
inicia la reproducción...
EDITAR
Insertar Capítulo
Eliminar Capítulo
Ocultar Capítulo
Mostrar Capítulo
Nuevo Imágen
inicia la reproducción...
EDITAR
Insertar Capítulo
Eliminar Capítulo
Ocultar Capítulo
Mostrar Capítulo
Nuevo Imágen
1 Pulse Edit con la función "Reproducir título entero" para mostrar los capítulos ocultos.
Aparecerá el menú de edición.
2 Pulse para seleccionar "Mostrar capítulo" y luego pulse .
Para reproducir un capítulo oculto puede emplear la "Reproducción DVD - Continuación". Para más información sobre
cómo seleccionar un capítulo con la función Goto, véase el Capítulo 2-1: "Reproducción DVD – Continuación"

30
Funciones de grabación
4-3 Edición - Continuación
PRG 20
PRG 25
PRG 20
PRG 25
Mostrar capítulo
1 2
inicia la reproducción...
EDITAR
Insertar Capítulo
Eliminar Capítulo
Ocultar Capítulo
Mostrar Capítulo
Nuevo Imágen
Nueva imagen
1 Pulse / para seleccionar el título deseado y pulse para iniciar la reproducción.
2 Pulse Edit. Aparecerá el menú de edición.
3 Pulse para seleccionar "Nueva imagen". Cuando haya llegado a la posición donde
quiera insertar la miniatura, pulse .
4 En pantalla se mostrará el menú de título.
Después de pulsar para editar la nueva imagen, aparecerá un mensaje "ESPERE" abajo a la derecha. Se
puede tardar unos 15 a 30 segundos antes de que la nueva imagen aparezca en menú de título.
Nueva imagen 1 2 4
EDITAR
Insertar Capítulo
Eliminar Capítulo
Ocultar Capítulo
Mostrar Capítulo
Nuevo Imágen
La miniatura queda cambiada

31
Funciones de grabación
Español
C
0
C
h.2
5
C
h.2
0
C
5
C
h.2
0
C
h.2
5
4-3 Edición - Continuación
C
h.2
0
C
5
C
h.2
0
C
h.2
5
C
h.2
0
C
h.2
5
C
h.2
0
C
h.2
5
C
h.2
0
C
h.2
5
C
h.2
0
C
h.2
5
Para editar un título mientras no se reproduzca
Hay cuatro posibilidades para editar un título en un disco DVD+RW: Proteger título, Borrar título,
Reproducir título entero y Editar título.
Hay tres posibilidades para editar un título en un disco DVD+R: Editar título, Reproducir título entero y Cerrar.
1 Pulse / para seleccionar un título del menú de títulos.
2 Pulse Edit. Aparecerá el menú de edición.
3 Pulse / para seleccionar la opción deseada pulsando .
4 Para las funciones Borrar título y Cerrar: Aparecerá un campo de opciones. Pulse
para seleccionar "Con rmar" y luego pulse .
Para Editar título: Aparecerá un campo "Editar título" con el nombre de título
predeterminado en el campo. Pulse
Cuando haya terminado de editar el título, pulse . En pantalla se mostrará el título
actualizado.
La función "Borrar título" no se puede aplicar a títulos protegidos. Primero tendrá que seleccionar "Desproteger
•
título" para desactivar la protección antes de que pueda editarlo.
Los nombres de título sólo pueden contener letras inglesas, números y símbolos. Cuando haya terminado de editar el título,
•
aparecerá el campo "LISTO". Se puede tardar unos segundos antes de que el nuevo título aparezca en el menú de título.
Para regresar al menú de selección de títulos, pulse Title.
•
Proteger título Borrar título
2 2 4 2
DVDR+W EDITAR
Proteger titulo
Borrar Título
Reproducir Título
EDITAR Título
DVDR+W EDITAR
Proteger titulo
Borrar Título
Reproducir Título
EDITAR Título
/
/ / para cambiar el nombre del título.
Reproducir título entero
DVDR+W EDITAR
Proteger titulo
Borrar Título
Reproducir Título
EDITAR Título
Borrar Título
Canceler Con rmar
DVDR+W EDITAR
Proteger titulo
Borrar Título
Reproducir Título
EDITAR Título
Editar título
2 4
DVDR+W EDITAR
Proteger titulo
Borrar Título
Reproducir Título
EDITAR Título
DVDR+W EDITAR
Proteger titulo
Borrar Título
Reproducir Título
EDITAR Título
S-VIDEO
DVDR+W EDITAR
Proteger titulo
Borrar Título
Reproducir Título
EDITAR Título
Sport
Nuevo título
Terminar
2 4
DVDR EDITAR
EDITAR Título
Reproducir Título
Terminar
DVDR EDITAR
EDITAR Título
Reproducir Título
Terminar
Ter mi nar
Canceler Con rmar

32
Para su información
5-1 Resolución de problemas
Antes de ponerse en contacto con nuestro servicio técnico para su grabadora de DVD, consulte
la tabla siguiente para identi car las posibles causas de su problema e intentar solucionarlo. En
ocasiones, una simple veri cación o un pequeño ajuste por su parte pueden solucionar el problema
y restablecer el buen funcionamiento del aparato.
PROBLEMA (COMÚN) SOLUCIÓN
No hay corriente eléctrica. • Inserte con precaución el cable de alimentación en la toma de corriente.
• Compruebe que el botón de encendido situado en la parte frontal de la grabadora
está en posición de encendido (ON).
• Enchufe otro aparato eléctrico para comprobar si hay corriente eléctrica en la toma de corriente.
La grabadora no inicia la reproducción • Se ha formado condensación. Espere entre 1 y 2 horas para que la condensación desaparezca.
después de pulsar el botón PLAY. • Esta grabadora sólo puede reproducir discos DVD y CDs de audio.
• Inténtelo con otro disco para comprobar si el disco es defectuoso.
• Veri que el código de región (código local).
La grabadora inicia la reproducción pero • Quizás el disco esté sucio. En ese caso, debe limpiarlo con cuidado.
se para enseguida. • Asegúrese de que ha insertado el disco con la etiqueta hacia arriba.
No hay imagen. • Compruebe que el equipo ha sido conectado correctamente.
• Asegúrese de que el ajuste de entrada de TV está en "Vídeo".
• Compruebe que el televisor está encendido.
• Seleccione el mismo canal y la misma fuente en la TV y en la grabadora.
No hay sonido. • Compruebe que el equipo ha sido conectado correctamente.
• Si utiliza un ampli cador de alta delidad, inténtelo con otra fuente sonora.
• Asegúrese de que ha seleccionado la salida analógica en el menú de ajustes de
la salida de audio.
Sonido distorsionado. • Compruebe que los ajustes de entrada para la TV y el sistema estéreo son correctos.
• No se emite ningún sonido durante la reproducción a cámara lenta o en modo de pausa.
No hay sonido en la salida digital. • Veri que las conexiones digitales.
• Asegúrese de que ha seleccionado la salida digital en el menú de ajustes.
• Compruebe que el formato de audio del idioma seleccionado corresponde a las
capacidades de su receptor.
Imagen distorsionada. • Compruebe que el disco no tiene huellas dactilares y límpielo con un paño suave
desde el centro hacia fuera.
• A veces pueden aparecer algunas distorsiones de la imagen. No es un mal funcionamiento.
Imagen totalmente distorsionada o sin color • El formato del disco no corresponde a la con guración TV utilizada (PAL/NTSC).
La imagen aparece distorsionada durante • Puede que la imagen aparezca distorsionada de vez en cuando. Es normal.
el avance o el rebobinado rápido.
El avance o rebobinado rápido no funciona. • Algunos discos tienen secciones que no permiten el avance o rebobinado rápido.
No hay imagen en formato 4:3 (16:9) • Seleccione el ajuste "Aspecto de pantalla" correcto correspondiente a las características
de su televisor.
El mando a distancia no funciona. • Compruebe que las pilas han sido insertadas respetando las polaridades (+ y -).
• Las pilas se han agotado: sustitúyalas.
• Dirija el mando a distancia hacia el sensor de señal del mando y realice la operación deseada.
• Utilice el mando a una distancia inferior a 7 metros del sensor.
• Retire los objetos situados entre el mando a distancia y el sensor de señal del
mando.

33
Para su información
Español
5-1
PROBLEMA (COMÚN) SOLUCIÓN
El botón PLAY no inicia la reproducción, • Compruebe que la función de protección (bloqueo para niños) está activada. En ese
incluso cuando el título está seleccionado. caso, desactívela o déjela activada, según lo que desee.
El idioma de los subtítulos y/o de las • Si el idioma de los subtítulos y/o de las pistas sonoras no existe en el disco, el idioma
pistas sonoras no es el seleccionado en seleccionado en los ajustes iniciales no se activará.
los ajustes iniciales.
No hay subtítulos. • Los subtítulos aparecen sólo en los discos que los contienen.
•
No se puede seleccionar otro idioma para • No puede seleccionar más de un idioma.
los subtítulos o las pistas sonoras.
No se puede modi car el ángulo. • Esta función depende del software. Incluso si un disco ofrece varios ángulos de
grabación, puede que dichos ángulos sólo se hayan grabado para escenas especí cas.
No hay sonido tras conectar los altavoces • Compruebe si el disco admite la reproducción en 5.1 canales.
de 5.1 canales • Compruebe el cableado de los altavoces.
• Compruebe el ajuste de salida de audio.
No funciona ninguna tecla (de la grabadora • Apague la unidad y vuelva a encenderla. Puede también apagar la unidad,
de DVD y/o del mando a distancia). desconectar el cable de alimentación de CA y luego volver a conectarlo. (Puede que
la grabadora no funcione correctamente en caso de tormenta, de electricidad estática
o debido a otros factores externos.)
No hay imagen ni sonido (para discos grabados) • Compruebe las conexiones de la grabadora de DVD y del equipo externo.
• Compruebe los ajustes de grabación programada.
• Veri que que haya utilizado un disco grabable adecuado (DVD+RW/DVD+R).
• Veri que que haya puesto el dispositivo en modo de espera antes de efectuar la
grabación programada.
• Veri que de haber cerrado el disco (sólo para discos DVD+R).
Imagen distorsionada o pantalla en blanco • Compruebe los ajustes para la norma de vídeo del televisor.
• Si desea utilizar el "Barrido progresivo", debe seleccionar primero "Componente"
para la salida de vídeo. El formato de salida actual debe ser el mismo.
El menú OSD no aparece • Debe guardar algún ajuste pulsando la tecla Izquierda. Compruébelo.
Hora incorrecta. • Ajuste la hora.
Resolución de problemas
Los subtítulos no aparecen en la pantalla de TV. Pulse el botón SUBTITLE para mostrarlos.
- Continuación

5-2 Manejo y mantenimiento del disco
Precauciones de uso
Toque el disco por los extremos para no ensuciar la super cie
•
con huellas dactilares. (A)
Las huellas dactilares, los rasguños y la suciedad pueden causar
saltos y distorsiones durante la reproducción .
No escriba en el lado de la etiqueta con un bolígrafo u otra her-
•
ramienta de escritura.
No utilice productos de limpieza en spray, gasolina, diluyente,
•
líquidos contra la electricidad estática u otro disolvente.
Procure no dejar caer el disco ni doblarlo.
•
No inserte más de un disco en la platina.
•
No intente cerrar la platina si el disco no ha sido introducido
•
correctamente. (B)
Conserve el disco en su caja de original cuando no lo utilice.
•
Si la super cie está sucia (C)
Límpiela con cuidado con un paño suave y húmedo (sólo con
agua).
Cuando limpie los discos, mueva siempre el paño desde el centro
(agujero) hacia fuera.
(Si limpia los discos con un movimiento circular, pueden aparecer
rayaduras circulares que generarán ruido o destrozarán el disco.)
Se puede formar humedad en el disco si lo ha movido de un entorno
Para su información
frío a un entorno caliente
Séquelo con un paño suave, seco y sin pelusa antes de utilizarlo.
(A)
(B)
Almacenamiento incorrecto del disco
Puede dañar sus discos si los almacena en los siguientes lugares:
Zonas expuestas a la luz directa del sol
•
Zonas con humedad o polvo
•
Zonas expuestas directamente a aparatos de calefacción u otras
•
fuentes de calor
Formatos de disco reproducibles
DVD, DVD+RW, DVD+R, DVD-RW, DVD-R, CD-DA, Mixed CD-
•
DA, discos con archivos JPEG y discos de imagen Kodak.
Formatos de disco grabables
DVD+RW (programas aplicativos)
•
DVD+R
•
Mantenimiento
Asegúrese de apagar la unidad y de desconectar el cable de
•
alimentación de CA antes de realizar cualquier operación de
mantenimiento.
Limpie la unidad con un paño suave y seco.
•
Si la super cie está muy sucia, límpiela con un paño ligeramente
mojado en agua jabonosa y bien escurrido, y luego un paño seco.
Nunca utilice alcohol, gasolina, diluyente, liquido de limpieza u
•
otros productos químicos. No utilice tampoco aire comprimido
para quitar el polvo.
Bandeja del
disco
(C)
Disco
34


 Loading...