

Page 1
Page 2

Français 5
English 8
Español 11
Italiano 14
Nederlands 17
Русский 20
32
Page 3
4
3
2
1
15
17
16
17c
18
19
20
21
22
24
26
27
9
10
11
12
13
5
6
7
8
23
25
17b17a
14
Page 4
C4 C5
D
G1
H1
H3
I1
I2
J
H4
H2
G2
E F1 G
F2
C2
A1
A2
B1
B2
C1
C3
G3
Page 5

Page 6

5
mode d’emploi dégagerait
Moulinex de toute responsabilité.
Votre aspirateur est un appareil
électrique : il doit être utilisé dans les
conditions normales d’utilisation.
Utilisez et rangez l’appareil hors de
portée des enfants.
Ne laissez jamais l’appareil fonctionner
sans surveillance.
Ne tenez pas le suceur ou l’extrémité du
tube à portée des yeux et des oreilles.
Vérifiez que la tension d’utilisation
(voltage) de votre aspirateur
corresponde bien à celle de votre
installation.
Débranchez l’appareil en retirant la prise
de courant :
- immédiatement après l’utilisation,
- avant chaque changement
d’accessoires,
- avant chaque nettoyage, entretien ou
changement de filtre.
N’aspirez pas de surfaces mouillées,
d’eau ou de liquides quelle que soit leur
nature, de substances chaudes, de
substances ultrafines (plâtre, ciment,
cendres...), de gros débris tranchants
(verre), de produits nocifs (solvants,
décapants...), agressifs (acides,
nettoyants...), inflammables et explosifs
(à base d’essence ou d’alcool).
Ne plongez jamais l’appareil dans l’eau,
ne projetez pas d’eau sur l’appareil et ne
l’entreposez pas à l’extérieur.
N’utilisez pas l’appareil :
- s’il est tombé et présente de
détériorations visibles ou des anomalies
de fonctionnement,
- si le cordon est défectueux.
Dans ce cas, n’ouvrez pas l’appareil,
mais envoyez-le au Centre Service
Agréé le plus proche (voir ci-joint la liste
des adresses).
Les réparations ne doivent être
effectuées que par des spécialistes avec
des pièces détachées d’origine.
Réparer un appareil soi-même peut
constituer un danger pour l’utilisateur.
L’ensemble enrouleur et cordon des
aspirateurs doit être remplacé
impérativement par un Centre Service
Agréé afin d’éviter un danger.
Conformément à la réglementation en
vigueur, tout appareil hors d’usage
doit être rendu définitivement
inutilisable : débrancher et couper le
cordon avant de jeter l’appareil.
Nous vous remercions d’avoir choisi
un appareil de la gamme Moulinex.
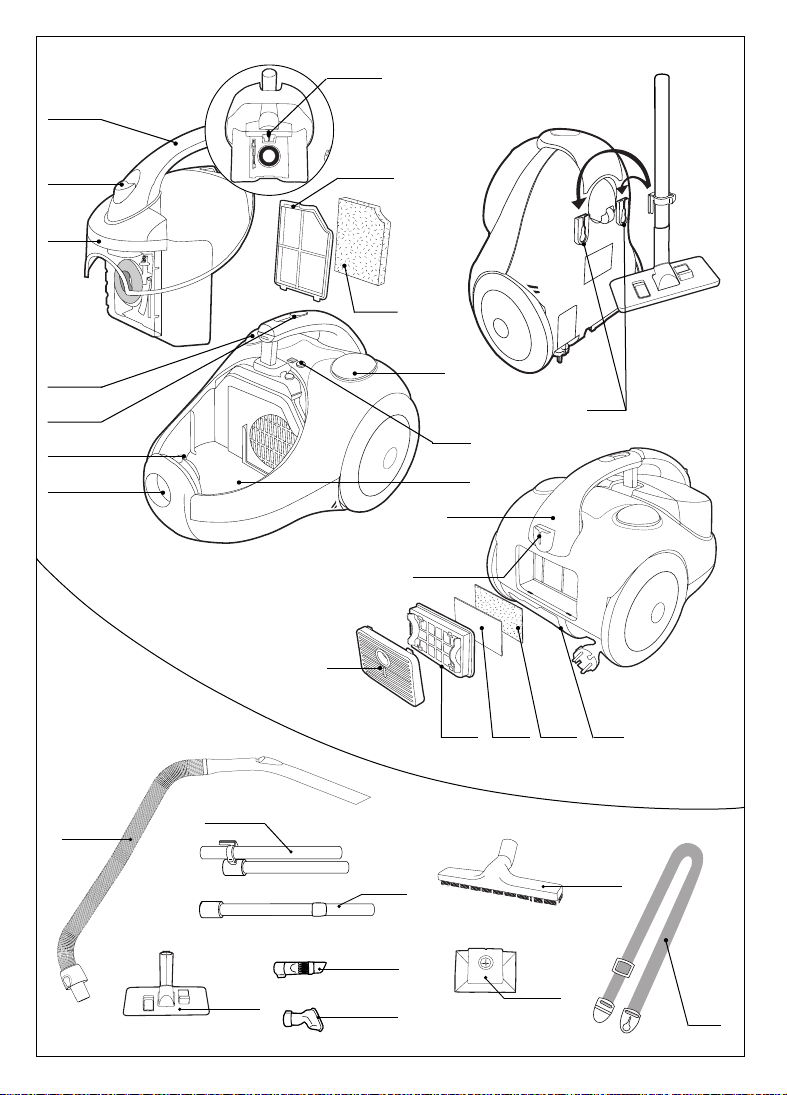
1. Ouverture d’aspiration
2. Glissières de maintien
3. Variateur électronique de
puissance (selon modèle*)
4. Pédale enrouleur de cordon
5. Couvercle avec support sac
6. Bouton d’éjection du sac
7. Poignée du couvercle
8. Clipse-sac
9. Grille de la mousse de protection
du moteur
10. Mousse de protection du moteur
11. Pédale Marche/Arrêt
12. Voyant lumineux de remplissage
du sac (selon modèle*)
13. Compartiment sac
14. Position de rangement des tubes
à la verticale
15. Poignée de transport de
l’aspirateur
16. Position de rangement des tubes
17. Grille de sortie d’air
a. Cassette filtre
b.
Filtre micro-actif (selon modèle*)
c. Filtre mousse
18. Rangement accessoires 2 en 1
Accessoires standard ou en option
(selon modèle*) :
19. Flexible avec crosse extra longue
et variateur mécanique de
puissance
20. Tubes
21. Tube télescopique
22. Suceur tous sols
23. Suceur 2 en 1
24. Suceur ameublement
25. Suceur parquet
26. Sacs papier réf. A26B09
27. Bandoulière
*Selon modèle : il s’agit
d’équipements spécifiques à certains
modèles ou d’accessoires
disponibles en option.
Lisez attentivement le mode
d’emploi avant la première
utilisation de votre appareil :
une utilisation non conforme au
Conseils de sécurité
Description
Page 7
6
Poussez le variateur pour régler la
puissance d’aspiration : vers la
position maxi pour les sols et sur la
position min pour le mobilier et les
tissus fragiles.
Avec le variateur mécanique de
puissance (selon modèle*) :
Ouvrez le volet du curseur de
régulation pour diminuer
manuellement la puissance
d’aspiration, ex : sur les surfaces
fragiles...
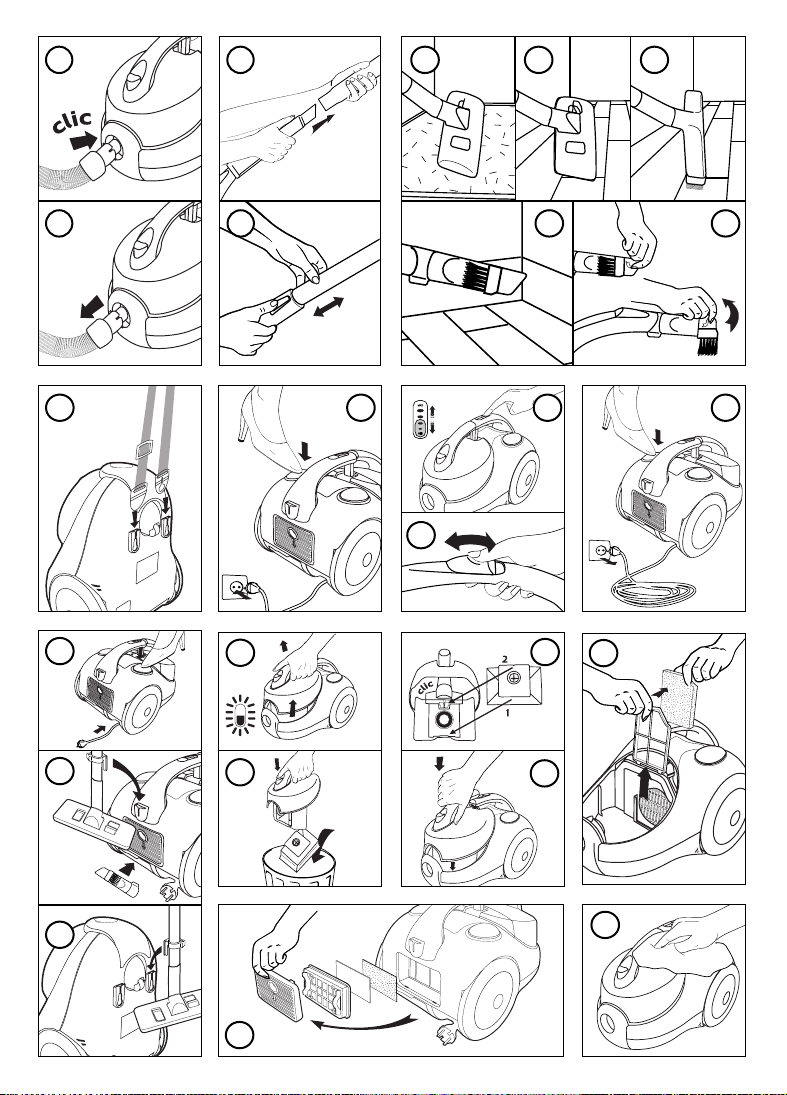
Rangement.
Après utilisation, arrêtez votre
aspirateur en appuyant sur la pédale
marche-arrêt (11) et débranchez-le.
Rangez le cordon en appuyant sur la
pédale enrouleur de cordon (4).
Placez les tubes dans le rangement
des tubes (16). Placez l’accessoire 2
en 1 (23) dans son rangement (18).
En position verticale, placez les tubes
dans leur rangement sous l’appareil
(14).
Important !
Arrêtez et débranchez toujours
votre aspirateur avant l’entretien
ou le nettoyage.
Changement de sac.
Le voyant de remplissage (12) du sac
(selon modèle*) vous indique que le
sac est plein ou saturé.
Si vous constatez une diminution de
l’efficacité de votre appareil, réglez la
puissance au maximum et maintenez
le suceur levé au-dessus du sol. Si le
voyant reste allumé, remplacez le sac.
Soulevez le couvercle par sa poignée
(7). Pour jeter le sac, placez-vous
au-dessus d’une poubelle et appuyez
sur le bouton d’éjection automatique
du sac (6).
Engagez le bas de la cartonnette d’un
sac neuf dans le support-sac et
appuyez sur le haut de la cartonnette
pour l’engager dans le clipse-sac (8).
Attention !
Vérifiez que le sac est bien en
place dans le clipse-sac avant de
refermer le couvercle.
Replacez le couvercle en faisant coulisser
le support sac le long des glissières de
maintien (2) et appuyez à fond sur la
poignée (7) pour fermer le couvercle.
Entretien et nettoyage
Cet appareil est uniquement réservé à
un usage ménager et domestique ; en
cas d’utilisation non appropriée ou non
conforme au mode d’emploi, aucune
responsabilité ne peut engager la
marque.
Votre appareil est conforme aux
directives 73/23 CEE et 89/336 CEE.
Mise en place du flexible sur
l’appareil.
Enfoncez le flexible (19) dans
l’ouverture d’aspiration (1) jusqu’au
déclic.
Pour le retirer, appuyez sur les
touches de l’embout flexible et tirez.
Montage des tubes.
Assemblez les deux tubes (20) en
tournant légèrement.
Si votre aspirateur est équipé du tube
télescopique métal (21) : poussez le
bouton de réglage vers l’avant, sortez
la longueur de tube désirée puis
relâchez le bouton pour le bloquer.
Montage des accessoires.
Emboîtez l’accessoire à l’extrémité du
tube.
Pour les tapis et moquettes : utilisez le
suceur (22) en position brosse rentrée.
Pour les parquets et sols lisses :
utilisez le suceur (22) en position sortie,
ou utilisez directement le suceur
parquet (25).
Pour les recoins et les endroits
difficiles d’accès : utilisez l’accessoire
2 en 1 (23) en position suceur plat.
Pour les meubles : utilisez la brossette
de l’accessoire 2 en 1 (23) ou le
suceur ameublement (24).
Installation de la bandoulière
(selon modèle*).
Votre appareil est équipé d’une
bandoulière (27) qui vous permet de
le porter sur l’épaule.
Pour monter la bandoulière fixez les
pattes de fixation dans les encoches.
Branchement du cordon et mise
en marche.
Déroulez complètement le cordon,
branchez votre aspirateur et appuyez
sur la pédale marche-arrêt (11).
Réglage de la puissance
d’aspiration.
Avec le variateur électronique de
puissance (3) (selon modèle*) :
Utilisation
A1
G
G1
G2
H1
H2
H3
H4
B1
C1
C2
C3
C4
D
E
F1
F2
B2
A2
C5
G3
Page 8
7
NB : ne soulevez jamais l’aspirateur
par la poignée du couvercle
(7)
,
utilisez toujours la poignée de
l’aspirateur
(15)
.
Nettoyage de la mousse de
protection du moteur.
Attention !
La mousse de protection doit
toujours rester en place lors de
l’utilisation.
Enlevez le couvercle (5). Retirez la
grille (9) et enlevez la mousse (10).
Secouez-la puis nettoyez-la, tous les
cinq changements de sac, avec de
l’eau savonneuse (détergent doux)
tiède.
Rincez, séchez et remettez en place.
Attention!
Laissez complètement sécher la
mousse avant de la remettre en
place.
Nettoyage du filtre mousse de
sortie d’air.
Ôtez la grille de sortie d’air (17),
enlevez la cassette-filtre (17a),
enlevez le filtre mousse (17c).
Secouez-le puis nettoyez-le, tous les
cinq changements de sac, avec de
l’eau savonneuse (détergent doux)
tiède.
Rincez, laissez sécher et remettez en
place.
Attention !
Laissez complètement sécher le
filtre mousse avant de le remettre
en place.
Changement du filtre micro-actif
(Ref A26B09) (selon modèle*).
Changez le filtre micro-actif (17b)
tous les cinq changements de sac, il
se trouve sous le filtre mousse de
sortie d’air (17c).
Nettoyage de l’aspirateur.
Essuyez le corps de l’appareil et les
accessoires avec un chiffon doux et
humide, puis séchez.
Essuyez le couvercle avec chiffon sec.
N’utilisez pas de produits agressifs ou
abrasifs.
Votre aspirateur ne démarre pas.
- L’appareil n’est pas alimenté : vérifiez
que l’appareil est correctement branché.
Votre aspirateur n’aspire pas.
- Un accessoire ou le flexible est bouché :
débouchez l’accessoire ou le flexible.
- Le couvercle est mal refermé : replacez
le couvercle en faisant coulisser le
support-sac le long des glissières de
maintien et appuyez à fond sur la
poignée pour fermer le couvercle.
Votre aspirateur aspire moins bien,
fait du bruit, siffle.
- Un accessoire ou le flexible est
partiellement bouché : débouchez
l’accessoire ou le flexible.
- Le sac est plein ou saturé par des
poussières fines : remplacez le sac ou
videz le sac textile.
-
Le filtre mousse et/ou le filtre micro-actif
sont saturés : nettoyez le filtre mousse
et remplacez le filtre micro-actif (selon
modèle*).
- Le variateur électronique de puissance
est en position min : augmentez la
puissance à l’aide du variateur
électronique de puissance (sauf si vous
aspirez des tissus fragiles).
L’indicateur de remplissage du sac
reste allumé.
- Le sac est saturé : remplacez le sac ou
videz le textile.
- Le suceur est difficile à déplacer :
ouvrez le curseur de régulation de la
crosse ou diminuez la puissance.
Le cordon ne rentre pas totalement.
- Le cordon est ralenti lors de sa rentrée :
ressortez le cordon et appuyez sur la
commande.
Si un problème persiste, confiez votre
aspirateur au Centre Service Agréé
Moulinex le plus proche. Consultez la
liste des Centres Service Agréés
Moulinex ou contactez le Service
Consommateurs Moulinex.
Si votre appareil ne fonctionne
pas ou fonctionne mal
I1
I2
J
Page 9

8
We thank you for having chosen an
appliance from the Moulinex range.
1. Suction opening
2. Retaining slides
3. Electronic power control
(Depending on model*)
4. Automatic cable rewind pedal
5. Cover with dust bag support
6. Bag eject button
7. Cover handle
8. Bag clips
9. Engine foam grill protection
10. Engine foam protection
11. On/Off pedal
12. Warning light for full dust bag
(depending on model*)
13. Bag compartment
14. Vertical storage position of tubes
15. Vacuum cleaner carrying handle
16. Storage position of tubes
17. Air exit grill
a. Filter cartridge
b. Micro-active filter (depending
on model*)
c. Foam filter
18. Storage accessories 1 and 2
Standard or optional accessories
(depending on model*)
19. Flexible tube with extra-long
handle and manual suction
power regulator
20. Tubes
21. Telescopic tube
22. Automatically adjusting floor head
23. Nozzle 2 in 1
24. Furniture nozzle
25. Floor nozzle
26. Paper bags ref.A26B09
27. Carrying strap
*Depending on model: it means special
equipment for some models or optional
accessories.
Read the instructions for use
carefully before using your appliance
for the first time: any use which
does not conform to these
instructions will absolve Moulinex
from any liability.
Your vacuum cleaner is an electrical
Safety Recommendations
Description
appliance: it must only be used under
normal operating conditions. The
appliance should be used and stored out
of the reach of children. Never leave the
appliance unattended when it is switched
on.
The appliance is not intended for use by
young children or infirm persons without
supervision.
Young children should be supervised to
ensure that they do not play with the
appliance.
Always keep nozzles and tube ends well
away from eyes and ears.
Make sure that the operating voltage of
your vacuum cleaner is the same as your
supply voltage - 230-240v.
Unplug the appliance by removing the
plug from the power outlet:
- immediately after use,
- before changing accessories,
- before maintenance, cleaning or
changing the dustbag.
Do not vacuum wet surfaces, any water
or any kind of liquids, hot substances,
ultra-fine substances (plaster, cement,
ash, etc.) large sharp debris (glass),
dangerous products (solvents, stripping
compounds, etc.), chemical products
(acids, cleaners, etc.), inflammable or
explosive products (petrol- or alcoholbased).
Do not immerse the appliance in water,
project water on the appliance or store it
outdoors.
Do not use the appliance:
- if it has been dropped and shows signs
of damage or functions abnormally,
- if the supply cord is defective.
In this case do not open the appliance
and call our helpline (overleaf).
Repairs should only be carried out by
specialists using original replacement
parts. It is dangerous to try to repair an
appliance by yourself.
Vacuum cleaner supply cords and
winding systems must, in all cases, be
replaced by our approved Service Centre.
In accordance with current regulations,
before disposing of an appliance no longer
needed, the appliance should be made
non-operational (by unplugging it and
cutting off the electricity supply cord).
This product has been designed for
domestic use only. Any professional use,
innapropriate use or failure to comply
with the instructions, the manufacturer
accepts no responsibillity and the
guarantee will not apply.
Your appliance conforms to the 73/23
EEC and 89/336 EEC directives.
Page 10

9
Attaching the flexible hose to the
vacuum cleaner.
Push the flexible hose (19) in the
opening (1) until your hear a clicking
sound.
To remove the flexible hose from the
vacuum cleaner, press the button
situated on the nozzle and pull.
Assembling the tubes.
Assemble the 2 tubes (20) by turning
slightly.
If your appliance is equipped with a
metal telescopic tube (21): push the
slide switch down, and adjust to the
required length, release the slide
switch to lock in place.
Fitting the accessories.
Fit the accessory at the end of the
tube.
For rugs and wall-to-wall carpeting:
use the head (22) with brushes lifted.
For floors and floor-boards: use the
head (22) in the lowered position,
or directly use the floor noozle.
To vacuum next to skirting boards and
awkward corners : use the dual
accessory tool (23) in the crevice
nozzle position.
For furniture: use the dusting brush of
the dual accessory tool (23) or the
furniture nozzle (24).
Installing the carrying strap
(depending on model*).
Your appliance is equipped with a
strap (27) that allows you to carry it
on your shoulder.
To attach the strap clip the hooks in
the slots.
Plugging in the electrical power
cord and using the vacuum
cleaner.
Completely unwind the power cord,
plug in your vacuum cleaner and push
the on/off pedal (11).
Adjusting the suction power.
With the electronic power selector (3)
(depending on model*)
Push the power selector or to select
the vacuuming power: position maxi
for floors and position mini for
furniture and delicate materials.
With the variable power selector
(depending on model*)
Using the appliance
Open the selector switch flap to
manually reduce suction power
regulator, ex: fragile surfaces…
Storage.
After use, stop your appliance by
pressing on the on/off pedal (11) and
unplug it.
Replace the cable by pressing the
automatic cable rewind pedal.
Place the tubes in their storage
position (16). Place the dual accessory
tool (23) in its storage area (18).
In vertical position, place the tubes in
their storage position under the
appliance (14).
Important!
Always stop and unplug your
appliance before maintenance or
cleaning.
Changing the bag.
The bag full indicator (12) indicates
(depending on model*) that the bag is
full or saturated.
If you notice that your vacuum cleaner
is less efficient, select the maximum
power and by lifting the floor head off
the floor, if the indicator stays on,
change the bag.
Lift the cover by its handle (7).
To throw away the bag, place the
cleaner above a rubbish bin and press
on the automatic eject button (6).
Place the bottom of a new dustbag
cardboard in the bag clip then push
on the top of the cardboard (8).
Warning!
Check that the bag is in place
before closing the cover.
Replace the cover by letting the bag
holder slide along the retaining slides
(2) then press firmly on the handle (7)
to close the cover.
NB. Never try to carry the vacuum
cleaner (7) by the cover handle,
always use the carrying handle (15).
Cleaning the motor foam protection.
Warning!
The motor foam protection must
always be in place when in use.
Remove the cover (5), the grid (9)
then remove the foam (10). Shake it
Maintenance and cleaning
A1
G
G1
H1
H2
H3
H4
B1
C1
C2
C3
C5
D
E
F1
F2
B2
A2
I1
G2
G3
C4
Page 11

10
and clean it, every five dustbag
changes, with tepid soapy water.
Rinse, dry and put it back in place.
Warning!
Leave the foam to dry thoroughly
before putting back in place.
Cleaning the air outlet filter.
Remove the air exit grill (17) to
remove the filter cartridge (17a).
Remove the foam filter, shake it and
clean it, every 5 dustbag changes,
with tepid soapy water. Rinse, dry and
put it back in place.
Warning !
Let the foam dry completely
before putting back in place.
Changing the micro-active filter
(Ref. A26B09) (depending on model*).
Change the micro-active filter (17b)
every 5 bag changes, it is under the
air exit foam filter (17c).
Cleaning the vacuum cleaner.
Clean the housing of the vacuum
cleaner with a soft and humid rag and
let dry.
Clean the cover with a dry rag
Do not use abrasive or aggressive
products.
Your vacuum cleaner does not
start.
- The appliance is not plugged-in,
check that the appliance is correctly
plugged in.
There is no suction.
- An accessory or the tube is clogged.
Unclog the accessory or flexible hose.
- The lid is not closed properly.
Reposition the lid by sliding the bag
support along the support slides and
by pressing firmly on the handle to
close the lid.
The suction of your vacuum
cleaner has dropped, it makes a
noise and whistles.
- An accessory or the flexible hose is
partially clogged. Unclog the
accessory or flexible hose.
If your appliance does not
work or has a problem
- The bag is full or saturated with fine
dust. Put a new bag in or empty the
fabric dust bag.
- The foam filter and/or the microactive filter are saturated. Clean the
foam filter and change the microactive filter (depending to the
model*).
-The electronic variable suction power
selector is in the minimum position.
Increase the power with the help of
the electronic variable suction power
selector (except if you are vacuuming
delicate fabrics).
The bag full indicator remains on.
-The bag is full. Put a new one in or
empty the fabric bag.
The floor head is hard to move
around.
-Open the suction regulator on the
handle or reduce power.
The power cable does not rewind
completely.
-The power cable is slow in reentering
its housing. Pull the cable back out
and press on the button again.
If the problem remains, contact and
give your vacuum cleaner to the
nearest Moulinex Approved Service
Centre.
Refer to the list of Approved Service
Centres or contact the Moulinex
Customer Service - See enclosed After
Sales Service leaflet.
I2
J
Page 12

11
Gracias por haber elegido un
electrodoméstico Moulinex
1. Boca de aspiración
2. Pestañas de fijación
3. Control electrónico de
potencia (depende del
modelo*)
4. Recogecables automático
5. Tapa con soporte para la bolsa
6. Botón de eyección automática de
la bolsa
7.
Asa de la tapa
8.
Pestañas de sujeción de la bolsa
9.
Rejilla de la espuma de protección
del motor
10.
Espuma de protección del
motor
11.
Pedal de conexión/desconexión
12.
Piloto luminoso de llenado de
bolsa (depende del modelo*)
13.
Compartimiento para la bolsa
14.
Posición de almacenamiento
vertical de los tubos
15.
Asa de transporte del aspirador
16.
Parking System
17.
Rejilla de salida de aire
a. Cartucho-filtro
b. Filtro micro-activo (depende del
modelo*)
c. Filtro de espumo
18.
Compartimiento de accesorios
2 en 1
Accesorios estándar u opcionales
(depende del modelo*)
19.
Tubo flexible con mango extra
largo y regulador manual de
potencia de aspiración
20.
Tubos
21.
Tubo telescópico
22.
Boquilla universal
23.
Boquilla 2 en 1
24.
Boquilla para tapicerías
25.
Boquilla parquet
26.
Bolsas de papel ref. A26B09
27.
Bandolera
*Depende del modelo: se refiere al
equipamiento especial que incluyen
algunos de los modelos o accesorios
opcionales.
Lea detenidamente las
instrucciones que acompañan al
Recomendaciones de seguridad
Descripción
aparato antes de utilizar por
primera vez este
electrodoméstico: Moulinex
queda exenta de cualquier
responsabilidad que pueda
derivarse de utilizar este
producto sin cumplir dichas
instrucciones.
Su aspirador es un aparato eléctrico: se
ha de utilizar encondiciones normales
de uso. Utilice y guarde el aparato fuera
del alcancede los niños. Nunca deje su
aparato en marcha sin vigilancia.
No acerque nunca la boquilla o la
extremidad del tubo a los ojos o
las orejas.
Compruebe que la tensión del aparato
utilizada (voltaje)corresponde a la de
su instalación eléctrica.
Desenchufe el aparato:
- justo después de su utilización,
- antes de cada cambio de accesorios,
- antes de cada limpieza,
mantenimiento o cambio de filtro.
No aspire superficies mojadas, agua u
otro líquido sea cual sea su naturaleza,
substancias calientes, materias ultrafinas
(yeso, cemento, cenizas…), desechos
voluminosos cortantes (vidrio),
productos nocivos (disolventes,...),
tóxicos (ácidos, limpiadores ...),
inflamables ni explosivos (a base de
gasolina o de alcohol).
No sumerja el aparato en agua, no
proyecte agua sobre él y no lo guarde
en el exterior.
No sumerja nunca el aparato en agua y
no lo deje en el exterior.
No utilice el aparato si:
- se ha caído o presenta averías
visibles o anomalías de
funcionamiento.
- el cable está defectuoso.
En este caso, no abra el aparato y
envíelo al Servicio Técnico más
cercano autorizado por la marca (ver
lista adjunta de direcciones).
Las reparaciones sólo deberán ser
realizadas por especialistas, con
piezas de recambio originales. Reparar
un aparato por su cuenta puede
representar un peligro para el usuario.
Deberá dirigirse exclusivamente a un
Servicio Técnico autorizado por el
fabricante para reemplazar los conjuntos
de recogecable y cable.
De acuerdo con la reglamentación
vigente, todo aparato que esté fuera de
servicio debe quedar inutilizado
definitivamente. Por ello, se ruega
desenchufar y cortar el cable antes de
tirar el aparato.
En caso de uso inadecuado o
Page 13

12
inconforme con el modo de empleo,
la marca declina toda responsabilidad.
Su aparato ha sido fabricado de
acuerdo con las directivas 73/23 CEE y
89/336 CEE.
Montaje del tubo flexible.
Introduzca el tubo flexible
(19)
en la
boca
(1)
hasta que oiga un clic.
Para extraer el tubo flexible del
aspirador, pulse el botón situado en la
boquilla y tire.
Montaje de los tubos.
Una los 2 tubos
(20)
haciéndolos girar
ligeramente.
Si su aparato está equipado con un
tubo telescópico de metal (21):
desplace la lengüeta hacia abajo, y
ajuste la longitud del tubo, luego
suelte la lengüeta para que quede fijo.
Montaje de los accesorios.
Acople los accesorios en el extremo
del tubo.
Para alfombras y moquetas, utilice la
boquilla universal en posición cepillo
recogido
(22)
.
Para suelos lisos y parquets: utilice la
boquilla universal en posición cepillo
bajado
(22)
,
o utilice directamente la boquilla
parket
(25)
.
Para limpiar zócalos y rincones
difíciles: utilice el accesorio 2 en 1
(23)
en posición boquilla plana.
Para limpiar muebles: utilice el cepillo
para el polvo que incorpora el
accesorio 2 en 1
(23)
o la boquilla para
tapicerías
(24)
.
Instalación de la bandolera de
transporte (depende del modelo*).
Su aparato incluye una bandolera
(27)
para que pueda colgárselo del
hombro.
Para colocarla en el aparato fije los
pasadores en las soportes
correspondiente.
Conexión del cable de
alimentación y utilización del
aspirador.
Extraiga completamente el cable de
alimentación, conecte el aspirador a la
toma de corriente y pulse el pedal de
conexión/desconexión
(11)
.
Ajuste de la potencia de
aspiración.
Con el selector electrónico de
Utilización del producto
potencia (depende del modelo*)
(3)
:
Empuje el botón para ajustar la
potencia de aspiración: posición Max
para los suelos y posición Min para
los muebles y las superficies
delicadas.
Con el selector de potencia variable
(depende del modelo*):
Abra la ventanilla del selector para
fijar manualmente una potencia de
aspiración menor si, por ejemplo, está
limpiando superficies frágiles…
Almacenamiento.
Cuando termine de utilizarlo,
desconecte el aparato pulsando el
pedal de conexión/desconexión
(11)
y
desenchúfelo de la red.
Guarde el cable presionando sobre el
pedal recogecables (4).
Coloque los tubos en el Parking
System (16). Coloque el accesorio 2
en 1
(23)
en su compartimiento
(18)
.
En posición vertical, coloque los tubos
en su alojamiento debajo del aparato
(14)
.
¡Importante!
Desconecte y desenchufe siempre
el aparato antes de proceder a su
mantenimiento o a su limpieza.
Cambio de la bolsa.
El piloto luminoso
(12)
indica
(depende del modelo*) que la bolsa
está llena o saturada.
Si nota que el aspirador limpia
menos, seleccione la potencia
máxima y levante la boquilla del
suelo; si el indicador continua
encendido, cambie la bolsa.
Levante la tapa utilizando el asa (7).
Para deshacerse de la bolsa, coloque
el aparato sobre un cubo de basura y
pulse la tecla de expulsion
automática
(6)
.
Enganche el cartón de una bolsa
nueva en el soporte de bolsa y
presione para que las pestañas la
sujeten bien (8).
¡Precaución!
Asegúrese de que la bolsa está
correctamente colocada antes de
cerrar la tapa.
Mantenimiento y limpieza
A1
G
G1
G2
H1
H2
H3
B1
C1
C2
C3
C4
D
E
F1
B2
A2
F2
C5
G3
Page 14

13
Coloque la tapa haciendo deslizar el
soporte de la bolsa a lo largo de las
pestañas de fijación (2) y presione a
fondo sobre el asa (7) para cerrar la
tapa.
Atención: nunca transporte el
aspirador utilizando el asa de la tapa
(7) utilice siempre el asa de
transporte (14).
Limpieza de la espuma de
protección del motor
¡Precaución!
La espuma de protección deberá
estar siempre colocada durante la
utilización.
Abra la tapa (5). Retire la rejilla (9) y
extraiga la espuma (10). Sacúdala y
limpíela, cada cinco cambios de bolsa,
con agua jabonosa tibia (detergente
suave). Aclare, seque y vuelva a
colocarlo.
¡Precaución!
Deje que la espuma se seque
completamente antes de
colocarla en su sitio.
Limpieza del filtro de espuma que
se encuentran en la rejilla de
salida de aire.
Extraiga la rejilla de salida del aire
(17), extraiga el cartoucho filtro (17a),
extraiga el filtro de espuma y límpielo
(17c
).
Cada vez que haya cambiado en cinco
ocasiones la bolsa con agua jabonosa
tibia (utilice un detergente suave).
Aclare, seque y vuelva a colocarlo.
¡Precaución!
Deje secar el filtro de espuma
completamente antes de
colocarlo de nuevo.
Cambio del filtro micro-activo
(Ref.
A26B09) (depende del modelo*).
Cambie el filtro micro-activo
(17b)
cada
cinco bolsas cambiadas; se encuentra
bajo el filtro de espuma de la rejilla de
salida de aire
(17c)
.
Limpieza del aspirador.
Limpie el cuerpo del aspirador con un
paño suave y húmedo y déjelo secar.
Limpie la tapa con un paño seco
No utilice productos abrasivos ni
agresivos.
El aspirador no se enciende.
- El aparato no está enchufado:
compruebe si el aparato está
correctamente conectado a la toma de
corriente.
No aspira.
- Uno de los componentes del tubo
está atascado: limpie dicho
componente o el tubo flexible.
- La tapa no está bien cerrada: acople
los soportes de la bolsa en las ranuras
correspondientes y presione con
fuerza sobre el asa para cerrar la tapa.
El aspirador ha perdido fuerza, se
escuchan ruidos y silbidos.
- Uno de los componentes del tubo
está parcialmente atascado: limpie
dicho componente o el tubo flexible.
- La bolsa está llena o saturada de
polvo: coloque una bolsa nueva o
vacíe la bolsa de tela.
- El filtro de espuma y/o el filtro
micro-activo están saturados: limpie
el filtro de espuma y cambie el filtro
micro-activo (depende del modelo*).
- El selector de potencia de aspiración
variable está en la posición mínima:
incremente la potencia mediante el
selector electrónico de potencia de
aspiración variable (excepto si está
limpiando telas delicadas).
El indicador de que la bolsa está
llena no se apaga.
- La bolsa está llena: coloque una
bolsa nueva o vacíe la bolsa de tela.
- La boquilla es difícil de colocar: abra
el regulador de aspiración del mango
o reduzca la potencia.
El cable de alimentación no se
recoge completamente.
- El cable se introduce lentamente en
su compartimiento: tire un poco del
cable hacia afuera y vuelva a pulsar el
botón.
Si el problema persiste, contacte con
un servicio autorizado Moulinex.
Consulte la lista de Servicios
autorizados o contacte con el servicio
de atención al cliente de Moulinex.
Si su aparato no funciona
o tiene algún problema
I1
I2
J
H4
Page 15

14
uso non conforme alle istruzioni,
decadrebbe ogni responsabilità
da parte di Moulinex.
Il vostro aspirapolvere va utilizzato nelle
condizioni normalmente previste per gli
apparecchi elettrici. Pertanto utilizzatelo
e riponetelo lontano dalla portata dei
bambini. Non lasciate mai funzionare
l’apparecchio senza sorveglianza.
Non tenete mai le bocchette o
l’estremità del tubo vicino agli occhi o
alle orecchie.
Verificate che la tensione d’utilizzo
(voltaggio) dell’apparecchio corrisponda
bene a quella del vostro impianto.
L’apparecchio va staccato dalla corrente
(staccarlo dalla presa):
- subito dopo l’utilizzo,
- prima di ogni sostituzione di
accessori,
- prima di ogni operazione di pulizia,
manutenzione o sostituzione di filtro.
Non aspirate superfici bagnate, nessun
genere di sostanze liquide o acqua, né
sostanze calde, sostanze ultrafini (gesso,
cemento, cenere, ecc.) grossi detriti
affilati (vetro), prodotti nocivi (solventi,
sverniciatori, ecc.), aggressivi (acidi,
detersivi, ecc.), infiammabili ed esplosivi
(a base di benzina o alcol).
Non immergete l’apparecchio
nell’acqua, non gettate acqua
sull’apparecchio e non lasciatelo
all’aperto.
Non utilizzate l’apparecchio se:
- è caduto,
- presenta danni visibili o anomalie di
funzionamento,
- il cavo è difettoso.
In questo caso non aprite l’apparecchio
ma inviatelo al più vicino Centro
Assistenza Tecnica Autorizzato (vedasi
l’allegata lista degli indirizzi).
Le riparazioni vanno effettuate
esclusivamente da specialisti e con
ricambi originali. Riparare da soli un
apparecchio puo’ costituire un pericolo
per l’utente.
Pertanto l’insieme avvolgicavo/cavo
degli apparecchi va tassativamente
sostituito da un Centro di Assistenza
Tecnica Autorizzato.
Conformemente alla regolamentazione
in vigore, ogni apparecchio fuori uso va
reso definitivamente inutilizzabile:
staccare e tagliare il filo prima di gettare
l’apparecchio.
La responsabilità del Marchio non sarà
coinvolta in caso d’utilizzo improprio
o non conforme alle istruzioni fornite.
Il vostro apparecchio è conforme alle
Direttive 73/23 CEE e 89/336 CEE.
Vi ringraziamo per aver scelto un
apparecchio della gamma Moulinex
1. Bocchetta di aspirazione
2. Guide
3. Variatore elettronico della
potenza
(secondo il modello*)
4. Pedale avvolgicavo
5. Capote con porta-sacco
6. Tasto di espulsione del sacco
7. Maniglia della capote
8. Clip sacchetto
9. Griglia filtro spugna di
protezione motore
10. Filtro spugna di protezione
motore
11. Pedale avvio/arresto
12. Spia sacco pieno
(secondo il modello*)
13.
Scomparto sacco
14.
Sistemazione verticale dei tubi
15.
Maniglia di trasporto
dell’aspirapolvere
16.
Posizione di sistemazione dei
tubi
17.
Griglia aria in uscita
a. Cassetta filtro
b. Filtro microattivo (secondo il
modello*)
c. Filtro spugna
18.
Scomparto porta-accessori 2 in 1
Accessori standard o in opzione
(secondo il modello*)
19.
Tubo flessibile completo di
prolunga extralunga e variatore
meccanico di potenza
20.
Tubi
21.
Tubo telescopico
22.
Spazzola universale
23.
Bocchetta 2 in 1
24.
Bocchetta per mobilio
25.
Spazzola per parquet
26.
Sacchi in carta ref.A26B09
27.
Tracolla
*Secondo il modello: Si tratta di
dotazioni specifiche a certi modelli o
di accessori disponibili in opzione.
Leggete attentamente queste
istruzioni prima del primo uso del
Vostro apparecchio: in caso di
Consigli di sicurezza
Descrizione
Page 16

15
Collegamento del flessibile
all’apparecchio.
Inserite il flessibile (19) nella bocchetta
di aspirazione fino (1) al clic.
Per toglierlo, premete sui tasti situati
sull’imboccatura del flessibile ed
estraetelo.
Montaggio dei tubi.
Collegate i due tubi (20) ruotandoli
leggermente.
Se il Vostro apparecchio è dotato di
tubo telescopico in metallo (21):
spingete il cursore di regolazione in
avanti, fate scorrere il tubo fino alla
lunghezza desiderata e rilasciate il
tasto, il tubo si blocca
automaticamente.
Montaggio degli accessori.
Inserite l’accessorio all’estremità del
tubo.
Per i tappeti e le moquette: la spazzola
(22) deve essere posta in posizione
alta, spazzola dentro.
Per i parquet e i pavimenti lisci:
utilizzate la spazzola (22) in posizione
bassa, spazzola fuori,
o utilizzate direttamenta la spazzola
per parquet (25).
Per gli angoli e i posti più difficili da
raggiungere: utilizzate l’accessorio 2
in 1 (23) in posizione spazzola piatta.
Per i mobili: utilizzate la spazzolina
dell’accessorio 2 in 1 (23) o la
bocchetta per mobilio(24).
Installazione della tracolla
(secondo il modello*).
Il Vostro apparecchio è dotato di una
tracolla (27) che vi permetterà di
trasportarlo a spalla.
Per montare la tracolla fissate gli
attacchi di fissaggio nelle tacche.
Collegamento del cavo e messa in
funzione.
Svolgete completamente il cavo,
collegate l’aspirapolvere e premete
sull’apposito pedale avvio/arresto
(11).
Regolazione della potenza di
aspirazione.
Con il variatore elettronico di potenza
(3) (secondo il modello*):
Utilizzo
Premere il bottone per regolare la
potenza d’aspirazione: posizione Max
per i pavimenti e posizione Mini per
mobili e superfici fragili.
Con il variatore di potenza
(secondo il modello*):
Aprite il cursore di regolazione per
diminuire manualmente la potenza di
aspirazione, per es: sulle superfici
fragili...
Sistemazione.
Dopo l’utilizzo spegnete
l’aspirapolvere premendo
sull’apposito pedale avvio/arresto (11)
e disinserite il cavo elettrico.
Premete il pedale avvolgicavo (4) fino
al completo avvolgimento del cavo.
Porre i tubi nella loro posizione di
sistemazione (16).
Posizionate l’accessorio 2 in 1 (23)
nell’apposito scomparto (18).
In posizione verticale, ponete i tubi
nella loro sistemazione sotto
l’apparecchio (14).
Importante ! Spegnete e disinserite
sempre il Vostro aspirapolvere prima
della manutenzione o della pulizia.
Sostituzione del sacco
La spia sacco pieno (12) (secondo il
modello*) Vi indica che il sacco è
pieno o saturo.
Se constatate una diminuzione
dell’efficienza del Vostro apparecchio,
selezionate la potenza massima e
mantenete la spazzola sollevata dal
pavimento, se l’indicatore rimane
acceso, sostituite il sacco.
Sollevate il cofano tramite la maniglia
(7).
Per buttare il sacco, posizionate Vi
sopra un bidone delle immondizie e
premete sul tasto di espulsione
automatica del sacco (6).
Posizionare il fondo in cartone di un
nuovo sacco carta nella clip quindi far
pressione sulla parte superiore del
cartone (8).
Attenzione !
Verificate che il sacco sia ben
posizionato prima di chiudere la
capote.
Manutenzione e pulizia
A1
G
G1
G2
H1
H2
H3
B1
C1
C2
C3
C4
D
E
F1
B2
A2
F2
C5
G3
Page 17

16
Rimettere la capote facendo scorrere
il supporto sacco lungo le guide di
contenimento (2) quindi premere con
forza la maniglia (7) per chiudere la
capote.
NB. Non tentare mai di trasportare
l'aspirapolvere (7) prendendolo per la
maniglia della capote, usare sempre
le maniglie di trasporto
dell'aspirapolvere (15).
Pulizia del filtro di gommapiuma del
flusso d’aria.
Attenzione !
La gommapiuma protettiva deve
sempre rimanere in sede durante
l’utilizzo.
Aprite la capote (5) e levate la griglia
(9), togliere la gommapiuma (10) e
pulirla, ogni cinque sostituzioni di sacco,
con acqua insaponata (detersivo
delicato) tiepida.
Attenzione !
Fate asciugare completamente il
filtro prima di rimetterlo in
posizione.
Pulite il filtro di gommapiuma
dell’aria in uscita.
Togliete la griglia di fuoriuscita dell'aria
(17), levate la cartuccia filtro (17a),
togliere il filtro spugna (17c) , e pulitelo,
ogni cinque sostituzione di sacco, con
acqua saponata (o detergente delicato)
tiepida. Sciacquate, asciugate e
rimettete a posto.
Attenzione !
Fate asciugare completamente il
filtro in spugna prima di rimetterlo
in posizione.
Cambio del filtro microattivo.
(ref A26B09) (secondo il modello*)
Sostituite il filtro microattivo (17b) ogni
cinque utilizzi del sacco, si trova sotto il
filtro spugna dell’aria in uscita (17c).
Pulizia dell’aspirapolvere.
Pulite il corpo dell’apparecchio e gli
accessori con un panno morbido e
umido, poi asciugatelo.
Pulite la capote con un panno secco.
Non utilizzate prodotti agressivi o
abrasivi.
Se il vostro apparecchio
non funziona o funziona male
Il Vostro aspirapolvere non si
accende.
- L’apparecchio non è alimentato:
verificate che l’apparecchio sia ben
collegato.
Il Vostro aspirapolvere non
aspira.
- Un accessorio o il flessibile sono
ostruiti: stappate l’accessorio o il
flessibile.
- La capote non è ben chiuso:
riposizionate il cofano facendo
scorrere il porta-sacco lungo le guide
e premete a fondo sull’impugnatura
per chiudere la capote.
Il Vostro aspirapolvere non aspira
bene, fa rumore, fischia.
- Un accessorio o il flessibile sono
parzialmente ostruiti: stappate
l’accessorio o il flessibile.
- Il sacchetto è pieno o saturo di
polvere fine: sostituite il sacco o
svuotate il contenuto del sacco in
tessuto.
- Il filtro spugna e/o il filtro
microattivo sono saturi: pulite il filtro
spugna e sostituite il filtro microattivo
(secondo il modello*).
- Il regolatore elettronico di potenza è
in posizione min: aumentate la
potenza tramite il regolatore di
potenza (salvo se aspirate su tessuti
fragili).
- La spia sacco pieno rimane accesa :
il sacco è saturo.
Sostituite il sacco o svuotate il
contenuto del sacco in tessuto.
- La spazzola è difficile da spostare:
Aprite il cursore di regolazione della
prolunga o diminuite la potenza.
Il cavo non si riavvolge
completamente
- Il cavo è rallentato all’entrata:
svolgete di nuovo il cavo e premete
sull’apposito comando.
Se il problema persiste, affidate il
Vostro aspirapolvere al Centro di
Assistenza Tecnica Autorizzato
Moulinex più vicino.
Consultate la lista dei Centri di
Assistenza Tecnica Autorizzati
Moulinex o contattate il Servizio
Consumatori Moulinex.
H4
I1
I2
J
Page 18

17
Wij wensen u veel geluk met dit
apparaat uit het Moulinex-assortiment
1. Zuigopening
2. Slangschuif
3. Elektronische vermogensregeling
(Afhankelijk van model*)
4. Automatische snoeroprolfunctie
5. Klep met stofzakhouder
6. Eject-knop voor stofzuigerzak
7. Handvat van afdekking
8. Zakclips
9. Rooster voor beschermschuim
10. Schuim ter bescherming van motor
11. Aan/uitknop
12. Waarschuwingslampje voor volle
stofzak (afhankelijk van model*)
13. Stofzuigerzakcompartiment
14. Opbergstuk voor slang
15. Handvat om de stofzuiger te
dragen
16. Opbergstand van slangen
17. Luchtuitlaat
a. Filtercassette
b. Micro-actieve filter (afhankelijk
van model*)
c. Schuimfilter
18. Opbergaccessoires 1 en 2
Standaard of optionele accessoires
(afhankelijk van model*)
19. Flexibele slang met extra lang
handvat en handmatig te
bedienen zuigkrachtregeling
20. Buizen
21. Uitschuifbuis
22. Automatisch instellende vloerkop
23. Mondstuk 2 in 1
24. Meubelmondstuk
25. Vloermondstuk
26. Papieren zakken ref.A26B09
27. Draagband
*Afhankelijk van het model: het betekent
speciale apparatuur voor sommige
modellen of optionele accessoires.
Lees de gebruiksaanwijzing goed
door voordat u uw stofzuiger voor
de eerste maal gebruikt. Elk gebruik
dat niet in overeenstemming is met
de gebruiksaanwijzing ontslaat
Moulinex van elke
aansprakelijkheid.
Veiligheidsaanbevelingen
Omschrijving
Lees de gebruiksaanwijzing goed door
voordat u uw stofzuiger voor de eerste
maal gebruikt. Elk gebruik dat niet in
overeenstemming is met de
gebruiksaanwijzing ontslaat Moulinex
van elke aansprakelijkheid.
Uw stofzuiger is een elektrisch apparaat:
het mag uitsluitend onder normale
omstandigheden gebruikt worden. Het
apparaat moet buiten bereik van
kinderen worden gebruikt en
opgeslagen. Laat het apparaat nooit
onbeheerd achter als het aan staat.
Het apparaat is niet bestemd voor
gebruik door jonge kinderen of
gehandicapten zonder toezicht.
Er moet op worden gelet dat jonge
kinderen niet met het apparaat spelen.
Houd de mondstukken en de
slanguiteinden altijd goed uit de buurt
van ogen en oren.
Zorg dat het voltage van uw stofzuiger
gelijk is aan het in uw land gebruikte
voltage - 230-240 v.
Schakel het apparaat uit door het snoer
uit het stopcontact te halen:
- onmiddellijk na gebruik,
- vóór het vervangen van accessoires,
- vóór onderhoud, schoonmaken of
vervangen van de stofzak.
Stofzuig geen natte oppervlakken, zuig
geen water of andere vloeistof, warme
stoffen, ultrafijne stoffen (gips, cement,
as etc.), grote scherpe stukken glas),
gevaarlijke producten (oplosmiddelen,
stripper etc.), chemische producten
(zuren, reinigingsmiddelen etc.),
ontvlambare of explosieve producten
(op benzine- of alcoholbasis) op.
Dompel het apparaat niet onder in
water, zorg dat er geen water op het
apparaat komt en sla het niet
buitenshuis op.
Gebruik het apparaat niet:
- als het gevallen is en tekenen van
schade vertoont of niet normaal
functioneert,
- als het snoer gebreken vertoont.
Open in dat geval het apparaat niet en
bel onze helplijn (zie ommezijde).
Reparaties mogen uitsluitend worden
verricht door specialisten, met
gebruikmaking van originele
vervangende onderdelen. Het is
gevaarlijk om zelf te proberen een
apparaat te repareren .
Snoeren en oprolsystemen voor de
stofzuiger moeten altijd worden
vervangen door ons goedgekeurde
Servicecentrum.
In overeenstemming met de geldende
Page 19

18
regels moet het apparaat voordat men
het wegdoet omdat men het niet meer
nodig heeft onbruikbaar worden
gemaakt (door het snoer uit het
stopcontact te halen en daarna door te
snijden).
Dit product is uitsluitend bestemd voor
huishoudelijk gebruik. Bij elk
professioneel gebruik, onjuist gebruik of
niet aanhouden van de
gebruiksaanwijzing aanvaardt de
fabrikant geen aansprakelijkheid en is de
garantie niet van toepassing.
Uw apparaat voldoet aan de richtlijnen
73/23 EG en 89/336 EG.
Bevestiging van de flexibele slang
aan de stofzuiger.
Druk de flexibele slang (19) in de
opening (1) tot u een klik hoort.
Druk om de flexibele slang uit de
stofzuiger te verwijderen op de knop op
het mondstuk en trek.
In elkaar zetten van de buizen.
Zet de 2 buizen (20) in elkaar door ze
iets te draaien.
Als uw apparaat is voorzien van een
metalen uitschuifbuis (21): druk de
schuif omlaag en stel in op de gewenste
lengte; laat de schuif los om op zijn
plaats vast te zetten.
Aansluiten van de accessoires.
Sluit het accessoire aan op het uiteinde
van de buis.
Voor tapijten en kamerbrede
vloerbedekking: gebruik de kop (22) met
de borstels omhoog.
Voor vloeren en planken vloeren:
gebruik de kop (22) met de borstels
omlaag,
Of gebruik het vloermondstuk (25).
Om te stofzuigen bij plinten en in lastige
hoeken: gebruik het dubbele accessoire
(23) in het kierenmondstuk.
Voor meubilair : gebruik de stofborstel
van het dubbele accessoire (23) of het
meubelmondstuk (24).
Installatie van de draagband
(afhankelijk van het model).
Uw apparaat is voorzien van een band
(27) waarmee u het aan uw schouder
kunt dragen.
Klem de haken in de uitsparingen om de
band te bevestigen.
Het gebruik van het
apparaat
Het netsnoer aansluiten en de
stofzuiger gebruiken.
Rol het snoer helemaal af, steek de
stekker in het stopcontact en druk op het
aan/uit-pedaal (11).
Instellen van de zuigkracht.
Met de elektronische
zuigkrachtschakelaar (3)
(afhankelijk van het model*)
Druk op de knop voor het kiezen van de
zuigkracht: zet op maxi voor vloeren en
op mini voor meubilair en voorzichtig te
behandelen materialen.
Met de variabele zuigkrachtschakelaar
(afhankelijk van het model*)
Open de keuzeschakelaarklep om de
zuigkrachtregelaar handmatig lager te
zetten, bijvoorbeeld op voorzichtig te
behandelen oppervlakken…
Opslag.
Zet na gebruik uw apparaat uit door het
aan/uit-pedaal (11) in te drukken en haal
de stekker uit het stopcontact.
Druk op het automatische
kabeloprolpedaal om het snoer op te
rollen (4).
Plaats de buizen in hun opslagpositie
(16). Plaats het dubbele accessoire (23)
in zijn opslagcompartiment (18).
In verticale positie. Plaats de buizen in
hun opslagpositie onder het apparaat
(14).
Belangrijk!
Zet uw apparaat altijd uit en haal de
stekker uit het stopcontact voordat
u begint met onderhoud of reinigen.
Vervangen van de stofzak.
De stofzak-vol indicator (12) geeft aan
(afhankelijk van het model*) dat de
stofzak vol of verzadigd is.
Als u merkt dat uw stofzuiger minder
efficiënt werkt, moet u de maximum
kracht kiezen en de vloerkop van de
vloer halen. Als de indicator dan aan
blijft, moet u de stofzak vervangen.
Til de klep op aan de hendel (7).
Plaats om de stofzak weg te werpen de
cleaner boven een vuilnisbak en druk op
de automatische uitwerpkop (6).
Schuif de bodem van een nieuwe
papieren stofzak in de clip en druk dan
op de bovenkant van het karton (8).
Onderhoud en reiniging
A1
G
G1
H1
H2
H3
B1
C1
C2
C3
C5
D
E
F1
F2
B2
A2
G2
G3
C4
Page 20

19
Waarschuwing!
Controleer of de zak op zijn plaats
zit voordat u de klep sluit.
Plaats de klep terug door de
stofzakhouder langs de schuiven terug te
duwen (2) en druk dan stevig op de
hendel (7) om de klep te sluiten.NB.
Probeer nooit de stofzuiger (7) aan de
hendel van de klep te dragen, gebruik
altijd de draaghendel (15).
Reinigen van de schuimbescherming
van de motor.
Waarschuwing!
De schuimbescherming van de
motor moet altijd op zijn plaats
zitten als de stofzuiger gebruikt
wordt.
Verwijder de klep (5), het rooster (9) en
dan het schuim (10). Schud het en
reinig het elke vijfde keer dat u de
stofzak vervangt, met lauw zeepwater.
Spoel, droog en plaats terug.
Waarschuwing!
Laat het schuim geheel drogen
voordat u het terugplaatst.
Reinigen van het luchtuitlaatfilter.
Verwijder de luchtuitlaat (17) om de
filtercassette te verwijderen (17a).
Verwijder het schuimfilter (17c), schud
het en reinig het elke vijfde keer dat u de
stofzak vervangt met lauw zeepwater.
Spoel af, droog en plaats terug.
Waarschuwing!
Laat het schuim geheel drogen
voordat u het terugplaatst.
Vervangen van het micro-actieve
filter
(Ref. A26B09) (afhankelijk van het
model*)
Vervang het micro-actieve filter (17b)
elke vijfde keer dat u de stofzak
vervangt, het zit onder de luchtuitlaat
schuimfilter (17c).
Reinigen van de stofzuiger.
Reinig de behuizing van de stofzuiger
met een zachte en vochtige doek en laat
drogen.
Reinig de klep met een droge doek
Gebruik geen schurende of agressieve
producten.
Als uw apparaat niet werkt
of er een probleem ontstaat
Uw stofzuiger start niet.
- De stekker zit niet in het stopcontact.
Controleer of de stekker goed in het
stopcontact zit.
Het apparaat zuigt niet.
- Een accessoire of de buis is verstopt.
Haal de verstopping uit het accessoire
of de flexibele slang.
- De klep is niet goed gesloten. Open de
klep en schuif de stofzaksteun langs de
sleuven en druk stevig op de hendel
om de klep te sluiten.
De zuigkracht van uw stofzuiger is
afgenomen, hij maakt een geluid
en fluit.
- Een accessoire of de flexibele slang is
gedeeltelijk verstopt. Haal de
verstopping uit het accessoire of de
flexibele slang.
- De stofzak is vol of verzadigd met fijn
stof. Plaats een nieuwe zak of ledig de
stoffen stofzak.
- Het schuimfilter en/of het microactieve filter is/zijn verzadigd. Reinig
het schuimfilter en vervang het microactieve filter (afhankelijk van het
model*).
-De elektronische variabele zuigkracht
knop staat in de laagste stand.
Verhoog de zuigkracht met behulp van
de elektronische variabele
zuigkrachtschakelaar (behalve als u
voorzichtig te behandelen stoffen
zuigt).
De stofzak vol indicator blijft aan.
-De stofzak is vol. Plaats een nieuwe of
leeg de stoffen zak.
De vloerkop is moeilijk te
bewegen.
-Open de zuigschakelaar op de hendel
om de zuigkracht te verlagen.
Het snoer kan niet geheel worden
opgerold.
-Het snoer rolt traag op in zijn
behuizing. Trek het snoer er weer uit en
druk opnieuw op de knop.
Neem als het probleem blijft bestaan
contact op met het dichtstbijzijnde
Goedgekeurde Servicecentrum van
Moulinex en laat de stofzuiger daar
nakijken.
Zie de lijst met Goedgekeurde
Servicecentra van Moulinex of neem
contact op met de Klantenservice van
Moulinex - Zie de bijgesloten
aftersalesinformatie.
H4
I1
I2
J
Page 21

20
Благодарим Вас за то, что Вы
выбрали аппарат фирмы Мoulinex.
1. Всасывающее отверстие
2. Направляющие
3. Электронный регулятор
мощности (в зависимости от
модели*)
4. Педаль намотчика сетевого
шнура
5. Крышка с держателем
пылесборника
6. Клавиша выброса пылесборника
7. Ручка крышки
8. Защелка пылесборника
9. Защитная решетка
электродвигателя
10. Поролоновая защита
электродвигателя
11. Клавиша Вкл/Выкл
12. Светодиодный индикатор
наполнения пылесборника (в
зависимости от модели*)
13. Отделение для пылесборника
14. Хранение трубок в вертикальном
положении.
15. Ручка переноски пылесоса
16. Отсек для хранения труб
17. Решетка выпускного отверстия
a.Кассета с фильтром
b.Микроактивный фильтр (в
зависимости от модели*)
c. поролоновый фильтр
18. Отсек для хранения насадки 2 в 1
Стандартные или дополнительные
насадки (в зависимости от модели*)
19. Гибкий шланг со сверхдлинной
ручкой и механическим
регулятором мощности (в
зависимости от модели*)
20. трубки
21. Телескопическая труба
22. Насадка для всех типов пола
23. Насадка
2 в 1
24. Насадка для мебели
25. Насадка для пола
26. Бумажный пылесборник
арт.A26B09
27. Наплечный ремень
*в зависимости от модели: насадки,
специфичные для некоторых моделей,
либо дополнительные
Советы по технике
безопасности
Описание
Перед тем, как в первый раз
пользоваться пылесосом, внимательно
ознакомьтесь с инструкцией по
эксплуатации: фирма Мулинекс снимает
с себя всякую ответственность при
несоответствующем инструкции
использовании пылесоса.
Ваш пылесос является электрическим
прибором: он должен эксплуатироваться в
нормальных условиях. Используйте и
храните ваш пылесос подальше от детей. Ни
в коем случае не оставляйте пылесос
работать без присмотра.
Ни в коем случае не приближать насадку или
конец трубки к глазам и ушам.
Проверьте, чтобы напряжение
электрической сети соответствовало
рабочему напряжению вашего пылесоса.
Выключайте пылесос, вынув вилку из
розетки сети электропитания :
- немедленно после использования,
перед каждой заменой принадлежностей,
перед каждой очисткой, обслуживанием или
заменой пылесборника,
- не обрабатывать пылесосом смоченные
какими бы то ни было жидкостями
пoвepxнocти.
Нe слeдуeт пылeсосить в мeстах,
гдe разлита жидкость, а такжe там, гдe
имeются горячиe вeщeства, мeлкозeрнистыe
сыпучиe матeриалы (гипс, цeмeнт, пeпeл),
крупныe осколки с рeжущими кромками
(осколки стeкла), врeдныe вeщeства
(растворитeли, дeкапирующиe срeдства...),
агрeссивныe растворы (кислоты, чистящиe
срeдства...), лeгковоспламeняющиeся и
взрывоопасныe жидкости (на основe
бeнзина или спирта). Нельзя погружать
прибор в воду и смачивать его водой.
Запрещается его хранение на улице.
Ни в коем случае не погружать пылесос в
воду и не хранить его на улице.
Не использовать пылесос:
- если он упал и имеет заметные
повреждения или нарушения работы,
- если поврежден шнур.
В этом случае нельзя открывать пылесос.
Для ремонта отправьте его в ближайший
сервисный центр (см. список адресов).
Ремонт должен быть произведен только
квалифицированными мастерами с
использованием запасных частей Мoulinex.
Попытки отремонтировать пылесос
собственными силами могут быть опасными
для пользователя.
Устройство смотки шнурa и caм шнуp
должны заменяться тoлькo в сервисном
центре Мoulinex.
Согласно существующим правилам все
неисправные пылесосы должны быть
полностью разобраны: отсоедините и
отрежьте шнур перед тем как выбрасывать
пылесос.
Фирма Мoulinex не несет никакой
ответственности в случае несоблюдения
указанных инструкций в Руководстве по
эксплуатации.
Page 22

21
Ваш пылесос соответствует стандартам
73/23 CEE и 89/336 CEE.
Подключение гибкого шланга
Вставьте гибкий шланг (19) во
всасывающее отверстие (1) до
щелчка.
Чтобы снять шланг, нажмите на
клавиши по бокам наконечника
шланга и потяните.
Установка труб
Соедините обе трубы (20), слегка
повернув их.
Если пылесос снабжен
металлической телескопической
трубой (21): сдвиньте фиксатор
вперед, вытяните трубу на желаемую
длину и отпустите фиксатор.
Установка насадок
Наденьте насадку на конец трубы
Для ковров и ковровых покрытий:
используйте насадку (22) с убранной
щеткой.
Для паркета и гладкого пола:
используйте насадку (22) с
выдвинутой щеткой,
Или непосредственно использовать
насадку для пола (25).
Для уборки в углах помещения и
труднодоступных местах:
используйте насадку 2 в 1 (23) в
положении без щетки.
Для чистки мебели: используйте
щетку 2 в 1 (23) или насадку для
мебели (24).
Монтаж наплечного ремня (в
зависимости от модели*).
Пылесос снабжен наплечным ремнем
(27) для переноски на плече.
Для монтажа наплечного ремня
вставьте лапки фиксатора в
соответствующие отверстия.
Подключение к сети и включение
Полностью вытяните сетевой шнур,
включите его в сетевую розетку и
нажмите (11).
Регулировка мощности пылесоса
С помощью электронного регулятора
мощности (3) (в зависимости от
модели*):
выберете нужную мощность
всасывания путем выставления
рычажка в позицию maxi для полов и
Использование
в позицию mini для мебели и
деликатных тканей.
С помощью регулятора мощности
(в зависимости от модели*)
Откройте окошко регулятора, чтобы
вручную уменьшить мощность
всасывания, например, при чистке
хрупких предметов.
После использования.
После пользования пылесосом
выключите его клавишей (11) и
отключите от сети.
Нажмите на педаль до полного
наматывания шнура (4).
Поставьте трубу в положение
парковки (16). Уберите насадку 2 в 1
(23) в предназначенное для нее
отделение (18).
Для хранения трубок в вертикальном
положении, закрепите их на задней
стенке прибора (14).
Внимание! Перед уходом за
пылесосом или его чисткой всегда
отключайте пылесос от сети.
Смена пылесборника.
Индикатор наполнения
пылесборника (12) (в зависимости от
модели*) показывает, что
пылесборник заполнен или
переполнен.
Если пылесос стал работать
хуже,установите регулятор мощности
на максимум и поднимите насадку
над полом; если светодиодный
индикатор горит, замените
пылесборник.
Возьмитесь за ручку крышки (7) и
откройте ее. Для выброса
пылесборника станьте над мусорным
ведром и нажмите клавишу
автовыброса пылесборника (6).
Вставьте картонную горловину
нового пылесборника в держатель и
вдвиньте ее до упора (8).
Внимание!
Перед тем, как закрыть крышку,
убедитесь в правильной установке
пылесборника.
Поставьте крышку таким образом,
чтобы держатель пылесборника
вошел в направляющие корпуса (2),
после чего плавно нажмите на ручку
(7) и закройте крышку (15).
Уход за пылесосом и чистка
A1
G
G1
G2
H1
H2
H3
H4
B1
C1
C2
C4
C5
D
E
F1
F2
B2
A2
C3
G3
Page 23

22
Чистка поролонового фильтра
защиты двигателя.
Внимание! Следите за тем, чтобы
во время работы пылесоса
поролоновый фильтр,
защищающий двигатель, всегда
была на месте.
Откройте крышку (5), снимите сетку
(9), затем достаньте поролоновый
фильтр (10). Вытряхивайте и
очищайте его после каждой пятой
замены пылесборника. Промойте его
в теплой мыльной воде, ополосните,
высушите и вставьте на место.
Внимание! Следите за тем, чтобы
поролоновый фильтр был
тщательно высушен перед тем,
как вставить его на место.
Чистка воздушного фильтра на
выпускном отверстии.
Снимите сетку (17), чтобы достать
кассету с фильтром (17а), Достаньте
поролоновый фильтр (17c).
Вытряхивайте и очищайте его после
каждой пятой замены пылесборника.
Промойте его в теплой мыльной
воде, ополосните, высушите и
вставьте на место.
Внимание!
Перед установкой поролона на
место дайте ему полностью
высохнуть.
Смена микроактивного фильтра :
(Арт.A26B09) (в зависимости от
модели*)
После каждых пяти замен
пылесборника заменяйте
микроактивный фильтр (17b),
который находится на поролоновом
фильтре выпускного отверстия (17с).
Чистка пылесоса
Протирайте корпус пылесоса и
насадки мягкой влажной тряпочкой,
затем дайте им высохнуть.
Протирайте крышку сухой тряпкой.
Не пользуйтесь едкими или
абразивными продуктами.
Пылесос не включается.
- Нет питания. Проверьте правильность
подключения к сети.
Если пылесос не работает или
работает плохо
Пылесос не всасывает.
- Насадка или гибкий шланг забились.
Прочистите насадку или гибкий шланг.
- Крышка закрыта неплотно. Закройте
крышку, сдвинув держатель
пылесборника по направляющим, и
сильно нажмите на ручку, чтобы
закрыть крышку.
Пылесос стал хуже всасывать,
шумит, свистит
- Насадка или гибкий шланг частично
забились. Прочистите насадку или
гибкий шланг.
- Пылесборник заполнен или
переполнен тонкой пылью.
Смените пылесборник или вытряхните
матерчатый пылесборник.
- Поролоновый и микроактивный
фильтры переполнены.
Очистите поролоновый фильтр и
замените микроактивный фильтр (в
зависимости от модели*)
- Электронный регулятор мощности
стоит в положении МИН.
увеличьте мощность с помощью
электронного регулятора мощности
(кроме случаев чистки
легкоповреждаемых тканей).
Индикатор заполнения
пылесборника горит постоянно
- Пылесборник переполнен. Замените
пылесборник или вытряхните
матерчатый пылесборник.
- Труба с насадкой перемещается с
трудом.
Откройте регулировочное окошко на
ручке или уменьшите мощность
всасывания.
Сетевой шнур полностью не
сматывается.
- Сетевой шнур сматывается медленно.
Вытяните шнур и снова нажмите на
клавишу сматывания.
Если неисправность не устранена,
обратитесь в ближайший
авторизованный сервисный центр
фирмы Мoulinex.
Выберите его из списка сервисных
центров фирмы или свяжитесь со
службой работы с клиентами
представительства фирмы Мoulinex.
I2
J
I1
Page 24

√´b «∞GDU¡ «∞v ±JU≤t °b≠l •U±KW «∞JOf «≤eôÆOUÎ
´Kv «∞πU≤∂Os «ù≤eôÆOOs (2) £r «{Gj °Iu… ´Kv
«∞LI∂i (7) ùÆHU‰ «∞GDU¡.
±ö•EW: ô ¢∫Lq «∞LJMºW «∞JNd°UzOW (7) °u«ßDW
±I∂i «∞GDU¡, «ß∑FLq œ«zLUÎ ±I∂i «∞∫Lq (51).
¢MEOn •LU¥W «∞L∫dÒ„ «ùßHMπOW
¢∫c¥d !
¥πV √Ê ¢JuÊ •LU¥W «∞L∫dÒ„ «ùßHMπOW ≠w ±JU≤NU
«∞B∫O` ´Mb «ùß∑FLU‰.
«¸≠l «∞GDU¡ (5), «∞A∂JW (9) £r «≤eŸ «ùßHMπW
(01). ≤EHNU °U∞∑∫d¥p «ù≥∑e«“Í, °Fb Øq 5
«ß∑∂b«ô‹ ∞JOf «∞G∂U¸, °U∞LU¡ Ë«∞BU°uÊ. ¢ÔBHÒv
Ë¢πHÒn, Ë¢FUœ «∞v ±JU≤NU
¢∫c¥d !
¥πV √Ê ¥JuÊ «∞LDU◊ «ùßHMπw §U· ¢LU±UÎ Æ∂q
≈¸§U´t «∞v ±JU≤t «_ÅKw.
¢MEOn ≠K∑d ±ªdà «∞Nu«¡
«≤eŸ ®∂JW ±ªdà «∞Nu«¡ (71) ∞Jw ¢MeŸ îd©u®W
«∞HK∑d (a71). «≤eŸ «∞HK∑d «ùßHMπw, ≤EHt
°U∞∑∫d¥p «ù≥∑e«“Í, °Fb Øq 5 «ß∑∂b«ô‹ ∞JOf
«∞G∂U¸, °U∞LU¡ Ë«∞BU°uÊ. ¥ÔBHÒv Ë ¥ÔπHÒn Ë¥FUœ
«∞v ±JU≤t .
¢∫c¥d !
¥πV √Ê ¥JuÊ «∞LDU◊ «ùßHMπw §U· ¢LU±UÎ Æ∂q
≈¸§U´t «∞v ±JU≤t «_ÅKw.
«ß∑∂b«‰ ≠K∑d "±U¥JdˬØ∑On" (±d§l 90B62A)
(•ºV «∞Luœ¥q).
«ß∑∂b‰ ≠K∑d "±U¥JdˬØ∑On" (b 71) °Fb Øq 5
«ß∑∂b«ô‹ ∞JOf «∞G∂U¸, «≤t ±u§uœ ¢∫X ±ªdÃ
≥u«¡ ≠K∑d «∞LDU◊ «ùßHMπw (c 71)
¢MEOn «∞LJMºW «∞JNd°UzOW
≤En •πd… «∞LJMºW °u«ßDW ÆDFW ÆLU‘ ≤U´LW
˸©∂W, «¢dØNU ∞Jw ¢πn ¢LU±UÎ.
≤En «∞GDU¡ °IDFW ÆLU‘ §U≠W. ô ¢º∑FLq «∞Lu«œ
«∞JU®DW √Ë «∞L∂OÒCW.
≈–« ØU≤X «∞LJMºW ô ¢FLq √Ë ≈–«
ØU≤X ≥MU∞p ±AJKW
«∞LJMºW ô ¢FLq
- ¢JuÊ ¨Od ±uÅu∞W °U∞∑OU¸, ¢QØb ±s «Ê «∞LM∑Z
±uÅu‰ °U∞∑OU¸ °AJq Å∫O`.
ô ¥u§b ®Hj
- ¥JuÊ «∞ªd©u √Ë «•b «ùغºu«¸«‹ ±ºbËœ.
îKÒh «∞ªd©u «Ë «ùغºu«¸ ±s «ù≤ºb«œ.
- «∞GDU¡ ¨Od ±IHq ¢LU±UÎ.
√´b «∞GDU¡ «∞v ±JU≤t «∞B∫O` °b≠l •U±KW «∞JOf
≠w «∞Le«∞Z, Ë°U∞CGj §Ob«Î ´Kv «∞LI∂i «ÆHq
«∞GDU¡.
ËÆFX «∞AHU©W √¸{UÎ , Ë°b√‹ ¢Bb¸ ´MNU
√Åu«‹ ËÅHOd.
- ¥JuÊ «∞ªd©u √Ë «•bÈ «ùغºu«¸«‹ Æb
«≤ºb‹ §ezOUÎ, ¢ªKh ±s «ù≤ºb«œ.
- «∞JOf Æb ¢A∂l °U∞G∂U¸ .
«ß∑FLq ØOºUÎ §b¥b«Î √Ë Ær °∑Hd¥m «∞JOf «∞ILU®w
±s «∞G∂U¸.
- «∞HK∑d «ùßHMπw/√Ë ≠K∑d «∞LU¥JdˬØ∑On
±A∂FUÊ °U∞G∂U¸.
≤En «∞HK∑d «ùßHMπw, Ë«ß∑∂b‰ ≠K∑d «∞LU¥JdË
¬Ø∑On (•ºV «∞Luœ¥q).
- «∞LM∑Iw ∞Iu… «∞AHj ´Kv ±uÆl «∞∫b «_œ≤v.
«¸≠l ±Fb‰ Æu… «∞AHj °LºU´b… ±M∑Iw Æu… «∞AHj
«ù∞J∑dË≤w (≈ô ≈–« ØMX °Bbœ ¢MEOn «_®OU¡
«∞dÆOIW).
±R®d «±∑ö¡ «∞JOf ¥∂Iv ±CU¡«Î
- «∞JOf Æb «±∑ú.
{l ØOºUÎ §b¥b«Î, √Ë «≠d⁄ «∞JOf «∞ILU®w.
¸√” «∞LJMºW ¥BFV ¢∫d¥Jt ´Kv «∞∂ö◊
«≠∑` ±MEr «∞AHj ´Kv «∞LI∂i √Ë îHn «∞Iu….
«∞ºKp «∞JNd°Uzw ô ¥K∑n «∞v ¬îdÁ
- «∞ºKp «∞JNd°Uzw °Dw¡ ≠w «∞d§uŸ «∞v •πd¢t
«∞ªUÅW °t. «ß∫V «∞ºKp «∞v ≤NU¥∑t £r «{Gj
´Kv «∞e¸ ±d… £U≤OW.
≈–« °IOX «∞LAJKW Ë∞r ¢πb ∞NU •öÎ, «¢Bq Ë«´d÷
±JMº∑p ´Kv ±dØe îb±W ±u∞OMJf ±F∑Lb.
¥LJs ±d«§FW ÆUzLW ±d«Øe «∞ªb±W «∞LF∑Lb¥s √Ë
«¢Bq °ªb±W “°Uzs ±u∞OMJf.
52
I1
I2
J
H4
Page 25

¢∂FUÎ ∞ú≤ELW «∞ºU¸¥W «∞LHFu‰ Ë Æ∂q «∞∑ªKh ±s
±M∑Z ∞r ¥Fb ÆOb «ùß∑FLU‰, ¥πV ¢FDOq ´LKt
(°u«ßDW ≠BKt ´s «∞∑OU¸ Ë ÆDl «∞ºKp «∞JNd°Uzw
«∞∑U°l ∞t).
ÅLr ≥c« «∞LM∑Z ∞ûß∑FLU‰ «∞LMe∞w ≠Ij. Ë √Í
«ß∑FLU‰ «•∑d«≠w √Ë √Í «ß∑FLU‰ îU©T √Ë ´bÂ
«∞∑IOb °Uù¸®Uœ«‹ ¥M∑Z ´Mt ¢FDOq «∞LM∑Z ô ¥∑∫Lq
«∞LBMl √¥W ±ºRË∞OW, Ë °U∞∑U∞w ¢ÔKGv «∞CLU≤t.
¥ªCl ≥c« «∞LM∑Z ∞Iu«≤Os ≈Í.≈Í. ßw 37/32 Ë
98/633 ≈Í.≈Í. ßw.
©d¥IW «ß∑FLU‰ «∞LM∑Z
¢uÅOq «∞ªd©u «∞v «∞LJMºW
«œ≠l ©d· «∞ªd©u (91) ≠w «∞H∑∫W (1) «∞v √Ê
¢ºLl Åu‹ ©IDIW.
∞MeŸ «∞ªd©u ±s «∞LJMºW «∞JNd°UzOW, «{Gj ´Kv
«∞e¸ «∞Lu§uœ ´Kv «∞Hu≥W Ë«ß∫V «∞ªd©uÂ.
¢dØOV «_≤U°OV
¸ØV «_≤∂u°Os (02) °U∞∑HU≠W °ºODW.
≈–« ØUÊ «∞LM∑Z ´Mb„ ±eËœ«Î °Q≤∂u» ±Fb≤w ©u¥q
(12): «œ≠l «∞LH∑UÕ «ù≤eôÆw «∞v «_ßHq, £r ´b‰
«∞Du‰ •ºV «∞LDKu», «¢d„ «∞LH∑UÕ «ù≤eôÆw ∞Jw
¥IHq ≠w ±JU≤t.
¢dØOV «ùغºu«¸«‹
¸ØV «ùغºu«¸ ≠w ≤NU¥W «∞ªd©uÂ.
∞∑MEOn «∞ºπUœ Ë«∞LuØOX: «ß∑FLq «∞d√” (22)
°∫OY ¢JuÊ «∞Hd®U… ±d≠u´W.
∞∑MEOn «∞∂ö◊ : «ß∑FLq «∞d√” (22) ≠w «∞u{l
«∞LMªHi.
√Ë «ß∑FLq ≠u≥W «∞∂ö◊ ±∂U®d…
∞∑MEOn «∞eË«¥U ËÆd» «∞ªe«zs: «ß∑FLq «_œ«…
«∞LeœË§W ±s «ùغºu«¸«‹ (32) ≠w «∞Hu≥W.
∞∑MEOn «_£UÀ : «ß∑FLq ≠d®U… «∞∑MEOn ≠w «_œ«…
«∞LeœË§W (32), √Ë ≠u≥W «∞Hd‘ (42).
¢dØOV •e«Â «∞∫Lq
(•ºV «∞Luœ¥q)
≈Ê «∞LM∑Z ±eËÒœ °∫e«Â (72) ¥∑O` •Lq «∞LJMºW
´Kv «∞J∑n.
∞∑dØOV «∞∫e«Â, ´KÒo «∞ªDU≠U‹ ≠w «∞∏Iu» «∞ªUÅW
°NU.
¢uÅOq «∞ºKp «∞JNd°Uzw Ë«ß∑FLU‰ «∞LJMºW
«∞JNd°UzOW.
±bœ «∞ºKp «∞JNd°Uzw ¢LU±UÎ, «ËÅKt °LBb¸ «∞∑OU¸
Ë«{Gj ´Kv «∞LH∑UÕ (11).
¢Fb¥q Æu… «∞AHj
°u«ßDW ±M∑Iw «∞Iu… «ù∞J∑dË≤w (3)
(•ºV «∞Luœ¥q)
«œ≠l ±M∑Iw «∞Iu… «∞v ±uÆl «∞AHj : ±uÆl ixam
∞K∂ö◊ ˱uÆl inim ∞KHd‘ Ë∞úßD` «∞MU´LW.
±l ±M∑Iw «∞Iu… «∞IU°q ∞K∑Fb¥q (•ºV «∞Luœ¥q*)
{l ±M∑Iw «∞Iu… ´Kv ±uÆl «ùß∑FLU‰ «∞ObËÍ
∞∑ªHOn Æu… ±ÔMEÒr «∞AHj ±∏q: «_ßD` «∞MU´LW
Ë«_®OU¡ «∞dÆOIW.
«∞∑ªe¥s
°Fb «ùß∑FLU‰, «ËÆn «∞LM∑Z ´s «∞FLq °U∞CGj ´Kv
œËÒ«ßW ¢AGOq/¢uÆn (11), £r «≠BKt ´s «∞∑OU¸.
«¸§l «∞ºKp «∞v ±JU≤t °U∞CGj ´Kv œËÒ«ßW ≈´Uœ…
∞n «∞ºKp.
{l «_≤U°OV ≠w ±JUÊ «∞∑ªe¥s (61).
{l «_œ«… «∞LeœË§W (32) ≠w ±MDIW «∞∑ªe¥s (81).
≠w ±u«Æl «∞∑ªe¥s «∞FLuœ¥W, {l «_≤U°OV ≠w
±u«ÆFNU «∞∑ªe¥MOW ¢∫X «∞LM∑Z (41)
«∞BOU≤W Ë«∞∑MEOn
¢∫c¥d ±Nr!
œ«zLUÎ, «ËÆn «∞LM∑Z ´s «∞FLq Ë«≠BKt ´s «∞∑OU¸
Æ∂q «∞IOU °Q¥W ´LKOW ¢MEOn √Ë ÅOU≤W.
¢MEOn «∞JOf
±R®d ≈±∑ö¡ «∞JOf (21) ¥AOd (•ºV «∞Luœ¥q*)
«∞v «Ê «∞JOf Æb «±∑ú √Ë «Å∂` ±A∂FUÎ.
≈–« ô•EX √Ê «∞LJMºW Æb «≤ªHCX ≠U´KOW ´LKNU,
{l ±H∑UÕ «∞Iu… ´Kv «∞∫b «_ÆBv ±l ¸≠l «∞d√”
´s «_¸÷, ≠S–« °Iw «∞LR®d ´Kv •U∞t, «Å∂`
±s «∞CdË¸Í ¢GOOd «∞JOf.
«¸≠l «∞GDU¡ °u«ßDW «∞LI∂i (7)
∞K∑ªKh ±s «∞JOf, {l «∞LJMºW ≠u‚ ßKW «∞LNLö‹
Ë«{Gj ´Kv “¸ «ùîd«Ã «_Ë¢u±U¢OJw (6).
{l ÆFd ØOf «∞G∂U¸ «∞πb¥b ≠w ôÆDW «∞JOf £r
«œ≠l «∞KuÕ «∞Jd¢u≤w ±s «_´Kv (8)
¢∫c¥d !
¢QØb ±s √Ê «∞JOf £U°X ≠w ±JU≤t ¢LU±UÎ Æ∂q ≈¨ö‚
«∞GDU¡.
42
A1
B1
B2
C1
C2
C3
C4
C5
D
A2
E
F1
F2
G1
G2
G3
G
H2
H1
H3
Page 26

≤AJdØr ùî∑OU¸Ør ±M∑πUÎ ±s ¢AJOKW ±M∑πU‹
±u∞OMJf
«∞∑HUÅOq
1 ≠∑∫W «∞AHj
2•u«§e ±Me∞IW
3 ¢∫Jr ≈∞J∑dË≤w °U∞∑OU¸ (•ºV «∞Luœ¥q)
4 œË«ßW ∞Kn «∞ºKp «∞JNd°Uzw √Ë¢u±U¢OJOUÎ
5 ¨DU¡ ±l œ´U±W ∞JOf «∞G∂U¸
6 “¸ ùîd«Ã «∞JOf
7 ±I∂i «∞GDU¡
8 ´öÆU‹ ∞KJOf
9 ±DU◊ «ßHMπw ∞∫LU¥W ®∂JW «∞L∫d„
01 ±DU◊ «ßHMπw ∞∫LU¥W «∞L∫d„
11 œË«ßW ¢AGOq/¢uÆn
21 {u¡ ¢∫c¥dÍ ´s «±∑ö¡ «∞JOf (•ºV
ǰLuϴq)
31 •πOd… «∞JOf
41 ±ªeÊ ´LuœÍ ∞ú≤U°OV
51 ±I∂i ∞∫Lq «∞LJMºW «∞JNd°UzOW
61 ±ªeÊ ∞ú≤U°OV
71 ®∂JW ±ªdà «∞Nu«¡
√- ´∂u… «∞HK∑d
»- ≠K∑d ±OJdË «Ø∑On (•ºV «∞Luœ¥q)
§‡- ≠K∑d «ßHMπw
81 «Øººu«¸«‹ «∞∑ªe¥s 1 Ë 2
´Uœ¥W √Ë ≈î∑OU¸¥W (•ºV «∞Luœ¥q)
91 îd©u ±dÊ ±l ±I∂i ©u¥q Ë ±MEÒr ¥bËÍ
∞Iu… «∞AHj.
02 îd«©Or
12 îd©u ©u¥q
22 ¸√” ¥∑Fb‰ √Ë¢u±U¢OJOUÎ ∞K∂ö◊
32 ≠u≥∑Os ≠w Ë«•b…
42 ≠u≥W ∞KHd‘
52 ≠u≥W ∞K∂ö◊
62 √ØOU” ±s «∞u¸‚ ±d§l 90B62A
72 •e«Â ∞K∫Lq
•ºV «∞Luœ¥q: ≠OLU ¥∑FKo °U∞LFb«‹ «∞ªUÅW
∞∂Fi «∞Luœ¥ö‹ √Ë «ùغºu«¸«‹ «ùî∑OU¸¥W.
¢FKOLU‹ ∞Kºö±W
«Æd√ ¢FKOLU‹ «ùß∑FLU‰ °bÆW Æ∂q √Ê
¢º∑FLq «∞LM∑Z ∞KLd… «_Ë∞v: ≈Ê √Í
«ß∑FLU‰ ô ¥∑Ho ±l ≥cÁ «∞∑FKOLU‹ ∞s ¢JuÊ
±u∞OMJf ±ºRË∞W ´Mt ÆU≤u≤OUÎ.
≈Ê ±JMº∑p «∞JNd°UzOW ≥w ±M∑Z ØNd°Uzw : ¥πV √Ê
¢º∑FLq ≠w ™dË· ´Uœ¥W. ¥πV «ß∑FLU‰ ≥c«
«∞LM∑Z Ë •HEt °FOb«Î ´s ±∑MUˉ «_©HU‰. ô ¢∑d„
«∞LM∑Z œËÊ ±d«Æ∂∑p ´Mb±U ¥JuÊ ≠w •U∞W ¢AGOq .
¥πV √Ê ô ¥º∑FLq «∞LM∑Z °u«ßDW «_©HU‰ √Ë °u«ßDW
√®ªU’ ¨Od ±R≥KOs ∞c∞p œËÊ ±d«Æ∂W.
¥πV ±d«Æ∂W «_©HU‰ Ë «∞∑QØb ±s √≤Nr ô ¥KF∂uÊ °U∞LM∑Z.
¥πV √Ê ¢∂Fb «∞FOMOs Ë «_–≤Os ´s ≠u≥U‹
«∞ªd«©Or Ë ≤NU¥U¢NU.
¢QØb √Ê Æu… «∞∑OU¸ ≠w «∞LM∑Z ¢∑MUßV ±l Æu… «∞∑OU¸
´Mb„ 032-042 ≠u∞X.
«≠Bq «∞LM∑Z ´s «∞∑OU¸ °º∫V «∞IU°f :
- ±∂U®d… °Fb «ôß∑FLU‰
- Æ∂q ¢GOd «ôغºu«¸«‹
- Æ∂q «∞BOU≤t,«∞∑MEOn √Ë ¢GOd «∞JOf
ô ¢º∑ªb «∞LM∑Z ≠w ¢MEOn «_ßD` «∞L∂KKW, ±U¡
√Ë √Í ≤uŸ ¬îd ±s «∞ºu«zq ,«∞Lu«œ «∞ºUîMW,
Ë«∞LºU•Oo «∞bÆOIW §b«Î (±∏q: «∞BLm, «_ßLMX,
«∞d±Uœ, ≈∞a..). «_≤IU÷ «∞J∂Od… «∞∫πr («∞e§UÃ),
«∞LM∑πU‹ «∞ªDd… («∞Lu«œ «∞Lc¥∂W ,±dØ∂U‹ «∞IAj,
≈∞a..) ,«∞LM∑πU‹ «∞JOLUË¥W («_ßOb,«∞LMEHU‹
,≈∞a..),«∞Lu«œ «∞IU°KW ∞û®∑FU‰ √Ë «∞Lu«œ «∞IU°KW
∞û≤HπU¸ («∞∂∑dˉ ˨OdÁ).
ô ¢FdÒ÷ «∞LM∑Z ∞KLU¡, Ëô ¢GLdÁ ≠Ot Ëô ¢ªeÒ≤t
îU¸Ã «∞LMe‰.
ô ¢º∑FLq «∞LM∑Z :
-≈–« ßIj √¸{UÎ Ë °b« ´KOt √≤t «¢Kn √Ë √≤t ô ¥RœÒÍ
«∞FLq °U∞AJq «∞LDKu».
-≈–« ØUÊ «∞ºKp «∞JNd°Uzw ¢U∞HUÎ, ≠w ≥cÁ «∞∫U∞W ô
¢H∑` «∞LM∑Z Ë«©KV ±ºU´b¢MU.
¥πV √Ê ¥∑r «∞∑BKO` °u«ßDW ±ª∑BOs ôß∑∂b«‰
«∞IDl «∞∑U∞HW °IDl √ÅKOW.
≈≤t ±s «∞ªDd §b«Î √Ê ¢Iu °∑BKO` «∞LM∑Z °MHºp.
«∞ºKp «∞JNd°Uzw ∞KLJMºW «∞JNd°UzOW Ë ≤EU ∞nÒ
«∞ºKp ≠w §LOl «_•u«‰ ¥πV ¢BKO∫t ≠w ±dØe
îb±W ±F∑Lb.
32
 Loading...