

Page 1
Genießen Sie eine schnelle, ideenreiche Küche. Genießen Sie eine schnelle, ideenreiche Küche.
Voor een snelle en lekkere bereiding van uw dagelijkse maaltijden. Maak verbinding en ontdek honderden recepten.
Disfruta de una cocina rápida y llena de ideas. Conéctate y accede a cientos de recetas.
Permite cozinhar diariamente os seus pratos de forma rápida e saborosa. Ligue-se e aceda a centenas de receitas.
Cucina velocemente e bene i vostri piatti di ogni giorno. Connettetevi e accedete a centinaia di ricette.
Page 2

sommaire - inhalt - inhoud - contenido - índice - indice
FR DE
P. 04-05 - AVANT UTILISATION
P. 06-07 - UTILISATION ET MISE EN FONCTIONNEMENT
P. 08-09 - MENU RÉGLAGES
P. 10 - MENU ON/OFF
P. 11-13 - CONNEXION
P. 14-19 - MENU MANUEL
P. 20-21 - INGRÉDIENTS
P. 22-23 - RECETTE
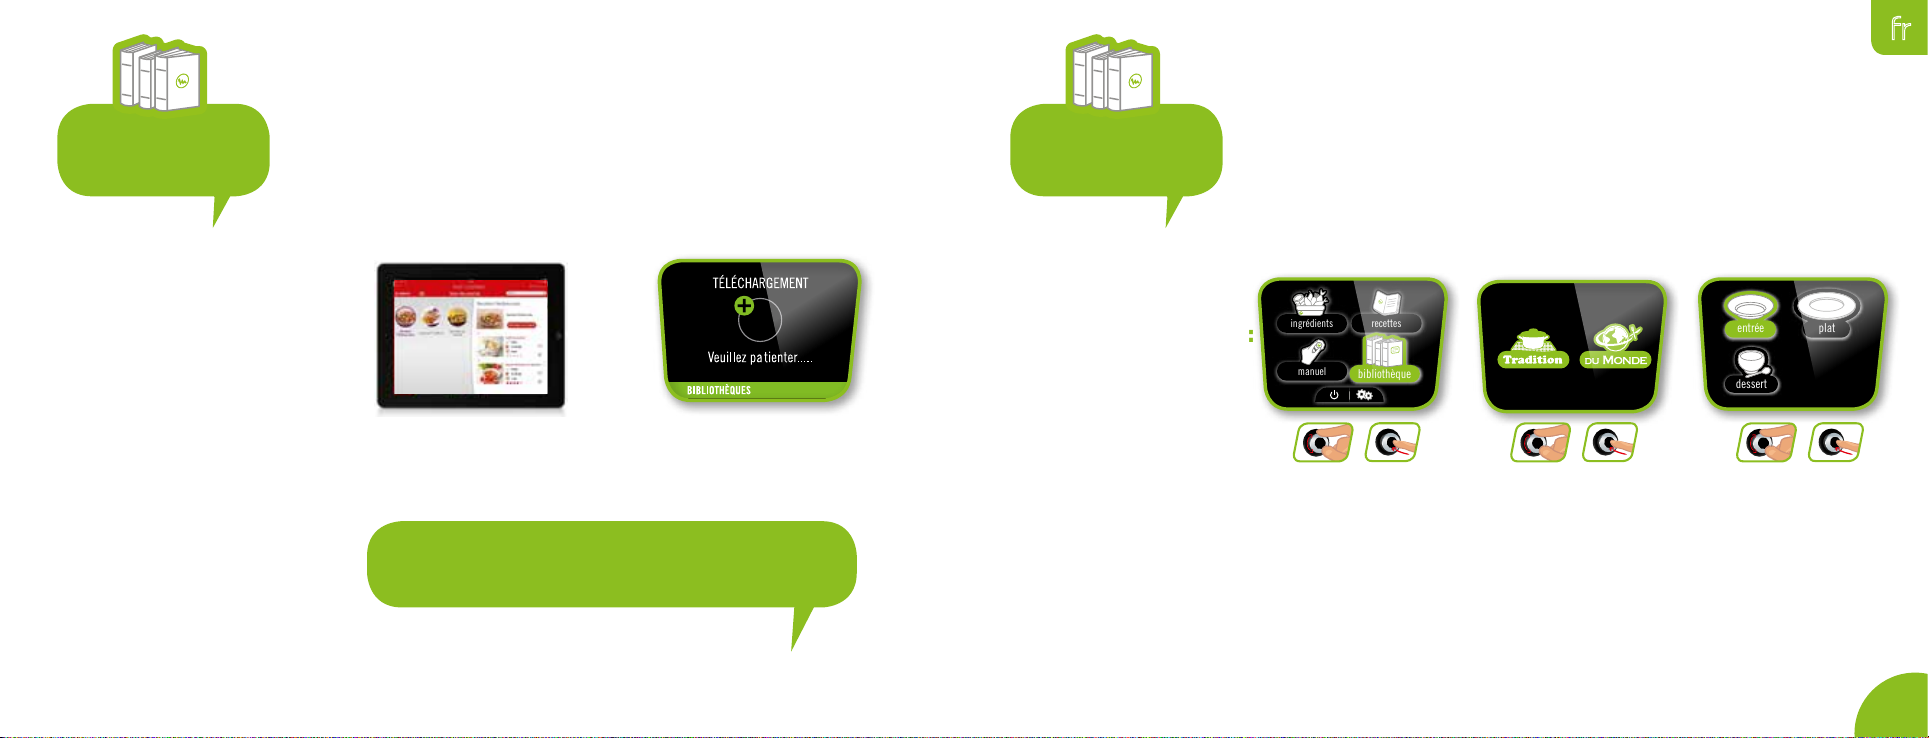
P. 24-25 - BIBLIOTHÈQUE
P. 26-27 - INGRÉDIENTS - LISTE DES RECETTES
P. 28-31 - NETTOYAGE ENTRETIEN
P. 32-33 - RÉSOLUTION DES PROBLÈMES
P. 34-35 - VOR DEM ERSTEN GEBRAUCH
P. 36-37 - GEBRAUCH UND INBETRIEBNAHME
P. 38-39 - MENÜEIN-STELLUNGEN
P. 40 - EIN/AUS MENÜ
P. 41-43 - CONNEXION
P. 44-49 - MANUELL
P. 50-51 - ZUTATEN
P. 52-53 - REZEPTE
P. 54-55 - BIBLIOTHEKEN
P. 56-57 - ZUTATEN - REZEPTLISTE
P. 58-61 - REINIGUNG UND WARTUNG
P. 62-63 - FEHLERSUCHE UND -BEHEBUNG
NL
P. 64-65 - VOOR HET GEBRUIK
P. 66-67 - GEBRUIK UND BEDIENING
P. 68-69 - MENU INSTELLINGEN
P. 70 - MENU AAN/UIT
P. 71-73 - VERBINDING
P. 74-79 - MANUEEL KOOKSTAND
P. 80-81 - INGREDIËNTEN
P. 82-83 - RECEPTEN
P. 84-85 - BIBLIOTHEKEN
P. 86-87 - INGREDIËNTEN UND RECEPTENLIJST
P. 88-91 - SCHOONMAAK ONDERHOUD
P. 92-93 - OPLOSSEN VAN PROBLEMEN
Page 3
ES ITPT
P. 94-95 - ANTES DE USAR
P. 96-97 - FUNCIONAMIENTO - USO
P. 98-99 - MENÚ CONFIGURACIONES
P. 100 - MENÚ ON/OFF
P. 101-103 - CONECTIVIDAD
P. 104-109 - MENÚ MANUAL
P. 110-111 - MENÚ DE INGREDIENTES
P. 112-113 - MENÚ DE RECETAS
P. 114-115 - BIBLIOTECA
P. 116-117 - INGREDIENTES - LISTA DE RECETAS*
P. 118-121 - LIMPIEZA Y MANTENIMIENTO
P. 122-123 - RESOLUCIÓN DE PROBLEMAS
P. 124-125 - ANTES DE UTILIZAR
P. 126-127 - FUNCIONAMENTO - UTILIZAÇÃO
P. 128-129 - MENU DE CONFIGURAÇÃO
P. 130 - MENU LIGAR /DESLIGAR
P. 131-133 - LIGAÇÃO
P. 134-139 - MENU MANUAL
P. 140-141 - MENU DOS INGREDIENTES
P. 142-143 - MENU DAS RECEITAS
P. 144-145 - BIBLIOTECA
P. 146-147 - INGREDIENTES - LISTA DE RECEITAS
P. 148-151 - LIMPEZA E MANUTENÇÃO
P. 152-153 - RESOLUÇÃO DE PROBLEMAS
P. 154-155 - PRIMA DELL’USO
P. 156-157 - FUNZIONAMENTO - USO
P. 158-159 - MENU IMPOSTAZIONI
P. 160 - MENU ON/OFF
P. 161-163 - CONNESSIONE
P. 164-169 - MENU MANUALE
P. 170-171 - MENU INGREDIENTI
P. 172-173 - MENU RICETTE
P. 174-175 - BIBLIOTECA
P. 176-177 - INGREDIENTI - ELENCO RICETTE
P. 178-181 - PULIZIA E MANUTENZIONE
P. 182-183 - RISOLUZIONE DEI PROBLEMI
Page 4

Poignée d’ouverture / fermeture du couvercle
Deckelgriff zum Öffnen/Schließen
Handgreep deksel openen/sluiten
Asa de apertura/cierre de la tapa
Pega de abrir e fechar a tampa
Impugnatura di apertura/chiusura del coperchio
Bouton annuler
»Abbrechen«-Taste
Knop Annuleren
Botón de cancelación
Botão para cancelar
Pulsante Annulla
Bouton d’utilisation principal
Hauptbedienungs-Taste
Hoofdknop bediening
Botón principal de operaciones
Botão principal de funcionamento
Pulsante di funzionamento principale
Valve silencieuse
Regelventil
Dempklep
Válvula silenciadora
Válvula silenciadora
Valvola silenziatrice
Voyant bleu indication connexion bluetooth
Blauw indicatielampje voor bluetooth-verbinding
Piloto azul de indicación de conexión bluetooth
Indicador azul de ligação Bluetooth
Spia blu indicazione connessione bluetooth
Blaue Kontrolllampe zur
Anzeige der Bluetooth-Verbindung
Repère visuel d’indication d’ouverture / fermeture
Geöffnet/geschlossen Markierung
Markering open/gesloten
Marca de apertura/cierre
Símbolos de Aberto / fechado
Simbolo di apertura/chiusura
Cuve de cuisson
Kochtopf
Kookpot
Cuba de cozedura
Pentola di cottura
Panneau de commande
Bedienungs-Anzeige
Bedieningspaneel
Panel de control
Painel de controlo
Pannello di controllo
Olla
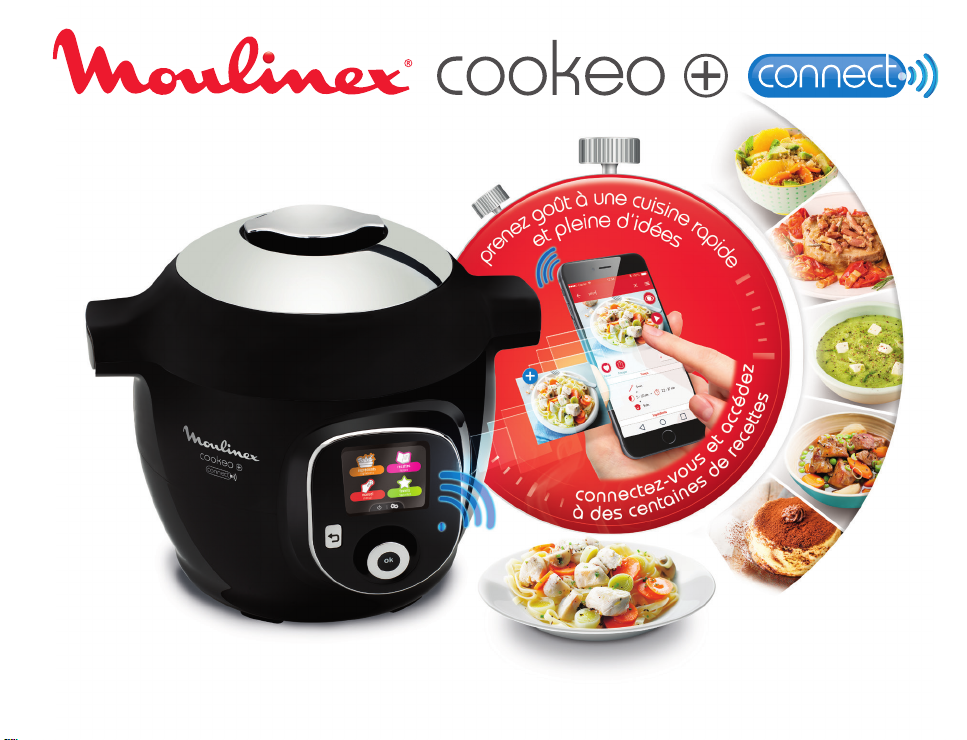
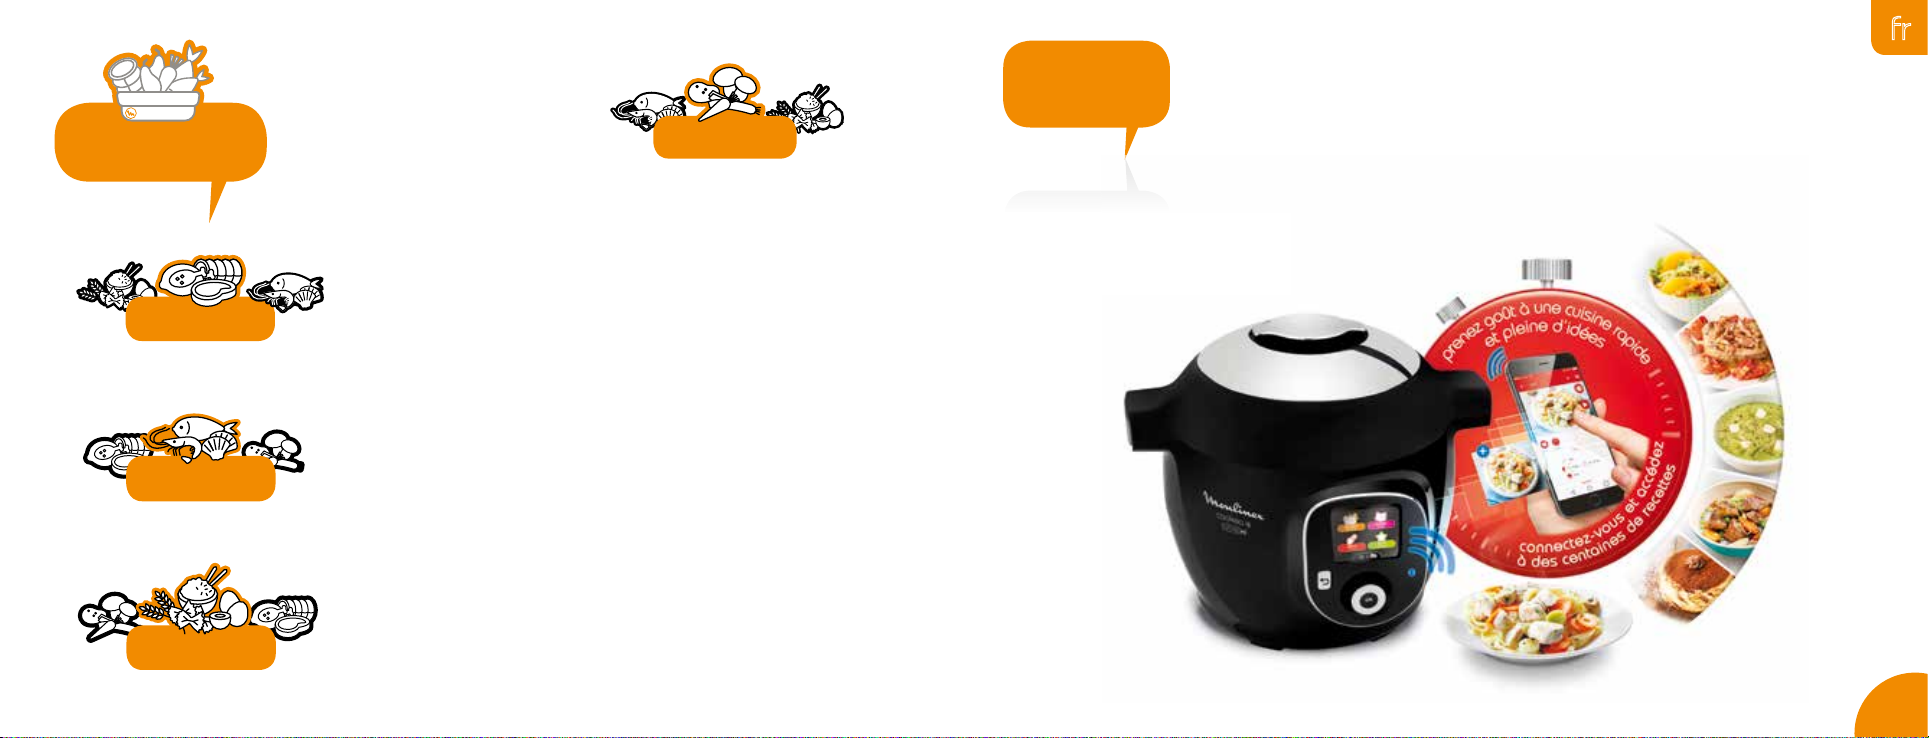
Mon assistant culinaire connecté pour la cuisine du quotidien
Cookeo+ Connect est un multicuiseur intelligent connecté qui dispose de 150 recettes déjà programmées. Il s’adapte
au nombre de convives, vous guide en pas à pas, et cuit sans surveillance. Grâce à son application dédiée, Mon
Cookeo, accédez à des centaines de recettes ; une simple connexion en Bluetooth vous permet de synchroniser
votre tablette et/ou smartphone à votre Cookeo.
Laissez-vous guider…
Mein Kochassistent mit Verbindungsfunktion für Alltagsgerichte
Cookeo+ Connect ist ein intelligenter Schnellkochtopf mit Verbindungsfunktion und 150 bereits vorprogrammierten
Rezepten. Er passt sich an die Zahl der Gäste an, leitet Sie Schritt für Schritt durch den Garvorgang und kocht ohne
Überwachung. Dank der zugehörigen App Mon Cookeo haben Sie Zugriff auf hunderte Rezepte; über eine einfache
Bluetooth-Verbindung können Sie Ihr Tablet/oder Smartphone mit Ihrer Cookeo-App synchronisieren. Ihre Anleitung
Mijn intelligente keukenassistent voor dagelijkse gerechten
Cookeo+ Connect is een intelligente verbonden multikoker die meer dan 150 voorgeprogrammeerde recepten bevat.
Het toestel past zich aan het aantal tafelgasten aan, begeleidt u stap voor stap en kookt zonder toezicht. Met de
bijhorende app «Mon Cookeo» heeft u toegang tot honderden recepten. Via een simpele Bluetooth-verbinding
kunt u uw tablet en/of smartphone met uw Cookeo synchroniseren. Laat u begeleiden...
Mi asistente de cocina que está conectado para cocinar todos los días
Cookeo+ Connect es un multicocedor inteligente y conectado que presenta 150 recetas ya programadas. Se
adapta al número de invitados, te guía paso a paso y cocina sin vigilancia. Su aplicación especialmente diseñada,
Mi Cookeo, te permitirá acceder a cientos de recetas: simplemente con conectarte a Bluetooth, podrás sincronizar
la tableta y/o el teléfono inteligente a tu Cookeo. Déjate guiar...
O meu assistente de cozinha com ligação Bluetooth para cozinhar no dia-a-dia
Cookeo+ Connect é um robot de cozinha multi-cozedura inteligente que inclui 150 receitas já programadas. Adaptase à quantidade de pessoas, guia-o em cada etapa e coze sem necessitar de vigilância. Graças à sua aplicação
dedicada, Mon Cookeo, aceda a centenas de receitas. Uma simples ligação Bluetooth permite-lhe sincronizar o
seu tablet e/ou smartphone ao Cookeo. Deixe-se guiar...
Il mio assistente culinario connesso per la cucina di ogni giorno
Cookeo+ Connect è una pentola multifunzione intelligente connessa, che dispone di 150 ricette già programmate.
Si adatta al numero dei commensali, vi guida passo dopo passo e cuoce senza necessità di sorveglianza. Grazie alla
sua applicazione dedicata, Mon Cookeo, potete accedere a centinaia di ricette; una semplice connessione Bluetooth
vi permette di sincronizzare il vostro tablet e/o smartphone a Cookeo. Lasciatevi guidare...
Page 5
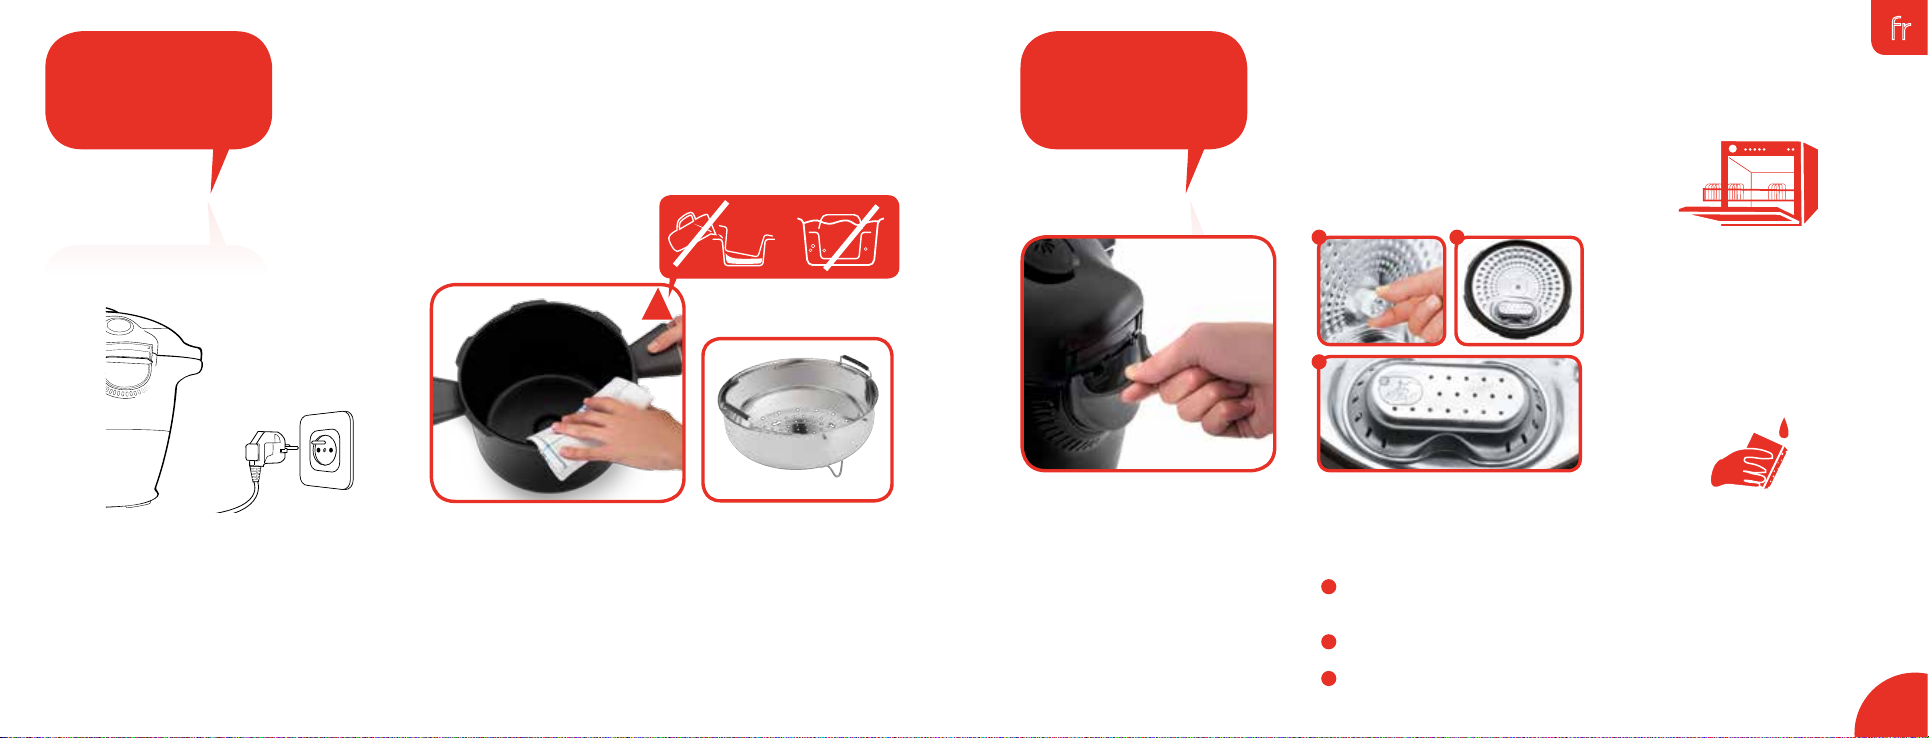
avant
utilisation
avant
utilisation
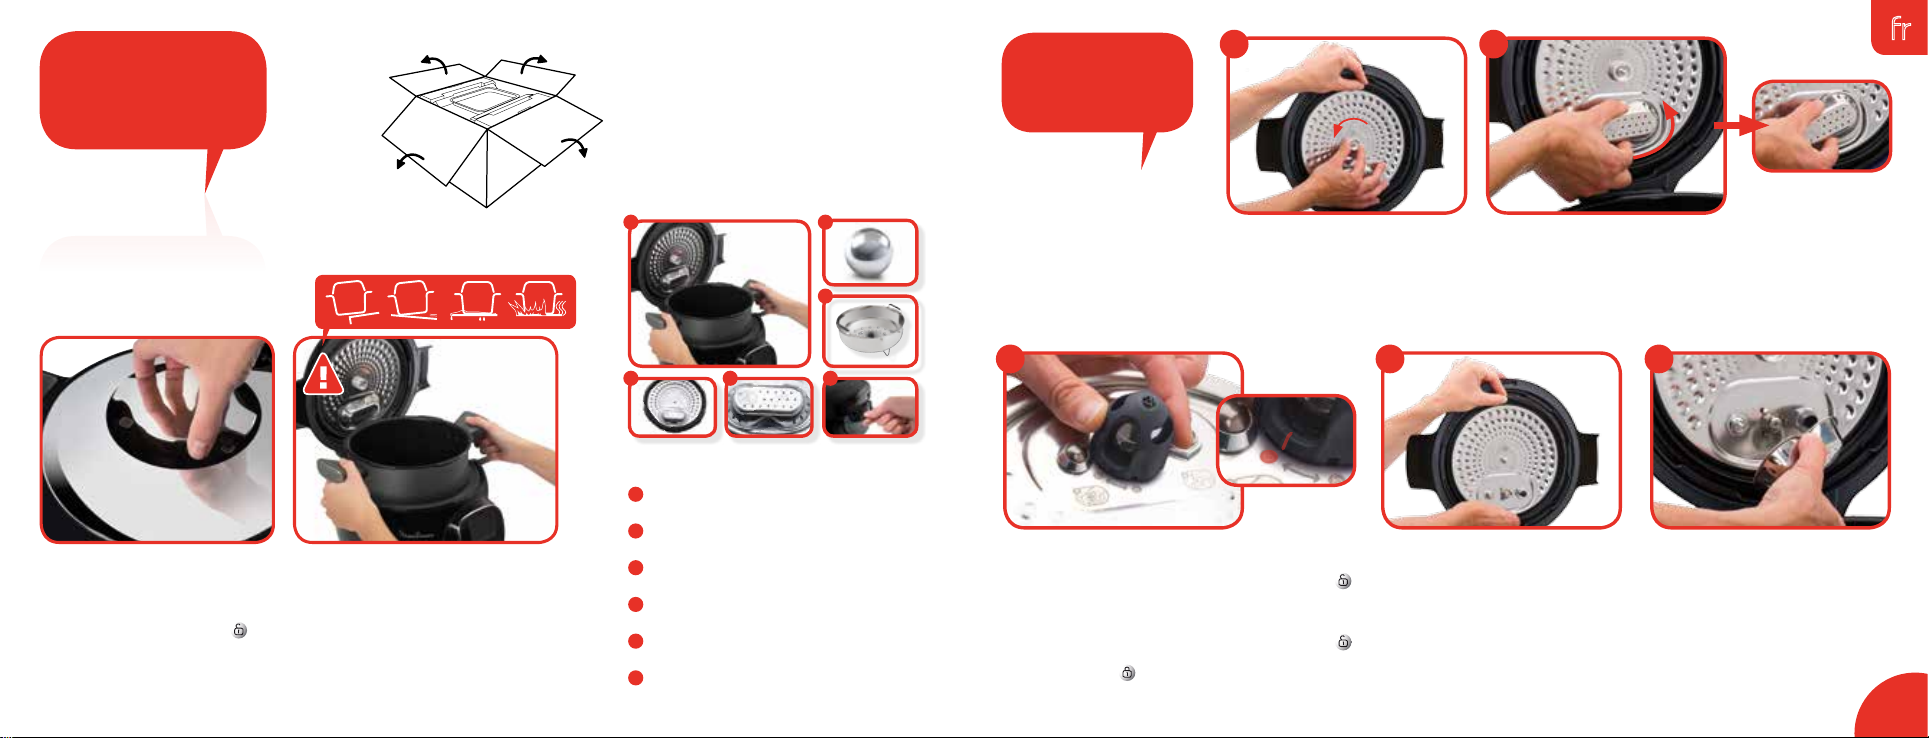
Sortez l’appareil de son emballage et lisez
attentivement les instructions de fonctionnement
et les consignes de sécurité avant d’utiliser le
produit pour la première fois.
avant
utilisation
1
2
fr
Pour ouvrir le produit, tournez la
poignée d’ouverture/fermeture sur
le dessus du couvercle de manière
à voir les cadenas ouverts : .
Installez l’appareil sur une surface
plane, sèche et froide. Enlevez tous les
emballages, autocollants ou accessoires
divers à l’intérieur comme à l’extérieur
de l’appareil.
1
2 43
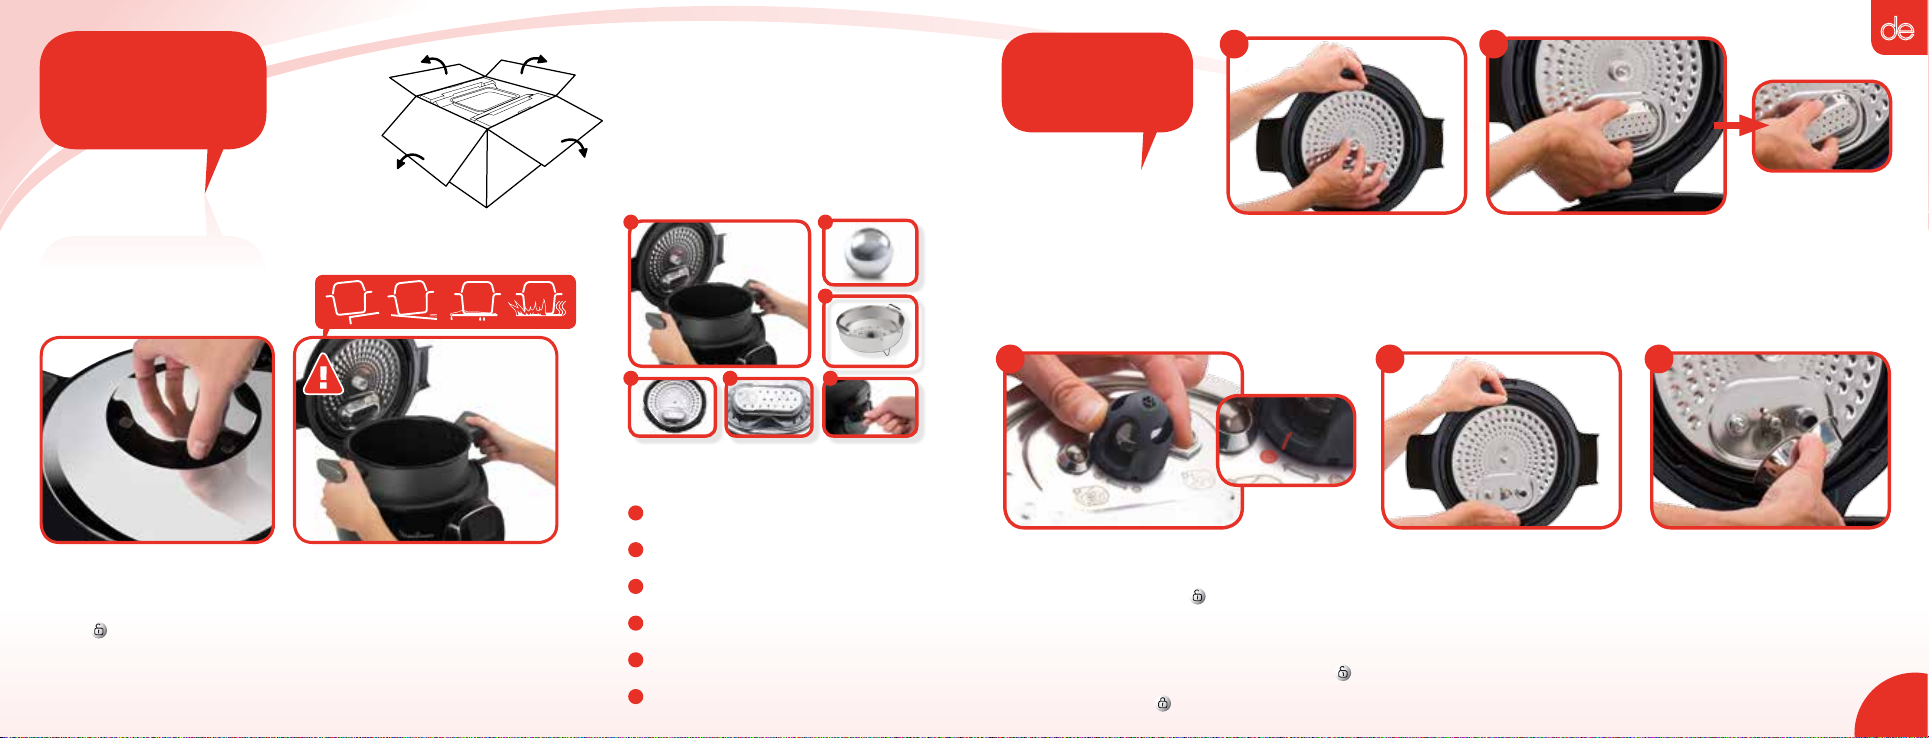
NETTOYEZ LES DIFFÉRENTS ÉLÉMENTS
1
La cuve de cuisson
2
Le couvercle métallique
3
Le cache valve
4
Le récupérateur de condensation
5
Le panier vapeur
6
La bille de décompression
6
5
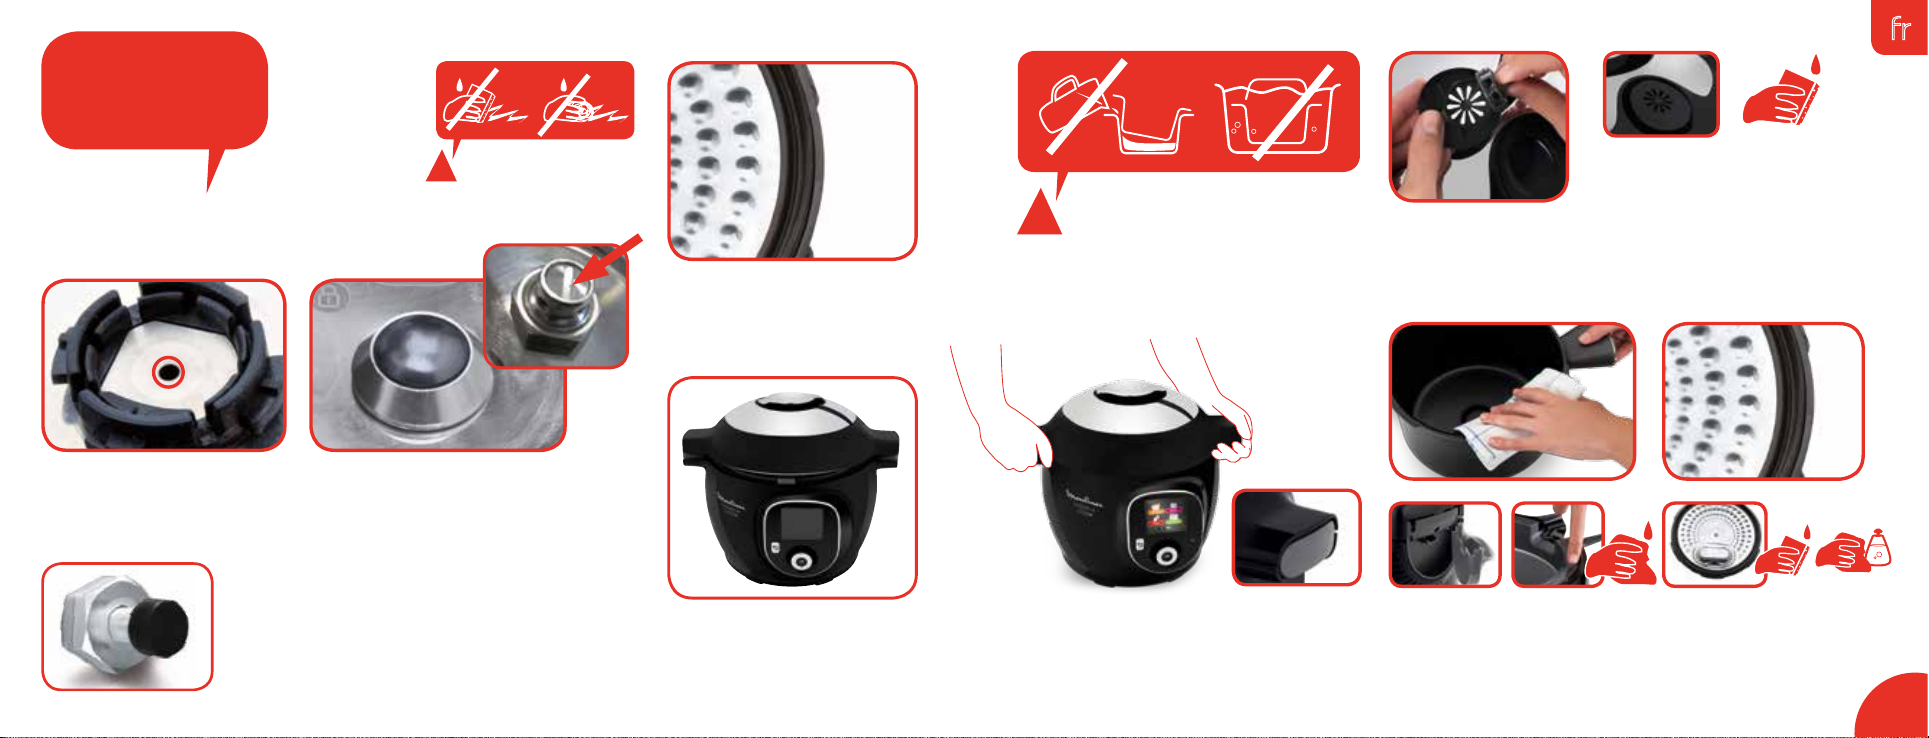
PRÉCISIONS SUR
LE DÉMONTAGE
ET LE REMONTAGE
DU COUVERCLE
ACCÈS À LA BILLE DE DÉCOMPRESSION :
Tournez le cache bille, dans le sens inverse des aiguilles
d’une montre, afin d’amener le repère I sur la position
Soulevez le cache. Retirez la bille, nettoyez-la délicatement
avec de l’eau et du liquide vaisselle, ainsi que son siège. Séchez
la bille à l’aide d’un chiffon doux, puis remettez-la sur son siège.
Remettez en place le cache bille, le repère I en position .
Verrouillez-le, en tournant le cache bille pour amener le repère en
face du picto “fermé” .
DÉMONTAGE DU COUVERCLE
MÉTALLIQUE :
Saisissez le sous-ensemble couvercle en le tenant
par le joint, et dévissez l’écrou central dans le
sens inverse des aiguilles d’une montre.
Retirez l’écrou puis le couvercle.
DÉMONTAGE DU CACHE VALVE :
Saisissez le cache valve par la partie centrale (comme indiqué) ;
puis tournez-le légèrement an de le déclipser.
Nettoyez le cache valve, en insistant sur la partie intérieure
(vériez qu’il n’y ait plus de résidus d’aliments).
4
REMONTAGE DU SOUS-ENSEMBLE
COUVERCLE MÉTALLIQUE :
Saisissez le sous-ensemble couvercle par
.
le joint comme indiqué sur la photo.
Centrez le couvercle sur l’axe central
et plaquez-le à plat.
Remettez en place l’écrou et vissez-le à fond,
dans le sens des aiguilles d’une montre.
53
REMONTAGE DU CACHE VALVE :
Prenez le cache valve comme indiqué sur la
photo (saisissez-le par la zone centrale).
Centrez la forme intérieure circulaire sur les
trois crochets, puis poussez an de clipser
le cache valve (on doit entendre un “clip”).
Le cache valve doit être parfaitement en
contact avec la face intérieure du couvercle.
5
Page 6
ok
ok
LANGUE
Italiano
English
Français
Deutsch
Español
ok
ok
LANGUE
Italiano
English
Français
Deutsch
Español
PAYS
Italia
United Kingdom
France
Deutschland
España
ok
ok
avant
utilisation
fr
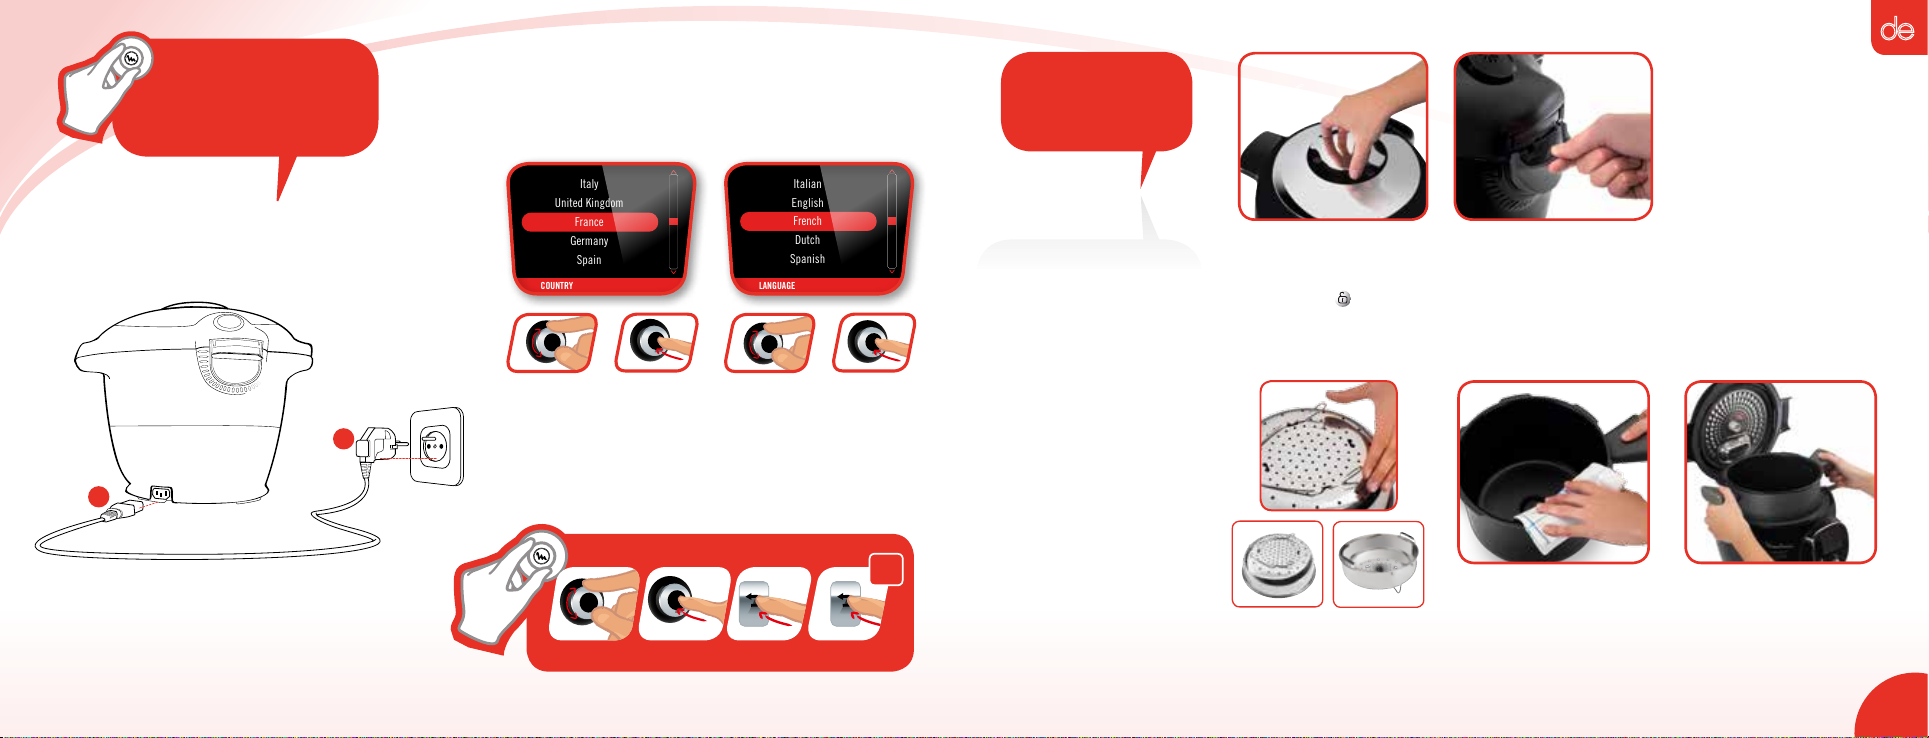
fonctionnement
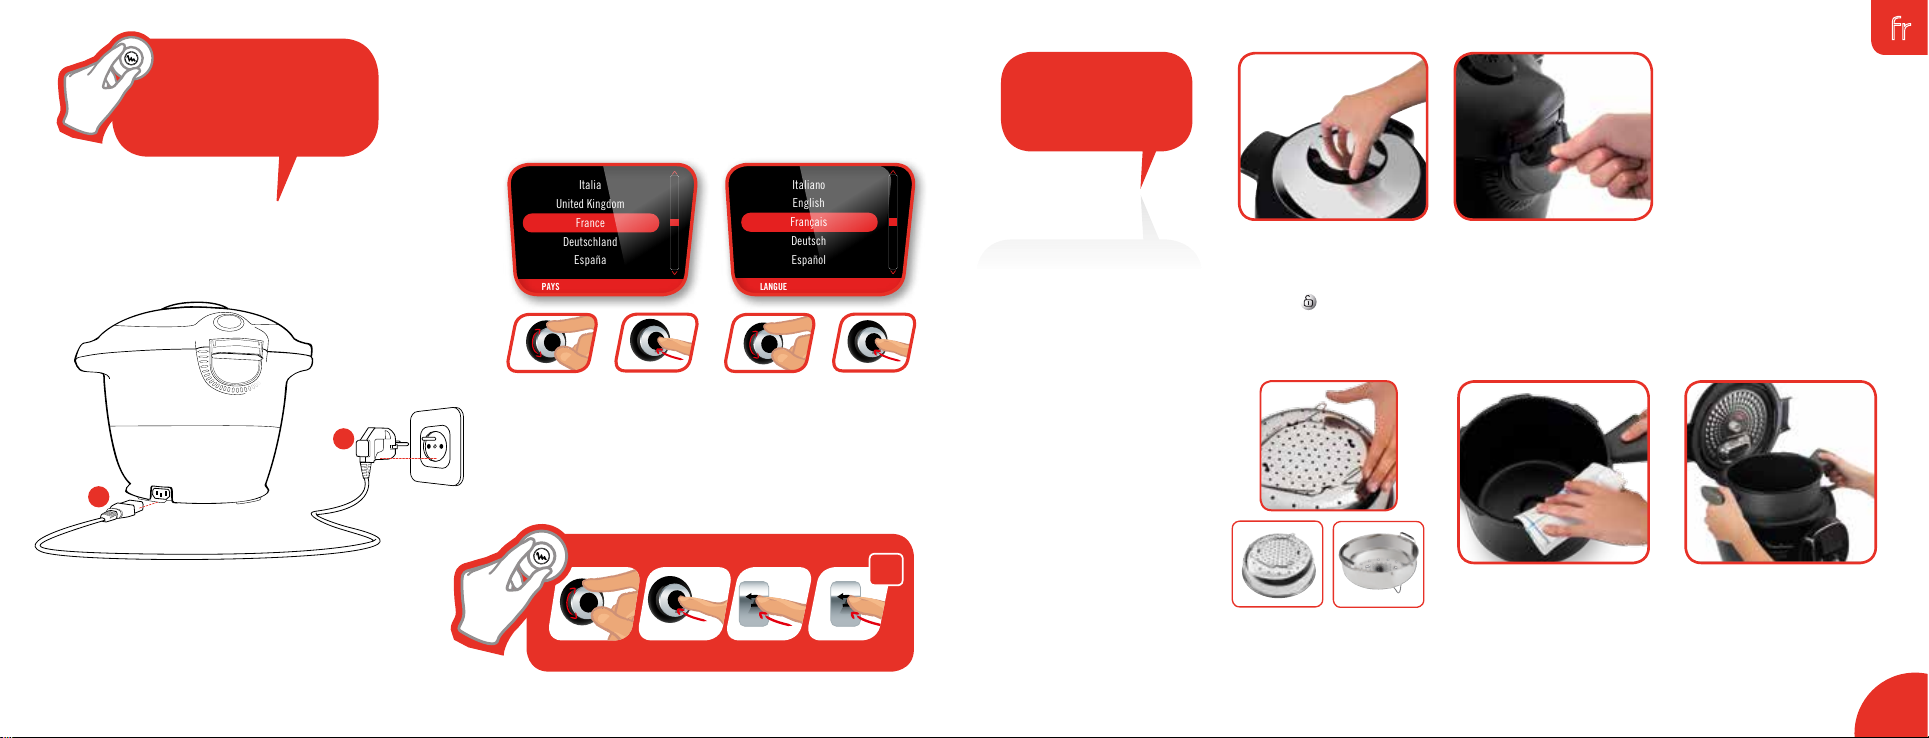
1
mise en
Pour la première mise sous tension,
vous accédez au menu réglage :
N’utilisez jamais l’appareil
sans la cuve de cuisson.
+
Choisissez votre pays
2
Choisissez votre langue
+
avant
utilisation
OUVERTURE DU COUVERCLE :
Pour ouvrir le produit, tournez la
poignée d’ouverture / fermeture
de manière à voir les cadenas
ouverts : . Ne jamais tenter
de forcer l’ouverture du couvercle
s’il résiste.
INSTALLATION DU RÉCUPÉRATEUR
DE CONDENSATION :
le récupérateur de condensation
soit vide puis installez-le à
l’arrière de l’appareil.
vériez que
Lors de la première
utilisation de votre
appareil, la cuve peut
COMMANDES DE L’INTERFACE
3s
SÉLECTIONNEZ VALIDEZ RETOUR RÉINITIALISEZ
dégager une légère odeur.
Ceci est normal.
MISE EN PLACE DU TRÉPIED
SOUS LE PANIER VAPEUR :
Pincez entre le pouce et l’index
le trépied an de l’installer sous
le panier vapeur.
POSITIONNEMENT DE LA CUVE
DANS L’APPAREIL :
le fond de la cuve de cuisson.
Assurez-vous qu’il n’y a aucun
résidu de nourriture ou de liquide
sous le bol ni sur le plateau
chauffant.
essuyez
Installez ensuite la cuve dans
l’appareil en positionnant bien
les poignées de la cuve dans les
encoches.
7
Page 7
ok
ok
ok
ok
ok
ok
ok
ok
ok
ok
ok
ok
ok
ok
ok
ok
ok
ok
ok
ok
ok
ok
ok
ok
ok
ok
ok
ok
ok
ok
ok
ok
ok
ok+ok
ok
ok
ok
ok
ok
ok
RECETTE 2
souhaitez-vous supprimer
cette recette ?
OUI NON
BIBLIOTHÈQUE 2
souhaitez-vous supprimer
cette bibliothèque ?
OUI NON
veuillez sélectionner la
bibliothèque à supprimer
bibliothèque 1
bibliothèque 2
langues/pays
suppression
recettes
écran/son
Connect
bibliothèques
recettes
recettes
manuel
ingrédients
langues/pays
suppression
recettes
écran/son
Connect
recettes
manuel
ingrédients
LANGUE
allemand
espagnol
français
italien
néerlandais
langues/pays
suppression
recettes
écran/son
Connect
recettes
manuel
ingrédients
recettes
manuel
ingrédients
PAYS
Allemagne
Espagne
France
Italie
Pays-Bas
LANGUE
allemand
espagnol
français
italien
néerlandais
langues/pays
suppression
recettes
écran/son
Connect
recettes
manuel
ingrédients
PAYS
Allemagne
Espagne
France
Italie
Pays-Bas
LANGUE
allemand
espagnol
français
italien
néerlandais
langues/pays
suppression
recettes
écran/son
Connect
langues/pays
suppression
recettes
écran/son
Connect
PAYS
Allemagne
Espagne
France
Italie
Pays-Bas
LANGUE
allemand
espagnol
français
italien
néerlandais
veuillez sélectionner la
recette à supprimer
recette 1
langues/pays
suppression
recettes
écran/son
Connect
langues/pays
suppression
recettes
écran/son
Connect
recette 2
PAYS
Allemagne
Espagne
France
Italie
Pays-Bas
LANGUE
allemand
espagnol
français
italien
néerlandais
RECETTE 2
souhaitez-vous supprimer
cette recette ?
OUI NON
veuillez sélectionner la
recette à supprimer
recette 1
langues/pays
suppression
recettes
écran/son
Connect
recette 2
PAYS
Allemagne
Espagne
France
Italie
Pays-Bas
LANGUE
RECETTE 2
souhaitez-vous supprimer
cette recette ?
OUI NON
veuillez sélectionner la
recette à supprimer
recette 1
langues/pays
suppression
recettes
écran/son
Connect
bibliothèques
recettes
recette 2
PAYS
RECETTE 2
souhaitez-vous supprimer
cette recette ?
OUI NON
veuillez sélectionner la
recette à supprimer
recette 1
veuillez sélectionner la
bibliothèque à supprimer
bibliothèque 1
bibliothèque 2
langues/pays
suppression
recettes
écran/son
Connect
bibliothèques
recettes
recette 2
RECETTE 2
souhaitez-vous supprimer
cette recette ?
OUI NON
veuillez sélectionner la
recette à supprimer
recette 1
BIBLIOTHÈQUE 2
souhaitez-vous supprimer
cette bibliothèque ?
OUI NON
veuillez sélectionner la
bibliothèque à supprimer
bibliothèque 1
bibliothèque 2
bibliothèques
recettes
recette 2
écran
son
BIBLIOTHÈQUE 2
souhaitez-vous supprimer
cette bibliothèque ?
OUI NON
veuillez sélectionner la
bibliothèque à supprimer
bibliothèque 1
bibliothèque 2
langues/pays
suppression
recettes
écran/son
Connect
bibliothèques
recettes
écran
son
mode démo
luminosité
BIBLIOTHÈQUE 2
souhaitez-vous supprimer
cette bibliothèque ?
OUI NON
veuillez sélectionner la
bibliothèque à supprimer
bibliothèque 1
bibliothèque 2
langues/pays
suppression
recettes
écran/son
Connect
écran
son
LUMINOSITÉ
mode démo
luminosité
BIBLIOTHÈQUE 2
souhaitez-vous supprimer
cette bibliothèque ?
OUI NON
langues/pays
suppression
recettes
écran/son
Connect
écran
son
LUMINOSITÉ
mode démo
luminosité
mode démo
luminosité
langues/pays
suppression
recettes
écran/son
Connect
écran
son
LUMINOSITÉ
mode démo
luminosité
mode démo
luminosité
MODE DÉMO
OFF ON
LUMINOSITÉ
mode démo
luminosité
mode démo
luminosité
MODE DÉMO
OFF ON
MODE DÉMO
3424
son
LUMINOSITÉ
mode démo
luminosité
MODE DÉMO
OFF ON
MODE DÉMO
3424
écran
son
mode démo
luminosité
MODE DÉMO
OFF ON
MODE DÉMO
3424
SON
OFF ON
écran
son
MODE DÉMO
OFF ON
MODE DÉMO
3424
SON
OFF ON
écran
langues/pays
suppression
recettes
écran/son
Connect
son
MODE DÉMO
3424
SON
OFF ON
écran
langues/pays
suppression
recettes
écran/son
Connect
OFF ON
Connect
PAYS
Allemagne
Espagne
France
Italie
Pays-Bas
LANGUE
allemand
espagnol
français
italien
néerlandais
langues/pays
suppression
recettes
écran/son
Connect
langues/pays
suppression
recettes
écran/son
Connect
bibliothèques
recettes
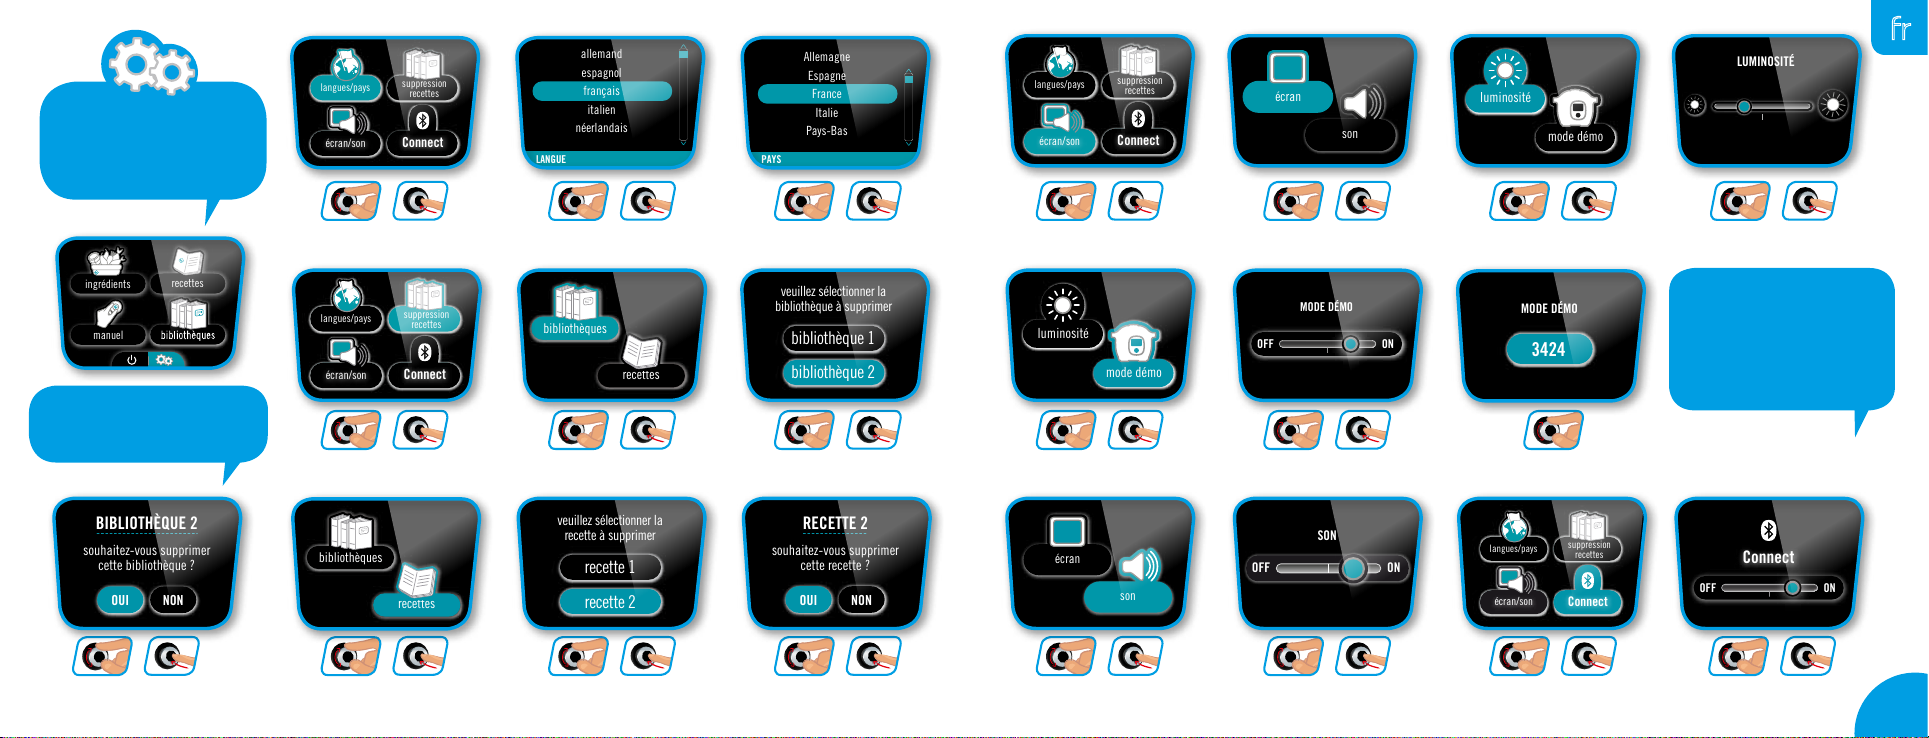
N.B. : Même si le son est
désactivé, les sons d’alerte
demeurent actifs.
menu
réglages
+
Choisissez
« langues/pays »
+
Choisissez
« suppression recettes »
+
Choisissez
votre langue
+
Choisissez « bibliothèques »
+
Choisissez
votre pays
Sélectionnez
« bibliothèque 2 »
+
Choisissez
« écran / son »
+
Choisissez « mode démo »
+
+
Choisissez « écran » Choisissez « luminosité »
+
Pour activer ou désactiver le mode démo,
vous devrez entrer un code : 3424
fr
+
Réglez la luminosité
N.B. : Le mode DÉMO
permet de faire
fonctionner le produit
sans qu’il ne chauffe
ou monte en pression.
Souhaitez-vous supprimer
+
cette bibliothèque ?
+
Choisissez « recettes »
+
Sélectionnez
« recette 2 »
+
Souhaitez-vous supprimer
cette recette ?
+
Choisissez « son » Choisissez « connect »
+
Réglez le son
+
+
Activer ou désactiver
le mode connect
9
Page 8
ok
ok
recettes
manuel
ingrédients
recettes
manuel
ingrédients
souhaitez-vous éteindre
votre appareil ?
OUI NON
recettes
manuel
ingrédients
souhaitez-vous éteindre
votre appareil ?
OUI NON
souhaitez-vous éteindre
votre appareil ?
OUI NON
Valider la demande de connexion
en appuyant sur OK
OK
ok
ok
ok
ok
ok
ok
fr
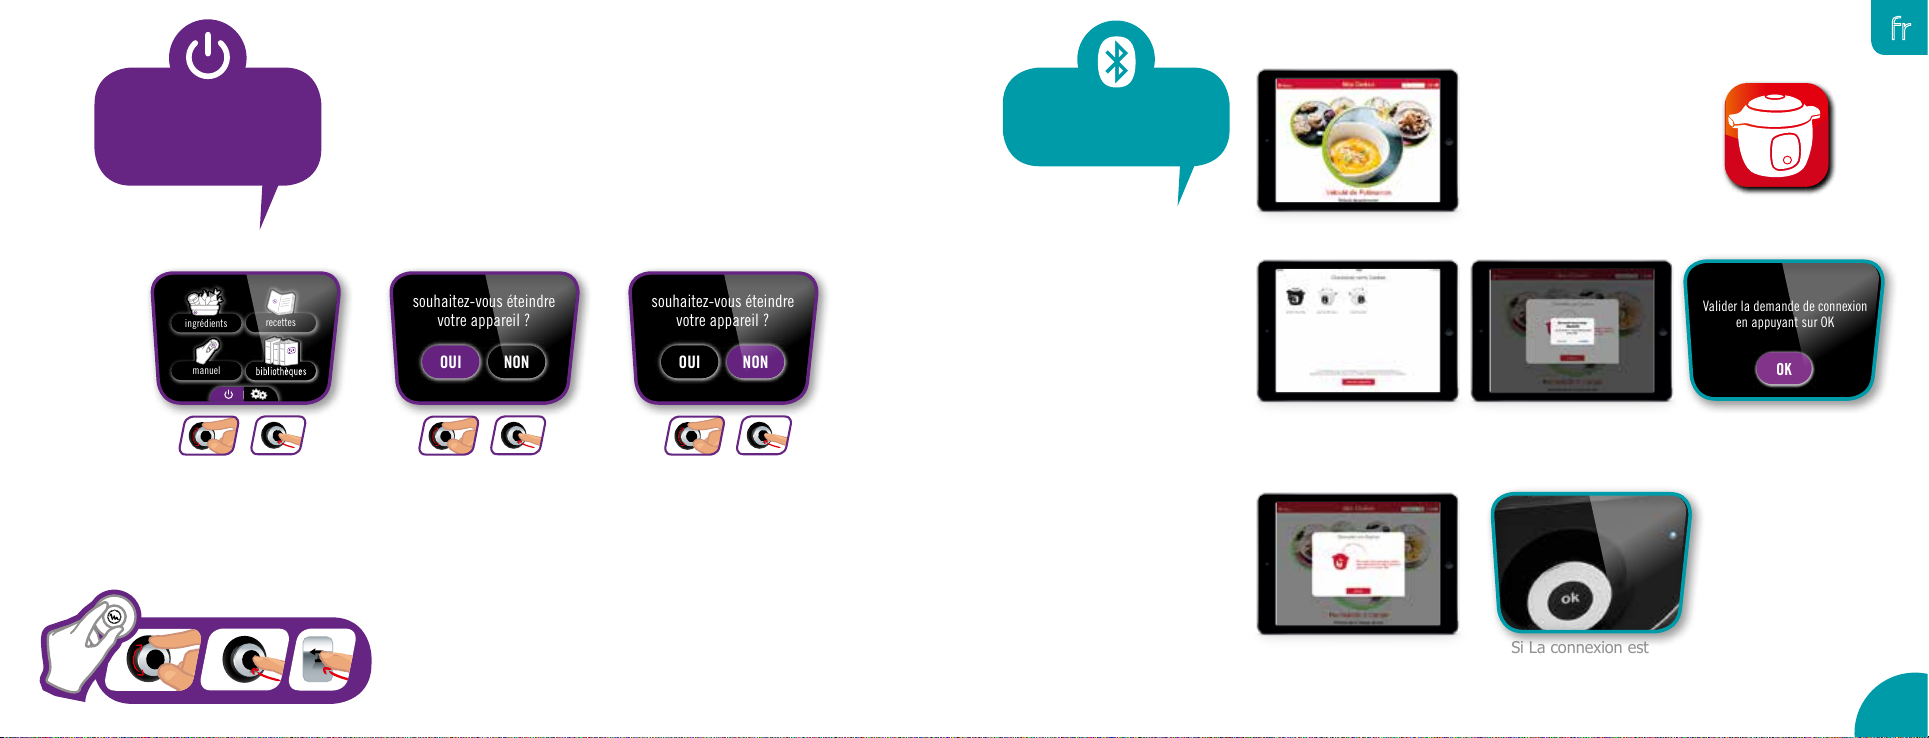
on /off
menu
connexion
Mon Cookeo en vous rendant
sur l’App Store depuis votre
tablette ou smartphone.
Votre Cookeo+ est
fonctionnel, vous pouvez
déjà utiliser votre produit
avec les 150 recettes pré-
programmées même sans
l’application.
Téléchargez l’application
Lorsque vous allumez votre
+
+
+
Une entrée ON/OFF vous permet d’éteindre votre appareil.Sélectionnez et validez
Cookeo+, le voyant bleu
clignote (en attente de
connexion) sauf si vous avez
À la première utilisation, jumelez votre produit à votre tablette en suivant
les instructions sur vos écrans.
désactivé manuellement
la fonction connect (voir
chapitre Réglages).
Si La connexion est
réussie, le voyant bleu
devient xe.
11
Page 9
fr
connexion
Problème de connexion :
Si la connexion a échoué, vous
verrez un message d’erreur. Vous
devez suivre les instructions sur
vos écrans pour une nouvelle
tentative de connexion.
Attention : une seule
connexion possible à la fois.
N.B. : si vous n’utilisez pas votre Cookeo+ pendant 30 minutes, il passera en mise en veille et la
connexion sera perdue. A la sortie de la mise en veille, la reconnexion se fera automatiquement.
Créer son compte :
Suivez les indications
sur l’application.
Barre de recherche :
Tapez vos mots clés dans
la barre de recherche et
accéder à la recherche par
ltre
Navigation :
Vous pouvez également
naviguer à travers l’application
en accédant au Menu :
• accueil
• recettes
• mes courses
• outils
• guide
• mon compte
Aucune incidence sur la cuisson si il y a perte de connexion. Cookeo+ reste dans tous les cas autonome.
N.B. : vous ne pouvez démarrer la cuisson qu’à partir de votre Cookeo+ en appuyant sur
le bouton OK (comme indiqué sur l’application).
Depuis l’application
vous pouvez soit :
• voir le pas à pas
• lancer la recette en pas à
pas en intéraction avec
votre Cookeo+
Recettes présentes
dans votre Cookeo+
Favoris
Bibliothèque
13
Page 10
recettes
manuel
ingrédients
ATTENTION
CUISSON SOUS PRESSION
insérer la cuve
00:10
CUISSON
maintien
au chaud
cuisson
sous pression
réchauffer
cuisson
classique
manuel
ATTENTION
CUISSON SOUS PRESSION
CUISSON SOUS PRESSION
insérer la cuve
00:10
CUISSON
départ
immédiat
départ
différé
maintien
au chaud
cuisson
sous pression
réchauffer
cuisson
classique
ATTENTION
CUISSON SOUS PRESSION
CUISSON SOUS PRESSION
insérer la cuve
00:10
CUISSON
départ
immédiat
départ
différé
ATTENTION
fermer et verrouiller le couvercle
maintien
au chaud
réchauffer
recettes
manuel
ingrédients
recettes
manuel
ingrédients
maintien
au chaud
cuisson
sous pression
réchauffer
cuisson
classique
recettes
manuel
ingrédients
ATTENTION
insérer la cuve
maintien
au chaud
cuisson
sous pression
réchauffer
cuisson
classique
okokok
ok
ATTENTION
CUISSON SOUS PRESSION
CUISSON SOUS PRESSION
CUISSON SOUS PRESSION
00:10
CUISSON
départ
immédiat
départ
différé
ATTENTION
fermer et verrouiller le couvercle
PRÉCHAUFFAGE
veuillez patienter
CUISSON SOUS PRESSION
CUISSON SOUS PRESSION
CUISSON SOUS PRESSION
CUISSON
départ
immédiat
départ
différé
ATTENTION
fermer et verrouiller le couvercle
PRÉCHAUFFAGE
veuillez patienter
CUISSON SOUS PRESSION
CUISSON
00:02
CUISSON SOUS PRESSION
CUISSON SOUS PRESSION
immédiat
différé
ATTENTION
fermer et verrouiller le couvercle
PRÉCHAUFFAGE
veuillez patienter
CUISSON SOUS PRESSION
CUISSON SOUS PRESSION
CUISSON
00:02
FIN DE CUISSON
veuillez patienter
12:20
CUISSON SOUS PRESSION
ATTENTION
fermer et verrouiller le couvercle
PRÉCHAUFFAGE
veuillez patienter
CUISSON SOUS PRESSION
CUISSON SOUS PRESSION
CUISSON SOUS PRESSION
CUISSON
00:02
FIN DE CUISSON
veuillez patienter
12:20
00:02
BON APPÉTIT !
Servir !
MAINTIEN AU CHAUD
Attention à la vapeur à l'ouverture du couvercle
ok
ok
ok
ok
ok
ok
ok
ok
SOUS PRESSION SOUS PRESSION
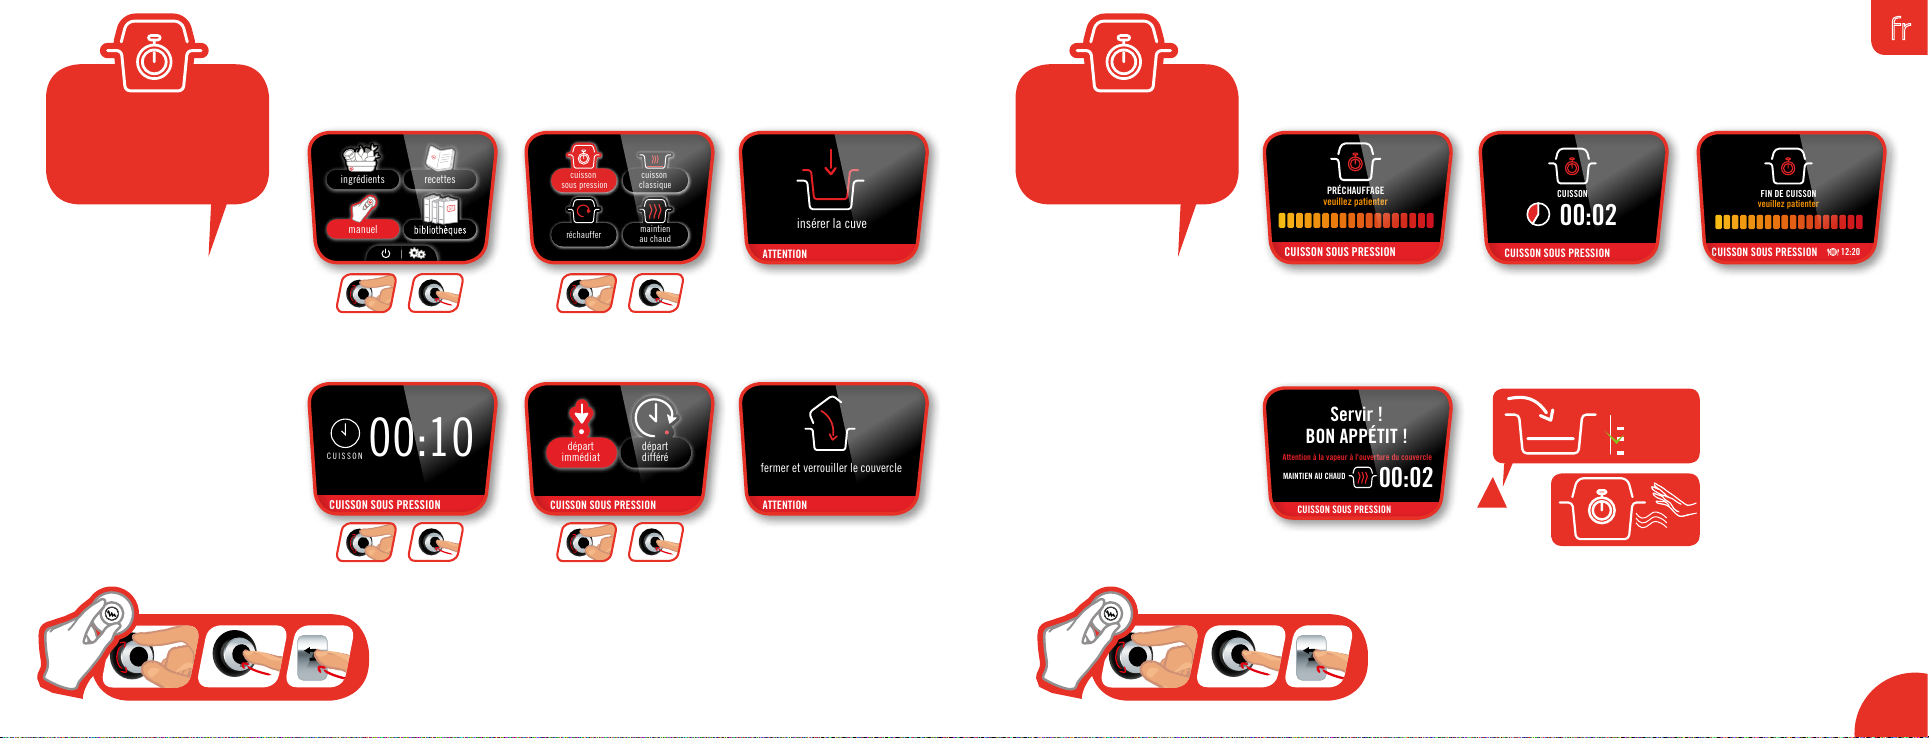
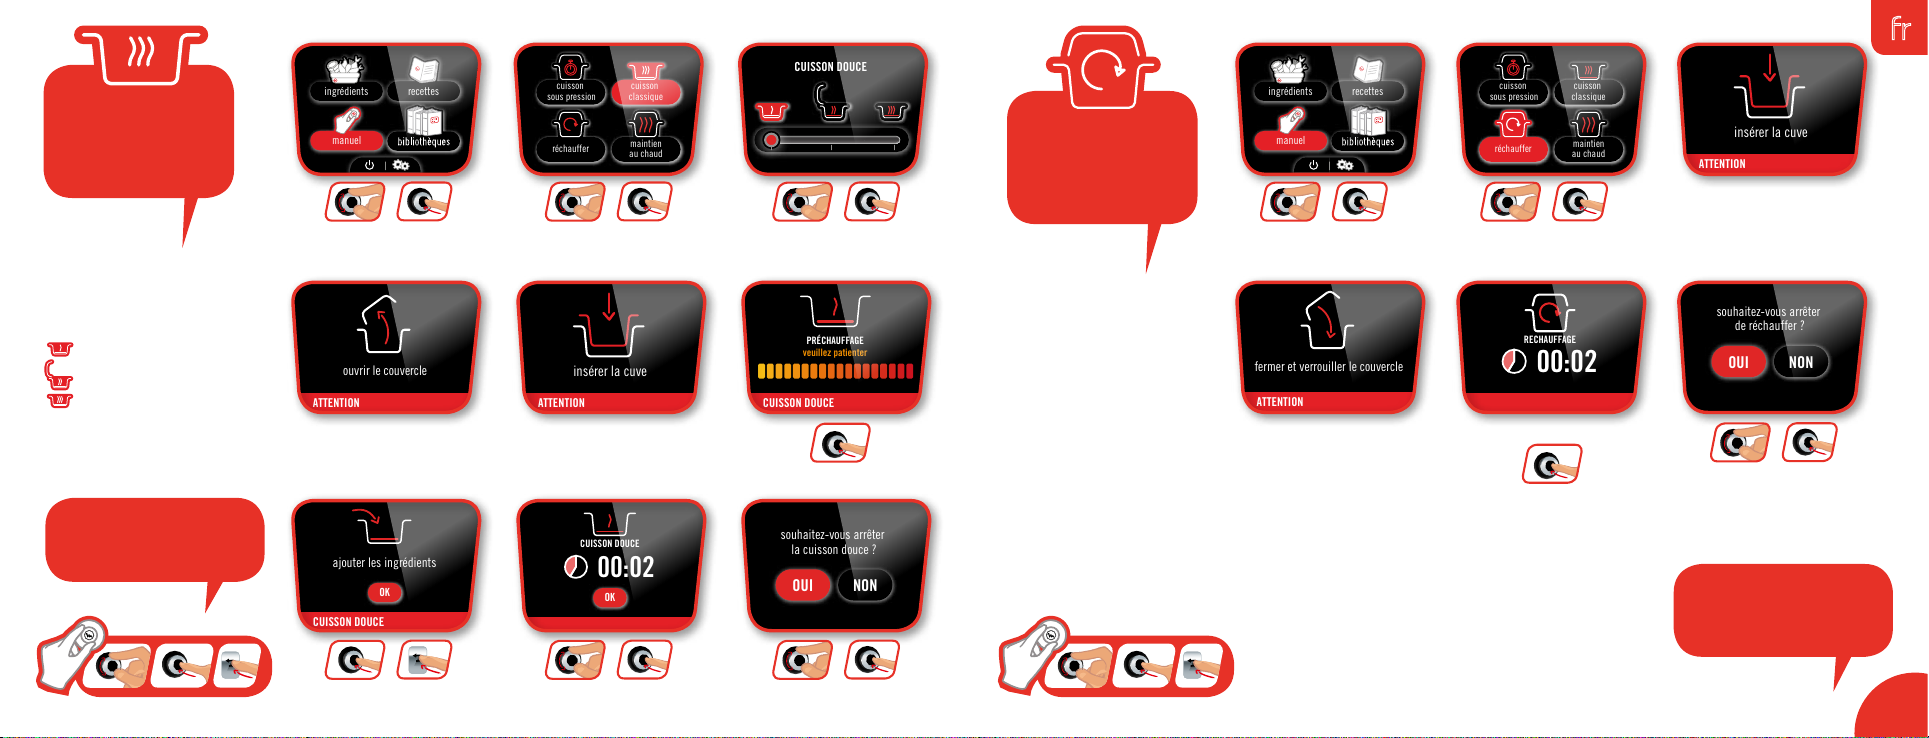
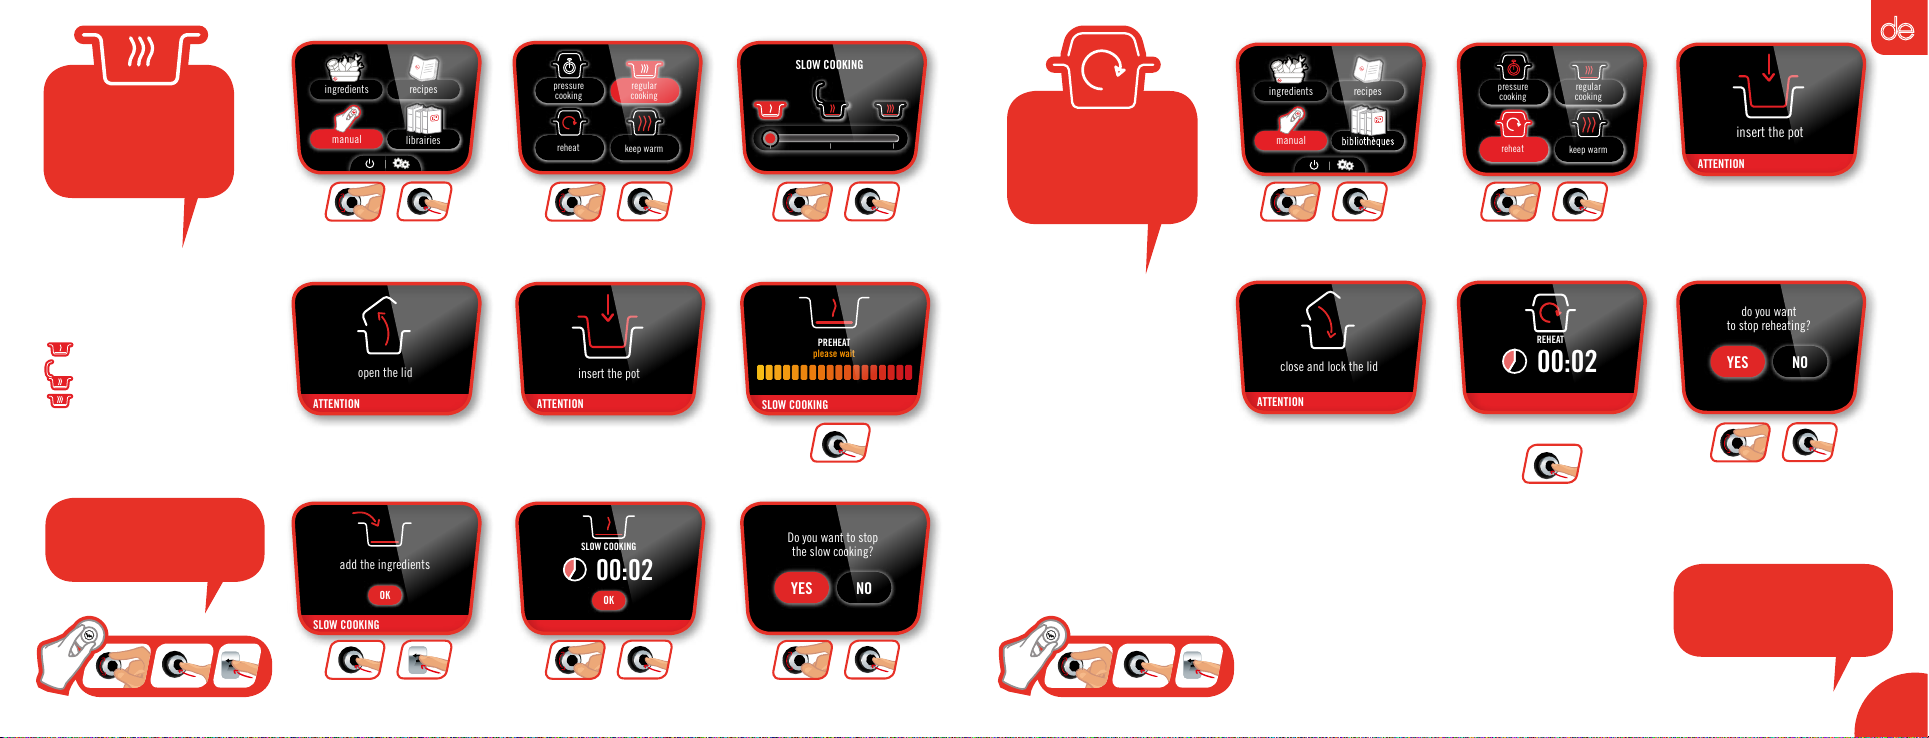
MENU MANUEL :
Avec le menu manuel, c’est
vous qui pilotez la cuisson.
Choisissez vous-même le
temps et le mode de cuisson :
menu
manuel
mode de cuisson
+
Sélectionnez le menu
« manuel »
+
Choisissez le mode
« sous pression »
menu
manuel
mode de cuisson
Insérez la cuve puis
ajoutez les ingrédients
cuisson sous pression,
cuisson classique (cuisson
douce, mijoter, dorer),
réchauffage ou maintien
au chaud.
+
Réglez le temps
de cuisson
+
Choisissez départ
immédiat ou différé
(p.19)
Fermez et verrouillez
L’appareil préchauffe La cuisson démarre
!
Vous pouvez déguster !
4 L (max)
3,5L
200 ml (min)
fr
La cuisson se termine
15
Page 11
okokok
ok
recettes
manuel
ingrédients
maintien
au chaud
cuisson
sous pression
réchauffer
cuisson
classique
recettes
manuel
ingrédients
ATTENTION
ouvrir le couvercle
maintien
au chaud
cuisson
sous pression
réchauffer
cuisson
classique
CUISSON DOUCE
recettes
manuel
ingrédients
ATTENTION
ATTENTION
insérer la cuve
ouvrir le couvercle
maintien
au chaud
cuisson
sous pression
réchauffer
cuisson
classique
CUISSON DOUCE
ATTENTION
ATTENTION
insérer la cuve
ouvrir le couvercle
CUISSON DOUCE
PRÉCHAUFFAGE
veuillez patienter
CUISSON DOUCE
ATTENTION
ATTENTION
insérer la cuve
CUISSON DOUCE
ouvrir le couvercle
CUISSON DOUCE
PRÉCHAUFFAGE
veuillez patienter
ajouter les ingrédients
OK
ATTENTION
ATTENTION
insérer la cuve
CUISSON DOUCE
CUISSON DOUCE
PRÉCHAUFFAGE
veuillez patienter
ajouter les ingrédients
OK
00:02
CUISSON DOUCE
OK
ATTENTION
CUISSON DOUCE
CUISSON DOUCE
PRÉCHAUFFAGE
veuillez patienter
ajouter les ingrédients
OK
00:02
CUISSON DOUCE
OK
souhaitez-vous arrêter
la cuisson douce ?
OUI NON
maintien
au chaud
cuisson
sous pression
réchauffer
cuisson
classique
CUISSON DOUCE
recettes
manuel
ingrédients
recettes
manuel
ingrédients
maintien
au chaud
cuisson
sous pression
réchauffer
cuisson
classique
recettes
manuel
ingrédients
ATTENTION
insérer la cuve
ATTENTION
fermer et verrouiller le couvercle
maintien
au chaud
cuisson
sous pression
réchauffer
cuisson
classique
recettes
manuel
ingrédients
ATTENTION
insérer la cuve
maintien
au chaud
cuisson
sous pression
réchauffer
cuisson
classique
recettes
manuel
ingrédients
ATTENTION
insérer la cuve
ATTENTION
fermer et verrouiller le couvercle
00:02
RECHAUFFAGE
maintien
au chaud
cuisson
sous pression
réchauffer
cuisson
classique
ATTENTION
insérer la cuve
souhaitez-vous arrêter
de réchauffer ?
OUI NON
ATTENTION
fermer et verrouiller le couvercle
00:02
RECHAUFFAGE
ok
ok
ok
ok
ok
ok
ok
ok
ok
ok
ok
ok
ok
ok
ok
ok
ok
ok
ok
mode de cuisson
menu
manuel
CLASSIQUE
Avec le mode de cuisson
classique, vous pouvez :
cuire doucement
mijoter
dorer
selon le résultat souhaité.
Le couvercle reste ouvert
pour ces types de cuisson.
N.B. : Le fonctionnement
est identique, seule la
température diffère.
fr
menu
manuel
+
Sélectionnez le menu
« manuel »
+
Choisissez la fonction
« classique »
+
Choisissez la fonction
désirée
Sélectionnez le menu
+
« manuel »
+
Choisissez le mode
« réchauffer »
RÉCHAUFFER
mode de cuisson
Ouvrez le couvercle
Insérez la cuve
Fermez et verrouillez
le couvercle
L’appareil préchauffe
+
+
+
Pour arrêter la cuisson, appuyez sur la èche retour, et sélectionnez soit l’arrêt
soit « cuisson sous pression ».
Le réchauffage commence.
pour l’interrompre
Insérez la cuve
+
Souhaitez-vous arrêter
de réchauffer ?
N.B. : Le réchauffage
commence et le temps
augmente.
17
Page 12
recettes
manuel
ingrédients
maintien
au chaud
cuisson
sous pression
réchauffer
cuisson
classique
recettes
manuel
ingrédients
ok
ATTENTION
insérer la cuve
maintien
au chaud
cuisson
sous pression
réchauffer
cuisson
classique
recettes
manuel
ingrédients
ATTENTION
insérer la cuve
MAINTIEN AU CHAUD
PRECHAUFFAGE
veuillez patienter
maintien
au chaud
cuisson
sous pression
réchauffer
cuisson
classique
recettes
manuel
ingrédients
ATTENTION
insérer la cuve
MAINTIEN AU CHAUD
MAINTIEN AU CHAUD
PRECHAUFFAGE
veuillez patienter
MAINTIEN AU CHAUD
00:02
maintien
au chaud
cuisson
sous pression
réchauffer
cuisson
classique
ATTENTION
insérer la cuve
souhaitez-vous arrêter
le maintien au chaud ?
OUI NON
MAINTIEN AU CHAUD
MAINTIEN AU CHAUD
PRECHAUFFAGE
veuillez patienter
MAINTIEN AU CHAUD
00:02
CUISSON SOUS PRESSION
départ
immédiat
départ
différé
CUISSON SOUS PRESSION
CUISSON SOUS PRESSION
h mn
quelle heure est-il ?
08:15
départ
immédiat
départ
différé
CUISSON SOUS PRESSION
CUISSON SOUS PRESSION
CUISSON SOUS PRESSION
h mn
quelle heure est-il ?
FIN DE
CUISSON
12:30
08:15
08:15
départ
immédiat
départ
différé
CUISSON SOUS PRESSION
CUISSON SOUS PRESSION
CUISSON SOUS PRESSION
h mn
quelle heure est-il ?
FIN DE
CUISSON
12:30
08:15
08:15
01:00
DÉPART DIFFÉRÉ FIN DE CUISSON
12:30
08:15
départ
immédiat
départ
différé
okokok
ok
ok
ok
ok
ok
ok
ok
ok
ok
ok
ok
fr
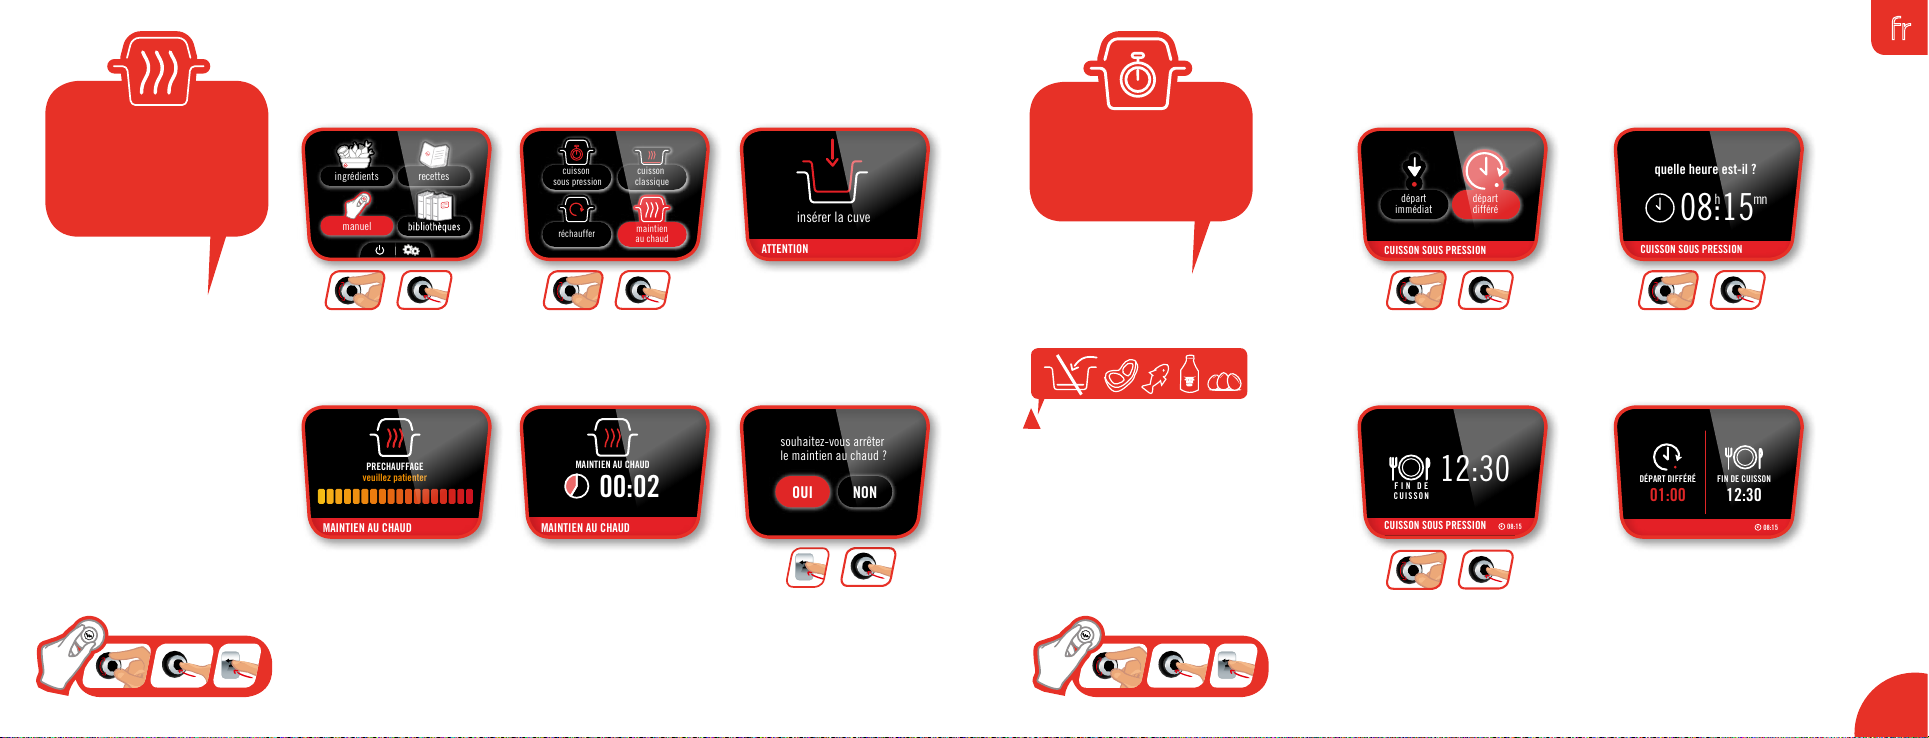
MAINTIEN AU CHAUD
menu
manuel
mode de cuisson
+
Sélectionnez le menu
« manuel »
Choisissez la fonction
« maintien au chaud »
+
L’appareil préchauffe Le maintien au chaud
commence
Insérez la cuve
+
Pour arrêter le maintien
au chaud, appuyez sur
la flèche « retour » et
sélectionnez « oui »
menu
manuel
mode de cuisson
DÉPART DIFFÉRÉ
(MODE CUISSON SOUS PRESSION)
!
Certains aliments ne permettent
pas d’utiliser la fonction départ
différé (ex : viande, poisson,
lait ...).
L’heure de n de cuisson peut
varier suivant le volume contenu
dans le produit.
+
Sélectionnez
« départ différé »
+
Sélectionnez
la n de cuisson
+
Sélectionnez
l’heure actuelle
Le départ différé
est programmé
19
Page 13
recettesingrédients
manuel
recettesingrédients
manuel
légumes / fruits
recettesingrédients
manuel
LEGUMES / FRUITS
artichaut
asperge
aubergine
betterave
brocoli
légumes / fruits
recettesingrédients
manuel
LEGUMES / FRUITS
BROCOLI
artichaut
asperge
aubergine
betterave
brocoli
légumes / fruits
300 gr
LEGUMES / FRUITS
BROCOLI
BROCOLI
artichaut
asperge
aubergine
betterave
brocoli
souhaitez-vous démarrer
la recette ?
légumes / fruits
BROCOLI
OUI NON
- verser 200ml d'eau dans le faitout.
- déposer les ingrédients dans le panier.
- placer le panier vapeur dans le faitout.
300 gr
TEMPS CONSEILLÉ : 10MIN
LEGUMES / FRUITS
BROCOLI
BROCOLI
artichaut
asperge
aubergine
betterave
brocoli
souhaitez-vous démarrer
la recette ?
CUISSON
BROCOLI
OUI NON
- verser 200ml d'eau dans le faitout.
- déposer les ingrédients dans le panier.
- placer le panier vapeur dans le faitout.
00:10
300 gr
TEMPS CONSEILLÉ : 10MIN
BROCOLI
BROCOLI
souhaitez-vous démarrer
la recette ?
CUISSON
BROCOLI
OUI NON
- verser 200ml d'eau dans le faitout.
- déposer les ingrédients dans le panier.
- placer le panier vapeur dans le faitout.
00:10
BROCOLI
départ
immédiat
départ
différé
300 gr
TEMPS CONSEILLÉ : 10MIN
BROCOLI
souhaitez-vous démarrer
la recette ?
CUISSON
BROCOLI
OUI NON
- verser 200ml d'eau dans le faitout.
- déposer les ingrédients dans le panier.
- placer le panier vapeur dans le faitout.
00:10
BROCOLI
ATTENTION
départ
immédiat
départ
différé
fermer et verrouiller
le couvercle
TEMPS CONSEILLÉ : 10MIN
PRÉCHAUFFAGE
veuillez patienter
CUISSON
BROCOLI
- verser 200ml d'eau dans le faitout.
- déposer les ingrédients dans le panier.
- placer le panier vapeur dans le faitout.
00:10
BROCOLI
ATTENTION
BROCOLI
départ
immédiat
départ
différé
fermer et verrouiller
le couvercle
TEMPS CONSEILLÉ : 10MIN
PRÉCHAUFFAGE
veuillez patienter
CUISSON
00:10
BROCOLI
ATTENTION
BROCOLI
BROCOLI
départ
immédiat
départ
différé
CUISSON
00:02
fermer et verrouiller
le couvercle
PRÉCHAUFFAGE
veuillez patienter
BROCOLI
ATTENTION
BROCOLI
FIN DE CUISSON
veuillez patienter
BROCOLI
BROCOLI
départ
immédiat
départ
différé
CUISSON
00:02
fermer et verrouiller
le couvercle
PRÉCHAUFFAGE
veuillez patienter
ATTENTION
BROCOLI
FIN DE CUISSON
veuillez patienter
BROCOLI
BROCOLI
CUISSON
00:02
00:02
fermer et verrouiller
le couvercle
BON APPÉTIT !
Servir !
MAINTIEN AU CHAUD
Attention à la vapeur à l'ouverture du couvercle
recettesingrédients
manuel
LEGUMES / FRUITS
BROCOLI
BROCOLI
artichaut
asperge
aubergine
betterave
brocoli
souhaitez-vous démarrer
la recette ?
légumes / fruits
OUI NON
300 gr
ok
ok
ok
ok
ok
ok
okokok
ok
ok
ok
ok
ok
ok
okokok
ok
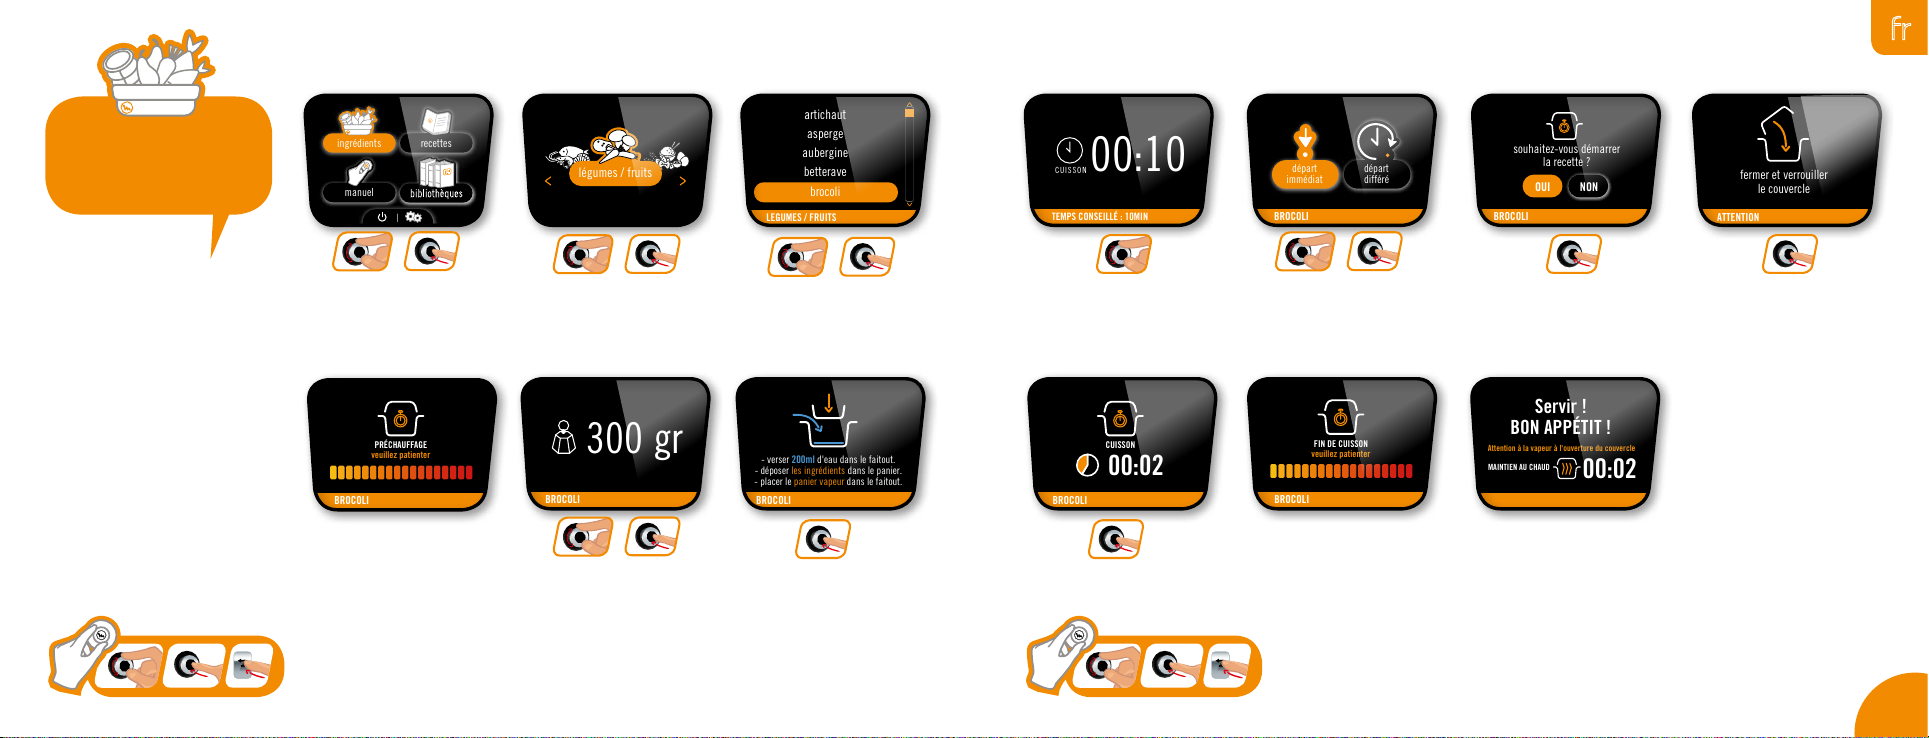
menu
ingrédients
MENU INGRÉDIENTS :
Avec le menu ingrédients,
cuisez vos ingrédients
seuls sans vous soucier
du mode et du temps de
cuisson : Cookeo+ vous
indique la marche à suivre
pour tous les poids et types
d’ingrédients : viandes,
poissons, légumes, fruits
et enn céréales.
+
Sélectionnez le menu
« ingrédients »
Préchauffage
+
Sélectionnez
les légumes
+
voulue de brocolis
(min. 300 g)
Sélectionnez
« brocoli »
Suivez les indicationsChoisissez la quantité
fr
+
Le temps de cuisson
conseillé s’afche
« départ immédiat »
Démarrez la cuisson
+
Choisissez
Fin de cuisson
Démarrez la recette
Vous pouvez déguster
Suivez les indications
21
Page 14
ok
recettesingrédients
manuel
recettesingrédients
manuel
platentrée
dessert
recettesingrédients
manuel
filet de cabillaud et brocolis
boeuf bourguignon
lapin aux olives et légumes
goulash
moules marinières
platentrée
dessert
recettesingrédients
manuel
filet de cabillaud et brocolis
boeuf bourguignon
lapin aux olives et légumes
goulash
moules marinières
04
PERS
platentrée
dessert
recettesingrédients
manuel
filet de cabillaud et brocolis
boeuf bourguignon
lapin aux olives et légumes
goulash
moules marinières
BOEUF BOURGUIGNON - 4 PERS
PRÉPARATION
10min 35min
CUISSON
04
PERS
OK
platentrée
dessert
filet de cabillaud et brocolis
boeuf bourguignon
lapin aux olives et légumes
goulash
moules marinières
BOEUF BOURGUIGNON - 4 PERS
PRÉPARATION
10min 35min
CUISSON
04
PERS
OK
Bœuf coupé en cubes de 25g
Vin rouge
Fond de veau
Lardons
Oignons
Huile végétale
800g
250 ml
150 ml
70g
150g
5cs
PRÉPARER LES INGRÉDIENTS
platentrée
dessert
BOEUF BOURGUIGNON
filet de cabillaud et brocolis
boeuf bourguignon
lapin aux olives et légumes
goulash
moules marinières
BOEUF BOURGUIGNON - 4 PERS
PRÉPARATION
10min 35min
CUISSON
04
PERS
OK
Bœuf coupé en cubes de 25g
Vin rouge
Fond de veau
Lardons
Oignons
Huile végétale
800g
250 ml
150 ml
70g
150g
5cs
PRÉPARER LES INGRÉDIENTS
souhaitez-vous démarrer
la recette ?
OUI NON
BOEUF BOURGUIGNON
BOEUF BOURGUIGNON - 4 PERS
PRÉPARATION
10min 35min
CUISSON
BOEUF BOURGUIGNON
04
PERS
OK
Bœuf coupé en cubes de 25g
Vin rouge
Fond de veau
Lardons
Oignons
Huile végétale
800g
250 ml
150 ml
70g
150g
5cs
PRÉPARER LES INGRÉDIENTS
souhaitez-vous démarrer
la recette ?
OUI NON
PRÉCHAUFFAGE
veuillez patienter
BOEUF BOURGUIGNON
BOEUF BOURGUIGNON - 4 PERS
PRÉPARATION
10min 35min
CUISSON
BOEUF BOURGUIGNON
BOEUF BOURGUIGNON
OK
OK
Bœuf coupé en cubes de 25g
Vin rouge
Fond de veau
Lardons
Oignons
Huile végétale
800g
250 ml
150 ml
70g
150g
5cs
PRÉPARER LES INGRÉDIENTS
souhaitez-vous démarrer
la recette ?
Faire revenir tous les ingrédients
sauf le liquide pendant 10 min
OUI NON
PRÉCHAUFFAGE
veuillez patienter
BOEUF BOURGUIGNON
BOEUF BOURGUIGNON
BOEUF BOURGUIGNON
BOEUF BOURGUIGNON
OK
Bœuf coupé en cubes de 25g
Vin rouge
Fond de veau
Lardons
Oignons
Huile végétale
800g
250 ml
150 ml
70g
150g
5cs
PRÉPARER LES INGRÉDIENTS
souhaitez-vous démarrer
la recette ?
Faire revenir tous les ingrédients
sauf le liquide pendant 10 min
OUI NON
PRÉCHAUFFAGE
veuillez patienter
souhaitez-vous arrêter
de dorer ?
OUI NON
BOEUF BOURGUIGNON
BOEUF BOURGUIGNON
BOEUF BOURGUIGNON
BOEUF BOURGUIGNON
BOEUF BOURGUIGNON
OK
souhaitez-vous démarrer
la recette ?
Faire revenir tous les ingrédients
sauf le liquide pendant 10 min
OUI NON
PRÉCHAUFFAGE
veuillez patienter
souhaitez-vous arrêter
de dorer ?
OUI NON
ajouter le reste des ingrédients
OK
BOEUF BOURGUIGNON
BOEUF BOURGUIGNON
BOEUF BOURGUIGNON
BOEUF BOURGUIGNON
BOEUF BOURGUIGNON
OK
Faire revenir tous les ingrédients
sauf le liquide pendant 10 min
PRÉCHAUFFAGE
veuillez patienter
souhaitez-vous arrêter
de dorer ?
OUI NON
souhaitez-vous démarrer
la cuisson ?
OUI NON
ajouter le reste des ingrédients
OK
BOEUF BOURGUIGNON
BOEUF BOURGUIGNON
BOEUF BOURGUIGNON
BOEUF BOURGUIGNON
BOEUF BOURGUIGNON
00:35
OK
Faire revenir tous les ingrédients
sauf le liquide pendant 10 min
souhaitez-vous arrêter
de dorer ?
OUI NON
souhaitez-vous démarrer
la cuisson ?
OUI NON
ajouter le reste des ingrédients
OK
CUISSON
BOEUF BOURGUIGNON
BOEUF BOURGUIGNON
BOEUF BOURGUIGNON
BOEUF BOURGUIGNON
BOEUF BOURGUIGNON
00:35
FIN DE CUISSON
veuillez patienter
souhaitez-vous arrêter
de dorer ?
OUI NON
souhaitez-vous démarrer
la cuisson ?
OUI NON
ajouter le reste des ingrédients
OK
CUISSON
BOEUF BOURGUIGNON
BOEUF BOURGUIGNON
BOEUF BOURGUIGNON
BOEUF BOURGUIGNON
00:10
00:35
FIN DE CUISSON
veuillez patienter
souhaitez-vous démarrer
la cuisson ?
OUI NON
ajouter le reste des ingrédients
OK
CUISSON
BOEUF BOURGUIGNON
BON APPÉTIT !
Servir !
MAINTIEN AU CHAUD
Attention à la vapeur à l'ouverture du couvercle
ok
ok
ok
ok
ok
ok
ok
ok
ok
okokok
ok
ok
ok
ok
ok
ok
okokok
ok
bourguignon
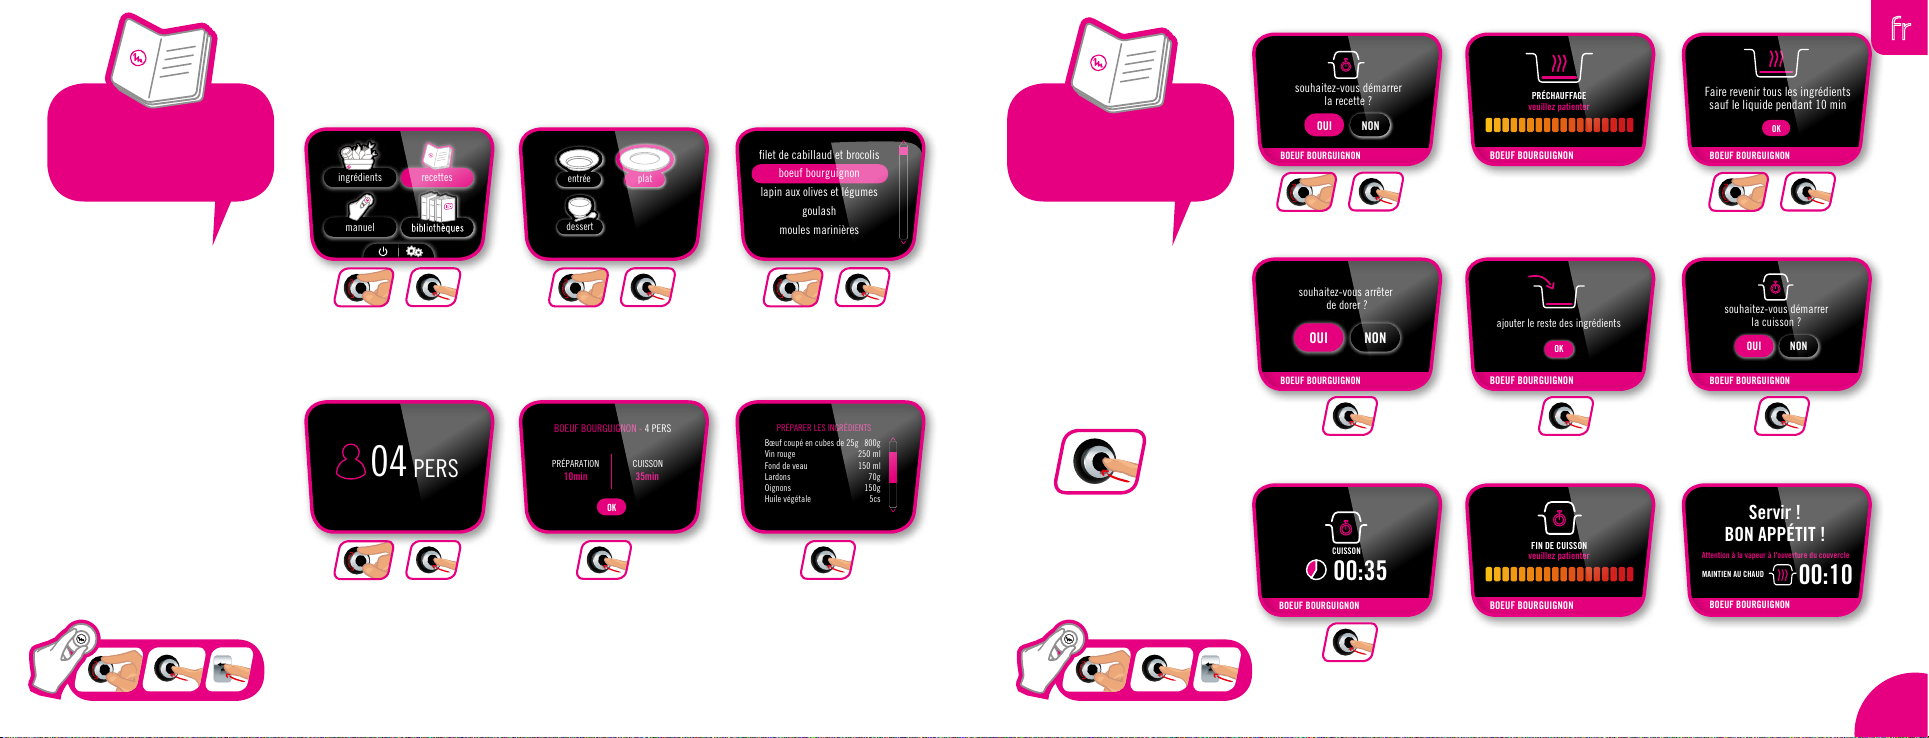
MENU RECETTES :
Avec le menu recettes,
choisissez parmi
150 recettes salées
et sucrées réparties
en trois catégories :
entrées / plats /
desserts.
recette boeuf
+
Sélectionnez
le menu recettes
+
Sélectionnez le nombre
de personnes
+
Choisissez le type
de recette
de la recette
Sélectionnez
une recette
Préparez les ingrédientsPrésentation
fr
menu
recettes
+
Démarrez la recette Suivez les instructions
Préchauffage
MENU RECETTES :
+
(SUITE)
Vous pouvez revenir
au menu initial
en appuyant
30 secondes sur
la touche retour
Arrêtez le dorage Suivez les instructions
Préchauffage
Temps de cuisson
Démarrez la cuisson
Vous pouvez déguster
+
23
Page 15
recettes
manuel
ingrédients
bibliothèque
platentrée
dessert
bibliothèque
platentrée
dessert
recettes
manuel
ingrédients
bibliothèque
platentrée
dessert
bibliothèque
recettes
manuel
ingrédients
bibliothèque
ok
ok
ok
ok
ok
ok
fr
CHARGEMENT
DE PACKS DE
RECETTES :
Une fois l’application
connectée à votre
Cookeo+, vous pouvez
télécharger des packs
de recettes.
Sélectionner un pack
et appuyer sur le bouton
Le téléchargement
est en cours
« Télécharger sur le
Cookeo+ »
N.B. : Vous pouvez à tout moment arrêter le
téléchargement en appuyant sur la touche retour du
Cookeo+.
bibliothèquebibliothèque
ACCÉDER AUX
BIBLIOTHÈQUES
DE VOTRE COOKEO+ :
Vous pouvez retrouver
vos packs téléchargés.
Lancez vos recettes
depuis votre Cookeo+
en accédant à votre
Bibliothèque.
+
Sélectionnez le sous-
menu « bibliothèque »
+
Sélectionnez le pack
de recettes désiré
+
Sélectionnez « entrée »,
« plat » ou « dessert »
et choisissez votre recette
25
Page 16
avant
utilisation
fr
Rrecettes
ingrédients
viandes
poissons, coquillages
& crustacé
riz & céréales
agneau
bœuf
lapin
porc
veau
volaille
crevettes / gambas
moules
poisson
saint-jacques
blé
boulgour
orge
quinoa
riz complet / sauvage
riz blanc
sarrasin
légumes / fruits
artichauts
asperges
aubergines
betteraves
brocolis
carottes
céleris raves
choux
choux eurs / choux romanesco
choux de Bruxelles
choux vert
côtes de blêtes
blêtes
courgettes
endives
épinards
fenouils
haricots verts
lentilles
navets
patates douces
petits pois / pois gourmands
poires
poireaux
pommes
pommes de terre
potirons
entrée
entrée
www.moulinex.com
Retrouvez nos recettes sur l’application
Mon Cookeo et sur www.moulinex.com
27
Page 17
avant
utilisation
avant
utilisation
fr
nettoyage
entretien
Une fois la cuisson de votre plat
terminée, débranchez l’appareil pour
le nettoyer. Nettoyez l’appareil après
chaque utilisation.
!
Vous pouvez nettoyer la cuve de cuisson et le panier vapeur à l’eau
chaude savonneuse ou bien au lave-vaisselle. Nettoyez le corps de
l’appareil à l’aide d’un chiffon humide.
Après plusieurs passages au lave vaisselle, l’extérieur de la cuve peut
devenir blanchâtre. Vous pouvez le nettoyer avec le grattoir de votre
éponge.
nettoyage
entretien
Après chaque utilisation, sortez le
récupérateur de condensation et
nettoyez-le soigneusement à l’eau
claire ou au lave-vaisselle. Prenez soin
de bien le sécher. Remettez-le ensuite
en place, à sa position initiale.
1 2
3
Pour nettoyer le couvercle métallique,
à la main ou au lave-vaisselle, vous
devez le démonter ainsi que le cachevalve.
1
Dévissez l’écrou au centre du
couvercle métallique
2
Ôtez le couvercle métallique
3
Démontez le cache valve
NETTOYAGE AU LAVE-VAISSELLE :
vous pouvez mettre le couvercle
métallique tel quel au lave-vaisselle,
sans démonter les valves. Après le
passage au lave-vaisselle, démontez
la bille et soufez dans le conduit
afin de vérifier qu’il ne soit pas
obstrué. Essuyez la bille et son siège
soigneusement avec un chiffon doux.
NETTOYAGE À LA MAIN :
vous pouvez nettoyer le couvercle
métallique à l’eau chaude savonneuse.
Tout d’abord, démontez la bille puis
nettoyez le tout. Essuyez la bille et
son siège avec un chiffon doux.
29
Page 18
nettoyage
entretien
fr
Avant de remonter la bille, vériez
que le conduit n’est pas obstrué en
soufant dedans.
Avant de remonter le couvercle intérieur. Nettoyez
la partie supérieure de la cuve de cuisson.
Nettoyez l’intérieur du couvercle métallique de
l’appareil avec une éponge humide et vériez le
logement du doigt d’aroma an d’être sûr qu’il n’est
pas obstrué. Rincez sous l’eau, et vériez la mobilité
du doigt d’aroma.
!
Appuyez sur la partie interne de la
soupape de sécurité à ressort an de
vérier qu’elle n’est pas colmatée.
Remplacez le joint d’étanchéité
au minimum tous les 3 ans. Cette
opération se fera dans un Centre de
Services Agréé.
Ne stockez pas l’appareil couvercle
fermé. Laissez-le en position ouverte
ou entr-ouverte ; cela évitera
l’apparition de mauvaises odeurs.
!
• En cas d’immersion accidentelle de l’appareil ou
si de l’eau a été versée directement sur l’élément
chauffant en l’absence de la cuve, emmenez
l’appareil dans un Centre de Service Agréé.
Transportez l’appareil en vous servant des deux
poignées latérales. Pour plus de sécurité, veillez à ce
que la poignée soit en position fermée. Pour plus de
sécurité, veillez à ce que le couvercle soit verrouillé.
Nettoyez l’extérieur du couvercle
de l’appareil à l’aide d’une éponge
humide. Nettoyez également la valve
silencieuse à l’arrière du couvercle
Nettoyez la partie supérieure de la
cuve de cuisson à l’aide d’un chiffon
humide. Nettoyez également le canal
de récupération à condensation avec
un chiffon humide.
Nettoyez le joint du couvercle
métallique à l’aide d’une éponge
humide, puis rincez abondamment.
N’utilisez pas d’objets coupants.
31
Page 19

PROBLÈMES CAUSES POSSIBLES SOLUTION
Il reste des corps étrangers entre la cuve et le plateau
Le couvercle
ne se ferme pas
Le produit
ne décompresse pas
Le couvercle ne s'ouvre pas
après libération de la vapeur
L'appareil ne monte
pas en pression
CODES ERREUR Code 24 : la pression décroit en cuisson sous pression
De la vapeur s’échappe des
bords du couvercle pendant
la cuisson (fuites)
De l'eau coule derrière
l'appareil
Le voyant ne clignote pas
ou ne s’allume pas
Le panneau de commande
ne s'allume pas
De la condensation apparaît
dans le voyant
On ne peut pas retirer
le couvercle métallique,
il est bloqué
chauffant
La poignée d'ouverture du couvercle n'est pas sur la bonne position
Le couvercle métallique et/ou l'écrou de serrage ne sont pas
correctement remontés ou vissés complètement
Le cache bille n’est pas bien positionné Laisser le produit refroidir complètement puis démonter le couvercle métallique et
Le doigt d'aroma reste en position haute Après s’être assuré qu’il n’y a plus d’échappement de vapeur, et que le produit est
Vériez la propreté du joint, de la soupape de sécurité violette
et du doigt d’aroma
Vériez que le couvercle est verrouillé et le repère soit bien en
face du cadenas fermé. Vériez la mobilité du doigt d’aroma,
et si besoin le nettoyer
La bille de décompression est mal positionnée ou sale Vériez que la bille est bien mise en place, et que son cache est en position verrouillée.
Code 21 et 26 : l’appareil ne monte pas en pression
Le joint du couvercle métallique et/ou les bords de cuve sont
sales
Usure, coupures et déformations du joint Le joint doit être changé tous les trois ans au maximum. Emmenez votre appareil dans un
Bord de cuve abîmé Emmenez votre appareil dans un centre de services agréé
L’écrou du couvercle métallique n’a pas été sufsamment revissé
Le récupérateur de condensation n'est pas en place ou
déborde
Les sécurités et/ou orices sont obstrués Vérier que le remplissage n’est pas excessif et qu’il ne s’agit pas d’aliments qui se
La LED assurant cette fonction ne fonctionne plus ou le
couvercle n’est pas complètement verrouillé
L’appareil n’est pas branché ou est en veille Assurez-vous que le cable d'alimentation est branché à la fois sur votre appareil et sur le
L'appareil est endommagé Emmenez votre appareil dans un centre de services agréé
Il y a de la condensation dans le couvercle Laissez sécher votre appareil à l’air libre pendant quelques heures
Le cache-bille du couvercle métallique n’a pas été bien remis
en place
Enlevez la cuve, vériez la propreté du plateau chauffant, de l’élément central et du
dessous de cuve. Vériez aussi la bonne mobilité de l’élément central
Assurez-vous que la poignée d'ouverture soit en position ouverte et complète
Vériez que vous avez remis tous les éléments du couvercle métallique en place, et que
l'écrou est serré
positionner correctement le cache bille (repère en position vérouillage)
totalement froid, insérez une pique dans le trou situé entre la poignée d’ouverture et la
valve silencieuse. Prenez garde à l’échappement de vapeur qui risque de subvenir après
que la tige ait été enfoncée. Quand il n’y aura plus de vapeur, essayez d’ouvrir votre appareil
Nettoyez votre appareil en suivant les instructions fournies dans la notice d'utilisation
Vériez la mobilité du doigt d’aroma, et si besoin le nettoyer
Nettoyez et essuyez la bille et son siège
Veuillez ajouter dans votre recette du liquide (eau ou sauce liquide)
Nettoyez le joint et le bord de cuve à l’aide d’un chiffon humide. Veillez à ne pas utiliser
d’instrument coupant
centre de services agréé
Revisser l’écrou au centre du couvercle métallique convenablement
Assurez-vous que le récupérateur de condensation est bien en place à l'arrière de
l'appareil et que le conduit d’écoulement ne soit pas bouché
dilatent (voir livret de consignes de sécurité)
Assurez-vous que le produit soit bien verrouillé. Emmenez votre appareil dans un centre
de services agréé si le problème persiste
secteur. Vériez que l’appareil n’est pas en veille en appuyant sur le bouton « OK »
Dévissez l’écrou au centre du couvercle métallique, puis appuyez sur la sonde au centre
de l’écrou. Cela débloque le couvercle, et vous pourrez accéder au cache-bille. Assurezvous qu’il soit bien remis en place, ainsi que la bille
fr
Pour tous vos problèmes liés à la connexion, rendez-vous
sur le site www.moulinex.fr ou sur l’application Mon Cookeo
(Menu / guide / FAQ).
Marques déposées
La marque et les logos Bluetooth® sont la propriété de Bluetooth SIG, Inc. et leur
utilisation par SEB SAS est soumise à licence. Les autres marques commerciales et
noms de marque sont la propriété de leur détenteurs respectifs.
Série EPC09
Basse pression 40kPa (109°C) / Haute pression : 70kPa (115°C)
CAPACITÉ PRODUIT : 6L / CAPACITÉ UTILE : 4L
Chauffage intégré
33
Page 20
avant
utilisation
Vor dem ersten
Gebrauch
Nehmen Sie das Gerät aus seiner Verpackung
und lesen Sie die Gebrauchsanleitung und
Sicherheitshinweise aufmerksam, bevor Sie das
Produkt das erste Mal verwenden.
Vor dem ersten
Gebrauch
1
2
de
Um das Produkt zu öffnen, drehen
Sie den Griff zum Öffnen/Schließen,
sodass Sie das offene Schloss
sehen: .
Stellen Sie das Gerät auf einer ebenen,
trockenen und kühlen Fläche ab.
Entfernen Sie die Verpackung, die
Aufkleber und das Zubehör vom Gerät.
1
2 43
REINIGEN SIE DIE VERSCHIEDENEN
BESTANDTEILE
1
Kochtopf
2
Metallinnendeckel
3
Ventildeckel
4
Kondenswasserbehälter
5
Dampfgarkorb
6
Überdruckventil (zum Druckabbau)
6
5
ANGABEN ZUR
DEMONTAGE UND
MONTAGE DES
DECKELS
ENTFERNEN UND EINSETZEN
DER DEKOMPRESSIONSKUGEL:
Drehen Sie die Kugelabdeckung gegen den Uhrzeigersinn, um
die Markierung I auf die Position zu platzieren. Nehmen Sie
die Abdeckungab. Nehmen Sie die Kugel heraus, reinigen Sie sie
und ihr Lager vorsichtig mit Wasser und Spülmittel. Trocknen
Sie die Kugel mit einem weichen Lappen, platzieren Sie sie
dann wieder in ihrem Lager. Setzen Sie die Kugelabdeckung
wieder an ihren Platz, die Markierung I auf Position
Verriegeln Sie die Kugelabdeckung, indem Sie die Markierung zum
Piktogramm «offen» drehen
DEMONTAGE DES
METALLINNENDECKELS:
Halten Sie den Deckel an der Dichtung und
schrauben Sie die zentrale Schraube gegen den
Uhrzeigersinn heraus. Entfernen Sie erst die
Schraube, dann den Deckel.
.
DEMONTAGE DER VENTILABDECKUNG:
Halten Sie die Ventilabdeckung in der Mitte (wie angegeben);
drehen Sie sie dann leicht, um sie abzuklipsen. Reinigen Sie die
Ventilabdeckung vor allem an der Innenseite (überprüfen Sie, ob
sich keine Lebensmittelreste mehr daran be nden).
4
MONTAGE DES METALLDECKELS:
rgestellt, an der Dichtung. Platzieren Sie den
Deckel mittig auf der Mittelachse und pressen
Sie ihn ach darauf. Setzen Sie die Schraube
wieder ein und schrauben Sie sie im Uhrzeigersinn
ganz hinein.
.
53
MONTAGE DER VENTILABDECKUNG:
Nehmen Sie die Ventilabdeckung wie auf dem
Foto angegeben (halten Sie sie im mittleren
Bereich). Platzieren Sie die runde Form im
Innern auf den drei Haken, drücken Sie dann,
um die Ventilabdeckung festzuklipsen (es muss
ein «Klick» zu hören sein). Die Ventilabdeckung
muss vollständig an der Innenseite des Deckels
anliegen.
35
Page 21
ok
ok
ok
ok
ok
ok
avant
utilisation
LANGUAGE
Italian
English
French
Dutch
Spanish
LANGUAGE
Italian
English
French
Dutch
Spanish
COUNTRY
Italy
United Kingdom
France
Germany
Spain
de
1
lnbetriebnahme
2
Bei der ersten Inbetriebnahme werden
Ihnen die Menü-Einstellungen angezeigt:
+
Wählen Sie Ihr Land ausWählen Sie Ihre
Sprache aus
STEUERUNGEN DER BENUTZEROBERFLÄCHE
+
3s
AUSWÄHLEN BESTÄTIGEN ZURÜCK
3 SEKUNDEN
DRÜCKEN ZUM
Gebrauch
Verwenden Sie das
Gerät nie ohne den
Kochtopf.
Wenn Sie Ihr Gerät das
erste Mal verwenden,
kann der Topf leicht
geruchbehaftet sein. Dies
ist normal.
ÖFFNEN DES DECKELS:
Um das Produkt zu öffnen,
drehen Sie den Griff zum Öffnen/
Schließen, sodass Sie das offene
Schloss sehen: . Den Deckel
auf keinen Fall mit Gewalt öffnen,
wenn dieser klemmt.
BRINGEN SIE DEN STÄNDER
UNTER DEM DAMPFGARKORB AN:
halten Sie den Ständer zwischen
Daumen und Zeigefi nger, um
diesen unter dem Dampfkorb
anzubringen.
ANBRINGEN DES
KONDENSATBEHÄLTERS:
Stellen Sie sicher, dass der
Kondensatbehälter leer ist und
installieren Sie diesen auf der
Rückseite des Geräts.
DEN TOPF IN DAS GERÄT EINSETZEN:
Wischen Sie die Unterseite des
Kochtopfs ab. Vergewissern Sie
sich, dass keine Essensreste
oder Flüssigkeiten unter dem
Topf oder auf der Heizplatte
vorhanden sind.
Setzen Sie anschließend den Topf
in das Gerät ein, indem Sie die
Topfgriffe in den vorgesehenen
Öffnungen positionieren.
37
Page 22

RECIPE 2
Do you want to delete
this recipe?
YES NO
language/country
delete libraires
screen/sound
Connect
recipes
librairies
Please select the library
you want to delete
library 1
library 2
LIBRARY 2
Do you want to delete
this library?
YES NO
favorites
recipesingredients
manual
language/country
delete libraires
screen/sound
Connect
favorites
recipesingredients
manual
LANGUAGE
deutsch
spanish
french
italian
nederlands
language/country
delete libraires
screen/sound
Connect
favorites
recipesingredients
manual
favorites
recipesingredients
manual
COUNTRY
Germany
Spain
France
Italy
Netherlands
LANGUAGE
deutsch
spanish
french
italian
nederlands
language/country
delete libraires
screen/sound
Connect
favorites
recipesingredients
manual
COUNTRY
Germany
Spain
France
Italy
Netherlands
LANGUAGE
deutsch
spanish
french
italian
nederlands
language/country
delete libraires
screen/sound
Connect
language/country
delete libraires
screen/sound
Connect
COUNTRY
Germany
Spain
France
Italy
Netherlands
LANGUAGE
deutsch
spanish
french
italian
nederlands
Please select the recipe
you want to delete
recipe 1
language/country
delete libraires
screen/sound
Connect
recipe 2
language/country
delete libraires
screen/sound
Connect
COUNTRY
Germany
Spain
France
Italy
Netherlands
LANGUAGE
deutsch
spanish
french
italian
nederlands
RECIPE 2
Do you want to delete
this recipe?
YES NO
Please select the recipe
you want to delete
recipe 1
recipe 2
language/country
delete libraires
screen/sound
Connect
COUNTRY
Germany
Spain
France
Italy
Netherlands
LANGUAGE
RECIPE 2
Do you want to delete
this recipe?
YES NO
Please select the recipe
you want to delete
recipe 1
recipe 2
language/country
delete libraires
screen/sound
Connect
recipes
librairies
COUNTRY
RECIPE 2
Do you want to delete
this recipe?
YES NO
Please select the recipe
you want to delete
recipe 1
recipe 2
language/country
delete libraires
screen/sound
Connect
recipes
librairies
Please select the library
you want to delete
library 1
library 2
RECIPE 2
Do you want to delete
this recipe?
YES NO
Please select the recipe
you want to delete
recipe 1
recipe 2
recipes
librairies
Please select the library
you want to delete
library 1
library 2
LIBRARY 2
Do you want to delete
this library?
YES NO
screen
sound
language/country
delete libraires
screen/sound
Connect
recipes
librairies
Please select the library
you want to delete
library 1
library 2
LIBRARY 2
Do you want to delete
this library?
YES NO
screen
sound
demo mode
brightness
language/country
delete libraires
screen/sound
Connect
Please select the library
you want to delete
library 1
library 2
LIBRARY 2
Do you want to delete
this library?
YES NO
screen
sound
BRIGHTNESS
demo mode
brightness
language/country
delete libraires
screen/sound
Connect
LIBRARY 2
Do you want to delete
this library?
YES NO
screen
sound
BRIGHTNESS
demo mode
brightness
language/country
delete libraires
screen/sound
Connect
demo mode
brightness
screen
sound
BRIGHTNESS
demo mode
brightness
DEMO MODE
OFF ON
demo mode
brightness
BRIGHTNESS
demo mode
brightness
DEMO MODE
OFF ON
DEMO MODE
3424
demo mode
brightness
BRIGHTNESS
DEMO MODE
OFF ON
DEMO MODE
3424
demo mode
brightness
screen
sound
DEMO MODE
OFF ON
DEMO MODE
3424
SOUND
OFF ON
demo mode
brightness
screen
sound
DEMO MODE
OFF ON
DEMO MODE
3424
SOUND
OFF ON
screen
sound
language/country
delete libraires
screen/sound
Connect
DEMO MODE
3424
SOUND
OFF ON
OFF ON
Connect
screen
sound
language/country
delete libraires
screen/sound
Connect
PAYS
Allemagne
Espagne
France
Italie
Pays-Bas
LANGUE
allemand
espagnol
français
italien
néerlandais
langues/pays
suppression
recettes
écran/son
Connect
langues/pays
suppression
recettes
écran/son
Connect
bibliothèques
recettes
ok
ok
ok
ok
ok
ok
ok
ok
ok
ok
ok
ok
ok
ok
ok
ok
ok
ok
ok
ok
ok
ok
ok
ok
ok
ok
ok
ok
ok
ok
ok
ok
ok
ok+ok
ok
ok
ok
ok
ok
ok
Menüein-
stellungen
Hinweis: Auch wenn der Ton
ausgeschaltet ist, bleiben die
Alarmtöne aktiviert.
+
Wählen Sie
«Land/Sprache» aus
+
Wählen Sie
«Rezepte löschen»
+
Wählen Sie Ihre
Sprache aus
+
Wählen Sie
«Bibliotheken löschen»
+
Wählen Sie Ihr
Land aus
Wählen Sie
«Bibliothek 2»
+
Wählen Sie die
Einstellung «Anzeige/Ton»
+
Wählen Sie «Demo-Modus»
+
+
«Anzeige» auswählen Wählen Sie «Helligkeit»
+
Zum Aktivieren oder Deaktivieren des Demo-Modus
müssen Sie einen Code eingeben: 3424
de
+
Stellen Sie die
Helligkeit ein
Anm.: Im Demo-Modus
kann das Produkt ohne
Erhitzen oder
Druckaufbau in Betrieb
genommen werden.
Möchten Sie diese Bibliothek
+
wirklich löschen?
+
Wählen Sie «rezepte»
+
Wählen Sie
«rezepte 2»
+
Möchten Sie diese rezepte
wirklich löschen?
+
«Ton» auswählen Wählen Sie «connect»
Volumen einstellen
+
+
+
Aktivieren oder Deaktivieren
des Connect-Modus
39
Page 23

recipes
manual
ingredients
library
do you want to switch off
the appliance?
YES NO
recipes
manual
ingredients
library
do you want to switch off
the appliance?
YES NO
YES NO
do you want to switch off
the appliance?
recipes
manual
ingredients
library
Validate the connexion request
and press OK
OK
ok
ok
ok
ok
ok
ok
ok
ok
de
Ein/Aus
Menü
+
Auswählen und bestätigen
+
+
Indem Sie auf JA drücken, können Sie Ihr
Gerät ausschalten
connexion
Ihr Cookeo+ ist
betriebsbereit, Sie
können es bereits für
150 vorprogrammierte
Rezepte einsetzen, auch
ohne die App.
Wenn Sie Ihr Cookeo+,
anschalten, blinkt die blaue
Kontrolllampe (während
die Verbindung hergestellt
wird), es sei denn Sie haben
manuell die VerbindungsFunktion deaktiviert (siehe
Kapitel Einstellungen).
Sie nden die App
Mon Cookeo auf App Store
zum Download von Ihrem
Tablet oder Smartphone aus.
Verbinden Sie das Gerät beim ersten Gebrauch mit Ihrem Tablet,
indem Sie den Anweisungen auf den Displays folgen.
Wenn die Verbindung
hergestellt ist, leuchtet
die blaue Kontrollampe
konstant.
41
Page 24
de
connexion
Verbindungsproblem:
Wenn die Verbindung
fehlgeschlagen
Fehlermeldung angezeigt.
Folgen Sie den Anweisungen auf
Ihren Displays, um einen
erneuten Verbindungsversuch zu
starten.
Achtung: Es ist jeweils nur
eine Verbindung möglich.
Bitte beachten Sie: Wenn Sie Ihr Cookeo+ 30 Minuten lang nicht benutzen, wird es in einen
Schlafmodus versetzt und die Verbindung bricht ab. Beim Verlassen des Schlafmodus wird die
Verbindung automatisch hergestellt.
ist, wird eine
Zur Kontoerstellung:
Folgen Sie den Hinweisen
in der App.
Suchleiste:
Geben Sie Ihre Schlüsselwörter
in die Suchleiste ein, um eine
Suche mit Filter durchzuführen.
Browser:
Sie können auch über die
App navigieren, indem Sie
das Menü aufrufen:
• Start
• Rezepte
• Einkäufe
• Tools
• Bedienungsanleitung
• Mein Konto
Ein Verbindungsabbruch hat keine Auswirkung auf den Garvorgang. Cookeo+ funktioniert stets
eigenständig.
Bitte beachten Sie: Sie können den Garvorgang nur von Ihrem Cookeo+ aus starten, indem
Sie auf die Taste OK drücken (wie in der App dargestellt).
it der App können Sie:
• die Schritt-für-SchrittAnleitung ansehen
• das Rezept Schritt für
Schritt zusammen mit Ihrem
Cookeo+ umsetzen
Rezepte, die Ihr
Cookeo+ bereithält
Favoriten
Bibliothek
43
Page 25

ATTENTION
PRESSURE COOKING
insert the pot
00:10
COOKING
pressure
cooking
reheat
regular
cooking
keep warm
recipesingredients
manual
librairies
ATTENTION
PRESSURE COOKING
PRESSURE COOKING
insert the pot
00:10
COOKING
immediate
start
delayed
start
pressure
cooking
reheat
regular
cooking
keep warm
manual
librairies
ATTENTION
PRESSURE COOKING
PRESSURE COOKING
insert the pot
00:10
COOKING
immediate
start
delayed
start
ATTENTION
close and lock the lid
reheat
keep warm
recipesingredients
manual
librairies
pressure
cooking
reheat
regular
cooking
keep warm
recipesingredients
manual
librairies
ATTENTION
insert the pot
pressure
cooking
reheat
regular
cooking
keep warm
recipesingredients
manual
librairies
ATTENTION
PRESSURE COOKING
PRESSURE COOKING
PRESSURE COOKING
00:10
COOKING
immediate
start
delayed
start
ATTENTION
close and lock the lid
PREHEAT
please wait
PRESSURE COOKING
PRESSURE COOKING
PRESSURE COOKING
COOKING
immediate
start
delayed
start
ATTENTION
close and lock the lid
PREHEAT
please wait
PRESSURE COOKING
COOKING
00:02
PRESSURE COOKING
PRESSURE COOKING
start
start
ATTENTION
close and lock the lid
PREHEAT
please wait
PRESSURE COOKING
PRESSURE COOKING
COOKING
00:02
END OF COOKING
please wait
12:20
PRESSURE COOKING
ATTENTION
PREHEAT
please wait
PRESSURE COOKING
PRESSURE COOKING
PRESSURE COOKING
COOKING
00:02
END OF COOKING
please wait
12:20
KEEP WARM
00:02
BON APPÉTIT !
Serve !
Beware of the steam while opening the lid
okokok
ok
ok
ok
ok
ok
ok
ok
ok
ok
Manuell
Kochart
de
Manuell
Kochart
DRUCKGAREN DRUCKGAREN
MANUELLES MENÜ:
Mit dem manuellen Menü
steuern Sie den Garvorgang
selbst. Wählen Sie Garzeit
+
Wählen Sie «Manuell»
im Menü aus
+
Wählen Sie den Modus
«Druckgaren»
Setzen Sie den Topf ein
und geben Sie die
Zutaten hinzu
und -modus selbst aus:
Druckgaren, klassisches
Garen (Niedertemperaturgaren, Schmoren,
Braten), Aufwärmen oder
Warmhalten.
+
Kochdauer einstellen Wählen Sie den unmittelbaren
oder den verzögerten Start
+
(S. 49)
Schließen und sichern
Das Gerät wärmt vor Der Kochvorgang
hat begonnen
!
Probierbereit!
4 L (max)
3,5L
200 ml (min)
Der Kochvorgang
ist abgeschlossen
45
Page 26
recipesingredients
manual
librairies
recipesingredients
manual
pressure
cooking
reheat
regular
cooking
keep warm
librairies
ATTENTION
open the lid
SLOW COOKING
recipesingredients
manual
pressure
cooking
reheat
regular
cooking
keep warm
librairies
ATTENTION
ATTENTION
insert the pot
open the lid
SLOW COOKING
pressure
cooking
reheat
regular
cooking
keep warm
ATTENTION
ATTENTION
insert the pot
open the lid
SLOW COOKING
PREHEAT
please wait
SLOW COOKING
ATTENTION
ATTENTION
insert the pot
SLOW COOKING
open the lid
SLOW COOKING
PREHEAT
please wait
add the ingredients
OK
ATTENTION
ATTENTION
insert the pot
SLOW COOKING
SLOW COOKING
PREHEAT
please wait
add the ingredients
OK
00:02
SLOW COOKING
OK
ATTENTION
SLOW COOKING
SLOW COOKING
PREHEAT
please wait
add the ingredients
OK
00:02
SLOW COOKING
OK
Do you want to stop
the slow cooking?
YES NO
SLOW COOKING
recipesingredients
manual
pressure
cooking
reheat
regular
cooking
keep warm
librairies
recipesingredients
manual
pressure
cooking
reheat
regular
cooking
keep warm
recipesingredients
manual
ATTENTION
insert the pot
ATTENTION
close and lock the lid
pressure
cooking
reheat
regular
cooking
keep warm
recipesingredients
manual
ATTENTION
insert the pot
pressure
cooking
reheat
regular
cooking
keep warm
recipesingredients
manual
ATTENTION
insert the pot
ATTENTION
close and lock the lid
00:02
REHEAT
pressure
cooking
reheat
regular
cooking
keep warm
ATTENTION
insert the pot
do you want
to stop reheating?
YES NO
ATTENTION
close and lock the lid
00:02
REHEAT
okokok
ok
ok
ok
ok
ok
ok
ok
ok
ok
ok
ok
ok
ok
ok
ok
ok
ok
ok
ok
ok
Manuell
Kochart
KLASSISCH
Im klassischen Garmodus
können Sie:
schmoren
braten
je nach gewünschtem Ergebnis.
Der Deckel bleibt bei diesen
Garvarianten offen.
Anm.: Die Funktionsweise
ist gleich, nur die Temperatur ist unterschiedlich.
niedertemperaturgaren
+
Wählen Sie «Manuell»
im Menü aus
Deckel öffnen
Klassische Menü
+
Wählen Sie das
Topf einsetzen
Wählen Sie die
gewünschte Funktion
Das Gerät wärmt vor
+
+
Um das Garen abzubrechen, drücken Sie die Zurück-Taste und wählen Sie
entweder Stopp oder
de
Manuell
Kochart
+
+
Wählen Sie «Manuell»
im Menü aus
Modus «aufwärmen»
AUFWÄRMEN
Deckel schließen
und sichern
+
Das Aufwärmen hat begonnen
+
Wählen Sie den
abbrechen
Topf einsetzen
Geben sie die zutaten hinzu
+
Möchten Sie das
Aufwärmen abbrechen?
Hinweis: Das Aufwärmen
beginnt und die Dauer
wird erhöht.
47
Page 27

recipesingredients
manual
librairies
pressure
cooking
reheat
regular
cooking
keep warm
recipesingredients
manual
librairies
ATTENTION
insert the pot
pressure
cooking
reheat
regular
cooking
keep warm
recipesingredients
manual
librairies
ATTENTION
insert the pot
KEEP WARM
PREHEAT
please wait
pressure
cooking
reheat
regular
cooking
keep warm
recipesingredients
manual
librairies
ATTENTION
insert the pot
KEEP WARM
PREHEAT
please wait
KEEP WARM
00:02
pressure
cooking
reheat
regular
cooking
keep warm
ATTENTION
insert the pot
do you want to stop
the keep warm function?
YES NO
KEEP WARM
PREHEAT
please wait
KEEP WARM
00:02
immediate
start
delayed
start
PRESSURE COOKING
h m
what time is it?
08:15
immediate
start
delayed
start
PRESSURE COOKING
PRESSURE COOKING
h m
what time is it?
END OF
COOKING
12:30
08:15
08:15
immediate
start
delayed
start
PRESSURE COOKING
PRESSURE COOKING
PRESSURE COOKING
h m
what time is it?
END OF
COOKING
12:30
08:15
08:15
01:00
DELAYED START END OF COOKING
12:30
08:15
immediate
start
delayed
start
PRESSURE COOKING
PRESSURE COOKING
PRESSURE COOKING
ok
okokok
ok
ok
ok
ok
ok
ok
ok
ok
ok
ok
ok
de
WARMHALTEN
Manuell
Kochart
Manuell
Kochart
+
Wählen Sie «Manuell»
im Menü aus
Das Gerät wärmt vor Das Warmhalten
Wählen Sie den Modus
«warmhalten» aus
+
wurde gestartet
Topf einsetzen
Geben sie die zutaten hinzu
+
Um das Warmhalten zu
beenden, drücken Sie auf
die «Zurück»-Taste und
wählen Sie «Ja»
VERZÖGERTER START
(DRUCKGARMODUS)
!
Bei manchen Zutaten kann die
Timer-Funktion nicht verwendet
werden (z. B.: Fleisch, Fisch,
Milch…).
Je nach Volumen, das im Produkt
zubereitet wird, kann das Ende
der Garzeit variieren.
+
Wählen Sie
«verzögerter Start»
+
Wählen Sie das
Ende der Kochzeit
+
Wählen Sie die
aktuelle Zeit
Der verzögerter Start
wurde programmiert
49
Page 28
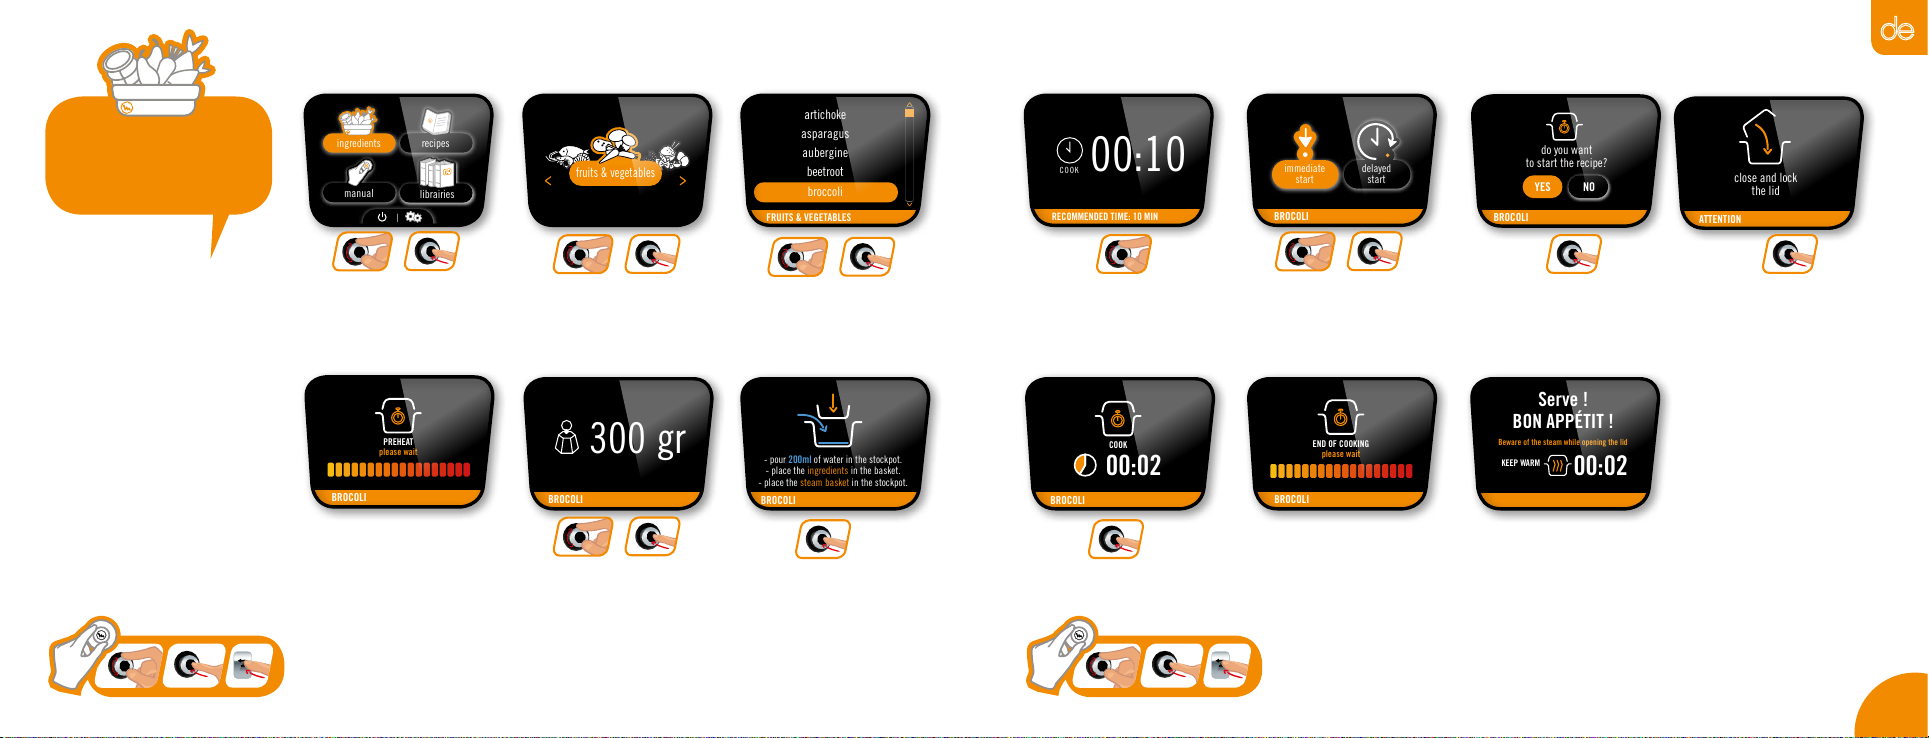
recipesingredients
manual
librairies
fruits & vegetables
recipesingredients
manual
librairies
FRUITS & VEGETABLES
artichoke
asparagus
aubergine
beetroot
broccoli
fruits & vegetables
recipesingredients
manual
librairies
FRUITS & VEGETABLES
BROCOLI
artichoke
asparagus
aubergine
beetroot
broccoli
300 gr
fruits & vegetables
recipesingredients
manual
librairies
FRUITS & VEGETABLES
BROCOLI
BROCOLI
artichoke
asparagus
aubergine
beetroot
broccoli
do you want
to start the recipe?
BROCOLI
YES NO
- pour 200ml of water in the stockpot.
- place the ingredients in the basket.
- place the steam basket in the stockpot.
300 gr
fruits & vegetables
RECOMMENDED TIME: 10 MIN
FRUITS & VEGETABLES
BROCOLI
BROCOLI
artichoke
asparagus
aubergine
beetroot
broccoli
do you want
to start the recipe?
COOK
BROCOLI
YES NO
- pour 200ml of water in the stockpot.
- place the ingredients in the basket.
- place the steam basket in the stockpot.
00:10
300 gr
RECOMMENDED TIME: 10 MIN
BROCOLI
BROCOLI
do you want
to start the recipe?
COOK
BROCOLI
YES NO
- pour 200ml of water in the stockpot.
- place the ingredients in the basket.
- place the steam basket in the stockpot.
00:10
BROCOLI
immediate
start
delayed
start
300 gr
RECOMMENDED TIME: 10 MIN
BROCOLI
do you want
to start the recipe?
COOK
BROCOLI
YES NO
- pour 200ml of water in the stockpot.
- place the ingredients in the basket.
- place the steam basket in the stockpot.
00:10
BROCOLI
ATTENTION
immediate
start
delayed
start
close and lock
the lid
RECOMMENDED TIME: 10 MIN
PREHEAT
please wait
COOK
BROCOLI
- pour 200ml of water in the stockpot.
- place the ingredients in the basket.
- place the steam basket in the stockpot.
00:10
BROCOLI
ATTENTION
BROCOLI
immediate
start
delayed
start
close and lock
the lid
RECOMMENDED TIME: 10 MIN
PREHEAT
please wait
COOK
00:10
BROCOLI
ATTENTION
BROCOLI
BROCOLI
immediate
start
delayed
start
COOK
00:02
close and lock
the lid
PREHEAT
please wait
BROCOLI
ATTENTION
BROCOLI
END OF COOKING
please wait
BROCOLI
BROCOLI
immediate
start
delayed
start
COOK
00:02
close and lock
the lid
PREHEAT
please wait
ATTENTION
BROCOLI
END OF COOKING
please wait
BROCOLI
BROCOLI
COOK
00:02
KEEP WARM
00:02
close and lock
the lid
BON APPÉTIT !
Serve !
Beware of the steam while opening the lid
FRUITS & VEGETABLES
BROCOLI
BROCOLI
artichoke
asparagus
aubergine
beetroot
broccoli
do you want
to start the recipe?
YES NO
300 gr
fruits & vegetables
recipesingredients
manual
librairies
ok
ok
ok
ok
ok
ok
okokok
ok
ok
ok
ok
ok
ok
okokok
ok
ZUTATEN:
Mit dem Menü «Zutaten»
wählen Sie nur die Zutaten
aus, ohne dass Sie sich um
den Kochmodus oder die
Garzeit kümmern müssen:
Cookeo+ unterstützt Sie
Zutaten
mit
Anweisungen für alle
Zutatenarten und -gewichte:
Fleisch, Fisch, Gemüse,
Obst und Reis & Getreide.
+
Wählen Sie «Zutaten»
im Menü aus
Das Gerät heizt vor
+
Wählen Sie
«Gemüse/Früchte»
+
Wählen Sie die gewünschte
Menge Brokkoli (min. 300g)
+
Wählen Sie
«Brokkoli»
Folgen Sie den
Anweisungen
Die empfohlene Kochzeit
wird angezeigt
Der Kochvorgang beginnt
+
Wählen Sie
unmittelbaren Start
Der Kochvorgang
ist abgeschlossen
Beginnen Sie
mit dem Kochen
Probierbereit!
de
Folgen Sie den
Anweisungen
51
Page 29

recipesingredients
manual
librairies
mainstarter
dessert
recipesingredients
manual
librairies
cod fillet and broccoli
beef bourguignon
rabbit with olives and vegetables
goulash
moules marinières
mainstarter
dessert
recipesingredients
manual
librairies
cod fillet and broccoli
beef bourguignon
rabbit with olives and vegetables
goulash
moules marinières
04
PERS
mainstarter
dessert
recipesingredients
manual
librairies
cod fillet and broccoli
beef bourguignon
rabbit with olives and vegetables
goulash
moules marinières
BEEF BOURGUIGNON - 4 PERS
PREPARATION
10min 35min
COOKING
04
PERS
OK
mainstarter
dessert
recipesingredients
manual
librairies
cod fillet and broccoli
beef bourguignon
rabbit with olives and vegetables
goulash
moules marinières
BEEF BOURGUIGNON - 4 PERS
PREPARATION
10min 35min
COOKING
04
PERS
OK
Beef cut into 25 g cubes
Red wine
Veal stock
Bacons
Onions
Vegetable oil
800g
250 ml
150 ml
70g
150g
5cs
PREPARE THE INGREDIENTS
mainstarter
dessert
BEEF BOURGUIGNON
cod fillet and broccoli
beef bourguignon
rabbit with olives and vegetables
goulash
moules marinières
BEEF BOURGUIGNON - 4 PERS
PREPARATION
10min 35min
COOKING
04
PERS
OK
Beef cut into 25 g cubes
Red wine
Veal stock
Bacons
Onions
Vegetable oil
800g
250 ml
150 ml
70g
150g
5cs
PREPARE THE INGREDIENTS
do you want to start
the recipe?
YES NO
BEEF BOURGUIGNON
BEEF BOURGUIGNON
BEEF BOURGUIGNON
BEEF BOURGUIGNON
OK
Beef cut into 25 g cubes
Red wine
Veal stock
Bacons
Onions
Vegetable oil
800g
250 ml
150 ml
70g
150g
5cs
PREPARE THE INGREDIENTS
do you want to start
the recipe?
brown all the ingredients
except the liquid for 10 mins
YES NO
PREHEAT
please wait
do you want
to stop browning?
YES NO
BEEF BOURGUIGNON
BEEF BOURGUIGNON
BEEF BOURGUIGNON
BEEF BOURGUIGNON
BEEF BOURGUIGNON
00:35
OK
brown all the ingredients
except the liquid for 10 mins
do you want
to stop browning?
YES NO
do you want
to start cooking?
YES NO
add the rest of the ingredients
OK
COOK
BEEF BOURGUIGNON
BEEF BOURGUIGNON - 4 PERS
PREPARATION
10min 35min
COOKING
BEEF BOURGUIGNON
04
PERS
OK
Beef cut into 25 g cubes
Red wine
Veal stock
Bacons
Onions
Vegetable oil
800g
250 ml
150 ml
70g
150g
5cs
PREPARE THE INGREDIENTS
do you want to start
the recipe?
YES NO
PREHEAT
please wait
BEEF BOURGUIGNON
BEEF BOURGUIGNON
BEEF BOURGUIGNON
BEEF BOURGUIGNON
BEEF BOURGUIGNON
OK
do you want to start
the recipe?
brown all the ingredients
except the liquid for 10 mins
YES NO
PREHEAT
please wait
do you want
to stop browning?
YES NO
add the rest of the ingredients
OK
BEEF BOURGUIGNON
BEEF BOURGUIGNON
BEEF BOURGUIGNON
BEEF BOURGUIGNON
BEEF BOURGUIGNON
00:35
END OF COOKING
please wait
do you want
to stop browning?
YES NO
do you want
to start cooking?
YES NO
add the rest of the ingredients
OK
COOK
BEEF BOURGUIGNON
BEEF BOURGUIGNON - 4 PERS
PREPARATION
10min 35min
COOKING
BEEF BOURGUIGNON
BEEF BOURGUIGNON
OK
OK
Beef cut into 25 g cubes
Red wine
Veal stock
Bacons
Onions
Vegetable oil
800g
250 ml
150 ml
70g
150g
5cs
PREPARE THE INGREDIENTS
do you want to start
the recipe?
brown all the ingredients
except the liquid for 10 mins
YES NO
PREHEAT
please wait
BEEF BOURGUIGNON
BEEF BOURGUIGNON
BEEF BOURGUIGNON
BEEF BOURGUIGNON
BEEF BOURGUIGNON
OK
brown all the ingredients
except the liquid for 10 mins
PREHEAT
please wait
do you want
to stop browning?
YES NO
do you want
to start cooking?
YES NO
add the rest of the ingredients
OK
BEEF BOURGUIGNON
BEEF BOURGUIGNON
BEEF BOURGUIGNON
BEEF BOURGUIGNON
BON APPÉTIT!
KEEP WARM
00:10
00:35
END OF COOKING
please wait
do you want
to start cooking?
YES NO
add the rest of the ingredients
OK
COOK
BEEF BOURGUIGNON
ok
ok
ok
ok
ok
ok
ok
ok
ok
ok
okokok
ok
ok
ok
ok
ok
ok
okokok
ok
Rotweinsoße
REZEPTE MENÜ:
Über das Menü Rezepte
können Sie aus
150 herzhaften und
süßen Rezepten,
unterteilt in drei
Kategorien, auswählen:
Vorspeisen/
Hauptgerichte/
Desserts.
Rindfleisch in
+
Wählen Sie die
«Rezepte» im Menü
+
Wählen Sie die
Anzahl der Personen
+
Rezeptkategorie
Rezeptanzeige
Wählen Sie ein RezeptWählen Sie die
Bereiten Sie
die Zutaten vor
de
Rezepte
menü
Beginnen Sie mit dem
Kochen des Rezepts
REZEPTE:
+
(FORTSETZUNG)
Indem Sie 30
Sekunden auf die
Zurücktaste drücken,
kommen Sie zum
ursprünglichen
Menü zurück.
Kochvorgang beginnt
+
Das Gerät heizt vor
Anbraten beenden Folgen Sie den
Anweisungen
Kochvorgang beendet
+
Folgen Sie den
Anweisungen
Beginnen Sie mit
dem Kochen
Sie können probieren!
53
Page 30

Please wait
DOWNLOADING
LIBRAIRIES
recipes
manual
ingredients
library
recipes
manual
ingredients
library
mainstarter
dessert
library
World
recipes
manual
ingredients
library
mainstarter
dessert
library
ok
ok
ok
ok
ok
ok
de
bibliothekbibliothek
HERUNTERLADEN
DER REZEPTPAKETE:
Sobald die App mit
Ihrem Cookeo+
verbunden ist, können
Sie die Rezeptpakete
herunterladen.
Wählen Sie ein Paket aus
und klicken Sie auf «Auf
Das Rezeptpaket wird
heruntergeladen
Cookeo+ herunterladen»
Hinweis: Sie können den Downloadvorgang jederzeit
abbrechen, indem Sie die Zurück-Taste Ihres Cookeo+
drücken.
ZUGANG ZUR
REZEPTSAMMLUNG
AUF IHREM COOKEO+:
Sie können Ihre
heruntergeladenen
Rezeptpakete ganz
einfach wiedernden.
Gehen Sie zu Ihrer
gespeicherten
Rezeptsammlung
und starten Sie die
Zubereitung Ihrer
Gerichte auf Ihrem
Cookeo+.
+
Wählen Sie das
Untermenü «Bibliothek»
+
Wählen Sie das gewünschte
Thema oder Express-Rezepte
+
Wählen Sie «Vorspeise»,
«Hauptspeise» oder
«Dessert» und wählen
Sie Ihr Rezept
55
Page 31

avant
utilisation
de
rezepte
Zutaten
Fleisch
Fisch &
Meeresfrüchte
Reis & Getreide
Geügel
Kalbeisch
Kaninchen
Lamm
Rind
Schwein
Fisch
Jakobsmuscheln
Garnelen/Krabben
Muscheln
Buchweizen
Bulgur
Gerste/Graupen
Quinoa
Reis (weiß)
Vollkornreis/Wildreis
Weizen
Gemüse/Früchte
Äpfel
Artischocken
Auberginen
Birnen
Blumenkohl/Romanesco
Brokkoli
Chicorée
Erbsen/Zuckererbsen
Fenchel
Grüne Bohnen
Grünkohl
Karotten
Kartoffeln
Kohl
Kürbis
Lauch
Linsen
Stielmangold (Mangoldrippen)
Rosenkohl
Rote Bete
Weiße Rüben
Knollensellerie
Spargel
Spinat
Blattmangold
Süßkartoffeln
Zucchini
entrée
entrée
www.moulinex.de
Rezepte nden Sie in der App Mon Cookeo
oder auf der Seite www.moulinex.fr
57
Page 32

avant
utilisation
avant
utilisation
de
Reinigung
& Wartung
Trennen Sie das Gerät nach der
Zubereitung Ihrer Mahlzeit von der
Stromquelle, um es zu reinigen.
Reinigen Sie das Gerät nach jedem
Gebrauch.
!
Sie können den Kochtopf und den Dampfgarkorb in warmem
Spülwasser oder in der Geschirrspülmaschine reinigen. Reinigen Sie das
Gerätegehäuse mit einem feuchten Tuch. Nach mehreren Durchläufen
in der Spülmaschine kann sich derKochtopf etwas weißlich färben. Sie
können es mit der rauen Seite ihres Schwammes reinigen.
Reinigung
Wartung
und
Entfernen Sie den Kondensatbehälter
nach jedem Gebrauch und reinigen Sie
diesen in sauberem Wasser oder in der
Geschirrspülmaschine. Trocknen Sie
diesen gut ab. Bringen Sie ihn wieder
in seiner ursprünglichen Position an.
1 2
3
Zur Reinigung des Metallinnendeckel, per
Hand oder in der Geschirrspülmaschine,
müssen Sie den Ventildeckel auf der
Außenseite des Metallinnendeckels
entfernen.
1
Nehmen Sie die Spannschraube in
der Mitte des Metallinnendeckels ab
2
Nehmen Sie den Metallinnendeckelab
3
Entfernen Sie den Ventildeckel
SPÜLEN IN DER GESCHIRRSPÜLMASCHINE:
Sie können den Metallinnendeckel in die
Geschirrspülmaschine geben, ohne die
Ventile zu entfernen. Nach dem Spülen
in der Geschirrspülmaschine, entfernen
Sie die Dekompressionskugel und blasen
Sie in das Rohr, um zu überprüfen, ob
dieses nicht verstopft ist. Trocknen
Sie die Dekompressionskugel und ihre
Halterung behutsam mit einem weichen
Tuch ab.
PER HAND SPÜLEN:
Sie können den Metallinnendeckel mit
warmem Spülwasser spülen. Entfernen
Sie zuerst die Dekompressionskugel
und säubern Sie den Deckel vollständig.
Trocknen Sie die Dekompressionskugel
und ihre Halterung mit einem weichen
Tuch ab.
59
Page 33

Reinigung
& Wartung
de
Blasen Sie in das kleine Rohr (auf der
sich normalerweise die Dekompressionskugel
be ndet), um zu überprüfen, ob dieses
nicht verstopft ist, bevor Sie die
Dekompressionskugel wieder einsetzen.
Bevor Sie den entfernen, säubern Sie den oberen
Teil des Kochtopfs. Säubern Sie den inneren Teil des
Metallinnendeckels des Geräts mit einem feuchten
Schwamm und überprüfen Sie, ob das Druckventil
sauber ist und sich bewegen lässt und dass dieses
nicht blockiert wird.
!
Drücken Sie auf der Außenseite des
Metallinnendeckels auf das Sicherheitsventil
(metallener Schraubkopf), um zu überprüfen,
ob dieses sich nicht festgehakt hat. Auf
diese Weise hebt sich der violettfarbene
Schraubenkopf auf der Innenseite des
Metallinnendeckels leicht.
Reinigen Sie den äußeren Teil des
Gerätedeckels mit einem feuchten
Schwamm. Säubern Sie das Regelventil
!
• Falls das Gerät ungewollt ins Wasser getaucht wird
oder falls Wasser direkt auf das Heizelement spritzt,
wenn der Kochtopf nicht in Position ist, bringen
Sie das Gerät zu einem autorisierten Kundendienstzentrum.
Verstauen Sie das Gerät nicht mit
geschlossenem Deckel. Lassen Sie
es offen oder halb offen stehen;
dies verhindert eine unangenehme
Geruchsbildung.
Tragen Sie das Gerät, indem Sie es mit beiden
Griffen halten. Zur erhöhten Sicherheit, überprüfen
Sie, ob der Deckelgriff sich in der Schließstellung
be ndet. Zur erhöhten Sicherheit, überprüfen Sie,
ob der Deckel gesperrt ist.
Reinigen Sie den oberen Bereich des
Kochtopfs mit einem feuchten Tuch und
überprüfen Sie, dass der Rand richtig
sauber ist. Reinigen Sie den Kondensatbehälter
mit einem feuchten Tuch. Spülen Sie ihn
mit Wasser ab.
auf im hinteren Bereich des Deckels.
Reinigen Sie die Dichtung des
Metallinnendeckels mit einem feuchten
Tuch und spülen Sie diese anschließend
ausgiebig mit Wasser. Verwenden Sie
keine scharfen Gegenstände.
61
Page 34

PROBLEME MÖGLICHE URSACHEN LÖSUNG
Es benden sich Fremdkörper zwischen dem Topf und der
Heizplatte
Der Deckel schließt nicht
Das Produkt dekomprimiert
nicht
Der Deckel öffnet sich
nicht, nachdem der Dampf
abgelassen wurde
Das Gerät wird nicht unter
Druck gesetzt
FEHLERMELDUNGEN Code 24: der Druck nimmt während des Dampfdruckkochens ab
Beim Kochen wird Dampf
Seiten abgelassen
an den
(undichte Stellen)
Es läuft Wasser an der
Hinterseite des Geräts herab
Die Anzeige leuchtet nicht auf
oder funktioniert nicht
Das Bedienelement leuchtet
nicht auf
Auf der Anzeige wird
Kondensierung angezeigt
Der Metallinnendeckel kann
entfernt werden, er ist
nicht
blockiert
Der offene Deckelgriff bendet sich nicht in der korrekten Position Überprüfen Sie, ob der offene Deckelgriff vollständig geöffnet ist
Der Metallinnendeckel und/oder die Spannschraube wurden nicht
korrekt angebracht oder nicht vollständig angezogen
Die Kugelabdeckung ist nicht richtig positioniert Lassen Sie das Gerät komplett abkühlen, demontieren Sie dann den Metallinnendeckel
Das Druckventil (die Manometerstange) bendet sich noch immer
in der oberen Position
Überprüfen Sie, ob die Dichtung, das violettfarbene Sicherheitsventil
und das Druckventil (die Manometerstange) sauber sind
Überprüfen Sie, ob der Deckel gesichert wurde und sich die
Markierung des drehbaren Deckelgriffs auf dem roten Symbol
(geschlossenes Schloss) bendet
Die Dekompressionskugel bendet sich nicht in der korrekten
Position oder ist schmutzig
Code 21 und 26: das Gerät baut keinen Druck auf
Die Dichtung des Metallinnendeckels und/oder die Ränder des
Topfs sind schmutzig
Abnutzung, Einschnitte und Verformung der Dichtung Die Dichtung muss mindestens alle drei Jahre ersetzt werden. Bringen Sie Ihr Gerät zu einem
Beschädigte Topfränder Bringen Sie Ihr Gerät zu einem autorisierten Kundendienstzentrum
Die Spannschraube des Metallinnendeckels wurde nicht ausreichend festgezogen
Der Kondensatbehälter bendet sich nicht in der korrekten
Position oder läuft über
Die Sicherheitsvorrichtungen und/oder Öffnungen sind
verstopft
Die LED-Anzeige funktioniert nicht mehr oder der Deckel wurde
nicht vollständig gesichert
Das Gerät ist nicht angeschlossen oder bendet sich im Stand-
by-Betrieb
Das Gerät ist beschädigt Bringen Sie Ihr Gerät zu einem autorisierten Kundendienstzentrum
Auf dem Deckel bendet sich Kondenswasser Lassen Sie das Gerät ein paar Stunden an der Luft trocknen
Die Kugelabdeckung auf der Innenseite des
Metallinnendeckels wurde nicht wieder richtig eingesetzt
Entfernen Sie den Topf und überprüfen Sie, ob die Heizplatte, das Mittelstück und die Unterseite
des Topfs sauber sind. Überprüfen Sie ebenfalls, ob sich das Mittelstück drehen lässt
Überprüfen Sie, ob Sie alle Bestandteile des Metallinnendeckels eingesetzt haben und ob die
Spannschraube angezogen wurde
und positionieren Sie die Kugelabdeckung richtig (Markierung in der verriegelten Position)
Nachdem Sie sich vergewissert haben, dass kein Dampf mehr abgelassen wird und dass das
Gerät vollständig abgekühlt ist, führen Sie ein Stäbchen in das Loch, das sich zwischen dem drehbaren
Deckelgriff und dem weißen Regelventil -Deckel im hinteren Bereich des Deckels bendet, ein.
Geben Sie auf den Dampf acht, der freigelassen wird sobald der Stab eingeführt wird. Wenn kein
Dampf mehr entweicht, versuchen Sie das Gerät zu öffnen
Reinigen Sie das Gerät, indem Sie die Anweisungen in der Anleitung befolgen
Überprüfen Sie, ob das Druckventil (die Manometerstange) sich bewegen lässt und ob diese
gegebenenfalls gereinigt werden muss
Überprüfen Sie, ob die Dekompressionskugel sich in der korrekten Position bendet und ob der
Deckel sich in der Schließstellung bendet. Reinigen Sie die Kugel und Ihre Halterung
Geben Sie Flüssigkeit (Wasser oder Saucenüssigkeit) zu Ihrer Zubereitung
Reinigen Sie die Seiten des Topfs und die Dichtung mit einem feuchten Tuch. Verwenden Sie
keine scharfen Gegenstände
autorisierten Kundendienstzentrum
Ziehen Sie die Spannschraube in der Mitte des Metallinnendeckels richtig fest
Überprüfen Sie, ob der Kondensatbehälter korrekt auf der Rückseite des Geräts angebracht
wurde und das das Durchussrohr nicht verstopft ist
Überprüfen Sie, ob der Topf nicht zu sehr gefüllt ist und ob es sich nicht um Lebensmittel
handelt, die sich ausdehnen (siehe Sicherheitshinweise)
Überprüfen Sie, ob das Gerät vollständig verriegelt wurde. Bringen Sie Ihr Gerät zu einem
autorisierten Kundendienstzentrum, wenn das Problem weiterhin auftritt
Überprüfen Sie, ob das Stromkabel sowohl mit dem Gerät als auch mit dem Stromnetz
verbunden ist. Überprüfen Sie, ob das Gerät sich nicht im Stand-by-Betrieb bendet, indem Sie
auf die »OK«-Taste drücken
Schrauben Sie die Spannschraube in der Mitte des Metallinnendeckels heraus, drücken Sie dann
auf den Stift, auf den die Spannschraube aufgeschraubt ist. Dadurch wird der Deckel entriegelt
und Sie haben Zugang zur Kugelabdeckung. Stellen Sie sicher, dass diese sowie die
Dekompressionskugel richtig eingesetzt sind
de
Hilfe bei Verbindungsproblemen nden Sie auf der Seite
www.moulinex.fr oder in der App Mon Cookeo (Menü /
Anleitung / FAQ).
Eingetragene Marken
Die Bluetooth®-Marke und die Logos sind Eigentum der Bluetooth SIG, Inc. Die
Nutzung durch SEB SAS erfolgt auf Grundlage einer entsprechenden Genehmigung.
Die anderen Markenzeichen und Markennamen sind Eigentum ihrer jeweiligen
Inhaber.
EPC09-Serie
Niedriger Druck: 40 kPa (109°C) / Hoher Druck: 70kPa (115°C)
GESAMTVOLUMEN: 6L / NUTZVOLUMEN: 4L
Integriertes Heizelement
63
Page 35

avant
utilisation
Voor het
gebruik
Haal het apparaat uit zijn verpakking en
lees aandachtig de gebruiksaanwijzing en
veiligheidsinstructies alvorens het product voor
de eerste keer te gebruiken.
Voor het
gebruik
1
2
nl
Draai om het toestel te openen de
handgreep voor openen/sluiten aan
de bovenkant van het deksel totdat u
het open hangslot te zien krijgt: .
Installeer het apparaat op een vlak,
droog en koud oppervlak. Verwijder
de verpakking, de stickers of andere
accessoires binnenin en aan de
buitenkant van het apparaat.
1
2 43
MAAK DE VERSCHILLENDE ONDERDELEN
SCHOON
1
Kookpot
2
Metalen deksel
3
Omhulsel voor de klep
4
Stoomafsluiter
5
Stoommandje
6
Decompressiebal
6
5
BIJZONDERHEDEN
OVER DE
DEMONTAGE EN DE
TERUGPLAATSING
VAN HET DEKSEL
TOEGANG TOT DE DECOMPRESSIEKOGEL:
Draai de kogelafsluiter tegen de richting van de klok, zodat de
aanduiding I op de positie . staat. Neem de afsluiter af.
Verwijder de kogel en maak deze en de kamer waarin de kogel
zich bevindt voorzichtig schoon met water en afwasmiddel. Droog
de kogel met behulp van een zachte doek en leg deze terug
in zijn kamer. Zet de kogelafsluiter terug op zijn plaats en zet de
aanduiding I terug op positie . Vergrendel deze door de
kogelafsluiter net zo lang te draaien totdat de aanduiding tegenover
het pictogram «dicht» staat .
DEMONTAGE VAN HET METALEN
DEKSEL:
Pak het deksel goed vast bij de dichtingsring en
schroef de middelste moer tegen de richting van
de klok los. Neem de moer en vervolgens het
deksel af.
DEMONTAGE VAN DE VENTIELDOP:
Pak de ventieldop bij het middelste gedeelte vast (zoals
aangegeven) en draai vervolgens rustig om deze los te maken.
Maak de ventieldop en met name de binnenkant ervan schoon
(controleer of er geen etensresten inzitten).
4
TERUGPLAATSING VAN HET
METALEN DEKSEL:
Pak het deksel vast bij de dichtingsring zoals
aangegeven op de afbeelding. Plaats het deksel
op de middelste as en druk deze goed aan. Zet
de moer terug op zijn plaats en schroef goed vast
met de richting van de klok mee.
53
TERUGPLAATSING VAN DE
VENTIELDOP:
Neem de ventieldop zoals aangegeven op de
foto (pak deze in het midden vast). Zet de
cirkelvormige binnenkant van de dop op de
drie haken en druk vervolgens totdat deze goed
vastzit (u moet een «klik» horen). De ventieldop
moet geheel in contact zijn met de binnenkant
van het deksel.
65
Page 36

ok
ok
ok
ok
ok
ok
avant
utilisation
LANGUAGE
Italian
English
French
Dutch
Spanish
LANGUAGE
Italian
English
French
Dutch
Spanish
COUNTRY
Italy
United Kingdom
France
Germany
Spain
nl
1
bediening
Wanneer u het apparaat aansluit voor de eerste
keer, krijgt u toegang tot het menu instellingen:
+
+
gebruik
Gebruik het apparaat
nooit zonder de kookpot.
OPEN HET DEKSEL:
Draai om het toestel te openen
de handgreep voor openen/
sluiten totdat u het open hangslot
te zien krijgt: . Probeer nooit
het deksel van het toestel
te forceren wanneer dit niet
opengaat.
DE STOOMAFSLUITER
INSTALLEREN:
Controleer dat de condensatietank
leeg is en installeer hem vervolgens
achter het apparaat.
Selecteer uw taalSelecteer uw land
2
Wanneer u het apparaat
voor de eerste keer
gebruikt, is het mogelijk
BEDIENINGSPANEEL INTERFACE
3s
SELECTEER BEVESTIGEN TERUG OPNIEUW STARTEN
dat de pot een lichte geur
afgeeft. Dit is normaal.
HET REKJE INSTALLEREN
ONDERHET STOOMMANDJE:
knijp het rekje tussen uw duim en
wijsvinger om het te installeren
onder het stoommandje.
DE POT IN HET APPARAAT
PLAATSEN:
veeg de onderkant van de
kookpot af. Zorg ervoor dat er
geen etensresten of vloeistof
blijven plakken onder de kom of
op de verwarmingsplaat.
Plaats vervolgens de kuip in het
toestel. Let er hierbij op dat de
handvaten van de kuip correct in
de daarvoor bestemde gleuven
zitten.
67
Page 37

RECIPE 2
Do you want to delete
this recipe?
YES NO
language/country
delete libraires
screen/sound
Connect
recipes
librairies
Please select the library
you want to delete
library 1
library 2
LIBRARY 2
Do you want to delete
this library?
YES NO
favorites
recipesingredients
manual
language/country
delete libraires
screen/sound
Connect
favorites
recipesingredients
manual
LANGUAGE
deutsch
spanish
french
italian
nederlands
language/country
delete libraires
screen/sound
Connect
favorites
recipesingredients
manual
favorites
recipesingredients
manual
COUNTRY
Germany
Spain
France
Italy
Netherlands
LANGUAGE
deutsch
spanish
french
italian
nederlands
language/country
delete libraires
screen/sound
Connect
favorites
recipesingredients
manual
COUNTRY
Germany
Spain
France
Italy
Netherlands
LANGUAGE
deutsch
spanish
french
italian
nederlands
language/country
delete libraires
screen/sound
Connect
language/country
delete libraires
screen/sound
Connect
COUNTRY
Germany
Spain
France
Italy
Netherlands
LANGUAGE
deutsch
spanish
french
italian
nederlands
Please select the recipe
you want to delete
recipe 1
language/country
delete libraires
screen/sound
Connect
recipe 2
language/country
delete libraires
screen/sound
Connect
COUNTRY
Germany
Spain
France
Italy
Netherlands
LANGUAGE
deutsch
spanish
french
italian
nederlands
RECIPE 2
Do you want to delete
this recipe?
YES NO
Please select the recipe
you want to delete
recipe 1
recipe 2
language/country
delete libraires
screen/sound
Connect
COUNTRY
Germany
Spain
France
Italy
Netherlands
LANGUAGE
RECIPE 2
Do you want to delete
this recipe?
YES NO
Please select the recipe
you want to delete
recipe 1
recipe 2
language/country
delete libraires
screen/sound
Connect
recipes
librairies
COUNTRY
RECIPE 2
Do you want to delete
this recipe?
YES NO
Please select the recipe
you want to delete
recipe 1
recipe 2
language/country
delete libraires
screen/sound
Connect
recipes
librairies
Please select the library
you want to delete
library 1
library 2
RECIPE 2
Do you want to delete
this recipe?
YES NO
Please select the recipe
you want to delete
recipe 1
recipe 2
recipes
librairies
Please select the library
you want to delete
library 1
library 2
LIBRARY 2
Do you want to delete
this library?
YES NO
screen
sound
language/country
delete libraires
screen/sound
Connect
recipes
librairies
Please select the library
you want to delete
library 1
library 2
LIBRARY 2
Do you want to delete
this library?
YES NO
screen
sound
demo mode
brightness
language/country
delete libraires
screen/sound
Connect
Please select the library
you want to delete
library 1
library 2
LIBRARY 2
Do you want to delete
this library?
YES NO
screen
sound
BRIGHTNESS
demo mode
brightness
language/country
delete libraires
screen/sound
Connect
LIBRARY 2
Do you want to delete
this library?
YES NO
screen
sound
BRIGHTNESS
demo mode
brightness
language/country
delete libraires
screen/sound
Connect
demo mode
brightness
screen
sound
BRIGHTNESS
demo mode
brightness
DEMO MODE
OFF ON
demo mode
brightness
BRIGHTNESS
demo mode
brightness
DEMO MODE
OFF ON
DEMO MODE
3424
demo mode
brightness
BRIGHTNESS
DEMO MODE
OFF ON
DEMO MODE
3424
demo mode
brightness
screen
sound
DEMO MODE
OFF ON
DEMO MODE
3424
SOUND
OFF ON
demo mode
brightness
screen
sound
DEMO MODE
OFF ON
DEMO MODE
3424
SOUND
OFF ON
screen
sound
language/country
delete libraires
screen/sound
Connect
DEMO MODE
3424
SOUND
OFF ON
OFF ON
Connect
screen
sound
language/country
delete libraires
screen/sound
Connect
PAYS
Allemagne
Espagne
France
Italie
Pays-Bas
LANGUE
allemand
espagnol
français
italien
néerlandais
langues/pays
suppression
recettes
écran/son
Connect
langues/pays
suppression
recettes
écran/son
Connect
bibliothèques
recettes
ok
ok
ok
ok
ok
ok
ok
ok
ok
ok
ok
ok
ok
ok
ok
ok
ok
ok
ok
ok
ok
ok
ok
ok
ok
ok
ok
ok
ok
ok
ok
ok
ok
ok+ok
ok
ok
ok
ok
ok
ok
Opgelet: zelfs als het geluid
gedesactiveerd is, blijven de
waarschuwingsgeluiden actief
menu
instellingen
«recepten wissen»
+
Selecteer
«taal/land»
+
Kies
Kies «bibliotheken»
+
Selecteer
uw taal
+
+
Selecteer
uw land
Kies «bibliotheek 2»
Selecteer de instelling
+
«scherm/geluid»
+
Kies «demofunctie»
+
+
Selecteer «scherm» Kies «lichtsterkte»
+
Om de demofunctie te activeren of te deactiveren,
geeft u een code in: 3424
nl
+
Regel de lichtsterkte
N.B.: met de demofunctie laat u het
product werken zonder
dat het verwarmt of in
druk toeneemt.
+
Wilt u deze
bibliotheek wissen?
+
Kies «recepten»
+
Selecteer
«recept 2»
+
Wilt u deze
recepten wissen?
+
Selecteer «geluid» Selecteer «connect»
Stel het volume in
+
+
+
Democonnect te activeren
of te deactiveren
69
Page 38

recipes
manual
ingredients
library
do you want to switch off
the appliance?
YES NO
recipes
manual
ingredients
library
do you want to switch off
the appliance?
YES NO
YES NO
do you want to switch off
the appliance?
recipes
manual
ingredients
library
Validate the connexion request
and press OK
OK
ok
ok
ok
ok
ok
ok
ok
ok
nl
menu
aan/uit
+
verbinding
phone de Mijn Cookeo-app
in de App Store.
Uw Cookeo+ is klaar
voor gebruik. U kunt
zelfs zonder de app al
aan de slag met de 150
voorgeprogrammeerde
recepten.
Download via tablet of smart-
Wanneer u uw Cookeo+,
+
+
Door op ON/OFF te drukken kunt u uw apparaat uitschakelen.Selecteer en bevestig
inschakelt, knippert het
blauwe controlelampje
(wachtend op verbinding),
Bij het eerste gebruik sluit u het apparaat aan op uw tablet en volgt u de instructies
op de schermen.
behalve wanneer u de
functie «connect» manueel
deactiveert (zie hoofdstuk
Instellingen).
Wanneer de verbinding
tot stand is gekomen,
blijft het blauwe controle
lampje branden.
-
71
Page 39

nl
verbinding
Problemen met de
verbinding:
Indien de verbinding niet tot stand
komt, ziet u een foutmelding. Volg
de instructies op de schermen om
het opnieuw te proberen.
Opgelet: er is slechts 1 enkele
verbinding per keer mogelijk.
N.B. Als u de Cookeo+ gedurende 30 minuten niet gebruikt, zal deze op waakstand overschakelen.
De verbinding wordt dan verbroken. Wanneer het apparaat uit waakstand komt, wordt de
verbinding automatisch hersteld.
Een account aanmaken:
Volg de instructies van de
app.
Zoekbalk:
Typ de trefwoorden in de
zoekbalk en gebruik het
zoeklter.
Navigatie:
U kunt ook door de app
navigeren met behulp
van het menu:
• home
• recepten
• mijn boodschappen
• tools
• gids
• mijn account
Als de verbinding wordt verbroken, heeft dit geen invloed op de bereiding. De Cookeo+ blijft altijd
autonoom functioneren.
N.B. U kunt de bereiding enkel starten door op «OK» te drukken op uw Cookeo+ (zoals
aangegeven via de app).
Vanuit de app kunt u:
• het recept stap voor stap
bekijken
• het recept stap voor stap
uitvoeren samen met uw
Cookeo+
Opgeslagen recepten
in uw Cookeo+
Favorieten
Bibliotheek
73
Page 40

ATTENTION
PRESSURE COOKING
insert the pot
00:10
COOKING
pressure
cooking
reheat
regular
cooking
keep warm
recipesingredients
manual
librairies
ATTENTION
PRESSURE COOKING
PRESSURE COOKING
insert the pot
00:10
COOKING
immediate
start
delayed
start
pressure
cooking
reheat
regular
cooking
keep warm
manual
librairies
ATTENTION
PRESSURE COOKING
PRESSURE COOKING
insert the pot
00:10
COOKING
immediate
start
delayed
start
ATTENTION
close and lock the lid
reheat
keep warm
recipesingredients
manual
librairies
pressure
cooking
reheat
regular
cooking
keep warm
recipesingredients
manual
librairies
ATTENTION
insert the pot
pressure
cooking
reheat
regular
cooking
keep warm
recipesingredients
manual
librairies
ATTENTION
PRESSURE COOKING
PRESSURE COOKING
PRESSURE COOKING
00:10
COOKING
immediate
start
delayed
start
ATTENTION
close and lock the lid
PREHEAT
please wait
PRESSURE COOKING
PRESSURE COOKING
PRESSURE COOKING
COOKING
immediate
start
delayed
start
ATTENTION
close and lock the lid
PREHEAT
please wait
PRESSURE COOKING
COOKING
00:02
PRESSURE COOKING
PRESSURE COOKING
start
start
ATTENTION
close and lock the lid
PREHEAT
please wait
PRESSURE COOKING
PRESSURE COOKING
COOKING
00:02
END OF COOKING
please wait
12:20
PRESSURE COOKING
ATTENTION
PREHEAT
please wait
PRESSURE COOKING
PRESSURE COOKING
PRESSURE COOKING
COOKING
00:02
END OF COOKING
please wait
12:20
KEEP WARM
00:02
BON APPÉTIT !
Serve !
Beware of the steam while opening the lid
okokok
ok
ok
ok
ok
ok
ok
ok
ok
ok
manueel
kookstand
nl
manueel
kookstand
ONDER DRUK ONDER DRUK
MANUEEL MENU:
Met het manuele menu stuurt
u de bereiding. Kies zelf
de bereidingstijd en-wijze:
koken onder druk, klassieke
bereiding (zachte bereiding,
sudderen, kleuren), opwarmen
of warm houden.
Selecteer het menu
«handmatig»
+
+
Plaats de pot en voeg
vervolgens de ingrediënten toe
Kies de functie
«onder druk»
+
+
Hermetisch sluiten
Stel de kooktijd in Selecteer onmiddellijk of
uitgesteld starten (p.79)
Het apparaat is aan
het voorwarmen
Klaar om te proeven!
Het koken is gestart
!
4 L (max)
3,5L
200 ml (min)
Het koken is beëindigd
75
Page 41

recipesingredients
manual
librairies
recipesingredients
manual
pressure
cooking
reheat
regular
cooking
keep warm
librairies
ATTENTION
open the lid
SLOW COOKING
recipesingredients
manual
pressure
cooking
reheat
regular
cooking
keep warm
librairies
ATTENTION
ATTENTION
insert the pot
open the lid
SLOW COOKING
pressure
cooking
reheat
regular
cooking
keep warm
ATTENTION
ATTENTION
insert the pot
open the lid
SLOW COOKING
PREHEAT
please wait
SLOW COOKING
ATTENTION
ATTENTION
insert the pot
SLOW COOKING
open the lid
SLOW COOKING
PREHEAT
please wait
add the ingredients
OK
ATTENTION
ATTENTION
insert the pot
SLOW COOKING
SLOW COOKING
PREHEAT
please wait
add the ingredients
OK
00:02
SLOW COOKING
OK
ATTENTION
SLOW COOKING
SLOW COOKING
PREHEAT
please wait
add the ingredients
OK
00:02
SLOW COOKING
OK
Do you want to stop
the slow cooking?
YES NO
SLOW COOKING
recipesingredients
manual
pressure
cooking
reheat
regular
cooking
keep warm
librairies
recipesingredients
manual
pressure
cooking
reheat
regular
cooking
keep warm
recipesingredients
manual
ATTENTION
insert the pot
ATTENTION
close and lock the lid
pressure
cooking
reheat
regular
cooking
keep warm
recipesingredients
manual
ATTENTION
insert the pot
pressure
cooking
reheat
regular
cooking
keep warm
recipesingredients
manual
ATTENTION
insert the pot
ATTENTION
close and lock the lid
00:02
REHEAT
pressure
cooking
reheat
regular
cooking
keep warm
ATTENTION
insert the pot
do you want
to stop reheating?
YES NO
ATTENTION
close and lock the lid
00:02
REHEAT
okokok
ok
ok
ok
ok
ok
ok
ok
ok
ok
ok
ok
ok
ok
ok
ok
ok
ok
ok
ok
ok
manueel
kookstand
KLASSIEK
Met de klassieke
bereidingswijze kunt u:
zacht koken
sudderen
goudbruin kleuren
afhankelijk van het gewenste
resultaat. Het deksel blijft voor
dit type van bereidingen open.
N.B.: de werking is
identiek, enkel de
temperatuur verschilt.
+
Selecteer het
menu «manueel»
Open het deksel
+
+
Kies het
klassieke menu
Plaats de pot
+
Kies de gewenste
functie
Het apparaat is aan het
voorwarmen
Druk om de bereiding te stoppen op de «terug»-pijl en selecteer Stop.
nl
manueel
kookstand
+
+
Selecteer het
menu «manueel»
«opnieuw opwarmen»
+
Selecteer de stand
OPWARMEN
Sluit het deksel
hermetisch
+
Het opnieuw opwarmen
is begonnen
om te onderbreken
Plaats de pot
+
Wilt u stoppen met
opnieuw opwarmen?
N.B. Het opnieuw
opwarmen begint
en de tijd verhoogt.
77
Page 42

recipesingredients
manual
librairies
pressure
cooking
reheat
regular
cooking
keep warm
recipesingredients
manual
librairies
ATTENTION
insert the pot
pressure
cooking
reheat
regular
cooking
keep warm
recipesingredients
manual
librairies
ATTENTION
insert the pot
KEEP WARM
PREHEAT
please wait
pressure
cooking
reheat
regular
cooking
keep warm
recipesingredients
manual
librairies
ATTENTION
insert the pot
KEEP WARM
PREHEAT
please wait
KEEP WARM
00:02
pressure
cooking
reheat
regular
cooking
keep warm
ATTENTION
insert the pot
do you want to stop
the keep warm function?
YES NO
KEEP WARM
PREHEAT
please wait
KEEP WARM
00:02
immediate
start
delayed
start
PRESSURE COOKING
h m
what time is it?
08:15
immediate
start
delayed
start
PRESSURE COOKING
PRESSURE COOKING
h m
what time is it?
END OF
COOKING
12:30
08:15
08:15
immediate
start
delayed
start
PRESSURE COOKING
PRESSURE COOKING
PRESSURE COOKING
h m
what time is it?
END OF
COOKING
12:30
08:15
08:15
01:00
DELAYED START END OF COOKING
12:30
08:15
immediate
start
delayed
start
PRESSURE COOKING
PRESSURE COOKING
PRESSURE COOKING
ok
okokok
ok
ok
ok
ok
ok
ok
ok
ok
ok
ok
ok
nl
WARM HOUDEN
manueel
kookstand
manueel
kookstand
+
Selecteer het
Selecteer de functie
menu «manueel»
Het apparaat is aan
het voorwarmen
houden is begonnen
+
«warm houden»
De functie warm
Plaats de pot
+
Om de functie warmhouden
te stoppen, druk op de
knop «terug» en selecteer
«ja»
UITGESTELDE START
(MODUS KOKEN ONDER DRUK)
!
Voor bepaalde voedingsmiddelen is het gebruik van de
uitgestelde start onmogelijk
(bv.: vlees, vis, melk, ...).
De bereidingsduur kan variëren
naargelang de hoeveelheid
voedsel in het apparaat.
+
Selecteer
«uitgestelde start»
+
Selecteer het einde
van het koken
+
Selecteer de
huidige tijd
Uitgestelde start
is geprogrammeerd
79
Page 43

recipesingredients
manual
librairies
fruits & vegetables
recipesingredients
manual
librairies
FRUITS & VEGETABLES
artichoke
asparagus
aubergine
beetroot
broccoli
fruits & vegetables
recipesingredients
manual
librairies
FRUITS & VEGETABLES
BROCOLI
artichoke
asparagus
aubergine
beetroot
broccoli
300 gr
fruits & vegetables
recipesingredients
manual
librairies
FRUITS & VEGETABLES
BROCOLI
BROCOLI
artichoke
asparagus
aubergine
beetroot
broccoli
do you want
to start the recipe?
BROCOLI
YES NO
- pour 200ml of water in the stockpot.
- place the ingredients in the basket.
- place the steam basket in the stockpot.
300 gr
fruits & vegetables
RECOMMENDED TIME: 10 MIN
FRUITS & VEGETABLES
BROCOLI
BROCOLI
artichoke
asparagus
aubergine
beetroot
broccoli
do you want
to start the recipe?
COOK
BROCOLI
YES NO
- pour 200ml of water in the stockpot.
- place the ingredients in the basket.
- place the steam basket in the stockpot.
00:10
300 gr
RECOMMENDED TIME: 10 MIN
BROCOLI
BROCOLI
do you want
to start the recipe?
COOK
BROCOLI
YES NO
- pour 200ml of water in the stockpot.
- place the ingredients in the basket.
- place the steam basket in the stockpot.
00:10
BROCOLI
immediate
start
delayed
start
300 gr
RECOMMENDED TIME: 10 MIN
BROCOLI
do you want
to start the recipe?
COOK
BROCOLI
YES NO
- pour 200ml of water in the stockpot.
- place the ingredients in the basket.
- place the steam basket in the stockpot.
00:10
BROCOLI
ATTENTION
immediate
start
delayed
start
close and lock
the lid
RECOMMENDED TIME: 10 MIN
PREHEAT
please wait
COOK
BROCOLI
- pour 200ml of water in the stockpot.
- place the ingredients in the basket.
- place the steam basket in the stockpot.
00:10
BROCOLI
ATTENTION
BROCOLI
immediate
start
delayed
start
close and lock
the lid
RECOMMENDED TIME: 10 MIN
PREHEAT
please wait
COOK
00:10
BROCOLI
ATTENTION
BROCOLI
BROCOLI
immediate
start
delayed
start
COOK
00:02
close and lock
the lid
PREHEAT
please wait
BROCOLI
ATTENTION
BROCOLI
END OF COOKING
please wait
BROCOLI
BROCOLI
immediate
start
delayed
start
COOK
00:02
close and lock
the lid
PREHEAT
please wait
ATTENTION
BROCOLI
END OF COOKING
please wait
BROCOLI
BROCOLI
COOK
00:02
KEEP WARM
00:02
close and lock
the lid
BON APPÉTIT !
Serve !
Beware of the steam while opening the lid
FRUITS & VEGETABLES
BROCOLI
BROCOLI
artichoke
asparagus
aubergine
beetroot
broccoli
do you want
to start the recipe?
YES NO
300 gr
fruits & vegetables
recipesingredients
manual
librairies
ok
ok
ok
ok
ok
ok
okokok
ok
ok
ok
ok
ok
ok
okokok
ok
INGREDIËNTEN:
Met het menu «ingrediënten»
selecteert u de ingrediënten,
zonder zich zorgen te maken
over de bakwijze of de
kooktijd : Cookeo+ helpt u
stapsgewijze bij het verloop
ingrediënten
van elk ingrediënt en
hun gewicht: vlees, vis,
groenten, fruit, rijst en
granen.
Selecteer het menu
«ingrediënten»
Het apparaat
verwarmt voor
nl
+
+
Selecteer
«de groenten»
+
Selecteer
«broccoli»
De aanbevolen bereidingstijd
wordt weergegeven
onmiddellijke start
+
Volg de instructiesSelecteer de gewenste
Start het kookproces
hoeveelheid van broccoli
(min. 300 g)
+
Selecteer
Het kookproces
is voltooid
Start het recept
Smakelijk!
Volg de instructies
81
Page 44

recipesingredients
manual
librairies
mainstarter
dessert
recipesingredients
manual
librairies
cod fillet and broccoli
beef bourguignon
rabbit with olives and vegetables
goulash
moules marinières
mainstarter
dessert
recipesingredients
manual
librairies
cod fillet and broccoli
beef bourguignon
rabbit with olives and vegetables
goulash
moules marinières
04
PERS
mainstarter
dessert
recipesingredients
manual
librairies
cod fillet and broccoli
beef bourguignon
rabbit with olives and vegetables
goulash
moules marinières
BEEF BOURGUIGNON - 4 PERS
PREPARATION
10min 35min
COOKING
04
PERS
OK
mainstarter
dessert
recipesingredients
manual
librairies
cod fillet and broccoli
beef bourguignon
rabbit with olives and vegetables
goulash
moules marinières
BEEF BOURGUIGNON - 4 PERS
PREPARATION
10min 35min
COOKING
04
PERS
OK
Beef cut into 25 g cubes
Red wine
Veal stock
Bacons
Onions
Vegetable oil
800g
250 ml
150 ml
70g
150g
5cs
PREPARE THE INGREDIENTS
mainstarter
dessert
BEEF BOURGUIGNON
cod fillet and broccoli
beef bourguignon
rabbit with olives and vegetables
goulash
moules marinières
BEEF BOURGUIGNON - 4 PERS
PREPARATION
10min 35min
COOKING
04
PERS
OK
Beef cut into 25 g cubes
Red wine
Veal stock
Bacons
Onions
Vegetable oil
800g
250 ml
150 ml
70g
150g
5cs
PREPARE THE INGREDIENTS
do you want to start
the recipe?
YES NO
BEEF BOURGUIGNON
BEEF BOURGUIGNON
BEEF BOURGUIGNON
BEEF BOURGUIGNON
OK
Beef cut into 25 g cubes
Red wine
Veal stock
Bacons
Onions
Vegetable oil
800g
250 ml
150 ml
70g
150g
5cs
PREPARE THE INGREDIENTS
do you want to start
the recipe?
brown all the ingredients
except the liquid for 10 mins
YES NO
PREHEAT
please wait
do you want
to stop browning?
YES NO
BEEF BOURGUIGNON
BEEF BOURGUIGNON
BEEF BOURGUIGNON
BEEF BOURGUIGNON
BEEF BOURGUIGNON
00:35
OK
brown all the ingredients
except the liquid for 10 mins
do you want
to stop browning?
YES NO
do you want
to start cooking?
YES NO
add the rest of the ingredients
OK
COOK
BEEF BOURGUIGNON
BEEF BOURGUIGNON - 4 PERS
PREPARATION
10min 35min
COOKING
BEEF BOURGUIGNON
04
PERS
OK
Beef cut into 25 g cubes
Red wine
Veal stock
Bacons
Onions
Vegetable oil
800g
250 ml
150 ml
70g
150g
5cs
PREPARE THE INGREDIENTS
do you want to start
the recipe?
YES NO
PREHEAT
please wait
BEEF BOURGUIGNON
BEEF BOURGUIGNON
BEEF BOURGUIGNON
BEEF BOURGUIGNON
BEEF BOURGUIGNON
OK
do you want to start
the recipe?
brown all the ingredients
except the liquid for 10 mins
YES NO
PREHEAT
please wait
do you want
to stop browning?
YES NO
add the rest of the ingredients
OK
BEEF BOURGUIGNON
BEEF BOURGUIGNON
BEEF BOURGUIGNON
BEEF BOURGUIGNON
BEEF BOURGUIGNON
00:35
END OF COOKING
please wait
do you want
to stop browning?
YES NO
do you want
to start cooking?
YES NO
add the rest of the ingredients
OK
COOK
BEEF BOURGUIGNON
BEEF BOURGUIGNON - 4 PERS
PREPARATION
10min 35min
COOKING
BEEF BOURGUIGNON
BEEF BOURGUIGNON
OK
OK
Beef cut into 25 g cubes
Red wine
Veal stock
Bacons
Onions
Vegetable oil
800g
250 ml
150 ml
70g
150g
5cs
PREPARE THE INGREDIENTS
do you want to start
the recipe?
brown all the ingredients
except the liquid for 10 mins
YES NO
PREHEAT
please wait
BEEF BOURGUIGNON
BEEF BOURGUIGNON
BEEF BOURGUIGNON
BEEF BOURGUIGNON
BEEF BOURGUIGNON
OK
brown all the ingredients
except the liquid for 10 mins
PREHEAT
please wait
do you want
to stop browning?
YES NO
do you want
to start cooking?
YES NO
add the rest of the ingredients
OK
BEEF BOURGUIGNON
BEEF BOURGUIGNON
BEEF BOURGUIGNON
BEEF BOURGUIGNON
BON APPÉTIT!
KEEP WARM
00:10
00:35
END OF COOKING
please wait
do you want
to start cooking?
YES NO
add the rest of the ingredients
OK
COOK
BEEF BOURGUIGNON
ok
ok
ok
ok
ok
ok
ok
ok
ok
ok
okokok
ok
ok
ok
ok
ok
ok
okokok
ok
bourguignon
RECEPTEN MENU:
Kies via het menu
Recepten tussen 150
hartige en en zoete
recepten verdeeld over
drie categorieën:
voorgerechten /
hoofdgerechten /
nagerechten..
boeuf
+
Selecteer het
menu «recepten»
+
Selecteer het
aantal personen
+
van het recept
nl
recepten
menu
+
Start het kookproces Volg de instructies
Het apparaat
verwarmt voor
RECEPTEN:
+
Selecteer een receptKies het type recept
(VERVOLG)
Door op de knop
Vorige 30 seconden,
terug te komen op
het oorspronkelijke
menu.
Het aanbraden stoppen Volg de instructies
Bereid de ingrediëntenPresentatie
Het kookproces
is voltooid
Het kookproces begint
Start het kookproces
+
Smakelijk!
83
Page 45

Please wait
DOWNLOADING
LIBRAIRIES
recipes
manual
ingredients
library
recipes
manual
ingredients
library
mainstarter
dessert
library
World
recipes
manual
ingredients
library
mainstarter
dessert
library
ok
ok
ok
ok
ok
ok
nl
bibliothekenbibliotheken
DOWNLOADEN VAN
RECEPTENBUNDELS:
Zodra de app verbonden
is met uw Cookeo+,
kunt u receptenbundels
downloaden.
Selecteer een bundel en
Bezig met downloaden
druk op de knop
«Downloaden naar
de Cookeo+»
N.B.: U kunt het downloaden te allen tijde stoppen
door op de terug-toets van de Cookeo+ te drukken.
GA NAAR DE
BIBLIOTHEEK
VAN UW COOKEO+:
U kunt nu de
gedownloade bundels
terugvinden. Open
de recepten op uw
Cookeo+ via
de bibliotheek.
+
Kies het submenu
«bibliotheek»
+
Kies het gewenste thema
of de snelle recepten
+
Kies «voorgerecht»,
«hoofdgerecht»
of «nagerecht»
en kies uw recept
85
Page 46

avant
utilisation
nl
recepten
ingrediënten
vlees
vis & schelpdieren
rijst & granen
kalf
kip
konijn
lam
rundvlees
varken
garnalen
mosselen
sint-jakobsschelpen
vis
boekweit
bulgur
gerst
quinoa
tarwe
wilde rijst
witte rijst
groenten fruit
aardappelen
appel
artisjokken
asperges
aubergine
bataten
bloemkool
broccoli
cichorei
courgette
groene kool
kool
linzen
prinsessenbonen
peer
prei
peper
raap
rode biet
selder
spruitjes
spinazie
snijbiet
venkel
wortel
www.moulinex.nl
Vind recepten op de Mon Cookeo-app
en www.moulinex.nl
87
Page 47

avant
utilisation
avant
utilisation
nl
schoonmaak
onderhoud
Zodra u klaar bent met het koken
van uw schotel, koppel het apparaat
los en maak het schoon. Maak het
apparaat schoon na elk gebruik.
!
!
U kunt de kookpot en het stoommandje afwassen in warm zeepwater
of in de vaatwasmachine. Maak het centrale gedeelte van het apparaat
schoon met een vochtige doek.
Na een aantal keer afwassen in de afwasmachine, kan de buitenkant
van de kookpot wit worden. U kan deze aanslag verwijderen met een
schuursponge.
schoonmaak
onderhoud
Na elk gebruik, verwijder de stoomafsluiter
en was hem zorgvuldig in schoon water
of in de vaatwasmachine. Zorg ervoor
dat u hem goed afdroogt. Plaats terug
op zijn oorspronkelijke plaats.
1 2
3
Om het metalen deksel schoon
te maken, met de hand of in de
vaatwasmachine, dient u het omhulsel
van de klep weg te nemen.
1
Draai de schroef in het midden van
het metalen deksel los
2
Verwijder het metalen deksel
3
Verwijder het omhulsel van de klep
SCHOONMAKEN IN DE
VAATWASMACHINE:
u kunt het metalen deksel in de
vaatwasmachine plaatsen zonder de
kleppen te verwijderen. Nadat u hem
in de vaatwasmachine zet, verwijder
de bal en blaas in de buis om na te
gaan of hij niet verstopt zit. Droog de
bal en de ondersteuning zorgvuldig
af met een zachte doek.
MANUEEL SCHOONMAKEN:
u kunt het metalen deksel schoonmaken
met warm zeepwater. Verwijder
eerst de bal en maak het vervolgens
volledig schoon. Droog de bal en de
ondersteuning af met een droge
doek.
89
Page 48

schoonmaak
onderhoud
nl
Voordat u de bal opnieuw installeert
dient u na te gaan of de buis niet
geblokkeerd is door er in te blazen.
Voordat u het interne deksel wegneemt, dient u
de bovenkant van de kookpot schoon te maken.
Maak de binnenkant van het metalen deksel van
het apparaat schoon met behulp van een vochtige
spons en ga na dat de manometrische staaf correct
op zijn plaats zit om ervoor te zorgen dat hij niet
geblokkeerd geraakt.
!
Druk op het interne deel van veer van
de veiligheidsklep om na te gaan of
deze niet verstopt zit.
Sluit het deksel niet wanneer u het
apparaat opbergt. Laat het open of
half open; dit voorkomt onaangename
geuren.
!
• In het geval dat het apparaat per ongeluk wordt
ondergedompeld of als er water wordt gemorst
rechtstreeks op het verwarmingselement wanneer
de pot niet op de juiste plaats staat, breng het
apparaat dan naar een erkend servicecentrum.
Vervoer het apparaat met behulp van de twee
handvatten aan de zijkant. Voor een grotere
veiligheid, zorg ervoor dat het handvat gesloten
is. Voor een grotere veiligheid, zorg ervoor dat het
deksel geblokkeerd is.
Maak de buitenkant van het deksel
van het apparaat schoon met behulp
van een vochtige spons. Maak de
dempklep aan de achterkant van het
deksel schoon.
Maak de bovenkant van de kookpot
schoon met behulp van een vochtige
doek. Maak de stoomafsluiter schoon
aan de hand van een vochtige doek.
Maak de hermetische afsluiting
op het metalen deksel schoon
met een vochtige doek en spoel
grondig af. Gebruik geen scherpe
voorwerpen.
91
Page 49

PROBLEMEN MOGELIJKE OORZAKEN OPLOSSING
Er bevinden zich vreemde voorwerpen tussen de pot en de
verwarmingsplaat
Het deksel sluit niet
Het product vermindert de
druk niet
Het deksel gaat niet
open nadat de stoom is
vrijgekomen
Het apparaat komt niet
onder druk te staan
FOUTCODES Code 24: de druk neemt af bij het koken onder druk
Er komt stoom vrij aan
de zijkant van het deksel
tijdens het koken (lekken)
Er stroomt water langs de
achterkant van het apparaat
Het controlelampje is niet aan
het knipperen of licht niet op
Het controlepaneel licht
niet op
Er verschijnt condens op het
controlelampje
Het metalen deksel is
geblokkeerd en kan niet
worden losgemaakt
Het handvat om het deksel te open is niet correct geplaatst Ga na of het open handvat volledig open is
Het metalen deksel en/of de aandraaischroef zijn niet
correct geïnstalleerd of volledig aangeschroefd
De kogelafsluiter zit niet goed op zijn plaats Laat het product volledig afkoelen, demonteer het metalen deksel en plaats de
De manometrische staaf bevindt zich nog steeds bovenaan Nadat u zich ervan heeft vergewist dat er geen stoom meer vrijkomt en dat het product
Ga na of de hermetische afsluiting, de paarse veiligheidsklep
en de manometrische staaf schoon zijn
Ga na of het deksel geblokkeerd is en of de markering op dezelfde
lijn staat als het gesloten slot. Ga na of de manometrische
staaf vrij kan bewegen en of hij moet worden schoongemaakt
De decompressiebal is niet correct geplaatst of is vuil Ga na of de bal correct geplaatst is en of het omhulsel zich in de geblokkeerde positie
Code 21 en 26: de druk in het apparaat stijgt niet
De hermetische afsluiting van het metalen deksel en/of de
randen van de pot zijn vuil
Slijtage, sneden en vervorming van de hermetische
afsluiting
De randen van de pot zijn beschadigd Breng uw apparaat naar een erkend servicecentrum
De moer van het metalen deksel is niet goed vastgeschroefd
De stoomafsluiting is niet correct geplaatst of is aan het
overstromen
Het veiligheidsventiel en/of de openingen zijn verstopt Controleer of het apparaat niet te vol zit en of de producten niet uitzetten (zie boekje
De LED werkt niet meer of het deksel is niet volledig
hermetisch afgesloten
Het apparaat is niet aangesloten of bevindt zich in stand-by Ga na of het elektriciteitssnoer is aangesloten zowel op het apparaat als op het netwerk.
Het apparaat is beschadigd Breng uw apparaat naar een erkend servicecentrum
Er verschijnt condens op het deksel Laat het apparaat gedurende enkele uren drogen in openlucht
De kogelafsluiter van het metalen deksel is niet goed op zijn
plaats teruggezet
Verwijder de pot, zorg ervoor dat de verwarmingsplaat, het centrale element en de
onderkant van de pot schoon zijn. Ga ook na of het centrale element vrij kan bewegen
Ga na of u alle elementen van het metalen deksel heeft geplaatst en dat de schroef is
vastgedraaid
kogelafsluiter goed (op de vergrendelingspositie).
volledig is afgekoeld, dient u een stokje te plaatsen in de opening tussen het open
handvat en de dampklep. Zorg ervoor dat er geen stoom vrijkomt wanneer u het stokje
erin prikt. Als er geen stoom meer vrijkomt, probeer het apparaat dan te openen
Maak uw apparaat schoon volgens de instructies in de instructiehandleiding
Ga na of de manometrische staaf vrij kan bewegen en of hij moet worden
schoongemaakt
bevindt. Maak de bal en de ondersteuning schoon en droog alles af
Voeg wat vloeistof (water of vloeibare saus) aan uw recept toe
Maak het centrale gedeelte van de pot schoon met een vochtige doek. Gebruik geen
scherpe instrumenten
De hermetische afsluiting dient minstens elke drie jaar te worden vervangen. Breng uw
apparaat naar een erkend servicecentrum
Schroef de moer in het midden van het metalen deksel goed aan
Zorg ervoor dat de condensatietank correct geplaatst is aan de achterkant van het
apparaat en dat de stoombuis niet verstopt is
met veiligheidsinstructies)
Ga na of het product volledig hermetisch is afgesloten Breng uw apparaat naar een
erkend servicecentrum als het probleem zich verder blijft voordoen
Ga na of het apparaat zich niet in stand-by bevindt door op de knop «OK» te drukken
Schroef de moer in het midden van het metalen deksel los en druk vervolgens op de
knop in het midden van de moer. Hierdoor wordt het deksel gedeblokkeerd, waarna u toegang
hebt tot de kogelafsluiter. Zorg ervoor dat zowel de afsluiter als de kogel goed op zijn
plaats zit
nl
Voor alle problemen met betrekking tot de verbinding,
raadpleeg de website www.moulinex.fr of de Mon Cookeoapp (Menu / gids / FAQ).
Gedeponeerde merken
Het merk en de logo’s van Bluetooth® zijn eigendom van Bluetooth SIG, Inc. en SEB
SAS heeft een licentie verkregen voor het gebruik ervan. Alle andere handelsmerken
en -namen zijn eigendom van de respectieve eigenaars.
EPC09 Serie
Lage druk 40kPa (109°C) / Hoge druk: 70kPa (115°C)
PRODUCTCAPACITEIT: 6L / BRUIKBARE CAPACITEIT: 4L
Geïntegreerde verwarming
93
Page 50

antes de
usar
Saque el aparato de su embalaje y lea
detenidamente las instrucciones de uso y las
recomendaciones de seguridad antes de
utilizar el producto por primera vez.
antes de
usar
1
2
es
Para abrir el producto, gira el
asa de apertura y cierre que está
encima de la tapa, para poder ver
el candado abierto: .
Instale el aparato en una super cie
plana, seca y fría. Quite el embalaje,
las pegatinas u otros accesorios en el
interior y el exterior del aparato.
1
2 43
LIMPIE SUS COMPONENTES
1
Bol de cocción
2
Tapa de metal
3
Cubierta de la válvula
4
Válvula de condensación
5
Cesta de vapor
6
Bola de descompresión
6
5
ESPECIFICACIONES
ACERCA DEL
MONTAJE Y
DESMONTAJE
DE LA TAPA
ACCESO A LA ESFERA DE DESCOMPRESIÓN:
Gire el protector de esfera en el sentido contrario a las agujas del
reloj para desplazar la marca de referencia hasta la posición .
Levante el protector. Retire la esfera y limpie con cuidado tanto esta
como su soporte, usando agua y líquido lavavajillas. Seque la esfera
con un paño suave y vuelva a colocarla sobre su soporte. Vuelva a
poner el protector de esfera con la marca de referencia en la posición
adecuada . Bloquee el protector de esfera girándolo hasta que la
marca de referencia quede alineada con el símbolo de «cerrado» .
DESMONTAJE DE LA TAPA
METÁLICA:
Agarre el subconjunto de tapa sujetándolo por la
junta y desenrosque la tuerca central girándola en
el sentido contrario a las agujas del reloj. Retire
la tuerca y la tapa.
DESMONTAJE DEL PROTECTOR DE VÁLVULA:
Agarre el protector de válvula por su parte central (tal como se
indica); a continuación, gírelo ligeramente para desacoplarlo.
Limpie el protector de válvula, especialmente por su parte
interior (compruebe que no queden restos de alimentos).
4
MONTAJE DEL SUBCONJUNTO DE
TAPA METÁLICA:
Agarre el subconjunto de tapa por la junta, tal
como se indica en la foto. Centre la tapa con
respecto al eje central y encájela por completo.
Vuelva a colocar en su sitio la tuerca y enrósquela
a fondo, girándola en el sentido de las agujas
del reloj.
53
MONTAJE DEL PROTECTOR DE
VÁLVULA:
Coja el protector de válvula como se indica en
la foto (agárrelo por su parte central). Centre
el per l circular interior con respecto a los tres
ganchos y presione para acoplar el protector
de válvula (deberá oír un «clic»). El protector
de válvula deberá quedar completamente en
contacto con la cara interior de la tapa.contact
avec la face intérieure du couvercle.
95
Page 51

LANGUE
Italiano
English
Français
Deutsch
Español
LANGUE
Italiano
English
Français
Deutsch
Español
PAYS
Italia
United Kingdom
France
Deutschland
España
ok
ok
ok
ok
ok
ok
avant
utilisation
es
funcionamiento
1
Cuando encienda el aparato por primera vez,
accederá al menú confi guraciones:
+
Seleccione su país
Seleccione su idioma
+
No utilice nunca el aparato
sin el bol de cocción.
uso
ABRIR LA TAPA:
Para abrir el producto, gira el asa
de apertura y cierre para poder
ver el candado abierto: .
Nunca intentes forzar la tapa
para abrirla si ejerce resistencia.
INSTALAR LA VÁLVULA DE
CONDENSACIÓN:
Controle que el tanque de
condensación se encuentre vacío
y a continuación instálelo detrás
del aparato.
2
Cuando utiliza el aparato
por primera vez, es posible
FUNCIONES DE LA INTERFAZ
3s
SELECCIONAR CONFIRMAR ATRÁS REINICIAR
La tercera pantalla solo se muestra si, para su país, tiene la opción
de elegir entre diferentes unidades de medida (dependiendo de
la versión del producto)
que el bol de cocción
desprenda un leve olor.
Esto es normal.
INSTALAR LA BASE DEBAJO DE
LA CESTA DE VAPOR:
coja la base entre su pulgar y su
dedo índice para instalarla debajo
de la cesta de vapor.
COLOCAR EL BOL DE COCCIÓN
EN EL APARATO:
seque el fondo de el bol de
cocción. Asegúrese que no
queden restos de comida o
líquido debajo del bol o en la
placa térmica.
Instala a continuación el bol de
cocción en el aparato. Para ello,
coloca las asas del bol de cocción
en la ranura.
97
Page 52

RECIPE 2
Do you want to delete
this recipe?
YES NO
language/country
delete libraires
screen/sound
Connect
recipes
librairies
Please select the library
you want to delete
library 1
library 2
LIBRARY 2
Do you want to delete
this library?
YES NO
favorites
recipesingredients
manual
language/country
delete libraires
screen/sound
Connect
favorites
recipesingredients
manual
LANGUAGE
deutsch
spanish
french
italian
nederlands
language/country
delete libraires
screen/sound
Connect
favorites
recipesingredients
manual
favorites
recipesingredients
manual
COUNTRY
Germany
Spain
France
Italy
Netherlands
LANGUAGE
deutsch
spanish
french
italian
nederlands
language/country
delete libraires
screen/sound
Connect
favorites
recipesingredients
manual
COUNTRY
Germany
Spain
France
Italy
Netherlands
LANGUAGE
deutsch
spanish
french
italian
nederlands
language/country
delete libraires
screen/sound
Connect
language/country
delete libraires
screen/sound
Connect
COUNTRY
Germany
Spain
France
Italy
Netherlands
LANGUAGE
deutsch
spanish
french
italian
nederlands
Please select the recipe
you want to delete
recipe 1
language/country
delete libraires
screen/sound
Connect
recipe 2
language/country
delete libraires
screen/sound
Connect
COUNTRY
Germany
Spain
France
Italy
Netherlands
LANGUAGE
deutsch
spanish
french
italian
nederlands
RECIPE 2
Do you want to delete
this recipe?
YES NO
Please select the recipe
you want to delete
recipe 1
recipe 2
language/country
delete libraires
screen/sound
Connect
COUNTRY
Germany
Spain
France
Italy
Netherlands
LANGUAGE
RECIPE 2
Do you want to delete
this recipe?
YES NO
Please select the recipe
you want to delete
recipe 1
recipe 2
language/country
delete libraires
screen/sound
Connect
recipes
librairies
COUNTRY
RECIPE 2
Do you want to delete
this recipe?
YES NO
Please select the recipe
you want to delete
recipe 1
recipe 2
language/country
delete libraires
screen/sound
Connect
recipes
librairies
Please select the library
you want to delete
library 1
library 2
RECIPE 2
Do you want to delete
this recipe?
YES NO
Please select the recipe
you want to delete
recipe 1
recipe 2
recipes
librairies
Please select the library
you want to delete
library 1
library 2
LIBRARY 2
Do you want to delete
this library?
YES NO
screen
sound
language/country
delete libraires
screen/sound
Connect
recipes
librairies
Please select the library
you want to delete
library 1
library 2
LIBRARY 2
Do you want to delete
this library?
YES NO
screen
sound
demo mode
brightness
language/country
delete libraires
screen/sound
Connect
Please select the library
you want to delete
library 1
library 2
LIBRARY 2
Do you want to delete
this library?
YES NO
screen
sound
BRIGHTNESS
demo mode
brightness
language/country
delete libraires
screen/sound
Connect
LIBRARY 2
Do you want to delete
this library?
YES NO
screen
sound
BRIGHTNESS
demo mode
brightness
language/country
delete libraires
screen/sound
Connect
demo mode
brightness
screen
sound
BRIGHTNESS
demo mode
brightness
DEMO MODE
OFF ON
demo mode
brightness
BRIGHTNESS
demo mode
brightness
DEMO MODE
OFF ON
DEMO MODE
3424
demo mode
brightness
BRIGHTNESS
DEMO MODE
OFF ON
DEMO MODE
3424
demo mode
brightness
screen
sound
DEMO MODE
OFF ON
DEMO MODE
3424
SOUND
OFF ON
demo mode
brightness
screen
sound
DEMO MODE
OFF ON
DEMO MODE
3424
SOUND
OFF ON
screen
sound
language/country
delete libraires
screen/sound
Connect
DEMO MODE
3424
SOUND
OFF ON
OFF ON
Connect
screen
sound
language/country
delete libraires
screen/sound
Connect
PAYS
Allemagne
Espagne
France
Italie
Pays-Bas
LANGUE
allemand
espagnol
français
italien
néerlandais
langues/pays
suppression
recettes
écran/son
Connect
langues/pays
suppression
recettes
écran/son
Connect
bibliothèques
recettes
ok
ok
ok
ok
ok
ok
ok
ok
ok
ok
ok
ok
ok
ok
ok
ok
ok
ok
ok
ok
ok
ok
ok
ok
ok
ok
ok
ok
ok
ok
ok
ok
ok
ok+ok
ok
ok
ok
ok
ok
ok
configuraciones
Nota: incluso cuando el sonido
se desactiva, los sonidos de
aviso quedan activos.
menú
+
Seleccione
"país/idioma"
+
Seleccione
"borrar bibliotecas"
+
+
Elige "bibliotecas"
Seleccione su paísSeleccione su idioma
Selecione
"biblioteca 2"
es
+
+
Seleccione
Seleccione "pantalla" Seleccione "brillo"
"pantalla/sonido"
+
Seleccione "modo demo"
Para activar o desactivar el modo de demostración,
+
+
+
introduzca el código siguiente: 3424
+
Ajuste el brillo
Nota: el modo DEMO
le permite usar el
producto sin calentarlo
o presurizarlo.
+
biblioteca?
¿Deseas eliminar esta
+
Elige "recetas"
+
Selecciona "receta 2"
+
¿Deseas eliminar esta receta?
+
Seleccione "sonido" Elige "connect"
Ajuste el volumen
+
+
+
Activa o desactiva
el modo connect
99
Page 53

recipes
manual
ingredients
library
do you want to switch off
the appliance?
YES NO
recipes
manual
ingredients
library
do you want to switch off
the appliance?
YES NO
YES NO
do you want to switch off
the appliance?
recipes
manual
ingredients
library
Validate the connexion request
and press OK
OK
ok
ok
ok
ok
ok
ok
ok
ok
es
menú
on/off
+
conectividad
Mi Cookeo entrando en
App Store desde tu tableta o
smartphone.
Tu Cookeo+ está en
funcionamiento, ya puedes
utilizar tu producto con
las 150 recetas pre-
programadas incluso sin la
aplicación.
Descarga la aplicación
Cuando enciendes tu
+
+
Presionar ON/OFF le permitirá apagar el aparato.Seleccione y confirme
Cookeo+, el testigo azul
parpadea (a la espera de
conexión), a no ser que hayas
La primera vez que lo uses, sincroniza tu producto con tu tableta siguiendo las
instrucciones visualizadas en la pantalla.
desactivado manualmente la
función connect (véase la
sección Ajustes).
Si la conexión se
establece correctamente,
el testigo azul se queda
fijo.
101
Page 54

es
conectividad
Problema de conexión:
Si la conexión ha fallado, verás
un mensaje de error. Debes
seguir las instrucciones en tus
pantallas para un nuevo intento
de conexión.
Atención: solo es posible una
conexión a la vez.
N.B.: Si no utilizas tu Cookeo+ durante 30 minutos, pasará al modo en espera y la conexión se
perderá. Al abandonar el modo en espera, la conexión se restablecerá automáticamente.
Crear tu cuenta:
Sigue las indicaciones en la
aplicación.
Barra de búsqueda:
Escribe tus palabras clave
en la barra de búsqueda y
accede a la búsqueda por
filtros
Navegación
También puedes navegar por
la aplicación accediendo al
Menú:
• inicio
• recetas
• mis compras
• herramientas
• guía
• mi cuenta
La pérdida de conexión no afecta para nada a la cocción. Cookeo+ mantiene su autonomía en todos
los casos.
N.B.: Solo puedes iniciar la cocción desde tu Cookeo+ pulsando el botón OK (como se indica
en la aplicación).
Desde la aplicación
puedes:
• ver paso a paso
• ejecutar la receta paso a
paso en interacción con tu
Cookeo+
Recetas presentes
en tu Cookeo+
Favoritos
Biblioteca
103
Page 55

ATTENTION
PRESSURE COOKING
insert the pot
00:10
COOKING
pressure
cooking
reheat
regular
cooking
keep warm
recipesingredients
manual
librairies
ATTENTION
PRESSURE COOKING
PRESSURE COOKING
insert the pot
00:10
COOKING
immediate
start
delayed
start
pressure
cooking
reheat
regular
cooking
keep warm
manual
librairies
ATTENTION
PRESSURE COOKING
PRESSURE COOKING
insert the pot
00:10
COOKING
immediate
start
delayed
start
ATTENTION
close and lock the lid
reheat
keep warm
recipesingredients
manual
librairies
pressure
cooking
reheat
regular
cooking
keep warm
recipesingredients
manual
librairies
ATTENTION
insert the pot
pressure
cooking
reheat
regular
cooking
keep warm
recipesingredients
manual
librairies
ATTENTION
PRESSURE COOKING
PRESSURE COOKING
PRESSURE COOKING
00:10
COOKING
immediate
start
delayed
start
ATTENTION
close and lock the lid
PREHEAT
please wait
PRESSURE COOKING
PRESSURE COOKING
PRESSURE COOKING
COOKING
immediate
start
delayed
start
ATTENTION
close and lock the lid
PREHEAT
please wait
PRESSURE COOKING
COOKING
00:02
PRESSURE COOKING
PRESSURE COOKING
start
start
ATTENTION
close and lock the lid
PREHEAT
please wait
PRESSURE COOKING
PRESSURE COOKING
COOKING
00:02
END OF COOKING
please wait
12:20
PRESSURE COOKING
ATTENTION
PREHEAT
please wait
PRESSURE COOKING
PRESSURE COOKING
PRESSURE COOKING
COOKING
00:02
END OF COOKING
please wait
12:20
KEEP WARM
00:02
BON APPÉTIT !
Serve !
Beware of the steam while opening the lid
okokok
ok
ok
ok
ok
ok
ok
ok
ok
ok
menú
manual
modo de cocción
es
menú
manual
modo de cocción
A PRESIÓN A PRESIÓN
MENÚ MANUAL:
Con el menú manual es Ud.
quien cocina. Seleccione
el modo de cocción:
Seleccione el menú
+
"manual"
+
Seleccione el modo
"cocción rápida"
Coloque el bol de
cocción y añada
los ingredientes a
continuación
dorado, cocción rápida,
recalentar o mantener
caliente, así como el
tiempo de cocción.
+
Confi gure el tiempo
de cocción
+
Seleccione un inicio
inmediato o programado
(pág. 109)
Cierre y bloquee
El aparato está
precalentándose
¡Listo para probar!
La cocción se ha
iniciado
!
4 L (max)
3,5L
200 ml (min)
La cocción ha terminado
105
Page 56

recipesingredients
manual
librairies
recipesingredients
manual
pressure
cooking
reheat
regular
cooking
keep warm
librairies
ATTENTION
open the lid
SLOW COOKING
recipesingredients
manual
pressure
cooking
reheat
regular
cooking
keep warm
librairies
ATTENTION
ATTENTION
insert the pot
open the lid
SLOW COOKING
pressure
cooking
reheat
regular
cooking
keep warm
ATTENTION
ATTENTION
insert the pot
open the lid
SLOW COOKING
PREHEAT
please wait
SLOW COOKING
ATTENTION
ATTENTION
insert the pot
SLOW COOKING
open the lid
SLOW COOKING
PREHEAT
please wait
add the ingredients
OK
ATTENTION
ATTENTION
insert the pot
SLOW COOKING
SLOW COOKING
PREHEAT
please wait
add the ingredients
OK
00:02
SLOW COOKING
OK
ATTENTION
SLOW COOKING
SLOW COOKING
PREHEAT
please wait
add the ingredients
OK
00:02
SLOW COOKING
OK
Do you want to stop
the slow cooking?
YES NO
SLOW COOKING
recipesingredients
manual
pressure
cooking
reheat
regular
cooking
keep warm
librairies
recipesingredients
manual
pressure
cooking
reheat
regular
cooking
keep warm
recipesingredients
manual
ATTENTION
insert the pot
ATTENTION
close and lock the lid
pressure
cooking
reheat
regular
cooking
keep warm
recipesingredients
manual
ATTENTION
insert the pot
pressure
cooking
reheat
regular
cooking
keep warm
recipesingredients
manual
ATTENTION
insert the pot
ATTENTION
close and lock the lid
00:02
REHEAT
pressure
cooking
reheat
regular
cooking
keep warm
ATTENTION
insert the pot
do you want
to stop reheating?
YES NO
ATTENTION
close and lock the lid
00:02
REHEAT
okokok
ok
ok
ok
ok
ok
ok
ok
ok
ok
ok
ok
ok
ok
ok
ok
ok
ok
ok
ok
ok
COCCIÓN
TRADICIONAL
En el modo de cocción
tradicional, podrá
en función del resultado
deseado. La tapa
permanecerá abierta para
este tipo de cocciones.
menú
manual
modo de
cocción
cocer lentamente
hervir
dorar
Nota: la operación
es la misma, solo
la temperatura es
diferente.
+
Seleccione el menú
"manual"
Abra la tapa
Seleccione la función
"cocción tradicional"
Coloque el bol de
+
cocción
Seleccione la función
deseada
El aparato está
precalentándose
+
+
Para detener la cocción, presiona el botón «atrás» y selecciona detener.
es
menú
manual
modo de
+
cocción
+
Seleccione el menú
Seleccione el modo
"manual"
RECALENTAR
Cierre y bloquee la tapa
+
El recalentamiento ha sido
+
"precalentar"
iniciado
Para interrumpir
Coloque el bol de
cocción
+
¿quiere terminar el
recalentamiento?
Nota: El
recalentamiento
empieza y el tiempo
aumenta.
107
Page 57

recipesingredients
manual
librairies
pressure
cooking
reheat
regular
cooking
keep warm
recipesingredients
manual
librairies
ATTENTION
insert the pot
pressure
cooking
reheat
regular
cooking
keep warm
recipesingredients
manual
librairies
ATTENTION
insert the pot
KEEP WARM
PREHEAT
please wait
pressure
cooking
reheat
regular
cooking
keep warm
recipesingredients
manual
librairies
ATTENTION
insert the pot
KEEP WARM
PREHEAT
please wait
KEEP WARM
00:02
pressure
cooking
reheat
regular
cooking
keep warm
ATTENTION
insert the pot
do you want to stop
the keep warm function?
YES NO
KEEP WARM
PREHEAT
please wait
KEEP WARM
00:02
immediate
start
delayed
start
PRESSURE COOKING
h m
what time is it?
08:15
immediate
start
delayed
start
PRESSURE COOKING
PRESSURE COOKING
h m
what time is it?
END OF
COOKING
12:30
08:15
08:15
immediate
start
delayed
start
PRESSURE COOKING
PRESSURE COOKING
PRESSURE COOKING
h m
what time is it?
END OF
COOKING
12:30
08:15
08:15
01:00
DELAYED START END OF COOKING
12:30
08:15
immediate
start
delayed
start
PRESSURE COOKING
PRESSURE COOKING
PRESSURE COOKING
ok
okokok
ok
ok
ok
ok
ok
ok
ok
ok
ok
ok
ok
es
MANTENER CALIENTE
menú
manual
modo de cocción
+
Seleccione el menú
"manual"
El aparato está
precalentándose
+
Seleccione la función
"mantener caliente"
La función de mantener
caliente ha sido iniciada
Coloque el bol de
cocción
+
Para terminar la función
de mantener caliente,
pulse el botón "atrás" y
seleccione "si"
menú
manual
modo de cocción
ENCENDIDO PROGRAMADO
(MODO COCCIÓN A PRESIÓN)
!
Algunos alimentos no pueden
cocinarse en el modo de inicio
programado (p. ej., carne,
pescado, leche, etc.)
El momento de fin de cocción
podrá variar en función del
volumen que contenga el
aparato.
+
Seleccione
"inicio programado"
+
Seleccione el fi nal de la
cocción
+
Seleccione la hora
actual
El Inicio programado ha
sido programado
109
Page 58
recipesingredients
manual
librairies
fruits & vegetables
recipesingredients
manual
librairies
FRUITS & VEGETABLES
artichoke
asparagus
aubergine
beetroot
broccoli
fruits & vegetables
recipesingredients
manual
librairies
FRUITS & VEGETABLES
BROCOLI
artichoke
asparagus
aubergine
beetroot
broccoli
300 gr
fruits & vegetables
recipesingredients
manual
librairies
FRUITS & VEGETABLES
BROCOLI
BROCOLI
artichoke
asparagus
aubergine
beetroot
broccoli
do you want
to start the recipe?
BROCOLI
YES NO
- pour 200ml of water in the stockpot.
- place the ingredients in the basket.
- place the steam basket in the stockpot.
300 gr
fruits & vegetables
RECOMMENDED TIME: 10 MIN
FRUITS & VEGETABLES
BROCOLI
BROCOLI
artichoke
asparagus
aubergine
beetroot
broccoli
do you want
to start the recipe?
COOK
BROCOLI
YES NO
- pour 200ml of water in the stockpot.
- place the ingredients in the basket.
- place the steam basket in the stockpot.
00:10
300 gr
RECOMMENDED TIME: 10 MIN
BROCOLI
BROCOLI
do you want
to start the recipe?
COOK
BROCOLI
YES NO
- pour 200ml of water in the stockpot.
- place the ingredients in the basket.
- place the steam basket in the stockpot.
00:10
BROCOLI
immediate
start
delayed
start
300 gr
RECOMMENDED TIME: 10 MIN
BROCOLI
do you want
to start the recipe?
COOK
BROCOLI
YES NO
- pour 200ml of water in the stockpot.
- place the ingredients in the basket.
- place the steam basket in the stockpot.
00:10
BROCOLI
ATTENTION
immediate
start
delayed
start
close and lock
the lid
RECOMMENDED TIME: 10 MIN
PREHEAT
please wait
COOK
BROCOLI
- pour 200ml of water in the stockpot.
- place the ingredients in the basket.
- place the steam basket in the stockpot.
00:10
BROCOLI
ATTENTION
BROCOLI
immediate
start
delayed
start
close and lock
the lid
RECOMMENDED TIME: 10 MIN
PREHEAT
please wait
COOK
00:10
BROCOLI
ATTENTION
BROCOLI
BROCOLI
immediate
start
delayed
start
COOK
00:02
close and lock
the lid
PREHEAT
please wait
BROCOLI
ATTENTION
BROCOLI
END OF COOKING
please wait
BROCOLI
BROCOLI
immediate
start
delayed
start
COOK
00:02
close and lock
the lid
PREHEAT
please wait
ATTENTION
BROCOLI
END OF COOKING
please wait
BROCOLI
BROCOLI
COOK
00:02
KEEP WARM
00:02
close and lock
the lid
BON APPÉTIT !
Serve !
Beware of the steam while opening the lid
FRUITS & VEGETABLES
BROCOLI
BROCOLI
artichoke
asparagus
aubergine
beetroot
broccoli
do you want
to start the recipe?
YES NO
300 gr
fruits & vegetables
recipesingredients
manual
librairies
ok
ok
ok
ok
ok
ok
okokok
ok
ok
ok
ok
ok
ok
okokok
ok
menú de
ingredientes
MENÚ INGREDIENTES:
Gracias al menú de
ingredientes, podrá cocinar
sus ingredientes sin tener
que preocuparse por el
modo ni el tiempo de
cocción:
Cookeo+ le indicará el
procedimiento que debe
seguir para cualquier tipo
y peso de ingredientes:
carne, pescado, verduras,
frutas y, por último,
cereales.
+
Seleccione el menú
"ingredientes"
El aparato está
precalentándose
+
Seleccione "verduras"
+
ingredientes (mín. 300 g)
+
Seleccione el
ingrediente deseado
Siga las instruccionesElija la cantidad de
Se mostrará el
tiempo de cocción
recomendado
La cocción se ha
iniciado
+
Empezar la receta Siga las instrucciones
La cocción ha terminado
Empezar la receta
¡Listo para probar!
es
111
Page 59

recipesingredients
manual
librairies
mainstarter
dessert
recipesingredients
manual
librairies
cod fillet and broccoli
beef bourguignon
rabbit with olives and vegetables
goulash
moules marinières
mainstarter
dessert
recipesingredients
manual
librairies
cod fillet and broccoli
beef bourguignon
rabbit with olives and vegetables
goulash
moules marinières
04
PERS
mainstarter
dessert
recipesingredients
manual
librairies
cod fillet and broccoli
beef bourguignon
rabbit with olives and vegetables
goulash
moules marinières
BEEF BOURGUIGNON - 4 PERS
PREPARATION
10min 35min
COOKING
04
PERS
OK
mainstarter
dessert
recipesingredients
manual
librairies
cod fillet and broccoli
beef bourguignon
rabbit with olives and vegetables
goulash
moules marinières
BEEF BOURGUIGNON - 4 PERS
PREPARATION
10min 35min
COOKING
04
PERS
OK
Beef cut into 25 g cubes
Red wine
Veal stock
Bacons
Onions
Vegetable oil
800g
250 ml
150 ml
70g
150g
5cs
PREPARE THE INGREDIENTS
mainstarter
dessert
BEEF BOURGUIGNON
cod fillet and broccoli
beef bourguignon
rabbit with olives and vegetables
goulash
moules marinières
BEEF BOURGUIGNON - 4 PERS
PREPARATION
10min 35min
COOKING
04
PERS
OK
Beef cut into 25 g cubes
Red wine
Veal stock
Bacons
Onions
Vegetable oil
800g
250 ml
150 ml
70g
150g
5cs
PREPARE THE INGREDIENTS
do you want to start
the recipe?
YES NO
BEEF BOURGUIGNON
BEEF BOURGUIGNON - 4 PERS
PREPARATION
10min 35min
COOKING
BEEF BOURGUIGNON
04
PERS
OK
Beef cut into 25 g cubes
Red wine
Veal stock
Bacons
Onions
Vegetable oil
800g
250 ml
150 ml
70g
150g
5cs
PREPARE THE INGREDIENTS
do you want to start
the recipe?
YES NO
PREHEAT
please wait
BEEF BOURGUIGNON
BEEF BOURGUIGNON - 4 PERS
PREPARATION
10min 35min
COOKING
BEEF BOURGUIGNON
BEEF BOURGUIGNON
OK
OK
Beef cut into 25 g cubes
Red wine
Veal stock
Bacons
Onions
Vegetable oil
800g
250 ml
150 ml
70g
150g
5cs
PREPARE THE INGREDIENTS
do you want to start
the recipe?
brown all the ingredients
except the liquid for 10 mins
YES NO
PREHEAT
please wait
BEEF BOURGUIGNON
BEEF BOURGUIGNON
BEEF BOURGUIGNON
BEEF BOURGUIGNON
OK
Beef cut into 25 g cubes
Red wine
Veal stock
Bacons
Onions
Vegetable oil
800g
250 ml
150 ml
70g
150g
5cs
PREPARE THE INGREDIENTS
do you want to start
the recipe?
brown all the ingredients
except the liquid for 10 mins
YES NO
PREHEAT
please wait
do you want
to stop browning?
YES NO
BEEF BOURGUIGNON
BEEF BOURGUIGNON
BEEF BOURGUIGNON
BEEF BOURGUIGNON
BEEF BOURGUIGNON
OK
do you want to start
the recipe?
brown all the ingredients
except the liquid for 10 mins
YES NO
PREHEAT
please wait
do you want
to stop browning?
YES NO
add the rest of the ingredients
OK
BEEF BOURGUIGNON
BEEF BOURGUIGNON
BEEF BOURGUIGNON
BEEF BOURGUIGNON
BEEF BOURGUIGNON
OK
brown all the ingredients
except the liquid for 10 mins
PREHEAT
please wait
do you want
to stop browning?
YES NO
do you want
to start cooking?
YES NO
add the rest of the ingredients
OK
BEEF BOURGUIGNON
BEEF BOURGUIGNON
BEEF BOURGUIGNON
BEEF BOURGUIGNON
BEEF BOURGUIGNON
00:35
OK
brown all the ingredients
except the liquid for 10 mins
do you want
to stop browning?
YES NO
do you want
to start cooking?
YES NO
add the rest of the ingredients
OK
COOK
BEEF BOURGUIGNON
BEEF BOURGUIGNON
BEEF BOURGUIGNON
BEEF BOURGUIGNON
BEEF BOURGUIGNON
00:35
END OF COOKING
please wait
do you want
to stop browning?
YES NO
do you want
to start cooking?
YES NO
add the rest of the ingredients
OK
COOK
BEEF BOURGUIGNON
BEEF BOURGUIGNON
BEEF BOURGUIGNON
BEEF BOURGUIGNON
BON APPÉTIT!
KEEP WARM
00:10
00:35
END OF COOKING
please wait
do you want
to start cooking?
YES NO
add the rest of the ingredients
OK
COOK
BEEF BOURGUIGNON
ok
ok
ok
ok
ok
ok
ok
ok
ok
ok
okokok
ok
ok
ok
ok
ok
ok
okokok
ok
MENÚ DE RECETAS:
Con el menú recetas,
elige entre 150 recetas
saladas y dulces
repartidas en tres
categorías: entradas /
platos / postres.
receta de
ternera a la
borgoña
+
Seleccione el menú de
recetas
+
Seleccione el número de
personas
+
plato
es
menú de
recetas
+
Inicie la receta Siga las instrucciones
El aparato está
precalentándose
MENÚ DE
+
Seleccione una recetaSeleccione el tipo de
RECETAS:
(CONTINUACIÓN)
Pulse el botón
“atrás” durante 30
segundos si desea
volver al menú inicial
Dejar de dorar Siga las instrucciones
Prepare los ingredientesVea la receta
El aparat está
Tiempo de cocción
precalentándose
+
Empezar la receta
¡Listo para probar!
113
Page 60

Please wait
DOWNLOADING
LIBRAIRIES
recipes
manual
ingredients
library
recipes
manual
ingredients
library
mainstarter
dessert
library
World
recipes
manual
ingredients
library
mainstarter
dessert
library
ok
ok
ok
ok
ok
ok
es
bibliotecabiblioteca
CARGA DE PAQUETES
DE RECETAS:
Una vez que la
aplicación está
conectada a Tu
Cookeo+, puedes
descargar paquetes de
recetas.
Selecciona un paquete y
La descarga está en curso
pulsa el botón "Descargar
en Cookeo+"
N.B.: Puedes detener en cualquier momento
la descarga pulsando la tecla volver de Cookeo+.
ACCEDE A LAS
BIBLIOTECAS DE TU
COOKEO+:
Puedes encontrar tus
paquetes descargados.
Ejecuta tus recetas
desde tu Cookeo+
accediendo a tu
Biblioteca.
+
Selecciona el submenú
"biblioteca"
+
Selecciona el paquete de
recetas deseado
+
Selecciona "entrante", "plato"
o "postre" y selecciona tu
receta
115
Page 61

avant
utilisation
es
Rrecetas
ingredientes
carne
pescado y marisco
arroz y cereales
buey
carne de ave
cerdo
conejo
cordero
ternera
gambas
mejillones
pescado
vieiras
alforfón
arroz blanco
arroz salvaje
cebada
mijo
quinoa
trigo
trigo bulgur
verduras / frutas
acelga
alcachofa
apio nabo
batata
berenjena
brócoli
calabacín
col
col rizada
coles de bruselas
colifl or
endibia
espárrago
espinaca
hinojo
judías verdes
lentejas
manzana
nabo
patata
pera
pimiento
puerro
remolacha
setas
zanahoria
www.moulinex.es
Encuentra recetas en mi Cookeo
y www.moulinex.es
117
Page 62

avant
utilisation
avant
utilisation
es
limpieza y
mantenimiento
Cuando termine de cocinar su plato,
desconecte el aparato para limpiarlo.
Limpie el aparato después de cada
uso.
!
!
Puede limpiar el bol de cocción y la cesta de vapor en agua caliente
con detergente o en el lavavajillas. Limpie el cuerpo del aparato con
un trapo húmedo. Después de varios lavados en el lavavajillas, la
parte exterior de la cubeta puede adquirir un color blanquecino. Puede
limpiarla utilizando la parte áspera de su estropajo.
limpieza y
mantenimiento
Después de cada uso, quite la válvula
de condensación y límpiela con cuidado
en agua clara o en el lavavajillas.
Asegúrese que se seque bien. Vuelva
a la posición original.
1 2
3
Para limpiar la tapa de metal,
manualmente o en el lavavajillas,
necesita quitar la cubierta de la válvula.
1
Desenrosque la tuerca en el centro
de la tapa de metal
2
Quite la tapa de metal
3
Quite la cubierta de la válvula
LIMPIAR EN EL LAVAVAJILLAS:
puede colocar la tapa de metal
en el lavavajillas sin quitar las
válvulas. Después de colocarla en
el lavavajillas, quite la bola y sople
en el tubo para controlar que no
esté atascado. Seque la bola y el
soporte con cuidado utilizando un
trapo suave.
LIMPIAR MANUALMENTE:
puede limpiar la tapa de metal
utilizando agua caliente con
detergente. Quite en primer lugar
la bola y a continuación limpie
completamente. Seque la bola y el
soporte utilizando un trapo seco.
119
Page 63

limpieza y
mantenimiento
es
Antes de reinstalar la bola, controle
que el tubo no se encuentra atascado
soplando a través de él.
Antes de quitar la tapa interna, limpie la parte
superior del bol de cocción. Limpie la parte interior
de la tapa de metal del aparato utilizando una
esponja húmeda y controle que la vara manométrica
quede correctamente colocada para
asegurarse que no se bloquee.
Enjuague el pasador de seguridad bajo el agua del
grifo y compruebe su movilidad.
!
Pulse en la parte interna de la válvula
de seguridad para controlar que no se
encuentra obstruido.
Sustituya la junta impermeable al
menos una vez cada tres años. Esta
operación se realizará en un Centro de
Servicio Autorizado.
No guarde el aparato con la tapa
cerrada. Déjelo abierto o semiabierto;
esto evitará olores desagradables.
!
• En el caso de que el aparato se sumerja o si se
derrama agua directamente sobre el elemento
térmico cuando el bol de cocción no se encuentra
colocado, lleve el aparato a un Centro de Servicio
Autorizado.
Transporte el aparato utilizando las dos asas
laterales. Para una mayor seguridad, controle que el
asa se encuentra en una posición cerrada. Para una
mayor seguridad, controle que la tapa se encuentra
bloqueada.
Limpie la parte exterior de la tapa del
aparato con una esponja húmeda.
Limpie la válvula silenciadora en la
parte trasera de la tapa.
Limpie la parte superior del bol de
cocción con un trapo húmedo. Limpie
la válvula de condensación con un
trapo húmedo. Aclare bajo el agua
y controle que la vara manométrica
pueda moverse libremente.
Limpie la junta en la tapa de metal
con un trapo húmedo y aclare a
continuación con abundante agua.
No utilice objetos agudos.
121
Page 64

PROBLEMAS
La tapa no se cierra
El aparato no se
despresuriza
La tapa no se abre después
de haberse expulsado el
vapor
El aparato no se presuriza
CÓDIGOS DE ERROR
Sale vapor por los lados de
la tapa durante la cocción
(fugas)
Sale agua por detrás del
aparato
El indicador no parpadea o
no se ilumina
El panel de control no se
ilumina
Aparece condensación en el
indicador
La tapa metálica no puede
abrirse; está bloqueada
POSIBLES CAUSAS SOLUCIONES
Hay algo entre la olla y la placa térmica Retire la olla y compruebe que la placa térmica, el elemento central y la parte inferior de la olla
El asa de apertura de no está posicionada correctamente Compruebe que el asa de apertura esté completamente abierta
La tapa metálica y/o el tornillo no están bien instalados o bien
apretados
La cubierta de la bola no está bien colocada Espere hasta que el aparato se enfríe por completo. A continuación, desmonte la tapa
La vara manométrica permanece en una posición elevada Tras asegurarse de que no sale más vapor y que el producto está completamente frío,
Compruebe que la junta, la válvula de seguridad púrpura y la
vara manométrica estén limpias
Compruebe que la tapa esté cerrada y que la marca esté
correctamente alineada con el candado cerrado Compruebe
que la vara manométrica se mueva con libertad y si es
necesario limpiarla
La bola de descompresión no está colocada correctamente o
está sucia
Código 24: la presión disminuye durante la cocción a presión
Códigos 21 y 26: la presión no aumenta
La junta de la tapa metálica y/o los bordes de la olla están
sucios
Desgastes, cortes o deformaciones en la junta La junta debe cambiarse cada tres años como mínimo. Lleve su aparato a un servicio
Los bordes de la olla están dañados Lleve su aparato a un servicio técnico autorizado
La tuerca de la tapa metálica no se ha apretado lo suciente Apriete bien la tuerca central de la tapa metálica
El contenedor de condensación no está colocado
correctamente o se ha desbordado
Las válvulas de seguridad y/o las aberturas están obstruidas Compruebe que el contenedor no esté demasiado lleno y que no contenga alimentos que
El led no funciona o la tapa no está bien asegurada Compruebe que el aparato esté completamente cerrado Lleve su aparato a un servicio
El aparato no está enchufado o está apagado Compruebe que el cable de alimentación esté conectado tanto al aparato como a la toma
El aparato está averiado Lleve su aparato a un servicio técnico autorizado
Hay condensación en la tapa Deje que el aparato se seque al aire libre durante unas horas
La bola de la tapa metálica no está bien colocada Desenrosque la tuerca central de la tapa metálica y presione la sonda hacia el centro de la
estén limpios. Compruebe también que el elemento central pueda moverse con libertad.
Asegúrese de haber montado todos los elementos de la tapa metálica y que el tornillo esté
bien apretado
metálica y coloque la cubierta de la bola correctamente (ja en la posición de cierre)
inserte un palillo de dientes por el oricio situado entre el asa de apertura y la válvula
silenciadora. Tenga cuidado con el vapor expulsado una vez que inserte el palillo. Trate de
abrir el aparato cuando deje de salir vapor
Limpie el aparato siguiendo las instrucciones proporcionadas en el manual
Compruebe que la vara manométrica se mueva con libertad y si es necesario limpiarla
Compruebe que la bola esté colocada correctamente y que la cubierta esté en la posición
cerrada. Limpie y seque tanto la bola como su alojamiento
Añada de 50 a 100 ml líquido a su receta (agua, caldo o salsa líquida) y reinicie el
programa de la receta
Limpie las paredes de la olla y la junta con un paño húmedo No utilice utensilios alados
técnico autorizado
Compruebe que el contenedor de condensación esté bien colocado en la parte posterior
del aparato y que el conducto no esté bloqueado
se expandan (consulte el folleto de medidas de seguridad)
técnico autorizado si el problema persiste
de corriente. Pulse el botón "OK" para comprobar que el aparato no está apagado
tuerca para abrir la tapa y poder acceder a la cubierta de la bola. Asegúrese de colocar la
bola correctamente
es
Para resolver problemas relacionados con la conexión,
consulta el sitio www.moulinex.fr o la aplicación Mi Cookeo
(Menú / guía / FAQ).
Marcas registradas
La marca y los logotipos Bluetooth® son propiedad de Bluetooth SIG, Inc. y su
utilización por SEB SAS está sujeta a autorización. El resto de marcas comerciales
y nombres de marca son propiedad de sus titulares respectivos.
EPC09 Serie
Baja presión: 40 kPa (109 °C) / Alta presión: 70 kPa (115 °C)
Capacidad del producto: 6 L / Capacidad útil: 4 L
Sistema de calentamiento integrado
123
Page 65

avant
utilisation
antes de
utilizar
Retire o aparelho da sua embalagem e leia
atentamente as instruções de funcionamento e
as instruções de segurança antes de utilizar o
aparelho pela primeira vez.
antes de
utilizar
1
2
pt
Para abrir o aparelho, rode o
manípulo de abertura/fecho na
parte superior da tampa até
aparecerem os símbolos de
cadeados abertos: .
Coloque o aparelho sobre uma superfície
plana, seca e fria. Retire todas as
embalagens e autocolantes quer do
interior quer do exterior do aparelho.
1
2 43
LIMPAR OS DIFERENTES COMPONENTES
1
Cuba de cozedura
2
Tampa metálica
3
Proteção da válvula
4
Depósito de condensação
5
Cesto de cozedura a vapor
6
Bola de descompressão
6
5
INFORMAÇÕES
SOBRE A
DESMONTAGEM
E MONTAGEM DA
TAMPA
ACESSO À BOLA DE DESCOMPRESSÃO:
Rode a proteção da bola no sentido inverso ao dos ponteiros do
relógio para colocar a marca na posição . Levante a proteção.
Retire a bola, limpe-a cuidadosamente com água e detergente para
a loiça, assim como o suporte. Seque a bola com um pano macio,
a seguir volte a colocá-la no suporte. Volte a colocar a proteção da
bola com a marca
da bola para colocar a marca no símbolo «fechada»
na posição . Encaixe-a, rodando a proteção
DESMONTAGEM DA TAMPA
METÁLICA:
Pegue no conjunto da tampa segurando-o pelo
anel e desaperte a porca central no sentido
inverso ao dos ponteiros do relógio. Retire a porca
e a seguir a tampa.
.
DESMONTAGEM DA PROTEÇÃO DA VÁLVULA:
Rode a proteção da válvula pela parte central (como indicado);
a seguir rode-a ligeiramente para a libertar. Limpe a proteção
da válvula, incidindo mais na parte interior (verifique se não
existem resíduos de alimentos).
4
MONTAGEM DO CONJUNTO
DA TAMPA METÁLICA:
Segure o conjunto da tampa pelo anel, tal
como indicado na imagem. Centre a tampa no
eixo central e coloque-a na horizontal. Volte a
colocar a porca e enrosque-a até ao fim, no
sentido dos ponteiros do relógio.
53
MONTAGEM DA PROTEÇÃO
DA VÁLVULA:
Segure a proteção da válvula como indicado
na fotografia (rode-a pela zona central).
Centre a forma interior circular nas três
varetas e, de seguida, empurre de forma a
encaixar a proteção da válvula (deve ouvir
um «clique»). A proteção da válvula deve
estar em total contacto com a parte interior
da tampa.
125
Page 66

LANGUE
Italiano
English
Français
Deutsch
Español
LANGUE
Italiano
English
Français
Deutsch
Español
PAYS
Italia
United Kingdom
France
Deutschland
España
ok
ok
ok
ok
ok
ok
avant
utilisation
pt
funcionamento
1
Ao ligar o aparelho pela primeira vez, terá
acesso ao menu de definições:
+
Selecione o seu país
Selecione a sua língua
+
utilização
Nunca utilize o aparelho
sem a cuba de cozedura.
ABRIR A TAMPA:
Para abrir o aparelho, rode o
manípulo de abertura/fecho
até aparecerem os símbolos de
cadeados abertos: . Nunca
tente forçar a abertura da da
tampa em caso de resistência.
COLOCAR O DEPÓSITO DE
CONDENSAÇÃO:
Confirme que o depósito de
condensação está vazio e coloque
-o na parte de trás do aparelho.
2
Ao utilizar o seu aparelho
pela primeira vez, a cuba
pode libertar um odor
CONTROLOS DO INTERFACE
3s
SELECIONAR CONFIRMAR RETROCEDER REINICIAR
ligeiro. Trata-se de um
fenómeno perfeitamente
normal.
COLOCAR O APOIO POR BAIXO
DO CESTO DE COZEDURA
A VAPOR:
extremidades do apoio entre o
polegar e o dedo indicador para
o colocar por baixo do cesto de
cozedura a vapor.
pressione as
POSICIONAR A CUBA NO
APARELHO:
cuba de cozedura. Certifiquese de que não há restos de
alimentos ou líquidos por
baixo da cuba ou na base de
aquecimento.
limpe o fundo da
Instale a cuba no aparelho posi
cionando corretamente as pegas
da mesma nas ranhuras.
127
-
Page 67

RECIPE 2
Do you want to delete
this recipe?
YES NO
language/country
delete libraires
screen/sound
Connect
recipes
librairies
Please select the library
you want to delete
library 1
library 2
LIBRARY 2
Do you want to delete
this library?
YES NO
favorites
recipesingredients
manual
language/country
delete libraires
screen/sound
Connect
favorites
recipesingredients
manual
LANGUAGE
deutsch
spanish
french
italian
nederlands
language/country
delete libraires
screen/sound
Connect
favorites
recipesingredients
manual
favorites
recipesingredients
manual
COUNTRY
Germany
Spain
France
Italy
Netherlands
LANGUAGE
deutsch
spanish
french
italian
nederlands
language/country
delete libraires
screen/sound
Connect
favorites
recipesingredients
manual
COUNTRY
Germany
Spain
France
Italy
Netherlands
LANGUAGE
deutsch
spanish
french
italian
nederlands
language/country
delete libraires
screen/sound
Connect
language/country
delete libraires
screen/sound
Connect
COUNTRY
Germany
Spain
France
Italy
Netherlands
LANGUAGE
deutsch
spanish
french
italian
nederlands
Please select the recipe
you want to delete
recipe 1
language/country
delete libraires
screen/sound
Connect
recipe 2
language/country
delete libraires
screen/sound
Connect
COUNTRY
Germany
Spain
France
Italy
Netherlands
LANGUAGE
deutsch
spanish
french
italian
nederlands
RECIPE 2
Do you want to delete
this recipe?
YES NO
Please select the recipe
you want to delete
recipe 1
recipe 2
language/country
delete libraires
screen/sound
Connect
COUNTRY
Germany
Spain
France
Italy
Netherlands
LANGUAGE
RECIPE 2
Do you want to delete
this recipe?
YES NO
Please select the recipe
you want to delete
recipe 1
recipe 2
language/country
delete libraires
screen/sound
Connect
recipes
librairies
COUNTRY
RECIPE 2
Do you want to delete
this recipe?
YES NO
Please select the recipe
you want to delete
recipe 1
recipe 2
language/country
delete libraires
screen/sound
Connect
recipes
librairies
Please select the library
you want to delete
library 1
library 2
RECIPE 2
Do you want to delete
this recipe?
YES NO
Please select the recipe
you want to delete
recipe 1
recipe 2
recipes
librairies
Please select the library
you want to delete
library 1
library 2
LIBRARY 2
Do you want to delete
this library?
YES NO
screen
sound
language/country
delete libraires
screen/sound
Connect
recipes
librairies
Please select the library
you want to delete
library 1
library 2
LIBRARY 2
Do you want to delete
this library?
YES NO
screen
sound
demo mode
brightness
language/country
delete libraires
screen/sound
Connect
Please select the library
you want to delete
library 1
library 2
LIBRARY 2
Do you want to delete
this library?
YES NO
screen
sound
BRIGHTNESS
demo mode
brightness
language/country
delete libraires
screen/sound
Connect
LIBRARY 2
Do you want to delete
this library?
YES NO
screen
sound
BRIGHTNESS
demo mode
brightness
language/country
delete libraires
screen/sound
Connect
demo mode
brightness
screen
sound
BRIGHTNESS
demo mode
brightness
DEMO MODE
OFF ON
demo mode
brightness
BRIGHTNESS
demo mode
brightness
DEMO MODE
OFF ON
DEMO MODE
3424
demo mode
brightness
BRIGHTNESS
DEMO MODE
OFF ON
DEMO MODE
3424
demo mode
brightness
screen
sound
DEMO MODE
OFF ON
DEMO MODE
3424
SOUND
OFF ON
demo mode
brightness
screen
sound
DEMO MODE
OFF ON
DEMO MODE
3424
SOUND
OFF ON
screen
sound
language/country
delete libraires
screen/sound
Connect
DEMO MODE
3424
SOUND
OFF ON
OFF ON
Connect
screen
sound
language/country
delete libraires
screen/sound
Connect
PAYS
Allemagne
Espagne
France
Italie
Pays-Bas
LANGUE
allemand
espagnol
français
italien
néerlandais
langues/pays
suppression
recettes
écran/son
Connect
langues/pays
suppression
recettes
écran/son
Connect
bibliothèques
recettes
ok
ok
ok
ok
ok
ok
ok
ok
ok
ok
ok
ok
ok
ok
ok
ok
ok
ok
ok
ok
ok
ok
ok
ok
ok
ok
ok
ok
ok
ok
ok
ok
ok
ok+ok
ok
ok
ok
ok
ok
ok
configuração
Nota: mesmo que o som
esteja desativado, os sinais
sonoros continuam ativos.
menu de
+
Selecione
"língua e país"
+
Selecione "Eliminar receita"
+
+
Escolha "bibliotecas"
Selecione o seu paísSelecione a sua língua
Selecione
"biblioteca 2"
pt
+
Selecione a definição
+
Selecione "visor" Selecione "luz"
"visor/som"
+
Selecione
Para ativar ou desativar o modo de demonstração,
"modo de demonstração"
+
+
+
por favor introduza o código: 3424
+
Ajuste a luz
Atenção: O modo
de DEMONSTRAÇÃO
permite-lhe utilizar
o produto sem
aquecimento nem
pressurização.
+
biblioteca?
Pretende eliminar esta
+
Escolha "receitas"
+
Selecione "receita 2"
+
Pretende eliminar esta receita?
+
Selecione "som" Selecione "connect"
+
Ajuste o volume
+
+
Ative ou desative o modo
connect
129
Page 68

recipes
manual
ingredients
library
do you want to switch off
the appliance?
YES NO
recipes
manual
ingredients
library
do you want to switch off
the appliance?
YES NO
YES NO
do you want to switch off
the appliance?
recipes
manual
ingredients
library
Validate the connexion request
and press OK
OK
ok
ok
ok
ok
ok
ok
ok
ok
pt
menu ligar /
desligar
+
Selecionar e confirmar
+
+
Carregar em LIGAR/DESLIGAR permite-lhe desligar, ou
não, o seu aparelho.
ligação
A sua Cookeo+ está
funcional, pelo que
pode utilizá-la com as
150 receitas préprogramadas, mesmo sem
a aplicação.
Quando liga a Cookeo+,
o indicador azul pisca (a
aguardar ligação), exceto se
tiver desativado manualmente
a função Connect (consultar o
capítulo Definições).
Efetue o download da aplicação
A minha Cookeo na App Store,
a partir do seu tablet ou Smartphone.
Aquando da primeira utilização, emparelhe o produto ao seu tablet seguindo as
instruções no ecrã.
Se a ligação for bem
sucedida, o indicador
deixa de piscar.
131
Page 69

pt
ligação
Problema de ligação:
Se a ligação falhar, aparecerá
uma mensagem de erro. Tem
de seguir as instruções nos
ecrãs e tentar efetuar a ligação
novamente.
Atenção: só pode ser feita uma
ligação de cada vez.
Nota: se não utilizar a Cookeo+ durante 30 minutos, esta passa para o modo standby e a ligação
cai. Quando terminar o modo standby, a ligação volta a ser feita automaticamente.
Criar a sua conta:
Siga as instruções da
aplicação.
Barra de pesquisa:
Insira a sua palavra-chave
na barra de pesquisa e
aceda à pesquisa por filtro
Navegação:
Pode também navegar na
aplicação acedendo ao menu:
• página principal
• receitas
• as minhas compras
• ferramentas
• guia
• a minha conta
A perda de ligação não tem qualquer influência sobre a cozedura. A Cookeo+ mantém a sua
autonomia em qualquer situação.
Nota: só é possível iniciar a cozedura a partir da Cookeo+, premindo o botão "OK" (tal como
indicação na aplicação)
Na aplicação pode:
• ver a receita passo a passo
• iniciar a receita passo a
passo interagindo com a
Cookeo+
Receitas incluídas
na Cookeo+
Favoritos
Biblioteca
133
Page 70

ATTENTION
PRESSURE COOKING
insert the pot
00:10
COOKING
pressure
cooking
reheat
regular
cooking
keep warm
recipesingredients
manual
librairies
ATTENTION
PRESSURE COOKING
PRESSURE COOKING
insert the pot
00:10
COOKING
immediate
start
delayed
start
pressure
cooking
reheat
regular
cooking
keep warm
manual
librairies
ATTENTION
PRESSURE COOKING
PRESSURE COOKING
insert the pot
00:10
COOKING
immediate
start
delayed
start
ATTENTION
close and lock the lid
reheat
keep warm
recipesingredients
manual
librairies
pressure
cooking
reheat
regular
cooking
keep warm
recipesingredients
manual
librairies
ATTENTION
insert the pot
pressure
cooking
reheat
regular
cooking
keep warm
recipesingredients
manual
librairies
ATTENTION
PRESSURE COOKING
PRESSURE COOKING
PRESSURE COOKING
00:10
COOKING
immediate
start
delayed
start
ATTENTION
close and lock the lid
PREHEAT
please wait
PRESSURE COOKING
PRESSURE COOKING
PRESSURE COOKING
COOKING
immediate
start
delayed
start
ATTENTION
close and lock the lid
PREHEAT
please wait
PRESSURE COOKING
COOKING
00:02
PRESSURE COOKING
PRESSURE COOKING
start
start
ATTENTION
close and lock the lid
PREHEAT
please wait
PRESSURE COOKING
PRESSURE COOKING
COOKING
00:02
END OF COOKING
please wait
12:20
PRESSURE COOKING
ATTENTION
PREHEAT
please wait
PRESSURE COOKING
PRESSURE COOKING
PRESSURE COOKING
COOKING
00:02
END OF COOKING
please wait
12:20
KEEP WARM
00:02
BON APPÉTIT !
Serve !
Beware of the steam while opening the lid
okokok
ok
ok
ok
ok
ok
ok
ok
ok
ok
pt
RÁPIDO RÁPIDO
MENU MANUAL :
Com o menu manual,
é você quem orienta a
cozedura. Selecione o
manual
modo de cozedura
+
Selecione o
menu “manual”
+
Selecione o modo
"cozedura rápida"
Introduza a cuba
e depois junte os
ingredientes
menu
modo de cozedura:
alourar, cozedura
rápida, reaquecer ou
manter quente, bem
como o tempo de
cozedura.
+
Defina o tempo de
cozedura
+
Escolha entre início
imediato ou início
diferido (p.139)
Feche e fixe a tampa
menu
manual
modo de cozedura
O aparelho está a fazer
o pré-aquecimento
Está pronto a servir!
A cozedura começou
!
4 L (max)
3,5L
200 ml (min)
A cozedura acabou
135
Page 71

recipesingredients
manual
librairies
recipesingredients
manual
pressure
cooking
reheat
regular
cooking
keep warm
librairies
ATTENTION
open the lid
SLOW COOKING
recipesingredients
manual
pressure
cooking
reheat
regular
cooking
keep warm
librairies
ATTENTION
ATTENTION
insert the pot
open the lid
SLOW COOKING
pressure
cooking
reheat
regular
cooking
keep warm
ATTENTION
ATTENTION
insert the pot
open the lid
SLOW COOKING
PREHEAT
please wait
SLOW COOKING
ATTENTION
ATTENTION
insert the pot
SLOW COOKING
open the lid
SLOW COOKING
PREHEAT
please wait
add the ingredients
OK
ATTENTION
ATTENTION
insert the pot
SLOW COOKING
SLOW COOKING
PREHEAT
please wait
add the ingredients
OK
00:02
SLOW COOKING
OK
ATTENTION
SLOW COOKING
SLOW COOKING
PREHEAT
please wait
add the ingredients
OK
00:02
SLOW COOKING
OK
Do you want to stop
the slow cooking?
YES NO
SLOW COOKING
recipesingredients
manual
pressure
cooking
reheat
regular
cooking
keep warm
librairies
recipesingredients
manual
pressure
cooking
reheat
regular
cooking
keep warm
recipesingredients
manual
ATTENTION
insert the pot
ATTENTION
close and lock the lid
pressure
cooking
reheat
regular
cooking
keep warm
recipesingredients
manual
ATTENTION
insert the pot
pressure
cooking
reheat
regular
cooking
keep warm
recipesingredients
manual
ATTENTION
insert the pot
ATTENTION
close and lock the lid
00:02
REHEAT
pressure
cooking
reheat
regular
cooking
keep warm
ATTENTION
insert the pot
do you want
to stop reheating?
YES NO
ATTENTION
close and lock the lid
00:02
REHEAT
okokok
ok
ok
ok
ok
ok
ok
ok
ok
ok
ok
ok
ok
ok
ok
ok
ok
ok
ok
ok
ok
modo de cozedura
menu
manual
ALOURAR
Com o modo normal, é
possível:
alourar
dependendo do resultado
pretendido. A tampa permanece
aberta durante estas diferentes
formas de cozinhar.
Atenção: O funcionamento é o mesmo, apenas
difere na temperatura.
cozinhar lentamente
cozinhar em "lume brando"
+
Selecione o
menu "manual"
Abra a tampa
Selecione a função
Introduza a cuba
+
"alourar"
Selecione a função
desejada
O aparelho está a fazer
o pré-aquecimento
+
+
Para interromper a cozedura, prima a tecla de retorno e selecione a
paragem.
pt
menu
manual
modo de cozedura
+
+
Selecione o
Selecione o modo de
menu "manual"
+
"reaquecer".
AQUECER
Feche e bloqueie
a tampa
+
A função reaquecer começou
Pressione para interromper
Introduza a cuba
+
Quer parar a função
reaquecer
Nota: a função
reaquecer começa e o
temporizador inicia.
137
Page 72

recipesingredients
manual
librairies
pressure
cooking
reheat
regular
cooking
keep warm
recipesingredients
manual
librairies
ATTENTION
insert the pot
pressure
cooking
reheat
regular
cooking
keep warm
recipesingredients
manual
librairies
ATTENTION
insert the pot
KEEP WARM
PREHEAT
please wait
pressure
cooking
reheat
regular
cooking
keep warm
recipesingredients
manual
librairies
ATTENTION
insert the pot
KEEP WARM
PREHEAT
please wait
KEEP WARM
00:02
pressure
cooking
reheat
regular
cooking
keep warm
ATTENTION
insert the pot
do you want to stop
the keep warm function?
YES NO
KEEP WARM
PREHEAT
please wait
KEEP WARM
00:02
immediate
start
delayed
start
PRESSURE COOKING
h m
what time is it?
08:15
immediate
start
delayed
start
PRESSURE COOKING
PRESSURE COOKING
h m
what time is it?
END OF
COOKING
12:30
08:15
08:15
immediate
start
delayed
start
PRESSURE COOKING
PRESSURE COOKING
PRESSURE COOKING
h m
what time is it?
END OF
COOKING
12:30
08:15
08:15
01:00
DELAYED START END OF COOKING
12:30
08:15
immediate
start
delayed
start
PRESSURE COOKING
PRESSURE COOKING
PRESSURE COOKING
ok
okokok
ok
ok
ok
ok
ok
ok
ok
ok
ok
ok
ok
pt
MANTER QUENTE
menu
manual
modo de cozedura
menu
manual
modo de cozedura
+
Selecione o
Selecione a função de
menu "manual"
O aparelho está a fazer
o pré-aquecimento
+
"manter quente"
A função
"manter quente"
começou
Introduza a cuba
+
Para parar a função
"manter quente",
carregue no botão
"voltar" e selecione
"sim"
INÍCIO DIFERIDO
(MODO COZEDURA SOB PRESSÃO
!
A hora do fim da cozedura pode
variar de acordo com o volume
contido no aparelho.
O tempo de cozedura pode variar
consoante o volume do produto
a ser cozinhado.
+
Selecione
"início diferido"
+
Selecione a hora de fim
de cozedura
+
Selecione a hora actual
O início diferido está
programado
139
Page 73

recipesingredients
manual
librairies
fruits & vegetables
recipesingredients
manual
librairies
FRUITS & VEGETABLES
artichoke
asparagus
aubergine
beetroot
broccoli
fruits & vegetables
recipesingredients
manual
librairies
FRUITS & VEGETABLES
BROCOLI
artichoke
asparagus
aubergine
beetroot
broccoli
300 gr
fruits & vegetables
recipesingredients
manual
librairies
FRUITS & VEGETABLES
BROCOLI
BROCOLI
artichoke
asparagus
aubergine
beetroot
broccoli
do you want
to start the recipe?
BROCOLI
YES NO
- pour 200ml of water in the stockpot.
- place the ingredients in the basket.
- place the steam basket in the stockpot.
300 gr
fruits & vegetables
RECOMMENDED TIME: 10 MIN
FRUITS & VEGETABLES
BROCOLI
BROCOLI
artichoke
asparagus
aubergine
beetroot
broccoli
do you want
to start the recipe?
COOK
BROCOLI
YES NO
- pour 200ml of water in the stockpot.
- place the ingredients in the basket.
- place the steam basket in the stockpot.
00:10
300 gr
RECOMMENDED TIME: 10 MIN
BROCOLI
BROCOLI
do you want
to start the recipe?
COOK
BROCOLI
YES NO
- pour 200ml of water in the stockpot.
- place the ingredients in the basket.
- place the steam basket in the stockpot.
00:10
BROCOLI
immediate
start
delayed
start
300 gr
RECOMMENDED TIME: 10 MIN
BROCOLI
do you want
to start the recipe?
COOK
BROCOLI
YES NO
- pour 200ml of water in the stockpot.
- place the ingredients in the basket.
- place the steam basket in the stockpot.
00:10
BROCOLI
ATTENTION
immediate
start
delayed
start
close and lock
the lid
RECOMMENDED TIME: 10 MIN
PREHEAT
please wait
COOK
BROCOLI
- pour 200ml of water in the stockpot.
- place the ingredients in the basket.
- place the steam basket in the stockpot.
00:10
BROCOLI
ATTENTION
BROCOLI
immediate
start
delayed
start
close and lock
the lid
RECOMMENDED TIME: 10 MIN
PREHEAT
please wait
COOK
00:10
BROCOLI
ATTENTION
BROCOLI
BROCOLI
immediate
start
delayed
start
COOK
00:02
close and lock
the lid
PREHEAT
please wait
BROCOLI
ATTENTION
BROCOLI
END OF COOKING
please wait
BROCOLI
BROCOLI
immediate
start
delayed
start
COOK
00:02
close and lock
the lid
PREHEAT
please wait
ATTENTION
BROCOLI
END OF COOKING
please wait
BROCOLI
BROCOLI
COOK
00:02
KEEP WARM
00:02
close and lock
the lid
BON APPÉTIT !
Serve !
Beware of the steam while opening the lid
FRUITS & VEGETABLES
BROCOLI
BROCOLI
artichoke
asparagus
aubergine
beetroot
broccoli
do you want
to start the recipe?
YES NO
300 gr
fruits & vegetables
recipesingredients
manual
librairies
ok
ok
ok
ok
ok
ok
okokok
ok
ok
ok
ok
ok
ok
okokok
ok
menu dos
ingredientes
MENU INGREDIENTES:
Com o menu ingredientes,
cozinhe os seus
ingredientes sem se
preocupar com o modo
e o tempo de cozedura.
A Cookeo+ indica os
passos a seguir para
todos os pesos e tipos de
ingredientes: carne, peixe,
legumes, frutas e por fim
cereais.
+
Selecione o
menu "ingredientes"
O aparelho está a fazer
o pré-aquecimento
+
Selecione
"frutas e vegetais"
+
ingredientes
Selecione o ingrediente
+
pretendido
Siga as instruçõesEscolha a quantidade dos
É exibido o tempo de
cozedura recomendado
Iniciar a cozedura
+
Selecione
"início imediato"
Final de cozedura
Iniciar a receita
Está pronto a servir!
pt
Siga as instruções
141
Page 74

recipesingredients
manual
librairies
mainstarter
dessert
recipesingredients
manual
librairies
cod fillet and broccoli
beef bourguignon
rabbit with olives and vegetables
goulash
moules marinières
mainstarter
dessert
recipesingredients
manual
librairies
cod fillet and broccoli
beef bourguignon
rabbit with olives and vegetables
goulash
moules marinières
04
PERS
mainstarter
dessert
recipesingredients
manual
librairies
cod fillet and broccoli
beef bourguignon
rabbit with olives and vegetables
goulash
moules marinières
BEEF BOURGUIGNON - 4 PERS
PREPARATION
10min 35min
COOKING
04
PERS
OK
mainstarter
dessert
recipesingredients
manual
librairies
cod fillet and broccoli
beef bourguignon
rabbit with olives and vegetables
goulash
moules marinières
BEEF BOURGUIGNON - 4 PERS
PREPARATION
10min 35min
COOKING
04
PERS
OK
Beef cut into 25 g cubes
Red wine
Veal stock
Bacons
Onions
Vegetable oil
800g
250 ml
150 ml
70g
150g
5cs
PREPARE THE INGREDIENTS
mainstarter
dessert
BEEF BOURGUIGNON
cod fillet and broccoli
beef bourguignon
rabbit with olives and vegetables
goulash
moules marinières
BEEF BOURGUIGNON - 4 PERS
PREPARATION
10min 35min
COOKING
04
PERS
OK
Beef cut into 25 g cubes
Red wine
Veal stock
Bacons
Onions
Vegetable oil
800g
250 ml
150 ml
70g
150g
5cs
PREPARE THE INGREDIENTS
do you want to start
the recipe?
YES NO
BEEF BOURGUIGNON
BEEF BOURGUIGNON - 4 PERS
PREPARATION
10min 35min
COOKING
BEEF BOURGUIGNON
04
PERS
OK
Beef cut into 25 g cubes
Red wine
Veal stock
Bacons
Onions
Vegetable oil
800g
250 ml
150 ml
70g
150g
5cs
PREPARE THE INGREDIENTS
do you want to start
the recipe?
YES NO
PREHEAT
please wait
BEEF BOURGUIGNON
BEEF BOURGUIGNON - 4 PERS
PREPARATION
10min 35min
COOKING
BEEF BOURGUIGNON
BEEF BOURGUIGNON
OK
OK
Beef cut into 25 g cubes
Red wine
Veal stock
Bacons
Onions
Vegetable oil
800g
250 ml
150 ml
70g
150g
5cs
PREPARE THE INGREDIENTS
do you want to start
the recipe?
brown all the ingredients
except the liquid for 10 mins
YES NO
PREHEAT
please wait
BEEF BOURGUIGNON
BEEF BOURGUIGNON
BEEF BOURGUIGNON
BEEF BOURGUIGNON
OK
Beef cut into 25 g cubes
Red wine
Veal stock
Bacons
Onions
Vegetable oil
800g
250 ml
150 ml
70g
150g
5cs
PREPARE THE INGREDIENTS
do you want to start
the recipe?
brown all the ingredients
except the liquid for 10 mins
YES NO
PREHEAT
please wait
do you want
to stop browning?
YES NO
BEEF BOURGUIGNON
BEEF BOURGUIGNON
BEEF BOURGUIGNON
BEEF BOURGUIGNON
BEEF BOURGUIGNON
OK
do you want to start
the recipe?
brown all the ingredients
except the liquid for 10 mins
YES NO
PREHEAT
please wait
do you want
to stop browning?
YES NO
add the rest of the ingredients
OK
BEEF BOURGUIGNON
BEEF BOURGUIGNON
BEEF BOURGUIGNON
BEEF BOURGUIGNON
BEEF BOURGUIGNON
OK
brown all the ingredients
except the liquid for 10 mins
PREHEAT
please wait
do you want
to stop browning?
YES NO
do you want
to start cooking?
YES NO
add the rest of the ingredients
OK
BEEF BOURGUIGNON
BEEF BOURGUIGNON
BEEF BOURGUIGNON
BEEF BOURGUIGNON
BEEF BOURGUIGNON
00:35
OK
brown all the ingredients
except the liquid for 10 mins
do you want
to stop browning?
YES NO
do you want
to start cooking?
YES NO
add the rest of the ingredients
OK
COOK
BEEF BOURGUIGNON
BEEF BOURGUIGNON
BEEF BOURGUIGNON
BEEF BOURGUIGNON
BEEF BOURGUIGNON
00:35
END OF COOKING
please wait
do you want
to stop browning?
YES NO
do you want
to start cooking?
YES NO
add the rest of the ingredients
OK
COOK
BEEF BOURGUIGNON
BEEF BOURGUIGNON
BEEF BOURGUIGNON
BEEF BOURGUIGNON
BON APPÉTIT!
KEEP WARM
00:10
00:35
END OF COOKING
please wait
do you want
to start cooking?
YES NO
add the rest of the ingredients
OK
COOK
BEEF BOURGUIGNON
ok
ok
ok
ok
ok
ok
ok
ok
ok
ok
okokok
ok
ok
ok
ok
ok
ok
okokok
ok
MENU DAS
RECEITAS:
No menu Receitas
escolha entre
150 receitas salgadas
e doces divididas
em três categorias:
entradas/pratos
principais/
sobremesas.
receita
jardineira
de carne
+
Selecione o menu das
receitas
+
Escolha o número de
pessoas
pt
menu das
receitas
+
Iniciar a receita Siga as instruções
Pré-aquecimento
MENU DAS
+
+
Selecione uma receitaEscolha o tipo de receita
RECEITAS:
(CONTINUAÇÃO)
Pode voltar ao menu
inicial, premindo o
botão «retroceder»
durante 30 segundos.
Parar de alourar? Siga as instruções
Prepare os ingredientesApresentação da receita
Final da cozedura
Tempo de cozedura
Já está pronto a servir!
+
Inicie a cozedura
143
Page 75

Please wait
DOWNLOADING
LIBRAIRIES
recipes
manual
ingredients
library
recipes
manual
ingredients
library
mainstarter
dessert
library
World
recipes
manual
ingredients
library
mainstarter
dessert
library
ok
ok
ok
ok
ok
ok
pt
bibliotecabiblioteca
DOWNLOAD DE
CONJUNTOS DE
RECEITAS:
Depois de conectar a
aplicação à Cookeo+,
pode fazer o download
dos conjuntos de
receitas.
Selecione um conjunto e
O download está em curso
prima o botão "Download
para a Cookeo+"
Nota: Pode, em qualquer altura, parar o download
premindo a tecla Voltar da Cookeo+
ACEDA ÀS
BIBLIOTECAS DA SUA
COOKEO+:
Pode encontrar os packs
que descarregou. Abra
as suas receitas na
Cookeo+ acedendo à
sua Biblioteca.
+
Selecione o submenu
"biblioteca"
+
Selecione o conjunto de
receitas pretendido
+
Selecione "entrada" "prato" ou
"sobremesa" e escolha a sua
receita
145
Page 76

avant
utilisation
pt
receitas
ingredientes
carnes
peixe e marisco
arroz e cereais
aves
borrego
carne de vaca
coelho
porco
vitela
bacalhau
camarões
mexilhões
peixe
vieiras
arroz branco
arroz selvagem
bulgur
cevada
milho-miúdo
quinoa
trigo
trigo preto
vegetais / frutas
acelga
aipo-rábano
alcachofra
alho-françês
batata
batata doce
beringela
beterraba
brócolos
cenoura
cogumelos
couve
couve de bruxelas
couve lombarda
couve-flor
curgete
endívias
espargos
espinafres
feijão verde
funcho
lentilhas
maçã
nabo
pêra
pimento
www.moulinex.pt
Encontrar receitas no minha Cookeo
e www.moulinex.pt
147
Page 77

avant
utilisation
avant
utilisation
pt
limpeza e
manutenção
Uma vez terminada a cozedura
do seu prato, desligue o aparelho
da corrente para proceder à sua
limpeza. Limpe o aparelho após cada
utilização.
!
!
Pode lavar a cuba e o cesto de cozedura a vapor em água quente com
detergente para loiça ou na máquina de lavar loiça. Limpe o corpo do
aparelho com um pano húmido.
Depois de várias lavagens na máquina, o exterior da cuba pode ficar
esbranquiçado. Pode lavá-lo com um esfregão.
limpeza e
manutenção
Após cada utilização, retire o depósito
de condensação e lave-o com cuidado
em água limpa ou na máquina de lavar
loiça. Seque-o cuidadosamente. Volte a
colocá-lo no seu compartimento.
1 2
3
Para limpar a tampa metálica, à mão
ou na máquina de lavar louça, tem de
retirar a proteção da válvula.
1
Desaperte a porca central da tampa
metálica
2
Tire a tampa metálica
3
Retire a proteção da válvula
LIMPEZA NA MÁQUINA DE LAVAR
LOIÇA:
pode pôr a tampa metálica na
máquina de lavar loiça, sem retirar
as válvulas. Depois de pôr na
máquina de lavar loiça, retire a bola
e sopre no tubo para confirmar que
não está entupido. Seque a bola e
o respetivo suporte com cuidado
usando um pano macio.
LIMPEZA À MÃO:
pode limpar a tampa metálica
usando água quente com detergente
para a loiça. Primeiro retire a bola,
depois limpe completamente. Seque
a bola e o respetivo suporte usando
um pano macio.
149
Page 78

limpeza e
manutenção
pt
Antes de voltar a colocar a bola,
sopre no tubo para confirmar que
não está entupido.
Antes de retirar a tampa interna, limpe a parte
de cima da cuba de cozedura. Limpe o interior
da tampa metálica do aparelho com uma esponja
húmida e confirme que a haste de pressão está
devidamente posicionada para garantir que não
está bloqueada.
Passe por água e tome atenção à mobilidade da
cavilha de segurança.
!
Carregue na parte interna da mola da
válvula de segurança para confirmar
que não está obstruída.
Substitua o vedante impermeável
pelo menos de três em três anos.
Essa intervenção deve ser efetuada
num Serviço de Assistência Técnica
Autorizado.
Não guarde o aparelho com a tampa
fechada. Deixe-a aberta ou meia
aberta; isto ajuda a evitar odores
desagradáveis.
!
Desloque o aparelho usando as duas pegas laterais.
Para maior segurança, confirme que o sistema
abrir/fechar está em posição fechada. Para maior
segurança, confirme que a tampa está presa.
Limpe o exterior da tampa do aparelho
com uma esponja húmida. Limpe a
válvula silenciadora por trás da tampa.
Limpe a parte de cima da cuba de
cozedura com um pano húmido.
Limpe o depósito de condensação
com um pano húmido. Passe por água
corrente e confirme que a haste de
pressão consegue mexer-se.
Limpe o vedante na tampa
metálica com um pano húmido e
depois passe bem por água. Não
use objectos afiados.
151
Page 79

PROBLEMAS CAUSAS POSSÍVEIS SOLUÇÕES
Encontram-se corpos estranhos entre a cuba e a placa
de aquecimento
A tampa não fecha
O aparelho não faz a
descompressão
A tampa não se abre após a
libertação do vapor
A pressão do aparelho não
aumenta
CÓDIGOS DE ERRO Código 24: a pressão diminuiu numa cozedura sob pressão
Há libertação de vapor pelas
extremidades da tampa
durante a cozedura (fugas)
Escorre água na parte de
trás do aparelho
O indicador não ca
intermitente ou não se acende
O painel de comando não
se acende
Surge condensação no visor Existe condensação na tampa Deixe secar o aparelho ao ar durante algumas horas
O sistema abrir/fechar da tampa não está na posição correta Certique-se de que a pega de abertura está na posição de abertura e completa
A tampa metálica e/ou a porca de xação não estão montadas
corretamente ou completamente apertadas
A proteção da bola não está bem posicionada Deixe o produto arrefecer totalmente e a seguir desmonte a tampa metálica e posicione
A válvula de utuação ca na posição elevada Depois de se certicar de que já não existe libertação de vapor e de que o aparelho está
Verique a limpeza do anel, da válvula de segurança roxa e da
válvula de ututação
Verique se a tampa está bloqueada e se a marca está situada
à frente do cadeado fechado. Verique a mobilidade da válvula
utuante e, se for necessário, limpe-a
A bola de descompressão está mal posicionada ou suja Verique se a bola está bem colocada e se a respetiva proteção está na posição
Códigos 21 e 26: a pressão do aparelho não aumenta
O anel da tampa metálica e/ou as extremidades da cuba
estão sujos
Desgaste, corte e deformação do anel O anel deve ser substituído a cada três anos, no máximo. Leve o aparelho a um Serviço de
Extremidade da cuba danicada Leve o aparelho a um Serviço de Assistência Técnica autorizado
A porca da tampa metálica não está sucientemente apertada Aperte adequadamente a porca no centro da tampa metálica
O recuperador de condensação não está colocado ou está a
transbordar
As seguranças e/ou os orifícios estão obstruídos Verique se não está demasiado cheio e se os alimentos não sofreram dilatação
O LED que garante esta função deixou de funcionar ou a
tampa não está corretamente colocada
O aparelho não está ligado à fonte de alimentação ou está em
modo de poupança de energia
O aparelho está danicado Leve o aparelho a um Serviço de Assistência Técnica autorizado
Retire a cuba, verique a limpeza da placa de aquecimento, do elemento central
e por baixo da cuba. Verique também a boa mobilidade do elemento central
Verique se instalou todos os elementos da tampa metálica e se a porca está apertada
corretamente a proteção da bola (marca na posição de cadeado)
totalmente frio, insira um palito no orifício situado entre a pega de abertura e a válvula
silenciosa. Tenha cuidado com a libertação de vapor que pode ocorrer depois de colocar a
haste. Quando deixar de haver vapor, tente abrir o aparelho
Limpe o aparelho seguindo as instruções fornecidas nas instruções de utilização
Verique a mobilidade da válvula utuante e, se for necessário, limpe-a
bloqueada. Limpe e seque a bola e o suporte
Adicione líquido à receita (água ou molho líquido)
Limpe o anel e a extremidade da cuba com um pano húmido.
Não utilize utensílios cortantes
Assistência Técnica autorizado
Certique-se de que o recuperador de condensação está bem colocado na parte de trás do
aparelho e de que a conduta de escoamento não está obstruída
(ver folheto de instruções de segurança)
Certique-se de que o aparelho está bem bloqueado. Se o problema persistir, leve o
aparelho a um Serviço de Assistência Técnica autorizado
Certique-se de que o cabo de alimentação está ligado ao aparelho e à corrente. Verique
se o aparelho não está em modo de poupança de energia, premindo o botão "OK"
pt
Caso esteja com problemas de ligação, entre
no site www.moulinex.pt ou na aplicação A minha Cookeo
(Menu / guia / Perguntas frequentes).
Marcas registadas
A marca e os logótipos Bluetooth® são propriedade da Bluetooth SIG, Inc. e a sua
utilização pela SEB SAS está sujeita a licença. As restantes marcas comerciais e
nomes de marcas são detidas pelos respetivos proprietários.
Série EPC09
Baixa pressão 40 kPa (109 °C) / Alta pressão: 70 kPa (115 °C)
Capacidade do produto: 6L / Capacidade útil: 4L
Aquecimento integrado
Não é possível retirar a
tampa metálica, pois está
bloqueada
A protecção da bola da tampa metálica não está corretamente
colocada
Desaperte a porca que se encontra no centro da tampa metálica e, em seguida, na sonda
no centro da porca. Esta ação desbloqueia a tampa e, depois, poderá aceder à proteção
da bola. Certique-se de que está corretamente colocada no lugar, bem como a bola
153
Page 80

avant
utilisation
prima
dell’uso
Estrarre l’apparecchio dalla confezione e leggere
attentamente le istruzioni prima di usare il prodotto per la prima volta.
prima
dell’uso
1
2
it
Per aprire il prodotto, ruotare la
manopola di apertura/chiusura
sulla parte superiore del coperchio
in modo da vedere il lucchetto
aperto .
Installare l’apparecchio su una superficie
piana, asciutta e fredda. Rimuovere tutti
i materiali di imballaggio, gli adesivi e
i vari accessori all’interno e all’esterno
dell’apparecchio.
1
2 43
PULIRE TUTTI I COMPONENTI
1
Pentola di cottura
2
Coperchio in metallo
3
Coperchio della valvola
4
Raccogli-condensa
5
Cestello vapore
6
Sfera di decompressione
6
5
COME
DISASSEMBLARE E
RIASSEMBLARE IL
COPERCHIO
ACCEDERE ALLA SFERA DI DECOMPRESSIONE
Ruotare il coperchio della sfera in senso antiorario fino a portare la
in posizione . Sollevare il coperchio. Rimuovere la sfera e
linea
pulirla delicatamente insieme al coperchio, con acqua e detersivo.
Asciugare la sfera con un panno morbido, quindi riposizionarla.
Riposizionare la sfera e riportare la linea in posizione . Fissare
il coperchio della sfera ruotandolo finché la linea non si trova nella
posizione indicata dal simbolo di chiusura
COME DISASSEMBLARE IL
COPERCHIO IN METALLO
Afferrare il sottogruppo del coperchio tenendolo
per la guarnizione e svitare il dado centrale in
senso antiorario. Rimuovere il dado, quindi il
coperchio.
.
COME RIMUOVERE IL COPERCHIO DELLA
VALVOLA
Afferrare il coperchio della valvola sulla parte centrale (come
illustrato); quindi ruotarlo leggermente per sbloccarlo. Pulire
il coperchio della valvola, prestando particolare attenzione
all’interno (verificare l’assenza di residui alimentari).
4
RIPOSIZIONARE IL SOTTOGRUPPO
DEL COPERCHIO
Afferrare il sottogruppo sulla guarnizione come
illustrato in figura. Allineare il coperchio con
l’asse centrale e premerlo contro il sottogruppo.
Riposizionare il dado e ruotarlo in senso orario,
serrandolo il più possibile.
53
RIPOSIZIONARE IL COPERCHIO
DELLA VALVOLA
Afferrare il coperchio della valvola come
indicato in figura (afferrando la parte
centrale). Allineare la forma circolare interna
con le tre sporgenze, quindi spingere il
coperchio della valvola fino a udire un
“clic”. Il coperchio della valvola deve aderire
perfettamente all’interno del coperchio.
155
Page 81

LANGUE
Italiano
English
Français
Deutsch
Español
LANGUE
Italiano
English
Français
Deutsch
Español
PAYS
Italia
United Kingdom
France
Deutschland
España
ok
ok
ok
ok
ok
ok
avant
utilisation
it
1
funzionamento
2
Alla prima accensione, apparirà il menu
Impostazioni:
+
Selezionare il paese
CONTROLLI INTERFACCIA
SELEZIONA CONFERMA
Selezionare la lingua
INDIETRO RIAVVIA
+
3s
uso
Non usare mai l’apparecchio
senza la pentola di cottura.
Al primo utilizzo
dell’apparecchio, la
pentola potrebbe
emettere un leggero
odore. È un fenomeno
normale.
APRIRE IL COPERCHIO
Per aprire il prodotto, ruotare la
manopola di apertura/chiusura
in modo da vedere il lucchetto
aperto . Non cercare mai di
forzare l’apertura del coperchio.
INSTALLARE IL SUPPORTO
SOTTO IL CESTELLO VAPORE
Prendere il supporto tra pollice
e indice per installarlo sotto il
cestello vapore.
INSTALLARE IL RACCOGLICONDENSA
Verificare che il raccogli-condensa
sia vuoto, quindi installarlo sul
retro dell’apparecchio.
INSERIRE LA PENTOLA
NELL’APPARECCHIO
Pulire la parte inferiore della
pentola di cottura. Verificare che
la parte inferiore della pentola e
la piastra riscaldante siano prive
di residui alimentari o liquidi.
Posizionare quindi il recipiente
nell’apparecchio, inserendo
correttamente le impugnature
nelle tacche.
157
Page 82

RECIPE 2
Do you want to delete
this recipe?
YES NO
language/country
delete libraires
screen/sound
Connect
recipes
librairies
Please select the library
you want to delete
library 1
library 2
LIBRARY 2
Do you want to delete
this library?
YES NO
favorites
recipesingredients
manual
language/country
delete libraires
screen/sound
Connect
favorites
recipesingredients
manual
LANGUAGE
deutsch
spanish
french
italian
nederlands
language/country
delete libraires
screen/sound
Connect
favorites
recipesingredients
manual
favorites
recipesingredients
manual
COUNTRY
Germany
Spain
France
Italy
Netherlands
LANGUAGE
deutsch
spanish
french
italian
nederlands
language/country
delete libraires
screen/sound
Connect
favorites
recipesingredients
manual
COUNTRY
Germany
Spain
France
Italy
Netherlands
LANGUAGE
deutsch
spanish
french
italian
nederlands
language/country
delete libraires
screen/sound
Connect
language/country
delete libraires
screen/sound
Connect
COUNTRY
Germany
Spain
France
Italy
Netherlands
LANGUAGE
deutsch
spanish
french
italian
nederlands
Please select the recipe
you want to delete
recipe 1
language/country
delete libraires
screen/sound
Connect
recipe 2
language/country
delete libraires
screen/sound
Connect
COUNTRY
Germany
Spain
France
Italy
Netherlands
LANGUAGE
deutsch
spanish
french
italian
nederlands
RECIPE 2
Do you want to delete
this recipe?
YES NO
Please select the recipe
you want to delete
recipe 1
recipe 2
language/country
delete libraires
screen/sound
Connect
COUNTRY
Germany
Spain
France
Italy
Netherlands
LANGUAGE
RECIPE 2
Do you want to delete
this recipe?
YES NO
Please select the recipe
you want to delete
recipe 1
recipe 2
language/country
delete libraires
screen/sound
Connect
recipes
librairies
COUNTRY
RECIPE 2
Do you want to delete
this recipe?
YES NO
Please select the recipe
you want to delete
recipe 1
recipe 2
language/country
delete libraires
screen/sound
Connect
recipes
librairies
Please select the library
you want to delete
library 1
library 2
RECIPE 2
Do you want to delete
this recipe?
YES NO
Please select the recipe
you want to delete
recipe 1
recipe 2
recipes
librairies
Please select the library
you want to delete
library 1
library 2
LIBRARY 2
Do you want to delete
this library?
YES NO
screen
sound
language/country
delete libraires
screen/sound
Connect
recipes
librairies
Please select the library
you want to delete
library 1
library 2
LIBRARY 2
Do you want to delete
this library?
YES NO
screen
sound
demo mode
brightness
language/country
delete libraires
screen/sound
Connect
Please select the library
you want to delete
library 1
library 2
LIBRARY 2
Do you want to delete
this library?
YES NO
screen
sound
BRIGHTNESS
demo mode
brightness
language/country
delete libraires
screen/sound
Connect
LIBRARY 2
Do you want to delete
this library?
YES NO
screen
sound
BRIGHTNESS
demo mode
brightness
language/country
delete libraires
screen/sound
Connect
demo mode
brightness
screen
sound
BRIGHTNESS
demo mode
brightness
DEMO MODE
OFF ON
demo mode
brightness
BRIGHTNESS
demo mode
brightness
DEMO MODE
OFF ON
DEMO MODE
3424
demo mode
brightness
BRIGHTNESS
DEMO MODE
OFF ON
DEMO MODE
3424
demo mode
brightness
screen
sound
DEMO MODE
OFF ON
DEMO MODE
3424
SOUND
OFF ON
demo mode
brightness
screen
sound
DEMO MODE
OFF ON
DEMO MODE
3424
SOUND
OFF ON
screen
sound
language/country
delete libraires
screen/sound
Connect
DEMO MODE
3424
SOUND
OFF ON
OFF ON
Connect
screen
sound
language/country
delete libraires
screen/sound
Connect
PAYS
Allemagne
Espagne
France
Italie
Pays-Bas
LANGUE
allemand
espagnol
français
italien
néerlandais
langues/pays
suppression
recettes
écran/son
Connect
langues/pays
suppression
recettes
écran/son
Connect
bibliothèques
recettes
ok
ok
ok
ok
ok
ok
ok
ok
ok
ok
ok
ok
ok
ok
ok
ok
ok
ok
ok
ok
ok
ok
ok
ok
ok
ok
ok
ok
ok
ok
ok
ok
ok
ok+ok
ok
ok
ok
ok
ok
ok
Nota: anche se i suoni sono
disattivati, gli avvisi acustici
rimangono attivi.
menu
impostazioni
+
Selezionare
“lingua/paese”
+
Selezionate
“Eliminazione di ricette”
+
+
Selezionate “biblioteche”
Selezionare il paeseSelezionare la lingua
Selezionate
“biblioteca 2”
it
+
+
Selezionare
Selezionare “display” Selezionare “luminosità”
“display/suoni”
+
Selezionare “modalità demo”
Per attivare o disattivare la modalità Demo, inserire
+
+
+
Regolare la luminosità
Nota: la modalità
DEMO permette di
usare il prodotto
senza riscaldarlo o
pressurizzarlo.
+
il codice: 3424
+
Desiderate eliminare
questa biblioteca?
+
Selezionate “ricette”
+
Selezionate
“ricetta 2”
+
Desiderate eliminare
questa ricetta?
+
Selezionare “suoni” Selezionate “connetti”
Regolare il volume
+
+
+
Selezionate “connetti”
159
Page 83

recipes
manual
ingredients
library
do you want to switch off
the appliance?
YES NO
recipes
manual
ingredients
library
do you want to switch off
the appliance?
YES NO
YES NO
do you want to switch off
the appliance?
recipes
manual
ingredients
library
Validate the connexion request
and press OK
OK
ok
ok
ok
ok
ok
ok
ok
ok
it
menu
on /off
+
connessione
mio Cookeo andando sull’App
Store dal vostro tablet o smartphone.
Il vostro Cookeo+ è
funzionante, potete già
utilizzare il vostro prodotto
con le 150 ricette pre-
programmate anche senza
l’applicazione.
Scaricate l’applicazione Il
Ogni volta che accendete il
+
+
Premere ON/OFF per spegnere l’apparecchioSelezionare e confermare
vostro Cookeo+, la spia blu
lampeggia (in attesa della
connessione), tranne nel
In occasione del primo utilizzo, collegate il vostro prodotto al tablet seguendo le
istruzioni sul vostro schermo.
caso in cui abbiate disattivato
manualmente la funzione
connetti (vedere il capitolo
Regolazione).
Se la connessione è
riuscita, la spia blu
diventa fissa.
161
Page 84

it
connessione
Problema di connessione:
Se la connessione non è riuscita,
visualizzerete un messaggio
di errore. Dovrete seguire le
istruzioni sul vostro schermo per
effettuare un nuovo tentativo di
connessione.
Attenzione: è possibile
connettere un solo dispositivo
per volta.
N.B.: se non utilizzate il vostro Cookeo+ per 30 minuti, questo si porrà in modalità stand-by e la
connessione scadrà. Al termine dello stand-by la connessione si ripristinerà automaticamente.
Per creare un conto:
seguite le indicazioni
sull’applicazione.
Barra di ricerca:
Inserite le vostre parole
chiave nella barra di ricerca
e accedete alla ricerca per
filtro
Navigazione:
potete anche navigare tramite
l’applicazione accedendo al
menu:
• benvenuto
• ricette
• la mia spesa
• strumenti
• guida
• il mio conto
Eventuali perdite di connessione non incidono
assolutamente sulla cottura. Cookeo+ rimane in ogni caso
autonomo.
N.B. Potete avviare la cottura soltanto dal vostro Cookeo+, premendo il tasto OK (come indicato
sull’applicazione).
Dall’applicazione potete:
• vedere il procedimento step
by step
• lanciare la ricetta step by
step in interazione con il
vostro Cookeo+
Ricette presenti nel
vostro Cookeo+
Preferiti
Biblioteca
163
Page 85

ATTENTION
PRESSURE COOKING
insert the pot
00:10
COOKING
pressure
cooking
reheat
regular
cooking
keep warm
recipesingredients
manual
librairies
ATTENTION
PRESSURE COOKING
PRESSURE COOKING
insert the pot
00:10
COOKING
immediate
start
delayed
start
pressure
cooking
reheat
regular
cooking
keep warm
manual
librairies
ATTENTION
PRESSURE COOKING
PRESSURE COOKING
insert the pot
00:10
COOKING
immediate
start
delayed
start
ATTENTION
close and lock the lid
reheat
keep warm
recipesingredients
manual
librairies
pressure
cooking
reheat
regular
cooking
keep warm
recipesingredients
manual
librairies
ATTENTION
insert the pot
pressure
cooking
reheat
regular
cooking
keep warm
recipesingredients
manual
librairies
ATTENTION
PRESSURE COOKING
PRESSURE COOKING
PRESSURE COOKING
00:10
COOKING
immediate
start
delayed
start
ATTENTION
close and lock the lid
PREHEAT
please wait
PRESSURE COOKING
PRESSURE COOKING
PRESSURE COOKING
COOKING
immediate
start
delayed
start
ATTENTION
close and lock the lid
PREHEAT
please wait
PRESSURE COOKING
COOKING
00:02
PRESSURE COOKING
PRESSURE COOKING
start
start
ATTENTION
close and lock the lid
PREHEAT
please wait
PRESSURE COOKING
PRESSURE COOKING
COOKING
00:02
END OF COOKING
please wait
12:20
PRESSURE COOKING
ATTENTION
PREHEAT
please wait
PRESSURE COOKING
PRESSURE COOKING
PRESSURE COOKING
COOKING
00:02
END OF COOKING
please wait
12:20
KEEP WARM
00:02
BON APPÉTIT !
Serve !
Beware of the steam while opening the lid
okokok
ok
ok
ok
ok
ok
ok
ok
ok
ok
it
PRESSIONE PRESSIONE
MENU MANUALE
Con il menu Manuale,
la cottura è guidata
manualmente. Selezionare
manuale
modalità di cottura
+
Selezionare il
menu “manuale”
+
Selezionare la modalità
“pressione”
Inserire la pentola,
quindi aggiungere gli
ingredienti
menu
menu
manuale
modalità di cottura
la modalità di cottura:
cottura a pressione,
cottura normale (lenta,
bollitura, rosolatura),
riscaldamento o
mantieni caldo.
+
Impostare il tempo di
cottura
+
Selezionare l’avvio
immediato o ritardato
(p.169)
Chiudere e bloccare
L’apparecchio è in
preriscaldamento
È pronto!
La cottura è iniziata
!
4 L (max)
3,5L
200 ml (min)
La cottura è terminata
165
Page 86

recipesingredients
manual
librairies
recipesingredients
manual
pressure
cooking
reheat
regular
cooking
keep warm
librairies
ATTENTION
open the lid
SLOW COOKING
recipesingredients
manual
pressure
cooking
reheat
regular
cooking
keep warm
librairies
ATTENTION
ATTENTION
insert the pot
open the lid
SLOW COOKING
pressure
cooking
reheat
regular
cooking
keep warm
ATTENTION
ATTENTION
insert the pot
open the lid
SLOW COOKING
PREHEAT
please wait
SLOW COOKING
ATTENTION
ATTENTION
insert the pot
SLOW COOKING
open the lid
SLOW COOKING
PREHEAT
please wait
add the ingredients
OK
ATTENTION
ATTENTION
insert the pot
SLOW COOKING
SLOW COOKING
PREHEAT
please wait
add the ingredients
OK
00:02
SLOW COOKING
OK
ATTENTION
SLOW COOKING
SLOW COOKING
PREHEAT
please wait
add the ingredients
OK
00:02
SLOW COOKING
OK
Do you want to stop
the slow cooking?
YES NO
SLOW COOKING
recipesingredients
manual
pressure
cooking
reheat
regular
cooking
keep warm
librairies
recipesingredients
manual
pressure
cooking
reheat
regular
cooking
keep warm
recipesingredients
manual
ATTENTION
insert the pot
ATTENTION
close and lock the lid
pressure
cooking
reheat
regular
cooking
keep warm
recipesingredients
manual
ATTENTION
insert the pot
pressure
cooking
reheat
regular
cooking
keep warm
recipesingredients
manual
ATTENTION
insert the pot
ATTENTION
close and lock the lid
00:02
REHEAT
pressure
cooking
reheat
regular
cooking
keep warm
ATTENTION
insert the pot
do you want
to stop reheating?
YES NO
ATTENTION
close and lock the lid
00:02
REHEAT
okokok
ok
ok
ok
ok
ok
ok
ok
ok
ok
ok
ok
ok
ok
ok
ok
ok
ok
ok
ok
ok
manuale
modalità di cottura
NORMALE
Con la modalità di cottura
normale è possibile:
cuocere lentamente
bollire lentamente
rosolare
a seconda del risultato
desiderato. In queste modalità
di cottura il coperchio rimane
aperto.
Nota: il processo
è identico, solo la
temperatura è diversa.
menu
+
Selezionare il
menu “manuale”
Aprire il coperchio
Selezionare la modalità
Inserire la pentola
+
“normale”
+
Selezionare la funzione
desiderata
L’apparecchio è in
preriscaldamento
+
+
+
Per arrestare la cottura, premere il pulsante con la freccia Indietro e selezionare o
l’opzione di arresto.
menu
manuale
modalità di cottura
RISCALDARE
+
Selezionare il
menu “manuale”
Chiudere e bloccare il
coperchio
+
Selezionare la modalità
“riscaldamento”
Il riscaldamento è iniziato
Per interrompere
it
Inserire la pentola
+
Interrompere il
riscaldamento?
Nota: il riscaldamento
inizia e il tempo
aumenta.
167
Page 87

recipesingredients
manual
librairies
pressure
cooking
reheat
regular
cooking
keep warm
recipesingredients
manual
librairies
ATTENTION
insert the pot
pressure
cooking
reheat
regular
cooking
keep warm
recipesingredients
manual
librairies
ATTENTION
insert the pot
KEEP WARM
PREHEAT
please wait
pressure
cooking
reheat
regular
cooking
keep warm
recipesingredients
manual
librairies
ATTENTION
insert the pot
KEEP WARM
PREHEAT
please wait
KEEP WARM
00:02
pressure
cooking
reheat
regular
cooking
keep warm
ATTENTION
insert the pot
do you want to stop
the keep warm function?
YES NO
KEEP WARM
PREHEAT
please wait
KEEP WARM
00:02
immediate
start
delayed
start
PRESSURE COOKING
h m
what time is it?
08:15
immediate
start
delayed
start
PRESSURE COOKING
PRESSURE COOKING
h m
what time is it?
END OF
COOKING
12:30
08:15
08:15
immediate
start
delayed
start
PRESSURE COOKING
PRESSURE COOKING
PRESSURE COOKING
h m
what time is it?
END OF
COOKING
12:30
08:15
08:15
01:00
DELAYED START END OF COOKING
12:30
08:15
immediate
start
delayed
start
PRESSURE COOKING
PRESSURE COOKING
PRESSURE COOKING
ok
okokok
ok
ok
ok
ok
ok
ok
ok
ok
ok
ok
ok
it
MANTIENI CALDO
menu
manuale
modalità di cottura
+
Selezionare il
menu “manuale”
L’apparecchio è in
preriscaldamento
+
Selezionare la modalità
“mantieni caldo”
La modalità Mantieni
caldo è iniziata
Inserire la pentola
+
Per interrompere la
modalità Mantieni caldo,
premere il pulsante
Indietro e
selezionare “sì”
menu
manuale
modalità di cottura
AVVIO RITARDATO
(MODALITÀ COTTURA A PRESSIONE
!
Alcuni alimenti non possono
essere cotti in modalità Avvio
ritardato (carne, pesce, latte,
ecc.).
Il tempo di cottura può variare
a seconda del volume all’interno
del prodotto.
+
Selezionare
“avvio ritardato”
+
Selezionare l’ora di
termine della cottura
+
Selezionare l’ora
corrente
L’avvio ritardato è
programmato
169
Page 88

recipesingredients
manual
librairies
fruits & vegetables
recipesingredients
manual
librairies
FRUITS & VEGETABLES
artichoke
asparagus
aubergine
beetroot
broccoli
fruits & vegetables
recipesingredients
manual
librairies
FRUITS & VEGETABLES
BROCOLI
artichoke
asparagus
aubergine
beetroot
broccoli
300 gr
fruits & vegetables
recipesingredients
manual
librairies
FRUITS & VEGETABLES
BROCOLI
BROCOLI
artichoke
asparagus
aubergine
beetroot
broccoli
do you want
to start the recipe?
BROCOLI
YES NO
- pour 200ml of water in the stockpot.
- place the ingredients in the basket.
- place the steam basket in the stockpot.
300 gr
fruits & vegetables
RECOMMENDED TIME: 10 MIN
FRUITS & VEGETABLES
BROCOLI
BROCOLI
artichoke
asparagus
aubergine
beetroot
broccoli
do you want
to start the recipe?
COOK
BROCOLI
YES NO
- pour 200ml of water in the stockpot.
- place the ingredients in the basket.
- place the steam basket in the stockpot.
00:10
300 gr
RECOMMENDED TIME: 10 MIN
BROCOLI
BROCOLI
do you want
to start the recipe?
COOK
BROCOLI
YES NO
- pour 200ml of water in the stockpot.
- place the ingredients in the basket.
- place the steam basket in the stockpot.
00:10
BROCOLI
immediate
start
delayed
start
300 gr
RECOMMENDED TIME: 10 MIN
BROCOLI
do you want
to start the recipe?
COOK
BROCOLI
YES NO
- pour 200ml of water in the stockpot.
- place the ingredients in the basket.
- place the steam basket in the stockpot.
00:10
BROCOLI
ATTENTION
immediate
start
delayed
start
close and lock
the lid
RECOMMENDED TIME: 10 MIN
PREHEAT
please wait
COOK
BROCOLI
- pour 200ml of water in the stockpot.
- place the ingredients in the basket.
- place the steam basket in the stockpot.
00:10
BROCOLI
ATTENTION
BROCOLI
immediate
start
delayed
start
close and lock
the lid
RECOMMENDED TIME: 10 MIN
PREHEAT
please wait
COOK
00:10
BROCOLI
ATTENTION
BROCOLI
BROCOLI
immediate
start
delayed
start
COOK
00:02
close and lock
the lid
PREHEAT
please wait
BROCOLI
ATTENTION
BROCOLI
END OF COOKING
please wait
BROCOLI
BROCOLI
immediate
start
delayed
start
COOK
00:02
close and lock
the lid
PREHEAT
please wait
ATTENTION
BROCOLI
END OF COOKING
please wait
BROCOLI
BROCOLI
COOK
00:02
KEEP WARM
00:02
close and lock
the lid
BON APPÉTIT !
Serve !
Beware of the steam while opening the lid
FRUITS & VEGETABLES
BROCOLI
BROCOLI
artichoke
asparagus
aubergine
beetroot
broccoli
do you want
to start the recipe?
YES NO
300 gr
fruits & vegetables
recipesingredients
manual
librairies
ok
ok
ok
ok
ok
ok
okokok
ok
ok
ok
ok
ok
ok
okokok
ok
menu
ingredienti
MENU INGREDIENTI
Con il menu Ingredienti
non è necessario inserire
la modalità o il tempo di
cottura: Cookeo+ fornisce
tutte le istruzioni per ogni
tipo e peso di ingrediente:
carne, pesce, verdura,
frutta e cereali.
+
Selezionare il
menu “ingredienti”
Preriscaldamento
+
+
broccoli (min 300 g).
it
Selezionare “broccoli”Selezionare la verdura
Apparirà il tempo di
cottura raccomandato
“avvio immediato”
Termine della cottura
+
Seguire le istruzioniSelezionare la quantità di
Avviare la cottura
+
Selezionare
Avviare la ricetta
È pronto!
Seguire le istruzioni
171
Page 89

recipesingredients
manual
librairies
primi piattiantipasti
dolce
secondi piatti
primi piattiantipasti
dolce
secondi piatti
cod fillet and broccoli
beef bourguignon
rabbit with olives and vegetables
goulash
moules marinières
mainstarter
dessert
recipesingredients
manual
librairies
cod fillet and broccoli
beef bourguignon
rabbit with olives and vegetables
goulash
moules marinières
04
PERS
mainstarter
dessert
recipesingredients
manual
librairies
cod fillet and broccoli
beef bourguignon
rabbit with olives and vegetables
goulash
moules marinières
BEEF BOURGUIGNON - 4 PERS
PREPARATION
10min 35min
COOKING
04
PERS
OK
mainstarter
dessert
recipesingredients
manual
librairies
cod fillet and broccoli
beef bourguignon
rabbit with olives and vegetables
goulash
moules marinières
BEEF BOURGUIGNON - 4 PERS
PREPARATION
10min 35min
COOKING
04
PERS
OK
Beef cut into 25 g cubes
Red wine
Veal stock
Bacons
Onions
Vegetable oil
800g
250 ml
150 ml
70g
150g
5cs
PREPARE THE INGREDIENTS
mainstarter
dessert
BEEF BOURGUIGNON
cod fillet and broccoli
beef bourguignon
rabbit with olives and vegetables
goulash
moules marinières
BEEF BOURGUIGNON - 4 PERS
PREPARATION
10min 35min
COOKING
04
PERS
OK
Beef cut into 25 g cubes
Red wine
Veal stock
Bacons
Onions
Vegetable oil
800g
250 ml
150 ml
70g
150g
5cs
PREPARE THE INGREDIENTS
do you want to start
the recipe?
YES NO
BEEF BOURGUIGNON
BEEF BOURGUIGNON - 4 PERS
PREPARATION
10min 35min
COOKING
BEEF BOURGUIGNON
04
PERS
OK
Beef cut into 25 g cubes
Red wine
Veal stock
Bacons
Onions
Vegetable oil
800g
250 ml
150 ml
70g
150g
5cs
PREPARE THE INGREDIENTS
do you want to start
the recipe?
YES NO
PREHEAT
please wait
BEEF BOURGUIGNON
BEEF BOURGUIGNON - 4 PERS
PREPARATION
10min 35min
COOKING
BEEF BOURGUIGNON
BEEF BOURGUIGNON
OK
OK
Beef cut into 25 g cubes
Red wine
Veal stock
Bacons
Onions
Vegetable oil
800g
250 ml
150 ml
70g
150g
5cs
PREPARE THE INGREDIENTS
do you want to start
the recipe?
brown all the ingredients
except the liquid for 10 mins
YES NO
PREHEAT
please wait
BEEF BOURGUIGNON
BEEF BOURGUIGNON
BEEF BOURGUIGNON
BEEF BOURGUIGNON
OK
Beef cut into 25 g cubes
Red wine
Veal stock
Bacons
Onions
Vegetable oil
800g
250 ml
150 ml
70g
150g
5cs
PREPARE THE INGREDIENTS
do you want to start
the recipe?
brown all the ingredients
except the liquid for 10 mins
YES NO
PREHEAT
please wait
do you want
to stop browning?
YES NO
BEEF BOURGUIGNON
BEEF BOURGUIGNON
BEEF BOURGUIGNON
BEEF BOURGUIGNON
BEEF BOURGUIGNON
OK
do you want to start
the recipe?
brown all the ingredients
except the liquid for 10 mins
YES NO
PREHEAT
please wait
do you want
to stop browning?
YES NO
add the rest of the ingredients
OK
BEEF BOURGUIGNON
BEEF BOURGUIGNON
BEEF BOURGUIGNON
BEEF BOURGUIGNON
BEEF BOURGUIGNON
OK
brown all the ingredients
except the liquid for 10 mins
PREHEAT
please wait
do you want
to stop browning?
YES NO
do you want
to start cooking?
YES NO
add the rest of the ingredients
OK
BEEF BOURGUIGNON
BEEF BOURGUIGNON
BEEF BOURGUIGNON
BEEF BOURGUIGNON
BEEF BOURGUIGNON
00:35
OK
brown all the ingredients
except the liquid for 10 mins
do you want
to stop browning?
YES NO
do you want
to start cooking?
YES NO
add the rest of the ingredients
OK
COOK
BEEF BOURGUIGNON
BEEF BOURGUIGNON
BEEF BOURGUIGNON
BEEF BOURGUIGNON
BEEF BOURGUIGNON
00:35
END OF COOKING
please wait
do you want
to stop browning?
YES NO
do you want
to start cooking?
YES NO
add the rest of the ingredients
OK
COOK
BEEF BOURGUIGNON
BEEF BOURGUIGNON
BEEF BOURGUIGNON
BEEF BOURGUIGNON
BON APPÉTIT!
KEEP WARM
00:10
00:35
END OF COOKING
please wait
do you want
to start cooking?
YES NO
add the rest of the ingredients
OK
COOK
BEEF BOURGUIGNON
ok
ok
ok
ok
ok
ok
ok
ok
ok
ok
okokok
ok
ok
ok
ok
ok
ok
okokok
ok
ricetta manzo alla
MENU RICETTE
Con il menu ricette,
scegliete tra 150 ricette
salate e dolci suddivise
in tre categorie:
antipasti / piatti
principali/ Dessert.
borgognona
+
Selezionare il menu
“ricette”
+
Selezionare il numero di
persone
+
ricetta
it
menu
ricette
+
Avviare la ricetta Seguire le istruzioni
Preriscaldamento
MENU RICETTE
+
Selezionare una ricettaSelezionare il tipo di
(CONTINUA)
È possibile tornare
al menu iniziale
tenendo premuto il
pulsante Indietro per
30 secondi.
Interrompere la
rosolatura
Preparare gli ingredientiVisualizzare la ricetta
Tempo di cottura
Seguire le istruzioni
Preriscaldamento
+
Avviare la cottura
È pronto!
173
Page 90

Please wait
DOWNLOADING
LIBRAIRIES
recipes
manual
ingredients
library
recipes
manual
ingredients
library
mainstarter
dessert
library
World
recipes
manual
ingredients
library
mainstarter
dessert
library
ok
ok
ok
ok
ok
ok
it
bibliotecabiblioteca
CARICAMENTO
DI PACCHETTI DI
RICETTE:
Dopo aver connesso
l’applicazione al vostro
Cookeo+, potete
scaricare dei pacchetti di
ricette.
Selezionare un pacchetto e
Scaricamento in corso
premere il tasto “Scaricare
su Cookeo+”
N.B.: Potete arrestare in ogni momento lo
scaricamento premendo il tasto “indietro” del
Cookeo+.
ACCEDERE ALLE
BIBLIOTECHE DEL
VOSTRO COOKEO+:
potete ritrovare i
pacchetti che avete
scaricato. Lanciate
le ricette dal vostro
Cookeo+ accedendo alla
vostra biblioteca.
+
Selezionatele dal sotto-
menu “biblioteca”
+
Selezionate il pacchetto
di ricette desiderato
+
Selezionate “antipasto”,
“
piatto principale” o “dessert”
e scegliete la vostra ricetta
175
Page 91

avant
utilisation
it
Rricette
ingredienti
carne
pesci e crostacei
riso e cereali
manzo
agnello
maiale
pollame
coniglio
vitello
pesce
cozze
cape sante
gamberi/scampi
orzo
riso integrale
grano saraceno
bulgur
quinoa
grano
riso bianco
frutta/verdura
carciofi
asparagi
melanzane
barbabietole
broccoli
carote
sedano rapa
cavolo
cavolfiore/broccolo romanesco
cavoletti di Bruxelles
cavolo verde
gambi di bietola
bietola
zucchine
cicoria
spinaci
finocchi
fagiolini
lenticchie
rapa
patate dolci
piselli/taccole
pere
porri
mele
patate
zucche
entrée
entrée
www.moulinex.it
Trova ricette sul mio Cookeo
e www.moulinex.it
177
Page 92

avant
utilisation
avant
utilisation
it
pulizia e
manutenzione
Dopo l’uso, scollegare l’apparecchio
dalla presa di corrente per pulirlo.
Pulire l’apparecchio dopo ogni
utilizzo.
!
!
È possibile lavare la pentola di cottura e il cestello vapore con acqua
calda saponata o in lavastoviglie. Il corpo centrale dell’apparecchio
deve essere pulito con un panno umido.
Dopo diversi lavaggi in lavastoviglie, l’esterno della pentola potrebbe
scolorirsi. È possibile pulirlo con la parte ruvida di una spugna.
pulizia e
manutenzione
Dopo ogni utilizzo, rimuovere il raccoglicondensa e lavarlo accuratamente
con acqua pulita o in lavastoviglie.
Asciugarlo accuratamente. Riportarlo
nella posizione originale.
1 2
3
Per lavare il coperchio in metallo, a
mano o in lavastoviglie, è necessario
rimuovere il coperchio della valvola.
1
Svitare il dado al centro del
coperchio in metallo
2
Rimuovere il coperchio in metallo
3
Rimuovere il coperchio della valvola
LAVAGGIO IN LAVASTOVIGLIE
È possibile lavare il coperchio in
metallo in lavastoviglie, senza
rimuovere le valvole. Dopo il
lavaggio, rimuovere la sfera e soffiare
nel tubo per verificare che non sia
bloccato. Asciugare accuratamente
la sfera e il suo coperchio con un
panno morbido.
LAVAGGIO A MANO
È possibile lavare il coperchio in
metallo con acqua calda saponata.
Rimuovere la sfera e pulirla
accuratamente. Asciugare la sfera
e il suo coperchio con un panno
morbido.
179
Page 93

pulizia e
manutenzione
it
Prima di reinserire la sfera, soffiare
nel tubo per verificare che non sia
ostruito.
Prima di rimuovere il coperchio interno, pulire la
parte superiore della pentola di cottura. Pulire
l’interno del coperchio in metallo dell’apparecchio
con una spugna umida e verificare che l’asta
manometrica sia posizionata correttamente e non
sia ostruita.
Risciacquare con acqua corrente e verificare la
mobilità del perno di sicurezza.
!
Premere la parte interna della molla
della valvola di sicurezza per verificare
che non sia ostruita.
Sostituire la guarnizione impermeabile
almeno ogni tre anni. Questa
operazione può essere effettuata in
un centro di assistenza autorizzato.
Non riporre l’apparecchio con il
coperchio chiuso; lasciarlo aperto o
socchiuso per evitare la formazione
di odori sgradevoli.
!
• In caso di immersione accidentale dell’apparecchio
in acqua o se l’elemento riscaldante entra a contatto
con acqua quando la pentola non è in posizione,
portare l’apparecchio presso un centro di assistenza
autorizzato.
Trasportare l’apparecchio usando le due maniglie
laterali. Per una maggiore sicurezza, verificare che
l’impugnatura sia in posizione di chiusura. Per una
maggiore sicurezza, verificare che il coperchio sia
chiuso.
Pulire le superfici esterne del coperchio
dell’apparecchio con una spugna
umida. Pulire la valvola silenziatrice
situata sul retro del coperchio.
Pulire la parte superiore della pentola
di cottura con un panno umido.
Pulire il raccogli-condensa con un
panno umido. Risciacquare con
acqua corrente e verificare la mobilità
dell’asta di sicurezza.
Pulire la guarnizione sul coperchio
di metallo con un panno umido,
quindi risciacquarla accuratamente.
Non usare oggetti appuntiti.
181
Page 94

PROBLEMA POSSIBILE CAUSA SOLUZIONE
Il coperchio non si chiude.
L'apparecchio non si
decomprime.
Il coperchio non si apre
dopo la fuoriuscita del
vapore
L'apparecchio non si
pressurizza.
CODICI ERRORE Codice 24: la pressione diminuisce durante la cottura a pressione.
Durante la cottura fuoriesce
del vapore dai lati del
coperchio (perdite).
Fuoriesce dell'acqua dal
retro dell'apparecchio.
La spia non lampeggia o
non si accende.
Il pannello di controllo non
si accende.
È presente della condensa
nella spia.
Il coperchio in metallo
non può essere rimosso, è
bloccato.
Tra la pentola e la piastra riscaldante sono presenti corpi
estranei.
L'impugnatura di apertura del coperchio non è posizionata
correttamente.
Il coperchio in metallo e/o il dado di serraggio non sono
installati correttamente o avvitati completamente.
Il coperchio della sfera non è posizionato correttamente. Lasciare che l'apparecchio si raffreddi completamente, quindi rimuovere il coperchio in metallo
L'asta manometrica è ancora in posizione sollevata. Dopo aver vericato che non fuoriesca altro vapore e che la pentola sia completamente
Vericare che la guarnizione, la valvola di sicurezza viola e
l'asta manometrica siano pulite.
Vericare che il coperchio sia bloccato e che la linea sia
allineata correttamente con il lucchetto chiuso. Vericare che
l'asta manometrica sia libera di muoversi e che sia pulita.
La sfera di decompressione non è posizionata correttamente
o è sporca.
Codici 21 e 26: la pressione non aumenta.
La guarnizione del coperchio in metallo e/o i bordi della pentola
sono sporchi.
La guarnizione è usurata, danneggiata o deformata. La guarnizione deve essere sostituita almeno ogni tre anni. Portare l'apparecchio presso un
I bordi della pentola sono danneggiati. Portare l'apparecchio presso un centro di assistenza autorizzato.
Il dado del coperchio in metallo non è abbastanza serrato. Serrare il dado al centro del coperchio in metallo.
Il raccogli-condensa non è in posizione o è troppo pieno. Vericare che il raccogli-condensa sia posizionato correttamente sul retro dell'apparecchio e
Le valvole di sicurezza e/o le aperture sono ostruite. Vericare che il raccogli-condensa non sia troppo pieno e che non siano presenti alimenti
La spia non funziona o il coperchio non è completamente
bloccato.
L'apparecchio non è collegato alla presa di corrente o è in
modalità di standby.
L'apparecchio è danneggiato. Portare l'apparecchio presso un centro di assistenza autorizzato.
È presente della condensa sul coperchio. Lasciare asciugare l'apparecchio all'aria aperta per qualche ora.
Il coperchio della sfera sul coperchio in metallo non è
posizionato correttamente.
Rimuovere la pentola e vericare che la piastra riscaldante, l'elemento centrale e la parte
inferiore della pentola siano puliti. Vericare inoltre la mobilità dell'elemento centrale.
Vericare che l'impugnatura del coperchio sia completamente aperta.
Vericare di aver posizionato tutti gli elementi del coperchio in metallo e che il dado sia
serrato.
e posizionare correttamente il coperchio della sfera (ssarlo in posizione di chiusura).
fredda, inserire uno stecchino nel foro situato tra l'impugnatura di apertura e la valvola
silenziatrice. Fare attenzione al vapore rilasciato dopo aver inserito lo stecchino. Quando
non fuoriesce più vapore, provare ad aprire l'apparecchio.
Pulire l'apparecchio seguendo le istruzioni fornite nel manuale.
Vericare che l'asta manometrica sia libera di muoversi e che sia pulita.
Vericare che la sfera sia posizionata correttamente e che il coperchio sia in posizione di
chiusura. Pulire e asciugare la sfera e il suo coperchio.
Aggiungere del liquido nella pentola (acqua, brodo o salsa), 50-100 ml alla volta, e
riavviare la ricetta.
Pulire i lati della pentola e la guarnizione con un panno umido. Non usare oggetti appuntiti.
centro di assistenza autorizzato.
che il tubo di usso non sia ostruito.
soggetti a espansione (consultare le istruzioni di sicurezza).
Vericare che l'apparecchio sia completamente bloccato. Portare l'apparecchio presso un
centro di assistenza autorizzato se il problema persiste.
Vericare che il cavo di alimentazione sia collegato sia all'apparecchio che a una presa di
corrente. Vericare che l'apparecchio non sia in standby premendo il pulsante OK.
Svitare il dado al centro del coperchio in metallo e premere il perno al centro del dado per
rilasciare il coperchio e accedere al coperchio della sfera. Posizionare accuratamente sia la
sfera che il coperchio in metallo.
it
Per qualsiasi problema di connessione, consultate il sito
www.moulinex.fr o l’applicazione Mon Cookeo
(Menu / Guida / FAQ).
Marchi depositati
Il marchio e il logo Bluetooth® sono di proprietà di Bluetooth SIG, Inc. e il loro
utilizzo da parte di SEB SAS è soggetto a licenza. Gli altri marchi commerciali e nomi
di marchi sono di proprietà dei rispettivi titolari.
Serie EPC09
Bassa pressione: 40 kPa (109°C) / Alta pressione: 70 kPa (115°C)
Capacità totale: 6 L / Capacità utile: 4 L
Riscaldamento integrato
183
Page 95

Page 96

Félix Création - Photos : Michel Boudier.
NC00136521
 Loading...