

Page 1
Field Service Manual
Basic and Field Level Test Procedures
iDEN
Digital Multi-Service,
Data-Capable Portable
Page 2

i580
Digital Multi-Service,
Data-Capable Portable
Field Service Manual
Basic and Field Level
Test Procedures
2006
68P80401P05 i
Page 3

Manual Revisions
Changes that occur after this manual is printed are described in the Field Manual Revisions (FMRs). The FMRs provide
the most current instructions and component information.
Copyright Information
The Motorola products described in this manual may include Motorola computer programs stored in semiconductor
memories or other media that are copyrighted with all rights reserved worldwide to Motorola. Laws in the United States
and other countries preserve for Motorola, Inc. certain exclusive rights to the copyrighted computer programs, including
the exclusive right to copy, reproduce, modify, decompile, disassemble, and reverse-engineer the Motorola computer
programs in any manner or form without Motorola’s prior written consent. Furthermore, the purchase of Motorola products shall not be deemed to grant either directly or by implication, estoppel, or otherwise, any license or rights under the
copyrights, patents, or patent applications of Motorola, except for a nonexclusive license to use the Motorola product
and the Motorola computer programs with the Motorola product.
Trademarks
MOTOROLA, the Stylized M Logo, Message Mail, VibraCall, and iDEN are registered trademarks of Motorola, Inc.
® Reg. U.S. Pat. & Tm. Off. All other product or service names are the property of their respective owners.
© Copyright 2006, Motorola, Inc. All rights reserved.
ii 68P80401P05
Page 4

SAFETY AND GENERAL INFORMATION
SAFETY AND GENERAL INFORMATION
IMPORTANT INFORMATION ON SAFE AND EFFICIENT OPERATION.
READ THIS INFORMATION BEFORE USING YOUR INTEGRATED
MULTI-SERVICE PORTABLE RADIO.
RF Operational Characteristics
Your radio product contains a radio frequency transmitter to
convey the information you wish to send as well as occasional
automatic signals used to sustain connection to the wireless
network, and a receiver which enables you to receive
communication and connection information from the network.
PORTABLE RADIO PRODUCT OPERATION
AND EME EXPOSURE
Your Motorola two-way radio complies with the following RF
energy exposure standards and guidelines:
• United States Federal Communications Commission, Code
of Federal Regulations; 47 CFR part 2 sub-part J
• American National Standards Institute (ANSI) / Institute of
Electrical and Electronics Engineers (IEEE). C95. 1-1992
• Institute of Electrical and Electronics Engineers (IEEE).
C95. 1-1999 Edition
• International Commission on Non-Ionizing Radiation
Protection (ICNIRP) 1998
• Ministry of Health (Canada). Safety Code 6. Limits of
Human Exposure to Radiofrequency Electromagnetic Fields
in the Frequency Range from 3 kHz to 300 GHz, 1999
• Australian Communications Authority
Radiocommunications (Electromagnetic Radiation - Human
Exposure) Standard 2001
• ANATEL, Brasil Regulatory Authority, Resolution 256
(April 11, 2001) “additional requirements for SMR, cellular
and PCS product certification.”
To assure optimal radio product performance and
make sure human exposure to radio frequency
electromagnetic energy is within the guidelines set forth in
the above standards, always adhere to the following
procedures:
Phone Operation
Two-way radio operation
When using your radio product as a
traditional two-way radio, hold the
radio product in a vertical position
with the microphone one to two
inches (2.5 to 5 cm) away from the
lips.
Body-worn operation
To maintain compliance with FCC RF exposure guidelines, if
you wear a radio product on your body when transmitting,
always place the radio product in a Motorola approved clip,
holder, holster, case or body harness for this product. Use of
non-Motorola-approved accessories may exceed FCC RF
exposure guidelines. If you do not use a Motorola approved
body-worn accessory and are not using the radio product in
the intended use positions along side the head in the phone
mode or in front of the face in the two-way radio mode, then
ensure the antenna and the radio product are kept the
following minimum distances from the body when
transmitting:
• Phone or Two-way radio mode: one inch (2.5 cm)
• Data operation using any data feature with or without
an accessory cable: one inch (2.5 cm)
Antenna Care
Use only the supplied or an approved replacement antenna.
Unauthorized antennas, modifications, or attachments could
damage the radio product and may violate FCC regulations.
DO NOT hold the antenna when the radio product is “IN
USE”. Holding the antenna affects call quality and may cause
the radio product to operate at a higher power level than needed.
Approved Accessories
For a list of approved Motorola accessories call 1-800-4530920, visit our website at www.mot.com/iden or look in the
accessory section of this manual.
When placing or receiving a phone call, hold your radio product
as you would a wireline telephone. Speak directly into the
microphone.
68P80401P05 iii
Page 5

SAFETY AND GENERAL INFORMATION
ALL MODELS WITH FCC ID AZ489FT5848 MEET THE
GOVERNMENT'S REQUIREMENTS FOR EXPOSURE TO
RADIO WAVES.
Your wireless phone is a radio transmitter and receiver. It is designed
and manufactured not to exceed the emission limits for exposure to
radiofrequency (RF) energy set by the Federal Communications
Commission of the U.S. Government. These limits are part of
comprehensive guidelines and establish permitted levels of RF energy
for the general population. The guidelines are based on standards that
were developed by independent scientific organizations through
periodic and thorough evaluation of scientific studies. The standards
include a substantial safety margin designed to assure the safety of all
persons, regardless of age and health.
The exposure standard for wireless mobile phones employs a unit of
measurement known as the Specific Absorption Rate, or SAR. The SAR
limit set by the FCC is 1.6 W/kg.* Tests for SAR are conducted using
standard operating positions specified by the FCC with the phone
transmitting at its highest certified power level in all tested frequency
bands. Although the SAR is determined at the highest certified power
level, the actual SAR level of the phone while operating can be well below
the maximum value. This is because the phone is designed to operate at
multiple power levels so as to use only the power required to reach the
network. In general, the closer you are to a wireless base station antenna,
the lower the power output.
Before a phone model is available for sale to the public, it must be tested
and certified to the FCC that is does not exceed the limit established by
the government-adopted requirement for safe exposure. The tests are
performed in positions and locations (e.g., at the ear and worn on the
body) as required by the FCC for each model. The highest SAR value
for this model phone when tested for use at the ear is 1.02 W/kg and
when tested on the body, as described in the user guide, is 1.30 W/kg
during packet data transmission. (Body-worn measurements differ
among phone models, depending upon available accessories and FCC
requirements.) While there may be differences between the SAR levels
or various phones and at various positions, they all meet the government
requirement for safe exposure.
The FCC has granted an Equipment Authorization for this model phone
with all reported SAR levels evaluated as in compliance with the FCC
RF exposure guidelines. SAR information on this model phone is on file
with the FCC and can be found under the Display Grant section of
http://www.fcc.gov/oet/fccid after searching on FCC ID
AZ489FT5848.
Additional information on Specific Absorption Rates (SAR) can be
found on the Cellular Telecommunications Industry Association (CTIA)
web-site at http://www.wow-com.com.
Facilities
To avoid electromagnetic interference and/or compatibility
conflicts, turn off your radio product in any facility where
posted notices instruct you to do so. Hospitals or health care
facilities may be using equipment that is sensitive to external RF
energy.
Aircraft
When instructed to do so, turn off your radio product when on
board an aircraft. Any use of a radio product must be in
accordance with applicable regulations per airline crew
instructions.
Medical Devices
Pacemakers
The Advanced Medical Technology Association (AdvaMed)
recommends that a minimum separation of 6 inches (15 cm) be
maintained between a handheld wireless radio product and a
pacemaker. These recommendations are consistent with those of
the U.S. Food and Drug Administration.
Persons with pacemakers should:
• ALWAYS keep the radio product more than 6 inches
(15 cm) from their pacemaker when the radio product is
turned ON.
• Not carry the radio product in a breast pocket.
• Use the ear opposite the pacemaker to minimize the
potential for interference.
• Turn the radio product OFF immediately if you have any
reason to suspect that interference is taking place.
Hearing Aids
Some digital wireless radio products may interfere with some
hearing aids. In the event of such interference, you may want to
consult your hearing aid manufacturer to discuss alternatives.
Other Medical Devices
If you use any other personal medical device, consult the
manufacturer of your device to determine if it is adequately
* In the United States and Canada, the SAR limit for mobile phones used by
the public is 1.6 watts/kg (W/kg) averaged over one gram of tissue. The
standard incorporates a substantial margin of safety to give additional
protection for the public and to account for any variations in measurements.
shielded from RF energy. Your physician may be able to assist
you in obtaining this information.
Use While Driving
Check the laws and regulations on the use of radio products in
Electro Magnetic Interference/
Compatibility
NOTE: Nearly every electronic device is susceptible
to electromagnetic interference (EMI) if
inadequately shielded, designed or
otherwise configured for electromagnetic
compatibility.
the area where you drive. Always obey them. When using the
radio product while driving, please:
• Give full attention to driving and to the road.
• Use hands-free operation, if available.
• Pull off the road and park before making or answering a call
if driving conditions so require.
iv 68P80401P05
Page 6

Operational Warnings
P
SAFETY AND GENERAL INFORMATION
Operational Cautions
F
For Vehicles Equipped with an Air Bag
Do not place a portable radio product in the area over the air bag
or in the air bag deployment area. Air bags inflate with great
force. If a portable radio is placed in the air bag deployment area
and the air bag inflates, the radio product may be propelled with
great force and cause serious injury to occupants of the vehicle.
Potentially Explosive Atmospheres
Turn off your radio product prior to entering any area with a
potentially explosive atmosphere, unless it is a radio product type
especially qualified for use in such areas as “Intrinsically Safe”
(for example, Factory Mutual, CSA, or US approved). Do not
remove, install, or charge batteries in such areas. Sparks in a
potentially explosive atmosphere can cause an explosion or fire
resulting in bodily injury or even death.
NOTE: The areas with potentially explosive atmospheres
referred to above include fueling areas such as
below decks on boats; fuel or chemical transfer or
storage facilities; areas where the air contains
chemicals or particles, such as grain, dust or
metal powders; and any other area where you
would normally be advised to turn off your vehicle
engine. Areas with potentially explosive
atmospheres are often, but not always, posted.
Blasting Caps and Areas
To avoid possible interference with blasting operations, turn off
your radio product when you are near electrical blasting caps, in a
blasting area, or in areas posted: “Turn off two-way radio”. Obey
all signs and instructions.
Antennas
Do not use any portable radio product that has a damaged
antenna. If a damaged antenna comes into contact with your skin,
a minor burn can result.
Batteries
All batteries can cause property damage and/or bodily injury, such
as burns if a conductive material, such as jewelry, keys, or beaded
chains touches exposed terminals. The conductive material may
complete an electrical circuit (short circuit) and become quite hot.
Exercise care in handling any charged battery, particularly when
placing it inside a pocket, purse, or other container with metal
objects.
If the radio product does not work after following the steps
listed above, contact your dealer for servicing information.
Clean the external surfaces of the radio product with a damp
cloth, using a mild solution of dishwashing detergent and water.
Some household cleaners may contain chemicals that could
seriously damage the radio product. Avoid the use of any
petroleum-based solvent cleaners. Also, avoid applying liquids
directly on the radio product.
Accessory Safety Information
IMPORTANT: SAVE THESE ACCESSORY SAFETY
INSTRUCTIONS
Cleaning and Drying Considerations
Using a leather carry case may help protect the surfaces and help
prevent liquids (e.g., rain) from entering into the interior of the
radio product. This product is not water proof, and exposing the
unit to liquids may result in permanent damage to the unit.
If your radio product interior gets wet, then do not try to
accelerate drying with the use of an oven or a dryer as this will
damage the radio product and void the warranty. Instead, do the
following:
1. Immediately power off the radio product.
2. Remove Battery and SIM card (if so equipped) from radio
product.
3. Shake excess liquid from radio product.
4. Place the radio product and battery in an area that is at room
temperature and has good air flow.
5. Let the radio product, battery, and SIM card dry for 72 hours
before reconnecting the battery and/or powering on the radio
product.
• Before using any battery or battery charger, read all the
instructions for and cautionary markings on (1) the battery,
(2) the battery charger, which may include a separate wallmounted power supply or transformer, and (3) the radio
product using the battery.
• Do not expose any battery charger to water, rain, or snow as
they are designed for indoor or in-vehicle use only.
WARNING: To reduce the risk of
injury, charge only the rechargeable
P
batteries listed in the Accessories
section of this manual. Other types
of batteries may burst, causing
personal injury and damage.
• To reduce the risk of damage to the cord or plug, pull by the
plug rather than the cord when you disconnect the battery
charger from the power source outlet.
• Do not operate any battery charger with a damaged cord or
plug — replace them immediately.
• Battery chargers may become warm during operation, but
not hot. If it becomes hot to the touch, unplug it from the
power outlet immediately and discontinue its use.
68P80401P05 v
Page 7

SAFETY AND GENERAL INFORMATION
• Use of a non-recommended attachment to a battery charger
may result in a risk of fire, electric shock, or injury to
persons.
• Make sure the battery charger power cord is located so that
it will not be stepped on, tripped over, or subjected to
damage or stress.
• An extension cord should not be used with any battery
charger unless absolutely necessary. Use of an improper
extension cord could result in a risk of fire and electric
shock. If an extension cord must be used, make sure that:
• The pins on the plug of the extension cord are the same
number, size, and shape as those on the plug of the
charger.
• The extension cord is properly wired and in good
electrical condition.
• The cord size is 18AWG for lengths up to 100 feet and
16AWG for lengths up to 150 feet.
• Do not operate any battery charger if it has received a sharp
blow, has been dropped, or has been damaged in any way;
take it to a qualified service technician.
• Do not disassemble a battery charger; take it to a qualified
service technician when service or repair is required.
Incorrect reassembly may result in a risk of electric shock or
fire.
• Maximum ambient temperature around the power supply or
transformer of any battery charger should not exceed 40°C
(104°F).
• The output power from the power supply or transformer
must not exceed the rating given on the Desktop DualPocket Charger.
• The disconnection from the line voltage is made by
unplugging the power supply from the AC receptacle.
• To reduce risk of electric shock, unplug any battery charger
from the outlet before attempting any maintenance or
cleaning.
For optimum charging performance, turn off the radio product
while charging it in any battery charger.
vi 68P80401P05
Page 8

MODEL INFORMATION
This manual applies to the following iDEN i580 Digital Portable models:
H83XAH6RR4AN 806-940 MHz, Multi-Service, Data-Capable Portable
MODEL NUMBERING SYSTEM
Typical Model Number: H 8 3 X A H 6 R R 4 A N
Position: 123456789101112
Position 1 - Type of Unit
H = Hand-Held Portable
M = Mobile Product
MODEL INFORMATION
Positions 2 and 3 - Model Series Position 12 - Unique
40 = i85s/i55sr/i50sx Products
41 = i90c Products
45 = i265 Products
48 = i80s Products
56 = i30sx/i30s Products
57 = i95cl Products
58 = i88s/i58sr Products
59 = i60c Products
62 = i205/i305 Products
63 = i530/i730/i710 Products
68 = i325pro Products
69 = i315plus Products
73 = i860 Products
74 = i830 Products
75 = i285 Products
72 = i930 Products
85 = i870 Products
83 = i580 Products
Position 4 - Frequency Band Position 11 - Version
U = 806 to 870 MHz Version Letter (Alpha) X = 806 to 941 MHz Major Change
*Values given represent range only; they are not absolute.
Position 5 - Power Level Position 10 - Feature level
A = 0 to 0.7 Watts 1 = Basic 6 = Standard Plus
B = 0.7 to 0.9 Watts 2 = Limited Pkg 7 = Expanded Pkg
C = 1.0 to 3.9 Watts 3 = Limited Plus 8 = Expanded Plus
D = 4.0 to 5.0 Watts 4 = Intermediate 9 = Full Feature/
E = 5.1 to 6.0 Watts 5 = Standard Pkg Programmable
F = 6.1 to 10.0 Watts
Position 6 - Physical Packages Position 9 - Primary System Type
F = Limited Keypad - With Display R = iDEN Shared
H = Full Keypad - With Display
N = Enhanced Controls - Enhanced Display
Model Variations
N = Standard Package
Position 7 - Channel Spacing Position 8 - Primary Operation
1 = 5 kHz 5 = 15 kHz N = Digital Dispatch
2 = 6.25 kHz 6 = 25 kHz Q = Low Profile - Basic Display
3 = 10 kHz 7 = 30 kHz R = Digital Multi-Service
4 = 12.5 kHz 9 = Variable Programmable J = TDMA Digital Dual Mode
68P80401P05 vii
Page 9

MODEL SPECIFICATIONS
MODEL SPECIFICATIONS
GENERAL RECEIVER TRANSMITTER
FCC Designation: AZ489FT5848 Receiver Type: Direct Conversion Transmitter Type Single Conversion
Operational Modes:
800 MHz Band only:
Temperature Range:
Operating –10°C to +60°C
Storage (w/o battery) –40°C to +85°C
Power Supply:
Battery Type Lithium Ion
Recommended
Battery: SNN5744B
Battery Voltage:
Nominal
Range
Dimensions (HxWxD):
w/750mAh 94 x 57
battery door x 34 mm
w/500mAh 94 x 57
battery door x 31 mm
Phone
Private
Group
Circuit Data
Packet Data
MotoTalk
SNN5769A
3.6 Vdc
3.0 to 4.2 Vdc
Frequency Range: 851-870 MHz
935-940 MHz
902-928 MHz
Channel Spacing:
iDEN
MotoTalk
Frequency Stability:
Referenced to base
station 0.4 ppm
Sensitivity (10%) BER:
(M-16 QAM)
MotoTalk (3%)BER
(FSK)
Spurious Response
Immunity: -51 dBm
Spurious Radiation:
Above 960 MHz
216–960 MHz
88–216 MHz
30–88 MHz
25 kHz
50 kHz
–111 dBm
–119 dBm
<500 µV/m.
<200 µV/m.
<150 µV/m.
<100 µV/m.
Frequency Range: 806-825 MHz
896-901 MHz
902-928 MHz
Emission Designator: 18K3D7W
Modulation Types: Quad 16QAM
Quad 64QAM
Quad QPSK
FSK
Frequency Stability:
Referenced to base
station 0.4 ppm
Spurious Emissions:
Conducted
Radiated
MotoTalk Radiated
RF Pulse Avg Power:
iDEN (dynamically
adjusted)
MotoTalk
22.6 to +28.82 dBm
–13 dBm
–13 dBm
–41.2 dBm
–6 to +28 dBm
Weight:
(without battery)
viii 68P80401P05
112.5 g
Audio Output Power
and Speakerphone
Rating:
(Private and Group
Modes only) into
8 ohms at maximum
volume (nominal
battery voltage) 500 mW
Distortion at Rated
Audio:
Electrical
Acoustical
Specifications subject to change without notice.
5% Max.
10% Max.
Adjacent Channel
Power:
iDEN (at ±25 kHz in
18 kHz BW)
MotoTalk
(at ±50 kHz in 26 kHz
BW)
-55 dB
-55 dB
Page 10

Contents
SAFETY AND GENERAL INFORMATION ....................................... iii
MODEL INFORMATION...................................................................... vii
MODEL SPECIFICATIONS ................................................................ viii
PREFACE................................................................................................... v
Who Should Use This Manual ................................................................................ v
How This Manual Is Organized............................................................................... v
Conventions Used in This Manual ......................................................................... vi
Related Publications .............................................................................................. vi
CHAPTER 1 OVERVIEW............................................................................................... 1
i DEN Digital Modulation Technology...................................................................... 1
i DEN Voice Compression Technology ................................................................... 3
RF Transmission Bursts ........................................................................................................... 3
Calling Area Coverage.............................................................................................................. 4
Global Positioning System (GPS) Section.............................................................. 5
MOTOtalk ............................................................................................................... 5
Bluetooth® Wireless System .................................................................................. 5
SIM Cards............................................................................................................... 6
Removing and Inserting a SIM Card......................................................................................... 6
CHAPTER 2 FEATURES, ICONS, AND INDICATORS............................................ 8
i 580 Features ..................... ................................................. ................................... 8
Display Icons .......................................................................................................... 9
Main Menu Icons ...................................................................................................................... 9
Status Icons ............................................................................................................................ 10
CHAPTER 3 DISPLAYS, MESSAGES, AND ALERTS............................................ 11
Power-Up Sequence............................................................................................. 11
Power-Down Sequence ........................................................................................ 12
Messages ............................................................................................................. 12
Self-Test Errors....................................................................................................................... 12
Self-Test Reset Errors ............................................................................................................ 12
Service Messages .................................................................................................................. 13
Alert Tones ........................................................................................................... 14
Using the Optional Vibrate Function ..................................................................... 17
PREPARING FOR BASIC LEVEL TESTING.................................... 19
Test Equipment..................................................................................................... 19
Reference Unit........................................................................................................................ 19
Reference Accessories ........................................................................................................... 19
CHAPTER 5 BASIC LEVEL CHECKS AND SELF TESTS..................................... 20
Customer Care ..................................................................................................... 20
Test Conditions..................................................................................................... 20
Antenna Condition .................................................................................................................. 20
Reset Condition ...................................................................................................................... 20
Basic-Level Test Checklist.................................................................................... 21
68P80401P05 i
Page 11

Preventive Maintenance ...................................................................................... 21
Mechanical and Electrical Checks ....................................................................... 22
SIM Card Swap Test............................................................................................................... 22
Accessory Swap Test ............................................................................................................. 23
Lockup Test ............................................................................................................................ 23
Battery Connections Test ....................................................................................................... 24
Testing the GPS Receiver ...................................................................................................... 24
Voltage Recognition Test........................................................................................................ 25
Self-Test Procedures ........................................................................................... 25
Passcode Test ........................................................................................................................ 26
Programming Menu Settings Check ....................................................................................... 26
Call Performance Test ............................................................................................................ 31
CHAPTER 6 BASIC LEVEL TEST MODES AND PROCEDURES........................ 33
Test Modes .......................................................................................................... 33
Entering Debug Mode ............................................................................................................. 33
Trace Mode Display Screens.................................................................................................. 34
Entering Test Mode ................................................................................................................ 36
Test Mode Test Procedures................................................................................. 36
Audio Loopback Test .............................................................................................................. 36
ESN and IMEI Matching Test ................................................................................................. 37
Debug Check .......................................................................................................................... 37
Technician Test Procedures ................................................................................ 40
Programming the i580 Unit .................................................................................. 41
Connecting the Unit to the RSS Workstation ....................................................... 41
Codeplug Help ........................................................................................................................ 42
Codeplug Troubleshooting...................................................................................................... 42
CHAPTER 7 PREPARING FOR FIELD LEVEL TESTING.................................... 43
Preparing Equipment for Testing ......................................................................... 43
Calibrating Equipment ............................................................................................................ 43
Checking the RF Cable........................................................................................................... 43
Strong-Signal Environments................................................................................................... 43
Protecting Static-Sensitive Devices ........................................................................................ 43
Using RSS ........................................................................................................... 44
Connecting an i DEN Unit to the R-2660.............................................................. 44
Operating the R-2660 .......................................................................................... 46
Disassembling and Reassembling the Unit ......................................................... 47
Disassembly Sequence Flowchart ....................................................................... 47
Assembly/Disassembly Procedures..................................................................... 47
Remove Battery Cover......................................................................................... 48
Remove: ................................................................................................................................. 48
Install: ..................................................................................................................................... 48
Remove Battery ................................................................................................... 49
Remove: ................................................................................................................................. 49
Remove SIM Card ............................................................................................... 50
Remove: ................................................................................................................................. 50
Remove Antenna ................................................................................................. 50
Remove Back Housing ........................................................................................ 52
Remove: ................................................................................................................................. 52
Install: ..................................................................................................................................... 52
Remove Main Board, Keypad .............................................................................. 53
Remove: ................................................................................................................................. 53
ii 68P80401P05
Page 12

Remove Flip Assembly ......................................................................................... 54
Procedure to remove flip assembly: ....................................................................................... 54
Install Flip Assembly ............................................................................................. 56
Procedure to install flip assembly: .......................................................................................... 56
Exploded View and Parts List ............................................................................... 58
i580 Component Parts List ..................................................................................................... 58
i580 Exploded View ................................................................................................................ 59
CHAPTER 8 FIELD LEVEL TEST MODES AND PROCEDURES........................ 60
Test Modes ........................................................................................................... 60
Entering Test Mode ................................................................................................................ 60
Required Test Equipment ..................................................................................... 61
Field-Level Test Checklist..................................................................................... 61
Registration/Call Test ........................................................................................... 63
Signal Quality Error (SQE) Test............................................................................ 64
TX Power Test ...................................................................................................... 65
Bit Error Rate (BER) Test ..................................................................................... 66
Power-Up Test...................................................................................................... 67
Keypad Test.......................................................................................................... 68
Audio Test............................................................................................................. 69
Reset Test ............................................................................................................ 70
Reset Log Test ..................................................................................................... 71
Model Assembly (MA) Test Mode Test................................................................. 72
GPS (Global Positioning System) Receiver Test.................................................. 73
MOTOtalk ............................................................................................................. 74
Bluetooth Test....................................................................................................... 75
CHAPTER 9 MECHANICAL PARTS REWORK AND REPAIR ........................... 77
Recommended Equipment ................................................................................... 77
Hot Air Machine ...................................................................................................................... 77
Preheater................................................................................................................................ 77
High Performance Soldering Station ...................................................................................... 77
Microscope ............................................................................................................................. 77
Magnifier Lamp ....................................................................................................................... 77
Fume Absorber ....................................................................................................................... 77
Recommended Tools............................................................................................ 78
Nozzles ................................................................................................................................... 78
Heat Shields ........................................................................................................................... 78
Tweezers ................................................................................................................................ 78
Probe/Pick .............................................................................................................................. 78
Vacuum Pick........................................................................................................................... 78
Recommended Supplies....................................................................................... 78
Rework/Repair Requirements:.............................................................................. 78
Temperatures: ........................................................................................................................ 78
Board Preparation:.................................................................................................................. 79
Components Identification ...................................................................................................... 79
Mechanical Parts Rework Procedure ................................................................... 80
Removal Procedure................................................................................................................ 80
Land Preparation Procedure................................................................................................... 80
Installation Procedure ............................................................................................................. 80
J600 RF Connector................................................................................................................. 81
J752 Audio Jack ..................................................................................................................... 81
68P80401P05 iii
Page 13

J401 (30 Pin Board-to-Flex Connector) .................................................................................. 81
J400 (80 Pin Board-to Flex Connector) .................................................................................. 82
M002 (SIMM Connector) ....................................................................................................... 82
M105 (Battery Contact ............................................................................................................ 82
M2 (2 Pin-Contact).................................................................................................................. 83
J753 (Microphone Socket)...................................................................................................... 83
SW-all (Key/Switch) ................................................................................................................ 83
D401 through D412 (LED) ...................................................................................................... 84
APPENDIX A ORDERING REPLACEMENT PARTS AND KITS........................... 85
Customer Service ................................................................................................ 85
Replacement Parts .............................................................................................. 85
Domestic Orders .................................................................................................. 85
International Orders ............................................................................................. 85
Replacement Kits................................................................................................. 86
Recommended Test Equipment and Tools.......................................................... 90
Recommended Programming Equipment............................................................ 90
iv 68P80401P05
Page 14

PREFACE
The iDEN i580 Digital Multi-Service, Data-Capable Portable Field Service Manual contains the
information necessary to identify and fix problems in the Motorola i580 Digital Portable. This unit
is based on digital technology and is designed to operate on iDEN systems.
Basic and field-level service for the this unit as described in this manual includes troubleshooting,
testing, board swapping, and maintenance.
Service for this unit is based on the substitution method: a faulty part is replaced by a working one,
providing quicker service to the customer. For example, if the battery is faulty, it is replaced. If the
unit requires more complete testing or service than is available at the basic level, it is sent to the
field-level service facility, serviced, and returned to the iDEN Customer Care Center (ICC).
NOTE: Before operating or testing this unit, please read the Safety and General Information
section in the front of this manual.
1.1 Who Should Use This Manual
PREFACE: Who Should Use This Manual
This manual is intended for service technicians who should be familiar with the test equipment
recommended in Appendix A. To help pinpoint basic problems with the unit, first perform the
mechanical checks and self tests as described in Chapter 5; then proceed to field level
troubleshooting and testing.
1.2 How This Manual Is Organized
This manual contains the following chapters and appendices:
Chapter 1 presents the theory and technology used by the iDEN system and the unit.
Chapter 2 describes the unit’s features, icons, and indicators.
Chapter 3 describes displays, messages, and alerts.
Chapter 4 describes preparing for basic level testing.
Chapter 5 describes basic mechanical checks and self test procedures to be performed.
Chapter 6 describes basic test modes and technician test procedures.
Chapter 7 describes how to prepare and operate field level test equipment. It also contains
disassembly and reassembly instructions.
Chapter 8 describes field level test modes and procedures.
Chapter 9 describes large component repair and rework procedures.
Appendix A provides information on ordering kits and replacement parts. It also contains lists of
recommended test equipment.
68P80401P05 v
Page 15

PREFACE: Conventions Used in This Manual
1.3 Conventions Used in This Manual
The following conventions are used throughout this manual:
italics Used for emphasis and new terms
bold Defines menu items, fields, and buttons
code Used for sample input and output
1.4 Related Publications
The following publications are available separately:
iDEN i580 Digital Multi-Service Data-Capable Phone User’s Guide NNTN6775A
R-2660 Digital Communications System Analyzer Operator’s Manual 68P80386B72
vi 68P80401P05
Page 16

CHAPTER 1
OVERVIEW
To achieve a high spectrum efficiency, the i580 digital multi-service, data-capable portable uses a
unique modulation technology and sophisticated voice-compression algorithm. The voice of the
person speaking into the microphone is converted into a digital bit stream consisting of zeros (0)
and ones (1). The stream then is modulated into a radio-frequency (RF) signal, which is transmitted
over the air to another unit. This process is called digital modulation.
1.1 i DEN Digital Modulation Technology
The i580 digital portable is a dual band 806-870 MHz and 896-940 MHz unit that can operate in
multiple modes: phone, private, data, and group. It uses three digital modulation technologies:
Quad QAM, Quadrature Phase Shift Keying (QPSK), and Time Division Multiple Access (TDMA).
Quadrature Amplitude Modulation (QAM) is a modulation technique that transmits information by
altering the amplitude and phase of the radio frequency (RF) signal. Data is converted into complex
symbols, which alter the RF signal and transmit the information. When the signal is received, the
amplitude and phase are converted back into symbols and then into the original data.
OVERVIEW: i DEN Digital Modulation Technology
There are three different QAM modes that are used for different applications: 64QAM, 16QAM, and
4QAM. In voice applications, 16QAM is used, while in data applications, 64QAM, 16QAM, and
4QAM are used.
NOTE: The 900 MHz band operates only in 16QAM modulation.
In 64QAM, 64 possible combinations of 6 bits are converted into a unique amplitude and phase. In
16QAM, there are 16 possible combinations of 4 bits, while in 4QAM, there are 4 possible
combinations of 2 bits.
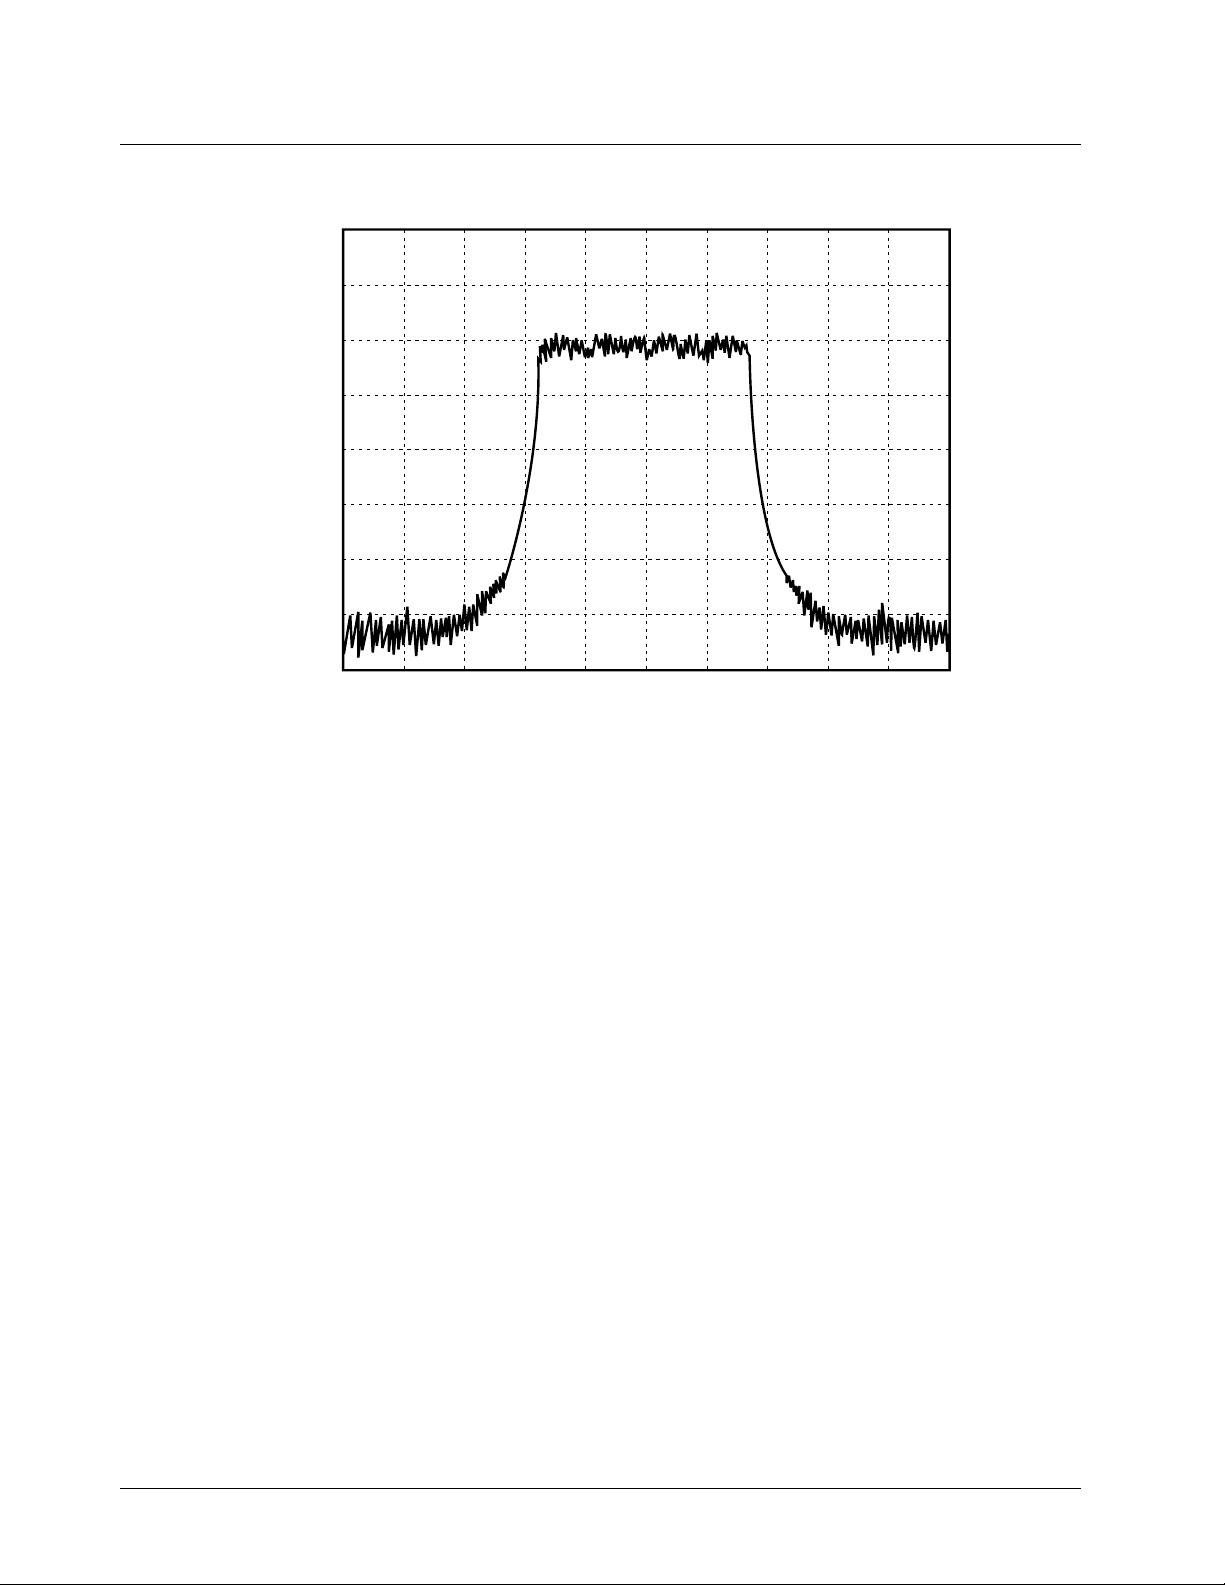
The traditional 25 kHz channel used for two-way radios is split into four QAM signals (subcarriers)
that are transmitted simultaneously. This technique can transmit 64 Kbps in a single 25 kHz
channel.
The iDEN system requires approximately 10 Kbps to transmit a compressed voice; therefore, 64
Kbps can accommodate 6 voice channels or 3 voice channels in enhanced systems.
The signal spectrum of the Quad 16QAM is shown in Figure 1-1.
68P80401P05 1
Page 17
OVERVIEW: i DEN Digital Modulation Technology
RL 0dBm 10 dB/
-10
-20
-30
Power
-40
(dB)
-50
-60
-70
0-10-20 10 20
Frequency from Desired Channel Center
(kHz)
Figure 1-1. Spectrum of i DEN Quad 16QAM
Quadrature Phase Shift Keying (QPSK) is one of the most common modulation techniques for
satellite communications. In QPSK, a digital data stream is taken two bits at a time to generate four
possible phase states of the transmitted carrier. A characteristic of this technique is its resistance to
noise.
Time Division Multiple Access (TDMA) is used to allocate portions of the RF signal by dividing
time into 6 slots, one for each unit. Time allocation enables each unit to transmit its voice
information without interference from another unit’s transmission.
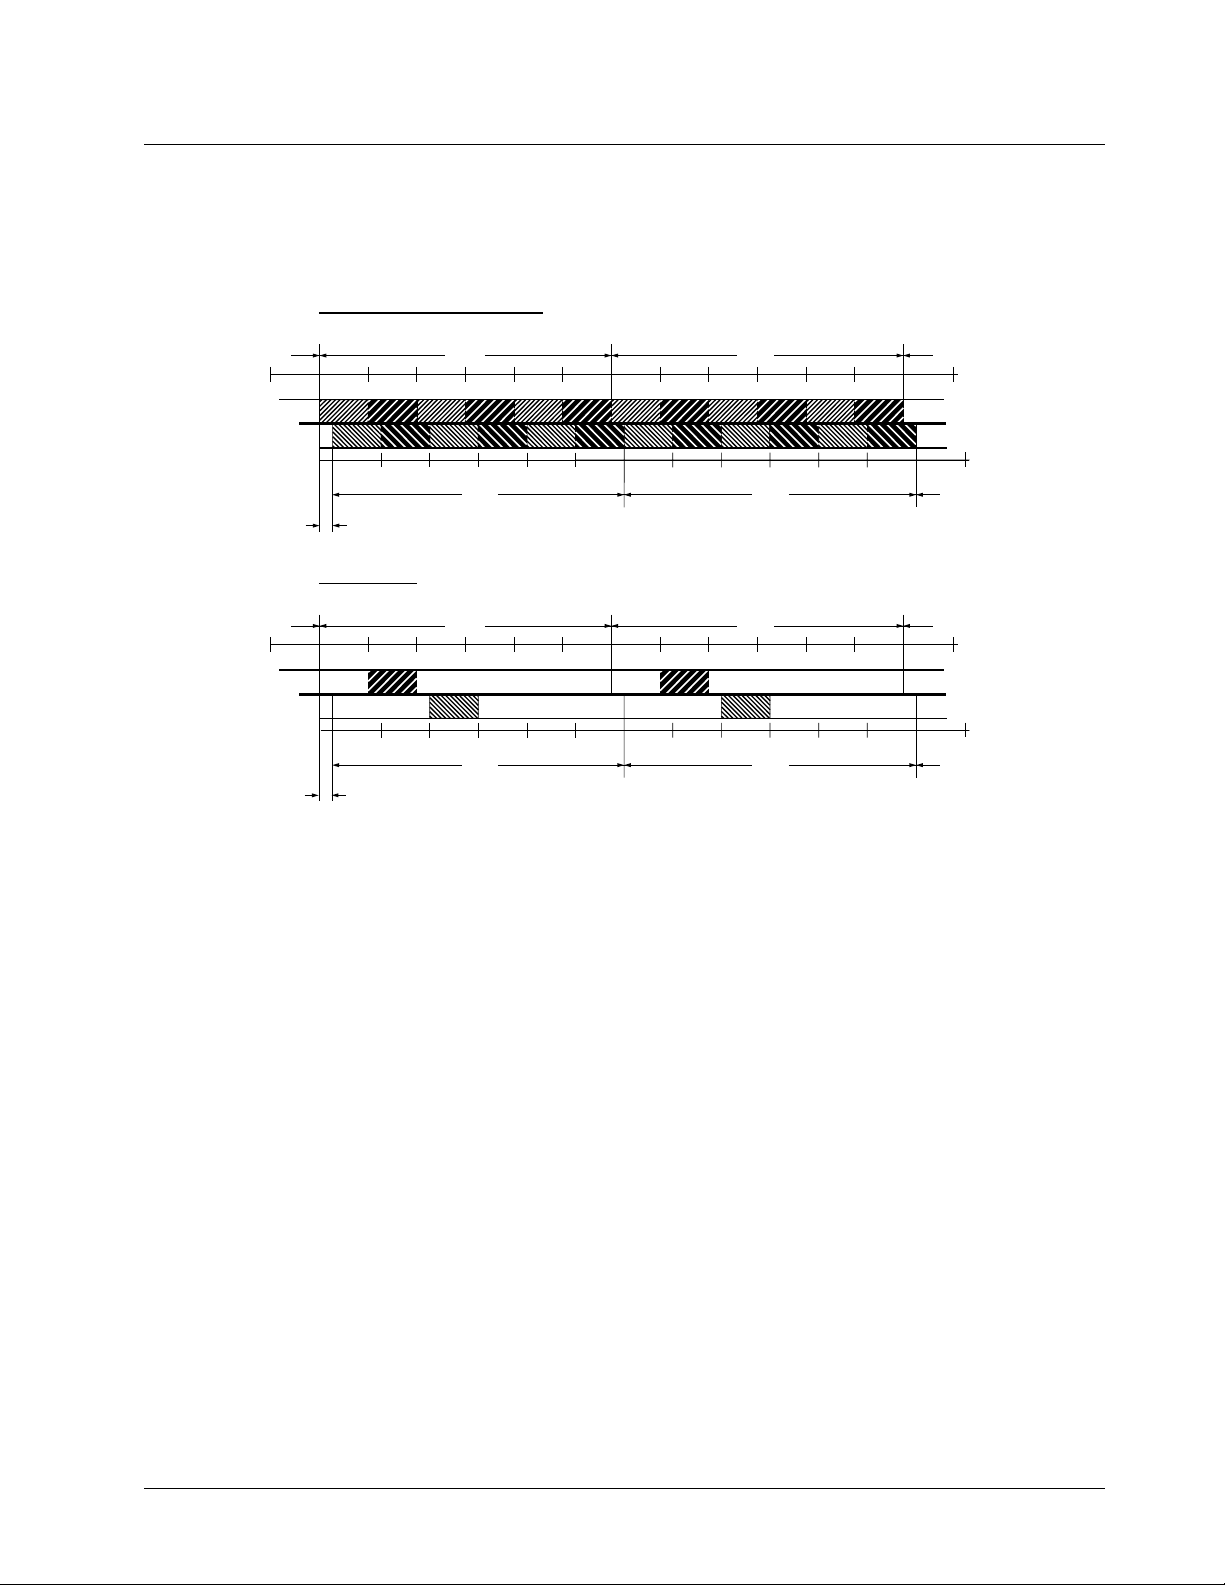
Transmission from a unit or base station is accommodated in time-slot lengths of 15 milliseconds
and frame lengths of 90 milliseconds (see Figure 1-2).
Note that Rx (outbound) indicates base-to subscriber transmissions; Tx (inbound) indicates
subscriber-to-base transmissions. The slots are paired and have a fixed offset of 19 milliseconds;
their timings are synchronized by the iDEN system. The TDMA technique requires sophisticated
2 68P80401P05
Page 18
OVERVIEW: i DEN Voice Compression Technology
algorithms and one digital-signal processor (DSP) to perform voice compression/decompression
and RF modulation/demodulation.
Base Station Control Channel
Transmitting 6 of 6 slots continually.
90ms 90ms
15ms
Tx
Rx
15ms
90ms 90ms
Receiver 4ms delayed
Portable Unit
When turned on, scans for control station, then transmits one slot every six slots.
90ms 90ms
15ms
Rx
Tx
15ms
90ms 90ms
Transmitter 4ms delayed
Figure 1-2. i DEN TDMA Format
1.2 i DEN Voice Compression Technology
15ms15ms 15ms15ms 15ms 15ms 15ms 15ms 15ms 15ms 15ms 15ms 15ms
15ms15ms 15ms 15ms 15ms 15ms 15ms 15ms 15ms 15ms 15ms 15ms
15ms15ms 15ms15ms 15ms 15ms 15ms 15ms 15ms 15ms 15ms 15ms 15ms
15ms15ms 15ms 15ms 15ms 15ms 15ms 15ms 15ms 15ms 15ms 15ms
Voice is converted into a digital bit stream by sampling the voice signal at a high rate and converting
the samples into numbers, which are represented by bits. A sample consists of 8 bits. Approximately
8000 samples per second (64 Kbps) are required to maintain a reasonable quality.
Voice compression reduces the number of bits per second while maintaining the voice at an
acceptable quality level. The iDEN system uses a coding technique called Vector Sum Excited
Linear Prediction (VSELP) to compress voice to 4.2 or 8.0 Kbps. The compressed voice-data bits
modulate the RF signal. The compression rate is based on the type of call (dispatch or interconnect)
and the network configuration established by the local service provider.
Adding error-correction bits to the coded-voice bits increases the required RF-transmission bit rate
to approximately 7.4 Kbps for the 4.2 Kbps voi ce coder and 14.8 Kbps for the 8.0 Kbps voice coder.
1.2.1 RF Transmission Bursts
All RF transmissions within an iDEN system occur in 15-millisecond blocks called bursts. An
iDEN base station transmits bursts continuously on each RF frequency it uses. Transmission bursts
from the stations are synchronized in time by signals received from the global positioning satellite
68P80401P05 3
Page 19

OVERVIEW: i DEN Voice Compression Technology
(GPS) system. Each burst is numbered; the number is referred to as the slot number. All bursts
occurring at a given time carry the same slot number.
Inbound transmission bursts (sent from the unit) are offset 19 milliseconds from the outb ound burst;
the inbound burst begins 4 milliseconds after the end of the outbound burst (see Figure 1-2 on
page 1-3). This offset in time allows the unit to appear capable of transmitting and receiving at the
same time (it actually is switching rapidly back and forth between receiving and transmitting).
In current iDEN systems, outbound transmissions in the 800 MHz band range from 851–870 MHz;
inbound transmissions are 45 MHz lower in frequency. For the 900 MHz band, outbound
transmissions range from 935-940 MHz; inbound transmissions are 39 MHz lower in frequency.
An iDEN channel is created by grouping bursts so that their slot numbers differ by a number referred
to as the repetition rate. The unit uses two repetition rates for interconnect voice calls: 6:1 and 3:1. A
single frequency can handle 6 calls using a 6:1 repetition rate with the 4.2 Kbps coder.
Dispatch calls always use this rate. However, the audio quality of the 3:1 repetition rate with the 8.0
Kbps coder is superior to the 6:1 rate with the 4.2 Kbps coder . Most service providers configure the
system and unit to allow only the 3:1 rate for interconnect calls.
Calls are set up on a primary control channel (PCCH) in response to a request from a unit or a
regular telephone connected to the Public Switch Telephone Network (PSTN). The PCCH is
established by the base station equipment; typically, it is a 6:1 channel.
The outbound PCCH carries system information and “pages” to specific subscriber units and asks
them to respond if they are available for a call. Inbound PCCH transmissions carry responses to the
“pages” and requests by subscriber units to set up calls. Inbound transmissions on the primary
control channel only take 7.5 milliseconds and can be timed to occur in either half of a 15millisecond burst.
The dual band unit will power up in the 800 MHz band and will use these channels for control
channels—Primary Control Channel (PCCH) and Broadcast Control Channel (BCCH). The 900
MHz mode will be used only during 3:1 interconnect calls. Every attempt will be made to assign the
unit to 900 MHz carriers during new 3:1 interconnect calls, handov ers into a cell, and inter-cell
handovers. If no resources are available, or if available resources have insufficient channel quality
(in the case of a handover), then 800 MHz carriers will be evaluated.
Using the above techniques, the iDEN system can operate 6 voice channels simultaneously in
dispatch mode or 3 voice channels simultaneously in interconnect mode on a single RF carrier at
25 kHz bandwidth.
1.2.2 Calling Area Coverage
Area coverage is obtained by dividing the area into a mosaic of cells. Coverage is controlled so that
frequencies can be reused with less distance between sites. Each cell is covered by a base station,
which is classified as Omni or Sectored. An Omni station connects base transceivers to antennas that
have a circular pattern centered at the site. A Sectored station connects base transceivers to
directional antennas that point in particular directions. Units that operate in a multi-site system must
4 68P80401P05
Page 20

OVERVIEW: Global Positioning System (GPS) Section
be able to “handoff” from one coverage area to another as the user moves about during a call.
Handoff is controlled by the iDEN system.
1.3 Global Positioning System (GPS) Section
The U.S. Department of Defense (DoD) has built a 24-satellite constellation for the purpose of
pinpointing locations anywhere on the planet. The satellites circle the earth every 12 hours,
transmitting radio signals at a fixed frequency of 1575.42 MHz. The satellites share the 1575.42
MHz spectrum with each other through the use of CDMA modulation.
To determine a location on earth, a receiver must be built that can receive the simultaneous signals
from the satellites that are in view of the receiver and use that information to calculate the location
of the receiver. The receiver must pick up the signals from 4 satellites. Once the 4 satellites are
located, the receiver measures the time it took for the satellite signals to arrive. From this timing
information, the distance between the receiver and each satellite can be calculated. The four
satellites’ ephemeris data provide the satellite’s X, Y, and Z positions. The range, R, is the receiver
measurement made by calculating the time it took for the signal to reach the receiver. The user’s
position, (Ux, Uy, Uz), and the clock bias, Cb, is then calculated.
To use the GPS, a receiver that can receive the spread-spectrum signals must be built. The detected
signals are then converted from RF signals into appropriate digital input formats. These digital
inputs are processed and converted into position information. Once the position coordinates are
determined, they are communicated to the handset microprocessor and displayed on the screen or
transmitted to the base station as required.
1.4 MOTOtalk
The purpose of the MOTOtalk feature is to allow simple, direct, simplex two-way radio-to-radio
communications between subscriber units. It is a PTT (Push-To-Talk)- based feature that operates
like most any two-way radio might. A good basic model for operation is that of the Motorola
Talkabout product. What makes it quite different, however, is that it is digital in operation, which
allows for superior range and voice quality. It is also asynchronous in nature, and requires no
external source of synchronization for connections between units to be made.
1.5 Bluetooth® Wireless System
Bluetooth technology is used for short range wireless communications that do not require high data
rates. The original usage models included telephone, headsets, low-data rate access point, file
transfer, and automatic synchronization. The newer usage models have added human interface
devices, remote control, print capability, cable replacements, and personal area networks.
Bluetooth devices use GFSK modulation in the 2.4 to 2.4835 GHz ban d. The channels have a
bandwidth of 1MHz. Frequency hopping is used to provide immunity to interference. The master
unit in a pico-net dictates the hopping sequence at a rate of 1600 hops per second. This translates to
a 625 uS transmission. The maximum data rate through a Bluetooth device is 1Mb per second.
68P80401P05 5
Page 21

OVERVIEW: SIM Cards
1.6 SIM Cards
This unit is designed to work with a mini Subscriber Identity Module (SIM). The SIM card contains
all of the personal data required to access iDEN services. Data held by the SIM card includes:
• Temporary Mobile Subscriber Identity
• Services to which the user subscribes
• PIN and unblocking codes
• Call barring codes
The SIM card is also capable of storing phone numbers and names.
Available SIM cards for this unit are 64 kB and prepaid.
1.6.1 Removing and Inserting a SIM Card
NOTE: When a SIM card is defective and must be replaced with a new one, the following
information will be erased:
• The recent calls list
• Call forwarding settings
• Net alerts
• Mobile originated text messages, drafts, and quick notes
• Information stored in Memo
• 3 most recent GPS enabled locations
• Voice records
• Voice names
To remove a SIM card (Figure 1-3):
F
1. Power off the unit and remove the battery cover and battery.
2. Turn the unit face down so that the antenna is at the upper left corner.
3. Slide open latch.
4. Open the SIM card holder (see Figure 1-3).
5. Grasp SIM card from one side and pull out.
CAUTION: Do not touch the gold-colored area of the SIM card.
6 68P80401P05
Page 22
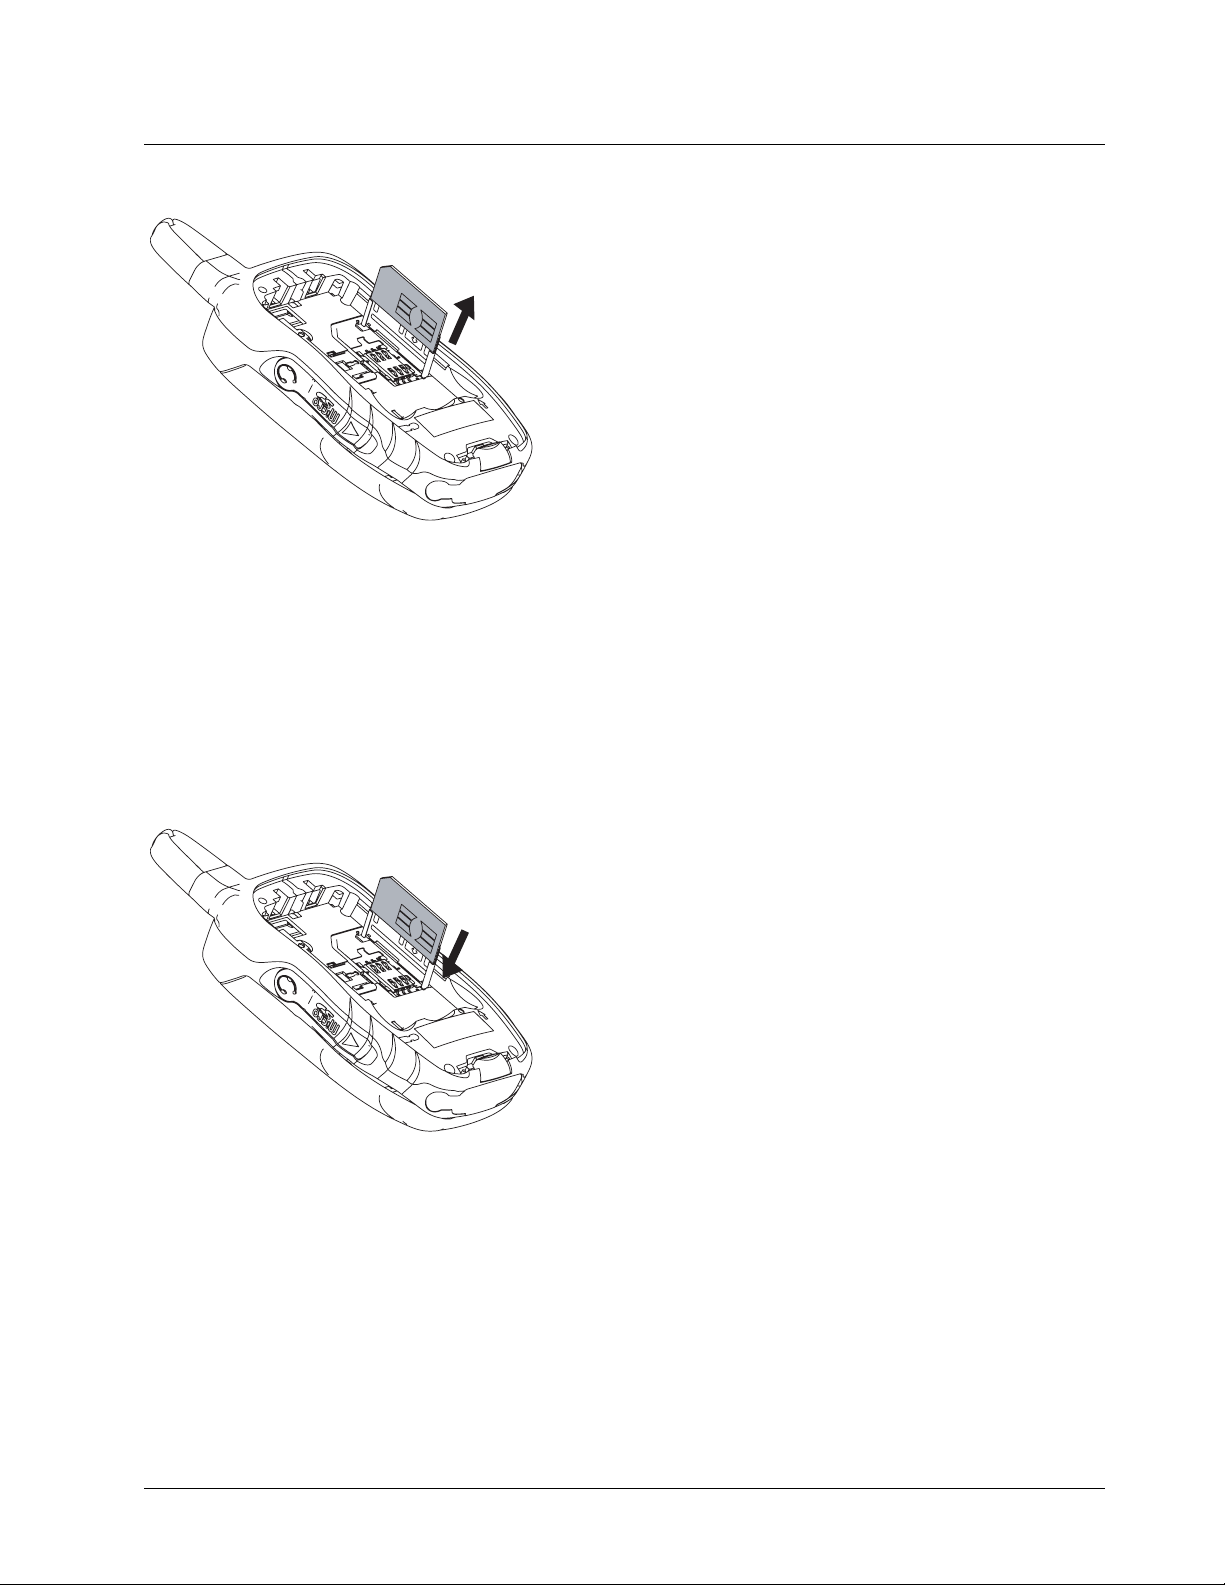
Figure 1-3. Removing a SIM Card
To insert a SIM card (Figure 1-4):
1. Open the SIM card holder.
OVERVIEW: SIM Cards
2. Carefully slide the SIM card into the holder (see Figure 1-4). Position SIM card as shown.
3. Close SIM door, slide latch to shut.
4. Reinstall the battery, and reattach the battery cover.
Figure 1-4. Inserting a SIM Card
68P80401P05 7
Page 23
FEATURES, ICONS, AND INDICATORS: i 580 Features
CHAPTER 2
FEATURES, ICONS, AND INDICATORS
To conduct basic troubleshooting and maintenance of the i580 unit, you must become familiar with
the components, display icons, and status indicators associated with the unit.
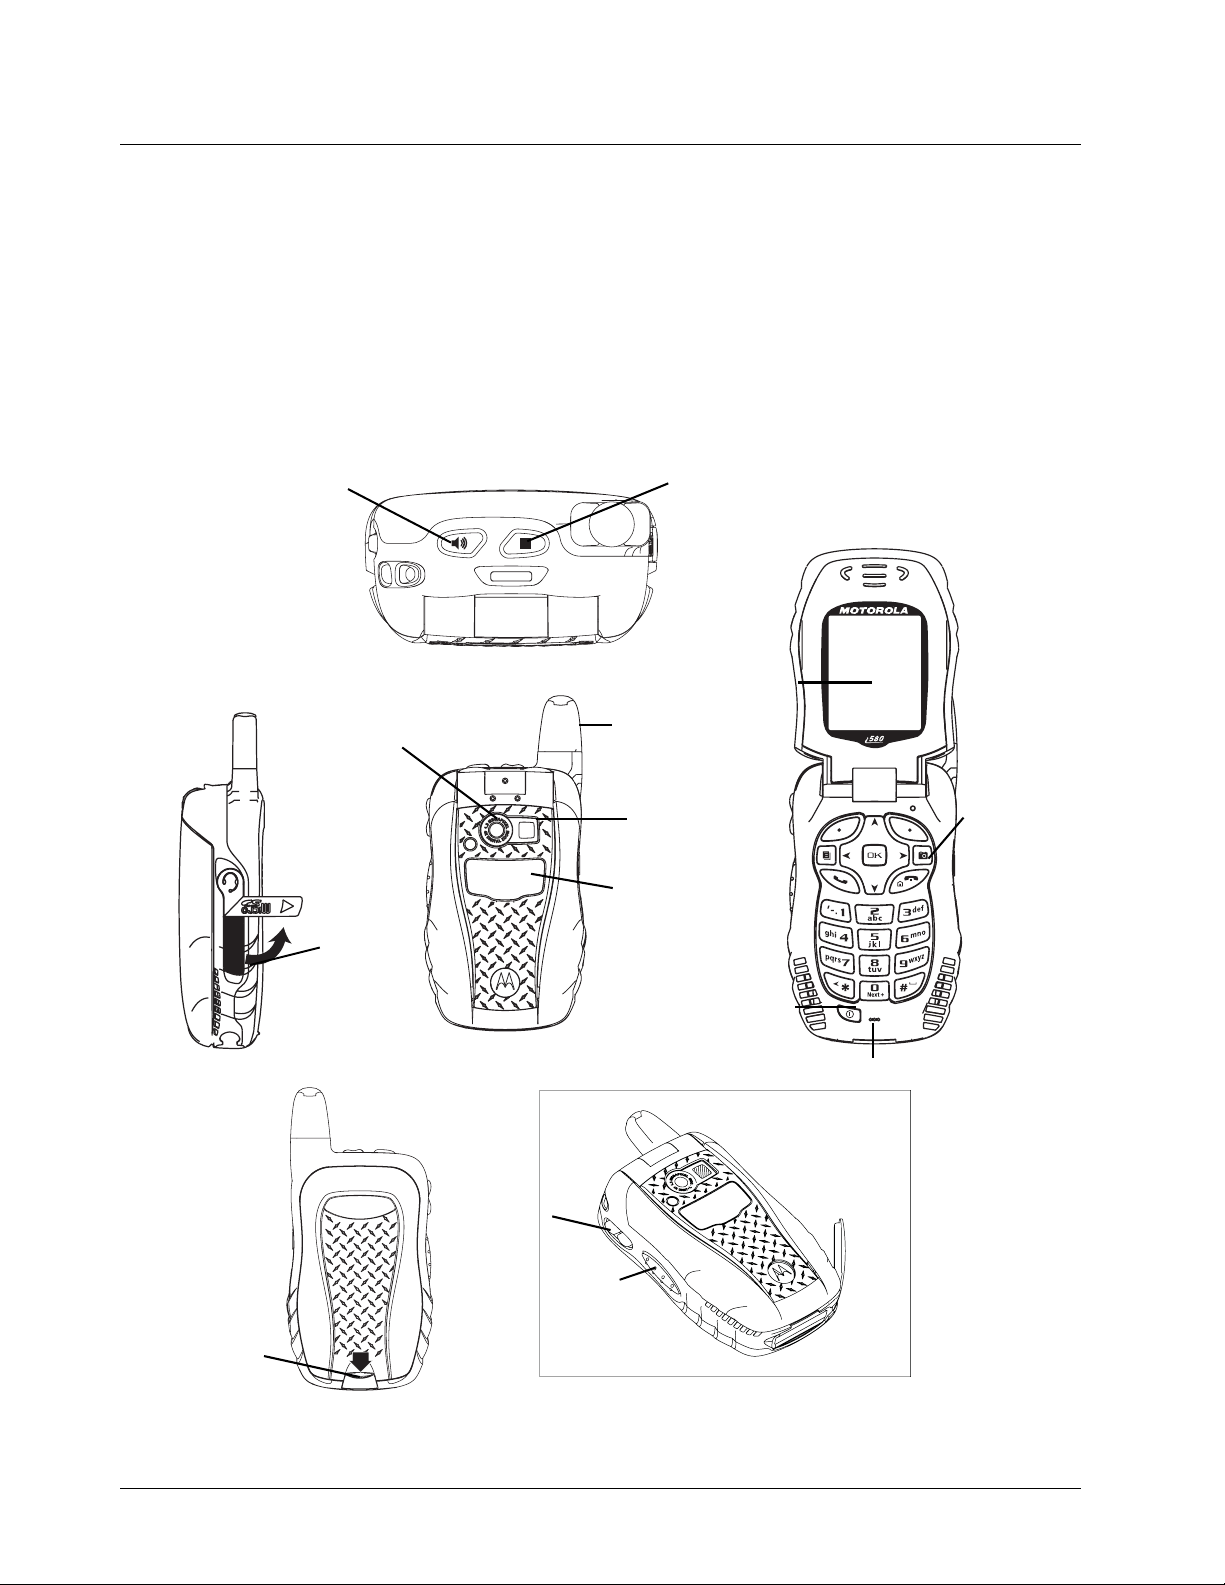
2.1 i 580 Features
Speaker Key;
Send Calls to Voicemail
Answer Calls
Right Side
Transflash
Card Slot
Camera
Lens
Top View
Front View
Closed
End Calls;
Send Calls
to Voicemail
Display
Retractable Antenna
Mirror
External Display
Power Button
Front View
Open
Camera
Key
Microphone
Release
Button
Back View
Left Side
Vol ume
Controls
Walkie-Talkie Button
Controls
Figure 2-1. i580 Feature Views
8 68P80401P05
Page 24

2.2 Display Icons
Icons for this unit provide information that is useful for troubleshooting and testing purposes. All
features can be accessed through the main menu. When using a feature, the icon for that feature
appears in the upper left corner of the display. Depending upon features and options chosen, the
following icons can appear on the unit’s display.
NOTE: Feature icons may appear in various places within the display. Check the specific User’s
Guide for more information about the unit’s icons and indicators.
2.2.1 Main Menu Icons
Browser Browse the W e b.
Java Apps Use Java applications on your phone.
Settings Customize your phone.
VoiceRecord Record and play audio messages.
Contacts Create, view, store, edit contacts.
FEATURES, ICONS, AND INDICATORS: Display Icons
.
Messages Access messages.
Call Forward Set call forwarding options.
Datebook Schedule appointments.
Memo Store a number to access later.
Call Timers Phone usage information.
Recent Calls Access information about recent calls.
Shortcuts Create sh ortcuts to screens.
My Info View personal phone information, including phone
number and Private ID.
Profiles Apply groups of settings together.
Call Alert Access information about call alerts.
Bluetooth Connect to a device with Bluetooth.
GPS Find your approximate geographical location.
Ring Tones Assign ring tones and turn ringer off.
Camera Image in camera lens shows on the main display.
Media Center Edit captured images.
Audio Player Access the MP3 audio player.
Quick PTT Access private ID’s and Selective Dynamic Groups
(SDG). (Carrier optional feature.)
68P80401P05 9
Page 25
FEATURES, ICONS, AND INDICATORS: Display Icons
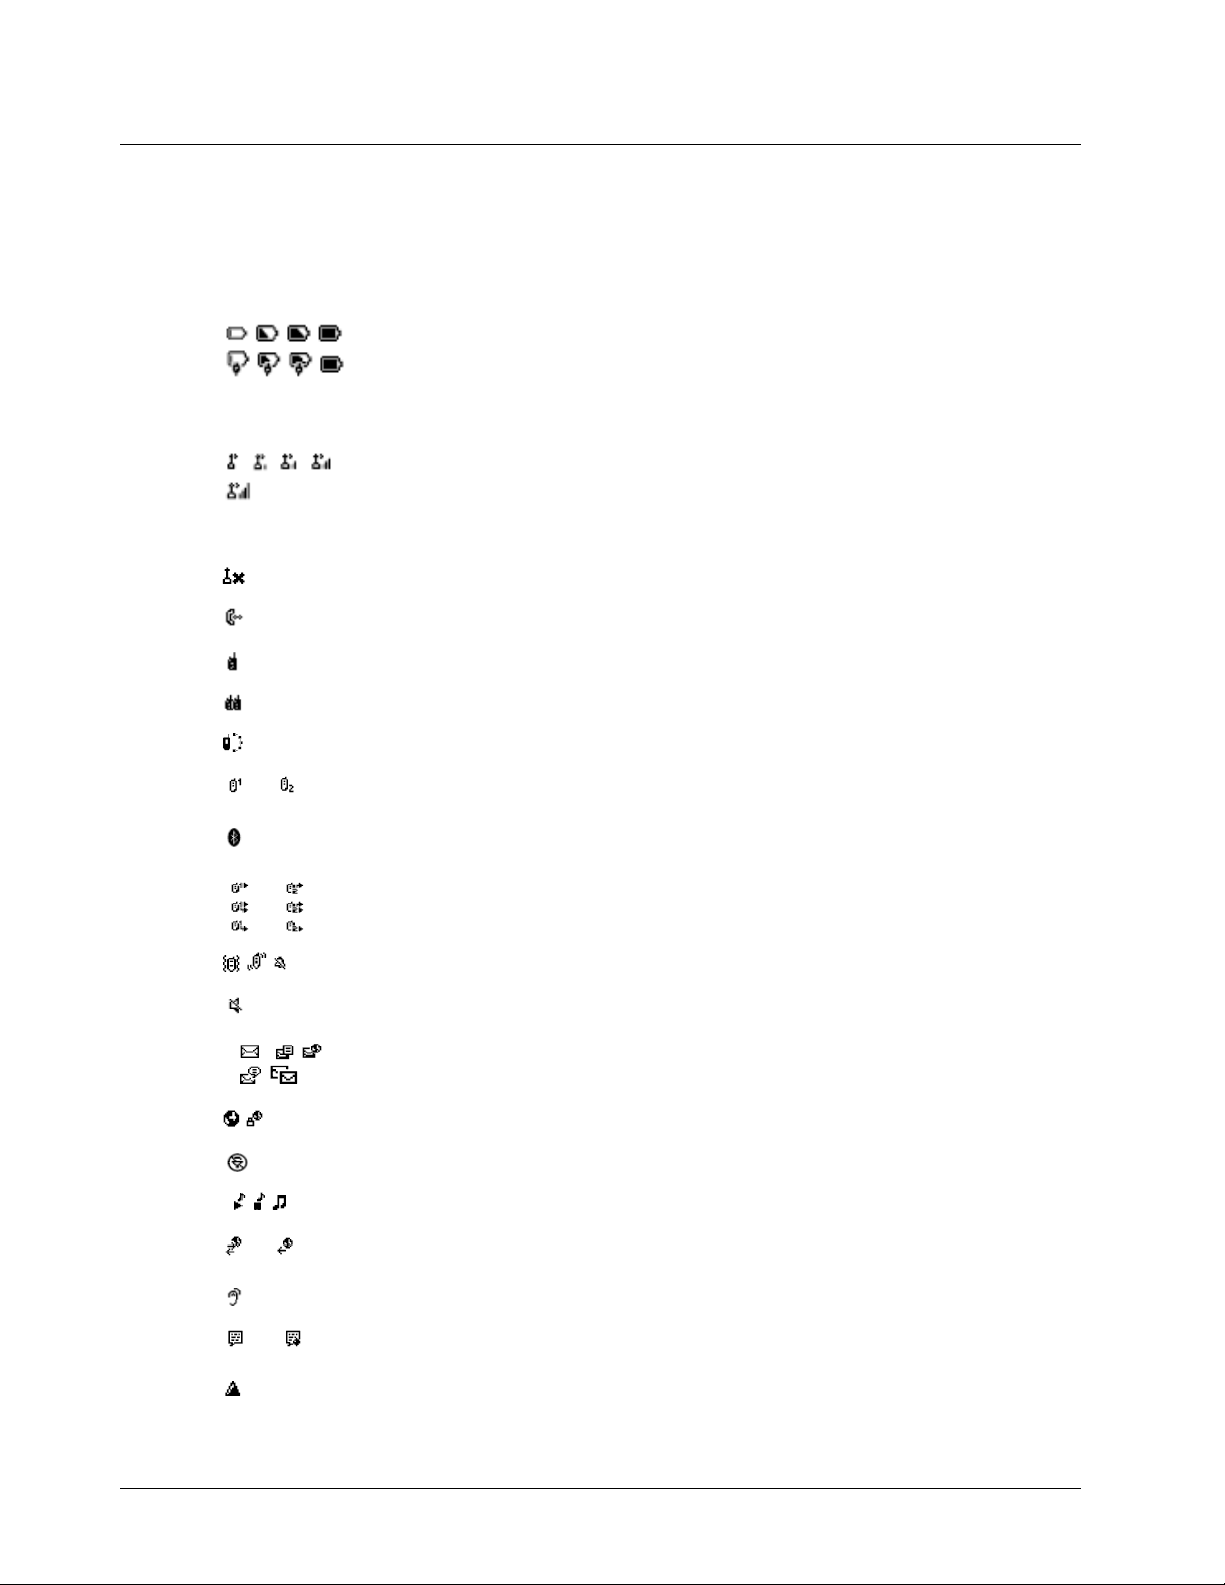
2.2.2 Status Icons
Status icons appear in the two rows at the top of the display. Some appear at all times. Others appear
only when your phone is engaged in certain activities or when you have activated certain features.
Battery Strength—Indicates the battery’s stored level of charge.
The Battery Strength icon exhibits a darkened area inside the simulated battery image to in dicate
the level of stored charge. The levels of charge are shown in the display with or without the
charger attached. A depleted battery has little or no darkened area. As the battery is charged, the
levels of darkened area increase until the ba ttery is fully charged . As the battery is depleted, the
darkened area decreases.
Signal Strength—Indicates the device is registered and the strength of the network signal. The
antenna portion of the icon is always displayed. Up to 4 bars are displayed next to the antenna.
The more bars depicted, the stronger the signal. One bar = approx. 19 SQE and >-103 RSSI, 4
bars = approx. 29 SQE and >-88 RSSI. When the unit is in a no-service state, or the signal is less
than 19 SQE or <-103 RSSI, no bars appear next to the antenna.
No Service — your phone is without service. You cannot make or receive any type of call.
Phone In Use — your phone is active on a phone call.
Private In Use — your phone is active on a Private call.
Talkgroup In Use — your phone is active on a Group Connect call.
SDG Call In Use — unit active on an SDG call.
Active Phone Line — 1 indicates phone line 1 is ready to make calls; 2 indicates phone line 2 is
ready to make calls.
Bluetooth in Use — your phone is using Bluetooth. If this icon is blinking, then your phone is in
discoverable mode. If this icon is static, your phone is active in a Bluetooth connection.
Call Forward — your phone is set to forward calls.
Ringer Off — your phone is set not to ring.
Speaker Off — Sounds associated with Private calls and group calls are set to come through the
earpiece rather than through the speaker.
Messages — you have one or more messages.
Internet — you are ready to browse the internet or are browsing the internet.
Transmitters — your phone is set not to receive calls and other transmissions.
Audio Player — The audio player is active.
Packet Data — you are ready to transfer packet data or are transferring packet data using a data
cable.
Hearing Aid — your phone is set for use with a hearing aid.
TTY— Indicates that unit is connected to a TTY device and TTY mode is enabled. You can
select either VCO (voice-carry-over) or HCO (hearing-carry-over) mode.
Roaming — You are using your phone outside your carrier’s network.
10 68P80401P05
Page 26
DISPLAYS, MESSAGES, AND ALERTS: Power-Up Sequence
CHAPTER 3
DISPLAYS, MESSAGES, AND ALERTS
To conduct basic troubleshooting and maintenance of the i580 unit, you must become familiar with
the display screens, messages, and alert tones associated with the unit.
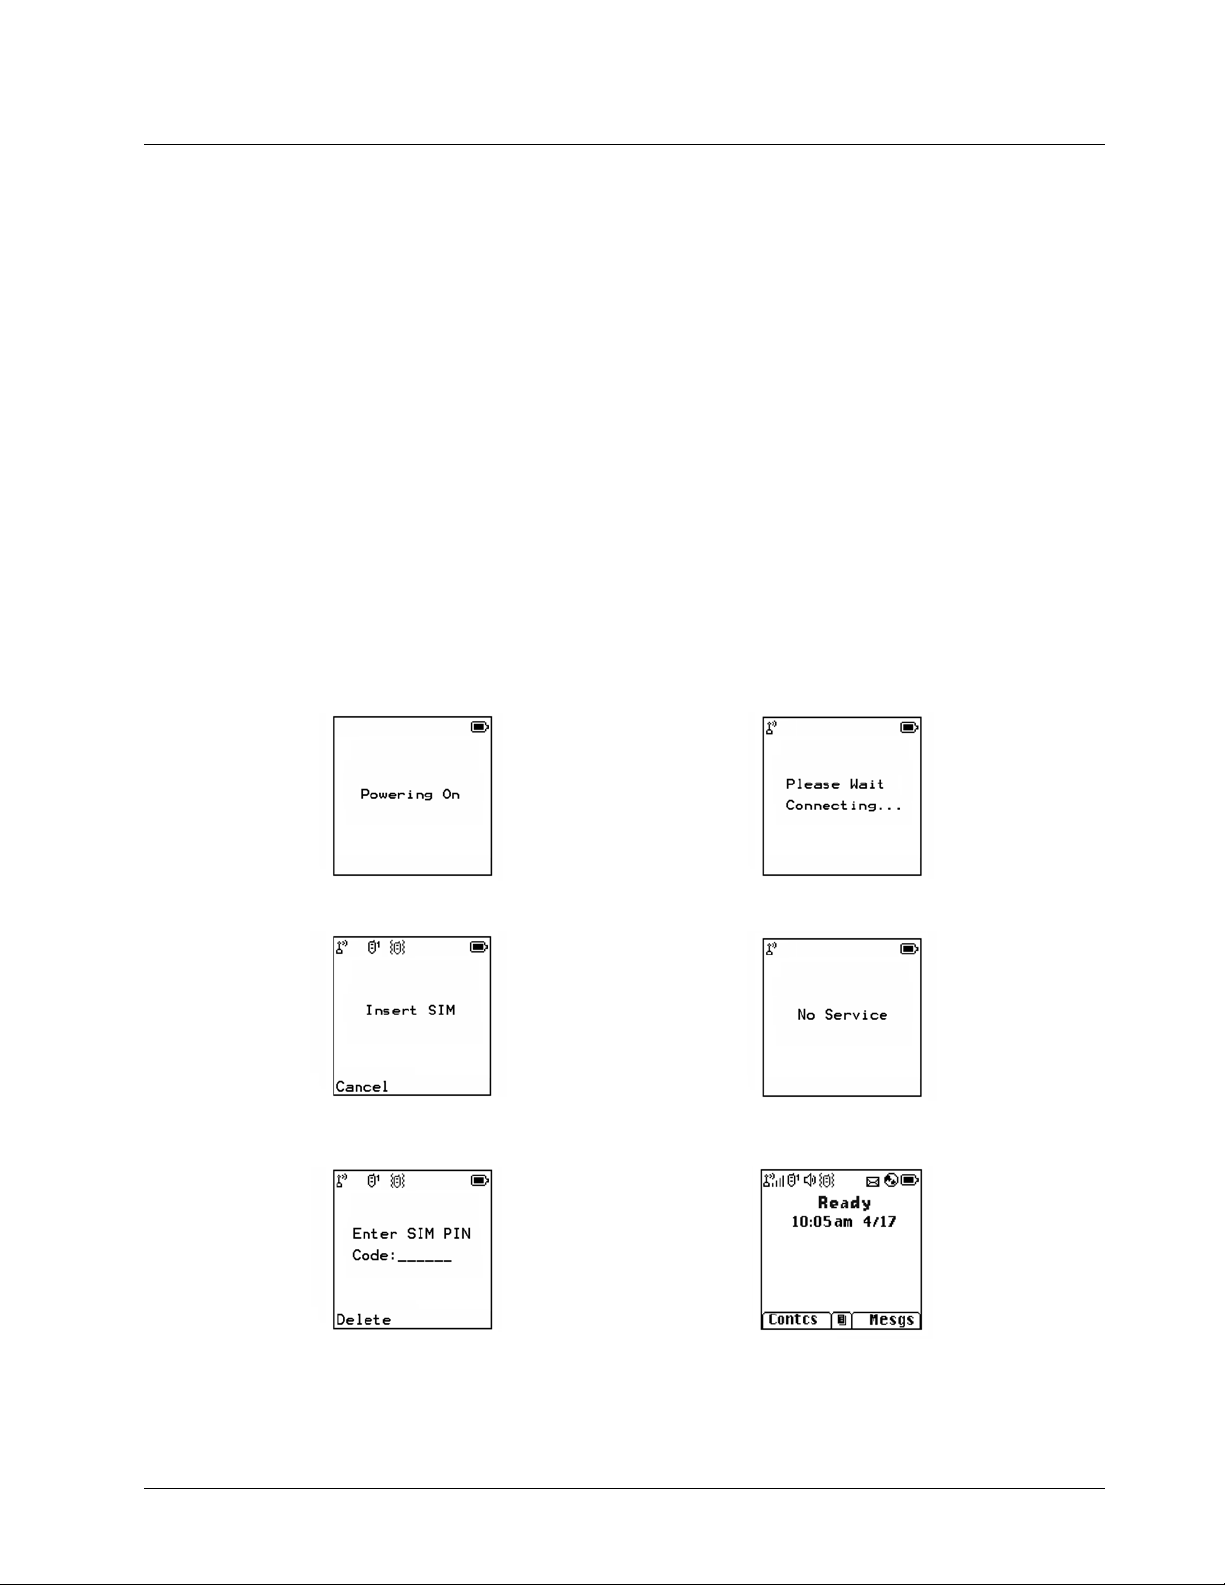
3.1 Power-Up Sequence
Extend the antenna whip and press the Power key until the power-up sequence begins. The powerup sequence initiates a series of displays on the unit. Each display reflects a stage in the sequence.
If the last display shows the idle screen, the power up was successful; if the last display shows No
Service, the unit is out of range or there is a hardware or software problem. If the vibrate function is
enabled for incoming phone calls, voice mail, or message mail, the power-up sequence includes a
500ms vibrate cycle.
Depending upon the service provider, the power-up sequence screens may differ from those shown.
1. Powering On 4. Connecting
2. Insert SIM
OR OR
3. Enter SIM
Note: SIM PIN feature can be
cancelled.
Figure 3-1. Power-Up Sequence Displays
5. No Service
6. Unit Ready Display (Idle
Note: Idle screens differ depending
68P80401P05 11
Page 27
DISPLAYS, MESSAGES, AND ALERTS: Power-Down Sequence
3.2 Power-Down Sequence
To power down the unit, press and hold the Power key until the unit begins powering down.
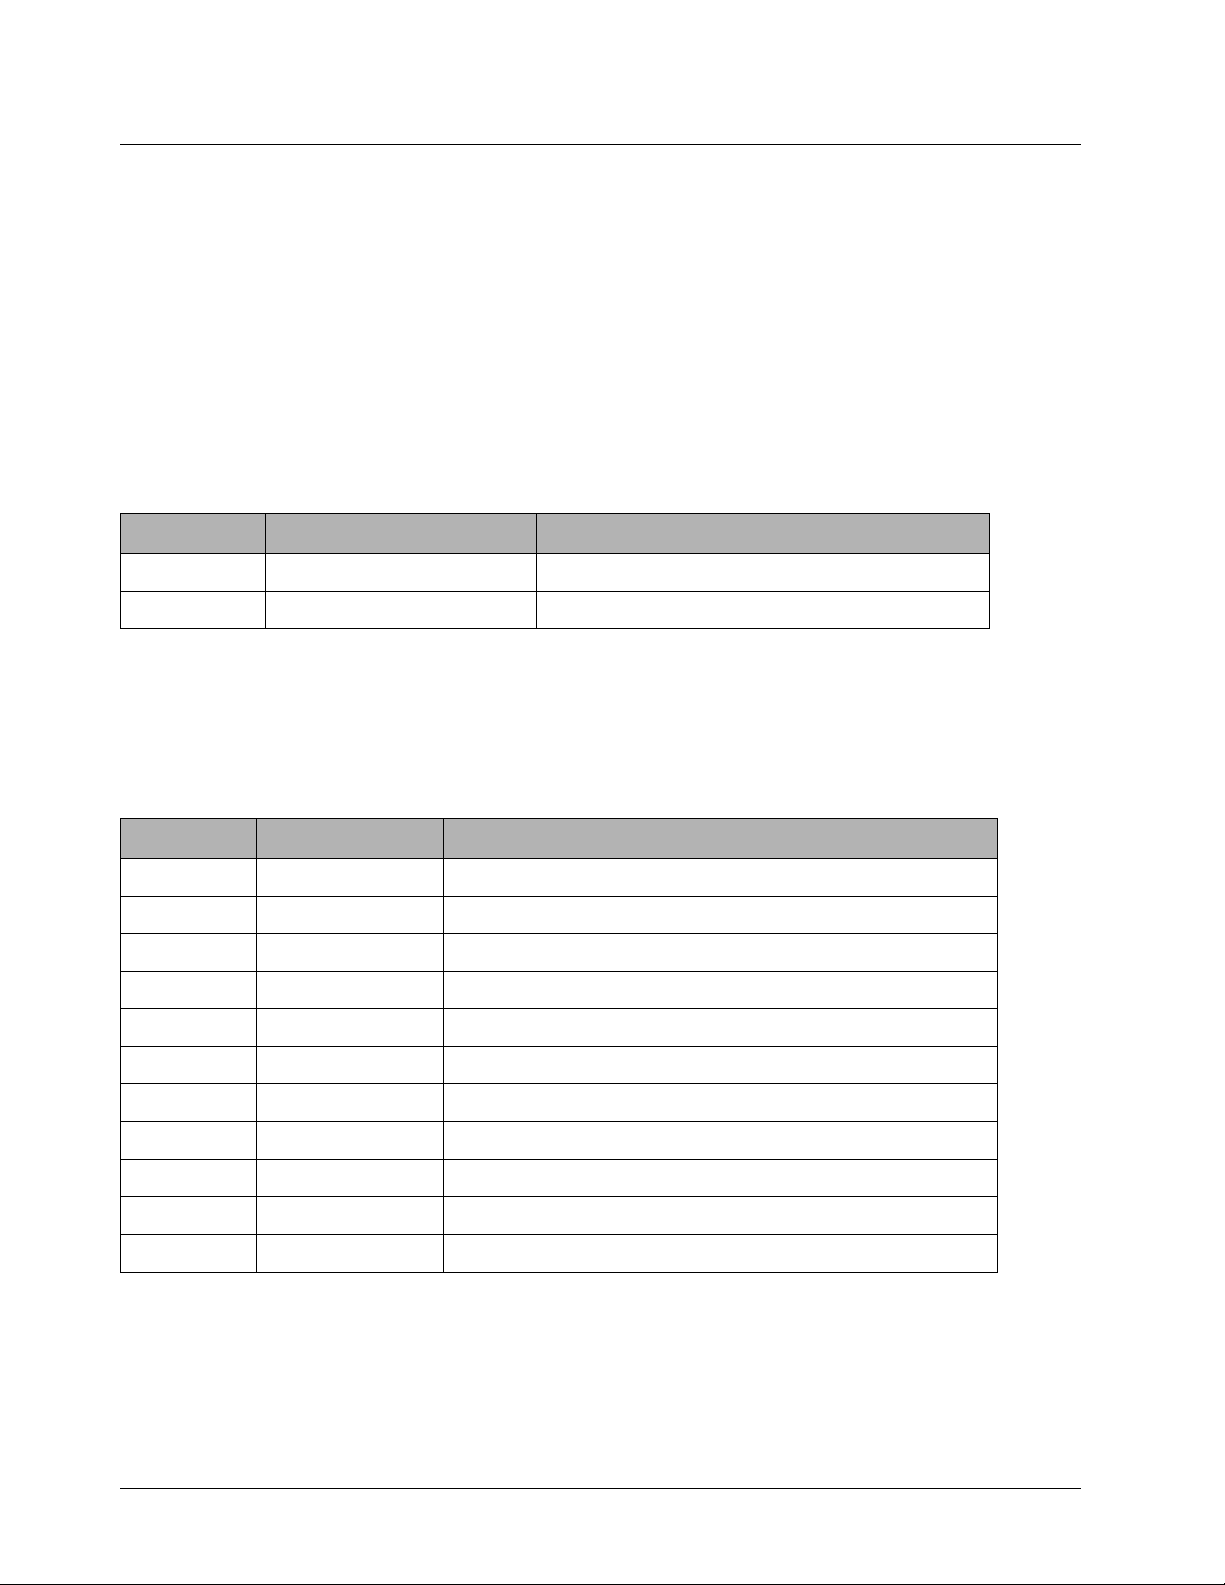
3.3 Messages
3.3.1 Self-Test Errors
The following table contains the list of self-test non-reset errors. These errors are displayed as SELF
CHECK ERROR YXXXX (YXXXX represents the identifier for that error).
Table 3-1. Self-Test Errors
Y XXXX Description of Error
0 0001 Non-reset error log
0 0002 Codeplug error log
3.3.2 Self-Test Reset Errors
The following table contains the list of self-test reset errors. These errors are displayed as SELF
CHECK FAIL YXXXX (YXXXX represents the identifier for that error).
Table 3-2. Self-Test Reset Errors
Y XXXX Description of Error
0 0100 RAM failure
0 0200 Data lines failure
0 0400 Address line failure
0 0800 Codeplug corruption/invalid
0 1000 Flash checksum error
0 2000 Reset error logging
0 4000 Codeplug mismatch
F 4000 Ergo pre-self-test codeplug error
F 8000 Ergo pre-self-test invalid device or device failure
F 8002 Ergo pre-self-test invalid device or device failure
: 0800 FDI-related error
12 68P80401P05
Page 28

3.3.3 Service Messages
Service messages indicate the probable cause of a problem. The following table lists the messages,
their probable causes, and recommended corrective actions.
Table 3-3. Service Messages
Message Cause Action
Charger Attached While Power Down
DISPLAYS, MESSAGES, AND ALERTS: Messages
Device Attached 17-Pin connector plugged in while
Device Detached 17-Pin connector removed while
Device Not Compatible Incompatible with unit’s hardware Acquire compatible software or hardware
Error Unidentified error Report problem to your service provider
Invalid Number Invalid number entered or invalid
Low Battery Unable to
Locate Sats
No Entry No numbers in phone list Add phone numbers to list
No Service Phone unable to register Report problem to service provider
Number Not In Service Invalid target ID Re-enter ID or try a different ID
Please Try Again 1. Loss of service or system failure
powered up.
powered up.
voice-mail access number
received
Battery level is too low to obtain
fix but is able to perform dispatch
or interconnect communication
2. Network problem
Re-enter number or report problem to service
provider
Charge or replace battery
1. Ask provider how long problem will continue
2. Report problem to service provider
Service Conflict Current service conflicts with
previously activated service
Service Not Available Not currently available on system Ask provider when service will be available
Service Restricted Service not subscribed to Ask provider when service will be available
System Busy, Try Later System is currently busy Try call again later
Target Busy in Private Target unit in a Private Call or Call
Alert
Target Not Authorized Target unit not authorized to
receive call
68P80401P05 13
Deactivate previous service and try current service
again
Try call again later
Do not call unauthorized unit
Page 29
DISPLAYS, MESSAGES, AND ALERTS: Alert Tones
Table 3-3. Service Messages (Continued)
Message Cause Action
Technical Error Unable to
Locate Sats
Unable to locate Sats Unit does not have clear view of
Unknown User Unit unknown to system Report problem to provider
User Not Available Target unit in Private, Group, or
Problem detected with the GPS
circuitry
GPS satellites
Alert call, or is not in service
Reboot unit. If problem persists, contact Motorola
Make sure user is out in clear sky and stationary. If
problem persists, reboot unit.
Try call again later
3.4 Alert Tones
This unit can send alert tones to the earpiece, speaker, or external speaker. Press the Mute key to
determine where some of the tones are sent.
As shown in the following table, alert tones have specific frequencies and cadences/durations. They
are grouped according to function; grouped tones have the same tone specifications.
Table 3-4. Alert Tones
Tone Low High Freq Cadence When Tone Occurs
Automatic
Callback
Call Alert
Acknowledgment
Received
Call Alert No Ack
Received
Call Alert
Received
Call Alert Sent Ear Spkr 1800Hz2x (80ms off+80ms on) Call Alert acknowledged by
Call Waiting
Received
Clear to Send Ear Spkr 2300Hz1x50ms on Reception inhibited; clear to
Data Ringer Ear Spkr 2091/
DTMF (0-9, #, *) Ear Ear DTMF Continuous DTMF is transmitted
Earpiece Volume
Set
Ear Spkr 1800Hz2x (24ms on+24ms off) + 48ms on Voice channel for prior request
Ear Spkr 1800Hz2x (80ms off+80ms on) Call Alert successfully sent
Ear Spkr 900Hz 1x500ms on Call Alert fails
Spkr Spkr 2300Hz4x (150ms off+150ms on) every 10
seconds
Ear Ear 440Hz 2x(300ms off+300ms on) every 5
seconds
2823H
z
Ear Ear 1000HzContinuous Earpiece volume changed on
14x (80ms on 2091Hz + 100ms on
2823Hz + 2.5 seconds off
Call Alert received
FNE
Phone call received while
another call is active
transmit
Unit receives an incoming
circuit data call
quiet channel or in
Programming Menu (PRGM)
14 68P80401P05
Page 30

DISPLAYS, MESSAGES, AND ALERTS: Alert Tones
Table 3-4. Alert Tones (Continued)
Tone Low High Freq Cadence When Tone Occurs
Group Call Alert Spkr Spkr 2300H
z
In Service Spkr Spkr 2300H
z
Interconnect Busy Ear Ear 480/
Invalid Key Ear Ear 900Hz 1x80ms on Invalid key pressed
Low Battery in Idle Spkr Spkr 2300H
Keypad Volume
Set
Message Mail
Received in Idle
Msg Mail
Received in
Interconnect
Message Volume
Set
Net Alert Ear Spkr 880Hz,
One Minute Beep Ear Ear 2300H
Phone Fast Busy Ear Ear 480/
Phone Redial Alert Spkr Spkr 2091/
Ear Ear 1800HzContinuous Keypad volume changed on
Spkr Spkr 2400/
Ear Ear 2400/
Spkr Spkr 2400/
620Hz
z
2743H
z
2743H
z
2743H
z
1760H
z/
330Hz,
990Hz
z
620Hz
2556H
z
2x (150ms off+150ms on) Group call received
1x50ms on Entering in-service mode
1s off + 1s on 480Hz;
1s off +1s on 620Hz continuous
24ms on+24ms off + 24ms on+240
ms off + 24ms on+24ms off + 24ms
on+30ms off every 30 seconds
8x(64ms on 2400Hz + 64ms on
2743Hz)every 30 seconds
8x(64ms on 2400Hz + 64ms on
2743Hz) every 30 seconds
8x(64ms on 2400Hz + 64ms on
2743Hz) continuous
5x (50ms on 880Hz + 50ms on
1760Hz) 8x (50ms on 330Hz +
50ms on 990Hz) repeated every
750ms
1x 50ms on During interconnect calls
0.25s on+0.25s off 480Hz 0.25s
on+0.25s off 620Hz continuous
14x(24ms on 2091Hz + 24ms on
2556Hz)
Interconnect channel or line is
busy
Battery below preset value.
(Tone sounds from earpiece if
in low audio during a dispatch
or interconnect call.)
quiet channel or in
Programming Menu
Message mail received while
unit is idle
Message mail received while
unit is in interconnect mode
Message volume changed on
quiet channel or in
Programming Menu
Net alert received while in idle
Call failed (system busy, out of
service, or trouble with
network)
Phone redial successful
68P80401P05 15
Page 31

DISPLAYS, MESSAGES, AND ALERTS: Alert Tones
Table 3-4. Alert Tones (Continued)
Tone Low High Freq Cadence When Tone Occurs
Phone Ring (U.S.) Spkr Spkr
2091/
2556H
z
2230/
2040H
z
2310/
2820H
z
3240/
2140H
z
3160/
1980/
2580H
z
2540/
2300/
2030H
z
2740/
3200H
z
2500H
z
Available ringer tones:
14x(24ms on 2091Hz + 24ms on
2556Hz) + 2.5s off
14x(64ms on 2230Hz + 64ms on
2040Hz) + 2.5s off
3x(400ms on 2310Hz + 400ms on
2820Hz) + 2.5s off
14x(38ms on 3240Hz + 38ms on
2140Hz) + 2.5s off
1x(200ms on 3160Hz + 100ms on
1980Hz + 200ms on 2580Hz) +
2.5s off
1x(200ms on 2540Hz + 200ms on
2300Hz + 200ms on 2030Hz) +
2.5s off
1x(150ms on 2740Hz + 150ms on
3200Hz + 150ms on 2740Hz) +
2.5s off
1x(200ms on 2500Hz + 200ms off +
200ms on 2500Hz + 200ms off
+ 200ms on 2500Hz) + 2.5s off
1x(200ms on 2580Hz + 200ms on
3200Hz + 200ms on 2040Hz)
+ 2.5s off
Phone call received
2580/
3200/
2040H
z
Phone Ring Back Ear Ear 440/
480Hz
Private Call
Received
Reject Ear Spkr 900Hz 1x500ms on Requested service denied or
Ringer Volume Set Spkr Spkr 2091/
Sat No Fix Spkr Spkr 900 Hz 1x500ms on Unable to fix on satellite
Self-Test Fail Spkr Spkr 900Hz 1x500ms on Self test fails on power up
16 68P80401P05
Spkr Spkr 2300Hz2x (88ms off+88ms on) Private call received
2556H
z
2s on+4s off 440Hz;
2s on+4s off 480Hz
24ms on 2091Hz + 24ms on 2556Hz
continuous
Called phone is ringing
failed
Ringer volume changed
Page 32

DISPLAYS, MESSAGES, AND ALERTS: Using the Optional Vibrate Function
Table 3-4. Alert Tones (Continued)
Tone Low High Freq Cadence When Tone Occurs
Speaker Volume
Set
System Busy Ear Spkr 480/
Talk Permit Ear Spkr 1800Hz2x (24ms on+24ms off) + 48ms on PTT transmission accepted
Talk Prohibit Ear Spkr 900Hz Continuous PTT transmission not allowed
TOT Warning Ear Spkr 900Hz 1x80ms on Transmission rights expiring
Valid Key Press Ear Ear 1800Hz 1x80ms on Valid key pressed or unit
Voice Mail
Received in Idle
Voice Mail
Received in
Interconnect
Spkr Spkr 1000HzContinuous Volume changed on quiet
channel or in Programming
Menu
620Hz
Spkr Spkr 2400/
2743H
z
Ear Ear 2400/
2743H
z
4x(0.25s on+0.25s off) 480Hz; 4x
(0.25s on+ 0.25s off) 620Hz
8x(64ms on 2400Hz + 64ms on
2743Hz) every 30 seconds
8x(64ms on 2400Hz + 64ms on
2743Hz) every 30 seconds
All channels are busy
powered up
Voice mail received while unit
is idle
Voice mail received while unit
is in interconnect mode
3.5 Using the Optional Vibrate Function
The vibrate function (VibraCall) notifies the user of incoming phone or dispatch calls, DC/GC calls,
messages, notifications, and call alerts.
If the unit is set for Vibrate in any mode, it will vibrate for 1/2 sec during the power-up sequence.
To set unit to vibrate for all calls:
1. Using the keypad, press
the Menu key
.
2. Scroll to Ring Tones, then press the OK button.
3. Scroll to Vibrate All, then press the OK button.
4. Scroll up or down to set Vibrate All on or off.
5. After you select a Vibrate mode, the unit vibrates for 1/2 sec while exiting the menu.
The following table describes the cadence for each vibrator mode:
Table 3-5. Vibrator Settings
Mode Cadence
Vibrate All or Selectable Vibrate 2x(500ms on, 500ms off) + 500ms on + 2.5 sec. off
Ring Tones Three Vibrate Only cadences, followed by an audible ring tone
until answered or party hangs up
Off Turns off the vibrator function
68P80401P05 17
Page 33

DISPLAYS, MESSAGES, AND ALERTS: Using the Optional Vibrate Function
To set unit to vibrate for Direct Connect and Group Connect calls only:
1. From the main menu, select Settings > 2-Way Radio > Alert Type.
2. If Alert Type does not appear, from the main menu select Ring Tones. Make sure Vibrate All
or Silent All is set to Off. Repeat step 1.
3. Press the OK button to change.
4. Scroll to Vibrate.
5. Press the OK button to select.
18 68P80401P05
Page 34

PREPARING FOR BASIC LEVEL TESTING: Test Equipment
PREPARING FOR BASIC LEVEL TESTING
4.1 Test Equipment
The following equipment is useful when testing an i580 unit: a reference unit, a reference SIM card,
and reference accessories. For a list of recommended test and programming equipment used to
troubleshoot this unit, see Appendix A: Ordering Replacement Parts and Kits.
4.1.1 Reference Unit
Use a reference unit (i580 unit known to be in good working order) to verify the accuracy of some tests.
You may want to set the Auto Answer Settings Menu setting so that the reference unit automatically
answers incoming calls for testing purposes.
4.1.2 Reference Accessories
Use reference accessories (accessories known to be in good working order) to verify the accuracy of
some tests.
68P80401P05 19
Page 35

BASIC LEVEL CHECKS AND SELF TESTS: Customer Care
CHAPTER 5
BASIC LEVEL CHECKS AND SELF TESTS
Before you perform basic troubleshooting and self tests on an i580 unit, determine if any special
conditions could affect testing and check the units for defective parts.
There are five categories of basic tests:
• Preventive maintenance
• Mechanical/electrical checks
• Self tests
• Technician tests
Test procedures are listed in the order in which they should be implemented. Each test contains a
description of what it does and the approximate time needed to perform it. For your convenience, a
checklist is included that can be used to ensure that all the necessary tests are conducted.
5.1 Customer Care
It is sometimes helpful to contact your regional Customer Care representative to determine if the
customer has service or billing issues or is known to be using the unit in a poorly covered area. The
representative also can inform you if there are system outages or known unit defects.
5.2 Test Conditions
During testing, ensure the following antenna conditions are adhered to. Reset conditions can be
comparatively difficult to diagnose.
5.2.1 Antenna Condition
For intermittent or no transmit problems, ensure the antenna stays fully extended or fully collapsed
at all times, never partially extended. If the antenna is loose or collapses halfway down, the unit can
lose up to 20 dB of radiated power.
5.2.2 Reset Condition
A reset condition can be the most difficult failure to duplicate because a reset can be caused by
software, hardware, system, accessory, and coverage problems. A severe hardware failure usually
can be detected immediately.
20 68P80401P05
Page 36
BASIC LEVEL CHECKS AND SELF TESTS: Basic-Level Test Checklist
5.3 Basic-Level Test Checklist
Use the following checklist to ensure that all the necessary tests are performed and to provide a
tracking mechanism in case the unit is sent to the next level of service. Check the appropriate box for
each test performed and indicate whether or not the test was completed successfully.
Table 5-1. Basic-Level Test Checklist
Done Test Pass Fail
Shock and Pressure
SIM Card Swap
Accessory Swap
Lockup
Battery Connections
Voltage Recognition
GPS Receiver
Passcode
Programming Menu Settings
Call Performance
Audio Loopback
ESN and IMEI Matching
Debug/Trace Mode
Model Assembly Test Mode
Codeplug Error Messages
Codeplug Troubleshooting
Software Utility Procedure
5.4 Preventive Maintenance
Although the unit does not require a scheduled preventive maintenance program, a visual inspection
and cleaning is recommended before testing begins.
NOTE: Do not use aerosol sprays, tuner cleaners, or other chemicals to clean the unit. Damage to
the plastic surfaces might occur.
To clean the unit takes approximately 3 minutes:
1. Prepare a 0.5% solution of a mild dishwashing detergent and water.
2. Apply the solution sparingly to the external surfaces of the unit with a soft, absorbent cloth.
Prevent moisture from getting inside the unit.
68P80401P05 21
Page 37

BASIC LEVEL CHECKS AND SELF TESTS: Mechanical and Electrical Checks
3. Remove any dirt from the unit using a stiff, non-metallic, short-bristled brush.
4. Wipe and dry the unit with a soft, absorbent, lint-free cloth. Make sure that there are no damp
spots on the connectors or in cracks and crevices.
5.5 Mechanical and Electrical Checks
Before conducting more complex tests, clean and check the unit for any mechanical defects that
might cause or contribute to the problem.
The following tests constitute the mechanical and electrical consistency of the unit:
• Shock and Pressure
• SIM Card Swap
• Accessory Swap
• Lockup
• Battery Connections
• GPS Receiver
• Voltage Recognition
The Shock and Pressure test time is approximately 3 minutes:
1. Power up the unit.
2. Throw the unit into the palm of your hand alternating the front, sides, and back of the unit.
Check if the unit turns off, displays “Reset,” or status LED (if so equipped) turns to red. Then,
continue to the next step.
3. Apply pressure to the front, sides, and back of the unit with your thumbs. Never apply direct
pressure to any display or lens area.
If unit turns off, displays “Reset,” or status LED (if so equipped) turns to red, retry this test with
a battery known to be in good working condition. Verify that the contacts in the unit and on the
battery are clean.
4. Start test again. If the reset/intermittent contact condition persists, power down the unit and send
to your iDEN Customer Support Center.
5.5.1 SIM Card Swap Test
Use this test to determine if the SIM card is defective, or if the unit is defective.
The SIM Card Swap test time is approximately 5 minutes:
1. Power off the unit, and then remove the battery.
2. Remove the SIM card from the unit.
3. Clean the SIM card, if necessary, by wiping its surfaces with a clean, static-free cloth, and then
check the contact areas in the unit for foreign material, damage, or other defects.
22 68P80401P05
Page 38

4. Replace the SIM card with the test (reference) SIM card. Ensure the test SIM card is clean.
5. Power on the unit, and verify that the test SIM card works with the unit.
If the unit works, the customer’s SIM card is defective and should be replaced, or the problem is
due to operator error, system, or carrier. If the unit does not work, the unit is defective and
should be sent to the iDEN Radio Support Center.
NOTE: If a defective SIM card is replaced with a new card or test card, all personal
information (voice notes, datebook entries, etc.) that was stored on the original card
will be lost.
6. Install the customer’s SIM card in a test (reference) unit.
If the test unit works, the customer’s unit is defective and should be sent to the iDEN Radio
Support Center
5.5.2 Accessory Swap Test
Use this test to determine if the unit’s accessories are defective.
NOTE: When adding or removing accessories, the main screen displays “Device Attached” or
“Device Detached” and the external screen displays a similar message.
BASIC LEVEL CHECKS AND SELF TESTS: Mechanical and Electrical Checks
The Accessory Swap test time is approximately 5 minutes:
1. Remove the accessory and check the contact areas for foreign material, damage, or other
defects.
2. Replace the problem accessory with the reference accessory.
3. Verify the reference accessory works with the unit.
If the reference accessory works, the customer’s accessory is defective and should be replaced.
4. Verify the customer’s accessory works with a reference unit.
If the accessory works, the customer’s unit is defective and should be sent to the iDEN Radio
Support Center.
5.5.3 Lockup Test
Use this test to determine if the unit locks up when keys are pressed or when it is powered down.
The Lockup Test time is approximately 6 minutes:
1. Power up the unit.
2. Press End Call to clear display inputs.
68P80401P05 23
Page 39

BASIC LEVEL CHECKS AND SELF TESTS: Mechanical and Electrical Checks
3. Press each of the alphanumeric keys to see if the unit responds. If the unit does not respond to a
pressed key, remove the battery to cycle power on.
If the problem persists after several tries, replace the unit.
5.5.4 Battery Connections Test
Use this test to check the battery connections in the unit.
The Battery Connections test time is approximately 5 minutes:
1. Remove the battery cover and battery from the unit.
2. Inspect the battery for physical damage.
If damage is evident, replace the battery.
3. Insert and remove the battery several times to check the battery connections and back plate of
the unit.
If either components are damaged, replace the unit.
4. Check the battery contacts for foreign material. Use a gold contact cleaning pen (see Appendix
A: Ordering Replacement Parts & Kits for part number) to clean the contact area on the battery.
CAUTION: Do not use a pencil eraser or similar material to clean the contacts.
F
5. Check the battery cover to ensure it fits and attaches properly to the back of the unit. Replace, if
necessary.
6. Use a pencil or similar object to depress the battery contacts. They should spring back to their
original position.
If the battery contacts do not spring back, they are damaged. Replace the unit.
If you do, damage can occur to the contacts.
5.5.5 Testing the GPS Receiver
The GPS receiver does not require alignment. The functionality of the receiver can be checked using
the autonomous mode feature.
Equipment Required: A known good i580 unit, or a commercial GPS receiver.
To test the GPS Receiver:
1. Move the unit to an open sky area, preferably outside—away from tall buildings and foliage.
2. With the unit turned on, press Menu.
3. Scroll until the GPS menu option is highlighted.
4. Press SELECT.
24 68P80401P05
Page 40

5. Scroll down on the GPS menu until the “POSITION” option is selected.
6. Press SELECT. The unit will display a “Position” information sheet.
7. Press RFRSH. The unit will respond with “Scanning for Satellites” or “Satellite Data Is
Outdated, Continue?” depending upon whether the GPS Almanac is up-to-date or not.
8. If the unit responds with “Satellite Data is Outdated, Continue?” press YES, otherwise, no
action is required. The unit is searching for satellites. Once it has obtained a position fix, the
unit will display the “Position” information sheet again. This could take as long as 10 minutes.
CAUTION: The unit must be held in a fixed position during the time that it is
F
9. Scroll down until the position coordinates are displayed. Compare these position coordinates to
a known good i580 unit or a commercial GPS receiver. If a commercial GPS receiver is used,
the coordinates must be displayed according to the WGS84 standard
searching for satellites.
5.5.6 Voltage Recognition Test
Use this test to check the voltage-recognition circuit in the unit. To accomplish this test, the unit
must first be registered on an iDEN system.
BASIC LEVEL CHECKS AND SELF TESTS: Self-Test Procedures
Compare the readings on the unit under test with the readings on a reference unit.
The Voltage Recognition test time is approximately 4 minutes:
1. Perform the Battery Connections test.
2. Power up the unit with a fully charged battery that is known to be in good working order. Three
voltage bars (4 Vdc) should appear on the Battery Strength icon.
Note that:
0 bars ≅ 0–10% of full charge
1 bar ≅ 11-34% of full charge
2 bars ≅ 35-64% of full charge
3 bars ≅ 65-100% of full charge
3. Complete a Direct Call and monitor the Battery Strength icon while the Push- to-Talk (PTT)
button is pressed.
4. Power down the unit.
If this test is successful, place the unit’s battery in the reference unit and re-run the test.
5.6 Self-Test Procedures
An i580 unit allows you to conduct automatic self tests to ensure that it is working properly. Selftest procedures include gathering information from the unit’s displays and testing the functionality
of basic components. These procedures usually do not require test equipment other than a reference
SIM card.
68P80401P05 25
Page 41

BASIC LEVEL CHECKS AND SELF TESTS: Self-Test Procedures
The following self-tests can be performed on an i580 unit:
• Passcode
• Programming Menu Settings
• Call Performance
5.6.1 Passcode Test
Use this test to determine the passcode for the unit.
The Passcode test time is approximately 5 minutes:
1. Power on the unit.
2. If the display reads Unit Locked Enter Code, enter 0000 or the 4-digit code provided by the
customer. (If the customer has changed the passcode but does not remember the new code, read
the codeplug to determine the passcode.)
3. If the passcode unlocks the unit, from the Main Menu, select Settings > Security > Phone
Lock, and press the Option key under Off.
If the unit does not unlock, repeat the test. If the problem persists, send the unit to the field level
of service.
NOTE: If applicable, ensure that the unit’s codeplug file is copied and retained for future use.
5.6.2 Programming Menu Settings Check
Use this test to verify that the unit’s menu settings perform correctly.
The Programming Menu Settings check time is approximately 15 minutes:
Display/Info: The Display/Info menu controls how the keypad and display appear:
• Wallpaper — Wallpapers can be set at different time settings and in a random order.
Settings > Display/Info > Wallpaper > OK > Wallpaper.
Settings > Display/Info > Wallpaper > OK > Auto Cycle.
• Text Size — User can select displayed text size. Settings > Display/Info > Text Size > OK.
• Theme — Sets various background images. Settings > Display/Info > Theme > OK.
• Home Icons — When activated, displays Shortcut Icons on the idle screen.
Settings > Display/Info > Home Icons > OK.
• Backlight — controls how long backlight stays on after you make or receive a call. The
backlight will go to 1/4 brightness after 10 seconds.
• Clock — controls whether the time and date appears on the idle screen, sets the format of the
time and date, and sets the year.
• Menu View — User can select the menu display in either LIST or ICON view.
Settings > Display/Info > Menu View > OK.
26 68P80401P05
Page 42

BASIC LEVEL CHECKS AND SELF TESTS: Self-Test Procedures
• Large Dialing — Displays transient large number text while dialing.
Settings > Display/Info > Large Dialing > OK.
• Contrast — sets the contrast on the display. To set the contrast of the display:
1. From the main menu, select Settings >Display/Info > Contrast.
2. Press the OK button to change.
3. Scroll left or right to set the contrast.
4. Press the OK button.
• Language — sets the language that your phone displays.
Phone Calls Features
The Phone Calls menu controls how your phone handles phone calls:
• SetLine — sets phone line 1 or phone line 2 as the active line for outgoing calls.
• AnyKeyAns — If this feature is on, you can answer calls by pressing any key on the keypad.
• AutoRedial — sets your phone to automatically redial calls you make when the system is busy.
• CallWaiting — To turn off Call Waiting for the next call you make or receive:
1. From the main menu, select Settings > Phone Calls > Call Waiting.
2. Press the OK button to change.
3. Scroll to Off.
4. Press the OK button. Call Waiting is turned back on when you end the call.
• Auto Ans — sets your phone to automatically answer an incoming call after a specified number
of rings. When this feature is on, the phone answers by connecting you to the caller; it does not
send the call to voice mail, unless you are out of coverage or on the line.
• Flip Activation — User can set the flip opening to answer and/or end a call.
Settings > Phone Calls > Flip Activation > OK > Flip to Ans.
Settings > Phone Calls > Flip Activation > OK > Flip to End.
• Minute Beep — causes beep to sound every minute of an active call.
• CallDuration — causes the duration of a call to appear on the phones display when the call
ends.
• TTY — lets you use your phone with a TTY device. To use your phone to make phone calls
using a teletypewriter (TTY) device:
1. Connect one end of a 2.5 mm cable into the audio jack on your phone. Connect the other
end of the cable to your TTY device.
2. Make sure that your phone’s TTY feature is on and select the TTY mode you want to use.
3. Use your phone to enter phone numbers and make calls.
• Notifications —To control whether your phone sounds message notification tones while you
are on phone calls:
1. From the main menu, select Settings > Phone Calls > Notifications.
68P80401P05 27
Page 43

BASIC LEVEL CHECKS AND SELF TESTS: Self-Test Procedures
2. Choose the option you want:
Receive All — Tones sound during calls for all types of messages.
Msg Mail Only — Tones sound during calls for mail messages; tones for all other types of
messages are held until you end calls.
Delay All—Tones for all types of messages are held until you end calls.
3. Press the OK button.
Tip: To set notifications options during a call: Press the OK button. Select Notifications.
2-Way Radio Options
The Two-Way Radio menu controls how your phone handles Direct Connect (DC) and Group
Connect (GC):
• Tkgroup Silent — controls whether you hear group calls or call alerts to your Talkgroup. To
receive group calls made to a Talkgroup, you must join the Talkgroup. You can belong to only
one Talkgroup at a time. When you join a new Talkgroup, you no long belong to your previous
Talkgroup. To join a Talkgroup:
1. Press the Pound(#) key. Then enter the Talkgroup number using the keypad.
-or-
2. Choose the Talkgroup name from Contacts or recent calls list.
• Tkgroup Area — lets you name Talkgroups and choose your Talkgroup area.
• One Touch PTT — One Touch PTT sets your phone to call the most recent Private ID on the
recent calls list, or to a Private ID you choose, every time you press the PTT button. To set your
phone to call the most recent Private ID on the recent calls list:
1. From the main menu, select Settings > DC/GC Options > One Touch DC.
2. Scroll to Last Call.
3. Press the Ok button.
• AlertType — Sets your phone to make no sound when you receive DC and GC calls. To set
your phone to vibrate instead of making a sound when you receive DC and GC calls, even if you
want your phone to ring for other features:
1. From the main menu, select Settings > DC/GC Options > Alert Type.
If Alert Type does not appear, from the main menu select Ring Tones. Make sure
VibrateAll or SilentAll is set to Off. Repeat step 1.
2. Press the Ok button to change.
3. Scroll to Vibe.
4. Press the Ok button to Select.
If your phone does not include a vibrate feature, you can still set your phone make no
sound. Scroll to Silent in step 3.
• PTV — Push To View. Enables sending or receiving pictures during private calls. Select On or
Off.
28 68P80401P05
Page 44

BASIC LEVEL CHECKS AND SELF TESTS: Self-Test Procedures
Personalize
• Menu Options — User can reorder menu items and add/remove stored applications.
Settings > Personalize> Menu Options > OK > Reorder Menu.
Settings > Personalize> Menu Options > OK > Add/Remove Apps.
• Up Key — At idle, user can press UP key as shortcut to selected application.
Settings > Personalize> Up Key > OK.
• Down Key — At idle, user can press DOWN key as shortcut to selected application.
Settings > Personalize> Down Key > OK.
• Left Key — At idle, user can press LEFT key as shortcut to selected application.
Settings > Personalize> Left Key > OK.
• Right Key — At idle, user can press RIGHT key as shortcut to selected application.
Settings > Personalize> Right Key > OK.
• Center Key — At idle, press the Ok button as shortcut to selected application.
Settings > Personalize> Center Key > OK.
• Left Softkey — Customize the left soft key to the user selected application.
Settings > Personalize> Left Softkey > OK.
• Right Softkey — Customize the right soft key to the user selected application.
Settings > Personalize> Right Softkey > OK.
• Power Up — User selects startup default application upon powering up the radio.
Settings > Personalize> Power Up > OK > App.
Volume Features
The Volume menu sets the volume of sounds your phone makes:
• Line1 — sets ringer volume for phone line 1.
• Line2 — sets ringer volume for phone line 2.
• Messages — sets the volume of message notifications.
• Earpiece — sets the volume of sound coming out of the earpiece.
• Speaker — sets the volume of sound coming out of the speaker.
• Keypad — sets the volume of sound associated with pressing keys and buttons.
• Java Earpiece — Sets the Earpiece volume when selected java application is on.
• Java Speaker — Sets the Speaker volume when selected java application is on.
• Data — sets the volume of sounds that notify you that you are receiving a circuit data call.
Security Features
The Security menu lets you turn security features on and off and change passwords:
68P80401P05 29
Page 45

BASIC LEVEL CHECKS AND SELF TESTS: Self-Test Procedures
• Phone Lock — turns on a feature that locks your phone, either immediately or automatically
after a set period of inactivity. An unlock code is required to enable this feature, to unlock the
phone, and to set a new Unlock code. Contact your service provider for your default unlock
code.
• KeypadLock— locks the phone’s keypad, either immediately or automatically after a set period
of inactivity. To lock the keypad:
1. From the idle screen, press Menu.
2. Press the Asterisk(*) key.
If you press a key while the keypad is locked, instructions for unlocking the keypad
display briefly. To unlock the keypad:
3. From the idle screen, press Menu.
4. Press the Asterisk(*) key.
While the keypad is locked, you can respond to incoming calls, messages, and alerts just
as you do when the keypad is not locked. When finished, press End Call to return to the
idle screen. The keypad remains locked.
• SIMPIN— enables and disables your phone’s SIM PIN security feature. When the SIM PIN
requirement is on, you are prompted to enter your PIN each time you turn on your phone.
Note: If a SIM PIN is required, your phone will not function until the SIM PIN is entered,
except for making emergency calls. When the PIN requirement is off, your phone can be used
without entering a PIN.
Important: When the SIM PIN requirement is off, the personal data on your SIM card is not
protected. Anyone can use your phone and access your personal data.
1. From the main menu, select Settings > Security > SIM PIN.
2. Scroll to On or Off.
3. Press the Ok button.
4. Enter the current SIM PIN.
5. Press the Ok button.
• GPS PIN — enables and disables your phone’s GPS PIN security feature. To turn the GPS
Enabled security feature on or off:
1. From the main menu, select Settings > Security > GPS PIN.
2. Scroll to On or Off.
3. Press the Ok button.
4. Enter the current GPS PIN.
Note: When you receive your phone, your GPS PIN is 0000.
5. Press the Ok button.
To change your GPS PIN:
1. From the main menu, select Settings > Security > Change Password > GPS PIN.
2. Enter the current GPS PIN.
Note: When you receive your phone, your GPS PIN is 0000.
3. Press the Ok button.
30 68P80401P05
Page 46

BASIC LEVEL CHECKS AND SELF TESTS: Self-Test Procedures
4. Enter the new 4- to 8-digit GPS PIN.
5. Press the Ok button.
6. Enter the new 4- to 8-digit GPS PIN to confirm.
7. Press the Ok button.
• Change Password — changes your phone unlock code, security code SIM PIN, and GPS PIN.
Advanced Features
The Advanced menu contains advanced and rarely used Settings features.
• Alert Timeout — controls the amount of time a tone continues to sound when you receive a
message notification or call alert.
• Headset/Spker—If you use a headset or similar device with your phone, you can set your
phone to send incoming sound to the headset only, or to the headset and the speaker at the same
time:
1. From the main menu, select Settings > Advanced > Headset/Spker.
2. Press the Ok button.
3. Scroll to HdsetOnly to send incoming sound to the headset only.
-or-
Scroll to Hdset&Spker to send incoming sound to the headset and the speaker at the same
time.
4. Press the Ok button.
• Connectivity — Network ID sets the phone’s network IDs and their roaming options under the
direction of your service provider; Master Reset lets your service provider to reset your service
in the event of a security or provisioning problem.
• Reset Defaults — Reset Settings returns all settings to their original defaults; Reset All returns
all settings to their original defaults and erases all stored lists. Use only under the direction of
your service provider.
• Return to Home — controls how long the recent calls list displays after calls.
• Airplane Mode — User option to stop unit from receiving/transmitting radio frequency.
Settings > Advanced > Airplane Mode > OK > Off.
Settings > Advanced > Airplane Mode > OK > On.
Settings > Advanced > Airplane Mode > OK > [Help].
• Phone Only — prevents your phone from making or receiving Private calls or group calls.
• BaudRate — sets the baud rate at which your phone communicates with a laptop computer, PC,
or similar device.
5.6.3 Call Performance Test
Use this test to verify the unit’s ability to complete interconnect and dispatch calls.
NOTE: To prevent FM noise interference during testing, be sure to separate the test units by an
appropriate distance.
68P80401P05 31
Page 47

BASIC LEVEL CHECKS AND SELF TESTS: Self-Test Procedures
Required equipment: reference unit
The Call Performance test time is approximately 7 minutes:
1. Power up the unit. Wait until registration is complete before continuing.
2. Place an interconnect call from the problem unit to the reference unit.
3. Ensure that both units have a signal strength of 3 bars or more.
4. Press Menu > Settings > Volume (Speaker Volume), and use the Vo lu m e keys to set the
speaker volume of the problem unit to 3 bars.
5. Verify that the problem unit performs within audio-quality standards.
If defects such as distortion, hum, or screeching exist, replace the unit.
6. Place a dispatch call to another unit in the group.
If defects such as distortion, hum, or screeching exist, replace the unit.
7. To automate this test, turn on the Auto Answer menu setting (Menu > Settings > Phone Calls)
in the reference unit and place the unit next to a good source of voice audio, such as a taperecorded speech.
32 68P80401P05
Page 48

BASIC LEVEL TEST MODES AND PROCEDURES: Test Modes
CHAPTER 6
BASIC LEVEL TEST MODES AND PROCEDURES
To complete basic testing of an i580 unit, you must enter a test mode to retrieve data from the unit,
and perform the technician tests in the correct sequence with the appropriate equipment.
Test procedures are listed in the order in which they should be implemented. Each test contains a
description of what it does, the approximate time needed to perform it, and the type of equipment
required (if any).
NOTE: The unit must be powered up and registered before performing most tests.
6.1 Test Modes
Some tests require that a certain mode be entered to conduct the test and/or retrieve data from the
unit. The following test modes are used with this unit:
• Debug/Trace Mode
• Test M o d e
NOTE: Do not enter these modes until the unit has been powered up and the power-up sequence
has been completed.
6.1.1 Entering Debug Mode
Use this procedure to access the Debug Mode.
To enter Debug/Trace Mode:
1. Power up the unit. Wait until registration is complete before continuing.
NOTE: Steps 2 through 5 must be performed quickly with no more than one second between
each key press: (#, *, M, >)
2. Press #.
3. Press *.
4. Press Menu.
5. Press the right Scroll key. You now are in Debug Mode.
If you press the option key under Trace while in Debug Mode, you can enter Trace Mode. To
exit Trace Mode, re-enter Debug Mode, press the option key under Tra ce again, and then press
the option key under Exit.
In Trace Mode, the unit switches every five seconds between Debug Mode and normal
operation to allow you to monitor and sample a variety of signals and signal characteristics,
particularly in the SQE/Carrier and multi-data displays.
68P80401P05 33
Page 49

BASIC LEVEL TEST MODES AND PROCEDURES: Test Modes
To exit Debug Mode, press the option key under Back.
6.1.2 Trace Mode Display Screens
Display screens on this unit provide information that is useful for troubleshooting purposes. These
displays appear only when the unit is placed in Debug Mode (see “Entering Debug Mode” on page
6-1).
To navigate through the screens, press the appropriate scroll key to highlight the desired screen, and
then press the View option key. To select a choice within a screen, press the Select option key. To
exit from a choice or screen, press the Back option key.
Table 6-1. Display Screens
Name Description
Unit Info
• Phone Model
Displays the unit model number and product sub ID, such as i580 and A.
• CP Ver
• USR Ver
• CSD Ver
• Software
Tegic
Flash Packs
Total Usage Displays the number of minutes the unit has used a traffic (dispatch and interconnect) or a
Tx Status First line displays the SQE/Carrier data: Outbound signal quality, Frequency band, current
Rx Status First line displays the SQE/Carrier data: Inbound signal quality, Frequency band, current
Displays the Codeplug Version. The first half of the line displays the codeplug structure and
default version; the second half displays the codeplug bandmap.
Version of carrier specific modification to the product code plug. Programmed at shipment.
Displays the Customer Static Data version. The first number indicates the customer. The
second number indicates the structure revision. The third number indicates the data revision.
Displays the current software version programmed in the unit, as well as the software type
(RSS model) and build date.
Text 9 code version/LDB version.
Version of the preferred language: French, Spanish, Hebrew, Korean, or Portugese and the
associated Font Pack.
Packet Data channel since manufacture.
carrier code, and color.
Second line displays Tx power cutback in RSSI.
Third line displays current temperature and the difference between the current temperature
and temperature 2 seconds ago.
carrier code, and color.
Second line displays Rx power cutback in RSSI.
Third line displays AGC Step Attenuator State, Channel Code.
34 68P80401P05
Page 50

BASIC LEVEL TEST MODES AND PROCEDURES: Test Modes
Table 6-1. Display Screens (Continued)
Name Description
N6:1 Intrcnct Parameter details for the 6:1 Interconnect Feature enabling transmission of RF-originated
messages through the telephone system.
Line 1 shows MS, the Mobile Subscriber's ability to support 6:1 Interconnect and FNE, the
Fixed Network Equipment’s ability to support 6:1 Interconnect respectively. Numbers 0 or
1 indicate No or Yes respectively.
Line 2 shows I, Interleave of the current channel, O, Offset of the current channel, and S,
Sub-slot of the current channel. Values for Interleave are 1 – 24, Offset values are 0 – 23,
and Sub-slot can be A, B or N.
Line 3 shows ECC, Extended Color Code and PO, Primary Control Channel Offset of the
current carrier.
Values for ECC are 0 – 16. Values for PCCH Offset are 0 - 11.
During Trace Mode, radio activity such as interconnect, dispatch call, packet data session,
registration, or location update information will automatically update every 2 seconds.
N6:1 Dispatch Displays status of a new 6:1 dispatch call. Data displayed shows “MS 1 FNE 1”. All other
GPS Displays the GPS location, time info, assist, navigation, summary, GPS version.
IMEI/SIM ID/SN Displays the electronic serial number, SIM ID serial number, and unit serial number.
Registration Log Displays the Dispatch Log, Interconnect Log, Packet Data Log, Mobile IP Log, and Phone
Err/Channel Displays the physical channel that the unit is connected to or the radio link procedure that
Current Freq Displays current frequency and band. Pressing OK allows the current frequency and band
Dispatch IDs Displays the Dispatch Group ID affiliated with the unit in the current dispatch-location area.
Band Info Displays primary and secondary bands.
data combinations are old 6:1 dispatches.
The IMEI is the global name assigned to the mobile station at manufacturing time and
should correspond to the serial-number tag of the unit.
The SIM ID is the SIM electronic serial number and should correspond with the number
stamped on the SIM card. The SN is applied during manufacturing.
Pressing OK allows the IMEI/SIM ID to be traced.
Rst Log. Registration Log information is updated when the user deselects and selects the
Registration Log choice.
is currently active. Also, displays error codes encountered during normal operation if Err/
Channel is On. At power up, Err/Channel is Off.
to be traced.
Also, displays the Dispatch Individual ID affiliated with the unit in the current dispatch
location. Pressing OK allows the dispatch IDs to be displayed periodically.
Bandmap Displays the currently selected regional bandmap. Pressing OK allows the bandmap to be
Hardware Displays the AFC Offset and Channel Number.
Fatal Err/# Displays the Fatal Error log. This log contains a count of any fatal errors logged during the
Flags: Displays the error log. This log contains any errors logged by the unit software. Pressing
68P80401P05 35
displayed periodically.
Pressing OK allows the hardware parameters to be traced.
unit's automatic self test. Optioning clear empties the log.
Menu when it appears displays the Clearall screen in which the user can clear all the logged
errors.
Page 51

BASIC LEVEL TEST MODES AND PROCEDURES: Test Mode Test Procedures
Table 6-1. Display Screens (Continued)
Name Description
Resets: Displays the Reset Error log. This log contains any errors logged when the user resets the
unit during operation. The most recent reset appears at the top of the list. Pressing Menu
when it appears displays the Clearall screen in which the user can clear all the logged errors.
CE Status Indicates accessory type connected to unit.
6.1.3 Entering Test Mode
Use this procedure to access Test Mode.
To enter Test Mode:
1. Power up the unit. Wait until the power-up sequence is complete before continuing.
NOTE: Steps 2 through 7 must be performed quickly with no more than one second between each
key press: (#,*, M, M, M, <, M, M, <)
2. Press
3. Press
#.
*.
4. Press Menu key three times.
5. Press the left Scroll key.
6. Press Menu key twice.
7. Press the left Scroll key. You are now in Test Mode.
To exit Test Mode, press the option key under Exit. The unit waits for a few seconds, resets, and
then re-registers the unit.
6.2 Test Mode Test Procedures
Enter Debug or Test Mode to perform the following tests:
• Audio Loopback Test
• ESN and IMEI Matching Test
• Debug Check
6.2.1 Audio Loopback Test
Use this test to check the functionality of the microphone and the audio quality of the earpiece. The
loopback test checks the unit’s audio by passing a test signal from the Codec microphone input to
the Codec Rx output.
36 68P80401P05
Page 52

BASIC LEVEL TEST MODES AND PROCEDURES: Test Mode Test Procedures
The Audio Loopback test time is approximately 3 minutes:
1. Enter Test Mode.
2. With the Test Mode screen displayed, press Menu. The right option key changes to Edit.
3. Press the option key under Edit. The right option key changes to Change.
4. Press the Change option key.
5. Using the bottom scroll key, scroll down the list until AUDIO1 or 800AUD1 is displayed.
6. Press the Select option key.
7. Press the Back option key.
8. Press Menu.
9. Press the Start option key to begin the actual audio test in the TX On mode.
10. Talk into the microphone. The audio from the earpiece should sound clear.
If there is a problem with the microphone or the earpiece, power down the unit and repeat the
test. If the problem persists, send the unit to the field-level Support Facility.
11. Press the Tx Off key, and repeat the previous step.
12. Press the Stop key to end the test.
6.2.2 ESN and IMEI Matching Test
Use this test to verify that the electronic serial number (ESN) matches the International Mobile
Equipment Identifier (IMEI) on the Serial Number label located on the chassis of the unit.
The ESN/IMEI Matching test time is approximately 6 minutes:
1. Power up the unit. Wait until the power-up sequence is complete before continuing.
2. Enter Debug Mode. The Unit Info display appears.
3. Scroll down until the IMEI/SIM ID choice is highlighted, then press View to view the IMEI/
SIM ID display.
4. Write down the digits shown in the IMEI line.
5. Verify that this number matches the IMEI on the Serial Number label. The last zero on the label
will be missing.
If the numbers do not match, send the unit to the field level of service.
6.2.3 Debug Check
Use this check to monitor (measure) the data in an i580 unit.
68P80401P05 37
Page 53

BASIC LEVEL TEST MODES AND PROCEDURES: Test Mode Test Procedures
NOTE: The following procedure describes the sequence of displays accessed via the down scroll
key. If you press the up scroll key, the sequence appears in reverse order.
To monitor the data in the unit:
1. Power up the unit. Wait until the power-up sequence is complete before continuing.
2. Enter Debug Mode. The Unit Info display appears.
a. Press View to view the Phone Model display, and then press Select to view the phone
model, such as i580.
b. Press Back to return to the Unit Info display, and then scroll down (down scroll key) to
highlight the CP Ver choice.
c. Press Select to view the Codeplug Version. The first half of the line displays the codeplug
structure and default version; the second half displays the codeplug bandmap.
d. Press Back to return to the Unit Info display, and then scroll down to highlight the CSD
Ve r choice.
e. Press Select to view the Customer Static Data version. The first number indicates the
customer. The second number indicates the structure revision. The third number indicates
the data revision.
f. Press Back to return to the Unit Info display, and then scroll down to highlight the
Software choice.
g. Press Select to view the current software version programmed in the unit, as well as the
software type (RSS model) and build date.
3. Press Back twice to return to the Trace Mode display.
4. Scroll down to highlight To t al Us ag e , and then press View to view the Total Usage display.
This screen displays the number of minutes the unit has used a traffic (dispatch and
interconnect) or a Packet Data channel since manufacture.
5. Press Back to return to the Trace Mode display.
6. Scroll down to highlight Tx/Rx Status, and then press View to view the Tx/Rx Status display.
The first line displays the SQE/Carrier data (outbound signal quality, frequency band, current
carrier code, and color code). The second line displays the Tx/Rx power (current adjusted
transmit output power and receiver input power) of the unit. The third line displays the current
temperature and the difference between the current temperature and the temperature two
seconds ago.
7. Press Back to return to the Trace Mode display.
8. Scroll down to highlight N6: Intrcnct, then press OK to view parameter details related to
RF-originated messages.
9. Press Back to return to the Trace Mode display.
10. Scroll down to N6: Dispatch, then press OK to view the newest dispatch data.
38 68P80401P05
Page 54

BASIC LEVEL TEST MODES AND PROCEDURES: Test Mode Test Procedures
11. Press Back to return to the Trace Mode display.
12. Scroll down to highlight GPS, and then press View to view the GPS display.
a. Location selection displays the number of satellites used to obtain the position fix, the
current cell site latitude and longitude, the subscriber unit latitude and altitude information,
as well as the last calculated horizontal and vertical accuracy.
b. Time selection contains iDEN time information used to determine accurate GPS time.
c. Assist selection contains the subscriber unit latitude, longitude and horizontal accuracy in
meters as well as an indication of whether the data is valid or not.
d. Navigation selection contains the heading as well as velocity and velocity error in
kilometers/hour.
e. Summary selection contains time and longitude/latitude expressed in degrees. Accuracy in
meters is also displayed.
f. GPS Version contains information about the custom Sirf software used in the unit.
13. Press Back to return to the Trace Mode display.
14. Scroll down to highlight IMEI/SIM ID, and then press View to view the IMEI/SIM ID
display. The IMEI is the global name assigned to the mobile station at manufacturing time and
should correspond to the serial-number tag of the unit. The SIM ID is the SIM electronic serial
number and should correspond with the number stamped on the SIM card.
15. Press Back to return to the Trace Mode display.
16. Scroll down to highlight Registr Log, and then press View to view the Registr Log display.
This screen displays the Dispatch Log, Interconnect Log, Packet Data Log, Mobile IP Log, and
Phone Rst Log. Registration Log information is updated when the user deselects and selects the
Registr Log choice.
17. Press Back to return to the Trace Mode display.
18. Scroll down to highlight Err/Chan Codes, and then press On to view the Err/Chan Codes
display. This screen displays the physical channel that the unit is connected to or the radio link
procedure that is currently active. Also, displays error codes of errors encountered during
normal operation if Err/Chan codes is On. (At power up, Err/Chan Codes is Off)
19. Press Back to return to the Trace Mode display.
20. Scroll down to highlight Current Freq, and then press View to view the Current Freq display,
which shows the current frequency and band.
21. Press Back to return to the Trace Mode display.
22. Scroll down to highlight Dispatch IDs, and then press View to view the Dispatch IDs display.
This screen displays the dispatch group id affiliated with the unit in the current dispatchlocation area. Also, displays the dispatch individual id affiliated with the unit in the current
dispatch location.
23. Press Back to return to the Trace Mode display.
68P80401P05 39
Page 55

BASIC LEVEL TEST MODES AND PROCEDURES: Technician Test Procedures
24. Scroll down to highlight Band Info, and then press View to view the Band Info display. This
screen displays the primary and secondary control channels: Pri Band: 02 for 800 MHz; Sec
Band: 02 for 800 MHz and 04 for 900 MHz.
25. Press Back to return to the Trace Mode display.
26. Scroll down to highlight Bandmap, and then press View to view the Bandmap display. This
screen displays the currently selected regional bandmap.
27. Press Back to return to the Trace Mode display.
28. Scroll down to highlight Hardware, and then press View to view the Hardware display. This
screen displays RF Xtal (RF Crystal), a factory-tuned parameter that adjusts the output
frequency; Xtal Offset (RF Crystal Warp offset), which is derived during frequency
compensation; and Level Set (Level Set value), which regulates the transmit output power of the
unit.
29. Press Back to return to the Trace Mode display.
30. Scroll down to highlight Fatal Err/#, and then press View to view the Fatal Err/# display. This
screen displays the Fatal Error log. This log contains a count of any fatal errors logged during
the unit's automatic self test.
31. Press Back to return to the Trace Mode display.
32. Scroll down to highlight Flags, and then press View to view the Flags display. This screen
displays the error log, which contains any errors logged by the unit software.
33. Press Back to return to the Trace Mode display.
34. Scroll down to highlight Coin Cell, and then press View to show the Preset Charging Voltage on
line 1 and Current Battery Voltage on line 2.
35. Press Back to return to the Trace Mode display.
36. Scroll down to highlight CE Status, and then press OK to view accessory type connected to the
unit.
37. Press Back to return to the Trace Mode display.
6.3 Technician Test Procedures
Technician Tests usually require special equipment to test the functionality of the components in the
unit.
The following tests check the software functionality of the unit:
• Codeplug Help
• Codeplug Troubleshooting
40 68P80401P05
Page 56

BASIC LEVEL TEST MODES AND PROCEDURES: Programming the i580 Unit
Unit Under Test
RS232 Data Cable
or
USB Data Cable
6.4 Programming the i580 Unit
Use Radio Service Software (RSS) to activate a new software utility or to program specific codeplug
user information.
Refer to Radio Service Software’s Help Menu, iDEN Service Bulletins, the Motorola iDEN website,
or contact iDEN Customer Care for information on the setup and use of RSS.
NOTE: iDEN Service Bulletins, Software Utilities, and Updates can be found online at:
http://idenphones.motorola.com/iden/support/
6.5 Connecting the Unit to the RSS Workstation
Some technician tests enter programming information into the unit. To perform these tests, the unit
must be correctly connected to the test equipment.
Recommended equipment: RS232 data cable(NKN6560A) or USB data cable(NKN6559A) and a
PC computer workstation with RSS installed.
NOTE: For a list of recommended programming equipment, applicable part numbers, and
descriptions, refer to Appendix A: Ordering Replacement Parts and Kits.
To connect the unit to a PC using the iDEN RS-232(serial) or USB data cable (Figure
6-1):
1. Insert the 17-pin connector on the data cable to the 17-pin connector located at the base of the
unit.
2. Attach the other end of the data cable to the RS-232 port or USB port on the RSS computer
workstation that is used for testing purposes.
Computer
Workstation
(RSS)
Unit Under Test
Serial Port/
USB Port
RS232 Data Cable
or
USB Data Cable
Figure 6-1. Data Cable Programming Setup
68P80401P05 41
Page 57

BASIC LEVEL TEST MODES AND PROCEDURES: Connecting the Unit to the RSS Workstation
Refer to any relevant Radio Service Software Read-Me’s or active iDEN Service Bulletins for more
information on setting up your test computer as an RSS workstation.
NOTE: For faster codeplug reading using an RS-232 connector, enable the QuickComm feature in
the RSS configuration setup.
6.5.1 Codeplug Help
If the codeplug is corrupted, the unit displays a SELF CHECK ERROR 0800 message. The
procedure for repairing a corrupted codeplug is described in the RSS online Help System.
Equipment Required: Computer workstation with RSS installed, data cable RS232 or USB,
reference unit (must be the same model as the problem unit).
To access the codeplug Help topic in Windows:
1. Set up your test equipment configuration. See Figure 6-1 for an illustration of this configuration.
2. Start the RSS program.
3. Click on the Help choice on the menu bar, and then select Contents. The RSS online Help is
displayed.
4. Click on the Troubleshooting link, and follow the detailed directions.
To prevent the loss of call lists, create a backup of the codeplug before attempting any form of
modification. Refer to the Radio Service Software’s Help Menu for instructions on reading and
saving codeplug information.
6.5.2 Codeplug Troubleshooting
The RSS online Help System topics contain information for troubleshooting codeplug problems.
The following error messages are discussed:
• Unable to read the codeplug
• Unable to write partial codeplug
• Unable to write entire codeplug
• Unable to write subscriber software (flashing)
• Unable to write software and codeplug
• Update failed while writing subscriber software
• Update failed while reading radio or writing entire codeplug
42 68P80401P05
Page 58

PREPARING FOR FIELD LEVEL TESTING: Preparing Equipment for Testing
CHAPTER 7
PREPARING FOR FIELD LEVEL TESTING
Field level testing requires external equipment and support. To conduct field level troubleshooting
and testing of an i580 unit, you must become familiar with the screen readouts of the recommended
test equipment.
Display screens provide information that is useful for troubleshooting purposes. Refer to Chapter 3
for information on the displays, errors, alert tones, and messages associated with this unit.
7.1 Preparing Equipment for Testing
To ensure accurate testing of the unit, it is important that the test equipment function properly.
7.1.1 Calibrating Equipment
Test equipment should be internally calibrated before being used for testing. Note that the internal
calibration does not substitute for a factory calibration. For more information, refer to R-2660
Digital Communications System Analyzer Operator’s Manual.
7.1.2 Checking the RF Cable
Check the cable connection and quality to ensure that the test results are true. Cable length is critical
to consistent Rx sensitivity and Tx power measurements. Use a high-quality, shielded, 50-ohm,
coaxial cable that is approximately 1.5 feet in length. Place the unit to be tested at least 6 inches
from the R-2660 Communications System Analyzer. The cable loss should be less than 2 dB.
7.1.3 Strong-Signal Environments
When using the R-2660 Communications System Analyzer to test a unit in a strong-signal
environment (–75 dBm or stronger), change the bandmap of the unit.
For Registration/Call testing: Power up the unit. Immediately after hearing the beep, press Start on
the R-2660. The unit will lock onto the first strong signal.
7.1.4 Protecting Static-Sensitive Devices
This unit contains static-sensitive devices that must be protected when opening the unit, or storing
and transporting any printed circuit board. Consider the following information to create a proper
ground:
• Ground the working surface of your service bench. If possible, use the Motorola Static
Protection Assembly (P/N 0180386A82) to ground your service bench. This assembly contains
a wrist strap, two ground cords, a table mat, and a floor mat.
• Wear a conductive wrist strap in series with a 100 kΩ resistor to ground.
68P80401P05 43
Page 59

PREPARING FOR FIELD LEVEL TESTING: Using RSS
• Do not wear nylon clothing when handling any printed-circuit board.
• Prior to touching any printed-circuit board, touch an electrical ground to remove any static
charge that might have accumulated.
Refer to Service and Repair Note SRN-F1052 for more information. This note is available through:
Motorola Literature Distribution Center
2290 Hammond Drive
Schaumburg, IL 60173
847-576-2826
The following should be considered when storing or transporting a circuit board:
• Place the printed-circuit board in conductive, anti-static material.
• Do not insert the printed-circuit board into conventional plastic “snow” trays used for
transporting other devices.
7.2 Using RSS
Use Radio Service Software (RSS) to program a new software version or to update user information
in the codeplug. Refer to “Connecting the Unit to the RSS Workstation” and the Radio Service
Software User’s Guide for information on the setup and use of RSS.
NOTE: You can use the RSS online Help for locating specific information about RSS dialog boxes
and fields. To access online Help, press F1 while you are viewing an RSS screen.
If you are using the R-2660A Communications System Analyzer in the iDEN mode, which is 6:1
capable, use RSS to program an i580 unit for Full Rate operation. Use the 6:1 Interconnect softkey
for all interconnect testing.
If you are using the R-2660B or later, which is 3:1 capable, use RSS to program an i580 unit for
Half Rate operation. Use the 3:1 Interconnect softkey for all interconnect testing.
In the carrier version of RSS (but not the agent version), you can change interleave values. To access
the fields where you can change these interleave values, go to the User Ergonomics dialog box, and
then click on the Interleave tab.
NOTE: After servicing a unit, use RSS to reprogram the unit back to its original operating state.
Refer to the R-2660 Digital Communications System Analyzer Operator’s Manual for more
information on how to set up this equipment for iDEN mode testing.
7.3 Connecting an i DEN Unit to the R-2660
The R-2660 Communications System Analyzer enables you to monitor and perform tests on iDEN
units. Figure 7-1 shows a typical R-2660 test setup.
Equipment Required: R-2660, reference SIM card, SMA to N-type RF coaxial cable, battery
eliminator, 5.0-12.0 Vdc power supply.
44 68P80401P05
Page 60

PREPARING FOR FIELD LEVEL TESTING: Connecting an i DEN Unit to the R-2660
+
5.0 to 12.0 Vdc
Power Supply
Coaxial Cable
Unit Under Test
Battery
Eliminator
RF
In/Out
(N-type)
R-2660
Communications
System
Analyzer
Figure 7-1. Typical R-2660 Setup
To connect the unit to the R-2660:
1. Ensure the unit is powered off, and then turn on the R-2660.
2. Remove the battery cover and battery from the unit, and insert the reference SIM card.
3. Attach the battery eliminator to the back of the unit.
4. Engage RF.
5. Connect the SMA connector of the RF cable to the RF connector on the battery eliminator.
6. Connect the N-type connector of the RF cable to the R-2660 RF In/Out connector.
7. Attach the power leads on the battery eliminator to the DC power supply.
CAUTION: Be very careful to observe polarity when connecting power to the
F
battery eliminator.
8. Turn on the power supply, and adjust output between 5.0 and 12.0 Vdc. With the correct setting,
the regulated battery eliminator will provide 4.0 Vdc to the subject unit.
9. If power supply is capable, set current limit = 4.0 A.
68P80401P05 45
Page 61

PREPARING FOR FIELD LEVEL TESTING: Operating the R-2660
10. Power up the subject unit.
Refer to the R-2660 Digital Communications System Analyzer Operator’s Manual for more
information on how to use this equipment.
7.4 Operating the R-2660
Most of the technician tests performed with the R-2660 Communications System Analyzer require
that the analyzer use the Initial Registration test mode.
To enter Initial Registration mode:
1. Turn on the R-2660.
2. Press DISP to place the cursor in the Display zone portion of the screen.
3. Use the arrow keys to move the cursor to the Mode field.
4. Press More until iDEN MOBILE appears in the Mode field.
5. Press the iDEN MOBILE softkey. The RF zone displays DUPLEX in the RF Control field.
6. Use the arrow keys to move the cursor to the Meter field in the display zone.
7. Press More until INITIAL REG appears in the Meter field.
8. Press the INITIAL REG softkey. The display zone displays DISPATCH in the Registration
Type field.
9. Press RF to move to the RF zone.
10. Enter the appropriate values in the following RF zone fields. These values might be different,
depending on your bandmap. Use the arrow keys to move between fields and the keypad to enter
values.
Table 7-1. RF Zone Fields and Values
Field Value
Carr. # Choose the appropriate carrier number from your bandmap. The
Mon. Freq Choose the appropriate monitor frequency from your bandmap. The
Offset 800 MHz = +45 MHz; 900 MHz = +39 MHz
Format iDEN
Mon. 40 dB RF I/O
Gen -070 dBm RF I/O
Mon. Freq. field displays the associated frequency.
Carr. # field displays the associated carrier frequency.
11. Press the DISP key to return to the Display zone. You now are ready to begin testing.
46 68P80401P05
Page 62

PREPARING FOR FIELD LEVEL TESTING: Disassembling and Reassembling the Unit
7.5 Disassembling and Reassembling the Unit
Motorola recommends the service technician follow a prescribed disassembly sequence to access
specific items or components of the unit. This product is an efficiently designed package that
incorporates the physical overlap and integration of some modular components. Refer to the
Disassembly Sequence Flowchart for a suggested path to reach specific components.
NOTE: In some cases, the technician may not need to remove certain components to reach others.
7.6 Disassembly Sequence Flowchart
Battery Cover
Battery SIM Card
Back Housing
Front Housing with
Flip Assembly
Main Keypad
Flip Assembly
Antenna Assembly
Audio Jack Seal
Main Board
Assembly
Accessory Connector
Seal
7.7 Assembly/Disassembly Procedures
NOTE: Installation procedures to be performed in reverse of disassembly except where noted.
Screws used to assemble the i580 are: 1 antenna screw, T-4 drive; 6 housing assembly screws, four
T-6 drive, two T4 drive.
68P80401P05 47
Page 63

PREPARING FOR FIELD LEVEL TESTING: Remove Battery Cover
7.8 Remove Battery Cover
7.8.1 Remove:
1. Place thumb or fingernail against release latch (see Figure 7-2).
2. Push or pull down latch.
3. Hold latch in the down position and use fingernail to lift cover off housing bottom edge.
4. Pull cover down slightly to release from top clips and pull up to remove.
7.8.2 Install:
1. Bring top clips of cover into their respective slots.
2. While keeping clips engaged, close cover until release latch fully snaps into place.
2
33
Figure 7-2.
48 68P80401P05
Page 64

7.9 Remove Battery
7.9.1 Remove:
1. Place fingernail against the battery base exposed section.
2. Push the battery up towards unit’s top to release from bottom clip and lift up the battery to
remove.
PREPARING FOR FIELD LEVEL TESTING: Remove Battery
1
Figure 7-3.
2
68P80401P05 49
Page 65

PREPARING FOR FIELD LEVEL TESTING: Remove SIM Card
7.10 Remove SIM Card
7.10.1 Remove:
1. Slide tray lock away from SIM tray.
2. Open SIM Card Tray by lifting at tray access tab.
3. Grasp exposed corner of SIM Card and pull to slide SIM Card out.
7.11 Remove Antenna
Tools: Required Tools: T4 Torx Bit, Tweezers.
1
3
Figure 7-4.
7.11.1 Remove:
1. Loosen T4 counter-clockwise. Remove completely.
50 68P80401P05
Page 66

2. Extend antenna whip fully.
3. Hold unit stationary while tugging at collar until antenna assembly releases.
4. Insert tweezers into the antenna housing port, grab the edge of antenna tube and pull it out.
7.11.2 Install:
1. Carefully push antenna collar into position.
2. Insert antenna assembly with whip fully extended, contact toward interior of unit. Push firmly
until fully seated.
3. Pull antenna whip in and out to check for correct operation. Reinsert T-4 screw and tighten
clockwise to 0.5 in/lb.
4. Align and insert new valence plug. Must be flush with surface.
PREPARING FOR FIELD LEVEL TESTING: Remove Antenna
11
33
Figure 7-5.
68P80401P05 51
Page 67

PREPARING FOR FIELD LEVEL TESTING: Remove Back Housing
7.12 Remove Back Housing
Tools: T-4, T-6 Torx Bits, Black Stick.
Preparation: Remove Battery Cover, Battery, and Antenna.
7.12.1 Remove:
1. Remove four T-6 screws—one in the antenna tube channel.
2. Grasp the back housing at the top end and the front housing at the flip pivots. Gently pull apart
the housing halves.
3. Once the housings are free, avoid stressing flex strip near the PTT key.
4. Wedge black stick under flex pad to unseat flex connector.
NOTE: Do not touch flex contacts with fingers or dirty tools. Do not damage the flex strip.
7.12.2 Install:
1. Reattach flex connector carefully without contamination (see Figure 7-6).
2. Bring housing halves together checking alignment of flex, PTT/volume keypad, back acoustic
seal, and audio jack seal.
3. Torque screws to 1.8 in/lb (2.1 in/lb new plastic).
1
4
Figure 7-6.
52 68P80401P05
Page 68
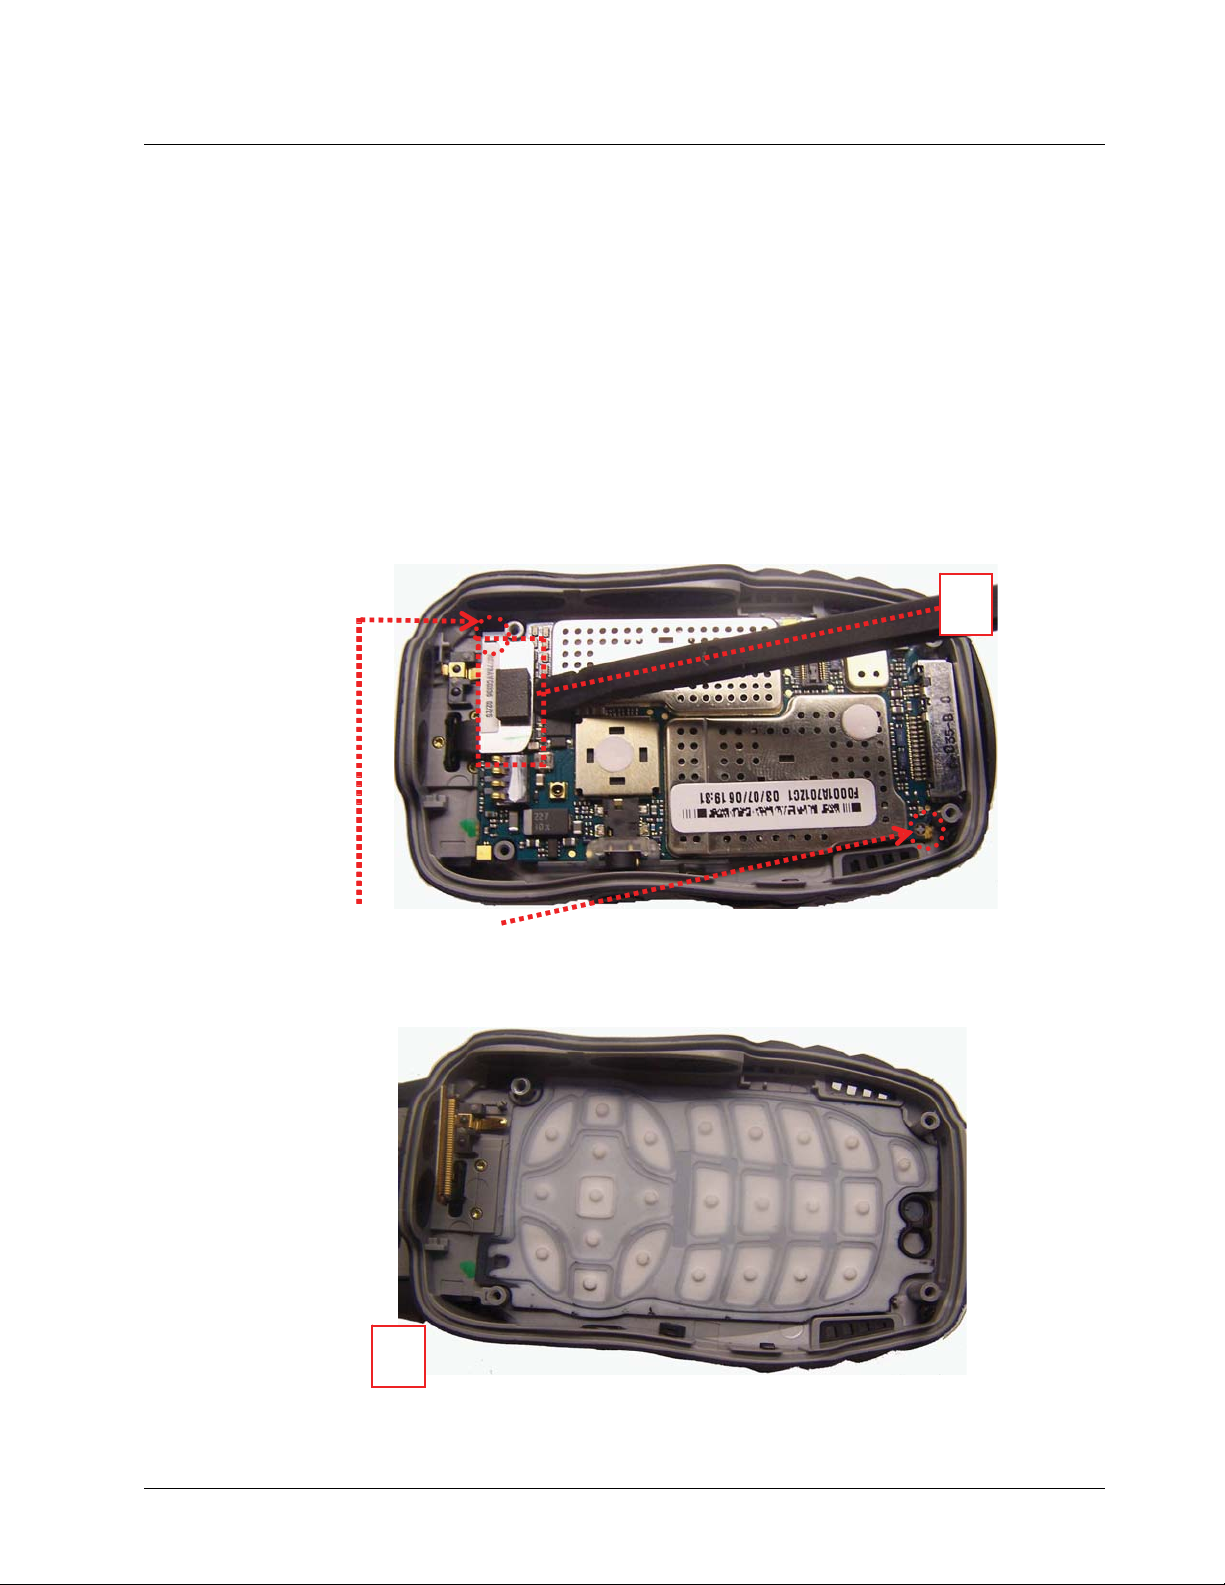
PREPARING FOR FIELD LEVEL TESTING: Remove Main Board, Keypad
7.13 Remove Main Board, Keypad
Tools: Black Stick, Tweezers.
7.13.1 Remove:
1. Wedge black stick under flip flex connector. Gently pry upwards along length until release.
2. Lift main board straight up from housing bosses.
3. Remove the housing keypad backer.
4. Lift Keypad straight up from housing frame
5. Clean around keypad holes. Replace keypad if worn or dirty
1
Housing Bosses
4
Figure 7-7.
68P80401P05 53
Page 69

PREPARING FOR FIELD LEVEL TESTING: Remove Flip Assembly
7.14 Remove Flip Assembly
7.14.1 Procedure to remove flip assembly:
Tools: Black stick. NO metallic tools!
NOTE: i580 flip components include a Flex Connector ribbon which can be easily torn or
damaged if not handled properly. Handle the Flex Ribbon with care especially when
working it through the front housing slot.
1. Remove the keypad and main board from the front housing. Make sure the flip is in the open
position.
2. Remove the three T-4 screws securing the frame-flip center hinge. Flip the unit over and lift the
flip-center hinge straight up to remove.
3. Locate the slight gap between the right knuckle and flip assembly. Align the flat tip of the black
stick with the gap.
2
3
Figure 7-8.
54 68P80401P05
Page 70

PREPARING FOR FIELD LEVEL TESTING: Remove Flip Assembly
4. While carefully pushing the black stick in towards the flip assembly about 2mm, twist the stick
as if you were tightening a screw.
5. Try to compress the hinge spring by moving the stick in a shoveling motion. The front housing
will deflect slightly, allowing the hinge to release the right side from the front housing.
6. Once the Flip Assembly is free of the front housing, carefully feed the Flex Connector through
the slot in the front housing. Take extra precaution to prevent stressing and/or tearing the Flex
Ribbon.
7. Angle the flex connector end slightly while prodding the flex ribbon out through front housing
slot. The flex connector will pass through the slot, albeit tightly.
8. Remove the Hinge Assembly Mechanism by inserting the tip of the black stick into the flex
guard slot and pushing on the hinge assembly tip until it pops out.
8
57
Figure 7-9.
68P80401P05 55
Page 71

PREPARING FOR FIELD LEVEL TESTING: Install Flip Assembly
7.15 Install Flip Assembly
7.15.1 Procedure to install flip assembly:
Tools: Black stick.
NOTE: Ensure the flip and housing pivot points are clean.
1. Insert the Hinge Assembly Mechanism into flip right knuckle. Gently press inward until seated
and ensure that the two surfaces are flush.
2. Carefully guide the flex connector through access slot in front housing.
3. Align flip assembly to front housing to resemble a semi closed position.
4. Slip the left knuckle side of the flip into position on the front housing.
2
4
Figure 7-10.
5. Slip the right knuckle into the front housing.
56 68P80401P05
Page 72
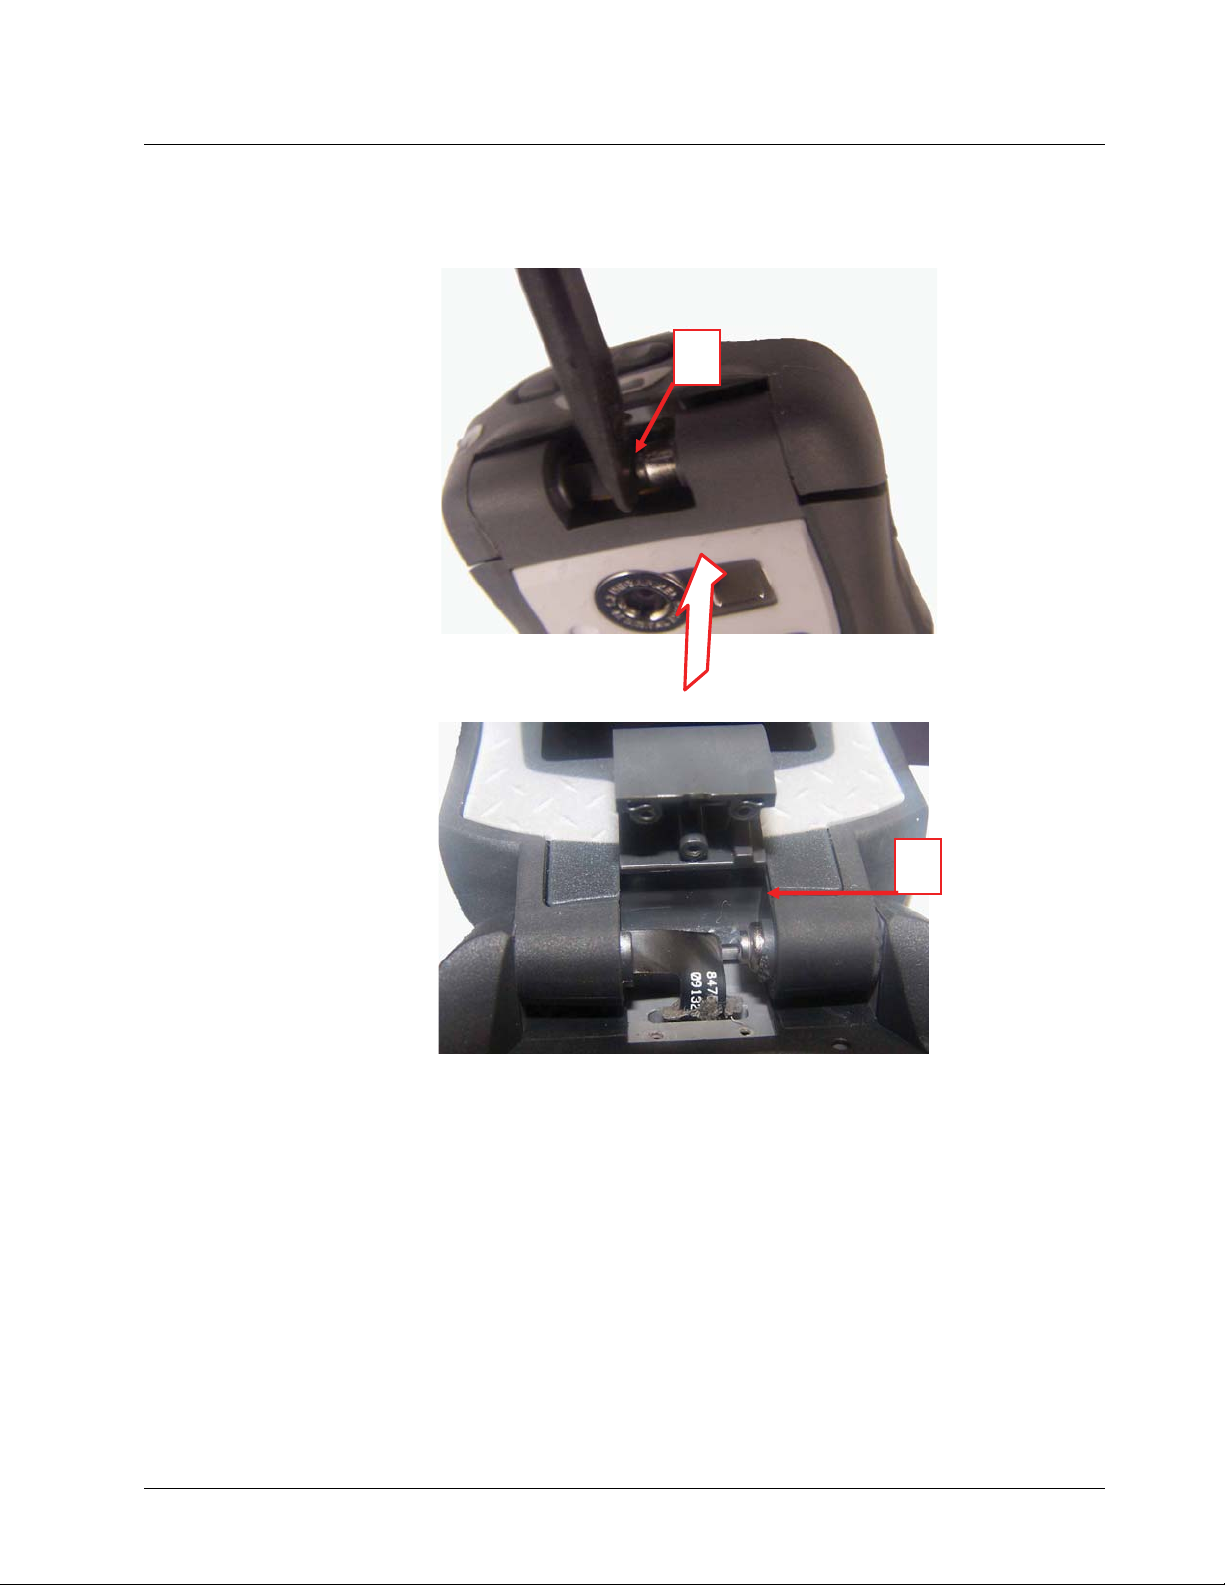
PREPARING FOR FIELD LEVEL TESTING: Install Flip Assembly
6. Align the flip to the front housing to resemble closed flip. Using the black stick, push the Hinge
Assembly Mechanism inward into the right knuckle of the front housing.
6
8
Figure 7-11.
7. Once set, check the hinge position by opening and closing the flip looking for binding or other
unusual action. Flip should open smoothly, stay open, and close completely.
8. Align frame-flip center hinge within the slot between the left and right knuckle of the flip.
9. Insert the three T4 screw. Tighten clockwise to 0.5 in/lb.
68P80401P05 57
Page 73

PREPARING FOR FIELD LEVEL TESTING: Exploded View and Parts List
7.16 Exploded View and Parts List
This section contains the component parts list and exploded view for the i580 unit.
i580 Component Parts List
Black/Yellow Grey Tanapa
58 68P80401P05
Page 74

i580 Exploded View
PREPARING FOR FIELD LEVEL TESTING: Exploded View and Parts List
68P80401P05 59
Page 75

FIELD LEVEL TEST MODES AND PROCEDURES: Test Modes
CHAPTER 8
FIELD LEVEL TEST MODES AND PROCEDURES
To perform field level testing on the i580 unit, you must enter a test mode to retrieve data from the
unit, and perform the technician tests in the correct sequence with the appropriate equipment.
NOTE: All tests should be performed in an RF interference-free environment.
Test procedures are listed in the order in which they should be implemented. Each test contains a
description of what it does and the type of equipment required (if any).
NOTE: The unit must be powered up and registered before performing most tests.
8.1 Test Modes
Some tests require that a certain mode be entered to conduct the test and/or retrieve data from the
unit. The following test modes are used with the i580 unit:
• Debug Mode/Trace Mode)
• Test M o d e
NOTE: Do not enter these modes until unit registration has been completed.
8.1.1 Entering Test Mode
Use this procedure to access Test Mode.
To enter Test Mode:
1. Power up the unit. Wait until registration is complete before continuing.
NOTE: Steps 2 through 7 must be performed quickly with no more than one second between
each key press. (#, *, M, M, M, <, M, M, <)
2. Press
3. Press
4. Press Menu three times.
5. Press the left Scroll key.
6. Press Menu twice.
7. Press the left Scroll key. You now are in Test Mode.
#.
*.
To exit Test Mode, press the option key under Exit. The unit waits for a few seconds, resets, and
then re-registers.
60 68P80401P05
Page 76

FIELD LEVEL TEST MODES AND PROCEDURES: Required Test Equipment
The following tests are performed in Test Mode:
• TX Power Test
• BER Tests
800BER1
800BER2
800BER3
800BER4
900BER1
900BER2
900BER3
NOTE: The Power, MPX, and MOD test parameters are for factory use only and should not be
adjusted by field service personnel. The default values for these parameters are as follows:
• Power: 0 dB
• MPX: 1:6
• MOD: QAM16
8.2 Required Test Equipment
Use the following list to identify the test equipment required to perform the technician tests. Refer
to the appendix for test equipment part numbers and descriptions.
• Battery eliminator
• Data cable RS232 or USB data cable
• R-2660 Digital Communications System Analyzer
• RF Adapter
• Variable 5.0 to 12.0 Vdc power supply (3.0 A capability)
8.3 Field-Level Test Checklist
Use the following test checklist to ensure that all the necessary tests are performed and to provide a
tracking mechanism in case the unit is sent to the next level of service.
Check the appropriate box for each test performed and indicate whether or not the test was
completed successfully.
68P80401P05 61
Page 77

FIELD LEVEL TEST MODES AND PROCEDURES: Field-Level Test Checklist
Table 8-4. Field-Level Test Checklist
Done Technical Tests Pass Fail
Registration/Call
SQE
TX Power
800BER1
800BER2
800BER3
800BER4
900BER1
900BER2
900BER3
Power-Up
Keypad
Audio
Reset
Reset Log
GPS Receiver
MA Test Mode
62 68P80401P05
Page 78

8.4 Registration/Call Test
Use this test on a unit having any of the following symptoms: No Service failures, Please Wait...
Registering failures. (Use a reference unit to get a baseline.)
Note: For 900 MHz verification, please perform the BER Test. May require ordering additional option for test.
Contact Motorola Customer Service (see Appendix A).
FIELD LEVEL TEST MODES AND PROCEDURES: Registration/Call Test
Set up the R-2660 for iDEN
Mobile operation, and connect the
unit to the RF IN/OUT connector.
See Figure 7-1 on page 7-3.
Power up
the unit. Enter initial
Registration mode (see
Operating the R-2660). Press Start.
The Call SEQ: 1 thru 6 lights up
when the unit has
registered.
Pass
Verify the
unit can complete
an interconnect call. Press
End/Home until unit displays
Ready. Press Interconnect (3:1 or 6:1)
and Start on the R-2660. Press Send
on the unit. The Call SEQ: 1 thru 8
lights up when the unit has
entered Phone
mode.
Notes:
1. See the Strong Signal Environment section.
2. Master reset can be completed on the unit by pressing Menu,
Settings, Security.
3. Registration and calls might take over 1 minute to complete.
4. Make sure the R-2660 is set to a frequency in the radio bandmap.
Fail
Fail
Verify the
R-2660 calibration, setup,
and cable continuity.
Fix, if necessary.
Verify the
unit is programmed
for Half Rate if attempting
a 3:1 phone call or Full Rate if
attempting a 6:1 phone
call. Repeat the
test.
OK
Fail
Perform
BER Test.
Pass
Pass
Unit passed test. Look for
system, coverage, accessory,
or software problems.
68P80401P05 63
Pass
Fail
Replace the
Main board.
Page 79

FIELD LEVEL TEST MODES AND PROCEDURES: Signal Quality Error (SQE) Test
8.5 Signal Quality Error (SQE) Test
Use this test on a unit having any of the following symptoms: No service failures or poor SQE/RSSI
(poor performance in known good coverage area).
Set up the R-2660 for iDEN
Mobile operation, and connect the
unit to the RF IN/OUT
connector. See Figure 7-1 on page
7-3.
Connect the regulated battery
eliminator to the unit to be
tested. Set the power supply 7.0
Vdc.
Initial Registration mode (see
Pass
Ver i f y t ha t
the unit can complete an
interconnect call. Press End/Home
until the unit displays Ready. Press Intercon-
nect (3:1 or 6:1) and Start on the R-2660. Wait for the
green LED to light. Press Send on the unit.
Note: Leave call connected for
the next test.
Operating the R-2660.) Press Start.
The Call SEQ: 1 thru 6 lights up
Pass
Place unit
in Debug Mode (see
Entering Debug Mode). Press
Trace to monitor the SQE & TX level.
Press RF in the R-2660 and arrow down to Gen:.
Verify that it is set to -70dBm.
Verify that the SQE is
greater than
26.
Notes:
1. Watch unit for resetting during this procedure.
2. Master reset can be completed on the unit by pressing Menu,
Settings, Security.
3. Registration and calls might take over 1 minute to complete.
4. See the Strong Signal Environment section in Chapter 7.
Power
up the unit. Enter
Fail
when unit has
registered.
Fail
Perform the
Registration/Call test.
Fail
Perform the Registra-
tion/Call test.
SQE Reference Chart
Gen SQE Level
-70 dBm >26
-80 dBm >25
-90 dBm >23
-100 dBm >20
Note: Gen levels in the SQE chart
include RF Adapter losses.
Replace the
Main board.
Pass
Change
Gen: to -80 dBm, and
check the SQE Reference chart to
verify the unit’s SQE per Gen:
output using the
chart.
Pass
64 68P80401P05
Fail
Unit passed test. Look for
system, coverage, accessory, or
software problems.
Replace the
Main board.
Page 80
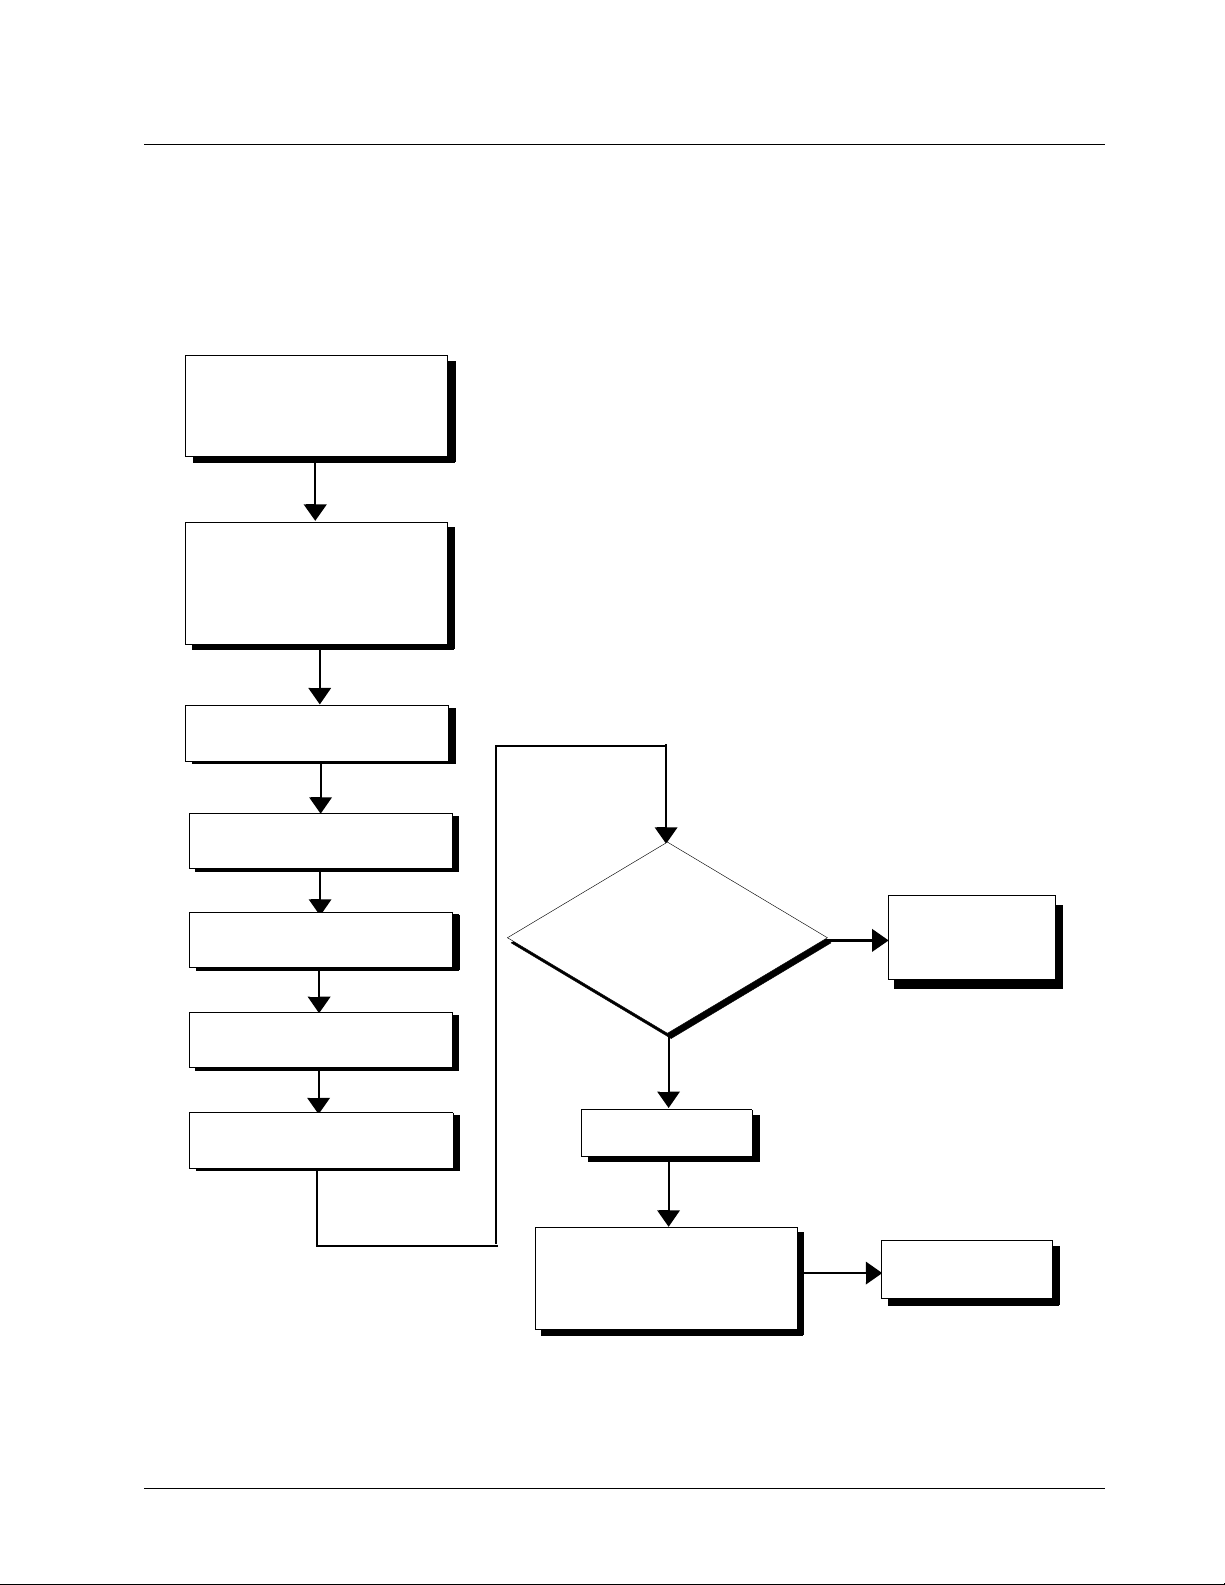
8.6 TX Power Test
Use this test on a unit having bad transmission (TX) or intermittent service failures. (This is a
transmitter test only.)
Set up the R-2660 for Spectrum
Analyzer display, and
connect the unit to the
RF IN/OUT connector.
Connect the regulated battery
eliminator to the unit to be tested.
Remove the antenna from the unit.
Set the power supply between 5.0
and 12.0 Vdc.
FIELD LEVEL TEST MODES AND PROCEDURES: TX Power Test
Notes:
1. Place the unit into Test Mode for this test.
2. Unit will transmit at greater than 24 dBm.
3. In the United States, the Main board can only be replaced and
programmed at the factory or iDEN Radio Support Center.
Power up unit. Enter Test Mode
(see Entering Test Mode).
Press Menu, Edit,
Ok.
Scroll down until 800 POW 2 is
highlighted.
Press Ok, Back, Menu,
Start.
Press TX ON to start
transmitting.
Watch for a signal on the
R-2660. (Make sure the R-2660
is set for the proper frequency:
813.5125MHz.)
Pass
Press STOP.
Press Exit on the unit to exit this
mode, or press Menu, Edit, right
Scroll key to continue on to BER
test.
Fail
Replace the
Main board, and
repeat the test.
Continue with the
BER test.
68P80401P05 65
Page 81

FIELD LEVEL TEST MODES AND PROCEDURES: Bit Error Rate (BER) Test
8.7 Bit Error Rate (BER) Test
Use this test on a unit having any of the following symptoms: resets (RAAAA Type), No Service
failures.
Set up the R-2660 for iDEN BER
Test, and connect the unit to the RF
IN/OUT connector.
Connect the battery eliminator to the
unit. Remove the antenna. Set power
supply between 5.0 and 12.0 Vdc.
Power up the unit. Enter Test Mode.
Do the following:
1. Press the Menu key, and then the Edit option key.
2. Press the Change option key, and scroll down to 800BER1.
3. Press Select to select the test.
4. Press the Back key, and then press Menu.
Press Start
on unit. Press TX ON. The
RX BER that appears on the display
should be 0.0% at -70 dBm. Verify that
the TX BER on the R-2660
is < 0.07%.
Notes:
1. Confirm the reset log has errors.
2. Place the unit into Test Mode for this test.
3. Watch the unit for resetting during this procedure.
4. Verify the R-2660 has been calibrated and cable continuity is good.
5. In the United States, the Main board can only be replaced and
6. The Power, MPX, and MOD test parameters are for factory use
Fail
Pass
Note: Ensure that the maximum cable
Lower
Gen: to -109 dBm
and check the RX BER in the
display. The BER should be less than 10%
when at Gen: -109 dBm. (Freq
Error should be less
than 200 Hz.)
loss does not exceed 2 dB.
Fail
programmed at the factory or iDEN Radio Support Center.
only and should not be adjusted by field service personnel (see page
7-2 for default values).
The monitor frequency is 806.0125
(Carr#1) for BER1.
Replace the
Main board, and
repeat the test.
Replace the
Main board, and
repeat the test.
Pass
Repeat the
above test using
800BER2, 800BER3,
800BER4; 900BER1, 900BER2,
and 900BER3 in Test Mode.
The monitor frequency is 813.5125
(Carr#601) for 800BER2, 820.9875 (Carr#1199)
for 800BER3, and 824.9875 for 800BER4.
The monitor frequency is 896.01875 for
900BER1, 898.51875 for
Pass
900BER2 and
900.98125 for
900BER3.
Note: Change offset on R2660 to +39 MHz for 900
MHz (900BER1, 900BER2, and 900BER3).
Fail
Unit passed test. Look for system, cover-
Replace the
Main board, and
repeat the test.
age, accessory, or software problems.
66 68P80401P05
Page 82

8.8 Power-Up Test
Use this test to check power-up. Symptoms: dead battery, short battery life, or unit does not power
up.
FIELD LEVEL TEST MODES AND PROCEDURES: Power-Up Test
Try to power up
the unit.
Pass
Verify
that the
display pixels
light up.
Pass
Check
the battery-level
meter for 3 bars on the
unit’s display.
Note: In the United States, the Main board can only be replaced and
programmed at the factory or iDEN Radio Support Center.
Swap the Display mod-
Fail
Fail
ule and the Main board
one at a time in that
sequence until the display lights up.
Replace the
battery.
Pass
Check
the battery-level
meter for 3 bars on the
unit’s display.
Fail
Replace the
Main board.
Pass
Unit
passed test.
68P80401P05 67
Page 83

FIELD LEVEL TEST MODES AND PROCEDURES: Keypad Test
8.9 Keypad Test
Use this test to check the operation of the unit’s keypads and display. Symptoms: unit locked, or
stuck key
.
Power up
the unit.
Enter the Model Assem-
bly (MA) Test Mode.
Verify
that all the
display tests complete
correctly.
Pass
Proceed
to the MA Test
Mode Keypad Test,
and press all the main keypad
keys to ensure they
are working
correctly.
Pass
Fail
Fail
Pass
Swap the Display module
and the Main board one
at a time in sequence until
the display lights up.
Replace the Main
board, and repeat the test.
Rerun
the MA Test Mode
Keypad Test for the
main keypad.
Fail
Replace the
Main board.
Unit passed test.
68 68P80401P05
Page 84
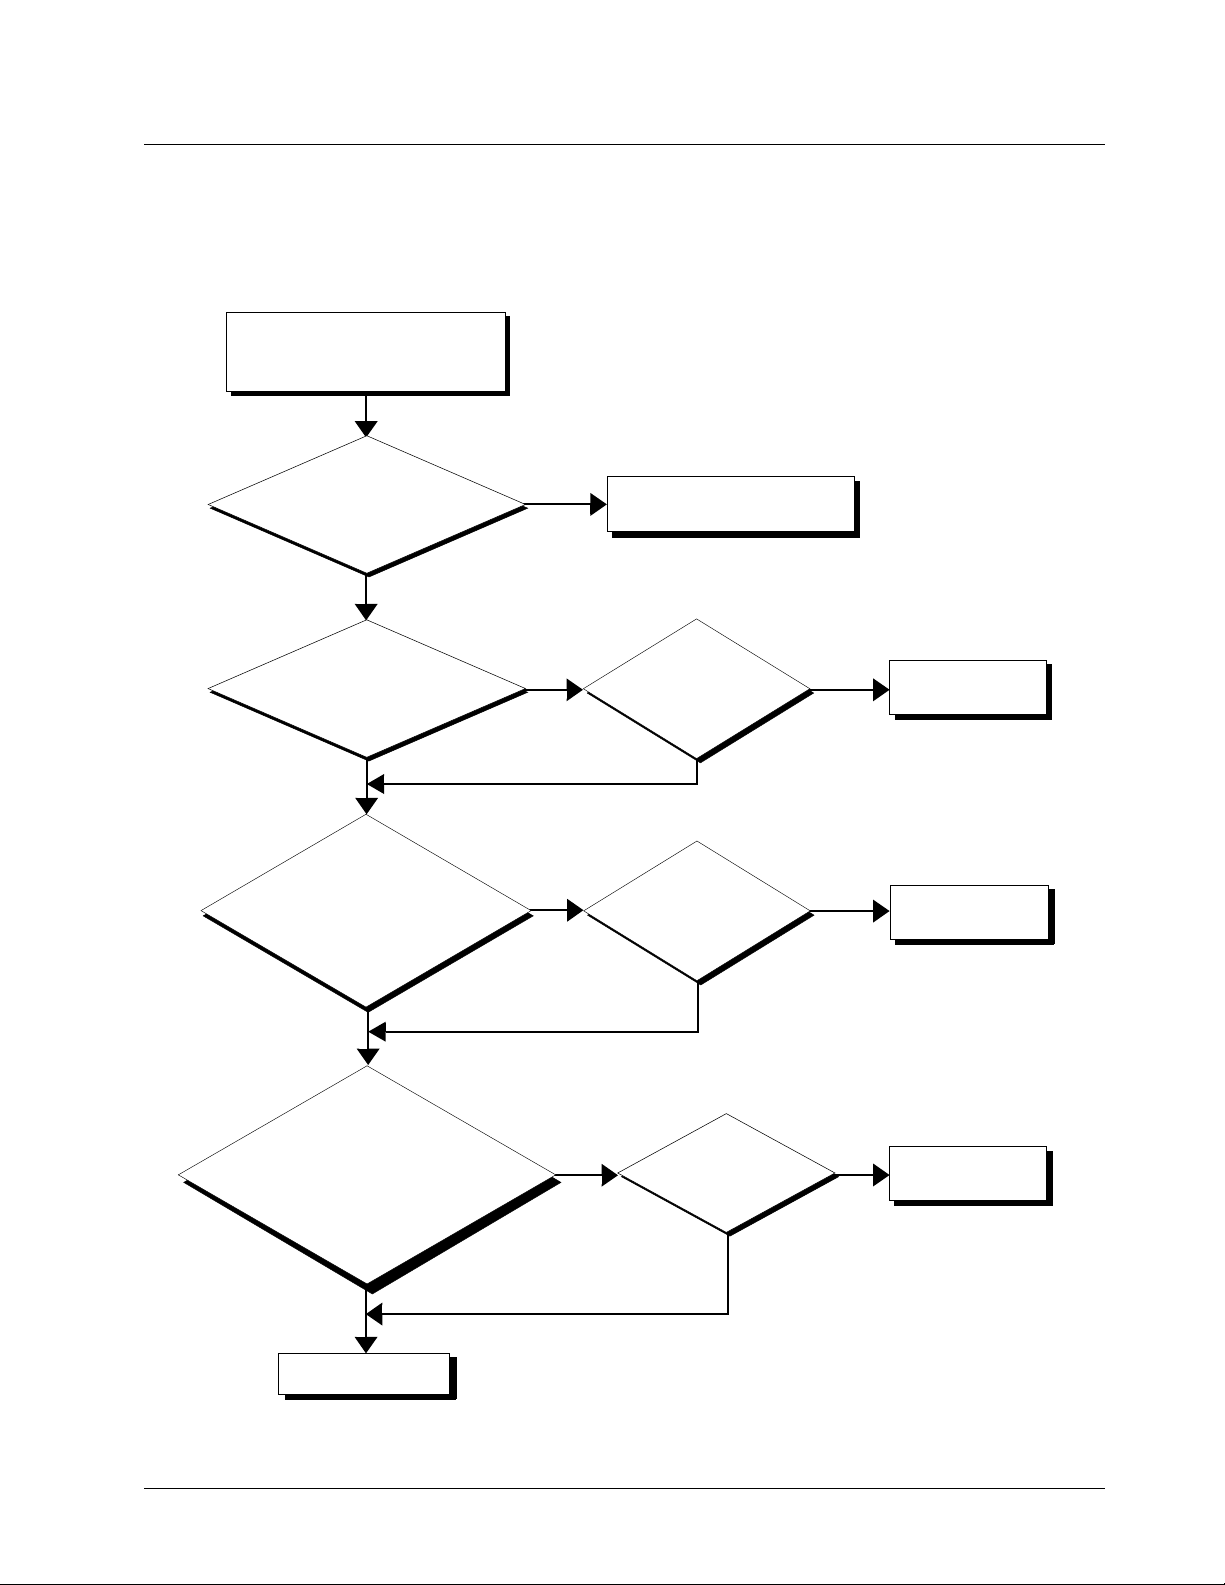
8.10 Audio Test
Use this test to check the audio portion of the unit.
FIELD LEVEL TEST MODES AND PROCEDURES: Audio Test
Set up the R-2660 for iDEN
Mobile operation, and connect the
unit to the RF IN/OUT connector.
Place an
interconnect call. (See
Registration/Call test.)
Pass
Note: Set the R-2660
volume to maximum.
Complete a call.
Talk into the microphone, and
listen for your reply from the
R-2660 speaker.
Pass
Press PTT
on the R-2660, and speak
into the microphone. Listen to your
reply in the unit’s earpiece. You might
have to increase volume
to maximum.
Notes:
1. Verify that the unit can pass the SQE test before performing the
Audio test.
2. This test checks outbound interconnect signals using the earpiece.
Fail
Fail
Perform Registration/Call trou-
bleshooting procedure.
Replace
the microphone
assembly on the frame assem-
bly and repeat
the test.
Fail
Replace the
Main board.
Pass
Replace
Fail
the frame assembly
containing the earpiece
and repeat the
test.
Fail
Replace the
Main board.
Pass
Pass
End the
interconnect call.
Initiate the dispatch call
(see the Registration/Call test).
Press the PTT on the R-2660, and
speak into the microphone. Listen
for a reply from the
speaker.
Fail
Replace
the Housing Assembly
Containing the
Speaker
Fail
Replace the
Main board.
Pass
Pass
Unit passed test.
68P80401P05 69
Page 85

FIELD LEVEL TEST MODES AND PROCEDURES: Reset Test
8.11 Reset Test
Use this test on a unit having any of the following symptoms: unit resets, or unit powers off and then
on.
Set up the R-2660 for iDEN
Mobile operation, and connect the
unit to the RF IN/OUT connector.
Power up the unit.
Enter Initial Registration mode
(see Operating the R-2660).
Place
unit in lock (press
Menu, Settings, Security,
Phone Lock) and complete an
interconnect call. Leave call
connected for several
minutes.
Pass
Increase
attenuation 10 dB
at a time to confirm operation
in a weak-signal environment.
See the SQE Reference
chart.
Notes:
1. Verify that the unit has resets entries in the Reset log. See the Reset Log
Test.
2. Try to duplicate the failure.
3. Record information pertaining to the failure.
4. Monitor the unit at all times for visual resetting.
5. Make sure the R-2660 is set to a frequency in the unit bandmap.
SQE Reference Chart
Gen SQE Level
-70 dBm >26
-80 dBm >25
-90 dBm >23
-100 dBm >20
Note: Gen levels in the SQE
chart include RF Adapter
losses.
Reset
Reset
Replace the
Main board, and
repeat test.
Replace the
Main board, and
repeat test.
Pass
Tap the
front (face) of the
unit with your
fingers.
Reset
Replace the
Main board, and
repeat test.
No reset
Unit passed test.
70 68P80401P05
Page 86

8.12 Reset Log Test
Use this test to check the reset log in the unit.
To perform the reset log test:
1. Power on the unit and wait until registration is complete.
2. If the unit does not have the latest software version, reflash (reprogram) the unit.
If the unit attempts to reset, perform the Reset test (see page 8-11).
3. Enter Trace Mode (see page 6-1). The Unit Info display appears.
4. Scroll down and highlight Resets, and then press View to view the Resets display.
5. Look for and record any reset errors.
If the log contains reset errors, perform the Reset test.
6. Place a dispatch call.
7. Look for, and record, any reset errors.
If the unit attempts to reset, perform the Reset test.
FIELD LEVEL TEST MODES AND PROCEDURES: Reset Log Test
8. Place an interconnect call.
9. Look for and record any reset errors.
If the unit attempts to reset, perform the Reset test.
NOTE: If the customer agrees, set the Auto Lock feature. This feature helps detect reset
conditions.
68P80401P05 71
Page 87

FIELD LEVEL TEST MODES AND PROCEDURES: Model Assembly (MA) Test Mode Test
8.13 Model Assembly (MA) Test Mode Test
• Model Assembly Test Mode is an embedded series of operational tests of the unit’s user
interface and functional features.
• Motorola iDEN recommends MA Test Mode be performed after any servicing of the unit.
• An audio test cable is required to complete MA Test Mode effectively. See the Required Tools
section or contact Motorola’s Aftermarket Accessories Division (AAD).
MA Test mode is achieved by starting from a power-down condition:
1. Press and hold three number keys simultaneously with the Power key, such as 1-2-3, 4-5-6,
7-8-9.
2. Release once the opening screen appears in the main display.
3. Follow instructions as they appear pressing the indicated keys.
4. No instruction? Press any key or Scroll right.
5. No reaction? Power down the unit and start MA Test again.
• Main LCD and CID displays depicted as follows. Note that opening displays may vary
depending on carrier preference.
72 68P80401P05
Page 88

FIELD LEVEL TEST MODES AND PROCEDURES: GPS (Global Positioning System) Receiver Test
8.14 GPS (Global Positioning System) Receiver Test
Use this test on a unit to check its GPS functionality.
Find
an open
sky area.
Extend antenna and
power up unit.
Obtain
Activate
GPS
reference
GPS
receiver.
Phone
returns
location
coordinates
?
No
Ye s
GPS
not
working.
Location
coordinates
match
reference
?
No
Ye s
GPS
working.
68P80401P05 73
Page 89

FIELD LEVEL TEST MODES AND PROCEDURES: MOTOtalk
8.15 MOTOtalk
Perform BER Test and TX Power Test prior to the MOTOtalk Test. If these tests do not pass, replace
the Main Board. Use the MOTOtalk Test to test MOTOtalk without test equipment. Perform the
MOTOtalk Test with the golden radio as transmitter, determine pass or fail. Then, use the golden
radio as receiver and determine pass or fail.
Place radio under test and a golden
radio into MOTOtalk Mode:
1. Menu.
2. More.
3. Down.
4. Down.
5. Right.
6. Right.
7. OK.
8. OK.
Place each radio on
Channel 1 and Code 1:
1. Edit.
2. Edit.
3. Scroll to 1.
4. OK.
5. Down. (to Code)
6. Edit.
7. Scroll to 1.
8. OK.
9. Back.
1. Place Radios 5-10 feet apart.
2. Press PTT on one radio.
Vo i c e
received on the
receiving radio
?
No
Fail if 5
attempts failed.
Ye s
Pass
74 68P80401P05
Page 90

8.16 Bluetooth Test
Use this test on a unit to check the functionality of the Bluetooth headset.
Obtain Motorola
HS820 or similar
Motorola Bluetooth
headset.
Extend handset
antenna and
power up handset.
Using instructions
supplied with the
headset, put the
headset into
discoverable mode.
FIELD LEVEL TEST MODES AND PROCEDURES: Bluetooth Test
On the handset under
Bluetooth; Hands
Free; Find Devices;
scan for the headset.
Headset found
under scan
results?
No
Bluetooth Status
Message given on
handset?
Bluetooth not
working.
Yes
No
Bond with
Headset.
Yes Yes
Verify Status
message in
Table 3-4.
Successful
Bluetooth
Link?
No
Make phone
Yes
call with
Bluetooth
headset.
Message
Description
states to please
try again?
No
Successful
Bluetooth
audio in
phone
call?
Bluetooth not
Yes
No
Bluetooth is
working.
working.
68P80401P05 75
Page 91

This Page intentionally left blank
76 68P80401P05
Page 92

MECHANICAL PARTS REWORK AND REPAIR: Recommended Equipment
CHAPTER 9
MECHANICAL PARTS REWORK AND REPAIR
The following section details the equipment and procedures needed to correctly remove and replace
specific Main Board components on the i580.
9.1 Recommended Equipment
9.1.1 Hot Air Machine
Pace ThermoFlo 200 or similar.
9.1.2 Preheater
X-Kar 1000-S or similar.
9.1.3 High Performance Soldering Station
Pace HeatWise 200 with thermal recovery system or similar.
1. .6mm (0.06”) CHISEL (P/N1124-0019-P1) to fill lands (Big) during Land Preparation
procedure.
2. 0.40mm (0.016”) 1/64” 60° BEVEL (P/N1124-0011-P1) to fill/level lands (Big) during Land
Preparation procedure.
3. 10.80mm (.425”) BLADE (P/N1124-0501-P1) to wick off or level solder (BGAs) during Land
Preparation procedure.
9.1.4 Microscope
Leica Stereozoom 6 or similar.
9.1.5 Magnifier Lamp
5-diopter magnifier lamp.
9.1.6 Fume Absorber
Pace Arm-Evac 200 or similar.
68P80401P05 77
Page 93

MECHANICAL PARTS REWORK AND REPAIR: Recommended Tools
9.2 Recommended Tools
9.2.1 Nozzles
• N-Q07
• N-P20
• N-P32
• N-P68
• N-P84
• N-Q1420
9.2.2 Heat Shields
• A
• F
• J
• I, and
• L (new)
9.2.3 Tweezers
Excelta 5CSAD or similar
9.2.4 Probe/Pick
BeauTech 241 or similar
9.2.5 Vacuum Pick
X-Kar XVP-200 or similar
9.3 Recommended Supplies
Indium Indalloy NC771 flux pen (Motorola P/N 1185768C01) for rework of bottom connector, RF
connector and switches
9.4 Rework/Repair Requirements:
9.4.1 Temperatures:
• Bottom heat is necessary to rework Falcon boards
• Use Lead-free Temperature Profile.
• Ιndium Indalloy NC771 flux pen (Motorola P/N 1185768C01) must be used for rework of
bottom connector, RF connector and switches
78 68P80401P05
Page 94
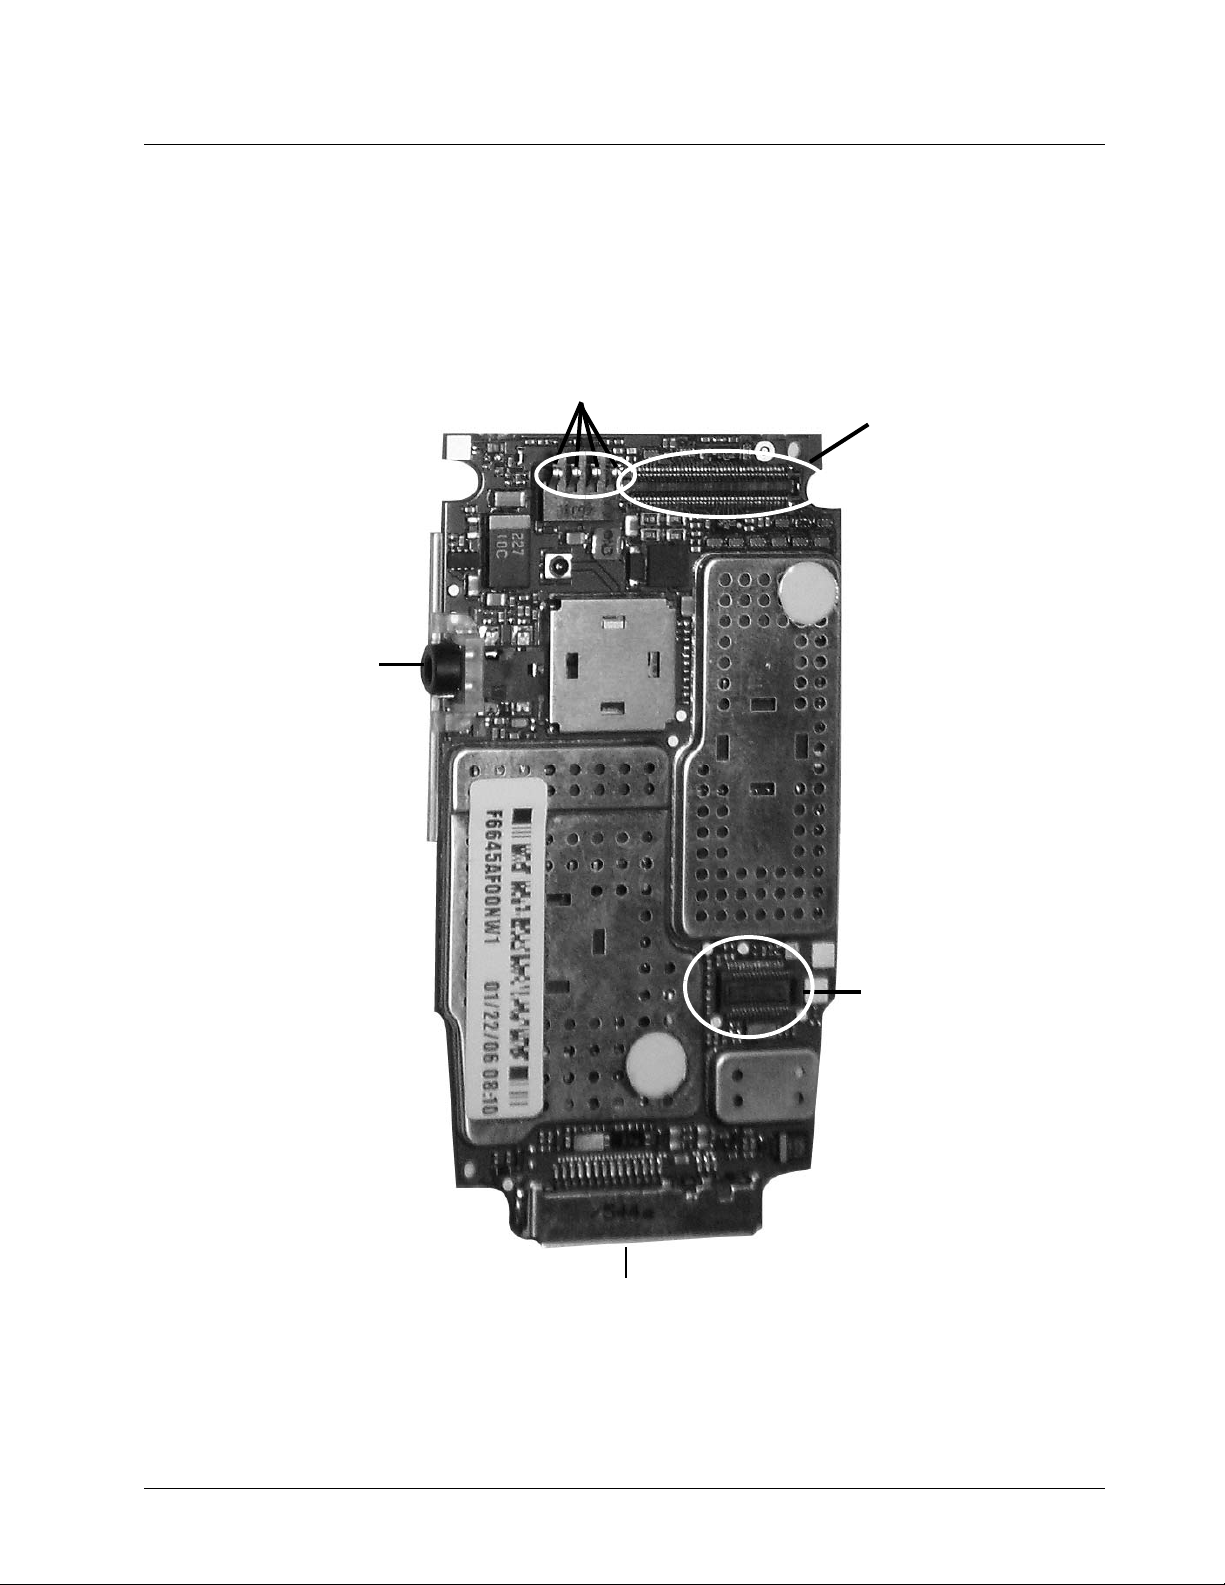
9.4.2 Board Preparation:
• Moisture indicators (white dots) must be removed before rework or baking, and must be placed
back on before assembling or re-assembling the radio.
• Audio jack cover (dog house) must be removed (If present) prior to rework or baking.
9.4.3 Components Identification
Battery Contacts
Audio Jack
MECHANICAL PARTS REWORK AND REPAIR: Rework/Repair Requirements:
Flip Ribbon
Connector
SIM Ribbon
Connector
Accessory Connector
68P80401P05 79
Page 95

MECHANICAL PARTS REWORK AND REPAIR: Mechanical Parts Rework Procedure
9.5 Mechanical Parts Rework Procedure
9.5.1 Removal Procedure
1. Set proper temperatures.
2. With bottom heater ON, place the assembly on top of it to start preheating the PCB.
3. Place adequate nozzle in the hand-piece of the hot air machine.
4. Set desired air pressure.
5. Get the new component ready by fluxing it as per specifications.
6. Protect any heat-sensitive component by placing appropriate heat shield over (If necessary)
7. Lower the nozzle and evenly apply heat until reflow of all solder joints is observed.
8. Immediately remove component before solder joints re-solidifies.
9. Release faulty component onto a heat resistant surface.
10. Check for component disturbance before proceed and fix it if necessary.
9.5.2 Land Preparation Procedure
1. Swing out the top heater and maintain the board over the bottom heater.
2. Pre-fill and re-level the lands by fluxing the targeted area, re-flowing wire solder with a
soldering iron over each land uniformly. The quantity of solder applied is critical to achieving
acceptable joints.
3. Clean lands of flux residue.
9.5.3 Installation Procedure
1. Pick the new part and place it over the lands as per overlay or Pedro.
2. Swing in microscope to aid on component alignment.
3. Align part (tack if necessary) and swing microscope out.
4. Carefully cover component with appropriate heat shield to protect it from degradation.
5. Lower nozzle over the component/heat shield and start the heating cycle.
6. Observe until reflow is completed.
7. Rise nozzle and stop heat cycle.
8. Allow solder to resolidify.
9. Cool off the PC board using bench fan.
10. Inspect solder joints and adjacent components under microscope.
80 68P80401P05
Page 96
NOTE: Indium Indalloy NC771 flux pen (Motorola P/N 1185768C01) must be used for rework of
bottom connector, RF connector and switches.
NOTE: NO FINAL FLUX CLEAN UP IS ALLOWED to avoid flux spreading over/inside gold
contacts/mechanism.
NOTE: No touch ups are allowed (fill lands with a good amount of solder to avoid unsolder leads).
Degradation of component material will affect fit and/or function and may cause future
failures.
9.5.4 J600 RF Connector
Top 330ºC - Bottom 100ºC N-P07
MECHANICAL PARTS REWORK AND REPAIR: Mechanical Parts Rework Procedure
OK Industries 151/min
Pace 6/7
NOTE: Use Flux Pen Indium-Indalloy NC771 ONLY (Motorola P/N 1185768C01). Use flux
sparingly.
9.5.5 J752 Audio Jack
Top 330ºC - Bottom 100ºC N-P20
OK Industries 151/min
Pace 6/7
9.5.6 J401 (30 Pin Board-to-Flex Connector)
“F” over M105, and “F” over J600 during
Installation Procedure.
Modified “F” over J752 during Installation
Procedure.
Top 330ºC - Bottom 100ºC N-Q07
OK Industries 151/min
Pace 6/7
“I” over M002 & part of SH 3 during Removal
Procedure.
“L” over M002 & J401 during Installation
Procedure.
NOTE: Tack down a couple of leads if necessary
68P80401P05 81
Page 97

MECHANICAL PARTS REWORK AND REPAIR: Mechanical Parts Rework Procedure
9.5.7 J400 (80 Pin Board-to Flex Connector)
Top 330ºC - Bottom 100ºC N-P32
OK Industries 151/min
Pace 6/7
NOTE: Use Flux Pen Indium-Indalloy NC771 ONLY (Motorola P/N 1185768C01).
Use flux sparingly
9.5.8 M002 (SIMM Connector)
Top 330ºC - Bottom 100ºC N-P32
OK Industries 201/min
Pace 8/9
9.5.9 M105 (Battery Contact
“L” over J400 during Installation Procedure.
“L” over M002 & J401 during Installation
Procedure.
Top 330ºC - Bottom 100ºC N-P20
OK Industries 151/min
Pace 6/7
82 68P80401P05
“F” over J600 during Removal Procedure.
“F” over J600 & F over M105 during Installation
Procedure.
Page 98

9.5.10 M2 (2 Pin-Contact)
Top 330ºC - Bottom 100ºC N-Q07
MECHANICAL PARTS REWORK AND REPAIR: Mechanical Parts Rework Procedure
OK Industries 151/min
Pace 6/7
9.5.11 J753 (Microphone Socket)
Top 330ºC - Bottom 100ºC N-P20
OK Industries 151/min
Pace 6/7
9.5.12 SW-all (Key/Switch)
Top 330ºC - Bottom 100ºC N-Q07
“J” over J753 during Removal Procedure.
“J” over J753 & “F” over M2 during Installation
Procedure.
“F” over M2 during Removal Procedure.
“F” over M2 & “C” over J753 during Installation
Procedure.
OK Industries 151/min
Pace 6/7
“I” over nearby SW during Removal Procedure.
“I” over nearby SW & “I” over replaced SW during
Installation Procedure.
NOTE: Use Flux Pen Indium-Indalloy NC771 ONLY (Motorola P/N 1185768C01). Use flux
sparingly.
NOTE: Always protect switches from heat and Flux intrusion to avoid component malfunction.
NOTE: Keep alcohol or solvent away from switch area after rework to avoid reliability issues.Tack
down a couple of leads if necessary.
68P80401P05 83
Page 99
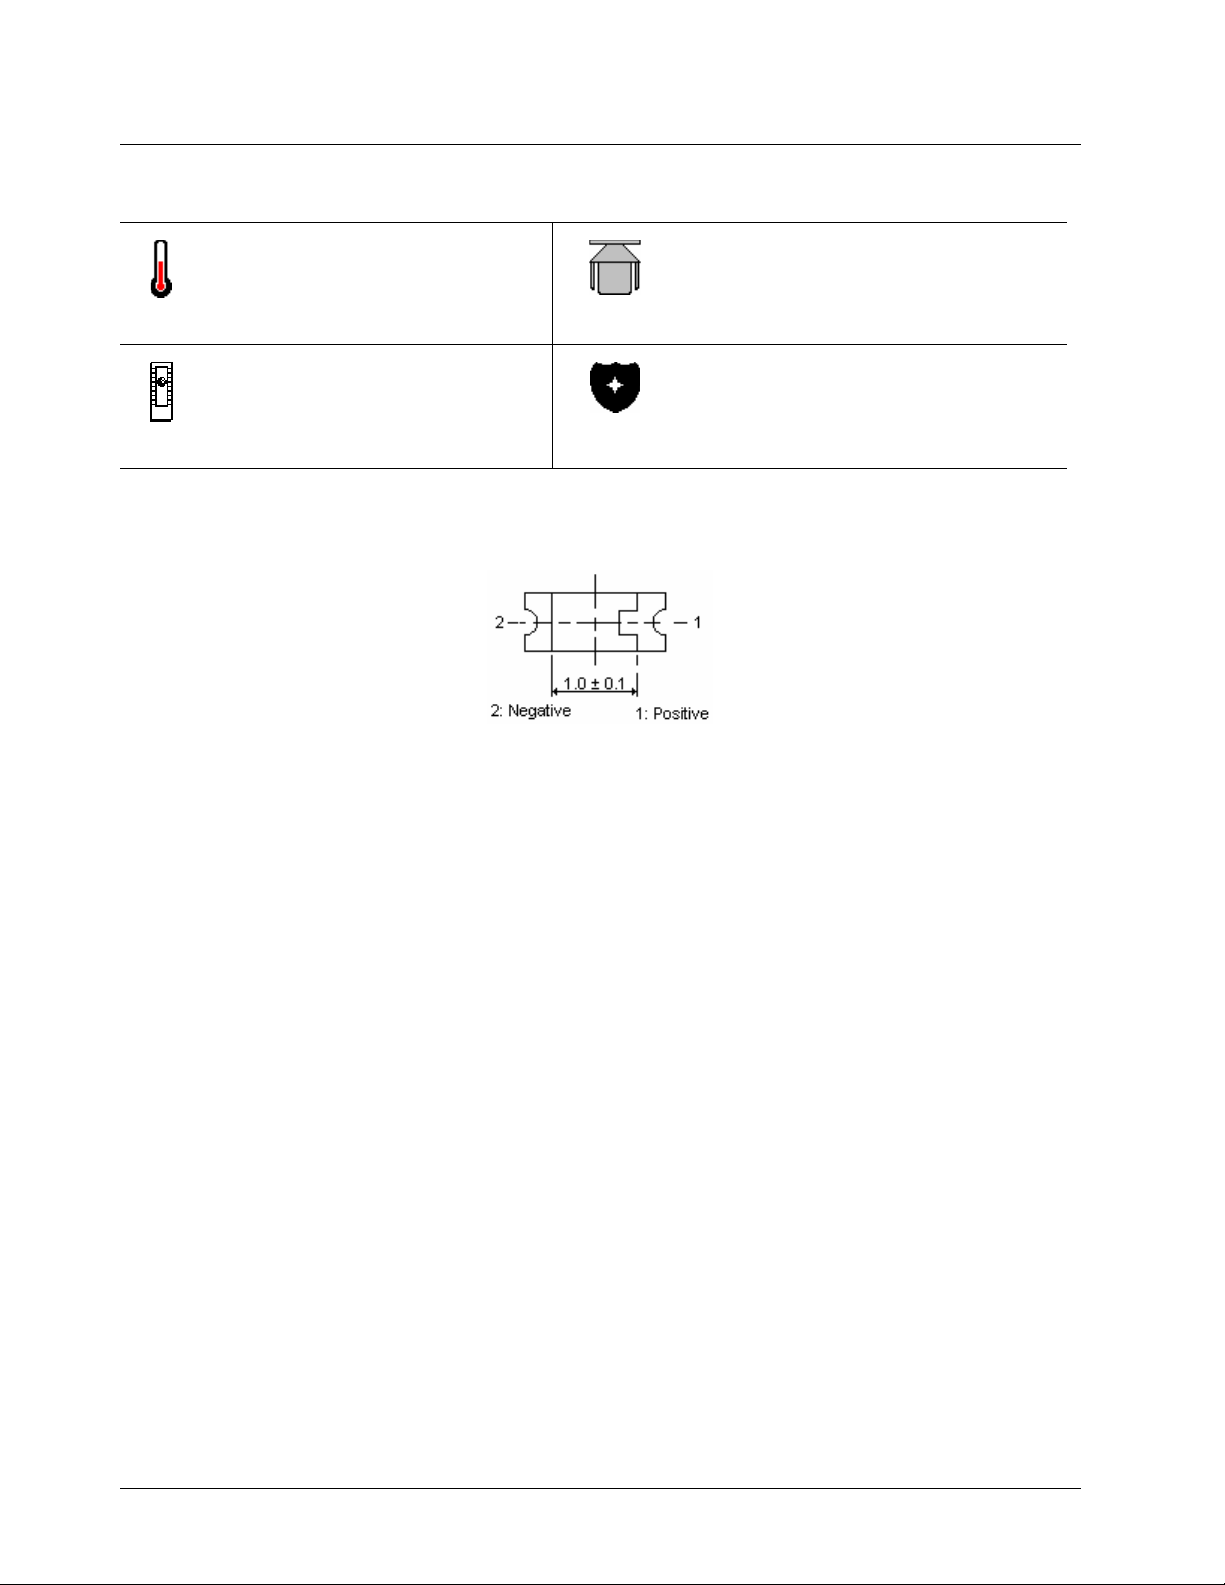
MECHANICAL PARTS REWORK AND REPAIR: Mechanical Parts Rework Procedure
9.5.13 D401 through D412 (LED)
Top 330ºC - No Bottom Heat N-Q07
OK Industries 151/min
Pace 6/7
“I” over nearby SW during Removal Procedure.
“I” over nearby SW & “A” over LED during
Installation Procedure.
Orientation
NOTE: Use Liquid Flux Indium-Indalloy NC771 ONLY. Use flux sparingly.
NOTE: Always protect switches from heat and Flux intrusion to avoid component malfunction.
84 68P80401P05
Page 100

ORDERING REPLACEMENT PARTS AND KITS: Customer Service
APPENDIX A
ORDERING REPLACEMENT PARTS AND KITS
Parts should be replaced with identical replacement parts. Replacement parts and kits for
i580 units can be ordered directly from the Motorola Accessories and Aftermarket Division (AAD)
at 1-800-422-4210 and listen to the prompts; or FAX 800-622-6210.
A.1 Customer Service
For warranty and customer service assistance, call:
1-800-453-0920 U.S./Canada
1-954-723-3000 FAX
1-954-723-4910 International (outside U.S./Canada)
A.2 Replacement Parts
When ordering replacement and accessory parts, the complete part number should be included. If
the correct part number cannot be located, call Motorola Parts Identification at 1-800-422-4210.
A.3 Domestic Orders
Send written orders for replacement parts, test equipment, or manuals to:
Motorola, Inc.
Accessories and Aftermarket Division
Attn: Order Processing
1313 E. Algonquin Road
Schaumburg, IL 60196
Call, fax, or telex orders to:
1-800-422-4210
1-847-538-8198 FAX
280127 TELEX
A.4 International Orders
For international orders:
Motorola, Inc.
Accessories and Aftermarket Division
Attn: International Order Processing
1313 E. Algonquin Road
Schaumburg, IL 60196
68P80401P05 85
 Loading...