

Page 1

HS850
Page 2

Page 3

Welcome
The Motorola Wireless Headset HS850
makes connectivity invisible and
reliable. It is astonishingly advanced and
simple to use.
Motorola is actively creating
Bluetooth
home, and life everywhere around the
globe.
Thank you for choosing the Motorola
Wireless Headset HS850 with
Bluetooth technology!
®
solutions for work, play,
1
Page 4

Export Law Assurances
This product is controlled under the export
regulations of the United States of America and
Canada. The Governments of the United States
of America and Canada may restrict the
exportation or re-exportation of this product to
certain destinations. For further information
contact the U.S. Department of Commerce or
the Canadian Department of Foreign Affairs and
International Trade.
The use of wireless devices and their
accessories may be prohibited or restricted in
certain areas. Always obey the laws and
regulations on the use of these products.
MOTOROLA and the Stylized M Logo are
registered in the US Patent & Trademark Office.
The Bluetooth trademarks are owned by their
proprietor and used by Motorola, Inc. under
license.
All other product or service names are the
property of their respective owners.
© Motorola, Inc., 2004.
680948 9A97-O
2
Page 5

Contents
Safety and General Information . . . 4
Introduction. . . . . . . . . . . . . . . . . . . 10
Headset Features . . . . . . . . . . . . . 10
Using Your Headset . . . . . . . . . . . . 12
Pairing Your Headset and
Phone . . . . . . . . . . . . . . . . . . . . . . 15
Wearing Your Headset . . . . . . . . . . 19
Controlling Headset Volume . . . . . 22
Making and Receiving Calls. . . . . . 23
Headset Indicator . . . . . . . . . . . . . 28
Audio Tones. . . . . . . . . . . . . . . . . . 30
3
Page 6

Safety and
General
Information
IMPORTANT INFORMATION ON
SAFE AND EFFICIENT OPERATION.
READ THIS INFORMATION BEFORE
USING YOUR DEVICE.
Users are not permitted to make
changes or modify the device in any
way. Changes or modifications not
expressly approved by the party
responsible for compliance could void
the user’s authority to operate the
equipment. See 47 CFR Sec. 15.21.
This device complies with part 15 of the
FCC Rules. Operation is subject to the
Safety and General
4
Page 7

following two conditions: (1) This device
may not cause harmful interference,
and (2) this device must accept any
interference received, including
interference that may cause undesired
operation. See 47 CFR Sec. 15.19(3).
Electromagnetic
Interference/Compatibility
Note:
Nearly every electronic device is
susceptible to electromagnetic
interference (EMI) if inadequately
shielded, designed, or otherwise
configured for electromagnetic
compatibility.
Facilities
To avoid electromagnetic interference
and/or compatibility conflicts, turn off
your device in any facility where posted
notices instruct you to do so. Hospitals
Safety and General
5
Page 8

or health care facilities may be using
equipment that is sensitive to external
radio frequency (RF) energy.
Aircraft
When instructed to do so, turn off your
device when on board an aircraft. Any
use of a device must be in accordance
with applicable regulations per airline
crew instructions.
Medical Devices
Hearing Aids
Some devices may interfere with some
hearing aids. In the event of such
interference, you may want to consult
with your hearing aid manufacturer to
discuss alternatives.
Other Medical Devices
If you use any other personal medical
device, consult the manufacturer of your
Safety and General
6
Page 9

device to determine if it is adequately
shielded from RF energy. Your physician
may be able to assist you in obtaining
this information.
Industry Canada Notice to
Users
Operation is subject to the following
two conditions: (1) This device may not
cause interference and (2) This device
must accept any interference, including
interference that may cause undesired
operation of the device. See Ref IC: RSS
210 Sec. 5.11. The term “IC:” before
the certification/registration number
signifies that registration was
performed based on a Declaration of
Conformity indicating that Industry
Canada technical specifications were
met. It does not imply that Industry
Safety and General
7
Page 10

Canada approved the equipment. See
Ref IC Self-Marking 6(f) and RSP-100
Sec. 4.
FCC Notice to Users
This equipment has been tested and
found to comply with the limits for a
Class B digital device, pursuant to part
15 of the FCC Rules. These limits are
designed to provide reasonable
protection against harmful interference
in a residential installation. This
equipment generates, uses and can
radiate radio frequency energy and, if
not installed and used in accordance
with the instructions, may cause
harmful interference to radio
communications. However, there is no
guarantee that interference will not
occur in a particular installation. If this
equipment does cause harmful
Safety and General
8
Page 11

interference to radio or television
reception, which can be determined by
turning the equipment off and on, you
are encouraged to try to correct the
interference by one or more of the
following measures:
•
Reorient or relocate the receiving
antenna.
•
Increase the separation between
the equipment and the receiver.
•
Connect the equipment to an
outlet on a circuit different from
that to which the receiver is
connected.
•
Consult the dealer or an
experienced radio/TV technician
for help.
Safety and General
9
Page 12

Introduction
Headset Features
Headset off
(boom closed)
Headset on
(boom open)
2
8
1
1—Headset Indicator LED
visual status about headset.
2—Volume Control Buttons
speaker (receive) volume up or
down.
Introduction
10
10
5
9
3
4
Provides
Adjusts
6
7
Page 13

3—Microphone
input.
4—Boom
controls power (On/Off) on headset.
5—Earhook
your ear.
6—Speaker
receive on the call.
7—Charging Port
for the battery charger.
8—Lanyard Loop
lanyard to the headset, so you
can wear the headset around your
neck and always keep it near.
9—Multifunction Button
Controls several headset functions.
10—Removable Speaker Shroud
Helps channel sound to your ear.
Shroud can be removed if it
causes discomfort.
Receives your voice
Contains microphone and
Attaches headset to
Plays the sound you
Accepts the plug
Lets you attach a
E
Introduction
11
Page 14

Using Your
Headset
Charging Your Headset
First-Time Use
your headset, you need to charge its
self-contained battery for two hours.
Recharging
rapid high tones through the headset
speaker, repeated at 20-second
intervals, the headset battery needs to
be recharged.
Over time, batteries gradually wear
down and require longer charging times.
This is normal. The more you talk on the
phone with the headset, the less
standby time your battery has.
Using Your Headset
12
—Before you can use
—When you hear five
Page 15

The rechargeable batteries
that power this product must
be disposed of properly and
may need to be recycled. Contact your
local recycling center for proper disposal
methods. Never dispose of batteries in a
fire because they may explode.
How to Charge
Action
1
Plug the Motorola charger into your
headset, with the charger’s release
tab facing down and your headset
facing up.
Release Tab
Faci ng Down
Using Your Headset
13
Page 16

Action
2
Plug the other end of the charger
into an electrical outlet.
While charging, the headset
indicator turns on and remains on
until charging is complete. The
headset will not function while
charging. Your headset fully
charges in approximately two hours.
3
When charging is complete
(indicators off), remove the charger
from the electrical outlet, press the
release tab, and detach the charger
cord from the headset.
Using Your Headset
14
Page 17

Note:
You can also use a
Motorola Original™ Vehicle Power
Adapter to charge your headset while in
your vehicle.
A fully charged headset battery provides
approximately:
•
talk time–8 hours
•
standby time (boom open)–200
hours
Pairing Your Headset
and Phone
Note:
You must pair your headset and
phone before you can make a call.
“Pairing” creates a link between
devices equipped with Bluetooth
wireless technology and allows the
phone to remember your headset’s
Using Your Headset
15
Page 18

unique ID. After your headset and phone
are paired, your headset automatically
connects to your phone any time you
open the boom.
With your headset and phone in close
proximity:
Step
1
Put your headset into pairing mode.
a
With the headset’s boom closed,
press and hold the Multifunction
Button
indicator turns on (about
3 seconds).
The headset indicator turns on.
b
Release the button, then open the
headset boom.
The headset indicator remains on.
Using Your Headset
16
E
until the headset
Page 19

Step
2
Perform a
the phone.
For details on device discovery
for your phone, refer to the
phone’s user’s guide.
When the scan is complete, the phone
displays the devices found.
3
Select the Motorola HS850 from the
discovered devices list and confirm
following the on screen prompts.
4
When prompted by the phone, enter
the passkey
the headset with the phone.
The device ID is now stored in the
phone’s memory.
Pairing is successful when the
headset indicator flashes 10 times
rapidly.
device discovery
0000
and confirm to pair
from
Using Your Headset
17
Page 20

Pairing to Additional
Devices
Your headset can store pairing
information for up to eight different
devices that have Bl uetooth wireless
technology. Devices are stored in a
“Paired Device List” in memory in
chronological order. When an attempt to
pair to more than eight devices is made,
the oldest paired device is removed
from the list.
Any of the eight paired devices can
initiate a paired connection to your
headset.
Your headset will only automatically
initiate a paired connection (by opening
the boom) with the
connected to
your headset to another device in the
Using Your Headset
18
last
device it was
. If you want to connect
Page 21

paired device list, you must initiate the
connection from that device. Whichever
of the eight devices initiates a
connection to the headset afterwards,
that device then becomes the “last
connected” device.
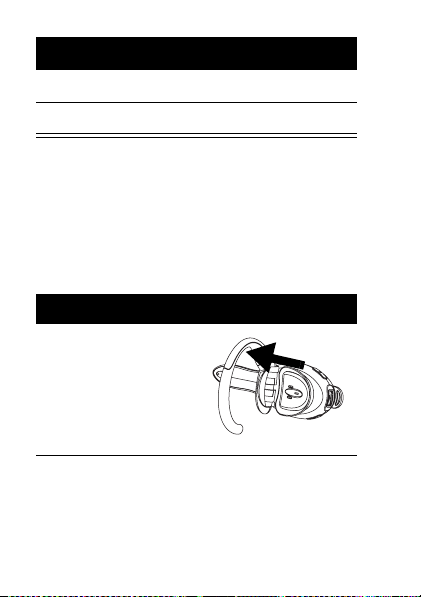
Wearing Your Headset
When packaged, your headset is
configured for wear on your right ear.
Action
1
Open the boom,
then open the
earhook
(45
from the
°
headset).
2
Loop the earhook over your ear.
Using Your Headset
19
Page 22
Action
3
Press the headset to your ear.
4
Point the boom toward your mouth.
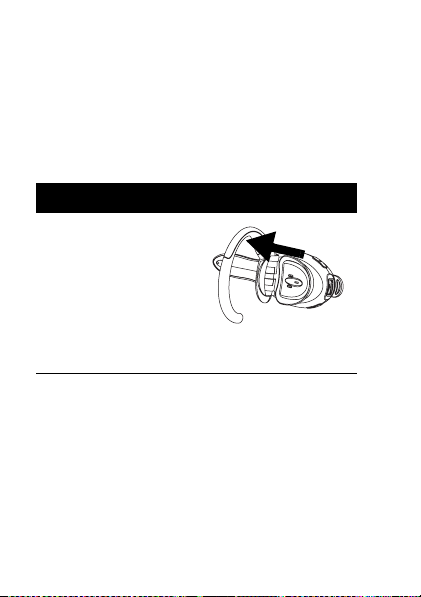
Wearing on the left ear
When packaged, the headset is
configured for wear on the right ear.
To change it for wear on your left ear:
Action
1
Open the boom,
then open the
earhook
(90
from the
°
headset).
Using Your Headset
20
Page 23

Action
2
Gently lift and
pull the top of
the earhook up
and off the
upper hinge pin.
Then pull it
away to
remove it.
3
Flip the headset over.
4
Hook the bottom of the earhook
onto the lower hinge pin, then lift
and pull the top of the earhook over
the upper hinge pin.
5
To change the volume button
orientation, see “Volume
Orientation” on page 22.
Using Your Headset
21
Page 24

Controlling Headset
Volum e
To increase speaker volume, press the
top volume button repeatedly until you
reach the desired volume level.
To decrease speaker volume, press the
bottom volume button repeatedly until
you reach the desired volume level.
Volume Orientation
To change the volume button orientation
for left or right ear:
Action
1
With the headset’s boom closed,
press and hold the Multifunction
E
button until the headset
indicator turns on (about
3 seconds).
Using Your Headset
22
Page 25

Action
2
Press the volume button that you
want to use as the volume up. The
headset indicator will flash several
times to indicate success.
Repeat the above steps anytime to
change the volume button orientation.
Making and Receiving
Calls
Your headset supports both Handsfree
and Headset Profiles. Accessing call
functions depends on which profile your
phone supports.
Note:
Some phones do not support all
features listed. Please consult your
phone user’s guide.
Using Your Headset
23
Page 26

You can activate call functions according
to the following table:
Device Status
Phone Headset Action
Enter Pairing (Configuration) Mode:
On Off
(boom
closed)
Make a Voice Dial Call:
On in idle On Short press E,
Dial a Number:
On–user
dials
number
Redial a Number:
On–Idle On–
24
On Press SEND on
(Idle)
Using Your Headset
Press & hold E
until LED remains
on. Release
open boom.
speak name, phone
dials call.
phone to complete
the call.
Long press
E
E
,
.
Page 27

Device Status
Phone Headset Action
End a Call:
On–in call On
Put Active Call On Hold:
On–in call On
Put Active Call On Hold:
On–in call On
Receive a Call:
On–
phone
rings
Reject a Call:
On–phone
rings
On Short press E (call
On
Short press
Long press
Long press
is answered)
Long press
E
E
E
E
.
.
.
.
.
Using Your Headset
25
Page 28

Device Status
Phone Headset Action
Answer 2nd incoming call:
On–in call,
2nd call
coming in
Toggle between two active calls:
On–in call,
2nd call on
hold
Join two calls (3-way calling):
On - in call,
2nd call on
hold
Transfer call from phone to Headset:
On–in call On Short press E,
26
On Long press E,
On
places 1st call on
hold, answers
incoming call
Long press
On Press both
Volume buttons
simultaneously.
Both calls will
become active.
(call transferred to
headset).
Using Your Headset
.
E
.
Page 29

Note:
If the link is abnormally
disconnected (for example, out of
range) the headset tries to reestablish
the link.
Headset Indicator
With charger plugged in:
Headset
Indicator
ON Charging in
OFF Charging
With no charger attached:
Headset
Indicator
OFF Power off
Headset
progress
complete
Headset
Using Your Headset
27
Page 30

Headset
Indicator
ON (steady) Pairing mode
10 rapid flashes Pairing
Flashes at a
3-second interval
(0.1 seconds ON
2.9 seconds OFF).
Flashes at an
8-second interval
(2.0 seconds ON,
6.0 seconds OFF).
Note:
When your wireless headset is
paired to your phone and there is no
activity for 5 minutes, the blue flashing
LED turns off. Any button press on the
headset turns on your headset and
resumes the flashing . If you press the
Using Your Headset
28
Headset
successful
Standby
(not on a call)
Connected
(on a call)
Page 31

up and down volume buttons at the
same time during a call, the flashing
LED turns off for the rest of that call.
Audio Tones
Audio Tone Headset Status
One high tone
when pressing
volume button
Five rapid high
tones, repeated
every 20 seconds
No audio
indications;
deteriorating
audio quality
Series of 4 tones,
low to high
Volume maximum
or minimum
reached
Low battery
Out of range
Audio link open
(Headset mode),
active call (Hands
Free mode)
Using Your Headset
29
Page 32

Audio Tone Headset Status
Ring tone Incoming call
Single high tone Pairing
confirmation
One low tone Initiate voice
activation
Dual high/low
tone
One high tone End call
Series of 4 tones,
high to low
Fast high/low tone
every 5 seconds
(max. & min.
volume confirm
beep)
No tone Power ON/OFF
Using Your Headset
30
Voice tag not
recognized
Audio link closed
(Headset mode),
call ended
(Handsfree
mode)
No
network/service
Page 33

Bienvenue
Le casque sans fil Motorola HS850
permet une connectivité invisible et
fiable. Il offre une technologie
incroyablement avancée, tout en
demeurant remarquablement simple à
utiliser.
Motorola crée activement de nouvelles
®
solutions Bluetooth
loisirs, la maison et la vie à l’échelle
mondiale.
Merci d’avoir choisi le casque sans fil
Motorola HS850 doté de la technologie
Bluetooth!
pour le travail, les
31
Page 34

Assurances de la loi sur l’exportation
Ce produit est contrôlé par des règlements sur
l’exportation des États-Unis d’Amérique et du
Canada. Les gouvernements du Canada et des
États-Unis peuvent restreindre l’exportation ou
la réexportation de ce produit vers certaines
destinations. Pour obtenir plus de
renseignements, communiquez avec le
ministère des Affaires étrangères et du
Commerce international du Canada ou le
Department of Commerce des États-Unis.
L’utilisation d’appareils cellulaires ou de leurs
accessoires peut être interdite ou restreinte
dans certains endroits. Conformez-vous
toujours aux lois et aux règlements régissant
l’utilisation de ces appareils.
MOTOROLA et le logo M stylisé sont des marques
déposées au US Patent & Trademark Office.
Les marques de commerce Bluetooth sont la
propriété de leur détenteur et sont utilisées sous
licence par Motorola, Inc.
Tous les autres noms de produits et de services
sont la propriété de leur détenteur respectif.
© Motorola, Inc., 2004.
680948 9A97-O
32
Page 35

Contenu
Renseignements généraux et de
sécurité . . . . . . . . . . . . . . . . . . . . . . 36
Introduction. . . . . . . . . . . . . . . . . . . 43
Caractéristiques du casque . . . . . . 43
Utilisation du casque . . . . . . . . . . . 46
Appariement du casque
et du téléphone . . . . . . . . . . . . . . . 50
Port du casque . . . . . . . . . . . . . . . 55
Contrôle du volume du
casque . . . . . . . . . . . . . . . . . . . . . . 58
Acheminement et
réception d’appels. . . . . . . . . . . . . 60
Indicateur du casque . . . . . . . . . . . 67
Tonalités . . . . . . . . . . . . . . . . . . . . 70
33
Page 36

Renseignements
généraux et de
sécurité
RENSEIGNEMENTS IMPORTANTS
POUR UN FONCTIONNEMENT SÛR
ET EFFICACE. LISEZ CES
RENSEIGNEMENTS AVANT
D’UTILISER VOTRE APPAREIL.
Les utilisateurs ne sont pas autorisés à
apporter des modifications de quelque
nature que ce soit à l’appareil. Tout
changement ou toute modification non
expressément approuvée par les
autorités responsables de la conformité
du produit aux normes peut annuler le
droit d’utilisation de l’appareil par
l’utilisateur. Voir 47 CFR Sec. 15.21.
Renseignements généraux et de sécurité
34
Page 37

Cet appareil est conforme à la Partie 15
des règlements de la FCC. L’utilisation
de l’appareil doit répondre aux deux
conditions suivantes : (1) cet appareil ne
doit pas émettre de brouillage nuisible,
et (2) cet appareil doit accepter toute
interférence, y compris toute
interférence qui pourrait occasionner un
fonctionnement inopportun. Voir 47 CFR
Sec. 15.19(3).
Interférence
électromagnétique et
compatibilité
Nota :
Pratiquement tout dispositif
électronique peut être sujet à
l’interférence électromagnétique (EMI)
s’il n’est pas adéquatement protégé ou
conçu, ou s’il n’est pas configuré pour la
compatibilité électromagnétique.
Renseignements généraux et de sécurité
35
Page 38

Installations
Afin d’éviter l’interférence
électromagnétique et les problèmes de
compatibilité, mettez votre dispositif
hors tension lorsque des avis vous
demandent de le faire. Les hôpitaux et
les établissements de santé utilisent
régulièrement du matériel sensible à
l’énergie radioélectrique externe.
Avions
À bord d’un avion, mettez votre
dispositif hors tension lorsqu’on vous
demande de le faire. Utilisez toujours
votre dispositif en respectant les
règlements applicables que l’équipage
vous demande de suivre.
Appareils médicaux
Prothèses auditives
Certains dispositifs peuvent causer de
Renseignements généraux et de sécurité
36
Page 39

l’interférence avec quelques prothèses
auditives. Le cas échéant, veuillez
consulter votre fabricant de prothèses
auditives afin de vérifier s’il est possible
d’utiliser un autre modèle de prothèse.
Autres appareils médicaux
personnels
Si vous utilisez tout autre appareil
médical personnel, consultez le
fabricant pour savoir si l’appareil est
convenablement protégé contre
l’énergie RF. Votre médecin peut vous
aider à trouver cette information.
Avis d’Industrie Canada aux
utilisateurs
L’utilisation de l’appareil doit répondre
aux deux conditions suivantes : (1) le
dispositif ne doit pas produire de
brouillage, et (2) l’utilisateur du dispositif
Renseignements généraux et de sécurité
37
Page 40

doit être prêt à accepter tout brouillage
radioélectrique reçu, même si ce
brouillage est susceptible de
compromettre le fonctionnement du
dispositif. Voir réf. IC CNR-210 art. 5.11.
L’acronyme « IC » qui figure devant le
numéro de certification ou
d’enregistrement signifie seulement
que l’enregistrement a été effectué sur
la base d’une déclaration de conformité,
ce qui indique que les spécifications
techniques d’Industrie Canada ont été
respectées. Cela n’indique pas
qu’Industrie Canada a approuvé le
dispositif. Voir réf. IC Auto-marquage 6(f)
et PNR-100 art. 4.
Renseignements généraux et de sécurité
38
Page 41

Avis de la FCC aux
utilisateurs
Cet appareil a été testé et est conforme
aux limites imposées pour les
dispositifs numériques de Classe B
conformément à la partie 15 des
règlements de la FCC. Ces limites ont
été établies pour offrir une protection
raisonnable contre l’interférence
nuisible dans les bâtiments résidentiels.
Cet appareil génère, utilise et peut
émettre des radiofréquences et, s’il
n’est pas installé et utilisé
conformément aux directives, peut
causer de l’interférence nuisible aux
communications radio. Cependant, il n’y
a aucune garantie d’absence de toute
interférence dans une installation
donnée. Si l’appareil cause de
l’interférence nuisible à la réception des
Renseignements généraux et de sécurité
39
Page 42

postes de radio ou de télévision, ce qui
peut être déterminé en mettant
l’appareil hors tension puis sous
tension, il est recommandé que
l’utilisateur tente de prévenir cette
interférence de l’une des manières
suivantes :
• réorienter ou rediriger l’antenne
de réception;
• augmenter la distance entre
l’appareil et le récepteur;
• brancher l’appareil dans une prise
d’un circuit différent de celui
auquel est branché le récepteur;
• communiquer avec le détaillant
ou avec un technicien qualifié en
radio/télévision pour obtenir de
l’aide.
Renseignements généraux et de sécurité
40
Page 43

Introduction
Caractéristiques du
casque
Casque
hors tension
(micro-rail fermé)
2
Casque
sous tension
(micro-rail ouvert)
3
4
6
8
1
1 — Indicateur à DEL du casque
Affichage visuel de l’état du
casque.
10
5
9
Introduction
7
41
Page 44

2 — Touches de contrôle du volume
Permettent de régler le volume du
haut-parleur (pour la réception).
3 — Microphone
4 — Micro-rail
et contrôle la mise sous tension et
hors tension du casque.
5 — Crochet
casque à l’oreille.
6 — Haut-parleur
lors d’un appel.
7 — Port de charge
brancher la fiche du chargeur de
batterie.
8 — Œillet de courroie
fixer une courroie au casque afin
de le porter autour du cou et
l’avoir toujours à portée de la
main.
Introduction
42
Capte votre voix.
Contient le microphone
Permet de fixer le
Émet le son reçu
Permet de
Per met de
Page 45

9 — Touche multifonction E
Contrôle plusieurs fonctions du
casque.
10 — Recouvrement de
haut-parleur amovible
l’acheminement du son jusqu’à
l’oreille. Le recouvrement peut
être enlevé s’il est inconfortable.
Facilite
Introduction
43
Page 46

Utilisation du
casque
Charge du casque
Première utilisation
pouvoir utiliser votre casque, vous devez
charger sa batterie intégrée pendant
deux heures.
— Avant de
Recharge
dans le haut-parleur cinq tonalités
aiguës rapides, répétées à des
intervalles de 20 secondes, vous devez
recharger la batterie du casque.
Augmentez le temps de charge des
vieilles batteries, car, avec le temps, les
batteries s’usent. Cela est normal. Plus
vous parlez au téléphone avec le
casque, plus le temps de réserve de la
batterie est réduit.
44
— Lorsque vous entendez
Utilisation du casque
Page 47

Les batteries rechargeables
qui alimentent ce produit
doivent être mises au rebut
de la manière appropriée ou recyclées.
Communiquez avec un centre de
recyclage local pour connaître les
méthodes de mise au rebut
appropriées. Ne jetez jamais les
batteries au feu, car elles pourraient
exploser.
Utilisation du casque
45
Page 48

Comment charger
Action
1
Branchez le chargeur Motorola au
casque en plaçant la patte de
déclenchement du chargeur vers le
bas et le casque face vers le haut.
Patte de
déclenchement
vers le bas
2
Branchez le chargeur dans une
prise électrique.
Pendant la charge, l’indicateur du
casque s’allume et reste allumé
jusqu’à ce que la charge soit
terminée. Le casque ne fonctionne
pas pendant la charge. Votre
casque sera chargé à pleine
capacité en deux heures environ.
Utilisation du casque
46
Page 49

Action
3
Lorsque la charge est terminée
(l’indicateur s’éteint), débranchez le
chargeur de la prise électrique,
appuyez sur la patte de
déclenchement et retirez le cordon
du chargeur du casque.
Nota :
Vous pouvez également utiliser
un adaptateur d’alimentation véhiculaire
Motorola Original
casque dans votre véhicule.
Lorsque la batterie du casque est
chargée à pleine capacité, elle offre
environ :
• temps de conversation :
• temps de réserve (micro-rail
ouvert) :
MC
pour charger le
200 heures
8 heures
Utilisation du casque
47
Page 50

Appariement du casque
et du téléphone
Nota :
Vous devez apparier votre casque
et votre téléphone avant de pouvoir
acheminer un appel.
L’appariement permet de créer un lien
entre des dispositifs dotés de la
technologie sans fil Bluetooth et
enregistre dans la mémoire de votre
téléphone l’identité unique de votre
casque. Une fois votre casque et votre
téléphone appariés, votre casque se
connecte automatiquement au téléphone
chaque fois que vous ouvrez le micro-rail.
Utilisation du casque
48
Page 51

Rapprochez le casque et le téléphone,
puis :
Étape
1
Mettez le casque en mode
d’appariement.
a
En laissant le micro-rail fermé,
tenez la touche multifonction
enfoncée jusqu’à ce que
l’indicateur du casque s’allume
(environ 3 secondes).
L’indicateur du casque s’allume.
b
Relâchez la touche, puis ouvrez le
micro-rail.
L’indicateur du casque reste allumé.
E
Utilisation du casque
49
Page 52

Étape
2
Effectuez une
dispositif
Pour plus de détails sur la
découverte de dispositif à partir
du téléphone, reportez-vous au
guide de l’utilisateur du
téléphone.
Lorsque la recherche est terminée, le
téléphone affiche les dispositifs
trouvés.
3
Sélectionnez le Motorola HS850
dans la liste des dispositifs trouvés
et confirmez ce choix en répondant
aux messages-guides qui s’affichent
au visuel.
Utilisation du casque
50
Découverte de
à partir du téléphone.
Page 53

Étape
4
Lorsque le téléphone vous le
demande, entrez le code
0000
d’autorisation
pour apparier le casque au
téléphone.
L’identité du dispositif est maintenant
sauvegardée dans la mémoire du
téléphone.
L’appariement est réussi lorsque
l’indicateur du casque clignote
rapidement 10 fois de suite.
et confirmez-le
Appariement à d’autres
dispositifs
Votre casque peut sauvegarder
l’information d’appariement de huit
dispositifs dotés de la technologie sans
fil Bluetooth. Les informations relatives
Utilisation du casque
51
Page 54

aux dispositifs sont sauvegardées en
mémoire dans une « liste de dispositifs
appariés », selon l’ordre chronologique
d’entrée de ces dispositifs. Si vous
appariez un neuvième dispositif, le
premier dispositif apparié est
automatiquement supprimé de la liste.
Les huit dispositifs appariés sont tous
en mesure, individuellement, de lancer
une connexion au casque.
Votre casque ne peut lancer automatiquement une connexion appariée (à l’ouverture du micro-rail) qu’avec le
dernier
necté
casque à un autre dispositif de la liste,
vous devez lancer cette connexion à partir
de l’autre dispositif. Par la suite, celui des
huit dispositifs qui se connecte au casque
devient le « dernier dispositif connecté ».
52
dispositif auquel
. Si vous désirez connecter votre
Utilisation du casque
il a été con-
Page 55

Port du casque
Lors de l’emballage, le casque est
configuré pour être porté sur l’oreille
droite.
Action
1
Ouvrez le
micro-rail, puis
ouvrez le
crochet d’oreille
(à un angle de
par rapport
45
°
au casque).
2
Passez le crochet d’oreille
au-dessus de votre oreille.
3
Appuyez le casque contre votre
oreille.
4
Dirigez le micro-rail vers votre
bouche.
Utilisation du casque
53
Page 56
Port sur l’oreille gauche
Lors de l’emballage, le casque est
configuré pour être porté sur l’oreille
droite. Pour l’ajuster afin de le porter sur
l’oreille gauche, faites comme suit :
Action
1
Ouvrez le
micro-rail, puis
ouvrez le
crochet d’oreille
(à un angle de
par rapport
90
°
au casque).
Utilisation du casque
54
Page 57

Action
2
Soulevez
doucement le
haut du crochet
et tirez-le vers
le haut pour le
sortir de l’axe
de charnière
supérieur, puis
retirez-le.
3
Retournez le casque.
4
Insérez le bas du crochet dans l’axe
de charnière inférieur, puis soulevez
et tirez le haut du crochet
par-dessus l’axe de charnière
supérieur.
5
Pour changer l’orientation de la
touche de volume, consultez la
rubrique « Orientation de la touche
de volume » à la page 57.
Utilisation du casque
55
Page 58

Contrôle du volume
du casque
Pour augmenter le volume du
haut-parleur, appuyez plusieurs fois sur
la touche de volume supérieure, selon le
réglage désiré.
Pour diminuer le volume du haut-parleur,
appuyez plusieurs fois sur la touche de
volume inférieure, selon le réglage
désiré.
Utilisation du casque
56
Page 59

Orientation de la touche
de volume
Pour changer l’orientation de la touche
de volume pour l’oreille droite ou
l’oreille gauche :
Action
1
En laissant le micro-rail fermé,
E
tenez la touche multifonction
enfoncée jusqu’à ce que l’indicateur
du casque s’allume (environ
3 secondes).
2
Appuyez sur la touche de volume
que vous désirez utiliser comme
touche d’augmentation du volume.
Lorsque l’opération a réussi,
l’indicateur du casque clignote
plusieurs fois.
Utilisation du casque
57
Page 60

Répétez au besoin les étapes ci-dessus
pour changer l’orientation de la touche
de volume.
Acheminement et
réception d’appels
Votre casque fonctionne aussi bien en
mode mains libres qu’en mode casque.
L’accès aux fonctions d’appel dépend du
mode soutenu par le téléphone.
Nota :
Certains téléphones n’offrent pas
toutes les fonctions énumérées.
Veuillez consulter le guide de
l’utilisateur de votre téléphone.
Utilisation du casque
58
Page 61

Pour activer les fonctions d’appel,
reportez-vous au tableau suivant :
État du dispositif
Téléphone Casque
Accéder au mode d’appariement
(configuration) :
Sous
tension
Hors
tension
(microrail
fermé)
Action
Tenez la touche
E
enfoncée
jusqu’à ce que
l’indicateur à DEL
reste allumé.
Relâchez la touche
E
, puis ouvrez le
micro-rail.
Utilisation du casque
59
Page 62

État du dispositif
Téléphone Casque
Acheminer un appel par composition
vocale :
Sous
tension, en
mode
d’attente
Composer un numéro :
Sous
tension,
l’utilisateur
compose le
numéro
60
Sous
tension
Sous
tension
Utilisation du casque
Action
Appuyez
brièvement sur la
touche
E
le nom; le
téléphone compose
le numéro.
Appuyez sur ENVOI
pour acheminer
l’appel.
et dites
Page 63

État du dispositif
Téléphone Casque
Recomposer un numéro :
Tenez la touche
E
enfoncée.
Appuyez
brièvement sur
E
Tenez la touche
E
enfoncée.
Sous
tension, en
mode
d’attente
Terminer un appel :
Sous
tension, en
appel
Mettre en garde l’appel actif :
Sous
tension, en
appel
Sous
tension,
en
mode
d’attente
Sous
tension
Sous
tension
Action
Utilisation du casque
61
Page 64

État du dispositif
Téléphone Casque
Mettre en garde l’appel actif :
Sous
tension, en
appel
Recevoir un appel :
Sous
tension, le
téléphone
sonne
Refuser un appel :
Sous
tension, le
téléphone
sonne
62
Sous
tension
Sous
tension
Sous
tension
Utilisation du casque
Tenez la touche
E
enfoncée.
Appuyez
brièvement sur
(le téléphone
répond à l’appel).
Tenez la touche
E
enfoncée.
Action
E
Page 65

État du dispositif
Téléphone Casque
Répondre à un deuxième appel entrant :
Sous
tension, en
appel,
deuxième
appel
entrant
Passer d’un appel actif à l’autre :
Sous
tension, en
appel,
deuxième
appel en
garde
Sous
tension
Sous
tension
Action
Tenez la touche
E
enfoncée; le
téléphone met le
premier appel en
garde et répond au
deuxième appel.
Tenez la touche
E
enfoncée.
Utilisation du casque
63
Page 66

État du dispositif
Téléphone Casque
Joindre deux appels (conférence à
trois) :
Sous
tension,
en appel,
deuxième
appel en
garde
Transférer l’appel du téléphone au
casque :
Sous
tension,
en appel
64
Sous
tension
Sous
tension
Utilisation du casque
Action
Appuyez
simultanément sur
les deux touches de
volume. Les deux
appels deviennent
actifs.
Appuyez
brièvement sur
(l’appel est
transféré au
casque).
E
Page 67

Nota :
Si le lien est perdu
accidentellement (p. ex. si le dispositif
est hors de portée), le casque tente de
rétablir le lien.
Indicateur du casque
Lorsque le chargeur est branché au
casque :
Indicateur du
casque
ALLUMÉ La charge est en
ÉTEINT La charge est
Casque
cours
terminée
Utilisation du casque
65
Page 68

Lorsque le chargeur n’est pas branché :
Indicateur du
casque
ÉTEINT Hors tension
ALLUMÉ (en
continu)
10 clignotements
rapides
Clignotements à
intervalles de
3 secondes
(0,1 seconde
ALLUMÉ,
2,9 secondes
ÉTEINT).
Utilisation du casque
66
Casque
Mode
d’appariement
Appariement
réussi
En attente
(aucun appel en
cours)
Page 69

Indicateur du
casque
Clignotements à
intervalles de
8 secondes
(2,0 secondes
ALLUMÉ,
6,0 secondes
ÉTEINT).
Nota :
Lorsque le casque sans fil est
apparié au téléphone et qu’il n’y a pas
d’activité pendant 5 minutes,
l’indicateur à DEL bleue cesse de
clignoter. Une pression sur n’importe
quelle touche du casque réactive le
casque et le clignotement
recommence. Si vous appuyez
simultanément sur les touches
d’augmentation et de diminution du
volume pendant un appel, l’indicateur à
Casque
Connecté (appel
en cours)
Utilisation du casque
67
Page 70

DEL cesse de clignoter pour la durée de
cet appel.
Tonalités
To n a l i t é État du casque
Une tonalité aiguë
sur pression
d’une touche de
volume
Cinq tonalités
aiguës rapides
toutes les
20 secondes
Aucune indication
audio, perte de
qualité audio
Utilisation du casque
68
Le niveau
maximum ou
minimum du
volume a été
atteint
Batterie faible
Hors de portée
Page 71

Tonalité État du casque
Série de quatre
tonalités, de
graves à aiguës
Tonalité de
sonnerie
Une tonalité aiguë Confirmation de
Une tonalité grave Lancement de
Double tonalité
aiguë/grave
Une tonalité aiguë Fin de l’appel
Série de quatre
tonalités, d’aiguës
à graves
Lien audio ouvert
(mode casque) ou
appel actif (mode
mains libres)
Appel entrant
l’appariement
l’activation vocale
Étiquette vocale
non reconnue
Lien audio fermé
(mode casque) ou
appel terminé
(mode mains
libres)
Utilisation du casque
69
Page 72

Tonalité État du casque
Tonalités
aiguës/graves
rapides toutes les
5 secondes
(tonalité de
confirmation des
niveaux maximal
et minimal du
volume)
Aucune tonalité Mise sous
Utilisation du casque
70
Aucun
service/réseau
tension/hors
tension
Page 73

Bienvenido
El Audífono inalámbrico HS850 de
Motorola hace la conectividad invisible y
confiable. Es sorprendentemente
avanzado y sencillo de usar.
Motorola crea activamente soluciones
Bluetooth
entretenimiento, el hogar y la vida, en
cualquier parte alrededor del mundo.
Gracias por elegir el Audífono
inalámbrico HS850 de Motorola con
tecnología Bluetooth.
®
para el trabajo, el
71
Page 74

Garantías de la ley de exportaciones
Este producto está controlado por las
regulaciones de exportación de Estados Unidos
de América y Canadá. Los gobiernos de
Estados Unidos de América y Canadá pueden
restringir la exportación o reexportación de este
producto a ciertos destinos. Para obtener más
información, póngase en contacto con el
Departamento de Comercio de Estados Unidos
o el Departamento de Asuntos extranjeros y
Comercio internacional de Canadá.
El uso de dispositivos inalámbricos y sus
accesorios puede estar prohibido o restringido
en ciertas áreas. Obedezca siempre las leyes y
regulaciones sobre el uso de estos productos.
MOTOROLA y el logotipo de la M estilizada son
marcas registradas en la Oficina de Patentes y
Marcas de los EE.UU.
Las marcas comerciales Bluetooth pertenecen a
sus respectivos dueños y son utilizadas por
Motorola, Inc. bajo licencia.
Todos los demás nombres de productos o
servicios pertenecen a sus respectivos dueños.
© Motorola, Inc. 2004
680948 9A97-O
72
Page 75

Contenido
Información general
y de seguridad. . . . . . . . . . . . . . . . . 76
Introducción . . . . . . . . . . . . . . . . . . 83
Características del audífono . . . . . 83
Uso del audífono. . . . . . . . . . . . . . . 85
Asociación del audífono
y el teléfono. . . . . . . . . . . . . . . . . . 88
Uso del audífono . . . . . . . . . . . . . . 93
Control del volumen del
audífono. . . . . . . . . . . . . . . . . . . . . 96
Realización y recepción
de llamadas . . . . . . . . . . . . . . . . . . 98
Indicador del audífono . . . . . . . . . 104
Tonos de audio . . . . . . . . . . . . . . 106
73
Page 76

Información general
y de seguridad
INFORMACIÓN IMPORTANTE PARA
UNA OPERACIÓN SEGURA Y
EFICIENTE. LEA ESTA INFORMACIÓN
ANTES DE UTILIZAR EL
DISPOSITIVO.
No se permite a los usuarios alterar o
modificar el dispositivo de ninguna
forma. Las alteraciones o
modificaciones no aprobadas
expresamente por la parte responsable
por el cumplimiento podrían anular la
autoridad del usuario para operar el
equipo. Consulte CFR 47 Sec. 15.21.
Este dispositivo cumple con la parte 15
de las Normas de la FCC. Su
Información general y de seguridad
74
Page 77

funcionamiento está sujeto a las
siguientes condiciones: (1) Este
dispositivo no puede provocar
interferencia dañina y (2) este
dispositivo debe aceptar cualquier
interferencia recibida, incluso aquella
que pudiera provocar un funcionamiento
no deseado. Consulte CFR 47
Sec. 15.19(3).
Interferencia
electromagnética y
compatibilidad
Nota:
Casi todos los dispositivos
electrónicos son susceptibles de
experimentar interferencia
electromagnética (EMI) si no están
protegidos, diseñados o configurados
en forma adecuada para tener
compatibilidad electromagnética.
Información general y de seguridad
75
Page 78

Instalaciones
Para evitar interferencia
electromagnética o conflictos de
compatibilidad, apague el dispositivo en
cualquier instalación en que haya avisos
que así lo indiquen. Las instalaciones de
atención de salud y los hospitales
pueden utilizar equipos que son
sensibles a la energía de radio
frecuencia (RF) externa.
Aviones
Cuando reciba instrucciones para
hacerlo, apague el dispositivo dentro de
un avión. El uso de un dispositivo debe
respetar las reglamentaciones
aplicables según las instrucciones
impartidas por el personal de la
aerolínea.
Información general y de seguridad
76
Page 79

Dispositivos médicos
Prótesis auditivas
Es posible que algunos dispositivos
causen interferencia en algunas prótesis
auditivas. En ese caso, solicite
asesoramiento al fabricante de la
prótesis auditiva para analizar las
alternativas.
Otros dispositivos médicos
Si usted utiliza cualquier otro dispositivo
personal de uso médico, consulte al
fabricante del dispositivo para
determinar si está correctamente
protegido contra las señales de
radiofrecuencia. Su médico puede
ayudarle a obtener esta información.
Información general y de seguridad
77
Page 80

Aviso de Industry Canada
para los usuarios
Su funcionamiento está sujeto a las
siguientes condiciones: (1) Este
dispositivo no puede provocar
interferencia y (2) este dispositivo debe
aceptar cualquier interferencia, incluso
aquella que pudiera provocar un
funcionamiento no deseado del
dispositivo. Consulte Ref. IC: RSS 210
Sec. 5.11. El término “IC”: antes del
número de certificación o registro
significa que el registro se realizó en
base a una Declaración de conformidad
donde se indicaba que se cumplieron
las especificaciones técnicas de
Industry Canada. No quiere decir que
Industry Canada haya aprobado el
equipo. Consulte Ref IC Self-Marking 6(f)
y RSP-100 Sec. 4.
Información general y de seguridad
78
Page 81

Aviso de la FCC para los
usuarios
Este equipo ha sido probado y se
comprobó que cumple con los límites
para un dispositivo digital Clase B, en
aplicación de lo dispuesto en la parte 15
de las Normas de la FCC. Estos límites
están diseñados para proporcionar
protección razonable contra
interferencia dañina en una instalación
residencial. Este equipo genera, usa y
puede irradiar energía de
radiofrecuencia y, si no se instala y usa
de acuerdo con las instrucciones, puede
causar interferencia dañina a
comunicaciones por radio. Sin embargo,
no se garantiza que no ocurra
interferencia en una instalación en
particular. Si este equipo causa
interferencia dañina en la recepción de
Información general y de seguridad
79
Page 82

radio o televisión, lo que se puede
descubrir encendiendo y apagando el
equipo, se aconseja que intente corregir
la interferencia siguiendo uno o más de
los procedimientos indicados a
continuación:
• Reoriente o ubique en otra parte
la antena receptora.
• Aumente la separación entre el
equipo y el receptor.
• Conecte el equipo a una toma de
corriente o un circuito distinto al
cual está conectado el receptor.
• Consulte al distribuidor o a un
técnico experimentado de radio o
TV para recibir ayuda.
Información general y de seguridad
80
Page 83

Introducción
Características del
audífono
Audífono apagado
(brazo desplegable
cerrado)
2
Audífono
encendido(brazo
desplegable
abierto)
3
4
6
8
1
1—LED indicador del audífono
Proporciona un estado visual
acerca del audífono.
10
5
9
Introducción
7
81
Page 84

2—Botones de control de volumen
Aumentan y disminuyen el volumen
del altavoz (recepción).
3—Micrófono
4—Brazo desplegable
micrófono y controla el estado
(encendido/apagado) del audífono.
5—Gancho para la oreja
audífono en la oreja.
6—Altavoz
recibe en la llamada.
7—Puerto de carga
enchufe del cargador de batería.
8—Orificio para correa
conectar una correa al audífono,
para que pueda colgarlo al cuello
y mantenerlo siempre cerca.
9—Botón multifunciónE
Controla varias funciones del
audífono.
Introducción
82
Recibe su voz.
Contiene el
Sujeta el
Reproduce el sonido que
Recibe el
Permite
Page 85

10—Cubierta extraíble del altavoz
Ayuda a canalizar el sonido al
oído. Se puede retirar si resulta
incómodo.
Introducción
83
Page 86

Uso del audífono
Carga del audífono
Uso por primera vez
pueda usar el audífono, es necesario
que cargue por dos horas la batería
autónoma.
Recargar
altos rápidos por el altavoz del audífono,
repetidos a intervalos de 20 segundos,
es necesario que recargue la batería del
audífono.
Con el tiempo, las baterías se desgastan
gradualmente y requieren mayores
tiempos de carga. Esto es normal.
Mientras más hable por teléfono con el
audífono, menor tiempo de reserva
tendrá la batería.
84
: cuando escuche cinco tonos
Uso del audífono
: antes de que
Page 87

Las baterías recargables que proporcionan la energía a este pro-
ducto, se deben desechar
correctamente y puede ser necesario reciclarlas. Póngase en contacto con el centro
de reciclaje local para conocer los métodos
de desecho correctos. Jamás arroje las baterías al fuego, ya que pueden explotar.
Cómo cargar
Acción
1
Conecte el cargador Motorola al audífono, con la lengüeta de liberación del
cargador mirando hacia abajo y el
audífono mirando hacia arriba.
Lengüeta de liberación
mirando hacia abajo
Uso del audífono
85
Page 88

Acción
2
Conecte el otro extremo del
cargador a una toma de corriente.
Mientras se carga, el indicador del
audífono se enciende y permanece
así hasta que se completa la carga.
El audífono no funciona mientras se
carga. Ésta se completa en
aproximadamente dos horas.
3
Cuando la carga esté completa (y se
apague el indicador), retire el
cargador de la toma de corriente,
oprima la lengüeta de liberación y
desconecte del audífono el cable del
cargador.
Nota:
También puede usar un adaptador
de corriente para vehículos
Motorola Original
audífono cuando esté en su vehículo.
Uso del audífono
86
TM
para cargar el
Page 89

La batería del audífono cargada
completamente proporciona
aproximadamente:
• tiempo de conversación
• tiempo de reserva (brazo
desplegable abierto)
:
8 horas
:
200 horas
Asociación del audífono
y el teléfono
Nota:
Es necesario asociar el audífono y
el teléfono antes de que pueda realizar
una llamada.
La “asociación” crea un vínculo entre
los dispositivos que cuentan con
tecnología inalámbrica Bluetooth y
permite que el teléfono recuerde la
identificación única del teléfono. Una
vez que el audífono y el teléfono están
Uso del audífono
87
Page 90

asociados, el audífono se conecta
automáticamente con el teléfono cada
vez que abre el brazo desplegable.
Con el audífono y el teléfono ubicados
cerca el uno del otro:
Paso
1
Coloque el audífono en modo de
asociación.
a
Con el brazo desplegable del
audífono cerrado, mantenga
oprimido el Botón multifunción
hasta que se encienda el indicador
del audífono (3 segundos
aproximadamente).
Se encenderá el indicador del audífono.
b
Suelte el botón y luego abra el
brazo desplegable del audífono.
Se encenderá el indicador del
audífono.
Uso del audífono
88
E
Page 91

Paso
2
Realice un
dispositivo
Para obtener más información
acerca del descubrimiento de
dispositivos para su teléfono,
consulte la guía del usuario del
teléfono.
Cuando la exploración finalice, el
teléfono mostrará los dispositivos
encontrados.
3
De la lista de dispositivos
encontrados, seleccione el Motorola
HS850 y confirme según las
indicaciones en pantalla.
descubrimiento de
desde el teléfono.
Uso del audífono
89
Page 92

Paso
4
Cuando el teléfono lo solicite,
0000
ingrese la contraseña
para asociar el audífono con el
teléfono.
La identificación del dispositivo ahora
está guardada en la memoria del
teléfono.
La asociación fue exitosa si el
indicador del audífono destella
rápidamente 10 veces.
y confirme
Asociación a dispositivos
adicionales
El audífono puede almacenar
información de asociación para un
máximo de 8 dispositivos distintos que
tienen tecnología inalámbrica Bluetooth.
Los dispositivos se almacenan en la
Uso del audífono
90
Page 93

memoria en una “Lista de dispositivos
asociados” en orden cronológico.
Cuando se intenta asociar más de ocho
dispositivos, se elimina de la lista el
dispositivo asociado más antiguo.
Cualquiera de los ocho dispositivos
asociados puede iniciar una conexión
asociada con el audífono.
Éste sólo iniciará automáticamente una
conexión asociada (abriendo el brazo
desplegable) con el
con el que se
conectar el audífono a otro dispositivo
de la lista de dispositivos asociados,
debe iniciar la conexión desde ese
dispositivo. Cualquiera de entre los ocho
dispositivos que inicie posteriormente
una conexión con el audífono, se
transformará en el “último conectado”.
último
conectó
dispositivo
. Si desea
Uso del audífono
91
Page 94

Uso del audífono
En forma predeterminada, el audífono
está configurado para usarlo en la oreja
derecha.
Acción
1
Abra el brazo
desplegable y
luego el gancho
para la oreja
(45
desde el
°
audífono).
2
Sujete el gancho sobre su oreja.
3
Presione el audífono sobre su oreja.
4
Apunte el brazo desplegable hacia
su boca.
Uso del audífono
92
Page 95

Uso en la oreja izquierda
En forma predeterminada, el audífono
está configurado para usarlo en la oreja
derecha. Para cambiarlo al uso en la
oreja izquierda:
Acción
1
Abra el brazo
desplegable y
luego el gancho
para la oreja
(90
°
audífono).
desde el
Uso del audífono
93
Page 96

Acción
2
Levante y tire
suavemente la
parte superior
del gancho
para la oreja,
sacándolo del
pasador de bisagra superior. Luego
tírelo hacia fuera para quitarlo.
3
Dé vuelta al auricular.
4
Enganche la parte inferior del
gancho para la oreja al pasador de
bisagra inferior y luego levante la
parte superior del gancho para la
oreja y cubra con ella el pasador de
bisagra superior.
5
Para cambiar la orientación del
botón del volumen, consulte
“Orientación del volumen” en la
página 96.
Uso del audífono
94
Page 97

Control del volumen
del audífono
Para aumentar el volumen del altavoz,
oprima repetidamente el botón de
volumen superior hasta que alcance el
nivel de volumen deseado.
Para disminuir el volumen del altavoz,
oprima repetidamente el botón de
volumen inferior hasta que alcance el
nivel de volumen deseado.
Uso del audífono
95
Page 98

Orientación del volumen
Para cambiar la orientación del botón de
volumen para la oreja izquierda o derecha:
Acción
1
Con el brazo desplegable del
audífono cerrado, mantenga
oprimido el botón Multifunción
hasta que se encienda el indicador
del audífono (3 segundos
aproximadamente).
2
Oprima el botón de volumen que
desea usar para subir el volumen.
El indicador del audífono destellará
varias veces para indicar el éxito de
la operación.
Repita los pasos mencionados en
cualquier momento para cambiar la
orientación del botón de volumen.
Uso del audífono
96
E
Page 99

Realización y recepción
de llamadas
El altavoz soporta los perfiles manos
libres y altavoz. El acceso a las
funciones de llamada depende del perfil
que admita el teléfono.
Nota:
Algunos teléfonos no admiten
todas las funciones presentadas.
Consulte la guía del usuario del teléfono.
Uso del audífono
97
Page 100

Puede activar las funciones de llamada
según la siguiente tabla:
Estado del dispositivo
Te léfono Audífono Acción
Ingresar al modo de asociación
(configuración):
Activado Desacti-
vado
(brazo
desplegable cerrado)
Realizar una llamada de marcado por voz:
Encendido
en reposo
98
Activado Oprima breve-
Uso del audífono
Mantenga oprimido
E
hasta que el
LED permanezca
encendido. Suelte
E
y abra el brazo
desplegable.
mente
E
el nombre y el
teléfono marcará
la llamada.
, diga
 Loading...