

Page 1
ET1
ENTERPRISE TABLET
USER GUIDE
Page 2

Page 3

Copyrights
TheMotorolaproductsdescribedinthisdocumentmayincludecopyrightedMotorolacomputerprograms.Laws
intheUnitedStatesandothercountriespreserveforMotorolacertainexclusiverightsforcopyrightedcomputer
programs.Accordingly,anycopyrightedMotorolacomputerprogramscontainedintheMotorolaproducts
describedinthisdocumentmaynotbecopiedorreproducedinanymannerwithouttheexpresswrittenpermission
ofMotorola.
©2013MotorolaSolutions,Inc.AllRightsReserved
Nopartofthisdocumentmaybereproduced,transmitted,storedinaretrievalsystem,ortranslatedintoany
languageorcomputerlanguage,inanyformorbyanymeans,withoutthepriorwrittenpermissionofMotorola
Solutions,Inc.
Furthermore,thepurchaseofMotorolaproductsshallnotbedeemedtogranteitherdirectlyorbyimplication,
estoppelorotherwise,anylicenseunderthecopyrights,patentsorpatentapplicationsofMotorola,exceptforthe
normalnon-exclusive,royalty-freelicensetousethatarisesbyoperationoflawinthesaleofaproduct.
Disclaimer
Pleasenotethatcertainfeatures,facilities,andcapabilitiesdescribedinthisdocumentmaynotbeapplicableto
orlicensedforuseonaparticularsystem,ormaybedependentuponthecharacteristicsofaparticularmobile
subscriberunitorcongurationofcertainparameters.PleaserefertoyourMotorolacontactforfurtherinformation.
Trademarks
MOTOROLA,MOTO,MOTOROLASOLUTIONS,andtheStylizedMLogoaretrademarksorregistered
trademarksofMotorolaTrademarkHoldings,LLCandareusedunderlicense.Allothertrademarksarethe
propertyoftheirrespectiveowners.
EuropeanUnion(EU)WasteofElectricalandElectronicEquipment (WEEE)directive
TheEuropeanUnion'sWEEEdirectiverequiresthatproductssoldintoEUcountriesmusthavethecrossedout
trashbinlabelontheproduct(orthepackageinsomecases).
AsdenedbytheWEEEdirective,thiscross-outtrashbinlabelmeansthatcustomersandend-usersinEU
countriesshouldnotdisposeofelectronicandelectricalequipmentoraccessoriesinhouseholdwaste.
Customersorend-usersinEUcountriesshouldcontacttheirlocalequipmentsupplierrepresentativeorservice
centreforinformationaboutthewastecollectionsystemintheircountry.
i
Page 4

Page 5

RevisionHistory
Changestotheoriginalguidearelistedbelow:
Change
-01RevA
Date
07/11/2013Initialrelease.
Description
iii
Page 6

Page 7

Contents
1GettingStarted..........................................................................................................................................1-1
1.1Features..........................................................................................................................................1-1
1.2Unpacking.......................................................................................................................................1-4
1.3Setup..............................................................................................................................................1-4
1.3.1InstallingtheSIMCard.............................................................................................................1-4
1.3.2InstallingtheBattery................................................................................................................1-5
1.3.3ChargingtheBattery................................................................................................................1-6
1.3.3.1ChargingtheMainBattery..................................................................................................1-7
1.3.3.2ChargingTemperature........................................................................................................1-8
1.3.3.3ChargingSpareBatteries....................................................................................................1-8
1.3.4PoweringOntheET1...............................................................................................................1-8
1.3.5WANActivation......................................................................................................................1-8
1.3.5.1GSMActivation...............................................................................................................1-8
1.3.5.2CDMAActivation.............................................................................................................1-8
1.4ReplacingtheBattery........................................................................................................................1-9
1.5ReplacingthemicroSDCard.............................................................................................................1-10
1.6Handstrap......................................................................................................................................1-12
1.7BatteryManagement.......................................................................................................................1-13
1.7.1MonitorBatteryUsage...........................................................................................................1-14
1.7.2LowBatteryNotication.........................................................................................................1-14
1.7.3BatteryOptimization..............................................................................................................1-15
1.7.3.1ChangingtheScreenTimeoutSetting.................................................................................1-15
1.7.3.2ChangingtheBrightnessSetting........................................................................................1-16
1.7.3.3TurningOfftheRadios....................................................................................................1-17
1.8SettingtheDateandTime................................................................................................................1-17
1.9DisplaySetting...............................................................................................................................1-18
1.9.1SettingtheScreenBrightness...................................................................................................1-18
1.9.2SettingScreenRotation..........................................................................................................1-19
1.9.3SettingScreenSleep...............................................................................................................1-20
1.9.4SettingFontSize...................................................................................................................1-20
1.10GeneralSoundsSetting..................................................................................................................1-21
2UsingtheET1...........................................................................................................................................2-1
2.1HomeScreen...................................................................................................................................2-1
2.2StatusBar........................................................................................................................................2-2
2.2.1StatusIcons............................................................................................................................2-2
2.2.2NoticationIcons....................................................................................................................2-4
2.2.3ManagingNotications.............................................................................................................2-5
2.3ApplicationShortcutsandWidgets.......................................................................................................2-6
2.3.1AddinganApplicationorWidgettotheHomeScreen....................................................................2-7
2.3.2MovingItemsontheHomeScreen.............................................................................................2-7
2.3.3RemovinganApporWidgetfromtheHomeScreen......................................................................2-7
2.4Folders...........................................................................................................................................2-7
2.4.1CreatingFolders......................................................................................................................2-8
2.4.2NamingFolders.......................................................................................................................2-8
2.4.3RemovingaFolderFromtheHomeScreen...................................................................................2-9
2.5HomeScreenWallpaper.....................................................................................................................2-9
2.5.1ChangetheHomeScreenW allpaper..........................................................................................2-10
2.6MovingItemsontheHomeScreen.....................................................................................................2-10
2.7RemovingItemsfromtheHomeScreen..............................................................................................2-10
2.8UsingtheTouchscreen.....................................................................................................................2-10
2.9UsingtheOn-screenKeyboard..........................................................................................................2-11
2.9.1EnteringT ext........................................................................................................................2-12
v
Page 8

ET1EnterpriseTabletUserGuide
2.10Applications.................................................................................................................................2-13
2.10.1SwitchingBetweenRecentApplications...................................................................................2-16
2.11Un-LockingtheScreen...................................................................................................................2-16
2.11.1SingleUserMode................................................................................................................2-16
2.11.2MultiUserMode..................................................................................................................2-18
2.11.2.1MultiuserLogin............................................................................................................2-19
2.11.2.2MultiuserLogout...........................................................................................................2-19
2.12ResettingtheDevice......................................................................................................................2-20
2.12.1PerformingaSoftReset........................................................................................................2-20
2.12.2PerformingaHardReset.......................................................................................................2-20
2.13Wake-upSettings..........................................................................................................................2-20
2.13.1WakingtheET1...................................................................................................................2-21
2.14FileBrowser................................................................................................................................2-21
2.15Messaging...................................................................................................................................2-23
2.15.1OpeningMessaging..............................................................................................................2-23
2.15.2SendingaTextMessage........................................................................................................2-23
2.15.3RespondingtoaMessage......................................................................................................2-23
2.15.4ForwardingaMessage..........................................................................................................2-24
2.15.5LockingaMessage...............................................................................................................2-24
2.15.6ViewingMessageDetails......................................................................................................2-25
2.15.7DeletingaMessageThread....................................................................................................2-25
2.15.8MessagingSettings..............................................................................................................2-25
3DataCapture.............................................................................................................................................3-1
3.1ScanningModules............................................................................................................................3-1
3.1.1OperationalModes...................................................................................................................3-1
3.2DigitalCamera.................................................................................................................................3-2
3.3LaserScanning.................................................................................................................................3-2
3.4ScanningConsiderations....................................................................................................................3-2
3.5BarCodeCapturewithScanningorScanning/MSRModule.....................................................................3-3
3.6BarCodeCapturewithIntegratedCamera.............................................................................................3-4
3.7BarCodeCapturewithCS3070BluetoothScanner.................................................................................3-5
3.8ReadingMagneticStripeCardswithScanning/MSRModule....................................................................3-6
3.9DataWedge......................................................................................................................................3-7
3.9.1EnablingDataW edge................................................................................................................3-8
3.9.2DisablingDataW edge...............................................................................................................3-8
3.9.3DataWedgeConguration.........................................................................................................3-9
4WLAN.....................................................................................................................................................4-1
4.1ConnectingtoaWi-FiNetwork...........................................................................................................4-1
5Bluetooth.................................................................................................................................................5-1
5.1AdaptiveFrequencyHopping..............................................................................................................5-1
5.2Security..........................................................................................................................................5-1
5.3BluetoothProles.............................................................................................................................5-2
5.4BluetoothPowerStates......................................................................................................................5-2
5.5BluetoothRadioPower......................................................................................................................5-2
5.5.1EnablingBluetooth..................................................................................................................5-3
5.5.2DisablingBluetooth.................................................................................................................5-3
5.6DiscoveringBluetoothDevices...........................................................................................................5-3
5.7ChangingtheBluetoothName.............................................................................................................5-5
5.8ConnectingtoaBluetoothDevice........................................................................................................5-5
5.9SelectingProlesontheBluetoothDevice.............................................................................................5-6
5.10UnpairingaBluetoothDevice............................................................................................................5-6
6PhotosandVideos......................................................................................................................................6-1
6.1TakingPhotos..................................................................................................................................6-1
6.2TakingaPanoramicPhoto..................................................................................................................6-3
6.3RecordingVideos.............................................................................................................................6-4
vi
Page 9

RevisionHistory
6.4CameraSettings...............................................................................................................................6-6
6.4.1Rear-facingCameraSettings......................................................................................................6-6
6.4.2Front-facingCameraSettings.....................................................................................................6-7
6.5VideoSettings..................................................................................................................................6-7
6.5.1Video-Rear-facingCameraSettings...........................................................................................6-7
6.5.2Video-Front-facingCameraSettings..........................................................................................6-8
6.6ViewingPhotosandV ideos................................................................................................................6-8
6.6.1WorkingwithAlbums..............................................................................................................6-9
6.6.1.1ShareanAlbum..............................................................................................................6-11
6.6.1.2GetAlbumInformation....................................................................................................6-11
6.6.1.3DeletinganAlbum..........................................................................................................6-11
6.6.2WorkingwithPhotos..............................................................................................................6-12
6.6.2.1ViewingandBrowsingPhotos...........................................................................................6-12
6.6.2.2RotatingaPhoto.............................................................................................................6-13
6.6.2.3CroppingaPhoto............................................................................................................6-13
6.6.2.4SettingaPhotoasaContactIcon.......................................................................................6-14
6.6.2.5GetPhotoInformation.....................................................................................................6-15
6.6.2.6ShareaPhoto.................................................................................................................6-15
6.6.2.7DeletingaPhoto.............................................................................................................6-16
6.6.3WorkingwithVideos..............................................................................................................6-16
6.6.3.1W atchingVideos.............................................................................................................6-16
6.6.3.2SharingaV ideo..............................................................................................................6-17
6.6.3.3DeletingaV ideo.............................................................................................................6-18
7Accessories...............................................................................................................................................7-1
7.1ET1Accessories...............................................................................................................................7-1
7.2Single-slotUSBDockingCradle..........................................................................................................7-2
7.3Four-slotChargeOnlyDockingCradle.................................................................................................7-3
7.4Four-SlotBatteryCharger..................................................................................................................7-4
7.5USB/ChargeCable............................................................................................................................7-6
7.6UsingtheHostUSBModule...............................................................................................................7-7
8MaintenanceandTroubleshooting.................................................................................................................8-1
8.1MaintainingtheET1..........................................................................................................................8-1
8.2BatterySafetyGuidelines...................................................................................................................8-1
8.3CleaningInstructions.........................................................................................................................8-2
8.3.1CleaningtheET1.....................................................................................................................8-3
8.3.1.1Housing..........................................................................................................................8-3
8.3.1.2Display...........................................................................................................................8-3
8.3.1.3CameraWindow...............................................................................................................8-3
8.3.1.4ConnectorCleaning...........................................................................................................8-3
8.3.2CleaningCradleConnectors......................................................................................................8-4
8.4Troubleshooting...............................................................................................................................8-5
8.4.1TroubleshootingtheET1EnterpriseTablet...................................................................................8-6
8.4.2Single-slotUSBDockingCradleTroubleshooting..........................................................................8-8
8.4.3Four-slotChargeOnlyDockingCradleTroubleshooting.................................................................8-9
8.4.4Four-slotBatteryChargerTroubleshooting...................................................................................8-9
8.4.5USB/ChargeCableTroubleshooting..........................................................................................8-10
AppendixAT echnicalSpecications..............................................................................................................A-1
A.1ET1T echnicalSpecications.............................................................................................................A-1
A.2Single-slotUSBDockingCradleTechnicalSpecications.......................................................................A-3
A.3Four-slotChargeOnlyCradleTechnicalSpecications...........................................................................A-4
A.4Four-slotBatteryChargerTechnicalSpecications................................................................................A-5
A.5USB/ChargeCableTechnicalSpecications.........................................................................................A-5
vii
Page 10

Page 11

ListofTables
Table1-1Features...................................................................................................................................1-2
Table1-2BatteryChargeLEDStatus.........................................................................................................1-7
Table2-1HomeScreenItems....................................................................................................................2-1
Table2-2StatusIcons..............................................................................................................................2-2
Table2-3NoticationIcons......................................................................................................................2-4
Table2-4ET1DefaultApplications.........................................................................................................2-13
Table2-5Wake-upDefaultSettings.........................................................................................................2-20
Table7-1ET1Accessories.......................................................................................................................7-1
Table7-2BatteryLEDChargingIndicators.................................................................................................7-5
Table8-1TroubleshootingtheET1EnterpriseTablet.....................................................................................8-6
Table8-2TroubleshootingtheSingle-slotUSBDockingCradle......................................................................8-8
Table8-3TroubleshootingtheFour-slotChargeOnlyDockingCradle..............................................................8-9
Table8-4TroubleshootingtheFour-slotBatteryCharger................................................................................8-9
Table8-5TroubleshootingtheUSB/ChargeCable.......................................................................................8-10
TableA-1ET1T echnicalSpecications......................................................................................................A-1
TableA-2Single-slotUSBDockingCradleTechnicalSpecications................................................................A-3
TableA-3Four-slotChargeOnlyCradleTechnicalSpecications....................................................................A-4
TableA-4Four-slotBatteryChargerTechnicalSpecications.........................................................................A-5
TableA-5USB/ChargeCableTechnicalSpecications..................................................................................A-5
ix
Page 12

Page 13

ListofFigures
Figure1-1FrontView...............................................................................................................................1-1
Figure1-2BackView...............................................................................................................................1-2
Figure1-3InstallingSIMCard...................................................................................................................1-5
Figure1-4InsertingtheBattery..................................................................................................................1-6
Figure1-5ActivationScreen......................................................................................................................1-9
Figure1-6RemovingtheBattery..............................................................................................................1-10
Figure1-7LiftAccessDoor.....................................................................................................................1-11
Figure1-8InsertmicroSDCard................................................................................................................1-12
Figure1-9CloseAccessDoor..................................................................................................................1-12
Figure1-10RotateHandstrap360Degrees...................................................................................................1-13
Figure1-11HandinHandstrap...................................................................................................................1-13
Figure1-12BatteryScreen........................................................................................................................1-14
Figure1-13LowBatteryNotication..........................................................................................................1-15
Figure1-14BrightnessDialogBox.............................................................................................................1-19
Figure1-15SoundsScreen........................................................................................................................1-21
Figure1-16V olumesDialogBox................................................................................................................1-22
Figure2-1HomeScreen............................................................................................................................2-1
Figure2-2NoticationandStatusIcons.......................................................................................................2-2
Figure2-3NoticationPanel......................................................................................................................2-5
Figure2-4StackedShortcutIcons...............................................................................................................2-8
Figure2-5UnnamedFolder.......................................................................................................................2-8
Figure2-6OpenFolder.............................................................................................................................2-8
Figure2-7RenamedFolder........................................................................................................................2-9
Figure2-8On-screenKeyboard................................................................................................................2-12
Figure2-9RecentlyUsedApplications......................................................................................................2-16
Figure2-10LockScreen...........................................................................................................................2-17
Figure2-11PINScreen.............................................................................................................................2-17
Figure2-12PatternScreen........................................................................................................................2-18
Figure2-13PasswordScreen.....................................................................................................................2-18
Figure2-14MultipleuserLogInScreen......................................................................................................2-19
Figure2-15FileBrowserScreen.................................................................................................................2-22
Figure3-1BarCodeScanning....................................................................................................................3-3
Figure3-2AimingPattern.........................................................................................................................3-4
Figure3-3PickListModewithMultipleBarCodesinAimingPattern...............................................................3-4
Figure3-4SampleScanApplicationwithPreviewWindow.............................................................................3-5
Figure3-5CS3070BluetoothScanner..........................................................................................................3-5
Figure3-6CS3070Scanning......................................................................................................................3-6
Figure3-7LinearScannerAimingPattern....................................................................................................3-6
Figure3-8SwipingaMagneticStripeCard...................................................................................................3-7
Figure5-1BluetoothPairing-EnterPIN......................................................................................................5-4
Figure5-2BluetoothPairing—SimplePairing.............................................................................................5-4
Figure6-1CameraMode...........................................................................................................................6-2
Figure6-2PanoramicMode.......................................................................................................................6-4
Figure6-3VideoMode.............................................................................................................................6-5
Figure6-4Gallery—Albums....................................................................................................................6-9
Figure6-5PhotosInsideanAlbum............................................................................................................6-10
Figure6-6PhotoExample.......................................................................................................................6-13
Figure6-7CroppingT ool........................................................................................................................6-14
Figure6-8VideoExample.......................................................................................................................6-17
Figure7-1ET1inSingle-slotUSBDockingCradle........................................................................................7-3
Figure7-2ET1BatteryCharging................................................................................................................7-4
Figure7-3ET1BatteryCharging................................................................................................................7-5
xi
Page 14

ET1EnterpriseTabletUserGuide
Figure7-4ChargingUsingtheUSB/ChargeCable.........................................................................................7-6
Figure7-5CommunicationUsingUSB/ChargeCable.....................................................................................7-7
Figure7-6USBHostModuleConnection.....................................................................................................7-8
xii
Page 15

AboutThisGuide
ThisguideprovidesinformationonusingtheET1EnterpriseT abletandaccessories.
Screensandwindowspicturedinthisguidearesamplesandcandifferfromactualscreens.
DocumentationSet
ThedocumentationsetfortheET1providesinformationforspecicuserneeds,andincludes:
•ET1EnterpriseTabletQuickStartGuide-describeshowtosetuptheET1andbasicoperatinginstructions.
•ET1EnterpriseT abletUserGuide-describeshowtousetheET1.
•ET1EnterpriseT abletIntegratorGuide-describeshowtoconguretheET1andaccessories.
Congurations
Thisguidecoversthefollowingcongurations:
Conguration
ET1N0WLAN:
ET1N2WLAN:
RadiosDisplayMemory
7.0”WSVGA
802.11a/b/g/n
WPAN:
Bluetoothv2.1
withEDR
802.11a/b/g/n
WPAN:
Bluetoothv2.1
withEDR
WWAN:
HSDPA/
CDMA
Color
7.0”WSVGA
Color
SoftwareVersions
Todeterminethecurrentsoftwareversionstouch
•Serialnumber-Displaystheserialnumber.
•Modelnumber-Displaysthemodelnumber.
•Androidversion-Displaystheoperatingsystemversion.
1GBRAM/4
GBFlash/4GB
microSDcard
1GBRAM/4
GBFlash/4GB
microSDcard
> Aboutdevice.
DataCapture
Options
camera,
Scanning
Module,
Scanning/MSR
Module,
optionalCS3070
camera,
Scanning
Module,
Scanning/MSR
Module,
optionalCS3070
Operating
System
Android-based,
Android
Open-Source
Project4.1.1
Android-based,
Android
Open-Source
Project4.1.1
xiii
Page 16

ET1EnterpriseTabletUserGuide
•Kernelversion-Displaysthekernelversionnumber.
•Buildnumber-Displaysthesoftwarebuildnumber.
ChapterDescriptions
Topicscoveredinthisguideareasfollows:
•1GettingStarted,page1-1providesinformationongettingtheET1upandrunningforthersttime.
•2UsingtheET1,page2-1providesbasicinstructionsforusingtheET1,includingpoweringonandresetting
theET1.
•3DataCapture,page3-1providesinformationforcapturingbarcodedatausingtheinternalcameraandoptional
scanmodulesandBluetoothscanner.
•4WLAN,page4-1providesinformationforconguringWi-Fi.
•5Bluetooth,page5-1providesinformationforconguringBluetooth.
•6PhotosandVideos,page6-1explainshowtotakephotos,capturevideosandvideoimagesintheGallery
application.
•7Accessories,page7-1describestheavailableaccessoriesandhowtousethemwiththeET1.
•8MaintenanceandTroubleshooting,page8-1includesinstructionsoncleaningandstoringtheET1,andprovides
troubleshootingsolutionsforpotentialproblemsduringET1operation.
•ATechnicalSpecications,pageA-1providesthetechnicalspecicationsfortheET1.
NotationalConventions
Thefollowingconventionsareusedinthisdocument:
•Italicsareusedtohighlightthefollowing:
–Chaptersandsectionsinthisandrelateddocuments
–Iconsonascreen.
•Boldtextisusedtohighlightthefollowing:
–Dialogbox,window,andscreennames
–Drop-downlistandlistboxnames
–Checkboxandradiobuttonnames
–Buttonnamesonascreen.
•Bullets(•)indicate:
–Actionitems
–Listsofalternatives
–Listsofrequiredstepsthatarenotnecessarilysequential
•Sequentiallists(forexample,liststhatdescribestep-by-stepprocedures)appearasnumberedlists.
xiv
Page 17

IconConventions
IconConventions
Thedocumentationsetisdesignedtogivethereadermorevisualclues.Thefollowinggraphiciconsareused
throughoutthedocumentationset.Theseiconsandtheirassociatedmeaningsaredescribedbelow .
ThewordW ARNINGwiththeassociatedsafetyiconimpliesinformationthat,ifdisregarded,could
resultindeathorseriousinjury ,orseriousproductdamage.
ThewordCAUTIONwiththeassociatedsafetyiconimpliesinformationthat,ifdisregarded,may
resultinminorormoderateinjury,orseriousproductdamage.
NOTEcontainsinformationmoreimportantthanthesurroundingtext,suchasexceptionsorpreconditions.
Theyalsoreferthereaderelsewhereforadditionalinformation,remindthereaderhowtocompletean
action(whenitisnotpartofthecurrentprocedure,forinstance),ortellthereaderwheresomethingis
locatedonthescreen.Thereisnowarninglevelassociatedwithanote.
RelatedDocuments
•ET1EnterpriseT abletQuickStartGuide,p/nMN000021A01-xx
•ET1EnterpriseT abletRegulatoryGuide,p/n72-148509-xx
•ET1EnterpriseT abletIntegratorGuide,p/nMN000022A01-xx
•SymbolCS3000SeriesScannerProductReferenceGuide,p/n72E-136088-xx
•MSPClientSoftwareGuide,p/n72E-128805-xx
•MSP4.2ReleaseNotes,p/n72E-100160-xx.
Forthelatestversionofthisguideandallguides,goto:http://supportcentral.motorolasolutions.com
ServiceInformation
Ifyouhaveaproblemwithyourequipment,contactMotorolaSolutionsGlobalCustomerSupportCenterforyour
region.Contactinformationisavailableat:http://www .motorolasolutions.com/support
.
WhencontactingMotorolaSolutionsGlobalCustomerSupportCenter,havethefollowinginformationavailable:
•Serialnumberoftheunit(foundonthemanufacturinglabel)
•Modelnumberorproductname(foundonthemanufacturinglabel)
•Softwaretypeandversionnumber
xv
Page 18

ET1EnterpriseTabletUserGuide
Motorolarespondstocallsbyemailortelephonewithinthetimelimitssetinsupportagreements.
IftheMotorolaSolutionsGlobalCustomerSupportCentercannotsolvetheproblem,youmayneedtoreturnthe
equipmentforservicing.TheSupportCenterprovidesthespecicdirections.Motorolaisnotresponsibleforany
damagesincurredduringshipmentiftheapprovedshippingcontainerisnotused.Shippingtheunitsimproperly
canpossiblyvoidthewarranty.
IfyoupurchasedyourproductfromaMotorolabusinesspartner,contactthatbusinesspartnerforsupport.
xvi
Page 19
1GettingStarted
13
1
6
711
5
3
2
4
891012
ThischapterprovidesthefeaturesoftheET1andexplainshowtosetitupforthersttime.
1.1Features
Figure1-1FrontView
MN000022A01-May2013
1-1
Page 20
ET1EnterpriseT abletUserGuide
17
26
14
22
23
24
18
15
16
20
19
19
25
21
Figure1-2BackView
Table1-1Features
NumberItemFunction
1
2
3
4
DecodeLEDIndicatesdecodefunctionality.Lightsredwhenscanninginprocess.
MicrophoneUseformakingvoicerecordings.
LightSensorDeterminesambientlightforcontrollingdisplaybacklightintensity.
BatteryCharge
LED
5
Communication
LED
6
Front-facing
Camera
7
8
Lightsgreenindicatingasuccessfuldecode.
Indicatesbatterychargestate.
Userprogrammable.
Useforcapturingafrontviewpicture.Useformakingvideocallswith
third-partyvideoapplications.
MenuButton—Opensamenuwithitemsthataffectthecurrentscreen
orapplication.
HomeButton—DisplaystheHomescreenwithasingletouch.Displays
recentlyusedapplicationswhenheldforashortperiod.
1-2
MN000022A01-May2013
Page 21

Table1-1Features(cont'd.)
NumberItemFunction
9
10P3
11P2
12P1
13
14
15
16
17
BackButton—Displaysthepreviousscreen.Closesthekeyboardifthe
on-screenkeyboardisopen.
LaunchestheSearchapplication(default).Usercongurable.
Increasesthevolume(default).Usercongurable.
Decreasesthevolume(default).Usercongurable.
TouchScreenDisplaysallinformationrequiredtooperatetheET1.
CameraFlashProvidesilluminationforrear-facingcamera.
Rear-facing
Takesphotos,videos,andcapturesbarcodedata.
Camera
USBHost
ProvidesUSBhostconnectiontoaperipheral.
Expansion
Module
ScanningModuleProvides1Dand2Dbarcodescanning.
Scanning/MSR
Provides1Dand2Dbarcodescanningandmagneticstripecardreading.
Module
PowerButton
PressandholdtoturnontheET1.Presstoturnonoroffthescreen.
Pressandholdtoselectoneoftheseoptions:
1.1Features
18
19
20HDMIOutput
21
22
23
24
25
26
•Silentmode-Thedeviceissettovibratemode;allsoundsare
disabledexceptforalarms.
•Airplanemode-Disableallwirelessconnections.
•Batteryswap-Shutdownthedevicewhenreplacingthebattery.
•Reset-ReboottheET1whensoftwarestopsresponding.
•Poweroff-TurnofftheET1.
LeftScan/Action
Opensthescanapplication(default).Programmable.
Button
SpeakersProvidesaudiooutputforvideoandmusicplayback.
ProvidesHDMIaudioandvideosignalstoanHDMIcompatiblemonitor
Connector
ortelevision.
I/OConnectorProvidespowertothedevicefromcradlesandcablesandprovidesUSB
clientandhostcommunications.
HeadsetJackConnectstomonoheadphones(3-wire,2.5mmplug).
Battery
ProvidesoperatingpowertotheET1.
BatteryLatchReleasesthebatteryforremoval.
SideLEDIndicatesbatterychargestate.
Right
Opensthescanapplication(default).Programmable.
Scan/Action
Button
MN000022A01-May2013
1-3
Page 22

ET1EnterpriseT abletUserGuide
1.2Unpacking
CarefullyremoveallprotectivematerialfromtheET1andsavetheshippingcontainerforlaterstorageandshipping.
Verifythefollowingitemsareinthebox:
•ET1EnterpriseTabletwith4GBmicrosecuredigital(SD)cardinstalled
•Lithium-ionbattery
•QuickStartGuide
•RegulatoryGuide.
1.3Setup
TostartusingtheET1forthersttime:
•InstallSIMcardinanET1N2withGSM(optional).
•Installthebattery .
•ChargetheET1.
•PowerontheET1.
•ActivatetheET1N2onamobiledatanetwork(optional).
1.3.1InstallingtheSIMCard
ET1N2only .
TheET1N2requiresanactivatedSIMcard.Obtainthecardfromaserviceprovider.
1-4
MN000022A01-May2013
Page 23
ProcedureSteps
1Lifttheaccessdoor.
Figure1-3InstallingSIMCard
1.3.2InstallingtheBattery
2InsertSIMcardintotheSIMholderwiththecontactsfacingdownandthecutedgefacingawayfromtheholder.
3Closetheaccessdoor.
1.3.2InstallingtheBattery
EnsurethatthecorrectbatteryisusedwiththeET1.OntheET1N0useeitherthe4620mAhbattery,
p/n82-149690-xxorthe5640mAhbattery,p/n82-158261-xx.OntheET1N2useonlythe5640mAh
battery,p/n82-158261-xx.
Toinstallthebattery:
MN000022A01-May2013
1-5
Page 24

ET1EnterpriseT abletUserGuide
2
1
ProcedureSteps
1Alignthetracksonthesideofthebatterywiththerailsinthebatterycompartment.
2Pushthebatteryinuntilthebatteryreleaselatchsnapsintoplace.
3Ifthebatteryischarged,pressandholdthePowerbuttonfortwosecondsuntilthesplashscreenappears.
Figure1-4InsertingtheBattery
1.Rails
2.BatteryTracks
1.3.3ChargingtheBattery
Ensurethatyoufollowtheguidelinesforbatterysafetydescribedin8.2BatterySafetyGuidelines,
page8-1.
1-6
MN000022A01-May2013
Page 25

1.3.3.1ChargingtheMainBattery
BeforeusingtheET1forthersttime,chargethemainbatteryuntiltheBatteryChargelightemittingdiode
(LED)turnssolidgreen(seeTable1-2BatteryChargeLEDStatusforchargestatusindications).T ochargethe
ET1,useacableoracradlewiththeappropriatepowersupply.Forinformationabouttheaccessoriesavailable
fortheET1,see7Accessories,page7-1.
TheET1isequippedwithamemorybackupbatterythatautomaticallychargesfromthefully-chargedmain
battery.WhenusingtheET1forthersttime,thebackupbatteryrequiresapproximately40hourstofullycharge.
Thisisalsotrueanytimethebackupbatteryisdischarged,whichoccurswhenthemainbatteryisremovedfor
severalhours.Thebackupbatteryretainsrandomaccessmemory(RAM)datainmemoryforatleast15minutes
(atroomtemperature)whentheET1’smainbatteryisremoved,whenBatteryswapfeatureisused.Whenthe
ET1reachesaverylowbatterystate,thecombinationofmainbatteryandbackupbatteryretainsRAMdatain
memoryforatleast36hours.
ForcableandcradlesetupandchargingproceduresrefertotheET1EnterpriseTabletIntegratorGuide.
•USB/ChargeCable
•Single-slotUSBDockingCradle
•Four-slotChargeOnlyDockingCradle.
1.3.3.1ChargingtheMainBattery
Tochargethemainbattery:
1.Connectthechargingaccessorytotheappropriatepowersource.See7Accessories,page7-1formoreinformation.
2.InserttheET1intoacradleorattachtoacable.TheET1beginscharging.TheBatteryChargeLEDsblinkyellow
whilecharging,thenturnssolidgreenwhenfullycharged.SeeT able1-2BatteryChargeLEDStatusforcharging
indications.
Thebatterychargesinlessthansixhours.
Table1-2BatteryChargeLEDStatus
Status
Indications
OffET1isnotinsertedcorrectlyinthecradle.ET1isnotconnectedtoapower
source.Chargerorcradleisnotpowered.
SlowBlinkingYellow(3blinks
ET1ischarging.
every2seconds)
SolidGreenChargingcomplete.
FastBlinkingyellow(2
Chargingerror,e.g.:
blinks/second)
•Temperatureistoolowortoohigh.
•Charginghasgoneontoolongwithoutcompletion(typicallyeight
hours).
FlashesY ellowthreetimeswhen
Criticalbatterystate.Batterytoolowtobootdevice.
Powerbuttonpressed
FastblinkingYellow(whenPower
buttonpressed)
Batteryover-temperaturecondition.Deviceshutsdown.Batterywillnot
chargeuntiltemperaturereturnstonormaloperatingvalue.
MN000022A01-May2013
1-7
Page 26

ET1EnterpriseT abletUserGuide
1.3.3.2ChargingTemperature
Chargebatteriesintemperaturesfrom0°Cto40°C(32°Fto104°F).Notethatchargingisintelligentlycontrolled
bytheET1.T oaccomplishthis,forsmallperiodsoftime,theET1oraccessoryalternatelyenablesanddisables
batterychargingtokeepthebatteryatacceptabletemperatures.TheET1oraccessoryindicateswhenchargingis
disabledduetoabnormaltemperaturesviaitsLED.SeeTable1-2BatteryChargeLEDStatus.
1.3.3.3ChargingSpareBatteries
See7Accessories,page7-1forinformationonusingaccessoriestochargesparebatteries.
1.3.4PoweringOntheET1
PressthePowerbuttonuntiltheBatteryChargeLEDashesthreetimes.Thesplashscreendisplaysforabouta
minuteastheET1initializesitsashlesystem.Notethatthesewindowsalsoappearuponreset.
1.3.5WANActivation
1.3.5.1GSMActivation
1.3.5.2CDMAActivation
ET1N2only .
InordertousetheW ANradiofordatacommunication,theET1N2mustbeactivatedontheserviceprovider’s
network.Bydefault,theET1N2isconguredforaGSMnetwork.T oactivateonaCDMAnetwork,manual
congurationisrequired.
RefertotheET1EnterpriseT abletIntegratorGuidefordetailedW ANcongurationinformation.
WhentheET1N2turnsonitautomaticallyconguresforthenetwork.IftheSIMcardrequiresaPIN,thePIN
screenappears.EnterthePINandtouchOK.
PriortousingtheET1N2onaCDMAnetwork,theET1mustberegisteredwiththeserviceprovider.Contactthe
serviceprovidertosetupanaccountandprovidetheMEIDnumber(locatedunderthebattery).
Bydefault,theET1N2isconguredforaGSMnetwork.ToactivateonaCDMAnetwork:
1-8
MN000022A01-May2013
Page 27
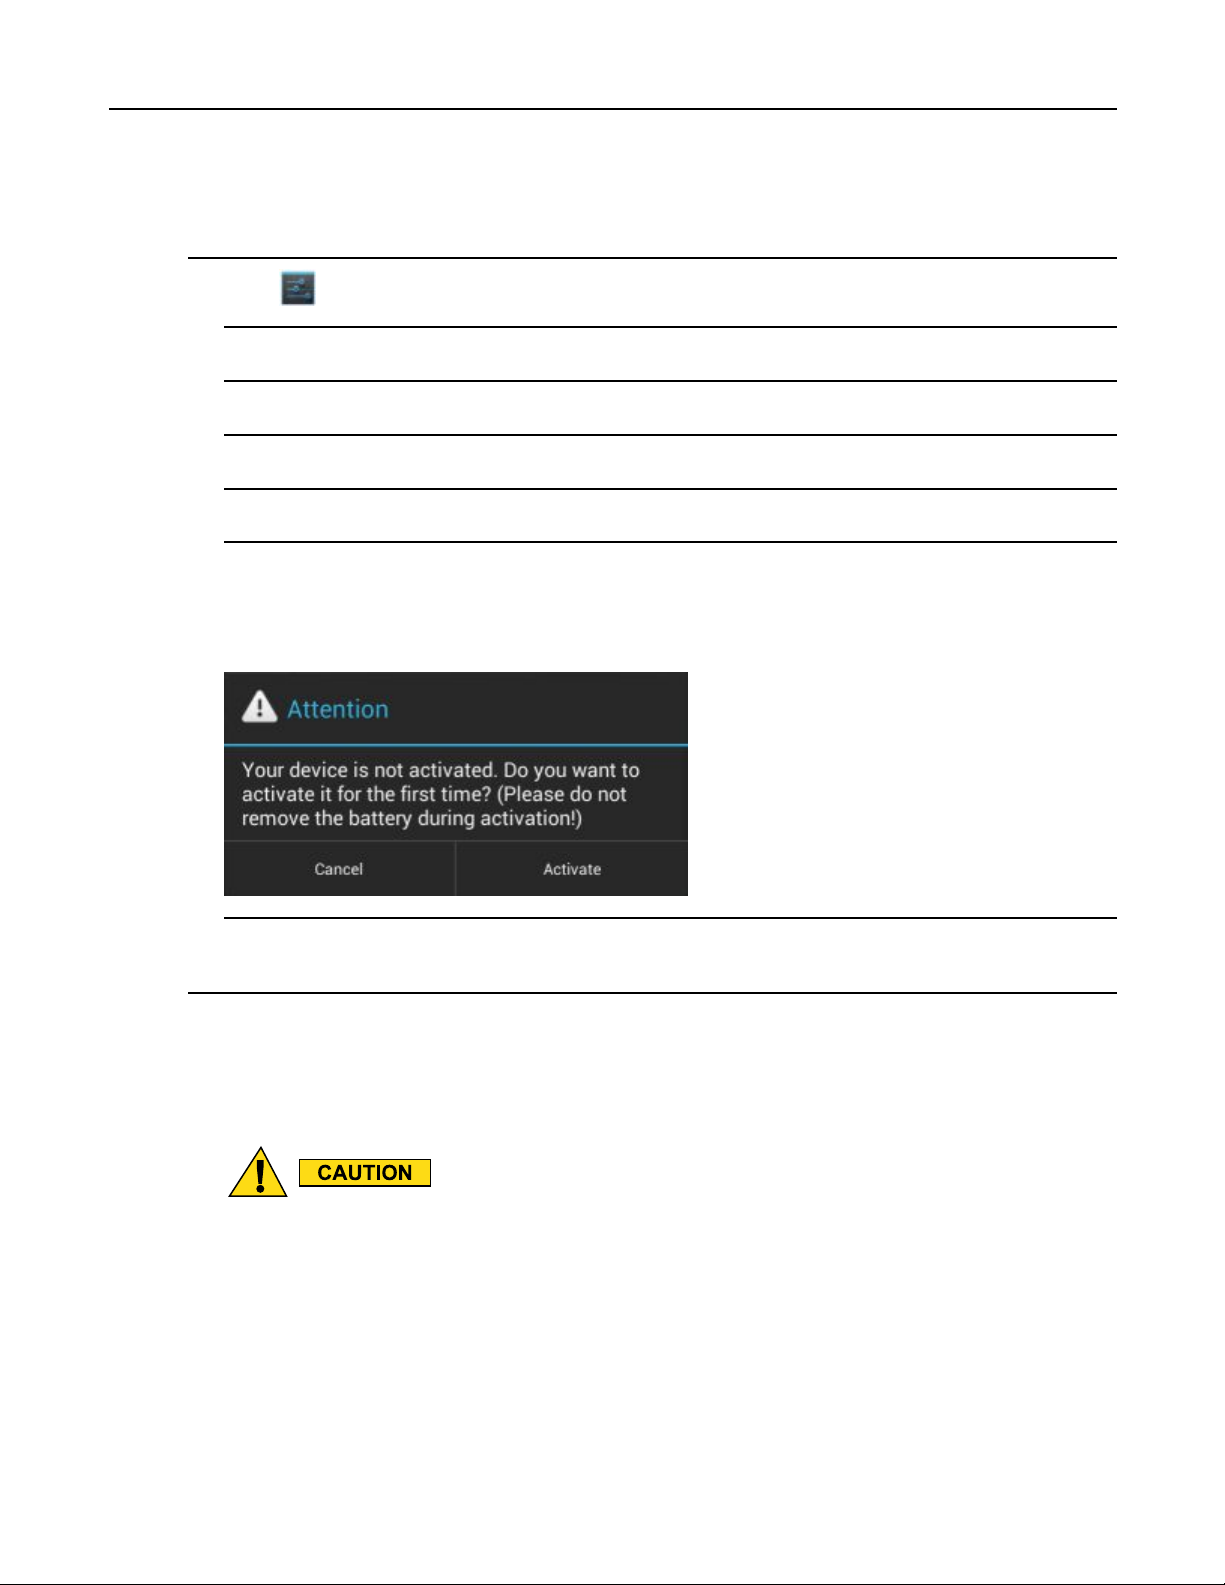
1.4ReplacingtheBattery
ProcedureSteps
1Touch .
2TouchMore....
3TouchMobilenetworks.
4TouchTechnologypreferences.
5TouchNetworkmode.
6IntheNetworkmodemenu,selecteitherSprintorV erizon.TheET1switchesthemodemrmwareandthe
ActivationDialogboxappears.
Figure1-5ActivationScreen
7TouchActivate.TheET1N2beginstheactivationprocess.Iftheactivationisunsuccessful,contactthe
serviceprovider .
1.4ReplacingtheBattery
DonotremovethemicroSDcardwhileinBatterySwapmode.
EnsurethattheBatterySwapmodeproceduresarefollowed,otherwisethebackupbatterywill
depletequicklyandontheET1N2,SIMcarddatacorruptionmightoccur .
Toreplacethebattery:
MN000022A01-May2013
1-9
Page 28
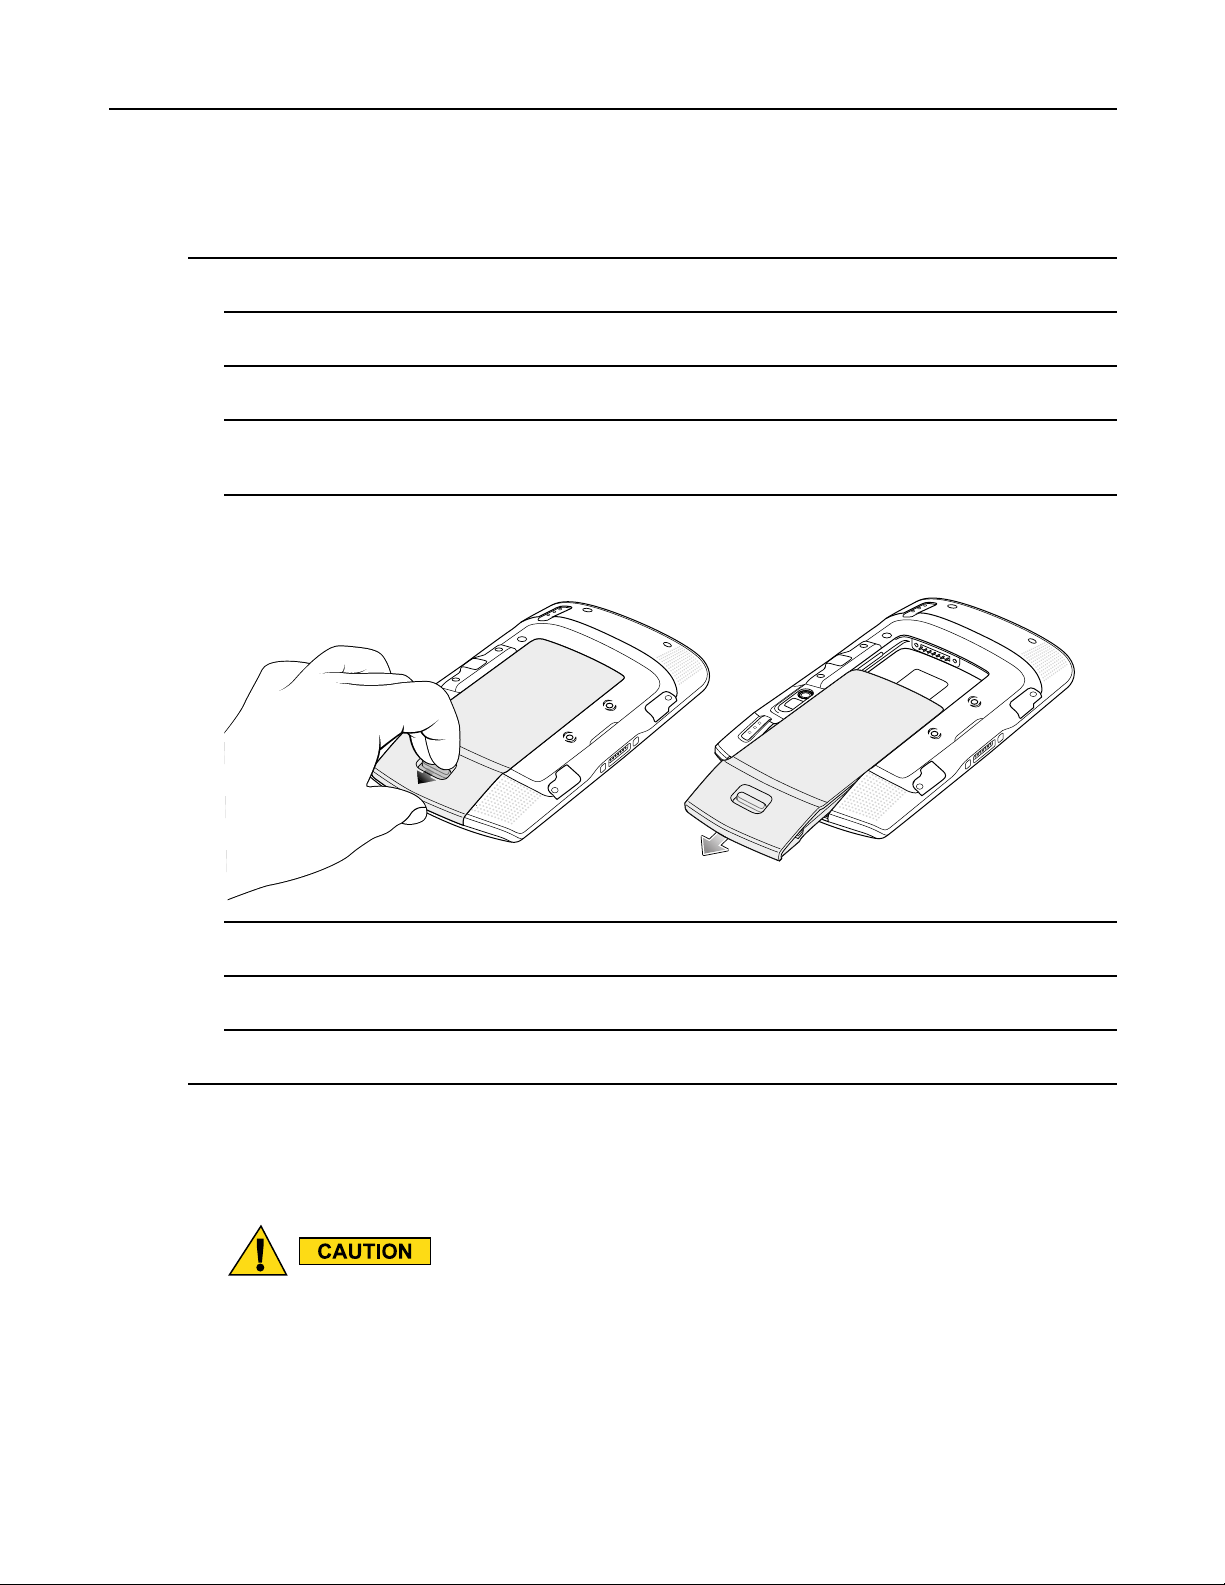
ET1EnterpriseT abletUserGuide
ProcedureSteps
1PressthePowerbuttonuntilthemenudisplays.
2TouchBatterySwap.TheScanLEDlightsred.
3WaituntiltheScanLEDturnsoff.
4PressthumbagainstthesideoftheET1andbattery .Usingtheindexandmiddlengers,movethebattery
releaselatchtowardthumb.
5Pullthebatteryoutofthebatterycompartment.
Figure1-6RemovingtheBattery
6Alignthetracksonthesideofthereplacementbatterywiththerailsinthebatterycompartment.
7Pushthebatteryinuntilthebatteryreleaselatchsnapsintoplace.
8PressthePowerbuttontoturnontheET1.
1.5ReplacingthemicroSDCard
Forproperelectrostaticdischarge(ESD)precautionstoavoiddamagingtheSDcard.Proper
ESDprecautionsinclude,butnotlimitedto,workingonanESDmatandensuringthattheuser
isproperlygrounded.
ChangingthemicroSDcardcanchangethefunctionalityoftheET1.
ToreplacethemicroSDcard:
1-10
MN000022A01-May2013
Page 29

1.5ReplacingthemicroSDCard
ProcedureSteps
1PressthePowerbuttonuntilthemenudisplays.
2TouchPoweroff.
3TouchOK.
4WaitfortheET1topoweroffcompletely.
5PressthumbagainstthesideoftheET1andbattery .Usingtheindexandmiddlengers,movethebattery
releaselatchtowardthumb.
6Pullthebatteryoutofthebatterycompartment.
7Lifttheaccessdoor.
Figure1-7LiftAccessDoor
8RemovethemicroSDcardfromthecardholder.
9AlignthereplacementmicroSDcardwiththecardholder.Ensurethatthecontactsonthecardarefacing
downandtowardthecardholder.
MN000022A01-May2013
1-11
Page 30
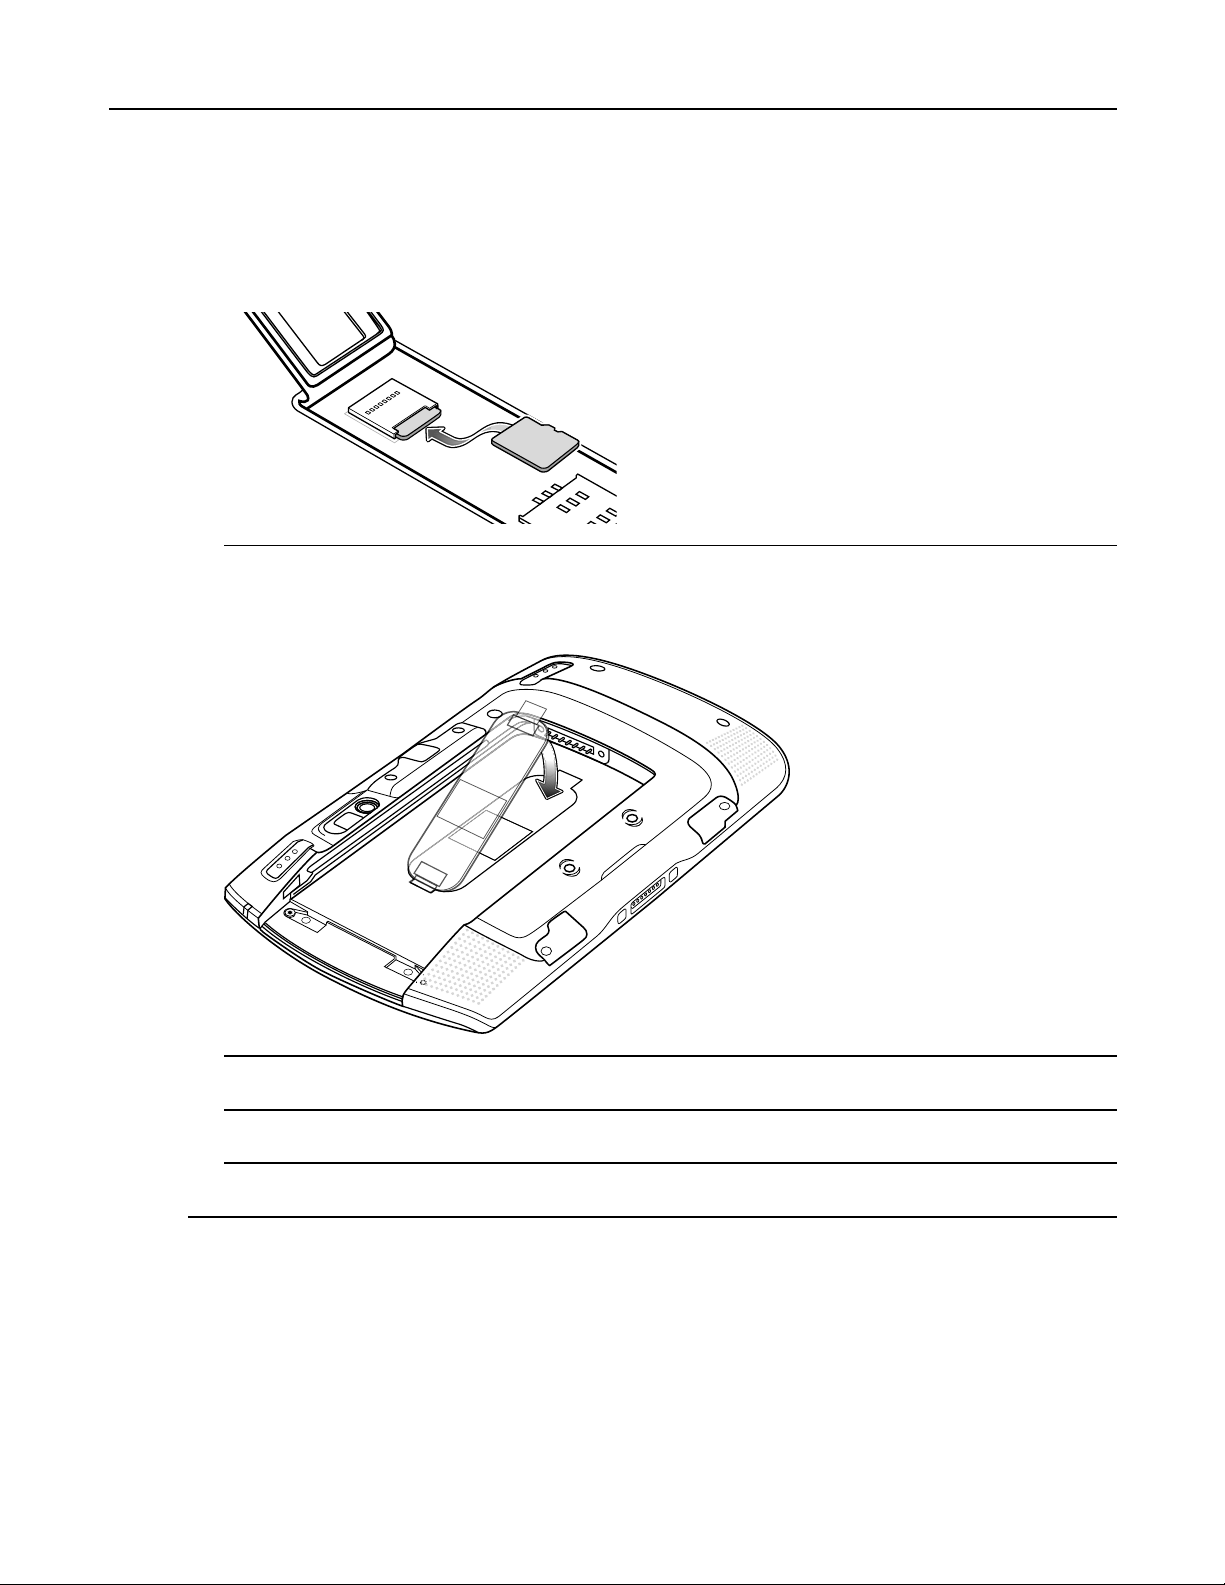
ET1EnterpriseT abletUserGuide
10InsertthemicroSDcardintothecardholder.
Figure1-8InsertmicroSDCard
11Closetheaccessdoor.
Figure1-9CloseAccessDoor
12Alignthetracksonthesideofthereplacementbatterywiththerailsinthebatterycompartment.
13Pushthebatteryinuntilthebatteryreleaselatchsnapsintoplace.
14PressthePowerbuttontoturnontheET1.
1.6Handstrap
Usetheoptional360-degreerotatablehandstraptosecurelyholdtheET1whileworking.RefertotheET1
EnterpriseTabletIntegratorGuideforinformationoninstallingthehandstrap.
Rotatethehandstrapforlandscapeorportraitviewing.
1-12
MN000022A01-May2013
Page 31

Figure1-10RotateHandstrap360Degrees
Inserthandintothehandstrapandtightenstrap.
Figure1-11HandinHandstrap
1.7BatteryManagement
1.7BatteryManagement
Tocheckthechargestatusofthemainbattery ,touch
BatterystatusindicatesthatthebatteryisdischargingandBatterylevelliststhebatterycharge(asapercentage
offullycharged).
MN000022A01-May2013
Priortocheckingthebatterychargelevel,removetheET1fromanyACpowersource(cradleorcable).
> Aboutdevice>Status.
1-13
Page 32

ET1EnterpriseT abletUserGuide
1.7.1MonitorBatteryUsage
TheBatteryscreenlistswhichapplicationsconsumethemostbatterypower.Alsouseittoturnoffapplications
thatweredownloadediftheyareconsumingtoomuchpower.
Touch
Figure1-12BatteryScreen
TheBatteryscreenliststheapplicationsusingthebattery.Thedischargegraphatthetopofthescreenshowsthe
rateofthebatterydischargesincelastcharged(shortperiodsoftimewhenconnectedtoachargerareshownasthin
greenlinesatthebottomofthechart),andhowlongithasbeenrunningonbatterypower.
> Battery.
TouchanapplicationintheBatteryscreentodisplaydetailsaboutitspowerconsumption.Differentapplications
displaydifferentinformation.Someapplicationsincludebuttonsthatopenscreenswithsettingstoadjustpoweruse.
1.7.2LowBatteryNotication
Whenthebatterychargedropsbelow20%,theET1displaysanoticetoconnecttheET1topower.
1-14
MN000022A01-May2013
Page 33

1.7.3BatteryOptimization
Figure1-13LowBatteryNotication
TheusershouldreplacethebatteryorchargetheET1usingoneofthechargingaccessories.
Whenthebatterychargedropsbelow10%,theET1goesintocriticalsuspendmodetosavedata.Thescreenturns
off.IfthePowerbuttonispressed,theChargeLEDashesyellow.
TheusermustreplacethebatteryorchargetheET1usingoneofthechargingaccessoriestoretaindata.
1.7.3BatteryOptimization
Observethefollowingbatterysavingtips:
•LeavetheET1connectedtoACpoweratalltimeswhennotisuse.
•Setthescreentoturnoffafterashortperiodofnon-use.
•Reducescreenbrightness.
•Turnoffallwirelessradioswhennotinuse.Notethattheglobalpositioningsystem(GPS)receiverisonlyturned
onwhenaGPSapplicationisusingGPS.
•TurnoffautomaticsyncingforEmail,Calendar,Contactsandotherapplications.
•UsethePowerControlwidgettocheckandcontrolthestatusofradios,thescreenbrightness,andsyncing.
•MinimizeuseofapplicationsthatkeeptheET1fromsuspending,forexample,music,GPSandvideoapplications.
1.7.3.1ChangingtheScreenTimeoutSetting
TosettheET1toturnoffafterashortperiodofnon-use:
MN000022A01-May2013
1-15
Page 34

ET1EnterpriseT abletUserGuide
ProcedureSteps
1Touch .
2Touch Display.
3TouchSleep.
4SelectavaluefromtheSleepwindow.Options:
•15seconds
•30seconds
•1minute(default)
•2minutes
•5minutes
•10minutes
•30minutes
5Touch .
1.7.3.2ChangingtheBrightnessSetting
Tochangethebrightnesssettinginordertoconservemorebatterypower:
1-16
MN000022A01-May2013
Page 35

ProcedureSteps
1Touch .
2Touch Display.
3TouchBrightness.
4IftheAutomaticBrightnesscheckboxisset,touchthecheckboxtodisable.
5Movetheslidertothelefttoreducethebrightness.
6TouchOK.
7Touch .
1.7.3.3TurningOfftheRadios
1.7.3.3TurningOfftheRadios
Toturnoffalltheradios:
ProcedureSteps
1PressthePowerbuttonuntilthemenuappears.
2TouchAirplanemode.Theairplaneicon appearsintheStatusbarindicatingthatalltheradiosareoff.
1.8SettingtheDateandTime
ThedateandtimeareautomaticallysynchronizedusinganNTPserverwhentheET1isconnectedtoawireless
network.Theuserisonlyrequiredtosetthetimezone.RefertotheET1EnterpriseT abletIntegratorGuidefor
moreinformationonconguringtheNTPserverconnection.
Tosetthedateandtime:
MN000022A01-May2013
1-17
Page 36

ET1EnterpriseT abletUserGuide
ProcedureSteps
1Touch .
2Touch Date&time.
3TouchSelecttimezone.
4Touchthetimezoneforthecurrentlocation.
5Touch .
1.9DisplaySetting
TheDisplaysettingsscreenallowstheusertosetthefollowingoptions:
•Brightness
•Screenrotation
•Sleeptime
•Fontsize
1.9.1SettingtheScreenBrightness
Tosetthescreenbrightness:
1-18
MN000022A01-May2013
Page 37

ProcedureSteps
1Touch .
2Touch Display.
3TouchBrightness.
Figure1-14BrightnessDialogBox
1.9.2SettingScreenRotation
4IntheBrightnessdialogbox,checktheAutomaticbrightnesscheckboxtosettheET1toautomaticallyadjust
thebrightnessusingthebuilt-inlightsensor.Uncheckthecheckboxtosetthebrightnessmanually.Usethe
slidertosetabrightnesslevel.
5TouchOK.
6Touch .
1.9.2SettingScreenRotation
TheusercansettheET1screentorotate90degreesleftorright.
MN000022A01-May2013
1-19
Page 38

ET1EnterpriseT abletUserGuide
ProcedureSteps
1Touch .
2Touch Display.
3IntheDisplaysettingsscreen,checkAuto-rotatescreentosettheET1toautomaticallyswitchorientation
whentheET1isrotated.
4Touch .
1.9.3SettingScreenSleep
TheusercansettheET1displaytoturnoffafteraperiodofinactivity .
ProcedureSteps
1Touch .
2Touch Display.
3TouchSleep.
4IntheSleepmenu,selectoneofthesleepvalues.
•15seconds
•30seconds
•1minute(default)
•2minutes
•5minutes
•10minutes
•30minutes
5Touch .
1.9.4SettingFontSize
Tosetthesizeofthefontinsystemapplications:
1-20
MN000022A01-May2013
Page 39

ProcedureSteps
1Touch .
2Touch Display.
3TouchFontsize.
4IntheFontsizemenu,selectoneofthefontsizevalues.
•Small
•Normal
•Large
•Huge
5Touch .
1.10GeneralSoundsSetting
1.10GeneralSoundsSetting
UsetheSoundssettingstoconguremediaandalarmvolumes.T ouch
Figure1-15SoundsScreen
> > Sounds.
MN000022A01-May2013
•Volumes—Usetochangethevolumeofmedia,ringtonesandnoticationsandalarms.
1-21
Page 40

ET1EnterpriseT abletUserGuide
Figure1-16V olumesDialogBox
•CallRingtoneandVibrate
–Vibratewhenringing-ChecktomaketheET1vibratewhenacallisreceived.
•System
–Defaultnotication-Touchtoselectasoundtoplayforallsystemnotications.
–Touchsounds-Checktoplayasoundwhenmakingscreenselections.
–Screenlocksounds-Checktoplayasoundwhenlockingandunlockingthescreen.
–Vibrateontouch-ChecktohavetheET1vibratewhentouchingsoftkeysandoncertainscreen
interactions.
1-22
MN000022A01-May2013
Page 41

2UsingtheET1
Thischapterdescribesthescreens,statusandnoticationicons,andcontrolsontheET1,andprovidesbasic
instructionsforusingtheET1.
2.1HomeScreen
TheHomescreendisplayswhentheET1turnson.Dependingupontheconguration,theHomescreenmight
appeardifferent.Contactyoursystemadministratorformoreinformation.
Afterasuspendorscreentime-out,theHomescreendisplayswiththelockicon.Touchandslide
touches
Figure2-1HomeScreen
.Forscreenlockinginformationsee2.11Un-LockingtheScreen,page2-16.
upuntilit
Table2-1HomeScreenItems
ItemDescription
1—StatusBar
2—BrowserIcon
MN000022A01-May2013
Displaysthetime,statusicons(rightside),andnoticationicons(leftside).Formore
informationsee2.2.1StatusIcons,page2-2and2.2.3ManagingNotications,page2-5.
OpenstheBrowserapplication.
2-1
Page 42

ET1EnterpriseT abletUserGuide
Table2-1HomeScreenItems(cont'd.)
ItemDescription
3—AllApps
Icon
4—SettingsIconOpenstheSettingswindow.
5—Shortcut
Icons
6—WidgetsLaunchesstand-aloneapplicationsthatrunontheHomescreen.See2.3Application
TheHomescreenprovidesfouradditionalscreensforplacementofwidgetsandshortcuts.Swipethescreen
leftorrighttoviewtheadditionalscreens.
2.2StatusBar
OpenstheAPPSwindow.
OpensapplicationsinstalledontheET1.See2.3ApplicationShortcutsandWidgets,page
2-6formoreinformation.
ShortcutsandWidgets,page2-6formoreinformation.
TheStatusbardisplaysthetime,noticationicons(leftside)andstatusicons(rightside).
Figure2-2NoticationandStatusIcons
IftherearemorenoticationsthancantintheStatusbar,
OpentheNoticationspaneltoviewallnoticationsandstatus.
2.2.1StatusIcons
Table2-2listsStatusiconsthatmightappearintheStatusBar.
Table2-2StatusIcons
IconDescription
1.Noticationicons
2.Statusicons.
displaysindicatingthatmorenoticationsexist.
IndicatesthatGPSison.
IndicatesthattheET1isreceivinglocationdatafromGPS.
IndicatesthatBluetoothison.
2-2
MN000022A01-May2013
Page 43

Table2-2StatusIcons(cont'd.)
IconDescription
2.2.1StatusIcons
IndicatesthattheET1isconnectedtoaBluetoothdevice.
IndicatesthattheAlarmisactive.
Indicatesthatallsoundsexceptmediaandalarmsaresilencedandvibratemodeisactive.
Indicatesthattheringerissilenced.
ConnectedtoaWi-Finetwork.
NoWi-Fisignal.
Indicatesthatthebatterychargeisverylow.
Indicatesthatthebatterychargeislow.
Indicatesthatthebatteryispartiallydrained.
Indicatesthatthebatteryisfullycharged.
Indicatesthatthebatteryischarging.
IndicatesthattheAirplaneModeisactive.Allradiosareturnedoff.
Mobilenetworksignalstrength(ET1N2only).
Nomobilenetworksignal(ET1N2only).
ConnectedtoanEDGEorEVD0network(ET1N2only).
Connectedtoa3Gnetwork(ET1N2only).
MN000022A01-May2013
ConnectedtoanHSP Anetwork(ET1N2only).
Connectedtoa1XCDMAnetwork(ET1N2only).
2-3
Page 44

ET1EnterpriseT abletUserGuide
Table2-2StatusIcons(cont'd.)
IconDescription
2.2.2NoticationIcons
Table2-3NoticationIconsliststhepossiblenoticationicons.See2.2.3ManagingNotications,page2-5for
informationaboutrespondingtothesenotications.Inadditiontotheseicons,installedapplicationsmaydisplay
theirownnoticationicons.
Table2-3NoticationIcons
Roamingfromanetwork(ET1N2only).
NoSIMcardinstalled(ET1N2only).
IconDescription
Indicatesthatmorenoticationsareavailableforviewing.
Indicatesthatdataissyncing.
Indicatesanupcomingevent.
IndicatesthatanopenWi-Finetworkisavailable.
Indicatesthatasongisplaying.
Indicatesthataproblemwithsign-inorsynchasoccurred.
IndicatesthattheET1isuploadingdata.
IndicatesthatthemicroSDcardisalmostfull.
IndicatesthattheET1isdownloadingdatawhenanimatedanddownloadiscompletewhen
static.
IndicatesthattheET1isconnectedviaUSBcable.
IndicatesthattheET1isconnectedtoordisconnectedfromvirtualprivatenetwork(VPN).
2-4
MN000022A01-May2013
Page 45

Table2-3NoticationIcons(cont'd.)
IconDescription
2.2.3ManagingNotications
PreparingSDcard.
IndicatesthatUSBdebuggingisenabledontheET1.
IndicatesthattheMultiUserfeatureisenabled.
Indicatesthatanewuserisloggingin.
IndicatesthattheET1hasreceivedatextmessage(ET1N2only).
2.2.3ManagingNotications
Noticationiconsreportthearrivalofnewmessages,calendarevents,andalarms,aswellasongoingevents.When
anoticationoccurs,aniconappearsintheStatusbarwithabriefdescription.SeeTable2-3NoticationIcons.
OpentheNoticationsPaneltoviewalistofallthenotications.
ToopentheNoticationPaneldragtheStatusbardownfromthetopofthescreen.
Figure2-3NoticationPanel
Torespondtoanotication,opentheNoticationsPanelandthentouchanotication.TheNoticationsPanel
closesandthesubsequentactivityisdependentonthenotication.
MN000022A01-May2013
2-5
Page 46

ET1EnterpriseT abletUserGuide
Toclearallnotications,opentheNoticationsPanelandthentouch .Allevent-basednoticationsare
removed.Ongoingnoticationsremaininthelist.
ToclosetheNoticationPanel,dragthebottomoftheNoticationsPaneltothetopofthescreenortouch .
2.3ApplicationShortcutsandWidgets
ApplicationshortcutsplacedontheHomescreenallowquickandeasyaccesstoapplications.Widgetsare
self-containedapplicationsplacedontheHomescreentoaccessfrequentlyusedfeatures.
2-6
MN000022A01-May2013
Page 47

2.3.1AddinganApplicationorW idgettotheHomeScreen
2.3.1AddinganApplicationorWidgettotheHomeScreen
ProcedureSteps
1GotothedesiredHomescreen.
2Touch .
3Swiperight,ifnecessary ,tondtheapplicationiconorwidget.
4TouchandholdtheiconorwidgetuntiltheHomescreenappears.
5Positiontheicononthescreenandthenrelease.
2.3.2MovingItemsontheHomeScreen
ProcedureSteps
1Touchandholdtheitemuntilitoatsonthescreen.
2Dragtheitemtoanewlocation.PauseattheedgeofthescreentodragtheitemontoanadjacentHomescreen.
3LiftngertoplacetheitemontheHomescreen.
2.3.3RemovinganApporWidgetfromtheHomeScreen
ProcedureSteps
1GotothedesiredHomescreen.
2Touchandholdtheapplicationshortcutorwidgeticonuntilitoatsonthescreen.
3Dragtheiconto inthetopleftcornerofthescreenandthenrelease.
2.4Folders
UseFolderstoorganizesimilarapplicationstogether.T ouchthefoldertoopenanddisplayitemsinthefolder.
MN000022A01-May2013
2-7
Page 48

ET1EnterpriseT abletUserGuide
2.4.1CreatingFolders
ProcedureSteps
1GotothedesiredHomescreen.
2PlaceatleasttwoapplicationshortcutsontheHomescreen.
3Touchandholdashortcutuntilitoatsonthescreen.
4Movetheiconoveranothericon.Abluecircleappearsaroundtheicons.
Figure2-4StackedShortcutIcons
5Liftngertostacktheicons.Theshortcuticonsappearsoverablackcircle.
2.4.2NamingFolders
ProcedureSteps
1Touchthefolder.
Figure2-5UnnamedFolder
Figure2-6OpenFolder
2Touchthetitleareaandenterafoldernameusingthekeyboard.
3TouchDone.
2-8
MN000022A01-May2013
Page 49

4TouchanywhereontheHomescreentoclosethefolder .Thefoldernameappearsunderthefolder.
Figure2-7RenamedFolder
2.4.3RemovingaFolderFromtheHomeScreen
ProcedureSteps
1Touchandholdthefoldericonuntilitoatsonthescreen.
2.4.3RemovingaFolderFromtheHomeScreen
2Dragtheiconto inthetopleftcornerofthescreenandthenrelease.
2.5HomeScreenWallpaper
UseofLiveW allpapermayreducebatterylife.
MN000022A01-May2013
2-9
Page 50

ET1EnterpriseT abletUserGuide
2.5.1ChangetheHomeScreenWallpaper
ProcedureSteps
1TouchandholdontheHomescreenuntiltheChooseWallpaperfrommenuappears.
2TouchGallery,LivewallpapersorWallpapers.
•Gallery-Selecttouseanimagestoredonthedevice.
•Livewallpapers-Selecttouseananimatedwallpaperimage.
•Wallpapers-Selecttouseawallpaperimage.
3TouchSaveorSetwallpaper.
2.6MovingItemsontheHomeScreen
ProcedureSteps
1Touchandholdtheitemuntilitenlarges.
2Dragtheitemtoanewlocation.PauseattheedgeofthescreentodragtheitemontoanadjacentHomescreen.
3Liftngertoplaceitem.
2.7RemovingItemsfromtheHomeScreen
ProcedureSteps
1Touchandholdtheitemuntilitenlarges.
2Dragtheitemover inthetopleftcornerofthescreenandthenrelease..
2.8UsingtheTouchscreen
Usethemulti-touchsensitivescreentooperatethedevice.
•Touch-Touchto:
–selectitemsonthescreen
–typelettersandsymbolsusingtheon-screenkeyboard
2-10
MN000022A01-May2013
Page 51

2.9UsingtheOn-screenKeyboard
–presson-screenbuttons.
•TouchandHold-Touchandhold:
–anitemontheHomescreentomoveittoanewlocationortothetrash.
–theLaunchericonordotsontheHomescreentoopentheHomescreenthumbnails.
–anitemintheLaunchertocreateashortcutontheHomescreen.
–theHomescreentoopenamenuforcustomizingtheHomescreen.
–anemptyareaontheHomescreenuntilthemenuappears.
•Drag-Touchandholdanitemforamomentandthenmovengeronthescreenuntilreachingthenew
position.
•Swipe-Movengerupanddownorleftandrightonthescreento:
–unlockthescreen
–viewadditionalHomescreens
–viewadditionalapplicationiconsintheLauncherwindow
–viewmoreinformationonanapplication’sscreen.
•Double-tap-T aptwiceonawebpage,map,orotherscreentozoominandout.
•Pinch-Insomeapplications,zoominandoutbyplacingtwongersonthescreenandpinchingthem
together(tozoomout)orspreadingthemapart(tozoomin).
2.9UsingtheOn-screenKeyboard
Usetheon-screenkeyboardtoentertextinatexteld.T ocongurethekeyboardsettings,touch
selectkeyboardsettings.
EditingText
Editenteredtextandusemenucommandstocut,copy,andpastetextwithinoracrossapplications.Some
applicationsdonotsupporteditingsomeorallofthetexttheydisplay;othersmayoffertheirownwaytoselecttext.
EnteringNumbers,SymbolsandSpecialCharacters
Toenternumbersandsymbols:
•Touchandholdoneofthetop-rowkeysuntilamenuappearsthenselectanumber .Keyswithalternatecharacters
displayanellipsis(...)belowthecharacter.
•TouchandholdtheShiftkeywithonenger,touchoneormorecapitallettersorsymbolstoenterthem,andthen
liftbothngerstoreturntothelowercasekeyboard.
andthen
•Touch
•TouchtheAL Tkeyonthenumbersandsymbolskeyboardtoviewadditionalsymbols.
Toenterspecialcharacters,touchandholdanumberorsymbolkeytoopenamenuofadditionalsymbols.
•Alargerversionofthekeydisplaysbrieyoverthekeyboard.
MN000022A01-May2013
toswitchtothenumbersandsymbolskeyboard.
2-11
Page 52

ET1EnterpriseT abletUserGuide
•Keyswithalternatecharactersdisplayanellipsis(...)belowthecharacter .
2.9.1EnteringText
Entertextusingtheon-screenkeyboard:
Someappsopenthekeyboardautomatically.Inothers,openitbytouchingwheretotype.
Figure2-8On-screenKeyboard
2-12
MN000022A01-May2013
Page 53

2.10Applications
ProcedureSteps
1Touchatexteld.Theon-screenkeyboardappears.
2Touchkeysonthekeyboardtoentertext.
Theenteredtextappearsinthetexteldandinthesuggestionstrip.Whenthekeyboardhasasuggestion,the
wordisunderlinedinthetexteldandthesuggestionsappearinblue.Theboldfacedsuggestionatthecenterof
thestripisthekeyboard’sbestsuggestion.Dragthestriptothelefttoviewadditionalsuggestions.
3Pressspaceorapunctuationmarktoentertheboldfacedsuggestedword.
4Touch toerasecharacterstotheleftofthecursor.
5Touch toclosethekeyboard.
2.10Applications
TheAPPSscreendisplaysiconsforallinstalledapplications.Table2-4liststhedefaultapplicationsontheET1.
RefertotheET1EnterpriseTabletIntegratorGuideforinformationoninstallinganduninstallingapplication.
Table2-4ET1DefaultApplications
IconDescription
Browser-UsetoaccesstheInternetorintranet.
Calculator-Providesthebasicandscienticarithmeticfunctions.
Calendar-Usetomanageeventsandappointments.
Camera-Takephotosorrecordvideos.See6PhotosandVideos,page6-1for
moreinformation.
Clock-Usetoschedulealarmsforappointmentsorasawake-up.
MN000022A01-May2013
DataWedge-Enablesdatacaptureusingthecameraoroptionalscanner.
2-13
Page 54

ET1EnterpriseT abletUserGuide
Table2-4ET1DefaultApplications(cont'd.)
IconDescription
Downloads-listsalldownloadsles.
DWDemo-ProvidesawaytodemonstratethedatacapturefeaturesusingtheCamera,
ScanningModuleorMagneticStripeReader.
Email-Usetosendandreceiveemail.
ET1UserGuide-DisplaystheOn-deviceUserGuide.
FileBrowser-OrganizeandmanagelesontheET1.See2.14FileBrowser,page
2-21formoreinformation.
Gallery-UsetoviewphotosstoredonthemicroSDcard.See6PhotosandV ideos,
page6-1formoreinformation.
GPSStatus2-Usetocongurelocationservices.
Messaging-UsetosendandreceiveSMSmessagesonET1N2only.
MSPAgent-EnablesmanagementoftheET1fromanMSPserver.Requires
thepurchaseofanappropriateMSPclientlicenseperdevicetosuitthelevelof
managementfunctionalityrequired.
Music-PlaymusicstoredonthemicroSDcard.
Contacts-Usetomanagecontactinformation.
2-14
MN000022A01-May2013
Page 55

Table2-4ET1DefaultApplications(cont'd.)
IconDescription
2.10Applications
RapidDeployment-AllowstheET1tostageadeviceforinitialusebyinitiatingthe
deploymentofsettings,rmwareandsoftware.RequiresthepurchaseofanMSP
clientlicenseperdevice.
RILLog-Usetocapturedebugginginformation.(ET1N2only).
Search-UsethesearchenginetosearchtheInternetandtheET1.
Settings-UsetoconguretheET1.Formoreinformation,refertotheET1Enterprise
TabletIntegratorGuide.
SoundRecorder-Usetorecordaudio.
AppLockAdministrator-UsetoconguretheApplicationLockfeature.Thisicon
appearsaftertheoptionalapplicationisinstalled.
MultiUserAdministrator-UsetoconguretheMultiUserfeature.Thisiconappears
aftertheoptionalapplicationisinstalled.
SecureStorageAdministrator-UsetoconguretheSecureStoragefeature.This
iconappearsaftertheoptionalapplicationisinstalled.
DWDemo-ProvidesawaytodemonstratethedatacapturefeaturesusingtheCamera,
ScanningModuleorMagneticStripeReader.
MN000022A01-May2013
2-15
Page 56

ET1EnterpriseT abletUserGuide
2.10.1SwitchingBetweenRecentApplications
ProcedureSteps
1Touchandhold .Ascreenappearswithrecentlyusedapplications.
Figure2-9RecentlyUsedApplications
2Touchanapplicationtoopenitorpress toreturntothecurrentscreen.
3Swipeanapplicationupordowntoremovefromthelist.
2.11Un-LockingtheScreen
UsetheLockscreentoprotectaccesstodataontheET1.Someemailaccountrequirelockingthescreen.Referto
theET1EnterpriseT abletIntegratorGuideforinformationonsettingupthelockingfeature.TheLockingfeature
functionsdifferentlyinSingleUsermodeorMultipleUsermode.
2.11.1SingleUserMode
Whenlocked,apattern,PINorpasswordisrequiredtounlockthedevice.PressthePowerbuttontolockthe
screen.Thedevicealsolocksafterapre-denedtime-out.
PressandreleasethePowerbuttontowakethedevice.
TheLockscreendisplays.Touchandslide
enabled,thePatternscreenappearsinsteadoftheLockscreen.
upuntilittouches .IfthePatternscreenunlockfeatureis
2-16
MN000022A01-May2013
Page 57

IfthePINorPasswordscreenunlockfeatureisenabled,enterthePINorpasswordafterunlockingthescreen.
Figure2-10LockScreen
2.11.1SingleUserMode
Figure2-11PINScreen
MN000022A01-May2013
2-17
Page 58

ET1EnterpriseT abletUserGuide
Figure2-12PatternScreen
Figure2-13PasswordScreen
2.11.2MultiUserMode
WithMultiUserlogin,multipleuserscanlogontothedevicewitheachuserhavingaccesstovariousapplications
andfeatures.Whenenabled,theLoginscreenappearsafterpoweringon,resettingorafterthedevicewakes
fromsuspendmode.
2-18
MN000022A01-May2013
Page 59

2.11.2.1MultiuserLogin
ProcedureSteps
1IntheLogintexteld,entertheusername.
Figure2-14MultipleuserLogInScreen
2.11.2.1MultiuserLogin
2InthePasswordtexteld,enterthepassword.
3TouchOK.Afteraresumefromsuspend,theusermustenterthepassword.
2.11.2.2MultiuserLogout
ProcedureSteps
1DragtheStatusBardownfromthetopofthescreen.
2TouchMultiUserisactive.
3TouchLogout.
4TheLoginscreenappears.
MN000022A01-May2013
2-19
Page 60

ET1EnterpriseT abletUserGuide
2.12ResettingtheDevice
Therearetworesetfunctions,softresetandhardreset.
2.12.1PerformingaSoftReset
Performasoftresetifapplicationsstopresponding.
ProcedureSteps
1PressandholdthePowerbuttonuntilthemenuappears.
2TouchReset.
3Thedeviceshutsdownandthenreboots.
2.12.2PerformingaHardReset
PerformingahardresetwithaSIMcardinstalledintheET1N2maycausedamageordata
corruptiontotheSIMcard.
PerformahardresetiftheET1stopsresponding.Toperformahardreset:
ProcedureSteps
1SimultaneouslypressthePower,LeftScan/ActionandRightScan/Actionbuttons.
2TheET1shutsdownandthenreboots.
2.13Wake-upSettings
Thewake-upconditionsdenewhatactionswakeuptheET1afterithasgoneintosuspendmode.TheET1cango
intosuspendmodebyeitherpressingthePowerbuttonorautomaticallybyatime-outsettings.Table2-5W ake-up
DefaultSettingslistthedefaultwakeupconditions.
Table2-5Wake-upDefaultSettings
ConditionforWake-up
ACpowerisapplied.
ET1isinsertedintoacradle.
2-20
PowerButtonAutomaticTime-out
NoYes
YesY es
MN000022A01-May2013
Page 61

Table2-5Wake-upDefaultSettings(cont'd.)
2.13.1W akingtheET1
ConditionforWake-up
ET1isremovedfromacradle.
ET1isconnectedtoaUSBdevice.
ET1isdisconnectedfromaUSBdevice.
Scan/Actionbuttonispressed.
Thescreenistouched.
Bluetoothcommunication
2.13.1WakingtheET1
IftheET1isnotusedforawhile,thescreendimsandthendarkenstoconservethebattery.
TheLockscreendisplays.T ouchandslide
enabled,thePatternscreenappearsinsteadoftheLockscreen.See2.11Un-LockingtheScreen,page2-16for
moreinformation.
2.14FileBrowser
PowerButtonAutomaticTime-out
NoNo
NoYes
NoYes
YesY es
NoNo
YesY es
upuntilittouch .IfthePatternscreenunlockfeatureis
UsetheFileBrowserapplicationtoviewandmangelesontheET1.
ToopenFileBrowser,touch
> .
MN000022A01-May2013
2-21
Page 62

ET1EnterpriseT abletUserGuide
Figure2-15FileBrowserScreen
Theaddressbar(1)indicatesthecurrentfolderpath.T ouchthecurrentfolderpathtomanuallyenterapathand
foldername.
Use
Use
Use
Use
(2)toselectmultipleles/folder.
(3)toviewtotheET1internalstoragerootfolder.
(3)toviewthemicroSDcardrootfolder.
(4)toviewthepreviousfolderortoexittheapplication.
Touchandholdanitemtoperformanoperationonthatitem.Selectoneoftheoptionsfromthemenu:
•Information-Viewdetailedinformationabouttheleorfolder.
•Move-Movetheleorfoldertoanewlocation.
•Copy-Copytheselectle.
•Delete-Deletetheselectedle.
•Rename-Renametheselectle.
•Openas-Opentheselectedleasaspecicletype.
Touch
toopenadditionalfunctionality:
•Touch
•Touch
•Touch
•Touch
•Touch
>NewFoldertocreateanewfolderinthecurrentfolder .
>Searchtosearchforaleorfolder .
>Sorttosortthelistbyname,bytype,bysizeorbydate.
>Refreshtore-displaythecontentsofthecurrentfolder.
>ListViewtochangethefolderviewfromtiletolistformat.
2-22
MN000022A01-May2013
Page 63

2.15Messaging
2.15.1OpeningMessaging
2.15Messaging
•Touch >ChangeSizetochangethesizeoftheicons:Large,NormalorSmall.
MessagingisonlyavailableontheET1N2conguration.
UseMessagingtoexchangetextmessages(SMS)withothermobiledevices.
ToopentheMessagingapplicationtouch
•TouchNEWMESSAGEtostartanewtextmessage.
•Touchanexistingmessagethreadtoopenit.
2.15.2SendingaTextMessage
ProcedureSteps
1OntheMessagingscreen,touchNEWMESSAGE.
2IntheT oeld,enteramobilephonenumberorcontactname.
3TouchtheTypemessagetextboxtostartenteringamessage.
Atextmessageislimitedto160character.
Iftheusergoesoverthatlimit,multipletextmessagesaresent.Iftheuserpresses
message,it’ssavedasadraftintheMessagingwindow .T ouchthemessagetoresumecomposingit.
4Touch .
TheMessagewindowopens,withthemessageaftertheuser’sname.Responsesappearinthewindow.Asthe
userviewsandsendsadditionalmessages,amessagethreadiscreated
> .TheMessagingwindowopens.
whilecomposinga
2.15.3RespondingtoaMessage
Whenanewmessageisreceivedanoticationappearsand
PulldowntheNoticationShadeandtouchthemessagenotication.
MN000022A01-May2013
appearsintheStatusbar .
2-23
Page 64

ET1EnterpriseT abletUserGuide
TheMessagewindowappears.
TouchandholdamessageuntiltheMessageoptionsmenuappearswithnumberofoptionsforworkingwith
themessageanditssender’sinformation.
2.15.4ForwardingaMessage
ProcedureSteps
1TouchandholdamessageuntiltheMessageoptionsmenuappears.
2TouchForward.
3Enterarecipientforthemessageandeditthecontent.
4Touch .
2.15.5LockingaMessage
Lockamessagesoitcannotbedeletedifthestoragelimitsisreached.Iftheusertriestodeleteathreadthat
containsalockedmessage,theuserisaskedtoconrmdeletingit.
2-24
MN000022A01-May2013
Page 65

ProcedureSteps
1TouchandholdamessageinaMessagewindowuntiltheMessageoptionsmenuappears.
2TouchLock.Alockiconappearstotherightofthemessage.
Tounlockamessage,TouchandholdamessageuntiltheMessageoptionsmenuappears.T ouchUnlock.
2.15.6ViewingMessageDetails
ProcedureSteps
1TouchandholdamessageuntiltheMessageoptionsmenuappears.
2TouchViewdetails.TheMessagedetailsdialogboxappears.
2.15.6ViewingMessageDetails
3Touchthescreenanywhereoutsidethedialogboxtoclose.
2.15.7DeletingaMessageThread
ProcedureSteps
1Touchandholdthemessagethreaduntiltheamenuappears.
2TouchDeletethread.
2.15.8MessagingSettings
TochangeMessagingsettingstouch > > >Settings.
•STORAGE
–Deleteoldmessages-Checktodeleteoldermessagesinathreadwhenthetextmessagelimitisreached.
Unchecktokeepallmessages.
–Textmessagelimit-Touchtosetthenumberofmessagestosaveperthreadoftextmessages.Whenthelimit
isreached,oldermessagesaredeletedifDeleteoldmessagesischecked.
•TEXT(SMS)MESSAGES
•NOTIFICATIONS
MN000022A01-May2013
–ManageSIMcardmessages-ViewtextmessagesstoredonaSIMcard.
–Notications-ChecktoreceiveanoticationwhenevertheET1receivesanewmessage.
2-25
Page 66

ET1EnterpriseT abletUserGuide
–Chooseringtone-OpensadialogboxtoselecttheringtonetosoundwhentheET1receivesanewmessage
notications.
–Vibrate-OpensadialogboxtosettheET1tovibratewheneveritreceivesanewmessagenotication.
Options:Always,OnlywhensilentorNever(default).
2-26
MN000022A01-May2013
Page 67

3DataCapture
•ScanningModule
•Scanning/MSRModule
•integrateddigitalcamera
•optionalCS3070Bluetoothlaserscanner.
3.1ScanningModules
•Omnidirectionalreadingofavarietyofbarcodesymbologies,includingthemostpopularlinear,postal,PDF417,
•Advancedintuitivelaseraimingcross-hairforeasypoint-and-shootoperation.
TheET1offersthefollowingdatacaptureoptions:
DataWedgeisinstalledandenabledontheET1bydefault.
TheET1withanintegratedScanModulehasthefollowingfeatures:
and2Dmatrixcodetypes.
Themodulesusesdigitalcameratechnologytotakeadigitalpictureofabarcode,storestheresultingimageinits
memory,andexecutesstate-of-the-artsoftwaredecodingalgorithmstoextractthedatafromtheimage.
3.1.1OperationalModes
Thedevicewithanintegratedimagersupportstwomodesofoperation,listedbelow.Activateeachmodeby
pressingascanbutton.
•DecodeMode:Inthismode,thedeviceattemptstolocateanddecodeenabledbarcodeswithinitseldofview.
Theimagerremainsinthismodeaslongastheuserholdsthescanbutton,oruntilitdecodesabarcode.
ToenablePickListMode,congureinDataW edge.
•PickListMode:Thismodeallowstheusertoselectivelydecodeabarcodewhenmorethanonebarcodeisin
thedevice’seldofview.Toaccomplishthis,movetheaimingcrosshairovertherequiredbarcodetodecode
onlythisbarcode.Thisfeatureisidealforpicklistscontainingmultiplebarcodesandmanufacturingortransport
labelscontainingmorethanonebarcodetype(either1Dor2D).
MN000022A01-May2013
3-1
Page 68

ET1EnterpriseT abletUserGuide
3.2DigitalCamera
Thedevicewithanintegratedcamerabasedbarcodescanningsolutionhasthefollowingfeatures:
•Omnidirectionalreadingofavarietyofbarcodesymbologies,includingthemostpopularlinear,postal,QR,
PDF417,and2Dmatrixcodetypes.
•Cross-hairreticleforeasypoint-and-shootoperation.
•Picklistmodetodecodeaparticularbarcodefrommanyintheeldofview.
Thesolutionusestheadvancedcameratechnologytotakeadigitalpictureofabarcode,andexecutes
state-of-the-artsoftwaredecodingalgorithmstoextractthedatafromtheimage.
3.3LaserScanning
TheoptionalCS3070scannerhasthefollowingfeatures:
•Readingofavarietyofbarcodesymbologies,includingthemostpopularlinear,postal,and1-Dcodetypes.
•Intuitiveaimingforeasypoint-and-shootoperation.
3.4ScanningConsiderations
Typically,scanningisasimplematterofaim,scan,anddecodeandafewquicktrialeffortsmasterit.However,
considerthefollowingtooptimizescanningperformance:
•Range
–Anyscanningdevicedecodeswelloveraparticularworkingrange—minimumandmaximumdistancesfrom
thebarcode.Thisrangevariesaccordingtobarcodedensityandscanningdeviceoptics.
–Scanningwithinrangebringsquickandconstantdecodes;scanningtoocloseortoofarawaypreventsdecodes.
Movethescannercloserandfartherawaytondtherightworkingrangeforthebarcodesbeingscanned.
•Angle
–Scanangleisimportantforpromotingquickdecodes.Whenlaserbeamsreectdirectlybackintothescanner
fromthebarcode,thisspecularreectioncan“blind”thescanner.
–Toavoidthis,scanthebarcodesothatthebeamdoesnotbouncedirectlyback.Butdonotscanattoo
sharpanangle;thescannerneedstocollectscatteredreectionsfromthescantomakeasuccessfuldecode.
Practicequicklyshowswhattolerancestoworkwithin.
•Holdthedevicefartherawayforlargersymbols.
•Movethedevicecloserforsymbolswithbarsthatareclosetogether.
Scanningproceduresdependontheapplicationanddeviceconguration.Anapplicationmayusedifferent
scanningproceduresfromthosedescribed.
3-2
MN000022A01-May2013
Page 69

3.5BarCodeCapturewithScanningorScanning/MSR Module
ProcedureSteps
1EnsurethatanapplicationisopenontheET1andatexteldisinfocus(textcursorintexteld).
2PointthetopoftheET1atabarcode.
Figure3-1BarCodeScanning
3.5BarCodeCapturewithScanningorScanning/MSRModule
MN000022A01-May2013
3-3
Page 70

ET1EnterpriseT abletUserGuide
3PressandholdeitherScan/Actionbutton.
Theredlaseraimingpatternturnsontoassistinaiming.Ensurethebarcodeiswithintheareaformedbythe
cross-hairsintheaimingpattern.Theaimingdotisusedforincreasedvisibilityinbrightlightingconditions.
TheScan/DecodeLEDlightsredtoindicatethatscanningisinprocess,thenlightsgreen,abeepsoundsandthe
ET1vibrates,bydefault,toindicatethebarcodewasdecodedsuccessfully.NotethatwhentheET1isinPick
ListMode,theET1doesnotdecodethebarcodeuntilthecenterofthecrosshairtouchesthebarcode.
Figure3-2AimingPattern
Figure3-3PickListModewithMultipleBarCodesinAimingPattern
4Releasethescanbutton.
5Thecaptureddataappearsinthetexteld.
3.6BarCodeCapturewithIntegratedCamera
ProcedureSteps
1EnsurethatanapplicationisopenontheET1andatexteldisinfocus(textcursorinatexteld).
2Aimtherear-facingcameraatabarcode.
3-4
MN000022A01-May2013
Page 71

3.7BarCodeCapturewithCS3070BluetoothScanner
3
4
1
2
5
3PressandholdeitherScan/Actionbutton.Bydefault,apreviewwindowappears.TheDecodelightemitting
diode(LED)lightsredtoindicatethatdatacaptureisinprocess.
Figure3-4SampleScanApplicationwithPreviewWindow
4MovetheET1untilthebarcodeiscentered.
5TheDecodeLEDlightsgreen,abeepsoundsandtheET1vibrates,bydefault,toindicatethebarcodewas
decodedsuccessfully.
6Thecaptureddataappearsinthetexteld.
3.7BarCodeCapturewithCS3070BluetoothScanner
TheCS3070Bluetoothscannercapturesbarcodedata,andtransmitsittotheET1viaBluetooth.Thescanner
supportsBluetoothhumaninterfacedevice(HID)connectiontotheET1wherethescanneremulatesakeyboard,as
wellasSerialPortProle(SPP)connectionwherethescannerbehavesasifthereisaserialconnection.SeetheET1
EnterpriseT abletIntegratorGuideforsetupandcongurationinformation.
Figure3-5CS3070BluetoothScanner
MN000022A01-May2013
1.BluetoothButton/LED
2.DeleteButton
3.ScanButton
3-5
Page 72

ET1EnterpriseT abletUserGuide
4.LED
5.ExitWindow
ProcedureSteps
1EnsurethatanapplicationisopenontheET1andatexteldisinfocus(textcursorinatexteld).
2Aimthescanneratthebarcode.
3Pressthescan(+)button.
Figure3-6CS3070Scanning
4Ensurethescanlinecrosseseverybarandspaceofthesymbol.
Figure3-7LinearScannerAimingPattern
5ThescannerbeepsandtheLEDturnsgreentoindicateasuccessfuldecode.
6Thecaptureddataappearsinthetexteld.
3.8ReadingMagneticStripeCardswith Scanning/MSRModule
UsetheScanning/MSRModuletoreadmagneticstripecards.
3-6
MN000022A01-May2013
Page 73

ProcedureSteps
1EnsurethatMSRinputisenabledinDataWedgeandthecursorisinatexteld.
2Alignthemagneticstripeonthecardtowardthedisplayandswipethecardineitherdirection.
Figure3-8SwipingaMagneticStripeCard
3.9DataWedge
3Thecaptureddataappearsinthetexteld.
3.9DataWedge
DataWedgeisautilitythataddsadvancedbarcodescanningcapabilitytoanyapplicationwithoutwritingcode.It
runsinthebackgroundandhandlestheinterfacetobothbuilt-inandattachedbarcodescanners.Thecapturedbar
codedataisconvertedtokeystrokesandsenttothetargetapplicationasifitwastypedonthekeypad.
MN000022A01-May2013
3-7
Page 74

ET1EnterpriseT abletUserGuide
TocongureDataWedgerefertotheTC55IntegratorGuide.
3.9.1EnablingDataWedge
ToenableDataW edge:
ProcedureSteps
1Touch .
2Touch .TheDataWedgeProleswindowappears.
3Touch .
4T ouchSettings.
5TouchtheDataWedgeenabledcheckbox.Abluecheckmarkappearsinthecheckboxindicatingthat
DataWedgeisenabled.
6Touch .
3.9.2DisablingDataWedge
TodisableDataW edge:
3-8
MN000022A01-May2013
Page 75

3.9.3DataW edgeConguration
ProcedureSteps
1Touch .
2Touch .TheDataWedgeProleswindowappears.
3Touch .
4T ouchSettings.
5TouchtheDataW edgeenabledcheckbox.Thebluecheckmarkdisappearsfromthecheckboxindicatingthat
DataWedgeisdisabled.
6Touch .
3.9.3DataWedgeConguration
TocongureDataW edgeseetheET1EnterpriseT abletIntegratorGuide.
MN000022A01-May2013
3-9
Page 76

Page 77

4WLAN
Wirelesslocalareanetworks(WLANs)allowtheET1tocommunicatewirelesslyinsideabuilding.Beforeusing
theET1onaWLAN,thefacilitymustbesetupwiththerequiredhardwaretoruntheWLAN(sometimesknownas
infrastructure).TheinfrastructureandtheET1mustbothbeproperlyconguredtoenablethiscommunication.
Refertothedocumentationprovidedwiththeinfrastructure(accesspoints(APs),accessports,switchesorRadius
servers)forinstructionsonhowtosetuptheinfrastructure.
OncetheinfrastructureissetuptoenforcethechosenWLANsecurityscheme,usetheWi-Fisettingscongurethe
ET1tomatchthesecurityscheme.
TurnoffWi-Fiwhennotusingit,toextendthelifeofthebattery.
TheStatusBardisplaysiconsthatindicateWi-FinetworkavailabilityandWi-Fistatus.See2.2StatusBar,page
2-2moreinformation.
4.1ConnectingtoaWi-FiNetwork
ProcedureSteps
1Touch
2Touch Wi-Fi.
3SlidetheWi-FiswitchtotheOnposition.TheET1searchesforWLANsintheareaanddisplaystheminthe
list.Opennetworksareindicatedwith
4ScrollthroughthelistandtouchthedesiredWLANnetwork.
5Foropennetworks,theET1automaticallyconnectstothenetwork.
Forsecurenetworks,entertherequiredpasswordorothercredentialsthentouchConnect.Seethesystem
administratorformoreinformation
TheET1obtainsanetworkaddressandotherrequiredinformationfromthenetworkusingthedynamichost
congurationprotocol(DHCP)protocol.ToconguretheET1withaxedinternetprotocol(IP)address,see
theET1EnterpriseT abletIntegratorGuide.
6WhentheET1connectstothenetwork,thenetworknameappearsatthetopofthelistandConnectedappears
belowthenetworkname.
andsecurenetworksareindicatedwith .
MN000022A01-May2013
4-1
Page 78

Page 79

5Bluetooth
Bluetooth-equippeddevicescancommunicatewithoutwires,usingfrequency-hoppingspreadspectrum(FHSS)
radiofrequency(RF)totransmitandreceivedatainthe2.4GHzIndustryScienticandMedical(ISM)band
(802.15.1).Bluetoothwirelesstechnologyisspecicallydesignedforshort-range(10meters(32.8feet))
communicationandlowpowerconsumption.
DeviceswithBluetoothcapabilitiescanexchangeinformation(e.g.,les,appointments,andtasks)withother
Bluetoothenableddevicessuchasprinters,accesspoints,andothermobiledevices.
5.1AdaptiveFrequencyHopping
AdaptiveFrequencyHopping(AFH)isamethodofavoidingxedfrequencyinterferers,andcanbeusedwith
Bluetoothvoice.Alldevicesinthepiconet(Bluetoothnetwork)mustbeAFH-capableinorderforAFHtowork.
ThereisnoAFHwhenconnectinganddiscoveringdevices.A voidmakingBluetoothconnectionsanddiscoveries
duringcritical802.11bcommunications.AFHforBluetoothconsistsoffourmainsections:
•ChannelClassication-Amethodofdetectinganinterferenceonachannel-by-channelbasis,orpre-dened
channelmask.
•LinkManagement-CoordinatesanddistributestheAFHinformationtotherestoftheBluetoothnetwork.
•HopSequenceModication-Avoidsinterferencebyselectivelyreducingthenumberofhoppingchannels.
•ChannelMaintenance-Amethodforperiodicallyre-evaluatingthechannels.
WhenAFHisenabled,theBluetoothradio“hopsaround”(insteadofthrough)the802.11bhigh-ratechannels.
AFHcoexistenceallowsMotorolaEnterpriseTabletstooperateinanyinfrastructure.
TheBluetoothradiointhisdeviceoperatesasaClass2devicepowerclass.Themaximumoutputpoweris2.5mW
andtheexpectedrangeis10meters(32.8ft.).Adenitionofrangesbasedonpowerclassisdifculttoobtaindue
topoweranddevicedifferences,andwhetheronemeasuresopenspaceorclosedofcespace.
5.2Security
ThecurrentBluetoothspecicationdenessecurityatthelinklevel.Application-levelsecurityisnotspecied.
Thisallowsapplicationdeveloperstodenesecuritymechanismstailoredtotheirspecicneed.Link-levelsecurity
occursbetweendevices,notusers,whileapplication-levelsecuritycanbeimplementedonaper-userbasis.The
Bluetoothspecicationdenessecurityalgorithmsandproceduresrequiredtoauthenticatedevices,andifneeded,
encryptthedataowingonthelinkbetweenthedevices.DeviceauthenticationisamandatoryfeatureofBluetooth
whilelinkencryptionisoptional.
PairingofBluetoothdevicesisaccomplishedbycreatinganinitializationkeyusedtoauthenticatethedevicesand
createalinkkeyforthem.Enteringacommonpersonalidenticationnumber(PIN)inthedevicesbeingpaired
generatestheinitializationkey.ThePINisneversentovertheair.Bydefault,theBluetoothstackrespondswith
nokeywhenakeyisrequested(itisuptousertorespondtothekeyrequestevent).AuthenticationofBluetooth
MN000022A01-May2013
ItisnotrecommendedtoperformBluetoothwirelesstechnologyinquirywhenhighrate802.11boperation
isrequired.
5-1
Page 80

ET1EnterpriseT abletUserGuide
devicesisbased-uponachallenge-responsetransaction.BluetoothallowsforaPINorpasskeyusedtocreateother
128-bitkeysusedforsecurityandencryption.Theencryptionkeyisderivedfromthelinkkeyusedtoauthenticate
thepairingdevices.AlsoworthyofnoteisthelimitedrangeandfastfrequencyhoppingoftheBluetoothradiosthat
makeslong-distanceeavesdroppingdifcult.
Recommendationsare:
•Performpairinginasecureenvironment
•KeepPINcodesprivateanddonotstorethePINcodesinthedevice
•Implementapplication-levelsecurity.
5.3BluetoothProles
TheET1supportsthefollowingBluetoothservices:
•GenericAccessProle(GAP)-MustsupportbothInitiatorandAcceptorroles.
•ServiceDiscoveryProtocol(SDP)-SupportsbothLocalDeviceandRemoteDevice.
•SerialPortProle(SPP)-SupportsbothDeviceAandDeviceBroles.
•HumanInterfaceDevice(HID)Prole-SupportsHostrole.
•Dial-upNetworking(DUN)Prole-SupportsconnectingacomputertotheET1toaccesstheinternet.
5.4BluetoothPowerStates
TheBluetoothradioisoffbydefault.
•Suspend—WhenthereisnoactiveBluetoothconnections,theBluetoothradioturnsoff.
IfthereisanactiveBluetoothconnectionbetweentheET1andanotherBluetoothdeviceandthereisno
dataactivity,theET1willtimeout.However,iftheuserpressesthePowerbuttonontheET1,theET1
willsuspendanduponreceivingdatafromaremoteBluetoothdevice,theET1willwakefromsuspend
mode.Forexample,BluetoothscannersendingdatatotheET1.
•Resume—WhentheET1resumes,Bluetoothturnsonifitwasonpriortosuspend.
•AirplaneMode—WhentheET1isplacedinAirplaneMode,theBluetoothradioturnsoff.WhenAirplane
Modeisdisabled,theBluetoothradioreturnstothepriorstate.
5.5BluetoothRadioPower
TurnofftheBluetoothradiotosavepowerorifenteringanareawithradiorestrictions(e.g.,anairplane).When
theradioisoff,otherBluetoothdevicescannotseeorconnecttothedevice.TurnontheBluetoothradioto
exchangeinformationwithotherBluetoothdevices(withinrange).CommunicateonlywithBluetoothradios
incloseproximity .
5-2
MN000022A01-May2013
Page 81

5.5.1EnablingBluetooth
5.5.1EnablingBluetooth
Toachievethebestbatterylifeturnoffradiosnotinuse.
ProcedureSteps
1Touch .
2SlidetheBluetoothswitchtotheONposition.TheBluetoothicon alsoappearsintheStatusbar.
3Touch .
5.5.2DisablingBluetooth
ProcedureSteps
1Touch .
2SlidetheBluetoothswitchtotheOFFposition.
3Touch .
5.6DiscoveringBluetoothDevices
TheET1canreceiveinformationfromdiscovereddeviceswithoutpairing.However,oncepaired,theET1anda
paireddeviceexchangeinformationautomaticallywhentheBluetoothradioison.TondBluetoothdevices
inthearea:
ProcedureSteps
1EnsurethatBluetoothisenabledonbothdevices.
2EnsurethattheBluetoothdevicetodiscoverisindiscoverablemode.
3Ensurethatthetwodevicesarewithin10meters(32.8ft.)ofoneanother.
MN000022A01-May2013
5-3
Page 82

ET1EnterpriseT abletUserGuide
4Touch .
5Touch Bluetooth.
6TouchSCANFORDEVICES.TheET1beginssearchingfordiscoverableBluetoothdevicesinthearea
anddisplaysthemunderA V AILABLEDEVICES.
7Scrollthroughthelistandselectadevice.TheBluetoothpairingrequestdialogboxappears.
Figure5-1BluetoothPairing-EnterPIN
Figure5-2BluetoothPairing—SimplePairing
8EnteraPINinthetextboxandtouchOK.
9EnterthesamePINontheotherdevice.T ouchPair.
5-4
MN000022A01-May2013
Page 83

10TheBluetoothdeviceisaddedtothePAIREDDEVICESlistandatrusted(“paired”)connectionisestablished.
5.7ChangingtheBluetoothName
Bydefault,theET1hasagenericBluetoothnamethatisvisibletootherdeviceswhenconnected.
TochangetheBluetoothname:
ProcedureSteps
1Touch .
2Touch Bluetooth.
5.7ChangingtheBluetoothName
3IfBluetoothisnoton,slidetheswitchtotheONposition.
4Touch .
5TouchRenamedevice.TheRenamedevicedialogboxappears.
6EnteranameandtouchDone.
7Touch .
5.8ConnectingtoaBluetoothDevice
Oncepaired,connecttoaBluetoothdevice:
MN000022A01-May2013
5-5
Page 84

ET1EnterpriseT abletUserGuide
ProcedureSteps
1Touch .
2Touch Bluetooth.
3IfBluetoothisnoton,slidetheswitchtotheONposition.
4InthePAIREDDEVICESlist,touchandholdonaunconnectedBluetoothdeviceuntilamenuappears.
5TouchConnect.Whenconnected,thedeviceisdisplayedasconnectedinthelist.
5.9SelectingProlesontheBluetoothDevice
SomeBluetoothdeviceshavemultipleproles.Toselectaprole:
ProcedureSteps
1Touch .
2Touch Bluetooth.
3IfBluetoothisnotturnedon,slidetheblueswitchtotheOnposition.
4IntheP AIREDDEVICESlist,touch nexttothedevicename.
5UnderPROFILES,checkoruncheckaproletoallowtheET1tousethatprole.
6Touch .
5.10UnpairingaBluetoothDevice
TounpairaBluetoothdeviceanderaseallpairinginformation:
5-6
MN000022A01-May2013
Page 85

ProcedureSteps
1Touch .
2TouchBluetooth.
3IntheP AIREDDEVICESlist,touch nexttothedevicename.
4TouchUnpair.TheBluetoothdeviceisremovedfromthePAIREDDEVICElist.
5Touch .
5.10UnpairingaBluetoothDevice
MN000022A01-May2013
5-7
Page 86

Page 87

6PhotosandVideos
Thischapterprovidesinformationfortakingphotosandrecordingvideosusingtheintegrateddigitalcameras.
AninstalledmicroSDcardisrequiredtostorephotosandvideos.
Photosandvideosarestoredonthemicrosecuredigital(SD)card.
6.1TakingPhotos
Camerasettingsaredescribedin6.4CameraSettings,page6-6.
ProcedureSteps
1Touch .
MN000022A01-May2013
6-1
Page 88

ET1EnterpriseT abletUserGuide
2Touch .
Figure6-1CameraMode
3Ifnecessary,touchtheoptionsbarandtouch .
4Touch toswitchbetweenthefrontorrearcameras.
5Touch toadjustexposure,ash,andothersettingsusingthecamerasettings.See6.4CameraSettings,
page6-6formoreinformation.
6Touch andtoadjustthezoomlevel.
7Framethesubjectonscreen.
6-2
MN000022A01-May2013
Page 89

6.2T akingaPanoramicPhoto
8Touch .
Thecamerabringstheimageintofocus.Whentheimageisinfocus,thefocusindicatorsineachcornerturn
green,thecameratakesaphotoandashuttersoundplays.
Todisabletheshuttersound,turnnoticationsoundsoff.T ouch > Sounds>Volumesand
slidetheNoticationssliderallthewaytotheleft.
Alternately,touch
Thephotoappearsmomentarilythendisplaysasathumbnailintheupperrightcorner.
9TouchthethumbnailtoviewthephotoinGallery.See6.6ViewingPhotosandV ideos,page6-8formore
information.
andholdtofocusrst,beforetakingaphoto;thenreleasetotakeafocusedphoto.
6.2TakingaPanoramicPhoto
Panoramamodeletstheusercreateasinglewideimagebypanningslowlyacrossascene.T otakeapanoramic
photo:
ProcedureSteps
1Touch .
2Touch .
MN000022A01-May2013
6-3
Page 90

ET1EnterpriseT abletUserGuide
3Touchtheoptionsbarandtouch .
Figure6-2PanoramicMode
4Frameonesideofthescenetocapture.
5Touch andslowlystartpanningacrosstheareatocapture.Asmallwhitesquareappearsinsidethe
buttontheshotisinprogress.
Ifpanningtooquickly,themessageToofastappears.
6Touch toendtheshot.Thepanoramaappearsimmediatelyandaprogressindicatordisplayswhileit
savestheimage.
7TouchthethumbnailtoviewthephotoinGallery.See6.6ViewingPhotosandV ideos,page6-8.
6.3RecordingVideos
ProcedureSteps
1Touch .
2Touch .
6-4
MN000022A01-May2013
Page 91

3Touchtheoptionsbarandtouch .
Figure6-3VideoMode
6.3RecordingV ideos
4Touch toswitchbetweenthefrontorrearcameras.
5Touch toadjustexposure,ash,andothersettingsusingthevideosettings.See6.5VideoSettings,page
6-7formoreinformation.
6Touch andtoadjustthezoomlevel.
7Pointthecameraandframethescene.
8Touch tostartrecording.
TheET1startsrecordingthevideo.Thevideotimeremainingappearsinthetopleftofthescreen.
9Touch toendrecording.
Previouslyrecordedvideodisplaysinthethumbnailatthetopright.
10TouchthethumbnailtoaccesstheGalleryapplication.See6.6ViewingPhotosandVideos,page6-8.
MN000022A01-May2013
6-5
Page 92

ET1EnterpriseT abletUserGuide
6.4CameraSettings
WheninCameramode,Camerasettingsaredisplayedonscreen.Touch
6.4.1Rear-facingCameraSettings
Touch
•
–Storelocation-IncludelocationinformationwitheachphotousingtheET1globalpositioningsystem
–FocusMode-Setthefocusmodeofthecamera.Options:Macro,Innity,Continuous,orAuto(default).
–Capturemode-Settheimagecapturemode.Options:HighQuality(default)orZeroShutterMode.
–Picturesize-Touchtosetthesize(inpixels)ofthephoto.Options:QVGA,VGA,1MPixels,1.3MPixels,
–ISO-Sethowsensitivethecameraistolight.Options:800,400,200,100,orAuto(default).
–Picturequality-Options:Superne(default),FineorNormal.
–Restoredefaults-T ouchRestoredefaultstorestoreallcamerasettingstothedefaultvalues.
•
Options:Auto(default),Portrait,Landscape,Night,Steadyphoto,orSports.
todisplaythecamerasettingoptions.
CameraSettings-T ouchtoopenascrollinglistofsettings:
(GPS).Options:OnorOff(default).
2Mpixels,3Mpixels,5Mpixels,or8Mpixels(default).
Scenemode-T ouchtoselectapresetcombinationofcamerasettingsdesignedforspecicscenes.
forthesettingstochange.
Exposure-Touchtoadjusttheexposuresettings.Options:+3,+2,+1,0(default),-1,-2,or-3.
•
•
•
Whitebalance-T ouchtoselecthowCameraadjustscolorsindifferentkindsoflight,toachievethemost
natural-lookingcolors.
–Auto-Adjustthewhitebalanceautomatically(default).
Incandescent-Adjustthewhitebalanceforincandescentlighting.
–
–Daylight-Adjustthewhitebalancefordaylight.
Fluorescent-Adjustthewhitebalancefororescentlighting.
–
Cloudy-Adjustthewhitebalanceforacloudyenvironment.
–
Flashmode-T ouchtosetwhetherRear-facingCamerareliesonitslightmetertodecidewhetheraashis
necessary,ortoturnitonoroffforallshots.
–
–
–Off-Disableash(default).
–
Auto-Cameraadjustsashautomaticallydependinguponlightmeter.
On-Enableashupontakingaphoto.
Torch-Turnashoncontinuously.
6-6
MN000022A01-May2013
Page 93

6.4.2Front-facingCameraSettings
6.4.2Front-facingCameraSettings
Touch
•
–Storelocation-IncludelocationinformationwitheachphotousingtheET1globalpositioningsystem
–Picturesize-Touchtosetthesize(inpixels)ofthephoto.Options:QVGAorVGA(default).
–Picturequality-Options:Superne(default),Fine,Normal.
–Restoredefaults-T ouchRestoredefaultstorestoreallcamerasettingstothedefaultvalues.
•
Options:Auto(default)orNight.
todisplaythecamerasettingoptions.
CameraSettings-T ouchtoopenascrollinglistofsettings:
(GPS).Options:OnorOff(default).
Scenemode-T ouchtoselectapresetcombinationofcamerasettingsdesignedforspecicscenes.
6.5VideoSettings
WheninVideomode,Videosettingsaredisplayedonthescreen.Touch
6.5.1Video-Rear-facingCameraSettings
Touch
todisplaythecamerasettingoptions.
tochangethevideosettings.
•
•Videoquality-T ouchtoselectvideoquality:
•Timelapseinterval—Touchtoselectatimeintervaltosettheframeratefortimelapsephotography.Options:
Off(default),1s,1.5s,2s,2.5s,3s,5sor10s.
•
mostnatural-lookingcolorsforthevideo.
MN000022A01-May2013
Settings-Touchtoopenascrollinglistofsettings:
–Storelocation-IncludelocationinformationwitheachphotousingtheET1globalpositioningsystem
(GPS).Options:OnorOff(default).
–Restoredefaults-Touchtorestoreallcamerasettingstothedefaultvalues.
–HD-Highdenition1080p.
–HD-Highdenition720p.
–SD-Standarddenition480p(default).
Whitebalance-Touchtoselecthowthecameraadjustscolorsindifferentkindsoflight,toachievethe
–
–
–
–
Auto-Adjustthewhitebalanceautomatically(default).
Incandescent-Adjustthewhitebalanceforincandescentlighting.
Daylight-Adjustthewhitebalancefordaylight.
Fluorescent-Adjustthewhitebalancefororescentlighting.
6-7
Page 94

ET1EnterpriseT abletUserGuide
– Cloudy-Adjustthewhitebalanceforacloudyenvironment.
•
Flashmode-Selecttoilluminatethevideobyturningonthecameraash.
–
–
On-Enableash.
Off-Disableash(default).
6.5.2Video-Front-facingCameraSettings
Touch
•
–Restoredefaults—Touchtorestoreallcamerasettingstothedefaultvalues.
–Timelapseinterval—Touchtoselectatimeintervaltosettheframeratefortimelapsephotography .
todisplaythecamerasettingoptions.
CameraSettings-T ouchtoopenascrollinglistofsettings:
Options:Off(default),1s,1.5s,2s,2.5s,3s,5sor10s.
6.6ViewingPhotosandVideos
TheET1supportsthefollowingimageformats:jpeg,gif,pngandbmp.
TheET1supportsthefollowingvideoformats:H.263,H.264andMPEG4SimpleProle.
UseGalleryto:
•viewphotos
•playvideos
•performbasiceditingofphotos
•setphotosaswallpaper
•setphotosasacontactphoto
•sharephotosandvideos.
ToopentheGalleryapplication,touch
thetopright.
GallerypresentsallphotosandvideosstoredonthemicroSDcardinalbums.
6-8
> orinthecameraapplicationtouchthethumbnailimageat
MN000022A01-May2013
Page 95

Figure6-4Gallery—Albums
6.6.1W orkingwithAlbums
•Touchanalbumtoopenitandviewitscontents.Thephotosandvideosinthealbumaredisplayedin
chronologicalorder.
•Touchaphotoorvideoinanalbumtoviewit.
•Touch
6.6.1WorkingwithAlbums
Albumsaregroupsofimagesandvideosinfolders.Touchanalbumtoopenit.Thephotosandvideosarelistedin
achronologicallyorderedgrid.Thenameofthealbumdisplaysatthetopofthescreen.
icon(topleftcorner)toreturntothemainGalleryscreen.
MN000022A01-May2013
6-9
Page 96

ET1EnterpriseT abletUserGuide
Figure6-5PhotosInsideanAlbum
Swipeleftorrighttoscrollimagesacrossthescreen.
6-10
MN000022A01-May2013
Page 97

6.6.1.1ShareanAlbum
ProcedureSteps
1Touch .
2Touch .
3Touchandholdanalbumuntilithighlights.
4Touchotheralbumsasrequired.
5Touch .TheSharemenuopens.T ouchtheapplicationtousetosharetheselectedalbums.
6Followtheinstructionswithintheselectedapplication.
6.6.1.1ShareanAlbum
6.6.1.2GetAlbumInformation
ProcedureSteps
1Touch .
2Touch .
3Touchandholdanalbumuntilithighlights.
4Touch >Details.
6.6.1.3DeletinganAlbum
TodeleteanalbumanditscontentsfromthemicroSDcard:
MN000022A01-May2013
6-11
Page 98

ET1EnterpriseT abletUserGuide
ProcedureSteps
1Touch .
2Touch .
3Touchandholdanalbumuntilithighlights.
4Checkotheralbumstodelete.Ensurethatotheralbumsareselected.
5Touch .TheDeleteselecteditem?menudisplays.
6TouchOKtodeletethealbum.
6.6.2WorkingwithPhotos
UseGallerytoviewphotosonthemicroSDcardandeditandsharephotos.
6.6.2.1ViewingandBrowsingPhotos
ProcedureSteps
1Touch .
2Touch .
3Touchanalbumtoopenit.
6-12
MN000022A01-May2013
Page 99

4Touchaphoto.
Figure6-6PhotoExample
6.6.2.2RotatingaPhoto
5Swipeleftorrighttoviewthenextorpreviousphotointhealbum.
6TurntheET1toviewthephotoinupright(portrait)orsideways(landscape)orientation.Thephotoisdisplayed
(butnotsaved)intheneworientation.
7Touchthephototoviewthecontrols.
8Double-tapthescreentozoominorpinchtwongerstogetherorspreadthemaparttozoominorout.
9Dragthephototoviewpartsthatarenotinview.
6.6.2.2RotatingaPhoto
ProcedureSteps
1Touchaphototoviewthecontrols.
2TouchRotateLeftorRotateRight.Thephotoisautomaticallysavedwiththeneworientation.
6.6.2.3CroppingaPhoto
ProcedureSteps
MN000022A01-May2013
6-13
Page 100

ET1EnterpriseT abletUserGuide
1Touchaphototoviewthecontrols.
2TouchMenu>Crop.Thebluecroppingtoolappears.
3Usethecroppingtooltoselecttheportionofthephototocrop.
Figure6-7CroppingTool
•Dragfromtheinsideofthecroppingtooltomoveit.
•Draganedgeofthecroppingtooltoresizeittoanyproportion.
•Dragacornerofthecroppingtooltoresizeitwithxedproportions.
4TouchOKtosaveacopyofthecroppedphoto.Theoriginalversionisretained.
6.6.2.4SettingaPhotoasaContactIcon
ProcedureSteps
1Touch .
2Touch .
3Touchanalbumtoopenit.
6-14
MN000022A01-May2013
 Loading...