


OWNER'S HANDBOOK
XEN-PC
apricot
MITSUBISHI ELECTRIC

OWNER'S HANDBOOK
Chapter

Microsoft, MS, MS-DOS, MS LAN Manager and Xenix are registered trademarks, and Windows is
a trademark, of Microsoft Corporation.
IBM is a registered trademark, and VGA and PS/2 are trademarks, of International Business
Machines Corporation.
Intel is a registered trademark, and Intel486, Intel487 and OverDrive are trademarks, of Intel
Corporation.
Information contained in this document is subject to change without notice and does not
represent a commitment on the part of Apricot Computers Limited. Any software described in
this manual is furnished under a license agreement. The software may be used or copied only in
accordance with the terms of this agreement. It is against the law to copy any disk supplied for any
purpose other than the purchaser’s personal use.
All rights reserved; no use or disclosure without written consent.
Copyright © Apricot Computers Limited 1993
Published by
Apricot Computers Limited
3500 Parkside
Birmingham Business Park
Birmingham B37 7YS
MITSUBISHI ELECTRIC
Printed in the United Kingdom
Part No. 15205031
Revision 01

Safety and Regulatory Notices
Safety and Regulatory Notices
Read the separate Power Connection Guide before using the
Apricot XEN-PC for the first time. Information in the Owner’s
Handbook relating to connection to the AC power supply may
not apply outside the United Kingdom.
The Apricot XEN-PC uses a safety ground and must be earthed.
The system unit AC power cord is its “disconnect device”.
Ensure that the system unit is positioned close to the AC power
outlet, and that the plug is easily accessible.
It is imperative that the Apricot XEN-PC is set to the correct
voltage range before use. If not, the machine may be irreparably
damaged.
Turn off the Apricot XEN-PC and unplug all power cords before
moving the system unit, cleaning the computer or removing the
system unit top cover.
The CD-ROM drive contains a laser system which is harmful to
the eyes, and is classified as a CLASS 1 LASER PRODUCT
according to IEC 825 Radiation Safety of Laser Products (Equipment
Classification: Requirements & User's Guide). Do not attempt to
disassemble the CD-ROM drive; if a fault occurs, call an
authorized Apricot maintainer. Use the CD-ROM drive only as
described in this manual; failure to do so may result in exposure
to hazardous radiation.
Safety
To prevent fire and electric shock, do not expose any part of
the system unit to rain or moisture.
When positioning the Apricot XEN-PC system unit, monitor
and keyboard, take into account any local or national regulations
relating to ergonomic requirements.
XEN-PC OWNER'S HANDBOOK I
Safety and Regulatory Notices
Power cord The power cord packed with the Apricot XEN-PC complies
requirements with the safety standards applicable in the country in which it
is sold. Use only this power cord; do not substitute a power
cord from any other equipment.
Safety
If you wish to use the computer in another country, you must
ensure that you use a power cord and plug which complies with
the safety standards of that country.
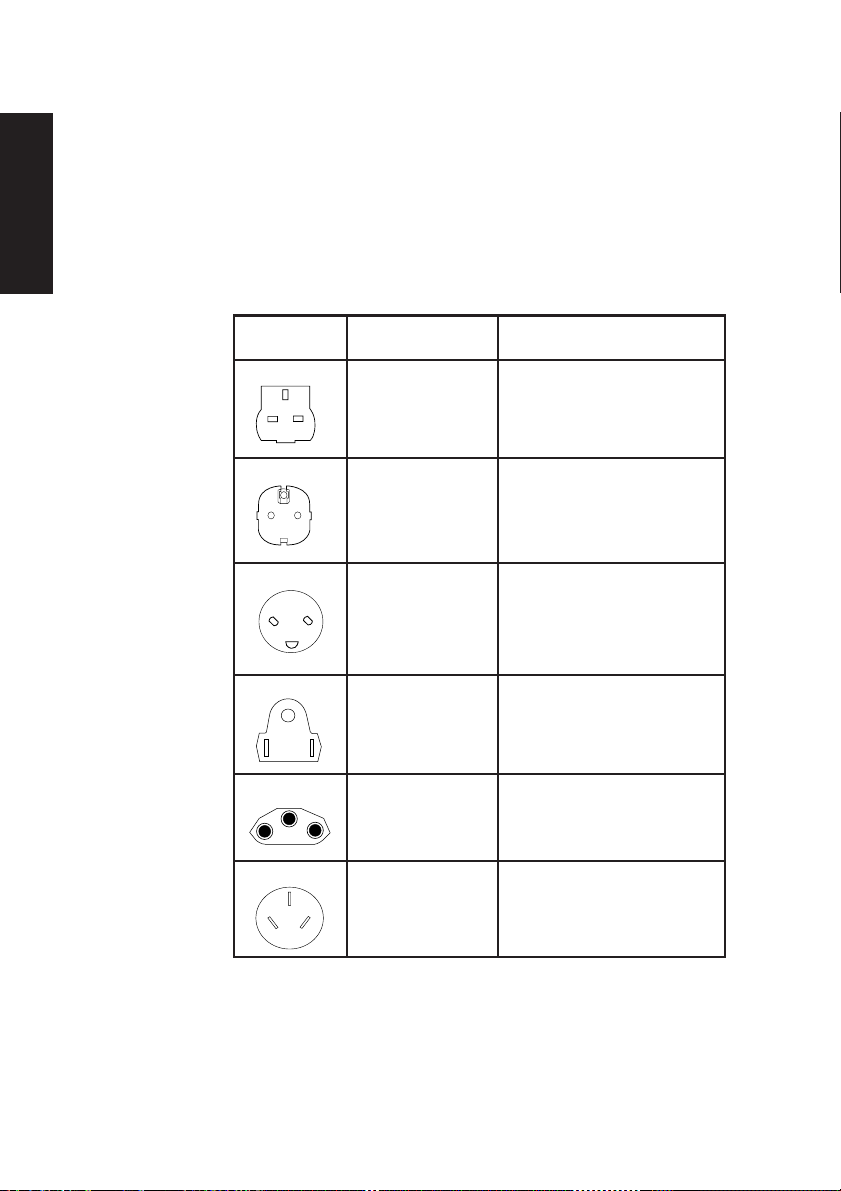
Plug Standard Countries
250V
E
LN
250V
E
NL
250V
N
E
125V
E
N
250V
L
L
BS1363A United Kingdom
Austria, Belgium, Finland,
SHUCO France, Germany, Holland,
Italy, Norway, Sweden
SRAF 1962/ Denmark
DB16/87
NEMA 5-15P USA, Canada
ASE 1011 Switzerland
250V
The power cord fittings must bear the certification mark of the
agency responsible for evaluation.
Refer to your authorized Apricot supplier if you ever require
additional or alternative power cables.
II XEN-PC OWNER'S HANDBOOK
AS 3112-1981 Australia
Safety and Regulatory Notices
UK plug wiring instructions
IMPORTANT Power
Cable Connections
This appliance is supplied with a mains lead that
has a non-removable moulded plug. If the socket
outlets are not suitable for the plug supplied with
this appliance, it should be cut off and an
appropriate three-pin plug fitted.
Note: The plug severed from the mains lead must
be destroyed, as a plug with the bared flexible
cord is hazardous if engaged in a live socket
outlet.
The following wiring information should be
employed when adding the replacement plug.
The wires in the mains lead are coloured in
accordance with the following code:
Green and Yellow Earth
Blue Neutral
Brown Live
As the colours of the wires in the mains lead of
this appliance may not correspond with the
coloured markings identifying the terminals in
your plug, proceed as follows.
The wire which is coloured green-and-yellow
must be connected to the terminal in the plug
which is marked with the letter E, or by the earth
or coloured green or green-and-
symbol
yellow.
The wire which is coloured blue must be connected
to the terminal which is marked with the letter N or
coloured black. The wire which is coloured brown
must be connected to the terminal which is marked
with the letter L or coloured red.
Use a fuse approved by ASTA to BS1362, i.e.
carries the
Always replace the fuse cover, never use the plug
with the fuse cover omitted.
Replace with same colour fuse cover only.
Replacement fuse covers may be obtained from
your dealer.
WARNING THIS APPLIANCE MUST BE
EARTHED
This diagram
shows the wiring
inside the moulded
plug. Use it as a
guideline if you
need to re-fit a plug
of a similar type to
the mains lead.
Noise levels German Acoustic Noise Regulation
Sound power level is less than 70 dB(A) according to DIN
45635 Part 19 (ISO 7779).
Die Deutsche Akoustische Lärm-Regulierung
ASA
Safety
mark.
E
L
N
Der Grad der Klangstärke ist weniger als 70 dB(A) je nach DIN
45635 Teil 19 (ISO 7779).
The CD-ROM drive is
CLASS 1
LASER PRODUCT TO IEC 825
classified as a CLASS 1
LASER PRODUCT.
The CLASS 1 LASER
LASER KLASSE 1
PRODUKT NACH IEC 825
PRODUCT label is
located on the under
side of the system unit.
XEN-PC OWNER'S HANDBOOK III

Safety and Regulatory Notices
Refer to the labels on the rear of your computer to establish which of the following warnings
apply.
FCC Class A
Warning - this equipment has been tested and found to comply with the limits for a Class A
computing device, pursuant to Subpart J of Part 15 of FCC rules. Only peripherals (computer
input/output devices, terminals, printer, etc.) certified to comply with the Class A limits may be
Safety
attached to this computer. Operation of this equipment in a residential area may cause
unacceptable interference to radio and television reception requiring the operator to take
whatever steps are necessary to correct the interference.
FCC Class B
Warning - this equipment has been certified to comply with the limits for a Class B computing
device, pursuant to Subpart J of Part 15 of FCC rules. Only peripherals (computer input/output
devices, terminals, printer, etc.) certified to comply with the Class B limits may be attached to
this computer. Operation with non-certified peripherals is likely to result in interference with
radio and TV reception.
Radio and television interference
The computer described in this manual generates and uses radio frequency energy for its
operation. If it is not installed and used properly, in strict accordance with the manual, it may
cause interference with radio and television reception.
The computer has been tested and found to comply with the RF emission limits for an FCC
Class B computing device which is intended to provide reasonable protection against such
interference in a residential installation. However, there is no guarantee that interference will
not occur in a particular installation.
If this equipment does cause interference with radio or television reception, which can be
determined by turning the equipment off and on, the user is encouraged to try to correct the
interference by one or more of the following measures:
• Move the computer away from the receiver being interfered with.
• Turn the computer with respect to the receiver.
• Turn the receiver with respect to the computer.
• Plug the computer into an outlet that is on a different branch circuit from the receiver.
• Disconnect and remove any I/O cables that are not being used.
• Unplug and remove any expansion cards that are not being used, and replace the relevant
blanking plates.
• Make sure that the computer is plugged into a grounded outlet.
If you need additional help, consult your supplier. You may find the following booklet helpful:
How to Identify and Resolve Radio-TV Interference Problems. This booklet is available from the
US Government Printing Office: Washington DC 20402 - Stock No. 004-000-000345-4.
DOC Class A
The computer described in this manual complies with: Canadian DOC radio interference
regulations CRCc 1374 governing Class A digital devices.
DOC Class B
The computer described in this manual complies with: Canadian DOC radio interference
regulations CRCc 1374 governing Class B digital devices.
IV XEN-PC OWNER'S HANDBOOK
CONTENTS
Chapter

Contents
CONTENTS
1 Introducing the Apricot XEN-PC
2 Getting Started with the Apricot XEN-PC
General advice 2/2
Connecting the components 2/3
Turning on and booting the computer 2/4
Preparing a second hard disk 2/6
Backing up the pre-installed software 2/6
Using the SETUP utility 2/7
Using Apricot Help 2/8
3 Operating the Apricot XEN-PC
Using the front panel controls 3/2
Using the 3.5" diskette drive 3/3
Using the 5.25" floppy disk drive 3/4
Using the SLCD CD-ROM drive 3/5
Using the Irwin FTD tape drive 3/7
Using the SCSI QIC tape drive 3/9
Using the SCSI DDS or DDS-DC tape drive 3/12
Using the SCSI CD-ROM drive 3/17
Using the Apricot XEN-PC abroad 3/21
Contents
4 Caring for the Apricot XEN-PC
Cleaning the Apricot XEN-PC 4/2
Replacing the configuration battery 4/6
Transporting the Apricot XEN-PC 4/7
XEN-PC OWNER'S HANDBOOK I

Contents
5 Upgrading the Apricot XEN-PC
ISA expansion cards 5/2
Memory upgrades 5/6
Processor upgrades 5/9
Installing additional video RAM 5/15
Installing cache RAM 5/17
5.25" drives 5/19
3.5" hard disk drives 5/25
6 Using the SETUP utility
Introduction 6/1
Contents
Invoking SETUP 6/1
Using SETUP 6/1
Initial menu 6/3
System configuration 6/4
Basic System Configuration 6/5
Date 6/6
Time 6/6
Diskette Drives 6/7
Fixed Disk Drives 6/7
System Memory 6/8
Math Coprocessor 6/8
Video display 6/8
Serial port 1 settings 6/8
Memory Test 6/8
Fixed Disk Black Mode 6/8
Advanced System Configuration 6/9
Shadow RAM 6/9
Cache 6/10
System Speed 6/10
Memory at 15MB-16MB 6/10
Fixed Disk Power Saving Mode 6/10
System Security 6/11
Disk drive control 6/11
I/O Ports 6/12
Passwords 6/13
II XEN-PC OWNER'S HANDBOOK

7 Troubleshooting
Problems when starting 7/2
Troubleshooting charts 7/4
A Inside the Apricot XEN-PC
Anti-static precautions A/2
Removing the top cover A/3
Configuring expansion cards A/4
Motherboard jumper settings A/12
Hard disk drive types A/15
B Technical Information
Specifications B/2
Physical characteristics B/6
Electrical characteristics B/7
Port characteristics B/8
Contents
Contents
XEN-PC OWNER'S HANDBOOK III

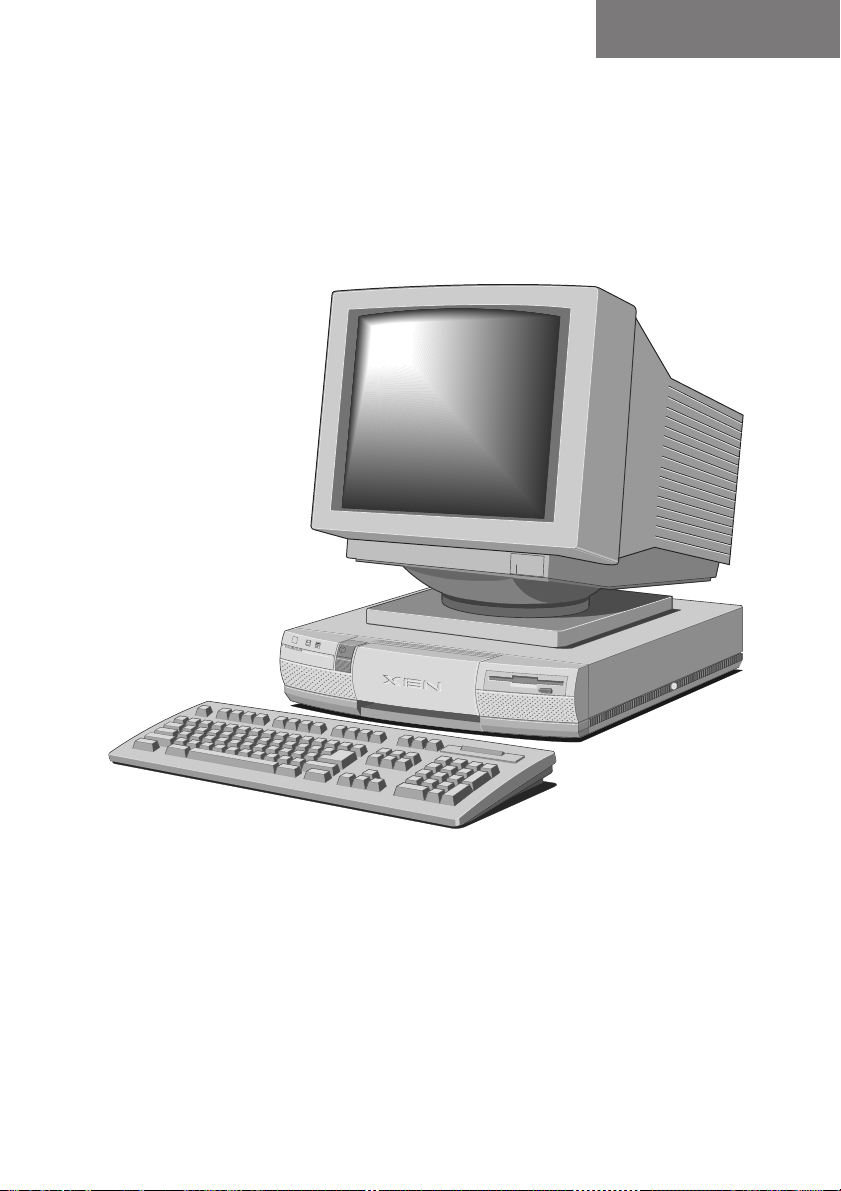
INTRODUCING THE APRICOT XEN-PC
Chapter 1
Chapter

Introducing the Apricot XEN-PC
1 INTRODUCING THE
APRICOT XEN-PC
The Apricot XEN-PC is ideally suited for use as general-purpose
personal computers, networked business workstations and
workgroup servers.
Read the separate Power Connection Guide before using
the Apricot XEN-PC for the first time.
Chapter 1
XEN-PC OWNER'S HANDBOOK 1/1

Introducing the Apricot XEN-PC
Standard The standard features of the Apricot XEN-PC range include:
features
Chapter 1
• Intel486 system processor with OverDrive upgrade
capability.
• Three full-length 16-bit Industry Standard Architecture
(ISA) expansion card slots.
• Standard 4 Mbytes of motherboard random access
memory (RAM), upgradable to 36 Mbytes by the use of
single in-line memory modules (SIMMs).
• SETUP configuration utility in read-only memory (ROM).
• Apricot Advanced Graphics system featuring the Apricot
CL542x Enhanced Video Graphics Array (EVGA) adapter,
fitted with at least 512 kbytes of video RAM, supporting
various high-resolution and multicolour display modes.
View the Apricot Help provided on your hard disk drive
to find out what enhanced modes your system supports.
• Integrated Drive Electronics (IDE) disk drive system.
• Extended keyboard, two-button mouse, parallel and dual
serial ports.
• 1.44 Mbyte 3.5" diskette drive; 3.5" hard disk drive bay
with room for two one-inch drives; one 5.25" removable
media drive bay.
These standard features can be enhanced by more memory,
various hard disk and removable media drives, LAN adapter
cards, and so on. For an outline of these options, see Chapter 5,
“Upgrading the Apricot XEN-PC”.
Advanced The following advanced features are fitted on some models in
features the range:
• 256 Kbyte system memory cache.
• 1 Mbyte video RAM
1/2 XEN-PC OWNER'S HANDBOOK

Introducing the Apricot XEN-PC
Unpacking On unpacking the computer, you should find:
• Apricot XEN-PC system unit.
• Apricot/Mitsubishi monitor and accompanying User’s
Guide.
• Apricot extended keyboard and two-button mouse.
• System unit AC power cord and monitor power cord
appropriate for the country of sale.
• System documentation (Owner’s Handbook, Warranty Pack,
and so on).
• Microsoft MS-DOS pack.
• Microsoft Windows or Microsoft Windows for
Workgroups pack (if the system has a hard disk).
More elaborate systems may include software or hardware
options with accompanying installation diskettes and additional
documentation. Some of these options may have been factoryconfigured or installed by your Apricot supplier.
Chapter 1
Keep the cartons, boxes and packaging materials; you will need
them again if you have to transport the computer elsewhere.
Make a note of the manufacturer’s data recorded on the various
components (product codes, serial numbers, etc.). You may
need this information if the XEN-PC develops a fault.
Instructions for removing the top cover are given in Appendix
A, “Inside the Apricot XEN-PC”.
Turn off the Apricot XEN-PC and unplug all power
cords before removing the top cover.
XEN-PC OWNER'S HANDBOOK 1/3
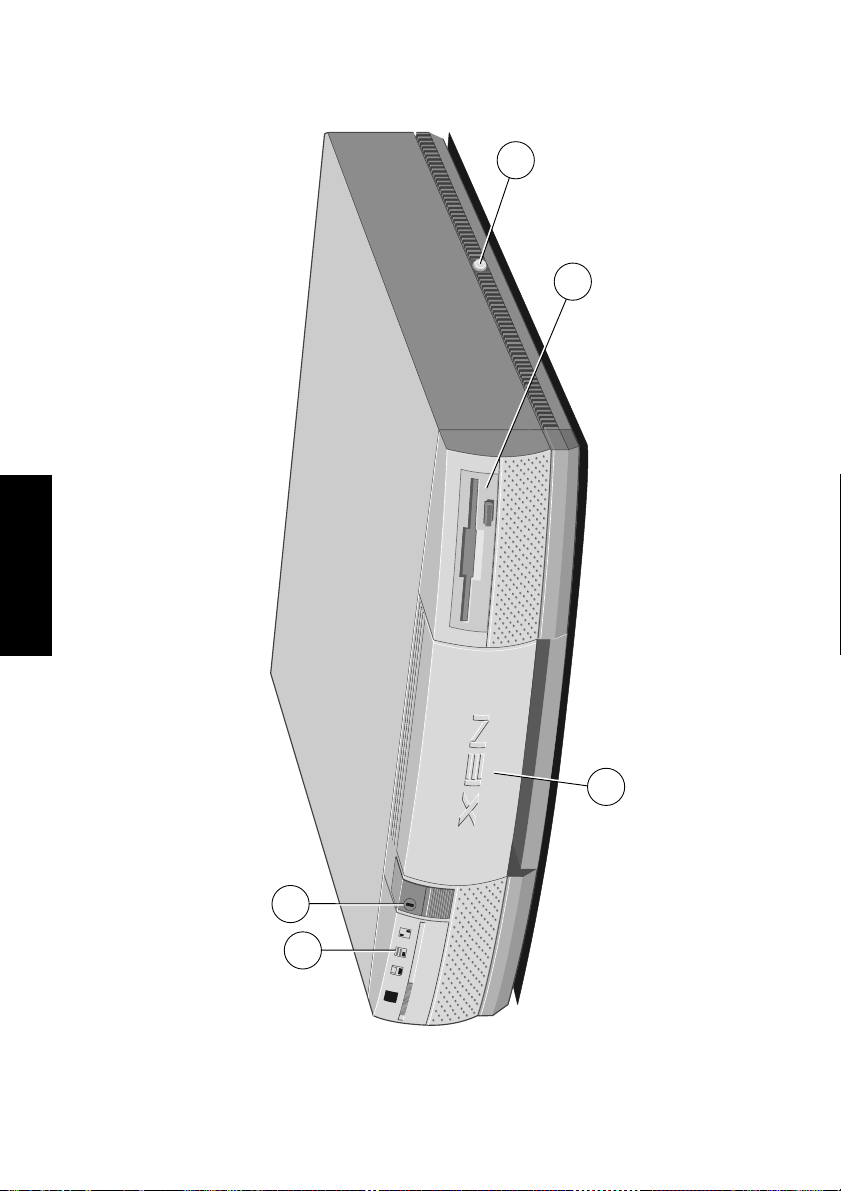
Introducing the Apricot XEN-PC
5
4
Chapter 1
1/4 XEN-PC OWNER'S HANDBOOK
3
1
2

Introducing the Apricot XEN-PC
1 POWER button: press to turn the system on or off.
The green indicator on the button lights when the
system unit is powered.
2 activity indicators, from left to right:
lights when a diskette, floppy disk or Irwin tape
drive is accessed (depending on the operating system).
lights when a hard disk drive or SCSI tape drive is
accessed (depending on the operating system).
3 door (shown closed): hinges down to reveal the
removable-media drive bay.
4 3.5" diskette drive: fitted as standard in every Apricot
XEN-PC system.
5 system lock: prevents unauthorized access to the
inside of the system unit.
Chapter 1
XEN-PC OWNER'S HANDBOOK 1/5
Introducing the Apricot XEN-PC
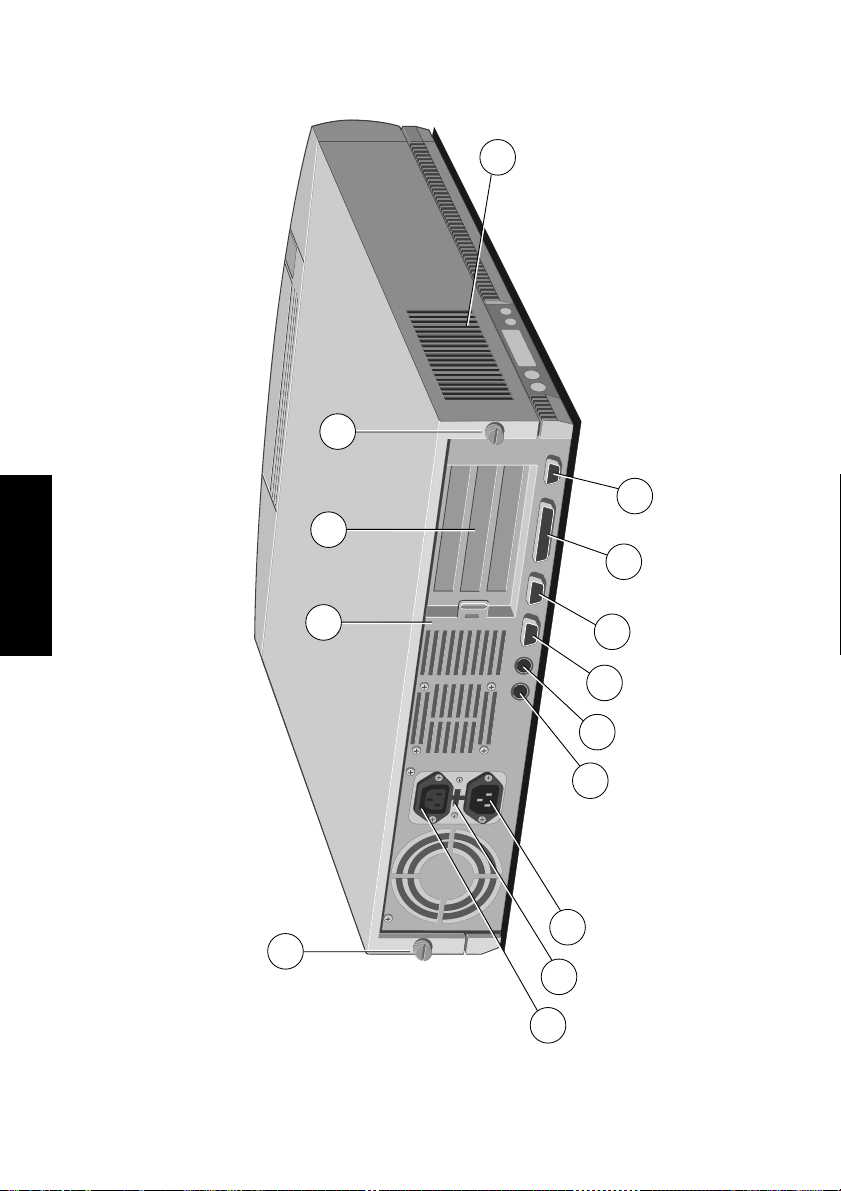
13
10
9
12
8
Chapter 1
1/6 XEN-PC OWNER'S HANDBOOK
10
11
7
6
5
4
3
2
1

Introducing the Apricot XEN-PC
1 AC power outlet: where the monitor power cord
can plug in. Only Apricot-approved monitors should
be powered from this outlet.
2 voltage selection switch: the Apricot XEN-PC can
be set to operate with a 100-120 volt or 220-240 volt
AC power supply.
3 AC power inlet: where the system unit AC power
cord plugs in.
4 keyboard port: connect the keyboard to this port.
5 mouse port: connect the (optional) Apricot mouse
to this port.
6 serial port 1: (110 baud to 9600 baud): typically used
for connecting an external modem or a serial printer
signal cable.
7 serial port 2: (110 baud to 9600 baud): typically used
for connecting an external modem or a serial printer
signal cable.
8 parallel port: typically used for a printer signal cable.
Chapter 1
9 monitor port: connect the monitor signal cable to
this port (if you are using the on-board Apricot
Advanced Graphics system).
10 casing screws: loosen these to remove the top cover.
11 security loop: you can feed a security chain or cable
through this loop and secure it to prevent theft of the
system unit.
12 blanking plates: for Industry Standard Architecture
(ISA) expansion card slots.
13 air vent: do not block this vent or the system will
overheat.
XEN-PC OWNER'S HANDBOOK 1/7
Introducing the Apricot XEN-PC
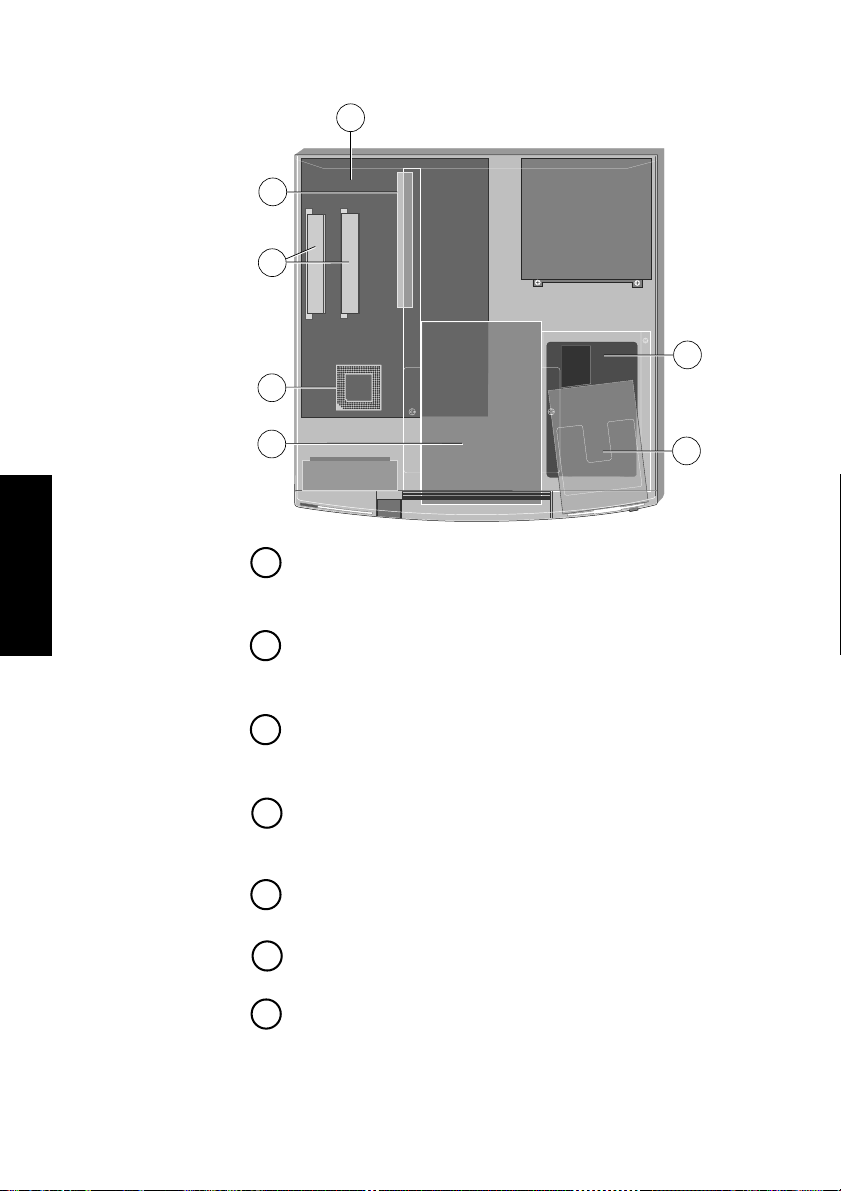
2
3
4
1
6
Chapter 1
5
7
1 motherboard: see the label inside the system unit lid
for up-to-date information on the layout of the
motherboard.
2 Industry Standard Architecture (ISA) expansion
card slots: three slots in total, although one may be
occupied by a drive controller card.
3 SIMM sockets: every XEN-PC has 4 Mbytes of
motherboard memory which can be upgraded to 36
Mbytes by the use of single in-line memory modules.
4 processor socket: insert an OverDrive processor
here to upgrade the processing power of your Apricot
XEN-PC.
5 5.25" removable-media drive bay: may be occupied
by a removable media drive.
6 3.5" hard-disk drive bay: this bay has room for two
one-inch high IDE hard disk drives.
7 3.5" diskette drive: fitted as standard in every Apricot
XEN-PC system.
1/8 XEN-PC OWNER'S HANDBOOK

GETTING STARTED WITH THE
APRICOT XEN-PC
Chapter
Chapter 2

Getting started with the Apricot XEN-PC
2 GETTING STARTED WITH THE
APRICOT XEN-PC
You should read this chapter even if you do not read any other.
It provides important information to help you site, connect,
power and configure the Apricot XEN-PC.
If you are familiar with the operation of personal computers,
this chapter will probably tell you all you need to know in order
to start working with your XEN-PC. Chapter 3, “Operating the
Apricot XEN-PC”, has more information about the use of the
various disk and tape drives with which the XEN-PC may be
fitted.
Read the separate Power Connection Guide before using
the Apricot XEN-PC for the first time.
XEN-PC OWNER'S HANDBOOK 2/1
Chapter 2

Getting started with the Apricot XEN-PC
General advice
The Apricot XEN-PC is designed to be used in a normal office
environment. Here are a few hints for choosing a suitable site:
• Place the XEN-PC system unit flat on a sturdy, level
surface. Unlike some other computers, the system unit
is not designed to be stood on its side.
• Site the XEN-PC away from moisture, direct sunlight,
and extremes of heat and cold. Avoid situations in which
the surrounding temperature or humidity may change
rapidly. See Appendix B, “Technical Information”, for
recommended temperature and humidity ranges.
• When positioning the XEN-PC system unit, monitor and
keyboard, take into account any local or national
regulations relating to ergonomic requirements. For
example, you should ensure that little or no ambient light
is reflected off the monitor screen as glare, and that the
keyboard is placed in a comfortable position for typing.
• Give the XEN-PC plenty of room so that air can circulate
on all sides. Air is drawn into the system unit through the
vent on the left-hand side. Ensure that this vent is never
obstructed.
Chapter 2
2/2 XEN-PC OWNER'S HANDBOOK
The Apricot XEN-PC uses the system unit AC power
cord as its “disconnect device”. Ensure that the system
unit is positioned close to the AC power outlet, and
that the plug is easily accessible.
To prevent fire and electric shock, do not expose any
part of the system unit to rain or moisture.
• Do not allow any cables, particularly power cords, to
trail across the floor where they can be snagged by people
walking past.

Getting started with the Apricot XEN-PC
Connecting the components
See Chapter 1, “Introducing the Apricot XEN-PC”, if you need
help indentifying the various ports on the system unit.
Checking When your Apricot XEN-PC is delivered, it is ready for the
the AC commercial AC power supply generally available in the country
power supply in which it is sold. It has been set for the correct voltage range,
and is supplied with an AC power cord and plug which comply
with the relevant safety standards.
Before using your XEN-PC in a country other than which it was
originally sold, you must check the voltage and frequency of
that country’s AC power supply, and the type of power cord
required there.
If necessary, the AC voltage setting of the Apricot XEN-PC can
be adjusted by the voltage selection switch on the rear of the
system unit (see the section on “Using the Apricot XEN-PC
abroad” in Chapter 3, “Operating the Apricot XEN-PC”). Note
that the monitor’s voltage setting will probably also need
adjusting; consult the User’s Guide that accompanies the monitor,
or ask your Apricot supplier for help.
The “Safety and Regulatory Notices” section at the start of the
Owner’s Handbook includes advice about suitable power cords.
Installing If your XEN-PC arrived with uninstalled add-on options, (such
add-on expansion cards or memory modules) consult Chapter 5
options "Upgrading the Apricot XEN-PC" for step-by-step instructions
installing them. Expansion cards may also have their own
documentation.
Note that some options for which you have installation guides
may have already been installed for you at the factory or by your
Apricot supplier.
XEN-PC OWNER'S HANDBOOK 2/3
Chapter 2

Getting started with the Apricot XEN-PC
Connecting Having assured yourself that the voltage settings and the AC
the power cords of the computer, the monitor and any other
components peripherals are correct:
1. If your AC power outlets have switches, set them to
their Off positions.
2. Ensure that the system unit, the monitor, and any
peripherals are turned off.
3. Connect signal cables and power cords (in that order)
to their respective ports and inlets on the XEN-PC
system unit, the monitor, and any peripherals. Make
sure the cables are connected securely.
When you plug the keyboard cable into the rear of the
XEN-PC, be careful not to plug it into the mouse port
by mistake.
4. Connect the system unit and peripheral power cords
to nearby, grounded AC power outlets.
5. If your AC power outlets have switches, set them to
their On positions.
Your Apricot XEN-PC is now ready to use. The rest of this
chapter tells you how to turn your XEN-PC on and off, and how
to configure it using the built-in SETUP utility.
Turning on and booting the computer
Chapter 2
Turning the To turn on the Apricot XEN-PC, simply press the POWER button.
power on The green indicator on the POWER button lights to show that the
system unit is powered. Remember that the monitor has own
power control; see the monitor’s User’s Guide for details.
Always make sure that the XEN-PC is turned on before turning
on any attached peripherals, particularly a printer attached to
the parallel port. The computer's parallel port is vulnerable to
surges in the AC power supply, which can be passed onto it via
the printer's parallel cable.
2/4 XEN-PC OWNER'S HANDBOOK

Getting started with the Apricot XEN-PC
Power-on Whenever the XEN-PC is turned on, the power-on self-test
self-test (POST) routine tests various hardware components, including
memory, and checks the computer’s configuration. During this
time, BIOS sign-on and POST messages are displayed.
The boot Provided that POST succeeds without discovering any serious
sequence errors or configuration discrepancies, the XEN-PC attempts
to find an operating system; that is, it attempts to boot. It will
look first for a system diskette, then for a bootable hard disk
partition.
Turning the When you have finished using the XEN-PC and want to turn it
power off off, be sure that any information you want to keep is stored on
a diskette or on a hard disk. Any information held in the
computer’s system memory will be lost when you turn off the
computer.
Always turn off any attached peripherals first, particularly a
printer attached to the parallel port.
If you are logged-in to a network, log out before turning off the
computer. Similarly, close down or exit from any software
which employs virtual memory or disk-caching (for example,
Microsoft Windows v3.1 with SMARTDrive).
Do not turn off the computer if any of the activity indicators on
the front panel are lit; this means that the computer is accessing
either a drive or the network. Wait until that operation is
completed before turning off the computer.
Chapter 2
To turn off the XEN-PC, simply press the POWER button again.
The green indicator on the button goes out. (Remember that
the monitor is powered from the system unit.)
After you turn the computer off, wait at least 5 seconds before
turning it on again. The computer may not initialize itself properly
if you turn it off then on again in quick succession.
XEN-PC OWNER'S HANDBOOK 2/5

Getting started with the Apricot XEN-PC
Preparing a second hard disk
Some Apricot XEN-PC computers have two hard disk drives,
known as master and slave.
Apricot partitions and formats the master drive with Microsoft
MS-DOS at the factory. The drive is given a single primary DOS
partition, which is the active partition. When you turn the
computer on, it will boot (load its operating system) from the
master drive, which will appear as MS-DOS drive C.
The slave drive is not partitioned or formatted. You must
partition the slave drive with the MS-DOS Fdisk program, and
format the partitions with the Format command. Until you do
this, you will be unable to use the slave drive. See your MS-DOS
manual for instructions on using Fdisk and Format.
Caution: When you run Fdisk, it assumes you want to work
with the first, or master, drive (it says the “Current fixed disk
drive” is “1”). To switch attention to the slave drive, choose
Sel ect next fixed disk drive (option 5) from the main
menu.
Of course, you may also want to use Fdisk to repartition the
master drive. If you decide to do this, be sure to make a back
up copy of all the information on the drive first, including MSDOS itself, as repartitioning will cause the master drive’s existing
contents to be lost.
Backing up the pre-installed software
Chapter 2
All Apricot XEN-PC computers with a hard disk arrive with
Microsoft MS-DOS pre-installed. In addition, some XEN-PC
systems will also be pre-installed with Microsoft Windows or
Windows for Workgroups. Other software may be pre-installed
by Apricot or your Apricot supplier.
Apricot recommends that you copy or back up any pre-installed
software soon after setting up your system. This is particularly
important for systems which are supplied without master
diskettes for the software on the hard disk. A back up copy will
safeguard the pre-installed software against loss if the hard disk
fails or if you accidentally overwrite or delete files.
2/6 XEN-PC OWNER'S HANDBOOK

Getting started with the Apricot XEN-PC
Instructions for backing up files can be found in your MS-DOS
manual. It is a good idea to begin by creating a bootable system
diskette containing the programs needed to partition and format
the hard disk and to restore the backed up copy. In this way,
you should be able to recover any programs or data lost by a
hard disk failure.
Using the SETUP utility
What is SETUP is a configuration utility programmed into the
SETUP? XEN-PC’s read-only memory (ROM). Because it is permanently
kept in ROM, SETUP does not need an operating system to
function and can be invoked whenever you wish to reconfigure
your computer.
SETUP’s purpose is to allow you to view and alter your
computer’s configuration. To configure a computer means to
declare its hardware components, such as the amount of memory
it has or the type of monitor, and to say how you want them
to be used. Configuring your computer is often necessary to
ensure that the software you use can recognise and exploit the
system’s capabilities.
The configuration data is kept in a special part of the computer’s
memory, known as configuration memory or CMOS memory.
This memory is sustained by a small battery, so its contents are
preserved while the computer is turned off.
Your XEN-PC arrives preconfigured, but may need to be
reconfigured after you add or remove add-on options such as
memory modules or expansion cards.
Invoking The SETUP utility can be invoked at any time from the DOS
SETUP command line. It is invoked by pressing the CTRL+ALT+ESC key
combination.
Once you have reconfigured your computer you can exit SETUP.
The XEN-PC will then automatically reboot, and the changes
come into effect.
A full description of the SETUP utility is given in Chapter 6
"Using the SETUP utility".
XEN-PC OWNER'S HANDBOOK 2/7
Chapter 2

Getting started with the Apricot XEN-PC
Using Apricot Help
Along with the software preinstalled on your hard disk you will
find an Apricot Help file. This explains what software is on your
hard disk, and how to install drivers to use the enhanced features
of the system.
Apricot Help may be supplied in various forms, according to
the target operating system. The two most common forms are
ASCII text files and Microsoft Windows help files.
Viewing ASCII text files, identified by their .txt file extensions, can be
text files read by most text editors and wordprocessing programs.
Alternatively they can be displayed, one screenful at a time,
using the DOS Type command; for example:
type helpfile.txt | more
Viewing Windows help files can be displayed only by the Microsoft
Windows Windows Help program (v3.1 or later).
help files
If your computer has a hard disk on which Apricot has preinstalled either Microsoft Windows or Windows for
Workgroups, copies of some Windows help files may already
be available as icons in the “Apricot” program group. To view
a help file, simply double-click on its icon, or select the icon and
press ENTER. For more information about using Help, see your
Windows documentation.
Chapter 2
If the Windows help file you want to view is not already installed,
or if for any other reason you need to view a Windows help file
directly from a diskette:
1. Insert the diskette into a suitable drive.
2. Use Windows File Manager to view the contents of the
diskette.
2/8 XEN-PC OWNER'S HANDBOOK

Getting started with the Apricot XEN-PC
3. Choose the help file, identified by its .hlp file extension,
either by double-clicking on its filename or by selecting
the filename with the cursor and then pressing ENTER.
The Windows Help program starts, displaying the first
topic in the help file. For more information about using
Help, see your Windows documentation.
Alternatively, you can copy the Windows help file from the
diskette to a hard disk or network drive, and create a program
item for it using Program Manager. The help file can then be
viewed at any time simply by double-clicking on its icon. To do
this:
1. Insert the diskette into a suitable drive. Copy the
Windows help file, and also the diskhelp.ico icon file,
from the diskette to a hard disk or network drive.
2. Choose New from the File menu in Program Manager.
Select the Program Item option in the New Program
Object dialog box, then choose OK. The Program
Item Properties dialog box appears.
3. In the Description text box, type the title of the diskette
from which the help file was copied.
4. In the Command Line text box, type the path and
filename of the help file (including its .hlp extension).
5. Choose Change Icon. The Change Icon dialog box
appears. In the File Name text box, type the path and
filename of the diskhelp.ico icon file. Choose OK.
6. In the Program Item Properties dialog box, choose
OK. The dialog box closes and the Apricot disk help
icon appears in the program group.
All the help files provided by Apricot have a version number so
you can tell whether you’re looking at the most up-to-date
version. You can discover the version number of a Windows
help file by viewing it with Help and choosing About Help
from the Help menu.
XEN-PC OWNER'S HANDBOOK 2/9
Chapter 2
 Loading...