

Page 1

MITSUBISHI ELECTRIC
2004
Service
Manual
PROJECTION TELEVISION
V25 / V25+ / V25++ CHASSIS
V25+ MODELS
WS-55615
WS-65615
WS-73615
WS-48515
V25 MODELS
WS-48515
WS-55515
WS-65515
V25++ MODELS
WS-55815
WS-65815
CAUTION:
Before servicing this chassis, it is important that the service person read the "SAFETY PRECAUTIONS" and
"PRODUCT SAFETY NOTICE" contained in this manual.
SPECIFICATIONS
• Power Input : AC 120V, 60Hz
• Power Usage : 275W
300W [WS-65815/ WS-73615 only]
• Frequency Range : VHF 54 ~ 470MHz
UHF 470 ~ 806MHz
• Antenna Input : VHF/UHF 75Ω unbalanced
1 NTSC /ATSC /QAM
1 NTSC for PIP
• CRT Size : [7 inches]
: [9 inches] WS-65815/ WS-73615 only
• High Voltage : 32.0kV (at 0A)
• Cabinet Weight and Dimensions (Refer to page 5)
• Speakers (8 Ohms 10W)
: 2-5" full range [WS-48515]
: 2-6" full range [WS-55515 / WS-65515]
: 2-6" coaxials [WS-55615 / WS-65615 / WS-73615]
: 2-5"x7" coaxial [WS-55815 / WS-65815]
• Input Level : VIDEO IN JACK (RCA Type)
1.0Vp-p 75Ω unbalanced
: AUDIO IN JACK (RCA Type)
-4.7dBm 43kΩ unbalanced
: S-VIDEO IN JACK
(Y/C separate type)
Y:1.0 Vp-p C:0.286Vp-p(BURST)
75Ω unbalanced
: COMP / Y, Cr, Cb (RCA Type)
Y: 1.0 Vp-p Cr, Cb: 700mVp-p
• Output Level : VIDEO OUT JACK (RCA Type)
1.0Vp-p 75Ω unbalanced
: AUDIO OUT JACK (RCA Type)
-4.7dBm 4.7kΩ unbalanced
• Digital : IEEE-1394 I/O Jacks
Interface : AC-3 Digtal Audio Output
: HDMI
: 4 Memory Card Reader Inputs
(V25++ Only)
: CableCARD
: System 5 IR
: USB Service Port
• Design specifications are subject to change without notice.
MITSUBISHI DIGITAL ELECTRONICS AMERICA, INC.
9351 Jeronimo Road, Irvine, CA 92618-1904
Copyright © 2004 Mitsubishi Digital Electronics America, Inc.
All Rights Reserved
Page 2

Page 3

MODELS: WS-48515 / WS-55515 / WS-55615 / WS-55815 / WS-65515 / WS-65615 / WS-65815 / WS-73615
CONTENTS
INTRODUCTION ................................................................................................................................5
CABINET WEIGHT & DIMENSIONS .................................................................................................. 5
PRODUCT SAFETY NOTICE ............................................................................................................. 5
DISASSEMBLY PROCEDURES ......................................................................................................... 7
WS-48515
Front Cabinet Components .................................................................................................... 7
Rear Cabinet Components ..................................................................................................... 8
WS-55515 / WS-55615 / WS-65515 / WS-65615
Front Cabinet Components .................................................................................................... 9
Rear Cabinet Components ................................................................................................... 10
WS-55815
Front Cabinet Components .................................................................................................. 11
Rear Cabinet Components ................................................................................................... 12
WS-65815
Front Cabinet Components .................................................................................................. 13
Rear Cabinet Components ................................................................................................... 14
WS-73615
Front Cabinet Components .................................................................................................. 15
Rear Cabinet Components ................................................................................................... 16
SERVICING THE LENTICULAR LENS AND FRESNEL SCREEN ..................................................... 17
Removal of the Lenticular Screen and Fresnel Lens
WS-48515............................................................................................................................ 17
WS-55515 / WS-65515 ........................................................................................................ 18
WS-55815 / WS-65815 ........................................................................................................ 19
WS-55615 / WS-65615 / WS-73615 .................................................................................... 20
All Models
Installation of the Lenticular Screen and Fresnel Lens .......................................................... 21
DIAMONDSHIELD
TM
Removal and Installation ............................................................................. 22
CABINET SEPARATION PROCEDURES
WS-65815..................................................................................................................................... 23
WS-65515 / WS-65615 / WS-73615 ............................................................................................. 24
SERVICING PCBs ............................................................................................................................ 25
Chassis Removal .......................................................................................................................... 25
PCB Locations .............................................................................................................................. 25
Major Parts Locations ................................................................................................................... 26
DM Module Replacement .............................................................................................................. 26
CRT REPLACEMENT ....................................................................................................................... 27
CRT Removal ................................................................................................................................27
CRT Installation ............................................................................................................................ 28
ELECTRICAL ADJUSTMENTS ........................................................................................................ 30
Equipment and Initial Setup .......................................................................................................... 30
LED Indicator Diagnostics ............................................................................................................. 32
Remote Control Operational Mode ................................................................................................ 32
Circuit Adjustment Mode ............................................................................................................... 33
Service Mode Reset ...................................................................................................................... 34
Page 3
Page 4

MODELS: WS-48515 / WS-55515 / WS-55615 / WS-55815 / WS-65515 / WS-65615 / WS-65815 / WS-73615
Convergence Adjustment Mode ..................................................................................................... 34
Adjustment Items List ................................................................................................................... 36
Adjustment Procedures ................................................................................................................ 39
Test Point Locations ............................................................................................................39
HV Regulation & Main / Sub Y Level .................................................................................... 40
Main / Sub Color Level & CRT Cutoff .................................................................................... 41
White Balance (NTSC) & White Balance (HD) ..................................................................... 42
Black Level & Sub Contrast ................................................................................................. 43
Dynamic Focus Presets & Lens Focus................................................................................ 44
Alignment Magnet / Electrostatic Focus & Charactrer Position ............................................ 45
Geometry Presets ............................................................................................................... 46
Deflection Geometry Adjustments ........................................................................................ 47
Convergence Geometry Adjustments ................................................................................... 48
Centering & Static Convergence ........................................................................................... 49
Coarse Convergence Adjustments ........................................................................................ 50
Fine Convergence Adjustments ............................................................................................ 51
CHIP PARTS REPLACEMENT ......................................................................................................... 52
REPLACEMENT PARTS .................................................................................................................. 53
Parts Ordering .............................................................................................................................. 53
Critical and Warranty Parts Designation........................................................................................ 53
Parts Tolerance Codes .................................................................................................................. 53
Quick Reference List .................................................................................................................... 54
SERVICE PARTS LIST .................................................................................................................... 55
SCREEN ASSEMBLY PARTS LIST .................................................................................................. 69
CIRCUITRY BLOCK DIAGRAMS ..................................................................................................... 73
Part 2
Schematic Diagrams
CONTENTS Page
SCHEMATIC DIAGRAMS
PCB Interconnect Diagram .............................................................................................................. 1
PCB-MAIN ...................................................................................................................................... 2
PCB-TERMINAL -1 [INPUT SWITCH] .............................................................................................. 3
PCB-TERMINAL -2 [PIC µP / FIF / E2P] ......................................................................................... 4
PCBs-CRT / CONTROL1 / CONTROL2 / FRONT / PREAMP / DBF ............................................... 5
PCB-HDMI ...................................................................................................................................... 6
PCB-SIGNAL-1 [MICRO] ................................................................................................................. 7
PCB-SIGNAL-2 [CONVERGENCE GENERATOR] .......................................................................... 8
PCB-SIGNAL-3 [VCJ / VERTICAL DEFLECTION / AUDIO] ............................................................. 9
PCB-TUNER-1 [TUNER / AUDIO] .................................................................................................. 10
PCB-TUNER-2 [DEMODULATOR] ................................................................................................. 11
PCB LAYOUT DIAGRAMS ............................................................................................................... 12
Page 4
Page 5
MODELS: WS-48515 / WS-55515 / WS-55615 / WS-55815 / WS-65515 / WS-65615 / WS-65815 / WS-73615
INTRODUCTION
This service manual provides service instructions for the V25, V25+ and V25++ PTV chassis types. The specific
models for each chassis type are listed below. Service personnel should read this manual thoroughly before servicing
these chassis.
V25 Chassis V25+ Chassis V25++ Chassis
WS-48515 WS-55615 WS-55815
WS-55515 WS-65615 WS-65815
WS-65515 WS-73615
This service manual includes:
1. Assembly and disassembly instructions for the front and rear cabinet components.
2. Servicing of the Lenticular Screen and Fresnel Lens.
3. Servicing printed circuit boards (PCBs).
4. CRT replacement procedure.
5. Electrical adjustments.
6. Chip parts replacement procedures.
7. Circuit path diagrams.
The parts list section of this service manual includes:
1. Electrical parts.
2. Cabinet and screen parts.
Schematic and block diagrams of the above listed models are included in this service manual for better understanding of the circuitry. PCB drawings are also included for easy location of parts and test points.
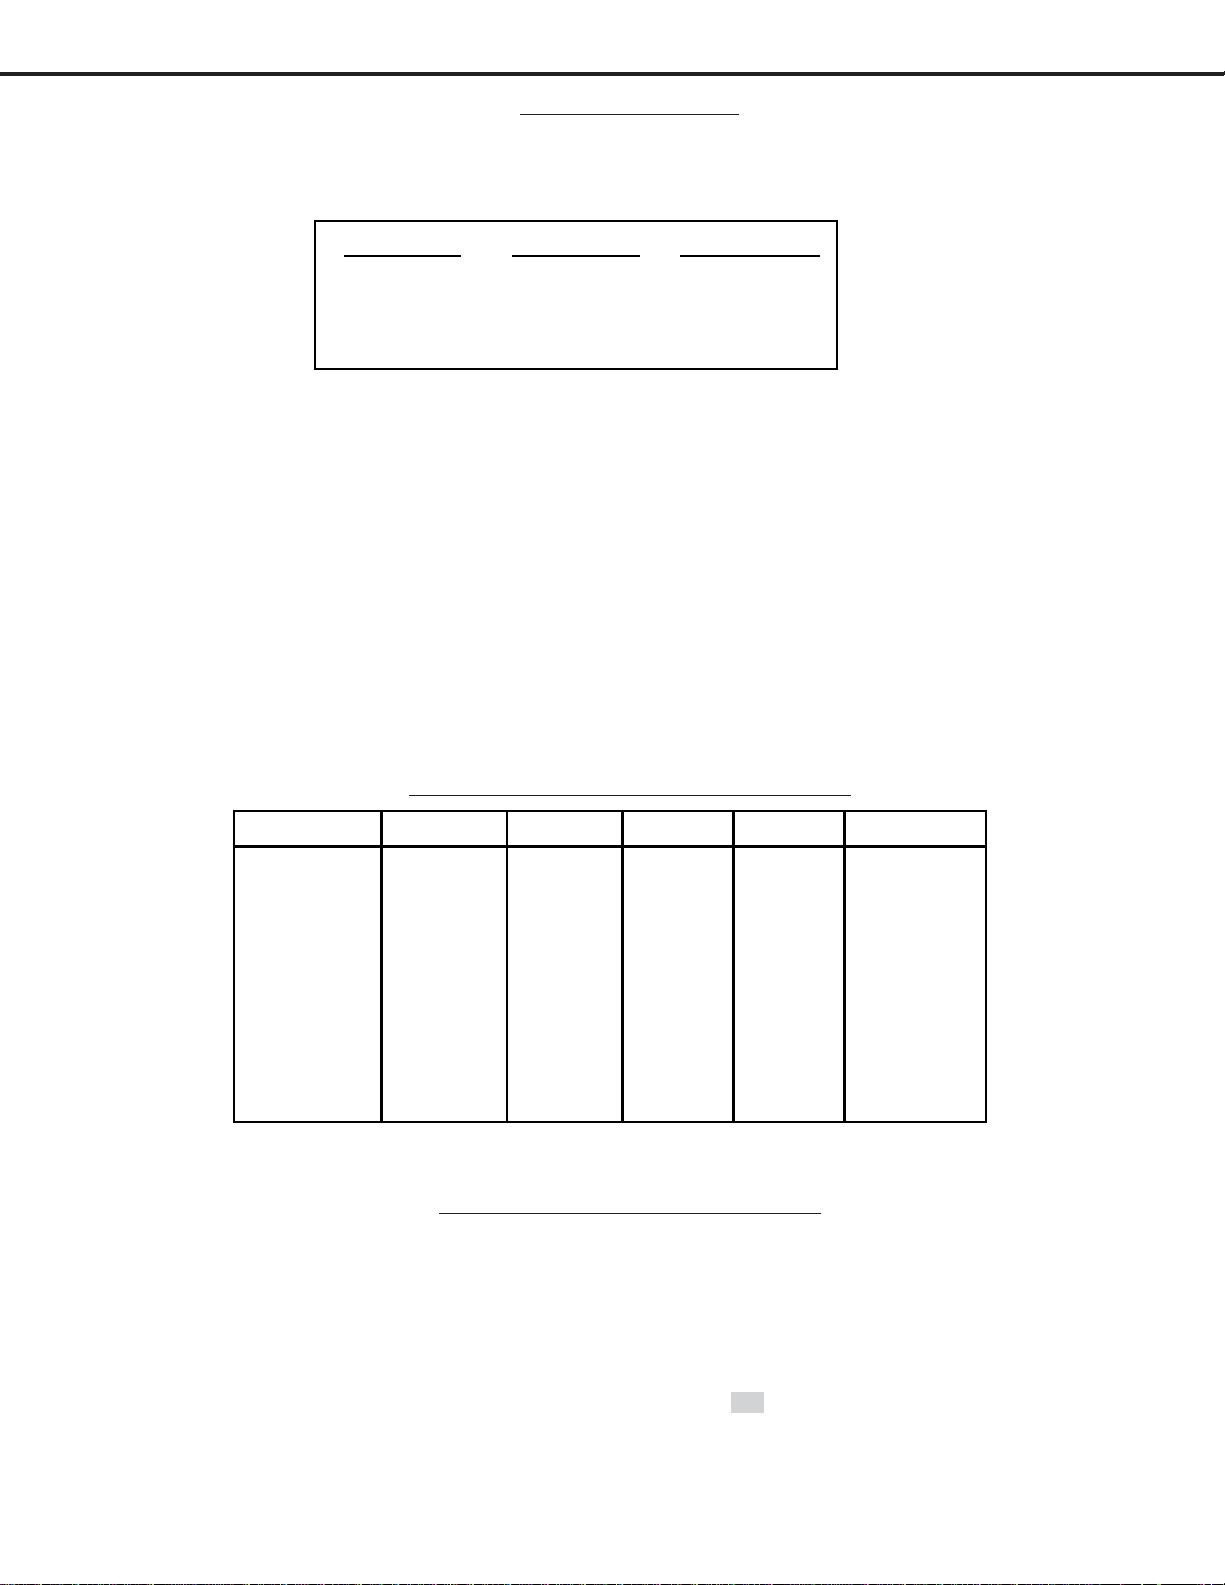
Cabinet Weight and Dimensions
Model Weight Height Width Depth Spkrs
WS-48515
WS-55515
WS-55615
172 lbs 49 in 44.5 in. 24 in. 5" 10W
213 lbs 53 in 56 in 34 in 6" 10W
213 lbs 50.5 in 51 in 28 in 6" 10W
WS-55815 195 lbs 50.5 in 51 in 27 in 5x7" 10W
WS-65515
WS-65615
WS-65815
WS-73615
327 lbs 62 in 59 in 28 in 6" 10W
327 lbs 62 in 59 in 28 in 6" 10W
276 lbs 62 in 58 in 28 in 5x7" 10W
313 lbs 66 in 66 in 30 in 6" 10W
• Weight and Dimensions are approximate
PRODUCT SAFETY NOTICE
Many electrical and mechanical parts in television receivers have special safety related characteristics. These
characteristics are often not evident from visual inspection nor can the protection afforded by them necessarily be
obtained by using replacement components rated for higher voltage, wattage, etc.
Replacement parts which have special safety characteristics are identified in this service manual.
Electrical components having such features are identified by shading
type in the parts list of this service manual. The replacement for any safety part should be identical in value
and characteristics.
Page 5
on the schematic diagram and by bold
Page 6
MODELS: WS-48515 / WS-55515 / WS-55615 / WS-55815 / WS-65515 / WS-65615 / WS-65815 / WS-73615
SAFETY PRECAUTIONS
NOTICE: Observe all cautions and safety related notes located inside the receiver cabinet and on the
receiver chassis.
WARNING:
1. Operation of this receiver outside the cabinet or with the cover removed presents a shock hazard
from the receiver's power supplies. Work on the receiver should not be attempted by anyone who is
not thoroughly familiar with the precautions necessary when working on high voltage equipment.
2. Do not install, remove or handle the picture tubes in any manner unless shatterproof goggles are
worn. People not so equipped should be kept away while the picture tube is being handled. Keep
the picture tube away from the body while handling.
3. When service is required, observe the original lead dress. Extra precaution should be taken to
assure correct lead dress in the high voltage area. Where a short-circuit has occurred, replace those
components that indicate evidence of overheating.
X-Radiation warning
The surface of the cathode ray tubes (CRTs) may generate X-Radiation, so take proper precautions when servicing. It is recommended that a lead apron be used for shielding while handling the CRT. Use this method if
possible.
When replacing the CRTs, use only the designated replacement part since it is a critical component with regard to
X-Radiation. High voltage must be set as prescribed under the section titled Electrical Adjustments.
Leakage current check
Before returning the receiver to the customer, it is recommended that leakage current be measured according to
the following methods.
1. Cold Check
With the alternating current (AC) plug removed from the AC source, place a jumper across the two AC plug
prongs. Connect one lead of an ohm meter to the AC plug and touch the other lead to each exposed metal
part (i.e. antennas, handle bracket, metal cabinet, screw heads, metal overlay, control shafts, etc.), particularly any exposed metal part that has a return path to the chassis. The resistance of the exposed metal parts
having a return path to the chassis should be a minimum of 1Mega Ohm. Any resistance below this value
indicates an abnormal condition and requires corrective action.
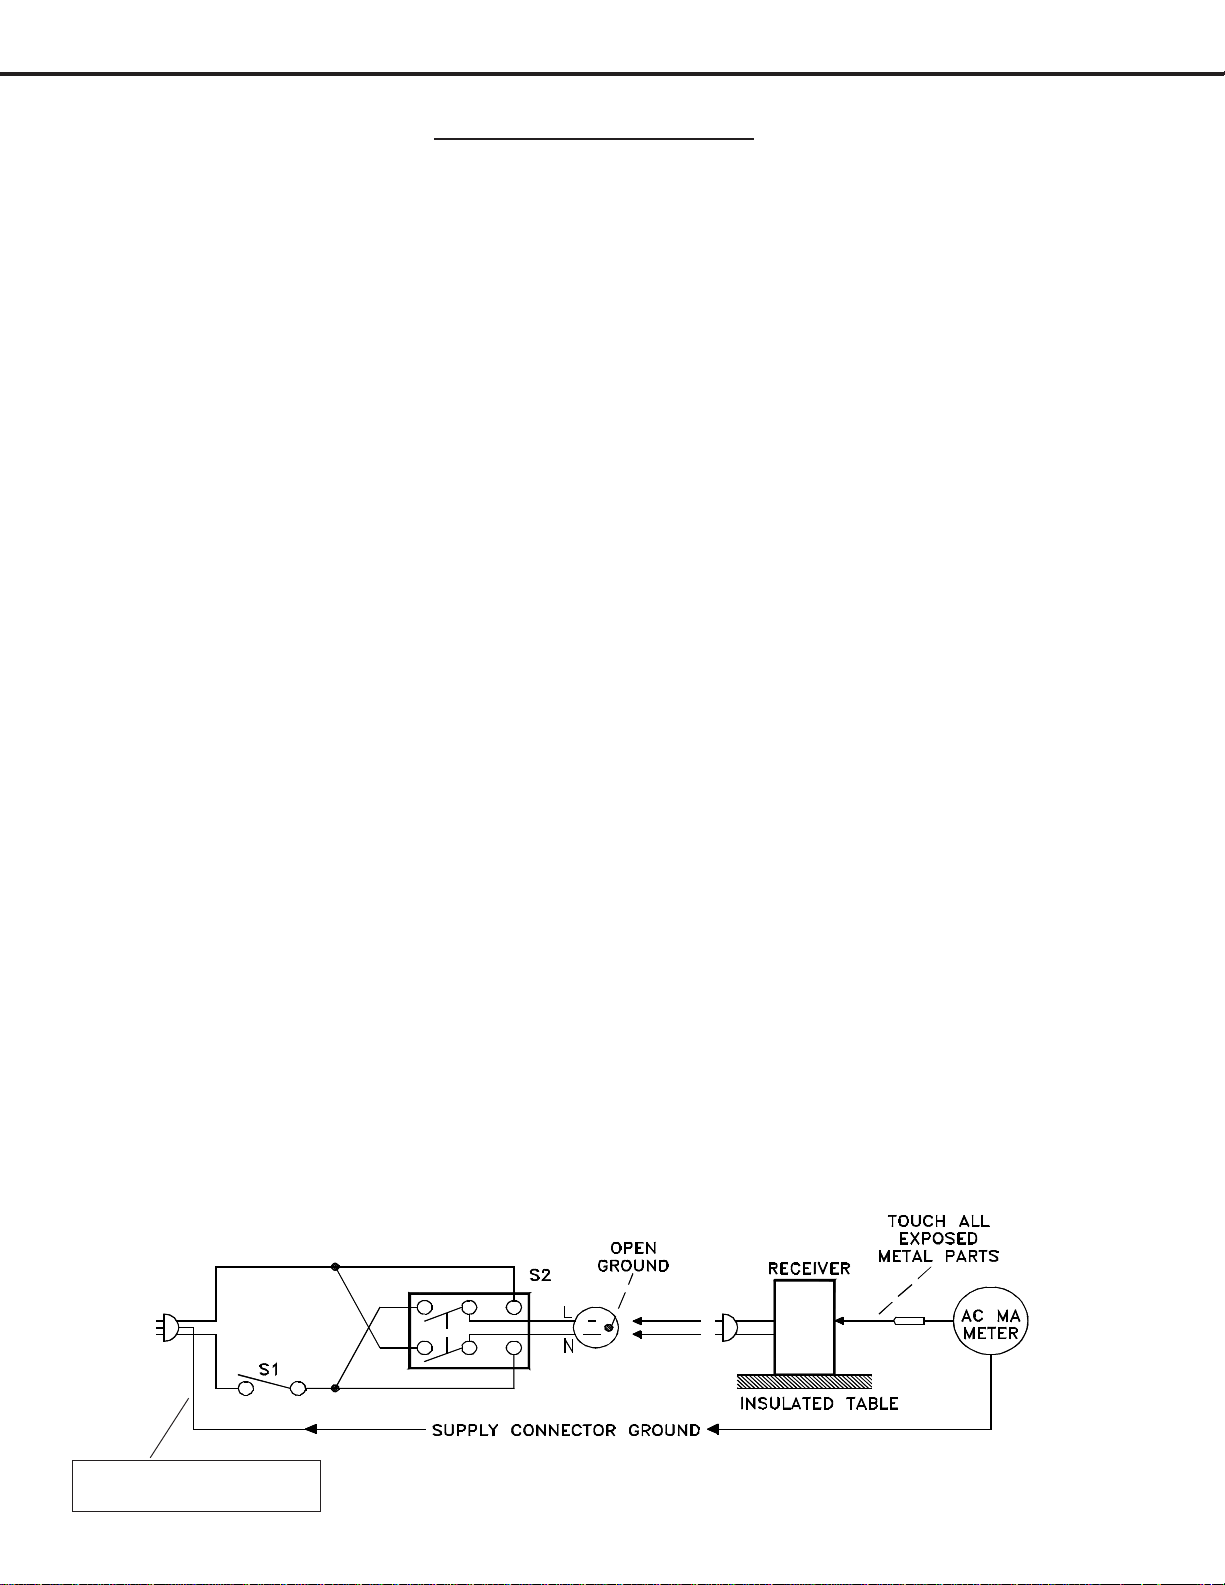
2. Hot Check ...Use the circuit shown below to perform the hot check test.
1. Keep switch S1 open and connect the receiver to the measuring circuit. Immediately after
connection, and with the switching devices of the receiver in their operating positions, measure
the leakage current for both positions of switch S2.
2. Close switch S1, energizing the receiver. Immediately after closing switch S1, and with the
switching devices of the receiver in their operating positions, measure the leakage current for both
positions of switch S2. Repeat the current measurements of items 1 and 2 after the receiver has
reached thermal stabilization. The leakage current must not exceed 0.5 milliampere (mA).
GWG - Green Wire Ground
(Earth Ground)
Page 6
Page 7
MODELS: WS-48515 / WS-55515 / WS-55615 / WS-55815 / WS-65515 / WS-65615 / WS-65815 / WS-73615
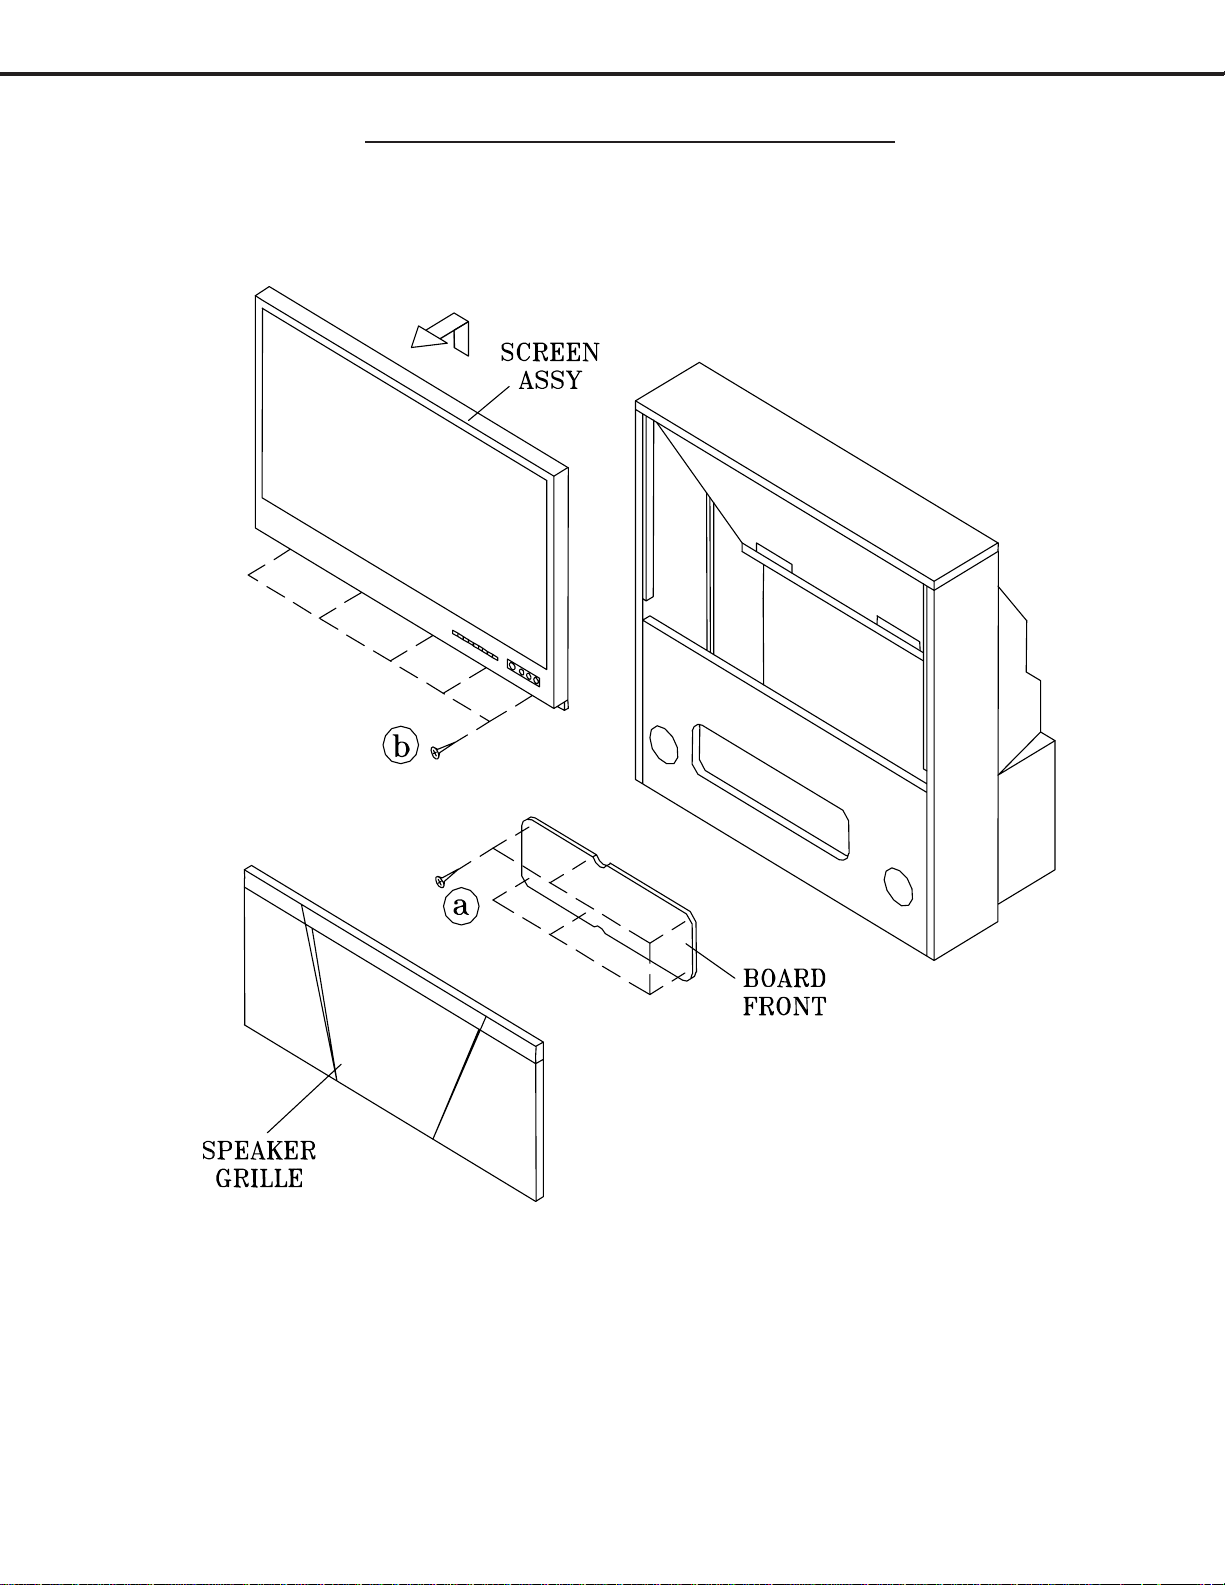
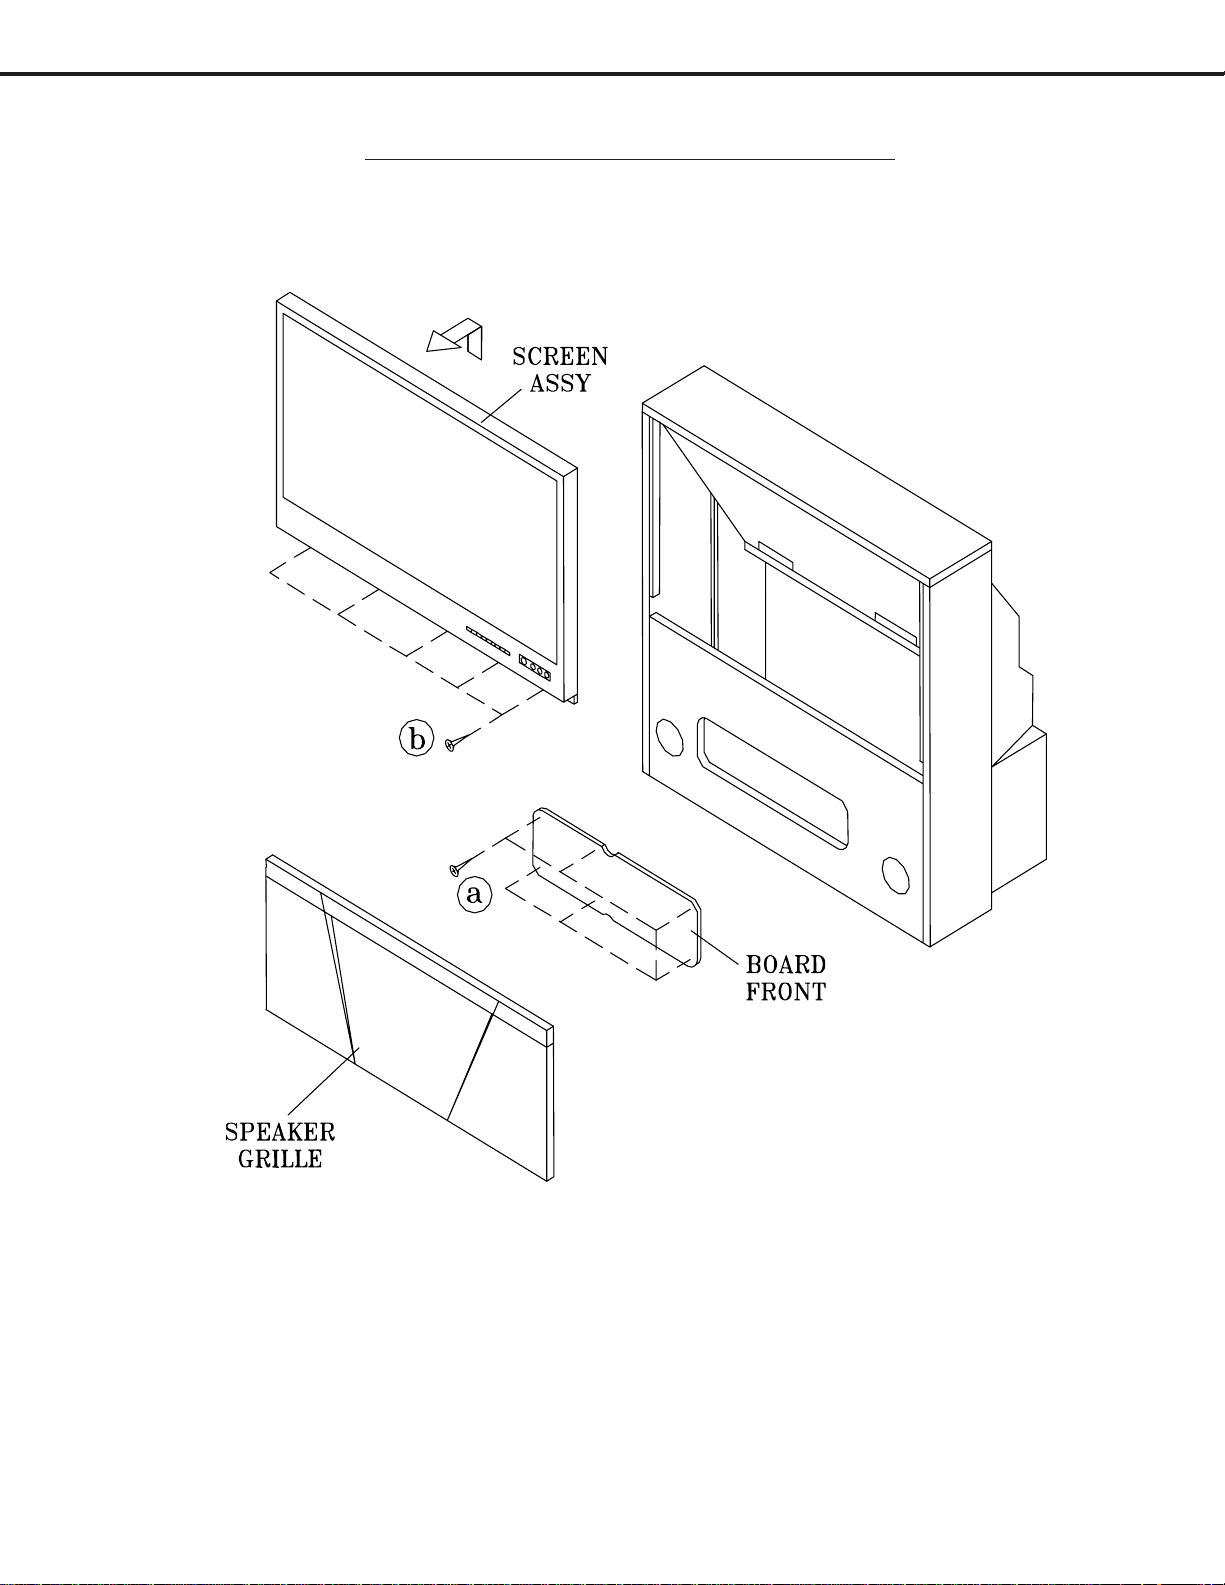
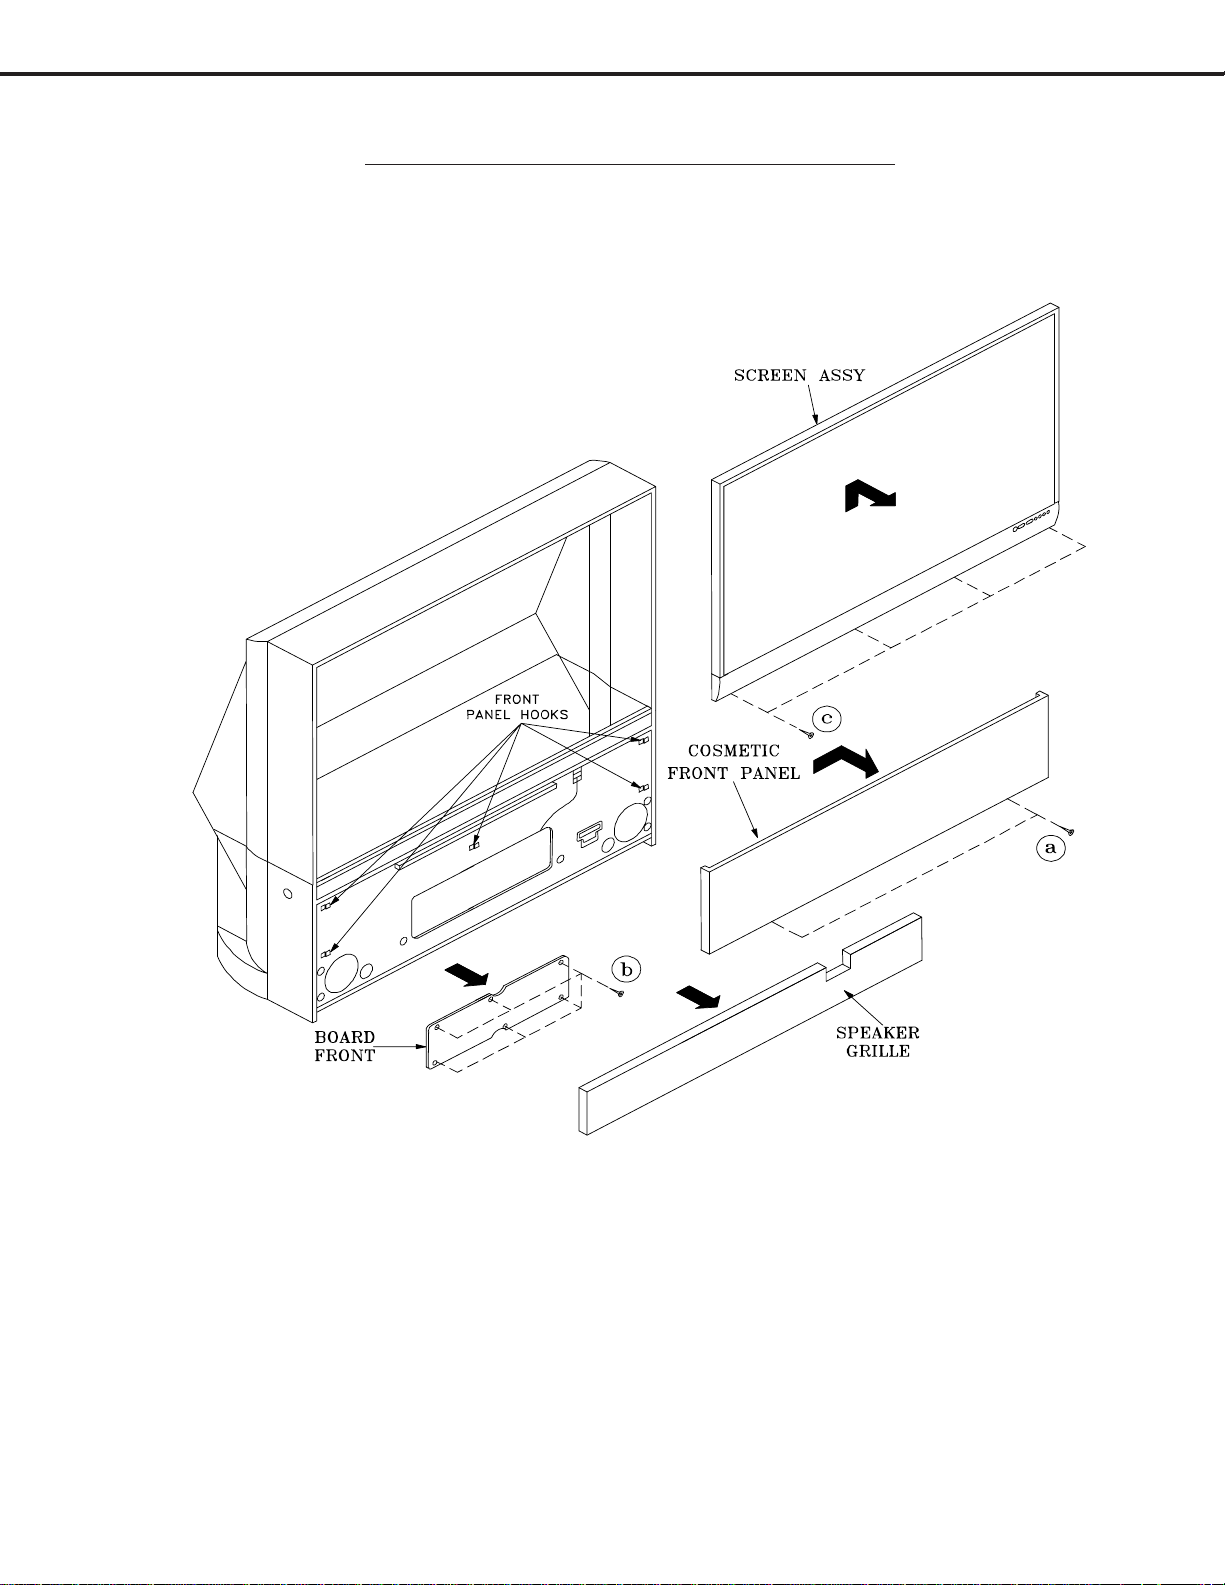
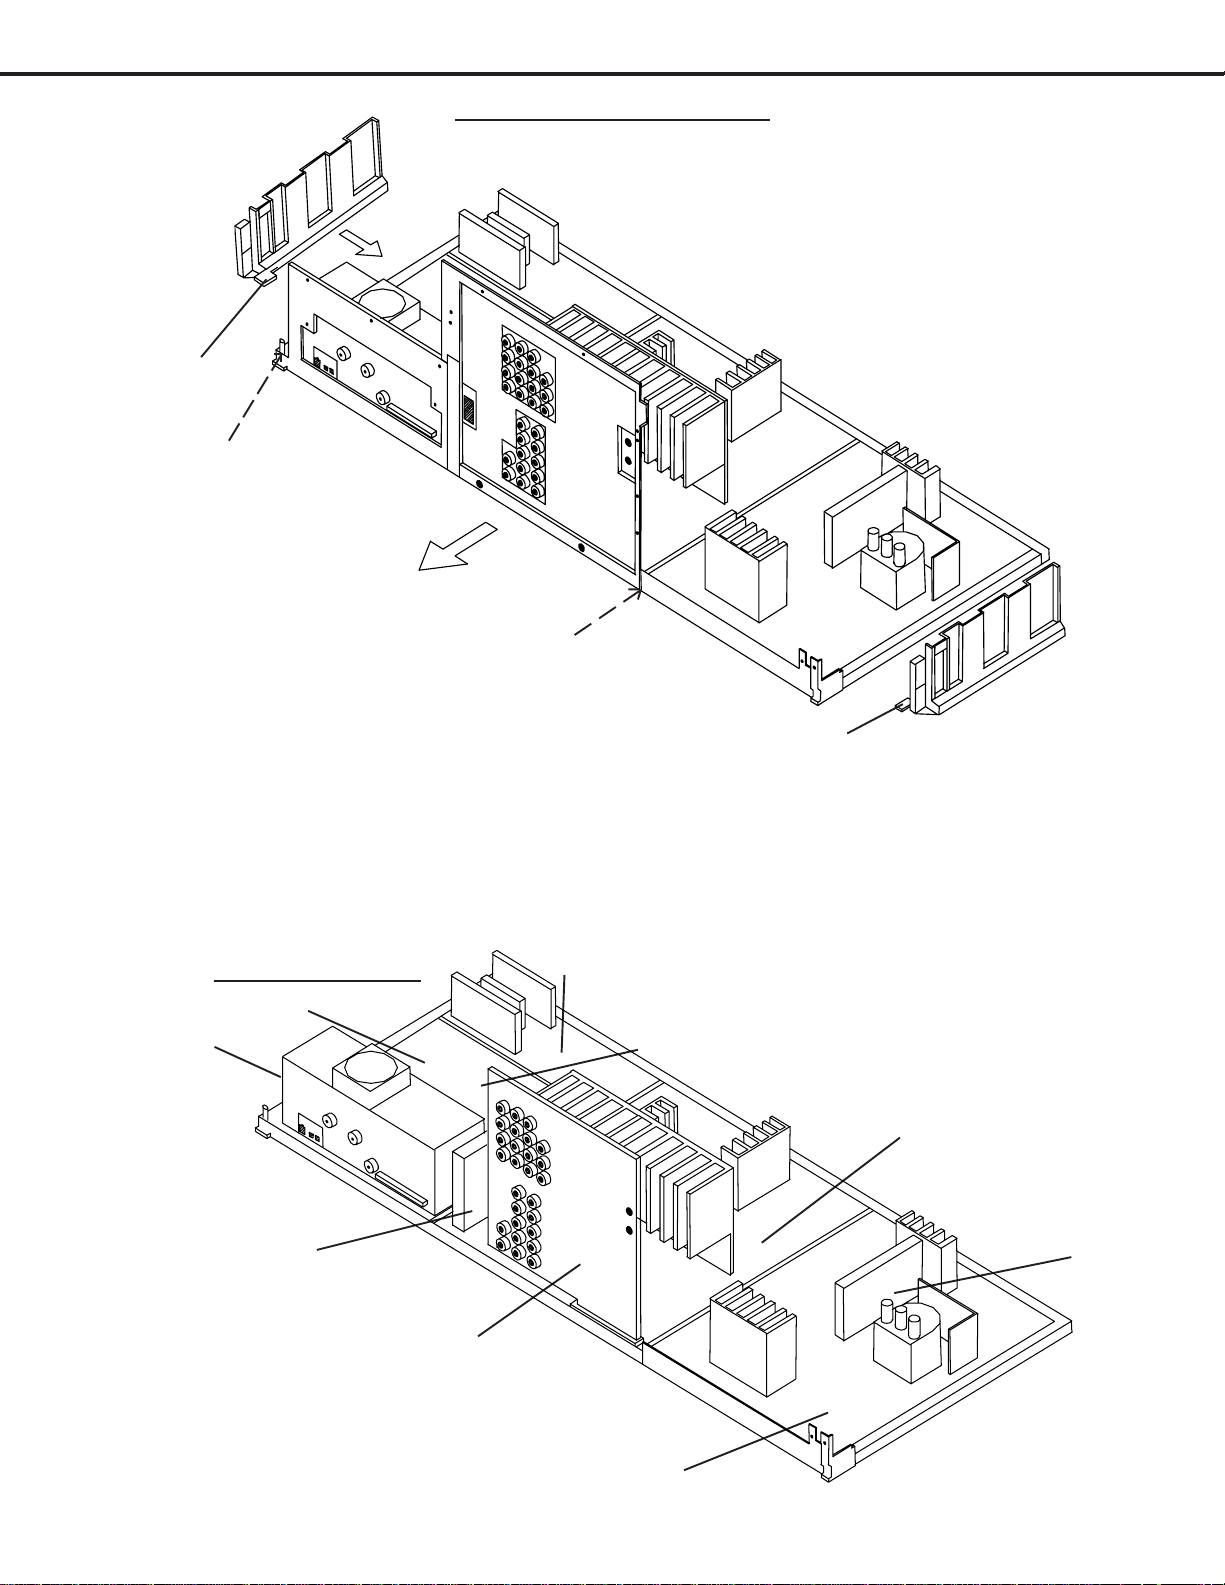
CABINET DISASSEMBLY (FRONT VIEW)
WS-48515
*Refer to the Parts List for Part Numbers
Front Cabinet Disassembly
1. Remove the Speaker Grille by pulling forward.
2. Remove the Board Front by removing 6 screws (a).
3. Remove 4 screws (b) holding the Screen Assembly.
4. Lift the Screen Assembly up and away from the cabinet.
Page 7
Page 8
MODELS: WS-48515 / WS-55515 / WS-55615 / WS-55815 / WS-65515 / WS-65615 / WS-65815 / WS-73615
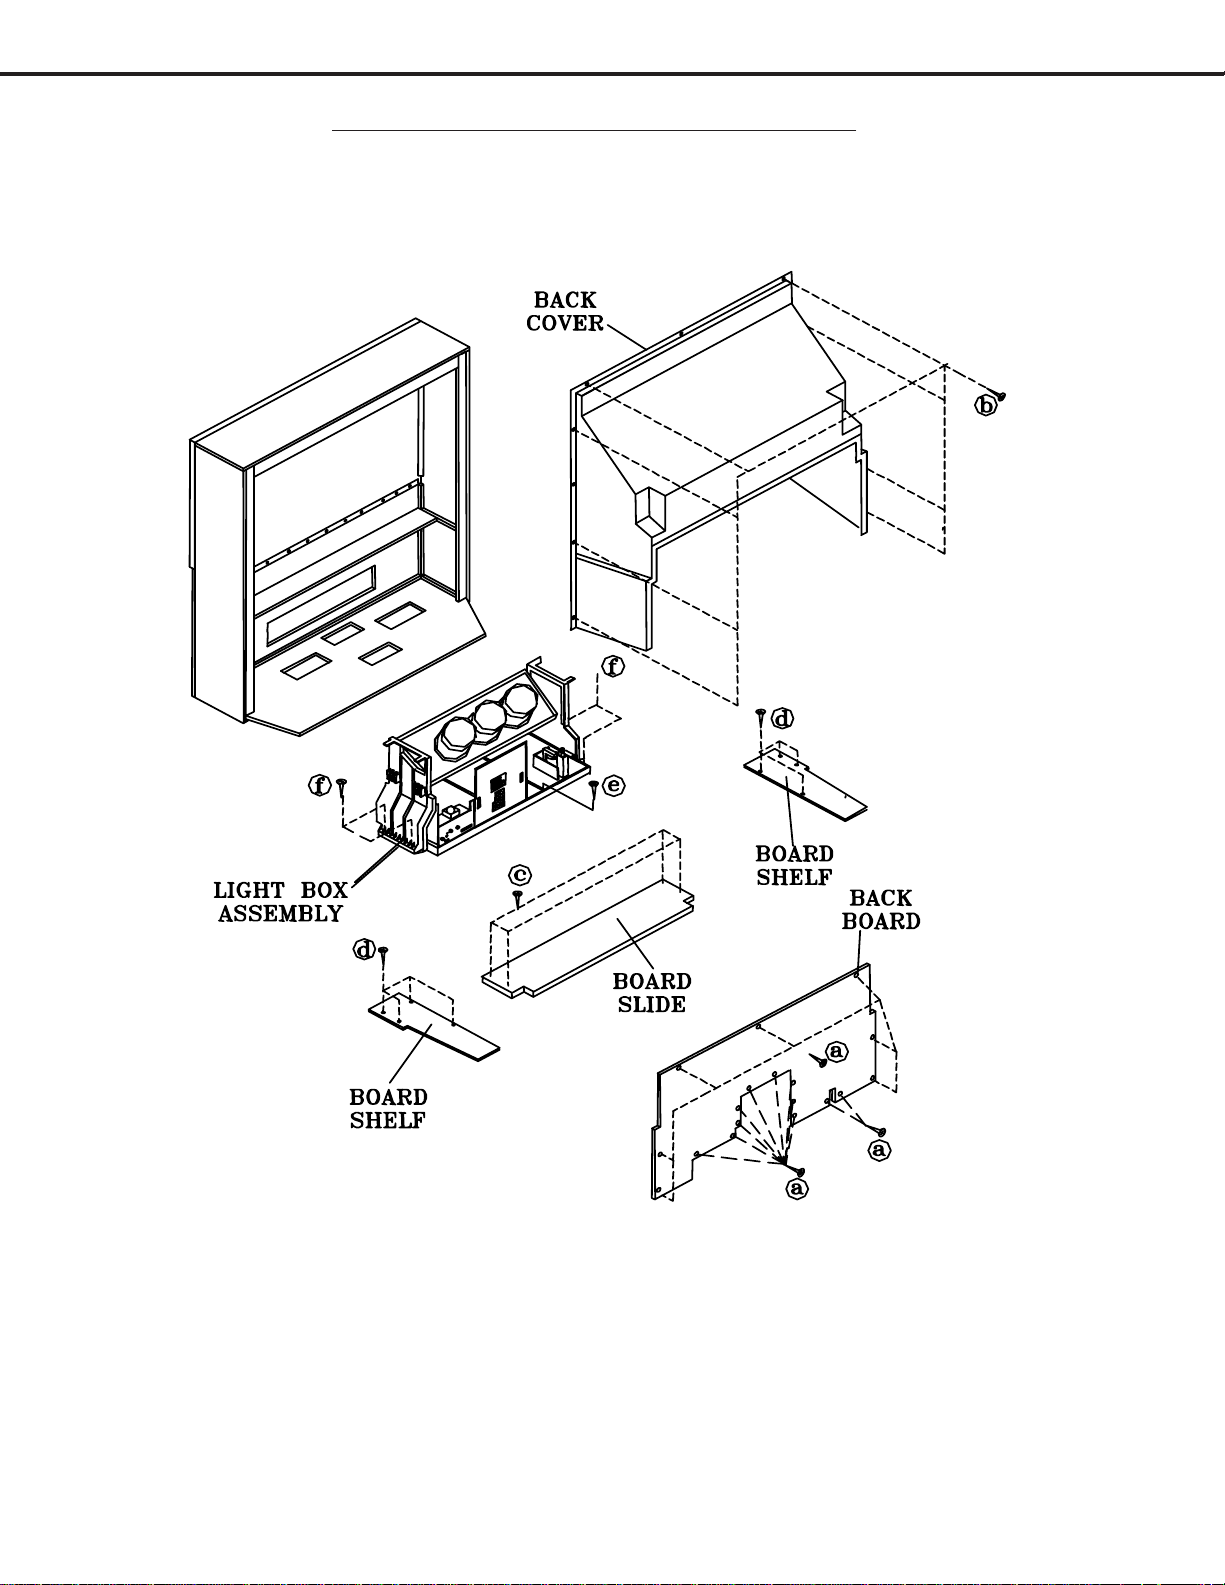
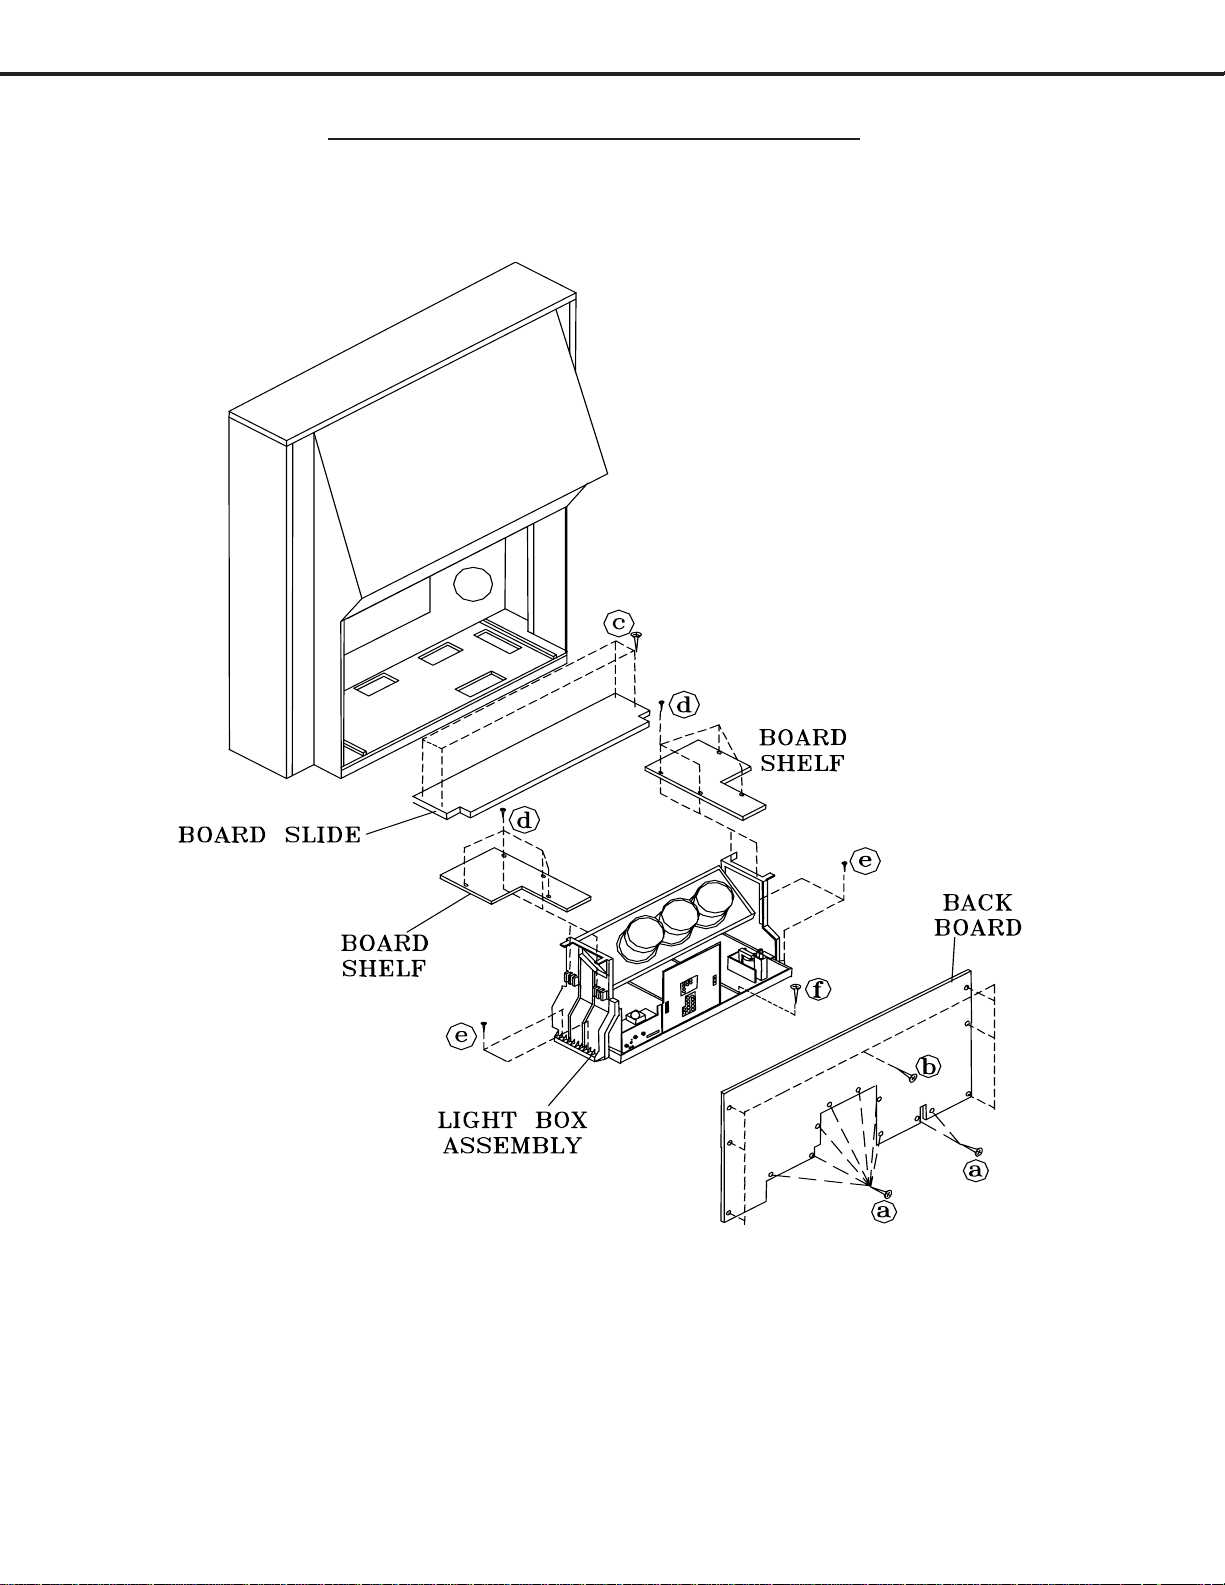
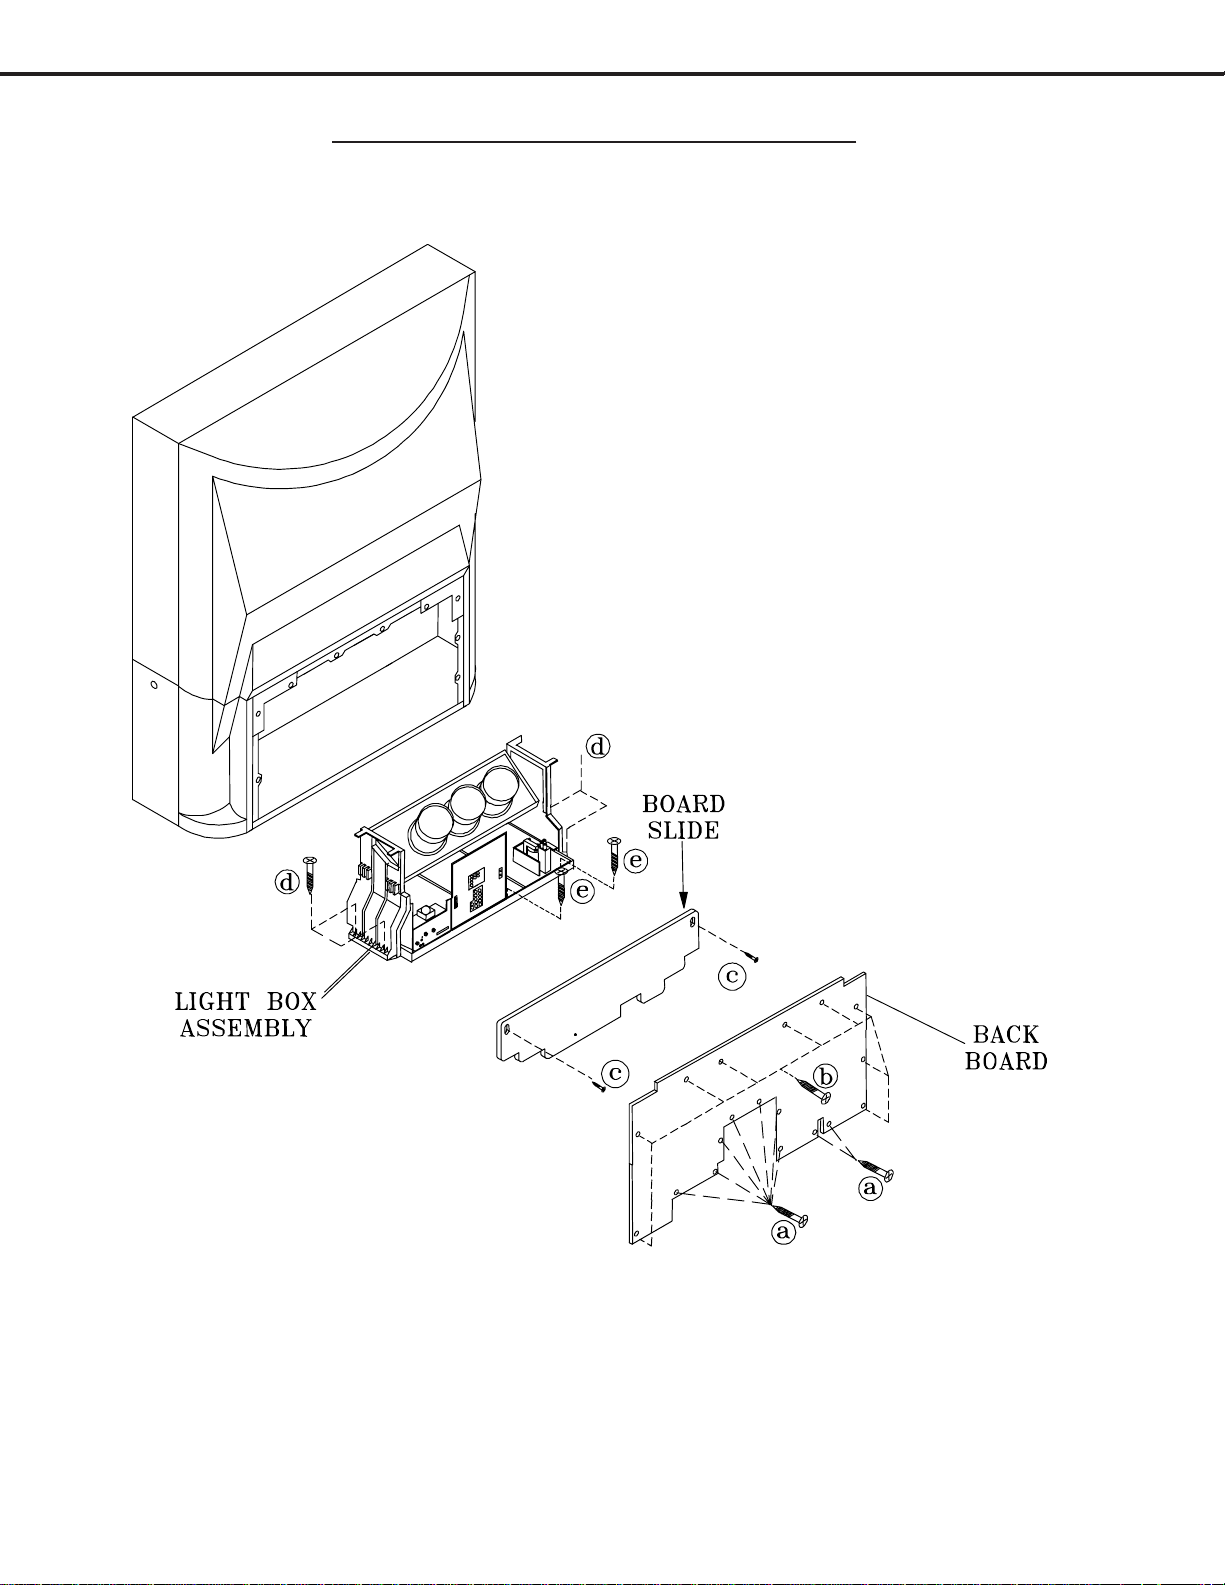
CABINET DISASSEMBLY (REAR VIEW)
WS-48515
*Refer to the Parts List for Part Numbers
Rear Cabinet Disassembly
1. Remove the Back Board by removing 18 screws (a).
2. Remove the Back Cover by removing 8 screws (b).
3 Remove 4 screws (c) to remove the Board Slide.
4. Remove 4 screws (d) to remove the Board Shelves.
5. Remove screw (e) holding the chassis.
6. Remove 4 screws (f) securing the Light Box Assembly.
7. Be certain that all cables and connectors between the Light Box Assembly and external items are
disconnected (e.g. speaker plugs, etc.), including the USB and 1394 connectors from the Card Reader to
the DM.
8. Slide the Light Box Assembly from the cabinet.
Page 8
Page 9
MODELS: WS-48515 / WS-55515 / WS-55615 / WS-55815 / WS-65515 / WS-65615 / WS-65815 / WS-73615
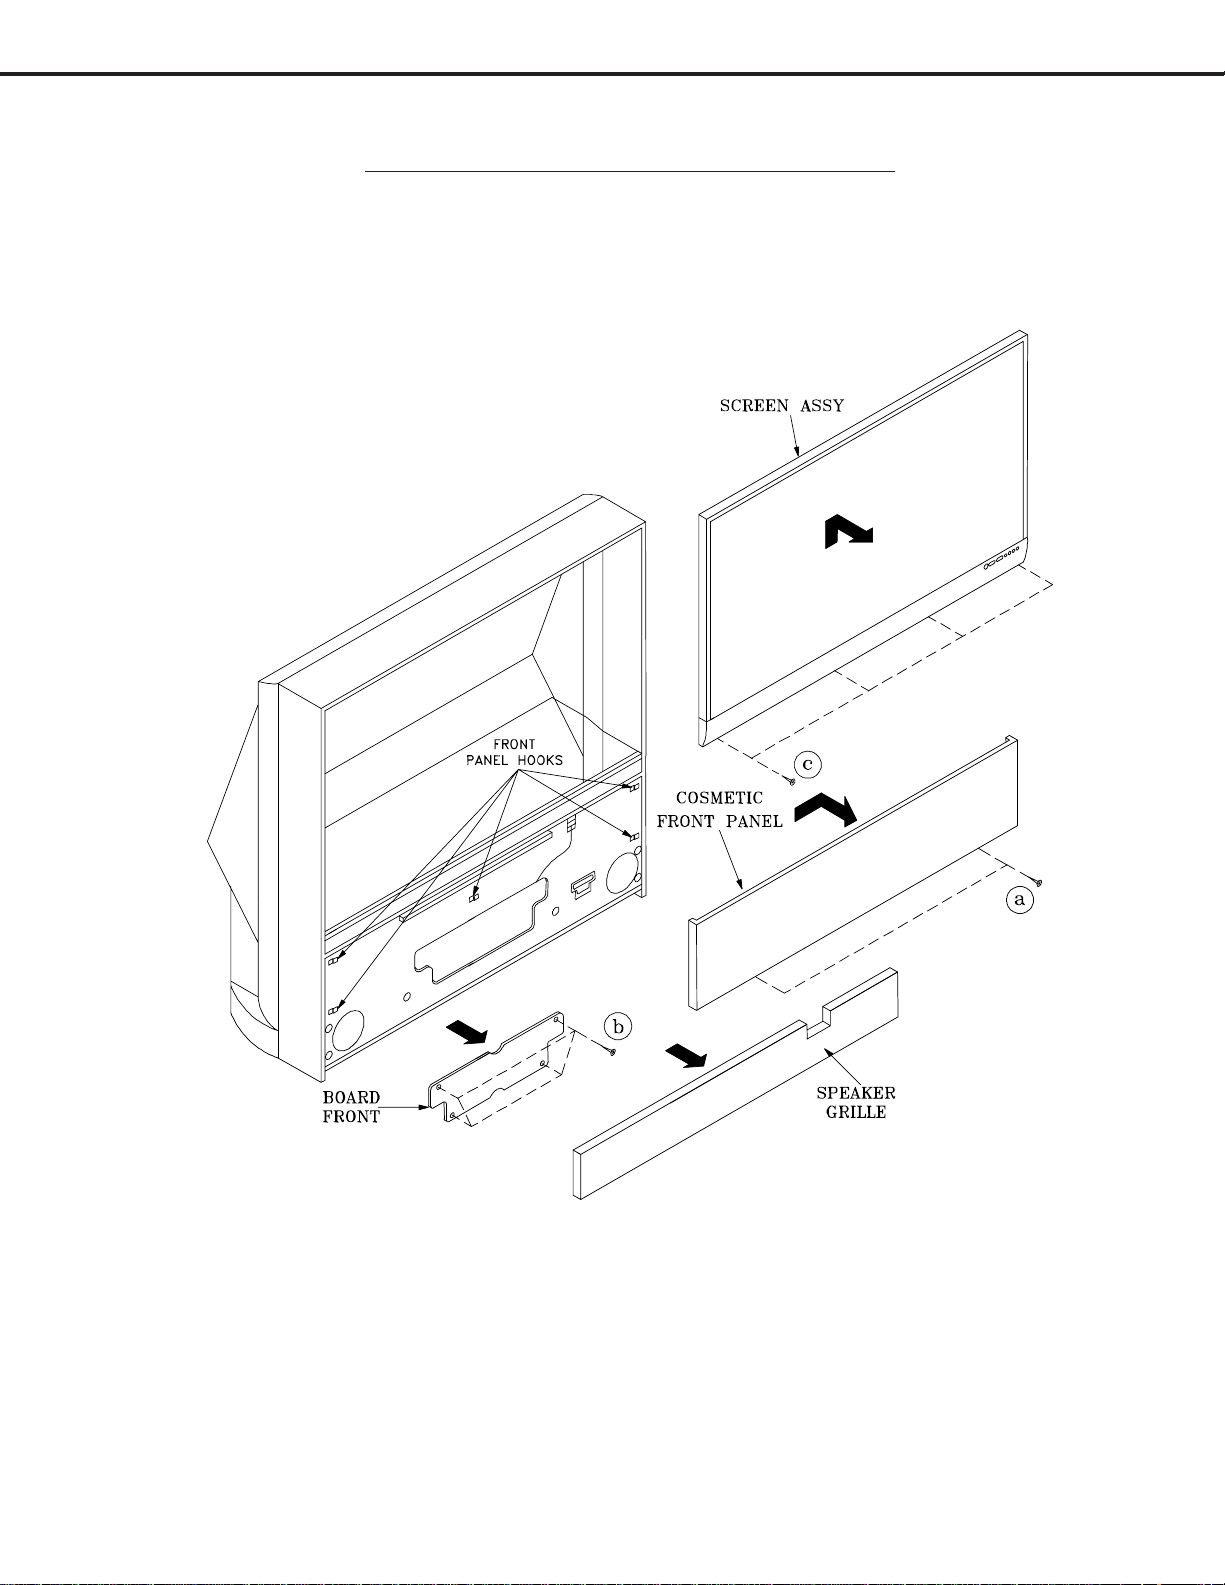
CABINET DISASSEMBLY (FRONT VIEW)
WS-55515 / WS-65515 / WS-55615 / WS-65615
*Refer to the Parts List for Part Numbers
Front Cabinet Disassembly
1. Remove the Speaker Grille by pulling forward.
2. Remove the Board Front by removing 6 screws (a).
3. Remove the 5 screws (b) holding the Screen Assembly.
4. Unplug the cables to the Control Panel and the Front Panel Inputs.
4. Lift the Screen Assembly up and away from the cabinet.
Page 9
Page 10
MODELS: WS-48515 / WS-55515 / WS-55615 / WS-55815 / WS-65515 / WS-65615 / WS-65815 / WS-73615
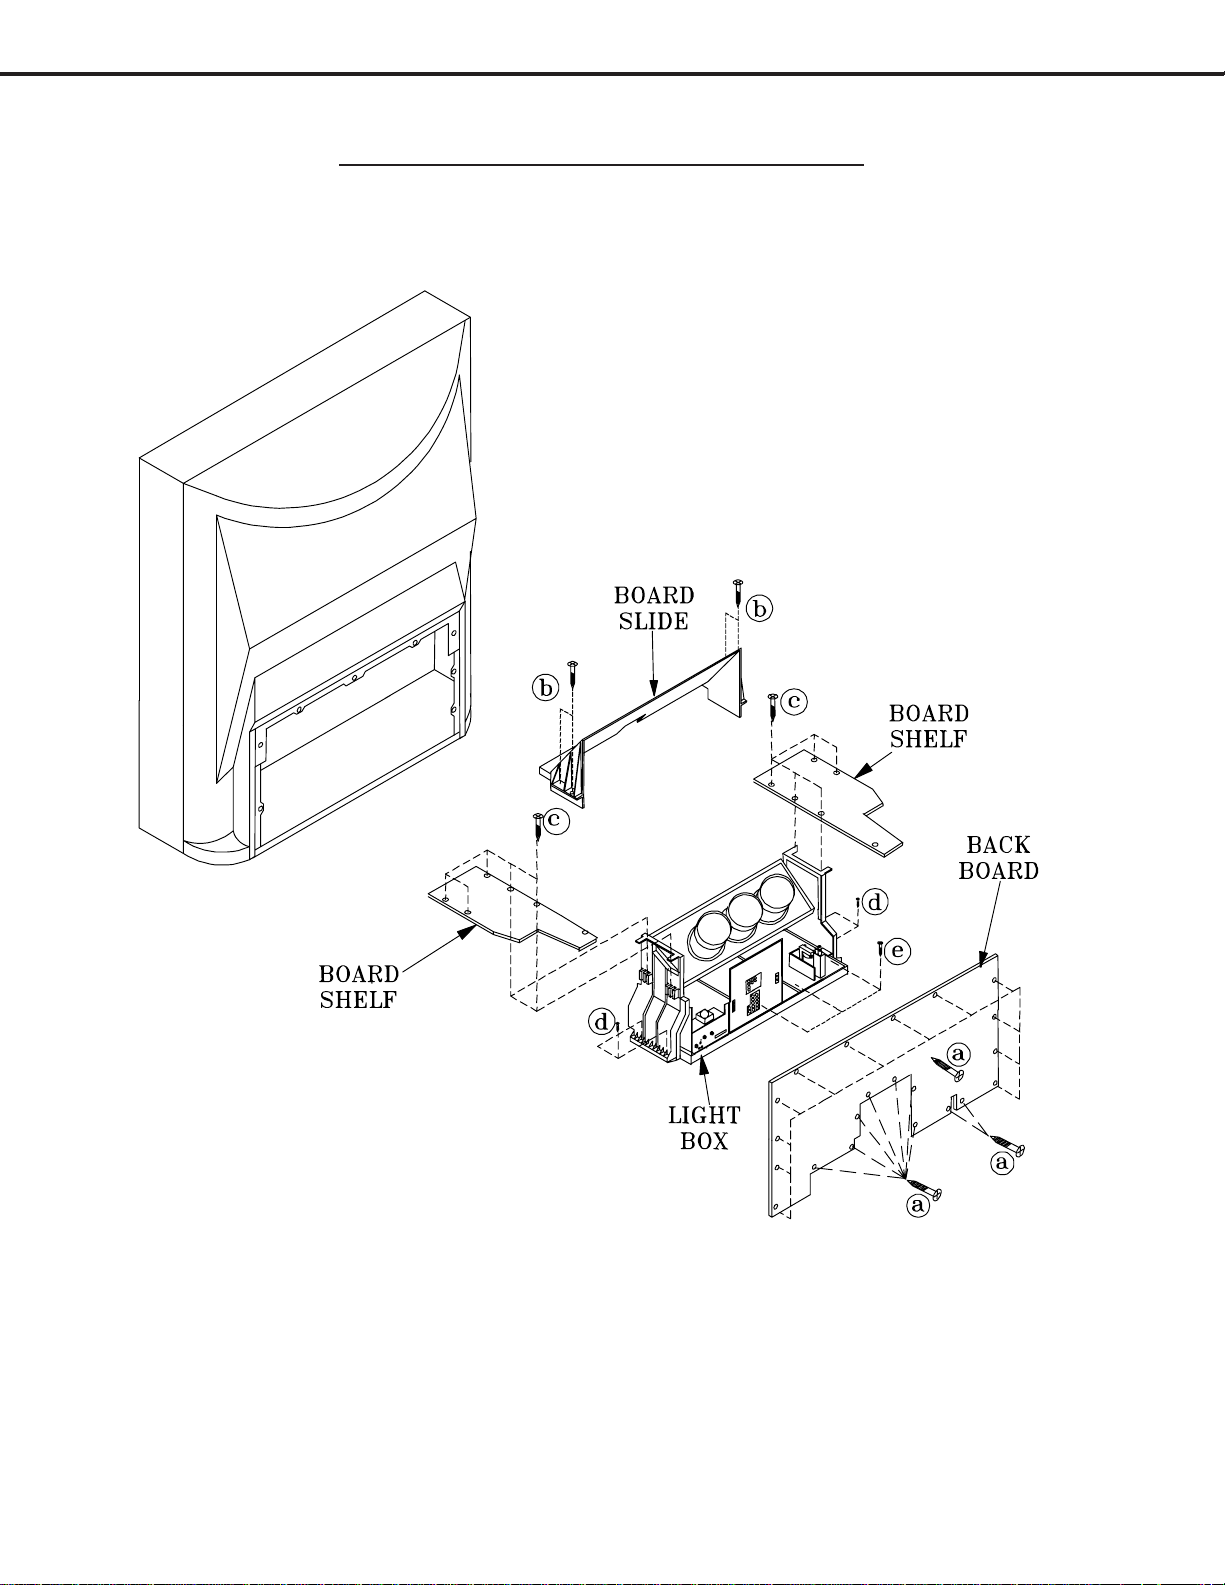
CABINET DISASSEMBLY (REAR VIEW)
WS-55515 / WS-65515 / WS-55615 / WS-65615
*Refer to the Parts List for Part Numbers
Rear Cabinet Disassembly
1. Remove 9 screws (a) and 6 screws (b) holding the Back Board.
2. Remove 4 screws (c) holding the Board Slide
3. Remove the 4 screws (d) holding each Board Shelf.
4. Remove 1 screw (f) holding the chassis.
5. Remove 4 screws (e) securing the Light Box Assembly.
6. Be certain that all cables and connectors between the Light Box Assembly and external items are
disconnected (e.g. speaker plugs, etc.), including the USB and 1394 cables from the Card Reader.
7. Slide the Light Box out the rear of the Cabinet.
Page 10
Page 11
MODELS: WS-48515 / WS-55515 / WS-55615 / WS-55815 / WS-65515 / WS-65615 / WS-65815 / WS-73615
CABINET DISASSEMBLY (FRONT VIEW)
WS-55815
*Refer to the Parts List for Part Numbers
Front Cabinet Disassembly
1. Remove the Speaker Grille by pulling forward.
2. Remove 2 screws (a) securing the Front Panel.
3. Slide the Front Panel 1 inch to the right, then pull away from the TV.
4. Remove 4 screws (b) to remove the Board Front.
5. Unplug the the connectors to the Control Panel.
6. Remove the 4 screws (c) securing the Screen Assembly.
7. Pull screen bottom away from cabinet 15deg, then up and away from the cabinet.
Page 11
Page 12
MODELS: WS-48515 / WS-55515 / WS-55615 / WS-55815 / WS-65515 / WS-65615 / WS-65815 / WS-73615
CABINET DISASSEMBLY (REAR VIEW)
WS-55815
*Refer to the Parts List for Part Numbers
Rear Cabinet Disassembly
1. Remove 21 screws (a) holding the Back Board.
2. Remove 4 screws (b) holding the Board Slide
3. Remove the 5 screws (c) holding each Board Shelf.
4. Remove 4 screws (d) and 3 screws (e) securing the Light Box Assembly.
5. Be certain that all cables and connectors between the Light Box Assembly and external items are
disconnected (e.g. speaker plugs, etc.), including the USB and 1394 cables from the Card Reader..
6. Slide the Light Box out the rear of the Cabinet.
Page 12
Page 13
MODELS: WS-48515 / WS-55515 / WS-55615 / WS-55815 / WS-65515 / WS-65615 / WS-65815 / WS-73615
CABINET DISASSEMBLY (FRONT VIEW)
WS-65815
*Refer to the Parts List for Part Numbers
Front Cabinet Disassembly
1. Remove the Speaker Grille by pulling forward.
2. Remove 2 screws (a) securing the Front Panel.
3. Slide the Front Panel 1 inch to the right, then pull away from the TV.
4. Remove 6 screws (b) to remove the Board Front.
5. Unplug the connectors to the Screen Assembly.
6. Remove the 4 screws (c) securing the Screen Assembly.
7. Pull screen bottom away from cabinet 15deg, then up and away from the cabinet.
Page 13
Page 14
MODELS: WS-48515 / WS-55515 / WS-55615 / WS-55815 / WS-65515 / WS-65615 / WS-65815 / WS-73615
CABINET DISASSEMBLY (REAR VIEW)
WS-65815
*Refer to the Parts List for Part Numbers
Rear Cabinet Disassembly
1. Remove 9 screws (a) and 9 screws (b) holding the Back Board.
2. Remove the 2 screws (c) holding the Board Slide.
3. Remove the 3 screws (d) and 2 screws (e).
Page 14
Page 15
MODELS: WS-48515 / WS-55515 / WS-55615 / WS-55815 / WS-65515 / WS-65615 / WS-65815 / WS-73615
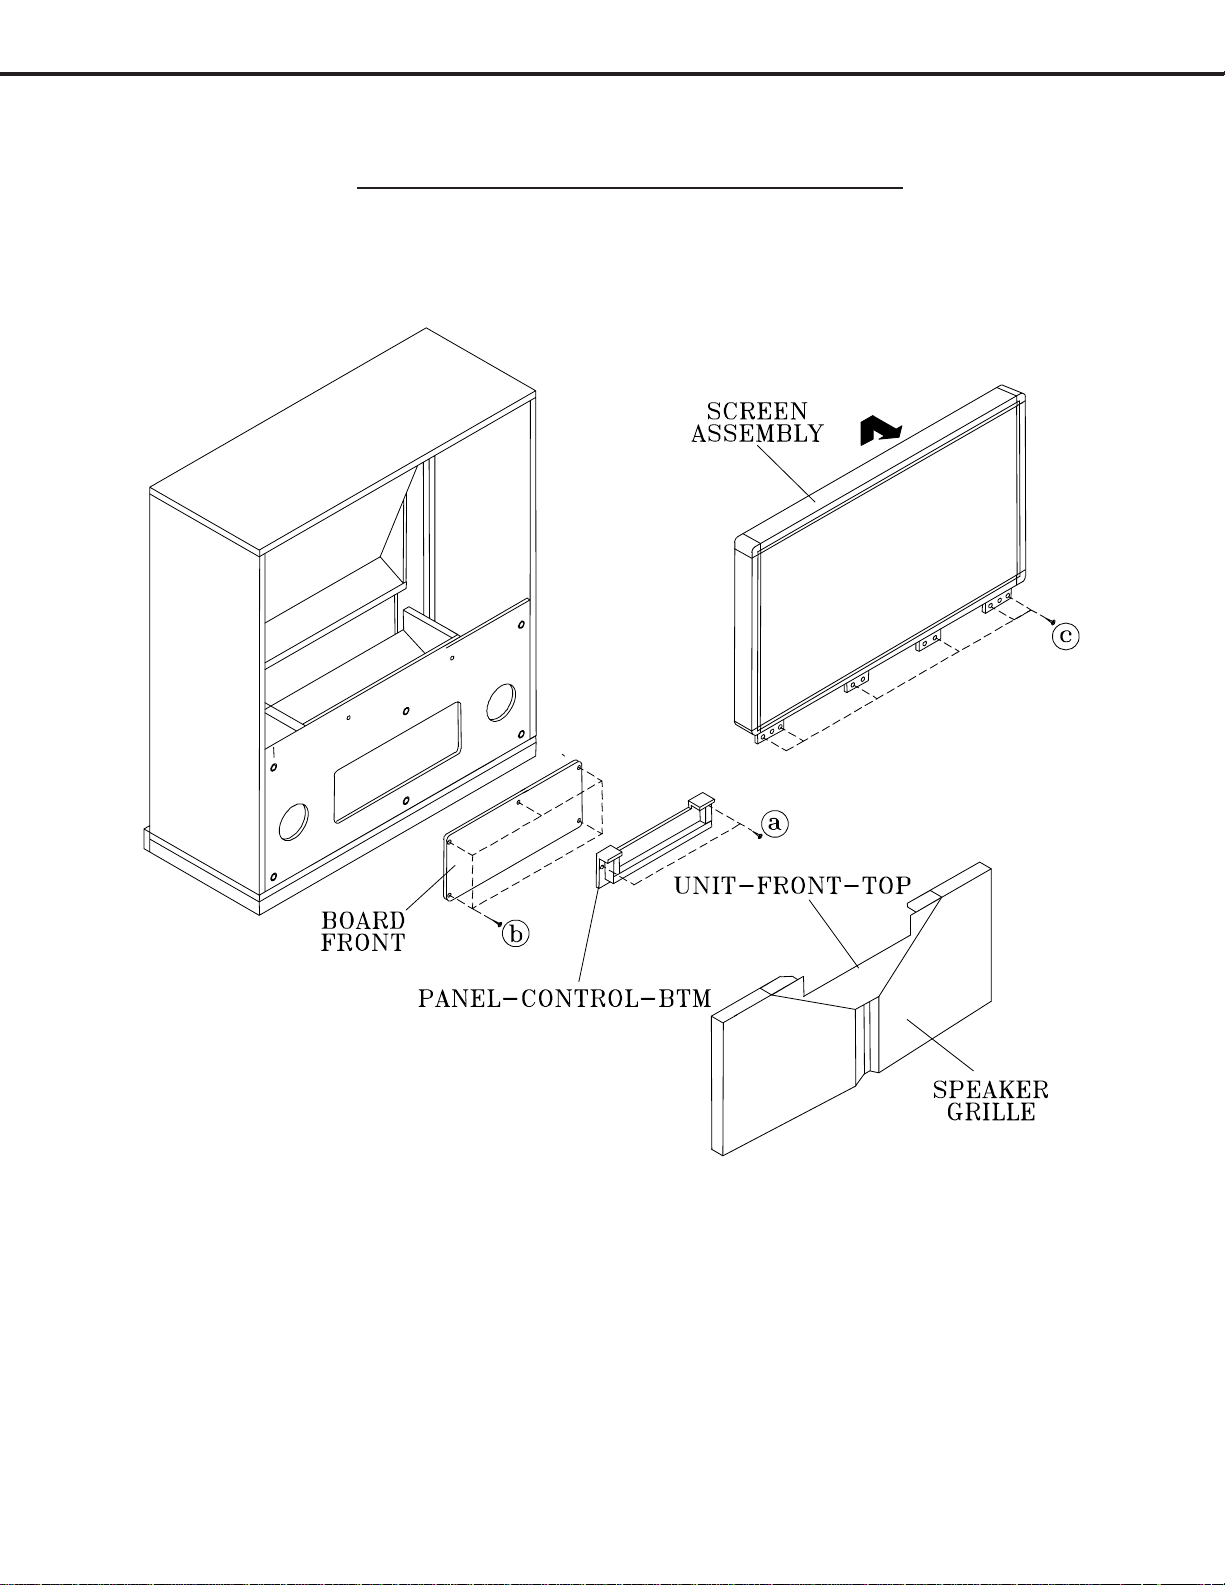
CABINET DISASSEMBLY (FRONT VIEW)
WS-73615
*Refer to the Parts List for Part Numbers
Front Cabinet Disassembly
1. Remove the Speaker Grille by pulling forward.
2. Remove 2 screws (a) securing the PANEL-CONTROL-BTM
3. Remove 5 screws (b) to remove the Board Front.
4. Remove the 6 screws (c) securing the Screen Assembly.
5. Lift the Screen Assembly up and away from the cabinet.
Page 15
Page 16
MODELS: WS-48515 / WS-55515 / WS-55615 / WS-55815 / WS-65515 / WS-65615 / WS-65815 / WS-73615
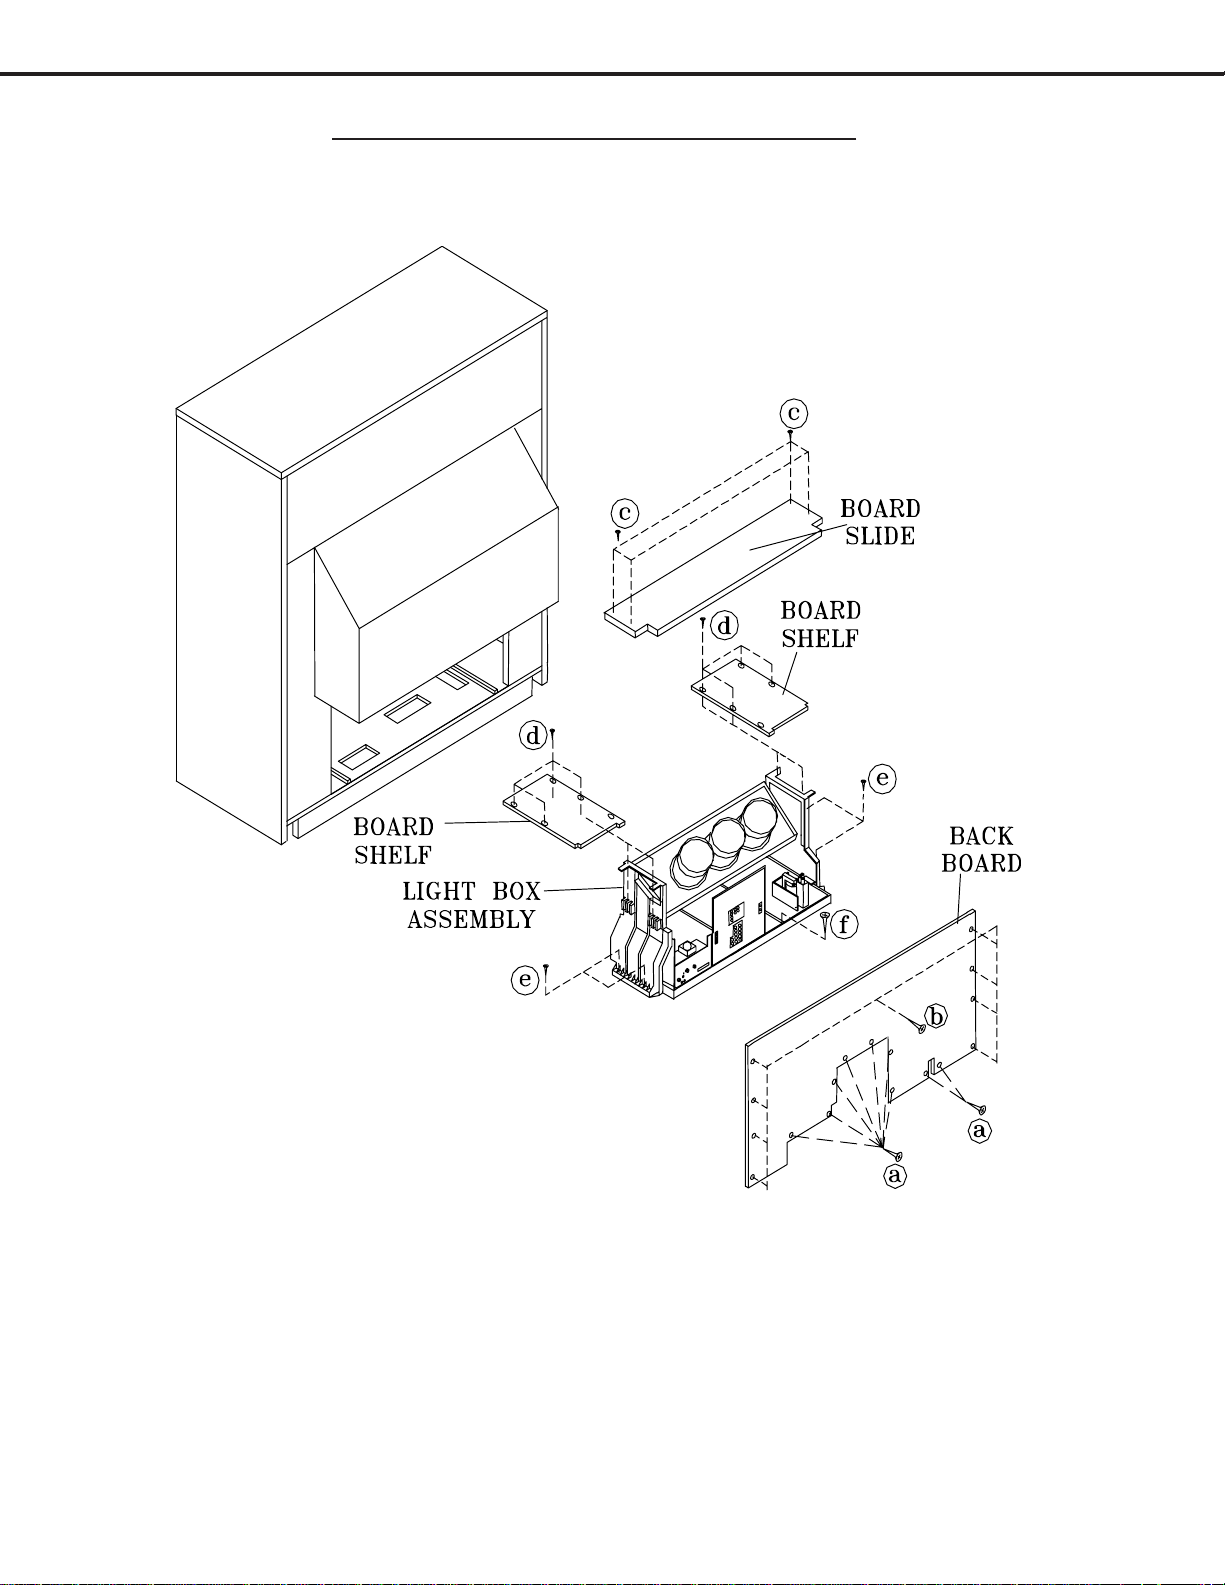
CABINET DISASSEMBLY (REAR VIEW)
WS-73615
*Refer to the Parts List for Part Numbers
Rear Cabinet Disassembly
1. Remove 9 screws (a), 6 screws(b) holding the Back Board.
2. Remove the 4 screws (c) holding the Board Slide.
3. Rmove 4 screws (d) securing each Board Shelf.
3. Remove the 4 screws (e) and a screw (f) securing the Light Box Assembly.
4. Disconnect cabling to the front panel (Control Panel, Speakers, Inputs, etc.), including the USB and 1394
cables from the Card Reader.
4. Slide the Light Box out the rear of the Cabinet.
Page 16
Page 17
MODELS: WS-48515 / WS-55515 / WS-55615 / WS-55815 / WS-65515 / WS-65615 / WS-65815 / WS-73615
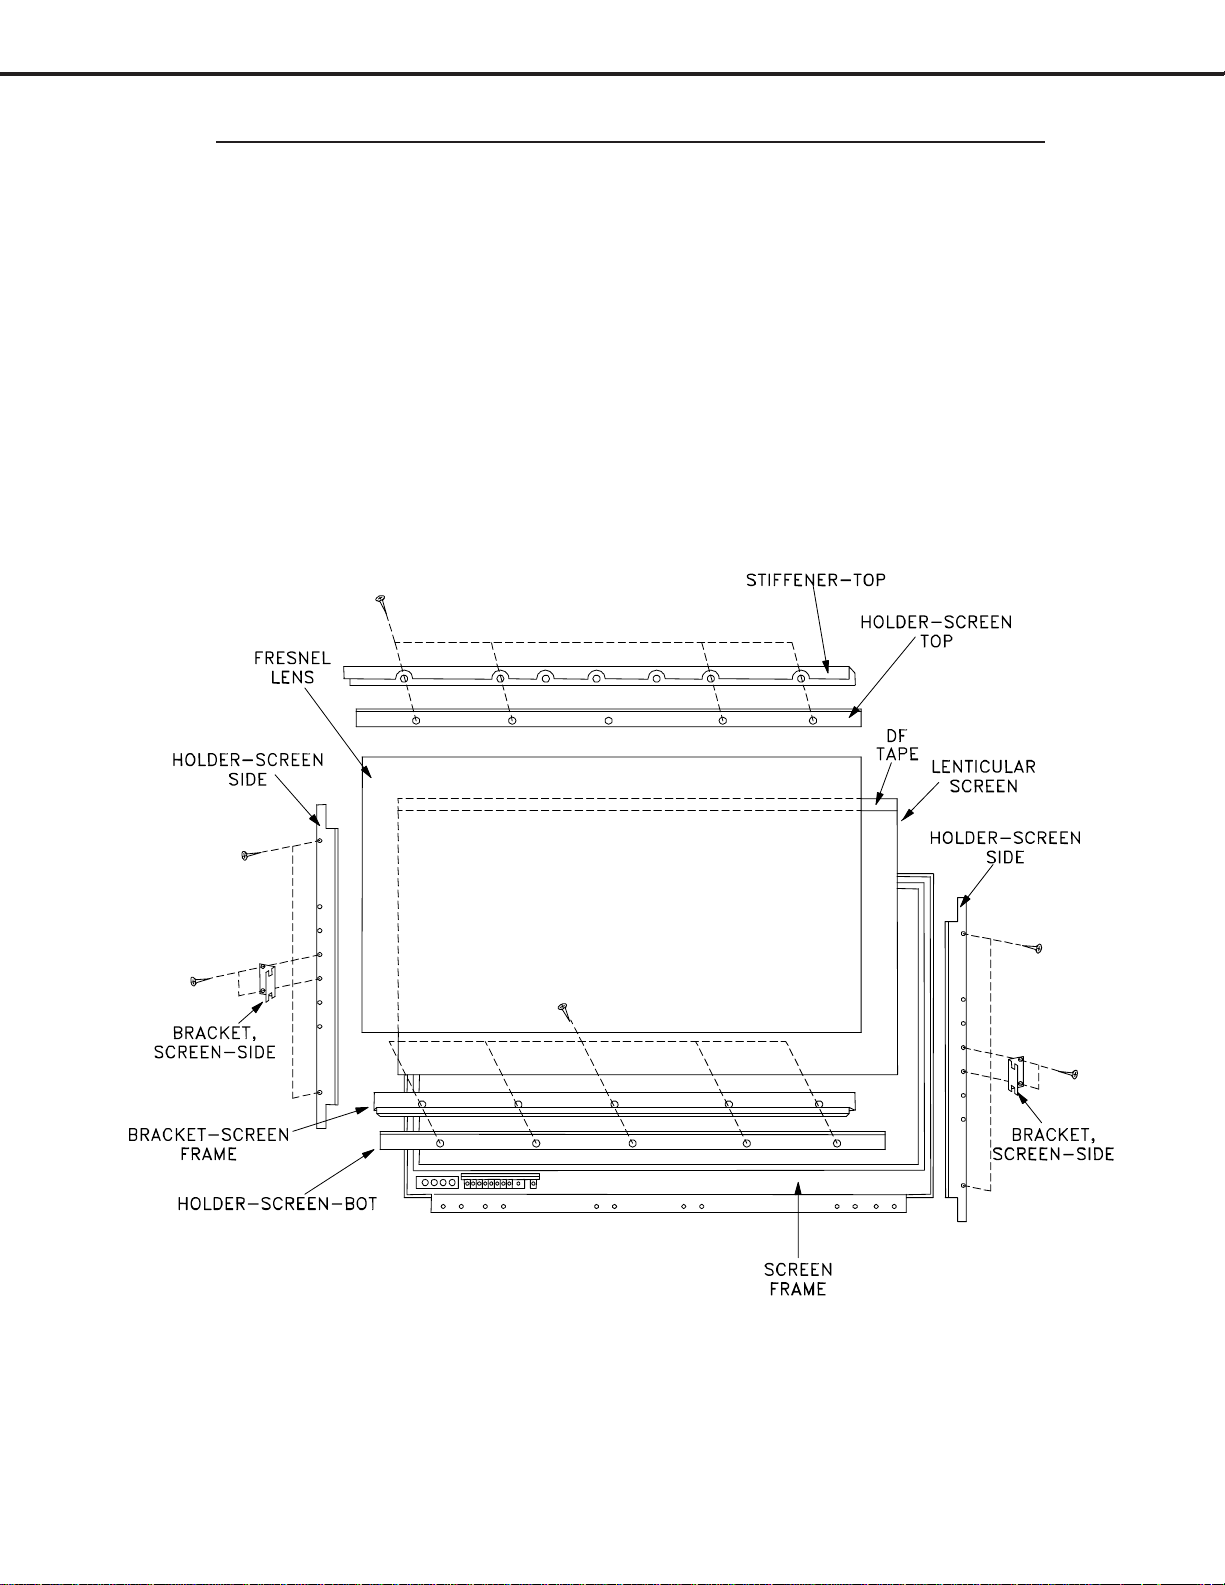
SERVICING THE LENTICULAR SCREEN AND FRESNEL LENS
CAUTION: Wear gloves when handling the Lenticular Screen and Fresnel Lens.
This prevents cuts and finger prints. Do not place Fresnel Lens in the sun.
This may cause fire and heat related injuries.
WS-48515
Lenticular Screen and Fresnel Lens Removal
1. Remove the screen assembly shown in the Cabinet Disassembly procedure.
2. Remove the Top, Bottom and Side Screen Holders.
3. Carefully lift the Lenticular Screen and Fresnel Lens combination from the Screen Frame assembly.
Note: When separating the Lenticular Screen from the Fresnel Lens, use caution
while prying the Screen and Lens apart. Use a slot type screw driver, and
remove the pressure sensitive double sided tape.
Page 17
Page 18
MODELS: WS-48515 / WS-55515 / WS-55615 / WS-55815 / WS-65515 / WS-65615 / WS-65815 / WS-73615
SERVICING THE LENTICULAR SCREEN AND FRESNEL LENS
WS-55515 / WS-65515
CAUTION: Wear gloves when handling the Lenticular Screen and Fresnel Lens.
This prevents cuts and finger prints. Do not place Fresnel Lens in the sun.
This may cause fire and heat related injuries.
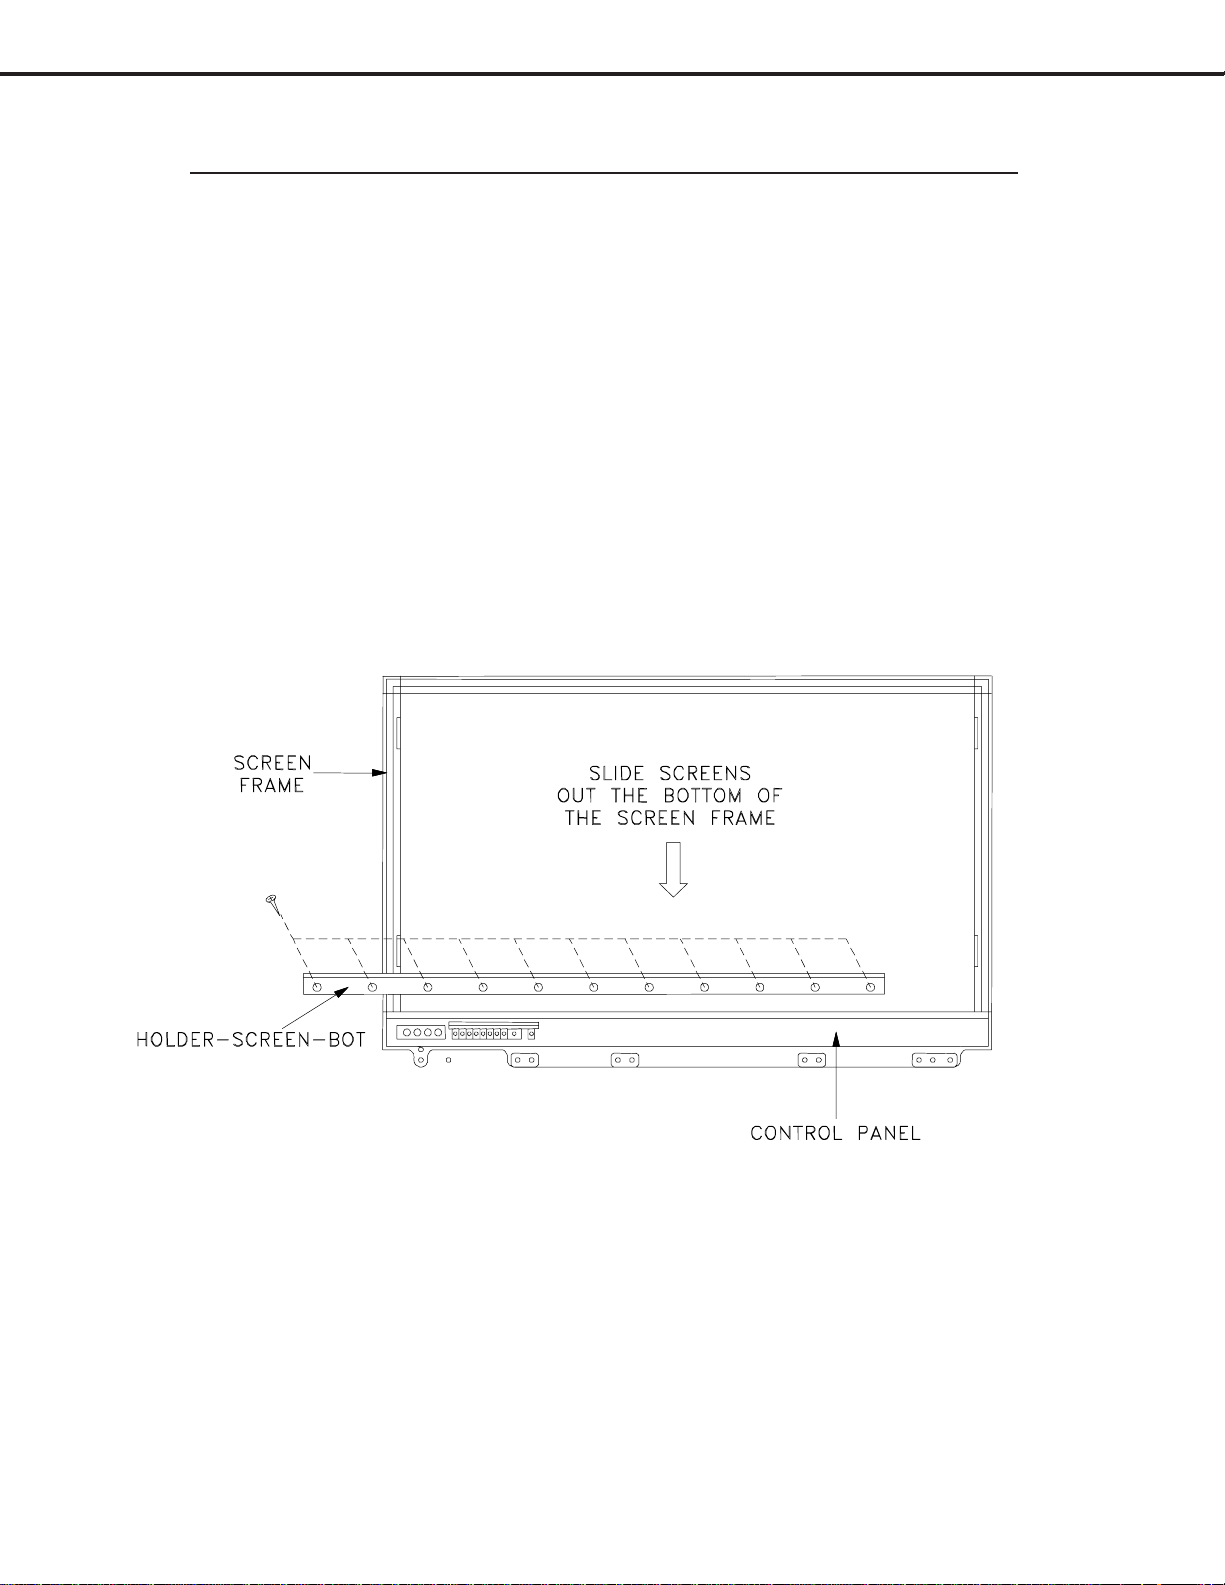
1b. Lenticular Screen and Fresnel Lens Removal
1. Remove the screen assembly as shown in the Cabinet Disassembly procedure.
2. Remove the HOLDER-SCREEN-BOTTOM.
3. Carefully slide the Lenticular Screen and Fresnel Lens combination from the upper Screen Frame Assembly.
Note: When separating the Lenticular Screen from the Fresnel Lens, use caution
while prying the Screen and Lens apart. Use a slot type screw driver, and
remove the pressure sensitive double sided tape.
1b. Installing the Fresnel Lens and Lenticular Screen
1. Insert the Lenticular Screen and Fresnel Lens combination into the upper Screen Frame.
2. Install the HOLDER-SCREEN-BOTTOM, install the end screws first. .
Page 18
Page 19
MODELS: WS-48515 / WS-55515 / WS-55615 / WS-55815 / WS-65515 / WS-65615 / WS-65815 / WS-73615
SERVICING THE LENTICULAR SCREEN AND FRESNEL LENS
CAUTION: Wear gloves when handling the Lenticular Screen and Fresnel Lens.
This prevents cuts and finger prints. Do not place Fresnel Lens in the sun.
This may cause fire and heat related injuries.
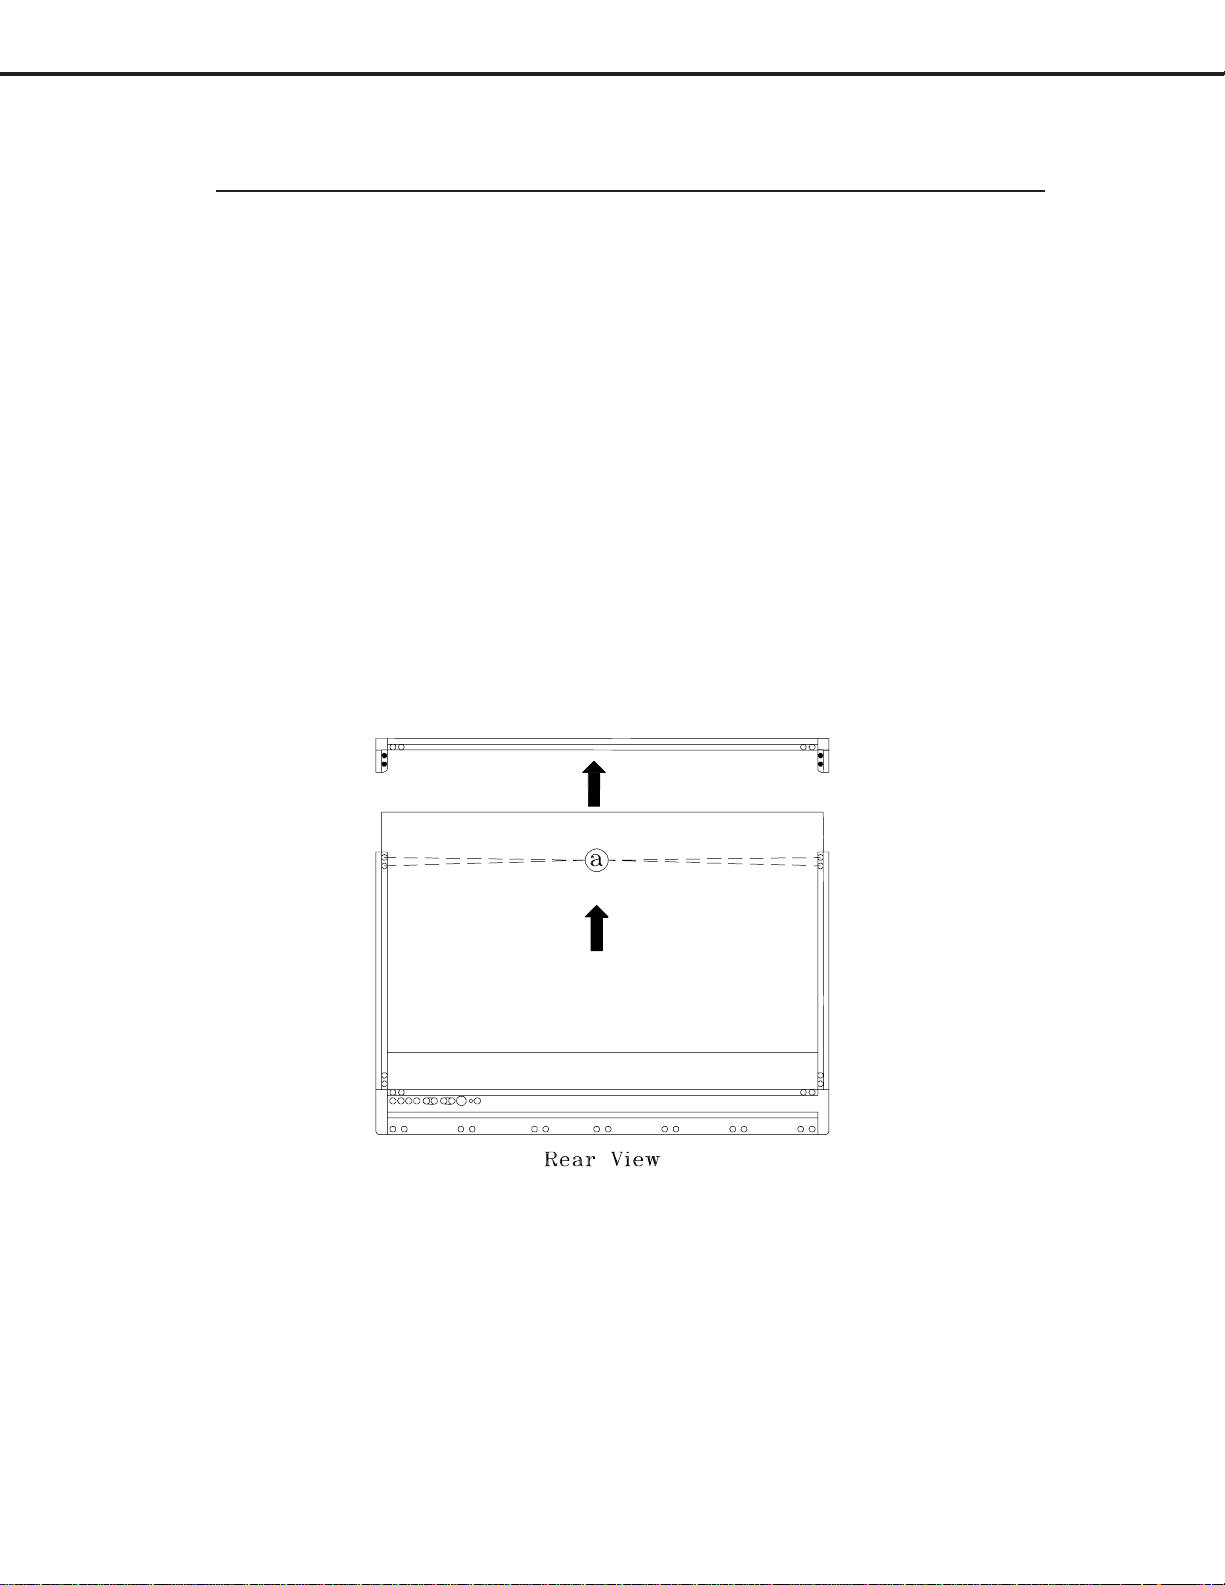
WS-55815 / WS-65815
Lenticular Screen and Fresnel Lens Removal
1. Remove the screen assembly shown in the Cabinet Disassembly procedure.
2. Remove the Screen Frame top section by removing 4 screws (a).
3. Carefully grasp the Lenticular Screen and Fresnel Lens combination and pull upward and out
of the Screen Frame Assembly.
Note: When separating the Lenticular Screen from the Fresnel Lens, use caution
while prying the Screen and Lens apart. Use a slot type screw driver, and
remove the pressure sensitive double sided tape.
Page 19
Page 20
MODELS: WS-48515 / WS-55515 / WS-55615 / WS-55815 / WS-65515 / WS-65615 / WS-65815 / WS-73615
SERVICING THE LENTICULAR SCREEN AND FRESNEL LENS
CAUTION: Wear gloves when handling the Lenticular Screen and Fresnel Lens.
This prevents cuts and finger prints. Do not place Fresnel Lens in the sun.
This may cause fire and heat related injuries.
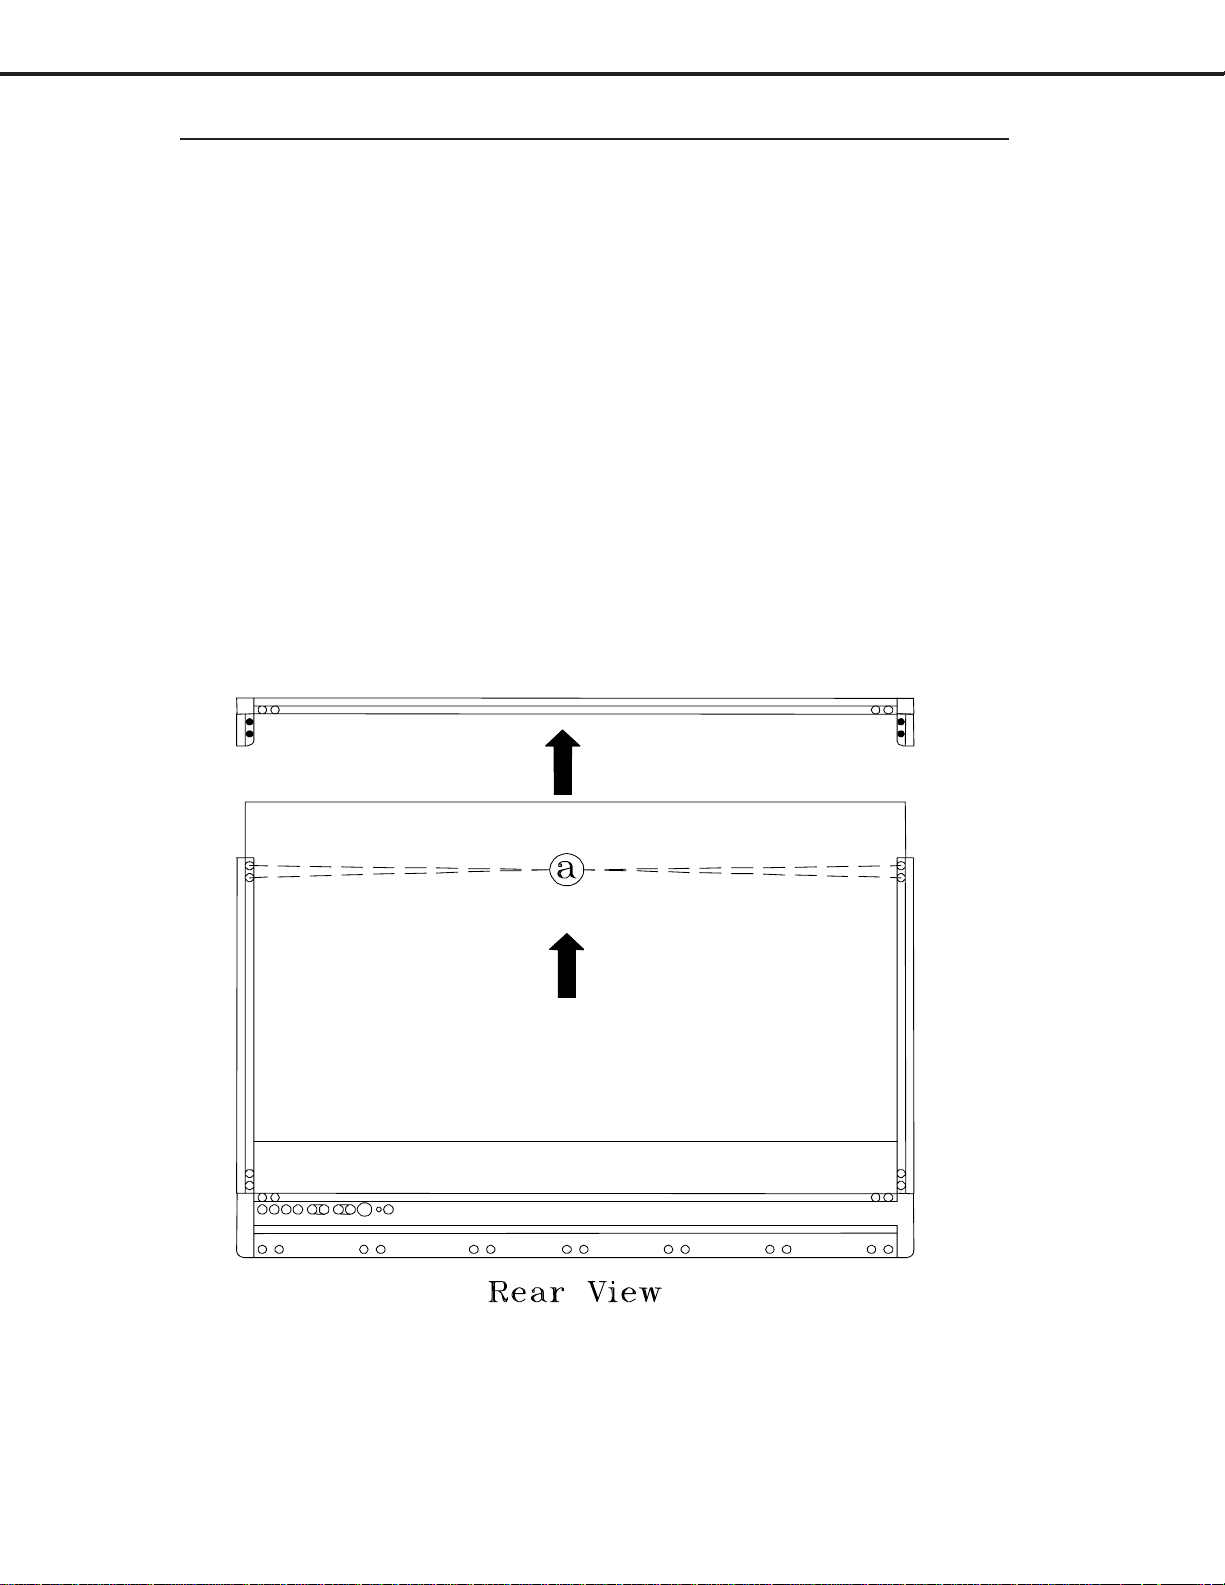
WS-55615 / WS-65615 / WS-73615
Lenticular Screen and Fresnel Lens Removal
1. Remove the screen assembly shown in the Cabinet Disassembly procedure.
2. Remove the Screen Frame top section by removing 4 screws (a).
3. Carefully grasp the Lenticular Screen and Fresnel Lens combination and pull upward and out
of the Screen Frame Assembly.
Note: When separating the Lenticular Screen from the Fresnel Lens, use caution
while prying the Screen and Lens apart. Use a slot type screw driver, and
remove the pressure sensitive double sided tape.
Page 20
Page 21
MODELS: WS-48515 / WS-55515 / WS-55615 / WS-55815 / WS-65515 / WS-65615 / WS-65815 / WS-73615
SERVICING THE LENTICULAR SCREEN AND FRESNEL LENS
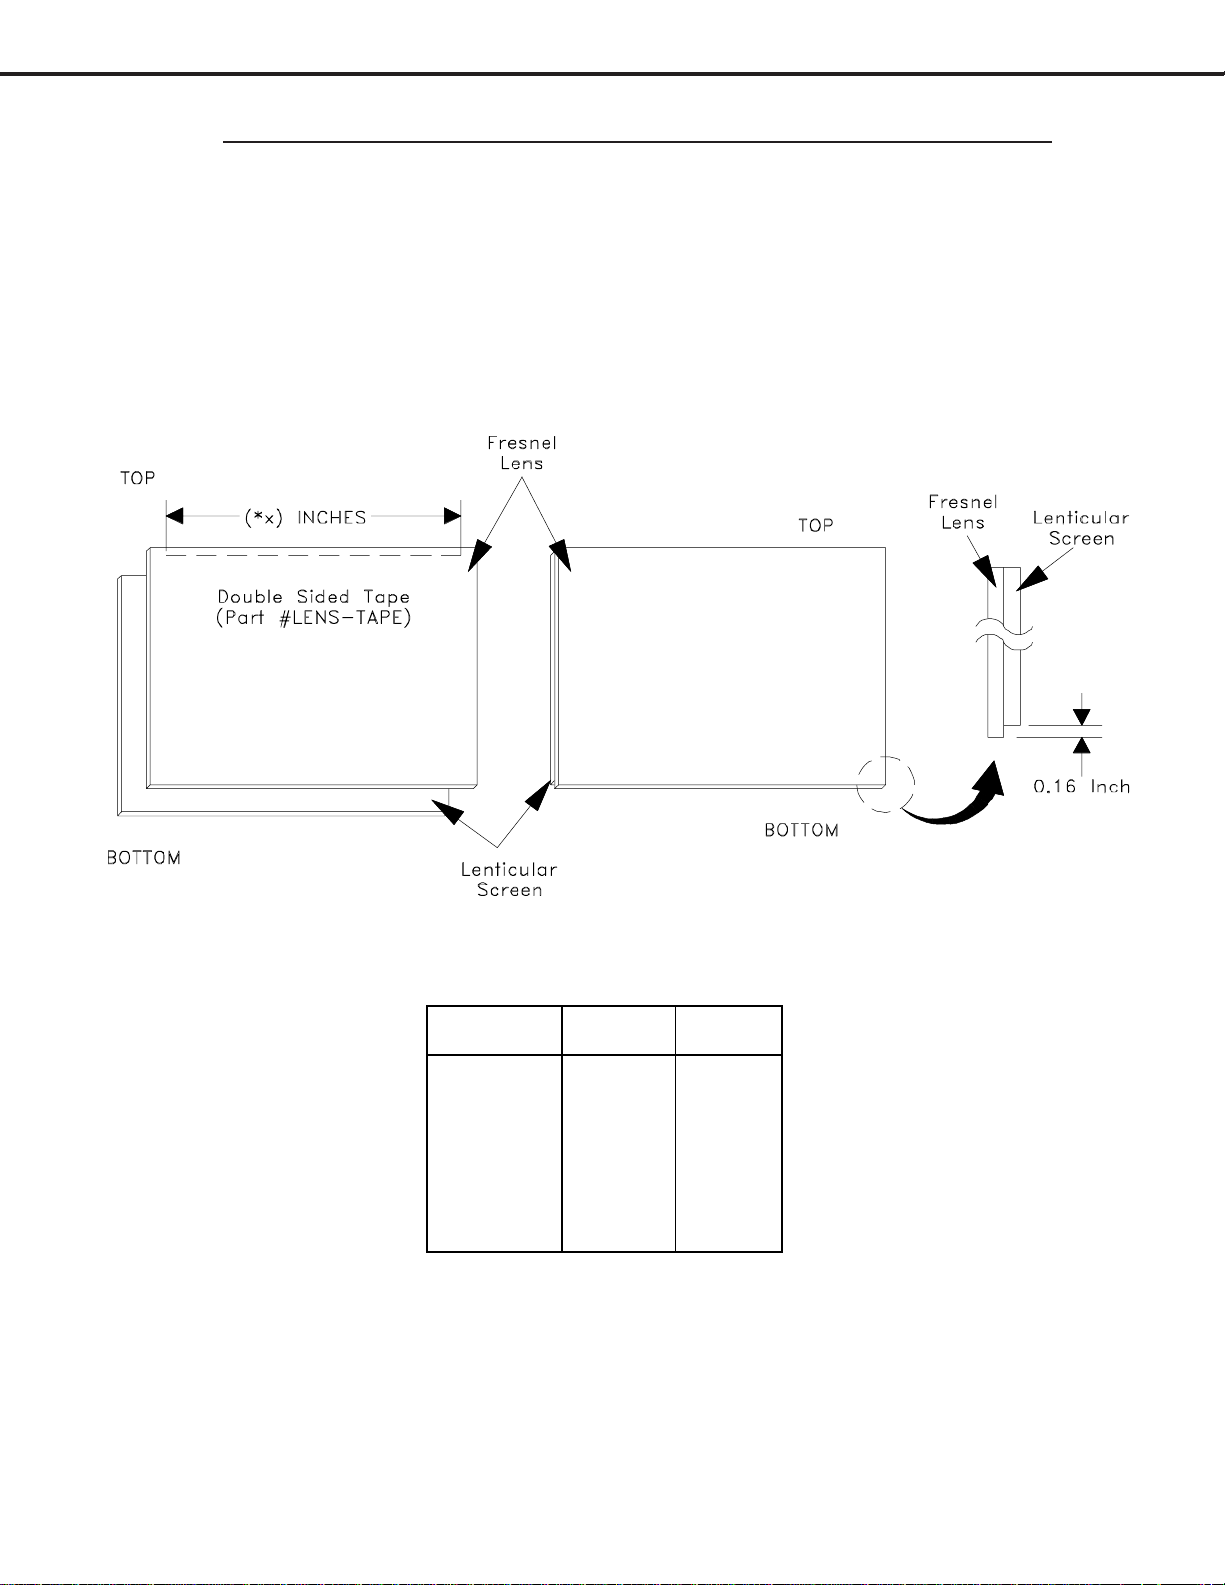
2. Lenticular Screen and Fresnel Lens Installation.
Note: Store the Lenticular Screen and Fresnel Lens in a cool dry place. High humidity may
deform the Lenticular Screen and Fresnel Lens.
1. Apply double coated tape (Part # LENS-TAPE) along the top front edge of the Fresnel Lens
as shown below. Refer to the Table below for proper tape length.
2. Place the Fresnel Lens on top of the Lenticular Screen and apply pressure at the top edge
to bond them together as shown below.
Model
WS-48515 48" 41.8"
WS-55515 55" 47.8"
WS-55615 " "
WS-55815 " "
WS-65515 65" 56.5"
WS-65615 " "
WS-65815 " "
WS-73615 73" 63.5"
Screen
Size
Tape
Length
Page 21
Page 22
MODELS: WS-48515 / WS-55515 / WS-55615 / WS-55815 / WS-65515 / WS-65615 / WS-65815 / WS-73615
SERVICING THE DIAMONDSHIELD™
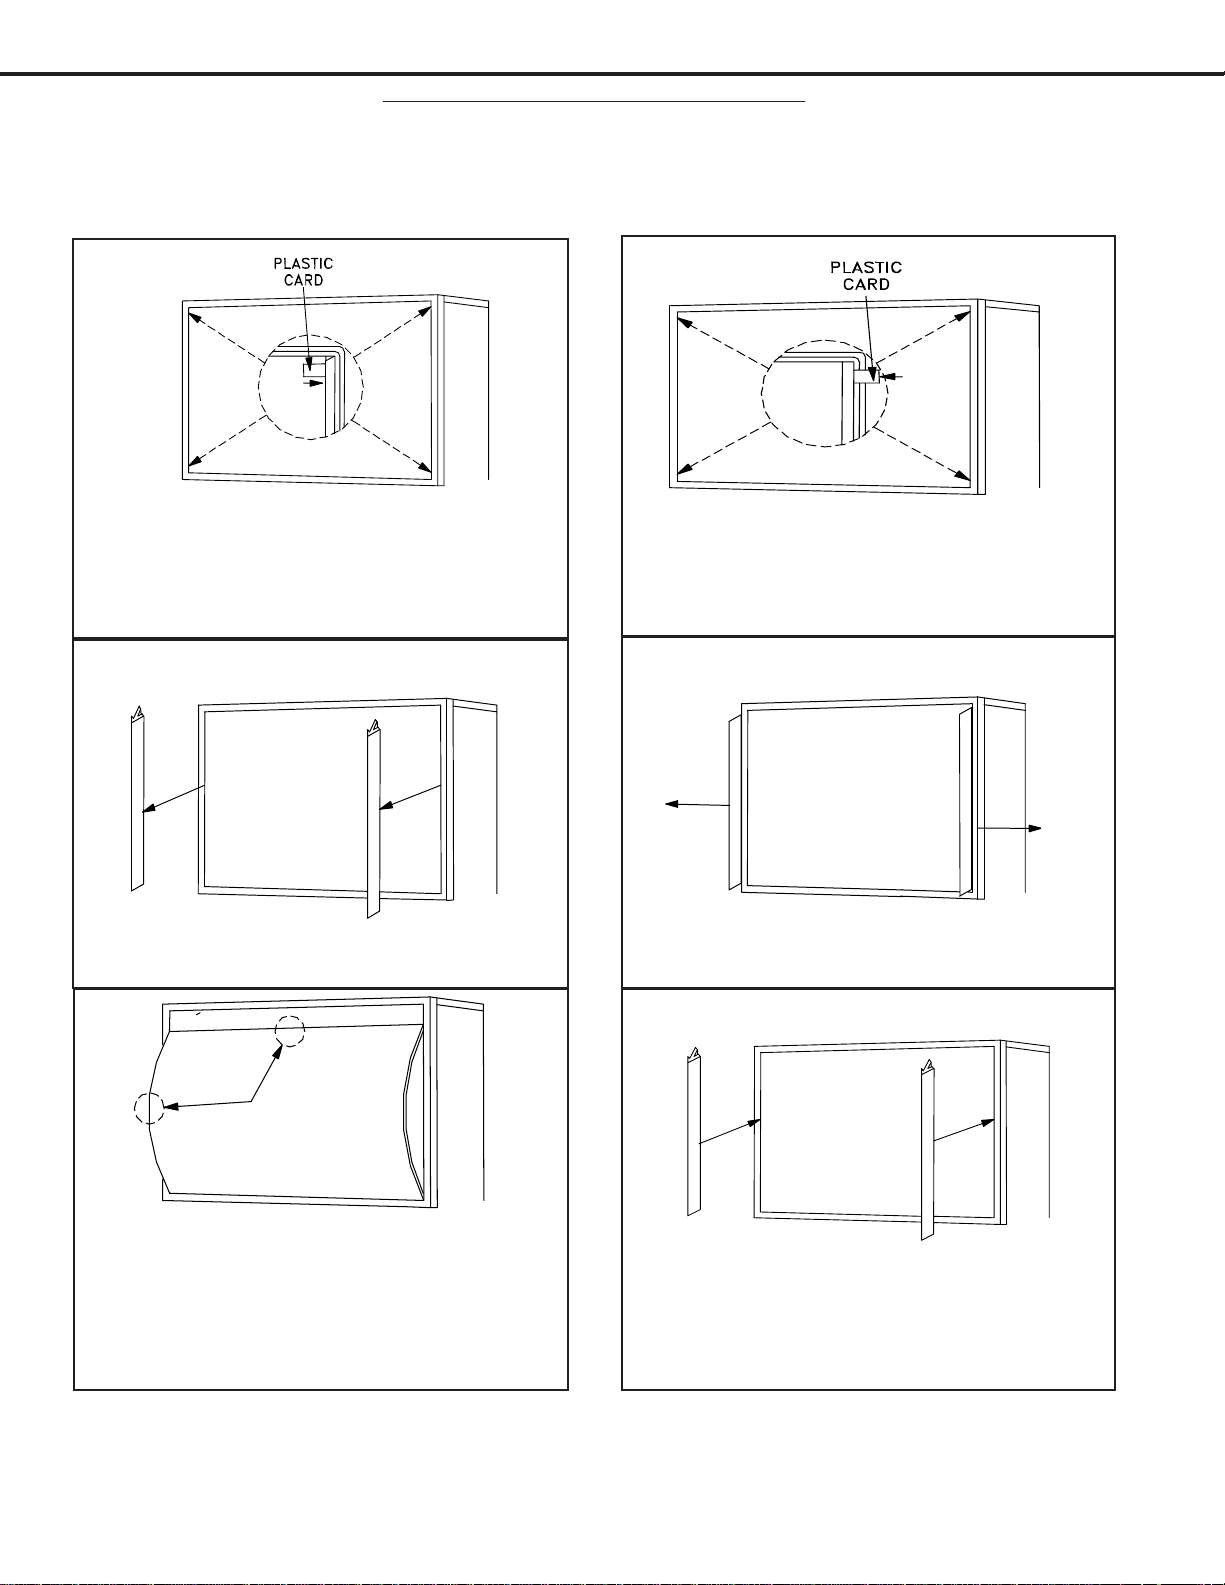
1. DiamondShield™ Removal Procedure
The appropriate disassembly procedure given below.
Note:
1. Gently insert a small plastic card (such as a
credit card or a plastic putty knfe) between the
DiamondShield™ and one end of the clip to pry
the clip loose.
WS-48515 / WS-55515 / WS-55815 / WS-65515 / WS-65815
Wear gloves when handling the DiamondShield™ to prevent finger prints.
WS-48515 (ONLY)
1. Gently insert a small plastic card (such as a credit
card or a plastic putty knfe) between the notch of
the bracket and one end of the clip to pry the clip
loose.
WS-55615 / WS-65615 / WS-73615
2. Remove both clips by pulling them toward you.
3. Carefully insert the small plastic card (or plastic
putty knife) into the gap at the side/center point
of the Shield and pull the Shield slightly away
from the unit. Place your hands at the points
shown and gently bow the Shield toward you
and remove from the unit.
2. DiamondShield™ Installation Procedure
*(See the Parts List for DiamondShield™ part numbers)
To install the DiamondShieldTM, reverse the above Removal Procedure.
2. From edge of trim, pull bracket outward to
open like a hinge.
4. Reinstall the two clips
Page 22
Page 23
MODELS: WS-48515 / WS-55515 / WS-55615 / WS-55815 / WS-65515 / WS-65615 / WS-65815 / WS-73615
CABINET SEPARATION
Mitsubishi 65 and 73 inch Projection TVs have been assembled in two pieces. These pieces may be separated for
easier delivery and setup. The cabinet separation procedure requires two persons and varies between models.
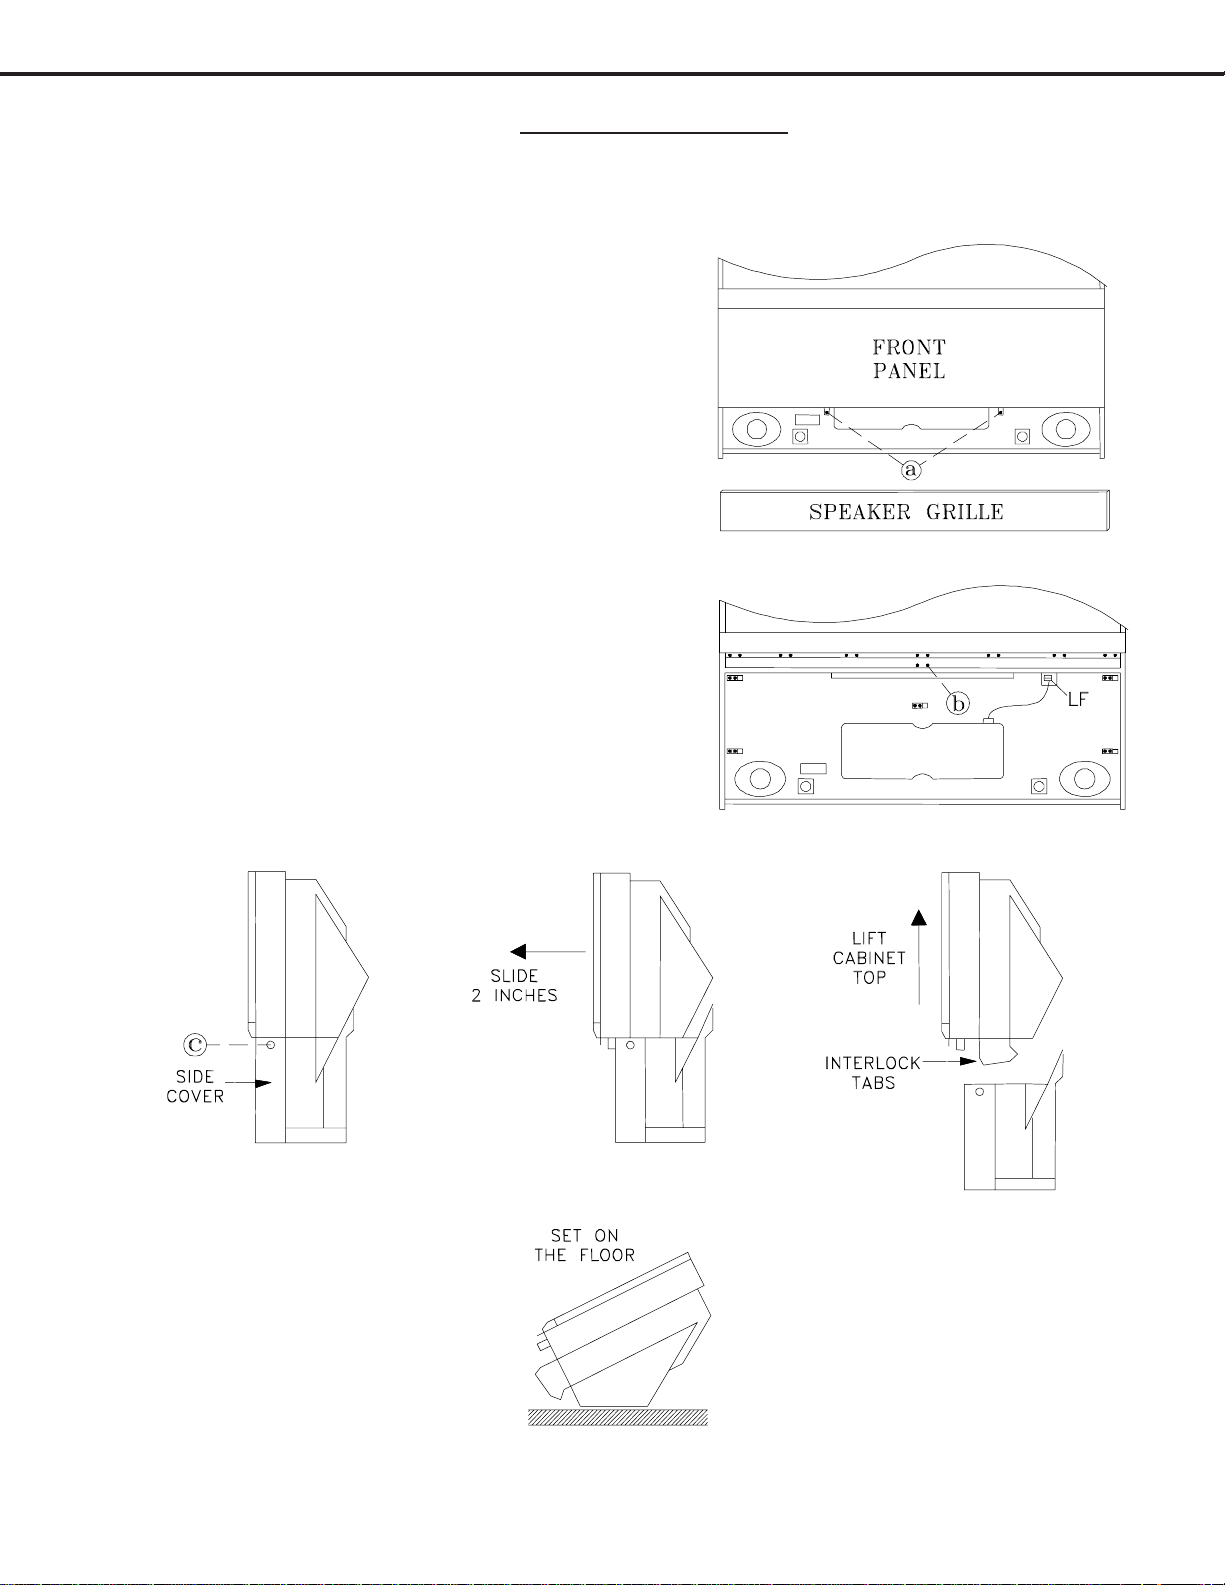
WS-65815 Cabinet Separation Procedure
Figure 1
1. Remove the Speaker Grille by pulling forward.
2. Remove the two Front Cover screws (a).
3. To remove the Front Cover, slide to the right
approximately 1”, then pull away from the TV.
Figure 2
4. Remove Screw (b) from the front board.
5. Disconnect the LF connector.
Figure 3
6. Remove the plastic cover on each side.
7. Remove screw (c) on each side of the cabinet.
Figure 4
8. Slide the top of the cabinet top forward.
Figure 5
9. Carefully lift the cabinet top until the interlock
tabs clear the cabinet bottom
Figure 6
10. Carefully place the cabinet top on the floor
as shown.
Figure 1
Figure 2
Figure 3
Figure 4
Figure 5
Figure 6
Page 23
Page 24
MODELS: WS-48515 / WS-55515 / WS-55615 / WS-55815 / WS-65515 / WS-65615 / WS-65815 / WS-73615
CABINET SEPARATION PROCEDURE
(WS-65515 / WS-65615 / WS-737615)
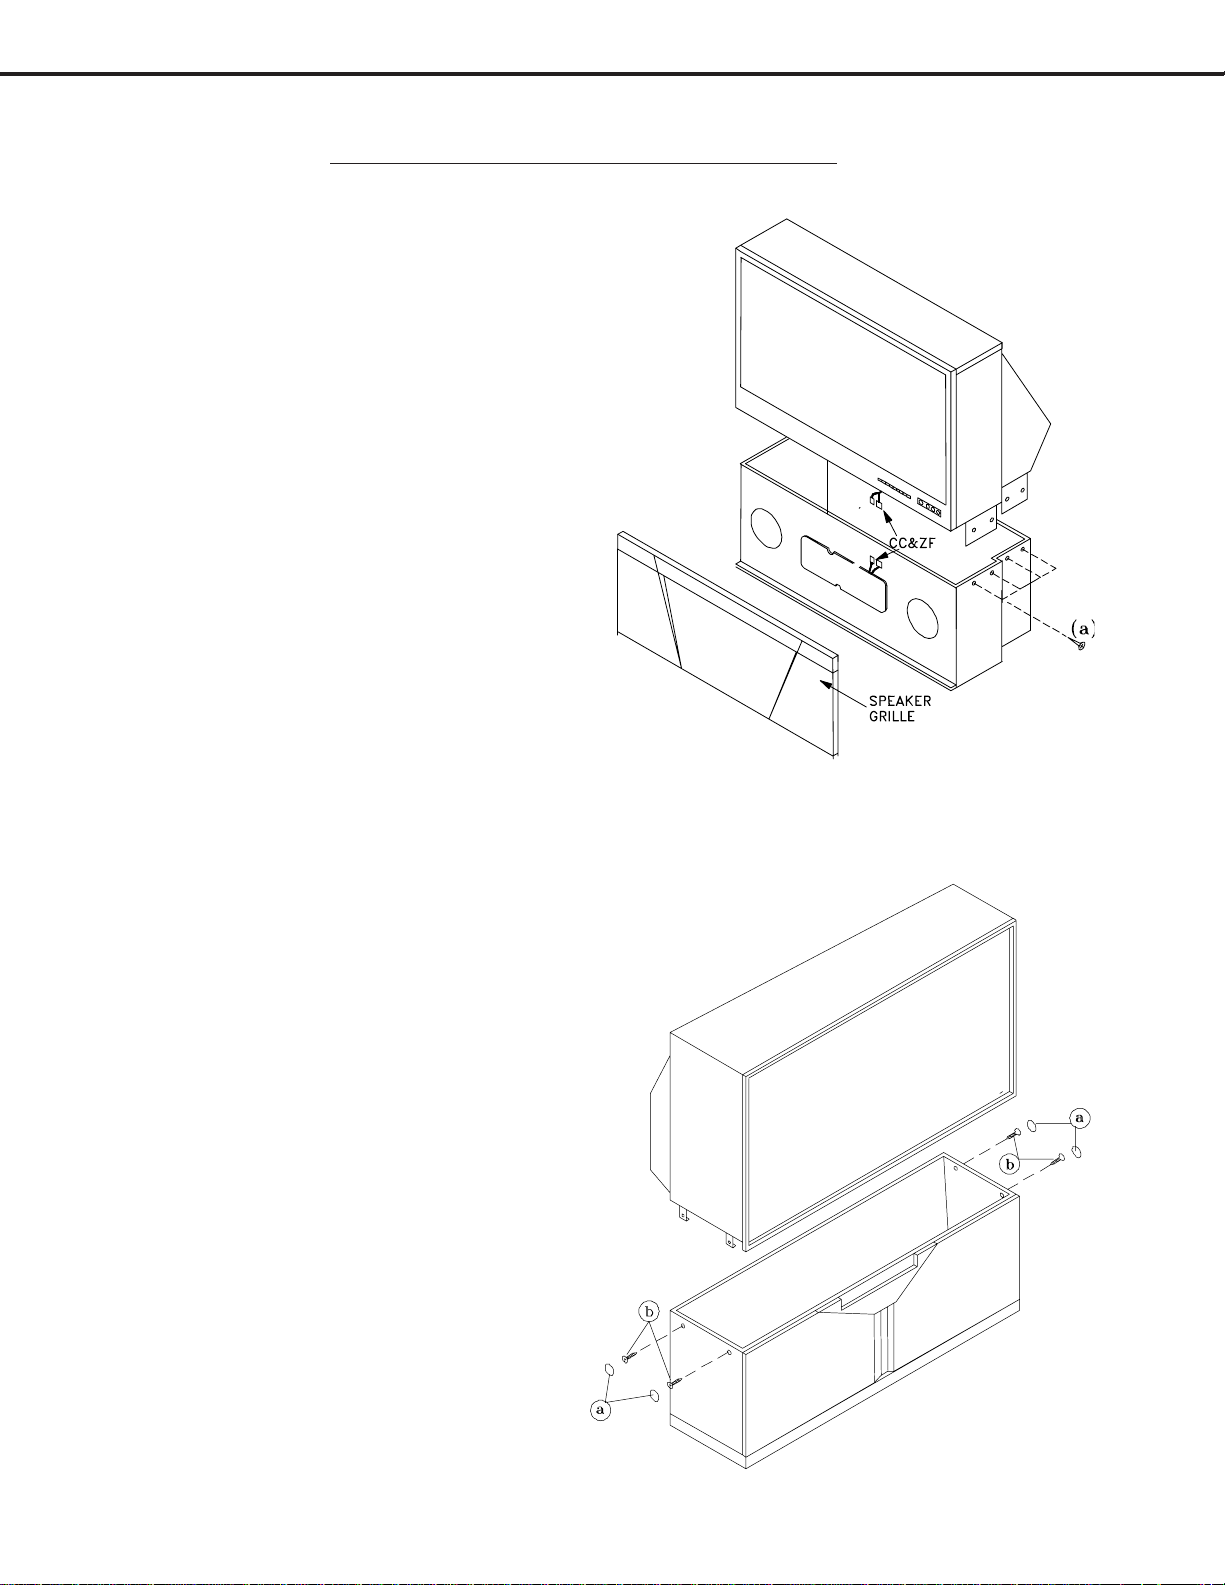
WS-65515 / WS-65615
Cabinet Separation Precedure
1. Pull the Speaker Grill from the cabinet.
2. Unplug the CC and ZF connectore
3. Remove 4 plastic covers and screws (a) from
each side of the cabinet.
4. Carefully lift the cabinet top and place it on
the floor.
5. Place the cabinet bottom in the desired location.
6. Reverse the procedure and mount the cabinet
top on the cabinet bottom.
WS-73615
Cabinet Separation Precedure
1. Remove the 4 screw covers (a).
2. Remove 4 screws (b) securing the top and
bottom cabinet sections .
3. Carefully lift the cabinet top and place it on
the floor.
4. Place the cabinet bottom in the desired location.
5. Reverse the procedure and mount the cabinet
top on the cabinet bottom.
WS-65515
WS-65615
Page 24
WS-73615
Page 25
MODELS: WS-48515 / WS-55515 / WS-55615 / WS-55815 / WS-65515 / WS-65615 / WS-65815 / WS-73615
Main Chassis Removal
Chassis
Lock
(b)
(a)
Chassis Removal
1. Undo the cable wire ties to the Front Panel, Speakers, CRTs, etc.
2. Unplug the Card Reader USB and 1394 cables from the DM PCB.
2. Remove screw (a) securing the Main Chassis and screws (b) in models WS-55815 and WS-65815 .
3. Release the Chassis Locks on each side of the chassis.
4. Slide the Chassis out the rear of the unit.
5. Tilt upward to access the bottom of the main chassis.
PCB Locations
TUNER-PCB
Chassis
Lock
DM3-PCB
FIF-PCB
E2P-PCB
SIGNAL-PCB
HDMI-PCB
DBF-PCB
TERMINAL-PCB
MAIN-PCB
Page 25
Page 26

MODELS: WS-48515 / WS-55515 / WS-55615 / WS-55815 / WS-65515 / WS-65615 / WS-65815 / WS-73615
Main Components Location (Top View)
DM Module Replacement
1. Unplug the Card Reader USB and 1394 cables from the DM module, and refer to the Chassis Removal
Procedure to slide the chassis towards the rear of the set.
2. Remove screws (a) and remove DM cover.
3.
Remove screws (b) and nuts (c).
3. Remove the PCB-E2P from the original DM and plug it into the replacement DM.
4. Remove the PCB-FIF from the DM and install into the replacement DM (V25+ and V25++ only).
5. If CableCardTM is installed, remove.
5. Disconnect all wiring and connectors.
NOTE: After replacement notify customer to contact cable company to reprogram CableCardTM.
(a)
(a)
(b)
(b)
(c)
Page 26
(a)
(a)
(a)
Page 27

MODELS: WS-48515 / WS-55515 / WS-55615 / WS-55815 / WS-65515 / WS-65615 / WS-65815 / WS-73615
CRT REPLACEMENT
1. Removal of the CRT
Caution! High voltage should be completely discharged prior to CRT removal.
Since The CRTs receive high voltage from the HV Block, discharge
by shorting the open end of the respective high voltage cable to
chassis ground.
Note: Refer to the Cabinet Disassembly Procedures when performing steps 1 through 4.
1. Remove the Speaker Grille, Front Board, and Screen Assy.
2. Remove the Back Board.
3. Remove the Anode Lead Wire from the CR Block.
4. Remove the PCB-CRT.
5. Remove 4 hex-screws "a" retaining the Optical Unit. [Figure 5-1]
6. Remove 4 screws "b" retaining the Lens.
Note: DO NOT loosen the RED screws. Doing so will break the seal between the
C-Element and the # 6 Lens, causing leakage of the CRT Coolant.
7. Remove 4 screws "c" retaining the CRT. [Figure 5-2]
8. Remove the Deflection Yoke from the neck of the CRT. [Figure 5-7]
Figure 5-1
Figure 5-2
Note: The 4 spring-loaded screws shown
in Fig 5-2 and labeled as "DO NOT
REMOVE", should not be loosened
under any circumstance. Doing so
will break the seal between the
CRT and the CRT-Spacer, causing
leakage of the CRT Coolant.
Page 27
Page 28

MODELS: WS-48515 / WS-55515 / WS-55615 / WS-55815 / WS-65515 / WS-65615 / WS-65815 / WS-73615
2. Installation of the CRT
Note: The replacement CRT is supplied as an assembly comprised of the CRT and the
Inner Lens with the space between them filled with ethylene glycol. Care should
be taken during handling and installation to prevent shock from disrupting the seal
or alignment between the CRT and Inner Lens. [Figure 5-3]
Figure 5-3
Note: The CRT fixing screws should not be loosened nor should they be removed. [Figure 5-4]
Figure 5-4
1. Carefully position the replacement CRT and fasten in place using 4 screws "d". [Figure 5-6]
Figure 5-6
Figure 5-5
Page 28
Page 29

MODELS: WS-48515 / WS-55515 / WS-55615 / WS-55815 / WS-65515 / WS-65615 / WS-65815 / WS-73615
2. Install the Deflection Yoke on the CRT neck. [Figure 5-7]
3. Install the Lens that was removed in step 6 of Removal Of The CRT. [ Figures 5-1 and 5-2 ]
a) Position the Lens so that the Label faces the direction shown in Figure 5-8.
b) Install the mounting screws. [Figure 5-1]
4. Connect the PCB-CRT.
5. Insert the Optical Unit into the Light Box Assembly.
6. Insert the Anode Lead Wire into the Flyback Transformer.
7. Re-clamp the Lead Wire in its original position.
Figure 5-7
Figure 5-8
Adjustment procedures after replacing the CRT(s)
• CRT Cut Off / White Balance Adjustment
• Static Convergence Adjustment
• Dynamic Convergence Adjustment
Page 29
Page 30

MODELS: WS-48515 / WS-55515 / WS-55615 / WS-55815 / WS-65515 / WS-65615 /WS-65815 / WS-73615
ELECTRICAL ADJUSTMENTS
Note: Perform only the adjustments required.
Do not attempt an alignment if proper equipment is not available.
Test Equipment
• Oscilloscope (Unless otherwise specified, use 10:1 probes)
• Signal Generator (both SD and HD capable)
• Frequency Counter
• Direct Current Voltmeter
• Direct Current Power Supply
• Multiplex Audio Signal Generator
• Direct Current Ampere Meter
Test Signal
A. Monoscope Signal
Note: If you do not have
a monoscope signal source,
connect the unit to a VCR
and play a Monoscope
*alignment tape.
(* Part Number: 859C568060)
B. Color Bar Signal
Use the color bar signal shown
below, unless otherwise specified
in this manual.
100%
75%
40%
40%
Monoscope Signal
1H
Split-Field Color Bars (100% window)
Page 30
Page 31

MODELS: WS-48515 / WS-55515 / WS-55615 / WS-55815 / WS-65515 / WS-65615 /WS-65815 / WS-73615
e
Initial Setup
A. Option Menu Setup
Follow the steps below for the initial set-up:
1. Select the "MENU" display by pressing the "MENU" button once.
2. Press the number buttons "2", "4", "7", "0" in sequence to select
the "OPTION MENU" display.
3. Press the "ADJUST" button to select "INITIAL."
4. Press "ENTER."
NOTE: At this time channel 3 is automatically selected.
(MENU-2-4-7-0)
OPTION MENU
Initial
Power restore :OFF
DTV Port :Auto
Direct Key Mode :OFF
B. Default Settings
MAIN MENU DEFAULT SETTINGS
SETUP
Edit Setup Clock Setting Manual Volum e 30%
Review Time 12:00 AM B ass 50%
Antenna 1 (✓) Enabled Date 01/01/01 Treble 50%
Antenna 2 (✓) Enabled Daylight Saving Applies B alance 50%
Input 1 (✓) Enabled Surround Off
Input 2 (✓) Enabled Analog Captions On if Mute Listen to Stereo
Input 3 (✓) Enabled Back ground Gray Level Sound On
Component 1 (✓) Enabled Digital Captions On if Mut e TV Speakers On
Component 2 (✓) Enabled Digital Settings A udio 2 Out Main
HDMI (✓) Enabled Appearance Default Video
Card 1 (V25+ + ) (✓) Enabled Contrast 100%
Card 2 (V25+ + ) (✓) Enabled V-CHIP Off Brightness 50%
Card 3 (V25+ + ) (✓) Enabled TV Rating TV-PG Sharpness 50%
Card 4 (V25+ + ) (✓) Enabled FV-Fantasy Violence (✓) Enabled Color 50%
Icon Position As above D-Sexual Dialog (✓) Enabled Tint 50%
Ant-1, Ant-2, ComFlash L-Adult Language (✓) Enabled Color Temp. High
Input-1, Input-2, Input-3, Comp-1, S-Sexual S ituation (✓) Enabled Video Noise Standard
Comp-2, HDMI, Cards 1…4 V-Violence (✓) Enabled Film M ode On
Program not Rated (✓) Enabled VSM Sharpness On
Transport Menu On Movie Rating PG Video Mute On
Energy Mode S tandard V-Chip Time Black Enhancem ent On
Language English Start Time 12:00 AM
Digital Record Devic
Channel View OFF PerfectColor™
ANTENNA
Antenna ANT 1 Unlock Time NA Source Ant 1 Ch 3
Memorize Channels A ir Front Button Lock Off PIP Position Lower Right
Channel Ch-3 POP Position Right Half
Memory Deleted A /V Memory Reset Ant-1 PIP/POP Format Dble. W indow
Prefer Digital --- Format Stretched
PVR Stop Time 12:00 AM Color Balance Manual
Lock by Time Off A/V Memory for Ant-A All Centered
Lock Time NA
AUDIO/VIDEO SETTINGS
TIME
CAPTIONS
V-CHIP LOCK
Lock By Time
Audio
Advanced
PIP/POP
A/V RESET DEFAULT SETTINGS (By Input)
A/V Memory Ant 1/2
INPUTS
1/2/3
Compon.
1/2
1394
(If
connected)
HDMI
Card 1~4
(V25++ Only)
Contrast Max. Max. Max. Max. Max. Max.
Brightness Center Center Center Center Center Center
Sharpness Center Center Center Center Center Center
Color Center Center Center Center Center Center
Tint Center Center Center Center Center Center
Color Temp. High High High High High High
Video Noise Standard Standard Standard N/A Standard N/A
Image Type On On On N/A On N/A
Define Edge VSM
On On On On On On
Bass Center Center Center Center Center Center
Treble Center Center Center Center Center Center
Balance Center Center Center Center Center Center
Surround OFF OFF OFF OFF OFF OFF
Listen To Stereo N/A N/A N/A N/A N/A
Level Sound On On On On On On
Page 31
Page 32

MODELS: WS-48515 / WS-55515 / WS-55615 / WS-55815 / WS-65515 / WS-65615 /WS-65815 / WS-73615
C. A/V Memory
Each of the external inputs has its’ own Audio/Video Memory. A change in an A/V setting at a specific input is
stored in memory for that specific input.
A/V Reset
1. The front panel AV Reset button initializes all A/V Memories.
2. The AV Reset in the user’s menu initializes only the selected input’s A/V Memory except for
Balance and Listen to.
LED Indicator Diagnostics
The “Power ON LED” provides an indication of the sets operation, and the possible cause of a malfunction.
1. Initial Control Circuitry Check
Immediately after the TV is connected to an AC power source:
LED Indications Conditions Probable Cause
Off After AC is applied No Standby Power or TV µPC not running
Fast Blink for 70 sec. After AC is applied Normal - DM µPC is booting up.
Fast Blink (Doesn't stop) After AC is applied TV µPC is running, but DM failed to boot up
Slow Blink Set is Off Normal - Timer is set for Auto Turn On
2. Error Code Operational Check
Note: The TV must be in “Shut Down” and not heve been switched Off, to perform the Error Code Opera-
tional Check. When the TV is switched Off, the code automatically resets to “12” No Error.
Pressing the front panel “DEVICE” and “MENU” buttons at the same time, and holding for 5 seconds,
activates the Error Code Mode. The LED flashes denoting a two digit Error Code, or indicating no problem
has occured since the last Initalization.
Note: The front panel buttons must used, NOT those on the Remote Control.
• The number of flashes indicates the value of the MSD (tens digit) of the Error Code.
• The flashing then pauses for approximately 1/2 second.
• The LED then flashes indicating the value of the LSD (ones digit) of the Error Code.
• The Error Code is repeated a total of 5 times.
Example: If the Error Code is “23”, the LED will flash two times, pause, and then flash three
times.
3. Error Codes
The Error Code designations indicating malfunction, or no malfunction, are listed below:
Error Code Probable Cause
12 No error detected
21 X-Ray Protect
22 Short Protect
23 Loss of Deflection
35 Fan Failure
Remote Control Operational Modes
There are two Remote Hand Unit Operational Modes, “Standard” and “NetCommandTM”. The Remote is initially
in the “Standard” mode. The “NetCommandTM” mode is used when controlling Home Theater devices using
NetCommandTM. To change the Remote Operational Mode:
• Set the Remote to the TV Layer
Page 32
Page 33

MODELS: WS-48515 / WS-55515 / WS-55615 / WS-55815 / WS-65515 / WS-65615 /WS-65815 / WS-73615
• To change to “Netcommand
TM
” ... Hold the “Power” button and press “9-3-5” in sequence.
• To change to “Standard” ... Hold the “Power” button and press “0-0-0” in sequence.
Circuit Adjustment Mode
Most of the adjustments can only be performed using the remote hand unit. Many of the adjustments must be
performed in both the 480i and 1080i modes. Video/Color adjustments must be performed in the 480i and
1080i modes, and data must be preset in the 480P (DVD) mode.
Note: Set the Remote Operational Mode to “NetCommandTM”. (Hold the “Power” button and press
“9-3-5” in sequence.) This slows the remote’s response and makes adjustments easier. When
adjustments are complete, set the Remote to its’ original Operational Mode.
(Hold the “Power” button and press “0-0-0” in sequence)
A. Activating the Circuit Adjustment Mode
The current signal source determines if the
activated Adjustment Mode is 480i or 1080i.
1. Select the signal source (480i or 1080i).
2. Press the "MENU" button on a remote hand unit.
3. Press the number buttons "2", "4", "5", "7" in sequence.
The screen will change to the Adjustment Mode.
Note: Repeat steps 1 and 2 if the circuit
adjustment mode does not appear
on screen.
CHASSIS
FUNCTION
ADJ ITEM
V25
CRT-VC
22 CBOF 16 480i
ABBREV. DATA
SIGNAL
B. Selection of adjustment Functions and
Adjustment Items
To select an adjustment item in the circuit adjustment mode, first select the adjustment function that includes
the specific adjustment item to be selected. Then select the adjustment item. Refer to the following pages for
the listing of adjustment functions and adjustment items.
1. Press the "AUDIO" button on a remote hand unit to select an adjustment function. Each time the button
is pressed, the Function changes in the following sequence:
CRT_VC MMTX
CRT-JNGL SMTX
Adjustment Functions
2. Press the “VIDEO” button to select a specific Adjustment Item. The Item number increases each time the
“VIDEO” button is pressed.
C. Changing Data
After selecting an adjustment Item, use the “ADJUST UP/DOWN” buttons to change data.
• Press “ADJUST DOWN” to decrease the data value.
• Press “ADJUST UP” to increase the data value.
Page 33
Page 34

MODELS: WS-48515 / WS-55515 / WS-55615 / WS-55815 / WS-65515 / WS-65615 /WS-65815 / WS-73615
D. Saving Adjustment Data
Press “ENTER” to save adjustment data in memory. The character display turns red for approximately one
second in this step.
Note: If the circuit adjustment mode is terminated without pressing “ENTER”, changes in adjustment data
are not saved.
E. Terminating the Circuit Adjustment Mode
Press the “MENU” button on the remote hand unit twice to terminate the adjustment mode.
Note: The circuit adjustment mode can also be terminated by turning power OFF.
F. Toggle Between Reception Modes
Pressing “3” when in the Adjustment Mode CRT-VC Function toggles between 480i, 480p and 1080i.
However data changes are not automatically saved. Press “ENTER” to save data before pressing “3”.
G. Service Mode Reset
To reset items in the Service Mode to their factory values:
1. Press MENU-2-4-5-7 to enter the Service Mode.
2. Press the “0,1,2,3,” insequence to Reset to the Factory
settings.
On Screen Display Position Adjustment Mode
Activation
1. Select 480i or 1080i source.
2. Press MENU-2-4-8-8
Convergence Adjustment Mode
The Convergence mode is used to perform raster geometry correction, and convergence adjustments. These
adjustments must be made in both the SD (NTSC) and HD modes.
Note: Before activating the Convergence mode, turn “Video Mute” Off. The internal crosshatch pattern
will not be displayed with “Video Mute” On, only a blue background is displayed.
A. Convergence Mode Activation
1. Press MENU-2-4-5-9
2. When the Convergence Mode is activated, this display appears on a Green Crosshatch.
B. Selecting the HD or SD Mode
1. Select the Signal Source before entering the
Convergence Mode, either an NTSC or HD source.
2. Enter the Convergence Mode
• If the signal source is NTSC, the SD mode is activated.
• If the signal source is HD, the HD mode is activated.
ITEM NO.
ABREV
DATA
MODE
HD OR SD
C. Convergence Mode Functions
In the Convergence Mode there are three main Functions (Categories).
• Pressing “6” activates CONV MISC
• Pressing “5” activates COARSE CONV
• Pressing “4” activates FINE CONV
D. CONVERGENCE MISC (Press 6)
This mode is used to preset data values controlling the Convergence Generator, and to perform the HV Regulation
adjustment.
1. Use the VIDEO button to select an item.
2. Use the ADJUST buttons to change data.
Page 34
Page 35

MODELS: WS-48515 / WS-55515 / WS-55615 / WS-55815 / WS-65515 / WS-65615 /WS-65815 / WS-73615
NOTE: When Item “1 HVOL” is selected the screen goes black except for the data display. This occurs
since a black screen is required when making the HV Regulation adjustment.
E. COARSE CONVERGENCE (Press 5)
There are four Sub Functions in the Coarse mode, COARSE GREEN, COARSE RED, COARSE BLUE and
DF.
• COARSE GREEN .... used to make Coarse Raster Geometry Adjustments.
• COARSE RED ... used to make Coarse Red Convergence Adjustments.
• COARSE BLUE ... used to make Coarse Blue Convergence Adjustments.
• DF ... used to preset data values controlling the Dynamic Beam Focus circuit drive signal.
1. Use AUDIO button to select a Sub Function
2. Use the VIDEO button to select an Adjustment Item.
3. Use the ADJUST buttons to change data.
F. FINE CONVERGENCE (Press 4)
Sub Functions
This mode is used to perform Fine Raster Correction, and Fine Red and Blue Convergence Adjustments.
There are three Sub Adjustment Functions, selected with the AUDIO button:
• FINE GREEN .... a Green Crosshatch is displayed, to make Fine Raster Corrections.
• FINE RED .... a White Crosshatch is displayed, to make Fine Red Convergence Adjustments.
• FINE BLUE .... a White Crosshatch is displayed, to make Fine Blue Convergence Adjustments.
Cursor
In the Fine mode a Cursor is added to the Crosshatch. The ENTER button toggles the Cursor between two
modes:
• MOVE (blinking Cursor) .... use the ADJUST buttons to select any of 64 points on the Crosshatch.
• ADJUST (Non blinking Cursor) .... the ADJUST buttons adjust the active color at the current Cursor
position, horizontally or vertically.
Display
The on-screen display changes in the Fine mode, as shown at the right.
The display shows the vertical and horizontal data for the current Cursor
Position, and the horizontal and vertical coordinates for that position.
G. Saving Data and Exiting the Convergence Mode
Press MENU twice to exit the Convergence mode, data is automatically saved.
V25
CONV FINE G REEN
V13 H-4 SD
VERTICAL
DATA
HORIZ.
DATA
Page 35
Page 36

MODELS: WS-48515 / WS-55515 / WS-55615 / WS-55815 / WS-65515 / WS-65615 /WS-65815 / WS-73615
mSDHDSD
D
D
D
D
6
3
3
31083333333
3
E2PROM Replacement
Data accessed in the Convergence Adjustment Mode is stored in IC8D01on the PCB-SIGNAL and on the PCB-
E2P. Replacement PCB’s are supplied pre-aligned by model size so that only fine adjustments should be
necessary after replacement. Other service data is stored on the PCB-E2P located on the DM assembly.
When replacing the DM assembly, retaining the original PCB-E2P will eliminate the need for any realignment.
The following tables are provided as a guide in case of total data loss.
List of Adjustment Items.
CRT-VC (Video Color)
Function Display
NO. Abbrev.
Adjustment Description
Data
Range
ANT/INPUT
1 SBRT Sub Brightness Adjust 0~63 20 20 Black Level
2 SCT Picture Gain Adjust 0~63 42 42 Sub Contrast
3 SCON Sub Contrast Adjust 0~15 7 7 Preset
4 RDRH R-Drive (high) 0~15 31 31 White Balance
5 GDRH G-Drive (high) 0~15 41 41 "
6 BDRH B-Drive (high) 0~63 31 31 White Balance
7 CTRH R-Cutoff (high) 0~63 31 31 "
8 CTGH G-Cutoff (high) 0~63 31 31 "
9 CTBH B-Cutoff (high) 0~63 31 31 "
10 RDRL R-Drive (low) 0~63 31 31 "
11 GDRL G-Drive (low) 0~63 41 41 "
12 BDRL B-Drive (low) 0~63 31 31 "
13 CTRL R-Cutoff (low) 0~63 31 31 "
14 CTGL G-Cutoff (low) 0~63 31 31 "
15 CTBL B-Cutoff (low) 0~63 31 31 "
16 GMMA RGB Gamma correction 0~3 2 2 "
17 GAML Gamma Differ. Sw. 0~1 0 0 Preset
18 BRT Brightness Control 0~63 28 32 33 36 User
19 COL Color Control 0~63 34 34 35 32 User
20 TNT Hue Control 0~63 26 29 30 29 User
22 CBOF Cb sub signal DC cancel 0~63 31 31 Preset
23 CR0F Cr sub signal DC cancel 0~63 31 31 "
38 DCTR Y DC trans. Ration 0~3 1 2 "
56 ASBL S-ABL gain setting 0~3 0 0 "
Initial Data
480i
Component
20
31
7
31
37
31
31
25
31
31
37
31
31
25
31
2
0
31
31
1
0
480p 1080i
Notes
IC2V00
CRT-JNGL Function (Jungle)
Adj ustment
Description
No. Ite
1HWIDHorizontal Width 0~63 323129302121262628282525
2 HKEY Horizontal Keystone 0~63 24 25 24 25 24 25 24 25 24 25 24 25
7 VHGT Vertical Height 0~63 27 30 25 21 21 25 33 38 38 41 28 31
8 VLIN Vertical Linearity 0~15 6 6 4 4 6 6 6 6 6 6 6 6
9VSCNVertical S-Correction0~15 000000000000
13 H-POS Horizontal Position 0~63 23 24 23 24 23 24 23 24 23 24 23 24
PINAPin Distortion 0~6
3
Data
Range
Page 36
WS-55815
WS-55615
HD S
WS-65515
WS-65615
HD S
WS-73615Display WS-48515 WS-55515
HD S
WS-65815
HD S
HD
Page 37

MODELS: WS-48515 / WS-55515 / WS-55615 / WS-55815 / WS-65515 / WS-65615 /WS-65815 / WS-73615
eSD
D
D
D
2
00000000000
0
eSD
D
D
D
eSD
D
D
D
0
C
n
0
0
CONV GREEN Items
WS-48515
No. Abbrev. Description
Nam
1HSTA*Horizontal Position 000000000000
2VSTA*Vertical Position 000000000000
3 SKEW Skew (Y axis rotation) 0 0 0 000000000
4TILTTilt (X axis rotation) 000000000000
5 HWIDHorisontal Width 202020202020202020202020
6 HLIN Horizontal Linearity 12 12 0 0 12 12 12 12 12 12 12 12
7SPCCSide Pin Cushion Correction000000000000
8HKEYHorizontal Keystone 00101000000000
9 TBPC Top/Bottom PC Correction -180 -150 -110 -110 -195 -180 -200 -170 -210 -180 -210 -180
10 VKEY Vertical Keystone 0 0 15 10 00000000
11VWIDVertical Height 000000000000
VLIN Vertical Linearity.
1
*HSTA and VSTA must not exceed ±200
WS-55515 WS-73615WS-65815
HD S
WS-55615
WS-55815
HD S
WS-65515
WS-65615
HD SDHDSDHD S
(MENU-2-4-5-9-5)
HD
CONV RED Items (MENU-2-4-5-9-5)
WS-48515
No. Abbrev. Description
Nam
1 HSTA Horizontal Position 50 50 50 50 50 50 50 50 100 100 10 100
2VSTAVertical Position 000000000000
3 SKEW Skew (Y axis rotation) 0 0 0 000000000
4TILTTilt (X axix rotation) 000000000000
5 HLIN Horixontal Linearity -210 -190 -165 -165 -210 -150 -180 -160 -230 -210 -230 -210
6HWIDHorizontal Width 00001010000000
7 VKEY Vertical Keystone Correction -140 -120 -85 -85 -100 -100 -100 -90 -170 -140 -140 -110
8VWIDVertical Height 000000000000
9 VLIN Vertical Linearity 0 0 0 000000000
10 TPPC Top/Bottom PC Correction 20 20 30 30 20 20 20 20 20 20 20 20
11SDBWHorizontal Side Bow 303020303030303030303030
*HSTA and VSTA must not exceed ±200
WS-55515
HD S
WS-55615
WS-55815
HD S
WS-65515
WS-65615
HD SDHDSDHD S
WS-65815 WS-73615
HD
CONV BLUE Items
WS-48515
No. Abbrev. Description
Nam
1 HSTA Horizontal Position -50 -50 -50 -50 -50 -50 -50 -50 -100 -100 -100 -100
2VSTAVertical Position 000000000000
3 SKEW Skew (Y axis rotation) 0 0 0 000000000
4TILTTilt (X axix rotation) 000000000000
5 HLIN Horixontal Linearity 210 190 165 165 180 180 180 160 250 220 230 200
6HWIDHorizontal Width 00-20-2000000000
7 VKEY Vertical Keystone Correction 110 100 85 85 100 100 100 70 70 90 70 90
8VWIDVertical Height 000000000000
9 VLIN Vertical Linearity 0 0 0 000000000
TPP
1
11 HSBW Horizontal Side Bow -30-30-30-30-30-30-30-30-30-30-30-3
*HSTA and VSTA must not exceed ±200
Top/Bottom PC Correctio
-20-20-20-20-20-20-20-20-20-20-20-2
WS-55515
HD S
Page 37
WS-55615
WS-55815
HD S
WS-65515
WS-65615
HD SDHDSDHD S
(MENU-2-4-5-9-5)
WS-65815 WS-73615
HD
Page 38

MODELS: WS-48515 / WS-55515 / WS-55615 / WS-55815 / WS-65515 / WS-65615 /WS-65815 / WS-73615
OSD Horizontal Centering
Abbrev.
Name
HR Display horiz. Centering (NTSC) 120
Description Data
(MENU-2-4-8-8)
DYNAMIC FOCUS (MENU-2-4-5-9-5)
Item
Number
1 DFH Dynamic Focus Horizontal -375 -450
2 DFV Dynamic Focus Vertical 200 200
CONV MISC
Item Abbrev. Data Notes
Number Name SD HD
* Do not change "1 HVOL" if it has been
previously set.
Abbrev.
Name
1 HVOL 228 216 HV Adj.
Description
(MENU-2-4-5-9-6)
V25
V25+
V25++
MAIN MATRIX (MENU-2-4-5-7)
Item
Number
4 COLM COLOR GAIN CONTROL 0-63 17
15 YDRM Y DRIVE GAIN CONTROL 0-31 5
Abbrev.
Name
Description
Range Initial
SUB MATRIX (MENU-2-4-5-7)
Item
Number
4 COLS COLOR GAIN CONTROL 0-63 17
15 YDRS Y DRIVE GAIN CONTROL 0-31 5
Abbrev.
Name
Description
Range Initial
Page 38
Page 39

MODELS: WS-48515 / WS-55515 / WS-55615 / WS-55815 / WS-65515 / WS-65615 /WS-65815 / WS-73615
Adjustment Test Point Location
Test Points
DT pin 3 - HV Adjust
DT pin 6 - Ground
DT pin 7 - 12 Volts
DT pin 8 - ACL
JA pin 25- Main Picture (Y)
JA pin 29 - Main Picture (Cr)
JA pin 40 - Sub Picture (Y)
JA pin 44 - Sub Pictur (Cr)
TP6(R, G or B) - CRT Cathode
Page 39
Page 40

MODELS: WS-48515 / WS-55515 / WS-55615 / WS-55815 / WS-65515 / WS-65615 /WS-65815 / WS-73615
[HV Circuit]
1. HV Regulation
Measuring
Instrument
Test Point
Ext. Trigger
Measuring
Range
Input Signal
Input Terminal
DC Voltmeter
DT connector pins 3 & 6
------
-------
Video Signal
Monoscope
Video Input
Purpose:
Symptom:
Note:
This adjustment must be rechecked following Adjustment 4 CRT Cutoff.
To set the CRT Anode voltage.
Dark Picture
1. Supply a video monoscope signal.
2. Set Contrast to maximum, and Brightness to mid position.
3. Connect a DC volt meter between pins 3 and 6 of the DT connector.
(Positive lead to pin 3)
4. Activate the Conv-Misc Mode.
5. Select Item “1 HVOL” (screen goes black).
6. Adjust Item “1 HVOL” for 15.4V ±0.2V on the meter.
7. Save data and exit the Conv-Misc mode.
8. Confirm that the voltage does not change more than 0.15V.
Note:
This adjustment must be performed if E2RESET or Convergence E2RESET
are activated.
CONVERGENCE MODE
Activate … …..MEN U-2-4-5-9
Misc. …...…………….……"6"
Color (R ,G o r B)..… …AUDIO
Item N o … … ..… ….…..VIDEO
Adjust/Move….…….ADJUST
Sa ve Data……....… ..ENTER
Exit…….……...MENU (twice)
[Video Circuit]
2. Main/Sub Y Level
Measuring
Instrument
Test Point
Ext. Trigger
Measuring
Range
Input Signal
Input Terminal
Oscilloscope
JA connector pins 25 &40
------
------
Color Bars
Video Input
Purpose
Symptom:
To set picture luminance
Excess or insufficient brightness.
1. Supply a color bar signal to a Video Input (not an RF input).
2. Select the color bar signal for both the main and sub pictures.
3. Connect the oscilloscope to connector JA pin 25.
4. Activate the Adjustment Mode
5. Select Item “15 YDRM” in the MAIN MTRX function.
6. Adjust the data for 0.66 Vp-p ~ 0.71 Vp-p.
(If it cannot be adjusted within this range, set to the lower value)
7. Move the oscilloscope to JA pin 40.
8. Select Item “15 YDRS” in the SUB MTRX function.
9. Adjust the data to equal the MAIN-Y Gain (+0.0V -0.05V).
CIRCUIT ADJ UST MODE
Activate … … .. MEN U -2 -4- 5-7
Func tion … ...………..AUD IO
Item No. ……….…….VIDEO
Adjust Data ….…….ADJUST
Sa ve D a ta …. ……… E NTER
Exit …………..MENU (twice)
Page 40
Page 41

MODELS: WS-48515 / WS-55515 / WS-55615 / WS-55815 / WS-65515 / WS-65615 /WS-65815 / WS-73615
[Video Circuit]
3. Main/Sub Color Level
Purpose:
Symptom:
To match the sub picture color to that of the main picture.
Main and sub pictures colors differ.
Measuring
Instrument
Test Point
Ext. Trigger
Measuring
Range
Input Signal
Input Terminal
Oscilloscope
JA pin 29 & JA pin 44
------
------
Color Bars
Video
1. Supply an NTSC signal to an External Video Input.
2. Select the NTSC signal as the source for both the main and sub pictures.
3. Connect an oscilloscope to connector JA pin 29.
4. Activate the Adjustment mode.
5. Select Item “04 COLM” in the Main Matrix Function.
6. Adjust data so the signal is 0.66 Vp-p ~ 0.71 Vp-p.
(If it cannot be adjusted within this range, set to the lower value)
7. Connect an oscilloscope to connector JA pin 44.
8. Select item “04 COLS” in the Sub Matrix Function.
9. Adjust so Sub = Main (+0.0V - 0.05V).
CIRCUIT ADJ UST MODE
Activate … ….. MEN U -2 -4-5- 7
Function … ...………..AUD IO
Item No. ……….…….VIDEO
Adjust Data ….…….ADJUST
Sa ve D a ta …. …… … ENTER
Exit …………..MENU (twice)
[CRT Circuit]
4. CRT Cutoff
Measuring
Instrument
Test Point
Ext. Trigger
Measuring
Range
Input Signal
Input Terminal
Oscilloscope
TP6R, TP6G, TP6B
------
50V/Div. 2msec/Div.
None
Video Input
CRT Cutoff Presets
VC Function
Item Abbr. Setting
1SBRT20
2SCT31
3SCON7
4 RDRH 31
5 GDRH 37
6BDRH31
7CTRH31
8CTGH25
9CTBH31
Purpose
Symptom:
Note:
Use the Expand mode (full screen)
To set the cutoff point for all three CRTs.
Monochrome has a color tint, or incorrect brightness.
1. Select an External Input with no signal.
2. Enter the Adjustment Mode, VC Function.
3. Press “1”, automatically blanks the screen and sets COL to 0.
Note: If the screen goes blue, turn off Video Mute.
4. Set the data to the values given in the table below.
5. Connect the oscilloscope to TP6R.
6. Adjust the Red Screen VR so the black level is 175V, as shown below, or
179V ±1VDC using an DC Voltmeter.
7. Repeat Steps 4 and 5 to set the Blue and Green Screen VRs, using
TP6G and TP6B.
Note:
White Balance must be performed
after this adjustment.
CIRCUIT ADJ UST MODE
Activate … ….. MEN U -2 -4-5- 7
Function … ...………..AUD IO
Item No. ……….…….VIDEO
Adjust Data ….…….ADJUST
Sa ve D a ta …. …… … ENTER
Exit …………..MENU (twice)
Page 41
Page 42

MODELS: WS-48515 / WS-55515 / WS-55615 / WS-55815 / WS-65515 / WS-65615 /WS-65815 / WS-73615
[CRT Circuit]
5. White Balance (NTSC)
Measuring
Instrument
Test Point
Ext. Trigger
Measuring
Range
Input Signal
Input Terminal
CIRCUIT ADJ UST MODE
Activate … ….. MEN U -2 -4-5- 7
Function … ...………..AUD IO
Item No. ……….…….VIDEO
Adjust Data ….…….ADJUST
Sa ve D a ta …. …… … ENTER
Exit …………..MENU (twice)
------
------
------
NTSC White Raster
RF or Video
Purpose:
Symptom:
Note:
Use the “FORMAT” button to activate the Expand mode (full screen).
To set the CRTs white level in the NTSC mode.
Monochrome has a color tint.
1. Supply a full White Raster Signal
2. Activate the Service Mode, VC function.
3. Adjust Items “4 RDRH” and “6 BDRH” for optimum white at the center of
the screen.
4. Reduce the input luminance level to 25%.
5. Adjust Items “7 CTRH” and “9 CTBH” for optimum white.
6. Insert a Milliammeter in series with each CRT Cathode. The maximum
allowable current for each CRT is given in the table below.
7. Set the white raster to 100% and adjust Items “10 RDRL” and “12 BDRL” for
optimum white at the center of the screen.
8. Reduce the luminance level to 25%.
9. Adjust Item “13 CTRL” and “15 CTBL” for optimum white.
10. Set the data for Item “19 COL” back to 31.
Ma x im um CRT Current
WS-65815
WS-73615
CRT
RED
GREEN
BLUE
WS-48515 WS-55615 WS-65615
WS-55815 WS-55515 WS-65515
580ua 900ua
580ua 900ua
580ua 900ua
[CRT Circuit]
6. White Balance (HD)
Measuring
Instrument
Test Point
Ext. Trigger
Measuring
Range
Input Signal
Input Terminal
-----
-----
------
-----
HD White Raster
Component
Purpose
Symptom:
To set the CRTs white level in the HD mode.
Monchrome pictures have a color tint.
1. Supply an HD Full White Raster signal to the Component Inputs.
2. Select the Component Inputs (Input button)
3. Activate the Adjustment mode, VC Function.
4. Set Item “19 COL” to 0.
5. Adjust Items “4 RDRH” and “6 BDRH” for optimum white at the center of the
screen.
6. Reduce the input signal luminance to 25%.
7. Adjust Items “7 CTRH” and “9 CTBH” for optimum white.
8. Set the data for Item “19 COL” back to original value.
CIRCUIT ADJ UST MODE
Activate … ….. MEN U -2 -4-5- 7
Function … ...………..AUD IO
Item No. ……….…….VIDEO
Adjust Data ….…….ADJUST
Sa ve D a ta …. …… … ENTER
Exit …………..MENU (twice)
Page 42
Page 43

MODELS: WS-48515 / WS-55515 / WS-55615 / WS-55815 / WS-65515 / WS-65615 /WS-65815 / WS-73615
[Video Circuit]
7. Black Level
Measuring
Instrument
Test Point
Ext. Trigger
Measuring
Range
Input Signal
Input Terminal
CIRCUIT ADJ UST MODE
Activate … … .. MEN U -2 -4- 5-7
Func tion … ...………..AUD IO
Item No. ……….…….VIDEO
Adjust Data ….…….ADJUST
Sa ve D a ta …. ……… E NTER
Exit …………..MENU (twice)
-----
-----
------
------
Monoscope
Video Input
Purpose:
Symptom:
To set the black level of the picture.
Excess or insufficient brightness.
1. Supply a Monoscope signal to a Video Input.
2. Activate the Adjust Mode, VC Function.
3. Adjust Item “1 SBRT” so the 0% and 10% black levels on the gradation scale
are the same.
4. Press ENTER to save data.
7. Exit the Service Mode.
40% 30% 20% 10%
50% 0% 0% 0%
60% 70% 80% 90%
GRADATION SCALE
[Video Circuit]
8. Sub Contrast
Measuring
Instrument
Test Point
Ext. Trigger
Measuring
Range
Input Signal
Input Terminal
CIRCUIT ADJ UST MODE
Activate … … .. MEN U -2 -4- 5-7
Func tion … ...………..AUD IO
Item No. ……….…….VIDEO
Adjust Data ….…….ADJUST
Sa ve D a ta …. ……… E NTER
Exit …………..MENU (twice)
DC ma meter
DT connector pins 7 & 8
------
-----
Grayscale
RF Input
Purpose
Symptom:
To set overall beam current to its’ optimum level.
Excess or insufficient contrast.
Note: Activate the Stretch mode for this alignment.
1. Supply a Grayscale signal to a RF Input.
2. Activate the Adjust Mode, CRT-VC Function.
3. Select Item “2 SCT”, signal level automatically reduces.
4. Connect a 3ma DC meter between DT connector pins 7 and 8. Positive lead to
pin 7.
5. Adjust Item “2 SCT” to the values given in the Table below.
MODEL CURRENT
W S-65815 & W S-73615 525 ±5ua
All Other Models 480 ±5ua
6. Remove the meter.
7. Save data and Exit the Service Mode.
Page 43
Page 44

MODELS: WS-48515 / WS-55515 / WS-55615 / WS-55815 / WS-65515 / WS-65615 /WS-65815 / WS-73615
[Focus Circuit]
9. Dynamic Focus Preset
Purpose:
Symptom:
To improve edge focus.
Poor focus at the edges of the screen.
Measuring
Instrument
Test Point
Ext. Trigger
Measuring
Range
Input Signal
Input Terminal
Activate … …..MENU-2-4 -5 -9
Misc. ……………….……"6"
Coarse………………..…."5"
Fine ……………………..."4"
Color (R,G or B)……AUD IO
Item N o ………….…..VID EO
Adjust/Move……….ADJUST
Cursor Toggle….…..ENTER
Save & Exit…..MENU (twice)
-----
-----
------
-----
Monoscope
Video Input
CONVERGENCE MODE
1. Supply a Monoscope signal to a Video Input
2. Activate the Convergence Mode.
3. Select the DF Function under the Conv. Coarse Mode.
4. Set Items “1 DFH” and “2 DFV” to the data values given in the DF Table.
5. Exit the Conv. Mode.
DF
(MENU-2-4-5-9-5)
Item Abbr. Function
1 DFH Dynamic Focus Horizontal - 375 -450
2 DFV Dynamic Focus Vertical 200 200
Data
WS-48515
WS-55515
WS-55615 WS-55815 WS-65515 WS65615 WS-65815 WS-73615
[Video Circuit]
10. Lens Focus
Measuring
Instrument
Test Point
Ext. Trigger
Measuring
Range
Input Signal
Input Terminal
-----
------
------
-----
Monoscope
Video Input
Purpose
Symptom:
Note:
This adjustment must be done before Electrostatic Focus. Perform this
To set the Lens position for optimum focus.
Poor focus
adjustment for RED, GREEN, and BLUE monochrome pictures.
1. Supply a VIDEO signal (Monoscope).
2. Cover the Red and Blue Lens (producing a green raster).
3. Adjust the Green Lens for best focus at the center of the Monoscope pattern.
Note:
Attach a white paper to the
screen center. During adjustment,
observe the picture on the screen
from inside for easier adjustment.
4. Repeat Steps 2 and 3 for the Red
and Blue monochrome pictures.
Page 44
Page 45

MODELS: WS-48515 / WS-55515 / WS-55615 / WS-55815 / WS-65515 / WS-65615 /WS-65815 / WS-73615
[CRT Circuit]
11. Electrostatic Focus &
(Alignment Magnet)
Measuring
Instrument
Test Point
Ext. Trigger
Measuring
Range
Input Signal
Input Terminal
-----
-----
------
------
Monscope & Crosshatch
Video Input
Purpose:
Symptom:
Note:
This adjustment must be performed after the Sub Contrast adjustment.
Alignment Magnet Adjustment
To set electrostatic focus to the optimum point.
Poor focus.
This adjustment must be performed before Static Focus Adjustment
1. Supply a Crosshatch with Center Dot signal to a Video Input.
2. Set the display format to Standard (Format button)
3. Select a Green raster using the table below.
4. Roughly adjust Green Focus VR.
5. Rotate Green Focus VR CCW so the center dot is about 10mm diameter.
6. Adjust the Green 4 Pole Magnet for the roundest center dot.
7. Set the Green Focus VR for optimum focus.
8. Repeat the procedure with a Red raster and adjust the Red 4 Pole Magnet.
9. Use silicon to lock the magnets in place.
Static Focus Adjustment (All Models)
1. Supply a Monoscope signal to a Video Input
2. Activate A/V Reset
3. Select Red, Green or Blue rasters using the table below.
3. Set the Red, Green and Blue Focus VRs for optimum focus in the center of
the picture.
Raster Color Selection
Color Raster Activation Code
Red MENU-2-4-5-9-1
Green MENU-2-4-5-9-2
Blue ME NU-2-4-5-9-3
[On Screen Display]
12.Character Position
Measuring
Instrument
Test Point
Ext. Trigger
Measuring
Range
Input Signal
Input Terminal
-----
-----
------
------
Video Signal (NTSC)
ANT-1
Purpose
Symptom:
1. Supply an NTSC signal to Ant-1 and select Ant-1 as the source.
2. Enter the OSD Position Mode, press “MENU-2-4-8-8”.
3. Adjust “OSDSD” to center the OSD horizontally.
4. Press “MENU” to save data and exit the mode.
To position the character display horizontally.
Incorrect display position
Page 45
Page 46

MODELS: WS-48515 / WS-55515 / WS-55615 / WS-55815 / WS-65515 / WS-65615 /WS-65815 / WS-73615
2
[Conv/Defl]
13. Geometry Preset
Purpose:
Symptom:
To preset data controlling raster geometry
Raster distortion.
Measuring
Instrument
Test Point
Ext. Trigger
Measuring
Range
Input Signal
-----
------
------
-----
NTSC & HD
Procedure
In the Circuit Adjustment and Coarse Convergence Modes pre-set the data to the
values given in the Tables below.
CRT-JNGL Function (Jungl e)
Dat a
Range
No.Item SDHDSDHDSDHDSDHDSDHDSDHD
Input Terminal
Video & Component Inputs
1HWID 0~63 323129302121262628282525
2 HKEY 0~63 24 25 24 25 24 25 24 25 24 25 24 25
7VHGT 0~63 273025212125333838412831
8VLIN0~15 664466666666
9VSCN0~15 000000000000
13H-POS 0~63 232423242324232423242324
36PINA0~63 3310833333333
CONV GREEN I tems (MENU-2- 4-5-9- 5)
WS-48515
No. Abbrev. Descri ption
Name SD HD SD H D SD HD SD HD SD HD SD HD
1HSTA*Horizontal Position 000000000000
2VSTA*Vertical Position 000000000000
3SKEWSkew (Y axis rotation) 000000000000
4TILTTilt (X axis rotation) 000000000000
5 HWIDHorisontal Width 202020202020202020202020
6 HLIN Hori zontal Lineari ty 12 12 0 0 12 12 12 12 12 12 12 12
7SPCCSide Pin Cushion Correction000000000000
8HKEYHorizontal Keystone 00101000000000
9 TBPC Top/Bott om PC Correct ion -180 -150 -110 -110 -195 -180 -200 -170 - 210 - 180 - 210 -180
10 VKEY Vert ical Keyst one 0 0 15 10 00000000
11VWIDVertical Height 000000000000
1
VLINVertical Linearity. 000000000000
WS-55515 WS-73615WS-65815
WS-55615
WS-55815
WS-65515
WS-65615
CONV RED I t ems (MENU-2- 4-5-9- 5)
No. Abbrev. Descri ption
WS-48515
Name SD HD SD H D SD HD SD HD SD HD SD HD
1 HSTA Horizont al Positi on 50 50 50 50 50 50 50 50 100 100 10 100
2VSTAVertical Position 000000000000
3SKEWSkew (Y axis rotation) 000000000000
4TILTTilt (X axix rotation) 000000000000
5 HLIN Hori xontal Lineari ty -210 -190 -165 -165 - 210 - 150 - 180 -160 - 230 -210 -230 -210
6HWIDHorizontal Width 00001010000000
7 VKEY Vert ical Keyst one Corr ection -140 -120 - 85 -85 -100 -100 - 100 -90 -170 -140 -140 -110
8VWIDVertical Height 000000000000
9 VLIN Vertical Linearity 000000000000
10 TPPC Top/Bottom PC Correct ion 20 20 30 30 20 20 20 20 20 20 20 20
11SDBWHorizontal Side Bow 303020303030303030303030
WS-55515
WS-55615
WS-55815
WS-65515
WS-65615
WS-65815 WS-73615
CONV BLUE I tems (MENU-2- 4-5-9- 5)
WS-55815
WS-55615
WS-65515
WS-65615
WS-73615Display WS-48515 WS-55515
WS-65815
CIRCUIT ADJ UST MODE
Activate … ….. MEN U -2 -4-5- 7
Function … ...………..AUD IO
Item No. ……….…….VIDEO
Adjust Data ….…….ADJUST
Sa ve D a ta …. …… … ENTER
Exit …………..MENU (twice)
CONVERGENCE M ODE
Activate ……..MENU-2-4-5-9
Misc. ……………….……"6"
Coarse………………..…."5"
Fine ……………………..."4"
Color (R,G or B)……AUDIO
Item No … … …….…..VIDE O
Adjust/Move……….ADJUST
Cursor Toggle….…..ENTER
Save & Exit…..MENU (twice)
WS-48515
No. Abbrev. Descri ption
Name SD HD SD H D SD HD SD HD SD HD SD HD
1 HSTA Horizont al Positi on - 50 -50 - 50 -50 -50 -50 -50 - 50 -100 -100 -100 -100
2VSTAVertical Position 000000000000
3SKEWSkew (Y axis rotation) 000000000000
4TILTTilt (X axix rotation) 000000000000
5 HLIN Hori xontal Lineari ty 210 190 165 165 180 180 180 160 250 220 230 200
6HWIDHorizontal Width 00-20-2000000000
7 VKEY Vert ical Keyst one Corr ection 110 100 85 85 100 100 100 70 70 90 70 90
8VWIDVertical Height 000000000000
9 VLIN Vertical Linearity 000000000000
10 TPPC Top/Bottom PC Correct ion -20 -20 -20 - 20 -20 - 20 -20 -20 - 20 -20 - 20 -20
11 HSBW Horizontal Side Bow -30 - 30 -30 -30 -30 -30 - 30 -30 - 30 -30 -30 -30
WS-55515
WS-55615
WS-55815
WS-65515
WS-65615
WS-65815 WS-73615
Page 46
Page 47

MODELS: WS-48515 / WS-55515 / WS-55615 / WS-55815 / WS-65515 / WS-65615 /WS-65815 / WS-73615
[Deflection Circuit]
14: Deflection Geometry
Height & Width Adjustment
Measuring
Instrument
Test Point
Ext. Trigger
Measuring
Range
Input Signal
Input Terminal
CIRCUIT ADJ UST MODE
Activate … ….. MEN U -2 -4-5- 7
Function … ...………..AUD IO
Item No. ……….…….VIDEO
Adjust Data ….…….ADJUST
Sa ve D a ta …. …… … ENTER
Exit …………..MENU (twice)
-----
-----
------
-----
Monoscope (NTSC & HD)
Video & Component Inputs
Purpose:
Symptom:
To set the height, width and linearity of the raster.
Incorrect height, width and/or linearity.
Note:
Always use the
Standard Format
when aligning Geometry and Convergence.
Preliminary:
1. DO NOT change the initial values for “#8 VLIN” in the CRT-JUNGLE Function.
2.
DO NOT exceed the following VHGT adjustment ranges:
NTSC ... from -4 to +10
HD ... from -10 TO +5
NTSC Mode
1. Supply an NTSC Monoscope signal to a Video Input.
2. Select the Monoscope as the signal source.
3. Activate the Adjustment Mode, CRT-JNGL Function.
4. Select and adjust each of the following items.
• “7 VHGT” ... so the vertical marker sum = 4
• “1 HWD” ... so the horizontal marker sum = 7
5. Save data and Exit the Service Mode.
HD Mode
1. Supply an HD Monoscope signal to the Component HD Inputs.
2. Select the Component Inputs as the signal source (Input button)
3. Activate the Service Mode, CRT-JNGL Function.
4. Select and adjust each of the following items.
• “7 VHGT” ... so the vertical marker sum = 2
• “1 HWD” ... so the horizontal marker sum = 5
5. Save data and Exit the Service Mode.
Page 47
Page 48

MODELS: WS-48515 / WS-55515 / WS-55615 / WS-55815 / WS-65515 / WS-65615 /WS-65815 / WS-73615
[Convergence Circuit]
15. Convergence Geometry
Adjustment
Measuring
Instrument
Test Point
Ext. Trigger
Measuring
Range
Input Signal
Input Terminal
Activate … …..MENU-2-4 -5 -9
Misc. ……………….……"6"
Coarse………………..…."5"
Fine ……………………..."4"
Color (R,G or B)……AUD IO
Item N o ………….…..VID EO
Adjust/Move……….ADJUST
Cursor Toggle….…..ENTER
Save & Exit…..MENU (twice)
-----
------
------
-----
NTSC -- None
HD -- HD sync
Video & Component Inputs
CONVERGENCE MODE
Purpose:
Symptom:
Note:
Deflection Circuit Geometry must be performed before this adjustment.
Note:
Always use the
NTSC mode
1. Select a Video Input with no signal.
2. Activate the Convergence Mode, Coarse Green.
3. Adjust the Coarse Green Items shown below for straight crosshatch lines.
4. Select the Fine Green Mode, a Cursor is displayed on the crosshatch.
5. Use the Cursor to adjust for straight crosshatch lines.
6. Exit the Convergence Mode.
HD mode
1. Supply horizontal and vertical HD sync to the Components Input and select the
Component Inputs as the source.
3. Repeat NTSC Steps 3 through 6 from NSTC mode above in HD mode.
To set the Convergence circuit geometry adjustments.
Raster distortion at the top, bottom or sides of the picture.
Standard Format
when aligning Geometry and Convergence.
Page 48
Page 49

MODELS: WS-48515 / WS-55515 / WS-55615 / WS-55815 / WS-65515 / WS-65615 /WS-65815 / WS-73615
[Convergence Circuit]
16. Centering and Static
Convergence
Measuring
Instrument
Test Point
Ext. Trigger
Measuring
Range
Input Signal
Input Terminal
Activate … …..MENU-2-4 -5 -9
Misc. ……………….……"6"
Coarse………………..…."5"
Fine ……………………..."4"
Color (R,G or B)……AUD IO
Item N o ………….…..VID EO
Adjust/Move……….ADJUST
Cursor Toggle….…..ENTER
Save & Exit…..MENU (twice)
-----
-----
------
-----
NTSC -- Monoscope
HD -- Monoscope
Video & Component Inputs
CONVERGENCE MODE
Purpose:
Symptom:
To converge red, green and blue at the center of the screen
Color edging over the entire picture.
Preliminary
Degauss the shield cover and bracket unit of the CRT assembly and chassis.
DO NOT degauss the CPM Assemblies.
CAUTION:
Do Not adjust the Alignment Magnets instead of the Centering Magnets.
NOTE: Confirm that Item #13 HPOS, in the CRT-JNGL function of the MENU-2-4-5-7
Adjustment mode is set to the following values:
HD=34
SD=23
HD mode (The following steps must be performed in the HD mode)
1. Supply an HD Monoscope signal to the Component Input.
2. Select the Component Input as the signal source (Input button).
3. Enter the Convergence Coarse mode.
4. Set the data for the “HSTA” and “VSTA” items to:
GREEN RED BLUE
HSTS = 0 HSTA = 50 HSTA = -50
VSTA = 0 VSTA = 0 VSTA = 0
5. In the Coarse Green mode:
• Center the Green Raster using the Green Centering Magnet.
• Rotate the Green Deflection Yoke to correct any tilt.
6. In the Coarse Red mode, use the Red Centering Magnet to converge
red on the green at the center of screen. Correct any red tilt with the Red
Deflection Yoke.
7. In the Coarse Blue mode, repeat Step 6 using the Blue Centering magnet and
the Blue Deflection Yoke.
8. Exit the Convergence mode.
SD mode
1. Supply an NTSC Monoscope signal to a Video Input.
2. Select the Monoscope as the signal source (Input button).
3. Enter the Convergence Coarse Green mode.
4. Confirm that the Green Raster is centered.
Page 49
Page 50

MODELS: WS-48515 / WS-55515 / WS-55615 / WS-55815 / WS-65515 / WS-65615 /WS-65815 / WS-73615
[Convergence Circuit]
17. Coarse Convergence
Purpose:
Symptom:
To converge red and blue on green at the edges of the
screen.
Color edging at the top, bottom and sides of the screen.
Measuring
Instrument
Test Point
Ext. Trigger
Measuring
Range
Input Signal
Input Terminal
Activate … …..MEN U-2 -4 -5 -9
Misc. ……………….……"6"
Coarse………………..…."5"
Fine ……………………..."4"
Color (R,G or B)……AUD IO
Item N o …… …….…..VIDEO
Adjust/Move……….ADJUST
Cursor Toggle….…..ENTER
Save & Exit…..MENU (twice)
-----
------
------
-----
NTSC -- None
HD -- HD sync
Video & Component Input
CONVERGENCE MODE
Note:
Always use the
SD mode
1. Select an External Input with no signal.
2. Activate the Convergence Mode, Coarse Red.
3. Adjust the Items shown below to converge the red on the green.
4. Select Coarse Blue mode.
5. Adjust the Items shown below to converge the blue on the green.
Note:
Standard Format
when aligning Geometry and Convergence.
If center convergence shifts, use red and blue Items “0 HSTA” and
“1 VSTA” to correct the shift.
6. Exit the Convergence Mode.
HD mode
1. Supply horizontal and vertical HD sync to the Component Input and select the
Component Input as the source.
2. Repeat SD Steps 2 through 5 in the From the SD mode in HD mode.
3. Exit the Convergence mode.
Page 50
Page 51

MODELS: WS-48515 / WS-55515 / WS-55615 / WS-55815 / WS-65515 / WS-65615 /WS-65815 / WS-73615
[Convergence Circuit]
18. Fine Convergence
Purpose:
Symptom:
To converge red, green and blue at the edges of the screen
Color edging at the edges of the picture.
Measuring
Instrument
Test Point
Ext. Trigger
Measuring
Range
Input Signal
Input Terminal
Activate … …..MENU-2-4 -5 -9
Misc. ……………….……"6"
Coarse………………..…."5"
Fine ……………………..."4"
Color (R,G or B)……AUD IO
Item N o ………….…..VID EO
Adjust/Move……….ADJUST
Cursor Toggle….…..ENTER
Save & Exit…..MENU (twice)
-----
-----
------
-----
NTSC -- None
HD -- HD sync
Video & Component Input
CONVERGENCE MODE
Note:
Always use the
Standard Format
when aligning Geometry and Convergence.
SD Fine Adjustment
1. Select an External Input, no signal.
2. Activate the Convergence Mode, Fine Red.
3. Use the Cursor to converge red on the green.
4. Select the Fine Blue mode.
5. Use the Cursor to converge blue on the green.
6. Exit the Convergence mode.
HD Fine Adjustment
1. Supply an HD signal (sync only) to the Component input and select Component
Input as the input source.
2. Repeat SD Fine Adjustment Steps 2 through 6, in the HD mode.
3. Exit the Convergence mode.
Page 51
Page 52

MODELS: WS-48515 / WS-55515 / WS-55615 / WS-55815 / WS-65515 / WS-65615 / WS-65815 / WS-73615
CHIP PARTS REPLACEMENT
Some resistors, shorting jumpers (0 Ohm resistors),
ceramic capacitors, transistors and diodes are chip parts.
The following precautions should be taken when replacing
these parts.
Cautions:
1. Use a fine tipped, well insulated soldering iron
(approximately 30 watts), and tweezers.
2. Melt the solder and remove the chip parts
carefully so as not to tear the copper foil from
the printed circuit board.
3. Discard removed chips; do not reuse them.
4. Do not apply heat for more than 3 (three)
seconds to new chip parts.
5. Avoid using a rubbing stroke when soldering.
6. Take care not to scratch, or damage the chip
parts when soldering.
7. Supplementary cementing is not required.
Chip Parts Removal (Resistors, Capacitors, etc.)
1. Grasp the part with tweezers. Melt the solder
at both sides alternately, and remove one side
of the part with a twisting motion.
2. Melt the solder at the other side and remove
the part.
Chip Parts Removal (Transistors)
1. Melt the solder of one lead and lift the side of
that lead upward.
2. Simultaneously melt the solder of the other
two leads and lift the part from the PCB.
Replacement
1. Presolder the contact points on the circuit
pattern.
2. Press the part downward with tweezers and
apply the soldering iron as shown.
PAGE 52
Page 53

MODELS: WS-48515 / WS-55515 / WS-55615 / WS-55815 / WS-65515 / WS-65615 / WS-65815 / WS-73615
REPLACEMENT PARTS
Parts Ordering
To expedite delivery of replacement parts orders, specify the following:
1. Model Number/Serial Number
2. Part Number and description
3. Quantity
Note: Unless complete information is supplied, delay in processing of orders will result.
Critical and Warranty Parts Designation
Critical Electrical Components are indicated in the parts data base and by Bold Type in the Parts List.
Parts Tolerance Codes
Refer to the following chart for tolerance characteristics of electrical components.
MARK B C D F G J K
Tolerance % ± 0.1 ± 0.25 ± 0.5 ± 1 ± 2 ± 5 ± 10
MARK M N V X Z P Q
Tolerance %
MARK M N V X Z
Tolerance (pF) ± 0.1 ± 0.25 ± 0.5 ± 1 ± 2
± 20 ± 30 ± 10 + 40 + 80 + 100 + 30
-20 -20 - 0 -10
PAGE 53
Page 54

MODELS: WS-48515 / WS-55515 / WS-55615 / WS-55815 / WS-65515 / WS-65615 / WS-65815 / WS-73615
QUICK REFERENCE FOR COMMON REPLACEMENT P ARTS
CRT ASSEMBLIES
M ODEL A SSY-CRT-RED A SSY-CRT-GR EEN ASSY-CRT-BLUE
WS-48515 251C227010 251 C22 7020 251C227030
WS-55515 251C227040 251 C22 7050 251C227060
WS-55615 251C228010 251 C22 8020 251C228030
WS-55815 251C228040 251 C22 8050 251C228060
WS-65515 251C228070 251 C22 8080 251C228090
WS-65615 251C330010 251 C33 0020 251C330030
WS-65815 251C227070 251 C22 7080 251C227090
WS-73615 " " "
REMOTE CONTROL
290P122010 REMOTE-CONTROL - V25/V25+ WS-48515 / WS-55515 / WS-55615
WS-65515 / WS-65615 / WS-73615
290P123010 REMOTE-CONTROL - V25++ WS-55815 / WS-65815
HIGH VOLTAGE / DEFLECTION COMPONENTS
Q5A31 261P122010 HORIZ-OUT 2SC5778
Q5A51 261P142010 HV-OUT 2SK2847
T5A51 334P288010 TRANS-FLYBACK
129P070020 VR-FOCUS
338P054010 SVM COIL WS-48515 / WS-55515 / WS-65515
338P054020 SVM COIL WS-55615 / WS-55815 / WS-65615
WS-65815 / WS-73615
330P294010 DEFL-YOKE 840uH WS-48515 / WS-55515
330P294020 DEFL-YOKE 720uH WS-55615 / WS-55815 / WS-65515 / WS-65615
WS-65815 / WS-73615
453B036010 CAP-ANODE-LONG-RED WS-48515 / WS-55515 / WS-55615 / WS-55815
WS-65515 / WS-65615
453B036020 CAP ANODE-LONG-G&B “ “ “ “ “ “
453B036070 CAP-ANODE-SHORT-RED WS-65815 / WS-73615
453B036080 CAP ANODE-LONG-G&B “ “ “
MISCELLANEOUS
MODEL MIRROR
WS-48515 767D072040 491P138030 491P139020
WS-55515 767D072050 491P180010 491P181010
WS-55615 767D072030 " "
WS-55815 767D072060 " "
WS-65515 767D048090 491P182010 491P183010
WS-65615 " " "
WS-65815 " 491P182020 491P183020
WS-73615 767C031020 491P185010 491P186010
LENTICULAR
SCREEN
FRESNEL
LENS
PAGE 54
Page 55

MODELS: WS-48515 / WS-55515 / WS-55615 / WS-55815 / WS-65515 / WS-65615 /WS-65815 / WS-73615
[#] Model Legend:
(a) WS-48515, (b) WS-55515, (c) WS-55615, (d) WS-55815, (e) WS-65515, (f) WS-65615, (g) WS-65815, (h) WS-73615
Ref # Part # Part Name & Description [#]
TUBES
251C227010 ASSY-CRT-R(P16LZA00RFA) a
251C227020 ASSY-CRT-GR(P16LZA00HHA) a
251C227030 ASSY-CRT-BL(P16LZA00BMB) a
251C227040 ASSY-CRT-R(P16MAC03RJA) b
251C227050 ASSY-CRT-GR(P16MAC03HKA) b
251C227060 ASSY-CRT-BL(P16MAC03BMB) b
251C227070 ASSY-CRT-R(P21LUB05RJA) gh
251C227080 ASSY-CRT-GR(P21LUB05HKA) gh
251C227090 ASSY-CRT-BL(P21LUB05BMB) gh
251C228010 ASSY-CRT-R(P16MAC03RJA) c
251C228020 ASSY-CRT-GR(P16MAC03HKA) c
251C228030 ASSY-CRT-BL(P16MAC03BMB) c
251C228040 ASSY-CRT-R(P16MAC03RJA) d
251C228050 ASSY-CRT-GR(P16MAC03HKA) d
251C228060 ASSY-CRT-BL(P16MAC03BMB) d
251C228070 ASSY-CRT-R(P16MAC03RJA) e
251C228080 ASSY-CRT-GR(P16MAC03HKA) e
251C228090 ASSY-CRT-BL(P16MAC03BMB) e
251C330010 ASSY-CRT-R(P16MAC03RJA) f
251C330020 ASSY-CRT-GR(P16MAC03HKA) f
251C330030 ASSY-CRT-BL(P16MAC03BMB) f
INTEGRATED CIRCUITS
IC2000 276P090010 IC-C-MOS - SiI9993
IC2010 261P829010 TR-CHIP - NDC7002N
IC2020 275P981010 IC-C-MOS - 24LCS22AT/SN
IC2030 271P069010 IC-C-MOS - CM1210-08MS
IC2040 271P072020 IC - LD29150DT33
IC2050 271P099010 IC - LD29150PT50R
IC2300 276P109010 IC-C-MOS - CS4334-KS
IC2K01 271P061010 IC - CXA2189Q
IC2L01 271P078010 IC - MM1566AJBE
IC2L41 271P078010 IC - MM1566AJBE
IC2M01 275P947010 IC-C-MOS - UPD64083
IC2M02 272P379020 IC - LM1881MX (NSC)
IC2N01 270P658030 IC - CXA2019AQ/T4
IC2N41 270P703010 IC - BA7657F
IC2P01 270P658030 IC - CXA2019AQ/T4
IC2P41 270P703010 IC - BA7657F
IC2V00 275P733010 IC-C-MOS - CXA2150AQ
IC2V01 271P068010 IC - LM324AD
IC3002 276P109010 IC-C-MOS - CS4334-KS
IC3003 270P938010 IC - MC33202D
IC3004 275P731020 IC-C-MOS - MSP3445G-QI-B8-V3
IC3005 275P278010 IC-C-MOS - TC74LVX14FT
IC3006 270P838010 IC-C-MOS - NJM2520M
IC3007 270P838010 IC-C-MOS - NJM2520M
IC3E01 270P750010 IC - LA4663
IC3J01 271P060010 IC - CXA2188Q
IC4B01 270P261020 IC - TDA8177
IC5A00 267P163010 HIC - MSPAD401
IC5A01 271P068010 IC - LM324AD
IC5A02 271P067010 IC - LM339AD
IC5A03 270P704010 IC - LM4040BIZ-10.0
IC5A04 271P062010 IC - BA9759F
IC6B01 270P667010 IC - TDA6120Q
IC6G01 270P667010 IC - TDA6120Q
IC6R01 270P667010 IC - TDA6120Q
Ref # Part # Part Name & Description [#]
IC7A00 276P087010 IC-C-MOS - M306V7MG-086FP
IC7A02 270P706020 IC - MAX823REUK
IC7D00 275P278010 IC-C-MOS - TC74LVX14FT
IC7D01 270P818020 IC - CXA3506R
IC7DA1 267P176010 HIC - AF-9412
IC7DB0 271P072020 IC - LD29150DT33
IC7DC0 271P072040 IC - LD29150DT18R
IC7E01 275P894010 IC-C-MOS - AD9883AKST- 110
IC7EA0 275P663030 IC-C-MOS - M4A3-32/32-5VC-48
IC7H00 276P106010 IC-C-MOS - MB87M1823PFV-ES-BND
IC7K21
IC7M00 276P091010 IC-C-MOS - M12L64322A-6T
IC7N00 270P997010 IC-C-MOS - SM5301AS
IC7P01 275P943030 IC-C-MOS - PIC18F252T-I/SO030
IC7P02 271P023010 IC - SN74CBTD1G125DBVR
IC7P03 263P154010 IC-C-MOS - SN74HC132DB
IC7Q01 275P533010 IC-C-MOS - M24C64WM6T
IC8001 276P030020 IC-C-MOS - 215H31AGA12
IC8002 270P706020 IC - MAX823REUK
IC8003 276P064010 IC-C-MOS - SN74LVC1G125DBVR
IC80E1 275P657050 IC-C-MOS - 24LC256T-I/SN
IC80E3 270P880010 IC - 24LC64I/SN
IC8101 271P033010 IC - LP2996MRX
IC8102 276P029020 IC-C-MOS - NT5DS16M16BT-5T
IC8103 276P029020 IC-C-MOS - NT5DS16M16BT-5T
IC8104 276P029020 IC-C-MOS - NT5DS16M16BT-5T d g
IC8105 276P029020 IC-C-MOS - NT5DS16M16BT-5T d g
IC81A1 270P991010 IC - IRU3037CS
IC81A2 261P135010 FET-HEX - IRF7313
IC81A3 270P879020 IC - SC1566I5M-1.8.TR
IC81A4 270P992010 IC - BA18BC0FP
IC81A5 270P879020 IC - SC1566I5M-1.8.TR
IC81A6 270P037020 IC - MIC29150-X.X BU
IC81A7 270P999010 IC - NJM2370R09
IC81A8 271P081010 IC - BA00CC0WFP
IC8205 276P042010 IC-C-MOS - MIC2544-1BM
IC821 1 276P029020 IC-C-MOS - NT5DS16M16BT-5T
IC8212 276P029020 IC-C-MOS - NT5DS16M16BT-5T
IC8280 275P955010 IC-C-MOS - RTC-8564JE
IC8301 275P677010 IC-C-MOS - SN74LVC573APWR
IC8302 275P677010 IC-C-MOS - SN74LVC573APWR
IC8303 275P677010 IC-C-MOS - SN74LVC573APWR
IC8305 275P956010 IC-C-MOS - MD2811-D16-V3
IC8307 275P983020 IC-C-MOS - ST16C650ACQ48
IC8308 276P077010 IC-C-MOS - ST013T dg
IC8309 275P660020 IC-C-MOS - CS4341-KSR
IC8310 275P270010 IC-C-MOS - M66010GP
IC831 1 275P769010 IC-C-MOS - TC74AC157FT dg
IC8312 270P938010 IC - MC33202D
IC8313 275P731020 IC-C-MOS - MSP3445G-QI-B8-V3
IC8314 275P677010 IC-C-MOS - SN74LVC573APWR
IC8315 275P464010 IC-C-MOS - TC7WH14FK
IC8316 276P064010 IC-C-MOS - SN74LVC1G125DBVR dg
IC8401 275P624010 IC-C-MOS - TSB42AA4
IC8402 275P686010 IC-C-MOS - TSB41AB3PFP
IC8501 275P679010 IC-C-MOS - TC74LCX74FT
IC8502 275P124040 IC-C-MOS - SN74LVC245APWR
IC8503 275P677010 IC-C-MOS - SN74LVC573APWR
270P831010 IC-C-MOS - OPA2350P A
PAGE 55
Page 56

MODELS: WS-48515 / WS-55515 / WS-55615 / WS-55815 / WS-65515 / WS-65615 /WS-65815 / WS-73615
[#] Model Legend:
(a) WS-48515, (b) WS-55515, (c) WS-55615, (d) WS-55815, (e) WS-65515, (f) WS-65615, (g) WS-65815, (h) WS-73615
Ref # Part # Part Name & Description [#]
IC8504 271P036020 IC - TPS2221PWPR
IC8505 275P677010 IC-C-MOS - SN74LVC573APWR
IC8506 276P065020 IC-C-MOS - CIMAX(103563)
IC8507 275P680010 IC-C-MOS - TC74VCX257FT
IC8508 275P675010 IC-C-MOS - SN74LV125APWR
IC8509 271P036020 IC - TPS2221PWPR
IC8708 271P072030 IC - LD29150DT50
IC8709 271P082010 IC - LD1117DT12
IC8710 271P072010 IC - LD29150DT25
IC8719 271P023010 IC - SN74CBTD1G125DBVR
IC8720 271P023010 IC - SN74CBTD1G125DBVR
IC8721 270P677030 IC - BAO9FP
IC8800 270P877010 IC - UPC3217GV
IC8801 270P877010 IC - UPC3217GV
IC8802 275P464010 IC-C-MOS - TC7WH14FK
IC8805 271P064010 IC - TA75S01F
IC8806 271P039010 IC-C-MOS - NXT2003 100C
IC8C01 267P173010 HIC - STK394-250
IC8C02 267P173010 HIC - STK394-250
IC8D00 276P088010 IC-C-MOS - CM0038AF
IC8D01 275P222020 IC-C-MOS - M24C32MN6T
IC8E00 270P751010 IC - TL084CD
IC8E01 270P751010 IC - TL084CD
IC8E02 270P751010 IC - TL084CD
IC8E03 275P721020 IC-C-MOS - CD0031CM
IC9A20 267P175010 HIC - STR-W6735
IC9A21 270P816010 IC - NJM431L
IC9A50 267P161010 HIC - STR-F6428S
IC9C01 271P071020 IC - BA09SFP
IC9C02 271P099010 IC - LD29150PT50R
IC9C03 271P099010 IC - LD29150PT50R
IC9C04 271P071010 IC - BA033SFP
IC9C05 271P071020 IC - BA09SFP
IC9C21 271P072020 IC IC9C41 271P072030 IC - LD29150DT50
IC9C61 271P072010 IC - LD29150DT25
IC9M01 270P677010 IC - BA033FP
IC9M02 270P992020 IC - BA25BC0FP
LD29150DT33
TRANSISTORS
CHIP Type Transistors (Listed by Part No.)
Ref # Part # Part Name & Description [#]
TRANSISTORS
Conventional Transistors (By Ref #)
Q2V30 260C004020 TR - 2SC1740S-R,S/2SC3311A-R,S
Q5A04 261P149010 TR - 2SJ585LS
Q5A07 260C416030 TR - 2SC2274-F/2SC2274K-F
Q5A09 260C255040 TR - 2SA950-Y
Q5A31 261P122010 TR - 2SC5778
Q5A32 261P155010 TR - 2SK2169
Q5A34 261P150010 TR - 2SA1207
Q5A36 260P630010 TR - 2SD2012
Q5A41 261P151010 TR - 2SC2909
Q5A51 261P142010 TR - 2SK2847
Q5H03 260C001040 TR - 2SC2603-G/2SC1740S-E
Q5H04 260C001040 TR - 2SC2603-G/2SC1740S-E
Q5H05 260C001040 TR - 2SC2603-G/2SC1740S-E
Q5H06 260C001060 TR - 2SA1115-F/2SA933S-S
Q5H09 260C001030 TR - 2SC2603-F,G/2SC1740S
Q5H10 260C001060 TR - 2SA1115-F/2SA933S-S
Q5H11 260P644040 TR - 2SA1535-R
Q5H12 260P647040 TR - 2SC3944-R
Q5K01 260C004050 TR - 2SA933S-R,S/2SA1309A-R,S
Q5K02 261P151010 TR - 2SC2909
Q5K03 260C004010 TR - 2SC1740S-R,S/2SC3311A-R,S
Q5K04 261P151010 TR - 2SC2909
Q5K05 261P150010 TR - 2SA1207
Q5K06 261P152010 TR - 2SC3116
Q5K07 261P152010 TR - 2SC3116
Q5K08 260C004050 TR - 2SA933S-R,S/2SA1309A-R,S
Q5K09 261P214010 TR - 2SC4634LS
Q5K50 261P214010 TR - 2SC4634LS
Q6B01 260C001010 TR - 2SC2603-E,F
Q6B02 260C001050 TR - 2SA1115-E,F/2SA933S
Q6B03 260C001050 TR - 2SA1115-E,F/2SA933S
Q6G01 260C001010 TR - 2SC2603-E,F
Q6R01 260C001010 TR - 2SC2603-E,F
Q7K21 260C004010 TR - 2SC1740S-R,S/2SC3311A-R,S
Q7P22 261P114010 TR - 2SA1585STPR
Q8701 261P026010 TR Q9A21 260P630010 TR - 2SD2012
Q9A50 260C416030 TR - 2SC2274-F/2SC2274K-F
2SC3356
Part No. Description
260P806010 DTA124EK/UN2112
260P817030 2SA1037K-S
260P817050 2SA1037K-R,S/2SB709AI-R,S
260P817080 2SA1037K-R,S
260P818010 2SC2412K-Q
260P818030 2SC2412K-S
260P818050 2SC2412K-R,S/2SD601AI-R,S
260P818080 2SC2412K-R,S
260P836090 2SC3326-A,B
260P846030 DTC143ZKAT146
DIODES
D2760 264P828010 D-CHIP - DAN202U/MA142WK
D2761 264P828010 D-CHIP - DAN202U/MA142WK
D2770 262P805050 D-CHIP - UDZS5.1B
D2771 264P828010 D-CHIP - DAN202U/MA142WK
D2W01 264P828010 D-CHIP - DAN202U/MA142WK
D2W02 264P828010 D-CHIP - DAN202U/MA142WK
D2W03 264P828010 D-CHIP - DAN202U/MA142WK
D2W04 264P828010 D-CHIP - DAN202U/MA142WK
D4B01 264D056020 DIODE - S5500D/EM1Z/ERB12-02RK
D4B04 264P828010 D-CHIP - DAN202U/MA142WK
D4B05 264P828010 D-CHIP - DAN202U/MA142WK
D5A01 264P045080 DIODE - 1S2076A/1S2471OM
D5A02 264P045080 DIODE - 1S2076A/1S2471OM
PAGE 56
Page 57

MODELS: WS-48515 / WS-55515 / WS-55615 / WS-55815 / WS-65515 / WS-65615 /WS-65815 / WS-73615
[#] Model Legend:
(a) WS-48515, (b) WS-55515, (c) WS-55615, (d) WS-55815, (e) WS-65515, (f) WS-65615, (g) WS-65815, (h) WS-73615
Ref # Part # Part Name & Description [#]
Ref # Part # Part Name & Description [#]
D5A03 264P045080 DIODE - 1S2076A/1S2471OM
D5A04 264P045080 DIODE - 1S2076A/1S2471OM
D5A05 264P466040 DIODE - EQA02-15AB/RD16EB1
D5A06 262P085010 DIODE - 11EFS2N-TA2B5
D5A12 264P045080 DIODE - 1S2076A/1S2471OM
D5A13 264P045080 DIODE - 1S2076A/1S2471OM
D5A14 264P045080 DIODE - 1S2076A/1S2471OM
D5A33 262P129010 DIODE - 30PRA20-FC5
D5A34 264P460060 DIODE - EQA02-05C/RD5.1EB1
D5A35 264P045080 DIODE - 1S2076A/1S2471OM
D5A36 264P045080 DIODE - 1S2076A/1S2471OM
D5A37 264D056020 DIODE - S5500D/EM1Z/ERB12-02RK
D5A51 262P039010 DIODE - BYW96E/20
D5A52 264P899010 DIODE - BYV26E
D5A53 264P466040 DIODE - EQA02-15AB/RD16EB1
D5A54 262P085010 DIODE - 11EFS2N-TA2B5
D5A55 262P085010 DIODE - 11EFS2N-TA2B5
D5A56 264P045080 DIODE - 1S2076A/1S2471OM
D5A57 262P085010 DIODE - 11EFS2N-TA2B5
D5A58 264P045080 DIODE - 1S2076A/1S2471OM
D5A60 264P463040 DIODE - RD9.1EB1
D5H01 264P045080 DIODE - 1S2076A/1S2471OM
D5H02 264P045080 DIODE - 1S2076A/1S2471OM
D5K00 264P528030 DIODE - RP 1H
D5K01 264P528030 DIODE - RP 1H
D6B00 262P063010 DIODE - 1SS244
D6B07 262P063010 DIODE - 1SS244
D6B08 262P063010 DIODE - 1SS244
D6G00 262P063010 DIODE - 1SS244
D6G07 262P063010 DIODE - 1SS244
D6G08 262P063010 DIODE - 1SS244
D6R00 262P063010 DIODE - 1SS244
D6R07 262P063010 DIODE - 1SS244
D6R08 262P063010 DIODE - 1SS244
D7K21 268P100010 DIODE-PHOTO - SFH235FA
D7K22 264P045080 DIODE - 1S2076A/1S2471OM
D7L21 264P212020 D-LED - LN31GPH abdeg
D7L41 264P212020 D-LED - LN31GPH cfh
D7R03 264P828010 D-CHIP - DAN202U/MA142WK
D81A1 264P828010 D-CHIP - DAN202U/MA142WK
D81A2 264P828010 D-CHIP - DAN202U/MA142WK
D81A3 264P828010 D-CHIP - DAN202U/MA142WK
D81A4 262P090010
D81A5 264P458050 DIODE - RD3.9EB1
D8201 264P846010 DIODE-CHIP - MA732
D8202 264P846010 DIODE-CHIP - MA732
D8203 264P846010 DIODE-CHIP - MA732
D8204 264P846010 DIODE-CHIP - MA732
D8280 264P808010 DIODE-CHIP - DAN202K
D8800 262P089010 DIODE - MA2S728
D8802 262P071070 DIODE-LE - SML-210FT
D8803 262P071070 DIODE-LE - SML-210FT
D8805 262P089010 DIODE - MA2S728
D8C03 262P817010 DIODE-CHIP - PTZ9.1B
D8C04 262P817010 DIODE-CHIP - PTZ9.1B
D9A01 262P031010 DIODE - D6SB80
D9A02 264P045080 DIODE - 1S2076A/1S2471OM
D9A03 264P461050 DIODE - EQA02-06B/RD5.6EB3
DIODE - M1FP3
D9A04 264P045080 DIODE - 1S2076A/1S2471OM
D9A20 264P045080 DIODE - 1S2076A/1S2471OM
D9A21 264P899010 DIODE - BYV26E
D9A22 264P825040 DIODE - ERA15-08
D9A23 262P085010 DIODE - 11EFS2N-TA2B5
D9A24 264P045080 DIODE - 1S2076A/1S2471OM
D9A25 262P085010 DIODE - 11EFS2N-TA2B5
D9A26 262P128010 DIODE - FSH05A06
D9A27 262P127010 DIODE - FSH05A03L
D9A28 264P045080 DIODE - 1S2076A/1S2471OM
D9A29 264P045080 DIODE - 1S2076A/1S2471OM
D9A30 264P470070 DIODE - EQA02-32B/RD33EB3
D9A31 264P045080 DIODE - 1S2076A/1S2471OM
D9A50 264P045080 DIODE - 1S2076A/1S2471OM
D9A51 264P045080 DIODE - 1S2076A/1S2471OM
D9A52 264P045080 DIODE - 1S2076A/1S2471OM
D9A53 264P045080 DIODE - 1S2076A/1S2471OM
D9A54 262P085010 DIODE - 11EFS2N-TA2B5
D9A55 264P045080 DIODE - 1S2076A/1S2471OM
D9A56 262P083010 DIODE - FSF05A20
D9A57 264P899010 DIODE - BYV26E
D9A58 262P088010 DIODE - 31DF4-FC5
D9A60 262P129010 DIODE - 30PRA20-FC5
D9A61 262P129010 DIODE - 30PRA20-FC5
D9A68 264P469070 DIODE - EQA02-28A/RD27EB4
D9A69 264P527020 DIODE - AK04
COILS
L1H01 321C114010 COIL-RF - 2200MH-J
L1H02 325C461030 COIL-PEAKING - 10MH-K
L1H51 321C114010 COIL-RF - 2200MH-J
L1H52 325C461030 COIL-PEAKING - 10MH-K
L2011 409P777080 EMI-F-CHIP - BLM21P221S
L2012 409P777080 EMI-F-CHIP - BLM21P221S
L2061 409P777080 EMI-F-CHIP - BLM21P221S
L2071 409P777080 EMI-F-CHIP - BLM21P221S
L2111 409P777080 EMI-F-CHIP - BLM21P221S
L2121 409P777080 EMI-F-CHIP - BLM21P221S
L2141 409P777080 EMI-F-CHIP - BLM21P221S
L2151 409P777080 EMI-F-CHIP - BLM21P221S
L2231 409P777080 EMI-F-CHIP - BLM21P221S
L2271 409P865020 EMI-F-CHIP - BLM11A601S
L2300 409P923060 EMI-F-CHIP - BLM21B272S
L2301 409P865020 EMI-F-CHIP - BLM11A601S
L2311 409P865020 EMI-F-CHIP - BLM11A601S
L2321 409P865020 EMI-F-CHIP - BLM11A601S
L2331 409P865020 EMI-F-CHIP - BLM11A601S
L2341 409P865020 EMI-F-CHIP - BLM11A601S
L2711 409P865020 EMI-F-CHIP - BLM11A601S
L2721 409P865020 EMI-F-CHIP - BLM11A601S
L2761 409P777080 EMI-F-CHIP - BLM21P221S
L2801 409P777080 EMI-F-CHIP - BLM21P221S
L2821 409P777080 EMI-F-CHIP - BLM21P221S
L2K01 325C461030 COIL-PEAKING - 10MH-K
L2K09 325C461030 COIL-PEAKING - 10MH-K
L2K58 325C461030 COIL-PEAKING - 10MH-K
L2K67 325C461030 COIL-PEAKING - 10MH-K
PAGE 57
Page 58

MODELS: WS-48515 / WS-55515 / WS-55615 / WS-55815 / WS-65515 / WS-65615 /WS-65815 / WS-73615
[#] Model Legend:
(a) WS-48515, (b) WS-55515, (c) WS-55615, (d) WS-55815, (e) WS-65515, (f) WS-65615, (g) WS-65815, (h) WS-73615
Ref # Part # Part Name & Description [#]
L2L01 325C461030 COIL-PEAKING - 10MH-K
L2L61 325C461030 COIL-PEAKING - 10MH-K
L2M21 325C461030 COIL-PEAKING - 10MH-K
L2M31 409P777080 EMI-F-CHIP - BLM21P221S
L2M35 325C461050 COIL-PEAKING - 15MH-K
L2M36 325C461030 COIL-PEAKING - 10MH-K
L2M38 409P777080 EMI-F-CHIP - BLM21P221S
L2M40 325C461030 COIL-PEAKING - 10MH-K
L2M41 325C461030 COIL-PEAKING - 10MH-K
L2M45 409P777080 EMI-F-CHIP - BLM21P221S
L2M46 409P777080 EMI-F-CHIP - BLM21P221S
L2M50 325C461000 COIL-PEAKING - 5.6MH-K
L2M53 325C461030 COIL-PEAKING - 10MH-K
L2M70 325C461030 COIL-PEAKING - 10MH-K
L2M71 325C461030 COIL-PEAKING - 10MH-K
L2M77 325C461030 COIL-PEAKING - 10MH-K
L2M81 409P777080 EMI-F-CHIP - BLM21P221S
L2N03 325C461030 COIL-PEAKING - 10MH-K
L2N25 409P777080 EMI-F-CHIP - BLM21P221S
L2N60 409P777080 EMI-F-CHIP - BLM21P221S
L2P03 325C461030 COIL-PEAKING - 10MH-K
L2P25 409P777080 EMI-F-CHIP - BLM21P221S
L2P60 409P777080 EMI-F-CHIP - BLM21P221S
L2V19 325C461010 COIL-PEAKING - 6.8MH-K
L2V55 325C461010 COIL-PEAKING - 6.8MH-K
L2V61 325C461010 COIL-PEAKING - 6.8MH-K
L2W02 409P923060 EMI-F-CHIP - BLM21B272S
L2W03 409P923060 EMI-F-CHIP - BLM21B272S
L2W04 409P923060 EMI-F-CHIP - BLM21B272S
L3020 409P923060 EMI-F-CHIP - BLM21B272S
L3034 409P923060 EMI-F-CHIP - BLM21B272S
L3048 409P923060 EMI-F-CHIP - BLM21B272S
L3049 409P923060 EMI-F-CHIP - BLM21B272S
L3050 409P923060 EMI-F-CHIP - BLM21B272S
L3054 409P923060 EMI-F-CHIP - BLM21B272S
L4B01 321C140060 COIL-RF - 2.7MH-M
L5A01 321C141070 COIL-RF - 22MH-K
L5A02 411D009020 FERRITE-CORE - ZBF503D-01
L5A03 411D009020 FERRITE-CORE - ZBF503D-01
L5A22 333P059020 COIL-HORIZ-LIN cdefgh
L5A34 321C140060 COIL-RF - 2.7MH-M
L5A51
L5A54 411D009020 FERRITE-CORE - ZBF503D-01
L7A16 409P777050 EMI-F-CHIP - BLM21B201S
L7A19 409P777050 EMI-F-CHIP - BLM21B201S
L7A88 409P777050 EMI-F-CHIP - BLM21B201S
L7A90 409P777050 EMI-F-CHIP - BLM21B201S
L7A91 409P777050 EMI-F-CHIP - BLM21B201S
L7A99 409P777050 EMI-F-CHIP - BLM21B201S
L7D16 325C420070 COIL-CHIP - 10MH-K
L7DA7 325C420070 COIL-CHIP - 10MH-K
L7DF4 409P777080 EMI-F-CHIP - BLM21P221S
L7DF8 325C420070 COIL-CHIP - 10MH-K
L7E34 409P777080 EMI-F-CHIP - BLM21P221S
L7E42 409P777080 EMI-F-CHIP - BLM21P221S
L7E69 409P777080 EMI-F-CHIP - BLM21P221S
L7EB7 409P777080 EMI-F-CHIP - BLM21P221S
L7H01 409P777080 EMI-F-CHIP - BLM21P221S
321C151010 COIL-RF - 6.8MH-M
Ref # Part # Part Name & Description [#]
L7H04 409P777080 EMI-F-CHIP - BLM21P221S
L7H23 409P777080 EMI-F-CHIP - BLM21P221S
L7H29 409P777080 EMI-F-CHIP - BLM21P221S
L7H49 409P777080 EMI-F-CHIP - BLM21P221S
L7H66 409P777080 EMI-F-CHIP - BLM21P221S
L7H76 409P777080 EMI-F-CHIP - BLM21P221S
L7H95 409P865020 EMI-F-CHIP - BLM11A601S
L7H96 409P865020 EMI-F-CHIP - BLM11A601S
L7J13 409P777080 EMI-F-CHIP - BLM21P221S
L7J23 325C420070 COIL-CHIP - 10MH-K
L7J38 409P777080 EMI-F-CHIP - BLM21P221S
L7J44 409P777080 EMI-F-CHIP - BLM21P221S
L7K01 325C121030 COIL-PEAKING - 10MH-K
L7M90 409P777080 EMI-F-CHIP - BLM21P221S
L7N24 325C420070 COIL-CHIP - 10MH-K
L7P14 409P777050 EMI-F-CHIP - BLM21B201S
L7P20 409P777050 EMI-F-CHIP - BLM21B201S
L7Q31 409P777080 EMI-F-CHIP - BLM21P221S
L7R08 409P777050 EMI-F-CHIP - BLM21B201S
L8001 409P865080 EMI-FILTER-CHIP - BLM18PG600SN1
L8002 409P865080 EMI-FILTER-CHIP - BLM18PG600SN1
L8003 409P865080 EMI-FILTER-CHIP - BLM18PG600SN1
L8004 409P865080 EMI-FILTER-CHIP - BLM18PG600SN1
L8005 409P865080
L8006 409P865080 EMI-FILTER-CHIP - BLM18PG600SN1
L8007 409P865080 EMI-FILTER-CHIP - BLM18PG600SN1
L8008 409P865080 EMI-FILTER-CHIP - BLM18PG600SN1
L8009 409P777080 EMI-F-CHIP - BLM21P221S
L8012 409P865080 EMI-FILTER-CHIP - BLM18PG600SN1
L8013 409P865080 EMI-FILTER-CHIP - BLM18PG600SN1
L81A1 321C140060 COIL-RF - 2.7MH-M
L81A2 351P250010 COIL-CHOKE - GSTC6018-100M
L81A3 409P777080 EMI-F-CHIP - BLM21P221S
L81A4 321C140060 COIL-RF - 2.7MH-M
L81A5 321C140060 COIL-RF - 2.7MH-M
L81A6 409P777080 EMI-F-CHIP - BLM21P221S
L81A7 409P865080 EMI-FILTER-CHIP - BLM18PG600SN1
L81A8 409P777080 EMI-F-CHIP - BLM21P221S
L8202 409P777080 EMI-F-CHIP - BLM21P221S
L8203 409P777080 EMI-F-CHIP - BLM21P221S
L8204 409P777080 EMI-F-CHIP - BLM21P221S
L8205 409P777080 EMI-F-CHIP - BLM21P221S
L8206 351P265010 COIL-CHOKE-CHIP
L8207 351P265010 COIL-CHOKE-CHIP
L8280 409P865080 EMI-FILTER-CHIP - BLM18PG600SN1
L8301 409P865080 EMI-FILTER-CHIP - BLM18PG600SN1
L8304 325C501010 COIL-CHIP - ALQM21NNR47K10
L8305 325C501010 COIL-CHIP - ALQM21NNR47K10
L8307 409P865080 EMI-FILTER-CHIP - BLM18PG600SN1
L8309 409P865080 EMI-FILTER-CHIP - BLM18PG600SN1 dg
L8310 409P865080 EMI-FILTER-CHIP - BLM18PG600SN1 dg
L8311 409P865080 EMI-FILTER-CHIP - BLM18PG600SN1 dg
L8312 409P865080 EMI-FILTER-CHIP - BLM18PG600SN1 dg
L8313 409P865080 EMI-FILTER-CHIP - BLM18PG600SN1
L8314 409P865080 EMI-FILTER-CHIP - BLM18PG600SN1
L8315 409P865080 EMI-FILTER-CHIP - BLM18PG600SN1
L8316 409P865080 EMI-FILTER-CHIP - BLM18PG600SN1
L8320 409P865080 EMI-FILTER-CHIP - BLM18PG600SN1
EMI-FILTER-CHIP - BLM18PG600SN1
PAGE 58
Page 59

MODELS: WS-48515 / WS-55515 / WS-55615 / WS-55815 / WS-65515 / WS-65615 /WS-65815 / WS-73615
[#] Model Legend:
(a) WS-48515, (b) WS-55515, (c) WS-55615, (d) WS-55815, (e) WS-65515, (f) WS-65615, (g) WS-65815, (h) WS-73615
Ref # Part # Part Name & Description [#]
L8321 409P865080 EMI-FILTER-CHIP - BLM18PG600SN1
L8322 409P865080 EMI-FILTER-CHIP - BLM18PG600SN1
L8323 409P865080 EMI-FILTER-CHIP - BLM18PG600SN1
L8324 409P865080 EMI-FILTER-CHIP - BLM18PG600SN1
L8326 409P865080 EMI-FILTER-CHIP - BLM18PG600SN1
L8329 409P865080 EMI-FILTER-CHIP - BLM18PG600SN1
L8331 409P865080 EMI-FILTER-CHIP - BLM18PG600SN1
L8332 409P865080 EMI-FILTER-CHIP - BLM18PG600SN1
L8401 409P865080 EMI-FILTER-CHIP - BLM18PG600SN1
L8403 409P777080 EMI-F-CHIP - BLM21P221S
L8404 409P777080 EMI-F-CHIP - BLM21P221S
L8411 351P265020 COIL-CHIP - ACM2012-201-2P
L8412 351P265020 COIL-CHIP - ACM2012-201-2P
L8413 351P265020 COIL-CHIP - ACM2012-201-2P
L8414 351P265020 COIL-CHIP - ACM2012-201-2P
L8415 351P265020 COIL-CHIP - ACM2012-201-2P
L8416 351P265020 COIL-CHIP - ACM2012-201-2P
L8501 409P865080 EMI-FILTER-CHIP - BLM18PG600SN1
L8502 409P777080 EMI-F-CHIP - BLM21P221S
L8503 409P865080 EMI-FILTER-CHIP - BLM18PG600SN1
L8504 409P777080 EMI-F-CHIP - BLM21P221S
L8505 409P865080 EMI-FILTER-CHIP - BLM18PG600SN1
L8506 409P777080 EMI-F-CHIP - BLM21P221S
L8507 409P865080 EMI-FILTER-CHIP - BLM18PG600SN1
L8508 409P865080 EMI-FILTER-CHIP - BLM18PG600SN1
L8509 409P865080 EMI-FILTER-CHIP - BLM18PG600SN1
L8510 409P777080 EMI-F-CHIP - BLM21P221S
L8511 409P777080 EMI-F-CHIP - BLM21P221S
L8512 409P777080 EMI-F-CHIP - BLM21P221S
L8701 409P923060 EMI-F-CHIP - BLM21B272S
L8702 409P923060 EMI-F-CHIP - BLM21B272S
L8703 409P923060 EMI-F-CHIP - BLM21B272S
L8704 409P923060 EMI-F-CHIP - BLM21B272S
L8706 409P923060 EMI-F-CHIP - BLM21B272S
L8711 325C414030 COIL-CHIP - 0.22MH-J
L8717 409P923060 EMI-F-CHIP - BLM21B272S
L8718 409P923060 EMI-F-CHIP - BLM21B272S
L8723 409P923060 EMI-F-CHIP - BLM21B272S
L8725 409P923060 EMI-F-CHIP - BLM21B272S
L8726 409P923060 EMI-F-CHIP - BLM21B272S
L8727 409P923060 EMI-F-CHIP - BLM21B272S
L8736 409P923060 EMI-F-CHIP - BLM21B272S
L8802 409P923060 EMI-F-CHIP - BLM21B272S
L8803 409P923060 EMI-F-CHIP - BLM21B272S
L8804 409P923060 EMI-F-CHIP - BLM21B272S
L8805 409P923060 EMI-F-CHIP - BLM21B272S
L8808 409P923060 EMI-F-CHIP - BLM21B272S
L8809 325C410040 COIL-CHIP - 1.8MH-J
L8810 409P923060
L8811 409P923060 EMI-F-CHIP - BLM21B272S
L8814 325C141070 COIL-CHIP - 22MH-K/J
L8815 409P923060 EMI-F-CHIP - BLM21B272S
L8824 409P923060 EMI-F-CHIP - BLM21B272S
L8C01 321C141070 COIL-RF - 22MH-K
L8C02 321C141070 COIL-RF - 22MH-K
L8D01 409P777080 EMI-F-CHIP - BLM21P221S
L8D02 409P777080 EMI-F-CHIP - BLM21P221S
L8D03 409P777080 EMI-F-CHIP - BLM21P221S
L8D04 409P777080 EMI-F-CHIP - BLM21P221S
EMI-F-CHIP - BLM21B272S
Ref # Part # Part Name & Description [#]
L8D05 325C461030 COIL-PEAKING - 10MH-K
L8D06 409P777080 EMI-F-CHIP - BLM21P221S
L8D07 409P777080 EMI-F-CHIP - BLM21P221S
L8D08 325C461030 COIL-PEAKING - 10MH-K
L8D09 325C461030 COIL-PEAKING - 10MH-K
L8G00 409P777080 EMI-F-CHIP - BLM21P221S
L8G01 409P777080 EMI-F-CHIP - BLM21P221S
L9A21 321C141010 COIL-RF - 6.8MH-M
L9A22 321C141030 COIL-RF - 10MH-K
L9A23 321C141030 COIL-RF - 10MH-K
L9A50 411D009020 FERRITE-CORE - ZBF503D-01
L9A51 321C141010 COIL-RF - 6.8MH-M
L9A52 411D009020 FERRITE-CORE - ZBF503D-01
L9A53 321C141010 COIL-RF - 6.8MH-M
L9A54 411D009020 FERRITE-CORE - ZBF503D-01
L9A55 321C142030 COIL-RF - 68MH-K
L9A56 411D009020 FERRITE-CORE - ZBF503D-01
L9A57 321C141010 COIL-RF - 6.8MH-M
L9A62 321C141010 COIL-RF - 6.8MH-M
L9A63 321C141070 COIL-RF - 22MH-K
L9A64 321C141070 COIL-RF - 22MH-K
L9D00 351P266010 LINE-FILTER - ELF22V050BN
L9D01 351P266010 LINE-FILTER - ELF22V050BN
LC2H40 409P777020 EMI-F-CHIP - BLM21A05
LC2H41 409P777020 EMI-F-CHIP - BLM21A05
LC2H42 409P777020 EMI-F-CHIP - BLM21A05
LC2H43 409P777020 EMI-F-CHIP - BLM21A05
LC2H44 409P777020 EMI-F-CHIP - BLM21A05
LC2H45
LC81A1 409P945010 EMI-F-CHIP - NFL21SP506X13CD
LC8301 409P945010 EMI-F-CHIP - NFL21SP506X13CD
LC8302 409P945010 EMI-F-CHIP - NFL21SP506X13CD
LC8303 409P945010 EMI-F-CHIP - NFL21SP506X13CD
LC8304 409P945010 EMI-F-CHIP - NFL21SP506X13CD
LC8305 409P945010 EMI-F-CHIP - NFL21SP506X13CD
LC8306 409P945010 EMI-F-CHIP - NFL21SP506X13CD
LC8307 409P945010 EMI-F-CHIP - NFL21SP506X13CD
LC8308 409P945010 EMI-F-CHIP - NFL21SP506X13CD
LC8309 409P945010 EMI-F-CHIP - NFL21SP506X13CD
LC8310 409P945010 EMI-F-CHIP - NFL21SP506X13CD
LC8311 409P945010 EMI-F-CHIP - NFL21SP506X13CD
LC8312 409P945010 EMI-F-CHIP - NFL21SP506X13CD
LC8313 409P945010 EMI-F-CHIP - NFL21SP506X13CD
LC8314 409P945010 EMI-F-CHIP - NFL21SP506X13CD
LC8315 409P945010 EMI-F-CHIP - NFL21SP506X13CD
LC8316 409P945010 EMI-F-CHIP - NFL21SP506X13CD
LC8317 409P945010 EMI-F-CHIP - NFL21SP506X13CD
LC8318 409P945010 EMI-F-CHIP - NFL21SP506X13CD
LC8319 409P945010 EMI-F-CHIP - NFL21SP506X13CD
LC8501 409P945010 EMI-F-CHIP - NFL21SP506X13CD
LC8502 409P945010 EMI-F-CHIP - NFL21SP506X13CD
LC8503 409P945010 EMI-F-CHIP - NFL21SP506X13CD
LC8504 409P945010 EMI-F-CHIP - NFL21SP506X13CD
LC8505 409P945010 EMI-F-CHIP - NFL21SP506X13CD
LC8506 409P945010 EMI-F-CHIP - NFL21SP506X13CD
LC8507 409P945010 EMI-F-CHIP - NFL21SP506X13CD
LC8508 409P945010 EMI-F-CHIP - NFL21SP506X13CD
LC8509 409P945010 EMI-F-CHIP - NFL21SP506X13CD
LC8511 409P945010 EMI-F-CHIP - NFL21SP506X13CD
409P777020 EMI-F-CHIP - BLM21A05
PAGE 59
Page 60

MODELS: WS-48515 / WS-55515 / WS-55615 / WS-55815 / WS-65515 / WS-65615 /WS-65815 / WS-73615
[#] Model Legend:
(a) WS-48515, (b) WS-55515, (c) WS-55615, (d) WS-55815, (e) WS-65515, (f) WS-65615, (g) WS-65815, (h) WS-73615
Ref # Part # Part Name & Description [#]
LC8512 409P945010 EMI-F-CHIP - NFL21SP506X13CD
LC8514 409P945010 EMI-F-CHIP - NFL21SP506X13CD
LC8515 409P945010 EMI-F-CHIP - NFL21SP506X13CD
LC8516 409P945010 EMI-F-CHIP - NFL21SP506X13CD
LC8517 409P945010 EMI-F-CHIP - NFL21SP506X13CD
LC8518 409P945010 EMI-F-CHIP - NFL21SP506X13CD
LC8519 409P945010 EMI-F-CHIP - NFL21SP506X13CD
LC8520 409P945010 EMI-F-CHIP - NFL21SP506X13CD
LC8521 409P945010 EMI-F-CHIP - NFL21SP506X13CD
LC8522 409P945010 EMI-F-CHIP - NFL21SP506X13CD
LC8523 409P945010 EMI-F-CHIP - NFL21SP506X13CD
LC8524 409P945010 EMI-F-CHIP - NFL21SP506X13CD
LC8525 409P945010 EMI-F-CHIP - NFL21SP506X13CD
LC8526 409P945010 EMI-F-CHIP - NFL21SP506X13CD
LC8527 409P945010 EMI-F-CHIP - NFL21SP506X13CD
LC8528 409P945010 EMI-F-CHIP - NFL21SP506X13CD
LC8529 409P945010 EMI-F-CHIP - NFL21SP506X13CD
LC8530 409P945010 EMI-F-CHIP - NFL21SP506X13CD
LC8531 409P945010 EMI-F-CHIP - NFL21SP506X13CD
LF7D02 409P944010 EMI-F-CHIP - NFL21SP107X1
LF7D04 409P944010 EMI-F-CHIP - NFL21SP107X1
LF7D06 409P944010 EMI-F-CHIP - NFL21SP107X1
LF7D08 409P944010 EMI-F-CHIP - NFL21SP107X1
LF7D10 409P944010 EMI-F-CHIP - NFL21SP107X1
LF7D12 409P944010 EMI-F-CHIP - NFL21SP107X1
LF7D14 409P944010 EMI-F-CHIP - NFL21SP107X1
LF7D16 409P944010 EMI-F-CHIP - NFL21SP107X1
LF7D18 409P944010 EMI-F-CHIP - NFL21SP107X1
LF7D20 409P944010 EMI-F-CHIP - NFL21SP107X1
LF7D22 409P944010 EMI-F-CHIP - NFL21SP107X1
LF7D24 409P944010 EMI-F-CHIP - NFL21SP107X1
LF7H02 409P944010 EMI-F-CHIP - NFL21SP107X1
LF7H04 409P944010 EMI-F-CHIP - NFL21SP107X1
LF7H06 409P944010
LF7H08 409P944010 EMI-F-CHIP - NFL21SP107X1
LF7H10 409P944010 EMI-F-CHIP - NFL21SP107X1
LF7H13 409P865020 EMI-F-CHIP - BLM11A601S
LF7H14 409P865020 EMI-F-CHIP - BLM11A601S
LF7H18 409P865020 EMI-F-CHIP - BLM11A601S
LF7H20 409P865020 EMI-F-CHIP - BLM11A601S
LF7H22 409P865020 EMI-F-CHIP - BLM11A601S
LF7H24 409P865020 EMI-F-CHIP - BLM11A601S
EMI-F-CHIP - NFL21SP107X1
TRANSFORMERS
T5A31 349P223010 TRANS-HORIZ
T5A32 349P224010 TRANS-HORIZ-DRIVE
T5A51 334P288010 TRANS-FLYBACK
T5K01 349P222010 TRANS-DBF
T9A20 350P819010 TRANS-POWER
T9A50 350P818010 TRANS-POWER
VARIABLE RESISTORS
129P070020 VR-FOCUS
RESISTORS
CHIP Type Resistors (Listed by Value)
Ref # Part # Part Name & Description [#]
Part No. Value Part No. Value
103P509050 1/16W 0OHM 103P493020 1/16W 2K-F
103P409050 1/8W 0OHM 103P493030 1/16W 2.2K-F
103P508040 1/16W 2.2-J 103P502090 1/16W 2.2K-J
103P509000 1/16W 6.8-J 103P493040 1/16W 2.4K-F
103P500010 1/16W 10-J 103P493050 1/16W 2.7K-F
103P793020 1/16W 20F 103P503000 1/16W 2.7K-J
103P500050 1/16W 22-J 103P493060 1/16W 3K-F
103P400050 1/10W 22-J 103P493070 1/16W 3.3K-F
103P500060 1/16W 27-J 103P503010 1/16W 3.3K-J
103P910070 1/16W 33-J 103P503020 1/16W 3.9K-J
103P500070 1/16W 33-J 103P494000 1/16W 4.3K-F
103P793080 1/16W 36F 103P494010 1/16W 4.7K-F
103P500080 1/16W 39-J 103P503030 1/16W 4.7K-J
103P794010 1/16W 47-F 103P494020 1/16W 5.1K-F
103P500090 1/16W 47-J 103P494030 1/16W 5.6K-F
103P911000 1/16W 56-J 103P503040 1/16W 5.6K-J
103P501000 1/16W 56-J 103P814040 1/16W 6.2K-D
103P501010 1/16W 68-J 103P503050 1/16W 6.8K-J
103P509090 1/16W 75-J 103P494050 1/16W 6.8K-F
103P794060 1/16W 75-F 103P494070 1/16W 8.2K-F
103P489090 1/4W 75-J 103P503060 1/16W 8.2K-J
103P501020 1/16W 82-J 103P494080 1/16W 9.1K-F
103P794080 1/16W 91F 103P494090 1/16W 10K-F
103P490010 1/16W 100F 103P503070 1/16W 10K-J
103P401030 1/10W 100-J 103P495010 1/16W 12K-F
103P501030 1/16W 100-J 103P503080
103P501040 1/16W 120-J 103P495020 1/16W 13K-F
103P810050 1/16W 150-D 103P495030 1/16W 15K-F
103P501050 1/16W 150-J 103P503090 1/16W 15K-J
103P401050 1/10W 150-J 103P495040 1/16W 16K-F
103P501060 1/16W 180-J 103P504000 1/16W 18K-J
103P490080 1/16W 200-F 103P495050 1/16W 18K-F
103P501070 1/16W 220-J 103P504010 1/16W 22K-J
103P481070 1/4W 220-J 103P495070 1/16W 22K-F
103P471010 1/8W 270-F 103P495080 1/16W 24K-F
103P491020 1/16W 300-F 103P495090 1/16W 27K-F
103P501090 1/16W 330-J 103P496000 1/16W 30K-F
103P491040 1/16W 360-F 103P504030 1/16W 33K-J
103P502000 1/16W 390-J 103P496010 1/16W 33K-F
103P491050 1/16W 390-F 103P496040 1/16W 43K-F
103P502010 1/16W 470-J 103P504050 1/16W 47K-J
103P491070 1/16W 470-F 103P496050 1/16W 47K-F
103P491080 1/16W 510-F 103P504060 1/16W 56K-J
103P502020 1/16W 560-J 103P496080 1/16W 62K-F
103P492000 1/16W 620-F 103P504070 1/16W 68K-J
103P492010 1/16W 680-F 103P496090 1/16W 68K-F
103P502030 1/16W 680-J 103P504080 1/16W 82K-J
103P492020 1/16W 750-F
103P502040 1/16W 820-J
103P492030 1/16W 820-F
103P492050 1/16W 1K-F
103P502050 1/16W 1K-J
103P492060 1/16W 1.1K-F
103P502060 1/16W 1.2K-J
103P402070 1/8W 1.5K-J
103P472090 1/8W 1.5K-F
103P502070 1/16W 1.5K-J
103P492090 1/16W 1.5K-F
103P502080 1/16W 1.8K-J
103P497030 1/16W 100K-F
103P504090 1/16W 100K-J
103P505000 1/16W 120K-J
103P497070 1/16W 150K-F
103P505030 1/16W 220K-J
103P498020 1/16W 240K-F
103P505050 1/16W 330K-J
103P505070 1/16W 470K-J
103P505090 1/16W 680K-J
103P506000 1/16W 820K-J
103P506010 1/16W 1M-J
103P506070 1/16W 3.3M-J
1/16W 12K-J
PAGE 60
Page 61

MODELS: WS-48515 / WS-55515 / WS-55615 / WS-55815 / WS-65515 / WS-65615 /WS-65815 / WS-73615
[#] Model Legend:
(a) WS-48515, (b) WS-55515, (c) WS-55615, (d) WS-55815, (e) WS-65515, (f) WS-65615, (g) WS-65815, (h) WS-73615
Ref # Part # Part Name & Description [#]
RESISTORS
Conventional Resistors (By Ref #)
Ref # Part # Part Name & Description [#]
R2J03 103P719090 R-CARBON - 1/4W 75-J
R2J05 103P719090 R-CARBON - 1/4W 75-J
R2J07 103P719090 R-CARBON - 1/4W 75-J
R2V96 109D151050 R-CARBON - 1/4W 75-J
R3E09 109D151010 R-CARBON - 1/4W 2.2-J
R3E11 109D151010 R-CARBON - 1/4W 2.2-J
R3E12 109D151010 R-CARBON - 1/4W 2.2-J
R3E14 109D151010 R-CARBON - 1/4W 2.2-J
R4B04 103C178060 R-METAL - 1W 3.3-J
R4B10 103C188040 R-METAL - 2W 2.2-J cdefgh
R4B12 103C188040 R-METAL - 2W 2.2-J
R4B16 109P095010 R-METAL-LIN - 1/4W 5.1K-J
R4B18 103P338020 R-CARBON-25 - 1/4W 1.5-J
R4B23 109D151080 R-CARBON - 1/4W 220-J
R5A16 103P144010 R-CARBON 1/2W 22K-J
R5A20 103P144050 R-CARBON 1/2W 47K-J
R5A26 103P761030 R-FUSE - 1/2W 100-J
R5A32 103P145030 R-CARBON - 1/2W 220K-J
R5A34 103P143070 R-CARBON 1/2W 10K-J
R5A35 103P143030 R-CARBON - 1/2W 4.7K-J
R5A36 103P143070 R-CARBON 1/2W 10K-J
R5A37 103C393010 R-METAL-P - 3W 3.3K-J cdefgh
R5A37 103C393030 R-METAL-P - 3W 4.7K-J ab
R5A38 103C187020 R-METAL - 2W 0.22-J
R5A39 103P140090 R-CARBON - 1/2W 47-J
R5A45 109D151090 R-CARBON - 1/4W 33-J
R5A46 103C391050 R-METAL-P - 3W 150-J
R5A50 103P711000 R-CARBON - 1/4W 56-J
R5A62 103P711070 R-CARBON - 1/4W 220-J
R5A64 103P712010 R-CARBON - 1/4W 470-J
R5A65 103P141030 R-CARBON - 1/2W 100-J
R5A80 109P180010 R-WIRE - 2W 0.16-G
R5A82 103P370090 R-FUSE - 1/4W 47-J
R5A85 109D151030 R-CARBON - 1/4W 4.7-J
R5A87 103P142060 R-CARBON - 1/2W 1.2K-J
R5A90 103P711060 R-CARBON - 1/4W 180-J
R5A93 103P140090 R-CARBON - 1/2W 47-J
R5A94 103C390060 R-METAL-P - 3W 27-J
R5B04 103P711030 R-CARBON - 1/4W 100-J
R5H02 103P758000 R-FUSE - 1/4W 1-J
R5H07 103P461060 R-METAL - 1/4W 430-F
R5H11 103P712020 R-CARBON - 1/4W 560-J
R5H12 103P712020 R-CARBON - 1/4W 560-J
R5H13
R5H16 103P710020 R-CARBON - 1/4W 12-J
R5H17 103P710020 R-CARBON - 1/4W 12-J
R5H47 103C392010 R-METAL-P - 3W 470-J
R5H49 103P714070 R-CARBON - 1/4W 68K-J
R5H50 103P714070 R-CARBON - 1/4W 68K-J
R5H55 103P140070 R-CARBON - 1/2W 33-J
R5H56 103P140070 R-CARBON - 1/2W 33-J
R5H58 103P148000 R-CARBON - 1/2W 1-J
R5H59 103C191050 R-METAL - 3W 150-J
R5H60 103C178080 R-METAL - 1W 4.7-J
103P712020 R-CARBON - 1/4W 560-J
Ref # Part # Part Name & Description [#]
R5K00 103P760060 R-FUSE - 1/2W 27-J
R5K01 103P760060 R-FUSE - 1/2W 27-J
R5K02 103P143070 R-CARBON 1/2W 10K-J
R5K03 103P143070 R-CARBON 1/2W 10K-J
R5K04 103P760060 R-FUSE - 1/2W 27-J
R5K05 103P712080 R-CARBON - 1/4W 1.8K-J
R5K06 103P712030 R-CARBON - 1/4W 680-J
R5K07 109D151090 R-CARBON - 1/4W 33-J
R5K08 103P712050 R-CARBON - 1/4W 1K-J
R5K09 109D151090 R-CARBON - 1/4W 33-J
R5K10 109D031070 R-COMP - 1/2W 10K-K
R5K11 103P713070 R-CARBON - 1/4W 10K-J
R5K12 103P711030 R-CARBON - 1/4W 100-J
R5K13 103P712030 R-CARBON - 1/4W 680-J
R5K15 103P144070 R-CARBON - 1/2W 68K-J
R5K16 103P143070 R-CARBON 1/2W 10K-J
R5K17 103P145050 R-CARBON - 1/2W 330K-J
R5K18 103P145050 R-CARBON - 1/2W 330K-J
R5K19 103P145050 R-CARBON - 1/2W 330K-J
R5K20 103P145050 R-CARBON - 1/2W 330K-J
R5K21 103P712050 R-CARBON - 1/4W 1K-J
R5K22 103P714010 R-CARBON - 1/4W 22K-J
R5K23 103P713070 R-CARBON - 1/4W 10K-J
R5K24 103P713050 R-CARBON - 1/4W 6.8K-J
R5K25 103P712090 R-CARBON - 1/4W 2.2K-J
R5K26 103P712050 R-CARBON - 1/4W 1K-J
R5K27 103P713070 R-CARBON - 1/4W 10K-J
R5K28 103P143070 R-CARBON 1/2W 10K-J
R5K29 103P146010 R-CARBON - 1/2W 1M-J
R5K30 103P146010 R-CARBON - 1/2W 1M-J
R5K31 103P713070 R-CARBON - 1/4W 10K-J
R5K32 103P714090 R-CARBON - 1/4W 100K-J
R5K33 103P711080 R-CARBON - 1/4W 270-J
R5K34 103P143020 R-CARBON - 1/2W 3.9K-J
R5K35 109D151030
R5K36 109D151030 R-CARBON - 1/4W 4.7-J
R5K37 109D151090 R-CARBON - 1/4W 33-J
R5K38 109D151090 R-CARBON - 1/4W 33-J
R5K50 103P714010 R-CARBON - 1/4W 22K-J
R5K51 103P713030 R-CARBON - 1/4W 4.7K-J
R5K52 109D031090 R-COMP - 1/2W 470K-K
R6B01 103P711030 R-CARBON - 1/4W 100-J
R6B02 103P713090 R-CARBON - 1/4W 15K-J
R6B03 103P464020 R-METAL - 1/4W 2.4K-F
R6B04 103P713000 R-CARBON - 1/4W 2.7K-J
R6B05 103P411010 R-CARBON - 1/4W 68-J
R6B06 103P462050 R-METAL - 1/4W 1K-F
R6B07 103P711030 R-CARBON - 1/4W 100-J
R6B08 103P710010 R-CARBON - 1/4W 10-J
R6B09 103P711030 R-CARBON - 1/4W 100-J
R6B10 103P713030 R-CARBON - 1/4W 4.7K-J
R6B11 103C194020 R-METAL - 3W 27K-J
R6B13 103P331030 R-CARBON - 1/4W 100-J
R6B15 103P714090 R-CARBON - 1/4W 100K-J
R6B16 103P411000 R-CARBON - 1/4W 56-J
R6B17 101P221030 R-COMP - 1/2W 220-K
R6B18 103P713040 R-CARBON - 1/4W 5.6K-J
R6B19 103P713050 R-CARBON - 1/4W 6.8K-J
R6B20 101P221030 R-COMP - 1/2W 220-K
R-CARBON - 1/4W 4.7-J
PAGE 61
Page 62

MODELS: WS-48515 / WS-55515 / WS-55615 / WS-55815 / WS-65515 / WS-65615 /WS-65815 / WS-73615
[#] Model Legend:
(a) WS-48515, (b) WS-55515, (c) WS-55615, (d) WS-55815, (e) WS-65515, (f) WS-65615, (g) WS-65815, (h) WS-73615
Ref # Part # Part Name & Description [#]
R6B21 103P467030 R-METAL - 1/4W 100K-F
R6B22 103P467030 R-METAL - 1/4W 100K-F
R6B23 103P711030 R-CARBON - 1/4W 100-J
R6B24 103P713030 R-CARBON - 1/4W 4.7K-J
R6B25 103P711030 R-CARBON - 1/4W 100-J
R6B26 103P713050 R-CARBON - 1/4W 6.8K-J
R6B27 103P711030 R-CARBON - 1/4W 100-J
R6B31 103P712060 R-CARBON - 1/4W 1.2K-J
R6G01 103P711030 R-CARBON - 1/4W 100-J
R6G02 103P713090 R-CARBON - 1/4W 15K-J
R6G03 103P464020 R-METAL - 1/4W 2.4K-F
R6G04 103P463040 R-METAL - 1/4W 2.4K-F
R6G05 103P411010 R-CARBON - 1/4W 68-J
R6G06 103P462030 R-METAL - 1/4W 820-F
R6G07 103P711030 R-CARBON - 1/4W 100-J
R6G08 103P710010 R-CARBON - 1/4W 10-J
R6G09 103P711030 R-CARBON - 1/4W 100-J
R6G10 103P713030 R-CARBON - 1/4W 4.7K-J
R6G11 103C194020 R-METAL - 3W 27K-J
R6G13 103P331030 R-CARBON - 1/4W 100-J
R6G15 103P714090 R-CARBON - 1/4W 100K-J
R6G16 103P411000 R-CARBON - 1/4W 56-J
R6G17 101P221030 R-COMP - 1/2W 220-K
R6G20 101P221030 R-COMP - 1/2W 220-K
R6G21 103P467010 R-METAL - 1/4W 82K-F
R6G22 103P467010 R-METAL - 1/4W 82K-F
R6G23 103P711030 R-CARBON - 1/4W 100-J
R6G31 103P712060 R-CARBON - 1/4W 1.2K-J
R6R01 103P711030 R-CARBON - 1/4W 100-J
R6R02 103P713090 R-CARBON - 1/4W 15K-J
R6R03 103P464020 R-METAL - 1/4W 2.4K-F
R6R04 103P713000 R-CARBON - 1/4W 2.7K-J
R6R05 103P411010 R-CARBON - 1/4W 68-J
R6R06 103P462050 R-METAL - 1/4W 1K-F
R6R07 103P711030 R-CARBON - 1/4W 100-J
R6R08 103P710010 R-CARBON - 1/4W 10-J
R6R09
R6R10 103P713030 R-CARBON - 1/4W 4.7K-J
R6R11 103C194020 R-METAL - 3W 27K-J
R6R13 103P331030 R-CARBON - 1/4W 100-J
R6R15 103P714090 R-CARBON - 1/4W 100K-J
R6R16 103P411000 R-CARBON - 1/4W 56-J
R6R17 101P221030 R-COMP - 1/2W 220-K
R6R20 101P221030 R-COMP - 1/2W 220-K
R6R21 103P467030 R-METAL - 1/4W 100K-F
R6R22 103P467030 R-METAL - 1/4W 100K-F
R6R23 103P711030 R-CARBON - 1/4W 100-J
R6R31 103P712060 R-CARBON - 1/4W 1.2K-J
R7K01 103P712050 R-CARBON - 1/4W 1K-J
R7K02 103P713010 R-CARBON - 1/4W 3.3K-J
R7K21 103P710090 R-CARBON - 1/4W 47-J
R7K22 103P715030 R-CARBON - 1/4W 220K-J
R7K23 103P712050 R-CARBON - 1/4W 1K-J
R7K24 103P713080 R-CARBON - 1/4W 12K-J
R7K25 103P712050 R-CARBON - 1/4W 1K-J
R7K26 103P715030 R-CARBON - 1/4W 220K-J
R7K27 103P713070 R-CARBON - 1/4W 10K-J
R7K28 103P711050 R-CARBON - 1/4W 150-J
R7K29 103P712060 R-CARBON - 1/4W 1.2K-J
103P711030 R-CARBON - 1/4W 100-J
Ref # Part # Part Name & Description [#]
R7K30 103P712050 R-CARBON - 1/4W 1K-J
R7K31 103P715030 R-CARBON - 1/4W 220K-J
R7K32 103P713030 R-CARBON - 1/4W 4.7K-J
R7K33 103P712050 R-CARBON - 1/4W 1K-J
R7K34 103P713000 R-CARBON - 1/4W 2.7K-J
R7K35 103P711030 R-CARBON - 1/4W 100-J
R7K36 103P710090 R-CARBON - 1/4W 47-J
R7L26 103P462090 R-METAL - 1/4W 1.5K-F abdeg
R7L27 103P463030 R-METAL - 1/4W 2.2K-F abdeg
R7L28 103P463070 R-METAL - 1/4W 3.3K-F abdeg
R7L29 103P464030 R-METAL - 1/4W 5.6K-F abdeg
R7L30 103P465010 R-METAL - 1/4W 12K-F abdeg
R7L31 103P466010 R-METAL - 1/4W 33K-F abdeg
R7L32 103P466070 R-METAL - 1/4W 56K-F abdeg
R7L42 103P466070 R-METAL - 1/4W 56K-F cfh
R7L44 103P462090 R-METAL - 1/4W 1.5K-F cfh
R7L45 103P463030 R-METAL - 1/4W 2.2K-F cfh
R7L46 103P463070 R-METAL - 1/4W 3.3K-F cfh
R7L47 103P464030 R-METAL - 1/4W 5.6K-F cfh
R7L48 103P465010 R-METAL - 1/4W 12K-F cfh
R7L49 103P466010 R-METAL - 1/4W 33K-F cfh
R7P22 109D151010 R-CARBON - 1/4W 2.2-J
R7P28 109D151010 R-CARBON - 1/4W 2.2-J
R8798 103C288040 R-METAL-CP - 2W 2.2-J
R8C05 103C288070 R-METAL-CP - 2W 3.9-J
R8C06 103C288070 R-METAL-CP - 2W 3.9-J
R8C07 103C391050 R-METAL-P - 3W 150-J
R8C13 103C288070 R-METAL-CP - 2W 3.9-J
R8C14 103C288070 R-METAL-CP - 2W 3.9-J
R8C15 103C391050 R-METAL-P - 3W 150-J
R8C21 103C288070 R-METAL-CP - 2W 3.9-J
R8C22 103C288070 R-METAL-CP - 2W 3.9-J
R8C23 103C391050 R-METAL-P - 3W 150-J
R8C29 103C288070 R-METAL-CP - 2W 3.9-J
R8C30 103C288070 R-METAL-CP - 2W 3.9-J
R8C31 103C391050 R-METAL-P - 3W 150-J
R8C37 103C288070 R-METAL-CP - 2W 3.9-J
R8C38 103C288070 R-METAL-CP - 2W 3.9-J
R8C39 103C391050 R-METAL-P - 3W 150-J
R8C45 103C288070 R-METAL-CP - 2W 3.9-J
R8C46 103C288070 R-METAL-CP - 2W 3.9-J
R8C47 103C391050 R-METAL-P - 3W 150-J
R8C60 103C191090 R-METAL - 3W 330-J
R8C61 103C191090 R-METAL - 3W 330-J
R9A02 109P179010 R-CEMENT-PLATE - 6.8-J
R9A03 109C010010 R-COMP - 1/2W 1M-K
R9A05 109C010010 R-COMP - 1/2W 1M-K
R9A06 109C010010 R-COMP - 1/2W 1M-K
R9A09 103P145030 R-CARBON - 1/2W 220K-J
R9A11 103P145030 R-CARBON - 1/2W 220K-J
R9A20 103P144020 R-CARBON - 1/2W 27K-J
R9A21 103P144020
R9A22 109P175030 R-WIRE - 2W 0.39-J
R9A25 103P142050 R-CARBON - 1/2W 1K-J
R9A26 109D151090 R-CARBON - 1/4W 33-J
R9A27 109D151050 R-CARBON - 1/4W 75-J
R9A36 103P142070 R-CARBON - 1/2W 1.5K-J
R9A38 103P144090 R-CARBON - 1/2W 100K-J
R9A50 103P143010 R-CARBON - 1/2W 3.3K-J
R-CARBON - 1/2W 27K-J
PAGE 62
Page 63

MODELS: WS-48515 / WS-55515 / WS-55615 / WS-55815 / WS-65515 / WS-65615 /WS-65815 / WS-73615
[#] Model Legend:
(a) WS-48515, (b) WS-55515, (c) WS-55615, (d) WS-55815, (e) WS-65515, (f) WS-65615, (g) WS-65815, (h) WS-73615
Ref # Part # Part Name & Description [#]
R9A52 103P140090 R-CARBON - 1/2W 47-J
R9A54 109P175020 R-WIRE - 2W 0.15-J
R9A55 109P175010 R-WIRE - 2W 0.12-J
R9A59 109D151030 R-CARBON - 1/4W 4.7-J
R9A60 109D151090 R-CARBON - 1/4W 33-J
R9A64 103P713030 R-CARBON - 1/4W 4.7K-J
R9A67 103P710050 R-CARBON - 1/4W 22-J
R9A68 103C390020 R-METAL-P - 3W 12-J
R9A70 109D151090 R-CARBON - 1/4W 33-J
R9A71 103P145030 R-CARBON - 1/2W 220K-J
R9C01 103C298040 R-METAL-CP - 3W 2.2-J
R9D00 109D036020 R-COMP - 1/2W 4.7M-K
CAPACITORS
CHIP Type Capacitors (Listed by Value)
Part No. Value Part No. Value
154P340040 50V 3P-C 141P140050 B50V 470P-K
141P142090 B25V 0.047M-K 141P139090 B16V 0.47M-K
141P143010 B25V 0.068M-K 141P146080 B10V 0.47M-K
154P340090 CH50V 8P-C 154P345030 CH25V 560P-J
141P143020 B16V 0.082M-K 154P345050 CH25V 680P-J
154P341010 CH50V 10P-C 154P345070 CH25V 820P-J
141P142010 B50V 0.01M-K 141P140090 B50V 1000P-K
141P143080 F50V 0.01M-Z 154P345090 CH25V 1000P-J
154P341030 CH50V 12P-J 141P143050 F50V 1000P-Z
154P341050 CH50V 15P-J 141P134070 B16V 1M-K
154P341070 CH50V 18P-J 141P147020 B10V/6.3V 1M-K
154P341090 CH50V 22P-J 181P526010 50V 1M-M
154P342010 CH50V 27P-J 141P144060 F16V 1M-Z
154P342030 CH50V 33P-J 141P141010 B50V 1500P-K
154P342050 CH50V 39P-J 141P141050 B50V 3300P-K
154P342070 CH50V 47P-J 181P506030 50V 3.3M-M
154P340080 CH50V 47P-J 141P141070 B50V 4700P-K
154P342070 CH50V 47P-J 181P524090 35V 4.7M-M 105C
154P352080 SL50V 47P-J 141P141090 B50V 6800P-K
154P342090 CH50V 56P-J 141P142000 B50V 8200P-K
154P343030 CH50V 82P-J 181P502030 16V 10M-M
154P343050 CH50V 100P-J 181P532030 16V 10M-M
141P139030 B25V 0.1M-K 181P522030 16V 10M-M 105C
141P143030 B16V 0.1M-K 181P525000 35V 10M-M 105C
141P144020 F25V 0.1M-Z 181P522040 16V 22M-M 105C
141P134090 F50V 0.1M-Z 181P520010 6.3V 22M-M 105C
141P135080 F50V/25V 0.1M-Z 181P500030 6.3V 47M-M
154P343070 CH50V 120P-J 181P520030 6.3V 47M-M
154P343090
141P139050 B25V 0.15 M-K 181P502070 16V 100M-M
154P344030 CH50V 220P-J 181P528000 4V 100M-M 105C
141P140010 B50V 220P-K 181P520040 6.3V 100M-M
154P344050 CH50V 270P-J 181P528010 4V 220M-M 105C
141P138080 B25V 0.33M-K 181P520050 6.3V 220M-M 105C
154P345010 CH50V 470P-J
CH50V 150P-J 181P522060 6V 47M-M
Ref # Part # Part Name & Description [#]
CAPACITORS AND TRIMMERS
Conventional Capacitors (By Ref #)
C1H03 181P352040 C-ELEC - 16V 100M-M
C1H05 172P262010 C-M-POLY - 50V 0.047M-J
C1H53 181P352040 C-ELEC - 16V 100M-M
C1H55 172P262010 C-M-POLY - 50V 0.047M-J
C2014 181P355060 C-ELEC - 50V 22M-M
C2016 181P352040 C-ELEC - 16V 100M-M
C2019 181P351070 C-ELEC - 10V 470M-M
C2051 181P352040 C-ELEC - 16V 100M-M
C2054 181P743040 C-ELEC - 16V 330M-M
C2064 181P355060 C-ELEC - 50V 22M-M
C2081 181P355050 C-ELEC - 50V 10M-M
C2114 181P355060 C-ELEC - 50V 22M-M
C2144 181P355060 C-ELEC - 50V 22M-M
C2173 181P355060 C-ELEC - 50V 22M-M
C2213 181P355060 C-ELEC - 50V 22M-M
C2233 181P355050 C-ELEC - 50V 10M-M
C2242 181P355050 C-ELEC - 50V 10M-M
C2762 181P355050 C-ELEC - 50V 10M-M
C2803 181P355050 C-ELEC - 50V 10M-M
C2824 181P355060 C-ELEC - 50V 22M-M
C2K06 181P355050 C-ELEC - 50V 10M-M
C2K10 181P355050 C-ELEC - 50V 10M-M
C2K52 181P352030 C-ELEC - 16V 47M-M
C2K59 181P352030 C-ELEC - 16V 47M-M
C2K62 181P352030 C-ELEC - 16V 47M-M
C2K68 181P352030 C-ELEC - 16V 47M-M
C2K72 181P352030 C-ELEC - 16V 47M-M
C2K73 181P352030 C-ELEC - 16V 47M-M
C2K77 181P352030 C-ELEC - 16V 47M-M
C2L01 181P352030 C-ELEC - 16V 47M-M
C2L08 181P352010 C-ELEC - 16V 22M-M
C2L12 181P352010 C-ELEC - 16V 22M-M
C2L13 181P352040 C-ELEC - 16V 100M-M
C2L31 181P355050 C-ELEC - 50V 10M-M
C2L32 181P122070 C-ELEC-NP - 25V 10M-M
C2L33 181P355050 C-ELEC - 50V 10M-M
C2L34 181P122070 C-ELEC-NP - 25V 10M-M
C2L51 181P355050 C-ELEC - 50V 10M-M
C2L52 181P122070 C-ELEC-NP - 25V 10M-M
C2L53 181P355050 C-ELEC - 50V 10M-M
C2L54 181P122070 C-ELEC-NP - 25V 10M-M
C2L61 181P352030 C-ELEC - 16V 47M-M
C2L67 181P352010 C-ELEC - 16V 22M-M
C2L69 181P352040 C-ELEC - 16V 100M-M
C2L70 181P352010 C-ELEC - 16V 22M-M
C2L72 181P352040 C-ELEC - 16V 100M-M
C2L73 181P352010 C-ELEC - 16V 22M-M
C2M26 181P352040
C-ELEC - 16V 100M-M
C2M28 181P351080 C-ELEC - 10V 1000M-M
C2M29 181P351080 C-ELEC - 10V 1000M-M
C2M31 181P352030 C-ELEC - 16V 47M-M
C2M33 181P352030 C-ELEC - 16V 47M-M
C2M36 181P352040 C-ELEC - 16V 100M-M
C2M38 181P352030 C-ELEC - 16V 47M-M
C2M39 181P352030 C-ELEC - 16V 47M-M
PAGE 63
Page 64

MODELS: WS-48515 / WS-55515 / WS-55615 / WS-55815 / WS-65515 / WS-65615 /WS-65815 / WS-73615
[#] Model Legend:
(a) WS-48515, (b) WS-55515, (c) WS-55615, (d) WS-55815, (e) WS-65515, (f) WS-65615, (g) WS-65815, (h) WS-73615
Ref # Part # Part Name & Description [#]
C2M39 181P352030 C-ELEC - 16V 47M-M
C2M43 181P352030 C-ELEC - 16V 47M-M
C2M44 181P352030 C-ELEC - 16V 47M-M
C2M54 181P355050 C-ELEC - 50V 10M-M
C2M56 181P355050 C-ELEC - 50V 10M-M
C2M59 181P352030 C-ELEC - 16V 47M-M
C2M64 181P352030 C-ELEC - 16V 47M-M
C2M73 181P355050 C-ELEC - 50V 10M-M
C2M75 181P212060 C-ELEC - 16V 47M-M
C2M77 181P352040 C-ELEC - 16V 100M-M
C2M80 181P352030 C-ELEC - 16V 47M-M
C2M88 181P355010 C-ELEC - 50V 1M-M
C2M89 181P352030 C-ELEC - 16V 47M-M
C2M98 181P355050 C-ELEC - 50V 10M-M
C2N01 181P355040 C-ELEC - 50V 4.7M-M
C2N04 181P352030 C-ELEC - 16V 47M-M
C2N24 181P352030 C-ELEC - 16V 47M-M
C2N33 181P355040 C-ELEC - 50V 4.7M-M
C2N41 181P121070 C-ELEC - 16V 47M-M NP
C2N45 181P121070 C-ELEC - 16V 47M-M NP
C2N47 181P121070 C-ELEC - 16V 47M-M NP
C2N48 181P121070 C-ELEC - 16V 47M-M NP
C2N50 181P121070 C-ELEC - 16V 47M-M NP
C2N52 181P121070 C-ELEC - 16V 47M-M NP
C2N60 181P352030 C-ELEC - 16V 47M-M
C2P01 181P355040 C-ELEC - 50V 4.7M-M
C2P04 181P352030 C-ELEC - 16V 47M-M
C2P24 181P352030 C-ELEC - 16V 47M-M
C2P33 181P355040 C-ELEC - 50V 4.7M-M
C2P42 181P121070 C-ELEC - 16V 47M-M NP
C2P45 181P121070 C-ELEC - 16V 47M-M NP
C2P47 181P121070 C-ELEC - 16V 47M-M NP
C2P48 181P121070 C-ELEC - 16V 47M-M NP
C2P50 181P121070 C-ELEC - 16V 47M-M NP
C2P52 181P121070 C-ELEC - 16V 47M-M NP
C2P60 181P352030 C-ELEC - 16V 47M-M
C2V14 181P352040 C-ELEC - 16V 100M-M
C2V17 181P355040 C-ELEC - 50V 4.7M-M
C2V19 181P352040 C-ELEC - 16V 100M-M
C2V29 181P352040 C-ELEC - 16V 100M-M
C2V30 181P118010 C-ELEC - 50V 0.68M-M
C2V32 181P355000 C-ELEC - 50V 0.47M-M
C2V48 172P166030 C-TF - 50V 0.1M-J
C2V49 172P166030 C-TF - 50V 0.1M-J
C2V55 181P352040 C-ELEC - 16V 100M-M
C2V57 181P355060 C-ELEC - 50V 22M-M
C2V61 181P352040 C-ELEC - 16V 100M-M
C2V62 181P355050 C-ELEC - 50V 10M-M
C2W02 181P352080 C-ELEC - 16V 1000M-M
C2W05 181P352030 C-ELEC - 16V 47M-M
C2W09 181P352030 C-ELEC - 16V 47M-M
C2W14 181P352030 C-ELEC - 16V 47M-M
C3007 181P353020 C-ELEC - 25V 10M-M
C3012 181P352030 C-ELEC - 16V 47M-M
C3022 181P353020 C-ELEC - 25V 10M-M
C3025 181P352030 C-ELEC - 16V 47M-M
C3026 181P355030 C-ELEC - 50V 3.3M-M
C3061 181P352030 C-ELEC - 16V 47M-M
Ref # Part # Part Name & Description [#]
C3070 181P352030 C-ELEC - 16V 47M-M
C3E01 181P354050 C-ELEC - 35V 47M-M cdefgh
C3E01 181P354050 C-ELEC - 35V 47M-M ab
C3E02 181P355010 C-ELEC - 50V 1M-M
C3E03 172P331010 C-POLY - 50V 6800P-J
C3E04 181P355010 C-ELEC - 50V 1M-M
C3E05 172P331010 C-POLY - 50V 6800P-J
C3E06 181P355050 C-ELEC - 50V 10M-M
C3E07 181P353090 C-ELEC - 5V 2200M-M
C3E09 172P262050 C-M-POLY - 50V 0.1M-J
C3E11 172P262050 C-M-POLY - 50V 0.1M-J
C3E12 172P262050 C-M-POLY - 50V 0.1M-J
C3E14 172P262050 C-M-POLY - 50V 0.1M-J
C3J08 181P352030 C-ELEC - 16V 47M-M
C3J26 181P352030 C-ELEC - 16V 47M-M
C3J38 181P355050 C-ELEC - 50V 10M-M
C4B01 172P261030 C-M-POLY - 50V 0.01M-J
C4B02 181P358000 C-ELEC - 35V 1000M-M
C4B03 172P383030 C-M-POLY - 100V 0.47M-K
C4B04 181P184020 C-ELEC - 35V 100M-M
C4B06 172P330090 C-POLY - 50V 4700P-J
C4B07 172P383030 C-M-POLY - 100V 0.47M-K
C4B08 172P263070 C-M-POLY - 50V 1.0M-J
C4B09 181P355060 C-ELEC - 50V 22M-M
C4B10 181P354050 C-ELEC - 35V 47M-M cdefgh
C4B10 181P354050 C-ELEC - 35V 47M-M ab
C4B11 181P353090 C-ELEC - 5V 2200M-M
C5A01 181P355050 C-ELEC - 50V 10M-M
C5A02 154P345090 C-CER-CHIP - CH25V 1000P-J
C5A03 141P140090 C-CER-CHIP - B50V 1000P-K
C5A04 172P262010 C-M-POLY - 50V 0.047M-J
C5A07 181P354050 C-ELEC - 35V 47M-M
C5A09 181P355060 C-ELEC - 50V 22M-M
C5A10 172P331070 C-POLY - 50V 0.022M-J
C5A12 181P354090 C-ELEC - 35V 470M-M
C5A14 172P434010 C-M-PLA-PP - 250V 0.047M-J
C5A15 189D185010 C-ELEC - 160V 100M-M
C5A21 172P262050 C-M-POLY - 50V 0.1M-J ab
C5A22 181P355050 C-ELEC - 50V 10M-M
C5A23 181P355050 C-ELEC - 50V 10M-M
C5A31 172P571050 C-M-PLA-PP - 1500VHP 3900P-J-OR-H ab
C5A31 172P571070 C-M-PLA-PP - 1500V 5600P-J cdefgh
C5A32 172P571010 C-M-PLA-PP - 1500V 2700P-J
C5A34 172P434010 C-M-PLA-PP - 250V 0.047M-J
C5A36 172P436070 C-M-PLA-PP - 250V 0.56M-J
C5A39 142P011030 C-CER - B500V 1000P-K
C5A40 142P011000 C-CER - B500V 560P-K
C5A41 181P352080 C-ELEC - 16V 1000M-M
C5A42 181P354050 C-ELEC - 35V 47M-M
C5A43 181P780030 C-ELEC - 160V 2.2M-M 105C
C5A52 172P571030 C-M-PLA-PP - 1500V 3300P-J
C5A53 185D120020 C-ELEC - H160V 470M-M 105C
C5A55 172P082090 C-PLA-PP - 630V 8200P-J
C5A56 181P354050 C-ELEC - 35V 47M-M
C5A60 172P262050 C-M-POLY - 50V 0.1M-J
C5A61 181P355040 C-ELEC - 50V 4.7M-M
C5A64 181P355060 C-ELEC - 50V 22M-M
C5A65 181P355050 C-ELEC - 50V 10M-M
C5A68 181P123070 C-ELEC-NP - 50V 0.47M-M
PAGE 64
Page 65

MODELS: WS-48515 / WS-55515 / WS-55615 / WS-55815 / WS-65515 / WS-65615 /WS-65815 / WS-73615
[#] Model Legend:
(a) WS-48515, (b) WS-55515, (c) WS-55615, (d) WS-55815, (e) WS-65515, (f) WS-65615, (g) WS-65815, (h) WS-73615
Ref # Part # Part Name & Description [#]
C5A70 172P264010 C-M-POLY - 50V 2.2M-J
C5A71 172P262050 C-M-POLY - 50V 0.1M-J
C5A72 181P355010 C-ELEC - 50V 1M-M
C5H01 181P354080 C-ELEC - 35V 330M-M
C5H16 172P186030 C-PLA-PP - 200V 0.01M-K
C5H17 172P261030 C-M-POLY - 50V 0.01M-J
C5H19 181P352040 C-ELEC - 16V 100M-M
C5H20 181P352040 C-ELEC - 16V 100M-M
C5H21 181P780060 C-ELEC - 160V 10M-M
C5H24 181P192060 C-ELEC - 200V 22M-M/Q
C5K00 172P572090 C-M-PLA-PP - 1500V 0.015M-J
C5K01 172P572090 C-M-PLA-PP - 1500V 0.015M-J
C5K03 142P024060 C-CER - BF50V 0.1M-Z
C5K04 181P191000 C-ELEC - 160V 22M-M/Q
C5K05 172P383030 C-M-POLY - 100V 0.47M-K
C5K06 154P260080 C-CER - R1KV 3300P-K
C5K07 172P261030 C-M-POLY - 50V 0.01M-J
C5K08 155P239040 C-CER - CH50V 100P-J
C5K09 172P262010 C-M-POLY - 50V 0.047M-J
C5K10 181P354050 C-ELEC - 35V 47M-M
C5K11 181P355050 C-ELEC - 50V 10M-M
C5K12 172P262010 C-M-POLY - 50V 0.047M-J
C5K13 154P270050 C-CER - SL1KV 22P-J
C5K51 142P023080 C-CER - BF50V 0.01M-Z
C6B02 181P195050 C-ELEC - 350V 10M-M/Q
C6B03 155P231090 C-CER - CH50V 22P-J
C6B04 142P023080 C-CER - BF50V 0.01M-Z
C6B05 181P352080 C-ELEC - 16V 1000M-M
C6B06 142P023080 C-CER - BF50V 0.01M-Z
C6B07 172P532050 C-M-POLY - 400V 0.1M-J
C6B08 142P020030 C-CER - B50V 330P-K
C6B09 142P023080 C-CER - BF50V 0.01M-Z
C6B10 172P532050 C-M-POLY - 400V 0.1M-J
C6B11 154P400010 C-CER - B1KV 220P-K
C6B12 155P231050 C-CER - CH50V 15P-J
C6B13 155P231090 C-CER - CH50V 22P-J
C6B14 154P405000 C-CER - B3KV 1000P-K
C6G02 181P195050 C-ELEC - 350V 10M-M/Q
C6G03 155P232010 C-CER - CH50V 27P-J
C6G04 142P023080 C-CER - BF50V 0.01M-Z
C6G05 181P352080 C-ELEC - 16V 1000M-M
C6G06 142P023080 C-CER - BF50V 0.01M-Z
C6G07 172P532050 C-M-POLY - 400V 0.1M-J
C6G09 142P023080 C-CER - BF50V 0.01M-Z
C6G10 172P532050 C-M-POLY - 400V 0.1M-J
C6G11 154P400010 C-CER - B1KV 220P-K
C6G12 155P231050 C-CER - CH50V 15P-J
C6G13 155P231090 C-CER - CH50V 22P-J
C6G14 154P405000 C-CER - B3KV 1000P-K
C6G20 172P532050 C-M-POLY - 400V 0.1M-J
C6R02 181P195050 C-ELEC - 350V 10M-M/Q
C6R03 155P231090 C-CER - CH50V 22P-J
C6R04 142P023080 C-CER - BF50V 0.01M-Z
C6R05 181P352080 C-ELEC - 16V 1000M-M
C6R06 142P023080 C-CER - BF50V 0.01M-Z
C6R07 172P532050 C-M-POLY - 400V 0.1M-J
C6R09 142P023080 C-CER - BF50V 0.01M-Z
C6R10 172P532050 C-M-POLY - 400V 0.1M-J
Ref # Part # Part Name & Description [#]
C6R11 154P400010 C-CER - B1KV 220P-K
C6R12 155P231050 C-CER - CH50V 15P-J
C6R13 155P231090 C-CER - CH50V 22P-J
C6R14 154P405000 C-CER - B3KV 1000P-K
C7A00 154P345050 C-CER-CHIP - CH25V 680P-J
C7B02 181P355020 C-ELEC - 50V 2.2M-M
C7B16 181P352030 C-ELEC - 16V 47M-M
C7B88 181P355050 C-ELEC - 50V 10M-M
C7B96 181P355020 C-ELEC - 50V 2.2M-M
C7B99 181P352030 C-ELEC - 16V 47M-M
C7DF3 181P350060 C-ELEC - 3V 1000M-M
C7K01 181P352030 C-ELEC - 16V 47M-M
C7K20 155P314040 C-CER - SL50V 220P-J
C7K21 181P355050 C-ELEC - 50V 10M-M
C7K23 181P355010 C-ELEC - 50V 1M-M
C7K25 172P262050 C-M-POLY - 50V 0.1M-J
C7K26 172P262050 C-M-POLY - 50V 0.1M-J
C7K27 181P355010 C-ELEC - 50V 1M-M
C7K28 181P352040 C-ELEC - 16V 100M-M
C7K30 172P261030 C-M-POLY - 50V 0.01M-J
C7M92 181P350040 C-ELEC - 6.3V 330M-M
C7N06 181P350040 C-ELEC - 6.3V 330M-M
C7P15 181P212060 C-ELEC - 16V 47M-M
C7P19 181P352030 C-ELEC - 16V 47M-M
C7P22 181P352050 C-ELEC - 16V 220M-M
C7Q02 181P352040 C-ELEC - 16V 100M-M
C7Q03 181P352030 C-ELEC - 16V 47M-M
C7Q52 181P352040 C-ELEC - 16V 100M-M
C7Q53 181P352030 C-ELEC - 16V 47M-M
C7R08 181P355050 C-ELEC - 50V 10M-M
C81A2 181P182030 C-ELEC - 16V 1000M-M 105C
C81A3 181P182030 C-ELEC - 16V 1000M-M 105C
C81B3 181P182030 C-ELEC - 16V 1000M-M 105C
C81B4 181P182030 C-ELEC - 16V 1000M-M 105C
C8281 189P197020 C-ELE-DBL-LA - FM0H473Z/EECS5R5T473Z
C8705 181P185060 C-ELEC - 50V 10M-M 105C
C8710 181P181000 C-ELEC - 10V 330M-M 105C
C8717 181P352060 C-ELEC - 16V 330M-M
C8719 181P732000 C-ELEC - 10V 680M-M 105C
C8720 181P185060 C-ELEC - 50V 10M-M 105C
C8725 181P182010 C-ELEC - 16V 330M-M 105C
C8727 181P181000 C-ELEC - 10V 330M-M 105C
C8729 181P732000 C-ELEC - 10V 680M-M 105C
C8730 181P352060 C-ELEC - 16V 330M-M
C8733 181P182010 C-ELEC - 16V 330M-M 105C
C8751 181P355090 C-ELEC - 50V 100M-M
C8761 181P352060 C-ELEC - 16V 330M-M
C8764 181P352060 C-ELEC - 16V 330M-M
C8771 181P353060 C-ELEC - 25V 330M-M
C8772 181P732000 C-ELEC - 10V 680M-M 105C
C8780 181P352060 C-ELEC - 16V 330M-M
C8783 181P350040 C-ELEC - 6.3V 330M-M
C8795 181P350040 C-ELEC - 6.3V 330M-M
C8797 181P350040 C-ELEC - 6.3V 330M-M
C8798 181P350040 C-ELEC - 6.3V 330M-M
C8889 181P350040 C-ELEC - 6.3V 330M-M
C8C03 181P358000 C-ELEC - 35V 1000M-M
C8C05 181P358000 C-ELEC - 35V 1000M-M
C8C18 181P358000 C-ELEC - 35V 1000M-M
PAGE 65
Page 66

MODELS: WS-48515 / WS-55515 / WS-55615 / WS-55815 / WS-65515 / WS-65615 /WS-65815 / WS-73615
[#] Model Legend:
(a) WS-48515, (b) WS-55515, (c) WS-55615, (d) WS-55815, (e) WS-65515, (f) WS-65615, (g) WS-65815, (h) WS-73615
Ref # Part # Part Name & Description [#]
C8C20 181P358000 C-ELEC - 35V 1000M-M
C8D12 181P352030 C-ELEC - 16V 47M-M
C8D16 181P352030 C-ELEC - 16V 47M-M
C8D20 181P352030 C-ELEC - 16V 47M-M
C8D21 181P352030 C-ELEC - 16V 47M-M
C8D22 181P352030 C-ELEC - 16V 47M-M
C8D30 181P352030 C-ELEC - 16V 47M-M
C8D31 181P352030 C-ELEC - 16V 47M-M
C8D39 181P352030 C-ELEC - 16V 47M-M
C8D40 181P352030 C-ELEC - 16V 47M-M
C8E01 181P352030 C-ELEC - 16V 47M-M
C8E03 181P352030 C-ELEC - 16V 47M-M
C8E05 181P352030 C-ELEC - 16V 47M-M
C8E07 181P352030 C-ELEC - 16V 47M-M
C8E09 181P352030 C-ELEC - 16V 47M-M
C8E12 181P352030 C-ELEC - 16V 47M-M
C8E14 181P352030 C-ELEC - 16V 47M-M
C8E16 181P352030 C-ELEC - 16V 47M-M
C8G00 181P352030 C-ELEC - 16V 47M-M
C8G01 181P352030 C-ELEC - 16V 47M-M
C8G03 181P352020 C-ELEC - 16V 33M-M
C8G05 181P352030 C-ELEC - 16V 47M-M
C8G06 181P352030 C-ELEC - 16V 47M-M
C9A01 181P352030 C-ELEC - 16V 47M-M
C9A05 189P185070 C-CER - AC250V E1000P-M
C9A06 189P185070 C-CER - AC250V E1000P-M
C9A08 189P185090 C-CER - AC250V E2200P-M
C9A09 189P185090 C-CER - AC250V E2200P-M
C9A10 189P185090 C-CER - AC250V E2200P-M
C9A11 189P185090 C-CER - AC250V E2200P-M
C9A13 189P152070 C-M-POLY - 250VAC 0.01M-M
C9A14 189P152070 C-M-POLY - 250VAC 0.01M-M
C9A20 154P400050 C-CER - B1KV 1000P-K
C9A21 181P355050 C-ELEC - 50V 10M-M
C9A25 172P138010 C-POLY - 50V 4700P-J
C9A26 185D122050 C-ELEC - H200V 1000M-M
C9A29 181P355050 C-ELEC - 50V 10M-M
C9A30 181P355050 C-ELEC - 50V 10M-M
C9A32 181P735020
C9A33 181P735020 C-ELEC - 25V 1000M-M 105C
C9A34 154P400050 C-CER - B1KV 1000P-K
C9A35 181P735010 C-ELEC - 25V 470M-M
C9A37 181P734000 C-ELEC - 16V 2200M-M 105C
C9A38 181P734000 C-ELEC - 16V 2200M-M 105C
C9A41 181P732010 C-ELEC - 10V 1000M-M 105C
C9A43 172P262050 C-M-POLY - 50V 0.1M-J
C9A45 189P185090 C-CER - AC250V E2200P-M
C9A50 142P020050 C-CER - B50V 470P-K
C9A51 181P355090 C-ELEC - 50V 100M-M
C9A52 154P260080 C-CER - R1KV 3300P-K
C9A54 154P260080 C-CER - R1KV 3300P-K
C9A56 181P355080 C-ELEC - 50V 47M-M
C9A57 142P010090 C-CER - B500V 470P-K
C9A58 185D122040 C-ELEC - H200V 820M-M
C9A59 185D122040 C-ELEC - H200V 820M-M
C9A60 154P400030 C-CER - B1KV 470P-K
C9A61 142P010090 C-CER - B500V 470P-K
C9A62 189D183010 C-ELEC - 400V 100M-KC
C-ELEC - 25V 1000M-M 105C
Ref # Part # Part Name & Description [#]
C9A63 185D120020 C-ELEC - H160V 470M-M 105C
C9A65 181P194000 C-ELEC - 250V 10M-M/Q
C9A66 142P012050 C-CER - B500V 0.01M-K
C9A68 142P010090 C-CER - B500V 470P-K
C9A69 181P736070 C-ELEC - 35V 330M-M
C9A72 181P736070 C-ELEC - 35V 330M-M
C9A74 142P010090 C-CER - B500V 470P-K
C9A75 181P355080 C-ELEC - 50V 47M-M
C9A79 181P736070 C-ELEC - 35V 330M-M
C9A80 181P736070 C-ELEC - 35V 330M-M
C9A85 181P735020 C-ELEC - 25V 1000M-M 105C
C9A86 181P735020 C-ELEC - 25V 1000M-M 105C
C9C02 181P352040 C-ELEC - 16V 100M-M
C9C03 181P743040 C-ELEC - 16V 330M-M
C9C06 181P352040 C-ELEC - 16V 100M-M
C9C07 181P743040 C-ELEC - 16V 330M-M
C9C10 181P743040 C-ELEC - 16V 330M-M
C9C13 181P352040 C-ELEC - 16V 100M-M
C9C14 181P743040 C-ELEC - 16V 330M-M
C9C16 181P352040 C-ELEC - 16V 100M-M
C9C19 181P743040 C-ELEC - 16V 330M-M
C9C22 181P352030 C-ELEC - 16V 47M-M
C9C42 181P352040 C-ELEC - 16V 100M-M
C9C44 181P352040 C-ELEC - 16V 100M-M
C9C62
C9D00 189P153040 C-M-POLY - 250VAC 0.1M-M
C9D02 189P153040 C-M-POLY - 250VAC 0.1M-M
C9M01 181P352030 C-ELEC - 16V 47M-M
C9M04 181P352030 C-ELEC - 16V 47M-M
C9M05 181P212060 C-ELEC - 16V 47M-M
C9M08 181P352030 C-ELEC - 16V 47M-M
181P352030 C-ELEC - 16V 47M-M
SWITCHES
S7L20 432P109010 SW-KEY BOARD - KSHS611BT abdeg
S7L21 432P109010 SW-KEY BOARD - KSHS611BT abdeg
S7L22 432P109010 SW-KEY BOARD - KSHS611BT abdeg
S7L23 432P109010 SW-KEY BOARD - KSHS611BT abdeg
S7L24 432P109010 SW-KEY BOARD - KSHS611BT abdeg
S7L25 432P109010 SW-KEY BOARD - KSHS611BT abdeg
S7L26 432P109010 SW-KEY BOARD - KSHS611BT abdeg
S7L27 432P109010 SW-KEY BOARD - KSHS611BT abdeg
S7L28 432P109010 SW-KEY BOARD - KSHS611BT abdeg
S7L29 432P109010 SW-KEY BOARD - KSHS611BT abdeg
S7L40 432P109010 SW-KEY BOARD - KSHS611BT cfh
S7L41 432P109010 SW-KEY BOARD - KSHS611BT cfh
S7L42 432P109010 SW-KEY BOARD - KSHS611BT cfh
S7L43 432P109010 SW-KEY BOARD - KSHS611BT cfh
S7L44 432P109010 SW-KEY BOARD - KSHS611BT cfh
S7L45 432P109010 SW-KEY BOARD - KSHS611BT cfh
S7L46 432P109010 SW-KEY BOARD - KSHS611BT cfh
S7L47 432P109010 SW-KEY BOARD - KSHS611BT cfh
S7L48 432P109010 SW-KEY BOARD - KSHS611BT cfh
S7L49 432P109010 SW-KEY BOARD - KSHS611BT cfh
PAGE 66
Page 67

MODELS: WS-48515 / WS-55515 / WS-55615 / WS-55815 / WS-65515 / WS-65615 /WS-65815 / WS-73615
[#] Model Legend:
(a) WS-48515, (b) WS-55515, (c) WS-55615, (d) WS-55815, (e) WS-65515, (f) WS-65615, (g) WS-65815, (h) WS-73615
Ref # Part # Part Name & Description [#]
Ref # Part # Part Name & Description [#]
MISCELLANEOUS
096Z465030 TAPE-LENS bcdefh
096Z465080 TAPE-LENS ag
242D535010 CABLE-EXTENSION - 1394 g
242D535040 CABLE - 1394:300mm cfh
242D535050 CABLE - 1394:1000mm cfh
242D536010 CABLE-MEMORY - USB/5P-JS dg
242D540010 CABLE-IF - F-CONN 250mm
242D540020 CABLE-IF - PIN-PLUG 325mm
242D540030 CABLE-IF - PIN-PLUG 375mm
242D535020 CABLE - 1394:700mm dg
299P103060 FAN-COOLING
299P254020 IR-EMITTER, 4-HEAD - T-IR-02 W/FERRITE CO
299P271010 MEMORY-CARD-READER-PWB dg
305P703010 2RF-SWITCH
330P294010 YOKE-DEFL - 840UH ab
330P294020 YOKE-DEFL - 720UH cdefgh
338P054010 SVM-ASSY abe
338P054020 SVM-ASSY cdfgh
411D033010 CORE-FERRITE - R15 L18
411D044020 CORE-FERRITE - R19.5 L32
411D062010 CORE-FERRITE - R15 L18 abcefh
411D063030 CORE-FERRITE - ZCAT2032-0930
411D064010 FERRITE CORE - HF57SH35X0.8
411D064020 FERRITE CORE - HF57SH28X0.7
453B036010 CAP-ANODE - [R] abcdef
453B036020 CAP-ANODE - [GB] abcdef
453B036070 CAP-ANODE - [R] gh
453B036080 CAP-ANODE - [BG] gh
480P053010 SPEAKER - 5" a
480P063010 SPEAKER - 6" be
480P066010 SPEAKER - 6" cfh
480P074010 SPEAKER - 5"x 7" dg
490P154010 LENS-BARREL:RED a
490P154020 LENS-BARREL:BLUE/GREEN a
490P172070 LENS-BARREL:RED e
490P172080 LENS-BARREL:GREEN e
490P172090 LENS-BARREL:BLUE e
490P205040 LENS-BARREL:RED cf
490P205050 LENS-BARREL:GREEN cf
490P205060 LENS-BARREL:BLUE cf
490P210040 LENS-BARREL:RED d
490P210050 LENS-BARREL:GREEN d
490P210060 LENS-BARREL:BLUE d
490P220010 LENS-BARREL:BLUE b
490P220040 LENS-BARREL:RED/GREEN b
490P226010 LENS-BARREL:ALL gh
598D456010 BRACKET-MIRROR - TOP a
598D651010 COVER - DM
589C063010 CASTOR - DUAL WHEEL
594C932010 SHEILD-CRT - TRAY gh
598D417020 PLATE-RF SWITCH
622B009020 TRAY - CRT-COOLANT abcdefh
622C086010 CLIP-MIRROR - TOP a
642C340010 BRACKET-MIRROR - TOP ef
642C352010 CLIP-MIRROR - TOP bc
AG6B01 224D019090 AIR GAP - 1.5+-0.5KV
AG6B02 224D019090 AIR GAP - 1.5+-0.5KV
AG6G01 224D019090 AIR GAP - 1.5+-0.5KV
AG6G02 224D019090 AIR GAP - 1.5+-0.5KV
AG6R02 224D019090 AIR GAP - 1.5+-0.5KV
AG6R01 224D019090 AIR GAP - 1.5+-0.5KV
RV9D00 265P100020 VAR - ERZV10D271CS
F5A00 283P144070 FUSE - 125V 3A
F9A01 283P144060 FUSE - 125V 7A
F9A02 283P144090 FUSE - 125V 10A
F9A03 283P144080 FUSE - 125V 5A
F9A04 283P144080 FUSE - 125V 5A
F9A05 283P144080 FUSE - 125V 5A
F9A21 283P144090 FUSE - 125V 10A
F9A22 283P144090 FUSE - 125V 10A
F9A23 283P144070 FUSE - 125V 3A
F9D00 283D131040 FUSE - S10A 125A
SF8800 296P171010 SAW-FILTER - X6892D
SF8801 296P172010 SAW-FILTER - X7303P
CF2N01 299P128010 OSC-CERAMIC - CSB500F2
CF2P01 299P128010 OSC-CERAMIC - CSB500F2
CF2V01
T2830 409P961010 CHIP-FILTER - ACM2012D-9002P
T2860 409P961010 CHIP-FILTER - ACM2012D-9002P
T2910 409P961010 CHIP-FILTER - ACM2012D-9002P
T2961 409P961010 CHIP-FILTER - ACM2012D-9002P
J2J21 452C401010 CONNECTOR-USB cdfgh
J2J22 451P246010 JACK-1394 - MINI cdfgh
J8202 452C401010 CONNECTOR-USB
J8301 440C393030 PIN-JACK-BOARD-1P
J8402 451P246010 JACK-1394 - MINI
J8403 451P246010 JACK-1394 - MINI
K9A50 287P111030 RELAY-POWER - LKS1AF-12V
PC9A21 268P058020 PHOTO-COUPLER - ON3131-R/ON3161-R
PC9A50 268P106010 PHOTO-COUPLER - CNZ3133
PJ2J00 440C407010 PIN-JACK-BOARD-6P
PJ2J01 440C412020 PIN-JACK-BOARD-3P-1S
PJ2J02 440C421010 PIN-JACK-BOARD-2P
PJ2J03 440C410010 PIN-JACK-BOARD-5P
PJ2J04 440C410010 PIN-JACK-BOARD-5P
669D633010 SCREW-LIQUID - M6*1.0-17.5 abcdef
685D039010 SCREW-LIQUID gh
702A447011 ASSY-PANEL-TERMINAL
703D124010 CAP - SCREW GLOSSY BLACK g
703D125010 CAP - SCREW GRAY efh
703D125020 CAP - SCREW BLACK ef
750A449010 COVER-BACK - TOP a
761C725010 COVER-BTM - CARD READER dg
761C726010 COVER-TOP - CARD READER dg
767C031020 MIRROR - 73" h
767D048090 MIRROR - 65" efg
767D072030 MIRROR - 55" c
767D072040 MIRROR - 48" a
767D072060 MIRROR - 55" d
767D072050 MIRROR - 55" b
850C089020 INLAY DM dg
850C089010 INLAY DM abcefh
955C238003 ASSY-MEMORY CARD READER dg
299P259010 OSC-CERAMIC - CSALA2M6964ZF01-B0
PAGE 67
Page 68

MODELS: WS-48515 / WS-55515 / WS-55615 / WS-55815 / WS-65515 / WS-65615 /WS-65815 / WS-73615
[#] Model Legend:
(a) WS-48515, (b) WS-55515, (c) WS-55615, (d) WS-55815, (e) WS-65515, (f) WS-65615, (g) WS-65815, (h) WS-73615
Ref # Part # Part Name & Description [#]
PJ2J05 440C421010 PIN-JACK-BOARD-2P
PJ2J06 451C259010 JACK-MICROPHONE
PJ2J07 451C259010 JACK-MICROPHONE
PJ2J11 440C412010 PIN-JACK-BOARD-3P
SKT6B1 449C141030 SOCKET-CRT
SKT6R1 449C141030 SOCKET-CRT
SKT6G1 449C141030 SOCKET-CRT
TU8700 295P490040 TUNER-TV - ENA46914P4A
TU8701 295P523010 TUNER-NTSC/ATSC
TU8702 295P524010 TUNER-OOB
TU8704 295P527010 TUNER-NTSC DEMODULATOR
X2K51 285P426020 QTZ-CRYST - 4.000000MHZ
X2M47 285P426040 QTZ-CRYST - 20.000MHZ
X2N26 285P426010 QTZ-CRYST - 3.579545MHZ
X2P26 285P426010 QTZ-CRYST - 3.579545MHZ
X3001 285P413010 QTZ-CRYST - 18.432MHZ
X7A13 285P434020 QTZ-CRYST - 16.000MHZ
X7J10 285P335050 QTZ-CRYST - 80.000MHZ
X7P09 285P434010 QTZ-CRYST - 8.000MHZ
X8001 285P441040 QTZ-CRYST - 26.1621MHZ
X8301 285P434020 QTZ-CRYST - 16.000MHZ
X8302 285P441030 QTZ-CRYST - 14.31818MHZ dg
X8303 285P413030 QTZ-CRYST - 18.432MHZ
X8401 285P431020 QTZ-CRYST - 54.000MHZ
X8402 285P410020 QTZ-CRYST - 24.576MHZ
X8800 285P410080 QTZ-CRYST - 25.14MHZ
Z7K01 939P617010 UNIT-PREAMP - GP1U283Q
Z81A1 283P128050 FUSE-CHIP - AC125/100V 4A
Z81A2 283P128050 FUSE-CHIP - AC125/100V 4A
Z81A3 283P128050 FUSE-CHIP - AC125/100V 4A
Z81A4 283P128050 FUSE-CHIP - AC125/100V 4A
PRINTED CIRCUIT BOARDS
930B918001 ASSY-PWB-MAIN ab
930B918002 ASSY-PWB-MAIN cdef
930B918003 ASSY-PWB-MAIN gh
930B919001-48 ASSY-PWB-SIGNAL a
930B919001-55 ASSY-PWB-SIGNAL b
930B919002-55 ASSY-PWB-SIGNAL c
930B919002-65 ASSY-PWB-SIGNAL ef
930B919003 ASSY-PWB-SIGNAL h
930B919006 ASSY-PWB-SIGNAL d
930B919007 ASSY-PWB-SIGNAL g
930B920001 ASSY-PWB-TERMINAL abcefh
930B920002 ASSY-PWB-TERMINAL dg
934C106001 ASSY-PWB-CRT
934C107001 ASSY-PWB-HDMI
934C108001 ASSY-PWB-DM3 abe
934C108002 ASSY-PWB-DM3 dg
934C108003 ASSY-PWB-DM3 cfh
934C109001-48 ASSY-PWB-E2P a
934C109001-55 ASSY-PWB-E2P bcd
934C109001-65 ASSY-PWB-E2P efg
934C109001-73 ASSY-PWB-E2P h
934C110001 ASSY-PWB-TUNER
935D762001 ASSY-PWB-PREAMP
Ref # Part # Part Name & Description [#]
935D763001 ASSY-PWB-FRONT abcefh
935D763002 ASSY-PWB-FRONT dg
935D764001 ASSY-PWB-CONTROL abdeg
935D767001 ASSY-PWB-DBF
935D770001 ASSY-PWB-FIF cdfgh
935D772001 ASSY-PWB-CONTROL cfh
COSMETIC PARTS
703B038010 DOOR - A/V abcef
703B044010 PANEL-CARD READER - FRONT dg
716C040A20 BADGE-BRAND - GOLD cfh
716C040010 BADGE-BRAND - SILVER abe
716C041010 BADGE-BRAND - ALUMINUM dg
720C188050 COVER-FRONT ag
720C250020 COVER-FRONT ef
720C254010 COVER-FRONT bc
720C257020 COVER-FRONT d
761A209030 GRILLE - SPEAKER a
761A210010 GRILLE - SPEAKER b
761A211010 GRILLE - SPEAKER e
761A224010 GRILLE SPEAKER c
761A225010 GRILLE SPEAKER f
761A226010 GRILLE SPEAKER h
761A199020 GRILLE-SPEAKER - 65" g
761A223010 GRILLE-SPEAKER - 55" d
762B375020 PANEL-FRONT - WOOD g
762B384010 PANEL-FRONT - WOOD d
775B140010 NAME-PLATE - WS-55515 b
775B140060 NAME-PLATE - WS-48515 a
775B140070 NAME-PLATE - WS-65515 e
775B140080 NAME-PLATE - WS-55615 c
775B140090 NAME-PLATE - WS-65615 f
775B141010 NAME-PLATE - WS-73615 h
775B141020 NAME-PLATE - WS-55815 d
775B141030 NAME-PLATE - WS-65815 g
ACCESSORIES
242D525010 CABLE - AUDIO
242D527010 CABLE - IR dg
246C351030 CORD-AC - POWER
290P122010 REMOTE-CONTROL - V25/V25+ abcefh
290P123010 REMOTE-CONTROL - V25++ dg
I/QR WS48515 GUIDE - QUICK REF:V25/V25+ abcefh
I/QR WS55815 GUIDE - QUICK REF:V25++ dg
I/B WS48515 GUIDE - OWNERS:V25/V25+ abcefh
I/B WS55815 GUIDE - OWNERS:V25++ dg
PAGE 68
Page 69

MODELS: WS-48515 / WS-55515 / WS-55615 / WS-55815 / WS-65515 / WS-65615 / WS-65815 / WS-73615
[#] Model Legend:
(a) WS-48515, (b) WS-55515, (c) WS-55615, (d) WS-55815, (e) WS-65515, (f) WS-65615, (g) WS-65815, (h) WS-73615
Ref # Part # Part Name & Description [#]
WS-48515
(Figure 1)
(1) 491P138030 SCREEN-LENTICULAR - 48" a
(2) 491P139020 LENS-FRESNEL - 48" a
(3) 597C027010 BRACKET-SCREEN FRAME a
(4) 598D339010 BRACKET-SCREEN-SIDE a
(5) 622B010010 HOLDER-SCREEN - TOP a
(6) 622B011010 HOLDER-SCREEN - BOTTOM a
(7) 622B012010 HOLDER-SCREEN - SIDE a
(8) 622B013030 CLIP-DIAMOND SHIELD - 48" a
(9) 635B109010 STIFFENER-SCREEN - TOP a
(10) 751A005080 BEZEL-FRONT 48" a
(11) 760D628090 DIAMOND SHIELD-48" a
Figure 1: WS-48515
PAGE 69
Page 70

MODELS: WS-48515 / WS-55515 / WS-55615 / WS-55815 / WS-65515 / WS-65615 / WS-65815 / WS-73615
[#] Model Legend:
(a) WS-48515, (b) WS-55515, (c) WS-55615, (d) WS-55815, (e) WS-65515, (f) WS-65615, (g) WS-65815, (h) WS-73615
Ref # Part # Part Name & Description [#]
Ref # Part # Part Name & Description [#]
WS-55515 (Figure 2)
(1) 491P180010 SCREEN-LENTICULAR - 55" b
(2) 491P181010 LENS-FRESNEL - 55" b
(3) 622B016010 CLIP-DIAMOND SHIELD - 55" b
(4) 622C104010 HOLDER-SCREEN b
(5) 701B481010 FRAME-SCREEN-TOP b
(6) 701B482010 FRAME-SCREEN-SIDE b
(7) 702A446010 CAP-CORNER - TOP b
(8) 702A436050 PANEL-CONTROL - BTM FRAME b
(9) 760D628080 DIAMOND SHIELD - 55" b
(11) 598D491010 BRACKET-SCREEN SIDE b
WS-65515 (Figure 2)
(1) 491P182010 SCREEN-LENTICULAR - 65" e
(2) 491P183010 LENS-FRESNEL - 65" e
(3) 622B016020 CLIP-DIAMOND SHIELD - 65" e
(4) 622C104020 HOLDER-SCREEN e
(5) 701B481020 FRAME-SCREEN-TOP e
(6) 701B482020 FRAME-SCREEN-SIDE e
(7) 702A446010 CAP-CORNER - TOP e
(8) 702A437050 PANEL-CONTROL - BTM FRAME e
(9) 760D627070 DIAMOND SHIELD - 65" e
(10) 594C988010 BRACKET-SCREEN FRAME efh
(11) 598D491010 BRACKET-SCREEN SIDE e
Figure 2: WS-55515 / WS-65515
PAGE 70
Page 71

MODELS: WS-48515 / WS-55515 / WS-55615 / WS-55815 / WS-65515 / WS-65615 / WS-65815 / WS-73615
[#] Model Legend:
(a) WS-48515, (b) WS-55515, (c) WS-55615, (d) WS-55815, (e) WS-65515, (f) WS-65615, (g) WS-65815, (h) WS-73615
Ref # Part # Part Name & Description [#]
Ref # Part # Part Name & Description [#]
WS-55815 (Figure 3)
(1) 491P180010 SCREEN-LENTICULAR - 55" d
(2) 491P181010 SCREEN-FRESNEL - 55" d
(3) 622C090020 CLIP-DIAMOND SHIELD - 55" d
(4) 702A408010 CAP-CORNER - TOP dg
(6) 702A409020 CAP-CORNER-BOTTOM - LEFT dg
(7) 760D646010 DIAMOND SHIELD - 55" AR d
(8) 701B466020 FRAME-SCREEN-SIDE d
(9) 701B467020 FRAME-SCREEN-TOP d
(10) 701B468050 FRAME-SCREEN-BTM d
(11) 702A409010 CAP-CORNER-BOTTOM - RIGHT dg
WS-65815 (Figure 3)
(1) 491P182020 SCREEN-LENTICULAR - 65" g
(2) 491P183020 SCREEN-FRESNEL - 65" g
(3) 622C090010 CLIP-DIAMOND SHIELD - 65" g
(4) 702A408010 CAP-CORNER - TOP dg
(6) 702A409020 CAP-CORNER-BOTTOM - LEFT dg
(7) 760D644020 DIAMOND SHIELD - 65" AR g
(8) 701B466030 FRAME-SCREEN-SIDE g
(9) 701B467030 FRAME-SCREEN-TOP g
(10) 701B468040 FRAME-SCREEN-BTM g
(11) 702A409010 CAP-CORNER-BOTTOM - RIGHT dg
Figure 3: WS-55815 / WS-65815
PAGE 71
Page 72

MODELS: WS-48515 / WS-55515 / WS-55615 / WS-55815 / WS-65515 / WS-65615 / WS-65815 / WS-73615
[#] Model Legend:
(a) WS-48515, (b) WS-55515, (c) WS-55615, (d) WS-55815, (e) WS-65515, (f) WS-65615, (g) WS-65815, (h) WS-73615
Ref # Part # Part Name & Description [#]
WS-55615 (Figure 4)
(1) 491P181010 LENS-FRESNEL bcd
(2) 491P180010 SCREEN-LENTICULAR bcd
(3) 702A449010 FRAME SCREEN TOP c
(4) 701B498010 FRAME SCREEN SIDE c
(5) 598D619010 BRACKET SCREEN SIDE cfh
(6) 635B113010 FRAME TOP - SUPPORT c
(7) 760D628080 DIAMOND - SHIELD bc
(8) 622C104030 HOLDER SCREEN c
(9) 702A550010 CONTROL PANEL c
WS-65615 (Figure 4)
(1) 491P183010 LENS-FRESNEL ef
(2) 491P182010 SCREEN-LENTICULAR ef
(3) 702A453010 FRAME SCREEN TOP f
(4) 701B498020 FRAME SCREEN SIDE f
(5) 598D619010 BRACKET SCREEN SIDE cfh
Ref # Part # Part Name & Description [#]
(6) 635B113020 FRAME TOP - SUPPORT efh
(7) 760D627070 DIAMOND SHIELD f
(8) 622C104040 HOLDER SCREEN ef
(9) 702A452010 CONTROL PANEL f
(10) 594C988010 BRACKET - FRAME efh
WS-73615 (Figure 4)
(1) 491P186010 LENS-FRESNEL h
(2) 491P185010 SCREEN-LENTICULAR h
(3) 702A454010 FRAME SCREEN TOP h
(4) 701B498030 FRAME SCREEN SIDE h
(5) 598D619010 BRACKET SCREEN SIDE cfh
(6) 635B113030 FRAME TOP - SUPPORT efh
(7) 760D638010 DIAMOND SHIELD - 73" h
(8) 622C214010 HOLDER SCREEN h
(9) 702A450010 CONTROL PANEL h
(10) 594C988010 BRACKET - FRAME efh
6
4
3
7
2
1
8
5
9
Rear View
10
Figure 4: WS-55615 / WS-65615 / WS-73615
PAGE 72
Page 73

MODELS: WS-48515 / WS-55515 / WS-55615 / WS-55815 / WS-65515 / WS-65615 / WS-65815 / WS-73615
POWER SUPPLY
Page 73
Page 74

MODELS: WS-48515 / WS-55515 / WS-55615 / WS-55815 / WS-65515 / WS-65615 / WS-65815 / WS-73615
VIDEO SIGNAL PATH
Page 74
Page 75

MODELS: WS-48515 / WS-55515 / WS-55615 / WS-55815 / WS-65515 / WS-65615 / WS-65815 / WS-73615
A/V SWITCH
Page 75
Page 76

MODELS: WS-48515 / WS-55515 / WS-55615 / WS-55815 / WS-65515 / WS-65615 / WS-65815 / WS-73615
SYNC PATH
Page 76
Page 77

MODELS: WS-48515 / WS-55515 / WS-55615 / WS-55815 / WS-65515 / WS-65615 / WS-65815 / WS-73615
DEFLECTION / HV
Page 77
Page 78

MODELS: WS-48515 / WS-55515 / WS-55615 / WS-55815 / WS-65515 / WS-65615 / WS-65815 / WS-73615
X-RAY PROTECT
Page 78
Page 79

MODELS: WS-48515 / WS-55515 / WS-55615 / WS-55815 / WS-65515 / WS-65615 / WS-65815 / WS-73615
CONVERGENCE CIRCUIT
Page 79
Page 80

MODELS: WS-48515 / WS-55515 / WS-55615 / WS-55815 / WS-65515 / WS-65615 / WS-65815 / WS-73615
SOUND CIRCUIT
Page 80
Page 81

MODELS: WS-48515 / WS-55515 / WS-55615 / WS-55815 / WS-65515 / WS-65615 / WS-65815 / WS-73615
CONTROL CIRCUITRY
Page 81
 Loading...