

Page 1
Introduction
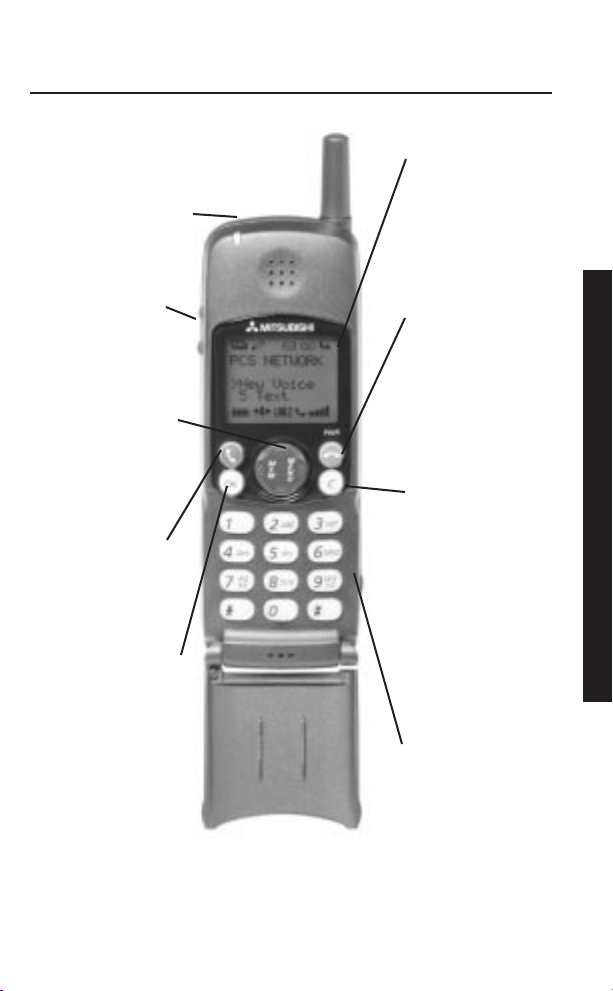
LED Indicator
Flashing green
incoming call
Redbattery charging
Greenbattery
charged
Volume Control
Ringer and conversation volumes
Express Key
Left for Memory Menu
Right for Main Menu
In a menu moves
arrow between options
Edit Mode moves
cursor around text
Talk
Initiates call or request
to network.
OK
Select desired menu
options. Confirm
operations.
Main Display
Current status of
phone
ON/OFF
.5 second press
power on
1.0 second press
power off
Press briefly to end
call
Introduction
C (Clear)
In a menu
Previous menu level
Edit Mode
brief press, delete
character;
long press, delete
all
Entering numbers
brief press, delete
digit; long press,
delete all
In conversation
mute
Numeric Keys
Enter telephone,
memory location
numbers, and
alphanumeric
information.
1
Page 2
Main Display Format
Center displays text messages. Outside displays
symbolic icons indicating the phones status.
SIM
Memory
Icon The
SIM
memory
has been
accessed.
Edit Mode
Icon
Enter or edit
alphanumeric
information.
Roaming Icon
When out of
range of home
network and
another
network is
available.
Text Message
Icon
You have text
messages.
Voice Mail
Icon
You have
Voice Mail.
Rm
Main Display
Introduction
Battery Level
Icon Indicates
battery level.
With low
battery, flashes
until empty or
recharged.
More Icon
More menu
options can
be accessed
by using the
Express Key.
Use LEFT on the Express Key to access the Memory menu
and to scroll through menus and options.
Use RIGHT on the Express Key to access the Main Menu
and to scroll through menus and options.
Use UP and DOWN on the Express Key to scroll through text
messages, menus, or options.
Alternate
Line
Indicator
Your
second
line is in
use.
OffHook
Icon
A line is
active.
Received Signal
Strength Indicator
(RSSI) Icon
Signal strength of
the selected
network.
Call
Forwarding
Icon
Call
Forwarding
Unconditional is
activated.
2
Page 3

LED Indicator
Flashing Greenthere is an incoming call.
Constant Redthe battery is charging.
Constant Greenthe battery is at full charge.
Tones
Power On/Offhigh-pitched beep sounds when you
turn your phone on or off.
Dial Tonestandard dial tone heard through the
earpiece when you press before dialing a number.
Ringingchoose from a variety of ring tones to sound
when you receive a call.
Call Waitingnormal Call Waiting tone heard through
the earpiece.
Key TonesDual Tone Multi-Frequency (DTMF) tones
sound when you press numeric keys.
Low Battery Alerttone sounds every 20 seconds.
After 1 minute, the phone terminates the call and
turns off.
Text Message Arrival Tonebeeps twice when you
receive a text message.
Introduction
Cell Message Toneone beep tone sounds when you
receive a Cell Broadcast message.
Backlight
Backlight is on when your phone is connected to an
external power source. On battery power, the backlight
duration is selectable. When your phone is not connected
to an external power source and the backlight feature is
engaged, the backlight comes on after a key press or
during an incoming call.
3
Page 4

Phone Features
Your phone allows you:
To place and receive calls
To send Dual Tone Multi-Frequency tones
To send and receive text messages*
To display call costs*
To perform Hold and Call Waiting*
To have two lines [Alternating Line Service]*
To perform Call Forwarding *
To perform Call Barring*
To show the number of the person who calls you*
To hide your number from the person you call*
To have conference calls*
To receive Cell Broadcast messages*
To access Closed User Group services*
Introduction
To store and retrieve numbers
To retry calls
To call stored numbers (unanswered and last dialed
numbers)
To display talk time
To set up passwords such as Personal Identity
Numbers
To be notified of an incoming call with a ring, vibra-
tion or both (G150 only).
* These features may not be available depending on your
network subscription. Contact your Service Provider for more
information.
4
Page 5
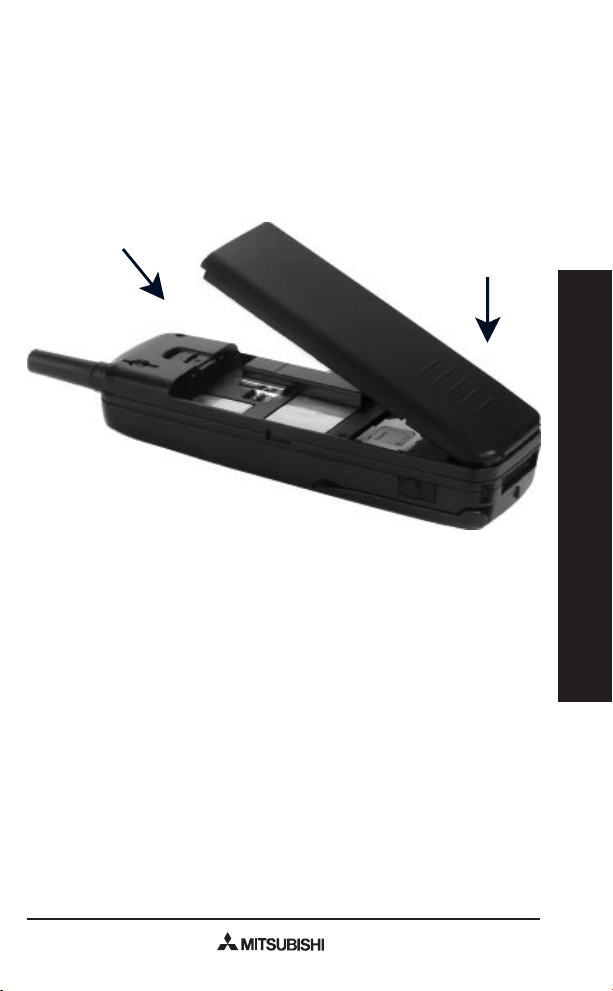
Battery
Attaching the Battery
2. Swing the battery
downward until the
top clicks into place.
1. Insert the
bottom of the
battery into the
clips.
Removing the Battery
1. Push up and hold the battery catch located on the back
of the phone.
2. Lift the end of the battery up and away from the catch.
Introduction
5
Page 6
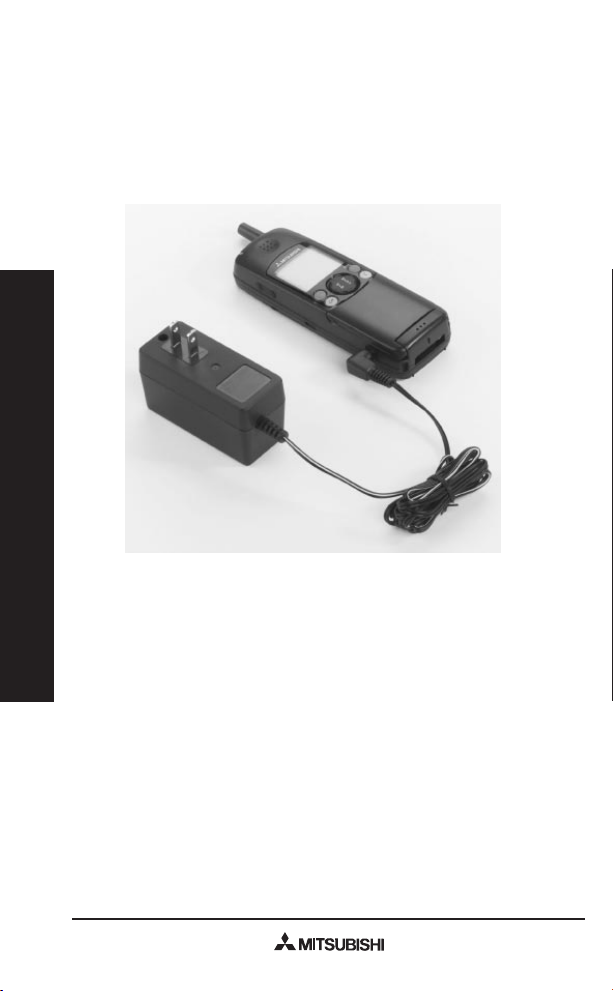
Charging the Battery
1. Connect the charger that came with your phone as
shown in the diagram below.
2. Plug the charger into a standard 110 volt wall outlet.
NOTE: Your phone may be used during charging.
Introduction
Battery Charging Display
Power Off
No external power supplythe display is empty and
top LED is off.
External power supply connectedtop LED lights red
and Charging displays.
At full chargetop LED lights green and Battery Full
displays.
Problems chargingCheck Battery displays.
6
Page 7

Power On
No external power supplyIdle/Standby Mode
display and top LED is off.
External power supply connectedBattery icon
flashes from empty to full.
At full chargeBattery icon stops flashing and
indicates full charge.
Problems chargingLED does not light and Battery
Level icon does not display.
Low Battery
When the battery level falls to the lowest safe level, the
Low Battery Alert Tone sounds and Low Battery! displays
and flashes. The phone terminates any active calls after
1 minute.
The following is a chart containing the charge time for
the 3 available battery packs:
NiMH-S NiMH-M NiMH-L
(600mAh) (650mAh) (1150mAh)
Recharge Time With
AC Adapter (approx.) 1hr. 15min. 1hr. 25min. 2hr.15min.
Introduction
These are the charging time values under normal conditions
(such as room temperature, and empty battery).
Charging time may vary under different conditions.
7
Page 8
Basic Operation
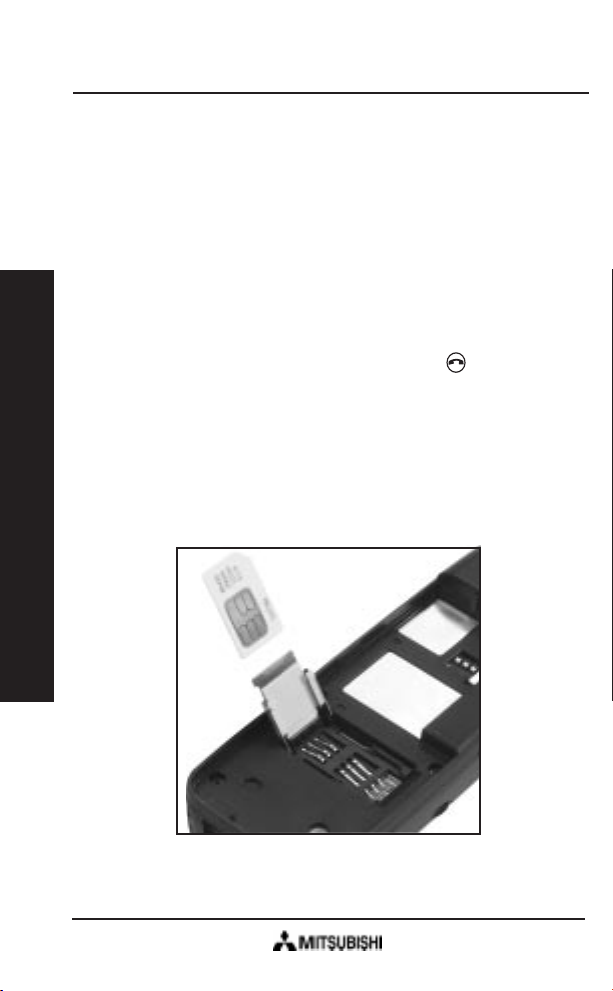
SIM Card Installation
The Subscriber Identity Module (SIM) card helps your
wireless network identify and communicate with your
phone. It is also used for storing messages and phone
numbers. You cannot use your phone without a SIM
card except to dial emergency calls.
If a SIM card is not installed, Check SIM! displays when
you turn on the phone. To install your SIM card:
1. Turn off the phones power by pressing for 1 second.
2. Remove the battery and insert the SIM card in its
socket, making sure that it fits properly.
The SIM card fits into its socket only one way, as
shown below.
3. Close the hinge on the socket and slide into place.
Basic Operation
4. Reinsert the battery and turn the phones power back
on.
8
Page 9

5. If requested, enter your unlock code when Unlock
Code? displays.
If Enter Pin and Press OK displays, enter your PIN (4-8
digits) and press . For security, the digits display as
asterisks. If you enter a digit incorrectly, press , and
start over.
If you enter an incorrect PIN, Wrong PIN Enter Again!
displays. You have 3 attempts to enter the PIN correctly.
On the last attempt, Last Attempt flashes and the phone
is locked.
Contact your Service Provider Customer Care to
unlock your phone.
NOTE: To disable the PIN, see Enabling and Disabling
the SIM PIN in Security.
Tur ning the Phone On
Press and hold for 1 second. The power-on tone
sounds, and all icons display for a few seconds.
If Check SIM! displays, see SIM Card Installation.
If Auto Lock is enabled, Unlock Code? displays.
Enter your Unlock Code. If you make a mistake,
press and re-enter your Unlock Code.
If Enter PIN and Press OK displays, enter the PIN
and press .
Basic Operation
9
Page 10

Network Selection
We strongly recommend that you select automatic
network selection although your phone can also select
networks manually. See Network Selection Menu in
Main Menu.
Automatic Network Search
When your phone is turned on, Searching displays.
When your phone finds a network, the network name
and Receiving Signal Strength Indicator icon
displays. Your phone is now ready to use.
When you are outside of home network range, the Rm
(Roaming Indicator) icon displays.
If you are outside of any PCS network, No Service
Currently Available displays.
Manual Network Search
Contact your Service Provider before selecting Manual
network search.
Basic Operation
Message Center
The phone checks for new messages. If you have any
unretrieved messages, the Message Center screen
displays.
Voice Mail
If you have new Voice Mail, the icon appears and
New Voice displays. Select New Voice. Your phone
dials the Voice Mail Center and retrieves the Voice Mail.
10
Page 11

Text Messages (Short Message Service)
You can use your phone to send and receive text messages. If you have unretrieved messages, the Messages
icon appears and the number of messages displays,
followed by Text. If SIM memory for Text Messages is full,
the icon flashes.
See Messages Menu in the Main Menu chapter to read,
write, and send messages.
Placing Calls
Either:
Press , listen for a dial tone. When Enter Num-
ber displays, dial the number.
Dial the desired number first, then press .
NOTE: The button deletes any misdialed numbers.
1. After you press the icon, Dialing, and the number
you dialed display.
If the called party is busy, a normal busy tone sounds
and Busy displays.
If the call is restricted, Call Restricted displays.
If the call does not connect the first time, and Call
Retry is on, the phone retries the call.
If the Call Retry function is not on, Call Failed! Try
Again? displays. Select Yes to retry the call.
After a call connects, the Call Timer displays. After 1
hour, the Call Timer display format changes from
minutes and seconds to hours and minutes.
2. When the call is complete, press briefly to hang up.
Basic Operation
11
Page 12

Emergency Calls
You can place emergency calls at any time by dialing
one of the emergency numbers (911, 999, or 112) and
pressing .
Only emergency calls can be placed when SIM cards are
not inserted in phones.
International Calls
To place international calls, press twice in quick
succession (+, the international access code, displays)
and dial the remaining digits.
Receiving Calls
When you receive a call one of three things happens
depending on the vibrator setting (G150 only). See
Vibrator in the Main Menu chapter for more information.
If the vibrator is turned off (default setting), the
phone rings, the backlight illuminates, the LED
indicator flashes green and Call (or Forwarded Call)
Basic Operation
displays.
If the vibrator is turned on, the phone vibrates, the
backlight illuminates, the LED indicator flashes green
and Call (or Forwarded Call) displays.
If the vibrator is set to vibe & ring, the phone rings,
the phone vibrates, the backlight illuminates, the
LED indicator flashes green and Call (or Forwarded
Call) displays.
Note: If the vibrator is on while the phone is connected
to an external power supply during an incoming call, the
phone will ring but not vibrate.
To answer the call, press any key except and 0. To
reject the call, press , or press 0 followed by .
12
Page 13

The callers number (if available) displays. If you have
this number in memory, the persons name displays.
If you do not answer a call, Unanswered Calls and the
number of calls display. The phone stores up to 10
unanswered calls. View the phone numbers using
Unanswered Calls in the Memory Menu.
Volume Controls
Adjusting Ringer Volume
During Incoming Calls and Idle/Standby Mode (phone on,
no call placed), the volume control on the left side of the
phone controls ringer volume.
During Idle/Standby Mode, you can also do the following:
1. Press Right on the Express Key, then use Down on
the Express Key to select Settings and press .
2. Use Down on the Express Key to select Volumes, and
press .
3. Select Ring Tones and press .
If vibrator is turned on, Vibrator ON displays and
the ring tone volume cannot be adjusted (G150
only).
Basic Operation
If vibrator is turned off or vibe & ring is off, a sectioned line appears at bottom of the screen to
indicate the volume level.
4. Adjust volume using Right and Left on the Express
Key and press to validate, to exit this menu.
If ramping is engaged, the volume increases by 1 volume
level each successive ring until full volume is reached.
13
Page 14

Adjusting Handset Speaker Volume
Use the volume control on the left side of the phone
during conversation to adjust handset speaker volume.
Adjusting Keypad Tone Volume
1. Press Right on the Express Key to display the Main
Menu.
2. Select Settings and press .
3. Select Volumes and press .
4. Select Keys and press .
5. Adjust volume using Right and Left on the Express
Key and press to validate or to exit this menu.
DTMF Tone Transmission
DTMF tones are the sounds your phone makes when you
enter digits. You may need to send DTMF tones when
you are communicating with computerized answering
systems.
While in Conversation:
Basic Operation
1. Press Right on the Express Key, select Send DTMF,
and press .
2. Enter the desired DTMF string using the keypad, then
press .
Storing DTMF Strings
To store DTMF strings or numbers with DTMF strings for
automatic dialing and sending, see "Entering Phone
Numbers in SIM memory" (Storing and Retrieving Information).
Insert a P (3 second pause) between the phone
number and DTMF string by pressing and holding
second. You can insert as many Ps as necessary.
for 1
Recall the number from memory and press . The
phone dials the number, pauses for 3 seconds for
each P, and sends the DTMF string.
14
Page 15

Call Waiting
If Call Waiting is active and you have a second call, a call
waiting tone sounds, and the display changes as follows:
The first line displays 1-Actv followed by the name or
the last 5 digits of the number for the person you are
speaking with (if available).
The second line displays 2-Wait and that persons
name or the last 5 digits of the phone number (if
available).
The bottom right part of the screen displays the
waiting callers phone number (if available).
When a call is waiting, you have the following options:
Reject the call by pressing 0, then .
Hang up the first call and accept the second by
pressing 1, then .
Put the first call on hold and accept the second by
pressing 2 and , or simply press .
Hang up any of the calls by pressing X (X is the
number of the call) and .
NOTE: You can also reject calls, put calls on hold, or take
calls off hold using the Main Menu. See the Menus
chapter for information on the Main Menu.
Basic Operation
Hold/Retrieve
To put a call on hold in order to place a second call,
simply dial the desired phone number and press or
vice versa. You may also select Hold from the Main
Menu, press , then dial the number followed by .
When you put a call on hold the following happens:
While the phone is dialing, the first line of the screen
displays 1-Hold and a caller identifier (if available).
15
Page 16

The second line displays 2-Dial and a caller identifier
(if available).
When the call connects, its status designation
changes from 2-Dial to 2-Actv.
To retrieve the call (the active call is put on hold), either:
Press .
Press 2, then .
Select Swap from the Main Menu and press .
Multi-Party Conferencing
Adding Parties by Calling Them
1. Put the first call on hold by pressing and dialing a
number, or vise versa. The screen displays the first
call with the status 1-Hold and the second with 2-Actv.
2. Add the original call back into the conference by
selecting Join from the Main Menu and pressing , or
by pressing 3 and then . All parties are now active.
Basic Operation
Adding Incoming Calls
1. Answer the call and put the first call on hold by press-
ing 2 and then , or press only.
2. Reconnect the first call by pressing 3 and , or by
selecting Join from the Main Menu and pressing .
You can perform these steps to include up to 5 callers.
Holding Private Conversations
Select Private from the Main Menu, then select a person
from the list of calls. To return to the conference, press
or select Join from the Main Menu and press .
16
Page 17

Removing Calls From the Conference
To remove a call from the conference, set up a private
conversation, then select Reject in the Main Menu and
press . Press or select Swap or Join in the Main
Menu and press to return to the conference.
Second Line Service
When you receive a call on a second line, the following
happens:
LINE 2 indicator appears next to the icon.
If you receive a call on one line while you are on the
other, the second call displays as 2 Wait.
Answer an incoming call on one line while you are on the
other line as you would a waiting call.
Interrupted Calls
When a call is interrupted due to loss of the signal, the
phone may try to reconnect the call. When the phone tries
to reconnect the call, Reconnecting displays.
Power Off
To turn off your phone, press for 1 second. A power off
tone sounds, and Power Off displays.
Basic Operation
DO NOT disconnect the battery while this message
displays. The phone saves information to the SIM card.
17
Page 18

How To Use the Menus
Over view
You can use the following menus to access all of your
phone's functions:
Memory Menu
Press Left on the Express Key to access the memory
functions.
See the "Storing and Retrieving" chapter.
Main Menu
Press Right on the Express Key to access the Main Menu.
See the Main Menu chapter for detailed information on
Main Menus functions.
Using the Menus
Use Up and Down on the Express Key to move the
cursor (>) from selection to selection, and page to
How To Use the Menus
page.
Press to select a menu item when the cursor (>) is
next to it.
Press to go back to the previous menu level. (A
longer press exits the menu altogether.)
NOTES:
If no action is performed in a menu for 30 seconds, the
phone will exit all menus.
To select a menu, press or Right on the Express Key.
To return to the previous menu, press or Left on the
Express Key.
18
Page 19

Storing and Retrieving Information
Memory Menu
Press Left on the Express Key to access the Memory
Menu.
Last Dial to display last dialed numbers.
Recall Name to recall numbers by name.
Mem. Store to store numbers and names.
Own Number to display your own number.
Scratchpad to read scratchpad memory. Scratchpad
memory can be written only during conversation.
Unanswered to display phone numbers of unan-
swered calls.
Received to display phone numbers of received calls.
Entering Alphanumeric
Characters
The icon and Enter Text display when you can enter
text from the keypad (e.g., to store numbers and names,
or to write or modify text messages).
To enter a character, press the corresponding key (all the
characters available for that key appear at the bottom of
the display) until the desired character is displayed. Wait
for the cursor to move to the next position before entering
the next character (see Alphanumeric Table on the
following page).
To delete one character, press .
To delete all text, hold for over 1 second. Delete Text?
displays. Select Delete Text?, select Yes, and press to
confirm.
Storing
19
Page 20

To relocate the cursor in the text during text editing,
you can use the Express Key.
To end text entry, press .
NOTE: To access your phones pre-written messages,
press the # key twice in quick succession.
Alphanumeric Character Table
UPPERCASE lowercase
Key Characters Characters
. ? ! , : ( ) ¿ 1 . ? ! , : ( ) ¿ 1
A B C à ç 2 a b c à ç 2
D E F é É 3 d e f é è 3
G H I ì 4 g h i ì 4
J K L 5 j k l 5
M N O Ñ ò 6 m n o ñ ò 6
P Q R S 7 p q r s 7
Storing
T U V ù 8 t u v ù 8
W X Y Z 9 w x y z 9
+ - / = > < 0 + - / = > < 0
% £ $ @ * % £ $ @ *
Space # Space #
Press and hold key to switch between lower and
uppercase.
For example, to enter the letter L, press the key 3
times in quick succession.
20
Page 21

Storing Information
NOTE: Some of the following procedures use selections
from the Memory Menu.
Entering Phone Numbers in SIM Memory
1. Press Left on the Express Key.
2. Select Mem. Store and press .
3. At Address? select the displayed memory location or
enter another location, then press .
If location is nonexistent, Invalid Memory Address
displays.
4. At Number?, enter phone number to be saved, then
press .
5. At Name?, enter a name for the stored number and
press . To skip name, press . Name, phone
number and memory address display briefly.
If Memory Full displays with Replace Memory Entry?,
replace existing information as follows:
1. Select Yes and press .
2. At Address? enter the 3 digit location you want to use,
then press .
3. Enter phone number and name and press .
NOTE: It is recommended that the most frequently called
numbers be stored in memory locations 1-9. This may be
accessed with One Touch Dialing (see One Touch Speed
Dialing on the next page).
Storing
21
Page 22

Storing Numbers from Other Memories
1. Press left on the Express Key. Using Down and Down
on the Express Key select the memory (either Last Dial,
Scratchpad, Unanswered or Received) and press .
2. Use Up and Down on the Express Key to select the
number you wish to store and press .
3. The number displays. Press Left on the Express Key.
4. Select Mem. Store and press .
5. Follow the instructions described in the chapter "Enter-
ing Phone Numbers in SIM memory" (previous page)
from step 3 to step 5.
One Touch Speed Dialing
To dial any of the numbers in memory locations 1-9 with a
single key, press and hold the digit corresponding to the
memory location for 1 second.
Retrieving Numbers by Name
1. Press Left on the Express Key.
Storing
2. Select RecallName, press . Enter Name and
Icon display.
3. Use alphanumeric keypad to key 1-3 letters of name you
want to view, then press . The name with closest
match displays. To view other names in alphabetical
order, use Up or Down on the Express Key. If no letters
are entered, pressing Down on the Express Key scrolls
through names in alphabetical order.
4. Press to dial the number.
5. To exit Recall Name, press briefly at any time.
Retrieving by Memory Location
Number
1. Enter the number of the memory location, then press #.
2. Press to dial the phone number stored in that
location.
22
Page 23

NOTES: To scroll locations in numerical order, use Up
and Down on the Express Key.
If displays, press Left on the Express Key to display
hidden information.
Last Dialed Numbers Memory
Last Dial Memory Redialing
1. Press Left on the Express Key.
2. Select Last Dial in the Memory Menu and press ,
then scroll to the desired number on the Last Dial list.
3. Press to dial the number.
NOTE: You may also enter the Last Dial list by pressing
twice.
Deleting from Last Dial Memory
1. Select a number.
2. Press for at least half a second, then select Yes or
Delete All. If you select Delete All, Delete All Last
Dials? displays. To clear Last Dial memory, select Yes.
Unanswered Calls Memory
If the numbers are available, your phone stores the last 10
unanswered calls with associated caller names (if available).
1. Press Left on the Express Key.
2. Select Unanswered using Down on the Express Key
and press . Calls display in chronological order. If
you have no unanswered calls, No Unanswered Calls
displays.
Important: Unanswered calls do not remain in memory
after you turn off the power.
23
Storing
Page 24

Received Calls Memory
1. Press Left on the Express Key.
2. Select Received from the Memory Menu using Down
on the Express Key and press . If there are no
received calls, No Received Calls displays.
3. Scroll through calls using Up and Down on the Express
Key.
4. Press to dial a number, or press to select the
number to change or save in SIM memory. See
Storing Numbers from Other Memories.
Important: Received calls do not remain in memory
after you turn off the power.
Own Number Display
Select and press to select Memory Menu.
Scratchpad Memory
During Conversation Mode, you can store up to 9 num-
Storing
bers in the Scratchpad.
1. Press Left on the Express Key.
2. Select Scratchpad and press .
3. Enter a phone number at Number?, then press .
Important: Scratchpad numbers do not remain in
memory after you turn off the power.
Retrieving Numbers from the Scratchpad
1. Press Left on the Express Key.
2. Select Scratchpad and press , then scroll to the
desired number.
NOTE: When you retrieve information from a memory
location you can press to dial the number, or press
to select the number to change or store in a different
location.
24
Page 25

Main Menu
Overview
Press Right on the Express Key to enter the Main Menu.
Main menu items change depending on whether you are
in Idle/Standby mode (phone is on and no call is placed)
or in conversation.
In the Idle/Standby mode, you can use the Main Menu to
access the following functions:
Voice Mail to set up or dial your Voice Mail center.
Messages to read, write or send text messages or
set up your text message center.
KeyLock ON? to lock or unlock keypad.
Services to set up services such as call forwarding,
call barring, call waiting and data. (Please check with
your Service Provider before modifying setup.)
Settings. These include settings of your phone (e.g.
language, volume, ring tones, auto retry, prefix and
vibrator).
Talktime to show or reset talktime timers.
Security to set up or modify passwords and fixed
dial.
Broadcast to set up or remove Cell Broadcast.
(Please check with your Service Provider before
using this function.)
Network to display your network configuration
(information read from the SIM card).
Main Menu
25
Page 26

During conversation, you can use the Main Menu to
access these options:
Hold to put active calls on hold.
Swap to toggle active and hold calls.
Reject to reject calls.
Join to add new participants to conference calls.
Private to hold private conversation while in confer-
ence.
Send DTMF to communicate with computerized
systems.
Messages to read, write or send text messages or
set up your text message center.
Some options may be hidden depending on your subscription. Call your Service Provider for more information.
Idle/Standby Main Menu
Main Menu
Voice Mail
Retrieving Voice Mail
1. Press Right on the Express Key to display the Main
Menu.
2. Select Voice Mail from the Main Menu and press .
3. Select Voice Mail from the Voice Mail Menu and press
.
NOTE: If no Voice Mail Center is programmed, No Voice
Mail Center Number displays. Then, Number? displays.
Enter the Voice Mail Center number.
26
Page 27

Setting the Voice Mail Number
1. Select V.M. Center from the Voice Mail Menu.
2. At Number?, enter your Voice Mail Center phone
number, then press .
Please check with your Service Provider before changing
Voice Mail Number.
Text Messages
Your phone allows you to send and receive text messages. To get into the Message Menu:
1. Press Right on the Express Key.
2. Select Messages and press .
Reading New Text Messages
New text messages are displayed either:
At power on. When you turn on your phone, new
text messages (if any) are displayed.
At other times. Your phone continuously looks for
new text messages and alerts you as they arrive
( displays).
Main Menu
To read new text messages, in the Messages menu
select Read New and press .
Several icons may be displayed:
Character > at the end of the messagethe
message is longer. Press Right on the Express Key
to read remaining text.
Character < at the beginning of a phone num-
berthe number has more digits. Press Left on the
Express Key to read remaining digits.
27
Page 28

The iconyou have received more than one
new text message. Press Down on the Express Key
to read the other messages.
After reading new text messages, you can:
Reply to the message by selecting the Respond sub-
menu.
Save the message by selecting the Save/Exit sub-
menu.
Delete the message by selecting the Delete sub-menu.
Call the number displayed in the message by select-
ing .
More explanation is provided in the sections that follow.
Using Call Back Function
If a message contains a number, call the sender by
pressing .
If a message contains more than 1 number in the text or
Main Menu
there is a number in the text and an originating address,
a list of numbers displays when you press . Select the
appropriate number using Up and Down on the Express
Key, then press to dial.
A maximum of 4 numbers displays. Only embedded
numbers are eligible for the Call Back function.
When you use the Call Back function, the phone saves
the message.
Reading Old Text Messages
Select Read Old in the Messages Menu to re-read saved
text messages and press .
28
Page 29

Writing Text Messages
Select the Write/Send option in the Messages Menu and
press to enter a message and send it.
Creating New Text Messages
Select Create New from the Write/Send Menu and press
. The icon appears and Enter Text displays.
To select from a list of prewritten messages, press the
key 3 times in quick succession, then select a message
from the list below.
Call me
Call me at
I am late
See you at
Meet me at
meeting canceled
I love you
Send reply
as soon as possible
ASAP
NOTE: When you select a message, a blinking cursor
appears after it to allow you to add text.
Main Menu
Modifying Old Text Messages
1. Select Modify Old from the Write/Send Menu.
2. Use Up and Down on the Express Key to select the
first page of the desired message.
3. Use Right on the Express Key to view the entire text
of the message. The icon appears.
4. Use Up, Down, Left, and Right on the Express Key.
Use to delete.
29
Page 30

Sending Text Messages
When you have finished typing your text message, press
(see previous page). Select either Send+Save; Send
using Up/Down on the Express Key and press .
If you selected either Send+Save or Send, choose Recall
No. or Enter No.
If the number is in memory, select Recall No. A list of
numbers displays. Select a number from the list.
If you selected Enter No., enter the phone number at
Number?, then press .
Sending Message displays, followed by Message Sent.
Saving Text Messages
If you selected Save, the phone saves the message in
SIM memory and displays Message Stored before
returning to the Messages Menu.
Text Message Settings
Main Menu
Select Setting in the Messages Menu to set the Message
Center number and message format.
Select Msg.Center. Enter the Message Center
number at Number?, then press . This number will
be saved on your SIM card.
Select Format to set the message delivery format,
then select Text (the most common option), Voice, G3
Fax, X-400, Paging, or E-Mail.
30
Page 31

Cell Broadcast
Cell broadcasts are information messages (such as
traffic, weather, emergencies or other event information)
that are sent regularly by the network to all users in a
specific area.
Please check with your Service Provider about availability
of Cell Broadcast messages.
Only selected message types will display. See Preprogrammed Message Types on the next page.
Use Up and Down on the Express Key to control the
scrolling.
NOTE: If a Cell Broadcast Message contains a phone
number, press to dial it.
Turning Cell Broadcast On or Off
1. Press Right on the Express Key to select the Main
Menu.
2. Select Broadcast in the Main Menu.
3. Select On or Off.
NOTE: If there are no Message Types set, Set Message
Types Before Broadcast On displays.
Main Menu
Selecting Broadcast Message Types
1. Select Msg.Types in the Broadcast Menu. If the
message type is defined in the pre-programmed
message type list, a description is displayed.
2. To change the first Message Type, press , then
select a Message Type from the list. To exit the list
without selecting, press . To delete an item, press
for at least 1 second. To add a new Message
Type, select the desired field, then enter the 3-digit
31
Page 32

code on the keypad. Press to accept the number.
3. Press Down on the Express Key to access the second
Message Type field, then select another Message
Type. Repeat these steps to fill up to 5 Message Type
fields.
4. Press to return to the Main Menu.
Pre-programmed Message Types
CODE TYPE
000 Index
010 Flashes
020 Hospitals
022 Doctors
024 Pharmacy
030 Long Distance Road Reports
032 Local Road Reports
034 Taxis
Main Menu
040 Weather
050 District (base station identity)
052 Network Information
054 Operator Services
056 Directory Inquires (National)
057 Directory Inquires (International)
058 Customer Care (National)
059 Customer Care (International)
Cell Broadcast Alert
Select Alert in the Cell Broadcast Menu to activate a 1
beep, audible alert that sounds whenever you receive a
Cell Broadcast. Select Alert On or Alert Off.
32
Page 33

Keylock
Prevents keys from being pressed accidentally. When
you answer a call, Keylock is temporarily suspended.
When you complete the call, Keylock becomes active
again.
Activating/Deactivating Keylock
1. Press Right on the Express Key.
2. Select Keylock ON? or Keylock OFF?. A confirmation
displays.
NOTE: Emergency calls (e.g., 911, 112, and 999) can be
placed regardless of the keylock status.
Services
1. Press Right on the Express Key to access Main Menu.
2. Select Services Menu and press to access it.
Second Line Service
Your phone can accommodate two lines for making and
receiving calls. The lines can have different service
subscriptions, since each line is billed separately.
Contact your Service Provider for more information.
Line Selection
1. In the Services menu, select Two Lines and press .
2. Select Line Select and press .
3. Select Line 1 or Line 2. A confirmation displays briefly.
33
Main Menu
Page 34

Naming Lines
You can name Line 1 BUSINESS, for example, and
Line 2 PRIVATE. By default, Line 1 and Line 2 display
(if you have two lines).
1. Select Line 1 Tag or Line 2 Tag from the two lines
menu. The icon appears.
2. Enter the new line name (up to 12 characters) using
alphanumeric entry, then press .
You can modify line tags only if your SIM supports it
(alphatags feature).
Deleting Line Names
1. Select Line 1 Tag or Line 2 Tag from the Two Lines
menu.
2. Press for more than 1 second, then select Yes at
Delete Tag?.
Call Forwarding Service
When activated, the network forwards (diverts) incoming
calls to a specific number under certain conditions. The
following messages display for Call Forwarding:
Forwarding ONwhen you make a call when Call
Forwarding is active.
Forwarded Callincoming call forwarded.
Main Menu
Activated Call Forwardingyour party has activated
call forwarding.
Forwarding Canceled by Networkcall forwarding
rejected by the network.
These messages are displayed only if the network sent
them to your phone.
Call Forwarding Conditions
All Voiceall voice calls forwarded.
All Dataall data calls forwarded.
All Faxall fax calls forwarded.
No Replyunanswered calls forwarded.
Unreachablewhen phone is off or when outside
service area.
Busybusy calls forwarded.
Cancel Allno calls forwarded.
34
Page 35

Activating Call Forwarding
1. Select Forwarding from the Services Menu and
press .
2. Select the call forwarding condition and press .
3. Select Activate and press .
4. Choose either Recall No. to recall forwarding number
from memory (see Retrieving Numbers by Name
chapter) or Enter No. to enter forwarding number from
keypad.
Canceling Call Forwarding
1. Select Forwarding from the Services Menu and
press .
2. Select the call forwarding condition and press .
3. Select Cancel and press .
Checking Call Forwarding Status
1. Select Forwarding from the Services Menu and
press .
2. Select the call forwarding condition and press .
3. Select Status and press .
Main Menu
Call Barring Service
Call Barring prevents incoming or outgoing calls under
certain conditions.
When calling someone who is not accessible (either you
have barred outgoing calls or the person you are calling
has barred incoming calls) Call Barred! displays.
These messages are displayed only if the network sends
them to your phone.
35
Page 36

Activating Call Barring
1. Select Barring from the Services Menu and press .
2. Select either Outgoing or Incoming from the Call
Barring Menu and press .
3. Select one of the following Call Barring options
according to information on your SIM (some options
may not be displayed; others may be accessible):
Allbars all incoming or outgoing calls.
Intlbars all international calls.
Int'l-homebars all international calls except your
own network (home network).
4. Select Activate and press .
5. At Password?, enter the Call Barring password
(provided by Service Provider).
Canceling Call Barring
1. Select Barring from the Services Menu and press .
2. Select the type of Call Barring you want to deactivate.
3. Select the specific Call Barring service you want to
Main Menu
deactivate.
4. Select Cancel.
5. Enter your Call Barring password at Password?, then
press . A confirmation displays, and the Call
Barring Menu displays.
NOTE: You can deactivate all Call Barring by selecting
Cancel All from the Call Barring Menu.
Checking Call Barring Status
1. From the Call Barring Menu, select Incoming or Outgo-
ing and press .
2. Select the specific type of Call Barring that you would
like to check.
3. Select Status. The type of Call Barring, and either On
or Off displays.
36
Page 37

Changing the Call Barring Password
1. Select Change PW from the Call Barring Menu.
2. Enter your old password at Old Password?; press .
3. Enter the new password twice at New Password?.
Press each time. Change Password OK displays.
Interaction of Call Barring and
Call Forwarding
Forward-to numbers that conflict with an Outgoing Call
Barring are rejected. When you bar all incoming calls, Call
Forwarding is turned off.
Call Waiting Service
Activating/Deactivating Call Waiting
1. Select Waiting from the Services Menu and press .
2. Select Activate or Cancel and press . A brief
confirmation displays.
Checking Call Waiting Status
1. Select Waiting from the Services Menu and press .
2. Select Status and press . Call Waiting (On or Off)
displays.
For information on the operation of Call Waiting, see Call
Waiting in Basic Operation.
Send Own Number
Determines whether or not your phone sends your phone
number to the phone you are calling.
1. Select Own Number from the Services Menu.
2. Select On or Off.
37
Main Menu
Page 38

Closed User Group
Contact your Service Provider for more information.
1. Press Right on the Express Key.
2. Select Security and press .
3. Select the CUG (Closed User Group) menu and press
to get into the Closed User Group menu.
To activate a Closed User Group
In the CUG menu select either:
Preset (to activate the default pre-defined CUG accord
ing to your subscription or any other CUG) and press
.
On (to activate any CUG) and press .
Select either:
OAI Off (outgoing calls barred if they do not belong to
Main Menu
OAI On (all outgoing calls allowed) and press .
Enter Group Number? and the icon displays.
the User Group) and press .
a) if you have selected Preset previously, either:
Press to confirm the pre-defined group number.F
Press Clear to delete the pre-defined group number,
enter your desired group number and press .
b) If you have selected On previously, enter group
number and press .
In the Closed User Group select Off and press . CUG
Off displays.
38
Page 39

Data
1. Press Right on the Express Key to select Main Menu.
2. Select Services and press .
3. Select Data and press .
4. Select Dial or Set Mode and press .
Settings
1. Press Right on the Express Key to select Main Menu.
2. Select Settings and press to select Settings Menu.
Vibrator (G150 only)
1. Select Alert Type from the Settings Menu and press .
2. Select Vibrator and press .
3. Make your selection from the following and press .
Offto deactivate the vibrator and activate the
ringer. Once selected display returns to previous
menu.
Onto activate the vibrator and deactivate the
ringer. Once selected Vibrator ON displays with a
slight vibration for 2 seconds. During idle/standby
modeSilent Alert displays.
Main Menu
Vibe & Ringto activate the ringer and vibrator.
Once selected Vibrator ON and Ringing displays with
a slight vibration and ring for 2 seconds.
Note: If the vibrator is on while the phone is connected
to an external power source and there is an incoming
call, the phone will ring but not vibrate.
39
Page 40

Ring Tone Selection
1. Select Alert Type from the Settings Menu and
press .
2. Select Select Tone and press .
If vibrator is turned on,Vibrator ON displays for 2
seconds, then returns to the previous menu. A tone
cannot be selected (G150 only).
If vibrator is turned off or set to vibe & ring, a list of
8 ring tones displays.
Note: To change the vibrator setting see Vibrator
in this chapter.
3. Move the cursor in front of each ring tone. If the
cursor remains by a tone selection for longer than a
1/2 second, a sample of the tone will sound.
4. Select a tone. A brief confirmation displays.
Ring Tone Ramping
1. Select Alert Type from the Settings Menu and
Main Menu
press .
2. Select Ramping and press .
If vibrator is turned on, Vibrator ON displays for 2
seconds, then returns to the previous menu. Ring
tone ramping cannot be activated (G150 only).
If vibrator is turned off or set to vibe & ring, select
On and press . The ring tones will now ramp
(increase) in volume after each successive ring.
Note: To change the vibrator setting see Vibrator
in this chapter.
40
Page 41

Ring Tone Volume
1. Select Volumes from the Settings Menu and press .
2. Select Ring Tones and press .
If vibrator is turned on, Vibrator ON displays and
the ring tone volume cannot be adjusted (G150 only).
If vibrator is turned off or vibe & ring is off, a sectioned line appears at bottom of the screen to
indicate the volume level.
Note: To change the vibrator setting see Vibrator
in this chapter.
3. Set the volume using Left (lowers) and Right (raises)
on the Express Key. The symbols < and > display as
you adjust the level.
Note: If the cursor remains at a certain level for longer
than 1/2 second, a sample of the ring volume will sound.
4. Press to accept the new volume or to leave the
volume unchanged.
Keypad Volume
1. Select Volumes from the Settings Menu and press .
2. Select Keys and press .
3. Set the volume with Left (lowers) and Right (raises)
on the Express Key. The symbols < and > display as
you adjust the level. The sectioned line at the bottom
of the screen indicates the volume level.
4. Press to accept the new volume or to leave the
volume unchanged.
Main Menu
Language Selection
1. Select Languages from the Settings Menu and
press .
2. Select English, Français, or Español and press .
41
Page 42

Display Contrast
The display visibility depends on the contrast level of the
screen.
1. Select Contrast from the Settings Menu and press .
2. Use Right and Left on the Express Key to increase or
decrease contrast. A contrast indicator line displays.
Backlight
The backlight stays lit while the phone is connected to an
external power source. On battery power, you can turn
the backlight on or off manually.
1. Select Backlight from the Settings Menu and press .
2. Select On or Off and press .
When you turn the backlight on, it will light for 10 seconds
whenever you press a button.
NOTE: The backlight turns on during incoming calls/text
Main Menu
messages regardless of the setting.
Auto Answer
Phone answers calls automatically after 10 seconds.
1. Select Auto Answer from the Settings Menu and
press .
2. Select On or Off and press .
Auto Retry
Phones attempt several times to connect a call. During
Auto Retry, press to discontinue this call retry.
1. Select Auto Retry from the Settings Menu and press .
2. Select On or Off and press .
42
Page 43

Phone Setup
You can save your settings in Default memory. Factory
default settings are also available.
Save Newsave current settings as default settings.
Select Yes to replace old settings.
Recall Old to return all settings to default.
Factoryreturns to the factory default.
Factory Default Settings List
Ring Tones Tone 1
Volume Control All volumes are
set to level 4
Language Selection English
Display Contrast Mid-range
Vibrator Off
Backlight On
Prefix Off
Auto Answer Off
Auto Retry Off
Network Selection Auto
Phone Lock Off
Ramping Off
Send Own Number On
Cell Broadcast Alert On
SMS Format Text
When Auto Retry option is ON, your phone redials
unsuccessful calls.
Main Menu
43
Page 44

Prefix
When enabled, the prefix is inserted when you dial a
number.
1. Select Prefix from the Settings Menu and press .
2. Select New Prefix and press , then enter the
desired prefix (up to 10 digits) when Enter New Prefix
displays. The prefix number displays at the bottom of
the screen. Press .
3. Turn the prefix function on or off in the same menu.
NOTE: Prefix does not insert when you use another
prefix or when you use the + sign to make an international call.
Talk Timers and Costs
1. Press Right on the Express Key to select Main Menu.
2. Select Talktime and press to select the Talk Time
Menu.
Main Menu
Viewing Talk Timers
1. From the Talk Time Menu, (as described in the
previous chapter), select Talk Timers and press .
2. Select Show Timers and press .
3. Scroll the Show Timers using Up and Down on the
Express Key elect Talktime and press to select the
Talk Time Menu.
Resetting Talk Timers
1. From the Talk Time Menu, (as described in the
previous chapter), select Talk Timers and press .
2. Select Reset Timers and press .
3. Select YES at Reset Timers? and press .
44
Page 45

Viewing Call Costs
1. Select Show Costs and press .
2. Use Down on the Express Key to view your total call
charges.
Resetting Call Costs
1. Select Call Costs from the Talk Timers Menu and
press .
2. Select Reset Cost and press .
3. At Enter PIN2 and Press OK, enter PIN2, and press
.
4. Select Yes at Reset Call Charge?. Call charge
meters reset and a confirmation displays.
Setting a Call Costs Limit
1. Select Cost Limit from the Talk Timers Menu and
press .
2. At Enter PIN2 and Press OK, enter PIN2 and press
.
3. Enter a cost limit at Enter Limit in Units, then press .
NOTE: When you reach the cost limit, the phone locks,
and a warning and service number display.
Main Menu
Security
1. Press Right on the Express Key to select Main Menu.
2. Select Security and press to select the Security
Menu.
45
Page 46

About Passwords
Several passwords can be used to enhance the security
of your phone:
Personal Identification Numbers (PIN)which are
stored on the SIM card:
PINto prevent unauthorized access of your SIM
card.
PIN2 to modify security options.
PIN Unblock Key (PUK)to unlock your phone if you
try to enter the PIN 3 times unsuccessfully.
Phone Lockto prevent unauthorized access to your
phone. If enabled, Unlock Code is displayed when
the phone is turned on.
Phone Lock
When Phone Lock is on, you must enter an unlock code
when you turn on your phone. This function prevents
unauthorized use of the phone.
Main Menu
1. Select Phone Lock from the Security Menu. Press .
2. Select On or Off and press .
3. Enter Unlock Code at Unlock Code? (Factory setting
is 0000).
Change Phone Lock
1. Select Change Lock from the Security Menu. Press .
2. Enter the old unlock code (factory setting is 0000) at
Enter Old Unlock Code, then press .
3. Enter the new unlock code at Enter New Unlock
Code?(Factory setting is 0000).
4. Enter the new unlock code again, then press .
Unlock Code Change OK displays briefly.
46
Page 47

Enabling and Disabling the PIN Setting
1. Select PIN Setting from the Security Menu. Press .
2. Select Yes and press when Enable (or Disable)
PIN? displays.
3. When Enter PIN displays, enter your PIN on the
keypad and press .
Changing the PIN or PIN2
1. Select Change PIN from the Security Menu. Press .
2. Select PIN Change or PIN2 Change and press .
3. Enter your old PIN at Enter Old PIN, then press .
4. Enter your new PIN (4-8 digits) at Enter New PIN, then
press .
5. Enter your new PIN again and press . The confir-
mation PIN Change OK displays briefly.
Fixed Dial
Prevents calls to numbers that do not start with a number
from the Fixed Dialing list. This function works only with
SIM cards that support it.
1. Select Fixed Dial from the Security Menu.
2. At Enter PIN2 and Press OK, enter PIN2 and press .
Fixed Dial (ON or Off) displays.
Main Menu
NOTE: To create the Fixed Dialing list, use Mem Store.
(See Storing and Retrieving Information.) All numbers
stored during Fixed Dialing Mode are part of the Fixed
Dialing list.
47
Page 48

Network Selection
In Automatic Network Selection, the phone registers (by
default) on the first available network from the following
priority list:
Last Registered Network (if available from SIM)
Home Network
Networks in the user-created Preferred Network List
Networks above a certain signal strength
All networks
Enabling Manual Network Selection
1. Select Network from the Main Menu and press .
2. Select Select Net and press .
3. Select Manual. A list of available networks displays.
Scroll the list using Up and Down on the Express Key.
4. Select a network. Registering on Network displays,
and the phone goes into Idle/Standby. If the network
is not available, Registration Failure Network Not
Main Menu
Allowed displays. Select another network.
NOTE: In Manual Network Selection, if the Last Registered Network is not available when the phone is turned
on, you should choose a network manually. Manual
selection is also required if the current network becomes
unavailable.
Creating a Preferred Network List
1. Select Pref. Nets from the Network Menu. The first
slot of the Preferred Network List displays.
2. Select the slot to edit, then select from the list of
available networks.
3. To clear a network from the network list, press and
hold for 1 second. Then select Yes.
48
Page 49

Displaying Your Home Network
Select Displ. Home from the Network Menu.
Conversation Main Menu
The Conversation Mode Menu is available during a call.
Press RIGHT on the Express Key to enter the Main
Menu.
In conversation, the Main Menu includes the following
functions:
Hold to put the currently active call on hold.
Swap to put an active call on hold and activate a
held or waiting call.
Rej to remove a caller from a conference.
Join to add participants to a conference; rejoins a
conference after private conversation.
Pri to choose a private conversation during
conference. Select a name or phone number.
Messages to read, write or send text messages or
to set up your text message center (see Message in
Idle Main Menu).
Main Menu
Send DTMF (see DTMF Tone Transmission in
Basic Operation).
See the Basic Operation chapter for information on MultiParty Conferencing.
49
Page 50

Supplemental Information
Service
If questions or problems arise, call your service provider.
Accessories
AC Rapid Charging Adapter
An AC Rapid Charging Adapter is included for battery charging.
Plug the adapter into a wall outlet and into the jack on the left
side of your phone.
Cigarette Lighter Adapter/Charger
Supplemental
The Cigarette Lighter Adapter provides phone operation and
charging power.
One end of the Adapter plugs into any car cigarette lighter; the
other plugs into the jack on the left side of the phone.
Desktop Rapid Charger
Plug the AC Rapid Charging Adapter into the charger and
stand your phone upright. Your phones battery charges while
your phone remains handy for use.
Mobile Holder
Use this holder to mount the phone in your car for easy
accessibility.
50
Page 51

PCMCIA Card and Cable
A PCMCIA Data/Fax Card and Cable is available that
allow you to connect your phone to a PC. The PCMCIA
card works like a modem and can be used for faxing, email, and data transmission (when a network supports
these features).
SMS Cable
A Short Message Service (SMS) Cable is available for
reading, editing, and writing text messages.
The SMS Cable connects your phone to your PC via the
serial port.
Handsfree Adapter
The Handsfree Adapter allows you to use your phone in
the car while both hands are on the wheel. The
Handsfree Adapter includes a mounting kit, external
microphone, DC power supply and battery charging
capability, car mount antenna connection, and an optional external speaker.
Headset
A Headset is also available. The Headset has an earphone and microphone.
Supplemental
Carrying Case
Made of high grade leather, this attractive Carrying Case
protects your phone.
Belt Clip
An optional belt clip provides extra portability for your
telephone.
51
Page 52

Safety Information for
Wireless Handheld
Phones
WARNING!! Please do not use your Mitsubishi wireless
telephone if you may be distracted from another activity
(such as driving a motor vehicle or walking across the
street) and create a safety hazard to yourself and
others. Use your wireless telephone responsibly. Be
alert to your surroundings whenever you operate your
wireless telephone.
For the safe and efficient operation of your phone,
observe the following guidelines:
Exposure to Radio Frequency (RF) Energy
Your wireless handheld portable telephone is a low
power radio transmitter and receiver. When it is ON, it
receives and also sends out radio frequency signals.
Safety Information
In August, 1996, the Federal Communications Commission (FCC) adopted RF exposure guidelines with safety
levels for handheld wireless phones. Those guidelines
are consistent with the safety standards previously set by
both U.S. and international standard bodies:
ANSI C95.1 (1992)*
NCRP Report 86 (1986)*
ICNIRP (1996)*
* American National Standards Institute; National Council
on Radiation Protection and Measurements; International
Commission on Non-Ionizing Radiation Protection.
Those standards were based on comprehensive and
periodic evaluations of the relevant scientific literature.
52
Page 53

For example, over 120 scientists, engineers, and physicians from universities, government health agencies, and
industry reviewed the available body of research to
develop the ANSI Standard (C95.1).
The design of your phone complies with the FCC guidelines (and those standards).
This equipment has been tested and found to comply
with the limits for a Class B digital device, pursuant to
part 15 of the FCC Rules. These limits are designed to
provide reasonable protection against harmful interference in a residential installation. This equipment generates, uses and can radiate radio frequency energy and, if
not installed and used in accordance with the instructions, may cause harmful interference to radio communications. However, there is no guarantee that interference will not occur in a particular installation. If this
equipment does cause harmful interference to radio or
television reception, which can be determined by turning
the equipment off and on, the user is encouraged to try to
correct the interference by one of more of the following
measures:
Reorient or relocate the receiving antenna.
Increase the separation between the equipment and
the receiver.
Connect the equipment into an outlet on a circuit
different from that to which the receiver is connected.
Consult the dealer or an experienced radio/TV
technician for help.
Antenna Care
Use only the supplied or an approved replacement
antenna. Unauthorized antennas, modifications, or
attachments could damage the phone and may violate
FCC regulations.
Safety Information
53
Page 54

Phone Operation
NORMAL POSITION: Hold the phone as you would any
other telephone with the antenna pointed up and over
your shoulder.
TIPS ON EFFICIENT OPERATION: For your phone to
operate most efficiently:
Do not touch the antenna unnecessarily when the
phone is in use. Contact with the antenna affects call
quality and may cause the phone to operate at a
higher power level than otherwise needed.
Driving
Check the laws and regulations on the use of wireless
telephones in the areas in which you drive. Always obey
them. Also, if using your phone while driving, please:
Give full attention to driving--driving safely is your
first responsibility;
Use handsfree operation, if available;
Pull off the road and park before making or answer-
ing a call if driving conditions so require.
Safety Information
Electronic Devices
Most modern electronic equipment is shielded from RF
signals; however, certain electronic equipment may not
be shielded against the RF signals from your wireless
phone.
Pacemakers
The Health Industry Manufacturers Association recommends that a minimum separation of six (6") inches be
maintained between a handheld wireless phone and a
pacemaker to avoid potential interference with the
pacemaker. These recommendations are consistent with
the independent research by and recommendations of
Wireless Technology Research.
54
Page 55

Persons with pacemakers:
Should ALWAYS keep the phone more than six
inches from their pacemaker when the phone is
turned ON;
Should not carry the phone in a breast pocket
Should use the ear opposite the pacemaker to
minimize the potential for interference
If you have any reason to suspect that interference is
taking place, turn your phone OFF immediately.
Hearing Aids
Your phone is compatible with HATIS headsets.
Some digital wireless phones may interfere with some
hearing aids. In the event of such interference, you may
want to consult with the Service Provider.
Other Medical Devices
If you use any other personal medical device, consult the
manufacturer of your device to determine if they are
adequately shielded from external RF energy. Your
physician may be able to assist you in obtaining this
information.
Turn your phone OFF in health care facilities when any
regulations posted in these areas instruct you to do so.
Hospitals or health care facilities may be using equipment that could be sensitive to RF energy.
Vehicles
RF signals may affect improperly installed or inadeqately
shielded electronic systems in motor vehicles. Check
with the manufacturer or its representative regarding
your vehicle. You should also consult the manufacturer
of any equipment that has been added to your vehicle.
Safety Information
55
Page 56

Posted Facilities
Turn your phone OFF in any facility where posted notices
so require.
Aircraft
FCC regulations prohibit using your phone while in the
air. Switch your phone OFF before boarding an aircraft.
Blasting Areas
To avoid interfering with blasting operations, turn your
phone OFF when in a blasting area, or in areas posted
Turn off two-way radio. Obey all signals and instructions.
Potentially Explosive Atmospheres
Turn your phone OFF when in any area with a potentially
explosive atmosphere and obey all signs and instructions. Sparks in such areas could cause an explosion or
fire resulting in bodily injury or even death.
Areas with a potentially explosive atmosphere are often,
but not always clearly marked. They include fueling
Safety Information
areas such as gasoline stations; below deck on boats;
fuel or chemical transfer or storage facilities; vehicles
using liquefied petroleum gas (such as propane or
butane); areas where the air contains chemicals or
particles, such as grain, dust, or metal powders; and any
other area where you would normally be advised to turn
off your vehicle engine.
For Vehicles Equipped With an Air Bag
An air bag inflates with great force. DO NOT place
objects, including both installed or portable wireless
equipment, in the area over the air bag or in the air bag
deployment area. If in-vehicle wireless equipment is
improperly installed and the air bag inflates, serious
injury could result.
56
Page 57

Troubleshooting
What To Do If
Your phone does not work at all when switched on...
If you are using a handheld phone...
Recharge the battery before use or replace it.
If you are using a handsfree adapter in a vehicle...
A battery is required to use the handsfree adapter;
make sure it is installed on the back of the phone. If
you are sure the adapter is functioning properly, check
that the phone is connected to the adapter.
When charging, battery level icon does not displayWhen charging, battery level icon does not display
When charging, battery level icon does not display
When charging, battery level icon does not displayWhen charging, battery level icon does not display
See"Battery" in the Introduction chapter.
Low battery! displays and the phone beeps...Low battery! displays and the phone beeps...
Low battery! displays and the phone beeps...
Low battery! displays and the phone beeps...Low battery! displays and the phone beeps...
You have 1 minute to terminate an active call. You
should turn the phone off and recharge or replace the
battery. See Battery in the Introduction chapter.
Check SIM displays...Check SIM displays...
Check SIM displays...
Check SIM displays...Check SIM displays...
See SIM Card Installation in the Basic Operation
chapter. When the SIM card is not installed, only
emergency calls can be placed.
Incorrect SIM displays...Incorrect SIM displays...
Incorrect SIM displays...
Incorrect SIM displays...Incorrect SIM displays...
Contact your Service Provider.
......
...
......
61
Troubleshooting
Page 58

PIN is no longer valid displays...PIN is no longer valid displays...
PIN is no longer valid displays...
PIN is no longer valid displays...PIN is no longer valid displays...
You entered a wrong PIN number several times.
Contact your Service Provider to unlock your SIM.
SIM is now Inaccessible displays...SIM is now Inaccessible displays...
SIM is now Inaccessible displays...
SIM is now Inaccessible displays...SIM is now Inaccessible displays...
Your SIM is permanently blocked. Contact your
Service Provider or network operator to unblock your
SIM.
Emergency call Only displays...Emergency call Only displays...
Emergency call Only displays...
Emergency call Only displays...Emergency call Only displays...
Check that your SIM is inserted in the phone. See
SIM Card Installation in the Basic Operation
chapter.
No service currently available displays...No service currently available displays...
No service currently available displays...
No service currently available displays...No service currently available displays...
This message displays when you cannot connect to a
PCS network because:
a) You are located in an area which is not covered by
a PCS network.
b) The signal is too weak. You must move to another
Troubleshooting
location to use your phone.
Keylocked displays...Keylocked displays...
Keylocked displays...
Keylocked displays...Keylocked displays...
Press Right on the Express Key and select Keylock
Off by pressing
.
62
 Loading...