

Mitsubishi Electric FX5UC-96MT/D, FX5UC-32MT/DSS, FX5UC-96MT/DSS, FX5UC-64MT/D, FX5UC-64MT/DSS User Manual
...
MELSEC iQ-F
FX5UC User's Manual (Hardware)

SAFETY PRECAUTIONS
WARNING
Indicates that incorrect handling may cause hazardous conditions, resulting in
death or severe injury.
CAUTION
Indicates that incorrect handling may cause hazardous conditions, resulting in
minor or moderate injury or property damage.
(Read these precautions before use.)
Before using this product, please read this manual and the relevant manuals introduced in this manual carefully and pay full
attention to safety in order to handle the product correctly.
If the equipment is used in a manner not specified by the manufacturer, the protection provided by the equipment may be
impaired.
This manual classifies the safety precautions into two categories: [ WARNING] and [ CAUTION].
Depending on the circumstances, procedures indicated by [ CAUTION] may also cause severe injury.
It is important to follow all precautions for personal safety.
Store this manual in a safe place so that it can be read whenever necessary. Always forward it to the end user.
[DESIGN PRECAUTIONS]
WARNING
● Make sure to set up the following safety circuits outside the PLC to ensure safe system operation
even during external power supply problems or PLC failure. Otherwise, malfunctions may cause
serious accidents.
- Most importantly, set up the following: an emergency stop circuit, a protection circuit, an interlock
circuit for opposite movements (such as normal vs. reverse rotation), and an interlock circuit (to
prevent damage to the equipment at the upper and lower positioning limits.)
- Note that when the CPU module detects an error, such as a watchdog timer error, during self-
diagnosis, all outputs are turned off. Also, when an error that cannot be detected by the CPU
module occurs in an input/output control block, output control may be disabled. External circuits
and mechanisms should be designed to ensure safe machinery operation in such a case.
- Note that when an error occurs in a relay, transistor or triac of an output circuit, the output might
stay on or off. For output signals that may lead to serious accidents, external circuits and
mechanisms should be designed to ensure safe machinery operation in such a case.
● Construct an interlock circuit in the program so that the whole system always operates on the safe
side before executing the control (for data change) of the PLC in operation.
Read the manual thoroughly and ensure complete safety before executing other controls (for program
change, parameter change, forcible output and operation status change) of the PLC in operation.
Otherwise, the machine may be damaged and accidents may occur due to erroneous operations.
● In an output circuit, when a load current exceeding the current rating or an overcurrent caused by a
load short-circuit flows for a long time, it may cause smoke and fire. To prevent this, configure an
external safety circuit, such as a fuse.
● For the operating status of each station after a communication failure of the network, refer to relevant
manuals for the network. Incorrect output or malfunction may result in an accident.
● To maintain the safety of the programmable controller system against unauthorized access from
external devices via the network, take appropriate measures. To maintain the safety against
unauthorized access via the Internet, take measures such as installing a firewall.
1

WARNING
[Precautions for using products in a UL/cUL Class , Division 2 environment]
● Products*1 with the Cl., DIV.2 mark on the rating plate are suitable for use in Class , Division 2,
Groups A, B, C and D hazardous locations, or nonhazardous locations only.
This mark indicates that the product is certified for use in the Class , Division 2 environment where
flammable gases, vapors, or liquids exist under abnormal conditions. When using the products in the
Class , Division 2 environment, observe the following to reduce the risk of explosion.
- This device is open-type and is to be installed in an enclosure suitable for the environment and
require a tool or key to open.
- Warning - Explosion Hazard - Substitution of any component may impair suitability for Class ,
Division 2.
- Warning - Explosion Hazard - Do not disconnect equipment while the circuit is live or unless the
area is known to be free of ignitable concentrations.
- Do not open the cover of the CPU module and remove the battery unless the area is known to be
nonhazardous.
*1 Products conforming to the UL explosion-proof standard are as follows:
Manufactured in October 2017 onwards
FX5 CPU module
FX5UC-32MT/D, FX5UC-32MT/DSS, FX5UC-64MT/D, FX5UC-64MT/DSS, FX5UC-96MT/D, FX5UC-96MT/DSS
FX5 extension module
FX5-C16EX/D, FX5-C16EX/DS, FX5-C16EYT/D, FX5-C16EYT/DSS, FX5-C32EX/D, FX5-C32EX/DS, FX5-C32EYT/D, FX5C32EYT/DSS, FX5-C32ET/D, FX5-C32ET/DSS, FX5-232ADP, FX5-485ADP, FX5-C1PS-5V, FX5-CNV-BUSC, FX5-4ADADP, FX5-4DA-ADP
[DESIGN PRECAUTIONS]
CAUTION
● When an inductive load such as a lamp, heater, or solenoid valve is controlled, a large current
(approximately ten times greater than normal) may flow when the output is turned from off to on. Take
proper measures so that the flowing current does not exceed the value corresponding to the
maximum load specification of the resistance load.
● After the CPU module is powered on or is reset, the time taken to enter the RUN status varies
depending on the system configuration, parameter settings, and/or program size.
Design circuits so that the entire system will always operate safely, regardless of this variation in time.
● Simultaneously turn on and off the power supplies of the CPU module and extension modules.
● If a long-time power failure or an abnormal voltage drop occurs, the PLC stops, and output is turned
off. When the power supply is restored, it will automatically restart (when the RUN/STOP/RESET
switch is on RUN side).
2

[INSTALLATION PRECAUTIONS]
WARNING
● Make sure to cut off all phases of the power supply externally before attempting installation or wiring
work. Failure to do so may cause electric shock or damage to the product.
● Use the product within the generic environment specifications described in Page 30 Generic
Specifications of this manual.
Never use the product in areas with excessive dust, oily smoke, conductive dusts, corrosive gas (salt
air, Cl
condensation, or rain and wind.
If the product is used in such conditions, electric shock, fire, malfunctions, deterioration or damage
may occur.
, H2S, SO2 or NO2), flammable gas, vibration or impacts, or expose it to high temperature,
2
[INSTALLATION PRECAUTIONS]
CAUTION
● Do not touch the conductive parts of the product directly. Doing so may cause device failures or
malfunctions.
● When drilling screw holes or wiring, make sure that cutting and wiring debris do not enter the
ventilation slits of the PLC. Failure to do so may cause fire, equipment failures or malfunctions.
● For product supplied together with a dust proof sheet, the sheet should be affixed to the ventilation
slits before the installation and wiring work to prevent foreign objects such as cutting and wiring
debris.
However, when the installation work is completed, make sure to remove the sheet to provide
adequate ventilation. Failure to do so may cause fire, equipment failures or malfunctions.
● Install the product on a flat surface. If the mounting surface is rough, undue force will be applied to the
PC board, thereby causing nonconformities.
● Install the product securely using a DIN rail.
● Connect the expansion adapter securely to their designated connectors. Loose connections may
cause malfunctions.
● Work carefully when using a screwdriver such as installation of the product. Failure to do so may
cause damage to the product or accidents.
● Connect the extension cables, peripheral device cables, input/output cables and battery connecting
cable securely to their designated connectors. Loose connections may cause malfunctions.
● When using an SD memory card, insert it into the SD memory card slot. Check that it is inserted
completely. Poor contact may cause malfunction.
● Turn off the power to the PLC before attaching or detaching the following devices. Failure to do so
may cause equipment failures or malfunctions.
- Peripheral devices, expansion adapter, and connector conversion adapter
- Extension modules, bus conversion module and connector conversion module
-Battery
3

[WIRING PRECAUTIONS]
WARNING
● Make sure to cut off all phases of the power supply externally before attempting installation or wiring
work. Failure to do so may cause electric shock or damage to the product.
● Make sure to attach the terminal cover, provided as an accessory, before turning on the power or
initiating operation after installation or wiring work. Failure to do so may cause electric shock.
● The temperature rating of the cable should be 80 or more.
It may differ depending on the extension devices. For details, refer to the user's manual of the
extension devices.
● Make sure to wire the screw terminal block in accordance with the following precautions. Failure to do
so may cause electric shock, equipment failures, a short-circuit, wire breakage, malfunctions, or
damage to the product.
- The disposal size of the cable end should follow the dimensions described in the manual.
- Tightening torque should follow the specifications in the manual.
- Tighten the screws using a Phillips-head screwdriver No. 2 (shaft diameter 6 mm or less). Make
sure that the screwdriver does not touch the partition part of the terminal block.
● Make sure to properly wire to the terminal block (European type) in accordance with the following
precautions. Failure to do so may cause electric shock, equipment failures, a short-circuit, wire
breakage, malfunctions, or damage to the product.
- The disposal size of the cable end should follow the dimensions described in the manual.
- Tightening torque should follow the specifications in the manual.
- Twist the ends of stranded wires and make sure that there are no loose wires.
- Do not solder-plate the electric wire ends.
- Do not connect more than the specified number of wires or electric wires of unspecified size.
- Affix the electric wires so that neither the terminal block nor the connected parts are directly
stressed.
● Make sure to properly wire to the spring clamp terminal block in accordance with the following
precautions. Failure to do so may cause electric shock, equipment failures, a shortcircuit, wire
breakage, malfunctions, or damage to the product.
- The disposal size of the cable end should follow the dimensions described in the manual.
- Twist the ends of stranded wires and make sure that there are no loose wires.
- Do not solder-plate the electric wire ends.
- Do not connect more than the specified number of wires or electric wires of unspecified size.
- Affix the electric wires so that neither the terminal block nor the connected parts are directly
stressed.
4

[WIRING PRECAUTIONS]
CAUTION
● Perform class D grounding (grounding resistance: 100 or less) of the grounding terminal on the
2
CPU module and extension modules with a wire 2 mm
Do not use common grounding with heavy electrical systems (refer to Page 95 Grounding).
● Connect the power supply wiring to the dedicated terminals described in this manual. If an AC power
supply is connected to a DC input/output terminal or DC power supply terminal, the PLC will burn out.
● Do not wire vacant terminals externally. Doing so may damage the product.
● Install module so that excessive force will not be applied to terminal blocks, power connectors, I/O
connectors, communication connectors, or communication cables. Failure to do so may result in wire
damage/breakage or PLC failure.
● Make sure to observe the following precautions in order to prevent any damage to the machinery or
accidents due to malfunction of the PLC caused by abnormal data written to the PLC due to the
effects of noise.
- Do not bundle the power line, control line and communication cables together with or lay them
close to the main circuit, high-voltage line, load line or power line. As a guideline, lay the power
line, control line and communication cables at least 100 mm away from the main circuit, highvoltage line, load line or power line.
- Ground the shield of the shielded wire or shielded cable at one point on the PLC. However, do not
use common grounding with heavy electrical systems.
- Ground the shield of the analog input/output cable at one point on the signal receiving side.
However, do not use common grounding with heavy electrical systems.
or thicker.
5
[STARTUP AND MAINTENANCE PRECAUTIONS]
WARNING
● Do not touch any terminal while the PLC's power is on. Doing so may cause electric shock or
malfunctions.
● Before cleaning or retightening terminals, cut off all phases of the power supply externally. Failure to
do so in the power ON status may cause electric shock.
● Before modifying the program in operation, forcible output, running or stopping the PLC, read through
this manual carefully, and ensure complete safety. An operation error may damage the machinery or
cause accidents.
● Do not change the program in the PLC from two or more peripheral equipment devices at the same
time. (i.e. from an engineering tool and a GOT) Doing so may cause destruction or malfunction of the
PLC program.
● Use the battery for memory backup in conformance to this manual.
- Use the battery for the specified purpose only.
- Connect the battery correctly.
- Do not charge, disassemble, heat, put in fire, short-circuit, connect reversely, weld, swallow or
burn the battery, or apply excessive forces (vibration, impact, drop, etc.) to the battery.
- Do not store or use the battery at high temperatures or expose to direct sunlight.
- Do not expose to water, bring near fire or touch liquid leakage or other contents directly.
- When replacing the battery, make sure to use our specified product (FX3U-32BL).
- When a battery error occurs ("BAT" LED is lit in red), follow the description in this manual.
Incorrect handling of the battery may cause heat excessive generation, bursting, ignition, liquid
leakage or deformation, and lead to injury, fire or failures and malfunction of facilities and other
equipment.
[STARTUP AND MAINTENANCE PRECAUTIONS]
CAUTION
● Do not disassemble or modify the PLC. Doing so may cause fire, equipment failures, or malfunctions.
For repair, contact your local Mitsubishi Electric representative.
● After the first use of the SD memory card, do not insert/remove the memory card more than 500 times.
500 times or more may cause malfunction.
● Turn off the power to the PLC before connecting or disconnecting any extension cable. Failure to do
so may cause equipment failures or malfunctions.
● Turn off the power to the PLC before attaching or detaching the following devices. Failure to do so
may cause equipment failures or malfunctions.
- Peripheral devices, expansion adapter and connector conversion adapter
- Extension modules, bus conversion module, and connector conversion module
- Battery
● Do not use the chemicals for cleaning.
● If there is the possibility of touching the PLC inside a control panel in maintenance, make sure to
discharge to avoid the influence of static electricity.
6

[OPERATION PRECAUTIONS]
CAUTION
● Construct an interlock circuit in the program so that the whole system always operates on the safe
side before executing control (for data change) of the PLC in operation. Read the manual thoroughly
and ensure complete safety before executing other controls (for program change, parameter change,
forcible output and operation status change) of the PLC in operation. Otherwise, the machine may be
damaged and accidents may occur by erroneous operations.
[DISPOSAL PRECAUTIONS]
CAUTION
● Please contact a certified electronic waste disposal company for the environmentally safe recycling
and disposal of your device.
● When disposing of batteries, separate them from other waste according to local regulations. (For
details on the Battery Directive in EU countries, refer to Page 193 Handling of Batteries and
Devices with Built-in Batteries in EU Member States.)
[TRANSPORTATION PRECAUTIONS]
CAUTION
● When transporting the PLC with the optional battery, turn on the PLC before shipment, confirm that
the battery mode is set using a parameter and the BAT LED is OFF, and check the battery life. If the
PLC is transported with the BAT LED ON or the battery exhausted, the battery-backed data may be
unstable during transportation.
● The PLC is a precision instrument. During transportation, avoid impacts larger than those specified in
the general specifications (Page 30 Generic Specifications) by using dedicated packaging boxes
and shock-absorbing palettes. Failure to do so may cause failures in the PLC. After transportation,
verify operation of the PLC and check for damage of the mounting part, etc.
● When transporting lithium batteries, follow required transportation regulations. (For details on the
regulated products, refer to Page 193 Handling of Batteries and Devices with Built-in Batteries in
EU Member States.)
● When fumigants that contain halogen materials such as fluorine, chlorine, bromine, and iodine are
used for disinfecting and protecting wooden packaging from insects, they cause malfunction when
entering our products. Please take necessary precautions to ensure that remaining materials from
fumigant do not enter our product, or treat packaging with methods other than fumigation (heat
method). Additionally, disinfect and protect wood from insects before packing products.
7

PRÉCAUTIONS DE SÉCURITÉ
AVERTISSEMENT
Attire l'attention sur le fait qu'une négligence peut créer une situation de
danger avec risque de mort ou de blessures graves.
ATTENTION
Attire l'attention sur le fait qu'une négligence peut créer une situation de danger avec
risque de blessures légères ou de gravité moyennes ou risque de dégâts matériels.
(Lire ces précautions avant toute utilisation du produit.)
Avant d'utiliser ce produit, lire attentivement ce manuel ainsi que les manuels auxquels il renvoie, et toujours considérer la
sécurité comme de la plus haute importance en manipulant le produit correctement.
Si vous utilisez mal l'equipement, la protection peut ne pas fonctionner.
Dans ce manuel les précautions de sécurité sont regroupées en deux catégories : [ AVERTISSEMENT] et
[ ATTENTION].
Dans certaines circonstances, le non-respect d'une précaution de sécurité introduite sous le titre [ ATTENTION] peut
avoir des conséquences graves.
Les précautions de ces deux niveaux doivent être observées dans leur intégralité car elles ont trait à la sécurité des
personnes et aussi du système.
Veiller à ce que les utilisateurs finaux lisent ce manuel qui doit être conservé soigneusement à portée de main pour s'y référer
autant que de besoin.
[PRÉCAUTIONS DE CONCEPTION]
AVERTISSEMENT
● Assurez-vous de configurer les circuits de sécurité suivants en dehors du contrôleur programmable
pour assurer un fonctionnement sûr du système, même pendant les problèmes d'alimentation externe
ou la panne du contrôleur programmable. Faute de quoi, des dysfonctionnements peuvent causer des
accidents graves.
- Configurez surtout ce qui suit : un circuit d'arrêt d'urgence, un circuit de protection, un circuit de
verrouillage pour les mouvements opposés (tels que la rotation normale ou inversée) et un circuit
de verrouillage (pour éviter d'endommager l'équipement aux niveaux supérieur et inférieur de
limites de positionnement).
- Notez que lorsque le module CPU détecte une erreur, telle qu'une erreur de minuteur de
surveillance, pendant l’auto-diagnostic, toutes les sorties sont désactivées. En outre, lorsqu'une
erreur qui ne peut pas être détectée par le module CPU se produit dans un bloc de contrôle E/S,
la commande de sortie peut être désactivée. Les circuits et mécanismes externes devraient être
conçus pour assurer un fonctionnement sûr des machines dans un tel cas.
- Notez que lorsqu'une erreur se produit dans un relais, un transistor ou un triac d'un circuit de
sortie, la sortie peut rester activée ou désactivée. Pour les signaux de sortie susceptibles
d'entraîner des accidents graves, des circuits et mécanismes externes devraient être conçus pour
assurer le fonctionnement sûr des machines dans un tel cas.
● Construire un circuit de verrouillage dans le programme afin que l'ensemble du système fonctionne
toujours sur le côté sûr avant d'exécuter le contrôle (pour le changement de données) du contrôleur
programmable en fonctionnement. Lisez attentivement le manuel et assurez-vous une sécurité
complète avant d'exécuter d'autres commandes (pour le changement de programme, le changement
de paramètre, la sortie forcée et le changement d'état d’opération) du contrôleur programmable en
cours de fonctionnement. Faute de quoi, la machine peut être endommagée et des accidents peuvent
se produire en raison d'opérations erronées.
8

AVERTISSEMENT
● Dans un circuit de sortie, si le courant de charge excède la valeur nominale ou si une surintensité
causée par un court-circuit à la charge persiste longtemps, il peut en résulter un dégagement de
fumée avec départ de feu. Pour éviter cela, il faut configurer un circuit de sécurité externe tel qu’un
fusible.
● Quant à l'état d’opération de chacune des stations en cas de problème de communication, voir les
manuels correspondants pour le réseau. Une sortie erronée ou un dysfonctionnement peut être à
l'origine d'un accident.
● Prendre les mesures appropriées pour maintenir la sécurité sur le système du contrôleur
programmable en cas d'accès non autorisé d'un dispositif externe via le réseau. Pour maintenir la
sécurité en cas d'accès via Internet, prendre des mesures adéquates telles que l’installation d’un
pare-feu.
[Precautions d'utilisation des produits en environnement de UL/cUL Class , Division 2]
● Les produits*1 marques Cl., DIV.2 sur la plaque signaletique peuvent etre utilises en Class , Division
2, local dangereux de groupe A, B, C et D, ou uniquement en local non dangereux. Ce logo indique
que le produit est homologue pour utilisation en environnement de Class , Division 2 ou, dans des
circonstances anormales, il peut y avoir presence de gaz, vapeurs ou liquides inflammables.
Si le produit est utilise en environnement de Class , Division 2, observer les precautions suivantes
pour reduire le risque d'explosion.
- Cet appareil est de type ouvert et il doit etre installe dans une enceinte appropriee a
l'environnement et ne pouvant etre ouverte qu'au moyen d'une cle ou d'un outil.
- Avertissement - Danger d'explosion - Toute substitution de composant peut compromettre
l'aptitude a l'utilisation en Class , Division 2.
- Avertissement - Danger d'explosion - Ne pas deconnecter l'equipement quand le circuit est sous
tension, ni avant de d'etre assure de l'absence d'atmosphere inflammable.
- Ne pas ouvrir le couvercle du module CPU et ne pas retirer la batterie avant d'avoir verifie que
l'atmosphere est sans danger.
*1 Les produits sont conformés à la norme pour anti-explosion UL comme suit :
Fabriqué à partir d’octobre 2017
Module FX5 CPU
FX5UC-32MT/D, FX5UC-32MT/DSS, FX5UC-64MT/D, FX5UC-64MT/DSS, FX5UC-96MT/D, FX5UC-96MT/DSS
Module d’extension FX5
FX5-C16EX/D, FX5-C16EX/DS, FX5-C16EYT/D, FX5-C16EYT/DSS, FX5-C32EX/D, FX5-C32EX/DS, FX5-C32EYT/D, FX5C32EYT/DSS, FX5-C32ET/D, FX5-C32ET/DSS, FX5-232ADP, FX5-485ADP, FX5-C1PS-5V, FX5-CNV-BUSC, FX5-4ADADP, FX5-4DA-ADP
9

[PRÉCAUTIONS DE CONCEPTION]
ATTENTION
● À la commande d'une charge inductive comme une lampe, un réchauffeur ou une électrovanne, un
fort courant (environ 10 fois supérieur à l'intensité normale) peut traverser la sortie quand celle-ci
passe de OFF à ON. Prenez les mesures appropriées pour que l’intensité de courant ne dépasse pas
la valeur correspondant à la spécification de charge maximale de la charge de résistance.
● À la mise sous tension ou à la réinitialisation du module CPU, le temps nécessaire à l'entrée en état
RUN dépend de la configuration du système, du paramétrage et/ou de la taille du programme.
Concevoir les circuits de manière que tout le système fonctionne en sécurité à tout moment,
indépendamment de cette variation de temps.
● Lancez et éteignez simultanément les blocs d'alimentation du module CPU et des modules
d'extension.
● Si une panne de courant de longue durée ou une chute de tension anormale se produit, le contrôleur
programmable s'arrête et la sortie est désactivée. Lorsque l'alimentation est rétablie, elle redémarre
automatiquement (lorsque le commutateur RUN/STOP/RESET est sur le côté RUN).
[PRÉCAUTIONS D'INSTALLATION]
AVERTISSEMENT
● Assurez-vous de couper toutes les phases de l'alimentation externe avant d’essayer l'installation ou le
câblage. Faute de quoi, il y a risque d'électrocution ou d'endommagement du produit.
● Utilisez le produit dans les spécifications d'environnement générique décrites dans la Page 30
Generic Specifications de ce manuel.
Ne jamais utiliser le produit dans les zones à poussières excessives, à fumées grasses, à poussières
conductrices, à gaz corrosifs (air salé, Cl
impacts, ou l'exposer à haute température, à condensation ou à pluie et vent.
Si le produit est utilisé dans de telles conditions, l’électrocution, le feu, des dysfonctionnements, des
détériorations ou des dommages peuvent se produire.
, H2S, SO2 ou NO2), à gaz inflammables, à vibrations ou à
2
10

[PRÉCAUTIONS D'INSTALLATION]
ATTENTION
● Ne pas toucher directement les parties conductrices du produit. Cela pourrait être à l'origine d'une
panne ou d'un dysfonctionnement.
● Lors du perçage des trous de vis ou du câblage, assurez-vous que les débris de coupe et de câblage
ne pénètrent pas dans les fentes de ventilation du contrôleur programmable. Faute de quoi, il y a
risque de départ de feu, de panne ou de dysfonctionnement de l'équipement.
● Pour le produit fourni avec une feuille anti-poussière, la feuille doit être fixée aux fentes de ventilation
avant l'installation et le câblage pour éviter les objets étrangers tels que les débris de coupe et de
câblage.
Cependant, lorsque les travaux d'installation sont terminés, assurez-vous d'enlever la feuille pour
assurer une ventilation adéquate. Faute de quoi, il y a risque de départ de feu, de panne ou de
dysfonctionnement de l'équipement.
● Installez le produit sur une surface plane. Si la surface de montage est rugueuse, une force excessive
sera appliquée à la carte PC, ce qui entraînera des non-conformités.
● Installez le produit solidement à l'aide d'un rail DIN.
● Connectez l'adaptateur d'extension de manière sécurisée à leurs connecteurs désignés. Les
connexions lâches peuvent provoquer des dysfonctionnements.
● Travailler soigneusement lorsque vous utilisez un tournevis comme pour l'installation du produit.
Faute de quoi, il y a risque d'endommagement du produit ou des accidents.
● Connectez les câbles d'extension, les câbles de périphériques, les câbles d'entrée/sortie et le câble
de connexion de la batterie solidement à leurs connecteurs désignés. Les connexions lâches peuvent
provoquer des dysfonctionnements.
● Lorsque vous utilisez une carte mémoire SD, insérez-la dans la fente de la carte mémoire SD. Vérifier
que la carte a été poussée bien à fond dans le logement. Tout mauvais contact peut provoquer des
dysfonctionnements.
● Coupez l’alimentation du contrôleur programmable avant d'attacher ou de détacher les appareils
suivants. Faute de quoi, il y a risque de panne ou de dysfonctionnement des équipements.
- Périphériques, adaptateur d'extension et adaptateur de conversion de connecteur
- Modules d'extension, module de conversion de bus et module de conversion de connecteur
-Batterie
11

[PRÉCAUTIONS DE CABLAGE]
AVERTISSEMENT
● Assurez-vous de couper toutes les phases de l'alimentation externe avant d’essayer l'installation ou le
câblage. Faute de quoi, il y a risque d'électrocution ou d'endommagement du produit.
● Assurez-vous d'attacher le couvercle de borne, fourni en tant qu'accessoire, avant d'alimentation ou
d'opération de lancement après installation ou câblage. Faute de quoi, il y a risque d'électrocution.
● La température nominale du câble doit être de 80 ou plus.
Il peut varier en fonction des équipements d'extension. Pour les détails, voir le Manuel de l'Utilisateur
des équipements d'extension.
● Assurez-vous de brancher le bornier à vis conformément aux précautions suivantes. Faute de quoi, il
y a risque d'électrocution ou de panne d'équipement, de court-circuit, de rupture de fil, de
dysfonctionnements ou de dommages au produit.
- La taille de l'extrémité du câble lors de la mise au rebut doit suivre les dimensions décrites dans le
manuel.
- Le couple de serrage doit suivre les spécifications du manuel.
- Serrer les vis à l'aide d'un tournevis Phillips n 2 (diamètre de l'arbre de 6 mm ou moins). Assurez-
vous que le tournevis ne touche pas la partie de séparation du bornier.
● Assurez-vous de bien câbler le bornier (type européen) conformément aux précautions suivantes.
Faute de quoi, il y a risque d'électrocution, de panne d'équipement, de court-circuit, de rupture de fil,
de dysfonctionnements ou de dommages au produit.
- La taille de l'extrémité du câble lors de la mise au rebut doit suivre les dimensions décrites dans le
manuel.
- Le couple de serrage doit suivre les spécifications du manuel.
- Tordre les extrémités des fils échoués et s'assurer qu'il n'y a pas de fils lâches.
- Ne pas souder et plaquer les extrémités des fils électriques.
- Ne pas connecter plus que le nombre spécifié de fils ou fils électriques de taille non spécifiée.
- Fixez les fils électriques afin que ni le bornier ni les pièces connectées ne soient directement
soumis à une contrainte.
● Assurez-vous de bien câbler la plaque à bornes avec bride à ressort conformément aux précautions
suivantes. Faute de quoi, il y a le risque d’électrocutions, de pannes d'équipement, de court-circuit, de
rupture du fil, de dysfonctionnements ou de dommages au produit.
- La taille des extrémités du câble lors de la mise au rebut doit suivre les dimensions décrites dans
le manuel.
- Tordre les extrémités des fils échoués et s'assurer qu'il n'y a pas de fils lâches.
- Ne pas souder et plaquer les extrémités des fils électriques.
- Ne pas connecter plus que le nombre spécifié de fils ou fils électriques de taille non spécifiée.
- Fixez les fils électriques de sorte que ni le bornier ni les pièces connectées ne soient directement
soumis à une contrainte.
12

[PRÉCAUTIONS DE CABLAGE]
ATTENTION
● Effectuer la mise à la terre classe D (résistance à la mise à la terre : 100 ou moins) de la borne de
2
mise à la terre sur le module CPU et les modules d'extension avec un fil de 2 mm
Ne pas utiliser de mise à la terre commune pour les systèmes électriques lourds (voir Page 95
Grounding).
● Connectez le câblage d’alimentation aux bornes dédiées décrites dans ce manuel. Quand
l’alimentation AC est connectée à une borne d'E/S ou à une borne d'alimentation DC, le contrôleur
programmable s’éteindra.
● Ne pas câbler les bornes vides à l'extérieur. Cela pourrait endommager le produit.
● Installer le module afin que la force excessive ne soit pas appliquée aux borniers, aux connecteurs
d'alimentation, aux connecteurs E/S, aux connecteurs de communication ou aux câbles de
communication. Faute de quoi, il y a risque d'endommagement ou de rupture ou de panne du
contrôleur programmable.
● Assurez-vous d'observer les précautions suivantes afin d'éviter tout endommagement aux machines
ou les accidents dues au dysfonctionnement du contrôleur programmable causé par des données
anormales écrites sur le contrôleur programmable en raison d’effets du bruit.
- Ne pas regrouper la ligne d'alimentation, la ligne de commande et les câbles de communication,
ou ni les placer près du circuit principal, la ligne à haute tension, la ligne de charge ou la ligne
d’alimentation. À titre indicatif, posez la ligne d'alimentation, la ligne de commande et les câbles
de communication au moins à 100 mm du circuit principal, de la ligne à haute tension, de la ligne
de charge ou de la ligne d’alimentation.
- Effectuer la mise à la terre du blindage du fil blindé ou du câble blindé en un point sur le contrôleur
programmable. Toutefois, ne pas utiliser de mise à la terre commune avec des systèmes
électriques lourds.
- Effectuer la mise à la terre du blindage du câble E/S analogique sur un point du côté réception
des signaux. Toutefois, ne pas utiliser de mise à la terre commune avec des systèmes électriques
lourds.
ou plus épais.
[PRÉCAUTIONS DE MISE EN SERVICE ET DE MAINTENANCE]
AVERTISSEMENT
● Ne toucher aucune borne quand le contrôleur programmable est sous tension. Cela pourrait être à
l'origine d’électrocutions ou de dysfonctionnements.
● Avant de nettoyer ou de resserrer les bornes, couper toutes les phases de l'alimentation externe.
Faute de quoi, il y a risque d'électrocution avec les bornes sous tension.
● Avant d’effectuer une modification au programme en cours, une sortie forcée, ou une exécution ou un
arrêt du contrôleur programmable, lisez attentivement ce manuel et assurez-vous une sécurité
complète. Une opération erronée peut endommager la machine ou provoquer des accidents.
● Ne pas modifier le programme dans le contrôleur programmable à partir de deux ou plusieurs
périphériques en même temps (c'est-à-dire à partir d'un outil d'ingénierie et d'un GOT). Cela pourrait
être à l'origine des destructions ou des dysfonctionnement du programme du contrôleur
programmable.
13

AVERTISSEMENT
● Utiliser la batterie pour la sauvegarde de la mémoire conformément à ce manuel.
- Utiliser la batterie uniquement dans le but spécifié.
- Raccorder la batterie correctement.
- Ne pas charger, ni démonter, ni chauffer, ni mettre en feu, ni court-circuiter, ni relier inversement,
ni souder, ni avaler ou ni brûler la batterie, ou ni appliquer aucune force excessive (vibration,
impact, chute, etc.) à la batterie.
- Ne pas stocker ni utiliser la batterie à haute température ou ni l’exposer aux rayons directs du
soleil.
- Ne pas exposer à l'eau, ni rapprocher du feu ou ni toucher des fuites de liquide ou d'autres
contenus directement.
- Toujours utiliser le produit (FX3U-32BL) désigné par notre société pour le remplacement.
- En cas d’erreur de batterie (la DEL [BAT] s’allume en rouge), procéder conformément au manuel.
Une manipulation incorrecte de la batterie peut causer une génération excessive de chaleur, un
éclatement, un allumage, une fuite de liquide ou une déformation, et entraîner des blessures, des
feux ou des pannes et des dysfonctionnements des installations et d'autres équipements.
[PRÉCAUTIONS DE MISE EN SERVICE ET DE MAINTENANCE]
ATTENTION
● Ne pas démonter ni modifier le contrôleur programmable. Cela pourrait causer un départ de feu, une
panne ou un dysfonctionnement des équipements.
Pour réparation, contactez votre représentant local de Mitsubishi Electric.
● Après la mise en service de la carte-mémoire SD, ne pas insérer/retirer la carte-mémoire plus de 500
fois. Cette opération de plus de 500 fois peut causer un dysfonctionnement.
● Coupez l’alimentation du contrôleur programmable avant de connecter ou déconnecter les câbles
d'extension. Faute de quoi, il y a risque de panne ou de dysfonctionnement des équipements.
● Coupez l’alimentation du contrôleur programmable avant d'attacher ou de détacher les appareils
suivants. Faute de quoi, il y a risque de panne ou de dysfonctionnement des équipements.
- Périphériques, adaptateur d'extension et adaptateur de conversion de connecteur
- Modules d'extension, module de conversion de bus et module de conversion de connecteur
-Batterie
● Ne pas utiliser de produit chimique pour le nettoyage.
● Si le contact avec le contrôleur logique programmable dans le boîtier de commutation est possible
lors de l’entretien, etc., toujours éliminer l’électricité statique pour éviter son influence.
[PRECAUTIONS D’OPÉRATION]
ATTENTION
● Construire un circuit de verrouillage dans le programme afin que l'ensemble du système fonctionne
toujours sur le côté sûr avant d'exécuter la commande (pour le changement de données) du
contrôleur programmable en fonctionnement. Lisez attentivement le manuel et assurez-vous une
sécurité complète avant d'exécuter d'autres commandes (pour le changement de programme, le
changement de paramètre, la sortie forcée et le changement d'état d’opération) du contrôleur
programmable en cours de fonctionnement. Sinon, la machine peut être endommagée et des
accidents peuvent se produire à cause des opérations erronées.
14

[PRÉCAUTIONS DE MISE AU REBUT]
ATTENTION
● Veuillez contacter une société certifiée de mise au rebut des déchets électroniques pour le recyclage
et la mise au rebut écologique de votre équipement.
● Les piles ou batteries doivent être mises au rebut séparément des autres déchets et conformément à
la réglementation locale. (Pour les détails de la directive sur les piles et batteries dans les pays de
l'UE, reportez-vous à la Page 193 Handling of Batteries and Devices with Built-in Batteries in EU
Member States.)
[PRÉCAUTIONS DE TRANSPORT]
ATTENTION
● Lors du transport du contrôleur programmable équipé de la batterie en option, allumez le contrôleur
programmable avant l'expédition, confirmez que le mode batterie est réglé à l'aide d'un paramètre et
que la LED BAT est éteinte (OFF) et vérifiez la durée de vie de la batterie. Si le contrôleur
programmable est transporté avec la LED BAT sous tension (ON) ou la batterie épuisée, les données
sauvegardées par batterie peuvent être instables pendant le transport.
● Le contrôleur programmable est un instrument de précision. Pendant le transport, évitez de donner
des chocs supérieurs à ceux spécifiés dans les spécifications générales (Page 30 Generic
Specifications) en utilisant des boîtes d'emballage dédiées et des palettes amortisseuse. Faute de
quoi, il y a risque de panne du contrôleur programmable. Après le transport, vérifiez le bon
fonctionnement du contrôleur programmable et contrôlez l’absence de dégâts des pièces de
montage, etc.
● Pour le transport des piles au lithium, respecter la réglementation afférente à ce transport. (Pour les
détails des produits, reportez-vous à la Page 193 Handling of Batteries and Devices with Built-in
Batteries in EU Member States.)
● Lorsque les fumigants contenant des matières halogènes comme le fluor, le chlore, le brome et l'iode
sont utilisés pour désinfecter et protéger les emballages en bois des insectes, ils provoquent des
dysfonctionnements lors de leur entrée dans nos produits. Prenez les précautions nécessaires pour
vous assurer que les matériaux restants du fumigant ne pénètrent pas dans nos produits ou que
l'emballage est traité avec des méthodes autres que la fumigation (méthode de la chaleur). En outre,
désinfectez et protégez le bois des insectes avant d'emballer les produits.
15

INTRODUCTION
This manual contains text, diagrams and explanations which will guide the reader in the correct installation, safe use and
operation of the FX5UC Programmable Controllers and should be read and understood before attempting to install or use the
module.
Always forward it to the end user.
Regarding use of this product
• This product has been manufactured as a general-purpose part for general industries, and has not been designed or
manufactured to be incorporated in a device or system used in purposes related to human life.
• Before using the product for special purposes such as nuclear power, electric power, aerospace, medicine or passenger
movement vehicles, consult Mitsubishi Electric.
• This product has been manufactured under strict quality control. However when installing the product where major
accidents or losses could occur if the product fails, install appropriate backup or failsafe functions in the system.
Note
• If in doubt at any stage during the installation of the product, always consult a professional electrical engineer who is
qualified and trained in the local and national standards. If in doubt about the operation or use, please consult the nearest
Mitsubishi Electric representative.
• Since the examples indicated by this manual, technical bulletin, catalog, etc. are used as a reference, please use it after
confirming the function and safety of the equipment and system. Mitsubishi Electric will accept no responsibility for actual
use of the product based on these illustrative examples.
• This manual content, specification etc. may be changed, without a notice, for improvement.
• The information in this manual has been carefully checked and is believed to be accurate; however, if you notice a doubtful
point, an error, etc., please contact the nearest Mitsubishi Electric representative. When doing so, please provide the
manual number given at the end of this manual.
16

MEMO
17

CONTENTS
SAFETY PRECAUTIONS . . . . . . . . . . . . . . . . . . . . . . . . . . . . . . . . . . . . . . . . . . . . . . . . . . . . . . . . . . . . . . . . . . . .1
PRÉCAUTIONS DE SÉCURITÉ . . . . . . . . . . . . . . . . . . . . . . . . . . . . . . . . . . . . . . . . . . . . . . . . . . . . . . . . . . . . . . .8
INTRODUCTION. . . . . . . . . . . . . . . . . . . . . . . . . . . . . . . . . . . . . . . . . . . . . . . . . . . . . . . . . . . . . . . . . . . . . . . . . .16
RELEVANT MANUALS . . . . . . . . . . . . . . . . . . . . . . . . . . . . . . . . . . . . . . . . . . . . . . . . . . . . . . . . . . . . . . . . . . . . .24
TERMS . . . . . . . . . . . . . . . . . . . . . . . . . . . . . . . . . . . . . . . . . . . . . . . . . . . . . . . . . . . . . . . . . . . . . . . . . . . . . . . . .25
CHAPTER 1 OUTLINE 27
1.1 Part Names. . . . . . . . . . . . . . . . . . . . . . . . . . . . . . . . . . . . . . . . . . . . . . . . . . . . . . . . . . . . . . . . . . . . . . . . . . . . . 27
Front panel . . . . . . . . . . . . . . . . . . . . . . . . . . . . . . . . . . . . . . . . . . . . . . . . . . . . . . . . . . . . . . . . . . . . . . . . . . . . . 27
Side . . . . . . . . . . . . . . . . . . . . . . . . . . . . . . . . . . . . . . . . . . . . . . . . . . . . . . . . . . . . . . . . . . . . . . . . . . . . . . . . . . . 28
CHAPTER 2 SPECIFICATIONS 30
2.1 Generic Specifications . . . . . . . . . . . . . . . . . . . . . . . . . . . . . . . . . . . . . . . . . . . . . . . . . . . . . . . . . . . . . . . . . . . 30
2.2 Power Supply Specifications . . . . . . . . . . . . . . . . . . . . . . . . . . . . . . . . . . . . . . . . . . . . . . . . . . . . . . . . . . . . . . 31
DC power supply . . . . . . . . . . . . . . . . . . . . . . . . . . . . . . . . . . . . . . . . . . . . . . . . . . . . . . . . . . . . . . . . . . . . . . . . . 31
2.3 Input Specifications . . . . . . . . . . . . . . . . . . . . . . . . . . . . . . . . . . . . . . . . . . . . . . . . . . . . . . . . . . . . . . . . . . . . . 32
24 V DC input (sink/source). . . . . . . . . . . . . . . . . . . . . . . . . . . . . . . . . . . . . . . . . . . . . . . . . . . . . . . . . . . . . . . . . 32
2.4 Output Specifications . . . . . . . . . . . . . . . . . . . . . . . . . . . . . . . . . . . . . . . . . . . . . . . . . . . . . . . . . . . . . . . . . . . . 34
Transistor output . . . . . . . . . . . . . . . . . . . . . . . . . . . . . . . . . . . . . . . . . . . . . . . . . . . . . . . . . . . . . . . . . . . . . . . . . 34
2.5 Input/Output Derating Curve . . . . . . . . . . . . . . . . . . . . . . . . . . . . . . . . . . . . . . . . . . . . . . . . . . . . . . . . . . . . . . 34
2.6 Performance Specifications . . . . . . . . . . . . . . . . . . . . . . . . . . . . . . . . . . . . . . . . . . . . . . . . . . . . . . . . . . . . . . . 35
2.7 Communication Specifications . . . . . . . . . . . . . . . . . . . . . . . . . . . . . . . . . . . . . . . . . . . . . . . . . . . . . . . . . . . . 37
Built-in Ethernet communication . . . . . . . . . . . . . . . . . . . . . . . . . . . . . . . . . . . . . . . . . . . . . . . . . . . . . . . . . . . . . 37
Built-in RS-485 communication . . . . . . . . . . . . . . . . . . . . . . . . . . . . . . . . . . . . . . . . . . . . . . . . . . . . . . . . . . . . . . 38
2.8 External Dimensions . . . . . . . . . . . . . . . . . . . . . . . . . . . . . . . . . . . . . . . . . . . . . . . . . . . . . . . . . . . . . . . . . . . . . 38
CPU module . . . . . . . . . . . . . . . . . . . . . . . . . . . . . . . . . . . . . . . . . . . . . . . . . . . . . . . . . . . . . . . . . . . . . . . . . . . . 38
2.9 Terminal Layout. . . . . . . . . . . . . . . . . . . . . . . . . . . . . . . . . . . . . . . . . . . . . . . . . . . . . . . . . . . . . . . . . . . . . . . . . 39
CHAPTER 3 PRODUCT LIST 42
3.1 Overall Configuration . . . . . . . . . . . . . . . . . . . . . . . . . . . . . . . . . . . . . . . . . . . . . . . . . . . . . . . . . . . . . . . . . . . . 42
3.2 CPU Module . . . . . . . . . . . . . . . . . . . . . . . . . . . . . . . . . . . . . . . . . . . . . . . . . . . . . . . . . . . . . . . . . . . . . . . . . . . . 43
3.3 Extension Module . . . . . . . . . . . . . . . . . . . . . . . . . . . . . . . . . . . . . . . . . . . . . . . . . . . . . . . . . . . . . . . . . . . . . . . 44
I/O module . . . . . . . . . . . . . . . . . . . . . . . . . . . . . . . . . . . . . . . . . . . . . . . . . . . . . . . . . . . . . . . . . . . . . . . . . . . . . . 44
Intelligent function module. . . . . . . . . . . . . . . . . . . . . . . . . . . . . . . . . . . . . . . . . . . . . . . . . . . . . . . . . . . . . . . . . . 47
Extension power supply module . . . . . . . . . . . . . . . . . . . . . . . . . . . . . . . . . . . . . . . . . . . . . . . . . . . . . . . . . . . . . 49
Connector conversion module. . . . . . . . . . . . . . . . . . . . . . . . . . . . . . . . . . . . . . . . . . . . . . . . . . . . . . . . . . . . . . . 49
Bus conversion module . . . . . . . . . . . . . . . . . . . . . . . . . . . . . . . . . . . . . . . . . . . . . . . . . . . . . . . . . . . . . . . . . . . . 50
3.4 Expansion Adapter . . . . . . . . . . . . . . . . . . . . . . . . . . . . . . . . . . . . . . . . . . . . . . . . . . . . . . . . . . . . . . . . . . . . . . 50
3.5 Extended Extension Cable and Connector Conversion Adapter . . . . . . . . . . . . . . . . . . . . . . . . . . . . . . . . . 50
Extended extension cable . . . . . . . . . . . . . . . . . . . . . . . . . . . . . . . . . . . . . . . . . . . . . . . . . . . . . . . . . . . . . . . . . . 50
Connector conversion adapter . . . . . . . . . . . . . . . . . . . . . . . . . . . . . . . . . . . . . . . . . . . . . . . . . . . . . . . . . . . . . . 50
3.6 Terminal Module . . . . . . . . . . . . . . . . . . . . . . . . . . . . . . . . . . . . . . . . . . . . . . . . . . . . . . . . . . . . . . . . . . . . . . . . 51
3.7 SD Memory Card . . . . . . . . . . . . . . . . . . . . . . . . . . . . . . . . . . . . . . . . . . . . . . . . . . . . . . . . . . . . . . . . . . . . . . . . 51
3.8 Battery . . . . . . . . . . . . . . . . . . . . . . . . . . . . . . . . . . . . . . . . . . . . . . . . . . . . . . . . . . . . . . . . . . . . . . . . . . . . . . . . 51
3.9 Communication Cable. . . . . . . . . . . . . . . . . . . . . . . . . . . . . . . . . . . . . . . . . . . . . . . . . . . . . . . . . . . . . . . . . . . . 51
3.10 Engineering Tool . . . . . . . . . . . . . . . . . . . . . . . . . . . . . . . . . . . . . . . . . . . . . . . . . . . . . . . . . . . . . . . . . . . . . . . . 51
18

CHAPTER 4 SYSTEM CONFIGURATION 52
4.1 Rules of System Configuration . . . . . . . . . . . . . . . . . . . . . . . . . . . . . . . . . . . . . . . . . . . . . . . . . . . . . . . . . . . . 53
4.2 Limitations on the Number of Connected Extension Devices . . . . . . . . . . . . . . . . . . . . . . . . . . . . . . . . . . .55
Number of connected expansion adapters . . . . . . . . . . . . . . . . . . . . . . . . . . . . . . . . . . . . . . . . . . . . . . . . . . . . . 55
Number of connected extension modules (including extended extension cable) . . . . . . . . . . . . . . . . . . . . . . . . 55
4.3 Limitation on the Number of Input/Output Points . . . . . . . . . . . . . . . . . . . . . . . . . . . . . . . . . . . . . . . . . . . . . 58
Total number of I/O points and remote I/O points . . . . . . . . . . . . . . . . . . . . . . . . . . . . . . . . . . . . . . . . . . . . . . . . 58
Calculation of the number of input/output points . . . . . . . . . . . . . . . . . . . . . . . . . . . . . . . . . . . . . . . . . . . . . . . . . 58
Calculation of the number of remote I/O points . . . . . . . . . . . . . . . . . . . . . . . . . . . . . . . . . . . . . . . . . . . . . . . . . . 59
4.4 Limitation on Current Consumption . . . . . . . . . . . . . . . . . . . . . . . . . . . . . . . . . . . . . . . . . . . . . . . . . . . . . . . . 61
Power supply check from the CPU module (current consumption calculation). . . . . . . . . . . . . . . . . . . . . . . . . . 61
Power supply check from the powered input/output module (current consumption calculation) . . . . . . . . . . . . . 63
Power supply check from extension power supply module (current consumption calculation) . . . . . . . . . . . . . . 64
4.5 Rules of System Configuration and Examples of Reconfiguration . . . . . . . . . . . . . . . . . . . . . . . . . . . . . . . 66
System configuration example . . . . . . . . . . . . . . . . . . . . . . . . . . . . . . . . . . . . . . . . . . . . . . . . . . . . . . . . . . . . . . 66
System reconfiguration example . . . . . . . . . . . . . . . . . . . . . . . . . . . . . . . . . . . . . . . . . . . . . . . . . . . . . . . . . . . . . 69
4.6 Numbers and Assignment in System . . . . . . . . . . . . . . . . . . . . . . . . . . . . . . . . . . . . . . . . . . . . . . . . . . . . . . . 74
Module input/output number . . . . . . . . . . . . . . . . . . . . . . . . . . . . . . . . . . . . . . . . . . . . . . . . . . . . . . . . . . . . . . . . 74
Module number of extension modules. . . . . . . . . . . . . . . . . . . . . . . . . . . . . . . . . . . . . . . . . . . . . . . . . . . . . . . . . 74
CHAPTER 5 INSTALLATION 75
CONTENTS
5.1 Installation Location . . . . . . . . . . . . . . . . . . . . . . . . . . . . . . . . . . . . . . . . . . . . . . . . . . . . . . . . . . . . . . . . . . . . . 75
Installation location in enclosure . . . . . . . . . . . . . . . . . . . . . . . . . . . . . . . . . . . . . . . . . . . . . . . . . . . . . . . . . . . . . 75
Spaces in enclosure . . . . . . . . . . . . . . . . . . . . . . . . . . . . . . . . . . . . . . . . . . . . . . . . . . . . . . . . . . . . . . . . . . . . . . 75
Layout in enclosure . . . . . . . . . . . . . . . . . . . . . . . . . . . . . . . . . . . . . . . . . . . . . . . . . . . . . . . . . . . . . . . . . . . . . . . 76
5.2 Examination for Installing Method in Enclosure . . . . . . . . . . . . . . . . . . . . . . . . . . . . . . . . . . . . . . . . . . . . . . 77
5.3 Procedures for Installing on and Detaching from DIN Rail . . . . . . . . . . . . . . . . . . . . . . . . . . . . . . . . . . . . . . 78
Preparation for installation . . . . . . . . . . . . . . . . . . . . . . . . . . . . . . . . . . . . . . . . . . . . . . . . . . . . . . . . . . . . . . . . . . 78
Installation of CPU module . . . . . . . . . . . . . . . . . . . . . . . . . . . . . . . . . . . . . . . . . . . . . . . . . . . . . . . . . . . . . . . . . 78
Installation of extension modules (extension cable type) . . . . . . . . . . . . . . . . . . . . . . . . . . . . . . . . . . . . . . . . . .79
Installation of terminal modules . . . . . . . . . . . . . . . . . . . . . . . . . . . . . . . . . . . . . . . . . . . . . . . . . . . . . . . . . . . . . . 79
Removal of CPU module . . . . . . . . . . . . . . . . . . . . . . . . . . . . . . . . . . . . . . . . . . . . . . . . . . . . . . . . . . . . . . . . . . . 79
5.4 Procedures for Installing Directly (with M4 Screws) . . . . . . . . . . . . . . . . . . . . . . . . . . . . . . . . . . . . . . . . . . .80
Hole pitches for direct mounting . . . . . . . . . . . . . . . . . . . . . . . . . . . . . . . . . . . . . . . . . . . . . . . . . . . . . . . . . . . . . 80
Hole pitches when extension module connected . . . . . . . . . . . . . . . . . . . . . . . . . . . . . . . . . . . . . . . . . . . . . . . . 81
Installation of extension module (extension cable type) . . . . . . . . . . . . . . . . . . . . . . . . . . . . . . . . . . . . . . . . . . . 81
5.5 Connecting Methods for CPU Module and Extension Devices. . . . . . . . . . . . . . . . . . . . . . . . . . . . . . . . . . . 82
Connection of extension devices. . . . . . . . . . . . . . . . . . . . . . . . . . . . . . . . . . . . . . . . . . . . . . . . . . . . . . . . . . . . . 82
Connecting method A - connection of an expansion adapter . . . . . . . . . . . . . . . . . . . . . . . . . . . . . . . . . . . . . . .82
Connecting method B - connection of an extension module (extension connector type) . . . . . . . . . . . . . . . . . . 83
Connecting method C - connection of a connector conversion module (extension connector type)
or the extension power supply module and an extension module (extension cable type) . . . . . . . . . . . . . . . . . 84
Connecting method D - connection between extension modules (extension cable type) . . . . . . . . . . . . . . . . . .84
Connecting method E - connection of extended extension cable and connector conversion adapter . . . . . . . . 85
Connecting method F - connection of a bus conversion module and an FX3 intelligent function module . . . . .85
Connection of power cables . . . . . . . . . . . . . . . . . . . . . . . . . . . . . . . . . . . . . . . . . . . . . . . . . . . . . . . . . . . . . . . . 86
Removal of power cables . . . . . . . . . . . . . . . . . . . . . . . . . . . . . . . . . . . . . . . . . . . . . . . . . . . . . . . . . . . . . . . . . . 87
Connection of I/O cables . . . . . . . . . . . . . . . . . . . . . . . . . . . . . . . . . . . . . . . . . . . . . . . . . . . . . . . . . . . . . . . . . . . 87
19

CHAPTER 6 WIRING 89
6.1 Wiring Preparations . . . . . . . . . . . . . . . . . . . . . . . . . . . . . . . . . . . . . . . . . . . . . . . . . . . . . . . . . . . . . . . . . . . . . 89
Wiring procedure . . . . . . . . . . . . . . . . . . . . . . . . . . . . . . . . . . . . . . . . . . . . . . . . . . . . . . . . . . . . . . . . . . . . . . . . . 89
6.2 Cable Connecting Procedure . . . . . . . . . . . . . . . . . . . . . . . . . . . . . . . . . . . . . . . . . . . . . . . . . . . . . . . . . . . . . . 90
European-type terminal block . . . . . . . . . . . . . . . . . . . . . . . . . . . . . . . . . . . . . . . . . . . . . . . . . . . . . . . . . . . . . . . 90
Spring Clamp Terminal Block. . . . . . . . . . . . . . . . . . . . . . . . . . . . . . . . . . . . . . . . . . . . . . . . . . . . . . . . . . . . . . . . 91
Screw terminal block . . . . . . . . . . . . . . . . . . . . . . . . . . . . . . . . . . . . . . . . . . . . . . . . . . . . . . . . . . . . . . . . . . . . . . 93
6.3 Grounding . . . . . . . . . . . . . . . . . . . . . . . . . . . . . . . . . . . . . . . . . . . . . . . . . . . . . . . . . . . . . . . . . . . . . . . . . . . . . 95
6.4 Power Supply Wiring. . . . . . . . . . . . . . . . . . . . . . . . . . . . . . . . . . . . . . . . . . . . . . . . . . . . . . . . . . . . . . . . . . . . . 96
Examples of DC power supply wiring . . . . . . . . . . . . . . . . . . . . . . . . . . . . . . . . . . . . . . . . . . . . . . . . . . . . . . . . . 96
6.5 Input Wiring . . . . . . . . . . . . . . . . . . . . . . . . . . . . . . . . . . . . . . . . . . . . . . . . . . . . . . . . . . . . . . . . . . . . . . . . . . . . 98
24 V DC input . . . . . . . . . . . . . . . . . . . . . . . . . . . . . . . . . . . . . . . . . . . . . . . . . . . . . . . . . . . . . . . . . . . . . . . . . . . 98
Input wiring example . . . . . . . . . . . . . . . . . . . . . . . . . . . . . . . . . . . . . . . . . . . . . . . . . . . . . . . . . . . . . . . . . . . . .103
Input wiring examples of terminal modules . . . . . . . . . . . . . . . . . . . . . . . . . . . . . . . . . . . . . . . . . . . . . . . . . . . .106
6.6 Output Wiring. . . . . . . . . . . . . . . . . . . . . . . . . . . . . . . . . . . . . . . . . . . . . . . . . . . . . . . . . . . . . . . . . . . . . . . . . . 108
Transistor output . . . . . . . . . . . . . . . . . . . . . . . . . . . . . . . . . . . . . . . . . . . . . . . . . . . . . . . . . . . . . . . . . . . . . . . . 108
Relay output . . . . . . . . . . . . . . . . . . . . . . . . . . . . . . . . . . . . . . . . . . . . . . . . . . . . . . . . . . . . . . . . . . . . . . . . . . . 111
Triac output . . . . . . . . . . . . . . . . . . . . . . . . . . . . . . . . . . . . . . . . . . . . . . . . . . . . . . . . . . . . . . . . . . . . . . . . . . . . 114
Output wiring example. . . . . . . . . . . . . . . . . . . . . . . . . . . . . . . . . . . . . . . . . . . . . . . . . . . . . . . . . . . . . . . . . . . . 116
Output wiring examples of terminal modules. . . . . . . . . . . . . . . . . . . . . . . . . . . . . . . . . . . . . . . . . . . . . . . . . . . 119
6.7 Examples of Wiring for Various Uses . . . . . . . . . . . . . . . . . . . . . . . . . . . . . . . . . . . . . . . . . . . . . . . . . . . . . . 123
Positioning function . . . . . . . . . . . . . . . . . . . . . . . . . . . . . . . . . . . . . . . . . . . . . . . . . . . . . . . . . . . . . . . . . . . . . . 123
Communication function . . . . . . . . . . . . . . . . . . . . . . . . . . . . . . . . . . . . . . . . . . . . . . . . . . . . . . . . . . . . . . . . . . 123
High-speed counter . . . . . . . . . . . . . . . . . . . . . . . . . . . . . . . . . . . . . . . . . . . . . . . . . . . . . . . . . . . . . . . . . . . . . . 123
Interruption . . . . . . . . . . . . . . . . . . . . . . . . . . . . . . . . . . . . . . . . . . . . . . . . . . . . . . . . . . . . . . . . . . . . . . . . . . . . 126
Digital switch . . . . . . . . . . . . . . . . . . . . . . . . . . . . . . . . . . . . . . . . . . . . . . . . . . . . . . . . . . . . . . . . . . . . . . . . . . . 127
Input matrix . . . . . . . . . . . . . . . . . . . . . . . . . . . . . . . . . . . . . . . . . . . . . . . . . . . . . . . . . . . . . . . . . . . . . . . . . . . . 129
Seven segment with latch . . . . . . . . . . . . . . . . . . . . . . . . . . . . . . . . . . . . . . . . . . . . . . . . . . . . . . . . . . . . . . . . . 130
CHAPTER 7 OPERATION ADJUSTMENT 132
7.1 Preparation for Operation. . . . . . . . . . . . . . . . . . . . . . . . . . . . . . . . . . . . . . . . . . . . . . . . . . . . . . . . . . . . . . . . 132
Preliminary inspection . . . . . . . . . . . . . . . . . . . . . . . . . . . . . . . . . . . . . . . . . . . . . . . . . . . . . . . . . . . . . . . . . . . . 132
Procedure until operation . . . . . . . . . . . . . . . . . . . . . . . . . . . . . . . . . . . . . . . . . . . . . . . . . . . . . . . . . . . . . . . . . 132
Connection with a personal computer. . . . . . . . . . . . . . . . . . . . . . . . . . . . . . . . . . . . . . . . . . . . . . . . . . . . . . . .133
7.2 Operation and Test . . . . . . . . . . . . . . . . . . . . . . . . . . . . . . . . . . . . . . . . . . . . . . . . . . . . . . . . . . . . . . . . . . . . . 134
Self-diagnostic function . . . . . . . . . . . . . . . . . . . . . . . . . . . . . . . . . . . . . . . . . . . . . . . . . . . . . . . . . . . . . . . . . . . 134
Monitoring and debugging. . . . . . . . . . . . . . . . . . . . . . . . . . . . . . . . . . . . . . . . . . . . . . . . . . . . . . . . . . . . . . . . . 134
7.3 Running, Stopping, and Resetting. . . . . . . . . . . . . . . . . . . . . . . . . . . . . . . . . . . . . . . . . . . . . . . . . . . . . . . . . 135
Methods of running, stopping, and resetting . . . . . . . . . . . . . . . . . . . . . . . . . . . . . . . . . . . . . . . . . . . . . . . . . . . 135
CHAPTER 8 MAINTENANCE AND INSPECTION 136
8.1 Daily Inspection . . . . . . . . . . . . . . . . . . . . . . . . . . . . . . . . . . . . . . . . . . . . . . . . . . . . . . . . . . . . . . . . . . . . . . . . 136
8.2 Periodic Inspection . . . . . . . . . . . . . . . . . . . . . . . . . . . . . . . . . . . . . . . . . . . . . . . . . . . . . . . . . . . . . . . . . . . . . 136
8.3 Battery . . . . . . . . . . . . . . . . . . . . . . . . . . . . . . . . . . . . . . . . . . . . . . . . . . . . . . . . . . . . . . . . . . . . . . . . . . . . . . . 137
Part names . . . . . . . . . . . . . . . . . . . . . . . . . . . . . . . . . . . . . . . . . . . . . . . . . . . . . . . . . . . . . . . . . . . . . . . . . . . . 137
Specifications . . . . . . . . . . . . . . . . . . . . . . . . . . . . . . . . . . . . . . . . . . . . . . . . . . . . . . . . . . . . . . . . . . . . . . . . . . 137
Battery attachment . . . . . . . . . . . . . . . . . . . . . . . . . . . . . . . . . . . . . . . . . . . . . . . . . . . . . . . . . . . . . . . . . . . . . . 137
Battery replacement . . . . . . . . . . . . . . . . . . . . . . . . . . . . . . . . . . . . . . . . . . . . . . . . . . . . . . . . . . . . . . . . . . . . . 138
Special relay for low battery voltage . . . . . . . . . . . . . . . . . . . . . . . . . . . . . . . . . . . . . . . . . . . . . . . . . . . . . . . . . 140
20

CHAPTER 9 TROUBLESHOOTING 141
9.1 Troubleshooting Procedure . . . . . . . . . . . . . . . . . . . . . . . . . . . . . . . . . . . . . . . . . . . . . . . . . . . . . . . . . . . . . . 141
9.2 Checking with LEDs . . . . . . . . . . . . . . . . . . . . . . . . . . . . . . . . . . . . . . . . . . . . . . . . . . . . . . . . . . . . . . . . . . . . 141
Checking the PWR LED . . . . . . . . . . . . . . . . . . . . . . . . . . . . . . . . . . . . . . . . . . . . . . . . . . . . . . . . . . . . . . . . . . 141
Checking the BAT LED . . . . . . . . . . . . . . . . . . . . . . . . . . . . . . . . . . . . . . . . . . . . . . . . . . . . . . . . . . . . . . . . . . . 141
Checking the ERR LED . . . . . . . . . . . . . . . . . . . . . . . . . . . . . . . . . . . . . . . . . . . . . . . . . . . . . . . . . . . . . . . . . . . 142
Checking the P.RUN LED . . . . . . . . . . . . . . . . . . . . . . . . . . . . . . . . . . . . . . . . . . . . . . . . . . . . . . . . . . . . . . . . . 142
9.3 Troubleshooting using the engineering tool . . . . . . . . . . . . . . . . . . . . . . . . . . . . . . . . . . . . . . . . . . . . . . . . 143
Module diagnostics (CPU diagnostics) . . . . . . . . . . . . . . . . . . . . . . . . . . . . . . . . . . . . . . . . . . . . . . . . . . . . . . .143
Event history . . . . . . . . . . . . . . . . . . . . . . . . . . . . . . . . . . . . . . . . . . . . . . . . . . . . . . . . . . . . . . . . . . . . . . . . . . . 144
9.4 Error Status and Operations on Occurrence of an Error. . . . . . . . . . . . . . . . . . . . . . . . . . . . . . . . . . . . . . . 145
9.5 Backing Up the Data . . . . . . . . . . . . . . . . . . . . . . . . . . . . . . . . . . . . . . . . . . . . . . . . . . . . . . . . . . . . . . . . . . . . 146
9.6 Canceling Errors . . . . . . . . . . . . . . . . . . . . . . . . . . . . . . . . . . . . . . . . . . . . . . . . . . . . . . . . . . . . . . . . . . . . . . . 146
9.7 Troubleshooting for Each Symptom . . . . . . . . . . . . . . . . . . . . . . . . . . . . . . . . . . . . . . . . . . . . . . . . . . . . . . . 147
I/O operation (CPU module, I/O module) . . . . . . . . . . . . . . . . . . . . . . . . . . . . . . . . . . . . . . . . . . . . . . . . . . . . . 147
PLC write, PLC read . . . . . . . . . . . . . . . . . . . . . . . . . . . . . . . . . . . . . . . . . . . . . . . . . . . . . . . . . . . . . . . . . . . . . 148
Boot operation . . . . . . . . . . . . . . . . . . . . . . . . . . . . . . . . . . . . . . . . . . . . . . . . . . . . . . . . . . . . . . . . . . . . . . . . . . 148
APPENDIX 149
Appendix 1 How to Check the Date of Manufacture . . . . . . . . . . . . . . . . . . . . . . . . . . . . . . . . . . . . . . . . . . . . . . . . 149
Appendix 2 Standards . . . . . . . . . . . . . . . . . . . . . . . . . . . . . . . . . . . . . . . . . . . . . . . . . . . . . . . . . . . . . . . . . . . . . . . . 150
Certification of UL, cUL standards. . . . . . . . . . . . . . . . . . . . . . . . . . . . . . . . . . . . . . . . . . . . . . . . . . . . . . . . . . . 150
Compliance with EC directive (CE Marking) . . . . . . . . . . . . . . . . . . . . . . . . . . . . . . . . . . . . . . . . . . . . . . . . . . . 150
Appendix 3 Precautions for Operating Ambient Temperature. . . . . . . . . . . . . . . . . . . . . . . . . . . . . . . . . . . . . . . . 154
Appendix 4 I/O Module. . . . . . . . . . . . . . . . . . . . . . . . . . . . . . . . . . . . . . . . . . . . . . . . . . . . . . . . . . . . . . . . . . . . . . . . 155
Product configuration. . . . . . . . . . . . . . . . . . . . . . . . . . . . . . . . . . . . . . . . . . . . . . . . . . . . . . . . . . . . . . . . . . . . . 155
Product list. . . . . . . . . . . . . . . . . . . . . . . . . . . . . . . . . . . . . . . . . . . . . . . . . . . . . . . . . . . . . . . . . . . . . . . . . . . . . 155
Specifications . . . . . . . . . . . . . . . . . . . . . . . . . . . . . . . . . . . . . . . . . . . . . . . . . . . . . . . . . . . . . . . . . . . . . . . . . . 158
External dimensions and component names. . . . . . . . . . . . . . . . . . . . . . . . . . . . . . . . . . . . . . . . . . . . . . . . . . . 166
Terminal layout . . . . . . . . . . . . . . . . . . . . . . . . . . . . . . . . . . . . . . . . . . . . . . . . . . . . . . . . . . . . . . . . . . . . . . . . . 172
Appendix 5 Connector Conversion Module. . . . . . . . . . . . . . . . . . . . . . . . . . . . . . . . . . . . . . . . . . . . . . . . . . . . . . . 175
External dimensions and component names. . . . . . . . . . . . . . . . . . . . . . . . . . . . . . . . . . . . . . . . . . . . . . . . . . . 175
Specifications . . . . . . . . . . . . . . . . . . . . . . . . . . . . . . . . . . . . . . . . . . . . . . . . . . . . . . . . . . . . . . . . . . . . . . . . . . 175
Appendix 6 SD Memory Card . . . . . . . . . . . . . . . . . . . . . . . . . . . . . . . . . . . . . . . . . . . . . . . . . . . . . . . . . . . . . . . . . . 176
Part names . . . . . . . . . . . . . . . . . . . . . . . . . . . . . . . . . . . . . . . . . . . . . . . . . . . . . . . . . . . . . . . . . . . . . . . . . . . . 176
Specifications . . . . . . . . . . . . . . . . . . . . . . . . . . . . . . . . . . . . . . . . . . . . . . . . . . . . . . . . . . . . . . . . . . . . . . . . . . 176
Insertion and removal of the SD memory card . . . . . . . . . . . . . . . . . . . . . . . . . . . . . . . . . . . . . . . . . . . . . . . . . 177
Appendix 7 Terminal Module. . . . . . . . . . . . . . . . . . . . . . . . . . . . . . . . . . . . . . . . . . . . . . . . . . . . . . . . . . . . . . . . . . . 178
Product configuration. . . . . . . . . . . . . . . . . . . . . . . . . . . . . . . . . . . . . . . . . . . . . . . . . . . . . . . . . . . . . . . . . . . . . 178
Product list. . . . . . . . . . . . . . . . . . . . . . . . . . . . . . . . . . . . . . . . . . . . . . . . . . . . . . . . . . . . . . . . . . . . . . . . . . . . . 178
Specifications . . . . . . . . . . . . . . . . . . . . . . . . . . . . . . . . . . . . . . . . . . . . . . . . . . . . . . . . . . . . . . . . . . . . . . . . . . 179
External dimensions and component names. . . . . . . . . . . . . . . . . . . . . . . . . . . . . . . . . . . . . . . . . . . . . . . . . . . 184
Terminal layout . . . . . . . . . . . . . . . . . . . . . . . . . . . . . . . . . . . . . . . . . . . . . . . . . . . . . . . . . . . . . . . . . . . . . . . . . 185
Internal circuit . . . . . . . . . . . . . . . . . . . . . . . . . . . . . . . . . . . . . . . . . . . . . . . . . . . . . . . . . . . . . . . . . . . . . . . . . . 186
Appendix 8 Precautions for Battery Transportation. . . . . . . . . . . . . . . . . . . . . . . . . . . . . . . . . . . . . . . . . . . . . . . . 192
Control-subject product . . . . . . . . . . . . . . . . . . . . . . . . . . . . . . . . . . . . . . . . . . . . . . . . . . . . . . . . . . . . . . . . . . . 192
Precautions for transportation . . . . . . . . . . . . . . . . . . . . . . . . . . . . . . . . . . . . . . . . . . . . . . . . . . . . . . . . . . . . . . 192
CONTENTS
21

Appendix 9 Handling of Batteries and Devices with Built-in Batteries in EU Member States . . . . . . . . . . . . . . 193
Disposal precautions . . . . . . . . . . . . . . . . . . . . . . . . . . . . . . . . . . . . . . . . . . . . . . . . . . . . . . . . . . . . . . . . . . . . . 193
Exportation precautions. . . . . . . . . . . . . . . . . . . . . . . . . . . . . . . . . . . . . . . . . . . . . . . . . . . . . . . . . . . . . . . . . . . 193
Appendix 10Added and Changed Functions . . . . . . . . . . . . . . . . . . . . . . . . . . . . . . . . . . . . . . . . . . . . . . . . . . . . . . 194
INDEX 195
REVISIONS. . . . . . . . . . . . . . . . . . . . . . . . . . . . . . . . . . . . . . . . . . . . . . . . . . . . . . . . . . . . . . . . . . . . . . . . . . . . .196
WARRANTY . . . . . . . . . . . . . . . . . . . . . . . . . . . . . . . . . . . . . . . . . . . . . . . . . . . . . . . . . . . . . . . . . . . . . . . . . . . .197
TRADEMARKS . . . . . . . . . . . . . . . . . . . . . . . . . . . . . . . . . . . . . . . . . . . . . . . . . . . . . . . . . . . . . . . . . . . . . . . . . .198
22

CONTENTS
23

RELEVANT MANUALS
Manual name <manual number> Description
MELSEC iQ-F FX5UC CPU Module Hardware Manual
<JY997D61001>
MELSEC iQ-F FX5 User's Manual (Startup)
<JY997D58201>
MELSEC iQ-F FX5U User's Manual (Hardware)
<JY997D55301>
MELSEC iQ-F FX5UC User's Manual (Hardware)
<JY997D61401> (This manual)
MELSEC iQ-F FX5 User's Manual (Application)
<JY997D55401>
MELSEC iQ-F FX5 Programming Manual (Program Design)
<JY997D55701>
MELSEC iQ-F FX5 Programming Manual (Instructions, Standard
Functions/Function Blocks)
<JY997D55801>
MELSEC iQ-F FX5 User's Manual (Serial Communication)
<JY997D55901>
MELSEC iQ-F FX5 User's Manual (MELSEC Communication Protocol)
<JY997D60801>
MELSEC iQ-F FX5 User's Manual (MODBUS Communication)
<JY997D56101>
MELSEC iQ-F FX5 User's Manual (Ethernet Communication)
<JY997D56201>
MELSEC iQ-F FX5 User's Manual (SLMP)
<JY997D56001>
MELSEC iQ-F FX5 User's Manual (CC-Link IE)
<JY997D64201>
MELSEC iQ-F FX5 User's Manual (CC-Link)
<SH-081793ENG>
MELSEC iQ-F FX5 User's Manual (ASLINK)
<SH-081796ENG>
MELSEC iQ-F FX5 User's Manual (Positioning Control - CPU module
built-in, High-speed pulse input/output module)
<JY997D56301>
MELSEC iQ-F FX5 User's Manual (Positioning Control - Intelligent
function module)
<SH-081805ENG>
MELSEC iQ-F FX5 Simple Motion Module User's Manual (Startup)
<IB0300251>
MELSEC iQ-F FX5 Simple Motion Module User's Manual (Application)
<IB0300253>
MELSEC iQ-F FX5 Simple Motion Module User's Manual (Advanced
Synchronous Control)
<IB0300255>
MELSEC iQ-F FX5 User's Manual (Analog Control - CPU module builtin, Expansion adapter)
<JY997D60501>
MELSEC iQ-F FX5 User's Manual (Analog Control - Intelligent function
module)
<SH-081802ENG>
MELSEC iQ-F FX5 User's Manual (Temperature Control)
<SH-081799ENG>
GX Works3 Operating Manual
<SH-081215ENG>
Transition from MELSEC FX3U, FX3UC Series to MELSEC iQ-F
Series Handbook
<JY997D66201>
Describes the details of input/output specifications, wiring and installation of the
FX5UC CPU module from MELSEC iQ-F FX5UC User's Manual (Hardware).
Performance specifications, procedures before operation, and troubleshooting of the
CPU module.
Describes the details of hardware of the FX5U CPU module, including input/output
specifications, wiring, installation, and maintenance.
Describes the details of hardware of the FX5UC CPU module, including input/output
specifications, wiring, installation, and maintenance.
Describes basic knowledge required for program design, functions of the CPU
module, devices/labels, and parameters.
Describes specifications of ladders, ST, FBD/LD, and other programs and labels.
Describes specifications of instructions and functions that can be used in programs.
Describes N:N network, Parallel link, MELSEC Communication protocol, inverter
communication, non-protocol communication, and predefined protocol support.
Explains methods for the device that is communicating with the CPU module by MC
protocol to read and write the data of the CPU module.
Describes MODBUS serial communication and MODBUS/TCP communication.
Describes the functions of the built-in Ethernet port communication function.
Explains methods for the device that is communicating with the CPU module by
SLMP to read and write the data of the CPU module.
Describes CC-Link IE field network module.
Describes CC-Link system master/intelligent device module.
Describes AnyWireASLINK system master module.
Describes the positioning function of the CPU module built-in and the high-speed
pulse input/output module.
Describes the positioning module.
Specifications, procedures before operation, system configuration, wiring, and
operation examples of the Simple Motion module.
Functions, input/output signals, buffer memories, parameter settings, programming,
and troubleshooting of the Simple Motion module.
Functions and programming for the synchronous control of the Simple Motion
module.
Describes the analog function of the CPU module built-in and the analog adapter.
Describes the analog input module, analog output module, and multiple input
module.
Describes the temperature control module.
System configuration, parameter settings, and online operations of GX Works3.
Describes the transition from MELSEC FX3U/FX3UC series to MELSEC iQ-F series.
24

TERMS
Unless otherwise specified, this manual uses the following terms.
• indicates a variable part to collectively call multiple models or versions.
(Example) FX5-C32EX/D, FX5-C32ET/D, FX5-C32EYT/D FX5-C32E/D
• For details on the FX3 devices that can be connected with the FX5UC CPU module, refer to Page 42 PRODUCT LIST.
Term s Description
■Devices
FX5 Generic term for FX5U and FX5UC PLCs
FX3 Generic term for FX3S, FX3G, FX3GC, FX3U, and FX3UC PLCs
FX5 CPU module Generic term for FX5U CPU module and FX5UC CPU module
FX5U CPU module Generic term for FX5U-32MR/ES, FX5U-32MT/ES, FX5U-32MT/ESS, FX5U-64MR/ES, FX5U-64MT/ES,
FX5U-64MT/ESS, FX5U-80MR/ES, FX5U-80MT/ES, FX5U-80MT/ESS, FX5U-32MR/DS, FX5U-32MT/DS,
FX5U-32MT/DSS, FX5U-64MR/DS, FX5U-64MT/DS, FX5U-64MT/DSS, FX5U-80MR/DS, FX5U-80MT/DS, and
FX5U-80MT/DSS
FX5UC CPU module Generic term for FX5UC-32MT/D, FX5UC-32MT/DSS, FX5UC-64MT/D, FX5UC-64MT/DSS, FX5UC-96MT/D,
FX5UC-96MT/DSS, FX5UC-32MT/DS-TS, and FX5UC-32MT/DSS-TS
Extension module Generic term for FX5 extension modules and FX3 function modules
• FX5 extension module Generic term for I/O modules, FX5 extension power supply modules, and FX5 intelligent function modules
• FX3 extension module Different name for FX3 intelligent function module
• Extension module (extension cable type) Generic term for Input modules (extension cable type), Output modules (extension cable type), Input/output
• Extension module (extension connector
type)
I/O module Generic term for Input modules, Output modules, Input/output modules, Powered input/output modules, and
Input module Generic term for Input modules (extension cable type) and Input modules (extension connector type)
• Input module (extension cable type) Generic term for FX5-8EX/ES and FX5-16EX/ES
• Input module (extension connector type) Generic term for FX5-C16EX/D, FX5-C16EX/DS, FX5-C32EX/D, FX5-C32EX/DS, and FX5-C32EX/DS-TS
Output module Generic term for Output modules (extension cable type) and Output modules (extension connector type)
• Output module (extension cable type) Generic term for FX5-8EYR/ES, FX5-8EYT/ES, FX5-8EYT/ESS, FX5-16EYR/ES, FX5-16EYT/ES, and FX5-
• Output module (extension connector type) Generic term for FX5-C16EYT/D, FX5-C16EYT/DSS, FX5-C32EYT/D, FX5-C32EYT/DSS, FX5-C32EYT/D-TS,
Input/output module Generic term for Input/output modules (extension cable type) and Input/output modules (extension connector
• Input/output module (extension cable
type)
• Input/output module (extension connector
type)
Powered input/output module Generic term for FX5-32ER/DS, FX5-32ET/DS, and FX5-32ET/DSS
High-speed pulse input/output module Generic term for FX5-16ET/ES-H and FX5-16ET/ESS-H
Extension power supply module Different name for FX5-C1PS-5V
Intelligent module The abbreviation for intelligent function modules
Intelligent function module Generic term for FX5 intelligent function modules and FX3 intelligent function modules
• FX5 intelligent function module Generic term for FX5-4AD, FX5-4DA, FX5-8AD, FX5-4LC, FX5-20PG-P, FX5-40SSC-S, FX5-80SSC-S, FX5-
• FX3 intelligent function module Generic term for FX3U-4AD, FX3U-4DA, FX3U-4LC, FX3U-1PG, FX3U-2HC, FX3U-16CCL-M, FX3U-64CCL,
Expansion adapter Generic term for adapter for FX5 CPU module
• Communication adapter Generic term for FX5-232ADP and FX5-485ADP
• Analog adapter Generic term for FX5-4AD-ADP, FX5-4DA-ADP, FX5-4AD-PT-ADP, and FX5-4AD-TC-ADP
Bus conversion module Generic term for Bus conversion module (extension cable type) and Bus conversion module (extension
• Bus conversion module (extension cable
type)
modules (extension cable type), Powered input/output module, High-speed pulse input/output module,
Intelligent function modules, and Bus conversion module (extension cable type)
Generic term for Input modules (extension connector type), Output modules (extension connector type), Input/
output modules (extension connector type), Extension power supply module, Connector conversion module
(extension connector type), and Bus conversion module (extension connector type)
High-speed pulse input/output modules
16EYT/ESS
and FX5-C32EYT/DSS-TS
type)
Generic term for FX5-16ER/ES, FX5-16ET/ES, and FX5-16ET/ESS
Generic term for FX5-C32ET/D, FX5-C32ET/DSS, FX5-C32ET/DS-TS, and FX5-C32ET/DSS-TS
CCLIEF, FX5-CCL-MS, and FX5-ASL-M
and FX3U-128ASL-M
connector type)
Different name for FX5-CNV-BUS
25

Term s Description
• Bus conversion module (extension
connector type)
Connector conversion module (extension
connector type)
Extended extension cable Generic term for FX5-30EC and FX5-65EC
Connector conversion adapter Different name for FX5-CNV-BC
Battery Different name for FX3U-32BL
SD memory card Generic term for NZ1MEM-2GBSD, NZ1MEM-4GBSD, NZ1MEM-8GBSD, NZ1MEM-16GBSD, L1MEM-2GBSD
Peripheral device Generic term for engineering tools and GOTs
GOT Generic term for Mitsubishi Electric Graphic Operation Terminal GOT1000 and GOT2000 series
■Software packages
Engineering tool The product name of the software package for the MELSEC programmable controllers
GX Works3 The product name of the software package, SWnDND-GXW3, for the MELSEC programmable controllers (The
Different name for FX5-CNV-BUSC
Different name for FX5-CNV-IFC
and L1MEM-4GBSD SD memory cards
Abbreviation of Secure Digital Memory Card. Device that stores data using flash memory.
'n' represents a version.)
26

1 OUTLINE
[17]
[15]
[16]
[11]
When the front covers are openSpring clamp terminal block type
[14]
[1]
[1]
[4]
[3]
[2]
[6]
[5]
Connector type
[9]
[10]
[8]
[6]
[7] [12]
[13]
1.1 Part Names
Front panel
1
No. Name Description
[1] Expansion adapter connecting
hooks
[2] Built-in RS-485 communication
terminal block
[3] Built-in Ethernet communication
connector
[4] Operation status display LED
PWR LED Indicates whether the CPU module is powered or not.
ERR LED Indicates the error status of the CPU module. (Page 141 Checking with LEDs)
P.RUN LED Indicates the program running status.
BAT LED Indicates the battery status.
CARD LED Indicates whether an SD memory card can be used or not.
SD/RD LED Lit when the CPU module is sending or receiving data through built-in Ethernet communication.
RD LED Lit when the CPU module is receiving data through built-in RS-485 communication.
SD LED Lit when the CPU module is sending data through built-in RS-485 communication.
[5] Input connector Connector for connecting input signal cables.
[6] Extension module connecting hook When connecting an expansion module, secure it with these hooks.
[7] I/O display LED Lit when the input or output is on.
When connecting an expansion adapter, secure it with these hooks.
Terminal block for connection with RS-485-compatible devices
Connector for connection with Ethernet-compatible devices (with cap)
For details, refer to MELSEC iQ-F FX5 User's Manual (Ethernet Communication).
Lit: Powered
Off: Not powered or hardware error (Page 141 Checking with LEDs)
Lit: Error or hardware error
Flashing: Factory default setting, error, hardware error, or resetting
Off: Operating normally
Lit: Operating normally
Flashing: Paused
Off: Stopped or stop error
Flashing: Battery error
Off: Operating normally (Page 141 Checking with LEDs)
Lit: Can be used or cannot be removed.
Flashing: In preparation
Off: Not inserted or can be removed.
For details on the terminal layout, refer to Page 39 Terminal Layout.
1 OUTLINE
1.1 Part Names
27
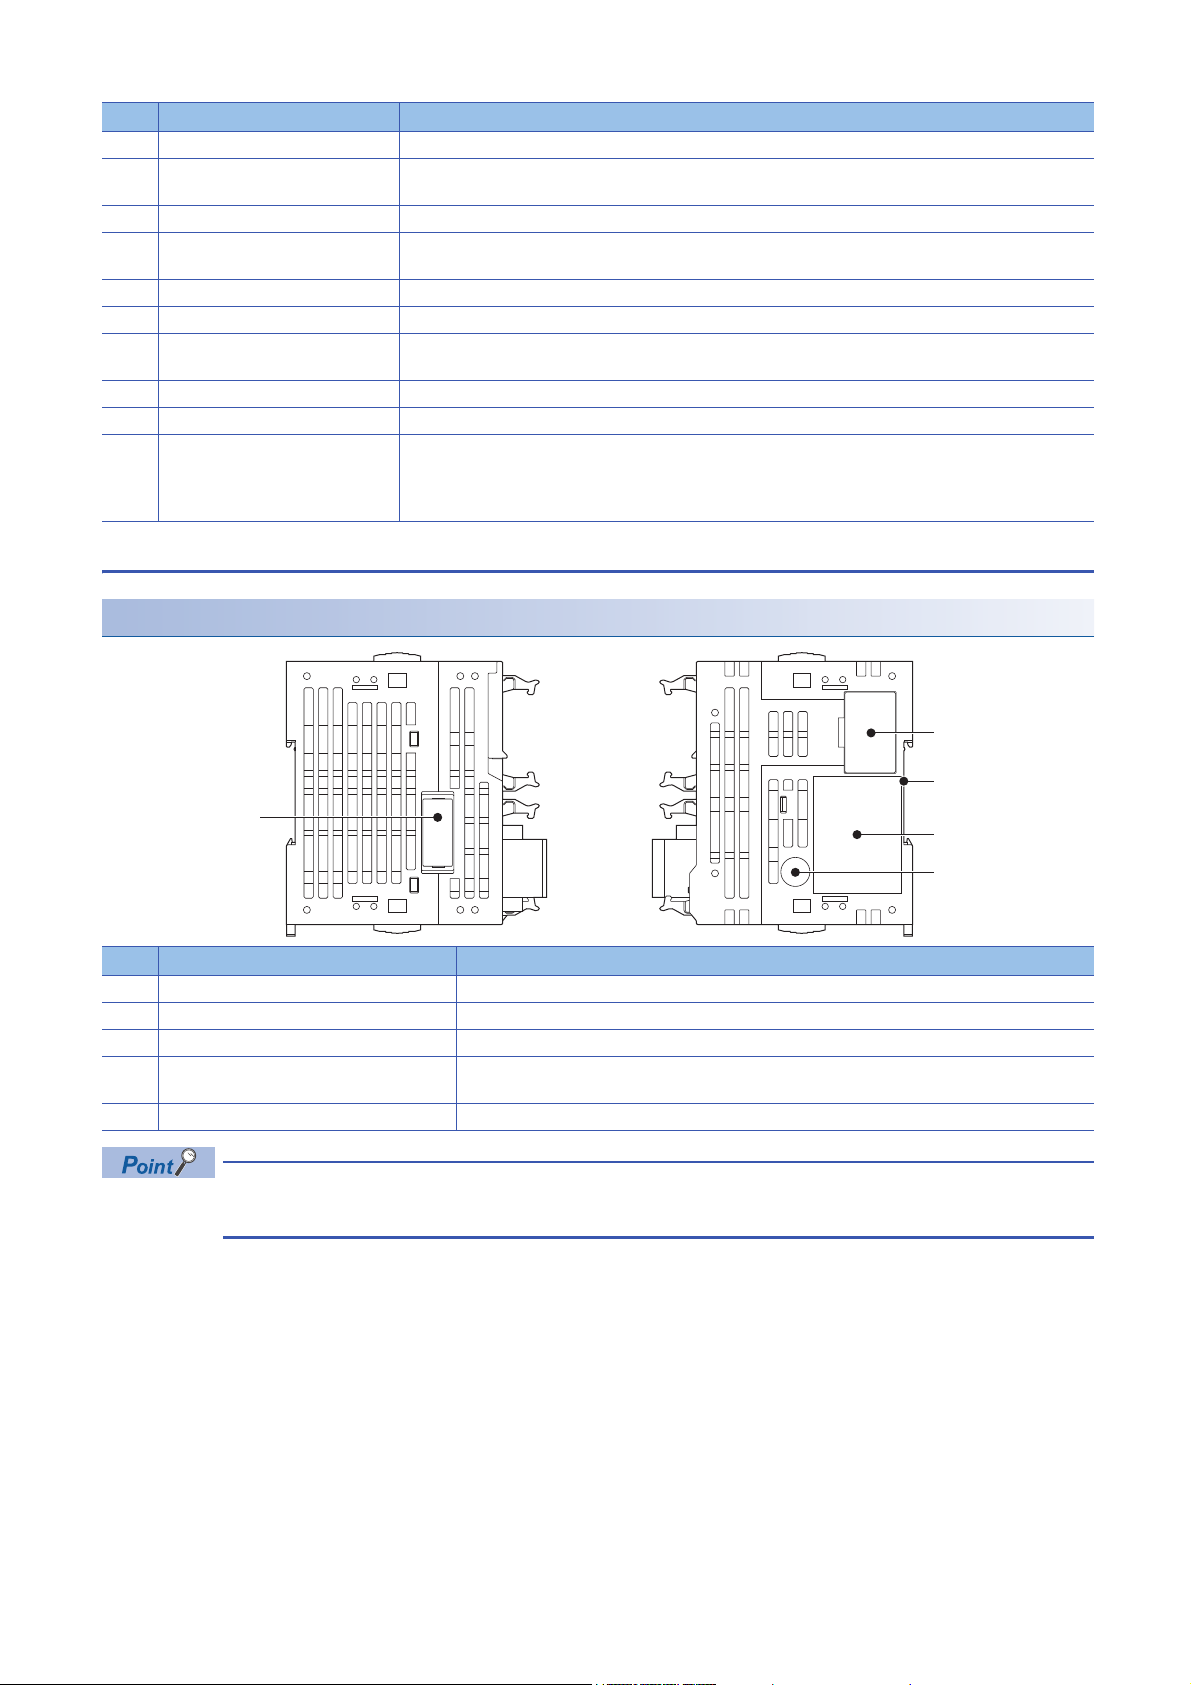
No. Name Description
[1]
[2]
[3]
[4]
[5]
[8] DISP switch Switches input/output of the I/O display LED.
[9] Output connector Connector for connecting output signal cables.
For details on the terminal layout, refer to Page 39 Terminal Layout.
[10] DIN rail mounting hook Hook for mounting a CPU module on a DIN rail of DIN46277 (35 mm wide).
[11] Input terminal Terminals for input.
[12] Input display LED Lit when input is on.
[13] Output display LED Lit when output is on.
[14] Output terminal Terminals for output.
[15] SD memory card disable switch Switch for disabling access to the SD memory card when the card is to be removed.
[16] SD memory card slot Slot for inserting an SD memory card.
[17] RUN/STOP/RESET switch Switch for operating the CPU module. (Page 135 Methods of running, stopping, and resetting)
For details on the terminal layout, refer to Page 39 Terminal Layout.
For details on the terminal layout, refer to Page 39 Terminal Layout.
RUN: Runs the program
STOP: Stops the program
RESET: Resets the CPU module (hold the switch on the RESET side for approximately 1 second.)
Side
Left side/right side
No. Name Description
[1] Expansion adapter connector cover Cover for protecting the expansion adapter connector.
[2] Subsequent extension connector cover Cover for protecting the subsequent extension connector.
[3] DIN rail mounting groove The module can be installed on a DIN46277 rail (35 mm wide).
[4] Nameplate The product model name, manufacturer's serial number, power supply specifications, and MAC
[5] Genuine product certification label Genuine product certification label to prevent counterfeiting
address are shown.
Products that do not have the genuine product certification label or nameplate are not covered by the
warranty.
28
1 OUTLINE
1.1 Part Names
 Loading...