

Page 1

Installation and Setup Guide
Release 1.1
Page 2

Notice
The information contained in this document is believed to be accurate in all
respects but is not warranted by Mitel Networks™ Corporation (MITEL
®
). The
information is subject to change without notice and should not be construed in any
way as a commitment by Mitel or any of its affiliates or subsidiaries. Mitel and its
affiliates and subsidiaries assume no responsibility for any errors or omissions in
this document. Revisions of this document or new editions of it may be issued to
incorporate such changes.
No part of this document can be reproduced or transmitted in any form or by any
means - electronic or mechanical - for any purpose without written permission from
Mitel Networks Corporation.
Trademarks
Mitel Networks and the MITEL logo are trademarks of Mitel Networks
Corporation.
VCON is a trademark of VCON Ltd.
MeetingPoint is a registered trademark of VCON, Inc., in the United States.
Microsoft, Windows, NetMeeting and the Microsoft Internet Explorer logo are
registered trademarks or trademarks of Microsoft Corporation.
Other product names mentioned in this document may be trademarks of their
respective companies and are hereby acknowledged.
Revision A
March 2003
, Trademark of MITEL Networks Corporation Ltd.
Copyright 2002, MITEL Networks Corporation Ltd.
All rights reserved.
ii Mitel Networks 5750 DV Installation and Setup Guide
Page 3

Limited Warranty
Mitel Networks Corporation warrants the Product identified by the serial number
indicated on the HARDWARE either accompanying the SOFTWARE or purchased
separately will be free from defects in materials and workmanship under normal
use and service for a period of ONE (1) year from the date of receipt. This Limited
Warranty shall not apply to any product that in the opinion of Mitel Networks
Corporation has not been installed or upgraded according to accompanying
documentation from Mitel Networks Corporation or been subject to misuse,
misapplication, negligence or accident while in the hands of the purchaser. Mitel
Networks Corporation warrants that SOFTWARE will perform according to
accompanying user documentation for a period of 90 (ninety) days from the date of
receipt; replacement SOFTWARE will be warranted for 90 (ninety) days from the
date of receipt.
GRANT OF LICENSE Mitel Networks Corporation grants the Purchaser a nonexclusive and non-transferable license to use the SOFTWARE product and to make
one copy solely for backup or archival purposes, which may include user
documentation provided via online or other electronic form. Additional copies may
not be made, nor may anyone else be allowed to copy or otherwise reproduce any
part of the licensed software without prior written consent of Mitel Networks
Corporation.
LIABILITIES Mitel Networks Corporation’s entire liability and the Purchaser’s
exclusive remedy shall be at Mitel Networks Corporation’s option, either return of
the price paid or repair/replacement of the Product not meeting Mitel Networks
Corporation’s declared Limited warranty. Mitel Networks Corporation or its
suppliers shall not be liable in any event to anyone for any indirect, incidental,
consequential, special or exemplary damages including without limitation damages
for loss of business profits, business interruptions, business information or other
pecuniary loss arising out of the use of or inability to use the said Product even if
advised of the possibility of such damages. In any case, Mitel Networks
Corporation’s entire liability under any provision of this agreement shall be limited
to the amount actually paid by the Purchase for the Product.
Mitel Networks 5750 DV Installation and Setup Guide iii
Page 4

Safety Notice
When you use the 5750 DVA system, observe the following safety guidelines:
Make sure that the voltage of the power supply matches the AC power available at
your location:
! 115 V/60 Hz in most of North and South America and some Far Eastern
countries such as Japan, South Korea and Taiwan.
! 230 V/50 Hz in most of Europe, the Middle East and the Far East.
Make sure the monitor and attached accessories are electrically rated to operate
with the AC power available in your location.
Plug the accessories’ power cables into properly grounded power sources. These
cables are equipped with three-prong plugs to help ensure proper grounding.
Do not use adapter plugs or remove the grounding prong from a cable. If you must
use an extension cable, use a three-wire cable with properly grounded plugs.
Make sure that nothing rests on the cables and that the cables are not located where
they can be stepped on or tripped over.
Do not spill food or liquids on the system or accessories.
Keep the system away from radiators and heat sources, and do not block cooling
vents.
iv Mitel Networks 5750 DV Installation and Setup Guide
Page 5

Regulatory Notices
Note: This equipment has been tested and found to comply with the limits for a
Class B digital device, pursuant to Part 15 of the FCC Rules. These limits are
designed to provide reasonable protection against harmful interference in a
residential installation. This equipment generates, uses and can radiate radio
frequency energy and, if not installed and used in accordance with the instructions,
may cause harmful interference to radio communications. However, there is no
guarantee that interference will not occur in a particular installation. If this
equipment does cause harmful interference to radio or television reception, which
can be determined by turning the equipment off and on, the user is encouraged to
try to correct the interference by one or more of the following measures:
– Reorient or relocate the receiving antenna.
– Increase the separation between the equipment and receiver.
– Connect the equipment into an outlet on a circuit different from that to which
the receiver is connected.
– Consult the dealer or an experienced radio/TV technician for help.
CAUTION:
To comply with the limits for a Class B digital device, pursuant to Part 15 of the
FCC Rules, only Mitel Networks 5750 Desktop Video Appliance original
equipment should be used. All cables used to connect the 5750 DVA and
peripherals must be shielded and grounded. Operation with non-certified
accessories or non-shielded cables may result in interference to radio or television
reception.
Mitel Networks 5750 DV Installation and Setup Guide v
Page 6

For Users in Canada
NOTICE:
The Industry Canada Label identifies certified equipment. This certification means
that the equipment meets telecommunications network protective, operational and
safety requirements as prescribed in the appropriate Terminal equipment Technical
Requirements document(s). The Department does not guarantee the equipment will
operate to the user’s satisfaction.
Before installing this equipment, users should ensure that it is permissible to be
connected to the facilities of the local telecommunications company. The
equipment must also be installed using an acceptable method of connection. The
customer should be aware that compliance with the above conditions may not
prevent degradation of service in some situations.
Repairs to certified equipment should be coordinated by a representative
designated by the supplier. Any repairs or alterations made by the user to this
equipment, or equipment malfunctions, may give the telecommunications company
cause to request the user to disconnect the equipment.
Users should ensure for their own protection that the electrical ground connections
of the power utility, telephone lines and internal metallic water pipe system, if
present, are connected together. This precaution may be particularly important in
rural areas.
CAUTION
Users should not attempt to make such connections themselves, but should contact
the appropriate electric inspection authority, or electrician, as appropriate.
vi Mitel Networks 5750 DV Installation and Setup Guide
Page 7

Pour les utilisateurs au Canada
AV I S :
Le label d’Industrie Canada identifie le matériel homologué. Ce label certifie que le
matériel est conforme aux normes de protection, d’exploitation et de sécurité des
réseaux de télécommunications, comme le prescrivent les documents concernant
les exigences techniques relatives au matériel terminal. Le Ministère n’assure
toutefois pas que le matériel fonctionnera à la satisfaction de l’utilisateur.
Avant d’installer ce matériel, l’utilisateur doit s’assurer qu’il est permis de le
raccorder aux installations de l’opérateur local de télécommunication. Le matériel
doit également être installé suivant une méthode acceptée de raccordement.
L’abonné ne doit pas oublier qu’il est possible que la conformité aux conditions
énoncées ci-dessus n’empêche pas la dégradation du service dans certaines
situations.
Les réparations de matériel homologué doivent être coordonnées par un
représentant désigné par le fournisseur. L’opérateur de télécommunications peut
demander à l’utilisateur de débrancher un appareil à la suite de réparations ou de
modifications effectuées par l’utilisateur ou à cause de dysfonctionnnement.
Pour sa propre protection, l’utilisateur doit s’assurer que tous les fils, de mise à la
terre, de la source d’énergie électrique, des lignes téléphoniques et des canalisations
d’eau métalliques, s’il y en a, sont raccordés ensemble. Cette précaution est
particulièrement importante dans les régions rurales.
Avertissement
L’utilisateur ne doit pas tenter de faire ces reccordements lui-même; il doit avoir
recours à un service d’inspection des installations électriques, ou à un électricien,
selon le cas.
Mitel Networks 5750 DV Installation and Setup Guide vii
Page 8

Conformance to EC Directives
The “CE” mark is affixed to this product to demonstrate conformance to the
R&TTE directive (99/05/EC) (Radio Equipment and Telecommunications
Terminal Equipment Directive).
Declaration of Conformity
We, VCON Ltd.
Of
PO Box 12747
22 Maskit Street
Herzliya 46733
Israel
Declare under our sole responsibility that the product:
Mitel Networks 5750, 5760 and all associated peripherals manufactured by VCON
Ltd.
To which this declaration relates is in conformity with the essential requirements
specified in Article 3.1 (a) and 3.1 (b) of:
Directive 99/05/EC (Radio Equipment and Telecommunications Terminal
Equipment Directive)
For a copy of the Original Signed Declaration (In full conformance with EN45014)
please contact the Regulatory Approvals Manager at the above address.
viii Mitel Networks 5750 DV Installation and Setup Guide
Page 9

Product Names
PRODUCT NAMES
VCON product names may appear in the customer documentation and in the
graphical user interface of this product.
Mitel Networks product names correspond to the following VCON product names:
VCON product name Mitel Networks
product name
Media Xchange Manager (MXM) Mitel Networks 5700 Voice First
Application (5700 VFA)
Falcon IP Mitel Networks 5760 Video Conference
Appliance (5760 VCA)
ViGO Personal Mitel Networks 5750 Desktop Video
Appliance (5750 DVA)
MediaConnect 9000 Mitel Networks 5770 Boardroom
Conference Appliance (5770 BCA)
NOTE There are minor differences between Mitel Networks products and the
equivalent VCON products.
Mitel Networks 5750 DV Installation and Setup Guide ix
Page 10

Product Names
About this Installation and Setup Guide
This Installation and Setup guide explains how to set up the Mitel Networks™
5750 Desktop Video Appliance, connect its accessories, and install and set up the
VCON MeetingPoint conferencing application.
The following chapter summary briefly describes this guide’s contents:
Chapter 1 Welcome to Video over IP
Introduction to this Installation and Setup Guide
Chapter 2 System Installation and Connections
Procedures for connecting the standard equipment to the
5750 DVA.
Chapter 3 MeetingPoint Setup
Procedures for installing the MeetingPoint application
and setting up its configuration.
Chapter 4 5750 DVA Controls and LEDs
Summary of the functions of the buttons and LEDs on
the 5750 DVA unit’s base.
Chapter 5 Troubleshooting
Solutions for possible problems that you may encounter
with the 5750 DVA.
Appendix A Connecting Optional Accessories
Procedures for connecting optional accessories and
peripheral equipment to the 5750 DVA.
Mitel Networks Technical Support
This Installation and Setup Guide was designed to help you prepare your
conferencing system easily so that you can enjoy its many features.
If a situation occurs that is not covered by the supplied documentation, please
request help from our Technical Support channels.
! Contact your local Mitel Networks distributor, and request assistance from its
technical support department.
x Mitel Networks 5750 DV Installation and Setup Guide
Page 11

Table of Contents
TABLE OF CONTENTS
1 Welcome to Video over IP
1.1 5750 DVA Models................................................................................1–1
1.2 5750 DVA System Components...........................................................1–2
5750 DVA Appliance Unit ...................................................................1–3
Camera ..................................................................................................1–4
Headset..................................................................................................1–5
Tabletop Microphone............................................................................1–6
5750 DVA Setup CD-ROM..................................................................1–6
Document Camera ................................................................................1–6
Wide Angle Lens ..................................................................................1–6
2 System Installation and Connections
2.1 Package Contents..................................................................................2–1
2.2 Setting Up the 5750 DVA Appliance ...................................................2–2
Assembling the 5750 DVA Tower .......................................................2–3
The 5750 DVA Base Connectors..........................................................2–4
Connecting the Desktop Camera ..........................................................2–5
Connecting the Headset ........................................................................2–7
Connecting a PTZ Camera....................................................................2–8
Connecting a Tabletop Microphone .....................................................2–9
Connecting the Power Supply.............................................................2–10
Connecting the 5750 DVA to a Computer..........................................2–11
3 MeetingPoint Setup
3.1 Minimum System Requirements ..........................................................3–1
3.2 Uninstalling Previous MeetingPoint Versions......................................3–2
3.3 Installing MeetingPoint.........................................................................3–3
3.4 Starting and Exiting MeetingPoint® ..................................................3–11
System Managed by 5700 VFA (MXM) ............................................3–11
Stand-alone System.............................................................................3–13
Exiting MeetingPoint ..........................................................................3–13
3.5 Setting Up the MeetingPoint Configuration .......................................3–14
3.6 Changing Configuration Information .................................................3–21
4 5750 DVA Controls and LEDs
5 Troubleshooting
Mitel Networks 5750 DV Installation and Setup Guide xi
Page 12

Table of Contents
A Connecting Optional Accessories
A.1 Connecting External Speakers............................................................. A–1
Connecting Multimedia Speakers ....................................................... A–1
Connecting a VGA Monitor’s Speakers.............................................. A–2
A.2 Connecting a Second Camera.............................................................. A–3
A.3 Connecting a VCR............................................................................... A–4
A.4 Connecting a Document Camera......................................................... A–5
A.5 Connecting Other USB Devices.......................................................... A–6
xii Mitel Networks 5750 DV Installation and Setup Guide
Page 13

1WELCOME TO VIDEO OVER IP
Congratulations on your entry into the rapidly growing world of Video over IP
conferencing! Mitel Networks
compact and portable, yet sophisticated and friendly. It gives you high video
quality and powerful conferencing capabilities over an enterprise’s Internet
Protocol (IP) local-area networks (LAN) and wide-area networks (WAN).
When connected to a Mitel Networks 3300 Integrated Communications Platform
(3300 ICP) via the Mitel Networks 5700 Voice First Application (5700 VFA), you
can use the 5750 DVA with the Mitel Networks 5020/5220 IP Phone and 5310 IP
Boardroom Conference Unit. Making videoconferences then becomes as easy as
making a voice call, then pressing a key to add video to the call.
The 5750 DVA meets all the technical requirements prescribed in the H.323 ITU-T
global recommendation for transmitting video, audio and data across LANs and
WANs.
1.1 5750 DVA Models
The 5750 DVA appliance comes in the following product configurations:
™ innovative 5750 Desktop Video Appliance is
5750 DVA
Standard
5750 DVA
Professional
5750 DVA
Executive
Unless specified otherwise, this Guide uses the term “5750 DVA” to refer to
all models.
Mitel Networks 5750 DV Installation and Setup Guide 1–1
Plug-and-play Video over IP appliance that supports a
bandwidth of up to 384 Kbps and includes a camera and
a headset.
Plug-and-play Video over IP appliance that supports a
bandwidth of up to 1.5 Mbps, and includes a camera, a
headset, Mitel Networks Interactive Multicast for
multiparty video meetings, and the 5750 DVA tower
speaker.
Plug-and-play Video over IP appliance that supports a
bandwidth of up to 1.5 Mbps, and includes a Pan/Tilt/
Zoom (PTZ) camera, a tabletop microphone, a headset,
Mitel Networks Interactive Multicast for multiparty
video meetings, and the 5750 DVA tower speaker.
Page 14
Chapter 1 Welcome to Video over IP
The 5750 DVA Professional
1.2 5750 DVA System Components
The 5750 DVA Personal Conferencing Appliance is an elegant, fully-featured
portable conferencing system for today’s business professionals. All the
components required for connecting and installing the system are supplied along
with comprehensive documentation and powerful software to make your video
meetings productive and enjoyable.
The main standard 5750 DVA system components are:
• 5750 DVA appliance unit
• Desktop camera (Standard and Professional models)
Pan/Tilt/Zoom (PTZ) camera (Executive model)
• Headset
• Tabletop microphone (Executive model only)
• MeetingPoint setup CD-ROM
1–2 Mitel Networks 5750 DV Installation and Setup Guide
Page 15
Chapter 1 Welcome to Video over IP
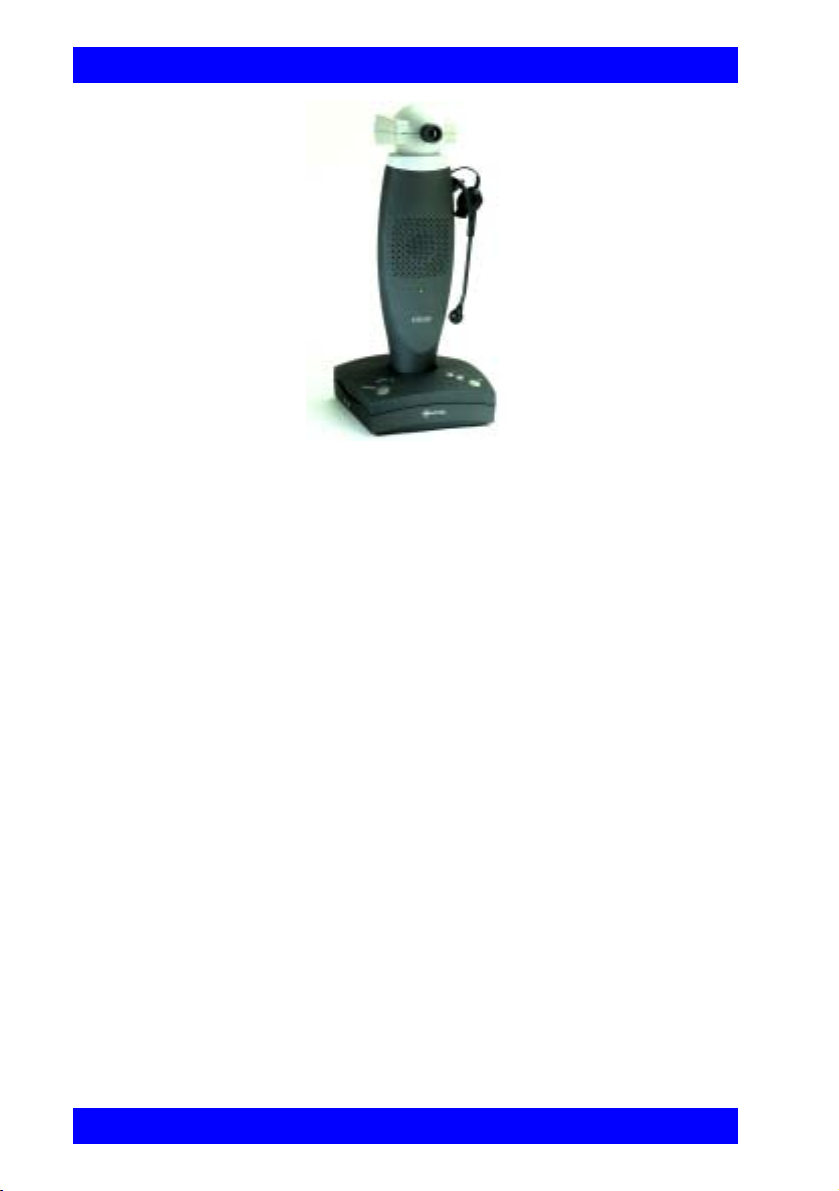
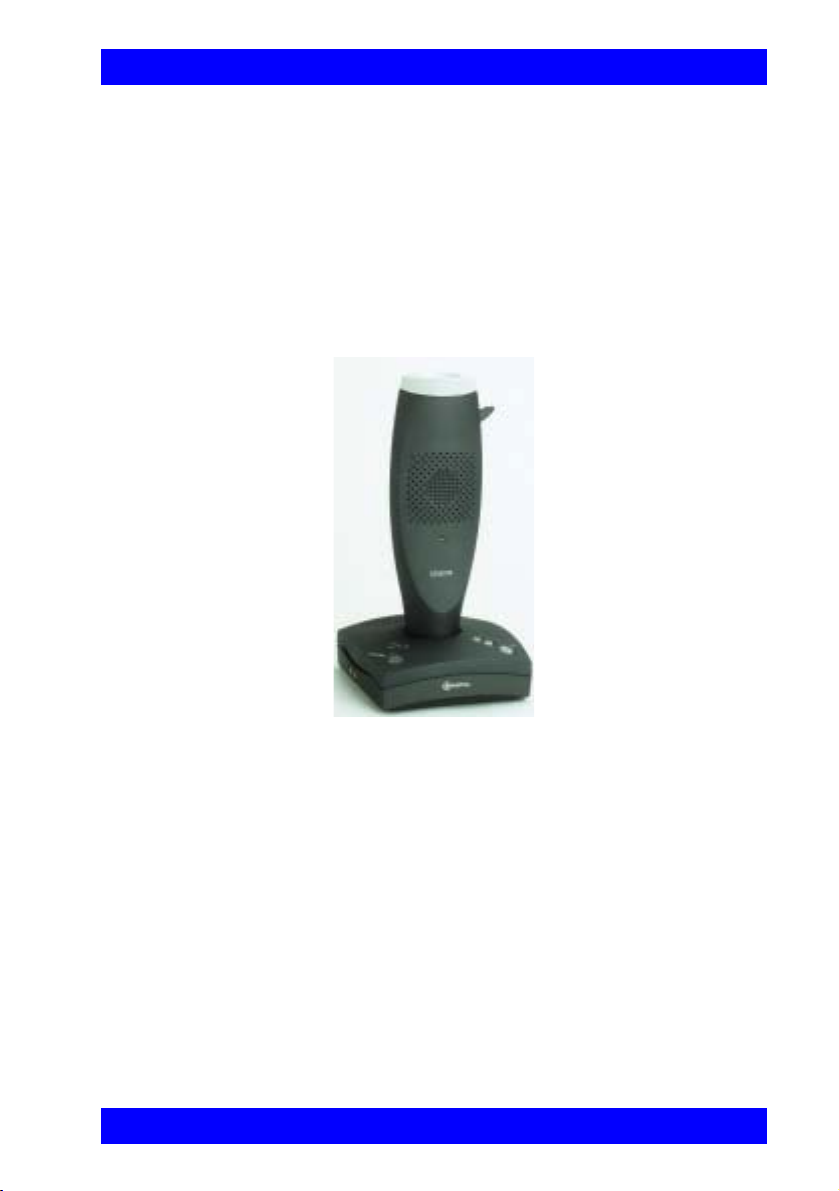
5750 DVA Appliance Unit
The appliance of all 5750 DVA models is called the base, which contains the
videoconferencing board and various connectors for connecting other components
and accessories. The top of the base includes a multi-purpose Smart button, volume
controls, and status LEDs.
The 5750 DVA Professional and 5750 DVA Executive also include the tower for
space-saving convenience and superior audio quality. It has a cup for positioning
the camera at eye-level, a built-in speaker, and a hook for hanging the headset when
its not being used.
5750 DVA Appliance Unit: Base and Tower
Mitel Networks 5750 DV Installation and Setup Guide 1–3
Page 16

Chapter 1 Welcome to Video over IP
Camera
The main supplied camera depends on the purchased 5750 DVA model:
• 5750 DVA Standard and Professional - Desktop camera
• 5750 DVA Executive - Pan/Tilt/Zoom (PTZ) camera
Desktop Camera for 5750 DVA Standard and Professional Models
The desktop camera is handy for both a desktop environment and for portable use.
It provides color video and includes a built-in microphone, focus, contrast, and
other controls for adjusting the image manually.
Desktop Cameras
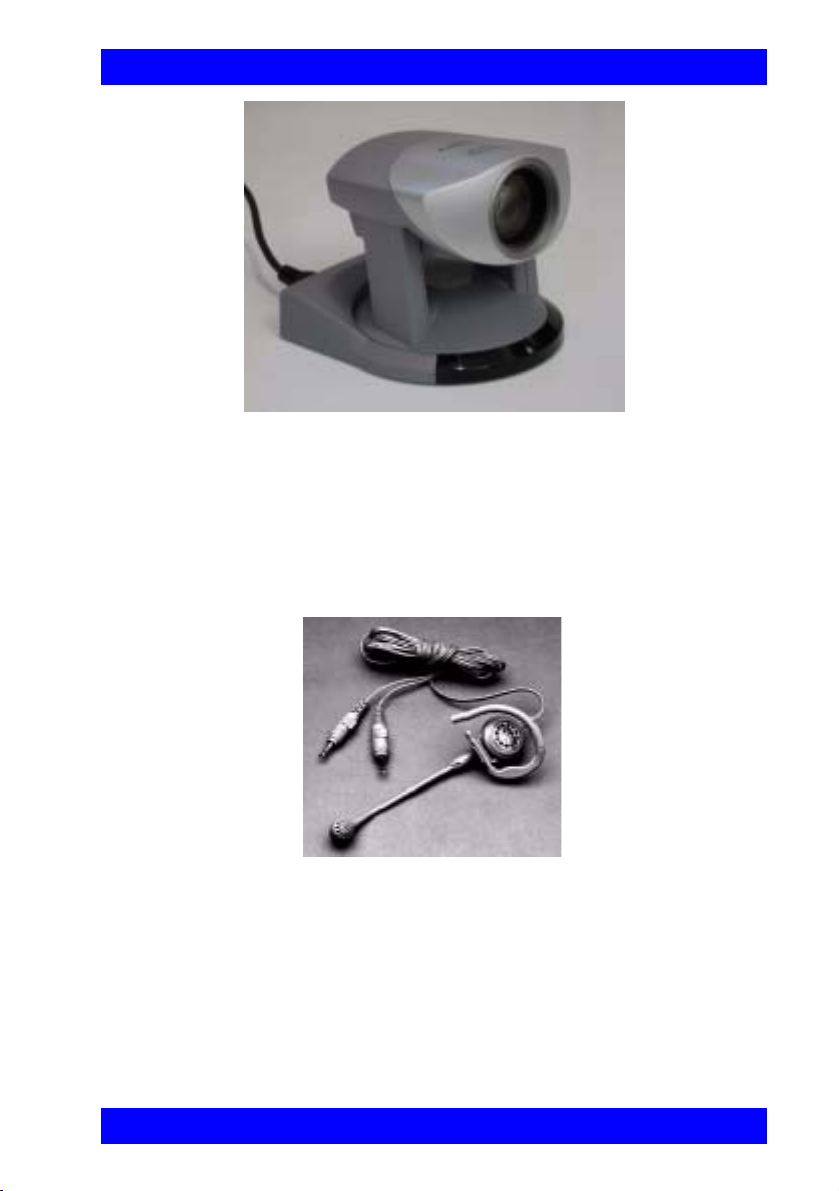
PTZ Camera for 5750 DVA Executive Model
The Pan/Tilt/Zoom (PTZ) camera is controlled through the Camera Controller of
the MeetingPoint software. You can pan, tilt and zoom the camera in a wide range
of directions during videoconferences.
Zoom control is up to 16 times with automatic focus control.
Up to six pre-set positions can be set for instant recall through the MeetingPoint
application.
Connectors located on the rear of the Camera Unit enable connectivity through the
system cables to the 5750 DVA base.
The PTZ camera is available as an option with the 5750 DVA Standard and
Professional models.
1–4 Mitel Networks 5750 DV Installation and Setup Guide
Page 17
Chapter 1 Welcome to Video over IP
PTZ Camera
Headset
The supplied headset is ultra-lightweight, single-sided to be worn over one ear. It
enables you to carry on hands-free conferencing, so you may simultaneously write
or work on your computer as you converse. The headset includes a highperformance speaker and a boom-mounted noise-cancelling electret microphone.
Headset
Mitel Networks 5750 DV Installation and Setup Guide 1–5
Page 18

Chapter 1 Welcome to Video over IP
Tabletop Microphone
The tabletop microphone is the standard audio source of the 5750 DVA Executive
model. It provides high-performance, outgoing audio during videoconferences. It is
highly sensitive, with a working range covering approximately 6 meters (app. 20
feet) at an area greater than 180° from the front of the unit. The microphone
transfers the full range of speaker audio.
The microphone’s cable is 6 meters (about 20 feet).
A tabletop microphone is available as an option with the 5750 DVA
Standard and Professional models.
5750 DVA Setup CD-ROM
The CD-ROM in the original 5750 DVA package contains Mitel Networks
conferencing application and online guides for setting up and operating your
system. The CD-ROM includes:
• MeetingPoint 4.6 or higher
• Microsoft NetMeeting™ 3.01
• Microsoft Internet Explorer 5.0 (for viewing the online help)
• Online Product Guides
— 5750 DVA Installation and Setup Guide
— MeetingPoint User Guide
Document Camera
The document camera is available as an optional accessory to all 5750 DVA
models. It displays a placed document on the screens of both parties during a
videoconference.
Wide Angle Lens
The wide angle lens is available as an optional accessory to the 5750 DC Executive
PTZ camera.
1–6 Mitel Networks 5750 DV Installation and Setup Guide
Page 19

2SYSTEM INSTALLATION AND CONNECTIONS
The 5750 DVA over IP system installation includes the following stages:
! Checking the items included in the shipping package
! Connecting the supplied equipment (for connection procedures of optional
accessories, see Appendix A, “Connecting Optional Accessories”).
2.1 Package Contents
When you open the 5750 DVA system shipping package for the first time, check
that the following items are included, in accordance with the purchased model.:
Item Standard Professional Executive
5750 DVA base
5750 DVA tower
NTSC or PAL desktop camera
PTZ camera, including power
supply (220V or 110V), video
cable, and control cable
Wide angle lens for PTZ
camera
Clamp for camera cable
Audio headset
Universal power supply (100240 V, 50-60 Hz) and cord
USB cable
Carrying bag
5750 DVA setup CD-ROM
5750 DVA Installation &
Setup Guide
"""
N/A
""
Opt Opt "
Opt Opt Opt
""
N/A
"""
"""
"""
"""
N/A
""
"""
"""
Tabletop microphone
Mitel Networks 5750 DV Installation and Setup Guide 2–1
Opt Opt
"
Page 20

Chapter 2 System Installation and Connections
Item Standard Professional Executive
Document camera Opt Opt Opt
2nd camera Opt Opt Opt
Legend: " - Standard, Opt - Option, N/A - Not applicable.
2.2 Setting Up the 5750 DVA Appliance
Correct operation of the 5750 DVA appliance requires several connections between
the 5750 DVA and other devices. This section describes how to connect the basic
components:
• Assembling the 5750 DVA Tower
• The 5750 DVA Base Connectors
• Connecting the Desktop Camera
• Connecting a PTZ Camera
• Connecting a Tabletop Microphone
• Connecting the Headset
• Connecting the Power Supply
• Connecting the 5750 DVA to a Computer
If you purchased the 5750 DVA Standard, which does not include the tower,
proceed directly to the section, “The 5750 DVA Base Connectors” on page 2-4.
CAUTION Do not clean the 5750 DVA appliance using alcohol, as it may
remove the paint.
2–2 Mitel Networks 5750 DV Installation and Setup Guide
Page 21

Chapter 2 System Installation and Connections
Assembling the 5750 DVA Tower
The 5750 DVA Professional and Executive models consist of two main parts: the
base and the tower. They are packed separately in the shipping package. The tower
mounts easily onto the top of the base.
CAUTION Do not connect the 5750 DVA to a power supply before
assembling the system and connecting the accessories.
" To assemble the 5750 DVA tower
1. Remove the cover from the tower hole on the 5750 DVA base.
2. Place the base on a flat surface so that the side with the buttons, LEDs, and
tower hole are on top.
3. Insert the tower into the hole as far as possible so that it sits securely.
4. Turn the tower so that the speaker faces the front (towards the buttons and
LEDs).
Assembling the 5750 DVA Tower
Mitel Networks 5750 DV Installation and Setup Guide 2–3
Page 22

Chapter 2 System Installation and Connections
The 5750 DVA Base Connectors
In the following sections and in Appendix A, “Connecting Optional Accessories”,
the procedures refer to connectors located on the 5750 DVA’s rear and side panel
(left from the front). The following illustrations show the connectors’ locations.
USB A
from the 5750 DVA to
another USB device
from the 5750 DVA
to the computer
USB B
Aux Audio In
for auxiliary audio
source (e.g. VCR)
Aux Video In
for auxiliary video source
(e.g. PTZ camera)
Base Rear Panel
SPKR
Base Side Panel
Camera In
MIC
Power In
Power Switch
2–4 Mitel Networks 5750 DV Installation and Setup Guide
Page 23

Chapter 2 System Installation and Connections
Connecting the Desktop Camera
As standard equipment in the 5750 DVA Standard and Professional models, a
stationary desktop camera is provided. To reduce the space occupied by the cable
and to prevent tangling, a cable clip is supplied.
CAUTION Make sure that the 5750 DVA is turned off.
" To connect the desktop camera to the 5750 DVA
1. Connect the camera’s cable connector to the Camera IN connector on
the 5750 DVA rear panel.
Before inserting the cable, align the arrow mark on the cable
connector with the breakage of the inner metal ring of the Camera IN
connector.
2. Place the camera on the top of the tower or any other stable surface.
3. To reduce the space occupied by the cable and to prevent tangling, place
two sections of the camera cable inside the supplied cable clip (see the
following illustration).
Mitel Networks 5750 DV Installation and Setup Guide 2–5
Page 24

Chapter 2 System Installation and Connections
Connecting the Desktop Camera to the 5750 DVA
2–6 Mitel Networks 5750 DV Installation and Setup Guide
Page 25

Chapter 2 System Installation and Connections
Connecting the Headset
The 5750 DVA includes a headset for incoming and outgoing audio.
" To connect the headset to the 5750 DVA
1. Insert the Audio Out (Speaker) jack into the Spkr (left) connector on the
5750 DVA side panel.
2. Insert the Audio In (Microphone) jack into the Mic (right) connector on
the 5750 DVA side panel.
The 5750 DVA tower includes a hook for hanging the headset when it is not
used.
Connecting the Headset to the 5750 DVA
Mitel Networks 5750 DV Installation and Setup Guide 2–7
Page 26

Chapter 2 System Installation and Connections
Connecting a PTZ Camera
A controllable Pan/Tilt/Zoom (PTZ) camera is the standard supplied camera of the
5750 DVA Executive model, and is available as an option with the 5750 DVA
Standard and Professional models. The PTZ camera can be controlled from the
Video Window in the MeetingPoint application (see “Controlling PTZ Camera(s)”
in the MeetingPoint User’s Guide).
" To connect a PTZ camera to the 5750 DVA rear panel
1. Connect the yellow-tipped cable between the camera VIDEO OUT
connector and the Aux Video IN (yellow) connector on the 5750
DVA rear panel.
2. Connect the Camera Control cable between the camera’s serial
communication connector and a free COM port on the computer.
3. Verify that the camera is connected to a power supply.
For specific instructions on installing and operating the PTZ camera, see its
accompanying user’s guide.
COM port
VIDEO OUT
Serial Communication
Connecting a PTZ Camera to the 5750 DVA
2–8 Mitel Networks 5750 DV Installation and Setup Guide
Page 27

Chapter 2 System Installation and Connections
Connecting a Tabletop Microphone
If more than one person will participate from the local side during the same
conferences, a tabletop microphone is more efficient for sending out audio. A
tabletop microphone is the standard supplied audio source of the 5750 DVA
Executive model, and is available as an option with the 5750 DVA Standard and
Professional models.
The microphone may be connected to the Audio In (Microphone) connector and
either multimedia speakers or the 5750 DVA’s built-in speaker may be used for
Audio Out.
" To connect the tabletop microphone
1. Connect the microphone’s 3.5 mm jack to the Mic (right) connector on
the 5750 DVA side panel.
2. Place the microphone on your desk with the cable stretching toward the
5750 DVA unit.
Connecting a Tabletop Microphone to the 5750 DVA
Mitel Networks 5750 DV Installation and Setup Guide 2–9
Page 28

Chapter 2 System Installation and Connections
Connecting the Power Supply
A universal power supply (100-240 V, 50-60 Hz) is supplied in the 5750 DVA
package, enabling compatibility with the electricity grid in your region.
CAUTION Make sure that the 5750 DVA’s power is turned off before you
connect the power supply.
" To provide power to the 5750 DVA
1. Connect the power supply’s DC output connector to the Power IN
socket on the 5750 DVA rear panel.
2. Connect the AC power cord between the AC input connector of the power
supply and a grounded electrical wall outlet.
3. Place the power supply on a flat surface. Do not cover it with any objects
or other cables.
Connecting the 5750 DVA to the Power Supply
2–10 Mitel Networks 5750 DV Installation and Setup Guide
Page 29

Chapter 2 System Installation and Connections
Connecting the 5750 DVA to a Computer
The 5750 DVA is a Plug and Play appliance. When you connect it to your
computer’s USB port, it operates normally with no need to change the
configuration or other system properties of the computer.
CAUTION Before connecting the 5750 DVA to your computer, you must
install the MeetingPoint software. See Chapter 3,
“MeetingPoint Setup”, for instructions.
" To connect the 5750 DVA to a PC, laptop or notebook computer
1. Connect the 5750 DVA’s USB cable between the USB B connector
on the 5750 DVA rear panel and the computer’s USB A port.
USB Connector Types
2. Turn on all accessories and peripherals (such as cameras, VCR,
multimedia speakers) connected to the 5750 DVA.
3. To turn the 5750 DVA on, press the Power switch on the 5750 DVA rear
panel to I. Make sure that the POWER LED and the desktop camera’s
green LED turn on. A message may state that Windows is loading a new
USB driver. Wait a few seconds for the message to disappear.
4. Press the ViGO Smart button on the top of the base to start MeetingPoint.
When you start MeetingPoint for the first time, the Configuration Setup
Wizard guides you through the required stages and requests the relevant
information for normal operation of MeetingPoint. For instructions on
setting up Meeting Point, see “Setting Up the MeetingPoint
Configuration” on page 3-14.
Otherwise, MeetingPoint opens on your screen as usual.
For detailed information about operating MeetingPoint, see the online
User Guide, supplied on the 5750 DVA setup CD-ROM.
Mitel Networks 5750 DV Installation and Setup Guide 2–11
Page 30

Chapter 2 System Installation and Connections
Connecting the 5750 DVA to the Computer
2–12 Mitel Networks 5750 DV Installation and Setup Guide
Page 31

3MEETINGPOINT SETUP
Before connecting the 5750 DVA system (with its accessories) to the computer,
install and set up the MeetingPoint software. This enables the setup program to
identify a 5750 DVA installation instead of another product. The MeetingPoint
setup stages include:
! Verifying that your computer equipment matches the minimum requirements
! Uninstalling any previous version of MeetingPoint
! Installing the new version of MeetingPoint
! Setting up the MeetingPoint configuration.
3.1 Minimum System Requirements
Before installing MeetingPoint, make sure that your computer equipment meets the
following minimum requirements:
! PC, notebook computer or laptop computer - Pentium 300 MHz or higher
! Any Ethernet Network Interface Card (for LAN/IP videoconferencing)
! Windows 98, Windows ME or Windows 2000 operating system with
Microsoft TCP/IP installed
! Microsoft
Internet Explorer 4.0 (or later) installed
If Internet Explorer is not installed on your computer, you may install IE 5.0
from the 5750 DVA Setup CD-ROM.
! CD-ROM drive or access to a network CD-ROM drive
! Universal Serial Bus (USB) installed
! 64 MB RAM
! 50 MB free disk space
! Mouse or other pointing device
! SVGA monitor or projector
! SVGA card supporting Direct Draw with minimum 2 MB memory.
Mitel Networks 5750 DV Installation and Setup Guide 3–1
Page 32

Chapter 3 MeetingPoint Setup
3.2 Uninstalling Previous MeetingPoint Versions
If a previous version of MeetingPoint is currently installed on the computer,
uninstall it completely. The Uninstall program deletes all previous MeetingPoint
information and files. However, the program provides the options of saving setup
information and the existing address book entries, which may shorten the process
of setting up MeetingPoint.
" To delete the previous MeetingPoint version
1. In the Windows desktop, click Start, point to Settings and then click
Control Panel. The Control Panel window appears.
Windows Control Panel
2. Double-click Add/Remove Programs. The Add/Remove Programs
Properties dialog box appears.
3. Click VCON Meeting Point x.x and then click Add/Remove. The
MeetingPoint Uninstall Wizard opens.
4. Perform the instructions on the screen. When the Uninstall process is
complete, restart the computer.
3–2 Mitel Networks 5750 DV Installation and Setup Guide
Page 33

Chapter 3 MeetingPoint Setup
Add/Remove Programs Dialog Box
3.3 Installing MeetingPoint
To communicate using MeetingPoint, TCP/IP protocol components must be
installed on your computer. If necessary, install them before installing
MeetingPoint. Consult with your system administrator.
The supplied 5750 DVA Setup CD-ROM contains the MeetingPoint Setup
program.
" To install MeetingPoint on your computer
1. Close all open applications.
2. Insert the 5750 DVA Setup CD-ROM into the computer’s CD-ROM
drive. After you close the drive door, the MeetingPoint Installation Utility
appears (see the figures on the next page).
If the Installation Utility window does not appear, click Start at the lower
left corner of the Windows desktop. Click Run to open the Run dialog box.
Locate and select the install application file on the CD-ROM drive and click
Open. In the Run dialog box, click OK.
Mitel Networks 5750 DV Installation and Setup Guide 3–3
Page 34

Chapter 3 MeetingPoint Setup
MeetingPoint Installation Utility Window
3. Click Install MeetingPoint to start the MeetingPoint installation process.
A message asks if you want to proceed with a MeetingPoint for ViGO
Videoconferencing Kit installation.
Message that Setup Will Install MeetingPoint for ViGO
Click Ye s to continue.
3–4 Mitel Networks 5750 DV Installation and Setup Guide
Page 35

Chapter 3 MeetingPoint Setup
4. A message then asks if your system will register to a VCON Media
Xchange Manager™ (MXM) system. If your system is managed by a
5700 VFA (MXM), telephony exchange functions such as Call
Forwarding, Call Pickup, Call Transfer and Ad-hoc Conferencing are
available.
5700 VFA (MXM) Management Question
Click Ye s or No, accordingly, to continue. If asked if you are sure if you
want 5700 VFA (MXM) management, click Ye s again to install a
5700 VFA-managed version.
If your computer requires, Setup then installs Microsoft Direct-X drivers,
followed by Microsoft NetMeeting™.
5. The Welcome screen appears. Click Next.
Welcome Window
Mitel Networks 5750 DV Installation and Setup Guide 3–5
Page 36

Chapter 3 MeetingPoint Setup
6. The User Information dialog box appears.
User Information Dialog Box
Type your Name and Company name. The product’s license number
appears automatically in the Serial box.
Click Next.
7. The Software License Agreement appears.
Software License Agreement
3–6 Mitel Networks 5750 DV Installation and Setup Guide
Page 37

Chapter 3 MeetingPoint Setup
Read the terms and conditions in the software license agreement carefully.
— To accept the terms and conditions in the license agreement, click
Ye s to continue the installation.
— To reject the terms, click No. The installation process ends.
8. The Language Options dialog box appears.
Choosing Application Language
Choose the language of your MeetingPoint application. Click Next.
Mitel Networks 5750 DV Installation and Setup Guide 3–7
Page 38

Chapter 3 MeetingPoint Setup
9. The Choose Destination Location dialog box appears.
Choose Destination Location Dialog Box
The MeetingPoint program will be installed to the default folder.
If you want to install MeetingPoint in a different folder, click Browse. In
the Choose folder dialog box, select a different location and click OK.
10. The Start Copying Files dialog box appears.
Start Copying Files Dialog Box
3–8 Mitel Networks 5750 DV Installation and Setup Guide
Page 39

Chapter 3 MeetingPoint Setup
In the Start Copying Files dialog box, check and confirm your settings.
— To change any incorrect settings, click Back as many times as
necessary to open the appropriate dialog box.
— Otherwise, click Next to continue. The installation program copies
the MeetingPoint files to the destination folder on the hard disk. The
progress of the installation is shown.
MeetingPoint Installation Progress
Updating the MeetingPoint Registry
Mitel Networks 5750 DV Installation and Setup Guide 3–9
Page 40

Chapter 3 MeetingPoint Setup
11. At the end of the installation, the Setup Complete dialog box appears.
Setup Complete Dialog Box
To start MeetingPoint for the first time, you must restart the computer.
Select Ye s if you want to restart the computer now or select No if you
want to continue with another activity and restart the computer later.
Click Finish and close the Installation program.
12. While the computer is restarting, turn the 5750 DVA on. During its startup
process, the computer will detect the 5750 DVA and install the necessary
drivers.
3–10 Mitel Networks 5750 DV Installation and Setup Guide
Page 41

Chapter 3 MeetingPoint Setup
3.4 Starting and Exiting MeetingPoint
MeetingPoint’s Start procedure varies, depending on whether or not your system
will be in a videoconferencing network managed by a Mitel Networks 5700 Voice
First Application.
NOTE MeetingPoint disables your computer’s screensaver.
®
System Managed by 5700 VFA (MXM)
" To start MeetingPoint
1. In the Windows Desktop, click the VCON MeetingPoint icon.
-or-
Press the ViGO Smart button on the top of the device.
The Login dialog box appears.
Initial Login to 5700 VFA (MXM)
2. Enter 5700 VFA (MXM) login information as follows (consult with your
system administrator):
MXM Login
Name
Password/
Verify Password
Gatekeeper The IP address of the 5700 VFA (MXM). If you do not
Mitel Networks 5750 DV Installation and Setup Guide 3–11
The name of your computer as listed in the MXM
database and the 5700 VFA (MXM) Administrator.
Password required to log in. The first time you register,
you must type it twice for verification. If you do not
supply this password, the login request is rejected.
know it, ask your system administrator (when entering
an IP address, do not enter leading zeroes).
Page 42

Chapter 3 MeetingPoint Setup
3. Click Connect to complete the login process.
— If the 5700 VFA (MXM) automatically registers your computer, the
MeetingPoint application opens.
— If a message appears stating that the MeetingPoint startup cannot
proceed until login is granted, contact your system administrator.
After login is granted, click Connect to continue.
If you are running MeetingPoint for the first time after installation (or
logging into a different 5700 VFA (MXM), the Configuration Wizard setup
program appears. This program asks you to enter the information required to
run MeetingPoint from your specific location. For the complete standard
setup procedure, see “Setting Up the MeetingPoint Configuration” on
page 3-14.
MeetingPoint’s default properties are suitable for most video meeting
requirements. If you must change these settings, please consult with your
system administrator or Mitel Networks distributor.
The Conference Panel appears, followed by the Local Video window.
Conference Panel (5700 VFA (MXM) Management) and Local Video Window
At this point, if the system’s communication lines are connected, you may
start a video meeting and receive incoming video meeting calls.
3–12 Mitel Networks 5750 DV Installation and Setup Guide
Page 43

Chapter 3 MeetingPoint Setup
Stand-alone System
" To start MeetingPoint
1. In the Windows Desktop, click the VCON MeetingPoint icon.
-or-
Press the ViGO Smart button on the top of the device.
If you are running MeetingPoint for the first time after installation, the
Configuration Wizard setup program appears. This program asks you to
enter the information required to run MeetingPoint from your specific
location. For the complete standard setup procedure, see “Setting Up the
MeetingPoint Configuration” on page 3-14.
MeetingPoint’s default properties are suitable for most video meeting
requirements. If you must change these settings, please consult with your
system administrator or VCON distributor.
The Conference Panel appears, followed by the Local Video window.
Conference Panel - Stand-alone MeetingPoint
At this point, if the system’s communication lines are connected, you may
start a video meeting and receive incoming video meeting calls.
Exiting MeetingPoint
" To exit MeetingPoint
! Double-click the MeetingPoint icon at the far left side of the Conference
Panel.
-or-
Right-click anywhere in the Conference Panel and click Exit.
If you are connected in a video meeting, a message asks you to hang up
before you exit MeetingPoint.
Mitel Networks 5750 DV Installation and Setup Guide 3–13
Page 44

Chapter 3 MeetingPoint Setup
3.5 Setting Up the MeetingPoint Configuration
This section provides procedures for setting up MeetingPoint according to your
particular specifications. As instructed in the previous section, you must restart the
computer after installing MeetingPoint in order to run it for the first time.
The Configuration Wizard guides you through the required stages and requests the
relevant information for normal operation of MeetingPoint.
In addition, you may change any of these configuration details (as long as they are
compatible with your equipment) whenever the system is on. The Properties
command is available:
! The Conference Panel’s shortcut menu. Right-click to open it.
! The Conference Panel button menus. Click any arrow to open a specific menu
for each MeetingPoint application.
! In particular windows and dialog boxes.
Configuration Setup Wizard Introduction
3–14 Mitel Networks 5750 DV Installation and Setup Guide
Page 45

Chapter 3 MeetingPoint Setup
" To set up the MeetingPoint configuration
1. From the Configuration Wizard’s opening page, click Next to continue.
The User Information dialog box appears.
2. In the User information section, type your First Name, Last Name,
Company name, and E-mail address.
User Information Configuration
Click Next. The LAN dialog box appears.
Mitel Networks 5750 DV Installation and Setup Guide 3–15
Page 46

Chapter 3 MeetingPoint Setup
3. In the LAN dialog box, enter information about the connected LAN
(Local Area Network).
LAN Connection Configuration
The LAN configuration includes:
User Name The user’s unique name on the connected network
(H.323 alias).
User Number The user’s unique logical number (E.164 string) as
defined by your network’s system administrator.
The User Number must consist of digits only.
For example, it could be the same as your phone
extension, so that others can remember it.
Gatekeeper
Address
The IP address of the 5700 VFA (MXM) or H.323
Gatekeeper to which the computer will register (do
not enter leading zeroes). This information is
optional. However, if your organization has
installed a gatekeeper, we recommend that you
enter its address. If you do not know its address,
ask your system administrator.
3–16 Mitel Networks 5750 DV Installation and Setup Guide
Page 47

Chapter 3 MeetingPoint Setup
If you leave this box blank, the computer cannot
register with a gatekeeper.
CAUTION If you want to register a stand-alone
system in a 5700 VFA, you must
uninstall MeetingPoint and then
define this request during the new
MeetingPoint installation. Do not
type the address of the 5700 VFA in
this space.
Allow Adaptive
Bandwidth
Adjustment
Enable Lip
Synchronization
Mechanization
Automatic
Buffering
Control
Select this option to enable reduction of the alloted
bandwidth if the network is congested.
Select this option to enable adjustment of the video
and the audio if they are out of sync with each other
(see the MeetingPoint User’s Guide, Appendix B,
“Monitoring the Conference State”).
! Select this option to enable the system to
automatically control the amount of buffering
required to maintain the consistency of the
video and audio transmission. For example, if
video packets are delayed for 1 or 2 seconds,
the system will automatically synchronize the
transmission so that the delay does not disturb
the visible video.
! Deselect this option only if the automatic
buffering is not sufficient — for example, if
the quality of the video meeting is poor or
there is a noticeable delay.
Click Next to continue. The Pan/ Tilt/Zoom Camera dialog box appears.
Mitel Networks 5750 DV Installation and Setup Guide 3–17
Page 48

Chapter 3 MeetingPoint Setup
4. The Pan/ Tilt /Zoom Camera setting is applicable if a Pan/Tilt/Zoom-type
(PTZ) camera is connected to the 5750 DVA (standard in 5750 DVA
Executive).
Pan/Tilt/Zoom Camera Configuration Dialog Box
Enter information as follows:
Camera Selection
Pan/Tilt/Zoom
camera type
Select the manufacturer and/or model of the PTZ
camera. If you do not use a PTZ camera, you can
select None.
Communication
port it is
connected to
Select the name of the computer port to which the
camera is connected. The available options are
COM1, COM2, COM3 and COM4.
Camera Control
Allow the
remote side to
control camera
settings
3–18 Mitel Networks 5750 DV Installation and Setup Guide
Select to permit the remote participant in a video
meeting to control the positioning of the PTZ
camera. If you do not have a PTZ camera, this
option is not relevant.
Page 49

Chapter 3 MeetingPoint Setup
Click Next to continue. The Confirmation dialog box appears.
5. In the Confirmation dialog box, review the information that you entered
during the MeetingPoint setup process. If necessary, drag the scroll bar
down to see more information.
Confirmation of Setup Information
To change any information before exiting the MeetingPoint Configuration
Setup Wizard, click Back to return to a specific dialog box and make the
appropriate changes. When you are finished, click Next as many times as
necessary to return to the Confirmation dialog box and check your settings
again.
6. To save the setup and exit the Configuration Setup Wizard, click Finish.
The MeetingPoint program now starts, and the Conference Panel and the
Local Video Window appear.
To cancel the setup, click Cancel. In this case, all setup information will
be discarded and you will not be able to run MeetingPoint until you
perform the setup at another time.
Mitel Networks 5750 DV Installation and Setup Guide 3–19
Page 50

Chapter 3 MeetingPoint Setup
3.6 Changing Configuration Information
After completing the Configuration Wizard the first time that you run
MeetingPoint, you can change the configuration information through the System
Properties dialog boxes. The System Properties are accessible from several
locations.
The table below describes the quickest way to access the configuration information
that you entered in the Configuration Wizard.
User Information In the Conference Panel, right-click and then click
Properties. In the Properties dialog box, click the User
Data icon.
LAN
or
! Double-click the Gatekeeper icon in the Conference
Panel tray.
-or-
5700 VFA-managed versions only
In the Conference Panel, click the Network arrow
and then click H.323 Properties.
If the system is not registered with a GateKeeper:
! In the Conference Panel, right-click and then click
Properties. In the Properties dialog box, click the
Communication icon.
Online
Directories
Pan/Tilt/Zoom 1. In the Conference Panel, right-click and then click
Non-5700 VFA applications only
1. In the Conference Panel, click the Dialer arrow and
then click Properties. The Address Book
Properties dialog box appears with the General tab
open.
2. Click the Online Directories tab.
Properties. In the Properties dialog box, click the
Hardware icon.
2. Click the Camera tab.
3–20 Mitel Networks 5750 DV Installation and Setup Guide
Page 51

4 5750 DVA CONTROLS AND LEDS
The 5750 DVA base’s top panel contains buttons and LEDs for performing various
functions and LEDs for providing operational status information.
POWER LED (Green)
ON - 5750 DVA is on.
OFF - 5750 DVA is off.
+ button
Increase
incoming
volume.
- button
Lower
incoming
volume.
MUTE button
Mute/restore
outgoing
audio.
CALL LED (Red)
ON - in a call.
OFF - not in a call.
BLINKING - incoming call;
- loading 5750 DVA (USB
device).
Mitel Networks 5750 DV Installation and Setup Guide 4–1
— Start MeetingPoint.
— Start a call (open the address
— Answer an incoming call.
— Hang up the current call (press
ViGO Smart button
book).
again to confirm).
Page 52

Chapter 4 5750 DVA Controls and LEDs
The desktop camera contains an internal microphone and a power LED. The LED
of the 5750 DVA tower provides audio information during a call.
Power button
Focus wheel
POWER LED (Green)
ON - powered on.
OFF - not operating.
BLINKING - faulty
connection. Check the
cable connection.
Internal microphone
SPEAKER LED (Green)
ON - tower’s internal speaker is selected during a
call.
OFF - 5750 DVA is not in a call,
- tower’s internal speaker is not selected during
a call.
BLINKING - tower’s internal speaker is selected but
muted.
4–2 Mitel Networks 5750 DV Installation and Setup Guide
Page 53

5TROUBLESHOOTING
This chapter provides solutions for common oversights and issues.
If you cannot find a solution to a problem, call your local Mitel Networks service
provider.
PROBLEM: The Power LED on the 5750 DVA appliance does not light up.
SOLUTION:
1. Make sure that you pressed the 5750 DVA power switch to the ON position
(I).
2. Make sure that the power supply is plugged firmly into the outlet.
3. Make sure that the power outlet is supplying electricity.
PROBLEM: The computer does not show the “USB device starting” message
when MeetingPoint starts.
SOLUTION:
1. Make sure that the USB cable is connected correctly between the 5750 DVA
appliance and the computer.
2. Make sure that the 5750 DVA appliance is turned on.
3. If the 5750 DVA appliance was not turned off since the last time it was used,
the message will not appear. The appliance should operate correctly.
4. If the preceding solutions do not help, follow this procedure:
a. Open the Windows Device Manager (Start/Settings/Control Panel/
System/Device Manager tab).
b. Check the Universal serial bus controller entries.
c. If Generic USB hub or Mitel Networks 5750 DVA Driver has an “X” or
“!” over it, right-click the entry.
d. In the pop-up menu that opens, click Remove.
e. In the Device Manager window, click Refresh. The 5750 DVA appliance
should operate correctly, and the message should appear the next time you
turn it on.
Mitel Networks 5750 DV Installation and Setup Guide 5–1
Page 54

Chapter 5 Troubleshooting
PROBLEM: A message appears: “MeetingPoint could not communicate with
the 5750 DVA device.”
SOLUTION:
1. Make sure that the installed MeetingPoint software is version 4.6 or later.
2. Check that you correctly connected the 5750 DVA to the computer, and that
the 5750 DVA and the computer are turned ON.
3. Open Windows Device Manager and check that the USB drivers are correctly
installed. If not, remove them and then click Refresh.
PROBLEM: The desktop camera keeps slipping backwards.
SOLUTION: The 5750 DVA package contains a small clip. Connect the camera
cable and set up the desktop camera as you want it for video meetings; then fasten
the clip around the cable to hold the camera in place.
PROBLEM: The display of the local video freezes during a call.
SOLUTION: Press the 5750 DVA’s power switch off and then on again. After the
“USB device starting” message finishes running, the call is resumed.
PROBLEM: The local video is black.
SOLUTION:
1. Check that the power switch on the camera is ON.
2. Check that the cable is correctly connected between the camera and the 5750
DVA.
3. Make sure the right camera is selected in the local video window.
PROBLEM: The video quality is poor.
SOLUTION:
1. Make sure that your computer meets the minimum requirements (see
“Minimum System Requirements” on page 3-1).
2. Adjust the focus of the camera manually.
5–2 Mitel Networks 5750 DV Installation and Setup Guide
Page 55

Chapter 5 Troubleshooting
PROBLEM: The remote side cannot hear you.
SOLUTION:
1. Make sure that the audio source that you are using is selected in the
MeetingPoint Audio - System Properties dialog box.
2. Make sure that the audio input device is correctly connected to the 5750 DVA.
3. Check if Mute Microphone is active. If so, disable muting.
PROBLEM: You cannot hear the remote side.
SOLUTION:
1. Make sure that the 5750 DVA’s volume is high enough. Press the + button on
the appliance to raise the volume.
2. Make sure that the headset’s or the optional speakers’ cable is firmly inserted
into the SPKR connector on the side of the appliance.
3. In MeetingPoint, open the Audio tab of the System Properties Hardware
dialog box. Make sure that the correct Speaker is selected.
PROBLEM: An optional Pan/Tilt/Zoom camera is connected, but 5750 DVA
is not using it.
SOLUTION:
1. Check that you selected the appropriate PTZ camera in the Local Video
window (right-click and then click Select Camera).
2. Check that you selected the appropriate PTZ camera type in the Camera tab of
the Hardware - System Properties dialog box.
3. Check that the camera cables are securely connected to the 5750 DVA’s Video
connector and the computer’s COM port.
Mitel Networks 5750 DV Installation and Setup Guide 5–3
Page 56

Chapter 5 Troubleshooting
PROBLEM: The 5750 DVA cannot make Interactive Multicast calls.
SOLUTION: The 5750 DVA Professional and Executive include Interactive
Multicast as a standard part of their package. It installs automatically when you
install MeetingPoint. However, the 5750 DVA Standard does not come with
Interactive Multicast. If you want to add this option to your system, contact your
local distributor.
PROBLEM: The 5750 DVA cannot automatically open a video session after
losing and regaining its network connection.
SOLUTION: If the 5750 DVA loses its network connection, reset the 5750 DVA
after the network connection comes back up.
5–4 Mitel Networks 5750 DV Installation and Setup Guide
Page 57

ACONNECTING OPTIONAL ACCESSORIES
In addition to its standard components, the 5750 DVA system is compatible with
various optional accessories and peripheral devices that add features and
convenience to your conferencing. This appendix explains how to connect these
devices:
• Connecting External Speakers
• Connecting a Second Camera
• Connecting a VCR
• Connecting a Document Camera
• Connecting Other USB Devices
A.1 Connecting External Speakers
Connecting Multimedia Speakers
As an option, the 5750 DVA supports the use of external multimedia speakers
instead of the headset for hearing incoming audio. For two-way audio, they may be
paired with the headset, a tabletop microphone, or the camera’s built-in
microphone.
" To connect external multimedia speakers to the 5750 DVA
1. Connect the speakers to the Spkrs (left) connector on the 5750 DVA side
panel.
-or-
If the speakers are connected to a sound card, connect the audio cable
between the Spkrs (left) connector on the 5750 DVA side panel and the
Line In connector on the sound card.
2. In the MeetingPoint application’s Conference Panel, right-click and then
click Properties. Browse to the Hardware Properties.
3. Click the Audio tab. In the Configuration Mode area, select Manual.
VCON Mitel Networks 5750 DV Installation and Setup Guide A–1
Page 58

Appendix A Connecting Optional Accessories
4. In the Speaker area, select Headset/External.
External speakers do not receive power from the 5750 DVA. To turn these
speakers on and off, and to control the volume, you must use the speakers’
own controls.
Connecting Multimedia Speakers to the 5750 DVA
Connecting a VGA Monitor’s Speakers
For 5750 DVA Executive models
An additional option for enhancing the audio quality is the use of a VGA monitor’s
speakers. The 5750 DVA Executive contains two additional audio cables for this
audio configuration.
This configuration requires a sound card installed in the computer connected
to the 5750 DVA.
" To connect a VGA monitor’s speakers to the 5750 DVA
1. Connect an audio cable between the Spkrs (left) connector on the
5750 DVA side panel and the Line In connector on the sound card
2. Connect the second audio cable from the Audio Out connector of the
sound card to the Audio In connector of the VGA monitor.
3. In the MeetingPoint application’s Conference Panel, right-click and then
click Properties. Browse to the Hardware Properties.
4. Click the Audio tab. In the Configuration Mode area, select Manual.
A–2 VCON Mitel Networks 5750 DV Installation and Setup Guide
Page 59

Appendix A Connecting Optional Accessories
5. In the Speaker area, select Headset/External.
Connecting Multimedia Speakers to the 5750 DVA
A.2 Connecting a Second Camera
The 5750 DVA supports the use of a second camera as a video source.
" To connect a second camera to the 5750 DVA rear panel
! Connect the camera cable to the Aux Video IN (yellow) connector
of the 5750 DVA rear panel.
Connecting a Second Camera to the 5750 DVA
VCON Mitel Networks 5750 DV Installation and Setup Guide A–3
Page 60

Appendix A Connecting Optional Accessories
A.3 Connecting a VCR
The 5750 DVA supports playback of a videocassette to a video meeting.
" To connect a VCR to the 5750 DVA rear panel for playback
1. Connect the VCR Video cable with the jacks between the VIDEO
OUT connector of the VCR and the Aux Video IN (yellow)
connector of the 5750 DVA rear panel.
2. Connect the VCR cable with the jacks between the AUDIO OUT
connector of the VCR and the Aux Audio IN (white) connector of the
5750 DVA rear panel.
3. Verify that the VCR is connected to a power supply.
For specific instructions on installing and operating the VCR, see its accompanying
user’s guide.
VCR Audio Out
for playback
VCR Video Out
for playback
Connecting a VCR to the 5750 DVA
A–4 VCON Mitel Networks 5750 DV Installation and Setup Guide
Page 61

Appendix A Connecting Optional Accessories
A.4 Connecting a Document Camera
The 5750 DVA supports the use of a document camera as a source for displaying
documents and illustrations during conferences.
" To connect a document camera to the 5750 DVA rear panel
1. Connect the camera cable with the yellow connector between the
OUTPUT/VIDEO connector of the camera and the Aux Video IN
(yellow) connector of the 5750 DVA rear panel.
2. Verify that the camera is connected to a power supply.
For specific instructions on installing and operating the document camera, see its
accompanying user’s guide.
Connecting a Document Camera to the 5750 DVA
VCON Mitel Networks 5750 DV Installation and Setup Guide A–5
Page 62

Appendix A Connecting Optional Accessories
A.5 Connecting Other USB Devices
The 5750 DVA can be connected as part of a series (daisy chain) with low-power
Universal Serial Bus (USB) equipment with a maximum consumption of 100 mA
(such as a USB mouse), or devices with their own power supply (such as some
multimedia speakers). The daisy-chained devices share the same USB port as their
connection to the computer.
! For a USB device connected between the 5750 DVA and the computer,
connect it to the USB B connector on the 5750 DVA’s rear panel.
! For a USB device connected downstream from the 5750 DVA (farther away
from the computer), connect it to the USB A connector on the 5750 DVA’s
rear panel.
USB Connector Types
A–6 VCON Mitel Networks 5750 DV Installation and Setup Guide
Page 63

®,™ Trademark of Mitel Networks Corporation
© Copyright 2003, Corporation
Mitel Networks
All rights reserved
 Loading...