

Page 1
QUICK REFERENCE GUIDE
Mitel® 5610 IP DECT Cordless Handset
The Mitel 5610 Cordless Handset and IP DECT (Digital Enhanced Cordless
Telecommunications) Stand provides Mitel 5000 SIP call processing features on a
cordless handset. The IP DECT stand also provides conferencing, call transfer, and
other basic features between handsets.
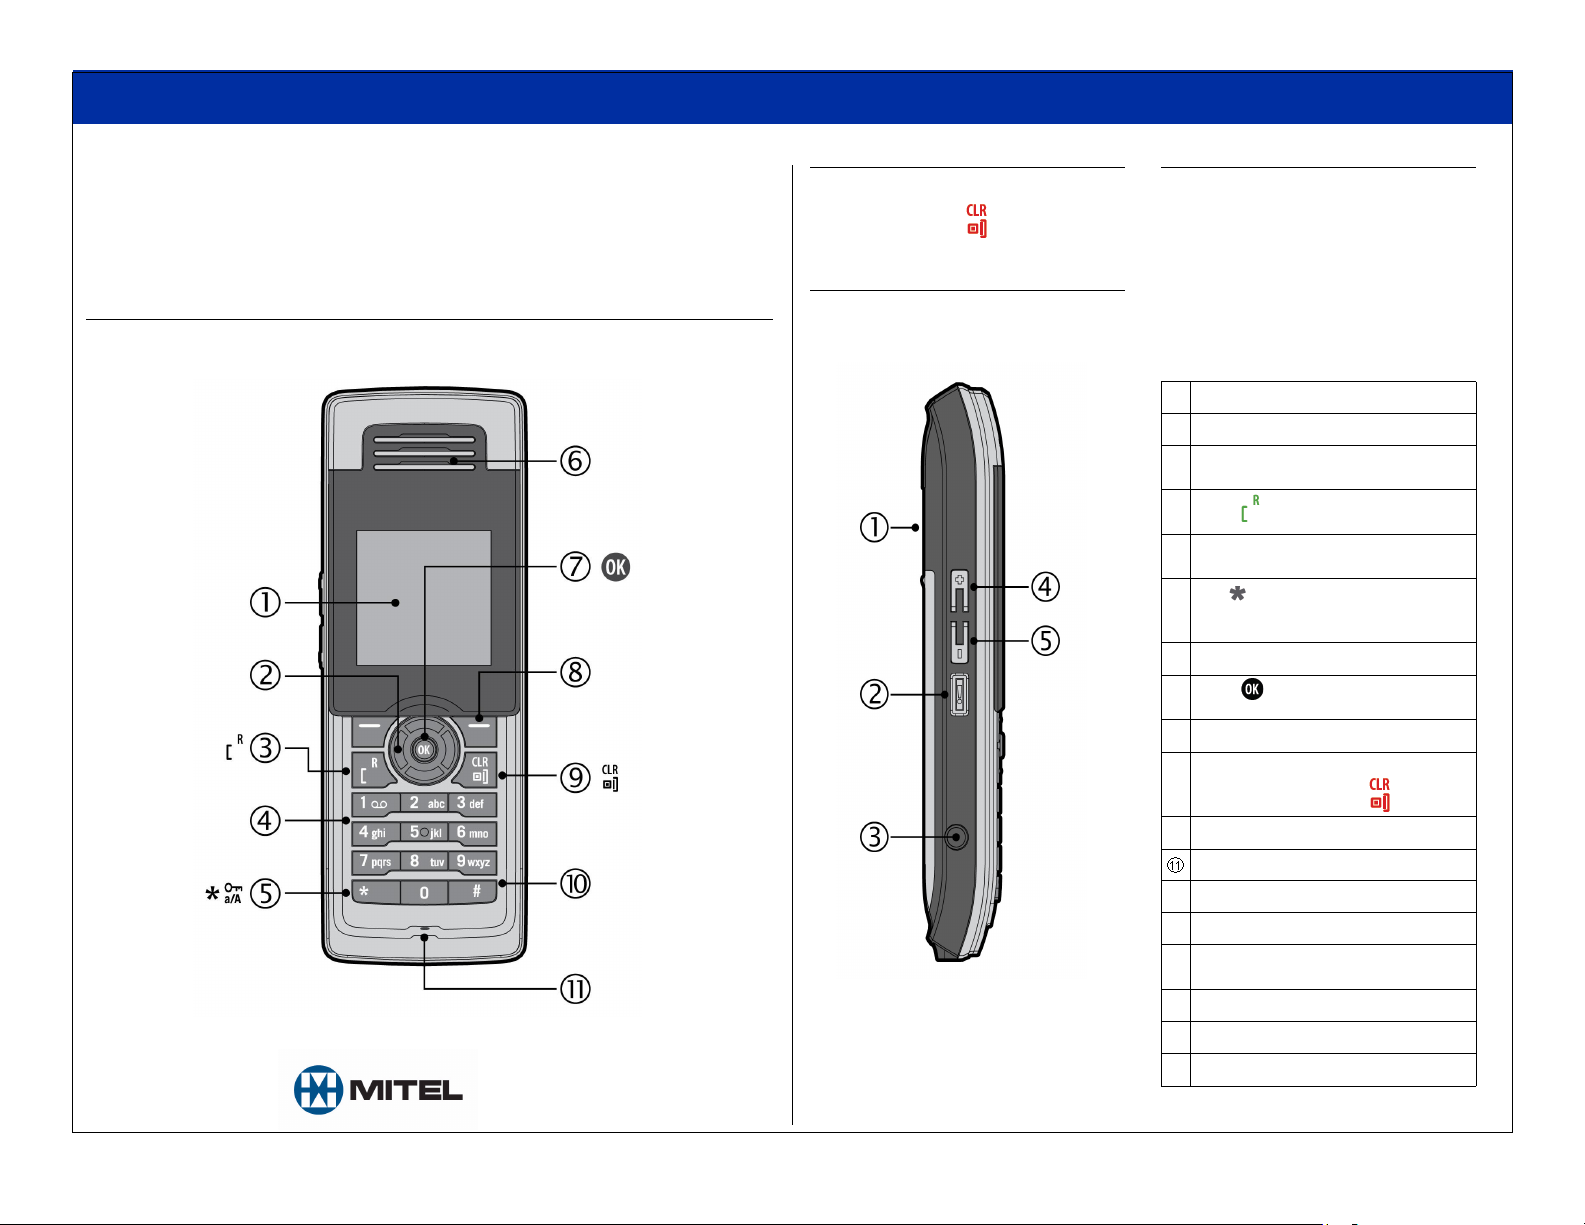
Handset - Front View
Turn Handset On or Off
Press and hold key.
Handset - Side View
Signal Range
The cordless handset has an indoor
signal range of up to 150 feet (50
meters) from the IP DECT stand. This
range can be limited by concrete or
metal barriers. If you go out of range
and then return back into range, the
handset will display MISSED CALL.
# Front View - Description
Color display
1
Press to navigate menus
2
and services
Press to make or answer calls
3
Use the keypad to enter numbers and
4
letters
Use in the name editor to capitalize
5
letters, type numbers, and enter the star
symbol
Earpiece
6
Press to enter main menu and
7
select and confirm options
Softkeys used for various functions
8
To hang up, exit a menu, and turn the
9
handset on or off, press .
Part Number 57011425
Pound key
Microphone
# Side View - Description
Loudspeaker for speakerphone
1
Speakerphone activate and deactivate
2
key
Headset jack connector (2.5 mm)
3
Volume Up key
4
Volume Down key
5
Mitel is a registered trademark of Mitel Networks Corporation. © 2010, Mitel Networks Corporation. All other products and services are the trademarks of their respective holders. All rights reserved.
1
Page 2
QUICK REFERENCE GUIDE
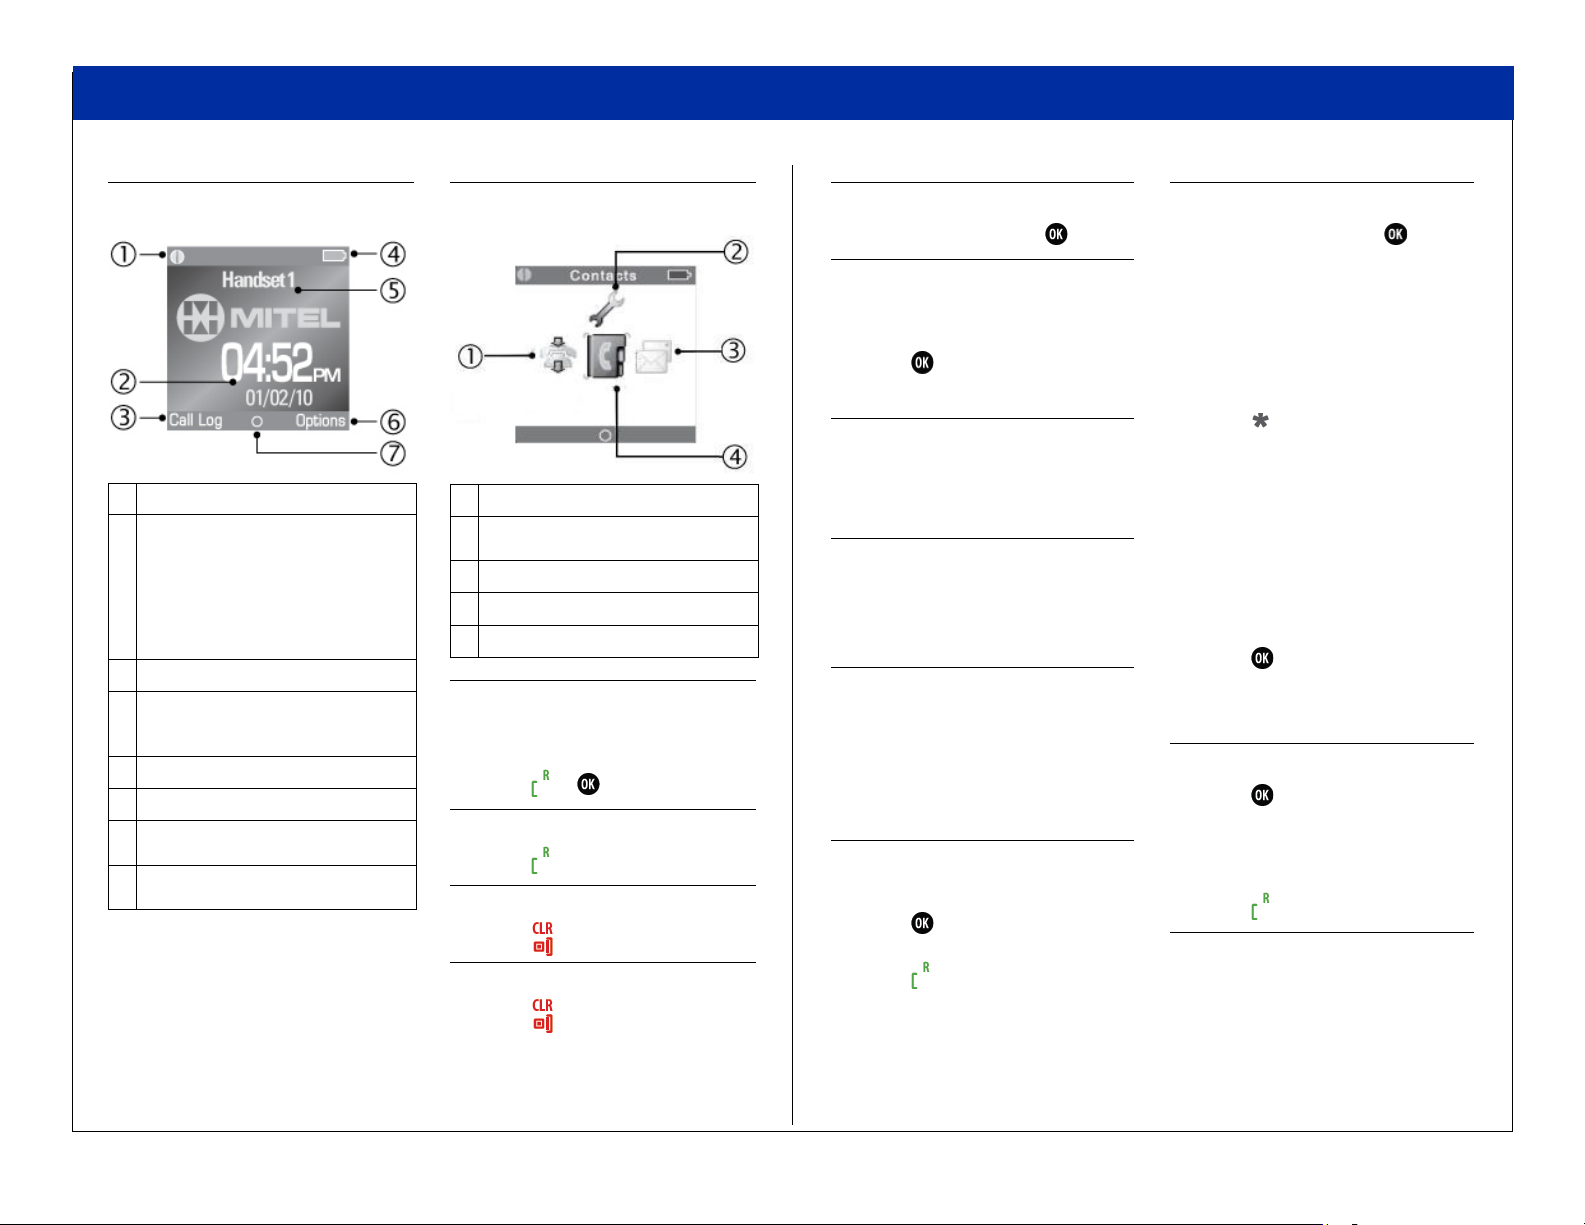
Handset Display - Idle Mode
# Idle Mode - Description
Connection status indicators
1
– Black/Black: out of range of
gateway
– White/Black: within range but not
ready for calls
– White/White: within range and ready
for calls
Time and date
2
Call Log for a list of incoming, outgoing
3
and missed calls (activated with
softkey)
Battery status and charging indicator
4
Handset name
5
Options for redial and active calls
6
(activated with softkey)
OK Key Indicator: o signifies that the
7
OK key is active
When using the handset:
• Grey @ sign indicates dialing
mode.
• Green @ sign indicates off hook
mode.
• Red @ sign indicates a connection
error.
Handset Display Main Menu
# Main Menu - Description
Call Log for a list of incoming, outgoing
1
and missed calls
Settings
2
Messages
3
Contacts
4
Make a Call
1. From Idle mode, enter phone
number.
2. Press or .
Answer a Call
Press .
End a Call
Press .
Reject a Call
Press or REJECT.
MISSED CALL appears in the
display. If you have a voice
mailbox, the call is forwarded to it.
Enter Main Menu
From Idle mode, press .
Select a Menu Option
1. Press the keys to
select a menu option.
2. Press .
3. Press BACK to exit a menu.
Adjust Volume
During a call, press + on the side
of the phone to increase volume or
- to decrease the volume.
press
Mute the Microphone
During a call, press MUTE.
To reactivate the microphone,
press MUTE OFF.
Use Speakerphone
1. During a call, press [!] on the side
of the phone to activate the
speaker.
2. Press
Redial a Call
1. From Idle mode, press OPTIONS.
2. Press to display the most
3. Press .
[!] to turn speakerphone
off.
recently dialed number.
Add a Contact
1. From Idle mode, press .
2. Select CONTACTS.
3. Press OPTIONS, and then select
ADD CONTACT.
4. Press EDIT.
5. Enter contact using the
keypad as a text editor.
Press to switch
between uppercase letters,
lowercase letters, and
numbers when working
with the text editor.
6. Press OK.
7. Select a destination icon.
8. Press EDIT.
9. Enter the contact number.
10. Press .
11. Press SAVE.
12. Press YES.
Call a Contact
1. Press to enter the main menu.
2. Select CONTACTS.
3. Select the contact that you want to
call.
4. Press .
Call Hold
While on a call, press HOLD.
To retrieve a call from hold, press
BACK.
2
Page 3

QUICK REFERENCE GUIDE
Call Swap
Call swap lets you alternate between two calls. Each call is private; neither person
can overhear your conversation with the other.
1. While on a call, press HOLD.
2. Enter the number of the second party that you want to call and press .
3. After speaking with the second party, press OPTIONS and select SWAP
CALLS to switch between the two parties.
Form a Conference
To form a Conference when a two-party call is already in place:
1. Press HOLD. The current call is placed on hold.
2. Enter the number of the second party, and then press .
3. After the second party answers, press OPTIONS and then select
CONFERENCE.
4. Press END CONF to remain connected with the second party only.
5. Press OPTIONS and then select SWAP CALLS switch between the two parties.
Change the Ringer Melody
1. Press to enter the main menu.
2. Select SETTINGS, and then AUDIO SETTINGS.
3. Select RINGER MELODY, and then select VoIP.
4. Select ALL LINES.
5. Select a melody from the list and press .
6. Press PLAY to listen to the melody and then press STOP.
7. Press to select the desired melody.
Listen to Voice Mail Message
If a message is left in your voice mailbox, MISSED CALL and then NEW
VOICEMAIL appears in the handset display. A small envelope icon is displayed at
the top of the main display.
1. Press to enter main menu.
2. Select MESSAGES, and then select VOICEMAIL.
3. Select your voice mail account.
4. Press PLAY. You are connected with the voice mail auto attendant. The auto
attendant prompts you for your passcode.
5. Enter your passcode. If necessary, contact your System Administrator to obtain
your passcode.
6. Follow the prompts to access your message(s).
Change Handset Language
1. Press to enter main menu.
2. Select SETTINGS.
3. Select SYSTEM SETTINGS.
4. Enter your PIN code (default is 0000) and press . If necessary, contact your
System Administrator to obtain your PIN code.
5. Select LANGUAGE.
6. Select the desired language and press .
Transfer a Call - Unsupervised
1. While on a call, select press HOLD. The current call is placed on hold.
2. Press OPTIONS, and then select TRANSFER.
3. Dial the extension of the transfer destination.
4. Press or .
Transfer a Call - Supervised
1. While on a call, press HOLD. The current call is placed on hold.
2. Dial the extension of the transfer destination.
3. Press or .
4. Wait until the called party answers, and then announce the transfer.
5. Press OPTIONS, and then select TRANSFER.
3
Page 4

QUICK REFERENCE GUIDE
Check Call Log
1. From idle mode, press CALL LOG.
2. Select the type of calls: Missed, Incoming, Outgoing, or All Calls.
3. Select the call.
4. Press .
About Feature Access Codes
You can dial feature access codes for Emergency Calls (911 U.S. or 999/112
Europe) and Outgoing Calls (8). You do not have to press before entering a code.
Your system may be programmed with different codes. Contact your System
Administrator to obtain the codes assigned for your system.
Call Handoff
If your handset is twinned to your desktop phone using the Dynamic Extension
Express (DEE) feature, you can use the DEE Handoff feature. This feature allows
you to “push” an active call from your desktop phone to your 5610 handset. You can
activate call handoff by pressing a DEE Handoff feature key (fc 388) on your
desktop phone. To program a DEE Handoff feature key, refer to your phone’s user
guide for instructions.
To push a call to your 5610 handset:
1. While on a call at your desktop phone, press the DEE Handoff key. The call is
transferred to your 5610 handset.
2. Press to continue the call on your handset.
Remove Belt Clip Cover
Use the belt clip removal tool. Insert the tool between the belt clip cover and the
phone.Then, using your thumb, press down and slide the clip up and off the back of
the phone.
Attach Belt Clip
Insert the clip belt into the back of the handset. Slide the clip down with your thumb
to snap the side tabs into place.
4
Page 5

Troubleshooting
Symptom Possible Cause Corrective Action
Unable to remove belt
clip cover using removal
tool.
Handset display is
black.
Handset does not
charge.
Cannot enable features
using Feature Access
Codes.
You are not inserting the removal
tool far enough into the opening
between the handset and clip
cover.
Handset is in power saving
mode.
Battery is drained. Put handset in charging cradle to
Power to handset charging
cradle is not connected.
Battery is not inserted correctly. Check that the battery is inserted
Battery life is exceeded and no
longer accepts charge.
Feature is not enabled for your
handset.
System does not use default
Feature Access Codes.
Insert the removal tool as shown
in the graphic on the previous
page.
Press any key.
recharge battery.
Ensure that power cable is
inserted in handset charging
cradle.
correctly. Refer to Installation
Guide for details.
Obtain replacement battery from
your System Administrator and
replace.
Contact your System
Administrator and ask to have the
feature enabled for your handset.
Contact your System
Administrator for a list of the
supported Feature Access Codes
for your system.
QUICK REFERENCE GUIDE
5
 Loading...