

Page 1

MioMore Desktop
User Manual
en
English
Page 2

Contents
Welcome................................................................................................................................................4
What is MioMore Desktop?....................................................................................................................5
How do I install MioMore Desktop onto my computer?......................................................................6
MioMore Desktop Menu ....................................................................................................................7
General Preferences.....................................................................................................................8
My Subscriptions....................................................................................................................................9
How do I purchase a subscription? ...................................................................................................9
How do I activate my subscription?...................................................................................................9
How do I update subscriptions on my Mio?.....................................................................................10
My Maps ..............................................................................................................................................11
How do I download and install free map updates? ..........................................................................12
How do install maps onto my Mio?..................................................................................................13
How do I remove maps from my Mio?.........................................................................................15
My Maps Preferences .....................................................................................................................15
Custom POIs........................................................................................................................................16
How do I install custom Points of Interest?......................................................................................16
How do I delete a Custom POI File from my Mio?...........................................................................17
Photo Album ........................................................................................................................................18
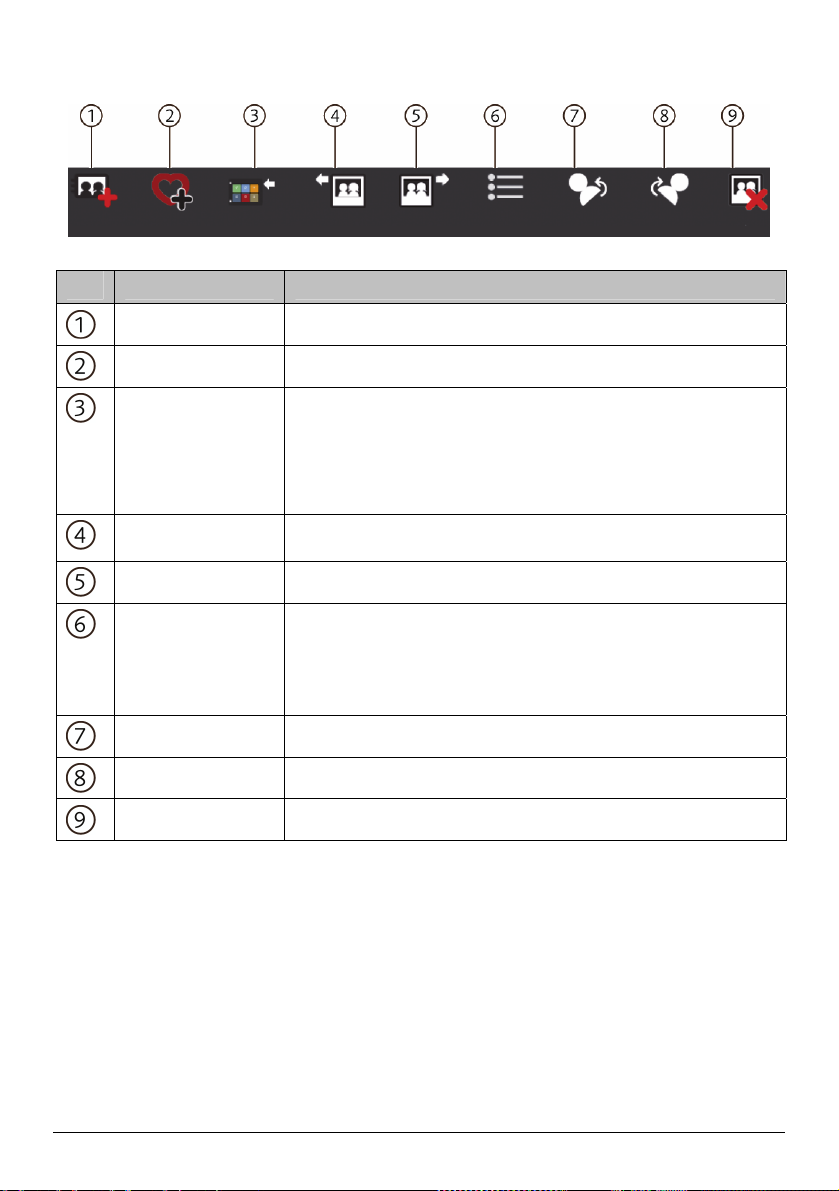
Toolbar............................................................................................................................................19
How do I transfer pictures from Photo Album to my Mio?................................................................20
How can I view and edit pictures or albums on my computer?........................................................20
What else can I do with pictures and albums on my computer? ......................................................21
Photo Album preferences................................................................................................................22
Image Search.......................................................................................................................................23
How do I download NavPix from the internet?.................................................................................23
How do I import NavPix to Photo Album?.....................................................................................23
How do I import NavPix to My Places?.........................................................................................23
Application Gallery ...............................................................................................................................24
How do I rearrange Main Menu applications on my Mio Main Menu? .............................................24
How do I add an application to my Mio?..........................................................................................24
How do I remove an application from my Mio?................................................................................24
My Places ............................................................................................................................................25
How do I sort My Place locations? ..................................................................................................25
How do I edit a location name or notes in My Places? ....................................................................26
How do I share a location from My Places? ....................................................................................26
How do I play a captured sound file? ..............................................................................................26
How do I upload a NavPix from My Places to Flickr™?...................................................................26
How do I delete a location from My Places?....................................................................................27
My Mio .................................................................................................................................................28
Voice transfer..................................................................................................................................28
How do I install a voice file?........................................................................................................28
How do I remove a voice file?.....................................................................................................28
Mileage Reporter ............................................................................................................................29
How do I import my trip data?.....................................................................................................29
How do I export a mileage report?..............................................................................................30
How do I delete travel logs from my Mio? ...................................................................................30
Mileage Reporter preferences.....................................................................................................30
Backup and Restore........................................................................................................................31
How do I backup my Mio?...........................................................................................................31
How do I restore a backup to my Mio?........................................................................................31
How do I delete a backup? .........................................................................................................31
Connect - Gas Prices...........................................................................................................................32
2
Page 3

How do I search for a gas prices using Connect? ...........................................................................32
My Media .............................................................................................................................................33
How do I import a music file to my MioMore Desktop library? .........................................................33
How do I transfer a music file from MioMore Desktop to my Mio?...................................................34
How do I remove a music file from my MioMore Desktop playlist?..................................................34
How do I remove a music file from my Mio playlist?........................................................................34
How do I permanently delete a music file from my Mio playlist?......................................................34
What else I can do in My Media? ....................................................................................................35
Appendices ..........................................................................................................................................36
For more information.......................................................................................................................36
Compliance.....................................................................................................................................37
Speed Limit.....................................................................................................................................37
Safety Camera POIs.......................................................................................................................37
Disclaimer .......................................................................................................................................37
Copyright ........................................................................................................................................38
3
Page 4

Welcome
Thank you for purchasing this MioMore Desktop software. Please read this manual carefully before using MioMore
Desktop for the first time. Keep this manual in a safe place and use as your first point of reference.
Important information for using the manual
It is important to understand the terms and typographical conventions used in this manual.
Formatting
The following kinds of formatting in the text identify special information:
Convention Type of Information
Bold Mio components or items displayed on screen, including buttons, headings, field names and
Italics
Icons
The following icons are used throughout this manual:
Icon Description
Terms
The following terms are used throughout this manual to describe user actions.
Term Description
Click Use the left mouse button to click a button or area on the screen.
Select Click an item in a list or click a command from a menu.
options.
Indicates the name of a screen.
Note
Tip
Warning
4
Page 5

What is MioMore Desktop?
MioMore Desktop is a suite of tools you can use to access greater functionality and product information via your
computer.
MioMore Desktop allows you to:
obtain software updates
manage maps
search online for local POIs
manage custom POIs
manage safety camera subscriptions
report trip mileage
transfer pictures to your Mio using Photo Album
browse the Mio website for special offers.
Can I use MioMore Desktop with my computer?
Ensure your computer has the following minimum system requirements before installing MioMore Desktop:
IBM compatible PC
Microsoft
Internet Explorer 6 or higher
DVD drive
USB port
Internet connection for activation.
Microsoft .NET 2.0, 3.0 and 3.5 will be installed on your computer as part of the installation of MioMore Desktop.
How do I install a map for the first time?
The most common task performed using MioMore Desktop is the installation of a new map to your Mio internal
memory or memory card. Complete the following procedures:
Step Action
1 Install Mio Spirit on your computer.
2 Check for software updates for Mio Spirit on your Mio.
3 Install one or more maps on your Mio.
®
Windows® XP SP2 or Vista x32
5
Page 6

How do I install MioMore Desktop onto my computer?
Before you begin: Ensure that your computer meets the minimum system requirements for MioMore Desktop,
especially:
i. Ensure that Internet Explorer 6 or higher is installed on you computer before you install MioMore Desktop, even if it
is not your default browser.
ii. Windows XP users, ensure that Windows XP Service Pack 2 or higher has been applied before you install
MioMore Desktop.
CAUTION: When your Mio is turned on and connected to a computer, it is recognized as an external massstorage device. Do NOT delete any files that are pre-installed on your Mio. Deleting the files can cause your Mio
to crash
1. Close all programs on your computer.
2. Insert the MioMore Desktop Application Installer DVD into your computer DVD drive.
The MioMore Desktop installer will start.
If your computer does not automatically launch the DVD, start the installation manually:
Start
Run. Type D:\Install.exe where “D” is the letter assigned to your DVD drive, then click OK
3. Select your preferred language for MioMore Desktop.
4. Click Install MioMore Desktop, then Install MioMore Desktop 2009.
5. Follow the screen prompts to install MioMore Desktop:
Review and accept the Licence Agreement for MioMore Desktop when prompted.
Select a destination folder for MioMore Desktop when prompted.
When the installation is complete, click Finish.
MioMore Desktop will open.
6. If prompted to connect your Mio to your computer, complete the following:
Plug the large end of the USB cable directly into a USB port on your computer (not a USB hub) and plug
the small end into the USB Socket (
) on the bottom of your Mio.
7. If prompted to update your Mio software, follow the on-screen prompts.
You are now ready to use MioMore Desktop to install maps to your Mio.
From now on, you can access MioMore Desktop via: Start All Programs Mio MioMore Desktop 2009
Where possible, plug the USB cable into a USB port at the back of your computer.
Slide the Power switch to the ON position, to turn on your Mio.
The following screen will display on your Mio:
6
Page 7

MioMore Desktop Menu
Depending on your Mio model, certain MioMore Desktop Menu options may not be available.
Component Description
Mio Online Displays the Mio website, Mio Store and other online features.
My Subscriptions Information on your current subscriptions, including safety camera subscriptions.
My Maps Install and manage maps.
Custom POIs Application that allows you to import custom POIs.
Photo Album Import and edit NavPix, including:
Manage albums
Copy NavPix
Delete NavPix
Move NavPix or albums between the NavPix library on your Mio and the
NavPix library on your computer
Add NavPix to My Places.
Image Search Search online and download NavPix which can be added to My Places or Mio.
This feature is powered by Flickr.
Application Gallery Customize and rearrange applications available on the Main Menu screen of
My Places View and modify all places including addresses, Points of Interest, NavPix, and
your Mio.
others added using MioMore Desktop and stored on your Mio.
7
Page 8

Component Description
My Mio A collection of applications that allow you transfer data to and from your Mio,
including:
Voice transfer
Activation
Mileage reporter
Backup and restore
Language
Recover keys
Reinstall software on your Mio
Options
Connect Search for and add live Points of Interest to My Places.
My Media Application used to transfer media files (.wav, .mp3, .wma) from your computer to
your Mio.
General Preferences
My Mio Options General
Complete one of the following:
If you want to ... Then ...
keep MioMore Desktop updated select the Auto check for updates checkbox.
When you select this option, every time you open MioMore Desktop,
any available service packs and bug fixes will be downloaded from the
Mio server and applied to your Mio.
change the units of measurement that
MioMore Desktop uses
Updating software is different from upgrading software. To
upgrade MioMore Desktop, you must first purchase a new version of
MioMore Desktop from a retailer, then install it on your Mio.
select or clear the Use metric units check box to change
between imperial and metric units
select or clear the Use decimal degrees check box to change
between decimal degrees and latitude/longitude co-ordinates.
8
Page 9

My Subscriptions
Subscription information is not available on all models and is only available in selected countries.
Your Mio contains pre-loaded subscriptions, including safety camera, MAD Maps and Travel Book information. To
subscribe to information updates, use the My Subscriptions application in MioMore Desktop.
MioMore Desktop
For the latest subscription updates, visit: www.mio.com
My Subscriptions
Safety Camera alerts can be set to enable a warning sound or visual warning when on your route.
How do I purchase a subscription?
1. Select a type of subscription.
A list of regions will display.
2. Select a region.
A list of available subscriptions will display.
3. Select a subscription or offer, then click Purchase an activation key from the Mio store.
The Mio Store website will open.
4. Follow the prompts to purchase your subscription.
A product key will be sent to you via email when you have subscribed. You will need to use this product key to
activate your subscription.
How do I activate my subscription?
MioMore Desktop My Places
1. Enter your product key.
2. Follow the prompts to activate your subscription.
9
Page 10

How do I update subscriptions on my Mio?
The My Mio section will display a list of subscriptions already installed on your Mio:
Icon Description
Red Expired subscriptions.
right click to purchase a new subscription.
Yellow Available subscriptions.
right click to update and purchase new subscription.
Green Active subscriptions.
No updates are available for these subscriptions.
10
Page 11

My Maps
My Maps allows you to install new maps, remove maps from your Mio and purchase new maps.
MioMore Desktop
My Maps
Component Description
Map Source A list of maps on the DVD or available for purchase via the Mio Store
My Mio A list of maps installed on your Mio.
Continent A drop down list of continents that have maps available for your Mio.
Zoom In / Zoom Out Click to zoom in or out of the globe.
Globe A map of the world or selected continent indicating the maps:
website.
on the current DVD,
installed on your Mio or memory card, or
available from Mio.
11
Page 12

How do I download and install free map updates?
Occasionally Mio will offer you free map updates. If a free map update is available and your Mio is connected to your
computer, a message will display when you first start MioMore Desktop.
The message can be disabled from displaying by selecting Suppress Free Map Offer messages from the
message box or from: My Mio
How do I download a map update immediately?
1. Select the map updates that you would like to download, then click Download.
Your default web browser will open and prompt you to save the map update files.
2. Navigate to your Loadable Maps Location and save the files.
The default Loadable Maps Location is the My Maps folder in your Documents folder. You can change the
location from: My Mio
How do I download a map update at a later time?
1. Click Close to close the Free Map Updates window.
2. When you are ready to download the map update, click My Maps.
A list of available map updates will be displayed under Free to download in the Available Downloads section.
Options My Maps
Options My Maps
3. Select the map update that you would like to download, then click Yes.
Your default web browser will open and prompt you to save the map update file.
4. Navigate to your Loadable Maps Location and save the files.
The default Loadable Maps Location is the My Maps folder in your Documents folder. You can change the
location from: My Mio
Options My Maps
How I do I install a map update that I have downloaded?
1. Click My Maps.
A list of downloaded map updates will be displayed in the Loadable Maps section.
2. Click Open next to the map update that your would like to install.
The globe will display. The free maps that you downloaded are yellow.
12
Page 13

3. Click the map you want to install to your Mio.
The map will change colour to a brighter yellow to indicate it has been selected.
To deselect a map, click the map again.
You may need to install multiple maps to cover the required geographical area.
4. Select the destination media for the selected map, then click Transfer Now.
The selected map will be installed and change colour to green.
5. To use your Mio, disconnect the USB cable.
WARNING: Do not disconnect the USB cable from the Mio USB Socket until the Globe has
refreshed, and the installed map or maps have changed colour to green.
How do install maps onto my Mio?
Your Mio comes with one or more pre-activated maps.
You can install maps from the DVD that came with your Mio or one that you have purchased separately to a memory
card or your Mio internal memory; however you may need to purchase a Map Product Key to activate maps on the
DVD that came with your Mio.
1. Open MioMore Desktop, if it is not already open:
Start
All Programs Mio MioMore Desktop
2. Click My Maps.
The My Maps application will display.
3. Insert a Map DVD into your computer DVD drive.
The maps already installed on your Mio are green.
The maps that are unlocked and ready to be installed to your Mio are yellow.
The maps that require activation before being installed to your Mio are red.
The maps that are available for purchase from Mio are blue.
If your computer opens Windows Explorer when the DVD is inserted, close the Windows Explorer window.
13
Page 14

4. Complete the following:
If the map to be installed is ... Then ...
yellow go to step 7.
red the map needs to be activated via the Internet before it can be
installed; continue to step 5.
5. If you connect to the Internet via a dial-up connection, connect to the Internet now.
6. Follow the prompts to activate your Map Product Key, including:
Enter the Map Product Key when prompted.
Your computer will connect to the Internet and activate your Map Product Key.
When activation has completed, the map will change colour to yellow; continue to step 7.
7. Click the map you want to install to your Mio.
The map will change colour to a brighter yellow to indicate it has been selected.
To deselect a map, click the map again.
You may need to install multiple maps to cover the required geographical area.
8. Complete the following:
If you want to ... Then ...
select a yellow map go back to step 7.
select a red map the map needs to be activated via the Internet before it can be
installed; go back to step 5.
install the selected maps to your Mio continue to step 9.
14
Page 15

9. Select the destination media for the selected maps, then click Transfer Now.
The selected maps will be installed and change colour to green.
10. To use your Mio, disconnect the USB cable.
WARNING: Do not disconnect the USB cable from the Mio USB Socket until the Globe has refreshed,
and the installed map or maps have changed colour to green.
How do I remove maps from my Mio?
1. Click My Maps.
The My Maps application will display.
2. From the My Mio panel, select the check box next to the map you want to remove.
3. Click Remove Maps to remove the selected maps.
4. Confirm that you want to remove the selected map when prompted.
The map is removed from your Mio.
My Maps Preferences
My Mio Options My Maps
Complete one of the following:
If you want to ... Then ...
change the location of where downloaded
maps and map updates will be saved
prevent offer messages from displaying select the Suppress Free Map Offer messages check box.
click Change.
select a location for your NavPix library.
click Save or OK.
The warning message will display and you will be prompted
to confirm your action.
Your NavPix library is moved to the new location.
15
Page 16

Custom POIs
Depending on your Mio model, Custom POIs features may not be available.
The Custom POIs (Points of Interest) application allows you to create or import your own POI files. These are called
custom POIs. Unlike preinstalled POIs, custom POIs can be removed from your Mio and can have audio as well as
visual alerts associated with them.
MioMore Desktop
Custom POIs
How do I install custom Points of Interest?
Various POI files are available for download free or by subscription from third-party websites1. Ensure that
downloaded files are in .csv (Comma Separated Values) format.
1. In the Add new POIs section, click Browse to select a source file.
The Open dialog box will open.
2. Select the file from your local or network drive, then click Open.
3. From the POI Category section:
If you want to... Then...
use an existing custom POI category select the Existing category option, then select a type from
create a new custom POI category select the New category option, then type a name for the
1
Mio is not responsible for the content or accuracy of the information or the reliability or availability of these websites. The use of
information regarding safety camera locations may be subject to local laws in the country of use. You are responsible for checking that
you can use the information in your country or in the country where the information will be used.
the drop down list.
POI category.
16
Page 17

4. Set Alert setting as required:
If you want to... Then...
enable a visual warning when a POI of this
category is in close proximity
select an icon to display on the map screens
for POIs of this category
select the distance from a POI of this
category at which the visual warning should
display or the warning chime should sound
enable a warning sound when a POI of this
category is in close proximity
select a custom sound alert file to play when
a POI of this category is in close proximity
5. Click Add to device to add the POI to your Mio.
select the Visual alert check box.
Click Browse to select the icon file from your local or
network drive. When you have located the icon file, select it
and click Open.
The icon file must be a bitmap (.bmp) graphic with a
minimum size of 6x6 pixels and a maximum size of 32x32
pixels.
If you do not select a custom icon, a default icon will
display.
select the distance from the Distance box.
To change the units used to measure distance for this
POI category, from the tools menu click on options and from
the general option select Use metric units check box.
select the Audio alert check box.
Either select a sound file from the list, or
Click Add to select a sound file (.WAV format) from
your local or network drive. When you have located the
file, select it and click Open.
If you do not select a custom sound file, a default sound
alert will play.
Each file corresponds to a POI category; for example, Hotels.csv will be listed in your Mio as the Hotels category.
How do I delete a Custom POI File from my Mio?
1. In the Installed POIs section, click Delete next to the file name.
The file is removed from the list, but is not yet deleted.
2. Accept the warning message.
The selected file is deleted.
17
Page 18

Photo Album
Depending on your Mio model, some Photo Album features may not be available.
Photo Album is a MioMore Desktop application which allows you to copy, delete or move pictures or albums between
the NavPix library on your Mio and the NavPix library on your computer.
MioMore Desktop
Photo Album
Component Description
Desktop albums Displays a list of all albums stored in the NavPix library on your computer.
Click an album to display its contents in the Album display area.
Click View all NavPix to display all pictures stored in the NavPix
library on your computer.
My Mio albums Displays a list of albums stored on the Mio internal memory and on the
memory card if one is inserted.
Click an album to display its contents in the Album display area.
Album display area Displays thumbnails of pictures in the selected album.
Selected picture When a thumbnail is selected it displays with a blue border.
Search Type to search for a NavPix by name.
Toolbar When a picture is selected, the icons which can be used will be active.
18
Page 19
Toolbar
The following options are available on the toolbar:
Button Description
Create new album Click to create a new album in the NavPix library you are viewing.
Add to My Places Click to transfer NavPix to My Places.
Transfer to your Mio
or
Transfer to your
computer
Import NavPix Imports NavPix from your computer to the NavPix library on your
Export to disk Click to save NavPix to your computer or a network drive.
View details Click to view the selected NavPix and edit NavPix details, including:
Rotate left Rotates the selected NavPix 90° to the left.
Rotate right Rotates the selected NavPix 90° to the right.
Delete NavPix Click to delete the selected NavPix.
If you are viewing NavPix in the NavPix library on your computer,
this will display as Transfer to your Mio.
Click to transfer the selected NavPix to your Mio.
If you are viewing NavPix in the Mio library this will display as
Transfer to your computer.
Click to transfer the selected photo(s) to the NavPix library on your
computer.
computer.
NavPix name
latitude
longitude
description.
19
Page 20

How do I transfer pictures from Photo Album to my Mio?
You can transfer pictures from your computer to your Mio. You can import any JPEG (.jpg) into Photo Album, add or
edit GPS information, and then copy the picture to your Mio.
1. From the Toolbar section, select Import NavPix.
The Open dialog box will display.
2. Select a NavPix from a folder on your computer and click Open.
Thumbnails of the NavPix will display in the Album display area.
You can also drag and drop a NavPix from a folder on your computer to an Album on your MioMore
Desktop.
3. Either click and drag the required NavPix to an album in the Mio albums section, or click the Transfer to
your Mio icon on the toolbar.
If you have transferred a NavPix with GPS coordinates you can then navigate to where the picture
was taken.
How can I view and edit pictures or albums on my computer?
If you want to ... Then....
rotate a picture to left
rotate a picture to right
view the picture details
edit GPS information
delete a picture
select the picture from the Album display area.
click Rotate left on the toolbar.
select the picture from the Album display area.
click Rotate Right on the toolbar.
select the picture from the Album display area.
right-click and select View Details, or click View Details on the toolbar.
select the picture from the Album display area.
double click on the picture or click View Details on the toolbar.
The following information will display:
Name
Latitude and Longitude
Description
Edit the details you want to modify.
Click OK to save the changes.
select the picture from the Album display area.
right click and select Delete or click Delete on the toolbar.
20
Page 21

What else can I do with pictures and albums on my computer?
From the NavPix library on your computer, you can:
add a picture to another album
remove pictures from an album
add a NavPix to My Places
view and edit details of a selected picture
upload pictures to Flickr™
export to disk
export pictures to Google Earth™
search for pictures
view all pictures in the library
If you want to ... Then....
add a picture to another album
remove a picture from an album
add a NavPix to My Places
view and edit picture details
upload picture to the Flickr website
save a picture to your computer
export to Google Earth™
(only NavPix with GPS
coordinates can be exported to
Google Earth)
in the Desktop albums section, select the album containing the
NavPix you want to include in another album
select the NavPix then drag it to the other album.
The selected NavPix is included in the new album, but is not moved,
i.e., one instance of the NavPix in the library may be included in multiple
albums.
in the Desktop albums section, select the album containing the
NavPix you want to remove
select the NavPix, right click and select Remove from album.
Click the Delete icon on the toolbar if you want to delete the NavPix
from all albums.
in the Desktop albums section, select the album containing the
NavPix you want to add to My Places.
select the NavPix, right click and select Upload to My Places.
select the picture then click the View Details icon on the toolbar.
edit the fields as required.
in the Desktop albums section, select the album containing the
NavPix you want to upload to the Flickr website.
select the NavPix, right click and select Upload to Flickr.
You need a Flickr account to upload NavPix. To create a Flickr
account visit www.flickr.com
.
select the picture from the Album display area.
right click and select Export to disk or click Export to disk on the
toolbar.
navigate to a folder on your computer where you want to save the
NavPix.
in the Desktop albums section, select the album containing the
picture you want to export to Google Earth.
select the NavPix, right click and select Export to Google Earth.
navigate to a folder on your computer to saev the file and then open it
in Google Earth.
You need to install the Google Earth software on your computer to be
able to view the file you have created. You can download Google Earth
from earth.google.com
.
21
Page 22
If you want to ... Then....
search for other NavPix You can search for other NavPix near the longitude and latitude of your
NavPix using Flickr.
view all pictures in the library click View all pictures at the bottom of the Desktop album section.
Photo Album preferences
My Mio Options Photo Album
Complete one of the following:
If you want to ... Then....
change your NavPix location
on your computer
receive a warning message
before deleting an image from
your device
receive a warning message
before deleting an image from
your NavPix library
create a new folder every time
you import new photos
view NavPix when on a route select the Show NavPix on map checkbox.
click Change.
select a location for your NavPix library.
click Save or OK.
The warning message will display and you will be prompted to confirm
your action.
Your NavPix library is moved to the new location.
select Warn me when permanently deleting a NavPix from my Mio check
box.
select Warn me when permanently deleting a NavPix from my library
check box.
select the Import photos to a new album checkbox.
22
Page 23
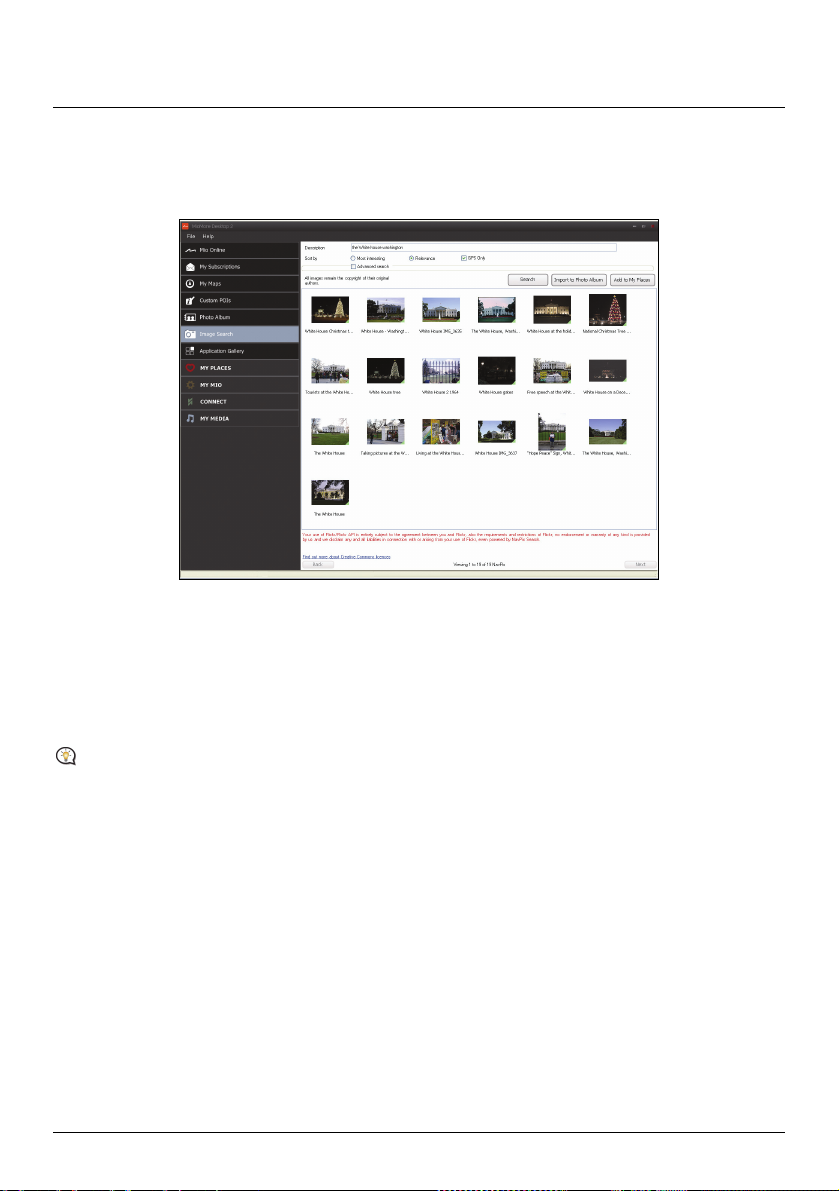
Image Search
Image Search is a MioMore Desktop application powered by Flickr™ allowing you to download photos and import
them to Photo Album. You can then upload the photo to the Flickr website, transfer photos to your Mio, export
pictures to Google Earth or search for other NavPix near the longitude and latitude of your NavPix.
MioMore Desktop
Image Search
How do I download NavPix from the internet?
1. In the Description field enter a search description for the image you are looking for.
2. Select one of the Sort by options.
3. Click Search.
Thumbnails of the NavPix will display in the NavPix display area.
You can narrow your search by selecting the Advanced search check box and then selecting a city from the
drop down list or by entering latitude and longitude details.
How do I import NavPix to Photo Album?
1. Select a picture or group of pictures you want to add to your Photo Album.
2. Click Import to Photo Album.
A new album is created in the Desktop album section of Photo Album.
How do I import NavPix to My Places?
1. Select a picture or group of pictures you want to add to your My Places.
2. Click Add to My Places.
The selected image is added to My Places.
23
Page 24
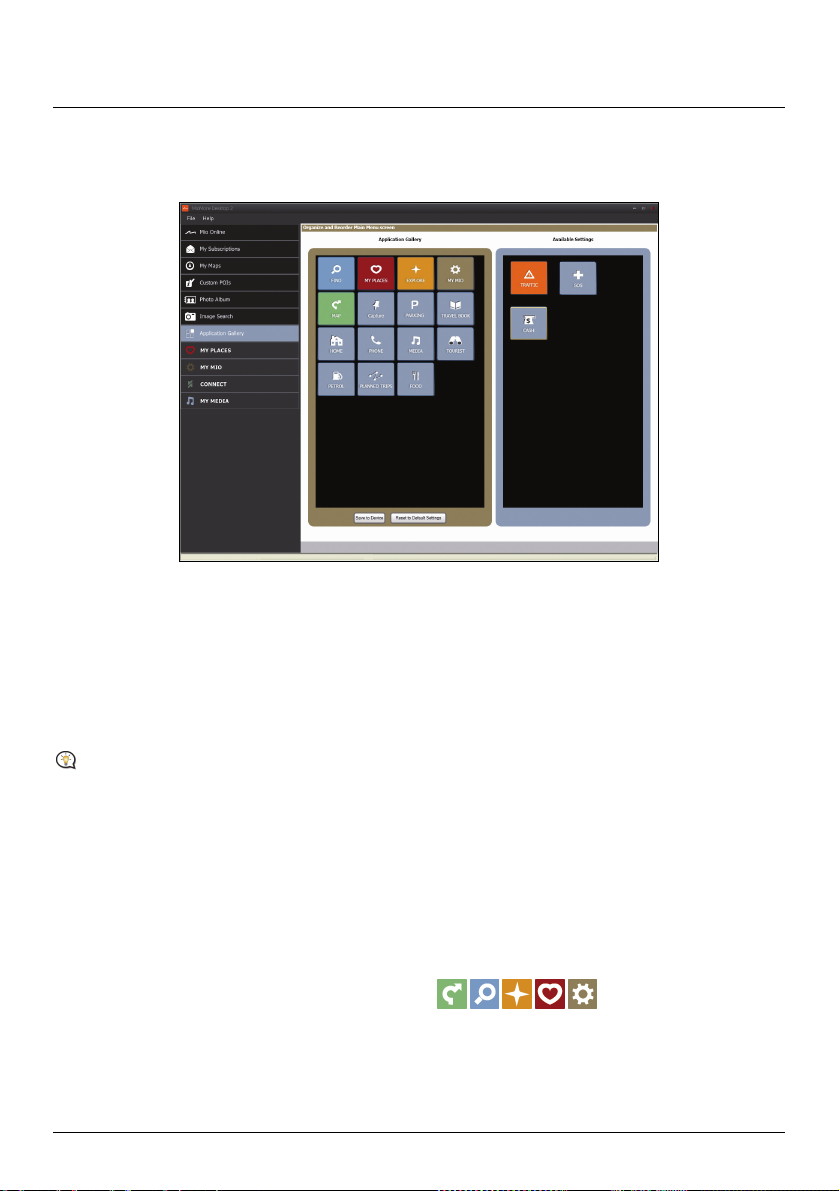
Application Gallery
Application Gallery is a MioMore Desktop application that allows you to add, remove and rearrange applications on
the Main Menu screen of your Mio.
MioMore Desktop
Application Gallery
How do I rearrange Main Menu applications on my Mio Main
Menu?
1. Select any application from the Application Gallery section.
2. Drag the application to the position that you would like it to appear on your Mio.
3. Click Save to Device.
The order of the Main Menu screen is saved on your Mio.
Click Rest to Default Settings to restore the Main Menu screen to the factory default order.
How do I add an application to my Mio?
1. Select any application from the Available Settings section.
2. Drag and drop the application to the Application Gallery section.
3. Click Save to Device.
The application is added to the Main Menu screen on your Mio.
How do I remove an application from my Mio?
The following applications cannot be removed from your Mio:
1. Select any application from the Application Gallery section.
2. Drag and drop the application to the Available Settings section.
3. Click Save to Device.
The application is removed from the Main Menu screen on your Mio and is no longer accessible.
24
Page 25
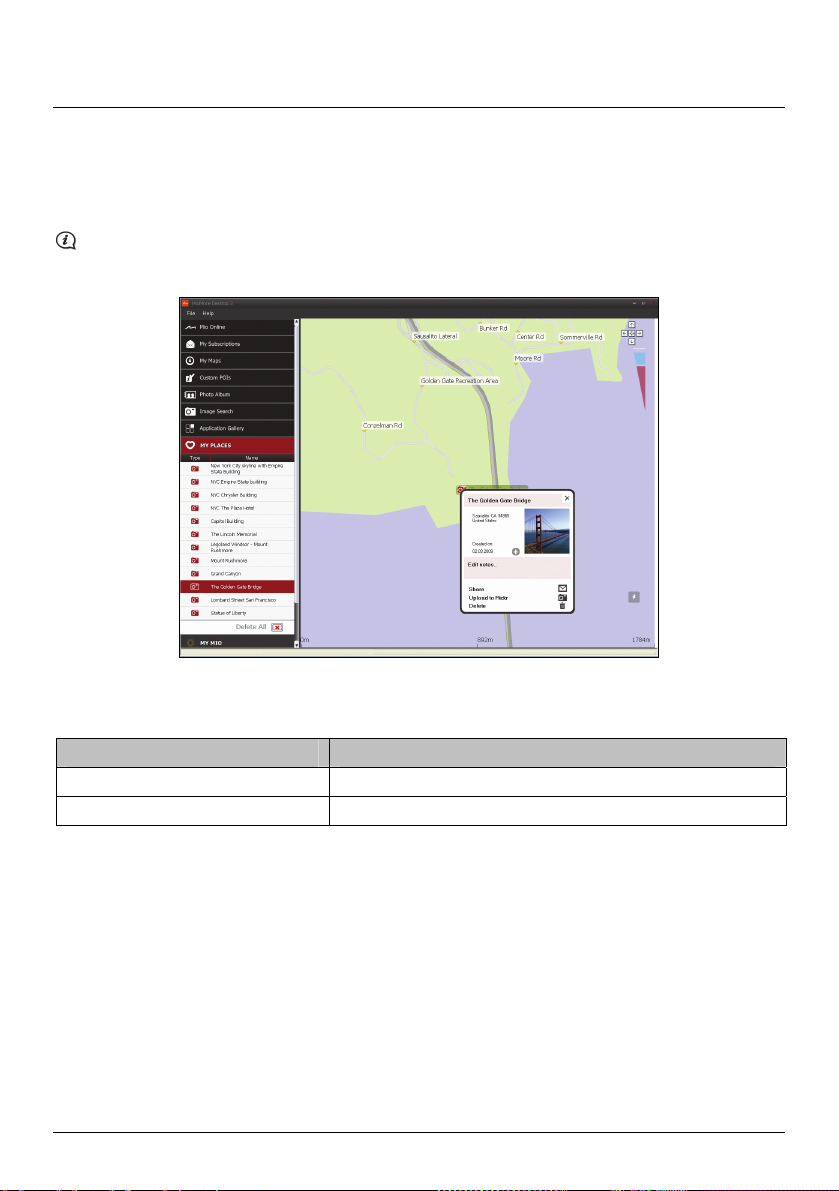
My Places
My Places is a MioMore Desktop application that allows you to use GOOGLE Maps™ to view all places that you
have saved on your Mio.
My Places includes saved addresses, captured journeys and sound, Points of Interest, NavPix, and other locations.
You can select, modify and delete places. You can also add locations from Connect, Photo Album and Image Search
to My Places.
You can install a maximum of 99 locations on your Mio via My Places.
MioMore Desktop
My Places
How do I sort My Place locations?
You can sort My Place locations by type and name:
If you want to ... Then ...
sort My Place locations by type click Type on the My Places panel.
sort My Place locations by name click Name on the My Places panel.
25
Page 26

How do I edit a location name or notes in My Places?
1. From the My Places panel select the location you want to edit.
2. Click the location icon on the GOOGLE map.
The location summary pop-up will display.
3. Complete one of the following:
If you want to ... Then ...
edit the location name
click the location name.
enter a new name or edit the existing name.
The location name is modified in both MioMore Desktop and your Mio.
edit the location notes
click Edit notes.
enter notes.
The location notes is modified in both MioMore Desktop and your Mio.
How do I share a location from My Places?
1. From the My Places panel select a location you want to edit.
2. Click the location icon on the GOOGLE map.
The location summary pop-up will display.
3. Click
.
An email will open ready to send to your friends.
Your friend will receive the email with links to either save the image or to save the location in My Places in MioMore
Desktop.
If the location is a NavPix, your friend will receive the image as an attachment to the email.
If the location is a captured journey, your friend will receive the journey as a .KMZ file attached to the email.
If the location is a captured voice recording, your friend will receive the journey as a .WAV file attached to the
email.
How do I play a captured sound file?
1. From the My Places panel select a captured sound that you want to listen to.
2. Click the location icon on the GOOGLE map.
The location summary pop-up will display.
3. Click
.
The captured sound file will play.
How do I upload a NavPix from My Places to Flickr™?
1. From the My Places panel select a location you want to edit.
2. Click the location icon on the GOOGLE map.
The location summary pop-up will display.
3. Click
You need a Flickr account to upload a NavPix. To create a Flickr account, visit www.flickr.com.
, then follow the prompts to upload a NavPix to Flickr.
26
Page 27

How do I delete a location from My Places?
1. From the My Places panel select a location you want to edit.
2. Click the location icon on the GOOGLE map.
The location summary pop-up will display.
3. Click
, then click Yes to delete the location.
4. The location is deleted from My Places.
You can delete all locations in My Places by clicking on the My Places panel.
27
Page 28

My Mio
Voice transfer
My Mio Voice Transfer
Voice Transfer is a MioMore Desktop application that allows you to install or remove voice files.
Voice files take up space on your Mio’s internal memory. If you do not use a voice file, you can remove it to free up
space. You can later reinstall it to your Mio if required.
How do I install a voice file?
In the Available voice files section, select the voice file you would like to install, then click Install selected voices.
How do I remove a voice file?
In the Available voice files section, select the voice file you would like to remove, then click Remove selected
voices.
28
Page 29

Mileage Reporter
Mileage Reporter is not available for all models.
Mileage Reporter is a MioMore Desktop feature that allows you to create expense reports (.csv format) based on the
mileage and estimated fuel usage recorded by your Mio.
Mileage Reporter
My Mio
Element Description
Timeframe specifies the time for which the mileage report will be created.
Report panel Displays your trip log data.
Fuel Select to include the amount of fuel (estimate) used for the mileage
select Show All to include all recorded mileage.
recorded. If selected, specify the number of miles traveled per gallon, or
miles/kilometers traveled per litre.
Report data buttons Import report data from your Mio, clear all report data from your Mio or
export data to a report (.csv).
How do I import my trip data?
1. Select Show All in the Timeframe section.
2. Select the Calculate fuel at check box, then enter the fuel consumption.
3. Click Load from your Mio.
The Transfer Log progress bar will display.
All your trip logs can now be viewed in the Report panel section.
29
Page 30

How do I export a mileage report?
1. Select a trip log from the Report panel section.
2. Click Export report.
The Open dialog box will open.
3. Select the file from your local or network drive, enter a name for your mileage report, then click Save.
The mileage report is saved in .csv format.
How do I delete travel logs from my Mio?
1. Select a trip log from the Report panel section.
2. Click Clear from your Mio.
3. Click Yes to delete all travel logs.
Mileage Reporter preferences
My Mio Options Mileage Reporter
If you want to ... Then ...
receive a warning when mileage logs
are deleted from your Mio
calculate fuel economy preference by
distance per volume
calculate fuel economy preference by
volume per distance
select the Warn me when deleting all log files from my Mio check
box.
select the Distance per volume option.
select the Volume per distance option.
30
Page 31

Backup and Restore
You can save backups of data from your Mio, and later restore it if required.
Backup and Restore
My Mio
How do I backup my Mio?
1. Click Create new backup.
2. Select the data you would like to backup.
IMPORTANT: NavPix, sound and video files will not be backed up.
3. Click OK.
The backup will be saved to your computer. The backup will be listed on the Backup & Restore window.
How do I restore a backup to my Mio?
1. Select the backup from the list that you would like to restore.
2. Click Restore, then click OK.
The backup will be restored to your Mio.
How do I delete a backup?
1. Select the backup from the list that you would like to delete.
2. Click Delete, then click OK.
The backup will be deleted.
31
Page 32

Connect - Gas Prices
Connect is not available for all models.
Connect is a MioMore Desktop application that allows you to search and install local gas price information from your
computer to your Mio.
Before you begin, ensure your Mio is correctly plugged into your computer: Plug the large end of the USB cable
directly into a USB port on your computer (not a USB hub); plug the small end into
MioMore Desktop
Connect
on the bottom of your Mio.
How do I search for a gas prices using Connect?
1. From the country drop down box, select a Country.
2. From the Region/State drop down box select a region or state if required.
3. In the Place name box, enter the first few letters of a city and then select your preference.
4. Click Continue.
The Available Services page will display.
5. Select your preferred search service.
The selected services page will display.
Depending on the country you are navigating, the available search services may vary.
6. Enter the first few letters of a gas station company as the search criteria, then click Search.
The Select search method page will display.
For some countries you are required to accept the terms of use.
7. Select your preferred search method, then click Search.
A list of search results will display.
8. Click
The gas station locations will be added to My Places.
9. Repeat step 8 to install more gas stations to your Mio.
To view local gas prices on your route, refer to "How do I view gas prices I have downloaded using MioMore
Desktop?" in the Software user Manual
next to the gas station for which you want to install gas prices to your Mio.
32
Page 33

My Media
My Media is not available for all models.
My Media is a MioMore Desktop application allowing you to import music (.wav, .mp3, .wma) and video files from
your computer to your Mio.
Before you begin, ensure your Mio is correctly plugged into your computer: Plug the large end of the USB cable
directly into a USB port on your computer (not a USB hub); plug the small end into on the side of your Mio.
MioMore Desktop
My Media
Element Description
My Library Displays a list of music files stored in the library on your computer.
My Mio Displays a list of folders containing playlists stored on the Mio internal memory
Music display area Displays music file from the selected folder
Toolbar When a music file is selected, the icons that can be used will be available.
Click a field to display its contents in the Music display area.
and memory card.
Click a folder to display its contents in the Music display area.
How do I import a music file to my MioMore Desktop library?
1. From the Toolbar section select Import media to library.
The Open dialog box will display.
2. Navigate and select a music file you want to transfer.
3. Click Open.
The selected music file is imported and can be viewed in the display area.
4. Repeat steps 1-3 to transfer more music files.
33
Page 34

How do I transfer a music file from MioMore Desktop to my
Mio?
1. From the display area select a music file by selecting the checkbox next to it.
2. Click Transfer file(s) to Mio.
The Select location window will display.
3. Select Mio or the SD card as the destination for the file.
The selected music file is transferred to your Mio.
4. Repeat step 1, 2 and 3 to transfer additional music files to your Mio.
You can also drag and drop the music file to your Mio or the memory card. You can save the music files either on
your Mio’s internal memory or the memory card if one is inserted.
How do I remove a music file from my MioMore Desktop
playlist?
1. From the display area select a music file by selecting the checkbox next to it.
2. Click Remove marked from list.
The selected file is removed from your MioMore Desktop playlist.
You can select multiple files to remove them from the playlist.
3. Repeat steps 1 and 2 to remove additional music files to your Mio.
Removing music files from the playlist will not delete the music files from your computer.
How do I remove a music file from my Mio playlist?
1. From the My Mio section select Albums.
Music files on your Mio are displayed in the display area.
2. Select a music file you want to remove and then click Remove marked from list in the toolbar section.
The selected music file is removed from the play list.
3. Repeat the process to remove additional music files to your Mio.
You can select multiple files to remove them from the playlist. Removing music files from the playlist will not
delete the music flies from your Mio.
How do I permanently delete a music file from my Mio playlist?
1. From the My Mio section select Albums.
Music files on your Mio are displayed in the display area.
2. Select a music file you want to delete, right click and select Delete.
The selected music file is permanently deleted from the play list as well as your Mio.
3. Repeat steps 1 and 2 to delete additional music files to your Mio.
34
Page 35

What else I can do in My Media?
From the My Media section on MioMore Desktop you can:
sort music files by ratings, date, artist, album, etc
preview a music file
add your ratings to the music files
If you want to ... Then ...
sort media files from My Library, expand a field and select your field preference.
You can sort music files by the following fields:
Album name
Artist
Year of release
Rating
Genre
Date Added
preview a media file from Music display area, select a music file you want to preview.
to play the music file
to pause the music file
to stop the music file
to forward the music file
to rewind the music file.
rate a music file
from Music display area, select a music file you want to rate.
right click and select Rating to rate the file.
You can rate music files as:
A Bad
AA Ok
AAA Good
AAAA Very Good
AAAAA Excellent
35
Page 36

Appendices
For more information
User Manuals
The latest User Manuals can be downloaded from our website: www.mio.com
Online support
For 24/7 help and support with Mio products, visit our Technical Support website at: service.mio.com
36
Page 37

Compliance
The software is based in part on the work of the Independent JPEG Group.
The software application uses a modified version of the Minimal XML Library, Flickr Library and Python Library. The libraries and their
use are covered by the GNU Lesser General Public License (www.gnu.org/licenses/lgpl.html).
The modified source code is available from the following URLs:
Minimal XML Library: http://download.mio.com/opensource/gnu/mxml.zip
Flickr Library: http://download.mio.com/opensource/gnu/FlickrNet.zip
Python Library: http://download.mio.com/opensource/gnu/python25.zip
Speed Limit
Mio products are designed to be used as an aid to safer driving. Mio does not condone speeding or any other failure to comply with your
local traffic laws. It is your responsibility to drive within the posted speed limit at all times and to drive in a careful manner. Mio accepts
NO liability whatsoever for you receiving any speeding fines or points on your license through using this device. Mio does not guarantee
the accuracy of the data contained within this database either expressed or implied. In the event you receive a fine or any other penalty
for speeding or contravention of any traffic law, or are involved in an accident, Mio is not responsible for any damages of any type. In
some countries the data information regarding speed limits may conflict with local law and/or regulations. It is your responsibility to make
sure that your use of the data is in compliance with local laws and/or regulations. Usage is at your own risk.
Safety Camera POIs
Mio products are designed to be used as an aid to safer driving. You can receive messages to alert you to locations of safety cameras,
which will enable you to monitor your speed through these areas. Mio does not warrant that all types and locations of safety camera data
are available, as cameras may be removed, relocated or new cameras installed. Mio does not condone speeding or any other failure to
comply with your local traffic laws. It is your responsibility to drive within the posted speed limit at all times and to drive in a careful
manner. Mio accepts NO liability whatsoever for you receiving any speeding fines or points on your license through using this device.
Mio does not guarantee the accuracy of the data contained within this database either expressed or implied. In the event you receive a
fine or any other penalty for speeding or contravention of any traffic law, or are involved in an accident, Mio is not responsible for any
damages of any type. In some countries the data information regarding safety or speed cameras may conflict with local law and/or
regulations. It is your responsibility to make sure that your use of the data is in compliance with local laws and/or regulatio ns. Usage is at
your own risk.
Disclaimer
Mio operates a policy of ongoing development. Mio reserves the right to make changes and improvements to any of the products
described in this document without prior notice. Mio does not warrant that this document is error-free. The screenshots and other
presentations shown in this manual may differ from the actual screens and presentations generated by the actual product. All such
differences are minor and the actual product will deliver the described functionality as presented in this User Manual in all material
respects.
37
Page 38

Copyright
© 2009 MiTAC International Corporation. Mio is a registered trademark of MiTAC International Corporation and is used under licence by
Mio Technology Ltd. All rights reserved.
The software contains proprietary information of MiTAC International Corporation; it is provided under a licence agreement containing
restrictions on use and disclosure and is also protected by copyright law. Reverse engineering of the software is prohibited.
No part of this publication may be reproduced, stored in a retrieval system, or transmitted in any form or by any means, electronic,
mechanical, photocopying, recording or otherwise, without the prior written permission of Mio.
Back-On-Track, Drive-Away, MioMore Desktop, Mio Spirit, NavPix, Slide Touch and Turn-by-Turn are either registered trademarks or
trademarks of MiTAC International Corporation and are used under licence by Mio Technology Ltd. All rights reserved.
Microsoft, Windows, Windows Vista and Internet Explorer are either registered trademarks or trademarks of Microsoft Corporation in the
United States and/or other countries. All rights reserved.
© 2008 Microsoft Corporation. All rights reserved. Microsoft, MSN, and the MSN logo are trademarks of the Microsoft group of
companies.
© MAD Maps, Inc. MAD Maps owns all rights, title and interest in, or if applicable, licenses to, the MAD Maps technology including, but
not limited to, all trademarks, data, and content.
Travel Book Data wcities.com © 2009
microSD and the microSD logo are trademarks of SD Card Association.
GOOGLE and Google Earth are trademarks of Google Inc.
This product uses the Flickr API but is not endorsed or certified by Flickr.
Location Identifiers © 2005 International Air Transport Association.
POI Data © 2007 InfoUSA.
The database containing all the points of Interest in Mexico, are the property of Nanatec S de RL de CV and its brands
(www.estoyenelmapa.com y DestinoGPS), Aunicios en Directorio S.A de C.V (Seccion Amarilla). The content can not be copied,
reproduced, sold, distributed, or purchased without the written approval of Nanatec S de RL de CV.
Argentina- POIS Powered by Paginasamarillas.com.ar
All other trademarks and registrations are the property of their respective owners.
Published in New Zealand.
38
Page 39

DOC-160-A
 Loading...