

Page 1

User’s Manual
Manuale Utente
Manuel d’utilisation
Benutzerhandbuch
Handleiding
Page 2

English
Mio Map
User’s Manual
R01
September 2004
Page 3

English
Trademarks
All brand and product names are trademarks or registered trademarks of their
respective companies.
Note
The information in this manual is subject to change without notice.
Page 4

English
0 Table of Contents
Preface.................................................................................................... iv
1 Mio Map Installation ......................................................................... 1
1.1 Installing Mio Map Console.................................................................... 1
1.2 Installing and Activating Mio Map (Select Models Only) ....................... 2
1.3 Installing the Map(s) .............................................................................. 2
2 Mio Map Overview ............................................................................ 5
2.1 Mio Map Features.................................................................................. 5
2.2 Mio Map Hot Keys ................................................................................. 6
2.3 Starting Mio Map.................................................................................... 7
2.4 Mio Map Screen..................................................................................... 8
Map, Buttons, and Menus...................................................................... 8
Dragging the Map .................................................................................. 8
Zooming the Map................................................................................... 9
2.5 Quitting Mio Map.................................................................................... 9
3 Basic Navigation ............................................................................11
3.1 Selecting an Origin .............................................................................. 11
3.2 Selecting a Destination ........................................................................ 11
Using Address...................................................................................... 12
Using Point of Interest (POI)................................................................ 14
Using Favorites.................................................................................... 16
Using History........................................................................................ 18
Using Outlook Contacts ....................................................................... 19
Using Map Cursor................................................................................ 20
3.3 Navigational Aids ................................................................................. 21
Calculating a Route ............................................................................. 21
Recalculating the Route....................................................................... 22
3.4 Show Route ......................................................................................... 23
3.5 Cancel Route ....................................................................................... 23
i
Page 5

English
4 More Navigation Features............................................................. 25
4.1 Avoid Roads.........................................................................................25
Creating a List of Roads to Avoid ........................................................25
Selecting the Roads to Avoid...............................................................28
4.2 Favorites and Auto Alerts..................................................................... 29
Creating Favorites or Auto Alerts......................................................... 29
Configuring Auto Alert Category .......................................................... 31
Managing Favorites .............................................................................31
4.3 History .................................................................................................. 33
4.4 Records................................................................................................34
Recording a Journey............................................................................34
Playing a Recording.............................................................................34
Deleting a Recording ...........................................................................35
4.5 Trip Planner.......................................................................................... 36
Part 1. Select Planner Mode................................................................ 36
Part 2. Manually Select the Origin .......................................................36
Part 3. Set Waypoints .......................................................................... 37
Part 4. Calculate the Route.................................................................. 39
5 Changing Map Views..................................................................... 41
5.1 Types of View....................................................................................... 41
2D View................................................................................................41
3D View................................................................................................42
Bird’s-eye View ....................................................................................42
5.2 View the Route.....................................................................................43
Turn by Turn.........................................................................................43
Driving Direction................................................................................... 43
5.3 Day/Night Color Skin............................................................................ 44
Day Color Skin .....................................................................................44
Night Color Skin ................................................................................... 45
6 Options, Settings, and Preferences ............................................. 47
6.1 General Settings ..................................................................................47
6.2 Map Settings ........................................................................................ 48
6.3 Route Settings ..................................................................................... 49
6.4 Alert Settings........................................................................................50
6.5 GPS Status ..........................................................................................51
6.6 Look and Feel ......................................................................................51
7 Using Mio Map Console ................................................................ 53
7.1 Creating Your Own Maps by Map Cutting ...........................................53
Part 1. Load the Map ...........................................................................53
Part 2. Select the Area to Cut ..............................................................55
ii
Page 6

English
Part 3. Save the Cut Map .................................................................... 59
7.2 Creating Your Own Maps by Route Cutting ........................................ 61
7.3 Installing Newly Created Maps to Pocket PC ...................................... 62
7.4 Removing Maps ................................................................................... 63
7.5 Installing Mio Map to Your Pocket PC ................................................. 64
7.6 Using Favorites Importer ..................................................................... 65
iii
Page 7

English
1 Preface
Precautions and Notices
For your own safety, do not operate the controls of the product while driving.
Use this product prudently. The product is intended to be used only as a
navigation aid. It is not for precise measurement of direction, distance,
location or topography.
The calculated route is for reference only. It is the user’s responsibility to
follow the traffic signs and local regulations along the roads.
When you get off the car, do not leave your Pocket PC on the dashboard that is
subject to direct sunlight. The overheating of the battery can cause
malfunction and/or danger.
GPS is operated by the United States government, which is solely responsible
for the performance of GPS. Any change to the GPS system can affect the
accuracy of all GPS equipments.
GPS satellite signals cannot pass through solid materials (except glass). When
you are inside a tunnel or building, GPS positioning is not available.
A minimum of 4 GPS satellite signals is needed to determine current GPS
position. Signal reception can be affected by situations such as bad weather or
dense overhead obstacles (e.g. trees and tall buildings).
iv
Page 8

English
About This Manual
This manual assumes that you are familiar with basic Pocket PC operations. If not,
refer to the User’s Manual of your Pocket PC and familiarize yourself with the
basic operations.
This manual contains the following chapters:
Chapter 1, Mio Map Installation, guides you through the installation process.
Chapter2, Mio Map Overview, introduces the features of Mio Map, tells you
how to start Mio Map, and provides a quick glance of the screen elements.
Chapter 3, Basic Navigation, gets you started with the navigation function.
Chapter 4, More Navigation Features, provides information on advanced
navigation features.
Chapter 5, Changing Map Views, introduces the ways you can view the map.
Chapter 6, Options, Settings, and Preferences, tells you how to customize
Mio Map for your personal likes and needs.
Chapter 7, Using Mio Map Console, gives information on the Mio Map
Console features such as cut map and find map.
v
Page 9

English
Terminology
Get familiar with some terminology used by Mio Map and you are ready to start.
GPS
Route
Origin
Destination
Destinate
Navigation
Navigate
Navigation mode
vs.
Planner mode
GPS (Global Positioning System) is a “constellation” of 24
well-spaced satellites that orbit the Earth and make it possible
for vehicles/people/assets enabled with GPS receivers to
pinpoint their location.
Route is a course calculated by Mio Map, starting from the
origin to the destination.
Origin is your starting point for a route. It is either your GPS
position or a location selected by you on the map.
Destination is your end point for a route.
Destinate is the command that you use to select a location on the
map. There are several ways you can select a location.
Navigation is the process where Mio Map leads you from your
origin to your destination.
Navigate is the command that you use, after determining the
origin and destination, to calculate a route and start navigation.
Mio Map can operate in either of the two modes:
Navigation Mode
This is the default mode of operation. In this mode, GPS
positioning is on. A blue route with moving arrow shows
your progress.
vi
Planner Mode
In this mode, GPS positioning is off. Mio Map displays
planned calculated routes, but not your progress.
Page 10

English
1 Mio Map Installation
The Mio Map installation process includes two to three parts: first, installing the
Mio Map Console on your desktop computer; second, installing Mio Map to your
Pocket PC (for models without pre-installed Mio Map); and third, installing the
map(s) to your Pocket PC.
NOTE: Make sure that you have already performed the initial startup of your Pocket PC and
set up a partnership with your desktop computer using Microsoft ActiveSync. (See the Quick
Start Guide or User’s Manual of your Pocket PC for instructions.)
1.1 Installing Mio Map Console
Mio Map Console is a tool for you to easily install software, install/remove maps,
cut maps, etc.
1. Insert Mio Map Disk 1 CD into your desktop computer’s CD-ROM drive.
The wise installer screen appears automatically. (If it does not appear, double
click the InstConsMioA.EXE or InstConsMioE.EXE file on the CD.)
2. Select your language preference for the installation procedure and click
3. Follow the onscreen instructions to select a destination location (default
directory is recommended).
4. Select the language(s) that you want available for both the Mio Map Console
on your desktop computer and the Mio Map to be installed in your Pocket PC.
With the language(s) you want highlighted, click
5. Follow the onscreen instructions to complete the installation. A status window
indicates the progress of the installation.
6. Click
Finish to exit installer program.
Next.
OK.
1
Page 11

English
1.2 Installing and Activating Mio Map (Select Models
Only)
Depending on the model you purchased, the Mio Map software may have been
pre-installed in your Pocket PC. If your model doesn’t have Mio Map
pre-installed, you must install and Activate Mio Map by yourself. (See section 7.5
for information.)
1.3 Installing the Map(s)
You must install the map(s) that you want before you can use the navigation
function of Mio Map though your Pocket PC may have a small sample map
pre-installed.
You can install map(s) to your Pocket PC’s main memory or to a memory card (SD
or MMC). It is recommended that you use a memory card since maps normally
require large memory.
1. Acquire a memory card (or called storage card) and insert it into the SD/MMC
slot of your Pocket PC. (Alternatively, you can insert the card to the card
reader connected to the USB port of your computer, if such connection is
available. This makes the installation much faster.)
2. Connect your Pocket PC with your desktop computer using Microsoft
ActiveSync. (See the User’s Manual of your Pocket PC for instructions.)
3. Start the Mio Map Console on your desktop computer by clicking
Programs MioMap Mio Map Console.
4. From “Target device”, tap
Change to choose where to install maps.
Start
2
Page 12

English
5. In the next dialog, highlight where to install maps (e.g. Storage Card) and
click
OK.
This or other removable disk(s)
appears only if a card reader is
connected to your computer
through the USB connection.
6. Select the map you wish to install by selecting it from the list. A check mark
(√) represents a selected map to install.
The available memory on the storage card or main memory is displayed.
3
Page 13

English
NOTE: If you have memory limitations, you can use subregion maps or cut the map to include
only the area you need. (See Section 7.1 for details.)
7. Click the Install/ Remove Maps button on the toolbar.
8. When prompted to insert Mio Map Disk 1 or 2, insert the CD as required into
your desktop computer’s CD-ROM drive.
9. Click the
OK button to install the map(s). A status window will indicate the
progress of the map installation.
10. When the map installation has completed, press OK.
11. To close the Mio Map Console, click
File Exit.
4
Page 14

English
2 Mio Map Overview
Mio Map is a full-featured mobile satellite navigation aid (NAVAID) software.
Utilizing the onboard GPS, Mio Map can pinpoint your location and give accurate
directions to your destinations with turn-by-turn, voice, and visual guidance.
2.1 Mio Map Features
Electronic maps with roads, freeways, highways, railways, rivers, lakes, points
of interest, etc.
GPS positioning
Optimal route calculation and trip plan
Friendly and efficient navigation with turn-by-turn, voice, and visual guidance
Various ways for searching a location on the map
− Using a known address
− Using a POI (point of interest)
− Using Favorites (personal stored locations)
− Using Pocket Outlook Contacts
− Using History (previous destinations)
Recording and playback of journeys
Viewing modes for different needs and situations:
− 2D, 3D, or Bird’s eye view
− Daytime or nighttime view
− Turn-by-turn view of the route
− Driving direction of the route
5
Page 15

English
2.2 Mio Map Hot Keys
Three buttons on your Pocket PC have been predefined as hot keys for quick
access of the following functions:
Mio Map Main Screen
Press this button to start Mio Map and display the main screen. This button can
also be used to bring Mio Map into view if another application is on top of it.
Quick Find (POI)
Press this button to start Mio Map and search points of interests (POI).
Pressing this button when on the main screen will also bring up the POI screen.
GPS Status
Press this button to start Mio Map and display the GPS status. You can also
jump from the main screen to GPS status by pressing this button.
6
Page 16

English
2.3 Starting Mio Map
1. If your maps are contained in a memory card, insert the card to the SD/MMC
slot of your Pocket PC.
CAUTION: Keep the memory card in the slot when using Mio Map.
2. Rotate the GPS receiver of your Pocket PC to the
horizontal position. This allows the receiver to
receive signals from the GPS satellites overhead.
NOTE: For better signal reception, use a car antenna
(option).
3. You can start Mio Map in any of the following ways:
• Press the
• Tap
• Tap
4. Tap
5. If this is the first time you use Mio Map, select the map you want to use by
tapping
tap
6. For initial positioning, make sure that you remain at the same spot with a clear
view of the sky. The GPS may take a few minutes to find its current location
initially.
When valid signals are available, you will see on the screen a small blue circle
with an arrow
Start Mio Map.
Start Programs Mio Map.
Agree on the warning screen.
View (bottom toolbar) Switch Maps. Tap the map in the map list and
Switch Map (bottom toolbar).
button on your Pocket PC.
indicating your current location.
7
Page 17

English
r
r
2.4 Mio Map Screen
Map, Buttons, and Menus
The Mio Map main screen contains a scalable map in the middle, a scroll bar to the
right, and a toolbar at the bottom.
Compass
An arrow indicates the GPS position.
An X indicates that GPS is not found.
Map scale indicato
Origin
Toolba
Tap to zoom in.
Drag to adjust the scale.
Tap to zoom out.
Signal strength
Destinate menu View menu Options menu
Dragging the Map
Use the stylus to drag the map.
8
Page 18

English
Zooming the Map
You can zoom the map from 60 yards (100 meters) to 200 miles (400 km).
Use any of the following methods:
Drag the slider of the zoom scroll bar. Drag up to zoom in and down to zoom
out.
Tap + of the zoom scroll bar to zoom in and − to zoom out.
Use the Navigate Stick on the front of your Pocket PC. Push the stick up to
zoom in and down to zoom out.
Automatic Zoom On
While in Navigation mode, the Automatic Zoom mode is turned on by default.
The zoom level automatically adjusts for the current speed of the vehicle. You can
still manually zoom in/out to override the auto zoom. After a few seconds, the
zoom level automatically returns to the default setting.
Automatic Zoom Off
If you turn off Automatic Zoom mode (using Options Map Settings), you can
zoom in or out manually and it will remain at that level.
2.5 Quitting Mio Map
Always quit Mio Map when you have finished using the program.
To quit, tap
9
ok in the top right corner and tap Yes.
Page 19

Page 20

English
3 Basic Navigation
For Mio Map to calculate a route, you need an origin (starting point) and a
destination (end point). Then, you can start your journey with Mio Map guiding
you along the roads.
NOTE: This chapter assumes that you are in the default Navigation mode. To know how to
use the other mode (Planner mode), see Section 4.5.
3.1 Selecting an Origin
By default, you origin is your GPS position, indicated by the icon on the map.
NOTE: You can manually select your origin if necessary. (See “Part 2. Manually Select the
Origin” in Section 4.5 for information.)
3.2 Selecting a Destination
You can easily select a destination with any of the following ways:
With a known address, intersection, or zip code
With a POI
With a location in Favorites (personal stored locations)
With an address in your Pocket Outlook Contacts
With an address in History (previous destinations)
NOTE: If there are roads that you want Mio Map to avoid when calculating a route, use the
Avoid Roads function. (See Section 4.1 for instructions.)
11
Page 21

English
Using Address
If you have the information such as address, intersection, or zip code of your
destination, you can use this method to select a location.
1. Tap
Destinate (bottom toolbar) Address.
By default, the sequence for entering the address is
NOTE: You can change the sequence for entering the address. (See the subsection later for
instructions.)
City Street Number.
2. Tap (highlight) the city in the scroll list. Or, you can use the soft keyboard to
enter the first few characters. The highlight will move accordingly.
NOTE:
Tap the Input Panel button at the lower right corner of the screen if the soft keyboard is
hidden.
You can also use the Navigation Stick of your Pocket PC to scroll through the list. Left and
right motion scrolls through the alphabets.
For more Information on a selection, tap and it will display the location’s details.
3. After selecting the city, tap Street (top of the screen) to display a list of street
names for the selected city. Then, select the street name.
4. After selecting the street, tap
using the soft keyboard.
12
Number (top of the screen). Enter the number
Page 22

English
5. You can preview your destination by tapping Show (bottom toolbar).
6. To calculate the route, tap
Navigate (bottom toolbar). The route is shown as a
highlighted blue line starting from your origin to your destination. (See
Section 3.3 for more information.)
Using a Different Address Sequence
Street First
This sequence is recommended for larger cities.
While in the Address menu, tap the
change the sequence for entering the address to
Intersection
If your destination is an intersection and you know the names of the two streets,
you can use this method.
While in the Address menu, tap the
change the sequence for entering the address to
select the first street and tap the next Street (top of the screen), the names of the
streets that intersected with the first street are displayed. You can then select the
second street.
Zip Code
While in the Address menu, tap the
to change the sequence for entering the address to Zip Street Number or
Zip
Street Zip Number. You can then enter the information as necessary.
button (top right) and tap Street City to
Street City Number.
button (top right) and tap Intersection to
City Street Street. After you
button (top right) and tap Zip Street or Street
13
Page 23

English
Using Point of Interest (POI)
POI on a map represents local places of interest or importance. POIs are identified
on the maps by various icons (e.g.
Mio Map allows you to choose your destination from a vast database of POIs. POI
navigation is especially handy when you need to find a facility, attraction or
amenity by the type or sort. For example, you can ask Mio Map to guide you to the
closest bank, mall, hotel, restaurant, gas station, etc.
Banks or Restaurants).
1. Tap
2. In the category list, tap (highlight) the desired category name (not the check
Destinate (bottom toolbar) POI. You can also press the
quickly access the POI screen.
box). You can scroll up or down for other choices.
hot key to
14
Page 24
English
NOTE:
A check mark () before a category means that the POI icons will display on the map.
The plus sign (+) located to the left indicates that the main category contains at least one
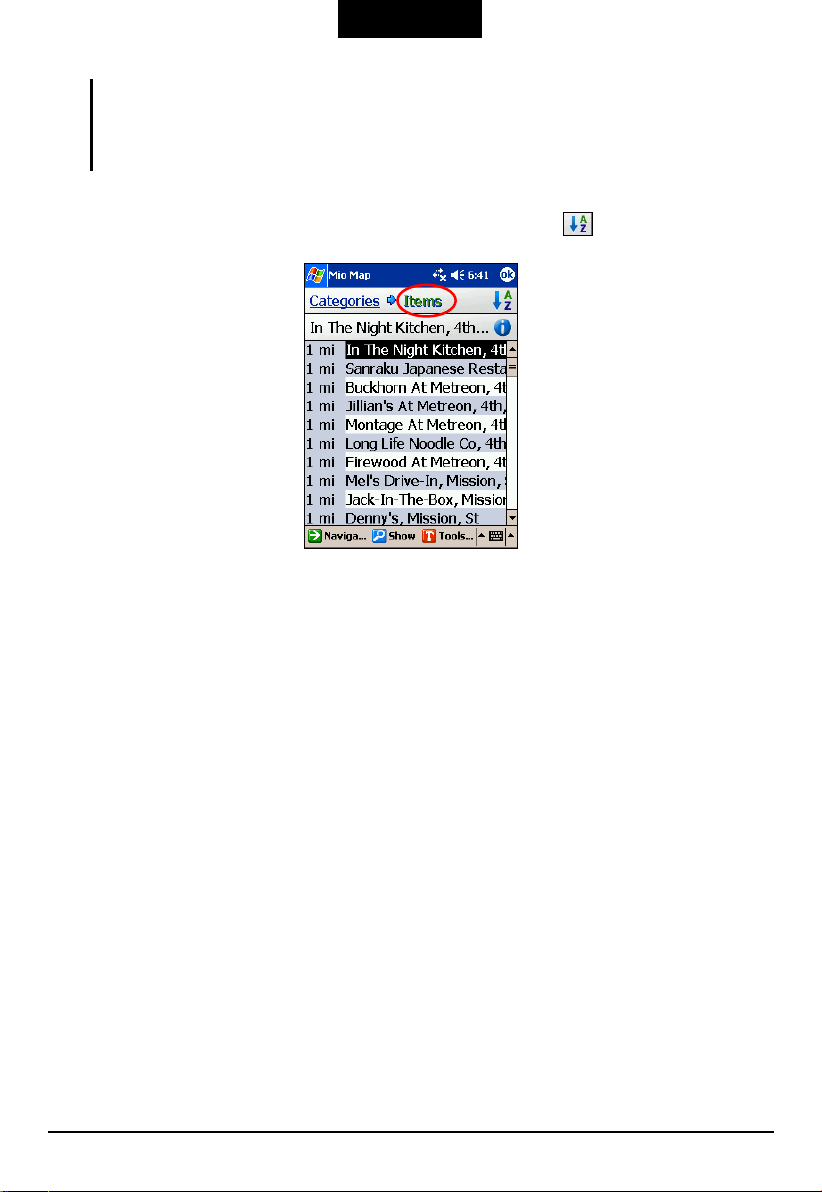
3. Tap Items (top of the screen). The POIs for the selected category are listed in
4. Tap (highlight) the desired POI in the list.
sub-category (e.g. Restaurants - Italian, Indian, Barbecue or Cajun).
order of distance. To sort them alphabetically, tap the
button.
5. You can preview your destination by tapping
6. To calculate the route, tap
Navigate (bottom toolbar). The route is shown as a
Show (bottom toolbar).
highlighted blue line starting from your origin to your destination. (See
Section 3.3 for more information.)
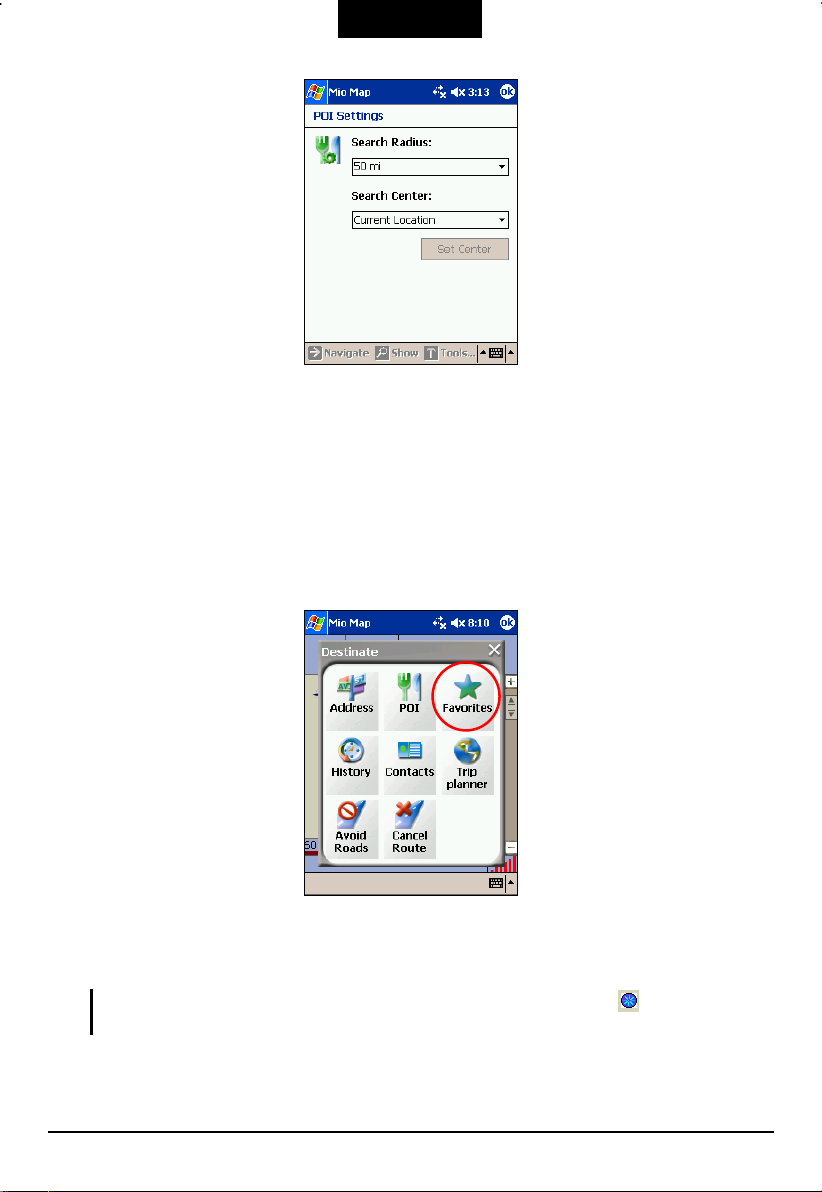
POI Settings
By default, Mio Map displays POIs in a 50-mile search radius with your current
origin as the center. You can change the radius and center by using
toolbar) Settings.
15
Tools (bottom
Page 25
English
Using Favorites
Favorites is a collection of locations previously stored by you for future use. (See
Section 4.2 for information on creating Favorites.)
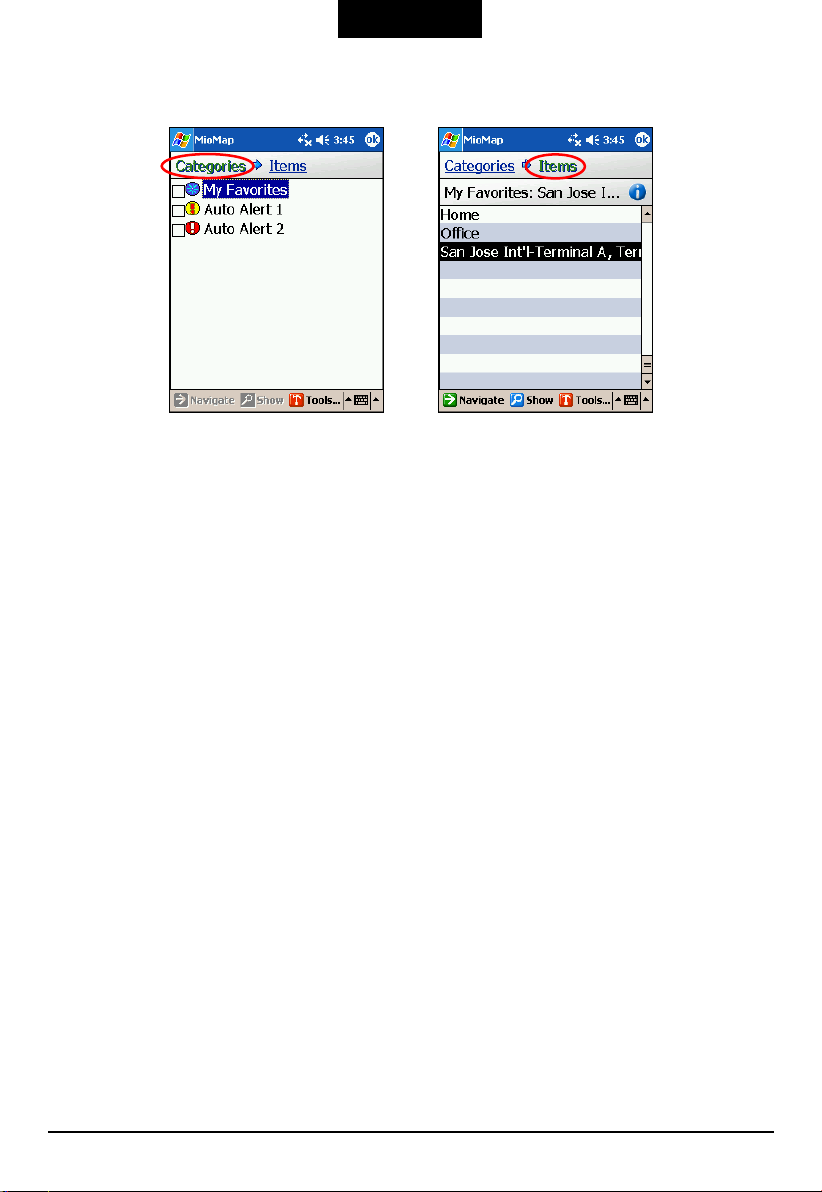
You can select a destination from the list of stored
1. Tap
2. In the category list, tap (highlight) the desired category name (not the check
3. Tap Items (top of the screen). The favorite items for the selected category are
Destinate (bottom toolbar) Favorites.
box).
NOTE: A check mark () before a category means the Favorites icons will display on the
map.
listed.
Favorites.
16
Page 26
English
4. Tap (highlight) the desired item.
5. You can preview your destination by tapping Show (bottom toolbar).
6. To calculate the route, tap
highlighted blue line starting from your origin to your destination. (See
Section 3.3 for more information.)
Navigate (bottom toolbar). The route is shown as a
17
Page 27
English
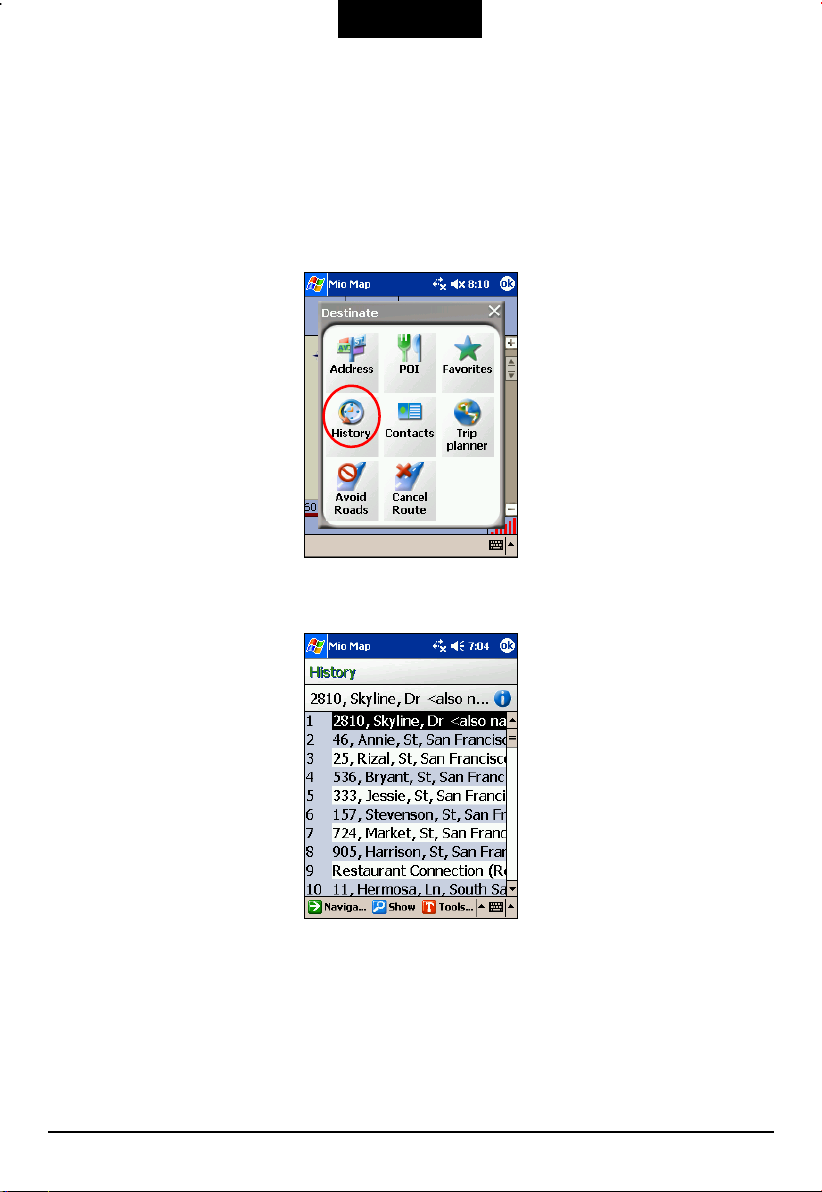
Using History
Use History to select an existing destination from a list of previously traveled
destinations. Mio Map automatically stores the last few destinations in memory.
(See Section 4.4 for more information.)
1. Tap
2. Tap (highlight) the desired item in the history list.
Destinate (bottom tool bar) History.
3. You can preview your destination by tapping
4. To calculate the route, tap
highlighted blue line starting from your origin to your destination. (See
Section 3.3 for more information.)
Navigate (bottom toolbar). The route is shown as a
Show (bottom toolbar).
18
Page 28
English
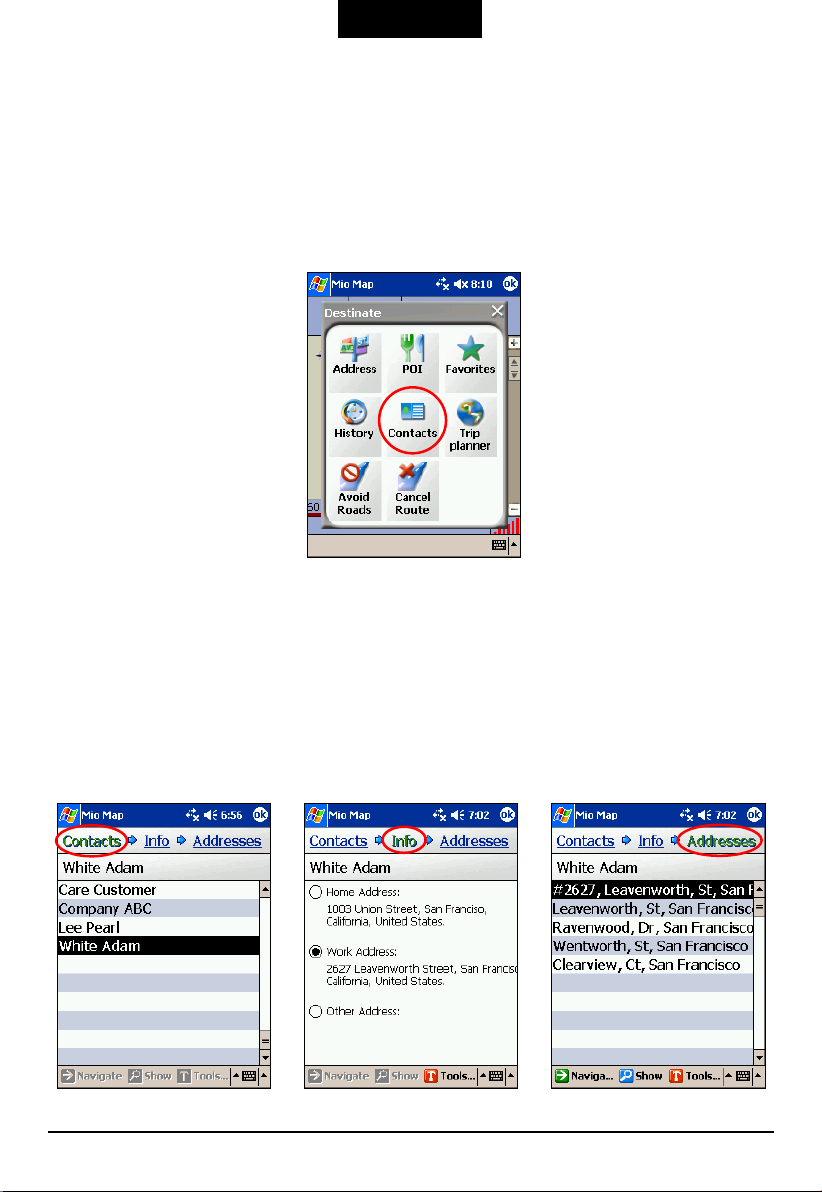
Using Outlook Contacts
You may use this feature to navigate to any address stored in your Contacts list in
Microsoft Pocket Outlook. (For information on Contacts, see the User’s Manual of
your Pocket PC.)
1. Tap
2. The contacts list appears on the screen. Scroll or start typing the contact’s
3. Tap
4. Tap
5. Tap (highlight) the address you wish to use.
Destinate (bottom tool bar) Contacts.
name until the name you are navigating to is highlighted.
Info (top of the screen) and select the address from Home, Work or Other.
Addresses (top of the screen) to display a list of possible matching
addresses.
19
Page 29
English
6. You can preview your destination by tapping Show (bottom toolbar).
7. To calculate the route, tap
highlighted blue line starting from your origin to your destination. (See
Section 3.3 for more information.)
Navigate (bottom toolbar). The route is shown as a
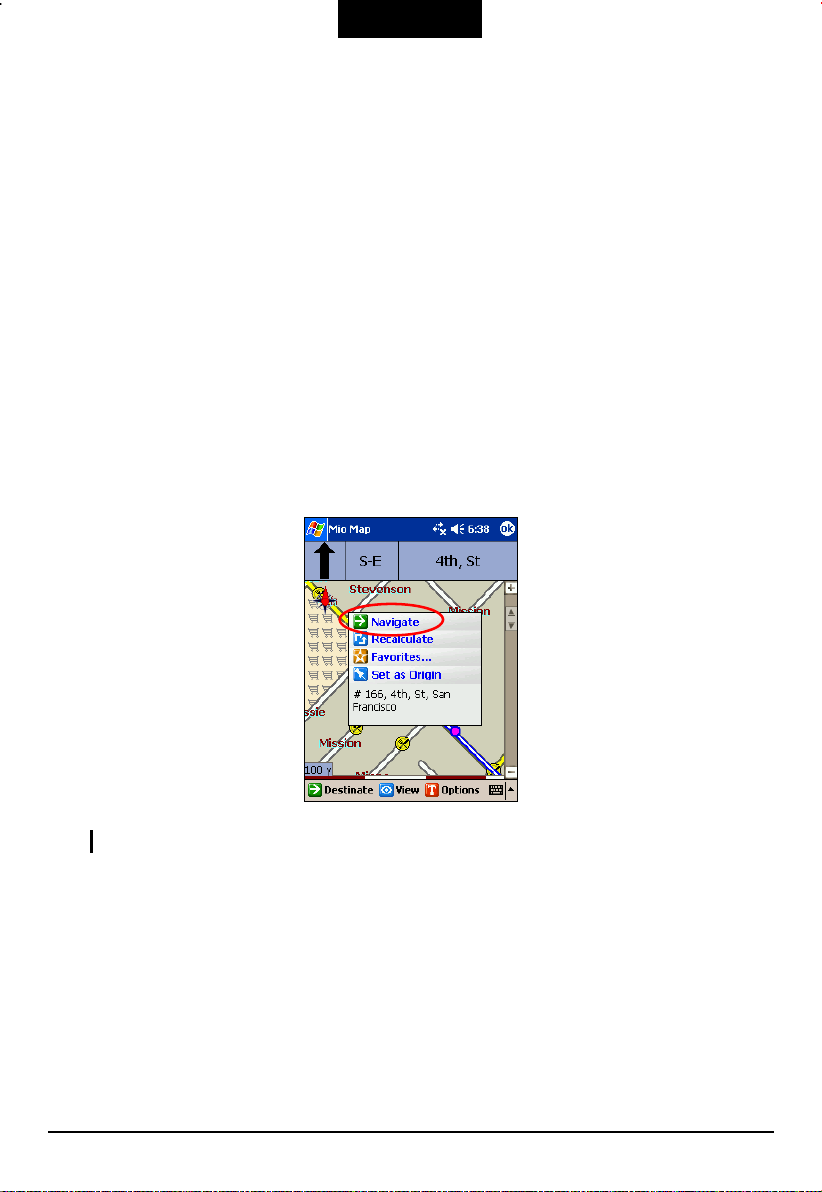
Using Map Cursor
Map Cursor means using the stylus to pinpoint a location on the map and then
view details, set as origin, save the location to Favorites or initiate navigation to
the location.
Navigate to Map Cursor is especially handy when you want to navigate to a
physical location, facility, or attraction on the map rather than by its street address.
1. Use the stylus to drag the map to a specific location of your choice.
2. Tap the location with your stylus. The Map Cursor pop-up menu appears.
NOTE: To clear the pop-up menu, tap the screen again.
3. Tap Navigate on the pop-up menu. The route is immediately calculated and
shown as a highlighted blue line from your origin. (See Section 3.3 for more
information.)
20
Page 30
English
3.3 Navigational Aids
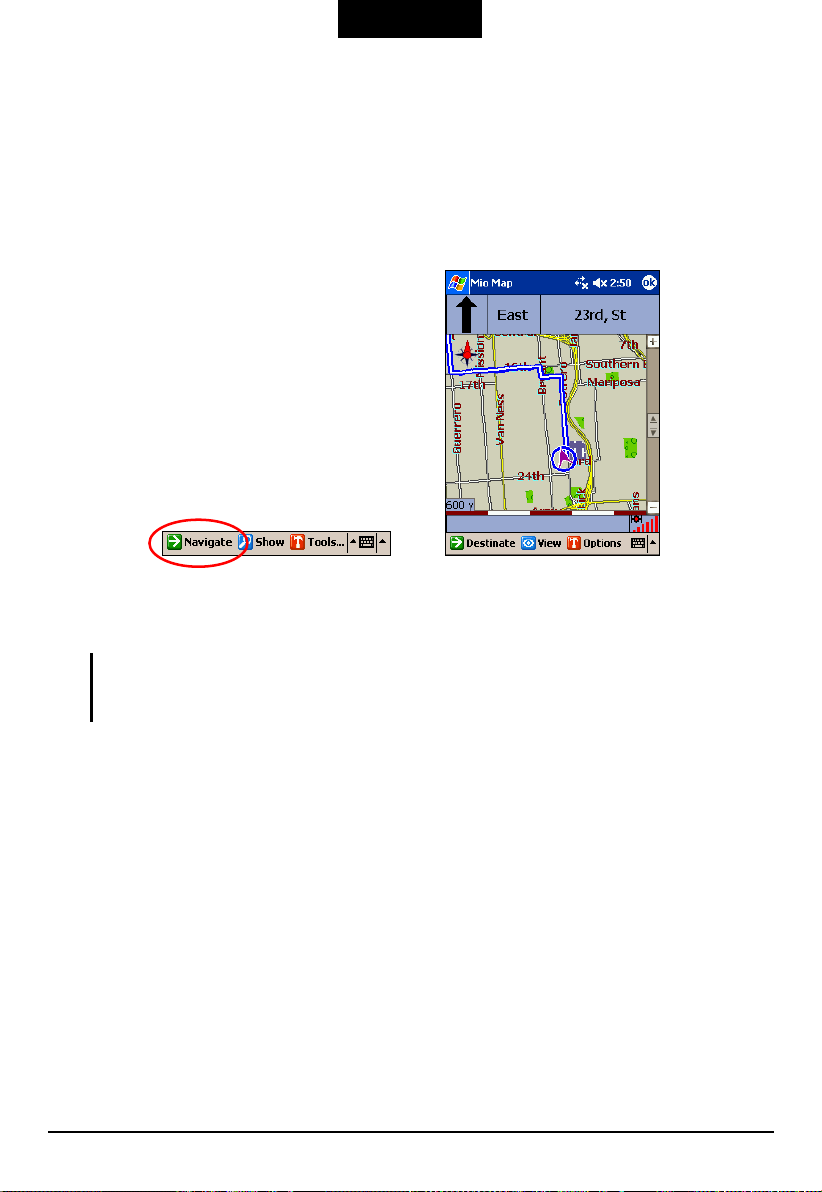
Calculating a Route
With a destination selected, tap Navigate (bottom toolbar). Mio Map calculates the
route and shows the route in a blue line on the map.
You can start your journey right away. As you progress, Mio Map gives you
turn-by-turn voice prompts to get you to your destination.
NOTE: When Mio Map is started, the sound volume of your Pocket PC is automatically
adjusted to the highest level. If you ever turned off the sound, be sure to turn it back on if you
want to hear voice prompts.
At intervals of 3 Km, 500m, 200m, and 50m of the next turn or change of direction,
Mio Map generates a voice prompt.
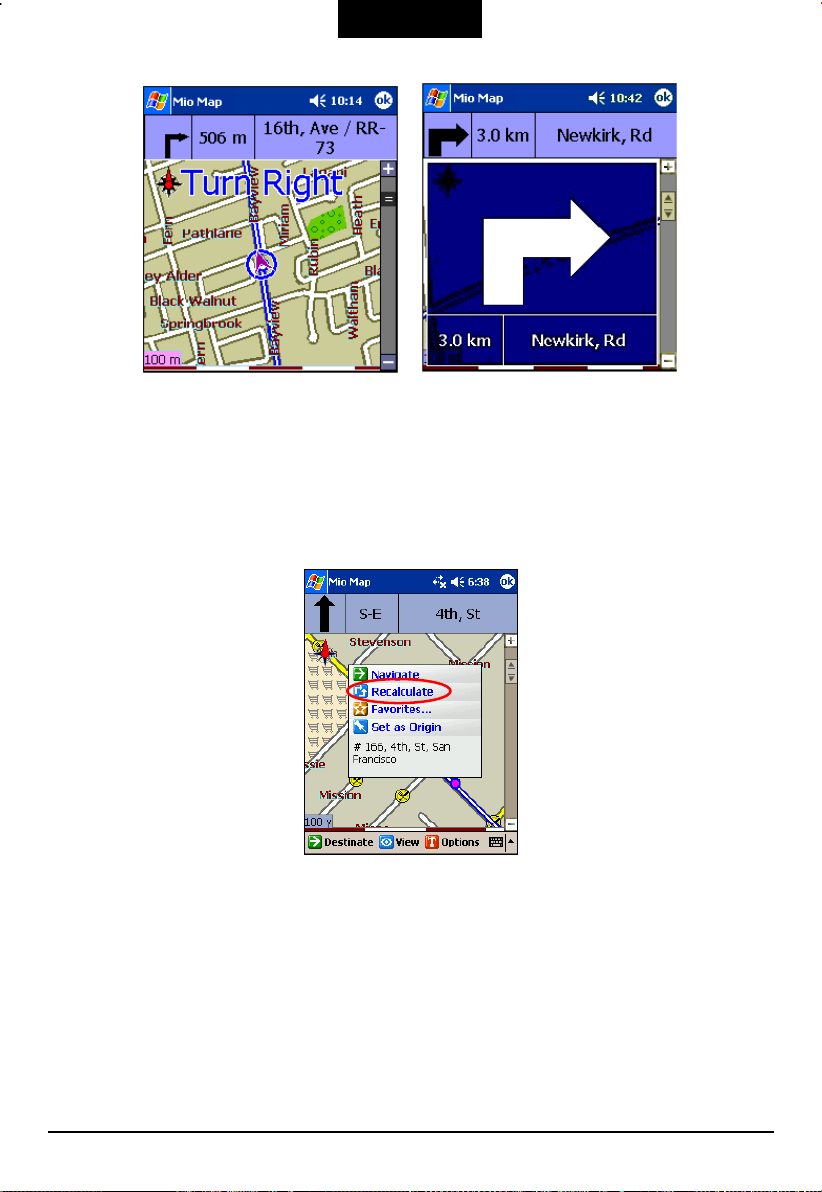
You can also enable visual notifications (using
screen will flash with an enlarged version of the next change of direction.
Options Alert Settings) so that the
21
Page 31
English
Recalculating the Route
While on the road, Mio Map automatically recalculates the route when you have
deviated from the original route. You can also tap on the screen to bring up the
Map Cursor pop-up menu and tap
Recalculate to immediately recalculate the route.
If you hear on the radio that there are construction zones or traffic jams along your
planned route, you can also avoid the streets or highways and recalculate a new
route. (See “Driving Direction” in Section 5.2 for more information.)
22
Page 32
English
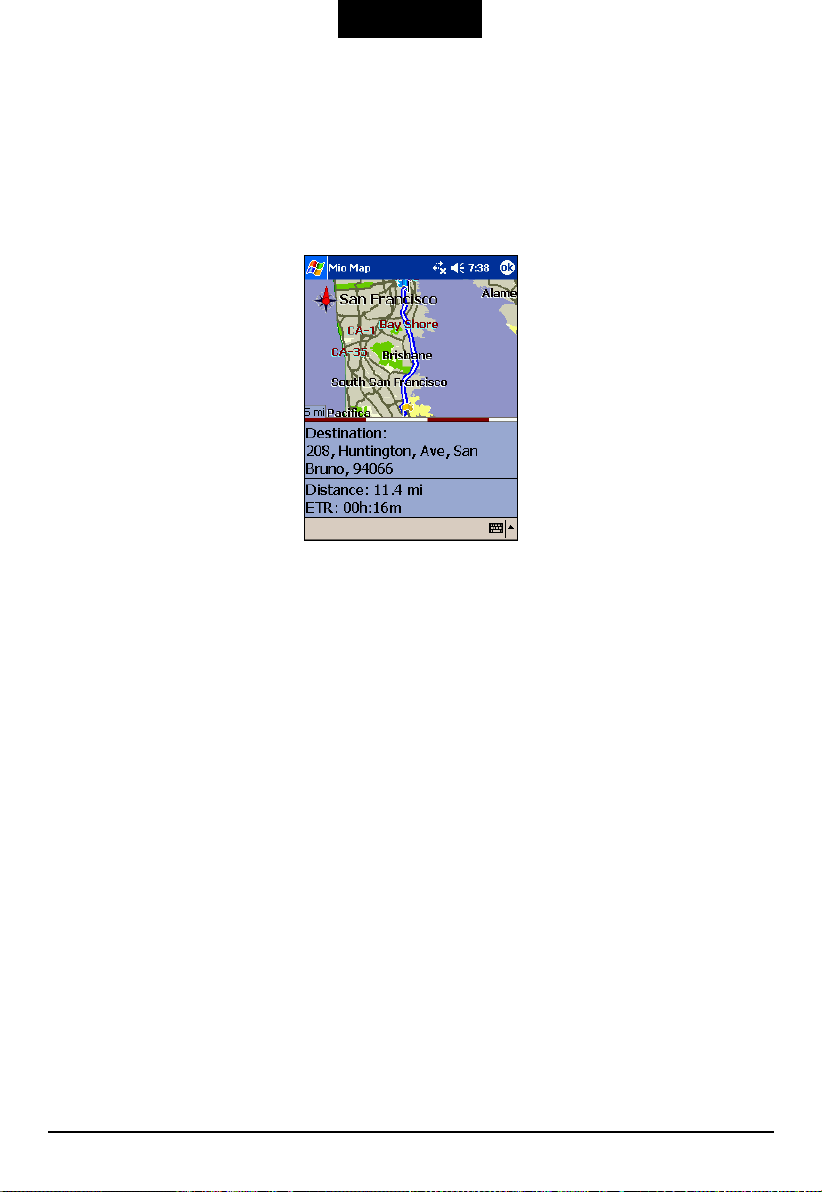
3.4 Show Route
The Show Route feature displays the entire route, plus details as name, time, and
distances of the route.
After calculating a route, tap
The following information is displayed on the screen:
On the map:
The starting point is indicated with a blue flag, and the destination with an
orange flag. The calculated route is always displayed in blue.
In the information box:
Destination - Address of the destination
Distance - Total length of journey
ETR - Estimated Time Remaining
ETA - Estimate Time Of Arrival (not available in Planner mode)
View (bottom toolbar) Show Route.
3.5 Cancel Route
Use Cancel Route to terminate navigation to a destination at any time.
Tap
Destinate (bottom toolbar) Cancel Route. The route is cleared and you and
you can start all over again.
23
Page 33

Page 34

English
4 More Navigation Features
Mio Map provides various tools for easier, flexible, and enhanced use of
navigation features.
4.1 Avoid Roads
There might be road works, detours or other obstacles along your planned route.
You can avoid certain roads such as highways, expressways or toll roads. Mio Map
allows you to pre-program these into its route calculations.
Using Avoid Roads is a two-part process:
Part 1: Create a list of roads to avoid
Part 2: Select the roads to be avoided before calculating a route
Creating a List of Roads to Avoid
NOTE: Depending on the map you are using, an Avoid Roads list (such as toll road list) may
have been predefined by Mio Map.
You can create your own list of roads to avoid.
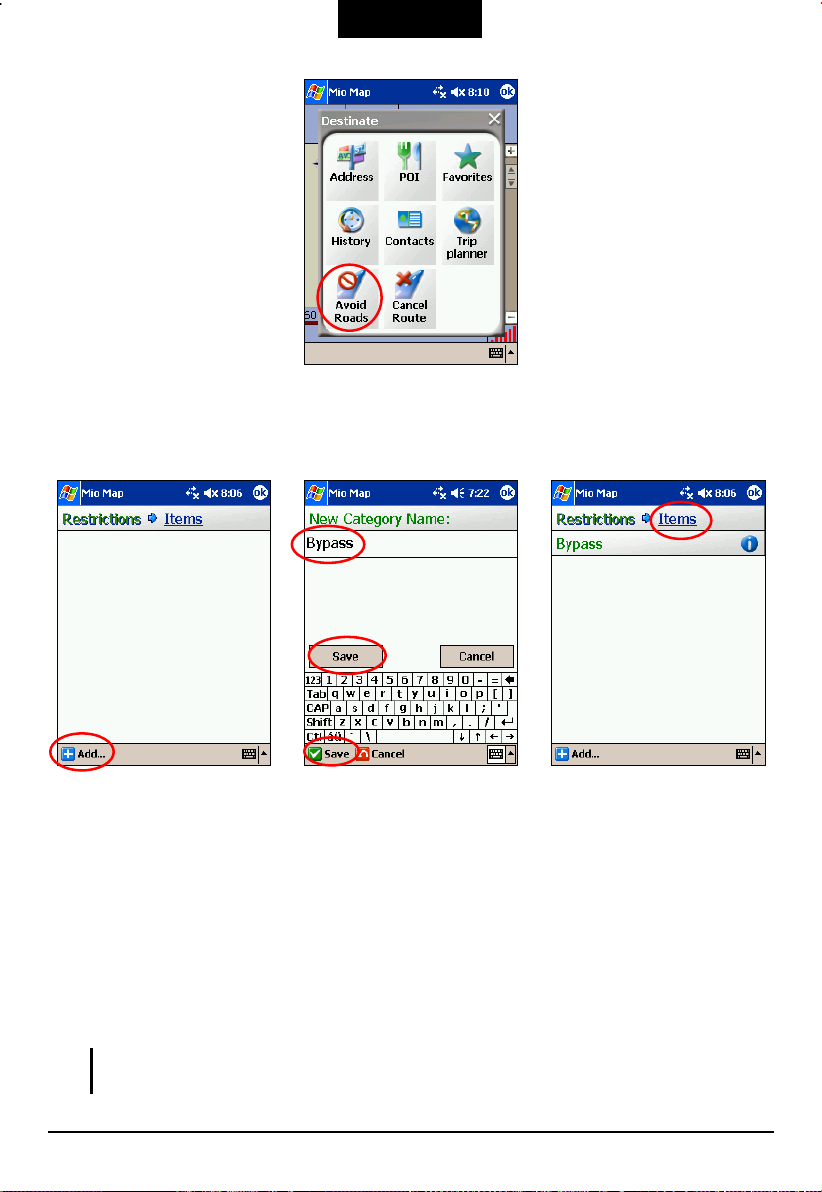
1. Tap
25
Destinate (bottom tool bar) Avoid Roads.
Page 35
English
2. Tap
Add (bottom toolbar).
3. Enter the desired category name (e.g. Bypass) and tap
4. Tap
5. Tap
Items (top of the screen).
Add (bottom tool bar). The City Street menu appears with the city list on
the screen.
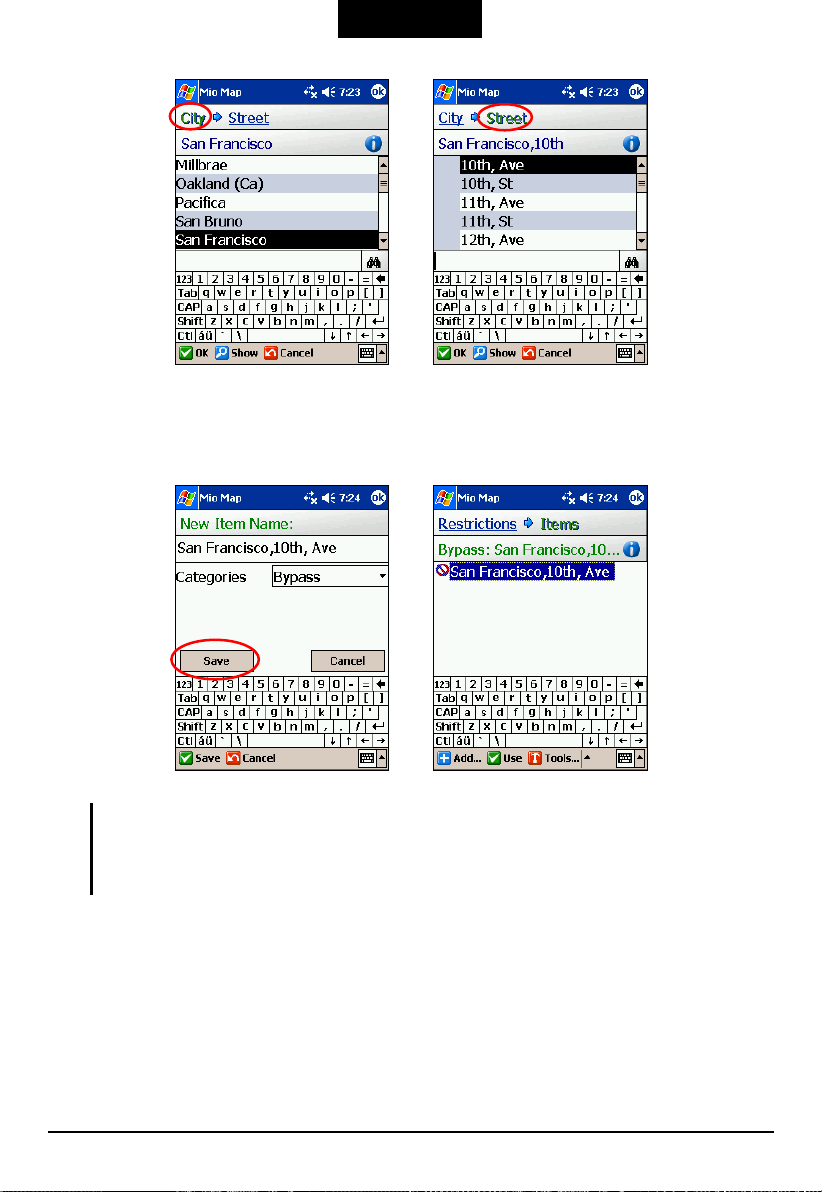
6. Tap (highlight) the city in the scroll list.
7. Tap
Street (top of the screen). The street list for the selected city appears on the
screen.
Save.
8. Tap (highlight) the street to avoid.
NOTE: If you make a mistake, tap Cancel (bottom toolbar) and repeat with the correct city
and street names.
26
Page 36
English
9. Tap OK (bottom toolbar). The “New Item Name” screen appears.
10. Tap
Save to add the street to your list.
NOTE:
You can save the selected street to another category if you wish.
You can delete or edit a personal category or item using Tools. (You cannot delete or edit
the predefined category and items.)
11. If there is more than one road to avoid, repeat and enter all the streets. You can
also create multiple lists if necessary.
12. Tap ok (top right corner) to return to the main screen.
27
Page 37
English
Selecting the Roads to Avoid
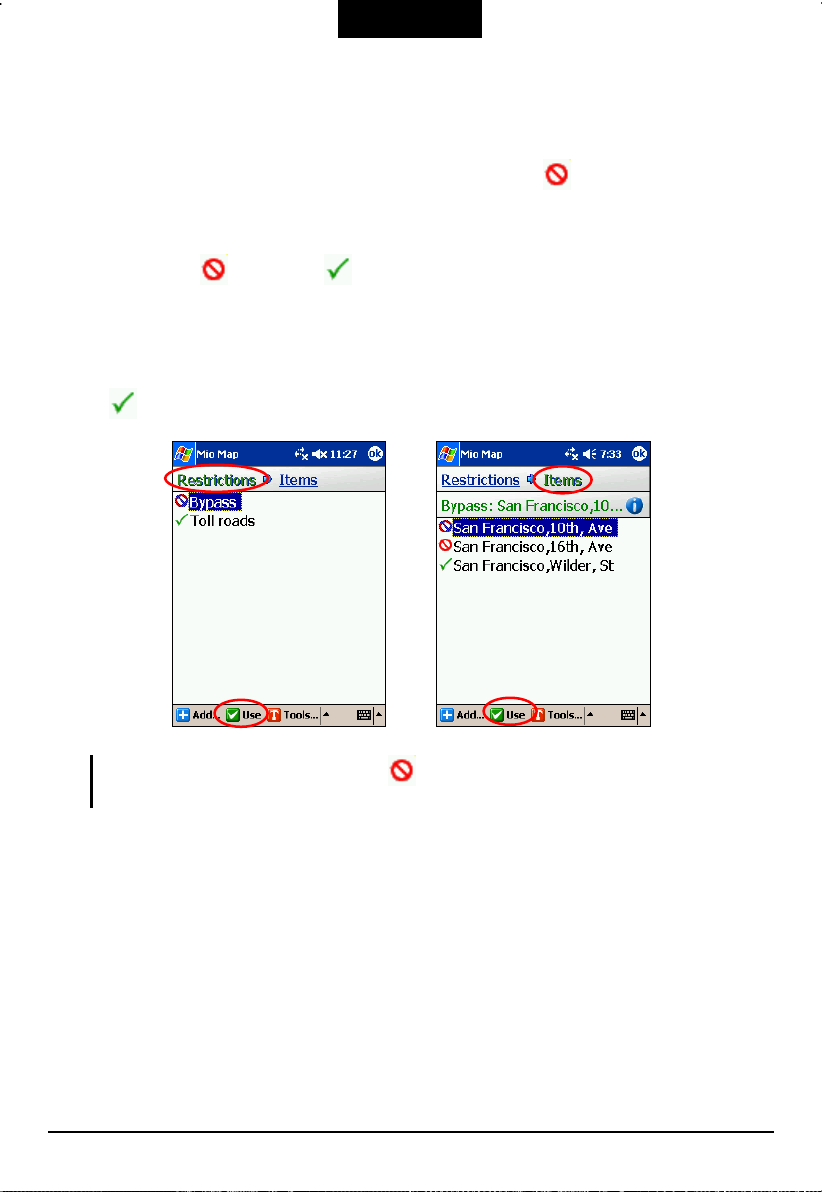
After creating the Avoid Roads list as described earlier, simply make sure that all
the streets, roads or highways you want to avoid have a
Map will avoid the selected roads when calculating the route.
If you are not avoiding all the roads in your next route, you can change the attribute
of the road from
(avoid) to (use). Follow this procedure:
before it. Then, Mio
1. Tap
2. To change the attribute of either a category or street, tap (highlight) the desired
Destinate (bottom tool bar) Avoid Roads.
one in the list and tap
to
.
NOTE: To change the attribute back to , select the desired item and tap Avoid (bottom
toolbar).
Use (bottom toolbar). The attribute icon will be changed
28
Page 38
English
4.2 Favorites and Auto Alerts
The Favorites feature allows you to save your frequently used locations for easy
access later. It also includes automatic alert categories. An “automatic alert” refers
to an item that you configure so that Mio Map will alert you when you are within a
certain distance of the item’s location. You can configure two distances for each
automatic alert. Mio Map will first alert you when you are within the first distance
and then alert you when you are within the second. Automatic alerts must be stored
in either one of two predefined categories - Auto Alerts 1 or Auto Alerts 2.
Creating Favorites or Auto Alerts
You select a location for your Favorites the same way you select a destination.
Follow this procedure to create a Favorites location:
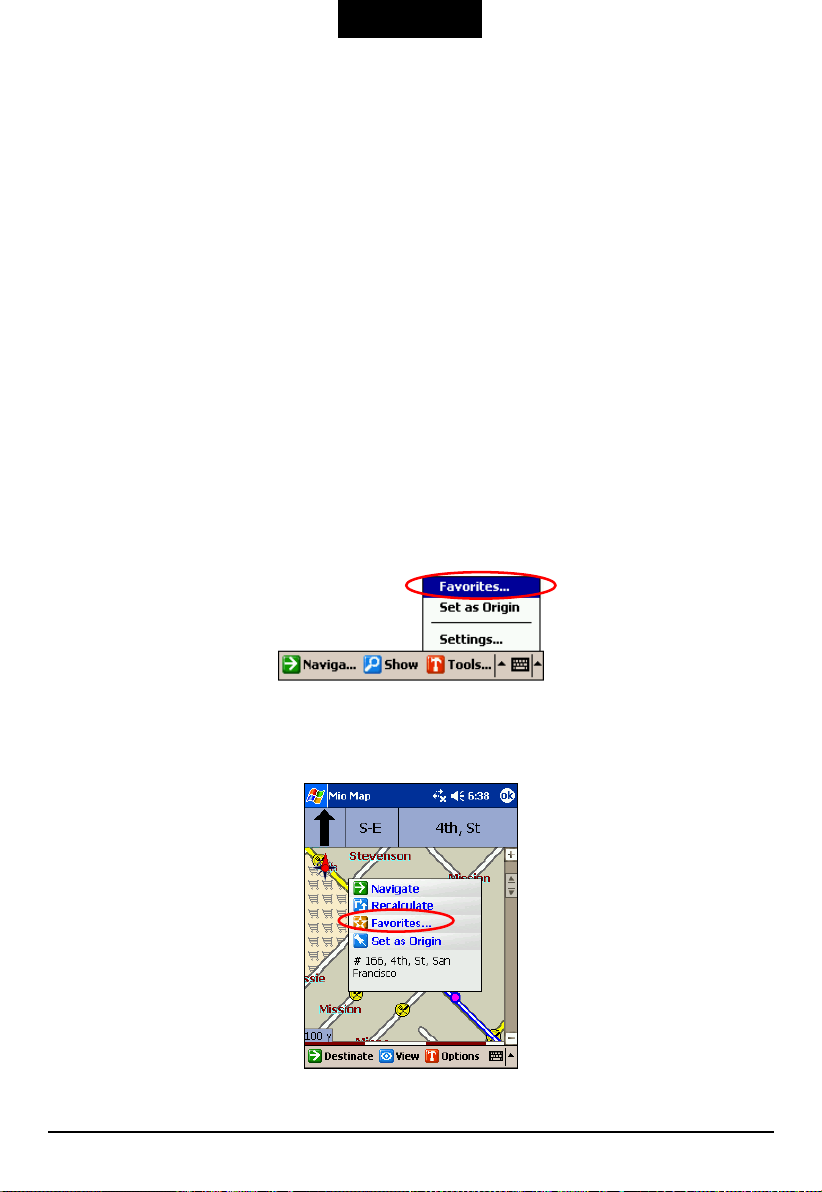
1. Tap
Destinate (bottom toolbar) and select a location from Address, POI,
History, or Contacts. (See Section 3.2 for detailed information.) Then, tap
Tools (bottom toolbar) Favorites.
Or, you can drag the map and tap the location on the map. Then, tap
the Map Cursor pop-up menu.
Favorites in
29
Page 39
English
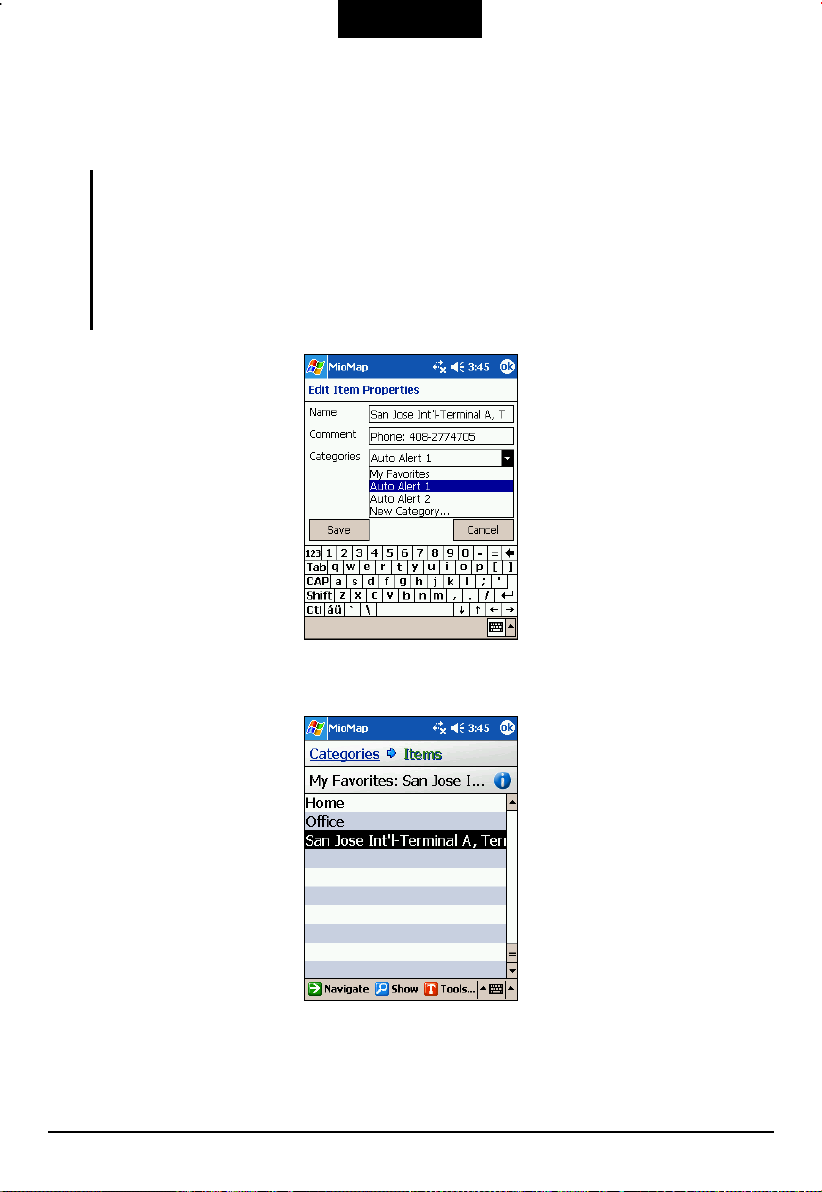
2. In the “Edit Item” menu, enter a name and comment, if not already existing.
Select a category as needed. (Default categories are My Favorites, Auto
Alert 1, and Auto Alert 2.)
NOTE:
Only those items found in either Auto Alert 1 or Auto Alert 2 will function as auto alerts. You
must configure the Auto Alert categores for the audio alerts to take effect. (See
“Configuring Auto Alert Category” later.)
You may want to create a new category to store your Favorites in different groups. Tap the
down arrow to pull down the menu of Categories and tap New Category. Then type a
name in the next screen, select an icon for the category, and tap Save.
3. Tap
30
Save to store the location as one of your favorites.
Page 40
English
Configuring Auto Alert Category
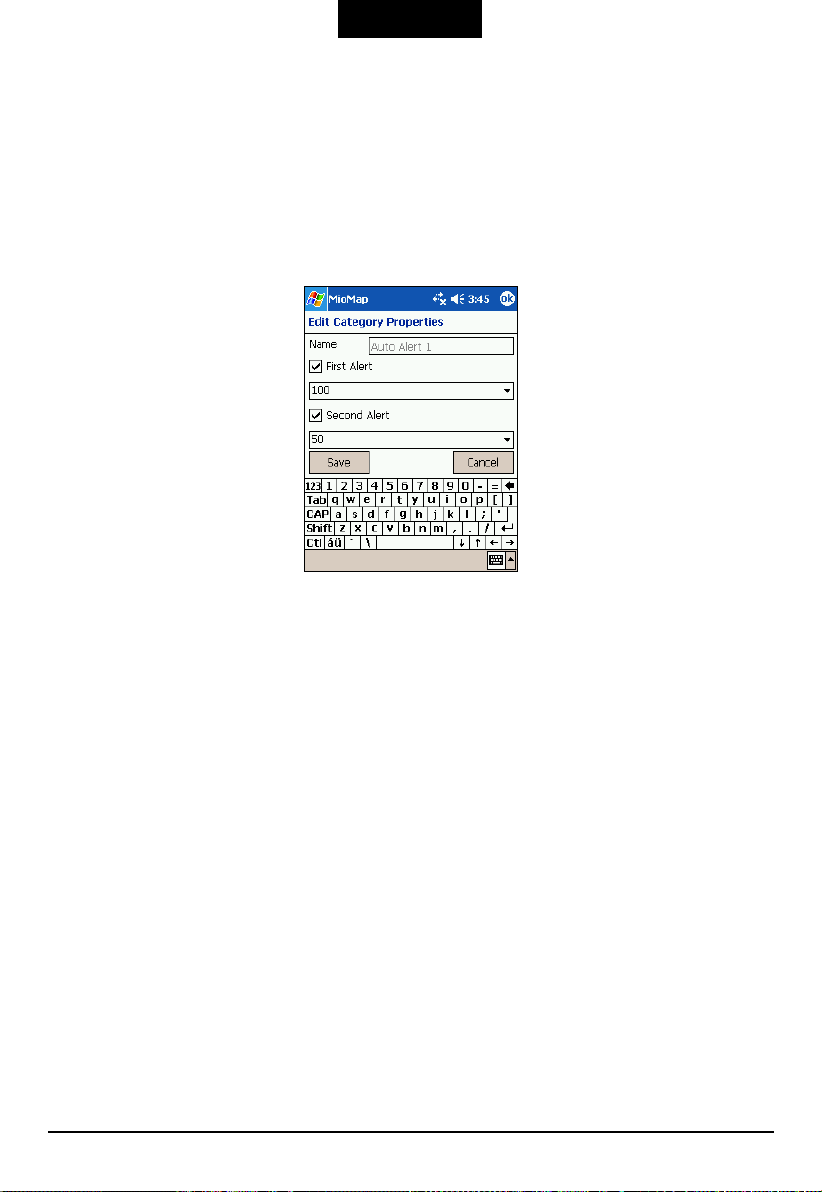
1. Tap Destinate (bottom toolbar) Favorites.
2. Tap (highlight) the Auto Alert 1 or Auto Alert 2 category you want to
configure.
3. Tap
4. To enable both alerts, check both boxes. Or, you can disable one of the alerts
5. From the pull-down menus, select a distance for each enabled alert. Mio Map
6. Tap
Tools (bottom toolbar) Edit.
by clearing the box next to it. If you configure two alerts, the first must have a
greater distance than the second.
will alert you when the distance between your current traveling position and
the location of the alert equals the distance you enter here.
Save to complete the configuration.
Managing Favorites
Editing or Deleting an Item in Favorites
1. Tap Destinate (bottom toolbar) Favorites.
2. Tap (highlight) the category.
3. Tap
4. Tap (highlight) the item you want to edit or delete.
31
Items (top of the screen).
Page 41
English
5. Tap Tools (bottom toolbar) Edit or Delete.
Editing or Deleting Your New Category in Favorites
NOTE: You cannot edit or delete the default categories (My Favorites, Auto Alert 1, and Auto
Alert 2).
1. Tap Destinate (bottom toolbar) Favorites.
2. Tap (highlight) the category (the one you created).
3. To edit or delete the category, tap
Tools (bottom toolbar) Edit or Delete.
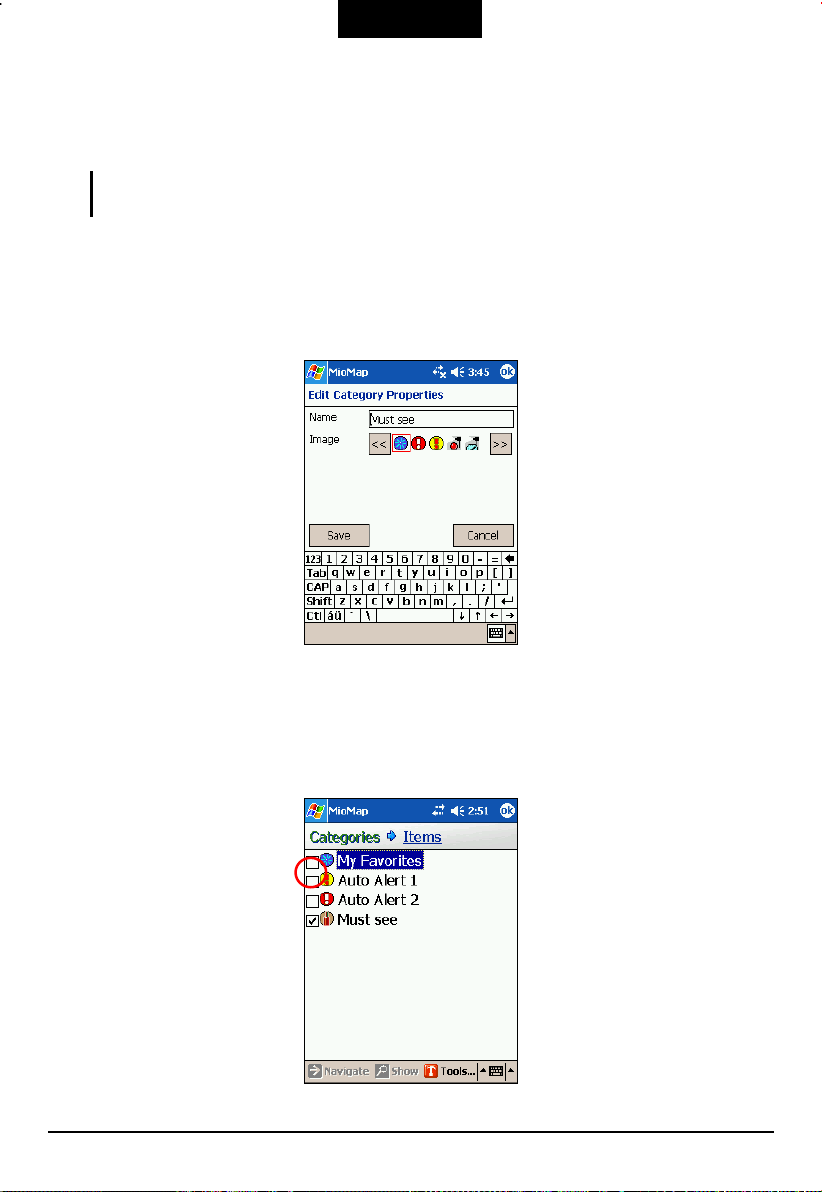
Displaying Favorites Icons on the Map
If you want the Favorite icons to display on the map, tap Destinate (bottom toolbar)
Favorites. Tap the checkbox before the category name.
32
Page 42
English
4.3 History
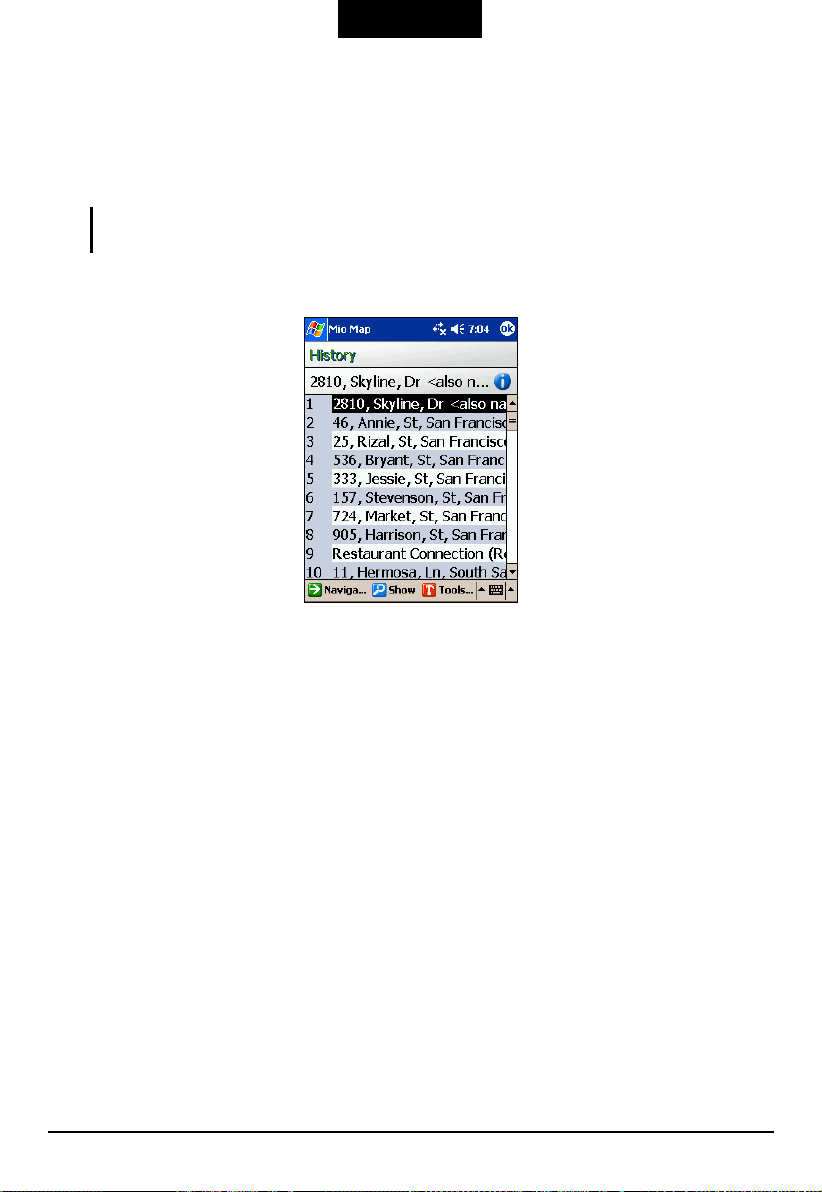
History is the storing of previous destinations. It allows you to select a previous
destination for searching, viewing, or reusing purpose.
NOTE: Mio Map automatically stores the last few in memory. As newer destinations are
written, to the top of the stack, the older destinations at the bottom of the stack are erased.
To use History, tap Destinate (bottom toolbar) History.
With a history selected, you can do any of the followings:
If you want to reuse it as your destination, tap Navigate (bottom toolbar) to
calculate a route.
If you want to view the location details, tap View (bottom toolbar).
If you want to save it as one of your Favorites, tap Tools (bottom toolbar)
Favorites.
If want to use it as your origin, tap Tools (bottom toolbar) Set as Origin.
33
Page 43
English
4.4 Records
You can record your journey to share with your friends and family or to replay
your journey some other time.
Recording a Journey
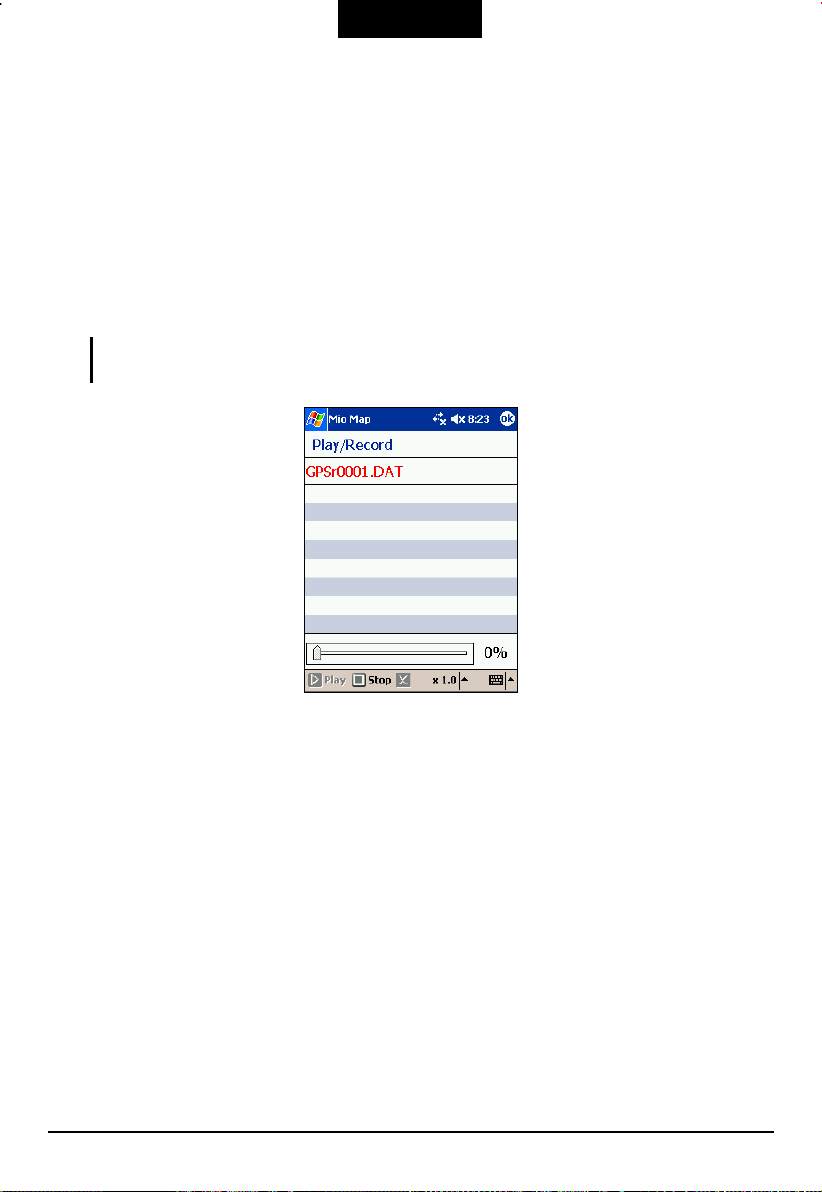
1. When you are about to start your journey after calculating a route, tap Options
(bottom toolbar)
NOTE: A filename GPRSr00xx.DAT (where xx = the recorded route number) is automatically
created.
Play Record (bottom toolbar).
2. As you travel, Mio Map records your track.
3. When you have reached the end of your journey, tap
Play Stop (bottom toolbar).
Options (bottom toolbar)
Playing a Recording
1. Tap Options (bottom toolbar) Play.
2. Tap the file you want to play back and tap
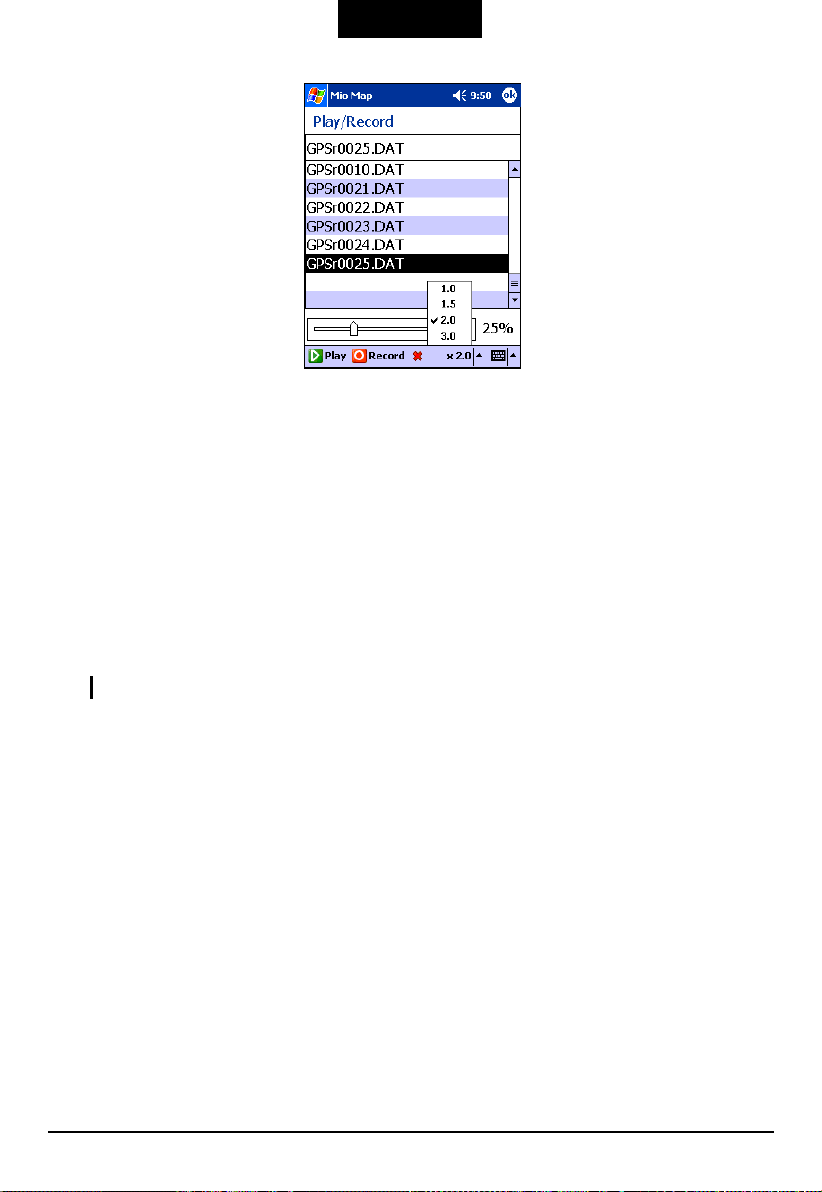
3. You can advance the playback to start at a different point by moving the slider
along the progress track bar (Expressed as %).
You can also adjust the playback speed i.e.: from normal to 3x normal from the
pop up list.
34
Play (bottom toolbar).
Page 44
English
4. To stop the replay of the recording, tap
(bottom toolbar).
Options (bottom toolbar) Play Stop
Deleting a Recording
1. Tap Options (bottom toolbar) Play.
2. Select the GPSr00xx.DAT file (where xx = the recorded route number) to be
deleted.
3. Tap
Delete (bottom toolbar) Yes.
CAUTION: Once the recorded route is deleted, it is not retrievable.
35
Page 45
English
4.5 Trip Planner
The Trip Planner feature allows you to calculate a route any time without
initiating GPS positioning.
You can manually select your own origin, waypoints, and destination. Then you
can calculate a route for future use.
Trip Planner includes four major parts:
Part 1: Select Planner mode
Part 2: Manually select the origin
Part 3: Set waypoints
Part 4: Calculate the trip route
Part 1. Select Planner Mode
You can use the Trip Planner feature only if you are in Planner mode.
Tap
Options (bottom toolbar) Route Settings. Tap Planner mode and then ok.
Part 2. Manually Select the Origin
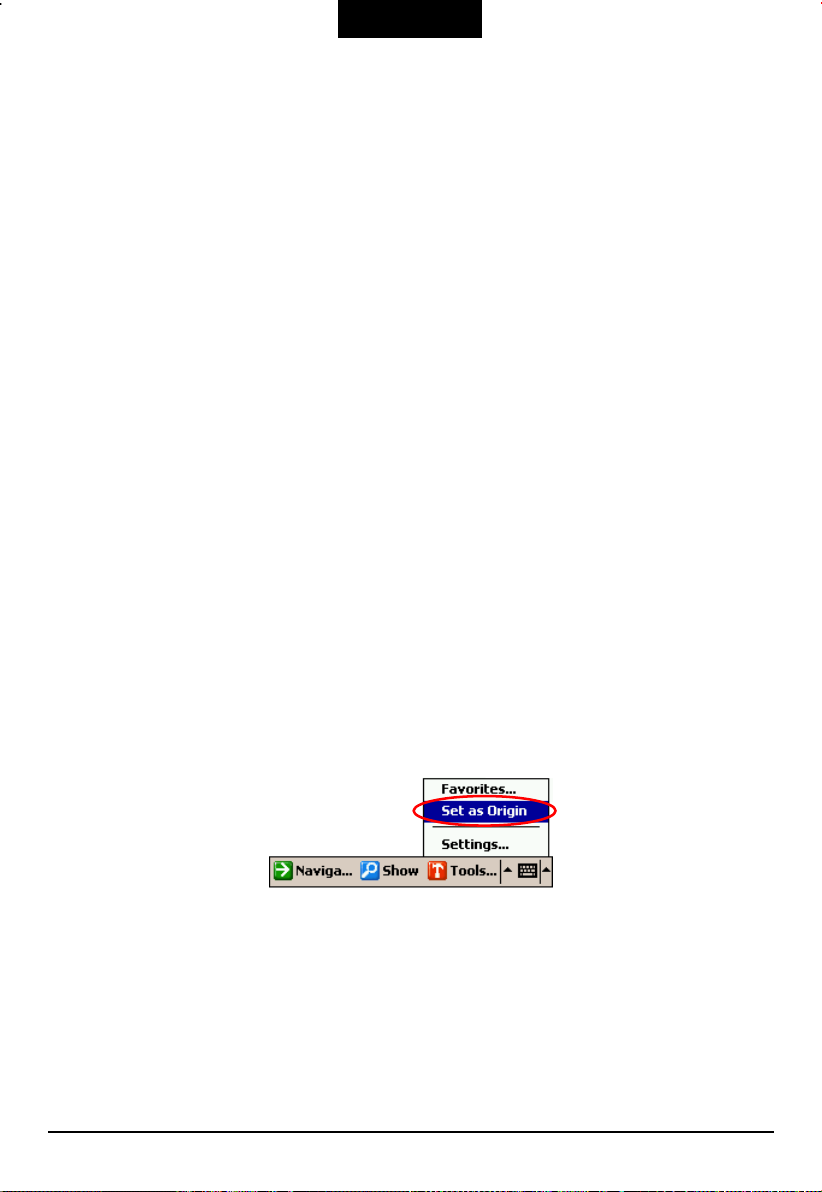
Tap Destinate (bottom toolbar) and select a location from Address, POI, Favorites,
History, or Contacts. (See Section 3.2 for detailed information.) Then, tap
(bottom toolbar) Set as Origin.
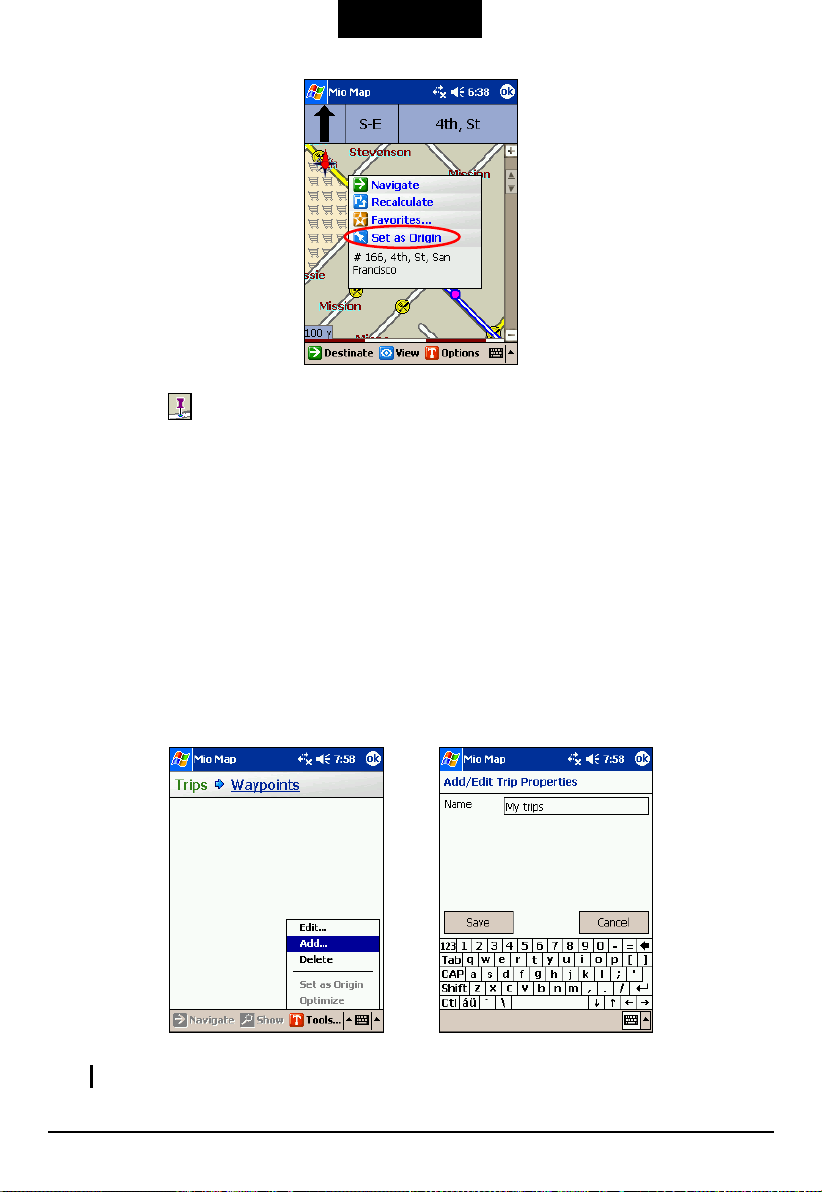
Or, you can drag the map and tap the location on the map. Then, tap Set as Origin in
the Map Cursor pop-up menu.
36
Tools
Page 46
English
The pin icon
appears on the screen to indicate the origin.
Part 3. Set Waypoints
You can set one or more waypoints if necessary. A waypoint is a stop or break in
your journey along a route.
1. Tap
2. If this is the first time you use Trip Planner, you will need to create a trip
3. Type a name (e.g. My trip) using the soft keyboard and tap
Destinate (bottom toolbar) Trip planner.
category in which to store your trip details. To create a trip, tap
toolbar)
Add.
Save.
Tools (bottom
NOTE: You can rename an existing category name using Tools Edit.
37
Page 47
English
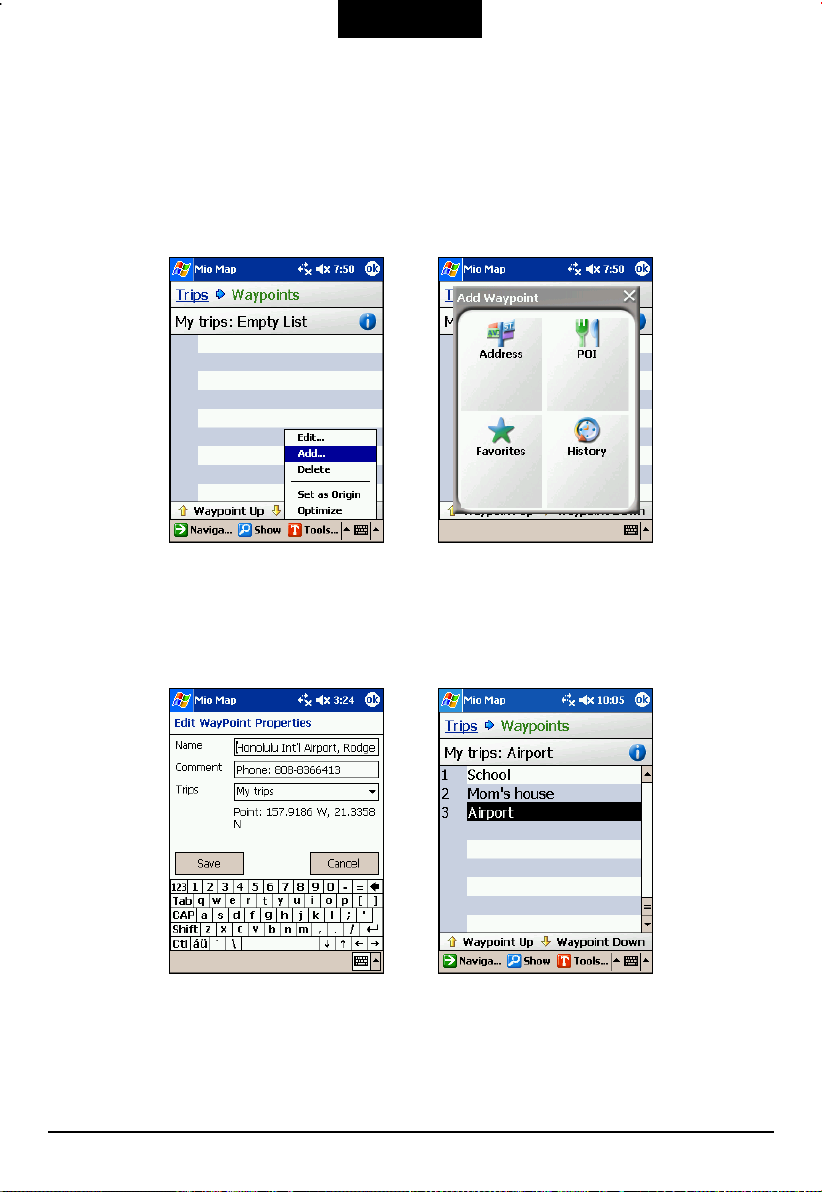
4. Tap Waypoints (top of the screen). If “No items were found” message appears,
ignore it and tap
OK.
5. Tap
Tools (bottom toolbar) Add.
6. Select a waypoint – be it an Address, POI, Favorites or History. (See Section
3.2 for detailed information.)
7. With a location selected, tap
OK (bottom toolbar).
8. In “Edit Waypoint Properties” fields, enter a waypoint name or change the
default details and tap
Save to save the waypoint.
9. Repeat steps 5 to 8 to enter all the waypoints.
10. You can use
Waypoint Down or Waypoint Up to move the waypoints around to
suite your purposes or driving needs.
38
Page 48

English
Or, you can tap Tools Optimize to automatically sort the waypoints in the
most effective and quickest route.
11. You can tap
Show (bottom toolbar) to view the complete route.
Part 4. Calculate the Route
To calculate the route, tap Navigate (bottom toolbar).
The route is calculated, in stages, from the departure point to the first waypoint.
Once there, recalculates to the second waypoint, and then recalculates for the third
waypoint and so on.
If you tap
the second, third and last (waypoints) part of route is shown in a series of single
line vectors.
Show, the first part of the route is, shown as normal, in blue double lines,
NOTE: To start the trip, remember to change back to Navigation mode by tapping Options
(bottom toolbar) Route Settings Navigation mode ok.
39
Page 49

Page 50
English
5 Changing Map Views
Mio Map provides different views of the map to enhance your viewing and
navigational experience.
5.1 Types of View
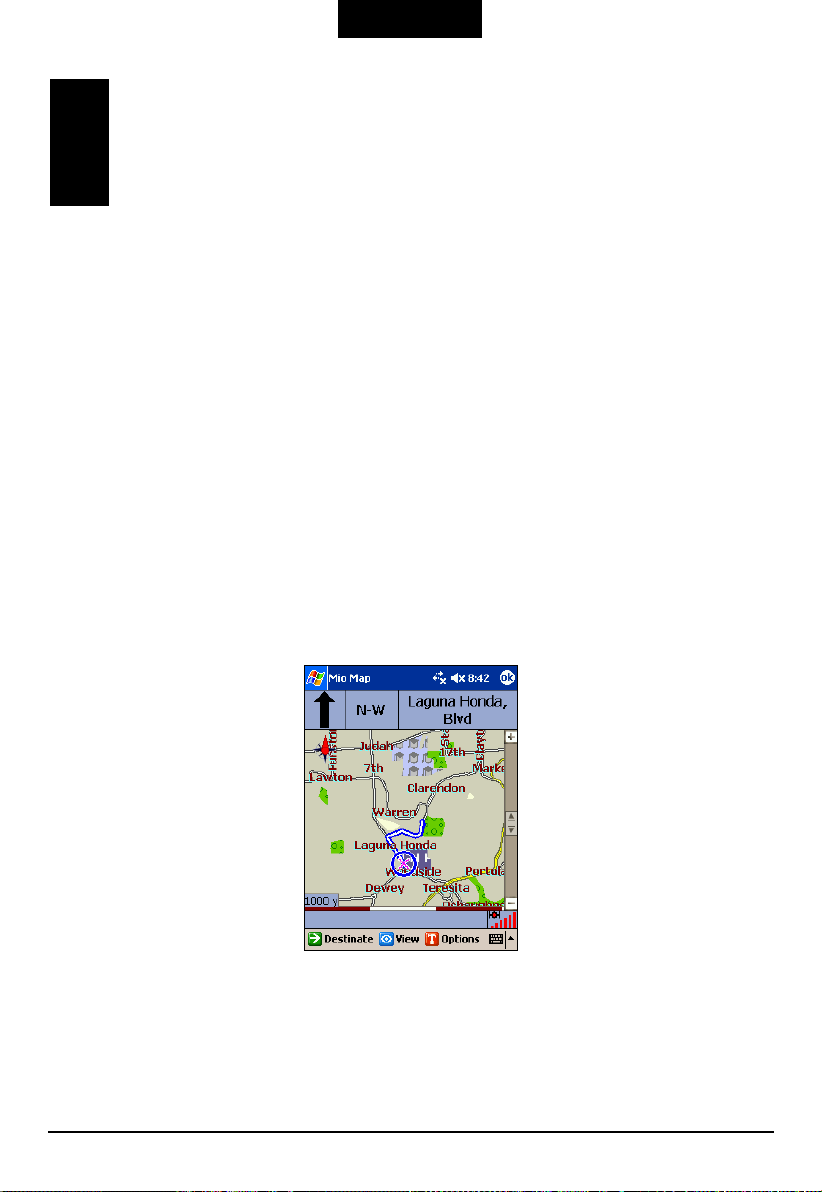
You can view the map in one of the three viewpoints: 2D, 3D, and Bird’s–eye
view.
2D View
The default 2D view is the straightforward two-dimensional normal view.
To switch to 2D view, tap
41
View (bottom toolbar) 2D.
Page 51
English
3D View
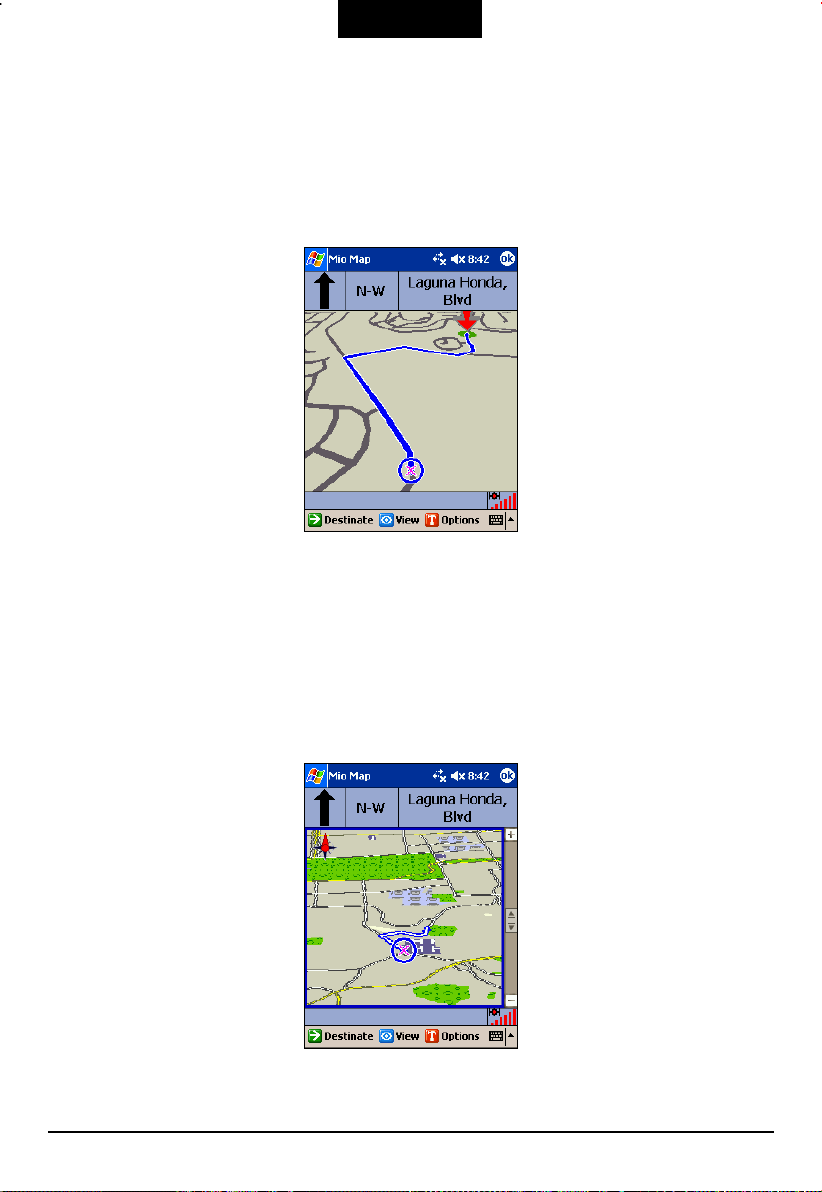
3D view is a general 3D (three dimensional) viewpoint showing the map in a basic
3D outline.
To switch to 3D view, tap
View (bottom toolbar) 3D.
Bird’s-eye View
Bird’s-eye view gives a bird’s-eyes view of the map. The map is displayed in a
unique 3D angle with horizon fill to enhance the viewing and navigational
experience.
To switch to bird’s eye view, tap
View (bottom toolbar) Bird’s-eye.
42
Page 52
English
5.2 View the Route
Turn by Turn
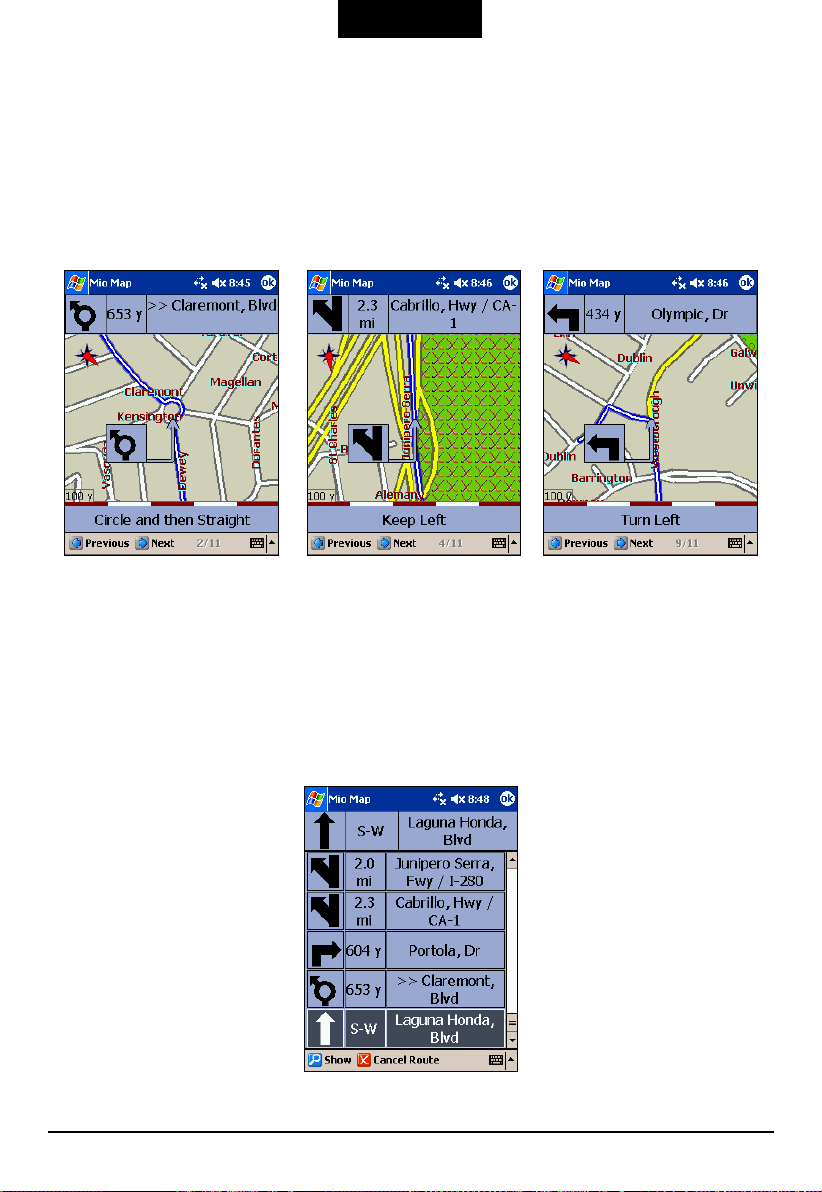
After calculating a route, you can view turn-by-turn instructions on the map. Tap
View (bottom toolbar) Turn By Turn.
This view indicates the route turn by turn
the next or previous turn.
. Use the Next or Previous button to go to
Driving Direction
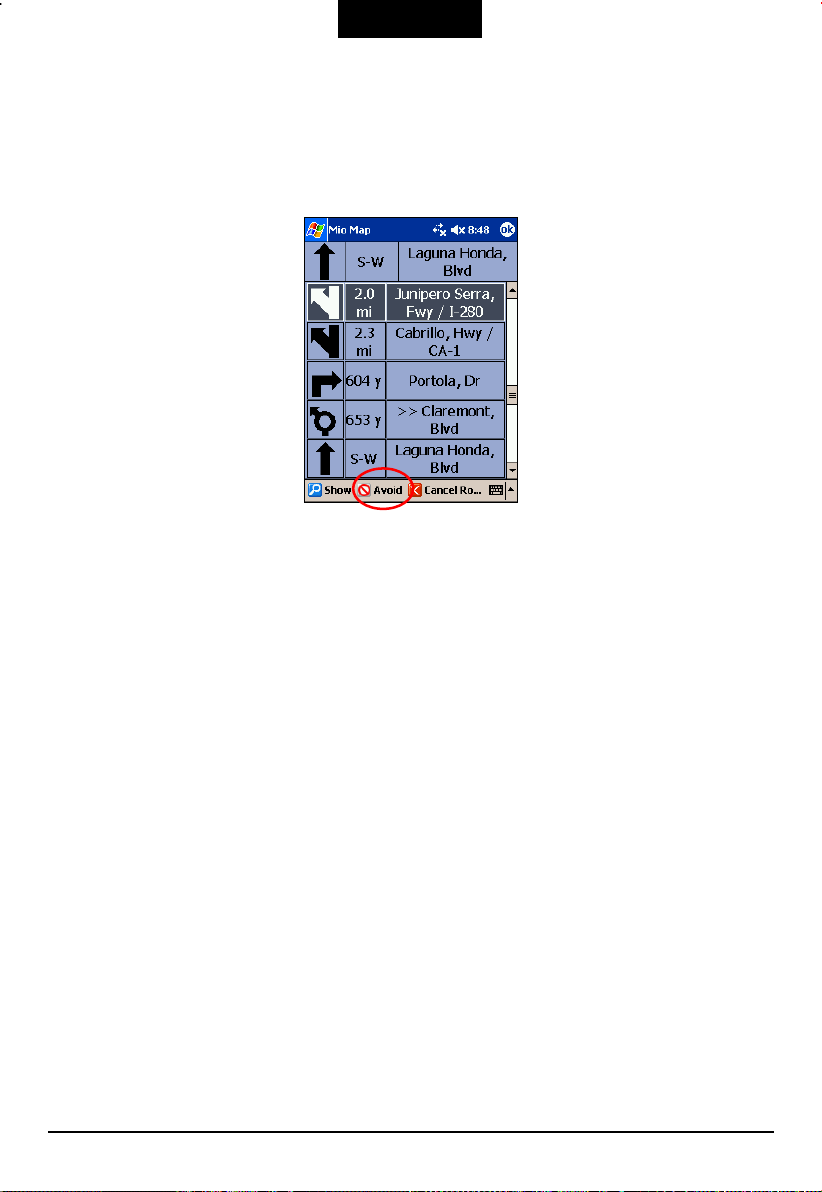
After calculating a route, you can view driving directions. Tap View (bottom
toolbar) Driving Directions.
43
Page 53
English
A list displays on the screen, with distances between each turn and the street name.
As you review your route, you may decide to avoid certain roads, as highways and
toll roads, or detours. When you tap (highlight) a street and tap
toolbar), the route is automatically recalculated and new route is displayed.
Avoid (bottom
If not satisfied with new route, tap
the route and return you to the main map view, ready to select a different route.
Tapping
Show will bring you to the turn-by-turn view as described earlier.
Cancel Route (bottom toolbar). This will cancel
5.3 Day/Night Color Skin
Day Color Skin
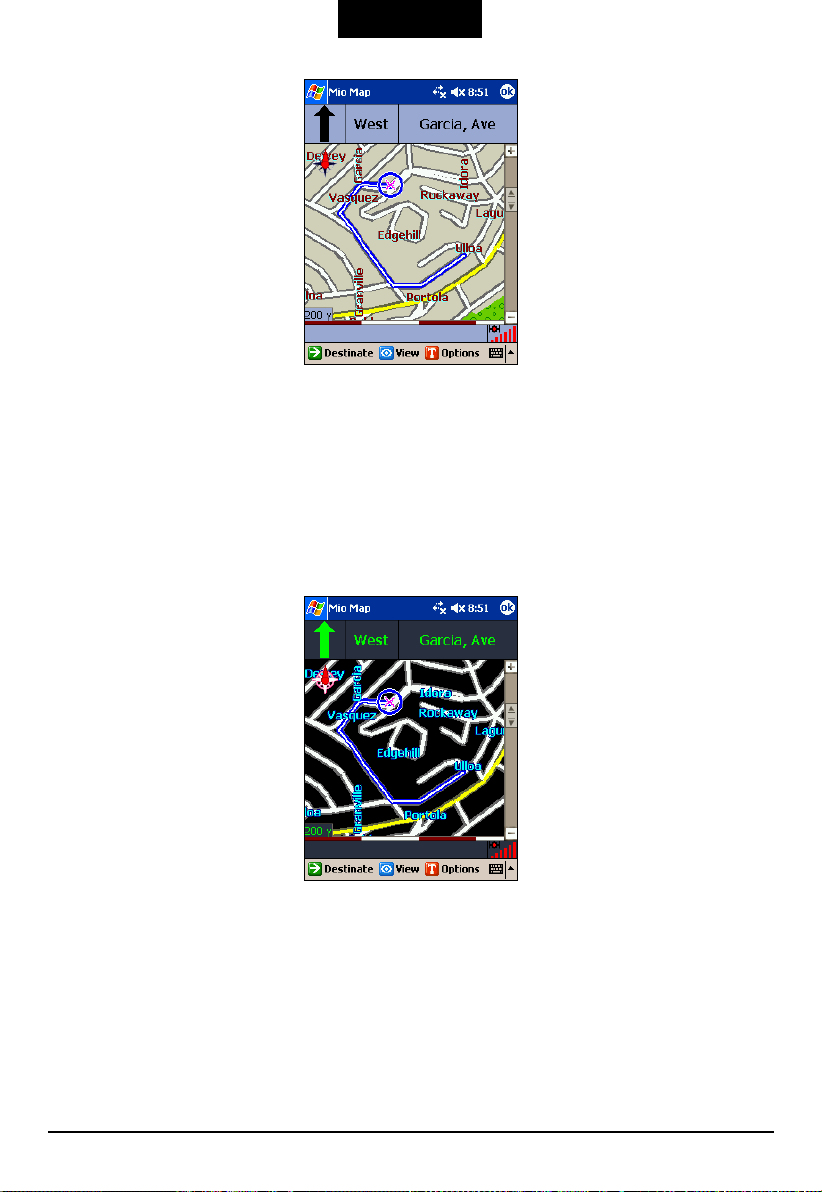
Day Color Skin is the default color scheme of the map. You can use View Day
color skin
Colors are bright and easy to view under most daytime conditions.
for daylight driving conditions.
44
Page 54
English
Night Color Skin
To change the background color for nighttime or adverse weather conditions, tap
View Night color skin.
Colors and background are muted to assist nighttime driving making the route and
current position more visible.
45
Page 55

Page 56
English
Options, Settings, and
6 Options, Settings, and Preferences
Mio Map initially has certain default settings when it is installed. You can use the
Options command to customize it to meet your personal likes and needs. Your
settings remain until you make a change again.
Preferences
6.1 General Settings
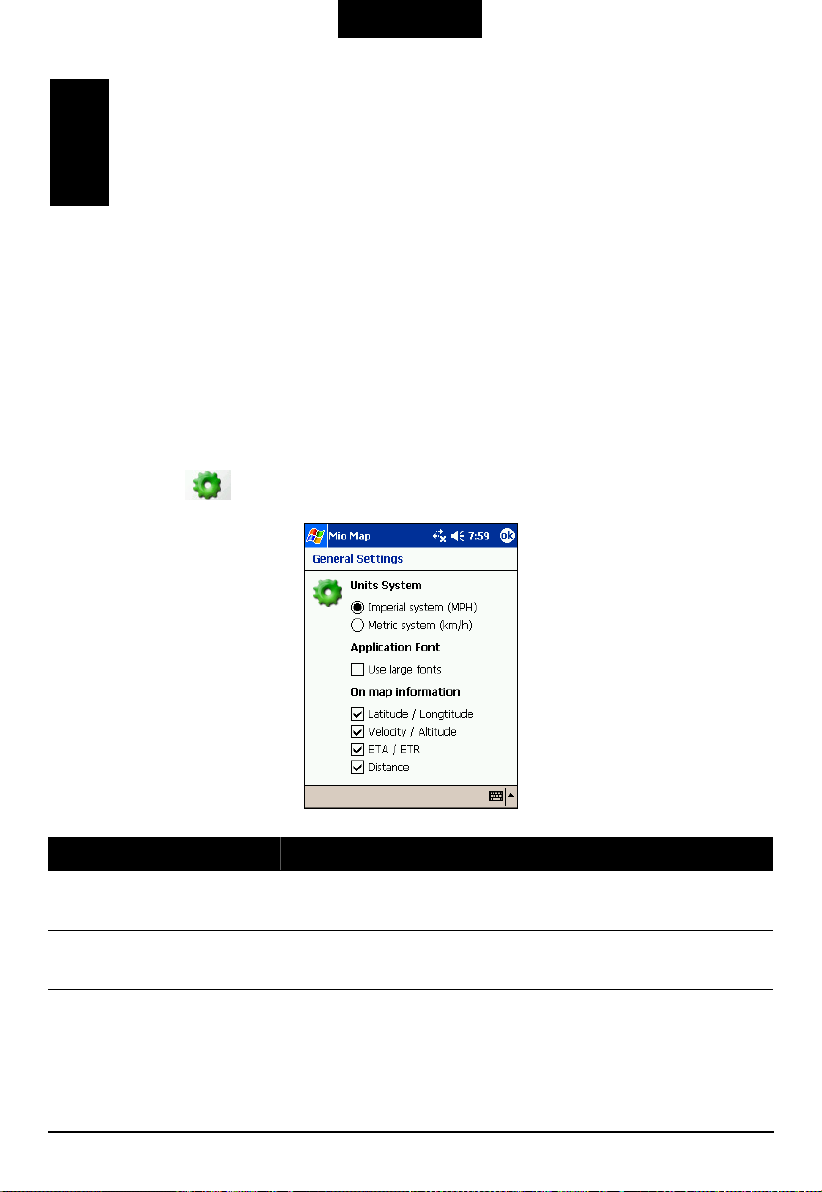
Tap Options General Settings to access the following settings:
General Settings Descriptions
Units System
Application Font
47
Select Imperial system (miles and yards) or Metric
system (kilometers and meters) to display distances.
Select Use Large fonts if needed. This makes the
display easier to read especially in bad lighting.
Page 57
English
On map information
Tap ok (top right corner) to exit and save any changes you have made.
Select the items that you want displayed on the map:
Latitude/Longitude
Velocity altitude
ETA/ETR
Distance
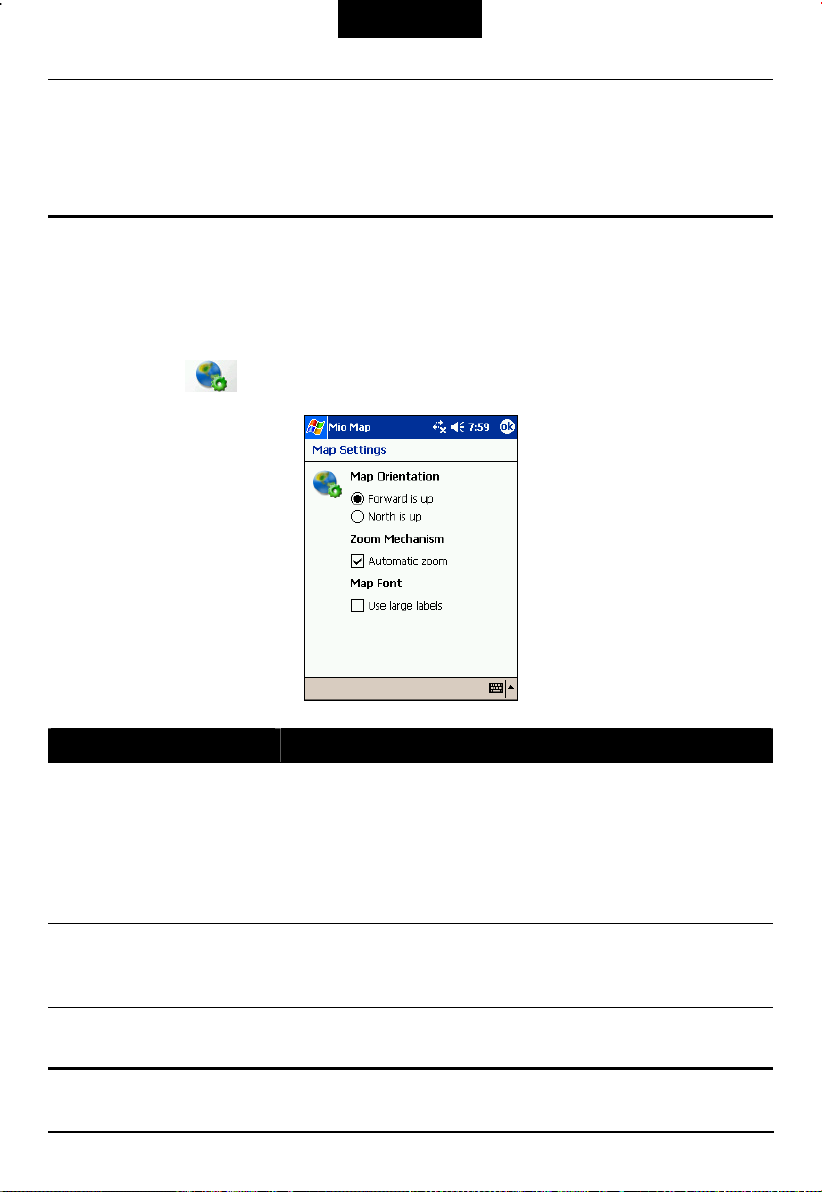
6.2 Map Settings
Tap Options Map Settings to access the following settings:
Map Settings Descriptions
Map Orientation
Zoom Mechanism
Map Font
Select Forward is up to use dynamic map notation.
The map will rotate as you turn the direction. Mio Map
will also update the compass to show the north-south
direction after the turns.
Select North is up to keep the map static in a north-up
orientation.
Select Automatic Zoom to allow Mio Map to
automatically scale the map according to the current
speed of the vehicle/person.
Select Use Large labels for easier reading under
adverse lighting conditions.
48
Page 58
English
Tap ok (top right corner) to exit and save any changes you have made.
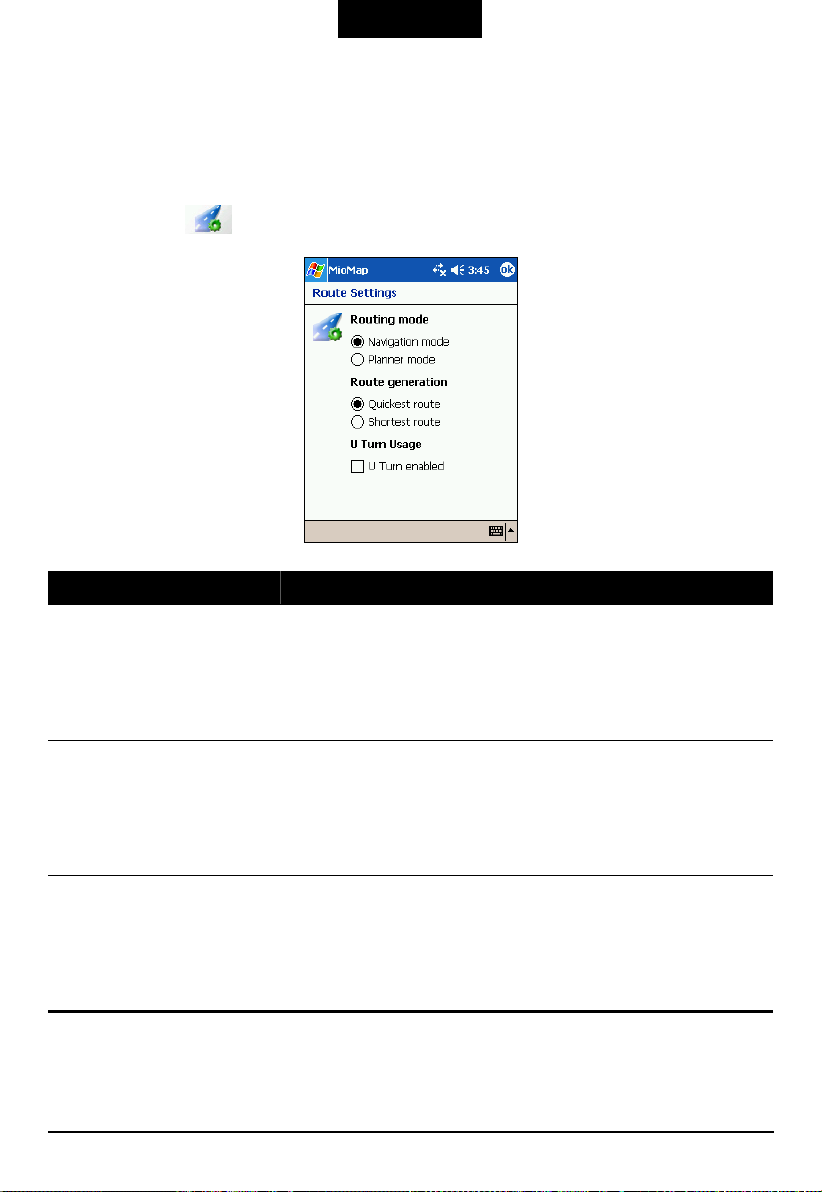
6.3 Route Settings
Tap Options Route Settings to access the following settings:
Route Settings Descriptions
Routing Mode
Select Navigation mode for normal driving with GPS
on.
Select Planner mode if you want to display planned
routes, but does not show your progress, as you travel.
(See Section 4.5 for more information.)
Route generation
U Turn Usage
Tap ok (top right corner) to exit and save any changes you have made.
Select Quickest route to allow Mio Map to calculate
the route by picking the shortest distance and highest
speed limits.
Select Shortest route to allow Mio Map to calculate
the route by picking the shortest distance.
If you select this option, the route will be calculated by
including any U Turns that are needed. If you clear this
option, the route will be calculated without any U
Turns. (This feature is included because some drivers
prefer not to make U Turns.)
49
Page 59
English
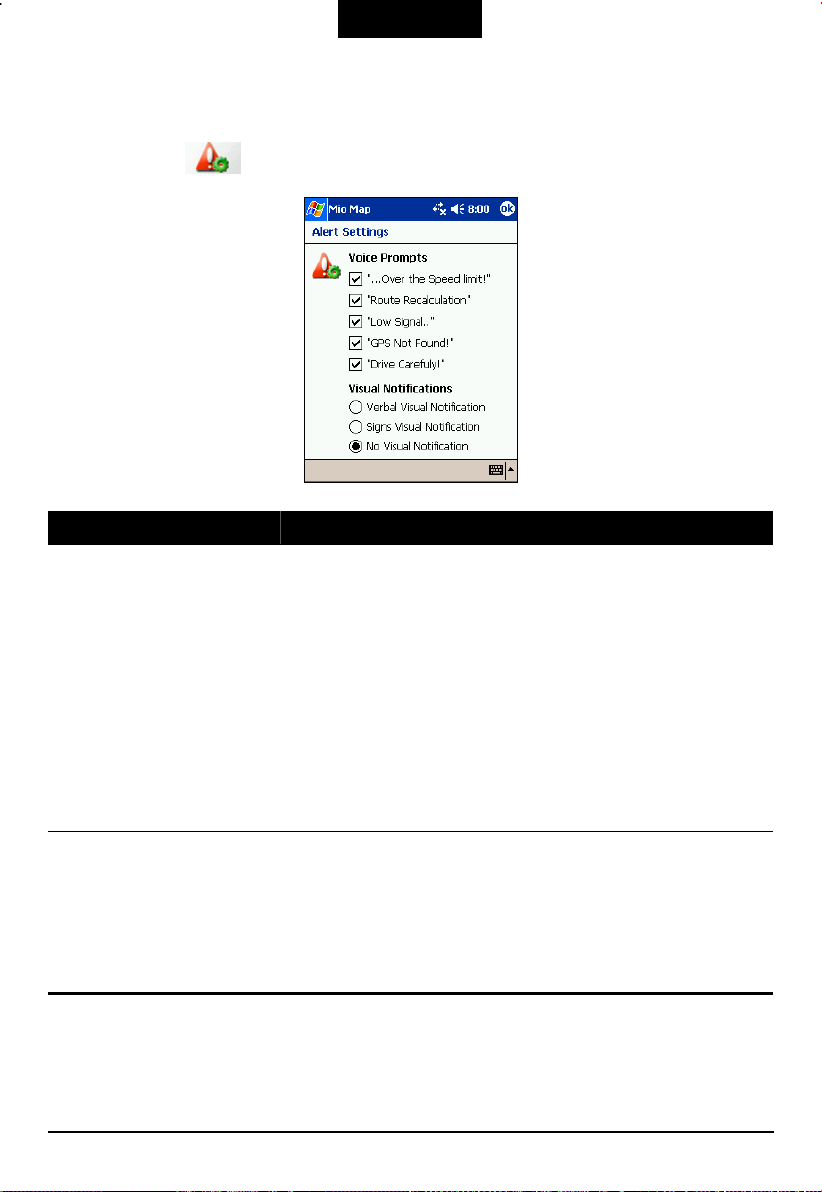
6.4 Alert Settings
Tap Options Alert Settings to access the following settings:
Alert Settings Descriptions
Voice Prompts
Select the item(s) you want to hear:
“…Over the Speed limit!” – gives you a voice
reminder when your car exceeds the speed limit on this
section of the road.
“Route recalculation” – gives a voice prompt that
Mio Map will automatically recalculate new route.
“Low signal..” – Warning that you are in an area of
low signal.
“GPS Not Found” – Alerts you if GPS signal is lost.
“Drive Carefully” – Friendly reminder at the start of
each journey.
Visual Notifications
Tap ok (top right corner) to exit and save any changes you have made.
Select one of the following three types:
Verbal Visual Notification – Displays both visual and
verbal guidance prompts.
Signs Visual Notification – Only displays visual
prompts.
No visual Notification – No visual prompts displayed.
50
Page 60
English
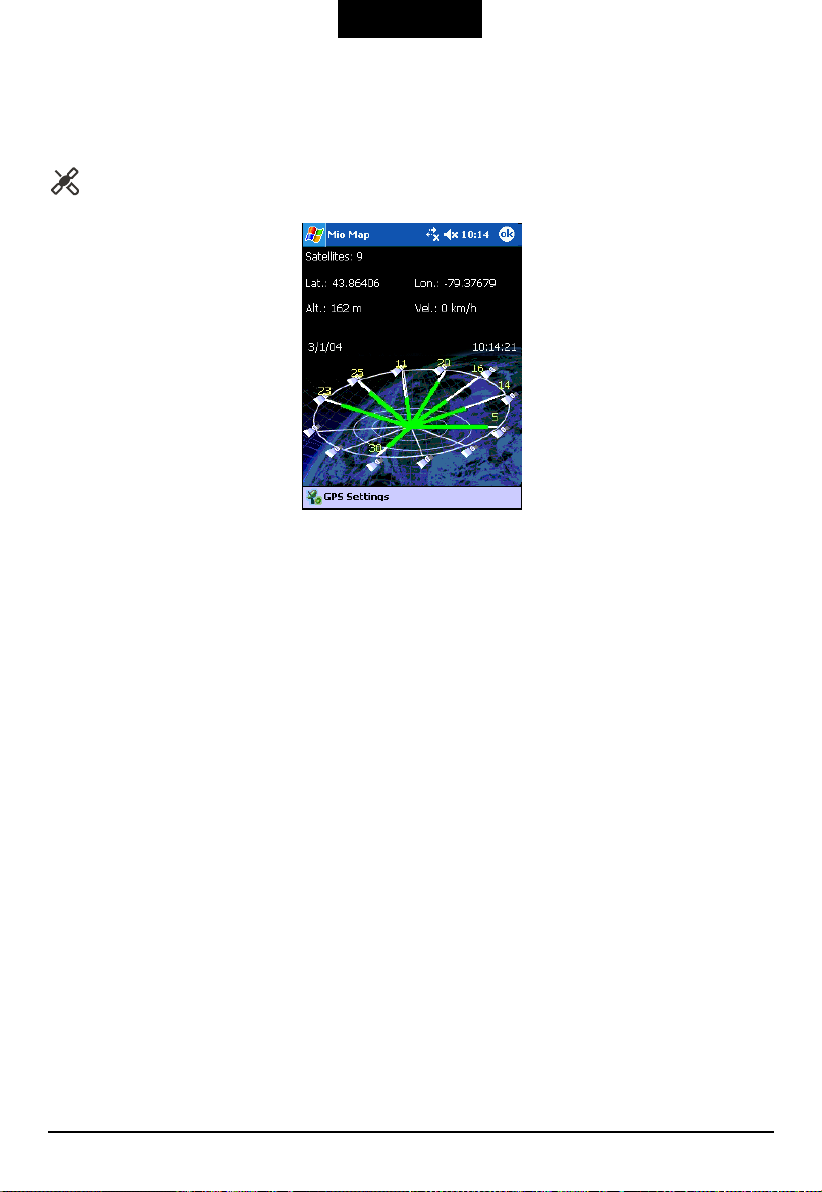
6.5 GPS Status
Tap Options GPS Status to check the current GPS status. You can also press the
hot key to directly access the status screen.
Mio Map uses GPS signals to pinpoint your location. Mio Map remembers your
last location. However, to continually update your location, the software must
acquire fresh GPS signals. (At least four different satellite signals are needed).
In Navigation mode, the software automatically acquires GPS signals and
constantly updates your position.
To exit this screen, tap
ok.
6.6 Look and Feel
Tap Options Look and Feel. Only default settings are currently available.
51
Page 61

Page 62

English
7 Using Mio Map Console
In addition to installing Mio Map with the Mio Map Console, you can also use the
Console for advanced features such as Cut Map and Favorites Importer.
7.1 Creating Your Own Maps by Map Cutting
Living in California, but need only the map and driving directions for San
Francisco? Mio Map has made that easy with its simple to use Cut Map tool.
The process includes three major parts:
Part 1. Load the map.
Part 2. Select the area to cut.
Part 3. Save the cut map.
Part 1. Load the Map
1. Start the Mio Map Console on your desktop computer by clicking Start
Programs MioMap Mio Map Console.
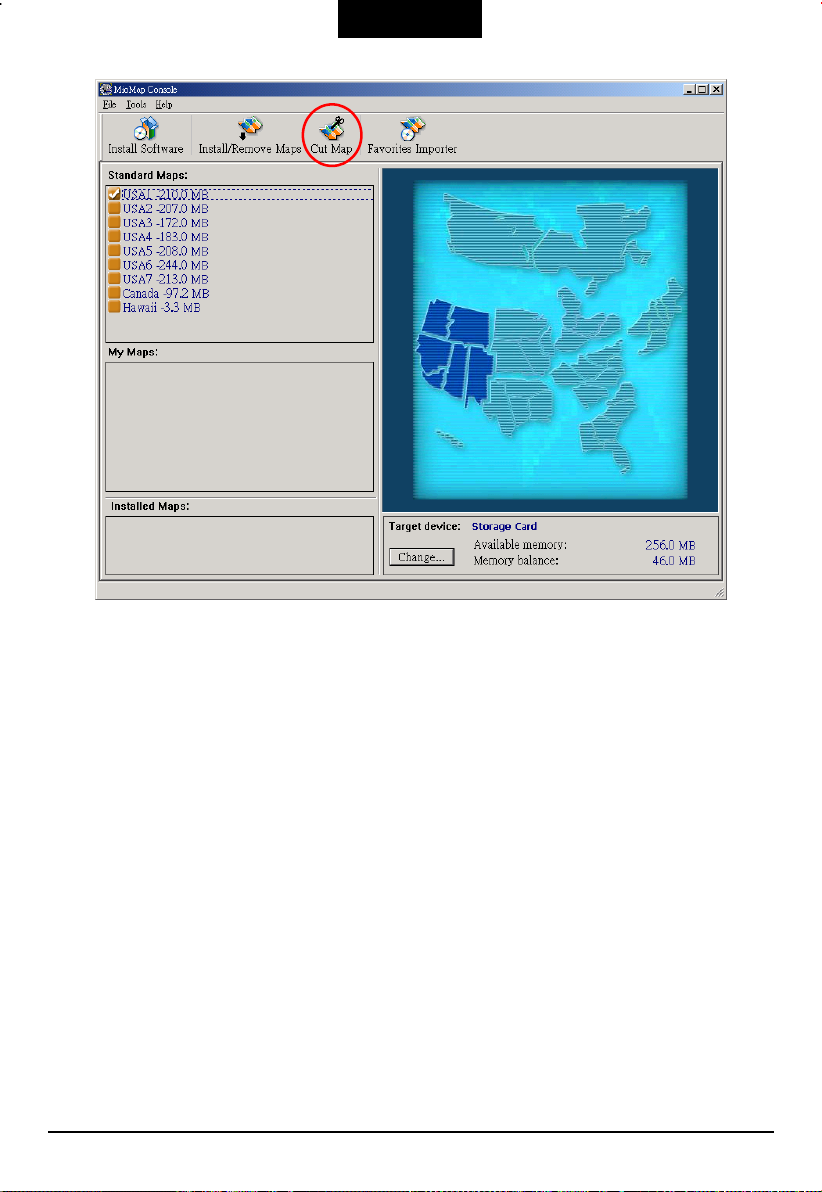
2. Select the map you want to cut by selecting it from the list. A check mark (√)
represents a selected map.
3. Click the
53
Cut Map button on the toolbar.
Page 63
English
4. In the “License Agreement” window, click
5. Insert Mio Map Disk 1 or Disk 2 if prompted. Click the
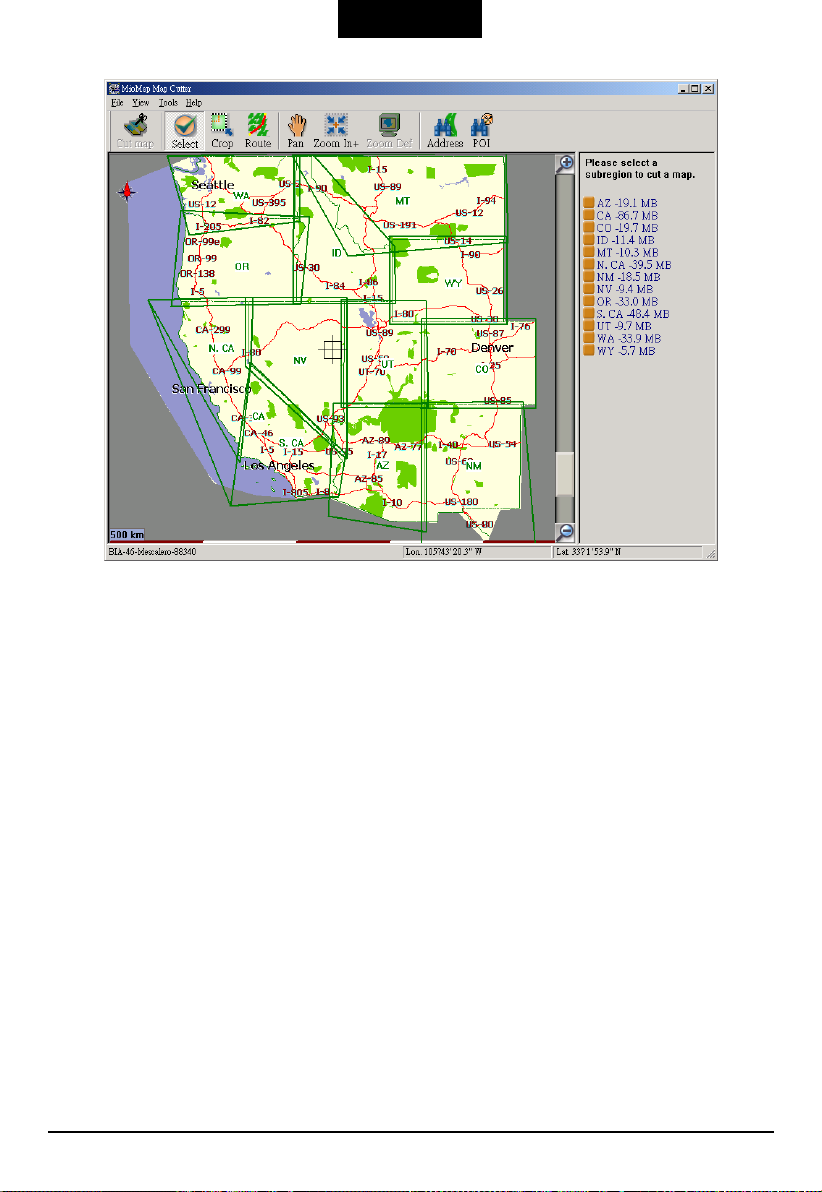
6. The selected map is temporally loaded to the hard disk and displays on the
screen.
Yes, I agree.
OK button.
54
Page 64
English
7. Go to “Part 2. Select the Area to Cut.”
Part 2. Select the Area to Cut
You have several ways to select an area on the map to cut:
Select a precut subregion
Select by address
Select by POI
Select by directly dragging and zooming
Selecting by Subregion
Some maps are precut into subregions, available for you to select.
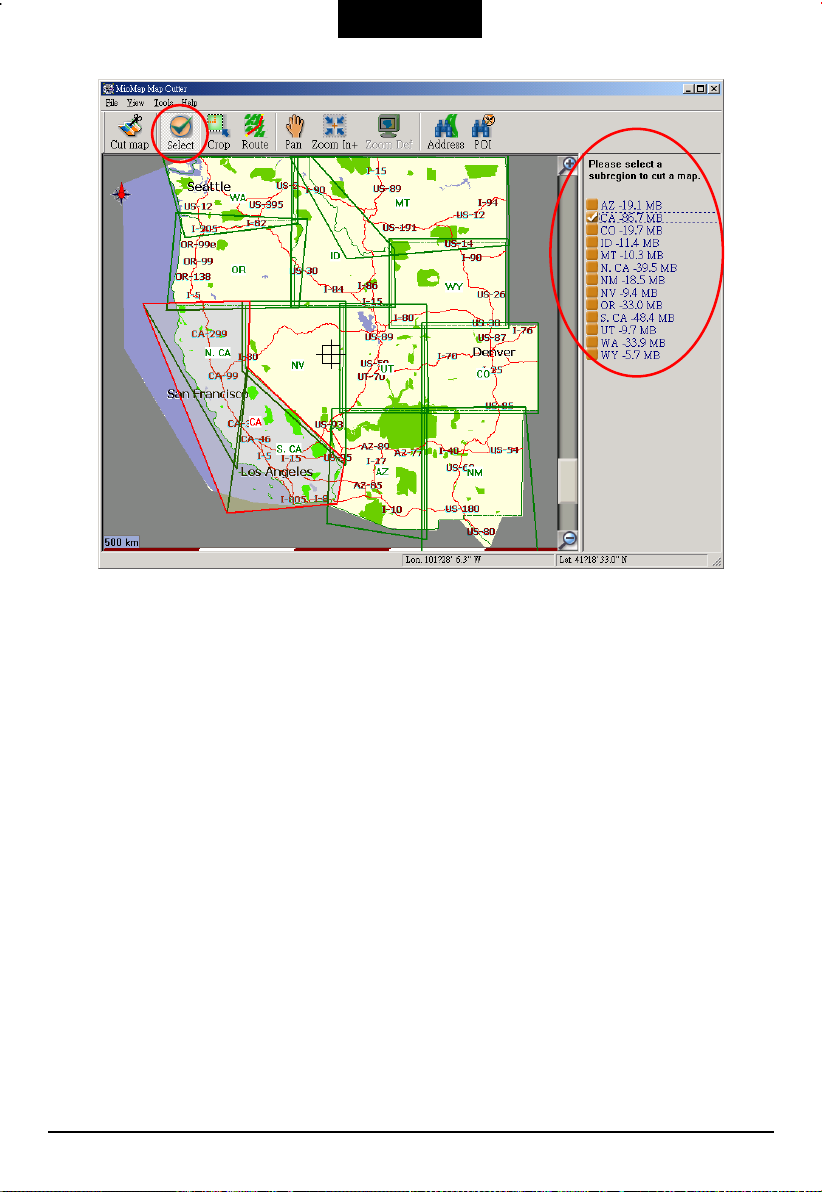
1. In the Map Cutter screen, click the
2. Select (check) a subregion from the list on the right side. The selected
subregion is highlighted in the map.
55
Select button on the toolbar.
Page 65
English
3. With the selected area displayed on the map, go to “Part 3. Save the Cut Map.”
Selecting by Address
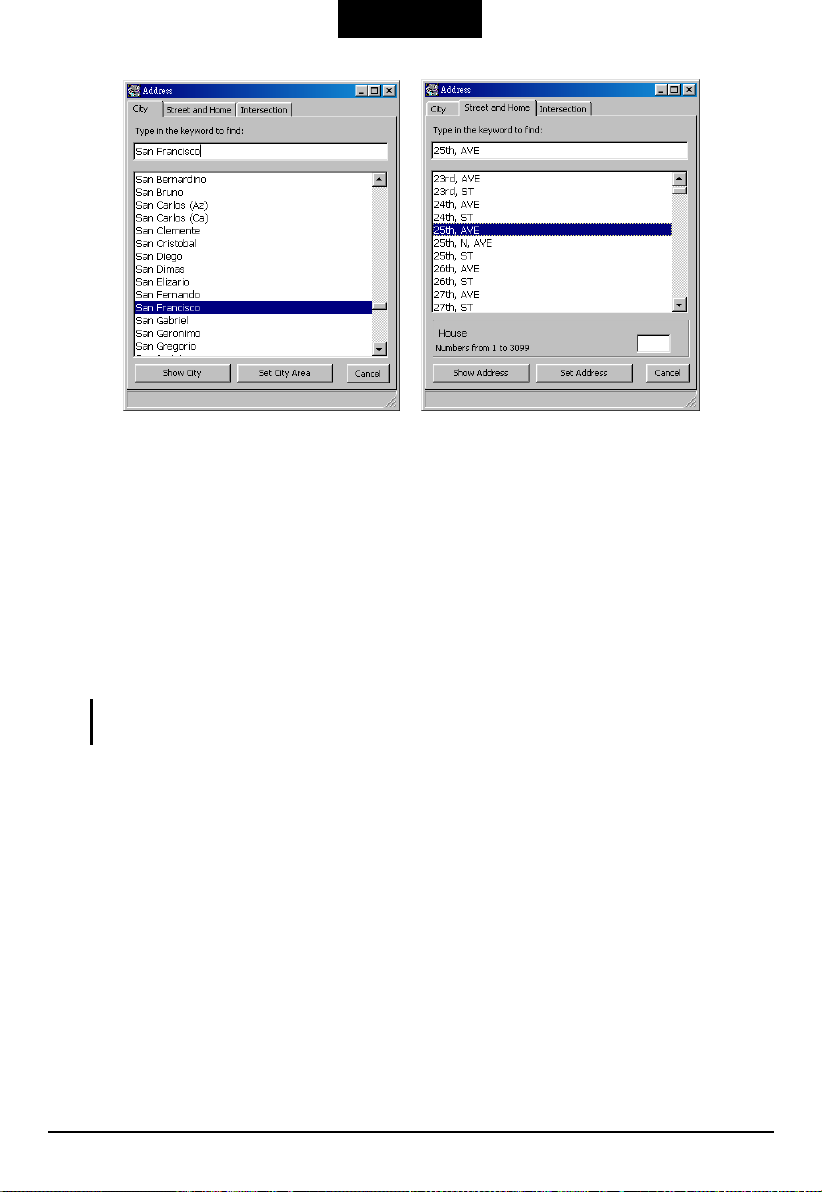
1. In the Map Cutter screen, click the Address button on the toolbar.
2. Select by
56
City Street and Home or City Intersection.
Page 66
English
3. Click
Show Address. In the Map Cutter screen, the map is updated with the
selected area centered and marked.
4. With the selected area displayed on the map, go to “Part 3. Save the Cut Map.”
Selecting by POI
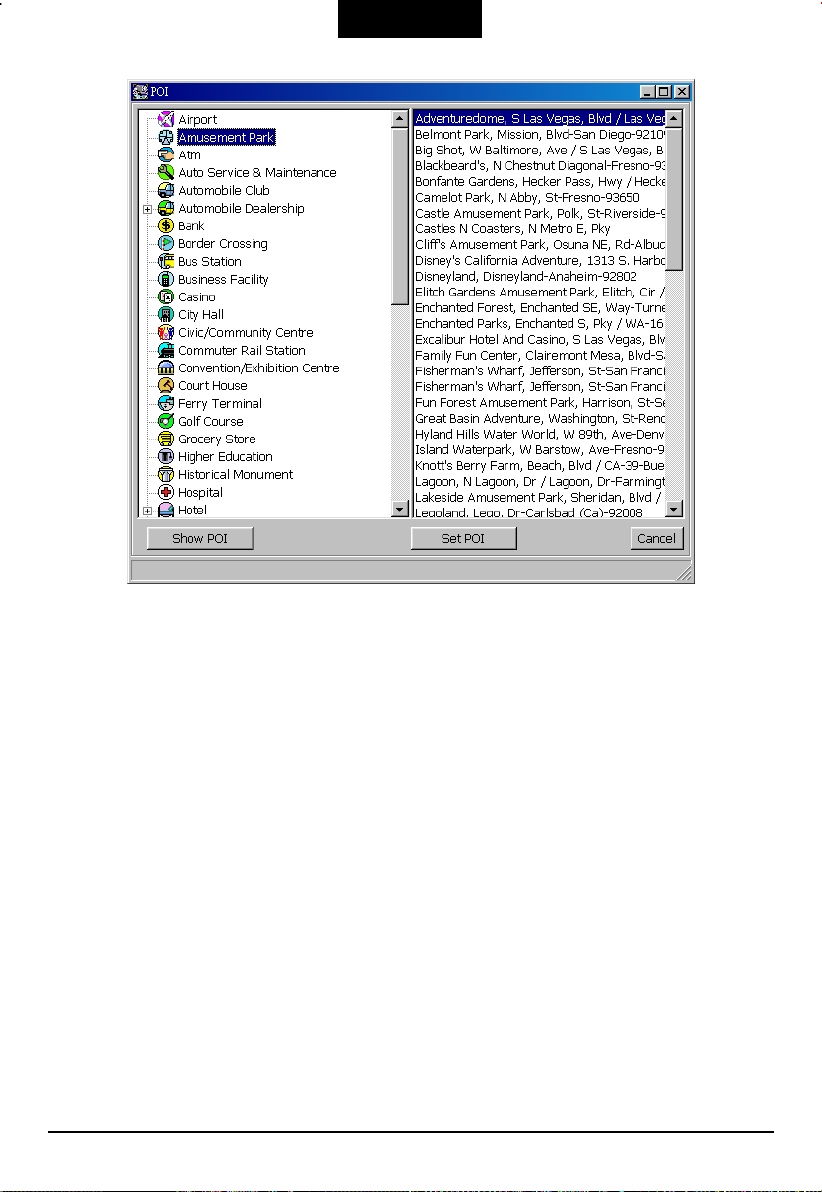
1. In the Map Cutter screen, click the POI button on the toolbar.
2. Select a POI category and all the matching POIs appear in the right column.
Then, select a POI from the list.
NOTE: The plus sign (+) located to the left indicates that the main category contains at least
one sub-category.
57
Page 67
English
3. Click
4. With the selected area displayed on the map, go to “Part 3. Save the Cut Map.”
Show POI. In the Map Cutter screen, the map is updated with the selected
area centered and marked.
Selecting by Dragging and Zooming
In the Map Cutter screen, you can click the Pan button on the toolbar to enable the
Pan function. Then, you can drag the map in any direction using the mouse.
To zoom on the map, use the zoom scroll bar (along the right of the map) to zoom
in or out on the map. Or, use the
With the selected area displayed on the map, go to “Part 3. Save the Cut Map.”
58
Zoom In button on the toolbar to zoom in.
Page 68
English
Part 3. Save the Cut Map
NOTE: Skip steps 1 and 2 if you are saving a whole subregion as the cut map.
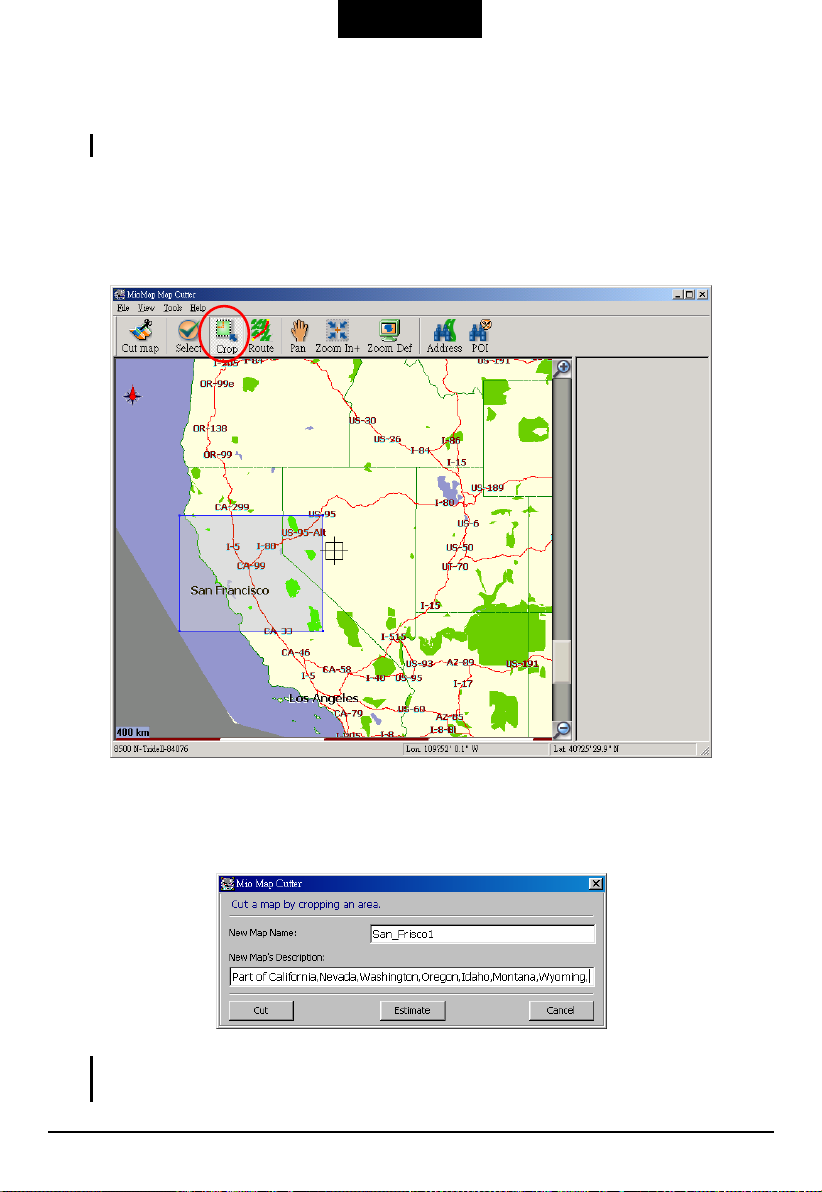
1. In the Map Cutter screen, click the Crop button on the toolbar. A cross appears
on the screen indicating your mouse location.
2. Drag to draw a rectangular zone to be cut.
3. Click the Cut Map button on the toolbar to save the cut map.
4. Enter a unique name as the new map name (e.g. San_Frisco1).
NOTE: Spaces between words are not allowed, but you can use underscores to separate the
words (16 character maximum).
59
Page 69
English
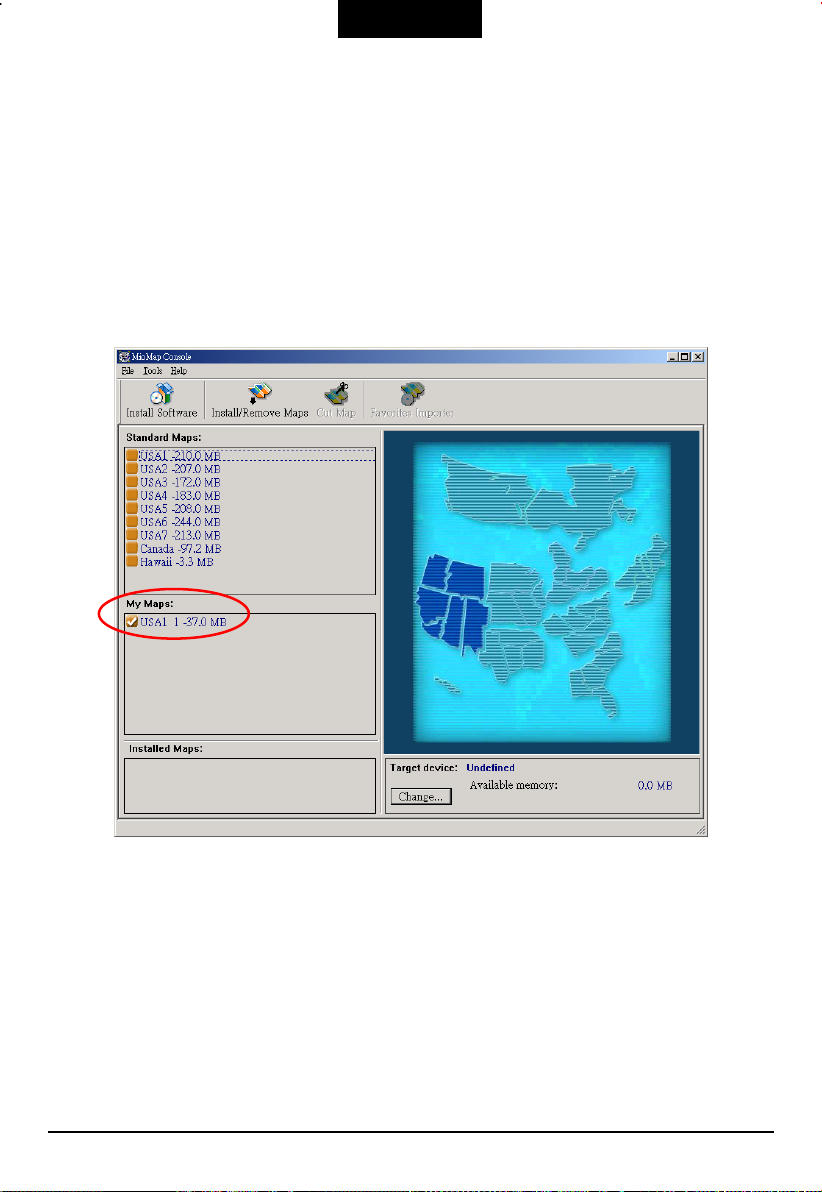
5. Make sure that you have enough memory available. You can click Estimate to
know the size of the cut map.
6. Click
Cut to store the newly cut map on your computer. Mio Map creates a
default directory on your computer, C:\MioMap\New Maps, where all cut
maps are stored.
7. Click
8. Click
OK.
File Return to Console to return to the Mio Map Console. The new map
appears in the My Maps list.
60
Page 70
English
7.2 Creating Your Own Maps by Route Cutting
Mio Map supports route cutting, which allows you to create a map composed of a
travel route. To create the route, you specify two or more points. After the route
has been created you can create a map from it and download the map to your
Pocket PC.
1. From the console, select one of the standard maps. The route you create will be
restricted to the area of the predefined map.
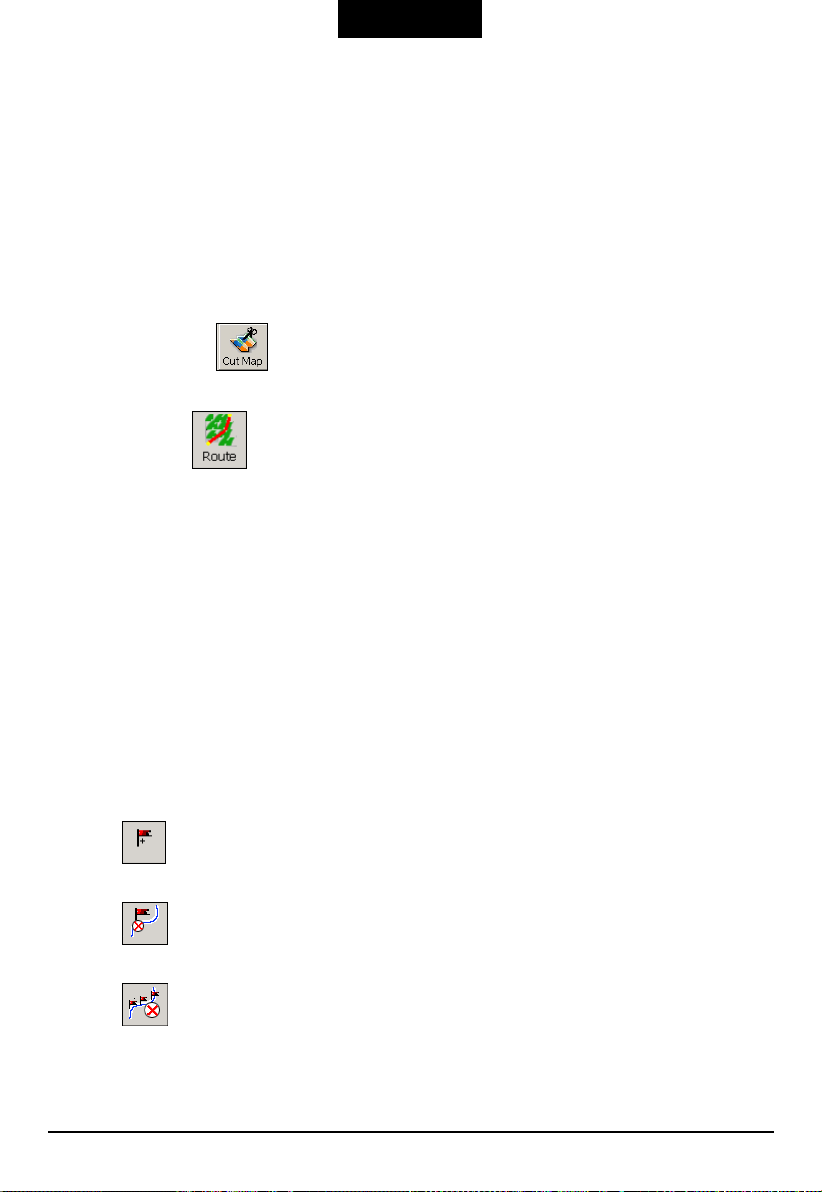
2. Click
3. Click
4. To establish a point on your route, click on the desired position on the map. A
5. Some tools you can use when creating a route:
Cut Map . An enlarged image of the map is displayed in the
left-hand pane.
Route . Notice the additional window that is displayed in the
right-hand pane.
description of the point is displayed in the right-hand pane. To more precisely
select a point, you can click on
The first point you define is considered the starting point of the route. A route
must include at least two points.
Corridor - You can select how much surrounding area will be included
•
along the route’s path. You can also choose either kilometers or miles.
•
Route - You can select either the quickest or the shortest route to connect
the points.
•
• - Deletes a single point from the route. First, highlight the point in
- Centers a point on the map. First, highlight the point in the
right-hand pane, and then click the icon.
the right-hand pane, and then click the icon.
Address or POI as the previous section describes.
•
- Click this icon to delete all points from the route.
61
Page 71
English
• and - Changes the numerical order of the points on the map
and in the right-hand pane. First, highlight a point in the right-hand pane,
and then click one of these icons.
6. When you have established all the points on the route, click the
icon. Notice that all the points become connected by a blue line that is
bordered by a corridor. You can use any of the tools described in step 5 to
modify the route shown. If you modify the route, you will have to recreate the
route by simply clicking on the
7. To create a map of the route, click Cut Map . You will be prompted to
give the map a name. The map will be displayed in the “My Maps” section on
the Console. Then, you can download the map to your Pocket PC just as you
would download any other map as described in the next section.
Create Route icon again.
Create Route
7.3 Installing Newly Created Maps to Pocket PC
1. Connect your Pocket PC to your desktop computer. (See the User’s Manual of
your Pocket PC for information.)
2. Start the Mio Map Console on your desktop computer by clicking
Programs MioMap Mio Map Console.
3. Select the map(s) you wish to install by clicking the map under the My Maps
list. A check mark (√) represents a selected map to install (e.g. San_Frisco1).
Start
4. From “Target device” (bottom left corner), tap
install maps.
5. In the next dialog, highlight where to install maps (e.g. Storage Card) and
OK.
click
6. Click the
requiring confirmation appears.
7. Click
8. Mio Map Console will display a progress window to let you monitor the
installation’s progress.
9. When the map installation has completed, press
Install/Remove Maps button on the toolbar. A pop-up message
OK to load map(s).
Change to choose where to
OK.
62
Page 72
English
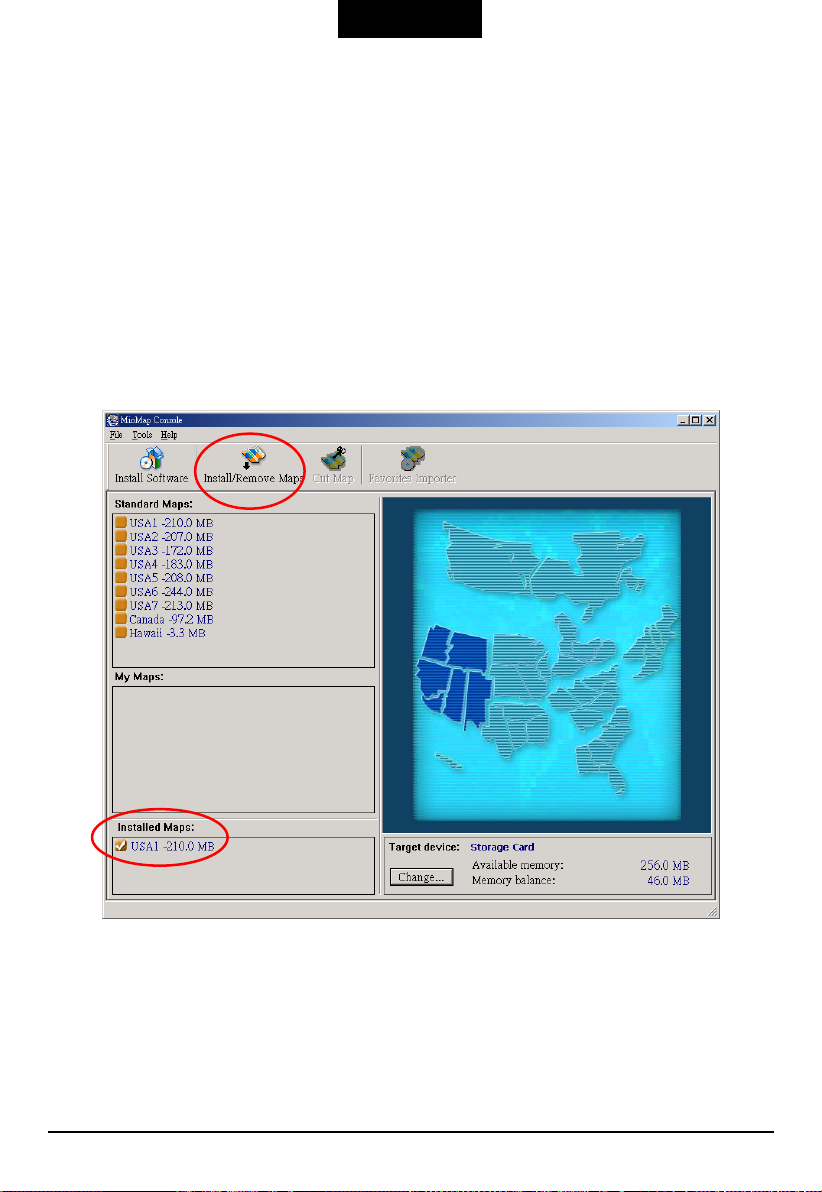
7.4 Removing Maps
1. Connect your Pocket PC to your desktop computer. (See the User’s Manual of
your Pocket PC for information.)
2. Start the Mio Map Console on your desktop computer by clicking
Programs MioMap Mio Map Console.
3. From “Target device” (bottom left corner), tap
remove map(s).
4. The Installed Map list displays a list of all the loaded maps available. Click in
the check box (√) beside the map(s) you wish to remove.
Change to select where to
Start
5. Press
6. Click
Install/Remove Maps button on the toolbar to remove the selected map(s).
Yes to confirm and the selected map(s) are removed from memory.
63
Page 73

English
7.5 Installing Mio Map to Your Pocket PC
If your model doesn’t have Mio Map pre-installed, you must install and Activate
Mio Map by yourself.
NOTE: Before installing, make sure that:
Your Pocket PC has a minimum of 32 MB RAM and 96 MB external memory.
Your desktop computer has a minimum of 300MB free memory for temporary files.
1. Connect your Pocket PC to your desktop computer via Microsoft ActiveSync.
(See the User’s Manual for your Pocket PC for information.)
2. Start the Mio Map Console on your desktop computer by clicking
Programs MioMap Mio Map Console.
3. Click
4. Click the
Tools Language to select the language you want.
Install Software button on the toolbar to install Mio Map. The language
Start
installed in your Pocket PC will correspond to the language of your current
Mio Map Console.
5. Follow the onscreen instructions to complete the installation. A status window
indicates the progress of the installation.
6. After installation, a window pops up asking if you want to activate Mio Map.
Before proceeding with Quick Activation, make ure that your Pocket PC is
connected to your computer and that your computer is connected to the
Internet.
NOTE: The Quick Activation function can be accessed by clicking Help Quick
Activation.
7. Follow the onscreen instructions to complete the activation process.
64
Page 74

English
7.6 Using Favorites Importer
Mio Map also lets you download a list of locations from your computer to any
category within Favorites on your Pocket PC. Creating information about
locations in this way is much faster than entering the information via the Pocket
PC’s soft keyboard. A practical application of this time-saving feature could
include a commercial vendor who would create a list of all retail outlet locations in
a specific area. You can then download the list quickly to your Pocket PC.
You can download a list of locations from your computer to your Pocket PC to any
category within Favorites, including Auto Alerts. The list must be contained in
*.csv files. As part of the download procedure, you convert the *.csv files to *.dat
format for storage on your Pocket PC by using a conversion utility.
To download Favorites to your Pocket PC:
1. Connect your Pocket PC to your desktop computer.
2. Start the Mio Map Console on your desktop computer by clicking
Programs MioMap Mio Map Console.
Start
3. On the Mio Map Console, click a Standard Map. This will enable the Favorites
Importer feature.
4. Click the
Favorites Importer button. The converter dialog is displayed.
5. Select the file (*.csv format) containing the automatic alert.
NOTE: The *csv file contains addresses and longitude and latitude values for locations. The
file must contain exact street address, zip, and city data. However, the longitude and latitude
values can be omitted because the Mio Map software will query the map you selected in Step
3 above for any missing longitude and latitude. If the *.csv file does not contain longitudes and
latitudes, the separating commas must still be included.
6. Convert the .csv file to .dat format by highlighting the file, entering a Category
Name, and selecting the
Convert button. The Report area of the screen will
display a message stating that the content of the file has been converted and
that the file is ready for download.
7. Download the file to your Pocket PC by selecting the
Download button.
65
 Loading...