

Page 1
Bike Storage Stand
This stand is NOT compatible with a bike equipped with a mud guard.
!
Do not use this stand for any other purpose than instructed.
Lusso-mM
instructions manual
(ver.1.0 2018/3)
How To Assemble
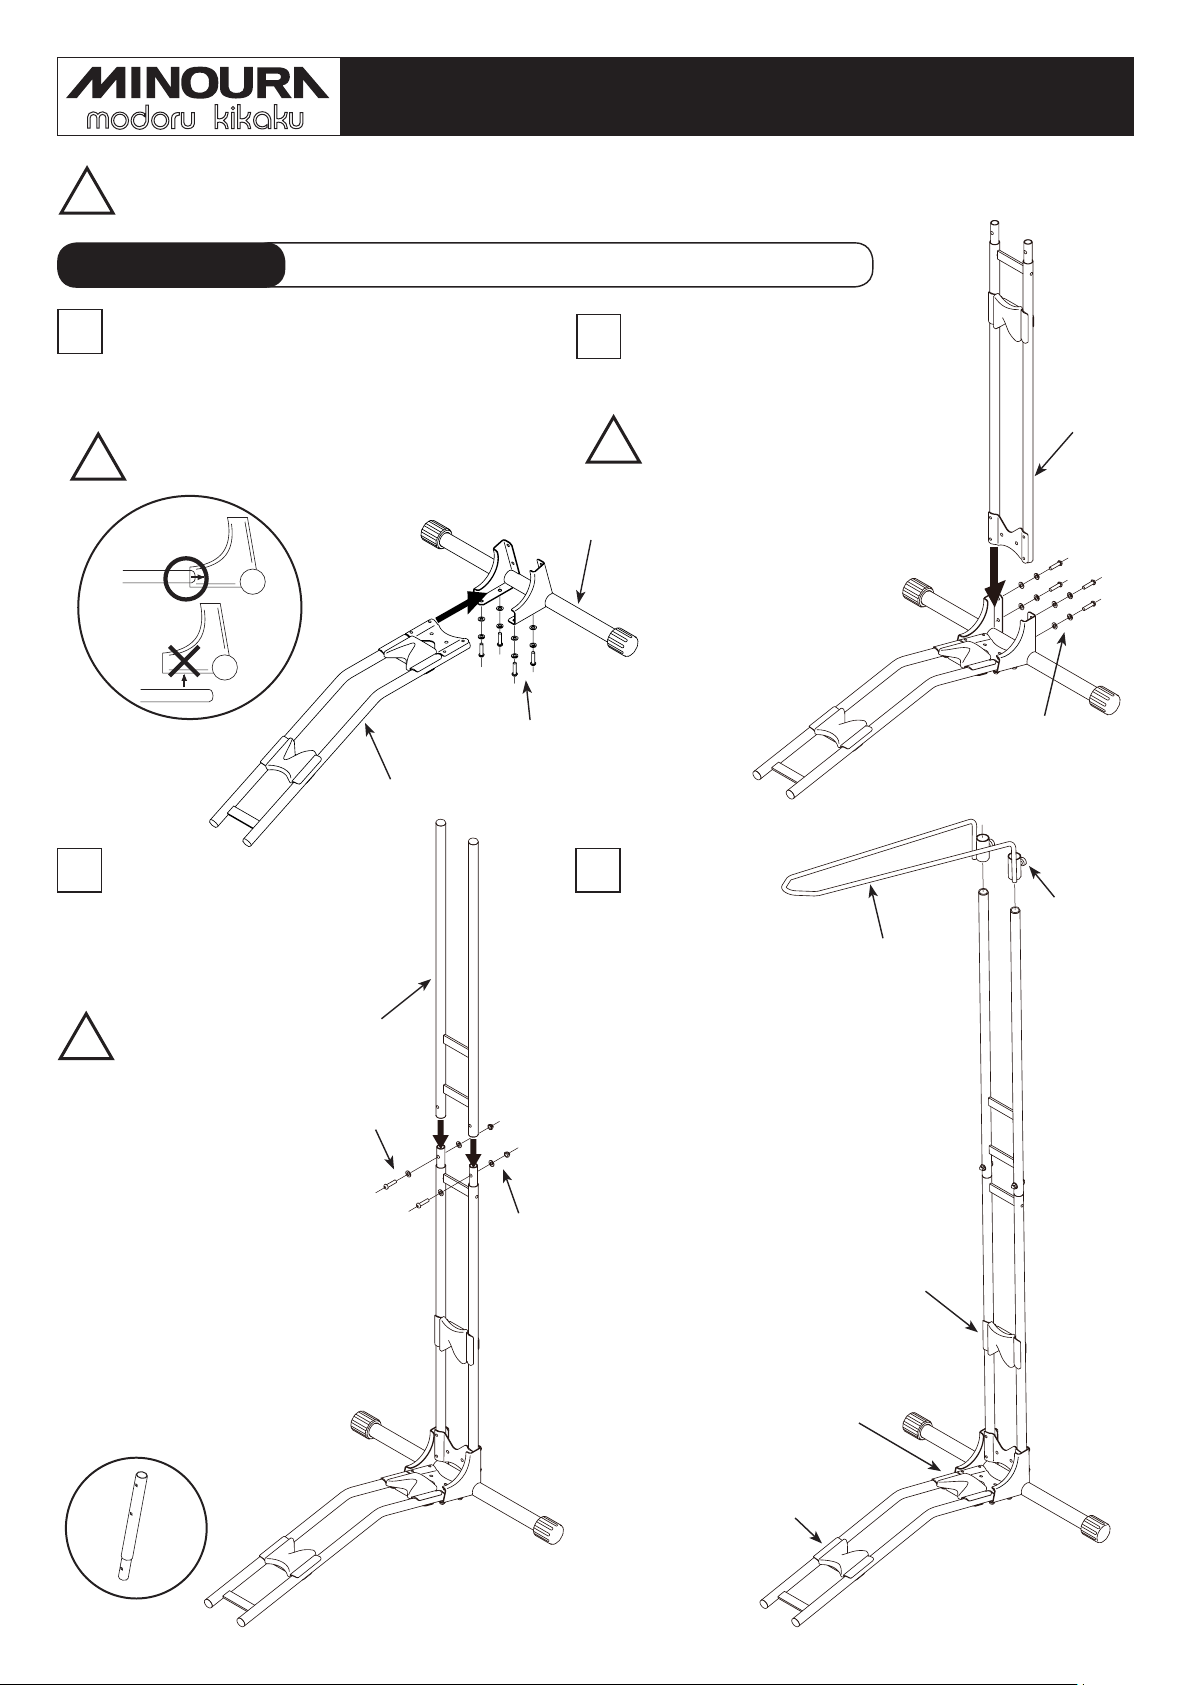
Insert the Rear Tire Holder into the Step-
1
Bar (no specific direction) and fix it with
four M6x30 Bolts.
Insert the Tire Holder into the Step-Bar,
do not attach underneath yet.
!
Required Tools :
Rear Tire Holder
4mm Hex Wrench, 10mm Spanner
Insert the Lower Frame into
2
the Step-Bar, and fix it with
four M6x30 Bolts.
This is also the same.
!
Insert the frame into the StepBar, do not attach behind it.
Step-Bar
Flat Wasaher
Spring Washer
M6x30 Bolt
Tighten each
bolt equally and
alternately.
Do not try to tighten
just one bolt rmly.
You may not be able
to screw other bolts.
Lower
Frame
Flat Wasaher
Spring Washer
M6x30 Bolt
3 4
Joint the Upper Frame to the
Lower Frame, and fix them with
two shorter M6x25 Bolts.
Upper
Frame
!
Please be advised
the stand may fall
backward at this
moment due to the
imbalance of the
stand at this point.
[Extention Bar]
If your bike has long wheelbase
such as large 29" wheel MTB,
install the optional Extention
Bars between the upper and
lower frames.
This extends the frame length
100mm.
M6x25 Bolt
Flat Washer
Dome Nut
Flat Washer
Put the Front Tire
Holder at the top of
the Upper Frame, and
temporarily hold it with
the Knob Bolts.
You will adjust the
positions of the Tire
Guide - A and C in the
next step.
Tire Guide - B
Knob Bolt
Front
Tire
Holder
Tire Guide - C
Tire Guide - A
Page 2
5
[If Your Bike Wheelbase Is Much Longer]
Adjust the positions of the Tire
Guide - A and C precisely to fit
to your exact tire size.
Please note that the rear tire
must be supported at 3 points in
order to expect the bike vertical
and stable.
If the Tire Guide - C doesn't
touch the rear tire, the bike will
not be supported properly and
may fall down.
Confirm the Tire Guide - A has
been set in the position indicated
with the decal on the frame.
While supporting the rear tire
with the Tire Guide A and B,
loosen the backside bolts of the
Tire Guide - C and slide down
until it touches the tire surface,
then tighten the bolts to fix the
position.
Shake the rear tire side to side to
confirm if it is being held stably.
If you cannot set your long wheelbase
bike on this stand properly even though
you adjust the Front Tire Holder at the
maximum end, try to change the Tire
Guide - B position to sink the bike.
The Tire Guide - B is set on the frame
by sandwiching the frame tube with the
back plate.
Disassemble the Guide - B and directly
install it onto the bracket on the frame.
How To Use
The frame touches
the front tire.
Hold the bike diagonally. Insert the front tire in the Front Tire Holder from bottom side, and
place the rear tire on the Rear Tire Holder. This action will keep the bike vertical.
Check if the bike is supported stably by shaking the bike side to side before releasing your
hands.
The Front Tire Holder should
be set as the front wheel
doesn't move back and forth.
You will not change this
position when using same
bike.
Contact
Made in Japan
MINOURA JAPAN
1197-1 Godo, Anpachi, Gifu 503-2305 Japan
Fax : +81-584-27-7505 / URL : www.minoura.jp
Email : minoura@minoura.jp
Warranty Period : 1 Year
Warranty period shall start from
the date of your purchase.
For more detailed information,
please visit Minoura web site;
www.minoura.jp
 Loading...