

Page 1
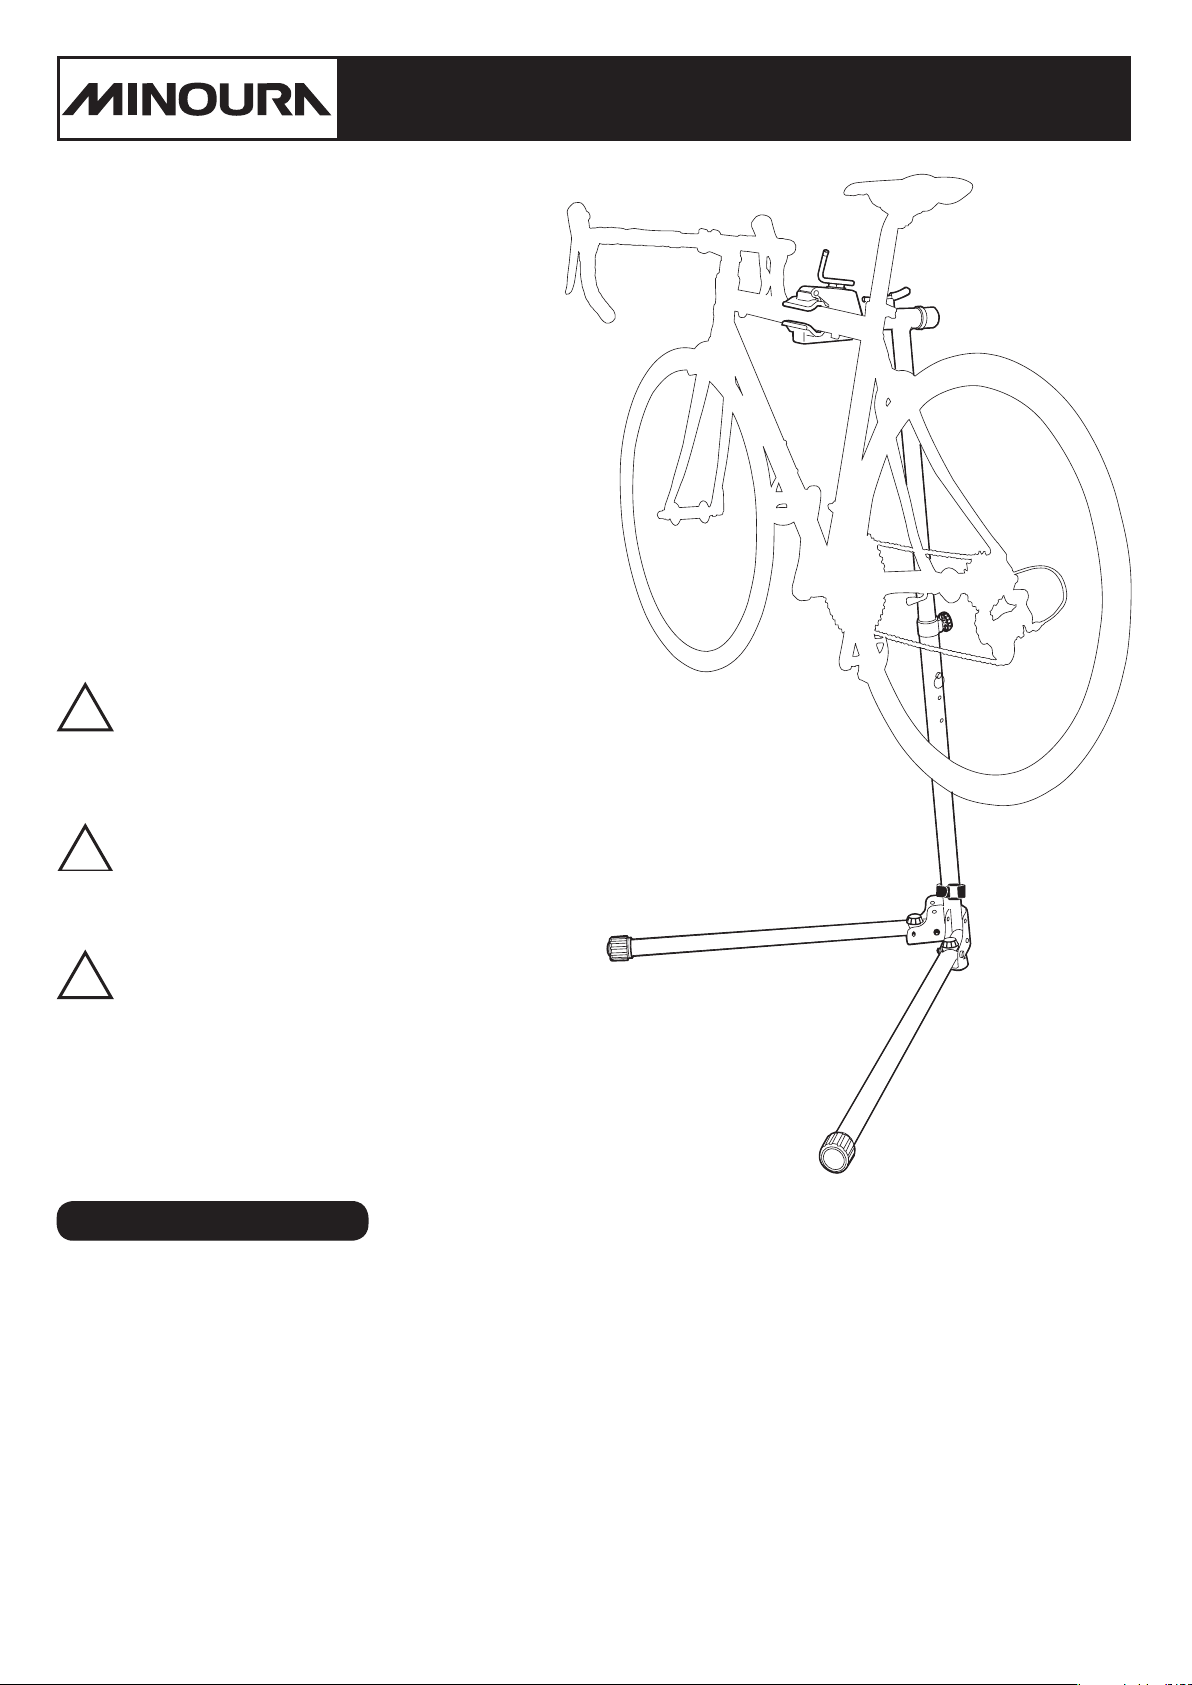
自転車整備作業スタンド
!
Bicycle Maintenance Stand
DW-2
取扱説明書
instructions manual
●トップチューブあるいはシートポストをクランプでつかんで持ち
上げることで、無理のない作業しやすい高さに自転車を保持する
ことができるスタンドです。自転車の保管台としても使えます。
DW-2 lifts up your bike far above from the floor by clamping
the top-tube or the seat-pillar with the jaws in order for
providing more comfortable working position.
DW-2 also can be used as a stylish bike storage stand.
●脚や支柱は工具なしで折りたたみや展開・伸縮ができます。
Legs and pillar are foldable and adjustable without any tool.
●クランプは 18 度刻みで 360 度回すことができるため、最適な作
業位置に自転車を保持できます。
The clamp jaws rotate fully 360 degrees and can fix its angle at
every 18 degrees (20 positions).
●クランプの高さは床面から 1,280mm 〜 1,430mm の範囲で 50mm
ごと 4 段階に調節することができます。
The clamp height is adjustable in 4 positions between 1,280mm
and 1,430mm in every 50mm pitch.
クランプは真円断面のパイプにのみ適合します。
楕円・四角断面あるいは特殊なエアロ形状のフレームやシートポストはしっかりと
!
つかめないため、おすすめできません。
The clamp jaws t round dimention tubing only. Any special shape tubings such as
oval, rectangle or aero-shape are not compatible with this clamp.
(ver.1.0 2013/8)
カーボンや薄肉アルミ製の自転車フレームは潰れてしまう恐れがありますので、
あまり強くつかまないようにしてください。
Some bike frame materials such as carbon or thin light alloy should be weak.
Do not apply too much compression against them.
自転車をつかむとき、特にシートポストを
クランプする場合は重量バランスに十分注意をして
!
ください。極端な左右非対称の場合は転倒の恐れが
あります。
When placing the bike on the clamp jaws, especially
when clamping the seat-pillar, maintain the weight
balance carefully.
Too unsymmetrical mounting should cause falling
down problem.
お問い合わせ先/
もし何かご不明な点や不具合があった場合には、まずはこの商品をお買い求めになったショップにご相談ください。
If you have any questions or need help, you should contact the dealer where you purchased or the Minoura distributor in your country rst.
The distributor can be found on our web site. Only when you cannot get enough service from them, you can contact us.
株式会社
462-0062
〒
Phone (052) 909-6201 Phone (0584) 27-3131
Fax (052) 909-6212 Fax (0584) 27-7505
Web www.fukaya-sangyo.co.jp Mail [email protected]
Contact
深谷産業
愛知県名古屋市北区新沼町
(販売元)
150
株式会社
503-2305
〒
(製造元)
箕浦
岐阜県安八郡神戸町神戸
(カスタマーサービス)
トップチューブを掴んだ例
Top-tube clamping style
1197-1
MINOURA North America MINOURA Japan Headquarters
(for U.S. residents ONLY) (for ALL customers)
Hayward, California, U.S.A. 1197-1 Godo, Anpachi, Gifu 503-2305 Japan
Phone 1-510-538-8599 Fax +81-584-27-7505
Fax 1-510-538-5899 Mail [email protected]
Mail [email protected] Web www.minoura.jp
Made in China
/中国製
Page 2
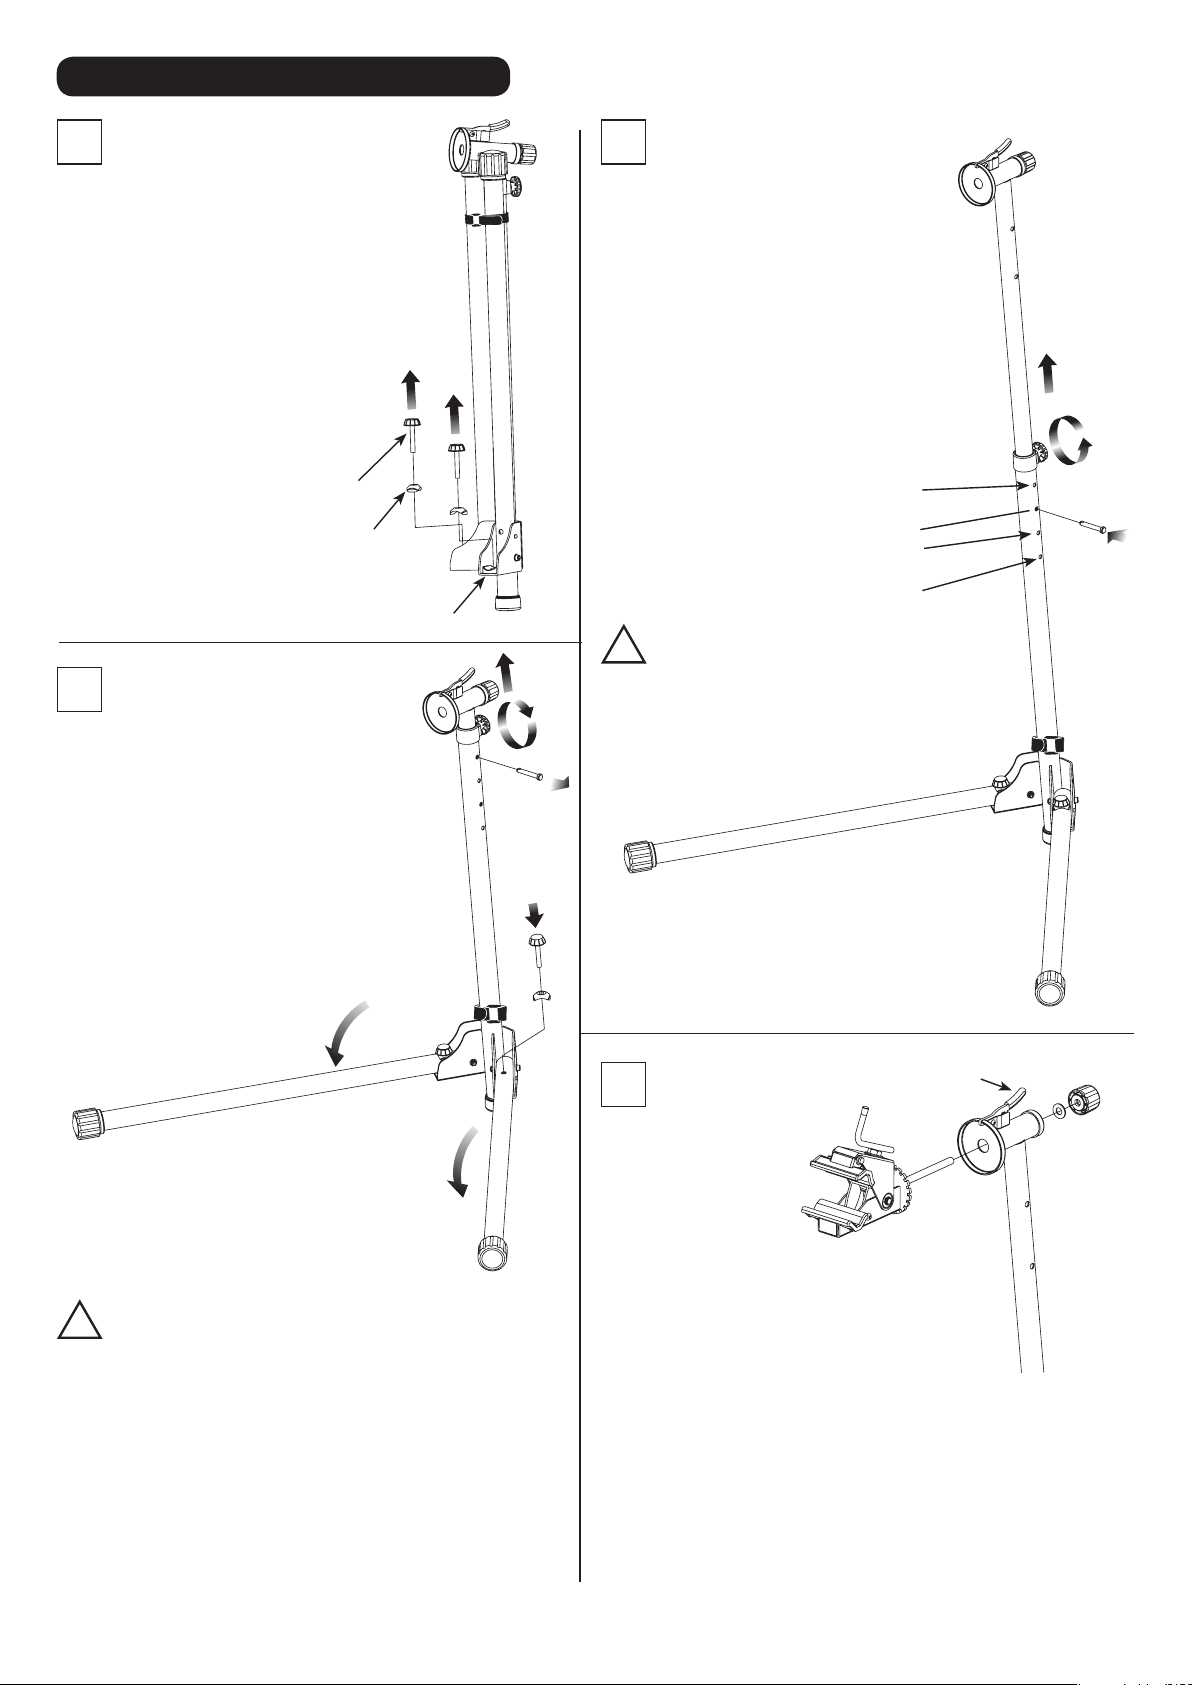
セットアップのしかた/
How To Setup
1
脚受け金具部分に止めてあるノブボルトと
樹脂製の脚押さえカラーを取り外します。
その下にある樹脂製の台座も簡単に取り外
せてしまいますが、紛失させないように注
意してください。
Remove the pre-installed knob bolt and
the plastic upper cover from the base
bracket.
The plastic lower cover may come off
easily but be careful not to lose it.
ノブボルト/ Knob Bolt
脚押さえカバー/ Upper Cover
台座/ Lower Cover
2
脚と支柱とを保持しているベルクロテープを
取り外します。
折りたたまれている脚を開き、脚押さえカバー
を通したノブボルトを脚の上から孔を貫通さ
せて脚受け金具のネジ孔にねじ込みます。
3
希望の高さになる下支柱の4つの孔のうち
ひとつと、上支柱の下端にある孔の両方を
貫通するようにピンを差し込んで位置決め
をし、背面のノブを締め込んで支柱のがた
つきを止めます。
Insert the pin through one of 4 holes
on the lower pillar which gives your
favorite clamp height and the hole on
the bottom of the top pillar (invisible
due to the lower pillar) to fix the height.
Then tighten the backside knob to fix the
position.
1,430mm
クランプ高さ調整
Clamp Height Adjustment
1,380mm
1,330mm
1,280mm
!
ピンを差し込むとき、上支柱の下端にある孔
(下支柱に隠れて見えません)にも同時にピン
が貫通していることを確認してください。
もし通っていないと、予期せず上支柱がすっ
ぽ抜けてしまう事故につながります。
Remove the velcro tape which holds the
pillar and the legs.
Fully open the leg, and screw the knob bolt
with upper cover into the thread hole on the
base bracket through the hole on leg.
ピンを引き抜き、背面のノブを緩めてから、
支柱を上に引き上げます。
Pull out the pin, loosen the backside knob,
and pull up the pillar.
ノブボルトはきつく締め付ける必要はありません。
!
脚がガタつかない程度に軽く締めるだけで十分です。
締め付けがきつ過ぎると、脚を折りたたむ際に緩め
るのが非常に困難になってしまうことがあります。
なおノブボルトを緩める際は、スタンド全体を後傾
させ脚を浮かした状態で行なうのがいいでしょう。
When re-inserting the pin, make sure it also
comes through the hole on the bottom of the
upper pillar (invisible in the lower pillar).
Failure to do so may cause serious accident
that the upper pillar comes off unexpectedly.
ロック解除レバー/ Lock Release Lever
4
クランプを取り付けます。
ノブナットと平ワッシャを外し、シャフトを孔に
挿入し、クランプ回転ロック解除レバーを少し押
し下げて先端の爪とクランプ外周のギア歯とを噛
み合わせてから、背面からノブを締め付けます。
レバーを押し下げてクランプを回してみて、ガタ
つきなくスムースに回る程度にノブを締めてくだ
さい。
You don't have to tighten the knob bolt so rmly.
Just screwing until the leg doesn't move is ne.
If the knob bolt has been tightened too strongly,
it will become very difcult to loosen.
We recommend you to lean back the stand for
lifting up the leg from the oor to loosen the bolt
easier.
Install the clamp jaws to the upper frame.
Remove the knob nut from the clamp, insert the axle into the
hole. Push down the lock release lever to engage with the gear
teeth around the clamp body. Then tighten the knob nut.
Adjust tightning as to the clamp rotates smoothly without any
shaking.
- 2 -
Page 3

注意していただきたいこと/
Cautions
●折りたたんだ状態で持ち運ぶときは、必ず支柱と脚とを付属
のベルクロテープで巻いて固定してから、支柱を持って運ん
でください。脚だけを持たないでください。
!
●必ず水平で平坦な床面に設置してください。傾斜地での使用
は安定が保てないため危険です。
●自転車を搭載する前に一度クランプを押し下げてみて、支柱
や脚が正しく固定されているかどうかを確かめてください。
組み立てが不完全だと、自転車を乗せた重みで支柱が滑り落
ちてきたり転倒してしまいます。
●本スタンドは 3 点接地なので、斜め後方へは倒れやすい性質
を持っていることを意識して作業を行なってください。
●本スタンド上に搭載した自転車から車輪を取り外す際は急に
バランスが変わるため、転倒には十分注意してください。
●ボトムブラケットを締め込むなど大きな力のかかる作業は、
本スタンド上ではなく、いったん自転車を床に下ろしてから
行なってください。
● Place this stand on at and horizontal oor. It's not good to
use on the slanted oor or uneven ground.
● Push down the clamp toward the oor to conrm if the pillar
and the legs are correctly setup before mounting bike.
● When transporting DW-2, hold the legs with the pillar by the
supplied Velcro tape at the neck of the stand. Grab the pillar,
not the leg, for your safety.
● Be sure this stand has a habit that it falls obliquely backward
due to its triangle base design.
● Watch the balance when you remove either wheel from the
bike while on the stand. It will change the balance rapidly.
● Do not do any heavy job while
the bike sits on the stand such as
tightening the bottom bracket.
This kind of job must be done on
the oor.
クランプのしかた/
クランプ上部のL字型ハンドルを右向きに回すとクランプは閉
じていきます。左向きに回すとクランプは開いていきます。
金属製のシートポストをつかむ場合はクランプは強めに閉じて
も大丈夫ですが、カーボン製だった場合や、あるいは材質にか
かわらずトップチューブをつかむ場合は締め過ぎないように注
意してください。
How To Clamp
Turn the L-shaped handle above the clamp jaws clockwise,
then the jaws will close. Turn the handke counter-clockwise,
the jaws will open.
When clamping the metal seat-pillar, you can clamp it
firmly. But if the seat-pillar is made of carbon, or the case of
clamping the top-tube (whatever the material is), be careful
not to overtighten.
<完成状態/ Completed Style >
- 3 -
Page 4

工具皿(別売)/
別売の工具皿は上支柱の上側の孔に取り付けます。
このため折りたたみ時には上支柱は完全には縮まらなくな
りますので、ピンはその下の孔に通して使用してください。
工具皿は使いやすい角度になるよう左右に振れる構造です。
Tool Tray (option)
(SKU: 410-3601-01)
Install the optional tool tray on the upper hole on the
upper pillar.
This makes disabling fully retracting the upper pillar. Put
the lock pin to the lower hole.
The tray is designed swivel for easier approach to the
parts and tools on the tray.
替えゴム(別売)/
Clamp Rubber (option)
(SKU: 410-1001-01)
クランプのゴムが摩耗したり破損した時には交換すること
ができます(2 枚一組)。
ゴムは E リングと呼ばれる部品で止めてあります。プライ
ヤで横から押し込んで固定します。
If the clamp rubber has been damaged, you can replace it
easily (2 pcs / set). The rubber is held with E-Rings.
- 4 -
 Loading...