

Page 1
indoor bicycle trainer resistance unit – instruction manual
(ver.1.2 2018/5)
This is an upgrading unit to change your Minoura trainer to the latest SMART trainer that allows you to enjoy the
virtual courses and competitions on the internet.
Please be sure this is just a resistance unit. Refer your own trainer's instruction manual how to mount and use the
bike correctly.
Contact
If you need support, please first contact the shop you purchased this product from or contact
the distributor in your country for assistance. A list of our distributors can be found here:
http://www.minoura.jp/english/support/shop/distributor.html.
If you need further support, contact us at one of the places listed below.
MINOURA North American Tech Center MINOURA Japan Headquraters
(for U.S. residents ONLY)
Hayward, California, U.S.A. 1197-1 Godo, Anpachi, Gifu 503-2305 Japan
Phone: 1-510-538-8599 (8 am - 5 pm, Mon - Fri, PST) Fax: +81-584-27-7505
Fax: 1-510-538-5899 Email: minoura@minoura.jp
Email: support@minourausa.com Web: www.minoura.jp
Important Notes
• The supplied resistance unit needs to be attached to the frame before use.
The unit is very heavy and special care must be taken not to drop the unit. Be especially careful of the
ywheels (one at each end. One chrome, one black) dropping or otherwise hindering the unit will affect the
balance of the unit and void any warranty. Each unit is carefully and fully checked and in full working order
prior to being packaged.
• Adjust the roller pressure to the rear tire properly in order to maximize your tire life.
Tire and roller contact will eventually wear both your tire and the trainer roller.
Wipe the tire surface to remove any solid dust away before setting the bike on the trainer in order to maximize
both the tire and the drive roller life. Minoura recommends adding 10% more air to your tire when training.
Please read carefully before use
(for ALL customers)
Made in Japan
• Avoid using your brakes to stop your workout. Let the ywheel come to a stop naturally. Using your brakes
will cause damage to the unit and your tire, possibly causing it to burst.
• Be careful not to pinch your nger when raising up or folding down the resistance unit, or folding the frame.
• Touching the spinning wheel and/or any other moving parts while training may cause serious injury.
Keep children, pets, towel and clothings away from the trainer when in use.
• This product requires electric power souce AC 100 – 240V. Do NOT apply any moisture or mud to the electric
magnet unit. Keep clean and avoid any dust even when using indoors.
If your electric plug shape is different from the supplied one, please use appropriate plug adapter.
• LST9200 has two different resistance systems; the electric magnet and the physical neodymium magnet.
When using the electric magnet as a smart trainer, adjusting the resistance level can be done only by the
- 1 -
Page 2
wireless control via smart phone or PC. No manual control allowed. Smart phone, tablet, WindowsPC or
Macintosh must be set up separately. Control applications are not included and are available from third party
companies specializing in software applications for SMART trainers.
Neodymium magnet system (non electric) allows LST9200 to be used without electricity and provides basic
resistance for warming up or cooling down.
• LST9200 regularly outputs radio signals. Do NOT use it in the area where any wireless devices are restricted,
or near the person who has sensitive devices such as a pacemaker.
• Do NOT use any other AC-adapter supplied from third parties. Using wrong device could cause unexpected
trouble on the Kagura unit such as burning or melting.
• If you hear a strange noise or smell something, stop using LST9200 immediately and contact the retailer
where you purchased the trainer. Do not try to disassemble LST9200 without our prior approval.
• Any warranty will be void if you use LST9200 for other purpose than instructed.
Minorua offers
1-year limited warranty
on this product from the date of your purchase for any problem
caused by manufacturer's defect.
Any damage or problem caused by transporting process or user's misuse, also the natural wear will not be
covered under warranty.
Any damage from shipping or moving must be made to the shipping company.
Read the enclosed "
Minoura Limited Warranty Policy
" card for more detail.
For the latest information, refer Minoura web site (http://www.minoura.jp/english/).
• Minoura strongly reommend to visit our web site regularly to update the rmware of your own Kagura unit in
order to keep your system healthy.
For more info, check out
http://www.minoura.jp/english/trainer/smartturbo/lst9200.html
and click "
Firmware Updates
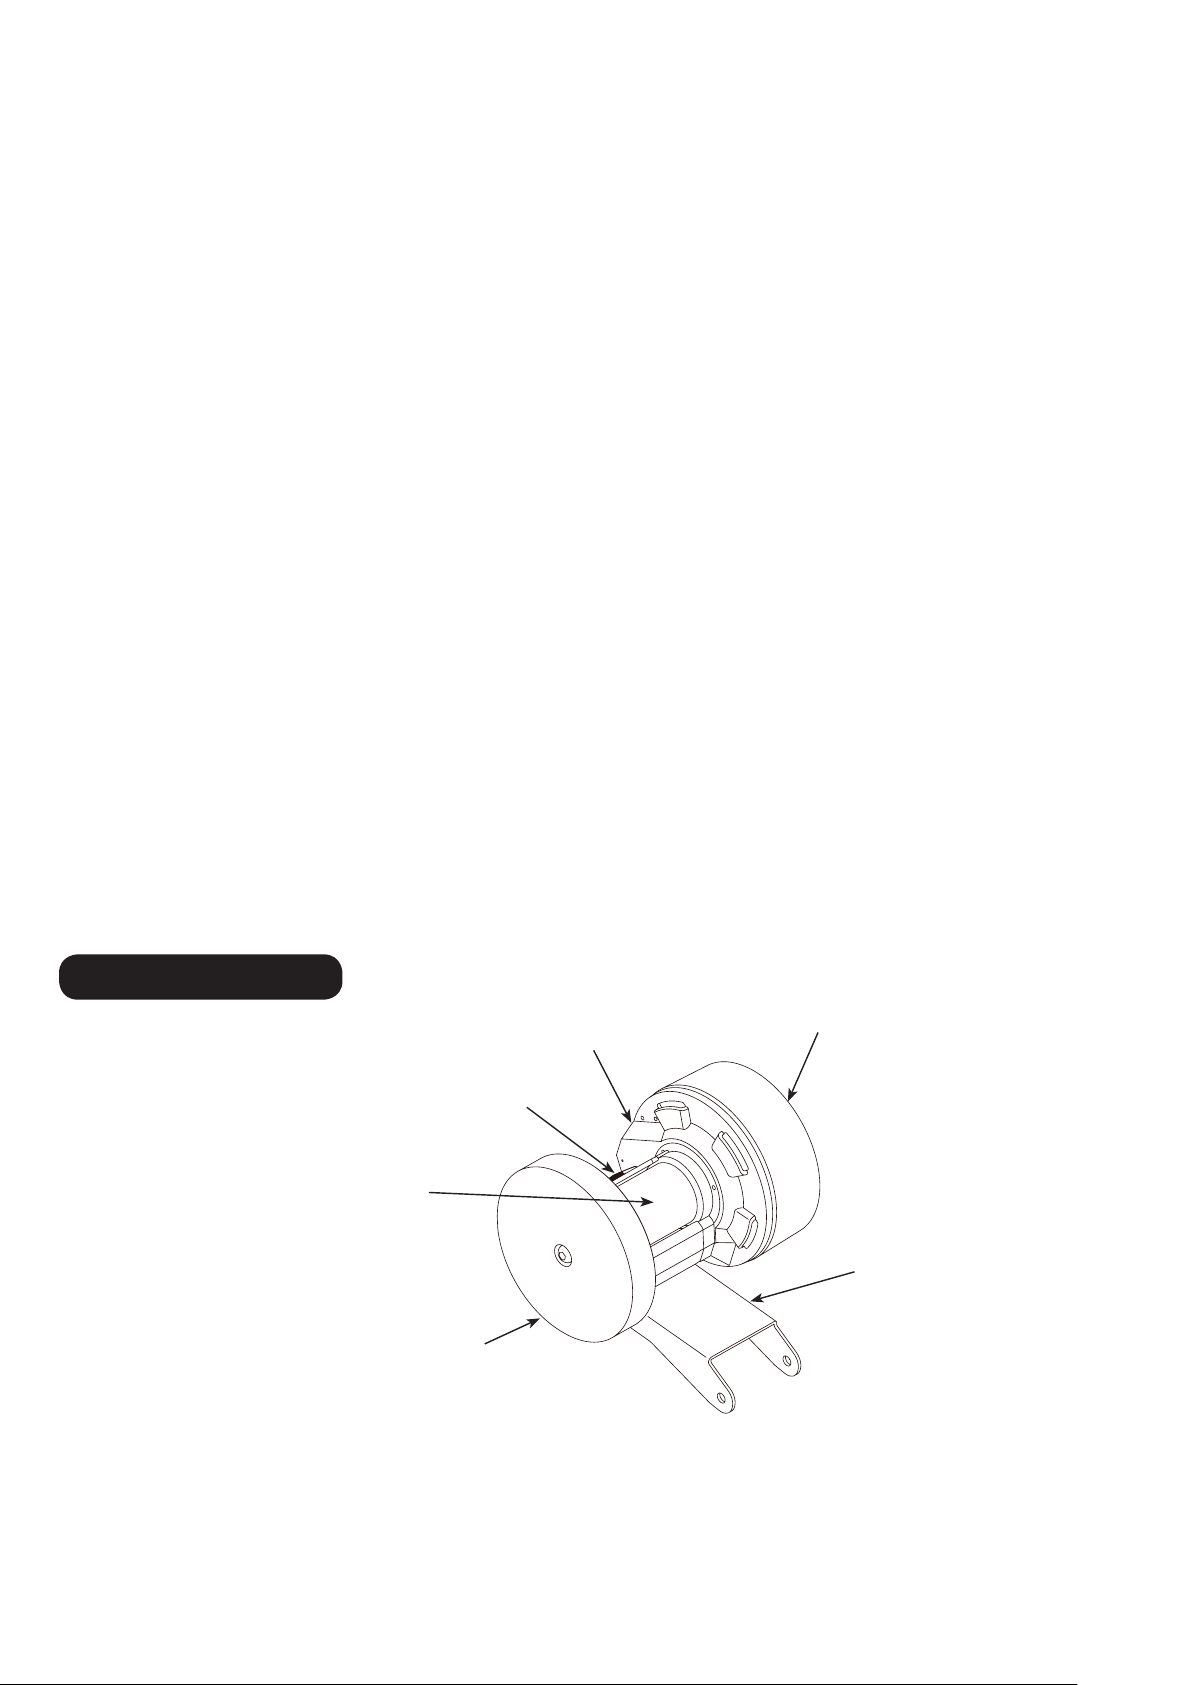
Part Names
Neodymium Magnet Unit (backside)
Sub Flywheel (Chrome Plated)
[Physical Magnet Side]
" button.
Drive Roller
Electric Magnet Unit
Main Flywheel (Black)
[Electric Magnet Side]
Base Plate
- 2 -
(Fig. A)
Page 3

How To Replace Your Mag Unit
Case-1 :
Remove the existing Mag unit.
①
There is a rubber pad between the Mag unit and the base plate
Rubber
Pad
19.5mm
(Fig. B)
Replace the mounting bolts to the supplied
②
longer one, and install LST9200 unit.
23.5mm
(Fig. C)
Case-2 :
Remove the existing Mag unit.
①
!
Mag unit is installed on the base plate directly
LST9200 unit could be too heavy
against some light weight trainer
frames that the legs will be lifted off
from the oor.
But it's not a problem. The legs will
touch the oor correctly when in use.
(Fig. D)
Continue using the same bolts to mount
②
LST9200 unit.
(Fig. E)
- 3 -
(Fig. F)
Page 4

Connecting Power Cable & Check
Insert the round side plug into the connecting port
1
behind the Electric Magnet Unit. (Fig. G)
Do NOT force to push the plug too much.
!
The inside circuit could be damaged seriously.
Insert the power cable (not shown in the picture) to
2
the AC Adapter firmly, then connect to the outlet.
Power turns on automatically.
3
The Red LED will turn on, and the Blue
LED will be blinking. (Fig. H)
To turn off the power, simply
4
remove the power cable from
the outlet.
Both LEDs will turn off.
Round Plug
Power Cable
Connecting
Port
You can see the current status of
5
the wireless connection with the
LED patterns as shown below.
The blinking red LED means
the resistance power is
increasing.
Minoura does not supply instructions
!
on how to connect or pair your
trainer with your chosen training
app. Please refer to the app for
instructions on how to connect the
trainer for use with any given app.
LED Patterns & Meanings
Blinking
Blue LED
Red LED
AC Adapter
Blue LED
Red LED
Lighting
Power is ON. Awaiting pairing process
(Fig. G)
(Fig. H)
Blue LED
Red LED
Blue LED
Red LED
Blue LED
Red LED
(Fig. I)
Connected via Bluetooth. The connection has been completed
(Blue LED changes from blinking to solid)
Connected via Bluetooth, and the electric power is increasing
Connecting via ANT+ is completed
(Blue LED is still blinking. Optional ANT+ reciever is required for this
connection. Refer the application screen about the connecting status)
- 4 -
Page 5

How To Use Neodymium Magnet
The red lever is for sliding the neodymium magnet to
generate resistance between the magnet and the steel
flywheel.
It does not require any electric power so it allows to
use outdoors as same as the stationary trainer.
4 levels are available. Good for light training sessions,
warming up or cooling down, or daily excercise.
To use it, slide the magnet unit while pushing down
the red lever. Set the lever in the fixed position.
The closer the magnet is to the flywheel, the more the
resistance power.
Indicator
0 2 31
0-Position
(Fig. J)
(not Zero)
Load Level :
Magnet sits in the farthest position from the
flywheel.
Few
1-Position
2-Position
3-Position
!
Do the power adjustment AFTER the wheel stops completely.
Slide Lever
0 2 31
0 2 31
0 2 31
Neodymium Magnet
(Fig. K)
Load Level :
(Fig. L)
Load Level :
(Fig. M)
Load Level :
(Fig. N)
(@ 40 km/h)
Approx. 100W
Magnet is 1 step closer to the flywheel.
Approx. 200W
Magnet is 2 steps closer to the flywheel.
Approx. 300W
Magnet is in the closest position to the
flywheel.
※
Power data is not
guaranteed accurate
and could vary.
(@ 40 km/h)
(@ 40 km/h)
※
※
※
!
!
!
Be careful not to pinch your nger between the magnet and the ywheel.
Conrm before using if the neodymium magnet surface is clean.
Set the magnet at the 0-position when you use LST9200 as a smart trainer.
- 5 -
 Loading...