

Page 1

Service Manual Addendum
Gas Module II
™
Gas Module SE
™
Gas Module SE™ with Spirometry
Gas Module 3
Page 2

Page 3

Service Manual Addendum
Gas Module II
™
Gas Module SE
™
Gas Module SE™ with Spirometry
Gas Module 3
Page 4

AION™ is a trademark of Artema Medical AB.
Copyright © Mindray DS USA, Inc., 2008. All rights reserved. Contents of this publication may not be reproduced in any
form without permission of Mindray DS USA, Inc.
™
D-Lite
is a trademark of GE Medical Systems Information Technologies.
DRYLINE
™
is a trademark of Artema Medical AB.
Gas Module II
Gas Module SE
™
Nafion
Passport
Passport 2
Spectrum
is a trademark of Perma Pure Inc.
®
XG is a U.S. registered trademark of Mindray DS USA, Inc.
®
is a U.S. registered trademark of Mindray DS USA, Inc.
®
is a U.S. registered trademark of Mindray DS USA, Inc.
Spectrum OR
®
is a U.S. registered trademark of Mindray DS USA, Inc.
™
is a U.S. trademark of Mindray DS USA, Inc.
™
is a U.S. trademark of Mindray DS USA, Inc.
0070-10-0522 Gas Module Service Manual Addendum
Page 5

Table of Contents
Introduction.................................................................................................................................................... v
Warnings, Precautions and Notes.....................................................................................................................vi
Warnings ......................................................................................................................................................vi
Cautions ........................................................................................................................................................ vii
Theory Of Operation......................................................................................................... 1 - 1
Gas Sampling System...................................................................................................................................... 1 - 2
Water Trap............................................................................................................................................. 1 - 3
Zero Valve and Absorber ......................................................................................................................... 1 - 4
™
Nafion
Tube ......................................................................................................................................... 1 - 4
Gas Analyzers ........................................................................................................................................ 1 - 4
Sample Flow Differential Pressure Transducer .............................................................................................. 1 - 4
Working Pressure Transducer.................................................................................................................... 1 - 4
Pneumatic Unit ........................................................................................................................................ 1 - 4
Connection Block..................................................................................................................................... 1 - 4
Occlusion Valve ...................................................................................................................................... 1 - 5
Sampling Pump and Damping Chamber..................................................................................................... 1 - 5
Anesthetic Agent Sensor .................................................................................................................................. 1 - 6
Gas Module II, Gas Module SE, and Gas Module SE with Spirometry ........................................................... 1 - 6
Gas Module 3 ........................................................................................................................................ 1 - 8
Sensor ..................................................................................................................................................... 1 - 11
O
2
Gas Module II, Gas Module SE, and Gas Module SE with Spirometry ........................................................... 1 - 11
Gas Module 3 ........................................................................................................................................ 1 - 12
CPU Board..................................................................................................................................................... 1 - 14
Gas Module II, Gas Module SE, and Gas Module SE with Spirometry ........................................................... 1 - 14
Gas Module 3 ........................................................................................................................................ 1 - 15
Board ...................................................................................................................................................... 1 - 16
O
2
Communication Interface Board........................................................................................................................ 1 - 17
Gas Module II, Gas Module SE, and Gas Module SE with Spirometry ........................................................... 1 - 17
Gas Module 3 ........................................................................................................................................ 1 - 18
Electrical Wiring Diagram................................................................................................................................ 1 - 19
Gas Module 3 Electronics ................................................................................................................................ 1 - 20
Power Supply ................................................................................................................................................. 1 - 22
Gas Module II, Gas Module SE, and Gas Module SE with Spirometry ........................................................... 1 - 22
Gas Module 3 ........................................................................................................................................ 1 - 23
Spirometry (Gas Module SE with Spirometry Only) Overview ............................................................................... 1 - 24
Measured Parameters .............................................................................................................................. 1 - 24
Measurement Principles............................................................................................................................ 1 - 25
PVX Measuring Unit ................................................................................................................................. 1 - 25
Specifications.................................................................................................................... 2 - 1
Performance Specifications .............................................................................................................................. 2 - 2
Gas Module II, Gas Module SE, and Gas Module SE with Spirometry ........................................................... 2 - 2
Gas Module 3 ........................................................................................................................................ 2 - 3
Gas Measurements ......................................................................................................................................... 2 - 6
Normal Conditions .................................................................................................................................. 2 - 6
Non-disturbing Gases .............................................................................................................................. 2 - 6
Disturbing Gases ..................................................................................................................................... 2 - 7
Gas Module 3 Interference Specifications................................................................................................... 2 - 7
...................................................................................................................................................... 2 - 8
CO
2
......................................................................................................................................................... 2 - 9
O
2
O...................................................................................................................................................... 2 - 10
N
2
Anesthetic Agents .................................................................................................................................... 2 - 10
Accuracy specifications at conditions exceeding normal............................................................................... 2 - 12
Gas Module Service Manual Addendum 0070-10-0522 i
Page 6

Table of Contents
ISO Mode Accuracy specifications for Gas Module 3 .................................................................................. 2 - 13
Patient Spirometry........................................................................................................................................... 2 - 15
Normal Conditions for Gas Module SE with Spirometry ............................................................................... 2 - 15
Accuracy specifications at conditions exceeding normal............................................................................... 2 - 16
Power Input Ratings......................................................................................................................................... 2 - 17
Environmental Conditions................................................................................................................................. 2 - 17
Gas Module II, Gas Module SE, and Gas Module SE with Spirometry ........................................................... 2 - 17
Gas Module 3 ........................................................................................................................................ 2 - 17
Physical Characteristics ................................................................................................................................... 2 - 18
Gas Module II......................................................................................................................................... 2 - 18
Gas Module SE....................................................................................................................................... 2 - 18
Gas Module 3 ........................................................................................................................................ 2 - 18
Agency Compliance........................................................................................................................................ 2 - 18
Gas Module II......................................................................................................................................... 2 - 18
Gas Module SE....................................................................................................................................... 2 - 19
Gas Module 3 ........................................................................................................................................ 2 - 19
Repair Information ........................................................................................................... 3 - 1
Introduction.................................................................................................................................................... 3 - 1
Safety Precautions........................................................................................................................................... 3 - 2
Troubleshooting .............................................................................................................................................. 3 - 2
General Troubleshooting Guidelines .......................................................................................................... 3 - 2
Gas Module Technical Troubleshooting ...................................................................................................... 3 - 3
Patient Spirometry Trouble Shooting........................................................................................................... 3 - 6
Exchange Program .................................................................................................................................. 3 - 7
Equipment and Special Tools Required .............................................................................................................. 3 - 8
Disassembly Instructions................................................................................................................................... 3 - 9
Gas Module II, Gas Module SE, and Gas Module SE with Spirometry ........................................................... 3 - 9
Gas Module 3 ........................................................................................................................................ 3 - 12
Mounting Hardware and Accessories................................................................................................................ 3 - 13
Passport XG/Gas Module Mounting .......................................................................................................... 3 - 13
Expert/Gas Module Mounting................................................................................................................... 3 - 15
Passport 2/Spectrum/Spectrum OR Gas Module Mounting .......................................................................... 3 - 17
Gas Module II/Gas Module SE Accessories ....................................................................................................... 3 - 21
Gas Module SE with Spirometry Accessories ...................................................................................................... 3 - 22
Gas Module 3 Accessories .............................................................................................................................. 3 - 23
Replacement Parts ............................................................................................................ 4 - 1
Introduction.................................................................................................................................................... 4 - 1
Available Replacement Parts and Sub-Assemblies ............................................................................................... 4 - 1
Exchange Program.......................................................................................................................................... 4 - 2
Replacement Parts Pricing Information ............................................................................................................... 4 - 2
Ordering Information ...................................................................................................................................... 4 - 3
Abbreviations................................................................................................................................................. 4 - 4
Isometric Drawing and Parts Lists ...................................................................................................................... 4 - 5
Calibration ....................................................................................................................... 5 - 1
Introduction.................................................................................................................................................... 5 - 1
Warnings and Guidelines................................................................................................................................ 5 - 1
Test Equipment and Special Tools Required........................................................................................................ 5 - 2
Power-Up Verification...................................................................................................................................... 5 - 2
Passport XG Configuration for Gas Module ................................................................................................ 5 - 2
Expert Configuration for Gas Module......................................................................................................... 5 - 3
Passport 2/Spectrum/Spectrum OR Configuration for the Gas Module .......................................................... 5 - 4
Gas Module 3 Pneumatic Leakage Test.............................................................................................................. 5 - 5
ii 0070-10-0522 Gas Module Service Manual Addendum
Page 7

Table of Contents
Gas Module 3 Zero Reference Valve Test .......................................................................................................... 5 - 5
Calibration..................................................................................................................................................... 5 - 6
Passport XG Gas Calibration .................................................................................................................... 5 - 6
Expert Gas Module Calibration................................................................................................................. 5 - 8
Gas Monitor Calibration - Passport 2/Spectrum/Spectrum OR...................................................................... 5-10
Power Supply PC Board Calibration .......................................................................................................... 5 - 16
Patient Spirometry Calibration Measurement (Spectrum OR only)...................................................................5-18
Patient Spirometry Leak Test Verification (Spectrum OR Only)........................................................................ 5 - 20
Gas Module Leakage Current Checks................................................................................................................ 5 - 21
Preventive Maintenance.................................................................................................... 6 - 1
Preventive Maintenance Introduction ................................................................................................................. 6 - 1
Preventive Maintenance Schedule ..................................................................................................................... 6 - 1
Performance Verification.................................................................................................................................. 6 - 2
Perform as required, or at 6 month intervals................................................................................................ 6 - 2
Perform as required, or 1 Year intervals ..................................................................................................... 6 - 2
Patient Spirometry Leak Test Verification (Spectrum OR Only)........................................................................ 6 - 2
Mechanical / Physical / Visual Inspection ......................................................................................................... 6 - 2
Perform at 6 month intervals...................................................................................................................... 6 - 2
Consumable Item Replacement ......................................................................................................................... 6 - 2
Replace at 1 month intervals ..................................................................................................................... 6 - 2
Replace at 2 month intervals ..................................................................................................................... 6 - 2
Replace at 12 month intervals ................................................................................................................... 6 - 2
Replace at 24 month intervals ................................................................................................................... 6 - 2
Internal Adjustments/Calibration....................................................................................................................... 6 - 3
Perform at 12 month intervals or as required............................................................................................... 6 - 3
Patient Spirometry Calibration Measurement (Spectrum OR only)...................................................................6-3
Care and Cleaning of Gas Module................................................................................................................... 6 - 4
Gas Module II, Gas Module SE, and Gas Module SE with Spirometry ........................................................... 6 - 4
Gas Module 3 ........................................................................................................................................ 6 - 5
Gas Module Service Manual Addendum 0070-10-0522 iii
Page 8

Table of Contents
This page intentionally left blank.
iv 0070-10-0522 Gas Module Service Manual Addendum
Page 9

Introduction Introduction
Introduction
The Gas Module is a companion to several Patient Monitors. It is capable of automatically
identifying and measuring five anesthetic agents (Desflurane, Enflurane, Sevoflurane,
Halothane and Isoflurane), as well as N
sidestream sampling.
The following models are referenced in this manual: Gas Module II, Gas Module SE, Gas
Module SE with Spirometry, and Gas Module 3. When information is common to all models,
the generic name “Gas Module” is used. Information that is unique to a specific model is
identified accordingly.
The system connects to the Patient Monitor via an RS232 connector.
A special “Y” shaped power cord is used to supply AC voltage to both the Gas Module and
the Monitor power supply. All Gas Module data displays on the monitor screen. All user
commands are entered on the monitor and then electronically transmitted to the Gas Module.
This addendum provides Gas Module information on theory of operation, specifications,
repair, parts, calibration and preventive maintenance. For related information on the Patient
Monitor, refer to the associated Service Manual and Operating Instructions.
O, CO2 and O2. The unit monitors all gases via
2
• Passport XG Operating Instructions
• Passport 2 Operating Instructions (Domestic)
• Passport 2 Operating Instructions (International)
• Expert Operating Instructions (Domestic)
• Spectrum Operating Instructions (Worldwide)
• Spectrum OR Operating Instructions (Worldwide)
NOTE: The Gas Module SE with Spirometry can only be used with
NOTE: The Gas Module 3 can only be used with Passport 2,
WARNING: Calibration gas is considered Dangerous Goods/Hazardous
the Spectrum OR monitor.
Spectrum, and Spectrum OR monitors.
Materials per I.A.T.A. and D.O.T. Regulations.
It is a violation of federal and international law to offer any
package or over pack of dangerous goods for
transportation without the package being appropriately
identified, packed, marked, classified, labeled and
documented according to D.O.T. and I.A.T.A. regulations.
Please refer to the applicable I.A.T.A. Dangerous Goods
Regulations and/or the Code of Federal Regulations 49
(Transportation, Parts 171-180) for further information.
Gas Module Service Manual Addendum 0070-10-0522 v
Page 10

Introduction Warnings, Precautions and Notes
Warnings, Precautions and Notes
Please read and adhere to all warnings, precautions and notes listed here and in the
appropriate areas throughout this manual.
A WARNING is provided to alert the user to potential serious outcomes (death, injury, or
serious adverse events) to the patient or the user.
A CAUTION is provided to alert the user to use special care necessary for the safe and
effective use of the device. They may include actions to be taken to avoid effects on patients
or users that may not be potentially life threatening or result in serious injury, but about which
the user should be aware. Cautions are also provided to alert the user to adverse effects on
this device of use or misuse and the care necessary to avoid such effects.
A NOTE is provided when additional general information is applicable.
Warnings
WARNING: Always Remove Power from the Gas Module BEFORE
WARNING: Remove Power from the Gas Module BEFORE removing the
WARNING: If the water trap breaks or becomes damaged during
WARNING: The airway adapter and sampling line are intended for
WARNING: The water trap, sampling line, and airway adapter should
WARNING: To avoid high sampling flow with the Gas Module 3, do not
WARNING: Connect only approved gas sampling lines to the water
WARNING: The Gas Module must not be used with flammable
WARNING: The use of gas sampling accessories other than specified
Disassembly.
Enclosure.
operation, there is a risk that bacteria and/or mucus may
contaminate the Gas Module.
single use only.
be disposed of in accordance with local regulations for
contaminated and biologically hazardous items.
use Adult/Pediatric water traps and/or sampling lines with
neonates.
trap.
anesthetic agents.
may cause significant measurement errors and patient risk.
WARNING: With the Gas Module 3, use only Neonate sampling lines
and water traps for Neonate patients. Do not use Neonate
sampling lines and water traps for Adult/Pediatric patients.
WARNING: Do not allow the sampling tubing to become kinked.
WARNING: Do not reuse disposable devices.
vi 0070-10-0522 Gas Module Service Manual Addendum
Page 11

Cautions Introduction
WARNING: Trace Gas Hazard – When using the optional Gas Module, a
WARNING: When monitoring CO
WARNING: Connection of the Gas Module exhaust port to the hospital’s
WARNING: Equipment not suitable for use in the presence of a
WARNING: Do not connect devices that are not specified as part of the
WARNING: Do not clean the Gas Module while it is on and/or
health hazard exists when trace amounts of vaporized
anesthetic agents are chronically inspired by operating
room personnel. See Appendix A in NFPA 56A on Inhalation
Anesthetics. During any procedure where such agents are
employed, the Gas Module exhaust output should be
connected to a medical gas-scavenging system.
, connection from the exhaust port to
the hospital’s waste gas-scavenging system is
recommended to prevent exposure of hospital personnel to
the patient’s respiratory sample.
waste gas-scavenging system is recommended to prevent
exposure of hospital personnel to the patient’s respiratory
sample. Vacuum (negative pressure) should not exceed 1
mmHg at the Gas Module exhaust fitting. Excessive
scavenge vacuum may result in damage to the Gas
Module’s internal pump.
flammable anesthetic mixture with air or with nitrogen or
nitrous oxide.
system.
plugged in.
2
WARNING: The contents of the water trap should be handled as a
potential infection hazard.
Cautions
CAUTION: The internal sampling system of the Gas Module does not
need to be cleaned or sterilized. There is no reverse flow
back to the patient. If the internal sampling system is
suspected to be clogged or dirty, the module should be
serviced by an authorized service person only.
CAUTION: If the dust filter for the fan cannot be cleaned or is
damaged, replace it with part number 0378-00-0040. Use
of another type of filter may decrease the cooling effectivity
and cause damage to the Gas Module.
CAUTION: Do not disinfect or open the water trap. Do not touch the
water trap membrane.
CAUTION: Dispose of the water trap in accordance with hospital policy.
Gas Module Service Manual Addendum 0070-10-0522 vii
Page 12

Introduction Cautions
This page intentionally left blank.
viii 0070-10-0522 Gas Module Service Manual Addendum
Page 13

1.0
Theory Of Operation
Contents of this chapter .................................................................... Page
1.1 Gas Sampling System ............................................................... 1-2
1.2 Anesthetic Agent Sensor ........................................................... 1-6
1.3 O2 Sensor ................................................................................ 1-11
1.4 CPU Board ................................................................................ 1-14
1.5 O2 Board ................................................................................. 1-16
1.6 Communication Interface Board ................................................ 1-17
1.7 Electrical Wiring Diagram ......................................................... 1-19
1.9 Power Supply ........................................................................... 1-22
1.10 Spirometry (Gas Module SE with Spirometry Only) Overview . 1-24
This Theory of Operation section provides block diagrams, a functional overview of the main
components and the gas sampling / measurement principle for the Gas Module.
The Gas Module consists of the following main components:
• Gas Sampling System
• Anesthetic Agent Sensor
Sensor
•O
2
•CPU Board
•O
Board
2
• Communications Interface Board
• Power Supply
• Spirometry Module (PVX unit)
• Water Trap
• Internal Tubing
Gas Module Service Manual Addendum 0070-10-0522 1 - 1
Page 14
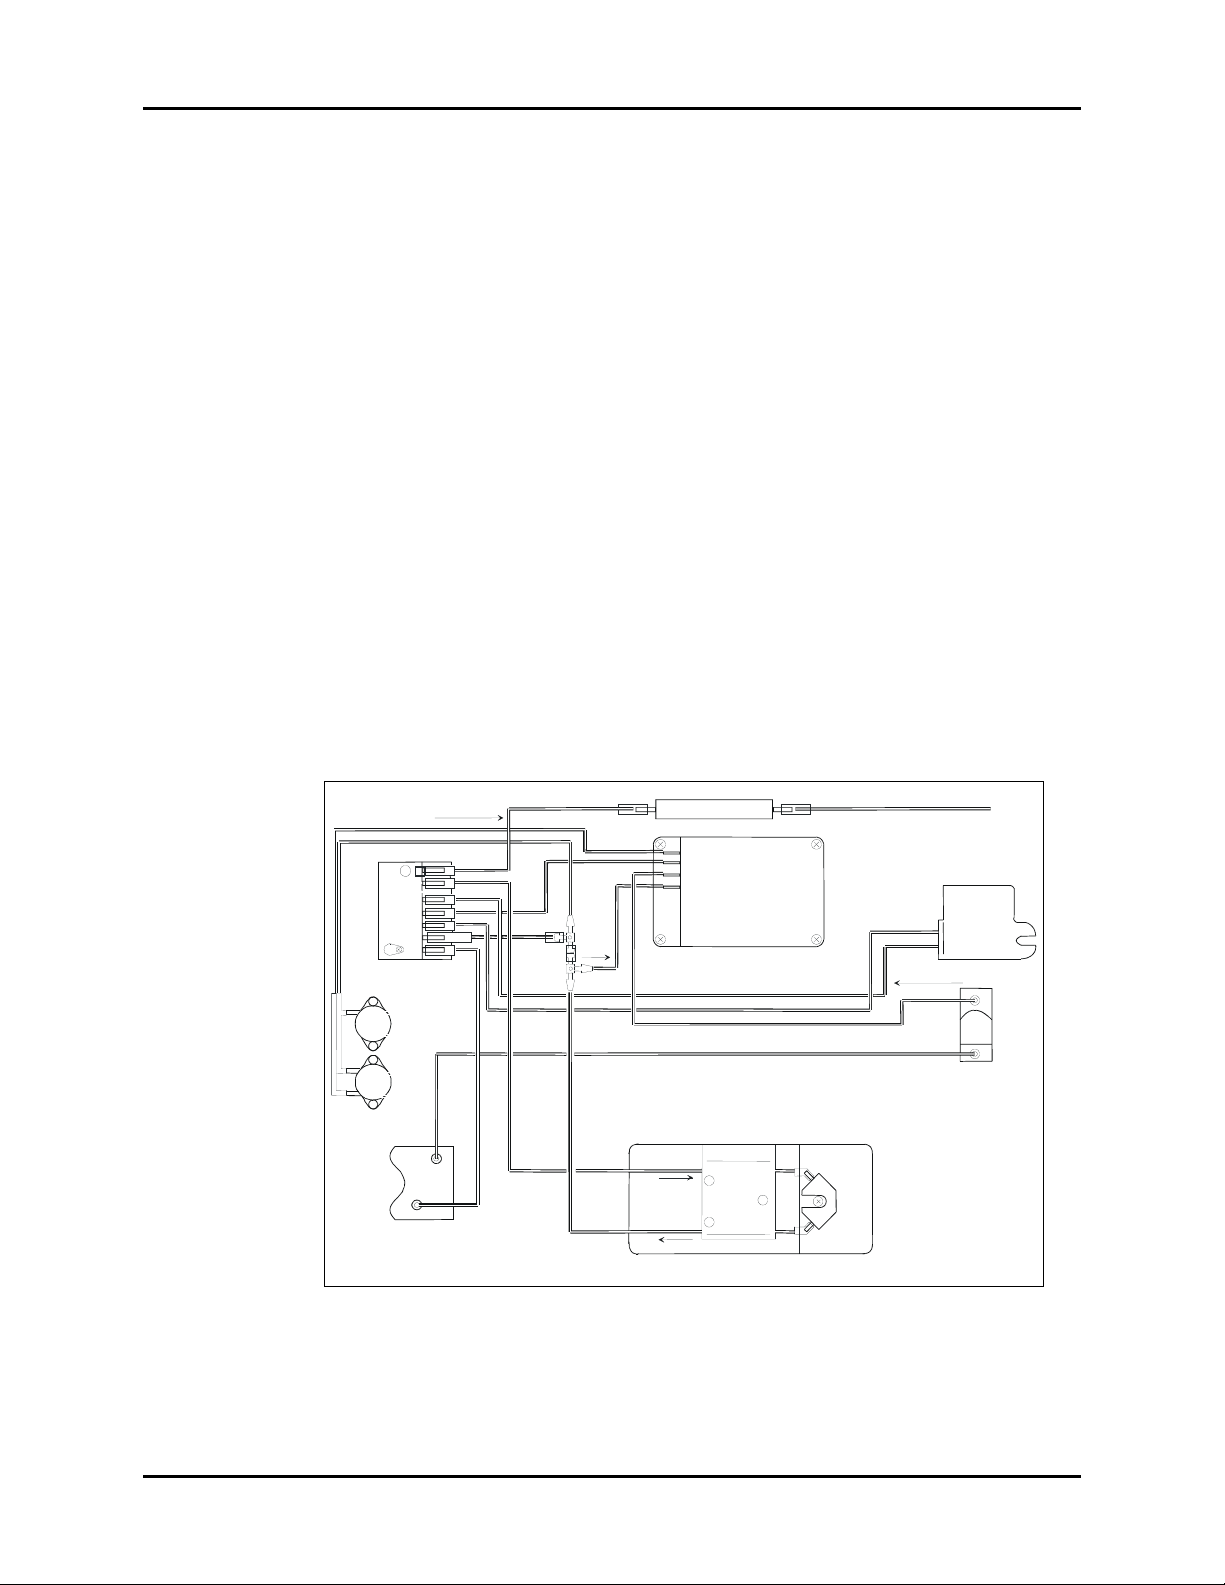
Gas Sampling System Theory Of Operation
P
OUT
REF
IN
B1
B2
E
D
C
B
A
F
Pneumatic
unit
Pressure
transducers
OUT
IN
Damping chamber
Sampling pump
TPX unit
OUT
IN
Connection
block
Wate r trap
OM unit
Nafion tube
G
CO2 absorber
Nafion tube
1.1 Gas Sampling System
The sampling system draws in a patient sample to the analyzers at a fixed rate.
The gas sampling system draws patient sample into the module, and removes water and
impurities from it in a water trap. The pump draws gas through the sampling line, through the
water trap and into the gas measuring units. After the measurements, the gas is expelled
through the exhaust port. The sample flow rates are as follows:
• For Gas Module II, Gas Module SE, and Gas Module SE with Spirometry, the sample
flow rate is 200 ml/min.
• For Gas Module 3, the sample flow rate is 200 ml/min with the Adult/Pediatric water
trap and 120 ml/min with the Neonatal water trap.
A number of flow restrictors are utilized to create a pressure difference with ambient pressure
in the gas sensors.
A larger pressure difference makes the presentation of the gas concentration curves less
sensitive to variations in the airway pressure thus meeting the accuracy requirements.
Refer to the FIGURE 1-1 and FIGURE 1-2 for the Gas Tubing Layout and Gas Sampling
Component Block Diagram for Gas Module II, Gas Module SE, and Gas Module SE with
Spirometry. Refer to the FIGURE 1-3 for the combination Gas Tubing Layout and Gas
Sampling Component Block Diagram for Gas Module 3.
FIGURE 1-1 Gas Tubing Layout – Gas Module II, Gas Module SE, and Gas Module SE
with Spirometry
1 - 2 0070-10-0522 Gas Module Service Manual Addendum
Page 15
Theory Of Operation Gas Sampling System
Sample
line
Zero
valve
Reference gas
p
Occlusion
valve
Room air
Room air
Pressure
Transducer
p
Filter
Filter
Pressure
Transducer
dp
TPX
Pump
Absorber
OM
Pump
Module
to O2
Sensor
from O2
Sensor
Purge
Sample In
DRYLINE
™
Water Trap
to EVAC
EVAC Outlet Connection
Purge
Valve
Zero Valve
Pneumatic
Module
Gas
Measurement
Bench
Servomex
O2 Sensor
Sample
Patient
AION
™
FIGURE 1-2 Gas Sampling Component Block Diagram – Gas Module II, Gas Module SE,
and Gas Module SE with Spirometry
FIGURE 1-3 Combination Gas Tubing Layout and Gas Sampling Component Block
Diagram – Gas Module 3
1.1.1 Water Trap
™
water trap system.
Gas Module Service Manual Addendum 0070-10-0522 1 - 3
The sample is drawn through a sample line. Then gas enters the monitor through the water
trap, where it is divided into two flows, a main flow and a side flow. The main flow goes into
the analyzers. This flow is separated from the patient side by a hydrophobic filter. The side
flow creates a slight subatmospheric pressure within the water trap which causes fluid
removed by the hydrophobic filter to collect in the bottle.
The Gas Module 3 uses the DRYLINE
Page 16

Gas Sampling System Theory Of Operation
*
1.1.2 Zero Valve and Absorber
The main flow passes through a magnetic valve before proceeding to the analyzers. This
valve is activated to establish the zero points for the Anesthetic Agent and O2 Sensors.
When the valve is activated, room air is drawn through the absorber into the internal system
and the gas sensors. Paralyme is used as the absorbent. The Absorber is for Gas Module II,
Gas Module SE, and Gas Module SE with Spirometry.
1.1.3 Nafion™ Tube
A nafion tube is used between the water trap and the zero valve to balance the sample gas
humidity with that of ambient air. The tube will prevent errors caused by the effect of water
vapor on gas partial pressure when the humid gases are measured after calibration with dry
gases.
*Nafion is a trademark of Perma Pure Inc.
1.1.4 Gas Analyzers
After the zero valve and nafion tube the gas passes through the Anesthetic Agent and O2
Sensors. The oxygen sensor has two inputs. One input accepts the gas sample and the other
draws room air for reference. The gas sample finally exits through the exhaust port on the
rear of the unit. Refer to sections 1.2 and 1.3 for more information on the Anesthetic Agent
and O
Sensors.
2
™
The Gas Module 3 uses an AION
Oxygen Sensor. The AION
must be a matched pair.
™
multigas analyzer and a Servomex Paramagnetic
multigas analyzer and Servomex Paramagnetic Oxygen Sensor
1.1.5 Sample Flow Differential Pressure Transducer
The sample flow differential pressure transducer (Gas Module II, Gas Module SE, and Gas
Module SE with Spirometry) measures pressure drop across the O2 Sensor inlet restrictor and
calculates sample flow from the pressure difference.
1.1.6 Working Pressure Transducer
The working pressure transducer (Gas Module II, Gas Module SE, and Gas Module SE with
Spirometry) measures absolute working pressure between the Anesthetic Agent and O
Sensors. It is used to detect situations which will post messages for occlusion and replace
trap.
1.1.7 Pneumatic Unit
The pneumatic unit contains the zeroing valve, occlusion valve and tubing connections. There
is a series of restrictors and chambers forming a pneumatic filter to prevent pressure
oscillations in the pump from reaching the measuring units. Zeroing and occlusion valve
connections to room air include a dust filter.
1.1.8 Connection Block
The connection block contains a sample gas outlet connector and an O2 Sensor reference
gas inlet. The inlet is equipped with a dust filter.
2
1 - 4 0070-10-0522 Gas Module Service Manual Addendum
Page 17

Theory Of Operation Gas Sampling System
1.1.9 Occlusion Valve
The valve (Gas Module II, Gas Module SE, and Gas Module SE with Spirometry) is activated
when the sample line gets occluded. The main flow is diverted to the side flow of the water
trap to help remove the occlusion faster.
1.1.10 Sampling Pump and Damping Chamber
The Gas Module II, Gas Module SE, and Gas Module SE with Spirometry gas sampling
pump is a membrane pump that is run by a brushless DC motor. The gas flow rate is
measured with a sample flow differential pressure transducer across a known restriction. The
motor is automatically controlled to maintain a constant flow, even when the water trap ages
and starts to get occluded. It also enables use of sample tubes with varying lengths and
diameters.
The damping chamber is used to even out the pulsating flow and silence the exhaust flow.
The Gas Module 3 pump module is a low power, high reliability membrane pump and flow
controller including preamplifier and pump power driver.
NOTE: Flow is never reversed towards the patient.
Gas Module Service Manual Addendum 0070-10-0522 1 - 5
Page 18

Anesthetic Agent Sensor Theory Of Operation
Thermopile
detectors
Temp sensor
Sample
gas in
Sample
gas out
Sample
chamber
1.2 Anesthetic Agent Sensor
1.2.1 Gas Module II, Gas Module SE, and Gas Module SE with Spirometry
FIGURE 1-4 Gas Module II, Gas Module SE, and Gas Module SE with Spirometry
Anesthetic Agent Sensor
The Anesthetic Agent Sensor is a sidestream gas analyzer, measuring real time
concentrations of CO
Desflurane, and Sevoflurane).
The Anesthetic Agent Sensor is a non-dispersive infrared analyzer, measuring absorption of
the gas sample at seven infrared wavelengths, which are selected using optical narrow band
filters. The IR lamp is a 4W filament, surrounded by thermal isolation. There is a hole in the
isolation, passing the radiated light to a conical measuring chamber with a 4 mm length.
FIGURE 1-5 Anesthetic Agent Sensor Principle
From the sample chamber, radiated light goes into seven tubular light guides with reflective
inner surfaces. At the other end of each light guide there is a thermopile infrared radiation
detector with an optical filter in front of it.
, N2O and five anesthetic agents (Halothane, Enflurane, Isoflurane,
2
The Temp sensor measures the Anesthetic Agent Sensor’s temperature and uses it for
temperature compensation.
1 - 6 0070-10-0522 Gas Module Service Manual Addendum
Page 19
Theory Of Operation Anesthetic Agent Sensor
Anesthetic agents or mixtures of two anesthetic agents are automatically identified and
concentrations of the identified agents are measured. The Anesthetic Agent Sensor also
detects mixtures of more than two agents.
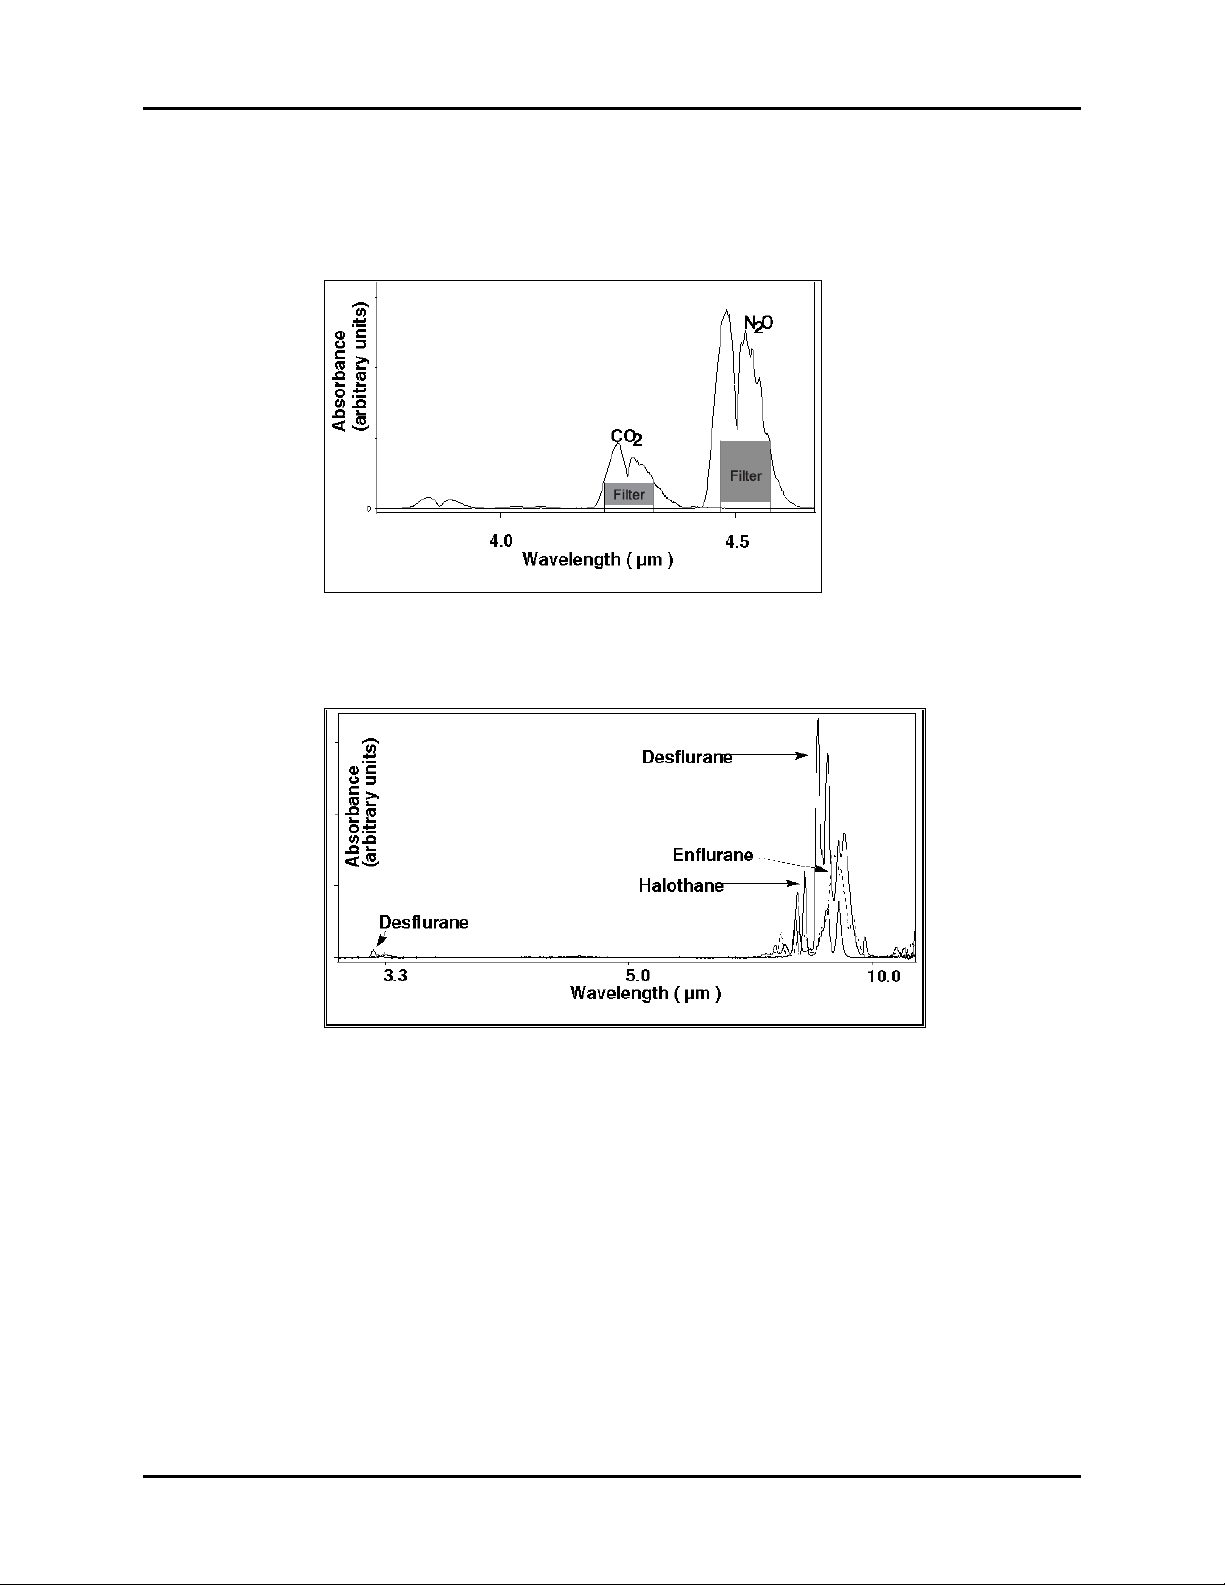
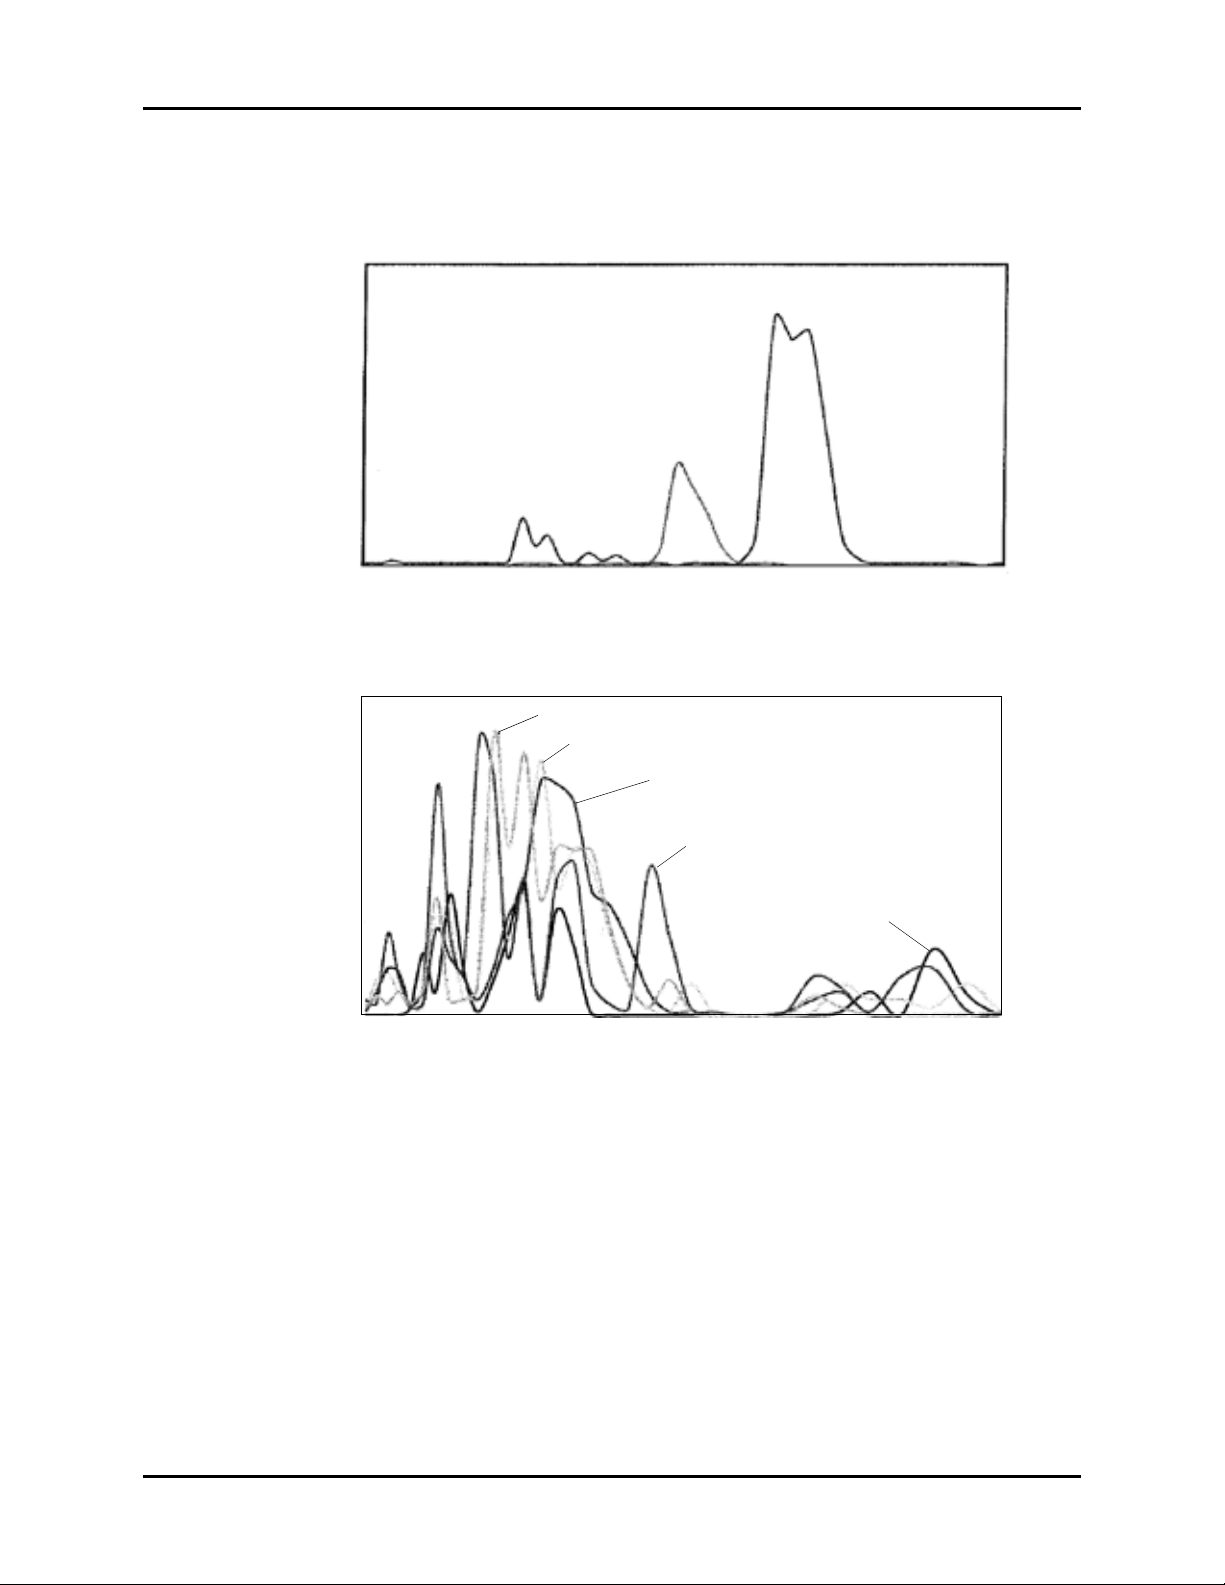
FIGURE 1-6 Infrared Absorbance of N
O and CO
2
2
Concentrations of CO2 and N2O are calculated from the absorption measured at 3 to 5 m.
FIGURE 1-7 Infrared Absorbance of Anesthetic Agents
Identification of anesthetic agents and calculation of their concentrations is performed by
measuring absorptions at five wavelengths in the 8 to 9 m band and solving for the
concentrations from a set of five equations.
The measuring accuracy is achieved utilizing numerous software compensations. The
compensation parameters are determined individually for each Anesthetic Agent Sensor
during factory calibration.
Gas Module Service Manual Addendum 0070-10-0522 1 - 7
Page 20
Anesthetic Agent Sensor Theory Of Operation
1.2.2 Gas Module 3
FIGURE 1-8 Gas Module 3
FIGURE 1-9 Gas Module 3 Anesthetic Agent Sensor
The Anesthetic Agent Sensor is a sidestream gas analyzer, measuring real time
concentrations of CO
Desflurane, and Sevoflurane).
The Anesthetic Agent Sensor is a non-dispersive infrared analyzer, measuring absorption of
the gas sample at up to eight infrared wavelengths, which are selected using optical narrow
band filters.
Anesthetic agents or mixtures of two anesthetic agents are automatically identified and
concentrations of the identified agents are measured. The Anesthetic Agent Sensor also
detects mixtures of more than two agents.
, N2O and five anesthetic agents (Halothane, Enflurane, Isoflurane,
2
1 - 8 0070-10-0522 Gas Module Service Manual Addendum
Page 21
Theory Of Operation Anesthetic Agent Sensor
N2O
CO
2
Absorbance
Wav eleng th ( )
m
3.5 4 4.5 54.5
Absorbance
Wav eleng th ( )
m
78 10
Desflurane
Isoflurane
Enflurane
Sevoflurane
Halothane
91112
m
m
The absorption spectra for CO2, N2O, and the five anesthetic agents Halothane, Enflurane,
Isoflurane, Sevoflurane, and Desflurane are shown in FIGURE 1-10 and FIGURE 1-11.
FIGURE 1-10 Infrared Absorption Spectra for N
O and CO
2
2
FIGURE 1-11 Infrared Absorption Spectra for Anesthetic Agents
To identify seven different gases in a mixture, measurements are done at seven different
wavelengths. Measurements are done at an eighth wavelength for reference. The AION
Multigas Analyzer uses the absorption peaks at 4.2 and 3.9 for measuring CO
N
O respectively and the absorption peaks in the 8–12 range for measuring anesthetic
2
agents. See FIGURE 1-10 and FIGURE 1-11.
and
2
A set of narrow optical band pass filters intercepts a broadband infrared source to provide
these wavelengths. The individual filters are mounted in a rapidly rotating filter wheel that
intersects the light path. The filtered light passes into a cylindrical measurement chamber. At
the other end of the chamber, there is an infrared radiation detector, whose output is directed
to the host interface through the signal processor. See FIGURE 1-12.
™
Gas Module Service Manual Addendum 0070-10-0522 1 - 9
Page 22
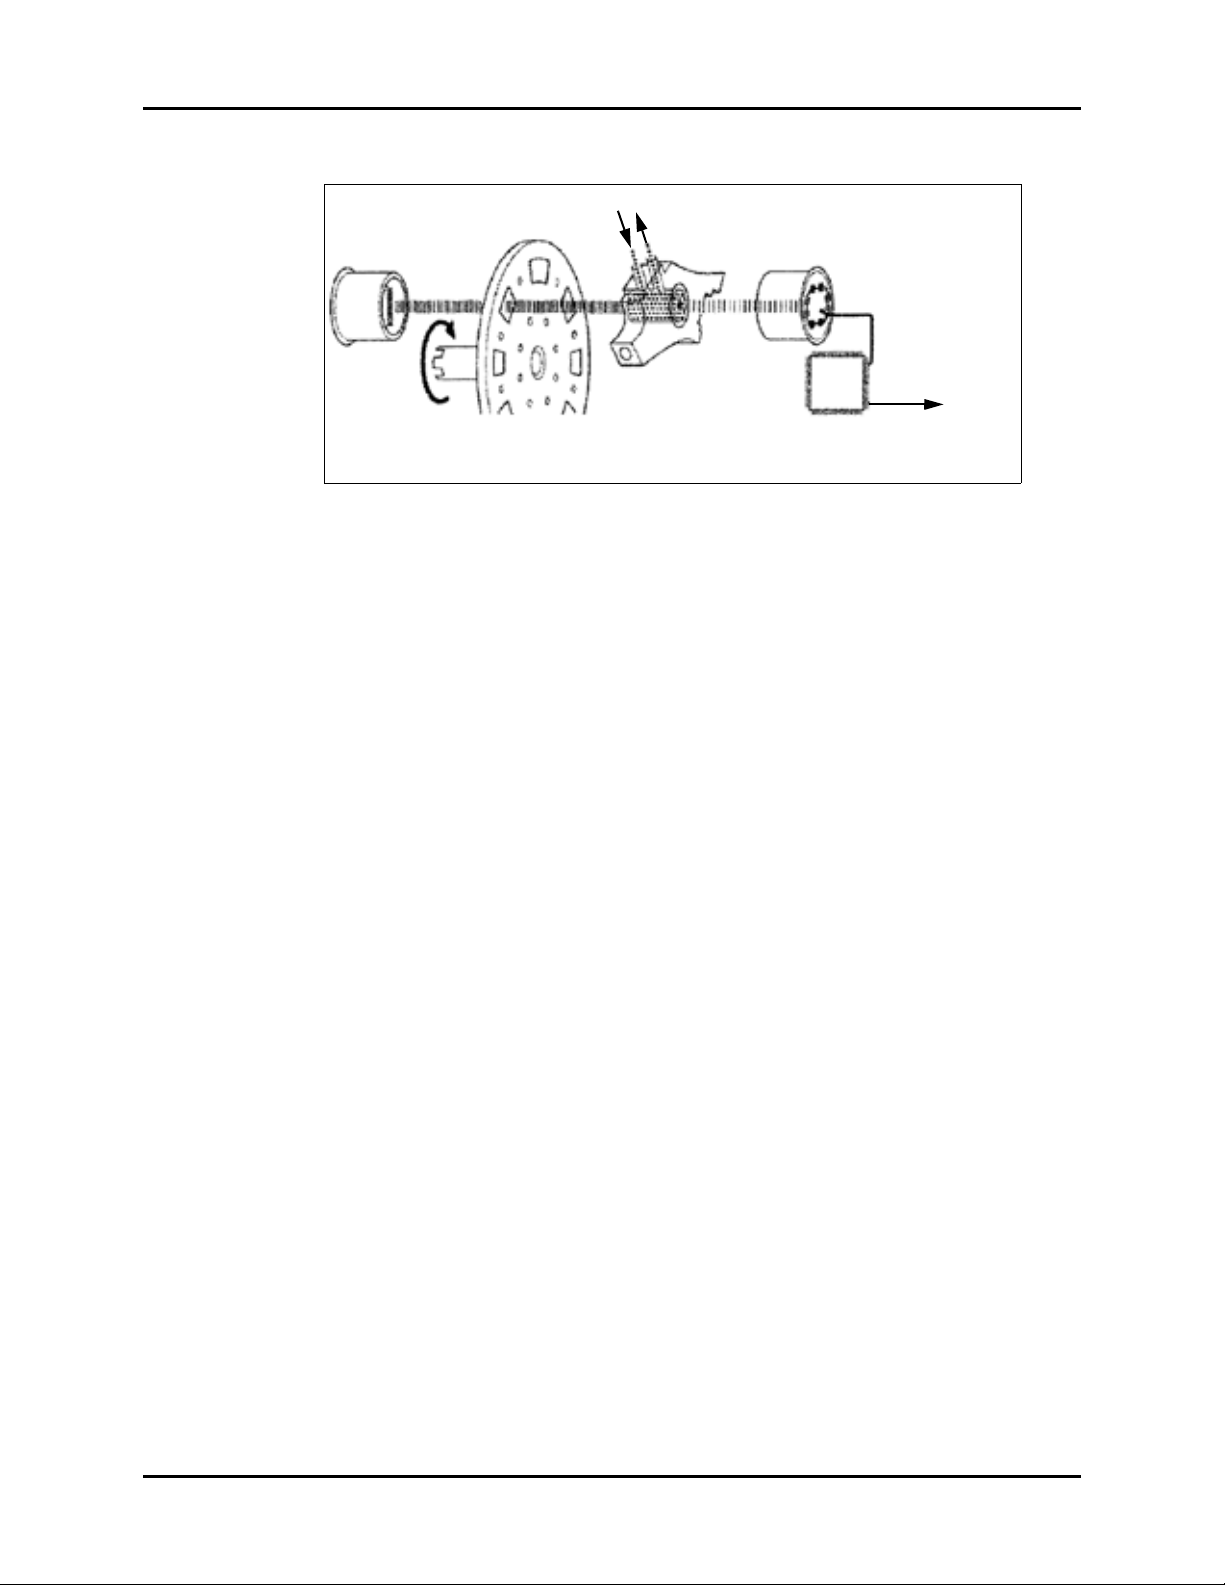
Anesthetic Agent Sensor Theory Of Operation
Gas Inlet Gas Outlet
Infrared
Detector
Signal
Processor
Host
Interface
Measurement
Chamber
Light
Source
Filter Wheel &
Optical FIlters
FIGURE 1-12 Optical Path
No radiation is absorbed if the measurement chamber is empty. The output signal from the
detector is at maximum amplitude at a concentration of zero. Lower amplitudes indicate the
presence of gases in the measurement chamber.
To establish the zero reference, the AION
™
Multigas Analyzer occasionally switches the zero
valve to direct ambient air through the measurement chamber.
1 - 10 0070-10-0522 Gas Module Service Manual Addendum
Page 23

Theory Of Operation O2 Sensor
Switched
Magnetic
field
Mixture
out
Electromagnet
Microphone
Sample in
Reference in
1.3 O2 Sensor
1.3.1 Gas Module II, Gas Module SE, and Gas Module SE with Spirometry
FIGURE 1-13 O2 Sensor
The differential O
configuration. The gas sample along with reference room air are conducted into a gap in an
electromagnet with a strong magnetic field switched on and off at a frequency of
approximately 165 Hz.
An alternating differential pressure is generated between the sample and reference inputs
due to forces acting on the oxygen molecules in a magnetic field gradient.
The pressure is measured with a sensitive differential transducer, rectified with a synchronous
detector and amplified to produce a DC voltage proportional to the O
difference between the two gases to be measured.
Sensor uses the paramagnetic principle in a pneumatic bridge
2
concentration
2
FIGURE 1-14 O
Gas Module Service Manual Addendum 0070-10-0522 1 - 11
Measurement Principle
2
Page 24
O2 Sensor Theory Of Operation
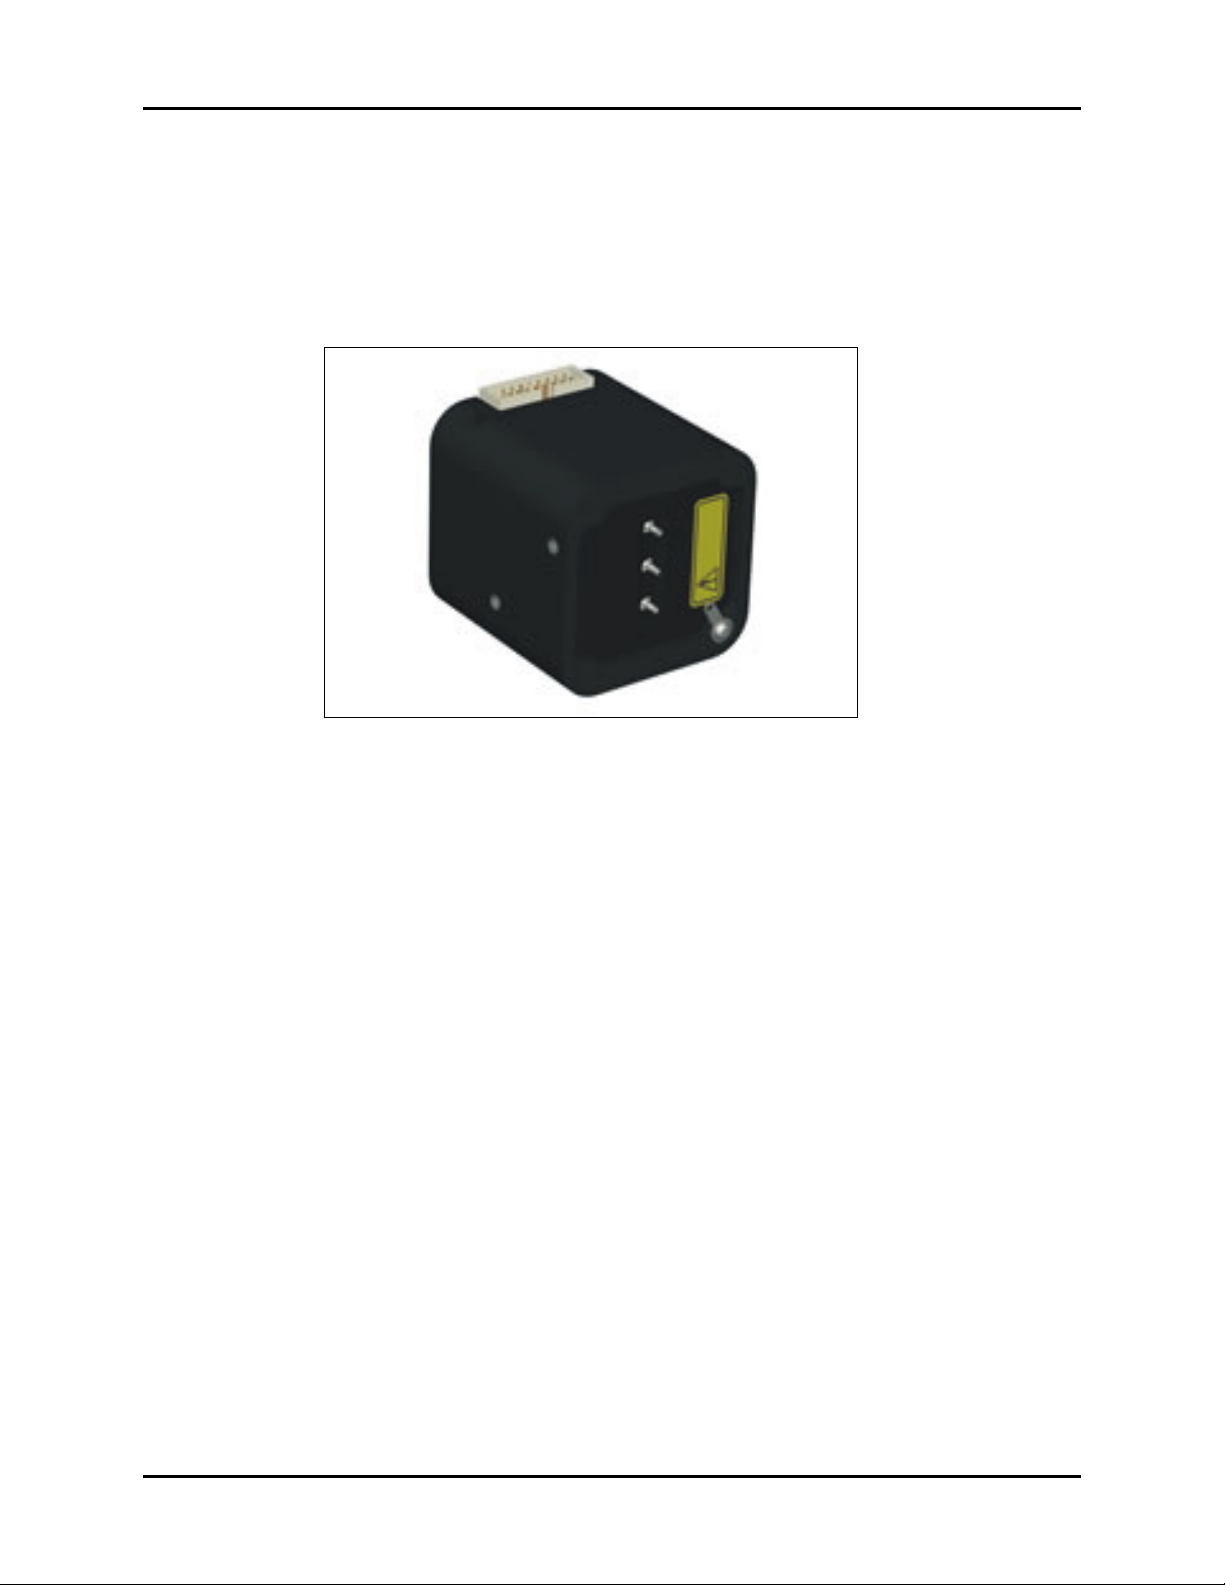
1.3.2 Gas Module 3
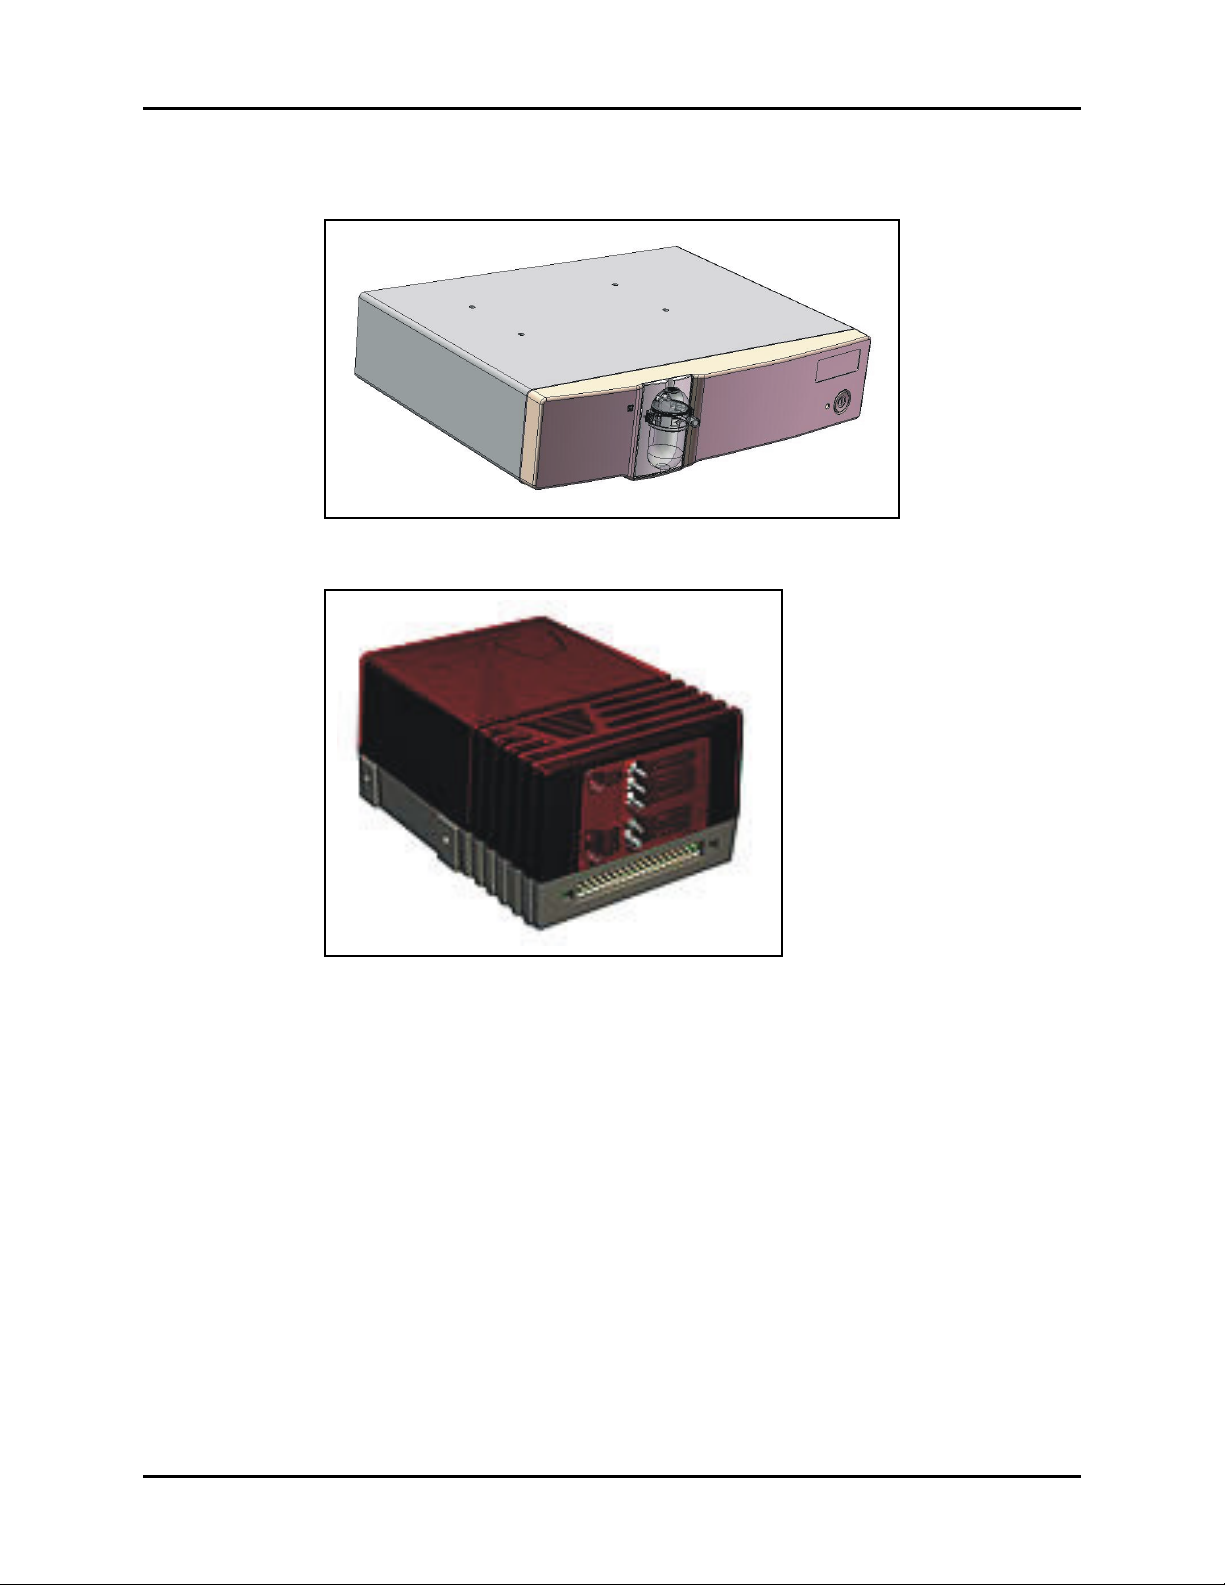
Oxygen measurements are essential for correct gas measurement in the AION™ Multigas
Analyzer. Because oxygen does not absorb infrared light to the same extent as other
breathing gases and must be measured using another method, there is no built in oxygen
measurement module. The Gas Module 3 uses a Servomex Paramagnetic Oxygen Sensor.
FIGURE 1-15 Servomex Paramagnetic Oxygen Sensor
The Servomex Paramagnetic Oxygen Sensor uses the paramagnetic susceptibility of oxygen,
which is physical property that distinguishes oxygen from most common gases. Inside the
sensor are two nitrogen-filled glass spheres mounted on a strong rare metal taut-band
suspension. The assembly is suspended in a symmetrical non-uniform magnetic field. In the
presence of paramagnetic oxygen, the glass spheres are pushed further away from the
strongest part of the magnetic field. The strength of the torque acting on the suspension is
proportional to the oxygen concentration (see FIGURE 1-16).
Paramagnetic technology is non-depleting, which means there are no consumable parts,
ensuring consistent performance over time. The selectivity of the paramagnetic measurement
for oxygen means there is no interference from other respiratory gases. The small volume
chamber allows a rapid gas exchange, giving the capability for fast response oxygen
measurement.
1 - 12 0070-10-0522 Gas Module Service Manual Addendum
Page 25
Theory Of Operation O2 Sensor
Permanent
Magnets
Feedback
Signal
Light Source
Photo Detector
R
Current proportional
to O
2
concentration
Output Voltage proportional
to O
2
concentration
FIGURE 1-16 The Paramagnetic Oxygen Sensor Measurement Principle
Gas Module Service Manual Addendum 0070-10-0522 1 - 13
Page 26
CPU Board Theory Of Operation
Signal Processing
Signal Processing
CPU Board
TPX Board
PVX Board
Flow Press
OM Board
MUX
CPU
80C196NT
Anaes.
Agents
N2O
CO
2
IR Thermopile Sensors
T Sensor
2 ch
A / D
16 bit
Module Bus
MUX
and
buffer
x 5
x 2
O
2
RS-485
driver
MUX
and
buffer
preamps
T Sensor
Signal Processing
Control Logic
Control Logic
CPU Board
Lamp Unit
OM Board
PVX Board
PVX
valves
MUX
Valves
A / D
Module Bus
TPX
Lamp
Gas press
Diff press
MUX &
buffer
Valves
CPU
80C196NT
Fan
pneumatics
unit
reset
data
Lamp
Current
Sensing
A / D
Temp
sensor
Control Logic
1.4 CPU Board
1.4.1 Gas Module II, Gas Module SE, and Gas Module SE with Spirometry
The CPU board contains the processor, memory and A/D converters that are common to the
whole module. The CPU board also contains preamplifiers for the Anesthetic Agent Sensor
and the drivers for the valves, fan and pump. The module is connected to the module bus
through a RS-485 serial channel.
FIGURE 1-17 CPU Signal Processing
1 - 14 0070-10-0522 Gas Module Service Manual Addendum
FIGURE 1-18 CPU Control Logic
Page 27

Theory Of Operation CPU Board
1.4.2 Gas Module 3
1.4.2.1 PCB
Power is a dedicated routing from the 12 V power filter. Power ground and signal ground
are connected on this board. The screws that attach the board to the enclosure are also
connected to chassis ground.
1.4.2.2 Power
To reduce noise from the power supply, both the 5 V and 12 V power lines are filtered. A 5 V
to 3.3 V linear regulator supplies power to the microcontroller. If the 5 V power supply drops
below 4.3 V, a reset signal is sent to the microprocessor.
1.4.2.3 Microcontroller
The microcontroller supports the following communication ports:
•AION
•Spirometry
• Patient Monitor
•Service
All ports use the RS-232 communication protocol. A real time clock (RTC) powered by either
3.3 V or by battery enables logging of malfunctions. If the RTC fails due to battery depletion
during battery mode, functionality is not affected.
™
1.4.2.4 Battery
The battery that supports the RTC in the microcontroller has a minimum lifetime of 7 years.
When the device is running on AC power, there is zero drain on the battery, thus prolonging
its lifetime.
Immediately after installing a new battery, the device should be power cycled to avoid high
battery currents (~540 µA). Follow the battery supplier’s handling recommendations.
The battery is installed at component number B401 on the PCB. The battery positive node is
marked with a “+” on the PCB and has two holes to differentiate it from the negative node
which has one hole on the PCB.
1.4.2.5 SPI Memory
The 8 Mb capacity of the SPI memory can store an error log with timestamps to facilitate
debugging and service.
Gas Module Service Manual Addendum 0070-10-0522 1 - 15
Page 28
O2 Board Theory Of Operation
Calibration Data Stored in
Calibration Data Stored in
EEPROM
EEPROM
CPU Board
TPX Board
PVX Board
OM Board
Module Bus
RS-485
driver
CPU
80C196NT
EEPROM
OM Board
Factory calibration
data for PVX
Factory calibration
data for OM and TPX
EEPROM
Correction data for
amplification and
offset of all amplification
channels
EEPROM
EEPROM
Calibration Data Stored in EEPROM
1.5 O2 Board
The O2 board is only used in the Gas Module II, Gas Module SE, and Gas Module SE with
Spirometry.
The O2 board contains the specific electronics for the O2 sensor. Sample flow measurement
and sampling system pressure sensors are on this board. It also contains EEPROM’s that store
factory calibration data of both the Anesthetic Agent and O
sensors.
2
FIGURE 1-19 O
1 - 16 0070-10-0522 Gas Module Service Manual Addendum
Board Calibration Data Stored in EEPROM
2
Page 29
Theory Of Operation Communication Interface Board
1.6 Communication Interface Board
1.6.1 Gas Module II, Gas Module SE, and Gas Module SE with Spirometry
This board is a converter between the Patient Monitor and the Gas Module. It converts the
proprietary RS-232 hardware protocol to the Gas Module’s RS-485 hardware protocol and
vice versa. The board contains a programmable micro-processor (Intel 87C196KD), a
QUART (Exar82C684CJ) and line drivers for RS-232 and RS-485 communication lines. For
production test purposes the RS-485 lines have been connected to D-connector X2 pins 1,5,6
and 8. Refer to the figure below.
FIGURE 1-20 Connectors Pin Configurations
Gas Module Service Manual Addendum 0070-10-0522 1 - 17
Page 30

Communication Interface Board Theory Of Operation
1.6.2 Gas Module 3
1.6.2.1 Patient Monitor
The interface to the patient monitor is a D-sub, 25-pin, female connector that uses the RS-232
communication protocol.
1.6.2.2 AION
™
The interface to the AION™ is a 2 x 17-pin IDC with locking clips. Communication between
the HOST and the AION
distributed from the communication board to the AION
™
is with the RS-232 communication protocol. 12 V power is
1.6.2.3 Servomex
The interface to the Servomex is a 2 x 8-pin IDC with locking clips. All communication is to
the AION
™
through the communication board.
1.6.2.4 DRYLINE™ Receptacle
The interface to the DRYLINE™ receptacle is a 4-pin picoblade. All communication is to the
™
AION
through the communication board.
1.6.2.5 OXIMA Receptacle
The interface to the OXIMA receptacle is a 10-pin DF20 from Hirose. All communication is to
the AION
™
through the communication board.
1.6.2.6 LED
Power ON indication is a green LED. Flash programming mode is indicated with a green LED
close to the flash programming switch for the AION
™
.
™
.
1.6.2.7 Switches
• SW201 is the flash programming initialization button for the AION
• SW202 is for future use
• SW501 is a reset switch for the microprocessor
1 - 18 0070-10-0522 Gas Module Service Manual Addendum
™
Page 31

Interface Board
M-GAS Assy
Power Supply PCB
Front Bezel Assy
CPU PCB
TPX
Agent Bench
OM
Oxygen Module
Pneumatics
Nafion
Exhaust
Air Input
Host Monitor
Ext.
Com.
Cable
Gas Module II
X3
Filter
A
b
s
o
r
b
e
r
Interface Board
M-GAS Assy
Power Supply PCB
Front Bezel Assy
CPU PCB
TPX
Agent Bench
OM
Oxygen Module
Pneumatics
Nafion
Exhaust
Air Input
Filter
Host Monitor
Ext.
Com.
Cable
Gas Module SE with Sp irometry
X3
A
b
s
o
r
b
e
r
PVX
Unit
Interface Board
M-GAS Assy
Power Supply PCB
Front Bezel Assy
CPU PCB
TPX
Agent Bench
OM
Oxygen Module
Pneumatics
Nafion
Exhaust
Air Input
Filter
Host Monitor
Ext.
Com.
Cable
Gas Module SE
X3
A
b
s
o
r
b
e
r
Theory Of Operation Electrical Wiring Diagram
1.7 Electrical Wiring Diagram
FIGURE 1-21
Gas Module Service Manual Addendum 0070-10-0522 1 - 19
Page 32

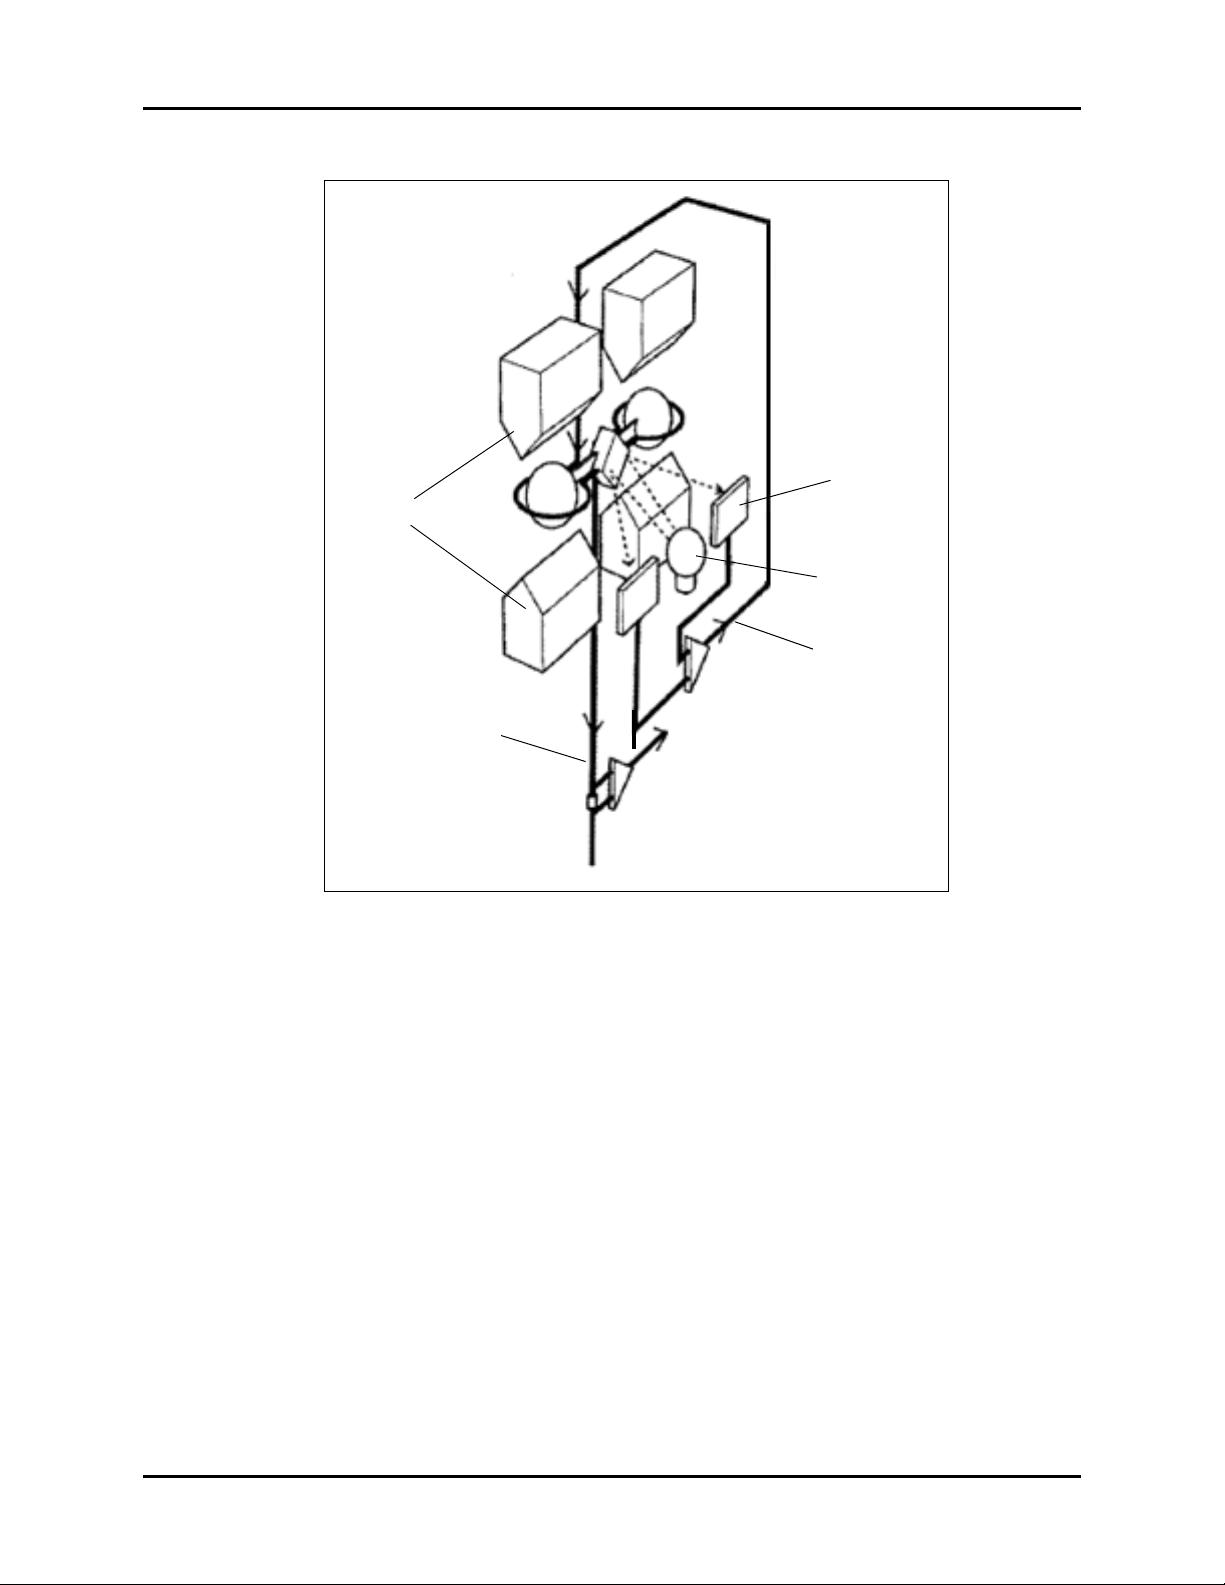
Gas Module 3 Electronics Theory Of Operation
AION™ Multigas Analyzer
Servomex Paramagnetic
Oxygen Sensor
Power Supply
FRONT
RS-232 Connector
Mains Connector
1.8 Gas Module 3 Electronics
FIGURE 1-22 Top View of the Component Layout of Gas Module 3
1 - 20 0070-10-0522 Gas Module Service Manual Addendum
Page 33

Theory Of Operation Gas Module 3 Electronics
FIGURE 1-23 Overview of Gas Module 3 Electronics
There are no accessible electrical components in the Gas Module 3.
Gas Module Service Manual Addendum 0070-10-0522 1 - 21
Page 34

Power Supply Theory Of Operation
1.9 Power Supply
1.9.1 Gas Module II, Gas Module SE, and Gas Module SE with Spirometry
The MSP1306 is a quad-output 53W power supply. The key features of this off-line switching
power supply are as follows:
• Wide-range AC input voltage —85 to 264 VAC,
• MOSFET based, current mode PWM converter stage,
• Fixed operating frequency —~ 62 kHz,
• Compliance with FCC and VDE Class B conducted EMI,
• Most outputs independently regulated,
• All outputs short-circuit protected,
• Output #1 is adjustable with overvoltage protection,
• Rated to operate from 0 to 50 °C.
NOTE: This description of circuit operation assumes a very basic
understanding of power rectifier circuits and current mode
pulse-width modulation (PWM) operation.
1.9.1.1 AC Input / Rectification
The input voltage is applied to the EMI filter through the fuse (F1). The input voltage must be
AC, 90 to 264 VAC, of 47 to 63 Hz, with less than 5% distortion. The input fuse provides
protection from fire hazard under catastrophic failure conditions. Under normal conditions,
the control circuits provide overcurrent protection. Current flow raises the temperature of the
thermistors, reducing their resistance and the inherent voltage drop across the thermistor to
less than 1V. A bleeder resistor across the AC mains is provided to discharge the EMI
capacitors when the AC power is interrupted. The input voltage is then rectified through a
full-wave bridge rectifier and filtered by large electrolytic capacitors to provide DC voltage
with a small ripple voltage at twice the input frequency. The peak ripple component is
typically 0 to 20% of the peak input voltage.
1.9.1.2 Switching Converter Stage Operation
The switching converter stage chops and transforms the high voltage DC bus to multiple low
voltage outputs. The DC bus voltage is always applied to one end of the primary winding of
the power transformer.
Energy storage is possible since the power transformer is actually an inductor with multiple
windings. Once the stored energy reaches a level determined by the control circuit, the gate
voltage is rapidly removed from the power switch gates, switching them off. The interruption
of current flow in the power transformer forces the voltage across the primary to reverse
almost instantaneously, rising to the level required to provide a discharge of the flux built up
in the power transformer. The action of the transformer is said to “fly back” to the clamping
level, thus the popular term flyback converter.
1 - 22 0070-10-0522 Gas Module Service Manual Addendum
Page 35

Theory Of Operation Power Supply
The primary current is sensed by a power resistor in series with the source of the switch. The
control circuit monitors the voltage analog of the primary current and shuts off the power
switches early if excess current is detected (approx. 1V peak).
1.9.1.3 Output Rectifiers, Filters and Post-regulators
• Output #1—The output rectifier clamps the transformer windings directly to the filter
capacitors for the +5V output.
• Output #2—Output #2 is regulated by a discrete linear regulator.
• Output #3—Output #3 is post-regulated by a conventional three-pin linear regulator.
• Output #4—Output #4 is also post-regulated with a three-pin regulator. An output rectifier
provides rectified charge to the filter capacitor during the flyback cycle.
1.9.1.4 Control Circuits
Main Output Regulation and PWM Operation—The main 5 volt output voltage is controlled
directly and thus sets the transformer voltage for all the other outputs. The output voltage is
sensed through a resistor divider. The potentiometer adjusts the voltage ratio is applied to the
2.50V reference.
Normal switching operation will commence if the fault has been removed. If the fault is still
present, the shutdown cycle will repeat. The power supply thus appears to be providing short
bursts of power or “hiccuping”.
Overvoltage Protection—If the voltage of the main output increases beyond safe limits, the
overvoltage protection zener diode begins to conduct. When sufficient current is available to
raise the gate of SCR1 to approx. 0.7V, the SCR latches “On”, shorting the output causing a
“hiccup” cycle that will repeat until the fault is removed or the power supply is repaired.
1.9.2 Gas Module 3
The power inlet is shielded, medical grade M5 with an integrated filter, a line fuse, and a
neutral fuse. A double pole power switch ensures that power to the gas analyzer is ON or
OFF due to its mechanical function.
The medical grade power supply can support an input range from 85 VAC to 264 VAC. Its
5 V and 12 V dual output can deliver a maximum power of 25 W. Power ON indication is a
green LED that is itself powered from the 5 V output.
Gas Module Service Manual Addendum 0070-10-0522 1 - 23
Page 36

Spirometry (Gas Module SE with Spirometry Only) Overview Theory Of Operation
1.10 Spirometry (Gas Module SE with Spirometry Only)
Overview
The Gas Module SE with spirometry option enables monitoring of the ventilator operation
and the patient respiratory status: CO2, O2, N2O, anesthetic agents, airway pressures,
volumes, and lung mechanics.
In the spirometry measurement, the airway pressures are measured as close to the patient as
possible, from the part between patient circuit and patient airway, using the adult and
pediatric sensors. The same sensors are used for gas sampling.
The spirometry sensors are designed to measure kinetic pressure by a two-sided Pitot tube.
Pressure is transferred to the monitor through a spirometry tube and measured by a pressure
transducer on the PVX board. The pressure difference across a flow restrictor together with
the gas concentration information is used to calculate flow. The volume information is
obtained by integrating the flow signal.
1.10.1 Measured Parameters
• Inspiratory and expiratory tidal volumes (Vtinsp/exp)
• Inspiratory and expiratory minute volumes (MVinsp/exp)
• Airway pressure
• Peak pressure (Ppeak)
• Plateau pressure (Pplat)
• Real-time pressure waveform
• Positive end expiratory pressure (PEEP)
• Compliance (Compl)
• Airway resistance (Raw)
•Flow
• Real time waveform (Flow)
• Ratio of the inspiratory and expiratory time (I:E)
• Pressure-volume loop (Paw-Vol. loop)
• Flow volume loop (Flow-Vol. loop)
NOTE: With spontaneous breaths, compliance and airway
resistance are not measured. With pressure supported
breaths, airway resistance is not measured.
1 - 24 0070-10-0522 Gas Module Service Manual Addendum
Page 37

Theory Of Operation Spirometry (Gas Module SE with Spirometry Only) Overview
Compl
Vtexp
Pplat PEEP–
----------------------------------
=
pt
Ra V·t Vt+
Compl PEEP+
----------------------------------------
=
V
·
1.10.2 Measurement Principles
• Ppeak is the maximum pressure during one breath
• Pplat is the pressure at the reversal point of the flow, at the end of the inspiration phase,
after the inspiratory pause.
• Pmean is the average pressure during one breath.
• PEEP is the pressure in the lungs at the end of the expiration, measured at the moment
when the expiratory phase changes to inspiratory flow.
• Compliance (Compl) is calculated for each breath from the following equation:
Compliance tells how big a pressure difference is needed to deliver a certain volume of gas
into the patient.
• The airway resistance, Raw, is calculated from an equation that describes the kinetics of
the gas flow between the lungs and the flow sensor. The pressure at the sensor can be
derived at any moment of the breath cycle from the following equation:
where p(t), (t) and V(t) are pressure, flow and volume measured at the sensor at a certain
time (t).
1.10.3 PVX Measuring Unit
NOTE: Never apply overpressure or negative pressure of more
When patient spirometry is used, a special sensor replaces the normal airway adapter in the
patient circuit. A double lumen tubing is attached to the two connectors on the adapter and
on the module front panel.
The PVX unit provides patient respiration monitoring capabilities using the adult and
pediatric flow sensors.
Gas Module Service Manual Addendum 0070-10-0522 1 - 25
than 300 cmH
pressure maximum is 25 cmH
when connecting tubes.
O to the flow and volume tubing. Differential
2
O on one port at a time, e.g.
2
Page 38

Spirometry (Gas Module SE with Spirometry Only) Overview Theory Of Operation
FIGURE 1-24 PVX measuring unit
The measurement is based on measuring the kinetic gas pressure and is performed using the
Pitot effect. A pressure transducer is used to measure the Pitot pressure. The signal is then
linearized and corrected according to the density of the gas. Speed of the flow is calculated
from the pressure and Vt (Tidal Volume) is integrated from it.
The PVX unit consists of airway connections, two pressure transducers, valves and
preamplifiers. The preamplifiers are connected to the A/D-converter on the main CPU
module.
A patient’s breathing flow passing through the adapter creates a pressure difference. This
pressure difference is measured by pressure transducer, B1. Overpressure and negative
pressure in airways are measured by another pressure transducer, B2.
1 - 26 0070-10-0522 Gas Module Service Manual Addendum
Page 39

2.0
Specifications
Contents of this chapter .................................................................... Page
2.1 Performance Specifications ....................................................... 2-2
2.4 Power Input Ratings ................................................................. 2-17
2.5 Environmental Conditions ......................................................... 2-17
2.6 Physical Characteristics ............................................................. 2-18
2.7 Agency Compliance .................................................................. 2-18
Gas Module Service Manual Addendum 0070-10-0522 2 - 1
Page 40

Performance Specifications Specifications
2.1 Performance Specifications
2.1.1 Gas Module II, Gas Module SE, and Gas Module SE with Spirometry
Sampling Rate: 200 ± 20 ml/min (with sampling line 6
meters, under normal conditions)
Sampling Delay: 2.5 seconds (with a 3 meter sampling line)
Total System Response Time: 2.9 seconds (with a 3 meter sampling line,
including sampling delay and rise time)
Display Update Rate: Breath-by-Breath
Compensation: Automatic for pressure, CO
O
collision broadening effect
2
Warm-up Time: Maximum 2 minutes to operation with CO2,
O
, and N2O
2
5 minutes to operation of anesthetic agents
30 minutes for full accuracy specifications
Autozeroing Interval: At startup and at 2, 4, 10, 15, 30, 45, and
60 minutes of operation. Every 60 minutes
thereafter.
O and CO2-
2-N2
2 - 2 0070-10-0522 Gas Module Service Manual Addendum
Page 41

Specifications Performance Specifications
2.1.2 Gas Module 3
2.1.2.1 General
Technology NDIR type gas analyzer measuring at 3.9 – 12.8 µm
with paramagnetic oxygen sensor. Pressure,
temperature and full spectral interference correction.
Operating modes • Startup
• ISO accuracy
• Full accuracy
Measured gases CO
, N2O, O2, HAL, ENF, ISO, SEV, DES
2
Measured parameters • Momentary gas concentration
• Inspired and expired concentrations of all gases
• Breath rate
Resolution CO
and agents: 0.01%; O2 and N2O: 0.1%
2
Warm-up time ISO accuracy within 45 s, full accuracy within 10 min
ISO Accuracy Specifications
1
As Full Accuracy Specifications, but de-rated as
follows:
• Add ± 0.3% ABS to inaccuracy for CO
2
• Add ± 8% REL to inaccuracy for all Agents
•N2O inaccuracy is ± (8% REL + 2% ABS)
•O
no addition
2
Rise times2 (t
@200 ml/min
10–90%
)
•CO
2
•N
O 250 ms
2
•O
2
250 ms (fall time 200 ms)
500 ms
• HAL, ISO, SEV, DES 300 ms
• ENF 350 ms
1 Includes interference from other gases.
2 The step rise time specification at 200 ml/min sample flow includes DRYLINE
and DRYLINE
3 The step rise time specification at 120 ml/min sample flow includes DRYLINE
DRYLINE
4 The delay time specification is valid both for 120 ml/min sample flow (using DRYLINE
and DRYLINE
Trap, Adult/Pediatric and DRYLINE
5 For HAL, add 0.1% ABS to threshold values.
Gas Module Service Manual Addendum 0070-10-0522 2 - 3
™
Sampling Line, Adult/Pediatric 2.5 m.
™
Sampling Line, Neonate 2.5 m.
™
Sampling Line, Neonate 2.5 m) and for 200 ml/min sample flow (using DRYLINE™ Water
™
Sampling Line, Adult/Pediatric 2.5 m).
™
Water Trap, Adult/Pediatric
™
Water Trap, Neonate and
™
Water Trap, Neonate
Page 42

Performance Specifications Specifications
Rise times3 (t
@120 ml/min
10–90%
)
•CO
2
•N
O 250 ms
2
•O
2
250 ms (fall time 200 ms)
600 ms
• HAL, ISO, SEV, DES 300 ms
• ENF 350 ms
Delay time4 (t
)< 4 s
0—10%
Identification Dual agent
Primary agent ID threshold
Secondary agent ID threshold
5
5
0.15% (0.4% during ISO accuracy mode)
0.3% (0.5% during ISO accuracy mode) or 5% REL
(10% REL for Isoflurane) of primary agent if primary
agent >10%
Agent ID time Three breaths - Typically less than 10 s
Display Update Rate: Breath-by-Breath
Main Fuse: 2x T0.8A 250V
1 Includes interference from other gases.
2 The step rise time specification at 200 ml/min sample flow includes DRYLINE
and DRYLINE
3 The step rise time specification at 120 ml/min sample flow includes DRYLINE
DRYLINE
4 The delay time specification is valid both for 120 ml/min sample flow (using DRYLINE
and DRYLINE
Trap, Adult/Pediatric and DRYLINE
5 For HAL, add 0.1% ABS to threshold values.
™
Sampling Line, Adult/Pediatric 2.5 m.
™
Sampling Line, Neonate 2.5 m.
™
Sampling Line, Neonate 2.5 m) and for 200 ml/min sample flow (using DRYLINE™ Water
™
Sampling Line, Adult/Pediatric 2.5 m).
™
Water Trap, Adult/Pediatric
™
Water Trap, Neonate and
™
Water Trap, Neonate
2 - 4 0070-10-0522 Gas Module Service Manual Addendum
Page 43

Specifications Performance Specifications
2.1.2.2 Pneumatic
Technology Side-stream gas sampling
Pneumatic modes • Room air reference measurement: Automatic
• Sampling system purge: Automatic
Pump Flow controlled dual membrane
Gas sampling rate
1
with DRYLINE™ Water Trap, Adult/Ped: 200 ml/min
™
with DRYLINE
Water Trap, Neonate: 120 ml/min
Occlusion alarm Actual flow < 40 ml/min
Room air reference measurement Automatic when gas measurement bench temperature
change is > 1°C or time since last ref. measurement is
> 4 h
Reference measurement interval ISO Accuracy Mode > 30 s
Full Accuracy Mode > 4 h
Reference measurement duration Typical 5 s, Max 9 s
Purge cycle Automatic when occlusion detected
Change water trap alarm Actual flow < 75% of set flow and purge
cycle has failed
Pressure difference
1 The Gas Module 3 measures volumetric flow at actual barometric pressure, normalized to room air
at 21 ˚C and 0% RH. The use of other gas mixtures the room air for flow calibration may cause flow
measurement errors.
2 For a complete system with DRYLINE
2
-40 hPa < (P
™
gas sampling accessories.
Sampling point
– P
) < + 30 hPa
Evac
Gas Module Service Manual Addendum 0070-10-0522 2 - 5
Page 44

Gas Measurements Specifications
2.2 Gas Measurements
2.2.1 Normal Conditions
(after 30 minute warm-up period)
2.2.1.1 Gas Module II, Gas Module SE, and Gas Module SE with Spirometry
Ambient temperature 18 – 28 °C within ± 5 °C of calibration
Ambient pressure 500 – 800 mmHg, ± 50 mmHg of calibration
Ambient humidity 20 – 80% RH, ± 50% RH of calibration
Room air reference measurement for Gas
Module 3
Automatic when gas measurement bench
temperature change is > 1
last ref. measurement is > 4 h
°
C or time since
2.2.1.2 Gas Module 3
Ambient temperature 10 – 55 °C within ± 5 °C of calibration
Ambient pressure 525 – 900 mmHg
Ambient humidity 10 – 95% RH
2.2.2 Non-disturbing Gases
2.2.2.1 Gas Module II, Gas Module SE, and Gas Module SE with Spirometry
Ethanol C
Acetone in concentrations < 0.1%
Methane CH
OH in concentrations < 0.3%
2H5
4
in concentrations < 0.2%
Nitrogen N
Carbon monoxide CO in any concentration
Nitric Oxide NO in concentrations < 200 ppm
Water vapor in any concentration
2 - 6 0070-10-0522 Gas Module Service Manual Addendum
2
in any concentration
Page 45

Specifications Gas Measurements
2.2.3 Disturbing Gases
2.2.3.1 Gas Module II, Gas Module SE, and Gas Module SE with Spirometry
Helium Decreases CO2 readings < 0.6 vol% typically
Decreases O2 readings < 3 vol% typically
Xenon Decreases CO2 readings < 0.4 vol% typically
2.2.4 Gas Module 3 Interference Specifications
2.2.4.1 Gas Interference [%ABS]
NOTE: The following is the maximum interference from each gas at
concentrations within specified accuracy ranges for each
gas. Total interference for all gases is never larger than 5%
REL. Multiple agent interference on CO
typically the same as single agent interference.
, N2O, and O2 is
2
CO
2
N2O: 0.1
O
: 0.1
2
Any agent: 0.1
N
OCO
2
: 0.1
2
O2: 0.1
Any agent: 0.1
HAL, ENF, ISO CO
N
2
: 0
2
O: 0.1
O2: 0.1
Second agent: 0.1 (typical)
SEV CO
N
2
: 0
2
O: 0.1
O2: 0.1
Second agent: 0.1 (typical)
DES CO
N
2
: 0
2
O: 0.1
O2: 0.1
Second agent: 0.1 (typical)
O
2
CO2: 0.2
N2O: 0.2
Any agent: 1.0
Gas Module Service Manual Addendum 0070-10-0522 2 - 7
Page 46

Gas Measurements Specifications
2.2.4.2 Contaminant Interference
INTERFERENCE [%ABS]
CONTAMINANT CO
< 100% Xenon 0.1 0 0 0.5%
< 50% He 0.1 0 0 0.5%
Metered dose inhaler propellants Unspecified Unspecified Unspecified 0.5%
< 0.1% Ethanol 0000.5%
Saturated Isopropanol vapor 0.1 0 0 0.5%
< 1% Acetone 0.1 0.1 0 0.5%
< 1% Methane 0.1 0.1 0 0.5%
2.2.5 CO
2
2
N2OAGENTSO
2
2.2.5.1 Gas Module II, Gas Module SE, and Gas Module SE with Spirometry
Measurement Range: 0 – 15 vol%
0 – 15 kPa
0 – 113 mmHg
0 – 113 Torr
Measurement Rise Time: < 400 ms
Accuracy: ± (0.2 vol% + 2% of reading)
Cross Effects: < 0.2 vol% for O
Threshold: 0.1 vol% (If value < 0.1%, 0.0 is displayed)
Respiration Rate: Breath Detection - 1% change in CO
2.2.5.2 Gas Module 3
Measurement Range: 0 – 10 vol%
Measurement Rise Time: 250 ms for 200 ml/min
Accuracy: ± 0.1% of Reading @ 0 – 1% of volume
, N2O, and anesthetic agents
2
level
2
Measurement Range - 4 to 60 bpm
0 – 10 kPa
0 – 75 mmHg
0 – 75 Torr
250 ms for 120 ml/min
± 0.2% of Reading @ 1 – 5% of volume
2 - 8 0070-10-0522 Gas Module Service Manual Addendum
Page 47

Specifications Gas Measurements
± 0.3% of Reading @ 5 – 7% of volume
± 0.5% of Reading @ 7 – 10% of volume
Unspecified @ > 10% of volume
Cross Effects: N2O – 0.1% of Reading
O
– 0.1% of Reading
2
Any Agent – 0.1% of Reading
Threshold: 0.1 vol% (0.3% during ISO accuracy mode)
If value < 0.1%, 0.0 is displayed
Respiration Rate: Breath detection > 1% change in CO2
concentration
Measurement Range 2 – 100 bpm with
accuracy ± 1 bpm @ < 60 bpm
2.2.6 O
2
2.2.6.1 Gas Module II, Gas Module SE, and Gas Module SE with Spirometry
Measurement Range: 0 – 100 vol%
Measurement Rise Time: < 400 ms
Accuracy: ± (1 vol% + 2% of reading)
Cross Effects: < 2 vol% for N
< 1 vol% for anesthetic agents
O
Fi - Et difference: 0.1 vol% resolution
2
O
2
2.2.6.2 Gas Module 3
Measurement Range: 0 – 100 vol%
Measurement Rise Time: < 400 ms for 200 ml/min
< 450 ms for 120 ml/min
Accuracy: ± 1% of Reading @ 0 – 25% of volume
± 2% of Reading @ 25 – 80% of volume
± 3% of Reading @ 80 – 100% of volume
Cross Effects (maximum): CO
Gas Module Service Manual Addendum 0070-10-0522 2 - 9
– 0.2% of Reading
2
Page 48

Gas Measurements Specifications
N2O – 0.2% of Reading
Any Agent – 1.0% of Reading
O
Fi - Et difference: < 0.1 vol% resolution
2
2.2.7 N2O
2.2.7.1 Gas Module II, Gas Module SE, and Gas Module SE with Spirometry
Measurement Range: 0 – 100% N
Measurement Rise Time: < 400ms
Accuracy: ± (2 vol% + 2% of reading)
Gas Cross Effects: < 2 vol% anesthetic agents
2.2.7.2 Gas Module 3
Measurement Range: 0 – 100% N
Measurement Rise Time: < 250 ms for 200 ml/min
Accuracy: ± 2% of Reading @ 0 – 20% of volume
Cross Effects (maximum): CO2 – 0.1% of Reading
O
2
O
2
< 250 ms for 120 ml/min
± 3% of Reading @ 20 – 100% of volume
– 0.1% of Reading
O
2
Any Agent – 0.1% of Reading
Threshold: 3 vol% (3% during ISO accuracy mode)
If value < 3%, 0.0 is displayed
2.2.8 Anesthetic Agents
2.2.8.1 Gas Module II, Gas Module SE, and Gas Module SE with Spirometry
Measurement Range: Halothane, Enflurane and Isoflurane -
0 to 6.0 vol%
Sevoflurane - 0 to 8 vol%
Desflurane - 0 to 20 vol%
2 - 10 0070-10-0522 Gas Module Service Manual Addendum
Page 49

Specifications Gas Measurements
Measurement Rise Time: Enflurane, Isoflurane, Sevoflurane, Desflurane
- < 600 ms
Halothane - < 1000 ms
Accuracy: ± (0.15 vol% + 5% of reading)
Gas Cross Effects: < 0.15 vol% N
Resolution: Two digits for Anesthetic Agent concentrations
Threshold: 0.15 vol%
Identification Time: < 20 seconds (for single agents)
Mixture Identification Threshold
for second agent:
2.2.8.2 Gas Module 3
Measurement Range: 0 – 5 vol% of ENF, HAL, ISO
O
2
< 1.0 vol%
If Anesthetic Agent concentration is below 0.1
vol%, 0.0% is displayed
0.2 vol% + 10% of total concentration
0 – 8 vol% of SEV
0 – 18 vol% of DES
Measurement Rise Time: DES, HAL, ISO, SEV: 300 ms for 200 ml/min
ENF: 350 ms for 200 ml/min
DES, HAL, ISO, SEV: 300 ms for 120 ml/min
ENF: 350 ms for 120 ml/min
Accuracy: ± 0.15% of Reading @ 0 – 1% of DES, ENF,
HAL, ISO, SEV volume
± 0.2% of Reading @ 1 – 5% of DES, ENF, HAL,
ISO, SEV volume
Unspecified @ > 5% of ENF, HAL, ISO volume
± 0.4% of Reading @ 5 – 8% of SEV volume
Unspecified @ > 8% of SEV volume
± 0.4% of Reading @ 5 – 10% of DES volume
± 0.6% of Reading @ 10 – 15% of DES volume
± 1% of Reading @ 15 – 18% of DES volume
Gas Module Service Manual Addendum 0070-10-0522 2 - 11
Page 50

Gas Measurements Specifications
Unspecified @ > 18% of DES volume
Cross Effects: CO2 – 0% of Reading
N
O – 0.1% of Reading
2
– 0.1% of Reading
O
2
2nd Agent – 0.1% of Reading
Threshold: Primary Agent ID 0.15% (0.4% during ISO
accuracy mode)
Secondary Agent ID 0.3% (0.5% during ISO
accuracy mode)
5% of volume (10% of volume for Isoflurane) of
primary agent > 10%
2.2.9 Accuracy specifications at conditions exceeding normal
NOTE: Gas Module II, Gas Module SE, and Gas Module SE with
1. Ambient temperature: 10 – 40
2. During warm-up: 2 to 10 minutes (anesthetic agents 5 - 10
3. During warm-up: 10 to 30 minutes, under normal conditions
4. N
2.2.9.1 CO
Accuracy: ± (0.3 vol% + 4% of reading)
2.2.9.2 O
Spirometry
°
C, within ± 5 °C of calibration
Ambient pressure: 500 – 800 mmHg, ± 50 mmHg of calibration
Ambient humidity: 10 – 98% RH, ± 20% RH of calibration
minutes), under normal conditions
O: > 85%
2
2
(at 5 vol% error ± 0.5 vol%) 1, 3
± (0.4 vol% + 7% of reading)
(at 5 vol% error ± 0.75 vol%) 2
2
Accuracy: ± (2 vol% + 2% of reading) 1, 3
± (3 vol% + 3% of reading) 2
2 - 12 0070-10-0522 Gas Module Service Manual Addendum
Page 51

Specifications Gas Measurements
2.2.9.3 N2O
Accuracy: ± (3 vol% + 3% of reading) 1, 3
± (3 vol% + 5% of reading) 2
± (2 vol% + 8% of reading) 4
2.2.9.4 Anesthetic Agents
(Halothane, Enflurane, Isoflurane, Sevoflurane, Desflurane)
No extended measuring range, but a warning of exceeding measuring range.
Accuracy: ± (0.2 vol% + 10% of reading) 1, 3
± (0.3 vol% + 10% of reading) 2
2.2.10 ISO Mode Accuracy specifications for Gas Module 3
2.2.10.1 CO
Accuracy: ± 0.4% of Reading @ 0 – 1% of volume
2.2.10.2 N2O
Accuracy: ± (10% of Reading + 2% of volume)
2.2.10.3 O
2
Accuracy: ± 1% of Reading @ 0 – 25% of volume
2
± 0.5% of Reading @ 1 – 5% of volume
± 0.6% of Reading @ 5 – 7% of volume
± 0.8% of Reading @ 7 – 10% of volume
Unspecified @ > 10% of volume
@ 0 – 20% of volume
± (11% of Reading + 2% of volume)
@ 0 – 20% of volume
± 2% of Reading @ 25 – 80% of volume
± 3% of Reading @ 80 – 100% of volume
2.2.10.4 Halothane, Enflurane, and Isoflurane
Accuracy: ± (0.15% of Reading + 8% of volume)
@ 0 – 1% of volume
Gas Module Service Manual Addendum 0070-10-0522 2 - 13
Page 52

Gas Measurements Specifications
± (0.2% of Reading + 8% of volume)
@ 1 – 5% of volume
Unspecified @ > 5% of volume
2.2.10.5 Sevoflurane
Accuracy: ± (0.15% of Reading + 8% of volume)
@ 0 – 1% of volume
± (0.2% of Reading + 8% of volume)
@ 1 – 5% of volume
± (0.4% of Reading + 8% of volume)
@ 5 – 8% of volume
Unspecified @ > 8% of volume
2.2.10.6 Desflurane
Accuracy: ± (0.15% of Reading + 8% of volume)
@ 0 – 1% of volume
± (0.2% of Reading + 8% of volume)
@ 1 – 5% of volume
± (0.4% of Reading + 8% of volume)
@ 5 – 10% of volume
± (0.6% of Reading + 8% of volume)
@ 10 – 15% of volume
± (1.0% of Reading + 8% of volume)
@ 15 – 18% of volume
Unspecified @ > 18% of volume
2 - 14 0070-10-0522 Gas Module Service Manual Addendum
Page 53

Specifications Patient Spirometry
2.3 Patient Spirometry
2.3.1 Normal Conditions for Gas Module SE with Spirometry
(after 10 minute warm-up period)
Ambient temperature 10 – 40 °C
Ambient pressure 500 – 800 mmHg
Ambient humidity 10 – 98% RH
Airway humidity 10 – 100% RH
Respiration rate 4 – 35 breaths/min (adult)
4 – 50 breaths/min (pediatric)
I:E ratio 1:4.5 – 2:1
Intubation tube 5.5 – 10 mm (adult)
2.3.1.1 Airway Pressure (Paw)
Measuring range: -20 to +100 cmH2O
Resolution: 0.5 cmH2O
Accuracy: ± 1 cmH2O
2.3.1.2 Flow
Measurement range (for both directions): 1.5 – 100 l/min (adult)
2.3.1.3 Tidal Volume
Measurement range: 150 – 2000 ml (adult)
Resolution: 1 ml
Accuracy: ± 6% or 30 ml (adult)
3 – 6 mm (pediatric)
0.25 – 25 l/min (pediatric)
15 – 300 ml (pediatric)
± 6% or 4 ml (pediatric)
Gas Module Service Manual Addendum 0070-10-0522 2 - 15
Page 54

Patient Spirometry Specifications
2.3.1.4 Minute Volume
Measurement range: 2 – 20 l/min (adult)
0.5 – 5 l/min (pediatric)
Resolution: 0.1 l/min
2.3.1.5 Compliance
Measurement range: 4 – 100 ml/cmH2O (adult)
1 – 100 ml/cmH
Resolution: 1 ml/cmH2O (adult)
O (pediatric)
2
0.1 ml/cmH
O (pediatric)
2
2.3.1.6 Airway Resistance
Measurement range: 0 – 40 cmH
Resolution: 1 cmH2O/l/s
O/l/s
2
2.3.2 Accuracy specifications at conditions exceeding normal
During warm-up: 2 to 10 minutes
2.3.2.1 Airway Pressure (Paw)
Accuracy: ± 2 cmH
O
2
2.3.2.2 Tidal volume
Accuracy: ± 10% or 100 ml (adult)
± 10% or 10 ml (pediatric)
2 - 16 0070-10-0522 Gas Module Service Manual Addendum
Page 55

Specifications Power Input Ratings
2.4 Power Input Ratings
Gas Module II/SE/SE with Spirometry: 100 to 240 VAC ± 10% (90 to 264 VAC),
50/60Hz, 18 W
Gas Module 3: 100 to 240 VAC ± 10% (90 to 264 VAC), 50/60Hz, < 15 W
2.5 Environmental Conditions
2.5.1 Gas Module II, Gas Module SE, and Gas Module SE with Spirometry
Transport and Storage Temperature: -20 °C to +60 °C
Transport and Storage Humidity: 5 to 95%, non-condensing
Operating Altitude: Sea Level to 8,000 feet
Operating Temperature: 10 °C to 35 °C
Operating Humidity: 10 to 95% RH, non-condensing
2.5.2 Gas Module 3
Transport and Storage Temperature: -40 °C to +70 °C
Transport and Storage Humidity: 5 to 100%, condensing
Operating Altitude: Sea Level to 8,000 feet
Operating Temperature: 10 °C to 40 °C
Operating Humidity: 10 to 95% RH, non-condensing
a. After storage in a condensing atmosphere, the unit shall before use be kept for more than 24 h in an environ-
ment equivalent to the operating atmosphere.
(in Airway: 0-100% RH, non-condensing)
a
(in Airway: 0-100% RH, non-condensing)
Gas Module Service Manual Addendum 0070-10-0522 2 - 17
Page 56

Physical Characteristics Specifications
2.6 Physical Characteristics
2.6.1 Gas Module II
Size: 12.5" wide x 9.6" deep x 4.2" high
(31.7 cm wide x 24.3 cm deep x 10.6 cm high)
Weight: 10.0 lbs. (4.54 kg) max
2.6.2 Gas Module SE
Size: 11.85” wide x 10.0” deep x 4.2” high
(30.1 cm wide x 25.4 cm deep x 10.6 cm high)
Weight: 9.6 lbs. (4.35 kg) max
2.6.3 Gas Module 3
Size: 11.9” wide x 10.4” deep x 3” high
Weight: 6.2 lbs (2.8 kg) max
2.7 Agency Compliance
The Gas Module is registered with CSA-Canada
The Gas Module complies with the requirements of the medical device directive 93/42/EEC.
The Gas Module is designed to comply with the following industry standards:
2.7.1 Gas Module II
CSA C22-2 No. 125-M 1984 IEC 601-2-30: 1995
UL 544, Third Edition IEC 601-2-34: 1994
IEC 601-1: 1988/EN60601-1:1990 ISO 9919: 1992
IEC 601-2-27: 1994 ISO 9918: 1993
(30.16 cm wide x 26.35 cm deep x 7.63 cm high)
EN60601-1-2: 1995
2 - 18 0070-10-0522 Gas Module Service Manual Addendum
Page 57

Specifications Agency Compliance
2.7.2 Gas Module SE
Performance: EN ISO 21647:2004
Safety standards: IEC 60601-1:1988 +A1:1991 +A2:1995
UL 2601-1:1997
CSA Standard C22.2 No. 60601.1M90
EN60601-1-1:2001/IEC 60601-1-1:2000
EN60601-1-4:1996 + A1:1999/
IEC 60601-1-4:1996 + A1:1999
EN ISO 14971:2000 + A1:2003
EMC standards: IEC 60601-1-2:Ed. 2.1
Mechanical stress: IEC 60068-2-6 Fc Sinusoidal Vibration
IEC 60068-2-27 Shock
IEC 60068-2-29 Eb Bump
IEC 60068-2-32 Ed Drop
IEC 60068-2-64 Broad Band
Random Vibration
ISO 2244 Shock
Temperature and humidity stress: IEC 60068-2-1 Ab, Ad
IEC 60068-2-2 Bb, Bd
IEC 60068-2-14 Na, Nb
IEC 60068-2-30 Db
IEC 60068-2-56 Cb
2.7.3 Gas Module 3
EN 60601-1/IEC 60601-1+A1+A2 UL 60601-1
CAN/CSA–C22.2 NO. 601.1-M90 EN 60601-1-1 / IEC 60601-1-1
EN 60601-1-4 / IEC 60601-1-4 EN ISO 21647
2.7.3.1 Safety designations per IEC 60601-1
Type of protection against electrical shock: Class 1 Equipment
Degree of protection against electric shock: Type BF Applied Part
Gas Module Service Manual Addendum 0070-10-0522 2 - 19
Page 58

Agency Compliance Specifications
Supply Connection: 100 – 240 VAC
50 – 60 Hz
10 W
0.22 – 0.10 A
Mode of Operation: Continuous
Protection Against Hazards of Explosion: Not Protected (ordinary)
Protection Against Ingress of Liquids: Not Protected (ordinary)
Degree of Electrical Connection between
Equipment and Patient:
Equipment designed as non-electrical
connection to the patient
Degree of Mobility: Transportable, Intra-Hospital
WARNING: Equipment not suitable for use in the presence of a
flammable anesthetic mixture with air or with nitrogen or
nitrous oxide.
WARNING: Do not connect devices that are not specified as part of the
system.
NOTE: If an MPSO (Multiple Portable Socket Outlet) is used with the
system, the maximum permitted load is 1.42 Amps. Do not
connect electrical equipment that has not been supplied as
part of the system.
2 - 20 0070-10-0522 Gas Module Service Manual Addendum
Page 59

3.0
Repair Information
Contents of this chapter .................................................................... Page
3.1 Introduction .............................................................................. 3-1
3.2 Safety Precautions .................................................................... 3-2
3.3 Troubleshooting ........................................................................ 3-2
3.3.1 General Troubleshooting Guidelines ....................................... 3-2
3.3.2 Gas Module Technical Troubleshooting ................................... 3-3
3.3.3 Patient Spirometry Trouble Shooting ...................................... 3-6
3.3.4 Exchange Program ................................................................ 3-7
3.4 Equipment and Special Tools Required ...................................... 3-8
3.5 Disassembly Instructions ........................................................... 3-9
3.6 Mounting Hardware and Accessories ........................................ 3-13
3.6.1 Passport XG/Gas Module Mounting ...................................... 3-13
3.6.2 Expert/Gas Module Mounting ................................................ 3-15
3.6.3 Passport 2/Spectrum/Spectrum OR Gas Module Mounting ..... 3-17
3.1 Introduction
This chapter of the Service Manual provides the necessary technical information to perform
repairs to the instrument. The most important prerequisites for effective troubleshooting are a
thorough understanding of the instrument functions, as well as an understanding of the theory
of operation. Therefore, if necessary, refer to the Patient Monitoring Operating Instructions
which describes the instrument functions and features, and refer to Chapter 2.0 of this
manual which provides a theory of operation.
Gas Module Service Manual Addendum 0070-10-0522 3 - 1
Page 60

Safety Precautions Repair Information
3.2 Safety Precautions
In the event that the instrument covers are removed, observe the following warnings and
general guidelines.
A. Do not short component leads together.
B. The troubleshooting charts are not intended as a rapid course on how to repair devices
of this type. Rather, they are intended as a guide for qualified technical personnel only.
The instrument covers must not be removed by other than technically qualified personnel
who have received supplementary instructions regarding maintenance of medical
electronic equipment or have equivalent experience in this area.
3.3 Troubleshooting
3.3.1 General Troubleshooting Guidelines
In an instrument as complex as this, it is virtually impossible to list each and every potential
problem and appropriate action. Any given problem, however, can be effectively identified
through an understanding of the instrument features and the theory of operation. These are
prerequisites for repair. If necessary, read the Operating Instructions Manual and study the
theory of operation presented in Chapter 2.0 of this manual. The benefits of the time spent
reading and absorbing this information is generally realized by a reduction in repair time
and, ultimately, in the overall experience of service personnel.
1. IDENTIFY THE PROBLEM. Due to the wide ranges of potential symptoms, certain
problems may be more subtle than others. One approach to trouble-shooting is to set-up
the instrument for testing as described in Chapter 5.0 and attempt testing. If successful,
there is a reasonable assurance that there is no problem. By contrast, the fact that a
particular test is not successful is generally indicative of a failure in that specific area.
2. AVOID SHORTING COMPONENT LEADS. During repair procedures, it can
become tempting to make a series of quick measurements. Always turn off the power
before connecting and disconnecting test leads and probes. The accidental shorting of
component leads can easily over stress components, resulting in a second unnecessary
failure (aside from creating a possible safety risk).
3. USE THE PROPER EQUIPMENT. The equipment listed in Section 5.3 is suggested to
fulfill a wide range of troubleshooting requirements. Use a soldering iron of the
appropriate wattage for a given job. For example, use a pencil-type iron (25 watts
max.) for repairs to printed wiring boards and a pistol-grip (75 watts) for repairs
requiring this much power. Do not use the high powered iron to repair the printed wiring
boards as the conductors will lift from the board under the extreme heat, thus ruining it.
4. CLEAN THE REPAIR AREA. After soldering operations, clean off the repaired area
with alcohol and a stiff hair brush. This will remove residual solder flux, making the
repaired area more visible for inspection and returning the instrument to its original,
neat appearance. Removal of the flux will also facilitate making electrical measurements
in the affected area.
3 - 2 0070-10-0522 Gas Module Service Manual Addendum
Page 61

Repair Information Troubleshooting
3.3.2 Gas Module Technical Troubleshooting
To begin the technical troubleshooting session perform the following steps first:
1. Check that the line voltage cable is plugged in securely, the power switch is set to 1
(ON), and the green front panel lamp is illuminated.
2. Check that the interface cable is installed correctly and securely to both the Gas Module
and the display monitor.
3. Substitute a fully operational display monitor and interface cable to eliminate them as
possible causes of the problem. If the problem persists, it can be assumed that the Gas
Module is causing the problem.
4. Consult the table below for specific error conditions and error messages.
5. Before replacing any components on the Gas Module II, Gas Module SE, and Gas
Module SE with Spirometry, verify that all power supply voltages are present and that
the +5V and +12V supplies are calibrated. Refer to section 5.0 for more details on
power supply calibration.
STATUS MESSAGES
AND OTHER
SYMPTOMS
GM: Warming up
message appears for
too long. The warm-up
period should last for
approximately two (2)
minutes.
GM: Agent Warming
Up message appears
for too long. The
warm-up period
should last for
approximately five (5)
minutes.
SOLUTION
(STEP 1)
Check all connections
and patient
accessories, Turn the
unit off and on again.
Check all connections
and patient
accessories, Turn the
unit off and on again.
SOLUTION
(STEP 2)
Replace the Interface
board.
Replace the Interface
board.
SOLUTION
(STEP 3)
If the Interface board
does not solve the
problem, replace the
M-GAS module.
If the Interface board
does not solve the
problem, replace the
M-GAS module.
Does not apply to Gas
Module 3.
GM: Exhaust Blocked Check for obstruction
of the Exhaust port.
Remove any tube that
may be obstructing.
GM: Mixed Agents Verify that one agent
is being applied. Has
an agent vaporizer
been incorrectly
filled?
GM: Agent Mismatch The agent labeled on
the monitor is not the
same as the agent
applied. To
automatically identify
the applied agent,
select Auto-ID from the
Gas Menu.
Gas Module Service Manual Addendum 0070-10-0522 3 - 3
Visually inspect the
tubing in and around
the M-GAS module.
Replace the M-GAS
Module.
Replace the M-GAS
Module.
Replace the defective
pneumatic
component.
If the M-GAS module
does not solve the
problem, replace the
interface board.
If the M-GAS module
does not solve the
problem, replace the
interface board.
Page 62

Troubleshooting Repair Information
STATUS MESSAGES
AND OTHER
SYMPTOMS
GM: Unknown Agent An non-recognizable
GM: Air Leak This message
GM: Pump Off
message appears. No
sound from the pump
is heard.
GM: Replace Trap
message caused by a
partial blockage in the
water trap.
GM:... Uncalibrated the identified channel
is not able to display
accurate data.
GM: Occlusion Replace the sample
GM: Cannot Zero...
Retrying
SOLUTION
(STEP 1)
agent (Halothane,
Isoflurane, Enflurane,
Desflurane or
Sevoflurane) is being
applied.
indicates that the
moisture trap is not
connected or an
internal leak exists.
Sample Catheter not
connected or
disconnected
Moisture Trap may not
be seated
Monitor turned off or
in Standby mode for
an extended period
with Gas Module
turned on.
This happens when a
leak has been
detected for more than
45 seconds. Restart
the pump via the Gas
Menu.
The flow rate fell
below 150 mL/
minute. Replace the
water trap.
Calibrate that channel
or the entire group of
gas channels.
line. If the message
persists with the
sample line removed,
replace the water
trap.
Retry calibration. See
the Operating
Instructions for details.
Try calibrating each
channel individually.
SOLUTION
(STEP 2)
Replace the M-GAS
Module.
Reinstall the moisture
trap. If GM: Pump Off
appears, restart the
pump via the Gas
Menu.
Ensure Sample
Catheter is connected
and restart pump from
the monitor Gas
Menu, if needed.
Re-seat trap and
restart pump from the
monitor Gas Menu, if
needed.
Restart pump from the
monitor Gas Menu
Replace the Interface
board.
Replace the M-GAS
Module.
Replace the M-GAS
Module.
Visually inspect the
tubing in and around
the M-GAS module
Replace the M-GAS
Module.
SOLUTION
(STEP 3)
If the M-GAS module
does not solve the
problem, replace the
interface board.
Replace the M-GAS
module.
Replace Sample
Catheter
Replace Moisture Trap
Turn both Gas Module
and monitor off, then
on again.
If the Interface board
does not solve the
problem, replace the
M-GAS module.
If the M-GAS module
does not solve the
problem, replace the
interface board.
If the M-GAS module
does not solve the
problem, replace the
interface board.
Replace the defective
pneumatic
component. Check
exhaust line for
blockage and clear if
possible.
If the M-GAS module
does not solve the
problem, replace the
interface board.
3 - 4 0070-10-0522 Gas Module Service Manual Addendum
Page 63

Repair Information Troubleshooting
STATUS MESSAGES
AND OTHER
SYMPTOMS
GM: Disconnected Verify that a fully
SOLUTION
(STEP 1)
operational monitor
and interface cable is
attached. Ensure the
SOLUTION
(STEP 2)
Replace the Interface
board.
SOLUTION
(STEP 3)
If the Interface board
does not solve the
problem, replace the
M-GAS module.
line cord is plugged in
and the power switch
is turned on.
GM: Failed An internal failure
exists.
Replace the Interface
board.
If the Interface board
does not solve the
problem, replace the
M-GAS module.
Erroneous
concentration for
CO
, N2O, O2, or
2
Agent is suspected.
Check the value of
each gas channel
using a precision
calibration gas can.
Replace the M-GAS
Module.
If the M-GAS module
does not solve the
problem, replace the
interface board.
See the Operating
Instructions for gas
channel
specifications. If
necessary, calibrate
all gas channels or the
individual channels
that are out of
specification.
Erroneous display of
concentrations for
CO
, N2O, O2 or
2
Agent are suspected.
Measure the
parameters outputs
while testing with a
calibrated standard
cal gas can. Are there
any leak messages?
1. If a “Leak” message
appears, inspect all
pneumatic tubes in
and around the MGAS module.
2. If a “Leak” message
If calibration is
impossible, replace
the M-GAS module.
does not appear, try
to calibrate each gas
channel.
No CO
a patient breathing
response to
2
Sample line or
moisture trap is
blocked, loose, or
improperly connected,
Replace the Interface
board.
If the Interface board
does not solve the
problem, replace the
M-GAS module.
or the moisture trap is
full. Reconnect or
replace related
accessories.
Sudden increase in
gas display.
Moisture Trap
malfunction. Replace
it.
Replace the Interface
board.
If the Interface board
does not solve the
problem, replace the
M-GAS module.
Abnormally high (or
low) responses to all
gases, or intermittent
or sudden occlusion
message.
Check that the sample
line or moisture trap is
not blocked, loose, or
improperly connected.
Reconnect or replace
Replace the Interface
board.
If the Interface board
does not solve the
problem, replace the
M-GAS module.
related accessories.
GM: Zero Error Remove any tube that
may be connected to
the air intake port on
the rear panel. Retry
Replace the M-GAS
Module.
If the M-GAS module
does not solve the
problem, replace the
interface board.
calibration.
Gas Module Service Manual Addendum 0070-10-0522 3 - 5
Page 64

Troubleshooting Repair Information
STATUS MESSAGES
AND OTHER
SYMPTOMS
GM: Sampling Error Check the cal gas
GM: Zero in Progress This message should
SOLUTION
(STEP 1)
canister contents.
Ensure the gas
regulator is operating
in the green zone
throughout the
calibration. Retry
calibration.
last approximately 20
seconds.
SOLUTION
(STEP 2)
Visually inspect the
tubing for leaks and
occlusions.
Replace the M-GAS
Module.
SOLUTION
(STEP 3)
Replace the M-GAS
Module.
If the M-GAS module
does not solve the
problem, replace the
interface board.
3.3.3 Patient Spirometry Trouble Shooting
NOTE: Gas Module SE with Spirometry only
PROBLEM
Insp Vt>Exp Vt • Leak in lungs
Exp Vt>Insp Vt • Spirometry tube
Loop overscale • Wrong scale
Monitored volumes
<set volumes
POSSIBLE
CLINICAL CAUSE
• ET tube cuff leak
POSSIBLE
TECHNICAL CAUSE ACTION
• Spirometry tube
leak
•Water inside
sensor or tubings
•Another side
stream gas
sampling between
sensor and patient
leak
•Water inside
sensor or tubings
selected
• Leak between
ventilator and
sensor
• Check leakages perform leak test
• Change tubings
and sensor
• Don’t use active
humidification
•Connect gas
sampling line only
and always to
spirometry sensor
• Check leakages perform leak test
• Change tubings
and sensor
• Don’t use active
humidification
•Change scaling
• Check ventilator
connections
3 - 6 0070-10-0522 Gas Module Service Manual Addendum
Page 65

Repair Information Troubleshooting
PROBLEM
Strongly vibrating
loop
Too large or too small
volumes
Fluctuating Raw • Mucus in airways
Too high Raw • Kink in tubing
Raw value invalid • Spontaneous breaths
Too high Ppeak • Bronchospasm
Compl value invalid • Spontaneous breaths
POSSIBLE
CLINICAL CAUSE
Mucus in ET tube • Water or
or tubing
• Breathing effort
against the
ventilator
• Patient triggered
breaths
• Mucus
• Asthmatic patient
• Bronchospasm
• Spontaneous breaths
• Breathing efforts against the ventilator
• Patient triggered breaths
• Breathing efforts against the ventilator
• Patient triggered breaths
• Patient is coughing
• Patient breaths against the ventilator
• Obstruction in airway
•HME obstructed
POSSIBLE
TECHNICAL CAUSE ACTION
• Suction the patient
secretions in hoses
of sensor
• Wrong mode vs.
sensor selection
• Incompatible
between selected
sensor and sensor
used
• Ventilator exp.
valve causes
fluctuations during
exp. flow
•Change dry
sensor and/or
empty the water
from hoses
• Check mode and
sensor size
•Clean expiratory
valve
3.3.4 Exchange Program
An exchange program for certain assemblies in the instrument is available. In many cases,
replacement of the complete assembly will result in the most expedient repairs. See section
4.3 for details concerning the exchange program.
Gas Module Service Manual Addendum 0070-10-0522 3 - 7
Page 66

Equipment and Special Tools Required Repair Information
3.4 Equipment and Special Tools Required
Description Specification
Volt Meter Standard
Calibration Gas P/N 0075-00-0028
2% DES, 5% CO
Calibration Gas Regulator P/N 0119-00-0166
, 55% O2, 33% N2O
2
Sample Line for Gas Module II, Gas Module
SE, and Gas Module SE with Spirometry
Sample Line for Gas Module 3 Adult/Ped: P/N 0683-00-0525-XX
Spirometry Tester P/N 0138-00-0011
P/N 0683-00-0451-XX
Neonate: P/N 0683-00-0524-XX
3 - 8 0070-10-0522 Gas Module Service Manual Addendum
Page 67

Repair Information Disassembly Instructions
3.5 Disassembly Instructions
3.5.1 Gas Module II, Gas Module SE, and Gas Module SE with Spirometry
Before disassembling the unit, perform the following:
1. Power down the Gas Module and remove the AC power cable.
2. Remove the interface cable from the Passport XG, Expert, Passport 2, Spectrum or
Spectrum OR. These instructions do not apply to the Gas Module 3.
3. Perform work on an anti-static mat at a grounded ESD workstation.
NOTE: The numbers in parentheses () refer to the isometric
drawings.
WARNING: Always Remove Power from the Gas Module BEFORE
Disassembly.
The six major assemblies of the Gas Module are: The Power Supply, the Interface board, the
front bezel, the main chassis, the Spirometry Module (PVX unit) and the M-GAS module. The
M-GAS module’s replaceable components include: the Nafion Tube, the Drive Pump, the
Valve Module, and the Fan. The M-GAS anesthetic agent and O
board are not available separately or as a sub module. In cases of component failure in
these assemblies, replacement M-GAS modules will be available. In addition there are three
cables, a dust filter cover, and a front panel moisture trap assembly. This section will detail
the most economical way to remove each assembly. Refer to the isometric drawings in
section 4.7.
analyzer, and their CPU
2
A. Removing the Enclosure (10):
WARNING: Remove Power from the Gas Module BEFORE removing the
1. Remove the four screws attaching the Monitor mounting bracket to the Gas Module.
2. Remove the four screws attaching the bottom of the Gas Module’s enclosure to the
NOTE: In the next step, use care not to bend or distort the EMC
3. Slide the enclosure back to expose the internal electronics.
4. To re-install, perform the above steps in the reverse order.
B. Replacing the Power Supply (26):
1. Remove the four screws attaching the Power Supply assembly to the chassis.
2. Slide the Power Supply assembly out the open side of the chassis.
3. Unplug the two keyed connectors on the Power Supply assembly.
4. Remove the clear plastic shield (13) and retain to install on the replacement part.
5. To install the replacement part, perform the above steps in the reverse order.
Enclosure.
chassis (11).
guard fingers while sliding the enclosure.
Gas Module Service Manual Addendum 0070-10-0522 3 - 9
Page 68

Disassembly Instructions Repair Information
C. Replacing the Line Voltage Receptacle (20):
1. Remove the two screws attaching the line voltage receptacle to the chassis.
2. Remove the spade lugs from the rear of the line voltage receptacle, noting each one’s
position. When installing the replacement part, reinstall the spade-lugged wired on to
the terminals they were removed from.
3. To install the replacement part, perform the above steps in the reverse order.
D. Replacing the Gas Module II Line Voltage Power Switch (21)
1. Remove the spade lugs from the line voltage power switch, noting each one’s position.
When installing the replacement part, reinstall the spade-lugged wired on to the
terminals they were removed from.
2. The line voltage power switch is snapped into the rear chassis. To release the switch,
pinch the plastic retainers and push the switch out.
3. To install the replacement part, perform the above steps in the reverse order.
E. Replacing the Gas Module SE Line Voltage Power Switch (21)
1. Remove the spade lugs from the line voltage power entry receptacle on the rear panel,
noting each one’s position. When installing the replacement part, reinstall the spadelugged wires onto the terminals they were removed from.
2. Remove the line voltage power switch connector from the power supply and remove
the ground wire lug from the chassis.
3. Remove the PVX unit (see step O).
4. Remove the Front Bezel (see step J).
5. Remove the two screws holding the switch to the Front Bezel.
6. To install the replacement part, perform the above steps in reverse order.
F. Replacing the Interface Board (1):
1. Remove the two jack-posts attaching the rear panel interface connector to the rear
panel. This interface connector is part of the Interface Board.
2. Remove the two screws (Gas Module II) or 1 screw (Gas Module SE) attaching the
Interface Board to the Interface board bracket.
3. Unplug the Power Supply Interface Board Cable from the Interface Board.
4. Unplug the 26 pin cable connector.
5. To install the replacement part, perform the above steps in the reverse order.
G. Replacing the Power Supply to Interface Board Cable (2):
1. Unplug the Power Supply to Interface cable at the Power Supply assembly
2. Unplug the Cable at the Interface board.
3. Carefully pull the Cable through the M-GAS module’s sub-chassis and through the
cable retainer on the rear of the chassis.
4. To install the replacement part, perform the above steps in the reverse order.
3 - 10 0070-10-0522 Gas Module Service Manual Addendum
Page 69

Repair Information Disassembly Instructions
H. Replacing the M-GAS Module (4):
1. Remove the shield, from the chassis, that exposes the M-GAS module Interface board.
2. Remove the four screws attaching the M-GAS module’s sub-chassis to the main chassis.
3. Lift the M-GAS until the (M-GAS) rear connector comes in contact with the rear panel
of the chassis.
4. Tilt the M-GAS module slightly to release it’s rear panel connector.
5. Unplug the M-GAS’s rear panel connector.
6. Remove the four pneumatic tubes that connect to the chassis fittings. Note the position
of each tube.
7. To install the replacement part, perform the above steps in the reverse order.
I. Replacing Specific Parts of the M-GAS Module (Pump, Fan, Valve Module):
See “L. Preventive Maintenance Items:” for Nafion Tube replacement details
The agent analysis sensor and O
sensor and the Main CPU board are a matched set and
2
must be replaced as an assembly. Problems in these areas will require replacing the M-GAS
assembly. Specific parts may be replaced.
1. Remove the M-GAS module from the chassis. Follow the steps in section H for details.
2. Remove the five, 1/4 inch screws that attach the M-GAS sub-chassis to the inner-sub-
chassis.
3. Remove the single, 1 1/4 inch long screw (that passes through two standoffs) that
attaches the circuit board to the sub-chassis.
4. Carefully lift the inner-sub-chassis away from the sub-chassis enough to unplug the O
sensor’s two cable connectors. Be sure to note the orientation of these connectors.
5. The Pump (17) is attached to the inner-sub-chassis with a tie-wrap. Cut the tie-wrap to
remove it.
6. The Fan (15) is attached by four screws, accessible through access holes in the fan’s
four corners.
7. The Valve module snaps into a spring-steal bracket of the inner-sub-chassis.
8. When disconnecting any pneumatic component, always note the orientation of that
component’s pneumatic tube connections.
9. To install the replacement part, perform the above steps in the reverse order.
J. Replacing the Front Bezel (6):
1. Remove the M-GAS, Interface board, PVX unit and the Power Supply assemblies. See
sections B, F, H and O for details.
2. Remove the four large screws holding the Bezel to the Main Chassis.
3. Pull the front Bezel away from the chassis.
4. To install the replacement part, perform the above steps in the reverse order.
K. Replacing the Chassis (11):
1. Replacing the main chassis requires removing each assembly. Remove each assembly
in the order given in these instruction.
2. To install the replacement part, perform the above steps in the reverse order.
2
Gas Module Service Manual Addendum 0070-10-0522 3 - 11
Page 70

Disassembly Instructions Repair Information
L. Preventive Maintenance Items:
The PM items are; The Moisture Trap (7), The Nafion Tube (25), the *CO
Absorber (30),
2
and the O2 Sensor Filter (24). Refer to the isometric drawing for details.
M. The Nafion Tube can be replaced without disassembling the inner-sub-chassis:
1. Remove the M-GAS module. See Section H for details.
2. Locate the cut-out window on the bottom of the M-GAS.
3. Using a tool, pull the Nafion tube away from its pneumatic port on the valve module.
4. Remove the other end of the Nafion tube from the Moisture Trap housing.
*CO
absorber will not be present in units S/N 4314008 or lower.
2
N. Replacing the Cooling Fan’s Dust Filter (18):
1. Remove the filter cover by pulling it straight out.
2. Replace the filter or rinse the filter with mild soap and water solution.
NOTE: Ensure the filter material dries completely before re-
installing.
O. PVX unit
1. Disconnect the ribbon cable and power connector (4 black wires) from the PVX unit.
2. Detach the PVX unit from the front panel (1 screw).
3. To install replacement part, perform the above steps in reverse order.
3.5.2 Gas Module 3
Before disassembling the unit, perform the following:
1. Power down the Gas Module and remove the AC power cable.
2. Remove the interface cable from the Passport 2, Spectrum or Spectrum OR.
3. Perform work on an anti-static mat at a grounded ESD workstation.
WARNING: Always Remove Power from the Gas Module BEFORE
A. Removing the Enclosure
WARNING: Remove Power from the Gas Module BEFORE removing the
1. Remove the four screws attaching the Monitor mounting bracket to the Gas Module.
2. Remove the four screws attaching the bottom of the Gas Module’s enclosure to the
chassis.
3. Slide the enclosure back to expose the internal modules. Be careful not to damage the
EMC gaskets.
4. To re-install, perform the above steps in the reverse order. Before sliding the enclosure on
inspect the EMC gaskets for damages or wear. Damaged or much worn EMC gaskets
must be replaced. Replacement of EMC gaskets is to be performed at factory.
Disassembly.
Enclosure.
3 - 12 0070-10-0522 Gas Module Service Manual Addendum
Page 71

Repair Information Mounting Hardward and Accessories
3.6 Mounting Hardware and Accessories
3.6.1 Passport XG/Gas Module Mounting
NOTE: For Gas Module II and Gas Module SE only
Refer to the diagrams on the next page for exploded views of the mounting hardware.
The following is a listing of the parts shown on the isometric drawings.
FIGURE NO. DESCRIPTION P/N
1 Gas Module SE 0998-00-0481-01
1 Gas Module II 0998-00-0143
2*Plate 0386-00-0232
3 *10-32 X .31 Flat HD Screws (Qty. of 4) 0216-04-1005
4 External Interface Cable 6’ 0012-00-1278
4 External Interface Cable 24” 0012-00-1082
5 Power Pack AC/DC Universal Input (9" cable) 0014-00-0173-04
6 Y-Shaped Power Cord (Domestic) 0012-00-1081-01
6 Y-Shaped Power Cord (International) 0012-00-1081-02
6 Y-Shaped Power Cord (Britain/Ireland) 0012-00-1081-03
7 8-32 X .375 Flat HD Screws (Qty. of 8) 0212-14-0806
8Plate 0386-00-0156
10 Mounting Bracket 0406-00-0729-01
11 Wall Mount Assembly 0040-00-0232-02
12 Rolling Stand Assembly 0040-00-0232-01
* Mounting Plate and screws are part of rolling stand or wall mount.
Gas Module Service Manual Addendum 0070-10-0522 3 - 13
Page 72

Mounting Hardward and Accessories Repair Information
Detail A
Shown without
J1 Expansion Box
Detail C
7
8
7
10
1
6
5
4
3
2
11
12
Detail B
FIGURE 3-1 Passport XG/Gas Module Mounts
3 - 14 0070-10-0522 Gas Module Service Manual Addendum
Page 73

Repair Information Mounting Hardward and Accessories
3.6.2 Expert/Gas Module Mounting
NOTE: For Gas Module II and Gas Module SE only
Refer to the diagrams on the next page for exploded views of the mounting hardware.
The following is a listing of the parts shown on the isometric drawings.
FIGURE NO. DESCRIPTION P/N
1. Screw, Panhead, Metric (4) 0211-13-0410
2. Plate, Mounting Expert/Gas Module 0386-00-0245
3. Screw, Plate Mounted on Gas Module (4) 0212-14-0806
4. Cable Assembly Interface Expert/Gas Module, 14” 0012-00-1213-01
4. Cable Assembly Interface Expert/Gas Module, 72” 0012-00-1213-02
5. Channel, Mounting Expert/Gas Module 0436-00-0154
6. Gas Module II 0998-00-0143
6. Gas Module SE 0998-00-0481-01
7. Plate, Mounting 0386-00-0232
8. 10-32 X .31 Flat Head Screws (4) 0216-04-1005
9. Wall Mount w/Arm 0436-00-0119
10. Expert Rolling Stand 0436-00-0123
11. Expert Main Unit 0997-00-0471-01
11. Expert Display 0997-00-0480-01
12. “Y” Shaped Power Cord (Domestic) 0012-00-1081-01
12. “Y” Shaped Power Cord (International) 0012-00-1081-02
12. “Y” Shaped Power Cord (Britain/Ireland) 0012-00-1081-03
Gas Module Service Manual Addendum 0070-10-0522 3 - 15
Page 74

Mounting Hardward and Accessories Repair Information
1
2
11
4
12
10
3
5
6
8
7
9
FIGURE 3-2 Expert / Gas Module Mounts
3 - 16 0070-10-0522 Gas Module Service Manual Addendum
Page 75

Repair Information Mounting Hardward and Accessories
3.6.3 Passport 2/Spectrum/Spectrum OR Gas Module Mounting
3.6.3.1 Gas Module II, Gas Module SE, and Gas Module SE with Spirometry
Refer to the diagrams on the next page for exploded views of the mounting hardware.
The following is a listing of the parts shown on the isometric drawings.
FIGURE NO. DESCRIPTION P/N
1 Gas Module SE 0998-00-0481-01
1 Gas Module II 0998-00-0143
2 *Plate for Gas Module II and Gas Module SE 0386-00-0232
3 *10-32 X .31 Flat HD Screws (Qty. of 4) 0216-04-1005
4 External Interface Cable12” 0012-00-1276-01
4 External Interface Cable 6’ 0012-00-1276-02
5Screws (Quantity of 4) 0212-17-0606
6 Y-Shaped Power Cord (Domestic) 0012-00-1081-01
6 Y-Shaped Power Cord (International) 0012-00-1081-02
6 Y-Shaped Power Cord (Britain/Ireland) 0012-00-1081-03
7 8-32 X .375 Flat HD Screws (Qty. of 4) 0212-14-0806
8 Stationary Mounting Bracket (with screws) 0040-00-0299-02
10 Mounting Plate 0436-00-0160
11 Wall Mount Assembly 0040-00-0232-02
12 Rolling Stand Assembly 0040-00-0232-01
* Mounting Plate and screws are part of rolling stand or wall mount.
Gas Module Service Manual Addendum 0070-10-0522 3 - 17
Page 76

Mounting Hardward and Accessories Repair Information
FIGURE 3-3 Passport 2/Spectrum/Spectrum OR Gas Module Mounts
3 - 18 0070-10-0522 Gas Module Service Manual Addendum
Page 77

Repair Information Mounting Hardward and Accessories
3.6.3.2 Gas Module 3
Refer to the diagrams on the next page for exploded views of the mounting hardware.
The following is a listing of the parts shown on the isometric drawings.
FIGURE NO. DESCRIPTION P/N
1 Gas Module 3 0998-00-1900-01
2 *Plate for Gas Module 3 0386-00-0344
3 Screw, M5 X 8 mm 0211-03-5008
4 External Interface Cable12” 0012-00-1276-01
4 External Interface Cable 6’ 0012-00-1276-02
5Screws (Quantity of 4) 0212-17-0606
6 Y-Shaped Power Cord (Domestic) 0012-00-1081-01
6 Y-Shaped Power Cord (International) 0012-00-1081-02
6 Y-Shaped Power Cord (Britain/Ireland) 0012-00-1081-03
7 Screws, M4 X 8 mm (Qty. of 4) 0211-04-4008
8 Stationary Mounting Bracket (with screws) 0040-00-0299-02
10 Mounting Plate 0436-00-0160
11 Wall Mount 0436-00-0061-01
* Includes 4 screws, Part Number 0211-03-5008
Gas Module Service Manual Addendum 0070-10-0522 3 - 19
Page 78

Mounting Hardward and Accessories Repair Information
FIGURE 3-4 Passport 2/Spectrum/Spectrum OR Gas Module Mounts
3 - 20 0070-10-0522 Gas Module Service Manual Addendum
Page 79

Repair Information Gas Module II/Gas Module SE Accessories
Water Trap Assembly
p/n 0202-00-0129
Gas Scavenging Adapter
p/n 0997-00-0923
(Quick Connect)
Or
p/n 0997-00-0984
(Luer Connector)
Mask Elbow
ET Tube Adapter
p/n 0683-00-0242-12
10 Foot Patient Sample Line
p/n 0683-00-0451-10
10 Foot Patient Sample Line
p/n 0683-00-0451-10
Straight Tee
ET Tube Adapter
p/n 0683-00-0242-22
7 Foot Nasal Cannula
CO2 Sample
p/n 0683-00-0424-10
7 Foot Nasal Cannula
CO2 Sample / O2 Delivery
p/n 0683-00-0452-10
Calibration Gas regulator
p/n 0119-00-0166
Calibration Gas
p/n 0075-00-0028
or
3.7 Gas Module II/Gas Module SE Accessories
FIGURE 3-5 Gas Module II/Gas Module SE Accessories
Gas Module Service Manual Addendum 0070-10-0522 3 - 21
Page 80

Gas Module SE with Spirometry Accessories Repair Information
Water Trap Assembly
P/N 0202-00-0129
Gas Scavenging Assembly
P/N 0997-00-0923
(Quick Connect)
Or
P/N 0997-00-0984
(Luer Connector)
Mask Elbow
ET Tube Adapter
P/N 0683-00-0242-12
10 Foot Patient Sample Line
P/N 0683-00-0451-10
10 Foot Patient Sample Line
P/N 0683-00-0451-10
Stra ight Tee
ET Tube Adapter
P/N 0683-00-0242-22
7 Foot Nasal Cannula
Co2 Sample
P/N 0683-00-0424-10
7 Foot Nasal Cannula
CO2 Sample / O2 Delivery
P/N 0683-00-0452-10
Calibration Gas regulator
P/N 0119-00-0166
Calibration Gas
P/N 0075-00-0028
10 Foot Patient Sample Line
P/N 0683-00-0451-10
Spirometry Tube
P/N 0004-00-0075-005
Spirometry Sensor
(Adult Reusable)
P/N 0600-00-0073-001
or
(Adult Disposable)
P/N 0600-00-0075-050
or
(Pediatric Reusable)
P/N 0600-00-0074-001
3.8 Gas Module SE with Spirometry Accessories
FIGURE 3-6 Gas Module SE with Spirometry Accessories
3 - 22 0070-10-0522 Gas Module Service Manual Addendum
Page 81

Repair Information Gas Module 3 Accessories
DRYLINE Water Trap Assembly
Adult
(Qty 10) p/n 0202-00-0182-10
Neonate (Qty 10) p/n 0202-00-0181-10
/Pediatric
Gas Scavenging Adapter
p/n 0997-00-0923
Or
p/n 0997-00-0984
Mask Elbow
ET Tube Adapter
p/n 0683-00-0242-12
2.5 meter DRYLINE Patient Sample Line
Adult/Pediatric (Qty 25) p/n 0683-00-0525-25
Neonate (Qty 25) p/n 0683-00-0524-25
Stra ight Tee
ET Tube Adapter
p/n 0683-00-0242-22
7 Foot Nasal Cannula
CO2 Sample
p/n 0683-00-0424-10
7 Foot Nasal Cannula
CO2 Sample / O2 Delivery
p/n 0683-00-0452-10
Calibration Gas regulator
p/n 0119-00-0166
Calibration Gas
p/n 0075-00-0028
or
3.9 Gas Module 3 Accessories
FIGURE 3-7 Gas Module 3 Accessories
Gas Module Service Manual Addendum 0070-10-0522 3 - 23
Page 82

Gas Module 3 Accessories Repair Information
This page intentionally left blank.
3 - 24 0070-10-0522 Gas Module Service Manual Addendum
Page 83

4.0
Replacement Parts
Contents of this chapter .................................................................... Page
4.1 Introduction .............................................................................. 4-1
4.2 Available Replacement Parts and Sub-Assemblies ..................... 4-1
4.3 Exchange Program ................................................................... 4-2
4.4 Replacement Parts Pricing Information ..................................... 4-2
4.5 Ordering Information ............................................................... 4-3
4.6 Abbreviations ........................................................................... 4-4
4.7 Isometric Drawing and Parts Lists ............................................. 4-5
4.1 Introduction
This chapter of the Service Manual provides information necessary to identify the
replacement parts and assemblies of the instrument.
4.2 Available Replacement Parts and Sub-Assemblies
The parts listings which follow are divided into two sections. The Isometric Drawings and the
accompanying parts lists identify the available chassis mounted components.
Gas Module Service Manual Addendum 0070-10-0522 4 - 1
Page 84

Exchange Program Replacement Parts
4.3 Exchange Program
An exchange policy for the M-Gas Module is available. This program may provide the most
expedient method of servicing the equipment. A standard charge for this service is made.
Contact the Service Department for details concerning this exchange program.
Many circuit boards make extensive use of multilayer technology and high density
packaging. Individual component replacement is not recommended on these boards unless
the technician is properly equipped to repair multilayer circuit boards.
Circuit boards, returned as parts of the exchange program, that show evidence of improper
repair techniques and are damaged in the process are not considered for exchange.
Damaged boards will be invoiced at full value and no exchange credit will be applied.
4.4 Replacement Parts Pricing Information
Current parts prices and exchange charges can be determined by contacting our Order
Entry Department.
4 - 2 0070-10-0522 Gas Module Service Manual Addendum
Page 85

Replacement Parts Ordering Information
4.5 Ordering Information
Replacement parts and assemblies are available from Mindray DS USA, Inc. Please follow
these guidelines when ordering replacement items for the instrument.
1. Include the Model and Serial Number of the instrument.
2. Include the Part Number exactly as it appears in the Parts List under the column, “Part
Number.”
3. Include a description of the item.
EXAMPLE ORDERS: (1) ea. P/N 0671-00-0127
PC Board, Interface (Connection C), Gas Module II Serial No. XXXX
(4) ea. P/N 0216-04-1005
Screw, #10-32 x .31 Flat Head,
Gas Module SE Serial No. XXXX
NOTE: Mindray DS USA, Inc. maintains a policy of continuous
development for product improvement and reserves the
right to change materials, specifications, and prices without
notice.
NOTE: Many components are described with sufficient detail to
permit procurement through local commercial channels. This
applies to hardware, such as screws and fasteners, as well
as to certain electronic components, such as resistors,
capacitors, certain integrated circuits and transistors.
However, in some cases, components are selected to meet
special performance criteria above and beyond the
component manufacturer’s specifications. The use of other
components in these applications may result in degradation
of reliability or instrument performance characteristics.
Gas Module Service Manual Addendum 0070-10-0522 4 - 3
Page 86

Abbreviations Replacement Parts
4.6 Abbreviations
The following abbreviations may appear in the parts listings which follow and/or through the
manual.
ABBREVIATION TERM ABBREVIATION TERM
A/D Analog to Digital MYLR Mylar
AMP Amplifier NTWK Network
BUF Buffer OP Operational
CAP Capacitor PB Push Button
CC Carbon Composition PIA Peripheral Interface
CER Ceramic POT Potentiometer
CERM Ceramic PRESS Pressure
CNTR Counter PWR Power
CONN Connector RAM Random Access Memory
CONT Controller REC Receiver
CONV Converter RECT Rectangular
CPU Central Processing Unit REG Regulated RES Resistor
DCDR Decoder STG Stage
DIFF Differential STK Stacked
DIA Diastolic SUP Supply
DIO DiodeS SW Switch
D/A Digital to Analog SYST Systolic
ELEC Electrolytic TANT Tantalum
EPROM Erasable Programmable
Read Only Memory
FXD Fixed VAR Variable
I.C. Integrated Circuit VIA Versatile Interface
INT. CKT. Integrated Circuit XDCR Transducer
KYBD Keyboard XFMR Transformer
LED Light Emitting Diode XSTL Crystal
MF Metal Film XSTR Transistor
MONO Monostable
TRANS Transistor
TRANSIS Transistor
Adaptor
Adapter
4 - 4 0070-10-0522 Gas Module Service Manual Addendum
Page 87

Replacement Parts Isometric Drawing and Parts Lists
4.7 Isometric Drawing and Parts Lists
Gas Module II and Gas Module SE
FIGURE NO. DESCRIPTION P/N
1 PC Board, Interface Gas Module II (Connection C) 0671-00-0127
1 PC Board, Interface Gas Module SE (Connection C) 0671-00-0226
2 Gas Module II Cable, Power (Connection B) 0012-00-1086
2 Gas Module SE Cable, Power (Connection B) 0012-00-1408
3 Gas Module II Cable, Interface (Connection C) 0012-00-1088
3 Gas Module SE Cable, Interface (Connection C) 0012-00-1409
4 Gas Module SE Gas Unit, M-Gas 0992-00-0157
5 Housing, Moisture Trap 0380-00-0337
6 Gas Module II Front Bezel 0200-00-0319
6 Gas Module SE Front Bezel 0200-00-0326
7 Water Trap Assembly Gas Module II and Gas Module SE 0202-00-0129
8 LED Cable (Connection A) 0012-00-1393
9 PVX Module (Spirometry) 0992-00-0156
10 Enclosure Gas Module II 0202-00-0128
10 Enclosure Gas Module SE 0202-00-0148
11 Chassis Gas Module II 0441-00-0099
11 Chassis Gas Module SE 0441-00-0174
12 Support Bracket, Interface PC Board Gas Module II 0406-00-0735
13 Guard, Power Supply Board 0337-00-0114
14 Shield (EMC) 0337-00-0115
15 Fan 0119-00-0165
16 Tubing Kit Includes: 0040-00-0233
Tubing, Outer, Exhaust - Connection H (PVC, 2.70 mm - ID)
Tubing, Inner, Exhaust - Connection H (PE, 1.65 mm - ID)
Tubing, sump inlet - Connection G (PE, 0.30 mm - ID)
Tube, Connecting - Connection D (Silicone, 1.70 mm - ID)
17 Pump 0104-00-0020
18 Filter, Dust 0378-00-0040
19 Cover, Dust Filter Gas Module II 0198-00-0025
19 Cover, Dust Filter Gas Module SE 0198-00-0048
20 Input Receptacle, AC Mains 0131-00-0245
21 Gas Module II Switch, DPST, AC Mains 0261-00-0193
21 Gas Module SE Switch, DPST, AC Mains 0012-00-1410
22 Fuse, 1Amp, 250 V, 5x20mm 0159-00-0038
23 Ground Lug, Equipotential 0124-00-0104-01
23A Flat washer, Equipotential Lug 0124-00-0104-02
23B Lock washer, Equipotential Lug 0124-00-0104-03
* Numbers for metric screws correspond to nominal size and length in millimeters.
** Numbers for metric nuts correspond to nominal nut (thread) diameter.
*** DIN is the German Industrial Standard.
Gas Module Service Manual Addendum 0070-10-0522 4 - 5
Page 88

Isometric Drawing and Parts Lists Replacement Parts
FIGURE NO. DESCRIPTION P/N
23C Nut, Equipotential Lug 0124-00-0104-04
24 Filter, O
25 Tube, Nafion (Connection F) 0008-00-0307
26 PC Board, Power Supply 0014-00-0183
27 Foot (Diameter=22.2 mm, Height=10.0 mm) 0348-00-0186
28 Exhaust Port (Connection H) 0103-00-0453
30 CO
31 Power Switch Button 0200-00-0327
32 Port Cover 0198-00-0047
N/S Enclosure Label Gas Module II 0334-00-1468
N/S Enclosure Label Gas Module SE 0334-00-2561
N/S Rear Chassis Label Gas Module II 0334-00-2545
N/S Rear Chassis Label Gas Module SE 0334-00-2560
* Numbers for metric screws correspond to nominal size and length in millimeters.
** Numbers for metric nuts correspond to nominal nut (thread) diameter.
*** DIN is the German Industrial Standard.
2
Absorber 0378-00-0046
2
0378-00-0041
Gas Module 3
ASSOCIATED
FIG
NO. DESCRIPTION
1 Exchange Multigas &
2 Receptacle with tubing D, E For GM3 S/N below
2a Receptacle with tubing D, E For GM3 S/N above
N/S O-ring kit DRYLINE
3 Nafion Assembly GM3 E For GM3 S/N below
3a Nafion Assembly GM3 E For GM3 S/N above
4AION System Tubing
5 SPIRIT Tubing 2,4/3,6
6 EVAC Coupling GM3 F 0103-00-0707
*7 Servomex Cable GM3 C For GM3 S/N below
*7a Servomex Cable GM3 C For GM3 S/N above
*8 AION Cable GM3 G For GM3 S/N below
* Cables not shown. Refer to associated connections.
O2 Analyzer Assembly
Receptacle
PUR 1.4 mm / 2.8 mm
mm PUR
CONNECTION(S)
(IF APPLICABLE)
C, G 0992-00-0290E
A, B, D, F Sold per meter 0008-00-0374
A, B, D, F Sold per meter 0008-00-0375
NOTE P/N
0380-00-0635-02
10001000 only
0380-00-0635-01
10001000 only
0040-00-0453
0008-00-0376-02
10001000 only
0008-00-0376-01
10001000 only
0012-00-1808-02
10001000 only
0012-00-1808-01
10001000 only
0012-00-1809-02
10001000 only
4 - 6 0070-10-0522 Gas Module Service Manual Addendum
Page 89

Replacement Parts Isometric Drawing and Parts Lists
FIG
NO. DESCRIPTION
*8a AION Cable GM3 G For GM3 S/N above
9 Power Inlet GM3 M, N, P 0131-00-0301
10 Fuse Holder GM3 0131-00-0302
11 Power Supply GM3 H, K, L, P 0014-00-0096
*12 Power Cable GM3 K, L, M, N, P 0012-00-1810
*13 Low Voltage Power
14 Communication Board
14a Communication Board
*15 Equipotential Cable
16 Bezel Assembly GM3 J For GM3 S/N below
16a Bezel Assembly GM3 J For GM3 S/N above
17 Power Switch GM3 K, L, M, N 0012-00-1813
18 Sheet Metal Cover
18a Sheet Metal Cover
19 Rubber Feet GM3, set
20 Equipotential
21 EMC Frame / Cage For GM3 S/N above
N/S Water Trap Assembly
N/S Water Trap Assembly
22 Screws, Top and
* Cables not shown. Refer to associated connections.
Cable GM3
GM3
GM3
GM3
GM3
GM3
of 4
Connector GM3
Adult/Pediatric
Neonate
Bottom Cover
ASSOCIATED
CONNECTION(S)
(IF APPLICABLE)
H 0012-00-1811
C, G, H, J For GM3 S/N below
C, G, H, J For GM3 S/N above
P 0012-00-1812
NOTE P/N
0012-00-1809-01
10001000 only
10001000 only
10001000 only
10001000 only
10001000 only
For GM3 S/N below
10001000 only
For GM3 S/N above
10001000 only
10001000 only
002-000024-00
0671-00-0275
0997-00-0647-02
0997-00-0647-01
0202-00-0185-02
0202-00-0185-01
0202-00-0184-02
0124-00-0149-02
099-000114-00
0202-00-0182-10
0202-00-0181-10
0211-03-4006
Gas Module Service Manual Addendum 0070-10-0522 4 - 7
Page 90

Isometric Drawing and Parts Lists Replacement Parts
This page intentionally left blank.
4 - 8 0070-10-0522 Gas Module Service Manual Addendum
Page 91

Isometric Drawing and Parts Lists Replacement Parts
4
13
2
26
6
7
11
23C
23B
23A
23
20
28
2
3
1
27
19
12
14
10
27
C
C
B
A
B
A
21
25
17
16
16
22
16
D
D
E
20
21
E
Inside Rear Panel
Rotated View of Gas Assembly
19
18
16
F
G
F
H
H
23B
15
B
C
5
24
8
30
J
FIGURE 4-1 Isometric Drawing Gas Module II
Gas Module Service Manual Addendum 0070-10-0522 4 - 9
Page 92

Replacement Parts Isometric Drawing and Parts Lists
4
13
2
26
6
7
11
23C
23B
23A
23
20
28
2
3
1
14
10
27
C
C
B
A
B
A
25
17
16
16
22
16
D
D
Rotated View of Gas Assembly
19
18
16
F
G
H
H
23B
15
E
C
24
8
20
21
5
30
21
SCALE 1.000
31
32
E
FIGURE 4-2 Isometric Drawing Gas Module SE
4 - 10 0070-10-0522 Gas Module Service Manual Addendum
Page 93

Isometric Drawing and Parts Lists Replacement Parts
4
13
2
26
6
7
11
23C
23B
23A
23
20
28
2
3
1
14
10
27
C
C
B
A
B
A
25
17
16
16
22
16
D
D
Rotated View of Gas Assembly
19
18
16
F
G
H
H
23B
15
C
24
8
20
21
5
30
21
9
SCALE 1.000
31
E
E
FIGURE 4-3 Isometric Drawing Gas Module SE with Spirometry
Gas Module Service Manual Addendum 0070-10-0522 4 - 11
Page 94

Replacement Parts Isometric Drawing and Parts Lists
FIGURE 4-4 Isometric Drawing Gas Module 3
4 - 12 0070-10-0522 Gas Module Service Manual Addendum
Page 95

Isometric Drawing and Parts Lists Replacement Parts
FIGURE 4-5 Isometric Drawing Gas Module 3 Interface Connectors
Gas Module Service Manual Addendum 0070-10-0522 4 - 13
Page 96

Replacement Parts Isometric Drawing and Parts Lists
This page intentionally left blank.
4 - 14 0070-10-0522 Gas Module Service Manual Addendum
Page 97

5.0
Calibration
Contents of this chapter .................................................................... Page
5.1 Introduction .............................................................................. 5-1
5.2 Warnings and Guidelines ......................................................... 5-1
5.3 Test Equipment and Special Tools Required ............................... 5-2
5.4 Power-Up Verification ............................................................... 5-2
5.5 Gas Module 3 Pneumatic Leakage Test ..................................... 5-5
5.6 Gas Module 3 Zero Reference Valve Test ................................... 5-5
5.7 Calibration ............................................................................... 5-6
5.8 Gas Module Leakage Current Checks ........................................ 5-21
5.1 Introduction
The following procedures are provided to verify the proper operation, calibration and
maintenance of the Gas Module.
5.2 Warnings and Guidelines
In the event that the instrument covers are removed, observe these following warnings and
general guidelines:
• Do not short component leads together.
• Perform all steps in the exact order given.
• Use extreme care when reaching inside the opened instrument. Do not contact exposed
metal parts which may become live.
• Read through each step in the procedure so it is understood prior to beginning the step.
Gas Module Service Manual Addendum 0070-10-0522 5 - 1
Page 98

Test Equipment and Special Tools Required Calibration
5.3 Test Equipment and Special Tools Required
Description Specification
Volt Meter Standard
Calibration Gas P/N 0075-00-0028
2% DES, 5% CO
Calibration Gas Regulator P/N 0119-00-0166
, 55% O2, 33% N2O
2
Sample Line for Gas Module II, Gas Module
SE, and Gas Module SE with Spirometry
Sample Line for Gas Module 3 Adult/Ped: P/N 0683-00-0525-XX
Spirometry Tester P/N 0138-00-0011
P/N 0683-00-0451-XX
Neonate: P/N 0683-00-0524-XX
5.4 Power-Up Verification
5.4.1 Passport XG Configuration for Gas Module
The Passport XG must be configured to communicate with the Gas Module. To configure the
Passport XG for use with the Gas Module:
1. Turn on the Passport and wait for the “Diagnostics in Progress” message to appear.
2. While the message is displayed press and hold the FREEZE key until the User
Configuration screen appears.
3. Use the down arrow to choose Serial Output Type.
4. Press SELECT to activate the sub-menu.
5. Press either arrow until Gas Module appears in the highlighted area.
6. Press SELECT, then press and hold the EXIT key for three (3) seconds to return to normal
operation.
NOTE: Setting the “Serial Output Type” to any other selection
activates the Passport XG’s on-board CO
deactivates the Gas Module.
function and
2
Electrical Connection and Power On
Verify that the Interface cable is connected between the Passport XG’s J1 connector and the
Gas Module’s rear panel Interface connection. Attach a sample line to the front panel water
trap inlet. Turn on the Gas Module by switching its power switch to “1”.
5 - 2 0070-10-0522 Gas Module Service Manual Addendum
Page 99

Calibration Power-Up Verification
Warm Up
The Gas Module begins its warm up by changing the “Disconnected” message to “Warming
Up” approximately 15 seconds after turn on. The messages “Warming up”, “Agent
Warming Up”, and “Zero in Progress” alternate in the message area for approximately two
(2) minutes. After two (2) minutes the CO
active. The agent display becomes active after approximately five (5) minutes. Automatic
zeroing of all Gas channels will take place at 5, 10, 15 and 30 minutes after turn-on and at
60 minute intervals thereafter.
, N2O, O2, and respiration displays become
2
5.4.2 Expert Configuration for Gas Module
The Expert must be configured to communicate with the Gas Module. To configure the Expert
to be used with the Gas Module perform the following steps:
1. Under the Service Panel of the Expert, set Dip switch #5 to ON to accept Gas Module II
information. Refer to the Expert Operating Instructions, section 2.2 “Main Control Unit”
for information on the location of the dip switch.
2. Set the soft switch for the CO
Expert Operating Instructions for more information on the soft switch setting.
3. For more information on the Gas Module Operation with the Expert, refer to section
3.21.2 of the Expert Operating Instructions.
Source to “GAS monitor”. Refer to section 3.29.15 of the
2
Electrical Connection and Power On
Verify the interface cable is connected between the Expert RS-232C connector and the Gas
Module rear panel interface connection. Attach a sample line to the front panel water trap
inlet. Turn on the Gas Module by switching it’s power switch to “1”.
Warm Up
The Gas Module begins its warm up by changing the “Disconnected” message to “Warming
Up” approximately 15 seconds after turn on. The messages “Warming Up,” “Agent
Warming Up” and “Zero in Progress” alternate in the message are for approximately two (2)
minutes. After two (2) minutes the CO
The agent display becomes active after approximately five (5) minutes. Automatic zeroing of
all Gas channels will take place at 5, 10, 15 and 30 minutes after turn-on and at 60 minute
intervals thereafter.
, N2O, O2 and respiration displays become active.
2
Gas Module Service Manual Addendum 0070-10-0522 5 - 3
Page 100

Power-Up Verification Calibration
5.4.3 Passport 2/Spectrum/Spectrum OR Configuration for the
Gas Module
The Passport 2, Spectrum and Spectrum OR must be configured to communicate with the Gas
Module as follows:
1. Access the Installation Menu by pressing and holding the DISCHARGE key
(Passport 2/Spectrum®) or the TRENDS key (Spectrum OR™) while powering
ON the monitor.
2. Rotate to the Set up Serial Port 1 menu choice and press the Navigator knob.
3. Rotate to GMII or Gas Module and press the Navigator knob to accept the selection.
4. Rotate to the Save Current menu choice and press the Navigator knob.
5. Powering OFF the monitor. Wait 3 seconds and power ON the monitor.
NOTE: Setting Serial Port 1 to any other selection activates the
monitor's on board CO
Module.
function and deactivates the Gas
2
Electrical Connection and Power On
Verify the Interface cable is connected between the Passport 2/Spectrum/Spectrum OR SP1
connector and the Gas Module's rear panel Interface Connection. Attach a sample line to the
front panel water trap inlet. Turn on the Gas Module by switching its power switch to “1”.
Warm Up
Gas Module II, Gas Module SE, and Gas Module SE with Spirometry – The Gas
Module begins its warm up by changing the “Disconnected” message to “Warming Up”
approximately 15 seconds after turn on. The messages “Warming Up”, “Agent Warming
Up” and “Zero in Progress” alternate in the message area for approximately two (2) minutes.
Automatic Zeroing of all channels will take place at 2, 4, 10, 15 and 30 minutes after turn
on and at 60 minute intervals thereafter.
Gas Module 3 – “Warming Up” is displayed until ISO accuracy is reached (approximately
45 seconds). During this period, two room air reference measurements are taken. Thereafter
they occur automatically whenever the bench temperature has changed 1°C. When the Gas
Module 3 has reached full accuracy (approximately 10 minutes), reference measurements
are taken every 4 hours.
5 - 4 0070-10-0522 Gas Module Service Manual Addendum
 Loading...