

Page 1
1
2
Produktgruppe 19 Umbau- und Montageanweisung
1 von 10 M.-Nr. 05274513
23.07.2004 Diese Unterlagen dürfen ohne unsere Genehmigung weder vervielfältigt noch Dritten zugänglich gemacht werden. Eigentumsrechte vorbehalten.
RD 11941
WTV 405
x
de
ni
Wasch-Trocken-Verbindungssatz 405 für Waschautomaten
der Baureihen: W 300 und
W 400 (nur Comfortline) in
Verbindung mit
Trockenautomaten der
Baureihen: T 200 (ohne
Comfortline)
Was-droog-verbindingsset 405
voor wasautomaten in de
series: W 300 en W 400 (alleen
comfortline) in combinatie met
droogautomaten in de serie:
T 200 (zonder comfortline)
en
da
Washer-dryer stack kit
WTV 405 for washing
machines from series W 300
and W 400 (ComfortLine only)
in combination with dryers from
series T 200 (without
ComfortLine)
Sammenbygningsbeslag 405 til
vaskemaskiner i serien W 300
og W 400 (kun Comfortline) i
forbindelse med tørretumblere i
serien T 200 (uden Comfortline)
fr
no
Cadre de superposition 405
pour les lave-linge des séries
W 300 et W 400 (Comfortline
uniquement) avec les
sèche-linge de la série T 200
(sans Comfortline)
Vask-tørk-mellomsats med
WTV 405 for vaskemaskiner i
W 300- og W 400-seriene (bare
Comfortline) i kombinasjon med
tørketrommel i seriene T 200
(ikke Comfortline)
sv
es
Byggsats WTV 405 för
montering av tvätt-torkpelare
bestående av tvättmaskiner i
modellserierna W 300 och
W 400 (endast Comfortline) i
kombination med torktumlare
ur modellserien T 200 (utan
Comfortline)
Juego de unión 405 de lavado
y secado para lavadoras de las
series W 300 y W 400 (sólo
Comfortline) en combinación
con secadoras de las series
T 200 (sin Comfortline)
fi
el
Pesu-kuivaus-tornin
välirakennussarja 405,
sarjojen: W 300 ja W 400
pesukoneille (vain Comfortline)
sekä sarjan: T 200
kuivausrummulle (ilman
Comfortlinea)
Συνδετικό κολώνας (WTV) 405
για πλυντήρια της σειράς:
W 300 και W 400 (μόνο
Comfortline) σε συνδυασμό με
στεγνωτήρια της σειράς: T 200
(χωρίς Comfortline)
it
pt
Set di giunzione colonna
bucato 405 per lavatrici della
serie: W 300 e W 400 (solo
Comfortline) in collegamento
con asciugabiancheria della
serie: T 200 (senza
Comfortline)
Conjunto de adaptação Coluna lavar/secar 405 para
Máquinas de lavar roupa da
série: W 300 e W 400 (só
Comfortline) em conjunto com
secadores da série T 200 (sem
Comfortline)
Page 2
3
4
de
x
Gefahr!
Die Montage darf nur von einer Fachkraft unter Berücksichtigung der gültigen Sicherheitsbestimmungen durchgeführt
werden.
Bevor Wartungs- und Instandsetzungsarbeiten am Gerät durchgeführt werden, ist eine Trennung vom Stromnetz
unbedingt erforderlich.
Hinweis
Waschautomat entsprechend der Gebrauchsanweisung aufstellen.
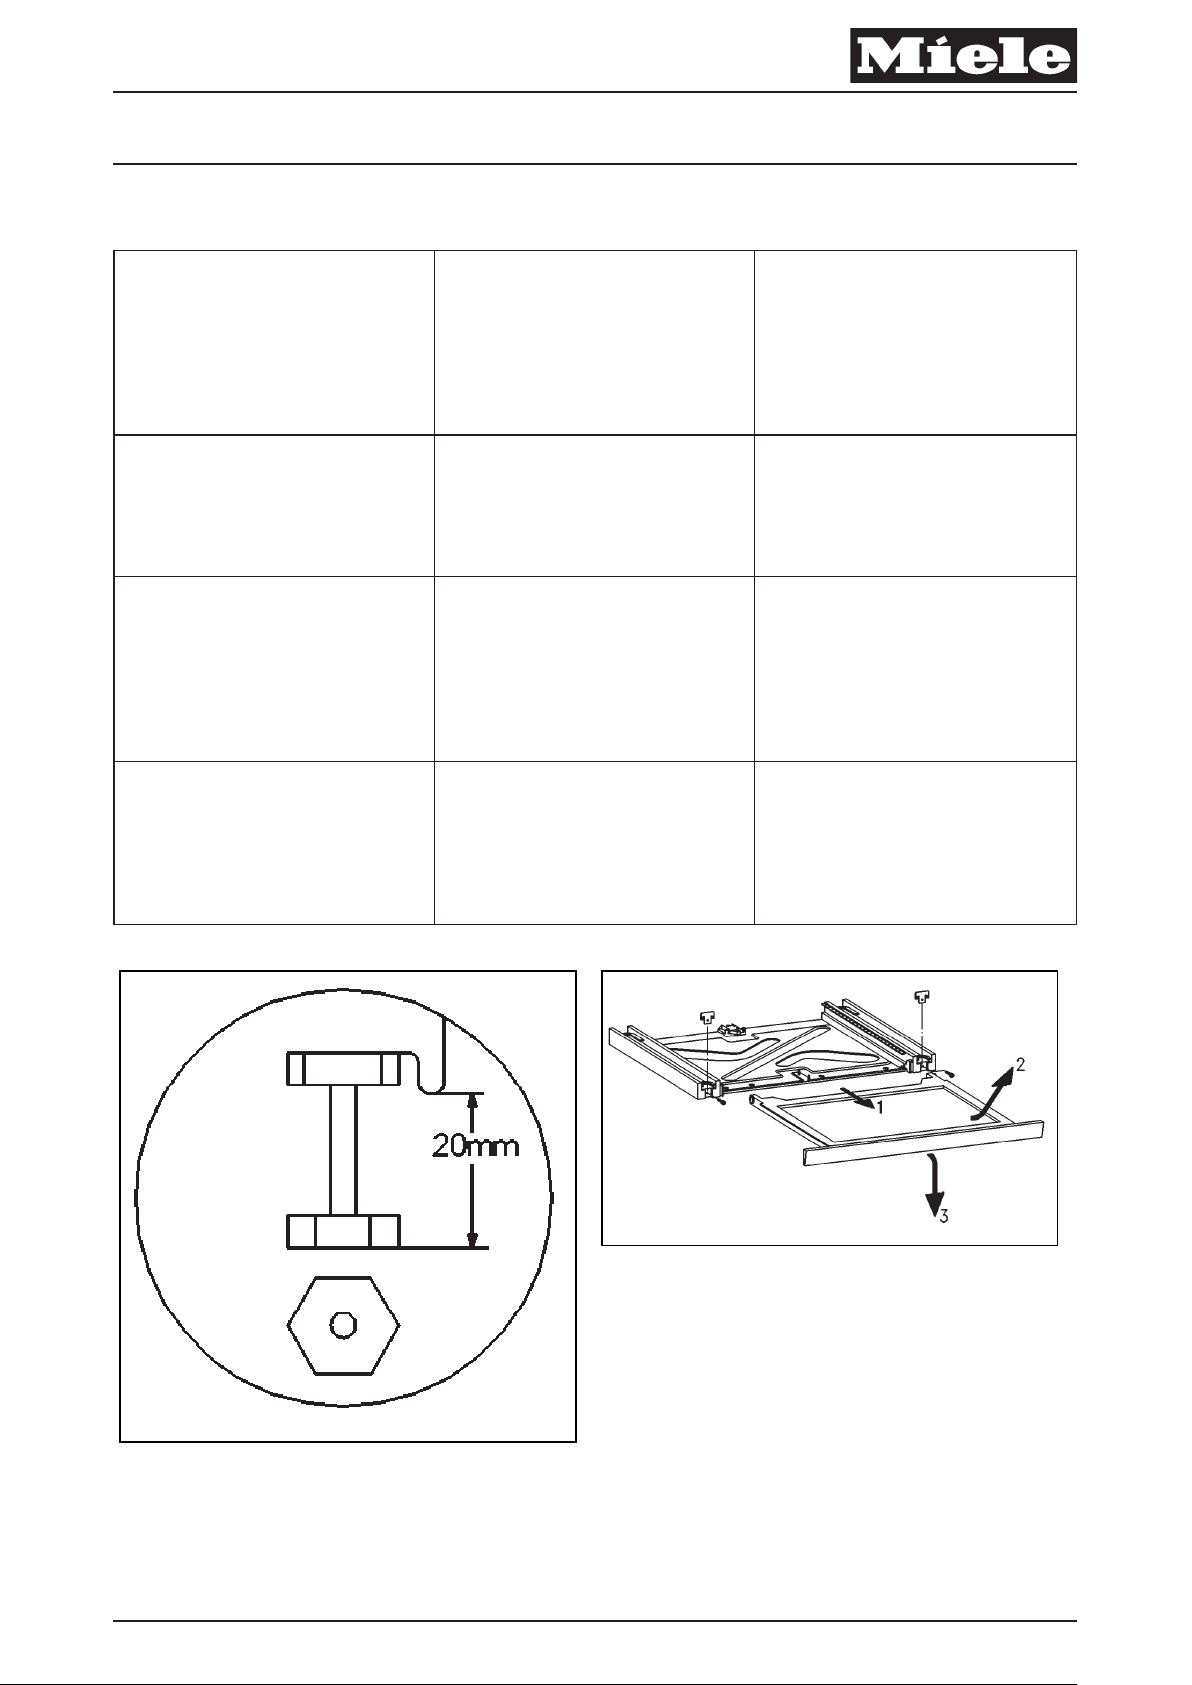
Trocknerfüße einstellen:
– Bei Kondenstrocknern das Kondenswasser aus dem Behälter entfernen.
– Trockner vorsichtig auf eine Gehäuseseite legen.
– Alle Füße vom Trockner auf 20 mm einstellen, siehe Abb. 1.
WTV-Arbeitsplatte herausnehmen:
– Die WTV-Arbeitsplatte durch Drücken entriegeln und bis zum Anschlag herausziehen, siehe Abb. 2 (1).
– Arbeitsplatte anheben und nach vorn ziehen, siehe Abb. 2 (2).
– Arbeitsplatte nach unten kippen und abnehmen, siehe Abb. 2 (3).
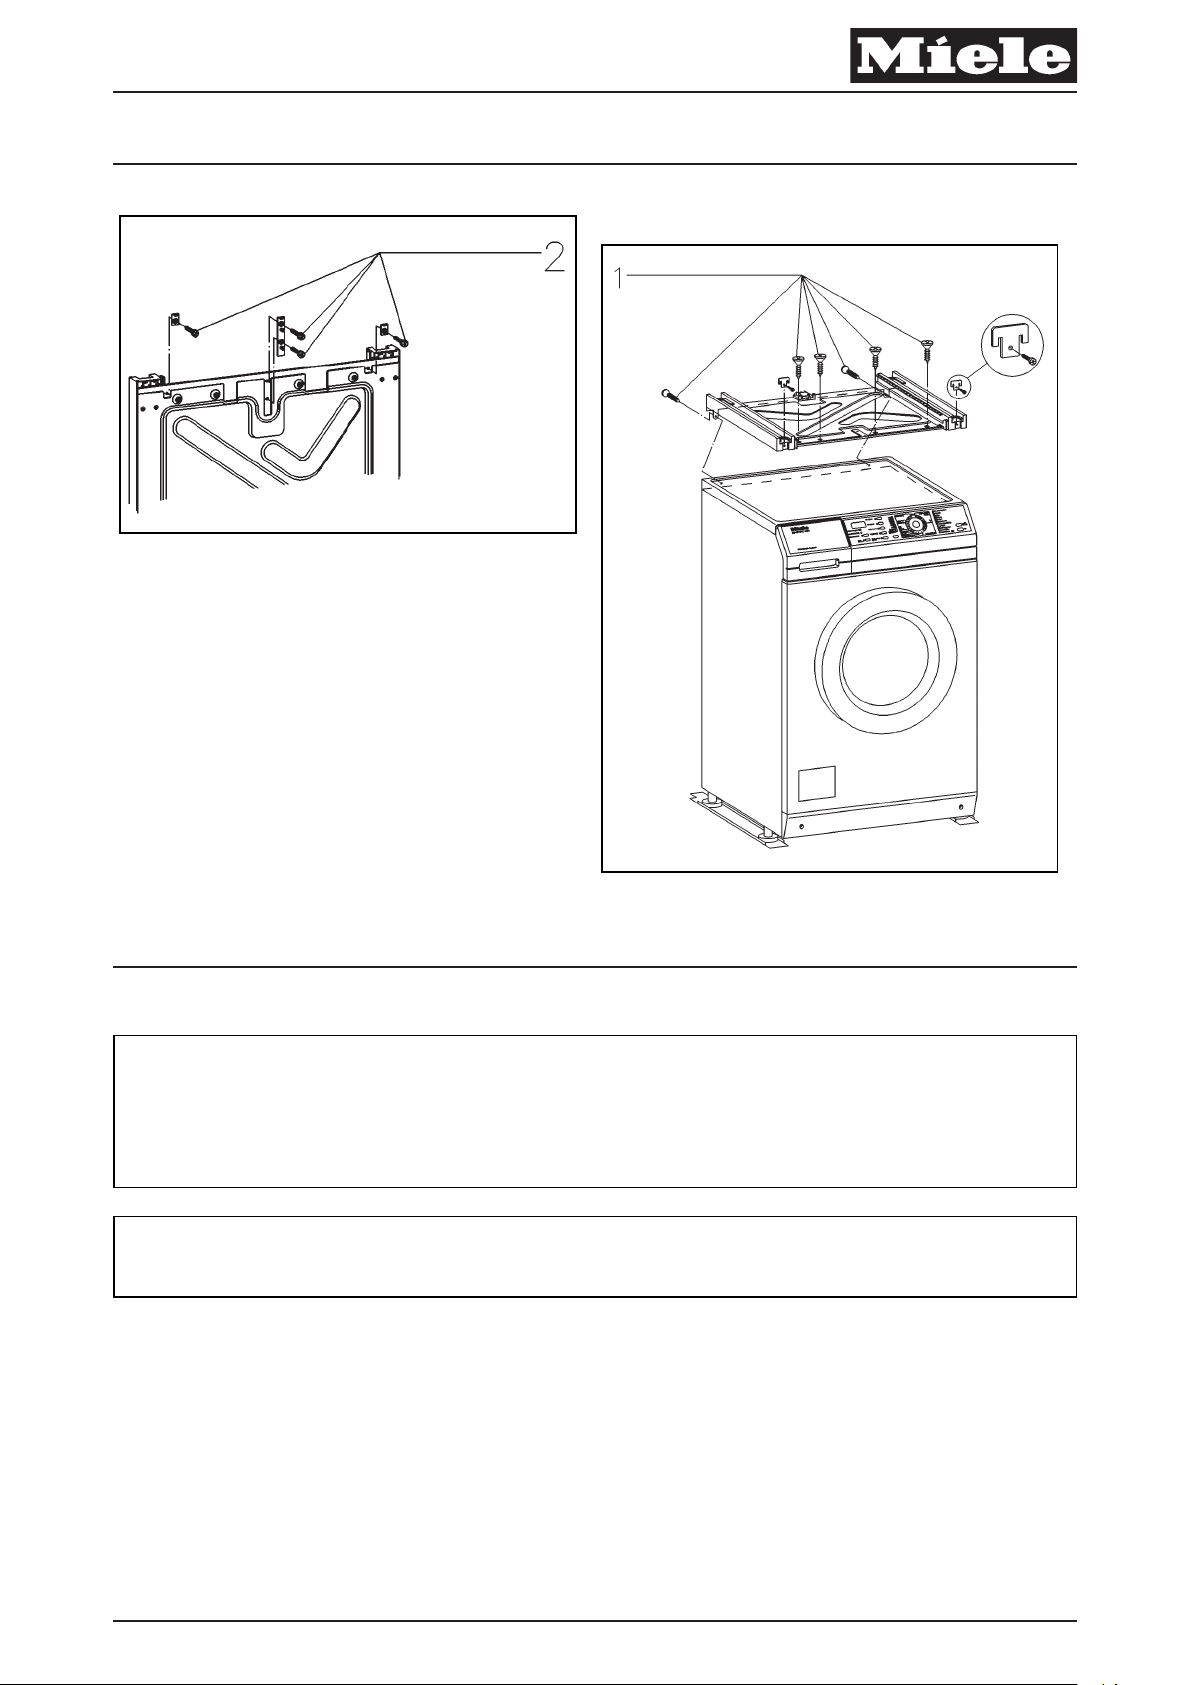
Nicht benötigte Bauteile vom WTV abbauen:
– Siehe Abb. 3 (2).
WTV auf dem Waschautomaten befestigen:
Produktgruppe 19 Umbau- und Montageanweisung
2 von 10 M.-Nr. 05274513
23.07.2004 Diese Unterlagen dürfen ohne unsere Genehmigung weder vervielfältigt noch Dritten zugänglich gemacht werden. Eigentumsrechte vorbehalten.
x
Page 3
Produktgruppe 19 Umbau- und Montageanweisung
3 von 10 M.-Nr. 05274513
23.07.2004 Diese Unterlagen dürfen ohne unsere Genehmigung weder vervielfältigt noch Dritten zugänglich gemacht werden. Eigentumsrechte vorbehalten.
– WTV auf den Waschautomaten legen, siehe Abb. 4.
– WTV vorn und hinten mit Holzschrauben auf dem Waschautomaten-Gerätedeckel befestigen.
(Wenn im Gerätedeckel die hinteren Löcher nicht vorhanden sind, dann zwei Löcher je 3 mm bohren.)
Arbeitsplatte einsetzen:
– Zuerst die rechte Rolle der Arbeitsplatte in die Führungsschiene einführen und dann in umgekehrter Reihenfolge wie
bei “ WTV-Arbeitsplatte herausnehmen” beschrieben, einsetzen.
Wasch-Trocken-Säule aufstellen:
– Trockner auf den Waschautomaten, in die WTV-Führungsschienen stellen.
– Sicherungen in die Verbindungsschienen einsetzen und mit Schrauben befestigen, siehe Abb. 4.
de
en
x
Danger!
Before any service work is commenced, the machine must be disconnected from the mains.
Service and repair work should only be carried out by suitably qualified persons in accordance with all appropriate local
and national safety regulations.
Note
Install the washing machine in accordance with the operating instructions.
Dryer feet adjustment
– On condenser dryers empty all condensate from the container drawer.
– Lay the dryer carefully on one side.
– Unscrew the dryer feet so that they protrude by 20 mm, Fig. 1.
Shelf removal
– Push the shelf in slightly to release it. Pull out the shelf to its end stop, Fig. 2 (1).
– Lift the shelf slightly and pull it forwards, Fig. 2 (2).
– Tilt the shelf downwards and remove it, Fig. 2 (3).
Removal of parts not required from stacking kit
– See Fig. 3 (2).
Fitting washer-dryer stacking kit
– Lay the stacking kit in position on the washing machine, Fig. 4.
– Secure the stacking kit on the washing machine lid at the front top edge and rear with wood screws.
(Two 3 mm holes must be drilled through the edge of the lid at the rear at the appropriate positions if they are not
already present.)
Shelf fitting
– First locate the right roller in the guide. Then fit the shelf by following the removal instructions in reverse order.
Washer-dryer stack assembly
– Fit the dryer on the washing machine in its guides and slide the feet into their retaining slots.
– Insert the retaining pieces and secure them with screws, Fig. 4.
en
fr
x
Danger !
Les travaux doivent être effectués exclusivement par un technicien qualifié conformément aux prescriptions de sécurité
en vigueur.
Mettre impérativement l'appareil hors tension avant toute intervention.
Page 4

Produktgruppe 19 Umbau- und Montageanweisung
4 von 10 M.-Nr. 05274513
23.07.2004 Diese Unterlagen dürfen ohne unsere Genehmigung weder vervielfältigt noch Dritten zugänglich gemacht werden. Eigentumsrechte vorbehalten.
Remarque
Installer le lave-linge d'après le mode d'emploi.
Régler les pieds du sèche-linge :
– Pour les sèche-linge à condensation, vider préalablement l'eau condensée du réservoir.
– Coucher avec prudence le sèche-linge sur le côté.
– Régler tous les pieds à 20 mm, voir croquis 1.
Enlever la tablette du cadre de superposition :
– Presser la tablette du cadre de superposition pour la déverrouiller puis la sortir jusqu'à la butée, voir croquis 2 (1).
– Soulever la tablette et la tirer vers l'avant, voir croquis 2 (2).
– Basculer la tablette vers l'arrière et l'enlever, voir croquis 2 (3).
Démonter les pièces superflues du cadre de superposition :
– Voir croquis 3 (2).
Fixer le cadre de superposition sur le lave-linge :
– Poser le cadre de superposition sur le lave-linge, voir croquis 4.
– Fixer le cadre de superposition sur le couvercle du lave-linge à l'avant et à l'arrière avec des vis à bois.
(si les perforations arrière ne sont pas pratiquées dans le couvercle de l'appareil, percer deux trous de 3 mm.)
Poser la tablette :
– Introduire d'abord le galet droit de la tablette dans la glissère puis poser la tablette en recommençant les opérations
décrites au paragraphe “Enlever la tablette du cadre de superposition” dans l'ordre inverse.
Monter la colonne lave-linge/sèche-linge :
– Poser le sèche-linge sur le lave-linge dans les glissières du cadre de superposition.
– Poser les plaques d'arrêt dans les rails puis fixer avec des vis, voir croquis 4.
fr
ni
x
Pas op!
De montage mag alleen door een vakman met inachtneming van alle geldende veiligheidsvoorschriften worden
uitgevoerd.
Voordat er onderhoudswerkzaamheden aan de machine uitgevoerd worden, dient het apparaat beslist spanningsvrij
gemaakt te worden.
Opmerking
Plaats de wasautomaat volgens de gebruiksaanwijzing.
Voeten van de droger instellen:
– Verwijder bij condensdrogers het condenswater uit het reservoir.
– Leg de droger voorzichtig op één kant.
– Stel alle stelvoeten van de droger op 20 mm in, zie afb. 1
Werkblad verwijderen:
– Ontgrendel het werkblad door het in te drukken en trek het tot aan de aanslag naar buiten, zie afb. 2 (1).
– Til het werkblad op en trek het naar voren, zie afb. 2 (2).
– Kantel het werkblad naar beneden en verwijder het, zie afb. 2 (3).
Overbodige onderdelen van het werkblad demonteren:
– Zie afb. 3 (2).
Was-droog-verbindingsset op de wasautomaat bevestigen:
– Leg de verbindingsset op de wasautomaat, zie afb. 4.
– Bevestig de was-droog-verbindingsset aan de voor- en achterkant met houtschroeven op het deksel van de
wasautomaat.
(als in het deksel de achterste gaten ontbreken, boor dan twee gaten van elk 3 mm.)
Page 5

Produktgruppe 19 Umbau- und Montageanweisung
5 von 10 M.-Nr. 05274513
23.07.2004 Diese Unterlagen dürfen ohne unsere Genehmigung weder vervielfältigt noch Dritten zugänglich gemacht werden. Eigentumsrechte vorbehalten.
Werkblad plaatsen:
– Schuif eerst de rechter rol van het werkblad in de geleiderails en plaats het werkblad dan in omgekeerde volgorde ten
opzichte van de beschrijving onder “WTV-werkblad ver wijderen”.
Was-droog-zuil monteren:
– De droger op de wasautomaat in de geleiderails van de WTV plaatsen.
– Plaats de houders in de verbindingsrails en bevestig deze met schroeven, zie afb. 4.
ni
da
x
Risiko!
Montering må kun udføres af fagfolk under hensyntagen til gældende sikkerhedsbestemmelser.
Inden reparation og vedligeholdelse påbegyndes, skal strømmen til maskinen afbrydes.
Bemærk
Vaskemaskinen opstilles som beskrevet i brugsanvisningen.
Tørretumblerens maskinben indstilles:
– På kondenstørretumblere tømmes kondensbeholderen for vand.
– Tørretumbleren lægges forsigtigt ned på siden.
– Alle maskinben på tørretumbleren drejes ud til en højde på 20 mm, se ill. 1.
Udtrækspladen til sammenbygningsbeslaget tages ud:
– Udtrækspladen løsnes med et tryk og trækkes ud, indtil der mødes modstand, se ill. 2 (1).
– Udtrækspladen løf tes op og trækkes ud fremad, se ill. 2 (2).
– Udtrækspladen vippes nedad og tages af, se ill. 2 (3).
Afmontering af overflødige dele fra sammenbygningsbeslaget:
– Se ill. 3 (2).
Sammenbygningsbeslaget fastgøres på vaskemaskinen:
– Sammenbygningsbeslaget anbringes på vaskemaskinen, se ill. 4.
– Sammenbygningsbeslaget fastgøres fortil og bagtil på vaskemaskinens topplade med træskruer.
(Hvis der ikke er nogen huller bagtil på toppladen, bores to huller på 3 mm)
Udtrækspladen sættes i:
– Den højre rulle på udtrækspladen føres først ind i skinnen, og dernæst monteres udtrækspladen i omvendt
rækkefølge som beskrevet under "Udtrækspladen til sammenbygningsbeslaget tages ud".
Vaske-/tørresøjle opstilles:
– Tørretumbleren stilles på vaskemaskinen i glideskinnen til sammenbygningsbeslaget.
– Sikringerne anbringes i skinnerne og fastgøres med skruer, se ill. 4.
da
no
x
Advarsel !
Monteringen skal bare utføres av kvalifiserte fagfolk som tar hensyn til de gjeldende sikkerhetsbestemmelser.
Før vedlikehold og reparasjoner utføres, er det absolutt nødvendig å gjøre maskinen spenningsløs.
NB!
Vaskemaskinen stilles opp i henhold til bruksanvisningen.
Innstilling av føttene på tørketrommel:
Page 6

Produktgruppe 19 Umbau- und Montageanweisung
6 von 10 M.-Nr. 05274513
23.07.2004 Diese Unterlagen dürfen ohne unsere Genehmigung weder vervielfältigt noch Dritten zugänglich gemacht werden. Eigentumsrechte vorbehalten.
– For kondenstørketromler skal kondensvannet fjernes fra beholderen.
– Legg tørketrommelen forsiktig på den ene kabinettsiden.
– Still inn alle maskinføttene på tørketrommelen så de stikker ut 20 mm, se Fig. 1.
Uttagning av WTV-arbeidsplate:
– Løsne WTV-arbeidsplaten ved å trykke den lett inn og trekk den fremover helt til den stopper, se Fig. 2 (1).
– Løft opp arbeidsplaten litt foran og trekk den forover, se Fig. 2 (2).
– Vipp arbeidsplaten forsiktig nedover og ta den av, se Fig. 2 (3).
Demontering av komponenter fra WTV-satsen som ikke er nødvendige:
– Se Fig. 3 (2).
Montering av WTV-satsen på vaskemaskinen:
– Legg WTV-satsen på vaskemaskinen, se Fig. 4.
– Fest WTV-satsen med treskruer foran og bak på kanten av vaskemaskinens kabinettdeksel.
(Hvis de bakre hullene ikke finnes i maskindekselet, skal 2 hull, hver på 3 mm, bores på passende sted gjennom
kanten på dekselet.)
Innsetting av arbeidsplate:
– Før først arbeidsplatens høyre hjul inn i skinnen og sett deretter inn arbeidsplaten i WTV-satsen i omvendt rekkefølge
av det som er forklart i “Uttagning av WTV-arbeidsplate”.
Oppstilling av vask-tørk-søyle:
– Still tørketrommelen på vaskemaskinen med maskinføttene i WTV-skinnene og skyv den bakover.
– Sett inn sikringene i skinnenes front og fest dem med skruer, se Fig. 4.
no
sv
x
Fara!
Monteringen får utföras endast av en fackman under beaktande av gällande säkerhetsföreskrifter.
En allpolig brytning från nätet måste ovillkorligen ske innan underhålls- och reparationsarbeten utförs på maskinen.
Anmärkning
Ställ upp tvättmaskinen enligt bruksanvisningen.
Ställa in torktumlarens fötter:
– Vad gäller kondenstorktumlare ska kondensvattnet tömmas ur behållaren.
– Lägg torktumlaren försiktigt på sidan.
– Reglera torktumlarens alla skruvfötter så att ett avstånd på 20 mm mellan golv och maskin uppnås, se bild 1.
Lyfta ut WTV-arbetsskivan (WTV=Wasch-Trocken-Verbindungssatz):
– Lossa WTV-arbetsskivan genom att först trycka in och sedan dra ut den tills det tar stopp, se bild 2 (1).
– Lyft upp arbetsskivan och dra den framåt, se bild 2 (2).
– Tippa arbetsskivan nedåt och lyft av den, se bild 2 (3).
Demontera de komponenter som inte behövs från WTV:n:
– Se bild 3 (2).
Fästa WTV:n på tvättmaskinen:
– Placera WTV:n på tvättmaskinen, se bild 4.
– Fäst WTV:n fram- och baktill på tvättmaskinens topplock med träskruvar.
(Om topplocket inte har några hål baktill, borra då två hål på vardera 3 mm.)
Montera tillbaka arbetsskivan:
– För först in arbetsskivans högra hjul i styrskenan och skjut sedan in den genom att följa anvisningarna under “Lyfta ut
WTV-arbetsskivan” men i omvänd ordningsföljd.
Ställa upp tvätt-torkpelaren:
– Placera torktumlaren ovanpå tvättmaskinen i WTV:ns styrskenor.
– Montera säkringar i förbindelseskenorna och fäst dessa med skruvar, se bild 4.
sv
Page 7

Produktgruppe 19 Umbau- und Montageanweisung
7 von 10 M.-Nr. 05274513
23.07.2004 Diese Unterlagen dürfen ohne unsere Genehmigung weder vervielfältigt noch Dritten zugänglich gemacht werden. Eigentumsrechte vorbehalten.
fi
x
Varoitus!
Asennus- ja korjaustöitä saa suorittaa vain ammattihenkilö huomioiden voimassa olevat turvallisuusmääräykset.
Ennen minkäänlaisia laitteessa suoritettavia huolto- ja käyttöönottotöitä, tulee laite ehdottomasti erottaa
verkkojännitteestä.
Ohje
Pesukone asennetaan käyttöohjeen mukaisesti.
Kuivausrummun jalat säädetään:
– Kondenssikuivaajassa tyhjennetään kondenssivesisäiliö.
– Kuivausrumpu asetetaan varovasti toiselle kyljelleen.
– Kuivausrummun kaikki jalat säädetään n. 20 mm, katso kuva 1.
Välirakennussarjan työtaso vedetään ulos:
– Välirakennussarjan työtaso vapautetaan painamalla ja vedetään estimeen saakka ulos, katso kuva 2 (1).
– Työtasoa nostetaan ja vedetään eteenpäin, katso kuva 2 (2).
– Työtasoa kallistetaan alas ja se poistetaan, katso kuva 2 (3).
Välirakennussarjasta irrotetaan tarpeettomat osat:
– Katso kuva 3 (2).
Välirakennussarja kiinnitetään pesukoneeseen:
– Välirakennussarja asetetaan pesukoneen päälle, katso kuva 4.
– Välirakennussarja kiinnitetään puuruuveilla edestä ja takaa pesukoneen kanteen.
(Jos pesukoneen kannessa takana ei ole porausreikiä, tulee siihen porata kaksi 3 mm reikää)
Työtaso asennetaan:
– Oikea rulla johdetaan ensin ohjauskiskoon ja asetetaan sen jälkeen päinvastaisessa järjestyksessä paikoilleen, kuten
kohdassa ”Välirakennussarjan työtason irrotus” on kerrottu.
Pesu-kuivaus-tornin pystytys:
– Kuivausrumpu asetetaan pesukoneen päällä oleville välirakennussarjan kiskoille.
– Kiskoille tulevat varmistinlevyt asetetaan kehyksiin ja ruuvataan kiinni, katso kuva 4.
fi
it
x
Pericolo!
Il montaggio può essere eseguito solo da un tecnico qualificato nel rispetto delle vigenti prescrizioni di sicurezza.
Prima di eseguire lavori di manutenzione e riparazione, è assolutamente necessario staccare la macchina dalla corrente.
Indicazione
Installare la lavatrice come descritto nelle istruzioni d'uso.
Registrare i piedini dell'asciugabiancheria:
– Per asciugabiancheria a condensazione, eliminare l'acqua di condensa dal contenitore.
– Posare l'asciugabiancheria delicatamente su un lato dell'involucro.
– Registrare tutti i piedini della macchina a 20 mm, vedasi fig. 1.
Estrarre il piano di lavoro WTV:
– Sbloccare mediante pressione il piano di lavoro WTV ed estrarlo fino alla battuta, vedasi fig. 2 (1).
– Alzare il piano di lavoro e tirarlo in avanti, vedasi fig. 2 (2).
– Ribaltare il piano di lavoro verso il basso e toglierlo, vedasi fig. 2 (3).
Page 8

Produktgruppe 19 Umbau- und Montageanweisung
8 von 10 M.-Nr. 05274513
23.07.2004 Diese Unterlagen dürfen ohne unsere Genehmigung weder vervielfältigt noch Dritten zugänglich gemacht werden. Eigentumsrechte vorbehalten.
Smontare dal WTV i componenti non necessari:
– Vedasi fig. 3 (2).
Fissare il WTV sulla lavatrice:
– Posare il WTV sulla lavatrice, vedasi fig. 4.
– Fissare il WTV davanti e dietro con viti da legno sul coperchio della lavatrice.
(Se nel coperchio non fossero predisposti i fori posteriori, praticare due fori, ognuno di 3 mm).
Inserire il piano di lavoro:
– Introdurre prima la rotella destra del piano di lavoro nella guida e poi inserire il piano con procedimento inverso
rispetto a come descritto in “Estrarre il piano di lavoro WTV”.
Posizionare la colonna bucato:
– Posare l'asciugabiancheria sulla lavatrice nelle guide WTV.
– Inserire i bloccaggi nelle guida di collegamento e fissarli con viti, vedasi fig. 4.
it
es
x
¡Peligro!
Los trabajos de montaje serán realizados exclusivamente por personal autorizado, ateniéndose estrictamente a las
normas de seguridad vigentes.
Antes de realizar cualquier trabajo de mantenimiento y reparación en el aparato, es imprescindible desconectarlo de la
red eléctrica.
Advertencia
Emplazar la lavadora según las instrucciones de manejo.
Ajustar las patas de la secadora:
– En el caso de secadoras por condensación, eliminar el agua condensada del recipiente.
– Colocar la lavadora cuidadosamente sobre un lado de la carcasa.
– Ajustar todas las patas de la secadora a 20 mm, véase fig. 1.
Extraer la encimera del juego de unión de lavado y secado:
– Desenclavar la encimera del juego de unión presionándola y extraerla hasta el tope, véase fig. 2 (1).
– Levantar la encimera y tirar de ella hacia delante, véase fig. 2 (2).
– Abatir la encimera hacia abajo y retirarla, véase fig. 2 (3).
Desmontar los componentes innecesarios del juego de unión:
– Véase fig. 3 (2).
Fijar el juego de unión sobre la lavadora:
– Colocar el juego de unión sobre la lavadora, véase fig. 4.
– Fijar la parte delantera y trasera del juego de unión con tornillos para madera a la tapa de la lavadora.
(Si la tapa del aparato no dispusiera de los orificios traseros, taladrar dos orificios de 3 mm cada uno.)
Colocar la encimera:
– Introducir primero el rodillo derecho de la encimera en el carril de guía e insertar la encimera siguiendo el orden
inverso de las instrucciones descritas en “Extraer la encimera del juego de unión de lavado y secado”.
Emplazar la columna de lavado y secado:
Page 9

Produktgruppe 19 Umbau- und Montageanweisung
9 von 10 M.-Nr. 05274513
23.07.2004 Diese Unterlagen dürfen ohne unsere Genehmigung weder vervielfältigt noch Dritten zugänglich gemacht werden. Eigentumsrechte vorbehalten.
– Posicionar la secadora sobre la lavadora introduciéndola en los carriles de guía del juego de unión.
– Colocar las protecciones en los carriles de guía y fijarlas con tornillos, véase fig. 4.
es
el
x
Κίνδυνος!
Οι εργασίες τοποθέτησης επιτρέπεται να γίνονται μόνο από ειδικευμένο τεχνικό που γνωρίζει και λαμβάνει υπόψη τους
ισχύοντες κανόνες ασφαλείας.
Πριν τη διεκπεραίωση εργασιών συντήρησης και αποκατάστασης βλάβης είναι απαραίτητη η αποσύνδεση της
συσκευής από το δίκτυο ρεύματος.
Υπόδειξη
Τοποθετήστε το πλυντήριο σύμφωνα με τις Οδηγίες Χρήσεως.
Ρύθμιση ποδιών στεγνωτηρίου:
– Σε στεγνωτήρια συμπύκνωσης υδρατμών αδειάστε το νερό των υδρατμών από το δοχείο.
– Γυρίστε προσεκτικά το στεγνωτήριο στη μία πλευρά του.
– Ρυθμίστε όλα τα πόδια του στεγνωτηρίου ώστε να έχουν ύψος 20 mm, βλέπε Εικ. 1.
Αφαίρεση της πλάκας εργασίας του WTV:
– Απασφαλίστε την πλάκα εργασίας του WTV πιέζοντάς τη και τραβήξτε την προς τα έξω, βλέπε Εικ. 2 (1).
– Ανασηκώστε λίγο την πλάκα εργασίας και τραβήξτε την μπροστά, βλέπε Εικ. 2 (2).
– Πιέζοντάς την ελαφρώς προς τα κάτω αφαιρέστε την, βλέπε Εικ. 2 (3).
Αφαίρεση μη απαραίτητων εξαρτημάτων από το συνδετικό κολώνας W TV:
– Βλέπε Εικ. 3 (2).
Τοποθέτηση W TV στο πλυντήριο:
– Βάλτε το WTV πάνω στο πλυντήριο, βλέπε Εικ. 4.
– Στερεώστε το WTV μπροστά και πίσω με ξυλόβιδες στο καπάκι του πλυντηρίου.
(Αν στο καπάκι της συσκευής δεν υπάρχουν οι πίσω τρύπες, ανοίξτε 2 τρύπες με διάμετρο 3 mm η καθεμία.)
Τοποθέτηση της πλάκας εργασίας:
– Βάλτε πρώτα το δεξί ροδάκι της πλάκας εργασίας στον οδηγό και ακολουθώντας σε ανάποδη σειρά τα βήματα
που κάνατε κατά την αφαίρεση της πλάκας βάλτε την και πάλι στη θέση της.
Στήσιμο της κολώνας πλυντηρίου-στεγνωτηρίου:
– Τοποθετήστε το στεγνωτήριο στις συνδετικές ράγες πάνω στο πλυντήριο.
– Βάλτε τις ασφάλειες στις συνδετικές ράγες και στερεώστε με βίδες, βλέπε Εικ. 4.
el
pt
x
Perigo!
A montagem deve ser efectuada por pessoal especializado atendendo às medidas de segurança em vigor.
Antes de efectuar trabalhos de manutenção e reparação deverá desligar o aparelho da corrente.
Indicação
Instalar a máquina de acordo com o indicado no livro de instruções.
Regular os pés do secador:
– No caso de secadores de condensação despejar a água da gaveta.
– Deitar o secador cuidadosamente sobre o lateral.
– Regular os pés do secador para ficarem com 20 mm, ver fig. 1.
Page 10

Produktgruppe 19 Umbau- und Montageanweisung
10 von 10 M.-Nr. 05274513
23.07.2004 Diese Unterlagen dürfen ohne unsere Genehmigung weder vervielfältigt noch Dritten zugänglich gemacht werden. Eigentumsrechte vorbehalten.
Desmontar o tampo da mesa extensível
– Pressione o tampo da mesa para o desbloquear e puxe-o até ao batente, ver fig. 2 (1).
– Levantar e puxar o tampo para a frente, ver fig. 2 (2).
– Inclinar o tampo para baixo e retira-lo, ver fig. 2 (3).
Desmontar as peças do conjunto de adaptação que não sejam necessárias
– ver fig. 3 (2)
Fixar o conjunto de adaptação à máquina de lavar roupa:
– Colocar o conjunto de adaptação sobre a máquina, ver fig. 4.
– Fixar o conjunto de adaptação ao tampo da máquina de lavar roupa.
(Se no tampo da máquina não existirem os orifícios atrás deverá fazer dois orifícios com 3 mm ).
Montar o tampo da mesa extensível:
– Primeiro encaixe o rodízio direito do tampo da mesa na calha e proceda a seguir em ordem inversa ao indicado em "
Desmontar o tampo da mesa extensível".
Montagem da coluna lavar/secar:
– Montagem da coluna lavar/secar:
– Colocar as seguranças nas calhas e fixa-las com os parafusos, ver fig. 4.
pt
 Loading...