

Page 1
en Operating Instructions Canister Vacuum Cleaner
fr Mode d'emploi Aspirateur-chariot
SDAE0, SDBE0, SDCE0
SDAE4, SDBE4, SDCE4
HS14
M.-Nr. 10 852 961
Page 2

en ....................................................................................................................... 5
fr ......................................................................................................................... 30
2
Page 3
Only Miele FilterBags, filters and accessories with
the "Original Miele" logo can be used with this
vacuum. Only then can the suction power of the
vacuum cleaner reach its optimum potential creating
the best possible cleaning results.
USE OF NON-MIELE COMPONENTS MAY VOID
THE WARRANTY.
,
The use of FilterBags made of paper or a similar
material, or FilterBags with a cardboard retaining
plate can lead to serious damage to the vacuum
cleaner and may void the warranty, just as with the
use of FilterBags without the "Original Miele" logo.
The "Original Miele" Logo will appear on the
packaging or directly on the FilterBag.
Purchasing new FilterBags and filters
Original Miele FilterBags and filters can be purchased
from an authorized Miele vacuum dealer or by visiting the
Miele store at www.mieleusa.com.
3
Page 4

en - Contents
IMPORTANT SAFETY INSTRUCTIONS ................................................................ 5
Caring for the environment ................................................................................11
Appliance description .........................................................................................12
References to illustrations..................................................................................14
Electrobrush / Turbobrush Operating Instructions ..........................................14
Preparing for use.................................................................................................14
Use........................................................................................................................16
Parking, transport and storage.......................................................................... 18
Maintenance ........................................................................................................18
Purchasing new FilterBags and filters................................................................... 19
Ordering the correct FilterBags and filters ............................................................ 19
When to change the FilterBag .............................................................................. 19
How the FilterBag change indicator works ........................................................... 20
How to replace the FilterBag ................................................................................ 20
When to change the motor protection filter........................................................... 20
How to change the motor protection filter ........................................................... 20
When to replace the exhaust filter......................................................................... 21
How to replace the AirClean filter ......................................................................... 21
Replacing the Active AirClean 50 and HEPA AirClean 50 exhaust filters ............. 21
Replacing one type of exhaust filter with another ................................................ 22
When changing the filter, please note: .................................................................. 22
When to change the thread catchers?.................................................................. 22
How to replace the thread lifters .......................................................................... 22
Cleaning the roller on the AllTeQ floorhead .......................................................... 22
Cleaning and care ...............................................................................................23
Frequently Asked Questions .............................................................................. 24
Technical Service................................................................................................. 25
Contact in case of fault ......................................................................................... 25
Warranty................................................................................................................ 25
Optional accessories ..........................................................................................25
Limited Warranty - Vacuum Cleaners USA ....................................................... 27
4
Page 5
en - IMPORTANT SAFETY INSTRUCTIONS
This vacuum cleaner complies with current safety requirements. Inappropriate use can, however, lead to personal injury and damage to property.
To avoid the risk of accidents and damage to the vacuum
cleaner, please read the operating instructions carefully
before using it for the first time. They contain important
information on its safety, operation and maintenance.
Keep these operating instructions in a safe place and
pass them on to any future user.
Always disconnect the vacuum cleaner from the power
supply when you have finished using it, before changing
any accessories, as well as for maintenance work and
cleaning. Turn the vacuum cleaner off and unplug it.
Correct use
This vacuum cleaner is intended for cleaning flooring in
domestic households and similar residential environments.
This vacuum cleaner can be used for all normal cleaning
of carpets, rugs and hard flooring.
This vacuum cleaner is not intended for outdoor use.
This vacuum cleaner is intended for use at altitudes of
up to 1300ft (4000m) above sea level.
The vacuum cleaner must only be used to vacuum dry
floor surfaces. Do not use on people and animals. Any
other usage, modification or alteration is not supported by
the manufacturer and could be dangerous.
5
Page 6

en - IMPORTANT SAFETY INSTRUCTIONS
Persons which lack physical, sensory or mental abilities
or experience with the machine should not use it without
supervision or instruction by a responsible person.
Safety with children
Danger of suffocation! Ensure that any plastic wrap-
pings, bags, etc. are disposed of safely and kept out of the
reach of children.
Do not allow the vacuum cleaner to be used as a toy.
Close attention is necessary when used near children.
WARNING To reduce the risk of fire, electric shock or injury:
Check the voltage rating of the vacuum cleaner before
connecting the power cord to an electrical outlet. Your
power source should correspond with the voltage rating
plate located on the underside of the vacuum. Use only
household AC outlets. Never use DC power sources. If you
are not sure of your home’s voltage supply, consult a qualified electrician. Connecting the vacuum cleaner to a
higher voltage than indicated in these instructions may result in damage to the vacuum cleaner or injury.
To reduce the risk of electric shock, this appliance has a
polarized plug (one blade is wider than the other.) This plug
will fit in a polarized outlet only one way. If the plug does
not fit fully in the outlet, reverse the plug. If it still does not
fit, contact a qualified electrician to install the proper outlet. Do not alter the plug in any way.
6
Page 7

en - IMPORTANT SAFETY INSTRUCTIONS
Technical safety
Before using the vacuum cleaner and its accessories,
check for any visible signs of damage. Do not use a damaged appliance.
Ensure that the connection data on the data plate of the
vacuum cleaner (voltage and frequency) match the household power supply. Without modifications, the vacuum
cleaner is suited for 50Hz or 60Hz.
The electrical outlet must be fitted with a 15A fuse.
Reliable and safe operation of this vacuum cleaner can
only be assured if it has been connected to the electricity
supply.
The socket on the vacuum cleaner (depending on
model) must only be used for the Miele Electrobrushes
listed in these operating instructions.
The Miele Powerbrush is a motor driven accessory for
use only with Miele vacuum cleaners. For safety reasons,
the vacuum cleaner must not be used with an Powerbrush
produced by another manufacturer.
Repairs must only be performed by an authorized ser-
vice agent in accordance with national and local safety
regulations. Unauthorized repairs could cause injury or machine damage. Otherwise the warranty will be void.
7
Page 8

en - IMPORTANT SAFETY INSTRUCTIONS
Do not pull or carry the vacuum cleaner by the power
cord, and be careful not to damage the cord when withdrawing the plug from the socket. Keep the cord away
from sharp edges and do not let it get pinched, for example, under a door. Avoid running the vacuum cleaner over
the cord. This could damage the cord, plug or socket. The
appliance must not be used if any of these have suffered
damage.
Do not use the vacuum cleaner if the power cord is
damaged. If the power cord is damaged it must be replaced together with the cord reel. For safety reasons this
must only be done by Miele Technical Service or a Miele
authorized service technician.
When vacuuming, in particular fine dust, e.g. sawdust,
sand, plaster, flour, talcum powder etc., electrostatic
charges build up naturally. Under certain conditions these
charges will be released. To avoid the unpleasant effects of
these discharges, a metal inlay has been incorporated into
the underside of the handle. Please make sure that you
keep your hand in constant contact with this metal strip
during vacuuming.
Do not allow the vacuum cleaner or Electrobrush, elec-
tric wand or electric hose to get wet. Clean only with a dry
or slightly damp cloth. If any moisture gets into the appliance, danger of electric shock.
The Electrobrush, electric wand and electric hose con-
tain power cords. The plug connectors must not come in
contact with water. Danger of electric shock. They should
only be cleaned with a dry cloth.
8
Page 9

en - IMPORTANT SAFETY INSTRUCTIONS
Repairs should only be carried out by a Miele-authorized
service technician. Repairs and other work by unqualified
persons can cause considerable danger to users.
Defective components should be replaced by Miele orig-
inal parts only. Only with these parts can safety of the appliance be assured as intended by the manufacturer.
Proper use
To avoid the risk of damage, do not use the vacuum
cleaner without the FilterBag, dust compartment filter and
exhaust filter in place.
The dust compartment cover will not close without a Fil-
terBag inserted. Do not force it.
Do not vacuum up anything which has been burning or
smoking, e.g., cigarettes, ashes or hot ash, whether glowing or apparently extinguished.
Do not use the vacuum cleaner to vacuum up any water,
liquid or damp dirt. Wait until any freshly cleaned or shampooed rugs or carpets are completely dry before attempting to vacuum.
Do not use the vacuum cleaner to vacuum toner dust.
Toner, such as that used in printers and photocopiers, can
conduct electricity.
Do not vacuum up any flammable or combustible liquids
or gases and do not vacuum in areas where such substances are stored.
Do not vacuum at head height and do not let the suction
get anywhere near a person's head.
9
Page 10
en - IMPORTANT SAFETY INSTRUCTIONS
Accessories
To avoid the risk of injury when vacuuming with a Miele
Powerbrush or Turbobrush, do not touch the rotating roller
brush.
It is not advisable to vacuum directly with the handle,
i.e., without an accessory attached, as the rim could get
damaged and you could hurt yourself on sharp edges.
Only use genuine FilterBags, filters and accessories with
the “Original Miele” logo on them. Otherwise the manufacturer cannot guarantee the safety of the product.
California Proposition 65
THE FOLLOWING WARNING IS REQUIRED BY THE STATE OF CALIFORNIA FOR CALIFORNIA RESIDENTS ONLY:
WARNING:
Cancer and Reproductive Harm -
www.P65Warnings.ca.gov.
SAVE THESE INSTRUCTIONS
10
Page 11

en - Caring for the environment
Disposal of the packing material
The cardboard box and packing materials protect the appliance during shipping. They have been designed to be
biodegradable and recyclable.
Ensure that any plastic wrappings,
bags, etc. are disposed of safely and
kept out of the reach of children. Danger of suffocation!
Disposing of the FilterBags and filters
Filterbags and filters are made from environmentally friendly materials, and can
be disposed of with the normal household waste, as long as they have been
used exclusively for general household
dust.
Disposing of your old appliance
Before disposing of your old appliance
remove the FilterBag and filters and dispose of them with your household
waste.
Electronic and electrical appliances
contain many valuable materials. They
also contain certain materials, compounds and components which were
essential for their correct functioning
and safety. These could be hazardous
to your health and to the environment if
disposed of with general waste or if
handled incorrectly. Please do not,
therefore, dispose of your old appliance
with general waste.
Instead, please make use of officially
designated collection and disposal
points to dispose of and recycle electrical and electronic appliances. By law,
you are solely responsible for deleting
any personal data from the appliance
prior to disposal. Please ensure that
your old appliance poses no risk to children while being stored for disposal.
11
Page 12

en - Appliance description12en - Appliance description
Page 13

a
XXL handle *
b
Air inlet valve *
c
Release buttons *
d
Telescopic suction wand release mechanism *
e
Telescopic suction wand *
f
Dust compartment lid release button
g
Floorhead *
h
Carrying handle
i
Socket for Electrobrush *
j
Original Miele FilterBag
k
Motor protection filter
l
Original Miele exhaust filter *
m
Power cord *
n
Foot switch for automatic cord rewind
o
Rotary selector
p
Park system for pauses during vacuuming
q
On/off foot switch
r
FilterBag change indicator
s
Connection socket *
t
Suction hose *
u
Accessories holder with three accessories
Park system for storage (on both sides of the vacuum cleaner - not shown)
* These features are model-specific and may vary or may not be available on your
vacuum cleaner.
13
Page 14

en-US
References to illustrations
The illustrations referred to in the text
are shown on the fold-out pages at
the end of these Operating Instructions.
Electrobrush / Turbobrush Operating Instructions
Your vacuum cleaner is equipped with
an Electrobrush or Turbobrush as standard. Please read the separate operating instructions supplied with the Electrobrush or Turbobrush before using it
for the first time.
Preparing for use
Attaching the suction hose (Fig. 01)
Insert the hose connector into the
suction socket on the vacuum
cleaner until it clicks into position. To
do this, line up the guides on the two
pieces.
Disconnecting the suction hose (Fig. 02)
Press the release buttons at the side
of the hose connector, and lift the
hose from the socket.
Connecting the suction hose to the handle (Fig. 03)
(required depending on model)
Insert the suction hose into the han-
dle until it clicks into position.
Connecting the handle to the wand (Fig. 04)
Insert the handle into the wand until it
clicks into position. To do this, line up
the guides on the two pieces.
14
To release the handle from the wand,
press the release button and pull the
handle out of the wand, twisting it
slightly as you do so.
Adjusting the telescopic suction wand
Depending on the model, your vacuum
cleaner will be fitted with one of the following suction wands:
– Telescopic suction wand
– Comfort telescopic suction wand
One part of the telescopic suction wand
is packed inside the other and it can be
adjusted to suit your height for comfortable vacuuming.
Telescopic suction wand (Fig. 05)
Press the release button and adjust
the telescopic suction wand to the required length.
Comfort telescopic suction wand (Fig. 05)
Grasp the release mechanism and
adjust the telescopic suction wand to
the required length.
Connecting the telescopic wand to the floorhead/floorbrush (Fig. 06)
(included as standard depending on
model)
Push the telescopic wand into the
suction nozzle and turn it clockwise
or counter-clockwise until it clicks
into position.
Page 15

en-US
To detach these parts from each
other, press the release button and
pull the telescopic wand out of the
suction nozzle, twisting it slightly as
you do so.
Adjusting the floorhead (Fig. 07)
(only for models with a reversible floorhead included in the standard version)
This vacuum cleaner can be used for
the everyday cleaning of carpets, rugs
and hard flooring.
Miele offers a range of other floorheads,
brushes and accessories for other types
of flooring and special applications (see
“Optional accessories”).
Please always follow the flooring
manufacturer's cleaning and care instructions.
Vacuum carpets and rugs with the
brush retracted:
Press the foot switch .
Clean hard flooring which is not sus-
ceptible to scratching, and flooring with
gaps or deep crevices in it with the
brush protruding:
Press the foot switch .
If the suction power of the adjustable
floorhead seems too high, reduce the
suction until the floorhead is easier
to maneuver (see “Use – Regulating
the suction power”).
Activating the TimeStrip® exhaust filter change indicator on the exhaust
filter
Depending on the model, your vacuum
cleaner will be fitted as standard with
one of the following exhaust filters (Fig.
08).
a AirClean
b Active AirClean 50 (black)
c HEPA AirClean 50 (white)
If your vacuum cleaner is fitted with exhaust filter b or c, you need to activate
the TimeStrip® exhaust filter change indicator.
Press the release button on the re-
cessed grip and raise the dust compartment lid as far as it will go (Fig.
09).
Remove the indicator strip (Fig. 10).
Press the TimeStrip® exhaust filter
change indicator(Fig. 11).
After approx. 10–15 seconds a thin red
line will appear in the left-hand side of
the display (Fig. 12).
Close the dust compartment lid se-
curely, making sure it clicks into position. Take care not to trap the FilterBag when doing so.
How the TimeStrip® exhaust filter
change indicator works
The TimeStrip® exhaust filter change
indicator shows the remaining functional life of the exhaust filter. After approx. 50 operating hours, or approx.
one year of average use, the display will
be completely filled with red (Fig. 13).
15
Page 16
en-US
Using the accessories supplied (Fig. 14)
Dusting brush / Dusting brush
with natural bristles
(depending on model)
For cleaning baseboards, as well
as ornate, carved or particularly
delicate objects.
The head can be swiveled to adjust the angle.
Upholstery nozzle
For cleaning upholstery, mattresses, cushions, curtains, etc.
Crevice nozzle
For cleaning in folds, crevices or
corners.
Accessories holder for the
above three accessories (Fig.
15)
Symbols on the holder show
where to attach the different accessories.
Attach the accessories holder to the
suction hose where it joins the handle
or to the hose connecter socket on
the vacuum cleaner. Make sure it
clicks into position.
Convertible floorhead / floor brush (Fig. 16)
(included as standard depending on
model)
For general use and also for vacuuming
the stairs.
For safety reasons when vacu-
uming stairs, it is best to start at the
bottom of the stairs and move upwards.
Use
Power cord
Unwind the cord completely to
aid the vacuum in dissipating heat.
Do not pull or carry by the cord, use
the cord as a handle, close a door on
the cord, or pull the cord around
sharp edges or corners. Do not run
the appliance over the cord. Keep
the cord away from heated surfaces.
Do not unplug by pulling the cord. To
unplug grasp the plug, not the cord.
This appliance is equipped with a
power cord reel. Hold the plug when
rewinding onto cord reel. Do not allow plug to whip when rewinding.
Some models are supplied as standard
with one of the following accessories
which are not illustrated.
– Electrobrush
– Turbobrush
These vacuum cleaners are supplied
with separate operating instructions for
the relevant accessory part.
16
Unwind the power cord (Fig. 17)
Pull the power cord out to the re-
quired length.
Insert the plug into the electrical
socket.
Page 17

en-US
If vacuuming for longer than
30minutes, the power cord must be
pulled out all the way. Otherwise
there is a danger of overheating and
damage.
Rewinding the power cord (Fig. 18)
Unplug the power cord from the
socket.
Step on the cord rewind foot switch.
The power cord will then retract itself
into the vacuum cleaner.
If you do not want the cord to retract
completely into the vacuum cleaner
you can deactivate this function. To do
this, take hold of the end of the cord
while rewinding it and give it a short
pull when you want the rewinding to
end.
Turning the vacuum cleaner on and off (Fig. 19)
Press the On/Off foot control .
Regulating the suction power (Fig. 20)
The suction power can be regulated to
suit the type of flooring being cleaned.
Reducing the suction power reduces
the amount of effort required to maneuver the floor brush.
The vacuum cleaner has symbols on
the controls which indicate the type of
use the settings are suitable for.
Curtains, fabric
Upholstery, cushions
Deep pile carpets, rugs and run-
ners
Energy-saving vacuuming. This
setting is also very quiet
Low pile carpet and rugs
Hard flooring and heavily soiled
carpets and rugs
When using the adjustable floorhead,
if the suction seems too high, reduce
the suction until the floorhead is easier to maneuver.
Turn the suction power selector man-
ually to the suction power setting you
require.
Opening the air inlet valve (Fig. 21 + 22)
(depending on model)
It is easy to reduce the suction power
for a short time, e.g., to prevent rugs or
other objects being sucked into the
vacuum cleaner.
Open the air inlet valve on the handle
far enough to reduce the suction
power.
This reduces the suction on the respective nozzle used.
During vacuuming
When vacuuming, pull the vacuum
cleaner behind you on its wheels. You
can stand it upright for vacuuming
stairs and curtains, etc.
17
Page 18
en-US
When vacuuming, in particular
fine dust, e.g. dust, sand, plaster,
flour, etc., electrostatic charges build
up naturally. Under certain conditions
these charges will be released. To
avoid the unpleasant effects of these
discharges, a metal inlay has been
incorporated into the underside of
the handle. Please make sure that
you keep your hand in constant contact with this metal strip during vacuuming (Fig. 23 + 24).
Parking, transport and storage
Park system for pauses during vacuuming (Fig. 25)
(cannot be used with the Electrobrush
SEB 228)
The park system allows you to conveniently park the suction wand and floorhead during pauses.
Slot the floorhead into the parking at-
tachment on the vacuum cleaner.
If your vacuum cleaner is on a sloping surface, e.g., a ramp, retract the
telescopic suction wand fully.
Slot the floorhead downwards into
one of the parking attachments on either side of the vacuum cleaner.
This makes the vacuum cleaner easier
to carry or store.
If your vacuum cleaner has an XXL handle, you can detach this so that the
vacuum cleaner requires less storage
space (Fig. 27).
Detach the XXL handle from the re-
tracted telescopic suction wand.
Wind the suction hose around the
telescopic suction wand and then slot
the XXL handle into the second parking attachment.
Maintenance
Always switch off the vacuum
cleaner for maintenance work and
remove the plug from the outlet.
The Miele filtration system consists of
three components:
– Original Miele FilterBag
– Motor protection filter
– Original Miele exhaust filter
Park system for storage (Fig. 26)
Always disconnect the vacuum
cleaner from the power supply when
you have finished using it. Remove
the plug from the socket.
Stand the vacuum cleaner upright.
It is a good idea to retract the telescopic suction wand fully.
18
These will need to be replaced from
time to time to ensure that your vacuum
cleaner performs efficiently.
Page 19

en-US
We recommend only using genuine
FilterBags, filters, and accessories
with the “Original Miele” logo on
them. This will ensure that the suction power of the vacuum cleaner is
maintained, giving the best possible
cleaning results.
FilterBags with the “Original Miele”
logo on them are not made from paper or paper-based materials and nor
do they have a cardboard collar. This
is why our FilterBags are particularly
long-lasting and reliable.
Please note that appliance faults and
damage originating from the use of
accessories which do not carry the
“Original Miele” logo will not be covered by the appliance guarantee.
Purchasing new FilterBags and filters
Original Miele FilterBags and filters are
available from the Miele web store,
Miele Technical Service, and your Miele
dealer.
Ordering the correct FilterBags and filters
Only use original Miele FJM FilterBags
with a red collar and original Miele filters. These are identified by the “ORIGINAL Miele” logo on the packaging.
Every packet of original Miele FilterBags
contains four bags, one AirClean exhaust filter and one motor protection filter. Original Miele multipacks contain 16
FilterBags, four AirClean exhaust filters
and four motor protection filters.
Original Miele exhaust filters can also
be purchased separately from your
Miele dealer or Miele Technical Service.
Please quote the model number of your
vacuum cleaner when ordering to make
sure you get the correct filter. You can
also order all accessories via the Miele
web store.
When to change the FilterBag (Fig. 28)
Change the FilterBag when the color
marker in the FilterBag change indicator
turns red.
FilterBags are disposable and intended to be used only once. Dispose of the entire FilterBag. Do not
attempt to re-use. Blocked pores reduce the efficiency of the vacuum
cleaner.
Checking the FilterBag change indicator
Attach the floor brush to the vacuum
cleaner (depending on the model).
Switch the vacuum cleaner on and
select the highest power setting.
Lift the floor brush off the floor a little.
19
Page 20

en-US
How the FilterBag change indicator works
The FilterBag change indicator is set for
normal household dust. This generally
contains a mixture of dust, hair,
threads, carpet lint, grit, etc.
However, if the cleaner has been used
to vacuum up fine dust, such as plaster,
brick dust, cement or flour, the pores of
the FilterBag will become blocked very
quickly.
This affects the air permeability of the
bag, and the marker will indicate that
the bag is “full” even when it is not. If
this happens you must still change the
FilterBag because suction power will be
greatly reduced by blocked pores in the
FilterBag.
If, on the other hand, a large amount of
hair and carpet lint which typically contains a lot of air is vacuumed up, the indicator may fail to react even though
the bag is full. You should still change it.
Both these extremes can occur.
How to replace the FilterBag (Fig. 29 + 30)
Press the release catches at the side
of the hose connector, and remove
the hose from the socket (Fig. 02).
Press the release button on the re-
cessed grip and raise the dust com-
partment lid as far as it will go (Fig.
09).
The FilterBag has a flap which closes
automatically when the dust compartment lid is raised to prevent any dust
escaping.
Pull the FilterBag out by the grip on
the collar.
20
Fit the new FilterBag into the red
holder as far as it will go. Leave it
folded up when you take it out of the
box.
Close the dust compartment lid se-
curely, making sure it clicks into position. Take care not to trap the FilterBag when doing so.
An empty operation lock prevents
the dust compartment lid from closing without a FilterBag in place. Do
not use force!
Insert the hose connector into the
suction socket on the vacuum
cleaner until it clicks into position. To
do this, line up the guides on the two
pieces (Fig. 01).
When to change the motor protection filter
Replace this filter every time you start a
new packet of filter bags.
Every packet of original Miele filter bags
contains a motor protection filter. Multipacks contain four motor protection filters.
How to change the motor protection filter (Fig. 31)
Open the dust compartment lid.
Pull the filter bag out by the grip on
the collar.
Lift up the filter frame until it clicks
and remove the old motor protection
filter. Hold by the clean, unsoiled section to remove it.
Replace with a new motor protection
filter.
Close the filter frame.
Page 21
en-US
Fit the filter bag into the holder as far
as it will go.
Close the dust compartment lid se-
curely, making sure it clicks into posi-
tion. Take care not to trap the filter
bag when doing so.
When to replace the exhaust filter
Depending on the model, your vacuum
cleaner will come with one of the following exhaust filters (Fig. 08) as standard:
a AirClean
Replace this filter every time you start a
new packet of Miele FilterBags. An AirClean exhaust filter is supplied with every packet of Miele FilterBags.
b Active AirClean 50 (black)
c HEPA AirClean 50 (white)
Replace if the display for the exhaust filter change indicator is completely filled
with red (Fig. 13). This occurs after approx. 50 hours of operation which is
equivalent to about a year of average
use. The vacuum cleaner can still be
used.
However, the suction power will be reduced as will the effectiveness of the filter if it is not replaced in good time.
How to replace the AirClean filter (Fig. 32 + 33)
Do not use more than one exhaust filter at a time.
Open the dust compartment lid.
Press the release catch on the filter
grille and open the grille until it clicks.
Grasp the used AirClean exhaust filter
by one of the clean, unsoiled sections
and take it out.
Replace it with a new AirClean ex-
haust filter.
If you wish to fit an Active AirClean
50 or HEPA AirClean 50 exhaust filter, see “Replacing one type of exhaust filter with another.”
Close the filter frame.
Close the dust compartment lid.
Replacing the Active AirClean 50 and HEPA AirClean 50 exhaust filters (Fig. 34 + 35)
Do not use more than one exhaust filter at a time.
Open the dust compartment lid.
Lift the exhaust filter and remove it.
Insert a new exhaust filter, making
sure it goes in properly, then push it
down into position.
Press the TimeStrip® exhaust filter
change indicator(Fig. 11).
After approx. 10 –15 seconds a thin red
line will appear in the left-hand side of
the display (Fig. 12).
If you wish to fit the AirClean exhaust
filter, see “Replacing one type of exhaust filter with another”.
Close the dust compartment lid.
21
Page 22

en-US
Replacing one type of exhaust filter with another (Fig. 08)
Depending on the model, your vacuum
cleaner will be fitted as standard with
one of the following exhaust filters :
a AirClean
b Active AirClean 50 (black)
c HEPA AirClean 50 (white)
Do not use more than one exhaust filter at a time.
When changing the filter, please note:
1. If you wish to replace exhaust filter a
with filter b or c, it is essential that
you remove the filter frame before
you fit the new exhaust filter.
In addition, you must activate the exhaust filter change indicator (Fig. 11).
2. If you wish to replace exhaust filter b
or c instead of a, so it is essential
that you also fit it in a filter frame *
(Fig. 32).
* Filter frame - see “Optional accessories.”
Install new thread lifters.
Cleaning the roller on the AllTeQ floorhead (Fig. 37)
Clean the roller on the floorhead if required.
Release the bearing using a coin.
Press the bearing out, and remove.
Remove the roller.
Remove any threads and hair, replace
the roller and refit the bearing, locking
it back into position.
Replacement parts are available from
your Miele dealer or through Miele
Technical Service.
When to change the thread catchers?
(only possible for models with a reversible floorhead included as standard)
The thread catchers on the suction inlet
of the reversible floorhead can be replaced. Check them from time to time
and replace them if the pile has worn
down.
How to replace the thread lifters (Fig. 36)
Use a suitable screwdriver to remove
the thread lifters from the slots.
22
Page 23

Cleaning and care
Always disconnect the vacuum
cleaner from the electrical supply before cleaning it. Turn off and unplug
it.
Vacuum cleaner and accessories
The vacuum cleaner and all plastic accessories can be cleaned with a proprietary cleaner suitable for plastic.
Do not use abrasive cleaning
agents, glass cleaning agents, allpurpose cleaners or oil-based conditioning agents!
Dust compartment
The dust compartment can, if necessary, be cleaned using a dry duster,
brush or, if available, a second vacuum
cleaner to vacuum the dust out.
en-US
Monitor the filter bag change indicator
and inspect all filters regularly. Clean or
replace them when necessary according to these Operating Instructions.
Do not let the vacuum cleaner
get wet. If moisture gets into the appliance, there is a risk of electric
shock.
23
Page 24

en-US
Frequently Asked Questions
With the help of the following guide minor faults in the performance of the machine, some of which may result from incorrect operation, can be remedied without contacting the Service Department.
This guide may help you to find the reason for the fault, and how to correct it.
Problem Possible cause and solution
The vacuum cleaner
turns off automatically.
A temperature limiter turns the vacuum cleaner off automatically if it gets too hot.
This can occur if, for instance, large articles block the
wand or when the FilterBag is full or contains particles of fine dust. A heavily soiled exhaust or dust
compartment filter can also be the cause of overheating.
Turn the vacuum cleaner off immediately using the
On/Off foot switch , and unplug it.
After removing the cause, wait for approximately 20 30minutes to allow the vacuum cleaner to cool down.
It can then be turned on again.
24
Page 25

en-US
Technical Service
Contact in case of fault
In the event of a fault which you cannot
remedy yourself, please contact your
Miele dealer or Miele Technical Service.
Contact information for Miele Technical Service can be found at the end of
this document.
Warranty
For more information about warranty
conditions, please contact Miele Technical Service.
Optional accessories
Certain models are supplied as standard with one or more of the following
accessories.
Please observe the flooring manufacturer's cleaning and care instructions.
These and many other products can be
ordered from the Miele Webstore, Miele
Technical Service or from your Miele
dealer.
Electrobrushes
Electrobrushes can only be connected
to a vacuum cleaner which has an Electrobrush socket.
Electro Comfort Electrobrush (SEB 217-3)
For the intensive vacuuming of carpets
which are subject to hard wear. The
Electrobrush removes deep-seated dirt
and prevents areas of frequent use being trodden into a path.
Electro Plus Electrobrush (SEB 228)
In comparison to the SEB 217-3, this
Electrobrush is broader and also comes
with a five-level adjustable range to
adapt to different pile heights.
Electro Premium Electrobrush (SEB 236)
In comparison to the SEB 228, this
Electrobrush also comes with LEDs to
illuminate the work area and with a multifunction control light.
Floor tools / Brushes
AllergoTeQ floorhead (SBDH 285-3)
This floor brush is suitable for daily hygienic cleaning of all floor surfaces. The
level of cleanliness of the floor shows in
a color “traffic light” display when vacuuming.
TurboTeQ (STB 305-3) / Turbobrush (STB 205-3)
This brush is ideal for removing lint and
hair from short-pile carpet.
Handheld Turbobrush Mini (STB 101)
For vacuuming upholstery, mattresses
or car seats, etc.
Floor brush Hardfloor (SBB 235-3)
This brush is designed for use on hard
flooring such as tiled or stone floors.
Floor brush Parquet (SBB Parquet-3)
This brush has natural bristles and is
designed for use on smooth floors that
are susceptible to scratching.
25
Page 26

en-US
Parquet Twister floorbrush with swiveling head (SBB 300-3)
With natural bristle for vacuuming
smooth hard floors and small gaps.
Floorbrush Parquet Twister XL with swiveling head (SBB 400-3)
With natural bristles for quickly vacuuming smooth hard floors and small
gaps.
Other accessories
MicroSet accessory case (SMC 20)
This set is specially designed for cleaning small objects and difficult to reach
areas (such as PC keyboards, stereo
equipment, intricately carved furniture
and ornaments, models, etc).
Universal brush (SUB 20)
For dusting books, shelves, etc.
Radiator brush (SHB 30)
For dusting radiators, narrow shelves
and crevices.
Mattress tool (SMD 10)
For vacuuming upholstery, mattresses,
cushions, curtains, covers, etc.
Crevice nozzle, 12" (300mm)
(SFD 10)
Extra long crevice nozzle for cleaning in
folds, crevices and corners.
Upholstery nozzle, 7 1/2" (190mm)
(SPD 10)
Extra wide upholstery nozzle for cleaning upholstered furniture, mattresses
and pillows.
Spotlight Handle (SGC 20)
(not applicable to models with electro
suction wand and electro telescopic
suction wand)
Lights up the area being vacuumed.
Filters
Active AirClean 50 exhaust filter (SF-AA 50)
For a significant reduction of unpleasant
odors. Ideal for households with pets or
smokers.
HEPA AirClean 50 exhaust filter (SF-HA 50)
Effectively filters fine dust and allergens.
Ideal for people allergic to house dust.
Filter frame
The filter frame is required if you wish to
use an AirClean filter instead of an
Active AirClean 50 or HEPA AirClean 50
filter.
Crevice nozzle, 22" (560mm)
(SFD 20)
Flexible crevice nozzle for vacuuming
hard to reach places.
26
Page 27
en - Limited Warranty - Vacuum Cleaners USA
What This Warranty Covers And For What Period The Coverage Extends
Miele, Inc. (hereinafter "Miele") warrants to the original purchaser of this product, living in the United States of
America, who purchased their vacuum from a Miele Authorized Distributor or Dealer:
a. That this product, including all of its Miele authorized parts is free of defects in material and workmanship.
b. That this product, if found to be defective within the stated warranty period, will be repaired free of charge to the
consumer (both parts and labor) by an authorized Miele service agent.
c. The warranty period for vacuum cleaners other than those listed below and the Scout RX1 and RX2 is one (1) year
from the date of purchase, with the following exceptions; vacuum motors, power head motors, and the structural
integrity of the vacuum cleaner casings (bodies) are warranted for seven (7) years from the date of purchase.
d. The warranty period for the models listed below is five (5) years from the date of purchase, with the following
exceptions; vacuum motors, power head motors, and the structural integrity of the vacuum cleaner casings
(bodies) for these models are warranted for ten(10) years from the date of purchase.
Model Model Model Model
Complete C3 HomeCare Complete C3 Brilliant Compact C1 HomeCare Classic C1 HomeCare (HEPA)
Complete C3 HomeCare+Dynamic U1 HomeCare Compact C2 Homecare Blizzard CX 1 HomeCare
e. The warranty period of the Scout RX1 and Scout RX2 is two (2) years from the date of purchase for the complete
vacuum, except for the battery, which will be warranted for one (1) year from the date of purchase.
f. This warranty only applies while the product remains within the United States, and is null and void in any other US
territories, possessions, or foreign countries.
Commercial Use
Vacuum cleaners other than the Scout RX1 and Scout RX2 used for commercial purposes, except for their motors,
will be warranted for a period of six (6) months from the date of purchase. The motors of commercially used upright
vacuums will be warranted for one (1) year and the motors of all other commercially used vacuum cleaners, except
for the Scout RX1 and Scout RX2 will be warranted for two (2) years. There is no warranty for the Scout RX1 or Scout
RX2 used for commercial purposes. Thereafter this Limited Warranty shall be null and void.
What is not covered by this Warranty
This warranty does not cover damage or defects caused by or resulting from repairs, service or alterations to the
product or any of its parts or accessories which have been performed by service centers or repairmen not authorized
by Miele, or damage or defects caused by negligence, accident, abuse, misuse, improper or abnormal usage or
maintenance of the product, its parts or accessories. Ordinary wear and tear or cosmetic damage (scuffs, scratches,
gouges, dents, etc.) shall not be considered a defect in materials or workmanship.
Exclusion of Other Warranties
Except for the limited warranty provided herein, Miele disclaims any and all other express warranties with respect to
the product. Any warranty of merchantability or fitness for a particular purpose is limited in its duration to the term of
the limited warranty provided herein.
Some states do not allow limitations on how long an implied warranty lasts, so the above limitation may not apply to
you.
Limitation of Liability for Special, Incidental or Consequential Damages
Miele will assume no liability, or other obligation with respect to any personal injury or property damage resulting
from the use of a vacuum cleaner, or its accessories, replacement parts, etc., which has not been purchased from,
or serviced by an Authorized Miele Dealer. Any purchaser who obtains a vacuum cleaner, accessories, replacement
parts, etc., from someone other than an Authorized Miele dealer proceeds at their own risk.
Miele specifically disclaims any and all liability, whether directly or by way of indemnity, for special incidental,
consequential or other damages, whether based on breach of contract, tort, strict or product liability, or any other
legal theory.
Some states do not allow the exclusion or limitation of incidental or consequential damages, so the above limitation
may not apply to you.
Special State Laws
This Limited Warranty gives you specific legal rights; you may have other rights, which vary, from state to state.
Service
For service under this Limited Warranty, or to find an Authorized Miele Dealer in your area, please visit us at
www.mieleusa.com.
Effective Date: January 1, 2018
©2018 Miele, Inc.
LIMITED WARRANTY - VACUUM CLEANERS USA
27
Page 28

25
Seuls des sacs à poussière, des filtres et des
accessoires portant le logo "Original Miele"
doivent être utilisés avec cet aspirateur.
Ceux-ci permettent de maximiser la puissance d'aspiration de l'aspirateur et de produire des résultats de
nettoyage optimaux.
L'UTILISATION DE COMPOSANTES D'UNE AUTRE
MARQUE POURRAIT INVALIDER LA GARANTIE.
,
Tout comme l'utilisation de sacs à poussière
n'arborant pas le logo "Original Miele", l'utilisation de
sacs à poussière faits de papier ou de matériau similaire, ou de sacs à poussière munis d'une plaque de
retenue en carton, peut endommager gravement l'aspirateur et risquer d'en annuler la garantie.
Le logo "Original Miele" se trouve sur l'emballage ou
directement sur le sac à poussière.
Vous pouvez vous procurer des sacs à poussière et
des filtres
Miele d'origine auprès d'un détaillant autorisé d'aspira-
teurs Miele ou à notre magasin Miele en ligne, à
www.miele.ca.
Vous pouvez vous procurer des sacs à poussière et des filtres Miele d'origine auprès d'un
détaillant autorisé d'aspirateurs Miele ou à notre
magasin Miele en ligne, à www.miele.ca.
28
Page 29

fr - Table des matières
INSTRUCTIONS IMPORTANTES DE SÉCURITÉ ............................................... 30
Protection de l'environnement...........................................................................38
Description de l'appareil..................................................................................... 40
Références aux illustrations...............................................................................42
Mode d'emploi de l'électrobrosse/la turbobrosse...........................................42
Préparer pour l'utilisation................................................................................... 42
Utilisation .............................................................................................................44
Immobilisation, transport et rangement............................................................46
Entretien............................................................................................................... 46
Achat de nouveaux sacs à poussière et de filtres................................................. 47
Commande des bons sacs à poussière et des bons filtres .................................. 47
Quand remplacer le sac à poussière .................................................................... 47
Comment fonctionne le voyant de remplacement du sac à poussière................. 48
Comment remplacer le sac à poussière ............................................................... 48
Quand remplacer le filtre de protection du moteur ............................................... 49
Comment remplacer le filtre de protection du moteur ......................................... 49
À quel moment remplacer le filtre d'évacuation?.................................................. 49
Comment remplacer le filtre AirClean .................................................................. 49
Remplacer les filtres d'évacuation Active AirClean 50 et HEPA AirClean 50 ....... 50
Remplacer un type de filtre d'évacuation par un autre ........................................ 50
Au moment de changer le filtre, veuillez remarquer:............................................ 50
Quand remplacer les ramasse-fils?....................................................................... 50
Comment remplacer les ramasse-fils ................................................................... 50
Nettoyage du rouleau de la brosse AllTeQ ........................................................... 50
Nettoyage et entretien ........................................................................................ 51
Foire aux questions.............................................................................................52
Service technique................................................................................................53
Contact en cas d'anomalies.................................................................................. 53
Garantie................................................................................................................. 53
Accessoires optionnels....................................................................................... 53
Limited Warranty - Vacuums Canada ................................................................ 56
Garantie restreinte – Aspirateurs Canada ......................................................... 58
29
Page 30
INSTRUCTIONS IMPORTANTES DE SÉCURITÉ
Cet aspirateur répond aux réglementations de sécurité
en vigueur. Néanmoins, une utilisation inappropriée de
l'appareil peut entraîner des blessures et des dommages
matériels.
Veuillez lire attentivement le mode d'emploi avant d'utiliser l'aspirateur pour la première fois afin d'éviter des accidents ou des dégâts éventuels à l'aspirateur. Il contient
des informations importantes sur la sécurité, l'utilisation
et l'entretien de votre aspirateur.
Conservez ce mode d'emploi en lieu sûr afin de pouvoir
le consulter au besoin et remettez-le au prochain utilisateur.
Débranchez toujours la prise de l'aspirateur après utilisation, avant de modifier les accessoires ou pour les travaux d'entretien et de nettoyage. Arrêtez, puis débranchez l'aspirateur de la prise murale.
Utilisation conforme
Conçu pour nettoyer les planchers, cet aspirateur est
destiné à un usage domestique ou à être utilisé dans des
environnements de vie similaires.
Cet aspirateur peut être utilisé pour le nettoyage normal
de la moquette, des tapis et des surfaces dures.
Cet aspirateur n'est pas conçu pour être utilisé à l'exté-
rieur.
Cet aspirateur est conçu pour une utilisation jusqu'à
4000m (13000pi) d'altitude au-dessus du niveau de la
mer.
30
Page 31

INSTRUCTIONS IMPORTANTES DE SÉCURITÉ
L'aspirateur ne doit être utilisé que pour aspirer les plan-
chers secs. Ne l'utilisez pas pour aspirer sur les personnes
ou les animaux. Toute autre utilisation ou modification
n'est pas recommandée par le fabricant et pourrait être
dangereuse.
Les personnes qui ne possèdent pas les capacités phy-
siques, l'expérience ou les connaissances requises pour
utiliser cet appareil doivent être supervisées ou formées
par une personne responsable.
Sécurité des enfants
Risque d'asphyxie! Jetez les emballages, sacs et autres
produits en plastique et gardez-les en tout temps hors de
la portée des enfants.
Ne laissez pas d'enfants sans surveillance à proximité
de l'aspirateur et ne les laissez pas jouer avec celui-ci.
31
Page 32

INSTRUCTIONS IMPORTANTES DE SÉCURITÉ
AVERTISSEMENT
Pour diminuer le risque d'incendie, de décharge électrique ou de blessure, respectez les instructions ciaprès:
Vérifiez la tension nominale de l'aspirateur avant de
brancher le cordon d'alimentation à une prise électrique.
Votre source d'alimentation devrait correspondre à la tension nominale sur la plaque signalétique située sur le dessous de l'aspirateur. Utilisez uniquement les prisesCA de
la résidence. N'utilisez jamais de sources d'alimentationCC. Si vous ne connaissez pas la tension d'alimentation de votre domicile, consultez un électricien qualifié.
Brancher l'aspirateur à une tension plus élevée que celle
indiquée dans ces instructions peut entraîner des dommages à l'aspirateur ou même des blessures.
Pour réduire le risque de décharge électrique, cet appa-
reil comporte une fiche polarisée (une lame est plus large
que l'autre). Cette fiche ne peut être branchée sur une
prise polarisée que dans un sens. Si la fiche ne peut être
branchée complètement dans la prise, inversez la fiche. Si
elle ne se branche toujours pas, communiquez avec un
électricien qualifié afin d'installer la fiche adéquate. Ne modifiez pas la prise d'une quelconque façon.
Sécurité technique
Avant d'utiliser l'aspirateur et ses accessoires, vérifiez la
présence de signes visibles de dommages. N'utilisez pas
un appareil endommagé.
32
Page 33

INSTRUCTIONS IMPORTANTES DE SÉCURITÉ
Assurez-vous que les données techniques (tension et
fréquence) indiquées sur la plaque signalétique de l'aspirateur correspondent exactement à celles du réseau électrique. Sans modification, l'aspirateur convient aux fréquences de 50Hz et 60Hz.
La prise de courant doit être équipée d'un fusible de
15ampères.
Le fonctionnement fiable et sécuritaire de l'aspirateur ne
peut être garanti que si celui-ci est raccordé au réseau
électrique public.
La prise de l'aspirateur (selon le modèle) doit être utilisée
uniquement avec les électrobrosses Miele présentées dans
ce mode d'emploi.
L'électrobrosse Miele est un accessoire muni d'un mo-
teur qui a été conçu spécialement pour les aspirateurs
Miele. L'utilisation de l'aspirateur avec une brosse électrique d'une autre marque n'est pas autorisée pour des raisons de sécurité.
Durant la période de garantie de l'aspirateur, les répara-
tions doivent être effectuées seulement par un technicien
autorisé de Miele. Sinon, la garantie sera invalidée.
33
Page 34

INSTRUCTIONS IMPORTANTES DE SÉCURITÉ
Ne pas transporter ni tirer l'aspirateur par le cordon d'ali-
mentation et faites attention de ne pas l'endommager
lorsque vous le retirez de la prise. Gardez le cordon à
l'écart des rebords tranchants et ne le laissez pas se pincer, par exemple sous une porte. Évitez de faire passer
l'aspirateur sur son cordon. Cela pourrait endommager le
cordon, la prise ou la fiche. L'appareil ne doit pas être utilisé si l'un de ces éléments a été endommagé.
N'utilisez pas l'aspirateur si le câble d'alimentation est
endommagé. Si le cordon électrique est endommagé, celui-ci et la bobine doivent être remplacés. Pour des motifs
de sécurité, ce travail doit être effectué uniquement par le
Service technique Miele ou un technicien autorisé de
Miele.
Lorsque vous aspirez de la poussière fine telle que de la
sciure, du sable, du plâtre, de la farine, de la poudre de
talc, etc. des décharges électrostatiques se créent naturellement. Dans certaines conditions, ces charges seront libérées. Pour éviter les effets désagréables de ces décharges, une bande métallique est incorporée dans une
rainure sous la poignée. Veuillez garder votre main toujours
en contact avec cette bande métallique lorsque vous utilisez l'appareil.
Assurez-vous de ne pas mouiller l'aspirateur, l'élec-
trobrosse, le tube électrique ou le tuyau électrique. Nettoyez l'appareil avec un chiffon sec ou légèrement humidifié. Si l’humidité pénètre dans l’appareil, vous risquez de
prendre une décharge électrique.
34
Page 35

INSTRUCTIONS IMPORTANTES DE SÉCURITÉ
L'électrobrosse, le tube électrique et le tuyau électrique
contiennent des cordons d'alimentation. Les fiches de
connexion ne doivent pas être mises en contact avec de
l'eau. Risque de décharge électrique. Pour les nettoyer, utilisez un linge sec.
Les réparations ne devraient être effectuées que par un
technicien autorisé de Miele. Les réparations et autres travaux effectués par des personnes non qualifiées peuvent
mettre les utilisateurs en danger.
Les pièces défectueuses doivent être remplacées uni-
quement par des pièces de rechange Miele d'origine.
Seules ces pièces permettent au fabricant de garantir la
sécurité de l'appareil.
Utilisation appropriée
Pour éviter les risques de dommages, n'utilisez pas l'as-
pirateur sans que le sac à poussière, le filtre du réservoir à
poussière et le filtre d'évacuation ne soient en place.
Le couvercle du réservoir à poussière ne se ferme pas
sans la présence d'un sac à poussière. Ne le forcez pas.
N'aspirez pas d'éléments qui ont brûlé ou qui reluisent
encore, p. ex., cigarettes, cendres ou cendres chaudes,
peu importe si elles reluisent ou aient apparemment été
éteintes.
35
Page 36

INSTRUCTIONS IMPORTANTES DE SÉCURITÉ
N'utilisez pas l'aspirateur pour aspirer de l'eau, des li-
quides ou des poussières humides. Attendez que des tapis
ou des moquettes venant d'être nettoyés ou traités au
shampoing aient complètement séchés avant de tenter de
passer l'aspirateur.
N'utilisez pas l'aspirateur pour aspirer la poudre d'impri-
mante. Cette poudre, utilisée pour les imprimantes et les
photocopieurs, peut être conductrice.
N'aspirez pas de liquides ou de gaz inflammables ou
combustibles et n'utilisez pas l'aspirateur dans des zones
où de telles substances sont entreposées.
N'aspirez pas à la hauteur de la tête et n'approchez pas
le tuyau d'aspiration de la tête d'une personne.
Accessoires
N'introduisez pas vos doigts dans l'électrobrosse ou la
turbobrosse quand celles-ci sont en marche !
Nous ne recommandons pas d'utiliser l'aspirateur direc-
tement avec la poignée, c.-à-d. sans d'accessoires attachés, étant donné que la gorge pourrait s'endommager et
vous pourriez vous blesser sur les rebords aiguisés.
Seuls des sacs à poussière, des filtres et des acces-
soires d'origine portant le logo «Original Miele» doivent
être utilisés avec cet aspirateur. Sinon, le fabricant ne peut
garantir la sécurité de ce produit.
CONSERVEZ CES INSTRUCTIONS
36
Page 37

37
Page 38

fr - Protection de l'environnement
Élimination des produits
d'emballage
La boîte de carton et les produits d'emballage protègent l'appareil durant le
transport. Ils ont été conçus afin d'être
biodégradables et recyclables.
Le recyclage de l'emballage réduit l'utilisation de matières premières dans le
processus de fabrication ainsi que la
quantité de déchets.
Élimination des sacs à poussière et des filtres
Les sacs à poussière et les filtres sont
fabriqués de matériaux écologiques et
peuvent être jetés avec les ordures ménagères normales, tant et aussi longtemps qu'ils ont été utilisés exclusivement pour de la poussière ménagère
générale.
Mise au rebut de votre ancien appareil
Avant de mettre au rebut votre ancien
appareil, veuillez retirer le sac à poussière et les filtres et en disposer avec
vos ordures ménagères.
Les appareils électriques et électroniques contiennent des matériaux précieux. Ils contiennent également des
substances, des composés et des éléments essentiels pour leur fonctionnement adéquat et sécuritaire. Une manipulation ou la mise au rebut inadéquate
de ces matériaux dans vos ordures ménagères peut poser un risque pour votre
santé et l'environnement. Donc, il est
important de ne pas jeter votre ancien
appareil avec vos ordures ménagères.
Utilisez plutôt des points de collecte et
de mise au rebut officiellement désignés pour mettre au rebut et recycler
les appareils électriques et électroniques. Selon la loi, vous êtes responsable de la suppression des données
personnelles de l'appareil avant la mise
au rebut. Veuillez vous assurer que
votre vieil appareil ne pose pas un
risque pour les enfants lorsqu'il est entreposé avant la mise au rebut.
38
Page 39

39
Page 40

fr - Description de l'appareil40fr - Description de l'appareil
Page 41

a
Poignée XXL *
b
Soupape d'entrée d'air *
c
Boutons de dégagement *
d
Mécanisme de dégagement du tube d'aspiration télescopique *
e
Tube d'aspiration télescopique *
f
Bouton d'ouverture du couvercle du compartiment à poussière
g
Brosse à plancher *
h
Poignée de transport
i
Prise pour l'électrobrosse *
j
Sac à poussière d'origine Miele
k
Filtre de protection du moteur
l
Filtre d'évacuation Miele d'origine *
m
Cordon d'alimentation *
n
Bouton de rembobinage du cordon d'alimentation
o
Sélecteur rotatif
p
Système d'immobilisation pour des pauses pendant l'utilisation
q
Bouton-pédale marche/arrêt
r
Voyant de remplacement du sac à poussière
s
Prise de raccord *
t
Tuyau d'aspiration *
u
Porte-accessoires avec trois accessoires
Système d'immobilisation pour le rangement (sur les deux côtés de l'aspirateur non représenté)
* Ces options varient selon le modèle et peuvent ne pas être fournies avec votre
aspirateur.
41
Page 42

fr-CA
Références aux illustrations
Les illustrations auxquelles renvoie le
texte se trouvent sur les pages dépliables à la fin des présentes instructions d'utilisation.
Mode d'emploi de l'électrobrosse/la turbobrosse
Selon le modèle de votre aspirateur, il
est équipé de série d'une électrobrosse
ou d'une turbobrosse. Veuillez lire le
mode d'emploi distinct, livré avec
l'électrobrosse ou la turbobrosse, avant
de l'utiliser pour la première fois.
Préparer pour l'utilisation
Attacher le tuyau d’aspiration
(Figure01)
Insérez le raccord de tuyau dans la
prise d'aspiration de l'aspirateur
jusqu'à ce qu'il s'enclenche. Pour ce
faire, alignez les guides des deux
pièces.
Enlever le tuyau d'aspiration (Figure 02)
Appuyez sur les boutons de dégage-
ment placés sur les côtés du raccord
du tuyau et soulevez le tuyau de la
prise.
Raccorder la poignée au tuyau d'aspiration (Figure 03)
(requis selon le modèle)
Insérez le tuyau d'aspiration dans la
poignée jusqu'à ce qu'il s'enclenche.
Raccordement de la poignée et du tube (Figure 04)
Insérez la poignée dans le tube d'as-
piration jusqu'à ce qu'il s'enclenche.
Pour ce faire, alignez les guides sur
ces deux pièces.
Pour enlever la poignée du tube d'as-
piration, appuyez sur le bouton de
dégagement et retirez la poignée du
tube en le faisant pivoter légèrement.
Réglage de la longueur du tube télescopique
Selon le modèle de votre aspirateur, l'un
des tubes d'aspiration de série suivants
convient à votre appareil:
– Tube d'aspiration télescopique
– Tube télescopique Comfort
Les deux parties du tube télescopique
s’emboîtent, ce qui vous permet de le
régler à votre taille pour une utilisation
tout en confort.
Tube d'aspiration télescopique (Figure 05)
Appuyez sur le mécanisme de déga-
gement afin de régler la longueur du
tube télescopique.
Tube télescopique Comfort (Figure 05)
Tenez le mécanisme de dégagement
afin de régler la longueur du tube télescopique.
Raccordement du tube télescopique à la brosse à plancher/électrobrosse (Figure 06)
(de série, selon le modèle)
42
Page 43

fr-CA
Poussez le tube télescopique dans le
manchon d'aspiration et tournez-le
dans le sens horaire ou antihoraire
jusqu'à ce qu'il s'enclenche.
Pour séparer ces pièces, appuyez sur
le bouton de dégagement et retirez le
tube télescopique du manchon d'aspiration en effectuant un léger mouvement de rotation.
Réglage de la brosse à plancher (Figure 07)
(uniquement pour les modèles dont la
version standard est équipée d'une
brosse à plancher réversible)
Cet aspirateur peut être utilisé pour le
nettoyage quotidien des moquettes, tapis et planchers durs.
Miele propose une gamme de brosses
à plancher, d'embouts et d'accessoires
pour d'autres types de plancher et
d'applications spéciales (voir la section
«Accessoires en option»).
Veuillez toujours suivre les consignes
de nettoyage et d'entretien des revêtements de sol du fabricant.
Nettoyez les moquettes et les tapis
avec la brosse rentrée:
Appuyez sur le bouton
Nettoyez les planchers durs non sus-
ceptibles d'être rayés, ainsi que les
planchers ayant des rainures ou des interstices profonds, avec la brosse sortie:
Appuyez sur le bouton
Si la puissance d'aspiration de la
brosse à plancher ajustable semble
trop élevée, réduisez-la jusqu'à ce
que la brosse à plancher glisse plus
facilement (voir la section «Utilisation – Sélection de la puissance
d'aspiration»).
Activer le voyant de remplacement
TimeStrip® du filtre d'évacuation
Selon le modèle, votre aspirateur peut
être équipé de l'un des filtres d'évacuation de série suivants(Figure 08).
a AirClean
b Active AirClean 50 (noir)
c HEPA AirClean 50 (blanc)
Si votre aspirateur est doté d'un filtre
d'évacuation de type b ou c, vous devrez activer le voyant de remplacement
TimeStrip® du filtre d'évacuation.
Appuyez sur le levier de dégagement
du couvercle du compartiment à
poussière et levez-le autant que possible (Figure 09).
Retirez la bande indicatrice (Figure
10).
Appuyez sur le voyant de remplace-
ment TimeStrip® du filtre d'évacuation (Figure 11).
Après 10 à 15secondes environ, une
petite bande rouge apparaîtra dans la
partie gauche du voyant (Figure 12).
Fermez le couvercle du compartiment
à poussière jusqu'à ce qu'il s'enclenche. Veillez à ne pas coincer le
sac à poussière.
43
Page 44

fr-CA
Fonctionnement du voyant de remplacement TimeStrip® du filtre d'évacuation
Le voyant de remplacement TimeStrip®
du filtre d'évacuation indique la durée
de vie utile du filtre d'évacuation. Le
voyant devient complètement rouge
après environ 50 heures de fonctionnement, ce qui représente une année
d’utilisation moyenne (Figure 13).
Utilisation des accessoires inclus (Figure14)
Brosse à épousseter / Brosse à
épousseter avec poils naturels
(selon le modèle)
Pour nettoyer plinthes, décorations, sculptures ou les objets particulièrement fragiles.
La tête de la brosse pivote et
s'adapte à la forme des objets.
Embout à coussins
Pour nettoyer meubles rembourrés, matelas, coussins, rideaux,
etc.
Embout à interstices
Pour nettoyer plis, fentes et recoins.
Porte-accessoires pour les trois
accessoires mentionnés ci-dessus (Figure 15)
Placez les différents accessoires
comme l'indiquent les symboles
sur le porte-accessoires.
Fixez le porte-accessoires au tuyau
d'aspiration au niveau de la jonction
avec la poignée ou sur la prise de
raccordement du tuyau sur l'aspirateur. Assurez-vous qu'il s'enclenche.
Certains modèles sont équipés de série
avec un des accessoires suivants, non
illustrés dans ce mode d'emploi.
– Électrobrosse
– Turbobrosse
Dans ce cas, un mode d’emploi séparé
correspondant à chaque type de brosse
est fourni.
Utilisation
Cordon d'alimentation
Déroulez complètement le cor-
don afin de faciliter l'évacuation de la
chaleur. Ne tirez pas sur le cordon,
ne vous en servez pas comme une
poignée, ne le coincez pas dans une
porte et ne le laissez pas en contact
avec des extrémités ou des coins
tranchants. Ne faites pas passer
l'appareil sur le cordon. Veillez à ce
que le cordon n'entre pas en contact
avec des surfaces chaudes. Ne débranchez pas l'appareil en tirant sur
le cordon. Tirez sur la fiche et non
sur le cordon. Cet appareil est muni
d'un dispositif de rembobinage du
cordon d'alimentation. Tenez la fiche
lorsque vous embobinez le cordon
de l'appareil. Ne laissez pas la fiche
virevolter lorsque vous enroulez le
cordon.
Dérouler le cordon d'alimentation (Figure 17)
Tirez le cordon d'alimentation jusqu'à
la longueur souhaitée.
Insérez la fiche dans la prise de cou-
rant.
44
Page 45

fr-CA
Si vous utilisez l'aspirateur pen-
dant plus de30minutes, il faut tirer
le cordon d'alimentation complètement. Sinon, il y a un risque de surchauffe et de dommages.
Enroulement du câble d'alimentation (Figure 18)
Débranchez la fiche de l'aspirateur.
Appuyez sur le bouton de rembobi-
nage: le câble s’enroule automatiquement.
Le câble s’enroule complètement.
Lorsque le câble d'alimentation ne
s'enroule pas complètement, vous
pouvez aussi désactiver cette fonction. Maintenez le câble d'alimentation
à la main pendant l'enroulement et tirez brièvement dessus pour terminer
l'enroulement.
Mettre en marche et arrêter l’aspirateur (Figure 19)
Appuyez sur l'interrupteur au pied
marche/arrêt .
Régler la puissance d'aspiration (Figure 20)
La puissance d'aspiration peut être réglée pour convenir au type de plancher
que vous nettoyez. Réduire la puissance d'aspiration réduit l'effort requis
pour manier la brosse.
L'aspirateur est doté de symboles sur le
sélecteur qui indiquent les types d'utilisation convenant aux différents réglages.
Voilages, rideaux
Meubles rembourrés, coussins
Moquettes à poils longs, tapis et
tapis de corridor
Aspiration avec économie d'éner-
gie. Ce réglage est également très
silencieux.
Moquettes à poils courts et tapis
Planchers durs, tapis très sales et
tapis
Si pendant l'utilisation de la brosse à
plancher la puissance d'aspiration
semble trop élevée, réduisez la puissance d'aspiration jusqu'à ce que la
brosse glisse plus facilement.
Tournez le sélecteur rotatif pour le
mettre au niveau de puissance d’aspiration souhaité.
Ouvrir la soupape d'entrée d'air
(Figure21 + 22)
(selon le modèle)
Il est facile de réduire la puissance d'as-
piration pendant un court moment, p.
ex. pour empêcher les tapis ou d'autres
objets d'être aspirés dans l'aspirateur.
Ouvrez la soupape d’entrée d’air sur
la poignée suffisamment pour réduire
la puissance d'aspiration.
Cela réduit la puissance d'aspiration sur
l'embout utilisé.
Pendant le nettoyage
Au moment de nettoyer, tirez l'aspira-
teur derrière vous sur ses roues. Vous
pouvez le maintenir debout pour nettoyer les escaliers et les rideaux, etc.
45
Page 46

fr-CA
Lorsque vous aspirez de la pous-
sière fine telle que de la sciure, du
sable, du plâtre, de la farine, etc. des
décharges électrostatiques se créent
naturellement. Dans certaines conditions, ces charges seront libérées.
Pour éviter les effets désagréables
de ces décharges, une bande métallique est incorporée dans une rainure
sous la poignée. Veuillez garder votre
main toujours en contact avec cette
bande métallique lorsque vous utilisez l'appareil (Figure23 + 24).
Immobilisation, transport et rangement
Système de fixation de tube avec arrêt automatique pour les pauses
(Figure 25)
(ne peut pas être utilisé avec l'électrobrosse SEB 228)
Le système d'immobilisation vous permet d'immobiliser le tube d'aspiration
et la brosse à plancher sur l'aspirateur
pendant de brèves pauses.
Insérez l'ergot de la brosse dans le
support de fixation de l'aspirateur.
Si votre aspirateur se trouve sur un
plan incliné, p. ex. une rampe, rentrez entièrement le tube télescopique.
Posez l’aspirateur à la verticale.
Il est préférable de raccourcir au maximum le tube télescopique.
Glissez la brosse à plancher vers le
bas dans un des systèmes d'immobilisation sur un des côtés de l'aspirateur.
Ceci est plus pratique pour transporter
ou ranger votre aspirateur.
Si votre aspirateur est équipé d'une poignée XXL, vous pouvez détacher cette
poignée de sorte que l'aspirateur
prenne moins de place lors du rangement (Figure 27).
Déconnectez la poignée XXL du tube
d'aspiration télescopique rentré.
Enroulez le tuyau d'aspiration autour
du tube d'aspiration télescopique et
insérez la poignée XXL dans le deuxième système d'immobilisation.
Entretien
Pour l'entretien de l'aspirateur,
éteignez-le toujours et débranchez le
cordon de la prise murale.
Le système de filtrage Miele comprend
trois composantes:
– Sac à poussière Miele d'origine
– Filtre de protection du moteur
Support du tube télescopique (Figure 26)
Après utilisation, arrêtez l'aspira-
teur et débranchez toujours la prise.
Débranchez la fiche de la prise de
courant.
46
– Filtre d'évacuation Miele d'origine
Ils devront être remplacés de temps en
temps pour veiller à ce que votre aspirateur fonctionne efficacement.
Page 47

Nous recommandons d'utiliser uniquement des sacs à poussière, des
filtres et des accessoires d'origine
portant le logo «Original Miele»
avec cet aspirateur. Cela permettra
d'assurer le maintien de sa puissance d'aspiration, ce qui donne les
meilleurs résultats de nettoyage possible.
Les sacs à poussière avec le logo
«Original Miele» ne sont pas fabriqués de papier ou de matériau à
base de papier et n'ont pas de collier
de carton. C'est pourquoi nos sacs à
poussière sont particulièrement durables et fiables.
Veuillez noter que les défauts et
dommages à l'appareil résultant de
l'utilisation d'accessoires qui ne
comportent pas le logo «Original
Miele» ne seront pas couverts par la
garantie de l'appareil.
Achat de nouveaux sacs à poussière et de filtres
Vous pouvez commander les sacs à
poussière et les filtres d'origine Miele
via la boutique en ligne Miele, auprès
du service technique Miele ou de votre
revendeur.
Commande des bons sacs à poussière et des bons filtres
N'utilisez que des sacs à poussière
FJM Miele d'origine avec un collier
rouge ainsi que des filtres Miele d'ori-
gine. Vous reconnaîtrez les accessoires
Miele d'origine par le logo «ORIGINAL
Miele» sur l'emballage.
fr-CA
Chaque boîte de sacs à poussière Miele
d'origine comprend quatre sacs, un
filtre d'évacuation AirClean et un filtre
de protection du moteur. Les lots Miele
d'origine contiennent 16 sacs à poussière, quatre filtres d'évacuation
AirClean et quatre filtres de protection
du moteur.
Des filtres d'évacuation Miele d'origine
peuvent également être achetés auprès
de votre revendeur Miele ou du service
technique Miele. Veuillez indiquer le numéro de modèle de votre aspirateur au
moment de passer votre commande
afin de vous assurer d'obtenir le bon
filtre. Vous pouvez également commander tous ces accessoires de la boutique
en ligne Miele.
Quand remplacer le sac à poussière (Figure 28)
Changez le sac à poussière lorsque le
marqueur dans le voyant de remplacement du sac à poussière tourne au
rouge.
Les sacs à poussière sont des produits à usage unique. Jetez les sacs
à poussière pleins. Ne les réutilisez
pas. Les pores obstrués réduisent la
puissance d'aspiration.
Vérifier le voyant de remplacement du sac à poussière
Fixez la brosse à plancher à l'aspira-
teur (selon le modèle).
47
Page 48

fr-CA
Mettez l'aspirateur en marche et sé-
lectionnez le niveau de puissance
maximal.
Soulevez légèrement la brosse à
plancher du sol.
Comment fonctionne le voyant de remplacement du sac à poussière
Le voyant de remplacement du sac à
poussière est réglé pour la poussière résidentielle normale. Elle contient généralement un mélange de poussière, de
cheveux, de fils, de peluches de tapis,
de sable, etc.
Toutefois, si l'aspirateur a servi pour
nettoyer de la poussière fine comme le
plâtre, la poussière de brique, le ciment
ou la farine, les pores du sac à poussière peuvent devenir rapidement obstrués.
Cela affecte la perméabilité à l'air du
sac et le marqueur indiquera que le sac
est «plein» même s'il ne l'est pas. Si
cela se produit, vous devez tout de
même changer le sac à poussière parce
que la puissance d'aspiration sera grandement réduite à cause de l'obstruction
des pores du sac à poussière.
Si, au contraire, une grande quantité de
cheveux ou de peluches de tapis, qui
contiennent généralement beaucoup
d'air, sont aspirés le voyant pourra ne
pas réagir même si le sac est plein.
Vous devez tout de même le changer.
Ces deux extrêmes peuvent se produire.
Comment remplacer le sac à poussière (Figure29 + 30)
Appuyez sur les boutons de dégage-
ment situés sur les côtés du raccord
du tuyau et retirez le tuyau de la prise
(Figure 02).
Appuyez sur le levier de dégagement
du couvercle du compartiment à
poussière et levez-le autant que possible (Figure 09).
Le sac à poussière est muni d'un rabat
qui se ferme automatiquement pour éviter que la poussière se répande au moment où vous retirez le sac.
Tirez le sac à poussière par la prise
sur le collier.
Insérez le nouveau sac à poussière le
plus loin possible dans le logement
rouge. Laissez-le plié tel que vous le
sortez de la boîte.
Fermez le couvercle du compartiment
à poussière jusqu'à ce qu'il s'enclenche. Veillez à ne pas coincer le
sac à poussière.
Un dispositif de verrouillage spécial
permet d'éviter que le couvercle du
compartiment à poussière puisse
être fermé s'il ne contient pas de
sac. Ne le forcez pas!
Insérez le raccord de tuyau dans la
prise d'aspiration de l'aspirateur
jusqu'à ce qu'il s'enclenche. Pour ce
faire, alignez les guides sur ces deux
pièces (Figure01).
48
Page 49

fr-CA
Quand remplacer le filtre de protection du moteur
Remplacez ce filtre chaque fois que
vous ouvrez une nouvelle boîte de sacs
à poussière.
Un filtre de protection du moteur est
fourni avec chaque boîte de sacs à
poussière Miele. Les lots contiennent
quatre filtres de protection du moteur.
Comment remplacer le filtre de protection du moteur (Figure31)
Ouvrez le compartiment à poussière.
Tirez le sac à poussière par la prise
sur le collier.
Soulevez la grille du filtre jusqu'à ce
qu'il s'enclenche et retirez l'ancien
filtre. Tenez-le par la partie propre,
non souillée pour le retirer.
Remplacez-le par un nouveau filtre
de protection du moteur.
Fermez la grille de filtre.
Insérez le sac à poussière le plus loin
possible dans le logement.
Fermez le couvercle du compartiment
à poussière jusqu'à ce qu'il s'enclenche. Veillez à ne pas coincer le
sac à poussière.
À quel moment remplacer le filtre d'évacuation?
Selon le modèle, votre aspirateur est
équipé de l'un des filtres (Figure 08)
d'évacuation de série suivants:
a AirClean
Remplacez ce filtre chaque fois que
vous commencez un nouveau paquet
de sacs à poussière Miele. Un filtre
d'évacuation AirClean est fourni avec
chaque paquet de sacs à poussière
Miele.
b Active AirClean 50 (noir)
c HEPA AirClean 50 (blanc)
Remplacez si l'affichage du voyant de
remplacement du filtre d'évacuation est
complètement rouge (Figure 13). Cela
se produit après environ 50heures de
fonctionnement ce qui équivaut à une
année d'utilisation. L'aspirateur peut
tout de même être utilisé. Toutefois, la
puissance d'aspiration sera réduite ainsi
que l'efficacité du filtre s'il n'est pas
remplacé au moment opportun.
Comment remplacer le filtre AirClean
(Figure32 + 33)
N'utilisez pas plus d'un filtre d'évacuation à la fois.
Soulevez le couvercle du réservoir à
poussière.
Appuyez sur le levier de dégagement
sur la grille du filtre et ouvrez la grille
jusqu'à ce qu'elle s'enclenche.
Prenez le filtre d'évacuation usé
AirClean par une des sections
propres, sans souillure et sortez-le.
Remplacez-le par un nouveau filtre
d'évacuation AirClean.
Si vous souhaitez poser un filtre
d'évacuation Active AirClean 50 ou
HEPA AirClean 50, voir la section
«Remplacer un type de filtre d'évacuation par un autre».
Fermez la grille du filtre.
Refermez le couvercle du réservoir à
poussière.
49
Page 50

fr-CA
Remplacer les filtres d'évacuation
Active AirClean 50 et HEPA AirClean
50 (Figure34 + 35)
N'utilisez qu'un seul filtre d'évacuation.
Ouvrez le compartiment à poussière.
Soulevez le filtre d'évacuation et reti-
rez-le.
Insérez un nouveau filtre d'évacuation
en vous assurant de l'ajuster adéquatement, puis poussez-le en place.
Appuyez sur le voyant de remplace-
ment TimeStrip® du filtre d'évacuation (Figure 11).
Après 10 à 15secondes environ, une
petite bande rouge apparaîtra dans la
partie gauche du voyant (Figure 12).
Si vous souhaitez insérer le filtre
d'évacuation AirClean, voir la section
«Changement du type de filtre
d'évacuation».
Fermez le couvercle du compartiment
à poussière.
Au moment de changer le filtre, veuillez remarquer:
1. Si vous souhaitez remplacer le filtre
d'évacuation de type a par le filtre de
type b ou le filtre de type c, vous devez retirer la grille du filtre avant d'insérer le nouveau filtre.
De plus, vous devez activer le voyant
de remplacement du filtre d'évacuation (Figure 11).
2. Si vous souhaitez remplacer le filtre
d'évacuation de type b ou c par le
filtre de type a, vous devez donc installer une grille de filtre * (Figure 32).
* Grille du filtre – voir la section «Accessoires optionnels».
Quand remplacer les ramasse-fils?
(uniquement pour les modèles dont la
version standard est équipée d'une
brosse à plancher réversible)
Les ramasse-fils situés à l'entrée d'aspiration de la brosse à plancher réversible peuvent être remplacés. Vérifiezles de temps en temps et remplacez-les
si le velours est usé.
Remplacer un type de filtre d'évacuation par un autre (Figure 08)
Selon le modèle de votre aspirateur, l'un
des filtres d'évacuation de série suivants convient à votre appareil:
a AirClean
b Active AirClean 50 (noir)
c HEPA AirClean 50 (blanc)
N'utilisez pas plus d'un filtre d'évacuation à la fois.
50
Comment remplacer les ramasse-fils
(Figure36)
Utilisez un tournevis adapté pour reti-
rer les ramasse-fils des fentes.
Installez les nouveaux ramasse-fils.
Nettoyage du rouleau de la brosse
AllTeQ (Figure37)
Nettoyez le rouleau de la brosse si nécessaire.
Relâchez le roulement à l'aide d'une
pièce de monnaie.
Page 51

fr-CA
Poussez le roulement et retirez-le.
Retirez le rouleau.
Retirez les fils et les cheveux, repla-
cez le rouleau et réajustez le roulement en le verrouillant en place.
Vous pouvez vous procurer des pièces
de rechange auprès de Miele, de votre
détaillant Miele ou du Service Miele.
Nettoyage et entretien
Débranchez toujours l'aspirateur
de l'alimentation électrique avant de
le nettoyer. Éteignez-le et débranchez-le.
L'aspirateur et ses accessoires
L'aspirateur et tous les accessoires de
plastique peuvent être nettoyés à l'aide
d'un nettoyant spécialement conçu
pour le plastique.
N'utilisez pas d'agents net-
toyants abrasifs, de produits pour
vitres, de nettoyants tout usage ni de
nettoyants à base d'huile!
Ne laissez pas l'aspirateur deve-
nir mouillé. Si de l’humidité pénètre
dans l’aspirateur, vous risquez de subir une décharge électrique.
Réservoir à poussière
Le réservoir à poussière peut être nettoyé, si nécessaire, avec un chiffon sec,
une brosse ou, si disponible, un deuxième aspirateur pour nettoyer la poussière.
Surveillez le voyant de remplacement
du sac à poussière et inspectez tous les
filtres régulièrement. Nettoyez-les ou
remplacez-les lorsque nécessaire,
conformément aux instructions d’utilisation.
51
Page 52

fr-CA
Foire aux questions
Vous pouvez régler la plupart des défauts ou anomalies courants par vous-même.
Dans bon nombre de cas, vous économiserez ainsi du temps et de l'argent car
vous n'aurez pas besoin de faire appel au service technique.
Les tableaux suivants vous aideront à déceler la cause d'un défaut ou d'une anomalie et à y remédier.
Problème Cause et solution possibles
L'aspirateur s'éteint automatiquement.
Un mécanisme de limitation de la température éteint
l'aspirateur automatiquement lorsqu'il devient trop
chaud.
Cela peut se produire si, par exemple, de gros articles
bloquent le tube ou lorsque le sac à poussière est
plein ou contient des particules de poussière fine.
Une évacuation très sale ou le filtre du réservoir à
poussière peuvent également causer la surchauffe.
Éteignez l'aspirateur immédiatement au moyen de
l'interrupteur au pied marche/arrêt et débranchez-le.
Après avoir retiré la cause, attendez environ 20 à
30minutes pour permettre à l'aspirateur de se refroidir. Puis, il pourra être rallumé.
52
Page 53

fr-CA
Service technique
Contact en cas d'anomalies
Vous n'arrivez pas à résoudre la panne
par vous même? Contactez le service
après-vente Miele ou votre revendeur
Miele.
Les numéros de téléphone du service
après-vente Miele figurent en fin de
notice.
Garantie
Pour plus d'informations reportez-vous
aux conditions de garantie fournies auprès du service après-vente Miele.
Accessoires optionnels
Certains modèles sont équipés de série d'au moins un des accessoires suivants.
Veuillez toujours suivre les instructions de nettoyage et d'entretien des
revêtements de sol du fabricant.
Vous pouvez commander ces produits,
ainsi que d'autres accessoires utiles facilement sur le site Web Miele, auprès
du Service Miele ou des détaillants
Miele.
L'électrobrosse convient uniquement
aux modèles d'aspirateur dotés d'une
prise spéciale.
Electrobrosse Electro Comfort (SEB 217-3)
Pour le nettoyage en profondeur des tapis et moquettes robustes. Elle permet
d'éliminer facilement les salissures incrustées sans laisser de marques de
passage.
Électrobrosse Electro Plus (SEB 228)
Par rapport au SEB 217-3, cette électrobrosse est plus large et est également réglable à cinq niveaux pour
s'adapter à différentes hauteurs de pile.
Electrobrosse Electro Premium (SEB 236)
Cette électrobrosse est par rapport au
modèle SEB 217-3 plus large de 60 mm
et plus puissante. Elle est donc particulièrement adaptée au nettoyage de surfaces plus grandes.
Par rapport à la brosse SEB 217-3, elle
dispose en plus
– d'un réglage en hauteur pour l'adap-
tation à différentes hauteurs de sol
– de diodes pour éclairer la surface à
aspirer
– d'un voyant lumineux multifonction.
Brosses à plancher/brosses
Brosse AllergoTeQ (SBDH 285-3)
Cette brosse convient au nettoyage hygiénique quotidien de toutes les surfaces. Lors de l'aspiration, le degré de
propreté est indiqué par un affichage
chromatique tricolore.
TurboTeQ (STB 305-3) / Turbobrosse (STB 205-3)
Idéale pour enlever les peluches et les
cheveux des tapis à poil court.
Miniturbobrosse (STB 101)
Pour nettoyer meubles rembourrés, matelas, sièges de voiture, etc.
53
Page 54

fr-CA
Brosse pour sols durs (SBB 235-3)
Cette brosse est conçue pour une utilisation sur les sols durs comme la céramique ou les planchers en pierre.
Brosse de parquet
(SBBParquet-3)
Cette brosse est munie de poils naturels et est conçue pour une utilisation
sur les planchers lisses susceptibles
d'être rayés.
Brosse à plancher Parquet Twister munie d'une tête pivotante (SBB 300-3)
Munie de poils naturels, pour nettoyer
les revêtements durs lisses et les interstices.
Brosse à plancher Parquet Twister XL munie d'une tête pivotante (SBB 400-3)
Munie de poils naturels, pour nettoyer
rapidement les revêtements durs lisses
et les interstices.
Brosse à radiateur
(SHB30)
Pour épousseter les radiateurs, les étagères étroites et les fentes.
Brosse à matelas (SMD10)
Pour nettoyer des meubles rembourrés,
des matelas, des coussins, des rideaux,
des housses, etc.
Embout à interstices de 300mm
(12po) (SFD10)
Embout plat très long pour nettoyer les
plis, les fentes et les recoins.
Embout à interstices de 560mm
(22po) (SFD20)
Embout plat flexible pour nettoyer les
endroits difficiles à atteindre.
Embout pour meubles rembourrés de
190mm (71/2 po) (SPD10)
Embout très large pour meubles rembourrés utilisé pour nettoyer les
meubles rembourrés, les matelas et les
oreillers.
Autres accessoires
Boîtier d'accessoires MicroSet
(SMC20)
Le coffret MicroSet est spécialement
conçu pour nettoyer des petits objets et
des endroits difficiles à atteindre (claviers d’ordinateurs, chaînes stéréo,
meubles et ornements finement sculptés, miniatures, etc.).
Brosse universelle (SUB20)
Pour épousseter des livres, des étagères, etc.
54
Poignée Spotlight (SGC 20)
(ne doit pas être utilisé sur modèles
avec un tube d'aspiration électro ou un
tube d'aspiration électro télescopique)
Éclaire la zone où vous passez l'aspirateur.
Filtres
Filtre d'évacuation Active AirClean50
(SF-AA50)
Pour une réduction significative des
odeurs désagréables. Idéal pour les
ménages avec des animaux domestiques ou des fumeurs.
Page 55

Filtre d'évacuation HEPA AirClean50
(SF-HA50)
Capte efficacement les poussières fines
et les allergènes. Idéal pour les personnes allergiques à la poussière domestique.
Grille du filtre
La grille du filtre est requise si vous
souhaitez utiliser un filtre d'évacuation
AirClean plutôt qu'un filtre Active
AirClean 50 ou HEPA AirClean 50.
fr-CA
55
Page 56

en - Limited Warranty - Vacuums Canada
The following warranty conditions are valid in Canada only.
Miele Limited, (hereinafter "Miele") warrants to the original purchaser that this product, including all of it’s Miele
authorized parts and accessories, is free of defects in material and workmanship.
1. Duration of Warranty
This warranty is valid during the following time periods:
a) Domestic appliances in normal, non-commercial, household use:
– One (1) year. Parts and labour.
– RemoteVision® Modules: Please refer to Miele's "Limited Warranty - RemoteVision® Module - Canada".
– Additional 5 and 10 Year Limited Warranty on Sealed Refrigeration Systems: The Warranty for the Sealed
Refrigeration System includes all original compressors, condensers, evaporators, driers, the original
refrigerant and the original connecting tubing.
– Five (5) Year Warranty - If a claim regarding a defect in material or workmanship relating to the Sealed
Refrigeration Systems used in Miele Refrigerators, Wine Coolers, and Freezers is received by Miele within
five (5) years from the date of purchase, then any warranted failures of the Sealed Refrigeration System
shall be repaired at no cost to you (including parts & labour).
– Ten (10) Year Warranty - If a claim of such a defect is received at any time during the period starting from
the sixth (6th) year and ending on the last day of the tenth (10th) year after the date of purchase, this
Warranty shall cover the replacement or repair of all parts of the Sealed Refrigeration System covered by
the Warranty that is found to be defective in material or workmanship but shall not include labour. Upon
request, such labour shall be provided by Miele and at the customary charge to the Miele Customer.
b) Domestic appliances in commercial use:
– Six (6) months, for parts and labour.
c) Vacuums in normal, non-commercial, household use:
– One (1) year, upright and canister vacuums. Parts and labour.
– Two (2) years, motor for S170 - S189 upright units. Parts and labour.
– Seven (7) years, VortexTM motor for canister and upright units, except S170 - S189 upright units for which
the motor warranty is two (2) years. Parts and labour.
d) Vacuums in commercial use:
– Six (6) months, for products used commercially. Parts and labour.
– One (1) year for motor for canister and upright models. Parts and labour.
e) Commercial appliances.
– One (1) year, parts and labour within Miele Direct Service Area (MDSA).
– One (1) year, parts only outside Miele Direct Service Area (MDSA).
Contact Miele Professional to determine if you are within a MDSA.
2. Commencement Date
Warranty coverage begins on the date of purchase. If a product under warranty is replaced by Miele, the original
warranty period is not extended but continues from the date of original purchase.
3. Warranty Preconditions
3.1 Miele assumes warranty responsibility subject to the following preconditions having been fulfilled:
a) You are the original purchaser and did not obtain the product through resale;
b) The product was purchased from Miele or an authorized Miele dealer in Canada;
c) If applicable, the product was installed by a person designated by Miele as qualified to do so and in
accordance with applicable installation instructions; and
d) The product is located in Canada.
3.2 Warranty claims will only be honoured provided that any failure to conform to this warranty is reported in writing
and the product is returned together with proof of purchase date to Miele or to a Miele authorized dealer, as
applicable, within the time period stated in Section 1 above.
4. Extent of Warranty
In the event of defect in material or workmanship occurring within the time period stated in I. above, Miele will
repair, or at its option replace, within a reasonable period of time, the product or any Miele authorized part or
accessory discovered to be defective in workmanship or materials. Defective products and parts become the
property of Miele upon replacement.
56
Page 57

en - Limited Warranty - Vacuums Canada
5. Exclusions
Warranty coverage excludes any product, including its parts and accessories, that:
a) was not installed according to Miele's installation instruction;
b) was damaged by negligence, accident, abuse, misuse, improper or abnormal usage, maintenance or
transportation;
c) contains non-authentic Miele accessories or replacement parts, including filters, dust bags and other non-
Miele products; and
d) was repaired, serviced, altered or modified by someone other than a Miele authorized service centre or
technician.
6. Ordinary Wear and Tear
Ordinary wear and tear shall not be considered a defect in workmanship or materials.
7. Limitation of Liability
7.1 Unless you purchase extended warranty coverage from Miele prior to the expiry of this warranty, this warranty
is the sole warranty offered by Miele to you. Miele disclaims any and all other warranties to the fullest extent
permitted by law, whether express or implied, including any warranty of merchantability or fitness for a
particular except as provided herein.
7.2 Your sole remedies under this warranty are those described herein. Unless otherwise stated, Miele's liability for
actual damage from any cause whatsoever is limited to the amount paid by you for the product. Miele disclaims
any and all liability and consequential or other damage whether based on breach of contract, tort (including
negligence), product liability or any other legal theory. In no event will either party be responsible for any lost profits
or savings, incidental damage or other economic damages.
8. Special Provincial laws
This warranty gives the purchaser specific legal rights. The purchaser may also have other rights which may vary
from Province to Province in Canada. Some provinces do not allow limitation or exclusion of implied warranties,
therefore, certain limitations and exclusions may not apply.
9. Customer Care
9.1 For service under this warranty or for further information please contact Miele at:
Miele Limited Toll free: 1-800-565-6435
161 Four Valley Drive E-mail: customercare@miele.ca
Vaughan, Ontario
Canada L4K 4V8
9.2 Service may require that the appliance be removed and taken, by authorized Miele personnel, to an
authorized Miele Service Centre. If service is requested by you in a remote geographical area, as determined
by Miele in its sole discretion from time to time, you will, at Miele's option, be responsible for either:
a) the travel expenses incurred by Miele to attend your premises; or
b) the cost of removal and shipment of the appliance from your premises to the nearest authorized Miele
Service Centre.
Miele Limited
Headquarter and Showroom
161 Four Valley Drive
Vaughan, ON L4K 4V8
Canada
Phone: 800-643-5381
905-660-9936
Fax: 905-535-2290
www.miele.ca
customercare@miele.ca
professional@miele.ca (commercial enquiries)
MieleCare National Service
Phone: 800-565-6435
905-532-2272
Fax: 905-532-2292
customercare@miele.ca (general and technical enquiries)
57
Page 58

fr - Garantie restreinte – Aspirateurs Canada
Les conditions de la garantie suivante sont valides au Canada seulement.
Miele Limitée, (ci-après nommée "Miele") garantit à l’acheteur original que ce produit, y compris tous ses accessoires
et pièces autorisés par Miele, est libre de tout défaut de matériel et de fabrication.
1. Entrée en vigueur et durée de la garantie
Cette garantie est valide durant la période de temps suivante :
a) Appareils électroménagers aux fins d’utilisation domestique normale et non commerciale :
– Un (1) an, pièce et main-d’œuvre.
– Modules RemoteVision® : Veuillez vous reporter à la "Garantie restreinte - Module RemoteVision® -
Canada" de Miele.
– Garantie supplémentaire de 5 et 10 ans sur les systèmes scellés de réfrigération : la garantie sur le
système scellé de réfrigération couvre tous les compresseurs, les condensateurs, les évaporateurs et les
déshydrateurs-filtres d'origine, ainsi que le fluide frigorigène et les tuyaux de raccordement d'origine.
– Garantie de cinq (5) ans - Si une plainte concernant un matériau défectueux ou un défaut de fabrication lié
au système scellé de réfrigération utilisé dans les réfrigérateurs, les caves à vin et les congélateurs Miele est
adressée à Miele dans les cinq (5) ans suivant la date d'achat de l'appareil, les défauts du système scellé de
réfrigération couverts par la garantie seront réparés gratuitement (pièces et main-d'œuvre comprises).
– Garantie de dix (10) ans - Si une plainte concernant les défauts susmentionnés est adressée à Miele à
partir de la sixième (6e) année et jusqu'au dernier jour de la dixième (10e) année suivant la date d'achat
de l'appareil, la garantie couvrira le remplacement ou la réparation de tous les éléments du système
scellé de réfrigération présentant un défaut matériel ou un défaut de fabrication couvert par la garantie,
excepté les frais de main-d'œuvre. Si le client en fait la demande, Miele se chargera de la réparation ou du
remplacement des pièces, mais aux frais du client.
b) Appareils électroménagers aux fins d’utilisation commerciale :
– Six (6) mois, pour pièces et main-d’œuvre.
c) Aspirateurs destinés à une utilisation domestique, non commerciale dans des conditions normales :
– Un (1) an, pour les aspirateurs verticaux et les aspirateurs-traîneaux pièces et main-d’œuvre.
– Deux (2) ans, pour le moteur des aspirateurs verticaux S170 - S189 pièces et main-d’œuvre.
– Sept (7) ans, pour le moteur VortexTM des aspirateurs-traîneaux, excepté pour les modèles d’aspirateurs
verticaux S170-S189 dont le moteur est garanti deux (2) ans pièces et main-d’œuvre.
d) Aspirateurs aux fins d’utilisation commerciale :
– Six (6) mois, pour les produits à utilisation commerciale. Pièce et main-d’œuvre.
– Un (1) an, pour le moteur des aspirateurs verticaux et des aspirateurs-traîneaux. Pièces et main-d’œuvre.
e) Appareils commerciaux.
– Un (1) an, pièces et main d’œuvre dans la zone de service direct Miele.
– Un (1) an, pièces uniquement dehors la zone de service direct Miele.
Contactez Miele Professional pour déterminer si vous êtes dans la zone de service direct Miele.
2. Date d’entrée en vigueur
La garantie entre en vigueur à la date de l'achat. En cas de remplacement par Miele d'un produit couvert par une
garantie, la période de garantie initiale n'est pas prolongée; sa date d'entrée en vigueur correspond à la date de
l'achat initial.
3. Conditions préalables liées à la garantie
3.1 Miele assume la responsabilité en vertu de la garantie à la condition que les conditions suivantes aient été
respectées :
a) vous êtes l'acheteur initial et votre produit ne provient pas d'une revente;
b) le produit a été acheté auprès de Miele ou auprès d'un détaillant Miele autorisé au Canada;
c) le cas échéant, le produit a été installé par une personne compétente, autorisée par Miele, conformément aux
instructions d'installation en vigueur;
d) le produit se trouve au Canada.
3.2 Les réclamations en vertu de la garantie seront honorées uniquement si la non-conformité aux dispositions de la
garantie est signalée par écrit et si le produit est retourné à Miele ou à un détaillant Miele autorisé accompagné
d'une preuve de la date d'achat, pendant la période prévue à l'article 1 ci-dessus.
4. Étendue de la garantie
En cas de matériaux défectueux ou de défaut de fabrication pendant la période prévue à l'article 1 ci-dessus, Miele
réparera ou, à son choix, remplacera dans un délai raisonnable le produit ou toute pièce ou tout accessoire Miele
dont la fabrication ou les matériaux sont défectueux. Les produits ou les pièces défectueux deviennent la propriété de
58
Page 59

fr - Garantie restreinte – Aspirateurs Canada
5. Exclusions de la garantie
La garantie ne couvre pas les produits, y compris les pièces et les accessoires de ces produits, qui :
a) n'ont pas été installés conformément aux instructions d'installation de Miele;
b) ont été endommagés par négligence, à la suite d'un accident ou d'une utilisation mauvaise, inappropriée ou
anormale, ou encore en raison de l'entretien ou du transport inapproprié ou anormal;
c) contiennent des accessoires ou des pièces de rechange non fabriqués par Miele, y compris les filtres, les
sacs à poussière et tout autre produit non fabriqué par Miele;
d) ont été réparés, entretenus ou modifiés par une personne autre qu'une personne du centre de services ou un
technicien autorisé par Miele.
6. Usure normale
L'usure normale ne constitue pas un défaut de fabrication ni un défaut de matériaux.
7. Limitation de responsabilité
7.1 À moins d'acheter une garantie prolongée auprès de Miele avant l'échéance de la présente garantie, celle-ci est la
seule garantie que vous offre Miele. Miele se désiste de toute autre garantie maximale permise par la loi, expresse
ou implicite, y compris toute garantie de qualité marchande ou d'usage à une fin particulière, à l'exception de la
présente garantie.
7.2 Les recours décrits dans le présent document constituent vos seuls recours en vertu de la présente garantie. À moins
d'une autre mention, la responsabilité de Miele pour les dommages réels, quelle que soit leur nature, est limitée au
montant que vous avez payé pour le produit. Miele se dégage de toute responsabilité, de tout dommage indirect ou de
tout autre dommage, qu'il soit attribuable à la violation du contrat, à la responsabilité délictuelle (y compris la négligence),
à la responsabilité du fait du produit ou à toute autre théorie juridique. En aucun cas les deux parties ne seront tenues
responsables de toute perte de bénéfices ou d'économies, de dommage consécutif ou de tout autre dommage financier.
8. Lois provinciales particulières
La présente garantie accorde à l'acheteur des droits légaux particuliers. L'acheteur peut également exercer d'autres
droits qui peuvent varier d'une province à l'autre au Canada. Certaines provinces interdisent la restriction ou l'exclusion
des garanties implicites. Par conséquent, il est possible que certaines restrictions et exclusions ne s'appliquent pas.
9. Service à la clientèle
9.1 Pour faire exécuter des travaux d'entretien couverts en vertu de la présente garantie ou pour obtenir de plus
amples renseignements, veuillez communiquer avec Miele à l'adresse ou aux numéros suivants :
Miele Limited, No sans frais : 1 800 565-6435
161, Four Valley Drive Adresse électronique : customercare@miele.ca
Vaughan (Ontario)
Canada L4K 4V8
9.2 Si des travaux d'entretien sont nécessaires, l'appareil devra peut-être être déplacé par une personne
autorisée par Miele et emporté à un centre de services Miele autorisé. Si vous demandez un entretien et que
vous habitez une région éloignée, tel qu'il a été déterminé par Miele, à sa seule discrétion, à l'occasion, vous
devrez, selon le choix de Miele, assumer certains frais :
a) soit les frais de déplacement qu'engage Miele pour se présenter à votre lieu de résidence;
b) soit les frais de déplacement et d'envoi de l'appareil, de votre lieu de résidence au centre de services
Miele autorisé le plus près.
Miele Limitée
Siège social et salon d'exposition au Canada
161 Four Valley Drive
Vaughan, ON L4K 4V8
Canada
Téléphone : (800)-643-5381
(905)-660-9936
Télécopieur : (905)-535-2290
www.miele.ca
customercare@miele.ca
professional@miele.ca (questions commerciales)
Service à la clientèle – MieleCare (Canada)
Téléphone : (800) 565-6435
(905) 532-2272
Télécopieur : (905) 532-2292
customercare@miele.ca (questions générales et Service technique)
59
Page 60

Page 61

Page 62

Page 63

Importateur
Miele Limitée
Siège social au Canada et Centre Miele
161 Four Valley Drive
Vaughan, ON L4K 4V8
www.miele.ca
Service à la clientèle
Téléphone : 800 565-6435
customercare@miele.ca
Miele & Cie. KG
Carl-Miele-Straße 29
33332 Gütersloh
Allemagne
Siège social national
Canada
Page 64

01
02
03
040506
07
08
09
10
11
13
12
Page 65
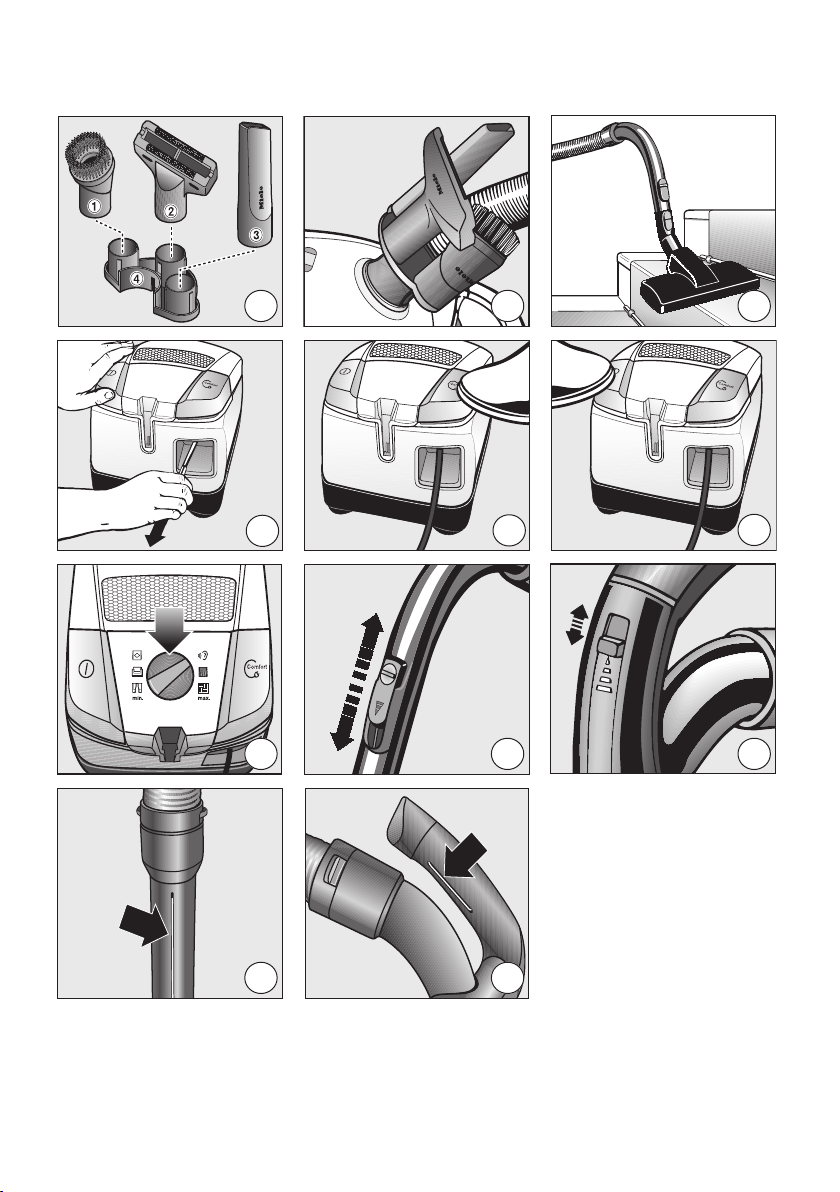
141516
17
18
19202122232425
Page 66

26
27
282930
31
323334
Page 67

35
36
37
Page 68

9 Independence Way
Princeton, NJ 08540
Phone:
Fax:
www.mieleusa.com
U.S.A.
Miele, Inc.
National Headquarters
Please have the model and serial number
of your appliance available when
contacting Technical Service.
Canada
Importer
Miele Limited
Headquarters and Miele Centre
800-843-7231
609-419-4298
Technical Service & Support
Phone:
Fax:
TechnicalService@mieleusa.com
161 Four Valley Drive
Vaughan, ON L4K 4V8
www.miele.ca
800-999-1360
888-586-8056
Customer Care Centre
Phone:
customercare@miele.ca
800-565-6435
905-532-2272
International Headquarters
Miele & Cie. KG
Carl-Miele-Straße 29
33332 Gütersloh
Germany
Compact C2 (SDxx0/4) - 0319 M.-Nr. 10 852 961 / 03
 Loading...