

Page 1
Operating Instructions
Vacuum Cleaner
S 2001
To prevent accidents
and machine damage,
read these instructions
before
installation and use.
en, fr - US, CA
HS12
M.-Nr. 07 851 591
Page 2
Only Miele dustbags, filters and accessories with
the "Original Miele" logo can be used with this
vacuum. Only then can the suction power of the
vacuum cleaner reach its optimum potential creating
the best possible cleaning results.
USE OF NON-MIELE COMPONENTS MAY VOID
THE WARRANTY.
The use of dustbags made of paper or a similar
,
material, or dustbags with a cardboard retaining plate
can lead to serious damage to the vacuum cleaner
and may void the warranty, just as with the use of
dustbags without the "Original Miele" logo.
The "Original Miele" Logo will appear on the
packaging or directly on the dustbag.
Purchasing new dustbags and filters
Original Miele dustbags and filters can be purchased
from an authorized Miele vacuum dealer or by visiting the
Miele store at www.mieleusa.com.
2
Page 3

Contents
IMPORTANT SAFETY INSTRUCTIONS. . . . . . . . . . . . . . . . . . . . . . . . . . . . . . . . . 4
Guide to the vacuum cleaner . . . . . . . . . . . . . . . . . . . . . . . . . . . . . . . . . . . . . . . . 8
Before using the vacuum cleaner . . . . . . . . . . . . . . . . . . . . . . . . . . . . . . . . . . . 10
Included accessories. . . . . . . . . . . . . . . . . . . . . . . . . . . . . . . . . . . . . . . . . . . . . . 13
Use . . . . . . . . . . . . . . . . . . . . . . . . . . . . . . . . . . . . . . . . . . . . . . . . . . . . . . . . . . . . 14
Power cord.......................................................14
Turning the vacuum On/Off ..........................................16
Adjusting the suction ...............................................16
Turning the Powerbrush On/Off .......................................17
Transport and storage. . . . . . . . . . . . . . . . . . . . . . . . . . . . . . . . . . . . . . . . . . . . . 18
Maintenance and care . . . . . . . . . . . . . . . . . . . . . . . . . . . . . . . . . . . . . . . . . . . . . 19
Purchasing new dustbags and filters ..................................19
Which dustbags and filters are the right ones? ...........................19
When to change the dustbag ........................................20
Replacing the dustbag .............................................21
When to change the dust compartment filter (Pre-motor filter) ...............22
Replacing the dust compartment filter (Pre-motor filter) ....................22
When to replace the Air Clean exhaust filter .............................22
Replacing the Air Clean filter .........................................22
Exchanging exhaust filters...........................................23
When to change the Active HEPA exhaust filter ..........................23
Replacing the Active HEPA exhaust filter ...............................23
When to change the thread catcher on the standard floor brush .............24
Replacing the thread catchers .......................................24
Cleaning and care . . . . . . . . . . . . . . . . . . . . . . . . . . . . . . . . . . . . . . . . . . . . . . . . 25
Frequently asked questions / Technical Service . . . . . . . . . . . . . . . . . . . . . . . 26
Optional accessories. . . . . . . . . . . . . . . . . . . . . . . . . . . . . . . . . . . . . . . . . . . . . . 27
LIMITED WARRANTY - VACUUM CLEANERS USA . . . . . . . . . . . . . . . . . 29
Caring for the environment. . . . . . . . . . . . . . . . . . . . . . . . . . . . . . . . . . . . . . . . . 31
3
Page 4

IMPORTANT SAFETY INSTRUCTIONS
When using an electrical appliance, basic precautions should always be followed,
including the following:
READ ALL INSTRUCTIONS BEFORE
USING THIS APPLIANCE
To reduce the risk of electric shock,
WARNING-
To reduce the risk of fire,
electric shock or injury:
Before Using
Check the voltage rating of the
~
vacuum cleaner before connecting the
power cord to an electrical outlet. Your
power source should correspond with
the voltage rating plate located on the
underside of the vacuum. Use only
household AC outlets. Never use DC
power sources. If you are not sure of
your home’s voltage supply, consult a
qualified electrician. Connecting the
vacuum cleaner to a higher voltage
may result in damage to the vacuum
cleaner or injury.
~
this appliance has a polarized plug
(one blade is wider than the other.) This
plug will fit in a polarized outlet only one
way. If the plug does not fit fully in the
outlet, reverse the plug. If it still does
not fit, contact a qualified electrician to
install the proper outlet. Do not alter the
plug in any way.
A damaged vacuum cleaner can be
~
dangerous. Check the packaging,
vacuum cleaner and accessories for
any signs of damage. Do not use a
damaged appliance.
Do not use with a damaged cord or
~
plug. If the appliance is not working as
it should, has been dropped, damaged,
left outdoors or submerged in water,
bring it to a service center.
The electrical outlet must be fitted
~
with a 15 A fuse.
4
Page 5

IMPORTANT SAFETY INSTRUCTIONS
Use
Do not use on people or animals.
~
Do not use outdoors or on wet
~
surfaces. Only dry surfaces should be
vacuumed.
Use only as described in this
~
manual. Use only Miele recommended
accessories described in this manual.
This appliance is intended strictly for
~
household use only.
Do not allow the vacuum cleaner to
~
be used as a toy. Close attention is
necessary when used near children.
Never use the vacuum cleaner
~
without the dustbag or filters in place.
Otherwise, it could be damaged.
If the dustbag is not inserted , the
~
dust compartment lid will not close. Do
not force it shut.
Do not leave the vacuum plugged
~
in. Unplug it from the outlet when not in
use and before servicing.
On the underside of the vacuum
~
hand piece is a metal insert designed
to absorb static electricity. Please make
certain that your hand remains around
this metal insert when vacuuming.
Persons who lack physical, sensory,
~
or mental capabilities or experience
with the machine should not use it
without supervision or instruction by a
responsible person.
Unwind the cord completely to aid
~
the vacuum in dissipating heat.
This vacuum should not be used to
~
entrap or retain any hazardous
materials.
Do not use the vacuum cleaner to
~
pick up liquids or damp dirt. This could
impair the electrical safety of the
vacuum cleaner. Wait for freshly
shampooed carpets to dry.
Do not vacuum anything that is
~
burning or smoking such as cigarettes,
matches or hot ashes. The vacuum
could catch fire.
Do not vacuum toner dust. Toner,
~
such as that used in printers and
photocopiers can conduct electricity.
Do not use the vacuum to pick up
~
any flammable or combustible liquids
such as gasoline or use in areas where
they may be present.
Do not vacuum up items which are
~
heavy, hard or have sharp edges. They
could cause a blockage and damage
the appliance.
Do not pull or carry by the cord, use
~
the cord as a handle, close a door on
the cord, or pull the cord around sharp
edges or corners. Do not run the
appliance over the cord. Keep the
cord away from heated surfaces.
Do not unplug by pulling the cord.
~
To unplug grasp the plug, not the cord.
Do not handle the plug or vacuum
~
with wet hands.
5
Page 6

IMPORTANT SAFETY INSTRUCTIONS
Keep hair, loose clothing, fingers,
~
and all parts of body away from
openings and moving parts.
To avoid risk of injury while
~
vacuuming, do not reach into the
moving beater bar of the Powerbrush.
Danger of injury.
Do not place anything into the
~
openings of the vacuum. Do not use if
any openings are blocked; keep them
free of dust, lint, hair or anything that
may reduce air flow.
This appliance is equipped with a
~
power cord reel. Hold the plug when
rewinding onto cord reel. Do not allow
plug to whip when rewinding.
Turn off all controls before
~
unplugging.
Use caution when vacuuming on
~
stairs.
Floor attachments, accessories and
~
wands must not be used at head level
to avoid injuries to the eyes and ears.
Using accessories
The hose and telescopic wand
~
contain electrical wires. Do not use the
vacuum cleaner if these parts are
damaged, cut or punctured. Avoid
picking up sharp objects. There is the
risk of electric shock.
Unplug the vacuum when changing
~
accessories, especially when using the
Powerbrush.
The socket on the vacuum cleaner is
~
only to be used for the Miele
Powerbrush.
The Miele Powerbrush is a
~
motor-driven accessory for use only
with Miele vacuum cleaners. The
vacuum must not be used with another
manufacturer's Powerbrush.
Do not use the vacuum without an
~
accessory attached. The rim could be
damaged and injuries could result from
sharp edges.
Miele dustbags are disposable and
~
intended to be used only once. Do not
attempt to reuse them. An over stuffed
dustbag will reduce the efficiency of the
vacuum cleaner.
Only use genuine Miele dustbags
~
with the Miele quality signet and
original Miele filters and accessories.
Only then will the manufacturer
guarantee its safety.
Always turn off this appliance before
~
connecting or disconnecting either
hose or motorized nozzle.
6
Page 7

IMPORTANT SAFETY INSTRUCTIONS
Cleaning, maintenance and
repairs
Turn the vacuum cleaner off after
~
each use and before every cleaning /
maintenance. Pull the plug from the
outlet.
Never submerge the vacuum
~
cleaner in water. Clean only with a dry
cloth or slightly damp cloth when
disconnected from the mains supply. If
moisture gets into the appliance there
is a risk of electrical shock.
Monitor the dustbag change
~
indicator and inspect all filters regularly.
For best performance, the dustbag and
filters should be replaced when
necessary. A full bag or blocked filter
will reduce the vacuum cleaners'
suction power. A temperature limiter
automatically switches the vacuum
cleaner off if it gets too hot, see
"Frequently asked questions".
The hose and telescopic wand
~
contain electrical wires. They should
not come in contact with water. These
items may only be cleaned with a dry
cloth. Danger of electric shock.
Disposing of an old appliance
Before discarding an old vacuum
~
cleaner, please cut off the power cord,
and render the plug useless. Ensure
the appliance presents no danger to
children while being stored for disposal
SAVE THESE
INSTRUCTIONS
Repairs during the warranty period
~
should only be performed by an
authorized service agent in accordance
with national and local safety
regulations. Unauthorized repairs could
cause injury or machine damage and
may void the warranty.
7
Page 8
Guide to the vacuum cleaner
8
Page 9

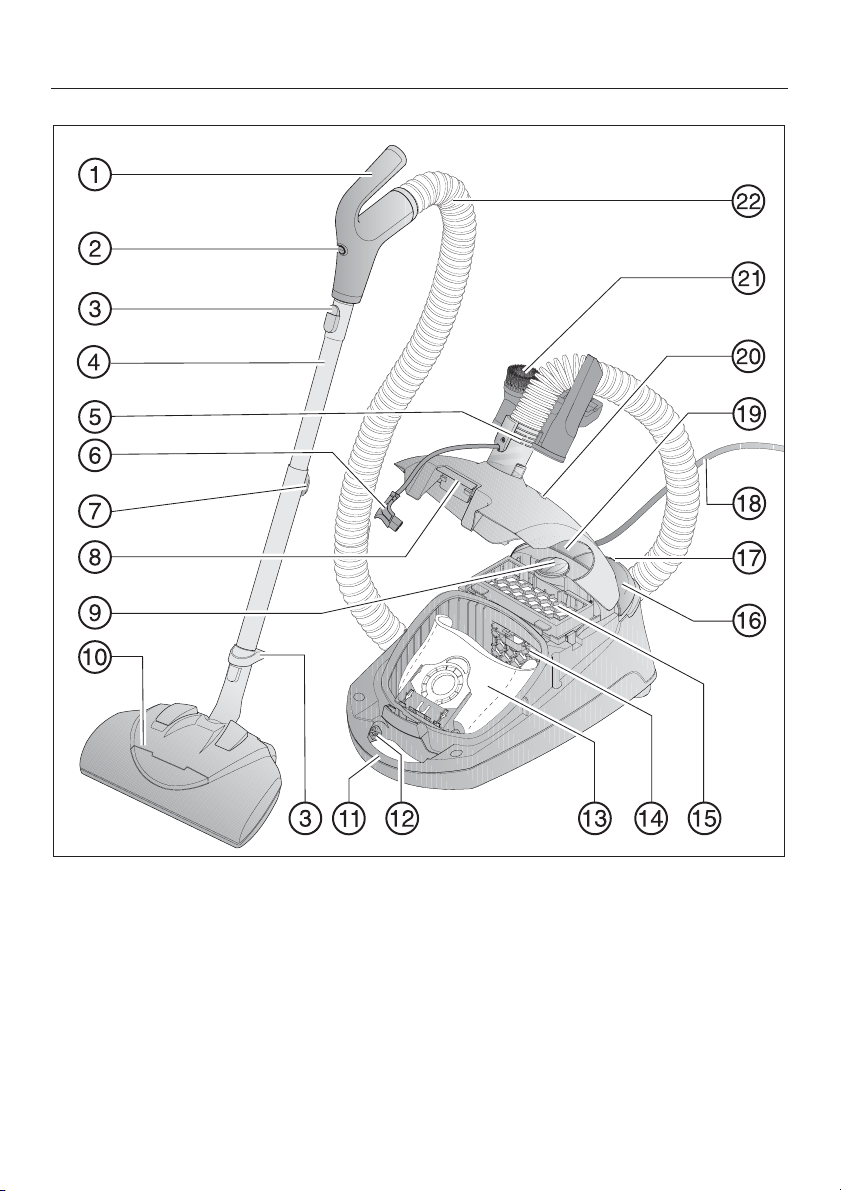
Guide to the vacuum cleaner
a Hand piece
b On/Off switch for the Powerbrush
c Lock release button
d Electro Telescopic wand SET 220
e Elbow
f Plug for Electro-accessories
g Electro Telescopic wand release button
h Dust compartment lid release
i Suction power selector
j Powerbrush SEB 217-3 / EB02 (not shown in these Operating Instructions) /
SEB 228 / EB03
A separate Operating manual for the respective accessory is supplied with the
vacuum.
k Carrying handle
l Socket for Electro-accessories
m Dustbag
n Dust compartment filter (pre-motor filter)
o Exhaust filter
p On/Off s foot switch
q Park-system
r Power cord
s Cord rewind switch
t Airflow indicator
u Accessory clip with three tools
v Suction hose SES 116
Optional accessories are available from your Miele dealer or Miele.com
9
Page 10
Before using the vacuum cleaner
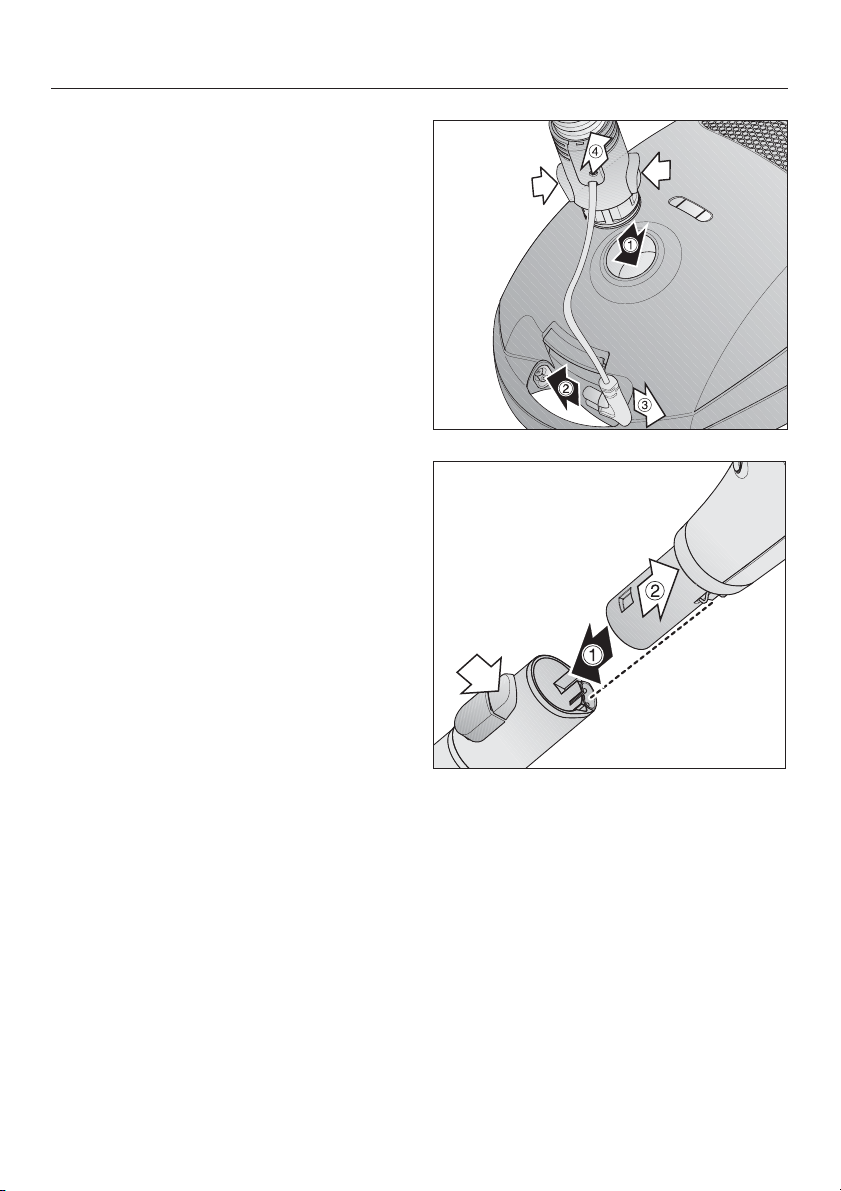
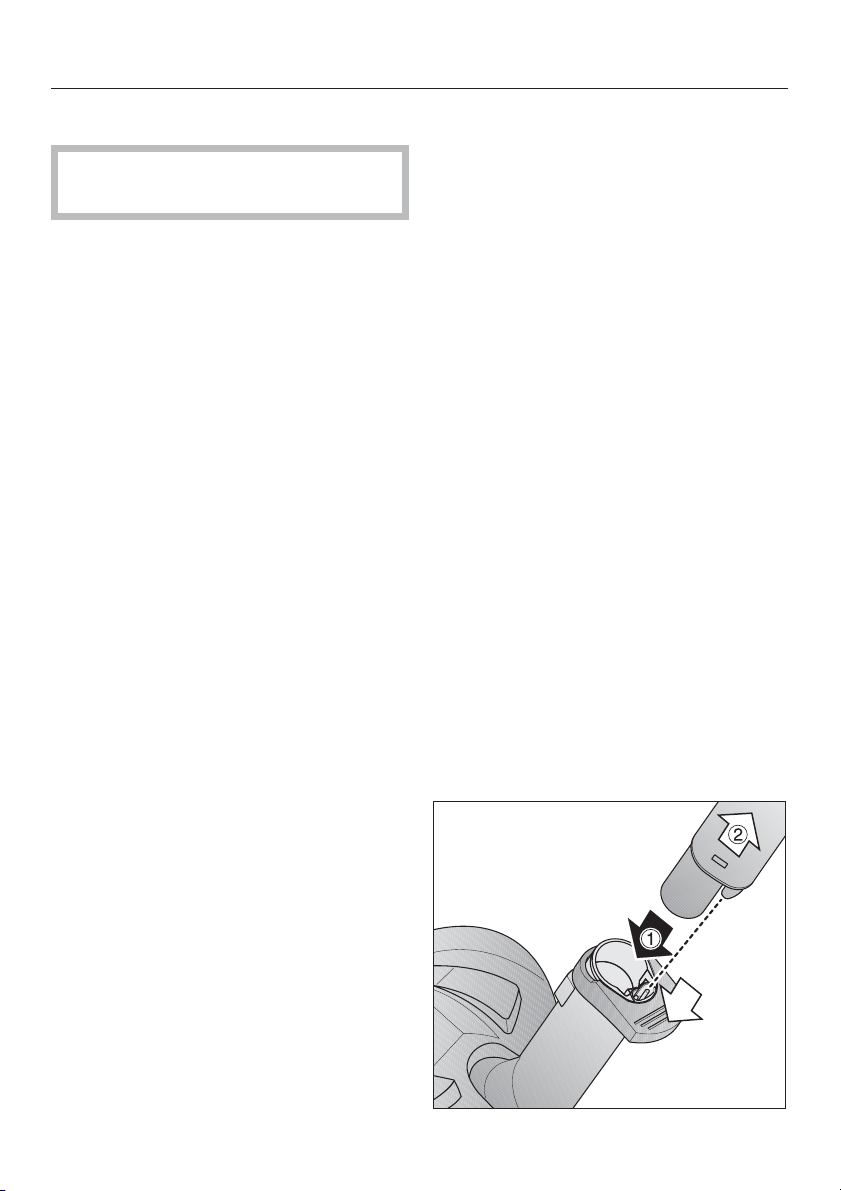
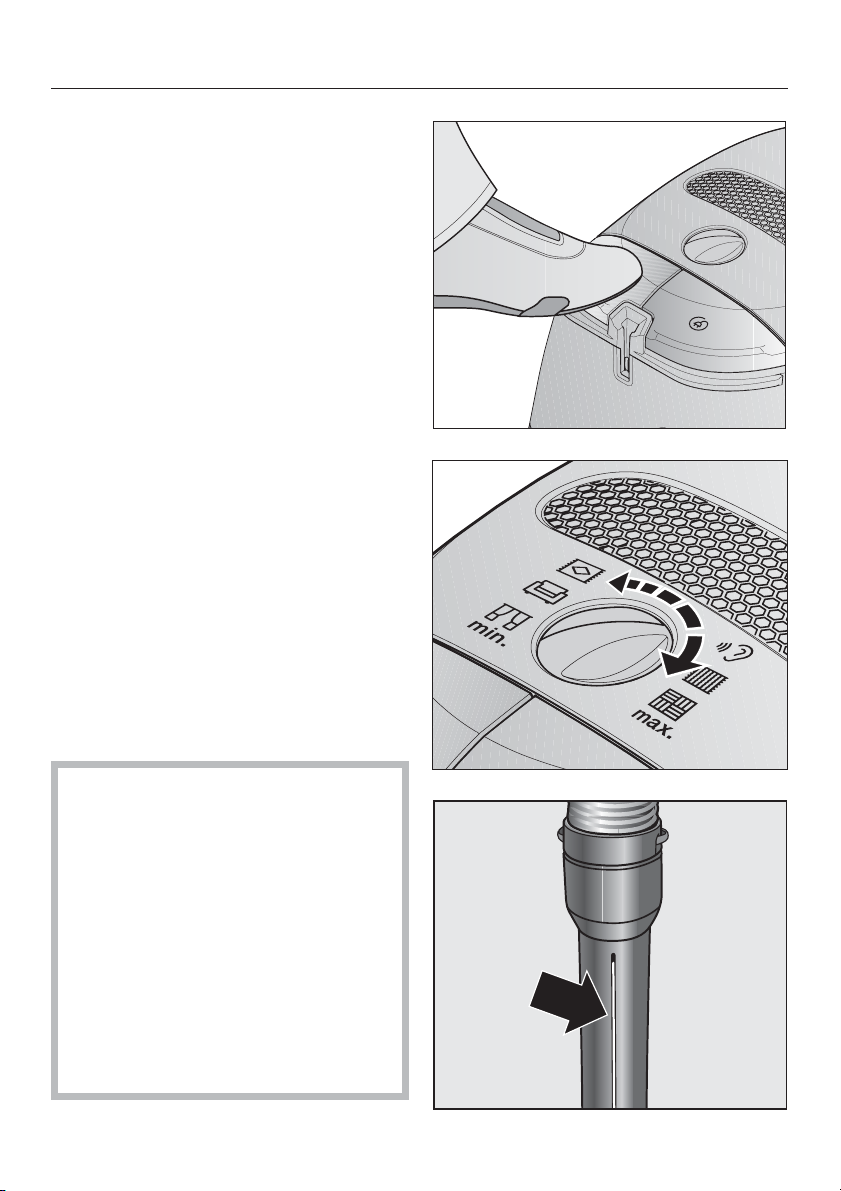
Connecting the Electro hose
a Insert the elbow into the suction
socket until it clicks into place.
b Insert the plug into the socket on the
inside of the carrying handle.
Disconnecting the Electro
hose
c Remove the plug from the socket.
d Press the two release buttons at the
sides of the elbow and lift the hose
from the socket.
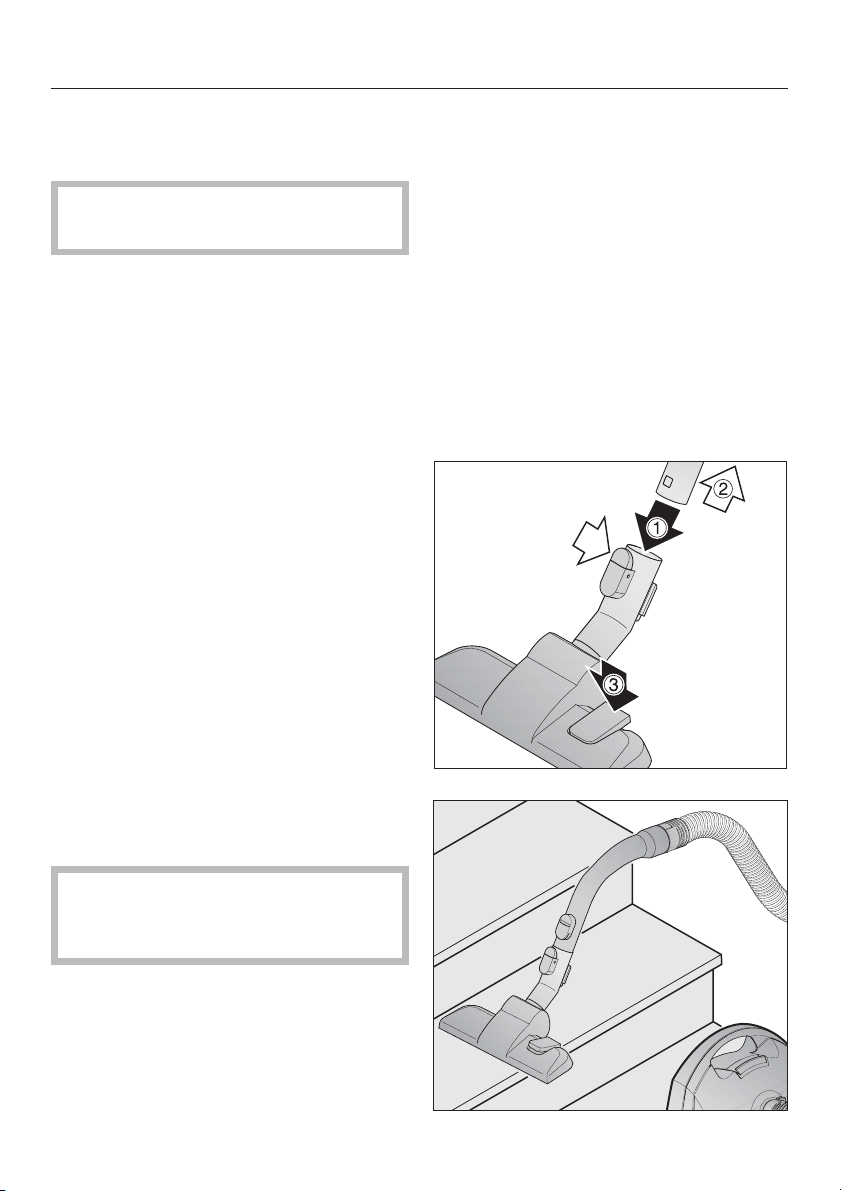
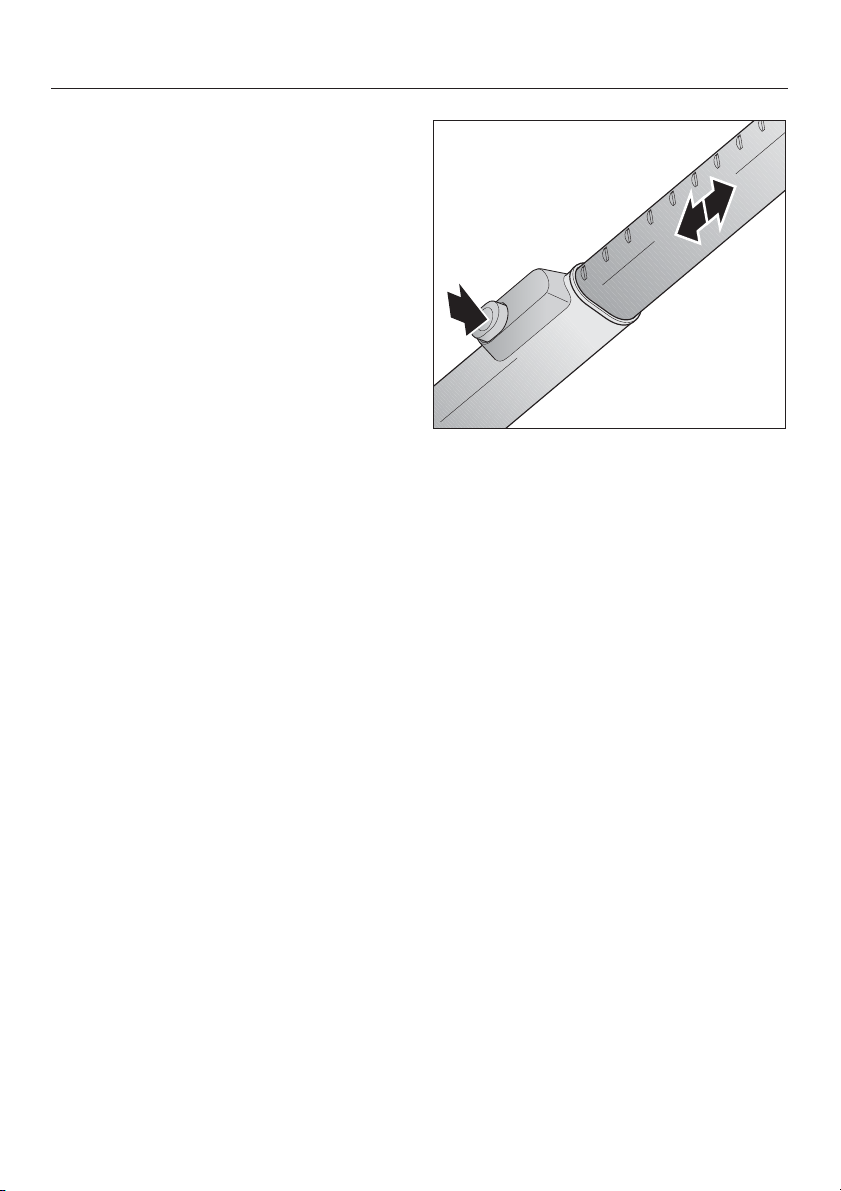
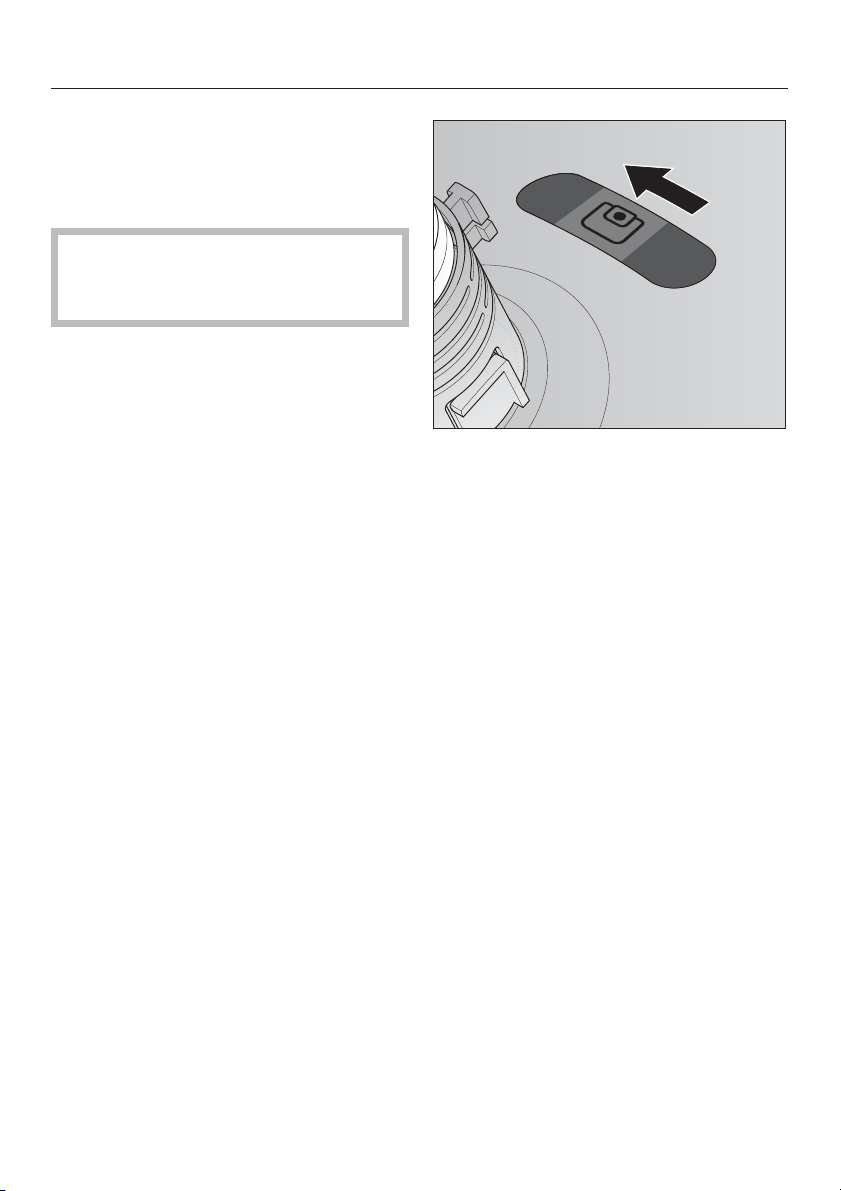
Connecting the hand piece and
the Electro Telescopic wand
^ Insert a the hand piece into the
electro telescopic wand until it clicks
into place. Use the inlet guides to
direct insertion.
^ To release the hand piece from the
telescopic wand press the locking
button (see arrow) and pull b the
hand piece away from the telescopic
wand.
10
Page 11
Before using the vacuum cleaner
Using the Powerbrush
Observe the cleaning instructions of
the floor manufacturer.
The Powerbrush is particularly suitable
for cleaning and restoring crushed
carpet pile of wall to wall carpeting and
floor coverings subject to hard wear,
especially in high traffic areas.
The Powerbrush can also be used on
smooth floor surfaces.
Do not use the powerbrush on:
– (SEB 217-3 only) Floors with a
variable or uneven surface. The
brush could come into contact with
the floor and cause damage.
– High quality, hand knotted rugs, for
example Berber or Persian rugs, as
well as extremely long piled area
rugs and carpets. There is a danger
of the threads being pulled out. Turn
the Powerbrush off to vacuum these
types of floor coverings and use only
suction.
Connecting the Powerbrush to
the Electro Telescopic wand
^
Insert a the Electro Telescopic wand
into the Powerbrush until it clicks into
place.
^
To release the parts, press the lock
release button and pull the wand up
and out b..
For more information on use and care
please refer to the instructions supplied
with the Powerbrush.
11
Page 12
Before using the vacuum cleaner
Using the standard floor brush
(depending on model)
Observe the cleaning instructions of
the floor manufacturer.
The floor brush is suitable for cleaning
carpets, rugs, carpeted stairs and hard
surfaces that are not susceptible to
scratching.
Connecting the floor brush
Place the floor brush into a the
^
suction hose and twist until it clicks
into place.
^ To separate the parts b, press the
locking button.
Adjusting the floor brush c
To clean carpets and area rugs:
^ Press the foot switch marked ö or
%.
To clean hard flooring:
^
Press the foot switch marked ä or
).
For safety, when vacuuming stairs it
is best to start at the bottom and
move upwards.
12
Page 13
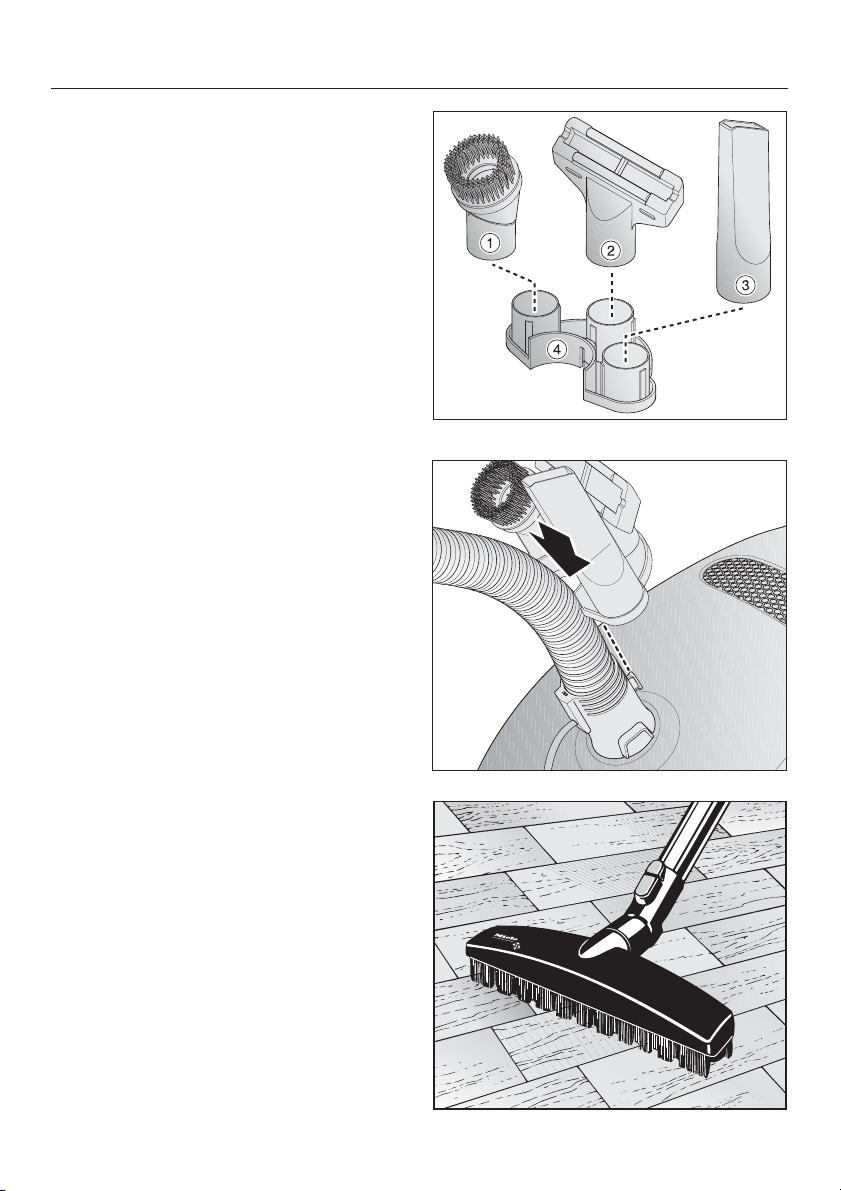
The following accessories are included:
a Dust brush with natural bristles
b Upholstery tool
c Crevice nozzle
d Accessory clip for the included
accessories
Position the accessories as indicated.
Accessory clip
^ Press onto the elbow until it clicks
into place.
Included accessories
Floor brush Parquet-3
(depending on model)
Special brush with natural bristles
intended for cleaning parquet and
laminate floors, especially those
susceptible to scratching.
The parquet floor brush can be cleaned
with the vacuum cleaner using the
crevice nozzle if necessary.
13
Page 14
Use
Power cord
Unwind the cord completely to
,
aid the vacuum in dissipating heat.
Do not pull or carry by the cord, use
the cord as a handle, close a door
on the cord, or pull the cord around
sharp edges or corners. Do not run
the appliance over the cord. Keep
the cord away from heated surfaces.
Do not unplug by pulling the cord.
To unplug grasp the plug, not the
cord.
This appliance is equipped with a
power cord reel. Hold the plug when
rewinding onto cord reel. Do not
allow plug to whip when rewinding.
Unwinding
^ Hold the plug and pull a out the
power cord.
,
To reduce the risk of electric
shock, the vacuum has a polarized
plug (one blade is wider than the
other). This plug will fit in a polarized
outlet only one way. If the plug does
not fit fully in the outlet, contact a
qualified electrician. Do not alter the
plug in any way.
Danger of overheating and damage.
Rewinding
^
Unplug the vacuum from the outlet.
^
Press the rewind switch - the power
cord will rewind automatically b.
Hold the plug so that it does not whip
around when rewinding.
14
Page 15
Adjusting the Electro
Telescopic suction wand
One part of the electro telescopic wand
is fitted inside the other and can be
adjusted to your height for comfortable
vacuum cleaning.
Press the telescopic wand release
^
button to release the tubes and
adjust to the desired height.
Use
15
Page 16
Use
Turning the vacuum On/Off
Press the On/Off foot switch s.
^
Adjusting the suction
You can adjust the suction power to suit
the type of flooring. By reducing the
suction power the floor brush can be
pushed easier.
The symbols on the controls indicate
the type of use the settings are suitable
for.
# curtains, lightweight fabrics
$ upholstery, cushions
% thick pile carpets, rugs and
runners
* energy saving, daily vacuuming
with low noise level
( low pile carpets
) hard flooring and intensive
cleaning of carpets
^
Turn the suction power selector to the
desired setting.
,
To prevent static electricity your
hand must touch the metal inlay on
the underside of the vacuum hand
piece. Be certain to continuously
touch this inlay when vacuuming fine
dust, flour or sawdust as these
materials are more likely to create a
static discharge. To further prevent
static discharge while vacuuming,
pull the vacuum along by the hose
with one hand while continuing to
hold the hand piece in the other
hand.
16
Page 17
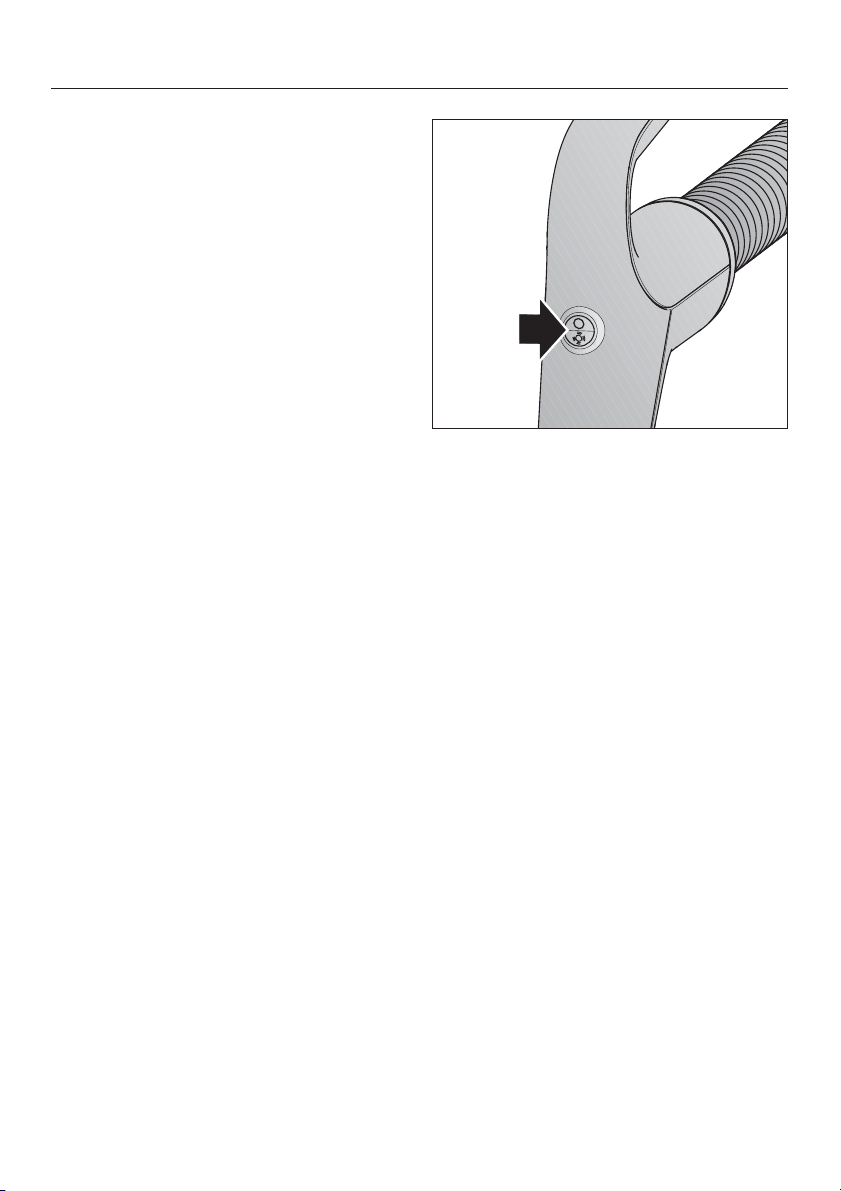
Turning the Powerbrush
On/Off
The Powerbrush is turned on and off
separately from the vacuum using the
hand piece.
The button allows you to turn off the
Powerbrush, e.g. when moving from
wall-to-wall carpeting to a persian rug.
Use
17
Page 18
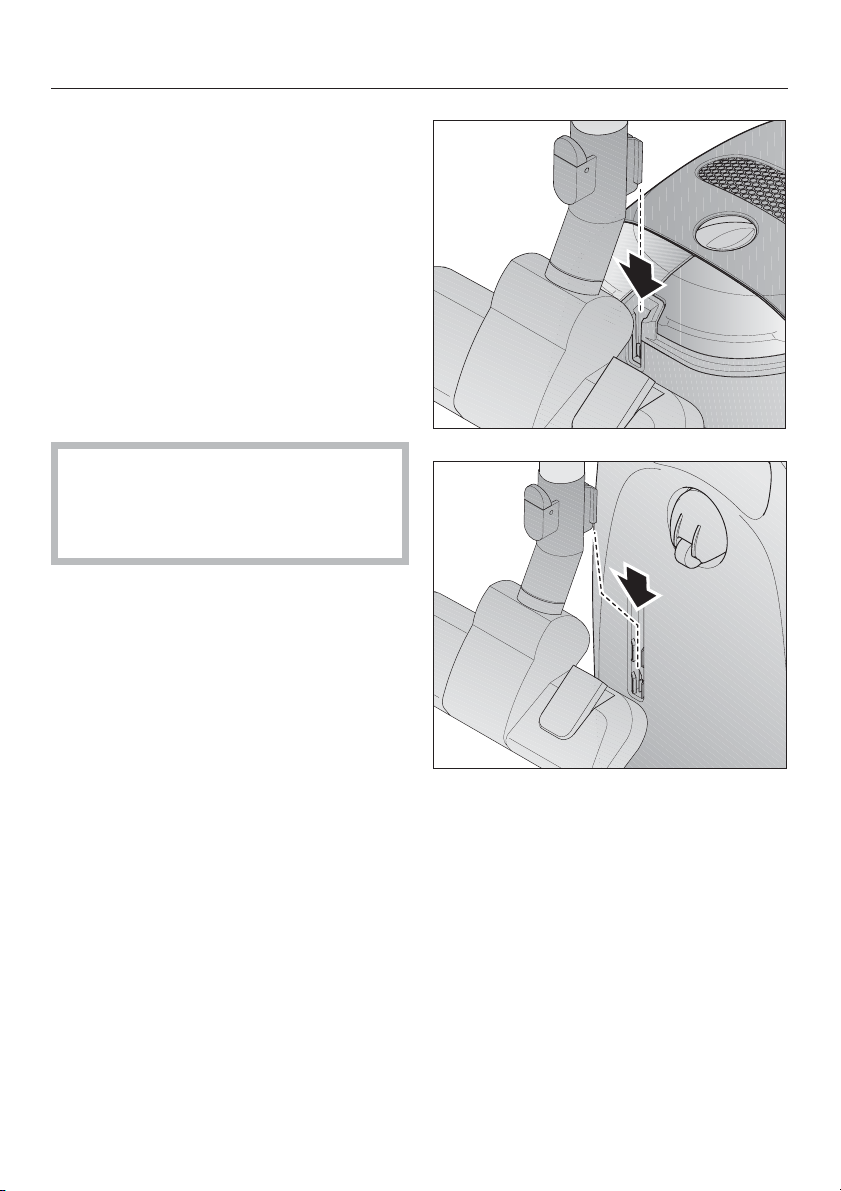
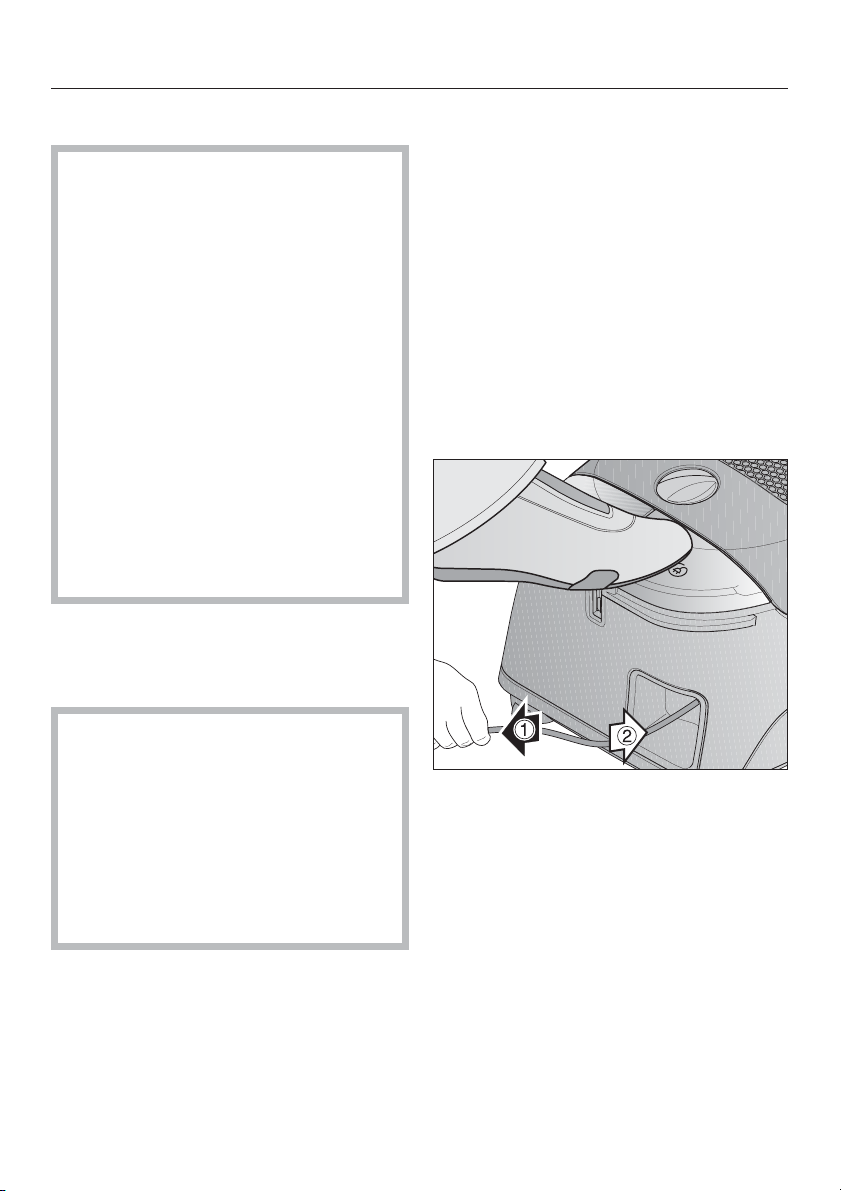
Transport and storage
Park system
(Cannot be used with the Powerbrush
SEB 228 / EB03.)
The Park system allows you to
conveniently park the telescopic wand
on the vacuum cleaner during brief
pauses.
A special parking attachment is fitted
^
to all floor brushes. Insert the lower
clip on the floor brush into the slot on
the end of the vacuum cleaner from
above.
When vacuuming on a sloping
surface, e.g. on a ramp, push all
telescopic tubing parts completely
together.
Transport and storage
^ For easier transportation and storage
stand the vacuum cleaner vertically.
^ Insert the parking clip attachment on
the floor tool or floor brush into the
parking slot from above (does not
apply to Powerbrush SEB 228 /
EB03).
^
To save space, completely collapse
the tubes in the telescopic wand.
18
Page 19
Turn off and unplug the vacuum
,
cleaner before performing any
maintenance work.
The Miele filter system consists of the
following three components.
Dustbag
–
Exhaust filter
–
Dust compartment filter
–
Each of these components must be
changed periodically to maintain the
vacuum cleaner’s efficiency.
Only use Miele dustbags, filters and
accessories with the "Original Miele"
logo. Only then can the suction
power of the vacuum cleaner reach
its optimum potential creating the
best possible cleaning results.
Maintenance and care
Purchasing new dustbags and
filters
Original Miele dustbags and filters can
be purchased from an authorized Miele
vacuum dealer or by visiting the Miele
store at http://store.miele.com.
Which dustbags and filters are
the right ones?
This vacuum cleaner uses Original
Miele dustbags Type G/N and an
Original Miele filters, the "Original Miele"
Logo will appear on the packaging or
directly on the dustbag.
,
The use of dustbags made of
paper or a similar material, or
dustbags with a cardboard retaining
plate can lead to serious damage to
the vacuum cleaner and possibly
voiding the warranty, just as with the
use of dustbags without the "Original
Miele" logo.
An "Air clean" exhaust filter and a dust
compartment filter are supplied with
every box of Miele dustbags.
If you would like to purchase additional
Miele filters separately, contact your
vacuum dealer or Miele, please quote
the model number of your Miele
vacuum cleaner to ensure correct parts
are ordered. These parts are also
available to order from the online Miele
store.
The exhaust filter supplied with the
vacuum cleaner can be exchanged
with another type of Original Miele filter
(see "Exchanging exhaust filters").
19
Page 20
Maintenance and care
When to change the dustbag
Change the dustbag when the colored
marker in the airflow indicator fills the
display.
Miele dustbags are disposable and
made to be used only once. Do not
attempt to reuse.
Checking the airflow indicator
Attach the standard floor brush
^
(depending on model) to the vacuum
cleaner. Perform this test with the
floor brush only, other attachments
can affect the function of the airflow
indicator.
^ Turn the vacuum cleaner on and
select the highest power setting.
^ Lift the floor brush slightly off the
floor. If the marker completely fills the
indicator window, the dustbag needs
to be changed.
How the airflow indicator works
The airflow indicator is designed to
show when the bag is full of common
household dust and measures the
amount of air flow through the dustbag.
Normal household dust is a mixture of
dust, hair, carpet fluff, threads, sand,
etc.
However, if fine dust, such as drill dust,
sand, plaster or flour is vacuumed, the
pores of the dustbag may become
blocked. The marker will indicate that
the bag is "full" even when it is not. The
dustbag should be changed as the
suction power is greatly reduced.
20
If the bag is bulging with pet fur, hair,
carpet fluff, etc. the indicator may not
register "full". This is because the air
flow of the dustbag may still be high
enough not to activate the marker to
show maximum. The dustbag should
still be changed.
Page 21
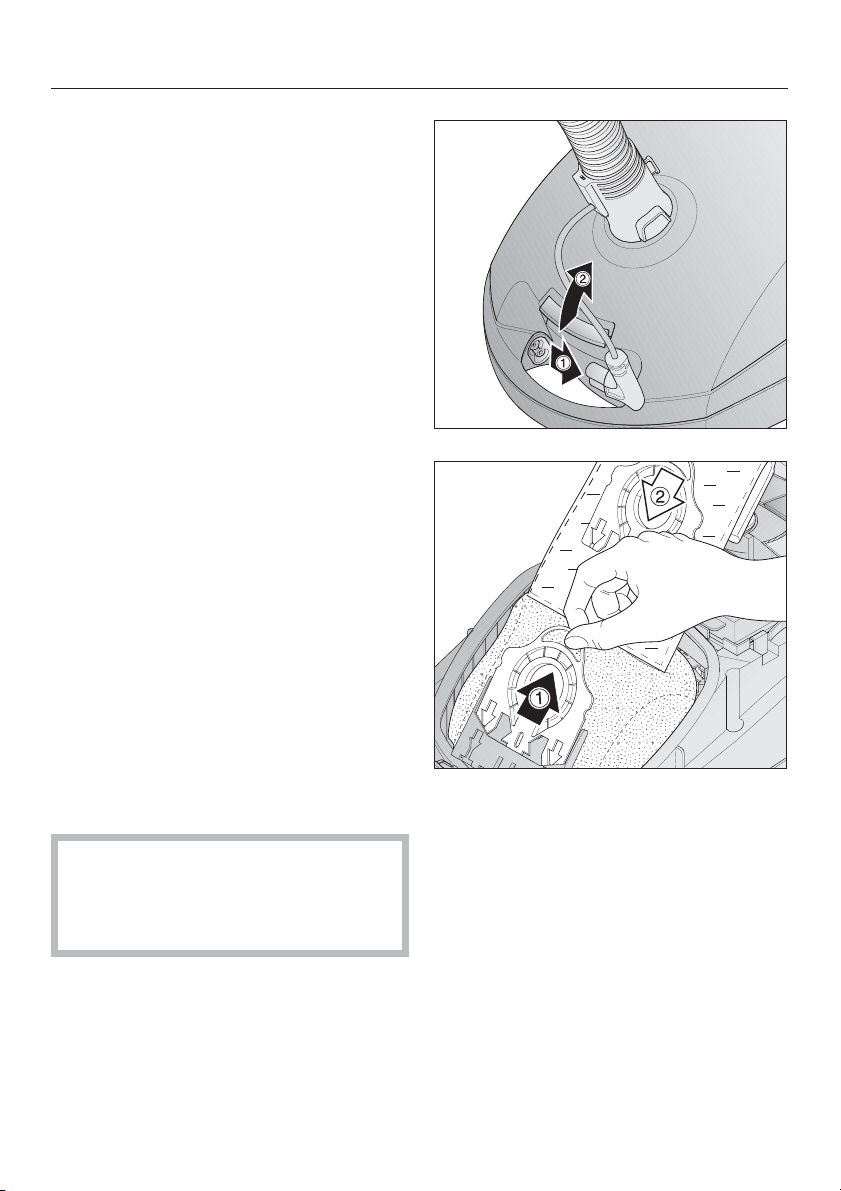
Replacing the dustbag
Pull a the plug from the socket
^
Open b the dust compartment lid
^
and raise until it clicks into place.
The dustbag has a closing flap which
closes automatically when the dust
compartment lid is raised to prevent
any dust from escaping.
^ Grasp the finger grip and pull a the
dustbag out of the holder.
^ Insert b the new dustbag as far as it
will go into the dustbag holder. Do
not unfold the dustbag when taking it
out of the box.
Maintenance and care
^ Unfold the dustbag in the dust
compartment.
^
Close the dust compartment lid until
it clicks into place. Take care not to
jam the dustbag in the lid.
,
An empty-operation-barrier
blocks the dust compartment lid
from closing if no dustbag is
inserted. Do not force it closed.
21
Page 22

Maintenance and care
When to change the dust
compartment filter (Pre-motor
filter)
Change the filter each time you open a
new box of genuine Miele dustbags. A
dust compartment filter is supplied with
each box.
Replacing the dust
compartment filter (Pre-motor
filter)
Open the dust compartment lid.
^
^ Open the filter frame, remove the old
filter, and insert a new filter.
^ Close the filter frame.
^ Close the dust compartment lid.
When to replace the Air Clean
exhaust filter
Each time a new box of Miele dustbags
is opened, this filter should be
changed. A new Air Clean exhaust filter
is included in every box of Miele
dustbags.
Replacing the Air Clean filter
Do not use more than one filter at a
time.
^
Open the dust compartment lid.
^
Open the filter frame until it clicks,
grasp the clean corner (see arrow)
and remove the used filter a.
^
Insert the new filter b.
^
Close the filter frame.
^
Close the dust compartment lid.
22
Page 23

Exchanging exhaust filters
Depending on the model, there may
also be an Active HEPA exhaust filter
included which can be used instead of
the standard Air Clean exhaust filter.
In order to use the Active HEPA filter
the Air Clean filter and filter frame must
be removed.
When to change the Active
HEPA exhaust filter
Change this filter approximately once a
year. You can make a note of the date
directly on the exhaust filter.
Replacing the Active HEPA
exhaust filter
^ Open the dust compartment lid.
^ Remove the used exhaust filter a.
Maintenance and care
^ Insert a new filter b.
^ Close the dust compartment lid.
23
Page 24

Maintenance and care
When to change the thread
catcher on the standard floor
brush
(depending on model)
The thread catcher on the floor brush
should be replaced as soon as they
appear worn.
Replacing the thread catchers
Use a screwdriver or similar object to
^
remove the thread catchers from the
slots.
^ Insert the new thread catchers.
Spare parts are available from your
Miele dealer or from Miele.
24
Page 25

Turn off the vacuum and unplug
,
it from the outlet before performing
any maintenance work.
Vacuum cleaner and accessories
The vacuum cleaner and other plastic
accessories can be cleaned with a
damp cloth or a cleaner suitable for
plastics.
Do not use abrasive, glass or all
,
purpose cleaners, or oil-based
conditioning agents! They will
damage the surface.
Dust compartment
The dust compartment can, if
necessary, be cleaned using a dry
cloth, dusting brush or a second
vacuum to remove any dust.
Cleaning and care
Monitor the airflow indicator and
inspect all filters regularly. Clean or
replace them when necessary
according to these Operating
Instructions.
,
Do not submerge the vacuum in
water. If moisture gets into the
appliance there is the risk of an
electric shock.
25
Page 26

Frequently asked questions / Technical Service
After sales service
Turn off and unplug the vacuum
,
cleaner before performing any
maintenance work.
What if the vacuum turns off
automatically?
The vacuum has overheated. The
temperature limiter automatically turns
the vacuum off.
This can occur if, for instance, large
articles block the suction tube or when
the filter bag is full or contains particles
of fine dust. A heavily soiled exhaust or
dust compartment filter can also be the
cause of overheating. Turn the vacuum
off and pull the plug from the outlet.
Check for any blockages and allow the
vacuum to cool for 30 minutes.
In the event of a fault which you cannot
fix yourself please contact the Miele
Service Department at the phone
number listed on the back of this
booklet.
Please quote the model type of your
^
appliance.
This can be found on the data plate on
the bottom of the vacuum.
26
Page 27

Observe the cleaning instructions of
the floor manufacturer.
Many of these accessories as well as
other products can be purchased from
the Miele Store at www.Mieleusa.com.
Optional accessories
Floor brush Parquet Twister with
swiveling head
For cleaning all hard flooring,
e.g. parquet and tiles. Especially
suitable for vacuuming niches and tight
spaces.
Some models come standard with one
or more of the following accessories.
Turbo / Floor brushes
Turbobrush Turbo Comfort - 3
Intended for cleaning short to medium
pile carpeting.
Hand Turbobrush Turbo Mini
Intended for vacuuming upholstery,
mattresses, car seats, carpeted stairs
and other areas inaccessible with the
standard Turbobrush.
Floor brush Hard floor - 3
To vacuum sturdy hard floors, e.g. tiles
and stone floors.
Floor brush Parquet - 3
Special brush with natural bristles
intended for cleaning parquet and
laminate floors, especially those
susceptible to scratching.
Floor brush Parquet Twister XL with
swiveling head
For cleaning large areas of hard
flooring, e.g. parquet and tiles.
27
Page 28

Optional accessories
Other accessories
MicroSet
For cleaning small objects and difficult
to reach areas (such as PC keyboards,
stereo equipment, carved furniture and
ornaments, models, etc).
CarCare accessory case
For cleaning car interiors.
HomeCare accessory case
For cleaning your home.
Universal brush
For dusting bookshelves, mantles,
molding, ceiling fans, sculptures, etc.
Radiator brush
For cleaning radiators, vents,
refrigerator coils, air conditioners,
decorative vases, etc.
Crevice nozzle 12" (300 mm)
For cleaning in folds, crevices, corners,
etc.
Crevice nozzle 22" (560 mm)
For cleaning hard to reach areas.
Upholstery tool 7 ½" (190 mm)
For cleaning upholstered furniture,
mattresses and pillows.
Mattress tool
For cleaning deep crevices, mattresses
and upholstery.
28
Page 29

LIMITED WARRANTY - VACUUM CLEANERS USA
What The Warranty Covers And For What Period The Coverage Extends
Miele, Inc. (hereinafter "Miele") warrants to the original purchaser of this product,
living in the United States of America, who purchased their vacuum from a Miele
authorized distributor or dealer:
a. That this product, including all of its Miele authorized parts is free of defects
in material and workmanship.
b. That this product, if found to be defective within the stated warranty period,
will be repaired free of charge to the consumer (both parts and labor) by an
authorized Miele service agent.
c. The warranty period for vacuum cleaners and accessories, excluding
vacuum cleaner motors, and vacuum cleaner casings (body), is one (1) year
from the date of purchase.
d. For vacuum cleaner casings (body), the warranty period will be as follows:
- The structural integrity of the vacuum cleaner casing (body) will be
covered for seven (7) years from the date of purchase against defects in
material and workmanship on the S2xxx, S4xxx, S5xxxx, S6xxx, S7xxx,
and S160 product series.
e. For vacuum cleaner motors, the warranty period will be as follows:
- Vacuum motors will be covered for seven (7) years from the date of
purchase on the S2xxx, S4xxx, S5xxx, S6xxx, S7xxx, and S160 product
series.
Vacuum cleaners used for commercial purposes, except for their motors, will be
warranted for a period of six (6) months from the date of purchase. The motors of
commercially used upright vacuums will be warranted for one (1) year and the
motors of all other commercially used vacuum cleaners will be warranted for two
(2) years. Thereafter this Limited Warranty shall be null and void.
This warranty only applies while the product remains within the United States, and
shall be null and void in any other US territories, possessions, or foreign countries.
What is not covered by this Warranty
This warranty does not cover damage or defects caused by or resulting from
repairs, service or alterations to the product or any of its parts or accessories
which have been performed by service centers or repairmen not authorized by
Miele, or damage or defects caused by negligence, accident, abuse, misuse,
improper or abnormal usage or maintenance of the product, its parts or
accessories. Ordinary wear and tear or cosmetic damage (scuffs, scratches,
gauges, dents, etc.) shall not be considered a defect in materials or workmanship.
29
Page 30

LIMITED WARRANTY - VACUUM CLEANERS USA
Exclusion of Other Warranties
Except for the limited warranty provided herein, Miele disclaims any and all other
express warranties with respect to the product. Any warranty of merchantability or
fitness for a particular purpose is limited in its duration to the term of the limited
warranty provided herein.
Some states do not allow limitations on how long an implied warranty lasts, so the
above limitation may not apply to you.
Limitation of Liability for Special, Incidental or Consequential Damages
Miele will assume no liability, or other obligation with respect to any personal injury
or property damage resulting from the use of a vacuum cleaner, or its
accessories, replacement parts, etc., which has not been purchased from, or
serviced by an Authorized Miele Dealer. Any purchaser who obtains a vacuum
cleaner, accessories, replacement parts, etc., from someone other than an
Authorized Miele dealer proceeds at their own risk.
Miele specifically disclaims any and all liability, whether directly or by way of
indemnity, for special incidental, consequential or other damages, whether based
on breach of contract, tort, strict or product liability, or any other legal theory.
Some states do not allow the exclusion or limitation of incidental or consequential
damages, so the above limitation may not apply to you.
Special State Laws
This Limited Warranty gives you specific legal rights; you may have other rights,
which vary, from state to state.
Service
For service under this Limited Warranty, or for information you may need about the
product, please contact Miele at the US address listed on the back of this booklet,
or visit us at .
Authorized Miele Dealers
To find an authorized Miele dealer in your area, please visit our website .
Effective Date: April 1, 2012
©2012 Miele, Inc.
30
Page 31

Caring for the environment
Disposal of the packing
material
The cardboard box and packaging
protect the appliance during shipping.
These materials are biodegradable and
recyclable. Please recycle.
Ensure that any plastic wrappings,
bags etc. are disposed of safely and
kept out of the reach of children.
Danger of suffocation!
Disposal of an old machine
Old appliances may contain materials
that can be recycled. Please contact
your local recycling authority about the
possibility of recycling these materials.
31
Page 32

Page 33

Instructions d'utilisation
Aspirateur
S 2001
Utilisez seulement des sacs à poussière portant le
sceau de qualité Miele et des filtres Miele d'origine.
Vous obtiendrez ainsi une puissance d'aspiration opti
male et une utilisation maximale des sacs.
Le fait d'utiliser des sacs à poussière d'une autre
marque pourrait endommager l'aspirateur et invalider la
garantie.
Afin de prévenir les accidents et
d'éviter d'endommager l'appareil,
veuillez lire attentivement les instructions
avant l'installation et l'utilisation.
-
fr-CA
HS12
M.-Nr. 07 851 591
Page 34

Seuls des sacs à poussière, des filtres et des
accessoires portant le logo "Original Miele"
doivent être utilisés avec cet aspirateur. Ceux-ci
permettent de maximiser la puissance d'aspiration de
l'aspirateur et de produire des résultats de nettoyage
optimaux.
L'UTILISATION DE COMPOSANTES D'UNE AUTRE
MARQUE POURRAIT INVALIDER LA GARANTIE.
Tout comme l'utilisation de sacs à poussière
,
n'arborant pas le logo "Original Miele", l'utilisation de
sacs à poussière faits de papier ou de matériau
similaire, ou de sacs à poussière munis d'une plaque
de retenue en carton, peut endommager gravement
l'aspirateur et risquer d'en annuler la garantie.
Le logo "Original Miele" se trouve sur l'emballage ou
directement sur le sac à poussière.
Vous pouvez vous procurer des sacs à poussière et
des filtres
Miele d'origine auprès d'un détaillant autorisé d'aspira
teurs Miele ou à notre magasin Miele en ligne, à
www.mieleusa.com.
-
2
Page 35

Table des matières
INSTRUCTIONS IMPORTANTES DE SÉCURITÉ .........................4
Guide de l'appareil.................................................8
Avant d'utiliser l'aspirateur.........................................10
Accessoires fournis...............................................13
Utilisation .......................................................14
Cordon d'alimentation ..............................................14
Mise en marche et arrêt de l'aspirateur.................................16
Réglage de la puissance d’aspiration ..................................16
Mise en marche et arrêt de l'électrobrosse ..............................17
Transport et rangement............................................18
Entretien ........................................................19
Achat de nouveaux sacs à poussière et de filtres.........................19
Les sacs à poussière et les filtres convenant à votre appareil ...............19
À quel moment remplacer le sac à poussière? ...........................20
Remplacement du sac à poussière....................................21
À quel moment remplacer le filtre du réservoir à poussière (filtre situé
devant le moteur)? .................................................22
Remplacement du filtre du réservoir à poussière (filtre situé devant le moteur). . 22
À quel moment remplacer le filtre d'évacuation Air Clean? .................23
Remplacement du filtre Air Clean .....................................23
Interchangement des filtres d'évacuation ...............................24
À quel moment remplacer le filtre d'évacuation Active HEPA?...............24
Remplacement du filtre Active HEPA ..................................24
À quel moment remplacer les capteurs de fils sur la brosse à plancher standard ?25
Remplacement des capteurs de fils ...................................25
Nettoyage et entretien .............................................26
Questions fréquemment posées/Service technique ....................27
Accessoires offerts en option ......................................28
LIMITED WARRANTY - VACUUM CLEANERS CDN .................30
GARANTIE RESTREINTE - ASPIRATEURS AU CANADA.................32
Protection de l'environnement ......................................34
3
Page 36

INSTRUCTIONS IMPORTANTES DE SÉCURITÉ
Lorsque vous utilisez un appareil électrique, respectez toujours les consignes de
sécurité élémentaires :
LISEZ ATTENTIVEMENT TOUTES LES
INSTRUCTIONS AVANT D'UTILISER
L'APPAREIL
AVERTISSEMENT -
Pour diminuer le risque d'in
cendie, de choc électrique ou
de blessure, respectez les instructions suivantes :
Avant la première utilisation
Vérifiez la capacité en voltage de
~
l'aspirateur avant de brancher le cordon d'alimentation dans une prise électrique. La tension de votre source d'alimentation doit correspondre à la capacité en voltage indiquée sur la plaque
signalétique située sous l'aspirateur.
Utilisez uniquement des prises de cou
rant alternatif. N'utilisez jamais des pri
ses de courant continu. Consultez un
électricien qualifié si vous n'êtes pas
sûr de connaître la capacité en voltage
de votre système électrique. Si vous
branchez votre aspirateur à une source
d'alimentation de tension supérieure,
vous pourriez vous blesser ou endom
mager l'appareil.
-
-
Pour réduire le risque de choc élec
~
trique, l’aspirateur est muni d’une fiche
polarisée (l’une des broches est plus
large que l’autre). Cette fiche peut être
insérée dans une prise polarisée d’une
seule manière. Si la fiche ne peut être
entièrement insérée dans la prise, retournez-la. S’il est encore impossible de
l’insérer, faites appel à un électricien
qualifié qui peut installer une prise appropriée. Ne modifiez aucunement la
fiche.
Un appareil endommagé présente
~
des risques. Vérifiez l'emballage, l'appareil et ses accessoires afin de détec
ter tout signe de dommages. N'utilisez
-
pas un appareil endommagé.
N'utilisez pas l'appareil avec un cor
~
don ou une prise endommagé. Si l'ap
pareil ne fonctionne pas correctement,
s'il est tombé, endommagé, a été laissé
à l'extérieur ou immergé dans l'eau, ap
portez-le à un centre de services.
La prise électrique doit être équipée
~
d'un fusible de 15 ampères.
-
-
-
-
-
4
Page 37

INSTRUCTIONS IMPORTANTES DE SÉCURITÉ
Utilisation
N'utilisez pas cette brosse pour net
~
toyer des personnes ou des animaux.
N'utilisez pas l'appareil à l'extérieur
~
ou sur des surfaces humides. Ne net
toyez que des surfaces sèches.
Utilisez l'appareil conformément aux
~
instructions du présent manuel. Utilisez
uniquement les accessoires recom
mandés par Miele décrits dans le pré
sent manuel.
Cet appareil est destiné uniquement
~
à un usage domestique.
Cet aspirateur n'est pas un jouet. Il
~
est nécessaire d'être vigilant lorsqu'il
est utilisé à proximité d'enfants.
N'utilisez jamais l'aspirateur si le sac
~
à poussière ou les filtres ne sont pas en
place. Vous pourriez endommager l'appareil.
Le couvercle du réservoir à pous-
~
sière ne se ferme pas si le sac à poussière n'est pas en place. Ne forcez pas
le couvercle pour qu'il ferme.
Ne laissez pas l'aspirateur branché.
~
Débranchez-le lorsqu'il n'est pas utilisé
ou avant de procéder à l'entretien.
Une plaque de métal conçue pour
~
absorber l’électricité statique est
placée sous la poignée. Assurez-vous
que votre main reste en contact avec
cette plaque lorsque vous utilisez l’ap
pareil.
-
-
-
-
Les personnes qui, en raison de ca
~
pacités physiques, sensorielles ou
mentales réduites, ou d'un manque
d'expérience, ne sont pas en mesure
d'utiliser cet appareil doivent être su
pervisées ou formées par une personne
responsable.
Déroulez complètement le cordon
~
afin de favoriser l'évacuation de la cha
leur.
N'utilisez pas cet aspirateur pour ra
~
masser ou conserver des matières dan
gereuses.
N'aspirez pas de liquides ou de
~
poussières humides. Cela pourrait
nuire à la sécurité électrique de l'appareil. Si des moquettes ont été fraîchement lavées, attendez qu'elles soient
complètement sèches avant de passer
l'aspirateur.
N'aspirez aucun élément brûlant ou
~
fumant comme des cigarettes, des allumettes ou des cendres chaudes. L'aspirateur pourrait prendre feu.
N'aspirez pas de poudre impri
~
mante. Cette poudre, utilisée pour les
imprimantes et les photocopieurs, peut
être conductrice.
N'aspirez pas de liquides inflamma
~
bles ou combustibles comme de l'es
sence et n'utilisez pas l'appareil dans
des zones où ces matières pourraient
être présentes.
N'aspirez pas d'éléments lourds,
~
durs ou ayant des bords coupants. Ils
pourraient boucher et endommager
l'appareil.
-
-
-
-
-
-
-
-
5
Page 38

INSTRUCTIONS IMPORTANTES DE SÉCURITÉ
Ne tirez pas sur le cordon, ne vous
~
en servez pas comme une poignée, ne
le coincez pas dans une porte et ne le
laissez pas en contact avec des extré
mités ou des coins tranchants. Ne fai
tes pas passer l'appareil sur le cordon.
Veillez à ce que le cordon n'entre pas
en contact avec des surfaces chaudes.
Ne débranchez pas l'appareil en ti
~
rant sur le cordon. Tirez sur la fiche et
non sur le cordon.
Ne manipulez pas la fiche ou le cor
~
don avec les mains mouillées.
Veillez à maintenir vos cheveux, vos
~
vêtements amples, vos doigts ou toute
autre partie de votre corps ainsi que le
cordon à distance des ouvertures et
des parties mobiles de l'appareil.
Afin d'éviter tout risque de blessure
~
lorsque vous utilisez votre aspirateur,
ne touchez pas à la brosse rotative de
l'électrobrosse. Sinon, vous risquez de
vous blesser.
Ne placez aucun objet dans les ou
~
vertures de l'aspirateur. N'utilisez pas
l'appareil si l'une des ouvertures est
obstruée; gardez les ouvertures libres
de toute poussière, charpie, cheveu ou
de tout élément qui pourrait limiter la
circulation d'air.
Cet appareil est muni d’un enrouleur
~
du cordon d’alimentation. Maintenez la
fiche lorsque vous enroulez le cordon
de l’appareil. Ne laissez pas la fiche vi
revolter lorsque vous enroulez le cor
don.
Éteignez toutes les commandes
~
avant de débrancher l'appareil.
-
-
-
Soyez prudent lorsque vous net
~
toyez un escalier.
Les accessoires et les tubes ne doi
~
vent pas être utilisés à la hauteur de la
tête afin d'éviter tout risque de blessure
aux yeux et aux oreilles.
Accessoires
Le tuyau et le tube télescopique
~
comportent des fils électriques. N’utili
sez pas l’appareil si ces éléments sont
-
endommagés, déchirés ou percés. Évi
tez d’aspirer des objets pointus. Vous
risquez de subir un choc électrique.
Débranchez l'aspirateur avant de
~
changer les accessoires, particulièrement l'électrobrosse.
Le raccord de l'aspirateur doit être
~
uniquement utilisé avec l'électrobrosse
Miele.
L'électrobrosse Miele est un acces-
~
soire actionné par un moteur, prévu
pour être utilisé uniquement avec les
-
aspirateurs Miele. L'aspirateur ne doit
pas être utilisé avec une électrobrosse
d'une autre marque.
N’utilisez pas l’appareil sans la pré
~
sence d’un accessoire placé à l’extré
mité du tuyau ou du tube télescopique.
Le rebord du tube pourrait être endom
magé et les angles vifs pourraient cau
ser des blessures.
Les sacs à poussière Miele sont je
~
tables. Ne les réutilisez pas. Un sac
trop plein diminuera l'efficacité de l'as
pirateur.
-
-
-
-
-
-
-
-
-
-
6
Page 39

INSTRUCTIONS IMPORTANTES DE SÉCURITÉ
Utilisez seulement des sacs à pous
~
sière portant le sceau de qualité Miele
et des filtres et accessoires Miele d'ori
gine. Ce sont les seuls qui sont garantis
par le fabricant.
Éteignez toujours cet appareil avant
~
de brancher ou de débrancher le tuyau
ou la buse motorisée.
Nettoyage, entretien et répara
-
tions
Éteignez l'aspirateur après chaque
~
utilisation et avant d'effectuer l'entre
tien. Retirez la fiche de la prise de courant.
Ne plongez jamais l’aspirateur dans
~
l'eau. Utilisez uniquement un chiffon
sec ou légèrement humide pour nettoyer l'appareil une fois qu'il est débranché. Si l’humidité pénètre dans
l’appareil, vous risquez de subir un
choc électrique.
-
-
-
Les réparations doivent être effec
~
tuées uniquement par un technicien au
torisé, conformément aux normes de
sécurité nationales et locales. Les répa
rations effectuées par des personnes
non qualifiées pourraient causer des
blessures ou endommager l’appareil et
pourraient invalider la garantie.
Mise au rebut d'un ancien ap
pareil
Avant de mettre au rebut votre an
~
cien appareil, coupez le cordon d'ali
mentation et rendez la fiche inutilisable.
Assurez-vous que votre appareil ne
présente aucun danger pour les enfants jusqu'à ce qu'il soit mis au rebut.
CONSERVEZ CES
INSTRUCTIONS
-
-
-
-
-
-
Surveillez le voyant de remplace-
~
ment du sac à poussière et vérifiez ré
gulièrement les filtres. Pour obtenir un
rendement optimal, le sac à poussière
et les filtres doivent être remplacés fré
quemment. Un sac plein ou un filtre
obstrué réduit la puissance d'aspiration
de l'appareil. Un limiteur de tempéra
ture éteint automatiquement l'aspirateur
si ce dernier surchauffe, voir la section
"Foire aux questions".
Le tuyau et le tube télescopique
~
comportent des fils électriques. Ils ne
doivent pas entrer en contact avec de
l'eau. Pour nettoyer ces pièces, utilisez
un linge sec. Autrement, vous risque
riez de subir un choc électrique.
-
-
-
-
7
Page 40

Guide de l'appareil
8
Page 41

Guide de l'appareil
a Poignée
b Bouton Marche/Arrêt de l'électrobrosse
c Bouton de dégagement
d Tube télescopique Electro SET 220
e Coude
f Fiche d'alimentation pour les accessoires
g Bouton de dégagement du tube télescopique Electro
h Bouton d’ouverture du réservoir à poussière
i Sélecteur de puissance d’aspiration
j Électrobrosse
SEB 217-3/EB02 (ne figure pas dans ce guide d'utilisation) / SEB 228/EB03
Un autre guide d'utilisation portant sur l'accessoire en question est fourni avec
l'aspirateur.
k Poignée de transport
l Prise pour les accessoires électriques
m Sac à poussière
n Filtre du réservoir à poussière (filtre situé devant le moteur)
o Filtre d’évacuation
p Interrupteur s au pied
q Système d'immobilisation
r Cordon d'alimentation
s Interrupteur pour réenrouler le cordon
t Indicateur de circulation d'air
u Attache pour accessoires avec trois outils
v Tuyau d'aspiration SES 116.
Vous pouvez vous procurer des accessoires optionnels auprès de votre détaillant
Miele ou sur le site de Miele à l'adresse www.miele.ca.
9
Page 42

Avant d'utiliser l'aspirateur
Raccordement du tuyau Electro
a Insérez le coude dans la prise d’as
piration jusqu'à ce qu'il s'enclenche
avec un déclic.
b Branchez le cordon d'alimentation
dans la prise de courant à l'intérieur
de la poignée de transport.
Retrait du tuyau Electro
c Retirez la fiche de la prise de cou
rant.
d Appuyez sur les deux boutons de
dégagement placés sur les côtés du
coude et soulevez le tuyau du rac
cord.
Raccordement de la poignée et
du tube télescopique Electro
^ Insérez a la poignée dans le tube té-
lescopique Electro jusqu'à ce que
vous entendiez un déclic. Pour ce
faire, guidez-vous sur les aubes
d'entrée.
^ Pour dégager la poignée du tube té-
lescopique, appuyez sur le bouton
de verrouillage (voir la flèche) et sé
parez b les deux pièces.
-
-
-
-
Utilisation de l'électrobrosse
Respectez les instructions de net
toyage du fabricant du revêtement
de sol.
L'électrobrosse convient particulière
ment pour nettoyer et remettre en état
les poils écrasés de la moquette ou les
revêtements de sol susceptibles de
s'user davantage, surtout dans les en
droits plus frèquentés. L'électrobrosse
peut aussi être utilisée sur les surfaces
lisses.
10
-
-
-
Page 43

N’utilisez pas l'électrobrosse pour
nettoyer les endroits suivants :
(SEB 217-3/EB02 seulement) Les
–
planchers dont la surface est iné
gale. La brosse pourrait endomma
ger le plancher.
Les tapis noués à la main de qualité
–
supérieure, comme les tapis berbè
res ou de style oriental, ainsi que les
petits tapis et les moquettes à poils
très longs. L'électrobrosse pourrait
arracher les fils de ces tapis. Pour
nettoyer ces surfaces, éteignez
l'électrobrosse et utilisez seulement
la puissance d'aspiration normale de
votre appareil.
Raccordement de l'électrobrosse au tube télescopique
Electro
Avant d'utiliser l'aspirateur
-
-
-
^ Insérez a le tube télescopique
Electro dans l'électrobrosse jusqu'à
ce que vous entendiez un déclic.
^
Pour séparer les deux pièces, ap
puyez sur le bouton de dégagement
et retirez le tube en tirant vers le haut
b.
Veuillez vous reporter aux instructions
fournies avec l'électrobrosse pour en
savoir davantage sur son fonctionne
ment et son entretien.
-
-
11
Page 44

Avant d'utiliser l'aspirateur
Utilisation de la brosse à plan
cher standard
(selon le modèle)
Respectez les instructions de net
toyage du fabricant du revêtement
de sol.
La brosse à plancher convient au net
toyage de la moquette, des tapis, des
tapis d'escalier et des surfaces dures
qui ne sont pas susceptibles d'être
rayées.
-
-
Raccordement de la brosse à
plancher
^ Placez la brosse à plancher dans a
le tuyau d'aspiration et tournez la jusqu'à ce quelle s'enclenche.
^ Pour séparer les deux pièces b,ap-
puyez sur le bouton de dégagement.
Ajustement de la brosse à
plancher c
-
Pour nettoyer la moquette et les tapis,
abaissez l'outil comme suit :
^
Basculez l'interrupteur au pied à la
position ö ou %.
Pour nettoyer les planchers lisses, rele
vez l'outil comme suit :
^
Basculez l'interrupteur au pied à la
position ä ou ).
Par mesure de sécurité, il est préfé
rable de nettoyer l'escalier de bas
en haut.
12
-
-
Page 45

Les accessoires suivants sont fournis :
a Brosse à épousseter munie de poils
naturels
b Embout pour meubles rembourrés
c Suceur plat
d Attache pour les accessoires inclus
Accessoires fournis
Placez les accessoires de la façon in
diquée.
Attache pour accessoires
^ Appuyez sur le coude jusqu'à ce qu'il
s'enclenche.
Brosse à parquet - 3
(selon le modèle)
Brosse spéciale munie de poils naturels
servant à nettoyer des parquets et des
planchers lamellés, plus particulière
ment des planchers et des revêtements
de sol susceptibles d’être rayés.
-
-
Il est possible de nettoyer la brosse à
parquet avec l’aspirateur, à l’aide du
suceur plat, au besoin.
13
Page 46

Utilisation
Cordon d'alimentation
Déroulez complètement le cor
,
don afin de favoriser l'évacuation de
la chaleur.
Ne tirez pas sur le cordon, ne vous
en servez pas comme une poignée,
ne le coincez pas dans une porte et
ne le laissez pas en contact avec
des extrémités ou des coins tran
chants. Ne faites pas passer l'appa
reil sur le cordon. Veillez à ce que le
cordon n'entre pas en contact avec
des surfaces chaudes.
Ne débranchez pas l'appareil en tirant sur le cordon. Tirez sur la fiche
et non sur le cordon.
Cet appareil est muni d’un enrouleur
du cordon d’alimentation. Maintenez
la fiche lorsque vous enroulez le cordon de l’appareil. Ne laissez pas la
fiche virevolter lorsque vous enroulez le cordon.
-
-
-
14
Page 47

Déroulement du cordon
Déroulez le cordon d’alimentation a
^
en tirant sur la fiche.
Pour réduire le risque de choc
,
électrique, l’aspirateur est muni
d’une fiche polarisée (l’une des bro
ches est plus large que l’autre).
Cette fiche peut être insérée dans
une prise polarisée d’une seule ma
nière. Si la fiche ne peut être entière
ment insérée dans la prise, consul
tez un électricien qualifié. Ne modi
fiez aucunement la fiche.
Risque de surchauffe et de dommage.
Réenroulement du cordon
^ Débranchez l’aspirateur de la prise
de courant.
^ Appuyez sur l'interrupteur au pied.
Le cordon d’alimentation se réenroulera automatiquement b. Tenez la
fiche de façon à ce que le cordon ne
virevolte pas lorsqu'il s'enroule.
Utilisation
-
-
-
-
-
Réglage de la longueur du
tube télescopique Electro
Les deux parties du tube télescopique
Electro s’emboîtent, ce qui vous permet
de le régler à votre taille pour une utili
sation tout en confort.
^
Appuyez sur le bouton de dégage
ment du tube télescopique afin de
dégager les deux tubes et en régler
la longueur.
-
-
15
Page 48

Utilisation
Mise en marche et arrêt de
l'aspirateur
Appuyez sur l'interrupteur s.
^
Réglage de la puissance
d’aspiration
Vous pouvez régler la puissance d'as
piration en fonction du type de surface
à nettoyer. Lorsque la puissance d'as
piration est réduite, il est plus facile de
manier la brosse à plancher.
Les symboles du sélecteur indiquent
les types d’utilisation convenant aux dif
férents réglages.
# rideaux, tissus légers
$ meubles rembourrés, coussins
% moquettes à poils longs, tapis et
tapis de passage
* utilisation quotidienne à faible
consommation d’énergie et à
faible niveau de bruit
( tapis à poils courts légèrement
sales et moquettes
) sols durs texturés très sales et
nettoyage intensif de tapis
^
Tournez le sélecteur de puissance
d'aspiration pour le mettre au niveau
souhaité.
-
-
-
16
Page 49

Pour éviter la charge électrosta
,
tique, votre main doit rester en contact
avec la pièce métallique placée sous
la poignée. Assurez-vous que votre
main enveloppe bien cette pièce
lorsque vous nettoyez de la poussière
fine, de la farine ou de la sciure, car
ce sont les substances les plus sus
ceptibles de causer une charge élec
trostatique. Pour prévenir encore da
vantage la charge électrostatique
pendant le nettoyage, tirez l’aspirateur
en le tenant par le tuyau d’une main
tout en enveloppant la poignée de
l’autre main.
Mise en marche et arrêt de
l'électrobrosse
L'électrobrosse peut être allumée et
éteinte à l'aide du commutateur situé
sur la poignée, indépendamment de
l'aspirateur.
Utilisation
-
-
-
-
Ce bouton vous permet aussi
d'éteindre temporairement l'électro
brosse (p. ex., pour passer de la mo
quette à un tapis de style oriental).
-
-
17
Page 50

Transport et rangement
Système d'immobilisation
(ne peut être utilisé avec l'électrobrosse
SEB 228/EB03)
Le système d'immobilisation vous per
met d'immobiliser le tube télescopique
sur l'aspirateur pendant de brèves pau
ses.
Toutes les brosses sont munies d’un
^
accessoire d’immobilisation. Insérez
par le haut l’attache inférieure se trou
vant sur la brosse dans la fente située
à l’extrémité de l’aspirateur.
Si l'aspirateur se trouve sur une surface inclinée, comme une rampe,
glissez complètement toutes les
sections du tube télescopique à l'intérieur.
Transport et rangement
^ Pour faciliter le transport et le range-
ment, mettez l’aspirateur debout.
^
Insérez par le haut l'attache de l'ac
cessoire d'immobilisation sur la
brosse à plancher dans la fente
prévue à cet effet (ne s'applique pas
à l'électrobrosse SEB 228/EB03).
-
-
-
-
^
Afin d'économiser de l'espace, insé
rez complètement la rallonge ou l'ex
tension dans le tube télescopique.
18
-
-
Page 51

Éteignez et débranchez l’aspira
,
teur avant d’effectuer des travaux
d’entretien.
Le système de filtrage Miele comprend
les trois composantes suivantes :
Sac à poussière
–
Filtre d’évacuation
–
Filtre du réservoir à poussière (pour
–
protéger le moteur)
Afin que l'aspirateur demeure efficace,
chacune de ces composantes doit être
changée périodiquement.
Utilisez uniquement des sacs à
poussière, des filtres et des accessoires de Miele portant le logo "Original Miele". Ainsi, la puissance
d'aspiration de l'aspirateur sera
maximale et vous obtiendrez des résultats de nettoyage optimaux.
-
Entretien
Achat de nouveaux sacs à
poussière et de filtres
Vous pouvez vous procurer des sacs à
poussière et des filtres auprès d'un dé
taillant autorisé d'aspirateurs Miele ou
en visitant la boutique Miele en ligne à
l'adresse :
http://www.miele.ca/miele/canada/bou
tique.asp.
Les sacs à poussière et les
filtres convenant à votre
appareil
Les sacs à poussière Miele d'origine,
munis d'une poignée bleue, portant les
lettres G/N et le sceau de qualité Miele
conviennent à votre appareil.
-
-
,
Tout comme l'utilisation de sacs
à poussière n'arborant pas le logo
"Original Miele", l'utilisation de sacs
à poussière faits de papier ou de
matériau similaire, ou de sacs à
poussière munis d'une plaque de re
tenue en carton peut endommager
gravement l'aspirateur et risquer
d'en annuler la garantie.
Un filtre Air Clean et un filtre du réser
voir à poussière (filtre situé devant le
-
moteur) sont compris dans chaque
boîte de sacs à poussière. Vous pou
vez vous procurer d'autres filtres au
près d'un détaillant Miele autorisé ou en
visitant la Boutique Miele en ligne.
-
-
-
19
Page 52

Entretien
À quel moment remplacer le
sac à poussière?
Remplacez le sac à poussière lorsque
l'indicateur de couleur remplit la fenêtre
de l'indicateur de circulation d'air.
Les sacs à poussière Miele sont je
tables. Ne les réutilisez pas.
Vérification de l'indicateur de circula
tion d'air
Fixez la brosse à plancher standard
^
(selon le modèle) à l’aspirateur. Fai
tes l’essai uniquement avec la brosse
à plancher, car les autres accessoires peuvent nuire au fonctionnement
de l'indicateur de circulation d'air.
^ Mettez en marche l’aspirateur et sé-
lectionnez le niveau de puissance
maximale.
^ Soulevez légèrement la brosse à
plancher du sol. Si l'indicateur remplit
la fenêtre, il faut remplacer le sac à
poussière.
Fonctionnement de l'indicateur de
circulation d'air
L'indicateur de circulation d'air indique
à quel moment le sac est rempli de
poussière usuelle et fonctionne en me
surant la perméabilité à l’air du sac. La
poussière que l’on trouve habituelle
ment dans une résidence est un mé
lange de poussières, de cheveux, de
peluches, de fils, de grains de pous
sière, etc.
-
-
-
-
-
Cependant, si vous aspirez une cer-
taine quantité de poussière fine, telle
que de la poussière de forage, du
sable, du plâtre ou de la farine, le matériau poreux du sac à poussière se
bouche. La fenêtre de l'indicateur affiche alors que le sac est plein, même
s’il ne l’est pas en réalité. Il faut tout de
même remplacer le sac à poussière,
car la puissance d’aspiration est réduite.
Si vous aspirez une grande quantité de
poils d’animaux, de cheveux, de pelu
ches, etc. et que le sac en est gonflé, il
est possible que la fenêtre de l'indica
teur n'affiche pas que le sac est plein.
Cela est dû au fait que le sac à pous
sière est encore suffisamment per
méable à l’air à un point tel que la fe
nêtre de l'indicateur ne se remplisse
pas. Cependant, le sac à poussière
doit être changé.
-
-
-
-
-
20
Page 53

Remplacement du sac à
poussière
Retirez a la fiche de la prise de cou
^
rant.
Ouvrez b le couvercle du réservoir à
^
poussière et relevez le jusqu’à ce
que vous entendiez un déclic.
Le sac à poussière est muni d’un rabat
qui se ferme automatiquement lorsque
le couvercle du réservoir à poussière
est ouvert pour éviter que la poussière
ne s'échappe.
^ Tirez sur la poignée a afin de retirer
le sac à poussière de son support.
^ Insérez b un nouveau sac à pous-
sière et enfoncez-le le plus possible
dans son support. Ne dépliez pas le
sac à poussière lorsque vous le retirez de la boîte.
Entretien
-
^ Dépliez le sac à poussière dans le
réservoir.
^
Refermez bien le couvercle. Poussez
jusqu’à ce qu’il s’enclenche. Faites
attention que le sac à poussière ne
reste pas coincé dans le couvercle.
,
Un dispositif spécifique em
pêche le couvercle du réservoir à
poussière de se refermer si aucun
sac à poussière n'est inséré. Ne for
cez pas le couvercle pour qu'il
ferme.
-
-
21
Page 54

Entretien
À quel moment remplacer le
filtre du réservoir à poussière
(filtre situé devant le moteur)?
Remplacez le filtre chaque fois que
vous ouvrez une nouvelle boîte de sacs
à poussière Miele. Chaque boîte
contient un filtre de réservoir à pous
sière.
Remplacement du filtre du
réservoir à poussière (filtre
situé devant le moteur)
Ouvrez le couvercle du réservoir à
^
poussière.
^ Soulevez la grille du filtre, retirez l'an-
cien filtre et remplacez-le par un nouveau.
^ Rabaissez la grille du filtre.
^ Refermez le couvercle.
-
22
Page 55

À quel moment remplacer le
filtre d'évacuation Air Clean?
Entretien
Chaque fois que vous ouvrez une nou
velle boîte de sacs à poussière Miele,
vous devez changer ce filtre.
Chaque boîte de sacs à poussière
Miele contient un filtre d'évacuation Air
Clean.
Remplacement du filtre Air
Clean
N'utilisez pas plus d'un filtre à la
fois.
^ Ouvrez le couvercle du réservoir à
poussière.
^ Relevez la grille du filtre jusqu'à ce
qu'un déclic se fasse entendre, et
retirez le filtre a en le prenant par le
coin propre (voir la flèche)
^ Insérez le nouveau filtre b.
^
Rabaissez la grille du filtre.
^
Refermez le couvercle.
-
23
Page 56

Entretien
Interchangement des filtres
d'évacuation
Selon le modèle, votre appareil peut
également comporter un filtre Active
HEPA que vous pouvez utiliser à la
place du filtre d'évacuation Air Clean
standard.
Afin d'utiliser le filtre Active HEPA, vous
devez retirer le filtre Air Clean ainsi que
sa grille.
À quel moment remplacer le
filtre d'évacuation Active
HEPA?
Changez ce filtre environ une fois par
année.
Vous pouvez inscrire la date de remplacement directement sur le filtre d'évacuation.
Remplacement du filtre
Active HEPA
^
Ouvrez le couvercle du réservoir à
poussière.
^
Retirez le filtre d'évacuation usagé a.
^
Insérez le nouveau filtre b.
^
Refermez le couvercle.
24
Page 57

À quel moment remplacer les
capteurs de fils sur la brosse à
plancher standard ?
(selon le modèle)
Les capteurs de fils sur la brosse à
plancher doivent être remplacés dès
qu'ils semblent usés.
Remplacement des capteurs
de fils
À l'aide d'un tournevis, par exemple,
^
retirez le capteur de fils des fentes
d'insertion.
^ Insérez le nouveau capteur de fils.
Vous pouvez vous procurer des
coussinets de capteurs de fils auprès d'un détaillant Miele autorisé ou
directement auprès de Miele.
Entretien
25
Page 58

Nettoyage et entretien
Éteignez l’aspirateur et débran
,
chez-le de la prise avant d’effectuer
des travaux d’entretien.
L’aspirateur et ses accessoires
L'aspirateur et les autres accessoires
de plastique peuvent être nettoyés à
l'aide d'un linge humide ou d'un net
toyant spécialement conçu pour le
plastique.
N'utilisez pas de nettoyants
,
abrasifs, de nettoyants à base
d'huile, de produits pour vitres ni de
nettoyants tout usage.
Réservoir à poussière
Le réservoir à poussière peut être nettoyé, si nécessaire, avec un linge sec,
une brosse à épousseter ou un autre
aspirateur.
-
-
Surveillez l'indicateur de circulation
d'air et vérifiez régulièrement les filtres.
Nettoyez-les ou remplacez-les lorsque
nécessaire, conformément aux instruc
tions d’utilisation.
,
Ne plongez pas l’aspirateur
dans l'eau. Si l’humidité pénètre
dans l’appareil, vous risquez de su
bir un choc électrique.
26
-
-
Page 59

Questions fréquemment posées/Service technique
Éteignez et débranchez l’aspira
,
teur avant d’effectuer des travaux
d’entretien.
-
L'aspirateur s'éteint automatique
ment.
L'aspirateur a surchauffé. Le limiteur de
température éteint automatiquement
l’appareil.
Cela peut se produire, par exemple,
lorsque de gros éléments aspirés blo
quent le tuyau d’aspiration ou lorsque
le sac à poussière est plein, ou encore
si celui-ci contient des particules de
poussière fine. Si le filtre d’évacuation
ou le filtre du réservoir à poussière est
très sale, l'aspirateur peut également
surchauffer. Éteignez l'aspirateur et débranchez-le de la prise.
Vérifiez si des pièces sont obstruées et
laissez l'aspirateur refroidir pendant
30 minutes.
-
-
Service après-vente
Si vous ne pouvez résoudre certains
problèmes, veuillez communiquer avec
le Service technique Miele au numéro
indiqué au verso de la présente bro
chure.
-
^
Veuillez préciser le modèle de votre
appareil.
Ce renseignement figure sur la plaque
signalétique située en-dessous de l'as
pirateur.
-
27
Page 60

Accessoires offerts en option
Respectez les instructions de net
toyage du fabricant du revêtement
de sol.
Il est possible d'acheter bon nombre
de ces accessoires et d'autres produits
au magasin Miele en ligne, à
www.Mieleusa.com.
Certains modèles sont équipés de série
d'au moins un des accessoires sui
vants.
Turbobrosse/brosse à plancher
-
-
Brosse à plancher "Parquet Twister"
munie d'une tête pivotante
Sert à nettoyer tous les revêtements de
sol durs, comme les parquets et les
planchers en carrelage. Convient parti
culièrement pour nettoyer les niches et
les espaces étroits.
Brosse à plancher "Parquet Twister
XL" munie d'une tête pivotante
Sert à nettoyer les grandes surfaces re
couvertes de revêtements de sol durs,
comme les parquets et les planchers
en carrelage.
-
-
Turbobrosse Turbo Comfort - 3
Sert à nettoyer la moquette à poils
courts et moyens.
Mini turbobrosse
Sert à nettoyer les articles rembourrés,
les matelas, les sièges de voiture, les
escaliers recouverts de tapis et autres
endroits qui sont inaccessibles avec la
turbobrosse standard.
Brosse à sols durs - 3
Sert à nettoyer des surfaces dures,
comme les planchers en carrelage ou
en pierres.
Brosse à parquet - 3
Brosse spéciale munie de poils naturels
servant à nettoyer des parquets et des
planchers stratifiés, plus particulière
ment des planchers et des revêtements
de sol susceptibles d'être rayés.
-
Autres accessoires
Coffret MicroSet
Sert à nettoyer des petits objets et des
endroits difficiles à atteindre (claviers
d’ordinateurs, chaînes stéréo, meubles
sculptés, ornements, miniatures, etc.).
Boîtier d'accessoires "CarCare"
Sert à nettoyer l'intérieur de la voiture.
Boîtier d'accessoires "HomeCare"
Sert à nettoyer votre maison.
Brosse universelle
Pour épousseter des étagères, des
manteaux de cheminée, des moulures,
des ventilateurs de plafond, des sculp
tures, etc.
-
28
Page 61

Brosse à radiateur
Sert à nettoyer des radiateurs, des
évents, des serpentins de machine fri
gorifique, des conditionneurs d'air, des
vases décoratifs, etc.
Suceur pour matelas
Accessoires offerts en option
-
Sert à nettoyer des interstices, des ma
telas et des meubles rembourrés.
Suceur plat de 12 po (300 mm)
Sert à nettoyer des plis, des fentes, des
recoins, etc.
Suceur plat de 22 po (560 mm)
Sert à nettoyer les endroits difficiles à
atteindre.
Suceur pour meubles rembourrés de
7,5 po (190 mm)
Sert à nettoyer les meubles rembourrés, les matelas et les oreillers.
-
29
Page 62

LIMITED WARRANTY - VACUUM CLEANERS CDN
What The Warranty Covers And For What Period The Coverage Extends
Miele, Inc. (hereinafter "Miele") warrants to the original purchaser of this product,
living in Canada, who purchased their vacuum from a Miele authorized distributor
or dealer:
a. That this product, including all of its Miele authorized parts is free of defects
in material and workmanship.
b. That this product, if found to be defective within the stated warranty period,
will be repaired free of charge to the consumer (both parts and labor) by an
authorized Miele service agent.
c. The warranty period for vacuum cleaners and accessories, excluding
vacuum cleaner motors, and vacuum cleaner casings (body), is one (1) year
from the date of purchase.
d. For vacuum cleaner casings (body), the warranty period will be as follows:
- The structural integrity of the vacuum cleaner casing (body) will be
covered for seven (7) years from the date of purchase against defects in
material and workmanship on the S2xxx, S4xxx, S5xxxx, S6xxx, S7xxx,
and S160 product series.
e. For vacuum cleaner motors, the warranty period will be as follows:
- Vacuum motors will be covered for seven (7) years from the date of
purchase on the S2xxx, S4xxx, S5xxx, S6xxx, S7xxx, and S160 product
series.
Vacuum cleaners used for commercial purposes, except for their motors, will be
warranted for a period of six (6) months from the date of purchase. The motors of
commercially used upright vacuums will be warranted for one (1) year and the
motors of all other commercially used vacuum cleaners will be warranted for two
(2) years. Thereafter this Limited Warranty shall be null and void.
This warranty only applies while the product remains within Canada, and shall be
null and void in any other foreign countries.
What is not covered by this Warranty
This warranty does not cover damage or defects caused by or resulting from re
pairs, service or alterations to the product or any of its parts or accessories which
have been performed by service centers or repairmen not authorized by Miele, or
damage or defects caused by negligence, accident, abuse, misuse, improper or
abnormal usage or maintenance of the product, its parts or accessories. Ordinary
wear and tear or cosmetic damage (scuffs, scratches, gauges, dents, etc.) shall
not be considered a defect in materials or workmanship.
30
-
Page 63

LIMITED WARRANTY - VACUUM CLEANERS CDN
Exclusion of Other Warranties
Except for the limited warranty provided herein, Miele disclaims any and all other
express warranties with respect to the product. Any warranty of merchantability or
fitness for a particular purpose is limited in its duration to the term of the limited
warranty provided herein.
Limitation of Liability for Special, Incidental or Consequential Damages
Miele will assume no liability, or other obligation with respect to any personal injury
or property damage resulting from the use of a vacuum cleaner, or its accesso
ries, replacement parts, etc., which has not been purchased from, or serviced by
an Authorized Miele Dealer. Any purchaser who obtains a vacuum cleaner, acces
sories, replacement parts, etc., from someone other than an Authorized Miele dea
ler proceeds at their own risk.
Miele specifically disclaims any and all liability, whether directly or by way of indemnity, for special incidental, consequential or other damages, whether based
on breach of contract, tort, strict or product liability, or any other legal theory.
Service
For service under this Limited Warranty, or for information you may need about the
product, please contact Miele at the one of the addresses listed on the back of
this booklet, or visit us at www.miele.ca.
-
-
-
Authorized Miele Dealers
To find an authorized Miele dealer in your area, please visit our website .
Effective Date: April 1, 2012
©2012 Miele, Inc.
31
Page 64

GARANTIE RESTREINTE - ASPIRATEURS AU CANADA
Ce que couvre la garantie et pour combien de temps
Miele, Inc. (ci-après « Miele ») garantit à l’acheteur original, habitant au Canada,
qui a acheté son aspirateur d'un détaillant ou d’un distributeur Miele autorisé :
a. que ce produit, y compris toutes les pièces Miele qui s’y rapportent, est
exempt de défaut dans les matériaux et la fabrication
b. que ce produit, s'il s'avère défectueux durant la période de garantie
indiquée, sera réparé sans frais pour le consommateur (pièces et
main-d'œuvre) par un technicien autorisé de Miele.
c. que la période de garantie pour les aspirateurs et accessoires s'y rattachant,
à l'exception des moteurs et des boîtiers d'aspirateurs, est d'une durée
d'un (1) an à partir de la date de l'achat.
d. Pour ce qui est des boîtiers d'aspirateurs, la période de garantie sera la
suivante :
- l'intégrité de la structure du boîtier d'aspirateur sera couverte pendant
sept (7) ans à partir de la date de l'achat contre les défauts dans les
matériaux et la fabrication pour la gamme de produits S2xxx, S4xxx,
S5xxxx, S6xxx, S7xxx et S160.
e. Pour ce qui est des moteurs d'aspirateurs, la période de garantie sera la
suivante :
- Les moteurs seront couverts pendant sept (7) ans à partir de la date de
l'achat pour la gamme de produits S2xxx, S4xxx, S5xxxx, S6xxx, S7xxx
et S160.
Les aspirateurs utilisés à des fins commerciales, à l'exception de leurs moteurs,
seront garantis pour une période de six (6) mois à partir de la date de l'achat. Les
moteurs des aspirateurs verticaux utilisés à des fins commerciales seront garantis
pour une période d'un (1) an et les moteurs de tous les autres aspirateurs utilisés
à des fins commerciales seront garantis pour une période de deux (2) ans. Passé
ces délais, la garantie restreinte ne sera plus valide.
Cette garantie s'applique seulement si le produit demeure au Canada; elle n'est
pas valide dans un autre pays.
Ce que ne couvre pas la garantie
Cette garantie ne couvre pas les défauts ni les dommages causés par les élé
ments suivants ou en résultant : réparations, travaux d'entretien ou modifications
du produit ou de ses pièces et accessoires par un centre de services ou un répa
rateur non autorisé par Miele. La garantie ne couvre pas non plus les défauts ou
dommages causés par de la négligence, un accident, une utilisation abusive, une
mauvaise utilisation, inappropriée ou anormale, ou encore un entretien inappro
prié ou anormal du produit, de ses pièces ou de ses accessoires. L’usure normale
ou les dommages apparents (éraflures, égratignures, écartements, bosses, etc.)
ne constituent pas un défaut de fabrication ni un défaut de matériaux.
32
-
-
-
Page 65

GARANTIE RESTREINTE - ASPIRATEURS AU CANADA
Exclusion d’autres garanties
À l'exception de la garantie restreinte mentionnée ci-dessus, Miele se désiste de
toute autre garantie expresse en ce qui a trait au produit. Toute garantie de quali
té marchande ou d’usage à une fin particulière est limitée à la durée de la pré
sente garantie restreinte écrite.
Limite de responsabilité concernant les dommages particuliers, consécutifs
ou indirects
Miele ne peut être tenue d'assumer des responsabilités ou des obligations pour
des blessures ou des dommages matériels causés par l'utilisation d'un aspirateur,
de ses accessoires, de ses pièces de rechange, etc., qui n'ont pas été achetés
ou entretenus par un détaillant Miele autorisé. Toute personne qui achète un aspi
rateur, des accessoires, des pièces de rechange, etc., d'un autre détaillant qu'un
détaillant Miele autorisé le fait à ses propres risques.
Miele se dégage expressément de toute responsabilité, directe ou par le biais
d'indemnités, en ce qui concerne des dommages particuliers, consécutifs ou indirects, qu'ils soient fondés sur la violation du contrat, sur la responsabilité délictuelle, sur la responsabilité du fait du produit, sur la responsabilité stricte ou sur
toute autre théorie juridique.
Travaux d'entretien
-
-
-
Pour faire exécuter des travaux d'entretien couverts en vertu de la garantie restreinte ou pour obtenir de plus amples renseignements sur le produit, veuillez
communiquer avec Miele à l'une des adresses inscrites au verso de la présente
brochure, ou consultez notre site Web à l'adresse www.miele.ca.
Détaillants Miele autorisés
Pour trouver un détaillant Miele autorisé dans votre région, consultez notre site
Web.
Date d'entrée en vigueur : 01 april 2012
©2012 Miele, Inc.
33
Page 66

Protection de l'environnement
Élimination des produits d'em
ballage
La boîte de carton et l'emballage protè
gent l'aspirateur durant le transport.
Ces matériaux sont recyclables. Veuil
lez les recycler.
Pour prévenir les risques de suffoca
tion, débarrassez-vous des emballa
ges, sacs et autres produits en plas
tique en toute sécurité et gardez-les
hors de la portée des enfants.
-
-
-
Mise au rebut de votre ancien
appareil
Les anciens aspirateurs peuvent conte
nir des matériaux recyclables. Veuillez
communiquer avec le centre de recy
clage de votre localité pour savoir com
ment les recycler.
-
-
-
34
Page 67

Sous réserve de modifications / Aspirateurs S2 avec accessoires électriques / 2112
LES RENSEIGNEMENTS FOURNIS PEUVENT ÊTRE MODIFIÉS. VEUILLEZ CONSULTER NOTRE SITE
WEB POUR CONNAÎTRE LES CARACTÉRISTIQUES LES PLUS RÉCENTES DES PRODUITS AINSI
QUE LES DERNIERS RENSEIGNEMENTS TECHNIQUES ET L'INFORMATION MISE À JOUR
CONCERNANT LA GARANTIE.
Page 68

Alteration rights reserved / S2 with electro accessories / 2 12
INFORMATION IS SUBJECT TO CHANGE. PLEASE REFER TO OUR WEBSITE TO OBTAIN THE MOST
CURRENT PRODUCT SPECIFICATIONS, TECHNICAL & WARRANTY INFORMATION.
1
M.-Nr. 07 851 591 / 00M.-Nr. 07 851 591 / 00
 Loading...