

Page 1

Descriptive Technical
14.10.2005, DE_en This information should not be duplicated or passed on without Miele approval. All rights reserved.
Documentation
- Model-dependent -
DTD no. 521-7135
Model(s): PT 7135 C, PT 7136, PT 5135 C,
PT 5136
Page 2

This information should not be duplicated or passed on without Miele approval. All rights reserved. 14.10.2005, DE_en
Page 3

Descriptive Technical Documentation
DTD no. 521-7135 1
14.10.2005, DE_en This information should not be duplicated or passed on without Miele approval. All rights reserved.
Contents
General Information
A Warning and Safety Instructions
B Modification History
C Technical Data
D Layout of Electrical Components
Function Groups
020 Door
2 Function . . . . . . . . . . . . . . . . . . . . . . . . . . . . . . . . . . . . . . . . . . . 020-2
2.1 Door lock (A2). . . . . . . . . . . . . . . . . . . . . . . . . . . . . . . . . . . . . . . . . 020-2
030 Drum, bearing, sensors, heater bank
1 Technical Data . . . . . . . . . . . . . . . . . . . . . . . . . . . . . . . . . . . . . 030-2
2 Function
2.1 Heating control (R1, R2, R3) . . . . . . . . . . . . . . . . . . . . . . . . . . . . . 030-4
2.2 Temperature limiter (F2). . . . . . . . . . . . . . . . . . . . . . . . . . . . . . . . . 030-4
2.3 NTC temperature sensor - Fill ring (1R30) . . . . . . . . . . . . . . . . . . 030-4
2.4 NTC temperature sensor - Heater bank (2R30) . . . . . . . . . . . . . . 030-4
2.5 Light - Drum (H3/6). . . . . . . . . . . . . . . . . . . . . . . . . . . . . . . . . . . . . 030-5
040 Drive
1 Technical Data . . . . . . . . . . . . . . . . . . . . . . . . . . . . . . . . . . . . . 040-2
2 Function
2.1 Motor - Air flow and drum drive (M5) . . . . . . . . . . . . . . . . . . . . . . 040-3
2.2 Motor - Air flow and drum drive (M5) . . . . . . . . . . . . . . . . . . . . . . 040-3
. . . . . . . . . . . . . . . . . . . . . . . . . . . . . . . . . . . . . . . . . . . 030-4
. . . . . . . . . . . . . . . . . . . . . . . . . . . . . . . . . . . . . . . . . . . 040-3
070 Condensate pump (M5)
2 Function . . . . . . . . . . . . . . . . . . . . . . . . . . . . . . . . . . . . . . . . . . . 070-2
2.1 Level sensing - Float switch - Condensate (B8/7) . . . . . . . . . . . . 070-2
080 Fascia panel
1 Technical Data . . . . . . . . . . . . . . . . . . . . . . . . . . . . . . . . . . . . . 080-2
2 Function
2.1 Overriding time control. . . . . . . . . . . . . . . . . . . . . . . . . . . . . . . . . . 080-3
2.2 No-load recognition . . . . . . . . . . . . . . . . . . . . . . . . . . . . . . . . . . . . 080-3
2.3 Insufficient air flow measurement . . . . . . . . . . . . . . . . . . . . . . . . . 080-3
. . . . . . . . . . . . . . . . . . . . . . . . . . . . . . . . . . . . . . . . . . . 080-3
Page 4

Descriptive Technical Documentation
2 DTD no. 521-7135
This information should not be duplicated or passed on without Miele approval. All rights reserved. 14.10.2005, DE_en
2.4 Time of day programmable function . . . . . . . . . . . . . . . . . . . . . . . 080-3
2.5 Extended cooling phase programmable function. . . . . . . . . . . . . 080-4
2.6 Residual moisture level adjustment programmable function. . . . 080-4
2.7 Clean the airways warning modification programmable
function . . . . . . . . . . . . . . . . . . . . . . . . . . . . . . . . . . . . . . . . . . . . . . 080-5
2.8 Automatic programmable function. . . . . . . . . . . . . . . . . . . . . . . . 080-5
2.9 Clean filters programmable function . . . . . . . . . . . . . . . . . . . . . . 080-5
2.10 Clean heat exchanger programmable function . . . . . . . . . . . . . 080-6
2.11 Residual moisture level display programmable function . . . . . . . 080-6
2.12 Cool air free programmable function, with payment system
operation . . . . . . . . . . . . . . . . . . . . . . . . . . . . . . . . . . . . . . . . . . . . . 080-6
2.13 Payment system programmable function . . . . . . . . . . . . . . . . . . . 080-7
2.14 Operator code programmable function . . . . . . . . . . . . . . . . . . . . . 080-7
2.15 Signal to payment system socket (X1/1) pin 7 programmable
function . . . . . . . . . . . . . . . . . . . . . . . . . . . . . . . . . . . . . . . . . . . . . . 080-7
2.16 Overriding time control modification programmable function
with payment system operation. . . . . . . . . . . . . . . . . . . . . . . . . . . 080-8
2.17 Programme lock programmable function with payment system
operation . . . . . . . . . . . . . . . . . . . . . . . . . . . . . . . . . . . . . . . . . . . . . 080-8
2.18 Cool air timed programme maximum duration setting
programmable function . . . . . . . . . . . . . . . . . . . . . . . . . . . . . . . . . 080-8
2.19 Warm air timed programme maximum duration setting
programmable function . . . . . . . . . . . . . . . . . . . . . . . . . . . . . . . . . 080-9
2.20 Delay start programmable function . . . . . . . . . . . . . . . . . . . . . . . . 080-9
2.21 Language programmable function . . . . . . . . . . . . . . . . . . . . . . . . 080-9
2.22 Standard settings programmable function . . . . . . . . . . . . . . . . . . 080-9
3 Fault Repair . . . . . . . . . . . . . . . . . . . . . . . . . . . . . . . . . . . . . . . . 080-10
3.1 Warning indication: Clean filter . . . . . . . . . . . . . . . . . . . . . . . . . . 080-10
3.2 Warning indication: Clean heat exchanger. . . . . . . . . . . . . . . . . 080-11
3.3 Warning indication: Adjust the load – The drum is empty or the
laundry too dry . . . . . . . . . . . . . . . . . . . . . . . . . . . . . . . . . . . . . . . . 080-12
3.4 Demonstration mode active. . . . . . . . . . . . . . . . . . . . . . . . . . . . . . 080-13
3.5 Fault indication: Drain fault – Check the drain path . . . . . . . . . . 080-13
3.6 Fault indication: Clean the airways . . . . . . . . . . . . . . . . . . . . . . . 080-14
3.7 Fault indication: Technical fault . . . . . . . . . . . . . . . . . . . . . . . . . . 080-15
3.8 Fault code F1, heater bank NTC sensor short-circuited . . . . . . . 080-16
3.9 Fault code F2, heater bank NTC sensor open-circuited . . . . . . . 080-16
3.10 Fault code F3, fill ring NTC sensor short-circuited . . . . . . . . . . . . 080-17
3.11 Fault code F4, fill ring NTC sensor open-circuited . . . . . . . . . . . . 080-18
3.12 Fault code F41, faulty EEPROM / data fault . . . . . . . . . . . . . . . . . 080-18
3.13 Fault code F43, model type not programmed. . . . . . . . . . . . . . . . 080-19
3.14 Fault code F45, faulty flash RAM/ data fault. . . . . . . . . . . . . . . . . 080-19
3.15 Fault code F46, display fault . . . . . . . . . . . . . . . . . . . . . . . . . . . . . 080-20
3.16 Fault code F47, communication fault between selection module
(EW) and power-programme module (ELP). . . . . . . . . . . . . . . . . 080-20
3.17 Fault code F50, motor stationary and heating operates for 5 s . . 080-21
3.18 Fault code F55, overriding time limit exceeded (approx. 180
min) . . . . . . . . . . . . . . . . . . . . . . . . . . . . . . . . . . . . . . . . . . . . . . . . . 080-21
3.19 Fault code F66, air leakage fault . . . . . . . . . . . . . . . . . . . . . . . . . . 080-23
4 Service. . . . . . . . . . . . . . . . . . . . . . . . . . . . . . . . . . . . . . . . . . . . . 080-24
4.1 Programming mode summary. . . . . . . . . . . . . . . . . . . . . . . . . . . . 080-24
4.2 Programming mode summary. . . . . . . . . . . . . . . . . . . . . . . . . . . . 080-29
4.3 Demonstration mode activation / deactivation . . . . . . . . . . . . . . . 080-33
4.4 Demonstration mode activation / deactivation . . . . . . . . . . . . . . . 080-34
4.5 Service mode summary. . . . . . . . . . . . . . . . . . . . . . . . . . . . . . . . . 080-35
Page 5

Descriptive Technical Documentation
DTD no. 521-7135 3
14.10.2005, DE_en This information should not be duplicated or passed on without Miele approval. All rights reserved.
4.6 Service mode summary. . . . . . . . . . . . . . . . . . . . . . . . . . . . . . . . . 080-38
090 Electrical components
2 Function . . . . . . . . . . . . . . . . . . . . . . . . . . . . . . . . . . . . . . . . . . . 090-2
2.1 Mains terminal strip (X3/1). . . . . . . . . . . . . . . . . . . . . . . . . . . . . . . 090-2
2.2 Payment system socket (X1/1) . . . . . . . . . . . . . . . . . . . . . . . . . . . 090-2
2.3 Payment system. . . . . . . . . . . . . . . . . . . . . . . . . . . . . . . . . . . . . . . 090-2
2.4 Central control via RS 232 interface with 9-pole plug . . . . . . . . . 090-3
4 Service. . . . . . . . . . . . . . . . . . . . . . . . . . . . . . . . . . . . . . . . . . . . . 090-4
4.1 Fitting payment system on machine lid. . . . . . . . . . . . . . . . . . . . . 090-4
4.2 Payment system (programme operation) . . . . . . . . . . . . . . . . . . . 090-5
4.3 Payment system (timed operation) . . . . . . . . . . . . . . . . . . . . . . . . 090-6
4.4 Central control via RS 232 interface . . . . . . . . . . . . . . . . . . . . . . . 090-7
Page 6

Descriptive Technical Documentation
4 DTD no. 521-7135
This information should not be duplicated or passed on without Miele approval. All rights reserved. 14.10.2005, DE_en
Page 7

Descriptive Technical Documentation
DTD no. 521-7135 A-1
14.10.2005, DE_en This information should not be duplicated or passed on without Miele approval. All rights reserved.
A Warning and Safety Instructions
1 General information
Service and repair work should only be carried out by suitably qualified persons in
accordance with all appropriate local and national safety regulations.
Servicing, modification, testing and maintenance of electrical appliances should
only be carried out in accordance with all appropriate legal requirements, accident
prevention regulations and valid standards.
All regulations of the appropriate utility supply companies and standards relating
to safety (not limited to electrical safety) are to be complied with.
Before any service work is commenced, the machine must be disconnected from
the mains.
Even with the machine switched off, mains power may be applied to some
components.
A general visual check should always be carried out.
Page 8

Descriptive Technical Documentation
A-2 DTD no. 521-7135
This information should not be duplicated or passed on without Miele approval. All rights reserved. 14.10.2005, DE_en
2 Risk of injury due to sharp edges
There may be a risk of injury due to sharp edges.
Protective gloves should be worn and the edge protection, Mat. no. 05057680,
should be used.
Page 9

Descriptive Technical Documentation
DTD no. 521-7135 A-3
14.10.2005, DE_en This information should not be duplicated or passed on without Miele approval. All rights reserved.
3 Electrical connection via plug connector
It is always recommended to make electrical connection via a plug and socket so
that electrical safety checks, e.g. during repair or service work, can be carried out
easily.
The socket must be accessible after machine installation. This also applies even
if an on-site mains switch is also already provided.
For models with a total connected load greater than 9 kW, an additional on-site
mains switch must also be provided.
Electrical connection must be carried out in accordance with all appropriate legal
requirements, accident prevention regulations and valid standards.
Page 10

Descriptive Technical Documentation
A-4 DTD no. 521-7135
This information should not be duplicated or passed on without Miele approval. All rights reserved. 14.10.2005, DE_en
4 Touch current measurement
x
Note
On machines with an earth connection, touch current leakage measurements
should be carried out on all accessible conductive parts that are not connected
to the earth.
Warning!
Touch current measurement should only be carried out after the earth
connection of the unit under test has been checked and found to be satisfactory!
Dangerous voltages may exist on defective machines as well as on accessible
conductive parts that are not connected to earth!
Note
Touch current measurement should be carried out on the following accessible
conductive parts:
• None.
Page 11

Descriptive Technical Documentation
DTD no. 521-7135 B-1
14.10.2005, DE_en This information should not be duplicated or passed on without Miele approval. All rights reserved.
B Modification History
When? Who? What?
11.05.2005 Olaf Meyer zu Drewer Initial compilation
Page 12

Descriptive Technical Documentation
B-2 DTD no. 521-7135
This information should not be duplicated or passed on without Miele approval. All rights reserved. 14.10.2005, DE_en
Page 13
Descriptive Technical Documentation
DTD no. 521-7135 C-1
14.10.2005, DE_en This information should not be duplicated or passed on without Miele approval. All rights reserved.
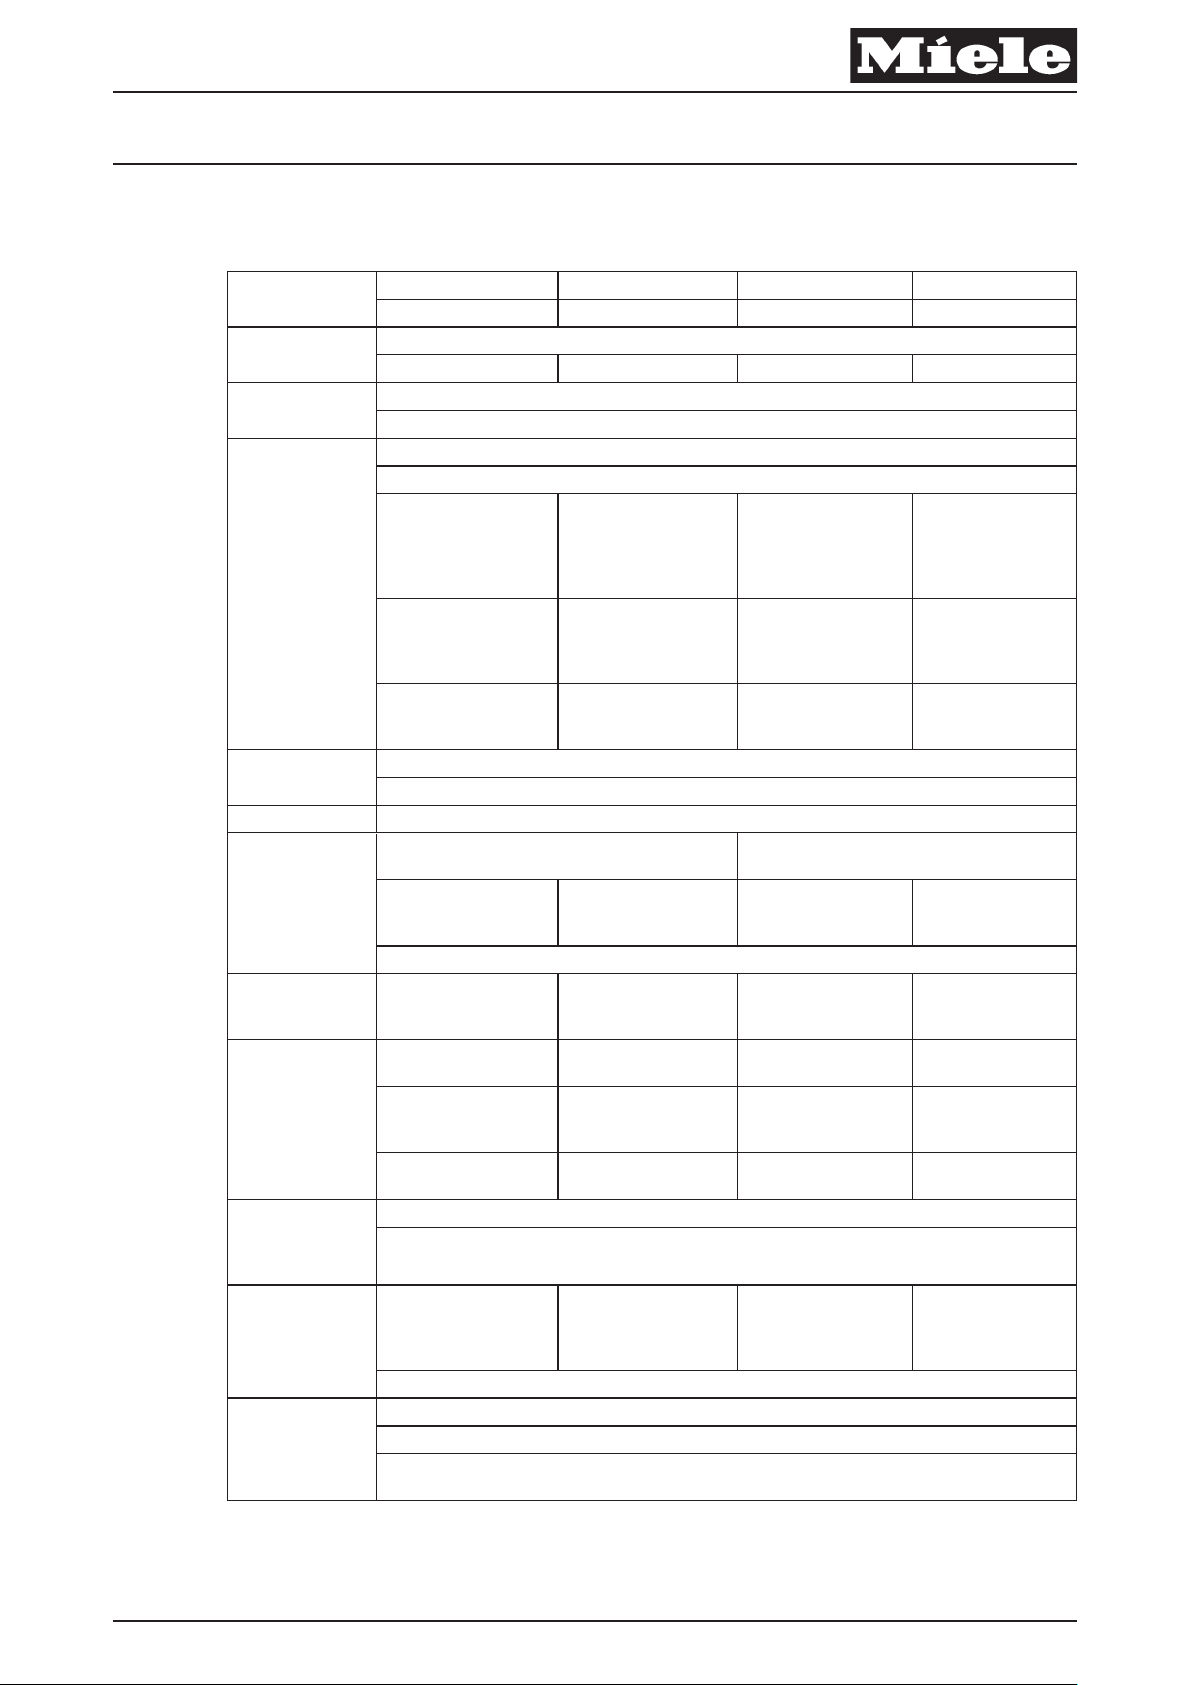
C Technical Data
Semi-commercial
machines
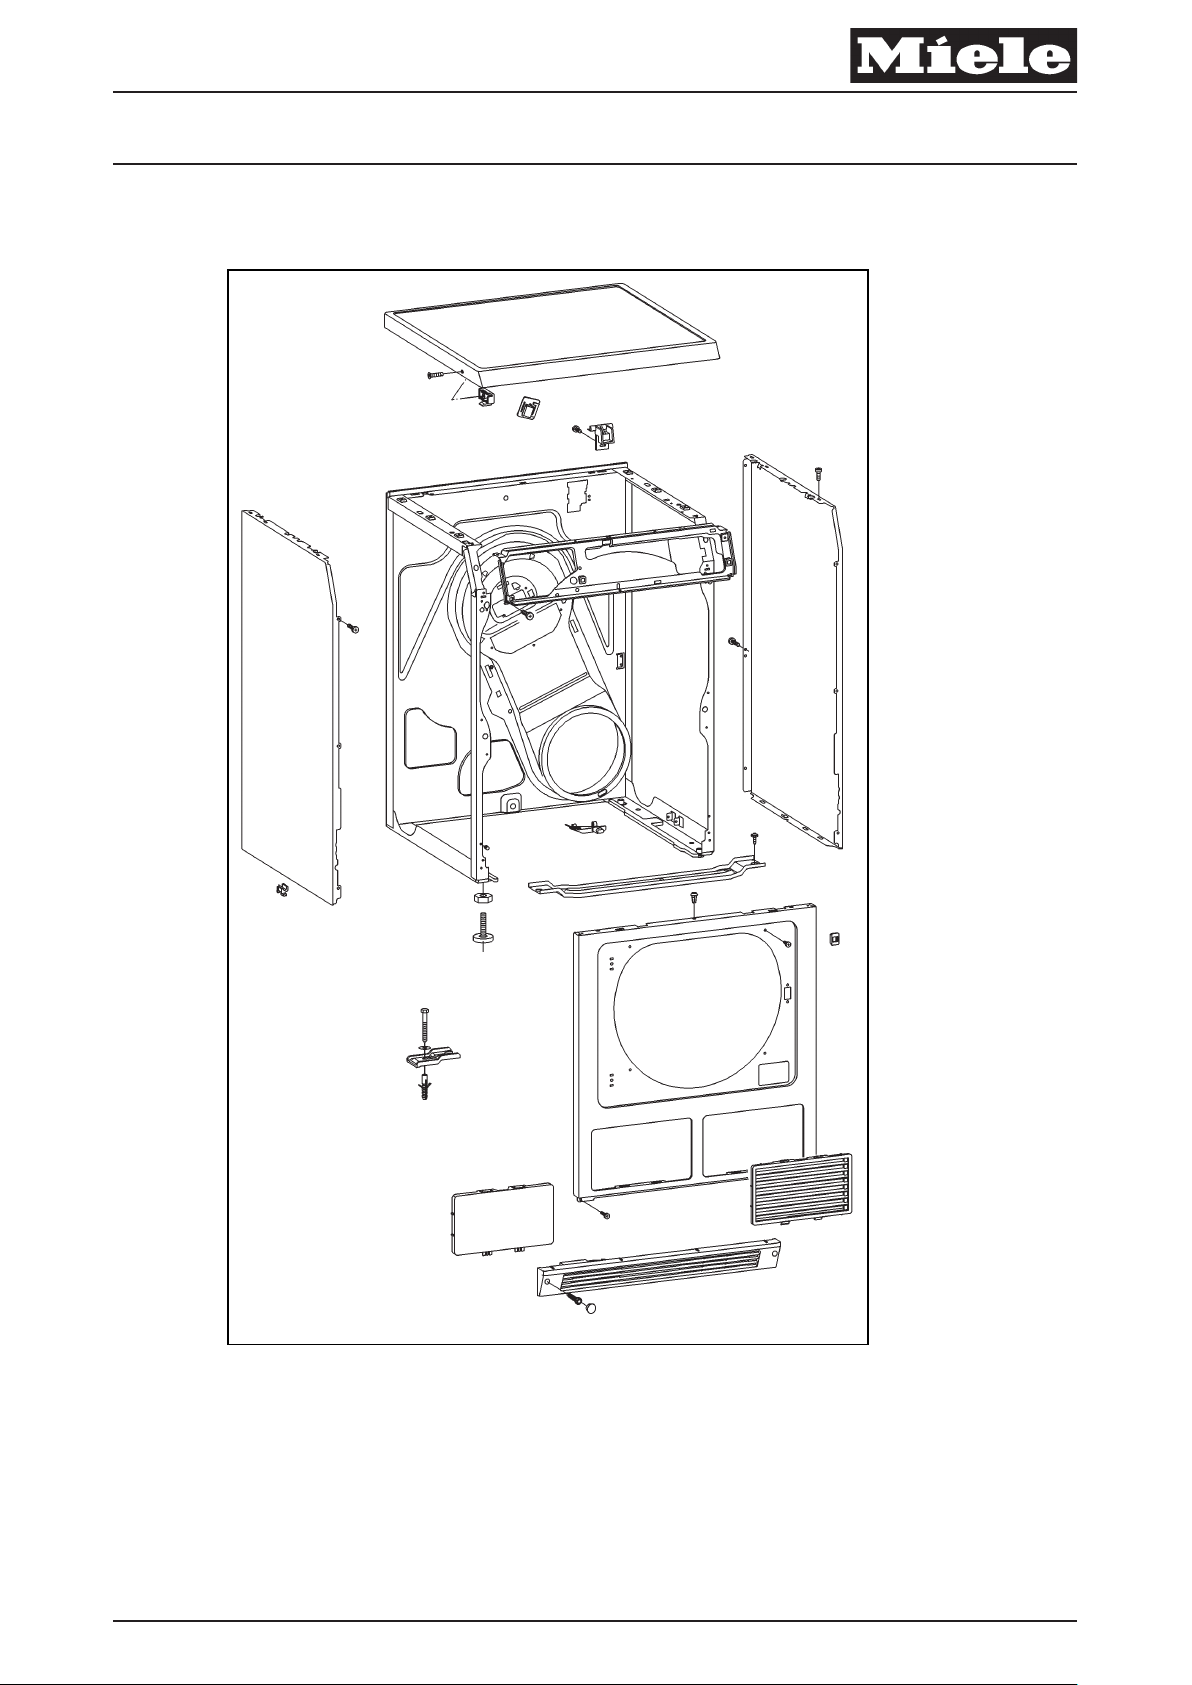
Casing Generation 2000, spaceframe construction
Door Door opened mechanically via pushbutton switch with Bowden cable
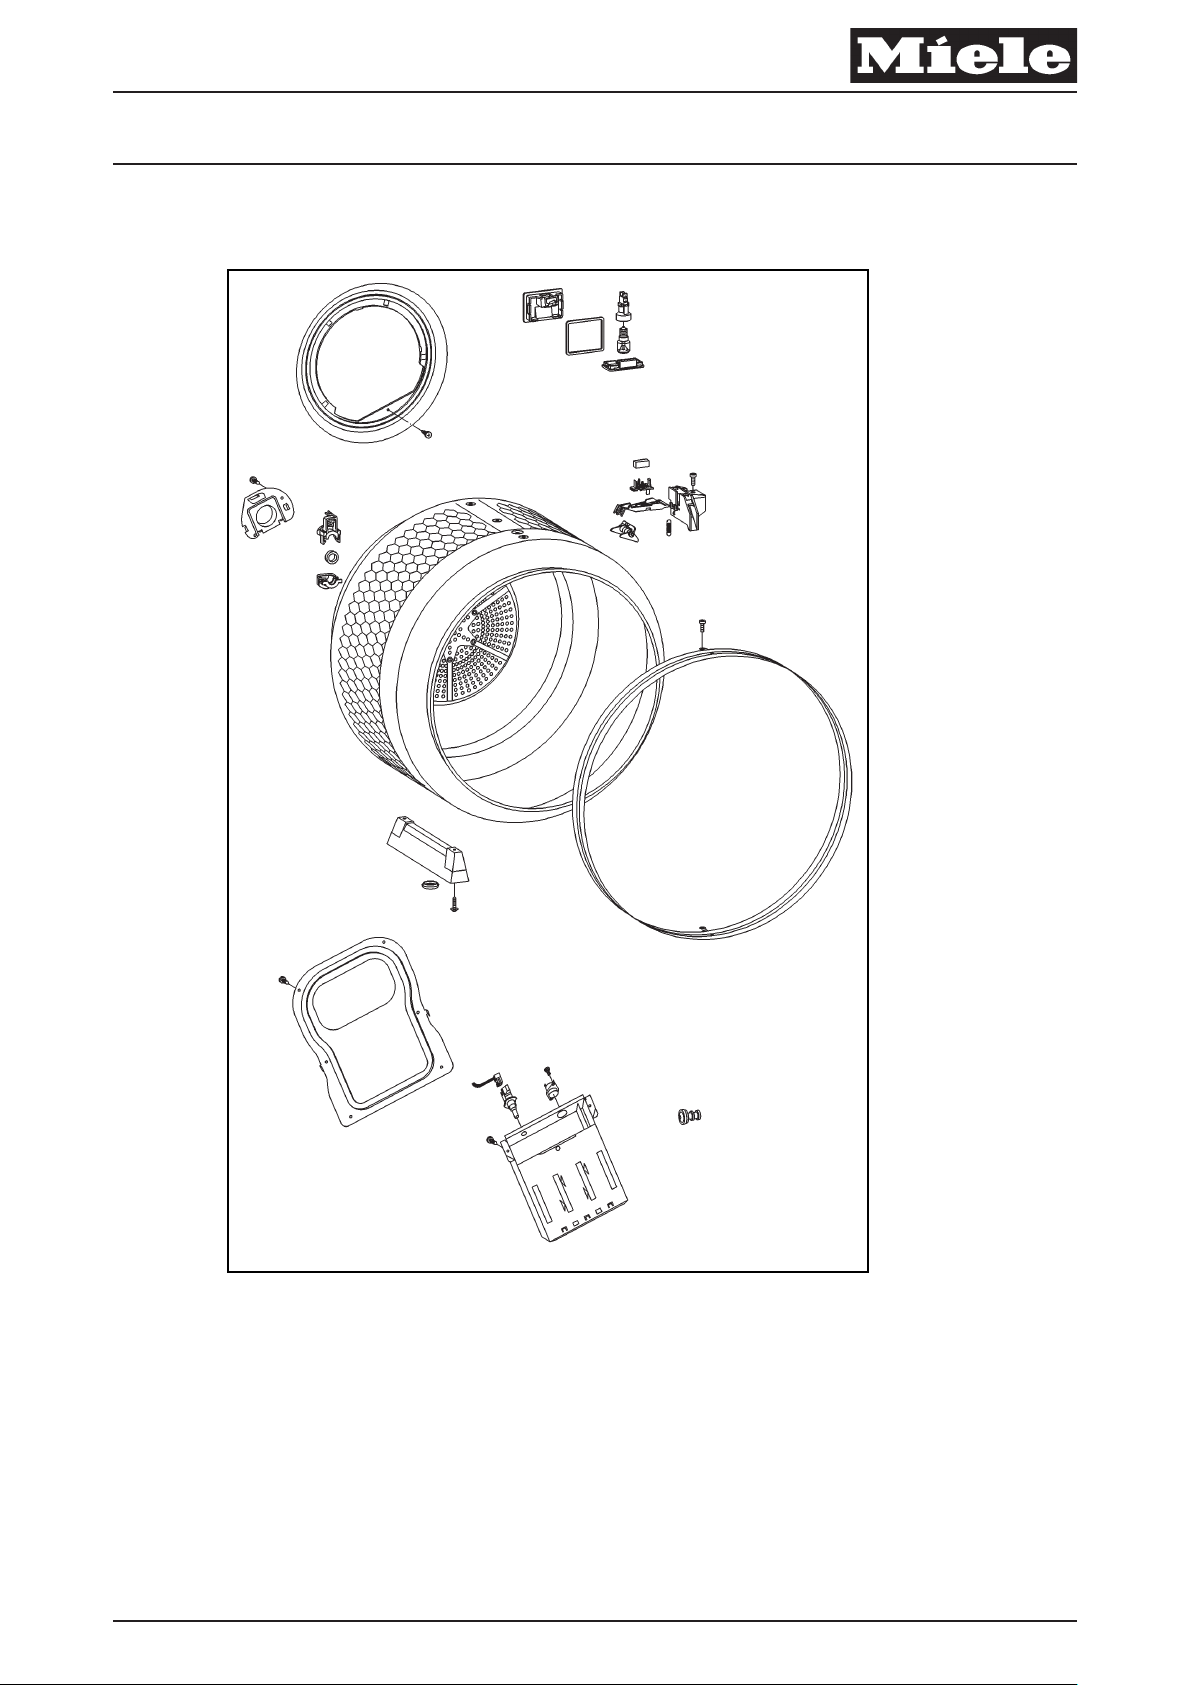
Drum, bearing,
sensors, heater
bank
Fill ring / Air guide Drying air NTC temperature sensor in fill ring, 1R30
Drive, fan Motor for air flow and drum drive (M5). Power consumption approx. 250 W
Fascia panel,
control module
Condenser box Condenser dryer
only
Condensate pump
(M13) - Condenser
dryer only
Electrical
connection German standard
models only
Drying technology Tangle prevention: Reversing cycle times via random generator
PT 7135 C PT 7136 PT 5135 C PT 5136
Condenser dryer Vented dryer Condenser dryer Vented dryer
- Filter flap / Cover - Filter flap / Cover
Door lock contact switch (A2)
Maximum load, dry laundry, 6.5 kg
Drum volume 130 l
Heater bank (R1, R2,
R3), 3-filament,
2-phase 3.45 kW
(1.94 kW + 0.71 kW,
0.8 kW)
Temperature limiter (F2),
170°C, manual reset
Drum light (H3/6). Bulb: 230 V,15 W. Activation via relay on power module.
Graphic LCD display, 240 x 64 lines, multifunction
selector
Electronic selection
module (2N1): EW 421
Fine-wire fuse (F7) 6.3 A, slow-blow
- Finger safety switch
Time- and
level- controlled
Max. drain pump head
height 1 m, max. drain
hose length 3 m
Power consumption
approx. 25 W
Connection cable length 1.6 m
Relay - Heating (K1), single armature relay, load rating 16 A, solenoid: 12 V DC, 200 Ω
Electronic powerprogramme module
(1N1), ELP 320 with
ID966
Can be updated via serial optical PC interface
Residual moisture indication: Laundry conductivity measurement process, time-left correction
Air path blockage monitoring via heater bank temperature sensor (2R30) behind perforated rear
drum panel and fill ring temperature sensor (1R30)
Heater bank (R1, R2,
R3), 3-filament,
3-phase 6.14 kW
(1.94 kW + 2.1 kW,
2.1 kW)
NTC temperature
sensor in heater bank
behind perforated rear
drum panel (2R30)
Temperature limiter
(F2), 175°C, manual
reset
Electronic selection
module (2N1): EW 421
(S32) on the fluff filter
flap
- Time- and level-
- Max. drain pump head
- Power consumption
Electronic powerprogramme module
(1N1), ELP 321 with
ID966
Heater bank (R1, R2,
R3), 3-filament,
2-phase 3.45 kW
(1.94 kW + 0.71 kW,
0.8 kW)
NTC temperature
sensor in heater bank
behind perforated rear
drum panel (2R30)
Temperature limiter
(F2), 170°C, manual
reset
Graphic LCD display, 132 x 48 lines, rotary
selector switch
Electronic selection
module (2N1): EW 391
- -
controlled
height 1 m, max. drain
hose length 3 m
approx. 25 W
Electronic powerprogramme module
(1N1), ELP 390 with
ID966
Heater bank (R1, R2,
R3), 3-filament,
3-phase 6.14 kW
(1.94 kW + 2.1 kW,
2.1 kW)
NTC temperature
sensor in heater bank
behind perforated rear
drum panel (2R30)
Temperature limiter
(F2), 175°C, manual
reset
Electronic selection
module (2N1):
EW 391
-
-
-
Electronic powerprogramme module
(1N1), ELP 391 with
ID966
Table 1: Semi-commercial tumble dryer (KG-TR), 2000 series
Page 14

Descriptive Technical Documentation
C-2 DTD no. 521-7135
This information should not be duplicated or passed on without Miele approval. All rights reserved. 14.10.2005, DE_en
Page 15
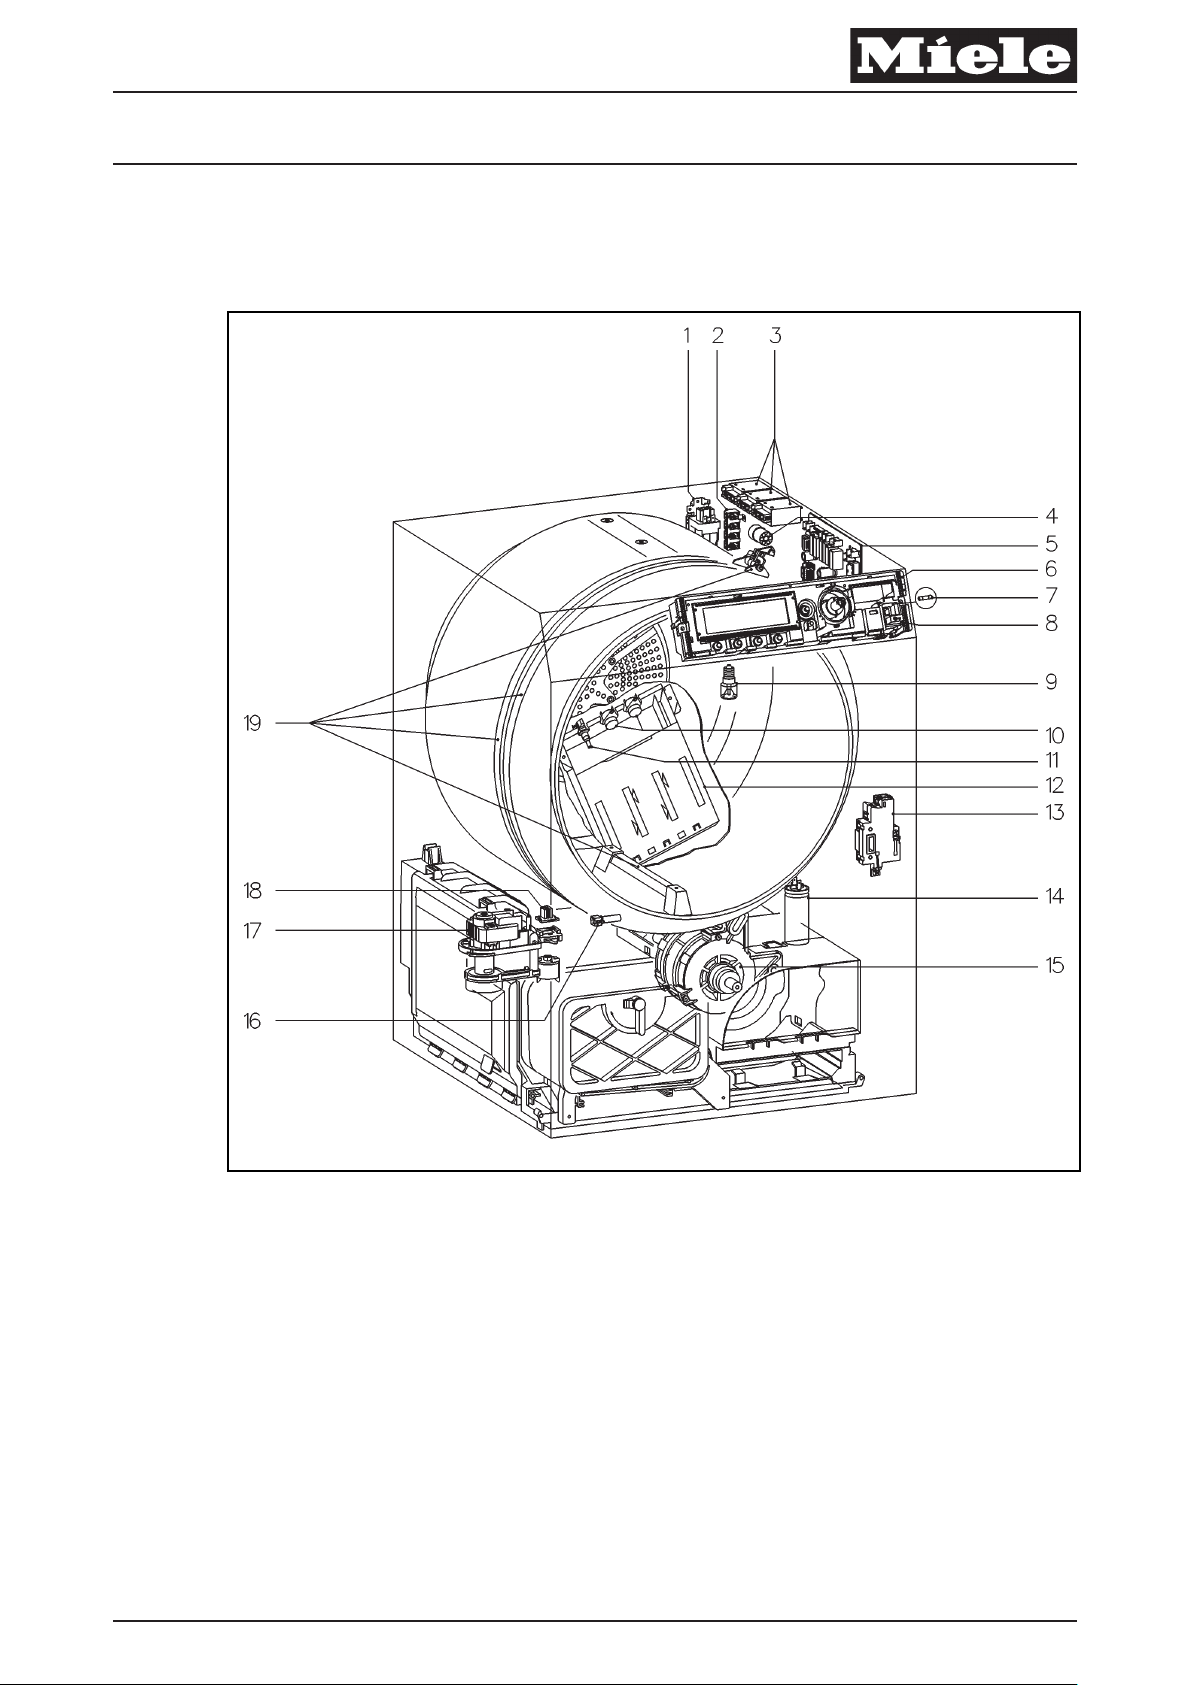
Layout 1
1 (Z1) Interference suppression capacitor
2 X3/1 Mains terminal strip
3 (1K1/1, 2K1/1, 3K1/1) Heating relay
4 (X1/1) Payment system socket
P6 Payment system – Programme unit
P8 Payment system – Time unit
5 (1N1) Power-programme module (ELP)
6 (2N1) Selection module (EW)
7 (F7) Fine-wire fuse
8 (S4) Pushbutton - Door (Bowden cable)
9 (H3/6) Light - Drum
10 (1F2, 2F2) Temperature limiter
Descriptive Technical Documentation
DTD no. 521-7135 D-1
14.10.2005, DE_en This information should not be duplicated or passed on without Miele approval. All rights reserved.
D Layout of Electrical Components
PT 7135 C
x
Page 16

Descriptive Technical Documentation
D-2 DTD no. 521-7135
This information should not be duplicated or passed on without Miele approval. All rights reserved. 14.10.2005, DE_en
11 (2R30) Drying air NTC temperature sensor - In heater bank
behind perforated rear drum panel
12 (R1, R2, R3) Heater bank
13 (A2) Door lock
14 (C5) Capacitor - Drum drive
15 (M5) Motor - Air flow and drum drive
16 (1R30) Drying air NTC temperature sensor - Fill ring
17 (M13) Motor - Condensate pump
18 (B8/7) Float switch - Condensate
19 (B3/1) Sensor - Residual moisture
Page 17
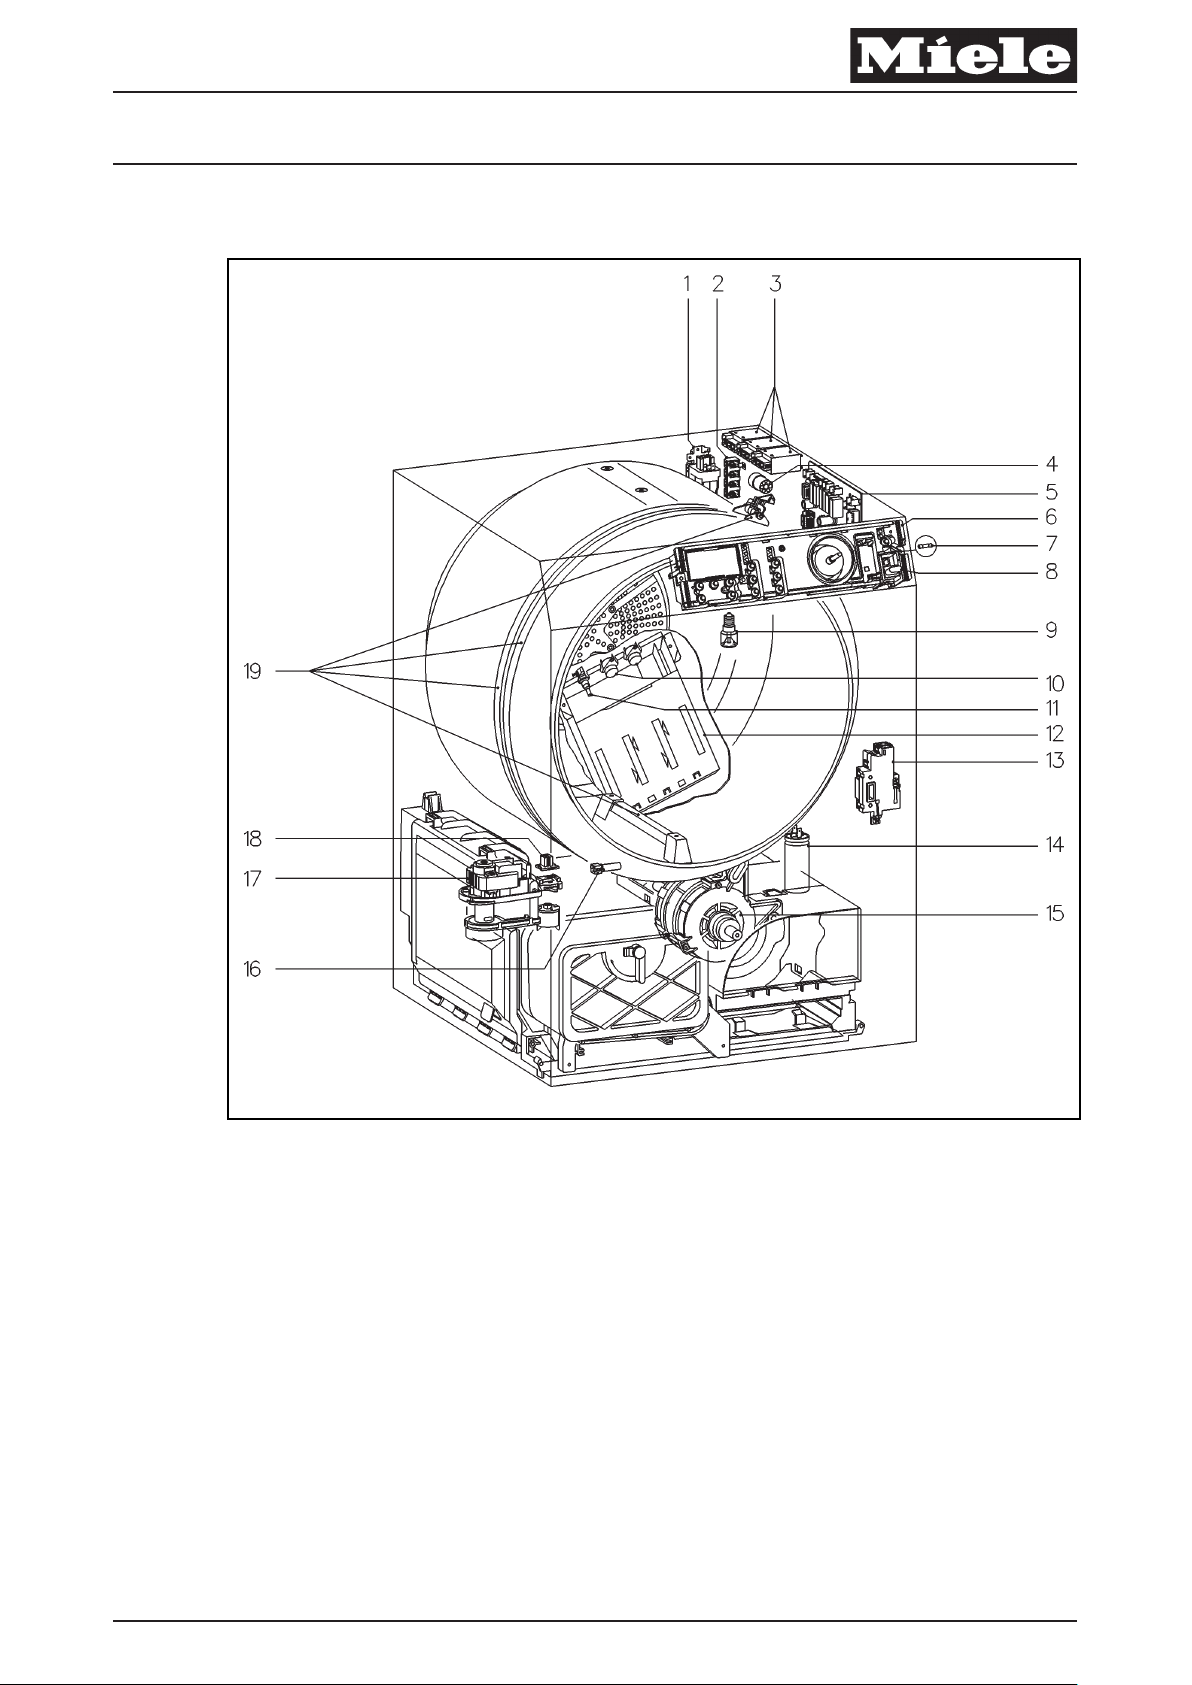
Layout 2
1 (Z1) Interference suppression capacitor
2 X3/1 Mains terminal strip
3 (1K1/1, 2K1/1, 3K1/1) Heating relay
4 (X1/1) Payment system socket
P6 Payment system – Programme unit
P8 Payment system – Time unit
5 (1N1) Power-programme module (ELP)
6 (2N1) Selection module (EW)
7 (F7) Fine-wire fuse
8 (S4) Pushbutton - Door (Bowden cable)
9 (H3/6) Light - Drum
10 (1F2, 2F2) Temperature limiter
11 (2R30) Drying air NTC temperature sensor - In heater bank
behind perforated rear drum panel
Descriptive Technical Documentation
DTD no. 521-7135 D-3
14.10.2005, DE_en This information should not be duplicated or passed on without Miele approval. All rights reserved.
PT 5135 C
x
Page 18

Descriptive Technical Documentation
D-4 DTD no. 521-7135
This information should not be duplicated or passed on without Miele approval. All rights reserved. 14.10.2005, DE_en
12 (R1, R2, R3) Heater bank
13 (A2) Door lock
14 (C5) Capacitor - Drum drive
15 (M5) Motor - Air flow and drum drive
16 (1R30) Drying air NTC temperature sensor - Fill ring
17 (M13) Motor - Condensate pump
18 (B8/7) Float switch - Condensate
19 (B3/1) Sensor - Residual moisture
Page 19

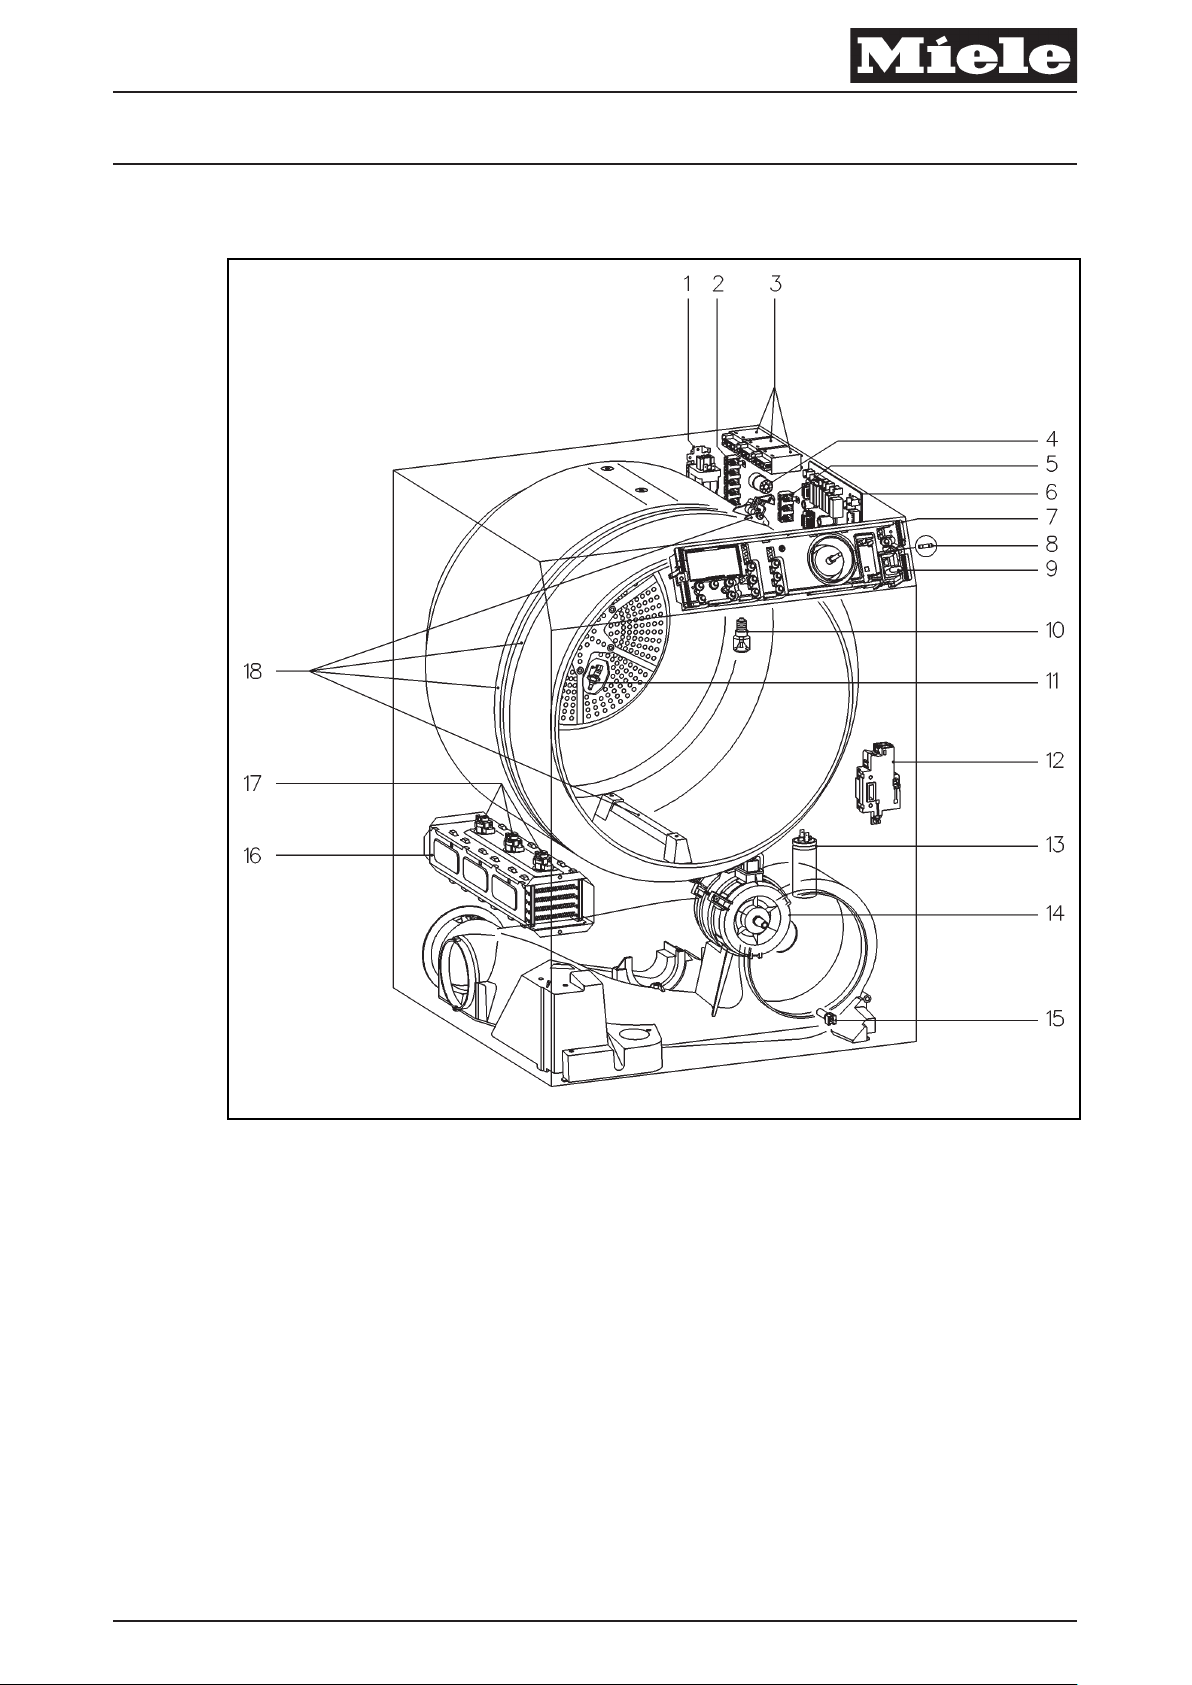
Layout 3
1 (Z1) Interference suppression capacitor
2 (X3/1) Mains terminal strip
3 (1K1/1, 2K1/1, 3K1/1) Heating relay
4 (X1/1) Payment system socket
P6 Payment system – Programme unit
P8 Payment system – Time unit
5 (M2) Fan (additional external cooling fan for Sweden)
6 (1N1) Power-programme module (ELP)
7 (2N1) Selection module (EW)
8 (F7) Fine-wire fuse
9 (S4) Pushbutton - Door (Bowden cable)
10 (H3/6) Light - Drum
11 (2R30) Drying air NTC temperature sensor - In heater bank
behind perforated rear drum panel
Descriptive Technical Documentation
DTD no. 521-7135 D-5
14.10.2005, DE_en This information should not be duplicated or passed on without Miele approval. All rights reserved.
PT 7136
x
Page 20

Descriptive Technical Documentation
D-6 DTD no. 521-7135
This information should not be duplicated or passed on without Miele approval. All rights reserved. 14.10.2005, DE_en
12 (A2) Door lock
13 (C5) Capacitor - Drum drive
14 (M5) Motor - Air flow and drum drive
15 (S32) Safety switch - Finger protection
16 (1R30) Drying air NTC temperature sensor - Fill ring
17 (R1, R2, R3) Heater bank
18 (1F2, 2F2, 3F2) Temperature limiter (vented operation)
19 (B3/1) Sensor - Residual moisture
Page 21
Layout 4
1 (Z1) Interference suppression capacitor
2 (X3/1) Mains terminal strip
3 (1K1/1, 2K1/1, 3K1/1) Heating relay
4 (X1/1) Payment system socket
P6 Payment system – Programme unit
P8 Payment system – Time unit
5 (M2) Fan (additional external cooling fan for Sweden)
6 (1N1) Power-programme module (ELP)
7 (2N1) Selection module (EW)
8 (F7) Fine-wire fuse
9 (S4) Pushbutton - Door (Bowden cable)
10 (H3/6) Light - Drum
11 (2R30) Drying air NTC temperature sensor - In heater bank
behind perforated rear drum panel
Descriptive Technical Documentation
DTD no. 521-7135 D-7
14.10.2005, DE_en This information should not be duplicated or passed on without Miele approval. All rights reserved.
PT 5136
x
Page 22

Descriptive Technical Documentation
D-8 DTD no. 521-7135
This information should not be duplicated or passed on without Miele approval. All rights reserved. 14.10.2005, DE_en
12 (A2) Door lock
13 (C5) Capacitor - Drum drive
14 (M5) Motor - Air flow and drum drive
15 (1R30) Drying air NTC temperature sensor - Fill ring
16 (R1, R2, R3) Heater bank
17 (1F2, 2F2, 3F2) Temperature limiter
18 (B3/1) Sensor - Residual moisture
Page 23
Descriptive Technical Documentation
DTD no. 521-7135 020-1
14.10.2005, DE_en This information should not be duplicated or passed on without Miele approval. All rights reserved.
020 Door
x
Page 24

Descriptive Technical Documentation
020-2 DTD no. 521-7135
This information should not be duplicated or passed on without Miele approval. All rights reserved. 14.10.2005, DE_en
2 Function
2.1 Door lock (A2)
Door release via Bowden cable.
An open door is registered via a microswitch in the door lock.
Microswitch in door lock (A2): Drum door open = Contact open.
Page 25
Descriptive Technical Documentation
DTD no. 521-7135 030-1
14.10.2005, DE_en This information should not be duplicated or passed on without Miele approval. All rights reserved.
030 Drum, bearing, sensors, heater bank
x
Page 26
Descriptive Technical Documentation
030-2 DTD no. 521-7135
This information should not be duplicated or passed on without Miele approval. All rights reserved. 14.10.2005, DE_en
1 Technical Data
Heater bank (R1, R2, R3) Condenser dryer Vented dryer
Heater rating with 230 V
connection
Table 1: Heater bank (R1, R2, R3)
Temperature (°C) Resistance (kΩ)
0 340
5 261
10 203
15 159
20 126
25 100
30 80.2
35 64.8
40 52.7
45 43.1
50 35.5
55 29.4
3-filament, 2-phase 3-filament, 3-phase
1.94 kW + 0.71 kW + 0.8 kW =
3.45 kW
1.94 kW + 2.1 kW + 2.1 =
6.14 kW
60 24.5
65 20.5
70 17.3
75 14.6
80 12.5
85 10.6
90 9.13
93 8.34
95 7.86
100 6.80
110 5.14
120 3.95
130 3.07
140 2.41
150 1.92
160 1.55
170 1.26
180 1.03
Page 27
Descriptive Technical Documentation
DTD no. 521-7135 030-3
14.10.2005, DE_en This information should not be duplicated or passed on without Miele approval. All rights reserved.
Temperature (°C) Resistance (kΩ)
190 0.852
200 0.710
Table 2: NTC temperature sensor - Heater bank (2R30) - Resistance values
Temperature (°C) Resistance (kΩ)
0 38.0
5 29.7
10 23.4
15 18.6
20 14.9
25 12.0
30 9.73
35 7.96
40 6.55
45 5.42
50 4.52
55 3.78
60 3.19
65 2.70
70 2.29
75 1.96
80 1.68
85 1.45
90 1.25
93 1.15
95 1.09
100 1.06
110 0.73
120 0.569
130 0.449
140 0.358
150 0.289
Table 3: NTC temperature sensor - Fill ring (1R30) - Resistance values
Page 28

Descriptive Technical Documentation
030-4 DTD no. 521-7135
This information should not be duplicated or passed on without Miele approval. All rights reserved. 14.10.2005, DE_en
2 Function
2.1 Heating control (R1, R2, R3)
Safety features:
If the fill ring temperature sensor (1R30) is defective, the heating is not activated.
The heating is switched off as soon as the heating relay is switched on for more
than 5 s without the fan relay being activated.
The heating has a reswitch-on delay of 10 s and is switched off before, during and
after a reversing pause.
2.2 Temperature limiter (F2)
Vented dryer:
Three 3/4 inch temperature limiters, 175°C, with manual reset via pushbutton,
located in the heater channel next to the heater bank.
Condenser dryer:
Two closed 3/4 inch temperature limiters, 170°C, with manual reset via
pushbutton, located on the heater bank.
2.3 NTC temperature sensor - Fill ring (1R30)
If the fill ring temperature sensor registers a drying air temperature less than 15°C or greater than 160°C, it is assumed to be defective.
2.4 NTC temperature sensor - Heater bank (2R30)
An open circuit at the heater bank temperature sensor (2R30) can only be
registered with a temperature greater than 14°C. As during operation lower
temperatures can exist, the sensor is only checked when the heating has
operated for at least 1 min.
If a short circuit exists at the heater bank temperature sensor (2R30), this is
equivalent to a temperature of 250°C and the heating is immediately switched off.
Page 29

Descriptive Technical Documentation
DTD no. 521-7135 030-5
14.10.2005, DE_en This information should not be duplicated or passed on without Miele approval. All rights reserved.
2.5 Light - Drum (H3/6)
Lighting is time-controlled. It is switched on approx.1 s after the door is opened.
Switch of f delay: 5 min.
When the door is closed, the lighting is always switched off.
Page 30

Descriptive Technical Documentation
030-6 DTD no. 521-7135
This information should not be duplicated or passed on without Miele approval. All rights reserved. 14.10.2005, DE_en
Page 31

Descriptive Technical Documentation
DTD no. 521-7135 040-1
14.10.2005, DE_en This information should not be duplicated or passed on without Miele approval. All rights reserved.
040 Drive
x
Page 32

Descriptive Technical Documentation
040-2 DTD no. 521-7135
This information should not be duplicated or passed on without Miele approval. All rights reserved. 14.10.2005, DE_en
1 Technical Data
Cooling fan flow rate Condenser dryer Vented dryer
Cooling air 300 m
Drying air 120 m
Table 1
3
/ h –
3
/ h 300 m3/ h. With 20 m vent duct
> 200 m
3
/ h
Page 33

Descriptive Technical Documentation
DTD no. 521-7135 040-3
14.10.2005, DE_en This information should not be duplicated or passed on without Miele approval. All rights reserved.
2 Function
2.1 Motor - Air flow and drum drive (M5)
PT 7135 C, PT 5135 C
The motor drives the drum, drying air fan and cooling air fan at the same time.
2.2 Motor - Air flow and drum drive (M5)
PT 7136, PT 5136
The motor drives the drum and drying air fan at the same time.
Page 34

Descriptive Technical Documentation
040-4 DTD no. 521-7135
This information should not be duplicated or passed on without Miele approval. All rights reserved. 14.10.2005, DE_en
Page 35

Descriptive Technical Documentation
DTD no. 521-7135 070-1
14.10.2005, DE_en This information should not be duplicated or passed on without Miele approval. All rights reserved.
070 Condensate pump (M5)
PT 7135 C, PT 5135 C
x
Page 36

Descriptive Technical Documentation
070-2 DTD no. 521-7135
This information should not be duplicated or passed on without Miele approval. All rights reserved. 14.10.2005, DE_en
2 Function
2.1 Level sensing - Float switch - Condensate (B8/7)
Level sensing is via a reed switch.
Page 37

Descriptive Technical Documentation
DTD no. 521-7135 080-1
14.10.2005, DE_en This information should not be duplicated or passed on without Miele approval. All rights reserved.
080 Fascia panel
x
Page 38

Descriptive Technical Documentation
080-2 DTD no. 521-7135
This information should not be duplicated or passed on without Miele approval. All rights reserved. 14.10.2005, DE_en
1 Technical Data
PT 7135 C
and PT 7136
Extra dry
Normal + - 2% 0% -2%
Normal 0% 2% 0% 2% 0% 2% 0%
Hand iron r 8% 8% 8% 8% 8% 8%
Hand iron rr 12%
Machine iron 20%
Table 1: Standard residual moisture levels
PT 5135 C
and
PT 5136
Extra dry
Normal + - 2% 0% - 2% - 2%
Normal 0% 2% 0% 2% 0% 0% 0%
Hand iron r 8% 8% 8% 8% 8% 8%
Machine
iron
Table 2: Standard residual moisture levels
Cottons Minimum
iron
Cottons Minimum
iron
20%
Automatic Outerwea Shirts Denim Proofing
Automatic Outer wear Shirts Denim Proofing Towelling
Residual moisture level adjustment programmable function, see 080 2.6 Residual
moisture level adjustment programmable function.
Page 39

Descriptive Technical Documentation
DTD no. 521-7135 080-3
14.10.2005, DE_en This information should not be duplicated or passed on without Miele approval. All rights reserved.
2 Function
2.1 Overriding time control
After programme start, an overriding time control of approx. 180 min applies to all
residual moisture drying programmes.
After this time has expired, the dr ying programme is cancelled and the cooling
stage for faults is activated. The anti-crease action phase is cancelled.
The fault is saved and can be called up in the service mode.
2.2 No-load recognition
No-load recognition and registration of very dry laundry can only take place with
residual moisture drying programmes.
The programme is cancelled, a cooling phase is started and the buzzer sounds
intermittently.
2.3 Insufficient air flow measurement
During warming up, the temperature increase at the heater bank temperature
sensor (2R30) is monitored.
If the air path is blocked, this temperature increases rapidly and a fault is
registered. The fault indication Insufficient air/Leakage is displayed.
2.4 Time of day programmable function
This is used to set the time of day display.
Page 40

Descriptive Technical Documentation
080-4 DTD no. 521-7135
This information should not be duplicated or passed on without Miele approval. All rights reserved. 14.10.2005, DE_en
2.5 Extended cooling phase programmable function
An extended cooling phase means that the laundry temperature is lower at the
end of the programme.
A lower laundry temperature reduces the perception of dampness in the load.
Extended cooling has no effect with timed programmes.
2.6 Residual moisture level adjustment programmable function
The standard residual moisture levels can be modified to make them dryer or
damper.
PT 7135 C and PT 7136: Standard residual moisture levels, see 080 Table 1.
PT 5135 C and PT 5136: Standard residual moisture levels, see 080 Table 2.
x
Display bar 1 2 3 4 5 6 7
Residual
moisture
adjustment
Damper 3 Damper 2 Damper 1 Normal Dryer 1 Dryer 2 Dryer 3
Table 3: Residual moisture level adjustment - Cottons
Display bars 1 2 3 4 5 6 7
Residual
moisture
adjustment
Table 4: Residual moisture level adjustment - Minimum iron
Display bars 1 2 3 4 5 6 7 8 9 10 11
Residual
moisture adjustment
Table 5: Residual moisture level adjustment - Cottons, machine iron
Damper 3 Damper 2 Damper 1 Normal Dryer 1 Dryer 2 Dryer 3
26% 25% 24% 23% 22% 21% 20% 19% 18% 17% 16%
Damper Normal Dryer
Page 41

Descriptive Technical Documentation
DTD no. 521-7135 080-5
14.10.2005, DE_en This information should not be duplicated or passed on without Miele approval. All rights reserved.
2.7 Clean the airways warning modification programmable function
This function can be used to modify the circumstances under which the Clean the
airways warning is displayed to suit individual requirements, see the operating
instructions or programming mode.
PT 7135 C and PT 7136: Service Dept. programming mode, see Programming
mode summary, 080 4.1.
PT 7136 vented dryer: The warning is reset via the finger protection safety switch
(S32) after opening the fluff filter flap.
PT 5135 C and PT 5136: Service Dept. programming mode, see Programming
mode summary, 080 4.2.
2.8 Automatic programmable function
PT 7135 C, PT 7136, PT 5135 C, PT 5136
This function can be used to add the Automatic programme to the programme
list.
2.9 Clean filters programmable function
PT 7136
When drying laundry which develops high levels of fluff, frequent cleaning of the
large surface area filter is necessary.
With a vented dryer this warning is shown at intervals and indicates that the filters
must be cleaned regularly.
This function can be used to modify the circumstances under which the Clean
filters warning is displayed to suit individual requirements, see the operating
instructions or programming mode.
Service Dept. programming mode, see Programming mode summary, 080 4.1.
Page 42

Descriptive Technical Documentation
080-6 DTD no. 521-7135
This information should not be duplicated or passed on without Miele approval. All rights reserved. 14.10.2005, DE_en
2.10 Clean heat exchanger programmable function
PT 7135 C, PT 5135 C
With a condenser dryer this warning is shown at intervals and indicates that the
heat exchanger must be cleaned regularly.
This function can be used to modify the circumstances under which the Clean
heat exchanger warning is displayed to suit individual requirements, see the
operating instructions or programming mode.
PT 7135 C: Service Dept. programming mode, see Programming mode summary,
080 4.1.
PT 5135 C: Service Dept. programming mode, see Programming mode summary,
080 4.2.
2.11 Residual moisture level display programmable function
PT 7135 C, PT 7136
This function can be used to programme the machine to display the current
residual moisture level of the load being dried in percent.
2.12 Cool air free programmable function, with payment system
operation
With payment system operation, this function can be set to provide the Cool air
programme at no charge.
The Cool air free programmable function is only available with payment system
operation.
Page 43

Descriptive Technical Documentation
DTD no. 521-7135 080-7
14.10.2005, DE_en This information should not be duplicated or passed on without Miele approval. All rights reserved.
2.13 Payment system programmable function
This is used to set the type of payment system. The appropriate operating
procedure is shown in the display.
For payment system details, see 090 2.3 Payment system.
PT 7135 C and PT 7136 only: For central control via RS 232 interface,
see 090 2.4 Central control via RS 232 interface with 9-pole plug
2.14 Operator code programmable function
With installation in a launderette, the domestic operation programmable functions
can be blocked.
Option code not required (domestic use):
Domestic programmable functions are freely available.
Supervisor programmable functions are not accessible.
Option code required (supervisor):
Access to domestic and supervisor programmable functions via code entry.
The code is freely selectable. If the code is no longer known to the supervisor,
then it can be reset to 000 by resetting all programmable functions to the standard
settings.
2.15 Signal to payment system socket (X1/1) pin 7 programmable
function
In order to reset an external payment system at the end of a programme, the
machine provides a mains voltage signal for 5 s applied to the payment system
connection socket (X1/1), pin 7 (payment system contact).
Page 44

Descriptive Technical Documentation
080-8 DTD no. 521-7135
This information should not be duplicated or passed on without Miele approval. All rights reserved. 14.10.2005, DE_en
2.16 Overriding time control modification programmable function with
payment system operation
To reduce the possibility of unauthorised manipulation with payment system
operation, the overriding time can be reduced.
For overriding time control details, see 080 2.1 Overriding time control.
2.17 Programme lock programmable function with payment system
operation
To reduce the possibility of unauthorised manipulation with payment system
operation, the programme lock feature can be activated.
Depending on the set options, the programme will be locked immediately the
programme is started or after a certain period.
If the door is opened when the programme is locked, the programme will be
cancelled and the payment already made will be lost.
To ensure that laundry can still be added, the programme lock can be set to
become active after a certain time has elapsed.
2.18 Cool air timed programme maximum duration setting
programmable function
This is used to set the maximum duration of the Cool air timed programme.
PT 7135 C and PT 7136: The programme duration can be reduced via the
multifunction selector switch but cannot be increased again.
PT 5135 C and PT 5136: The programme duration can be reduced via the + / buttons, but cannot be increased again.
Page 45

Descriptive Technical Documentation
DTD no. 521-7135 080-9
14.10.2005, DE_en This information should not be duplicated or passed on without Miele approval. All rights reserved.
2.19 Warm air timed programme maximum duration setting
programmable function
This is used to set the maximum duration of the Warm air timed programme.
PT 7135 C and PT 7136: The programme duration can be reduced via the
multifunction selector switch but cannot be increased again.
PT 5135 C and PT 5136: The programme duration can be reduced via the + / buttons, but cannot be increased again.
2.20 Delay start programmable function
This is used to activate the delay start feature.
If the delay start feature is deactivated, the display shows the time of day in the
style that has been set with the time of day programmable function.
2.21 Language programmable function
PT 7135 C, PT 7136
International:
Multilingual start screen, e.g. for multilingual countries and camp sites.
The desired language is selected before the basic programme menu and is
applicable for only one programme.
The Sort language programmable function is available to select and sort four
favourite languages for international installations.
2.22 Standard settings programmable function
To reset all programmable functions to standard settings.
The code no. for accessing the supervisor level will be reset to 000.
Page 46

Descriptive Technical Documentation
080-10 DTD no. 521-7135
This information should not be duplicated or passed on without Miele approval. All rights reserved. 14.10.2005, DE_en
3 Fault Repair
3.1 Warning indication: Clean filter
PT 7136
Cause
This warning is given at certain intervals as a reminder that the filters must be
cleaned.
Remedy
x
Note
Clean the fluff filters regularly, see the operating instructions.
A Clean both parts of the large surface area filter behind the service panel and
the filters in the door opening.
Cause
Clean filter warning shown too soon/late.
Remedy
A The circumstances under which the Clean filters warning is displayed can be
modified to suit individual requirements, see the operating instructions or
programming mode.
A Service Dept. programming mode, see Programming mode summary,
080 4.1.
Page 47

Descriptive Technical Documentation
DTD no. 521-7135 080-11
14.10.2005, DE_en This information should not be duplicated or passed on without Miele approval. All rights reserved.
3.2 Warning indication: Clean heat exchanger
PT 7135 C, PT 5135 C
Cause
With a condenser dryer this warning is shown at intervals and indicates that the
heat exchanger must be cleaned regularly.
Remedy
x
Note
Clean the heat exchanger regularly, see the operating instructions.
A Clean the heat exchanger.
Cause
Clean heat exchanger warning shown too soon/late.
Remedy
A The circumstances under which the Clean heat exchanger warning is
displayed can be modified to suit individual requirements, see the operating
instructions or programming mode.
A PT 7135 C: Service Dept. programming mode, see Programming mode
summary, 080 4.1.
A PT 5135 C: Service Dept. programming mode, see Programming mode
summary, 080 4.2.
Page 48

Descriptive Technical Documentation
080-12 DTD no. 521-7135
This information should not be duplicated or passed on without Miele approval. All rights reserved. 14.10.2005, DE_en
3.3 Warning indication: Adjust the load – The drum is empty or the
laundry too dry
Symptom
This warning can only be displayed with residual moisture drying programmes
(i.e. not timed drying).
The programme is cancelled, a cooling phase is started and the buzzer sounds
intermittently.
This warning is cancelled when the door is opened.
Cause
The drum is empty or loaded with a few small items only.
The residual moisture sensing circuit has high resistance and the sensing system
registers no load (no load recognition). This is not a technical fault.
Remedy
A Modify the load or select a timed drying programme.
Cause
Residual moisture sensor (B3/1) defective.
Residual moisture sensor check
A PT 7135 C and PT 7136: Check the residual moisture sensor circuit for low
resistance (continuity), see the service mode Service mode summar y, 080
4.5.
A PT 5135 C and PT 5136: Check the residual moisture sensor circuit for low
resistance (continuity), see the service mode Service mode summar y,
080 4.6.
A No load recognition, see 080 2.2 No-load recognition.
Page 49

Descriptive Technical Documentation
DTD no. 521-7135 080-13
14.10.2005, DE_en This information should not be duplicated or passed on without Miele approval. All rights reserved.
3.4 Demonstration mode active
Symptom
A programme start is not possible and the programming and service modes
cannot be accessed.
Cause
The demonstration mode is active.
Remedy
A PT 7135 C and PT 7136: Demonstration mode deactivation, see
Demonstration mode activation / deactivation, 080 4.3.
A PT 5135 C and PT 5136: Demonstration mode deactivation, see
Demonstration mode activation / deactivation, 080 4.4.
3.5 Fault indication: Drain fault – Check the drain path
Symptom
Applicable to condenser dryer only.
The programme is cancelled, a cooling phase is started and the buzzer sounds
intermittently.
This warning is cancelled when the door is opened.
Cause
Float switch - Condensate (B8/7) in the condensate pump housing is defective
(short-circuited).
Remedy
A Check the float switch - Condensate (B8/7). Exchange it if necessary.
A PT 7135 C and PT 7136: Service mode, see Service mode summary, 080 4.5.
A PT 5135 C and PT 5136: Service mode, see Service mode summary, 080 4.6.
Cause
Condensate pump (M13) defective.
Page 50

Descriptive Technical Documentation
080-14 DTD no. 521-7135
This information should not be duplicated or passed on without Miele approval. All rights reserved. 14.10.2005, DE_en
Remedy
A Check the condensate pump (M13). Exchange it if necessary.
A PT 7135 C and PT 7136: Service mode, see Service mode summary, 080 4.5.
A PT 5135 C and PT 5136: Service mode, see Service mode summary, 080 4.6.
Cause
The condensate drainage path is blocked.
Remedy
A Check the drainage path for blockages. Repair as necessary.
3.6 Fault indication: Clean the airways
Symptom
The programme continues normally or is interrupted.
The fault is indicated at the end of the cooling down phase.
The fault is saved in the fault memory, see Fault code F66, air leakage fault, 080
3.19.
PT 7135 C and PT 7136: This warning is cancelled when the door is opened.
Cause
Air paths are clogged.
Insufficient air flow registered, see 080 2.3 Insufficient air flow measurement.
Remedy
x
Note
Check and clean the filters regularly, see the operating instructions.
A Clean the fluff filters in the door cap and door fill ring.
A Condenser dryer: Remove the heat exchanger and clean it.
A Check and clean the air paths.
Page 51

Descriptive Technical Documentation
DTD no. 521-7135 080-15
14.10.2005, DE_en This information should not be duplicated or passed on without Miele approval. All rights reserved.
Cause
Clean the airways warning shown too early/late.
Remedy
A The point at which the Clean the airways warning is shown can be adjusted
to suit the needs of the operator, see the operating instructions or
programming mode.
A PT 7135 C and PT 7136: For Service Dept. programming mode see
Programming mode summary, 080 4.1.
A PT 5135 C and PT 5136: For Service Dept. programming mode see
Programming mode summary, 080 4.2.
3.7 Fault indication: Technical fault
Symptom
In normal operation mode the display shows Technical fault.
Programme interruption, cooling down phase, intermittent buzzer operation.
This fault indication is deleted by pressing the multifunction selector switch.
Cause
The power-programme module (ELP) or selection module (EW) has registered a
fault.
The power-programme module (ELP) interrupts the programme.
The displayed fault is the reason for the programme interruption.
Remedy
A PT 7135 C and PT 7136: For fault memory check, see the Service mode,
Service mode summary, 080 4.5.
A PT 5135 C and PT 5136: For fault memory check, see the Service mode,
Service mode summary, 080 4.6.
A Check the Mat. nos. to verify that the correct selection module (EW) and
power-programme module (ELP) are fitted.
A Check the electrical connection between the power-programme module (ELP)
and selection module (EW).
Page 52

Descriptive Technical Documentation
080-16 DTD no. 521-7135
This information should not be duplicated or passed on without Miele approval. All rights reserved. 14.10.2005, DE_en
3.8 Fault code F1, heater bank NTC sensor short-circuited
Symptom
In normal operation mode the display shows Technical fault.
Programme interruption, cooling down phase, intermittent buzzer operation.
Only the Cool air timed programme can be operated.
This fault indication is deleted by pressing the multifunction selector switch.
Cause
Heater bank temperature sensor (2R30) short-circuited (> 250°C).
Remedy
A Check the heater bank temperature sensor (2R30), its leads and its plug
connections for short or open circuit.
A Check the heater bank temperature sensor (2R30) for correct performance,
see 030 Table 2.
3.9 Fault code F2, heater bank NTC sensor open-circuited
Symptom
In normal operation mode the display shows Technical fault.
Programme interruption, cooling down phase, intermittent buzzer operation.
Only the Cool air timed programme can be operated.
This fault indication is deleted by pressing the multifunction selector switch.
Cause
Heater bank temperature sensor (2R30) open-circuited (< 20°C). Only registered
after the heating has been switched on for at least 1 min.
Remedy
A Check the heater bank temperature sensor (2R30), its leads and its plug
connections for short or open circuit.
A Check the heater bank temperature sensor (2R30) for correct performance,
see 030 Table 2.
Page 53

Descriptive Technical Documentation
DTD no. 521-7135 080-17
14.10.2005, DE_en This information should not be duplicated or passed on without Miele approval. All rights reserved.
Cause
Heater bank not heating.
Remedy
A Check the heater bank (R) for short or open circuit.
Cause
Heating relay (K1).
Remedy
A Check the heating relay (K1).
Cause
Temperature limiter (F2).
Remedy
A Check the temperature limiter F2 for continuity.
3.10 Fault code F3, fill ring NTC sensor short-circuited
Symptom
In normal operation mode the display shows Technical fault.
Programme interruption, cooling down phase, intermittent buzzer operation.
Only the Cool air timed programme can be operated.
This fault indication is deleted by pressing the multifunction selector switch.
Cause
Fill ring temperature sensor (1R30) short-circuited (> 160°C).
Remedy
A Check the fill ring temperature sensor (1R30), its leads and its plug
connections for short or open circuit.
A Check the fill ring temperature sensor (1R30) for correct performance, see
030 Table 3.
Page 54

Descriptive Technical Documentation
080-18 DTD no. 521-7135
This information should not be duplicated or passed on without Miele approval. All rights reserved. 14.10.2005, DE_en
3.11 Fault code F4, fill ring NTC sensor open-circuited
Symptom
In normal operation mode the display shows Technical fault.
Programme interruption, cooling down phase, intermittent buzzer operation.
Only the Cool air timed programme can be operated.
This fault indication is deleted by pressing the multifunction selector switch.
Cause
Fill ring temperature sensor (1R30) open-circuited (< 15°C).
Remedy
A Check the fill ring temperature sensor (1R30), its leads and its plug
connections for short or open circuit.
A Check the fill ring temperature sensor (1R30) for correct performance, see
030 Table 3.
3.12 Fault code F41, faulty EEPROM / data fault
Symptom
The programme operates with default values.
In normal operation mode the display shows Technical fault.
Programme interruption, cooling down phase, intermittent buzzer operation.
This warning is cancelled when the door is opened.
Cause
Faulty EEPROM / data fault.
Remedy
A If there is no functional fault, a remedy is not required.
A Otherwise exchange the power-programme module (1N1, ELP).
Page 55

Descriptive Technical Documentation
DTD no. 521-7135 080-19
14.10.2005, DE_en This information should not be duplicated or passed on without Miele approval. All rights reserved.
3.13 Fault code F43, model type not programmed
Cause
In normal operation mode this fault is not indicated via the display.
The selection module (EW) and power-programme module (ELP) do not match.
Remedy
A Check the Mat. nos. to verify that the correct selection module (EW) and
power-programme module (ELP) are fitted.
3.14 Fault code F45, faulty flash RAM/ data fault
Symptom
In normal operation mode the display shows Technical fault.
Programme interruption, cooling down phase, intermittent buzzer operation.
Cause
Faulty flash RAM/ data fault.
Remedy
A Check the Mat. nos. to verify that the correct selection module (EW) and
power-programme module (ELP) are fitted.
A Reset all programmable functions to standard settings. Then modify the
desired programmable functions.
A Exchange the power-programme module (ELP).
Page 56

Descriptive Technical Documentation
080-20 DTD no. 521-7135
This information should not be duplicated or passed on without Miele approval. All rights reserved. 14.10.2005, DE_en
3.15 Fault code F46, display fault
Symptom
Programme interruption, cooling down phase, intermittent buzzer operation.
Cause
Internal display fault on selection module (EW). Display driver for LCD module
defective.
Remedy
A Exchange the selection module (EW).
3.16 Fault code F47, communication fault between selection module
(EW) and power-programme module (ELP)
Symptom
In normal operation mode the display shows Technical fault.
Programme interruption, cooling down phase, intermittent buzzer operation.
With operation with a payment system, the programme end signal is provided at
the payment system socket (X1/1) pin 7.
Cause
Selection module (EW) - Power-programme module (ELP) interface fault.
Remedy
A Check the electrical connection between the selection module (EW) and
power-programme module (ELP).
Page 57

Descriptive Technical Documentation
DTD no. 521-7135 080-21
14.10.2005, DE_en This information should not be duplicated or passed on without Miele approval. All rights reserved.
3.17 Fault code F50, motor stationary and heating operates for 5 s
Symptom
The motor for air flow and drum drive (M5) is stationary.
This fault occurs in normal operating mode and the following occurs: Programme
interruption, cooling down phase, intermittent buzzer operation for 2 min.
This warning is cancelled when the door is opened.
Cause
The heating has operated for longer than 5 s with the motor stationary. This is a
power-programme module (ELP) fault.
Remedy
A Check the motor (M5).
A Exchange the power-programme module (ELP).
3.18 Fault code F55, overriding time limit exceeded (approx. 180 min)
Symptom
Only applicable to residual moisture programmes.
This fault occurs in normal operating mode and the following occurs: Programme
interruption, cooling down phase, intermittent buzzer operation for 2 min.
This warning is cancelled when the door is opened.
For the overriding time limit, see 080 2.1 Overriding time control.
Cause
Laundry too wet or dryer overloaded.
Remedy
A Spin the laundry more or reduce the quantity.
Cause
Electrically conductive item in load (e.g. zip).
Remedy
A Select a hot air drying programme.
Page 58

Descriptive Technical Documentation
080-22 DTD no. 521-7135
This information should not be duplicated or passed on without Miele approval. All rights reserved. 14.10.2005, DE_en
Cause
Air path clogged.
Remedy
A Check and clean the air paths.
Cause
Heater bank not heating.
Remedy
A Check the heater bank (R1) for short or open circuit.
Cause
Heating relay (K1/1).
Remedy
A Check the heating relay (K1/1).
Cause
Temperature limiter (F2).
Remedy
A Check the temperature limiter (F2) for continuity.
Cause
Residual moisture sensor (B3/1) defective.
Residual moisture sensor check
A PT 7135 C and PT 7136: Check the residual moisture sensor for high
resistance, see service mode Service mode summary, 080 4.5.
A PT 5135 C and PT 5136: Check the residual moisture sensor for high
resistance, see service mode Service mode summary, 080 4.6.
Page 59

Descriptive Technical Documentation
DTD no. 521-7135 080-23
14.10.2005, DE_en This information should not be duplicated or passed on without Miele approval. All rights reserved.
3.19 Fault code F66, air leakage fault
Symptom
In normal operation mode the display shows Clean the airways.
Cause
Air path clogged.
Insufficient air flow registered, see 080 2.3 Insufficient air flow measurement.
Remedy
A Check and clean the air paths.
Page 60

Descriptive Technical Documentation
080-24 DTD no. 521-7135
This information should not be duplicated or passed on without Miele approval. All rights reserved. 14.10.2005, DE_en
4 Service
4.1 Programming mode summary
PT 7135 C, PT 7136
Initial requirements
A Finish or cancel any programme in operation, including the demonstration
mode.
A Open the door.
A Disconnect the fill ring NTC temperature sensor (1R30) plug.
x
Note
If the fill ring NTC temperature sensor (1R30) plug is disconnected at the powerprogramme module (1N1), then power is also no longer supplied to the door lock
(A2). In this case the programming mode cannot be accessed.
A If the international multilingual start screen is shown, select the desired
language.
Accessing
x
Note
After it is begun, the accessing procedure must be completed within 10 s.
A Press and hold the Star t button.
A Close the door.
A As soon as the Start button flashes, release the Start button.
A Immediately press and release the Start button 5 times and at the 5th time
hold it pressed in until programmable functions are shown in the display.
Acknowledgement indicator
Successful accessing of the programming mode is indicated by rapid flashing
(5 Hz) of the Start button.
The display shows the Service Dept. programmable functions.
If the accessing procedure has been unsuccessful, the control automatically
reverts to the normal operating mode.
Page 61

Descriptive Technical Documentation
DTD no. 521-7135 080-25
14.10.2005, DE_en This information should not be duplicated or passed on without Miele approval. All rights reserved.
Options
The set option is indicated by a V next to it.
A Programmable function selection: Turn the multifunction selector switch to
mark the desired function and press the multifunction selector switch to
confirm the selection.
A Option selection: Turn the multifunction selector switch to mark the desired
option and press the multifunction selector switch to confirm the selection.
x
Note
Highlighted options are standard settings.
If an electronic module is supplied as a replacement part, the highlighted
options should be set to suit the machine in which the module is fitted!
Page 62

Descriptive Technical Documentation
080-26 DTD no. 521-7135
This information should not be duplicated or passed on without Miele approval. All rights reserved. 14.10.2005, DE_en
x
Programmable function Option
Language Language for operating, programming and service modes
Sort language Select and sort four favourite languages for international installations
Anti-crease action Off
On
Buzzer Off
Normal
Loud
Clock display, see 080 2.4 Time of day
programmable function
Display contrast Standard contrast setting: Bar diagram level 4
Display brightness Standard brightness setting: Bar diagram level 5
Stand-by On: Display und backlight switched off automatically after 10 min
Extended cooling time, see 080 2.5
Extended cooling phase programmable
function
Save On: Save option available. Favourite programmes can be allocated to
Residual moisture level adjustment Cottons
Residual moisture level adjustment Minimum iron
Residual moisture level adjustment Machine iron
Clean the airways warning, see 080 2.7
Clean the airways warning modification
programmable function
Automatic programme, see 080 2.8
Automatic programmable function
24 h clock
12 h clock am/pm
No clock, 24 h Delay start
Not in programme in operation: Stand-by only before and after
programme but not while it is in operation
0 min
2 min
4 min
6 min
8 min
10 min
12 min
14 min
16 min
18 min
direct selection buttons.
Off: Save option not available
The standard residual moisture levels can be modified to make them up to
3 stages dryer or damper, see 080 2.6 Residual moisture level adjustment
programmable function
The standard residual moisture levels can be modified to make them up to
3 stages dryer or damper, see 080 2.6 Residual moisture level adjustment
programmable function
The standard residual moisture levels can be modified to make them dryer
or damper, see 080 2.6 Residual moisture level adjustment programmable
function
Off
Reduced sensitivity
Normal
Sensitive
On: Automatic programme included in programme list
Off: Automatic programme not included in programme list
Page 63

Descriptive Technical Documentation
DTD no. 521-7135 080-27
14.10.2005, DE_en This information should not be duplicated or passed on without Miele approval. All rights reserved.
Programmable function Option
Clean filters warning, vented dryers only,
see 080 2.9 Clean filters programmable
function
Clean heat exchanger warning, condenser
dryers only, see 080 2.10 Clean heat
exchanger programmable function
Residual moisture level display, see
080 2.11 Residual moisture level display
programmable function
Cool air free, with payment system
operation, see 080 2.12 Cool air free
programmable function, with payment
system operation
Payment system operation, see 080 2.13
Payment system programmable function
Supervisor level code, see 080 2.14
Operator code programmable function
Signal to payment system socket (X1/1)
pin 7, see 080 2.15 Signal to payment
system socket (X1/1) pin 7 programmable
function
Off
Display after 5 h
Display after 10 h
Display after 15 h
Display after 20 h
Display after 25 h
Display after 30 h
Display after 35 h
Display after 40 h
Display after 45 h
Display after 50 h
Display after 55 h
Off
Display after 100 h
Display after 200 h
Display after 300 h
Display after 400 h
Display after 500 h
Display after 600 h
Display after 700 h
Display after 800 h
Display after 1000 h
Display after 1200 h
Display after 1400 h
Display after 1600 h
Without percentage indication
With percentage indication
Yes
No
Off
Programme operation (MZK)
Timed operation (MZZ)
IK 6 (RS 232)
RS 232 interface active
Code not required. Domestic programmable functions can be
modified.
Code required. After code entry, domestic and supervisor programmable
functions can be modified.
At programme end
When Start button is released
When Start button is released and at programme end
Page 64

Descriptive Technical Documentation
080-28 DTD no. 521-7135
This information should not be duplicated or passed on without Miele approval. All rights reserved. 14.10.2005, DE_en
Programmable function Option
Overriding time control modification with
payment system operation, see 080 2.16
Overriding time control modification
programmable function with payment
system operation
Programme lock with payment system
operation after releasing the Start button,
see 080 2.17 Programme lock
programmable function with payment
system operation
Cool air timed programme maximum
duration, see 080 2.18 Cool air timed
programme maximum duration setting
programmable function
Warm air timed programme maximum
duration, see 080 2.19 Warm air timed
programme maximum duration setting
programmable function
Delay start, see 080 2.20 Delay start
programmable function
Language setting, see 080 2.21 Language
programmable function
Standard settings, see 080 2.22 Standard
settings programmable function
120 min
135 min
150 min
165 min
180 min
195 min
210 min
225 min
240 min
None
Immediately
1 min
2 min
3 min
4 min
5 min
10 min
20 min
30 min
40 min
50 min
60 min
70 min
80 min
90 min
100 min
110 min
120 min
15 min
20 min
25 min
30 min
35 min
40 min
45 min
50 min
55 min
60 min
90 min
120 min
Active
Inactive
National
International, additional welcoming menu (favourite languages)
Reset all programmable functions to standard settings
Table 6: Programming mode summary
Page 65

Descriptive Technical Documentation
DTD no. 521-7135 080-29
14.10.2005, DE_en This information should not be duplicated or passed on without Miele approval. All rights reserved.
Save and quit
x
Note
Confirmed programmable options are saved.
A Reconnect the fill ring NTC temperature sensor (1R30) plug.
4.2 Programming mode summary
PT 5135 C, PT 5136
Initial requirements
A Finish or cancel any programme in operation, including the demonstration
mode.
A Open the door.
A Disconnect the fill ring NTC temperature sensor (1R30) plug.
x
Note
If the fill ring NTC temperature sensor (1R30) plug is disconnected at the powerprogramme module (1N1), then power is also no longer supplied to the door lock
(A2). In this case the programming mode cannot be accessed.
A During initial commissioning only: Select the desired language.
Accessing
x
Note
After it is begun, the accessing procedure must be completed within 10 s.
A Press and hold the Star t button.
A Close the door.
A As soon as the Start LED flashes, release the Start button.
A Immediately press and release the Start button 5 times and at the 5th time
hold it pressed in until the Start LED flashes.
Acknowledgement indicator
Successful accessing of the programming mode is indicated by rapid flashing
(5 Hz) of the Start LED.
Page 66

Descriptive Technical Documentation
080-30 DTD no. 521-7135
This information should not be duplicated or passed on without Miele approval. All rights reserved. 14.10.2005, DE_en
The display shows the Service Dept. programmable functions.
If the accessing procedure has been unsuccessful, the control automatically
reverts to the normal operating mode.
Options
A Programmable function selection: Press the + / - buttons as appropriate to
mark the desired function and press the OK button to confirm the selection.
The set option is indicated by a V next to it.
A Option selection: Press the + / - buttons as appropriate to mark the desired
option and press the OK button to confirm the selection.
x
Note
Highlighted options are standard settings.
If an electronic module is supplied as a replacement part, the highlighted
options should be set to suit the machine in which the module is fitted!
Programmable function Option
Language Language for operating, programming and service modes
Anti-crease action On
Off
Clock display, see 080 2.4 Time of day
programmable function
Supervisor level Code modification
Display contrast Standard contrast setting: Bar diagram level 4
Display brightness Standard brightness setting: Bar diagram level 5
Stand-by On: Display und backlight switched off automatically after 10 min
Buzzer Off
Extended cooling time, see 080 2.5
Extended cooling phase programmable
function
Residual moisture level adjustment Cottons
24 h clock
12 h clock am/pm
No clock, 24 h Delay start
Not in programme in operation: Stand-by only before and after
programme but not while it is in operation
Normal
Loud
0 min
2 min
4 min
6 min
8 min
10 min
12 min
14 min
16 min
18 min
The standard residual moisture levels can be modified to make them up to
3 stages dryer or damper, see 080 2.6 Residual moisture level adjustment
programmable function
Page 67

Descriptive Technical Documentation
DTD no. 521-7135 080-31
14.10.2005, DE_en This information should not be duplicated or passed on without Miele approval. All rights reserved.
Programmable function Option
Residual moisture level adjustment Minimum iron
Residual moisture level adjustment Machine iron
Clean the airways warning, see 080 2.7
Clean the airways warning modification
programmable function
Clean heat exchanger warning, condenser
dryers only, see 080 2.10 Clean heat
exchanger programmable function
Cool air free, with payment system
operation, see 080 2.12 Cool air free
programmable function, with payment
system operation
Payment system operation, see 080 2.13
Payment system programmable function
Supervisor level code, see 080 2.14
Operator code programmable function
Signal to payment system socket (X1/1)
pin 7, see 080 2.15 Signal to payment
system socket (X1/1) pin 7 programmable
function
Overriding time control modification with
payment system operation, see 080 2.16
Overriding time control modification
programmable function with payment
system operation
The standard residual moisture levels can be modified to make them up to
3 stages dryer or damper, see 080 2.6 Residual moisture level adjustment
programmable function
The standard residual moisture levels can be modified to make them dryer
or damper, see 080 2.6 Residual moisture level adjustment programmable
function
Off
Reduced sensitivity
Normal
Sensitive
Off
Display after 100 h
Display after 200 h
Display after 300 h
Display after 400 h
Display after 500 h
Display after 600 h
Display after 700 h
Display after 800 h
Display after 1000 h
Display after 1200 h
Display after 1400 h
Display after 1600 h
Yes
No
Off (Delay start possible)
Programme operation (MZK)
Timed operation (MZZ)
RS 232 interface active
Code not required. User programmable functions can be modified.
Code required. After code entry, supervisor programmable functions can
be modified.
At programme end
When Start button is released
When Start button is released and at programme end
120 min
135 min
150 min
165 min
180 min
195 min
210 min
225 min
240 min
Page 68

Descriptive Technical Documentation
080-32 DTD no. 521-7135
This information should not be duplicated or passed on without Miele approval. All rights reserved. 14.10.2005, DE_en
Programmable function Option
Programme lock with payment system
operation after releasing the Start button,
see 080 2.17 Programme lock
programmable function with payment
system operation
Cool air timed programme maximum
duration, see 080 2.18 Cool air timed
programme maximum duration setting
programmable function
Warm air timed programme maximum
duration, see 080 2.19 Warm air timed
programme maximum duration setting
programmable function
Delay start, see 080 2.20 Delay start
programmable function
Automatic programme, see 080 2.8
Automatic programmable function
Standard settings, see 080 2.22 Standard
settings programmable function
None
Immediately
1 min
2 min
3 min
4 min
5 min
10 min
20 min
30 min
40 min
50 min
60 min
70 min
80 min
90 min
100 min
110 min
120 min
15 min
20 min
25 min
30 min
35 min
40 min
45 min
50 min
55 min
60 Min
90 min
120 min
Active
Inactive
On: Automatic programme included in programme list
Off: Automatic programme not included in programme list
Reset all programmable functions to standard settings
Table 7: Programming mode summary
Save and quit
x
Note
Confirmed programmable options are saved.
A Reconnect the fill ring NTC temperature sensor (1R30) plug.
Page 69

Descriptive Technical Documentation
DTD no. 521-7135 080-33
14.10.2005, DE_en This information should not be duplicated or passed on without Miele approval. All rights reserved.
4.3 Demonstration mode activation / deactivation
PT 7135 C, PT 7136
Initial requirements
A Finish or cancel any programme in operation.
A Open the door.
A If the international multilingual start screen is shown, select the desired
language.
Accessing
x
Note
After it is begun, the accessing procedure must be completed within 10 s.
A Press and hold the Star t button.
A Close the door.
A As soon as the Start button lights up constantly, after approx. 5 s, release
the Start button.
x
Note
During deactivation the Start button does not light up constantly.
A Immediately press and hold the Start button again until an appropriate
instruction is shown in the display (approx. 5 s).
A Follow the instruction shown in the display.
Acknowledgement indicator
The demonstration programme operates.
If the accessing procedure has been unsuccessful, the control automatically
reverts to the normal operating mode.
Options
The demonstration mode programme duration is approx. 90 s. After a short
pause, it starts again automatically.
x
Note
After an interruption in the mains supply, the demonstration mode programme
begins again automatically.
Page 70

Descriptive Technical Documentation
080-34 DTD no. 521-7135
This information should not be duplicated or passed on without Miele approval. All rights reserved. 14.10.2005, DE_en
Save and quit
A Demonstration programme deactivation: Repeat the accessing procedure.
4.4 Demonstration mode activation / deactivation
PT 5135 C, PT 5136
Initial requirements
A Finish or cancel any programme in operation.
A Open the door.
Accessing
x
Note
After it is begun, the accessing procedure must be completed within 10 s.
A Press and hold the Star t button.
A Close the door.
A As soon as the Start LED lights up constantly, after approx. 5 s, release the
Start button.
x
Note
During deactivation the Start button does not light up constantly.
A Immediately press and hold the Start button again until an appropriate
instruction is shown in the display (approx. 5 s).
A Follow the instruction shown in the display.
Acknowledgement indicator
The demonstration programme operates.
If the accessing procedure has been unsuccessful, the control automatically
reverts to the normal operating mode.
Options
The demonstration mode programme duration is approx. 90 s. After a short
pause, it starts again automatically.
Page 71

Descriptive Technical Documentation
DTD no. 521-7135 080-35
14.10.2005, DE_en This information should not be duplicated or passed on without Miele approval. All rights reserved.
x
Note
After an interruption in the mains supply, the demonstration mode programme
begins again automatically.
Save and quit
A Demonstration programme deactivation: Repeat the accessing procedure.
4.5 Service mode summary
PT 7135 C, PT 7136
Initial requirements
A Ensure the machine is installed and connected correctly.
A Finish or cancel any programme in operation, including the demonstration
mode.
A Open the door.
A If the international multilingual start screen is shown, select the desired
language.
Accessing
x
Note
After it is begun, the accessing procedure must be completed within 10 s.
A Press and hold the Star t button.
A Close the door.
A As soon as the Start button flashes, release the Start button.
A Immediately press and release the Start button 3 times and at the 3rd time
hold it pressed in until service mode functions are shown in the display.
Acknowledgement indicator
Successful accessing of the service mode is indicated by slow flashing of the
Start button (1 Hz).
The display shows the service mode functions.
If the accessing procedure has been unsuccessful, the control automatically
reverts to the normal operating mode.
Page 72

Descriptive Technical Documentation
080-36 DTD no. 521-7135
This information should not be duplicated or passed on without Miele approval. All rights reserved. 14.10.2005, DE_en
Options
A Service function selection: Turn the multifunction selector switch as
appropriate.
A Service function start and test step advance: Press the multifunction
selector switch.
x
Note
The service mode is switched off automatically 30 min after the last service
function has been checked.
Service function Component / Sensor tested
Software version
Fault register display
and deletion
2)
Selection module (EW) ID no. Power-programme module (ELP) ID no.
Fault cause Fault code Remedy
No fault registered F 0 None required
Heater bank NTC sensor shortcircuited
Heater bank NTC sensor opencircuited
Fill ring NTC sensor shortcircuited
Fill ring NTC sensor opencircuited
Faulty EEPROM / data fault F 41 See Fault code F41, faulty
Model type not programmed F 43 See Fault code F43, model
1)
Faulty flash RAM/ data fault F 45 See Fault code F45, faulty flash
Display fault F 46 See Fault code F46, display
Communication fault between
EW / ELP electronic modules
Motor stationary and heating
operates for 5 s
Overriding time limit exceeded F 55 See Fault code F55, overriding
Air leakage fault F 66 See Fault code F66, air
F 1 See Fault code F1, heater bank
NTC sensor short-circuited,
080 3.8
F 2 See Fault code F2, heater bank
NTC sensor open-circuited,
080 3.9
F 3 See Fault code F3, fill ring NTC
sensor shor t-circuited, 080 3.10
F 4 See Fault code F4, fill ring NTC
sensor open-circuited, 080 3.11
EEPROM / data fault, 080 3.12
type not programmed, 080 3.13
RAM/ data fault, 080 3.14
fault, 080 3.15
F 47 See Fault code F47,
communication fault between
selection module (EW) and
power-programme module
(ELP), 080 3.16
F 50 See Fault code F50, motor
stationary and heating operates
for 5 s, 080 3.17
time limit exceeded (approx.
180 min), 080 3.18
leakage fault, 080 3.19
Page 73

Descriptive Technical Documentation
DTD no. 521-7135 080-37
14.10.2005, DE_en This information should not be duplicated or passed on without Miele approval. All rights reserved.
Service function Component / Sensor tested
Component activation Function tested/Machine response
All components Inactive
Drive/Fan motor (M5) Drum turns with reversing as follows: 10 s anticlockwise,
Heating 1 and drive/fan motor
(M5)
Condensate pump (M13)
(condenser dryer only)
Residual moisture sensor (B3/1)
circuit, low resistance check
Component activation
Sensor test
Operating hours
counter display
Controls Display / LED test All display points flash at the same time
Residual moisture sensor (B3/1)
circuit, high resistance check
Heating 1 and 2, and drive/fan
motor (M5)
Heating 1, 2 and 3, and drive/fan
motor (M5)
Payment system socket (X1/1),
programme end signal
Payment system socket (X1/1),
ready signal
Additional fan (2M2). Vented
dryer only, for external fan.
Sensors State
All sensors Inactive
Float switch - Condensate (B8/7) No water in condenser box => Float switch not activated =>
Door lock (A2) Door closed => Switch closed => Buzzer on
Payment system contact,
payment system socket (X1/1)
Finger protection safety switch
(S32) (fluf f filter flap, vented
dryer only)
Power-programme module (ELP) Operating hours display. Time from start of programme,
Display background light
(backlight)
Buzzer Audible signal –
Buttons Display indication for activated buttons
2.5 s pause, 10 s clockwise, 2.5 s pause, etc.
The heating relay 1K1/1 is activated and the drum turns
with reversing as follows: 600 s anticlockwise, 2.5 s pause,
10 s clockwise, 2.5 s pause
Condensate pump activated
Provide an electrical
bridge between the drum
and a rib
Without electrical bridge
between the drum and a
rib
The heating relays 1K1/1 and 2K1/1 are activated, and the
drum turns with reversing as follows: 600 s anticlockwise,
2.5 s pause, 10 s clockwise, 2.5 s pause
The heating relays 1K1/1, 2K1/1 and 3K1/1 are activated,
and the drum turns with reversing as follows: 600 s
anticlockwise, 2.5 s pause, 10 s clockwise, 2.5 s pause
Mains voltage applied between pin 7 and pin 3
Mains voltage applied between pin 1 and pin 3
Live (phase) and neutral conductors are switched on
Switch open => Buzzer off
Water in condenser box => Float switch activated =>
Switch closed => Buzzer on
Door open => Switch open => Buzzer off
Connection wire bridge fitted between 1W14 pin 1/2
Connection wire bridge not fitted between 1W14 pin 1/2
Flap closed => Switch closed => Buzzer on
Flap open => Switch open => Buzzer off
without delay start, until the start of the anti-crease phase.
The backlight flashes on and off
Condenser dryer:
Audible signal – Vented
dryer:
In case of fault: Check the
residual moisture sensor circuit.
In case of fault: Check the
residual moisture sensor circuit.
Intermittent
Continuous
Table 8: Service mode summary
1)
If several faults are registered, their codes are shown one after the other in ascending order when the Start button is
pressed.
2)
Fault code deletion: Press the Start button for longer than 5 s during the fault code display (all stored fault codes are
deleted).
Page 74

Descriptive Technical Documentation
080-38 DTD no. 521-7135
This information should not be duplicated or passed on without Miele approval. All rights reserved. 14.10.2005, DE_en
Quit (without saving)
A Open the door.
4.6 Service mode summary
PT 5135 C, PT 5136
Initial requirements
A Ensure the machine is installed and connected correctly.
A Finish or cancel any programme in operation, including the demonstration
mode.
A Open the door.
Accessing
x
Note
After it is begun, the accessing procedure must be completed within 10 s.
A Press and hold the Star t button.
A Close the door.
A As soon as the Start LED flashes, release the Start button.
A Immediately press and release the Start button 3 times and at the 3rd time
hold it pressed in until the Start LED flashes slowly.
Acknowledgement indicator
Successful accessing of the service mode is indicated by slow flashing of the
Start LED (1 Hz).
The display shows the service mode functions.
If the accessing procedure has been unsuccessful, the control automatically
reverts to the normal operating mode.
Options
A Service function selection: Press the + / - buttons as appropriate.
A Service function start and test step advance: Press the OK button.
A Back to main level: Press the OK button.
Page 75

Descriptive Technical Documentation
DTD no. 521-7135 080-39
14.10.2005, DE_en This information should not be duplicated or passed on without Miele approval. All rights reserved.
x
Note
The service mode is switched off automatically 30 min after the last service
function has been checked.
Service function Component / Sensor tested
Software version
Fault register display
and deletion
2)
Selection module (EW) ID no. Power-programme module (ELP) ID no.
Fault cause Fault code Remedy
No fault registered F 0 None required
Heater bank NTC sensor shortcircuited
Heater bank NTC sensor opencircuited
Fill ring NTC sensor shortcircuited
Fill ring NTC sensor opencircuited
Faulty EEPROM / data fault F 41 See Fault code F41, faulty
Model type not programmed F 43 See Fault code F43, model
1)
Faulty flash RAM/ data fault F 45 See Fault code F45, faulty flash
Display fault F 46 See Fault code F46, display
Communication fault between
EW / ELP electronic modules
Motor stationary and heating
operates for 5 s
Overriding time limit exceeded F 55 See Fault code F55, overriding
Air leakage fault F 66 See Fault code F66, air
F 1 See Fault code F1, heater bank
NTC sensor short-circuited,
080 3.8
F 2 See Fault code F2, heater bank
NTC sensor open-circuited,
080 3.9
F 3 See Fault code F3, fill ring NTC
sensor shor t-circuited, 080 3.10
F 4 See Fault code F4, fill ring NTC
sensor open-circuited, 080 3.11
EEPROM / data fault, 080 3.12
type not programmed, 080 3.13
RAM/ data fault, 080 3.14
fault, 080 3.15
F 47 See Fault code F47,
communication fault between
selection module (EW) and
power-programme module
(ELP), 080 3.16
F 50 See Fault code F50, motor
stationary and heating operates
for 5 s, 080 3.17
time limit exceeded (approx.
180 min), 080 3.18
leakage fault, 080 3.19
Page 76

Descriptive Technical Documentation
080-40 DTD no. 521-7135
This information should not be duplicated or passed on without Miele approval. All rights reserved. 14.10.2005, DE_en
Service function Component / Sensor tested
Component activation Function tested/Machine response
All components Inactive
Component activation
Sensor test
Operating hours
counter display
Drive/Fan motor (M5) Drum turns with reversing as follows: 10 s anticlockwise,
Heating 1 and drive/fan motor
(M5)
Condensate pump (M13)
(condenser dryer only)
Residual moisture sensor (B3/1)
circuit, low resistance check
Residual moisture sensor (B3/1)
circuit, high resistance check
Heating 1 and 2, and drive/fan
motor (M5)
Heating 1, 2 and 3, and drive/fan
motor (M5)
Payment system socket (X1/1),
programme end signal
Payment system socket (X1/1),
ready signal
Additional fan (2M2). Vented
dryer only, for external fan.
Sensors State
All sensors Inactive
Float switch - Condensate (B8/7) No water in condenser box => Float switch not activated =>
Door lock (A2) Door closed => Switch closed => Buzzer on
Payment system contact,
payment system socket (X1/1)
Finger protection safety switch
(S32) (fluf f filter flap, vented
dryer only)
Power-programme module (ELP) Operating hours display. Time from start of programme,
2.5 s pause, 10 s clockwise, 2.5 s pause, etc.
The heating relay 1K1/1 is activated and the drum turns
with reversing as follows: 600 s anticlockwise, 2.5 s pause,
10 s clockwise, 2.5 s pause
Condensate pump activated
Provide an electrical
bridge between the drum
and a rib
Without electrical bridge
between the drum and a
rib
The heating relays 1K1/1 and 2K1/1 are activated, and the
drum turns with reversing as follows: 600 s anticlockwise,
2.5 s pause, 10 s clockwise, 2.5 s pause
The heating relays 1K1/1, 2K1/1 and 3K1/1 are activated,
and the drum turns with reversing as follows: 600 s
anticlockwise, 2.5 s pause, 10 s clockwise, 2.5 s pause
Mains voltage applied between pin 7 and pin 3
Mains voltage applied between pin 1 and pin 3
Live (phase) and neutral conductors are switched on
Switch open => Buzzer off
Water in condenser box => Float switch activated =>
Switch closed => Buzzer on
Door open => Switch open => Buzzer off
Connection wire bridge fitted between 1W14 pin 1/2
Connection wire bridge not fitted between 1W14 pin 1/2
Flap closed => Switch closed => Buzzer on
Flap open => Switch open => Buzzer off
without delay start, until the start of the anti-crease phase.
In case of fault: Check the
residual moisture sensor circuit.
In case of fault: Check the
residual moisture sensor circuit.
Page 77

Descriptive Technical Documentation
DTD no. 521-7135 080-41
14.10.2005, DE_en This information should not be duplicated or passed on without Miele approval. All rights reserved.
Service function Component / Sensor tested
Controls Display / LED test All display points flash at the same time
Alle LEDs and the illuminated switch surround flash at the
same time
Display background light
(backlight)
Buzzer Audible signal –
Buttons Display indication for activated buttons
Rotary selector switch (DWS)
test
Table 9: Service mode summary
1)
If several faults are registered, their codes are shown one after the other in ascending order when the Start button is
pressed.
2)
Fault code deletion: Press the Start button for longer than 5 s during the fault code display (all stored fault codes are
deleted).
The backlight flashes on and off
Condenser dryer:
Audible signal – Vented
dryer:
Display indication for programme positions
Intermittent
Continuous
Quit (without saving)
A Open the door.
Page 78

Descriptive Technical Documentation
080-42 DTD no. 521-7135
This information should not be duplicated or passed on without Miele approval. All rights reserved. 14.10.2005, DE_en
Page 79

Descriptive Technical Documentation
DTD no. 521-7135 090-1
14.10.2005, DE_en This information should not be duplicated or passed on without Miele approval. All rights reserved.
090 Electrical components
x
Page 80

Descriptive Technical Documentation
090-2 DTD no. 521-7135
This information should not be duplicated or passed on without Miele approval. All rights reserved. 14.10.2005, DE_en
2 Function
2.1 Mains terminal strip (X3/1)
PT 7136, PT 5136
Depending on the country version, the mains terminal strip (X3/1) has a 4-/5-pole
connection cable with strain relief.
2.2 Payment system socket (X1/1)
x
Payment system socket (X1/1) - Tumble dryer side Potential Pin
Voltage supply switched by tumble dryer (ready for operation
signal)
Start permitted by payment system L` 2
Voltage supply direct for payment system N 3
Voltage supply direct for payment system L 4
Neutral switched by payment system - Time unit N` 5
Direct earth conductor PE 6
Start reset signal / Time stop / Programme end signal L` 7
Table 1: Payment system socket (X1/1) pin allocation
2.3 Payment system
The tumble dryer is pre-fitted with the requirements for operation in conjunction
with a payment system.
Payment system (programme operation):
The payment system provides the machine with a “start permitted” signal. After
the programme has been started, it continues without further influence from the
payment system.
L` 1
For further details, see Payment system (programme operation), 090 4.2.
Payment system (timed operation):
The payment system provides the machine with a constant “operation permitted”
signal throughout the period of timed operation that has been purchased.
The programme continues so long as the signal is provided.
If the signal is interrupted, the programme and time left are stopped and the
machine components are switched off.
For further details, see Payment system (timed operation), 090 4.3.
Page 81

Descriptive Technical Documentation
DTD no. 521-7135 090-3
14.10.2005, DE_en This information should not be duplicated or passed on without Miele approval. All rights reserved.
2.4 Central control via RS 232 interface with 9-pole plug
PT 7135 C, PT 7136
Possible to use one central control/payment system.
Control data can be read and modified.
For further details, see Central control via RS 232 interface, 090 4.4.
Page 82

Fig. 1
Warning!
When drilling through the machine lid, take care to not drill into the surface on
which it is resting!
A Drill 4 fixing holes through the machine lid in accordance with the payment
system template.
x
Fig. 2
A Place the plastic underlay on the machine lid. Secure the payment system to
the lid on the underlay using the screws, washers, retaining rings and nuts
provided.
A Refit the machine lid.
Descriptive Technical Documentation
090-4 DTD no. 521-7135
This information should not be duplicated or passed on without Miele approval. All rights reserved. 14.10.2005, DE_en
4 Service
4.1 Fitting payment system on machine lid
A Remove the machine lid.
x
Page 83

Fig. 3
A Open the pre-punched opening/s in the rear casing for the electrical
connections as necessary.
x
Warning!
Take care to lay wires such that they cannot be damaged by sharp edges.
A Fit the appropriate through-feed parts on the wires. Secure the through-feeds
on the rear casing.
A Lay the payment system wire to the payment system socket (X1/1).
A At the payment system socket (X1/1), cut through the wire bridge 1W14
between pins 1 and 2. Insulate the wire ends.
A Set the tumble dryer payment system programmable option to Programme
operation.
A PT 7135 C and PT 7136: For Service Dept. programming mode see
Programming mode summary, 080 4.1.
A PT 5135 C and PT 5136: For Service Dept. programming mode see
Programming mode summary, 080 4.2.
A Fit the payment system on the machine lid, see Fitting payment system on
machine lid, 090 4.1.
Descriptive Technical Documentation
DTD no. 521-7135 090-5
14.10.2005, DE_en This information should not be duplicated or passed on without Miele approval. All rights reserved.
4.2 Payment system (programme operation)
x
Note
The instructions given in the documentation provided with the payment system
must be followed.
Page 84

Fig. 4
A Open the pre-punched opening/s in the rear casing for the electrical
connections as necessary.
x
Warning!
Take care to lay wires such that they cannot be damaged by sharp edges.
A Fit the appropriate through-feed parts on the wires. Secure the through-feeds
on the rear casing.
A Lay the payment system wire to the payment system socket (X1/1).
A At the payment system socket (X1/1), cut through the wire bridge 2W14
between pins 3 and 5. Insulate the wire ends.
Descriptive Technical Documentation
090-6 DTD no. 521-7135
This information should not be duplicated or passed on without Miele approval. All rights reserved. 14.10.2005, DE_en
4.3 Payment system (timed operation)
x
Note
The instructions given in the documentation provided with the payment system
must be followed.
Warning!
The connection has been modified.
Danger of short circuit.
When a time payment system C 5003 is fitted, the connection from pin 7 to
connection 2 on the payment system must be disconnected.
A bridge must be made in the payment system from connection 3 (operational
signal) to connection 2 (transformer).
With incorrect connection, connection from pin 7 to connection 2 on the payment
system not disconnected, a short circuit will exist at the end of the programme.
Check the wiring diagram.
Page 85

Descriptive Technical Documentation
DTD no. 521-7135 090-7
14.10.2005, DE_en This information should not be duplicated or passed on without Miele approval. All rights reserved.
A Set the tumble dryer payment system programmable option to Timed
operation.
A PT 7135 C and PT 7136: For Service Dept. programming mode see
Programming mode summary, 080 4.1.
A PT 5135 C and PT 5136: For Service Dept. programming mode see
Programming mode summary, 080 4.2.
A Fit the payment system on the machine lid, see Fitting payment system on
machine lid, 090 4.1.
4.4 Central control via RS 232 interface
PT 7135 C, PT 7136
x
Danger!
Risk of electric shock due to voltage transfer with incorrectly laid data cables.
Note
The instructions given in the documentation provided with the central control
must be followed.
Warning!
Take care to lay wires such that they cannot be damaged by sharp edges.
Take care to lay wires such that they do not touch the drum.
A Remove the machine lid.
Page 86

Fig. 5
Fig. 6
A Unscrew and remove the mains connection box lid. Loosen the cable strain
relief.
A Pass the data cable through the casing opening for the mains connection
cable. Lay the data cable to the RS 232 interface on the power-programme
module (ELP).
A Connect the data cable plug to the RS 232 interface and secure it with the
screws.
A Secure the data cable in the strain relief together with the mains connection
cable.
Descriptive Technical Documentation
090-8 DTD no. 521-7135
This information should not be duplicated or passed on without Miele approval. All rights reserved. 14.10.2005, DE_en
x
Page 87

Descriptive Technical Documentation
DTD no. 521-7135 090-9
14.10.2005, DE_en This information should not be duplicated or passed on without Miele approval. All rights reserved.
A At the payment system socket (X1/1), cut either through the wire bridge 1W14
between pins 1 and 2 or the wire bridge 2W14 between pins 3 and 5 as
desired. Insulate the wire ends.
A At the tumble dryer, set the payment system programmable option to RS 232,
see Programming mode summary, 080 4.1.
Page 88

Descriptive Technical Documentation
090-10 DTD no. 521-7135
This information should not be duplicated or passed on without Miele approval. All rights reserved. 14.10.2005, DE_en
 Loading...