

Page 1
PM 1210
PM 1214
PM 1217
en Operating instructions Commercial Rotary Iron
fr Mode d'emploi Repasseuses professionnelles
en, fr - CA
M.-Nr. 10025790
Page 2

en-CA ................................................................................................................................ 4
fr-CA .................................................................................................................................. 23
2
Page 3

en-CA - Contents
Warning and Safety instructions........................................................................................ 4
Correct application................................................................................................................ 4
Technical and electrical safety .............................................................................................. 4
Operation............................................................................................................................... 5
Using accessories ................................................................................................................ 5
Notes on the use of this rotary iron ...................................................................................... 5
Caring for the environment.................................................................................................
7
Disposal of the packing material ........................................................................................... 7
Disposing of your old appliance............................................................................................ 7
Guide to the machine ..........................................................................................................
8
Control buttons on the Touch display ................................................................................... 9
Display symbols on the control panel ................................................................................. 10
Finger guard ........................................................................................................................ 11
Laundry rod ......................................................................................................................... 11
Preparing the laundry........................................................................................................
12
Residual moisture in the laundry ......................................................................................... 12
Preparing the laundry .......................................................................................................... 12
Operation............................................................................................................................
13
Preparing for use ................................................................................................................. 13
Ironing.................................................................................................................................. 13
Selecting the temperature............................................................................................... 13
Changing the pre-set temperature for a temperature selection button........................... 13
Selecting the ironer speed .............................................................................................. 14
Setting the ironer speed.................................................................................................. 14
Changing the pre-set roller speed for a roller speed selection button............................ 14
Laundry feed ................................................................................................................... 14
Pauses in ironing............................................................................................................. 14
Standby mode................................................................................................................. 15
FlexControl footswitch .................................................................................................... 15
Pick-off bands................................................................................................................. 15
After ironing ......................................................................................................................... 15
Ironing with a coin-operated payment system .................................................................... 15
Notes...................................................................................................................................
16
Changing the temperature unit (°C / °F) .............................................................................. 16
Favorites setting .................................................................................................................. 16
Increasing the life of the roller cover ................................................................................... 16
Power failure during ironing................................................................................................. 16
Peak load (option)................................................................................................................ 16
Fault messages ................................................................................................................... 17
Cleaning and care.............................................................................................................. 18
Cleaning and waxing the heater plate................................................................................. 18
Waxing the heater plate....................................................................................................... 18
Roller cover and padding instructions................................................................................. 19
Removing the roller cover.................................................................................................... 19
Fitting the roller cover.......................................................................................................... 19
Miele Service ....................................................................................................................... 20
3
Page 4

en-CA - Warning and Safety instructions
This rotary iron complies with current safety requirements. Inappropriate use can, how‐
ever, lead to personal injury and damage to property.
To avoid the risk of accidents and damage to the rotary iron, please read these instruc‐
tio
ns carefully before using it for the first time. They contain important information on its
safety, use and maintenance.
If other persons are being shown how to operate the rotary iron, they must be given or
nformed of these important safety Instructions.
i
Keep these instructions in a safe place and ensure that new users are familiar with the
ntent. Pass them on to any future owner.
co
Correct application
This rotary iron must be used as described in these instructions and must be checked on a
r
egular basis to make sure it is functioning correctly. Maintenance must be carried out
when necessary.
This r
have a care label stating that the article is suitable for machine ironing.
This r
ronment. If the rotary iron is operated in a publically accessible place, it is the supervisor's
responsibility to ensure suitable measures are in place to protect users from any source of
risk or danger.
This r
otary iron is only intended for ironing fabrics that were washed in water, and which
otary iron is a commercial machine. It is not intended for use in the domestic envi‐
otary iron is not intended for outdoor use.
Technical and electrical safety
This r
ing solvents containing PERC or CFCs.
The r
Only oper
impossible to touch an electrical, moving, or heated component.
otary iron should not be operated in the same room as dry-cleaning equipment us‐
otary iron should only be operated in a suitable dry room.
ate the rotary iron when all removable outer casings are in place so that it is
Do not damage, remove, or bypass the safety components or control elements of the
rotary iron.
Do not mak
e any alterations to the ironer, unless authorized to do so by Miele.
the controls or the electrical cabling insulation has been damaged, the rotary iron
If
must not be used until it has been repaired.
Repair and maint
by unqualified persons could be dangerous.
Defective co
Only with original Miele parts can the manufacturer guarantee the safety of the appliance.
The ele
rectly installed earthing system on site. It is most important that this standard safety re‐
quirement is present and tested regularly. If in any doubt, please have the on-site electrical
system tested by a qualified electrician. Miele cannot be held liable for damage or injury
cased by the lack or inadequacy of an effective earthing system.
4
ctrical safety of this rotary iron can only be guaranteed when connected to a cor‐
enance work should be performed by a Miele service technician. Work
mponents should only be replaced by genuine Miele original spare parts.
Page 5

en-CA - Warning and Safety instructions
The r
at the mains isolator, or the (on site) mains fuse is disconnected.
otary iron is only completely isolated from the electricity supply when switched off
Operation
The r
This r
capabilities or lack of experience or knowledge if they are supervised while using it or have
been shown how to use it in a safe way and understand and recognize the consequences
of incorrect operation.
Chil
to play with it!
In the heat
of burning if you touch the edge of the heater plate on the laundry output side.
Do not set a hig
the ironing temperature is too high, the laundry can catch on fire.
When ir
dry. There is a danger that you will not be able to move your hands to the side of the heat‐
er plate in a timely manner. This also applies to reaching into pockets whose open sides
are facing the heater plate.
otary iron may not be operated without supervision.
otary iron can only be used by people with reduced physical, sensory, or mental
dren should be supervised when they are near the rotary iron. Do not allow children
ed state and with the heater plate contacting the roller, there is a serious risk
her ironing temperature than specified on the care label of the laundry. If
oning double-layer laundry, do not reach between the layers to stretch the laun‐
P
rovide sufficient lighting during the operation of the rotary iron.
K
eep the work area around the rotary iron free of objects.
Mak
There is a risk of fire if the ironing temperature is too high, the laundry is not suited for iron‐
ing, or the laundry was not cleaned in water!
The insta
ships may be performed only by specialized companies/specialists if they can guarantee
the prerequisites for the safe use of this rotary iron. In addition, the country-specific safety
regulations, standards, and safety provisions must be observed.
e sure that a fire extinguisher is in the direct vicinity and can be used at any time.
llation and mounting of this rotary iron in non-stationary locations such as
Using accessories
Accessory parts may only be fitted when expressly approved by Miele. If spare parts or
accessories from other manufacturers are used, any claims from guarantee, warranty
and/or product liability will be invalidated.
Notes on the use of this rotary iron
Only r
operation of the rotary iron should use the infeed table.
esponsible people over the age of 16 years who are completely familiar with the
When working
back. Wide sleeves, apron straps, scarves and ties etc. could be taken in by the roller.
Remove rin
with the ironer, always wear close fitting clothes and keep long hair tied
gs and bracelets before ironing.
5
Page 6

en-CA - Warning and Safety instructions
Always smooth out wrinkl
table. Feed pillow cases and duvet covers into the ironer with the open end first. Do not
hold the corners from the inside and do not reach into the straps of shirts and aprons.
Check the fun
properly functioning safety devices. This guarantees that crushing injuries, burns, and oth‐
er severe injuries can be prevented.
Befor
If other persons are being shown how to operate the rotary iron, they must be given or
i
nformed of these important safety Instructions.
Keep these instructions in a safe place and ensure that new users are familiar with the
co
e switching the roller to the reverse mode, make sure that no one is endangered.
ntent. Pass them on to any future owner.
ction of the safety devices daily. The rotary iron may only be operated with
es as far away as possible from the infeed point on the infeed
6
Page 7

en-CA - Caring for the environment
Disposal of the packing material
The packaging protects the machine from transport damage. The packaging materials
have been sele
normally be recycled. Returning the packaging saves raw materials and reduces the
amount of waste.
Disposing of your old appliance
Old electrical and electronic equipment often still contain valuable materials. However, they
may al
use. Improperly disposing of these items in your household waste can be harmful to your
health and the environment. Therefore, please do not dispose of your old appliance in your
regular household waste.
so include harmful substances that were essential for proper functioning and safe
cted from materials which are environmentally friendly for disposal and can
Please make sure that your old appliance is disposed of according to the regional disposal
egulations. Contact your local community waste collection / recycling centre or Miele for
r
advice. Please make sure that your old appliance is stored in a childproof manner until col‐
lection.
7
Page 8
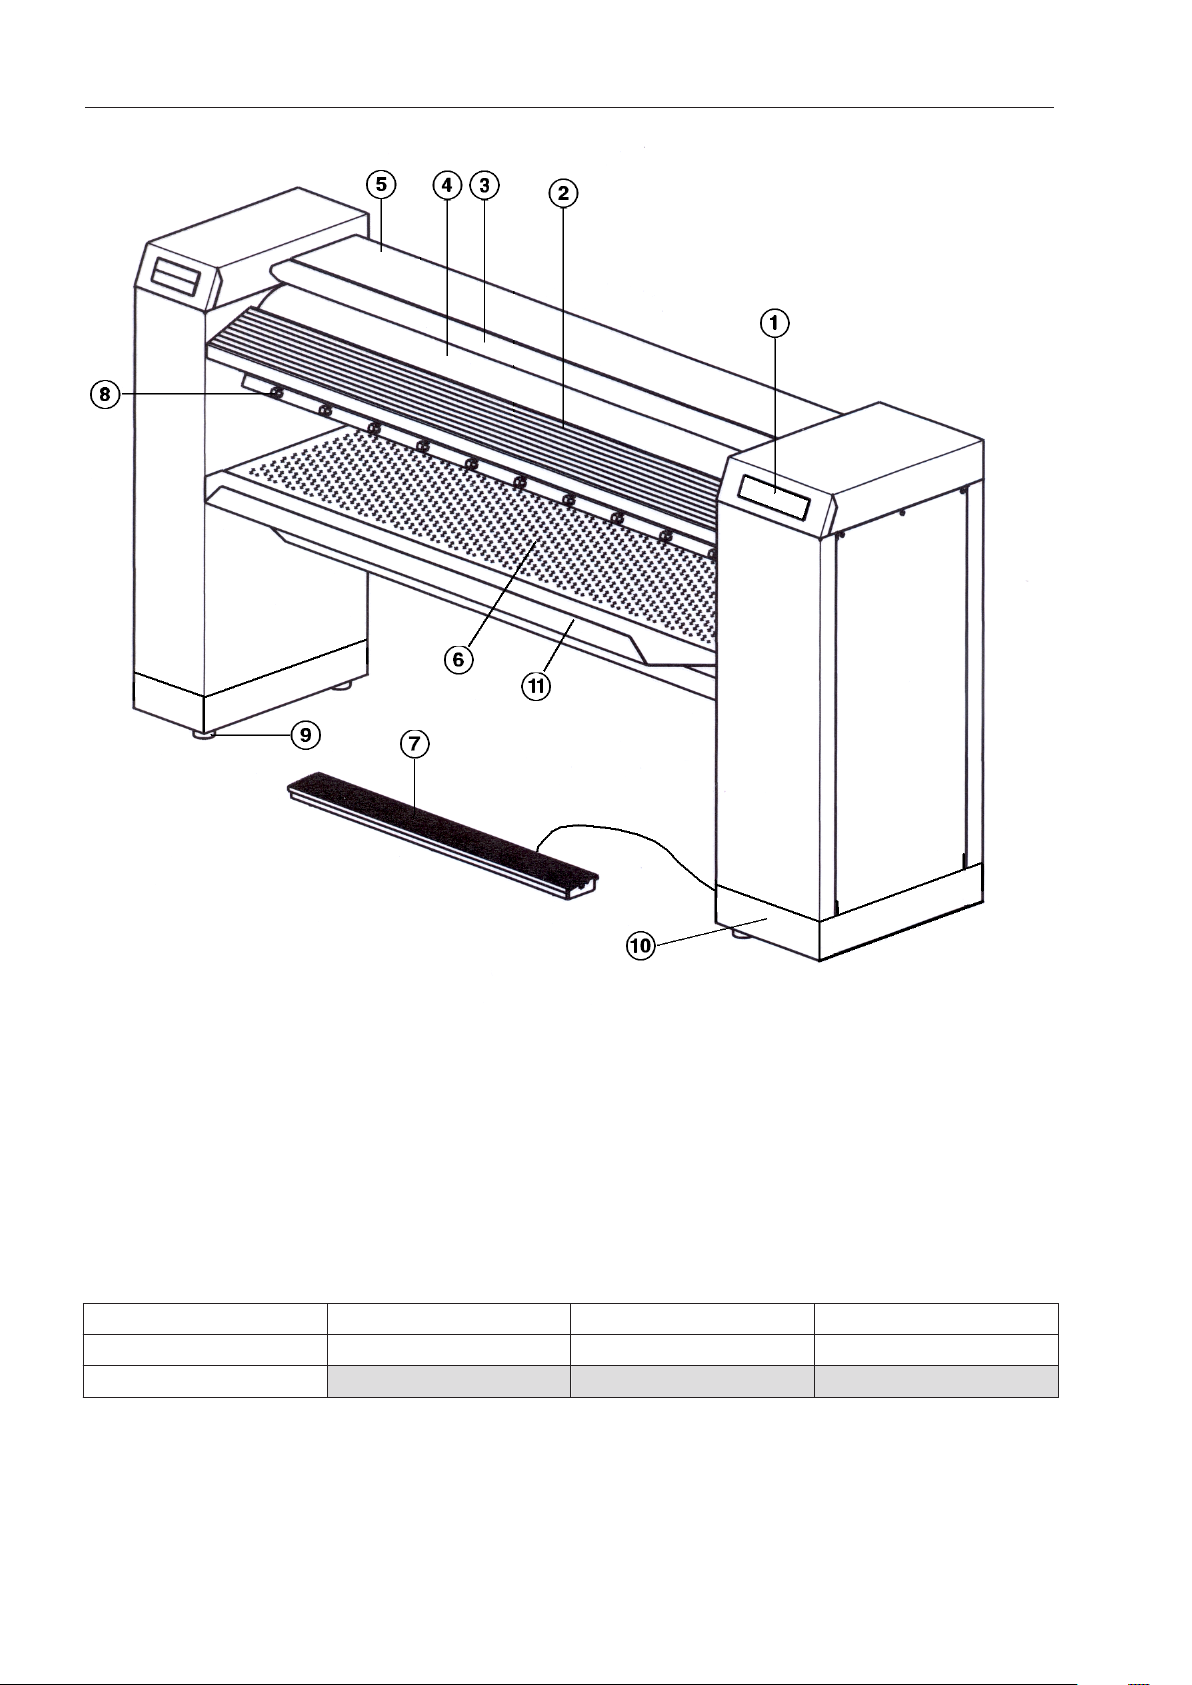
en-CA - Guide to the machine
a
Control panel (touch display)
b
Laundry infeed table
c
Finger guard
d
Roller
e
Heater plate with cover
f
Laundry outfeed table
Option PM 1210 PM 1214 PM 1217
Laundry rod Standard
Base X X X
8
g
FlexControl footswitch
h
Pick-off bands
i
Height adjustable screw feet
j
Base (optional)
k
Laundry box
Page 9
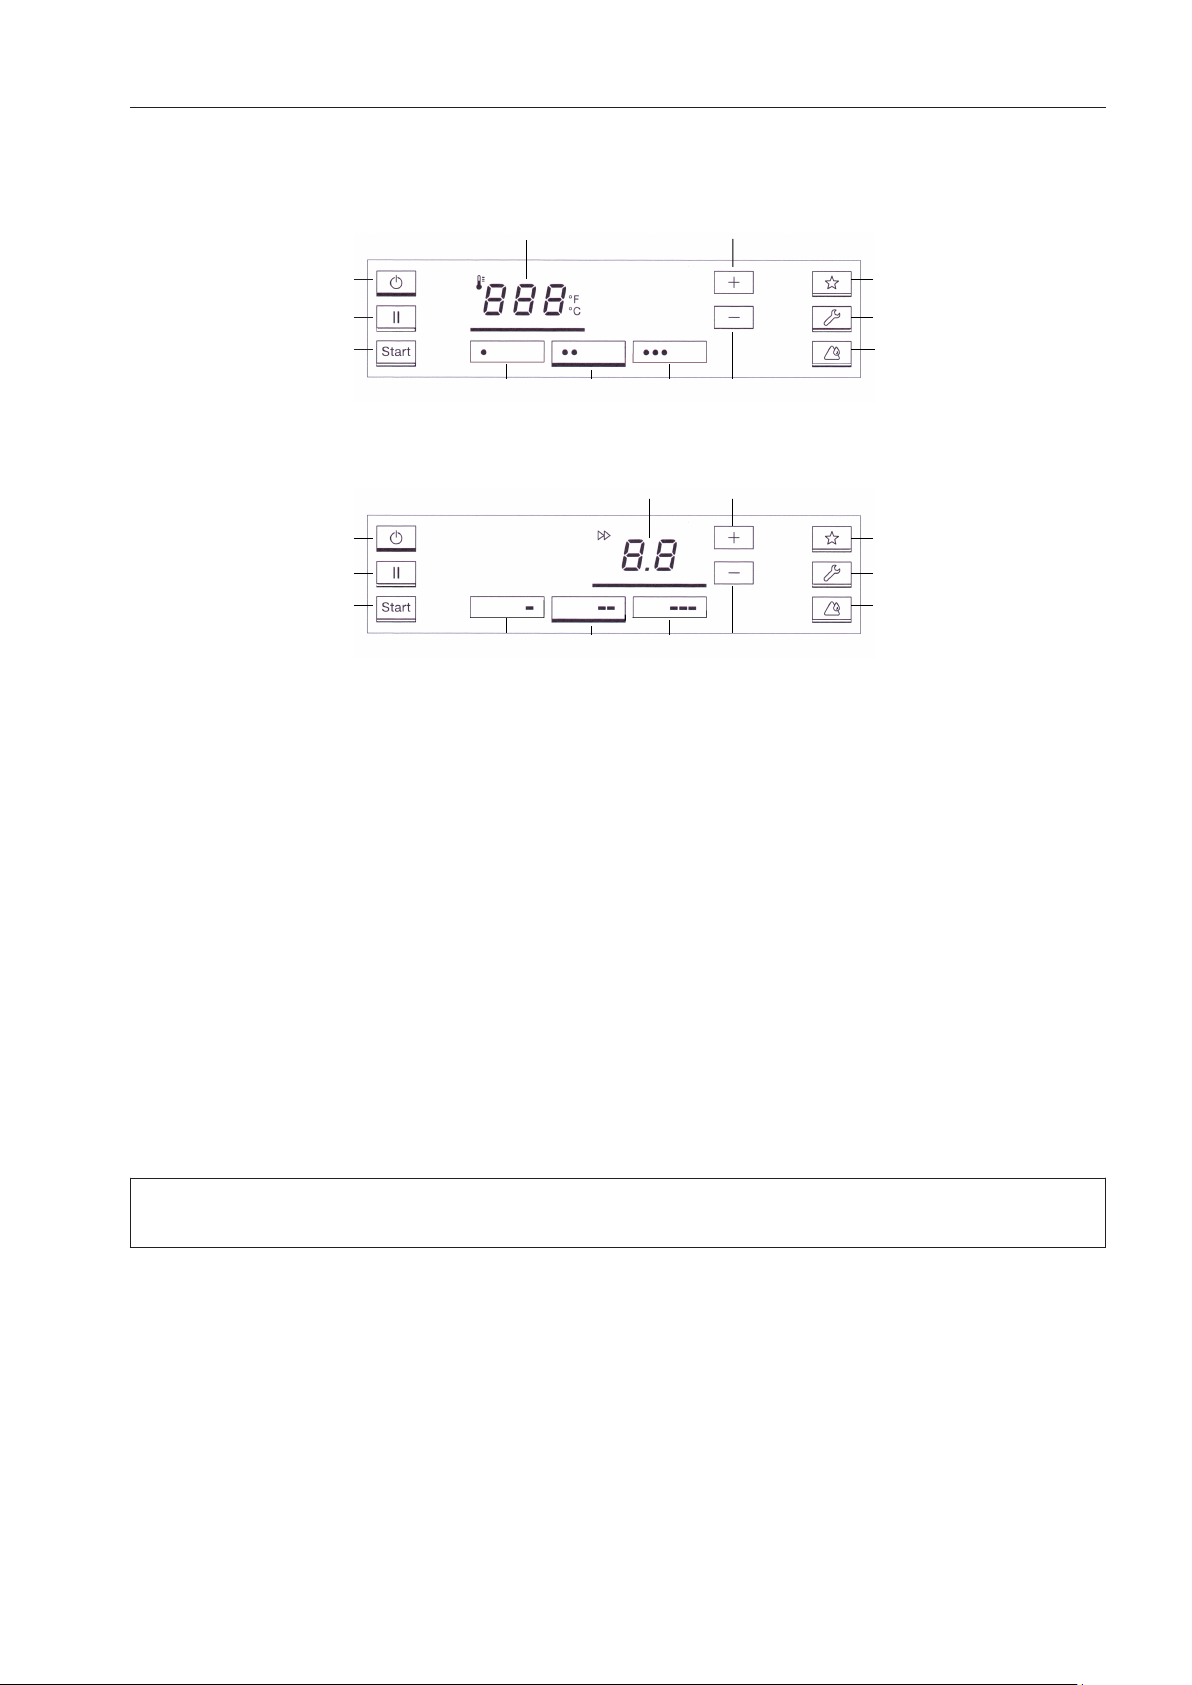
Control buttons on the Touch display
en-CA - Guide to the machine
Top: temperature range, Bottom: ironing speed range
a
On/Off, Standby
b
Pause
c
Start
d
Temperature selection mode
e
Temperature selection button 1
f
Temperature selection button 2
g
Temperature selection button 3
h
Increase temperature / roller speed
i
Decrease temperature / roller speed
j
Favorites program
k
Maintenance position*
l
Clean / Wax
m
Roller speed selection mode
n
Roller speed selection button 1
o
Roller speed selection button 2
p
Roller speed selection button 3
* Button can be activated by Miele Service during commissioning.
When a button is successfully pressed, it is highlighted with a bar. When the
flashes, the rotary iron can be started.
button
9
Page 10

en-CA - Guide to the machine
Display symbols on the control panel
a
Activate the finger guard
b
Heating on / temperature increasing
c
Cleaning and waxing (only for PM 1217)
d
Heating off / temperature too high
e
General fault
f
Constant incorrect laundry feed, left /
right
g
Pre-selection and display of temperature
in °C / °F
h
Pre-selection and display of roller speed
i
Roller speed range
j
Coin operation mode
k
Switch temperature units
10
Page 11
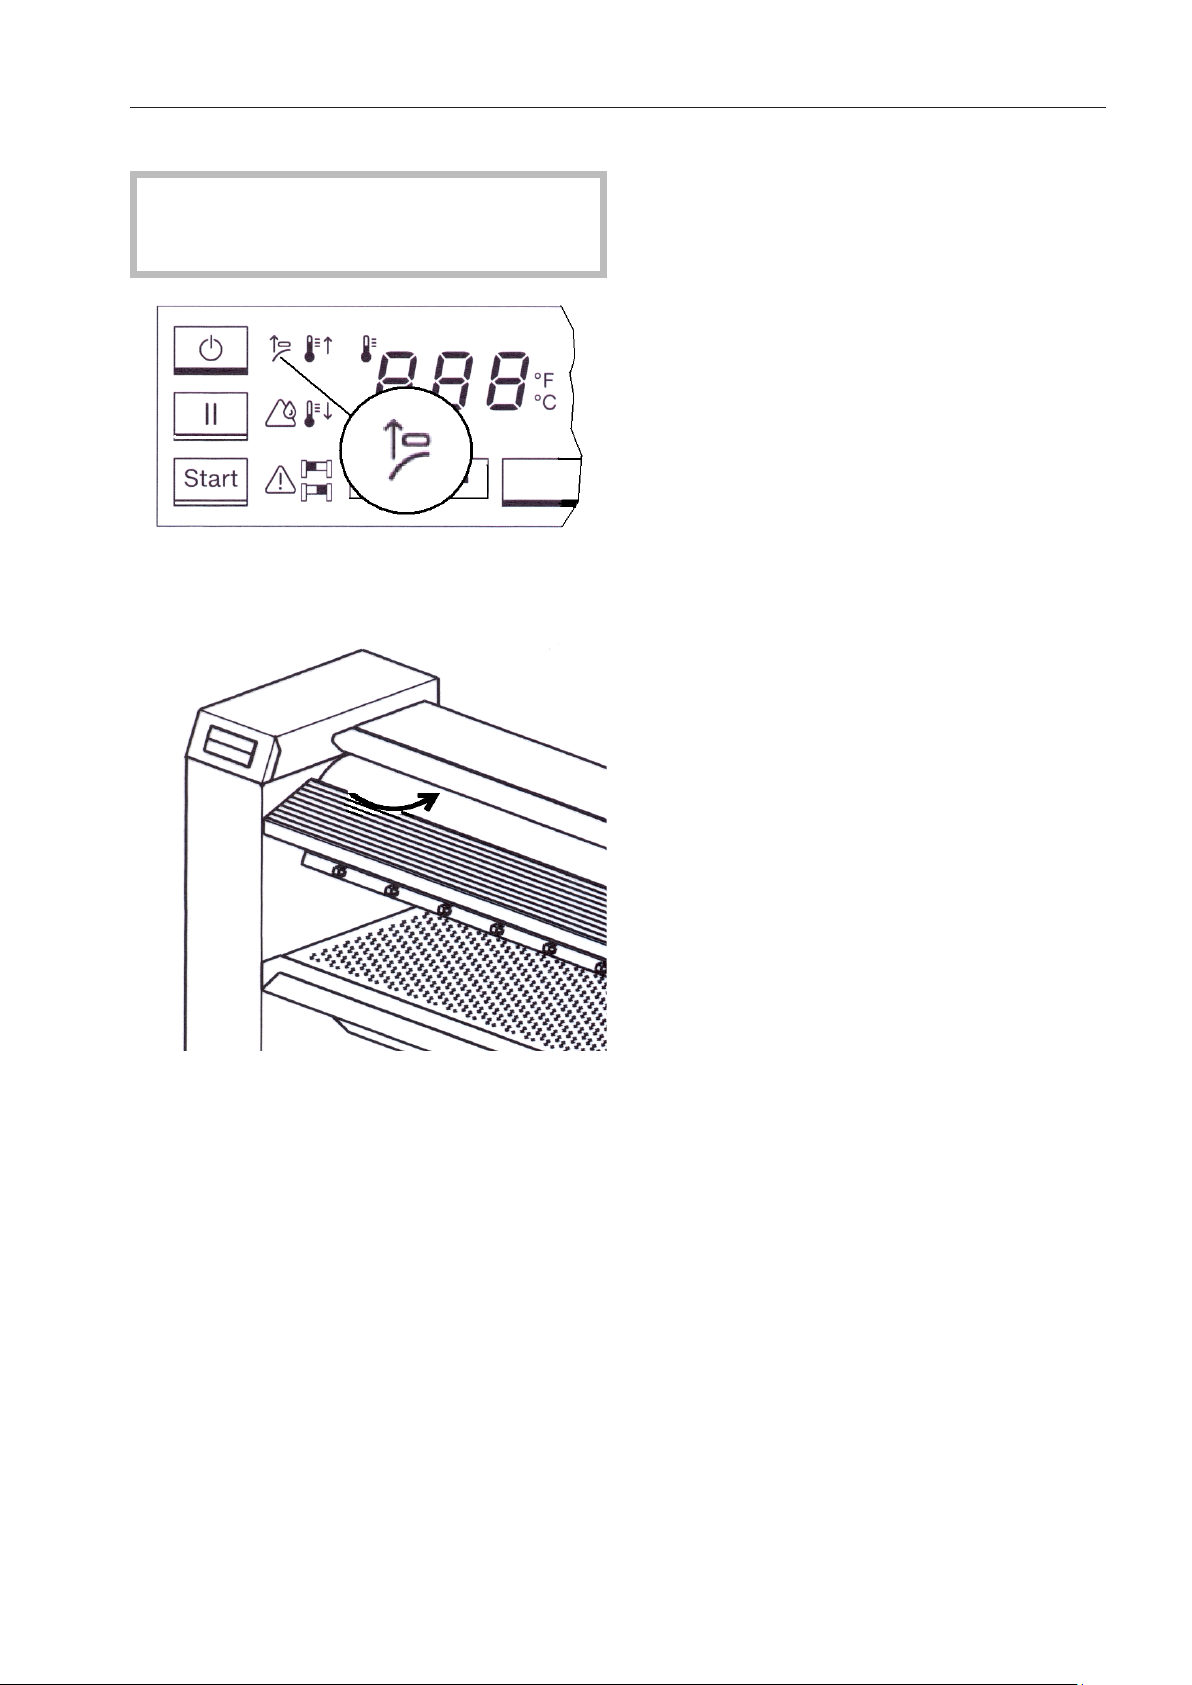
Finger guard
The finger guard is a safety device that
st be checked daily for proper function
mu
every time the ironer is turned on.
Activate the finger guard once while the
"Fing
er guard" symbol is flashing.
en-CA - Guide to the machine
If finger tips get between the roller and the
finge
r guard, the roller is stopped immedi‐
ately and the heater plate is withdrawn.
When this happens, the "Finger guard" dis‐
play symbol will light constantly. During the
reverse mode of the roller, the finger guard
has no function. The ironer can be turned on
again by pressing the button.
Do not use the finger guard intentionally to
turn off the machine.
Laundry rod
(only for PM 1210)
Ironed laundry can be placed over the swing
out bar t
o prevent creasing.
11
Page 12
en-CA - Preparing the laundry
Residual moisture in the laundry
For a good result and optimum iron per‐
formanc
for the PM 1214 and PM 1217 lies between
15% and 25%, for the PM 1210 at 15%.
The ideal residual moisture level depends
on the composition of the fabric.
Preparing the laundry
Before starting to ironer, sort the laundry ac‐
cor
pay attention to the care label. We recom‐
mend that the laundry be sorted in the fol‐
lowing order:
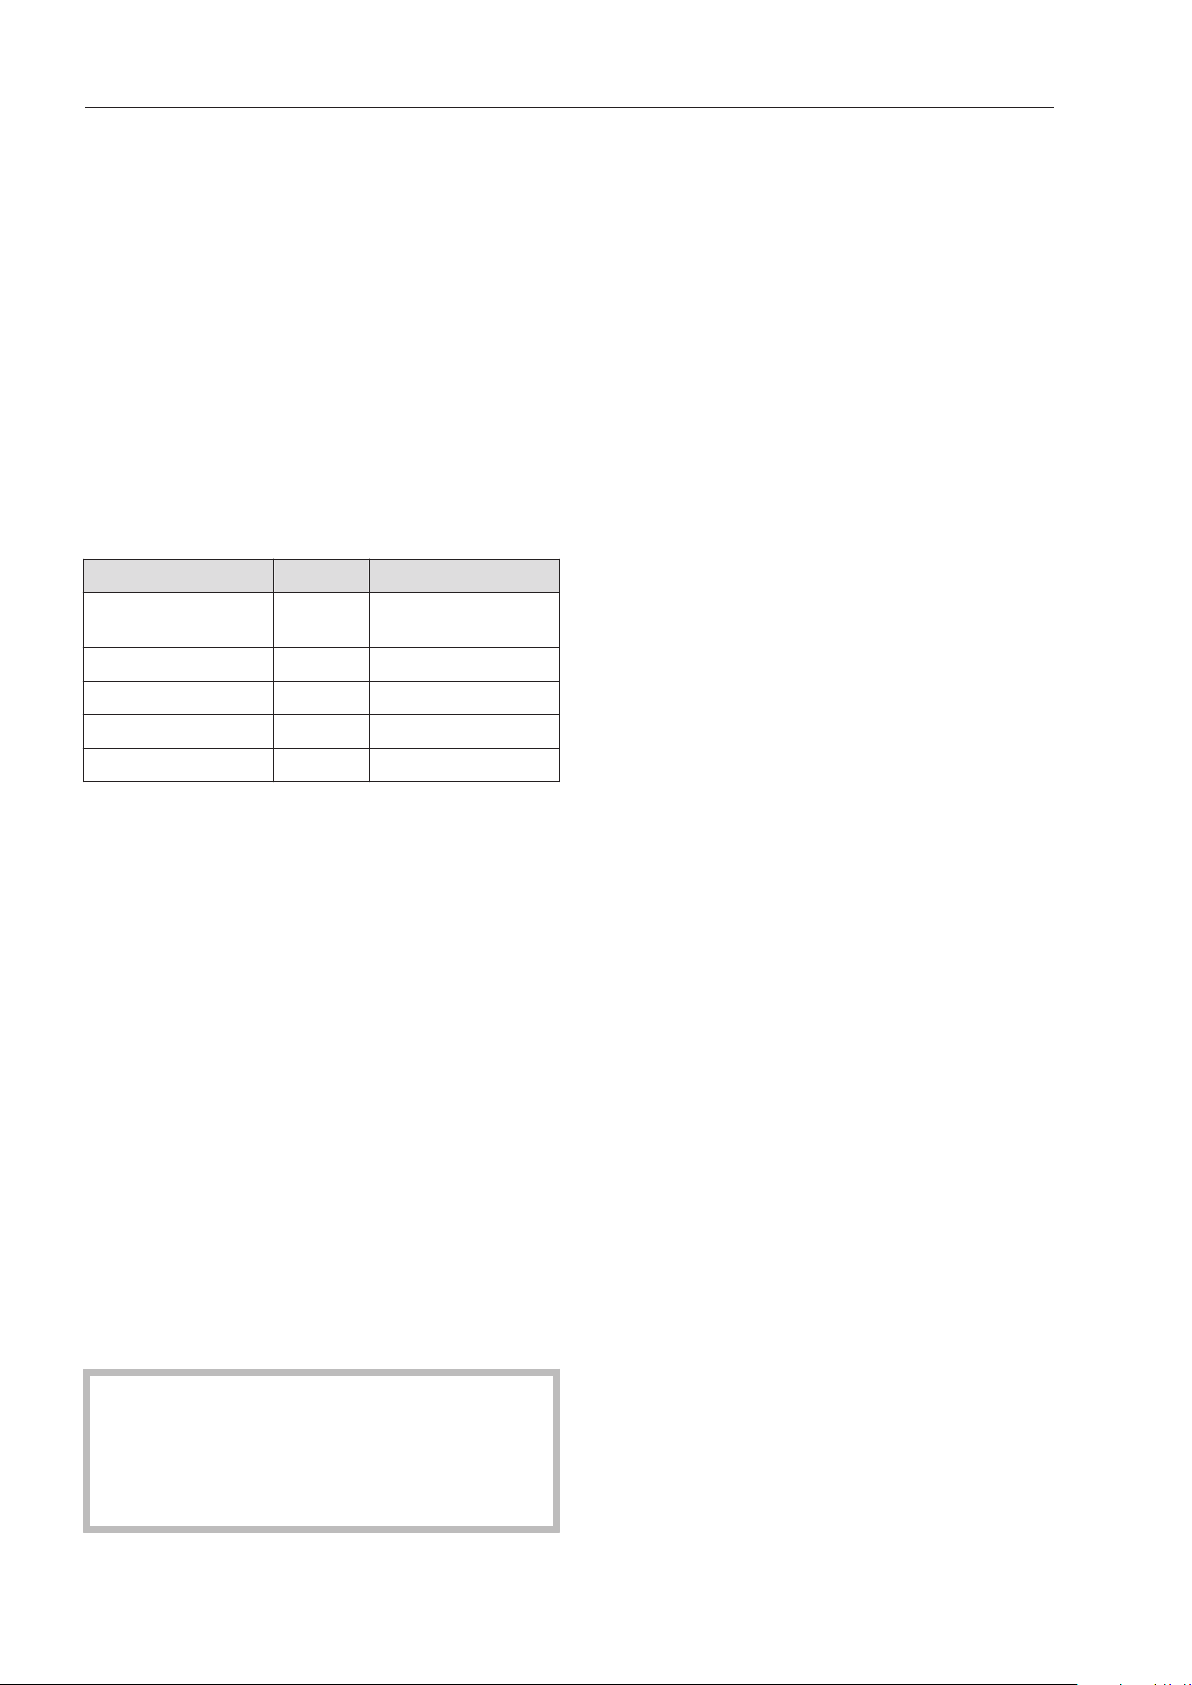
Material Symbol Temperature
Nylon, other synthet‐
ics
Then:
Wool, silk
And then
Cotton, linen
e the ideal residual moisture level
ding to type and fabric. In the process,
100 - 110°C
111 - 150°C
151 - 180°C
If it is necessary to switch to a lower tem‐
per
ature because the temperature is too
high, the display symbol will indicate that
the temperature is currently too high and the
heating is being deactivated. As soon as the
display symbol extinguishes, the selec‐
ted temperature is reached. Iron starched
laundry last so that any starch remaining on
the heater plate does not get onto other
laundry. Items with buttons must be fed in
such a way that the buttons are pointing to‐
wards the roller padding. If the buttons are
facing upwards, there is a danger that they
could be damaged or torn off when being
fed into the ironer. To protect the heater
plate, place a cloth over zippers, metal but‐
tons, and metal hooks before ironing. Do
not iron any kind of metal and plastic buckle
or extremely high buttons (such as ball-sha‐
ped buttons).
Before using the rotary iron for the first
, clean the heater plate by passing a
time
Miele cleaning cloth across the entire
width of the roller. Then, wax the heater
plate using the wax sparingly.
12
Page 13
en-CA - Operation
Preparing for use
Switch
Switch
Off button.
The "Finger guard" symbol will flash in the
display
N
The finger guard is a safety feature which
must be check
every time the ironer is switched on.
on the on-site mains switch.
the ironer on by pressing the On /
.
ow activate the finger guard by lifting it.
ed for proper functioning
Ironing
Aft
er switching the ironer on, wait until it
has reached the minimum ironing temper‐
ature.
The symbol will appear in the display
and the ir
oner will heat up.
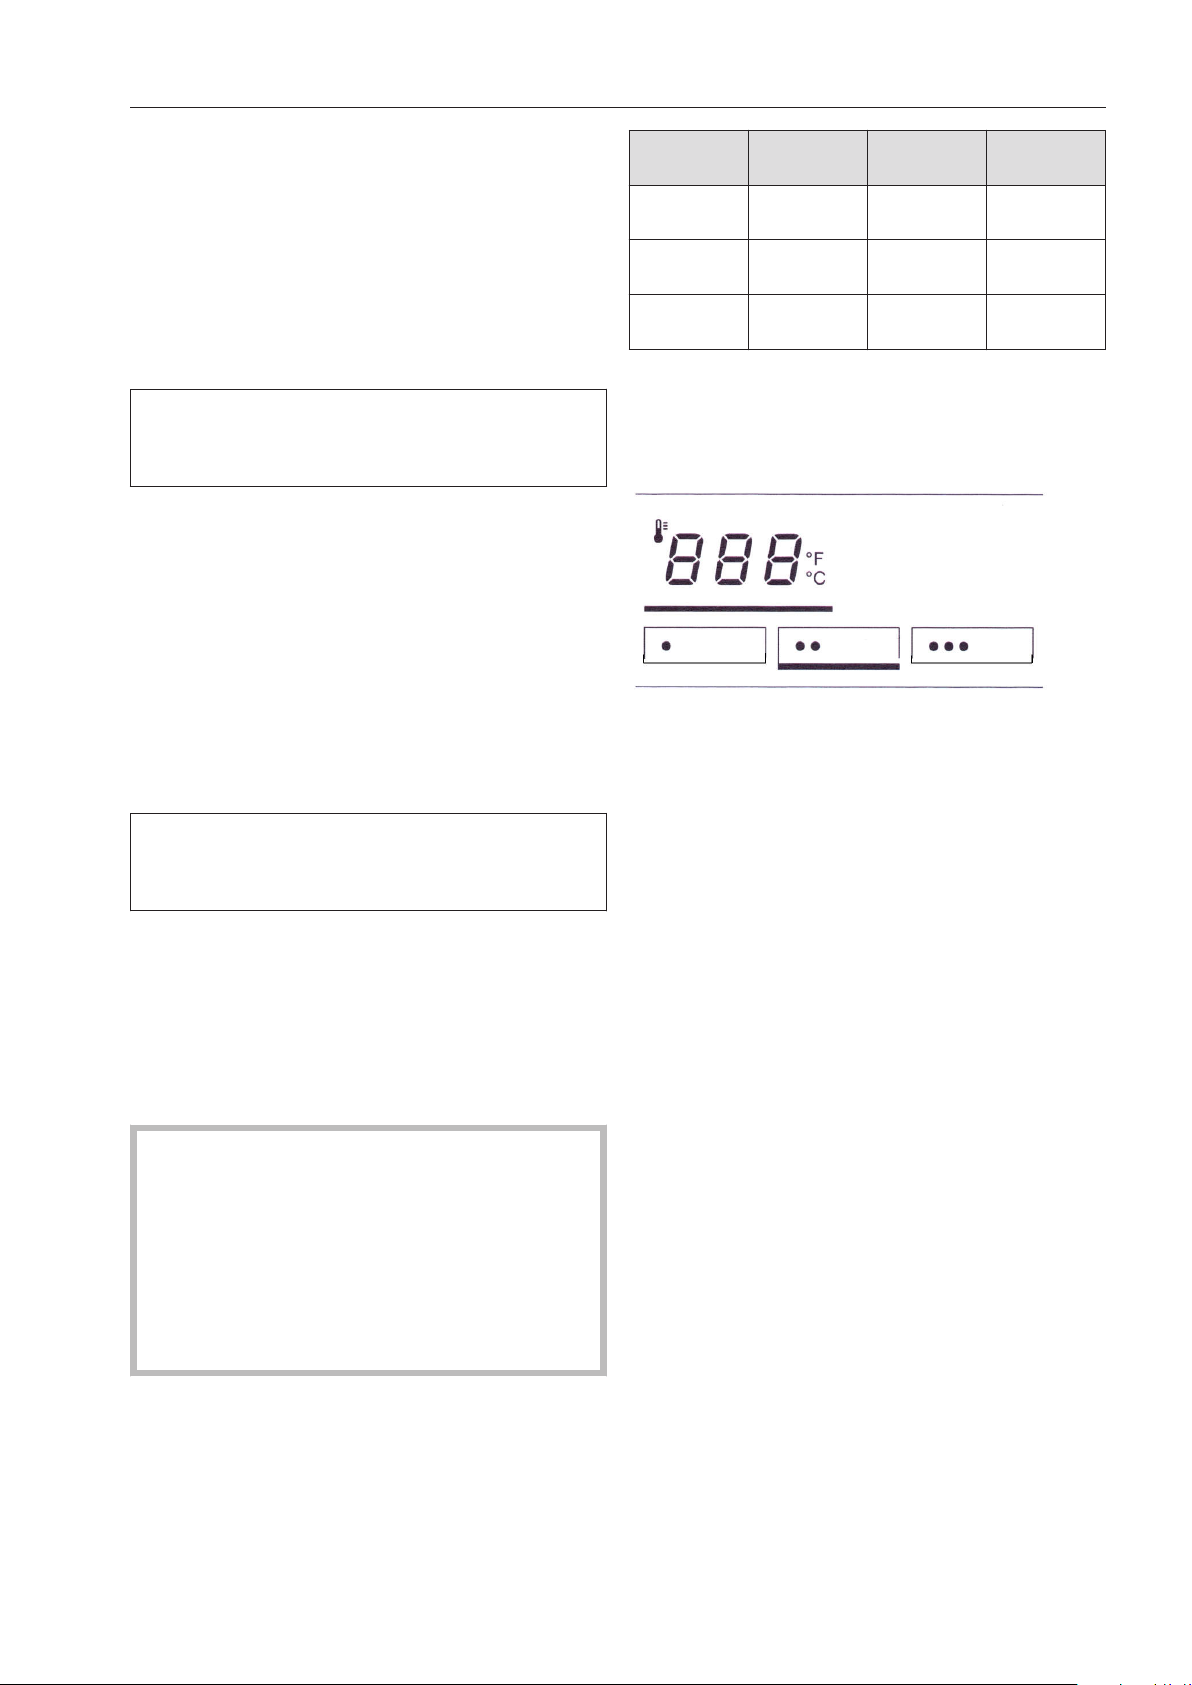
Material Symbol Tempera‐
e
tur
Nylon / artifi‐
cial silk
Wool, silk
Cotton, linen
100 - 110°C
(212 - 230°F)
111 - 150°C
(231 - 302°F)
151 - 185°C
(303 - 365°F)
Preset value
110°C
(230°F)
125°C
(257°F)
180°C
(356°F)
The temperature can be selected either us‐
ing
the preset temperature ranges or directly
by using the "Increase temperature" or
"Decrease temperature" buttons.
The butt
on begins to flash as soon as
the ironer has reached the minimum tem‐
perature.
The ironer is ready for operation when the
emperature is reached and the
set t
symbol no longer appears in the display.
ow press the flashing button to start
N
up the ironer.
The ironing process will begin.
Useful tip: Allo
w the roller to rotate for
about 5 minutes to enable the heat to equal‐
ize between the heater plate and the roller.
Danger of burns on the edge of the
eater plate!
h
There is danger of burning if the edge of
heater plate is touched on the laundry
the
outfeed side when the ironer is heated up
and the heater plate is engaged. There is
a warning sticker on the top and at the
back on the housing.
ress the "Temperature selection mode"
P
button on the control panel. The
button will then be highlighted with a bar
underneath.
T
o set a temperature range, press the rele‐
vant temperature selection button, e.g.
(pre-set as factory default to 125°C/
257°F). The button will be highlighted with
a bar underneath.
Changing the pre-set temperature for a
t
emperature selection button
ress the temperature selection button
P
you want to change the value for.
Keep it pressed in. The bar will light up un‐
derneath it and the curr
ent temperature val‐
ue will appear in the display.
Press the "Increase temperature" or
"Decrease temperature" buttons to set
the temperature you want to save for that
button.
Selecting the temperature
Set the co
rresponding heater plate tem‐
perature according to the type of fabric.
hen press and hold the selected temper‐
T
ature selection button (which is highligh‐
ted with a bar underneath) until it flashes
once.
13
Page 14
en-CA - Operation
The temperature value is now saved for that
t
emperature selection button.
Useful tip: Allow the roller to rotate for
about 5 minutes to enable the heat to equal‐
ize between the heater plate and the roller.
Selecting the ironer speed
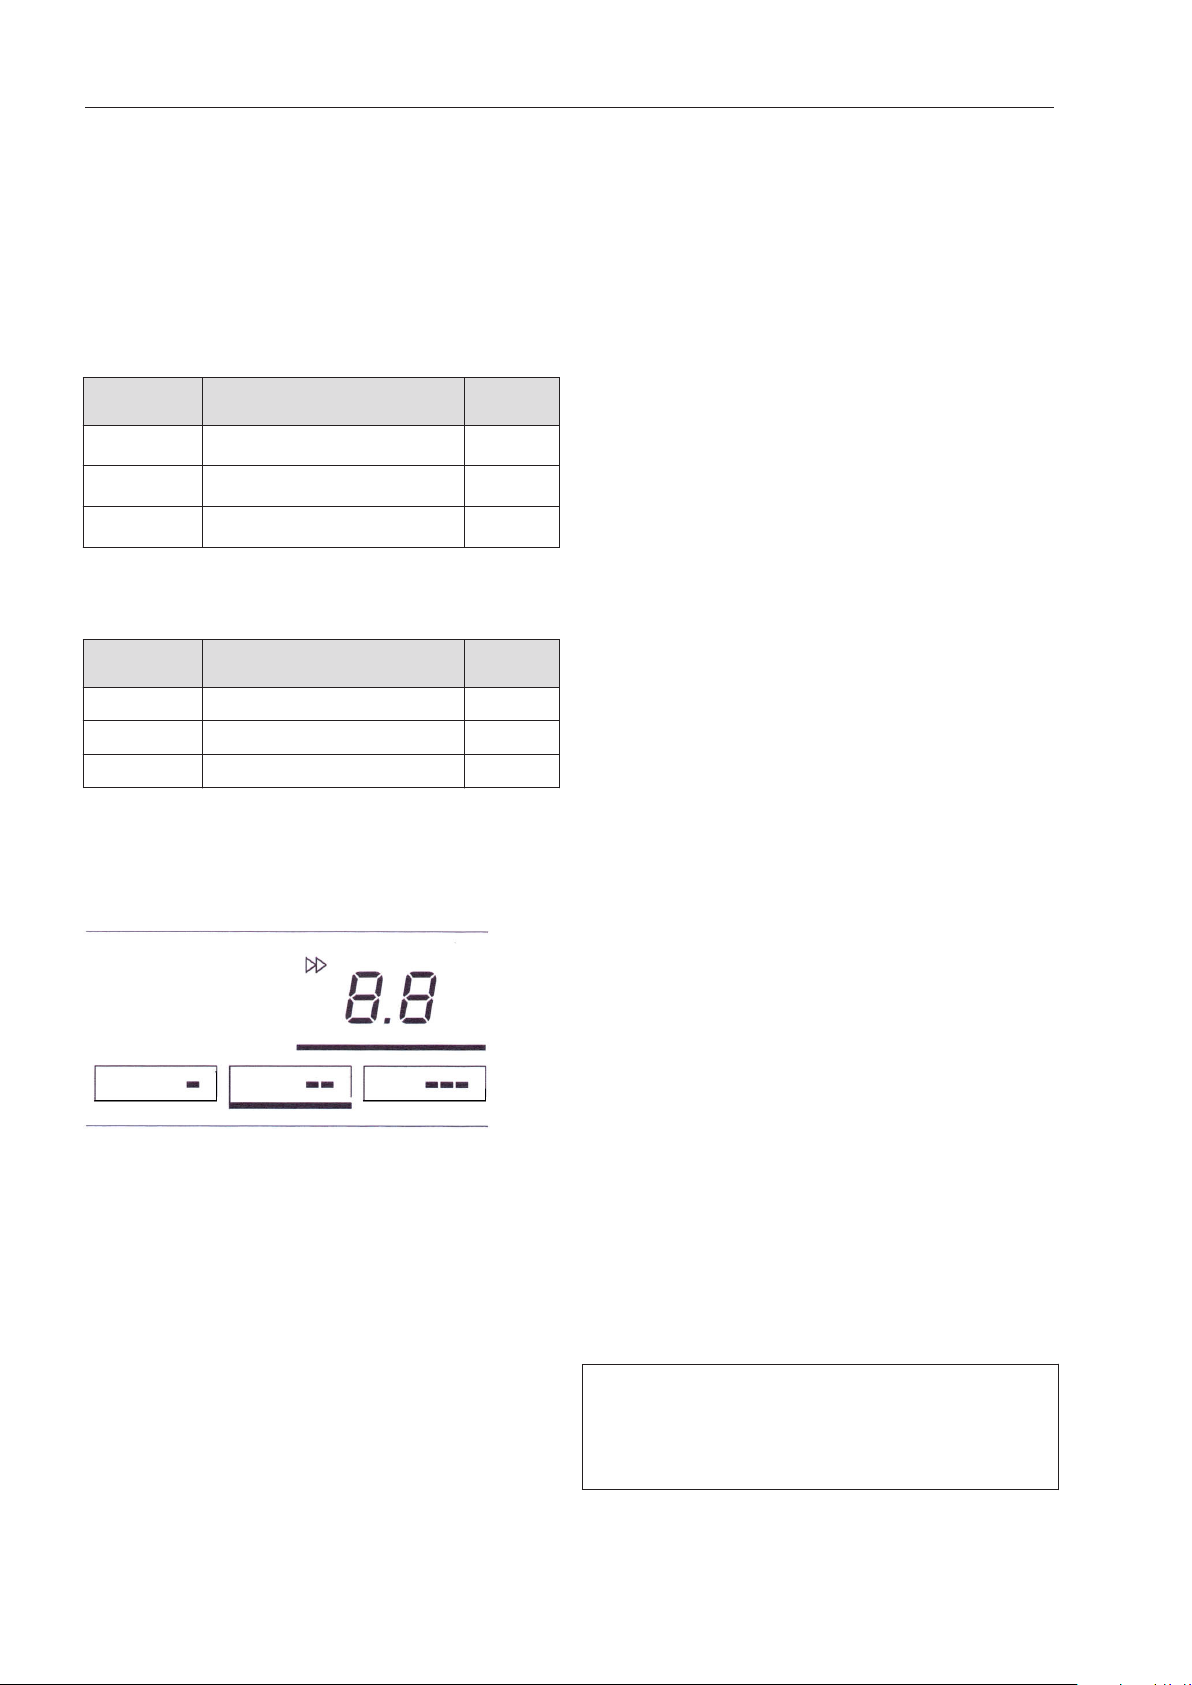
PM 1210 / PM 1214:
Symbol Speed range
Low speed range 1.5 - 2.2
Medium speed range 2.3 - 3.2
High speed range 3.3 - 4
m
/
min
PM 1217:
Symbol Speed range
Low speed range 1.5 - 2.4
Medium speed range 2.5 - 3.4
High speed range 3.5 - 4.5
m
/
min
Roller speed can be selected either using
the pr
eset speed ranges or directly by using
the "Increase roller speed" or "Decrease
roller speed" buttons.
Changing the pre-set roller speed for a
r
oller speed selection button
ress the roller speed button you want to
P
change the speed for.
Keep it pressed in. The bar will light up un‐
derneath it and the curr
ent roller speed will
appear in the display.
Press the "Increase roller speed" or
"Decrease roller speed" button to set
the roller speed you want to save for that
button.
hen press and hold the selected roller
T
speed button (which is highlighted with a
bar underneath) until it flashes once.
The roller speed is now saved for that roller
speed b
T
utton.
hen press the button.
Laundry feed
ay the item parallel to the roller at the be‐
L
ginning of the laundry infeed table.
Smo
F
Useful tip: Do n
oth the item.
eed the item into the machine.
ot restrict ironing of smaller
articles to any one part of the roller. Make
use of the whole roller width. If laundry is
continuously fed in on one side of the roller
an infeed fault symbol will appear in the dis‐
play (see display symbol on the control
panel).
Setting the ironer speed
P
ress the "Roller speed selection mode"
. button.
The button will then be highlighted with a
bar underneath.
hen press one of the three roller speed
T
buttons, e.g. the "Roller speed 2" but‐
ton.
The button will then be highlighted with a
bar underneath and the ironer will operate at
the pre-set roller speed for this button.
14
Pauses in ironing
ress the "Pause" button to go into
P
Pause mode.
The heater plate is disengaged and the roll‐
er comes t
o a standstill. The heating will re‐
main turned on.
ress the button to start ironing again.
P
The ironer remains ready to operate in
Pause mode. If it is not used for a period of
10 minutes the temperature is reduced to
60°C (140°F).
Page 15

en-CA - Operation
Standby mode
Standby mode is turned off at the factory. It
can be r
eactivated by Miele Service. The
time interval after which the ironer switches
into Standby mode can be set between 1
minute and 30 minutes of inactivity. The
ironer can be turned on again by pressing
the "On / Off" button.
In Standby mode the heater plate is disen‐
ed and the roller comes to a standstill.
gag
The heating is turned off.
FlexControl footswitch
Steaming the laundry
Whi
le ironing, press the FlexControl foot‐
switch with your foot to switch the ironer
to steaming mode and steam the laundry.
When the ironer is switched to steaming
mode, the r
oller stops. The heater plate re‐
mains in contact.
Continue ironing
Re
move your foot from the footswitch
again to continue with the ironing proce‐
dure.
When the foot switch is released, the roller
omatically starts to rotate again and the
aut
ironing procedure is continued.
Alternatively, the footswitch can be adjus‐
ed by Miele Service in such a way that the
t
heater plate disengages and the roller
stops when the footswitch is activated.
Pick-off bands
The pick-off bands are used for picking
dry off the roller.
laun
The ironed laundry can be very hot when
it co
mes out of the heater plate.
Danger of burns!
Use protective gloves if necessary.
After ironing
L
et the roller run for about 5 minutes at
minimum heating temperature to dry out
the roller cover completely.
urn off the rotary ironer using the "On /
T
Off" button .
The heater plate will disengage and the fan
will run for 10
minutes to cool down. The
"On / Off" button will flash during this
time.
Switch
All
off the on-site main switch.
ow the ironed laundry to cool down
before packing or stacking it.
Hot laundry could self-ignite and cause a
fir
e.
Ironing with a coin-operated pay‐
ment syst
Switch
Off" button.
The display symbol flashes.
Inser
The symbol will go
ect the corresponding temperature
Sel
range according to the type of laundry.
ect the desired roller speed.
Sel
After the indicat
rotary ironer is ready for ironing and the
countdown of the purchased ironing time
begins.
P
ress the button to start the ironer.
t the end of the ironing time, the heater
A
plate disengages and the roller comes to a
standstill. The display symbol flashes.
More ironing time can be purchased at
any time.
em
the ironer on by pressing the "On /
t the coin or token.
out in the display.
or light goes out, the
15
Page 16

en-CA - Notes
Changing the temperature unit (°C / °F)
The temperature unit can be changed from
°C t
o °F by Miele Service.
Favorites setting
Using the "Favorites" button , the most
used combinatio
speed can be saved so that they can be ac‐
cessed quickly and easily.
n of temperature and roller
Power failure during ironing
In case of a power failure, the heater plate
disenga
restored you need to restart the ironer by
pressing the button.
In case of a longer power outage, the ironer
must be sw
"On / Off" button, operating the finger
guard and pressing the button.
ges automatically. When power is
itched on again by pressing the
Peak load (option)
If the peak load option is active, the heating
of the ir
ture" and "Roller speed" flash in the display.
Ironing can be continued using the residual
heat in the heating plate until the ironer
goes into "Pause" mode.
oner is switched off and "Tempera‐
To save the desired parameters, press and
hol
d the "Favorites" button until it flashes
once. The saved values are then accessed
by pressing the "Favorites" button briefly.
When you leave the "Favorites" function, the
previously saved values are restored again.
Increasing the life of the roller cov‐
er
During longer pauses in ironing, switch off
oner or press the "On / Off" button
the ir
to enter Standby mode. This will considera‐
bly relieve the burden on the roller cover.
Avoid unnecessarily running the machine
witho
ut laundry. Do not restrict ironing of
smaller articles to any one part of the roll‐
er. Make use of the whole roller width.
If it is frequently used on only one side,
the heat is only absorbed on one side and
the
roller cover will wear unevenly. If laun‐
dry is continuously fed in on one side of
the roller an infeed fault symbol will ap‐
pear in the display and an audible tone
will sound.
16
Page 17
en-CA - Notes
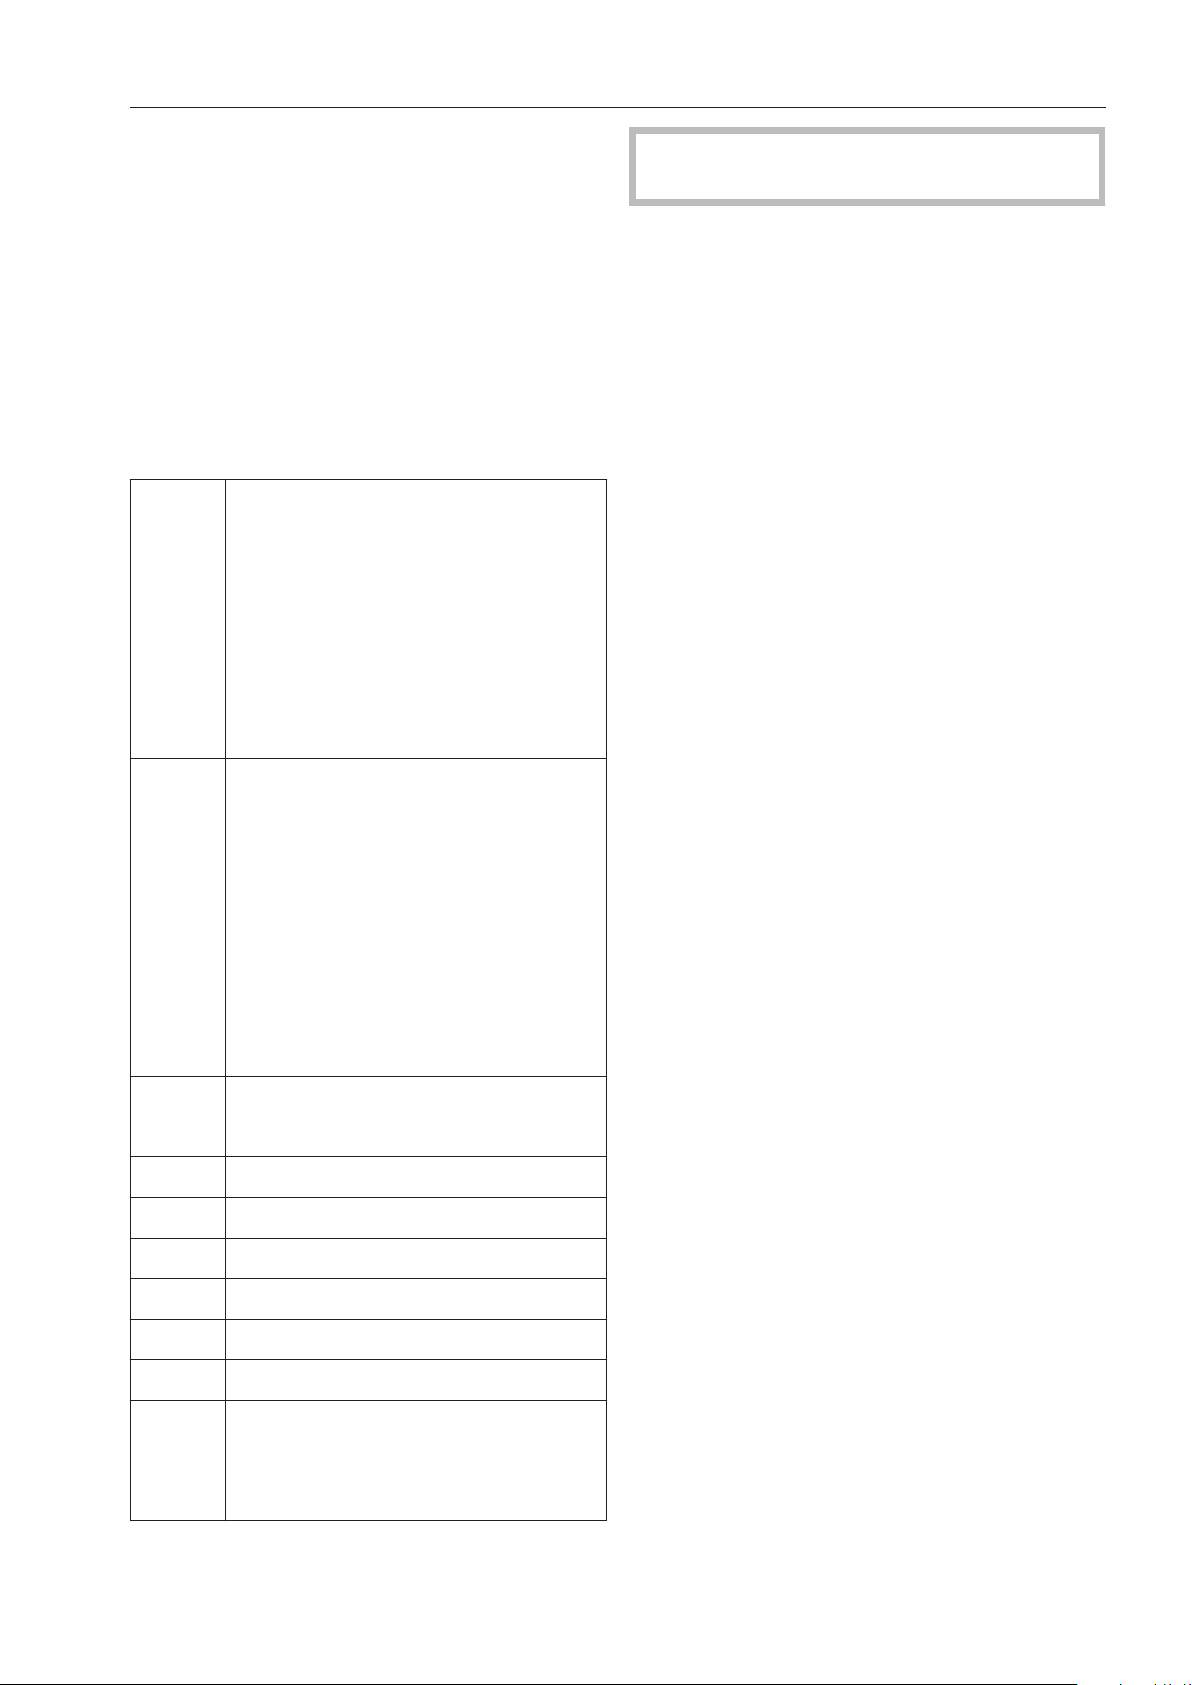
Fault messages
When a fault occurs ironing is interrupted,
and the "P
four-digit code appears in the display.
Pressing the flashing "Pause" button can‐
cels the fault (the fault is stored in the fault
memory). The "On/Off" button flashes
and ironing can be restarted.
If the fault message appears again, repeat
the pr
again.
F0
F1
F2
F8 Heating fault
F20
F24
ause" button flashes and a
ocedure or turn the ironer off and start
In the event of a malfunction, contact
Miele Service.
F25
F39
F40
F41
F42 Electronic module fault
F43
F45
F47
F49
F50 Drive fault
F53
F57 Fan fault
F61 12 V (24V) Voltage missing
F99 Machine blocked
F104 Drive voltage too low
F108 General compressor fault
F120 Low voltage
F4500
to Control system fault
F4512
17
Page 18

en-CA - Cleaning and care
Cleaning and waxing the heater
e
plat
Regular cleaning and maintenance of the
heat
er plate is essential for the protection of
the motor and the roller cover. Please follow
the notes in the Miele Ironing Handbook on
ironing and cleaning and care. The heater
plate must be waxed every time it is
cleaned. Failure to exercise due care and at‐
tention can result in a significant reduction
in the life cycle of the ironer.
The heater plate of this rotary ironer is
made of alu
not use coarse scouring agents or abra‐
sive cleaning cloths. For cleaning, use on‐
ly the Miele cleaning set. It includes a
cleaning cloth, wax cloth, and ironer wax.
This set can be ordered as a Miele acces‐
sory.
Use only the cleaning cloth approved by
Miele to clean the aluminum heater plate.
minum. For this reason, do
To start the cleaning mode, press the
"Clean / W
perature selection button . In this case, the
temperature is lowered to 80°C (175°F) and
the fan is turned off.
In case of heavier deposits, use the Miele
cleaning cloth. While doing so, use the low‐
es
t temperature setting and the lowest
roller speed. Wax the heater please after
every cleaning process as described in the
following section. Once the waxing has
been successfully carried out in waxing
mode, the interval for the cleaning prompt
indicator in the display (PM1217 has a fac‐
tory default of 40 hours) is reset. For the
PM1210 and PM1240 the same reminder
can be activated by Miele Service (Option).
ax" button and then the tem‐
Waxing the heater plate
To maintain the smooth surface of the
er plate it should be waxed sparingly
heat
with an ironer wax cloth every working day.
Residue (starch, detergent) may deposit in
the heat
heater plate according to degree of soiling,
before starting work.
The ironer has a cleaning program. The PM
1217
light up in the display after 40 operating
hours (factory default setting) to prompt
you to clean and wax the heater plate. The
interval at which the prompt appears is set
by Miele Service.
er plate. For this reason, clean the
also has an indicator which will
To start waxing mode, first press the
"Clean / W
ature selection button 3" button.
"Clean / Wax"
Wax the heater plate at maximum tempera‐
e, lowest speed and with the fan switch‐
tur
ed off. This setting is saved on the "Clean /
wax" button.
To activate the waxing function, press the
"Clean / Wax" button and hold it for
longer than 3 seconds. To deactivate the
function, press and hold the button again
for longer than 3 seconds.
ax" button and then "Temper‐
button
18
Page 19

T
o wax the heater plate with the wax
cloth, sprinkle the wax into the pocket of
the wax cloth and close the pocket.
Use the wax sparingly to avoid the roller
cover becom
ing too smooth.
en-CA - Cleaning and care
Removing the roller cover
Please note that the laundry pick-off
bands on
tracted one after the other.
T
urn on the rotary iron using the "On / Off"
button .
P
ress and hold the "Maintenance posi‐
tion" button for more than three sec‐
onds.
The heater plate lowers and is locked into
this position.
the rollers need to be fully re‐
As soo
n as the right temperature has been
reached, the "Start" button starts to flash.
Press this button to start the waxing proc‐
ess.
ay the pocket with the rubber-coated
L
side facing downwards (i.e., towards the
roller) and feed it into the warm machine
(heater plate temperature: approx. 180°C /
356°F).
Do not feed the wax cloth with the rub‐
ber-coated side facing upwards (i.e., to‐
wards the heater plate). It will damage the
roller padding!
By r
epeatedly pressing the "Reduce tem‐
perature / Roller speed " button, incre‐
mentally reverse the roller (jog mode).
T
ake the end of the roller cover and put it
on the laundry infeed table.
W
ith the roller in reverse, now remove the
roller cover (jog mode).
P
ress and hold the "Maintenance posi‐
tion" button for more than three sec‐
onds to deactivate the maintenance posi‐
tion.
Wire wool residues may fall onto the laundry
table whilst the r
oller cover is being taken
off. These must be removed.
Fitting the roller cover
Switch
ature and lowest speed by pressing the
"Start" button.
on the ironer at the lowest temper‐
Feed the wax cloth into the ironer from the
left or right at the necessary intervals
across the entire working width of the ma‐
chine.
o deactivate the function, press and hold
T
the "Clean / Wax" button for longer
than 3 seconds.
Roller cover and padding instruc‐
tions
Turn off the rotary iron before removing the
oller cover (for cleaning or exchange) and
r
let the heater plate cool down.
D
uring a normal ironing process, place the
roller cover on the ironer parallel to the
roller and feed the roller cover over the
roller.
19
Page 20

en-CA - Cleaning and care
The roller cover needs to be changed if
there is a visible gap on the lower edge of
the heater plate and roller (laundry infeed)
due to prolonged use.
Replacing the stainless wool padding on
the roller must only be carried out by
Miele Service.
The d
roller must not exceed the following di‐
mensions (including the roller cover).
iameter of a new or re-upholstered
PM 1210 / PM
1214:
min. 210 mm (ap‐
pr
ox. 8.3 in.) - max.
215 mm (approx. 8.5
in.)
Within this range the roller should be wound
cylin
drically over its entire length.
During the replacement of the roller pad‐
ding, Miele Service should check whether
the carbon brushes of the drive motor
need to be replaced as well.
PM 1217
min. 250 mm (ap‐
pr
ox. 9.8 in.) - max.
255 mm (approx. 10
in.)
Miele Service
In the event of a fault, contact Miele Serv‐
ice. Miel
Nr) and serial number (SN).
This information can be found on the data
plat
e Service will require the model (M-
e.
Use only genuine Miele spare parts for
eplacement Miele Service will require the
r
model and serial number (SN) when order‐
ing.
20
Page 21

fr-CA - Table des matières
Consignes de sécurité et mises en garde....................................................................... 23
Utilisation conforme............................................................................................................. 23
Sécurité technique et électrique ......................................................................................... 23
Utilisation de l'appareil ........................................................................................................ 24
Utilisation d'accessoires ..................................................................................................... 24
Quelques précautions à observer avec la repasseuse ....................................................... 25
Votre contribution à la protection de l'environnement ..................................................
26
Emballages de transport ..................................................................................................... 26
Votre ancien appareil .......................................................................................................... 26
Description de l'appareil...................................................................................................
27
Touches de commande sur l'écran tactile........................................................................... 28
Symboles d'affichage sur le panneau de commande ......................................................... 29
Barre protège-doigts ........................................................................................................... 30
Tringle à linge....................................................................................................................... 30
Préparation du linge..........................................................................................................
31
Humidité résiduelle du linge ................................................................................................ 31
Préparation du linge............................................................................................................. 31
Utilisation ...........................................................................................................................
32
Préparer la repasseuse pour le fonctionnement.................................................................. 32
Repassage........................................................................................................................... 32
Sélectionner la température ............................................................................................ 32
Modifier la valeur de température pré-réglée d'une touche de sélection de température
........................................................................................................................................
32
Choisir la vitesse de repassage....................................................................................... 33
Régler la vitesse de repassage ....................................................................................... 33
Modifier la valeur de vitesse de rotation pré-réglée d'une touche de sélection de vitesse
de r
otation du cylindre .................................................................................................... 33
Introduction du linge ....................................................................................................... 33
Pause de repassage........................................................................................................ 34
Mode Veille...................................................................................................................... 34
Barre de commande au pied "FlexControl".................................................................... 34
Décolleur ......................................................................................................................... 34
Après le repassage.............................................................................................................. 34
Utilisation d'un monnayeur.................................................................................................. 34
Remarques......................................................................................................................... 36
Changement d'unité de température................................................................................... 36
Réglage des Favoris............................................................................................................ 36
Augmentation de la durée de la toile de repassage............................................................ 36
Panne de courant pendant le repassage............................................................................. 36
Délestage (option)................................................................................................................ 36
Messages d'erreur .............................................................................................................. 37
Nettoyage et entretien ......................................................................................................
38
Nettoyer et paraffiner la presse ........................................................................................... 38
Paraffinage de la presse ...................................................................................................... 38
Garniture.............................................................................................................................. 39
Retirer la toile de repassage................................................................................................ 39
Pose de la toile de repassage.............................................................................................. 40
21
Page 22

fr-CA - Table des matières
Service après-vente Miele................................................................................................... 40
22
Page 23

fr-CA - Consignes de sécurité et mises en garde
Cette repasseuse répond aux consignes de sécurité en vigueur. Une utilisation non con‐
forme peut néanmoins être à l'origine de dommages corporels et matériels.
Lisez le mode d'emploi avant d'utiliser cette repasseuse pour la première fois. Vous y
tr
ouverez des informations importantes sur la sécurité, l'utilisation et l'entretien de cet
repasseuse. Vous assurez ainsi votre protection et éviterez d'endommager votre repas‐
seuse.
Si d'autres personnes sont formées à la manipulation de la repasseuse, il est impératif
de mettr
Conservez ce mode d'emploi et veuillez le remettre en cas de cession de cet appareil.
Utilisation conforme
Il faut impérativement utiliser cette repasseuse conformément aux instructions du mode
d'emploi, l'en
e à leur disposition les consignes de sécurité ou de leur expliquer.
tretenir régulièrement et vérifier son fonctionnement.
Cett
pouvant être repassés en repasseuse et munis du symbole d'entretien correspondant sur
l'étiquette.
Cett
mestique. Si la repasseuse est utilisée dans un endroit à accès public, l'exploitant doit ga‐
rantir par des mesures appropriées que l'utilisateur n'est pas exposé à une situation de
danger liée à des risques résiduels.
Cett
e repasseuse ne doit être utilisée que pour le repassage de textiles lavés dans l'eau
e repasseuse est à usage professionnel. Elle ne convient pas à une utilisation do‐
e repasseuse n'est pas prévue pour être utilisée en extérieur.
Sécurité technique et électrique
Cett
toyage travaillant aux solvants PER ou HCFC.
La r
La r
sont montées et qu'il n'y a pas de risque de contact avec des pièces conductrices, en
mouvement ou chauffées.
Ne pas abîmer
mande de la repasseuse.
e repasseuse ne doit pas être utilisée dans la même pièce qu'une machine de net‐
epasseuse ne doit fonctionner que dans un local sec.
epasseuse ne peut être utilisée que lorsque toutes les pièces d'habillage externes
, enlever ou désactiver les systèmes de sécurité et les éléments de com‐
N'effectue
autorisées par Miele.
Au cas où des or
la repasseuse, elle ne doit plus être mise en fonctionnement avant toute réparation.
z pas de modifications sur la repasseuse si elles ne sont pas expressément
ganes de commande ou des gaines d'isolation sont endommagés sur
La réparation des appareils électriques ne doit être effectuée que par un professionnel
agréé et habilité. Une réparation non conforme peut faire courir un danger considérable à
l'utilisateur.
Les pièces de rechange d'origine sont les seules dont Miele garantit qu'elles remplissent
pleinement les conditions de sécurité sur les repasseuses. Ne remplacez les pièces défec‐
tueuses que par des pièces détachées d'origine.
23
Page 24

fr-CA - Consignes de sécurité et mises en garde
Seul un r
repasseuse en toute sécurité. Respectez cette consigne de sécurité élémentaire afin de
prévenir tout dommage matériel ou corporel (ex. : décharge électrique). En cas de doute,
faites contrôler vos installations par un électricien. Miele ne saurait être tenu pour respon‐
sable de dommages causés par une mise à la terre manquante ou défectueuse.
La r
sible (à prévoir par l'utilisateur) est arrêté.
accordement à une prise de terre conforme garantit un fonctionnement de la
epasseuse n'est débranchée du secteur que lorsque l'interrupteur principal ou le fu‐
Utilisation de l'appareil
La r
L
inexpérience ou de leur ignorance, ne peuvent pas utiliser cette repasseuse en toute sécu‐
rité, ne doivent pas l'utiliser sans la surveillance et les instructions d'une personne respon‐
sable.
epasseuse ne doit jamais fonctionner sans surveillance.
es personnes qui en raison de déficiences physiques, sensorielles ou mentales, de leur
Ne laissez pas les enfants sans surveillance à proximité de la repasseuse. Ne les laissez
pas jouer avec l'appareil.
orsque la repasseuse est chaude et la presse est en position de repassage, le risque
L
de brûlure est important, en particulier si vous touchez le bord de l'auge au niveau de la
sortie du linge.
Ne r
d'entretien des textiles à repasser. En cas de température de repassage trop élevée, les
textiles pourraient s'enflammer.
L
deux couches pour tendre le linge. Vous risquez de ne plus pouvoir enlever votre main à
temps pour éviter de toucher la presse brûlante. Ne mettez pas non les mains dans les po‐
ches ouvertes vers la presse brûlante.
V
Dégag
V
prêt à être utilisé. Il existe un risque d'incendie en cas de température de repassage trop
élevée ou en cas de repassage de textiles non appropriés ou non lavés à l'eau !
L
effectués que par des entreprises spécialisées ou des professionnels, en veillant à ce que
les conditions de sécurité nécessaires au bon fonctionnement de cette repasseuse soient
réunies. Les règlements et prescriptions nationales en matière de sécurité ainsi que les
normes doivent également être respectés.
églez pas la température de repassage plus élevée que celle indiquée sur l'étiquette
orsque vous repassez du linge à double épaisseur, ne mettez pas la main entre les
érifiez que l'éclairage est suffisant lors du fonctionnement de la repasseuse.
ez bien la zone de travail autour de la repasseuse, aucun objet ne doit traîner.
érifiez qu'un extincteur se trouve bien à proximité immédiate et qu'il est à tout moment
e montage et l'installation de cette repasseuse sur des unités mobiles ne peuvent être
Utilisation d'accessoires
Seuls les acc
sur votre appareil, faute de quoi tout droit de recours à la garantie produit du fabricant ou
du revendeur devient caduque.
24
essoires expressément agréés par Miele peuvent être ajoutés ou montés
Page 25

fr-CA - Consignes de sécurité et mises en garde
Quelques précautions à observer avec la repasseuse
Seules des personnes âg
passeuse peuvent travailler à l'introduction du linge.
ortez toujours des vêtements près du corps pour repasser. Des vêtements amples (par
P
ex. des manches amples, les lanières de tablier, les foulards et les cravates) peuvent être
happés par le cylindre de la repasseuse.
vant d'utiliser la repasseuse, retirez vos bagues et bracelets.
A
Défr
d'appui. Introduisez les taies d'oreiller et les housses de couette en disposant le côté ou‐
vert vers le devant de la repasseuse. Ne tenez pas les coins de l'intérieur et ne mettez pas
les mains dans les manches de chemise et les poches de tablier.
V
peut être mise en service uniquement si les dispositifs de sécurité fonctionnent correcte‐
ment. De cette manière, il est possible de garantir que toutes blessures graves, pince‐
ments ou brûlures soient évités.
V
danger.
oissez les plis toujours le plus loin possible de la zone d'insertion sur la planche
érifiez quotidiennement le fonctionnement des dispositifs de sécurité. La repasseuse
érifiez avant d'enclencher la marche arrière du cylindre que cela ne mette personne en
Si d'autres personnes sont formées à la manipulation de la repasseuse, il est impératif
de mettr
Conservez ce mode d'emploi et veuillez le remettre en cas de cession de cet appareil.
e à leur disposition les consignes de sécurité ou de leur expliquer.
ées de plus de 16 ans et dûment formées pour utiliser la re‐
25
Page 26

fr-CA - Votre contribution à la protection de l'environnement
Emballages de transport
Nos emballages ont pour fonction de protéger la repasseuse des dommages dus au trans‐
por
t. Les matériaux utilisés sont sélectionnés d'après des critères écologiques de façon à
faciliter leur recyclage. Le recyclage de l'emballage économise les matières premières et
réduit le volume de déchets à éliminer. Le service de ramassage de déchets ou le centre
de tri de votre municipalité vous indiquera où se trouve le dépôt le plus proche.
Votre ancien appareil
La plupart du temps, les anciens appareils électriques et électroniques contiennent encore
des mat
saires au bon fonctionnement et à la sécurité des appareils. En déposant ces appareils
usagés avec vos ordures ménagères ou en les manipulant de manière inadéquate, vous
risquez de nuire à votre santé et à l'environnement. N'éliminez donc en aucun cas votre
ancien appareil avec les ordures ménagères.
ériaux précieux. Cependant, ils contiennent aussi des substances toxiques néces‐
Veuillez faire en sorte que votre ancien appareil soit éliminé conformément aux règlements
ux sur les déchets. Jusqu'à son enlèvement, veillez à ce que votre ancien appareil ne
loca
présente aucun danger pour les enfants.
26
Page 27

fr-CA - Description de l'appareil
a
Panneau de commande (écran tactile)
b
Table d'introduction du linge
c
Barre protège-doigts
d
Cylindre
e
Repasseuse avec habillage
f
Table de sortie du linge
Option PM 1210 PM 1214 PM 1217
Tringle à linge Standard
Socle X X X
g
Barre de commande au pied "FlexCon‐
trol"
h
Décolleur
i
Pieds à vis réglables en hauteur
j
Socle (en option)
k
Bac à linge
27
Page 28

fr-CA - Description de l'appareil
Touches de commande sur l'écran tactile
en haut : plage de sélection de température, en bas : plage de sélection de vitesse de repassage
a
On/Off, veille
b
Pause
c
Start
d
Mode de sélection de température
e
Touche de sélection de température 1
f
Touche de sélection de température 2
g
Touche de sélection de température 3
h
Augmenter la température/ la vitesse de
r
otation du cylindre
* La touche peut être activée par le Service Miele lors de la première mise en service.
i
Diminuer la température/ la vitesse de ro‐
tation
du cylindre
j
Programme Favoris
k
Position d'entretien*
l
Nettoyage/Paraffinage
m
Mode de sélection de vitesse de rotation
du cylindr
n
Touche de sélection de vitesse de rota‐
tion du cyli
o
Touche de sélection de vitesse de rota‐
tion du cyli
p
Touche de sélection de vitesse de rota‐
tion du cyli
e
ndre 1
ndre 2
ndre 3
En appuyant sur une touche avec succès, celle-ci est rétroéclairée. Le clignotement de la
ouche signale que la repasseuse peut être démarrée.
t
28
Page 29

fr-CA - Description de l'appareil
Symboles d'affichage sur le panneau de commande
a
Effleurer la barre protège-doigts
b
Chauffage On/Température augmente
c
Nettoyage et paraffinage (uniquement
pour PM 1217)
d
Chauffage Off/Température trop élevée
e
Erreur générale
f
Insertion incorrecte du linge durablement
à gauc
he / à droite
g
Pré-sélection et affichage de la tempéra‐
e en °C/°F
tur
h
Pré-sélection et affichage de la vitesse de
otation du cylindre
r
i
Plage de vitesse de rotation du cylindre
j
Mode monnayeur
k
Commutation entre unité de température
29
Page 30

fr-CA - Description de l'appareil
Barre protège-doigts
Le barre protège-doigts est un dispositif
de sécuri
avant de mettre la repasseuse en marche
qu'il fonctionne normalement ! Le contrô‐
le de sécurité de la barre protège-doigts
doit être effectué à chaque mise en fonc‐
tionnement de la repasseuse.
Appuyez une fois sur la barre protègedoigts, lorsque le
doigts" clignote.
té, vérifier quotidiennement
symbole "barre protège-
Tringle à linge
our PM1210 seulement)
(P
Vous pouvez suspendre le linge repassé sur
la tring
les plis.
le pivotante en prenant soin d'éviter
Si les doigts pénètrent entre le cylindre et le
barr
e protège-doigts, le cylindre est immé‐
diatement arrêté et la presse s'écarte du cy‐
lindre. Pour ce faire, le symbole "barre pro‐
tège-doigts" s'allume durablement. Pendant
la marche arrière du cylindre, la barre protè‐
ge-doigts ne fonctionne pas. La repasseuse
peut être réenclenchée en appuyant sur la
touche .
N'utilisez pas volontairement la barre protè‐
ge-doi
30
gts pour arrêter la machine.
Page 31

fr-CA - Préparation du linge
Humidité résiduelle du linge
L'humidité résiduelle idéale pour une bonne
finitio
n et un rendement de repassage opti‐
mal est pour les PM 1214 et PM 1217 com‐
prise entre 15% et 25%, pour la repasseuse
PM 1210 de 15%. L'humidité résiduelle
idéale dépend des propriétés du textile.
Préparation du linge
Triez le linge selon le type et le tissu avant
de commence
ce faire l'étiquette d'entretien des textiles.
Nous vous conseillons de trier le linge dans
l'ordre suivant :
Type de fibre Symbole Température
Perlon, nylon etc.
Ensuite :
Laine, soie
Puis :
Coton, lin
r à repasser. Respectez pour
100 - 110°C
111 - 150 °C
151 - 180°C
Nettoyez la presse avant la première mise
en service de la repasseuse en passant la
toile de nettoyage Miele sur toute la lar‐
geur du cylindre. Paraffinez pour finir la
presse (utilisez pour ce faire la cire avec
parcimonie).
Si en raison d'une température trop élevée,
etour à une température plus basse est
un r
nécessaire, le symbole affiche que la
température est actuellement trop élevée et
le chauffage est arrêté. Dès que le symbole
s'éteint, la température sélectionnée est
atteinte. Repassez le linge amidonné afin
que les éventuels résidus d'amidon restant
sur la presse ne nuisent pas au repassage
des autres textiles. Les textiles avec des
boutons doivent être retirés de telle sorte
que les boutons soient dirigés vers le cylin‐
dre. Si les boutons sont dirigés vers le bas,
il y a un risque qu'ils soient cassés ou qu'ils
se détachent lors de l'introduction dans la
presse. Placez un chiffon pour protéger la
presse des fermetures éclair, boutons et
crochets métalliques avant de repasser. Ne
repassez pas de boucles métalliques et
plastique ainsi que les boutons extrême‐
ment hauts (par ex. les boutons sphériques).
31
Page 32

fr-CA - Utilisation
Préparer la repasseuse pour le fonctionnement
Allume
mentation en courant.
Allume
che "On / Off".
Le symbole "barre protège-doigts" clignote.
C
soulevant.
La barre protège-doigts est un dispositif de
sécuri
service.
z l'interrupteur principal pour l'ali‐
z la repasseuse à l'aide de la tou‐
onfirmez la barre protège-doigts en la
té qui est vérifié à chaque mise en
Repassage
atientez après avoir activé la repasseuse
P
jusqu'à ce qu'elle est atteinte la tempéra‐
ture minimale pour repasser.
Le symbole
chauffe.
apparaît et la repasseuse
Sélectionner la température
glez la température de presse selon le
Ré
type de textile du linge.
Type de tex‐
tile
Perlon / soie
synthétique
Soie / laine
Coton / lin
Symbole Températu‐
e
r
100 - 110 °C 110 °C
111 - 150 °C 125 °C
151 - 185 °C 180 °C
Valeur pré-
églée
r
La température peut être sélectionnée soit
via les plage
s de température pré-réglées
soit directement par les touches "Aug‐
menter température" ou "Baisser tempé‐
rature".
La touche commence à cli
gnoter, dès
que la température minimale est atteinte.
La repasseuse est prête à fonctionner lors‐
que la t
empérature réglée a été atteinte et
le symbole ne s'allume plus.
Appuye
z sur la touche clignotante ,
pour mettre la repasseuse en service.
Le repassage débute.
Conseil : Lai
ssez le cylindre tourner environ
5 minutes avant de commencer à repasser,
pour que les températures de la presse et
du cylindre puissent être équivalente.
R
isque de brûlure sur le bord de l'au‐
ge !
Lorsque la repasseuse est chaude et la
esse est en position de repassage, le
pr
risque de brûlure est important, en parti‐
culier si vous touchez le bord de l'auge au
niveau de la sortie du linge. Des stickers
de mise en garde situés en haut et à l'ar‐
rière de l'habillage de la presse sont aussi
collés par sécurité.
Appuye
z sur la touche "Mode de
sélection de température" sur le panneau
de commande. La zone est alors rétroé‐
clairée.
P
our régler la plage de température, ap‐
puyez par ex. sur la touche de sélection
de température 2 (pré-réglée à l'usine
sur 125 °C), la zone est alors rétroéclairée.
Modifier la valeur de température pré-ré‐
glée d'une touche de sélection de tempé‐
rature
Appuye
z sur la touche de sélection de
température dont la valeur de température
doit être modifiée.
La touche de sélection de température ap‐
puyée est r
étroéclairée et la valeur de tem‐
pérature actuelle s'affiche.
Appuye
z sur la touche "Augmenter la
température" ou "Baisser la tempéra‐
ture", jusqu'à ce que la température que
vous souhaitez sauvegarder sur la touche
de sélection de température, soit atteinte.
32
Page 33

fr-CA - Utilisation
M
aintenez ensuite la touche de sélection
de température choisie (celle rétroéclairée)
jusqu'à ce qu'elle clignote une fois.
La valeur de température est désormais
sauveg
ardée sur la touche de sélection de
température.
Conseil : Lai
ssez le cylindre tourner environ
5 minutes avant de commencer à repasser,
pour que les températures de la presse et
du cylindre puissent être équivalente.
Choisir la vitesse de repassage
PM 1210 / PM 1214:
Symbole Plage de vitesse
Plage de vitesse basse 1,5 - 2,2
Plage de vitesse moyenne 2,3 - 3,2
Plage de vitesse élevée 3,3 - 4
m
/
min
PM 1217 :
Symbole Plage de vitesse
Plage de vitesse basse 1,5 - 2,4
Plage de vitesse moyenne 2,5 - 3,4
Plage de vitesse élevée 3,5 - 4,5
m
/
min
La vitesse de rotation du cylindre peut soit
êtr
e réglée via les plages de vitesse pré-ré‐
glées soit directement par les touches
"Augmenter la vitesse du cylindre" ou
"Diminuer la vitesse du cylindre".
Appuye
z ensuite sur une des trois touches
de vitesse de cylindre, par ex. touche
"Touche vitesse de rotation de cylindre 2".
La touche est rétroéclairée et la valeur de vi‐
t
esse de rotation du cylindre pré-réglée de
cette touche est reprise par la repasseuse.
Modifier la valeur de vitesse de rotation
pr
é-réglée d'une touche de sélection de
vitesse de rotation du cylindre
Appuye
z sur la touche de sélection de vi‐
tesse de rotation du cylindre dont la valeur
doit être modifiée.
La touche de sélection de vitesse de rota‐
tion du cyli
ndre appuyée est rétroéclairée et
la valeur de vitesse de rotation actuelle du
cylindre s'affiche.
Appuye
z sur la touche "Augmenter la
vitesse de rotation du cylindre" ou
"Baisser la vitesse de rotation du cylin‐
dre", jusqu'à ce que la vitesse de rotation
du cylindre que vous souhaitez sauve‐
garder sur la touche de sélection de vi‐
tesse de rotation du cylindre, soit atteinte.
aintenez ensuite la touche de sélection
M
de vitesse de rotation du cylindre choisie
(celle rétroéclairée) jusqu'à ce qu'elle
clignote une fois.
La vitesse de rotation du cylindre est désor‐
mais enr
egistrée sur la touche de vitesse de
rotation du cylindre.
Appuyez ensuite sur la touche .
Régler la vitesse de repassage
Appuye
z sur la touche . "Mode de sé‐
lection de vitesse de rotation du cylindre".
La touche est rétroéclairée.
Introduction du linge
acez le textile parallèlement au cylindre
Pl
au début de la table d'introduction du
linge.
D
éfroissez le textile.
aites passer le textile.
F
33
Page 34

fr-CA - Utilisation
Conseil : Ne r
epassez pas de petites pièces
de textiles que d'un côté du cylindre mais
utilisez le plus possible toute la largeur du
cylindre. L'introduction de linge d'un seul
côté de manière répétée fait s'afficher le
symbole d'insertion incorrecte sur le ban‐
deau de commande (voir symbole sur le
panneau de commande).
Pause de repassage
Appuye
z sur la touche "Pause", pour
passer en mode pause.
La presse s'écarte et le cylindre est immobi‐
lisé. L
Appuye
e chauffage reste activé.
z sur la touche , pour continuer
à repasser.
La repasseuse reste en fonctionnement en
mode pause. Si elle n'est pas utilisée au
bout de 10 minut
es, la température est ré‐
duite à 60 °C.
Continuez le repassage
tirez le pied de la barre de commande
Re
au pied pour continuer le repassage.
En relâchant la barre de commande au pied,
ndre recommence automatiquement à
le cyli
tourner et le repassage est poursuivi.
Il est aussi possible de régler la barre de
comman
de au pied par le Service Miele de
sorte que lors de l'actionnement de la bar‐
re de commande au pied, la presse s'écar‐
te et le cylindre s'arrête.
Décolleur
Le décolleur détache le linge du cylindre.
Le linge repassé peut être très chaud
rsqu'il sort de la presse.
lo
Risque de brûlure !
Utilisez le cas échéant des gants de pro‐
ection.
t
Mode Veille
Le mode veille est coupée à l'usine. Le mo‐
de veille peut êtr
e activé au niveau service
par le Service Miele. Il est possible de régler
entre 1 et 30 minutes de non utilisation la
valeur pendant la durée où la repasseuse
passe en mode veille. En appuyant sur la
touche "On/Off", la repasseuse peut à
nouveau être activée.
En mode veille, la presse s'écarte et le cy‐
lindre reste immobilisé. Le chauffage est
arrêté.
Barre de commande au pied "FlexCon‐
trol"
Défroisser (humidifier) le linge
endant le repassage, actionnez à l'aide
P
de votre pied la barre de commande au
pied "FlexControl" pour passer la repas‐
seuse en mode défroissage et défroisser
le linge.
En passant en mode défroissage, le cylindre
ête. La presse est démarrée.
s'arr
Après le repassage
L
aissez tourner le cylindre encore 5 mi‐
nutes à une température de chauffe mini‐
male, pour faire sécher complètement la
garniture.
êtez la repasseuse à l'aide de la touche
Arr
.
La presse s'écarte et le ventilateur tourne
pendant 10 minut
es pour refroidir. Puis, la
touche clignote.
teignez l'interrupteur principal.
É
Attendez que le linge repassé ait suffi‐
samment refroidi avant de l'emballer ou
de l'empiler.
Le linge chaud peut causer un incendie
s'il s'enflamme.
Utilisation d'un monnayeur
Mett
Le symbole clig
Intr
ez en marche la repasseuse à l'aide
de la touche .
note.
oduisez la pièce ou le jeton.
34
Page 35

fr-CA - Utilisation
Le symbole s'ét
hoisissez selon le type de textile, la
C
eint.
plage de température correspondante.
glez la vitesse de rotation du cylindre
Ré
qui vous convient.
Une fois la diode
éteinte, la repasseu‐
se est prête à fonctionner et le temps im‐
parti pour le repassage payé commence.
M
ettez la repasseuse en marche en ap‐
puyant sur la touche .
U
ne fois le temps de repassage écoulé, la
presse s'écarte et le cylindre reste immo‐
bilisé. L'affichage clignote. Il est possi‐
ble d'acheter ultérieurement à tout mo‐
ment du temps de repassage.
35
Page 36

fr-CA - Remarques
Changement d'unité de températu‐
e
r
La température peut être affichée par le Ser‐
vice Mie
le soit en °C soit en °F.
Réglage des Favoris
A l'aide de la touche "F
sible d'enregistrer la combinaison la plus
utilisée de température et de vitesse de ro‐
tation du cylindre, pour pouvoir l'interroger
rapidement et simplement.
L'enregistrement des paramètres souhaités
s'effectue en appuyant de manièr
gée sur la touche "Favoris", jusqu'à ce
qu'elle clignote une fois. En appuyant briè‐
vement sur la touche "Favoris" les va‐
leurs enregistrées sont appelées. En quittant
la fonction Favoris, les valeurs préalable‐
ment réglées sont appelées.
avoris", il est pos‐
e prolon‐
Augmentation de la durée de la toi‐
le de r
epassage
Evitez de faire sécher inutilement la re‐
passeuse (sans linge). Ne repassez pas
les petites pièces que d'un côté du cylin‐
dre, mais utilisez toute la largeur du cylin‐
dre.
Si le même côté est toujours utilisé, la
ch
aleur n'est absorbée que d'un côté et
la garniture n'est usée que d'un côté.
L'insertion incorrecte répétée du linge sur
le côté gauche ou droit est indiquée par le
symbole correspondant. Le symbole s'al‐
lume accompagné d'un signal sonore.
Panne de courant pendant le re‐
passage
En cas de panne de courant, la presse
s
'écarte automatiquement. Une fois la cou‐
pure terminée, il faut redémarrer la repas‐
seuse en appuyant sur le bouton .
En cas de panne de courant prolongé, il faut
r
edémarrer la repasseuse à l'aide de la tou‐
che "On/Off", actionner la barre protègedoigts et appuyer sur la touche .
Délestage (option)
Si le délestage est activé, le chauffage de la
epasseuse est coupé et les diodes "tempé‐
r
rature" et "vitesse de rotation du cylindre"
clignotent. Le repassage peut être poursuivi
grâce à la chaleur résiduelle dans la presse,
jusqu'à ce que la repasseuse soit en
"pause".
En cas de pauses prolongées, éteignez la
machi
mode veille. Cela permet de limiter considé‐
rablement l'usure de la toile de repassage.
36
ne ou actionnez la touche pour le
Page 37

fr-CA - Remarques
Messages d'erreur
Si une erreur apparaît, le repassage est in‐
t
errompu, la touche "pause" clignote et
un code d'erreur à 4 chiffres s'affiche à
l'écran. En appuyant sur la touche cligno‐
tante "pause" cela entraîne l'acquittement
de l'erreur (l'erreur est consignée dans la
mémoire des anomalies). La touche "On/
Off" clignote et le repassage peut à nou‐
veau être redémarré.
Si le message d'erreur apparaît à nouveau,
r
épétez le processus ou éteignez la repas‐
seuse et redémarrez.
F0
F1
F2
F8 Anomalie chauffage
F20
F104 Sous-tension entraînement
F108 Erreur générale compresseur
F120 Sous-tension
F 4500
à Anomalie de commande
F 4512
En cas de pannes, veuillez contacter le
vice Miele.
Ser
F24
F25
F39
F40
F41
F42 Anomalie électronique
F43
F45
F47
F49
F50 Anomalie d'entraînement
F53
F57 Anomalie de ventilateur
F61 12 V (24V) Absence de tension
F99 Appareil verrouillé
37
Page 38

fr-CA - Nettoyage et entretien
Nettoyer et paraffiner la presse
Il est nécessaire de nettoyer et d'entretenir
r
égulièrement la presse pour préserver l'en‐
traînement de cylindre et la garniture. Veuil‐
lez impérativement tenir compte des con‐
seils relatifs au repassage et à l'entretien de
votre repasseuse dans le manuel "Utilisation
des repasseuses Miele" ! La presse doit être
paraffinée après chaque nettoyage. Si vous
ne tenez pas compte de ce conseil, la durée
de vie de votre repasseuse sera considéra‐
blement réduite.
La presse de cette repasseuse est en alu‐
nium. N'utilisez pour ce faire aucun
mi
abrasif à gros grains ou de toile de net‐
toyage couvertes de papier émeri ! Utili‐
sez pour le nettoyage exclusivement le kit
de nettoyage Miele. Il contient une toile
de nettoyage, une toile de paraffinage et
une paraffine spéciale repasseuses. Ce
kit peut être commandé en tant qu'acces‐
soire Miele.
Utilisez pour le nettoyage de la presse en
alumi
nium uniquement la toile de nettoyage
approuvée par Miele.
Des dépôts (calcaire, restes d'amidon) peu‐
vent se déposer dans la pr
quoi il est conseillé de nettoyer la presse
avant chaque repassage, selon le degré de
salissures.
La repasseuse dispose d'un programme
de nett
équipée d'un affichage pour le nettoyage
, qui s'allume après env. 40 heures indi‐
quant le moment où la presse doit être pa‐
raffinée. L'intervalle de maintenance peut
être activé par le Service Miele.
oyage. La PM 1217 est par ailleurs
esse. C'est pour‐
Pour démarrer le mode de nettoyage, ap‐
z sur la touche "Nettoyage / Paraffi‐
puye
nage" puis sur la touche de sélection de
température. Pour ce faire, la température
est baissée à 80°C et le ventilateur est arrê‐
té.
En cas de très forts dépôts, utilisez la toile
de nett
réglage de température le plus bas et la
vitesse la plus faible de la repasseuse. Pa‐
raffinez la presse après chaque nettoyage,
comme décrit dans le chapitre suivant.
Lorsque le paraffinage a été réalisé avec
succès en mode paraffinage, l'intervalle de
maintenance (réglage d'usine pour PM
1217 : 40 heures de service) est réinitialisé.
Pour la PM 1210 et PM 1214 la meme rap‐
pel peut etre active par le Service Miele (op‐
tion).
oyage Miele. Utilisez pour ce faire le
Paraffinage de la presse
Afin d'entretenir le pouvoir glissant de la
pr
esse, nous vous conseillons de la paraffi‐
ner tous les jours mais parcimonieusement
avec une toile de paraffinage pour repas‐
seuses.
Pour démarrer le mode paraffinage, ap‐
z sur la touche "Nettoyage/Paraffi‐
puye
nage", et puis sur la touche "Touche de
sélection de température 3".
38
Page 39

Touche
"Nettoyage/Paraffinage"
Paraffinez la presse à un réglage maximal
empérature, à la vitesse la plus faible de
de t
la repasseuse et lorsque le ventilateur est
arrêté. Ce réglage est consigné sur la tou‐
che "Nettoyage/Paraffinage".
Pour activer la fonction paraffinage, main‐
t
enez la touche "Nettoyage/Paraffina‐
ge" appuyée pendant plus de 3 secondes.
Pour désactiver la fonction, maintenez à
nouveau cette touche appuyée pendant
plus de 3 secondes.
fr-CA - Nettoyage et entretien
Pl
acez la poche avec le côté caoutchouté
vers le bas (c'est-à-dire que le côté
caoutchouté est dirigé vers le cylindre) et
disposez la dans la machine chaude (tem‐
pérature de presse env. 180 °C).
N'introduisez en aucun cas, la toile de pa‐
r
affinage avec le côté caoutchouté vers le
haut (en direction de la presse).
assez la toile de paraffinage sur toute la
P
largeur du cylindre en partant de la gau‐
che ou de la droite et en respectant les
écarts nécessaires.
our désactiver la fonction, maintenez la
P
touche "Nettoyage/Paraffinage" ap‐
puyée pendant plus de 3 secondes.
Garniture
Avant d'enlever la toile de repassage (pour
la nett
passeuse et laissez refroidir la presse.
oyer ou la remplacer), arrêtez la re‐
our paraffiner la presse à l'aide de la toile
P
de paraffinage, parsemez les granulés de
paraffine dans la poche de la toile de par‐
affinage, et fermez la poche.
La cire doit être utilisée avec parcimonie
afin que la t
oile de repassage ne soit pas
excessivement lisse !
Retirer la toile de repassage
Veillez à détacher les pointes du décol‐
leurs une à une !
M
ettez en marche la repasseuse à l'aide
de la touche "On/Off".
Appuye
maintenance" pendant plus de 3 sec‐
ondes.
La presse s'écarte et est verrouillée dans
cett
e position.
Re
de manière répétée sur la touche "Di‐
minuer la température/ la vitesse de rota‐
tion du cylindre" (mode manuel).
Prenez l'extrémité de la toile de repassage
et placez la sur la table d'introduction du
linge.
z sur la touche "position de
culez le cylindre pas à pas en appuyant
ès que la bonne température est atteinte,
D
la touche "Start" clignote. Appuyez sur
cette touche pour lancer le processus de
paraffinage.
Re
tirez désormais complètement la toile
de repassage en reculant le cylindre
(mode manuel).
39
Page 40

fr-CA - Nettoyage et entretien
Appuye
de maintenance" pendant plus de 3 sec‐
ondes pour désactiver à nouveau la posi‐
tion de maintenance.
Lorsque la toile de repassage est enlevée
ou r
emise, des fibres de laine peuvent tom‐
ber sur la table d'introduction du linge. Ces
résidus doivent être retirés.
z ensuite sur la touche "position
Pose de la toile de repassage
ettez en marche la repasseuse lorsque
M
la température est la plus basse et la vi‐
tesse de rotation est la plus petite en ap‐
puyant sur la touche .
Pl
acez la toile de repassage pendant le re‐
passage normal parallèle au cylindre sur la
repasseuse, et insérez la toile de repas‐
sage au-dessus du cylindre.
Si un espace peut être décelé entre la
presse et le cylindre (sortie du linge), il
faut renouveler la toile.
Seul le service Miele est habilité à réparer
u à remplacer la garniture du cylindre en
o
laine d'acier !
Le diamètr
remplacé (y compris de la toile de repas‐
sage) ne doit pas être inférieur aux di‐
mensions ci-dessous.
e d'un cylindre renouvelé ou
En cas de remplacement, utilisez exclusi‐
vement les pi
Miele (dans ce cas également, veuillez indi‐
quer au Service Miele le modèle de la ma‐
chine et le numéro de série [SN]).
èces de rechange d'origine
PM 1210 / PM 1214 PM 1217
min. 210 - max. 215
mm
Le cylindre doit être recouvert sur toute sa
gueur, de façon égale.
lon
Lors du remplacement de la garniture du
indre, il faut vérifier par le Service Miele
cyl
si les charbons du moteur d'entraînement
doivent être remplacés.
min. 250 - max. 255
mm
Service après-vente Miele
En cas de panne, veuillez contacter le Servi‐
ce Miel
dèle et du numéro de série [SN].
Ces deux indications figurent sur la plaque
signalétique.
e. Le Service Miele a besoin du mo‐
40
Page 41

Page 42

Importer
Miele Limited
Professional Division
1-888-325-3957
1-800-803-3366
161FourValleyDrive
Vaughan,ONL4K4V8
Phone:
Fax:
www.mieleprofessional.ca
professional@miele.ca
Miele Professional Technical Service
1-888-325-3957
1-800-803-3366
Phone:
Fax:
serviceprofessional@miele.ca
Germany
Manufacturer
Miele&Cie.KG
Carl-Miele-Straße29
33332Gütersloh
Canada
Canada
Importateur
Miele Limitée
Professional Division
161 Four Valley Drive
Vaughan, ON L4K 4V8
Téléphone :
Télécopieur :
www.mieleprofessional.ca
professional@miele.ca
Miele Professional Service Technique
Téléphone : 1-888-325-3957
Télécopieur : 1-800-803-3366
serviceprofessional@miele.ca
Allemagne
Fabricant
Miele & Cie. KG
Carl-Miele-Straße 29
33332 Gütersloh
1-888-325-3957
1-800-803-3366
Alteration rights reserved/0915 M.-Nr. 10025790 / 01
Sous réserve de modifications / Date de création: 0915
 Loading...