


Operating Instructions
Laboratory Glassware Washer
PLW 8617
To prevent accidents and machine damage,
read these instructions before installation or
use.
en - US, CA
M.-Nr. 11 463 470

2

Contents
Guide to the manual ........................................................................................................ 6
Proper use........................................................................................................................ 7
User profiles..................................................................................................................... 8
Machine description........................................................................................................ 9
Machine overview.............................................................................................................. 9
Control elements on the display........................................................................................ 11
Main menu..................................................................................................................... 11
Program start display .................................................................................................... 13
IMPORTANT SAFETY INSTRUCTIONS .......................................................................... 18
Symbols on the machine................................................................................................... 23
Main menu........................................................................................................................ 24
Main menu......................................................................................................................... 24
Actions in theMain menu.............................................................................................. 24
Changing the display language ................................................................................. 25
Login........................................................................................................................... 25
Logout ........................................................................................................................... 26
Printing documentation ................................................................................................. 26
Opening and closing the door....................................................................................... 26
Application technology ................................................................................................... 27
General information........................................................................................................... 27
Transfer trolley ............................................................................................................... 27
Load carriers ................................................................................................................. 27
Arranging the wash items.............................................................................................. 28
Preparing the wash items.............................................................................................. 29
Before starting a program ............................................................................................. 31
At the end of a program ................................................................................................ 31
Laboratory glassware and utensils .................................................................................... 32
Program overview.............................................................................................................. 33
General program information ............................................................................................ 34
Programs for specific soiling ............................................................................................. 35
Programs for specific wash items ..................................................................................... 36
Additional programs.......................................................................................................... 37
Service program................................................................................................................ 37
Chemical processes and technology ............................................................................ 38
Dispensing liquid process chemicals............................................................................ 42
Dispensing systems .......................................................................................................... 42
Containers for process chemicals................................................................................. 43
Filling containers with process chemicals..................................................................... 43
Filling the dispensing system ........................................................................................ 44
Operation.......................................................................................................................... 45
Switching the machine on and off..................................................................................... 45
Loading the wash cabinet ................................................................................................. 45
Selecting a program .......................................................................................................... 46
Selecting a load carrier.................................................................................................. 46
Selecting programs from Favorites ............................................................................... 47
Starting a program ............................................................................................................ 48
3

Contents
Program sequence ............................................................................................................ 48
End of program.................................................................................................................. 49
Canceling a program......................................................................................................... 49
Program cancellation with manual disinfection ............................................................. 49
Delay start ......................................................................................................................... 50
Network connection........................................................................................................ 51
Network connection .......................................................................................................... 51
Network protocols............................................................................................................. 52
Process documentation .................................................................................................... 52
System settings ............................................................................................................... 53
System .............................................................................................................................. 53
Network connections ........................................................................................................ 53
Changing the PIN .......................................................................................................... 54
Granting write permissions............................................................................................ 55
Configuring the printer .................................................................................................. 56
Configuring the network................................................................................................ 57
Machine functions ............................................................................................................. 58
Automatic system test................................................................................................... 58
Carrying out self-disinfection (optional)......................................................................... 59
Starting the continuous program................................................................................... 60
Filling the dispensing system ........................................................................................ 61
Dispensing system setup .............................................................................................. 61
Calibrating the conductivity meter ................................................................................ 63
Carrying out a program test .......................................................................................... 64
Restarting .......................................................................................................................... 66
Opening the data plate Menu............................................................................................ 66
Managing favorites............................................................................................................ 67
Maintenance measures................................................................................................... 68
Maintenance...................................................................................................................... 68
Routine checks.................................................................................................................. 69
Cleaning the filters in the wash cabinet ............................................................................ 70
Cleaning the spray arms.................................................................................................... 71
Cleaning the machine........................................................................................................ 73
Locking the display ....................................................................................................... 73
Checking mobile units, modules, and inserts ................................................................... 75
Built-in printer (optional) .................................................................................................... 76
Replacing the paper roll ................................................................................................ 76
Thermal paper ............................................................................................................... 77
Fault messages and instructions................................................................................... 78
Representation of faults on the display............................................................................. 78
In the main menu........................................................................................................... 78
In the program sequence .............................................................................................. 78
Technical faults on the machine ........................................................................................ 79
List with active messages ............................................................................................. 79
Troubleshooting............................................................................................................. 80
Technical faults without fault number............................................................................ 81
After sales service........................................................................................................... 82
4

Contents
Electrical connection ...................................................................................................... 83
Electromagnetic compatibility (EMC) ................................................................................ 84
Plumbing .......................................................................................................................... 85
Technical details .............................................................................................................. 86
Disposing of your old machine ...................................................................................... 88
Appendix .......................................................................................................................... 90
User rights in theMain menu ............................................................................................ 90
User rights in the Systemmenu ........................................................................................ 91
Power levels of the programs/mobile units/module combinations ................................... 92
Optional extras .................................................................................................................. 95
5

Guide to the manual
Warnings
Information which is important for safety is highlighted in a thick
framed box with a warning symbol. This alerts you of potential danger of injury to people or damage to property.
Read these warning notes carefully and observe the instructions
and codes of practice described.
Notes
Notes contain information that is particularly important to follow.
They are highlighted by a thickly framed box.
Additional information and comments
Additional information and comments are contained in a simple
frame.
Operating steps
Operating steps are indicated by a black square bullet point.
Example:
Select an option using the arrow buttons and save your choice with
OK.
Display
Certain functions are shown in display messages using the same font
as used for the function itself in the display.
Example:
Menu Settings .
6

Proper use
The PLW 8617Laboratory Glassware Washer is designed to reprocess laboratory glassware, utensils, and similarly categorized components using water-based media.
Appropriate use
Reprocessing encompasses the cleaning, rinsing, and – where necessary – thermal disinfection and drying of the following wash items:
- Vessels such as beakers, flasks, cylinders, and test tubes
- Measuring vessels such as measuring cylinders, volumetric flasks,
and pipettes
- Dishes such as petri dishes and watch glasses
- Plates such as slides and sequencing plates
- Small items such as lids, magnetic stirring rods, spatulas, and stoppers
- Other items such as boxes, plastic flasks and containers, metal
parts, pipe and hose pieces, and funnels
The Laboratory Glassware Washer is generally referred to as “the machine” in these operating instructions. The term “wash items” is used
wherever the items to be reprocessed are not defined in any further
detail. The term “wash water” is used for the mixture of water and
process chemicals.
Reprocessing is carried out in conjunction with:
- Process chemicals which are tailored to the result of the reprocessing
- Load carriers which are tailored to the wash items
Observe the information issued by the manufacturer of the wash
items.
Inappropriate use
The PLW 8617Laboratory Glassware Washer may not be used for
any purposes other than the appropriate use described. This applies
in particular to:
- The reprocessing of medical devices suitable for reprocessing
- Use in the restaurant industry
- Residential or household use
7

User profiles
User administration
Access to the machine is restricted to a certain group of people. Authorized users are entered in User management via the machine’s
web interface. User managementis described in the programming
manual.
A User ID and PIN are required for the user Login on the machine.
User actions such as starting a reprocessing program are saved. User
data is read out on the Reprocessing report, for example.
User profiles
Day-to-day use
Service work
Administration
For day-to-day use, operators must be instructed on the basic functions and how to load the machine and must also be trained regularly.
They must have a basic knowledge of machine reprocessing of laboratory glassware and utensils.
Day-to-day work is carried out using the following user levels:
- Without message
- Automatic
- Operator
Modifications to the machine, such as on-site conditions, require additional specific knowledge of the machine.
They are carried out using the following user levels:
- Technician
- Administrator
Changes to the reprocessing process and performance testing also
require specialist knowledge about machine reprocessing of laboratory glassware and utensils, and about process technology.
They are carried out using the following user level:
- Administrator
8

Infeed and out-
1
2
3
5
6
4
feed side
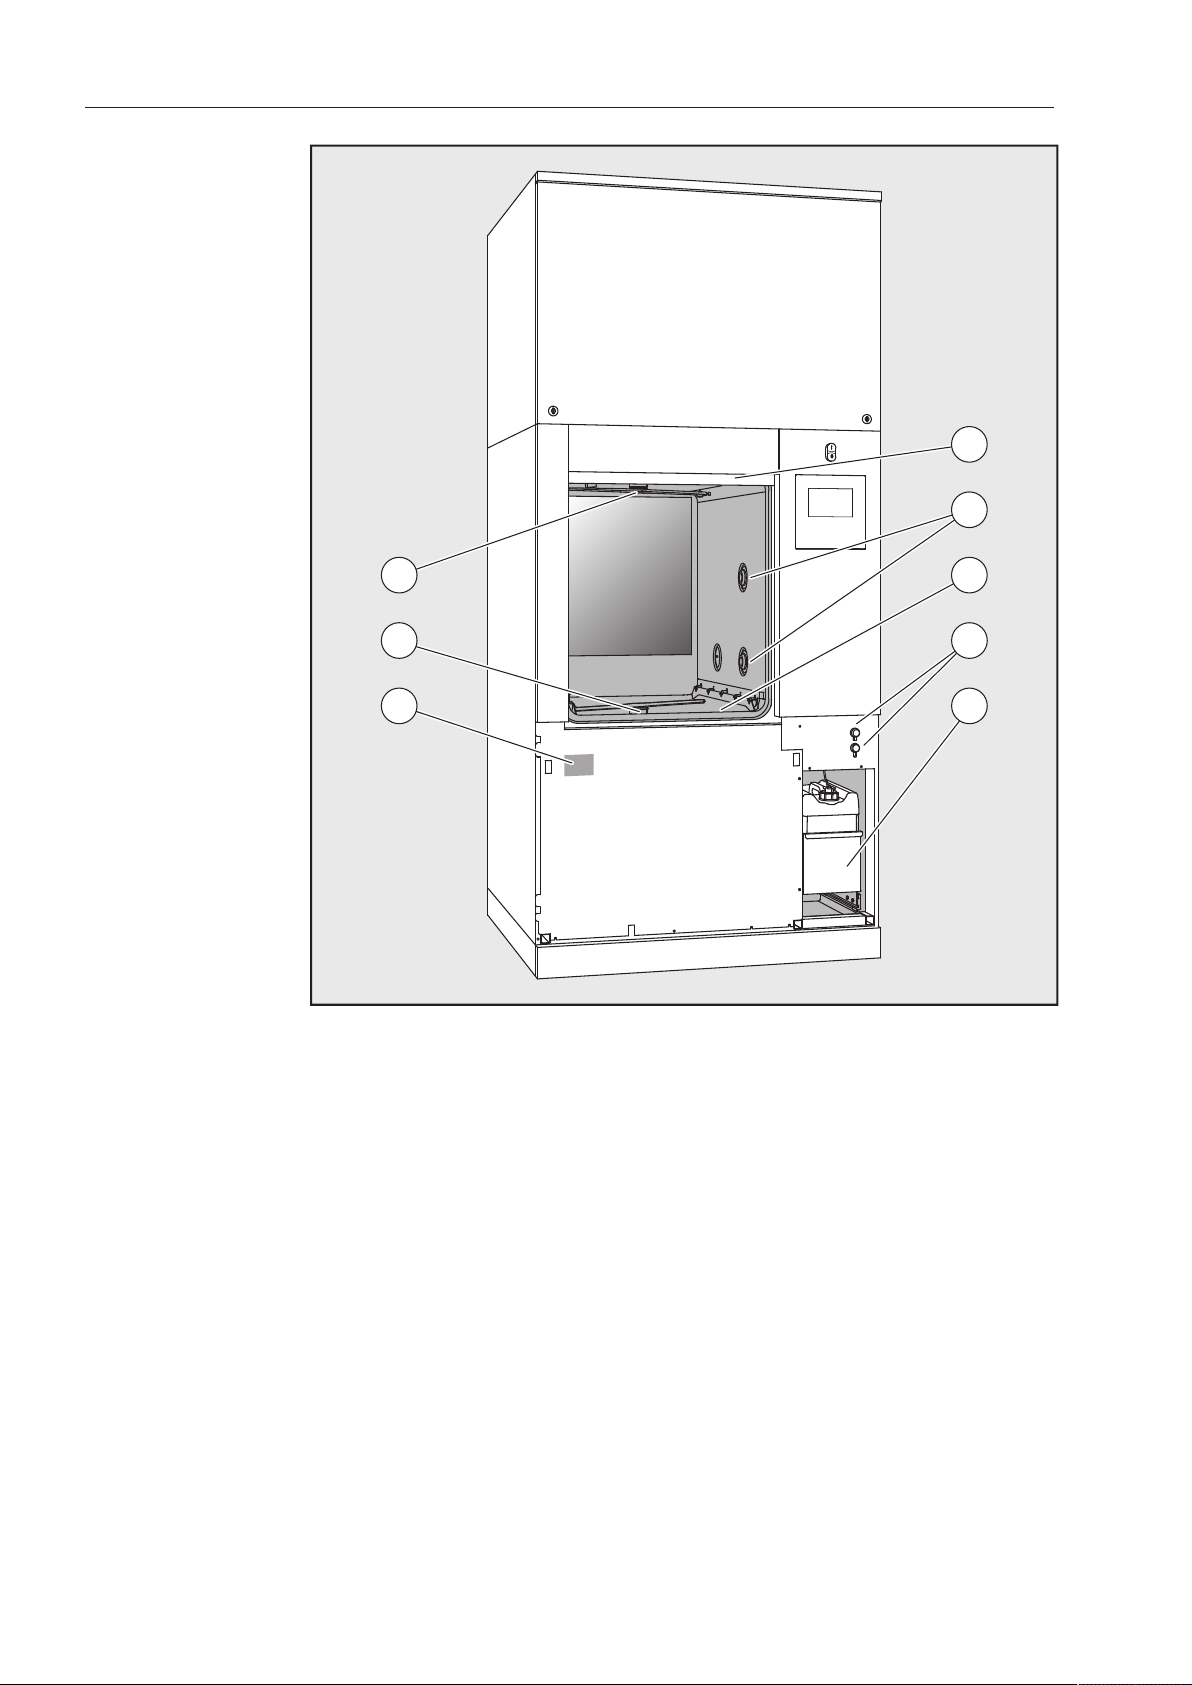
Machine description
Machine overview
a
Service cover for Miele Technical Service
b
I/0 power switch
c
Display
d
Docking system for transfer trolleys,
service cover lock
e
Service cover
f
Door closed
9
Machine description
1
2
3
4
7
8
56
Infeed and outfeed side without
service cover
a
Door open
b
Water supply for load carriers
c
Filter combination
d
Connections for Miele Technical Service
e
Drawer with containers and connections for process chemicals
f
Data plate
g
Lower machine spray arm
h
Upper machine spray arm
10
Control elements on the display
Reprocessing
Favorites
Documentation
System
Main menu
US
Login
18.06.2018 15:05
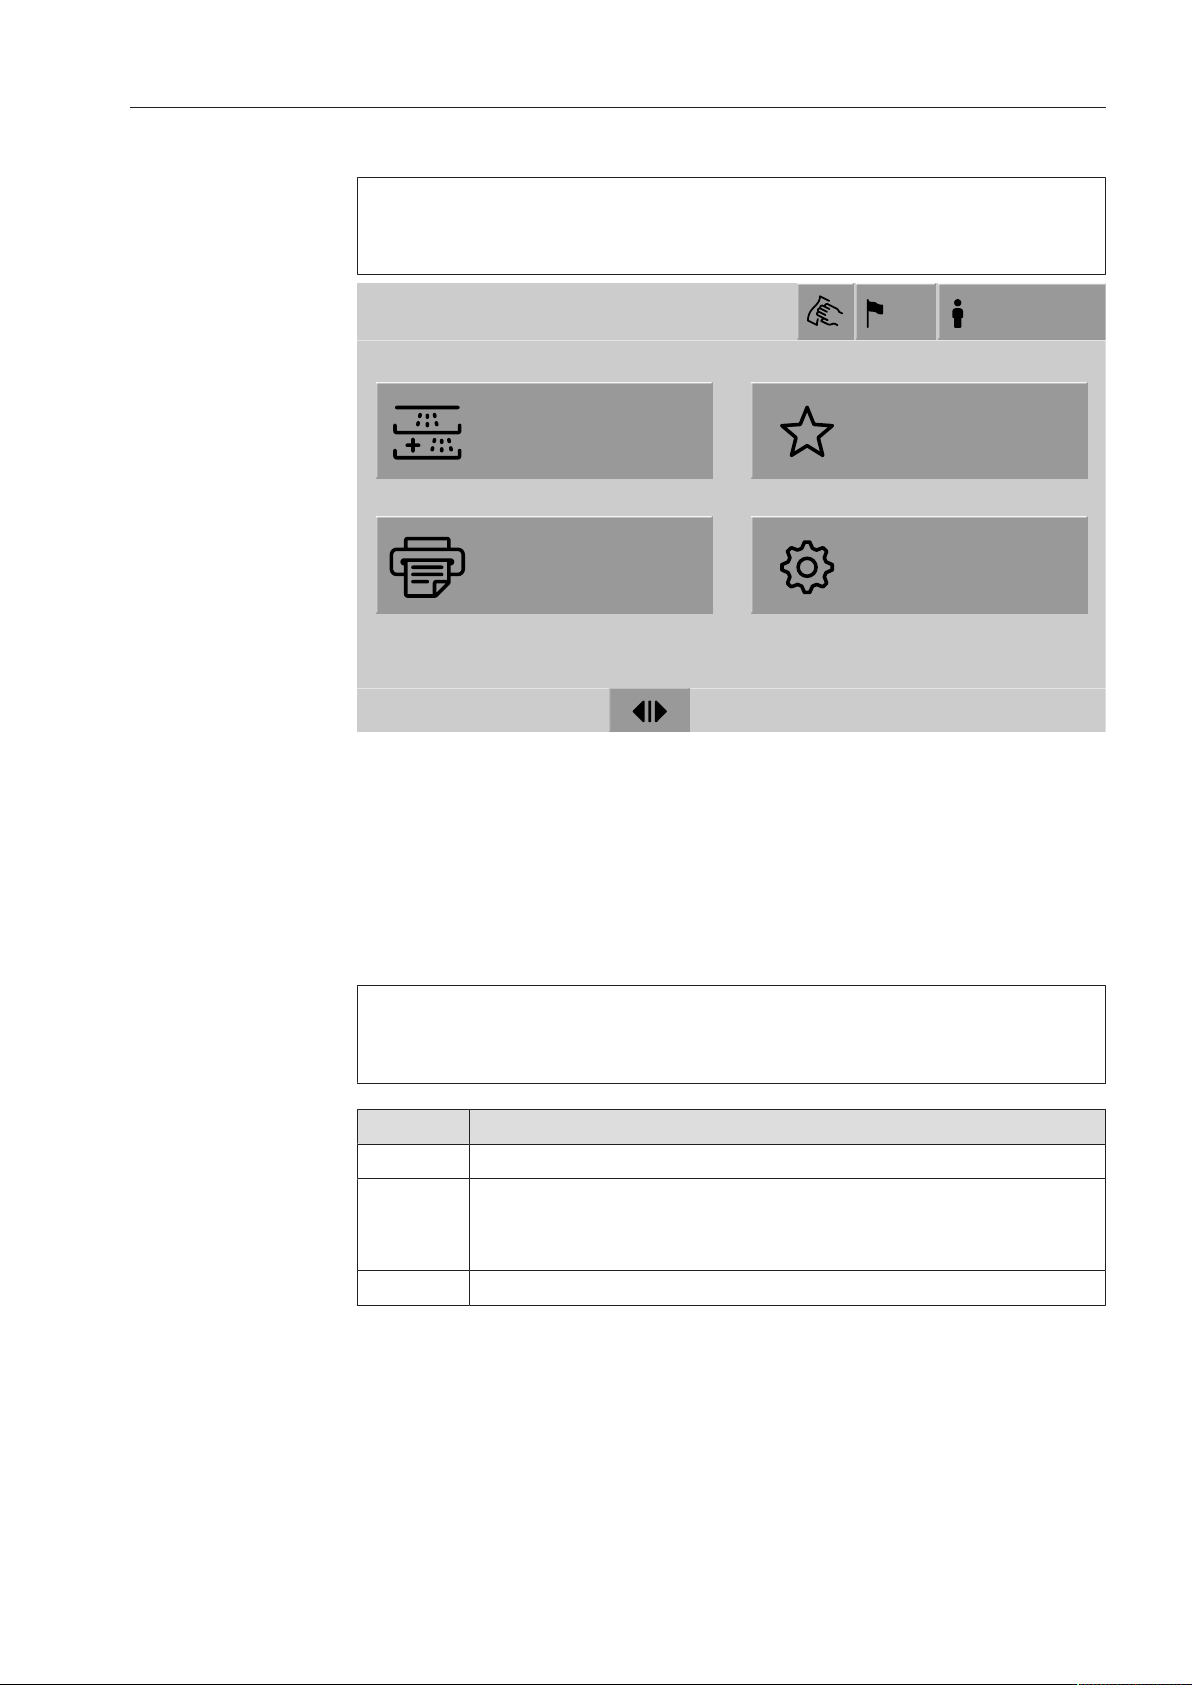
Machine description
Main menu
The machine display shows the control panel light on a black background. In these operating instructions, the display is shown as
black on a light background in order to improve legibility.
a
Header
b
Display language selected
c
Current user
d
Buttons to call up sub-menus
e
Footer
Buttons in the main menu/ header
Buttons for all enabled actions are displayed in the footer.
If a menu is split across several pages, a scroll bar will be displayed
above the footer. Swipe the display or tap the scroll bar to scroll between the pages.
Symbol Description/function of the button
Locks the display, e.g., for surface disinfection
Opens the Select display languagemenu.
Opens the login or logout dialog, e.g., to switch users
The language currently set is indicated after the symbol,
e.g., US
11
Machine description
Symbols in the
main menu
Buttons in the main menu/ footer
Buttons in the submenus/
footer
Symbol Description/function of the button
Reprocessing
Favorites Opens the list of favorites
Documentation Opens the list of available wash reports
System
Information
Please wait – screen is loading
Symbol Description/function of the button
Warning present, opens the Messageslist
Fault present, opens the Messageslist
Opens the door
Closes the door
The door is locked
Symbol Description/function of the button
Leaves menu, goes back to previous menu level, does not
save entries
Opens the list of reprocessing programs
which are assigned to the load carrier
Opens the configuration menu, e.g., for
network settings or to change the PIN
OK Confirms entries
12

Machine description
1:06
user/
18.06.2018 15:05
US
BED
Universal
Time left
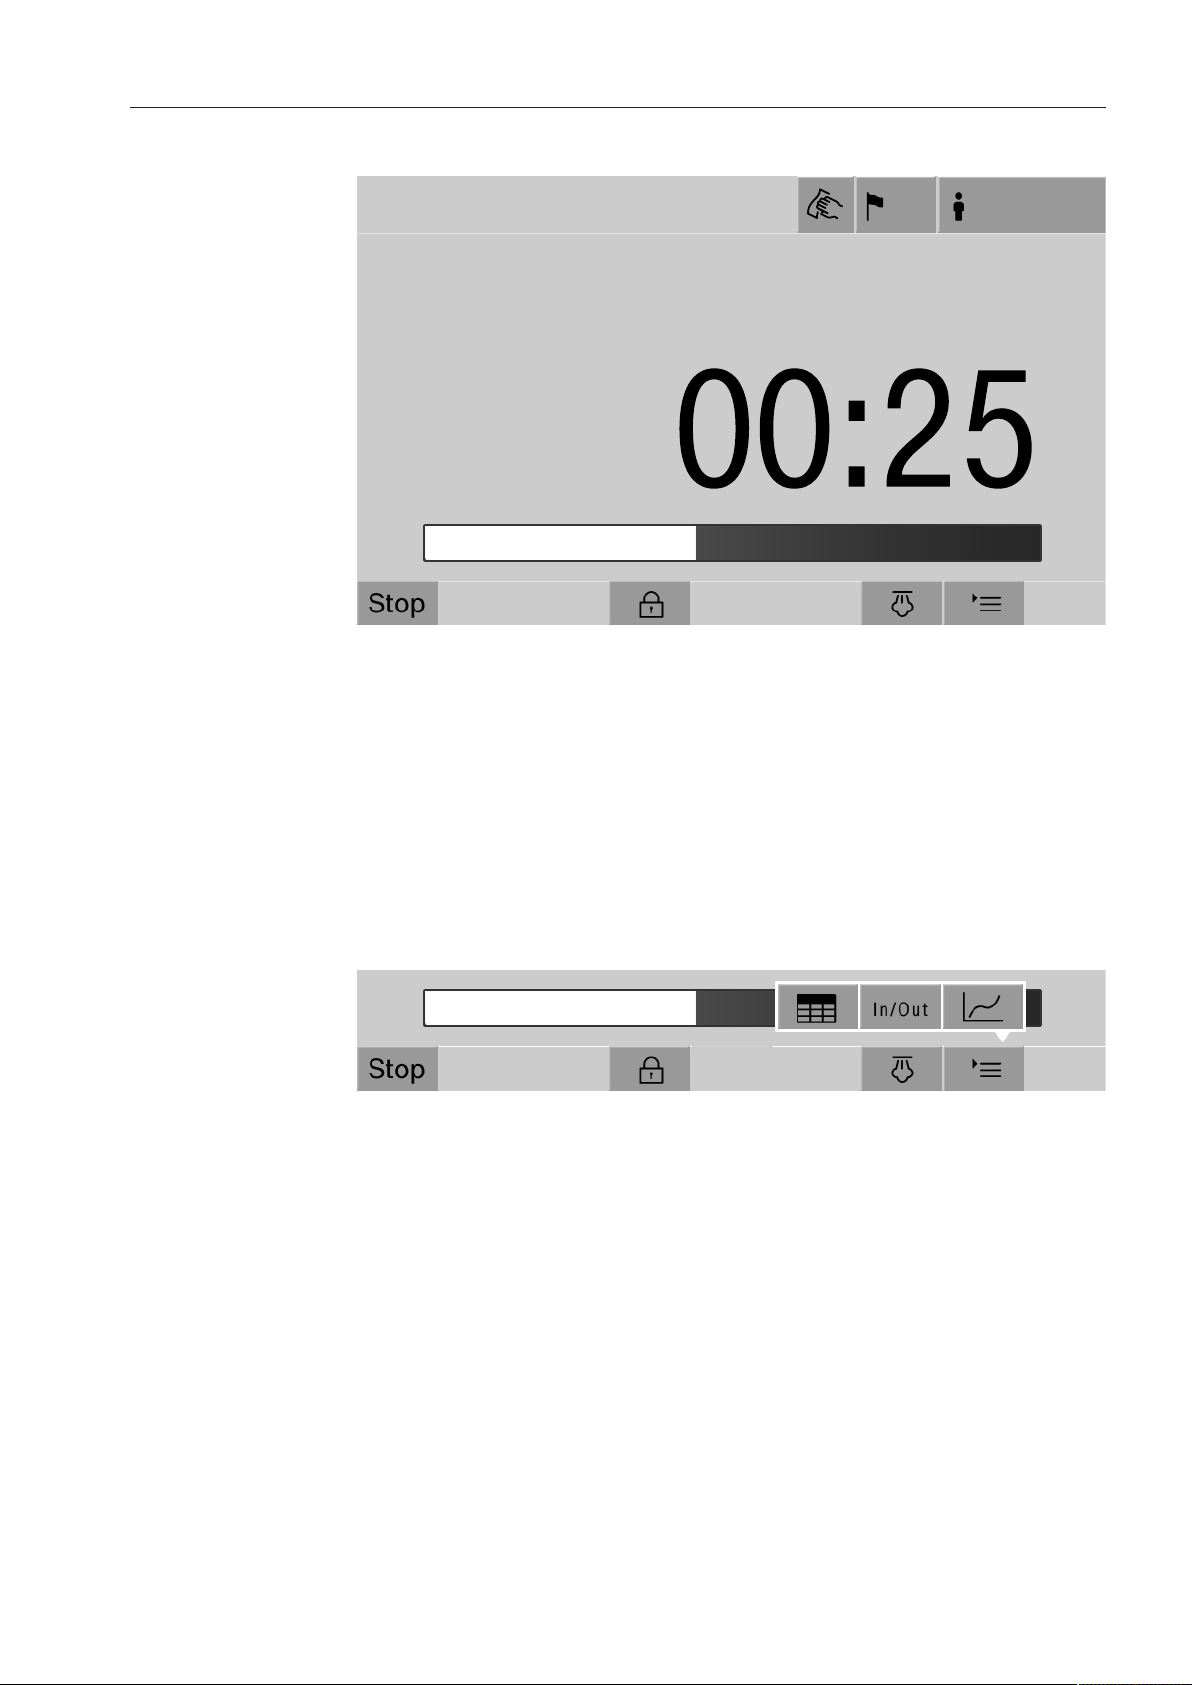
Program start display
Once the A 500load carrier, for example, has been selected in the
Reprocessingmenu and the associated Universalreprocessing program has been confirmed, the following is displayed:
The pictogram of the load carrier and the selected reprocessing program are displayed in the header.
The duration and a progress bar are shown on the display.
The color of the progress bar corresponds to the current machine
status:
- Black for ready for operation
- White for an ongoing reprocessing program
- Green for a reprocessing program that has been successfully completed
- Yellow for warnings
- Red for faults
13
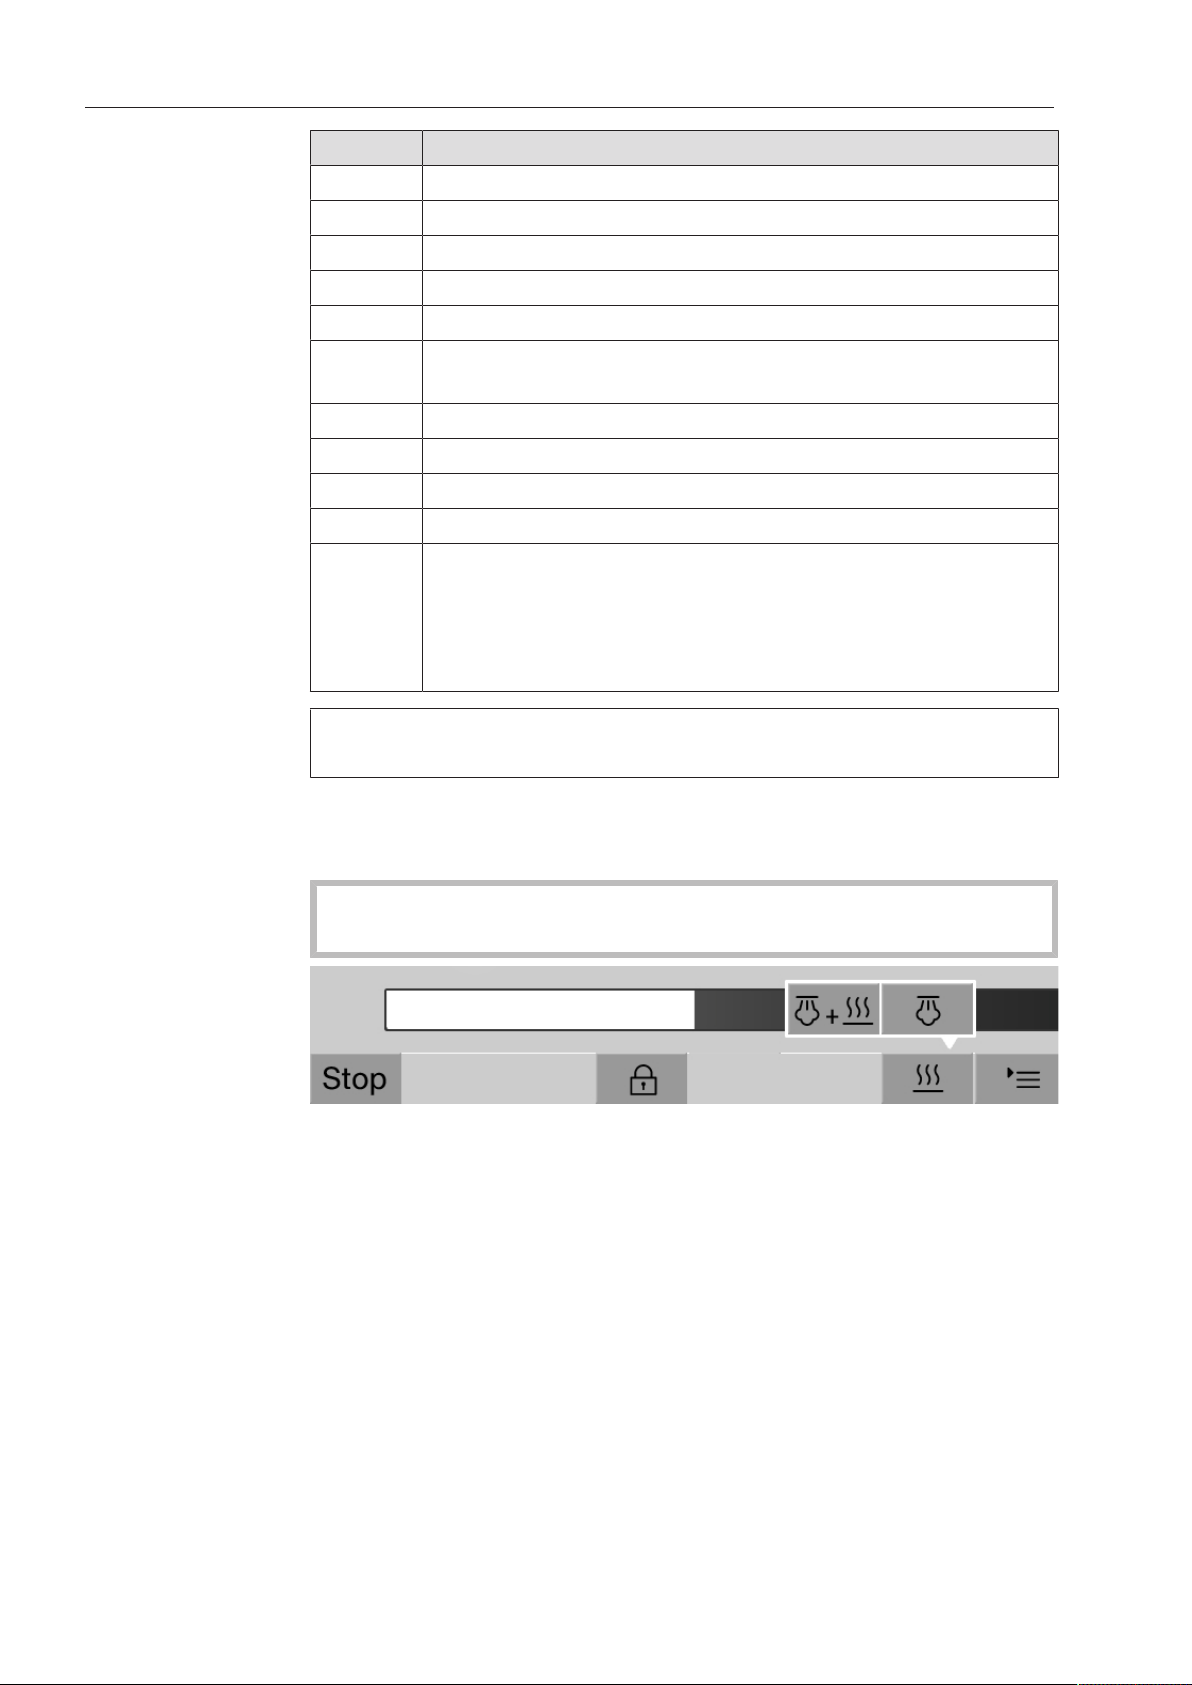
Machine description
Program start/program sequence
buttons/symbols
Heat-up
context menu (optional)
Symbol Description/function of the button
Program start
Program cancellation
Opens the input screen for selecting the start time
Door locked
Shows the program sequence display in the default view
In/Out
Displays the program sequence as a diagram
Selects the steam heating method
Selects the electric heating method
+ Selects the electric and steam heating method
(next to
the
progress
bar)
This context menu is only available in machines where it is possible
to switch the energy supply from electric to steam.
The energy source for heating can be changed before and during the
program sequence. The selected setting is used for heating up the
wash water and the DI water in the DI water tank.
Schematic program sequence display, contains information for Miele Technical Service
Displays the current faults and warnings in the progress
bar
The selected setting is applied permanently in the machine controls.
Press the button to open the context menu.
14
Machine description
0:25
°C
167 °F
Duration
Universal
user/
18.06.2018 15:05
BED
US
Program block
Temperature
Main wash 1
Example of a program sequence
display
After the program has started, the following display is shown:
The current program phase and the temperature reached are also
shown on the display.
The progress bar indicates the ratio between the duration and the
time left.
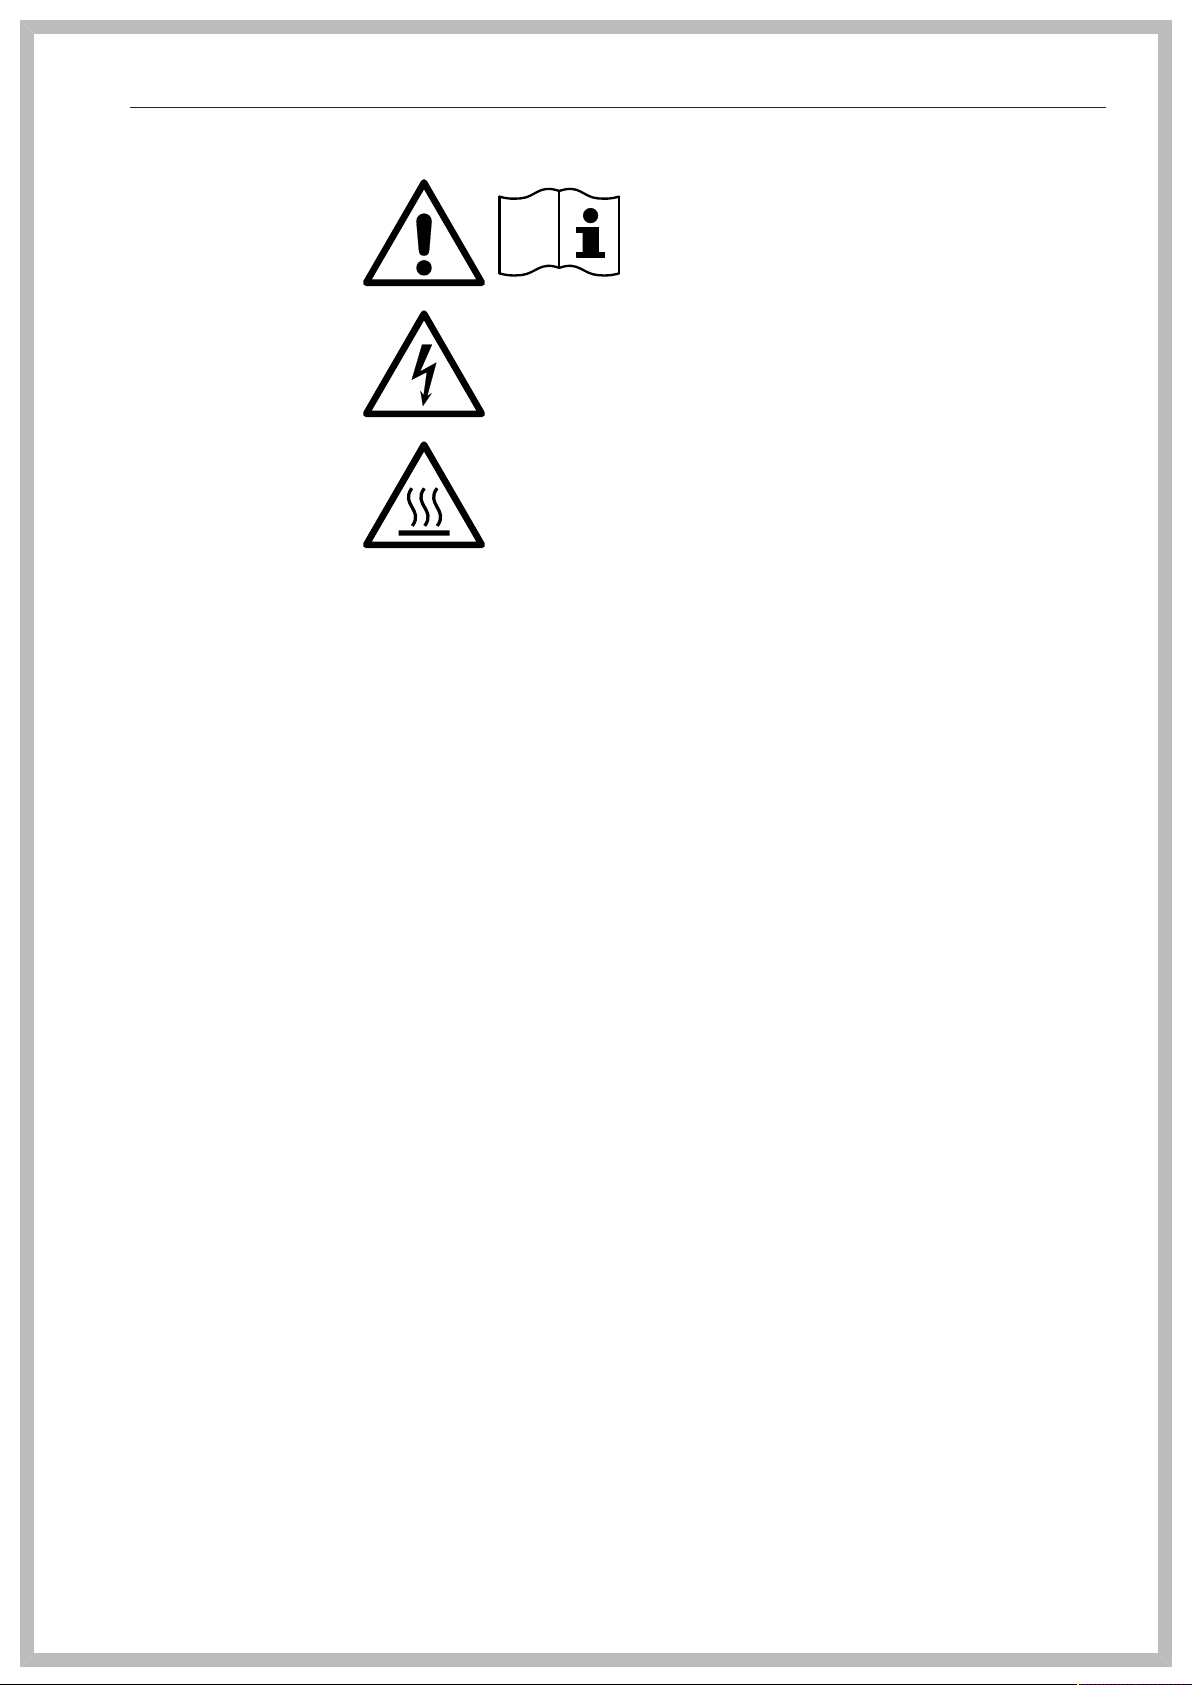
Program sequence display context menu
During the program sequence, you can choose between 4views:
- Standard –
- Table –
- In/Out chart – In/Out
- Graphical –
Press the button to open the context menu.
15

Machine description
Program cycle display – table view
Once you have switched to the table view using the button, the
following data is displayed:
- Block name
- Program phase countdown
- Holding time
- Program parameters with the associated target and actual values
and the minimum and maximum values reached
It is possible to scroll to other pages using the scroll bar.
The maximum possible program parameters are:
- Material number and Date of manufacture of the mobile unit
- Cycle number
- User information: First name, Last name, User level
- Temperature of the wash water, sensor 1 and 2 measured values
- Temperature in the dispensing phases 1–3, sensor 1 and 2 measured values
- Temperature of the air during internal drying in phases 1 and 2
- Temperature of the air during external drying in phases 1 and 2
- Water volumes in the program step and the program phase
- Dispensing quantities of the used dispensing systems
- A0-Value
- Conductivity in the water intake and drainage
- Wash pressure for the internal wash water circuit and the PowerPulseCleaning
- Spray arm speeds
16

Machine description
Program sequence display – In/Out chart
Program sequence display – graphical view
The In/Out chart – In/Out contains information about the input signals
(page1), the output signals (page2), and individual sensor measured
values:
- Wash water temperature
- Air temperature
- Wash pressure at the circulation pump
- Conductivity
This information is used by Miele Technical Service and is not explained in these operating instructions.
Once you have switched to the graphical view using the button,
the following values are displayed as curves:
- Wash water temperature [W]
- External air/drying temperature [EA]
- Internal air/drying temperature [IA]
- Internal wash pressure [P]
17

IMPORTANT SAFETY INSTRUCTIONS
Risk to health and risk of damage if the operating instructions
are not followed.
Failure to follow the operating instructions – and in particular the
safety instructions and warnings they contain – may result in persons being seriously injured or property being seriously damaged.
Read these operating instructions carefully before using the machine. This will help prevent the likelihood of both personal injury
and damage to the machine.
Keep these operating instructions in a safe place.
Proper use
Use of the machine is only approved for the applications stated in
the operating instructions. Conversions, modifications, and any other
use are not permitted and could be dangerous.
The cleaning and disinfection processes are only designed for laboratory glassware and utensils which are designated as reprocessable
by the manufacturer. The information provided by the manufacturer of
the wash items must be observed.
This machine is intended for indoor use in a stationary location
only.
The machine is equipped with a special lamp to cope with particu-
lar conditions (e.g., temperature, moisture, chemical resistance, abrasion resistance, and vibration). This special lamp must only be used
for the purpose for which it is intended. It is not suitable for room
lighting. Replacement bulbs may only be installed by Miele Technical
Service.
Risk of injury
Please pay attention to the following notes to avoid injury.
This machine must be commissioned, serviced and repaired by a
Miele authorized and trained service technician only. To ensure compliance with Good Laboratory Practice guidelines, Miele repair and
maintenance contracts are recommended. Unauthorized repairs can
pose considerable risks to the user.
Do not install the machine in an area where there is any risk of ex-
plosion or of freezing conditions.
The electrical safety of the machine can only be guaranteed when
correctly grounded. It is essential that this standard safety requirement is observed and regularly tested. If in any doubt, please have
the electrical installation inspected by a qualified electrician.
18
A damaged or leaking machine could be dangerous and compro-
mise your safety. Disconnect the machine from the electrical supply
immediately and contact Miele Service.

IMPORTANT SAFETY INSTRUCTIONS
Label machines which have been taken out of operation and lock
them to prevent them being switched on again without authorization.
The machine may only be put back into operation once it has been
successfully repaired by Miele Technical Service.
Personnel operating the machine should be trained regularly. Un-
trained personnel must not be allowed access to the machine or its
controls.
Use caution when handling process chemicals. These may contain
irritant, corrosive or toxic ingredients.
Please observe the process chemical manufacturer's safety instructions and safety data sheets.
Wear protective gloves and goggles.
The machine is designed for operation with water and recom-
mended additive process chemicals only. Organic solvents and
flammable liquid agents must not be used as this could cause an explosion, damage rubber or plastic components in the machine and
cause liquids to leak out of it.
The water in the wash cabinet is NOT safe to drink!
Be careful when sorting wash items with sharp, pointed ends. Po-
sition them in the machine so that you will not hurt yourself or create
a danger for others.
Broken glass can result in serious injury when loading or unload-
ing. Damaged glass wash items must not be processed in the machine.
When operating the machine, beware of the high temperatures in-
volved. If you bypass the electrical lock to open the door, there is a
risk of scalding or chemical burns.
Where there is a risk of toxic or chemical substances occurring in
or leaking into the chamber wash water during cleaning (e.g., aldehyde in the disinfecting agent), it is essential to regularly check door
seals and make sure that the steam condenser is functioning correctly.
Opening the machine door during a program interruption carries particular risks in such circumstances.
Should personnel accidentally come into contact with toxic vapors
or process chemicals, follow the emergency instructions given in the
manufacturer's safety data sheets.
After drying with the drying unit, leave the door open at first to al-
low the wash items, mobile unit, modules, and inserts to cool down.
Allow mobile units, modules, inserts, and the load to cool down
before removing them. Any water remaining in containers should be
emptied into the chamber before removing items.
19

IMPORTANT SAFETY INSTRUCTIONS
Steam heating is permissible up to a pressure of 145 psi
(1000kPa). This corresponds to a water steam temperature of 355°F
(180°C).
Never clean the machine with a water hose or a pressure washer.
The machine must be disconnected from the electrical supply be-
fore any maintenance or repair work is carried out.
Quality assurance
The following points should be observed to assist in maintaining
quality standards when processing laboratory glassware and
utensils and avoid damage to the loads being cleaned.
If it is necessary to interrupt a program, as an exception only, this
may only be done by authorized personnel.
The cleaning standard must be routinely confirmed by the user.
The process should be validated on a regular basis, and checked
against documented control results.
For thermal disinfection, use temperatures and temperature holding
times to achieve the required infection prophylaxis in accordance with
current health and safety regulations.
Make sure items being washed are suitable for machine reprocess-
ing and are in good condition. Plastic items must be thermally stable.
Nickel plated items and aluminum items can be machine processed
using special procedures only.
Items containing iron, and soiling containing residual rust must not be
placed in the cabinet.
Process chemicals can, in certain circumstances, cause damage to
the machine. Always follow the recommendations of the process
chemical manufacturer.
In case of damage or doubt about compatibility, please contact
Miele.
Cleaning detergents containing chlorine can damage the elas-
tomers of the machine.
If the use of process chemicals containing chlorine is required, a
maximum temperature of 167°F (75°C) in the “Cleaning” program
phases is recommended (see program chart).
In machines equipped with special oil-resistant elastomers (from the
factory) for oil and grease applications, cleaning detergents containing chlorine may not be used!
20
Pre-treatments with cleaning agents can create foam, as can cer-
tain types of soiling and process chemicals. Foam can have an adverse effect on the cleaning result.
Processes must be set up such that foam cannot escape from the
wash cabinet. It would hinder the correct functioning of the machine.

IMPORTANT SAFETY INSTRUCTIONS
The process used must be monitored on a regular basis by the su-
pervisor to check foaming levels.
To avoid the risk of damage to the machine and its accessories
caused by process chemicals, soiling, and any reaction between the
two, please read the notes in “Chemical processes and technology”.
Even when a process chemical, e.g., detergent, is recommended,
the machine manufacturer takes no responsibility for the effect of
such chemicals on the wash items.
Please note that changes in product formulation, storage conditions,
etc., which are not announced by manufacturers of process chemicals may impair the quality of cleaning results.
When using process chemicals, always consult the instructions is-
sued by individual manufacturers. Process chemicals must only be
used for the purpose they are designed for by the manufacturer to
avoid any material damage or the occurrence of very strong chemical
reactions, such as an oxyhydrogen explosion.
Always follow the manufacturer's instructions on storage and dis-
posal of process chemicals.
Particles ≥200μm are removed by the filters in the wash chamber.
Smaller particles may find their way into the circulation system.
In critical applications where very stringent requirements have to
be met, it is strongly recommended that all the relevant factors for the
process, such as process chemicals, water quality, etc., are discussed with Miele.
If the cleaning result is subject to particularly stringent require-
ments, e.g., in chemical analysis, regular quality control should be
carried out by the operator to ensure that required standards of
cleanliness are being achieved.
The mobile units, modules, and inserts that hold the wash items
must be used only as intended.
The interior of lumened wash items must be thoroughly flushed
through with wash water.
Secure small and light items with cover nets or place in a mesh
tray for small items, so that they do not block the spray arms.
Empty any containers or utensils before loading them.
The amount of residual solvents and acids on items going into the
cabinet should be minimal.
There should be no more than a trace of any solvents with a flash
point of below 70°F (21°C).
Chloride solutions, in particular hydrochloric acid, must not be
placed in the cabinet.
21

IMPORTANT SAFETY INSTRUCTIONS
Ensure that solutions or steam containing chlorides or hydrochloric
acid do not come into contact with the stainless steel outer casing of
the machine in order to avoid any damage through corrosion.
After any plumbing work, the water pipework to the machine will
need to be primed. If this is not done, components can be damaged.
Follow the installation instructions in the operating and installation
instructions.
Using components and accessories
Only Miele accessories should be connected to this machine. They
must be suitable for the application they are used for. Consult Miele
for details on the type of accessories that can be used.
Only use Miele Mobile Units, Modules, and Inserts. Using mobile
units and inserts made by other manufacturers or making modifications to Miele accessories can result in unsatisfactory cleaning and
disinfection results. Any resultant damage would not be covered by
the warranty.
Only use process chemicals which have been approved by their
manufacturer for the relevant application. The manufacturer of the
process chemicals is liable for any negative influences on the material
of the wash items and the machine.
22
IMPORTANT SAFETY INSTRUCTIONS
Symbols on the machine
Attention:
Observe the operating instructions!
Attention:
Danger of electric shock!
Warning: Hot surfaces:
It can be very hot inside the wash chamber
when the door is opened!
Disposal of your old machine
Please note that, depending on the application, the machine may
be contaminated with blood and other bodily fluids, pathogens, facultative pathogens, or genetically modified material, etc., and must be
decontaminated before disposal.
For environmental and safety reasons, dispose of all process chemical residues in accordance with safety regulations and the manufacturer’s safety data sheets (wear safety goggles and gloves).
Remove or disable the door so that children cannot become trapped
inside. Then make appropriate arrangements for safe disposal of the
machine.
For machines with a tank system, the water in the tank must be removed beforehand.
Before disposal, all personal data saved in the machine must be
deleted, such as user names.
23
Main menu
Reprocessing
Favorites
Documentation
System
Main menu
US
Login
18.06.2018 15:05
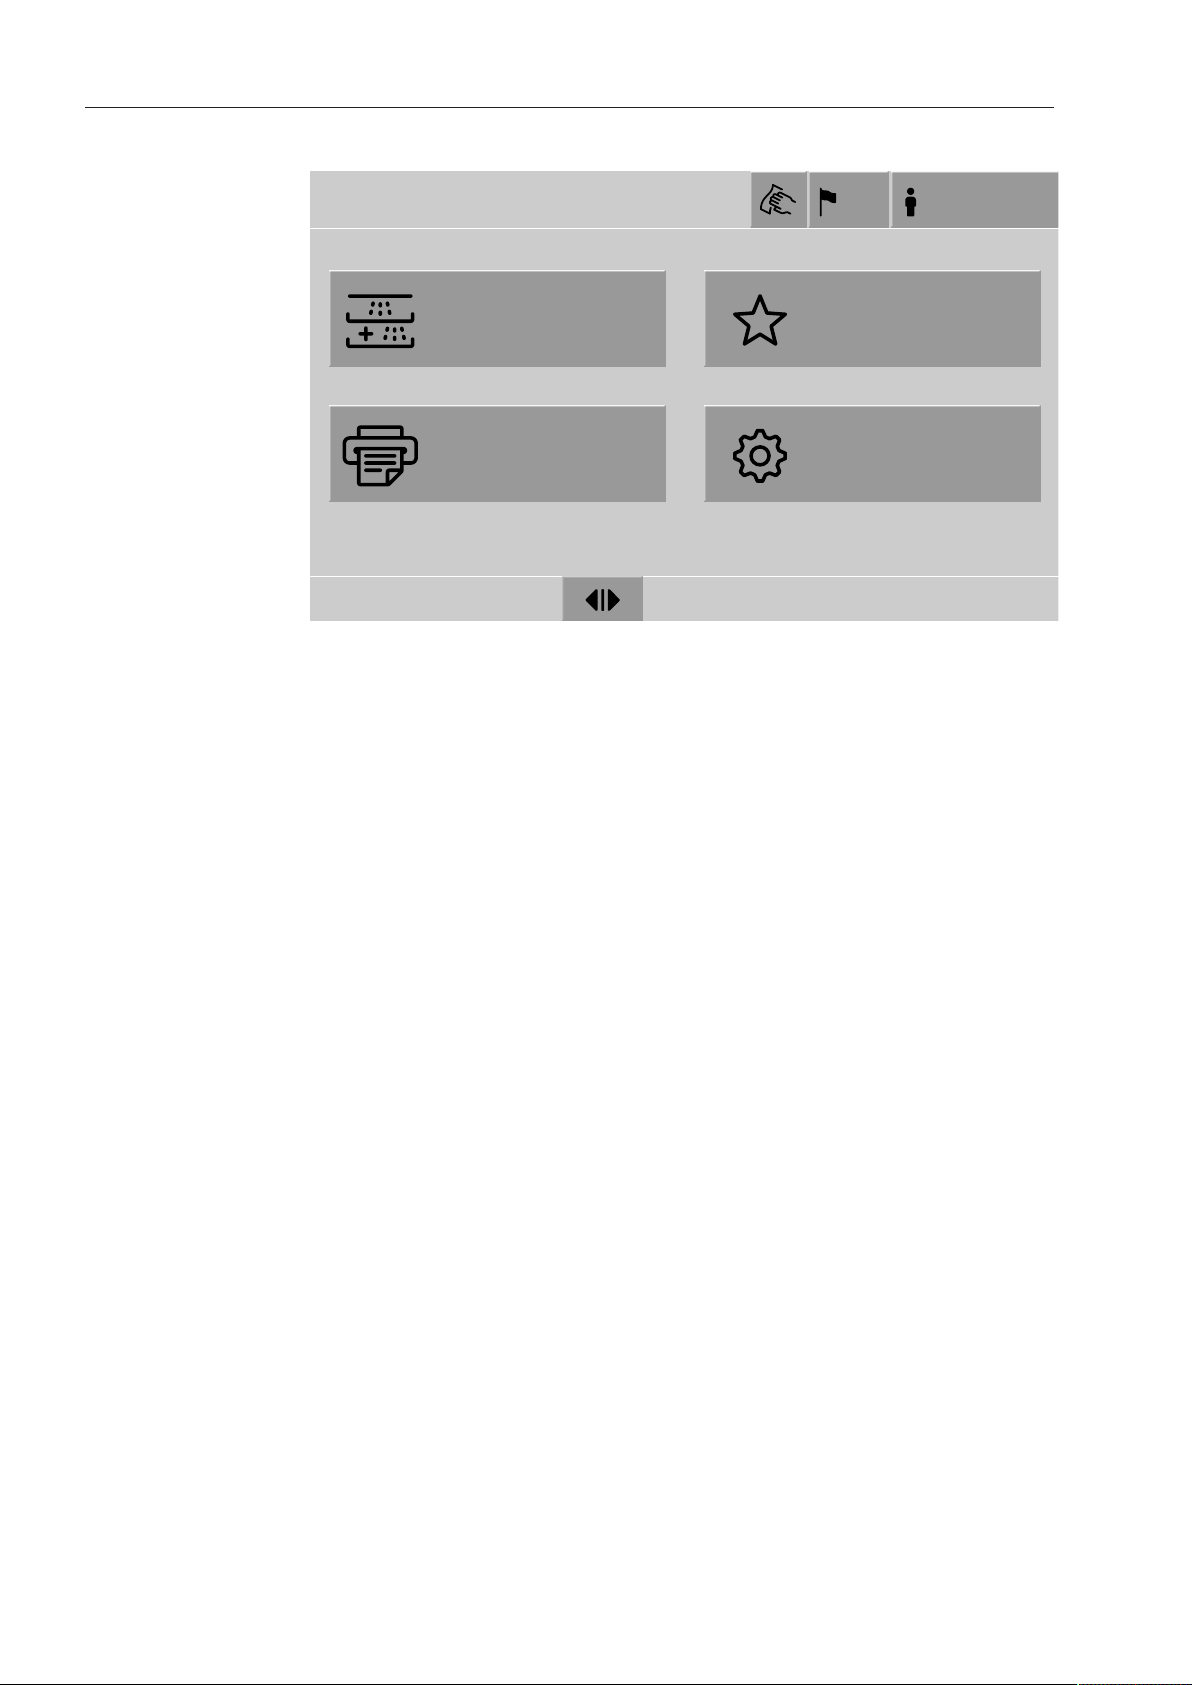
Main menu
Actions in
theMain menu
The main menu of the machine is split into headers and footers and
4menus. The following actions can be performed using the buttons:
- Lock the display, e.g., for surface cleaning (see “Maintenance, locking machines”)
- Change the display language
- Log a user in and out
- Close popups with messages depending on the user level and the
type of message, warning, or fault message (see “Fault messages
and instructions”)
- Open the list of active messages (see “Fault messages and instructions”)
- Select and start a reprocessing program depending on the settings
in the Program controlmenu in the web interface (see “Operation”)
- Call up and start reprocessing programs stored asFavorites depending on the settings in the System, Manage favoritesmenu (see
“Operation”)
- Print outReprocessing reports
24
- Open the Systemmenu to adjust the machine settings depending
on theUser level (see “System settings”)
- Open and close the loading door
- Open and close the unloading door after the end of a program depending on the “Authentification - End of program”setting in the
web interface
Main menu
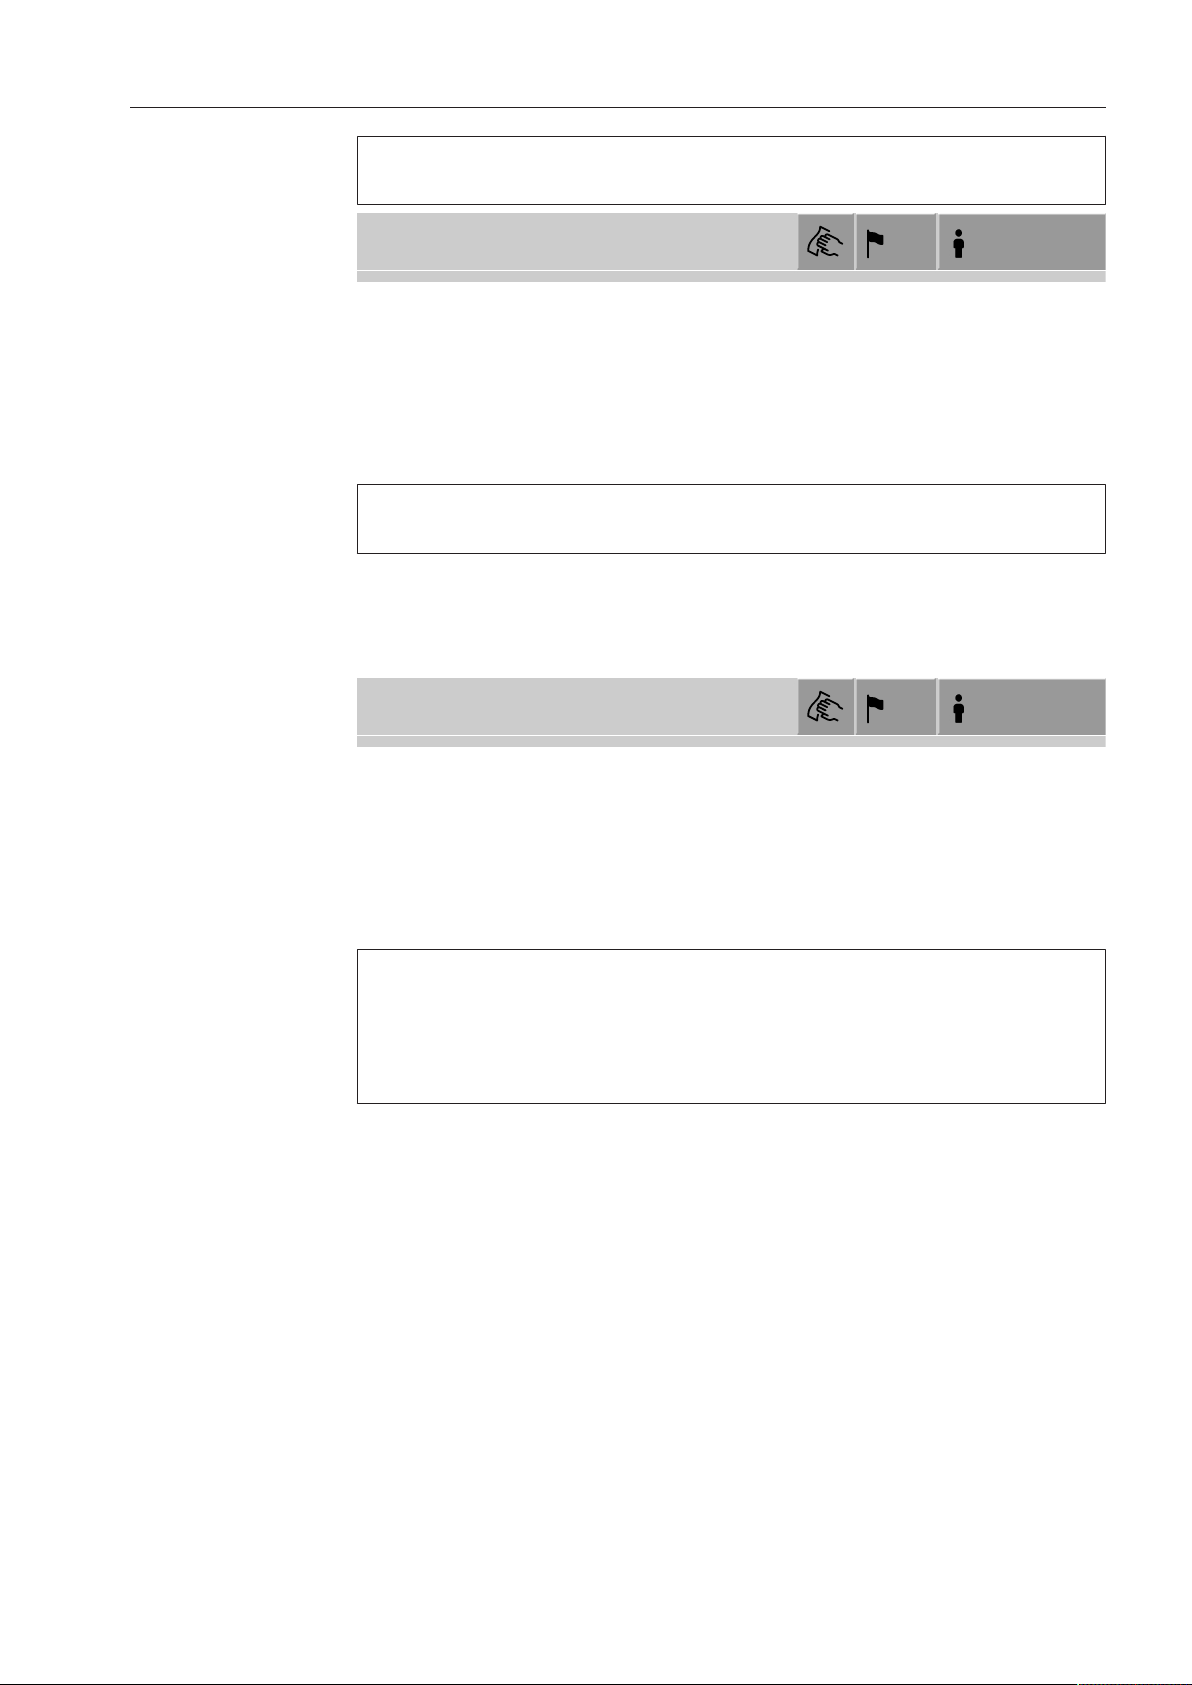
Changing the display language
Login
Manual login
Changing the display language has no impact on the set system language. Reports and printouts are issued in the system language.
Press the button in the header of the display.
The Select display languagemenu is displayed.
Press the button for the language you want.
The machine controls return to the previous menu; the selected language is set.
Press the button to exit the language selection menu if you do
not want to change the set language.
Access to the machine display is restricted to a certain group of
users. Every user must be entered in the User managementvia the
web interface (see programming manual, “User administration”).
Press the button in the header to open the entry window for user
login.
Enter the user ID and press OK to confirm.
Enter the PIN and press OK to confirm.
The functions on the machine display are enabled.
When a user logs in for the first time, they will be prompted to assign
a new PIN.
If the PIN has expired, this prompt will be displayed for the user. The
validity of the PIN can be set in the web interface under “System,
Identification”.
25

Main menu
Logout
Manual logout
Printing documentation
The logged-in user is automatically logged out after 24hours if no
button has been pressed on the display in that time, or if the machine
carries out an automatic restart.
The automatic restart can be set in the web interface under “System,
Automatic restart”.
A user who is logged in can log out manually, e.g., to protect the machine from access without authorization.
Press the button in the header to log out.
Confirm the confirmation prompt with Yes.
The functions on the machine display are disabled.
The last 200 reprocessing reports saved in the machine controls are
shown on the display. The most recent reprocessing report is the first
on the list. When the number of saved reprocessing reports exceeds
200, the oldest from the list is deleted.
If no external software for process documentation is connected to the
machine, the reprocessing reports can be printed out using an external printer connected via the network.
Opening and closing the door
Press the Documentationbutton.
A list of the reprocessing reports is displayed.
Press the button in the Printcolumn to activate the required repro-
cessing reports.
Press the OK button in the footer to start printing.
Press the button in the Printcolumn again to deactivate the selec-
tion.
The reprocessing report is printed out on the external printer.
The status of the machine door is shown in the footer of the display.
- The door has been released and can be opened.
- The door is open and can be closed.
- The door is locked.
Press the button with the symbol to open the door.
26
The door will move up.
Press the button with the symbol to close the door.
The door will move down.

General information
Application technology
Transfer trolley
Load carriers
A TT86 transfer trolley is required for transporting load carriers from
preparation areas to machines and from machines to checking and
packing tables.
In order to use MF27/28-1 transfer trolleys, the machine needs to be
equipped with the conversion kit RFMF27/28.
Transfer trolleys are supplied with their own operating instructions.
MF-1 transfer trolleys must not be used.
The machine can be fitted with a variety of load carriers, which can
be combined with a variety of modules and inserts depending on the
type and shape of items requiring cleaning.
Select load carriers and other equipment, such as rinsing fittings,
that are appropriate for the application.
Information on the individual areas of application can be found on the
following pages, as well as in the operating instructions for the load
carriers.
Miele offers suitable load carriers for all areas of application defined
in “Appropriate use”, such as mobile units, modules, inserts, and special rinsing fittings. More information can be obtained from Miele.
E9xx load carriers
Pictograms for manual program selection
Load carriers with the designation E9xx can be used in the machine
if they have a production date from 2007 onwards.
A857 retrofit kits for the mobile units are available from Miele.
When you select a program manually on the machine, you must select the relevant mobile unit first. Pictograms representing the mobile
units are shown on the display. The pictograms assigned to the mobile units in the A5xx model range are listed in the operating instructions for the mobile units.
Mobile unit/module combinations from the A5xx model range
The pictogram and name of the mobile unit can be found on a strut
on the front of the mobile unit. The model shown is the mobile unit
without modules inserted.
For different module combinations in the A500 and A503 mobile
units, several pictograms can be displayed (see operating instructions
for the mobile unit).
Fixed mobile units from the A5xx model range
The pictogram and name of the mobile unit can be found on the front
of the mobile unit.
27

Application technology
Arranging the wash items
Only items which have been declared by their manufacturer as suitable for machine reprocessing may be processed. The manufacturer’s specific reprocessing instructions must be observed.
Contaminated items pose a health risk.
Contaminated items can result in various hazards to health, which
can lead to infections, poisoning, injuries, and more depending on
the type of contamination.
When working with contaminated items, ensure that all necessary
measures are taken to protect personnel.
Wear protective gloves and use suitable aids.
- Arrange the wash items so that wash water can access all surfaces.
This ensures that they get properly cleaned.
- Do not place wash items to be cleaned inside other pieces where
they may be concealed.
- Do not place wash items so close together that cleaning is hampered.
- The interior of lumened wash items must be thoroughly flushed
through with wash water. Depending on the wash item, special rinsing fittings may be required for this, such as nozzles, irrigation
sleeves, or adapters.
- Ensure that wash items with long, narrow, hollow sections can be
flushed through properly before placing them in inserts or connecting them to a rinsing fitting.
- Lumened instruments should be inverted and placed in the correct
mobile units, modules, and inserts to ensure that wash water can
flow in and out of them unrestricted.
- Deep-sided wash items should be placed at an angle to make sure
the wash water runs off them freely.
- Tall, narrow lumened instruments should be placed in the center of
the mobile units if they are not going to be sprayed directly. This
ensures the insides of the lumened instruments are more easily accessed by the water jets.
- Take apart any wash items which can be dismantled according to
the manufacturer’s instructions and reprocess the individual parts
separately from each other.
- Lightweight wash items should be secured with a cover net to prevent them from spinning around in the wash cabinet and blocking
the spray arms.
28
- Only reprocess small items and micro components in special inserts, mesh trays with lids, or mesh inserts.
- The spray arms must not be blocked by wash items which are too
tall or which hang down in their path.

Application technology
- Broken glass can result in serious injury when loading or unloading.
Damaged glass wash items must not be reprocessed in the machine.
- Nickel and chrome-plated wash items and wash items made of aluminum are not generally suitable for machine reprocessing. Special
process conditions are required for these wash items.
- When cleaning items that are made entirely or partially out of plastic , the maximum thermal stability of the item must be considered.
Select an appropriate program or adjust the temperature of the program accordingly.
Preparing the wash items
Danger of explosion due to flammable gases.
Flammable solvents with a flash point below 70°F (21°C) outgas
and can generate a flammable mix of gases.
Only load the machine with wash items which have traces of sol-
vents at most.
Start the reprocessing program as soon as the machine has been
loaded with the wash items.
Risk of damage due to solvents.
Solvents with a flash point above 70°F (21°C) can damage elas-
tomers and plastics. The machine could leak as a result of this.
Only load the machine with wash items which have traces of sol-
vents at most.
Start the reprocessing program as soon as the machine has been
loaded with the wash items.
Risk of damage due to corrosion.
Chloride solutions, particularly hydrochloric acid, and ferrous mate-
rials that can rust or corrode cause corrosion on the stainless steel
of the machine and the load carrier.
Do not introduce any chloride solutions into the machine.
Do not introduce any ferrous materials that can rust or corrode into
the machine.
Risk of infection.
Microbiological material, pathogens, facultative pathogens, and ge-
netically modified material can cause infections or environmental
damage.
Before washing by machine, decide whether the wash items contaminated in this way need to be sterilized.
29

Application technology
Empty all wash items before loading into the machine, paying par-
ticular attention to relevant regulations.
Remove non-water soluble residues such as paint, adhesives, and
polymer compounds using appropriate solvents.
Rinse wash items which have been in contact with solvents, chlo-
ride solutions, or hydrochloric acid thoroughly with water and drain
very well. Start the reprocessing program immediately after loading
the machine.
Scoop nutrient media (agar) out of petri dishes.
Shake out any blood residues and remove any clots.
If necessary, rinse the wash items briefly with water to prevent
larger quantities of dirt from entering the machine.
Remove all stoppers, corks, labels, sealing wax residue, etc.
Sort small items such as stoppers and taps in suitable baskets for
small parts in order to secure them.
Remove any aids and additives which are difficult to get rid of and
contaminate the wash items in addition to the original soiling in advance. These include grease, paper labels, and other labels.
30

Application technology
Before starting a program
At the end of a program
Carry out a visual check before starting every program:
- Is everything correctly loaded/connected for cleaning?
- Can the wash water consistently permeate wash items with 2openings, such as pipettes and viscometers?
- Are the spray arms clean and do they rotate freely?
- Is the filter combination clean?
Remove any coarse soiling and clean the filter combination if necessary.
- Is the mobile unit correctly connected to the water supply?
- Are the removable modules, nozzles, irrigation sleeves, and other
rinsing fittings securely connected?
- Are all process chemical containers sufficiently filled?
The following must be checked at the end of every program:
- Are the nozzles and connectors securely held in position in the mobile unit, module, or insert?
- Are all lumened wash items still attached to the appropriate nozzles?
- Have any of the wash items on the load carriers moved during
cleaning?
If any of the wash items move during cleaning, this can have a negative effect on the wash result.
Assess whether wash needs to be repeated: for example, if petri
dishes have overturned or glass beakers have fallen over.
- Carry out a visual check of the wash items for cleanliness.
- Can wash water access the insides of wash items with 2openings?
- If the machine is equipped with a drying unit, carry out a visual
check of the wash items for dryness.
31

Application technology
Laboratory glassware and utensils
...wide-neck
...narrow-neck
Wash items with wide necks, such as glass beakers, wide-neck Erlenmeyer flasks, and petri dishes, or cylindrical items such as test
tubes, can be cleaned and rinsed inside and out using rotating spray
arms.
To do this, the wash items are positioned in inserts and placed in an
empty mobile unit with a spray arm.
Wash items with narrow necks, such as narrow-neck Erlenmeyer
flasks, round flasks, measuring cylinders, and pipettes, require special load carriers.
Load carriers are supplied with their own operating instructions.
When loading please note:
- Place petri dishes or similar items in the appropriate insert with the
dirty side facing downward.
- Place pipettes with the pointed end facing downward.
- Arrange inserts at least 1" (3cm) away from the edge of the load
carrier.
- Position inserts for test tubes in the center above the spray arm to
leave the corners of the load carrier free.
- Use a cover net to avoid breakages if required.
32

Application technology
Program overview
At delivery, the reprocessing programs are assigned to the A 503mobile unit. The following modules can be used in various combinations:
- A 612
- A 620
- A 621
- A 622
Exceptions to this are the Vials and Pipettesprograms (see table).
In order to use other mobile units, new load carriers must be set up in the web interface
under “Load carrier management”. “Load carrier management” is described in the programming manual.
Power levels
The mobile units in the modular loading concept can be fitted with modules in different
ways. Depending on the type and number of modules used, different volumes of water and
pump speeds are required to achieve a similar wash pressure. The individual reprocessing
programs are therefore available with different power levels. The higher the power level of a
reprocessing program, the higher the volume of water and the pump speed.
The program structure and the following parameters, which are relevant to performance,
are identical in the different power levels:
- Water quality
- Temperature
- Holding time
- Dispensed process chemical in %
- Drying temperature
- Drying duration
(see appendix: “Power levels/mobile units/module combinations” table)
33

Application technology
General program information
Program Area of application Mobile
unit
Mini - Very short program for barely soiled wash items and very low
rinse requirements
- For a wide range of soiling
- Not suitable for denatured residues such as protein
- Not suitable for inorganic, acid-soluble residues such as metallic salts
- In 2power levels
Standard - Short program for lightly soiled wash items and low rinse re-
quirements
- For a wide range of soiling
- Not suitable for denatured residues such as protein
- Not suitable for inorganic, acid-soluble residues such as metallic salts
- In 2power levels
Universal - Program for lightly soiled to moderately soiled wash items and
moderate rinse requirements
A 503
A 503
A 503
- For removing organic residues
- Suitable to a limited extent for inorganic, acid-soluble residues,
such as metallic salts
- In 2power levels
Intensive - Program for moderately soiled to heavily soiled wash items and
moderate to high rinse requirements
- For removing organic residues
- Suitable to a limited extent for inorganic, acid-soluble residues,
such as metallic salts
- In 2power levels
A 503
34

Application technology
Programs for specific soiling
Program Area of application Mobile
unit
Inorganic - Program for lightly soiled to moderately soiled wash items and
moderate to high rinse requirements
- For removing inorganic, acid-soluble residues such as metallic
salts
- In 2power levels
Organic - Program for moderately soiled to heavily soiled wash items
and moderate rinse requirements
- For removing concentrated organic residues, e.g., fats, waxes,
and stubborn dried-on or thermally adhered organic residues
- Not suitable for inorganic, acid-soluble residues such as
metallic salts
- In 2power levels
Oil - Program for heavily soiled wash items and moderate rinse re-
quirements
- For removing oils, greases, and in some cases waxes
- Not suitable for inorganic, acid-soluble residues such as
metallic salts
A 503
A 503
A 503
- In 2power levels
Agar - Program for moderately soiled to heavily soiled wash items
and moderate rinse requirements
- For removing agar
- In 2power levels
A 503
35

Application technology
Programs for specific wash items
Program Area of application Mobile
unit
Plastics - Program for lightly soiled to moderately soiled plastics and
moderate rinse requirements
- For heat-sensitive laboratory equipment, e.g., plastic bottles
that are resistant to temperatures of up to 130°F (55°C)
- In 2power levels
Vials - Program for lightly soiled to moderately soiled small wash
items and moderate to high rinse requirements
- For vials, centrifuge tubes, and test tubes
- In 2power levels
Pipettes - Program for lightly soiled to moderately soiled pipettes and
moderate to high rinse requirements
- For measuring and volumetric pipettes
- In 3power levels
A 503
A 503
+
A 605
A 503
+
A 613
36

Application technology
Additional programs
Program Area of application Mobile
unit
Laboratory
Special
- Program for cleaning and thermal disinfection at 199°F (93°C)
and 10min holding time in the first program phase; wash water is only pumped out after the disinfection process
- In 2power levels
Rinse cold water
- Program for rinsing wash items with cold water, e.g., to remove:
- Heavy soiling
- Disinfectant residue
or
- To prevent soiling from drying and becoming encrusted on
wash items before the start of a reprocessing program
Rinse DI water - Program for rinsing wash items with DI water, e.g., to remove:
- Heavy soiling
- Disinfectant residue
or
- To prevent soiling from drying and becoming encrusted on
wash items before the start of a reprocessing program
A 503
A 503
A 503
Drying - Program for drying temperature-stable wash items
A 503
- Not suitable for heat-sensitive wash items
Service program
Program Area of application Mobile
unit
Tank emptying Program for emptying the tank, e.g., for long downtimes; the
1)
Manual disinfection
wash cabinet must be empty
Program to drain the wash cabinet when the wash water needs
to be decontaminated by adding disinfecting agent in the event
of a program cancellation (see “Operation, program cancellation”)
1) Depending on the configuration of the Standby parameter in the web interface under
Water intake/DI water tank, the tank is automatically replenished at the end of the program
(see the programming manual, “System, appliance configuration, water intake”).
Zero
A 503
37

Chemical processes and technology
In this section you will find a description of the causes of common issues which can occur
between different types of soiling, process chemicals and the components of the machine,
along with their solutions as necessary.
This section is intended as a guide. If unforeseen interactions occur during reprocessing,
or if you have any questions on this subject, please contact Miele.
General information
Problem Solution
If elastomers (seals and hoses) and plastic
components in the machine are damaged,
this can lead to, for example, swelling,
shrinking, hardening or brittleness of materials, causing tears and cracks to develop.
Components cannot function correctly and
this generally leads to leaks.
A heavy build-up of foam during the program sequence will impair the cleaning and
rinsing effect on the wash items. Foam escaping from the wash cabinet can cause
damage to the machine.
When foam develops, the cleaning process
is not standardized or validated in principle.
Corrosion to stainless steel in the wash
cabinet and to accessories can give them a
different appearance:
- rust (red marks/discoloration)
- black marks/discoloration
- white marks/discoloration (etched surface)
- Determine and remedy the cause of the
damage.
See information regarding “Associated
process chemicals”, “Soiling”, and “Reaction between process chemicals and soiling” in this section.
- Determine and remedy the cause of the
foam build-up.
- Check the process used regularly to monitor foaming levels.
See information regarding “Associated
process chemicals”, “Soiling”, and “Reaction between process chemicals and soiling” in this section.
- Determine and remedy the cause of corrosion.
See information regarding “Associated
process chemicals”, “Soiling”, and “Reaction between process chemicals and soiling” in this section.
Corrosive pitting can lead to the machine
not being water-tight. Depending on the application, corrosion can affect cleaning and
rinsing results (laboratory analysis) or cause
corrosion to stainless steel wash items.
38

Chemical processes and technology
Associated process chemicals
Problem Solution
The ingredients in process chemicals have
a significant impact on the longevity and
functionality (throughput) of dispensing systems.
Process chemicals can damage elastomers
and plastics in the machine and accessories.
Hydrogen peroxide can release large
amounts of oxygen.
- Follow the process chemical manufacturer’s instructions and recommendations.
- Carry out regular visual inspections of the
dispensing system to check for signs of
damage.
- Check the throughput of the dispensing
system regularly.
- Ensure that the regular cycle of maintenance is observed.
- Contact Miele for advice.
- Follow the process chemical manufacturer’s instructions and recommendations.
- Carry out a regular visual check of any accessible elastomers and plastics for damage.
- Only use validated processes.
- The wash temperature must be lower than
158°F (70°C) when using hydrogen peroxide.
The following process chemicals can cause
large amounts of foam to build up:
- Cleaning agents and rinsing agents containing surfactants
Foam can occur:
- in the program phase in which the
process chemical is dispensed
- in the subsequent program phase if it has
been spilt
- in the subsequent program if rinsing agent
has been spilt during dispensing
- Contact Miele for advice.
- Process parameters in the wash program,
such as dispensing temperature and
dosage concentration, must be set to ensure the whole process is foam-free or
very low-foaming.
- Please observe the process chemical
manufacturer’s instructions.
39

Chemical processes and technology
Associated process chemicals
De-foaming agents, especially siliconebased ones, can cause the following:
- a build-up of deposits in the wash cabinet
- a build-up of deposits on the wash items
- De-foaming agents should be used as an
exception only; for instance, when they
are essential for the process.
- Clean the wash cabinet and accessories
periodically without any wash items and
- damage to elastomers and plastics in the
machine
- damage to certain plastics, e.g., polycar-
without de-foaming agent using the Or-
ganicprogram
- Contact Miele for advice.
bonate and plexiglass, in the wash items
being processed
Soiling
Problem Solution
The following substances can damage the
elastomers in hoses and seals, as well as
the plastics in the machine:
- oil, wax, aromatic and unsaturated hydrocarbons
- emollients
- cosmetics, hygiene and skincare products
such as creams
- Depending on usage, wipe the lower door
seal on the machine periodically with a
lint-free cloth or sponge.
- Clean the wash cabinet and accessories
without any wash items using the Or-
ganicprogram.
- Use the Oilprogram or a special program
that dispenses pH-neutral emulsifiers
containing surfactants in the pre-rinse.
The following substances can lead to a
heavy build-up of foam during washing and
rinsing:
- some disinfection agents, dishwashing
cleaning agents, etc.
- reagents for analysis, e.g., for microtiter
plates
- cosmetics, hygiene and skincare products
such as shampoos and creams
- active foaming agents such as surfactants
The following substances may cause corrosion to stainless steel in the wash cabinet
and on accessories:
- hydrochloric acid
- other substances containing chlorides,
such as sodium chloride
- concentrated sulfuric acid
- Thoroughly rinse wash items in water beforehand.
- Select a cleaning program with at least
one short pre-rinse in cold or hot water.
- Depending on the application, use defoaming agents that do not contain silicone oils.
- Thoroughly rinse wash items in water beforehand.
- Put the drip-dry wash items into mobile
units, modules, and inserts and place
these in the wash cabinet.
- Start a program as soon as possible after
placing them in the machine.
- chromic acid
- particles of iron and shavings
40

Chemical processes and technology
Reaction between process chemicals and soiling
Problem Solution
Natural oils and fats can be emulsified with
alkaline process chemicals. This can lead to
a heavy build-up of foam.
Soiling containing high protein levels can
cause a heavy build-up of foam when processed with alkaline process chemicals.
Non-precious metals such as aluminum,
magnesium, and zinc can release hydrogen
when processed with very acidic or alkaline
process chemicals (oxyhydrogen reaction).
- Use the Oilprogram.
- Use a special program that dispenses pHneutral emulsifiers containing surfactants
in the pre-rinse.
- Depending on the application, use defoaming agents that do not contain silicone oils.
- Select a cleaning program with at least
one short pre-rinse in cold water.
- Please observe the process chemical
manufacturer’s instructions.
41

Dispensing liquid process chemicals
Unsuitable process chemicals pose a health risk.
Using unsuitable process chemicals will generally cause an unsat-
isfactory wash result and can pose a health risk or cause damage
to property.
Only use process chemicals designed specifically for use in laboratory glassware washers and follow the manufacturer’s instructions
on how to use them.
Please follow any instructions relating to non-toxic residues.
Process chemicals pose a health risk.
Some process chemicals may be corrosive and irritant.
Observe the relevant safety codes and safety data sheets issued
by the process chemical manufacturers when handling process
chemicals.
Take all protective measures required by the process chemical
manufacturer, e.g., wear protective goggles and protective gloves.
Dispensing systems
The machine is fitted with 2dispensing systems for liquid detergent
and neutralizing agent as standard. Up to 4additional internal dispensing systems can be installed.
The dispensing systems and suction wands must be color-coded.
Stickers are supplied in the following colors:
- blue
- white
- red
- green
- yellow
- black
Enter the process chemicals used and the relevant color in the table
below if an additional dispensing system has been installed. When
containers with process chemicals are connected, the color coding
makes it easier to assign the relevant suction wand.
Dispensing
system
Color code Process chemical
42
1 blue
2
3 red
4
5
6

Dispensing liquid process chemicals
1
2
4external dispensing systems can be connected instead of the 4optional internal dispensing systems.
If a dispensing system is to dispense different process chemicals,
the chemicals must be changed by Miele Technical Service or an
authorized technician.
Containers for
process chemicals
Filling containers with process chemicals
The drawer for containers with process chemicals is located behind
the service cover. There is enough space in the drawer for 4containers with a 10l capacity.
Additional containers must be placed outside the machine.
The drawer is equipped with supports. The supports ensure that the
containers are slightly inclined. The containers must sit on the supports in such a way that the suction wand is located on the lower
side.
Always place the 4containers in the drawer, even if fewer process
chemicals are required. This will prevent the containers from falling
over when the drawer is opened or closed.
Fill the containers for process chemicals or replace them with a full
container if a corresponding message is displayed, e.g., Fill supply
container Dispensing system 1.
Unlock the service cover on the machine .
Tilt the service cover forward , lift it up, and lift it out of its lower
brackets.
Pull out the drawer with the containers for liquid process chemicals.
Take the corresponding container out of the drawer.
Unscrew and remove the suction wand.
Fill the process container with the required process chemical or re-
place it with a new container.
Observe the color coding for the dispensing system and the suction wand to ensure that the process chemicals do not get mixed
up.
43

Dispensing liquid process chemicals
Push the suction wand into the neck of the container and screw it
into place.
Place the container in the drawer.
The suction wand must be located on the lower side of the support.
Push the drawer into the machine.
Filling the dispensing system
Insert the service cover into the lower brackets of the machine and
press on it.
Lock the service cover.
Acknowledge the message Fill container for dispensing system “x”
with the OK button.
Each time a container is filled or replaced, the Fill dispensing sys-
temfunction must be carried out to remove any air from the dis-
pensing system.
A dispensing system must be filled when:
- The corresponding container has been filled or replaced with a new
one.
- The process chemicals have been changed.
A dispensing system can only be primed if there are no load carriers in the wash cabinet.
Open the Systemmenu.
Open the Machine functionsoption.
44
Open the Fill dispensing systemoption.
Press the button for the corresponding dispensing system, e.g.,
DOS 1.
The dispensing system will be filled.

Operation
Switching the machine on and off
The I/0 power switch disconnects the machine from the power supply. The switch is located above the display.
Press the I power switch to switch the machine on.
Once the boot process has finished, the machine is ready for operation.
Press the 0 power switch to switch the machine off.
The machine controls are shut down and the machine is disconnected from the power supply.
Loading the wash cabinet
The load carrier is pushed into the machine wash cabinet from the infeed side.
Press the button to open the door on the infeed side.
Push the load carrier from the transfer trolley into the machine wash
cabinet.
The markings on the load carrier and in the wash cabinet need
to be flush with one another.
Press the button to close the machine door.
45

Operation
Select load carrier
A 503 A 503 + A 603
A 500 + A 613 A 505
US
BED
user/
Selecting a program
The reprocessing programs are assigned to certain load carriers.
Therefore, a load carrier must be selected first with the help of a pictogram.
Selecting a load carrier
Press the Reprocessingbutton.
The menu for selecting the load carrier via a pictogram is displayed.
If more than 4load carriers are available, you will be able to scroll
through several pages in the selection menu.
Press the button for the required load carrier, e.g., A503.
The pictogram of the selected load carrier is displayed in the header,
e.g., Reprocessing.
The reprocessing programs which can be selected are listed.
Press the button for the required reprocessing program.
The program start screen is displayed.
46

Operation
US
BED
user/
Favorites
Universal
Agar Plus
Pipettes 1
Universal Plus
Selecting programs from
Favorites
If reprocessing programs have been defined in the System, Man-
age favoritesmenu, the program can be selected using the Favoritesbutton.
Press the Favoritesbutton.
The Select load carriermenu is displayed.
Press the button for the required load carrier, e.g., A503.
The pictogram of the selected load carrier is displayed in the header,
e.g., Favorites.
The reprocessing program defined as a favorite is displayed; Univer-
sal in this example.
Press the button for the required reprocessing program.
The program start screen is displayed.
47

Operation
1:06
user/
18.06.2018 15:05
US
BED
Universal
Time left
Starting a program
Check whether the right reprocessing program for the load carrier
is displayed in the header.
With the button, you can open the menu for selecting the reprocessing programs if you wish to choose a different reprocessing
program.
Press the button.
The reprocessing program starts.
It is only possible to start a reprocessing program when the machine
doors are closed and there are no fault messages.
If the symbol is displayed in the footer, you must work through
the list of active messages first (see “Fault messages and instructions”).
Program sequence
The program will run automatically once it has been started. You can
find detailed information about the program sequence and the program parameters on the machine display (see “Machine description”,
“Control panel on the display”).
48

Operation
End of program
After the program has ended, the following is displayed:
- Cycle number
- time elapsed since the end of the program
- Result of the wash process
- Program finishedmessage
The progress bar changes from white to green.
The wash cabinet lighting can be switched on automatically depending on the pre-setting.
Canceling a program
A reprocessing program can be canceled at any time. The wash water
is drained, then the door on the infeed side is released.
Press the button.
A confirmation prompt is displayed:
Cancel program?.
Program cancellation with manual
disinfection
Manual program cancellation
Confirm the confirmation prompt with Yes.
Once the water has finished draining, the following message will appear on the display:
Program cancelled.
The progress bar is red and the following fault message is displayed:
Program aborted by user.
Once the fault message has been acknowledged, the program can be
restarted.
For programs with the Drainage after disinfection parameter activated,
additional steps may be necessary for program cancellation. If there
has been no thermal disinfection, the wash water must be decontaminated manually.
During the first program phase:
Press the button and confirm the confirmation prompt Cancel
program? with Yes.
The fault messageProgram aborted by user is displayed.
There is wash water in the wash cabinet; it is not drained.
Program cancellation due to fault
Manual disinfection
If the program is canceled due to a fault during the initial program
phase, the wash water is not drained. The required steps are described under “Manual disinfection”.
Press OK to acknowledge the fault message in the list.
Press OK to acknowledge the program cancellation.
The message Please unload appears in the program sequence display.
49

Operation
Open the door on the infeed side.
Decontaminate the wash water by adding disinfecting agent.
Close the infeed side door.
Select the load carrier.
Select and start the Manual disinfectionprogram from the list of pro-
grams assigned to the load carrier.
The wash water is drained; another fault message is displayed.
Press OK to acknowledge the fault message in the list.
The infeed side door can be opened.
Delay start
The start of a program can be delayed. The delay start period can be
set to the exact minute.
If soiling is left to dry on the wash items for a long time, the reprocessing result can be adversely affected. There is also a risk of corrosion for stainless steel wash items.
To set the delay start, press the button in the footer.
Enter the Start timewith the on-screen keyboard and press OK to
confirm.
The reprocessing program starts automatically at the set time.
The automatic program start can be canceled at any time. To do
this, press the button in the footer. A confirmation prompt is displayed: Stop delay start?. Once the confirmation prompt has been
confirmed, the reprocessing program can be started manually.
50

Network connection
Network connection
The machine can be integrated into an internal network via an Ethernet interface. Only the systems required for machine access via a
web interface and for the documentation of reprocessing results (e.g.,
a PC on which the documentation software is installed) may be operated on this network. A standard network cable – CAT5 Ethernet cable or higher – is required for the connection.
Miele Technical Service must connect the network cable to the interface.
Unauthorized access poses a health risk.
Settings in the machine, e.g., parameters for disinfection or dis-
pensing process chemicals, may be changed as a result of unauthorized access via the network.
Under no circumstances should it be possible to access the machine via the Internet or other public or unsecured networks, either
directly or indirectly (e.g., using port forwarding)!
The IP addresses from 192.168.10.1 to 192.168.10.255 are reserved for Miele Technical Service. They must never be set in the
internal network.
1. The machine should be operated only in a separate network
segment which meets one of the following requirements:
– it is physically separated from other network segments
– access to the segment is restricted by a firewall or a router which
has been configured accordingly
2. Limit access to this separate network segment to persons requiring access in the course of their work.
3. Use strong passwords to protect access to systems that are
connected to the machine.
4. Configure the Ethernet interface.
51

Network connection
Network protocols
The machine supports communication via the following network protocols:
Network
protocols
DHCPv4 Assignment of dynamic IPv4addresses 68/UDP
DHCPv6 Assignment of dynamic IPv6addresses 546/UDP
NTP Time server 123/UDP
HTTPS Web interface for configuring the ma-
The ICMPv4 and ICMPv6 protocols are also supported.
Description Port
443/TCP
chine parameters
Process documentation
The reprocessing processes in the machine can be documented via
external process documentation software or an internal or external
printer.
Please note the following when connecting a printer or PC:
- Only PCs or printers which are certified in accordance with EN/
IEC60950 may be used.
- The size of the printer or PC must be taken into account when installing the machine.
- An extension cord for the Ethernet interface must not be longer
than 328 ft (100m).
Please contact the machine manufacturer for more information on
suitable printers and software.
52

System settings
Network connections
Machine functions
Restart
Data plate
Manage favorites
System
US
BED
user/
System
|
Network connections
Change PIN
Pairing
Printer
Network
US
ADM
user/
System
The Systemmenu contains the following functions:
Press the buttons to open the sub-menus. The functions in the submenus are described on the following pages.
Network connections
The Network connectionsmenu contains network configuration and
user login functions. Once the Network connectionsmenu has been
opened, the following menu will appear on the display:
Press the buttons to open the sub-menus.
53

System settings
Changing the PIN
A user can change their PIN at any time.
The minimum length of the PIN depends on the user level:
- Operator4 digits
- Technician6 digits
- Administrator6 digits
Press the Change PINbutton.
Entry prompts are given to change the PIN. The buttons next to the
parameters open the on-screen keyboard.
Enter the old PIN and then the new PIN twice and press OK to con-
firm.
The new PIN is applied in the User managementin the web interface.
It is not visible there. If a user has forgotten their PIN, they can reset it
in the User management.
The PIN for the Administratoruser level can only be reset by Miele
Technical Service.
If the machine is connected to a network, external applications can
access the machine controls, e.g., software for Process documentationor the Web interface. When the machine is connected for the first
time, Pairingmust be carried out between the machine and the external application.
A maximum of 9external applications can be connected to the machine at the same time. An old connection must be disconnected
before another new pairing request can be confirmed.
Press the Pairingbutton.
A menu is displayed which lists active connections and open requests with the date and time. Symbols are used to indicate the status of a pairing request:
Symbol Function
Pairing confirmed
Disconnect pairing
Pairing requested
54

System settings
Confirming pairing
Disconnecting or rejecting pairing
Granting write
permissions
The pairing request must be confirmed before the external application
can access the machine. A 6 to 10-digitPairing PIN is assigned for
this.
Press the button.
The on-screen keyboard is displayed for entering the Pairing PIN.
Enter the Pairing PIN and press OK to confirm.
This Pairing PIN must be entered in the external application to complete the pairing process.
An existing pairing connection can be disconnected and a pairing request can be rejected at any time.
Press the button next to the corresponding application.
The pairing connection is disconnected and the line for the corresponding application is deleted from the menu.
If data needs to be downloaded via the web interface or machine settings need to be changed, the logged-in user requires write permissions. As soon as a user has requested write permissions, the following message appears in the display:
Allow connection with write authorization?...
Date/Time
The request for write permissions can be confirmed by a Login on the
machine or rejected by pressing the button.
Press the Loginbutton to grant write permissions.
The on-screen keyboard is displayed for login.
During external access to the machine with write permissions, the following message appears in the :
Connection with write authorization active...
The write permissions can be revoked by doing the following:
Press the button.
The on-screen keyboard is displayed for login. Write permissions are
canceled with the login; the writing connection remains established
by pressing the button.
Write permissions can be deleted by the logged-in user in the web
interface. In this case, logging in to the machine display is not necessary.
55

System settings
Configuring the printer
A connected printer can be set up using the display or the web interface. To set the printer up in the web interface, see the programming
manual.
Press the Printerbutton.
Press the button next to the Typeparameter.
The display shows a menu with the available printer options.
Please note:
Activate the required printer with the button next to the model des-
ignation.
The bar in the button of the activated printer is displayed in white.
Exit the menu by pressing the button.
You must enter the corresponding IP address of the selected network
printer.
Press the button next to the IP Addressparameter.
The on-screen keyboard is displayed for entering the IP address.
Enter the IP address and press OK to confirm.
The Direct printparameter determines whether a reprocessing report
is to be transferred to the connected printer and printed out immediately at the end of the program. In addition to being printed out directly, the wash report is also saved in the machine controls. You can
print out additional copies of a wash report using the Documenta-
tionbutton in the Main menu.
Press the button next to the Direct printparameter to activate the
option to print out directly.
The bar in the button is displayed in white.
56

System settings
Configuring the
network
The Ethernet connection is configured in the Networkmenu. The network can be configured on the machine display or using the web interface. Before the machine is connected for the first time, e.g., to a
network printer, the network must be configured on the machine display. To set the printer up in the web interface, see the programming
manual.
You will receive the information required for configuring the network
from your network administrator.
Press the Networkbutton.
The network configuration parameters are displayed. The buttons
next to the parameters open the on-screen keyboard.
Enter the required values for each parameter and press OK to con-
firm.
Use the IP Address or the Host name to address the machine in the
network.
Manual entry
Parameter Report version IPv4 Report version IPv6
Active Active Active
DHCP Inactive Inactive
IP Address Entry field Entry field
Subnet Mask Entry field –
Prefix length – Entry field
Host name Entry field Entry field
Standard gateway Entry field Entry field
NTP Entry field Entry field
Automatic assignment
Parameter Report version IPv4 Report version IPv6
Active – –
DHCP Active Active
IP Address – –
Subnet Mask – –
Prefix length – –
Host name Entry field Entry field
Standard gateway – –
NTP – –
57

System settings
System
Machine functions
|
Continuous program
Fill dispensing system
Set up dispensing system
Self-disinfection
Adjust conductivity module
Program test
US
ADM
user/
Machine functions
The Machine functionsmenu contains service functions, e.g., for dispensing systems and for built-in tanks. Once the Machine func-
tionsmenu has been opened, the following menu will appear on the
display:
Automatic system test
Use the buttons to start individual functions.
During the automatic system test, the Self-disinfectionfunction for the
installed tanks (if present) is performed for a fixed period of time:
Prerequisites for the automatic system test are:
- The machine is switched on
- The wash cabinet is empty
- The machine door is closed
The automatic system test can be switched off via the web interface (see the programming manual, “System, appliance configuration, automatic system test”).
58

System settings
Carrying out selfdisinfection
(optional)
This button is only displayed when the machine is fitted with an internal tank. The machine’s internal tanks are disinfected during the automatic system test by the Self-disinfectionfunction.
If the automatic self-disinfection of the internal tank was not completed without faults, this function can be started manually.
Self-disinfection can only be carried out if there are no load carriers
in the wash cabinet.
Press the Self-disinfectionbutton.
The steps required for self-disinfection run automatically. Once selfdisinfection has finished, a message will appear on the display:
Self-disinfection completed
or
Self-disinfection failed
Press OK to confirm the message.
If self-disinfection is not repeated successfully, contact Miele Technical Service.
You can cancel self-disinfection with the button in the footer.
The Cancel self-disinfection?confirmation prompt is displayed. Press
Yes to cancel self-disinfection and press No to continue with self-
disinfection.
59

System settings
Starting the continuous program
A repeated program start can be defined for a reprocessing program
in the Continuous programmenu. This function can be used for washrelated trials, e.g., material tests, or for periodic decontamination in
the event of long downtimes.
Press the Continuous programbutton.
The display shows the available load carrier options.
Press the button for the required load carrier.
The available reprocessing programs are displayed.
Press the button for the required reprocessing program.
The parameters for defining the continuous program are displayed.
The buttons next to the parameters open the on-screen keyboard.
The limits for the selected parameters are displayed in the header of
the on-screen keyboard.
Parameters for the continuous program
Parameter Definition
Program cycles Number of program runs for the continuous pro-
gram
Pause between
program cycles
Period between the end of the program and the
subsequent program start
Door delay Period between the end of the program and the
opening of the machine door
Open door for Period between the opening and closing of the
machine door
Door selection Choice of machine door which is opened after a
program run
Enter the required values for each parameter.
Press the button in the footer to start the continuous program.
The message Continuous program: Warning! Door opens and closes
automatically. will appear on the display. Press OK to start the contin-
uous program and to cancel the procedure.
Once it has been started, the reprocessing program is repeated until
the set program runs have ended.
You can cancel the continuous program at any time with the
button.
60

System settings
Filling the dispensing system
Dispensing system setup
The Fill dispensing systemfunction is used to prime the relevant dispensing system. The function must be carried out after a container for
process chemicals is filled or replaced with a full container.
The function can only be carried out if there are no load carriers in
the wash cabinet.
Press the Fill dispensing systembutton.
Press the button for the required dispensing system, e.g., DOS 1.
The individual steps are shown on the display during the process.
Once the process has finished, a message will appear on the display:
Dispensing systemDOS 1 filled.
or
Dispensing systemDOS 1 not filled. Repeat Fill dispensing system.
Press OK to confirm the message.
If the process of filling a dispensing system is not repeated successfully, contact Miele Technical Service.
Set up dispensing system is used to calibrate the dispensing systems.
This must be performed if:
Carrying out setup
- The connected process chemical has been changed (different viscosity).
- A new dispenser pump or a new flow sensor has been installed
- The dispensing system needs to be checked, e.g., in the event of
qualification, requalification, or a periodic check.
During setup, the dispenser pump is activated for a defined number
of pulses. In parallel to this, the control module counts the pulses
emitted by the flow sensor. After the measured volume has been entered into the control module, the module calculates the conversion
factors for the throughput of the dispenser pump in µl/Imp and the
pulse rate of the flow sensor in µl/Imp.
The setup for a dispensing system can only be performed when
there are no load carriers in the wash cabinet.
To determine the precise throughput of the dispenser pump and the
pulse rate of the flow sensor, 2 measuring cylinders are required:
- 1x1000ml
- 1x100ml
Put the dispensing system suction wand in a 500–1000ml measur-
ing cylinder.
Fill the measuring cylinder with the process chemical to be dis-
pensed.
Fill the 100ml measuring cylinder with the process chemical to be
dispensed.
61

System settings
Press the Fill dispensing systembutton.
Press the button for the required dispensing system, e.g., DOS 1.
Once the process has finished:
Press OK to confirm the message.
Fill the 500–1000ml measuring cylinder with the process chemical
Completely fill the 100ml measuring cylinder with the process
Press the Set up dispensing systembutton.
Press the button for the required dispensing system, e.g., DOS 1.
The following message appears in the display:
DOS setup for dispensing system... starting. Prepare dispensing system.
Before dispensing system setup is performed, the dispensing systems need to be primed.
to be dispensed from the 100ml measuring cylinder and mark or
note the fill level.
chemical to be dispensed.
Press OK to confirm the message in the display.
The dispensing quantity measurement is carried out.
The process steps appear in the display, e.g., Dispenser pump active.
Once the measurement is complete, the on-screen keyboard opens.
The previously set value is displayed.
Fill the 500–1000ml measuring cylinder up to the original fill level
with the process chemical from the 100ml measuring cylinder.
Read off the required filling volume on the 100ml measuring cylin-
der.
Enter the read value using the on-screen keyboard and confirm with
OK.
The measurement results for the conversion factors are displayed,
e.g.:
Conversion factor DOS 1:
old... µl/Imp new... µl/Imp
Conversion factor flow sensor 1:
old... µl/Imp new... µl/Imp
Accept new values?
62
The new conversion factors are taken over by the control module with
OK; pressing retains the old conversion factors. The Set up dis-
pensing system menu reappears in the display.
Contact Miele Technical Service to carry out Set up dispensing sys-
tem if the machine dispensing systems are not equipped with suc-
tion wands.

System settings
Calibrating the
conductivity meter
When particularly high demands are placed on the cleaning and final
rinse result, e.g., in chemical analysis, the conductivity meter can be
calibrated with the Adjust conductivity modulefunction. The measuring
system is calibrated from DI water to cold water in the conductivity
measuring range.
Conductivity meter calibration can only be carried out if there are
no load carriers in the wash cabinet.
The wash cabinet should be rinsed with DI water to prevent high
measured values due to lye splitting.
Press the Adjust conductivity modulebutton.
The DI water measurement is carried out.
The message Please wait... and the current process step appear in
the display, e.g., Measurement active.
At the end of the measurement, the DI water conductivity: Actual is
displayed together with the input screen for the manually measured
value.
The infeed side door is released for the manual measurement.
Open the door and perform the manual conductivity measurement.
Close the door.
Press the button next to the DI water conductivity: Newparameter to
open the on-screen keyboard.
Enter the measured value using the on-screen keyboard and con-
firm with OK.
Measured values with decimal places need to be mathematically
rounded.
Press the OK button.
The cold water measurement is carried out.
Perform the same work steps as for DI water if the message Cold
water conductivity: Actual is displayed.
The values entered for Conductivity... New are taken over by the control module.
The Machine functions reappear in the display.
You can cancel the conductivity meter calibration using the button in the footer. The message Adjustment of conductivity module un-
successful. Please repeat. will appear on the display.
63

System settings
0:25
194 °F
Duration
Universal
user/
18.06.2018 15:05
ADM
US
Program block
Temperature
Main wash 1
Carrying out a program test
Newly created or modified reprocessing programs can be checked
with the Program test. A program can only be enabled with the
Checkedparameter if a reprocessing program has run through the
Program test without any faults (see programming manual, “Program
administration”).
The Program test can be used to check the cleaning performance.
During the program test, the program sequence stops after each program phase and the door on the infeed side can be opened so that a
sample can be taken.
When you open the door between 2program phases, please be
aware of the following sources of danger:
– risk of burning and scalding after high-temperature program
phases
– risk of contact with corrosive substances after program phases
that dispense process chemicals
– risk of inhaling toxic vapors after program phases that use disinfectants
Steam that escapes from the machine after high-temperature
phases can trigger a false alarm in smoke detectors.
64
After the reprocessing program has started, an additional button is
displayed next to the program phase. The button has two functions:
- Continue the reprocessing program without opening the door.
- Skip the next program phase.
Sampling example
Press the Program testbutton.
The display shows the available load carrier options.
Press the button for the required load carrier.
The available reprocessing programs are displayed.

System settings
Press the button for the required reprocessing program.
The following message appears on the display:
Program test: Skip program block with . Door can be opened at end of
each program block.
Press OK to confirm the message.
The program start screen is displayed.
Press the button.
The button is displayed – the start of the reprocessing program is
delayed.
Before the water intake, the relevant program phases displayed can
be skipped by pressing the button.
After each program phase, the following message will appear on the
display before the wash water is drained:
Program test: Door can be opened to take sample..
Press OK to confirm the message.
The and buttons are enabled.
To take a sample, press the buttons to open the door.
Once you have taken the sample, press the button to close the
door.
The following message will appear on the display:
Continue program test? To continue, press OK. To open door, press .
Press OK to confirm the message.
The wash water is drained and the next program phase begins.
If a sample does not need to be taken after a program phase:
Press the button.
The wash water is drained and the next program phase begins.
You can skip each program phase when it begins by pressing the
button.
65

System settings
Restarting
The Restartfunction shuts down the machine controls and then reboots them. This Restart can be used, for example, when you get the
prompt Switch machine off and on when you are troubleshooting.
Press the Restartbutton.
The Restart?confirmation prompt is displayed. Press OK to restart or
to cancel the process.
Opening the data plate Menu
The following information is listed in the Data platemenu:
For stable continuous operation, it is recommended to restart the
machine once every 24hours. The restart can be performed using
this function.
Alternatively, the machine restart can be performed in the web interface automatically using the System/Machine configuration/Auto-
matic restart function or manually under System/Machine functions/Restart the machine.
- Machine type
- Machine name
- Commissioning date
- Fabrication number
- Fabrication index
- Machine type
- Material number
- Software version
In addition to the Machine nameparameter, an individual name can
be entered for the machine.
Press the button next to the Machine nameparameter.
The on-screen keyboard is displayed for entering the machine name.
Enter the name for the machine and press OK to confirm.
The assigned machine name is used:
- in the web interface
66
- in reprocessing reports
- in fault reports
- in data transferred to software for process documentation

System settings
Blind
Blind
Blind
Blind
Blind
Instruments
Container
MIC
Orthopaedics
OK
DE
LogIn
06.12.2014 20:36
SP / WORLD
11.03.2017 20:36
| System | Systemsprach
OK
11.03.2019 20:36
|
ADM
user/
US
System
|
Manage favorites
Favorite 1
Favorite 2
Favorite 3
Favorite 4
:
:
:
:
Universal
Universal Plus
Pipettes 1
Agar Plus
Managing favorites
You can define your 4most commonly used programs as favorites in
the Manage favoritesmenu.
If Automatic program allocationis not activated:
After the Reprocessingbutton has been pressed, all reprocessing
programs assigned to the load carrier are displayed.
If you select the reprocessing program via the Favoritesbutton instead, only the 4reprocessing programs defined in the Manage fa-
voritesmenu are displayed.
If none of the 4favorites is assigned to the load carrier as a reprocessing program, the following message will appear on the display:
No Favorites available for current load carrier.
To define favorites:
Press the Manage favoritesbutton.
4buttons are displayed for the favorites.
Press the Favorite 1button.
The list of reprocessing programs is displayed.
Press the button for the required reprocessing program; Universal
in this example.
The name of the reprocessing program is displayed in the Favorite
1button.
Define favorites 2–4 in the same way.
Press OK to exit the menu.
67

Maintenance measures
Maintenance
The machine should be serviced every 2,000 hours of operation, or
at least once a year, by Miele Technical Service.
Maintenance covers the following:
- electrical safety according to national regulations
- door mechanism and door seal
- any screw connections and connectors in the wash cabinet
- water inlet and drainage
- internal and external dispensing systems
- spray arms
- filter combination
- sump including drain pump and drain valve
- all mobile units, modules, and inserts (charged separately)
Where applicable:
- Steam condenser
- Drying unit
- conductivity monitoring
- Connected printer
- network connection
External documentation software and computer networks are not
tested by MieleService.
The following operational tests are carried out as part of the maintenance:
- a program sequence as a test run with thermoelectrical measurement
- leak test on seals
- safety testing of all relevant measuring systems, including fault displays
- safety features
68

Maintenance measures
Routine checks
Before the start of each working day, the operator must conduct a
series of routine checks. A routine checklist is supplied with the machine.
The following items must be checked:
- all filters in the wash cabinet
- spray arms in the machine and in any mobile units, modules, or
baskets
- the wash cabinet and the door seal
- dispensing systems
- mobile units, baskets, modules, and inserts
- the filters in the load carriers
69

Maintenance measures
Cleaning the filters in the wash cabinet
The filters in the floor of the wash cabinet prevent coarse soiling from
coming into contact with the circulation system. Filters can become
blocked by soiling, so they need to be checked every day and
cleaned as necessary.
Risk of damage due to blocked waterways.
If the filters are not inserted, dirt particles will end up in the ma-
chine water circuit. The dirt particles may block the nozzles and
valves.
Only start a program if the filters are inserted.
Check that the filters are positioned correctly when you reinsert
them after cleaning.
Remove large bits of soiling from the surface of the filter.
Turn the holder to the left to release it and remove it from the
coarse filter .
Rinse the holder under running water, paying particular attention to
the perforation at the top end.
Remove the coarse filter and rinse under running water.
70

Maintenance measures
Remove the microfine screen filter.
Remove deposits and soiling with running water, using a brush if
necessary.
Blast the microfine screen filter with compressed air against the di-
rection of flow of the wash water.
Insert the microfine screen filter back into the sump.
Place the coarse filter on the microfine screen filter.
Push the holder through the opening in the coarse filter and turn it
to the right.
Cleaning the spray arms
Waste particles can lodge in the spray arm nozzles.
It is therefore important to inspect the spray arms daily.
The spray arms of the machine, some mobile units, and modules are
labeled as follows:
- M1 = Bottom machine spray arm
- M2 = Top machine spray arm
- A1 = A501, A504 mobile unit spray arms
- A2 = A603 module spray arm
Note the label on the spray arms when you reinsert these into the
machine, mobile units, and modules.
Use a sharp pointed object to push visible particles into the spray
arm nozzles and rinse well under running water.
71

Maintenance measures
Remove the spray arms as follows:
Machine spray arms
Spray arms on mobile units and modules
Remove any mobile units from the wash cabinet.
Loosen the securing clip on the spray arm connection, then pull the
lower spray arm upward and the upper spray arm downward.
Loosen the securing clip on the spray arm connection and then pull
the spray arm downward.
If there is considerable visible wear on the spray arm bearings, contact Miele Technical Service as this can result in functional problems.
Reinsert the spray arms after cleaning, then secure them with the
securing clips. Ensure that the securing clips are seated correctly.
After replacing the spray arms, check that they rotate freely.
Unsatisfactory cleaning results due to an incorrectly measured
spray arm speed.
There are powerful magnets at the end of the spray arms. If metallic objects get stuck on these magnets, this can cause a false reading of the spray arm speed.
Remove any metallic objects which are stuck to the magnets, such
as instrument parts.
72

Cleaning the machine
Press for 3 seconds to quit
Maintenance measures
Locking the display
Cleaning control
elements and the
glass door
The machine display can be locked for cleaning and surface disinfection.
Press the button in the header.
The following will appear on the display:
To unlock the machine display, hold the button for around 3s.
The glass door and the display should only be cleaned with a damp
cloth or a suitable cleaning agent designed for use on glass.
Do not use any abrasive materials or general-purpose cleaners.
These can cause considerable damage to the glass due to their
chemical composition.
73

Maintenance measures
Cleaning the front of the machine
Cleaning the wash cabinet
Cleaning the door
seal
The stainless steel front should only be cleaned with a damp cloth
and a cleaning and disinfecting agent or with a non-abrasive stainless steel cleaner.
To help prevent resoiling (fingerprints, etc.), a suitable stainless steel
conditioner can be used after cleaning.
Do not use cleaning agents containing ammonia or thinners!
These agents can damage the surface material.
Risk of fire due to ingress of water.
The pressure of a water jet can cause water to get into the ma-
chine.
Never clean the machine or near vicinity with a water hose or a
pressure washer.
The wash cabinet is mostly self-cleaning.
However, if you notice a build-up of deposits, please contact Miele
Technical Service for advice.
The door seal should be cleaned regularly with a damp cloth to re-
move any soiling.
Seals which are no longer tight or which have suffered damage
must be replaced with new ones by Miele Technical Service.
74

Maintenance measures
Checking mobile units, modules, and inserts
Mobile units, modules, and inserts should be checked daily to make
sure they are functioning correctly. A checklist is supplied with the
machine.
The following points must be checked:
- Are the guide rails in good condition, and are they securely attached to their mobile units?
- Are the lock nuts for the guide rails tightened securely?
- Are the locking caps in the module connectors of the modular system mobile units working properly?
- Are all injector nozzles, irrigation sleeves, and hose adapters securely attached to mobile units or inserts?
- Are all injector nozzles, irrigation sleeves, and hose adapters clear
so that wash water can flow through unhindered?
- Are all caps and fasteners securely attached to the irrigation
sleeves?
If spray arms are present:
- Do the spray arms rotate freely?
- Are the spray arm nozzles free from blockages (see “Maintenance”
– “Cleaning the spray arms”)?
- Are the magnets present at the end of the spray arms?
- Are the magnets at the end of the spray arms free from metallic objects?
Mobile units, modules, and inserts must be inspected periodically
together with the machine after 2000operating hours or at least
once per year, see “Maintenance” – “Periodic checks”.
75

Maintenance measures
Built-in printer (optional)
a
Lever for opening the flap
b
LED
c
Paper feed
d
Acknowledgement button
Replacing the paper roll
LED status Printer status
Off Power supply fault
On Ready for operation
1xflash Not ready for operation
2xflash Fault on the printer head
3xflash Paper jam/paper roll empty
4xflash Temperature fault
The paper roll for the built-in printer must not be replaced while a
program is running.
When the LED flashes three times, this indicates that the paper roll
has run out. To replace the paper roll, proceed as follows:
Pull the lever on the printer flap and lift the flap upwards.
Take the empty paper roll out of the printer compartment and insert
the new paper roll.
The end of the paper roll is on the bottom side of the compartment.
76
Pull a bit of the end of the paper out of the compartment and close
the printer flap.
Cut off the protruding strip of paper.
Press the acknowledgement button.
The printing process will continue.

Maintenance measures
Thermal paper
Replacement rolls of thermal paper with a width of 2 3/8" (60mm)
and an external diameter of approximately 2" (50mm) can be obtained from the machine manufacturer.
When this is stored under the following conditions, the text will remain legible for at least 7years:
- no direct light
- constant room temperature between 64°F (18°C) and 77°F (25°C)
- relative humidity of max. 40–60%
The durability of the thermal printout is reduced by:
- a faulty printer head in the thermal printer
- the thermal printer being set incorrectly; the printout appears faded
- prolonged exposure to temperatures above 105°F (40°C)
- storage in a damp or wet environment over a long period
- contact with emollients, which are found in PVC films, for example
- contact with oils, fats, or alcohol
- contact with aggressive chemicals
- direct sunlight
Unfavorable conditions will cause the text on the printout to fade.
The printout will not be legible and the data to be documented will
therefore be lost.
Avoid all influences which will impair the durability of the thermal
printout.
Prepare a backup copy on thermostable paper if necessary.
77

Fault messages and instructions
OK
Login
11.03.2020 20:36
Main menu
Warning
System test not carried out
2750
US
The fault messages on the machine display are designed to help you
find the cause of the malfunction and to resolve it. However, please
note the following:
Repairs should only be performed by Miele Technical Service or
an authorized technician.
Unauthorized repairs can expose the user to considerable risk.
Representation of faults on the display
Machine warnings and faults are shown in the footer of the display. The symbol is used as a button to open the list with all messages.
In the main menu
While the main menu is shown in the display, messages appear in a
pop-up:
If messages are present for multiple faults and warnings, a pop-up
appears for each one
The pop-ups are closed by pressing OK; the messages remain in the
list of active messages.
In the program sequence
78
It may be the case that a fault has occurred multiple times. If, for example, the system test could not be performed for 3 days, 3 popups appear with the relevant message. The pop-up must be closed
3 times by pressing OK.
The current message is displayed on the program sequence display
in addition to the progress bar. The color of the progress bar changes
depending on the type of message:
- Yellow for warnings
- Red for faults

List with active
28.01.2019 11:09
28.01.2019 10:32
28.01.2019 10:11
28.01.2019 10:06
28.01.2019 09:09
28.01.2019 09:09
Messages
US
user/
18.06.2018 15:05
BED
Timeout door gaskets inflation
Contact fault
Load carrier in chamber
User ID unknown
System test not carried out
2841
2750
2478
2650
Timeout door gaskets release
Peak-load cut-out DI water tank
2687
2651
messages
Fault messages and instructions
Technical faults on the machine
After a warning or fault symbol has been pressed in the main menu,
the list containing all active messages is shown on the display. If the
list contains more than 6entries, a scroll bar will appear above the
footer.
Moving the scroll bar opens the next page of the list.
The date and time of the occurrence are shown in addition to the fault
number.
In the right-hand column, the warnings and faults can be acknowledged with OK. The buttons are only active when acknowledgement
is possible.
Press the button with the message in the left-hand column to open
the description of the fault number with information on rectifying the
fault.
79

Fault messages and instructions
OK
PLW 8617
US
user/
18.06.2018 15:05
BED
Machine type
Fabrication number
Description
Fault
00 / 123456789
Confirm message with OK.
Check user administration.
If fault persists, contact Service.
2841
Troubleshooting
After a warning or fault button has been pressed in the message list,
a message with information on rectifying the fault appears on the display.
Press OK to acknowledge the message and exit the menu.
Press to exit the menu without acknowledging the message.
The message list is shown again on the display.
80

Fault messages and instructions
Technical faults without fault number
Problem Possible cause and solution
The machine display
is dark.
The wash water in
the machine wash
cabinet is not
drained after a program cancellation.
The machine display is not showing any information. This can be as a result of the following:
– The display is faulty.
– The connecting cable between the display
and the controls is faulty.
– The plug connection is faulty.
Contact Miele Technical Service.
The machine is not switched on.
Press the I power switch.
An external residual current device (RCD)
has switched.
Inform building services.
An external emergency off switch was activated.
Inform building services.
In the program head of the reprocessing program, the Drainage after disinfectionparameter is active.
Manually disinfect wash water and use the
Manual disinfection program to remove it
from the wash cabinet (see “Operation,
program cancellation, program cancellation with manual disinfection”).
81

After sales service
Repairs should only be carried out by Miele Technical Service or
an authorized technician.
Unauthorized repairs can expose the user to considerable risk.
To avoid unnecessary service visits, check that the fault has not been
caused by incorrect operation when a fault message first appears.
Fault messages appear on the machine display.
Notify Miele Technical Service if you are still not able to resolve the
problem after following the advice on the machine display.
Miele Technical Service will need to know the model and serial number of the machine. These can be found on the data plate (see “Electrical connection”).
82

*INSTALLATION*
Electrical connection
All electrical work must be carried out by a qualified electrician
in accordance with local and national safety regulations.
- The electrical installation must be in compliance with current local
and national safety regulations (DINVDE0100 in Germany).
- The connection to the power supply must comply with national regulations. The power outlet must be accessible after the machine
has been installed. An electrical safety test must be carried out after installation and after any servicing work.
- If the machine is hard-wired to the power supply, a power switch
capable of disconnecting the machine at all poles must be installed. This power switch must be designed to operate at the rated
current, have a contact gap of at least 1" (3mm), and also be lockable in the off position.
- If necessary, equipotential bonding must be carried out.
- The rated loads are specified on the data tag and in the circuit diagram supplied with the machine.
- The rotational direction of motorized power units depends on the
electrical connection of the machine. Machine phases must be connected in the correct sequence (clockwise rotating field).
- For added safety, the machine should be protected by a residual
current device with a trip current of 30mA.
You can find more information on electrical connection in the installation diagram supplied with the machine.
The machine must only be operated with the voltage, frequency, and
fuse rating shown on the data plate.
The data plate showing relevant certification marks is located behind
the service cover on the infeed side of the machine.
The wiring diagram is supplied with the machine.
83

*INSTALLATION*
Electrical connection
Electromagnetic compatibility (EMC)
The machine has been tested for electromagnetic compatibility (EMC)
in accordance with EN61326-1 and is suitable for operation in commercial environments, such as hospitals, medical practices, and laboratories plus other similar environments which are connected to the
domestic electrical supply.
The machine’s high frequency (HF) energy emissions are very low and
are therefore unlikely to interfere with other electronic machines in the
vicinity.
Flooring in the installation area must be wood, concrete, or tiled. Synthetic flooring must be able to withstand a relative humidity level of at
least 30% to minimize the risk of electrostatic discharges.
The quality of the power supply should comply with that found in a
typical commercial or hospital environment. Check that the power
supply voltage is within a range of +/-10% of its nominal value.
84

*INSTALLATION*
Plumbing
Health risk and risk of damage due to contaminated incoming
water.
Machine must be connected to a potable tap water supply.
Please refer to the installation diagram supplied with the machine.
- If the water supply has a high iron content, there is a risk of corrosion occurring on wash items and the machine itself.
- If the chloride content of the water exceeds 100mg/l, the risk of
corrosion on wash items being cleaned in the machine will be further increased.
- In certain regions, the water composition may cause precipitates to
form, requiring the use of softened water in the steam condenser.
85

Technical details
Height 98 1/4" (2495 mm)
Width 45 1/4" (1150 mm)
Depth 39" (990 mm)
Wash cabinet dimensions:
Height
Width
Depth
Weight (net) 1,210 lb (550 kg)
26 9/16" (675 mm)
45 1/4" (1150 mm)
39" (990 mm)
Maximum floor load
Voltage, rated load, fuse rating See data plate
Compressed air connection:
technical 87–108 psi (600–750 kPa)
Steam connection 36–145 psi/284–356°F (250–1000
Water connection water temperature:
Cold water/steam condenser
Hot water/DI water
Water connection pressure Max. 29–145 psi (200–1000 kPa)ex-
Operation:
Ambient temperature
Relative humidity maximum
linear decreasing to
8kN/m
kPa/140–180 °C)
Max. 68 °F (20 °C)
Max. 149 °F (65 °C)
cess pressure
40°F–105°F (5°C–40°C)
80% for temperatures up to 87°F
(31°C)
50% for temperatures up to 105°F
(40°C)
2
Storage and transportation conditions:
Ambient temperature
Relative humidity
Air pressure
Altitude above sea level Up to 4,921 ft (1,500m)
Type of protection (according to IEC60529) IP 20
Soiling level (according to IEC/EN61010-1) P2
Overvoltage category (according to IEC60664) II
Sound emission values in dB (A),
sound pressure level LpA during cleaning and
drying phases
Certification marks VDE, radio and television suppressed
UL / CSA UL 61010-1:2012-05 CA/CSA C22.2
-4 – +140 °F (-20 – + 60 °C)
10–85 %
500–1060 hPa
<70
No 61010-1-12,
UL 61010-2:0-40 CA/CSA C22.2 No
61010-2-16
86

Technical details
Manufacturer’s address Miele & Cie. KG, Carl-Miele-Str. 29,
33332 Gütersloh, Germany
87

Disposing of your old machine
Old electrical and electronic appliances often contain valuable materials. However, they also contain harmful substances which were essential for their correct functioning and safety. These could be hazardous to human health and to the environment if disposed of with
household waste or if handled incorrectly. Therefore, please do not
dispose of your old machine with household waste.
Please dispose of it at your local community waste collection/recycling center. Consult your dealer if necessary.
Please ensure that your old machine poses no risk to children while
being stored for disposal.
88

Appendix
89

Appendix
User rights in theMain menu
Action
Without message
Automatic
Operator
Technician
Open and close the loading door
Administrator
Open and close the unloading door after the end of a program
depending on the Authentification - End of programsetting in
the web interface
Select the electric or steam heating method (see “Machine
description”)
Change the display language
Close popups with messages depending on the type of message, warning, or fault message
Change the screen view in the current program (see “Machine
description”)
Select and start program (see “Operation”) depending on the
program administration settings in the web interface
Cancel the program (see “Operation”)
Print out process documentation
90

Appendix
User rights in the Systemmenu
Main menu/System
Without message
Automatic
Operator
Technician
Network connections Change PIN
Pairing
Printer
Network
Machine functions Self-disinfection
Continuous program
Fill dispensing system
Administrator
Set up dispensing system
Adjust conductivity module
Program test
Restart
Data plate
Manage favorites
91

Appendix
Power levels of the programs/mobile units/module combinations
Mobile unit Modules Programs/power levels
A500 - A603 Mini
Standard
Universal
Intensive
Organic
Inorganic
Oil
Agar
Plastics
Laboratory Special
A501 Mini Plus
Standard Plus
A503 - 1–3xA605
A605 modules can be replaced with
A620 modules, for example
A503 - 4–6xA605
A605 modules can be replaced with
A620 modules, for example
A503 - 1xA613
plus a maximum of 4other modules,
e.g., A612
Universal Plus
Intensive Plus
Organic Plus
Inorganic Plus
Oil Plus
Agar Plus
Plastics Plus
Laboratory Special Plus
Vials
Vials Plus
Pipettes 1
A503 - 2xA613
plus a maximum of 2other modules,
e.g., A620
A503 - 3xA613
No extra modules can be added
92
Pipettes 2
Pipettes 3

Appendix
Mobile unit Modules Programs/power levels
A503 1–3modules:
- A606
- A612
- A620
- A621
- A622
- A623
A503 4–6modules:
- A606
- A612
- A620
- A621
- A622
- A623
Mini
Standard
Universal
Intensive
Organic
Inorganic
Oil
Agar
Plastics
Laboratory Special
Mini Plus
Standard Plus
Universal Plus
Intensive Plus
Organic Plus
Inorganic Plus
Oil Plus
Agar Plus
Plastics Plus
Laboratory Special Plus
A503 1–6modules Drying
A505
A506
A508
E900-4/2
E900-5/2
E935/2
E940
E950/1
E957
E975/2
Mini Plus
Standard Plus
Universal Plus
Intensive Plus
Organic Plus
Inorganic Plus
Oil Plus
Agar Plus
Plastics Plus
Laboratory Special Plus
93

Appendix
Mobile unit Modules Programs/power levels
E941 - 1–4E943/2
- 1–4E944/2
- 1–2E945/2 + 2extra modules:
E943/2 or E944/3
E941 - 1–4E947/2 Vials Plus
If the E942/3 modules are to be used for pipettes, please contact Miele.
Service programs
Mobile unit Modules Power levels/
Mini Plus
Standard Plus
Universal Plus
Intensive Plus
Organic Plus
Inorganic Plus
Oil Plus
Agar Plus
Plastics Plus
Laboratory Special Plus
program
Zero - Without modules Tank emptying
All mobile
units
- Without restriction Manual disinfection
94

Appendix
Optional extras
Feature Standard Option
Drain valve (AV) X
Electric heating (EL) X
Conductivity monitoring (CS) X
Spray arm monitoring (RS) X
Option to switch between steam/electric
heating for wash cabinet and VE tank (if
present) (EL/S)
Recycling tank (RT) X
VE tank (TH) X
Additional options:
1–4 additional internal dispensing systems (DS)
Drain pump (DP)
Steam condenser (SC)*
Built-in printer for process documentation (PR)
Drying unit (DU)
* Only in combination with a drying unit
X
95

Please have the model and serial number
of your machine available when
contacting Technical Service.
U.S.A.
Miele, Inc.
National Headquarters
9 Independence Way
Princeton, NJ 08540
Phone:
Fax:
www.mieleusa.com/professional
proinfo@mieleusa.com
Technical Service & Support
Phone:
Fax:
proservice@mieleusa.com
800-991-9380
800-220-1348
800-991-9380
609-419-4241
Importer
Miele Limited
Professional Division
1-888-325-3957
1-800-803-3366
Miele Professional
Technical Service
1-888-325-3957
1-800-803-3366
Phone:
Fax:
serviceprofessional@miele.ca
Canada
161 Four Valley Drive
Vaughan, ON L4K 4V8
Phone:
Fax:
www.mieleprofessional.ca
professional@miele.ca
Manufacturer: Miele & Cie. KG
Carl-Miele-Straße 29, 33332 Gütersloh, Germany
Alteration rights reserved / Publication date: 2020-12-01 M.-Nr. 11 463 470 / 02
Valid for software version: 1.2
 Loading...