

Page 1

Operating instructions
Commercial dishwasher
PG 8059
To avoid the risk of accidents or damage
to the appliance, it is essential to read
these instructions before it is installed
and used for the first time.
en - GB
M.-Nr. 10 438 011
Page 2

Contents
Notes about these instructions..........................................................................................5
Guide to the appliance........................................................................................................6
Overview................................................................................................................................ 6
Control panel......................................................................................................................... 7
Correct application .............................................................................................................8
Warning and Safety instructions......................................................................................10
Correct installation .............................................................................................................. 10
Technical safety................................................................................................................... 10
Correct use.......................................................................................................................... 11
Safety with children............................................................................................................. 13
Accessories ......................................................................................................................... 13
Symbols used...................................................................................................................... 14
Disposal of your old dishwasher ........................................................................................ 14
Caring for the environment ..............................................................................................15
User profiles.......................................................................................................................16
User groups......................................................................................................................... 16
Daily operators ............................................................................................................... 16
Experienced operators ................................................................................................... 16
Operation tips ....................................................................................................................17
Display................................................................................................................................. 17
Menus.................................................................................................................................. 18
Symbols in the display ....................................................................................................... 20
Commissioning..................................................................................................................21
Opening and closing the door..........................................................................................25
Comfort door locking mechanism....................................................................................... 25
Opening the door .......................................................................................................... 25
Closing the door.................................................................................................................. 26
Opening the door using the emergency release ................................................................ 27
Filling the salt reservoir ....................................................................................................28
Reactivation......................................................................................................................... 28
Setting the water hardness level ......................................................................................... 29
Add salt reminder ................................................................................................................ 31
Machine lock-out in case of lack of salt.............................................................................. 31
Filling the salt reservoir........................................................................................................ 32
Adding rinsing agent .........................................................................................................34
Rinsing agent....................................................................................................................... 34
Add rinsing agent reminder ................................................................................................. 34
Adding rinsing agent ........................................................................................................... 35
Areas of application ..........................................................................................................36
Loading the dishwasher ...................................................................................................... 36
Upper basket....................................................................................................................... 38
Adjusting the upper basket ................................................................................................. 39
Lower basket....................................................................................................................... 41
Loading plastic trays ........................................................................................................... 43
2
Page 3

Contents
Operation............................................................................................................................45
Adding cleaning agent......................................................................................................... 45
Tips for the Super short programme................................................................................... 46
DOS module........................................................................................................................ 47
LEDs in the buttons............................................................................................................. 50
Switching on........................................................................................................................ 51
Selecting a programme ....................................................................................................... 51
Starting a programme ......................................................................................................... 53
At the end of the programme .............................................................................................. 54
Switching off........................................................................................................................ 54
Unloading the dishwasher................................................................................................... 54
Interrupting a programme.................................................................................................... 55
Cancelling a programme ..................................................................................................... 56
Additional functions ..........................................................................................................57
Delay start ........................................................................................................................... 57
Drying assistance ................................................................................................................ 58
Settings ...........................................................................................................................60
Menu structure .................................................................................................................... 61
Delay start ........................................................................................................................... 62
Drying .................................................................................................................................. 63
Setting the language........................................................................................................ 64
Venting DOS modules ......................................................................................................... 65
Setting the date................................................................................................................... 66
Date format..................................................................................................................... 66
Set .................................................................................................................................. 66
Setting the time of day ........................................................................................................ 67
Setting the time .............................................................................................................. 67
Display............................................................................................................................ 68
Clock display.................................................................................................................. 68
Regulating the volume......................................................................................................... 69
Keypad tone ................................................................................................................... 69
Buzzer tones................................................................................................................... 69
Settingthe volume .......................................................................................................... 70
Further settings .................................................................................................................71
Opening the "Further settings" menu.................................................................................. 71
Menu structure .................................................................................................................... 73
Code.................................................................................................................................... 75
Release........................................................................................................................... 75
Change code.................................................................................................................. 75
Log book ............................................................................................................................. 77
Temperature unit.................................................................................................................. 78
Move programme................................................................................................................ 79
Additional functions............................................................................................................. 80
Reset .............................................................................................................................. 80
Increased water level...................................................................................................... 81
Interim rinse.................................................................................................................... 81
DOS dispensing system................................................................................................. 82
Temperature / Time ........................................................................................................ 85
Releasing programmes ....................................................................................................... 88
3
Page 4

Contents
Water hardness ................................................................................................................... 89
Display view ........................................................................................................................ 89
Display................................................................................................................................. 90
Contrast.......................................................................................................................... 90
Brightness ...................................................................................................................... 90
Switch off after .................................................................................................................... 91
Factory default..................................................................................................................... 92
Software version.................................................................................................................. 93
Cleaning and care .............................................................................................................94
Periodic checks................................................................................................................... 94
Cleaning the control panel .................................................................................................. 95
Cleaning the door front ....................................................................................................... 95
Cleaning the wash cabinet .................................................................................................. 95
Cleaning the door and the door seal................................................................................... 96
Cleaning the filters in the wash cabinet .............................................................................. 96
Cleaning the spray arms...................................................................................................... 98
Problem solving guide ....................................................................................................100
Faults with water intake or drainage.................................................................................. 100
Door................................................................................................................................... 103
General problems with the dishwasher............................................................................. 104
Noises................................................................................................................................ 105
Unsatisfactory cleaning result ........................................................................................... 106
Maintenance ....................................................................................................................108
Clean the water intake filters............................................................................................. 108
Cleaning the drain pump and non-return valve................................................................. 109
After sales service...........................................................................................................111
Programme chart ............................................................................................................112
Installation........................................................................................................................116
Installation ......................................................................................................................... 116
Building under .............................................................................................................. 116
Levelling and securing the dishwasher ........................................................................ 117
Floor anchoring ............................................................................................................ 118
Moving the dishwasher ..................................................................................................... 118
Electrical connection ......................................................................................................119
Peak-load cut-out.............................................................................................................. 120
Plumbing ..........................................................................................................................121
Connection to the water supply ........................................................................................ 121
Connecting the drain hose ................................................................................................ 123
Technical data..................................................................................................................124
4
Page 5

Notes about these instructions
Important warnings
Information which is important for safety is highlighted in a thick
framed box with a warning symbol. This alerts you to the potential
danger of injury to people or damage to property.
Read these warning notes carefully and observe the procedural
instructions and codes of practice they describe.
Notes
Information of particular importance that must be observed is
highlighted in a thick framed box.
Additional information and comments
Additional information and comments are highlighted in a box
framed with a single black line.
Operating steps
Instructions on how to operate the dishwasher are described step by
step in a logical sequence.
Each step is introduced using a black square bullet point.
Example:
Open the dishwasher door.
Display
Information given via the display appears in a special display font to
match the font on the machine.
Example:
Select Delay start and confirm your choice with theOK button.
5
Page 6
Guide to the appliance
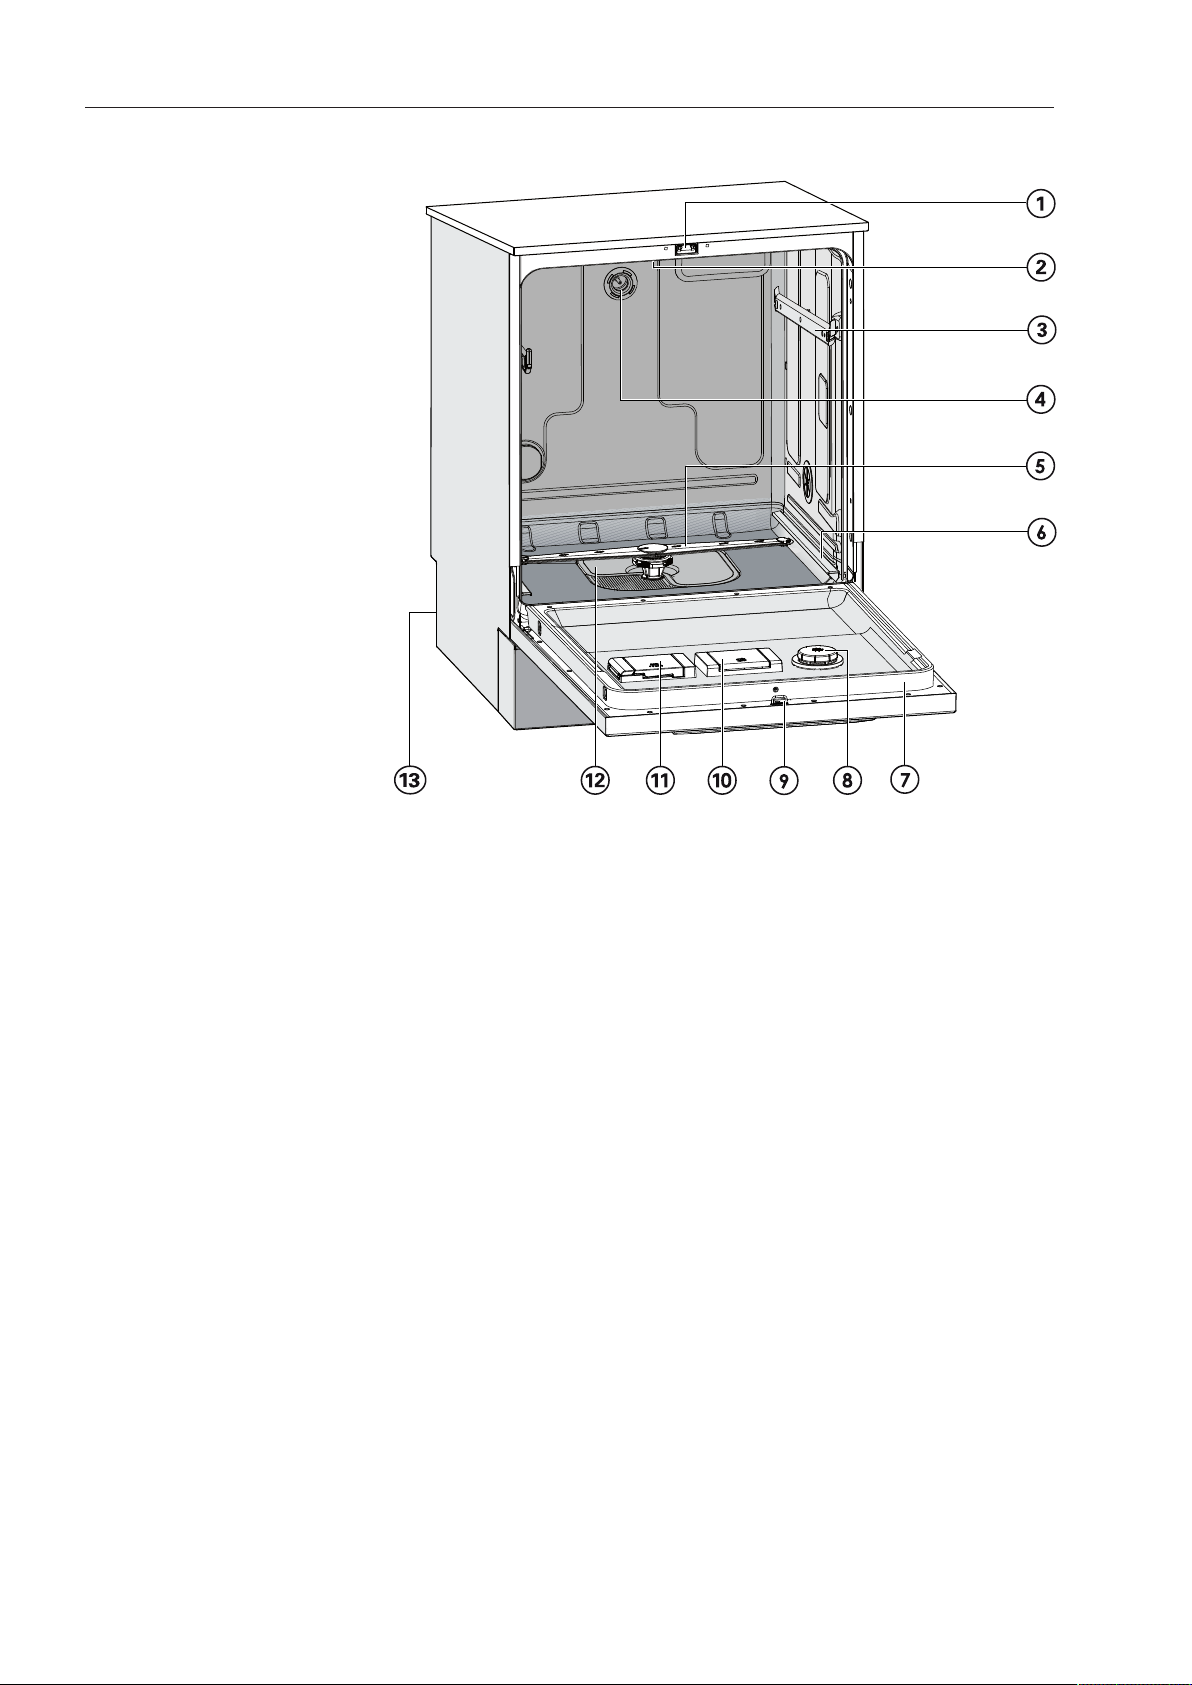
Overview
a
Door lock
b
Upper spray arm (not visible)
c
Runner for upper basket
d
Connection for upper basket spray arm
e
Lower spray arm
f
Runner for lower basket
g
Data plate
h
Rinsing agent reservoir
i
Door lock barrel
j
Salt reservoir
k
Dispenser for powder cleaning agent
l
Filter combination
m
Back:
Connection for DOS modules
External dispensing pump for liquid cleaning agent (DOS1)
External dispensing pump for rinsing agent (DOS4)
6
Page 7
Guide to the appliance
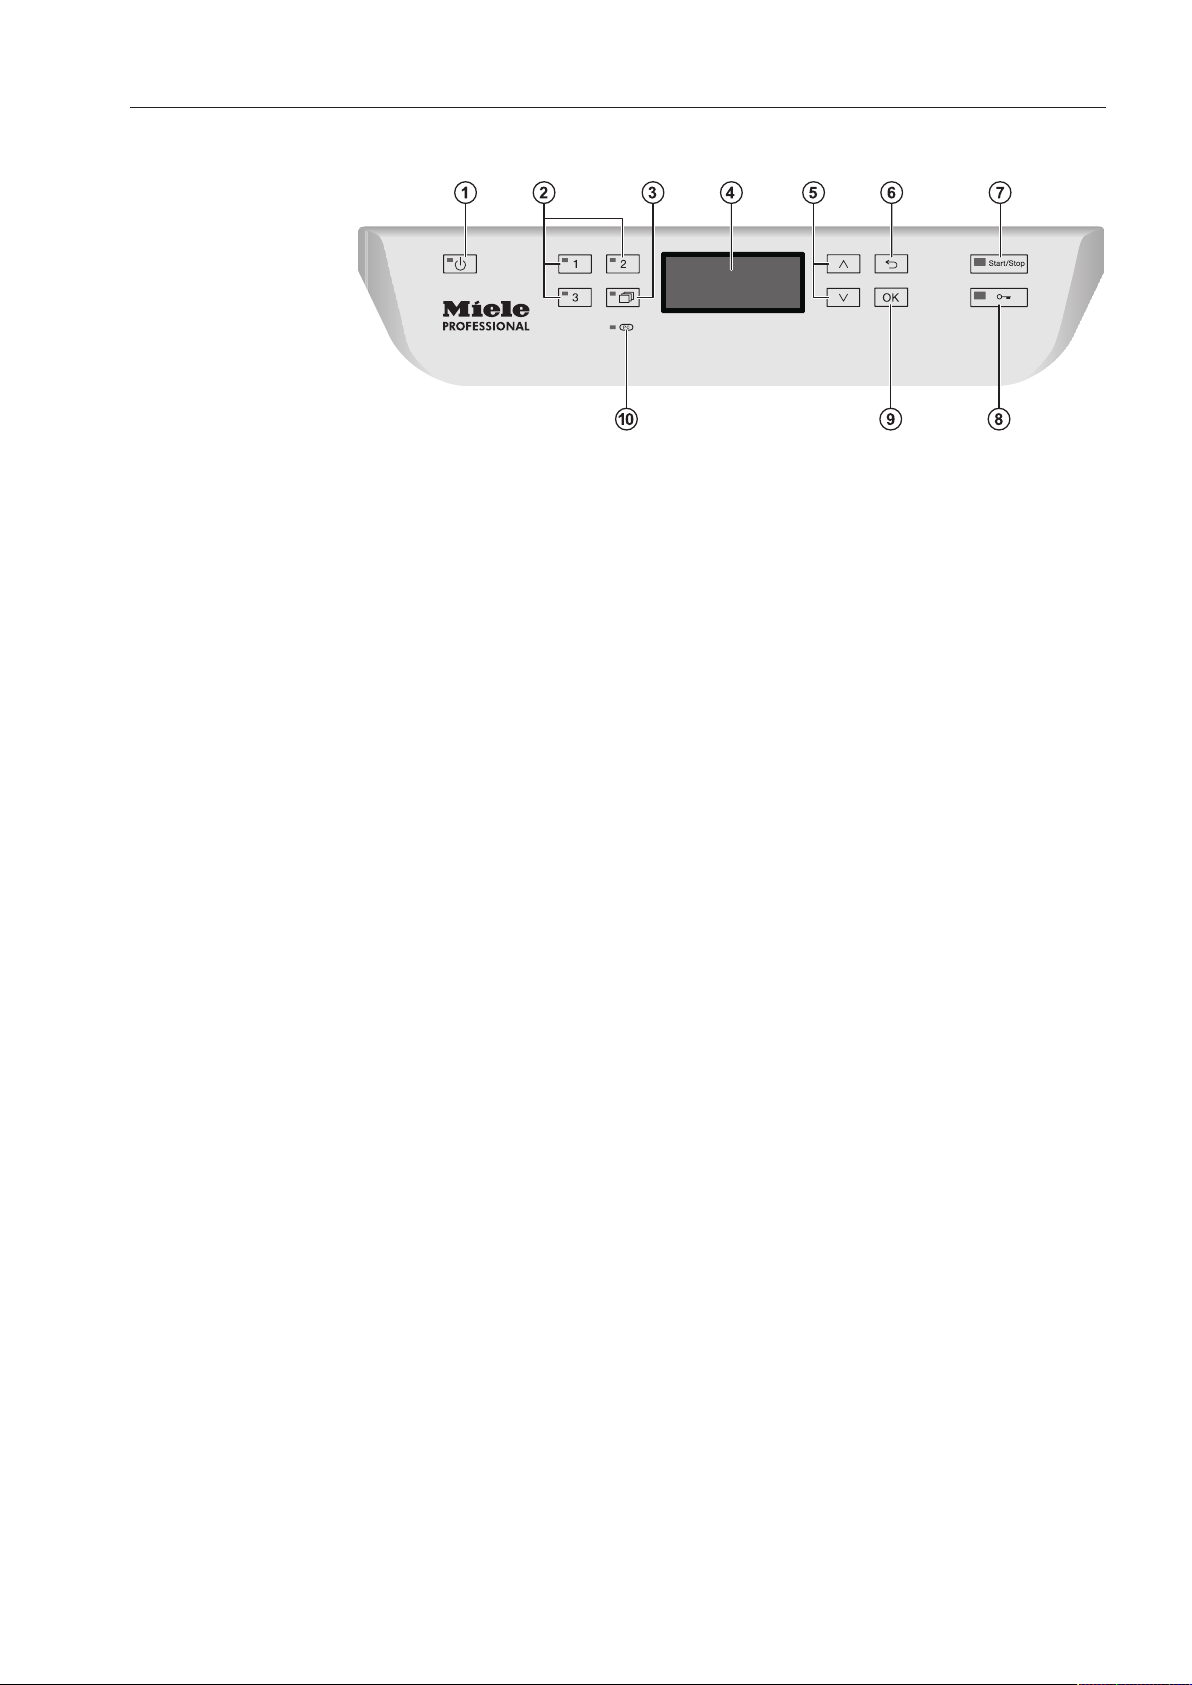
Control panel
a
On/Off button
For switching the dishwasher on and off
b
Buttons 1 - 3 (programme selector buttons)
Short cut buttons for storing favourite programmes
c
button (further programmes)
For selecting further programmes
d
Display
User interface
e
and buttons
For navigating within the display
f
button (cancel or back)
For cancelling a process
(not for cancelling programmes)
g
Start/Stop button
For starting or cancelling a programme
h
Door release button
For opening the door or interrupting a programme
i
OK button (confirmation)
For selecting or confirming entries
j
PC / Optical interface
This is used by Miele service technicians to run diagnostic checks
and can also be used to update programming data in the future.
7
Page 8

Correct application
This dishwasher complies with current safety requirements.
Inappropriate use can, however, lead to personal injury and
damage to property.
To avoid the risk of accidents and damage to the dishwasher,
please read these instructions carefully before using it for the first
time. They contain important information on its safety, installation,
use and maintenance. Keep these instructions in a safe place and
pass them on to any future owner.
This dishwasher with its short programme running times and
powerful cleaning performance is intended for commercial use in
– Guest houses
– Clubs
– Nursing homes
– and other similar commercial environments.
This appliance is designed exclusively for use as a "dishwasher"
for cleaning crockery, glassware and cutlery only, as described in
these instructions. Alterations or conversions to the dishwasher, or
using it for purposes other than those for which it is designed, are not
permitted and could be dangerous.
Miele cannot be held liable for damage caused by improper or
incorrect use or operation.
This dishwasher is intended for stationary, indoor use only.
The special inserts should only be used for their specific
application.
This dishwasher is not suitable for the reprocessing of medical
products or devices.
This dishwasher can only be used by people with reduced
physical, sensory or mental capabilities, or lack of experience or
knowledge, if they are supervised whilst using it or have been shown
how to use it in a safe way and understand and recognise the
consequences of incorrect operation.
8
Page 9

Correct application
This dishwasher can only be used if
– the ship’s hull is longer than 28metres.
– the list of the vessel is not more than2°.
– any external vibration is no more than 150 Hz at an amplitude of
0.35mm.
The safe operation and correct functioning of this commercial
dishwasher can only be guaranteed if the above conditions are met.
This dishwasher may not be operated on an open deck.
9
Page 10

Warning and Safety instructions
Correct installation
This dishwasher may only be installed and used in mobile
installations such as ships if a risk assessment of the installation has
been carried out by a suitably qualified engineer.
This dishwasher must be fixed in position when it is installed.
Failure to do this could result in personal injury, damage to the
machine and damage to property.
This dishwasher must be securely bolted to the floor using a BBF
80 kit.
Do not install this dishwasher in an area where there is a risk of
explosion or freezing conditions.
In order to reduce the risk of damage from condensation, the
furniture in the area around the dishwasher should be designed for
commercial use.
Technical safety
This dishwasher must only be installed, commissioned, repaired
and then maintained by the Miele Service Department or an
authorised Miele Service dealer. Installation, repair and other work by
unqualified persons could be dangerous and Miele will not be held
liable.
This dishwasher must only be operated by appropriately trained
personnel. They must be instructed and trained regularly.
Before using the dishwasher, check it for any externally visible
damage. Under no circumstances should you use it if it has been
damaged. It could be dangerous.
In the event of a damaged or leaking dishwasher, switch off at the
mains immediately and call the Miele Service Department or an
authorised Miele Service dealer.
Faulty components must only be replaced by genuine Miele
original spare parts. Only when these parts are fitted can Miele
guarantee the correct functioning and safety of the appliance.
The electrical safety of this dishwasher can only be guaranteed
when correctly earthed. It is essential that this standard safety
requirement is met. If in any doubt, please have the electrical
installation tested by a qualified electrician. Miele cannot be held
liable for the consequences of an inadequate earthing system (e.g.
electric shock).
10
Please follow the advice on installation in these instructions and
the separate Installation diagram.
Before connecting the appliance, ensure that the connection data
on the data plate (voltage, frequency and fuse rating) match the
mains electrical supply.
Page 11

Warning and Safety instructions
There must be no electrical sockets behind the dishwasher. Danger
of overheating and fire risk if the dishwasher were to be pushed up
against a plug (see "Electrical connection").
Do not connect the dishwasher to the mains electricity supply by a
multi-socket unit or an extension lead. These do not guarantee the
required safety of the appliance (e.g. danger of overheating).
Do not open the dishwasher casing. Tampering with electrical
connections or components and mechanical parts is highly
dangerous to the user and can cause operational faults.
The dishwasher must not be used if the electrical connection cable
is damaged. If the cable is damaged it must be replaced with a
special cable available from Miele. For safety reasons this must only
be done by the Miele Service Department or an authorised Miele
Service dealer.
The dishwasher must be disconnected from the mains electricity
supply before any maintenance or repair work is carried out.
The plastic housing of the water connection contains electrical
components. It must not be dipped in water.
There are electrical wires in the water inlet hose. Do not shorten
the water inlet hose, even if it is too long.
The integrated Waterproof system offers protection from water
damage, provided the following conditions are met:
– installation has been carried out correctly,
– the dishwasher is properly maintained and parts replaced where it
can be seen that this is necessary,
– the stopcock has been turned off during longer periods of
inactivity (e.g. whilst on holiday).
The Waterproof system will work even if the dishwasher is switched
off. However, the dishwasher must remain connected to the
electricity supply.
Correct use
This dishwasher is designed for operation with water and cleaning
agents suitable for use in commercial dishwashers only. Organic
solvents and flammable liquid agents must not be used in it.
This could cause an explosion, damage rubber or plastic components
in the dishwasher and cause liquids to leak out of it.
Only use cleaning agents formulated for use in commercial
dishwashers. Using unsuitable cleaning agents could adversely affect
components in the dishwasher, as well as items being cleaned.
Do not sit or lean on the opened door. This could cause the
dishwasher to tip up and be damaged or cause an injury.
11
Page 12

Warning and Safety instructions
After any plumbing work the water pipework to the dishwasher will
need to be vented. If this is not done, components can be damaged.
Please be aware that the dishwasher may be operating at high
temperatures. If the door is opened there is a danger of burning or
scalding. Crockery, cutlery, baskets and inserts must be allowed to
cool down before they are unloaded. Any water remaining in
containers could still be very hot. Empty them into the wash cabinet
before taking them out.
The water in the cabinet must not be used as drinking water.
Pre-treating items (for example with washing-up liquid and other
cleaning agents) as well as some types of soiling and some cleaning
agents can cause a build-up of foam in the wash cabinet. Foam can
have an adverse effect on the cleaning result.
Foam escaping from the wash cabinet can cause damage to the
dishwasher. If foam escapes the programme must be cancelled
immediately and the machine must be disconnected from the mains
electrical supply.
When using cleaning agents and specialised products, it is
essential that the manufacturer's instructions are followed. Cleaning
agents must only be used for the purpose they are designed for and
in the situation specified, to avoid such dangers as serious chemical
reactions and material damage (e.g. oxyhydrogen explosion).
Do not inhale or ingest powder cleaning agent. Dishwasher
cleaning agents contain irritant or corrosive ingredients which can
cause burning in the nose, mouth and throat if swallowed, or inhibit
breathing. Seek medical attention immediately if cleaning agent has
been swallowed or inhaled.
Miele cannot be held liable for any effect chemical cleaning agents
may have on the material of the items being cleaned. Observe the
cleaning agent manufacturer's instructions with regard to storage
conditions, use and dosage.
To avoid material damage and corrosion, do not allow any acids or
solutions containing chlorides or metals which are not rust-proof to
get into the wash cabinet.
Do not wash items soiled with ash, sand, wax, grease or paint in
the dishwasher. These substances could damage the dishwasher.
12
Do not hose the dishwasher or near vicinity down to clean it, e.g.
with a hosepipe or a pressure washer.
Ensure that the stainless steel outer casing of the appliance does
not come into contact with solutions or steam containing acid to
avoid any corrosion damage.
Page 13

Warning and Safety instructions
Be careful when sorting items with sharp pointed ends and
positioning them in the dishwasher that you do not hurt yourself or
create a danger for others. Sharp knives, forks, etc. should be placed
in baskets with the pointed ends facing downwards.
Remove any coarse food deposits and empty out any containers
or utensils before loading them in the dishwasher.
Safety with children
Supervise children when they are anywhere near this dishwasher.
Do not let them play with it. There is a danger that children playing
might shut themselves in the dishwasher.
Children must not be allowed to operate this dishwasher.
Keep children away from chemical agents. These contain irritant
and corrosive ingredients which can cause burning in the mouth,
nose and throat if swallowed, or inhibit breathing. Keep children away
from the dishwasher when the door is open. There could still be
residual chemical agent in the cabinet. Seek medical advice
immediately if a child has swallowed or inhaled chemical agent.
Accessories
Only use genuine Miele original spare parts and accessories with
this dishwasher. Using spare parts or accessories from other
manufacturers will invalidate the guarantee and Miele cannot accept
liability.
Only use Miele baskets and inserts with this dishwasher. Using
baskets and inserts made by other manufacturers, or making
modifications to Miele accessories can cause unsatisfactory cleaning
results, for which Miele cannot be held liable. Any resultant damage
would not be covered by the guarantee.
13
Page 14

Warning and Safety instructions
Symbols used
Warning:
Observe the operating instructions
Warning:
Danger of electric shock
Disposal of your old dishwasher
For safety and environmental reasons, dispose of all chemical
agents according to the manufacturer's instructions and to safety
regulations. Safety goggles and protective gloves should be worn.
Remove or disable the door lock prior to disposal of the
dishwasher, so that children cannot become trapped inside (see
"Caring for the environment").
Miele cannot be held liable for damage caused by non-compliance
with these Warning and Safety instructions.
14
Page 15
Caring for the environment
Disposal of the packing material
The packaging is designed to protect the appliance from damage
during transportation. The packaging materials used are selected
from materials which are environmentally friendly for disposal and
should be recycled.
Recycling the packaging reduces the use of raw materials in the
manufacturing process and also reduces the amount of waste in
landfill sites.
Disposing of your old appliance
Electrical and electronic appliances often contain valuable materials.
They also contain specific materials, compounds and components,
which were essential for their correct function and safety. These
could be hazardous to human health and to the environment if
disposed of with your domestic waste or if handled incorrectly.
Please do not, therefore, dispose of your old appliance with your
household waste.
Please dispose of it at your local community waste collection /
recycling centre for electrical and electronic appliances, or contact
your dealer or Miele for advice. You are also responsible (by law,
depending on country) for deleting any personal data that may be
stored on the appliance being disposed of. Please ensure that your
old appliance poses no risk to children while being stored prior to
disposal.
15
Page 16

User profiles
User groups
Users can be divided into two groups:
– Daily operators
– Experienced operators
Access to the machine can be blocked to general operators by using
a code (see "Further settings, Code").
Daily operators
Experienced operators
Operators must be instructed in operating and loading the
dishwasher and trained regularly to guarantee safe daily use.
Experienced operators can additionally block access to programmes,
modify temperature and holding times within programme cycles and
alter water levels.
16
Page 17
Operation tips
Display
The display is not a touch screen.
The display is used to select or set the following:
– the programme
– the Delay start time
– the settings
During a programme, the display shows the following:
– the programme name
– the programme stage / target temperature / actual temperature
– the estimated time left for the programme to run
– any relevant fault messages and information
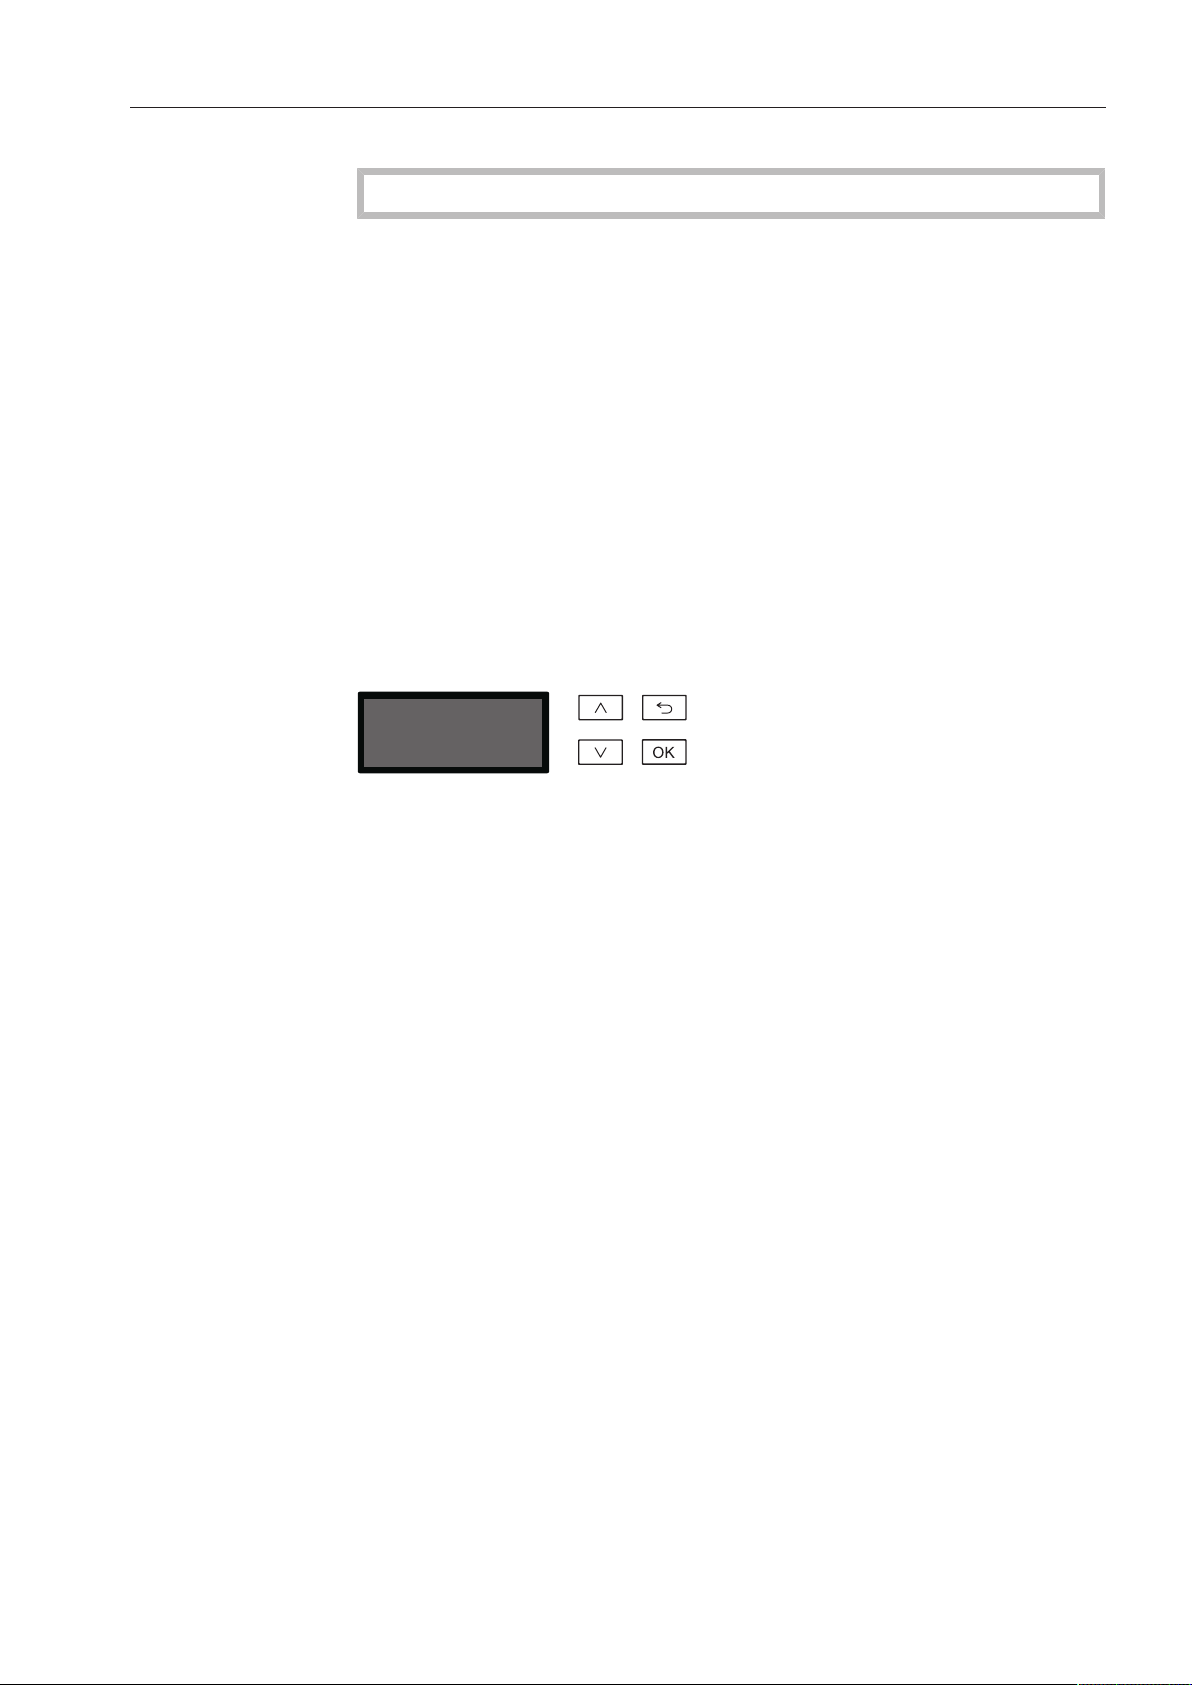
Menu operation
This dishwasher is operated exclusively via buttons on the control
panel. The buttons are arranged to the side of the display on the
stainless steel control panel and are operated by pressing gently.
Menu operation is via the keypad to the right of the display.
– button
For navigating upwards by row within a menu, or increasing the
value highlighted.
– button (Cancel or back)
For ending a menu early. Any changes to settings are not saved
and the display reverts to the previous menu.
– button
For navigating downwards by row within a menu, or decreasing the
value highlighted.
– OK button
For confirming a selection or for saving input. The display moves to
the next menu or, when entering values, to the next input position.
The procedure for entering values is described in the relevant
section.
17
Page 18

Operation tips
Language
,
;
(
english (GB)
deutsch
Delay start
Yes
No
(
Release programme
Short
Universal
,
;
9
9
Simple selection
Menus
This dishwasher is controlled by menus. The menus are displayed in
a 3-line display on the control panel.
Example:
The name of the menu and a maximum of two options are shown.
The currently selected option is highlighted.
Multiple selection
The arrow buttons and are used for navigating within the menu.
The highlighted option is selected by pressing the OK button. Once
selected, the option will have a tick beside it. Other options are
automatically deselected.
Press the OK button to progress to the next menu, or to the next
input position when confirming values. Press the button to revert
to the previous menu without saving the entry.
The and arrow buttons are used for navigating within the menu.
Several options can be selected in succession within the menu using
the OK button. Once selected, an option will have a tick beside it.
To save your selection, select Accept and confirm with the OK button.
18
Page 19

Operation tips
OK
Refill salt
System messages
The symbol denotes system messages. These give information
about current processes and the status of the dishwasher. System
messages are displayed individually at the end of the programme. If
there are a number of system messages, subsequent messages can
be displayed by pressing OK. A system message can be recalled by
pressing OK during a programme cycle.
Example:
Automatic switch-off
The dishwasher has an automatic switch-off function. The
dishwasher switches itself off automatically after the time set. The
display and all other LEDs are switched off. To switch the dishwasher
on press the On/Off button.
Automatic switch-off can be deactivated (see "Further settings,
Switch off after"). The display will then remain switched on in standby
mode.
19
Page 20

Operation tips
Delay start
Yes
No
(
Universal
Temperature
Duration
G
55 °C
Min
23
Symbols in the display
Navigation arrows
Dotted line -------
Tick
Drying
If a menu contains more than two options, two navigation arrows are
shown beside the options. The arrow buttons and can be used
to scroll through the options.
If a menu contains more than two options, the end of the option list is
marked by a dotted line. The last entry appears above the line, the
first entry below it.
If there are several options available, the current setting is marked
with a tick .
Example
If drying assistance has been activated, the drying symbol will be
displayed to the right of the programme name.
Example
System messages
Fault messages
The symbol denotes system messages and is displayed alternately
with the symbol. If OK appears in the bottom right of the display,
the system message must be confirmed using the OK button. If OK
does not appear in the display, after a few seconds the display skips
to the next level up.
In the event of a fault a warning triangle is shown in place of the
symbol. See "Problem solving guide" for more information.
20
Page 21
Commissioning
Language
,
;
(
english (GB)
deutsch
Before using for the first time
During commissioning the following settings must be carried out.
You will be asked to programme settings one after the other
automatically, and currently selected values have a tick beside
them. The commissioning process follows a set procedure which
cannot be interrupted.
The dishwasher will guide you automatically through the steps
required.
Reactivation is carried out during the first programme following
commissioning.
If the first programme after commissioning is not completed and
the dishwasher is then switched off, the commissioning process
must be carried out again.
The following options (with the exception of "Plumbing
connections") can be altered retrospectively via the "Settings "
menu and "Further settings".
Switching on
Setting the language
The dishwasher must be connected to the electrical supply.
Press the button until the button's LED lights up.
The commissioning process starts automatically with setting the
language. You are requested to set the display language.
Use the and arrow buttons to select the language you want
and confirm your choice using the OK button.
21
Page 22

Commissioning
Temperature unit
°C
°F
(
Date format
DD:MM:YY
MM:DD:YY
(
Date
12 . 07 . 2013
Clock display
(
24 h
12 h
Setting the temperature unit
Setting the date format
Setting the date
The display will change to the screen for setting the temperature unit.
Use the and arrow buttons to select the temperature unit you
want and confirm your choice using the OK button.
The display will change to the screen for setting the date format.
Use the and arrow buttons to select the date format you want
and confirm your choice using the OK button.
The display will change to the screen for setting the date.
Setting the clock format
Use the (higher) and (lower) arrow buttons to set the day,
month and year and confirm each entry using the OK button.
The display will change to the screen for setting the clock format.
Use the and arrow buttons to select the format you want and
confirm your choice using the OK button.
22
Page 23

Commissioning
Time of day
12 : 00
Water hardness
19
(0 - 70 °dH)
°dH
Setting the time of day
Setting the water hardness level
The display will change to the screen for setting the time of day.
Use the arrow buttons (higher) and (lower) to set the hours and
minutes and confirm each entry using the OK button.
If you have selected 12 h for the clock, "am" (in the morning) or
"pm" (in the afternoon) will appear beside the time.
The display will change to the screen for setting the water hardness.
The dishwasher must be programmed for the water hardness level in
your area.
Your local water authority will be able to advise you of the water
hardness level in your area.
Where the water hardness fluctuates e.g. between 1.4 and 3.1
mmol/l (8 - 17 °dH) always programme the dishwasher to the higher
value (3.1 mmol/l or 17 °dH in this example).
In the event of a fault, it will help the service technician if you know
the hardness of your local water supply.
Enter the water hardness below:
____________________°dH or mmol/l
The dishwasher is programmed at the factory for a water hardness
level of 19°dH (3.4 mmol/l).
Use the arrow buttons (higher) and (lower) to set the water
hardness required and confirm your entry using the OK button.
See "Filling the salt reservoir" for more information about setting the
water hardness level.
23
Page 24

Commissioning
Plumbing connections
Accept
Cold water
,
;
9
OK
Set up successful
M
PROFESSIONAL
PG 8059
Plumbing
connections
The display will then change to the screen for setting the plumbing
connection.
This setting can be switched off if the dishwasher cannot be
connected to all available plumbing connections.
If individual plumbing connections are switched off, they can only
be reactivated by Miele Service.
Use the and arrow buttons to select the plumbing connections
which are not connected and confirm your choice using the OK
button.
The tick will be removed from the box and the plumbing
connection is now switched off.
Select Accept to save your selection and confirm using the OK
button.
Commissioning completed
Commissioning is successfully completed and the following message
will appear in the display.
Press the OK button.
The dishwasher is now ready for use.
The start screen is displayed for 3 seconds.
Then the first short cut button programme will appear in the display.
24
Page 25

Opening and closing the door
Comfort door locking mechanism
This dishwasher is equipped with a Comfort door locking mechanism.
This door locking mechanism helps drying by opening the door by a
few centimetres at the end of the programme (except Super short,
Reactivation, Cold and Drain). This function can also be deactivated
(see "Settings , Drying").
Opening the door
The door can only be opened if the dishwasher is connected to the
electrical supply and is switched on (the LED in the button is lit
up).
The control panel also serves as a door handle.
Press the button to open the door. The LED in the button will go
out as soon as the door is unlocked.
Grasp the handle underneath the control panel and lower the door
to open.
Pressing the button during operation can interrupt the
programme (see "Operation, Interrupting a programme").
A programme which is already running should only be interrupted if
strictly necessary, e.g. if the wash load is moving about
significantly.
25
Page 26
Opening and closing the door
Closing the door
Push the baskets right in.
Raise the door upwards and push it gently until the catch audibly
engages. The door will be drawn automatically into its final closed
position by the closing mechanism.
Do not put your hand inside the door as it is closing.
Danger of injury.
If the door cannot be closed properly by the mechanism because it
is obstructed by crockery or similar, the Door blocked message or F
433 will appear in the display (see "Problem solving guide") and the
mechanism will open.
Remove the obstruction from the vicinity of the door.
If too much force is used when closing the door, the Comfort door
locking mechanism will reopen the door.
The dishwasher can only be guaranteed as waterproof if the
automatic closing mechanism has drawn the door into the final
closed position.
26
Page 27
Opening and closing the door
Emergency release Door opened
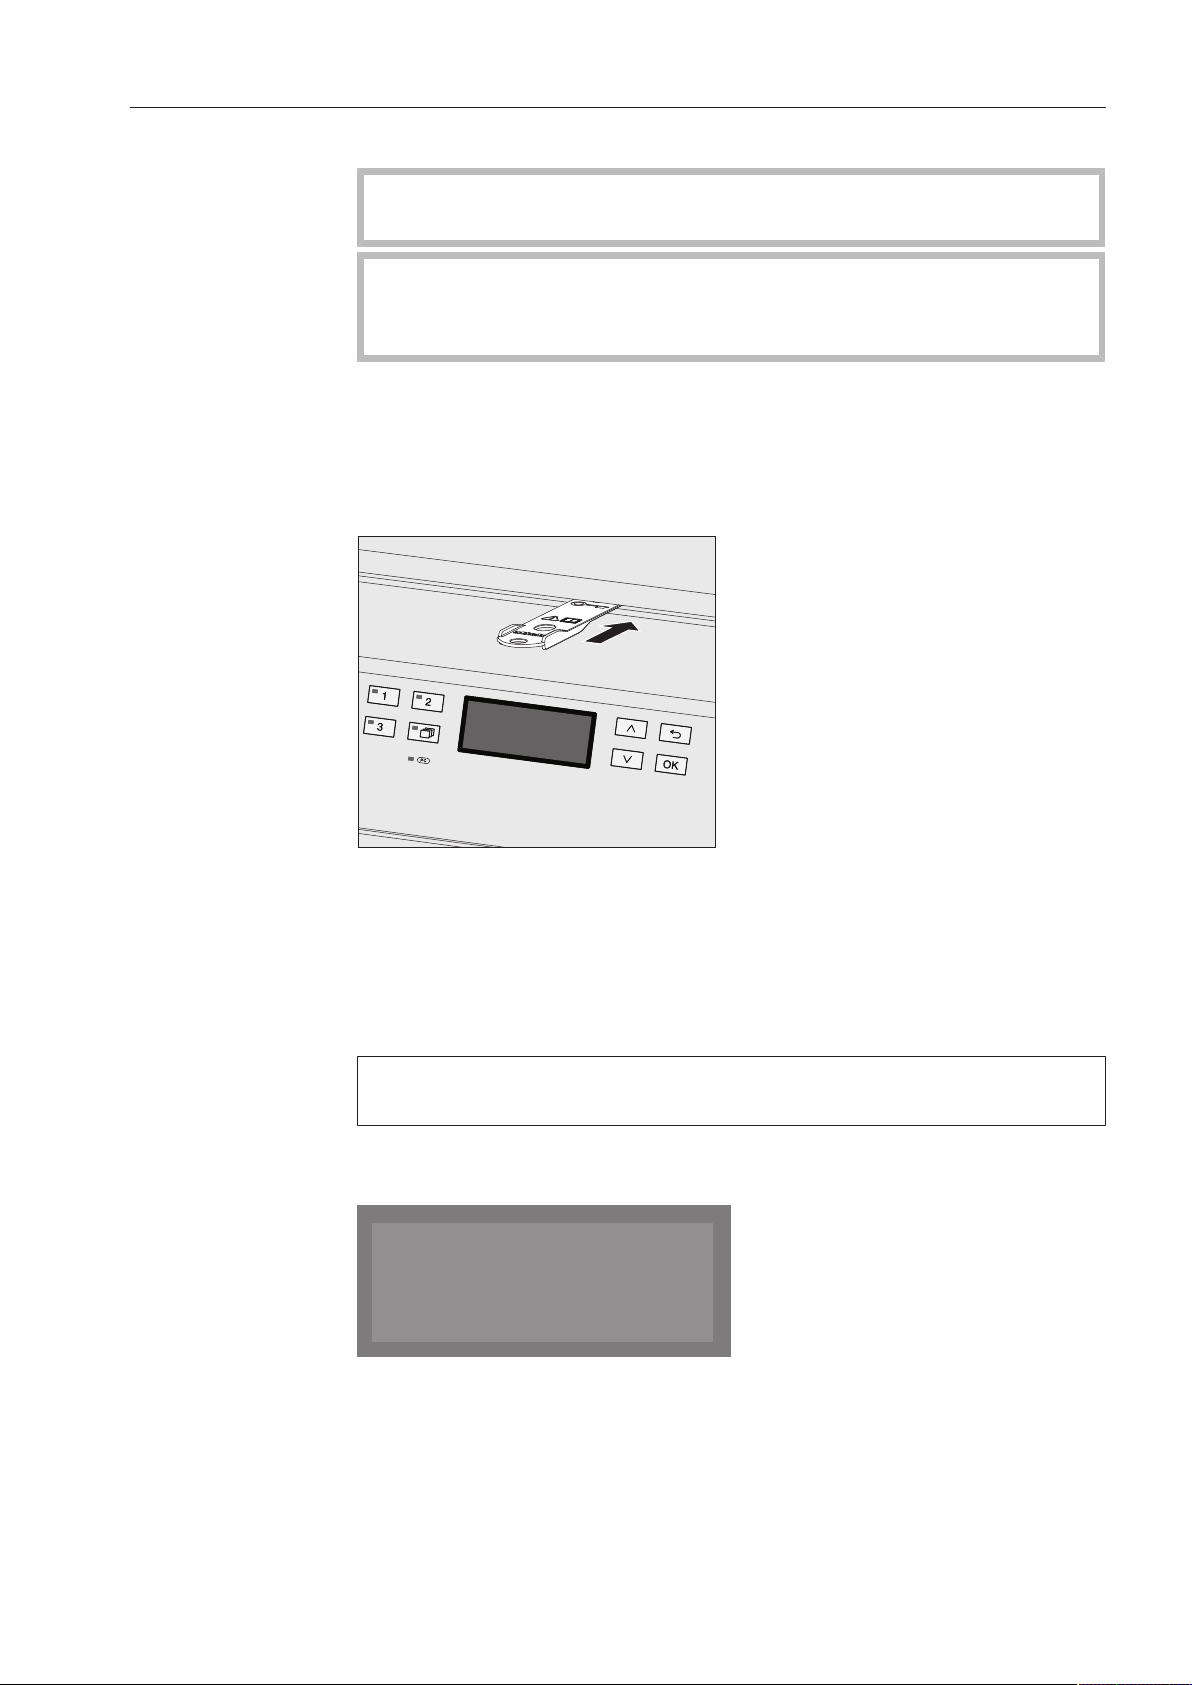
Opening the door using the emergency release
The emergency release may only be used when it is no longer
possible to open the door normally.
If the emergency release is operated during a programme cycle,
hot water can escape.
Danger of scalding and burning.
The emergency release mechanism is located on the right beside the
door lock between the door and the lid of the machine (or the
worktop, with built-under machines).
The emergency release is operated using the tool supplied in the
accessory pack with the operating instructions.
Insert the tool for the emergency release into the gap between the
lid and the door to the right of the lock. The right hand edge of the
tool should ideally be aligned with the right hand edge of the
display.
Push the slider for the emergency release backwards with the tool
until the door opens slightly.
If you push against the door of the dishwasher at the same time,
less force will be needed to operate the emergency release.
When the door has been opened using the emergency release, the
following message will appear in the display:
Confirm the message after the door has been released from the
closing mechanism. The last programme used will then appear in the
display.
27
Page 28
Filling the salt reservoir
Reactivation
In order to achieve good cleaning results, the dishwasher needs to
operate with soft mains water. Hard water results in the build-up of
calcium deposits on the load and in the dishwasher.
Mains water with a hardness of more than 0.7mmol/l (4°dH German
scale) must be softened. This occurs automatically in the integrated
water softener.
The water softener must be set to the exact hardness of the mains
water.
Your local water authority will be able to tell you the exact degree of
hardness of the mains water supply.
For future servicing it is useful to make a note of your water
hardness level. Enter your water hardness level here:
______________ °dH or mmol/l
The water softener must be reactivated at regular intervals.
Special reactivation salt is required for this.
Do not fill the salt reservoir with powder or liquid cleaning
agent.
Dishwasher cleaning agent will damage the water softener.
Only use special coarse grained dishwasher salt for reactivation, or
pure evaporated salt.
Miele Professional offer appropriate products.
Other salts may contain insoluble additives which can impair the
functioning of the water softener.
If the hardness of your water is constantly less than 0.7 mmol/l (=
4°dH German scale), salt is not required for the water softener.
However the water softener must still be set.
28
Page 29

Filling the salt reservoir
Water hardness
19
(0 - 70 °dH)
°dH
Setting the water hardness level
The water softener can be set between 0 - 12.6mmol/l (0 - 70°dH).
Select the Further settings menu.
Select Water hardness and confirm your choice with theOK button.
The factory default for the water softener is set to a hardness of
3.4°mmol/l (19°dH).
When adjusting the setting, please consult the following table.
Where the water hardness fluctuates, e.g. between 1.4 - 3.1 mmol/l (8
- 17 °dH), always programme the dishwasher to the higher value, 3.1
mmol/l (17 °dH) in this example.
Use the (higher) and (lower) arrow buttons to set the water
hardness required and confirm your entry using the OK button.
29
Page 30
Filling the salt reservoir
Settings
°dH °f mmol/l Display °dH °f mmol/l Display
0 0 0 0 36 65 6.5 36
1 2 0.2 1 37 67 6.7 37
2 4 0.4 2 38 68 6.8 38
3 5 0.5 3 39 70 7.0 39
4 7 0.7 4 40 72 7.2 40
5 9 0.9 5 41 74 7.4 41
6 11 1.1 6 42 76 7.6 42
7 13 1.3 7 43 77 7.7 43
8 14 1.4 8 44 79 7.9 44
9 16 1.6 9 45 81 8.1 45
10 18 1.8 10 46 83 8.3 46
11 20 2.0 11 47 85 8.5 47
12 22 2.2 12 48 86 8.6 48
13 23 2.3 13 49 88 8.8 49
14 25 2.5 14 50 90 9.0 50
15 27 2.7 15 51 92 9.2 51
16 29 2.9 16 52 94 9.4 52
17 31 3.1 17 53 95 9.5 53
18 32 3.2 18 54 97 9.7 54
19 34 3.4 19 *) 55 99 9.9 55
20 36 3.6 20 56 100 10.0 56
21 38 3.8 21 57 102 10.2 57
22 40 4.0 22 58 104 10.4 58
23 41 4.1 23 59 106 10.6 59
24 43 4.3 24 60 107 10.7 60
25 45 4.5 25 61 109 10.9 61
26 47 4.7 26 62 111 11.1 62
27 49 4.9 27 63 113 11.3 63
28 50 5.0 28 64 115 11.5 64
29 52 5.2 29 65 116 11.6 65
30 54 5.4 30 66 118 11.8 66
31 56 5.6 31 67 120 12.0 67
32 58 5.8 32 68 122 12.2 68
33 59 5.9 33 69 124 12.4 69
34 61 6.1 34 70 125 12.5 70
35 63 6.3 35
30
*) Factory default setting
Page 31

Filling the salt reservoir
K
OK
Machine locking out
Insufficient salt
K
OK
Salt container empty,
Programme locked out
Add salt reminder
When the reminder to refill the salt reservoir appears in the display,
wait until the end of the programme and then refill it with
reactivation salt.
Confirm the message shown with the OK button.
If salt is not added, the symbol indicating a lack of salt will appear
beside the programme name on the right.
The refill reminder will appear again at the end of every programme.
Refill reminders can be displayed during the programme cycle by
pressing the OK button.
If there are no further refill reminders, the symbol in the display will
go out after a few seconds when the salt is refilled.
The salt refill reminder is deactivated if the dishwasher is set to a
water hardness of 0 - 0.7 mmol/l (0 - 4 °dH).
Machine lock-out in case of lack of salt
If the refill salt reminder is ignored for several programme cycles and
the salt is not refilled, the dishwasher will lock itself against further
use until it is refilled.
The following message will appear in the display shortly before this
happens:
Only a few more programme cycles are possible, depending on the
programme selected and water hardness level set.
The dishwasher is locked against operation if further programme
cycles are run without salt being refilled.
When reactivation salt is added the machine will unlock itself after
a few seconds.
31
Page 32

Filling the salt reservoir
Filling the salt reservoir
When filling the salt reservoir only open the door halfway to
ensure that all the salt gets into the reservoir.
Press the button on the lid of the salt reservoir in the direction of the
arrow until the flap springs open.
Lift up the funnel.
Do not fill the reservoir with water.
Add salt only until the funnel of the salt reservoir is full, so that it
can close properly. The salt reservoir will take approx. 2kg of salt
on the first fill depending on the degree of coarseness.
Subsequent refills may take less salt, as there may still be salt
remaining in the reservoir.
32
Page 33

Filling the salt reservoir
Do not add any more than 2kg of salt.
As the salt reservoir is being filled, displaced water may run out.
Clean any excess salt from around the reservoir opening and the
seal around it, and then close the flap.
To avoid corrosion in the cabinet, run the Cold programme (without
any crockery in the dishwasher) immediately after refilling the salt
reservoir to remove any traces of salt.
33
Page 34

Adding rinsing agent
K
OK
Refill rinsing agent
Universal
Temperature
Duration
:
55 °C
Min
23
Rinsing agent
Rinsing agent is necessary to ensure water does not cling and leave
marks on crockery during the drying phase and helps crockery dry
faster after it has been washed.
Rinsing agent can be poured into the reservoir in the door or can be
dispensed via an external dispensing DOS module (Optional
accessory - see "DOS module").
Only fill the rinsing agent reservoir with rinsing agent. Do not fill
it with washing-up liquid or powder or liquid detergent. This will
seriously damage the reservoir.
Suitable products are available from Miele Professional.
Conversion to the external DOS module must be carried out only
by Miele Service or by an authorised Miele Service Dealer.
In the Beer glasses programme the final rinse is carried out without
rinsing agent.
Add rinsing agent reminder
Refill rinsing agent at the end of a programme as soon as the
message appears in the display.
Confirm the message shown with the OK button.
If rinsing agent is not added, the symbol indicating a lack of rinsing
agent will appear beside the programme name on the right.
The refill reminder will be displayed again at the end of every
subsequent programme.
34
Refill reminders can be displayed during the programme cycle by
pressing the OK button.
If there are no further refill reminders, the symbol in the display will
go out a few seconds after the rinsing agent has been refilled.
Page 35

Adding rinsing agent
Adding rinsing agent
Open the door fully.
Unscrew the cap on the rinsing agent reservoir
Add rinsing agent only until it is up to the maximum mark on the
edge of the funnel on the reservoir.
The reservoir holds approx. 300 ml.
Screw the cap back on securely so that water cannot get into the
reservoir during the wash cycle.
Run the "Cold" programme to rinse away any spilled rinsing agent.
This prevents over-foaming occurring during the next programme.
You can adjust the dosage for best results (see "Further settings,
Additional functions").
35
Page 36

Areas of application
Loading the dishwasher
Remove coarse food residues from crockery.
There is no need to rinse items under running water.
Notes
Ensure that no acid or solvent residues, especially hydrochloric
acid or chlorides, get inside the wash cabinet.
Do not wash items soiled with ash, sand, wax, lubricating
grease or paint in the dishwasher.
These substances will damage the dishwasher.
Crockery can be loaded into the appropriate places in the baskets,
but the following notes should be observed:
Load the crockery so that water can access all surfaces. This
ensures that they get properly cleaned.
Load plates symmetrically in the upper and lower baskets with the
concave surface towards the centre of the basket (as shown on the
following pages).
Do not place crockery and cutlery inside other pieces where they
may be concealed.
Make sure that all items are securely positioned.
Hollow items such as cups, glasses, pans, etc. must be inverted in
the basket.
Tall, narrow, hollow items should be placed in the centre of the
basket if possible to ensure better water coverage.
Wide based items should be placed at an angle so that water can
run off them freely.
The spray arms must not be blocked by items which are too tall or
hang through the baskets. If in doubt, test for free movement by
manually rotating the spray arms.
Small items can fall through the holders in the baskets. Small items
should therefore be placed in the cutlery basket.
36
Page 37

Areas of application
Items not suitable for dishwashers:
We recommend
– Wooden cutlery and crockery or items with wooden parts: these
may discolour and fade. The glue used in these items is not
dishwasher-proof and wooden handles may come loose after being
washed in a dishwasher.
– Craft items, antiques, valuable vases and decorative glassware:
such items are not suitable for dishwashers.
– Plastic items which are not heat resistant: the high temperatures in
the dishwasher may cause them to melt or lose shape.
– Copper, brass, tin and aluminium items: these may discolour or
become matt.
– Colours painted over a glaze: these may fade after a number of
washes.
– Delicate glassware and glassware containing lead crystal: clouding
may occur over time.
– When purchasing new crockery and cutlery, make sure they are
dishwasher-proof.
– Clouding may occur on glasses after frequent washing. If delicate
glassware is washed in the dishwasher ensure that only a special
glass-care programme with very low temperatures (see programme
chart) is selected and that suitable cleaning agent is used. This will
reduce the risk of clouding.
Please note:
Silver and aluminium which has been in contact with foods
containing sulphur can discolour.
Aluminium components (e.g. grease filters) must not be cleaned
with caustic alkaline commercial or industrial cleaning agents.
These may damage the material, or in extreme cases, there is a risk
of a severe explosive chemical reaction (such as an explosive
oxyhydrogen gas reaction).
37
Page 38

Areas of application
Upper basket
Use the upper basket for small, lightweight and delicate items such
as cups, saucers, glasses, dessert bowls etc. Light, heat resistant
plastic items can also be loaded in the upper basket.
O 891 upper basket
With insert E 810 for e.g. 20 cups, 33 saucers or 17 dessert plates.
Cup rack
The cup rack can be set at two different widths so that it can also
accommodate large cups.
Pull the cup rack upwards and click it back into position at the
required width.
38
Page 39

Areas of application
Adjusting the upper basket
In order to gain more space for taller pieces of crockery in the lower
or upper basket, the upper basket can be adjusted between two
positions with approx. 5cm between each position.
Pull out the upper basket.
Unscrew the fixing nuts on both sides.
Lift or lower the basket into the desired position.
Tighten the fixing nuts again.
The upper basket must be level in both positions.
If it is at an angle, this will obstruct the water connection.
When changing the height of the upper basket, always adjust
the water connection accordingly before pushing the upper basket
back in.
Turn the upper basket water connection to the upper or lower
position.
The water connection must click audibly into place.
39
Page 40

Areas of application
Depending on the setting of the upper basket, the following plate
dimensions can be accommodated:
Example upper basket O891:
Upper basket in
position
Upper max. 15 cm 33 cm *
Lower max. 20 cm 25 cm
* Plate insert E812 required in the lower basket
Upper basket plate Ø Lower basket plate Ø
40
Page 41

Areas of application
Lower basket
For larger and heavier items such as plates, serving platters,
saucepans, bowls, etc.
Only place thin, delicate glassware in the lower basket using a
suitable insert or basket.
U 890 lower basket carrier
For plastic trays, various inserts and cutlery inserts.
U 890 lower basket carrier with 2 x E816 inserts and 2 x E165 cutlery inserts
16 plates each with Ø 25 cm and various items of cutlery can be
loaded. Without the cutlery inserts, 19 plates each with Ø 25 cm can
be loaded into the E 816 inserts.
41
Page 42

Areas of application
U 890 lower basket carrier with an E816 insert rotated through 90°
With the E165 cutlery insert, 16 plates each with Ø 33 cm and
various items of cutlery can be loaded. Without the cutlery insert, 19
plates each with Ø 33 cm can be loaded into the rotated E 816 insert.
42
Page 43

Areas of application
Loading plastic trays
Lower basket carrier U 890 can be loaded with plastic trays
measuring 500 x 500 mm.
The special O885 upper basket carrier is required for loading plastic
trays in the upper basket (max. loading height for items 130mm).
The special U876 lower basket carrier is required for loading taller
items in the lower basket.
Which basket combination to use will depend upon the type, shape
and size of the items to be washed.
For further information on baskets please contact your Miele dealer or
the Miele Professional Department.
Example: (lower basket)
U525 5-row wire basket
The wire basket can be used for glasses with a maximum diameter of
8cm.
43
Page 44

Areas of application
U534 - U537 plastic trays with compartments for different glass heights
In this example the plastic tray is connected to the top frame by long
extenders.
(for assembly in U876 lower basket carrier only)
Assembling a plastic tray
The height of the basket can be altered by fitting a top frame to the
base with long or short extenders.
Push all four extenders into the base .
Press the top frame securely onto the extenders.
44
Page 45

Operation
Adding cleaning agent
Only use cleaning agent for commercial dishwashers.
Suitable products are available from Miele Professional.
Cleaning agent can be dispensed in powder form via the powder
detergent dispenser or in liquid form via an external DOS module
(Optional accessory - see "DOS module").
Tabs can be used in all programmes except for "Super short".
Only use tabs that are quick dissolving. Suitable tabs are available
from Miele Professional.
Powder cleaning agent
Only use powder cleaning agent or tabs in the door dispenser
compartment.
Add powder cleaning agent or a tab to the detergent dispenser in the
door before every wash programme (except Super short, Cold,
Reactivation and Drain). Follow the tips on the next page.
Add the appropriate amount of cleaning agent to the dispenser
according to the degree of soiling of the items to be washed
(observe the quantities given in the "Programme chart").
Press the opening catch on the dispenser in the direction of the
arrow. The flap will spring open to the left.
The flap is always open at the end of a programme.
45
Page 46

Operation
Place the required amount of powder cleaning agent or a tab in the
detergent dispenser in the door and close the flap.
Dispensing
Always follow the recommendations of the cleaning agent
manufacturer.
There are markings to assist with dispensing: 20 and 40. The marks
indicate a level of approx. 20 or 40 ml when the door is open in the
horizontal position. They also indicate the approx. level in grammes
(depending on the manufacturer and the coarseness of the agent).
The compartment holds a maximum of 60ml.
Tips for the Super short programme
With the Super short programme, the final rinse water is not pumped
out at the end of the programme in order to achieve short programme
durations in continuous use.
Cleaning agent cannot be rinsed out of the dispenser during the short
programme time.
If liquid detergent is not being dispensed, add powder cleaning
agent directly onto the inside of the door.
To avoid corrosion or discolouration, the wash programme must be
started immediately after dispensing cleaning agent directly onto
the inside of the door.
46
Page 47

Operation
DOS module
In addition to the internal dispensing systems, up to two further
external dispensing systems (DOS modules) can be connected for
dispensing liquid chemical agents.
Suitable products are available from Miele Professional.
For more information on Miele DOS modules please contact your
Miele dealer or the Miele Professional Department.
Labelling the siphons
Connecting DOS modules
Liquid chemical agents from external containers are dispensed by
siphons. Colour coding the siphons can be helpful for correct
dispensing.
For cleaning specific types of soiling, and for information on the
optimum cleaning agents and additives to use for liquid dispensing,
please contact the Miele Professional Department.
The DOS module is supplied with its own installation instructions.
Power supply for DOS 1, cleaning agent.
Power supply for DOS4 rinsing agent.
Connections for dispensing hoses
Before fitting the DOS module compare the connection data
(voltage and frequency) on the data plate with that on the data
plate of your machine. If the data does not match, the module
could sustain damage. If in any doubt, consult an electrician.
Connect the module to the electricity supply.
To connect the dispensing hose, release the hose clip on a free
connector and remove the safety cap.
Push the dispensing hose onto the connector and secure it with a
hose clip.
Unused connectors must be blanked off with safety caps to
prevent the leakage of wash fluid.
47
Page 48

Operation
K
OK
DOS
Refill
Setting the
dispensing
concentration
Refilling or
changing
containers
For adjusting dispensing concentration see "Further settings /
Additional functions / DOS Dispensing system".
The DOS module is equipped with a level indicator which gives a
message in the display when the level drops below the minimum.
As soon as the message appears in the display, refill or replace the
container with a full one at the end of the programme.
Confirm the message shown with the OK button.
Replace the container in good time to prevent the dispensing
system being emptied completely.
An empty dispensing system must be vented before starting the
next programme.
Place the container on the open cabinet door or on a surface which
is easy to clean.
Unscrew and remove the siphon. Place the siphon on the open
cabinet door.
Replace the empty container with a full one.
Push the siphon into the opening of the container and screw it on
tightly. Observe the colour coding.
Wipe up any spilled chemical agent thoroughly.
Place the container on the floor next to the dishwasher or in an
adjacent cupboard. The container must be on the same level as the
dishwasher. It must not be placed higher than the dishwasher or on
top of it.
The DOS system must then be vented.
To vent the system and adjust the dosage amount, see
"Further settings, Additional functions".
48
Page 49

Operation
Checking consumption
Monitor the amount of chemical agents used by regularly checking
the level in the container.
49
Page 50

Operation
LEDs in the buttons
Light-emitting diodes that indicate the status of the dishwasher are
set into the buttons.
Except for the Start/Stop button, which has a green LED in normal
operation, all other LEDs light up yellow.
In the event of a fault the Start/Stop button flashes red.
Button LED Status
On/Off
button
Buttons
,
and
Programme
short cut
buttons
Further
programme
s button
Start/Stop
button
ON The dishwasher is switched on.
OFF The dishwasher is switched off.
ON The respective programme has been
selected. At the end of the programme
the LED will remain lit until a different
programme is selected.
OFF The programme is not selected or the
programme settings are being selected.
ON A programme was selected from the
programme list. At the end of the
programme the LED will remain lit until a
different programme is selected.
OFF No programme has been selected from
the list or the programme settings are
being selected.
ON Programme running
FLASHES
GREEN
A programme has been selected but not
yet started.
Door
button
FLASHES
RED
OFF A programme has finished.
ON A programme has been selected but not
FLASHES A programme is finished and the door is
OFF Programme running
A fault has occurred.
yet started.
closed.
50
Page 51

Operation
Universal
Temperature
Duration
G
55 °C
Min
23
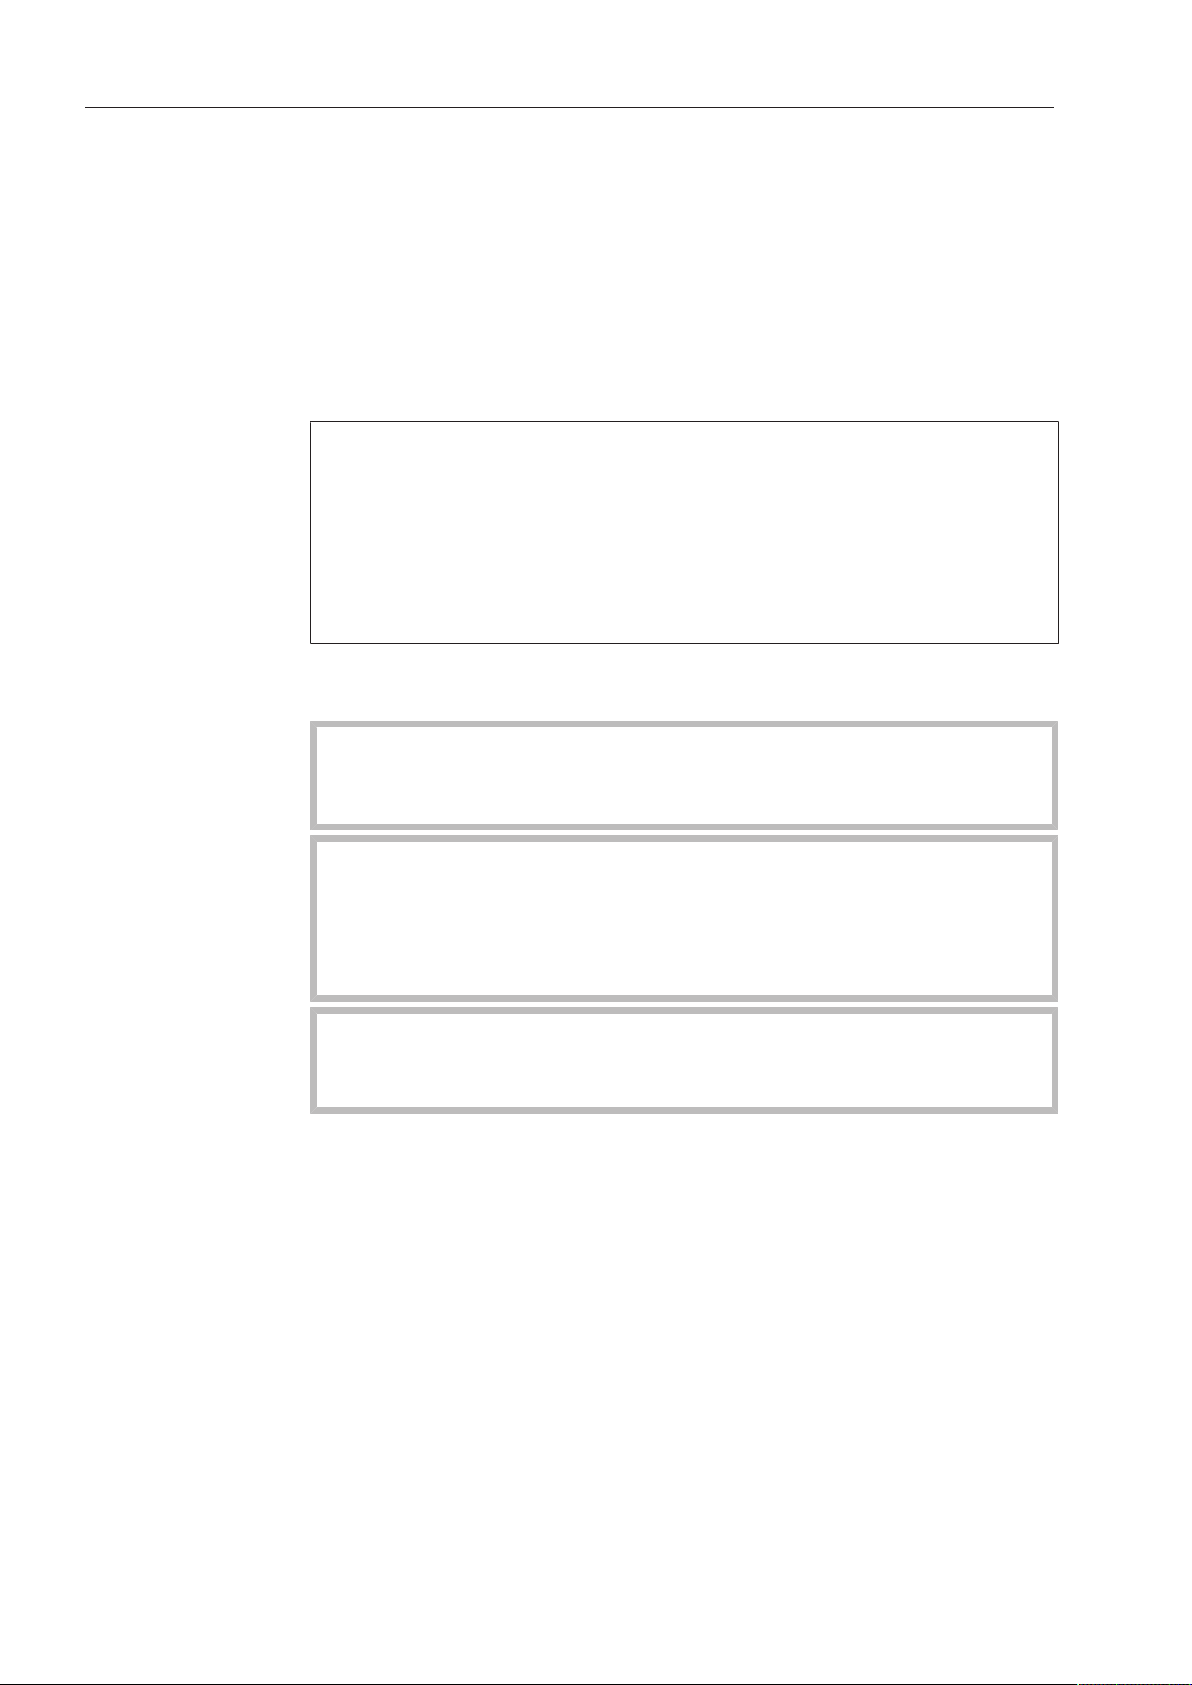
Switching on
Open the stopcock, if it is closed.
Press the button until the button's LED lights up.
Close the door (the button's LED will light up).
As soon as the dishwasher is ready for operation, the display
changes to show the last selected programme,
e.g.
Short cut buttons
Selecting a programme
Choose your programme according to the type of load and how dirty
it is.
The most regularly used programmes can be selected via short cut
buttons , or . These can be adapted to suit individual
needs (see "Further Settings").
The first three programmes from the Programme chart are allocated
to the short cut buttons as the factory default.
Select a programme using the short cut buttons.
The short cut button's LED will light up and the Start/Stop button's
LED will flash.
51
Page 52

Operation
Super short
Hygiene plus
,
;
Select programme
Universal
Temperature
Duration
55 °C
Min
23
G
Programme list
Programmes which cannot be selected via the short cut buttons can
be selected from the programme list.
Press the button.
The following option menu appears in the display
Select the programme you want using the and buttons and
confirm your choice using the OK button.
The selected programme will be shown in the display, e.g.
The button's LED will light up and the Start/Stop button's LED will
flash.
Additional functions can be selected by pressing the OK button (see
"Additional functions").
52
Page 53

Operation
Universal
Main wash
Duration
G
Min
23
Starting a programme
Press the Start/Stopbutton.
The Start/Stop button's LED will light up and the button's LED will
go out.
A programme can no longer be changed after it has been started.
A programme can either be interrupted (see "Interrupting a
programme") or cancelled (see "Cancelling a programme").
Programme sequence indicator
After the start of a programme the wash phase description and, for 10
seconds Programme running, are shown in the display.
During the programme cycle the and arrow buttons can be used
to switch between the wash phase and the target temperature or the
actual temperature in the second line of the display.
The time remaining is shown in the third line of the display.
53
Page 54

Operation
Universal
Temperature
Programme finished
55 °C
At the end of the programme
After a programme which has ended normally the Start/Stop button's
LED will go out and the button's LED will flash. The message
Programme finished will appear in the bottom line of the display.
In addition to this a buzzer will also sound for approx. 3 seconds
(factory default). To alter the buzzer tones see "Settings , Buzzer
tones".
If drying assistance has been activated (see "Settings , Drying"), the
door will automatically open a few centimetres.
If the switch-off function is activated, the dishwasher switches itself
off after a short time.
Press the button to switch on.
Switching off
Press the button until the LED in the button goes out.
Unloading the dishwasher
Dishes tend to break and chip more easily when they are hot. Allow
the dishes to cool until they are comfortable enough to handle before
unloading them.
If you open the door fully after switching off, the dishes will cool much
faster.
First unload the lower basket, then the upper basket. This will prevent
water drops from the upper basket falling onto the dishes in the lower
basket.
54
Page 55

Operation
Open door?
Yes
No
(
K
Programme interrupted:
Door opened
Interrupting a programme
A programme which is already running should only be interrupted if
strictly necessary, e.g. if the wash load is moving about significantly.
Caution. The wash load and the interior of the dishwasher may
be hot.
Danger of scalding and burning.
Press the button.
If the temperature in the wash cabinet is more than 70 °C, the
warning Wash cabinet too hot will appear in the display.
Confirm the message shown with the OK button.
The following will appear in the display:
Select Yes and confirm your choice with theOK button.
The programme will only be cancelled when Yes is confirmed.
If there is no further input 20 seconds after the button has been
pressed, the display will revert to the programme sequence.
The door will open and the following message will appear in the
display:
Rearrange the items so that they are stable.
Close the door.
The programme will continue from the point at which it was
interrupted.
The display will automatically revert to the programme sequence.
55
Page 56

Operation
Cancel programme
Yes
No
(
K
Programme cancelled
Cancelling a programme
Only cancel a programme which has already started if strictly
necessary, e.g. if you want to change the programme.
In the event of a fault the programme will be cancelled automatically.
Caution. The wash load and the interior of the dishwasher may
be hot.
Danger of scalding and burning.
Press the Start/Stopbutton.
The following will appear in the display:
Select Yes and confirm your choice with theOK button.
The programme will only be cancelled when Yes is confirmed.
If there is no further input approx. 20 seconds after the Start/Stop
button has been pressed, the display will revert to the programme
sequence.
The following message appears in the display:
If you change the programme and the cleaning agent compartment
flap is open, add more cleaning agent as necessary.
56
Page 57

Additional functions
Start time
-- : --
Universal
Temperature
55 °C
12:30Switch on at
G
Delay start
The start time of a programme can be delayed, e.g. to benefit from
economy rates of electricity. A delay start time of between 1 minute
and 24 hours can be selected.
Delay start must be switched on in the Settings menu (see
"Settings , Delay start").
If Delay start has been switched off, it will not be visible when
additional functions are called up.
When using the Delay start function, make sure that the cleaning
agent compartment is dry before adding cleaning agent. Wipe dry
with a cloth if necessary.
If the compartment is wet, cleaning agent can become lumpy and
stick to the dispenser, with the result that it is not fully dispensed.
Setting the start time
Switch the dishwasher on with the button.
Select the programme you require (see "Operation, Selecting a
programme"). The Start/Stop button's LED will flash.
Press the OK button.
Select Delay start and confirm your choice with theOK button.
Use the arrow buttons (higher) and (lower) to set the hours and
minutes and confirm each entry using the OK button.
When you have entered the start time, press the Start/Stop button.
The selected programme, along with the temperature and start time,
will then be displayed.
To cancel a set delay start before it has started, switch the
dishwasher off using the button.
57
Page 58

Additional functions
Selection
Drying assistance
Delay start
Drying
Yes
No
(
Drying assistance
To achieve better drying results, the dishwasher door will
automatically open a few centimetres at the end of the programme.
This function cannot be activated for all programmes (see
"Programme chart").
Drying assistance can be activated or deactivated for the selected
programme, even if it is switched on or off permanently under
"Settings , Drying".The setting adopted will then be applied once for
the programme selected and will go out at the end of the programme.
Switch the dishwasher on with the button.
Select the programme you require (see "Operation, Selecting a
programme"). The Start/Stop button's LED will flash.
Press the OK button.
If Delay start has been activated under "Settings , Delay start", the
following will appear in the Selection menu:
Select Drying assistance and confirm your choice with theOK
button.
If delay start has been deactivated under "Settings , Delay start", the
options for drying assistance will appear immediately.
– No
Drying assistance is deactivated for the selected programme.
– Yes
Drying assistance is activated for the selected programme.
The opposite of the setting which has been adopted under "Settings
, Drying" will appear as an option in the display. Pressing the OK
button will adopt the option.
58
Page 59

Additional functions
Universal
Temperature
Duration
G
55 °C
Min
23
If drying assistance has been activated, the drying symbol will
appear in the display to the right of the programme name.
If the wash cabinet temperature after the final wash phase is higher
than 67°C (e.g. in the Hygiene Plus programme), an active cooling
phase takes place before the end of the programme. The programme
will only end when the temperature is lower than 67°C.
An audible tone sounds, Programme finished appears in the display
and the door automatically opens a few centimetres.
59
Page 60

Settings
Menu
Settings
Further settings
Opening the "Settings " menu
To open the settings menu:
Switch the dishwasher off.
Press and hold the button and switch the dishwasher on using
the button.
After that, the display will show the following, for example:
If the button is pressed in this menu, the dishwasher will revert
to normal operation.
Select the Settings option and open the menu for this by pressing
the OK button.
Options in the
Settings menu
– Delay start
Switch Delay start on or off (see "Delay start")
– Drying
Switch drying assistance on or off permanently and adjust the
drying time (see "Drying").
– Language
Select the operating language (see "Setting the language")
– DOS venting (Option is only visible if a DOS module is activated)
Vent dispensing system (see "Venting DOS modules")
– Date
Set the date and date format (see "Setting the date")
– Time of day
Set the time and clock format (see "Setting the time")
– Volume
Set the volume of keypad and buzzer tones (see "Buzzer tones")
60
Page 61

Menu structure
Factory defaults are shown.
Menu Submenu 1 Submenu 2
1. Delay start No
Yes
2. Drying No
Yes
3. Language deutsch
english (GB)
etc.....
4. Venting DOS DOS 1
DOS 4
Settings
5. Date Date format
Set
6. Time of day Set
Display
Clock display
7. Volume Keypad tone
Buzzer tones
DD:MM:YY
MM:DD:YY
Set the time
Do not display
On
On for 60 seconds
12 h
24 h
Programme end
Warning
61
Page 62

Settings
Delay start
Yes
No
(
Delay start
You can select whether Delay start appears in the Additional
functions menu or not.
Selecting No will remove Delay start from the Additional functions
menu for operators.
To be able to delay the start of a programme, Yes must be selected in
order for it to be displayed in Additional functions.
To set the start time see "Additional functions, Delay start".
Select the Settings menu.
Select Delay start and confirm your choice with the OK button.
The following options are available:
– No
Delay start is switched off and therefore not visible as an additional
function.
– Yes
Delay start is switched on.
Select the option you want and confirm your choice with the OK
button.
62
Page 63

Settings
Drying
Yes
No
(
Drying
You can switch assisted drying on or off for all programmes that
support this function.
In Additional functions you can select or deselect drying for individual
programmes (see Additional functions, Drying assistance").
Select the Settings menu.
Select Drying and confirm your choice with the OK button.
The following options are available:
– No
Drying is switched off.
– Yes
Drying is switched on for those programmes which support drying
assistance.
63
Page 64

Settings
Language
,
;
(
english (GB)
deutsch
Setting the language
The language set will be used in the display.
The flag symbol after the word "Language" acts as a guide if a
language which you do not understand has already been set.
If this is the case, keep selecting the option which has a flag after it
until you reach the "Language" sub-menu.
Select the Settings menu.
Select Language and confirm your choice with theOK button.
A list will appear in the display with all the languages available in the
system.
Use the and arrow buttons to select the language you want
and confirm your choice using the OK button.
64
Page 65

Settings
DOS venting
DOS1
DOS4
Venting DOS modules
This option is only visible when a DOS module is connected.
The dispensing system for liquid agents can only dispense reliably if
the system has been purged of air.
The DOS system must be vented:
– if the dispensing system is being used for the first time,
– if the liquid cleaning agent container has been replaced,
– if the dispensing system has been sucked completely dry.
To avoid damage to the dispensing system, make sure before
venting that the containers for cleaning agent and rinsing agent are
sufficiently filled and the dispensing siphons are screwed securely
to the containers.
Select the Settings menu.
Select DOS venting and confirm your choice with the OK button.
Select the dispensing system to be vented using the and
arrows and confirm your choice with the OK button.
The dishwasher will then start to vent the selected dispensing system
automatically. As soon as this is completed, Dispensing system DOS
successfully vented will appear in the display.
Confirm the message with the OKbutton.
65
Page 66

Settings
Date
Date format
Set
Date format
DD:MM:YY
MM:DD:YY
(
Date
01 . 06 . 2013
Setting the date
Select the Settings menu.
Select Date and confirm your choice with theOK button.
In the following menu you can choose between:
– Date format
This option offers two variations for date format.
– Set
This option is used to set the date in the selected format.
Date format
Set
Select Date format and confirm your choice with theOK button.
DD stands for day
MM stands for month
YY stands for year
Select the date format you want and confirm your choice with the
OK button.
Select Set and confirm your choice with theOK button.
66
Use the arrow buttons (higher) and (lower) to set the day,
month and year and confirm each entry using the OK button.
When day, month and year have been set, the display reverts
automatically to the Date menu.
Page 67

Settings
Time of day
Set
Display
,
;
Time of day
12 : 00
Setting the time of day
Select the Settings menu.
Select Time of day and confirm your choice with theOK button.
In the following menu you can choose between:
– Set
Set the time of day
– Display
Time of day displayed when the dishwasher is idle.
– Clock display
Set the clock format
Setting the time
The dishwasher does not automatically adjust between summer and
winter time. This must be done manually by the operator as required.
Select Set and confirm your choice with theOK button.
Use the arrow buttons (higher) and (lower) to set the hours and
minutes and confirm each entry using the OK button.
When hours and minutes have been set, the display reverts
automatically to the Time of day menu.
67
Page 68

Settings
Display
Do not display
On
,
;
(
Clock display
(
24 h
12 h
Display
If required, the time of day can be displayed once the "Switch off
after duration" has elapsed (see Further settings, Switch off after. The
LED in the button will start to flash.
The dishwasher is ready for use when the time is visible in the
display. Pressing any button will reactivate it.
Select Display and confirm your choice with theOK button.
The following options are available:
– Do not display
The time of day is not displayed. The dishwasher switches off at the
end of the "Switch off after duration".
– On
The time of day is constantly displayed.
– On for 60 seconds
The time of day is displayed for 60seconds. The dishwasher
switches itself off once the 60 seconds have elapsed.
Clock display
Select the setting you want and confirm your choice with the
OKbutton.
Select Clock display and confirm your choice with theOK button.
The following options are available for clock format in the display:
– 12 h (am / pm)
– 24 h
Select the format you want and confirm your choice with the
OKbutton.
68
Page 69

Settings
Volume
Keypad tone
Buzzer tones
Buzzer tones
Programme end
Warning
Regulating the volume
The dishwasher has audible tones which sound when buttons on the
keypad are pressed, at the end of a programme and when there are
system messages.
Select the Settings menu.
Select Volume and confirm your choice with theOK button.
The following options are available:
– Keypad tone
Set the volume of the tone which sounds when one of the buttons
is pressed.
Keypad tone
Buzzer tones
– Buzzer tones
Set the buzzer volume for programme end and for warning
messages.
Select Keypad tone and confirm your choice with theOK button.
Set the volume you want (see "Setting the volume") and confirm
your choice with the OKbutton.
Select Buzzer tones and confirm your choice with theOK button.
The following options are available:
– Programme end
Set the buzzer tone at the end of the programme.
– Warning
Set the buzzer tone for warning messages.
Select the appropriate option and confirm your choice with the OK
button.
Set the volume you want (see "Setting the volume") and confirm
your choice with the OKbutton.
69
Page 70

Settings
z
Keypad tone
Quieter Louder
Setting the volume
The volume is always set in the same way. The display is also similar,
e.g.:
Set the volume using the arrow buttons (louder) and (quieter).
The volume level is represented by a bar chart. On the lowest setting
the tone is switched off.
Confirm the volume set with the OK button.
If there is no further input for approx. 15 seconds, the display will
revert to the previous menu without saving the setting.
70
Page 71

Further settings
Menu
Settings
Further settings
Opening the "Further settings" menu
To open the "Further settings" menu:
Switch the dishwasher off.
Press and hold the button and switch the dishwasher on using
the button.
After that, the display will show the following, for example:
If the button is pressed in this menu, the dishwasher will revert
to normal operation.
Select Further settings and press OK to open the relevant menu.
Options under Further settings
This menu can be protected with a code (see "Further settings,
Code").
– Code
Access rights via a code and settings can be administered (see
"Code")
– Log book
Displays consumption levels for agents used as well as operating
hours (see "Log book")
– Temperature unit
The temperature can be displayed in °C or °F (see "Temperature
unit")
– Move programme
Programmes can be allocated to the short cut buttons (see "Move
programme")
– Additional functions
Programme parameters such as water intake, interim rinses,
temperatures and holding times as well as cleaning agent
concentration levels for the DOS modules can be adapted with this
function (see "Additional functions")
– Release programme
You can specify which programmes are visible in the display (see
"Release programme")
– Water hardness
This option is used for setting the water hardness level (see "Water
hardness")
71
Page 72

Further settings
– Display view
The display can show the Actual temperature or the Required
temperature (see "Display view")
– Display
The display contrast and brightness can be adjusted (see "Display")
– Switch off after
Automatic switch off can be activated or deactivated (see "Switch
off after")
– Factory default
All parameters can be reset to the factory default settings (see
"Factory default setting")
– Software version
The software version can be viewed (see "Software version")
72
Page 73

Further settings
Menu structure
Factory defaults are shown.
Menu Submenu 1 Submenu 2 Submenu 3
1. Code Release
Change code
2. Log book Consumption: Water
Consumpt.:Cleaning
agent
Consumpt.: Rinsing
agent
Operating hours
Wash cycles
Service interval
3. Temperature unit °C
°F
4. Move programme 1. Short
2. Universal
3. Intensive
etc.
5. Additional functions Reset
Further settings
Enter code
Yes
No
Yes
Block
6. Release
programme
7. Water hardness
Increased water level
Interim rinse
Dispensing system
Temperature / time
All
Selection
Yes
No
DOS 2 Rinsing agent
DOS 1
DOS 4
Short
Universal
Intensive
etc.
Short
Universal
etc.
Accept
Active
Inactive
DOS venting
Concentration
Change name
Reset
Main wash
Final rinse
73
Page 74

Further settings
Menu Submenu 1 Submenu 2 Submenu 3
8. Display view Actual temperature
Required temperature
9. Display Contrast
Brightness
10. Switch off after Yes
No
Contrast Set
Brightness Set
Set the time
11. Factory default Reset No
Programme settings
only
All settings
12. Software version EB Id: XXXX
EGL Id: XXXX
EZL Id: XXXX
EFU Id: XXXX
74
Page 75

Further settings
Further settings
Yes
Block
(
Code
A code can be used to prevent unauthorised access to various
functions and system settings on the dishwasher.
Select the Further settings menu.
Select Code and press OK to open the relevant menu.
– Release
Restrict access to the Further settings menu to users with
administrative rights only, or allow access to all users.
– Change code
Set a new code.
Release
Select the Release option and confirm your choice with the
OKbutton.
Select Further settings and confirm your choice with theOK button.
The following options are available:
– Yes
The menu is available to all users.
– Block
The menu can only be accessed by using a code.
A tick indicates the current status.
Select the option you want and confirm your selection with the OK
button.
Change code
Select the Change code option and confirm your choice with the
OKbutton.
First enter the current Code (see "Enter code").
Then enter your new code.
The code is saved to memory once you have confirmed the last
digit.
75
Page 76

Further settings
Enter code
0 0 0 0
K
OK
Wrong code entered
Enter code
If in the Release menu you have selected the Block option, or if you
have set the Further settings menu up for access via a code, you have
to enter a code.
Settings within the Further settings menu can then only be changed
by people with administration rights.
The code is set at the factory to 8 0 0 0 if access in Further settings is
blocked.
In this instance the display will show the following message:
Use the and arrow buttons to enter the digits and confirm
each one with the OK button.
Each press of the OK button takes the highlighting to the next input
position automatically.
Each digit entered is replaced by an asterisk (*).
The protected settings are released once all digits have been
correctly entered.
If the code is entered incorrectly the following message will appear in
the display:
Confirm the message with the OKbutton.
The display will then revert to the input menu.
76
Page 77

Further settings
Log book
,
;
Consumption: Water
Consumpt.:Cleaning agent
Log book
The dishwasher controls measure the consumption levels for water,
cleaning agent and rinsing agent. They also calculate the number of
hours the dishwasher has been run for, how many programmes have
been run and measure the service intervals.
Select the Further settings menu.
Select Log book and press OK to open the relevant menu.
The following options are available:
– Consumption: Water
Display the total amount of water used in litres.
– Consumpt.:Cleaning agent
Display the total amount of cleaning agent used in litres (only for
dishwashers using a DOS module).
– Consumpt.: Rinsing agent
Display the total amount of rinsing agent used in litres.
– Operating hours
Display the total number of operating hours.
– Wash cycles
Display the total number of programmes run.
– Service interval
Display the date when the next service is due.
Select the option you want and confirm your choice with the OK
button.
The value will then be displayed.
Pressing the OK button takes you to the next level.
77
Page 78

Further settings
Temperature unit
°C
°F
(
Temperature unit
The temperature can be shown in the display in degrees Celsius or
degrees Fahrenheit.
Select the Further settings menu.
Select Temperature unit and confirm your choice with the OK
button.
– °C
The temperature is displayed in degrees Celsius
– °F
The temperature is displayed in degrees Fahrenheit
Use the and arrow buttons to select the option you want and
confirm your choice with the OKbutton.
78
Page 79

Further settings
Move programme
1.
2.
,
;
Short
Universal
1.
1.
2.
,
;
(
Move programme
Short
Universal
Move programme
You can change the order of the programmes and therefore also the
allocation of the shortcut buttons.
You can move the programmes you use most frequently to
programme places 1-3. These are then automatically allocated to the
shortcut buttons.
Select the Further settings menu.
Select Move programme and confirm your choice with the OK
button.
Short cut buttons
Programmes are displayed in their current order.
Use the and buttons to select a programme from the list that
you wish to move, and then confirm your choice with the OK
button.
The programme you select will be marked with a tick .
Use the and buttons to select the position you want to move it
to and confirm your choice with the OK button.
Moving a programme forwards moves the programmes after it down
a position.
Moving a programme to the end of the list moves the programmes in
front of it up a position.
79
Page 80

Further settings
Reset
Yes
No
(
Additional functions
It is possible to adapt individual parameters to tailor programme
sequences to particular types of soiling and to optimise the cleaning
result.
Select the Further settings menu.
Select Additional functions and press the OKbutton to open the
relevant menu.
In the following menu you can choose between:
– Reset
This resets all altered parameters in Additional functions to their
default settings.
– Increased water level
This increases the amount of water used in all wash programmes.
– Interim rinse
This introduces an interim rinse to all programmes that support this
feature (see "Programme chart").
Reset
– Dispensing system
This is used for venting the dispensing systems and for naming the
DOS module.
– Temperature / time
The temperature and holding time can be changed for the main
wash and final rinse stages of a programme.
Select the Reset option and confirm your choice with the
OKbutton.
Select the Yes option and confirm your choice with the OKbutton.
All parameters that have been altered under "Additional functions"
will be reset to the factory default setting.
80
Page 81

Further settings
Increased water level
0,0 l
(0,0 - 1,5 l)
Interim rinse
Yes
No
(
Increased water
level
Interim rinse
Select the Increased water level option and confirm your choice with
the OKbutton.
The amount of water is shown in litres and can be increased in
0.5litre increments up to 1.5litres.
Use the arrow buttons (higher) and (lower) to select the
amount of water you want and confirm your choice with the
OKbutton.
Select the Interim rinse option and confirm your choice with the
OKbutton.
The following options are available:
– Yes
Interim rinse activated.
– No
Interim rinse not activated.
Select the option you want and confirm your choice with the OK
button.
81
Page 82

Further settings
Dispensing system
DOS1
;
,
DOS 2 Rinsing agent
Active
Inactive
,
;
DOS1
DOS dispensing system
Select the Dispensing system option and confirm your choice with
the OKbutton.
Select the dispensing system you want and confirm your choice
with the OK button.
The following options are available:
– Active
Dispensing system activated.
– Inactive
Dispensing system not activated.
– DOS venting
This vents the dispensing system to ensure reliable dispensing.
– Concentration
The concentration level of cleaning agent and/or rinsing agent can
be set to suit requirements.
– Change name
The name of the dispenser can be changed.
With DOS 2 Rinsing agent the only option displayed is
Concentration.
The options DOS venting, Concentration and Change name are only
visible if Active has been selected
82
Page 83

Further settings
Concentration
0,30 %
(0,01 - 2,00 %)
Concentration
0,04 %
(0,01 - 2,00 %)
DOS venting
Setting the DOS concentration level
To avoid damage to the dispensing system, make sure before
venting that the containers for cleaning agent and rinsing agent are
sufficiently filled and the dispensing siphons are screwed securely
to the containers.
Select DOS venting and confirm your choice with theOK button.
The dishwasher will now start the automatic venting process of the
dispenser system.
Dispensing system DOS venting will appear in the display.
As soon as the process has finished, Dispensing system DOS
successfully vented will appear in the display.
Confirm the message with the OKbutton.
Please observe dispensing recommendations made by the
manufacturer of the agent.
Select Concentration and confirm your choice with theOK button.
Concentration levels are given as a percentage and can be set
between 0.01 and 2.00%.
The concentration level set then applies to all programmes.
Display for DOS1:
If a DOS G 60 module is connected to the dishwasher, the factory
set concentration level must be reduced by half.
Display for DOS2 Rinsing agent and DOS4:
Use the arrow buttons (higher) (lower) to set the concentration
level you want and confirm your choice with theOK button.
83
Page 84

Further settings
Change name
DOS1<_ _ _ _ _ _ _ _ _ _ _
P
OK
#
a
ä b c
.
Changing a DOS name
Select Change name and confirm your choice with theOK button.
The current name is shown on the second line of the display. This can
be changed using the options shown in the bottom line.
DOS is a set part of the name and cannot be changed.
The top line shows which option has been selected.
Navigate using the arrow buttons to shift the cursor to the option
required: (moves to the right) and (moves to the left).
Confirm each option individually with the OKbutton.
The following options are available:
– Letters from A - Z;
each new word will start with a capital letter.
– Numbers from 0 - 9
– Space
– Use the symbol to delete the last position in the name displayed.
– Select OK to save the name.
– If you do not want to save the name you have given press the
symbol.
84
Page 85

Further settings
Select programme
Short
Universal
,
;
Short
Reset
Main wash
,
;
Temperature / Time
The temperature and holding time for the main wash and final rinse
phases can be altered in some programmes (see "Programme chart").
Select Temperature / time and confirm your choice with theOK
button.
The following options are available:
– Reset
This resets values changed in a programme back to their factory
default settings.
– Main wash
This is used to alter the temperature and the holding time in the
main wash.
– Final rinse
This is used to alter the temperature and the holding time in the
final rinse.
85
Page 86

Further settings
Short
Holding time
Final rinse temp.
50
°C
(30 - 85 °C)
Final rinse temp.
Main wash / Final rinse
The procedure for altering settings in Main wash and Final rinse is the
same. The display also looks similar.
Select the Main wash or Final rinse option and confirm your choice
with the OK button.
Select the wash programme you want and confirm your choice with
the OK button.
The following options are available:
– Temperature / Final rinse temp.
The temperature for the main wash or the final rinse can be
changed.
– Holding time
The temperature holding time can be changed.
Final rinse temperature
Select Temperature or Final rinse temp. and confirm your choice with
the OK button.
The temperature for the main wash or the final rinse can be set from
30 to 85 °C in 1 °C increments.
In the Super short programme, the temperature can only be increased
to 70 °C.
Use the arrow buttons (higher) (lower) to set the temperature
you want and confirm your choice with the OK button.
86
Page 87

Further settings
Holding time
1 Min
(0 - 10 Min)
Holding time
Select Holding time and confirm your choice with theOK button.
The holding time is set in minutes and can be set between 0 and
10minutes in 1minute increments.
In the case of the Super short programme, the holding time is set in
seconds and can be set between 0 and 300 seconds in 5 second
increments.
Use the arrow buttons (higher) (lower) to set the holding time
you want and confirm your choice with the OKbutton.
87
Page 88

Further settings
Release programme
All
Selection
(
Release programme
Short
Universal
,
;
9
9
Releasing programmes
Individual programmes can be blocked so that they cannot be used.
All programmes are released for use as default.
Select the Further settings menu.
Select Release programme and press OK to open the relevant
menu.
The following options are available:
– All
All programmes are released for use.
– Selection
Individual programmes can be blocked.
Blocking programmes
Select Selection and confirm your choice with the OK button.
Select the programmes that you want to block from use and press
the OK button.
The tick will be removed from the box and the programme
cannot then be used.
To save your selection, select Accept at the end of the programme
list and confirm your choice with the OK button.
If programmes have been blocked, Selection is selected when
Release programme is opened again.
88
Page 89

Further settings
Display view
Actual temperature
Required temperature
(
Water hardness
You can use this menu to set the water softener to the water
hardness of the mains supply.
For further information see "Filling the salt reservoir".
Display view
During a programme the Actual or Required temperature can be
shown in the second line of the display.
Select the Further settings menu.
Select Display view and press OK to open the relevant menu.
The following options are available:
– Actual temperature
Display the actual temperature during a programme (this value will
vary during the course of the programme).
– Required temperature
Display the required temperature for the main wash or the final rinse
(the maximum value is displayed as a static value. It will change
from one programme block to the next).
Select the option you want and confirm your choice with the
OKbutton.
89
Page 90

Further settings
Display
Contrast
Brightness
{
Contrast
Lower Higher
Brightness
{
Darker Brighter
Display
The display menu can be used for altering the display contrast and
brightness.
Select the Further settings menu.
Select Display and press OK to open the relevant menu.
The following options are available:
– Contrast
Set the contrast.
– Brightness
Set the brightness.
Contrast
Brightness
Select the Contrast option and confirm your choice with the
OKbutton.
The contrast range is shown in a bar chart in the display.
Use the arrow buttons (higher) (lower) to set the contrast you
want and confirm your choice with the OK button.
Select the Brightness option and confirm your choice with the
OKbutton.
The brightness range is shown in a bar chart in the display.
Use the arrow buttons (brighter) (darker) to set the brightness
you want and confirm your choice with the OK button.
90
Page 91

Further settings
Switch off after
Yes
No
(
Switch off after
60 Min
(5 - 60 Min)
Switch off after
When not in use the dishwasher can be switched off to save energy
or be activated for use by selecting an option from the Settings ,
Time of day, Display menu.
The clock display will be visible when it is ready for use.
Select the Further settings menu.
Select Switch off after and press the OKbutton to open the relevant
menu.
The following options are available:
– Yes
The switch off after option is active and you can specify a duration
after which the machine switches off.
Setting the switch off after duration
– No
The switch off after option is not active.
Select the Yes option and confirm your choice with the OKbutton.
The switch off after duration is set to 60 minutes ex-works. It can be
adjusted in 5 minute increments from 5 to 60minutes.
Use the arrow buttons (higher) (lower) to set the switch off
after duration and confirm your choice with the OK button.
91
Page 92

Further settings
Factory default
Reset
Reset
No
Programme settings only
,
;
(
Factory default
The factory default setting can be used to reset all changed
parameters in the dishwasher back to their default settings or just
values that have been changed for programmes.
Select the Further settings menu.
Select Factory default and press OK to open the relevant menu.
The following options are available:
– No
Altered parameters will not be reset to their default settings.
– Programme settings only
Only values that have been altered in programmes will be reset to
their default settings.
– All settings
All parameters that have been altered in the dishwasher will be
reset to their default settings.
Select the option you want and confirm your choice with the OK
button.
Selecting Programme settings only or All settings restarts the
dishwasher. After it has restarted, you will be prompted to re-enter
basic parameters such as the language, date, time, water hardness
etc.
Enter the parameters displayed such as language, date, time etc.
Your selection will then be saved and the last programme used will
then appear in the display.
92
Page 93

Further settings
Software version
EB Id: XXXX
EGL Id: XXXX
,
;
Software version
This displays the various software components.
Select the Further settings menu.
Select Software version and press OK to open the relevant menu.
Software for individual units is displayed. XXXX denotes the version.
– EB Id: XXXX
Control and display elements.
– EGL Id: XXXX
Control board.
– EZL Id: XXXX
Relay board.
– EFU Id: XXXX
Frequency converter.
Alterations and updates to software can only be carried out by an
authorised Miele service technician.
93
Page 94

Cleaning and care
Periodic checks
To prolong the service life of the dishwasher, it should should be
serviced after every 1000 hours of operation, or at least once a
year by Miele Service.
This maintenance will cover the following:
– Electrical safety according to national regulations (VDE 0701/0702
in Germany)
– Door mechanism and door seal
– Any screw connections and connectors in the wash cabinet
– Water inlet and drainage
– Internal and external dispensing systems
– Spray arms
– Filter combination
– Sump including drain pump and non-return valve
– All baskets and inserts
The following operational tests will be carried out within the
framework of the maintenance:
– A programme will be run as a test run
– Thermo electrical measurements will be taken
– Seals will be tested for water tightness
– All relevant measuring systems will be safety tested including error
message displays.
– Safety features
94
Page 95

Cleaning and care
Remove any soiling from the control panel and from the front of
the dishwasher straight away.
Soiling that is left too long might become impossible to remove and
could cause the external surfaces to alter or discolour.
All surfaces are susceptible to scratching.
Contact with unsuitable cleaning agents can alter or discolour the
external surfaces.
Cleaning the control panel
Clean the control panel with a clean sponge and a solution of
washing-up liquid and hot water, or with a clean damp microfibre
cloth. Dry the control panel with a soft cloth afterwards.
Do not use abrasive cleaning agents!
These can damage the control panel.
Cleaning the door front
To clean the stainless steel front, use a damp cloth with a solution
of washing-up liquid and hot water, or with a non-abrasive cleaning
agent for use on stainless steel.
To help prevent re-soiling (fingerprints, etc.), a suitable stainless steel
conditioner (available from Miele) can be used after cleaning.
Do not use cleaning agents containing ammonia or thinners!
These agents can damage the surface material.
Do not hose the dishwasher or near vicinity down to clean it,
e.g. with a hosepipe or a pressure washer.
Cleaning the wash cabinet
The wash cabinet is largely self-cleaning, provided that the correct
amount of cleaning agent is always used.
If, despite this, limescale or grease deposits accumulate in the
cabinet, these can be removed with a proprietary dishwasher cleaner
(available from Miele).
95
Page 96

Cleaning and care
Cleaning the door and the door seal
Wipe the door seal and the area beneath the door regularly with a
damp cloth to remove food deposits.
Wipe away any spillages of food and drink from the sides of the
dishwasher and from the hinges.
With freestanding dishwashers that have a plinth facing, please
remove spillages of food and drink from the channel that runs
below the door
Be careful of sharp edges when cleaning.
Danger of cutting yourself.
These surfaces are outside the wash cabinet and are not accessed
by water from the spray arms. If soiling is not removed mould can
develop.
Cleaning the filters in the wash cabinet
The filter combination in the base of the wash cabinet retains coarse
soil from the suds solution, preventing it accessing the circulation
system and causing blockages in the spray arms.
Cleaning the coarse filter
This dishwasher must not be used without all the filters in place.
The filters must be checked regularly and cleaned when necessary.
Warning!
Danger of injury on glass splinters.
Press the catches towards each other and remove the coarse filter.
Rinse the filter thoroughly under running water. If necessary use a
soft washing-up brush to remove soiling.
96
Replace the filter making sure it engages correctly.
Page 97

Cleaning and care
Cleaning the flat and micro-fine filters
Remove the coarse filter.
Grasp the micro-fine filter by the upper rim and turn it in the
direction of the arrow to release it.
Then lift it out.
Remove the flat filter.
Rinse the filters thoroughly under running water. If necessary use a
soft washing-up brush to remove soiling.
Replace the filter combination in the reverse order, turning the microfine filter to the left to re-engage it.
The flat filter must lie flat in the bottom of the wash cabinet.
The spray arms will get blocked if the filters are not replaced
correctly.
97
Page 98

Cleaning and care
Cleaning the spray arms
This dishwasher has three different spray arms.
Particles of food can get stuck in the spray arm jets and bearings.
The spray arms should therefore be inspected and cleaned regularly.
Switch the dishwasher off.
Pull the upper spray arm downwards to remove it.
The middle and bottom spray arms are secured with a bayonet
fitting.
The bayonet fitting on the lower spray arm is coloured yellow so that
it cannot get mistaken for the fitting on the middle spray arm.
To release the bayonet fitting proceed as follows:
Using the knurled nut turn the middle spray arm to the left as far
as it will go and then pull the spray arm downwards to remove it.
Remove the lower basket.
Using the knurled nut turn the lower spray arm in the direction of
the arrow as far as it will go and then pull the spray arm upwards to
remove it.
98
Page 99

Cleaning and care
Use a pointed object to push food particles into the spray arm jets.
Rinse the spray arms thoroughly under running water.
Replace the spray arms and check that they rotate freely.
Make sure that the spray arm with the yellow bayonet fitting is fitted
in the bottom of the wash cabinet.
99
Page 100

Problem solving guide
With the help of the following guide, minor faults in the performance of the machine, some
of which may result from incorrect operation, can be put right without contacting the
Service Department.
Repair work to electrical appliances should only be carried out by an authorised
Miele service technician. Repairs and other work by unqualified persons could be
dangerous. The manufacturer cannot be held liable for unauthorised work.
Faults with water intake or drainage
Problem Cause and remedy
When the dishwasher is
switched on with the
button, the display stays
dark and the Start/Stop
indicator does not flash.
The dishwasher stops
during a programme.
Interruption to the power
supply during operation
The dishwasher is not plugged in.
Insert the plug and switch on at the socket.
The fuse has tripped.
Reset the trip switch
(minimum fuse rating - see data plate).
The fuse has tripped.
Reset the trip switch (minimum fuse rating - see data
plate).
If the mains fuse trips again, call the Miele Service
Department.
If a temporary interruption to the power supply occurs
during a programme sequence, no action is required.
The programme will continue after the interruption.
If the temperature in the wash cabinet drops below the
minimum value required for the programme block during
the interruption to the power supply, the programme block
will be repeated.
If there has been an interruption to the power supply of
≥20hours, the entire programme will be repeated.
One of the following fault
messages appears in the
Before rectifying the problem:
Switch the dishwasher off with the button.
display:
Check water inlet Water inlet fault.
Open the stopcock fully.
Clean the filter in the water inlet (see "Cleaning and
care").
100
 Loading...