

Page 1

Operating instructions
Professional dishwasher
G 8050 / PG 8050i
To prevent accidents
and machine damage
read these instructions
before
installation or use.
en - CA, US
M.-Nr. 07 950 142
Page 2

Contents
Safety instructions and warnings ....................................4
Guide to the machine ..............................................9
Overview .........................................................9
Control panel G 8050...............................................10
Control panel PG 8050i .............................................11
Before using for the first time.......................................12
Before using the machine for the first time you will need: ...................12
Opening and closing the door ......................................13
To open the door ..................................................13
To close the door ..................................................13
Child safety lock ..................................................13
Water softener ...................................................14
Filling the salt reservoir .............................................16
Recharge indicator ................................................17
Rinse aid ........................................................18
Filling the rinse aid reservoir .........................................18
Rinse aid indicator .................................................19
Setting the rinse aid dosage .........................................19
Use ............................................................20
Loading the machine ...............................................20
Items not recommended for dishwashing ...............................21
Upper basket .....................................................22
Adjusting the upper basket ..........................................23
Lower basket .....................................................24
Lower basket inserts ...............................................25
Removing an insert ..............................................25
Inserting an insert ...............................................25
Adding detergent..................................................26
Turning on .......................................................28
Selecting a program ...............................................28
Program sequence indicators ........................................29
Display ..........................................................29
At the end of a program.............................................30
Interrupting a program..............................................31
Changing a program ...............................................31
Program Guide G 8050 ............................................32
Program Guide PG 8050i...........................................34
2
Page 3

Contents
Options .........................................................36
Start delay .......................................................36
Extra Drying ......................................................37
Programming special functions .....................................38
Dispensing system settings for DOS Module G 60 Semi (optional extras) ......38
To access the DOS programming level ..............................38
Setting the dosage ..............................................39
Venting the dispensing system.....................................39
Special function 1 Setting the rinse temperature..........................40
Special function 2 Increasing the water level ............................42
Special function 3 Display time or temperature...........................44
Special function 4 Actual temperature display ...........................46
Special function 5 Setting the heating power ............................48
Cleaning and care ................................................50
Cleaning the water inlet filter .........................................54
Cleaning the drain pump and non-return valve...........................55
Frequently asked questions ........................................56
Technical faults ...................................................56
Poor cleaning results ...............................................59
Other faults ......................................................61
After sales service ................................................62
Installation instructions ...........................................63
Installation ......................................................64
Electrical connection..............................................67
Plumbing........................................................69
Water inlet .......................................................69
Drainage ........................................................70
Technical data ...................................................71
Help to protect the environment.....................................72
3
Page 4
Safety instructions and warnings
The special inserts are to be used
This commercial dishwasher
complies with all applicable safety
laws and regulations. However,
inappropriate use can result in
personal injury and property
damage.
These operating instructions contain
important information on the
installation, operation and care of
your commercial dishwasher. To
avoid the risk of personal injury or
damage to the commercial
dishwasher, it is important that you
carefully read these instructions
before use.
Keep them in a safe place and pass
them on to any future owner.
Proper use
Use this commercial dishwasher
~
only for the purpose of dishwashing, as
indicated in the instructions. Any other
use, conversions or modifications are
impermissible and possibly hazardous.
The manufacturer will not be held liable
for damage caused by inappropriate
use or improper operation.
Operating personnel must receive
~
training regularly. Untrained personnel
must not be permitted to work with the
commercial dishwasher.
Individuals who are incapable of
~
using this commercial dishwasher
safely because of physical, sensory or
mental factors, or their inexperience or
lack of knowledge, should not use this
commercial dishwasher without
supervision or instruction by a
responsible person.
~
only for their specific application.
Technical safety
Before installing the commercial
~
dishwasher, check for externally visible
damage. A damaged commercial
dishwasher must never be placed into
operation. A damaged commercial
dishwasher can jeopardize your safety.
The electrical safety of this
~
commercial dishwasher can be
ensured only when it has been properly
grounded in compliance with
applicable safety regulations. It is
imperative that this basic safety
requirement be met. In case of doubt,
have the electrical system checked by
a qualified technician.
The manufacturer will not be held liable
for damage or injury (such as electric
shock) caused by a missing or broken
protective grounding conductor.
Be sure to follow the installation
~
instructions in this manual and in the
installation diagram.
Before connecting the commercial
~
dishwasher, it is imperative to compare
the connection data (voltage and
frequency) on the data plate with those
of the electrical network.
These data must agree, if damage to
the unit is to be prevented. If in doubt,
ask a qualified electrician.
4
Page 5

Safety instructions and warnings
Installation, maintenance and
~
repairs should be performed only by
technicians authorized by the
manufacturer.
Improper installation and maintenance
or repairs can pose significant hazards
to the user; note that the manufacturer
will not be held liable for such hazards.
If the power cord is damaged, a
~
special cord must be installed by a
Miele-authorized technician.
The commercial dishwasher should
~
only be placed into operation and
serviced by Miele Customer Service, an
authorized Miele dealer or a qualified
technician.
To ensure safe operation, use the
~
commercial dishwasher only after it has
been correctly installed into place.
NEVER open the
~
commercial-dishwasher housing. Any
contact with live connections or any
changes to the electrical or mechanical
setup will endanger you and may
impair the functioning of the
commercial dishwasher.
Defective components should be
~
replaced by Miele original parts only.
Only these parts are guaranteed by the
manufacturer to comply with safety
requirements.
Do not connect the commercial
~
dishwasher to the power supply by
means of an extension cord or power
strip, as these do not guarantee the
required safety of the commercial
dishwasher (and could cause
overheating, for example).
A damaged commercial dishwasher
~
can jeopardize your safety. Immediately
shut down the damaged commercial
dishwasher and notify Miele Customer
Service, an authorized Miele dealer or a
qualified technician.
Before performing installation and
~
maintenance work or repairs, the
commercial dishwasher must be
disconnected from the power supply.
The commercial dishwasher is NOT
disconnected from the power supply
unless one of the following conditions is
met:
– The fuses or circuit breakers are
tripped.
–
The screw-in type fuses are fully
unscrewed.
–
The power cord is disconnected from
the electrical system.
To disconnect a commercial
dishwasher with a plug, grasp the
plug itself and pull. Do not pull on the
power cord.
5
Page 6

Safety instructions and warnings
Proper use
Repair of the commercial
~
dishwasher during the warranty period
should be performed only by a
customer service center authorized by
the manufacturer, otherwise any
damage will not be covered by the
warranty.
Always exercise care when handling
~
liquid cleaning agents or additives.
Some of these products contain
corrosive and irritating substances.
NEVER use organic solvents since
there is a risk of explosion.
ALWAYS observe the applicable safety
regulations. Use safety glasses
and gloves. Always follow the
manufacturer's safety
recommendations when using chemical
additives.
The water in the wash cabinet is
~
NOT safe to drink.
Avoid inhaling powdered cleaning
~
agents.
If detergents are swallowed, this can
result in chemical burns to the mouth
and throat or even suffocation.
Certain pre-treatments (for example,
~
that contain detergents), as well as,
certain contaminants and some
dishwashing liquids, can generate
foam. Foam can adversely affect the
cleaning performance.
The recommendation to use
~
chemical additives (such as cleaning
agents) does not mean that the washer
manufacturer accepts liability for how
these chemical additives may affect the
wash load.
Note that formulation changes, storage
conditions, etc., not disclosed by the
manufacturer, may alter the cleaning
results obtained.
When using cleaning agents and
~
special-purpose products, comply
strictly with the instructions of the
respective manufacturer. In order to
avoid possible chemical reactions
(such as explosive hydrogen gas
reactions), use cleaning agents only for
the applications intended by the
manufacturer.
The commercial dishwasher is
~
designed only for operation with water
and additive cleaning agents. Organic
solvents must NOT be used in the
appliance, as there is the danger of
explosion and/or damage.
(Note: Although many organic solvents
do not involve a danger of explosion,
they may still cause other problems,
such as the destruction of rubber and
plastics.)
For critical applications, where very
~
high processing-quality requirements
have to be met, it is strongly
recommended that all process-related
factors (cleaning agents, water quality,
etc.) be discussed in advance with
Miele's Application Technology.
6
Page 7

Safety instructions and warnings
Ensure that no appreciable residues
~
of solvents or acids, and especially of
hydrochloric acid or chloride solutions,
are introduced into the wash cabinet
along with the wash load. This also
applies for corrosive ferrous material.
Solvents combined with contaminants
(especially from hazard class A1)
should be present in trace amounts
only.
To avoid corrosive damage, make
~
sure the stainless steel housing (if
present on your model) does not come
into contact with solutions/steam
containing hydrochloric acid.
After work has been performed on
~
the supply plumbing, the supply line to
the commercial dishwasher must be
vented.
Failure to do so can result in damage to
the water-intake components.
NEVER hose down the commercial
~
dishwasher or the immediate vicinity,
for instance with a water hose or
pressure washer.
When operating the commercial
~
dishwasher in the upper temperature
range, proceed with caution. Be aware
of the danger of scalding or burning
when opening the door. Allow baskets
and inserts to cool off. Empty any hot
water remaining in hollow items into the
wash cabinet.
When opening the door during or
~
after the end of the program, take care
not to touch the heating elements or
heated surfaces on the floor of the
wash cabinet. They remain hot for quite
a few minutes after the program has
ended and can cause burns.
Empty all hollow items before
~
loading them.
Do not stand or sit on the open door,
~
as this could damage the commercial
dishwasher or cause it to tip over.
Be aware of the potential for injury
~
when utensils with sharp, pointed ends
are placed upright, and position them
so they cannot cause injury.
7
Page 8
Safety instructions and warnings
Proper installation
The installation and operation of this
~
commercial dishwasher in nonstationary locations should be
performed by specialized technicians
only and then only if they ensure that
the requirements for the safe use of the
appliance have been met.
Do NOT install the commercial
~
dishwasher in an area where there may
be the danger of explosion or freezing.
To ensure the stability of under-
~
counter dishwashers and integrated
under-counter dishwashers, they must
only be installed beneath a continuous
worktop that is bolted to the adjacent
cabinetry.
Children in the vicinity
Always supervise any children in the
~
vicinity of the commercial dishwasher.
Never allow children to play with the
commercial dishwasher.
Children must only be allowed to
~
use the commercial dishwasher without
supervision if the operation of the
dishwasher has been explained to them
in such a way that they can safely
operate it. Children must be able to
recognize the potential hazards of
improper operation.
Do not allow small children to play
~
with the commercial dishwasher or to
operate it. Among other hazards,
children run the risk of locking
themselves in the dishwasher.
Accessories
Accessories may only be attached
~
or installed if they have been expressly
approved by Miele. If other parts are
attached or installed, claims under the
warranty and/or product liability
become null and void.
Whatever the application, only Miele
~
accessories should be connected to
this machine. Miele application
advisors can provide you with the item
names and numbers for accessories.
Disposal of the
commercial dishwasher
For safety and environmental
~
protection, dispose of all detergent
residues in compliance with safety
regulations (use safety glasses and
gloves).
Remove or destroy the door latch to
prevent children from locking
themselves inside. Then dispose of the
commercial dishwasher properly (see:
Caring for the environment).
For commercial dishwashers with a
tank system, the water must first be
drained from the tank.
The manufacturer will not be held
liable for damage caused by failure
to comply with the safety instructions
and warnings.
8
Page 9
Overview
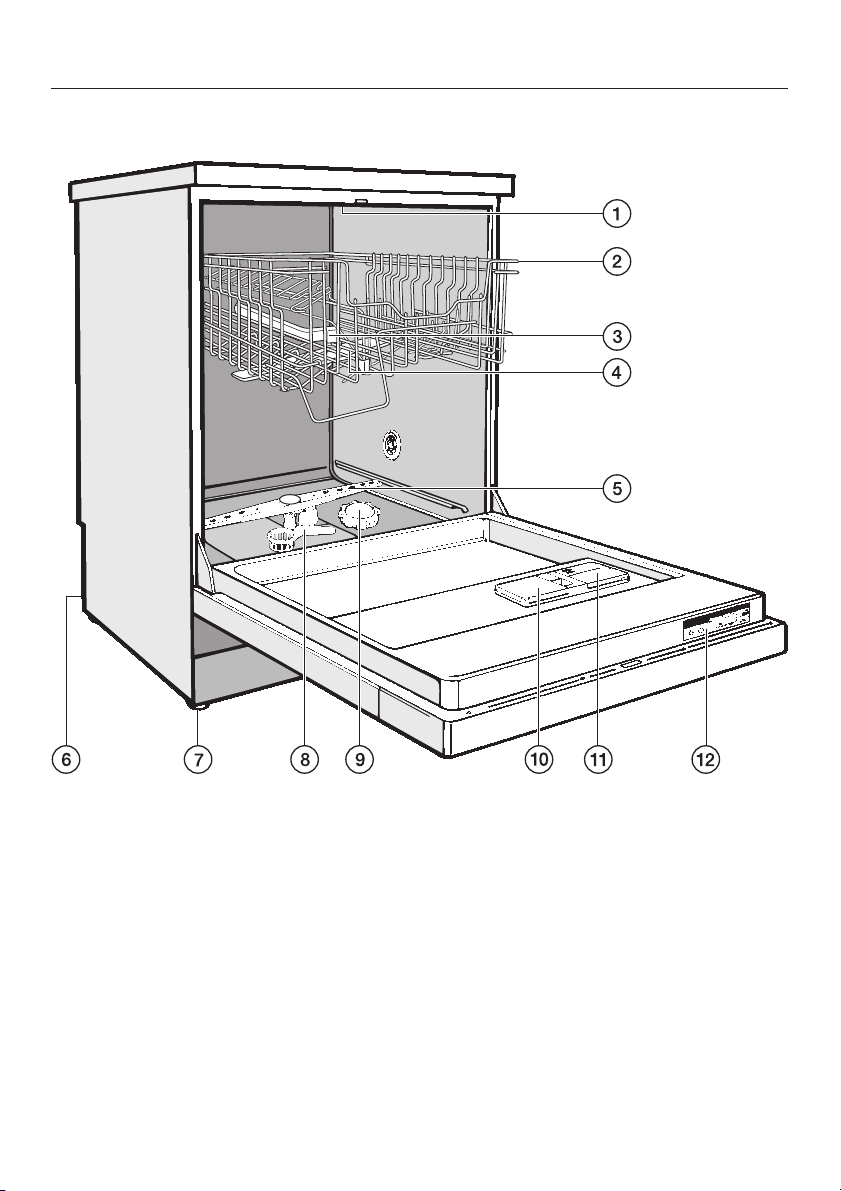
Guide to the machine
a Upper spray arm (not visible)
b Upper basket
c Water feed for middle spray arm
d Middle spray arm
e Lower spray arm
f Connection for DOS G 60 Semi
module
g Four height adjustable feet
h Triple filter
i Salt reservoir
j Dual compartment detergent
dispenser
k Rinse aid reservoir
(with dosage selector)
l Data plate
9
Page 10

Guide to the machine
Control panel G 8050
a On/Off button
b Maxi program indicator
c Midi program indicator
d Mini program indicator
e Add detergent indicator (only applies
to machines fitted with an optional
external DOS G60 Semi module)
f Check water inlet/drain indicator
g Program sequence indicators
h Display
i Start/Stop button
j Start delay button
k Check spray arm indicator
l Extra drying button
m Add rinse aid indicator
n Add salt (Recharge) indicator
o Program selection buttons
p Pre-wash program indicator
q Beer Glasses program indicator
r Glasses program indicator
s Child safety lock
t Door release
u Ventilation outlet for drying fan
10
Page 11
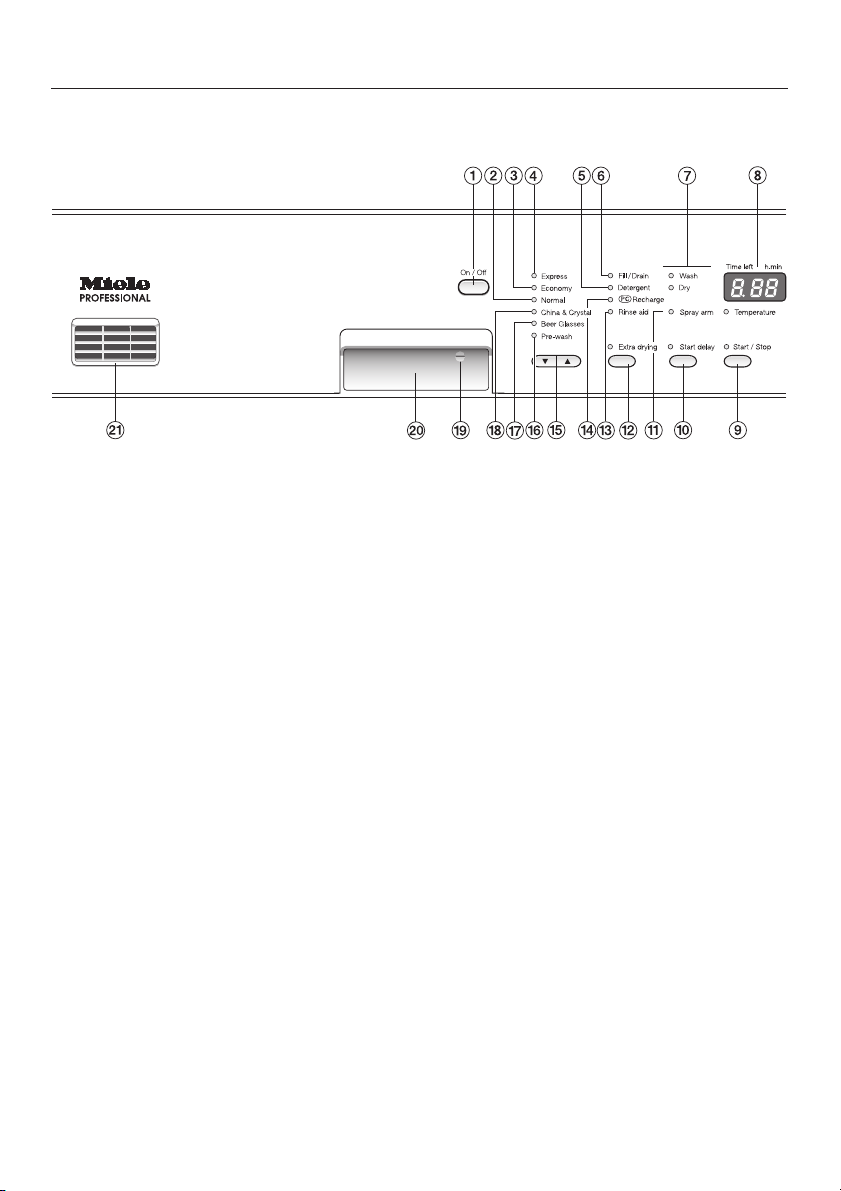
Control panel PG 8050i
Guide to the machine
a On/Off button
b Normal program indicator
c Economy program indicator
d Express program indicator
e Add detergent indicator (only applies
to machines fitted with an optional
external DOS G60 Semi module)
f Check water inlet/drain indicator
g Program sequence indicators
h Display
i Start/Stop button
j Start delay button
k Check spray arm indicator
l Extra drying button
m Add rinse aid indicator
n Add salt (Recharge) indicator
o Program selection buttons
p Pre-wash program indicator
q Beer Glasses program indicator
r China & Crystal program indicator
s Child safety lock
t Door release
u Ventilation outlet for drying fan
11
Page 12

Before using for the first time
Before using the machine for
the first time you will need:
2 liters of water,
–
2 kg of dishwasher reactivation salt,
–
detergent for commercial
–
dishwasher, and
rinse aid for household dishwasher.
–
Every dishwasher is tested at the
factory. There may be residual water
in the machine from this test. This is
not an indication that it has been
previously used.
12
Page 13
Opening and closing the door
To open the door
^ Press the release catch inside the
door grip and pull forward.
If the door is opened during operation
all functions are automatically
interrupted.
To close the door
^ Push the baskets in, lift the door and
push until it clicks into position.
Child safety lock
The yellow key for the child safety
lock is on one of the spikes in the
front of the upper basket.
Remove the key before using the
dishwasher and keep it in a safe
place away from the dishwasher.
To prevent children from opening the
dishwasher door during operation, use
the key to lock the door.
Horizontal setting:
The door is locked.
Vertical setting:
The door can be opened.
13
Page 14
Water softener
In order to achieve good cleaning
results, the dishwasher needs to
operate with soft water. Hard water
results in the build-up of calcium
deposits on cookware and in the
dishwasher.
Water with a hardness level higher than
4 gr/gal (4° d – German scale) needs to
be softened. This takes place
automatically in the integrated water
softener.
The water softener requires
–
dishwasher reactivation salt.
The dishwasher must be
–
programmed for the water hardness
in your area.
– Your local water authority can advise
you of the water hardness level in
your area.
Where the water hardness fluctuates
e.g. between8-18gr/gal (8 - 17 °d
German scale) always program the
dishwasher to the higher value (17°d in
this example).
The dishwasher is programmed at
the factory for a water hardness level
of 20 gr/gal (19 °d).
If this setting corresponds with the
hardness of your water, continue with
"Rinse aid".
If your water is harder or softer, you will
need to program the water hardness
level using the buttons on the control
panel.
The programming can be canceled
at any time by pressing the "On/Off"
button. The procedure can then be
restarted.
Checking the programmed water
hardness level
^ Turn the dishwasher off with the
"On/Off" button.
^ Press and hold the "Extra drying"
and "Start / Stop" buttons in and turn
the dishwasher on with the "On/Off"
button.
If the water in your area is very soft
and consistently lower than 4 gr/gal
(4 °d) you do not need to add
dishwasher salt. The salt indicator,
however, will still come on, but
should be ignored.
Local water hardness:
gr/gal or °d
14
^
Release the buttons.
The hardness level set will flash in the
display.
The digit sequence after the a
indicates the hardness level set in °d.
^
Turn the dishwasher off with the
"On/Off" button.
Page 15

Water softener
Settings
°d
German
scale
1
2
3
4
5
6
7
8
9
10
11
12
13
14
15
16
17
18
19
20
21
22
23
24
25
26
27
28
29
30
31
32
33
34
35
36-70
gr/gal Value displayed
1
2
3
4
5
6
7
8
9
10
11
12
13
14
16
17
18
19
20
21
22
23
24
25
26
27
28
29
30
31
32
33
34
35
36
37-73
1
2
3
4
5
6
7
8
9
10
11
12
13
14
15
16
17
18
19
20
21
22
23
24
25
26
27
28
29
30
31
32
33
34
35
36
Setting the water softener
Turn the dishwasher off with the
^
"On/Off" button.
Press and hold the "Extra drying"
^
and "Start / Stop" buttons, at the
same time turn the dishwasher on
with the "On/Off" button.
Release the buttons.
^
The "Wash" indicator will come on and
the "Recharge" indicator will flash.
If this does not happen, restart the
procedure.
If a19flashes in the timer display the
water hardness level has been set to
20 gr/gal (19 °d).
^ Use the program selection buttons
%$ to select the value that
corresponds to your water hardness
level.
% = to select a lower value.
$ = to increase the value.
The selected two digit value will flash in
the display.
^
Press the "Start/Stop" button twice.
The indicator beside the "Start / Stop"
button will flash.
The programmed water hardness level
is now stored into memory.
^
Turn the dishwasher off with the
"On/Off" button.
15
Page 16
Water softener
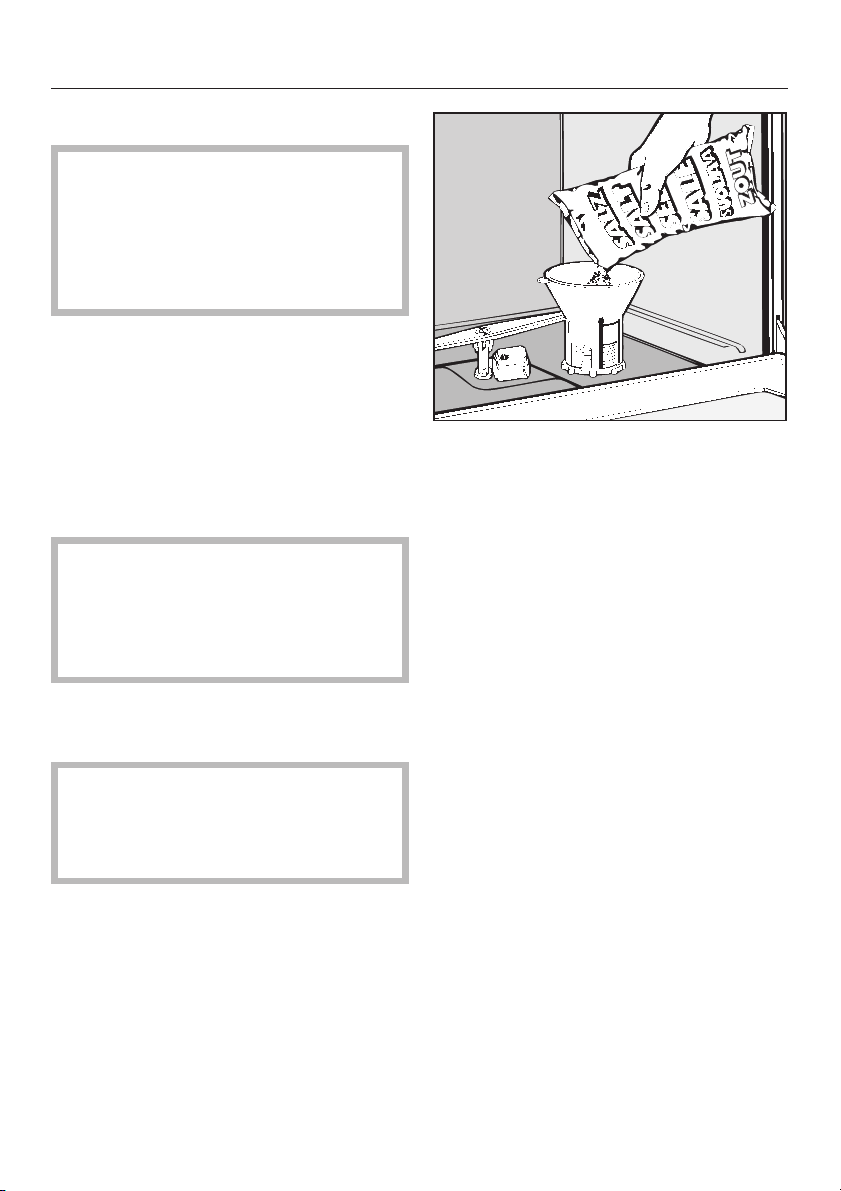
Filling the salt reservoir
Only special, coarse-grained
reactivation salt* should be used in
this machine.
*Available from Miele. Please see
back page for more information.
Do not use other types of salt, e.g. table
salt, agricultural or gritting salt. These
could contain components which are
insoluble in water and could damage
the water softener. If in doubt consult
the Miele Professional Department.
The salt reservoir holds about 2 kg of
salt.
Inadvertently filling the salt
,
reservoir with detergent will damage
the water softener.
Before filling, make sure that you are
using reactivation salt.
Place the supplied funnel over the
^
salt reservoir.
^ Carefully fill with reactivation salt.
Displaced water will run out as it is
being filled.
^ Remove the lower basket.
^
Unscrew the salt reservoir cap.
,
Filling the salt reservoir with
salt for the first time:
Fill the reservoir with approx. 2 liters
of water first.
16
Page 17
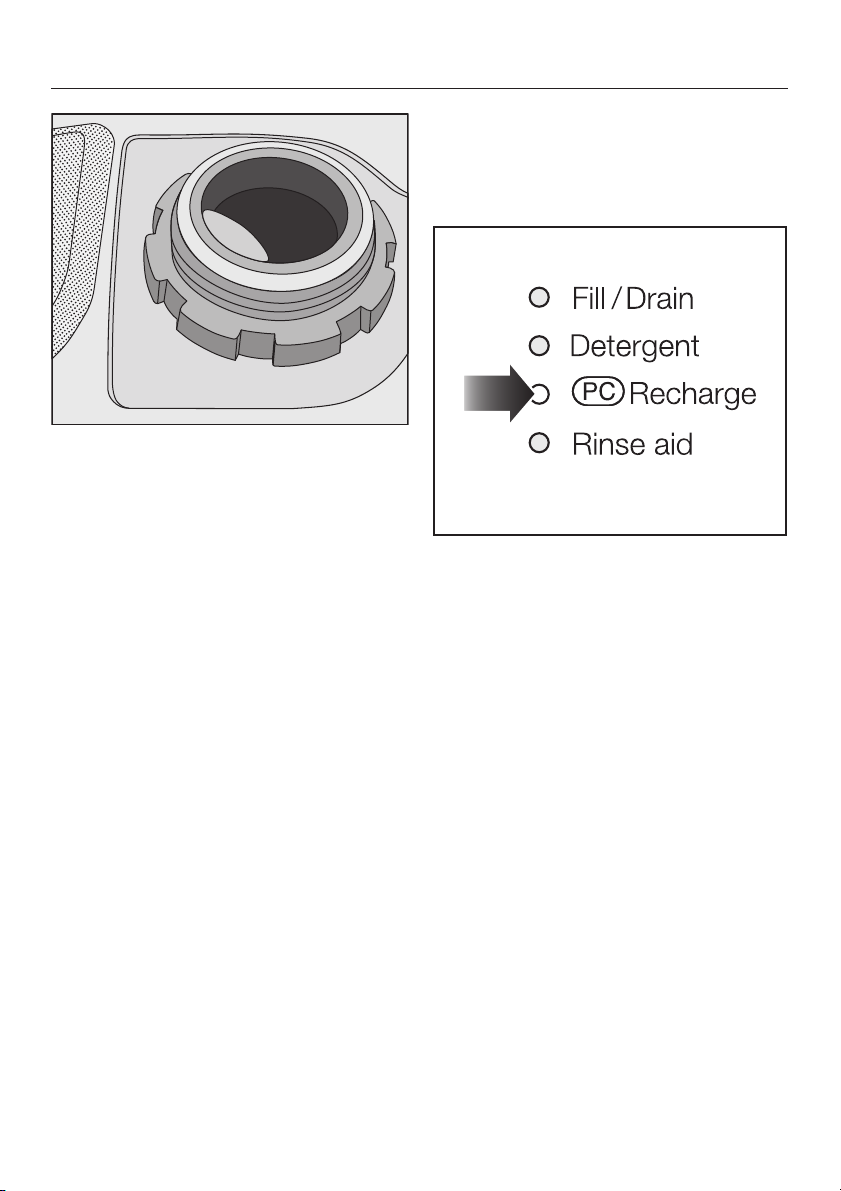
Clean any excess salt from the
^
thread and seal.
^ Screw the cap on firmly.
Water softener
Recharge indicator
The reactivation salt needs to be
replenished when the "Recharge"
indicator lights.
^ Close the door.
^ Immediately run the "Pre-wash"
program to remove any traces of salt
from the cabinet.
After the reservoir has been filled, the
water softener is automatically
reactivated the next time the
dishwasher is run. The salt indicator
may still light during this process. It will
go out once the salt concentration has
reached the correct level.
17
Page 18
Rinse aid
Rinse aid is needed to prevent spotting
on dishes and glassware. The rinse aid
is filled in the reservoir and the set
amount will be automatically dispensed
during the final rinse.
Inadvertently filling the rinse aid
,
reservoir with powder or liquid
detergent will damage the reservoir.
Only pour rinse aid formulated for
household dishwashers into the
reservoir.
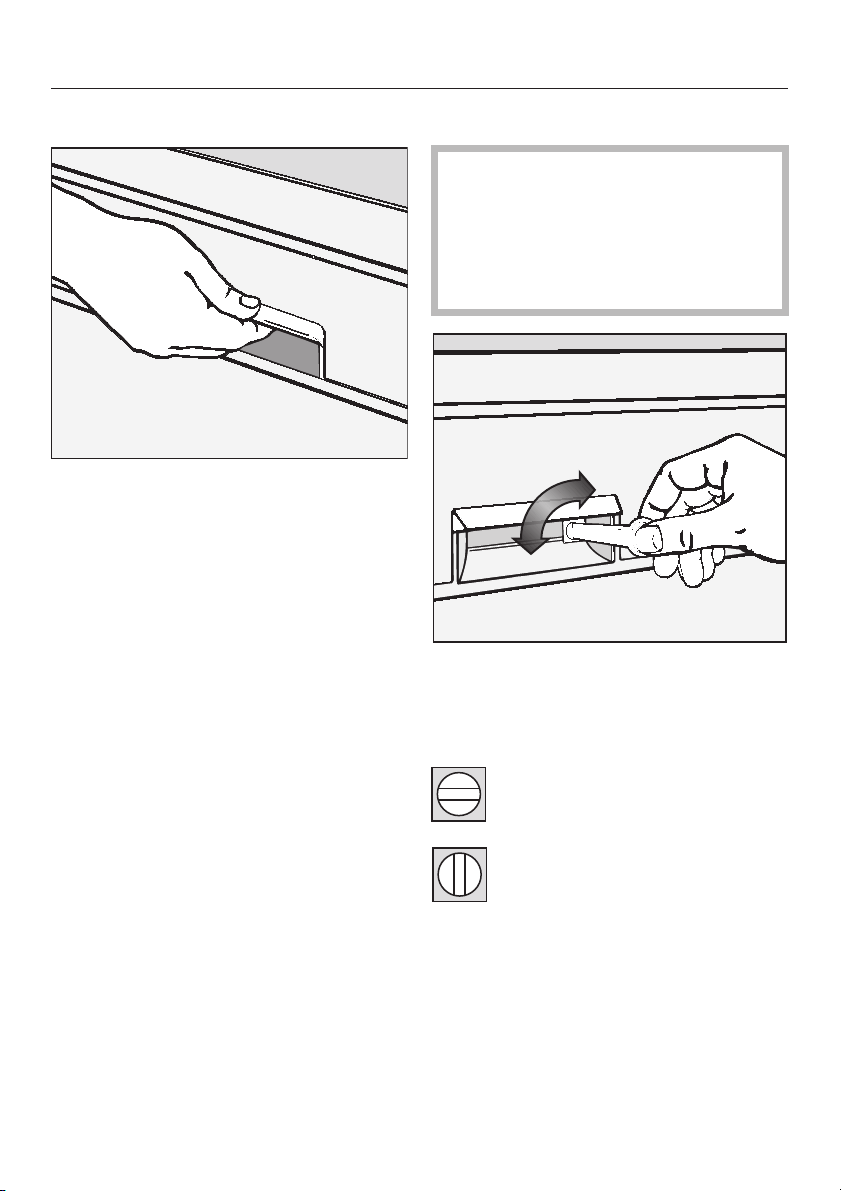
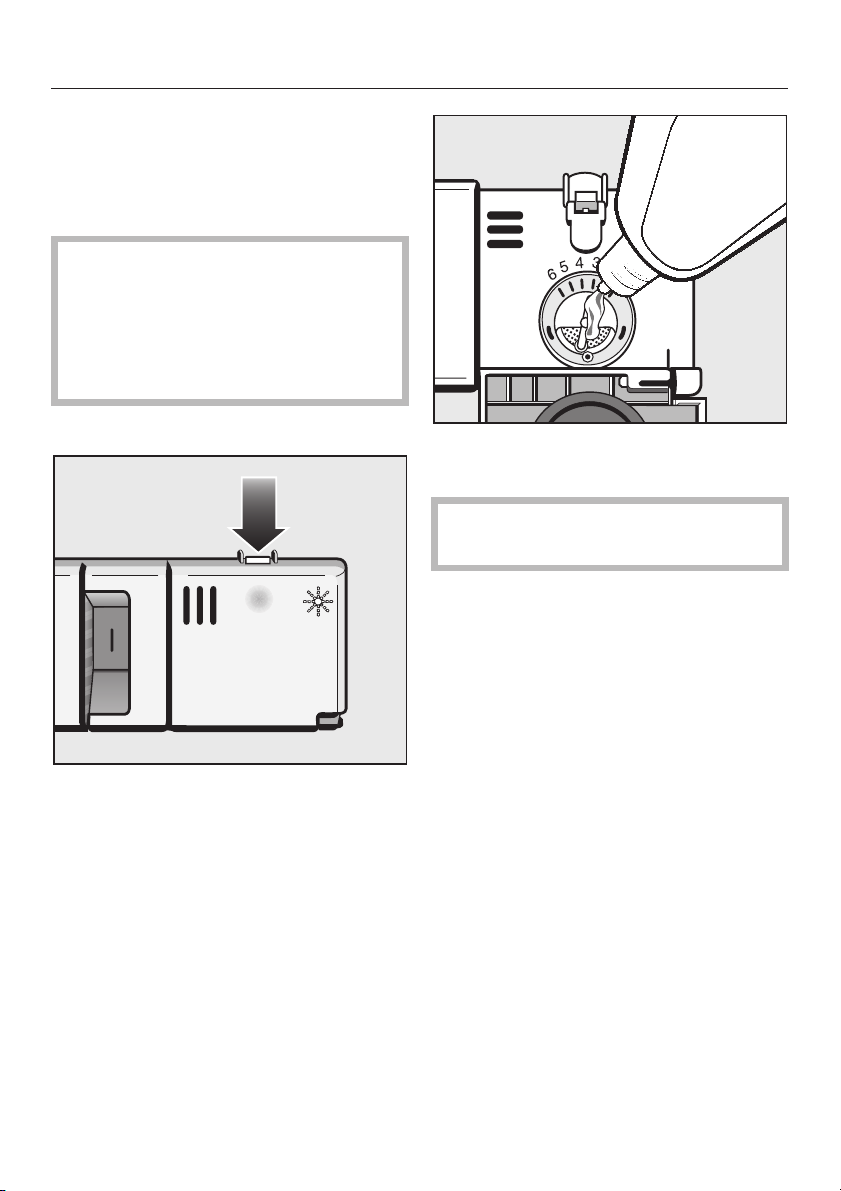
Filling the rinse aid reservoir
^
Press the button of the rinse aid
reservoir flap in the direction of the
arrow until the flap springs open.
Add rinse aid until it is visible on the
^
surface of the filter in the opening.
The rinse aid reservoir holds approx.
130 ml.
^ Close the flap firmly so that it clicks
into place otherwise, water will enter
the rinse aid reservoir during the
program.
^ Clean up any spilled rinse aid. This
prevents over-foaming from
occurring during the next program.
18
Page 19
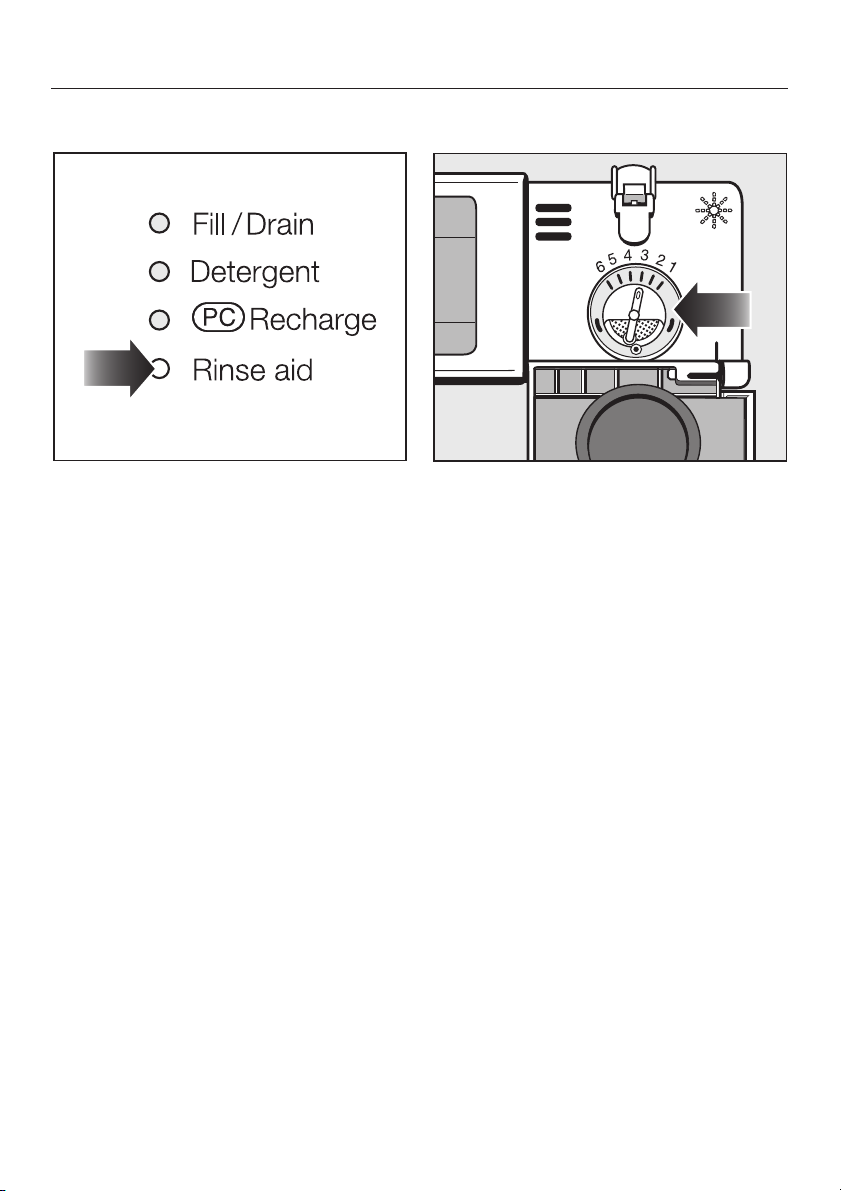
Rinse aid
Rinse aid indicator
^ Fill the rinse aid reservoir when the
"Rinse aid" indicator comes on. There
will be enough rinse aid left for2-3
wash programs.
Setting the rinse aid dosage
The dosage selector has settings from
1-6. It is factory set to the
recommended setting "3" (3 ml).
Approx. 3 ml of rinse aid are used per
program.
If spots appear on cookware and
glassware
^ Use a higher setting.
If clouding or smearing appears on
cookware and glassware
^
Use a lower setting.
19
Page 20

Use
Loading the machine
Removing excess soils
Scrape food from dishes before
^
placing them in the dishwasher.
Inadequate pre-cleaning can clog
the filters and interrupt the wash
program.
Important
Select baskets and inserts which are
–
appropriate for the application.
Load items so that water can reach
–
all surfaces.
– Do not place dishes or cutlery inside
other pieces.
– Hollow items such as cups, glasses,
pots, etc. should be placed upside
down in the respective inserts.
Hollow vessels should be inverted
and placed in the correct inserts.
– Concave based items such as mugs
or bowls, should be placed at an
angle so that water does not pool.
Small items should be placed on the
–
cup racks in the upper basket. Do
not obscure them with larger items
below, e.g. place bowls on the rack
above the cups so that water
reaches all items.
Do not place very tall items in the
–
front right hand area of the lower
basket as these would prevent the
detergent dispenser lid from
opening.
Cutlery can be placed in any order in
–
the cutlery holders however, for the
best cleaning and drying results,
place the cutlery in the inserts with
the handles down.
Be careful when sorting items
,
with sharp pointed ends. Position
them in the machine so that you do
not hurt yourself or create a danger
for others. Sharp knives, forks, etc.
should be placed in baskets with the
pointed ends facing downwards.
–
To ensure good water coverage, tall,
narrow and hollow items should be
placed in the center of the baskets
rather than in the corners. Do not
obscure them with larger items
below.
–
The spray arms must not be blocked
by items that are too tall or hang
through the baskets. Check
clearance by manually rotating the
spray arms.
20
Page 21

Use
Items not recommended for
dishwashing
Cutlery with wooden or bone
–
handles.
Wooden or plastic cutting boards.
–
Plastic items that are not heat
–
resistant.
Glued items, e.g. old knives with
–
handles which have been glued on.
Hand-made craft items, antiques,
–
valuable vases and decorative
glassware.
– Copper, brass, tin and aluminum
items may discolor or become matt.
– Colors painted over a glaze may
fade after a number of washes.
– Clouding may occur on glasses after
frequent washing. Do not wash
delicate glassware or glassware
containing lead crystal in a
dishwasher.
We recommend
When purchasing cookware,
–
glassware and cutlery, make sure
they are dishwasher-safe.
Wash particularly delicate glassware
–
by hand.
Please note
Silverware previously cleaned with a
silver polish may still be damp or
spotted at the end of a program, where
water has not run off smoothly. Dry with
a soft cloth.
Silver treated in a silver immersion dip
is usually dry at the end of a program
but may tarnish.
Silver which has been in contact with
foods containing sulphur may discolor.
These include egg yolk, onions,
mayonnaise, mustard, fish and
marinades.
,
Aluminum components (e.g.
grease filters) must not be cleaned
with caustic alkaline commercial or
industrial cleaning agents. These
may damage the material or, in
extreme cases, cause a severe
chemical reaction.
21
Page 22
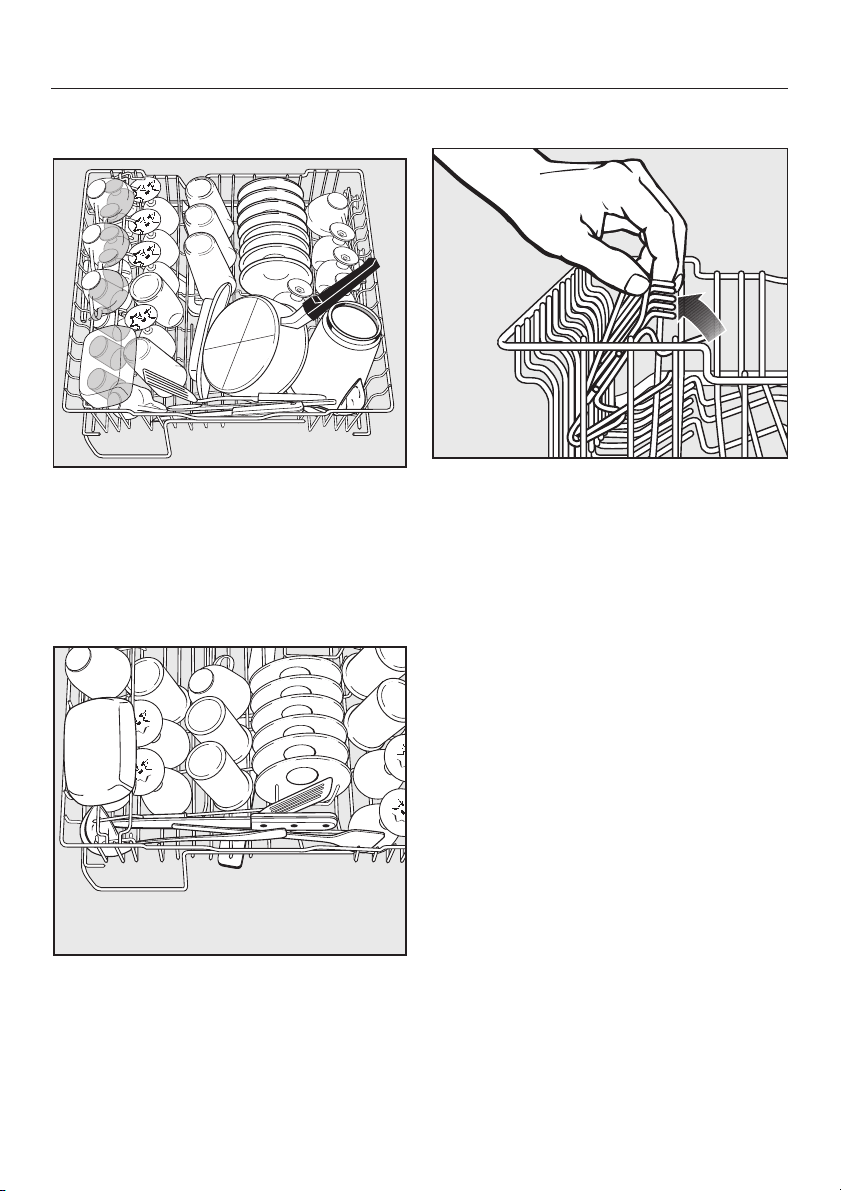
Use
Upper basket
Small, lightweight, delicate items such
as cups, saucers, glasses, dessert
bowls, etc. , should be placed in the
upper basket.
Shallow pans or casserole dishes can
also be placed in the upper basket.
Hinged cup rack
To make room for tall items, raise the
rack upwards.
Long items such as soup ladles, mixing
spoons and long knives should be
placed lying down across the front of
the upper basket.
22
Page 23
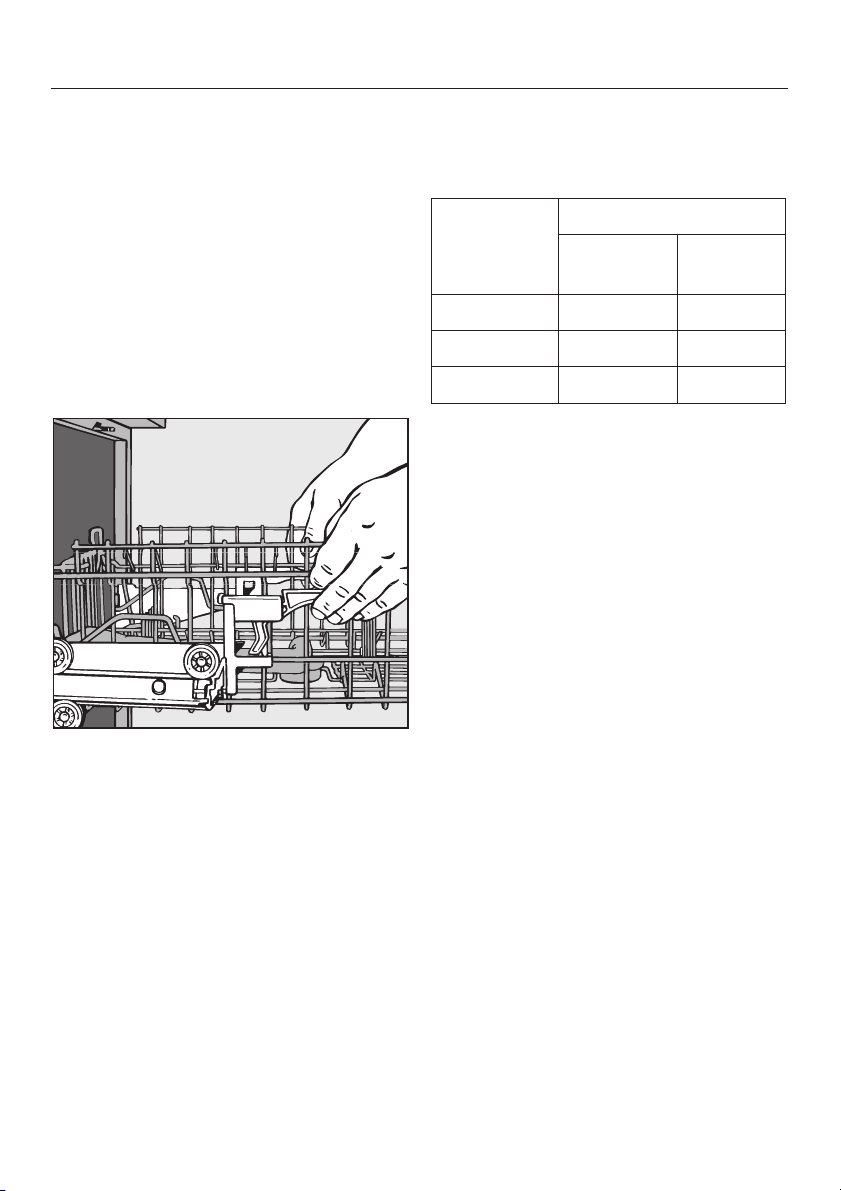
Use
Adjusting the upper basket
In order to gain more space for taller
pieces of cookware in the bottom or
upper basket, the upper basket can be
adjusted to three levels with 2 cm
between each level.
The upper basket can also be set at an
angle with one side high and the other
side low. Make sure that the basket can
be inserted smoothly into the cabinet.
Adjust the basket before loading it.
Depending on the setting of the upper
basket, the following plate dimensions
can be accommodated.
Upper
basket
level
Top 21.5 30
Middle 23.5 28
Bottom 25.5 26
Plate Ø in cm
Upper
basket
Lower
basket
^
Pull out the upper basket.
^
Pull upwards on the levers at either
side of the upper basket.
^
Adjust the basket to the desired
height.
^
Then push the levers securely back
down into position.
23
Page 24

Use
Lower basket
For larger and heavier items such as
plates, serving platters, saucepans,
bowls, etc.
Glasses and small items such as
saucers can also be placed in the lower
basket.
Do not place thin, delicate glassware in
the lower basket.
Height limitation
The guide at the front of the upper
basket shows the maximum height for
items placed in the lower basket so that
the middle spray arm is not blocked.
Hinged cup rack
To make room for tall items, raise the
rack upwards.
24
Page 25

Use
Lower basket inserts
Various removable inserts are available for the lower basket to accommodate your
special needs.
Removing an insert
To remove an insert, gently pull
^
upwards on the handle.
Inserting an insert
^ Slid the hitches of the inset under the
vertical struts of the lower basket.
^
Push down on the handle to snap the
insert into position.
25
Page 26

Use
Adding detergent
Only use detergents formulated
,
for commercial dishwashers. Do not
use dish soap.
Do not use tablet detergent, the
short program durations will not
allow the tablets to dissolve
properly.
Powder detergent is distributed through
a dispenser in the door or liquid
detergent via the DOS-Module G 60
Semi (available as an optional extra see "Programming special functions Dispensing system settings").
Dosage
^ Use at least 30 ml of detergent for a
full load in the following programs
(G 8050 / PG 8050i):
- Mini / Express,
- Midi / Economy,
- Maxi / Normal,
- Beer Glasses / Beer Glasses,
- Glasses / China & Crystal.
Avoid inhalation of powder
,
detergents and do not ingest
dishwasher detergent. Dishwasher
detergents contain irritants and/or
corrosive ingredients. They can
cause burning in the nose, mouth
and throat if swallowed or inhibit
breathing. Consult a doctor immedi
ately if detergent has been
swallowed or inhaled.
Keep detergent and other cleaning
agents out of the reach of children at
all times. Keep children away from
the dishwasher when the door is
open. There could still be detergent
residues in the cabinet.
-
^
See the "Program Guide" for
recommended dispensing amounts.
Follow the detergent manufacturer’s
instructions if they differ.
Failure to dispense the
recommended amount of detergent
may impair cleaning results.
26
Page 27

Press the button of the detergent
^
dispenser. The flap will spring open.
The flap is always open at the end of a
program.
Use
The horizontal marks in Compartment II
indicate levels of approximately 20, 25
and 30 ml respectively.
^ With the dishwasher door fully open,
fill compartment II with 30 ml of
powder detergent.
^ Close the cover. The cover will
always open at the end of a wash
program except in "Pre-wash".
27
Page 28

Use
G 8050
PG 8050i
Turning on
^ Make sure the spray arms are not
blocked.
^ Close the door.
^
Open the water supply, if closed.
^
Press the "On/Off" button.
The "Start/Stop" indicator will flash and
the indicator next to the last program
selected will come on.
28
Selecting a program
^ Choose your program according to
the type of load and the degree of
soiling.
^
See the "Program Guide" for info on
the programs.
^
Use the program selection buttons
%$ to select the desired program.
% = to scroll down through the
programs.
$ = to scroll up through the
programs.
The indicator next to the selected
program will come on.
The duration of the selected program
will appear in the display in hours and
minutes.
Page 29

Use
Selecting options
If desired, select the "Start delay" or
^
"Extra drying" options (see "Options").
Starting a program
Press the "Start/Stop" button.
^
The program will start. The "Start/Stop"
indicator and the indicator next to the
last program selected will come on. The
sequence indicator for the current
program stage reached will also come
on.
Do not finish a program prematurely.
Important program stages (e.g.
reactivating the water softener)
could be omitted.
Program sequence indicators
After a program has been started, the
current stage of the program is
indicated by the program sequence
indicators.
Display
The duration of the selected program
appears in hours and minutes in the
display before the program begins.
During the program the time left until
the end of the program is displayed.
The time displayed may vary with the
same program. This is due to the water
inlet temperature at each intake.
When a program is selected for the first
time, the display shows an average
time for a cold water intake.
Each time a program is run, the
electronic takes the water temperature
and the size of the load into account
and calculates the required time. This
new duration is displayed when this
program is selected the next time.
The indicator for the active program
stage lights up during the program.
"Wash": Main wash / Rinses
"Extra drying": Drying (Options)
29
Page 30

Use
At the end of a program
0 appears in the display when the
program has finished.
Open the door and unload the
^
dishwasher.
Dishes tend to break and chip more
easily when they are hot.
Allow the dishes to cool before
unloading them.
If you open the door fully after the
program turns off, the dishes will cool
much faster.
^ Press the "On/Off" button to turn the
dishwasher off.
The "Start/Stop" indicator will go out.
The dishwasher continues to use
electricity until turned off using the
"On/Off" button.
Drying fan running time:
During the drying phase, as long as
the door of the dishwasher remains
closed, moist air is expelled through
the ventilation outlet of the drying
fan. To prevent steam damage to
the countertop above the
dishwasher, you can select the
"Extra drying" option before starting
the program. The drying fan will then
run at the end of the program until
the door is opened (up to a
maximum of 45 minutes after the
program has finished).
^ If the dishwasher will not be used for
a longer period of time, e.g. while
vacationing, close the water supply.
30
Page 31

Use
Interrupting a program
A program is interrupted as soon as the
door is opened.
If the door is closed again, the program
will continue from the point it was at
before the door was opened.
Water in the dishwasher may be
,
hot. Danger of scalding!
Only open the door if absolutely
necessary and exercise extreme
caution when doing so. Before
closing the door again, leave it ajar
for approx. 20 seconds. This will
enable the temperature in the wash
cabinet to settle. Then close the
door firmly making sure that it clicks
into place.
Changing a program
Important:
If the detergent dispenser flap has
already opened, do not change the
program.
If a program has already started
Press the "Start/Stop" button for at
^
least one second.
The program will be canceled and the
"Start/Stop" indicator will flash.
Use the program selection buttons
^
%$ to select a different program.
The indicator next to the program
selected will come on.
^ Select the "Extra drying" and "Start
delay" options again if desired (see
"Options").
^ Press the "Start/Stop" button.
The program will begin.
31
Page 32

Program Guide G 8050
Program Use Powder detergent
(when not using a liquid
cleaning agent)
Follow manufacturers
instructions
Mini
For normally soiled loads. 30 g in the powder
dispenser
Midi
Maxi
Glasses
Beer Glasses
Pre-wash
For normally soiled items with a higher wash
temperature for removing starchy foods.
For heavily soiled items. Most of the soiling is
removed in an intensive cold-water pre-rinse.
Special program for glasses. 30 g in the powder
Special program for beer glasses. 30 g in the powder
To rinse heavily soiled items, (e.g. for removing
soiling or to prevent soiling from drying onto
dishes when a complete program is not yet
needed).
30 g in the powder
dispenser
30 g in the powder
dispenser
dispenser
dispenser
32
Page 33

Program Guide G 8050
Program Program sequence
Pre-rinse Pre-wash Main
wash
Mini X X
60 °C
4 min.
Midi X X
65 °C
10 min.
Maxi X X X
65 °C
10 min.
Glasses X X
65 °C
1 min.
Beer
Glasses
XX
60 °C
1 min.
Prewash
X
Cold
Interim
rinse I
Interim
rinse II
1)
X (X) X
X (X) X
X (X) X
X (X) X
X (X) X
Final
rinse
2)
85 °C
0.5 min.
2)
85 °C
1.5 min.
2)
85 °C
1.5 min.
85 °C
1 min.
3)
85 °C
1,25 min.
Drying
(Option)
(X)
(X)
(X)
(X)
(X)
12 min.
X = Sections included in a program (with temperature/temperature holding time)
1) If a second interim rinse is required, this must be programmed by a Miele ser
vice technician.
2) To alter the rinse aid temperature, see "Programming special functions".
The drying fan turns on to dissipate the steam.
3) Without rinse aid
-
33
Page 34

Program Guide PG 8050i
Program Use Powder detergent
(when not using a liquid
cleaning agent)
Follow manufacturers
instructions
Express
A quick wash program for cleaning lightly soiled
items.
30 g in the powder
dispenser
Economy
Normal
China & Crystal
Beer Glasses
Pre-wash
For washing lightly soiled dishes with light fatty
residues.
For washing normally and heavily soiled dishes
with fatty residues.
Program for completely washing a full load of
normally soiled dishes with the ability to adjust
energy and water consumption based on the soil
load of the dishes.
Special program for China & Crystal. 30 g in the powder
Special program for beer glasses. 30 g in the powder
To rinse heavily soiled items, (e.g. for removing
soiling or to prevent soiling from drying onto
dishes when a complete program is not yet
needed).
30 g in the powder
dispenser
30 g in the powder
dispenser
dispenser
dispenser
34
Page 35

Program Guide PG 8050i
Program Program sequence
Pre-rinse Pre-wash Main
wash
Express X X
60 °C
4 min.
Economy X X
65 °C
10 min.
Normal X X X
55 °C
30 min.
China &
Crystal
XX
50 °C
1 min.
Beer
Glasses
XX
50 °C
1 min.
Prewash
X
Cold
12 min.
Interim
rinse I
Interim
rinse II
1)
X (X) X
X (X) X
X (X) X
X (X) X
X (X) X
Final
rinse
2)
85 °C
0.5 min.
2)
85 °C
1.5 min.
60 °C
1.5 min.
50 °C
1 min.
3)
Cold
1,25 min.
Drying
(Option)
(X)
(X)
(X)
(X)
(X)
X = Sections included in a program (with temperature/temperature holding time)
1) If a second interim rinse is required, this must be programmed by a Miele ser
vice technician.
2) To alter the rinse aid temperature, see "Programming special functions".
The drying fan turns on to dissipate the steam.
3) Without rinse aid
-
35
Page 36

Options
Start delay
Press the "Start/Stop" button.
^
A start delay time between 30 minutes
and 24 hours can be selected.
With a start delay time between
30 minutes and 9 hours 30 minutes, the
delay is set in 30 minute increments.
For 10 hours or more it is set in one
hour increments.
Turn the dishwasher on with the
^
"On/Off" button.
The "Start/Stop" indicator will flash.
Use the program selection buttons
^
%/$ to select the desired
program.
^ Press the "Start delay" button.
The start delay time which was set the
last time the function was used will
appear in the display in hours and
minutes. The "Start delay" indicator will
come on.
^ Press and hold the "Start delay"
button until the desired start delay
time shows in the display.
^
To turn the function off, press the
"Start delay " button again when a
delay period of 24^ is shown in the
display .
The duration of the selected program
will appear in the display.
The "Start/Stop" light will come on.
The time starts counting down until the
program start time: in 1 hour
increments for start delay periods of
over 10 hours and in minutes for start
delay periods of under 10 hours.
At the end of the delay period, the
selected program starts automatically.
The program running time shows in the
display, the "Start delay" indicator goes
out.
How the start delay time is displayed
up to 59 minutes:
e.g. 30 minutes = 30
between 1 hour and 9 hours 30
minutes:
e.g. 5 hours = 5.00
10 hours and over:
e.g. 15 hours = 15^
,
To prevent children from coming
into contact with dishwasher
detergent do not fill the detergent
dispenser until just before starting
the program, i.e. before pressing
the "Start" button and activating the
child safety lock.
^
If desired, select the "Extra drying"
option.
36
When using the "Start delay" option,
make sure that the compartment is
dry before adding detergent. Wipe
dry with a cloth if necessary.
Page 37

Options
Starting a program before the Start
delay period has elapsed
Press the "Start/Stop" button for at
^
least one second.
The "Start delay" indicator will go out.
Note:
If the "Extra drying" option had been
selected, it must be selected again.
Press the "Start/Stop" button.
^
The program will begin. The "Start/Stop"
and "Wash" indicators will come on.
Extra Drying
The "Extra drying" option can be
selected immediately after selecting the
program.
Note: This option cannot be selected
with the "Pre-wash" program. The
drying process is carried out by the
built-in turbothermic fan and depends
on the program. The "Extra Drying" is an
additional heating time which turns on
for 11 - 17 minutes. The total program
duration will increase accordingly.
^ Select the desired program.
^ Press the "Extra drying" button.
^ Press the "Start/Stop" button.
37
Page 38

Programming special functions
Dispensing system settings for
DOS Module G 60 Semi
(optional extras)
It is not possible to change settings
while a program is running. You will
have to cancel the program. The
"Start/Stop" indicator must be
flashing.
To access the DOS programming
level
Turn the dishwasher off with the
^
"On/Off" button.
Press and hold the "Extra drying"
^
and "Start/Stop" buttons, at the same
time, turn the dishwasher on with the
"On/Off" button.
Release the buttons.
^
The "Wash" indicator will come on and
the "Recharge" indicator will flash.
If they do not come on, restart the
procedure.
The set water hardness will appear in
the display.
^ Press the "Extra drying" button once.
The set dispensing time will appear in
the display, e.g. 10 (factory setting).
The "Dry" indicator will come on and the
"Recharge" indicator will flash.
38
The programming level for the DOS
module has been accessed.
Page 39

Programming special functions
Setting the dosage
Set the dosage according to the
detergent manufacturer's
recommendations.
The machine needs 5.4 liters of water
for the main wash stage of the program.
Example:
A detergent manufacturer recommends
4 ml of cleaning agent per liter of water:
5.4lx4ml/l = 21.6 ml.
2 ml of cleaning agent will take about
1 second to dispense;
i.e. program to 11 seconds.
^ Use the program selection buttons
%$ to select the value that
corresponds with the desired
dispensing time.
% = button to select a lower value.
$ = button to increase the value.
The selected value is displayed.
Venting the dispensing system
Access the DOS programming level.
^
Press the "Start delay" button once.
^
"do1" will appear in the display.
Press the "Start delay" button again.
^
The venting process will be carried out.
The remaining time will appear in the
display.
At the end of the time 0 will appear in
the display. The dispensing system has
now been vented.
^ Turn the machine off with the
"On/Off" button.
Immediately after venting
^ Start the "Pre-wash" program so that
any agents in the wash cabinet are
diluted and drained away.
Saving the settings
^
Press the "Start/Stop" button twice.
The indicator beside the "Start/Stop"
button will flash.
The programmed dispensing time is
stored in memory.
^
Turn the dishwasher off with the
"On/Off" button.
Value set:
39
Page 40

Programming special functions
Special function 1
Setting the rinse temperature
If you alter the rinse temperature,
make a note of the new temperature
in the appropriate column of the
"Program Guide".
The rinse temperature factory setting
is listed in the "Program Guide".
Use Special function 1 to change the
rinse temperature from 85 °C to 65 °C.
At a temperature of 85 °C, the drying
fan will turn on when the
temperature reaches 65 °C to
dissipate the steam.
The drying fan will continue to run
for 45 minutes after the program has
finished.
The rinse temperature cannot be
altered in the programs "Glasses"
(G 8050) / "China & Crystal" (PG 8050i)
and "Beer Glasses".
It is not possible to change settings
while a program is running. You will
have to cancel the program. The
"Start/Stop" indicator must be
flashing.
Accessing the rinse temperature
programming level
Turn the dishwasher off with the
^
"On/Off" button.
Press and hold the "Extra drying"
^
and "Start/Stop" buttons, at the same
time, turn the dishwasher on with the
"On/Off" button.
The "Wash" indicator will come on and
the "Recharge" indicator will flash.
The set water hardness will then appear
in the display.
^ Press the "Extra drying" button twice.
The programming level is accessed.
The "Spray arm" indicator will come on,
the "Mini" (G 8050) / the "Express"
(PG 8050i) indicator will come on or will
flash and the "Recharge" indicator will
flash.
Special function 1 "Setting the rinse
temperature" is selected and indicated
with two-digit numbers in the display.
40
Page 41

Programming special functions
Setting the rinse temperature
The first figure is the number of the
Special function. The second figure
shows which temperature is set.
10 Rinse temperature 65 °C
The "Mini" (G 8050) /
the "Express" (PG 8050i)
indicator flashes.
11 Rinse temperature 85 °C
The "Mini" (G 8050) /
the "Express" (PG 8050i)
indicator lights.
Use the "Extra drying" button to
^
change the setting.
^ Use the %$ program selection
buttons to select Special function 1 to
5(10 or 11 to 50 or 51 in the display).
Saving the settings
Press the "Start/Stop" button twice.
^
The indicator beside the button will
flash.
The programmed setting is now stored
in memory.
Turn the dishwasher off with the
^
"On/Off" button.
Value set:
41
Page 42

Programming special functions
Special function 2
Increasing the water level
It is not possible to change settings
while a program is running. You will
have to cancel the program. The
"Start/Stop" indicator must be
flashing.
The amount of water taken into the
machine at each intake can be
increased by 20 %.
Accessing the programming level
Turn the dishwasher off with the
^
"On/Off" button.
Press and hold the "Extra drying"
^
and "Start/Stop" buttons, at the same
time, turn the dishwasher on with the
"On/Off" button.
Release these buttons.
^
The "Wash" indicator will come on and
the "Recharge" indicator will flash.
If they do not come on, restart the
procedure.
The set water hardness will then appear
in the display.
^ Press the "Extra drying" button twice.
Special function 1 "Rinse temperature
increased" is displayed in double digits
(10 or 11).
^ Press the % button until 20 or 21
appears in the display.
42
The programming level is accessed.
The "Spray arm" indicator comes on,
the "Midi" (G 8050) / the "Economy"
(PG 8050i) program indicator will come
on or flash and the "Recharge" indicator
will flash.
Special function 2 "Increasing the water
level" is selected and indicated with
two-digit numbers in the display.
Page 43

Programming special functions
Setting the water level
The first figure is the number of the
Special function. The second figure
shows whether or not the function is
activated.
20 Water level increased OFF.
The "Midi" (G 8050) /
the "Economy" (PG 8050i)
indicator flashes.
21 Water level increased ON.
The "Midi" (G 8050) /
the "Economy" (PG 8050i)
indicator lights
(20% more water will be
taken into the machine at each
water intake).
^ Use the "Extra drying" button to turn
the increased water level function on
or off.
^ Use the %$ program selection
buttons to select Special function 1 to
5(10 or 11 to 50 or 51 in the display).
Saving the settings
Press the "Start/Stop" button twice.
^
The indicator beside the "Start/Stop"
button will flash.
The programmed setting is now stored
in memory.
Turn the dishwasher off with the
^
"On/Off" button.
Value set:
43
Page 44

Programming special functions
Special function 3
Display time or temperature
It is not possible to change settings
while a program is running. You will
have to cancel the program. The
"Start/Stop" indicator must be
flashing.
The display can either show the time or
temperature.
Factory default setting is the time.
Accessing the programming level
Turn the dishwasher off with the
^
"On/Off" button.
Press and hold the "Extra drying"
^
and "Start/Stop" buttons, at the same
time, turn the dishwasher on with the
"On/Off" button.
Release these buttons.
^
The "Wash" indicator will come on and
the "Recharge" indicator will flash.
If they do not come on, restart the
procedure.
The set water hardness will then appear
in the display.
^ Press the "Extra drying" button twice.
Special function 1 "Rinse temperature
increased" is displayed in double digits
(10 or 11).
^ Press the % button until 30 or 31
appears in the display.
44
The programming level is accessed.
The "Spray arm" indicator will come on,
the "Maxi" (G 8050) / the "Normal"
(PG 8050i) program indicator will come
on or flash and the "Recharge" indicator
will flash.
Special function 3 "Display time or
temperature" is selected and indicated
with two-digit numbers in the display.
Page 45

Programming special functions
Setting the display
The first figure is the number of the
Special function. The second figure
shows which feature is displayed.
30 Time
31 Temperature
Use the "Extra drying" button to
^
display the time or temperature.
Use the %$ program selection
^
buttons to select Special function 1 to
5(10 or 11 to 50 or 51 in the display).
Saving the settings
Press the "Start/Stop" button twice.
^
The indicator beside the button will
flash.
The programmed setting is now stored
in memory.
Turn the dishwasher off with the
^
"On/Off" button.
Value set:
45
Page 46

Programming special functions
Special function 4
Actual temperature display
It is not possible to change settings
while a program is running. You will
have to cancel the program. The
"Start/Stop" indicator must be
flashing.
The actual temperature can be
displayed constantly or only during the
program blocks "Wash" and "Rinse".
Accessing the programming level
Turn the dishwasher off with the
^
"On/Off" button.
Press and hold the "Extra drying"
^
and "Start/Stop" buttons, at the same
time, turn the dishwasher on with the
"On/Off" button.
Release the buttons.
^
The "Wash" indicator will come on and
the "Recharge" indicator will flash.
If they do not come on, restart the
procedure.
The set water hardness will then appear
in the display.
^ Press the "Extra drying" button twice.
Special function 1 "Rinse aid
temperature increased" is displayed in
double digits (10 or 11).
^ Press the % button until 40 or 41
appears in the display.
46
The "Spray arm" indicator will come on,
the "Glasses" (G 8050 ) / the "China &
Crystal" (PG 8050i) program indicator
will come on or flash, the "Recharge"
indicator will flash.
Special function 4 "Actual temperature
display" is selected and indicated with
two-digit numbers in the display.
Page 47

Programming special functions
Setting the temperature display
The first figure is the number of the
Special function. The second figure
shows whether or not the function is
activated.
40 Actual temperature is displayed
constantly
41 Actual temperature is only
displayed during heating phases
(during program sequences
without heating bars will appear in
the display)
Use the "Extra drying" button to set
^
the actual temperature display.
^ Use the %$ program selection
buttons to select Special function 1 to
5(10 or 11 to 50 or 51 in the display).
Saving the settings
Press the "Start/Stop" button twice.
^
The indicator beside the button will
flash.
The programmed setting is now stored
in memory.
Turn the dishwasher off with the
^
"On/Off" button.
Value set:
47
Page 48

Programming special functions
Special function 5
Setting the heating power
It is not possible to change settings
while a program is running. You will
have to cancel the program. The
"Start/Stop" indicator must be
flashing.
The heating power can only be
altered when the rinse temperature is
set to 85°C, see "Special function 1".
The heating power is factory set to
1.3 kW.
If the dishwasher is set to a higher
heating power (see "Electrical
connection"), the heating power must
be adjusted in this special function.
Accessing the programming level
Turn the dishwasher off with the
^
"On/Off" button.
Press and hold the "Extra drying"
^
and "Start/Stop" buttons, at the same
time, turn the dishwasher on with the
"On/Off" button.
The "Wash" indicator will come on and
the "Recharge" indicator will flash.
If they do not come on, restart the
procedure.
The set water hardness will then appear
in the display.
^ Press the "Extra drying" button twice.
Special function 1 "Rinse aid
temperature increased" is displayed in
double digits (10 or 11).
^ Press the % button until 50 or 51
appears in the display.
The "Spray arm" indicator will come on,
the "Beer Glasses" program indicator
will come on or flash and the
"Recharge" indicator will flash.
48
Special function 5 "Setting the heating
power" is selected and indicated with
two-digit numbers in the display.
Page 49

Programming special functions
Setting the heating power
The first figure is the number of the
Special function. The second figure
shows the setting.
50 Heating power 1.3 kW
51 Heating power over 1.3 kW
Use the "Extra drying" button to set
^
the heating power.
Use the %$ program selection
^
buttons to select Special function 1 to
5(10 or 11 to 50 or 51 in the display).
Saving the settings
Press the "Start/Stop" button twice.
^
The indicator beside the button will
flash.
The programmed setting is now stored
in memory.
Turn the dishwasher off with the
^
"On/Off" button.
Value set:
49
Page 50

Cleaning and care
Check your dishwasher regularly
(approx. every4-6months). This
way faults and problems can be
avoided.
Cleaning the filters in the wash
cabinet
The triple filter in the base of the wash
cabinet retains coarse soil from the
wash water, preventing it from
accessing the circulation system and
re-entering the cabinet through the
spray arms.
The dishwasher must not be
,
used without all the filters in place.
Collection of coarse soil may cause the
filters to clog.
^ Check the triple filter regularly (every
week).
Turn the handle counterclockwise to
^
release the triple filter.
^ Turn the dishwasher off.
50
^
Lift the triple filter out of the
dishwasher.
^
Remove any coarse particles and
rinse the filter under running water.
Use a nylon brush if necessary.
Page 51

Cleaning and care
To clean the inside of the filter, the flap
must be opened.
^ Pull back the yellow clip.
^ Rinse all parts under running water,
using a nylon brush if necessary.
^ Then close the flap so that the catch
engages.
^ Replace the triple filter making sure
it is correctly secured in position in
the base of the wash cabinet.
^ Then turn the handle clockwise to
lock the triple filter in place.
51
Page 52

Cleaning and care
Cleaning the spray arms
Sometimes particles get stuck in the
spray arm jets.
The spray arms should be inspected
and cleaned every4-6months.
Turn the dishwasher off.
^
Push the top spray arm upwards to
^
engage the inner ratchet. Then
unscrew the spray arm.
^ Pull the lower spray arm firmly
upwards to remove it.
^
Push the middle spray arms upwards
a to engage the ratchet. Then
unscrew the spray arm b.
^
Remove the lower basket.
52
^
Use a pointed object to push food
particles into the spray arm jets.
^
Rinse thoroughly under running
water.
^
Replace the spray arms and check
that they rotate freely.
Page 53

Cleaning and care
Cleaning the wash cabinet
The wash cabinet is self-cleaning,
provided that the correct amount of
detergent is always used.
If limescale or grease deposits show in
the cabinet, they can be removed with
a dishwasher cleaner, available from
Miele.
Cleaning the door and the door
seal
Clean the door seals regularly with a
^
damp cloth to remove food deposits.
^ When the dishwasher is being
loaded, food and drink residue may
drip onto the sides of the dishwasher
door.
These surfaces are outside the wash
cabinet and are not accessed by
water from the spray arms. Any
soiling should be wiped off these
surfaces before the door is closed.
Cleaning the control panel and
exterior
Do not use thinners, abrasive-,
,
glass-, all-purpose - or ammonia
cleaners.
They will damage the surfaces.
Plastic surfaces
Clean with a damp cloth or with a
^
cleaner designed for use on plastic.
53
Page 54

Cleaning and care
Cleaning the water inlet filter
A filter is incorporated in the screw
connection of the valve on the water
inlet hose. The filter must be cleaned
when dirty, otherwise the water flowing
into the wash cabinet is insufficient.
The plastic housing of the water
,
connection contains an electrical
component. It must not be
submerged in water.
If the mains water contains a large
number of insoluble substances, we
recommend fitting a large-area filter in
the connection between the water
faucet and the water inlet hose
threaded union.
This filter is available from your Miele
dealer or Miele.
Carefully remove the seal.
^
^ Remove the filter using needle nose
pliers and rinse clean under running
water.
^ Replace the filter and seal, making
sure they are sitting correctly.
Cleaning the filter
^ Disconnect the machine from
electricity (unplug it or "trip" the
circuit breaker).
^
Close the water supply.
^
Unscrew the inlet hose.
54
^ Reconnect the inlet hose to the water
supply, making sure it goes on
correctly and is not cross-threaded.
^
Turn on the water supply gradually to
test for leaks.
Page 55

Cleaning the drain pump and
non-return valve
If the water has not been drained at the
end of a program the drain pump or the
non-return valve might be blocked.
Be careful - glass or bone
,
splinters could cause injury.
Take the triple filter out of the wash
^
cabinet (see "Cleaning and care" Cleaning the filters in the wash
cabinet").
^ Scoop the water out of the cabinet
using a suitable container or utensil.
Cleaning and care
Lift out the non-return valve and rinse
^
under running water.
^ Remove all foreign objects from the
non-return valve.
^
Raise the locking clamp of the
non-return valve.
The drain pump is located under the
non-return valve (see arrow).
^
Clean any foreign objects from the
drain pump. Turn the drain pump
impeller by hand to check for
objects.
^
Carefully replace the non-return valve
and secure it with the locking clamp.
55
Page 56

Frequently asked questions
With the aid of the following guide, minor problems can be fixed without a service call.
Repairs should only be carried out by a qualified and trained person in
accordance with local and national safety regulations. Unauthorized repairs
could cause personal injury or machine damage.
Technical faults
Issue Possible fault Solution
The "Start/Stop"
indicator does not flash
after the appliance has
been turned on with the
"On/Off" button.
The dishwasher stops
during a program.
The "Fill/Drain"
indicator lights and
flashes alternately.
The door is not properly
closed.
The appliance is not
plugged in.
The fuse is defective or
has tripped.
The fuse is defective or
has tripped.
The water supply is
closed.
The water inlet filter is
blocked.
The Waterproof system
has reacted.
Close the door firmly.
Insert the plug.
Replace the fuse
(see data plate).
Replace the fuse
(see data plate).
Open the water supply
fully.
Before fixing the problem:
– Press the "Start/Stop"
button for at least one
second.
–
Turn the dishwasher
off.
Then:
–
Clean the water inlet
filter, see "Cleaning the
water inlet filter".
Call the Miele Service
Department.
56
Page 57

Frequently asked questions
Issue Possible fault Solution
The "Fill/Drain"
indicator flashes and
the program stops.
The water supply is
closed.
The water inlet filter is
blocked.
The water pressure at
the intake is lower than
0.3 bar (4 psi).
The triple filter in the
wash cabinet is
clogged.
The drain pump or
non-return valve may be
blocked.
The drain hose is kinked. Remove any kinks in the drain
Before fixing the problem:
Press the "Start/Stop" button
–
for at least one second.
Restart the program.
–
Open the water supply fully.
Before fixing the problem:
Press the "Start/Stop" button
–
for at least one second.
Turn the dishwasher off.
–
Then:
– Clean the water inlet filter,
see "Cleaning the water
inlet filter".
Contact a plumber.
Before fixing the problem:
– Press the "Start/Stop" button
for at least one second.
– Turn the dishwasher off.
Clean the triple filter,
see "Cleaning and Care".
Clean the drain pump and
non-return valve, see
"Cleaning the drain pump and
non-return valve".
hose.
57
Page 58

Frequently asked questions
Issue Possible fault Solution
Three horizontal bars
show in the display at the
end of the program:---
Knocking noise in the
wash cabinet
Rattling noise Items are not secure
Knocking noise in the
water pipes
There may be a
technical fault.
The spray arm is
hitting an item in the
basket.
in the wash cabinet.
This may be caused
by the installation or
diameter of the pipe.
Press the "Start/Stop"
–
button for at least one
second.
Turn the dishwasher off.
–
After a few seconds:
Turn the dishwasher on.
–
Select the desired
–
program.
Press the "Start/Stop"
–
button.
If the three horizontal bars
appear again at the end of the
program, there is a technical
fault.
– Contact the Miele Service
Department.
Interrupt the program,
rearrange items blocking the
spray arms.
Interrupt the program and
rearrange loose pieces.
This has no effect on the
dishwasher. If in doubt
contact a plumber.
58
Page 59

Frequently asked questions
Poor cleaning results
Issue Possible fault Solution
The dishes are not
clean.
The dishes were not
loaded correctly.
The outlet of the water
intake pipe for the middle
spray arm was covered.
An insufficient amount of
water reached the middle
spray arm.
The program was not
powerful enough.
Not enough detergent
was dispensed.
Tall items are blocking the
path of the spray arms.
The spray arm jets are
blocked.
The triple filter in the base
of the wash cabinet is not
clean or is not correctly
fitted.
This may cause the spray
arm jets to get blocked.
The non-return valve is
open and blocked. Soiled
water got back into the
wash cabinet.
Load items so water can
reach all surfaces.
See "Use - Loading the
machine" for more
information.
Make sure that dishes
placed in the rear section
of the upper basket do
not cover the opening.
Select a more powerful
program, see the
"Program Guide".
Use more detergent, see
"Use - Adding detergent".
Rearrange the items so
that the spray arms can
rotate freely.
Clean the spray arm jets,
see "Cleaning and Care".
Clean and/or replace the
triple filter correctly.
Clean the spray arm jets,
see "Cleaning and Care".
Clean the drain pump and
the non-return valve, see
"Cleaning the drain pump
and non-return valve".
59
Page 60

Frequently asked questions
Issue Possible fault Solution
Dishes are not dry,
glasses and cutlery are
spotted
White residue is visible
on cutlery and dishes,
clouding occurs on
glassware and film can
be wiped off
Smears on glasses and
cutlery, bluish sheen on
the surface of glasses
and film can be wiped off
Glasses are dull and
discolored and film
cannot be wiped off
Tea or lipstick stains
have not been completely
removed
Plastics are discolored Natural dyes e.g. from
Rust stains on cutlery The salt reservoir cap was
The rinse aid setting may
be too low or the rinse aid
reservoir is empty.
Items were taken out of the
dishwasher too soon.
Not enough rinse aid was
used.
The salt reservoir is empty. Replenish reactivation
The salt reservoir cap was
not properly screwed on.
The rinse aid dosage is set
too high.
Glasses were not
dishwasher safe.
The wash temperature of
the selected program was
too low.
The detergent has a low
bleaching effect.
vegetables may be the
cause. Not enough
detergent was used to
break down natural dyes.
not properly screwed on.
The affected items are not
rust resistant.
The "Pre-wash" program
was not run after adding
reactivation salt. Traces of
salt got into the wash cycle.
Increase the dosage or
refill the reservoir, see
"Rinse aid".
Leave them in longer,
see "Use".
Increase the dosage,
see "Rinse aid".
salt, see "Water
softener".
Reseat and screw the
cap on firmly.
Use less rinse aid, see
"Rinse aid".
There is no remedy.
Only wash dishwasher
safe glasses.
Select a program with
a higher wash
temperature.
Use a different
detergent brand.
Use more detergent,
see "Use - Adding
detergent".
Discoloration is
permanent.
Reseat and screw the
cap on firmly.
There is no remedy.
Only wash dishwasher
safe cutlery.
Always run the
"Pre-wash" program
after adding
reactivation salt.
60
Page 61

Frequently asked questions
Other faults
Issue Possible fault Solution
Detergent residue is left
in the dispenser at the
end of a program.
The detergent lid cannot
be closed properly.
Water remains in the
wash cabinet at the end
of a program.
The dispenser was still
damp when detergent
was added.
Clogged detergent
residue is blocking the
catch.
The triple filter in the wash
cabinet is clogged.
The drain pump or
non-return valve may be
blocked.
The drain hose is kinked. Remove any kinks in the
Make sure the dispenser
is dry before adding
detergent.
Remove the residue.
Before fixing the problem:
Press the "Start/Stop"
–
button.
Turn the dishwasher
–
off.
Clean the triple filter, see
"Cleaning and Care".
Clean the drain pump and
the non-return valve, see
"Cleaning the drain pump
and non-return valve".
drain hose.
61
Page 62

After sales service
In the event of any faults that you
cannot fix yourself, please contact the
Miele Service Department. See back
cover for contact details.
When contacting your Dealer or the
^
Miele Service Department, please
quote the model type and number of
your machine, both of which are
shown on the data plate at the top of
the door.
Program update function - PC
The program update function (PC) is
designed to enable a service
technician to update your machine’s
electronics in keeping with advances in
technology.
The "PC" indicator is used as the
interface for this programming.
62
Page 63

Installation Instructions
To prevent accidents
and machine damage
read these instructions
before
installation or use.
63
Page 64

Installation
Installation options
Free-standing
–
Undercounter
–
The machine can be installed under a
continuous counter or sink drain. The
recess must be at least 60 cm wide,
60 cm deep and 82 cm high.
Installation
Furniture and fittings installed
,
near the machine must be of a
commercial standard (able to
withstand the effects of steam).
^ Please refer to the installation
diagram supplied with the machine.
Leveling the machine
^ The dishwasher needs to stand even.
It can be leveled with the four height
adjustable feet.
Integrated ("i") professional
dishwashers:
To ensure stability, these
,
dishwashers should only be installed
under a continuous countertop
which must be securely screwed to
adjacent units.
"i" models are designed for installation
under a continuous countertop.
The accessories are enclosed in a
–
separate package for on-site
installation.
– The front of the dishwasher is
designed to take a front panel. It can
be fitted with a base unit door front to
match the rest of the kitchen.
– The dishwasher does not have a
toekick. The toekick area of the
dishwasher needs to be covered
either with a toekick board to match
the kitchen cabinets or with one
which can be ordered as a special
accessory. The height of the
dishwasher toekick can be adjusted
to match that of adjacent cabinets.
The toekick recess depth is also
adjustable.
64
All instructions necessary for installing
the dishwasher are described in
separate installation instructions.
Page 65

Positioning and securing the
machine
To ensure stability for undercounter
installations, the machine must be
aligned and screwed to the counter.
^ Insert the brackets in the slots.
^ Line up the bracket holes with the
long holes in the cover plate. Adjust if
necessary making sure the
dishwasher is centered to the
adjacent cabinetry.
^
Push the dishwasher in the recess.
^
Open the door.
Installation
Secure the machine with the brackets
^
to the front edge of the countertop
using the supplied screws.
^ Make sure that the seal on the top
edge of the dishwasher sits flush
against the countertop. Adjust the
feet if necessary.
Do not use silicone sealant to seal
the gaps between the machine and
any neighboring units.
^
When not mounted undercounter,
floor mounting brackets must be
used.
65
Page 66

Installation
Steam Deflector
Depending on the requirements for an
undercounter installation, a steam
deflector can be ordered from the Miele
Technical Service Department.
The underside of the countertop is
protected from steam damage by this
stainless steel plate.
Granite and marble countertops
These countertops require that the
dishwasher is securely screwed to
neighboring units on the right and left
hand sides. Two special fixing brackets
are available as an accessory.+
Removing the lid
If necessary, remove the lid from the
machine to make installation possible.
^ Open the door.
^ Remove the fixing screws on the left
and right sides using a Phillips head
screwdriver.
^ Pull the machine lid approx. 5 mm
forwards, lift it upwards and remove.
66
Page 67

Electrical connection
Electrical connection
All electrical work must be
,
carried out by a suitably qualified
person in compliance with local and
national safety regulations.
Installation, repairs and other work
by unqualified persons could be
dangerous. The manufacturer
cannot be held responsible for
unauthorized work.
Ensure power is not supplied to
,
the appliance until after installation.
The dishwasher comes equipped with a
power cord and plug.
,
The power outlet must be
accessible after installation. Do not
use an extension cord to connect
the dishwasher to the mains. Danger
of overheating!
GROUNDING INSTRUCTIONS This
appliance must be grounded. In the
event of malfunction or breakdown,
grounding will reduce the risk of
electric shock by providing a path of
least resistance for electric current. This
appliance is equipped with a cord
having an equipment-grounding
conductor and a grounding plug. The
plug must be plugged into an
appropriate outlet that is properly
installed and grounded in accordance
with all local codes and ordinances.
WARNING – Improper connection of
the equipment-grounding conductor
can result in the risk of electric shock.
Check with an electrician if in doubt of
the appliance’s grounding. Do not
modify the plug provided with the
appliance: if it will not fit the outlet, have
a proper outlet installed by a qualified
electrician.
The wires in the cord are colored in
accordance with the following code:
A damaged power cord must only
be replaced with a genuine Miele
cord by a Miele service technician.
The machine must only be operated
with the voltage, frequency and
fusing shown on the data plate
located on the rear of the machine,
and on the top of the door.
Green/yellow = ground
Blue = neutral
Brown = live
WARNING
THIS APPLIANCE MUST BE
GROUNDED
67
Page 68

Electrical connection
The G 8050 / PG 8050i comes
equipped with a 14/3 AWG cord and
plug for connection to a standard 120
V, 60 Hz AC power outlet.
If available, the dishwasher may be
connected to a 208/240V single phase
power supply. This will increase the
power to the heating elements and
shorten the time of selected wash
cycle.
120V 208V 240V
Rated Load (kW) 1.5 3.6 4.0
Fuse Rating 15A 20A 20A
To connect the machine to a 208/240V
supply, the standard power cord must
be removed and replaced by a 10/4
AWG SJ or SJO cable. A 3 pole, 4-wire
grounding plug and receptacle are
recommended (NEMA Type 14-20R
and 14-20P).
Power connection options
The conversion diagram and wiring
diagram are secured to the inner side
of the toe kick.
Removing the toe kick
Disconnect the machine from the
mains electrical supply.
^
Remove the fixing screws from the
toe kick and take it off.
68
Page 69

Water inlet
Water in the machine must not
,
be used as drinking water.
The machine must be connected to
–
the water supply in accordance with
local and national regulations.
The water supply must meet or
–
surpass all applicable tap water
codes.
High iron content can lead to rust
formation in the appliance and on the
items washed.
If the chloride content in the water
supply is above 100mg/l, the risk of
corrosion is greatly increased.
– The washer is constructed so it may
be connected to a water supply
without an extra non-return valve,
unless required by code.
Plumbing
The machine is supplied to be
–
connected to a standard cold or hot
water supply at a maximum
temperature of 60 °C.
A water valve with
–
thread is to be provided on site. It
should be easily accessible so the
water supply can be turned off when
the machine is not in use.
The inlet hose is 1.7 m long, with a
–
2 cm female hose thread. A 1.5 m
extension hose is available (flexible
metal hose, 2.03 psi pressure). The
water inlet filters in the threads
must not be removed.
3
/4" male hose
– Water in certain regions shows
precipitations. In this case the
machine must only be used with a
water softener unit.
–
The water pressure (flow rate) must
be a minimum of 7.25 psi.
If the water pressure (flow rate) is
below 29 psi, the filling time is
automatically extended.
The max. permitted static pressure is
145 psi.
If the water pressure is not in the
range of 7.25 to 145 psi the
"Fill/Drain" indicator may come on
and the fault code "F2E" may show in
the display. Please contact the Miele
Service Department.
,
The inlet hose must not be
shortened or damaged in any way
(see illustration).
–
See also the installation diagram
supplied.
69
Page 70

Plumbing
Drainage
The drain hose is equipped with a
–
non-return valve which prevents
waste water from flowing back into
the machine.
The machine should preferably be
–
connected to a separate drainage
system onsite.
If separate drainage is not available
contact your Miele application
specialist for advice.
The onsite drain connection point
should be located between 1 ft.
(0.3 m) and 3’ 3". (1 m) above the
lower edge of the machine.
If it is lower than 1 ft. (0.3 m), bend
the hose in a curve to a height of at
least 1 ft. (0.3 m).
The drainage system must be able to
take a minimum drainage flow of
4.5 gal/min (16 l/min).
The flexible drain hose is 4’ 7" (1.4 m)
–
long and has an internal diameter of
7
/8" (22 mm). Do not cut the drain
hose.
Hose clamps are supplied for
securing it into position.
A longer drain hose (up to 13 ft.
–
[4 m] long) is available from Miele.
The drainage system must not
–
exceed 13 ft. (4 meters).
See the supplied installation
–
diagram.
70
Page 71

Height: 85 (82) cm
Width: 60 cm
Depth: 60 cm
Voltage: see data plate
Connected load: see data plate
Fuse rating: see data plate
Mains connection cable: approx. 1.8 m
Water pressure
(flow rate): 7.25 - 145 psi (50 - 1000 kPa)
Cold or hot water
connection: up to max. 60 °C
Delivery head: min. 0.3 m, max. 1 m
Drainage length: max. 4 m
Inlet hose: approx. 1.7 m
Drain hose: approx. 1.4 m
Noise level in dB (A):
Sound level LpA Free standing: under 60
Built-in: under 70
Technical data
Test marks: Interference suppression
Certification: CSA
Manufacturer address: Miele & Cie. KG, Carl-Miele-Str. 29
33332 Gütersloh, Germany
71
Page 72

Help to protect the environment
Disposal of the packing
material
The protective packing materials are
environmentally safe and can be
recycled.
Ensure that any plastic wrappings,
bags, etc. are disposed of safely and
kept out of the reach of children.
Danger of suffocation!
Disposal of the appliance
Appliances contain materials which can
be recycled. Please contact your local
authorities about recycling in your area.
Ensure that the machine presents no
danger to children while being stored
for disposal. See "Important Safety
Instructions".
727374
Page 73

Page 74

Page 75

75
Page 76

Alteration rights reserved / Publication date: 02/08/2011
M.-Nr. 07 950 142 / 00
 Loading...