

Page 1
Installation instructions
Catalytic converter
K 302
Instructions d’installation
Convertisseur catalytique
K 302
Instrucciones de instalación
Convertidor catalítico
K 302
UVls
M.-Nr.
05 xxx xxx
Page 2

UV
IMPORTANT SAFETY INSTRUCTIONS. . . . . . . . . . . . . . . . . . . . . . . . . . . . . . . . . 3
Installation instructions . . . . . . . . . . . . . . . . . . . . . . . . . . . . . . . . . . . . . . . . . . . . 5
Oven compatability . . . . . . . . . . . . . . . . . . . . . . . . . . . . . . . . . . . . . . . . . . . . . . . . . 5
Parts included . . . . . . . . . . . . . . . . . . . . . . . . . . . . . . . . . . . . . . . . . . . . . . . . . . . . 6
Installation and connection . . . . . . . . . . . . . . . . . . . . . . . . . . . . . . . . . . . . . . . . . 7
Before using for the first time: . . . . . . . . . . . . . . . . . . . . . . . . . . . . . . . . . . . . . . 14
l
INSTRUCTIONS IMPORTANTES SUR LA SÉCURITÉ . . . . . . . . . . . . . . . . . . . . 15
Instructions d’installation . . . . . . . . . . . . . . . . . . . . . . . . . . . . . . . . . . . . . . . . . . 17
Compatabilité avec le four. . . . . . . . . . . . . . . . . . . . . . . . . . . . . . . . . . . . . . . . . . . 17
Pièces incluses . . . . . . . . . . . . . . . . . . . . . . . . . . . . . . . . . . . . . . . . . . . . . . . . . . 18
Installation et branchement . . . . . . . . . . . . . . . . . . . . . . . . . . . . . . . . . . . . . . . . 19
Avant la première utilisation :. . . . . . . . . . . . . . . . . . . . . . . . . . . . . . . . . . . . . . . 27
s
INSTRUCCIONES IMPORTANTES DE SEGURIDAD . . . . . . . . . . . . . . . . . . . . . 28
Instrucciones de instalación . . . . . . . . . . . . . . . . . . . . . . . . . . . . . . . . . . . . . . . 30
Compatibilidad del horno . . . . . . . . . . . . . . . . . . . . . . . . . . . . . . . . . . . . . . . . . . . 30
Partes incluidas . . . . . . . . . . . . . . . . . . . . . . . . . . . . . . . . . . . . . . . . . . . . . . . . . . 31
Instalación y conexión. . . . . . . . . . . . . . . . . . . . . . . . . . . . . . . . . . . . . . . . . . . . . 32
Antes de usar por primera vez: . . . . . . . . . . . . . . . . . . . . . . . . . . . . . . . . . . . . . 39
2
Page 3
IMPORTANT SAFETY INSTRUCTIONS
This appliance complies with all
safety requirements. Improper use of
the appliance can present a risk of
personal injury and physical
damage.
Installation should only be per
formed by a qualified technician, in
accordance with current safety
legislation.
Read all instructions before installing
or using the appliance for the first
time to prevent accidents and
machine damage.
Keep these instructions in a safe
place, and pass them on to any
future user.
Correct usage
-
Technical safety
To prevent damage to the
appliance make sure that the
connection data on the package cor
responds to the voltage and frequency
of the household electrical supply,
before installing the catalytic converter.
If in doubt contact Technical Service.
To guarantee the electrical safety
of this appliance, continuity must
exist between the appliance and an
effective grounding system. It is imper
ative that this basic safety requirement
is met. If there is any doubt, have the
electrical system checked by a qualified electricain. The manufacturer can
not be held resposible for damages
caused by the lack or inadequacy of an
effective grounding system.
The appliance should only be
operated after it has been correctly
installed.
-
-
The K 302 catalytic converter may
only be used with a Miele built-in
oven, models H 350, H 373, H 387. It
must not be installed in another manu
facturer’s oven or a non-compatible
Miele oven. The manufacturer can not
be held responsible for damage caused
by an installation other than that speci
fied, or for improper use.
-
-
Under no circumstances should
the housing of the oven be open
ed. Contact with current carrying com
ponents or alterations to the electrical
or mechanical components is danger
ous, and could lead to injury and
machine damage.
-
-
-
3
Page 4

IMPORTANT SAFETY INSTRUCTIONS
Installation work and repairs should
only be performed by trained tech
nicians to ensure safety.
The appliance is only completely
shut off from the electrical supply
when the power main is shut off or the
circiut breaker is "tripped".
Do not connect the appliance to
the main power supply by an ex
tension cord.
Extension cords do not guarantee the
safety of the appliance (e.g. danger of
overheating).
For ovens with a retrofitted catalytic
converter:
This oven must only be used for cooking, baking or broiling food items. Do
not use it as a dryer, kiln, dehumidifier,
etc. Due to the heat generated in the
catalytic converter of the oven, any
fumes or vapors given off by glues,
plastics or other non-food items can
ignite and could damage the oven and
surrounding cabinetry.
-
Disposal of an old appliance
Before discarding an old appliance
turn it off and disconnect it from the
power supply. Cut off the power cord
and remove any doors to prevent
hazards.
In areas subject to infestation by
cockroaches or other vermin, keep
the appliance and its surroundings
clean at all times. Any damage caused
by cockroaches or other vermin is not
covered under warranty.
4
Page 5

Oven compatability
The K 302 catalytic converter may only
be combined with the following Miele
ovens:
H 350,
H 373,
H 387.
Installation instructions
The catalytic converter should only
be installed by a trained technician.
A faulty installation could be danger
ous.
The necessary connection data and
model number are located on the
catalytic converter package.
The connection data must correspond
to the voltage and frequency of the
household electricity supply and of the
oven.
After installing the catalytic
converter
The oven must be tested in accordance
with local and national safety regulations.
-
5
Page 6
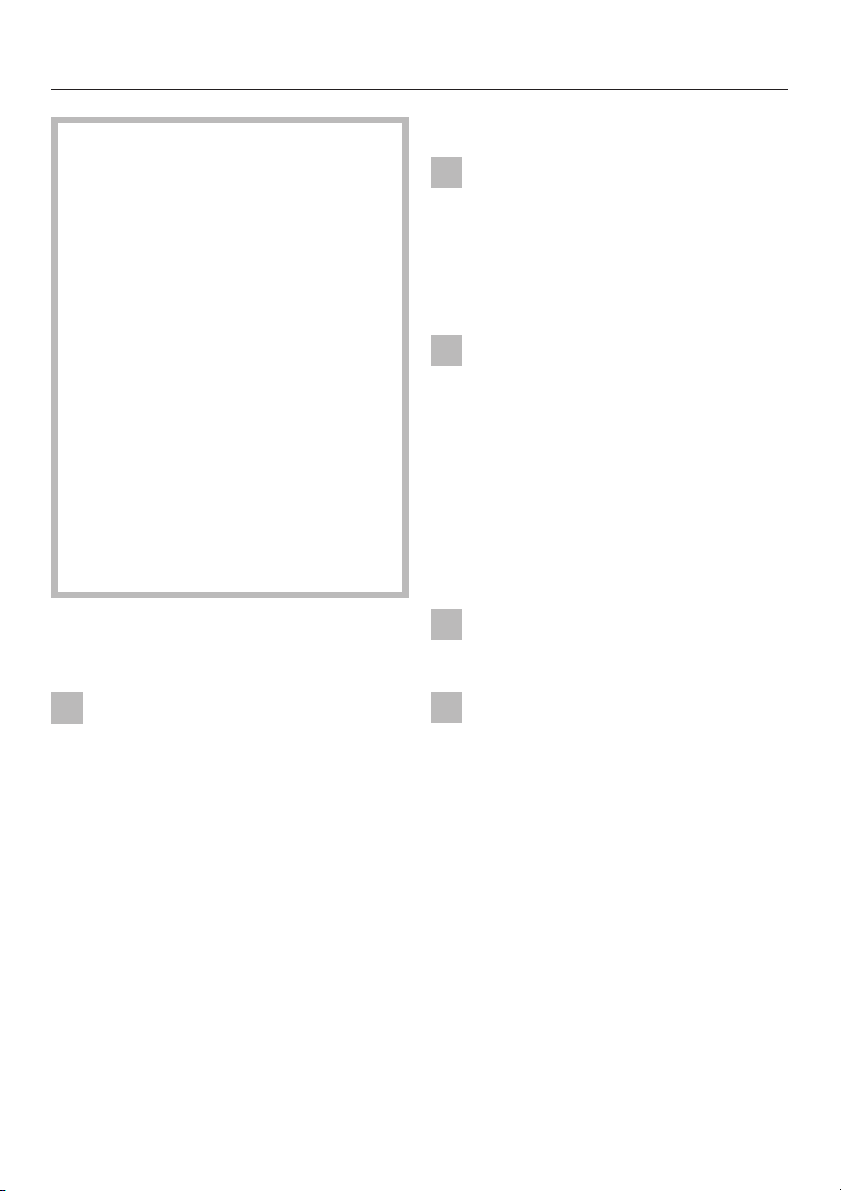
Parts included
Catalytic converter Collar
Dome nuts (3)
Self-tapping screw for securing
the cover to the catalytic converter
6
Page 7
,Turn off the power supply.
Remove the oven door.
^
Pull the oven out of the cabinet.
^
Unscrew the housing covers.
^
The cables required for connecting the
catalytic converter, are already inside
the appliance. They are located on the
terminal block on the vent duct support
bracket.
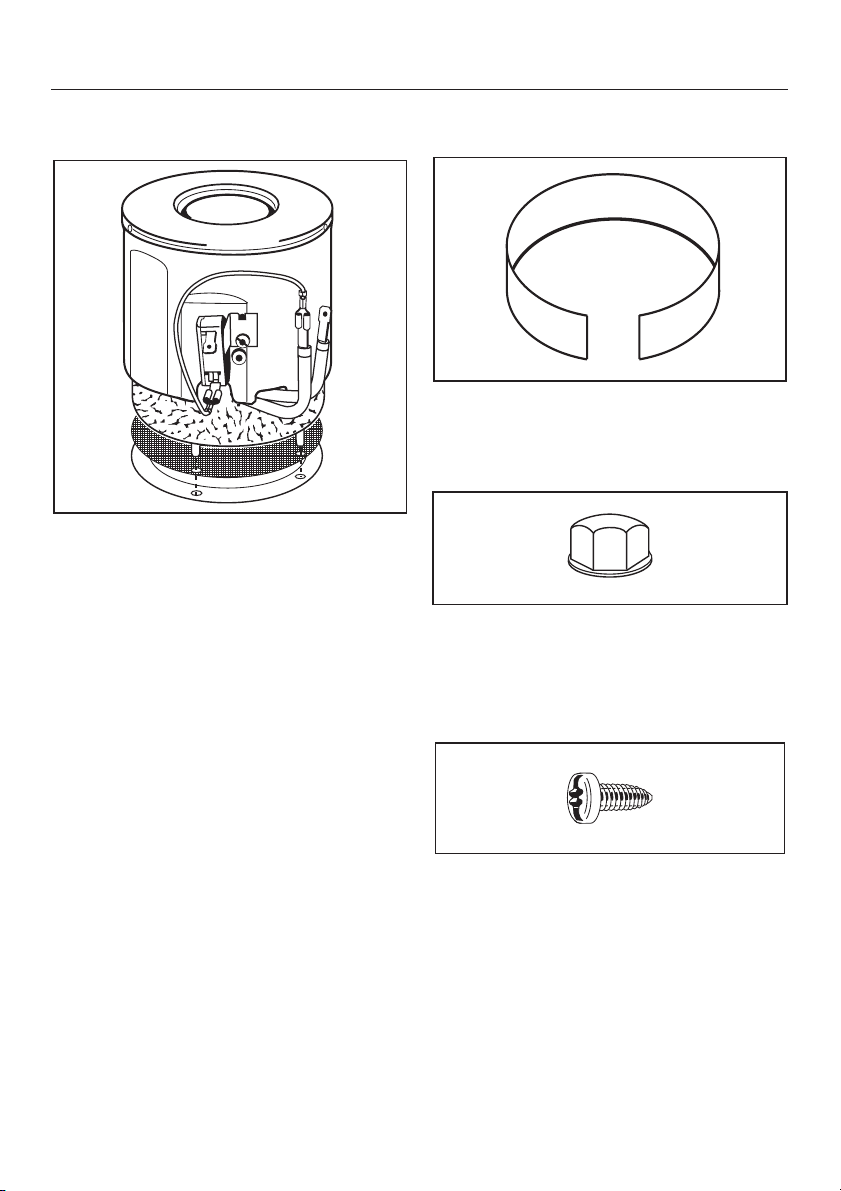
Installation and connection
H 350 :
^ Pull both plugs off.
H 373, H 387 :
^
Pull both plugs off.
This appliance has a plug and
Y-connector. The complete Yconnector must be pulled off.
7
Page 8
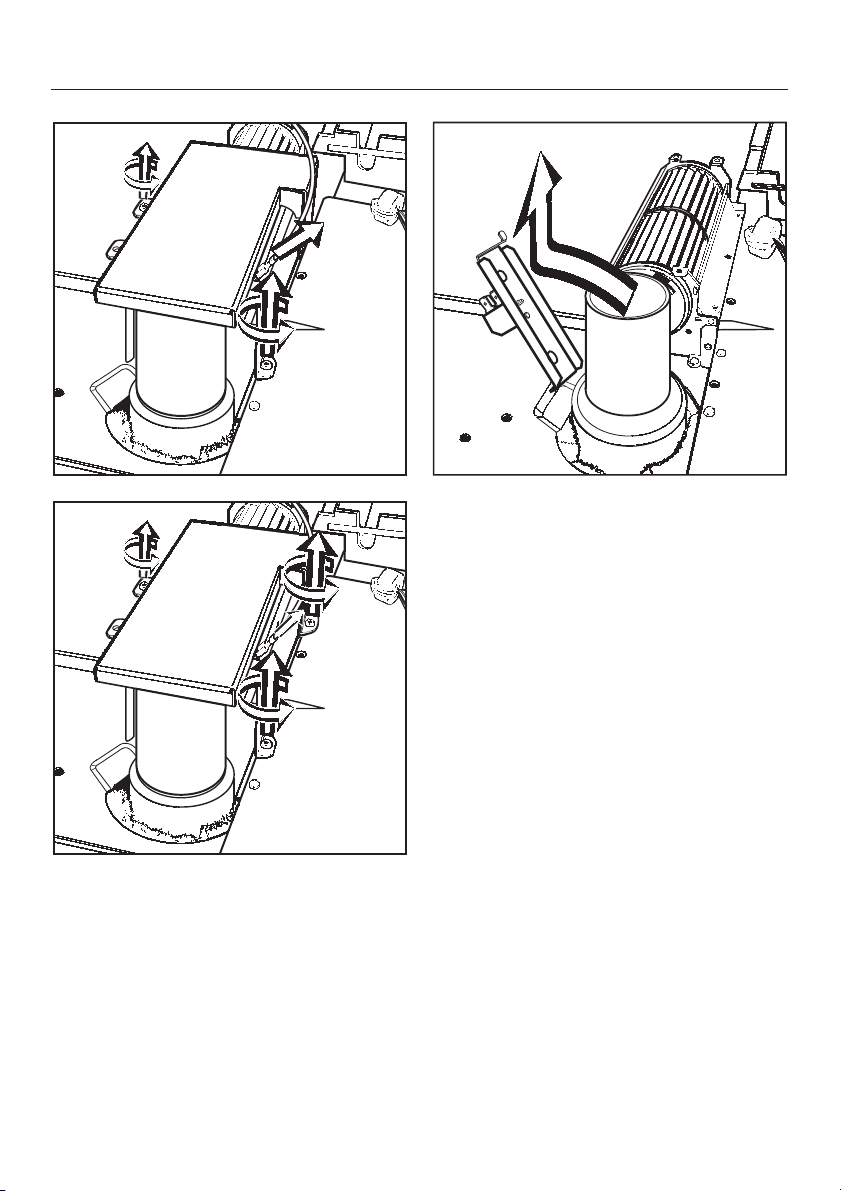
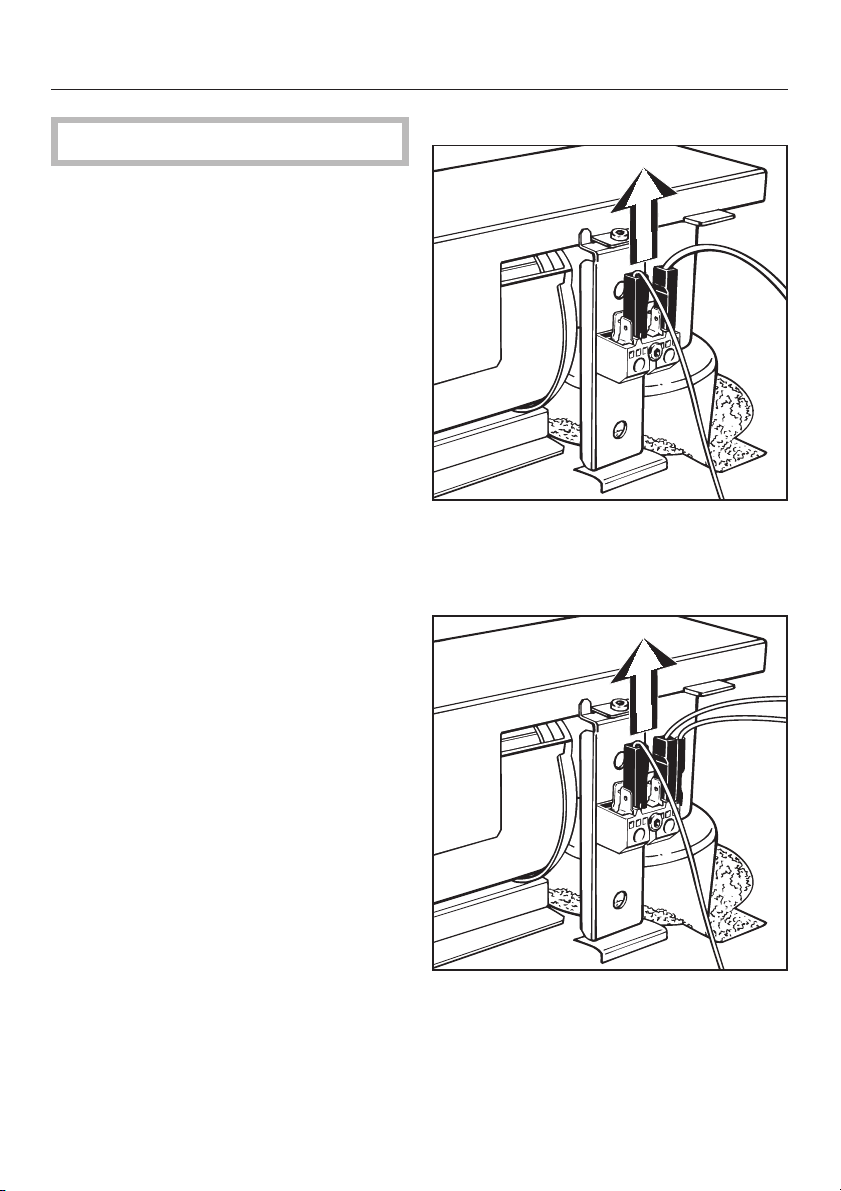
Installation and connection
A
B
^
Pull the grounding connector off the
vent duct, and loosen the screws.
Pull the vent duct up and off.
Depending on model there may be a
ground wire (green) on the vent and
this might come off at the same time.
^ Tilt the support bracket to the side
and pull up and off.
The support bracket and the terminal
block can be discarded. They are no
longer needed.
8
Page 9
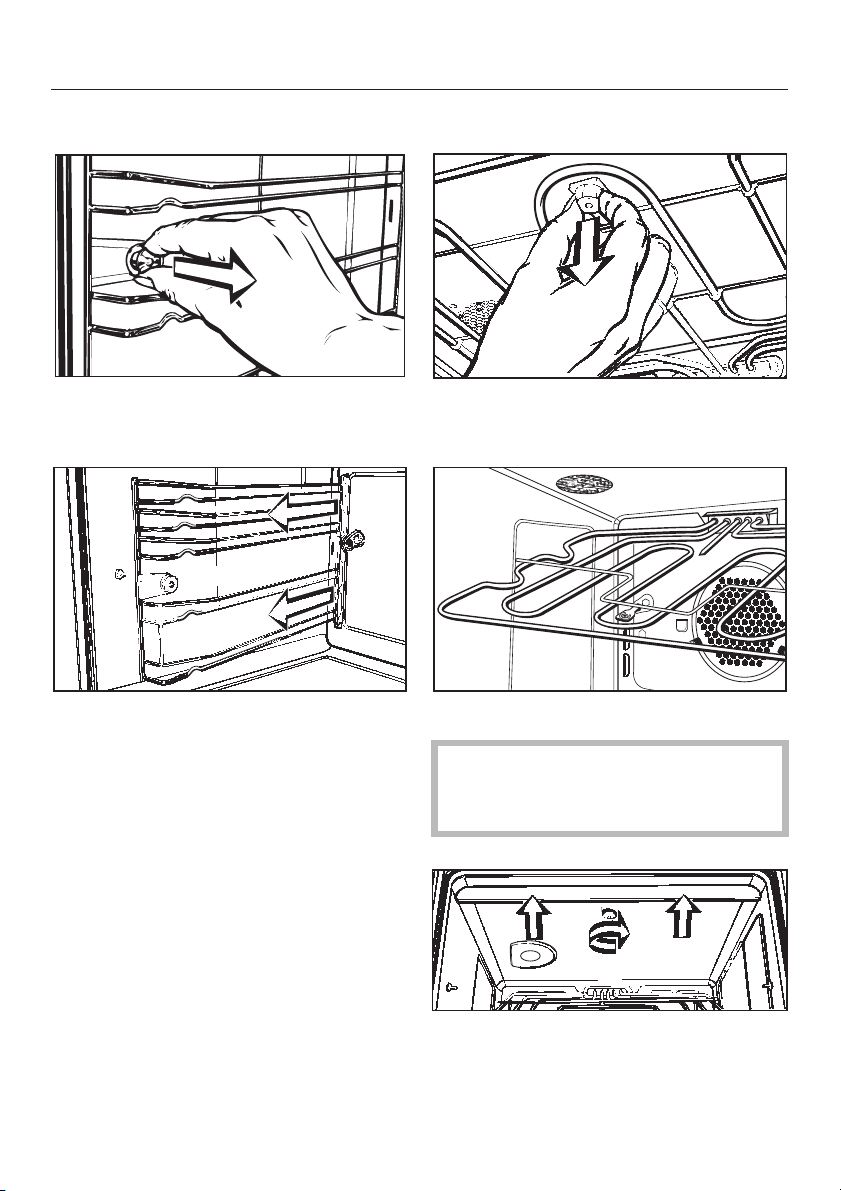
Installation and connection
Remove the runners
Release the runners by pulling on the
^
fastener.
Lower the heating element
Pull and turn the fastener on the heat
^
ing element to release it.
-
^
Pull the runners out from the insert in
the rear of the oven.
^
Gently lower the grill element.
To prevent damage to the element,
do not use extreme force when
lowering it.
Depending on the model the large roof
liner may also need to be removed.
9
Page 10
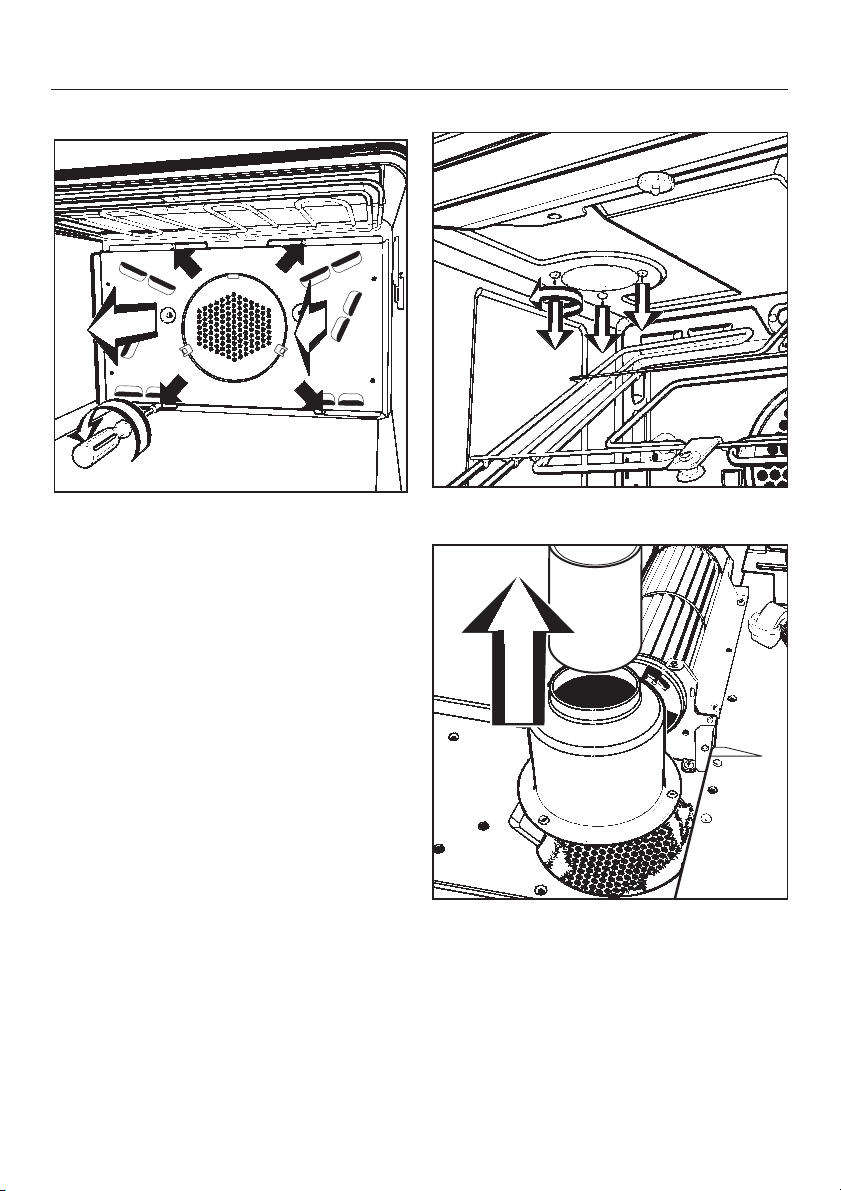
Installation and connection
H 387 :
^ The catalytic coated back panel on
this appliance must also be removed.
^ Loosen the vent screws.
^
Remove the vent.
It is no longer required.
Depending on the model there may
be a ground wire (green) present.
This is not required either when fitting
the catalytic converter.
10
Page 11
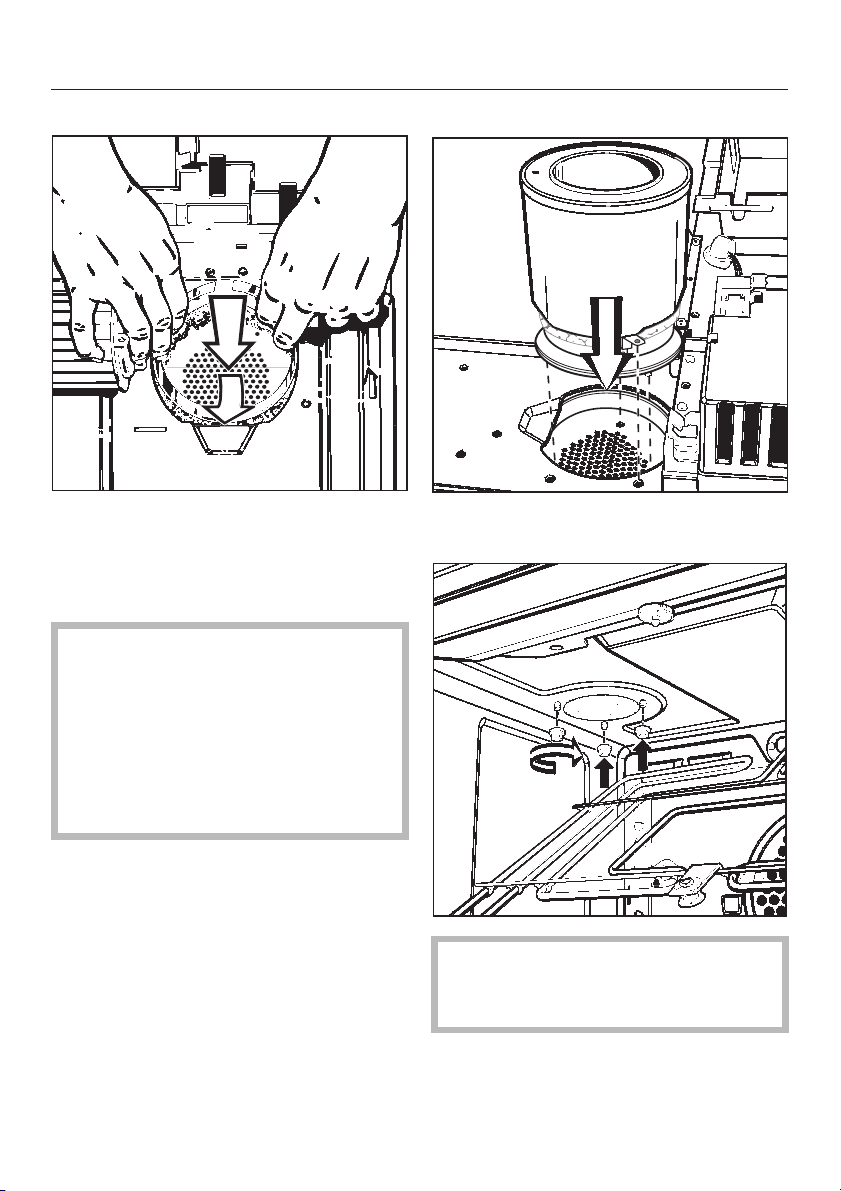
Installation and connection
^ Press back the ceiling insulation.
^ Gently compress the collar in place.
Then enlarge the collar pressing
back the insulation.
Ensure that the insulation is fully
pressed in by the collar without
being pinched.
Thoroughly clean the area around
the catalytic converter (vacuum if
possible) to ensure that insulation
fibers do not enter the oven cavity.
^ Insert the catalytic converter in to the
collar.
Make sure that the metal filter and
seal are underneath the catalytic
converter.
^
Secure the catalytic converter with
the dome nuts.
11
Page 12
Installation and connection
A
B
A
B
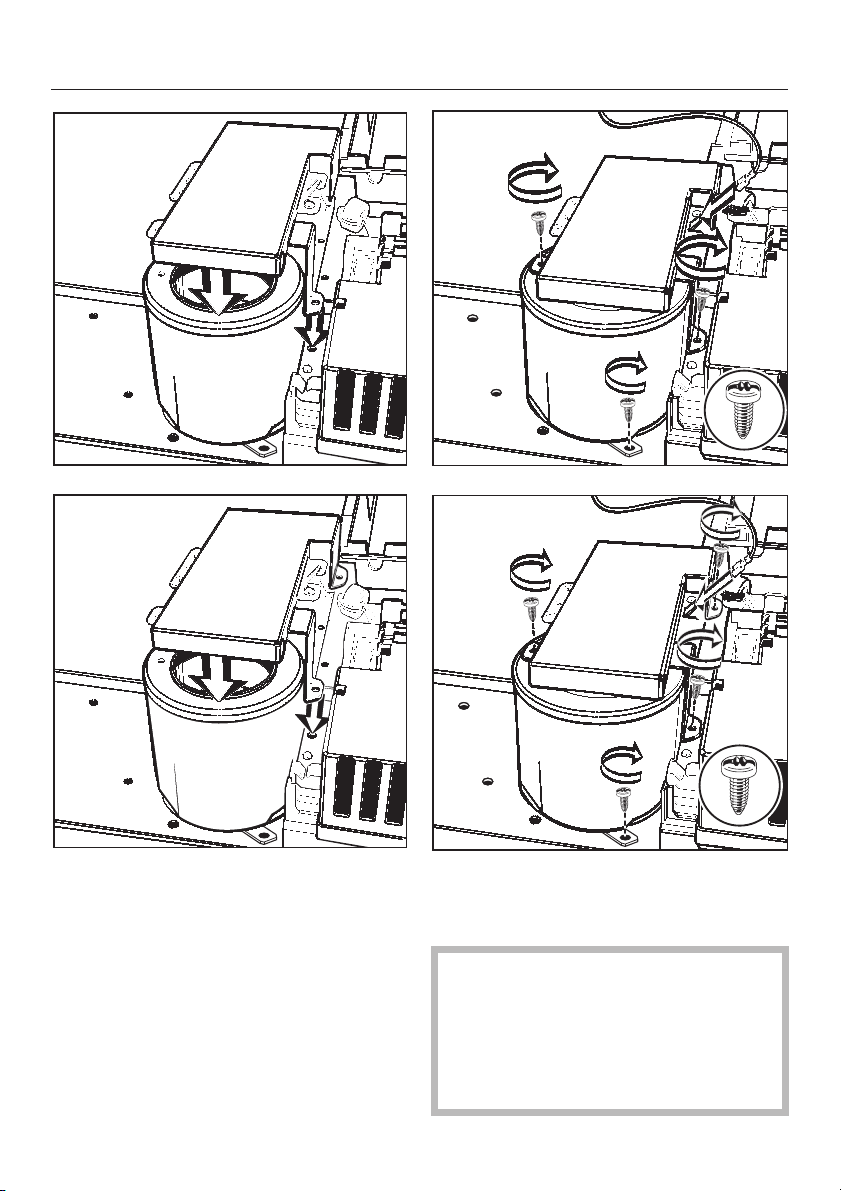
^
Place the vent duct over the catalytic
converter.
12
^
Tighten the vent duct screws, and the
grounding connector fixed to the
catalytic converter.
To do this you must use the screws,
which were removed when dismant
ling the vent duct initially, and the
supplied self-tapping screw. This is
the only way of ensuring the cata
lytic converter is correctly grounded.
-
-
Page 13

Replace the grounding connector.
^
Finally, attach the electrical connectors
to the catalytic converter.
There are two free connectors on the
catalytic converter. One on the thermo
stat, and one on the catalytic converter
heater element.
Installation and connection
-
^ Connect one cable to each of the two
terminals.
It does not matter which cable goes
onto which contact.
H 373, H 387: This model is supplied
with a plug and Y-connector. The com
plete Y-connector must be connected
to a free contact.
-
13
Page 14

Before using for the first time:
The catalytic converter may have a
slight odor at first. To eliminate the odor
quickly, the oven should be heated at a
high temperature for 45 minutes.
Make sure the room is well ventilated
during this process.
Turn the program selector to
^
"Convection".
Set the temperature to 480 °F (250
^
°C), using the "+" button while the
indicator light between the "+" and "-"
buttons is lit.
Set the timer for 45 minutes.
14
Page 15

INSTRUCTIONS IMPORTANTES SUR LA SÉCURITÉ
Sécurité technique
Cet appareil est conforme à toutes
les normes de sécurité. Une utilisa
tion inappropriée peut causer un
risque de blessure corporelle et un
dommage matériel.
L’installation devrait être confiée
seulement à un technicien qualifié
conformément aux normes de
sécurité en vigueur.
Lisez l’ensemble des instructions
avant d’installer l’appareil ou avant
la première utilisation afin de
prévenir les blessures possibles et
un dommage matériel.
Conservez ces instructions dans un
lieu sûr et donnez-les à toututilisateur futur.
-
Utilisation correcte
Le convertisseur catalytique K 302
peut être utilisé seulement avec un
four encastrable Miele. Ce sont les
modèles H 350, H 373 et H 387. Il ne
faut pas l’installer dans un four autre que
ceux de la marque Miele ou dans un
four Miele non compatible. Le fabricant
décline toute responsabilité quant aux
dommages causés par une installation
autre que celle indiquée ou par une
utilisation inappropriée.
Afin de prévenir tout dommage qui
pourrait être causé à l’appareil, vé
rifiez que les données de raccordement
sur l’emballage correspondent bien à la
tension et à la fréquence de l’alimenta
tion électrique du lieu avant d’installer
le convertisseur catalytique. Dans le
doute, consultez le service du soutien
technique.
Pour garantir la sécurité électrique
de l’appareil, il faut le raccorder à
une installation de mise à terre
appropriée. Il est essentiel de respecter
cette exigence sécuritaire élementaire.
Dans le doute, faites vérifier l’installation électrique de la maison par un
électricien qualifié.
Le fabricant ne peut être tenu
responsable des dommages causés
par l’absence d’une installation de mise
à terre ou par une installation
déficiente.
L’appareil devrait être utilisé
seulement après avoir été installé
correctement.
En aucun cas n’ouvrez la carros
serie du four.Le contact avec des
composants porteurs ou des modifica
tions aux composants électriques ou
mécaniques est dangereux et peut
causer une blessure et un dommage
matériel.
-
-
-
-
15
Page 16

INSTRUCTIONS IMPORTANTES SUR LA SÉCURITÉ
Les travaux d’installation et les
réparations devraient être confiés
seulement à des techniciens qualifiés
pour assurer la sécurité.
L’appareil est complètement éteint
seulement lorsque la source d’ali
mentation électrique principale a été
coupée ou le disjoncteur a été tiré.
Ne branchez pas l’appareil à la
source d’alimentation électrique
principale avec une rallonge.
Les rallonges ne garantissent pas la
sécurité de l’appareil (c.-à-d., il y a un
risque de surchauffe).
Pour les fours munis d’un convert-
isseur catalytique réaménagé :
Ce four doit servir uniquement à cuire,
rôtir ou griller des aliments. Ne l’utilisez
pas comme séchoir, étuve, déshumidificateur, etc. En raison de la chaleur
produite dans le convertisseur catalytique du four, les gaz ou les vapeurs
dégagés par des colles, des matières
plastiques ou autres matières non
alimentaires peuventenflammer et
endommager le four et l’aménagement
tout autour.
Mise au rebut d’un vieil
appareil
Avant de mettre au rebut un vieil
appareil, éteignez-le et
débranchez-le de la source d’alimenta
-
tion. Coupez le câble et enlevez-en les
portes pour prévenir toutincendie.
-
Dans les endroits qui peuvent être
infectés par des coquerelles ou
autre vermine, veillez à la proprété de
l’appareil et des lieux en tout temps.
Tout dommage causé par des coquer
elles ou autre vermine n’est pas couvert
par la garantie.
16
-
Page 17

Compatabilité avec le four
Le convertisseur catalytique K 302 peut
être combiné seulement avec les
modèles de fours Miele suivants :
H 350;
H 373;
H 387.
Instructions d’installation
Le convertisseur catalytique doit
être installé seulement par un
technicien qualifié. Une mauvaise
installation pourrait présenter des
dangers. Les données nécessaires
au branchement et le numéro du
modèle figurent sur l’emballage du
convertisseur catalytique. Ces
données doivent correspondre à la
tension et à la fréquence de l’ali
mentation électrique dans la maison
et à celle du four.
Après l’installation du convertisseur
catalytique
Il faut tester le four conformément aux
normes de sécurité locales et nationales.
-
17
Page 18

Pièces incluses
Convertisseur catalytique Bague
Écrous pour la partie couvrante (3)
18
Vis autotaraudeuse pour fixer le
couvercle du convertisseur
catalytique.
Page 19

,Coupez le courant électrique.
Enlevez la porte du four.
^
Retirez le four du meuble dans lequel
^
il est encastré.
Dévissez les plaques de couverture
^
de la carosserie.
Les câbles nécessaires à brancher le
convertisseur catalytique sont déjà
dans l’appareil. Vous les trouverez sur
les bornes d’attache placées sur la
cornière de maintien du conduit d’aéra
tion.
Installation et branchement
H 350 :
-
^ Retirez les deux fiches.
H 373, H 387 :
^
Retirez les deux fiches.
Cet appareil est muni d’un prise de
courant et d’un connecteur mâle.
Retirez le connecteur mâle.
19
Page 20

Installation et branchement
A
B
^
Retirez le connecteur de mise à terre
du conduit d’aération et desserrez
les écrous.
Tirez le conduit d’aération vers le
haut, puis, retirez-le.
Selon le modèle, il peut y avoir un fil
de mise à terre (vert) sur le conduit et
ce fil pourrait se détacher en même
temps.
^ Abaissez la cornière de maintien sur
le côté et tirez le conduit vers le haut,
puis retirez-le. La cornière de maintien et les bornes d’attache sont à
mettre au rebut maintenant, car ils ne
servent plus.
20
Page 21

Installation et branchement
Enlever les rails
Enlevez les rails en tirant sur l’at
^
tache.
Abaisser l’élément chauffant
Tirez et faites tourner l’attache placée
-
^
sur l’élément chauffant pour le
dégager.
^ Retirez les rails du support où ils sont
encastrés à l’arrière du four.
^
Abaissez doucement le gril.
Pour éviter d’endommager le gril, ne
forcez pas lorsque vous l’abaissez.
^
Selon le modèle, vous devrez
peut-être enlever aussi le plafond
intérieur.
21
Page 22

Installation et branchement
H 387 :
^ Vous devez enlever aussi le panneau
catalytique enduit placé à l’arrière de
l’appareil.
^ Desserrez les écrous du conduit
d’aération.
^
Enlevez le conduit d’aération.
Il n’est plus nécessaire.
Selon le modèle, il peut y avoir un fil
de mise à terre (vert). Ce fil n’est pas,
non plus, nécessaire pour monter le
convertisseur catalytique.
22
Page 23

Installation et branchement
^ Placez bien l’isolant du plafond
contre les parois.
^ Placez doucement la bague.
Ensuite, élargissez la bague en
appuyant contre l’isolant.
Assurez-vous que l’isolant adhère
entièrement à la bague sans être
coincé.
Nettoyez bien la zone autour du
convertisseur catalytique (avec un
aspirateur si possible) pour éviter
que les fibres de l’isolant ne
pénètrent dans la cavité du four.
^ Insérez le convertisseur catalytique
dans la bague.
Vérifiez bien que le filtre métallique
et le joint d’étanchéité se trouvent
sous le convertisseur catalytique.
^
Fixez le convertisseur catalytique
avec les écrous de la partie
couvrante.
23
Page 24

Installation et branchement
A
B
^ Placez le conduit d’aération sur le
convertisseur catalytique.
24
Page 25

Installation et branchement
A
B
^ Serrez les écrous du conduit d’aéra-
tion ainsi que le connecteur de mise
à terre fixé sur le convertisseur
catalytique.
Pour cela, vous devez utiliser les
écrous, que vous avez enlevés au
moment de démonter le conduit
d’aération, et la vis autotaraudeuse.
C’est la seule manière d’assurer la
bonne mise à terre du convertisseur
catalytique.
25
Page 26

Installation et branchement
Remettez en place le connecteur de
^
mise à terre. Finalement, branchez
les connecteurs électriques au
convertisseur catalytique.
Il y a deux connecteurs libres sur le
convertisseur catalytique : un connect
eur placé sur le thermostat et un autre,
placé sur l’élément chauffant du
convertisseur catalytique.
-
^
Raccordez chaque connecteur, au
moyen d’un câble, à chacune des
deux bornes.
Il n’y a pas de schéma précis à
suivre, il faut simplement raccorder
les connecteurs aux bornes.
H 373, H 387 : Ce modèle est offert
avec une broche et une fiche mâle.
Toutes les ramifications de la fiche mâle
doivent être raccordées à une prise
libre.
26
Page 27

Le convertisseur catalytique peut
dégager une légère odeur au début.
Afin d’éliminer rapidement cette odeur,
chauffez le four à une haute tempéra
ture durant 45 minutes.
Assurez-vous que la pièce est aérée
pendant ce temps.
Tournez le sélecteur de programme à
^
"Convection".
Réglez la température à 480 °F
^
(250 °C), à l’aide du bouton "+" pen
dant que le voyant lumineux se trou
vant entre les boutons "+" et "-" est allumé.
Réglez la minuterie à 45 minutes.
-
Avant la première utilisation
-
-
27
Page 28

INSTRUCCIONES IMPORTANTES DE SEGURIDAD
Seguridad técnica
Este aparato cumple con todos los
requisitos de seguridad; su uso in
debido puede representar un riesgo
de lesiones personales y daños
físicos.
La instalación sólo deberá ser lleva
da a cabo por un técnico calificado,
de conformidad con la legislación
de seguridadvigente.
Lea todas las instrucciones antes de
instalar o usar el aparato por prime
ra vez para evitar accidentes y
daños a la máquina.
Guarde estas instrucciones en un lugar seguro y transmítalas a cualquier futuro usuario.
-
-
-
Para evitar daños al aparato, cer
ciórese que la información de co
nexión en el empaque corresponda
con el voltaje y frecuencia del suminis
tro eléctrico de la casaantes de instalar
el convertidor catalítico. En caso de
duda, comuníquese con el Servicio
Técnico.
Para garantizar la seguridad eléc
trica de este aparato, debe haber
continuidad entre el aparato y un
sistema efectivo de conexión a tierra.
Es imperativo cumplir con este requisi
to básico de seguridad. En caso de
duda, haga que un electricista calificado revise el sistema eléctrico. El fabricante no se hará responsable de los
daños ocasionados por la insuficiencia
o por la falta de un sistema efectivo de
conexión a tierra.
-
-
-
-
-
Uso correcto
El convertidor catalítico K 302 pue-
de usarse solamente con un horno
empotrado Miele, modelos H 350,
H 373, H 387. No debe instalarse en un
horno de otro fabricante ni en un horno
que no sea compatible cono Miele. El
fabricante no se hará responsable de
los daños ocasionados por una instala
ción diferente a la especificada o por
uso indebido.
28
El aparato sólo deberá operarse
después de haber sido correcta-
mente instalado.
Bajo ninguna circunstancia deberá
abrirse la caja del horno. El con
tacto con cualquiera de los componen
tes portadores de corriente o la altera
ción de los componentes eléctricos o
mecánicos es peligrosa y puede oca
sionar lesiones y daños a la máquina.
-
-
-
-
Page 29

INSTRUCCIONES IMPORTANTES DE SEGURIDAD
Los trabajos de instalación y las re
paraciones sólo deberán ser reali
zadas por técnicos capacitados para
asegurar la seguridad.
El aparato queda completamente
desconectado del suministro eléc
trico cuando la fuente principal de
energía se apaga o cuando se "desen
gancha" el interruptor de circuitos.
No conecte el aparato a la fuente
principal de energía por medio de
una extensión.
Las extensiones no garantizan la segu
ridad del aparato (por ejemplo, peligro
de sobrecalentamiento).
Para hornos con un convertidor ca-
talítico modernizado:
Este horno sólo debe usarse para cocinar, hornear o asar alimentos. No debe
usarse como secador, horno de secado, deshumidificador, etc. Debido al
calor generado en el convertidor catalítico del horno, cualquier humo o vapor
desprendido de pegamentos, plásticos
u otros productos no alimenticios pue
de incendiarse y dañar el horno y los
gabinetes circundantes.
Desecho de un aparato viejo
-
-
-
-
-
-
Antes de desechar un aparato vie
jo, apáguelo y desconéctelo del
suministro de energía. Corte el cable
de energía y desmonte cualquier puer
ta para evitar riesgos.
-
-
En áreas sujetas a infestación de
cucarachas o cualquier otra plaga,
mantenga el aparato y sus alrededores
limpios en todo momento. Cualquier
daño ocasionado por cucarachas u
otras plagas no queda cubierto por la
garantía.
29
Page 30

Instrucciones de instalación
Compatibilidad del horno
El convertidor catalítico K 302 sólo pue
de combinarse con los siguientes hor
nos Miele:
H 350,
H 373,
H 387.
-
-
El convertidor catalítico deberá ser
instalado sólo por un técnico capa
citado. Una instalación defectuosa
puede resultar peligrosa.
La información de conexión necesaria
y el número de modelo se encuentran
en el empaque del convertidor catalíti
co.
-
-
La información de conexión debe co
rresponder al voltaje y a la frecuencia
del suministro eléctrico de la casa y del
horno.
Después de instalar el convertidor
catalítico
El horno debe probarse do conformidad con los reglamentos locales y nacionales de seguridad.
-
30
Page 31

Convertidor catalítico Collar
Tuercas abovedadas (3)
Partes incluidas
Tornillo de cabeza para sujetar
la cubierta la convertidor catalítico
31
Page 32

Instalación y conexión
,Apague el suministro de energía.
Desmonte la puerta del horno.
^
Jale el horno hacia fuera del gabine
^
te.
Destornille las cubiertas de la caja.
^
Los cables requeridos para conectar el
convertidor catalítico ya se encuentran
dentro del aparato. Están ubicados en
el bloque terminal sobre la ménsula de
soporte del ducto de ventilación.
H 350 :
-
^ Desconecte ambas clavijas.
H 373, H 387 :
32
^
Desconecte ambas clavijas.
Este aparato cuenta con una clavija y
un conector Y. El conector Y debe
desconectarsepor completo.
Page 33

A
Instalación y conexión
B
^
Desconecte el conector a tierra del
ducto de ventilación y afloje los torni
llos.
Jale el ducto de ventilación hacia
arriba y hacia fuera.
Dependiendo del modelo, es posible
que haya un cable a tierra (verde) en
la ventilación y éste puede desco
nectarse al mismo tiempo.
^ Incline la ménsula de soporte a un
lado y jale hacia arriba y hacia fuera.
La ménsula de soporte y el bloque terminal pueden desecharse debido a
que ya no serán necesarios.
-
-
33
Page 34

Instalación y conexión
Desmonte las correderas
Libere las correderas jalando el suje
^
tador.
^ Jale las correderas hacia fuera de los
puntos de inserción que se encuen
tran en la parte trasera del horno.
-
Baje el elemento de calenta
miento
Jale y gire el sujetador del elemento
^
de calentamiento para liberarlo.
^
Suavemente, baje suavemente la
rejilla.
-
34
Para evitar daños al elemento, no
use una fuerza extrema para bajarlo.
Dependiendo del modelo, es posible
que también sea necesario desmontar
el revestimiento grande del techo.
Page 35

H 387 :
Instalación y conexión
^ También debe desmontarse el panel
trasero con recubrimiento catalítico.
^ Afloje los tornillos de la ventilación.
^
Desmonte la ventilación.
Ya no será necesaria.
Dependiendo del modelo, puede ha
ber un cable de conexión a tierra
(verde). Este tampoco será necesario
cuando se adapte el convertidor ca
talítico.
-
-
35
Page 36

Instalación y conexión
^ Oprima hacia atrás el aislamiento del
techo.
^ Comprima suavemente el collar en
su lugar.
Luego, agrande el collar haciendo
presión hacia atrás sobre el aislamiento.
Cerciore que el aislamiento esté
completamente comprimido por el
collar sin quedar pellizcado.
Limpie cuidadosamente el área alre
dedor del convertidor catalítico (as
pire si es posible) para asegurar
que las fibras de aislamiento no se
introduzcan en la cavidad del horno.
-
^ Inserte el convertidor catalítico den-
tro del collar.
-
Cerciórese que el filtro metálico y el
sello estén por debajo del converti
dor catalítico.
^
Sujete el convertidor catalítico con
las tuercas abovedadas.
-
36
Page 37

Instalación y conexión
A
B
A
B
^
Coloque el ducto de ventilación por
encima del convertidor catalítico.
^
Apriete los tornillos del ducto de ven
tilación y fije el conector a tierra al
convertidor catalítico.
Para hacer esto, debe usar los tornillos
que fueron removidos al desmantelar
inicialemtne el ducto de ventilación, así
como el tornillo de cabeza. Esta es la
única forma de asegurar que el con
vertidor catalítico quede correctamente
conectado a tierra.
-
-
-
37
Page 38

Instalación y conexión
Reemplace el conector a tierra.
^
Finalmente, fije los conectores eléctri
cos al convertidor catalítico.
Hay dos conectores libres en el conver
tidor catalítico; uno en el termostato y
otro en el elemento de calentamiento
del convertidor catalítico.
^ Conecte un cable a cada una de las
dos terminales.
No importa qué cable vaya en qué
contacto.
-
-
H 373, H 387: Este modelo se suminis
tra con una clavija y un conector Y. El
conector Y completo debe conectarse
a un contacto libre.
38
-
Page 39

Antes de usar por primera vez:
El convertidor catalítico puede tener un
olor ligero al principio. Para eliminar el
olor rápidamente, el horno debe calen
tarse a una temperatura elevada duran
te 45 minutos.
Asegúrese que la habitación esté
bien ventilada durante este proceso.
Gire el selector de programas a
^
"Convection".
Ajuste la temperatura a 480 °F
^
(250 °C), con el botón "+" mientras la
luz indicadora entre los botones "+" y
"-" está encendida.
Ajuste el cronómetro a 45 minutos.
-
-
39
Page 40

UV Alteration rights reserved / 5002
This paper has been bleached without the use of chlorine.
l Droits de modification réservés / 5002
Papier blanchi sans recourir au chlore.
s Modificaciones con derechos reservados / 5002
Papel hecho con celulosa blanqueada sin cloro.
M.-Nr. 05 xxx xxx / V
00
 Loading...