

Operating and Installation Instructions
CVA 6800
Coffee System
To prevent accidents and appliance damage
read these instructions before installation or use.
M.-Nr. 09 741 610en - US, CA

Contents
IMPORTANT SAFETY INSTRUCTIONS.................................5
Guide to the coffee system .........................................10
Accessories .....................................................12
Operation .......................................................13
First steps to use .................................................17
Turning on .......................................................17
Water hardness ...................................................18
Filling the water tank ..............................................20
Filling the coffee bean container ....................................21
Turning the coffee machine on and off ...............................22
Dispenser adjustment .............................................23
Preparing beverages ..............................................24
Espresso, Coffee or Lungo coffee .....................................24
Preparing two portions..............................................24
Canceling preparation ..............................................25
Preparing multiple cups of coffee, one directly after another (Coffee pot ²)....25
Preparing coffee drinks from ground coffee .............................25
Beverages with milk................................................27
Instructions for the milk container...................................27
Preparing hot water ................................................28
Preparing drinks using a profile.......................................28
After preparing drinks ..............................................28
Customizing your coffee ...........................................29
Grinder setting ....................................................29
Changing the drink parameters.......................................30
Amount of ground coffee ............................................30
Brewing temperature ...............................................30
Pre-brewing ground coffee ..........................................31
Setting the serving size............................................32
Resetting drinks..................................................34
2

Contents
Profiles .........................................................35
Accessing profiles .................................................35
Creating a user profile ..............................................35
Selecting a user profile .............................................35
Changing the name ................................................35
Deleting a user profile ..............................................35
Changing a profile .................................................36
Editing drinks for a profile .........................................37
Creating a drink ...................................................37
Changing a drink: Changing the portion size, drink parameters and name ......37
Deleting a drink ...................................................37
MyMiele .........................................................38
Settings.........................................................39
Accessing the "Settings" menu .......................................39
Changing and saving settings........................................39
Overview of the Setting options .......................................40
Language........................................................42
Time ............................................................42
Clock type .......................................................42
Time of day ......................................................42
Date ............................................................42
Timers ..........................................................43
Eco mode........................................................44
Lighting .........................................................45
Starting screen....................................................45
Info (displaying information) .........................................45
Locking the coffee system (System lock 0) .............................45
Water hardness ...................................................46
Brightness .......................................................46
Volume ..........................................................46
Warming drawer ..................................................46
Adjusting the dispensers ............................................46
Factory default settings .............................................47
Showroom program (demo mode) ....................................47
3

Contents
Cleaning and care ................................................48
Overview ........................................................48
Rinsing the system.................................................50
Milk pipework.....................................................50
Rinsing the milk pipework manually .................................50
Cleaning the milk pipework using the milk line cleaner ..................51
Milk container with lid ..............................................52
Main dispenser ...................................................53
Cleaning the milk valve .............................................55
Sensor cover .....................................................55
Water tank .......................................................56
Waste unit .......................................................56
Drip tray .........................................................57
Drip tray cover ....................................................58
Bean container....................................................58
Main dispenser connector ...........................................58
Interior and front door ..............................................59
Brew unit ........................................................59
Removing the brew unit and rinse it by hand ..........................59
Degreasing the brew unit .........................................61
Exterior..........................................................62
Descaling .......................................................63
Frequently asked questions ........................................65
Cleaning clogged milk pipework ....................................74
After sales service ................................................77
Installation instructions ...........................................79
Caring for the environment.........................................80
Electrical connection..............................................81
Installation ......................................................82
Ventilation .......................................................84
Installation .......................................................84
Adjusting the door hinges ...........................................86
RemoteVision (optional accessory) ..................................87
Copyright and licenses ............................................88
Adresses .......................................................91
4
IMPORTANT SAFETY INSTRUCTIONS
When using electrical appliances basic safety precautions should always be
followed, including the following:
Read all instructions before installation or use of the coffee system.
Children in the household
Please read these instructions
carefully to prevent accidents and
machine damage.
This appliance complies with current
safety requirements. Improper use
of the appliance can cause personal
injury and material damage.
This appliance is for household use
only, to prepare espresso,
cappuccino and coffee.
Do not use this appliance other than
for its intended use. Any other use
could be dangerous.
The manufacturer cannot be held
responsible for damage caused by
improper use of the appliance.
Proper use
This coffee system is for household
~
use and similar indoor environments
only. This coffee system is not suitable
for outdoor use.
The coffee and hot water
,
dispensers present a danger of
burning or scalding!
Children's skin is more sensitive to
high temperatures than that of
adults.
Keep children from touching the hot
parts of the coffee machine or
exposing parts of their bodies to the
dispensers.
Keep the coffee system out of reach
~
of children.
Always supervise children in the
~
vicinity of the coffee machine. Do not
allow children to play with the unit.
Danger of suffocation! Children
~
could become entangled in packaging
(e.g. cling film) while playing or pull it
over their heads and suffocate. Keep
the packaging away from children.
Use this coffee system only in stan
~
dard household environments for
making coffee beverages such as
espresso, cappuccino, latte macchiato,
etc. Any other type of use is not
permitted.
Persons which lack physical,
~
sensory or mental abilities or
experience with the machine should not
use it without supervision or instruction
by a responsible person.
-
5
IMPORTANT SAFETY INSTRUCTIONS
Technical safety
Installation work and repairs must
~
only be performed by a trained
technician in accordance with national
and local safety regulations. Repairs
and other work by unauthorized
persons could be dangerous and may
void the warranty.
A damaged coffee system can be
~
dangerous. Before installing the coffee
machine, check for externally visible
damage. Do not operate a damaged
unit.
Be certain your appliance is
~
properly installed and grounded by a
qualified technician. To guarantee the
electrical safety of this appliance,
continuity must exist between the
appliance and an effective grounding
system. It is imperative that this basic
safety requirement be met. If there is
any doubt, have the electrical system of
the house checked by a qualified
electrician. The manufacturer cannot be
held responsible for damages caused
by the lack, or inadequacy, of an
effective grounding system.
To prevent damage to the coffee
~
machine, make sure that the
connection data on the data plate (fuse
rating, voltage and frequency) matches
the electrical power supply. Check this
before connecting the machine.
If in doubt, contact a qualified
electrician.
Do not use an extension cord to
~
connect the appliance to electricity.
Extension cords do not guarantee the
required safety of the appliance
(danger of overheating).
For safety reasons, this coffee
~
machine may only be used once it has
been safely installed.
If the machine is installed in
~
combination with other appliances, a
protective base should be installed
between the appliance and the unit.
The coffee machine must not be
~
used in mobile installations such as
boats.
Only use the coffee machine in
~
ambient temperatures between
+50°F/10°C and +100°F/38 °C.
Ensure that there is sufficient
~
ventilation around the coffee machine.
The ventilation openings in the
surrounding cabinets and the space
below the ceiling must be at least
78 3/4"
condensation can form, causing
damage to the coffee machine or the
surrounding cabinets.
~
electric burner, or in a heated oven.
~
closed kitchen cabinet, use the coffee
machine only when the cabinet door is
open. Do not close the cabinet door
when the coffee machine is in
operation.
~
Only then can the manufacturer
guarantee the safety of this machine.
~
disconnect the power supply by either
removing the fuse, “tripping” the circuit
breaker or unplugging the unit.
2
(200 cm2). Otherwise
Do not place on or near a hot gas or
If the coffee machine is installed in a
Only use Miele original spare parts.
Before service or maintenance
6
IMPORTANT SAFETY INSTRUCTIONS
Never open the outer casing of the
~
appliance. Tampering with electrical
connections or components and
mechanical parts is dangerous and
may cause machine damage.
Do not operate any appliance with a
~
damaged cord or plug, or after the
appliance malfunctions or has been
damaged in any manner. Contact
Miele.
Always attach the cord to the
~
appliance first, then plug it into the wall
outlet. To disconnect, turn the machine
off, then remove the plug from the wall
outlet.
Do not let cord hang over edge of
~
table or counter, or touch hot surfaces.
To reduce the risk of injury, do not
~
drape cord over the counter top or
table top where it can be pulled on by
children or tripped over unintentionally.
Do not damage or kink the cover of
~
the water intake hose.
To protect against fire, electric
~
shock and injury to persons do not
immerse cord, plugs, or coffee machine
in water or other liquid.
Proper use
The coffee and hot water
,
dispensers present a danger of
burning or scalding!
The dispensed liquids and steam
are extremely hot.
The water in the drip tray may be
very hot as well. Be careful when
emptying it.
Please note:
Keep away from the areas under the
–
coffee and hot water dispensers
when beverages or steam are being
dispensed.
– Do not touch hot surfaces. Use
handles or knobs.
– The spouts can spray hot liquid or
steam. Be sure the main dispenser is
fitted correctly and only use it if it is
clean.
,
Never look into the lighting
directly or with an optical
instrument.
Do not use the coffee machine to
~
clean objects.
Before the first use, clean the coffee
~
system and milk container thoroughly
(see "Cleaning and care").
7

IMPORTANT SAFETY INSTRUCTIONS
Please note the following regarding
~
water:
Only fill the water container with cold,
–
fresh tap water. Hot water or other
liquids can damage the coffee
machine.
Change the water every day to
–
prevent a build-up of bacteria.
Do not use mineral water. Mineral
–
water will cause serious lime scale
deposits to build up in your coffee
machine and damage it.
Do not use water from reverse
–
osmosis units. The machine could be
damaged.
Fill the bean container only with
~
roasted whole coffee beans. Do not fill
the bean container with coffee beans
which have been treated or with ground
coffee.
Sugar will damage the machine! Do
~
not use coffee beans which have been
treated with caramel, sugar, or similar,
and do not fill the coffee machine with
other sugar-containing liquids.
Do not fill anything but ground
~
coffee or a Miele cleaning tablet for
degreasing the brew unit into the
ground coffee chute.
Only use plain milk. Most sugary
~
additives can clog the coffee system.
This will damage the coffee machine.
Never place a cup with a burning
~
alcohol-coffee mixture underneath the
main dispenser. This could cause
plastic parts of the coffee machine to
catch fire and melt.
Do not lean on the open coffee
~
machine door, or apply any pressure to
it. Otherwise, the coffee machine could
be damaged.
The use of accessory attachments
~
not recommended by the appliance
manufacturer may result in fire, electric
shock or injury to persons.
Please note the following with
~
regard to cleaning the coffee machine:
Before cleaning and maintenance
–
switch off the appliance and
disconnect circuit breaker.
– Clean the coffee system and milk
container daily (see "Cleaning and
care").
– The steam dispensed by a steam
cleaner can reach the electrical
components and cause a short
circuit.
Never use a steam cleaner to clean
the coffee machine.
–
Descale the coffee machine regularly
with the appropriate number of Miele
descaling tablets for the water
hardness level in your area. Descale
the machine more frequently in areas
with very hard water.
–
Degrease the brew unit regularly with
the supplied Miele cleaning tablets.
Depending on the natural oil content
of the coffee used, the brew unit can
become blocked quite quickly.
The main dispenser connector cap
~
is lubricated with silicone grease. Be
careful of your clothing when removing
or inserting containers or other inside
components .
8

IMPORTANT SAFETY INSTRUCTIONS
For machines with stainless
steel trim:
Do not use sticky notes, transparent
~
adhesive tape, masking tape or other
types of adhesive on the surface of the
trim. These damage the surface,
causing it to lose its dirt repellent
protective coating.
The surface of the stainless steel
~
trim is susceptible to scratching. Even
magnets can cause scratches to
appear.
SAVE THESE
INSTRUCTIONS
9
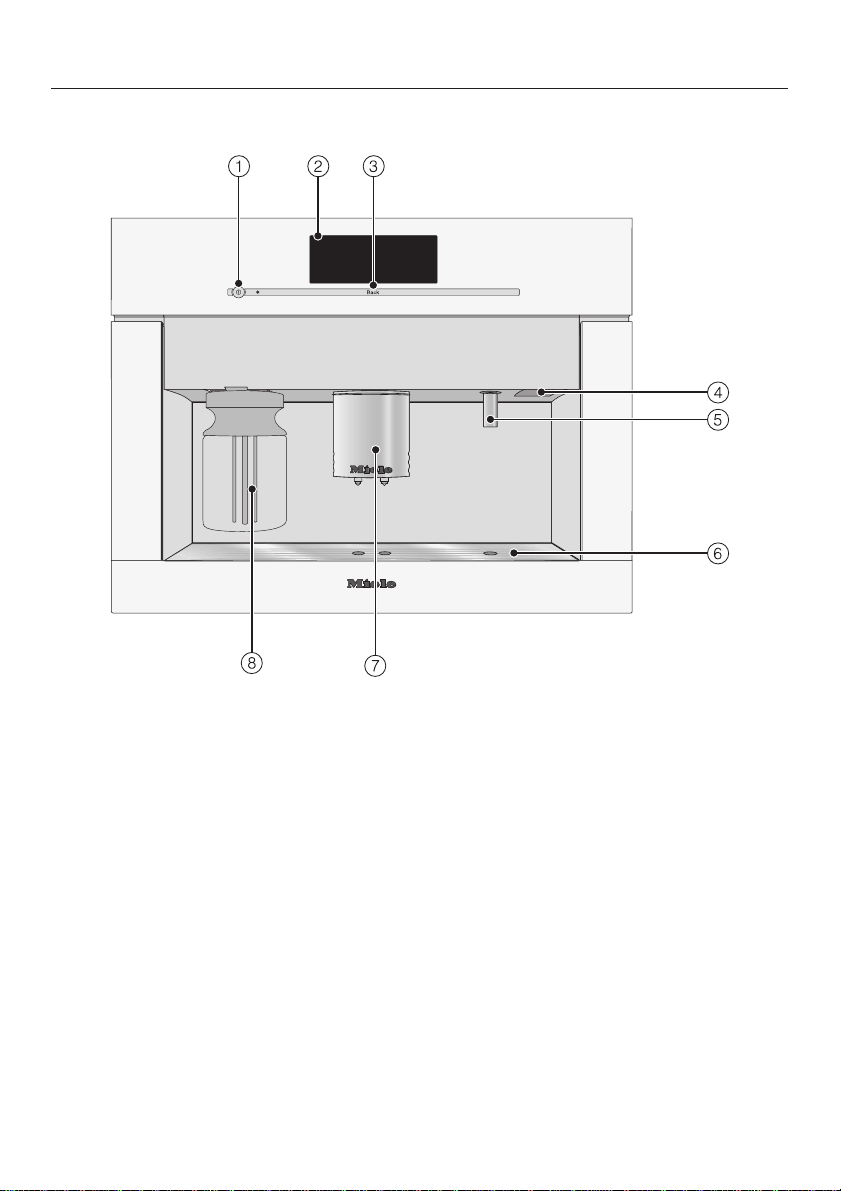
Guide to the coffee system
Front view
a On/Off K sensor
b Touch display
c "Back" sensor
d Door handle
e Hot water dispenser
f Drip tray
g Main dispenser, with automatic height-adjustment and lighting
h Milk container with lid
10
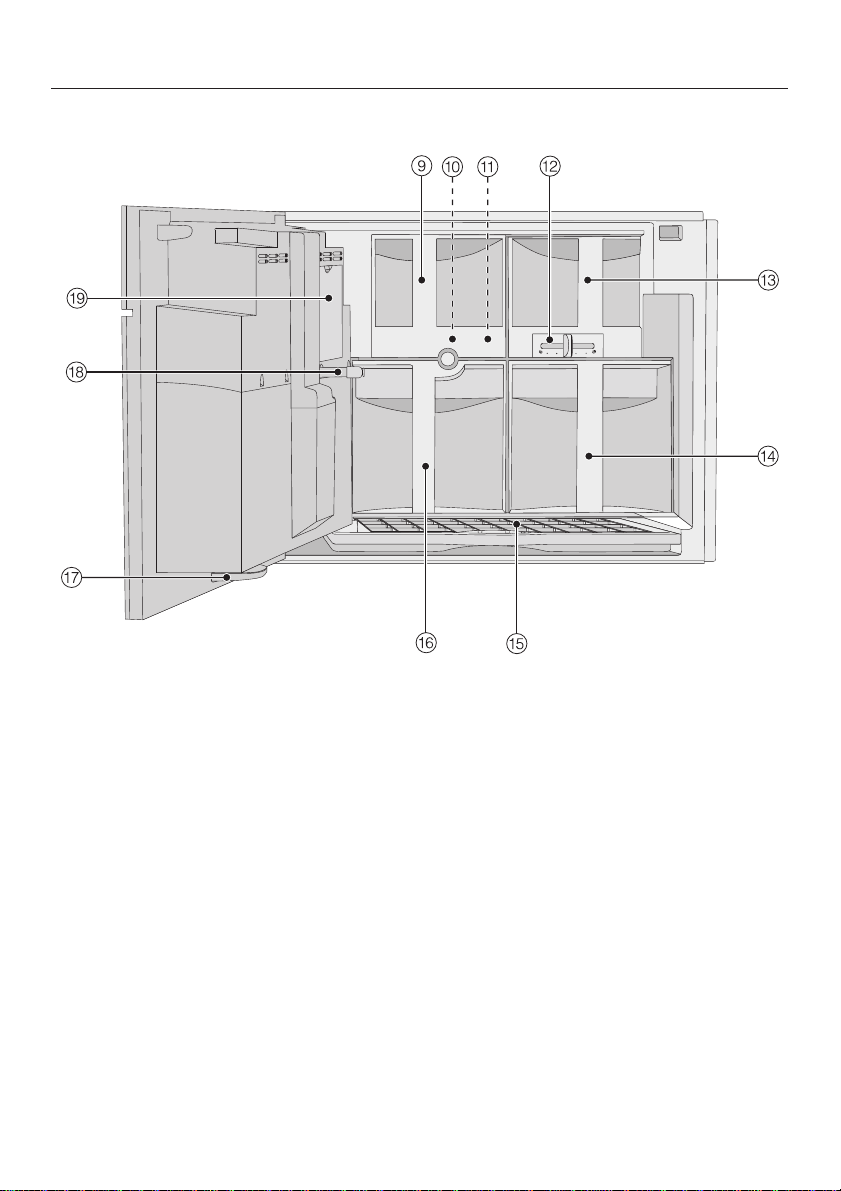
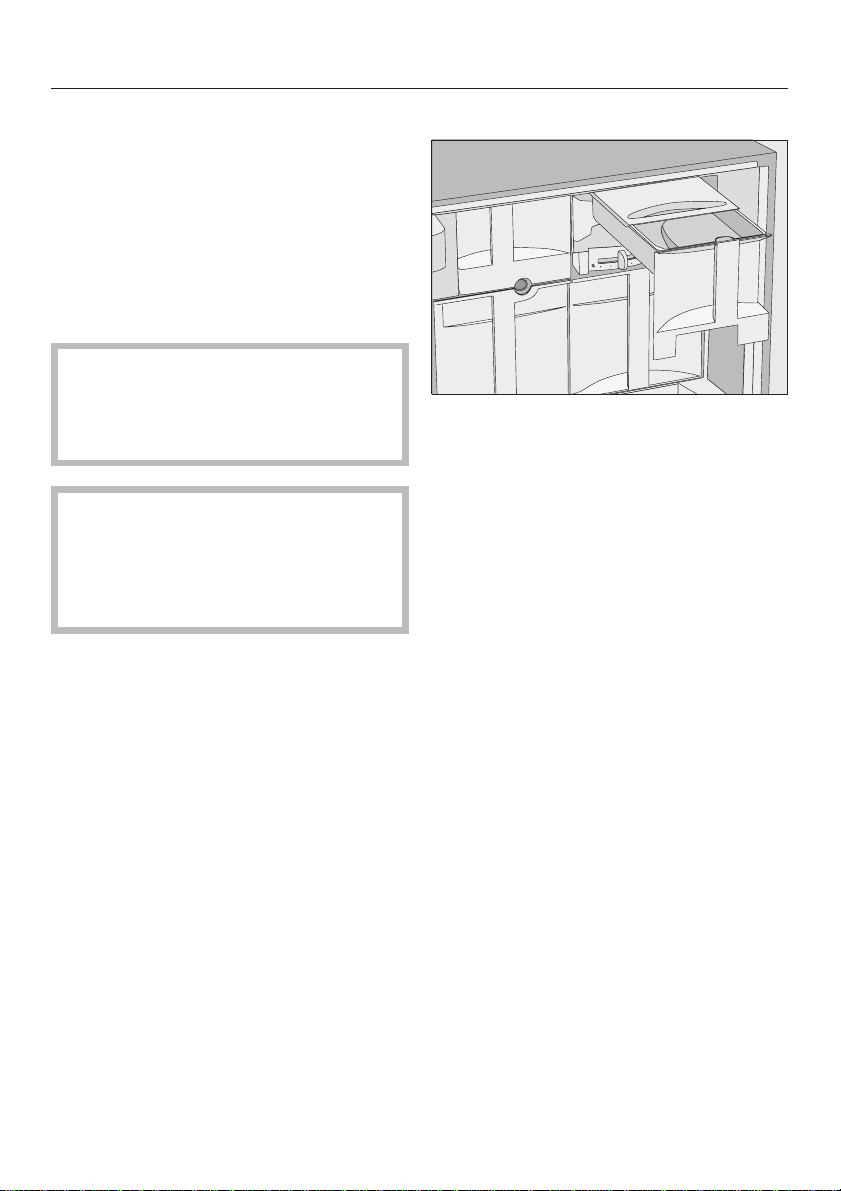
Interior view
Guide to the coffee system
i Ground coffee chute cover
j Brew unit
k Ground coffee chute
l Grind control slide
m Coffee bean container
n Water container
o Drip tray
p Waste unitr
q Drip catcher
r Main dispenser connector
s Service cover
11

Accessories
Included accessories
Coffee scoop
–
for measuring ground coffee
Milk container with lid
–
for storing and preparing milk
Milk pipework cleaning agent
–
for cleaning the milk system
(starter kit)
2 cleaning containers (large, small)
–
for cleaning and care
Descaling tablets
–
for descaling the water pipes
(starter kit)
– Cleaning tablets
for degreasing the brew unit
(starter kit)
– Test strips
for determining the water hardness
– Cleaning brush
for cleaning the milk pipework
– Silicone grease
for lubricating the main dispenser
cap connector
Optional accessories
Miele offers a range of useful
accessories, as well as cleaning and
conditioning products for your coffee
machine.
All-purpose micro fiber cloth
–
for removing fingerprints and minor
contamination
Milk container with lid
–
for storing and preparing milk
Compact seal
–
Milk container lid for storage in the
fridge
– Milk pipework cleaning agent
for cleaning the milk system
– Descaling tablets
for descaling the water pipes
– Cleaning tablets
for degreasing the brew unit
– Silicone grease
for lubricating the main dispenser
cap connector
–
Main dispenser cap connector
spare part
–
Milk pipework angle section
spare part
Additional accessories are
available. Contact Miele or visit the
Miele website for more information.
12

Operation
Touch display
The coffee system is operated by a finger touch.
If your fingers are cold, the touch display may not react to your finger contact .
Do not use pointed or sharp objects, e.g. pens, to operate the touch display.
This can damage the surface! The touch display will not react if you tap it with
such objects.
Do not let water get behind the display.
Display
The screen is divided into three areas:
The top line shows you where you are in a menu. Touching the name of the
desired menu will open the menu. Touching "..." will return you to the previous
menu. The time of day is displayed on the right hand side.
The control field is in the middle: The current menu and options are displayed
there. The V and W arrows are used to scroll to the right or left and select various
actions.
On the bottom line you can go to the displayed menus by touching the desired
gray field.
The number of boxes in the middle indicates the number of available pages in the
current menu.
13
Operation
Using the touch display
Each finger touch of an available option changes the respective field to orange.
Selecting or calling up a menu
Touch the respective field once.
^
Scrolling
Swipe the screen, i.e. place your finger on the touch display and swipe it in the
^
desired direction.
You can scroll to the right or the left. Some menu options allow you to scroll up
and down too.
Touch the V and W arrows to scroll to the left or right.
^
Exiting a menu ("Back" sensor)
Touch the "Back" sensor to go back to the previous screen. Entries made before
this which have not been confirmed with "OK" will not be saved.
Touch the "Back" sensor three times to go to the drinks menu. Touch the "Back"
sensor in the "Profiles" menu to go back step by step to the beginning.
Entering numbers using the numerical keypad z
You can enter numbers by swiping and touching the digit rollers or via the
numerical keypad.
Wait until the roller is gray. The entered setting will not be saved until it is gray.
^
Touch z.
14
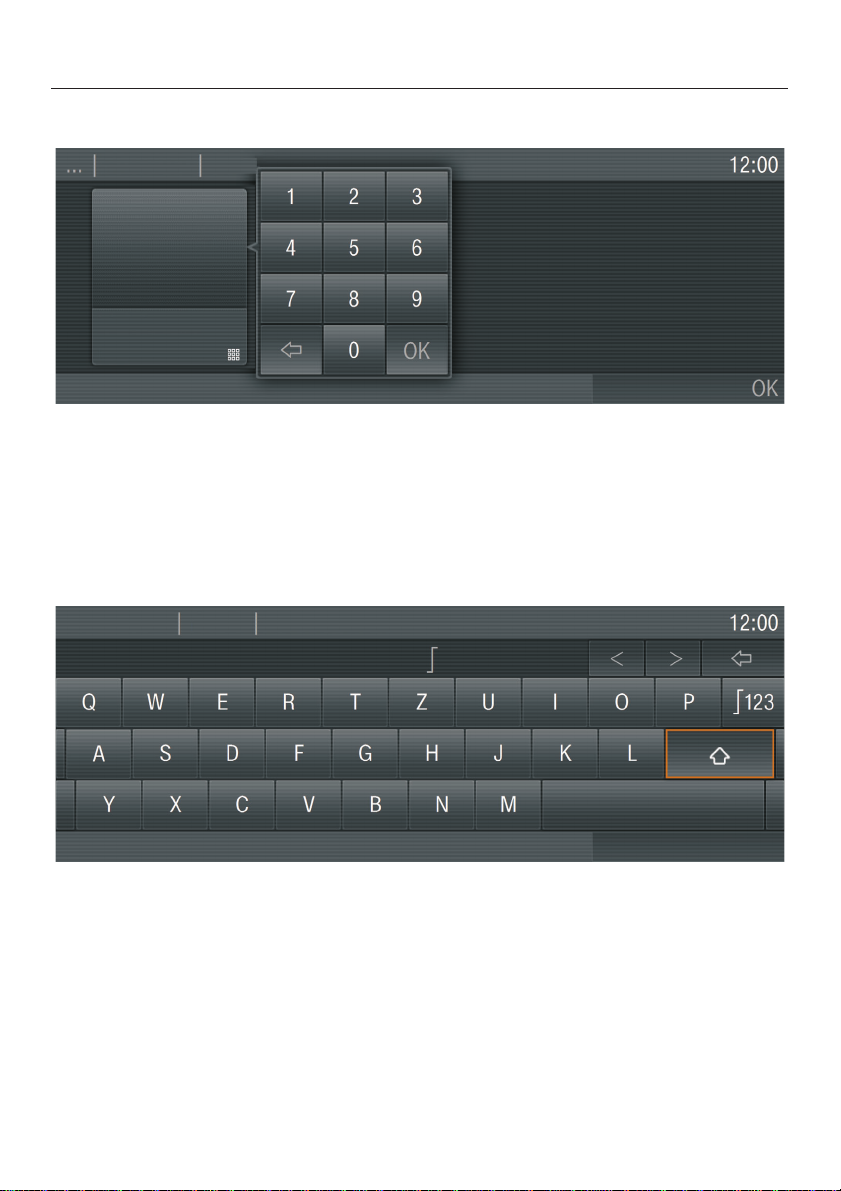
Operation
The numerical keypad appears.
Touch the desired numbers.
^
When you enter a valid number, the "OK" field will go green.
^ Touch "OK".
Entering letters
Profile names or the names for your own drinks are entered using a keyboard.
^
Touch the desired letters or characters.
^
Touch "Save".
15
Operation
The following symbols may appear in addition to the text and drinks symbols:
P P P P G G GM Settings such as the brightness of the display or the volume
of the audio signals are selected via a bar chart.
: Indicates information and instructions about operating the
coffee system.
Confirm the messages with "OK".
0 The system lock is active (see "Settings - Locking the coffee
system (System lock 0)"): The coffee system cannot be
operated.
+ The timer is activated for "Turn on at" (see "Settings –
Timer").
The symbol and the desired turning-on time appear in the
display 23:59 hours before the coffee system is due to turn
on, as long as "On" or "Night dimming" is selected for the
time display.
8 This symbol appears when the milk pipework is being
cleaned.
(The symbol is also on the water tank: Fill the water tank up
to this mark).
F This symbol appears when descaling is being carried out.
(The symbol is also on the water tank: Fill the water tank up
to this mark).
16
First steps to use
Before the first use
The appliance must be correctly
^
installed and connected before the
first use. See the "Installation
instructions".
Remove any protective coverings.
^
Clean the coffee machine
thoroughly (see "Cleaning and care")
before filling it with water and coffee
beans.
Turning on
When you turn the coffee machine on
for the first time, you will be prompted
to set the following after the welcome
screen has appeared:
– Language
– Date
– Time of day
– Display (time of day)
^
Touch the On/Off button K.
The display briefly shows the "Miele Welcome" message.
Setting the language
Touch the desired language and then
^
"OK".
Touch the desired country and then
^
"OK".
The setting is now saved.
Setting the date
Swipe the "Day" field in the display
^
until the current day appears.
Repeat this for "Month" and "Year"
^
until the current date is set.
^ Touch "OK".
The setting is now saved.
Setting the time (of day)
^ Swipe the "Hours" field in the display
until the number for the current hour
appears.
^ Repeat this for "Minutes" until the
current time of day is set.
^
Touch "OK".
The setting is now saved.
17
First steps to use
Display
You can choose from the following
options:
On: The display will always show the
–
date and time even when the system
is turned off.
Off: The display is dark when the
–
system is turned off.
Night dimming: The date and time
–
are only displayed between the
hours of 5 a.m. and 11 p.m.
Touch the option you want and then
^
"OK".
Depending on which option you
select, the coffee machine may
consume more energy. This is
indicated by a message on the
display.
"Set-up successful" appears in the
display.
"Fill and replace the water container"
appears in the display.
^
Fill the water container with cold,
fresh tap water.
Water hardness
Water hardness is an indication of the
amount of minerals dissolved in water.
The higher the mineral content, the
harder the water. And the harder the
water, the more often the coffee
machine will need to be descaled.
The coffee machine monitors the
quantity of water and steam used. The
number of beverages that can be
dispensed before the machine needs to
be descaled will depend on the water
hardness level set.
Set the water hardness level on the
coffee machine to the water hardness
level for the local area to ensure that
the machine functions correctly and is
not damaged. This will ensure that the
reminder to descale the machine will
appear in the display at the correct
time. If unsure of your water hardness
contact your local water authority.
You can program four hardness levels
on the machine:
Water hardness Hardness
0 - 8.7 gr/gal
(0 - 8.4°dH)
8.7 - 14.6 gr/gal
(8.4 - 14°dH)
14.6 - 21.9 gr/gal
(14 - 21°dH)
21.9 gr/gal
(21°dH)
range
soft soft 1
medium medium 2
hard hard 3
hard very hard 4
Setting
(hardness
level)
18
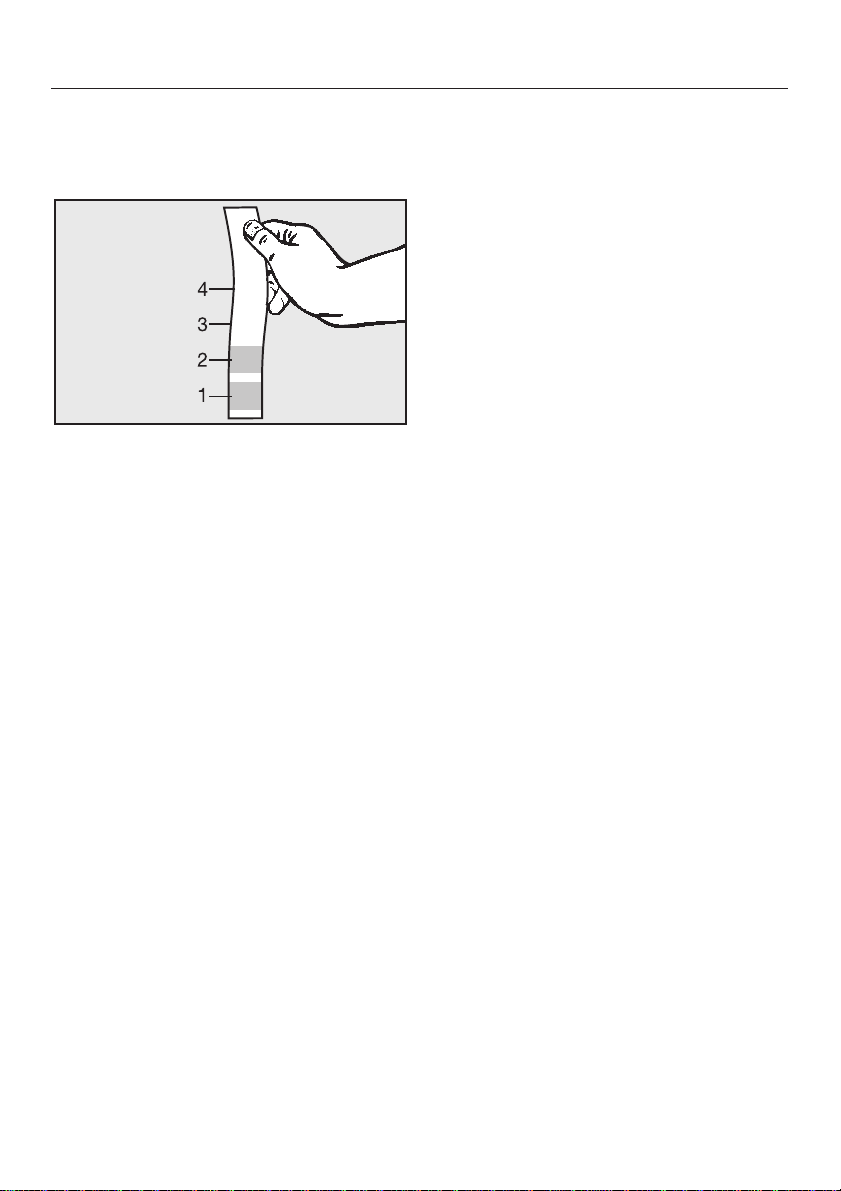
Checking water hardness level
You can check the water hardness level
using the supplied test strips.
Dip the test strip into your tap water
^
for about one second. Then shake off
any excess water. The result will be
visible after about one minute.
You can now set the water hardness
level for the coffee system.
Setting the water hardness
First steps to use
^ Touch "Settings" %.
^ Swipe the display until "Water
hardness" appears, and then touch it.
^
Touch the hardness level you want
and then "OK".
The setting is now saved.
19

Filling the water tank
Change the water daily to
,
prevent bacteria growth.
Before using the coffee system for
the first time, clean the appliance.
See "Cleaning and Care".
Only fill the water tank with cold,
fresh tap water.
Hot or warm water or other liquids
can damage the coffee machine.
Do not use mineral water to fill the
water tank. Mineral water will cause
serious lime scale deposits to build
up in your coffee machine and
damage it.
Open the appliance door.
^
20
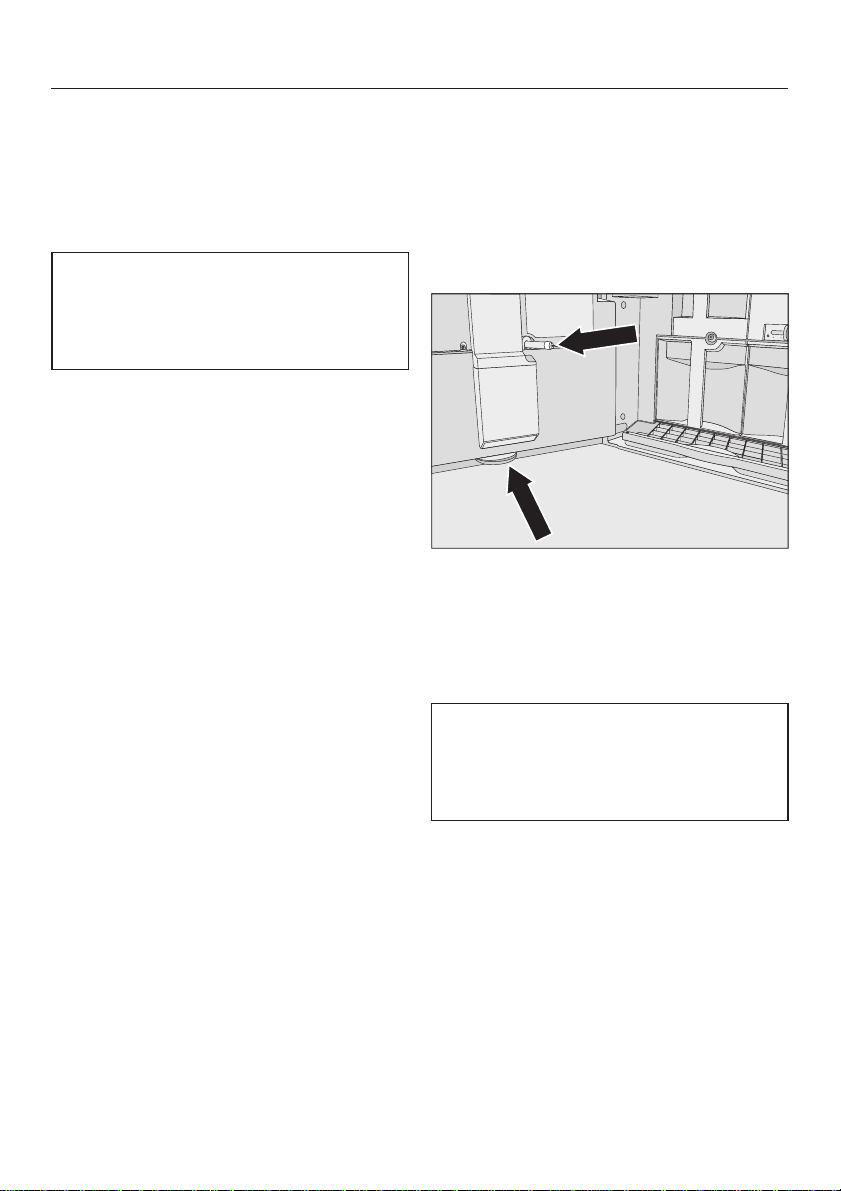
^
Slowly pull the water tank forward
and out.
^
Remove the lid and fill the container
with fresh, cold tap water to the
"Max." mark.
^
Push the water tank into the unit until
it clicks into place.
The water tank must be positioned
correctly or the valve will leak. If the
water tank has not clicked into place,
pull the tank out, check and clean the
niche.
Filling the coffee bean container
You can make coffee or espresso from
roasted whole coffee beans that the
coffee machine will grind fresh for each
portion. Add fresh beans to the coffee
bean container.
Alternatively, you can make coffee or
espresso from ground coffee (see
"Coffee beverages prepared from
ground coffee").
Only fill espresso or coffee beans in
the beans container. Anything else including ground coffee - will
damage the grinding unit.
Caramelized or otherwise
pre-treated beans or sugar
containing beverages must not be
filled into the appliance. It will
damage the coffee system.
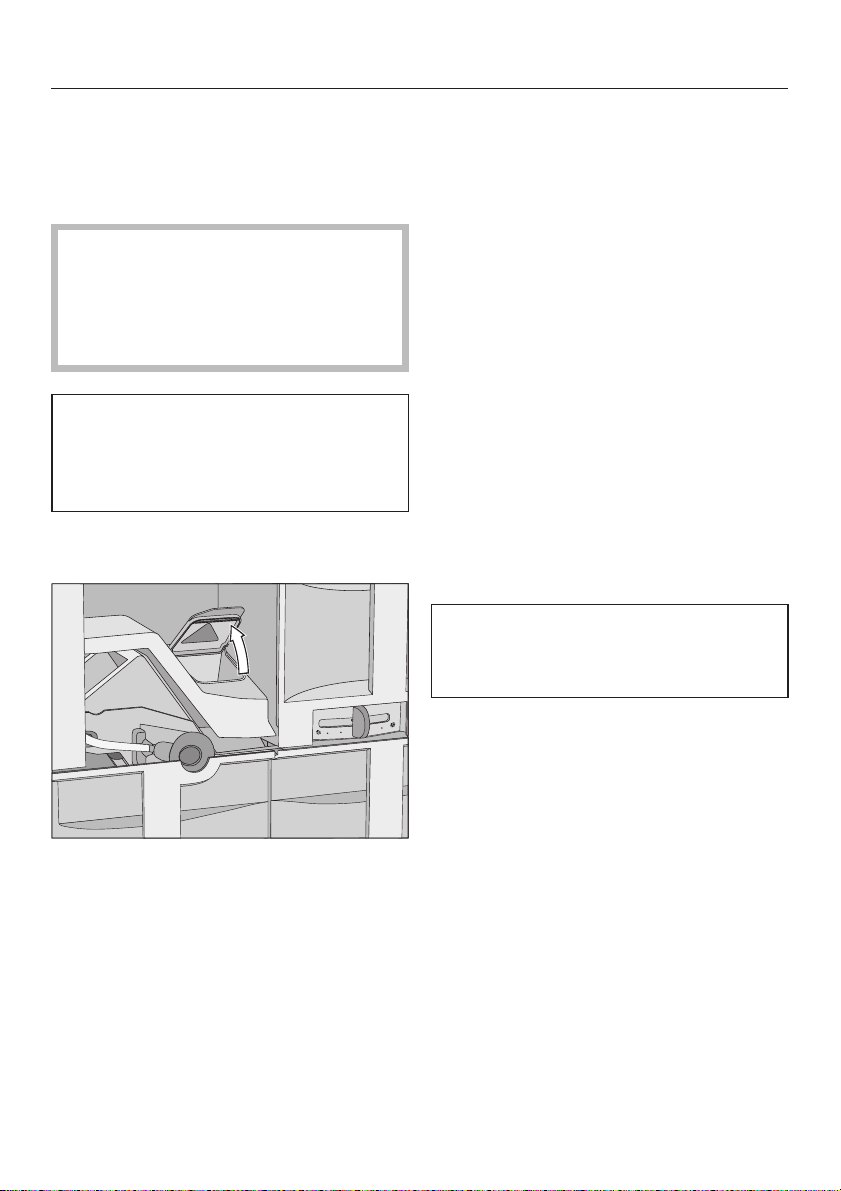
Pull the bean container out.
^
Slide the lid back, then fill the bean
^
container with roasted coffee beans.
^ Slide the cover all the way forward
again.
^ Slide the bean container back into
the coffee machine.
^ Close the door.
21
Turning the coffee machine on and off
Turning on
When the machine is turned on, it heats
up and rinses out the pipework. This
cleans and heats the pipework to ready
the machine for coffee preparation.
If the coffee machine still has an
operating temperature higher than
140°F (60°C), rinsing will not take
place.
Tap the On/Off button K.
^
Tip: If you do not want the water from
the rinsing process to flow into the drip
tray, place a suitable container (such
as the small cleaning container)
underneath the coffee dispensers
before preparing the first coffee of the
day.
After heating up, the machine will rinse
the pipes. Hot water will flow from the
coffee dispensers.
Drinks can now be prepared.
Turning off for longer periods
of time
If you will not be using the coffee
machine for a while:
Empty out the drip tray, the waste
^
unit and the water tank.
^ Thoroughly clean all components
including the brew unit, the main
dispenser connector and the drip
bowl in the door.
^ Turn the machine off.
Turning off
^
Tap the On/Off button K.
When a coffee beverage has been
prepared, the coffee machine also
rinses the coffee lines before turning
off.
22
If you leave the door open for an
extended period of time, unplug or
disconnect it from the power supply
to save energy.
The main dispenser cannot be
adjusted manually.
The coffee system senses the height of
the cup or glass being used. When a
drink has been selected, the main
dispenser automatically moves to the
optimum height before dispensing the
drink.
Make sure that there is not a spoon
or stirrer in the cup. This would
prevent the coffee system from
sensing the cup height correctly.
You can turn off the automatic
dispenser adjustment. The main
dispenser will then remain in the upper
position until the coffee system is
turned off. When a maintenance
program is being performed, the main
dispenser moves to the height of the
cleaning containers or into a
maintenance position.
Dispenser adjustment
Turning the dispenser adjustment on
or off
Touch "Main menu" or the Back
^
sensor.
Touch "Settings" %.
^
Swipe the display until "Dispenser
^
adjustment" appears, and then touch
it.
Touch the setting you want in order to
^
turn the dispenser adjustment on or
off.
Touch "OK".
^
The setting is now saved.
When the coffee system is turned off,
the main dispenser moves to a middle
position.
23
Preparing beverages
Espresso, Coffee or Lungo
coffee
From the "Drinks" menu:
^ Place a cup under the main
dispenser.
^ Touch Espresso ., Coffee / or Lungo
coffee /.
The chosen coffee drink will now be
dispensed.
To ensure that any residues from the
factory testing process are removed
from the brewing system, please
discard the first two cups of coffee
when using the system for the first
time.
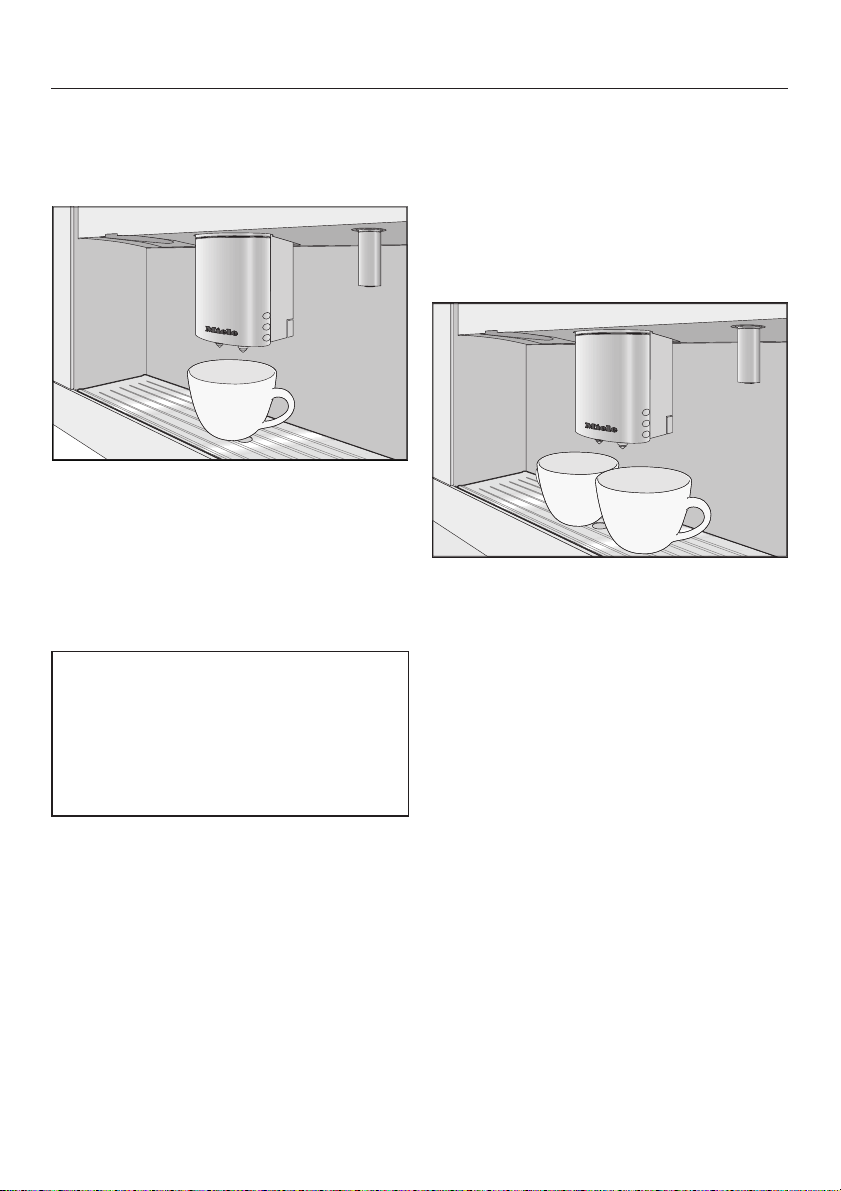
Preparing two portions
You can request two portions of
espresso or coffee at once in one cup
or in two separate cups simultaneously.
From the "Drinks" menu:
To fill two cups at the same time:
^ Place a cup under each main
dispenser nozzle.
^ Touch the two-cup symbol for the
drink you want.
Preparation begins and two portions of
the desired drink will be dispensed
from the main dispenser.
24

Canceling preparation
To cancel preparation,
Touch "Stop".
^
or
Touch "Cancel".
^
Preparing multiple cups of
coffee, one directly after
another (Coffee pot ²)
You can use the "Coffee pot" function to
prepare multiple cups of coffee, one
directly after another (max. 1 l), in order
to fill a coffee thermos, for example.
You can prepare up to 8 cups this way.
^ Place a suitably sized coffee pot or
other container under the main
dispenser.
^ Swipe the display until "Coffee pot" ²
appears and then touch it.
^ Touch the number of cups you want
(3 to 8).
Preparing beverages
You can use the "Coffee pot" function
twice in succession. After that, the
coffee system will need to cool down
for an hour to prevent damage to the
appliance.
Preparing coffee drinks from
ground coffee
To make espresso or coffee using
ready ground coffee, add a portion of
ground coffee to the ground coffee
chute.
This allows you to prepare a
decaffeinated coffee even if the bean
container is already filled with regular
coffee beans, for example.
The coffee machine will automatically
recognize that ground coffee has been
placed in the chute.
Only one portion of coffee or espresso
can be prepared at a time when using
ground coffee.
^
Follow the instructions on the display.
Each cup of coffee will be individually
ground, brewed and poured. Each
stage of the process is shown in the
display.
You can cancel the process at any
time:
^
Touch "Cancel" or "Stop".
25
Preparing beverages
Adding ground coffee
Use the scoop supplied with the system
to ensure the correct amount of ground
coffee is used.
Do not add more than one level
scoop of ground coffee to the coffee
chute. If too much ground coffee is
filled into the chute the brew unit
cannot process it.
The coffee machine will use all the
ground coffee that you have filled into
the chute for the next coffee
preparation.
^ Open the front door of the coffee
system.
Preparing coffee drinks from ground
coffee
If you want to use ground coffee:
Touch "Yes".
^
You can now select which coffee drink
you want prepared from the ground
coffee.
Place a cup under the main
^
dispenser.
Touch the drink you want.
^
The desired coffee drink will be
prepared.
If you don't want to use ground coffee:
^ Touch "No".
The ground coffee will be directed into
the waste unit.
If a button is not pressed within
approx. 15 seconds, the ground
coffee is emptied into the waste unit.
^
Pull out the cover of the ground
coffee chute. Open the lid of the
ground coffee chute.
^
Place a level scoop of ground coffee
into the chute.
^
Close the ground coffee chute and
slide the chute cover back into the
appliance. Close the front door.
The display shows the message "Use
ground coffee?"
26
Beverages with milk
You can prepare various specialty
coffee beverages with milk or Hot milk
and Milk froth.
The following specialty coffee options
are available:
Cappuccino H consists of about
two-thirds milk froth and one-third
espresso.
Preparing beverages
Latte macchiato k consists of one-third
each of hot milk, milk froth and
espresso.
Café latte ± consists of hot milk and
coffee.
Instructions for the milk container
The milk is not cooled in the milk
container. if you do not prepare milk
beverages for a while, place the milk
container in the refrigerator. Good
milk froth can only be prepared with
cold milk (under 55°F / 13 °C).
Only use plain milk. Most sugary
additives can clog the milk lines.
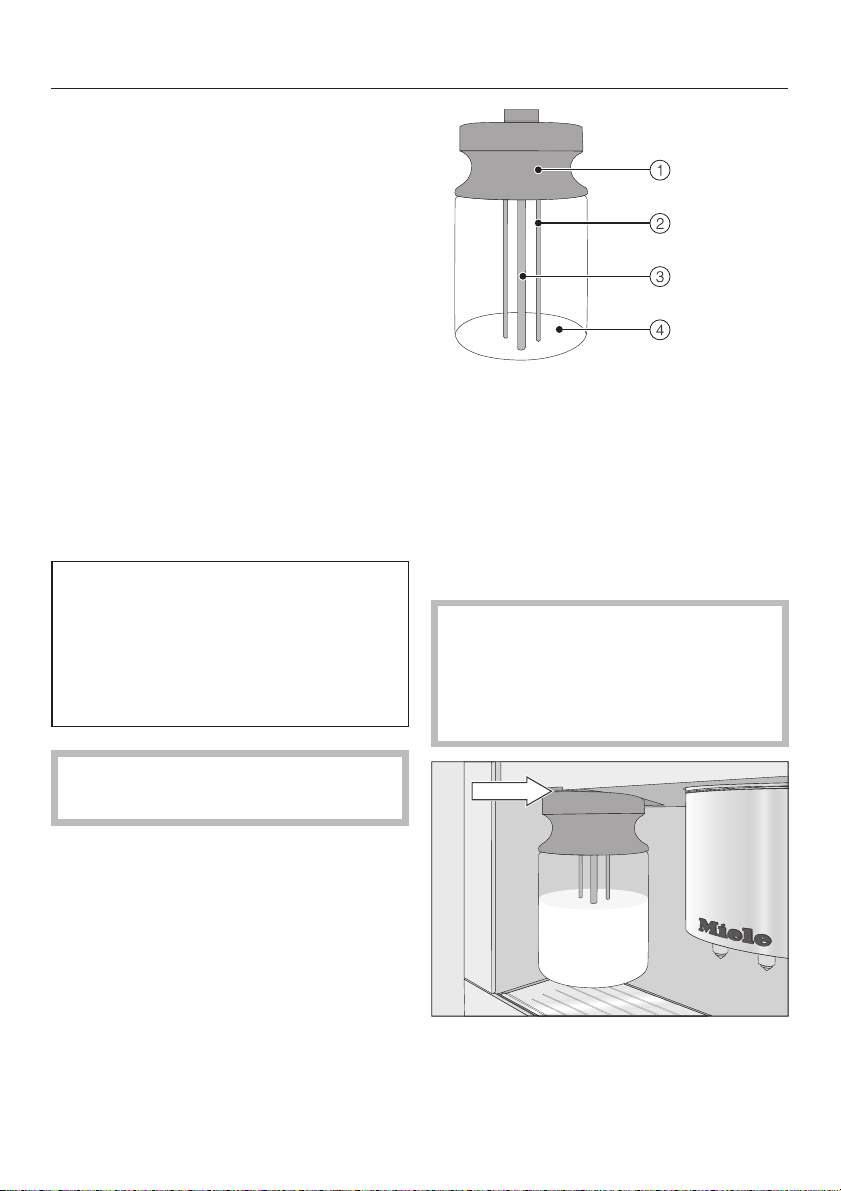
a Lid
b Sensor rod
c Milk intake tube
d Glass container
^ Fill the milk container to a maximum
level of 3/4" (2 cm) below the rim.
Place the lid on the milk container.
Ensure that the neck and lip of the
container are kept clean (both when
filling and when moving the
container). Contamination can
cause malfunctions.
^
Slide the milk container into the front
of the coffee machine.
27
Preparing beverages
Preparing drinks with milk
From the "Drinks" menu:
Place a suitable cup or glass under
^
the main dispenser.
Swipe the display until the desired
^
drink appears and then touch it.
The drink will be prepared.
Preparing hot water
Caution! Danger of scalding and
,
burns! The dispensed water is very
hot.
From the "Drinks" menu:
^ Place a suitable cup or glass under
the hot water dispenser.
^ Swipe the display until "Hot water"
appears, and then touch it.
Hot water is dispensed into the
container under the hot water
dispenser.
To cancel preparation:
Preparing drinks using a
profile
If you have already created a profile
(see "Profiles"), you can select it before
preparing a drink.
Touch "Profiles" { and select the
^
desired profile.
The profile name will appear in the
display to show that a profile has been
selected.
Now you can prepare your desired
drink.
After preparing drinks
If you have prepared a drink with milk,
"Start rinse cycle" will appear in the
display after a while.
^ Touch "OK".
The milk pipework will be rinsed.
Even if you do not confirm with "OK",
the coffee machine will automatically
rinse the milk pipework after a while.
^
Touch "Cancel" or "Stop".
The coffee system cancels the
preparation.
28

To customize the coffee system to suit
your requirements, you can
change the grinder setting,
–
change the amount of ground coffee,
–
change the brewing temperature, or
–
turn on the "Pre-brewing" option.
–
Grinder setting
You can change the grinder setting to
suit the type of coffee you are using.
When the beans are ground correctly
the coffee or espresso will flow evenly
into the cup and have a good crema.
The ideal crema has a hazel color.
There are various ways to tell whether
the coffee grinder is set correctly.
The grind is too coarse if
– espresso or coffee flows into the cup
too quickly;
– the crema is very pale and uneven.
Customizing your coffee
To prevent damage to the grinder:
Adjust the coffee grinder one level
at a time.
Grind the beans again before
adjusting another notch.
Open the front of the coffee system.
^
^ Push the grind control slide to the left
by no more than one increment (for a
finer grind) or to the right (for a
coarser grind).
Use a finer grinder setting so the coffee
beans will be ground more finely.
The grind is too fine if
–
espresso or coffee just drips into the
cup;
–
the crema is dark brown.
Use a coarser grinder setting so the
coffee beans will be ground more
coarsely.
^
Close the front.
^
Prepare a coffee beverage.
Then you can adjust the grinder by
another increment.
The adjusted grinder setting will only
take effect after the second coffee
portion.
29

Customizing your coffee
Changing the drink parameters
You can change the amount of ground
coffee, the pre-brewing and the
brewing temperature for each drink
individually.
From the "Drinks" menu:
Touch "Edit" or swipe the display until
^
"Make drinks" appears and then
touch it.
Touch "Change drink".
^
Swipe the display until the drink you
^
want appears and then touch it.
^ Touch "Drink parameters".
You can now
– change the amount of ground coffee,
– change the brewing temperature, or
– turn on the "Pre-brewing" option.
Amount of ground coffee
The coffee system can grind and brew
6-14 g of coffee per cup. The greater
the amount, the stronger the coffee or
espresso.
There are various ways to tell whether
the amount of ground coffee is set
correctly:
The amount is too small if
The amount is too much if
espresso or coffee just drips into the
–
cup;
the crema is dark brown;
–
the espresso or coffee tastes bitter.
–
Decrease the amount of ground coffee
so that a weaker coffee is brewed.
Touch "Amount of ground coffee".
^
Touch the bar for the amount you
^
want and then "OK".
Brewing temperature
The ideal brewing temperature will
depend on
– the type of coffee,
– whether an espresso or a coffee is
being prepared, and
– the altitude of the region.
There are five brewing temperatures.
Tip: Not every coffee can tolerate high
temperatures. Certain types are too
delicate, so the crema on top is not as
good and the taste is adversely
affected.
^
Swipe the screen in the "Brewing
temperature" field until the setting you
want appears.
–
espresso or coffee flows into the cup
very quickly,
–
the crema is very pale and uneven,
–
the espresso or coffee lacks body.
Increase the amount of ground coffee
so that a stronger coffee is brewed.
30
^
Touch "OK".
The setting is now saved.

Pre-brewing ground coffee
When the pre-brewing function is
turned on, the freshly ground coffee is
first moistened with a little hot water.
Then the remaining water is forced
through the moistened coffee at high
pressure. This helps release the flavor
of the coffee.
You can select short or long
pre-brewing or turn off the
"Pre-brewing" function.
The system is delivered with
"Pre-brewing" turned off.
^ Swipe the screen in the "Pre-brewing"
field until the setting you want
appears.
^ Touch "OK".
The setting is now saved.
Customizing your coffee
31

Setting the serving size
The flavor of a coffee beverage
depends not only on the type of coffee,
but also on the quantity of water used.
You can adjust the amount of water
used for each portion of espresso,
coffee or hot water to suit your cup size
and the type of coffee used.
For beverages prepared with milk, you
can also adjust the milk and milk froth
ratio in addition to the espresso or
coffee size. You can also program the
portion sizes of hot milk and froth.
There is a maximum amount which can
be programmed for each type of drink.
Preparation stops when this is reached.
The maximum portion size possible for
that type of beverage will then be
saved.
The changed beverage size is
always stored in the current profile.
The name of the current profile is
shown at the top left of the display.
From the "Drinks" menu:
Place the desired cup under the main
^
dispenser.
Touch "Edit".
^
Touch "Change drink".
^
Swipe the display until the beverage
^
you want appears and then touch it.
Touch ""Change the portion size".
^
The desired beverage is prepared and
the display shows "Save".
Touch "Save" when the cup has been
^
filled to the desired amount.
If you want to change the portion size
for Cappuccino, Latte macchiato or
Caffè latte the ingredients which make
up the drink will appear in the display.
Cappuccino: milk froth, espresso
Latte macchiato: hot milk, milk froth,
espresso
If there is insufficient water in the
water tank during preparation, the
coffee system will stop the portion
programming. The portion will not be
saved.
32
Caffè latte: hot milk, coffee
^
Touch the ingredients for which you
want to program the portion size.
The selected ingredients have a check
mark 9 beside them.
^
Touch "OK".

The coffee system will now start
preparing your drink. Portion sizes can
be set for each selected ingredient
when "Save" is displayed.
Touch "Save" when the correct
^
amount of the particular ingredient
has been dispensed.
Save the portion size for the selected
^
ingredients.
The programmed portion size and
ingredients will now be dispensed
every time that particular drink is
selected.
Setting the serving size
33

Resetting drinks
You can reset the portion sizes and
parameters for all drinks back to their
factory default setting.
From the "Drinks" menu:
Touch "Edit".
^
Touch "Reset drinks".
^
"Reset all drinks to default?" appears in
the display.
Touch "Yes".
^
34

Profiles
If the coffee system is used by several
people with different coffee
preferences, you can create individual
user profiles. You can choose the
serving size of each coffee beverage
for each profile (see "Setting the serving
sizes").
The name of the current profile is
shown at the top left of the display.
Accessing profiles
Touch { in the main menu or "Profiles"
^
in the drinks menu.
^ You can now create a profile.
If you have already created a profile in
addition to the standard Miele profile,
you also have the following options:
– Select profile from the pre-set
profiles already created for the
system.
– Change name, if you wish to change
the name of a profile.
–
Delete profile if you wish to delete a
profile.
Creating a user profile
Touch "Create profile".
^
The editor will open in the display.
Enter the desired name and touch
^
"OK".
Selecting a user profile
Touch the desired profile.
^
The name of the current profile is
shown at the top left of the display.
Changing the name
^ Touch "Edit".
^ Touch "Change name".
^ Touch the desired profile and then
"OK".
^ Enter the desired name and touch
"OK".
Deleting a user profile
^
Touch "Edit".
^
Touch "Delete profile".
–
Change profile to determine whether
the coffee system automatically
reverts to the standard Miele profile
after each drink or continues to use
the most recently selected user
profile.
^
Touch the desired profile and then
"OK".
35

Profiles
Changing a profile
You can customize the system so that
after preparing each beverage it
automatically reverts to the standard
Miele profile or retains the most recently
selected custom profile.
Touch "Edit".
^
Touch "Change profile".
^
You can now choose between:
Manually: The system retains the
–
selected profile until another profile is
selected.
– After each use: After each beverage
is dispensed, the system
automatically reverts to the standard
Miele profile.
– When turned on: Every time the
system is turned on, it automatically
selects the standard Miele profile, no
matter which profile was selected
before it was last turned off.
^
Touch the option you want and then
"OK".
36

You can create your own beverages for
each profile and set the portion size and
parameters, e.g. amount of coffee,
brewing temperature, for each beverage
individually.
You can also change the names of the
drinks and delete any unwanted drinks
from the profile. A profile can contain a
maximum of nine drinks.
Touch "Profiles" { in the main menu or
^
"Profiles" in the drinks menu.
Select the desired profile.
^
The name of the current profile is shown
at the top left of the display.
Creating a drink
You can create new drinks based on
existing ones. A profile can contain a
maximum of nine drinks.
The "Create drink" option will only
appear if there are less than nine drinks
in the profile.
^
Touch "Edit".
^
Touch "Create drink".
You can now select from the standard
drinks:
Editing drinks for a profile
Enter a name for the newly created
^
drink (maximum of 8 characters) and
touch "Save".
The newly created drink will appear in
the profile.
Changing a drink: Changing the
portion size, drink parameters
and name
Touch "Edit".
^
Touch "Change drink".
^
Swipe the display until the drink you
^
want appears and then touch it.
You can now either change the portion
size, drink parameters or name as
described.
Deleting a drink
^ Touch "Edit".
^ Touch "Delete drink".
^ Swipe the display until the drink you
want appears and then touch it.
^
Touch "OK".
^
Swipe the display until the desired
drink appears and then touch it.
^
Change the drinks parameters and
the portion size for this drink (see
"Customizing your coffee" and
"Changing the portion size").
Preparation will begin and you can save
the amount of each individual ingredient
as desired.
37

MyMiele
Frequently prepared drinks, drinks from
profiles and preferred maintenance
programs can be displayed on the
MyMiele screen.
You can select the MyMiele screen as
your starting screen (see "Settings Starting screen"). This screen is
displayed each time you turn your
coffee system on.
Accessing MyMiele
In the main menu, touch "MyMiele"
^
.
Now you can customize MyMiele and
add entries.
If you have already created entries, you
can select "Edit" to:
– sort entries or
– delete entries.
Adding entries
Deleting entries
Touch "Edit".
^
Touch "Delete entry".
^
Select the entry you want to delete
^
and confirm with "OK".
The entry is deleted.
Sorting entries
Touch "Edit".
^
Touch "Sort entries".
^
Select one by one the entries you
^
want to sort and insert them at the
desired positions.
^ Confirm each new position with OK.
^
Touch "Add entry".
You can add entries from:
–
Drinks /
–
Profiles {
–
Maintenance y
^
Touch the option you want and then
"OK".
A tile is displayed showing the selected
entry and the associated menu.
38

Settings
The "Settings" menu allows you to
customize the coffee system for your
personal needs.
Accessing the "Settings"
menu
You are in the "Drinks" menu.
Touch "Main menu" or the "Back"
^
sensor.
Touch "Settings" % .
^
Now you can check or change any
settings.
Touch # to return to the previous
menu.
The settings which are currently
selected have a colored frame around
them.
Changing and saving settings
Touch "Main menu" or the "Back"
^
sensor.
Touch "Settings" % .
^
Swipe the display until the setting you
^
want appears and then touch it.
Swipe the display until the option you
^
want appears and then touch it.
The setting is now saved.
39

Settings
Overview of the Setting options
The factory default for each setting is displayed in bold.
Option Available settings
Language German, English, other languages
Country
Time Display
Off / On / Night dimming
Clock type
Analog /Digital
Time format
12h/24 h
Set
Date Set
Timer Timer 1
Eco mode Eco mode (On / Off)
Lighting Brightness
Starting screen Main menu
Info Number of drinks
System lock On / Off
Set
Turn on at / Turn off after (1:00) / Turn off at
Days of the week
Monday / Tuesday / Wednesday / Thursday / Friday / Saturday /
Sunday / Accept
Activate
Turn on at (Yes / No) / Turn off at (Yes / No)
Timer 2
Set
Turn on at / Turn off at
Days of the week
Monday / Tuesday / Wednesday / Thursday / Friday / Saturday /
Sunday / Accept
Activate
Turn on at (Yes / No) / Turn off at (Yes / No)
Turn off after
Drinks menu
Profiles
MyMiele
Total no. of portions / espresso / coffee / lungo coffee / cappuccino /
latte macchiato / café latte / milk froth / hot milk / hot water
Portions until
Descaling / Degreasing the brew unit
40

Option Available settings
Water hardness Soft 1
Medium 2
Hard 3
Very hard 4
Brightness Set
Volume Audio signals
Keypad tone
Warming drawer On / Off / Automatic
Dispenser adjustment On / Off
Showroom program Demo mode (On / Off)
Factory default settings Settings
MyMiele
Settings
41

Settings
Language
You can select your language and
country for all the displayed text.
Tip: If you have accidentally selected
the wrong language, follow the flag icon
F to return to the "Language" option.
Time
You can customize the time display, the
time format and the time of day.
Display (Time of day)
You can choose from the following
options:
– On: The time of day is always
displayed even when the system is
turned off.
– Off: The time of day is not displayed
when the system is turned off.
– Night dimming: The time is only
displayed during the daytime.
Clock type
The time can be displayed as
Analog
or
Digital .
Time format
The options are:
– 24-hour clock (24 hr)
Your selection affects the energy
consumption of the coffee system.
This is indicated by a message on
the display.
42
–
12-hour clock (12 hr)
Time of day
You set the hours and minutes.
Date
You set the day, month and year.

Settings
Timers
There are two timers with the following
functions:
The coffee system
turns on at a particular time, e.g. in
–
the morning for breakfast ("Turn on
at").
turns off at a particular time ("Turn off
–
at").
turns off automatically after a certain
–
amount of time if no sensor is
touched or no drink is prepared
("Turn off after"; only available for
Timer 1).
You can also assign the timer functions
to individual days of the week.
For "Turn on at" and "Turn off at" the
timer must be activated and at least
one weekday must be assigned.
Selecting a timer
The options are:
–
Timer 1:
Turn on at, Turn off at, Turn off after
–
Timer 2:
Turn on at, Turn off at
Turn on at
If you have activated the system lock,
the coffee system will not turn on at
the specified time.
If the coffee system has turned itself on
automatically three times using the
timer function "Turn on at" but no drinks
have been dispensed, the system will
not turn itself on again automatically.
This prevents the coffee system from
turning itself on unnecessarily, for
example while you are away on
vacation.
The programmed times will, however,
remain in memory and will be
reactivated after manually turning the
system on again.
Turn off at
If you are away for a while, the stored
times will be reactivated the next time
the system is manually turned on (see
"Turn on at").
Turn off after
The timer function "Turn off after" is
only available with Timer 1.
If none of the sensors has been
touched or no drink has been
prepared, the coffee system will turn
itself off after 30 minutes to save
energy.
You can change this default setting and
select a time between 15 minutes and 9
hours.
43

Settings
Assigning week days
Select the day of the week you want.
The selected weekday is marked as 9.
When all desired weekdays are
checked:
Touch "OK".
^
Activating and deactivating the timer
If the timer for "Turn on at" is activated,
the + symbol and the desired turn-on
time will appear on the display 23:59
hours beforehand if the time display
has been set to "On" or "Night
dimming".
If the system lock has been
activated, the timer function "Turn on
at" cannot be selected.
Select the timer function you want. The
selected timer function is marked with a
9.
When all the desired timers are
checked:
Eco mode
The eco mode is a power-saving mode.
The steam system will only heat up
once a coffee beverage or steam for
hot milk and milk froth is requested.
If eco mode is turned off, milk froth and
hot milk as well as coffee and espresso
can be prepared consecutively. The
steam system remains heated up and
uses significantly more energy.
The coffee machine will indicate the
changed energy consumption.
^
Touch "OK".
44

Settings
Lighting
The following options are available:
Adjust the brightness of the lighting
–
while the system is turned on.
Adjust the brightness of the lighting
–
while the system is turned off.
Specify when the lighting should turn
–
off ("Turn off after").
Adjusting the brightness
First select:
Appliance turned on
–
– Appliance turned off
Setting the time the lighting turns off
(Turn off after)
You can select for how long the coffee
system lighting should stay on after the
system has been turned off.
When the coffee system is turned on,
the lighting will remain on for another 10
minutes after the last action. You
cannot change this time.
Info (displaying information)
In the "Info" option, the number of
portions prepared for each individual
drink can be displayed.
You can also see whether more than 50
portions can be dispensed before the
system needs to be descaled ("No. of
uses until descaling:").
To return to the previous menu:
Touch "OK".
^
Locking the coffee system
(System lock 0)
You can lock the coffee system to
prevent it being used without your
knowledge, by children, for example.
Activating and deactivating the
system lock 0
If the system lock has been
activated, the timer function "Turn on
at" cannot be selected.
Overriding the System lock
Starting screen
You can select which screen should be
displayed when the coffee system is
turned on.
–
Main menu
–
Drinks
–
Profiles
–
MyMiele
While the display shows "Press for 5
seconds to unlock",
^
touch the lock symbol for 5 seconds.
As soon as the coffee system is
turned off, the system is locked
again.
45

Settings
Water hardness
You will find the information on water
hardness in "First steps to use".
Brightness
You can set the brightness of the
display in the bar chart.
If you have programmed the coffee
system to turn on at a specific time
("Turn on at" timer function), the
warming drawer turns on
approximately 30 minutes before the
coffee system is due to turn on. So
your cups are warm and ready for
your coffee.
Volume
You can adjust the volume of the audio
signals and keypad tones in the bar
chart.
Warming drawer
A warming drawer can be connected
directly to an electrical outlet at the
back of the coffee system using a
special connection cable (available as
an optional accessory). Miele Customer
service or your Miele dealer will be able
to advise you on which dish or food
warmers are suitable.
The special connection cable required
is available to order from Miele.
Once the warming drawer is
connected, you need to activate it in
the "Settings" menu.
You can choose from the following
options:
–
Automatic: The warming drawer
turns on and off together with the
coffee system.
On: You can turn the warming
–
drawer on and off manually
whenever you want, independently of
the coffee system.
– Off: The warming drawer will not turn
on because the coffee system is not
supplying it with any electricity.
The coffee system is delivered with
the warming drawer to the "Off"
setting.
Adjusting the dispensers
You can find the information on
dispenser adjustment in "Dispenser
adjustment".
46

Settings
Factory default settings
You can reset the settings back to the
ones which were set when the coffee
system was delivered.
Please refer to the "Overview of the
setting options" chart for the default
factory settings.
The following settings will not be
reset:
- Language
- Time of day
- Number of drink portions
- Profile
Showroom program (demo
mode)
Do not activate this setting for
domestic use.
The coffee system can be presented in
"Demo mode" for showrooms or
exhibitions. In this mode the system
lights up, but no drinks can be
prepared or actions carried out.
The coffee system cannot be turned off
with the On/Off sensor K when demo
mode is activated.
47

Cleaning and care
Overview
The coffee system must be cleaned regularly to prevent a build-up of
,
bacteria.
Recommended frequency To be cleaned / maintained
Daily
(at the end of the day)
Once a week
(more often for heavier soiling)
Once a month Lubricate the cap on the main dispenser connector
When display advises Milk pipework (using the cleaning agent for milk pipework)
When necessary Bean container
Milk container and lid
Water container
Waste unit
Drip tray and no-spill grid
Main dispenser
Main dispenser connector
Clean the milk valve with a cleaning brush
Interior
Drip catcher on the inside of the front door
Brew unit
Front of the system (especially important immediately after
descaling)
Brew unit (with cleaning tablets)
Descale the system
Clean clogged milk pipework with the cleaning brush
Some components of the coffee system are dishwasher safe. However,
cleaning them frequently in the dishwasher can cause them to become
discolored due to food residues (e.g. tomatoes) in the dishwasher, or the
surface coating can be damaged.
The following components should be cleaned only by hand:
–
Main dispenser cover
–
Milk container lid
–
Brew unit
–
Bean container and lid
–
Service cover
48

Cleaning and care
Danger of burns!
Let the unit cool down before you
clean it, especially the water in the
drip tray.
Do NOT use a steam cleaner to
clean this unit. Doing so will damage
the unit.
Never use cleaning products that
contain sand, cleaning soda, acids,
or chlorides! They will corrode the
surface.
To avoid mold, growth and odors it is
important to clean the machine
regularly.
The main dispenser connector cap is
lubricated with silicone grease. Be
careful of your clothing when
removing or inserting containers or
other components from the inside of
the unit.
All surfaces are susceptible to
scratching. On glass surfaces,
scratches can lead to breakage.
All surfaces can become discolored
if they are cleaned with unsuitable
products.
Make sure to immediately wipe
away any splatters during
descaling.
To better maintain your appliance
avoid the following:
– cleaners containing soda, ammonia,
thinners, or chlorides
– cleaners containing descaling
agents or lime removers,
– abrasive cleaners,
– stainless steel cleaners,
– caustic (oven) cleaners,
– scouring pads, steel wool, hard
brushes,
–
eraser sponges,
–
metal scrapers.
Wipe any spills from descaling imme
diately!
-
49

Cleaning and care
Rinsing the system
After a coffee beverage has been
prepared, the coffee system rinses
itself before turning off. This removes
any remaining coffee residue.
You can also rinse the system
manually.
Touch "Main menu" or the "Back"
^
sensor.
Touch "Maintenance" y.
^
Touch "Rinse the appliance".
^
The pipework will now be rinsed. The
water used for rinsing will run out of the
main dispenser.
Milk pipework
Make sure that the milk pipework is
cleaned regularly and thoroughly.
Milk contains natural bacteria that
will multiply if the pipework is not
sufficiently clean. Contamination of
the system can be a health risk.
Rinsing the milk pipework manually
Milk residue can clog the milk
pipework. If you have prepared a drink
with milk, the coffee system will
automatically rinse the milk pipework
after a few minutes.
You can also rinse the milk pipework
manually.
^ Touch "Main menu" or the "Back"
sensor.
^ Touch "Maintenance" y.
^ Touch "Rinse the appliance".
The milk pipework will be rinsed.
50

Cleaning and care
Cleaning the milk pipework using the
milk line cleaner
Make sure that the milk pipework is
cleaned regularly and thoroughly.
Milk contains natural bacteria that
will multiply if the pipework is not
sufficiently clean. Contamination of
the system can be a health risk.
The milk pipework must be cleaned
about once a week. The coffee system
will remind you at the correct time.
"Clean the milk pipework in 3 days" is
displayed three days before the due
date. The remaining number of days
until the milk pipework needs to be
cleaned will show in the display every
time the coffee system is turned on.
^ To confirm this message, touch "OK".
When the number of days left is 0, the
display will show the message "Clean
the milk pipework". The function for
preparing drinks with milk is now
blocked.
^
Touch "OK".
Touch "Main menu" or the "Back"
^
sensor.
Touch "Maintenance" y.
^
Touch "Clean the milk pipework".
^
The program starts and various
messages appear in the display.
Follow the instructions.
^
When the display shows "Fill water
container with cleaning agent and
lukewarm water up to the 8 symbol
and replace", do the following:
Preparing the cleaning solution
The milk system detergent was
developed specifically for this coffee
machine. It is available from Miele.
To avoid damaging the coffee
system, use this cleaning agent
only.
^ Place one sachet of the cleaning
agent for milk pipework in the water
tank.
Now you can only prepare espresso,
coffee, large coffee and hot water. You
can only prepare drinks with milk again
once the milk pipework has been
cleaned.
The cleaning program cannot be
canceled once is has started. The
program has to be carried through to
the end.
51

Cleaning and care
^ Fill the water tank with lukewarm
water up to the 8 mark and stir the
solution.
Please observe the mixing ratio. It is
important that you fill the water tank
to the mark. Otherwise, the cleaning
process will be incomplete.
^ Reinsert the water tank and close the
front door.
Milk container with lid
Ensure that the neck and lip of the
container are kept clean (both when
filling and when moving the container).
Contamination can cause the system to
malfunction.
^ The milk container (glass) can be
cleaned in the dishwasher or by hand
with warm water and liquid dish
soap. After cleaning, dry the milk
container.
Clean the lid of the milk container
only by hand.
^ Follow the instructions in the display.
When "Fill and replace the water
container" is displayed:
^ Rinse the water tank carefully with
clean water. Make sure that no
detergent residue is left in the water
tank. Fill the water tank with fresh tap
water.
The cleaning process is complete when
"Program finished" is displayed.
52
^ Rinse the milk pipework in the lid
under running water.
If no water comes out of the milk
pipework a,
^ clean the lid as described in the
chapter "Clogged milk pipework –
Step 1: Cleaning the milk pipework in
the lid of the milk container".

Main dispenser
Clean the cover of the main dispenser
by hand only, using warm water and
liquid dishsoap. All other components
are dishwasher safe.
The main dispenser must be in the
maintenance position for cleaning.
Otherwise you will not be able to
remove the parts.
Cleaning and care
If there is a container underneath
the main dispenser, remove it so
that the main dispenser can move
into the maintenance position.
^ Touch "Main menu" or the "Back"
sensor.
^ Touch "Maintenance" y.
^ Touch "Clean the main dispenser".
The main dispenser moves into the
maintenance position a.
Push the catch upwards a, grasp
^
the dispensing unit by the handle
and pull it out towards the front b.
^
Hold the magnets at the side and pull
forwards to release the unit.
^
Pull the cover forward and off b.
53

Cleaning and care
Turn the top connecting piece a and
^
pull it up and off. Then pull the
bottom connecting piece b up and
off.
^ Pull off the dispensing nozzles c.
Now reassemble the dispensing unit
^
in the reverse order. Make sure that
the upper connecting piece a clicks
into place. Push the dispensing
nozzles b firmly onto the dispensing
unit.
Do not remove the Y-piece.
^ Thoroughly clean all components.
^
Clean the surface of the main
dispenser with a damp sponge.
^ Reinsert the dispensing unit.
^ Replace the cover.
54

Cleaning and care
Cleaning the milk valve
You should clean the milk valve once a
week to ensure good quality milk froth.
Touch "Main menu" or the "Back"
^
sensor.
Touch "Maintenance" y.
^
Touch "Clean the main dispenser".
^
The main dispenser and the milk valve
move into the maintenance position.
Important! Before you confirm
"Leave maintenance position" with
"OK", you must remove the cleaning
brush. Otherwise, the coffee system
will be damaged.
Sensor cover
The sensor cover for the cup protection
shut-off is located under the main
dispenser. If the automatic dispenser
adjustment sensors do not clearly
recognize a container, the cup
protection shut-off stops the main
dispenser.
Clean the sensor cover by hand only
as necessary using warm water and
liquid dish soap.
^ To remove, press and hold the
sensor cover between the dispenser
nozzles a. Then press the main
dispenser in from the sides at the
back b.
^
Insert the brush into the milk valve.
Move the brush back and forth.
^
Touch "OK".
The milk valve will move into the stan
dard position and the milk pipework is
rinsed.
This releases the sensor cover.
^
To replace, insert both hooks at the
back and press the sensor cover
upwards.
-
55

Cleaning and care
Water tank
Change the water every day to prevent
a build-up of bacteria.
Make sure that the valve, the
underside of the water tank and the
surface that the water tank sits on
are clean. Otherwise the water tank
will not sit correctly.
The water tank can be cleaned in the
^
dishwasher or by hand using warm
water and liquid dish soap. After
cleaning, dry the water tank.
Waste unit
After a certain time, the coffee system
displays a message indicating that the
waste unit needs to be emptied. At this
point the container must be cleaned.
However, it is best to clean the waste
container daily. Coffee grounds can
become moldy.
Typically there will also be some water
in the waste container, left over from the
brewing and rinsing processes.
Wash the waste container in the
^
dishwasher, or by hand with warm
water and liquid dish soap, then dry.
^ Also thoroughly clean the now
accessible areas inside the
appliance.
^
Carefully clean and dry the surface
that the water container sits on,
particularly the slots.
56

Drip tray
Clean the drip tray daily to prevent
odors and mold.
The coffee system displays a message
when the drip tray is full and needs to
be emptied. At this point the drip tray
must be emptied.
Risk of burns!
,
If the coffee system has just been
rinsed, wait a while before removing
the drip tray. Rinse water runs out of
the dispensers.
Cleaning and care
Make sure that the metal discs
(contacts) on the drip tray are
cleaned and dried properly. If they
are dirty or damp, the discs will not
be able to detect that the drip tray is
in place or that it is full.
Clean the space under the drip tray.
^
Push the drip tray back into the
^
coffee system.
Make sure the drip tray is pushed in
as far as it will go.
^
Open the front door and carefully
remove the drip tray.
The grid in the drip dray helps keep
the water in place while you move the
full drip tray.
^
Wash the drip tray and the grid in the
dishwasher, or by hand with warm
water and liquid dish soap, then dry.
57

Cleaning and care
Drip tray cover
Remove the drip tray cover.
^
The drip tray cover can be cleaned in
^
the dishwasher or by hand using
warm water and liquid dish soap.
Dry the drip tray cover thoroughly.
^
^ Replace the cover onto the drip tray.
Make sure that the front of the cover
is flush with the drip tray.
Bean container
Main dispenser connector
A connecting piece between the brew
unit and the main dispenser is located
on the inside of the front.
^ Clean this connector on a regular
basis with a damp cloth, but take
care not to remove the lubricant from
the cap.
^ Once a month, lubricate the cap with
the silicone grease provided.
^
Pull the bean container out of the
appliance and pull the lid toward the
back and off.
^
Clean the bean container and its lid
by hand using warm water and liquid
dish soap. Dry both components.
^
Slide the lid back on, then slide the
bean container back into the
appliance.
58

Cleaning and care
Interior and front door
Clean the interior and the front door
^
with warm water and liquid dish soap
once all removable parts have been
removed.
Tip: Use a vacuum cleaner to remove
dry coffee grounds.
In the lower part of the inside of the
front door there is a drip catcher.
^ Remove this cup and clean it in the
dishwasher or by hand using warm
water and liquid dish soap.
Brew unit
Clean the brew unit by hand only
using warm water. Do not use
soap.
The moving parts of the brew unit
are lubricated. Detergents will
damage the brew unit.
Clean the brew unit once a week.
Removing the brew unit and rinse it
by hand
The brew unit can be removed for
cleaning.
^ Open the front door.
^ Remove the water container, the
waste unit, and the ground coffee
chute lid.
Remember to reinsert the drip
catcher.
^
Press the button at the bottom of the
brew unit handle a while turning the
handle to the left b.
^
Press the brew unit catch c
downward, and carefully pull the
brew unit out of the machine.
59

Cleaning and care
If you cannot remove the brew unit or
can only do so with difficulty, the brew
unit is not in the correct position (see
"Frequently asked questions").
When the brew unit has been pulled
out, do not alter the position of the
brew unit handle.
This would shift the brew unit and it
would not fit back into the coffee
system.
Clean the brew unit by hand under
^
running hot water. Do not use soap.
To replace the brew unit, repeat the
previous steps in the reverse order:
Push the brew unit back into the
^
coffee system, making sure it is
straight.
^ Push the button on the bottom of the
brew unit handle a while turning the
handle to the right b.
^ Close the door.
^
Rub any coffee residue from the
filters. One filter is located inside the
funnel, the other to the left of the
funnel.
^
Dry the funnel to prevent ground
coffee from sticking to it the next time
coffee is prepared.
^
Clean the inside of the coffee system.
Use your vacuum cleaner to remove
dry coffee grounds.
60

Cleaning and care
Degreasing the brew unit
Depending on the natural oil content of
the coffee used, the brew unit can
become blocked quite quickly. Use the
supplied cleaning tablets to clean the
brew unit.
These cleaning tablets were specially
formulated for use in the coffee system.
They are available from Miele.
After 200 portions, the display will show
the message "Degrease brew unit". This
message will be displayed until the
brew unit has been degreased.
Degrease the brew unit regularly.
This ensures that the coffee system
continues to dispense aromatic
coffee and operates problem-free.
The cleaning program cannot be
stopped once is has started. The
program has to be carried through to
the end.
^
Touch the On/Off sensor K to turn
the coffee system on.
When the display prompts you to "Place
a cleaning tablet in the ground coffee
chute and close the chute":
Remove the ground coffee chute
^
cover and open the chute lid.
^ Drop the cleaning tablet into the
chute.
^ Close the lid, put the cover back on,
and close the door.
^ Follow the instructions in the display.
When "Program finished" is displayed:
^
Touch "OK".
The brew unit is now cleaned.
^
Touch "Main menu" or the "Back"
sensor.
^
Touch "Maintenance" y.
^
Touch "Degrease brew unit".
^
Follow the instructions in the display.
61

Cleaning and care
Exterior
The surfaces can become
discolored or otherwise altered if
soiling is not cleaned promptly.
Remove any soiling immediately.
Make sure no water can penetrate
the display!
All external surfaces are susceptible
to scratching. On glass surfaces,
scratches can lead to breakage.
All surfaces can become discolored
if they are cleaned with unsuitable
products.
Make sure to immediately wipe
away any spills during descaling!
^ Touch the On/Off sensor K to turn
the coffee system off.
^ Use a clean, soft sponge with warm
water and liquid dish soap to clean
the housing. Dry all parts with a soft
cloth.
Tip: You can also clean the exterior
using the Miele micro fiber cloth.
62

Descaling
Limescale builds up in the coffee
system during use. The limescale
buildup in the system depends on the
hardness of your local water supply.
Limescale must be removed regularly.
The system guides you through the
descaling process. Various instructions
appear in the display, e.g. you are
prompted to empty the drip tray or fill
the water tank.
Descaling is absolutely necessary
and takes approximately 20 minutes.
During the descaling program, water
containing descaling agent runs out of
the main dispenser and the hot water
dispenser. This is followed by a
working-in period before a little more
water with descaling agent is
dispensed, etc.
The coffee system will remind you via
the display when the descaling
program needs to be carried out. The
following message will appear in the
display: "No. of uses until appliance
needs descaling: 50". The remaining
number of portions that can be made
before descaling will show in the
display after each beverage is made.
^
Touch "OK" to confirm this message.
When the number of remaining drinks
is 0, the coffee system will lock. The
display will read, "Please descale".
Descaling after being prompted by
the display
The descaling program cannot be
canceled once it has started. The
program has to be carried through to
the end.
Touch "OK" to start descaling imme
^
diately.
The descaling process starts and
various messages appear in the
display.
Follow the instructions.
^
When the display shows "Fill water
container with lukewarm water and
descaling solution up to the F symbol
and insert", proceed as follows:
Preparing the descaling solution
The descaling tablets provided were
specially formulated for use with this
coffee system. Additional descaling
tablets are available from Miele.
You need two descaling tablets for the
descaling process.
Only use Miele descaling tablets.
Other types of descaling agents can
damage the system and affect the
taste.
-
You can turn the coffee system off if
you do not want to run the descaling
program at this time. However, no more
drinks can be prepared until the
descaling program has been
completed.
63

Descaling
Fill the water tank to the F mark with
^
lukewarm water.
Add two descaling tablets to the
^
water.
Please observe the mixing ratio for
the descaling tablets.
It is important that you fill the water
tank to the mark. Too little water can
cause the descaling program to
stop prematurely.
The descaling program is now
complete and drinks can be prepared
again.
When descaling the system, be sure
to wipe off any splatters of descaling
agent immediately! These could
damage the surfaces.
After descaling the system, carefully
clean the water tank and the drip tray to
remove all traces of descaling agent.
Descaling before being
prompted
The descaling program cannot be
canceled once it has started. The
program has to be carried through to
the end.
^ Touch "Main menu" or the "Back"
sensor.
^ Reinsert the water tank and close the
door.
^
Follow the instructions in the display.
When the display shows, "Fill the water
container with fresh tap water up to the
descaling mark":
^
Rinse the water tank carefully with
clean water. Make sure that no
descaling agent is left in the water
tank. Fill clean tap water up to the k
mark.
Also empty the waste container.
The descaling process is complete
when "Program finished" is displayed.
^
Touch "OK".
64
^ Touch "Maintenance" y.
^
Touch "Descale unit".
The descaling process will start.

Frequently asked questions
Repairs to electrical appliances should only be carried out by a suitably
,
qualified person in accordance with local and national safety regulations.
Repairs and other work by unqualified persons could be dangerous. The
manufacturer cannot be held responsible for unauthorized work.
Display messages
To address the "fault", follow the instructions on the display.
^
If the fault message still appears on the display, contact Miele Technical Ser
^
vice.
Fault Possible cause and solution
-
Fault1-4
80-83
Fault 74, 77
Fault 225, 226
Fault 235, 236
There is an internal malfunction.
^ Touch the On/Off sensor K to turn off the coffee system.
Wait about one hour and then turn the system back on.
There is an internal malfunction.
^ Touch the On/Off sensor K to turn off the coffee system.
Wait about 2 minutes and then turn the system back on.
65

Frequently asked questions
Fault Possible cause and solution
The brew unit cannot reset to the correct position or it is
Fault 73
or
"Check brew unit"
^
clogged and the ground coffee cannot be processed.
See if you can remove the brew unit (see "Cleaning and
^
care – Brew unit").
If you can remove the brew unit, clean it (see "Cleaning
^
and care – Brew unit").
Push the coffee ejector of the brew unit into the standard
position (see illustration).
^ Reinsert the waste container and the water tank. Do not
insert the brew unit. Close the door and turn on the coffee
system using the On/Off sensor K.
Fault 227 - 230,
Fault 233
66
The brew unit motor will automatically move to the correct
position.
^
When the message "Insert the brew unit" is displayed, open
the door and reinsert all the parts into the coffee system.
Close the front door.
If you cannot remove the brew unit:
^
Touch the On/Off sensor K to turn off the coffee system.
Wait about 2 minutes and then turn the system back on.
The automatic dispenser adjustment is malfunctioning.
^
To confirm the message, press OK.
The automatic dispenser adjustment will be deactivated
during beverage preparation as long as the system remains
turned on. You can still make beverages.

Frequently asked questions
Fault Possible cause and solution
Fault 234 The cup protection shut-off has been triggered three times
since the coffee system was turned on. The cups or glasses
being used are not clearly recognized by the automatic
dispenser adjustment.
Use only cups or glasses that can be recognized by the
^
automatic dispenser adjustment.
The automatic dispenser adjustment is malfunctioning.
Touch the On/Off sensor K to turn off the coffee system.
^
Wait about 2 minutes and then turn the system back on.
"Too much ground
coffee"
"Insert water
container until it
engages"
There is too much ground coffee in the ground coffee chute.
If more than one level scoop is put into the ground coffee
chute the brew unit cannot process it. The ground coffee will
be directed into the waste container, and an fault message
will be displayed.
^ Touch the On/Off sensor K to turn off the coffee system.
^ Remove the brew unit and clean it (see "Cleaning and care
– Brew unit").
^ Remove all ground coffee from the interior of the coffee
system, for example with a vacuum cleaner.
Use the supplied coffee scoop to measure out the ground
coffee. Scoop only one serving of ground coffee into the
ground coffee chute.
The water container is not sitting properly in the appliance.
^
Take the water container out, then put it back into the
appliance.
This fault message will also appear if the water container is
not correctly filled and inserted during descaling.
^
Fill it to the descaling mark F and restart the descaling
process.
67

Frequently asked questions
Unusual behavior of the coffee system
Problem Possible cause and solution
The lighting does
not come on when
the coffee system
is turned on.
The display
remains dark
when the coffee
system is turned
on using the
On/Off sensor K.
The coffee system
turns off suddenly.
The lighting has been turned off.
Turn on the lighting (see "Settings – Lighting").
^
The lighting is defective.
Contact Technical Service.
^
The On/Off sensor K was not touched long enough.
Touch the depression in the On/Off sensor K for at least
^
3 seconds.
The plug is not properly inserted into the electrical outlet.
^ Insert the plug into the outlet.
The circuit breaker has tripped due to a problem with the
coffee system, the electricity supply or another device.
^ Unplug the coffee system.
^ Contact a qualified electrician or Miele Technical Service
for assistance.
The programmed turn-off time has been reached.
^
If desired, set a new turn-off time (see "Settings – Timers").
The plug is not properly plugged into the electrical outlet.
^
Insert the plug into the electrical outlet.
The coffee system
is on. The lighting
turns off suddenly.
The sensor
buttons do not
respond. The
coffee system can
no longer be
operated.
68
If more than 10 minutes have passed since the coffee
system was last used, the lighting automatically turns off.
There is an internal malfunction.
^
Open the front door of the coffee system.
The current process is stopped.
^
Unplug the coffee system.

Frequently asked questions
Problem Possible cause and solution
The coffee system
does not turn on
at the
programmed time
even though "Turn
on at" is activated.
The displayed
messages are
difficult to read.
After the coffee
system has been
turned on, the
message "Fill and
insert water
container"
appears although
the tank is full and
inserted.
The system does
not rinse.
System lock is activated.
Deactivate system lock (see "Settings – System lock").
^
No days of the week have been selected.
Check the timer settings and adjust if necessary (see
^
"Settings – Timers").
The coffee system was not used after being automatically
turned on three times in a row (see "Settings – Timers").
Turn the system on and prepare a drink.
^
The brightness of the display is set too low.
^ Adjust this setting (see "Settings – Display brightness").
There is limescale build-up in the coffee system.
^ Touch the On/Off sensor K to turn off the coffee system.
Wait for approx. 1 hour.
^ Turn the system on again. As soon as "Preheating phase"
appears, touch "Maintenance" (bottom right) and select
"Descale unit".
^ Descale the coffee system. You may need to repeat the
descaling process.
If after this the fault message appears in the display again,
contact Miele Technical Service.
The milk pipework
is being rinsed but
no rinse water
comes out of the
main dispenser.
The message "Fill
and insert water
container is
displayed.
No milk or milk
froth comes out of
the main
dispenser.
The milk pipework or the air intake hose is clogged.
^
Follow the instructions in chapter "Cleaning clogged milk
pipework".
The milk pipework or the air intake hose is clogged.
^
Follow the instructions in chapter "Cleaning clogged milk
pipework".
69

Frequently asked questions
Problem Possible cause and solution
The display shows
the message "Fill
and insert milk
container"
although the milk
container is full
and in place.
"Empty drip tray"
appears in the
display even
though the drip
tray is empty.
The front door
cannot be closed.
The front door
cannot be closed.
The milk container lid may be soiled, causing the sensors to
malfunction.
Thoroughly clean the lid and milk container (see "Cleaning
^
clogged milk pipework").
The drip tray is not inserted correctly.
Slide the drip tray all the way into the unit.
^
The drip tray's sensors are not working properly.
Touch the On/Off sensor K to turn off the coffee system.
^
The metal contacts are dirty.
^ Clean and dry the contacts thoroughly (see "Cleaning and
care – Drip tray").
The containers are not fully inserted.
^ Check the containers.
The door hinges are not aligned correctly.
^ Adjust the door hinges (see "Installation – Adjusting the
door hinges").
The coffee system
suddenly stopped
preparing a
beverage.
70
If the water tank is emptied during beverage preparation, the
display will show the message "Continue preparation? yes /
no" after the water tank has been refilled and inserted. If you
do not confirm this message with "yes" within 5 minutes, the
system will stop preparing the beverage.

Frequently asked questions
Problem Possible cause and solution
The cup or glass
being used is
repeatedly not
recognized by the
automatic
dispenser
adjustment. The
main dispenser
moves to the rim
of the cup and
triggers the cup
protection
shut-off.
The cup
protection shut-off
is malfunctioning.
The main
dispenser moves
to the rim of the
cleaning or other
container,
jamming it in.
Use only cups or glasses which can be recognized by the
automatic dispenser adjustment.
The automatic dispenser adjustment is malfunctioning.
Touch the On/Off sensor K to turn off the coffee system.
^
Wait about 2 minutes and then turn the system back on.
Use another cup or glass and make a drink.
^
If the cup protection shut-off is triggered again or the main
dispenser moves to the rim of the cup or glass again,
contact Miele Technical Service.
If the cleaning container is very close to or touching the back
panel, the automatic dispenser adjustment will not detect it
properly.
^ Move the cleaning container further forward.
71

Frequently asked questions
Unsatisfactory results
Problem Possible cause and solution
The consistency of
the milk froth is
unsatisfactory.
The grinding of the
coffee beans
sounds louder
than usual.
Espresso or coffee
flows into the cup
too quickly.
Espresso or coffee
flows into the cup
too slowly.
The coffee or
espresso is not hot
enough.
The milk temperature is too high. Good milk froth can only
be prepared with cold milk (< 55°F/13°C).
Check the milk temperature in the milk container.
^
The milk pipework or the air intake hose is clogged.
Follow the instructions in chapter "Cleaning clogged milk
^
pipework".
The coffee bean container has run empty during the
grinding process.
^ Fill the coffee bean container with fresh beans.
There might be stones mixed in with the coffee beans.
^ Turn the coffee system off immediately. Contact Miele
Technical Service.
The grind level is too coarse.
^ Set the grinder control to a finer setting (see "Adjusting the
grinder setting").
The grind level is too fine.
^
Set the grinder control to a coarser setting (see "Adjusting
the grinder setting").
The cup has not been pre-heated.
The brewing temperature is set too low.
^
Set a higher brewing temperature (see "Brewing
temperature").
72
The brew unit filters are blocked.
^
Remove the brew unit and clean it by hand (see "Brew
unit" ).
^
Degrease the brew unit (see "Brew unit").

Frequently asked questions
Problem Possible cause and solution
There is no proper
crema on the
coffee or
espresso.
The grind level is too coarse or too fine.
Set the grinder control to a coarser or finer setting (see
^
"Adjusting the grinder setting").
The brewing temperature is too high for the type of coffee
being used.
Set a lower brewing temperature (see "Brewing
^
temperature").
The coffee beans are no longer fresh.
Add fresh beans to the coffee bean container.
^
73

Cleaning clogged milk pipework
If the quality of the milk froth is
unsatisfactory, the air intake hose may
be clogged. Follow the instructions in
"Step 2: Cleaning the air intake hose
and angled section in the door."
If no milk comes out of the main
dispenser, only steam, please follow
the instructions in Steps 1 to 3.
First check if the milk in the milk
container has spoiled. This can clog
the milk pipework.
To clean the clogged milk pipework,
take a step-by-step approach.
Afterwards, check if the preparation
and quality of the milk and/or milk froth
are satisfactory.
If the preparation and quality of the milk
and/or milk froth are still not
satisfactory, do not make any drinks
and repeat the steps described.
Step 1: Cleaning the milk
pipework in the lid of the milk
container
^ Pull the milk intake pipe a out of the
milk container lid.
Make sure you also remove the seal
b.
^ Clean both under running water.
Insert the supplied cleaning brush
into the stainless steel pipe and move
it back and forth until all milk residue
has been removed.
74
^
Use the cleaning brush to clean the
milk pipework in the lid as well.

Cleaning clogged milk pipework
To reassemble the lid:
First put the seal in the lid. Then
^
insert the milk intake pipe into the
seal.
Make sure not to slide the beveled
end of the milk intake hose into the
seal.
Step 2: Cleaning the air intake
hose and angled section in the
front door
Do not use a needle or similar sharp
item. They can damage the parts.
First detach the air intake hose a
^
from the opening c. Then pull off the
angled section b.
^ Pull both hoses out of the angled
section.
^ Clean the air intake hose a using the
supplied cleaning brush. "Blowing
through" can also dislodge any
blockages.
^ Clean the opening for the air intake
hose c in the front door.
^
Open the service cover on the back
of the front door.
^ Clean the angled section b under
running water. If necessary, replace it
with the supplied spare part.
^
Insert the brush into the milk hose d.
Move the brush back and forth until
all milk residue has been removed.
75

Cleaning clogged milk pipework
Slide the hoses back onto the angled
^
section and reinsert it.
Reinsert the air intake hose into the
^
opening c.
Step 3: Cleaning the milk valve
and the milk pipework in the
main dispenser
^ Touch "Main menu" or the "Back"
sensor.
^ Touch "Maintenance" y.
^
Touch "Clean the main dispenser".
Insert the brush into the milk valve.
^
Move the brush back and forth.
^ Remove and disassemble the
dispensing unit as described in
"Cleaning and care – Main
dispenser".
^ Rinse all parts carefully under
running water.
Use the cleaning brush to clean all
parts carefully. Do not use a needle
or suchlike in order to avoid piercing
the silicone parts.
The main dispenser and the milk valve
will move into the maintenance position.
Important! Before you confirm
"Leave maintenance position" with
"OK", you must remove the cleaning
brush. Otherwise, the coffee system
will be damaged.
76
^
Reassemble the dispensing unit and
reinsert it into the main dispenser.
^
Replace the cover.
^
Touch "OK".
The milk valve will move into the stan
dard position and the milk pipework is
rinsed.
-

After sales service
In the event of a fault which you cannot
easily fix yourself, please contact the
Miele Technical Service Department at
the contact information on the back of
this booklet.
When contacting the Technical Service
Department, please quote the model
and serial number of your appliance
given on the data plate inside the
appliance.
MieleCare
(USA only)
MieleCare, our Extended Service
Contract program, gives you the
assurance of knowing that your
appliance investment is covered by
5 years of worry free ownership.
MieleCare is the only Extended Service
Contract in the industry that guarantees
repairs by a Miele Authorized Service
Provider using genuine Miele parts.
Only genuine Miele parts installed by
factory trained professionals can
guarantee the safety, reliability, and
longevity of your Miele appliance.
Please note that unless expressly
approved in writing by Miele’s Service
department, Extended Service
Contracts offered by other providers for
Miele products will not be recognized
by Miele. Our goal is to prevent
unauthorized (and untrained) service
personnel from working on your Miele
products, possibly doing further
damage to them, you and/or your
home.
To learn more about MieleCare
Extended Service Contracts, please
contact your appliance dealer or visit
us online at:
http://mieleusa.com/mielecare
77

78

Installation instructions
Information is subject to change. Please refer to our website to obtain the most
current product specification, technical & warranty information.
The installation steps are described in the enclosed "Installation Diagram".
Leave these instructions with the appliance for the consumer/user.
Information is subject to change. Please refer to our website to obtain the most
current product specification, technical & warranty information.
79

Caring for the environment
Disposal of packing material
The cardboard box and packing
materials protect the appliance during
shipping. They have been designed to
be biodegradable and recyclable.
Please recycle.
Ensure that any plastic wrappings,
bags, etc. are disposed of safely and
kept out of the reach of children.
Danger of suffocation!
Disposal of an old appliance
Old appliances may contain materials
that can be recycled. Please contact
your local recycling authority about the
possibility of recycling these materials.
Ensure that the appliance presents no
danger to children while being stored
for disposal. Before discarding an old
appliance, unplug it from the outlet, cut
off its power cord and remove any
doors to prevent hazards.
80

Make sure that the power to the
(NEMA 5-15P, 15 amp, L1, N, G)
machine is OFF before installing or
performing maintenance or repairs.
All electrical work should be
performed by a qualified electrician
in strict accordance with national
and local safety regulations.
Installation, repairs and other work
by unqualified persons could be
dangerous.
Verify that the voltage, load and circuit
rating information found on the data
plate match the household electrical
supply before installing the coffee
system.
Do not connect the appliance to a
power inverter or directly to power
produced outside of the normal
electrical grid (i.e. direct solar or wind
power source).
Electrical connection
WARNING:
THIS APPLIANCE MUST BE
GROUNDED
Important
The coffee system comes equipped
witha6ft(1.8 m) power cord with a
NEMA 5-15P molded plug for
connection to a 120 V, 15 A, 60 Hz
power supply.
Direct connection to such power
sources can cause power surges and
tripped breakers when the appliance is
turned on, and could damage the
appliance.
Do not connect the appliance to energy
saving plugs or outlets. The reduction
of power to the appliance caused by
these devices will cause the appliance
to run hot and may damage it and/or
shorten its usable life.
If there is any question concerning the
electrical connection of this appliance
to your power supply, please consult a
licensed electrician or contact Miele’s
Technical Service Department. See
back page for contact information.
81

Installation
Installation and combination options
The system is designed to be built into cabinetry.
82

Installation
It is also possible to combine it with other built-in Miele appliances. If the coffee
system is to be built in above another appliance, there must be a full-width, closed
shelf between them (exception: installation with a warming drawer).
83

Installation
Ventilation
When installing the coffee system,
make sure that it is sufficiently
ventilated at the back so that steam
and hot air can escape.
The ventilation openings in the
surrounding cabinets and the space
below the ceiling must be at least
78 3/4"² (200 cm²).
Otherwise condensation can form,
causing damage to the coffee system
or the surrounding cabinets.
Installation
Make sure no power is supplied to
the unit. The same applies in the
event of disassembly!
When built into cabinetry, only use
the coffee machine in ambient
temperatures between +50°F/10°C
and +100°F/38 °C.
You will need two Allen wrenches
size 3 and 5 for the installation.
To align the appliance door flush with
the kitchen cabinetry, there must be a
sealing strip around the installation
recess; otherwise, a sealing strip must
be put in place around the appliance.
84
^
If there is no sealing strip around the
installation recess, stick the Miele
sealing strip onto the appliance from
behind before putting it into the
recess.
The sealing strip is available from
Miele.

Tip: A place to set down the coffee
system at the level of the installation
recess is helpful. This makes it easier
for you to install the system's
connections.
^ Unscrew the four feet on the
underside of the unit by about 1/16"
(2 mm) using the larger Allen wrench.
The feet can be unscrewed by up to
3/8" (10 mm).
Installation
Open the front door and partially
^
tighten the screws.
Align the appliance by carefully
^
adjusting the lower Allen head
screws until the unit is centered in the
installation recess.
^ To secure the system in the cabinet,
tighten the upper Allen head screws
by hand.
^ Connect the system to the electricity
supply.
^
Insert the coffee system all the way
into the installation recess.
When inserting the system into the
recess, make sure the electrical
connection is not damaged.
^
Make sure that the coffee system is
centered and straight in the
installation recess. If necessary, align
the system using the four feet.
The coffee system comes with four M5
Allen head screws that you can use to
align and fasten it in the installation
recess.
85

Installation
Adjusting the door hinges
If the door cannot be opened or closed
easily after installation, you will have to
align the door (TX 20):
^ To adjust the door flush with the front
of the cabinet, turn screw a.
^ To adjust the door horizontally and
vertically, turn screw b.
86

RemoteVision (optional accessory)
Miele's RemoteVision Wi-Fi technology
creates a 'virtual link' between your
appliance and our monitoring center. If
a fault occurs, Miele's client service
center will be notified and contact you,
or another trusted individual identified
on your call roster, in order to gain
access to your appliance to fix the
problem.
For information on set-up and
installation of the RemoteVision module
see the "Installation" section of this
manual.
Be sure your wireless system meets the
following requirements
A wireless router that supports an
–
IEEE 802.11b/g protocol
Windows XP
–
system, Mac
Cable or DSL modem
–
Microsoft
–
®
or newer operating
®
OS X 10.3 or higher
®
Internet Explorer 6 or
higher, Safari 2.0 or higher, Firefox
1.5 or higher
* Please note that each wireless router
manufacturer supplies their own device
drivers and setup programs. Due to the
differences in manufacturers, exact
router setup instructions are not
included in this manual. Wording and
instructions may vary.
87

Copyright and licenses
Miele uses software to operate and control the coffee system.
This product contains Adobe® Flash® Player software under license from Adobe
Systems Incorporated, Adobe Macromedia Software LLC. Adobe and Flash are
registered trademarks of Adobe Systems Incorporated.
The proprietary rights of Miele and other relevant software suppliers (e.g. Adobe)
must be respected.
Miele and its suppliers reserve all rights to the software components.
In particular, the following are prohibited:
Copying and distribution,
–
Modifications and derivations,
–
DE compilation, reverse engineering, disassembling and other such software
–
reductions.
An overview of the integrated Open Source components and a copy of the current
license can be obtained at www.miele.com/device-software-licences. You will
need to enter the specific product name.
888990


Please have the model and serial number
T
of your appliance available before
contacting Technical Service.
U.S.A.
Miele, Inc.
National Headquarters
9 Independence Way
Princeton, NJ 08540
Phone:
Fax:
www.mieleusa.com
Technical Service & Support
Nationwide
Phone:
Fax:
800-843-7231
609-419-9898
609-419-4298
800-999-1360
888-586-8056
echnicalService@mieleusa.com
Canada
Importer
Miele Limited
Headquarters and Miele Centre
161 Four Valley Drive
Vaughan, ON L4K 4V8
www.miele.ca
Customer Care Centre
Phone:
customercare@miele.ca
Germany
Manufacturer
Miele & Cie. KG
Carl-Miele-Straße 29
33332 Gütersloh
800-565-6435
905-532-2272
91

CVA 6800
M.-Nr. 09 741 610 / 02en - US, CA
 Loading...