

Page 1

User's Guide
for Windows
Page 2

Copyright 1999 by Microtek International, Inc.
All rights reserved.
Trademarks
Microtek, ScanMaker, and ScanWizard 5 are trademarks of Microtek International, Inc. IBM PC is the
trademark of International Business Machines Corporation. Windows and MS-DOS are trademarks of
Microsoft Corporation. Other product or company names are trademarks or registered trademarks of their
respective holders.
Important
Documents that you scan may be protected under copyright law. The unauthorized use of such documents
could be a violation of the rights of the copyright holder. Microtek bears no responsibility for the
unauthorized use of copyrighted materials.
To obtain optimal results from the Microtek scanning software and user's manual, you should be familiar with
such Windows concepts as pointing, clicking, dragging, and selecting from menus and dialog boxed. If these
things are new to you, refer to your Microsoft Windows User's Guide.
September 1999
Microtek Lab, Inc.
3715 Doolittle Drive
Redondo Beach, CA 90278-1226
Main: 310-297-5000
Sales: 800-654-4160
FAX: 310-297-5050
BBS: 310-297-5102
Technical Support: 310-297-5151
AutoTech fax back system: 310-297-5101
http://www.microtek.com
Microtek International, Inc.
6, Industry East Road 3
Science Based Industrial Park
Hsinchu, 30077, Taiwan
TEL: 886-3-5772155
FAX: 886-3-5772598
ii
Microtek Europe B.V.
Max Euwelaan 68
NL-3062 MA Rotterdam
The Netherlands
TEL: 31-10-2425688
FAX: 31-10-2425699
Page 3

Contents
1. Before You Begin 1-1
What is ScanWizard 5?.............................................................................................. 1-1
Standard & Advanced Control Panels ........................................................................ 1-2
Who Should Use the Standard Control Panel?..................................................... 1-2
Who Should Use the Advanced Control Panel? ................................................... 1-2
Switching between Standard and Advanced Modes ............................................. 1-2
Scanner Control ................................................................................................. 1-3
Power-Saving .............................................................................................. 1-3
Compression Capability............................................................................... 1-4
Scanner Information........................................................................................... 1-5
ScanWizard 5 Help Features...................................................................................... 1-6
On-Line-Help from ScanWizard 5-Standard Control Panel .................................. 1-6
On-Line-Help.............................................................................................. 1-6
Tutorial Guide ............................................................................................. 1-6
About ScanWizard 5.................................................................................... 1-6
On-Line-Help from ScanWizard 5-Advanced Control Panel................................. 1-7
About ......................................................................................................... 1-7
Installation................................................................................................................ 1-7
Installing ScanWizard 5 ...................................................................................... 1-7
Installing Your Image Editor ............................................................................... 1-8
Installing Your E-mail/Web Browser .................................................................... 1-8
2. Introduction to ScanWizard 5 Windows 2-1
ScanWizard 5-Standard Control Panel ....................................................................... 2-1
The ScanWizard 5-Standard Main Window................................................................ 2-2
Instant Help for Beginners......................................................................................... 2-2
On-Line-Help .................................................................................................... 2-3
Balloon Screen Tips ............................................................................................ 2-3
Tutorial, the Beginner's Guide............................................................................. 2-3
ScanWizard 5-Advanced Control Panel...................................................................... 2-4
3. ScanWizard 5-Standard Control Panel Tutorial 3-1
About the Tutorial..................................................................................................... 3-1
Using Windows ........................................................................................................ 3-1
iii
Page 4

Windows Basics ................................................................................................. 3-1
Basic Mouse and Keyboard Techniques ........................................................ 3-2
Choosing and Selecting Items ...................................................................... 3-2
Launching ScanWizard 5-Standard Tutorial ............................................................... 3-3
Launching from an Image Application ................................................................ 3-3
Defining Image Source................................................................................. 3-3
Launching ScanWizard 5-Standard from an Image Editor ............................. 3-4
Launching ScanWizard 5-Standard as Stand-Alone Program................................ 3-4
Running from Start Menu ............................................................................ 3-5
Running from Scanner Located Start Buttons ............................................... 3-5
Running from ScanWizard 5 Assistant Buttons ............................................. 3-5
ScanWizard 5-Standard Tutorial Step-by-Step ............................................................ 3-6
Step 1 Preview Button ....................................................................................... 3-6
Step 2 Original Button....................................................................................... 3-6
Step 3 Scan Type Button .................................................................................... 3-7
Step 4 Purpose Button....................................................................................... 3-7
Step 5 Scale Output Button ............................................................................... 3-7
Step 6 Adjust Button ......................................................................................... 3-8
Step 7 Final Scanning Buttons ........................................................................... 3-8
“Scan” Button.............................................................................................. 3-9
“Scan to” Button.......................................................................................... 3-9
Reviewing the Scanning Sequence ........................................................................... 3-11
Quitting ScanWizard 5 ............................................................................................ 3-11
Conclusion ............................................................................................................. 3-12
4. Your First Scan with ScanWizard 5-Standard 4-1
Launching/Exiting ScanWizard 5 ............................................................................... 4-1
When Launching from Scanner Start Buttons and Assistant Buttons .................... 4-1
Previewing Your Original Scan Material...................................................................... 4-2
Create and Manipulate a Scan Frame Selection.................................................... 4-2
Plotting a Scan Frame Area from the Preview Image...................................... 4-3
Re-sizing a Scan Frame ................................................................................ 4-3
Moving Scan Frame ..................................................................................... 4-3
Plotting a New Scan Frame .......................................................................... 4-4
Magnifying Your Preview Image .......................................................................... 4-4
Viewing Hidden Areas of Magnified Image ................................................... 4-4
Resizing Main Preview Window ................................................................... 4-5
Define Type of Output Image..................................................................................... 4-6
iv
Page 5

Resolution of Output Image ...................................................................................... 4-7
Intended Size of Output Image.................................................................................. 4-8
Improving Image Before Final Scan............................................................................ 4-8
Output Image Setting Information............................................................................. 4-9
Reset and Revert to Default Settings........................................................................... 4-9
Final Scan and Output Image Destinations .............................................................. 4-10
ScanWizard 5-Standard Launched from an Application ..................................... 4-10
ScanWizard 5-Standard Launched as Stand-Alone Program ............................... 4-10
Storing Scanned Output Image to File........................................................ 4-10
Routing the Saved Image to an Application ................................................ 4-12
Batch Saving of Outputs from ADF Equipped Scanners .............................. 4-12
Batch Routing of ADF Outputs to an Application ....................................... 4-12
Copy Output Image to Printer ................................................................... 4-13
Attach Output Image to an E-mail ............................................................. 4-14
Setting Preferences in ScanWizard 5-Standard.......................................................... 4-15
Preference Dialog Box....................................................................................... 4-15
Appearance Dialog Box..................................................................................... 4-16
Saving Your Favorite Color Scheme............................................................ 4-17
5. Your First Scan with ScanWizard 5-Advanced 5-1
Launching/Exiting ScanWizard 5-Advanced............................................................... 5-1
Switching to Advanced Mode .................................................................................... 5-1
The Main Windows of ScanWizard 5-Advanced Control Panel ................................... 5-2
Operating ScanWizard 5-Advanced Control Panel...................................................... 5-3
Scanning a single-bit image (line art or B&W diffusion) ............................................. 5-6
Scanning a grayscale image ........................................................................................ 5-8
Scanning an RGB color image .................................................................................. 5-11
Important scanning notes........................................................................................ 5-14
For previews and scans..................................................................................... 5-14
Using the Scan Frame tool ......................................................................... 5-14
Using the Prescan action button................................................................. 5-15
Fixed Scan Frame ...................................................................................... 5-16
Fixed Output Size ..................................................................................... 5-16
Keep proportion........................................................................................ 5-16
Selecting the correct resolution .................................................................. 5-16
For image correction ........................................................................................ 5-17
For scan job queue........................................................................................... 5-19
Scaling the view of an image .................................................................................... 5-20
Option 1: Enlarging the view ..................................................................... 5-20
v
Page 6

Option 2: Reducing the view.....................................................................5-21
Correcting images...................................................................................................5-22
Using the Advanced Image Correction dialog box....................................................5-23
Final Scan and Output Image Destinations..............................................................5-24
ScanWizard 5-Advanced Launched from an Application....................................5-24
ScanWizard 5-Advanced Launched as Stand-Alone Program..............................5-24
Storing Scanned Output Image to File........................................................5-24
Routing the Saved Image to an Application..........................................5-26
Batch Saving of Outputs from ADF Equipped Scanners.......................5-26
Batch Routing of ADF Outputs to an Application................................5-26
Copy Output Image to Printer...................................................................5-27
Attach Output Image to an E-mail.............................................................5-28
6. Reference to ScanWizard 5-Advanced 6-1
TWAIN Compliance..................................................................................................6-1
The Main Windows of ScanWizard 5-Advanced Control Panel...................................6-2
Running ScanWizard 5-Advanced Control Panel........................................................6-3
Quitting ScanWizard 5-Advanced Control Panel........................................................6-3
The Preview Window................................................................................................6-4
The Menu Bar...........................................................................................................6-5
The Scanner Menu.............................................................................................6-6
Scanner Model............................................................................................6-6
Get Current Scanner Info.............................................................................6-6
Scanner Probe.............................................................................................6-7
Exiting ScanWizard 5-Advanced Control Panel...................................................6-8
The View Menu..................................................................................................6-9
Overview Image..........................................................................................6-9
Prescan Image...........................................................................................6-10
Resize Window to Fit................................................................................6-11
Show/Hide commands...............................................................................6-12
The Preferences Menu......................................................................................6-13
Scan Material.............................................................................................6-14
The Scan Material Status icon....................................................................6-15
Color Matching Setup................................................................................6-16
White/Black Points Setup..........................................................................6-19
Cursor Auxiliary Lines...............................................................................6-20
Overview Setup.........................................................................................6-22
Prescan Setup............................................................................................6-23
vi
Page 7

Monitor Gamma Setup .............................................................................. 6-24
Invert........................................................................................................ 6-25
More command......................................................................................... 6-26
The Help Menu................................................................................................ 6-29
The Tool Buttons.............................................................................................. 6-31
Scan Frame tool ........................................................................................ 6-32
Magnify Glass tool ..................................................................................... 6-35
Pane tool................................................................................................... 6-36
Color Picker tool ....................................................................................... 6-37
Action Buttons ................................................................................................. 6-39
Rulers .............................................................................................................. 6-40
Preview Area .................................................................................................... 6-41
The Settings Window .............................................................................................. 6-41
Output Image Parameters ................................................................................. 6-42
Type (Image Type or Scan Mode)................................................................ 6-42
Resolution................................................................................................. 6-44
Unit selection ............................................................................................ 6-45
Image Dimension controls ......................................................................... 6-46
Rotate and Flip tool ............................................................................ 6-47
How to use the Input-Output dimensions.................................................. 6-48
Scaling ............................................................................................... 6-48
Advanced Image Correction Tools..................................................................... 6-49
Available Image Correction Effects.............................................................. 6-49
Introducing the Image Correction tools...................................................... 6-50
Using the Advanced Image Correction dialog box....................................... 6-50
The Action Buttons in the AIC dialog box ......................................................... 6-51
White/Black Points tool .................................................................................... 6-55
The White/Black Points dialog box (Color/Gray image) .............................. 6-55
The Threshold dialog box (Line-art image)................................................. 6-57
Tone Curve tool ............................................................................................... 6-58
How to read the curve ............................................................................... 6-58
Sample images and their curves ................................................................. 6-60
The Curve screen ...................................................................................... 6-61
Using the Curve buttons............................................................................ 6-63
Using the Curve tool ................................................................................. 6-64
Brightness and Contrast tool............................................................................. 6-65
Color Correction tool ....................................................................................... 6-67
vii
Page 8

Using the Color Correction tool................................................................. 6-68
Filters tool ....................................................................................................... 6-69
Blur filters ................................................................................................. 6-70
Sharpen filters ........................................................................................... 6-70
Edge Enhancement filter............................................................................ 6-71
Emboss filter ............................................................................................. 6-71
Descreen .......................................................................................................... 6-72
The Information Window........................................................................................ 6-73
Zoom Level Display.......................................................................................... 6-74
Cursor Locator................................................................................................. 6-74
Output value.................................................................................................... 6-74
Sample size button ........................................................................................... 6-75
Using the Pixel Display..................................................................................... 6-75
The Scan Job Queue Window.................................................................................. 6-76
Multiple Selections ........................................................................................... 6-77
How to read the Scan Job window .................................................................... 6-78
The New button............................................................................................... 6-79
The Duplicate button ....................................................................................... 6-84
The Delete button ............................................................................................ 6-86
The Check button ............................................................................................ 6-86
The Save/Load button ...................................................................................... 6-87
The Up/Down Position Arrows ......................................................................... 6-89
Appendix
Appendix A: Configuring E-mail Software .................................................................A-1
Appendix B: Using the Scanner Test Utility..................................................................B-1
Appendix C: Kodak Color Management System ........................................................C-1
Appendix D: Basic Concepts ...................................................................................... D-1
Appendix E: Troubleshooting ................................................................................... E-1
Appendix F: Glossary ................................................................................................F-1
viii
Page 9

1
Before You Begin
What is ScanWizard 5?
ScanWizard 5 is scanning software that provides both amateur and professional
levels of color image reproduction and scan stage image editing for printed
material, 35mm color slides and filmstrips.
You can launch ScanWizard 5 from any TWAIN-compliant program or from
your image editing programs (e.g., Adobe Photoshop, Ulead PhotoImpact, etc.)
where scanned image is transferred to your image editor. You may further edit
the image in the image editing program if needed.
In addition to launching from your image editor, you can also run ScanWizard 5
as a stand-alone program. Under this stand-alone mode of operation, you can:
• Send the scanned image to your printer
• Open your e-mail processor and auto-attach the image file to your new
message
• Open your web browser and view the scanned image or create HTML
documents
• Open an image software program with the scanned image already
inserted and ready for use.
ScanWizard 5 consists of two programs bundled together, namely the
ScanWizard 5-Standard Control Panel (also known as “SW 5-Standard”
throughout this manual) and the ScanWizard 5-Advanced Control Panel
(also known as “SW 5-Advanced” throughout this manual). Either control
panel can be accessed easily and you can switch from one mode to another as
well (no need to exit one mode in order to start the other). The Standard mode
suggested for novice scanner users while the Advanced mode is designed for
experienced users. Both programs support most models of Microtek scanners.
Before You Begin 1-1
Page 10
Standard & Advanced Control Panels
Who Should Use the Standard Control Panel?
If you are new to the world of image scanning, the ScanWizard 5-Standard
Control Panel was designed for you. The SW-Standard Control Panel will give
you the power to scan photos or documents without having to learn the art of
professional digital imaging. It provides a simple but straightforward control
over the look of your preview image before they are scanned. It integrates a
“follow-me” tutorial that guides beginners through an actual step-by-step
scanning session. This easy-to-follow tutorial is an instant educator for anyone
who wants to learn the basics of producing digital image from an original photo
or document. And though it is simple to operate, it uses advanced artificial
intelligence programming to automate the scanning process.
Who Should Use the Advanced Control Panel?
The ScanWizard 5-Advanced Control Panel provides advanced color image
enhancement tools tailored for those already familiar with the scanning process.
You can scan originals individually or scan them in multiple batches. The
scanned image can be reproduced optimally using the Advanced Image
Correction (AIC) tools. The ability to perform correction at scan stage
eliminates the need of exporting output image to an image application program
for further editing.
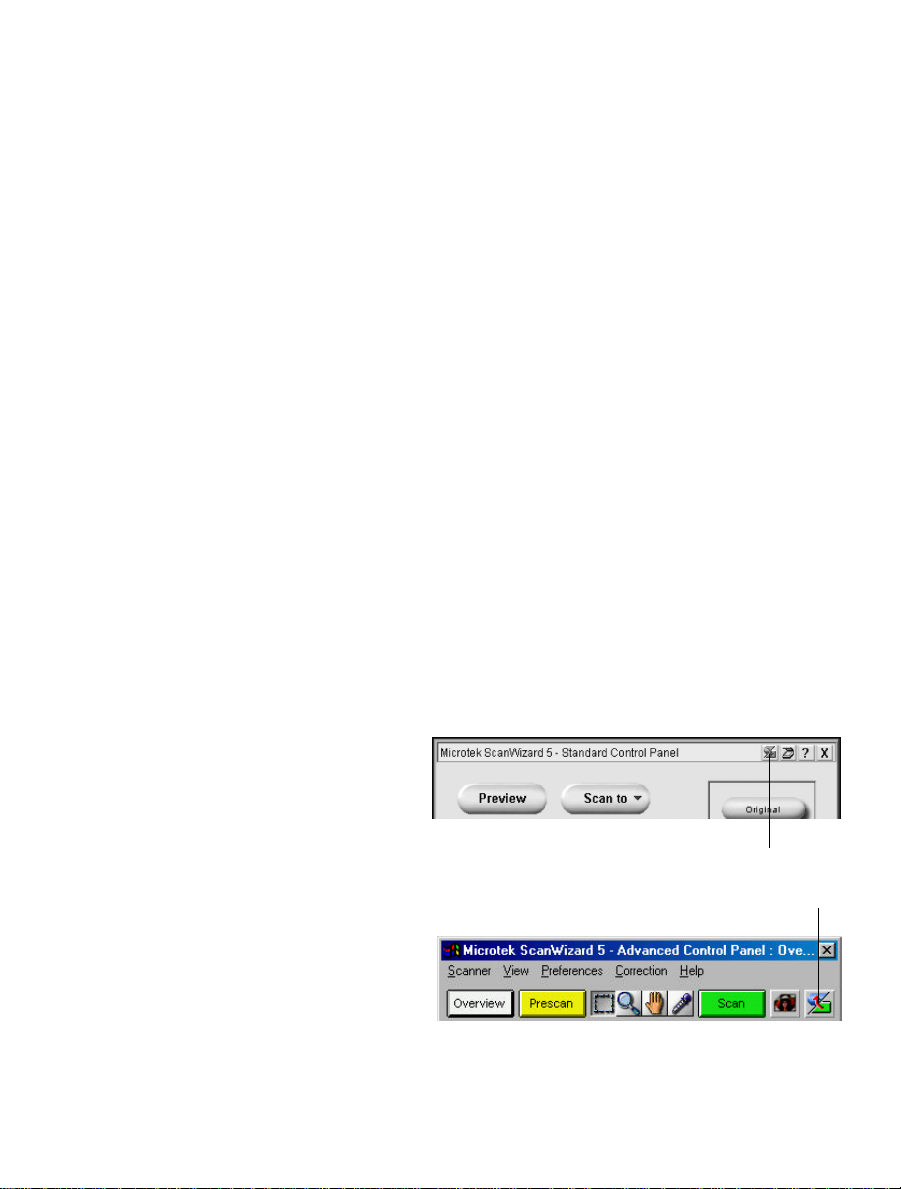
Switching between Standard and Advanced
Modes
To switch between
Standard and Advanced
Modes, click on the
Switch icon on the Title
bar (see right figure).
Within a few seconds, the
current program exits and
switches to the other
control panel mode.
1-2 Microtek ScanWizard 5
Click this icon to switch control
panels between Standard &
Advanced modes
Page 11
Scanner Control
Power-Saving
An energy saving feature is built into recent scanners models, in which the
scanning lamp switches to power-saving mode when the scanner remains idle
for a defined period of time. The scanner reverts to full power mode as soon as
Preview, Scan, Scan to, Copy, or E-mail button is executed. Aside from
the
saving power, the feature also helps extend the service life of the lamp and
prevents caking and deformation of your film original resulting from long
exposure to lamp heat.
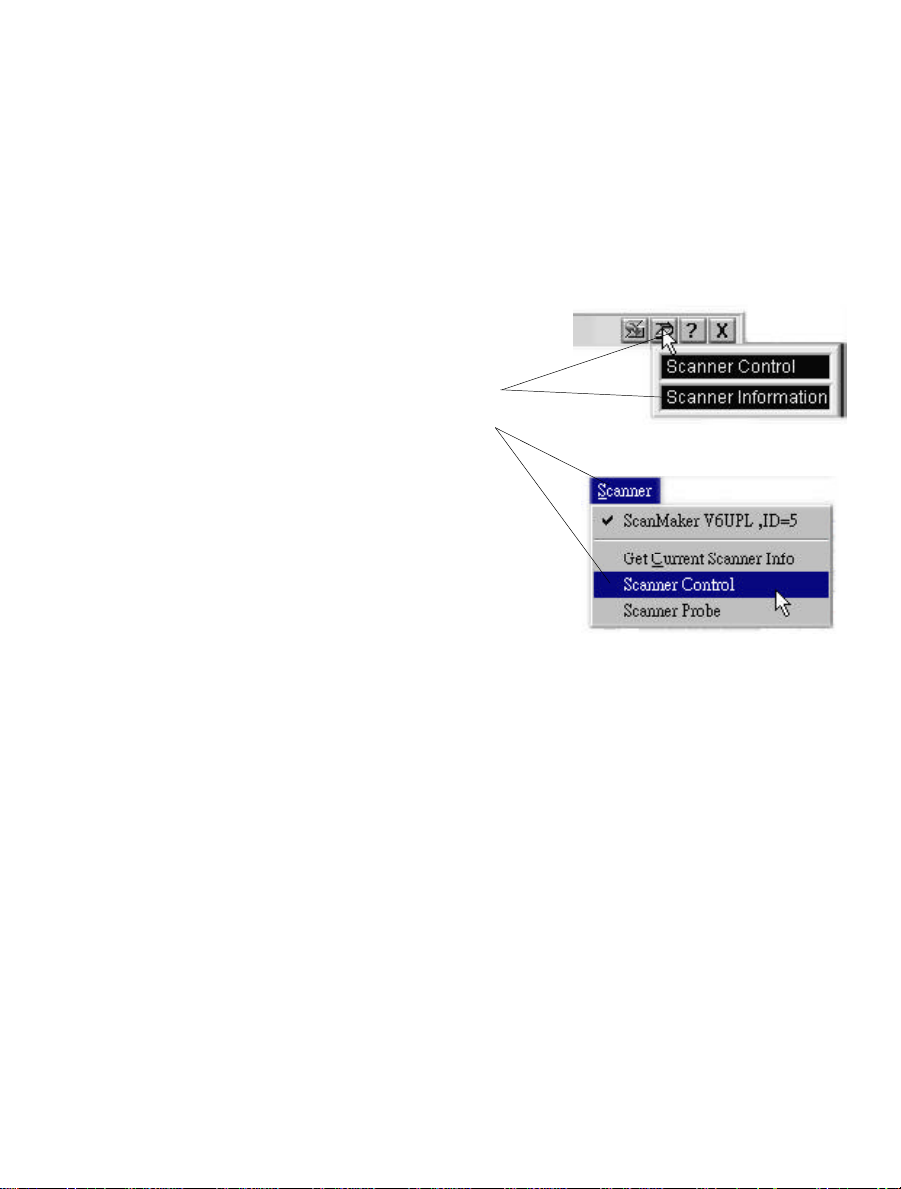
Click Scanner icon for
Standard mode (top), or
Scanner menu for
Advanced mode (bottom),
then choose Scanner
Control. The energy
saving dialog box will then
appear
Each scanner model has its own default idle time to induce the scanning lamp
into power-saving mode and factory set time for warm-up, revert to full power,
and start scanning operation. You may define your own idle time or disable the
feature altogether by clicking on the Scanner icon from the Title bar in Standard
Mode or from the Scanner menu of the Menu bar in Advanced Mode. Then
from the resulting menu, choose
Control dialog box will then display to allow you to change the default settings.
Scanner Control. The following Scanner
NOTENOTE If your scanner does not support the 'Power-Saving'
and 'Compression' features, "Scanner Control" will not display
from the menu.
If only 'Power-Saving' is supported ('Compression' not
supported), "Compression" is grayed out (disabled) from the
dialog box. Likewise, if "Compression" is enabled, but only either
"Lossless" or "Lossy" compression mode is supported, only the
supported mode is enabled. The non-supported mode is grayed
out.
Before You Begin 1-3
Page 12
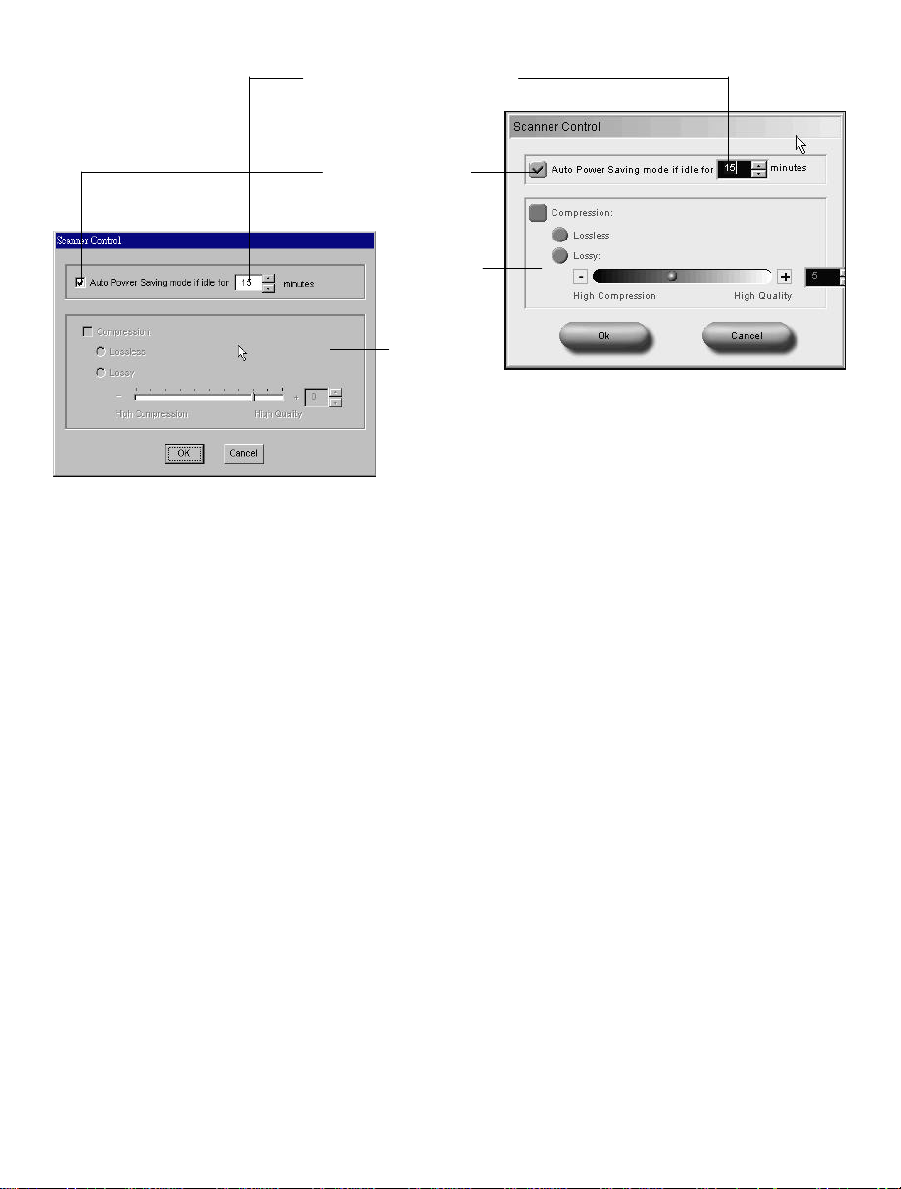
Define idle time interval for
Power-Saving mode to take
effect (60 minutes maximum)
Uncheck this box to
disable PowerSaving feature
Compression
Pane is
enabled
only if the
scanner
supports
compression
feature (see
next page)
Advanced Mode
Standard Mode
Compression Capability
Compression is supported in certain models of scanners. If your scanner does
not support any of the compression modes (
Compression pane in the Scanner Control dialog box is grayed out (see figure
in previous page).
Lossless or Lossy), the
Lossless compression is available, the scanner will scan and compress the
If
image before sending the image data to ScanWizard 5. The image data is then
automatically decompressed without losing its image quality by ScanWizar 5.
Lossy compression is supported, the scanner will scan and compress the
If
image before sending the image data to ScanWizard 5 where it is automatically
decompressed. The level of compression and decompression is dictated by the
setting provided in the
compression, the lower is the image decompression quality, and vice versa.
1-4 Microtek ScanWizard 5
Lossy slide meter. Take note that the higher the
Page 13
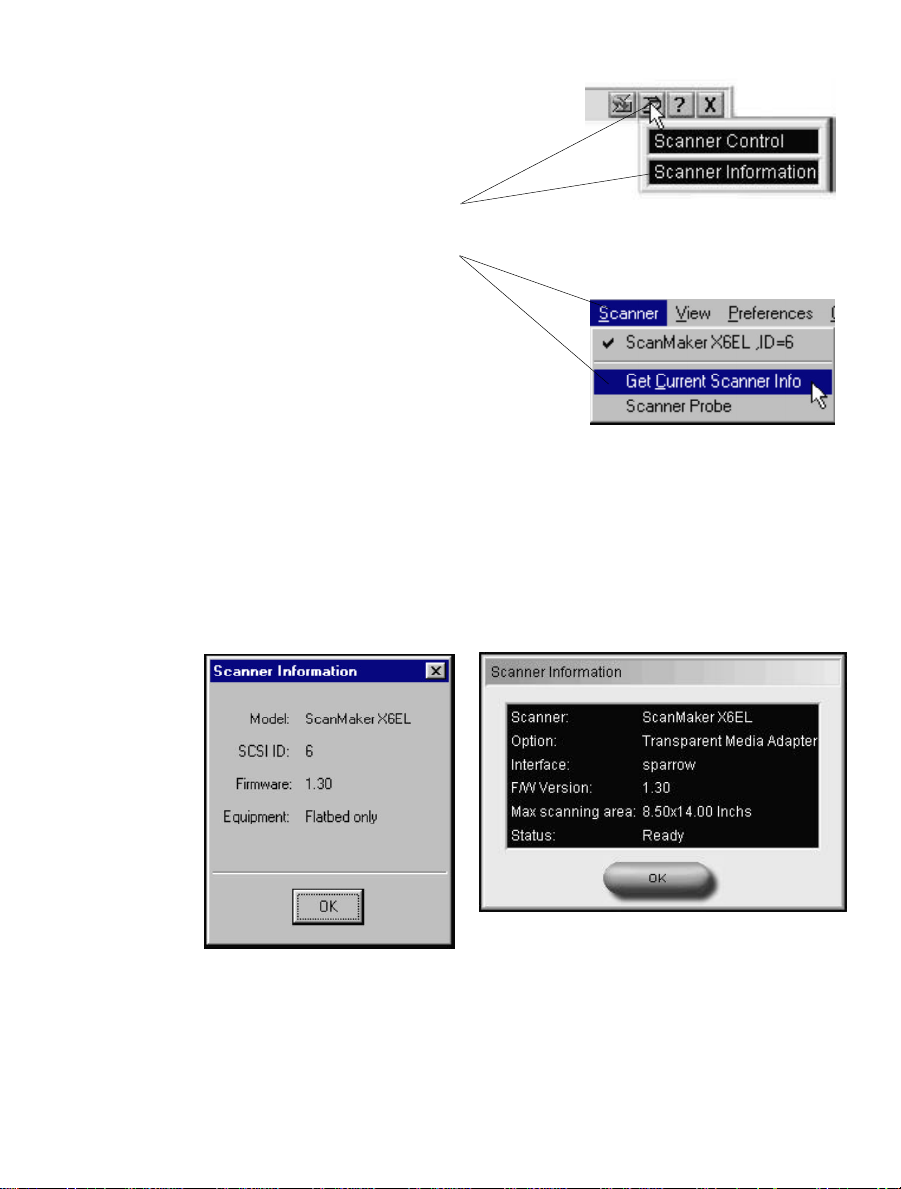
Scanner Information
Click Scanner menu
bar (Advanced mode,
top) or Scanner icon
(Standard mode,
bottom), then choose
scanner information
from their respective
menus to display the
Scanner Information
ScanWizard 5 is constantly in touch with your scanner, monitoring the scanner
availability, serviceability, as well as its make, and model. To see how your
scanner is doing, simply click the Scanner menu from the SW 5-Advanced
Menu bar, or click the scanner icon from the SW 5-Standard Title bar (see
figure above). From their respective menus, choose the item pertaining to
scanner information. The Scanner Information dialog box will then display as
shown below.
window
Advance Mode
Standard Mode
Before You Begin 1-5
Page 14
ScanWizard 5 Help Features
On-Line-Help from ScanWizard 5-Standard
Control Panel
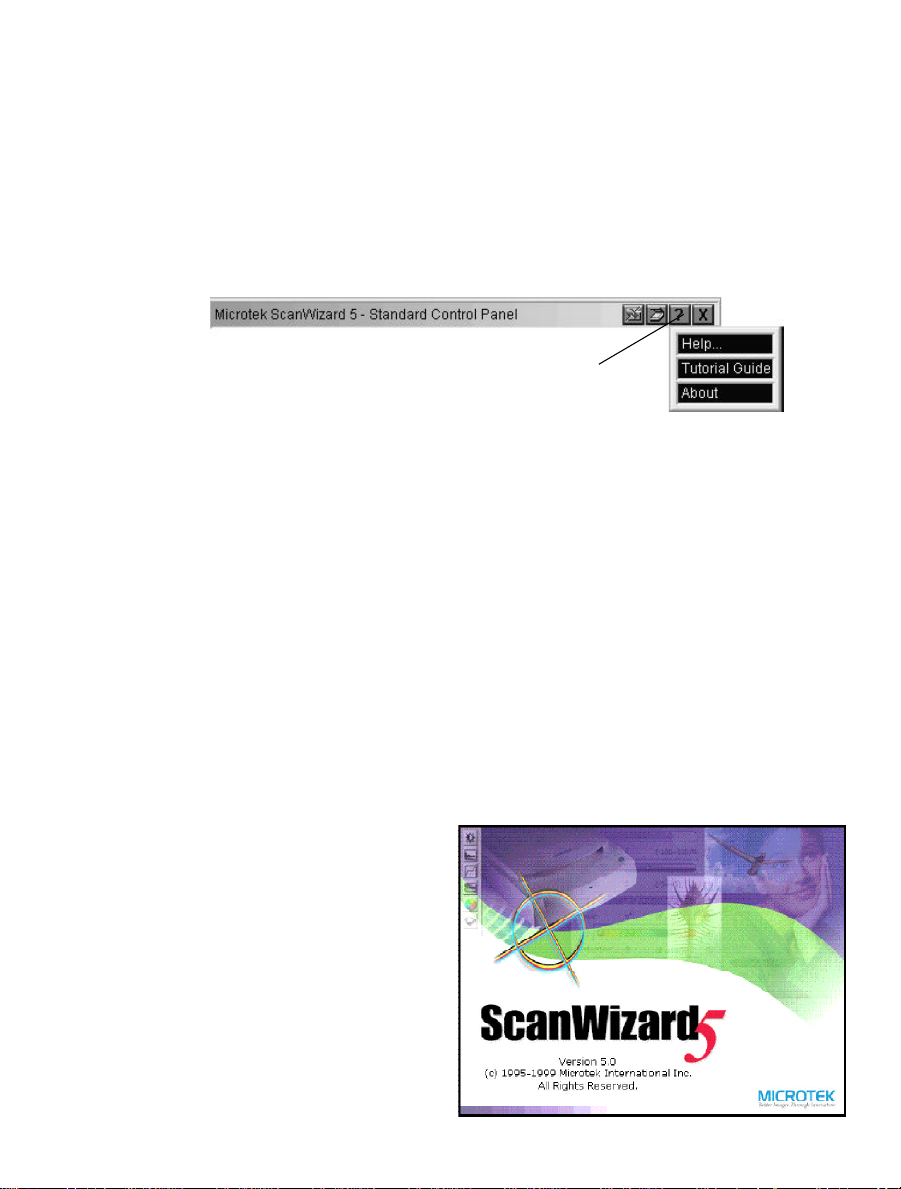
Aside from on-line-help, the Help [ ? ] icon on the Title bar also provides
access to Tutorial Guide program and SW 5-Standard version information.
Click Help [?] icon to access
on-line-help, Tutorial, and SW
5-Standard version information
On-Line-Help
To access on-line-help, click on the Help [?] icon. When the Help menu
displays, choose
Tutorial Guide
SW 5-Standard has simple but effective tutorial that guides you through stepby- step scanning.
Help.
To access tutorial, simply click on the
Title bar (see figure on top of this page), then choose
resulting menu. See Chapter 3 for more details on the tutorial.
About ScanWizard 5
To learn more about the
version and release date of
your ScanWizard 5, click
About from the menu
on
under the Help icon. The
following splash screen
will appear.
1-6 Microtek ScanWizard 5
Help [?] icon near the right end of the
Tutorial Guide from the
Page 15

On-Line-Help from ScanWizard 5-Advanced
Control Panel
The on-line-help of SW 5-Advanced mode is
accessed through the
bar.
The Help menu uses standard Windows
conventions for obtaining on-line help. If you are
not familiar with this procedure, refer to your
Microsoft Windows user's guide.
About
This command provides same the information as in the Standard mode and
displays the same splash screen shown in previous page.
Installation
This section emphasizes the important areas that should be taken into
consideration when installing ScanWizard 5 and other TWAIN-compliant
software interfacing with ScanWizard 5. For full installation details, refer to the
Installation Guide that came with your scanner package.
Help menu on the Menu
Installing ScanWizard 5
Install the SW 5-Standard driver program as instructed in the Installation Guide
that comes with your scanner.
NOTE NOTE For SW 5-Standard to work properly after installation,
the correct scanner model should be properly connected to your
host beforehand (as described in the Installation Guide). The
Scanner needs to be powered on before you start ScanWizard
5.
Before You Begin 1-7
Page 16
Installing Your Image Editor
If you intend to deliver your scanned image to an image editing program such as
Adobe Photoshop, you also need to install that particular image editing
program.
The table below lists the image editing programs supported by ScanWizard 5.
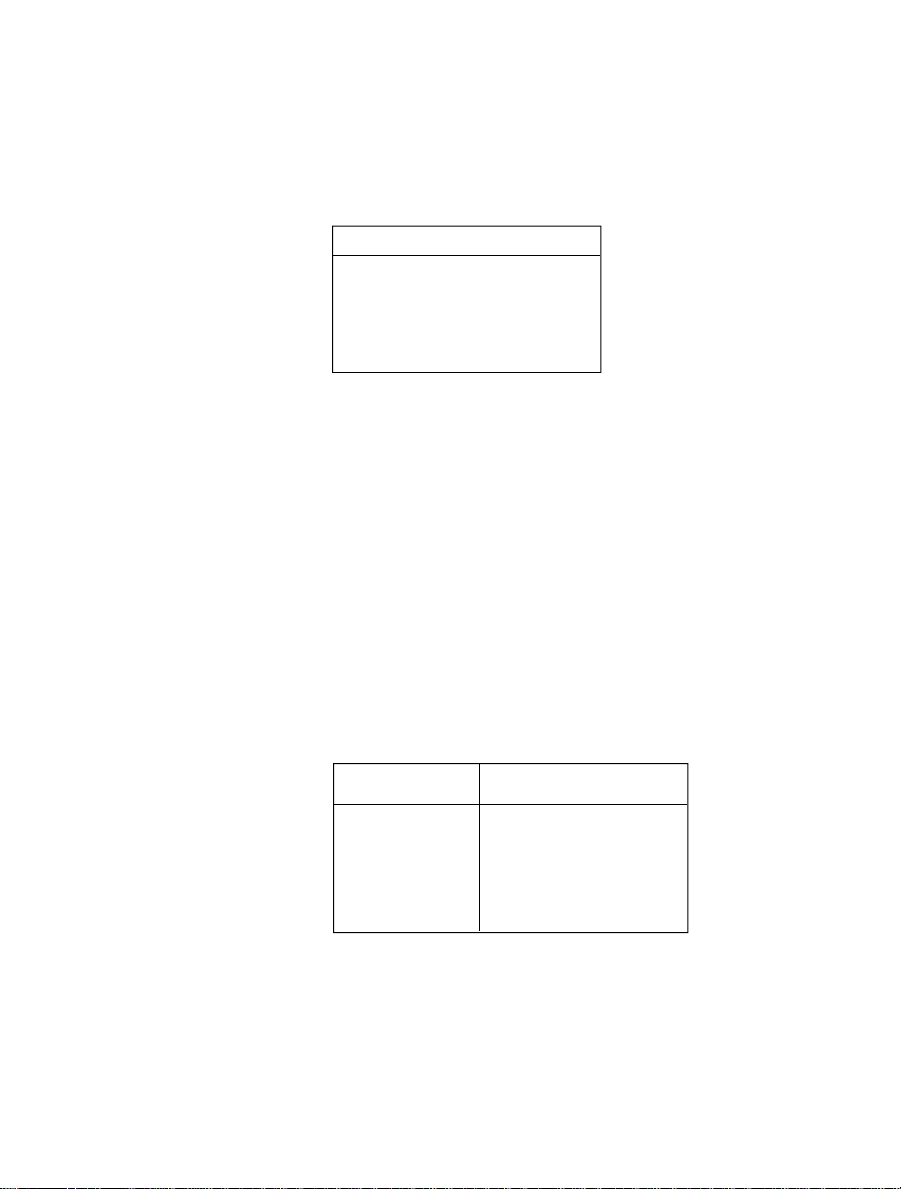
Supported Image Processors
Photoshop PhotoDeluxe
PhotoImpact Photo Express
Microsoft Imaging ImageStar III
PageKeeper Standard MS Picture It
Installing Your E-mail/Web Browser
If you are going to send out your scanned image via e-mail or wish to view the
scanned image with a web browser (e.g., Microsoft IE or Netscape Navigator),
you will also need to install your Internet program. Refer to the table below for
web browser and e-mail programs supported by ScanWizard 5. Installation and
setup details for these programs are described in the Appendix section of this
manual.
Embedded in the ScanWizard 5 is a modest “Internet Mail” mail program that
will allow you to send scanned images via the Internet without the hassle of
going through commercial Internet e-mail programs. See details of this function
in Chapter 4.
1-8 Microtek ScanWizard 5
Web Browsers E-Mail Processors
Netscape Navigator Netscape Messenger 4.6
Internet Explorer QualComm Eudora Pro 3.x
Outlook Express
Microsoft Outlook 97/98
Page 17

Introduction to
2
ScanWizard 5 Windows
ScanWizard 5-Standard Control Panel
SW 5-Standard is a single-window program that offers a simple and straightforward way of navigating a scanning session. It is a program designed for
neophyte scanner users or for those who wish to accomplish scanning jobs
quickly. Despite its simplicity, SW 5-Standard offers the essential tools for
adjusting and enhancing your original image before final scanning.
When ScanWizard 5 is launched from an image editing application, the scanned
output image is directly delivered to your image processing application. When
it is run on its own or as a stand-alone program from your program manager (or
run from the scanner located “
Assistant buttons), you are provided with options to either store the output
image to a file, copy it to your printer, or attach it to an e-mail. You can also
instruct SW 5-Standard to auto-invoke your image and web browser
applications and have the recently saved image opened in it.
Go” or “Scan” start button, or from its desktop
Aside from the “
may be launched from scanners equipped with “
buttons. The “
destinations, “
functions respectively. You may however change the predefined destinations to
assign other destinations before final scanning.
Integrated with SW 5-Standard is a “follow-me” tutorial that will guide firsttimers on a step-by-step scanning. The easy-to-follow tutorial will instantly
educate new scanner users on how to produce a digitized image from a printed
graphic through the scanner.
Go” or “Scan” start button, SW 5-Standard also supports and
Copy” and “E-mail” start
Go” or “Scan” start button provides access to all available
Copy” and “E-mail” provide short-cut access to printer and e-mail
Introduction 2-1
Page 18
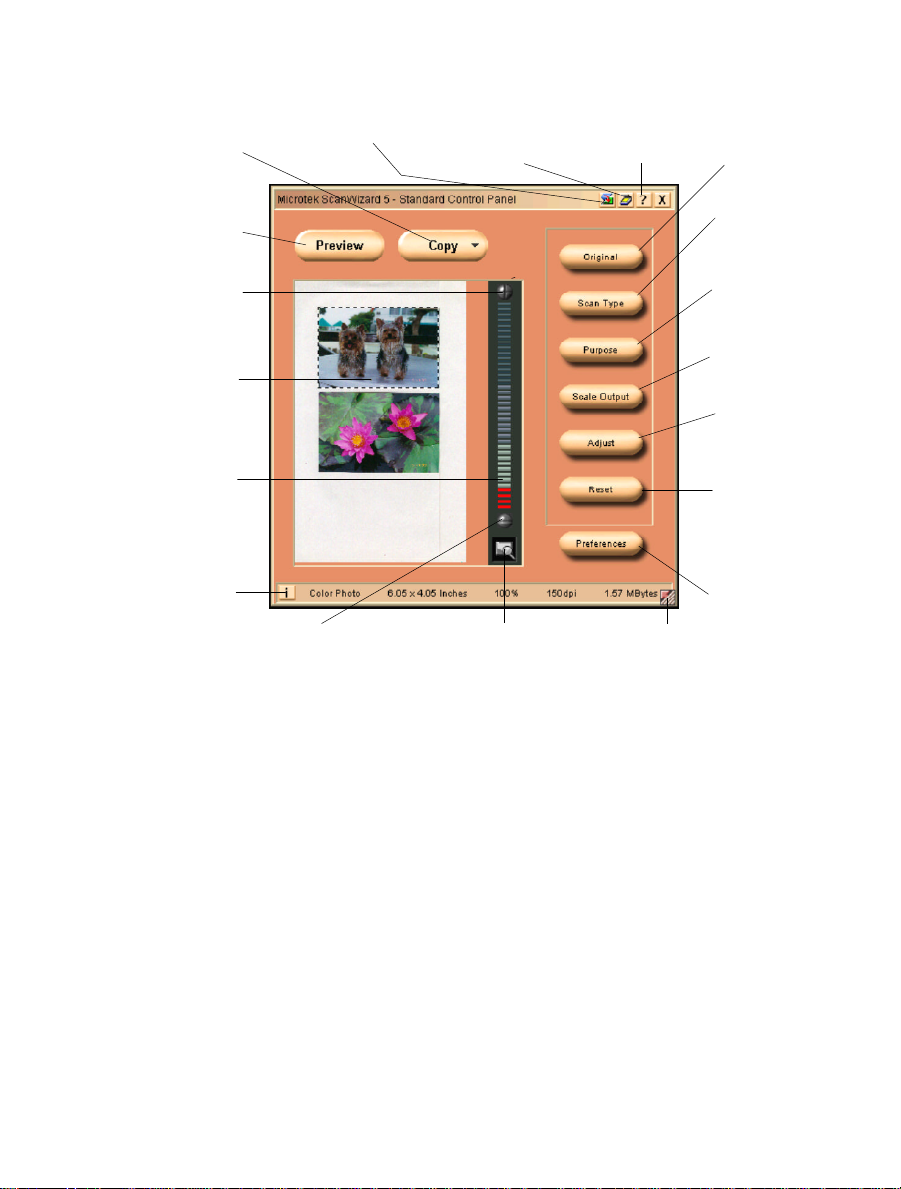
The ScanWizard 5-Standard Main Window
Click to perform final
scan and select a
destination for the
scanned image
Click to prescan
and preview
scan material
Zoom up (+) button to
magnify preview image
Preview image with the
scan selection
enclosed in a scan
frame
Click on Zoom Scale to
resize preview image
(magnify toward the top)
Status bar showing
summary settings for
output image. Click icon
for detailed info. The
status bar also serves
as a progress bar when
scanning is in process
Click to flip to
ScanWizard 5-
Advanced mode
Zoom down (-)
button to shrink
preview image
Click for scanner info
and power-save &
compression control
Click and hold Panning
Button to pan around a
magnified preview
image
Click for on-linehelp/SW 5 Standard info/tutorial
Drag this corner
to resize
preview window
Click to define category
of the original (scan
material)
Click to select
output image type
(color, gray, or B&W)
Click to define image
resolution to match
your target application
Click to select a size
(in aspect ratio) for
the output image
Click for image
enhancement tools
Click to cancel your
defined choices and
revert to default
settings
Click to access
"Preferences" dialog
box to set up scanning
functions and repaint
SW 5-Standard window
Instant Help for Beginners
The SW 5-Standard offers two types of instant help on line. One is through the
on-line-help system and the other is through the balloon-shape screen tips
which display hints on the function of each buttons as you hover your mouse
pointer over the buttons.
To help beginners, an easy to learn "follow-me" tutorial is also included in the
program that will instantly educated first timers on how to produce a digitized
image from a printed graphic through the scanner. Chapter 3 of this manual
discusses the details of the tutorial.
2-2 Microtek ScanWizard 5
Page 19
On-Line-Help
On-line-help can be accessed by clicking on the Help [?] icon near the right end
of the Title bar (top bar of the SW 5-Standard window). Then Choose
Help
from the resulting menu.
Click [?] icon to access on-line-help
and choose Help from menu
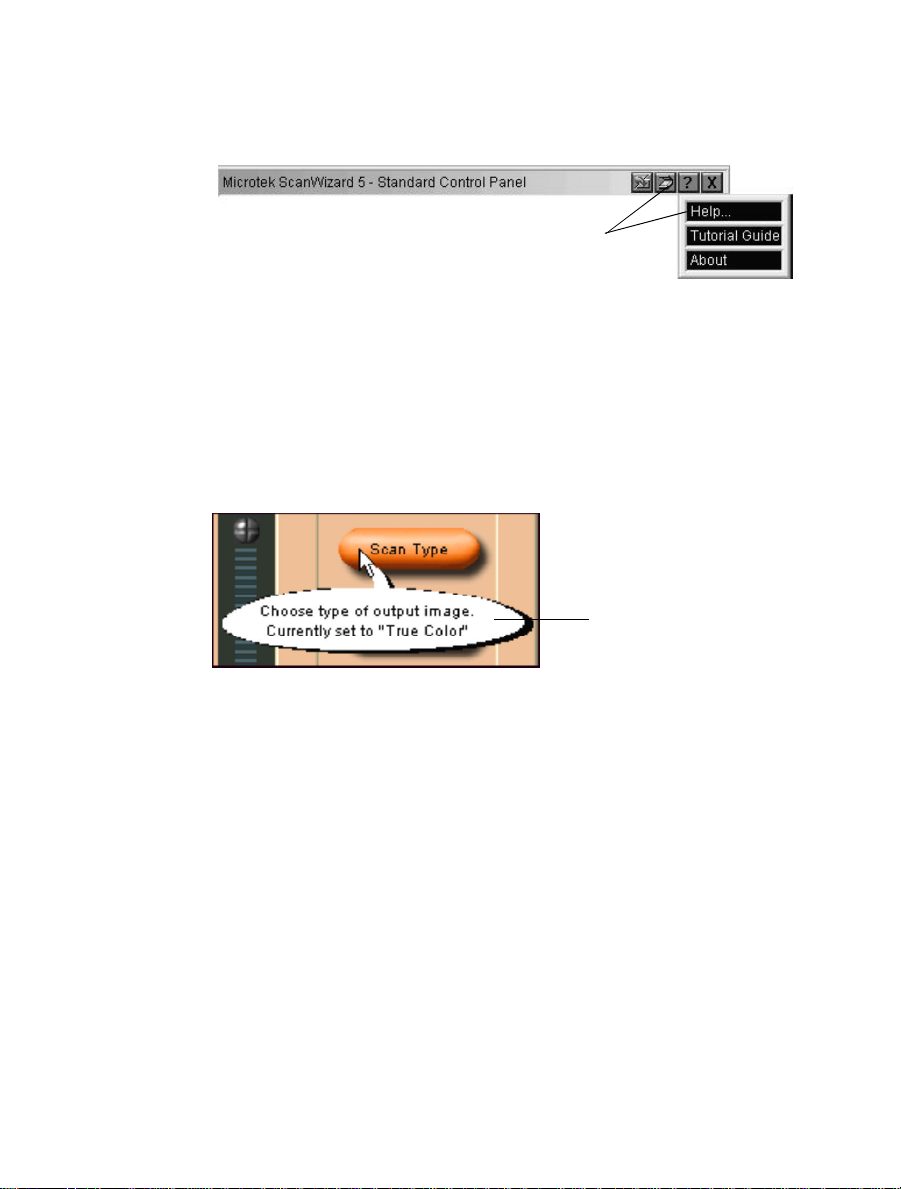
Balloon Screen Tips
When you bring the mouse pointer over any of the capsule shaped buttons, a
balloon-shape callout (containing hints on function and information of the
button) will display. You may disable this feature from the
box (see Chapter 4).
Balloon screen tip
providing tips on button
function and other
information
Preferences dialog
Tutorial, the Beginner's Guide
SW 5-Standard has something unique for neophytes in scanning technology. It
provides a simple but effective Tutorial that actually guides you, step-by-step on
the basic stages of scanning with most Microtek scanners in the market today.
To access tutorial, simply click on the
Title bar (see figure on top of this page). Then choose
resulting menu. The tutorial will guide you thereon.
Help [?] icon near the right end of the
Tutorial Guide from the
Introduction 2-3
Page 20
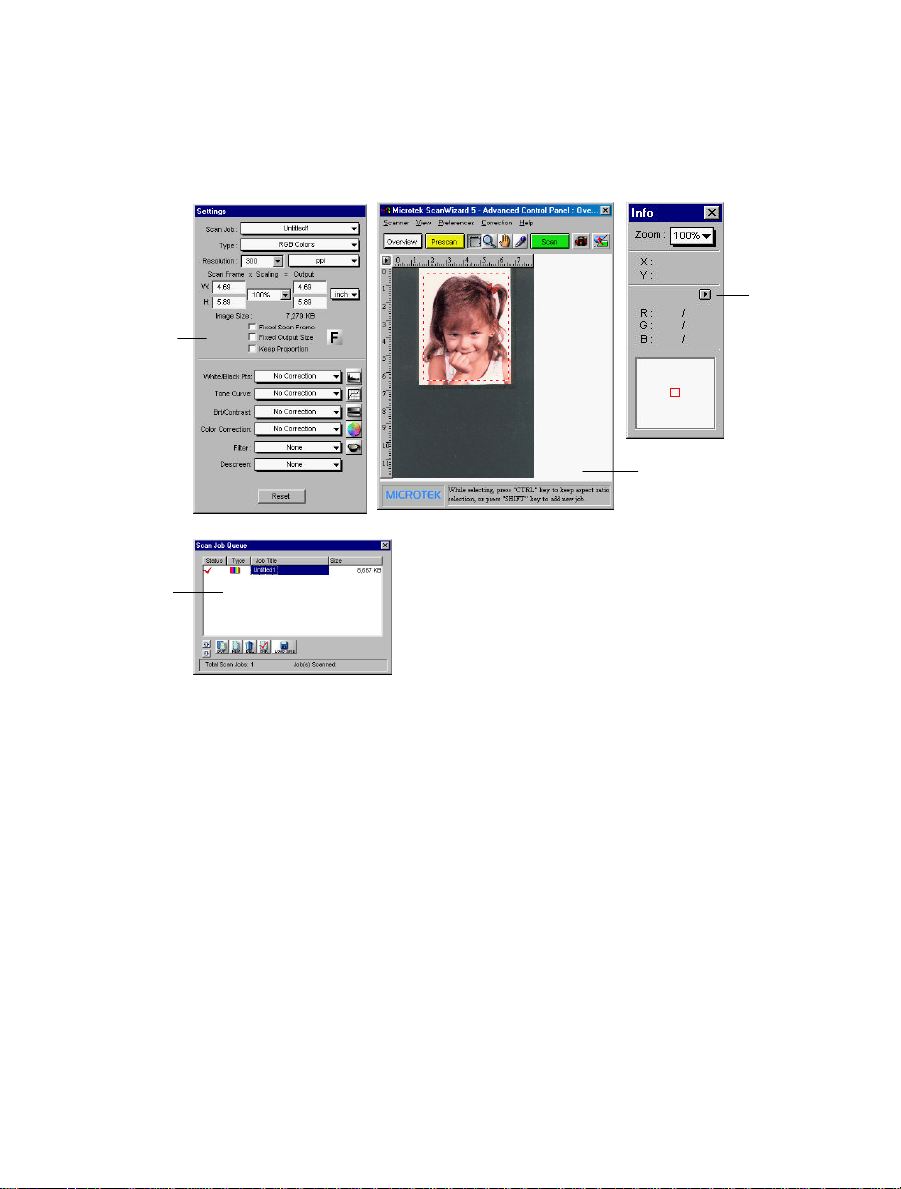
ScanWizard 5-Advanced Control Panel
The ScanWizard 5-Advanced Control Panel has four major windows consisting
of the Preview, Settings , Information , and Scan Job Queue windows.
Settings window
where output
image parameters
are defined and
includes the
Advanced Image
Correction (AIC)
enhancing images
tools for
at scan stage
Scan Job
Queue
window
provides
management
of scan jobs
Preview window
has the commands
and tools for
interfacing with the
scanner
Information
window
provides
sampling of
pixels of the
prescan
images
The Preview and Settings windows will always appear automatically whenever
ScanWizard 5 is started up. The Information and Scan Job Queue windows
will appear when you bring up ScanWizard for the first time but will not
reappear if you have hide these windows the last time you ran ScanWizard. You
may show (or hide again) the Information and Scan Job Queue window by
clicking on the
(or Hide) Info/Scan Job Window.
See Chapter 5 for more detailed information.
2-4 Microtek ScanWizard 5
View menu (on Preview window menu bar) and click on Show
Page 21

ScanWizard 5-Standard
3
Control Panel Tutorial
About the Tutorial
This tutorial is embedded in the ScanWizard 5 driver program. To access the
tutorial, you need run to ScanWizard 5-Standard. A powered-up scanner
should also be connected and configured with your host computer (refer to the
Installation Guide) before running the SW 5-Standard. You also need to place a
scan material (original image) on your scanner to obtain a scanned output image
at the end of the tutorial.
The tutorial is intended as a hands-on guide for those with no previous
background on scanning graphic images. In fact beginners can easily produce
an output by running the tutorial and let it do the almost hand-free scanning for
him.
Using Windows
The tutorial assumes that you are familiar with Windows operation. Some
Windows basics are explained below, but if you are unfamiliar with such things
as using a mouse, choosing a command from a menu, opening multiple
windows, entering text, selecting options, choosing actions, or sizing windows,
you should run the Windows tutorial before proceeding. The Windows tutorial
is on the Help menu of the Program Manager window.
Windows Basics
This section highlights some of the basic skills you need in order to work with
the SW 5-Standard window. If you are already familiar with Windows, skip to
the section on Launching SW 5-Standard Tutorial (page 3-3).
Tutorial 3-1
Page 22

Basic Mouse and Keyboard Techniques
This following explains some of the basic terms that are used in this manual.
Term Meaning
Click To quickly press and release mouse left button
Double-click To click mouse left button twice in rapid succession
Drag To hold down mouse left button while you move the mouse
Click To click mouse left button twice in rapid succession
Choosing and Selecting Items
In any Windows application, the terms choose and select have different, and
specific, meanings. Selecting an item usually means marking it with the
selection cursor, which can appear as a highlight, a dotted rectangle, or both.
You also select check boxes in dialog boxes. Selecting alone does not initiate an
action.
NOTE NOTE A dialog box is a window that appears temporarily to
request information. Many dialog boxes have options you must
select before SW 5-Standard can carry out a command.
One way to select an item is to point at it and click.
You choose an item to carry out an action. For example, choosing an icon
might start an application, open a window, or carry out a command. You can
also choose an item from a menu, or choose a command button in a dialog box.
One way to choose an item is to point at it and double-click.
Menus and dialog boxes are discussed in great detail in the Microsoft Windows
User’s Guide.
3-2 Microtek ScanWizard 5
Page 23
Launching ScanWizard 5-Standard Tutorial
NOTE NOTE Be sure you have the original image (or scan material)
properly placed on the powered on scanner before launching
tutorial.
Launching from an Image Application
You will need to launch SW 5-Standard from an image editing application (e.g.,
Photoshop, PhotoImpact, etc.) if you wish to immediately deliver your output
image to your application for further processing.
Note that for saving your output to a file, or sending it to a printer or an
Internet browser, or as attachment to an e-mail, or saved it to a file before
sending it to your image processor; you need to launch SW 5-Standard as a
stand-alone program from your program manager as explained in the next page.
To launch SW 5-Standard from your image processor, follow the steps below:
Defining Image Source
1. The first time you launch SW 5-Standard from your TWAIN-compliant
application, you need to tell your application program where to source the
image. The defined source is automatically saved in your application, and
you need not repeat the procedure the next time you enter SW 5-Standard
through the same application.
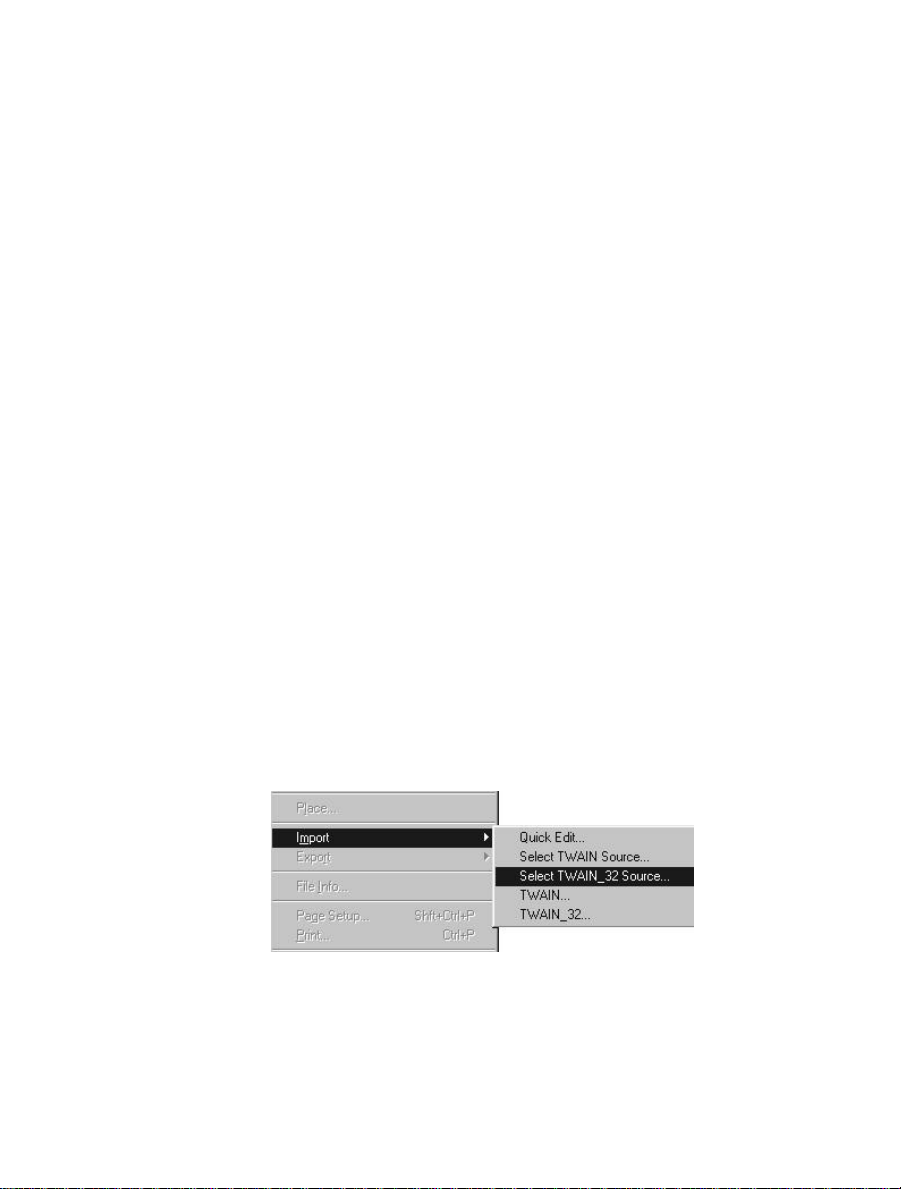
To define the image source after invoking your image editing program
(Adobe Photoshop is used in this example), click on the
the resulting pull-down menu, click on
TWAIN_32 Source... as illustrated below.
the Import item and select Select
File menu. From
Tutorial 3-3
Page 24
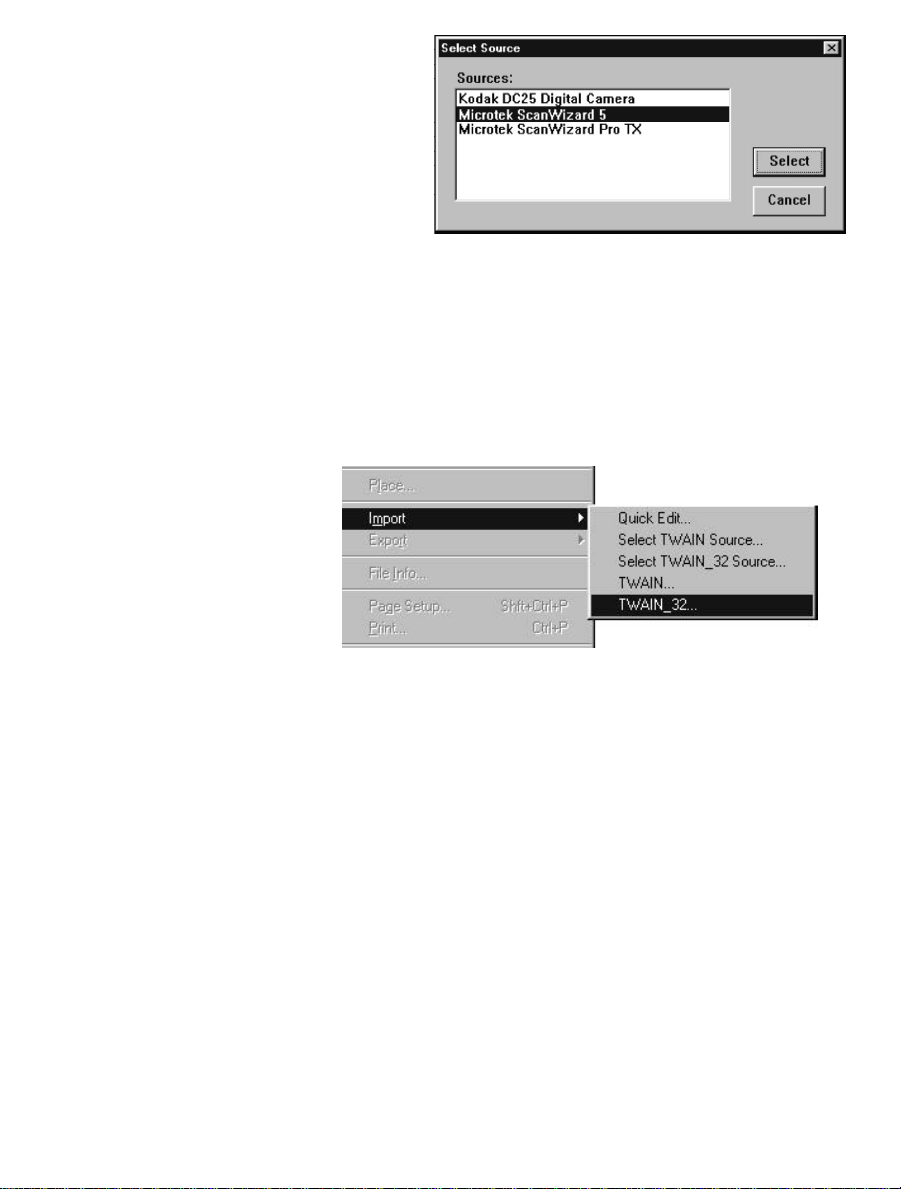
2. From the resulting
dialog box, select
Microtek ScanWizard
5 as the source of
your image. Click
Select to exit from
the dialog box and to
auto-save the image
source setting.
Launching ScanWizard 5-Standard from an Image Editor
With the image source defined, you may directly invoke SW 5-Standard from
the application (i.e., Photoshop) menu bar. Click on the
Import. From the resulting dialog box, choose TWAIN_32 ... (see figure below).
Wait for the SW 5-Standard window to display.
File menu and select
Launching ScanWizard 5-Standard as StandAlone Program
You need to launch SW 5-Standard as a stand-alone program
if you want to save your output into a file, or have it printed,
or save it and immediately attach the file to an e-mail, or view
the output image with your browser, or image processor. You
can launch SW 5-Standard as an stand-alone operation by
doing one of the following:
• Launching from your Start menu.
• By pressing the “
(whichever is available). If your scanner is also equipped with the
Copy” or “E-mail” start buttons, you may also launch SW 5-Standard
“
from such buttons.
• Click on the desktop Assistant buttons.
3-4 Microtek ScanWizard 5
Go” or “Scan” start button from your scanner
Page 25

Running from Start Menu
To launch SW 5-Standard from Start menu, click on-
3
4
1. Start button
2
2. Program
3. Microtek
ScanWizard 5 for
Windows
4. ScanWizard 5
1
Running from Scanner Located Start Buttons
If your scanner is equipped with either the "Go", or a combination of "Scan",
Copy", and "E-mail" start buttons, you may remotely launch SW 5-Standard
"
from the scanner by pressing any of the available buttons.
Note that these start buttons start SW 5-Standard as if it were launched from
Start menu. Hence, all SW 5-Standard functions are supported, but the “
E-mail” start buttons will cause the final scanning button to default at
and “
Copy” and “E-mail” respectively. That is -
“
Copy” SW 5 Standard is ready to perform final scan and send output image to
“
Copy”
your printer.
E-mail” SW 5 Standard is ready to perform final scan, then
“
save output image to a file. It then opens and
attaches the image to your e-mail editor.
Running from ScanWizard 5 Assistant Buttons
The "Scan", "Copy", and "E-mail" buttons of the desktop
Assistant buttons functions the same way as with the remote
scanner located start buttons described above.
Tutorial 3-5
Page 26
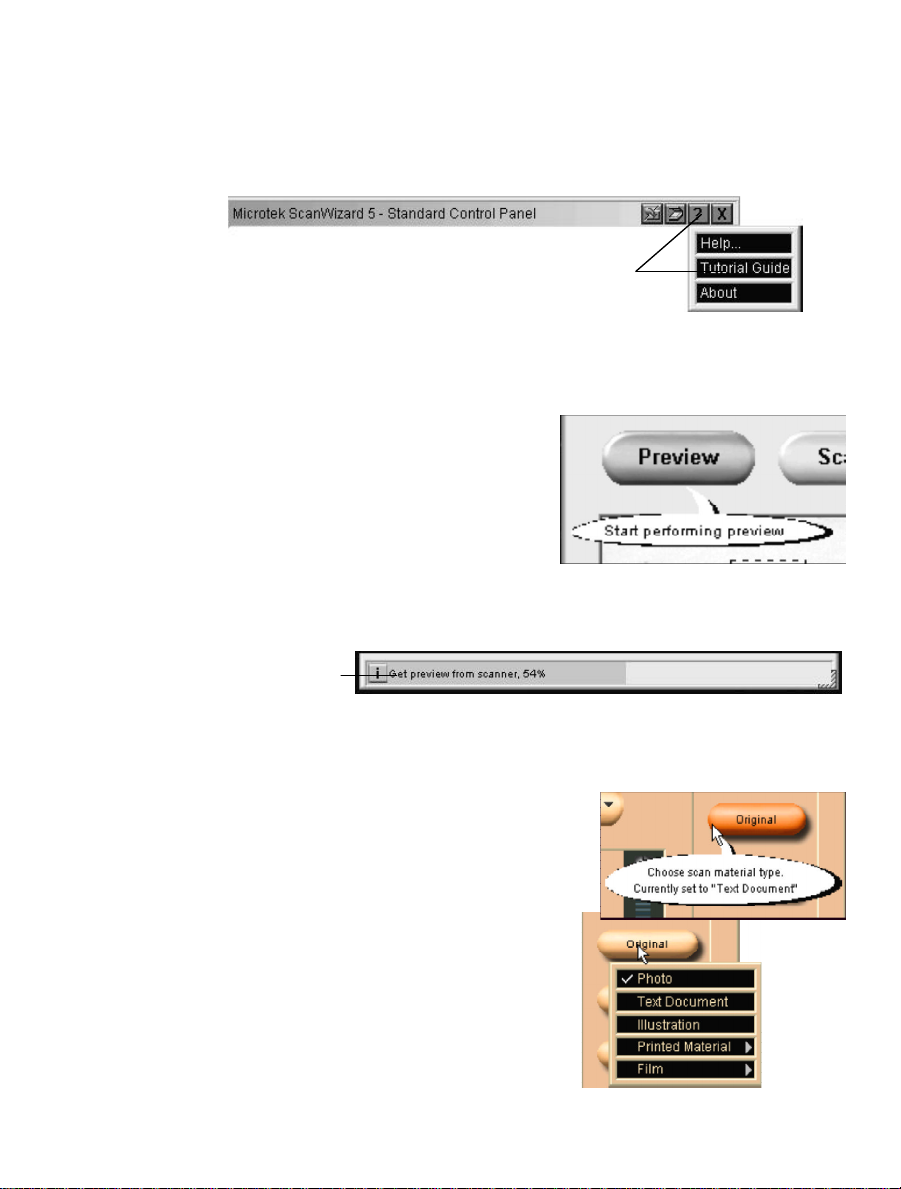
ScanWizard 5-Standard Tutorial Step-by-Step
When the SW 5-Standard main window appears, click on the help [?] icon at
top right of the window, and then choose
menu.
Click (?) to access Tutorial and
choose Tutorial Guide from menu
Step 1 Preview Button
You are now prompted (by the pointer
position) to click the
balloon screen tip on its function. Click the
Preview button and observe your scanner
starting to perform pre-scanning. You can
monitor the progress of the scanning
process through the Progress Status Bar at
the bottom of the window. When the
preview image appears, the
pointer automatically moves to the Original button or Step 2 below.
Scanning process
Progress Status Bar
Preview button with a
Tutorial Guide from the resulting
Step 2 Original Button
A screen tip appears again to provide hints
Original button function and scan
on the
material information. Click on the
button and a menu displays from which you
have to select the appropriate category of
your scan material. This will help SW 5Standard determine the best in-house
scanning parameter to accommodate your
original.
When selection is made, the pointer
automatically moves to
button or Step 3.
3-6 Microtek ScanWizard 5
Original
Scan Type
Page 27

Step 3 Scan Type Button
You are now prompted to click the Scan
Type button while a balloon screen tip again
provides hint on its function. Click
Type button and select into what image
Scan
output category you wish to convert your
original scan material.
After the type of output image is selected,
the pointer auto jumps to
Purpose button
or Step 4.
Step 4 Purpose Button
With a screen tip providing functional
information on the button, click on the
Purpose button and a menu displays from
which you have to select the intended usage
of the output image to determine output
image resolution. Different values of image
resolution are provided for different output
applications. The higher the resolution, the
bigger is the memory size required.
a purpose is defined, the pointer
When
automatically goes to
or Step 5.
Scale Output button
Observe pertinent
resolution (DPI)
value in the Edit
box as you point
on each item in
the menu
Step 5 Scale Output Button
With pointer on the Scale Output button
and a balloon screen tip again providing
hint on its function, click
button. From the resulting menu, select the
size (in % scale) you want for your output
image.
the output image size is selected, the
When
pointer now auto jumps to
button or Step 6.
Scale Output
Advance
Tutorial 3-7
Page 28
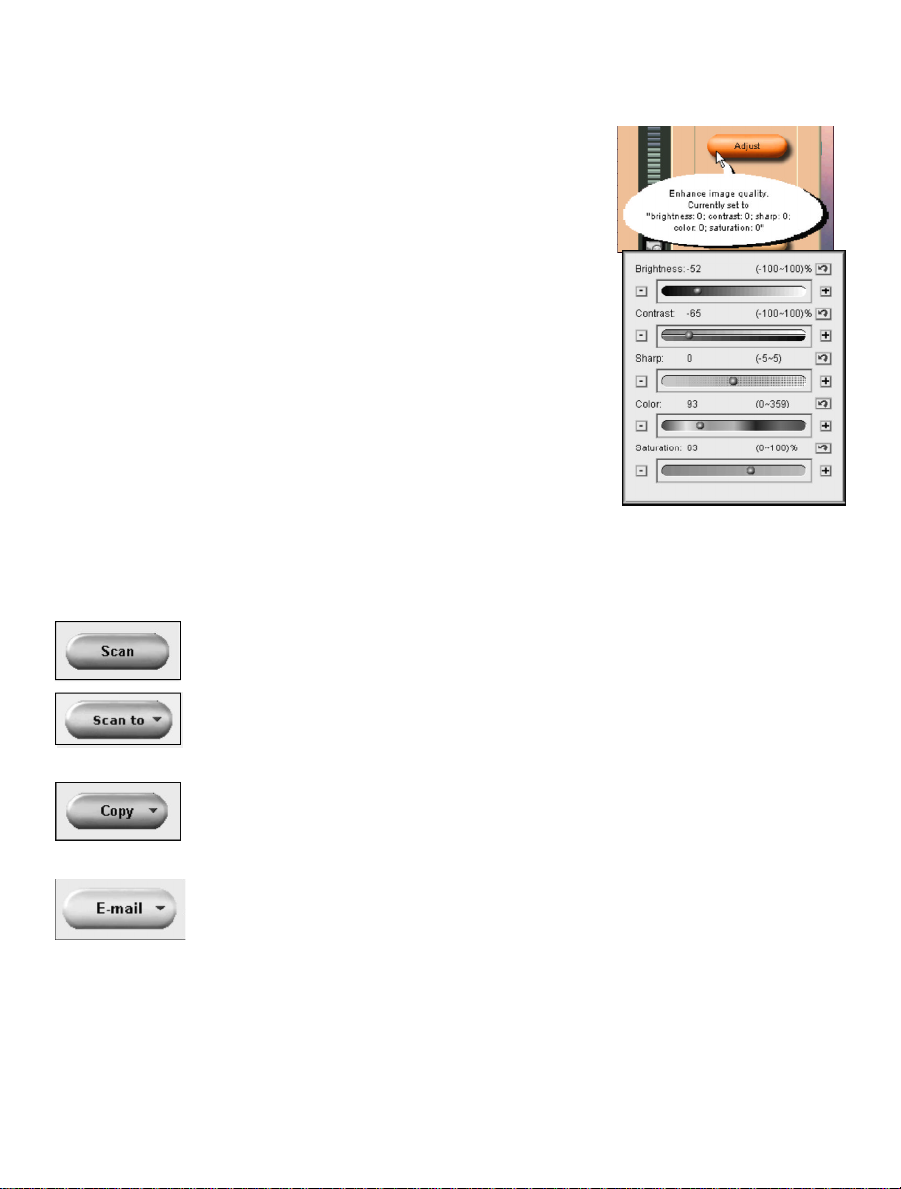
Step 6 Adjust Button
The screen tip on this button suggests you may
adjust (color toning, image brightness, etc.) the
preview image to provide an enhanced output
image. Click on the
Adjust button and the SW
5-Standard image correction tool panel displays.
Adjust image appearance by dragging the pellet
button of each tool along its grooves. Observe
the live update taking place with the preview
image as you reposition each pellet.
Click anywhere outside the image correction tool
panel to exit the panel, or press the
Enter key.
The pointer then auto points to the final
scanning button (Step 7).
Step 7 Final Scanning Buttons
This is the last step of your scanning tutorial
session where the final scanning is performed. The final scanning button
designated function will differ depending on how the SW 5-Standard was
launched as explained below.
Scan button This is the resulting button (default) when SW 5-Standard is
Scan to button This is the resulting button (default) when SW 5-Standard is
Copy button This is the resulting button (default) when SW 5-Standard is
E-mail button This is the resulting button (default) when SW 5-Standard is
3-8 Microtek ScanWizard 5
launched from an image processor.
launched from program manager or from scanner located
Go” or “Scan” start button, whichever is available.
“
remotely launched from scanner “
remotely launched from scanner “
Copy” start button.
E-mail” start button.
Page 29
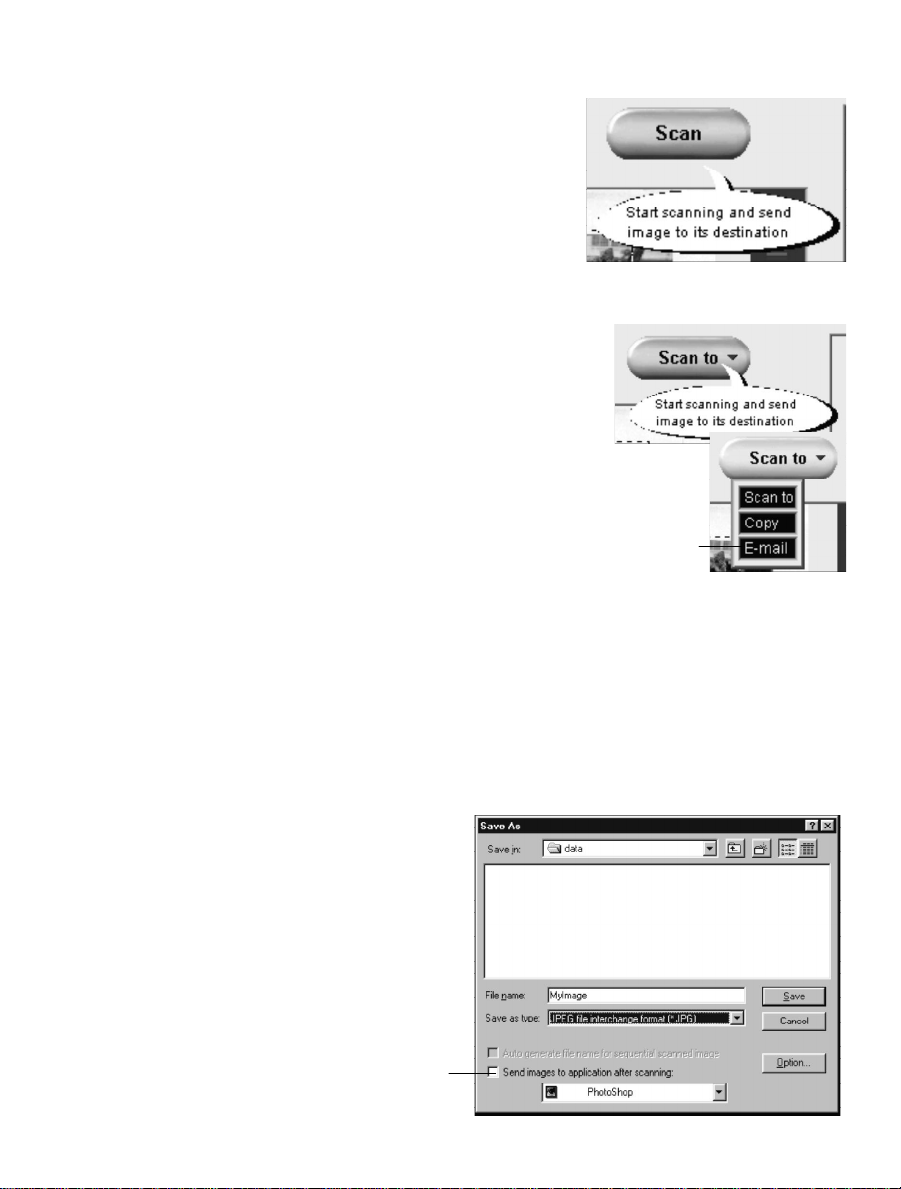
"Scan" Button
If SW 5-Standard was launched from an
image editing application, the final scanning
button is designated as
Scan. Its sole
function is to deliver the output image to the
image application from which SW 5-Standard
was launched. From your image processor,
you may further edit and save the image. No
option is available to deliver the output image
to other destinations.
"Scan to" Button
This is the default final scanning button when SW
5-Standard is launched as a stand-alone program
from program manager or from the scanner “
Scan” start button, (whichever is available).
or “
The Primary function is to save output image to a
file, with options to deliver the saved image to an
image processor, an e-mail editor, or to a web
browser.
Scan to button may be instantly switched
The
Copy or E-mail button (to change button
to
designation and function ) by holding the
mouse pointer on the
Scan to button for about 2 seconds or until an image
destination menu appears. Then select the new button designation from the
menu. If you click on the
(same effect when you click on
Scan to button, a Save as dialog box will display
Scan to from menu as detailed below).
Go”
Scan Image
Destination
menu
Scanning Image to File
Choose Scan to from the
menu (or click on the Scan to
button directly) if you want to
save output image to a file. A
Save As dialog box (see right
figure) will then display and
prompts you for a filename.
Check if you wish to redirect
output image to your image
processor/e-mail/browser
application (Photoshop in this
sample figure) after saving it to file
Tutorial 3-9
Page 30
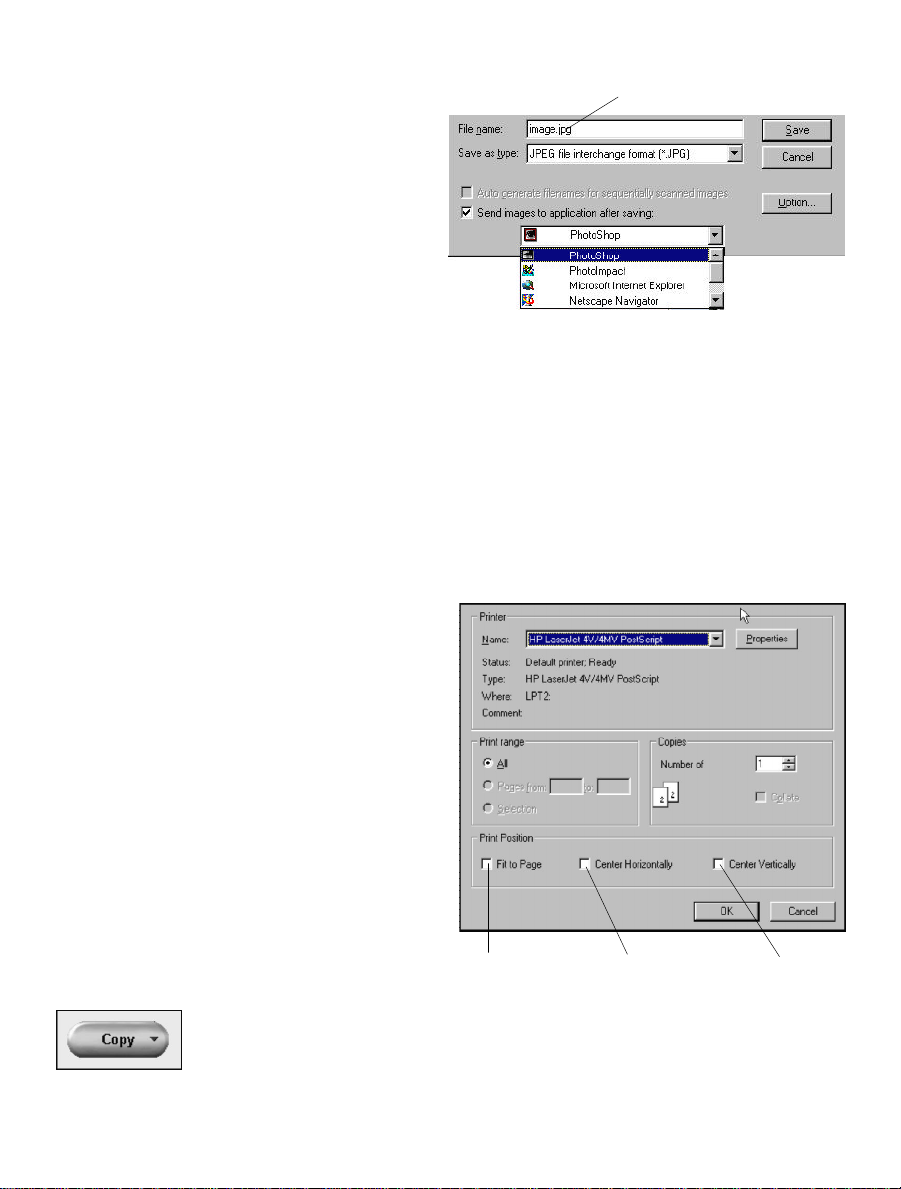
Enter a filename on the 'Filename' pane if the default filename does not suit
you. Click the
the scanned output image
Save button to store
Enter a filename here
into your disk. If you do
not assign a preferred
directory, the image is
saved by default in the
Data' folder located under
'
the same directory where
your SW 5-Standard
program is located, or in
Windows\ Twain_32\ScanWiz5.
At this juncture, if you wish to redirect the output image to your image editor,
e-mail, or web browser after saving it to file, you can do so by simply ticking the
check box for this feature and selecting the target application you wish to work
with from the combo box (see above figure). Clicking the
Save button with the
checkbox enabled, will save the output image into a file, followed by an autoexecution of your selected application. When the application is invoked, it
auto-opens the recently saved image from file. More details are provided in the
following sections.
Copy Image to Printer
Choose Copy from the
destination menu if you
wish to print a hard copy
of the output image. A
Print dialog box (see right
figure) will display to
prompt you for the print
setup.
Note that the dialog box
provides a print position
setup to facilitate proper
placement of your image
in a print page.
Click the
Ok button to
start printing. Notice that
Scan to button now
the
becomes the
3-10 Microtek ScanWizard 5
Copy button.
Select "Fit to
Page" to print
and fill whole
page (image is
enlarged and
printed full page,
but may not print
proportionally)
Select "Center
Horizontally"
to print image
at the center
of right and
left edges of
the page
Select "Center
Vertically" to
print image at
the center of
top and bottom
edges of the
page
Page 31

Attach to E-mail
Choose E-mail from the
menu if you wish to send
out a copy of the output
image as attachment to an
e-mail. Notice that the
Scan to button now
becomes the
button. When the Save
As dialog box appears
(with application check
box enabled by default),
click the
Watch the final scan being
performed and the
resulting output image is saved to file. Then your e-mail editor (Netscape
Messenger, Microsoft Outlook, etc.) is automatically launched with the saved
output file already attached to it.
E-mail
Save button.
If you have not installed any e-mail editor,
e-mail processor embedded in the SW 5-Standard) will default and provide you
with the facility to send the output image by e-mail.
Internet Mail (the Microtek provided
Reviewing the Scanning Sequence
To review the proper scanning sequence only (without performing actual
scanning) of SW 5-Standard, you may run the tutorial again and press the ESC
key each time the pointer hovers on each button. Observe how the pointer
jumps from one button to the next in accordance with its working sequence.
Quitting ScanWizard 5
To exit from ScanWizard 5, just click on the Exit [X] icon from the top right
corner of the SW 5-Standard window. Note that when you exit, you quit from
both standard and advanced modes.
Click to quit
SW 5-Standard
Tutorial 3-11
Page 32

Conclusion
This ends your tutorial session. You may now go through it again to gain a
deeper understanding of SW 5-Standard scanning steps and its basic features.
Once you master the tutorial, go to Chapter 4 for an actual scanning session and
for more details on SW 5-Standard not covered in this chapter.
3-12 Microtek ScanWizard 5
Page 33

Your First Scan with
4
ScanWizard 5-Standard
Launching/Exiting ScanWizard 5
Launch ScanWizard 5 as described in the preceding chapter (see page 3-3). Be
sure to launch from your image processor if you wish to further edit or
manipulate the scanned image with your application. Launch from your
scanner start buttons, ScanWizard 5 Assistant button, or Start menu if you are
going to save, print, browse, or e-mail the output image.
To quit ScanWizard 5, simply click on the [
SW 5-Standard window.
When Launching from Scanner Start Buttons and
Assistant Buttons
If your scanner is equipped with the “Go”, or the combination of “Scan”,
Copy”, and “E-mail” start buttons, you may launch SW 5-Standard by pressing
“
any of the buttons (or clicking from the desktop Assistant buttons). SW 5Standard will run as a stand-alone program, but varying default output image
destinations will result in each type of button:
Go”/“Scan” start button runs SW 5-Standard as if it were launched from Start
“
menu. The last function defined for the scan button will default
for the next scanning session. You may change output image
destination as you please.
Copy” start button runs SW 5-Standard with the primary purpose of
“
printing your output image. Hence, you are prompted with a
printer setup dialog box before final scanning. You may however
abort printing and redirect output image to other destination as in
regular operation.
E-mail” start button runs SW 5-Standard with the intent of attaching the
“
output image to your e-mail composer. Hence, you are prompted
with a dialog box where “
possible destinations for the output image after it is saved to file.
You may however abort the e-mail processing and redirect output
image to other destination.
X] button at top right corner of the
E-mail” or “Internet Mail” are the only
Your First Scan-Standard 4-1
Page 34

Previewing Your Original Scan Material
By default, SW 5-Standard automatically detects and creates a preview image of
your original in the SW 5-Standard preview window when you first launched
the program.
If you have disabled the auto preview function in the
(see section on Setting Preference in SW 5-Standard in this chapter), you need to
manually click the
material into the SW 5-Standard window.
If you have disabled the auto detect function as well,
SW 5-Standard will prescan your original as you have
defined in the previous scan session. If the resulting
type of the preview image does not match with your
original, you need to tell SW 5-Standard the actual
type of your original by clicking on the
button. From the resulting menu (see figure at right),
select the nearest scan material category that matches
your original.
NOTE NOTE There is no order of sequence required for using the
image setup buttons in defining various aspects of your image,
i.e., Original, Scan Type, Purpose, Scale Output, and Adjust
buttons.
Preview button to prescan and preview your original scan
Original
Preferences dialog box
Create and Manipulate a Scan Frame Selection
If you wish to scan only a segment of your scan material, you can do so by
plotting a scan frame (or a scan job selection) around the chosen area within the
preview image. The area outside the scan frame is excluded from the final
scanned output image.
4-2 Microtek ScanWizard 5
Page 35

Plotting a Scan Frame Area from the Preview Image
5
Ö
Ö
Ö
To plot a scan frame, point at any corner of
your intended scan frame. When the crosshair
pointer appears, drag diagonally until you have
the desired image selection enclosed in a frame,
then release the mouse. Your actual scan frame
border now turns into cascading lines.
Crosshair pointer
Scan Frame
Re-sizing a Scan Frame
You may adjust the size of your scan frame by
pointing at any side of the scan frame. When
Ö
the 2-way arrow pointer appears, drag
horizontally or vertically until you have
achieved the desired adjustment of the width
and height of the scan frame.
You can also adjust the scan frame width and
length together by pointing at any corner of the
scan frame. When the diagonal 2-way arrow
pointer appears, drag diagonally until you
achieve the desired adjustment to the scan
frame.
2-way arrow pointers
Moving Scan Frame
When you wish to maintain or use the existing
scan frame size to select another scan image
selection within the same preview image, just
move the existing scan frame over to the new
scan job area. To accomplish this, point
anywhere within the existing scan frame.
E
When the 4-way arrow pointer appears, drag
the scan frame to the location of the new
selected image area.
4-way arrow pointer
Your First Scan-Standard 4-3
Page 36

Plotting a New Scan Frame
You can always create another scan frame over
Previous selection or
existing scan frame
an existing one or at another location of the
same preview image. Like your previous scan
frame, point at any corner of your intended
new selection. When the crosshair pointer
appears, drag diagonally until you have the new
desired image selection enclosed in a frame.
When you release the mouse button, the
previous scan frame is discarded.
Drag crosshair pointer
to plot a new scan
frame selection.
(Previous selection is
discarded.)
Magnifying Your Preview Image
SW 5-Standard allows magnification of your preview image to as much as four
times (4x) the size of your original. The zoom scale bar (located at the right side
of your preview image) is provided to easily accomplish zooming of your
preview image. To magnify image, click toward the top (or the plus [+] button)
of the bar, image is zoomed up to an increment of 100% to the maximum of
400%. To shrink image, click toward the bottom (or minus [-] button) of the
bar, image is zoomed down at same increment, to its original size as minimum.
Viewing Hidden Areas of Magnified Image
When the magnified image becomes too large to be accommodated within the
preview window, click and hold on the Pane tool (see right figure above). A
panning frame occurs displaying a miniaturized replica of the whole original
image. Start panning the pane pointer toward the direction of the hidden area
in the miniaturized image. Observe the live or realtime effect in the preview
window which synchronizes the exposures of the hidden area .
4-4 Microtek ScanWizard 5
To magnify image, click on plus
(+) button or on higher scales
To shrink image, click
on minus (+) button or
on lower scales
To view hidden area of
magnified image,
click Pane tool (left).
When panning frame
occurs, drag pane
pointer (right) toward
hidden area of image
Page 37

Resizing Main Preview Window
Ö
Another option to view the hidden
area of a zoomed up image is to
directly expand the size of the
preview window. Simply point at the
bottom-right corner of the window.
When the diagonal 2-way arrow
pointer occurs, drag the corner down
diagonally to expand the window.
If you have a small-size original (e.g.,
pocket book photo, match box, slide,
etc.), expanding the preview window
before clicking the
will allow you to view a larger size
and a clearer preview of your
original. This will make selection of
a scan frame from the preview image
easier.
Preview button
way arrow pointer downward diagonally
to expand preview window and expose
Point at this corner. Then drag the 2-
hidden area of magnified image
Image on preview under default
preview window size
(unexpanded)
Image on preview under
expanded (full screen height)
preview window
Your First Scan-Standard 4-5
Page 38

Define Type of Output Image
With your original properly displayed in the preview
window, you have to specify the image category in
which you wish to convert and output your original.
To do this, click the
Standard offers four options of image conversion
formats as shown at right. However, not all
categories of the originals listed in the
button menu can be converted into all of the listed
conversion formats as shown in the table below.
Scan Type button. SW 5-
Original
Text Document
Graphics
Photo
Magazine
Art Magazine
Newspaper
Positive Film
Negative Film
True Color Gray
X X X ü
ü ü ü ü
ü ü ü ü
ü ü ü ü
ü ü ü ü
ü ü ü ü
ü ü ü X
ü ü ü X
Web Color
Black & White
4-6 Microtek ScanWizard 5
Page 39

Resolution of Output Image
Click and use the resulting menu that pops up
when you click the
the resolution for your output image. SW 5Standard provides default or predefined
resolutions (based on the ultimate purpose or
application, e.g., screen display, printing, etc.)
that closely match with the image type of your
original scan material (as defined under
Original button menu).
Select from the menu the particular setting that
will best match with the intended device
application for your output image. Different
types of original may have different predefined
values of resolution for certain device
applications as shown in the following table.
Purpose button to define
Select "Custom" and
enter custom resolution
in the Edit box
Photo and
+ / - Film
Graphic and
Magazine
Normal Screen
Fine Screen
Ink Jet Printer
300 Laser Printer
600 Laser Printer
Fax
OCR
Text
Document
72 dpi 72 dpi 72 dpi
96 dpi 96 dpi 96 dpi
300 dpi 200 dpi 300 dpi
300 dpi 100 dpi 300 dpi
600 dpi 150 dpi 300 dpi
200 dpi 200 dpi 200 dpi
300 dpi 300 dpi 300 dpi
If none of the predefined resolution matches with your need, you may define
your own resolution by selecting '
Custom' and then enter your own resolution
value in the Edit box provided at the bottom of the menu. Remember that the
higher the resolution, the larger the resulting file will be.
Your First Scan-Standard 4-7
Page 40

Intended Size of Output Image
By default, SW 5-Standard scans your original
into an actual size (100%) output image. To
change the output image dimension, click on the
Scale Output button. From the resulting menu,
select the predefined scaled size that best
matches your intended image output dimension.
Improving Image Before Final Scan
When you scan your original image without
making any adjustments of your own, SW 5Standard will auto process to enhance the
quality of your digitized image by using its
default image editing settings. If you are not
satisfied with what SW 5-Standard has done for
you (as reflected in the preview image), you
may modify the default artwork and apply your
own image manipulation before final scanning
by using the image correction tools panel under
Adjust button.
the
Click the
correction panel displays, adjust the preview
image by dragging the pellet button of each tool
along its groove. Observe a live update taking
place with your preview image as you
manipulate each of the image
correction tools. To reset a correction tool back to its original position, click on
the reset icon at right end of each tool (see figure at right).
Adjust button. When the image
Reset icon. Use this icon
to individually reset the
adjustment you have made
to each image correction
tool, back to its default
setting.
Note that the new settings are automatically saved and will remain in effect for
the subsequent scanning sessions (after a reboot) unless otherwise redefined or
if they are reset to default settings (as explained in the following section).
4-8 Microtek ScanWizard 5
Page 41

Output Image Setting Information
As you perform adjustments and define various settings for the output of your
original image (as reflected in the preview image), SW 5-Standard monitors and
makes records of them. Part of the defined settings are displayed in the Status
Bar (at the bottom of SW 5-Standard window) as soon as changes are made,
while a separate and more comprehensive record of the changes are kept at the
same time. To view a complete record of your settings, click on the Information icon [
then appears, listing all the current setting for your output image. If you have
not made any adjustment, the default settings will display.
i ] at the left end of Status Bar. The Image Information window
Status bar showing summary
settings for output image
Click icon to display detailed
info box (right)
Reset and Revert to Default Settings
When you feel like abandoning the adjustments you have just made, you can
easily revert to SW 5-Standard default settings and start all over again. Click on
Reset button. All changes you have made in the menus and control panels
the
Original, Scan Type, Purpose, Scale Output, and Advance buttons are
under
then reset back to SW 5-Standard defaults.
Drag this corner to resize
preview window
NOTE NOTE The settings you have made to dialog boxes under
Preference and Scan/Scan to/Copy/E-mail buttons are not
affected with the execution of the Reset button.
Your First Scan-Standard 4-9
Page 42

Final Scan and Output Image Destinations
If you are satisfied with the appearance of your intended output image (as
previewed from the preview window), you may now click the final scanning
button. Note that the button may be designated as
mail, depending on what environment in which you have launched your SW 5-
Standard (as explained below).
ScanWizard 5-Standard Launched from an
Application
If you have launched SW 5-Standard from an image editing application (e.g.,
Adobe Photoshop, Ulead PhotoImpact, etc.) the final scanning for the output
Scan
image is controlled by the
button. This button offers no option other than
to scan your original with the image adjustments you have made (if any). Upon
completion, the output image is delivered directly to your image processing
application. From your application, you may further edit and save the image.
ScanWizard 5-Standard Launched as StandAlone Program
If you have launched SW 5-Standard from Start menu or from the “Go”, “Scan”,
Copy”, or “E-mail” start button of your scanner, the final destination for the
“
output image will vary. Default at first start up is
Scan, Scan to, Copy, or E-
Scan to.
Go” or “Scan” start buttons invokes SW 5-Standard as if it were launched from
“
Start menu. “
button into the
prompt you to send the output to printer, while the
your e-mail editor and attach the output image file with it. However, these
destinations may be aborted and the output image redirected .
Storing Scanned Output Image to File
You need the Scan to button if you wish to store the
output image into a file. If the current button is
already set at
dialog box (see next page) will immediately display.
If the current button shows as
the pointer on the button for about two seconds or
until the selection menu appears. When the menu
displays, choose
immediately displays and the button turns into
to button.
4-10 Microtek ScanWizard 5
Copy” and “E-mail” start buttons switches the final scanning
Copy or E-mail button respectively. The Copy button will
E-mail button will invoke
Hold pointer on the button
for about 2 seconds to
display the menu for
Scan to, click button. The Save As
Copy or E-mail, hold
Scan to. The Save As dialog box
Scan
selecting destination of
output image
Page 43

For batch scanning with an auto
document feeder (ADF) equipped
scanner, you may provide root
filename only. SW 5-Standard will
auto-suffix such root filename with
serial numbers to generate multiple
filenames for the scanned and saved
images in continuous sequence
When your scanner is equipped with
an automatic document feeder (ADF),
ticking this check box will enable the
auto-filename generation for the batch
Check to also invoke your application
(Photoshop in this sample figure).
After image is saved, application is
auto invoked with the saved image
Applications Combo Box. Your
available image and Internet
application programs are auto-
detected and listed here. Select one
to further process your output image
scan-to-file images
opened
You may modify the folder and filename in the Save in and Filename panes
respectively, then click the
output image is saved to file.
NOTENOTE By default, files are saved in a 'Data' folder located in
the same directory as your SW 5-Standard, or
Windows\Twain_32\ScanWiz5 directory.
If filenames already exist, the following dialog box will display
showing conflicting filenames.
Error message when saving
a single output image
Save button. The final scan is performed and the
Error message when saving multiple output
images from ADF-equipped scanner
Your First Scan-Standard 4-11
Page 44

Routing the Saved Image to an Application
If during the save-to-file-stage, you decide to further edit your output image
with your image processor, or wish to send the image with your e-mail, or
insert the image with your web browser for inclusion in an HTML document,
just tick the check box (
Send images to application..). Then select your
application from the Combo Box (see figure in previous page). When you click
Save button, final scanning and saving routine starts. When done, SW
on the
5 Standard auto-launches the application you have selected from the Combo
Box. The application then auto-opens the recently saved image into your
application. If an
E-mail application was selected, the image file is delivered to
your e-mail composer as an attachment.
SW 5-Standard is designed to auto-detect the following image and web proces-
sors from your hard disk and displays them in the application Combo Box:
Image Processor Internet/Mail
Photoshop PhotoDeluxe Netscape Navigator Netscape Messenger 4.6
PhotoImpact Photo Express Internet Explorer QualComm Eudora Pro 3.x
Microsoft Imaging ImageStar III Outlook Express
PageKeeper Standard MS Picture It Microsoft Outlook 97/98
Batch Saving of Outputs from ADF Equipped Scanners
If you are using a scanner equipped with the automatic document feeder (ADF)
that allows multiple scanning in continuous sequence, you can auto scan and
save output images in batches. Just tick the check box (
filename...) to enable this feature before you click the Save button.
Auto generate
SW 5-Standard will auto-assign a serialized filenames for each of the batch
images and store them to files after they are scanned in sequence. You may also
provide your own root filename. SW 5-Standard will auto-suffix your root
filename with serial numbers (e.g., xxxx001.jpg, xxxx002.jpg, xxxx003.jpg,
etc.) as filenames for the saved images.
Batch Routing of ADF Outputs to an Application
You can also auto-send your multiple images in a batch to your application after
saving them. Tick the other check box (
function and click the
to file, the selected application is invoked and the image opened with it. SW 5Standard continues to scan each of the subsequent images in sequence. Each
output is saved to file as it is scanned, and opened (in same sequence as they
were saved) in your application in cascading formation.
4-12 Microtek ScanWizard 5
Send images to application...) for this
Save button. After the first image is scanned and saved
Page 45

If an E-mail application is selected, multiple windows of the e-mail application
will open - one for each of the output files. That is, if you have five output
image files, five e-mail composer are opened with an image file attached to each
of them.
Internet Mail application was selected, the files are delivered to the
If an
Microtek e-mail editor in one batch as multiple attachments.
Copy Output Image to Printer
You need the Copy button to send an image directly
to the printer. If the button is currently set at
click the button and the
Print dialog box displays.
Otherwise, hold the pointer on the button for about
two seconds or until the selection menu appears.
Copy,
When the menu displays, select Copy. The button
immediately turns into Copy button, followed by the
appearance of the Print dialog box. Click
Ok button
to start printing.
Select "Fit to
Page" to print
and fill whole
page (image is
enlarged and
printed full page,
but may not print
proportionally)
Select "Center
Horizontally"
to print image
at the center
of right and
left edges of
the page
Select "Center
Vertically" to
print image at
the center of
top and bottom
edges of the
page
Hold pointer for about 2
seconds to display menu
for selecting destination
of output image
Your First Scan-Standard 4-13
Page 46

Attach Output Image to an E-mail
You need the E-mail button to attach the output image to your e-mail. If the
button is currently set at E-mail, click button and the Save As dialog box
displays.
Otherwise, hold pointer on the button for about two seconds or until the
selection menu appears (see top-left figure in previous page). Then select
mail from the menu.
The button immediately
turns into
while the
E-mail button
Save AS dialog
box immediately displays
with the application check
box enabled by default.
Click to select from the
combo box which e-mail
processor you are going to
use (see figure at right).
'E-mail' is the e-mail editor (Netscape Messenger, Microsoft Outlook, etc.) you
have previously installed in your host. If none is installed, only
'Internet Mail'
will be available from the combo box. See Appendix A for proper e-mail editor
installation and setup to ensure compatibility with ScanWizard 5.
'Internet Mail' is the Microtek provided e-mail processor embedded in the
ScanWizard 5.
E-
Click the
Save button to execute final scanning, saving output image to file,
and launching of your e-mail application with the output image attached.
4-14 Microtek ScanWizard 5
Page 47

Setting Preferences in ScanWizard 5-Standard
When SW 5-Standard is launched for the first time, it will auto detect, by
default, the type of scan material you have placed in your scanner and
automatically performs a prescan on the original material. The prescan image is
then placed in the preview area of the SW 5-Standard window. At the same
time, it has a default window painted in "sky" blue tinted colors. You may
change all these default conditions using the options offered in the
dialog box described below.
NOTE NOTE The customized settings you have made will remain in
effect at subsequent SW 5-Standard start-ups until redefined.
Preference Dialog Box
The Preferences setup dialog box provides options on how you would like SW
5-Standard to handle your scan material when the program is launched. You
may also disable the balloon screen tip feature in this dialog box if you are
already well-acquainted with the function of each button.
Preferences
From the
dialog box where coloring options are available for repainting your SW 5Standard window. This includes all the buttons and the window background.
Left-handed users may also relocate the button pane location from right to left
side of the window for added convenience.
To redefine
Preferences dialog box displays, pick your options as illustrated in the
following page.
Preferences dialog box, you can also access the Appearance setup
Preferences setup, click on the Preferences button. When the
Your First Scan-Standard 4-15
Page 48

Uncheck to change prescan
image preview from auto to
manual operation
Uncheck to change image
detection and selection of the
original scan material, and
definition of output image type,
from auto to manual operation
Check to disable screen
'balloon' tips function
Change the unit of
measurement for image
selection as displayed in the
status bar (bottom of SW 5-
Standard window)
Appearance Dialog Box
Use this dialog box as your coloring pallet to repaint your SW 5 Standard
buttons and window background. If you are left handed, you may reposition
the block of frequently used setup buttons from right to left side of the window.
Try repainting the window with your favorite colors and add fun to your
scanning.
Click to access Appearance
dialog box (see below).
Use it to repaint SW 5Standard window buttons
and background, and to
relocate buttons pane
location to accommodate
left handed user (see
below).
You may click directly on the
background or on any other
particular item in the Preview
window you wish to repaint.
The clicked item is instantly
reflected on the color
definition pane below. You
may also scroll through the
Item menu to look for the
window item you wish to
repaint.
The Scheme pane contains
predefined coloring pattern
(default and user defined)
selections. Choosing from
these selections allows
instant color changes to the
whole SW 5-Standard
window.
4-16 Microtek ScanWizard 5
Click to display the color pallet
from which color is chosen to
repaint the window item
selected at left pane
Preview window where live
color updates are shown
Click on appropriate radio
button to reposition the row
of commonly used buttons
to either left or right side of
SW 5-Standard window
Use Delete button to
delete the no longer
needed color patterns
(user defined only).
Use Save As... button to
save your own defined
color patterns and add to
Scheme menu.
Click to display color pallet
from which color is chosen
to repaint the font of the
text on selected item
Page 49

Saving Your Favorite Color Scheme
When you saved the custom color pattern you have just defined, the pattern is
added at the bottom of an existing list of color patterns under
(see figure at right).
Scheme menu
When deleting color pattern items from the
Scheme menu, you can only delete
the user defined items. The default items can not be deleted.
User-defined pattern
Your First Scan-Standard 4-17
Page 50

4-18 Microtek ScanWizard 5
Page 51

Your First Scan with
5
ScanWizard 5-Advanced
Launching/Exiting ScanWizard 5-Advanced
Launch ScanWizard 5 as described in Chapter 3 (page 3-3). Be sure to launch
from your image processor if you wish to further edit or manipulate the scanned
image with your application. Launch from your scanner start buttons,
ScanWizard 5 Assistant button, or Start menu if you are going to save, print,
browse, or e-mail the output image.
To quit ScanWizard 5, simply click on the [
SW 5-Advanced window.
Switching to Advanced Mode
When you start ScanWizard 5 for the first time, the Standard Mode panel will
default. To switch to Advanced Mode, click on the Switch icon on the Title bar
of the Standard Mode window (see figure below). Within a few seconds, the
current program exits and switches to the other control panel mode.
X] button at top right corner of the
Click this icon to switch control
panels between Standard &
Advanced modes
Your First Scan-Advanced 5-1
Page 52

The Main Windows of ScanWizard 5-Advanced Control
Panel
The ScanWizard 5-Advanced Control Panel has four major windows consisting
of the Preview, Settings , Information , and Scan Job Queue windows.
Information
window
Settings
window where
parameters are
defined and
Advanced Image
Correction (AIC)
provides
pixels of the
prescan
enhancing images
at scan stage
Scan Job
Queue
window
provides
management
of scan jobs
Preview window
has the commands
interfacing with the
scanner
The Preview and Settings windows will always appear automatically whenever
ScanWizard 5 is started up. The Information and Scan Job Queue windows will
appear when you bring up ScanWizard for the first time but will not reappear if
you have hide these windows the last time you ran ScanWizard. You may show
(or hide again) the Information and Scan Job Queue window by clicking on the
View menu (on Preview window menu bar) and click on Show (or Hide) Info/Scan
Job Window.
5-2 Microtek ScanWizard 5
Page 53

Operating ScanWizard 5-Advanced Control Panel
NOTE NOTE Be sure you have the original image (or scan
material) properly placed on the powered on scanner
before launching ScanWizard 5.
1. Perform a low-resolution preview.
Click on the
Prescan
button
Overview
button
Overview button to scan an image.
Scan Frame tool Scan button
2. Select the required scan area.
Preview area
Click on the Scan Frame tool. With the pointer now a crossbar, move to the
image and define the scan frame (by holding down the mouse and dragging
it to draw a box). The scan frame will be enclosed by dotted lines and will be
the actual area that is scanned when you click on the Scan button.
Your First Scan-Advanced 5-3
Page 54

3. Select the image type.
Select the image type to be processed and scanned. You can put one image
type on the scanner and scan that in its original form, or you can scan it in
another form altogether. For example, you may have a color photo and scan
it in the same color mode, or you may scan it as a grayscale or line art
image.
Resolution
edit box
Image type
Output size
Image correction
tools
4. Set output resolution and Output Size.
Output resolution: Enter a resolution setting in the Resolution edit box,
then press Enter.
Output size: Enter the Output width/height value, indicating the
relationship of the input dimension, scaling, and the resulting image size.
5. [Optional] Perform a high-resolution preview for the current selected scan
area.
Click on the Prescan button to show the image in high resolution.
5-4 Microtek ScanWizard 5
Page 55

6. [Optional] Set Advanced Image Correction (AIC).
Click on any of the Advanced Image Correction (AIC) tools in the Settings
window. These tools allow you to adjust image features such as brightness
and contrast; black and white points; tone curve; hue or saturation; and lets
you apply various filters for special effects.
7. Perform the final scan.
Click on the Scan button to scan your selected image. The scanned image is
delivered to your application.
NOTE NOTE Refer to section on “Final Scan and Output
Image Destinations” at the back of this chapter for
other output image destination options.
Your First Scan-Advanced 5-5
Page 56

Scanning a single-bit image (line art or B&W diffusion)
1. Perform a low-resolution preview.
Click on the Overview button in the Preview window. In moments, a
preliminary view of the image appears in the preview area.
Prescan
button
Overview
button
Frame tool
Scan button
Preview area
2. Select the required scan area.
Click on the Scan Frame tool. With the pointer now a crossbar, move to the
image and define the scan frame (by holding down the mouse and dragging
it to draw a box). The scan frame will be enclosed by dotted lines and will be
the actual area that is scanned when you click on the Scan button.
5-6 Microtek ScanWizard 5
Page 57

3. Select the image type.
From the Settings window, at the Type drop-down menu, make your
selection.
Image type
Threshold button
Image correction
tools
• Choose Line art if you are scanning purely black or white images with
no shades of gray, such as pen-and-ink drawings, logos, and sketches.
Line art also applies if you're scanning an image with just one color (like
a mechanical drawing or blueprint).
• Choose B&W Diffusion if you are scanning black or white images with
shades of gray. A B&W diffusion image is similar to the images you see
in newspapers — there is only black and white, but the eye is fooled
into seeing gray because of the way dots in the image are arranged.
4. Set Output Resolution and Output Size.
At the Settings window, set the resolution. For now, select 300 dpi. But for
optimal results, select a resolution that matches the resolution of your
output device.
5. [Optional] Set Advanced Image Correction (AIC).
For line art only: Click the “Threshold” button in the Setting window.
6. Perform final scan.
Click on the Scan button to scan your selected image. The scanned image is
delivered to your application.
NOTE NOTE Refer to section on “Final Scan and Output
Image Destinations” at the back of this chapter for
other output image destination options.
Your First Scan-Advanced 5-7
Page 58

Scanning a grayscale image
1. Perform a low-resolution preview.
Click on the Overview button in the Preview window. In moments, a
preliminary view of the image will appear in the preview area.
Prescan
button
Overview
button
Scan Frame tool Scan button
Preview area
2. Select the required scan area.
Click on the Scan Frame tool. The pointer now becomes a crossbar, move to
the image and define the scan frame (by dragging the mouse to draw a box).
The scan frame will be enclosed by dotted lines and will be the actual scan
area when you click on the Scan button.
5-8 Microtek ScanWizard 5
Page 59

3. Select the image type.
From the Settings window, select the image type to be processed and
scanned.
Image type
Image
correction tools
4. Set Output Resolution and Output Size.
Output resolution: Enter a resolution setting in the Resolution edit box,
then press Enter.
Output size: Enter the Output width/height value, indicating the
relationship of the input dimension, scaling, and the resulting image size.
Printer Type Recommended Resolution Setting
Inkjet (360 dpi) 240 ppi
Laser (300 dpi) 120 - 150 ppi
Laser (600 dpi) 200 - 300 ppi
Dye-Sublimation Match with your printer's resolution
Imagesetter at least 300 ppi
Your First Scan-Advanced 5-9
Page 60

5. [Optional] Perform a high-resolution preview for the current selected scan
area.
Click on the Prescan button to see the image in high resolution.
6. [Optional] Set Advanced Image Correction (AIC).
Click on any of the Advanced Image Correction (AIC) tools in the Settings
window. These tools allow you to adjust image features such as brightness
and contrast; black and white points; tone curve; hue or saturation; and lets
you apply various filters for special effects.
7. Perform final scan.
Click on the Scan button to scan your selected image. The scanned image is
delivered to your application.
NOTE NOTE Refer to section on “Final Scan and Output
Image Destinations” at the back of this chapter for
other output image destination options.
5-10 Microtek ScanWizard 5
Page 61
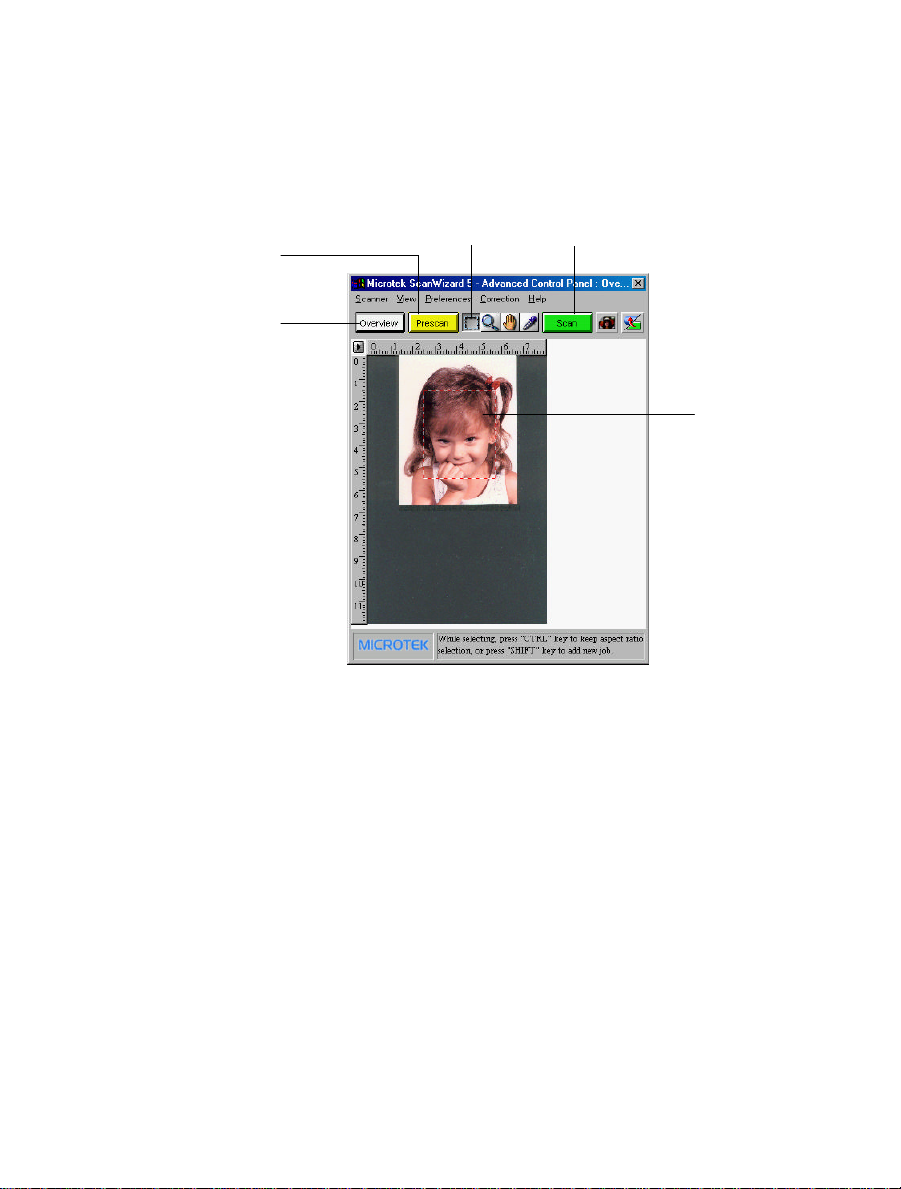
Scanning an RGB color image
1. Perform a low-resolution preview.
Click on the Overview button to preview image.
Prescan
button
Overview
button
Scan Frame tool Scan button
Preview area
2. Select the required scan area.
Click on the Scan Frame tool. The pointer now becomes a crossbar, move to
the image and define the scan frame (by dragging the mouse to draw a box).
The scan frame will be enclosed by dotted lines and will be the actual scan
area when you click on the Scan button.
Your First Scan-Advanced 5-11
Page 62

3. Select the image type
From the Setting window select the image type to be processed and
scanned.
Image type
Resolution
edit box
Output size
Image correction tools
4. Set Output Resolution and Output Size
Output resolution: Enter a resolution setting in the Resolution edit box,
then press Enter.
Output size: Enter the Output width/height value, indicating the
relationship of the input dimension, scaling, and the resulting image size.
Printer Type Recommended Resolution Setting
Inkjet (360 dpi) 240 ppi
Laser (300 dpi) 120 - 150 ppi
Laser (600 dpi) 200 - 300 ppi
Dye-Sublimation Match with your printer's resolution
Imagesetter at least 300 ppi
5-12 Microtek ScanWizard 5
Page 63

5. [Optional] Perform a high-resolution preview for the current selected scan
area.
Click on the Prescan button to see the image in high resolution.
6. [Optional] Set Advanced Image Correction (AIC).
Click on any of the Advanced Image Correction (AIC) tools in the Settings
window. These tools allow you to adjust image features such as brightness
and contrast; black and white points; tone curve; hue or saturation; and lets
you apply various filters for special effects.
7. Perform final scan.
Click on the Scan button to scan your selected image. The scanned image is
delivered to your application.
Your First Scan-Advanced 5-13
Page 64

Important scanning notes
If you are not familiar with the scanning process, you may wish to review the
preceding pages first on the individual scanning tasks to get a feel for the
software and how it works. Also, if some of the concepts discussed in these
pages are not familiar to you, refer to Chapter 6, Reference section of the manual
for more detailed discussion.
For previews and scans
Using the Scan Frame tool
Familiarize yourself with the Scan Frame tool. This tool is used to crop preview
images for final scanning. You can also use the Scan Frame tool to create
multiple scan frames, and with the creation of multiple scan frames, this means
you are actually creating duplicate scan jobs (based on the current scan job).
Each scan frame (and its related scan job) can have its particular settings, so that
one scan job can be in grayscales; another in color with a certain brightness
setting; and yet another in color with a filter applied to it. You can create
multiple scan frames in a single image, or you can have several images and have
several scan frames spread out among the images.
5-14 Microtek ScanWizard 5
Page 65

Using the Prescan action button
Familiarize yourself too with the Prescan button, which is ideal for enlarging the
preview image and previewing it in detailed, high resolution. The enlarged view
obtained from prescan is not the same as the view obtained from the Zoom tool,
which is simply an enlarged pixilated view in low resolution.
Prescan button
Your First Scan-Advanced 5-15
Page 66

Fixed Scan Frame
If checked, the size of the scan frame remains the same as the current one. You
may, however, move the scan frame in the Preview window.
For previews and scans
Fixed Output Size
If checked, the image size (disk space) and width/height of the output size
remain the same. The output size determines the width and height of your image
when output to a device such as a monitor or printer. The output size can be
changed only if this option is unchecked.
Keep proportion
If checked, the aspect ratio (X:Y) is kept as 1:1.
Selecting the correct resolution
Before scanning an image, select the correct resolution setting. Remember that
overly high settings slow down your scanning and create huge unmanageable
files.
5-16 Microtek ScanWizard 5
Page 67

For image correction
• Use the powerful image correction tools to improve your image if necessary,
and familiarize yourself with the features of the Advanced Image Correction
(AIC) dialog box.
Image correction tools
While in the AIC dialog box, you can see thumbnails of the image, make
image corrections there, and see the effects of the changes (“before” and
“after” versions ) in realtime. If the Preview checkbox is checked, these
effects are reflected in realtime in the Preview image.
Your First Scan-Advanced 5-17
Page 68

You can also switch from one tool to another within the AIC dialog box.
Familiarize yourself too with the various action buttons in the AIC dialog
box and how they work. This is important.
5-18 Microtek ScanWizard 5
Page 69

For scan job queue
• Use the flexibility provided by the scan job functions to manage your scan
jobs. With the Scan Job Queue Window, you can create new scan jobs, copy
settings for a duplicate scan job, save scan jobs as templates, and load the
scan jobs templates for future use.
• To master the intricacies of the scan job functions, familiarize yourself with
the usage of the Scan Frame tool and the Smoked Glass Background
feature, both of which are linked to the functions of the scan job.
Your First Scan-Advanced 5-19
Page 70

Scaling the view of an image
Click on the Overview button. When the preview image appears, do either of the
following:
Option 1: Enlarging the view
1. Click on the Zoom tool. The cursor will change to a magnifying glass pointer
with a plus (+) sign in it.
2. Move the pointer inside the image and click. The area where the pointer is
positioned is zoomed in, enlarging your view of it. Clicking successively will
enlarge your view of the image in ascending order on the zoom scale —
from 100% to 200%, to 400%, and 800%.
Zoom tool
Zoom scale
5-20 Microtek ScanWizard 5
Page 71

Option 2: Reducing the view
To reduce your view of the image after it was magnified:
While holding down the Shift key on your keyboard, move the pointer to any
portion of the image, and click on the mouse. The magnifying lens will show a
minus sign (-) in it, at the same time reducing your view of the image. Clicking
successively will continue to reduce the image until it is scaled down to its
original size.
1. In the Preview window, choose the Show Info window command from the
View menu.
2. Click on the Zoom Level Display in the Information window. From the dropdown list, select your zoom scale — 100%, 200%, 400%, or 800%.
Zoom scale
Your First Scan-Advanced 5-21
Page 72

Correcting images
The image correction tools are located in the Settings window.
Click on any of the image correction
tools to adjust your image. The AIC
dialog box will then appear.
5-22 Microtek ScanWizard 5
Page 73

Using the Advanced Image Correction dialog box
When you click on any of the image correction buttons in the Settings window,
the Advanced Image Correction (AIC) dialog box appears. In this box, you can
do the following:
1. See a thumbnail of the image captured by your scanner, and see how the
image changes when adjustments are applied to it. The “before” and “after”
images are the left and right thumbnails in the dialog box.
2a
2. Select another image correction tool by clicking on any of the buttons
displayed in the vertical toolbar on the right side of the dialog box.
3. Click on an action button to achieve a particular effect.
OK Accepts changes you have made and closes the AIC dialog box.
Cancel Abandons all changes and closes the AIC dialog box.
Reset Restores settings to default. The Reset dialog box appears, allowing
you to reset your settings.
Revert Cancels out the effects of the currently used tool. If you have used
three tools, for instance, Revert will preserve the changes of the
first two tools and ignore the changes made by the third.
Your First Scan-Advanced 5-23
Page 74

Final Scan and Output Image Destinations
If you are satisfied with the appearance of your intended output image (as
previewed from the preview window), you may now click the final scanning
button. Note that the button may be designated as
mail,
depending on what environment in which you have launched your SW 5-
Scan, Scan to, Copy, or E-
Standard (as explained below).
SW 5-Advanced Launched from an Application
If you have launched SW 5-Advanced from an image editing application (e.g.,
Adobe Photoshop, Ulead PhotoImpact, etc.) the final scanning for the output
image is controlled by the Scan button. This button offers no option other than
to scan your original with the image adjustments you have made (if any). Upon
completion, the output image is delivered directly to your image processing
application. From your application, you may further edit and save the image.
SW 5-Advanced Launched as Stand-Alone
Program
If you have launched SW 5-Advanced from Start menu or from the “Go”,
Scan”, “Copy”, or “E-mail” start button of your scanner, the final destination
“
for the output image will vary. Default at first start up is
Scan to.
Go” or “Scan” start buttons invokes SW 5-Advanced as if it were launched
“
from Start menu. “
button into the
prompt you to send the output to printer, while the
your e-mail editor and attach the output image file with it. However, these
destinations may be aborted and the output image redirected .
Storing Scanned Output Image to File
You need the
output image into a file. If the current button is
already set at
dialog box (see next page) will immediately display.
If the current button shows as
the pointer on the button for about two seconds or
until the selection menu appears. When the menu
displays, choose
immediately displays and the button turns into
to
button.
5-24 Microtek ScanWizard 5
Copy” and “E-mail” start buttons switches the final scanning
Copy or E-mail button respectively. The Copy button will
E-mail button will invoke
Scan to button if you wish to store the
Scan to, click button. The Save As
Copy or E-mail, hold
Scan to. The Save As dialog box
Scan
Hold pointer on button
for about 2 seconds to
display the menu for
selecting destination of
output image
Page 75

For batch scanning with an auto
document feeder (ADF) equipped
scanner, you may provide root
filename only. ScanWizard 5-
Advanced will auto-suffix such root
filename with serial numbers to
generate multiple filenames for the
scanned and saved images in
continuous sequence
Tick this check box to enable the auto-
filename generation for the scan-to-
Check to also invoke your application
(Photoshop in this sample figure).
After image is saved, application is
auto invoked with the saved image
Applications Combo Box. Your
available image and Internet
application programs are auto-
detected and listed here. Select one to
further process your output image.
file images
opened
You may modify the folder and filename in the Save in and Filename panes
respectively, then click the Save button. The Final scan is performed and the
output image is saved to file.
NOTENOTE By default, files are saved in a “Data” folder
located in the same directory as your ScanWizard 5Advanced, or Windows\Twain_32\ScanWiz5 directory.
If filenames already exist, the following dialog box will
display showing the conflicting filenames.
Your First Scan-Advanced 5-25
Page 76

Routing the Saved Image to an Application
If during the save-to-file-stage, you decide to further edit your output image with
your image processor, or wish to send the image with your e-mail, or insert the
image with your web browser for inclusion in an HTML document, just tick the
check box (
the Combo Box (see figure in previous page). When you click on the
Send images to application..). Then select your application from
Save
button, final scanning and saving routine starts. When done, SW 5-Advanced
auto-launches the application you have selected from the Combo Box. The
application then auto-opens the recently saved image into your application. If
E-mail application was selected, the image file is delivered to your e-mail
an
composer as an attachment.
SW 5-Advanced is designed to auto-detect the following image and web processors from your hard disk and displays them in the application Combo Box:
Image Processor Internet/Mail
PhotoShop Photo Deluxe Netscape Navigator Netscape Messenger 4.6
PhotoImpact Photo Express Internet Explorer QualComm Eudora Pro 3.x
Microsoft Imaging ImageStar III Outlook Express
Photo Soap MS Picture It Microsoft Outlook 97/98
Batch Saving of Outputs from ADF Equipped Scanners
If you are using a scanner equipped with the automatic document feeder (ADF)
that allows multiple scanning in continuous sequence, you can auto scan and
save output images in batches. Just tick the check box (
filename...) to enable this feature before you click the Save button.
Auto generate
ScanWizard 5-Advanced will auto-assign serialized filenames for each of the
batch images and store them to files after they are scanned in sequence. You
may also provide your own root filename. ScanWizard 5-Advanced will autosuffix your root filename with serial numbers (e.g., xxxx001.jpg, xxxx002.jpg,
xxxx003.jpg, etc.) as filenames for the saved images.
Batch Routing of ADF Outputs to an Application
You can also auto-send your multiple images in a batch to your application after
saving them. Tick the other check box (
function and click the
file, the selected application is invoked and the image opened with it.
ScanWizard 5-Advanced continues to scan each of the subsequent images in
sequence. Each output is saved to file as it is scanned, and opened (in same
sequence as they were saved) in your application in cascading formation.
5-26 Microtek ScanWizard 5
Send images to application...) for this
Save button. After the first image is scanned and saved to
Page 77

If an E-mail application is selected, multiple windows of the e-mail application
will open - one for each of the output files. That is, if you have five output image
files, five e-mail composer are opened with an image file attached to each of
them.
Internet Mail application was selected, the files are delivered to the
If an
Microtek e-mail editor in one batch as multiple attachments.
Hold pointer on button
Copy Output Image to Printer
You need the
Copy button to send an image directly
to the printer. If the button is currently set at
click the button and the
Print dialog box displays.
Copy,
for about 2 seconds
to display menu for
selecting destination
of output image
Otherwise, hold the pointer on the button for about
two seconds or until the selection menu appears.
When the menu displays, select Copy. The button
immediately turns into Copy button followed by the
appearance of the Print dialog box. Click Ok button
to start printing.
Select “Fit to
Page” to print
and fill whole
page (image is
enlarged and
printed full page,
but may not print
proportionally)
Select “Center
Horizontally”
to print image
at the center
of right and
left edges of
the page
Select “Center
Vertically” to
print image at
the center of
top and bottom
edges of the
page
Your First Scan-Advanced 5-27
Page 78

Attach Output Image to an E-mail
You need the
button is currently set at
E-mail button to attach the output image to your e-mail. If the
E-mail, click the button and the Save As dialog box
displays.
Otherwise, hold the pointer on the button for about two seconds or until the
selection menu appears (see top-left figure in previous page). Then select
E-mail
from the menu.
The button immediately
turns into the
E-mail
button while the Save AS
dialog box immediately
displays with the
application check box
enabled by default. Click
to select from the combo
box which e-mail
processor you are going to
use (see above figure).
'E-mail' is the e-mail editor (Netscape Messenger, Microsoft Outlook, etc.) you
have previously installed in your host. If none is installed, only
'Internet Mail' will
be available from the combo box. See Appendix A for proper e-mail editor
installation and setup to ensure compatibility with ScanWizard 5.
'Internet Mail' is the Microtek provided e-mail processor embedded in the
ScanWizard 5.
Click the
Save button to execute final scanning, saving output image to file, and
launching of your e-mail application with the output image attached.
5-28 Microtek ScanWizard 5
Page 79

Reference to
6
ScanWizard 5-Advanced
This chapter explains in details all the features offered by ScanWizard 5Advanced Control Panel. The reference information is organized into four
parts, each showing the four major windows of the program and their respective
detailed functions. The sequence of information is as follows:
• Preview window
• Settings window
• Information window
• Scan Job Queue window
NOTE: The ScanWizard 5-Advanced Control Panel is also referred to as "SW 5-
Advanced" throughout this chapter.
TWAIN Compliance
The ScanWizard 5 is a TWAIN-compliant program. This means that it conforms
to the TWAIN software industry standard for controlling imaging devices such as
scanners, film recorders, and video capture cards.
The TWAIN standard allows software applications and hardware imaging devices
to communicate directly. In practical terms, this means that when using an
application software that supports TWAIN, you can access the scanner through
ScanWizard 5. When a scan is performed, the captured image is automatically
delivered to your application. Hence, with a TWAIN-compliant application, you
do not have to leave the application you are working in. The scanner captured
image does not have to be saved and opened as a separate by your application
software. This allows you to scan images right into your favorite image-editing
application, word processor, spreadsheet, or any other TWAIN-compliant
application that makes use of images.
Reference: The Preview window 6-1
Page 80

The Main Windows of ScanWizard 5-Advanced Control
Panel
ScanWizard 5 consists of four major windows: Preview, Settings, Information,
and Scan Job Queue.
The four windows appear automatically after the ScanWizard 5-Advanced
Control Panel is started up. The Scan Job and Information windows appear
when you bring up ScanWizard 5 at the first time. You may hide or show them
from the View menu and click on the commands Show Scan Job Window and
Show Info Window.
window
Settings
scanning
parameters for
image and
includes image
Scan Job
window
provides key
functions in
managing
scan jobs
Information
window
provides
information
on the
Preview
image
Preview
window has
commands and
tools for
controlling the
scanner
6-2 Microtek ScanWizard 5
Page 81

Running ScanWizard 5-Advanced Control
Panel
To invoke ScanWizard 5, click on Start, Programs , select Microtek ScanWizard
5 for Windows , then ScanWizard 5 .
Alternatively, you may start up your image-editing software first. When the
application opens, choose the command for running ScanWizard 5 from your
application.
The Preview and Settings windows will always appear automatically whenever
the SW 5-Advanced is started up. The Information and Scan Job Queue
windows will appear when you bring up SW 5-Advanced for the first time but
will not reappear if you have hidden these windows the last time you run SW 5Advanced. You may hide or show them from the View menu and click on the
commands Show Scan Job Window and Show Info Window.
Quitting ScanWizard 5-Advanced Control
Panel
Quit SW 5-Advanced by clicking on the Close (X) box at top-right corner of the
Preview window.
SW 5-Advanced automatically saves the screen display status when you exit
from the program. Hence, during subsequent start ups of SW 5-Advanced, the
screen display will show the same display as the last time you exited from the
software. That is, if you had all four windows displayed the last time you quit,
SW 5-Advanced will show the same four windows (with the same on-screen
location) at next start up.
Reference: The Preview window 6-3
Page 82

The Preview Window
The Preview window is the most prominent window of the four major windows,
and it includes the various commands and tools for controlling the scanner.
Elements of the Preview window
1
3
7
1 The Menu Bar includes the different
menus for setting up the scanner
(Scanner menu), controlling view
options (View menu), customizing the
software (Preferences menu), Image
Correction function (Correction menu),
and accessing on-line help (Help menu).
2 The Tool buttons simplify the
performance of certain tasks. The Tool
buttons are (left to right) Frame,
Magnify Glass, Pane, and Dropper.
3 The Action buttons generate a specific
action from the scanning software. The
Action buttons include Overview,
Prescan and Scan.
2
4
5
6
8
5 The Scan Material Status icon shows
your scan material, whether it's
reflective, positive, or negative.
6 The Preview window is where the
Overview or Prescan image appears
after you click on the Overview or
Prescan button.
7 Rulers are located on both sides of the
window to help you with measurement
and alignment. The ruler unit can be
selected by clicking on the arrow at
the 0,0 point of the rulers.
8 The Status bar shows you some
information for easier operation.
4 The Switch button allows you to switch
to Standard mode control panel.
6-4 Microtek ScanWizard 5
Page 83

The Menu Bar
Reference: The Preview window 6-5
Page 84

The Scanner Menu
The Scanner Menu lets you:
• Show your scanner model or select a scanner if you have multiple scanners
• Get information about your scanner
• Get information about the SCSI chain
Scanner Model
The top of the scanner menu displays the scanner model you're using and its
Scanner ID. If you have multiple scanners on your system, all the scanners are
shown with their respective Scanner IDs, and the current scanner is indicated by
a check.
Only one scanner can be accessed at a time. To switch among various scanners,
select the scanner to be used.
Some scanner models include multiple scanning lens, one for high-resolution
scanning (for specific area) and the other for low-resolution (for general use). If
the multiple lens scanner is detected, there will be a sub-menu for lens selection.
Choose either one that suites you.
Get Current Scanner Info
This command provides information about your current scanner. When you
choose this command, a dialog box appears showing the scanner model,
Scanner ID number, and firmware version.
6-6 Microtek ScanWizard 5
The scanner with its Scanner ID is
displayed. The current scanner is
marked by a check.
Page 85

Scanner Probe
This command allows you to see the SCSI devices on your SCSI chain and the
Scanner ID number of the devices.
By default, all numbers are selected by the check boxes. To allow ScanWizard 5Advanced Control Panel to start up more quickly, select only the boxes that
match the Scanner ID of your scanner (or scanners, if you have multiple
scanners on your system). This will make the ScanWizard 5 bypass the numbers
for your other devices and focus effort on simply detecting scanners. If you're
not sure about which numbers to specify, check all the boxes.
The SCSI Chain dialog box
SCSI devices are
shown with their
Click on the Probe
button to update
information or
mount a SCSI
device if it's not
showing in the
dialog box.
Select your
interface card
here.
corresponding
Scanner ID
numbers.
To let
ScanWizard 5
start up more
quickly, check
only the boxes
that match the
Scanner ID of
your scanner.
To use the SCSI Chain feature:
1. Choose the Scanner Probe command. The SCSI Chain dialog box will appear.
2. If your scanner does not show, click on the Probe button. Make sure your
scanner is connected and turned on.
3. Make sure too that the correct interface card is shown in the card selection
box. If not, choose the correct interface card.
4. Check the box corresponding to your scanner or scanners. Click OK to
close the dialog box.
Reference: The Preview window 6-7
Page 86

Exiting ScanWizard 5-Advanced Control Panel
To exit ScanWizard 5, click on the close box on the upper right side of the
Preview window.
Double-click here to exit
ScanWizard 5
6-8 Microtek ScanWizard 5
Page 87

The View Menu
The View menu lets you:
• Get an overview or prescan view of an image
• Resize the Preview window
• Show or hide the Information and Scan Job windows
Overview Image
This command switches to Overview mode, lets you view the Overview image
among the scan jobs.
The Overview is a preview of your image as defined by the parameters set in the
Overview Setup command (in the Preferences menu). For instance, if your image
is 8" x 5" but the dimensions in the Overview Setup are 4" x 3", your overview
will be 4" x 3".
The maximum size of the Overview varies, depending on your scanner model.
For example, if the scan bed (the glass surface) of your scanner has a maximum
size of 8.5" x 11", the maximum Overview will be limited to those dimensions.
The size of the Overview can be changed by setting new dimensions in the
Overview Setup command. The new dimensions will take effect, however, only
with the next Overview. This means you need to click on the Overview button so
that the scanner does a new Overview; only then will you see the new
dimensions of the Overview.
Reference: The Preview window 6-9
Page 88

Prescan Image
By default, the Prescan Image Command does not exist, unless you press the
Prescan button. Each prescan image belongs to the respective scan job.
In the above screen, the Untitled1 Prescan Image is resulted ever since you
clicked the Prescan button for a scan job named Untitled1.
When you select the prescan image item (e.g., Untitled1 Prescan Image), the
preview window switches to the Prescan mode.
6-10 Microtek ScanWizard 5
Page 89

Resize Window to Fit
This command adjusts the Preview window to fit the Overview area.
In the example below, the Preview window is larger than the Overview area, as
denoted by the empty space below the vertical ruler. In other instances, the
Preview window may also exceed the Overview area if you manually enlarged
the Preview window (by dragging on the resize box).
To utilize window space more efficiently, use this command to resize the
Preview window.
Before resizing After resizing
To use this feature:
Choose the command Resize window to fit in the View menu.
This command is available only if the current zoom level is 100%, and is disabled
if zoom is set to other levels. To verify the zoom level, open the Information
window and look up the zoom level.
Reference: The Preview window 6-11
Page 90

Show/Hide commands
These commands allow you to switch between showing or hiding the Scan Job,
Information windows, and Status Bar on your screen.
To use this feature, choose the correct command from the View menu for
viewing a window. When the window appears, you can hide it by choosing the
particular Hide command for it.
The Setting Window always comes with the Preview window. You may bring the
Setting Window to the front by choosing it from the View menu.
6-12 Microtek ScanWizard 5
Page 91

The Preferences Menu
The Preferences menu lets you:
• Choose the correct scan material
• Set up color matching system
• Set up White/black point parameters
• Hide/show auxiliary cursor lines
• Set up Overview mode parameters
• Set up Prescan mode parameters
• Fine-tune monitor gamma values
• Invert images on the screen
• Further settings
Reference: The Preview Window 6-13
Page 92

Scan Material
This command allows you to select the correct scan material. Scan materials can
be classified into three types:
• Reflectives, such as photographs or prints.
• Positives, such as slides.
• Negatives, such as the negative film you use for your camera.
The default scan material depends upon the scanner you're using, and the
choices available to you in the Scan Material submenu will also depend on your
equipment.
For instance, the positive option appears only if you're using a Transparent
Media Adapter (TMA) with your scanner.
If you are scanning negatives or positives, make sure you specify the correct
scan material, or you will get inaccurate scanning results.
To use the scan material feature:
Choose the Scan Material command in the Preferences menu. From the submenu
that appears, select your scan material; a check will appear next to the selected
option. The selected option will also be shown in the Scan Material Status icon
(discussed below).
Note: If your Preview window is close to the right edge of your monitor, the Scan
Material submenu may appear on the left side instead of on the right (as shown above).
To resolve this, move the Preview window towards the left to create enough room for the
submenu to drop down on the right.
6-14 Microtek ScanWizard 5
Page 93

The Scan Material Status icon
Another way to access the Scan Material menu is to use the Scan Material Status
icon, located to the right of the Scan button.
Scan Material Status icon
The appearance of the Scan Material icon changes, depending on whether your
scan material is reflective, positive, or negative.
• If you're scanning a reflective (such as a photo or print), this icon will
appear in its normal form like an ordinary icon. When you click on the icon
and hold down the mouse, you'll see the Reflective option checked.
Appearance of the Scan Material Status icon when scanning
reflective materials.
• If you're scanning a positive transparency or filmstrip, this icon will appear
in the form of a positive. When you click on the icon and hold down the
mouse, you'll see the Positive Film option checked.
Appearance of the Scan Material Status icon when scanning a
positive transparency or filmstrip. Notice the perforations on the
top and bottom of the icon (characteristic of slides) to distinguish it
from the reflective icon.
• If you're scanning a negative transparency or filmstrip, this icon will appear
in the form of a negative. When you click on the icon and hold down the
mouse, you'll see the Negative Film option checked.
Appearance of the Scan Material Status icon when
scanning a negative transparency or filmstrip.
Reference: The Preview Window 6-15
Page 94

Color Matching Setup
To keep color consistency between the scanner, monitor, and printing device,
ScanWizard 5 applies Kodak CMS (Color management system) with ICC
(International Color Consortium) profile standards. For more information on
Color Management System, see Appendix C.
Color Matching Set Up command lets you select the correct ICC profile for
matching with your color monitor and color printer.
When you install ScanWizard 5, the default profiles of color monitor and printer
are set to sRGB. You may, however, update your settings from this command.
Monitor
This feature lets you select type of color monitor that is used for displaying RGB
data. The monitor profile will be applied only when “Displaying using monitor
compensation” option is checked.
Note: If the available monitor types do not include the one you have, select Generic P22
or Generic EBU. These two profiles are suitable for most of the monitors.
6-16 Microtek ScanWizard 5
Page 95

RGB Destination
This feature lets you select the RGB output device (e.g., display monitor, or RGBbased printer) for matching RGB Color family images (including RGB colors, 48bit RGB colors, and 256 colors image types).
Display Using Monitor Compensation
This option controls how the RGB destination data is displayed. If unchecked,
the RGB data are displayed directly to the monitor. If checked, RGB data are first
compensated according to the selected monitor type, then send to the monitor.
RGB Color Matching
If checked, this option lets you select the type of RGB Destination for matching
RGB color image. If unchecked, all images, including RGB colors, 48-bit RGB
colors, and 256 colors, will be scanned in the image data without any color
matching processing.
Add Profiles
This command allows you add additional ICC profiles normally came with your
device (e.g., display monitor or printer).
Reference: The Preview Window 6-17
Page 96

Select the profiles you need, then click on the Open button to load the profiles
to ScanWizard 5. This process takes a while for initialization.
Note: When you purchase color monitor or color printer, check to make sure your
supplier provides the corresponding ICC profiles.
Info
This command displays basic profile information for the current selected
devices.
6-18 Microtek ScanWizard 5
Page 97

White/Black Points Setup
White point is a reference point that specifies the lightest area in an image,
making other areas to be adjusted accordingly. Likewise, black point is the
darkest reference area.
Auto White Point Clipping
Lets you set the percentage of pixel in the highlight region to be truncated.
Effective only when “Auto White/Black point” option is selected in the AIC
dialog box.
Auto Black Point Clipping
Lets you set the percentage of pixel in the shadow region to be truncated.
Effective only when “Auto White/Black point” option is selected in the AIC
dialog box.
Minimum Output level
Lets you set the minimum output level of the Black Point. The higher the
percentage value, the lower the contrast.
Maximum Output level
Lets you set the maximum output level of the White Point. The lower the
percentage value, the lower the contrast.
Reference: The Preview Window 6-19
Page 98

Cursor Auxiliary Lines
This command allows you to create horizontal and vertical grid lines with your
cursor to help define a scan frame precisely. Using the grid lines, you can also
read the measurements off your ruler more easily.
Cursor auxiliary lines on the
x and y axis
To use this feature:
1. Choose the Cursor Auxiliary Lines command in the Preferences menu. From
the submenu that appears, select how the cursor lines will appear.
• On both x (horizontal) and y (vertical) axes
• On x axis only
• On y axis only
• None (no cursor lines)
Note: If your Preview window is close to the right edge of your monitor, the Cursor
Auxiliary Lines submenu may appear on the left side instead of on the right (as shown
above). To resolve this, move the Preview window towards the left to create enough room
for the submenu to drop down on the right.
6-20 Microtek ScanWizard 5
Page 99

2. Click on the Frame tool.
To see how the cursor lines work, draw a scan frame. Click on the top left
corner of the image as your starting point, then drag down to form a scan
frame.
As you draw the scan frame, cursor lines will appear to help you draw the
scan frame precisely.
When you release the mouse, your scan frame will be aligned with the
cursor lines.
Click on the Frame tool, then
define a starting point.
Cursor lines appear to the
top and left of the image.
As you drag the mouse down,
the scan frame is aligned with
cursor lines on the x and y
axis (based on your selected
option in the submenu).
Reference: The Preview Window 6-21
Page 100

Overview Setup
Specifies overview scanning speed options and the overview area for executing
the Overview command.
Fast Overview
The Fast option supports faster scanning with the sacrifice of overview image
quality; on the contrary, if Fast Overview is unchecked, Overview scanning
speed is slow, but it obtains better overview image quality.
Overview Area
Choose Maximum Size, other fixed dimensions, or choose Custom Size then
enter the required dimensions. You may also set the Overview Area by dragging
the dotted boarders.
Unit
Lets you set the ruler units such as inch, cm, and mm.
Preview
Click this button to get a scanning preview.
6-22 Microtek ScanWizard 5
 Loading...