

Page 1
ScanWizard 5 for Mac OS X
QUICK REFERENCE GUIDE
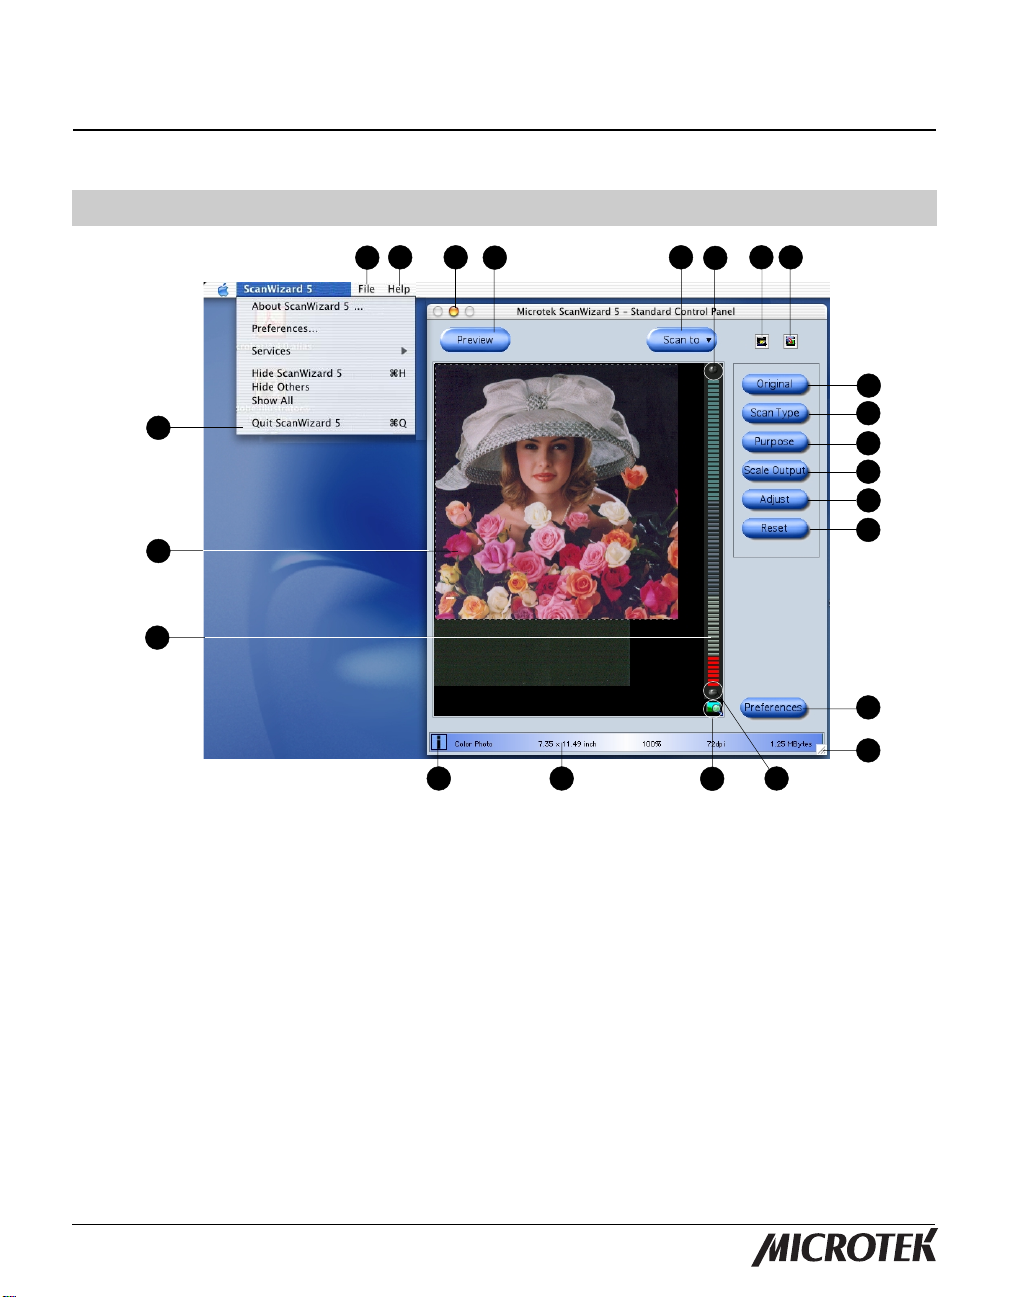
Preview Window (Standard Control Panel)
22 23
21
20
19
18
17 16
1. Prescans and previews the scan material.
2. Performs the final scan and selects a destination for
the scanned image.
3. Zoom in (+), magnifies preview image.
4. Scanner info and power-save.
5. Switches to the Advanced Control Panel.
6. Type of scan material (Photo, Text, Document, Film,
etc.).
7. Output image type (True color, Web color, Gray, or
B&W).
8. Output resolution presets (on-screen viewing, printing,
custom, etc.).
9. Output size or ratio (50%, 75%, 100%, 150%, or
200%).
10. Image enhancement tools (Brightness, Contrast,
Sharpness, or Saturation).
1
11. Cancel/Revert to default settings.
12. Preferences menu options (Includes scanning functions
and customizes the appearances of your Standard
Control Panel).
13. Drag this corner to resize the preview window.
14. Zoom out (-), shrinks preview image.
15. Pans and moves around a magnified area.
16. Shows current settings and becomes a Progress bar
during scanning.
17. Shows detailed settings and status of current scan job.
18. Resizes preview image.
19. Preview image enclosed in a Scan Frame.
20. Lets you quit ScanWizard 5.
21. Sets document attributes for your printer.
22. Online help of ScanWizard 5.
23. Minimizes the preview window to the Dock.
2
15
4 5
3
6
7
8
9
10
11
12
13
14
Copyright©2003 Microtek International, Inc. http://www.microtek.com
I49-003478 A, January 2003
Page 2

Preview Window (Advanced Control Panel)
14 15 1
13
3
2
12
1. Unit of measurement for rulers. Options include inch,
cm, mm, point, pixel, and pica.
2. The Menu bar provides 4 menus: Scanner Menu (set up
scanner-to-host interface); View Menu (control image
and view/hide options); Preferences Menu (customize
software); and Correction Menu (adjust/correct image).
3. The Minimize and Maximize icons.
Minimize: Minimizes the Preview window to the Dock.
Maximize: Expands the Preview window to its full size.
4. The Scan Material pull-down menu lets you select the
type of the current Scan Material.
5. The Overview button previews the image(s) on your
scanner bed.
6. The Prescan button shows a higher-resolution image of
the area selected by the Scan Frame tool.
7. The Scan To button performs the
final scan, and delivers the scanned
image to your application program.
Click the Scan To button to show
the pull-down menu:
Scan To saves the scanned image to a file; Copy
sends the output to a printer; E-mail attaches the
output to an E-mail message.
8. The Toolbar selects actions to be performed on the
overview or prescan image.
11
8
9
Zoom: Click to enlarge;
Shift or Option+Click
to shrink
Dropper: Selects
shadow/highlight values
on a prescan image
10
5
4
7
6
Scan Frame: Lets
you select a scan
frame area
Pan: Pans or moves
the hidden part of a
zoomed-in image
into view
9. The Switch button takes you back to the Standard
Control Panel.
10. Drag this corner to resize your Preview window.
11. The Status bar gives useful tips relating to the selected
tool in the Toolbar.
12. Handy buttons
Click to flash High/Low value markers.
Zoom in (+), enlarges preview image.
Zoom out (-), shrinks preview image.
Current image zoom size (100%).
Resolution info (in pixels per inch) for
overview and prescan image
13. Lets you exit ScanWizard 5"; accompanying windows
(Setting window, Scan Job Queue window, and Info
window) are closed as well.
14. Sets document attributes for your printer.
15. Online help of ScanWizard 5.
2
Page 3

Settings Window (Advanced Control Panel only)
1
2
3
6
7
8
4
5
9
1. The Job box shows the current scan job as highlighted
in the Scan Job Queue window. This job is also the
currently selected image in the Preview window.
2. The Type box shows the image type of the current
scan job.
RGB Colors/RGB Colors (48-bit): RGB colors use three
color channels R,G, B (red, green, blue) to reproduce
lifelike colors.
Gray Scale/Gray Scale (16-bit): Grayscale images use
shades of gray to simulate gradations of color.
Web/Internet Colors: This mode applies to images
that are displayed on the Web or Internet.
256 Colors (Default/Custom): This mode has a single
channel and uses a color lookup table containing up
to 256 colors. The Default mode uses an Adaptive
palette with Diffusion; the Custom mode gives you
additional options.
Line art: Line art images are made up of one bit of
color (black or white) per pixel. This mode is useful
for images consisting purely of black and white or of
a single color, such as mechanical drawings and
blueprints.
B&W Diffusion: This is a single-bit black-and-white
image dithered with error diffusion.
3. The Resolution box lets you specify the resolution level
for the final scan.
4. Output resolution (in ppi or lpi).
5. Choose your Unit of measurement from the available
options; e.g., inch, cm, mm, etc.
6. The Lock icon provides controls relating to the scan
frame, frame size, and output size; parameters are
used for controlling scan frame, frame size, output
size, and scaling.
7. Image Orientation; i.e., rotated, mirrored, etc.
8. The Advanced Image Correction(AIC) controls let you
adjust and enhance the image. The correction results
are displayed in real time in the Preview window and in
the AIC dialog box.
9. Resets any or all of the AIC settings to the default
values.
3
Page 4

Advanced Image Correction Tools (Advanced Control Panel only)
1
2
3
4
5
6
1. The White/Black Points tool lets you
change the shadow and highlight points
of an image. By using this tool, you can
manipulate shades so that the Shadow
point becomes the new darkest value
and the Highlight point becomes the new
lightest value.
2. The Tone Curve tool lets you control the
gamma, which measures the intensity
affecting the mid-level grays (midtones)
of an image. Adjusting the gamma lets
you change the values of the middle
range of gray tones without dramatically
altering the shadows and highlights.
3. The Brightness/Contrast tool changes
the brightness and contrast of the entire
image. Increasing the brightness makes
all tones in the image lighter. Contrast is
the range between the darkest and
lightest shades in the image.
Information Window (Advanced Control Panel only)
1
4. The Color Correction tool adjusts the hue or
saturation of colors. This tool applies only to
color images and is not available for use with
grayscale or black-and-white images.
Saturation refers to the intensity of a color.
Hue is the aspect of color that distinguishes
one color from another (whether it is red,
green, or blue).
5. The Filter tool lets you apply or create special
effects to your image. This tool is disabled
when your image type is set to Line art or B&W
Diffusion.
6. The Descreen tool lets you remove moiré
patterns in images. The moiré is an undesirable
pattern in printing that results from incorrect
screen angles of overprinting halftones. Moirés
usually result when you scan images taken
directly from a magazine (instead of scanning a
photographic original or a transparency).
Scan Job Queue Window (Advanced Control Panel only)
1 2 3
4
1. The Mouse Cursor
Position displays the
position of the mouse
cursor on the x/y axis of
the image.
2. The Color Meter Options
let you browse color
information (in values or
percentages), and let
you define the size of
the sample area.
2
3
4
3. The Color Output Meter
displays the output
values of the pixel at the
specific
x/y location.
4. The Sample Display Area
shows a pixel-by-pixel
display of the specific x/
y location of the pointer.
The size of the sampling
area depends on the
selection made in the
Color Meter Options.
1. Check marks indicate the
jobs to be scanned
when you click the Scan
To, Copy, or E-mail
button.
2. The Green indicator
flashes when scanning is
in progress.
3. A thumbnail image
indicates job has been
prescanned.
4
5
4. The highlighted scan job
is the Current scan job.
5. Function buttons
(Select All, Check, New,
Duplicate, Delete, and
Manager).
 Loading...