

Page 1

User's Guide
for the
Microtek ScanSuite
Software Utility
PC Version
Page 2

© 1998 MICROTEK LAB, INC.
All rights reserved.
Trademarks
Microtek and ScanMaker are trademarks of Microtek International, Inc. Other
product or company names are trademarks or registered trademarks of their
respective holders.
Important
Documents you scan may be protected under copyright law. The unauthorized
use of such documents could be a violation of the rights of the copyright
holder. Microtek bears no responsibility for the unauthorized use of copyrighted materials.
First Edition
June 1998
Microtek Lab, Inc. Microtek International, Inc. Microtek Europe BV
3715 Doolittle Drive 6, Industry East Road 3 Max Euwelaan 68
Redondo Beach, CA 90278 Science Based Industry Park NL -3062 MA Rotterdam
U.S.A. Hsinchu 30077, Taiwan R.O.C. The Netherlands
310-297-5000 voice 886-3-5772155 voice 31-10-242-5688 voice
310-297-5050 fax 886-3-5772598 fax 31-10--242-5699 fax
800-654-4160 sales
310-297-5101 AutoTech fax-back
Internet: http://www.microtekusa.com
Tech Support Web Page: http://www.support.microtek.com
Page 3

Contents
A Introduction .................................... 4
B Before you begin............................. 4
C Installation...................................... 4
1. Check your devices ...................................................... 4
2. Install software ............................................................. 4
3. Launch ScanSuite......................................................... 4
D The Scan Panel ............................... 5
D The ScanSuite Panels..................... 6
E How to scan .................................... 7
1. Click on a thumbnail ..................................................... 7
2. Click on a target application ......................................... 7
3. Start scanning ................................................................ 7
F Using customized images............... 8
G Adding target applications............. 9
H Using ScanSuite's
other functions ............................... 10
1. The Copier function ...................................................... 10
2. The Fax function ........................................................... 12
3. The OCR function ......................................................... 13
I Miscellaneous functions................. 14
1. Select Twain driver ....................................................... 14
2. Toolbox ......................................................................... 14
3. Exiting ScanSuite .......................................................... 14
4. Scanner Detector ........................................................... 15
Page 4

ScanSuite Software Reference
A. Introduction
ScanSuite is the companion software for Microtek’s
ScanWizard scanner driver program. While
ScanWizard offers various controls for scanning and
image adjustment, the ScanSuite utility integrates
scanning functions with other common everyday
tasks like printing, faxing, and OCR text scanning.
Executing each function in ScanSuite is simply a
few clicks away, and you can always bring up
ScanWizard to customize your scanner settings.
B. Before you begin
Before running ScanSuite, check to make sure that
these items have been installed and are ready to run:
• Your Microtek scanner and ScanWizard
• Your printer (so that you can execute ScanSuite's
Copier function)
• Your fax modem with its software program (to
execute ScanSuite's fax function)
• Your OCR application (to execute ScanSuite's
OCR function)
C. Installation
1. Check your devices
The green Ready indicator on your scanner
should stay lit. Check that the devices you want
to use with ScanSuite (such as a fax modem or
printer) are powered up.
2. Install software
ScanSuite is part of a full complement of
software included with your scanner, and all
software is on your Microtek scanner CDROM. For more details on installation, refer to
the printed documentation included with your
scanner.
3. Launch ScanSuite
Ther e are three ways to launch ScanSuite:
• During installation of ScanSuite, you will
have the option of allowing the program to
make a ScanSuite "alias" for you on the
desktop. If you chose to have this option during
installation, clicking on the alias is one way of
launching ScanSuite.
• Another way to launch ScanSuite is to start it
from Windows.
• A third way is for scanners with a "Go"
button to press the "Go" button once and hold it
down for 1 to 2 seconds and then releasing it .
This will then bring up the ScanSuite Scan
Panel (shown on the next page).
4
Page 5

Power button
Page tabs for storing
scanned job settings
Scan, Copy,
Fax, OCR Panel
function keys
D. The ScanSuite Scan Panel
Thumbnails
representing
scanned settings
Miscellaneous
functions
Exit ScanSuite
Page tabs for adding target applications Scan button
Target
application
area
Status bar
When ScanSuite is launched the first time, the program automatically detects the
supported e-mail, OCR, and default applications in your system when ScanSuite is
launched the first time. These applications will be reflected in the target application area.
5
Page 6

E. The ScanSuite Panels
The Scan Panel appears
when you press the Scan
button and is the first
screen that appears when
ScanSuite is launched.
The Copier Panel
appears when you press
the Copier button.
The Fax Panel appears
when you press the
Fax button.
The OCR Panel
appears when you
press the OCR
button.
6
Page 7

F. How to Scan
This section explains how to scan an image using
the pre-defined settings of the ScanSuite program.
To customize settings, see the next section, Using
Customized Settings.
1
Scanning is easy and can be done in three easy
steps: 1) Click on an image thumbnail in the Scan
Panel, then 2) Click on a target image-editing
application, and 3) click on the Scan button. The
procedure shown in the illustration at the right and
is explained in more detail below.
1. Click on a thumbnail
Click on an image thumbnail in the Scan Panel
to select a scan job. Each thumbnail represents
a specific scan job, and double-clicking on the
thumbnail activates that thumbnail's function.
• First thumbnail: Brings up the Microtek
ScanWizard scanner controller program.
ScanWizard provides even more controls
for scanning, as well as for image
adjustment and enhancement.
• Second thumbnail: Scans black-and-white
text, line art or logos.
• Third thumbnail: Activates the ScanSuite
Descreen function. Use this thumbnail
when the image to be scanned is not an
original photographic print but previously
printed material such as books or
magazines. Descreening removes the
moire patterns that result from scannning
previously printed material.
• Fourth thumbnail: Scans grayscale images
at 72 dpi (good for on-screen display).
• Fifth thumbnail: Scans color images at 72
dpi (good for on-screen display).
2
3
2. Choose a target image-editing application
After clicking on a thumbnail, click on a target
image-editing application — in this case Ulead
PhotoImpact. The first two icons are standard
settings for ScanSuite and represent the
functions for saving to file and saving to the
clipboard.
The other applications shown in this area
include any programs automatically detected
by ScanSuite when it is launched. These
programs could include image-editing
software, e-mail software, or OCR software.
To add other applications, see the section
Adding target applications.
3. Start scanning
On the ScanSuite Scan panel, click on the
green Scan button to begin scanning. If your
scanner has a "Go" button, you can also press
the "Go" button and hold it down for 1 to 2
seconds and then release it to start scanning.
Scanning progress is displayed in the blue
status bar located below the Scan button. It
may take the scanner a few seconds to start
scanning; make sure you don't press the "Go"
or "Scan" button more than once.
7
Page 8

G. Using customized settings
Customized settings allow you to create scan jobs to your own specifications. For instance, you may want
to create a setting for scanning 300-dpi color images. You can also duplicate settings, overwrite settings, or
delete customized settings. Five scan jobs are built into the program in tab 1 and cannot be modified.
1. Creating new settings from scratch
Click page tab 2, 3, or 4, then double-click on
any vacant position in the thumbnail area. This
will bring up ScanWizard, and set the required
settings for your particular scan (ex. designate a
scan setting as a color image, set resolution as
100 dpi, apply a filter).
Click the OK button in the ScanWizard
preview window, and a customized setting is
now created, represented by a new thumbnail.
To verify the settings of any thumbnail, select
the thumbnail, then go to the Edit menu and
choose the "Setting Info...." command.
2. Duplicating settings
Drag a thumbnail (representing a setting you've
created) in tabs 2, 3, or 4 to any vacant slot; a
duplicate of the scanning settings is then
shown. Take note that all the thumbnails in tab
#1 are preset and cannot be duplicated.
Another way to duplicate settings is to press
the Option key in your keyboard and drag an
existing thumbnail to another location.
3. Overwriting settings
Drag an image thumbnail onto another to
overwrite the scanning settings in the lower
thumbnail.
4. Deleting customized settings
a) Click on the page tab that contains the
customized scanning settings.
b) Right-click on the image thumbnail you
created.
c) A tiny Clear menu will appear. Click Clear
to delete, or click anywhere else to abort
deletion.
Note: You can double-click on any
thumbnail in tabs 2, 3 or 4 in order to
edit the settings for that tab. You can
also edit the text description under
each thumbnail (except the
descriptions for thumbnails in tab #1).
8
Page 9

H. Adding target applications
To delete target applications:
You may add other applications in addition to the
preset and auto-detected applications in ScanSuite.
To acquire a new target application:
1. Double-click on any of the vacant rooms in the
target application area.
2. When the Select Application dialog box below
appears, do the following:
a) Select the application you need.
b) Click on the Add button.
c) Click on the Close button. The new
application is then added to ScanSuite.
Note: The dialog box is like any other Open/
Save dialog box, and you can use it to browse
through your applications in order to select the
one you need.
1 Double-click on any target application. The
Select Application dialog box will appear.
2 Click to select the program name in the lower
left-hand box.
3 Click the Remove button. You can click the
Remove All button if you wish to delete all
acquired target applications.
Note: The preset applications in the target
application area — saving to disk and saving
to clipboard — cannot be deleted.
C
B
A
9
Page 10
I. Using ScanSuite's other functions (Copier, Fax, OCR)
Aside from scanning, ScanSuite also offers functions such as the Copier (printing), Fax, and OCR text
scanning. These functions are explained in more detail below and in the next few pages. To access these
functions, click on the appropriate function buttons at the upper left end of the Scan Panel screen (see Scan
Panel graphic on page 11 for reference).
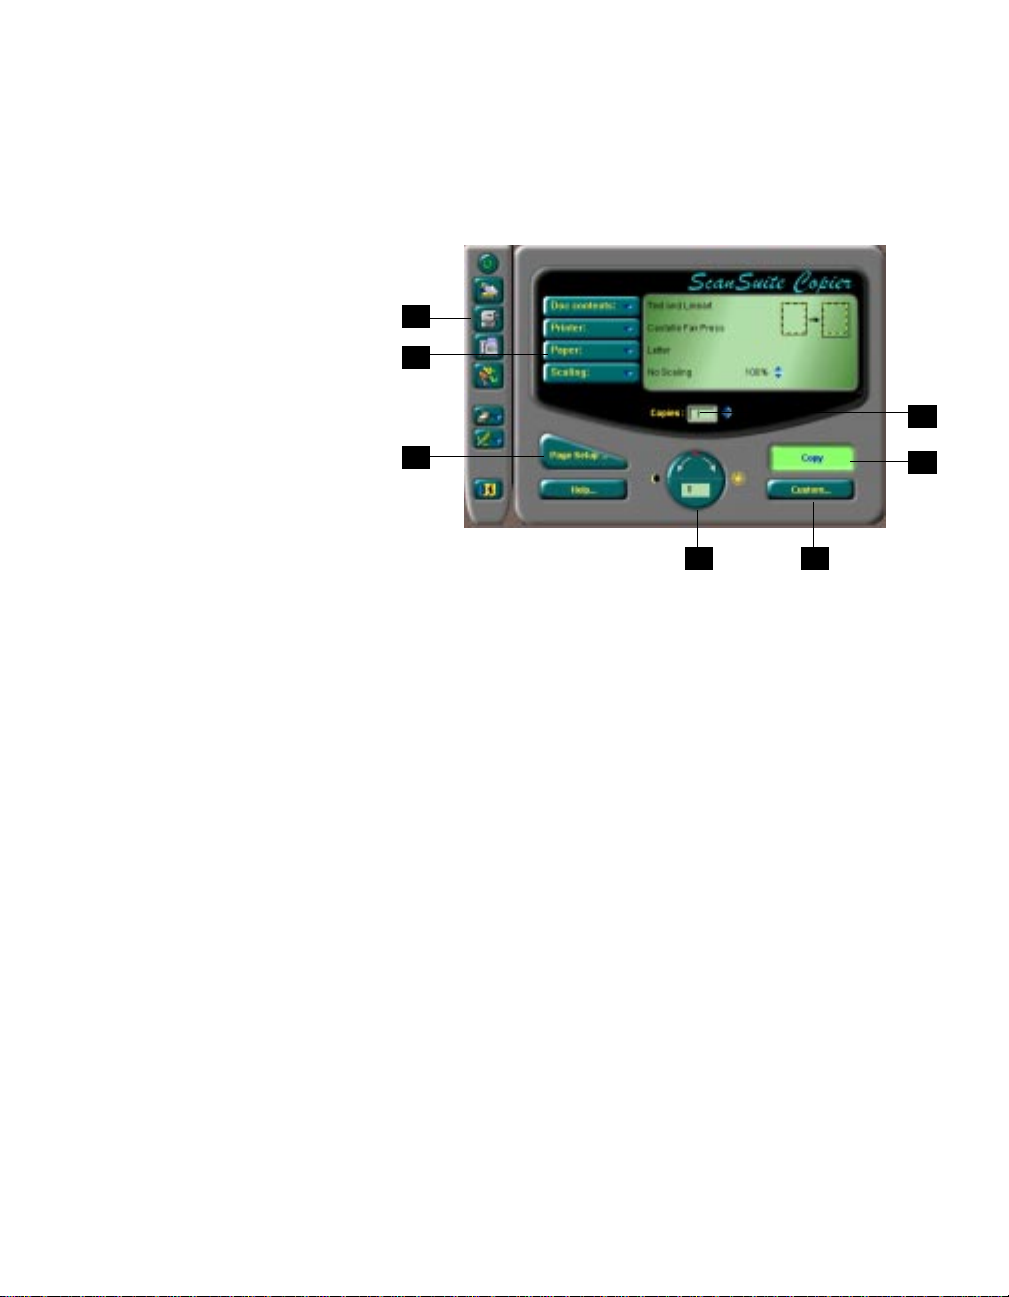
1. The Copier function
The Copier function allows you
to use your scanner and printer
together as a copier machine.
Before using the Copier function,
check to make sure that your
printer is connected to your
computer and that the printer's
power is turned on.
Click on the COPIER button to
display the Copier Panel, as
shown on the right.
1
2
3
4 5
6
7
Elements of the Copier Panel:
1 Copier function button: Click on this button to
display the Copier Panel.
2 Parameter buttons: Click on any or all four of
these buttons to change parameters for copying.
a) Doc. contents: This refers to the original
document or photo you are scanning. The
following options are provided: Text and
line art; Photo; Newspaper; Magazine; and
Art Magazine.
Note: The options Newspaper, Magazine,
and Art Magazine take substantially longer
to scan since the images need to be
processed further after a scan is complete.
b) Printer: Lists the printer drivers in your
computer.
c) Paper: Lists the available paper sizes for
your selected printer.
d) Scaling: Lists the resizing scales. To
customize sizes, click the Up / Down
arrows. The upper right-hand corner will
reflect the scaled-down look.
3 Page Setup: Sets paper orientation, the paper
tray, and other variables.
4 Brightness Settings: Sets the lighting intensity
of the scan. Click on the left arrow on the dial
to decrease brightness or the right arrow on the
dial to increase brightness.
5 Custom button: Allows you to set further
settings. See the next section for more details.
6 Copies: Sets the number of copies to be printed.
Click on the Up / Down arrows to set the
number.
7 Copy button: Click on this button to start
scanning and copying to the selected printer.
To use the Copier function:
1 Place the document or image to be printed on
your scanner.
2 Click the Copier function button in Scan Panel
3 When the Copier Panel appears, set the
parameters and variables for printing, then click
on the Copy button. You can also press the
"Go" button on the scanner if your scanner has
a "Go" button.
10
Page 11

The Copier Custom Dialog Box
The Custom dialog box below appears when you click on the Custom button in the Copier Panel. This
option is used when you want to copy only a portion of a document and place it on a specific area on the
printed page. For example, most printers cannot print to the edge of a page, so you may not want to scan
the entire margin of a document.
1
2
3
4
5 7
Elements of the Custom dialog box:
1 Scanner thumbnail: Dragging any corner of the
dotted rectangle in the scanner thumbnail
results in: a) its width and height being changed
accordingly, b) the Max. Scan Area entry
changes to Custom, and c) the printer thumbnail
shows a rough copy of the expected printout.
2 Printer thumbnail: Dragging any corner of the
dotted rectangle in the printer thumbnail results
in the “Magnification” message box reflecting
the scale. Take note that the aspect ratio is
always 1, so that scaling is effective along both
horizontal and vertical sides.
3 Auto Crop: Applies the maximum scanning area
and automatically seeks the proper target range
to scan.
6
4 Preview as entering the dialog box: If this
option is checked, the scanner will begin to
scan when you click on the Customize button
in the Copier Panel. If unchecked, scanning
will not start automatically until you click the
Preview button in the dialog box.
5 Preview button: Scans and displays a thumbnail
on the screen so you can adjust your crop area;
no printing performed.
6 Copy button: Executes the Copy function,
which scans the image or document on your
scanner and sends it to the printer.
7 Reset button: Changes all settings to their
default values.
11
Page 12

2. The Fax function
The Fax function is used to
fax a document or image
on your scanner. Before
using the fax function,
check to make sure that
your fax modem and driver
are functioning properly.
Click on the Fax button to
display the Fax Panel, as
shown on the right.
Elements of the Fax Panel:
1 Fax function button: Click on this button to
display the Fax Panel.
2 Parameter buttons: Click on any or all four of
these buttons to change parameters for faxing.
a) Doc. contents: This refers to the original
document or photo you are scanning. The
following options are provided: Text and
line art; Photo; Newspaper; Magazine; and
Art Magazine.
Note: The options Newspaper, Magazine,
and Art Magazine take substantially longer
to scan since the images need to be
processed further after a scan is complete.
b) FAX device: Lists the printer drivers in
your computer that also drive your fax.
c) Resize: Lists the resizing scales. To
customize sizes, click the Up / Down
arrows. The upper right-hand corner will
reflect the scaled-down look.
3 Page Setup: Sets paper orientation, the paper
tray, and other variables.
1
2
3
5
4
6
4 Brightness Settings: Sets the lighting intensity
of the scan. Click on the left arrow on the dial
to decrease brightness or the right arrow on the
dial to increase brightness.
Note: If faxing a picture, you may need to set
the Brightness setting to 20 or higher, since
some fax machines print images very darkly.
5 Fax button: Click on this button to start faxing.
6 Custom button: Allows you to set further
settings. Clicking on the Custom button
displays the Custom dialog box (shown in the
previous section).
To use the Fax function:
1 Place the document or image to be faxed on
your scanner.
2 Click on the Fax function button in the Scan
Panel.
3 When the Fax Panel appears, set the parameters
and variables for faxing, then click on the Fax
button. You can also press the "Go" button on
your scanner if it has a "Go" button.
12
Page 13
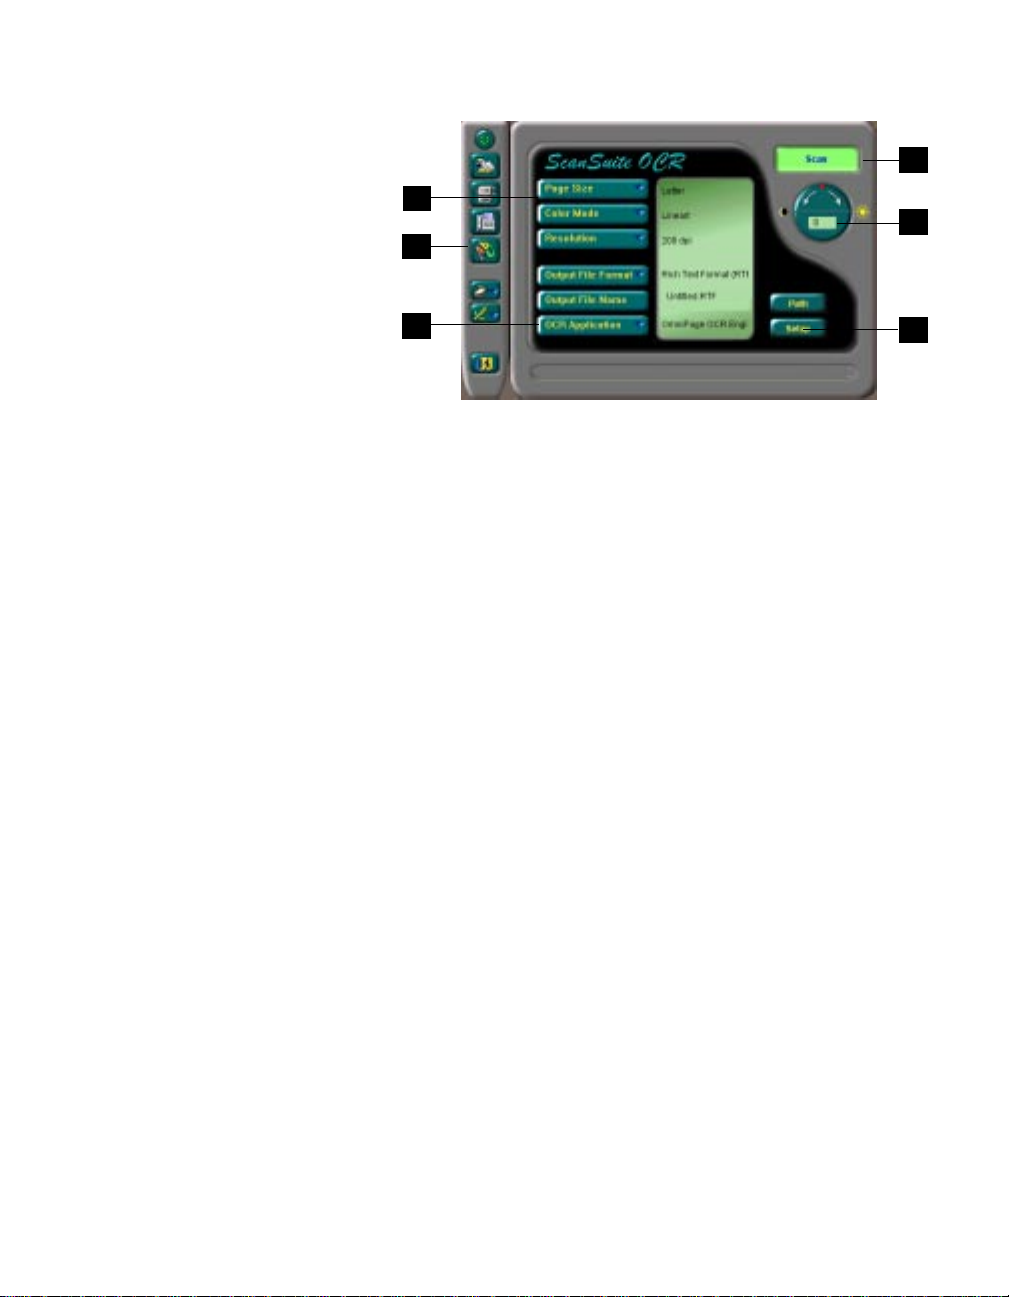
3. The OCR function
The OCR function is used to scan
text documents on your scanner.
OCR, or Optical Character
Recognition, is the process of
turning a scanned “picture” of a
document into a text file that can be
read by your word processor.
Before using the OCR function,
check to make sure that your OCR
application has been installed in your
computer. Click on the OCR button
to display the OCR Panel, as shown
on the right.
4
1
5
2
3
6
Elements of the OCR Panel:
1 Parameter buttons: Click on any of these
buttons to change parameters for OCR
scanning.
a) Page Size: Lists the available page sizes for
OCR text scanning.
b) Color Mode: Currently supports Line Art
images for character recognition.
c) Resolution: Lists available resolution rates,
which are at 200, 300, and 400 dpi. For best
results, leave this option at 300 dpi.
2 OCR function button: Click on this button to
display the OCR Panel.
3 OCR application: Lists the available OCR
applications in your computer which will
perform your OCR text scanning procedure.
The active OCR application is shown to the
right of this button.
Note: If you have purchased third-party OCR
software other than the one bundled with your
Microtek scanner, these applications may also
be run on ScanSuite to perform text scanning.
4 Scan: Click on this button to start OCR text
scanning. You can also press the "Go" button
on your scanner if it has a "Go" button.
5 Brightness Settings: Sets the lighting intensity
of the scan. Click on the left arrow on the dial
to decrease brightness or the right arrow on the
dial to increase brightness.
6 Setup: Allows you to add or remove OCR
applications to and from ScanSuite.
To use the OCR function:
1 Place the text document on which OCR is to be
perfomed on your scanner.
2 Click on the OCR function button in the Scan
Panel.
3 When the OCR Panel appears, set the
parameters and variables for OCR scanning,
then click on the Scan button. The file is
delivered to your OCR application — in this
case, OmniPage Limited Edition.
Once the file is in OmniPage Limited Edition,
click the OCR button to start OCR processing,
and then save the file so that it can be opened in
your word processor for editing. The OCR
button in OmniPage Limited Edition looks like
this:
13
Page 14

J. Miscellaneous functions
The miscellaneous functions of ScanSuite include Select Twain Driver, the Toolbox, and Exit. These
functions are controlled by the group of three icons located on the lower left-hand side of the Scan Panel
(see Scan Panel graphic on page 11 for reference). Another function, the Scanner Detector, is controlled by
an icon in the lower right-hand side of the ScanSuite Scan Panel screen shown on page 11.
Select Twain driver
Click on the Select Twain Driver icon to
choose the proper Twain driver program
that has been installed in your computer.
Currently, only Microtek's 32-bit Twain
Driver is supported.
Toolbox
Click on the Toolbox icon to see information on your current Scanner Settings and to specify
your Preferences.
a) Setting Info: Displays your current scanning settings in the ScanSuite Scan panel.
b) Preferences: Lets you set the General, Applications, and OCR Preferences.
A General Preferences: Includes two items
for selection, as shown below.
• Hide ScanSuite when it is in the
background: If this option is checked, the ScanSuite
panel is minimized when it is not the active window. If
unchecked, ScanSuite stays in the background when it is
not the active window.
Exiting ScanSuite
Click on the Exit button to close
ScanSuite and to return to Windows 95 or
Windows NT.
B Application Preferences: Brings up the
Select Application dialog box. This function is
the same as double-clicking on a vacant room or
icon in the Target Application area of the Scan
Panel screen (on page 11).
C OCR Preferences
::
: Brings up the Select
::
Application dialog box to select an OCR
application. This function is the same as
clicking on the Setup button in the OCR Panel.
• Wait next page for "x" seconds: Used to set the time
interval for consecutive scans, faxes, and OCRs which are
part of the same document. This function is useful when
your scanner has an ADF (Automatic Document Feeder)
accessory, or when you do not have an ADF and wish to
process multiple pages of the same document.
14
Page 15

Scanner Detector
The Scanner Detector function is controlled by the
icon in the lower right corner of your screen.
The Scanner Detector runs in the background,
constantly checking to see if the scanner has been
activated. Scanners with a "Go" button are activated
by pushing this button. Other models can be
activated by lifting the scanner lid and placing a
new photo or document on the scanner glass bed.
This is also called the Auto Paper-Detect function in
ScanWizard.
Clicking on the Scanner Detector icon brings up the
dialog box as shown below.
1
• You have more than one scanner daisychained in your system, and you wish to
select another scanner.
3 Stop Polling button: Disables the auto-paper
detection function. For scanners equipped with
a "Go" button, the Auto Scan and Auto
ScanSuite program launch will be disabled.
To select another scanner in the daisy chain:
A Select the interface card you need in the "Select
the interface card" drop-down box.
B Click on the Probe button. The Scanner
Detector automatically checks whether your
scanner is ready to run.
C Click OK. The Scanner Detector will start to
poll your scanner until it is detected.
2
Elements of the Microtek Scanner
Detector dialog box:
1 The name Sparrow indicates that you are using
an Adaptec SCSI interface card. For scanners
with a built-in Enhanced Parallel Port (EPP),
this would be replaced by "smplscsi" (stands
for simple SCSI).
2 Probe button: This is useful in the following
instances:
• You wish to obtain more detailed scanner
information.
• You encountered a scanning linkage
problem. Clicking the Probe button lets
you refresh the connections.
3
B
A
C
15
 Loading...