

Page 1
Object Scanner
Quick Start Guide
2.
Install Software
Important: You must install software before connecting your scanner. Always close
any open programs and turn off Antivirus utilities before installing software.
A. Place the Microtek Software DVD into a
drive, and follow the on-screen instructions
to install the scanner driver and software.
NOTE: If the Microtek Software Installer screen does
not come up automatically, double-click the following in
succession: “My Computer”; the DVD-ROM icon; then
Setup.exe to start the installer program.
B. Restart your computer at the end of all
software installation.
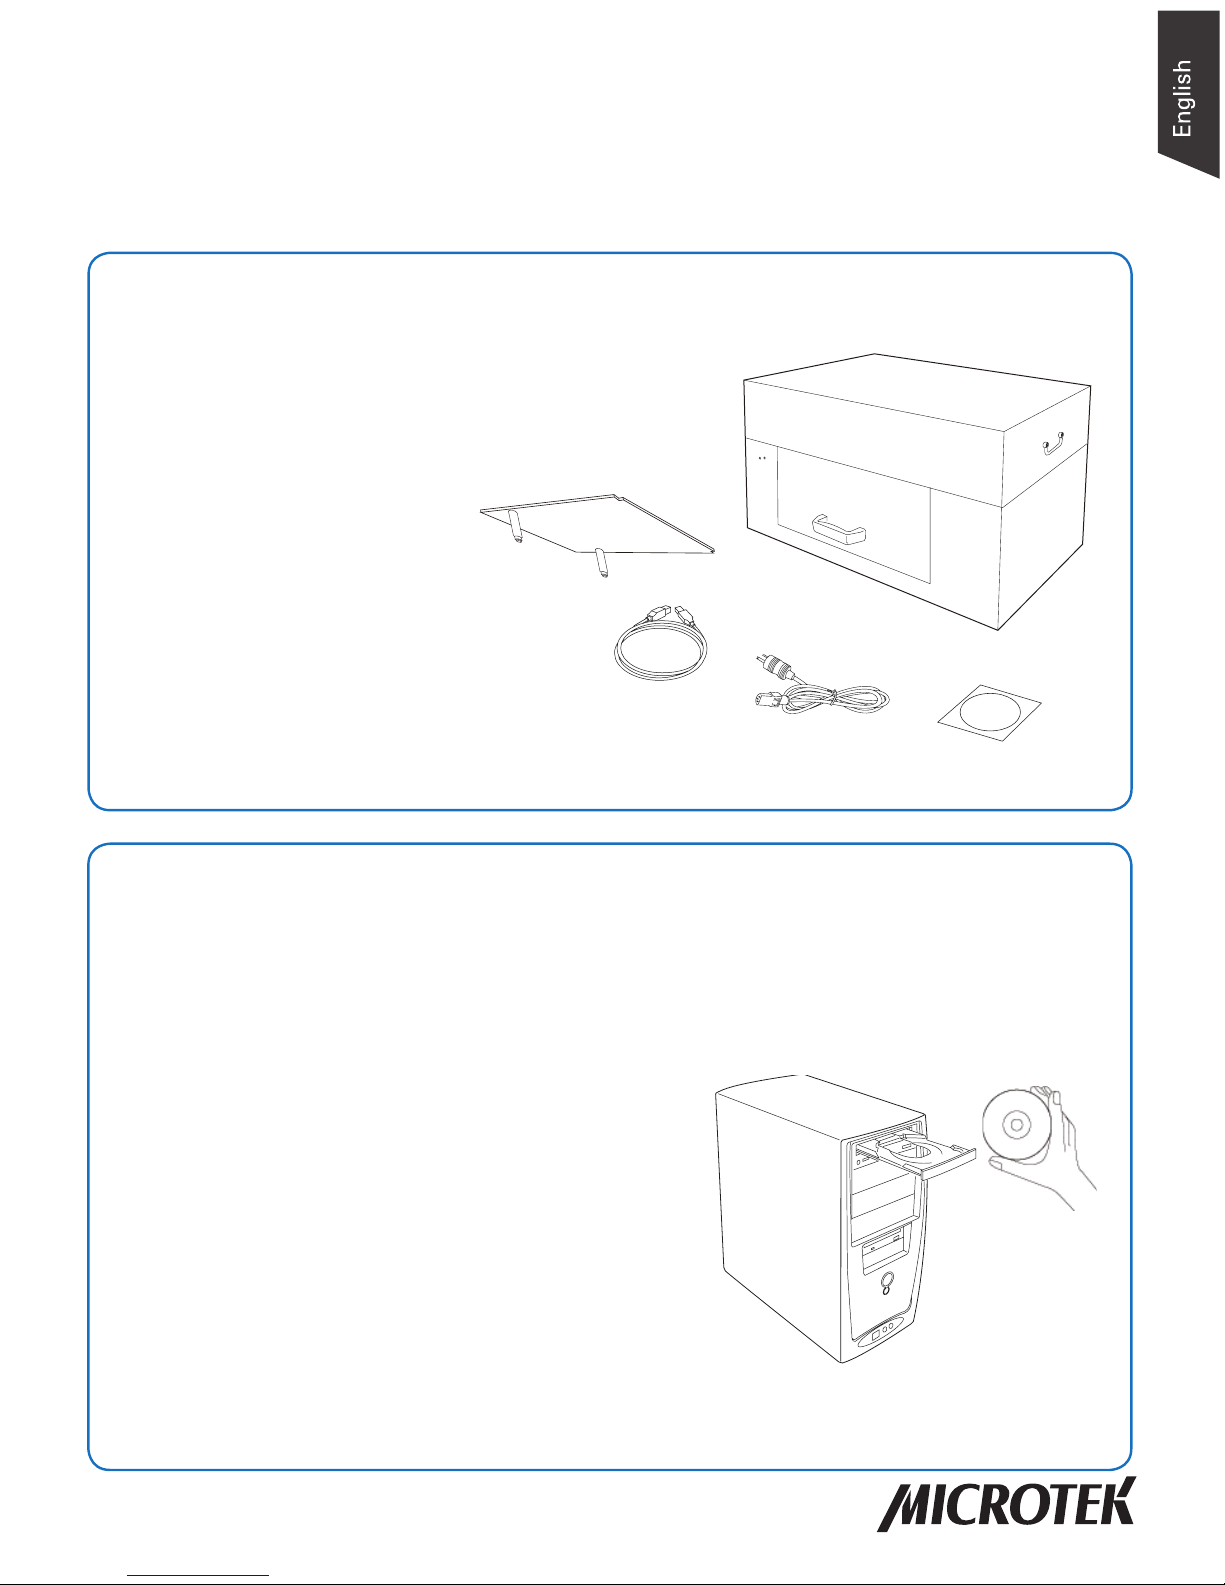
1.
Unpack Contents
Unpack your scanner package and check for major
components.
A. Scanner
B. Upper scan bed
C. Hi-Speed USB 2.0 cable
D. Power cord
E. Software DVD
Copyright © 2017 Microtek International, Inc. http://www.microtek.com
I49-005159 A1, November 2017
B
C
D
A
E
Page 2
2
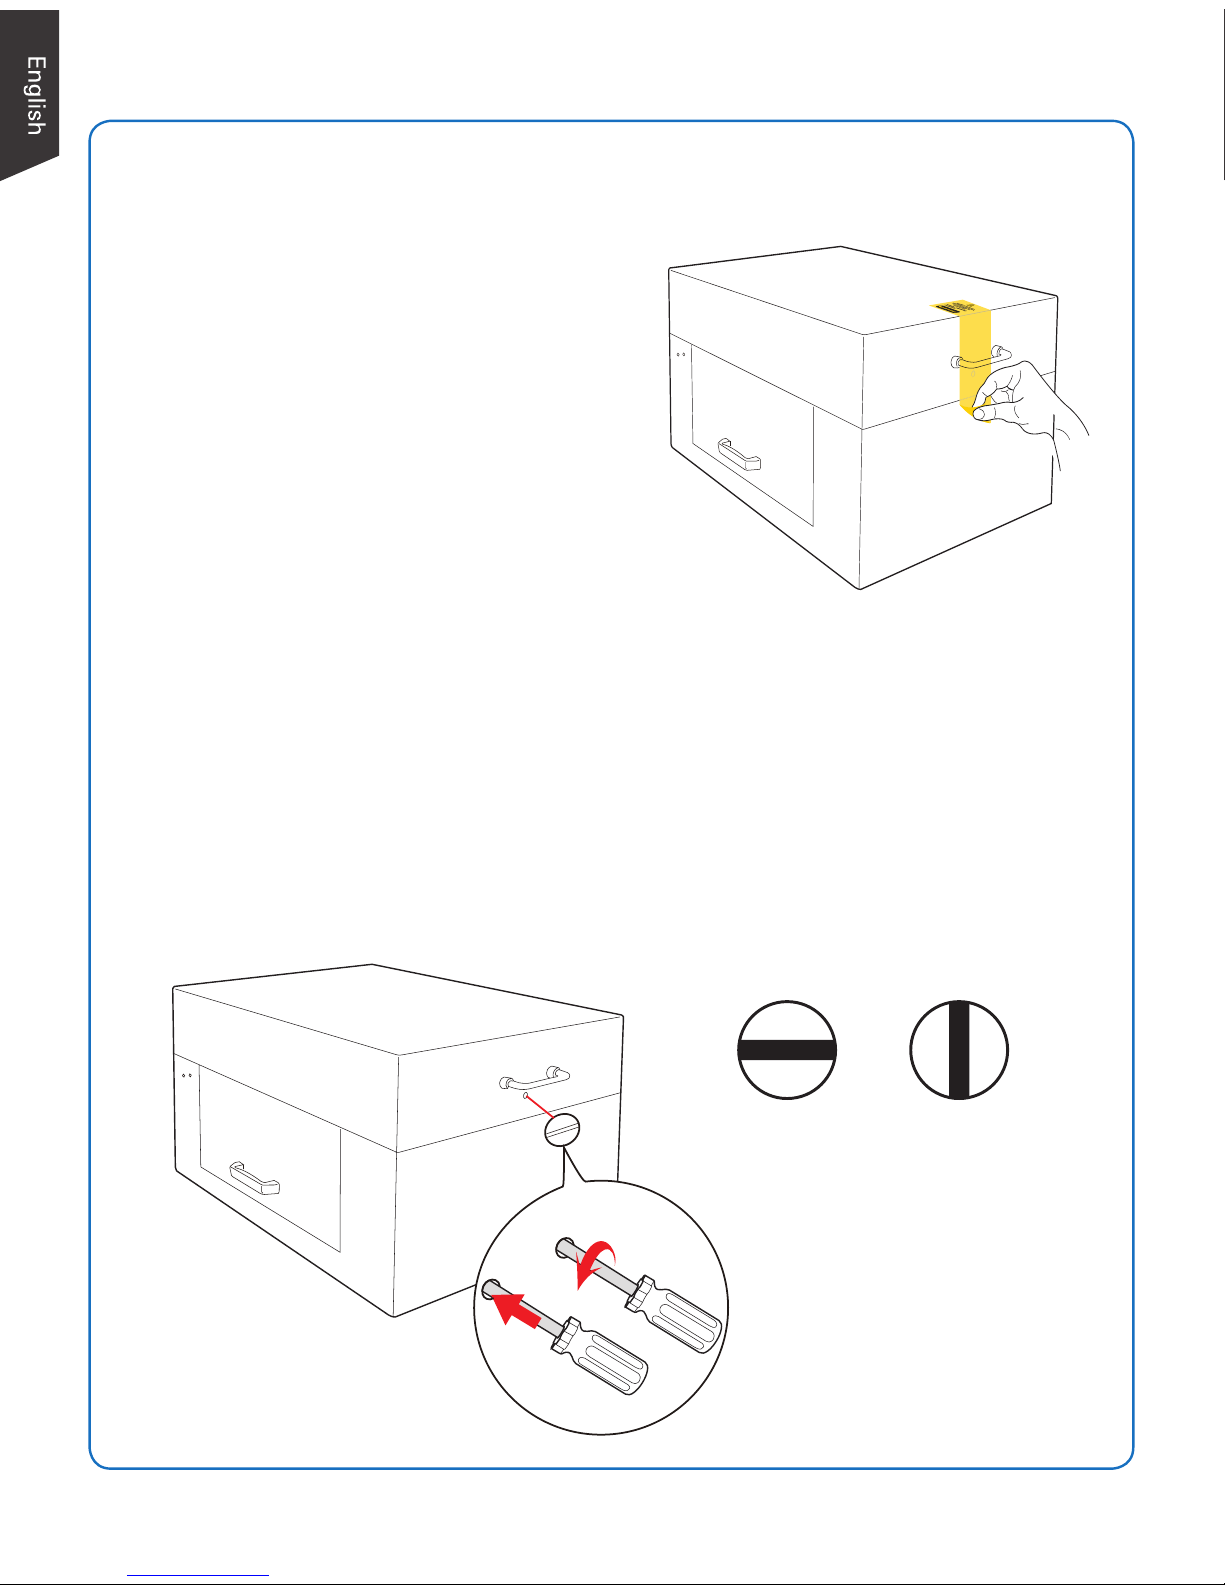
3.
Unlock Scanner
Locked Unlocked
2) Turn counterclockwise
1) Push to the end with force
A. Remove the yellow sticker at the
middle of the right panel of the
scanner and locate the locking screw
under.
B. Usingaat-headscrewdriver,passthrougharoundcircleattheoutershellof
the scanner and insert a hollow side of the locking screw: 1) push to the end
with force, and 2) turn the locking screw counterclockwise 90 degrees to the
unlock position.
When successfully unlocked, the screw will push out a little, protruding slightly
from the side of the scanner.
NOTE: To lock the scanner (for shipping and other reasons), refer to the User's Manual in the Microtek
Software DVD.
Page 3
3
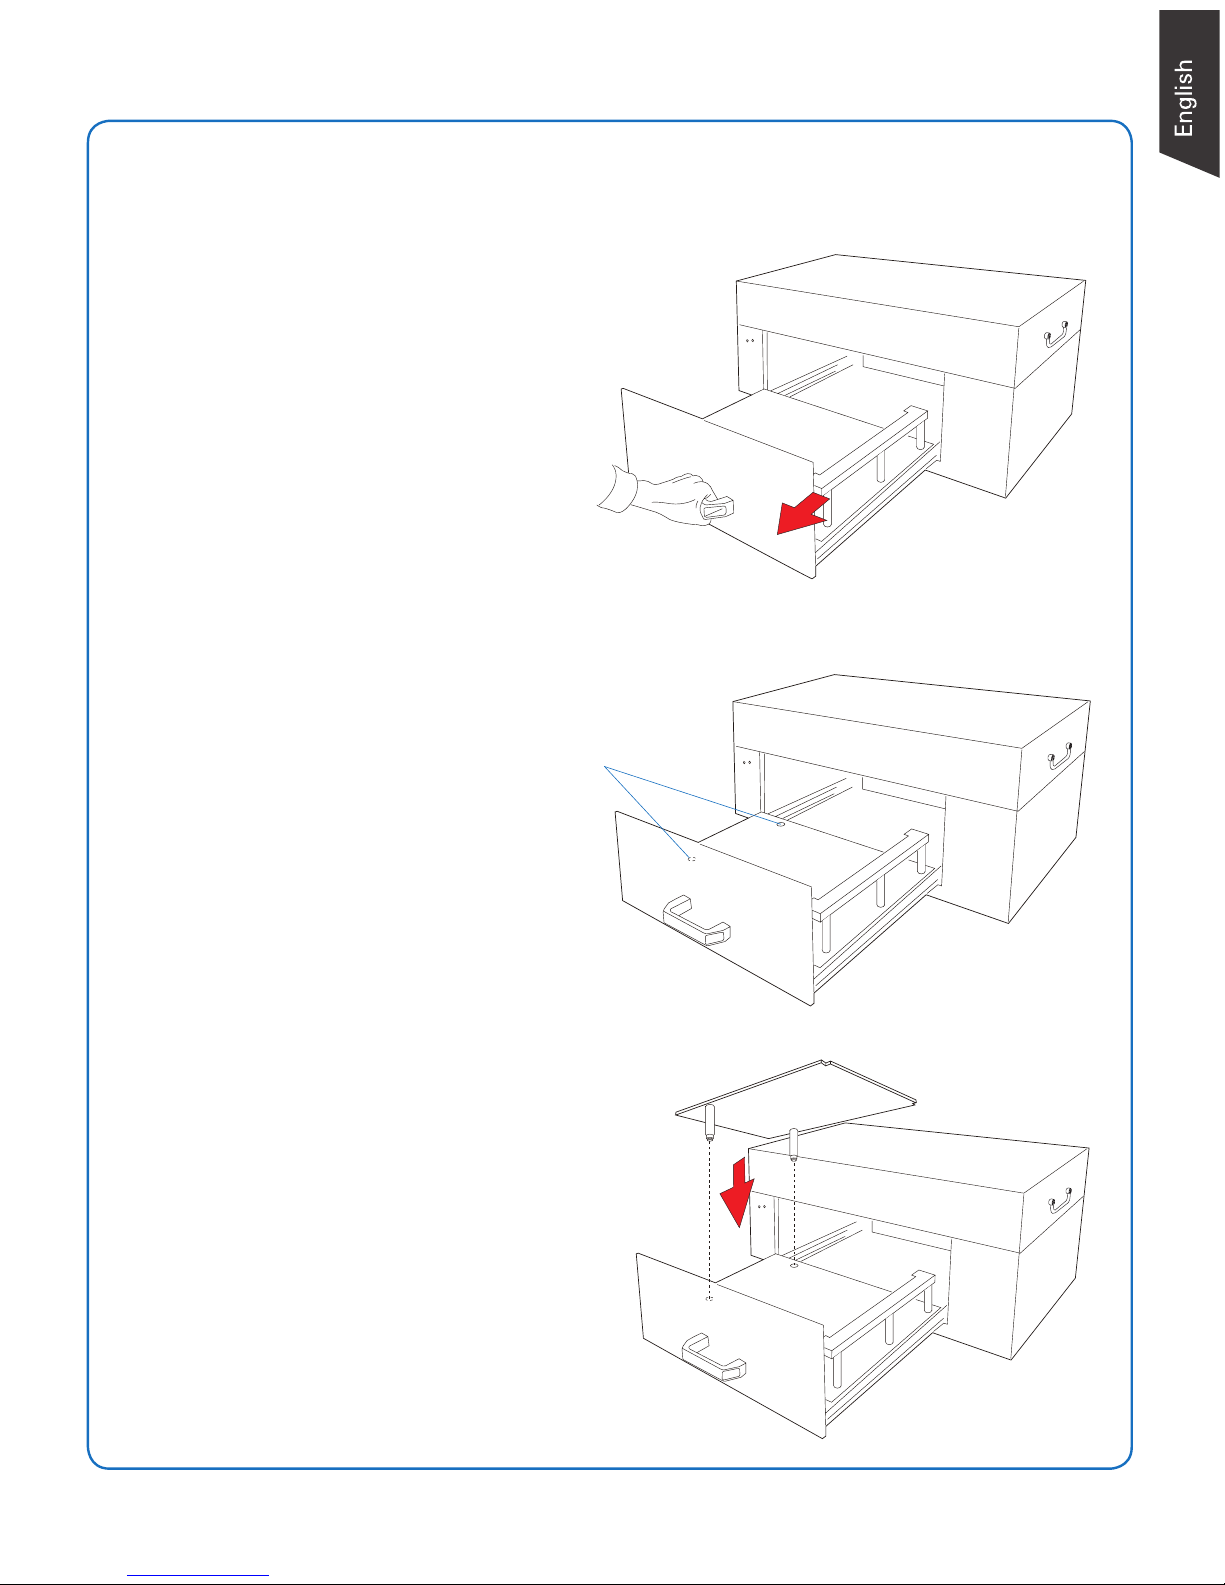
4.
Install Upper Scan Bed
1. Locate a handle at the front panel
of the scanner. Grab it to pull out
the drawer of the scanner until
reaching the edge of end.
2. Locate two hollows at the left
side of the lower scan bed.
3. Insert the stools at bottom of the
upper scan bed into the hollows
on the lower scan bed. Make
sure the upper scan bed has been
assembledinthescannerrmly.
Hollows
Page 4

4
5.
Connect Scanner
To the power cord
A. Connect one end of the power cord to the back side of the scanner and plug the
other end into a power source.
To the Hi-Speed USB cable
B. Connect one end of the USB cable to your computer and connect the other end
to the scanner.
C. Switch the Power button at the back side of the scanner to ON, and wait for
the indicators light on the front panel to stay on steady.
The system will detect your scanner automatically.
LED indicators
A
ON
OFF
B
C
Page 5

5
Position Materials
A. Locate a handle at the front panel of the scanner. Grab it to pull out the drawer
of the scanner until reaching the edge of end.
B. If the height of a scanned object is less than 2.76" (7 cm), center the object to
be scanned facing up directly on the upper scan bed.
When placing the scanned object, do not block the calibration area.
Upper scan bed
The calibration area (white strip) is next to the
upper scan bed which is an independent and
unremovable entity located at the right side of the
drawer.
To ensure optimal image quality during scanning,
removetheprotectivelmfromthesurfaceofthe
calibartion area before using the scanner.
During placement of the object,
make sure that the calibration area
is kept clear and free of obstruction
at all times.
Page 6

6
D. When done, grab the handle of the drawer and push it back into the scanner.
When "click" sound is heard, it means that the drawer has been closed properly.
Upper scan bed
C. If the height of a scanned object is larger than 2.76" (7 cm) (the maximum
height is 5.9" (15 cm)), take out the upper scan bed from the drawer; then,
center the object to be scanned facing up on the lower scan bed of the drawer.
When placing the scanned object, do not block the calibration area.
Lower scan bed
NOTE: The maximum loading weight for scan beds is 5.5 lbs (2.5 kg). Do not load any material heavier
than the loading limit.
During placement of the object,
make sure that the calibration area
is kept clear and free of obstruction
at all times.
Page 7

7
Launch ScanWizard Graph
After the software and scanner have been successfully installed and
connected, double-click the ScanWizard Graph icon on the desktop to
launch ScanWizard Graph.
Refer to the User's Manual in the Microtek Software DVD toward how
to scan materials and how to use ScanWizard Graph software.
Problems ?
The LEDs on the front-left panel of the scanner
indicate the status of the scanner.
First, make sure that you have followed Steps 1 to 5 as described in this guide to
install your scanner. Then if your problem is listed here, try the suggested solution.
1. No light comes on when the scanner is turned on.
Make sure your scanner is connected to your computer and plugged into a power
source.
2. The Add/Remove Hardware Wizard appears on your screen.
Click the “Cancel” button and close the ScanWizard Graph scanning software.
Disconnect the Hi-Speed USB cable from your computer, and refer to the
installation instructions in this document.
3. When trying to scan, an error message appears on your screen that reads, “Can’t
Find Scanners”.
Make sure your scanner is unlocked (see step “3. Unlock Scanner” section).
Make sure your scanner is connected to your computer and plugged in to a
power source (see step “5. Connect Scanner” section).
Uninstall and reinstall the ScanWizard Graph software.
4. After clicking “Scan,” a blank screen appears.
Uninstall and reinstall the ScanWizard Graph software.
All On - The scanner is found and ready to scan
Green Flashing - Scanning
All Off - Scanner is off
LED indicators
Page 8

8
Copyright © 2017 Microtek. Microtek, ScanMaker, ArtixScan, ScanWizard and ColoRescue
are trademarks or registered trademarks of Microtek International, Inc. All other trademarks or
registeredtrademarksarethepropertyoftheirrespectiveholders.Specications,softwareand
hardware bundles are subject to change without notice. Delivery of technical support services
subject to change without notice. Not responsible for typographical errors.
Do You Need Assistance?
Manuals
If you have additional questions and need further instruction or information, we
provide electronic manuals for using your scanner and ScanWizard Graph software
in the Microtek Software DVD.
Missing Items
If your package is missing items, please call the Microtek Customer Service
Department.
Drivers & Software Upgrades
Afteryounishtheinstallationofsoftware,ifyoufoundthattheinstalleddrivers
and software cannot run your product or your computer system properly later,
please go to the Microtek Download Service site at www.microtek.com/service.
php to download and install any updates you may require.
For additional information about Microtek products, please visit our website at
www.microtek.com.
 Loading...