

Page 1
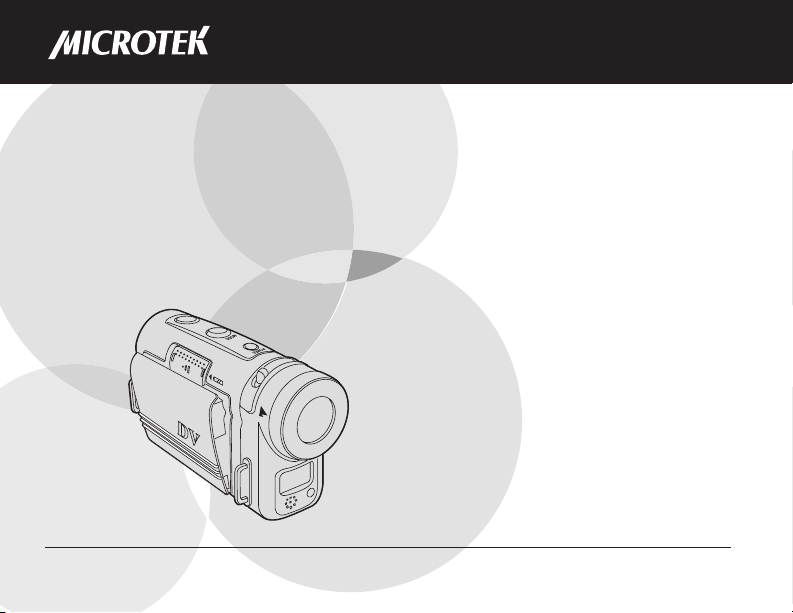
User Guide
This guide shows you how to operate the Take-it MV300 and provides information on basic functions,
movie/audio clip recording, still image shooting, playback, and troubleshooting.
Before using the DV camera, be sure to read the safety precautions to prevent injuries or damage to users or
equipment.
Page 2

Copyright© 2004 Microtek International, Inc.
All rights reserved
Microtek® is a registered trademarks of Microtek
International, Inc. Macintosh® and Apple® are registered
trademarks of Apple Computer, Inc. Windows® is a
registered trademark of Microsoft Corporation. Adobe®
and Acrobat® are registered trademarks of Adobe
Systems Incorporated. All other products or name
brands are trademarks of their respective holders.
Pictures you may acquire from any of the bundled
software and/or pictures, or documents you take a
snapshot may be protected under copyright law. The
unauthorized use of such materials could be a violation
of the rights of the copyright holder.
April 2004
2
Disclaimer of Warranty
Microtek does not guarantee the content of any written
materials or software, and is not liable for losses
sustained by the purchaser arising from the use or
inability to use these written materials, software or
equipment.
Warning
If you take pictures of or use copyrighted material, you
may violate copyright laws. Microtek holds no
responsibility for the use of Microtek’s equipment to
violate any such copyright laws.
Microtek Lab, Inc.
16941 Keegan Avenue, Carson, CA 90746
Main: 310-687-5800
Fax: 310-687-5950
http://www.microtekusa.com
Microtek International, Inc.
6, Industry East Road 3, Science Based Industrial Park
Hsinchu, 300, Taiwan
Tel: 886-3-5772155
Fax: 886-3-5772598
http://www.microtek.com
Page 3

Federal Communications Commission Interference
Statement
This equipment (MV300) has been tested and found to
comply with the limits for a Class B digital device,
pursuant to Part 15 of the FCC rules. These limits are
designed to provide reasonable protection against
harmful interference in a residential installation. This
equipment generates, uses and can radiate radio
frequency energy and, if not installed and used in
accordance with the instructions, may cause harmful
interference to radio communications. However, there is
no guarantee that interference will not occur in a
particular installation. If this equipment does cause
harmful interference to radio or television reception,
which can be determined by turning the equipment off
and on, the user is encouraged to try to correct the
interference by one or more of the following measures:
• Reorient or relocate the receiving antenna.
• Increase the separation between the equipment and
receiver.
• Connect the equipment into an outlet on a circuit
different from that to which the receiver is
connected.
• Consult the dealer or an experienced radio/TV
technician for help.
Notes: A shielded USB interface cable with ferrite core
installed on the DV camera connector end must be used
with this equipment.
Caution: Changes or modifications not expressly
approved by the manufacturer responsible for
compliance could void the user's authority to operate
the equipment.
This device complies with Part 15 of the FCC Rules.
Operation is subject to the following two conditions: (1)
This device may not cause harmful interference, and
(2) this device must accept any interference received,
including interference that may cause undesired
operation.
Responsible Party:
Loi Han
Microtek Lab, Inc.
16941 Keegan Avenue
Carson, CA 90746
USA
Phone: 310-687-5800
Fax: 310-687-5950
3
Page 4

Table of Contents
Federal Communications Commission Interference
Statement ........................................................ 3
Safety Precautions ............................................. 6
Introduction ...................................................... 8
DV camera Package ........................................... 9
DV camera Components ..................................... 9
Rear View .................................................... 9
Front/Bottom View ........................................ 10
Getting Started ..................................... 11
Attaching the Strap ........................................... 11
Loading the Battery ........................................... 11
Charging the Battery ......................................... 12
Inserting an SD Card .......................................... 13
Using the LCD Screen ........................................ 13
Shooting ............................................... 1 4
Shooting your First Video ................................... 14
Taking your First Still Image ................................ 15
Zoom .......................................................... 16
Macro ......................................................... 16
Voice Memo ................................................ 16
Modes .................................................. 16
Video Mode ..................................................... 17
Photo Mode ..................................................... 17
Audio Mode ..................................................... 18
Playback Mode ................................................. 18
USB Mode ....................................................... 19
4
Downloading Files ......................................... 19
Webcam Feature .......................................... 20
Using the Menus ................................... 21
Video/Photo Menu ............................................. 2 1
Size ............................................................ 21
Quality ........................................................ 22
Drive Mode .................................................. 23
EV Compensation .......................................... 23
White Balance .............................................. 24
Sharpness ................................................... 25
Voice Memo ................................................ 25
Color Mode .................................................. 26
Playback Menu ................................................. 27
Erase .......................................................... 27
Slide Show .................................................. 28
Rotate ........................................................ 28
Print ........................................................... 29
Setup Menu ..................................................... 29
Brightness ................................................... 29
Beep .......................................................... 30
Date ...........................................................30
Time .......................................................... 31
Date Stamp ................................................. 31
Video Out .................................................... 32
Format ........................................................ 32
Reset .......................................................... 33
Copy to SD .................................................. 33
Frequency ................................................... 34
Page 5

Power Saving ............................................... 34
Language .................................................... 35
USB Switch ................................................. 35
File No Reset ................................................ 36
Music Menu ..................................................... 36
Connecting ........................................... 37
Connecting to a TV ........................................... 37
Connecting to a Computer .................................. 37
Appendixes ........................................... 38
Appendix A – Installing Software ........................ 38
Appendix B – Maintenance ................................ 3 9
Appendix C – Troubleshooting ............................ 4 0
Appendix D – Menus and Factory Defaults ............ 46
Appendix E – Specifications ............................... 47
5
Page 6
Safety Precautions
Before you use the DV camera, be sure to read the
following safety precautions, which detail the proper
operation of the DV camera and its accessories to
prevent injuries or damage to users or equipment.
This symbol indicates situations where
improper use of the DV camera may result
in harm to the DV camera operator.
This symbol indicates situations where
improper use of the DV camera may result
in damage to the DV camera.
6
Children should not be allowed to have access to
the DV camera. They could injure themselves with
inappropriate use of the DV camera or by becoming
entangled in the carrying strap. If a child swallows a DV
camera battery, get the child medical attention.
Subjecting the DV camera to water or any other
liquid, or allowing condensation to form, may start a fire
or give the user an electrical shock.
• If liquid gets inside the DV camera, turn the DV
camera power off by removing the battery or
unplugging the power cord (with dry hands).
• Allowing the DV camera to slowly adjust to
temperature changes (as in transferring the unit from
outdoors to indoors) will help to prevent condensation.
Let any condensation evaporate before using the DV
camera.
Exposing the DV camera to too much heat may
warp the DV camera casing or damage the batteries.
Battery damage may result in fire, burns or electrical
shock.
Another source of possible burns is heat from the flash
or DV camera itself.
• Touching the flash after it has been used extensively
can cause burns.
• The DV camera body itself may burn your hands if
the DV camera has been operated for a lengthy
period of time.
Page 7
Do not drop batteries or let them be banged
around. This could damage the casings, causing the
batteries to leak.
• If the internal parts or components of the battery
come into contact with your eyes or your mouth,
flush the affected site with water and get medical
help.
• Do not short-circuit the battery terminals, and be
sure to cover the terminals before you throw
batteries away. If the terminals contact metal, they
may overheat and explode, causing a fire.
Black or bright (red, green, blue, and white) dots
may sometimes appear on the LCD screen. These are
merely misfiring pixels, and have no effect on the
recorded image.
If you aim the DV camera at the sun, or shoot the
flash close to someone’s eyes, you may injure your
eyesight or that of someone else.
If you see smoke or smell a burning odor coming
from your DV camera, turn the DV camera off. If you
continue to operate the DV camera, it could cause a fire
or give you an electrical shock.
Do not clean the DV camera with flammable liquid,
as these may cause a fire.
Do not leave the DV camera in humid or dusty
areas. Dust and humidity can cause the DV camera to
short circuit, leading to a fire.
If the DV camera gets anywhere near a strong
magnetic field, it may not work correctly, or the
pictures taken may be ruined or adversely affected.
Use a soft, absorbent cloth to clean the surface of
your DV camera.
7
Page 8

Introduction
Take-it MV300, Microtek’s Digital video camera,
incorporates the functions of digital camcorder, voice
recorder, digital still camera and webcam with super
image quality and fantastic audio. It applies the MPEG 4
recording video format to capture images with
640x480 resolution. Equipped with a larger 1.8” color
CD screen, you can focus on the images you want and
also review the live images as you take the shots. An
AV-out cable allows you to vividly view movies and
images on a TV set. When connected to a host
computer, the Take-it MV300 can also function as a
webcam.
Digital video camera
The DV camera can record digital movies in ASF format
with 640x480 or 320x240 pixels. Video footage can
be stored in the 16 MB internal memory or on optional
SD expansion card.
Digital still camera
The DV camera can take digital photographs in JPEG
format at resolutions of up to six megapixels. Pictures
can be stored in the 16 MB internal memory or on
optional SD expansion card.
Digital audio recorder
The DV camera can record digital audio in WAV format.
Audio footage can be stored in the 16 MB internal
memory or on optional SD expansion card.
8
Webcam
When connected to a host computer using a USB cable,
the DV camera can function as an advanced webcam.
Picture and video player
The DV camera features a 1.8-inch TFT LCD screen
which can be used to review the pictures and movies
stored on internal memory or on SD expansion card.
Page 9
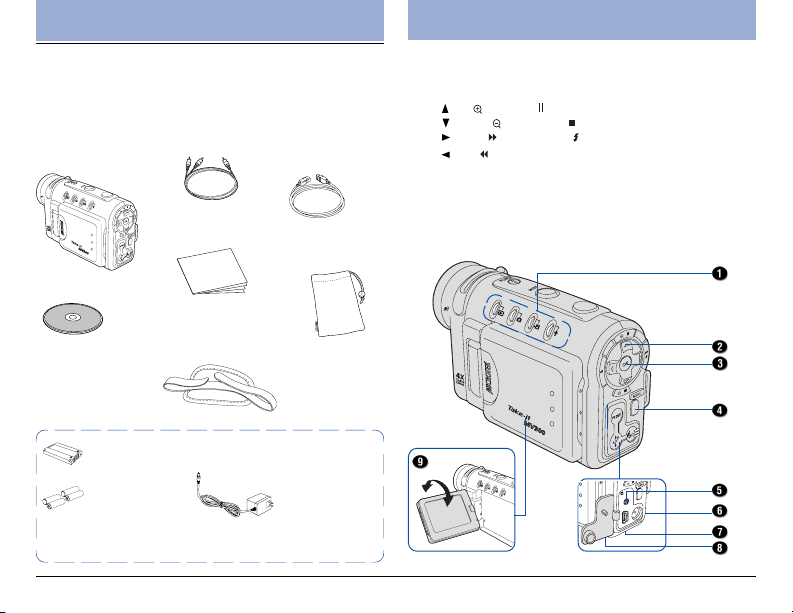
DV Camera Package
Unpacking the DV Camera
Open your DV camera package and check that you
have all of the components listed below.
If any component is missing, call the Microtek Customer
Service immediately.
Video cable
DV camera
Documentation:
Includes Quick Start
Microtek CD-ROM:
Includes bundled
software and DV
camera driver
*Rechargeable Lithium ion battery (Nokia 8210
compatible)
*Four AAA-sized
Alkaline batteries
* Power accessories you receive depend on the DV camera
purchased.
Guide and other inserts
USB cable
Pouch
Strap
*Power adapter
DV camera Components
Rear View
1. Mode indicator/Charger LED/READY LEDs
2. Multifunction/4-way arrow button
• Up/ Zoom In/ Pause/Play
• Down/ Zoom Out/ Stop
• Right/ Fastforward/ Flash
• Left/ Rewind
3. OK/Pan button
4. MENU button
5. TV-out connector
6. DC-in connector
9
Page 10
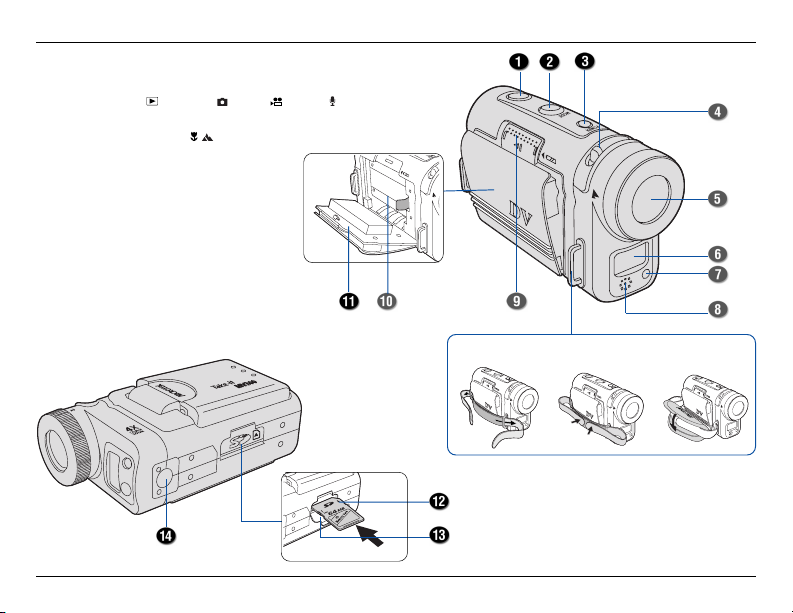
Front /Bottom View
1. Shutter button
2. MODE button ( Playback/ Photo/ Video / Audio)
3. POWER button
4. Macro-Normal switch ( / )
5. Lens
6. Flash
7. Self-timer indicator
8. Microphone
9. Battery cover slider
10. Battery compartment
11. Battery cover
12. Secure Digital (SD) compartment
13. SD card cover
14. Tripod mount
10
Attach the Strap
Page 11
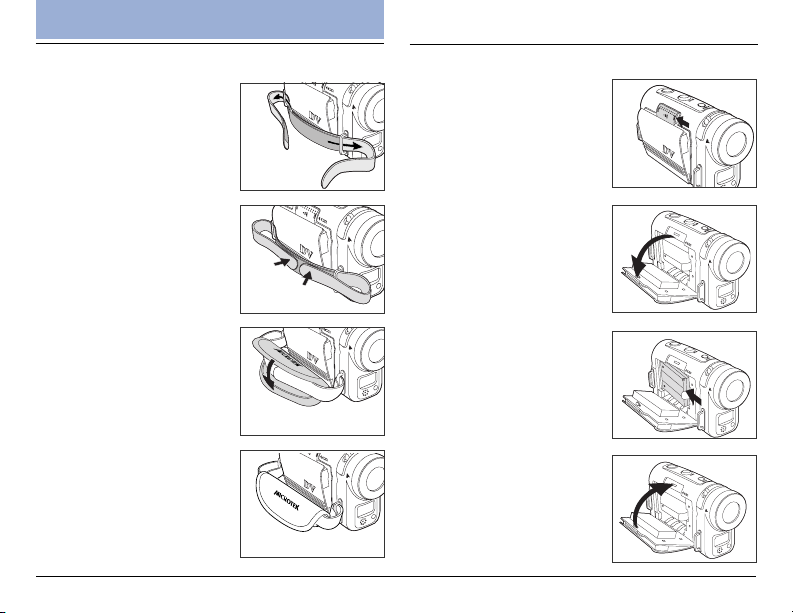
Getting Started
Attaching the Strap
1. Thread the end of the strap
through the DV camera strap
ring as shown.
2. Fasten the two ends of the
strap as shown.
1. Loading the Battery
1. Ensure the DV camera is
turned off; then push the
sliding battery case
indicated by the arrow to
open the battery cover.
3. Attach the grip belt to the
strap as shown.
2. Insert the battery into the
compartment.
Ensure that the battery is
inserted properly with the
Mylar pull tab held down.
3. Hold the battery in place
and close the battery cover
securely.
11
Page 12
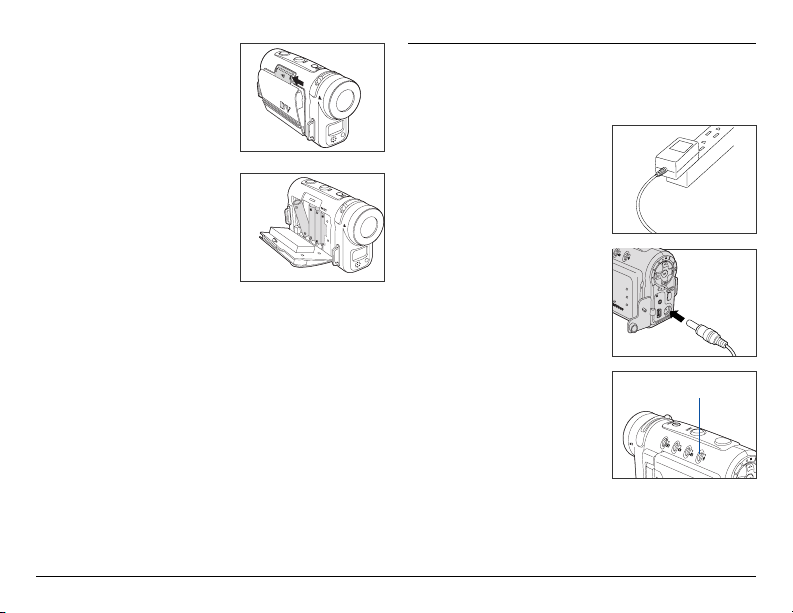
Push the sliding battery case
indicated by the arrow to
close.
Your DV camera can also use
alkaline batteries instead of a
single rechargeable Lithium
ion battery. Four AAA-sized
alkaline batteries should be
used in place of the supplied
rechargeable Lithium ion
battery and should be inserted
as shown.
A battery level indicator is displayed in the bottom left
hand corner of the LCD display. When the indicator
shows that the battery is nearly flat, you should connect
the AC adapter or change the battery.
12
Charging the Battery
Charge the Lithium ion battery using the supplied AC
adapter.
1. Plug the AC adapter into
the power source.
2. Ensure that the camera is
turned off; then connect the
DC plug of the AC adapter
to the camera’s DC-in
connector.
When the camera is
connected, the battery starts
to charge, and the charger
LED (Audio mode indicator)
lights up red at the same
time. Once the battery is
fully charged, the red light
will disappear.
Note:
• Use only the AC adapter provided with the DV camera to
charge the battery. Using any other adapter may damage
the DV camera.
• To minimize the risk of file and/or explosion, do not use
the AC adapter to charge alkaline batteries.
Charger LED
Page 13
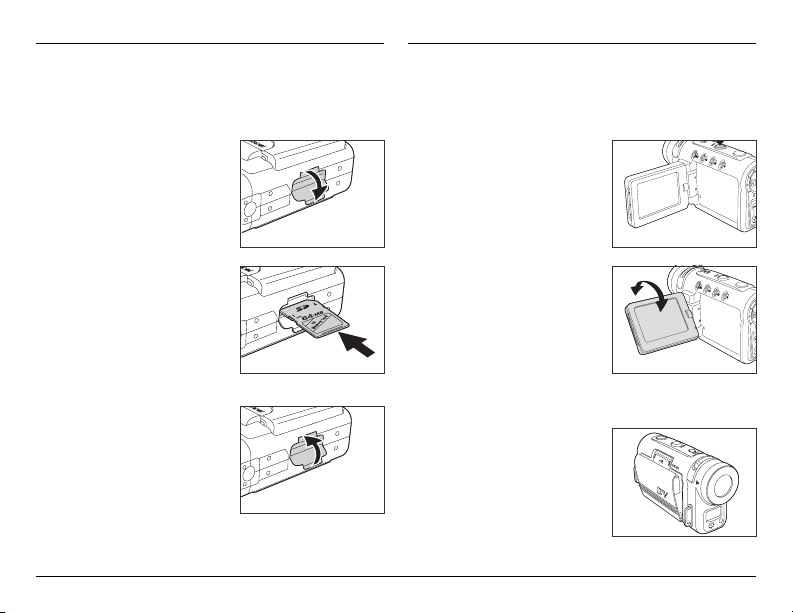
Inserting an SD Card
You can install an SD memory card in your DV camera
to increase the memory capacity. Follow the
instructions below to install an SD card.
1. Open the SD card
compartment door on the
bottom of the DV camera.
Ensure that the DV camera is
turned off.
Using the LCD Screen
The LCD screen can be used to frame your images
during shooting video or still images.
1. Swing to open the LCD
screen. The LCD screen can
be opened up to 90 degrees.
2 Insert the SD card (not
included) into the
compartment until you
hear a “click”.
Ensure that the orientation
of the SD card matches the
SD card marking in the SD
compartment.
3. Close the SD card
compartment door.
2. Adjust the viewing angle.
The LCD screen moves up
to 90 degrees to the
viewfinder side and up to
180 degrees to the lens
side.
When you adjust the angle of
the LCD screen, ensure the
LCD screen is fully opened.
3. Close the LCD screen.
When closing the LCD screen,
make sure the LCD screen is
set in the vertical position.
13
Page 14
Shooting
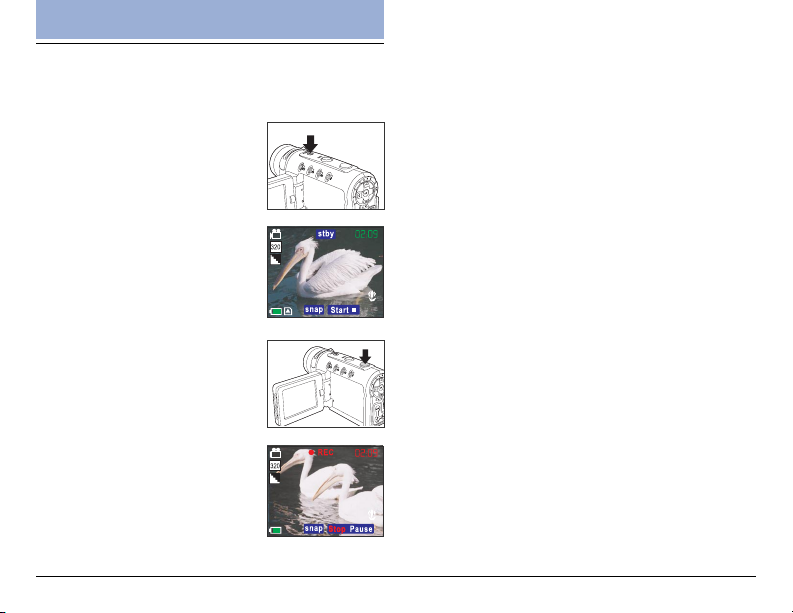
Shooting your First Video
Follow the instructions below to take your first still
photograph with your DV camera.
1. Turn on the DV camera by
pressing the POWER button
for two seconds.
The DV camera should be in
Video mode to shoot video.
Check for an icon in the top
left corner of the screen to
confirm this.
2. Use the LCD screen to
frame your shot.
3. Press the Shutter button and
release to begin recording.
You will be able to see your video
on the LCD screen as you record
it.
14
4. Press the Shutter button a second time to stop
recording.
When you press the shutter button to stop recording,
the footage is automatically saved in Playback mode. See
Playback mode on page 18.
You can change various settings on the DV camera that
will affect the quality and appearance of the video
footage you record. You can adjust the exposure, size,
and resolution of the image, white balance, and other
settings. See Video/Photo Menu on page 21.
Note: If the DV camera is not in Video mode when you turn
it on, see Video mode on page 17.
Page 15
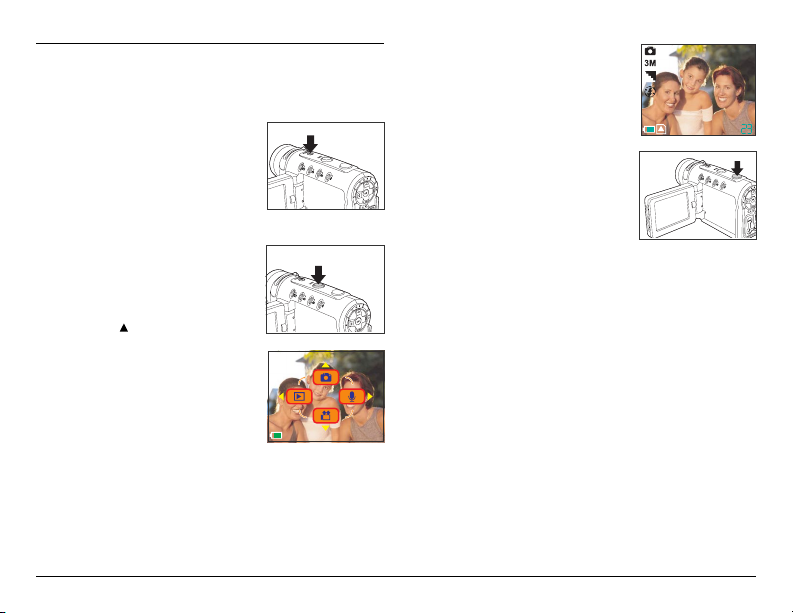
Taking Your First Still Image
Follow the instructions below to take your first still
photograph with your DV camera.
1. Turn on the DV camera by
pressing the POWER button for
two seconds.
The DV camera may start up in
Video mode and you will need to
select Photo mode to take still
pictures.
2. Press the MODE button on the
top of the DV camera.
The LCD displays a graphic
showing four mode options.
3. Press the button on the rear
of the DV camera to select
Photo mode.
The DV camera changes to Photo
mode. Check for the Photo mode
icon in the top left corner of the
screen to confirm this.
4. Use the LCD screen to compose
your still image.
5. Press the Shutter button to
take the picture.
When you press the shutter you
will hear a sound to indicate that
the picture has been taken
(unless the sound has been
disabled), and the captured
picture will remain on the screen
for two seconds. You can review
your picture in Playback mode.
See Playback mode on page 18.
You can change various settings on the DV camera that
will affect the quality and appearance of the pictures
you take. You can adjust the exposure, size, and
resolution of the image, white balance, and other
settings. See Photo Menu on page 21.
15
Page 16

Zoom
The DV camera is equipped with a digital zoom
function. You can zoom in on distant images by pressing
the button on the rear of the DV camera. Use the
button to zoom back out.
Macro
The DV is a fixed focus DV camera but there is a
manual focusing function that you can adjust to get the
best results. Move the Macro-Normal switch all the way
to the macro setting when taking pictures of very close
subjects. Move the Macro-Normal switch to the other
end of the scale when taking pictures of far away
subjects.
For most pictures, the Macro-Normal switch should be
left in the middle of the range but you should practice
taking pictures with different focusing settings to
achieve the best results.
When the Macro-Normal switch is in the macro position,
an icon will appear on the LCD screen to warn you.
Voice Memo
You can also record a short audio clips when you take a
picture. To record an audio clip to go with your still
picture:
1. Make sure that the voice memo function is turned
on. See Voice memo on page 25 for details on how
to do this.
2. Take the picture as normal.
3. Record your short voice memo after you take the
picture.
16
Modes
The DV camera can operate in four different modes.
Each mode offers different features and functions. In
this section you will learn what each mode is for and
how to use them.
This section also covers how to use the DV camera as
web cam and how to download your pictures, videos,
and audio samples from the DV camera to your hard
disk.
Page 17

Video mode
Use Video mode for recording digital moving images.
Video recordings will be in ASF format and will be
stored in memory. To select the DV camera to Video
mode from another mode, you should:
1. Press the MODE button on
the top of the DV camera.
The LCD displays the 4 mode
options.
Photo mode
Use Photo mode for taking still pictures in JPEG format.
To select the DV camera to Photo mode from another
mode:
1. Press the MODE button on
the top of the DV camera.
The LCD displays the 4 mode
options.
2. Press the button on the rear of the DV camera.
The DV camera will switch to Video mode.
In Video mode you can change various settings that will
affect the quality and appearance of the video footage
you record. You can adjust size and resolution of the
image, white balance and other settings. See Photo
Menu on page 21.
See Shooting your first video on page 14 for details on
how to shoot video.
2. Press the button on the rear of the DV camera.
The DV camera will switch to Photo mode.
In Photo mode you can change various settings on the
DV camera that will affect the quality and appearance
of the pictures you take. You can adjust the exposure
See Taking your first still image on page 15 for details
on how to take pictures in Photo mode.
17
Page 18

Audio Mode
Use Audio mode for recording digital sounds. To select
the DV camera to Audio mode from another mode, you
should:
1. Press the MODE button on the
top of the DV camera.
The LCD displays the 4 mode
options.
2. Press the button on the rear
of the DV camera.
The DV camera will switch to
Audio mode.
In Audio mode the LCD screen will not display any
picture but the microphone icon will appear in the
center of the screen to indicate that the DV camera is
ready to record sounds.
To begin recording, press the Shutter button.
To end recording, press the Shutter button a second
time.
Recordings are made using the internal microphone at
the front of the DV camera. Recordings will be stored in
memory as WAV files.
18
Playback Mode
Use Playback mode to review all the pictures, movies
and sounds that you have stored on the DV camera. To
select the DV camera to Playback mode:
1. Press the MODE button on
the top of the DV camera.
The LCD screen displays the
4 mode options.
2. Press the button on the
rear of the DV camera.
The DV camera will switch to
Playback mode.
In Playback mode, the LCD
screen displays all the files
stored in the DV camera
memory. Movies and still
images are displayed as
thumbnails of the image.
Audio files are displayed as
the microphone icon.
3. Use the 4-way arrow button on the rear of the DV
camera to select a file to display, and press the OK
button to confirm your selection.
The selected file appears on the LCD screen as a single
image display.
Page 19

In this display mode, you can use the / ( / ) button
to toggle forwards/backwards through all the
recordings.
4. Press the button to start the
movie/audio playback.
During the playback, do the following
if required:
• Press ( ) to pause movie/audio
playback.
• Press to continue the movie/audio playback.
• Press / ( / ) to advance or rewind the movie
playback with a speed. The speed adjustment are
made from -4 to +4 in 2-step increments.
• Press ( ) to stop the movie/audio playback.
5. Press the OK button to return to nine-image display.
Playback Zoom
The zoom feature allows you to magnify a captured still
image at up to four times the original viewing size.
• Press the
captured still image; press the ( ) button repeatedly
to return to the original viewing size.
( ) button repeatedly to magnify the
USB Mode
The DV camera will automatically switch to USB mode
when it is connected to a USB port using the cable
provided. See Connecting on page 37 for details on
how to connect your DV camera to a computer.
Note: When the camera is connected to a computer with a
USB cable, it automatically goes into USB mode. Other
modes cannot be selected using the Mode button until the
USB cable has been disconnected.
Downloading files
In USB mode you can download images, movies, or
audio recordings to your hard disk. The DV camera
appears as a removable disk on your Windows PC. To
access the images on your DV camera:
1. Turn on your DV camera and make sure that it is
not set to behave as a webcam. See USB Switch
on page 35.
2. Connect your DV camera to your computer USB
port using the cable provided. See Connecting to a
computer on page 37.
The first time you connect your DV camera to your
computer, the operating system will attempt to load
driver software. Windows ME, 2000 and XP will do this
automatically but if your computer uses Windows 98
SE, you will have to insert the CD provided and follow
the on-screen instructions. See Installing Software on
page 38.
19
Page 20

3. Open Windows Explorer and click on the My
Computer folder. You will see a list of all your hard
disks, optical disks and floppy drives. The DV
camera appears as a removable disk and is assigned
a drive letter.
4. Double click on the drive letter for the DV camera.
A folder named DCIM will be displayed. This folder
contains the contents of your DV camera memory or
the SD card.
5. Double click on the 100_MTDV folder to display
your images, movies and audio files.
Note: You can move, copy, or delete images in the DV
camera’s memory or SD card in exactly the same way as if
they were on an external hard disk drive. If an SD card is
inserted in the DV camera, only the contents of the SD card
will be displayed. If no SD card is inserted, the contents of
the DV camera internal memory will be displayed.
Tip: Before you connect your DV camera to a computer,
you may want to copy the contents of the internal DV
camera memory to the SD card. See Copy to SD on page
33.
20
Webcam feature
Standard webcam enabled applications such as
Microsoft Netmeeting, or Yahoo Messenger will
recognize the DV camera as a webacm when it is
connected to the USB port on your computer. You can
then use the DV camera for video chat.
To use your DV camera as a webcam:
1. Turn on your DV camera and make sure that it is set
to behave as a webcam. See USBSwitch on page
35.
2. Connect your DV camera to your computer using
the USB cable provided. See Connecting to a
computer on page 37.
The first time you connect your DV camera to a
computer as a webcam the operating system will
attempt to load driver software. You will need to insert
the CD provided and follow the on-screen instructions.
See Installing Software on page 38.
3. Start a webcam enabled application on your
computer. The application will detect that a
webcam is connected and the DV camera will
behave like a standard web-cam. See the
application user guide for more details on how to
use a webcam.
Page 21

Using the Menus
Your DV camera can be configured using four menus.
You can access the menus using the menu button on
the rear on the DV camera. Navigate through the menu
system using the arrow buttons on the rear of the DV
camera.
Note: Read this section carefully before making any
changes. If you make a mistake and do not know how to
correct it, you may have to reset all settings to the factory
default. See Reset on page 33.
Video/Photo Menu
Use the Video/Photo menu to set the size, quality,
sharpness, and color properties of pictures. You can also
adjust the exposure, white balance, set the shutter
mode, and turn the voice memo feature on or off.
The menu will include different options for each mode. If
you can’t find the option you are looking for, try exiting the
menu and checking the DV camera mode.
Size
The image size option can be accessed from either
Photo mode or Video mode. Choosing a bigger image
size will mean that more memory is required to store
each recorded picture or video. The DV camera can
take still pictures as large as 6M (2816x2112 pixels) or
as small as VGA (640x480 pixels). There are also two
size options available for video. To access the image
size option:
1. Turn on the DV camera and make sure that it is in
either Photo mode or Video mode. See Modes on
page 16.
2. Press the MENU button at the
rear of the DV camera to display
the main menu screen.
3. Use the
of the DV camera to select the
/ button on the rear
21
Page 22

Size icon.
4. Press the
button to display
320
the Size options. In Video
mode you can select either VGA
size or CIF size. In Photo mode
you can choose VGA, 1M, 2M,
3M, or 6M.
5. Use the
/ button to select the
image size you require and press the
confirm your choice.
6. Press the MENU button to exit the menu.
22
button to
Quality
The quality option can be accessed from either Video
mode or Photo mode. Quality can be set to either Fine,
Normal or Best. Higher quality images require more
memory space and fewer images can be stored on the
DV camera.
To access the quality option:
1. Turn on the DV camera and make sure that it is in
either Photo mode or Video mode. See Modes on
page 16.
2. Press the MENU button at the rear of the DV camera
to display the main menu screen.
3. Use the
of the DV camera to select the
Quality icon.
4. Press the
Quality options.
5. Use the
quality option, Fine, Normal,or
Best.
6. Press the
your choice
7. Press the MENU button to exit
the menu.
/ button on the rear
button to display the
/ button to select a
button to confirm
Page 23

Drive Mode
Use the Drive Mode setting to switch between a
standard shutter operation, a delayed shutter that allows
you to take pictures of yourself, and a multi-shot shutter
that allows you to take three pictures in rapid
succession every time you press the shutter button. This
setting is available only in Photo mode.
To access the Drive Mode setting:
1. Turn on the DV camera and make sure that it is in
either Photo mode. See Modes on page 16.
2. Press the MENU button at the rear of the DV camera
to display the main menu screen.
3. Use the
4. Press the
5. Use the
6. Press the
7. Press the MENU button to exit
/ button on the rear
of the DV camera to select the
Drive Mode icon.
button to display the
Drive Mode options.
/ button to select the
option you require.
button to confirm
your choice.
the menu.
EV Compensation
The DV camera features automatic exposure control,
but you can adjust the exposure manually in either
Photo mode or Video mode. In most cases no
adjustment is necessary but in some conditions, when
shooting into the sun for instance, you may want to
make a manual adjustment. To change the exposure
setting:
1. Turn on the DV camera and make sure that it is in
either Photo mode or Video mode. See Modes on
page 16.
2. Press the MENU button at the
rear of the DV camera to display
the main menu screen.
3. Use the
of the DV camera to select the
Exposure icon.
4. Press the
EV comp options.
5. Use the
exposure compensation option.
You can choose to increase or
decrease the exposure by one
or two stops or set the value to
zero.
6. Press the
7. Press the MENU button to exit the menu.
/ button on the rear
button to display the
/ button to select an
button to confirm your choice.
23
Page 24

White Balance
The white balance setting is used to set the correct
color balance under different lighting conditions. Without
the correct white balance setting, white objects would
look red under artificial lighting, or blue in sunlight.
Your DV camera can automatically set the white
balance for you, but you may wish to set it manually for
unusual lighting conditions or special effects. The White
Balance setting can be accessed from either Photo
mode or Video mode. To access the White Balance
setting:
1. Turn on the DV camera and make sure that it is in
either Photo mode or Video mode. See Modes on
page 16.
2. Press the MENU button at the
rear of the DV camera to display
the main menu screen.
3. Use the
4. Press the
24
/ button on the rear
of the DV camera to select the
White Balance icon.
button to display the White Balance
options.
5. Use the / button to select a
White Balance option. You can
choose to set the White Balance
setting to Daylight, Cloudy,
Tungsten, Fluorescent,orAuto.
When set to Auto the DV
camera detects the ambient
light and sets White Balance
automatically.
6. Press the
7. Press the MENU button to exit the menu.
button to confirm your choice
Page 25

Sharpness
Use the Sharpness option to sharpen or soften the
outlines in your images. Three settings are available,
Normal, Sharper, and Softer. This setting is only
available in Photo mode.
To access the Sharpness setting:
1. Turn on the DV camera and make sure that it is in
Photo mode. See Modes on page 16.
2. Press the MENU button at the rear of the DV camera
to display the main menu screen.
3. Use the
4. Press the
5. Use the
6. Press the
7. Press the MENU button to exit
/ button on the rear
of the DV camera to select the
Sharpness icon.
button to display the
Sharpness options.
/ button to select the
option you require.
button to confirm
your choice.
the menu.
Voice Memo
The Voice Memo function allows you to add a sound
clip to still images. The Voice Memo setting can only be
accessed from Photo mode.
To access the Voice memo setting:
1. Turn on the DV camera and make sure that it is in
Photo mode. See Modes on page 16.
2. Press the MENU button at the rear of the DV camera
to display the main menu screen.
The Voice Memo icon is not displayed on the screen
when you first enter the setup menu screen. Use the 4way arrow button to scroll through the list of options
to find the Voice Memo icon.
3. Use the / button on the rear
of the DV camera to select the
Voice Memo icon.
4. Press the
Voice Memo options.
5. Use the
either On or Off.
6. Press the
your choice.
button to display the
/ button to select
button to confirm
25
Page 26

7. Press the MENU button to exit the menu.
With the voice memo function turned on, you can
record a short audio clip with each photo. After you
have taken your photo in the usual way, the voice
memo icon appears on the screen. Press the Shutter
button to record your audio clip, and press the Shutter
button a second time to stop recording.
26
Color Mode
Use the Color Mode setting to change the color of your
images or videos. Three settings are available, Normal,
Black & White, and Classic. The Color Mode setting can
be accessed from either Photo mode or Video mode. To
access the Color Mode setting:
1. Turn on the DV camera and make sure that it is in
either Photo mode or Video mode. See Modes on
page 16.
2. Press the MENU button at the rear of the DV camera
to display the main menu
screen.
3. Use the
of the DV camera to select the
Color Mode icon.
4. Press the
Color Mode options.
5. Use the
option you require.
6. Press the
your choice.
Choosing the Normal option will produce standard
color pictures and video. The Black & White setting
produces monochrome style pictures and video. The
Classic option produces pictures and videos tinted to
look like old fashioned sepia photographs.
7. Press the MENU button to exit the menu.
/ button on the rear
button to display the
/ button to select the
button to confirm
Page 27

Playback Menu
Erase
Use the Erase function to delete and files from the
camera or SD card memory. The Erase function can be
accessed only when your DV camera is in Playback
mode. To access the Erase function:
1. Turn on the DV camera and make sure it is in
Playback mode. See Modes on page 16.
2. Press the MENU button at the
rear of the DV camera to display
the main menu screen.
3. Use the
4. Press the
/ button on the rear
of the DV camera to select the
Erase icon.
button to display the
Erase options. Use the /
button to select the option you
require.
5. Press the OK button to confirm your choice.
Using the Erase One option will
erase just the last file to be
selected in Playback mode.
Choosing the Erase Select option
will return you to the Playback
mode screen where you can use
the arrow keys to select a file to
delete and press the OK button
to confirm your choice.
Choosing the Erase ALL option
will erase all the files on your DV
camera and SD card if inserted.
6. Press the MENU button to exit the menu.
27
Page 28

Slide Show
Use the Slide Show function to display all the files
stored in your DV camera, one after the other. The
Slide Show function can only be accessed from
Playback mode. You can set the delay between files at
two or five seconds. To access the Slide Show
function:
1. Turn on the camera and make sure it is in Playback
mode. See Modes on page 16.
2. Press the MENU button on the rear of the DV
camera to display the main menu screen.
3. Use the / button on the rear
of the DV camera to select the
Slide Show icon.
4. Press the
Slide Show options. Use the /
button to select the option you
require.
5. Press the OK button to confirm
your choice. Set the delay to
either two or five seconds or
cancel the slide show and return
to Playback mode. When you
have selected a delay, all files
on the DV camera will be
displayed, one after the other.
6. Press the MENU button to exit the menu.
28
button to display the
Rotate
Use the rotate function to rotate an image stored on the
DV camera. This function will only work for still images
and can only be accessed from Playback mode. To
access the Rotate function:
1. Turn on the DV camera and make sure it is in
Playback mode. See Modes on page 16.
2. Press the MENU button on the rear of the DV
camera to display the main menu screen.
3. Use the
of the DV camera to select the
Rotate icon.
4. Press the
Rotate options. Use the /
button to select the option you
require.
You can choose to rotate an
image by 90°, 180°, or 270°.
The image rotated will be the
last one you selected.
5. Press the MENU button to exit the menu.
/ button on the rear
button to display the
Page 29
Print
Use the Print function to print still images stored on your
DV camera. You can print either an individual image or
all your images. To access the Print function:
1. Turn on the DV camera and make sure it is in
Playback mode. See Modes on page 16.
2. Press the MENU button on the rear of the DV
camera to display the setup menu screen.
3. Use the
4. Press the
5. Press the OK button to confirm
6. Press the MENU button to exit the menu.
/ button on the rear
of the DV camera to select the
Print icon.
button to display the
Print options. Use the / button
to select the option you require.
your choice.
If you chose to print just a single
image, the last image you
selected in Playback mode will
be printed.
If you chose to print all images,
all your still images will be
printed. Choosing Cancel will
return you to Playback mode
without printing any images.
Setup Menu
Use the Setup menu to set various parameters for your
DV camera. The Setup menu can be accessed from
any mode and is always the same.
Brightness
Use the Brightness option to set the LCD screen
brightness level. There are five levels of brightness
available.
1. Turn on the DV camera and press the MENU button
to display the main menu screen.
2. Press the
Setup menu option at the top.
3. Use the
Brightness option.
4. Press the
available options.
5. Use the
option.
6. Press the
your choice.
7. Press the MENU button to exit
the menu.
button to select the
/ button to select the
button to display the
/ button to select an
button to confirm
29
Page 30

Beep
Use the Beep option to turn on or off the beep noise
made by the DV camera when buttons are pressed. To
access the Beep option:
1. Turn on the DV camera and press the MENU button
to display the main menu screen.
2. Press the
at the top.
3. Use the
Beep option.
4. Press the
available options.
5. Use the
option.
6. Press the
your choice.
7. Press the MENU button to exit
the menu.
30
button to select the Setup menu option
/ button to select the
button to display the
/ button to select an
button to confirm
Date
Use the Date option to set the date. To access the Date
option:
1. Turn on the DV camera and press the MENU button
to display the main menu screen.
2. Press the
at the top.
3. Use the
Date option.
4. Press the
submenu.
5 Use the
field you want to change.
6. Enter a new value in the chosen
field using the
7. Press the OK button to confirm
your changes and return to the
Setup menu screen.
8. Press the MENU button to exit the menu.
button to select the Setup menu option
/ button to select the
button to display the
/ button to select the
/ button.
Page 31

Time
Use the Time option to set the time. To access the
Time option:
1. Turn on the DV camera and press the MENU button
to display the main menu screen.
2. Press the
at the top.
3. Use the
Time option.
4. Press the
submenu.
5 Use the
field you want to change.
6. Enter a new value in the chosen
field using the
7. Press the OK button to confirm
your changes and return to the
Setup menu screen.
8. Press the MENU button to exit the menu.
button to select the Setup menu option
/ button to select the
button to display the
/ button to select the
/ button.
Date Stamp
Your DV camera can be set to place a date stamp on
each image you take. To turn the Date Stamp function
on or off:
1. Turn on the DV camera and press the MENU button
to display the main menu screen.
2. Press the
at the top.
3. Use the
Date Stamp option.
4. Press the
the available options.
5. Use the
option.
6. Press the
your choice.
7. Press the MENU button to exit
the menu.
button to select the Setup menu option
/ button to select the
button to display
/ button to select an
button to confirm
31
Page 32

Video Out
Use the Video Out option to define the type of TV you
want to use to display your camera images on. You can
set the video output to either PAL or NTSC format.
NTSC is a format used in North America and some of
Asia. PAL format is used in Europe. If you are unsure
which system your TV uses, consult the documentation
that came with it. To set the Video Out option:
1. Turn on the DV camera and press the MENU button
to display the main menu screen.
2. Press the
at the top.
3. Use the
Video Out option.
4. Press the
available options.
5. Use the
option.
6. Press the
your choice.
7. Press the MENU button to exit
the menu.
32
button to select the Setup menu option
/ button to select the
button to display the
/ button to select an
button to confirm
Format
Use the Format option to erase all files on the DV
camera and SD card.
To access the Format option:
1. Turn on the DV camera and press the MENU button
to display the main menu screen.
2. Press the
at the top.
3. Use the
Format option.
4. Press the
submenu.
5. Use the
either OK or Cancel and press
the button to perform the
function.
All image files, audio files, and
movie files will be deleted.
Note: When you perform a format, all data on the DV
camera and SD card will be lost. Make sure you have saved
everything you need on your computer hard disk before you
perform a format.
button to select the Setup menu option
/ button to select the
button to display the
/ button to select
Page 33

Reset
Use the Reset option to restore all configurations to
factory default settings. To access the Reset option:
1. Turn on the DV camera and press the MENU button
to display the main menu screen.
2. Press the
at the top.
3. Use the
Reset option.
4. Press the
submenu.
5. Use the
either OK or Cancel and press
the button to perform the
function.
When you perform this function,
all settings are returned to the
original factory configuration and
any changes you made will be
lost.
button to select the Setup menu option
/ button to select the
button to display the
/ button to select
Copy to SD
Use the Copy to SD function to copy all files stored in
the DV camera memory to the SD card. You may need
this function if you want to use the SD card in another
device to download your movies or images. To access
the Copy to SD function:
1. Turn on the DV camera and press the MENU button
to display the main menu screen.
2. Press the
at the top.
3. Use the
Copy to SD option.
4. Press the
submenu.
5. Use the
either OK or Cancel and press
the button to perform the
function.
All images stored in the DV
camera memory will be copied to
the SD card.
button to select the Setup menu option
/ button to select the
button to display the
/ button to select
33
Page 34

Frequency
To avoid flickering images on the LCD screen, you
should make sure that the DV camera Frequency setting
matches the frequency of mains electricity in your
country. China and Europe use a 50 Hz system.
America and Japan use a 60 Hz system. If you are
unsure what frequency your mains supply is, consult
your power company.
To access the Frequency setting:
1. Turn on the DV camera and press the MENU button
to display the main menu screen.
2. Press the
at the top.
3. Use the
Frequency option.
4. Press the
available settings.
5. Use the
required setting.
6. Press the
your choice.
7. Press the MENU button to exit
the menu.
34
button to select the Setup menu option
/ button to select the
button to display the
/ button to select the
button to confirm
Power Saving
Turn the Power Saving function on to preserve battery
life. When the power saving function is used, the DV
camera will turn itself off after a few minutes of
inactivity. To access the Power Saving function:
1 Turn on the DV camera and press the MENU button
to display the main menu screen.
2. Press the
option at the top.
3. Use the
Power Saving option.
4. Press the
available settings.
5. Use the
required setting.
6. Press the
your choice.
7. Press the MENU button to exit
the menu.
button once to select the Setup menu
/ button to select the
button to display the
/ button to select the
button to confirm
Page 35

Language
Use the Language setting to change the language in
which the DV camera menus are displayed. Available
languages are, traditional Chinese, simplified Chinese,
German, French, Spanish and, English. To access the
language setting:
1. Turn on the DV camera and press the MENU button
to display the main menu screen.
2. Press the
at the top.
3. Use the
Language option.
4. Press the
available settings.
5. Use the
required setting.
6. Press the
your choice.
7. Press the MENU button to exit
the menu.
button to select the Setup menu option
/ button to select the
button to display the
/ button to select the
button to confirm
USB Switch
The DV can be connected to your PC to download your
images to the hard disk It can also be used as a
webcam. Use the USBSwitch setting to switch
between WC (webcam mode) or UM (standard USB
mode). To access the USBSwitch setting:
1. Turn on the DV camera and press the MENU button
to display the main menu screen.
2. Press the
at the top.
3. Use the
USBSwitch option.
4. Press the
available settings.
5. Use the
required setting.
6. Press the
your choice.
7. Press the MENU button to exit
the menu.
button to select the Setup menu option
/ button to select the
button to display the
/ button to select the
button to confirm
35
Page 36

File No Reset
Each picture you take with the DV camera is given a
number. The file number is also the name of the file
when you download it to your hard disk. To reset the
file number to zero, use the FileNoReset option. To
access the FileNoReset option:
1. Turn on the DV camera and press the MENU button
to display the main menu screen.
2. Press the
at the top.
3. Use the
FileNoReset option.
4 Press the
available settings.
5. Use the
required setting.
6. Press the
your choice.
7. Press the MENU button to exit
the menu.
36
button to select the Setup menu option
/ button to select the
button to display the
/ button to select the
button to confirm
Music menu
Use Music Menu to play MP3 files stored on the DV
camera. To access the MP3 player function:
1. Turn on the DV camera and make sure it is in
Playback mode. See Playback mode on page 18.
2. Press the MENU button to display the main menu
screen.
3. Press the
A music note icon appears on the screen.
4. Press the OK button on the rear of the DV camera to
display a list of MP3 files stored in the camera.
5. Use the
select the MP3 file to play.
6. Use the
• Use the / button to adjust the volume control.
• Press the button during playback to pause
• Press the button to stop playback.
button twice to display the Music menu.
/ button on the rear of the DV camera to
button to play the file.
playback.
Page 37
Connecting
You can connect your DV camera to a TV to view
either still pictures or video stored on the internal
memory or on an SD card.
You can also connect the DV camera to a computer
using a USB cable and download movies or images to
the hard disk. When the DV is connected to a
computer, you can also use it as a web cam.
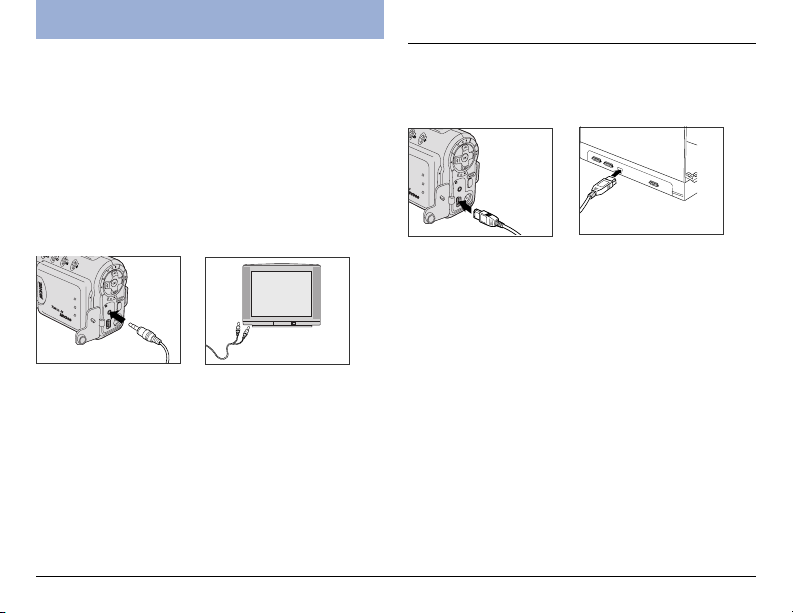
Connecting to a TV
Connect the DV camera to a TV using the supplied
video cable as shown below.
When your DV camera is connected to a TV, you can
view video or still images on the TV screen. You may
need to configure the DV camera to work correctly with
your TV. See Setup Menu on page 29.
Connecting to a Computer
Connect the DV camera to a computer using the
supplied USB cable as shown below.
When the DV camera is connected to your computer,
you can download the movies, images and audio
samples you have made to your hard disk. You can also
use the DV camera as a web cam. See USB mode on
page 19.
37
Page 38

Appendixes
Appendix A - Installing Software
Your DV camera comes complete with a CD-ROM containing drivers and applications. If your computer uses
Windows 98SE operating system, you will need to load a driver from the CD-ROM before you can download files
from your DV camera to your computer.
If you have Windows ME, 2000, or XP operating system, you can plug the DV camera straight into the USB port on
your computer and a driver will install automatically without the CD-ROM.
If you want to use the DV camera as a webcam, you will need to load a driver from CD-ROM whatever your
operating system.
To load the application software or drivers from CD-ROM, insert the CD-rom in your PC CD-ROM drive. The
installation menu should automatically appear after a few seconds. If it does not appear, use Windows explorer to
run the setup.exe file in the root directory on the CD-ROM. Follow the on-screen instructions to complete the
procedure.
38
Page 39

Appendix B – Maintenance
Always follow the Safety
Precautions that came with the DV
camera.
• Use a soft cloth, tissue or lint-free cloth to clean the DV camera body.
• Use a lens brush to remove particulate matter from the lens, and then
clean the lens with a soft eyeglass lens tissue or cloth.
• Do not use synthetic cleaning solutions or other solvents to clean the DV
camera body or lens. If you are unable to remove marks or dirt from the
lens, contact Microtek Customer Service.
• Do not rub the LCD screen forcefully or apply excessive pressure to it to
avoid scratching the surface.
• Do not use water, detergents, paint thinner or benzene to clean any part
of the DV camera, as this may damage the DV camera body or LCD
screen.
• Use a lens brush, soft cloth, or eyeglass tissue/cloth to clean the LCD
screen.
39
Page 40

Appendix C – Troubleshooting
DV Camera Problems
The DV camera does not power on.
A1: The DV camera is not powered up.
• Press and hold the POWER button for a few moments to see if the
READY LED is lit.
A2: The battery is inserted incorrectly.
• Insert the battery with the correct polarity as marked in the battery
compartment.
A3: The battery has poor electrical contact with the terminals in the
battery compartment.
• Clean the battery terminals with a dry cloth, reinsert them, and try
to power on the DV camera again.
A4: Battery power is depleted.
• Recharge the battery if it is rechargeable, or replace the batteries
with new ones.
A5: The incorrect type of battery is being used.
• Replace with four new AAA-size alkaline batteries.
• Replace with a new Lithium ion battery (Nokia 8210 compatible).
A6: The battery/SD card cover is open.
• Close the battery/SD cover securely.
The DV camera turns off suddenly.
40
A1: Your DV camera has a two-minute time-out setting for saving the
battery consumption.
• You can disable the “Power Saving” feature in the DV camera's
Setup mode menu. Press any button to turn the DV camera back on.
A2: Battery power is depleted.
• Recharge the batteries if they are rechargeable, or replace the
batteries with new ones.
Page 41

The DV camera does not shoot
images, movies, or record audio
clips.
A1: The Mode switch is set to the incorrect mode.
• Set the Mode switch to Photo mode ( ) to capture still images.
• Set the Mode switch to Video/Audio mode ( / ) to record movie/
audio clips.
A2: There is no available memory left on the SD card.
• Download files to your computer and removes the existing files from
the SD card, then you will have more available memory space.
• Replace with a new SD card.
A3: The SD card is write-protected.
• Set the write-protected tab on the SD card to the unlocked position.
A4: The SD card is corrupted or not formatted correctly.
• Reformat the SD card.
• The SD card may be damaged; contact your dealer.
The subject is not in the LCD
screen.
Digital Zoom does not function.
The date stamp could not be found
on the printed image.
The time/date stamp on the images
or movie/audio clips is incorrect.
A1: The Mode switch is set to the incorrect mode.
• Set the Mode switch to Photo mode (
) or Movie/Audio mode ( /
).
A2: The LCD screen is manually switched off.
• Press any button to turn it on.
A: Digital Zoom is disabled when shooting movies.
A: The “Date Stamp” setting is disabled.
• Enter the Setup mode and enable the “Date Stamp” function.
A: The date and time are incorrectly set.
• Enter the Setup mode, then set the correct date and time.
41
Page 42

Photography Problems
Shots are out of focus and blurry, or
photograph quality is not as good as
expected.
A1: The DV camera was moved while a shot was being taken.
• Hold the DV camera firmly when shooting, using a tripod if
necessary.
A2: The subject is not within the DV camera’s acceptable focus range.
• For normal shooting, make sure that the subject is at least 3.28 ft.
(1 m) away from the DV camera lens.
Photographed subject is too dark or
underexposed.
Photographed subject is too bright
or overexposed.
The flash does not fire.
42
A1: There is not enough ambient light.
• Turn the flash on.
A2: Your subject is backlit (i.e., light comes from the back of the subject).
• To improve, choose a positive EV value.
A3: The White Balance (WB) setting is incorrect.
• Adjust the White Balance setting.
A4: The subject is too far to be reached by the flash.
• The subject should not be more than 6.56 ft. (2 m) away.
A1: There is not enough distance between the flash and the subject.
• The subject should be within 4.92 to 6.56 ft. (1.5 to 2 m) of the
lens when the flash is used.
A2: The subject is under strong light.
• To improve, choose a negative EV value.
A3: The light source shines directly into the DV camera lens.
• Change the angle of the DV camera, or move the DV camera away
from the light source.
A4: The flash fires in every shot taken.
• Do not set the flash mode to “Forced flash” or “Forced flash with
Red-eye reduction”.
A: The flash mode is set to Flash off.
• Select any flash mode except “Flash off”.
Page 43

Images or Movie/Audio clips cannot
be played back.
A: The Mode switch is set to the incorrect mode.
• Set the Mode switch to Playback mode ( ).
The DV camera cannot delete
images or movie/audio clips.
Images or Movie/Audio clips cannot
be played back on TV.
A: The SD card is write-protected.
• Set the write-protected tab on the SD card to the unlocked position.
A1: The Mode switch is set to the incorrect mode.
• Set the Mode switch to Playback mode (
).
A2: The “Video Out” setting is set to the incorrect system.
• Enter the Setup mode, set Video Out to “NTSC” or “PAL” depending
on your video output system.
A3: The DV camera is disconnected from the TV set.
• Make sure the video cable is properly connected to both the DV
camera and the TV set.
43
Page 44

Mac OS cannot find the newly
created icon (Take-it, Take-it.SD)
on the desktop.
The DV camera does not operate in
Web Cam mode
44
A1: The “USB Switch” setting is set to the incorrect mode.
• Enter the Setup mode, set USB Switch to “USB Mode”.
A2: The DV camera is disconnected to the computer.
• Make sure one end of the USB cable is connected to your computer
and the other end to your DV camera’s USB connector.
• Make sure the USB cable is properly connected to both the DV
camera and the computer.
A1: The “USB Switch” setting is set to the incorrect mode.
• Enter the Setup mode, set USB Switch to “Web Cam”.
A2: The DV camera is disconnected from the computer.
For Windows Users,
• Make sure one end of the USB cable is connected to your computer
and the other end to your DV camera’s USB connector, then turn on
the DV camera.
• Check to see if “Camera Driver” has been installed on your
computer.
Go to the Windows Control Panel and double-click “Add/Remove
Programs”. If the DV camera driver (for Web Cam) does not appear
in the list, you must install the DV camera driver from the Microtek
CD-ROM.
• Check if the DV camera is detected by your system.
1) Right-click the “My Computer” icon and click Properties. The
“System Properties” window appears.
2) Click the “Hardware” tab and then click the “Device Manager”
button. Expand the “Image Device” tree; the DV camera should
be in the list.
Page 45

For Macintosh Users,
• Make sure one end of the USB cable is connected to your computer
and the other end to your DV camera’s USB connector, then turn on
the DV camera.
• Check to see if “Camera Driver” has been installed on your
computer.
• For Mac OS 9.x,
1) Go to the Apple menu and select “Apple System Profiler”. The
“Apple System Profiler” window appears.
2) Click the “Devices and Volumes” tab; the DV camera related
drivers should be in the “USB” tree.
45
Page 46

Appendix D - Menu Items and Factory Defaults
Video/Photo Menu Options Description
Size , *, , , / *, Selects the pixel recording size for images
Quality , *, Adjusts the compression rate for images
Drive Mode** , *, Toggles among Self-timer, Normal, and Continuous shooting modes
EV Compensation -2.0, -1.5, -1.0, -0.5, 0.0*, +0.5, +1.0, Compensates for extreme differences between background and foreground lighting
White Balance *, , , , Adjusts the White Balance according to the light conditions for the recording
Sharpness** , *, Adjusts the image outline for images
Voice Memo** On, Off* Records a voice memo for a captured image
Color Mode *, , Toggles among Normal, Black & White, and Classic photo color modes
Playback Menu Options Description
Erase Erase One, Erase Select, Erase All Erases the recorded images and movie/audio clips
Slide Show Cancel, 2S, 5S Plays back the stored images in a continuous slide show
Rotate Cancel, 90°, 180°, 270° Rotates pictures up to 270 degrees
Print Cancel, Select, All Adds a DPOF print mark on the recording for professional print services to determine
Setup Menu Options Description
Brightness , , , , Adjusts the brightness level of the LCD screen
Beep On*, Off Adjuststhe sound produced by the DV camera
Date yyyy/mm/dd Sets the date for the DV camera
Time 00:00:00 (hr/min/sec) Sets the time for the DV camera
Date Stamp On, Off* Stamps the time on the captured images
Video Out NTSC*, PAL Selects your video output system
Format Cancel,OK Formats the SD card
Reset Cancel, OK Resetsthe function settings to their default configurations
Copy to SD Cancel, OK Copies the data stored in internal memory to the SD card
Frequency 50HZ, 60HZ* Sets the power frequency to accommodate local AC power
Power Saving On*, Off Sets the DV camera to power off after two minutes of inactivity
Language English*, Japanese, Simplified Chinese, Sets the LCD language
USB Switch Web Cam, USB Mode* Toggles between USB Mode and Web Cam modes
001001001001
File No Reset Cancel, OK Resets the file number to zero
* Default setting
** For Photo menu only
46
+1.5, +2.0
which prints are to be printed at a photofinisher
Traditional Chinese, German, French, Italian, Spanish
Page 47

Specifications
Image Sensor 3.21 megapixels CMOS
Sensor Size 1/2”
Resolution
Movie clips 640x480 pixels (10 fps)
Still image 2816x2112 (interpolated),
Image Ratio (w:h) 4 : 3
Lens Aperture F 3.0
Focal Length f=8.3 mm
Digital Zoom 4X
Playback Zoom 4X
Focus Range • Normal: 3.28 ft. (1 m) to infinity
LCD screen 1.8" TFT LCD (270° rotation)
White Balance Auto, Daylight, Cloudy, Tungsten,
Exposure
Exposure Adjustment -2.0 EV to +2.0 EV in 1/2 step
Exposure Metering Full-zone Average
Shutter Speed 1/15 – 1/4000 sec.
Sensitivity Equivalent ISO 100
Flash
Built-in Flash Fixed
Flash Modes Auto, Auto with Red-eye reduction,
Flash Range 4.92 - 6.56 ft. (1.5 - 2.0 m)
Self-timer 10 sec. delay
Audio Clip Unlimited length (maximum length
File Formats • Still images: JPEG (Exif 2.2)
320x240 pixels (25 fps)
2048x1536, 1600x1200, 1280x960,
640x480 pixels
• Macro: 0.5 - 0.8 ft. (15 - 25 cm)
Fluorescent
Forced flash, Forced flash with Redeye reduction, Flash off
dependent on SD card)
• Movie clips: ASF
• Audio clips: WAV
Print Format DPOF (Digital Print Order Format)
Quality Levels Best, Fine, Normal
Storage Media (External) SD (SecureDigital) card support
Storage Included 16 MB internal flash memory
Driver USB mass storage device driver
I/O Terminals (Connectivity) USB 1.1, AV output (Video Out)
Video Output NTSC, PAL
Power Saving 2 min.
Power Source Four AAA-sized alkaline batteries,
Weight Approx. 5.7 oz. (165 g)
Dimensions 4.4” x 2.6” x 2.0”
Tripod Mount Yes
Microphone Yes
Speaker Yes
Environment
Operating Temperature: 32° to 104° F (0° to 40° C)
Relative Humidity: 0 to 85%
Storage Temperature: 14° to 140° F (-10° to 60° C)
rechargeable Lithium ion battery
(Nokia 8210 compatible), or
Adapter (5V, 2A)
(112x67x50mm)
47
 Loading...